New Easy Way to Add Effects to Art Video

Easy Way to Add Effects to Art Video
Filmora is a powerful tool and with the know-how can make your art be more than just a still image. Whether it is for a music video or a portfolio showreel, there are better ways than just inserting an image and letting it fade to the next still image. We can make use of effects and transitions to put our art to better use.
In this guide I’m going to show a couple of ways to enhance your images within Filmora for your videos.
Transitions
By inserting a transition to your image, you can add some diversity to how the viewer first see’s your image, You may want to emphasis a certain element of your art and therefore would select a transition that zooms in on that element before zooming out to the whole image or maybe you have a painting of a cyberpunk angel and wish to have the image enter in a grid formation. The point is that by experimenting with transitions and trying to select the best ones based on the element in your work you will achieve a better first impression. This is true for all aspects of video creation.
Having multiple transitions can create a unique look for your videos with minimal understanding of how to create a transition but there needs to be an understanding of how the layers work in Filmora being that a layer on top is in front of the one below, remember this when you start to add transitions as sometime you may need to duplicate your art as to keep it in the shot.
Free Download For Win 7 or later(64-bit)
Free Download For macOS 10.14 or later
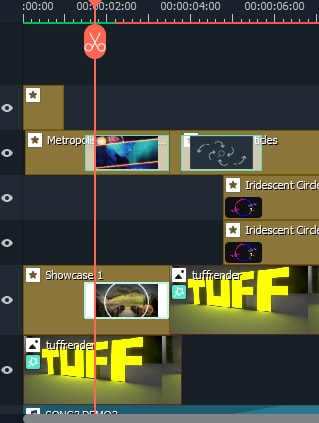
As you can see here, I have duplicated my image onto separate channels as to always keep the image in the scene.

In the image above you can see how I used multiple transitions, I did this as my image is off center and I wanted to emphasize that, I picked transitions that had clear symmetry and lines so that the viewer had a reference point of where center was without me having to place that in my art. This is a very useful way of adding information to your art without telling the viewer directly. As for the color theory, I went with oranges and yellows predominantly here as they are neighboring colors on the color wheel and we know they work well together with my main color of yellow. As for the composition I have tried to keep all the eye-catching points along the top third of the image as to create a piece more pleasing to the eye even with all this information going on.
Effects
The inclusion of effect onto your art should not be discouraged depending on what the art is used for, in my example i created this as though it was album art and the musician wanted to upload a simple music video using that art, on its own it is static and can loose engagement but by applying relevant effects you can capture the viewer’s eye and make the listening experience more enjoyable. Effects can also be stacked to create unique assets for your art and help tell a story, if your art includes fire why not add a fire effect breaking the stillness of the image or maybe your art has motion, you could include a motion effect to your still image and give the viewer more information.
Even when using effects you can use fundamentals such as color theory or composition to better enhance your imagery.

In this image you can see I have added an audio visualizer effect as well as a spectral light effect. I did this to reinforce the face of my image having a strong light source, it creates dynamic movement and the audio visualizer was added due to the nature of the video being music oriented but I felt this could have been done better. The composition of the audio visualizer was front and center and seemed boring and uninteresting. This is where the research into art fundamentals comes into play as remembering the rule of thirds and how all the main features of the image are in the top horizontal third, we can make use of the vertical thirds to gain a better composition and hopefully create more engagement.
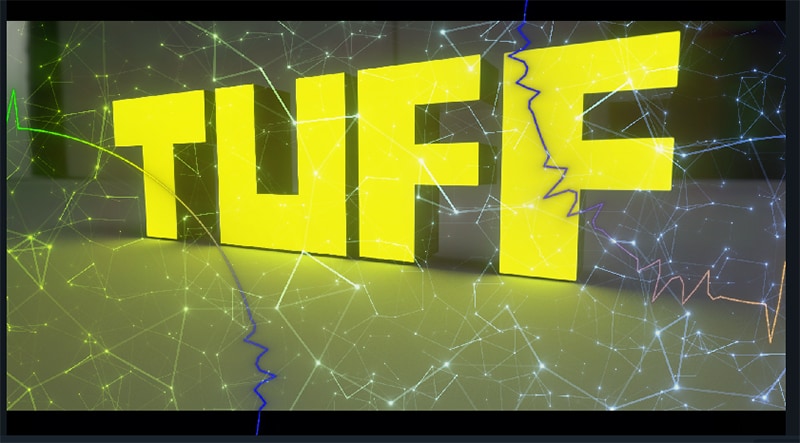
As you can see, we have duplicated the audio visualizer and made better use of the thirds nor having opposing placement within the scene, the same information is being given by the effect but we have managed to use the space more effectively and created a visually pleasing aesthetic to our video. Trick like this can make your still image feel more animated and have more purpose within the video itself.
Adding Titles and Text
Adding text is another way of adding information to your art. It’s said an image can speak a thousand words but sometimes you need words to talk for an image. When words are needed for your video, there should be some thought into how them words are presented as just selecting any text and inserting that to your video may look jarring to the viewer and result in a loss of interest towards your videos. Selecting the right transition for your text or the color or even the font can have different results and can help with affordance depending on what you’re looking to portray.

In my example I wanted to say thank you and felt sharp edges would seem formal and because of the main image it would be too similar so I went with a font that was more rounded. When inserting text onto a scene such as this one you are given a lot of information for your selections, we already have color in there to help us choose our font and background color, I went with yellow and pink due to the fact it was already in the scene and I didn’t want to take the attention away from the focus. The way the text transitions onto the screen secures just enough attention to itself that the viewer knows it’s there and can read it if they wish to. If I wanted to gain full attention i would have picked a transition that overlaps the key element and picked complementary colors on the opposite sides of the color wheel guaranteeing the viewer’s eyes would notice and engage with the motion.
Conclusion
By incorporating all the art fundamentals and skills we have learned we can use the tools provided by Filmora more effectively and create dynamic and engaging videos that are aesthetically pleasing for our audience. Upon learning the many different types and styles of transitions, effects, and titles we can enhance our artwork for use within our video. This includes artwork specifically made for use in video or even to show off your art and gain a wider audience. These are forever evolving and what you find is pleasing now may change in the future but that’s part of the fun with learning a new skill as you will find what you like and progress from there creating an identifiable style that viewers will recognize and associate you with.
Free Download For macOS 10.14 or later

As you can see here, I have duplicated my image onto separate channels as to always keep the image in the scene.

In the image above you can see how I used multiple transitions, I did this as my image is off center and I wanted to emphasize that, I picked transitions that had clear symmetry and lines so that the viewer had a reference point of where center was without me having to place that in my art. This is a very useful way of adding information to your art without telling the viewer directly. As for the color theory, I went with oranges and yellows predominantly here as they are neighboring colors on the color wheel and we know they work well together with my main color of yellow. As for the composition I have tried to keep all the eye-catching points along the top third of the image as to create a piece more pleasing to the eye even with all this information going on.
Effects
The inclusion of effect onto your art should not be discouraged depending on what the art is used for, in my example i created this as though it was album art and the musician wanted to upload a simple music video using that art, on its own it is static and can loose engagement but by applying relevant effects you can capture the viewer’s eye and make the listening experience more enjoyable. Effects can also be stacked to create unique assets for your art and help tell a story, if your art includes fire why not add a fire effect breaking the stillness of the image or maybe your art has motion, you could include a motion effect to your still image and give the viewer more information.
Even when using effects you can use fundamentals such as color theory or composition to better enhance your imagery.

In this image you can see I have added an audio visualizer effect as well as a spectral light effect. I did this to reinforce the face of my image having a strong light source, it creates dynamic movement and the audio visualizer was added due to the nature of the video being music oriented but I felt this could have been done better. The composition of the audio visualizer was front and center and seemed boring and uninteresting. This is where the research into art fundamentals comes into play as remembering the rule of thirds and how all the main features of the image are in the top horizontal third, we can make use of the vertical thirds to gain a better composition and hopefully create more engagement.

As you can see, we have duplicated the audio visualizer and made better use of the thirds nor having opposing placement within the scene, the same information is being given by the effect but we have managed to use the space more effectively and created a visually pleasing aesthetic to our video. Trick like this can make your still image feel more animated and have more purpose within the video itself.
Adding Titles and Text
Adding text is another way of adding information to your art. It’s said an image can speak a thousand words but sometimes you need words to talk for an image. When words are needed for your video, there should be some thought into how them words are presented as just selecting any text and inserting that to your video may look jarring to the viewer and result in a loss of interest towards your videos. Selecting the right transition for your text or the color or even the font can have different results and can help with affordance depending on what you’re looking to portray.

In my example I wanted to say thank you and felt sharp edges would seem formal and because of the main image it would be too similar so I went with a font that was more rounded. When inserting text onto a scene such as this one you are given a lot of information for your selections, we already have color in there to help us choose our font and background color, I went with yellow and pink due to the fact it was already in the scene and I didn’t want to take the attention away from the focus. The way the text transitions onto the screen secures just enough attention to itself that the viewer knows it’s there and can read it if they wish to. If I wanted to gain full attention i would have picked a transition that overlaps the key element and picked complementary colors on the opposite sides of the color wheel guaranteeing the viewer’s eyes would notice and engage with the motion.
Conclusion
By incorporating all the art fundamentals and skills we have learned we can use the tools provided by Filmora more effectively and create dynamic and engaging videos that are aesthetically pleasing for our audience. Upon learning the many different types and styles of transitions, effects, and titles we can enhance our artwork for use within our video. This includes artwork specifically made for use in video or even to show off your art and gain a wider audience. These are forever evolving and what you find is pleasing now may change in the future but that’s part of the fun with learning a new skill as you will find what you like and progress from there creating an identifiable style that viewers will recognize and associate you with.
Find a Video Background Change Online that Works for You. This Article Contains Tools that Can Edit Video Backgrounds Online with Little Effort
Popular Trends in the creative space engendered the creation of several tools that have reduced the difficulties involved in content creation. A few years ago, executing simple post-production tricks was a huge task. Simple edits like changing video backgrounds needed an expensive light setup and a proper green/blue screen background. In simpler words, it was expensive.
Today, we can utilize a video background changer online without an expensive setup. It has brought out the hidden creativity in thousands of content creators worldwide. Check out TikTok, Instagram, and other social media platforms to verify this claim.
This article covers a list of tools that can edit video backgrounds online. Content creators and anyone who wants to explore creativity can use these tools. Before we jump into the substance of this article, you might be wondering;
What is a Video Background Changer?
A video background changer is a tool that can swap the background of any video. These tools usually work in three simple steps.
- Analyze the footage.
- Separate the subject or “subjects” from the background
- Switch backgrounds.
The process starts when a user uploads a video clip. The tool analyzes the footage and separates the subjects from the background. The user can select other available pre-made backgrounds or upload a preferred one to the platform. After this process, users can share the finished video or save it to their devices. Other kinds of background changers only merge a transparent clip with a background.
How to Remove Background without Green Screen
Free Download For Win 7 or later(64-bit)
Free Download For macOS 10.14 or later
3 Video Background Changers Online
** Veed.io

Veed is an online feature-packed video editing platform. It comes with an interface that is suitable for newbies and professionals alike. Like many other competitors, it offers a free and premium version that unlocks more tools for you to play around with.
This tool allows you to edit video background online, transcribe audio, add subtitles, etc. Since this tool is web-based, there is no need to download any storage-intensive application. You can quickly edit your content online and share your videos.
Features
- Recorder feature for recording tutorials and online meetings
- Edit feature for creating catchy videos
- Transcriptions and subtitle module
- Color grading feature
- Online video hosting and storage
** BeeCut

BeeCut is a video editing software specifically created and designed for simplicity. Quick trims and edits for short videos are the primary focus of the BeeCut online application. A compilation of over 60+ reviews quickly exposes BeeCut as a beginner-friendly editing software. You can acquaint yourself with this platform in less than 24 hours.
You can change your background online for free using the BeeCut online editor. It allows you to Import a background and merge it with the clip that contains your subject. BeeCut has a familiar user interface that feels like it came from mobile editors. This simplicity makes it easy to understand.
Features
- Trim and cut your footage
- Add custom video intros and overlays
- Speech recognition for transcription and subtitling
- Online and offline versions for different functions
- Large community of over 1 million users
** Unscreen

If you’re searching for one of the fastest background removers, you’re in luck. Unscreen is the “sit tight and relax” version of background changers. You can change the video background online without clicking any buttons or learning how to use the software. You also don’t need to select pixels or use a color picker from an “ultra key” function. You only upload a video, and the platform does the rest.
In simple steps, you can quickly acquaint yourself with Unscreen. It also promises a risk-free money-back guarantee that lasts for 14 days only.
Features
- Other platforms can integrate it as a tool
- No watermarks
- Full HD video upload and download
- Affordable and more realistic payment structure
- Specialized background remover
3 Video Background Changers on Desktop
** Final Cut Pro

The video editors’ community refers to Final Cut Pro as one of the most professional applications for Mac users. It is a standard editing software that competes with DaVinci Resolve, Premiere Pro, and the rest. It uses the standard ground-to-top layering system to organize a timeline and is easy to learn.
Though it cannot edit background videos online, users can download it and use its chroma key effect. Like Premiere’s ultra-key effect, the chroma key function can select and remove a specific color. This is not the only way to remove backgrounds, but it is the most effective. If done correctly, no bleeding or distorted subject traces will be found.
Features
- Simple object motion tracking
- Color grading and cinematic color LUTs
- Supports 4k - 8k footage editing, rendering, and exporting
- Text animations
- Apple’s Neural Engine for speed edits
** Adobe Premiere Pro

Adobe Premiere Pro is one of the best-selling products from the Adobe franchise, apart from Acrobat Reader and Photoshop. Professionals worldwide trust Premiere Pro as their go-to editor. With features like cut & trim, animations (using keyframing), an in-built graphics panel, and a lumetri color grading panel. Most beginners start their creative video editing careers using Premiere Pro.
Online change video background features don’t come with this application. To change a video background, you have to use its “Ultra Key” effect, or mask out your subject frame-by-frame. The easiest way to achieve this is to use the color picker from the ultra key effect in your effects control panel. Premier Pro has a wide range of free tutorials on YouTube from various content creators. This makes the learning process a breeze.
Features
- AI-assisted transcription and subtitling
- Customizable workspaces
- Audio effects and dedicated audio editing interface
- Work seamlessly between After Effects (for complex motion graphics and effects) and Audition (for dedicated audio effects and editing)
- Large community support base
** Filmora

If you’re searching for easy-to-use video editing software for beginners and professionals, Filmora might be your best choice. With AI-assisted creative features, you can easily add effects and style to your video. Its AI Text-based editing feature makes adding effects enjoyable.
As a perfect alternative to getting a video background changer online, Filmora can save you hours in editing time. With AI assistance, you can separate your subject from your background without needing to do the work. You can add creative texts and colors to your background with a few clicks.
Features
- AI-assisted editing
- Hundreds of templates
- Countless effect templates.
Free Online Background Changer Fantastic tool for effortlessly transforming and enhancing your videos.
Try Filmora’s Background Changer Try Filmora’s Background Changer Explore Background Changer with Filmora

Conclusion
In finding the right Video background changer online, knowing the description and the features offered is key. We’ve saved you the stress of having to try them all out. With this article, you should be able to pick what works best for you.
Out of these mentioned tools, no one stands out as a better money’s worth like Filmora. With AI assistance, you can save hours in editing time, and get better results. Users worldwide have reviewed this app, and recommend it for easy use, quality exports, and seamless AI-assisted editing.
Free Download For Win 7 or later(64-bit)
Free Download For macOS 10.14 or later
3 Video Background Changers Online
** Veed.io

Veed is an online feature-packed video editing platform. It comes with an interface that is suitable for newbies and professionals alike. Like many other competitors, it offers a free and premium version that unlocks more tools for you to play around with.
This tool allows you to edit video background online, transcribe audio, add subtitles, etc. Since this tool is web-based, there is no need to download any storage-intensive application. You can quickly edit your content online and share your videos.
Features
- Recorder feature for recording tutorials and online meetings
- Edit feature for creating catchy videos
- Transcriptions and subtitle module
- Color grading feature
- Online video hosting and storage
** BeeCut

BeeCut is a video editing software specifically created and designed for simplicity. Quick trims and edits for short videos are the primary focus of the BeeCut online application. A compilation of over 60+ reviews quickly exposes BeeCut as a beginner-friendly editing software. You can acquaint yourself with this platform in less than 24 hours.
You can change your background online for free using the BeeCut online editor. It allows you to Import a background and merge it with the clip that contains your subject. BeeCut has a familiar user interface that feels like it came from mobile editors. This simplicity makes it easy to understand.
Features
- Trim and cut your footage
- Add custom video intros and overlays
- Speech recognition for transcription and subtitling
- Online and offline versions for different functions
- Large community of over 1 million users
** Unscreen

If you’re searching for one of the fastest background removers, you’re in luck. Unscreen is the “sit tight and relax” version of background changers. You can change the video background online without clicking any buttons or learning how to use the software. You also don’t need to select pixels or use a color picker from an “ultra key” function. You only upload a video, and the platform does the rest.
In simple steps, you can quickly acquaint yourself with Unscreen. It also promises a risk-free money-back guarantee that lasts for 14 days only.
Features
- Other platforms can integrate it as a tool
- No watermarks
- Full HD video upload and download
- Affordable and more realistic payment structure
- Specialized background remover
3 Video Background Changers on Desktop
** Final Cut Pro

The video editors’ community refers to Final Cut Pro as one of the most professional applications for Mac users. It is a standard editing software that competes with DaVinci Resolve, Premiere Pro, and the rest. It uses the standard ground-to-top layering system to organize a timeline and is easy to learn.
Though it cannot edit background videos online, users can download it and use its chroma key effect. Like Premiere’s ultra-key effect, the chroma key function can select and remove a specific color. This is not the only way to remove backgrounds, but it is the most effective. If done correctly, no bleeding or distorted subject traces will be found.
Features
- Simple object motion tracking
- Color grading and cinematic color LUTs
- Supports 4k - 8k footage editing, rendering, and exporting
- Text animations
- Apple’s Neural Engine for speed edits
** Adobe Premiere Pro

Adobe Premiere Pro is one of the best-selling products from the Adobe franchise, apart from Acrobat Reader and Photoshop. Professionals worldwide trust Premiere Pro as their go-to editor. With features like cut & trim, animations (using keyframing), an in-built graphics panel, and a lumetri color grading panel. Most beginners start their creative video editing careers using Premiere Pro.
Online change video background features don’t come with this application. To change a video background, you have to use its “Ultra Key” effect, or mask out your subject frame-by-frame. The easiest way to achieve this is to use the color picker from the ultra key effect in your effects control panel. Premier Pro has a wide range of free tutorials on YouTube from various content creators. This makes the learning process a breeze.
Features
- AI-assisted transcription and subtitling
- Customizable workspaces
- Audio effects and dedicated audio editing interface
- Work seamlessly between After Effects (for complex motion graphics and effects) and Audition (for dedicated audio effects and editing)
- Large community support base
** Filmora

If you’re searching for easy-to-use video editing software for beginners and professionals, Filmora might be your best choice. With AI-assisted creative features, you can easily add effects and style to your video. Its AI Text-based editing feature makes adding effects enjoyable.
As a perfect alternative to getting a video background changer online, Filmora can save you hours in editing time. With AI assistance, you can separate your subject from your background without needing to do the work. You can add creative texts and colors to your background with a few clicks.
Features
- AI-assisted editing
- Hundreds of templates
- Countless effect templates.
Free Online Background Changer Fantastic tool for effortlessly transforming and enhancing your videos.
Try Filmora’s Background Changer Try Filmora’s Background Changer Explore Background Changer with Filmora

Conclusion
In finding the right Video background changer online, knowing the description and the features offered is key. We’ve saved you the stress of having to try them all out. With this article, you should be able to pick what works best for you.
Out of these mentioned tools, no one stands out as a better money’s worth like Filmora. With AI assistance, you can save hours in editing time, and get better results. Users worldwide have reviewed this app, and recommend it for easy use, quality exports, and seamless AI-assisted editing.
Free Download For Win 7 or later(64-bit)
Free Download For macOS 10.14 or later
3 Video Background Changers Online
** Veed.io

Veed is an online feature-packed video editing platform. It comes with an interface that is suitable for newbies and professionals alike. Like many other competitors, it offers a free and premium version that unlocks more tools for you to play around with.
This tool allows you to edit video background online, transcribe audio, add subtitles, etc. Since this tool is web-based, there is no need to download any storage-intensive application. You can quickly edit your content online and share your videos.
Features
- Recorder feature for recording tutorials and online meetings
- Edit feature for creating catchy videos
- Transcriptions and subtitle module
- Color grading feature
- Online video hosting and storage
** BeeCut

BeeCut is a video editing software specifically created and designed for simplicity. Quick trims and edits for short videos are the primary focus of the BeeCut online application. A compilation of over 60+ reviews quickly exposes BeeCut as a beginner-friendly editing software. You can acquaint yourself with this platform in less than 24 hours.
You can change your background online for free using the BeeCut online editor. It allows you to Import a background and merge it with the clip that contains your subject. BeeCut has a familiar user interface that feels like it came from mobile editors. This simplicity makes it easy to understand.
Features
- Trim and cut your footage
- Add custom video intros and overlays
- Speech recognition for transcription and subtitling
- Online and offline versions for different functions
- Large community of over 1 million users
** Unscreen

If you’re searching for one of the fastest background removers, you’re in luck. Unscreen is the “sit tight and relax” version of background changers. You can change the video background online without clicking any buttons or learning how to use the software. You also don’t need to select pixels or use a color picker from an “ultra key” function. You only upload a video, and the platform does the rest.
In simple steps, you can quickly acquaint yourself with Unscreen. It also promises a risk-free money-back guarantee that lasts for 14 days only.
Features
- Other platforms can integrate it as a tool
- No watermarks
- Full HD video upload and download
- Affordable and more realistic payment structure
- Specialized background remover
3 Video Background Changers on Desktop
** Final Cut Pro

The video editors’ community refers to Final Cut Pro as one of the most professional applications for Mac users. It is a standard editing software that competes with DaVinci Resolve, Premiere Pro, and the rest. It uses the standard ground-to-top layering system to organize a timeline and is easy to learn.
Though it cannot edit background videos online, users can download it and use its chroma key effect. Like Premiere’s ultra-key effect, the chroma key function can select and remove a specific color. This is not the only way to remove backgrounds, but it is the most effective. If done correctly, no bleeding or distorted subject traces will be found.
Features
- Simple object motion tracking
- Color grading and cinematic color LUTs
- Supports 4k - 8k footage editing, rendering, and exporting
- Text animations
- Apple’s Neural Engine for speed edits
** Adobe Premiere Pro

Adobe Premiere Pro is one of the best-selling products from the Adobe franchise, apart from Acrobat Reader and Photoshop. Professionals worldwide trust Premiere Pro as their go-to editor. With features like cut & trim, animations (using keyframing), an in-built graphics panel, and a lumetri color grading panel. Most beginners start their creative video editing careers using Premiere Pro.
Online change video background features don’t come with this application. To change a video background, you have to use its “Ultra Key” effect, or mask out your subject frame-by-frame. The easiest way to achieve this is to use the color picker from the ultra key effect in your effects control panel. Premier Pro has a wide range of free tutorials on YouTube from various content creators. This makes the learning process a breeze.
Features
- AI-assisted transcription and subtitling
- Customizable workspaces
- Audio effects and dedicated audio editing interface
- Work seamlessly between After Effects (for complex motion graphics and effects) and Audition (for dedicated audio effects and editing)
- Large community support base
** Filmora

If you’re searching for easy-to-use video editing software for beginners and professionals, Filmora might be your best choice. With AI-assisted creative features, you can easily add effects and style to your video. Its AI Text-based editing feature makes adding effects enjoyable.
As a perfect alternative to getting a video background changer online, Filmora can save you hours in editing time. With AI assistance, you can separate your subject from your background without needing to do the work. You can add creative texts and colors to your background with a few clicks.
Features
- AI-assisted editing
- Hundreds of templates
- Countless effect templates.
Free Online Background Changer Fantastic tool for effortlessly transforming and enhancing your videos.
Try Filmora’s Background Changer Try Filmora’s Background Changer Explore Background Changer with Filmora

Conclusion
In finding the right Video background changer online, knowing the description and the features offered is key. We’ve saved you the stress of having to try them all out. With this article, you should be able to pick what works best for you.
Out of these mentioned tools, no one stands out as a better money’s worth like Filmora. With AI assistance, you can save hours in editing time, and get better results. Users worldwide have reviewed this app, and recommend it for easy use, quality exports, and seamless AI-assisted editing.
Free Download For Win 7 or later(64-bit)
Free Download For macOS 10.14 or later
3 Video Background Changers Online
** Veed.io

Veed is an online feature-packed video editing platform. It comes with an interface that is suitable for newbies and professionals alike. Like many other competitors, it offers a free and premium version that unlocks more tools for you to play around with.
This tool allows you to edit video background online, transcribe audio, add subtitles, etc. Since this tool is web-based, there is no need to download any storage-intensive application. You can quickly edit your content online and share your videos.
Features
- Recorder feature for recording tutorials and online meetings
- Edit feature for creating catchy videos
- Transcriptions and subtitle module
- Color grading feature
- Online video hosting and storage
** BeeCut

BeeCut is a video editing software specifically created and designed for simplicity. Quick trims and edits for short videos are the primary focus of the BeeCut online application. A compilation of over 60+ reviews quickly exposes BeeCut as a beginner-friendly editing software. You can acquaint yourself with this platform in less than 24 hours.
You can change your background online for free using the BeeCut online editor. It allows you to Import a background and merge it with the clip that contains your subject. BeeCut has a familiar user interface that feels like it came from mobile editors. This simplicity makes it easy to understand.
Features
- Trim and cut your footage
- Add custom video intros and overlays
- Speech recognition for transcription and subtitling
- Online and offline versions for different functions
- Large community of over 1 million users
** Unscreen

If you’re searching for one of the fastest background removers, you’re in luck. Unscreen is the “sit tight and relax” version of background changers. You can change the video background online without clicking any buttons or learning how to use the software. You also don’t need to select pixels or use a color picker from an “ultra key” function. You only upload a video, and the platform does the rest.
In simple steps, you can quickly acquaint yourself with Unscreen. It also promises a risk-free money-back guarantee that lasts for 14 days only.
Features
- Other platforms can integrate it as a tool
- No watermarks
- Full HD video upload and download
- Affordable and more realistic payment structure
- Specialized background remover
3 Video Background Changers on Desktop
** Final Cut Pro

The video editors’ community refers to Final Cut Pro as one of the most professional applications for Mac users. It is a standard editing software that competes with DaVinci Resolve, Premiere Pro, and the rest. It uses the standard ground-to-top layering system to organize a timeline and is easy to learn.
Though it cannot edit background videos online, users can download it and use its chroma key effect. Like Premiere’s ultra-key effect, the chroma key function can select and remove a specific color. This is not the only way to remove backgrounds, but it is the most effective. If done correctly, no bleeding or distorted subject traces will be found.
Features
- Simple object motion tracking
- Color grading and cinematic color LUTs
- Supports 4k - 8k footage editing, rendering, and exporting
- Text animations
- Apple’s Neural Engine for speed edits
** Adobe Premiere Pro

Adobe Premiere Pro is one of the best-selling products from the Adobe franchise, apart from Acrobat Reader and Photoshop. Professionals worldwide trust Premiere Pro as their go-to editor. With features like cut & trim, animations (using keyframing), an in-built graphics panel, and a lumetri color grading panel. Most beginners start their creative video editing careers using Premiere Pro.
Online change video background features don’t come with this application. To change a video background, you have to use its “Ultra Key” effect, or mask out your subject frame-by-frame. The easiest way to achieve this is to use the color picker from the ultra key effect in your effects control panel. Premier Pro has a wide range of free tutorials on YouTube from various content creators. This makes the learning process a breeze.
Features
- AI-assisted transcription and subtitling
- Customizable workspaces
- Audio effects and dedicated audio editing interface
- Work seamlessly between After Effects (for complex motion graphics and effects) and Audition (for dedicated audio effects and editing)
- Large community support base
** Filmora

If you’re searching for easy-to-use video editing software for beginners and professionals, Filmora might be your best choice. With AI-assisted creative features, you can easily add effects and style to your video. Its AI Text-based editing feature makes adding effects enjoyable.
As a perfect alternative to getting a video background changer online, Filmora can save you hours in editing time. With AI assistance, you can separate your subject from your background without needing to do the work. You can add creative texts and colors to your background with a few clicks.
Features
- AI-assisted editing
- Hundreds of templates
- Countless effect templates.
Free Online Background Changer Fantastic tool for effortlessly transforming and enhancing your videos.
Try Filmora’s Background Changer Try Filmora’s Background Changer Explore Background Changer with Filmora

Conclusion
In finding the right Video background changer online, knowing the description and the features offered is key. We’ve saved you the stress of having to try them all out. With this article, you should be able to pick what works best for you.
Out of these mentioned tools, no one stands out as a better money’s worth like Filmora. With AI assistance, you can save hours in editing time, and get better results. Users worldwide have reviewed this app, and recommend it for easy use, quality exports, and seamless AI-assisted editing.
Create Slow Motion Videos Using Final Cut Pro with Ease
The slow-motion effect has been used for years to add dramatic effects to movies. An important scene is always highlighted and looks better with a slow-motion effect. Applying slow motion is beneficial, too, as it can give you a better preview of the scene. The effect is easily accessible in many video editing applications.
How would you find an app that gives good final cut slow-motion results? This article has got you all covered on that. Here, you will find the Final Cut Pro slow-motion effect that works fantastic without ruining your video’s quality. So, follow the article to learn more about using FCP slow motion.
Slow Motion Video Maker Slow your video’s speed with better control of your keyframes to create unique cinematic effects

Part 1: What Makes a Perfect Slow-Motion Video?
An ideal FCP slow-motion video requires careful attention to technical details and aesthetics. Below are some essential things to think about bringing perfection in slow-motion videos:
- Resolution: A slow-motion video with visual appeal and a high resolution is crucial. This is especially vital if you intend to crop or zoom in on the video while editing.
- Storytelling: Make sure the slow-motion clip supports the idea you’re attempting to portray. Your scenes will have more impact if you tell them with a thoughtful narrative.
- Editing: Try different speeds when editing your clip to achieve the best impact. Consider including sound effects or music to accompany the slow-motion images.
- Timing: Select the appropriate times to record in slow motion. You shouldn’t slow down your entire video. Instead, you can apply the effect to draw attention to acts or feelings.
- Frame Rate: Slow-motion videos are usually shot at a greater frame rate. Frame rates of 60, 120, 240, or even higher are common as they make the video look smoother.
- Shutter Speed: For precise and sharp results, use a fast shutter speed camera. This lessens the likelihood of motion blur in every slow-motion frame.
Part 2: Learning All Essential Techniques to Perform Slow Motion in Final Cut Pro X
Apple created Final Cut Pro , and it is only accessible to macOS users. Professional video editors can utilize the software’s array of capabilities. The tool offers incredible video editing functions. Its features are tailored to handle high-resolution video material. The tool has an AI object tracker that detects faces and objects. Its cinematic mode helps you create professional videos.
Final cut slow motion gives a dramatic and intense effect to your videos. You can create an entirely different video with the power of its editing features. Slow-mo Final Cut Pro gives high-resolution results. Follow the steps below to use this tool for slow-motion effects. However, you can choose any method that seems suitable and convenient to you:
Method 1
Import your video into the app and drag it into the timeline. Click on the video and select the “Speed Meter” icon from the timeline. If you want to access the retime menu directly, use the “Command+R” command. Now, select the “Slow” option, and from here, you can select the slow speed percentage at which you want your clip.

Method 2
Bring your video into the timeline and click on it. Select the “Speed Meter” icon; now, choose the “Custom” option. You can access customized settings directly using the “Control+Option+R” command to apply FCPX slow motion. Once you have opened the customization menu, manually set the speed rate and duration to how much you want.

Method 3
Drag the timeline cursor to where you want to make a speed change, select “Speed Meter,” and hit “Blade Speed” to create a cut and separate the clip. Make as many cuts as you want to, depending on how many speed changes you require. Now click on the clip whose speed you want changed and select “Custom” from the “Speed Meter” icon. Customize your clips’ speed rate and duration and save the video once you’re done.

Part 3: Wondershare Filmora: A Multi-Purpose Solution to Making Effective Slow-Motion Videos
Final Cut Pro can be difficult for beginners to understand. The tool has a variety of tutorials available online, but it’s still hard for many users to follow them. In this case, Wondershare Filmora is a great option for slow motion and other effects. It is an excellent alternative to final cut slow motion. Filmora offers many more wonderful features that will surely amaze you.
It can assist you in generating engaging content despite just cutting, trimming, and editing videos. With AI integration, this platform can automate your editing tasks.
Free Download For Win 7 or later(64-bit)
Free Download For macOS 10.14 or later
Step By Step Guide to Make Slow Motion Videos in Filmora
Unlike Final Cut Pro’s slow motion, Wondershare Filmora is more straightforward to operate. Follow the step-by-step guide below to apply slow-motion effects to your video.
Method 1: Uniform Speed
If you want to adjust the speed and retain its high quality, use the uniform speed option. You can access this option by following the stepwise method below. Using the advanced features, you don’t need any other tool to ensure the video’s original worth:
Step 1Import Your Project and Start a New Project
After launching Filmora, head to its “New Project” option from the home screen. You will enter the main editing screen this way. Import your project in the media panel and then drag it to the timeline.

Step 2Explore Uniform Speed and Adjust the Speed
Go to your video in the timeline and right-click on it. Now, explore the “Uniform Speed” option and tap on it to get an editing panel at the right. From that panel, move the “Speed” slider to the right and get a slow-motion video preview. You can see the “Duration” of the video after slowing it down and adjusting it accordingly.

Step 3Use Advanced Features to Ensure Quality of Videos
Move down and toggle the “Reverse Speed” option if required. You can enable the “Maintain Pitch” and “Ripple Edit” options to enhance the video automatically. Lastly, extend the “AI Frame Interpolation” menu using its downward symbol and choose “Optical Flow.” It will ensure that the video will remain slow with high quality.

Method 2: Speed Ramping
This method aims to bring smooth transitions in slow-motion videos. Instead of an abrupt change, a gradual increase in speed can impose a professional look. So, there are the steps to access this feature and get a preview of smooth playback.
Step 1Discover the Speed Ramping Feature
Access the Speed Ramping option next to the “Uniform Speed” in the right-side editing panel. Alternatively, you can right-click on the video and look for the “Speed Ramping” option from the list.

Step 2Pick a Template for Speed Ramping or Customize It
From the speed ramping section, you can choose any template from 6 options. Also, users can pick the “Customize” option to adjust the speed ramping as desired.

Step 3Use the Render Preview Option for Smooth Playback
To get a high-quality preview of your videos, look for Render Preview. In this regard, go to the top toolbar of the timeline section on the right side. Click the “Render Preview” icon next to the “Copilot Editor.” Wait for a while and get a smooth playback of your slow-motion video.

Integral Features of Filmora
Slowing down videos is easier than slow-mo Final Cut Pro. Filmora automates the process with an optical flow, ensuring the project’s high quality with one click. Without any wait, learn more about some top-rated features in the given section.
1. AI Thumbnail Creator
The AI Thumbnail Creator of Filmora makes thumbnail creation a matter of seconds. The tool is a treasure for YouTubers as it creates appealing thumbnails to attract viewers. It works with machine learning algorithms to detect the 3 best shots out of your video for thumbnail. Besides, there are over 58 thumbnail templates that can be customized after picking the right one.
2. AI Copilot Editing
AI Copilot is your personal assistant who guides you through everything related to Filmora. You can ask about any editing queries, and the AI will tell you the whole procedure within a second. It will also provide you with navigation towards the right feature. The tool is a big help for beginners; it makes using Filmora much faster and easier.
3. Motion Tracking
If you love giving an artistic touch to your videos, then motion tracking is exactly what you need. This feature automatically tracks the object throughout the video. You can add graphics, stickers, or even blur an object in the video. Furthermore, it allows you to add text with the tracked objects, like a name title with a running athlete.
4. Auto Reframe
With the help of the Auto Reframe feature, you can use one video on all social media platforms. The tool reframes your video in such a way that the main object doesn’t get removed. AI allows you to turn your landscape video into a vertical with a 19:6 aspect ratio. It saves you time and the trouble of creating different videos for every platform.
Conclusion
Slow-motion videos have become a trend due to social media, but they have been an essential film factor forever. Because of the rising demand for this effect, developers added the feature to their software. Many apps are developed to provide a slow-motion effect, which makes it tricky to choose one.
This article addresses your problem by showing you the use of final cut slow-motion. You have discovered a much simpler, faster, and effective platform, Wondershare Filmora. With proven statements in this article, it’s been easier to try Filmora and explore it fully instantly.
Make A Slow Motion Video Make A Slow Motion Video More Features

Part 1: What Makes a Perfect Slow-Motion Video?
An ideal FCP slow-motion video requires careful attention to technical details and aesthetics. Below are some essential things to think about bringing perfection in slow-motion videos:
- Resolution: A slow-motion video with visual appeal and a high resolution is crucial. This is especially vital if you intend to crop or zoom in on the video while editing.
- Storytelling: Make sure the slow-motion clip supports the idea you’re attempting to portray. Your scenes will have more impact if you tell them with a thoughtful narrative.
- Editing: Try different speeds when editing your clip to achieve the best impact. Consider including sound effects or music to accompany the slow-motion images.
- Timing: Select the appropriate times to record in slow motion. You shouldn’t slow down your entire video. Instead, you can apply the effect to draw attention to acts or feelings.
- Frame Rate: Slow-motion videos are usually shot at a greater frame rate. Frame rates of 60, 120, 240, or even higher are common as they make the video look smoother.
- Shutter Speed: For precise and sharp results, use a fast shutter speed camera. This lessens the likelihood of motion blur in every slow-motion frame.
Part 2: Learning All Essential Techniques to Perform Slow Motion in Final Cut Pro X
Apple created Final Cut Pro , and it is only accessible to macOS users. Professional video editors can utilize the software’s array of capabilities. The tool offers incredible video editing functions. Its features are tailored to handle high-resolution video material. The tool has an AI object tracker that detects faces and objects. Its cinematic mode helps you create professional videos.
Final cut slow motion gives a dramatic and intense effect to your videos. You can create an entirely different video with the power of its editing features. Slow-mo Final Cut Pro gives high-resolution results. Follow the steps below to use this tool for slow-motion effects. However, you can choose any method that seems suitable and convenient to you:
Method 1
Import your video into the app and drag it into the timeline. Click on the video and select the “Speed Meter” icon from the timeline. If you want to access the retime menu directly, use the “Command+R” command. Now, select the “Slow” option, and from here, you can select the slow speed percentage at which you want your clip.

Method 2
Bring your video into the timeline and click on it. Select the “Speed Meter” icon; now, choose the “Custom” option. You can access customized settings directly using the “Control+Option+R” command to apply FCPX slow motion. Once you have opened the customization menu, manually set the speed rate and duration to how much you want.

Method 3
Drag the timeline cursor to where you want to make a speed change, select “Speed Meter,” and hit “Blade Speed” to create a cut and separate the clip. Make as many cuts as you want to, depending on how many speed changes you require. Now click on the clip whose speed you want changed and select “Custom” from the “Speed Meter” icon. Customize your clips’ speed rate and duration and save the video once you’re done.

Part 3: Wondershare Filmora: A Multi-Purpose Solution to Making Effective Slow-Motion Videos
Final Cut Pro can be difficult for beginners to understand. The tool has a variety of tutorials available online, but it’s still hard for many users to follow them. In this case, Wondershare Filmora is a great option for slow motion and other effects. It is an excellent alternative to final cut slow motion. Filmora offers many more wonderful features that will surely amaze you.
It can assist you in generating engaging content despite just cutting, trimming, and editing videos. With AI integration, this platform can automate your editing tasks.
Free Download For Win 7 or later(64-bit)
Free Download For macOS 10.14 or later
Step By Step Guide to Make Slow Motion Videos in Filmora
Unlike Final Cut Pro’s slow motion, Wondershare Filmora is more straightforward to operate. Follow the step-by-step guide below to apply slow-motion effects to your video.
Method 1: Uniform Speed
If you want to adjust the speed and retain its high quality, use the uniform speed option. You can access this option by following the stepwise method below. Using the advanced features, you don’t need any other tool to ensure the video’s original worth:
Step 1Import Your Project and Start a New Project
After launching Filmora, head to its “New Project” option from the home screen. You will enter the main editing screen this way. Import your project in the media panel and then drag it to the timeline.

Step 2Explore Uniform Speed and Adjust the Speed
Go to your video in the timeline and right-click on it. Now, explore the “Uniform Speed” option and tap on it to get an editing panel at the right. From that panel, move the “Speed” slider to the right and get a slow-motion video preview. You can see the “Duration” of the video after slowing it down and adjusting it accordingly.

Step 3Use Advanced Features to Ensure Quality of Videos
Move down and toggle the “Reverse Speed” option if required. You can enable the “Maintain Pitch” and “Ripple Edit” options to enhance the video automatically. Lastly, extend the “AI Frame Interpolation” menu using its downward symbol and choose “Optical Flow.” It will ensure that the video will remain slow with high quality.

Method 2: Speed Ramping
This method aims to bring smooth transitions in slow-motion videos. Instead of an abrupt change, a gradual increase in speed can impose a professional look. So, there are the steps to access this feature and get a preview of smooth playback.
Step 1Discover the Speed Ramping Feature
Access the Speed Ramping option next to the “Uniform Speed” in the right-side editing panel. Alternatively, you can right-click on the video and look for the “Speed Ramping” option from the list.

Step 2Pick a Template for Speed Ramping or Customize It
From the speed ramping section, you can choose any template from 6 options. Also, users can pick the “Customize” option to adjust the speed ramping as desired.

Step 3Use the Render Preview Option for Smooth Playback
To get a high-quality preview of your videos, look for Render Preview. In this regard, go to the top toolbar of the timeline section on the right side. Click the “Render Preview” icon next to the “Copilot Editor.” Wait for a while and get a smooth playback of your slow-motion video.

Integral Features of Filmora
Slowing down videos is easier than slow-mo Final Cut Pro. Filmora automates the process with an optical flow, ensuring the project’s high quality with one click. Without any wait, learn more about some top-rated features in the given section.
1. AI Thumbnail Creator
The AI Thumbnail Creator of Filmora makes thumbnail creation a matter of seconds. The tool is a treasure for YouTubers as it creates appealing thumbnails to attract viewers. It works with machine learning algorithms to detect the 3 best shots out of your video for thumbnail. Besides, there are over 58 thumbnail templates that can be customized after picking the right one.
2. AI Copilot Editing
AI Copilot is your personal assistant who guides you through everything related to Filmora. You can ask about any editing queries, and the AI will tell you the whole procedure within a second. It will also provide you with navigation towards the right feature. The tool is a big help for beginners; it makes using Filmora much faster and easier.
3. Motion Tracking
If you love giving an artistic touch to your videos, then motion tracking is exactly what you need. This feature automatically tracks the object throughout the video. You can add graphics, stickers, or even blur an object in the video. Furthermore, it allows you to add text with the tracked objects, like a name title with a running athlete.
4. Auto Reframe
With the help of the Auto Reframe feature, you can use one video on all social media platforms. The tool reframes your video in such a way that the main object doesn’t get removed. AI allows you to turn your landscape video into a vertical with a 19:6 aspect ratio. It saves you time and the trouble of creating different videos for every platform.
Conclusion
Slow-motion videos have become a trend due to social media, but they have been an essential film factor forever. Because of the rising demand for this effect, developers added the feature to their software. Many apps are developed to provide a slow-motion effect, which makes it tricky to choose one.
This article addresses your problem by showing you the use of final cut slow-motion. You have discovered a much simpler, faster, and effective platform, Wondershare Filmora. With proven statements in this article, it’s been easier to try Filmora and explore it fully instantly.
8 Frame Rate Video Converters You Must Try
One important aspect to consider when creating high-quality videos is the frame rate. The frame rate, measured in frames per second (fps), determines the smoothness and fluidity of your video. If the frame rate is too low, your video may appear choppy or stutter. On the other hand, a higher frame rate can provide a more cinematic experience.
However, not all cameras or devices record videos at the same frame rate. That’s where frame rate video converters come in. These tools allow you to change the frame rate of your videos so they can be played back on different devices or platforms. With so many options available, it can be overwhelming to know which frame rate converters to use.
In this article, we’ll look at 8 of the best frame rate video converters you must try. These tools will help you achieve the perfect frame rate for your videos, from free online options to paid software.
Unknown Facts About Converting Frame Rates
When converting frame rates, there are a few things to keep in mind that you may need to be made aware of.
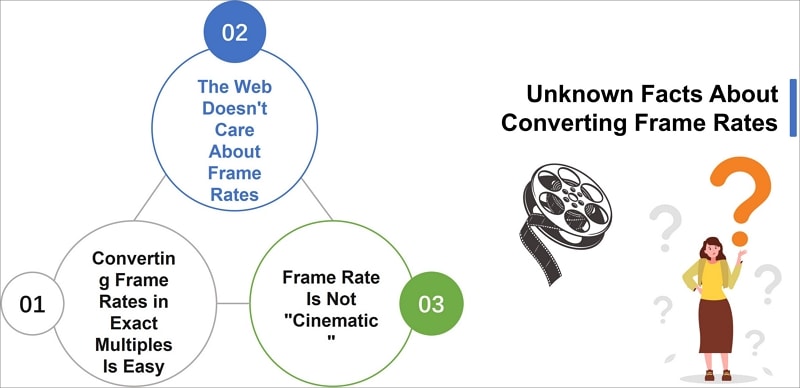
1. The Web Doesn’t Care About Frame Rates
First, it’s important to note that the web doesn’t care about frame rates. Most online platforms, such as YouTube and Vimeo, automatically adjust the frame rate of videos to match the viewer’s device or internet connection. This means that even if you have a video with a high frame rate, it may be automatically downgraded when it’s uploaded to the web.
2. Converting Frame Rates in Exact Multiples Is Easy
Another thing to remember is that converting frame rates in exact multiples is relatively easy.
For example, if you have a video recorded at 30 fps and want to convert it to 60 fps, it’s a simple process as it is a 2x multiple. However, if you want to convert your video to a frame rate that is not a multiple of the original, such as 29.97 fps, the process can be more complex and may result in some loss of quality.
3. Frame Rate Is Not “Cinematic”
Lastly, it’s important to note that frame rate is not “cinematic” because a higher frame rate does not automatically make your video look more cinematic. While a higher frame rate can provide a more smooth and more fluid video, it’s just one aspect of creating a cinematic experience. Other elements, such as lighting, composition, and sound design, also play a crucial role in creating a cinematic look.
5 Frame Rate Video Converters for Win/Mac
Many options are available for both Windows and Mac users when converting frame rates. Here are 5 of the best frame rate video converters for both platforms:
1. Wondershare Filmora
Free Download For Win 7 or later(64-bit)
Free Download For macOS 10.14 or later
Filmora Video Editor and Frame Rate Converter is a versatile tool for Windows and Mac users that allows you to edit and convert your videos easily. It has a user-friendly interface and provides a wide range of video editing functions, such as trimming, cropping, splitting, and merging.
It also allows you to change the frame rate of your videos with a few simple clicks. You can easily adjust the frame rate to match the output device or platform, such as 30fps for YouTube or 60fps for Vimeo. Moreover, it also provides various video effects, transitions, and text/title templates to enhance your video quality. With Filmora, you can easily turn your home videos into professional-looking films.
How To Convert Video Frame Rate With Filmora
Here’s the step-by-step process of converting video frame rate using Filmora:
Step1 Create a new project, then import the video. Right click the video, and click “Properties.”

Step2 Check the current frame rate of the video

Step3 Add the video to the timeline, then click the “Export“ button
Step4 Change the frame rate and then click “Export.”

2. VideoPad Video Editor and Frame Rate Converter for Win/Mac
VideoPad Video Editor, created by NCH Software, is a user-friendly video editing software suitable for professionals and beginners. It offers various editing tools, video transitions and effects, customizable templates, and audio editing options.
One of its key features is the ability to convert the frame rate of your videos during the exporting process, making it a versatile tool for adjusting video playback smoothness. It supports multiple video formats for input and output; a free version is available for non-commercial use only.
Here’s the step-by-step process of converting video frame rate using VideoPad:
Step1 Open VideoPad and import your video to the timeline
Step2 Edit the video as desired, then navigate to “Export Video“ > “Video File.”
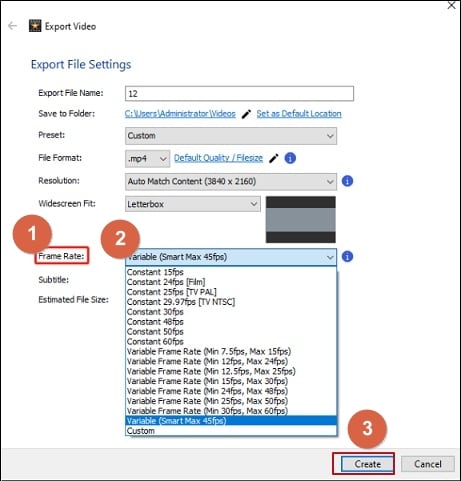
Step3 In the “Export File Settings“ window, select the desired frame rate, edit the file name, and choose the output folder, format, and resolution. Click “Create“ to export the video.
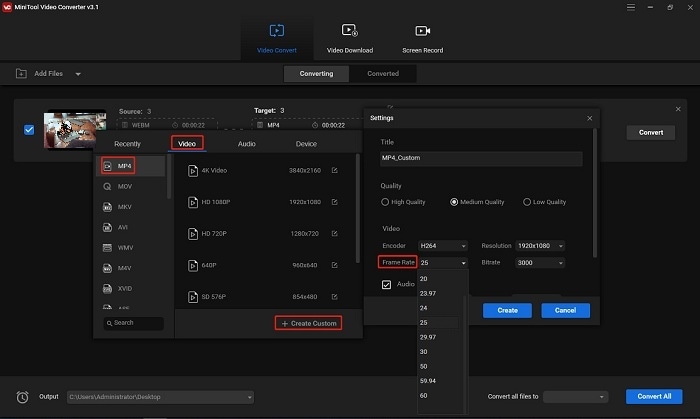
3. Frame Rate Converter - MiniTool Video Converter (Windows)
MiniTool Video Converter is a free and versatile tool for converting the frame rate of your videos. It offers multiple FPS options, such as 12, 15, 20, 23.97, 30, 50, and 60, which vary depending on your chosen video format. Not only can it change the frame rate, but it can also convert the video format, allowing you to import a video and then simultaneously change the format and frame rate.
Additionally, MiniTool offers options for video resolution, quality, encoder, and more. Furthermore, this video FPS converter allows you to record your computer screen in various formats, such as MP4, WMV, MKV, AVI, MOV, FLV, and TS in 15, 20, 25, and 30 fps. It also enables you to download videos and audio from YouTube.
Here’s the step-by-step process of converting video frame rate using MiniTool Video Converter:
Step1 Open MiniTool Video Converter, and upload the video you wish to convert by clicking “Add“ or dragging the file into the conversion area.
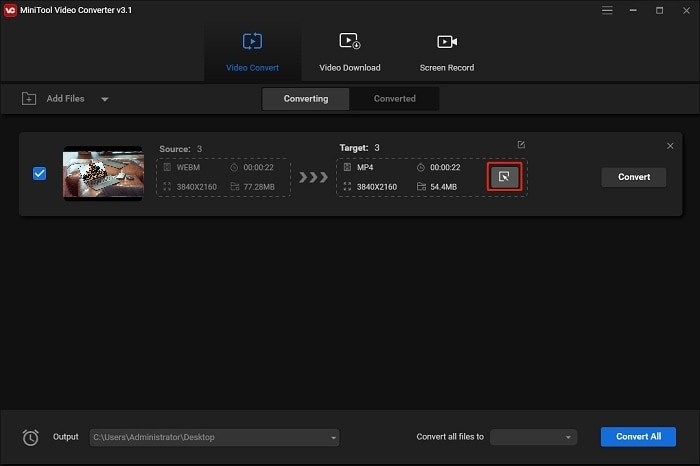
Step2 Under the Video tab in the new pop-up, select a format and click “Create Custom“ to open the settings window. Choose the desired frame rate.
Step3 Click “Convert,” and once completed, locate the converted video in the “Converted“ tab by clicking “Show in Folder.”
4. VLC Converter Frame Rate Conversion Software
The VLC media player is a well-known free tool for converting frame rates. It’s a versatile player that supports various audio-visual formats, including AVI, MPEG, WMV, DVD, and CD.
VLC also includes additional features such as cropping and de-interlacing, allowing you to configure and edit your files. VLC media players can also remove DRM protection and convert multiple videos in batches. It’s a great option for a free frame rate converter.
Here’s how to change the frame rate of a video using VLC Media Player:
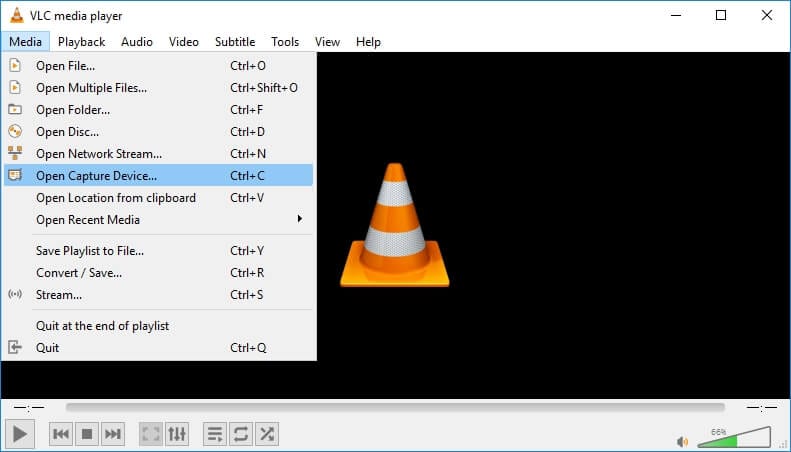
Step1 Open the VLC media player and click on “Media“ > “Capture Device.”
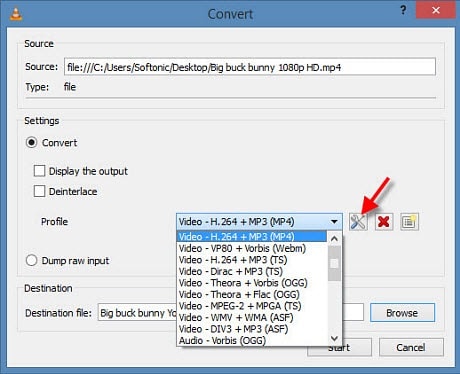
Step2 Select “Convert/Save“ and browse for the video you want to change the frame rate
Step3 Select the desired frame rate in the “Convert/Save“ dialog box and click “Start.”
Step4 Wait for the conversion to finish and click “Convert/Save“ to find the new video with the adjusted frame rate.
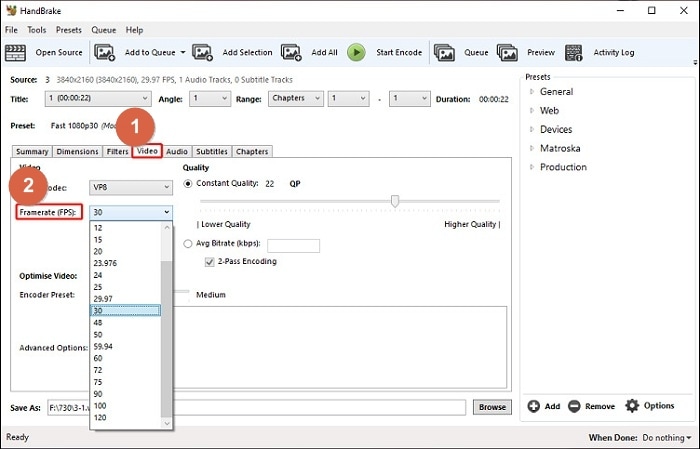
5. HandBrake: Open Source Frame Rate Converter
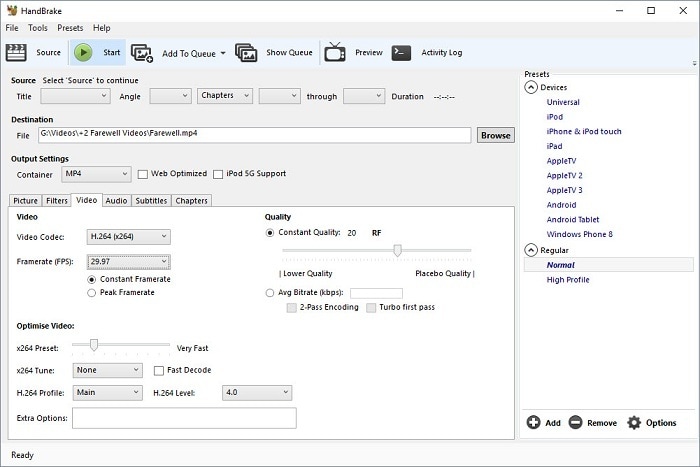
Handbrake is a versatile, open-source video converter that can change the frame rate of a video from nearly any format to MP4, WebM, or MKV. It offers a wide range of frame rate options, from 5 to 120 FPS, making it a great tool for video production needs.
In addition to frame rate conversion, Handbrake also features various filters to enhance video quality, such as reducing noise, sharpening, rotating, flipping videos, adding subtitles, and more. With Handbrake, you can easily change the frame rate of your videos to your desired settings.
Here’s how to change the frame rate of a video using HandBrake:
Step1 Open Handbrake and add your video.
Step2 Select a format, change the frame rate, and choose the output folder.
Step3 Click “Start Encode“ to convert the video frame rate.
3 Video FPS Converters Online
In addition to software-based video frame rate converters, a variety of online video FPS converters can be used for quick and easy frame rate conversions.
These online tools are often user-friendly and require no installation, making them accessible from any device with an internet connection. These tools allow for easy uploading of videos and the ability to select the desired frame rate for conversion. They also offer a variety of output formats and options for video quality, resolution, and more.
1. VEED.IO
VEED’s online frame rate converter is a simple tool to increase or decrease your video’s frame rate without leaving your browser. It supports popular frame rates such as 16fps, 24fps, 30fps, 60fps, and more.
Lower the frame rate to create a stop-motion video or GIF, or increase it to make the video appear smoother. The tool can upload videos in any format and render them in seconds without installing converter apps or software. It works on Windows 10, Mac, Linux, and mobile devices.
Here’s how to change the video frame rate using Veed.io:
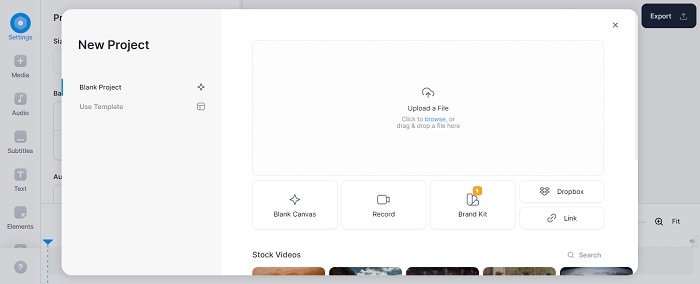
Step1 Import your video, or you can drag and drop your video.
Step2 Click “Export,” then click “switch to advanced settings“ to access frame rate settings. Adjust the frame rate using the framerate limit tool.
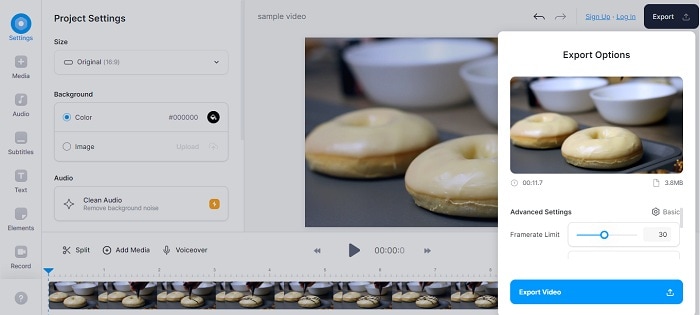
Step3 Click “Export Video,” and your video will render in seconds.

2. Video2Edit

Video2Edit is an all-in-one online video solution that offers a variety of editing options such as conversion, rotation, cutting, merging, and audio compression and normalization. Additionally, it is also a highly efficient online video frame rate converter. With Video2edit, you can easily change the frame rate of your videos to match your specific needs.
This tool makes it simple whether you want to increase or decrease the frame rate. It supports a wide range of frame rates, from 16 to 60 fps, and can convert your video to any format you need. With this powerful and versatile tool, you can ensure that your videos look smooth and professional and have the right frame rate for your desired output.
Here’s how to change the video frame rate using Video2Edit:
Step1 On Video2Edit’s website, select “Convert from video“ and upload your file.
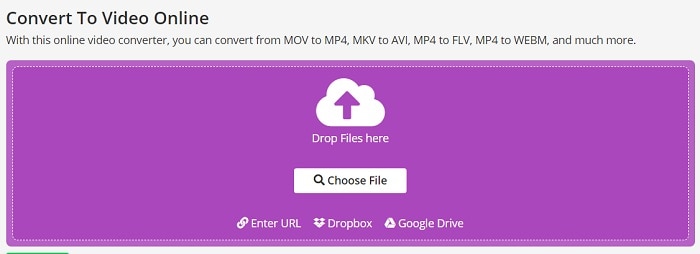
Step2 Select an output format and enter a new frame rate (1-120) in the “Change frame rate“ box.
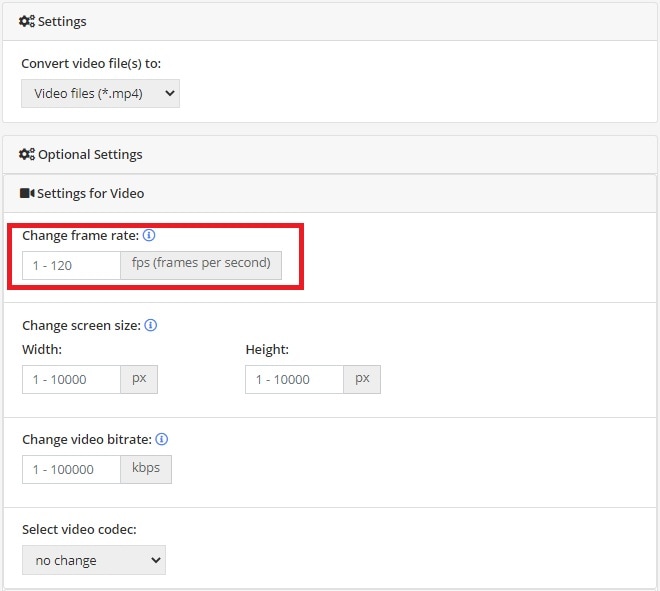
Step3 Click “START“ to begin the conversion process.
3. AConvert
With AConvert, you can quickly change the frame rate of your video to fit your needs. This online tool offers various frame rates, including 20fps, 24fps, 30fps, 50fps, and more, giving you the flexibility to find the right setting for your video.
Additionally, AConvert offers a range of video editing options, including cutting, merging, rotating, and cropping, allowing you to enhance your video in multiple ways. The process of converting frame rate with AConvert is simple.
Here’s how to change the video frame rate using AConvert:
Step1 Visit the AConvert website, select Video, and upload your video.
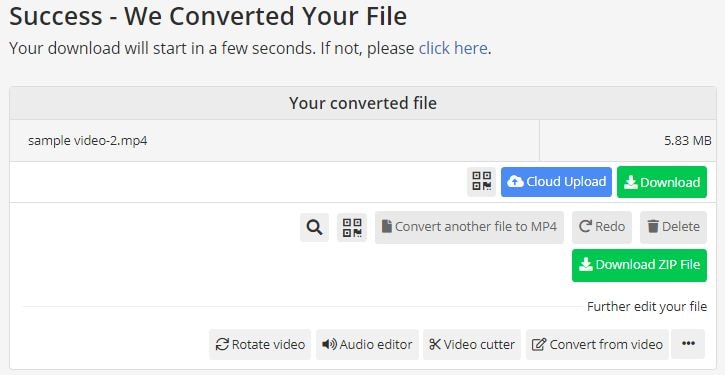
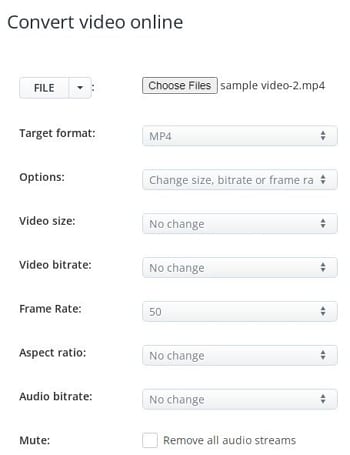
Step2 Choose “Change size, bitrate, or frame rate“ and select “Frame Rate“ in the drop-down menu.
Step3 Select a frame rate and click “Convert Now!“ to start the conversion process.
Conclusion
Converting video frame rates can significantly impact your video’s quality and viewing experience. Whether you’re looking to increase or decrease the frame rate, the above options provide easy and efficient ways. Regardless of the tool or software, the process is straightforward, allowing you to change the frame rate with just a few clicks. So go ahead and try out one of these options to improve your video’s frame rate today
Filmora Video Editor and Frame Rate Converter is a versatile tool for Windows and Mac users that allows you to edit and convert your videos easily. It has a user-friendly interface and provides a wide range of video editing functions, such as trimming, cropping, splitting, and merging.
It also allows you to change the frame rate of your videos with a few simple clicks. You can easily adjust the frame rate to match the output device or platform, such as 30fps for YouTube or 60fps for Vimeo. Moreover, it also provides various video effects, transitions, and text/title templates to enhance your video quality. With Filmora, you can easily turn your home videos into professional-looking films.
How To Convert Video Frame Rate With Filmora
Here’s the step-by-step process of converting video frame rate using Filmora:
Step1 Create a new project, then import the video. Right click the video, and click “Properties.”

Step2 Check the current frame rate of the video

Step3 Add the video to the timeline, then click the “Export“ button
Step4 Change the frame rate and then click “Export.”

2. VideoPad Video Editor and Frame Rate Converter for Win/Mac
VideoPad Video Editor, created by NCH Software, is a user-friendly video editing software suitable for professionals and beginners. It offers various editing tools, video transitions and effects, customizable templates, and audio editing options.
One of its key features is the ability to convert the frame rate of your videos during the exporting process, making it a versatile tool for adjusting video playback smoothness. It supports multiple video formats for input and output; a free version is available for non-commercial use only.
Here’s the step-by-step process of converting video frame rate using VideoPad:
Step1 Open VideoPad and import your video to the timeline
Step2 Edit the video as desired, then navigate to “Export Video“ > “Video File.”
Step3 In the “Export File Settings“ window, select the desired frame rate, edit the file name, and choose the output folder, format, and resolution. Click “Create“ to export the video.

3. Frame Rate Converter - MiniTool Video Converter (Windows)

MiniTool Video Converter is a free and versatile tool for converting the frame rate of your videos. It offers multiple FPS options, such as 12, 15, 20, 23.97, 30, 50, and 60, which vary depending on your chosen video format. Not only can it change the frame rate, but it can also convert the video format, allowing you to import a video and then simultaneously change the format and frame rate.
Additionally, MiniTool offers options for video resolution, quality, encoder, and more. Furthermore, this video FPS converter allows you to record your computer screen in various formats, such as MP4, WMV, MKV, AVI, MOV, FLV, and TS in 15, 20, 25, and 30 fps. It also enables you to download videos and audio from YouTube.
Here’s the step-by-step process of converting video frame rate using MiniTool Video Converter:
Step1 Open MiniTool Video Converter, and upload the video you wish to convert by clicking “Add“ or dragging the file into the conversion area.

Step2 Under the Video tab in the new pop-up, select a format and click “Create Custom“ to open the settings window. Choose the desired frame rate.
Step3 Click “Convert,” and once completed, locate the converted video in the “Converted“ tab by clicking “Show in Folder.”

4. VLC Converter Frame Rate Conversion Software

The VLC media player is a well-known free tool for converting frame rates. It’s a versatile player that supports various audio-visual formats, including AVI, MPEG, WMV, DVD, and CD.
VLC also includes additional features such as cropping and de-interlacing, allowing you to configure and edit your files. VLC media players can also remove DRM protection and convert multiple videos in batches. It’s a great option for a free frame rate converter.
Here’s how to change the frame rate of a video using VLC Media Player:
Step1 Open the VLC media player and click on “Media“ > “Capture Device.”
Step2 Select “Convert/Save“ and browse for the video you want to change the frame rate
Step3 Select the desired frame rate in the “Convert/Save“ dialog box and click “Start.”
Step4 Wait for the conversion to finish and click “Convert/Save“ to find the new video with the adjusted frame rate.

5. HandBrake: Open Source Frame Rate Converter

Handbrake is a versatile, open-source video converter that can change the frame rate of a video from nearly any format to MP4, WebM, or MKV. It offers a wide range of frame rate options, from 5 to 120 FPS, making it a great tool for video production needs.
In addition to frame rate conversion, Handbrake also features various filters to enhance video quality, such as reducing noise, sharpening, rotating, flipping videos, adding subtitles, and more. With Handbrake, you can easily change the frame rate of your videos to your desired settings.
Here’s how to change the frame rate of a video using HandBrake:
Step1 Open Handbrake and add your video.
Step2 Select a format, change the frame rate, and choose the output folder.
Step3 Click “Start Encode“ to convert the video frame rate.

3 Video FPS Converters Online
In addition to software-based video frame rate converters, a variety of online video FPS converters can be used for quick and easy frame rate conversions.
These online tools are often user-friendly and require no installation, making them accessible from any device with an internet connection. These tools allow for easy uploading of videos and the ability to select the desired frame rate for conversion. They also offer a variety of output formats and options for video quality, resolution, and more.
1. VEED.IO
VEED’s online frame rate converter is a simple tool to increase or decrease your video’s frame rate without leaving your browser. It supports popular frame rates such as 16fps, 24fps, 30fps, 60fps, and more.
Lower the frame rate to create a stop-motion video or GIF, or increase it to make the video appear smoother. The tool can upload videos in any format and render them in seconds without installing converter apps or software. It works on Windows 10, Mac, Linux, and mobile devices.
Here’s how to change the video frame rate using Veed.io:
Step1 Import your video, or you can drag and drop your video.

Step2 Click “Export,” then click “switch to advanced settings“ to access frame rate settings. Adjust the frame rate using the framerate limit tool.

Step3 Click “Export Video,” and your video will render in seconds.

2. Video2Edit

Video2Edit is an all-in-one online video solution that offers a variety of editing options such as conversion, rotation, cutting, merging, and audio compression and normalization. Additionally, it is also a highly efficient online video frame rate converter. With Video2edit, you can easily change the frame rate of your videos to match your specific needs.
This tool makes it simple whether you want to increase or decrease the frame rate. It supports a wide range of frame rates, from 16 to 60 fps, and can convert your video to any format you need. With this powerful and versatile tool, you can ensure that your videos look smooth and professional and have the right frame rate for your desired output.
Here’s how to change the video frame rate using Video2Edit:
Step1 On Video2Edit’s website, select “Convert from video“ and upload your file.

Step2 Select an output format and enter a new frame rate (1-120) in the “Change frame rate“ box.

Step3 Click “START“ to begin the conversion process.
3. AConvert
With AConvert, you can quickly change the frame rate of your video to fit your needs. This online tool offers various frame rates, including 20fps, 24fps, 30fps, 50fps, and more, giving you the flexibility to find the right setting for your video.
Additionally, AConvert offers a range of video editing options, including cutting, merging, rotating, and cropping, allowing you to enhance your video in multiple ways. The process of converting frame rate with AConvert is simple.
Here’s how to change the video frame rate using AConvert:
Step1 Visit the AConvert website, select Video, and upload your video.
Step2 Choose “Change size, bitrate, or frame rate“ and select “Frame Rate“ in the drop-down menu.
Step3 Select a frame rate and click “Convert Now!“ to start the conversion process.
Conclusion
Converting video frame rates can significantly impact your video’s quality and viewing experience. Whether you’re looking to increase or decrease the frame rate, the above options provide easy and efficient ways. Regardless of the tool or software, the process is straightforward, allowing you to change the frame rate with just a few clicks. So go ahead and try out one of these options to improve your video’s frame rate today!
Also read:
- New 5 Simple Tools to Merge Video and Audio Online for 2024
- New Step by Step to Rotate Videos in Windows Media Player
- In 2024, Want to Know the Full Process of Adding the Falling Text Effect as a Video Introduction? Detailed Guidelines on All the Steps Are Mentioned Here for Filmora Users
- In 2024, Looking For a Cheap Camera to Make Slow Motion Video? Get It Now
- Best 10 Mind-Blowing Video Collage Maker for PC
- New Top 6 Text to Speech Generators for YouTube Videos Windows, Mac, And
- 2024 Approved Using Track Matte and Tracking in Adobe After Effects Reviewing All Possibilities
- New Best Filmic Pro LUTs For Video Editing for 2024
- How to Resize FLV Videos Efficiently Windows, Mac,Android, iPhone & Online
- New How To Edit Youtube Videos In Simple Steps for 2024
- How to Create a DIY Green Screen Video Effect?
- In 2024, In This Article, We Will Be Discussing How to Crop a Video on Android, but Since Most Android Devices Dont Have This Option, You Will Need to Do It Externally, by Downloading and Using Different Apps
- Updated In 2024, 15 Best Free Cinematic LUTs for Your Film
- Updated Lets Learn How to Convert a Normal Video Into a Film Shot in the 1920S with Wondershare Filmora
- Do You Wish to Convert GIF to Animated PNG? Then, You Need to Know About Using a GIF to APNG Converter to Help You Carry This Process Out in No Time. Read On for 2024
- New 3GP Video Format What Is 3GP Format And How To Play It for 2024
- 2024 Approved Step by Step to Rotate Videos Using Handbrake
- Top 15 Slow Motion CapCut Templates to Work With for 2024
- New Kinetic Typography Text Effect 【EASY&FAST】
- How to DIY VHS Overlay in After Effects, In 2024
- Updated 2024 Approved Detailed Guide to Crop Videos in Sony Vegas Pro
- Using the Best Templates to Create Slow Motion Videos on CapCut
- 2024 Approved Looking Forward to Making up Your Career in Video Editing? Land in Here to Learn About the Credibility of some Popular Video Editing Courses
- Updated Applications and Software Take up Your Devices Storage to Create Slow-Mo. Explore This Piece to Learn About some Slow-Motion Video Online Makers
- Updated In 2024, How to Create a Bokeh Effect
- New Perfect Moody LUTs for VN Editor An Overview for 2024
- Updated 2024 Approved Ideas That Will Help You Out in Making Transparent Image
- In 2024, 2 Easy Methods | How To Zoom In On TikTok Videos?
- In 2024, How to Download and Use Vegas Pro
- New In 2024, 8 Excellent Video and Photo Mergers on Desktop/Mobile/Online
- With This Article, We Will Be Looking at Steps to Rotate a Video in Cyberlink PowerDirector to Help You when Required. We Have Also Mentioned the Steps You Will Need to Follow in Wondershare Filmora for 2024
- 2024 Approved Do You Need to Create a Video for Your Business Online but Feel You Do Not Have the Skill and Time to Do That? Try Out These AI Video Generators that Will Work for You to Carry Out Tasks Effectively
- In This Article Let Me Share with You How to Start a Vlog? Ideas and Any Tips for You to Start Your Own Vlogging Channel
- 2024 Approved How to Edit GoPro Videos on Mac
- In 2024, How to Make Falling Text Effect in Filmora?
- Updated 2024 Approved 15 Best LUTS to Buy
- How Can You DIY VHS Overlay in After Effects for 2024
- New In 2024, Vegas Pro - How to Download, Install and Use It?
- Updated Best Online MPEG to GIF Converters for 2024
- New Tiktok Video Aspect Ratio
- Find Out About MAGIX Vegas Pro Pricing Plan and Features to See How the Software Can Help You with Your Video Editing Tasks
- In 2024, How to Put a Filter on a Video in iMovie
- Updated Find Out The Best Dark Moody LUTs During Editing for 2024
- Updated Mastering DaVinci Resolve Scopes A Comprehensive Guide for 2024
- How to Use Lumetri Color in Adobe After Effects for 2024
- EasyHDR Review Is This a Good Choice to Create HDR
- Updated In 2024, 8 Excellent Video and Photo Mergers on Desktop/Mobile/Online
- New How To Make Ninja Jump Effect with Filmora
- Updated Perfect Moody LUTs for VN Editor An Overview
- How to Change Nokia G22 Location on Skout | Dr.fone
- How to Recover Apple iPhone 15 Pro Max Data From iOS iTunes? | Dr.fone
- How to See Someones Location on Apple iPhone 14 Plus | Dr.fone
- Step-by-Step Tutorial How To Bypass Tecno Spark 10 5G FRP
- In 2024, 5 Ways To Teach You To Transfer Files from HTC U23 Pro to Other Android Devices Easily | Dr.fone
- In 2024, A Step-by-Step Guide on Using ADB and Fastboot to Remove FRP Lock on your Motorola Moto G14
- In 2024, How Many Attempts To Unlock iPhone 13 mini | Dr.fone
- How to Reset Gmail Password on Infinix Note 30 Devices
- New In 2024, Best 8 AI Title Generators for Creating Catchy Titles For All Platform
- How to Transfer Photos from Samsung Galaxy A23 5G to Laptop Without USB | Dr.fone
- 2024 Approved Best AI YouTube Script Writers and The Ultimate Guide
- Updated In 2024, AI Script Generator | Virbo Guide
- How Can I Unlock My iPhone 11 Pro After Forgetting my PIN Code?
- In 2024, 10 Best Fake GPS Location Spoofers for Nubia Red Magic 8S Pro+ | Dr.fone
- New Top 10 Free AI Voice Generators to Use in Daily Life
- In 2024, Delete Gmail Account With/Without Password On Poco M6 Pro 5G
- Top Apps and Online Tools To Track Xiaomi Redmi K70E Phone With/Without IMEI Number
- Updated Essential Tools for Creating Dynamic Talking Avatars for 2024
- In 2024, Guide on How To Remove Apple ID From Apple iPhone 13 mini
- In 2024, How to Unlock Vivo Y36 Phone Password Without Factory Reset?
- How to Screen Mirroring Infinix Note 30 5G? | Dr.fone
- Updated Best 7 Talking Photo AI You Must Try (Online & Download)
- 5 Hassle-Free Solutions to Fake Location on Find My Friends Of Samsung Galaxy A05s | Dr.fone
- How to Fix My Samsung Galaxy A54 5G Location Is Wrong | Dr.fone
- Spotify Keeps Crashing A Complete List of Fixes You Can Use on Vivo Y200 | Dr.fone
- In 2024, 10 Free Location Spoofers to Fake GPS Location on your Motorola Moto E13 | Dr.fone
- What Legendaries Are In Pokemon Platinum On Realme 11 Pro+? | Dr.fone
- In 2024, 5 Ways to Track Apple iPhone 8 Plus without App | Dr.fone
- How To Transfer WhatsApp From Apple iPhone SE (2020) to Android? | Dr.fone
- Title: New Easy Way to Add Effects to Art Video
- Author: Chloe
- Created at : 2024-06-18 14:30:51
- Updated at : 2024-06-19 14:30:51
- Link: https://ai-editing-video.techidaily.com/new-easy-way-to-add-effects-to-art-video/
- License: This work is licensed under CC BY-NC-SA 4.0.

