:max_bytes(150000):strip_icc():format(webp)/GettyImages-1353420724-65161751b9924195880d3273e327cb54.jpg)
New End Your Struggles with Choppy Playback on DaVinci Resolve. Read This Guide to Find Effective Fixes and Reliable DaVinci Resolve Slow Playback Alternatives

End Your Struggles with Choppy Playback on DaVinci Resolve. Read This Guide to Find Effective Fixes and Reliable DaVinci Resolve Slow Playback Alternatives
Davinci Resolve is a well-known video editing software with an intuitive interface. This all-in-all program combines editing, color correction, motion graphics, and visual effects. Video editors don’t need to switch to many apps when DaVinci Resolve can do different tasks. High-quality editing of original camera images can only be done through this tool.
Hollywood films and series use this software to streamline the show. Overall, it’s incredible software, but sometimes DaVinci Resolve slow playback issues arise. To fix this issue, you can read this guide for effective and guaranteed solutions. There, you will also find a trustworthy alternative to avoid DaVinci Resolve slow-down playback.
Slow Motion Video Maker Slow your video’s speed with better control of your keyframes to create unique cinematic effects!
Make A Slow Motion Video Make A Slow Motion Video More Features

Part 1: Finding the Best Resolution for DaVinci Resolve Slow Playback Issue
As Highlighted, DaVinci Resolve is a good video editor for all kinds of use cases. Although it’s a powerful tool, it still shows some errors like choppy and slow playback. Modern problems require modern solutions. Thus, read the given fixes to make DaVinci Resolve faster playback. All the methods are easy and helpful for a smooth playback experience on Windows and macOS.
- Solution 1: Lower Playback Resolution
- Solution 2: Change Timeline Resolution
- Solution 3: Enable Render Cache
- Solution 4: Disable the Live Save Feature
- Solution 5: Use Proxy Media Files
- Solution 6: Disable Color Grades
Solution 1: Lower Playback Resolution
In DaVinci Resolve, full timeline proxy resolution is set by default. To enjoy a smooth playback while editing, you should reduce the playback resolution. Open your project in DaVinci Resolve and press the “Playback” menu from the top. Then, select “Timeline Proxy Resolution” and pick one either “Half” or “Quarter” options. It will reduce the playback resolution and speed up the playback.

Solution 2: Change Timeline Resolution
DaVinci Resolve can work on 4K high-resolution footage that might disrupt the playback. So, cutting down the resolution to speed up your playback is suggested. To do so, click the “Settings” icon from the bottom right side and enter the “Project Settings” window. Expand the “Time Resolution” menu and choose 1920x1080 HD if working on 4K or high resolutions. Now, apply the changes by hitting on “Save.”
Adjust the timeline resolution and right-click on the timeline in the Media Pool. Choose “Timeline” and then “Timeline Settings.” Lastly, check the “Use Project Settings” option and decide a resolution to click on “OK.”

Solution 3: Enable Render Cache
It’s another solution to fix the DaVinci resolve slow playback. Render cache is a file that stores the rendered frames and makes the rendering faster. Start by hitting the “Playback” option and choose “Render Cache.” Then, you’ll see 3 options: None, Smart, and User. You should select “Smart” and let DaVinci Resolve pick one clip to be cached.

Solution 4: Disable the Live Save Feature
Every change you make gets saved with the Live Save option in DaVinci Resolve. If your remote drive is linked, this feature can drag the playback speed down. You can disable it for a DaVinci resolve faster playback.
Look for the “User Preference” menu and click on the top left side button of DaVinci Resolve. Go to the “Preferences” under the user tab. From the “Project Save and load,” check the “Disable Live Save” option. Now, you should remember to manually save your projects after editing.

Solution 5: Use Proxy Media Files
Another solution is to use proxy media during the project editing. Proxy files are small copy files transcoded from a larger, original video file. Get the proxy file to increase the playback and go to your “Media Pool” in DaVinci Resolve. Right-click on the intended file and choose “Generate Proxy Media” from the list.

Solution 6: Disable Color Grades
If you are still failing to resolve the slow playback issue on Davinci Resolve, try this fix. Disable color grades and other effects in the first place. To do so, head to the DaVinci Resolve Edit Page. After getting there, press the “Bypass Color Grades and Fusion Effects” button from the top right side. This way, you can surely solve the DaVinci Resolve slow-down playback error.

Part 2: What Makes a Slow-Motion Video Good?
After resolving the DaVinci Resolve slow playback, let’s continue further editing. Create a slow-motion video to emphasize certain information in the video. It involves technical and creative elements for a good-quality video. You can read this section to understand the points that contribute to a good Slow-motion video.
- Frame Rate: Keep the frame rate higher for a good slow-motion video. In this regard, you can use common frame rates such as 60fps, 120fps, and 140fps. Moreover, you should pick video clips that are originally captured in a high frame rate.
- Shutter Speed: Minimize the motion blur in footage and use a faster shutter speed. It is important when you are shooting fast-moving objects. Adjusting the shutter speed can enhance the look of slow-motion videos.
- Resolution: A good slow motion is only possible when it is captured in high-quality resolution. Better image quality allows more detail in such footage. Moreover, you can optimize the camera settings for the desired resolution.
- Editing and Timing: Thoughtfully chosen clips, timings, and editing can set the stage. Thus, maintain a cohesive flow and pay more attention to the video pacing. Edit all segments in a way that fits seamlessly to contribute a good slow-motion video.
Part 3: Making Slow Playback Issues Go Away with Perfect Alternative: Wondershare Filmora
Sometimes, issues like DaVinci Resolve slow down playback do not go easily. Resolving them requires a lot of effort that might prove frustrating beyond limits. So, it seems better there to switch towards a better option. In this regard, Wondershare Filmora is the most effective solution in video editing. Professionals can rely on Filmora, which offers AI-integrated features for easy video-making.
Users can use its AI Copilot Editing for assistance if they are new to video editing. Moreover, Filmora can generate AI music, images, and scripts. It can ensure your workflow with the quickest editing. Discover more features of this application to unlock your creativity.
Free Download For Win 7 or later(64-bit)
Free Download For macOS 10.14 or later
How to Make a Slow-motion video with Optical Flow
Slow-motion videos with high resolution are not easy to create. Without any playback lagging, this tool can provide you with slow-motion video. Following are those steps that can lead you to easily create such videos:
Step 1Install Filmora and Import Your Project
Launch Filmora’s latest version in your system. Open it and choose the “New Project” option from its main interface. After getting into the editing screen, press the “Ctrl + I” keys to bring the media to Filmora. Drag and drop the file in the timeline section to start editing.

Step 2Explore the Speed Option and Use Optical Flow Feature
In the Timeline, right-click on the video and choose the “Uniform Speed” option. An extended menu will appear on the right side. Now, turn the video into slow motion with the “Speed” slider. Afterward, head down and extend the “AI Frame Interpolation” menu. From the list, select the “Optical Flow” option for slow but high-quality speed.

Step 3Continue Editing or Export as Desired
Now, you can extend your editing and work on “Reverse Speed” and “Ripple Edit.” If you have nothing to edit more, look for the “Export” option from the top-right corner. Click on it and export with customized parameters.

Conclusion
In short, there are several ways to fix DaVinci Resolve’s slow playback error. As explained earlier, you can use any solution for a smooth playback experience. If you don’t want to waste time resolving such issues, switch to Wondershare Filmora. It is a reliable, all-in-all tool for video editors that doesn’t cause any playback lagging. So, start creating slow-motion videos with optical flow.
Make A Slow Motion Video Make A Slow Motion Video More Features

Part 1: Finding the Best Resolution for DaVinci Resolve Slow Playback Issue
As Highlighted, DaVinci Resolve is a good video editor for all kinds of use cases. Although it’s a powerful tool, it still shows some errors like choppy and slow playback. Modern problems require modern solutions. Thus, read the given fixes to make DaVinci Resolve faster playback. All the methods are easy and helpful for a smooth playback experience on Windows and macOS.
- Solution 1: Lower Playback Resolution
- Solution 2: Change Timeline Resolution
- Solution 3: Enable Render Cache
- Solution 4: Disable the Live Save Feature
- Solution 5: Use Proxy Media Files
- Solution 6: Disable Color Grades
Solution 1: Lower Playback Resolution
In DaVinci Resolve, full timeline proxy resolution is set by default. To enjoy a smooth playback while editing, you should reduce the playback resolution. Open your project in DaVinci Resolve and press the “Playback” menu from the top. Then, select “Timeline Proxy Resolution” and pick one either “Half” or “Quarter” options. It will reduce the playback resolution and speed up the playback.

Solution 2: Change Timeline Resolution
DaVinci Resolve can work on 4K high-resolution footage that might disrupt the playback. So, cutting down the resolution to speed up your playback is suggested. To do so, click the “Settings” icon from the bottom right side and enter the “Project Settings” window. Expand the “Time Resolution” menu and choose 1920x1080 HD if working on 4K or high resolutions. Now, apply the changes by hitting on “Save.”
Adjust the timeline resolution and right-click on the timeline in the Media Pool. Choose “Timeline” and then “Timeline Settings.” Lastly, check the “Use Project Settings” option and decide a resolution to click on “OK.”

Solution 3: Enable Render Cache
It’s another solution to fix the DaVinci resolve slow playback. Render cache is a file that stores the rendered frames and makes the rendering faster. Start by hitting the “Playback” option and choose “Render Cache.” Then, you’ll see 3 options: None, Smart, and User. You should select “Smart” and let DaVinci Resolve pick one clip to be cached.

Solution 4: Disable the Live Save Feature
Every change you make gets saved with the Live Save option in DaVinci Resolve. If your remote drive is linked, this feature can drag the playback speed down. You can disable it for a DaVinci resolve faster playback.
Look for the “User Preference” menu and click on the top left side button of DaVinci Resolve. Go to the “Preferences” under the user tab. From the “Project Save and load,” check the “Disable Live Save” option. Now, you should remember to manually save your projects after editing.

Solution 5: Use Proxy Media Files
Another solution is to use proxy media during the project editing. Proxy files are small copy files transcoded from a larger, original video file. Get the proxy file to increase the playback and go to your “Media Pool” in DaVinci Resolve. Right-click on the intended file and choose “Generate Proxy Media” from the list.

Solution 6: Disable Color Grades
If you are still failing to resolve the slow playback issue on Davinci Resolve, try this fix. Disable color grades and other effects in the first place. To do so, head to the DaVinci Resolve Edit Page. After getting there, press the “Bypass Color Grades and Fusion Effects” button from the top right side. This way, you can surely solve the DaVinci Resolve slow-down playback error.

Part 2: What Makes a Slow-Motion Video Good?
After resolving the DaVinci Resolve slow playback, let’s continue further editing. Create a slow-motion video to emphasize certain information in the video. It involves technical and creative elements for a good-quality video. You can read this section to understand the points that contribute to a good Slow-motion video.
- Frame Rate: Keep the frame rate higher for a good slow-motion video. In this regard, you can use common frame rates such as 60fps, 120fps, and 140fps. Moreover, you should pick video clips that are originally captured in a high frame rate.
- Shutter Speed: Minimize the motion blur in footage and use a faster shutter speed. It is important when you are shooting fast-moving objects. Adjusting the shutter speed can enhance the look of slow-motion videos.
- Resolution: A good slow motion is only possible when it is captured in high-quality resolution. Better image quality allows more detail in such footage. Moreover, you can optimize the camera settings for the desired resolution.
- Editing and Timing: Thoughtfully chosen clips, timings, and editing can set the stage. Thus, maintain a cohesive flow and pay more attention to the video pacing. Edit all segments in a way that fits seamlessly to contribute a good slow-motion video.
Part 3: Making Slow Playback Issues Go Away with Perfect Alternative: Wondershare Filmora
Sometimes, issues like DaVinci Resolve slow down playback do not go easily. Resolving them requires a lot of effort that might prove frustrating beyond limits. So, it seems better there to switch towards a better option. In this regard, Wondershare Filmora is the most effective solution in video editing. Professionals can rely on Filmora, which offers AI-integrated features for easy video-making.
Users can use its AI Copilot Editing for assistance if they are new to video editing. Moreover, Filmora can generate AI music, images, and scripts. It can ensure your workflow with the quickest editing. Discover more features of this application to unlock your creativity.
Free Download For Win 7 or later(64-bit)
Free Download For macOS 10.14 or later
How to Make a Slow-motion video with Optical Flow
Slow-motion videos with high resolution are not easy to create. Without any playback lagging, this tool can provide you with slow-motion video. Following are those steps that can lead you to easily create such videos:
Step 1Install Filmora and Import Your Project
Launch Filmora’s latest version in your system. Open it and choose the “New Project” option from its main interface. After getting into the editing screen, press the “Ctrl + I” keys to bring the media to Filmora. Drag and drop the file in the timeline section to start editing.

Step 2Explore the Speed Option and Use Optical Flow Feature
In the Timeline, right-click on the video and choose the “Uniform Speed” option. An extended menu will appear on the right side. Now, turn the video into slow motion with the “Speed” slider. Afterward, head down and extend the “AI Frame Interpolation” menu. From the list, select the “Optical Flow” option for slow but high-quality speed.

Step 3Continue Editing or Export as Desired
Now, you can extend your editing and work on “Reverse Speed” and “Ripple Edit.” If you have nothing to edit more, look for the “Export” option from the top-right corner. Click on it and export with customized parameters.

Conclusion
In short, there are several ways to fix DaVinci Resolve’s slow playback error. As explained earlier, you can use any solution for a smooth playback experience. If you don’t want to waste time resolving such issues, switch to Wondershare Filmora. It is a reliable, all-in-all tool for video editors that doesn’t cause any playback lagging. So, start creating slow-motion videos with optical flow.
Mastering OpenCV Object Tracking: A Comprehensive Guide for Beginners and Experts
OpenCV Tracking is a popular method used for tracking objects in a video in real-time. OpenCV is a powerful library used for image processing and computer vision applications.
From real-time video analysis to Augmented Reality, OpenCV Tracking has a wide range of uses and can help both private and public sectors to detect and track the desired object in an image or video.
In this comprehensive guide, we’ll explore OpenCV Tracking and its pre-built trackers**.** We will use the OpenCV library and Python to implement this Object Tracking application.
- What Is OpenCV
- The Pre-Built Algorithms OpenCV Offers For Object Tracking
- Implementation In Python And OpenCV
Part 1. What Is Object Tracking?
Object Tracking determines the location of an object in a video and can be used for a variety of purposes, including surveillance, security, traffic control, digital forensics, anomaly detection, gesture recognition, visual surveillance, human-computer interaction, augmented reality, and robot vision.
Even though it may seem easy for an average person, object tracking is quite complex for computers because they have to analyze a set of frames and estimate the object’s trajectory based on numbers instead of images.
Because of how complicated it is, Object Tracking is considered one of the most difficult tasks in computer vision. Even though it’s a challenge, it’s not impossible to accomplish.
And there are two levels of Object Tracking that you should learn about:
1. SOT & MOT
- Single Object Tracking (SOT): SOT is a tracking algorithm that creates advanced appearance models and/or motion models to manage difficult issues like out-of-plane rotations, illumination variations, or scale changes.
- Multiple Object Tracking (MOT): MOT tracks every part of a video and is mainly concerned with mid-level tasks and serves as a foundation for high-level tasks.
2. The Difference Between Tracking And Detection
After knowing what Object Tracking is, there is another concept you should also be aware of - Object Detection.
The Object Tracking and Object Detection are two important methods in computer vision. Object Tracking tracks the position of a given object in an image in real-time, while Object Detection identifies and localizes objects in an image or video. That is the difference.
Part 2. Types Of Object Tracking
Image Tracking
Image tracking allows users to interact with digital content more naturally and helps users move and interact with digital objects in the same manner as they will with real-world physical objects.
Image tracking can be used in various augmented reality (AR) applications, such as AR gaming, shopping, and navigation. Moreover, you can also use it for educational purposes, such as teaching anatomy or providing instructions for a difficult task.
Video Tracking
Video tracking is the process of tracking objects in a video sequence and can be used for various applications, such as detecting and counting objects in a scene, understanding their motions, and recognizing activities.
Part 3. What Are The Difficulties Of Object Tracking?
As what has been mentioned above, the use of object tracking is versatile. However, there are some challenges associated with Object Tracking, such as:
Background Clutter: The background can impact extracting an object’s features. If the background is more densely populated, detecting or tracking the object of interest can be more difficult.
Occlusion: This is a phenomenon where the object being tracked is affected by the background or foreground. This causes the tracking algorithm to get confused due to multiple objects coming close together, hence, losing track of the object.
Varying spatial scales: Varying spatial scales refer to the target object being of a different size or shape, which can confuse the algorithm, leading to errors.
Training and Tracking Speed: If the object is moving too fast or is too small, it can be difficult to track. Therefore, the tracking module has to be designed to track, identify, and localize objects in a matter of seconds.
Part 4. Stages Of The Object Tracking Process
After the introduction of object tracking technically, let’s learn about its mechanism of it from two sides: periods of the working process and the way it tracks.
1. Stages Of The Object Tracking Process
Following are the stages of the Object Tracking process:
Target Initialization
Target initialization is the first step in Object Tracking and involves defining the targets or objects of interest and drawing a bounding box around them in the initial frame. After that, the tracker has to detect the position of the object in the frame while drawing the bounding box.
Appearance Modeling
Appearance modeling is important for understanding how an object will look under different circumstances. If the object being tracked changes appearance due to different lighting, angle, or speed, the tracking algorithm may lose its information and the object itself. Therefore, it has to be conducted to let the algorithm detect the changes and distortion.
Motion Estimation
Motion estimation entails the capacity of the model to anticipate an object’s future position with precision.
Target Positioning
Motion estimation is a process of approximating the most likely region where an object could be present. After the object’s location is approximated, a visual model can be used to determine the target’s location more accurately.
2. Methods Of Object Tracking
Here’re some methods of Object Tracking:
OpenCV-Based Object Tracking
OpenCV Object Tracking method is widely used because it offers several built-in functions designed specifically for this purpose, such as GOTURN, MIL, MediandFlow, and CSRT. The tracker type you select will depend on your specific application design. Each tracker has its pros and cons, so there is not a single type of tracker ideal for all applications.
MDNet
Multi-Domain Convolutional Neural Network Tracker is a convolutional neural-based visual tracker and has won the VOT2015 challenge. Moreover, it is composed of domain-specific layers, branches, and multiple shared layers.
The MDNetT tracker is a deep neural network that is trained on numerous Object Tracking datasets. The tracker is designed to work in multiple domains, including video, text, and images.
DeepSort
DeepSort algorithm can track objects in real-time and uses YOLO v3 to compute the bounding boxes around the objects in a frame.
DeepSort uses Kalman filter from Simple Online and Realtime Tracking algorithm and an identification model, ReID to interlink bounding boxes and object tracks.
ROLO
ROLO is a novel Object Tracking method that uses recurrent neural networks (RNNs) to learn object-specific Spatio-temporal representations. This method works with YOLO, an object detection algorithm, and an LTSM for determining the trajectory of an object.
Part 5. The powerful backup: OpenCV
We have demonstrated how powerful OpenCV Tracking is and how it works. However, do you wonder what OpenCV is? How it supports the tracking goals being achieved? In this part, we will focus on OpenCV and help you better understand the the underlying mechanisms.
1. What Is OpenCV?
OpenCV is a powerful library that allows you to perform image processing, deep learning, machine learning, and computer vision tasks on live video feeds. Moreover, it can be used to detect objects, track their movements, and recognize faces.
It can help process the data that have videos and images and has been used in various applications, such as object recognition and detection, autonomous cars, robots, medical image analysis, automated surveillance, and anomaly detection.
2. The Pre-Built Algorithms OpenCV Offers For Object Tracking
There are 8 pre-built algorithms that OpenCV offers for Objects Tracking. All of them have their uniquility and here we will present their pros and cons for your better understadning.
| Tracker | Pros | Cons |
|---|---|---|
| BOOSTING Tracker | Track objects accurately. | Relatively slow. Unable to stop when an object is lost. |
| MIL Tracker | Strong resistance to noise. Gives accurate results. | Low speed. Unable to stop tracking once the object is lost. |
| KCF Tracker | High speed and accuracy. Stops tracking when the object is lost. | Inability to continue tracking objects once lost. |
| TLD Tracker | Resistance to overlapping and object scaling. | Unstable in object detection and tracking. Constantly loses object. |
| MEDIANFLOW Tracker | High accuracy and speed. Accurate in determining the object’s loss. | Loses object quickly due to high speed. |
| GOTURN Tracker | Shows resistance to obstructions and noise. | If the speed of an object is high, it shifts to another object. |
| MOSSE Tracker | Able to continue tracking after the object is lost. High speed. | Loses object easily if very high speed. |
| CSRT Tracker | Good resistance to overlapping. High accuracy. | Low speed. Unstable when an object is lost. |
3. Implementation In Python And OpenCV
Now, after theoretical explanation of OpenCV and OpenCV Tracking, let’s learn Object Tracking OpenCV Python with coding and our simple and step-by-step instructions:
Install The Dependencies
Install the pycharm app on your PC, and launch it. Create a new project and go to Terminal. Install the opencv-contrib-python package by pasting the following command into the Terminal.
Set Up the Trackers
Now, create a Jupyter-notebook and set up the trackers with this code:
Tasks:
- cv2. version returns the OpenCV library version number.
- Save the name of the eight trackers.
- Check the list for the version you are working on and create a tracker object based on the number.
Capture The Video Input
For capturing the video input, write the following lines of code:
Tasks:
- Use the VideoCapture class to capture a video via the webcam or get a saved one from your PC.
- In VideoCapture - line 2, give the path to your video.
- Comment on the second line to use the webcam for tracking and uncomment the third one.
Creating The Bounding Box And Initializing The Tracker
Define an initial random bounding box or select the choices for the object you want to track with the following code:
Start The Tracker And Check The Output
Finally, write the below code lines to start the tracker:
Tasks
- Read each video frame.
- Start the timer and, through the tracker, determine the trajectory of the object.
- Use the trajectory to draw the bounding box.
- The program will start tracking. Afterward, press the space bar to stop tracking.
Video – Object Tracking with Opencv and Python
Conclusion
In this article, we’ve discussed Object Tracking in detail and how it compares with Object Detection. Furthermore, we explored the methods used for tracking objects and provided complete guidance on the OpenCV Tracking method and its built-in functionalities.
Hopefully, you find this guide helpful, and you can now track objects in real-time without any issues.
Free Download For Win 7 or later(64-bit)
Free Download For macOS 10.14 or later
- Image Tracking
- Video Tracking
- What Are The Difficulties Of Object Tracking
- Stages Of The Object Tracking Process
- What Is OpenCV
- The Pre-Built Algorithms OpenCV Offers For Object Tracking
- Implementation In Python And OpenCV
Part 1. What Is Object Tracking?
Object Tracking determines the location of an object in a video and can be used for a variety of purposes, including surveillance, security, traffic control, digital forensics, anomaly detection, gesture recognition, visual surveillance, human-computer interaction, augmented reality, and robot vision.
Even though it may seem easy for an average person, object tracking is quite complex for computers because they have to analyze a set of frames and estimate the object’s trajectory based on numbers instead of images.
Because of how complicated it is, Object Tracking is considered one of the most difficult tasks in computer vision. Even though it’s a challenge, it’s not impossible to accomplish.
And there are two levels of Object Tracking that you should learn about:
1. SOT & MOT
- Single Object Tracking (SOT): SOT is a tracking algorithm that creates advanced appearance models and/or motion models to manage difficult issues like out-of-plane rotations, illumination variations, or scale changes.
- Multiple Object Tracking (MOT): MOT tracks every part of a video and is mainly concerned with mid-level tasks and serves as a foundation for high-level tasks.
2. The Difference Between Tracking And Detection
After knowing what Object Tracking is, there is another concept you should also be aware of - Object Detection.
The Object Tracking and Object Detection are two important methods in computer vision. Object Tracking tracks the position of a given object in an image in real-time, while Object Detection identifies and localizes objects in an image or video. That is the difference.
Part 2. Types Of Object Tracking
Image Tracking
Image tracking allows users to interact with digital content more naturally and helps users move and interact with digital objects in the same manner as they will with real-world physical objects.
Image tracking can be used in various augmented reality (AR) applications, such as AR gaming, shopping, and navigation. Moreover, you can also use it for educational purposes, such as teaching anatomy or providing instructions for a difficult task.
Video Tracking
Video tracking is the process of tracking objects in a video sequence and can be used for various applications, such as detecting and counting objects in a scene, understanding their motions, and recognizing activities.
Part 3. What Are The Difficulties Of Object Tracking?
As what has been mentioned above, the use of object tracking is versatile. However, there are some challenges associated with Object Tracking, such as:
Background Clutter: The background can impact extracting an object’s features. If the background is more densely populated, detecting or tracking the object of interest can be more difficult.
Occlusion: This is a phenomenon where the object being tracked is affected by the background or foreground. This causes the tracking algorithm to get confused due to multiple objects coming close together, hence, losing track of the object.
Varying spatial scales: Varying spatial scales refer to the target object being of a different size or shape, which can confuse the algorithm, leading to errors.
Training and Tracking Speed: If the object is moving too fast or is too small, it can be difficult to track. Therefore, the tracking module has to be designed to track, identify, and localize objects in a matter of seconds.
Part 4. Stages Of The Object Tracking Process
After the introduction of object tracking technically, let’s learn about its mechanism of it from two sides: periods of the working process and the way it tracks.
1. Stages Of The Object Tracking Process
Following are the stages of the Object Tracking process:
Target Initialization
Target initialization is the first step in Object Tracking and involves defining the targets or objects of interest and drawing a bounding box around them in the initial frame. After that, the tracker has to detect the position of the object in the frame while drawing the bounding box.
Appearance Modeling
Appearance modeling is important for understanding how an object will look under different circumstances. If the object being tracked changes appearance due to different lighting, angle, or speed, the tracking algorithm may lose its information and the object itself. Therefore, it has to be conducted to let the algorithm detect the changes and distortion.
Motion Estimation
Motion estimation entails the capacity of the model to anticipate an object’s future position with precision.
Target Positioning
Motion estimation is a process of approximating the most likely region where an object could be present. After the object’s location is approximated, a visual model can be used to determine the target’s location more accurately.
2. Methods Of Object Tracking
Here’re some methods of Object Tracking:
OpenCV-Based Object Tracking
OpenCV Object Tracking method is widely used because it offers several built-in functions designed specifically for this purpose, such as GOTURN, MIL, MediandFlow, and CSRT. The tracker type you select will depend on your specific application design. Each tracker has its pros and cons, so there is not a single type of tracker ideal for all applications.
MDNet
Multi-Domain Convolutional Neural Network Tracker is a convolutional neural-based visual tracker and has won the VOT2015 challenge. Moreover, it is composed of domain-specific layers, branches, and multiple shared layers.
The MDNetT tracker is a deep neural network that is trained on numerous Object Tracking datasets. The tracker is designed to work in multiple domains, including video, text, and images.
DeepSort
DeepSort algorithm can track objects in real-time and uses YOLO v3 to compute the bounding boxes around the objects in a frame.
DeepSort uses Kalman filter from Simple Online and Realtime Tracking algorithm and an identification model, ReID to interlink bounding boxes and object tracks.
ROLO
ROLO is a novel Object Tracking method that uses recurrent neural networks (RNNs) to learn object-specific Spatio-temporal representations. This method works with YOLO, an object detection algorithm, and an LTSM for determining the trajectory of an object.
Part 5. The powerful backup: OpenCV
We have demonstrated how powerful OpenCV Tracking is and how it works. However, do you wonder what OpenCV is? How it supports the tracking goals being achieved? In this part, we will focus on OpenCV and help you better understand the the underlying mechanisms.
1. What Is OpenCV?
OpenCV is a powerful library that allows you to perform image processing, deep learning, machine learning, and computer vision tasks on live video feeds. Moreover, it can be used to detect objects, track their movements, and recognize faces.
It can help process the data that have videos and images and has been used in various applications, such as object recognition and detection, autonomous cars, robots, medical image analysis, automated surveillance, and anomaly detection.
2. The Pre-Built Algorithms OpenCV Offers For Object Tracking
There are 8 pre-built algorithms that OpenCV offers for Objects Tracking. All of them have their uniquility and here we will present their pros and cons for your better understadning.
| Tracker | Pros | Cons |
|---|---|---|
| BOOSTING Tracker | Track objects accurately. | Relatively slow. Unable to stop when an object is lost. |
| MIL Tracker | Strong resistance to noise. Gives accurate results. | Low speed. Unable to stop tracking once the object is lost. |
| KCF Tracker | High speed and accuracy. Stops tracking when the object is lost. | Inability to continue tracking objects once lost. |
| TLD Tracker | Resistance to overlapping and object scaling. | Unstable in object detection and tracking. Constantly loses object. |
| MEDIANFLOW Tracker | High accuracy and speed. Accurate in determining the object’s loss. | Loses object quickly due to high speed. |
| GOTURN Tracker | Shows resistance to obstructions and noise. | If the speed of an object is high, it shifts to another object. |
| MOSSE Tracker | Able to continue tracking after the object is lost. High speed. | Loses object easily if very high speed. |
| CSRT Tracker | Good resistance to overlapping. High accuracy. | Low speed. Unstable when an object is lost. |
3. Implementation In Python And OpenCV
Now, after theoretical explanation of OpenCV and OpenCV Tracking, let’s learn Object Tracking OpenCV Python with coding and our simple and step-by-step instructions:
Install The Dependencies
Install the pycharm app on your PC, and launch it. Create a new project and go to Terminal. Install the opencv-contrib-python package by pasting the following command into the Terminal.
Set Up the Trackers
Now, create a Jupyter-notebook and set up the trackers with this code:
Tasks:
- cv2. version returns the OpenCV library version number.
- Save the name of the eight trackers.
- Check the list for the version you are working on and create a tracker object based on the number.
Capture The Video Input
For capturing the video input, write the following lines of code:
Tasks:
- Use the VideoCapture class to capture a video via the webcam or get a saved one from your PC.
- In VideoCapture - line 2, give the path to your video.
- Comment on the second line to use the webcam for tracking and uncomment the third one.
Creating The Bounding Box And Initializing The Tracker
Define an initial random bounding box or select the choices for the object you want to track with the following code:
Start The Tracker And Check The Output
Finally, write the below code lines to start the tracker:
Tasks
- Read each video frame.
- Start the timer and, through the tracker, determine the trajectory of the object.
- Use the trajectory to draw the bounding box.
- The program will start tracking. Afterward, press the space bar to stop tracking.
Video – Object Tracking with Opencv and Python
Conclusion
In this article, we’ve discussed Object Tracking in detail and how it compares with Object Detection. Furthermore, we explored the methods used for tracking objects and provided complete guidance on the OpenCV Tracking method and its built-in functionalities.
Hopefully, you find this guide helpful, and you can now track objects in real-time without any issues.
Free Download For Win 7 or later(64-bit)
Free Download For macOS 10.14 or later
[Step by Step] to Rotate Video in Google Photos
Google photos let you store, view, edit and share your videos and photos and are automatically organized. It is a very great cloud storage service and most people use it. Google Photos has introduced an artificial intelligence technology into the app. That’s why it can automatically organize and rotate.
You have videos on google photos that are automatically rotated, others are not.
How do you rotate them manually?
It’s is so simple and will not take much of your time.
Let’s dive in…
Rotating videos in google photos
Rotating a video in google photos is pretty simple and will not take much of your time. You can easily fix the rotation and aspect ratio of your videos. But it’s a little tricky.
I’m going to show you how to flip your videos from portrait mode to landscape mode or from landscape mode to portrait mode.
You need to open up your google photos app and choose the video you want to flip, then you’re going to pick the button in the bottom middle with the levers on it and in the bottom right hand corner.
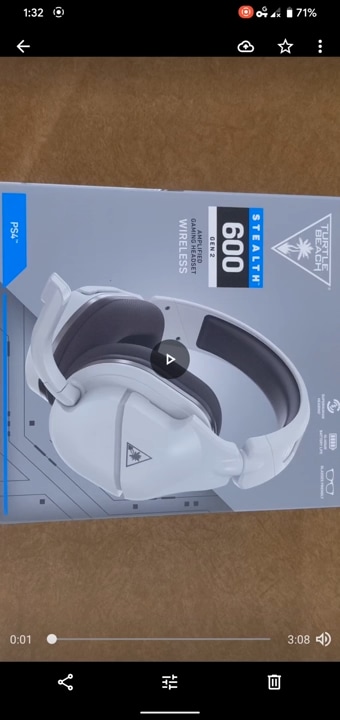
You will see a diamond with a circular arrow on it. You’re going to hit that until you find the way you want it to be.
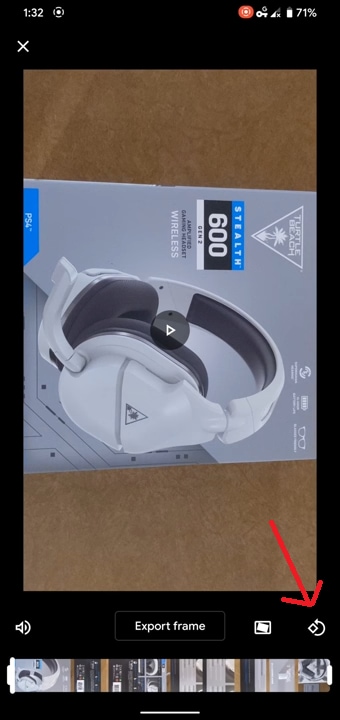
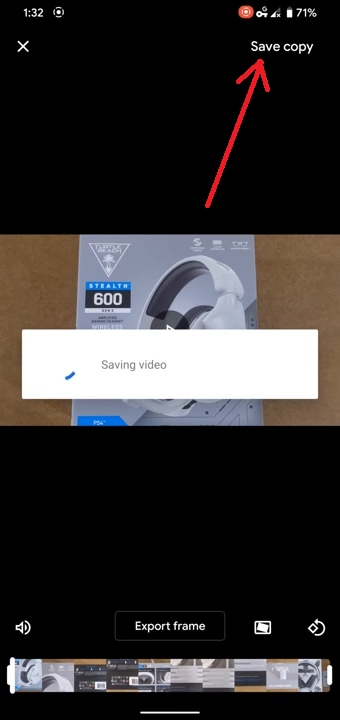
Once you’re happy, in the top right hand corner, hit Save Copy and that’s it, the size of the file determines how long it takes to finish this process later.
An easier way to rotate videos in Google Photos
If you just need to rotate a video in portrait mode to the landscape mode or 180 degrees, Google photos will be the best choice to do that. However, what if rotate a video 32 degrees or 157 degrees, or maybe you need to do more editing operations, you can’t rely on Google Photos anymore.
But stop worrying, you can set your video at any angle with Filmora Video Editor . It is one of the best video editing software that provides you with the editing tools you need to edit and share your videos across the globe. It allows you to flip and rotate the orientation of the video. It also supports many popular formats used on different social media platforms like Linkedin, Instagram, Twitter, YouTube and so many more.
Let’s have look at this professionally designed software that everyone can master in a few minutes and can film professional videos. Since it provides all the features that you will need to make movies in a good way. Moreover, its interface is very simple to use.
For Win 7 or later (64-bit)
For macOS 10.14 or later
Here’s How to do it…
Rotate video at any angle
You can also rotate the video by using the Transform tab located at the top right corner.
- Drag your video into the timeline.
- Double click on the video to bring up the editing panel.
- Hit the basic tab under the video tab in the menu bar.
- Select the Transform
- Click the rotate
- Here you can move the rotate slider or directly enter the rotating value.
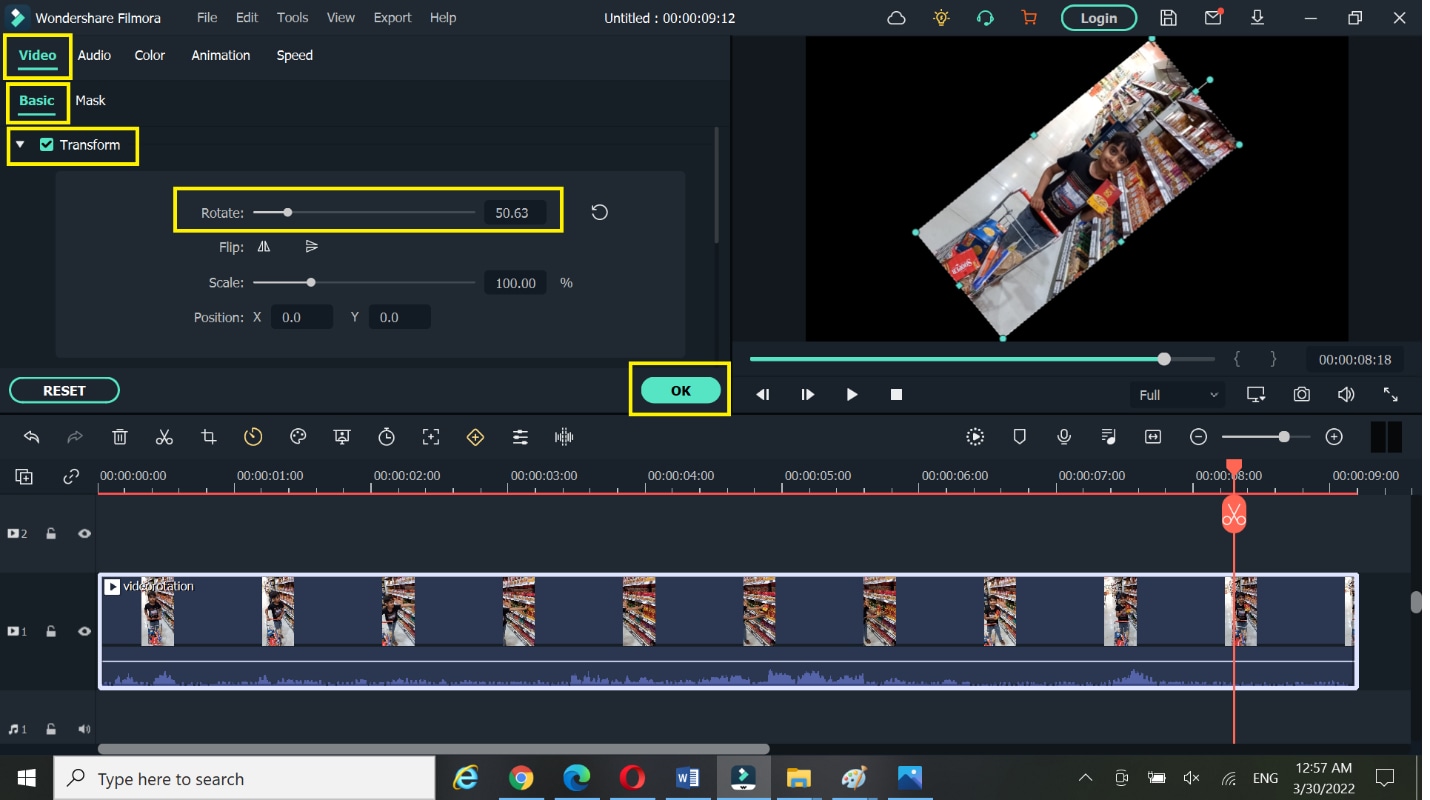
You will notice that I have changed the rotation of my video from its original position to the rotated angle.
You can rotate upside down, rotate left, rotate right or 90 degrees clockwise, 180 degrees, 270 degrees, 360 degrees rotate, and back to the original. Check the video result in the preview window. Once you get satisfied with the rotation.
- Hit the ok
- Select the save
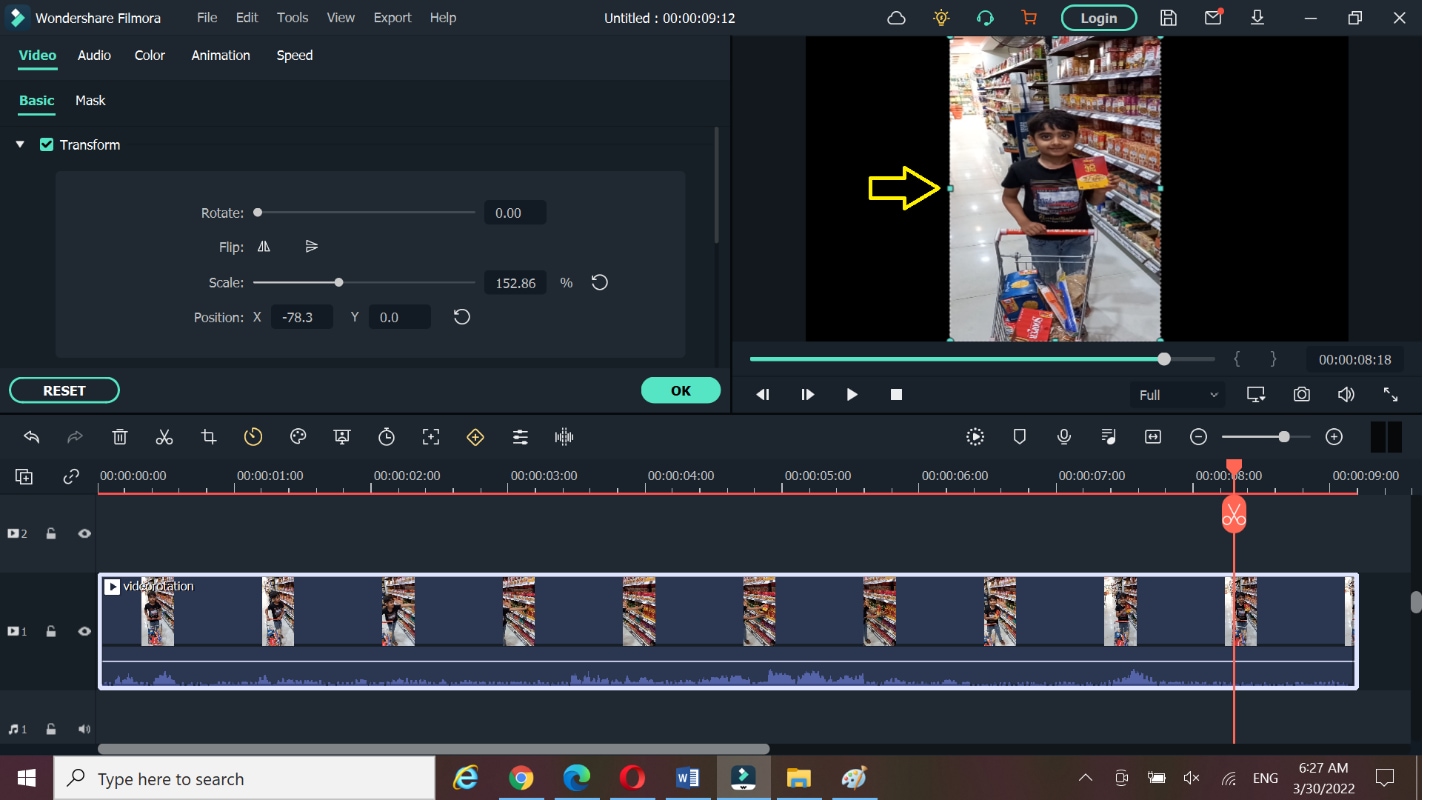
Similarly, you can drag the video from the preview panel and adjust it as required.
Here, you can Flip function your video to change the direction. Like in this screenshot, suppose you want to change the place from right to left. You can easily change the direction by hitting on the flip tab.
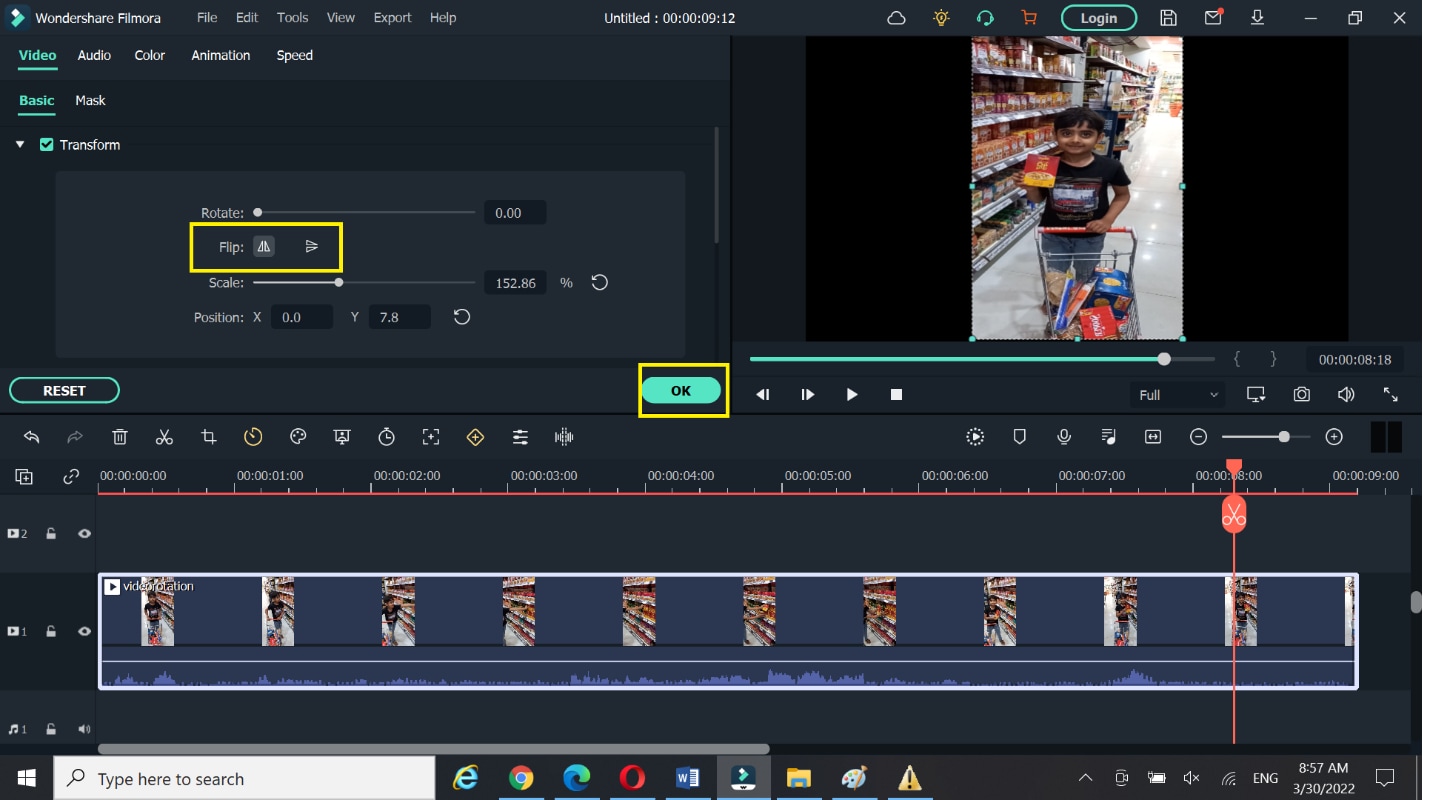
Now you can see that the image has flipped without making a big effort you can also do it. I have done it for you, you are smarter.
Just go ahead and start…
Scale is also used to remove the unwanted and rubbish scenes from the selected video. Like if you don’t want to show something behind the scene, you can use the scale function to cut that scene from your video.
What’s more you can do with Filmora
Changing the Aspect ratio
After you rotate the video at an angle you like. You can change the aspect ratio of the video furthermore.
- Import the desired video and drag it into the timeline. Then click the Aspect Ratio icon at the bottom of the preview window.
- You can select the 16:9, 1:1, 4:3, or custom aspect ratio.
- Press OK
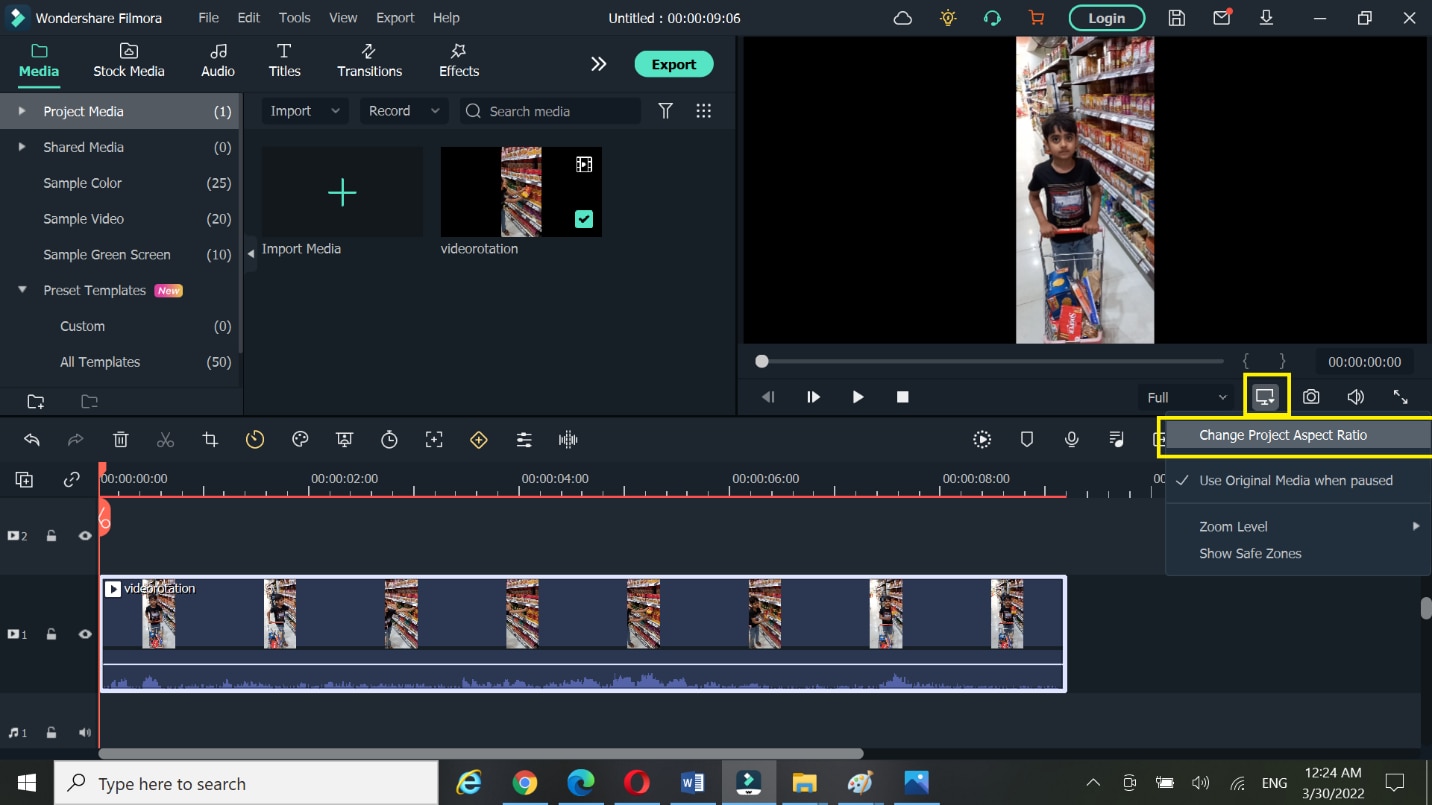
By the way, you can choose the suitable aspect ratio according to the social media platform you are using. Like, a 1:1 aspect ratio for Instagram, a 9:16 aspect ratio for portrait videos, and a 4:3 standard video.
Conclusion
Here’s how you can rotate your video using two different softwares. Now you can shoot your videos without setting the proper video orientation. Sometimes, while shooting a video, the real scene unfolds in making a lot settings. I hope, after reading this content, you will be confident enough to start shooting videos and then editing them without having trouble of learning the software.
Let’s dive in!
Go ahead…
A good destiny is waiting for you.
You will see a diamond with a circular arrow on it. You’re going to hit that until you find the way you want it to be.

Once you’re happy, in the top right hand corner, hit Save Copy and that’s it, the size of the file determines how long it takes to finish this process later.

An easier way to rotate videos in Google Photos
If you just need to rotate a video in portrait mode to the landscape mode or 180 degrees, Google photos will be the best choice to do that. However, what if rotate a video 32 degrees or 157 degrees, or maybe you need to do more editing operations, you can’t rely on Google Photos anymore.
But stop worrying, you can set your video at any angle with Filmora Video Editor . It is one of the best video editing software that provides you with the editing tools you need to edit and share your videos across the globe. It allows you to flip and rotate the orientation of the video. It also supports many popular formats used on different social media platforms like Linkedin, Instagram, Twitter, YouTube and so many more.
Let’s have look at this professionally designed software that everyone can master in a few minutes and can film professional videos. Since it provides all the features that you will need to make movies in a good way. Moreover, its interface is very simple to use.
For Win 7 or later (64-bit)
For macOS 10.14 or later
Here’s How to do it…
Rotate video at any angle
You can also rotate the video by using the Transform tab located at the top right corner.
- Drag your video into the timeline.
- Double click on the video to bring up the editing panel.
- Hit the basic tab under the video tab in the menu bar.
- Select the Transform
- Click the rotate
- Here you can move the rotate slider or directly enter the rotating value.

You will notice that I have changed the rotation of my video from its original position to the rotated angle.
You can rotate upside down, rotate left, rotate right or 90 degrees clockwise, 180 degrees, 270 degrees, 360 degrees rotate, and back to the original. Check the video result in the preview window. Once you get satisfied with the rotation.
- Hit the ok
- Select the save

Similarly, you can drag the video from the preview panel and adjust it as required.
Here, you can Flip function your video to change the direction. Like in this screenshot, suppose you want to change the place from right to left. You can easily change the direction by hitting on the flip tab.

Now you can see that the image has flipped without making a big effort you can also do it. I have done it for you, you are smarter.
Just go ahead and start…
Scale is also used to remove the unwanted and rubbish scenes from the selected video. Like if you don’t want to show something behind the scene, you can use the scale function to cut that scene from your video.
What’s more you can do with Filmora
Changing the Aspect ratio
After you rotate the video at an angle you like. You can change the aspect ratio of the video furthermore.
- Import the desired video and drag it into the timeline. Then click the Aspect Ratio icon at the bottom of the preview window.
- You can select the 16:9, 1:1, 4:3, or custom aspect ratio.
- Press OK

By the way, you can choose the suitable aspect ratio according to the social media platform you are using. Like, a 1:1 aspect ratio for Instagram, a 9:16 aspect ratio for portrait videos, and a 4:3 standard video.
Conclusion
Here’s how you can rotate your video using two different softwares. Now you can shoot your videos without setting the proper video orientation. Sometimes, while shooting a video, the real scene unfolds in making a lot settings. I hope, after reading this content, you will be confident enough to start shooting videos and then editing them without having trouble of learning the software.
Let’s dive in!
Go ahead…
A good destiny is waiting for you.
You will see a diamond with a circular arrow on it. You’re going to hit that until you find the way you want it to be.

Once you’re happy, in the top right hand corner, hit Save Copy and that’s it, the size of the file determines how long it takes to finish this process later.

An easier way to rotate videos in Google Photos
If you just need to rotate a video in portrait mode to the landscape mode or 180 degrees, Google photos will be the best choice to do that. However, what if rotate a video 32 degrees or 157 degrees, or maybe you need to do more editing operations, you can’t rely on Google Photos anymore.
But stop worrying, you can set your video at any angle with Filmora Video Editor . It is one of the best video editing software that provides you with the editing tools you need to edit and share your videos across the globe. It allows you to flip and rotate the orientation of the video. It also supports many popular formats used on different social media platforms like Linkedin, Instagram, Twitter, YouTube and so many more.
Let’s have look at this professionally designed software that everyone can master in a few minutes and can film professional videos. Since it provides all the features that you will need to make movies in a good way. Moreover, its interface is very simple to use.
For Win 7 or later (64-bit)
For macOS 10.14 or later
Here’s How to do it…
Rotate video at any angle
You can also rotate the video by using the Transform tab located at the top right corner.
- Drag your video into the timeline.
- Double click on the video to bring up the editing panel.
- Hit the basic tab under the video tab in the menu bar.
- Select the Transform
- Click the rotate
- Here you can move the rotate slider or directly enter the rotating value.

You will notice that I have changed the rotation of my video from its original position to the rotated angle.
You can rotate upside down, rotate left, rotate right or 90 degrees clockwise, 180 degrees, 270 degrees, 360 degrees rotate, and back to the original. Check the video result in the preview window. Once you get satisfied with the rotation.
- Hit the ok
- Select the save

Similarly, you can drag the video from the preview panel and adjust it as required.
Here, you can Flip function your video to change the direction. Like in this screenshot, suppose you want to change the place from right to left. You can easily change the direction by hitting on the flip tab.

Now you can see that the image has flipped without making a big effort you can also do it. I have done it for you, you are smarter.
Just go ahead and start…
Scale is also used to remove the unwanted and rubbish scenes from the selected video. Like if you don’t want to show something behind the scene, you can use the scale function to cut that scene from your video.
What’s more you can do with Filmora
Changing the Aspect ratio
After you rotate the video at an angle you like. You can change the aspect ratio of the video furthermore.
- Import the desired video and drag it into the timeline. Then click the Aspect Ratio icon at the bottom of the preview window.
- You can select the 16:9, 1:1, 4:3, or custom aspect ratio.
- Press OK

By the way, you can choose the suitable aspect ratio according to the social media platform you are using. Like, a 1:1 aspect ratio for Instagram, a 9:16 aspect ratio for portrait videos, and a 4:3 standard video.
Conclusion
Here’s how you can rotate your video using two different softwares. Now you can shoot your videos without setting the proper video orientation. Sometimes, while shooting a video, the real scene unfolds in making a lot settings. I hope, after reading this content, you will be confident enough to start shooting videos and then editing them without having trouble of learning the software.
Let’s dive in!
Go ahead…
A good destiny is waiting for you.
You will see a diamond with a circular arrow on it. You’re going to hit that until you find the way you want it to be.

Once you’re happy, in the top right hand corner, hit Save Copy and that’s it, the size of the file determines how long it takes to finish this process later.

An easier way to rotate videos in Google Photos
If you just need to rotate a video in portrait mode to the landscape mode or 180 degrees, Google photos will be the best choice to do that. However, what if rotate a video 32 degrees or 157 degrees, or maybe you need to do more editing operations, you can’t rely on Google Photos anymore.
But stop worrying, you can set your video at any angle with Filmora Video Editor . It is one of the best video editing software that provides you with the editing tools you need to edit and share your videos across the globe. It allows you to flip and rotate the orientation of the video. It also supports many popular formats used on different social media platforms like Linkedin, Instagram, Twitter, YouTube and so many more.
Let’s have look at this professionally designed software that everyone can master in a few minutes and can film professional videos. Since it provides all the features that you will need to make movies in a good way. Moreover, its interface is very simple to use.
For Win 7 or later (64-bit)
For macOS 10.14 or later
Here’s How to do it…
Rotate video at any angle
You can also rotate the video by using the Transform tab located at the top right corner.
- Drag your video into the timeline.
- Double click on the video to bring up the editing panel.
- Hit the basic tab under the video tab in the menu bar.
- Select the Transform
- Click the rotate
- Here you can move the rotate slider or directly enter the rotating value.

You will notice that I have changed the rotation of my video from its original position to the rotated angle.
You can rotate upside down, rotate left, rotate right or 90 degrees clockwise, 180 degrees, 270 degrees, 360 degrees rotate, and back to the original. Check the video result in the preview window. Once you get satisfied with the rotation.
- Hit the ok
- Select the save

Similarly, you can drag the video from the preview panel and adjust it as required.
Here, you can Flip function your video to change the direction. Like in this screenshot, suppose you want to change the place from right to left. You can easily change the direction by hitting on the flip tab.

Now you can see that the image has flipped without making a big effort you can also do it. I have done it for you, you are smarter.
Just go ahead and start…
Scale is also used to remove the unwanted and rubbish scenes from the selected video. Like if you don’t want to show something behind the scene, you can use the scale function to cut that scene from your video.
What’s more you can do with Filmora
Changing the Aspect ratio
After you rotate the video at an angle you like. You can change the aspect ratio of the video furthermore.
- Import the desired video and drag it into the timeline. Then click the Aspect Ratio icon at the bottom of the preview window.
- You can select the 16:9, 1:1, 4:3, or custom aspect ratio.
- Press OK

By the way, you can choose the suitable aspect ratio according to the social media platform you are using. Like, a 1:1 aspect ratio for Instagram, a 9:16 aspect ratio for portrait videos, and a 4:3 standard video.
Conclusion
Here’s how you can rotate your video using two different softwares. Now you can shoot your videos without setting the proper video orientation. Sometimes, while shooting a video, the real scene unfolds in making a lot settings. I hope, after reading this content, you will be confident enough to start shooting videos and then editing them without having trouble of learning the software.
Let’s dive in!
Go ahead…
A good destiny is waiting for you.
How to Download and Use Windows Movie Maker 10
Looking to create captivating movies from video clips? The best tool for the purpose can be the Windows movie maker 10. The program provides video editors with various tools to create professional-looking videos, including audio options, animations, transition overlays, and timeline narrations. Its functions are simple to use and enjoyable to explore, and its XML code enables users to create new effects and transitions or change current ones. Windows Movie Maker also allows for basic track editings, such as adding fade-in and fade-out features for audio tracks.
It’s also simple to upload finished Windows Movie Maker productions to social media platforms. One of the best benefits of using the Window Movie Maker is its user-friendliness, simple controls, and automatic preview. This program is perfect for beginners, and it comes free on the Windows PC with workflow and essential features in the video editing systems that are made for professionals. Let’s check out how you can download and use Windows Movie Maker and the alternative of this program.
Part 1. How to Download Windows Movie Maker on Win 10?
Who loved the older version of Windows Movie Maker, which was easy to use and a free editing tool? You might have searched “Where is movie maker in windows 10“ in google. If you are missing your favorite video editor, this article will help you download and install the Windows Movie Maker for your PC, which runs on Windows 10. You can download it from their official application; the best part is that it is free of cost. Now here are some steps by which you can download and install the Windows Movie Maker on your Windows 10:-
- Download the installer file of Movie Maker:- Authentic Movie Maker can be easily downloaded through Windows Essentials.
- Extract Zip file:- After completing your download process, you can extract the zip file and run the .exe file. Your Windows essentials will get started.
- Choose programs you wish to install:- You can install all Windows essentials, tap on select the programs you wish to install. Here you can have an option for selecting Movie Maker.
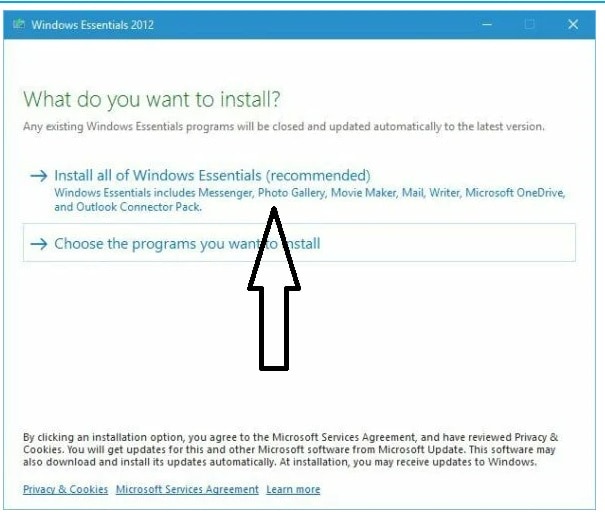
- Choose movie Maker and photo gallery:- On the screen, you must choose “Movie Maker and Photo Gallery” because you will install it on your PC. A simple tap on “Install,” and you will be ready, and the installation procedure will start.
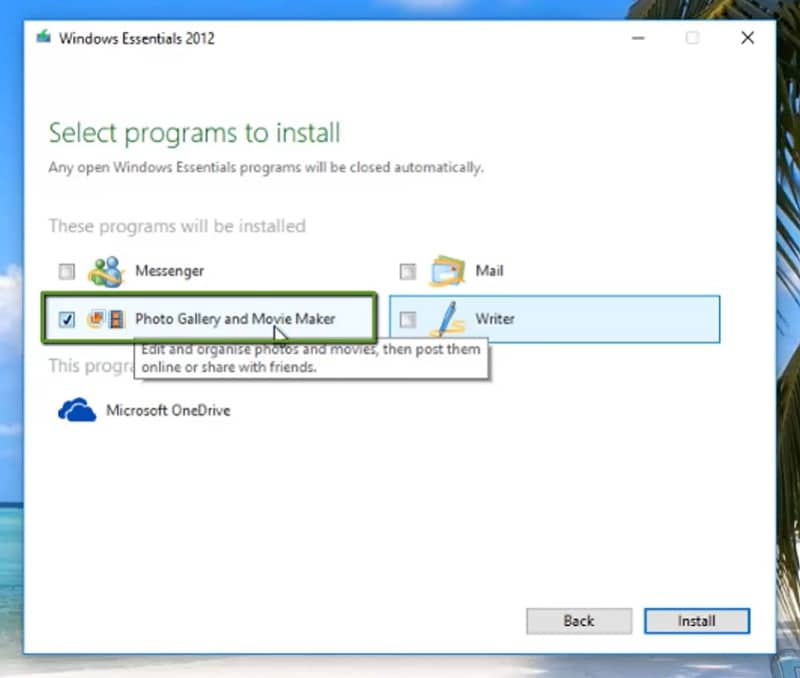
- Launch Movie Maker:- Visit the Start menu and type Movie Maker to launch the app. Open the app and use it. It is a free and easy video editor.

Part 2. How to Edit Videos with Windows Movie Maker?
Before starting your editing on Win10 movie maker, you must ensure that the movie maker supports the format. It’s because it accepts a few formats that includes:- MP3, .WAV, .WMA, .AVI(DV-AVI), .MPG(MPEG-1), .ASF/.WMV. If the videos are not supported in the Moviemaker for Windows 10, you might need to use a converter to convert the video and import the files into it.
Step1 Import clips to movie maker
- To import the photo or video in Windows Movie Maker, click “Add Photos or Videos.” A window will get opened, and users might select a video from their computer.
- After you select the files, you can click on “OK” to import the files to the storyboard.
Step2 Combine/Split/Cut/Trim the videos
You can preview the clips in the preview box. Users can use the Next or Previous Frame to preview the clips. While editing the video, you might have to trim the unwanted part and combine multiple clips into a new one.
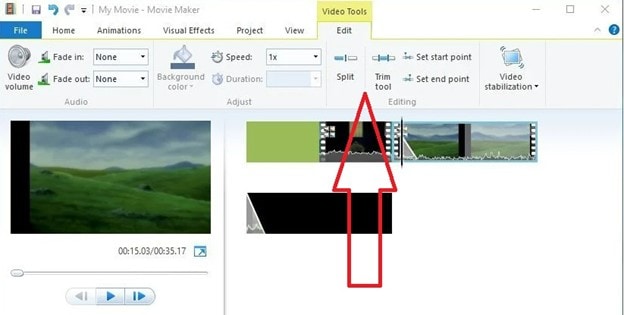
To remove the video parts, you can select the “Start frame” of the video you wish to eliminate, tap on a split button for splitting the segment, select the end frame you wish to remove, and tap on the “Split” option again. You can do it numerous times to edit the video.
Step3 Apply visual effects and transitions to the clips
Once you have the clips for your video, you can add transitions to your video. You can click on Animations to view various options. You will have to choose the clip and add some transitions which you wish.
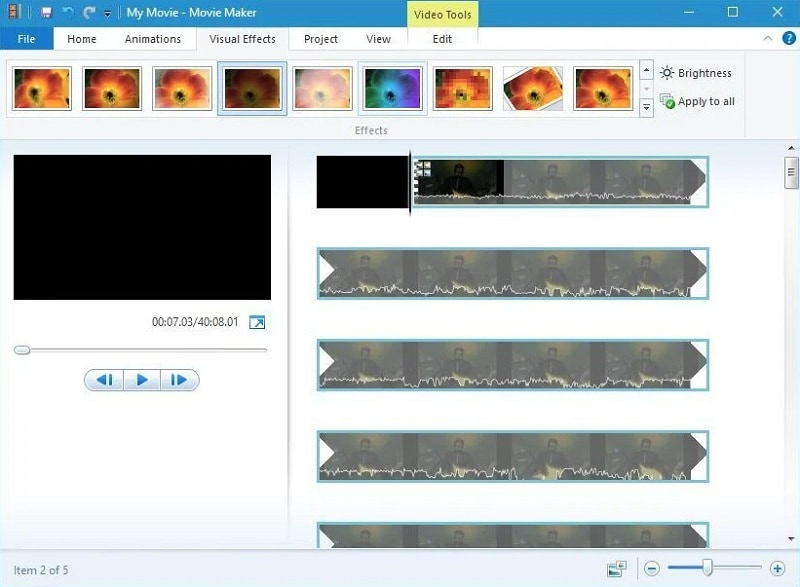
The software will do the work. You can preview the result by tapping on “Play.” After applying the visual effects, you will have to click on the Visual effects to add filter and overlays, and users can apply the effects to the clip.
Step4 Edit audio in the video
Are you planning to add some music to the video? You will have to double-click on your clip to enter into “Edit Panel” and click on the Volume button. You can mute or adjust the volume with the help of a volume slider, which will affect every sound of the clip.
After you adjust the sound of your clips, you can add your music to video clips. Add the music by tapping “Add Music” and choosing music for importing. One can even add the music from the PC.
Step5 Add text and title to the video
Windows Movie Maker allows users to add several types of texts to their videos. You can see three buttons that allow several types of texts to their video:- rolling credits, captions, and stationary title. Tap on the title; you will get options to add text before your video begins.
Choose a caption that you will add to your video frames and tap on the Credits to add effects to the video. After selecting the text type, one can enter the test and edit text effects. You can change the text visuals, duration, outline size, etc.
Step6 Save and Publish
After you have completed your edits, you can save your video by tapping on “File” and then clicking on Publish Movie. One can even choose the place where you wish to save your file.
You can even save the videos on your PC with various formats and resolutions. This editor allows users to save their videos for mobile devices or Email.
Part 3. Movie Maker Alternatives for Win 10 PC
If you want to create a polished clip for public consumption or if you want to experiment with your creativity while learning a new art form, Wondershare Filmora has swiftly established itself as one of the finest Windows 10 movie maker alternatives. Both seasoned and first-time users may successfully produce amazing videos with special effects thanks to Filmora’s user-friendly and straightforward interface. Wondershare Filmora supports a vast range of video formats, including AVCHD, MOV, AVI, MP4, and more. This allows you to combine, split, trim, crop and cut the clips in a few clicks. Now let’s see how you can edit your videos in Wondershare Filmora:-
Free Download For Win 7 or later(64-bit)
Free Download For macOS 10.14 or later
Step1 Create a new project and import the video
Tap “New Project” on the welcome screen and get into a video editor. Click on the “Register” option to register the product. Go to the “File” menu and tap on “Project Setting,” choose the ratio, and cut the video.

You can select from options like 4:3 or 16:9 ratios and customize the ratio according to your needs.
Step2 Place the audio and video files on the timeline and cut the unwanted parts
The raw clips mostly contain unwanted parts and mistakes which don’t belong in the video. If you want to trim or cut the videos, you can drag the video from your Media Tab and drop it on your timeline.

Users can add numerous video clips, but every file you will add will get placed after the previous clip. If you want to rearrange it, you can drag the clips to desired positions.
Step3 Apply the visual effects to your clips
Now that you have removed the unwanted parts from the video clips, you will have to detach the video and audio files, insert transitions, and add music to the clips or use a few visual effects of the Filmora software.

Click on the Credit or Text icon to add subtitles, end credits, or opening titles to the video. This software offers various text templates that you can utilize for your video.
Step4 Use color correction
You can utilize the hundreds of filters and overlays available under the Effects icon in your projects to give the colors in the clip a more vibrant appearance. Please drag & drop the filter you wish to use onto the timeline by clicking the icon and choosing it.
Simply sliding any end of a filter will change how long it lasts. After you are done with everything, save and publish it.
Conclusion
Now, you know the steps to download Windows Movie Maker on your PC. You can use it easily because of its friendly user interface. Editing and publishing videos with Windows Movie Maker becomes easy, and it is a perfect fit for beginners. But if you want something that supports everything, you can choose Wondershare Filmora because it is the best alternative to Windows movie maker. Wondershare Filmora offers limitless editing features and supports every video format. One can easily do professional-level editing in this user-friendly video editing software.
Free Download For macOS 10.14 or later
Step1 Create a new project and import the video
Tap “New Project” on the welcome screen and get into a video editor. Click on the “Register” option to register the product. Go to the “File” menu and tap on “Project Setting,” choose the ratio, and cut the video.

You can select from options like 4:3 or 16:9 ratios and customize the ratio according to your needs.
Step2 Place the audio and video files on the timeline and cut the unwanted parts
The raw clips mostly contain unwanted parts and mistakes which don’t belong in the video. If you want to trim or cut the videos, you can drag the video from your Media Tab and drop it on your timeline.

Users can add numerous video clips, but every file you will add will get placed after the previous clip. If you want to rearrange it, you can drag the clips to desired positions.
Step3 Apply the visual effects to your clips
Now that you have removed the unwanted parts from the video clips, you will have to detach the video and audio files, insert transitions, and add music to the clips or use a few visual effects of the Filmora software.

Click on the Credit or Text icon to add subtitles, end credits, or opening titles to the video. This software offers various text templates that you can utilize for your video.
Step4 Use color correction
You can utilize the hundreds of filters and overlays available under the Effects icon in your projects to give the colors in the clip a more vibrant appearance. Please drag & drop the filter you wish to use onto the timeline by clicking the icon and choosing it.
Simply sliding any end of a filter will change how long it lasts. After you are done with everything, save and publish it.
Conclusion
Now, you know the steps to download Windows Movie Maker on your PC. You can use it easily because of its friendly user interface. Editing and publishing videos with Windows Movie Maker becomes easy, and it is a perfect fit for beginners. But if you want something that supports everything, you can choose Wondershare Filmora because it is the best alternative to Windows movie maker. Wondershare Filmora offers limitless editing features and supports every video format. One can easily do professional-level editing in this user-friendly video editing software.
Also read:
- Why You Should Master Slideshows In Lightroom, In 2024
- Updated Despite the Aforementioned Restrictions, Cartoon Video Makers Still Offer a Sea of Possibilities to Their Users, so Lets Dive Into the Magical World of Animated Videos
- New Final Cut Pro for iPad for 2024
- If Youre Looking to Create a Brand Video that Makes Your Business Pop Out, We Have Put Together some Video Editing Tips and Tricks that Work
- Create a Stunning Light Sweep Effect in Filmora. Use Simple and Easy Steps to Export a High-Quality Video that Will Impress Even Pro Video Editors
- New In 2024, How to Loop a Video on Android
- Updated 2024 Approved How to Make Video Fade to Black in Movie Maker Easily
- In 2024, Top 10 Online And PC Cartoon Video Maker 2022 For Beginner
- New 2024 Approved A Review On 3D LUT Creator
- New How to Make a Smooth Speed Ramping in Premiere Pro, In 2024
- You Can Make Stylish Chroma Key Text Effects After Reading This Article. Wondershare Filmora Will Fill the Crazy Colors in Your Handwritten Note or Words for 2024
- The Latest 100+ Best TikTok Captions to Improve Your Next Post
- Updated 2024 Approved How to Create Your Own LUTs for Your Video with Filmora
- 18 Video Editors Weve Tested Heres What We Learned
- New Wondering About How to Easily Create a Slideshow on Your iPhone? Well, Take Note of some of the Finest Apps to Turn Your Vision Into Reality
- Updated 2024 Approved Learning Some Perfect Ways to Convert a Slow-Motion Video to Normal
- Updated In 2024, How to Brighten Video in Premiere Pro
- 4 Ways to Rotate Videos on Windows PC for 2024
- In 2024, If You Want to Know How to Live Stream Pre-Recorded Video, You Are in the Right Place. We Will Give You a Complete Guide on 8 Ways You Can Live Stream Pre-Recorded Videos Successfully
- 2024 Approved 15 Stunning GIF Splitter Examples You Need to Bookmark
- Updated How To Make a Photo Collage in Microsoft Word
- In This Article, We Introduce You Our Top 5 Picks of Video to Ppt Converter
- New In 2024, Top 5 Tips to Freeze-Frame in After Effects
- Are You Excited to Find Out the Top-Class VHS Video Effects Maker? Put Your Worries at Rest because This Article Will Provide the Best VHS Effect Makers
- Updated Enhance Social Media Posts with Transparent GIFs that Leave Your Peers in Awe
- In 2024, 15 Amazing GIF Splitter Examples You Need to Bookmark
- New Detailed Tutorial to Merge Videos in VLC Media Player for 2024
- Finding the Best GIF Websites Was Never Easier for 2024
- 4 Ways for Rotating Your GoPro Videos Professionally
- New Basic Introduction of LumaFusion Color Grading for 2024
- Updated How to Make Dynamic Video Collages?
- If You Are a Marketer Who Want to Create Facebook Ads to Boost Your Business, You Are Coming to the Right Place. Well Share You some Useful Tips to Start Your First FB Ads Campaign
- Voice Changer for Discord | Use Voicemod on Discord
- In 2024, 2 Methods to Cut Video in VLC on Windows
- In 2024, Adjust Background to Black for Your Product Review Video
- New In 2024, Adding a Spooky Shadow Effect with Filmora
- New 7 Best Green Screen Software for Beginners on Mac
- Looking for Efficient Ways to Create a Slow-Motion Video? Read the Article for Reliable Solutions that Provide Excellent Results
- Updated Top 5 Best Video to PPT Converters
- New Do You Wish to Make Your Discord PFP an Attention-Seeker? If Yes, Try the Animated Discord PFP. Lets Go over Essential Facts on the Topic, Including How to Get an Animated Discord PFP
- Updated In 2024, Free Green Screen Mobile Frame Downloads
- How To Synchronize Your Audio And Videos Properly for 2024
- Achieving GoPro Slow Motion with Quality An In-Depth Overview
- In 2024, The Article Is a Guide About the Split of the Videos in VLC. There Is Also a Particular Description of Its Alternative Wondershare Filmora. It Is Suitable as Well as Reasonable
- In 2024, Some Must-Know Useful Lego Animation Ideas
- Everything You Need to Know about Lock Screen Settings on your Vivo
- How to Change/Add Location Filters on Snapchat For your Motorola G24 Power | Dr.fone
- Top 5 Car Locator Apps for Vivo T2 Pro 5G | Dr.fone
- Apple ID Unlock On Apple iPhone 15 Plus? How to Fix it?
- In 2024, 15 Best Strongest Pokémon To Use in Pokémon GO PvP Leagues For Honor 100 Pro | Dr.fone
- In 2024, Getting the Pokemon Go GPS Signal Not Found 11 Error in Vivo Y200 | Dr.fone
- In 2024, How To Do Infinix Smart 7 HD Screen Sharing | Dr.fone
- 3 Best Tools to Hard Reset Honor 100 | Dr.fone
- Oppo A56s 5G Not Receiving Texts? 10 Hassle-Free Solutions Here | Dr.fone
- How to Track Apple iPhone 14 Plus Location without Installing Software? | Dr.fone
- How to Remove Activation Lock From the iPhone XR Without Previous Owner?
- How to Restore Deleted Oppo Find N3 Contacts An Easy Method Explained.
- 4 Ways to Fix Android Blue Screen of Death On Tecno Pop 7 Pro | Dr.fone
- How to retrieve erased music from Honor
- Vivo X100 Bootloop Problem, How to Fix it Without Data Loss | Dr.fone
- A Complete Guide To OEM Unlocking on Motorola Moto G Stylus 5G (2023)
- Full Guide How To Fix Connection Is Not Private on Vivo X100 Pro | Dr.fone
- How to Factory Reset Itel A60 If I Forgot Security Code or Password? | Dr.fone
- How To Unlock Samsung Galaxy XCover 7 Phone Without Password?
- How To Upgrade or Downgrade iPhone 8 Without Data Loss? | Dr.fone
- In 2024, How to Unlock Vivo V29 Phone without Google Account?
- Title: New End Your Struggles with Choppy Playback on DaVinci Resolve. Read This Guide to Find Effective Fixes and Reliable DaVinci Resolve Slow Playback Alternatives
- Author: Chloe
- Created at : 2024-04-24 07:08:19
- Updated at : 2024-04-25 07:08:19
- Link: https://ai-editing-video.techidaily.com/new-end-your-struggles-with-choppy-playback-on-davinci-resolve-read-this-guide-to-find-effective-fixes-and-reliable-davinci-resolve-slow-playback-alternativ/
- License: This work is licensed under CC BY-NC-SA 4.0.

