
New Everything That You Need to Know About Video Montages- Ideas, Techniques, and Software

Everything That You Need to Know About Video Montages- Ideas, Techniques, and Software
Video montages are one of the best types of video formats people enjoy, and they are useful for different occasions. Whether you want to create a montage of your memories as an anniversary gift or create a montage of product photos for promotions, uses are multiple here. This prompts the need for users to learn how to make a montage, and that is what we will cover in this post.
These videos, with a series of shots and information edited together cohesively in sequence, are useful for showcasing storyline progress. Here, you will learn about use cases of the process, like a birthday video montage, more ideas, and the process of making them. Read on if any of that interests you.

Part 1. Classic Montage Ideas in Art and Film
Video montages play a major role in films, art productions, and gaming, like the call of duty montage.
In terms of the first example, when you watch movies, you might notice this technique used in many movies, utilized more prominently since the 1920s when Sergei Eisenstein coined the term first. These scenes appear as stitched-together shots of the characters showing time passage, enjoying activities or memories.
Different techniques are common, like rhythmic, metric, intellectual, or tonal. For example, the 2000 movie “Requiem for a Dream” showcased an intellectual/metric style of video montage to show the disorientating effect of the character under drug influence. A relatively recent example would be Benedict Cumberbatch’s 2016 movie “Doctor Strange”, where the montage shows the titular character’s interaction with the villain (no spoilers).
3 Top Montages in Film for All Times
If the above two examples did not fully express what is a montage video, seeing more examples should help. For this, here are three of the top montage examples available in Film History, each version representing a separate video montage style.
1. Rocky (1976)
One of the most notable montages is available in the 1976 action movie, the Sylvester Stallone-starrer “Rocky”. The type of video montage that is visible in this movie is rhythmic in nature, showcasing the training the character undergoes. This is edited with a musical background score, summarising some shots’ full training progression process.
To add an emotive tone to the video, music is added to the video clip that engages audiences to feel the character’s passion. A rhythmic style of video montage technique is used to cut the shorts as per the content. The lengths of each clip are not similar and differ as per the action going on in the scene.
2. Mulan (1998)
Video montages are also visible in animated movies, as seen in the 1998 version of Disney’s “Mulan”. The scene in question is where the song “I’ll Make a Man Out of You” plays while Mulan undergoes strict training for the military from the male lead. A sequence of shots showing her progress is shown.
Here, the video montage is shown with the background music that perfectly aligns with what is occurring in the video. The visuals and the audio in the background cohesively show the main character’s struggle, which creates an emotional response in the audience. Therefore, the style of video montage here falls under tonal or overtonal categories.
Watch this video to get an idea of how music and visuals can partner for tonal video montages.
3. Creed (2015)
Like in the Rocky movie, its 2015 sequel, “Creed”, also has a video montage. Here, the clips in the sequence are also used to depict the intense training progress. However, where it differs from the rhythmic formula is that the sequence highlights the emotional journey or determination of Adonis Creed to succeed.
Plus, this video montage is a homage to the original version; the tonal effect is further noticeable in the scene of Rocky’s health deterioration against Creed’s training. Thus, it juxtaposes the two scenes, creating an emotional impact on viewers to root for the main character.
Watch this video to understand what is a montage video of the tonal type.
Part 2. Creative Montage Ideas for Social Media
Of course, movies and TV shows are the only types of media where video montage techniques are useful. Many non-professionals use options like a fortnite montage editor to create and edit montage videos for other projects they can share across platforms. Some even create video montages to create videos for social media.
These include vlog-like videos that people record and then edit together into a montage which different techniques. Plus, some users create montages of different things that interest them, like gameplay. Then, they share those videos across social media for views, like on TikTok or YouTube.
· Gaming Montages
Different creators focus on developing gaming montages to create projects for the games they operate. These can include videos showcasing the skills or gameplays of the creation, all explaining a specific theme in some cases.
There are different games that the users focus on for showcasing their gaming prowess in action. Common examples include Fortnite, Call of Duty, CSGO, or PUBG montage videos.
Watch this video to get an idea.
· Wedding Montages
Many users turn to edit video montages for specific occasions, adding clips of different moments instead of one long-running documentary. They incorporate stylish effects like slow motion and transitions, incorporate a moving background score, and more.
Many top influencers and celebrities have used this technique for their wedding videos on social media. Additionally, regular people also adopt the style.
Watch this video as an example.
· Birthday Montages
Like wedding videos, users can try out the video montage technique to create videos for birthdays. These can include scenes of the main creator throughout their preparation phase for the party. Alternately, some users create video montages of their experience leading up to the video celebration, through a longer period or the same day.
Watch this video to understand how these videos may look.
Part 3. How Can I Create Easily a Montage Video?
After understanding the types of video montage techniques and ideas, the next point of concern is learning how to make a montage.
One of the best editing software to use for this process is Wondershare Filmora . With this editor, you can create different video montages as per the theme, customized or instantly. Filmora includes premium-quality effects and transitions, including free stock media that you can also add. Plus, the software allows the ability to record voiceover and adjust background scores in the video.
You can also choose the aspect ratio for the video, depending on the platform you post it on. For example, if you are creating a full professional-level scene montage, use the widescreen (16:9) aspect ratio, like in YouTube videos. Or, use the portrait (9:16) for mobile-based videos for TikTok videos or a 1:1 aspect ratio for Instagram videos.
Watch this video to know how it works.
Free Download For Win 7 or later(64-bit)
Free Download For macOS 10.14 or later
Features of Filmora for Video Montage Making
There are multiple top-quality features available in the Filmora software that is useful for creating and editing video montages. Use them and create dynamic videos.
1. Screen Recorder
The Screen Recorder feature is accessible through the home page of the Filmora software after launching. Since the first stage of making a montage involves getting the video clips for it, you can use this to record the video. For example, if you have a movie saved on your desktop, use the screen recorder and tap the Play button to record the screen.

You can adjust further settings, like which headphone or speaker to use for the audio recording.
2. Preset Templates
Next comes the editing process. After completing the recording process for the montage video, you can use preset templates on Filmora via Instant Mode. This is useful for users who do not have enough time to fully edit a long montage video or have the technical skills for it.
You can click on the Instant Mode tab on the home page. Then, choose the specific theme of the video montage you will create, like Birthday, Wedding, Business, etc. After selecting the theme, you can insert multiple video clips into the editor. Adjust the clips in sequence and press the “Auto-Create” button.

3. Abundant Video Effects and Music Resources
If you want to customize the video montage video manually, you can use the various effects and advanced features in the main editor timeline. For example, click on the Effects tab to find your options.

After importing the file(s) into the editor and dragging it to the timeline, you can use the Crop icon to cut clips. Then, rearrange them and merge them. Plus, further editing features are available for premium-level edits, like the Chroma Key. Click on it and add a green screen in the background.

The AI Portrait feature is also available, automatically detecting the main character and accurately removing the background.
You can adjust the speed of transitions in the video with the Speed Ramping function. Many high-quality effects are available under the Effects tab, and you can add audio to the video through the Media tab.

Conclusion
Video montages are one of the tried-and-tested methods used in film-making, gaming videos, and social media videos. You can use Filmora to create such video montages based on the type of video montage technique that fits it. Then, share it directly to YouTube or save it for transferring across different platforms.
Free Download For Win 7 or later(64-bit)
Free Download For macOS 10.14 or later
Part 1. Classic Montage Ideas in Art and Film
Video montages play a major role in films, art productions, and gaming, like the call of duty montage.
In terms of the first example, when you watch movies, you might notice this technique used in many movies, utilized more prominently since the 1920s when Sergei Eisenstein coined the term first. These scenes appear as stitched-together shots of the characters showing time passage, enjoying activities or memories.
Different techniques are common, like rhythmic, metric, intellectual, or tonal. For example, the 2000 movie “Requiem for a Dream” showcased an intellectual/metric style of video montage to show the disorientating effect of the character under drug influence. A relatively recent example would be Benedict Cumberbatch’s 2016 movie “Doctor Strange”, where the montage shows the titular character’s interaction with the villain (no spoilers).
3 Top Montages in Film for All Times
If the above two examples did not fully express what is a montage video, seeing more examples should help. For this, here are three of the top montage examples available in Film History, each version representing a separate video montage style.
1. Rocky (1976)
One of the most notable montages is available in the 1976 action movie, the Sylvester Stallone-starrer “Rocky”. The type of video montage that is visible in this movie is rhythmic in nature, showcasing the training the character undergoes. This is edited with a musical background score, summarising some shots’ full training progression process.
To add an emotive tone to the video, music is added to the video clip that engages audiences to feel the character’s passion. A rhythmic style of video montage technique is used to cut the shorts as per the content. The lengths of each clip are not similar and differ as per the action going on in the scene.
2. Mulan (1998)
Video montages are also visible in animated movies, as seen in the 1998 version of Disney’s “Mulan”. The scene in question is where the song “I’ll Make a Man Out of You” plays while Mulan undergoes strict training for the military from the male lead. A sequence of shots showing her progress is shown.
Here, the video montage is shown with the background music that perfectly aligns with what is occurring in the video. The visuals and the audio in the background cohesively show the main character’s struggle, which creates an emotional response in the audience. Therefore, the style of video montage here falls under tonal or overtonal categories.
Watch this video to get an idea of how music and visuals can partner for tonal video montages.
3. Creed (2015)
Like in the Rocky movie, its 2015 sequel, “Creed”, also has a video montage. Here, the clips in the sequence are also used to depict the intense training progress. However, where it differs from the rhythmic formula is that the sequence highlights the emotional journey or determination of Adonis Creed to succeed.
Plus, this video montage is a homage to the original version; the tonal effect is further noticeable in the scene of Rocky’s health deterioration against Creed’s training. Thus, it juxtaposes the two scenes, creating an emotional impact on viewers to root for the main character.
Watch this video to understand what is a montage video of the tonal type.
Part 2. Creative Montage Ideas for Social Media
Of course, movies and TV shows are the only types of media where video montage techniques are useful. Many non-professionals use options like a fortnite montage editor to create and edit montage videos for other projects they can share across platforms. Some even create video montages to create videos for social media.
These include vlog-like videos that people record and then edit together into a montage which different techniques. Plus, some users create montages of different things that interest them, like gameplay. Then, they share those videos across social media for views, like on TikTok or YouTube.
· Gaming Montages
Different creators focus on developing gaming montages to create projects for the games they operate. These can include videos showcasing the skills or gameplays of the creation, all explaining a specific theme in some cases.
There are different games that the users focus on for showcasing their gaming prowess in action. Common examples include Fortnite, Call of Duty, CSGO, or PUBG montage videos.
Watch this video to get an idea.
· Wedding Montages
Many users turn to edit video montages for specific occasions, adding clips of different moments instead of one long-running documentary. They incorporate stylish effects like slow motion and transitions, incorporate a moving background score, and more.
Many top influencers and celebrities have used this technique for their wedding videos on social media. Additionally, regular people also adopt the style.
Watch this video as an example.
· Birthday Montages
Like wedding videos, users can try out the video montage technique to create videos for birthdays. These can include scenes of the main creator throughout their preparation phase for the party. Alternately, some users create video montages of their experience leading up to the video celebration, through a longer period or the same day.
Watch this video to understand how these videos may look.
Part 3. How Can I Create Easily a Montage Video?
After understanding the types of video montage techniques and ideas, the next point of concern is learning how to make a montage.
One of the best editing software to use for this process is Wondershare Filmora . With this editor, you can create different video montages as per the theme, customized or instantly. Filmora includes premium-quality effects and transitions, including free stock media that you can also add. Plus, the software allows the ability to record voiceover and adjust background scores in the video.
You can also choose the aspect ratio for the video, depending on the platform you post it on. For example, if you are creating a full professional-level scene montage, use the widescreen (16:9) aspect ratio, like in YouTube videos. Or, use the portrait (9:16) for mobile-based videos for TikTok videos or a 1:1 aspect ratio for Instagram videos.
Watch this video to know how it works.
Free Download For Win 7 or later(64-bit)
Free Download For macOS 10.14 or later
Features of Filmora for Video Montage Making
There are multiple top-quality features available in the Filmora software that is useful for creating and editing video montages. Use them and create dynamic videos.
1. Screen Recorder
The Screen Recorder feature is accessible through the home page of the Filmora software after launching. Since the first stage of making a montage involves getting the video clips for it, you can use this to record the video. For example, if you have a movie saved on your desktop, use the screen recorder and tap the Play button to record the screen.

You can adjust further settings, like which headphone or speaker to use for the audio recording.
2. Preset Templates
Next comes the editing process. After completing the recording process for the montage video, you can use preset templates on Filmora via Instant Mode. This is useful for users who do not have enough time to fully edit a long montage video or have the technical skills for it.
You can click on the Instant Mode tab on the home page. Then, choose the specific theme of the video montage you will create, like Birthday, Wedding, Business, etc. After selecting the theme, you can insert multiple video clips into the editor. Adjust the clips in sequence and press the “Auto-Create” button.

3. Abundant Video Effects and Music Resources
If you want to customize the video montage video manually, you can use the various effects and advanced features in the main editor timeline. For example, click on the Effects tab to find your options.

After importing the file(s) into the editor and dragging it to the timeline, you can use the Crop icon to cut clips. Then, rearrange them and merge them. Plus, further editing features are available for premium-level edits, like the Chroma Key. Click on it and add a green screen in the background.

The AI Portrait feature is also available, automatically detecting the main character and accurately removing the background.
You can adjust the speed of transitions in the video with the Speed Ramping function. Many high-quality effects are available under the Effects tab, and you can add audio to the video through the Media tab.

Conclusion
Video montages are one of the tried-and-tested methods used in film-making, gaming videos, and social media videos. You can use Filmora to create such video montages based on the type of video montage technique that fits it. Then, share it directly to YouTube or save it for transferring across different platforms.
Free Download For Win 7 or later(64-bit)
Free Download For macOS 10.14 or later
Have You Ever Heard Hyperlapse and Tume Lapse Videos? Do You Know the Differences Between Them? This Article Will Introduce the Concepts, Features and Differnces of Them
You’ve probably heard the terms “hyperlapse” and “timelapse” before. Whether it was in a blog post, a how-to guide, or on your preferred social media platform. Each of us has seen at least one image of one of them. However, what makes a difference? You’re about to learn in this article!
With that said, let’s begin!
Part 1. What is a timelapse, and how is it used?
Timelapses are familiar to you, whether they were used in a series to demonstrate a swift change from night today or at the beginning of your favorite influencer’s vlog. But exactly what is it? The term “timelapse” refers to a photography method in which static images are stitched together to produce a time-warping video. When the video is played, the time seems to pass more quickly, creating the illusion that time is slipping away.
Put your camera in a fixed position, stop it from moving, panning, or tilting, then record for a long time to make your own timelapse. This period of time could last for five minutes, an hour, days, or even years. Once the film is gathered, all that’s left to do is speed everything up.
The fact that time-lapses make for a pleasant visual effect is what makes them so popular in Vlogs and other media. This method enables you to describe the passage of time, the movement of individuals through space, etc. utilizes time-lapse.

Part 2. What is a hyperlapse?
On the other side, there are these things that we refer to as hyperlapses. In the subgenre of time-lapse photography known as cinematography, a hyperlapse is a filmmaking method used to generate motion shots by capturing movies rather than taking images. In order to create a hyperlapse, the camera does not remain stationary; rather, it follows the subject around and is typically held by the photographer.
The amount of time that elapses between pictures in a stop-motion video typically ranges from tenths of a second up to a few fractions of a second, although this can change significantly depending on what you want to show. However, after you have picked it, it must remain consistent in the same way that the timelapse does.
The attractive 3D look that hyperlapse produces is the primary draw for its utilization. The hyperlapse that is formed can produce a dreamy image, regardless of whether the camera is attached to a moving vehicle or is mounted on a tripod that is moving towards its target.
Additionally, you may use this approach to make stunning photographs with motion blur by employing long exposures. In most cases, the final image will be stabilized in post-production in order to eliminate some of the flaws that may have been captured in the original photo.

Part 3. What differentiates them from each other?
The movement of the camera is what differentiates these two approaches the most from one another. When capturing a time lapse, the camera is kept relatively still and in the same position throughout. In addition, when you use a hyperlapse, the camera is continuously moving, which creates a 3D appearance in the image.
You could be scratching your head right about now, wondering when you should employ one of the two methods. If your subject is moving, you should take a time-lapse photograph; if the camera is moving, you should take a hyperlapse photograph. This question has a relatively straightforward answer.
The act of recording video for a hyperlapse can cause your storage to be filled up really rapidly. Therefore, you may wish to swap between the two methods depending on the length of time that you want to shoot for. If you are going to be filming for a significant amount of time, you should consider using a timelapse.
It is simple to determine the timelapse interval if you already know these answers. Choose the video’s final frame rate. It may be 24, 25, or 30 fps. You shouldn’t select more quickly. Choose the option that best fits your audience and location. Additionally, a time-lapse calculator is available.
The shoot time should then be converted to seconds. For instance, two hours are equal to 2 x 60 x 60 seconds, or 7200 seconds. Determine how many frames are required for your chosen timelapse now. For instance, the final product should be 30 seconds of 25fps video. You’ll need to capture 750 frames in total because 30 x 25 is 750.
Divide the time (7200s in this case) by the number of frames to obtain the interval (750). You can round up the result, which is 9.6, which is pretty near to 10 seconds. Therefore, in our case, your interval should be set to 10s.
Part 4. Motion control timelapse
Now that we understand how the timelapse images that are static are created, we are able to incorporate some movement into the shots that are static. Moving the camera around during a timelapse is much more difficult than it appears to be in the video. Every movement of the camera is slowed down when using slow motion, which means that you can make even a shaky handheld movie look good when using slow motion. The situation is completely reversed while viewing a timelapse.
Because every movement of the camera is sped up, shooting with the handheld mode is nearly impossible. If you want the camera to appear to be moving slowly in the final timelapse, you will need to move it very slowly while shooting in order to achieve this effect.
For this reason, we will need to make use of motion control devices in order to accomplish our goal. Therefore, we refer to these kinds of photos as motion control timelapses. The camera can be moved very slowly and accurately along one, two, or all three axes using motors that are controlled electronically. The three-axis systems, which include a slider as well as a pan-tilt head, are by far the most popular.
Extra Info: Best Time Lapse Video Maker – Filmora
To create a time lapse video with cool effects, you can use the best video editor with rich effects – Filmora . This software offers many video speed change settings and creative effects to help make a time lapse video easily. Just download the software on your PC or Mac and then start creating a video on your own.
Conclusion
The finest results can be achieved by utilizing a variety of filmmaking approaches concurrently. Therefore, you shouldn’t be afraid to try out new things by combining time-lapse photography with slow motion and video. In addition, make sure you visit the Hyperlapse Academy so you can become familiar with all of the different approaches. Use your imagination, and don’t stop firing.
Free Download For Win 7 or later(64-bit)
Free Download For macOS 10.14 or later
Free Download For macOS 10.14 or later
How to Create a Vacation Slideshow in 5 Minutes
How to Make a Vocation Slideshow in Minutes
An easy yet powerful editor
Numerous effects to choose from
Detailed tutorials provided by the official channel
Who does not love vacations, but the saddest part of it is getting over? So, to relive your vacation memories and also share them with your dear ones is by creating a slideshow. With an interesting slideshow, you can present all your special vacation moments in an interesting and creative manner.
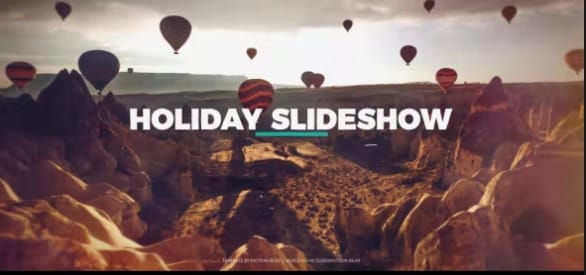
To create a vacation slideshow quickly and easily there are several factors that can be considered. Keep reading below to learn about these.
In this article
01 Tips for Creating a Vacation Slideshow in 5 Minutes
02 [Best Software for Creating a Vacation Slideshow in 5 Minutes- Wondershare Filmora](#Part 2)
Part 1 Tips For Creating A Vacation Slideshow In 5 Minutes
There are several useful tips that can help you create a vacation slideshow in just a few minutes. Check them below.
01Choose A Theme And Select Relevant Pictures
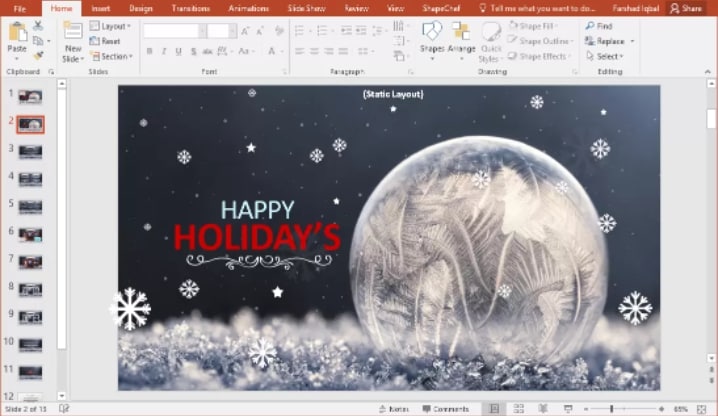
First of all, select a story or a theme for your holiday slideshow, and then choose the most relevant images and videos that can be included in the slideshow. With hundreds of images and videos for any particular trip selecting a few is the most cumbersome task and once you have a story in mind, picking up a few images becomes easy.
01Use Templates
Use a template for creating a slideshow as the readymade design will already help you get half the task done. Once you have the desired template, you simply need to add the pictures and other elements. There are several sites and tools where you can get travel, vacation, and holiday templates in different styles.
01Use A Professional Software For Editing And Creating A Software
To create a traveling sideshow that is eye-catchy, interesting, and also can be created in no time, a professional tool works as the best option. These programs have built-in features for image and video editing and in just a few simple clicks, you can create a professional-looking slideshow of your choice.
Part 2 Best Software For Creating A Vacation Slideshow In 5 Minutes- Wondershare Filmora
Creating a slideshow may sound like a simple task of adding a few pictures and videos, but in actual when you sit and start with the process it becomes quite hassled and time-consuming. As discussed above, the use of professional software will make the task simpler and quicker. One such software that we recommend here for creating a slideshow, editing videos, and other similar tasks is Wondershare Filmora Video Editor .
This Windows and Mac-based software can edit your videos like a pro and can help you create a slideshow with interesting elements like overlays, effects, templates, and more. The interface is user-friendly, which makes the software apt for all users.
You can add interesting transitions, and effects, edit images and videos and also share your created slideshow on YouTube and other sites.
For Win 7 or later (64-bit)
For macOS 10.12 or later
Steps for creating a vacation slideshow using Wondershare Filmora
Step 1. Download, install and launch the software on your system. Choose the New Project option from the main interface of the software.
Step 2. The images and the videos that have to be added to the slideshow have to be imported and added to the software Media Library. These files can be edited using the features like rotate, crop, and others. If needed you can even change the order of the files.
Step 3. Next, move the images and videos to the timeline by simply dragging them.
Step 4. Now add the transitions from the available designs, effects, filters, and also the music. You can add a local audio file or can also use it from the built-in library at the site.
Step 5. Finally, export and save the created slideshow to the local system or a DVD. There is also an option to share the slideshow directly to Vimeo or YouTube.
● Ending Thoughts →
● A vacation slideshow is a great way to bring together memorable pictures of your trip in a creative manner.
● To create an impressive slideshow quickly use a template, pick up a story, and make use of professional software.
● Wondershare Filmora is an excellent tool for creating a slideshow in just 5 minutes and in a hassle-free manner.
Who does not love vacations, but the saddest part of it is getting over? So, to relive your vacation memories and also share them with your dear ones is by creating a slideshow. With an interesting slideshow, you can present all your special vacation moments in an interesting and creative manner.

To create a vacation slideshow quickly and easily there are several factors that can be considered. Keep reading below to learn about these.
In this article
01 Tips for Creating a Vacation Slideshow in 5 Minutes
02 [Best Software for Creating a Vacation Slideshow in 5 Minutes- Wondershare Filmora](#Part 2)
Part 1 Tips For Creating A Vacation Slideshow In 5 Minutes
There are several useful tips that can help you create a vacation slideshow in just a few minutes. Check them below.

01Choose A Theme And Select Relevant Pictures
First of all, select a story or a theme for your holiday slideshow, and then choose the most relevant images and videos that can be included in the slideshow. With hundreds of images and videos for any particular trip selecting a few is the most cumbersome task and once you have a story in mind, picking up a few images becomes easy.
01Use Templates
Use a template for creating a slideshow as the readymade design will already help you get half the task done. Once you have the desired template, you simply need to add the pictures and other elements. There are several sites and tools where you can get travel, vacation, and holiday templates in different styles.
01Use A Professional Software For Editing And Creating A Software
To create a traveling sideshow that is eye-catchy, interesting, and also can be created in no time, a professional tool works as the best option. These programs have built-in features for image and video editing and in just a few simple clicks, you can create a professional-looking slideshow of your choice.
Part 2 Best Software For Creating A Vacation Slideshow In 5 Minutes- Wondershare Filmora
Creating a slideshow may sound like a simple task of adding a few pictures and videos, but in actual when you sit and start with the process it becomes quite hassled and time-consuming. As discussed above, the use of professional software will make the task simpler and quicker. One such software that we recommend here for creating a slideshow, editing videos, and other similar tasks is Wondershare Filmora Video Editor .
This Windows and Mac-based software can edit your videos like a pro and can help you create a slideshow with interesting elements like overlays, effects, templates, and more. The interface is user-friendly, which makes the software apt for all users.
You can add interesting transitions, and effects, edit images and videos and also share your created slideshow on YouTube and other sites.
For Win 7 or later (64-bit)
For macOS 10.12 or later
Steps for creating a vacation slideshow using Wondershare Filmora
Step 1. Download, install and launch the software on your system. Choose the New Project option from the main interface of the software.
Step 2. The images and the videos that have to be added to the slideshow have to be imported and added to the software Media Library. These files can be edited using the features like rotate, crop, and others. If needed you can even change the order of the files.
Step 3. Next, move the images and videos to the timeline by simply dragging them.
Step 4. Now add the transitions from the available designs, effects, filters, and also the music. You can add a local audio file or can also use it from the built-in library at the site.
Step 5. Finally, export and save the created slideshow to the local system or a DVD. There is also an option to share the slideshow directly to Vimeo or YouTube.
● Ending Thoughts →
● A vacation slideshow is a great way to bring together memorable pictures of your trip in a creative manner.
● To create an impressive slideshow quickly use a template, pick up a story, and make use of professional software.
● Wondershare Filmora is an excellent tool for creating a slideshow in just 5 minutes and in a hassle-free manner.
Who does not love vacations, but the saddest part of it is getting over? So, to relive your vacation memories and also share them with your dear ones is by creating a slideshow. With an interesting slideshow, you can present all your special vacation moments in an interesting and creative manner.

To create a vacation slideshow quickly and easily there are several factors that can be considered. Keep reading below to learn about these.
In this article
01 Tips for Creating a Vacation Slideshow in 5 Minutes
02 [Best Software for Creating a Vacation Slideshow in 5 Minutes- Wondershare Filmora](#Part 2)
Part 1 Tips For Creating A Vacation Slideshow In 5 Minutes
There are several useful tips that can help you create a vacation slideshow in just a few minutes. Check them below.

01Choose A Theme And Select Relevant Pictures
First of all, select a story or a theme for your holiday slideshow, and then choose the most relevant images and videos that can be included in the slideshow. With hundreds of images and videos for any particular trip selecting a few is the most cumbersome task and once you have a story in mind, picking up a few images becomes easy.
01Use Templates
Use a template for creating a slideshow as the readymade design will already help you get half the task done. Once you have the desired template, you simply need to add the pictures and other elements. There are several sites and tools where you can get travel, vacation, and holiday templates in different styles.
01Use A Professional Software For Editing And Creating A Software
To create a traveling sideshow that is eye-catchy, interesting, and also can be created in no time, a professional tool works as the best option. These programs have built-in features for image and video editing and in just a few simple clicks, you can create a professional-looking slideshow of your choice.
Part 2 Best Software For Creating A Vacation Slideshow In 5 Minutes- Wondershare Filmora
Creating a slideshow may sound like a simple task of adding a few pictures and videos, but in actual when you sit and start with the process it becomes quite hassled and time-consuming. As discussed above, the use of professional software will make the task simpler and quicker. One such software that we recommend here for creating a slideshow, editing videos, and other similar tasks is Wondershare Filmora Video Editor .
This Windows and Mac-based software can edit your videos like a pro and can help you create a slideshow with interesting elements like overlays, effects, templates, and more. The interface is user-friendly, which makes the software apt for all users.
You can add interesting transitions, and effects, edit images and videos and also share your created slideshow on YouTube and other sites.
For Win 7 or later (64-bit)
For macOS 10.12 or later
Steps for creating a vacation slideshow using Wondershare Filmora
Step 1. Download, install and launch the software on your system. Choose the New Project option from the main interface of the software.
Step 2. The images and the videos that have to be added to the slideshow have to be imported and added to the software Media Library. These files can be edited using the features like rotate, crop, and others. If needed you can even change the order of the files.
Step 3. Next, move the images and videos to the timeline by simply dragging them.
Step 4. Now add the transitions from the available designs, effects, filters, and also the music. You can add a local audio file or can also use it from the built-in library at the site.
Step 5. Finally, export and save the created slideshow to the local system or a DVD. There is also an option to share the slideshow directly to Vimeo or YouTube.
● Ending Thoughts →
● A vacation slideshow is a great way to bring together memorable pictures of your trip in a creative manner.
● To create an impressive slideshow quickly use a template, pick up a story, and make use of professional software.
● Wondershare Filmora is an excellent tool for creating a slideshow in just 5 minutes and in a hassle-free manner.
Who does not love vacations, but the saddest part of it is getting over? So, to relive your vacation memories and also share them with your dear ones is by creating a slideshow. With an interesting slideshow, you can present all your special vacation moments in an interesting and creative manner.

To create a vacation slideshow quickly and easily there are several factors that can be considered. Keep reading below to learn about these.
In this article
01 Tips for Creating a Vacation Slideshow in 5 Minutes
02 [Best Software for Creating a Vacation Slideshow in 5 Minutes- Wondershare Filmora](#Part 2)
Part 1 Tips For Creating A Vacation Slideshow In 5 Minutes
There are several useful tips that can help you create a vacation slideshow in just a few minutes. Check them below.

01Choose A Theme And Select Relevant Pictures
First of all, select a story or a theme for your holiday slideshow, and then choose the most relevant images and videos that can be included in the slideshow. With hundreds of images and videos for any particular trip selecting a few is the most cumbersome task and once you have a story in mind, picking up a few images becomes easy.
01Use Templates
Use a template for creating a slideshow as the readymade design will already help you get half the task done. Once you have the desired template, you simply need to add the pictures and other elements. There are several sites and tools where you can get travel, vacation, and holiday templates in different styles.
01Use A Professional Software For Editing And Creating A Software
To create a traveling sideshow that is eye-catchy, interesting, and also can be created in no time, a professional tool works as the best option. These programs have built-in features for image and video editing and in just a few simple clicks, you can create a professional-looking slideshow of your choice.
Part 2 Best Software For Creating A Vacation Slideshow In 5 Minutes- Wondershare Filmora
Creating a slideshow may sound like a simple task of adding a few pictures and videos, but in actual when you sit and start with the process it becomes quite hassled and time-consuming. As discussed above, the use of professional software will make the task simpler and quicker. One such software that we recommend here for creating a slideshow, editing videos, and other similar tasks is Wondershare Filmora Video Editor .
This Windows and Mac-based software can edit your videos like a pro and can help you create a slideshow with interesting elements like overlays, effects, templates, and more. The interface is user-friendly, which makes the software apt for all users.
You can add interesting transitions, and effects, edit images and videos and also share your created slideshow on YouTube and other sites.
For Win 7 or later (64-bit)
For macOS 10.12 or later
Steps for creating a vacation slideshow using Wondershare Filmora
Step 1. Download, install and launch the software on your system. Choose the New Project option from the main interface of the software.
Step 2. The images and the videos that have to be added to the slideshow have to be imported and added to the software Media Library. These files can be edited using the features like rotate, crop, and others. If needed you can even change the order of the files.
Step 3. Next, move the images and videos to the timeline by simply dragging them.
Step 4. Now add the transitions from the available designs, effects, filters, and also the music. You can add a local audio file or can also use it from the built-in library at the site.
Step 5. Finally, export and save the created slideshow to the local system or a DVD. There is also an option to share the slideshow directly to Vimeo or YouTube.
● Ending Thoughts →
● A vacation slideshow is a great way to bring together memorable pictures of your trip in a creative manner.
● To create an impressive slideshow quickly use a template, pick up a story, and make use of professional software.
● Wondershare Filmora is an excellent tool for creating a slideshow in just 5 minutes and in a hassle-free manner.
Make Super Easy Coin Magic With Filmora
Do you want to become a magician in your videos? Now, everyone can look like a magician with the magic of editing. This article will show you how to do a cool coin trick in Filmora 11 .
Part 1: What is the filmmaking technique “Cutting on action”
Cutting on action is a technique the editors use to cut in the middle of an action to another shot that matches the first shot’s action. Typically, the subject starts an action in one shot and continues the action in another, creating a smooth transition. For example, when you make the coin trick video, you need to cut on the tapping so it can trick the eyes, and the cut won’t be noticeable.
Part 2: Things You Need to Prepare for The Coin Magic Trick
- Glass and two coins

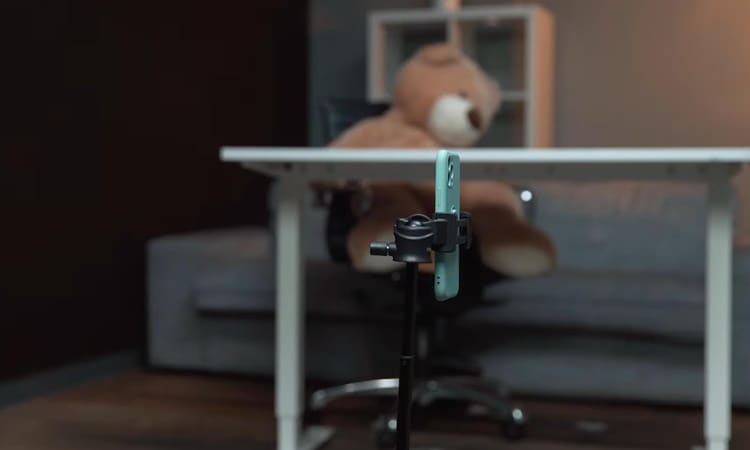
- Set the phone on a tripod. Because utilizing a tripod can significantly improve the recording’s stability.
Part 3: Start Filming
Step1 Firstly, you must show the coin and the bottom of the glass.
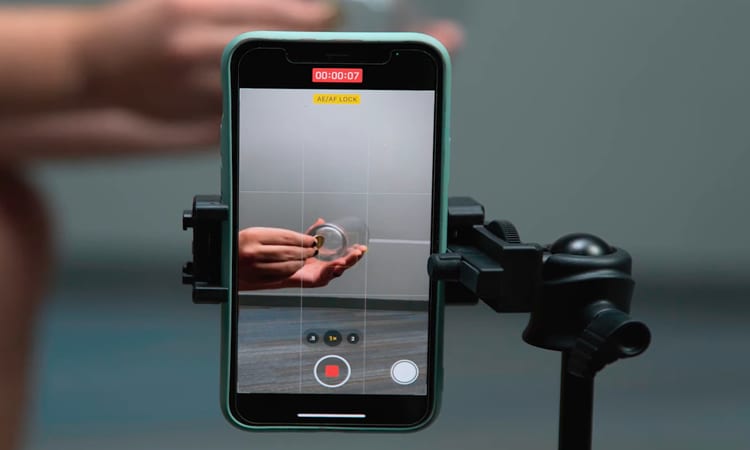
Step2 After that, you need to hold the coin with the fingers part of one hand and tap down on the coin. Make sure it looks like the coin is going through straight to the glass.
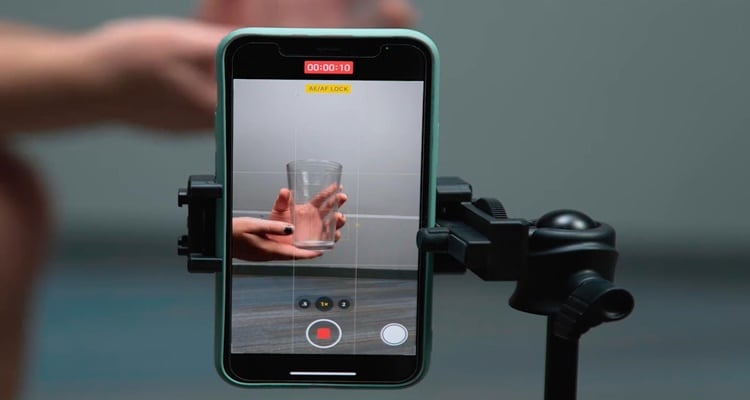
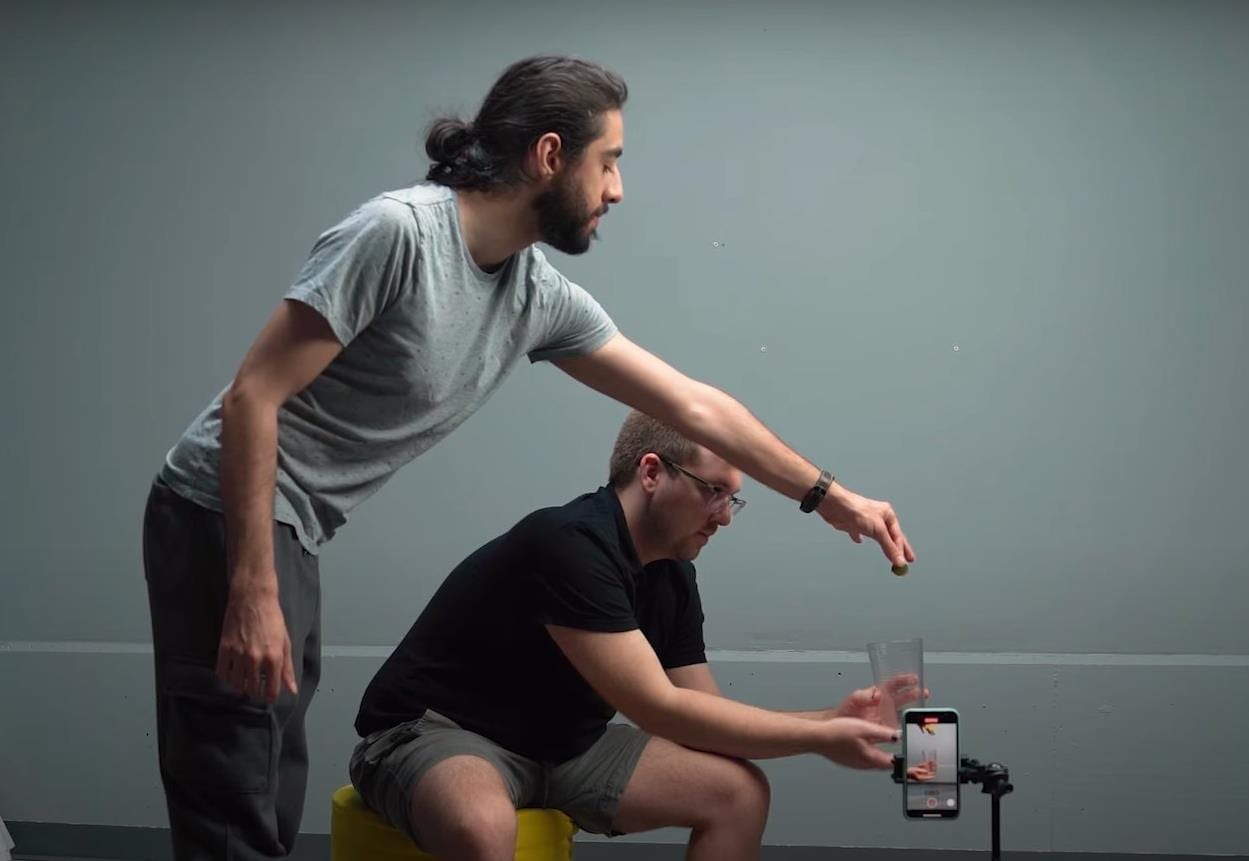
Step3 You need someone else to drop the other coin from the top. Meanwhile, you are pretending to tap a coin on the glass. You don’t need to worry about someone else hand in the frame. Since you can remove it easily with the masking feature in Filmora.
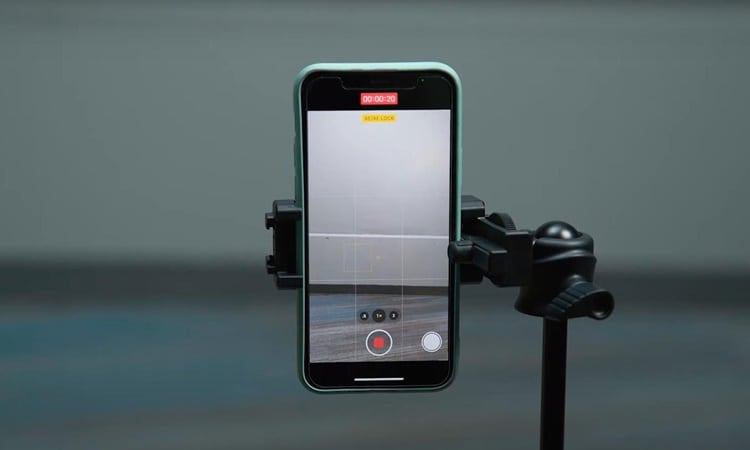
Step4 It would help if you had a second shot for a clean plate of the background. You can record background for 20 seconds.
Part 4: Bring the clips into Filmora 11
Step1 If you have not downloaded Filmora, you can visit filmora.wondershare.com to download Filmora’s new version.
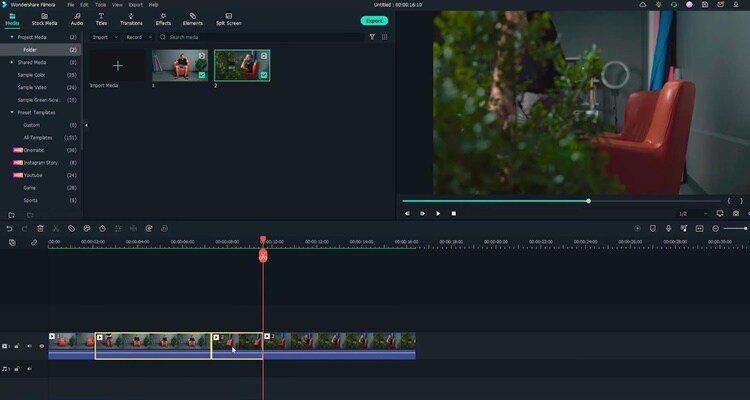
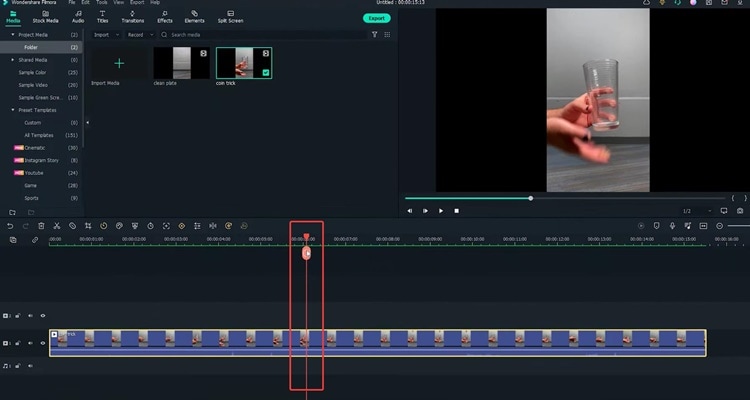
Step2 Drag and drop the clip onto the first track of the timeline.Afterward, move the playhead to the right and find the spot where you tapped the coin last time before your friend drops the other coin. Additionally, make sure it is in the middle of the tapping action and cut.
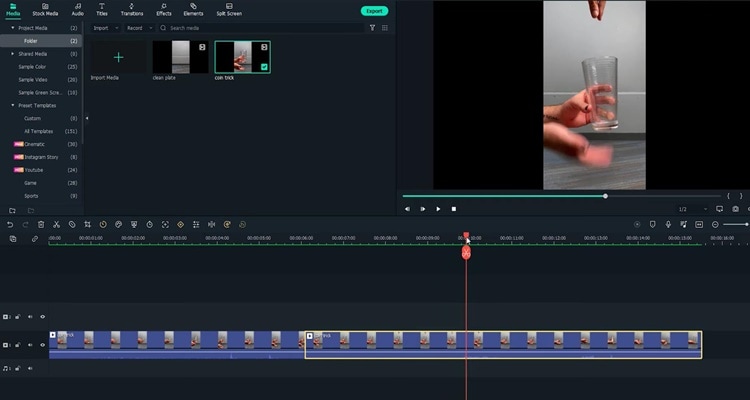
Step3 Then move the playhead to the right and find the spot where your friend drops the coin while you tap without the coin in your hand. Make sure it is in the middle of the tapping action, and the position of your hand roughly matches that in the last cut and make a cut.
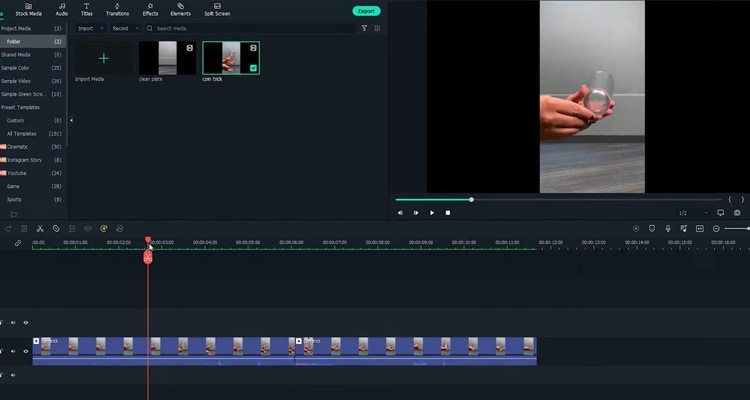
Step4 Now you need to delete the middle part and play it back. Indeed, cutting on action is the key to creating the illusion that the action is continued without editing.
Step5 Next, you must remove your friend’s hand in the frame with the Filmora masking feature. Afterwards. drag and drop the clean plate video onto the second track of the timeline.
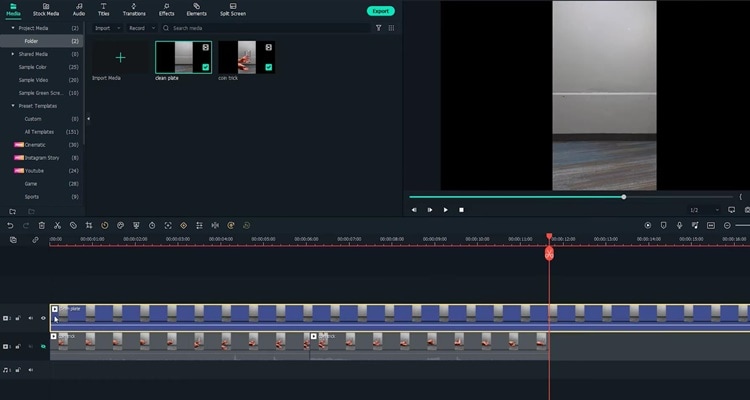
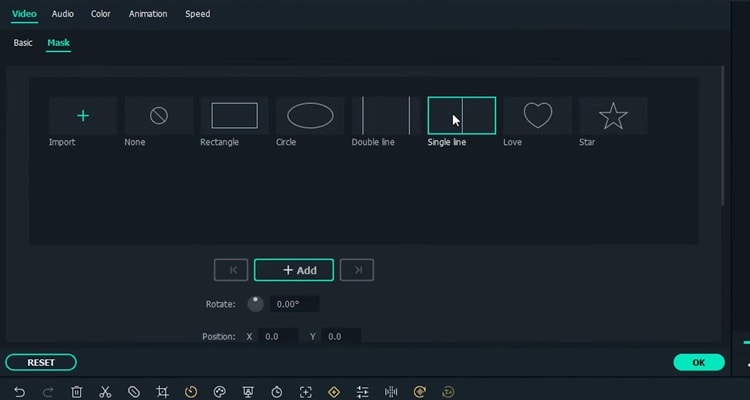
Step6 Next, double-click the clip to open the setting video. Find the Mask Section and select the single line.
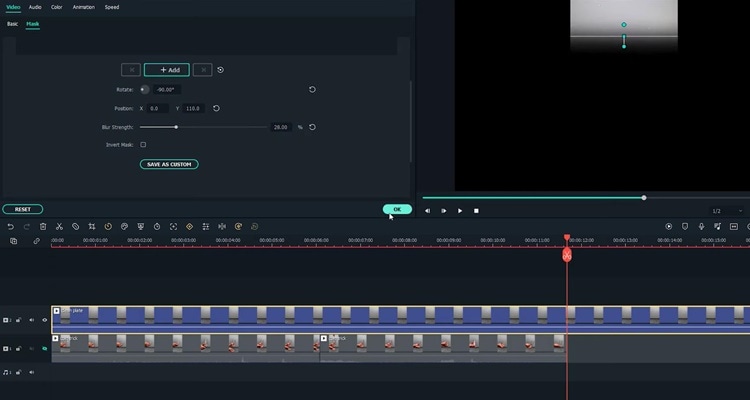
Step7 Here you can see the mask is applied.First, adjust the angle and position of the mask to only show the top part of the frame. Then you have to change the Blur Strength to add more blur to the edge of the mask.
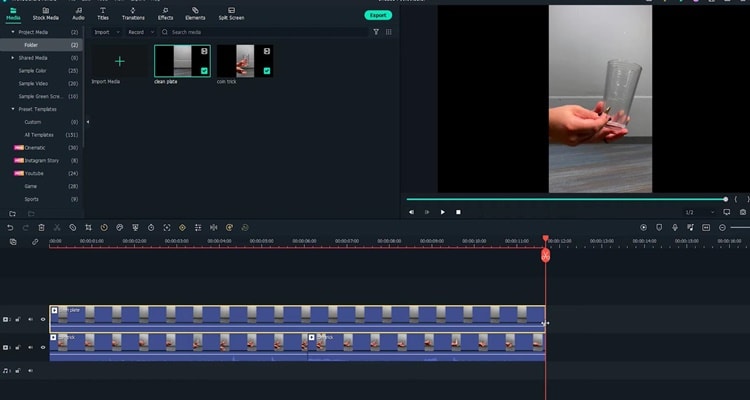
Step8 With the mask finalized, unhide the first video track and adjust the length of the clip on the timeline. Finally, playback the video and see how it looks.
Summary
That’s how to make a coin move through a glass-like MAGIC with the cutting on action editing technique. You can pay close attention to the steps above and follow each step for perfect results.
Free Download For Win 7 or later(64-bit)
Free Download For macOS 10.14 or later
Free Download For macOS 10.14 or later
Also read:
- [New] 2024 Approved Step-by-Step for Classic Film Aesthetics
- [New] How To Upload Media to Twitter without Copying Another User's Tweet
- [New] In 2024, Hands-On Approaches to Archive Vimeo Video
- 2024 Approved Use Path Blur In Photoshop To Create Motion Effect
- How To Make a Video by Mouse in Filmora?
- How to Move Your Samsung Information via Activated USB Device for Booting
- Msstfmt.dll Errors: How to Locate and Install the Missing File Correctly
- Navigate Languages with Ease: Our Selection of Top 6 No Internet Required Translators
- Network Locked SIM Card Inserted On Your Oppo A79 5G Phone? Unlock It Now
- New Best Practical Tips to Improve Your Lighting in the Sun for 2024
- New In 2024, Top 8 Sites to Download Glitch Transition for Premiere Pro
- New Step by Step to Split Clips in VLC for 2024
- Passare Il Tuo Hard Disk a Un Nuovo PC: Processo Semplice per Windows 11 Utenti
- Top 10 Resources for Finding the Perfect Rental
- Updated 2024 Approved Best Ideas on Using Green Screen with Filmora
- Updated How to Create Loop Videos with Filmora for 2024
- Title: New Everything That You Need to Know About Video Montages- Ideas, Techniques, and Software
- Author: Chloe
- Created at : 2024-12-07 02:00:41
- Updated at : 2024-12-11 16:46:40
- Link: https://ai-editing-video.techidaily.com/new-everything-that-you-need-to-know-about-video-montages-ideas-techniques-and-software/
- License: This work is licensed under CC BY-NC-SA 4.0.