:max_bytes(150000):strip_icc():format(webp)/GettyImages-1065028028-8e770c58918e4cf8b0852e81cff60ed6.jpg)
New Find Out How to Create Your Own Custom Motion Graphics in Filmora. Add Unique Objects, Manipulate Text, and Animate Anything You Want

Find Out How to Create Your Own Custom Motion Graphics in Filmora. Add Unique Objects, Manipulate Text, and Animate Anything You Want
Preparation
What you need to prepare:
- A computer (Windows or macOS)
- Your video materials.
- Filmora video editor
Step 1
Visit the filmora.wondershare.com website and download Filmora . Install the program and wait for it to Run. Then, click on New Project.
Step 2
Go to File → Project Settings and set the FPS to 60. Also, ensure that the project is in Full Resolution (1920x1080). Click OK.

Step 3
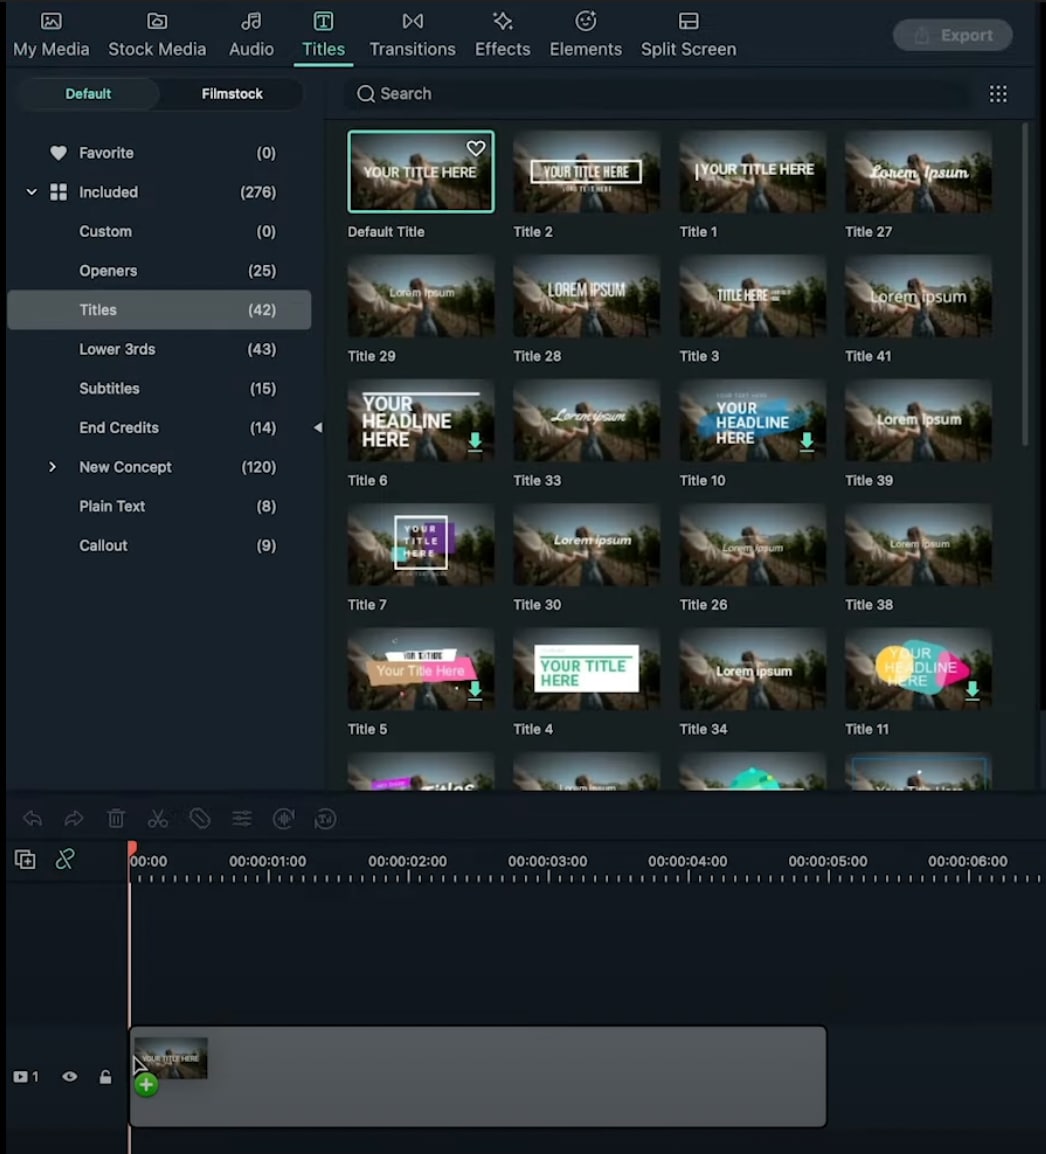
Open the Titles tab and drag the Default Title to the Timeline. Then, double-click on the Default Title and click on ADVANCED.
Step 4
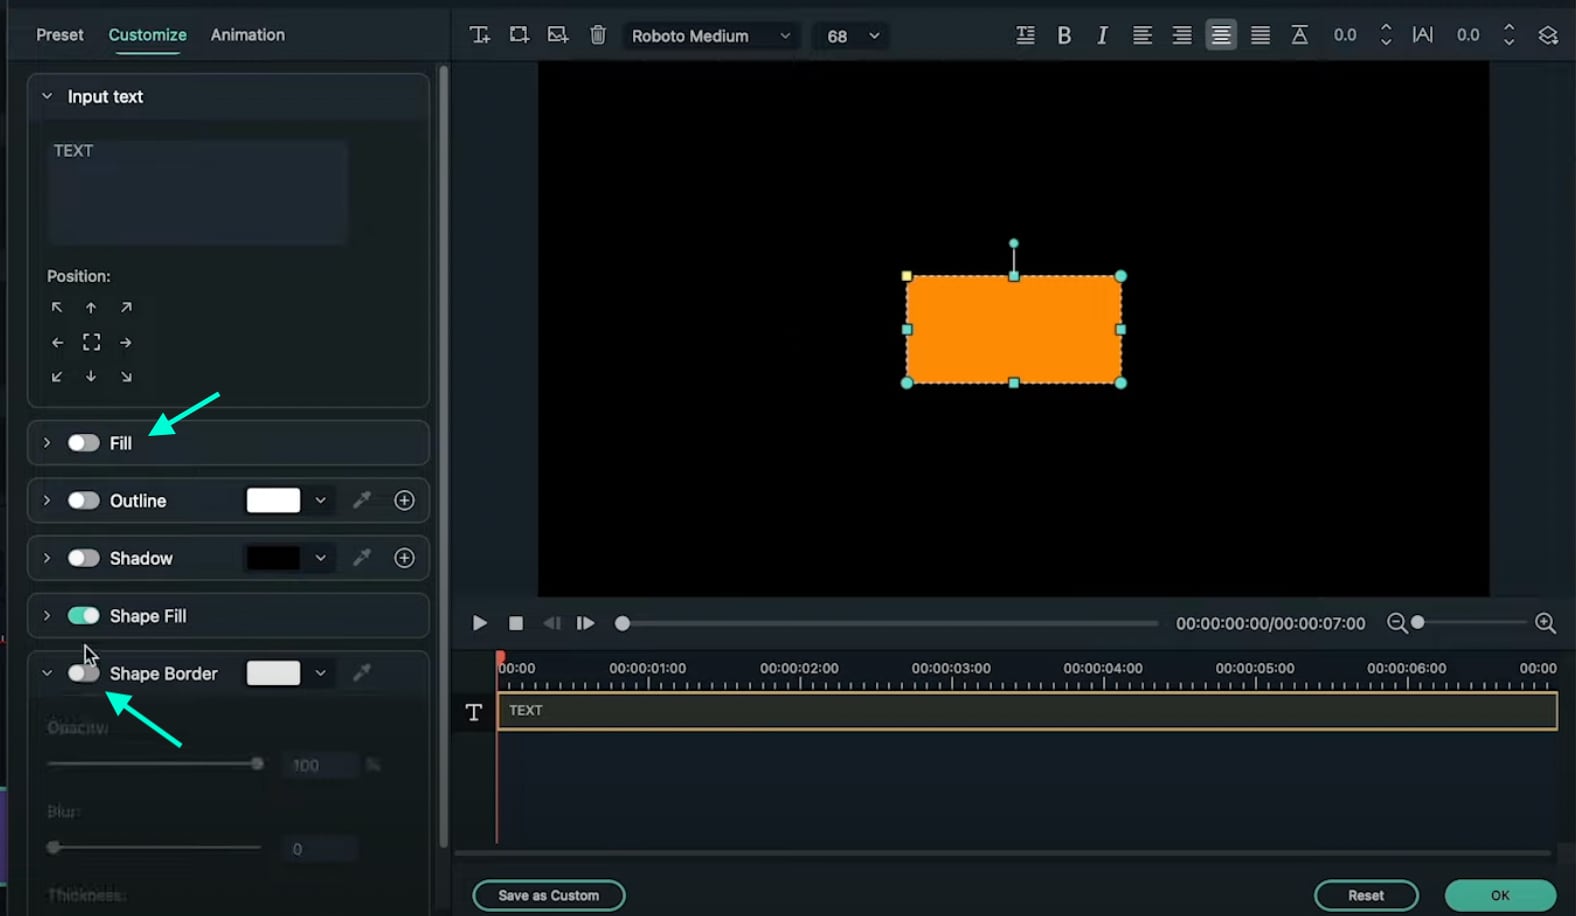
From the Advanced settings panel, delete the existing text and add a Rectangle shape.

Step 5
Disable the Text Fill and the Shape Border options from the panel on the left side.
Step 6
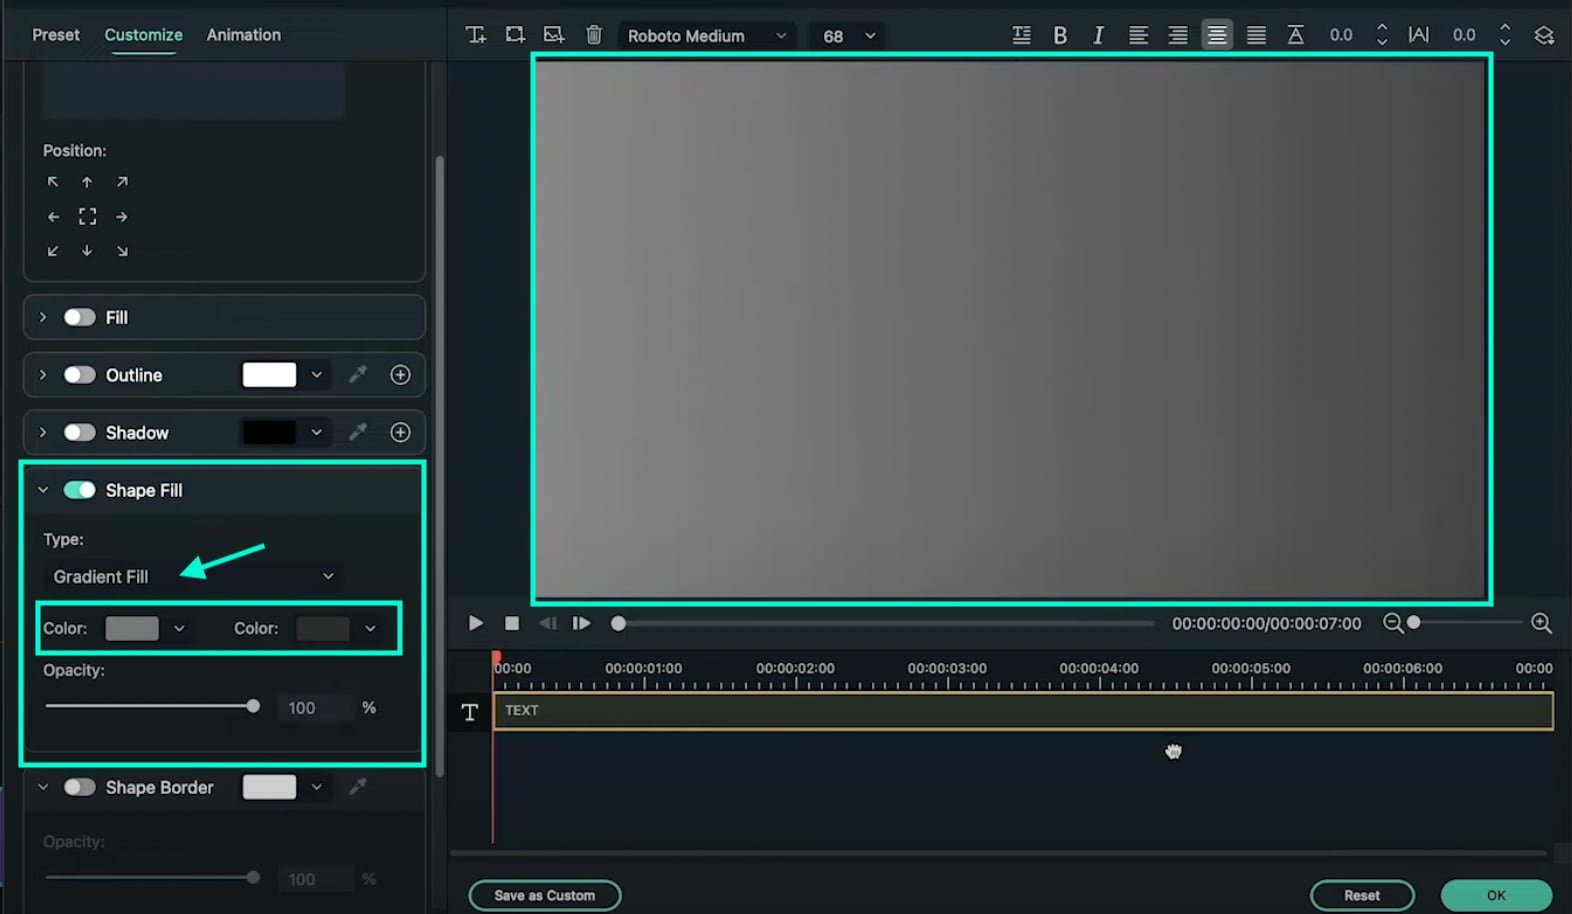
Click the drop-down arrow on the Shape Fill option and change the Type to Gradient Fill. Then, adjust the two color pallets from lighter to darker to create a gradient effect. Finally, adjust the rectangle to fit the entire screen. Click OK.
Step 7
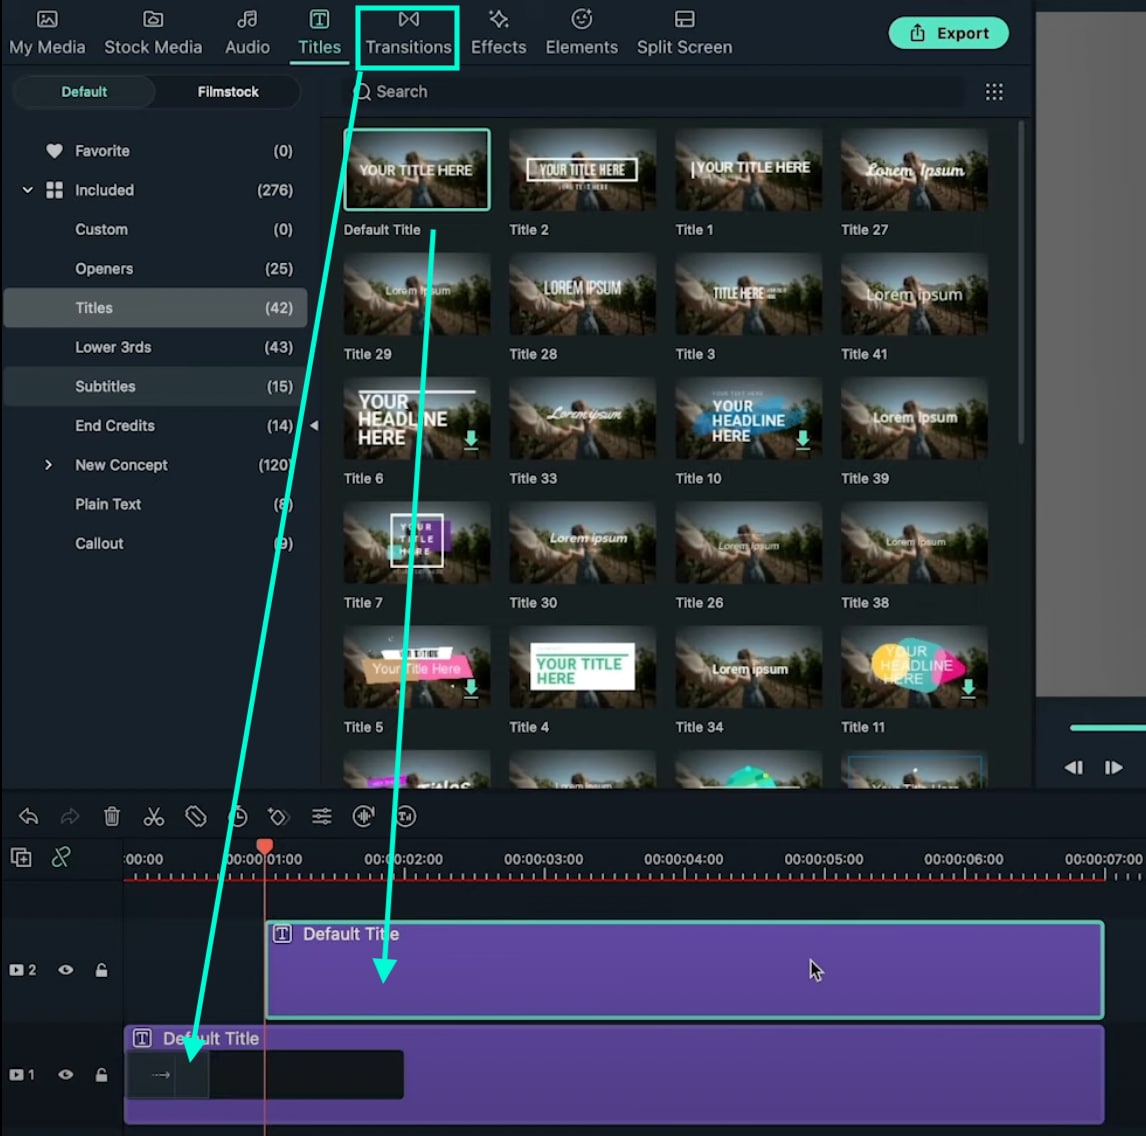
Go to the Transitions tab → search for “Push” → drag the Push transition to the Default Title in the Timeline. Then, move the Playhead to the 1-second marker and drag another Default Title to that point from the Titles tab.
Step 8
Double-click on the new Default Title → go to Advanced. Delete the default text and add a Circle shape this time instead of a Rectangle. Disable the Text Fill and Shape Fill options this time.
Step 9
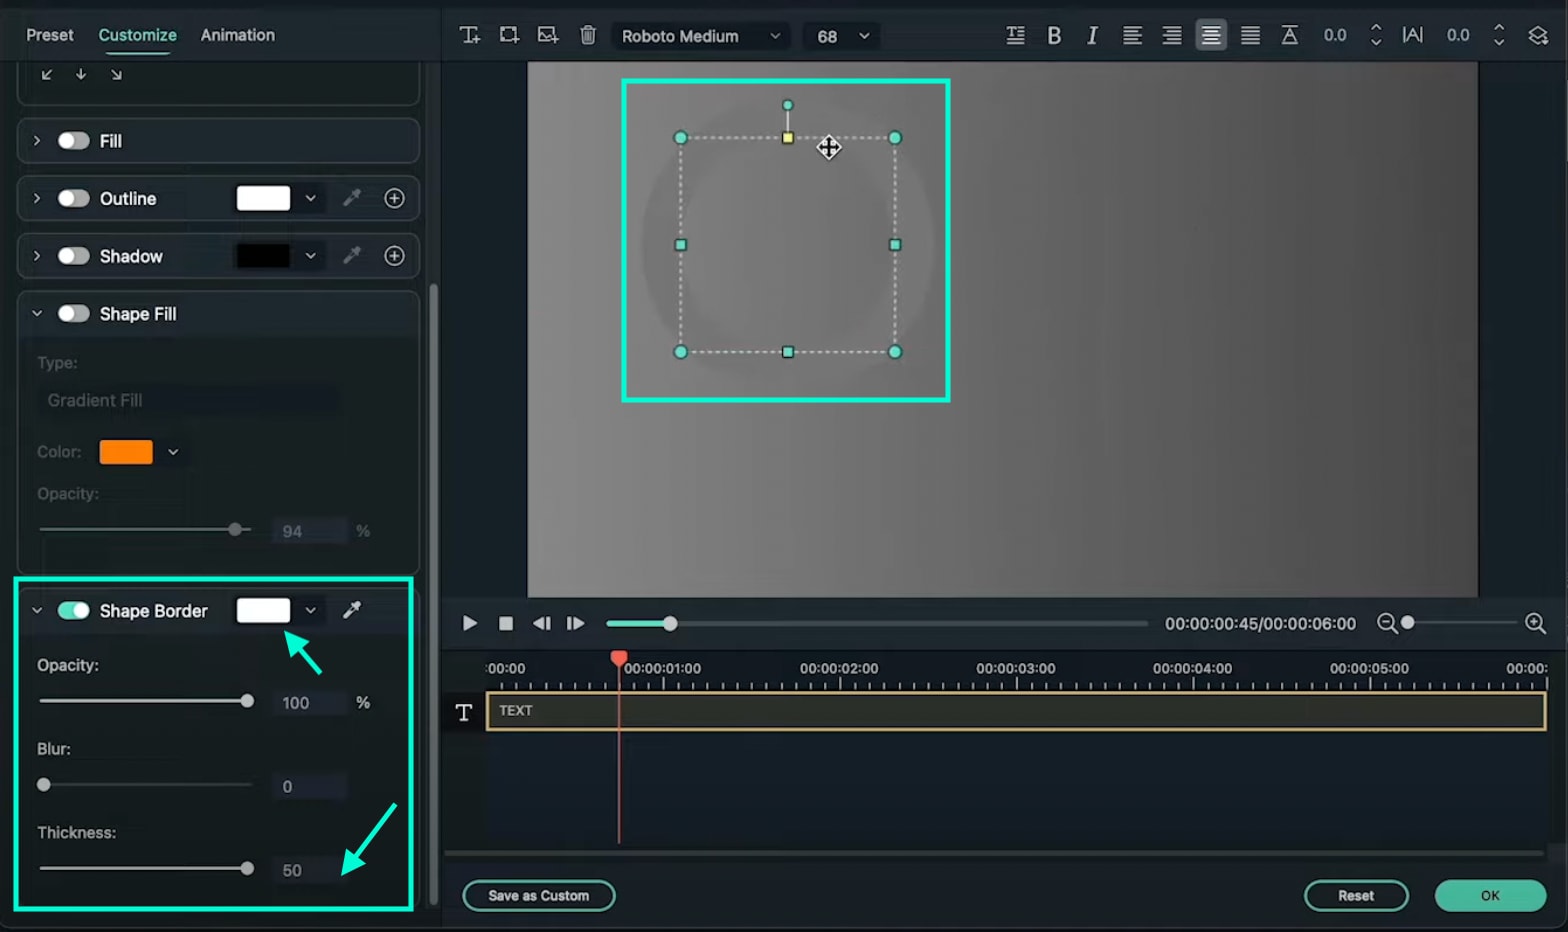
Scroll down to Shape Border and increase the Thickness bar all the way up. Then, change the circle’s color to match your background as closely as possible. Click OK.
Step 10
Copy the Title you just edited and paste it into the above layer. Then, double-click on the copied Title and go to its Advanced settings panel.

Step 11
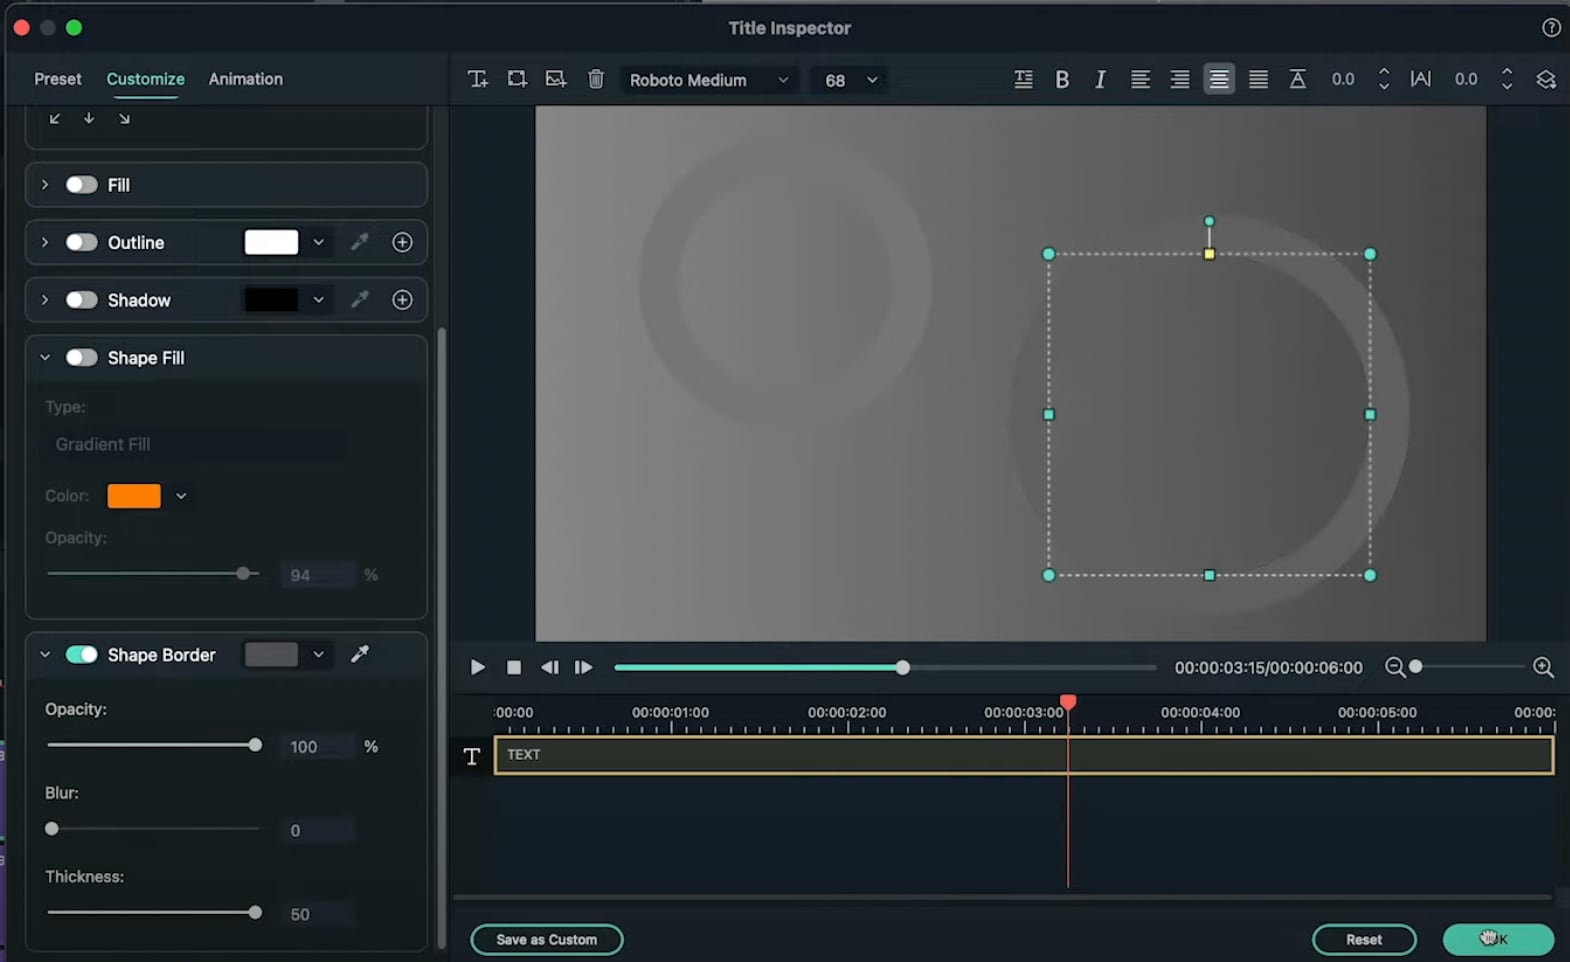
In the Advanced panel, copy the circle and paste it somewhere else on the screen. Change its size if you want, and change the shade of its color to match the background once more. You can add as many new copies of the Default Titles and copy as many circles as you want. Click OK.
Step 12
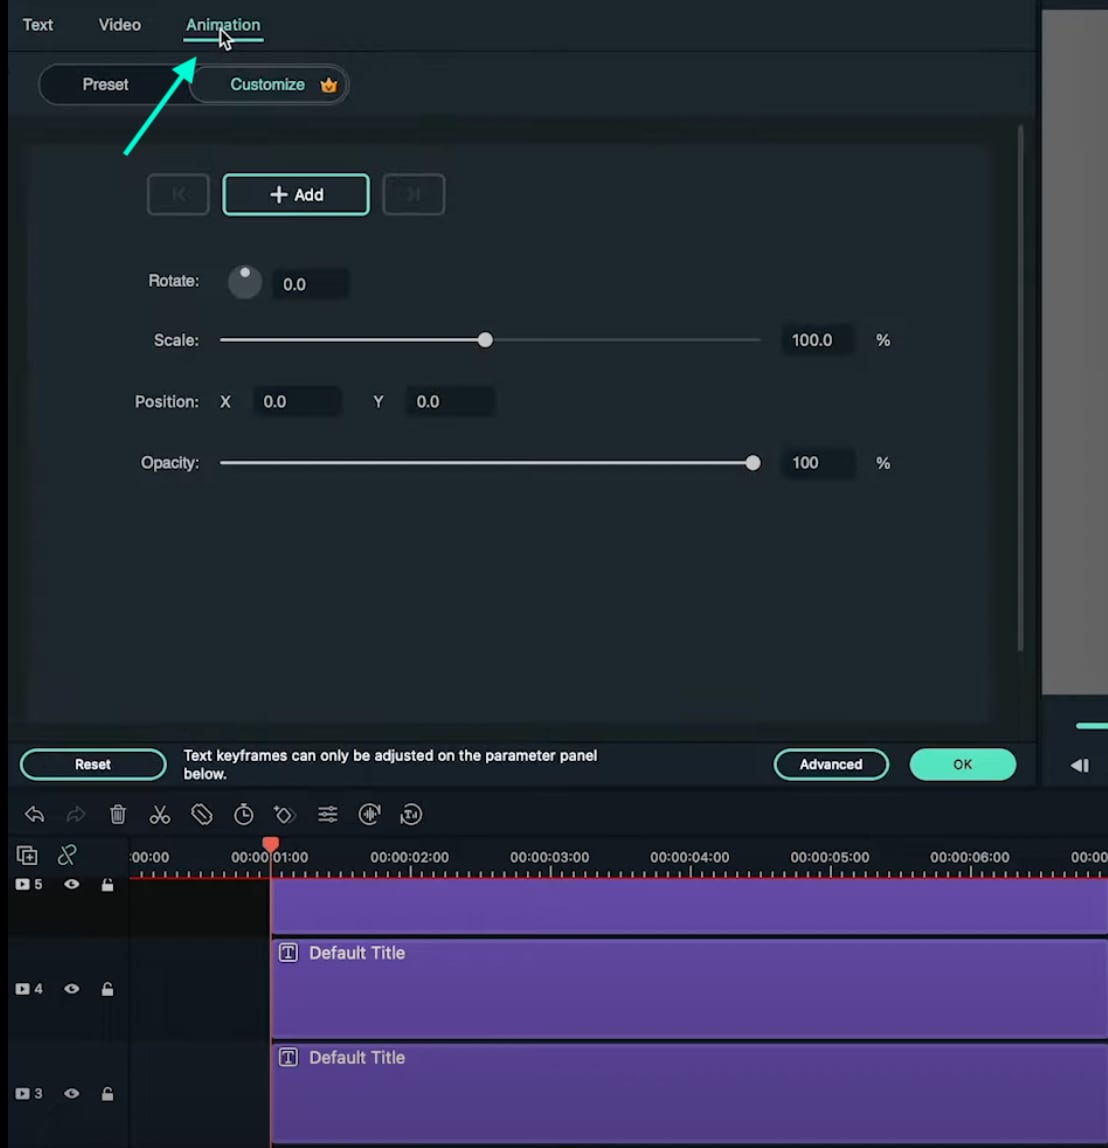
After you’re done copying and pasting more Default Titles with more Circles inside, you can start animating them. Start with the first one. Double-click on the first Default Title with the Circle inside. Make sure you place the Playhead at the beginning of that clip. Then, go to the Animation tab.
Step 13
You need to add 3 keyframes. Add the first one right now. Just click on the “**+Add” button. Then, move the Playhead somewhere in the middle and click “+Add” again. Last, move the Playhead at the end of the clip, and click “+Add**” again to add the third keyframe.

Step 14
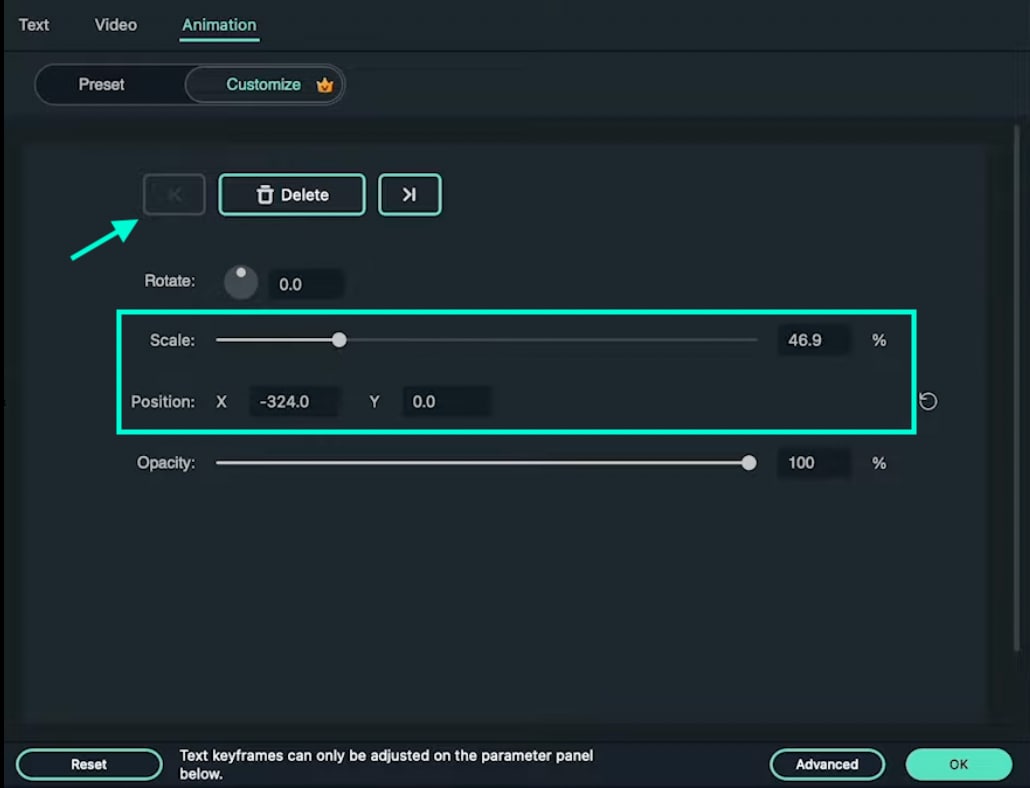
Now, go back to the first keyframe to edit its settings. Click the arrows to move between keyframes. Once you’re at the first one, start decreasing the Scale and the Position values as you move the Playhead toward the second keyframe. There are no rules here. Move each value based on how it looks best to you.
For the second keyframe, just increase the Scale and adjust the Position value based on how it looks on the screen.
Step 15
Now, apply the same method as in Step 14 to all the other circles in your video. Then, adjust the keyframe positions for all layers to create more unique movement throughout the video.
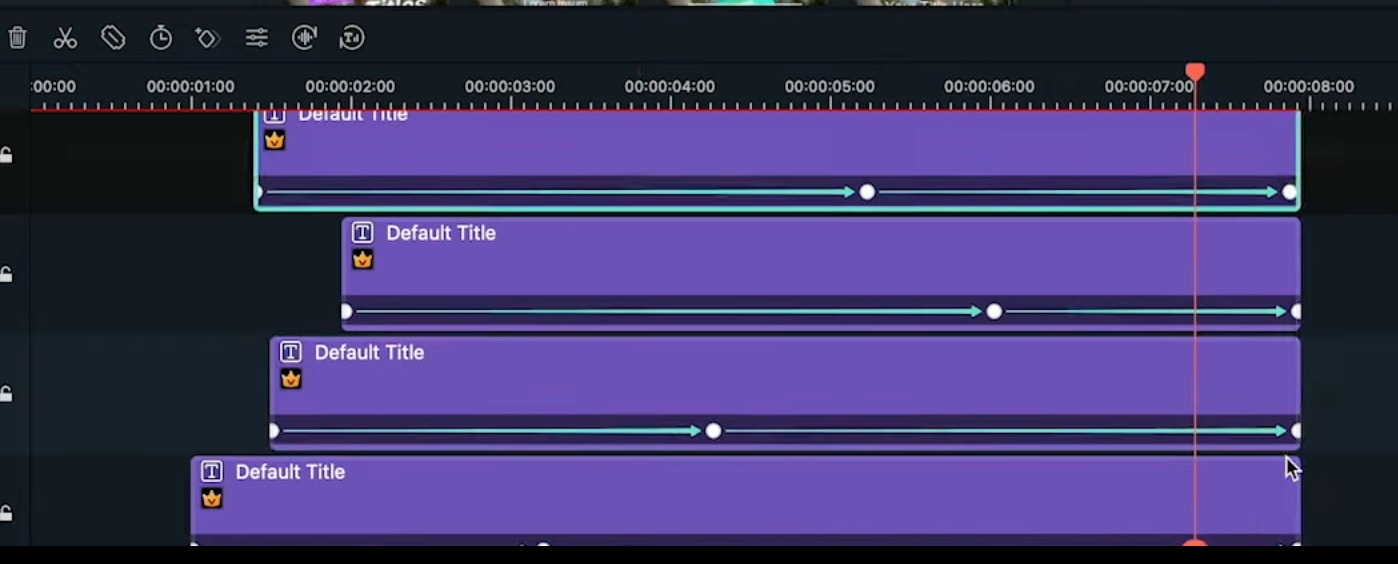
Step 16
Move the Playhead to 1 second and 30 frames. Then, add a new Default Title in the Timeline and go to its Advanced settings panel. From there, Enable the Outline option and Disable the Fill option. In the Outline option, change the color to White, set Opacity to 50%, and decrease Thickness to 1.
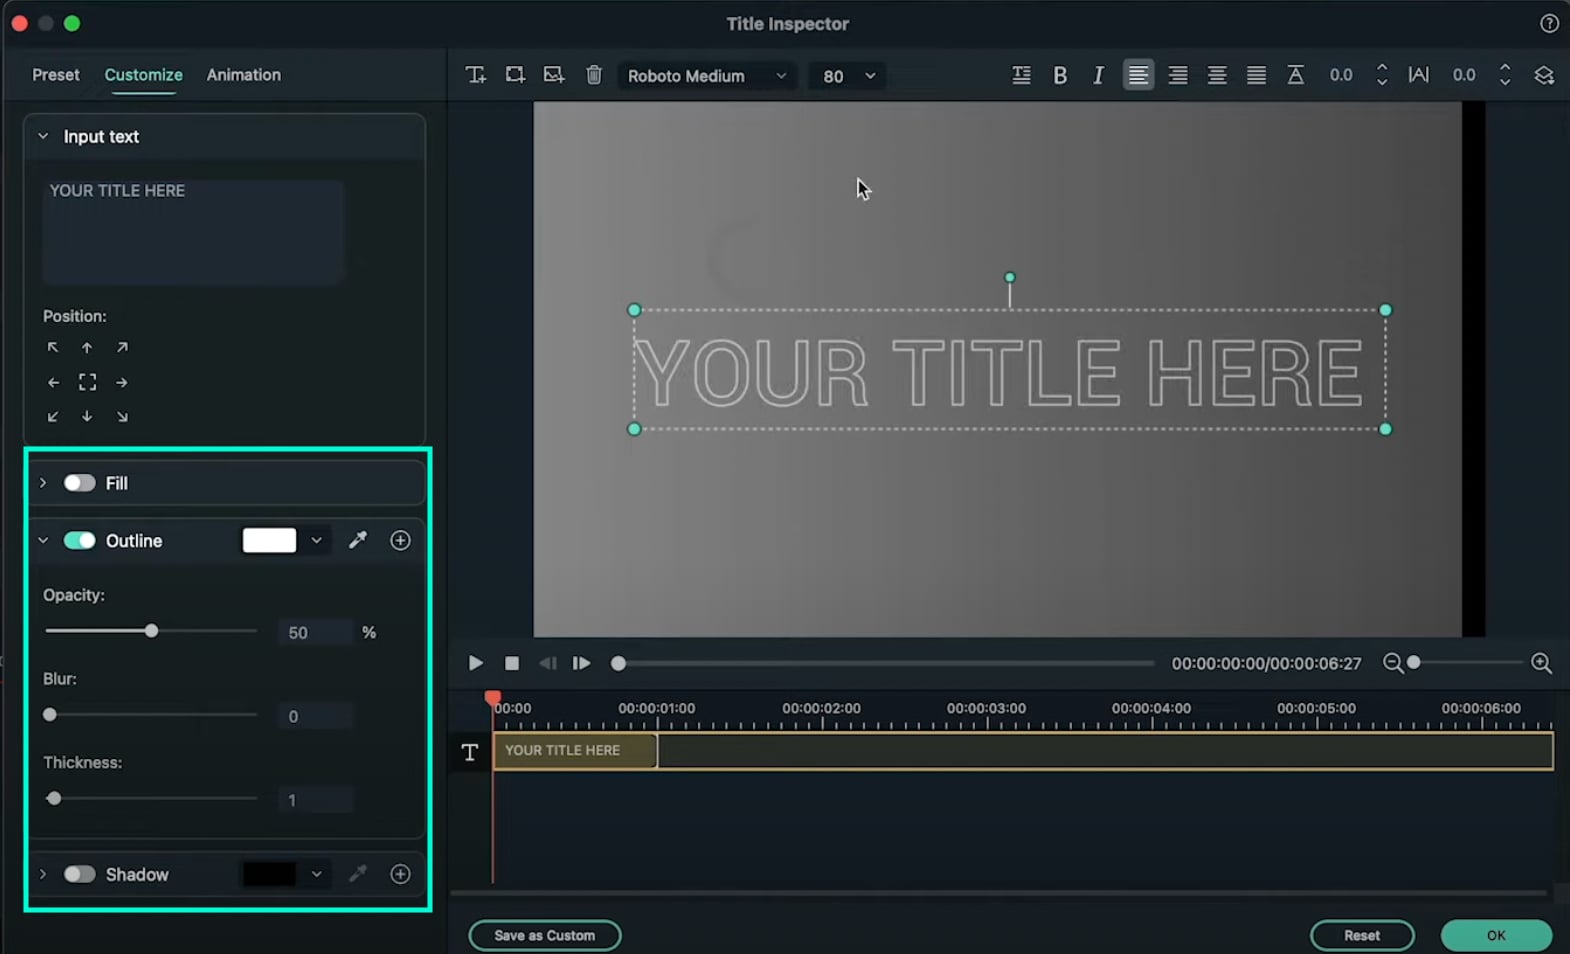
Step 17
Next, choose your favorite font and type in your text inside the textbox. Then, change the value you see highlighted in this image to “-20”. Finally, increase the text size to almost fit the entire screen. Don’t worry about the fact that you can’t see all of it on the screen.

Step 18
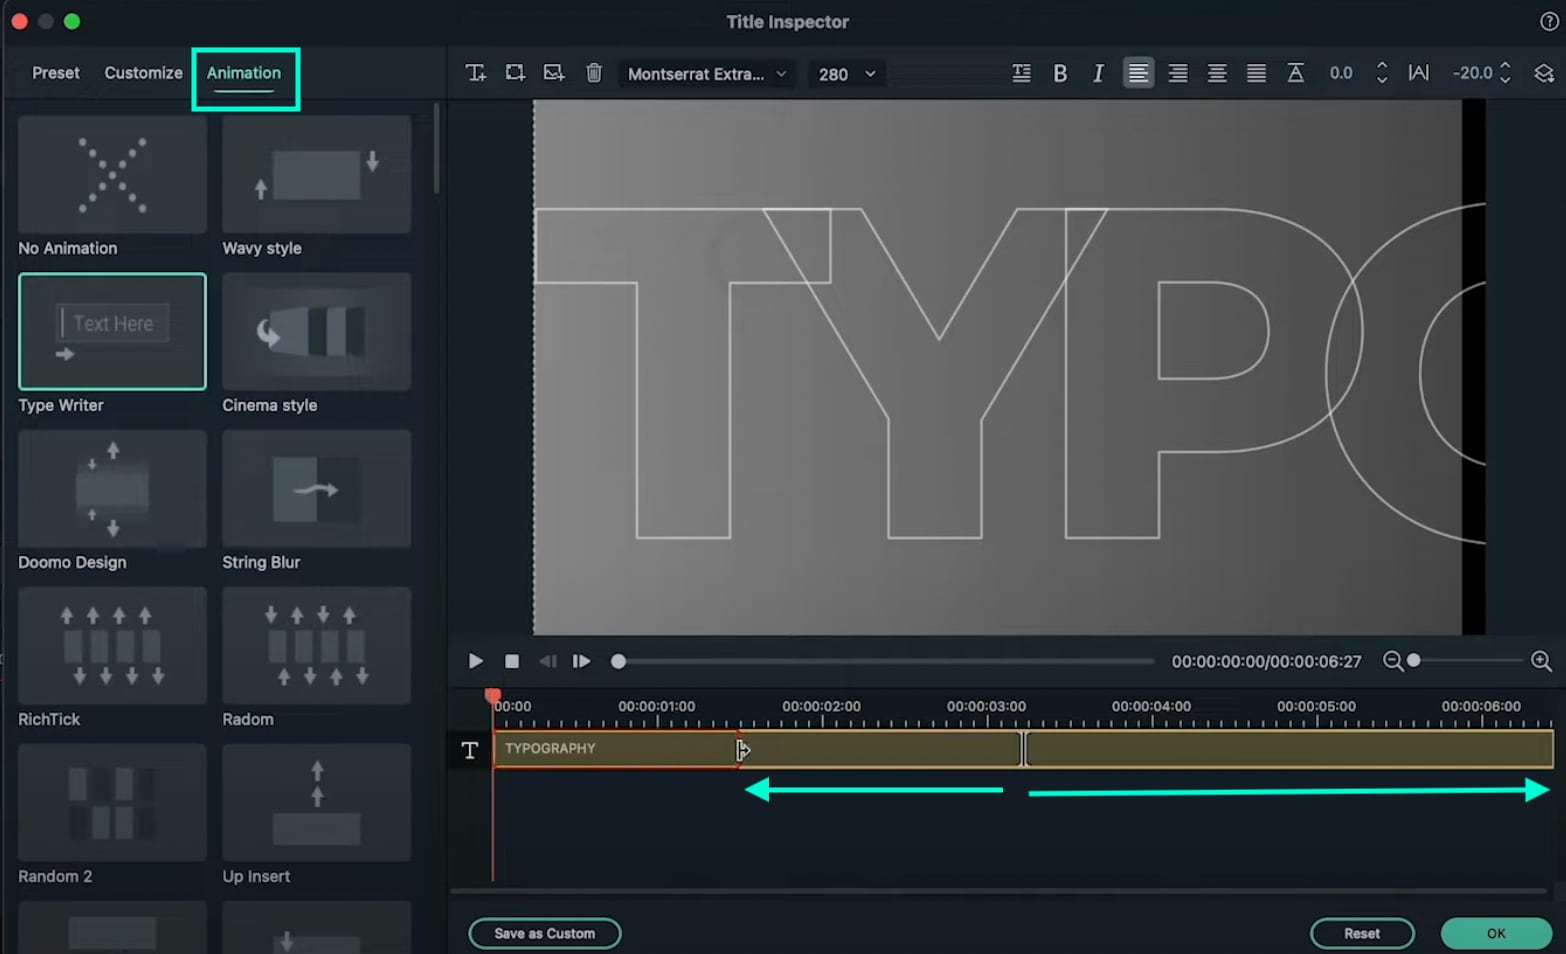
Go to the Animation tab and apply the “Type Writer” animation. Then, drag the yellow lines below just like you see in the image here. The arrows show you the length to which you need to drag these lines. Click OK.
Step 19
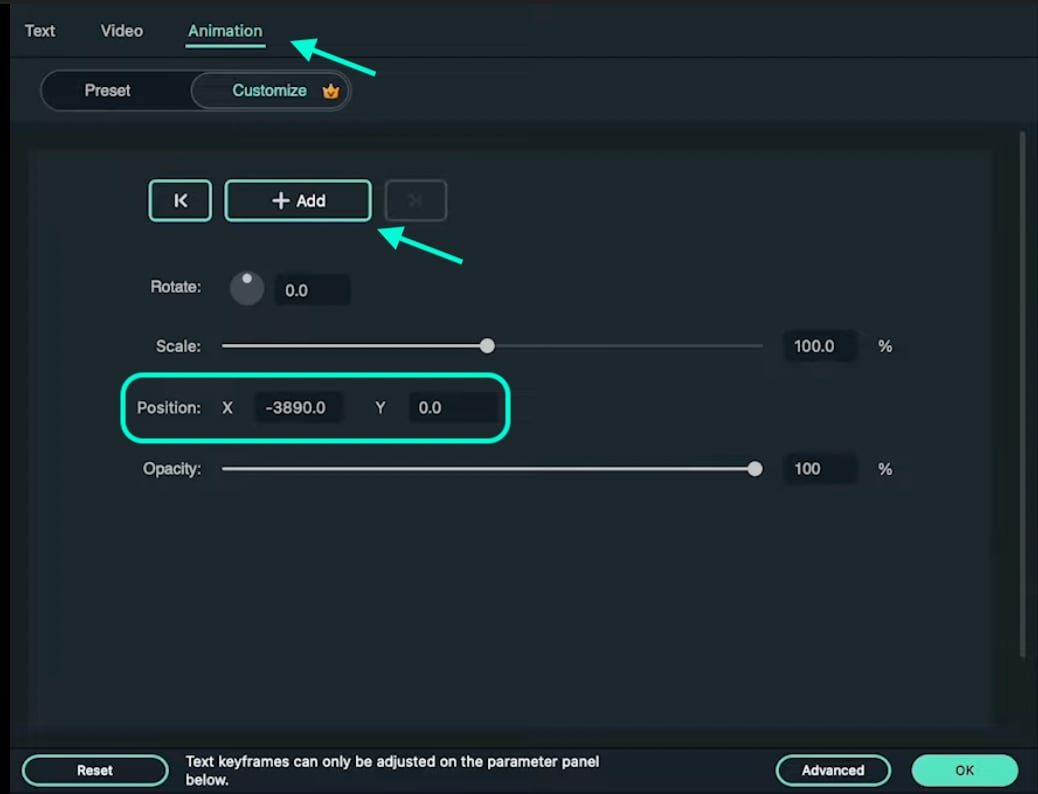
Set the Playhead to 1 second and 40 frames. Now, double-click on the last Default Title we just created and go to its Animation settings. NOTE: Don’t open its Advanced settings this time. Next, add a keyframe. Then, move the Playhead near the end of this clip in the Timeline. Now, drag the X position to the left until you see the last letter of your text appear on the screen. Click OK.
Step 20
Now, add another Default Title to the Timeline. Open its Advanced settings and type in your main text. Then, go to its Animation tab and apply the “Random 2” animation. Change its starting and end times according to your preference. Click OK.

Step 21
That’s it. You’re done! Feel free to preview the video and Render it. Congratulations on creating unique motion graphics in Filmora.
Summary
What you’ve learned:
- How to create custom motion graphics in Filmora
- How to edit and add animations to titles in Filmora
- Customize text and shapes in Filmora
What you need to prepare:
- A computer (Windows or macOS)
- Your video materials.
- Filmora video editor
Step 1
Visit the filmora.wondershare.com website and download Filmora . Install the program and wait for it to Run. Then, click on New Project.
Step 2
Go to File → Project Settings and set the FPS to 60. Also, ensure that the project is in Full Resolution (1920x1080). Click OK.

Step 3
Open the Titles tab and drag the Default Title to the Timeline. Then, double-click on the Default Title and click on ADVANCED.

Step 4
From the Advanced settings panel, delete the existing text and add a Rectangle shape.

Step 5
Disable the Text Fill and the Shape Border options from the panel on the left side.

Step 6
Click the drop-down arrow on the Shape Fill option and change the Type to Gradient Fill. Then, adjust the two color pallets from lighter to darker to create a gradient effect. Finally, adjust the rectangle to fit the entire screen. Click OK.

Step 7
Go to the Transitions tab → search for “Push” → drag the Push transition to the Default Title in the Timeline. Then, move the Playhead to the 1-second marker and drag another Default Title to that point from the Titles tab.

Step 8
Double-click on the new Default Title → go to Advanced. Delete the default text and add a Circle shape this time instead of a Rectangle. Disable the Text Fill and Shape Fill options this time.
Step 9
Scroll down to Shape Border and increase the Thickness bar all the way up. Then, change the circle’s color to match your background as closely as possible. Click OK.

Step 10
Copy the Title you just edited and paste it into the above layer. Then, double-click on the copied Title and go to its Advanced settings panel.

Step 11
In the Advanced panel, copy the circle and paste it somewhere else on the screen. Change its size if you want, and change the shade of its color to match the background once more. You can add as many new copies of the Default Titles and copy as many circles as you want. Click OK.

Step 12
After you’re done copying and pasting more Default Titles with more Circles inside, you can start animating them. Start with the first one. Double-click on the first Default Title with the Circle inside. Make sure you place the Playhead at the beginning of that clip. Then, go to the Animation tab.

Step 13
You need to add 3 keyframes. Add the first one right now. Just click on the “**+Add” button. Then, move the Playhead somewhere in the middle and click “+Add” again. Last, move the Playhead at the end of the clip, and click “+Add**” again to add the third keyframe.

Step 14
Now, go back to the first keyframe to edit its settings. Click the arrows to move between keyframes. Once you’re at the first one, start decreasing the Scale and the Position values as you move the Playhead toward the second keyframe. There are no rules here. Move each value based on how it looks best to you.
For the second keyframe, just increase the Scale and adjust the Position value based on how it looks on the screen.

Step 15
Now, apply the same method as in Step 14 to all the other circles in your video. Then, adjust the keyframe positions for all layers to create more unique movement throughout the video.

Step 16
Move the Playhead to 1 second and 30 frames. Then, add a new Default Title in the Timeline and go to its Advanced settings panel. From there, Enable the Outline option and Disable the Fill option. In the Outline option, change the color to White, set Opacity to 50%, and decrease Thickness to 1.

Step 17
Next, choose your favorite font and type in your text inside the textbox. Then, change the value you see highlighted in this image to “-20”. Finally, increase the text size to almost fit the entire screen. Don’t worry about the fact that you can’t see all of it on the screen.

Step 18
Go to the Animation tab and apply the “Type Writer” animation. Then, drag the yellow lines below just like you see in the image here. The arrows show you the length to which you need to drag these lines. Click OK.

Step 19
Set the Playhead to 1 second and 40 frames. Now, double-click on the last Default Title we just created and go to its Animation settings. NOTE: Don’t open its Advanced settings this time. Next, add a keyframe. Then, move the Playhead near the end of this clip in the Timeline. Now, drag the X position to the left until you see the last letter of your text appear on the screen. Click OK.

Step 20
Now, add another Default Title to the Timeline. Open its Advanced settings and type in your main text. Then, go to its Animation tab and apply the “Random 2” animation. Change its starting and end times according to your preference. Click OK.

Step 21
That’s it. You’re done! Feel free to preview the video and Render it. Congratulations on creating unique motion graphics in Filmora.
Summary
What you’ve learned:
- How to create custom motion graphics in Filmora
- How to edit and add animations to titles in Filmora
- Customize text and shapes in Filmora
What you need to prepare:
- A computer (Windows or macOS)
- Your video materials.
- Filmora video editor
Step 1
Visit the filmora.wondershare.com website and download Filmora . Install the program and wait for it to Run. Then, click on New Project.
Step 2
Go to File → Project Settings and set the FPS to 60. Also, ensure that the project is in Full Resolution (1920x1080). Click OK.

Step 3
Open the Titles tab and drag the Default Title to the Timeline. Then, double-click on the Default Title and click on ADVANCED.

Step 4
From the Advanced settings panel, delete the existing text and add a Rectangle shape.

Step 5
Disable the Text Fill and the Shape Border options from the panel on the left side.

Step 6
Click the drop-down arrow on the Shape Fill option and change the Type to Gradient Fill. Then, adjust the two color pallets from lighter to darker to create a gradient effect. Finally, adjust the rectangle to fit the entire screen. Click OK.

Step 7
Go to the Transitions tab → search for “Push” → drag the Push transition to the Default Title in the Timeline. Then, move the Playhead to the 1-second marker and drag another Default Title to that point from the Titles tab.

Step 8
Double-click on the new Default Title → go to Advanced. Delete the default text and add a Circle shape this time instead of a Rectangle. Disable the Text Fill and Shape Fill options this time.
Step 9
Scroll down to Shape Border and increase the Thickness bar all the way up. Then, change the circle’s color to match your background as closely as possible. Click OK.

Step 10
Copy the Title you just edited and paste it into the above layer. Then, double-click on the copied Title and go to its Advanced settings panel.

Step 11
In the Advanced panel, copy the circle and paste it somewhere else on the screen. Change its size if you want, and change the shade of its color to match the background once more. You can add as many new copies of the Default Titles and copy as many circles as you want. Click OK.

Step 12
After you’re done copying and pasting more Default Titles with more Circles inside, you can start animating them. Start with the first one. Double-click on the first Default Title with the Circle inside. Make sure you place the Playhead at the beginning of that clip. Then, go to the Animation tab.

Step 13
You need to add 3 keyframes. Add the first one right now. Just click on the “**+Add” button. Then, move the Playhead somewhere in the middle and click “+Add” again. Last, move the Playhead at the end of the clip, and click “+Add**” again to add the third keyframe.

Step 14
Now, go back to the first keyframe to edit its settings. Click the arrows to move between keyframes. Once you’re at the first one, start decreasing the Scale and the Position values as you move the Playhead toward the second keyframe. There are no rules here. Move each value based on how it looks best to you.
For the second keyframe, just increase the Scale and adjust the Position value based on how it looks on the screen.

Step 15
Now, apply the same method as in Step 14 to all the other circles in your video. Then, adjust the keyframe positions for all layers to create more unique movement throughout the video.

Step 16
Move the Playhead to 1 second and 30 frames. Then, add a new Default Title in the Timeline and go to its Advanced settings panel. From there, Enable the Outline option and Disable the Fill option. In the Outline option, change the color to White, set Opacity to 50%, and decrease Thickness to 1.

Step 17
Next, choose your favorite font and type in your text inside the textbox. Then, change the value you see highlighted in this image to “-20”. Finally, increase the text size to almost fit the entire screen. Don’t worry about the fact that you can’t see all of it on the screen.

Step 18
Go to the Animation tab and apply the “Type Writer” animation. Then, drag the yellow lines below just like you see in the image here. The arrows show you the length to which you need to drag these lines. Click OK.

Step 19
Set the Playhead to 1 second and 40 frames. Now, double-click on the last Default Title we just created and go to its Animation settings. NOTE: Don’t open its Advanced settings this time. Next, add a keyframe. Then, move the Playhead near the end of this clip in the Timeline. Now, drag the X position to the left until you see the last letter of your text appear on the screen. Click OK.

Step 20
Now, add another Default Title to the Timeline. Open its Advanced settings and type in your main text. Then, go to its Animation tab and apply the “Random 2” animation. Change its starting and end times according to your preference. Click OK.

Step 21
That’s it. You’re done! Feel free to preview the video and Render it. Congratulations on creating unique motion graphics in Filmora.
Summary
What you’ve learned:
- How to create custom motion graphics in Filmora
- How to edit and add animations to titles in Filmora
- Customize text and shapes in Filmora
What you need to prepare:
- A computer (Windows or macOS)
- Your video materials.
- Filmora video editor
Step 1
Visit the filmora.wondershare.com website and download Filmora . Install the program and wait for it to Run. Then, click on New Project.
Step 2
Go to File → Project Settings and set the FPS to 60. Also, ensure that the project is in Full Resolution (1920x1080). Click OK.

Step 3
Open the Titles tab and drag the Default Title to the Timeline. Then, double-click on the Default Title and click on ADVANCED.

Step 4
From the Advanced settings panel, delete the existing text and add a Rectangle shape.

Step 5
Disable the Text Fill and the Shape Border options from the panel on the left side.

Step 6
Click the drop-down arrow on the Shape Fill option and change the Type to Gradient Fill. Then, adjust the two color pallets from lighter to darker to create a gradient effect. Finally, adjust the rectangle to fit the entire screen. Click OK.

Step 7
Go to the Transitions tab → search for “Push” → drag the Push transition to the Default Title in the Timeline. Then, move the Playhead to the 1-second marker and drag another Default Title to that point from the Titles tab.

Step 8
Double-click on the new Default Title → go to Advanced. Delete the default text and add a Circle shape this time instead of a Rectangle. Disable the Text Fill and Shape Fill options this time.
Step 9
Scroll down to Shape Border and increase the Thickness bar all the way up. Then, change the circle’s color to match your background as closely as possible. Click OK.

Step 10
Copy the Title you just edited and paste it into the above layer. Then, double-click on the copied Title and go to its Advanced settings panel.

Step 11
In the Advanced panel, copy the circle and paste it somewhere else on the screen. Change its size if you want, and change the shade of its color to match the background once more. You can add as many new copies of the Default Titles and copy as many circles as you want. Click OK.

Step 12
After you’re done copying and pasting more Default Titles with more Circles inside, you can start animating them. Start with the first one. Double-click on the first Default Title with the Circle inside. Make sure you place the Playhead at the beginning of that clip. Then, go to the Animation tab.

Step 13
You need to add 3 keyframes. Add the first one right now. Just click on the “**+Add” button. Then, move the Playhead somewhere in the middle and click “+Add” again. Last, move the Playhead at the end of the clip, and click “+Add**” again to add the third keyframe.

Step 14
Now, go back to the first keyframe to edit its settings. Click the arrows to move between keyframes. Once you’re at the first one, start decreasing the Scale and the Position values as you move the Playhead toward the second keyframe. There are no rules here. Move each value based on how it looks best to you.
For the second keyframe, just increase the Scale and adjust the Position value based on how it looks on the screen.

Step 15
Now, apply the same method as in Step 14 to all the other circles in your video. Then, adjust the keyframe positions for all layers to create more unique movement throughout the video.

Step 16
Move the Playhead to 1 second and 30 frames. Then, add a new Default Title in the Timeline and go to its Advanced settings panel. From there, Enable the Outline option and Disable the Fill option. In the Outline option, change the color to White, set Opacity to 50%, and decrease Thickness to 1.

Step 17
Next, choose your favorite font and type in your text inside the textbox. Then, change the value you see highlighted in this image to “-20”. Finally, increase the text size to almost fit the entire screen. Don’t worry about the fact that you can’t see all of it on the screen.

Step 18
Go to the Animation tab and apply the “Type Writer” animation. Then, drag the yellow lines below just like you see in the image here. The arrows show you the length to which you need to drag these lines. Click OK.

Step 19
Set the Playhead to 1 second and 40 frames. Now, double-click on the last Default Title we just created and go to its Animation settings. NOTE: Don’t open its Advanced settings this time. Next, add a keyframe. Then, move the Playhead near the end of this clip in the Timeline. Now, drag the X position to the left until you see the last letter of your text appear on the screen. Click OK.

Step 20
Now, add another Default Title to the Timeline. Open its Advanced settings and type in your main text. Then, go to its Animation tab and apply the “Random 2” animation. Change its starting and end times according to your preference. Click OK.

Step 21
That’s it. You’re done! Feel free to preview the video and Render it. Congratulations on creating unique motion graphics in Filmora.
Summary
What you’ve learned:
- How to create custom motion graphics in Filmora
- How to edit and add animations to titles in Filmora
- Customize text and shapes in Filmora
How to Use Lumetri Color in After Effects
Create High-Quality Video - Wondershare Filmora
An easy and powerful YouTube video editor
Numerous video and audio effects to choose from
Detailed tutorials provided by the official channel
When going forth with film post-production, video game creation, and television production, almost every video editor’s goal is to produce outstanding results. Usually, this cannot be achieved by using mediocre tools. One of the top-notch software video editors need to use is Adobe After Effect. Adobe After Effect is a motion graphics, digital visual effect, and compositing application developed by the Adobe system.
Adobe After Effects has tons of tools, and an exceptional one is a Lumetri color. With this functionality, you can easily carry out your color correction and color grading. Read this article and get to the bottom line on how to use Lumetri Color in Adobe After Effects.
Let’s dig in!
In this article
01 Does After Effects have Lumetri Color?
02 How to use Lumetri Color in Adobe After Effects
03 Is there a simple way to Unionise the Color of my Video?
Does After Effects have Lumetri Color?
Yes, there is lumetri color in After Effects. Lumetri Color allows you to adjust contrast, light, and color to your video based on your preference. With After Effects, you can carry out various color customizations in the Lumerti panel without exiting your current project.
Furthermore, the Lumetri color panel in Adobe After Effects allows you to export your settings to another different premiere pro project wholly. Usually, the file is exported as a .cube file – This relieves you from the wearisomeness of creating new grading features.
How to use Lumetri Color in Adobe After Effects
You don’t need to be a pro for you to use Lumetri Color in Adobe After Effects. The color workspace in Adobe After Effect is designed to be straightforward and user-friendly.
The Lumetri Color panel in Adobe contains the histogram, vectorscope, parade scope, and waveform monitor. The histogram, parade scope, and waveform monitor display image intensity, whereas the vectorscope display hue and color saturation.
Lumetri Color is considered an ultimate choice by most editors due to its wide range of functionalities. Some of the functionalities in the Lumetri panel include:
1. Vignettes
Vignette is an outstanding feature that effortlessly allows Lumetri users to adjust lightness and darkness using sliders.
Vignettes allow you to darken the borders and highlight certain parts. You will therefore create more emphasis on highlighted parts in your clip.
2. HSL Secondary
When you want to get exceptional footage controls, HSL Secondary (Hue, Saturation, and Luminance) is often the best functionality. HSL Secondary easily separates your footage and works on a selected piece.
With the functionality, you can easily manipulate the skin tones in your footage and refocus images.

3. Curves
The Lumetri panel in Adobe After Effects renders its users the curves functionality. There are two curves in the Lumetri Panel, i.e., Hue Saturation curves and luminesce curves.
The Hue/Saturation curve uses the red, green, and blue (RBG) flagship, whereas the luminance curve helps manage the frame curve’s tone.

4. Fx Bypass
Fx Bypass is a new functionality feature in the Lumetri panel. It allows you to bypass and reset effects without switching to the controls panel.
How to use Lumetri Color
With your Adobe After Effects, you can make quick and advanced color changes to your clips. Here are the simple steps on how to use Lumetri Color.
Step 1. Add your footage to the timeline
First, open your Adobe After Effect and add your video file to the software. Drag and drop to add it to the timeline.

Step 2. Open Lumetri Color
Here, you highlight your video in the timeline, then head over to the “Window” menu. From the drop-down menu, select “Effects & presets” > “Lumetri Color.”
Alternatively, you can go to the “Effects” menu, which is at the left-hand side of your interface, then select “Color Correction”> “Lumetri Color.”

Step 3. Carry out your Color Grading and Saturation
With the “Lumetri Color” functionality, you can carry out various adjustable settings such as tone, hue, saturation and color grading.
To carry out saturation:
Click on the “ Hue/Saturation “ from the drop-down menu in “Lumetri Color.” You can change the color of the entire footage by adjusting the “Master Hue” from the Effects Control Panel.
Alternatively, you can opt to fine-tune the freshly selected color by using the “Master Saturation” and Master Lightness.”
To carry out color grading:
- After opening the “Lumetri Color” panel as in step 2 above, click on the eyedropper to select the curve you want to use.
- Click the color in your footage that you wish to adjust. Usually, when you use the eyedropper, three points will be added to the graph. The two bottom points restrict color selection to a minimum range, whereas the first represents your selected color.
How to Use Lumetri Scope
Besides the Lumetric Color, Lumetric Scope is another essential tool for post-film production in Adobe After Effects. The color correcting tool, Lumetric scope guarantees its users’ accurate results when used correctly.
When carrying out color corrections in films, it is advisable to use quality monitor calibrators and paint your workspace walls neutral grey. Usually, it reduces lighting distraction and the external color effect, respectively.
However, not every editor can meet all the required basics, and that is where Lumetri scope comes in. Lumetri Scope allows one to get the best color results in their videos. Here are the steps on how to use Lumetri Scope:

Step 1. Open Lumetric Scope
First, open your Adobe After Effect application and add your footage to the timeline. Go to the “ Window “ menu at the top-left-hand side of your interface.
In the drop-down menu, select “Lumetri Scopes” or “Workspaces,” then click on the “Color” option.
The Lumetri Scope tab will be displayed adjacent to the timeline footage.
Step 2. Evaluate Hue and Saturation using Vectorscope
In the Lumetri Scope tab, click on the wrench icon, and a drop-down menu will be displayed. From the menu, select “Vectorscope YUV” and read the saturation. When reading saturation, begin from the center going outwards.
Hue, on the other hand, is read in a circular direction.

Step 3. Evaluate the tonal values and Brightness using Histogram
The histogram in Lumetri Scope displays an image’s tonal values and brightness levels.
To measure the brightness and tonal values, go back to the Lumetri Scope panel and click on the wrench icon. Click on “Presets” from the drop-down menu and select “Histogram.”
The scale in the histogram starts from 0 (pure black) to 225 (pure white). You, therefore, need to view the number of pixels for every color horizontally when reading.

Step 4. Evaluate Color and Brightness Intensities using Waveform Monitor
The color and brightness are read from the bottom to the top in the waveform monitor.
Click on the wrench icon to view the intensities, then pick the “Presets” option > “Waveform RBG.” A drop-down menu (RGB, YC, Luma, and YC no Chroma) will be displayed that allows you to do the readings.
Reading the IRE scale is usually done in ascension (0 to 100).

Step 5. Evaluate the Individual color channels using Parade Scope
Here, click on the wrench icon in the Lumetri Scopes panel, then select the “Presets”> “Parade RGB.” Select from the alternate Lumetri scope combinations of RGB, RGB-White, YUV, YUV white.
Is there a simple way to Unionise the Color of my Video?
Have you tried color grading and color correction in Lumetri using Adobe After Effects, but your efforts are bearing no fruits? It would be best not to worry since there is a simple way out. So, Yes! There is a simple way to unionize the color of your video – it is by using Wondershare Filmora .
Wondershare Filmora is a professional application to edit videos with a wide range of tools that allows its users to create stunning videos with ease. From its simple and intuitive design to its wide range of functionalities and affordability, Filmora users have every reason to stick to the software.
Some of the functionality features that make Wondershare Filmora easy to use include:
Curve Section
Filmora has way simpler curves than Adobe After Effects. Filmora has two presets, i.e., One that creates an S-curve over the graph, and the other resets graph to a straight linear line. Usually, the S-curve represents soft contrasts.
YUV color correction
The YUV color correction feature in Filmora functions straightforwardly when compared to Adobe After Effects. The Y and V channels in Filmora stores color data, whereas the U channel carries the brightness data. Editors find it effortlessly using the YUV color correction in Filmora.
Hue and Saturation
Hue, saturation, and lightness levels in Wondershare Filmora are undeniably very easy to understand unline other premiere software applications.
In Filmora, the Hue shift plays an essential role in shuffling the colors, whereas the Saturation defines the overall intensity of colors in an image.
For Win 7 or later (64-bit)
For macOS 10.12 or later
Conclusion
● With the above illustrations, you need not find it challenging to use Lumetri Color in Adobe After Effect. But if you are getting your head stuck when using Adobe After Effects, you need not stress out. There is an ultimate solution, and that is Wondershare Filmora. Incorporate this easy-to-use and pocket-friendly software in your edits. Besides, you will not have to go through the user guide to get started.
When going forth with film post-production, video game creation, and television production, almost every video editor’s goal is to produce outstanding results. Usually, this cannot be achieved by using mediocre tools. One of the top-notch software video editors need to use is Adobe After Effect. Adobe After Effect is a motion graphics, digital visual effect, and compositing application developed by the Adobe system.
Adobe After Effects has tons of tools, and an exceptional one is a Lumetri color. With this functionality, you can easily carry out your color correction and color grading. Read this article and get to the bottom line on how to use Lumetri Color in Adobe After Effects.
Let’s dig in!
In this article
01 Does After Effects have Lumetri Color?
02 How to use Lumetri Color in Adobe After Effects
03 Is there a simple way to Unionise the Color of my Video?
Does After Effects have Lumetri Color?
Yes, there is lumetri color in After Effects. Lumetri Color allows you to adjust contrast, light, and color to your video based on your preference. With After Effects, you can carry out various color customizations in the Lumerti panel without exiting your current project.
Furthermore, the Lumetri color panel in Adobe After Effects allows you to export your settings to another different premiere pro project wholly. Usually, the file is exported as a .cube file – This relieves you from the wearisomeness of creating new grading features.
How to use Lumetri Color in Adobe After Effects
You don’t need to be a pro for you to use Lumetri Color in Adobe After Effects. The color workspace in Adobe After Effect is designed to be straightforward and user-friendly.
The Lumetri Color panel in Adobe contains the histogram, vectorscope, parade scope, and waveform monitor. The histogram, parade scope, and waveform monitor display image intensity, whereas the vectorscope display hue and color saturation.
Lumetri Color is considered an ultimate choice by most editors due to its wide range of functionalities. Some of the functionalities in the Lumetri panel include:
1. Vignettes
Vignette is an outstanding feature that effortlessly allows Lumetri users to adjust lightness and darkness using sliders.
Vignettes allow you to darken the borders and highlight certain parts. You will therefore create more emphasis on highlighted parts in your clip.
2. HSL Secondary
When you want to get exceptional footage controls, HSL Secondary (Hue, Saturation, and Luminance) is often the best functionality. HSL Secondary easily separates your footage and works on a selected piece.
With the functionality, you can easily manipulate the skin tones in your footage and refocus images.

3. Curves
The Lumetri panel in Adobe After Effects renders its users the curves functionality. There are two curves in the Lumetri Panel, i.e., Hue Saturation curves and luminesce curves.
The Hue/Saturation curve uses the red, green, and blue (RBG) flagship, whereas the luminance curve helps manage the frame curve’s tone.

4. Fx Bypass
Fx Bypass is a new functionality feature in the Lumetri panel. It allows you to bypass and reset effects without switching to the controls panel.
How to use Lumetri Color
With your Adobe After Effects, you can make quick and advanced color changes to your clips. Here are the simple steps on how to use Lumetri Color.
Step 1. Add your footage to the timeline
First, open your Adobe After Effect and add your video file to the software. Drag and drop to add it to the timeline.

Step 2. Open Lumetri Color
Here, you highlight your video in the timeline, then head over to the “Window” menu. From the drop-down menu, select “Effects & presets” > “Lumetri Color.”
Alternatively, you can go to the “Effects” menu, which is at the left-hand side of your interface, then select “Color Correction”> “Lumetri Color.”

Step 3. Carry out your Color Grading and Saturation
With the “Lumetri Color” functionality, you can carry out various adjustable settings such as tone, hue, saturation and color grading.
To carry out saturation:
Click on the “ Hue/Saturation “ from the drop-down menu in “Lumetri Color.” You can change the color of the entire footage by adjusting the “Master Hue” from the Effects Control Panel.
Alternatively, you can opt to fine-tune the freshly selected color by using the “Master Saturation” and Master Lightness.”
To carry out color grading:
- After opening the “Lumetri Color” panel as in step 2 above, click on the eyedropper to select the curve you want to use.
- Click the color in your footage that you wish to adjust. Usually, when you use the eyedropper, three points will be added to the graph. The two bottom points restrict color selection to a minimum range, whereas the first represents your selected color.
How to Use Lumetri Scope
Besides the Lumetric Color, Lumetric Scope is another essential tool for post-film production in Adobe After Effects. The color correcting tool, Lumetric scope guarantees its users’ accurate results when used correctly.
When carrying out color corrections in films, it is advisable to use quality monitor calibrators and paint your workspace walls neutral grey. Usually, it reduces lighting distraction and the external color effect, respectively.
However, not every editor can meet all the required basics, and that is where Lumetri scope comes in. Lumetri Scope allows one to get the best color results in their videos. Here are the steps on how to use Lumetri Scope:

Step 1. Open Lumetric Scope
First, open your Adobe After Effect application and add your footage to the timeline. Go to the “ Window “ menu at the top-left-hand side of your interface.
In the drop-down menu, select “Lumetri Scopes” or “Workspaces,” then click on the “Color” option.
The Lumetri Scope tab will be displayed adjacent to the timeline footage.
Step 2. Evaluate Hue and Saturation using Vectorscope
In the Lumetri Scope tab, click on the wrench icon, and a drop-down menu will be displayed. From the menu, select “Vectorscope YUV” and read the saturation. When reading saturation, begin from the center going outwards.
Hue, on the other hand, is read in a circular direction.

Step 3. Evaluate the tonal values and Brightness using Histogram
The histogram in Lumetri Scope displays an image’s tonal values and brightness levels.
To measure the brightness and tonal values, go back to the Lumetri Scope panel and click on the wrench icon. Click on “Presets” from the drop-down menu and select “Histogram.”
The scale in the histogram starts from 0 (pure black) to 225 (pure white). You, therefore, need to view the number of pixels for every color horizontally when reading.

Step 4. Evaluate Color and Brightness Intensities using Waveform Monitor
The color and brightness are read from the bottom to the top in the waveform monitor.
Click on the wrench icon to view the intensities, then pick the “Presets” option > “Waveform RBG.” A drop-down menu (RGB, YC, Luma, and YC no Chroma) will be displayed that allows you to do the readings.
Reading the IRE scale is usually done in ascension (0 to 100).

Step 5. Evaluate the Individual color channels using Parade Scope
Here, click on the wrench icon in the Lumetri Scopes panel, then select the “Presets”> “Parade RGB.” Select from the alternate Lumetri scope combinations of RGB, RGB-White, YUV, YUV white.
Is there a simple way to Unionise the Color of my Video?
Have you tried color grading and color correction in Lumetri using Adobe After Effects, but your efforts are bearing no fruits? It would be best not to worry since there is a simple way out. So, Yes! There is a simple way to unionize the color of your video – it is by using Wondershare Filmora .
Wondershare Filmora is a professional application to edit videos with a wide range of tools that allows its users to create stunning videos with ease. From its simple and intuitive design to its wide range of functionalities and affordability, Filmora users have every reason to stick to the software.
Some of the functionality features that make Wondershare Filmora easy to use include:
Curve Section
Filmora has way simpler curves than Adobe After Effects. Filmora has two presets, i.e., One that creates an S-curve over the graph, and the other resets graph to a straight linear line. Usually, the S-curve represents soft contrasts.
YUV color correction
The YUV color correction feature in Filmora functions straightforwardly when compared to Adobe After Effects. The Y and V channels in Filmora stores color data, whereas the U channel carries the brightness data. Editors find it effortlessly using the YUV color correction in Filmora.
Hue and Saturation
Hue, saturation, and lightness levels in Wondershare Filmora are undeniably very easy to understand unline other premiere software applications.
In Filmora, the Hue shift plays an essential role in shuffling the colors, whereas the Saturation defines the overall intensity of colors in an image.
For Win 7 or later (64-bit)
For macOS 10.12 or later
Conclusion
● With the above illustrations, you need not find it challenging to use Lumetri Color in Adobe After Effect. But if you are getting your head stuck when using Adobe After Effects, you need not stress out. There is an ultimate solution, and that is Wondershare Filmora. Incorporate this easy-to-use and pocket-friendly software in your edits. Besides, you will not have to go through the user guide to get started.
When going forth with film post-production, video game creation, and television production, almost every video editor’s goal is to produce outstanding results. Usually, this cannot be achieved by using mediocre tools. One of the top-notch software video editors need to use is Adobe After Effect. Adobe After Effect is a motion graphics, digital visual effect, and compositing application developed by the Adobe system.
Adobe After Effects has tons of tools, and an exceptional one is a Lumetri color. With this functionality, you can easily carry out your color correction and color grading. Read this article and get to the bottom line on how to use Lumetri Color in Adobe After Effects.
Let’s dig in!
In this article
01 Does After Effects have Lumetri Color?
02 How to use Lumetri Color in Adobe After Effects
03 Is there a simple way to Unionise the Color of my Video?
Does After Effects have Lumetri Color?
Yes, there is lumetri color in After Effects. Lumetri Color allows you to adjust contrast, light, and color to your video based on your preference. With After Effects, you can carry out various color customizations in the Lumerti panel without exiting your current project.
Furthermore, the Lumetri color panel in Adobe After Effects allows you to export your settings to another different premiere pro project wholly. Usually, the file is exported as a .cube file – This relieves you from the wearisomeness of creating new grading features.
How to use Lumetri Color in Adobe After Effects
You don’t need to be a pro for you to use Lumetri Color in Adobe After Effects. The color workspace in Adobe After Effect is designed to be straightforward and user-friendly.
The Lumetri Color panel in Adobe contains the histogram, vectorscope, parade scope, and waveform monitor. The histogram, parade scope, and waveform monitor display image intensity, whereas the vectorscope display hue and color saturation.
Lumetri Color is considered an ultimate choice by most editors due to its wide range of functionalities. Some of the functionalities in the Lumetri panel include:
1. Vignettes
Vignette is an outstanding feature that effortlessly allows Lumetri users to adjust lightness and darkness using sliders.
Vignettes allow you to darken the borders and highlight certain parts. You will therefore create more emphasis on highlighted parts in your clip.
2. HSL Secondary
When you want to get exceptional footage controls, HSL Secondary (Hue, Saturation, and Luminance) is often the best functionality. HSL Secondary easily separates your footage and works on a selected piece.
With the functionality, you can easily manipulate the skin tones in your footage and refocus images.

3. Curves
The Lumetri panel in Adobe After Effects renders its users the curves functionality. There are two curves in the Lumetri Panel, i.e., Hue Saturation curves and luminesce curves.
The Hue/Saturation curve uses the red, green, and blue (RBG) flagship, whereas the luminance curve helps manage the frame curve’s tone.

4. Fx Bypass
Fx Bypass is a new functionality feature in the Lumetri panel. It allows you to bypass and reset effects without switching to the controls panel.
How to use Lumetri Color
With your Adobe After Effects, you can make quick and advanced color changes to your clips. Here are the simple steps on how to use Lumetri Color.
Step 1. Add your footage to the timeline
First, open your Adobe After Effect and add your video file to the software. Drag and drop to add it to the timeline.

Step 2. Open Lumetri Color
Here, you highlight your video in the timeline, then head over to the “Window” menu. From the drop-down menu, select “Effects & presets” > “Lumetri Color.”
Alternatively, you can go to the “Effects” menu, which is at the left-hand side of your interface, then select “Color Correction”> “Lumetri Color.”

Step 3. Carry out your Color Grading and Saturation
With the “Lumetri Color” functionality, you can carry out various adjustable settings such as tone, hue, saturation and color grading.
To carry out saturation:
Click on the “ Hue/Saturation “ from the drop-down menu in “Lumetri Color.” You can change the color of the entire footage by adjusting the “Master Hue” from the Effects Control Panel.
Alternatively, you can opt to fine-tune the freshly selected color by using the “Master Saturation” and Master Lightness.”
To carry out color grading:
- After opening the “Lumetri Color” panel as in step 2 above, click on the eyedropper to select the curve you want to use.
- Click the color in your footage that you wish to adjust. Usually, when you use the eyedropper, three points will be added to the graph. The two bottom points restrict color selection to a minimum range, whereas the first represents your selected color.
How to Use Lumetri Scope
Besides the Lumetric Color, Lumetric Scope is another essential tool for post-film production in Adobe After Effects. The color correcting tool, Lumetric scope guarantees its users’ accurate results when used correctly.
When carrying out color corrections in films, it is advisable to use quality monitor calibrators and paint your workspace walls neutral grey. Usually, it reduces lighting distraction and the external color effect, respectively.
However, not every editor can meet all the required basics, and that is where Lumetri scope comes in. Lumetri Scope allows one to get the best color results in their videos. Here are the steps on how to use Lumetri Scope:

Step 1. Open Lumetric Scope
First, open your Adobe After Effect application and add your footage to the timeline. Go to the “ Window “ menu at the top-left-hand side of your interface.
In the drop-down menu, select “Lumetri Scopes” or “Workspaces,” then click on the “Color” option.
The Lumetri Scope tab will be displayed adjacent to the timeline footage.
Step 2. Evaluate Hue and Saturation using Vectorscope
In the Lumetri Scope tab, click on the wrench icon, and a drop-down menu will be displayed. From the menu, select “Vectorscope YUV” and read the saturation. When reading saturation, begin from the center going outwards.
Hue, on the other hand, is read in a circular direction.

Step 3. Evaluate the tonal values and Brightness using Histogram
The histogram in Lumetri Scope displays an image’s tonal values and brightness levels.
To measure the brightness and tonal values, go back to the Lumetri Scope panel and click on the wrench icon. Click on “Presets” from the drop-down menu and select “Histogram.”
The scale in the histogram starts from 0 (pure black) to 225 (pure white). You, therefore, need to view the number of pixels for every color horizontally when reading.

Step 4. Evaluate Color and Brightness Intensities using Waveform Monitor
The color and brightness are read from the bottom to the top in the waveform monitor.
Click on the wrench icon to view the intensities, then pick the “Presets” option > “Waveform RBG.” A drop-down menu (RGB, YC, Luma, and YC no Chroma) will be displayed that allows you to do the readings.
Reading the IRE scale is usually done in ascension (0 to 100).

Step 5. Evaluate the Individual color channels using Parade Scope
Here, click on the wrench icon in the Lumetri Scopes panel, then select the “Presets”> “Parade RGB.” Select from the alternate Lumetri scope combinations of RGB, RGB-White, YUV, YUV white.
Is there a simple way to Unionise the Color of my Video?
Have you tried color grading and color correction in Lumetri using Adobe After Effects, but your efforts are bearing no fruits? It would be best not to worry since there is a simple way out. So, Yes! There is a simple way to unionize the color of your video – it is by using Wondershare Filmora .
Wondershare Filmora is a professional application to edit videos with a wide range of tools that allows its users to create stunning videos with ease. From its simple and intuitive design to its wide range of functionalities and affordability, Filmora users have every reason to stick to the software.
Some of the functionality features that make Wondershare Filmora easy to use include:
Curve Section
Filmora has way simpler curves than Adobe After Effects. Filmora has two presets, i.e., One that creates an S-curve over the graph, and the other resets graph to a straight linear line. Usually, the S-curve represents soft contrasts.
YUV color correction
The YUV color correction feature in Filmora functions straightforwardly when compared to Adobe After Effects. The Y and V channels in Filmora stores color data, whereas the U channel carries the brightness data. Editors find it effortlessly using the YUV color correction in Filmora.
Hue and Saturation
Hue, saturation, and lightness levels in Wondershare Filmora are undeniably very easy to understand unline other premiere software applications.
In Filmora, the Hue shift plays an essential role in shuffling the colors, whereas the Saturation defines the overall intensity of colors in an image.
For Win 7 or later (64-bit)
For macOS 10.12 or later
Conclusion
● With the above illustrations, you need not find it challenging to use Lumetri Color in Adobe After Effect. But if you are getting your head stuck when using Adobe After Effects, you need not stress out. There is an ultimate solution, and that is Wondershare Filmora. Incorporate this easy-to-use and pocket-friendly software in your edits. Besides, you will not have to go through the user guide to get started.
When going forth with film post-production, video game creation, and television production, almost every video editor’s goal is to produce outstanding results. Usually, this cannot be achieved by using mediocre tools. One of the top-notch software video editors need to use is Adobe After Effect. Adobe After Effect is a motion graphics, digital visual effect, and compositing application developed by the Adobe system.
Adobe After Effects has tons of tools, and an exceptional one is a Lumetri color. With this functionality, you can easily carry out your color correction and color grading. Read this article and get to the bottom line on how to use Lumetri Color in Adobe After Effects.
Let’s dig in!
In this article
01 Does After Effects have Lumetri Color?
02 How to use Lumetri Color in Adobe After Effects
03 Is there a simple way to Unionise the Color of my Video?
Does After Effects have Lumetri Color?
Yes, there is lumetri color in After Effects. Lumetri Color allows you to adjust contrast, light, and color to your video based on your preference. With After Effects, you can carry out various color customizations in the Lumerti panel without exiting your current project.
Furthermore, the Lumetri color panel in Adobe After Effects allows you to export your settings to another different premiere pro project wholly. Usually, the file is exported as a .cube file – This relieves you from the wearisomeness of creating new grading features.
How to use Lumetri Color in Adobe After Effects
You don’t need to be a pro for you to use Lumetri Color in Adobe After Effects. The color workspace in Adobe After Effect is designed to be straightforward and user-friendly.
The Lumetri Color panel in Adobe contains the histogram, vectorscope, parade scope, and waveform monitor. The histogram, parade scope, and waveform monitor display image intensity, whereas the vectorscope display hue and color saturation.
Lumetri Color is considered an ultimate choice by most editors due to its wide range of functionalities. Some of the functionalities in the Lumetri panel include:
1. Vignettes
Vignette is an outstanding feature that effortlessly allows Lumetri users to adjust lightness and darkness using sliders.
Vignettes allow you to darken the borders and highlight certain parts. You will therefore create more emphasis on highlighted parts in your clip.
2. HSL Secondary
When you want to get exceptional footage controls, HSL Secondary (Hue, Saturation, and Luminance) is often the best functionality. HSL Secondary easily separates your footage and works on a selected piece.
With the functionality, you can easily manipulate the skin tones in your footage and refocus images.

3. Curves
The Lumetri panel in Adobe After Effects renders its users the curves functionality. There are two curves in the Lumetri Panel, i.e., Hue Saturation curves and luminesce curves.
The Hue/Saturation curve uses the red, green, and blue (RBG) flagship, whereas the luminance curve helps manage the frame curve’s tone.

4. Fx Bypass
Fx Bypass is a new functionality feature in the Lumetri panel. It allows you to bypass and reset effects without switching to the controls panel.
How to use Lumetri Color
With your Adobe After Effects, you can make quick and advanced color changes to your clips. Here are the simple steps on how to use Lumetri Color.
Step 1. Add your footage to the timeline
First, open your Adobe After Effect and add your video file to the software. Drag and drop to add it to the timeline.

Step 2. Open Lumetri Color
Here, you highlight your video in the timeline, then head over to the “Window” menu. From the drop-down menu, select “Effects & presets” > “Lumetri Color.”
Alternatively, you can go to the “Effects” menu, which is at the left-hand side of your interface, then select “Color Correction”> “Lumetri Color.”

Step 3. Carry out your Color Grading and Saturation
With the “Lumetri Color” functionality, you can carry out various adjustable settings such as tone, hue, saturation and color grading.
To carry out saturation:
Click on the “ Hue/Saturation “ from the drop-down menu in “Lumetri Color.” You can change the color of the entire footage by adjusting the “Master Hue” from the Effects Control Panel.
Alternatively, you can opt to fine-tune the freshly selected color by using the “Master Saturation” and Master Lightness.”
To carry out color grading:
- After opening the “Lumetri Color” panel as in step 2 above, click on the eyedropper to select the curve you want to use.
- Click the color in your footage that you wish to adjust. Usually, when you use the eyedropper, three points will be added to the graph. The two bottom points restrict color selection to a minimum range, whereas the first represents your selected color.
How to Use Lumetri Scope
Besides the Lumetric Color, Lumetric Scope is another essential tool for post-film production in Adobe After Effects. The color correcting tool, Lumetric scope guarantees its users’ accurate results when used correctly.
When carrying out color corrections in films, it is advisable to use quality monitor calibrators and paint your workspace walls neutral grey. Usually, it reduces lighting distraction and the external color effect, respectively.
However, not every editor can meet all the required basics, and that is where Lumetri scope comes in. Lumetri Scope allows one to get the best color results in their videos. Here are the steps on how to use Lumetri Scope:

Step 1. Open Lumetric Scope
First, open your Adobe After Effect application and add your footage to the timeline. Go to the “ Window “ menu at the top-left-hand side of your interface.
In the drop-down menu, select “Lumetri Scopes” or “Workspaces,” then click on the “Color” option.
The Lumetri Scope tab will be displayed adjacent to the timeline footage.
Step 2. Evaluate Hue and Saturation using Vectorscope
In the Lumetri Scope tab, click on the wrench icon, and a drop-down menu will be displayed. From the menu, select “Vectorscope YUV” and read the saturation. When reading saturation, begin from the center going outwards.
Hue, on the other hand, is read in a circular direction.

Step 3. Evaluate the tonal values and Brightness using Histogram
The histogram in Lumetri Scope displays an image’s tonal values and brightness levels.
To measure the brightness and tonal values, go back to the Lumetri Scope panel and click on the wrench icon. Click on “Presets” from the drop-down menu and select “Histogram.”
The scale in the histogram starts from 0 (pure black) to 225 (pure white). You, therefore, need to view the number of pixels for every color horizontally when reading.

Step 4. Evaluate Color and Brightness Intensities using Waveform Monitor
The color and brightness are read from the bottom to the top in the waveform monitor.
Click on the wrench icon to view the intensities, then pick the “Presets” option > “Waveform RBG.” A drop-down menu (RGB, YC, Luma, and YC no Chroma) will be displayed that allows you to do the readings.
Reading the IRE scale is usually done in ascension (0 to 100).

Step 5. Evaluate the Individual color channels using Parade Scope
Here, click on the wrench icon in the Lumetri Scopes panel, then select the “Presets”> “Parade RGB.” Select from the alternate Lumetri scope combinations of RGB, RGB-White, YUV, YUV white.
Is there a simple way to Unionise the Color of my Video?
Have you tried color grading and color correction in Lumetri using Adobe After Effects, but your efforts are bearing no fruits? It would be best not to worry since there is a simple way out. So, Yes! There is a simple way to unionize the color of your video – it is by using Wondershare Filmora .
Wondershare Filmora is a professional application to edit videos with a wide range of tools that allows its users to create stunning videos with ease. From its simple and intuitive design to its wide range of functionalities and affordability, Filmora users have every reason to stick to the software.
Some of the functionality features that make Wondershare Filmora easy to use include:
Curve Section
Filmora has way simpler curves than Adobe After Effects. Filmora has two presets, i.e., One that creates an S-curve over the graph, and the other resets graph to a straight linear line. Usually, the S-curve represents soft contrasts.
YUV color correction
The YUV color correction feature in Filmora functions straightforwardly when compared to Adobe After Effects. The Y and V channels in Filmora stores color data, whereas the U channel carries the brightness data. Editors find it effortlessly using the YUV color correction in Filmora.
Hue and Saturation
Hue, saturation, and lightness levels in Wondershare Filmora are undeniably very easy to understand unline other premiere software applications.
In Filmora, the Hue shift plays an essential role in shuffling the colors, whereas the Saturation defines the overall intensity of colors in an image.
For Win 7 or later (64-bit)
For macOS 10.12 or later
Conclusion
● With the above illustrations, you need not find it challenging to use Lumetri Color in Adobe After Effect. But if you are getting your head stuck when using Adobe After Effects, you need not stress out. There is an ultimate solution, and that is Wondershare Filmora. Incorporate this easy-to-use and pocket-friendly software in your edits. Besides, you will not have to go through the user guide to get started.
How to Become a Youtuber
I’m Sheila and I’m a Youtuber for five years in a row. I’m editing my vlogs using my cellphone only, not until I found this Wondershare Filmora for Personal Computers. Not like any other video editor that you need to crack your brain understanding each and every feature, this video editor that I’m talking about on the other hand, made it simple and very handy to use.

Why I Become a Youtuber
1. How I Decided to Start from Uploading the Video
But before we move forward for more details about the video editor itself, let’s get back first five years ago. It all started when I filmed a certain place during a trip and somebody told me to upload it on YouTube. At first, I was hesitant doing that because I have no clue of what is YouTube. So, I did research and got curious, so I decided to upload the video. Time went by and I started to learn how to vlog.
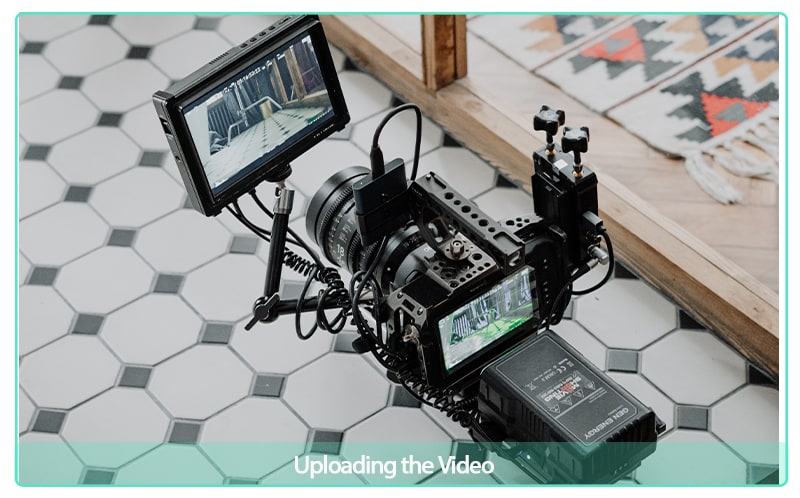
Uploading the Video
2. The Necessary Things a Vlog Should Have
- A teaser – wherein your aim is to caught the attention of your viewers.
- An intro – what is your channel all about.
- The body of the vlog – the part wherein you’re explaining everything in depth, elaborating things about the topic you chose to share. In this part, you can insert the so called “call of action“ - wherein you can tell your viewers to subscribe, to like and comment something about your vlog you’re tackling. And last is the
- Outro – closing session of your vlog.

Vlog
3. What Have I Encountered on the Way
As the saying goes by, “The beginning is always the hardest part“ and really it was. My YouTube journey was not as easy that even my friends didn’t recognize my endeavors. But still, I continue what I’m doing because I love it. It’s a hobby that at the same time, I’m learning something new on the process. And also, with the help of vlogging, I’m starting to gain my self-esteem that I forgot for many years back.

What Have I Encountered on the Way
It’s not easy to become a Youtuber, because you, yourself is the only one that you’ve got. You are the director – managing everything all at once. The artist (youtuber) - the one who’s going to talk in front of the camera. The scriptwriter – the one who’s in charge of the whole story of the video and even the editor- the one who’ll edit the video afterwards.
On YouTube platform, you have to be consistent. It doesn’t mean that you need to upload a video thrice in a week, but even a video will do. After all, it’s quality over quantity. You’ll have to think what kind of video you’ll upload because you need to give your viewers or audiences something significant out of your vlog. YouTube is the second largest search engine next to Google, so most of the people are searching for answers to their questions. Or even searching solutions to their problems. So, if you have something to offer, why not share it for free.
If you’re a new YouTuber, you don’t need to have high-end equipment’s for vlogging. Anyone can start up by using his/her mobile phone. I used to vlog using my Samsung S-6. Mobile phone nowadays, can record a high-definition resolution. You can add a tripod so that your phone can be sturdy during your filming session. Just film during day time so that you can minimize yourself from buying a ring light. A lavalier microphone can be a useful add-on so that your viewers or audiences can hear your voice clearly.
4. What to Do As a YouTuber
As a Youtuber, you should find your own niche. Something that you’re passionate about. Something denoting products, services, or interests that appeal to a small, specialized section of the population. Something that you’re a hundred percent that you can deliver to them loud and clear.

What to Do As a YouTuber
As a YouTuber, you should be yourself in front of the camera. At first it will be awkward, but in time you’ll get used to it. Speak with your heart and not with your mind because when you start to think of the things that you need to say, you’ll get distracted. But when you speak whatever is in your heart at that very moment, you can create miracles and wonders.
It’s okay that you stutter once in a while. Even a reporter experiencing that kind of phenomena and besides, no one is perfect. Everything that you said unnecessarily can be omitted during the editing process. During editing, the first thing that you need to do is to put all the raw videos in your video editor’s timeline. Cut all the unnecessary part specially the so called, “dead air“ or the part that you’re starting to think and not to talk at all. And your viewers can only see are all dead silence. After that you can add your personal touch. You can add your watermark (your trademark in other words), lower third green screens, subtitle if necessary (the hardest part to be honest) if you’re doing it manually. Some cool stickers, effects and transitions.
5. How I Started Video Editing
As I’ve told you at the start of this article, I’m a phone editor not until I found Wondershare Filmora Video Editor . And I must say that, this video editor is the best video editor for beginners. It has a user-friendly interface that even a person with zero experience on editing can fully understand it’s incredible features easily.
Wondershare Filmora 11 | More Than Just You
It also has new features that I personally not encountered with my previous video editor like Instant Mode and from the word itself, this mode can make your video in a blink of an eye. There’s Creator Academy wherein you can watch very interesting tutorials that can be a big help in your editing skills in the future.
If we’re going to dig in, there are lots of features that’s a game changer when it comes to editing indeed! Like bunch of Title styles that you can choose from. You can insert green screen videos (that I personally love to use in my vlogs) and there’s a Motion Tracker if you want to focus in an object or person in action. If you’re not in the mood in editing manually, you can make a montage and the software will make it for you in the Auto Montage Maker – the software will choose the highlights of your video and deliver the results after.
Key framing is also one of the incredible features of this editor in case that you want to emphasize things in your video. To zoom in/out a certain part to be exact.
How awesome Wondershare Filmora because you don’t need another software. Everything that you need is just right in front of your eyes. When needing of a PC screen recorder, I need another software to use. But as I’ve said this editor have it all. There’s a built in PC screen recorder when you want to do a tutorial video.
Steps to do video editing in Filmora:
Step 1Drag and Drop
The first step is to drag all the raw videos in the timeline.
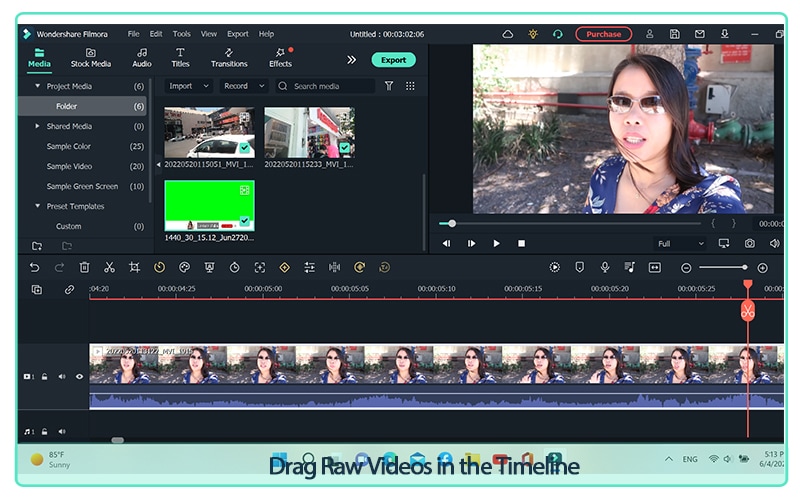
Drag Raw Videos in the Timeline
Step 2Add Transition
I just found this very cute transition so I put it between the clips.
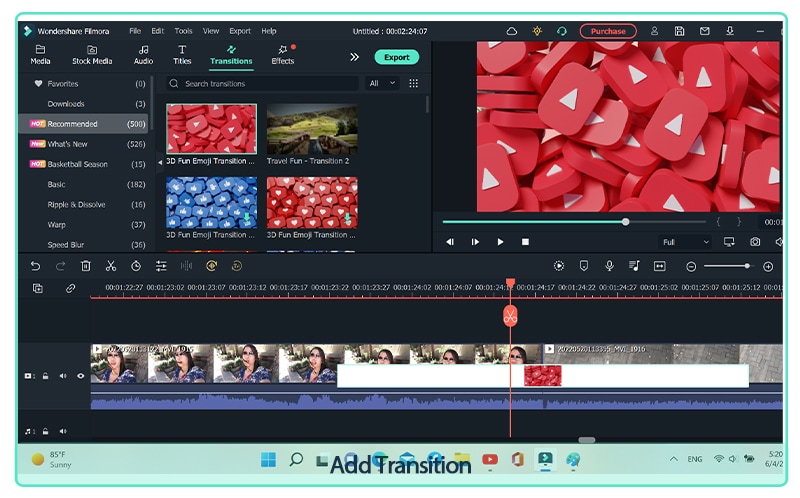
Add Transition
Step 3Lower Third Green
I’m a fan of lower third green so I insert this one.
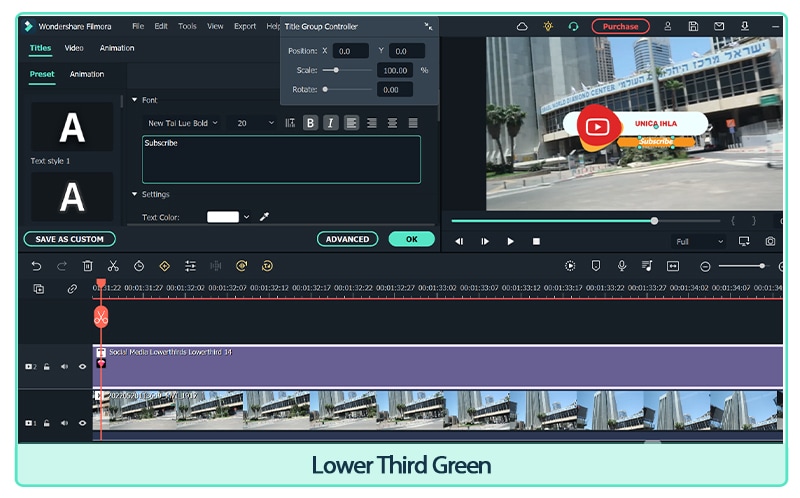
Lower Third Green
Step 4Green Screen
The green screen which I always used in all of my videos, just use the chroma key and the green background will disappear.
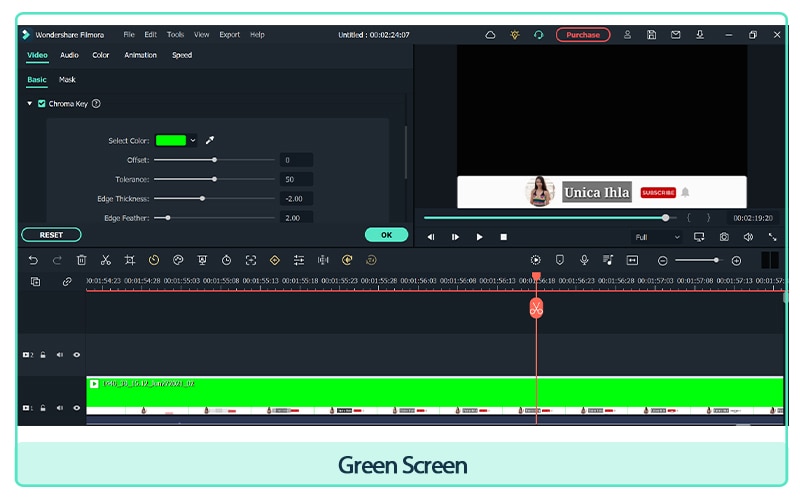
Green Screen
Step 5Varities of End Screens
I found there are varities of end screens so I tried to use this one. Awesome!
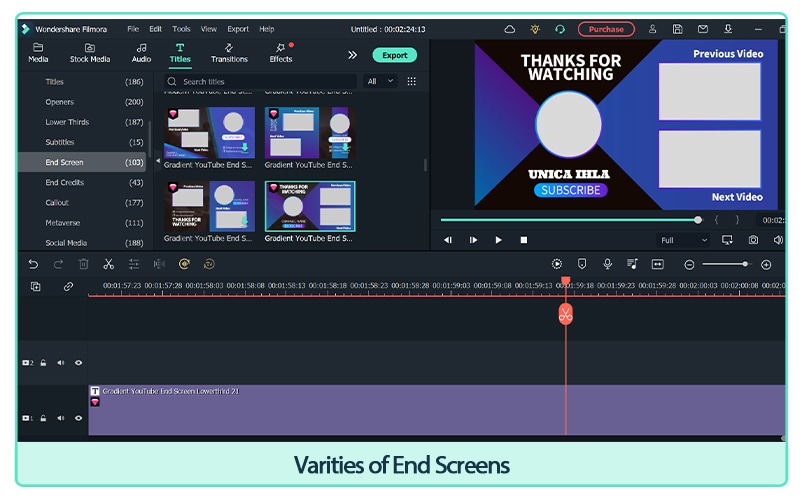
Varities of End Screens
Wrap Up
- To sum it up, if you’re looking for the best video editor for this year 2022; choose Wondershare Filmora and you’ll thank me later. Happy editing!
Wondershare Filmora 11 | More Than Just You
It also has new features that I personally not encountered with my previous video editor like Instant Mode and from the word itself, this mode can make your video in a blink of an eye. There’s Creator Academy wherein you can watch very interesting tutorials that can be a big help in your editing skills in the future.
If we’re going to dig in, there are lots of features that’s a game changer when it comes to editing indeed! Like bunch of Title styles that you can choose from. You can insert green screen videos (that I personally love to use in my vlogs) and there’s a Motion Tracker if you want to focus in an object or person in action. If you’re not in the mood in editing manually, you can make a montage and the software will make it for you in the Auto Montage Maker – the software will choose the highlights of your video and deliver the results after.
Key framing is also one of the incredible features of this editor in case that you want to emphasize things in your video. To zoom in/out a certain part to be exact.
How awesome Wondershare Filmora because you don’t need another software. Everything that you need is just right in front of your eyes. When needing of a PC screen recorder, I need another software to use. But as I’ve said this editor have it all. There’s a built in PC screen recorder when you want to do a tutorial video.
Steps to do video editing in Filmora:
Step 1Drag and Drop
The first step is to drag all the raw videos in the timeline.

Drag Raw Videos in the Timeline
Step 2Add Transition
I just found this very cute transition so I put it between the clips.

Add Transition
Step 3Lower Third Green
I’m a fan of lower third green so I insert this one.

Lower Third Green
Step 4Green Screen
The green screen which I always used in all of my videos, just use the chroma key and the green background will disappear.

Green Screen
Step 5Varities of End Screens
I found there are varities of end screens so I tried to use this one. Awesome!

Varities of End Screens
Wrap Up
- To sum it up, if you’re looking for the best video editor for this year 2022; choose Wondershare Filmora and you’ll thank me later. Happy editing!
Top 10 Best Slideshow Makers with Music
Let us now take a quick look at some of the coolest photo slideshow with music software. In this article, we will discuss the effectiveness of 10 photo slideshow makers by accessing if it comes with editing options, a music library, and the capacity to add audio, animation, or clipart. These top slideshow makers should ideally include multiple transition effects, just like a photo book service offers.
Best Slideshow Makers with Music
1. Filmora Video Editor
For Win 7 or later (64-bit)
For macOS 10.12 or later
As one of the best video editing software for beginners, Filmora features an intuitive interface and bunches of editing tools for making a video slideshow in a few minutes.
Advantages of using Filmora to make video slideshow:
- The royalty-free audio library provides music tracks and sound effects for different scenarios.
- Plentiful Transitions and Filters to make the slideshow looks glorious.
- Various text templates for making better annotation.
- Powerful and convenient editing tools to release your imagination.
Here is a brief video tutorial about making a video slideshow with music with Filmora. You can check this article about How to Make a Slideshow with Filmora video editor for the detailed step-by-step. Remember to download the free trial version of Filmora and make your slideshow video today.
For Win 7 or later (64-bit)
For macOS 10.12 or later
2. DVD Slideshow Builder Deluxe
Main Features of DVD Slideshow Builder Deluxe:
- Home movie making capacity for playback on television with any DVD player.
- More than 480 transition effects, including 3D effects.
- The text effects would allow you to create animated titles.
- Full support for HD input and output.
- The inbuilt edit tools will allow you to trim, enhance and apply other effects to the photos and videos.
- Over 150 animated and still DVD templates.
- Free online upgrade.
- Supports all the popular image and video formats.
Steps to create fancy slideshow with Wondershare DVD Slideshow Builder
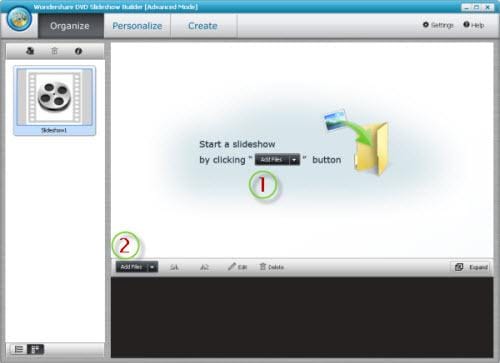
Add the image or video files to the application.
Customize your slideshow by adding transition or music.
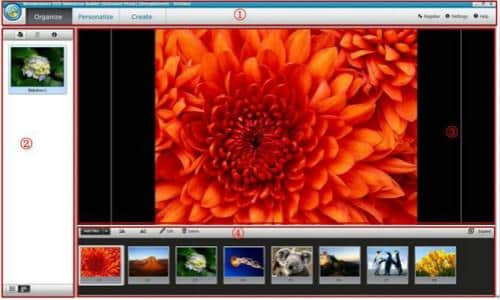
- Create the photo slideshow and burn it on a DVD.
3. Photo Stage Slideshow Pro
Main Features of Photo Stage Slideshow Pro:
- Comes with all the basic tools we look for in a slideshow made with music.
- More than 30 transitions.
- Unlimited images can be placed in the slideshow.
- It would allow you to add music, clip art, video clips, and voice recordings.
- Superb editing tools along with a comprehensive effects library for all sorts of photo effects.
Pros
You can easily create a slideshow by dragging and dropping your selected images.
Cons
It doesn’t come with any upgrade feature, and you need to buy a support plan for email support.
4. SmartSHOW
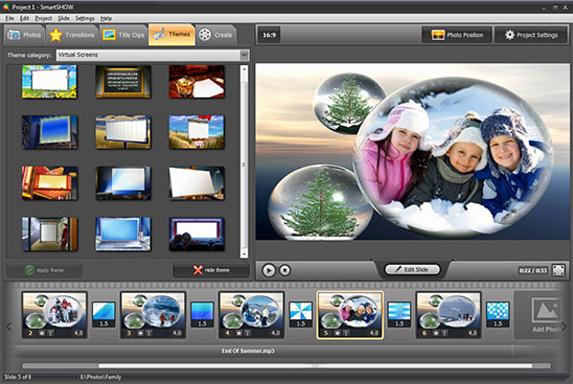
Main Features of SmartSHOW:
- lThis revolutionary slideshow maker for Windows would allow you to develop animated slideshows.
- It comes with innovative features which would allow you to convert all the images on your PC or camera into an exciting photo movie.
- The intuitive interface is extremely easy to use, even for novices.
Pros
It would allow you to view the object in its entirety or parts of it.
You will be able to add an umpteenth number of music and images while making a slideshow.
It comes with loads of exciting background themes.
Cons
It cannot be used on Mac.
Doesn’t come with many sound tracks.
5. VideoPad Video Editor
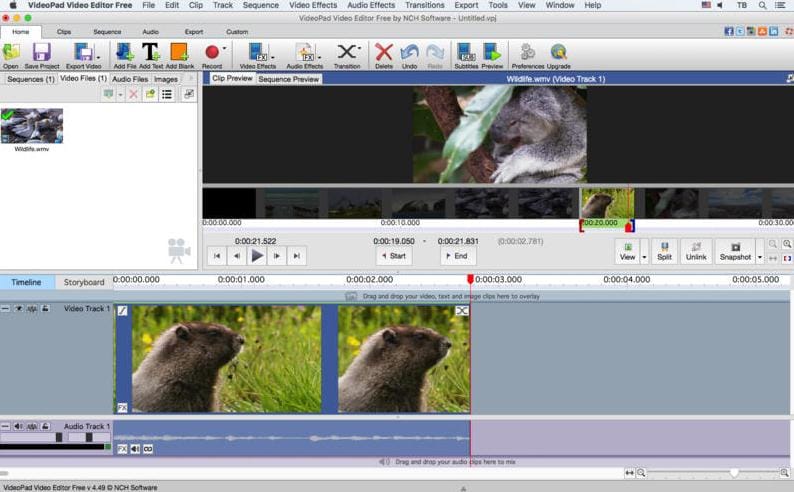
Main Features of VideoPad Video Editor:
- This DVD slideshow maker for Mac supports several video edit tools that would let you develop lively and interesting slideshows.
- This software can run on all versions of Mac OS X.
- The interface is simple, and it can be operated even by beginners.
- Just drag and drop the images to the interface, apply the effects and transitions, and prepare your slideshow.
- You can choose from more than 50 transition effects.
Pros
User-friendly interface.
Supports all input and output formats.
Plugin support would allow you to use loads of tools and effects.
Cons
This is not a free software
6. FotoMagico 5
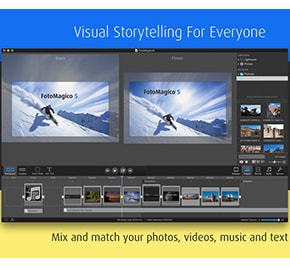
Main Features FotoMagico 5 slideshow maker:
- One of the best slideshow software for Mac machines, FotoMagico 5, will help you create a unique visual storytelling experience. It would give the users a hassle-free way of creating a superb image slideshow on Mac devices using images, videos, text, and music.
Pros
It allows you to create the best photo slideshow videos with 4K Ultra HD resolution.
The super fast speed will let you create a slideshow within 15 minutes.
Cons
It cannot be used on Windows machines.
7. Muvee Reveal Express for Mac
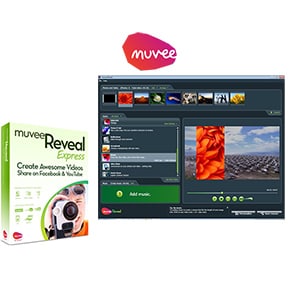
Features:
- This is a streamlined and easy-to-use slideshow maker tool to make your slideshow without effort.
- The custom soundtrack and special transition effects would help you create a stunning slideshow.
- You can use any images on your Mac hard disk or I-tune library to create the slideshow.
Pros
The in-built website would let you share the slideshow.
It comes with loads of transitions and special effects which can be applied to the slideshow.
Cons
There could have been more transitional effects and styles.
8. Photostory 2015 Deluxe

Features:
- It allows you to control many effects like rotate, zoom, camera pan effect, etc.
- More than 250 transition effects.
- You can add as many pictures you want.
- All the transitions are available in full HD.
- The movie templates would give your slideshow the look of a Hollywood movie.
- Packed with design features like voice narration, audio sync, and even editing soundtrack and audio clips.
- Comprehensive photo editing and music editing program.
- Face recognition ability.
- Supports tons and input and output format.
- It allows you to share the slideshow on YouTube or Facebook or upload them to any website.
Pros
Loads of useful tools and over 250 transition effects.
Cons
You need to pay a fee for technical support over the telephone.
9. CyberLink MediaShow 6

Features:
- Allows you to create a chronological slideshow.
- Comes with a face recognition tool for identifying people in the slideshow.
- The instant view content slider and the content filter would allow you to find any photo or video easily.
- Includes all the basic photo editing options.
- Can import photos from anywhere.
Pros
The FaceMe face recognition tool would help you identify the people in your pictures.
Cons
You will get telephone support only for an additional fee.
10. Proshow Gold
Features:
- Offers more than 400 transition effects.
- You can upload an umpteenth number of images.
- Users of various skill levels can use it.
- It allows you to add music from your CD or music folder.
- You can record your voice to add a narration track.
- Animation effect for photos.
- Comes with all basic photo editing features.
Pros
It offers the maximum number of transition effects.
Cons
This software is more suitable for advanced users, and it might take a lot of time and effort to master all the features.
Wondershare Filmora
Get started easily with Filmora’s powerful performance, intuitive interface, and countless effects!
Try It Free Try It Free Try It Free Learn More >

For Win 7 or later (64-bit)
For macOS 10.12 or later
As one of the best video editing software for beginners, Filmora features an intuitive interface and bunches of editing tools for making a video slideshow in a few minutes.
Advantages of using Filmora to make video slideshow:
- The royalty-free audio library provides music tracks and sound effects for different scenarios.
- Plentiful Transitions and Filters to make the slideshow looks glorious.
- Various text templates for making better annotation.
- Powerful and convenient editing tools to release your imagination.
Here is a brief video tutorial about making a video slideshow with music with Filmora. You can check this article about How to Make a Slideshow with Filmora video editor for the detailed step-by-step. Remember to download the free trial version of Filmora and make your slideshow video today.
For Win 7 or later (64-bit)
For macOS 10.12 or later
2. DVD Slideshow Builder Deluxe
Main Features of DVD Slideshow Builder Deluxe:
- Home movie making capacity for playback on television with any DVD player.
- More than 480 transition effects, including 3D effects.
- The text effects would allow you to create animated titles.
- Full support for HD input and output.
- The inbuilt edit tools will allow you to trim, enhance and apply other effects to the photos and videos.
- Over 150 animated and still DVD templates.
- Free online upgrade.
- Supports all the popular image and video formats.
Steps to create fancy slideshow with Wondershare DVD Slideshow Builder

Add the image or video files to the application.
Customize your slideshow by adding transition or music.

- Create the photo slideshow and burn it on a DVD.
3. Photo Stage Slideshow Pro
Main Features of Photo Stage Slideshow Pro:
- Comes with all the basic tools we look for in a slideshow made with music.
- More than 30 transitions.
- Unlimited images can be placed in the slideshow.
- It would allow you to add music, clip art, video clips, and voice recordings.
- Superb editing tools along with a comprehensive effects library for all sorts of photo effects.
Pros
You can easily create a slideshow by dragging and dropping your selected images.
Cons
It doesn’t come with any upgrade feature, and you need to buy a support plan for email support.
4. SmartSHOW

Main Features of SmartSHOW:
- lThis revolutionary slideshow maker for Windows would allow you to develop animated slideshows.
- It comes with innovative features which would allow you to convert all the images on your PC or camera into an exciting photo movie.
- The intuitive interface is extremely easy to use, even for novices.
Pros
It would allow you to view the object in its entirety or parts of it.
You will be able to add an umpteenth number of music and images while making a slideshow.
It comes with loads of exciting background themes.
Cons
It cannot be used on Mac.
Doesn’t come with many sound tracks.
5. VideoPad Video Editor

Main Features of VideoPad Video Editor:
- This DVD slideshow maker for Mac supports several video edit tools that would let you develop lively and interesting slideshows.
- This software can run on all versions of Mac OS X.
- The interface is simple, and it can be operated even by beginners.
- Just drag and drop the images to the interface, apply the effects and transitions, and prepare your slideshow.
- You can choose from more than 50 transition effects.
Pros
User-friendly interface.
Supports all input and output formats.
Plugin support would allow you to use loads of tools and effects.
Cons
This is not a free software
6. FotoMagico 5

Main Features FotoMagico 5 slideshow maker:
- One of the best slideshow software for Mac machines, FotoMagico 5, will help you create a unique visual storytelling experience. It would give the users a hassle-free way of creating a superb image slideshow on Mac devices using images, videos, text, and music.
Pros
It allows you to create the best photo slideshow videos with 4K Ultra HD resolution.
The super fast speed will let you create a slideshow within 15 minutes.
Cons
It cannot be used on Windows machines.
7. Muvee Reveal Express for Mac

Features:
- This is a streamlined and easy-to-use slideshow maker tool to make your slideshow without effort.
- The custom soundtrack and special transition effects would help you create a stunning slideshow.
- You can use any images on your Mac hard disk or I-tune library to create the slideshow.
Pros
The in-built website would let you share the slideshow.
It comes with loads of transitions and special effects which can be applied to the slideshow.
Cons
There could have been more transitional effects and styles.
8. Photostory 2015 Deluxe

Features:
- It allows you to control many effects like rotate, zoom, camera pan effect, etc.
- More than 250 transition effects.
- You can add as many pictures you want.
- All the transitions are available in full HD.
- The movie templates would give your slideshow the look of a Hollywood movie.
- Packed with design features like voice narration, audio sync, and even editing soundtrack and audio clips.
- Comprehensive photo editing and music editing program.
- Face recognition ability.
- Supports tons and input and output format.
- It allows you to share the slideshow on YouTube or Facebook or upload them to any website.
Pros
Loads of useful tools and over 250 transition effects.
Cons
You need to pay a fee for technical support over the telephone.
9. CyberLink MediaShow 6

Features:
- Allows you to create a chronological slideshow.
- Comes with a face recognition tool for identifying people in the slideshow.
- The instant view content slider and the content filter would allow you to find any photo or video easily.
- Includes all the basic photo editing options.
- Can import photos from anywhere.
Pros
The FaceMe face recognition tool would help you identify the people in your pictures.
Cons
You will get telephone support only for an additional fee.
10. Proshow Gold
Features:
- Offers more than 400 transition effects.
- You can upload an umpteenth number of images.
- Users of various skill levels can use it.
- It allows you to add music from your CD or music folder.
- You can record your voice to add a narration track.
- Animation effect for photos.
- Comes with all basic photo editing features.
Pros
It offers the maximum number of transition effects.
Cons
This software is more suitable for advanced users, and it might take a lot of time and effort to master all the features.
Wondershare Filmora
Get started easily with Filmora’s powerful performance, intuitive interface, and countless effects!
Try It Free Try It Free Try It Free Learn More >

For Win 7 or later (64-bit)
For macOS 10.12 or later
As one of the best video editing software for beginners, Filmora features an intuitive interface and bunches of editing tools for making a video slideshow in a few minutes.
Advantages of using Filmora to make video slideshow:
- The royalty-free audio library provides music tracks and sound effects for different scenarios.
- Plentiful Transitions and Filters to make the slideshow looks glorious.
- Various text templates for making better annotation.
- Powerful and convenient editing tools to release your imagination.
Here is a brief video tutorial about making a video slideshow with music with Filmora. You can check this article about How to Make a Slideshow with Filmora video editor for the detailed step-by-step. Remember to download the free trial version of Filmora and make your slideshow video today.
For Win 7 or later (64-bit)
For macOS 10.12 or later
2. DVD Slideshow Builder Deluxe
Main Features of DVD Slideshow Builder Deluxe:
- Home movie making capacity for playback on television with any DVD player.
- More than 480 transition effects, including 3D effects.
- The text effects would allow you to create animated titles.
- Full support for HD input and output.
- The inbuilt edit tools will allow you to trim, enhance and apply other effects to the photos and videos.
- Over 150 animated and still DVD templates.
- Free online upgrade.
- Supports all the popular image and video formats.
Steps to create fancy slideshow with Wondershare DVD Slideshow Builder

Add the image or video files to the application.
Customize your slideshow by adding transition or music.

- Create the photo slideshow and burn it on a DVD.
3. Photo Stage Slideshow Pro
Main Features of Photo Stage Slideshow Pro:
- Comes with all the basic tools we look for in a slideshow made with music.
- More than 30 transitions.
- Unlimited images can be placed in the slideshow.
- It would allow you to add music, clip art, video clips, and voice recordings.
- Superb editing tools along with a comprehensive effects library for all sorts of photo effects.
Pros
You can easily create a slideshow by dragging and dropping your selected images.
Cons
It doesn’t come with any upgrade feature, and you need to buy a support plan for email support.
4. SmartSHOW

Main Features of SmartSHOW:
- lThis revolutionary slideshow maker for Windows would allow you to develop animated slideshows.
- It comes with innovative features which would allow you to convert all the images on your PC or camera into an exciting photo movie.
- The intuitive interface is extremely easy to use, even for novices.
Pros
It would allow you to view the object in its entirety or parts of it.
You will be able to add an umpteenth number of music and images while making a slideshow.
It comes with loads of exciting background themes.
Cons
It cannot be used on Mac.
Doesn’t come with many sound tracks.
5. VideoPad Video Editor

Main Features of VideoPad Video Editor:
- This DVD slideshow maker for Mac supports several video edit tools that would let you develop lively and interesting slideshows.
- This software can run on all versions of Mac OS X.
- The interface is simple, and it can be operated even by beginners.
- Just drag and drop the images to the interface, apply the effects and transitions, and prepare your slideshow.
- You can choose from more than 50 transition effects.
Pros
User-friendly interface.
Supports all input and output formats.
Plugin support would allow you to use loads of tools and effects.
Cons
This is not a free software
6. FotoMagico 5

Main Features FotoMagico 5 slideshow maker:
- One of the best slideshow software for Mac machines, FotoMagico 5, will help you create a unique visual storytelling experience. It would give the users a hassle-free way of creating a superb image slideshow on Mac devices using images, videos, text, and music.
Pros
It allows you to create the best photo slideshow videos with 4K Ultra HD resolution.
The super fast speed will let you create a slideshow within 15 minutes.
Cons
It cannot be used on Windows machines.
7. Muvee Reveal Express for Mac

Features:
- This is a streamlined and easy-to-use slideshow maker tool to make your slideshow without effort.
- The custom soundtrack and special transition effects would help you create a stunning slideshow.
- You can use any images on your Mac hard disk or I-tune library to create the slideshow.
Pros
The in-built website would let you share the slideshow.
It comes with loads of transitions and special effects which can be applied to the slideshow.
Cons
There could have been more transitional effects and styles.
8. Photostory 2015 Deluxe

Features:
- It allows you to control many effects like rotate, zoom, camera pan effect, etc.
- More than 250 transition effects.
- You can add as many pictures you want.
- All the transitions are available in full HD.
- The movie templates would give your slideshow the look of a Hollywood movie.
- Packed with design features like voice narration, audio sync, and even editing soundtrack and audio clips.
- Comprehensive photo editing and music editing program.
- Face recognition ability.
- Supports tons and input and output format.
- It allows you to share the slideshow on YouTube or Facebook or upload them to any website.
Pros
Loads of useful tools and over 250 transition effects.
Cons
You need to pay a fee for technical support over the telephone.
9. CyberLink MediaShow 6

Features:
- Allows you to create a chronological slideshow.
- Comes with a face recognition tool for identifying people in the slideshow.
- The instant view content slider and the content filter would allow you to find any photo or video easily.
- Includes all the basic photo editing options.
- Can import photos from anywhere.
Pros
The FaceMe face recognition tool would help you identify the people in your pictures.
Cons
You will get telephone support only for an additional fee.
10. Proshow Gold
Features:
- Offers more than 400 transition effects.
- You can upload an umpteenth number of images.
- Users of various skill levels can use it.
- It allows you to add music from your CD or music folder.
- You can record your voice to add a narration track.
- Animation effect for photos.
- Comes with all basic photo editing features.
Pros
It offers the maximum number of transition effects.
Cons
This software is more suitable for advanced users, and it might take a lot of time and effort to master all the features.
Wondershare Filmora
Get started easily with Filmora’s powerful performance, intuitive interface, and countless effects!
Try It Free Try It Free Try It Free Learn More >

For Win 7 or later (64-bit)
For macOS 10.12 or later
As one of the best video editing software for beginners, Filmora features an intuitive interface and bunches of editing tools for making a video slideshow in a few minutes.
Advantages of using Filmora to make video slideshow:
- The royalty-free audio library provides music tracks and sound effects for different scenarios.
- Plentiful Transitions and Filters to make the slideshow looks glorious.
- Various text templates for making better annotation.
- Powerful and convenient editing tools to release your imagination.
Here is a brief video tutorial about making a video slideshow with music with Filmora. You can check this article about How to Make a Slideshow with Filmora video editor for the detailed step-by-step. Remember to download the free trial version of Filmora and make your slideshow video today.
For Win 7 or later (64-bit)
For macOS 10.12 or later
2. DVD Slideshow Builder Deluxe
Main Features of DVD Slideshow Builder Deluxe:
- Home movie making capacity for playback on television with any DVD player.
- More than 480 transition effects, including 3D effects.
- The text effects would allow you to create animated titles.
- Full support for HD input and output.
- The inbuilt edit tools will allow you to trim, enhance and apply other effects to the photos and videos.
- Over 150 animated and still DVD templates.
- Free online upgrade.
- Supports all the popular image and video formats.
Steps to create fancy slideshow with Wondershare DVD Slideshow Builder

Add the image or video files to the application.
Customize your slideshow by adding transition or music.

- Create the photo slideshow and burn it on a DVD.
3. Photo Stage Slideshow Pro
Main Features of Photo Stage Slideshow Pro:
- Comes with all the basic tools we look for in a slideshow made with music.
- More than 30 transitions.
- Unlimited images can be placed in the slideshow.
- It would allow you to add music, clip art, video clips, and voice recordings.
- Superb editing tools along with a comprehensive effects library for all sorts of photo effects.
Pros
You can easily create a slideshow by dragging and dropping your selected images.
Cons
It doesn’t come with any upgrade feature, and you need to buy a support plan for email support.
4. SmartSHOW

Main Features of SmartSHOW:
- lThis revolutionary slideshow maker for Windows would allow you to develop animated slideshows.
- It comes with innovative features which would allow you to convert all the images on your PC or camera into an exciting photo movie.
- The intuitive interface is extremely easy to use, even for novices.
Pros
It would allow you to view the object in its entirety or parts of it.
You will be able to add an umpteenth number of music and images while making a slideshow.
It comes with loads of exciting background themes.
Cons
It cannot be used on Mac.
Doesn’t come with many sound tracks.
5. VideoPad Video Editor

Main Features of VideoPad Video Editor:
- This DVD slideshow maker for Mac supports several video edit tools that would let you develop lively and interesting slideshows.
- This software can run on all versions of Mac OS X.
- The interface is simple, and it can be operated even by beginners.
- Just drag and drop the images to the interface, apply the effects and transitions, and prepare your slideshow.
- You can choose from more than 50 transition effects.
Pros
User-friendly interface.
Supports all input and output formats.
Plugin support would allow you to use loads of tools and effects.
Cons
This is not a free software
6. FotoMagico 5

Main Features FotoMagico 5 slideshow maker:
- One of the best slideshow software for Mac machines, FotoMagico 5, will help you create a unique visual storytelling experience. It would give the users a hassle-free way of creating a superb image slideshow on Mac devices using images, videos, text, and music.
Pros
It allows you to create the best photo slideshow videos with 4K Ultra HD resolution.
The super fast speed will let you create a slideshow within 15 minutes.
Cons
It cannot be used on Windows machines.
7. Muvee Reveal Express for Mac

Features:
- This is a streamlined and easy-to-use slideshow maker tool to make your slideshow without effort.
- The custom soundtrack and special transition effects would help you create a stunning slideshow.
- You can use any images on your Mac hard disk or I-tune library to create the slideshow.
Pros
The in-built website would let you share the slideshow.
It comes with loads of transitions and special effects which can be applied to the slideshow.
Cons
There could have been more transitional effects and styles.
8. Photostory 2015 Deluxe

Features:
- It allows you to control many effects like rotate, zoom, camera pan effect, etc.
- More than 250 transition effects.
- You can add as many pictures you want.
- All the transitions are available in full HD.
- The movie templates would give your slideshow the look of a Hollywood movie.
- Packed with design features like voice narration, audio sync, and even editing soundtrack and audio clips.
- Comprehensive photo editing and music editing program.
- Face recognition ability.
- Supports tons and input and output format.
- It allows you to share the slideshow on YouTube or Facebook or upload them to any website.
Pros
Loads of useful tools and over 250 transition effects.
Cons
You need to pay a fee for technical support over the telephone.
9. CyberLink MediaShow 6

Features:
- Allows you to create a chronological slideshow.
- Comes with a face recognition tool for identifying people in the slideshow.
- The instant view content slider and the content filter would allow you to find any photo or video easily.
- Includes all the basic photo editing options.
- Can import photos from anywhere.
Pros
The FaceMe face recognition tool would help you identify the people in your pictures.
Cons
You will get telephone support only for an additional fee.
10. Proshow Gold
Features:
- Offers more than 400 transition effects.
- You can upload an umpteenth number of images.
- Users of various skill levels can use it.
- It allows you to add music from your CD or music folder.
- You can record your voice to add a narration track.
- Animation effect for photos.
- Comes with all basic photo editing features.
Pros
It offers the maximum number of transition effects.
Cons
This software is more suitable for advanced users, and it might take a lot of time and effort to master all the features.
Wondershare Filmora
Get started easily with Filmora’s powerful performance, intuitive interface, and countless effects!
Try It Free Try It Free Try It Free Learn More >

Also read:
- Updated In 2024, How to Use Lumetri Color in Adobe After Effects
- Spooky Halloween Best 15+ Halloween Countdown Video Clips for 2024
- New List of Supported iPhone Video Formats and Best iPhone Video Editor
- Updated 15 Free Cinematic LUTs for Your Film for 2024
- Updated How To Be A Successful YouTuber for 2024
- Updated Vegas Pro - How to Download, Install and Use It?
- Achieving GoPro Slow Motion with Quality An In-Depth Overview
- How to Apply Gaussian Blur Effect to Videos In Premiere Pro, In 2024
- New In 2024, 2 Ways to Add Custom Subtitles to Netflix
- New Voice Changer for Discord | Use Voicemod on Discord for 2024
- 2024 Approved Do You Want to Edit a TikTok After Posting? This Article Will Provide Multiple Methods Through Which You Can Do It in No Time
- Create Motion Effect with Path Blur In Photoshop for 2024
- Updated 2024 Approved Spooky Halloween with the Best 15+ Halloween Countdown Video Clips
- Updated How to Create Your Own Subscribe Channel Graphics for 2024
- Do You Know How Boring a Video Can Be with Silent Moments? Some Tools with Silent Detection Features Help You Delete Those Moments for 2024
- How to Resize FLV Videos EfficientlyWindows, Mac, Android, iPhone & Online
- Updated The Best Jump Cut Editing Tricks Make Your Videos Snappy!
- What Is a Transparent Logo and Why Do You Need It
- Why Is My Tecno Spark 20C Offline? Troubleshooting Guide | Dr.fone
- In 2024, 4 solution to get rid of pokemon fail to detect location On Vivo S17t | Dr.fone
- In 2024, Best Anti Tracker Software For Motorola Razr 40 | Dr.fone
- How to watch AVCHD MTS video on Moto G Stylus (2023)?
- 3 Facts You Need to Know about Screen Mirroring Samsung Galaxy S23 Ultra | Dr.fone
- New Becoming a Pro in TikTok Live Shopping Your Complete Guide for 2024
- New Top Tips for Effortless Unity 3D Animation for 2024
- In 2024, 7 Ways to Lock Apps on iPhone XS and iPad Securely | Dr.fone
- 10 Best Fake GPS Location Spoofers for Sony Xperia 5 V | Dr.fone
- Use Device Manager to identify missing hardware drivers with Windows Device Manager on Windows 10 & 7
- 5 Most Effective Methods to Unlock iPhone 11 Pro Max in Lost Mode | Dr.fone
- Title: New Find Out How to Create Your Own Custom Motion Graphics in Filmora. Add Unique Objects, Manipulate Text, and Animate Anything You Want
- Author: Chloe
- Created at : 2024-04-24 07:08:19
- Updated at : 2024-04-25 07:08:19
- Link: https://ai-editing-video.techidaily.com/new-find-out-how-to-create-your-own-custom-motion-graphics-in-filmora-add-unique-objects-manipulate-text-and-animate-anything-you-want/
- License: This work is licensed under CC BY-NC-SA 4.0.

