:max_bytes(150000):strip_icc():format(webp)/GettyImages-1369568023-c596ac8d6b5a4f3682bda2fa0feb12bd.jpg)
New Free Ways To Split Video For Whatsapp Status On All Platforms

Free Ways To Split Video For Whatsapp Status On All Platforms
WhatsApp Status is a unique feature that allows you to post an image, video, text, or animated video, all of which will be deleted after 24 hours, on your mobile device. As long as each video is no longer than thirty seconds, you can choose to post numerous videos at once. So, if you have been looking for free ways to split video for WhatsApp on all platforms, this article is for you. It provides you with the best video editors for trimming videos for WhatsApp statuses on the Google Play Store and Apple Appstore.
How to usePhone’s built-in function to split videos for Whatsapp status
When the length of your intended videos on WhatsApp status is more than thirty seconds, you have a few choices: to cut or split them up into smaller pieces.
Android Devices
You do not require a third-party app to split or trim your videos however you see fit. If You are making use of an Android device, be sure to follow each of the procedures below very carefully:
- On your Android device, launch the app known as Gallery.
- Tap on the video you want to trim or split into segments.
- Go to the bottom of your device and tap the ‘edit’ button.

- When you go to the next screen, you can adjust the sliders to include your desired footage on the next screen.
- Proceed to save the clip by tapping the ‘Save’ button in the screen’s upper-right corner.

Please note that the feature’s availability depends on the Android device manufacturer, Although most Android devices have the inbuilt feature.
iOS Devices
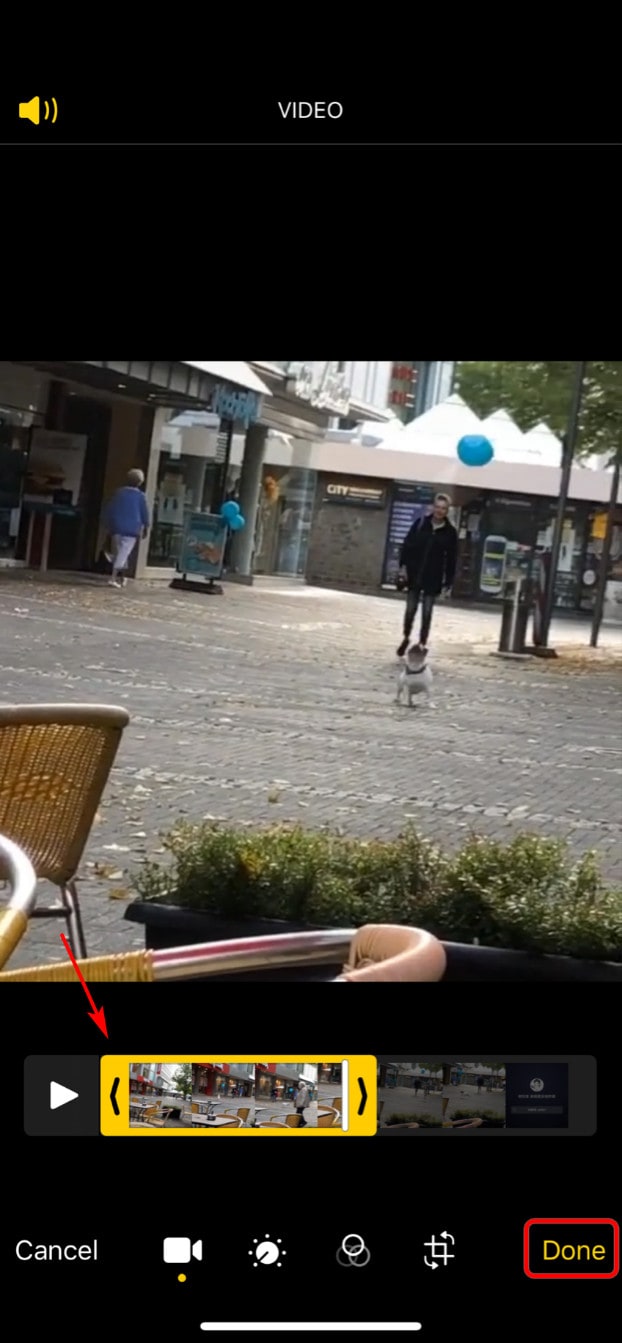
Using the Photos app, you can modify the length of your videos from your iPhone, Mac, or iPad. You can modify your video’s start and finish times using the Photos app, allowing you to create a shorter clip. You can accomplish this by carefully following the procedures that are mentioned below:
- Launch the Photos app, then select the video clip you wish to edit from the gallery.
- Tap on the ‘edit’ button.

- To adjust the beginning and end times of the video, simply move the sliders on either side of the timeline. Tap on the ‘play’ button to see a preview of the video that you have trimmed.
- Tap “Done,” and then tap “Save Video“ or “Save Video as New Clip.”
WhatsApp Inbuilt Function
You can use WhatsApp’s built-in trimming feature when you want to upload videos on WhatsApp status longer than thirty seconds. It’s effortless and straightforward to trim and split the video this way. To do this, carefully follow the steps below:
- Launch the WhatsApp application on your mobile device.
- Then select the Status button from the menu that appears.
- After that, navigate to the top of the page and select the My Status
- Now add the video you intend to use as a status update from the gallery on your phone.
- A slider will display at the top of your device as soon as the video is chosen to play. Slide this bar to the left or right to select a thirty-second segment of the video to be used.
- You can choose to adjust the position of the slider to cut off either the beginning or the end of the clip as necessary.
- You may also decide to add text to the video by utilizing the icons at the top of the screen of your device, cropping the area, and adding stickers or emojis to your creation.
- Now click the “Send“ icon once the video has been shortened to precisely 30 seconds, and it will be uploaded immediately as your status.
How to use Other Apps to split and edit video for Whatsapp status
You can choose to split or trim your videos using one of several third-party apps that are readily available. You can look into downloading these apps from either Google Play Store or the App Store, depending on the type of device you have.
Android Apps
There are many 3rd-party apps available for Android that extend the functionality of popular official apps. Fortunately, many video splitting and trimming apps are accessible from the Google Play Store, so you may choose the one that best suits your needs. However, we have compiled a selection of Apps for your consideration.
Filmora – This app allows you to split up large videos into thirty-second segments or any desired length and post them as a single story. Splitting videos to update your Whatsapp status doesn’t require using different apps. Video Splitter allows you to split your videos and share them to Facebook, Twitter, Instagram, and other social media accounts directly from your desktop.
Free Download For Win 7 or later(64-bit)
Free Download For macOS 10.14 or later
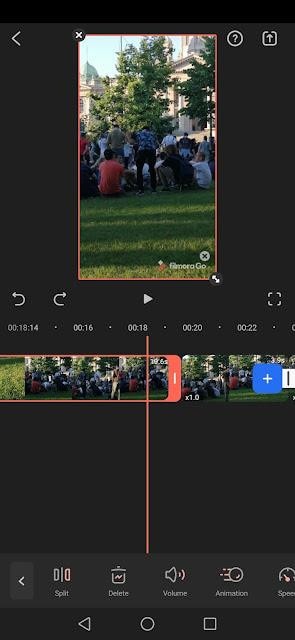
Crop, Cut & TrimVideo Editor - This program makes trimming and cropping easier. It’s also possible to enhance the colors and blur the video, just like in Photoshop. Easy-to-use controls allow you to quickly crop, blur, or cut any area of a video you’d like.
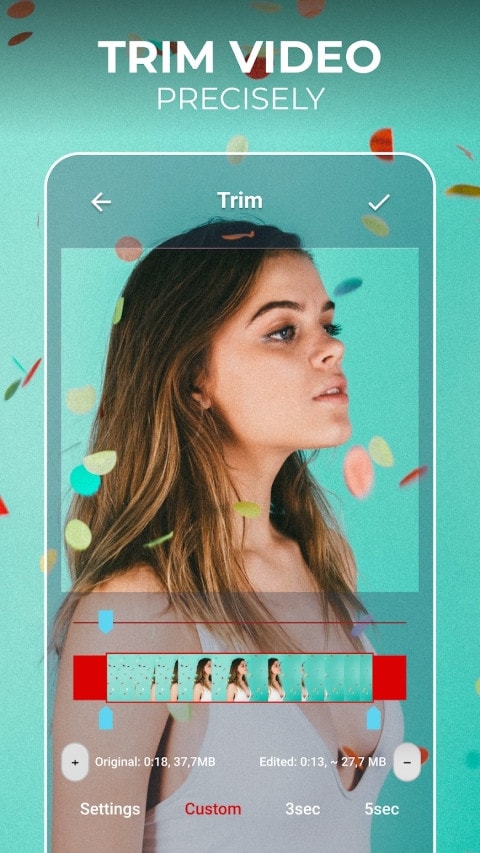
Easy Video Cutter – Here is another video splitter app that does the required task well. It is an editing tool without a watermark in edited videos. Its main features are to cut videos, merge videos, and extract MP3.

Other apps are Video Editor & Maker, Story Video Cutter, Easy Video cutter PRO and lots more.
iOS App
On the other hand, the Apple App Store does not contain nearly as many third-party applications as the Google Play Store does. However, there are still certain apps capable of doing the job reasonably well.
Video Cutter and Clip Splitter - With this app, you can effortlessly cut and split your large videos into smaller segments and just keep what you need. When the video is in the desired position, you may easily split it into segments by pressing the split button.

Cut, Trim, Split Video Editor – You can simply Cut/Delete undesired bits of a video using this app. You can use the right frames to trim your video clips, cut them in half, and save them as two separate pieces. It has an extra feature that allows you to import your videos from Cloud and via Wi-Fi.
Other Apps in the App Store are VidTrim, Video Splitter, and lots more.
How to use Online Sites to split videos for Whatsapp status
There are numerous video splitter web programs available on the internet. These programs provide a very basic and easy way to trim any small video file. You don’t need to install anything, as they operate from your browser. The tool is made so that you can move two markers that let you choose where the videos start and end.
Are you looking for a web app that can provide you with a quick video editing solution? Then this online video splitter is what you require. This video cutter supports nearly every format, including MP4, AVI, MPG, MOV, and VOB. The application provides extensive security for your files. Your files are protected to a great extent by this web app as well.
Video Cutter Online - This online tool splits your video into pieces and is an excellent solution for editing any short video file. This program, on the other hand, does not require any installation. Not only can you split videos with this tool, but you can also decide to frame them to your liking and modify the frame proportion.
Split Video – If you are ever tired of having to deal with splitting large or lengthy video files, then this web app is designed for you. This is one of the best online tools for splitting video and audio. With an easy-to-use interface, this app gives you an effective way to split your videos online for free.
Other online tools are Ezgif, Kapwing, Apowersoft Split Video Online, and lots more.
Conclusion
So there you have it, the best free ways to split video for WhatsApp on all platforms. It is essential to point out that while third-party mobile apps are easy to use, you risk becoming irritated by unfriendly interfaces and unwanted advertisements if you choose to download and use them. But it must be acknowledged that third-party video editing applications can be helpful in giving videos more possibilities. The built-in function on smartphone devices and the WhatsApp app will always be more reliable than third-party apps for splitting, trimming, and cutting small videos. So, while these apps are adequate for basic splitting and trimming, they do not provide advanced editing features. Nevertheless, if you need more advanced features, employing the tools available online is the best option.
How to usePhone’s built-in function to split videos for Whatsapp status
When the length of your intended videos on WhatsApp status is more than thirty seconds, you have a few choices: to cut or split them up into smaller pieces.
Android Devices
You do not require a third-party app to split or trim your videos however you see fit. If You are making use of an Android device, be sure to follow each of the procedures below very carefully:
- On your Android device, launch the app known as Gallery.
- Tap on the video you want to trim or split into segments.
- Go to the bottom of your device and tap the ‘edit’ button.

- When you go to the next screen, you can adjust the sliders to include your desired footage on the next screen.
- Proceed to save the clip by tapping the ‘Save’ button in the screen’s upper-right corner.

Please note that the feature’s availability depends on the Android device manufacturer, Although most Android devices have the inbuilt feature.
iOS Devices
Using the Photos app, you can modify the length of your videos from your iPhone, Mac, or iPad. You can modify your video’s start and finish times using the Photos app, allowing you to create a shorter clip. You can accomplish this by carefully following the procedures that are mentioned below:
- Launch the Photos app, then select the video clip you wish to edit from the gallery.
- Tap on the ‘edit’ button.

- To adjust the beginning and end times of the video, simply move the sliders on either side of the timeline. Tap on the ‘play’ button to see a preview of the video that you have trimmed.
- Tap “Done,” and then tap “Save Video“ or “Save Video as New Clip.”

WhatsApp Inbuilt Function
You can use WhatsApp’s built-in trimming feature when you want to upload videos on WhatsApp status longer than thirty seconds. It’s effortless and straightforward to trim and split the video this way. To do this, carefully follow the steps below:
- Launch the WhatsApp application on your mobile device.
- Then select the Status button from the menu that appears.
- After that, navigate to the top of the page and select the My Status
- Now add the video you intend to use as a status update from the gallery on your phone.
- A slider will display at the top of your device as soon as the video is chosen to play. Slide this bar to the left or right to select a thirty-second segment of the video to be used.
- You can choose to adjust the position of the slider to cut off either the beginning or the end of the clip as necessary.
- You may also decide to add text to the video by utilizing the icons at the top of the screen of your device, cropping the area, and adding stickers or emojis to your creation.
- Now click the “Send“ icon once the video has been shortened to precisely 30 seconds, and it will be uploaded immediately as your status.
How to use Other Apps to split and edit video for Whatsapp status
You can choose to split or trim your videos using one of several third-party apps that are readily available. You can look into downloading these apps from either Google Play Store or the App Store, depending on the type of device you have.
Android Apps
There are many 3rd-party apps available for Android that extend the functionality of popular official apps. Fortunately, many video splitting and trimming apps are accessible from the Google Play Store, so you may choose the one that best suits your needs. However, we have compiled a selection of Apps for your consideration.
Filmora – This app allows you to split up large videos into thirty-second segments or any desired length and post them as a single story. Splitting videos to update your Whatsapp status doesn’t require using different apps. Video Splitter allows you to split your videos and share them to Facebook, Twitter, Instagram, and other social media accounts directly from your desktop.
Free Download For Win 7 or later(64-bit)
Free Download For macOS 10.14 or later

Crop, Cut & TrimVideo Editor - This program makes trimming and cropping easier. It’s also possible to enhance the colors and blur the video, just like in Photoshop. Easy-to-use controls allow you to quickly crop, blur, or cut any area of a video you’d like.

Easy Video Cutter – Here is another video splitter app that does the required task well. It is an editing tool without a watermark in edited videos. Its main features are to cut videos, merge videos, and extract MP3.

Other apps are Video Editor & Maker, Story Video Cutter, Easy Video cutter PRO and lots more.
iOS App
On the other hand, the Apple App Store does not contain nearly as many third-party applications as the Google Play Store does. However, there are still certain apps capable of doing the job reasonably well.
Video Cutter and Clip Splitter - With this app, you can effortlessly cut and split your large videos into smaller segments and just keep what you need. When the video is in the desired position, you may easily split it into segments by pressing the split button.

Cut, Trim, Split Video Editor – You can simply Cut/Delete undesired bits of a video using this app. You can use the right frames to trim your video clips, cut them in half, and save them as two separate pieces. It has an extra feature that allows you to import your videos from Cloud and via Wi-Fi.
Other Apps in the App Store are VidTrim, Video Splitter, and lots more.
How to use Online Sites to split videos for Whatsapp status
There are numerous video splitter web programs available on the internet. These programs provide a very basic and easy way to trim any small video file. You don’t need to install anything, as they operate from your browser. The tool is made so that you can move two markers that let you choose where the videos start and end.
Are you looking for a web app that can provide you with a quick video editing solution? Then this online video splitter is what you require. This video cutter supports nearly every format, including MP4, AVI, MPG, MOV, and VOB. The application provides extensive security for your files. Your files are protected to a great extent by this web app as well.
Video Cutter Online - This online tool splits your video into pieces and is an excellent solution for editing any short video file. This program, on the other hand, does not require any installation. Not only can you split videos with this tool, but you can also decide to frame them to your liking and modify the frame proportion.
Split Video – If you are ever tired of having to deal with splitting large or lengthy video files, then this web app is designed for you. This is one of the best online tools for splitting video and audio. With an easy-to-use interface, this app gives you an effective way to split your videos online for free.
Other online tools are Ezgif, Kapwing, Apowersoft Split Video Online, and lots more.
Conclusion
So there you have it, the best free ways to split video for WhatsApp on all platforms. It is essential to point out that while third-party mobile apps are easy to use, you risk becoming irritated by unfriendly interfaces and unwanted advertisements if you choose to download and use them. But it must be acknowledged that third-party video editing applications can be helpful in giving videos more possibilities. The built-in function on smartphone devices and the WhatsApp app will always be more reliable than third-party apps for splitting, trimming, and cutting small videos. So, while these apps are adequate for basic splitting and trimming, they do not provide advanced editing features. Nevertheless, if you need more advanced features, employing the tools available online is the best option.
Add Selective Color Effect to Your Videos Using Filmora
Selective color is an effect that lets you desaturate all the colors in a photo or video while preserving one or more colors of your choice. It is done by isolating a specific color of your choice in the frame while all other colors turn into black and white, just like this.

By using this effect, we can draw viewers’ attention to a specific point in the clip. If you want your video do the same, Filmora can be a good helper. Alright, we’ll be creating selective color effects in two examples. Let’s get started.
Tutorial 1 on making color isolation by selective color effect
In this first example, we are going to use stock footage showing a subject on a bike.
To add a selective color effect, download Wondershare Filmora on your PC or Mac. Now follow the steps as explained below to add this effect and isolate the color of your choice.
Free Download For Win 7 or later(64-bit)
Free Download For macOS 10.14 or later
Step1 Launch Wondershare Filmora and drag and drop your clip to the timeline.
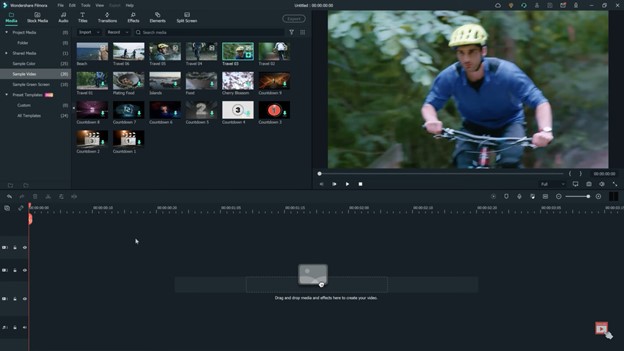
Step2 Go to effects and then click “NewBlue FX” option and select Newblue filters.
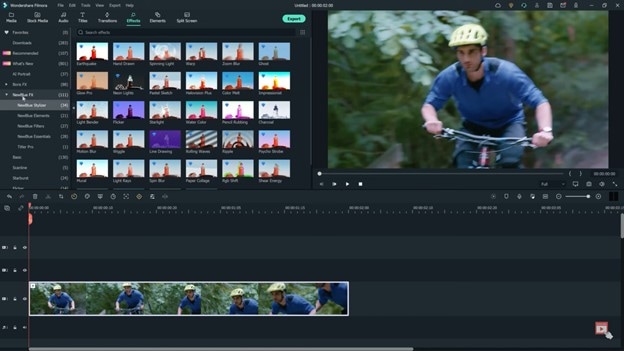
Step3 Find the Selective Color Effect and drag it onto the clip. The effect will be instantly applied.
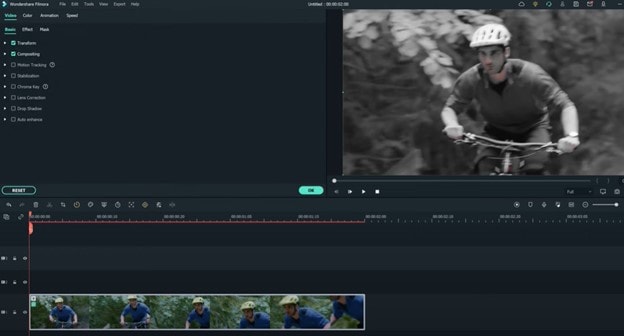
Step4 Next, double-click on the clip and check out the effects menu at the top of the screen.
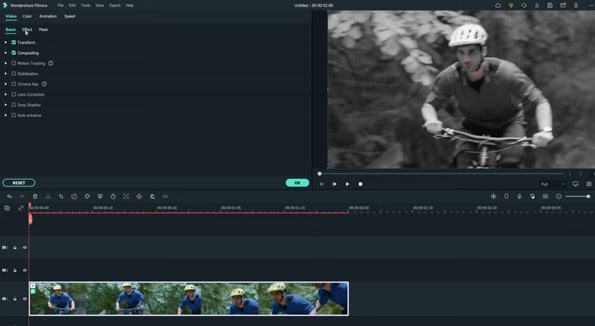
Step5 Open the preset drop-down menu. There will be a lot of presets with different colors. Select the preset you want to use. In this scenario, let us select Just Blue.
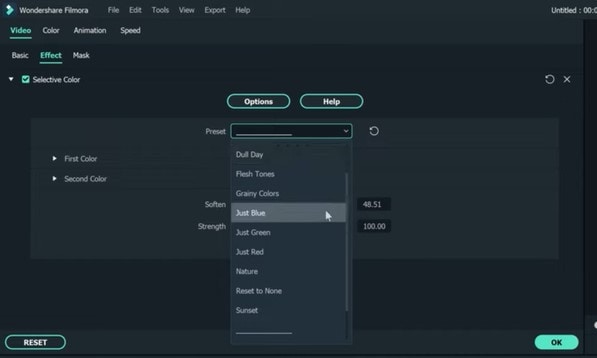
Step6 If you see a blue tint at a place or object which you want to be white and black, click on the first color.
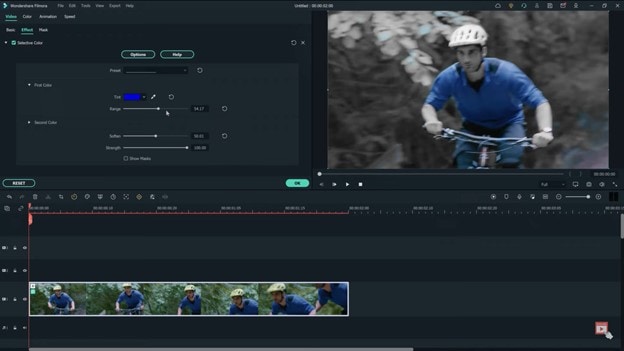
Step7 Now adjust the range slider to decrease the number of unwanted tints.
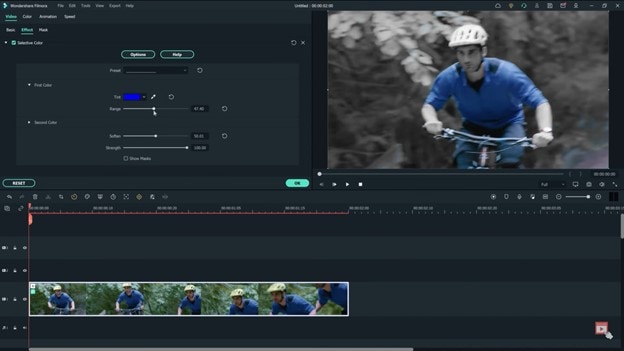
Step8 To blur the edges of the effects, turn up the softened slider and remove any unwanted tint previously remaining.
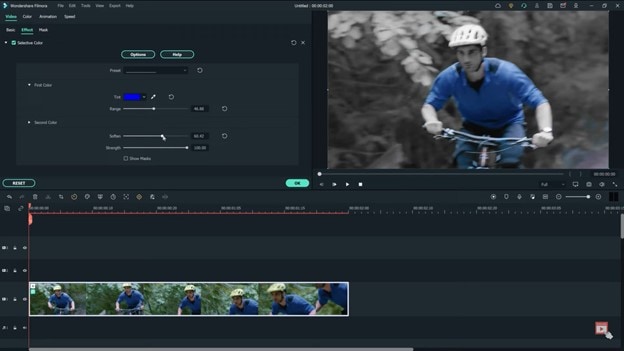
In this way, you can add a selective color effect to your video clips and isolate the color of your choice.
Tutorial 2 on make color isolation using eyedropper tool
You might ask how do we use the eyedropper tool here. It can sample colors from anywhere in a video or an image and add them to your swatch panel. The steps to use the eyedropper tool to add a selective color to your video are below.
Step1 As same as the first one, launching Wondershare Filmora is the first priority. And drag your clip to the timeline.
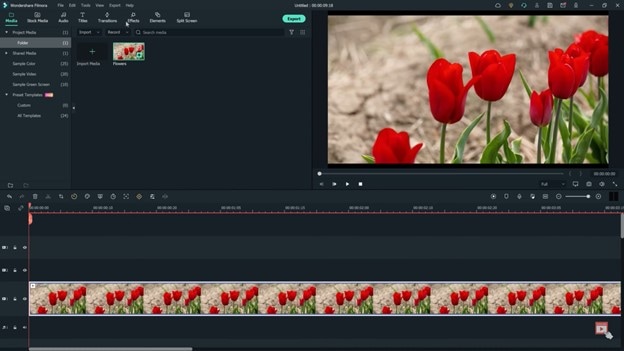
Step2 Go to effects at the top, and find Newblue effects, and click on the Newblue filters.
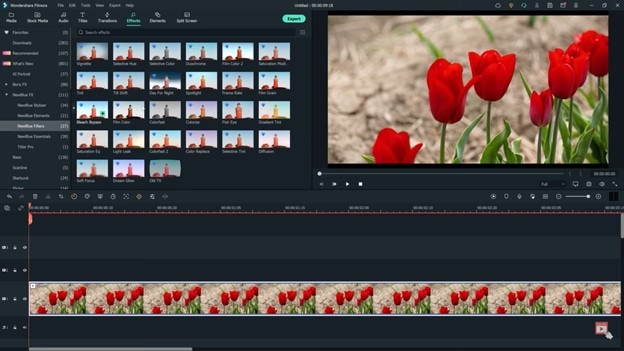
Step3 Find the selective color effect and drag it to the clip.
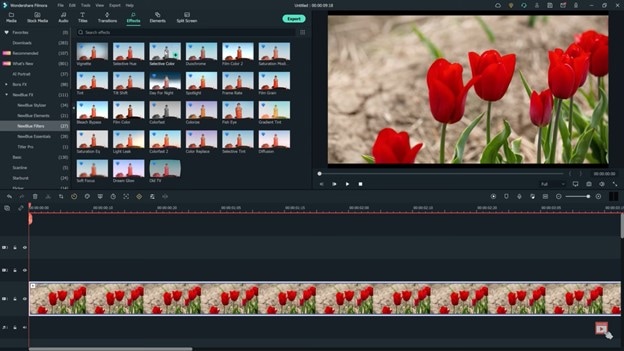
Step4 Double-click on the clip and visit the effects menu at the top of the screen.
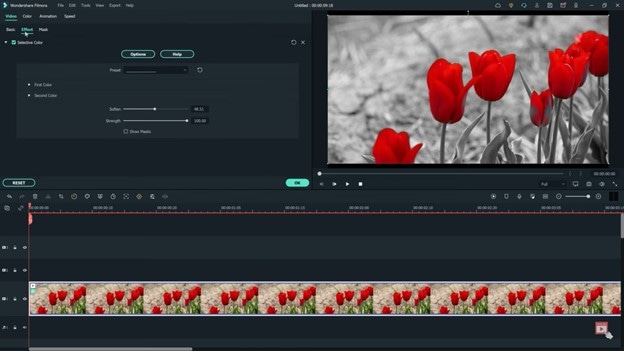
Step5 Click on the ‘first color’ and select the eye dropper tool. This will allow us to select the red flower in the preview window. You can also click different parts of the image to get the color that we want.
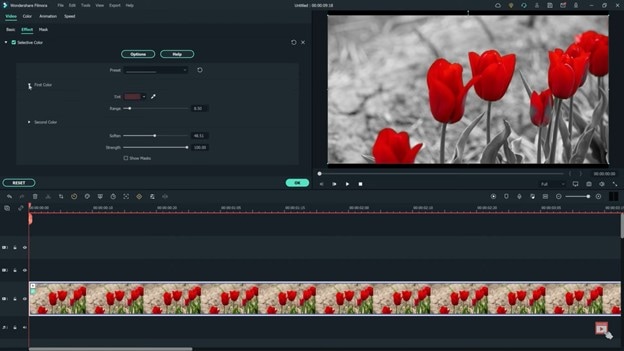
Step6 Next, try selecting a second color to isolate within our shot. In this example, we are going to make the stems on the flowers stand out as well. Select second color and go to the tint section. And find a color that is close to the second color, which will be green in this case.
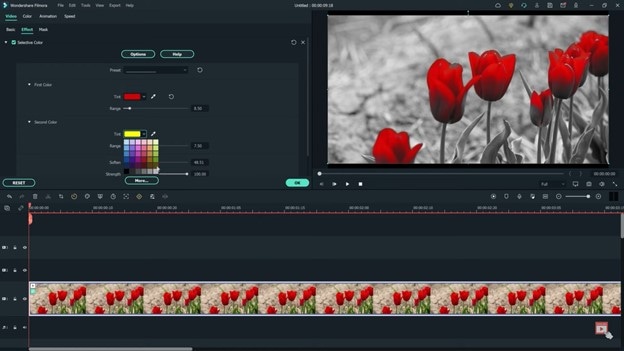
Step7 Pick the eyedropper tool and click it on the green part of the clip. Then adjust the range slider as needed.
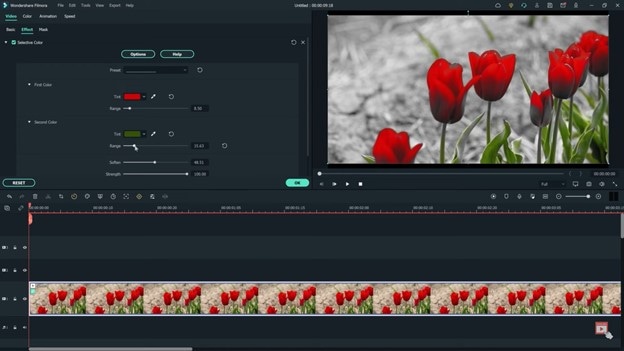
Alright, let’s watch back the video to see how both colors are now isolated.

Follow all the steps in the correct order. This is how you can use NewBlue effects for color isolation using Wondershare Filmora. The color isolation using the selective color effect defines the point of interest in the clip for the viewers.
Free Download For macOS 10.14 or later
Step1 Launch Wondershare Filmora and drag and drop your clip to the timeline.

Step2 Go to effects and then click “NewBlue FX” option and select Newblue filters.

Step3 Find the Selective Color Effect and drag it onto the clip. The effect will be instantly applied.

Step4 Next, double-click on the clip and check out the effects menu at the top of the screen.

Step5 Open the preset drop-down menu. There will be a lot of presets with different colors. Select the preset you want to use. In this scenario, let us select Just Blue.

Step6 If you see a blue tint at a place or object which you want to be white and black, click on the first color.

Step7 Now adjust the range slider to decrease the number of unwanted tints.

Step8 To blur the edges of the effects, turn up the softened slider and remove any unwanted tint previously remaining.

In this way, you can add a selective color effect to your video clips and isolate the color of your choice.
Tutorial 2 on make color isolation using eyedropper tool
You might ask how do we use the eyedropper tool here. It can sample colors from anywhere in a video or an image and add them to your swatch panel. The steps to use the eyedropper tool to add a selective color to your video are below.
Step1 As same as the first one, launching Wondershare Filmora is the first priority. And drag your clip to the timeline.

Step2 Go to effects at the top, and find Newblue effects, and click on the Newblue filters.

Step3 Find the selective color effect and drag it to the clip.

Step4 Double-click on the clip and visit the effects menu at the top of the screen.

Step5 Click on the ‘first color’ and select the eye dropper tool. This will allow us to select the red flower in the preview window. You can also click different parts of the image to get the color that we want.

Step6 Next, try selecting a second color to isolate within our shot. In this example, we are going to make the stems on the flowers stand out as well. Select second color and go to the tint section. And find a color that is close to the second color, which will be green in this case.

Step7 Pick the eyedropper tool and click it on the green part of the clip. Then adjust the range slider as needed.

Alright, let’s watch back the video to see how both colors are now isolated.

Follow all the steps in the correct order. This is how you can use NewBlue effects for color isolation using Wondershare Filmora. The color isolation using the selective color effect defines the point of interest in the clip for the viewers.
Best 20 Slideshow Makers for Win/Mac/Online Review
Top Slideshow Makers for WinMacOnline Review
An easy yet powerful editor
Numerous effects to choose from
Detailed tutorials provided by the official channel
To create slideshow, multiple tools and elements are required. Generally, people look for a tool that’s easy to use and that’s rich in features. Even if such a tool is found, the immediate problem is the operating system. Not every system is compatible with Windows or Mac.
Here, this article is all about cutting the efforts to search for the best app for slide show making. All the top tools are listed in this single article that can serve the purpose for Windows and Mac users along with online users.
In this article
01 [Top 10 Slideshow Makers for Windows](#Part 1)
02 [Top 5 Slideshow Makers for Mac](#Part 2)
03 [Top 5 Online Slideshow Makers](#Part 3)
Part 1 Top 10 Slideshow Makers for Windows
01Adobe Spark
Adobe Spark or Adobe Creative Cloud Express is a top-notch software for creating a slideshow in Windows 8.1 or newer versions. As Adobe is always been a promising platform to create unique designs, with this application as well, users can flaunt their thoughts through different features.

● A simple UI assists beginners to understand all the functionalities before using it without much hassle. It also increases the speed to make a slide show with simple yet efficient tools.
● It is totally compatible with other Adobe products, making it flexible for any kind of use.
● You can create slide show on your PC without any watermark and with different existing templates and elements.
02Movavi Slideshow Maker
Movavi brings some unique features to create a slideshow with enhanced video quality and modern tool arrangement for all of the people who love to create a better presentation. Even with a seamless platform, all the necessary tools are arranged in a familiar pattern to make it comfortable.
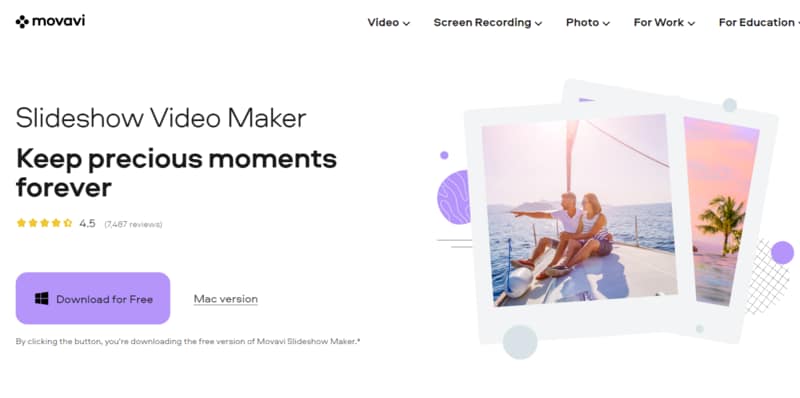
● Full slideshow wizard is available with Movavi slide show maker to assist the beginners to create a quality presentation.
● With the screen recording feature, you can add live demonstration in the presentation with 150+ filters and visual effects.
● This slide show app includes multiple ready-made templates, music functionalities, etc. for a professional slideshow-making setup.
03MiniTool MovieMaker
MiniTool MovieMaker is a comparatively new tool as a free slideshow maker for all Windows users. It consists of quirky features like cartoon clips, animated elements, etc. along with modern transition and video processing tools.

● As this is a new platform, the latest features are added on frequently and the users can apply them for an up-to-the-minute slideshow. From trimming a video to adding a transition to a photo slideshow, everything is available on a single software.
● Even if you don’t know anything about video editing or creating a slideshow, this tool would guide you through everything with a simple arrangement and a wide range of options.
● You can export a video in different formats like MP4, MOV, WMV, etc., and get watermark-free projects.
04PhotoStage Slideshow Software
To make a slide show quickly, you can go with PhotoStage Slideshow software without any doubt. This software is not only useful for beginners but has exciting features for intermediate video editors. This slideshow app is compatible with Windows XP, Vista, 7, 8, 8.1, 10, and 11.
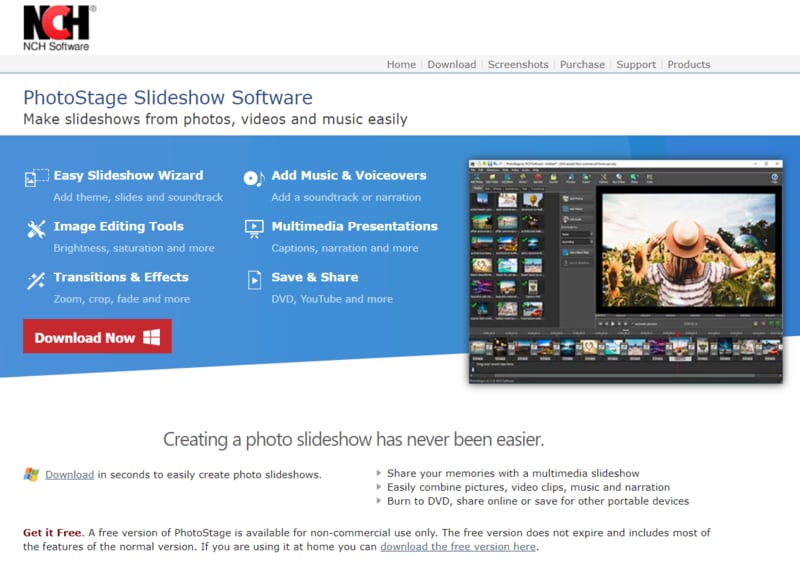
● There is a slideshow wizard feature to add themes, transitions, and music to the slides easily.
● Built-in DVD HD video authoring and YouTube sharing are available for wide usability of the slideshows for multiple purposes.
● Different audio tools and photo optimization tools are available to add a classy look to the presentation.
05Icecream Slideshow Maker
For the most simple yet efficient slideshow maker online, choose Icecream software that comes with a very beginner-friendly interface and options. For learning video editing and create a slideshow This software can be a good tool to start with. However, the features are very minimum and the professional creators might not find it very exciting. But for beginners or students, this would be a great choice.
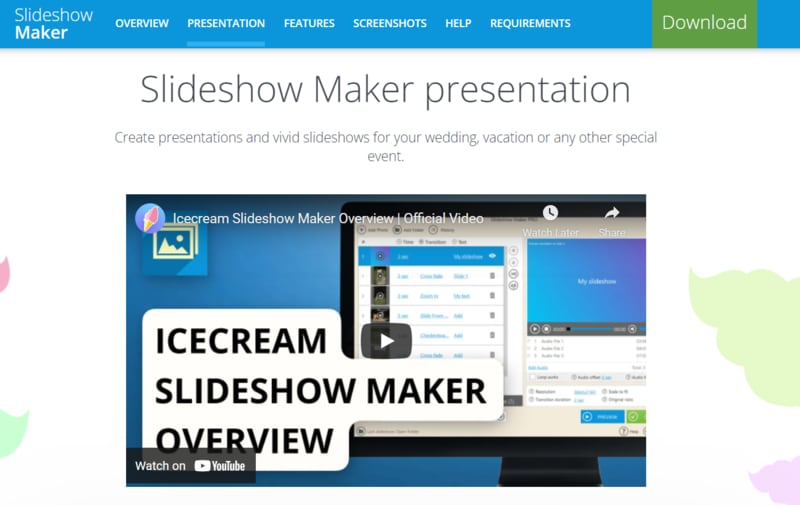
● It supports various audio formats including MP3, WAV, WMA, and TIFF. Also, image formats including JPG, JPEG, and PNG are supported.
● Along with YouTube uploading, DVD transfer, cloud storage (Dropbox or Google Drive) is supported.
● slideshow is supported in this free slide show maker.
06Kizoa
It’s become a hassle often to find the suitable aspect for a slideshow for different screens like laptops, TV, or smartphone. Kizoa slide show maker is eliminating this problem with 7 different aspect ratios for the slideshows. And this can be an effective advantage when making a slideshow for any professional purpose.
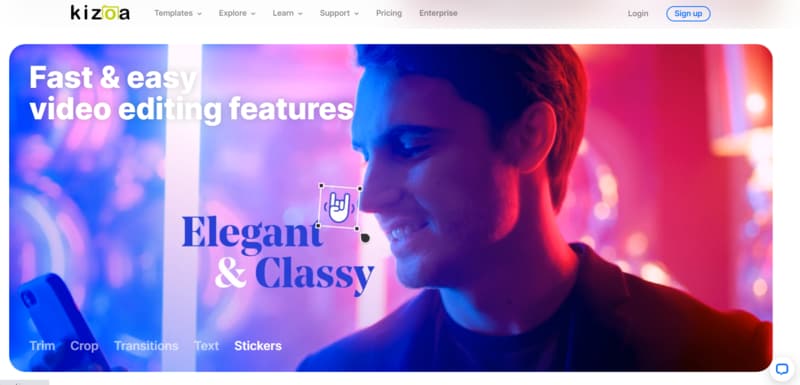
● This app for slide show is available for Windows 7 or higher versions till Windows 10. There’s not been an update till now for Windows 11.
● Bulk collection of 2D and 3D transitions, effects, and GIFs are available to use in the slides as per the requirement.
● This software is intended to create slideshow only and all the features are added according to that unlike any slideshow creator cum video editor app.
07Magix Photostory Deluxe
For a high-quality professional slideshow maker online, Magix Photostory Deluxe is a good option. This editor has almost 1,500 built-in effects, 200+ decorative elements, and 100+ pre-designed templates to assist users with the slideshows in lesser time.

● Built-in DVD and Blu-ray burning features along with a 4K resolution feature are present with this application.
● Unique camera tracking and zooming features are available to add more latest elements to the slideshow.
● All-in-one platform to create slideshow, edit photos, and videos.
08Slideshow Maker
The name in itself defines this as one of the best slideshow makers with high-quality results. 4K Slideshow maker is available for Windows 7 and higher versions. Those who don’t want to compromise with the video resolution in the slideshow can try this slideshow app. However other features like tool arrangement and UI is slightly poor compared to other software.
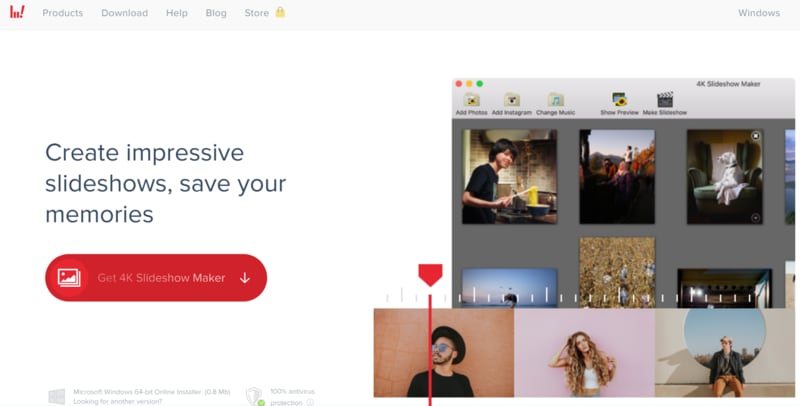
● This software supports different file formats and makes this platform flexible for multiple uses.
● All the projects are saved in high resolution, i.e., 1080p or 4K.
09SmartSHOW 3D
SmartSHOW 3D is an efficient free slideshow maker for high-quality, 3D slideshows. This is another beginner-friendly software with multiple tools and effects. Some latest addition like pan & zoom effect creation, the audio waveform in the music section, and customized picture frames would help to add extra effect to the slideshow.

● free templates and 200+ free music tracks are available in this free slide show maker to enhance the whole presentation properly.
● You can also make mobile-optimized videos using the SmartSHOW 3D editor.
● Add a soundtrack to the slideshow and use existing templates in the free trial before buying the subscription.
● Multiple formats are supported to download the project after creating a slideshow.
Part 2 Top 5 Slideshow Makers for Mac
01PowerDirector
PowerDirector is one of the best free slideshow makers on Mac systems, enabling the pro features of the storyboard, timeline, and slideshow interfaces. There’s a wide capability of visual effects that can boost the whole quality of the slideshow in no time.

02iMovie
iMovie slide show maker is available for both macOS and iOS systems, to let the creators make some elegant and high-resolution slideshows. It includes professional-looking themes and interfaces to add a classy look to the whole presentation. It’s simple for beginners as there’s no complicated tool arrangement in the UI.
03Photostage
Photostage is a complete package for slideshow creation, including the seamless options for photo arrangement, special effects, audio set-up, etc. For beginners, it might be a bit confusing but with time, it will be easier to use. This free slide show maker is equally compatible with both Windows and Mac, unlike much other software.

04Videopad
Videopad is another top slideshow maker on Mac systems that has 50+ transition effects, third-party plugin support, and all popular file format compatibility. The slides would be made as with a movie effect on this platform with various latest templates and features.

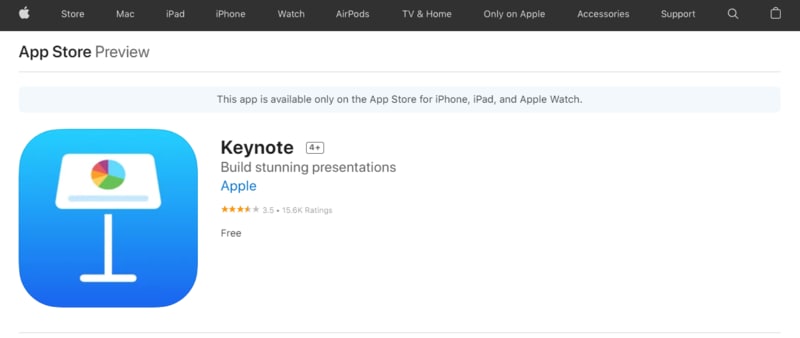
05Keynote
For real-time collaboration and PowerPoint features, Keynote would be the best choice to create slide show. It has the integration with Adobe Photoshop which extends the creativity range more. You can also find an in-built large library for pre-made templates to apply in the slideshow. However, for beginners, Keynote can a be hurdle.
Part 3 Top 5 Online Slideshow Makers
To be independent of any system, users might also want to make slideshow online. To support this choice, the following five best slideshow creators are mentioned.
01Canva
Canva is a popular online slide show maker that has everything you need to make a perfect presentation. From various templates to elements, graphics to custom frames, special social media templates, and versatile file formats- the free version itself has many features to serve.

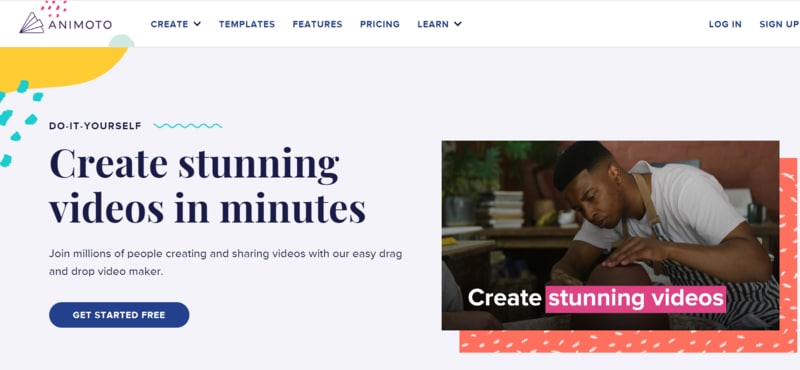
02Animoto
With an user-friendly interface and quick processing, Animoto is a favorite platform to make slideshow online. However, there is a problem with the watermark in some cases. You can automatically apply any modification to all the sections by applying the filters in one section. Note that, there’s no free subscription with this platform.
03FlexClip
Flexclip is a beginner-friendly online slideshow maker with numerous templates and assets to choose from. In the free version, you can download a video in 480p only. Also, there’s no undo button for slideshow creation. So, you need to be sure about any modification in this editor.

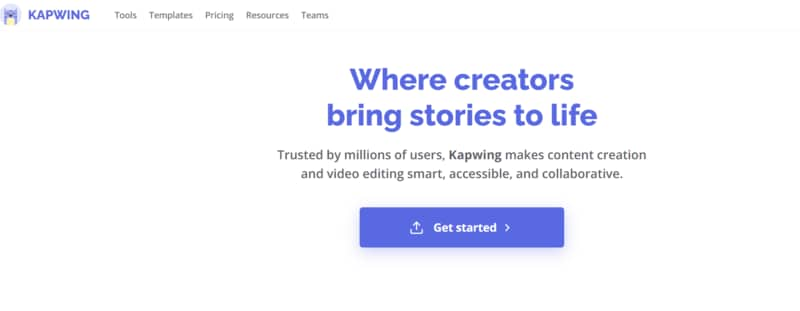
04Kapwing
Kapwing is a multipurpose online free slideshow maker for intermediate users. Different video editing tools are available along with subtitle and AI subtitle support. Note that, the content in free version is public and cannot be stored for more than 7 days.
05Visme
Visme is a quick slideshow maker with five easy steps to master. Companies like IBM and Accenture use Visme to create slideshows and infographics. Undoubtedly this can be a perfect pick for seamless, professional slideshow cration.

How to use Filmora?
Filmora is all-in-one software to create slide show for literary any purpose, in any operating system, providing all the features a creator might need while making a perfect slideshow. A slideshow can be for academic or professional purposes, to decorate some beautiful moments, or to create something unique. And for every separate aim, different tools and features are required in a slideshow maker. To fulfil all such requirements with the latest tools, Filomora has a versatile platform.
As in this article, we have already mentioned some of the best slideshow makers, you may find some restrictions like system boundaries, not being beginner-friendly, or missing the latest features in the free slideshow makers. That’s why the best possible solution is presented here with all the following advantages.
Advantages of Wondershare Filmora Video Editor Slideshow Maker:
● This software is compatible with both Windows (7 or later versions) and Mac OS (10.12 or later versions), giving flexible usability to all the slideshow enthusiasts.
For Win 7 or later (64-bit)
For macOS 10.12 or later
● It takes lesser time to create a slideshow in Filomra using the top-notch transitions and effects. Also, there’s a split-screen option to make a slideshow more efficiently.
● All the popular file formats are supported including images, audio, and video. And, it’s also easy to upload a project on any social media directly from Filmora.
● Numerous motion effects, titles, filters, effects, and overlays are available for free in this slide show app.
● The built-in audio library provides suitable music with the slideshows to make it better as a complete presentation.
● Ending Thoughts →
● This article consists of all the top slideshow makers with their features to choose the most suitable one without any doubt.
● Suggestions are available both for Windows and Mac in the case of the slideshow creators.
● You can go for any of this software based on your requirements, editing experience, and system compatibility. Gradually, the best slideshow can be created in no time.
To create slideshow, multiple tools and elements are required. Generally, people look for a tool that’s easy to use and that’s rich in features. Even if such a tool is found, the immediate problem is the operating system. Not every system is compatible with Windows or Mac.
Here, this article is all about cutting the efforts to search for the best app for slide show making. All the top tools are listed in this single article that can serve the purpose for Windows and Mac users along with online users.
In this article
01 [Top 10 Slideshow Makers for Windows](#Part 1)
02 [Top 5 Slideshow Makers for Mac](#Part 2)
03 [Top 5 Online Slideshow Makers](#Part 3)
Part 1 Top 10 Slideshow Makers for Windows
01Adobe Spark
Adobe Spark or Adobe Creative Cloud Express is a top-notch software for creating a slideshow in Windows 8.1 or newer versions. As Adobe is always been a promising platform to create unique designs, with this application as well, users can flaunt their thoughts through different features.

● A simple UI assists beginners to understand all the functionalities before using it without much hassle. It also increases the speed to make a slide show with simple yet efficient tools.
● It is totally compatible with other Adobe products, making it flexible for any kind of use.
● You can create slide show on your PC without any watermark and with different existing templates and elements.
02Movavi Slideshow Maker
Movavi brings some unique features to create a slideshow with enhanced video quality and modern tool arrangement for all of the people who love to create a better presentation. Even with a seamless platform, all the necessary tools are arranged in a familiar pattern to make it comfortable.

● Full slideshow wizard is available with Movavi slide show maker to assist the beginners to create a quality presentation.
● With the screen recording feature, you can add live demonstration in the presentation with 150+ filters and visual effects.
● This slide show app includes multiple ready-made templates, music functionalities, etc. for a professional slideshow-making setup.
03MiniTool MovieMaker
MiniTool MovieMaker is a comparatively new tool as a free slideshow maker for all Windows users. It consists of quirky features like cartoon clips, animated elements, etc. along with modern transition and video processing tools.

● As this is a new platform, the latest features are added on frequently and the users can apply them for an up-to-the-minute slideshow. From trimming a video to adding a transition to a photo slideshow, everything is available on a single software.
● Even if you don’t know anything about video editing or creating a slideshow, this tool would guide you through everything with a simple arrangement and a wide range of options.
● You can export a video in different formats like MP4, MOV, WMV, etc., and get watermark-free projects.
04PhotoStage Slideshow Software
To make a slide show quickly, you can go with PhotoStage Slideshow software without any doubt. This software is not only useful for beginners but has exciting features for intermediate video editors. This slideshow app is compatible with Windows XP, Vista, 7, 8, 8.1, 10, and 11.

● There is a slideshow wizard feature to add themes, transitions, and music to the slides easily.
● Built-in DVD HD video authoring and YouTube sharing are available for wide usability of the slideshows for multiple purposes.
● Different audio tools and photo optimization tools are available to add a classy look to the presentation.
05Icecream Slideshow Maker
For the most simple yet efficient slideshow maker online, choose Icecream software that comes with a very beginner-friendly interface and options. For learning video editing and create a slideshow This software can be a good tool to start with. However, the features are very minimum and the professional creators might not find it very exciting. But for beginners or students, this would be a great choice.

● It supports various audio formats including MP3, WAV, WMA, and TIFF. Also, image formats including JPG, JPEG, and PNG are supported.
● Along with YouTube uploading, DVD transfer, cloud storage (Dropbox or Google Drive) is supported.
● slideshow is supported in this free slide show maker.
06Kizoa
It’s become a hassle often to find the suitable aspect for a slideshow for different screens like laptops, TV, or smartphone. Kizoa slide show maker is eliminating this problem with 7 different aspect ratios for the slideshows. And this can be an effective advantage when making a slideshow for any professional purpose.

● This app for slide show is available for Windows 7 or higher versions till Windows 10. There’s not been an update till now for Windows 11.
● Bulk collection of 2D and 3D transitions, effects, and GIFs are available to use in the slides as per the requirement.
● This software is intended to create slideshow only and all the features are added according to that unlike any slideshow creator cum video editor app.
07Magix Photostory Deluxe
For a high-quality professional slideshow maker online, Magix Photostory Deluxe is a good option. This editor has almost 1,500 built-in effects, 200+ decorative elements, and 100+ pre-designed templates to assist users with the slideshows in lesser time.

● Built-in DVD and Blu-ray burning features along with a 4K resolution feature are present with this application.
● Unique camera tracking and zooming features are available to add more latest elements to the slideshow.
● All-in-one platform to create slideshow, edit photos, and videos.
08Slideshow Maker
The name in itself defines this as one of the best slideshow makers with high-quality results. 4K Slideshow maker is available for Windows 7 and higher versions. Those who don’t want to compromise with the video resolution in the slideshow can try this slideshow app. However other features like tool arrangement and UI is slightly poor compared to other software.

● This software supports different file formats and makes this platform flexible for multiple uses.
● All the projects are saved in high resolution, i.e., 1080p or 4K.
09SmartSHOW 3D
SmartSHOW 3D is an efficient free slideshow maker for high-quality, 3D slideshows. This is another beginner-friendly software with multiple tools and effects. Some latest addition like pan & zoom effect creation, the audio waveform in the music section, and customized picture frames would help to add extra effect to the slideshow.

● free templates and 200+ free music tracks are available in this free slide show maker to enhance the whole presentation properly.
● You can also make mobile-optimized videos using the SmartSHOW 3D editor.
● Add a soundtrack to the slideshow and use existing templates in the free trial before buying the subscription.
● Multiple formats are supported to download the project after creating a slideshow.
Part 2 Top 5 Slideshow Makers for Mac
01PowerDirector
PowerDirector is one of the best free slideshow makers on Mac systems, enabling the pro features of the storyboard, timeline, and slideshow interfaces. There’s a wide capability of visual effects that can boost the whole quality of the slideshow in no time.

02iMovie
iMovie slide show maker is available for both macOS and iOS systems, to let the creators make some elegant and high-resolution slideshows. It includes professional-looking themes and interfaces to add a classy look to the whole presentation. It’s simple for beginners as there’s no complicated tool arrangement in the UI.

03Photostage
Photostage is a complete package for slideshow creation, including the seamless options for photo arrangement, special effects, audio set-up, etc. For beginners, it might be a bit confusing but with time, it will be easier to use. This free slide show maker is equally compatible with both Windows and Mac, unlike much other software.

04Videopad
Videopad is another top slideshow maker on Mac systems that has 50+ transition effects, third-party plugin support, and all popular file format compatibility. The slides would be made as with a movie effect on this platform with various latest templates and features.

05Keynote
For real-time collaboration and PowerPoint features, Keynote would be the best choice to create slide show. It has the integration with Adobe Photoshop which extends the creativity range more. You can also find an in-built large library for pre-made templates to apply in the slideshow. However, for beginners, Keynote can a be hurdle.

Part 3 Top 5 Online Slideshow Makers
To be independent of any system, users might also want to make slideshow online. To support this choice, the following five best slideshow creators are mentioned.
01Canva
Canva is a popular online slide show maker that has everything you need to make a perfect presentation. From various templates to elements, graphics to custom frames, special social media templates, and versatile file formats- the free version itself has many features to serve.

02Animoto
With an user-friendly interface and quick processing, Animoto is a favorite platform to make slideshow online. However, there is a problem with the watermark in some cases. You can automatically apply any modification to all the sections by applying the filters in one section. Note that, there’s no free subscription with this platform.

03FlexClip
Flexclip is a beginner-friendly online slideshow maker with numerous templates and assets to choose from. In the free version, you can download a video in 480p only. Also, there’s no undo button for slideshow creation. So, you need to be sure about any modification in this editor.

04Kapwing
Kapwing is a multipurpose online free slideshow maker for intermediate users. Different video editing tools are available along with subtitle and AI subtitle support. Note that, the content in free version is public and cannot be stored for more than 7 days.

05Visme
Visme is a quick slideshow maker with five easy steps to master. Companies like IBM and Accenture use Visme to create slideshows and infographics. Undoubtedly this can be a perfect pick for seamless, professional slideshow cration.

How to use Filmora?
Filmora is all-in-one software to create slide show for literary any purpose, in any operating system, providing all the features a creator might need while making a perfect slideshow. A slideshow can be for academic or professional purposes, to decorate some beautiful moments, or to create something unique. And for every separate aim, different tools and features are required in a slideshow maker. To fulfil all such requirements with the latest tools, Filomora has a versatile platform.
As in this article, we have already mentioned some of the best slideshow makers, you may find some restrictions like system boundaries, not being beginner-friendly, or missing the latest features in the free slideshow makers. That’s why the best possible solution is presented here with all the following advantages.
Advantages of Wondershare Filmora Video Editor Slideshow Maker:
● This software is compatible with both Windows (7 or later versions) and Mac OS (10.12 or later versions), giving flexible usability to all the slideshow enthusiasts.
For Win 7 or later (64-bit)
For macOS 10.12 or later
● It takes lesser time to create a slideshow in Filomra using the top-notch transitions and effects. Also, there’s a split-screen option to make a slideshow more efficiently.
● All the popular file formats are supported including images, audio, and video. And, it’s also easy to upload a project on any social media directly from Filmora.
● Numerous motion effects, titles, filters, effects, and overlays are available for free in this slide show app.
● The built-in audio library provides suitable music with the slideshows to make it better as a complete presentation.
● Ending Thoughts →
● This article consists of all the top slideshow makers with their features to choose the most suitable one without any doubt.
● Suggestions are available both for Windows and Mac in the case of the slideshow creators.
● You can go for any of this software based on your requirements, editing experience, and system compatibility. Gradually, the best slideshow can be created in no time.
To create slideshow, multiple tools and elements are required. Generally, people look for a tool that’s easy to use and that’s rich in features. Even if such a tool is found, the immediate problem is the operating system. Not every system is compatible with Windows or Mac.
Here, this article is all about cutting the efforts to search for the best app for slide show making. All the top tools are listed in this single article that can serve the purpose for Windows and Mac users along with online users.
In this article
01 [Top 10 Slideshow Makers for Windows](#Part 1)
02 [Top 5 Slideshow Makers for Mac](#Part 2)
03 [Top 5 Online Slideshow Makers](#Part 3)
Part 1 Top 10 Slideshow Makers for Windows
01Adobe Spark
Adobe Spark or Adobe Creative Cloud Express is a top-notch software for creating a slideshow in Windows 8.1 or newer versions. As Adobe is always been a promising platform to create unique designs, with this application as well, users can flaunt their thoughts through different features.

● A simple UI assists beginners to understand all the functionalities before using it without much hassle. It also increases the speed to make a slide show with simple yet efficient tools.
● It is totally compatible with other Adobe products, making it flexible for any kind of use.
● You can create slide show on your PC without any watermark and with different existing templates and elements.
02Movavi Slideshow Maker
Movavi brings some unique features to create a slideshow with enhanced video quality and modern tool arrangement for all of the people who love to create a better presentation. Even with a seamless platform, all the necessary tools are arranged in a familiar pattern to make it comfortable.

● Full slideshow wizard is available with Movavi slide show maker to assist the beginners to create a quality presentation.
● With the screen recording feature, you can add live demonstration in the presentation with 150+ filters and visual effects.
● This slide show app includes multiple ready-made templates, music functionalities, etc. for a professional slideshow-making setup.
03MiniTool MovieMaker
MiniTool MovieMaker is a comparatively new tool as a free slideshow maker for all Windows users. It consists of quirky features like cartoon clips, animated elements, etc. along with modern transition and video processing tools.

● As this is a new platform, the latest features are added on frequently and the users can apply them for an up-to-the-minute slideshow. From trimming a video to adding a transition to a photo slideshow, everything is available on a single software.
● Even if you don’t know anything about video editing or creating a slideshow, this tool would guide you through everything with a simple arrangement and a wide range of options.
● You can export a video in different formats like MP4, MOV, WMV, etc., and get watermark-free projects.
04PhotoStage Slideshow Software
To make a slide show quickly, you can go with PhotoStage Slideshow software without any doubt. This software is not only useful for beginners but has exciting features for intermediate video editors. This slideshow app is compatible with Windows XP, Vista, 7, 8, 8.1, 10, and 11.

● There is a slideshow wizard feature to add themes, transitions, and music to the slides easily.
● Built-in DVD HD video authoring and YouTube sharing are available for wide usability of the slideshows for multiple purposes.
● Different audio tools and photo optimization tools are available to add a classy look to the presentation.
05Icecream Slideshow Maker
For the most simple yet efficient slideshow maker online, choose Icecream software that comes with a very beginner-friendly interface and options. For learning video editing and create a slideshow This software can be a good tool to start with. However, the features are very minimum and the professional creators might not find it very exciting. But for beginners or students, this would be a great choice.

● It supports various audio formats including MP3, WAV, WMA, and TIFF. Also, image formats including JPG, JPEG, and PNG are supported.
● Along with YouTube uploading, DVD transfer, cloud storage (Dropbox or Google Drive) is supported.
● slideshow is supported in this free slide show maker.
06Kizoa
It’s become a hassle often to find the suitable aspect for a slideshow for different screens like laptops, TV, or smartphone. Kizoa slide show maker is eliminating this problem with 7 different aspect ratios for the slideshows. And this can be an effective advantage when making a slideshow for any professional purpose.

● This app for slide show is available for Windows 7 or higher versions till Windows 10. There’s not been an update till now for Windows 11.
● Bulk collection of 2D and 3D transitions, effects, and GIFs are available to use in the slides as per the requirement.
● This software is intended to create slideshow only and all the features are added according to that unlike any slideshow creator cum video editor app.
07Magix Photostory Deluxe
For a high-quality professional slideshow maker online, Magix Photostory Deluxe is a good option. This editor has almost 1,500 built-in effects, 200+ decorative elements, and 100+ pre-designed templates to assist users with the slideshows in lesser time.

● Built-in DVD and Blu-ray burning features along with a 4K resolution feature are present with this application.
● Unique camera tracking and zooming features are available to add more latest elements to the slideshow.
● All-in-one platform to create slideshow, edit photos, and videos.
08Slideshow Maker
The name in itself defines this as one of the best slideshow makers with high-quality results. 4K Slideshow maker is available for Windows 7 and higher versions. Those who don’t want to compromise with the video resolution in the slideshow can try this slideshow app. However other features like tool arrangement and UI is slightly poor compared to other software.

● This software supports different file formats and makes this platform flexible for multiple uses.
● All the projects are saved in high resolution, i.e., 1080p or 4K.
09SmartSHOW 3D
SmartSHOW 3D is an efficient free slideshow maker for high-quality, 3D slideshows. This is another beginner-friendly software with multiple tools and effects. Some latest addition like pan & zoom effect creation, the audio waveform in the music section, and customized picture frames would help to add extra effect to the slideshow.

● free templates and 200+ free music tracks are available in this free slide show maker to enhance the whole presentation properly.
● You can also make mobile-optimized videos using the SmartSHOW 3D editor.
● Add a soundtrack to the slideshow and use existing templates in the free trial before buying the subscription.
● Multiple formats are supported to download the project after creating a slideshow.
Part 2 Top 5 Slideshow Makers for Mac
01PowerDirector
PowerDirector is one of the best free slideshow makers on Mac systems, enabling the pro features of the storyboard, timeline, and slideshow interfaces. There’s a wide capability of visual effects that can boost the whole quality of the slideshow in no time.

02iMovie
iMovie slide show maker is available for both macOS and iOS systems, to let the creators make some elegant and high-resolution slideshows. It includes professional-looking themes and interfaces to add a classy look to the whole presentation. It’s simple for beginners as there’s no complicated tool arrangement in the UI.

03Photostage
Photostage is a complete package for slideshow creation, including the seamless options for photo arrangement, special effects, audio set-up, etc. For beginners, it might be a bit confusing but with time, it will be easier to use. This free slide show maker is equally compatible with both Windows and Mac, unlike much other software.

04Videopad
Videopad is another top slideshow maker on Mac systems that has 50+ transition effects, third-party plugin support, and all popular file format compatibility. The slides would be made as with a movie effect on this platform with various latest templates and features.

05Keynote
For real-time collaboration and PowerPoint features, Keynote would be the best choice to create slide show. It has the integration with Adobe Photoshop which extends the creativity range more. You can also find an in-built large library for pre-made templates to apply in the slideshow. However, for beginners, Keynote can a be hurdle.

Part 3 Top 5 Online Slideshow Makers
To be independent of any system, users might also want to make slideshow online. To support this choice, the following five best slideshow creators are mentioned.
01Canva
Canva is a popular online slide show maker that has everything you need to make a perfect presentation. From various templates to elements, graphics to custom frames, special social media templates, and versatile file formats- the free version itself has many features to serve.

02Animoto
With an user-friendly interface and quick processing, Animoto is a favorite platform to make slideshow online. However, there is a problem with the watermark in some cases. You can automatically apply any modification to all the sections by applying the filters in one section. Note that, there’s no free subscription with this platform.

03FlexClip
Flexclip is a beginner-friendly online slideshow maker with numerous templates and assets to choose from. In the free version, you can download a video in 480p only. Also, there’s no undo button for slideshow creation. So, you need to be sure about any modification in this editor.

04Kapwing
Kapwing is a multipurpose online free slideshow maker for intermediate users. Different video editing tools are available along with subtitle and AI subtitle support. Note that, the content in free version is public and cannot be stored for more than 7 days.

05Visme
Visme is a quick slideshow maker with five easy steps to master. Companies like IBM and Accenture use Visme to create slideshows and infographics. Undoubtedly this can be a perfect pick for seamless, professional slideshow cration.

How to use Filmora?
Filmora is all-in-one software to create slide show for literary any purpose, in any operating system, providing all the features a creator might need while making a perfect slideshow. A slideshow can be for academic or professional purposes, to decorate some beautiful moments, or to create something unique. And for every separate aim, different tools and features are required in a slideshow maker. To fulfil all such requirements with the latest tools, Filomora has a versatile platform.
As in this article, we have already mentioned some of the best slideshow makers, you may find some restrictions like system boundaries, not being beginner-friendly, or missing the latest features in the free slideshow makers. That’s why the best possible solution is presented here with all the following advantages.
Advantages of Wondershare Filmora Video Editor Slideshow Maker:
● This software is compatible with both Windows (7 or later versions) and Mac OS (10.12 or later versions), giving flexible usability to all the slideshow enthusiasts.
For Win 7 or later (64-bit)
For macOS 10.12 or later
● It takes lesser time to create a slideshow in Filomra using the top-notch transitions and effects. Also, there’s a split-screen option to make a slideshow more efficiently.
● All the popular file formats are supported including images, audio, and video. And, it’s also easy to upload a project on any social media directly from Filmora.
● Numerous motion effects, titles, filters, effects, and overlays are available for free in this slide show app.
● The built-in audio library provides suitable music with the slideshows to make it better as a complete presentation.
● Ending Thoughts →
● This article consists of all the top slideshow makers with their features to choose the most suitable one without any doubt.
● Suggestions are available both for Windows and Mac in the case of the slideshow creators.
● You can go for any of this software based on your requirements, editing experience, and system compatibility. Gradually, the best slideshow can be created in no time.
To create slideshow, multiple tools and elements are required. Generally, people look for a tool that’s easy to use and that’s rich in features. Even if such a tool is found, the immediate problem is the operating system. Not every system is compatible with Windows or Mac.
Here, this article is all about cutting the efforts to search for the best app for slide show making. All the top tools are listed in this single article that can serve the purpose for Windows and Mac users along with online users.
In this article
01 [Top 10 Slideshow Makers for Windows](#Part 1)
02 [Top 5 Slideshow Makers for Mac](#Part 2)
03 [Top 5 Online Slideshow Makers](#Part 3)
Part 1 Top 10 Slideshow Makers for Windows
01Adobe Spark
Adobe Spark or Adobe Creative Cloud Express is a top-notch software for creating a slideshow in Windows 8.1 or newer versions. As Adobe is always been a promising platform to create unique designs, with this application as well, users can flaunt their thoughts through different features.

● A simple UI assists beginners to understand all the functionalities before using it without much hassle. It also increases the speed to make a slide show with simple yet efficient tools.
● It is totally compatible with other Adobe products, making it flexible for any kind of use.
● You can create slide show on your PC without any watermark and with different existing templates and elements.
02Movavi Slideshow Maker
Movavi brings some unique features to create a slideshow with enhanced video quality and modern tool arrangement for all of the people who love to create a better presentation. Even with a seamless platform, all the necessary tools are arranged in a familiar pattern to make it comfortable.

● Full slideshow wizard is available with Movavi slide show maker to assist the beginners to create a quality presentation.
● With the screen recording feature, you can add live demonstration in the presentation with 150+ filters and visual effects.
● This slide show app includes multiple ready-made templates, music functionalities, etc. for a professional slideshow-making setup.
03MiniTool MovieMaker
MiniTool MovieMaker is a comparatively new tool as a free slideshow maker for all Windows users. It consists of quirky features like cartoon clips, animated elements, etc. along with modern transition and video processing tools.

● As this is a new platform, the latest features are added on frequently and the users can apply them for an up-to-the-minute slideshow. From trimming a video to adding a transition to a photo slideshow, everything is available on a single software.
● Even if you don’t know anything about video editing or creating a slideshow, this tool would guide you through everything with a simple arrangement and a wide range of options.
● You can export a video in different formats like MP4, MOV, WMV, etc., and get watermark-free projects.
04PhotoStage Slideshow Software
To make a slide show quickly, you can go with PhotoStage Slideshow software without any doubt. This software is not only useful for beginners but has exciting features for intermediate video editors. This slideshow app is compatible with Windows XP, Vista, 7, 8, 8.1, 10, and 11.

● There is a slideshow wizard feature to add themes, transitions, and music to the slides easily.
● Built-in DVD HD video authoring and YouTube sharing are available for wide usability of the slideshows for multiple purposes.
● Different audio tools and photo optimization tools are available to add a classy look to the presentation.
05Icecream Slideshow Maker
For the most simple yet efficient slideshow maker online, choose Icecream software that comes with a very beginner-friendly interface and options. For learning video editing and create a slideshow This software can be a good tool to start with. However, the features are very minimum and the professional creators might not find it very exciting. But for beginners or students, this would be a great choice.

● It supports various audio formats including MP3, WAV, WMA, and TIFF. Also, image formats including JPG, JPEG, and PNG are supported.
● Along with YouTube uploading, DVD transfer, cloud storage (Dropbox or Google Drive) is supported.
● slideshow is supported in this free slide show maker.
06Kizoa
It’s become a hassle often to find the suitable aspect for a slideshow for different screens like laptops, TV, or smartphone. Kizoa slide show maker is eliminating this problem with 7 different aspect ratios for the slideshows. And this can be an effective advantage when making a slideshow for any professional purpose.

● This app for slide show is available for Windows 7 or higher versions till Windows 10. There’s not been an update till now for Windows 11.
● Bulk collection of 2D and 3D transitions, effects, and GIFs are available to use in the slides as per the requirement.
● This software is intended to create slideshow only and all the features are added according to that unlike any slideshow creator cum video editor app.
07Magix Photostory Deluxe
For a high-quality professional slideshow maker online, Magix Photostory Deluxe is a good option. This editor has almost 1,500 built-in effects, 200+ decorative elements, and 100+ pre-designed templates to assist users with the slideshows in lesser time.

● Built-in DVD and Blu-ray burning features along with a 4K resolution feature are present with this application.
● Unique camera tracking and zooming features are available to add more latest elements to the slideshow.
● All-in-one platform to create slideshow, edit photos, and videos.
08Slideshow Maker
The name in itself defines this as one of the best slideshow makers with high-quality results. 4K Slideshow maker is available for Windows 7 and higher versions. Those who don’t want to compromise with the video resolution in the slideshow can try this slideshow app. However other features like tool arrangement and UI is slightly poor compared to other software.

● This software supports different file formats and makes this platform flexible for multiple uses.
● All the projects are saved in high resolution, i.e., 1080p or 4K.
09SmartSHOW 3D
SmartSHOW 3D is an efficient free slideshow maker for high-quality, 3D slideshows. This is another beginner-friendly software with multiple tools and effects. Some latest addition like pan & zoom effect creation, the audio waveform in the music section, and customized picture frames would help to add extra effect to the slideshow.

● free templates and 200+ free music tracks are available in this free slide show maker to enhance the whole presentation properly.
● You can also make mobile-optimized videos using the SmartSHOW 3D editor.
● Add a soundtrack to the slideshow and use existing templates in the free trial before buying the subscription.
● Multiple formats are supported to download the project after creating a slideshow.
Part 2 Top 5 Slideshow Makers for Mac
01PowerDirector
PowerDirector is one of the best free slideshow makers on Mac systems, enabling the pro features of the storyboard, timeline, and slideshow interfaces. There’s a wide capability of visual effects that can boost the whole quality of the slideshow in no time.

02iMovie
iMovie slide show maker is available for both macOS and iOS systems, to let the creators make some elegant and high-resolution slideshows. It includes professional-looking themes and interfaces to add a classy look to the whole presentation. It’s simple for beginners as there’s no complicated tool arrangement in the UI.

03Photostage
Photostage is a complete package for slideshow creation, including the seamless options for photo arrangement, special effects, audio set-up, etc. For beginners, it might be a bit confusing but with time, it will be easier to use. This free slide show maker is equally compatible with both Windows and Mac, unlike much other software.

04Videopad
Videopad is another top slideshow maker on Mac systems that has 50+ transition effects, third-party plugin support, and all popular file format compatibility. The slides would be made as with a movie effect on this platform with various latest templates and features.

05Keynote
For real-time collaboration and PowerPoint features, Keynote would be the best choice to create slide show. It has the integration with Adobe Photoshop which extends the creativity range more. You can also find an in-built large library for pre-made templates to apply in the slideshow. However, for beginners, Keynote can a be hurdle.

Part 3 Top 5 Online Slideshow Makers
To be independent of any system, users might also want to make slideshow online. To support this choice, the following five best slideshow creators are mentioned.
01Canva
Canva is a popular online slide show maker that has everything you need to make a perfect presentation. From various templates to elements, graphics to custom frames, special social media templates, and versatile file formats- the free version itself has many features to serve.

02Animoto
With an user-friendly interface and quick processing, Animoto is a favorite platform to make slideshow online. However, there is a problem with the watermark in some cases. You can automatically apply any modification to all the sections by applying the filters in one section. Note that, there’s no free subscription with this platform.

03FlexClip
Flexclip is a beginner-friendly online slideshow maker with numerous templates and assets to choose from. In the free version, you can download a video in 480p only. Also, there’s no undo button for slideshow creation. So, you need to be sure about any modification in this editor.

04Kapwing
Kapwing is a multipurpose online free slideshow maker for intermediate users. Different video editing tools are available along with subtitle and AI subtitle support. Note that, the content in free version is public and cannot be stored for more than 7 days.

05Visme
Visme is a quick slideshow maker with five easy steps to master. Companies like IBM and Accenture use Visme to create slideshows and infographics. Undoubtedly this can be a perfect pick for seamless, professional slideshow cration.

How to use Filmora?
Filmora is all-in-one software to create slide show for literary any purpose, in any operating system, providing all the features a creator might need while making a perfect slideshow. A slideshow can be for academic or professional purposes, to decorate some beautiful moments, or to create something unique. And for every separate aim, different tools and features are required in a slideshow maker. To fulfil all such requirements with the latest tools, Filomora has a versatile platform.
As in this article, we have already mentioned some of the best slideshow makers, you may find some restrictions like system boundaries, not being beginner-friendly, or missing the latest features in the free slideshow makers. That’s why the best possible solution is presented here with all the following advantages.
Advantages of Wondershare Filmora Video Editor Slideshow Maker:
● This software is compatible with both Windows (7 or later versions) and Mac OS (10.12 or later versions), giving flexible usability to all the slideshow enthusiasts.
For Win 7 or later (64-bit)
For macOS 10.12 or later
● It takes lesser time to create a slideshow in Filomra using the top-notch transitions and effects. Also, there’s a split-screen option to make a slideshow more efficiently.
● All the popular file formats are supported including images, audio, and video. And, it’s also easy to upload a project on any social media directly from Filmora.
● Numerous motion effects, titles, filters, effects, and overlays are available for free in this slide show app.
● The built-in audio library provides suitable music with the slideshows to make it better as a complete presentation.
● Ending Thoughts →
● This article consists of all the top slideshow makers with their features to choose the most suitable one without any doubt.
● Suggestions are available both for Windows and Mac in the case of the slideshow creators.
● You can go for any of this software based on your requirements, editing experience, and system compatibility. Gradually, the best slideshow can be created in no time.
8 Tips to Apply Cinematic Color Grading to Your Video
Create High-Quality Video - Wondershare Filmora
An easy and powerful YouTube video editor
Numerous video and audio effects to choose from
Detailed tutorials are provided by the official channel
After a successful video shoot, video editing tends to wrap up the video production process. However, a video cannot be enlivened by using simple video editing tools, i.e., cut, crop, and trim, but rather tools such as cinematic color grading. Usually, directors want their video to evoke their intended ambiance and appear more realistic – This can only be achieved through cinematic color grading.
Color grading is the alteration and enhancement of color in a video, motion picture, or still image. Color grading is an essential tool for videographers since it enables them to enhance the mood or tone. Stick to this article and learn about the eight tips to apply cinematic color grading to your video.
In this article
02 8 Tips to Apply Cinematic Color Grading to Your Video
Don’t Make These Mistakes
Even though to err is human, there are some mistakes that colorists and video editors need to avoid at all costs. It is not only because they will make them look amateurish but also undermines the message and impact of the video.
Some people assume color grading is as simple as adding filters to their Instagram photos which they are absolutely wrong. Color grading is a long and frustrating process, and it only requires “persons with a thick skin.”
Some mistakes are not only committed by amateurs alone but also professional colorists who are in a rush to complete their projects on due time. Usually, these mistakes degrade the quality output. Some of the mistakes that one needs not make include:
1. Using a Poorly Calibrated Monitor
Almost every videographer and colorist’s goal is to design footages that distinctively display their primary colors and decipher the intended message. And this can only be achieved using a properly calibrated monitor.
Before working on a project, you ought to crosscheck your monitor calibration. Most people assume that the calibration is accurate since they possess a new, out-of-the-box monitor. It is utterly wrong since retailer shops usually adjust the monitor settings to overblown saturation and contrast to attract customers.
Furthermore, if you opt to edit your videos without adjusting your monitor calibration, you will have a poor footage.
2. Poor Prepping of the Video Footage
One major mistake that videographers often make is not prepping their video correctly. A poorly prepped footage is one that has a bad color space conversion. Usually, the outcome result of poorly prepped footage is an imbalanced image.
Prepping footage is not as easy as an apple pie. Besides, most videographers tend to follow a shortcut by starting messing with the gains and individual nodes, forgetting that a shortcut is often a wrong cut.
The best way of prepping a video is to start by making separate nodes and labeling them differently.
3. Imbalancing the Shadow
Have you ever seen video footage with partially opaque shadows? And when you look keenly, you see tinted greens and reds. Usually, this is a result of an imbalanced shadow.
This mistake is not only carried out by beginner videographers but also professionals who are always in a hurry to complete a project. When you look at your scope, you see the shadows are lifted or down in other scenarios – This is also a result of shadow imbalance.
4. Overusing LUTs
A mistake that beginner editors often make is overusing LUTs. Footages with overly used LUTs often appear to be dull. A thing that videographers need to observe when using LUTs is consistency.
When using LUTs, you need to ensure that your project has similar saturation, colors, and contrast throughout your video project. Moreover, it would be best to choose your LUTs based on the film color palette and your story.
5. Having Limited break
Having enough break enables one’s eyes to recalibrate. As a colorist, your eyes are often considered the main asset. Sitting for long periods in your workstation and staring for long hours at your monitor may cause one to add more saturation and contrast, thus making the video dull. Therefore the best remedy is to take a break from your monitor.
Besides, coming from a break enables one to have another different perspective about the color grading of the project.
8 Tips to Apply Cinematic Color Grading to Your Video
When it comes to creating cinematic looks in video footage, the camera type is usually non-essential. What matters is that you capture quality videos with the right angles then leave the rest to color grading.
For a video clip to look more cinematic, a couple of elements are put together. Here, we will look at those elements and create stunning videos.
1. Use Lumetri Color to adjust brightness, contrast, and saturation
The Lumeri color is an essential color grading functionality in most premiere software, including Wondershare Filmora, Adobe After Effects, and Davinci Resolve 17. With this functionality tool, you can carry out a wide range of customizable settings such as hue, saturation, contrasts, brightness, and tone.
The lumetri panel contains a histogram, vectorscope, parade scope, and waveform monitor. In your lumetri panel, you can measure the brightness and tonal values using a histogram, the light intensity with a waveform monitor, saturation and hue using vectorscope, and color channel using parade scope.
Adjusting the brightness, contrast, hue, saturation, and tone to moderate levels will give your video clip that cinematic look.

2. Use Cosmo functionality to adjust skin tones
Due to the light effect, shots taken during the day will have inconsistent color matches, especially skin tone. In the post-production process, one needs to make uniformity in skin tone and the clip. To rectify this, you need to involve a professional color grading functionality, Cosmo.
With cosmo, you can adjust the skin color, squeeze the skin, and soften the skin. Generally, Cosmo makes people in video clips look their best.

3. Use Highlights and Shadows adjustment
A clip will look more cinematic when the shadows and highlights are brought out as separate entities. The shadows become more vivid when adjusted to either teal, purple or blue. You can go a mile and adjust the highlights to become crystal clear by making the footage become yellow, red, or orange.
When carrying out color grading, you need to know the various video demands, such as the horror clips demand more of the dark shadow.

4. Use Vectorscope to get the accurate adjustment
Naked eyes cannot effectively see all the errors in a video project, which is the essence of having a vectorscope. A vectorscope provides all the quantitative information about a video image – This lessens work for video editors.
Vectorscope provides extensive details, such as how intense a given color is – This will help you make necessary adjustments to your footage.

5. Use the black and white functionality to change the opacity
Even though you can change your footage to black and white using the hue and saturation functionality, the black and white tool gives you more control.
This functionality feature can make your footage blend with the soft light part. Besides, it is best to first lower the contrast of your image or video to black and white to be able to highlight the unclear parts.

6. Use levels to unveil the whites, blacks, and mids of an image
Levels is a functionality feature that displays the blacks, whites, and mids of footage. With this functionality, you can make the highlight parts lighter and the shadows appear darker, which is essential in making cinematic videos.
In the levels histogram, the left slider defines the darkest part, the right defines the brightest part, and the top defines distributions.
In software such as Adobe After Effects, you can set this functionality to automatic or customize it based on your preference.

7. Use Vibrance to control other levels of saturation
The saturation of video footage or a clip can be regulated using vibrance functionality. With vibrance, you can alter the saturation levels of your clip while simultaneously minimizing clippings for the colors to approach complete saturation.
When you want to use this functionality in After Effects, you drag and drop it right on top of your footage – The exact part you want to apply it.

8. Use a Vignette to fade edges
To increase the point of focus, you need to fade your edges. In color grading, you can only fade your edges with a vignette.
This functionality allows you to center images or certain video parts and make the edges unclear. Your emphasis will be more on the central region.

Bottom line
● Color grading is not a piece of cake. Besides, you should not use it as an excuse for making simple mistakes such as the ones highlighted above. You need to pay close attention when color grading your films, and you will have your video project mapping out its intended meaning.
● Moreover, you need not be a pro to carry out cinematic color grading. You need to follow the above eight tips altogether to apply color grading to your video. You will create stunning video files that leave your viewers’ eyes gorged out.
After a successful video shoot, video editing tends to wrap up the video production process. However, a video cannot be enlivened by using simple video editing tools, i.e., cut, crop, and trim, but rather tools such as cinematic color grading. Usually, directors want their video to evoke their intended ambiance and appear more realistic – This can only be achieved through cinematic color grading.
Color grading is the alteration and enhancement of color in a video, motion picture, or still image. Color grading is an essential tool for videographers since it enables them to enhance the mood or tone. Stick to this article and learn about the eight tips to apply cinematic color grading to your video.
In this article
02 8 Tips to Apply Cinematic Color Grading to Your Video
Don’t Make These Mistakes
Even though to err is human, there are some mistakes that colorists and video editors need to avoid at all costs. It is not only because they will make them look amateurish but also undermines the message and impact of the video.
Some people assume color grading is as simple as adding filters to their Instagram photos which they are absolutely wrong. Color grading is a long and frustrating process, and it only requires “persons with a thick skin.”
Some mistakes are not only committed by amateurs alone but also professional colorists who are in a rush to complete their projects on due time. Usually, these mistakes degrade the quality output. Some of the mistakes that one needs not make include:
1. Using a Poorly Calibrated Monitor
Almost every videographer and colorist’s goal is to design footages that distinctively display their primary colors and decipher the intended message. And this can only be achieved using a properly calibrated monitor.
Before working on a project, you ought to crosscheck your monitor calibration. Most people assume that the calibration is accurate since they possess a new, out-of-the-box monitor. It is utterly wrong since retailer shops usually adjust the monitor settings to overblown saturation and contrast to attract customers.
Furthermore, if you opt to edit your videos without adjusting your monitor calibration, you will have a poor footage.
2. Poor Prepping of the Video Footage
One major mistake that videographers often make is not prepping their video correctly. A poorly prepped footage is one that has a bad color space conversion. Usually, the outcome result of poorly prepped footage is an imbalanced image.
Prepping footage is not as easy as an apple pie. Besides, most videographers tend to follow a shortcut by starting messing with the gains and individual nodes, forgetting that a shortcut is often a wrong cut.
The best way of prepping a video is to start by making separate nodes and labeling them differently.
3. Imbalancing the Shadow
Have you ever seen video footage with partially opaque shadows? And when you look keenly, you see tinted greens and reds. Usually, this is a result of an imbalanced shadow.
This mistake is not only carried out by beginner videographers but also professionals who are always in a hurry to complete a project. When you look at your scope, you see the shadows are lifted or down in other scenarios – This is also a result of shadow imbalance.
4. Overusing LUTs
A mistake that beginner editors often make is overusing LUTs. Footages with overly used LUTs often appear to be dull. A thing that videographers need to observe when using LUTs is consistency.
When using LUTs, you need to ensure that your project has similar saturation, colors, and contrast throughout your video project. Moreover, it would be best to choose your LUTs based on the film color palette and your story.
5. Having Limited break
Having enough break enables one’s eyes to recalibrate. As a colorist, your eyes are often considered the main asset. Sitting for long periods in your workstation and staring for long hours at your monitor may cause one to add more saturation and contrast, thus making the video dull. Therefore the best remedy is to take a break from your monitor.
Besides, coming from a break enables one to have another different perspective about the color grading of the project.
8 Tips to Apply Cinematic Color Grading to Your Video
When it comes to creating cinematic looks in video footage, the camera type is usually non-essential. What matters is that you capture quality videos with the right angles then leave the rest to color grading.
For a video clip to look more cinematic, a couple of elements are put together. Here, we will look at those elements and create stunning videos.
1. Use Lumetri Color to adjust brightness, contrast, and saturation
The Lumeri color is an essential color grading functionality in most premiere software, including Wondershare Filmora, Adobe After Effects, and Davinci Resolve 17. With this functionality tool, you can carry out a wide range of customizable settings such as hue, saturation, contrasts, brightness, and tone.
The lumetri panel contains a histogram, vectorscope, parade scope, and waveform monitor. In your lumetri panel, you can measure the brightness and tonal values using a histogram, the light intensity with a waveform monitor, saturation and hue using vectorscope, and color channel using parade scope.
Adjusting the brightness, contrast, hue, saturation, and tone to moderate levels will give your video clip that cinematic look.

2. Use Cosmo functionality to adjust skin tones
Due to the light effect, shots taken during the day will have inconsistent color matches, especially skin tone. In the post-production process, one needs to make uniformity in skin tone and the clip. To rectify this, you need to involve a professional color grading functionality, Cosmo.
With cosmo, you can adjust the skin color, squeeze the skin, and soften the skin. Generally, Cosmo makes people in video clips look their best.

3. Use Highlights and Shadows adjustment
A clip will look more cinematic when the shadows and highlights are brought out as separate entities. The shadows become more vivid when adjusted to either teal, purple or blue. You can go a mile and adjust the highlights to become crystal clear by making the footage become yellow, red, or orange.
When carrying out color grading, you need to know the various video demands, such as the horror clips demand more of the dark shadow.

4. Use Vectorscope to get the accurate adjustment
Naked eyes cannot effectively see all the errors in a video project, which is the essence of having a vectorscope. A vectorscope provides all the quantitative information about a video image – This lessens work for video editors.
Vectorscope provides extensive details, such as how intense a given color is – This will help you make necessary adjustments to your footage.

5. Use the black and white functionality to change the opacity
Even though you can change your footage to black and white using the hue and saturation functionality, the black and white tool gives you more control.
This functionality feature can make your footage blend with the soft light part. Besides, it is best to first lower the contrast of your image or video to black and white to be able to highlight the unclear parts.

6. Use levels to unveil the whites, blacks, and mids of an image
Levels is a functionality feature that displays the blacks, whites, and mids of footage. With this functionality, you can make the highlight parts lighter and the shadows appear darker, which is essential in making cinematic videos.
In the levels histogram, the left slider defines the darkest part, the right defines the brightest part, and the top defines distributions.
In software such as Adobe After Effects, you can set this functionality to automatic or customize it based on your preference.

7. Use Vibrance to control other levels of saturation
The saturation of video footage or a clip can be regulated using vibrance functionality. With vibrance, you can alter the saturation levels of your clip while simultaneously minimizing clippings for the colors to approach complete saturation.
When you want to use this functionality in After Effects, you drag and drop it right on top of your footage – The exact part you want to apply it.

8. Use a Vignette to fade edges
To increase the point of focus, you need to fade your edges. In color grading, you can only fade your edges with a vignette.
This functionality allows you to center images or certain video parts and make the edges unclear. Your emphasis will be more on the central region.

Bottom line
● Color grading is not a piece of cake. Besides, you should not use it as an excuse for making simple mistakes such as the ones highlighted above. You need to pay close attention when color grading your films, and you will have your video project mapping out its intended meaning.
● Moreover, you need not be a pro to carry out cinematic color grading. You need to follow the above eight tips altogether to apply color grading to your video. You will create stunning video files that leave your viewers’ eyes gorged out.
After a successful video shoot, video editing tends to wrap up the video production process. However, a video cannot be enlivened by using simple video editing tools, i.e., cut, crop, and trim, but rather tools such as cinematic color grading. Usually, directors want their video to evoke their intended ambiance and appear more realistic – This can only be achieved through cinematic color grading.
Color grading is the alteration and enhancement of color in a video, motion picture, or still image. Color grading is an essential tool for videographers since it enables them to enhance the mood or tone. Stick to this article and learn about the eight tips to apply cinematic color grading to your video.
In this article
02 8 Tips to Apply Cinematic Color Grading to Your Video
Don’t Make These Mistakes
Even though to err is human, there are some mistakes that colorists and video editors need to avoid at all costs. It is not only because they will make them look amateurish but also undermines the message and impact of the video.
Some people assume color grading is as simple as adding filters to their Instagram photos which they are absolutely wrong. Color grading is a long and frustrating process, and it only requires “persons with a thick skin.”
Some mistakes are not only committed by amateurs alone but also professional colorists who are in a rush to complete their projects on due time. Usually, these mistakes degrade the quality output. Some of the mistakes that one needs not make include:
1. Using a Poorly Calibrated Monitor
Almost every videographer and colorist’s goal is to design footages that distinctively display their primary colors and decipher the intended message. And this can only be achieved using a properly calibrated monitor.
Before working on a project, you ought to crosscheck your monitor calibration. Most people assume that the calibration is accurate since they possess a new, out-of-the-box monitor. It is utterly wrong since retailer shops usually adjust the monitor settings to overblown saturation and contrast to attract customers.
Furthermore, if you opt to edit your videos without adjusting your monitor calibration, you will have a poor footage.
2. Poor Prepping of the Video Footage
One major mistake that videographers often make is not prepping their video correctly. A poorly prepped footage is one that has a bad color space conversion. Usually, the outcome result of poorly prepped footage is an imbalanced image.
Prepping footage is not as easy as an apple pie. Besides, most videographers tend to follow a shortcut by starting messing with the gains and individual nodes, forgetting that a shortcut is often a wrong cut.
The best way of prepping a video is to start by making separate nodes and labeling them differently.
3. Imbalancing the Shadow
Have you ever seen video footage with partially opaque shadows? And when you look keenly, you see tinted greens and reds. Usually, this is a result of an imbalanced shadow.
This mistake is not only carried out by beginner videographers but also professionals who are always in a hurry to complete a project. When you look at your scope, you see the shadows are lifted or down in other scenarios – This is also a result of shadow imbalance.
4. Overusing LUTs
A mistake that beginner editors often make is overusing LUTs. Footages with overly used LUTs often appear to be dull. A thing that videographers need to observe when using LUTs is consistency.
When using LUTs, you need to ensure that your project has similar saturation, colors, and contrast throughout your video project. Moreover, it would be best to choose your LUTs based on the film color palette and your story.
5. Having Limited break
Having enough break enables one’s eyes to recalibrate. As a colorist, your eyes are often considered the main asset. Sitting for long periods in your workstation and staring for long hours at your monitor may cause one to add more saturation and contrast, thus making the video dull. Therefore the best remedy is to take a break from your monitor.
Besides, coming from a break enables one to have another different perspective about the color grading of the project.
8 Tips to Apply Cinematic Color Grading to Your Video
When it comes to creating cinematic looks in video footage, the camera type is usually non-essential. What matters is that you capture quality videos with the right angles then leave the rest to color grading.
For a video clip to look more cinematic, a couple of elements are put together. Here, we will look at those elements and create stunning videos.
1. Use Lumetri Color to adjust brightness, contrast, and saturation
The Lumeri color is an essential color grading functionality in most premiere software, including Wondershare Filmora, Adobe After Effects, and Davinci Resolve 17. With this functionality tool, you can carry out a wide range of customizable settings such as hue, saturation, contrasts, brightness, and tone.
The lumetri panel contains a histogram, vectorscope, parade scope, and waveform monitor. In your lumetri panel, you can measure the brightness and tonal values using a histogram, the light intensity with a waveform monitor, saturation and hue using vectorscope, and color channel using parade scope.
Adjusting the brightness, contrast, hue, saturation, and tone to moderate levels will give your video clip that cinematic look.

2. Use Cosmo functionality to adjust skin tones
Due to the light effect, shots taken during the day will have inconsistent color matches, especially skin tone. In the post-production process, one needs to make uniformity in skin tone and the clip. To rectify this, you need to involve a professional color grading functionality, Cosmo.
With cosmo, you can adjust the skin color, squeeze the skin, and soften the skin. Generally, Cosmo makes people in video clips look their best.

3. Use Highlights and Shadows adjustment
A clip will look more cinematic when the shadows and highlights are brought out as separate entities. The shadows become more vivid when adjusted to either teal, purple or blue. You can go a mile and adjust the highlights to become crystal clear by making the footage become yellow, red, or orange.
When carrying out color grading, you need to know the various video demands, such as the horror clips demand more of the dark shadow.

4. Use Vectorscope to get the accurate adjustment
Naked eyes cannot effectively see all the errors in a video project, which is the essence of having a vectorscope. A vectorscope provides all the quantitative information about a video image – This lessens work for video editors.
Vectorscope provides extensive details, such as how intense a given color is – This will help you make necessary adjustments to your footage.

5. Use the black and white functionality to change the opacity
Even though you can change your footage to black and white using the hue and saturation functionality, the black and white tool gives you more control.
This functionality feature can make your footage blend with the soft light part. Besides, it is best to first lower the contrast of your image or video to black and white to be able to highlight the unclear parts.

6. Use levels to unveil the whites, blacks, and mids of an image
Levels is a functionality feature that displays the blacks, whites, and mids of footage. With this functionality, you can make the highlight parts lighter and the shadows appear darker, which is essential in making cinematic videos.
In the levels histogram, the left slider defines the darkest part, the right defines the brightest part, and the top defines distributions.
In software such as Adobe After Effects, you can set this functionality to automatic or customize it based on your preference.

7. Use Vibrance to control other levels of saturation
The saturation of video footage or a clip can be regulated using vibrance functionality. With vibrance, you can alter the saturation levels of your clip while simultaneously minimizing clippings for the colors to approach complete saturation.
When you want to use this functionality in After Effects, you drag and drop it right on top of your footage – The exact part you want to apply it.

8. Use a Vignette to fade edges
To increase the point of focus, you need to fade your edges. In color grading, you can only fade your edges with a vignette.
This functionality allows you to center images or certain video parts and make the edges unclear. Your emphasis will be more on the central region.

Bottom line
● Color grading is not a piece of cake. Besides, you should not use it as an excuse for making simple mistakes such as the ones highlighted above. You need to pay close attention when color grading your films, and you will have your video project mapping out its intended meaning.
● Moreover, you need not be a pro to carry out cinematic color grading. You need to follow the above eight tips altogether to apply color grading to your video. You will create stunning video files that leave your viewers’ eyes gorged out.
After a successful video shoot, video editing tends to wrap up the video production process. However, a video cannot be enlivened by using simple video editing tools, i.e., cut, crop, and trim, but rather tools such as cinematic color grading. Usually, directors want their video to evoke their intended ambiance and appear more realistic – This can only be achieved through cinematic color grading.
Color grading is the alteration and enhancement of color in a video, motion picture, or still image. Color grading is an essential tool for videographers since it enables them to enhance the mood or tone. Stick to this article and learn about the eight tips to apply cinematic color grading to your video.
In this article
02 8 Tips to Apply Cinematic Color Grading to Your Video
Don’t Make These Mistakes
Even though to err is human, there are some mistakes that colorists and video editors need to avoid at all costs. It is not only because they will make them look amateurish but also undermines the message and impact of the video.
Some people assume color grading is as simple as adding filters to their Instagram photos which they are absolutely wrong. Color grading is a long and frustrating process, and it only requires “persons with a thick skin.”
Some mistakes are not only committed by amateurs alone but also professional colorists who are in a rush to complete their projects on due time. Usually, these mistakes degrade the quality output. Some of the mistakes that one needs not make include:
1. Using a Poorly Calibrated Monitor
Almost every videographer and colorist’s goal is to design footages that distinctively display their primary colors and decipher the intended message. And this can only be achieved using a properly calibrated monitor.
Before working on a project, you ought to crosscheck your monitor calibration. Most people assume that the calibration is accurate since they possess a new, out-of-the-box monitor. It is utterly wrong since retailer shops usually adjust the monitor settings to overblown saturation and contrast to attract customers.
Furthermore, if you opt to edit your videos without adjusting your monitor calibration, you will have a poor footage.
2. Poor Prepping of the Video Footage
One major mistake that videographers often make is not prepping their video correctly. A poorly prepped footage is one that has a bad color space conversion. Usually, the outcome result of poorly prepped footage is an imbalanced image.
Prepping footage is not as easy as an apple pie. Besides, most videographers tend to follow a shortcut by starting messing with the gains and individual nodes, forgetting that a shortcut is often a wrong cut.
The best way of prepping a video is to start by making separate nodes and labeling them differently.
3. Imbalancing the Shadow
Have you ever seen video footage with partially opaque shadows? And when you look keenly, you see tinted greens and reds. Usually, this is a result of an imbalanced shadow.
This mistake is not only carried out by beginner videographers but also professionals who are always in a hurry to complete a project. When you look at your scope, you see the shadows are lifted or down in other scenarios – This is also a result of shadow imbalance.
4. Overusing LUTs
A mistake that beginner editors often make is overusing LUTs. Footages with overly used LUTs often appear to be dull. A thing that videographers need to observe when using LUTs is consistency.
When using LUTs, you need to ensure that your project has similar saturation, colors, and contrast throughout your video project. Moreover, it would be best to choose your LUTs based on the film color palette and your story.
5. Having Limited break
Having enough break enables one’s eyes to recalibrate. As a colorist, your eyes are often considered the main asset. Sitting for long periods in your workstation and staring for long hours at your monitor may cause one to add more saturation and contrast, thus making the video dull. Therefore the best remedy is to take a break from your monitor.
Besides, coming from a break enables one to have another different perspective about the color grading of the project.
8 Tips to Apply Cinematic Color Grading to Your Video
When it comes to creating cinematic looks in video footage, the camera type is usually non-essential. What matters is that you capture quality videos with the right angles then leave the rest to color grading.
For a video clip to look more cinematic, a couple of elements are put together. Here, we will look at those elements and create stunning videos.
1. Use Lumetri Color to adjust brightness, contrast, and saturation
The Lumeri color is an essential color grading functionality in most premiere software, including Wondershare Filmora, Adobe After Effects, and Davinci Resolve 17. With this functionality tool, you can carry out a wide range of customizable settings such as hue, saturation, contrasts, brightness, and tone.
The lumetri panel contains a histogram, vectorscope, parade scope, and waveform monitor. In your lumetri panel, you can measure the brightness and tonal values using a histogram, the light intensity with a waveform monitor, saturation and hue using vectorscope, and color channel using parade scope.
Adjusting the brightness, contrast, hue, saturation, and tone to moderate levels will give your video clip that cinematic look.

2. Use Cosmo functionality to adjust skin tones
Due to the light effect, shots taken during the day will have inconsistent color matches, especially skin tone. In the post-production process, one needs to make uniformity in skin tone and the clip. To rectify this, you need to involve a professional color grading functionality, Cosmo.
With cosmo, you can adjust the skin color, squeeze the skin, and soften the skin. Generally, Cosmo makes people in video clips look their best.

3. Use Highlights and Shadows adjustment
A clip will look more cinematic when the shadows and highlights are brought out as separate entities. The shadows become more vivid when adjusted to either teal, purple or blue. You can go a mile and adjust the highlights to become crystal clear by making the footage become yellow, red, or orange.
When carrying out color grading, you need to know the various video demands, such as the horror clips demand more of the dark shadow.

4. Use Vectorscope to get the accurate adjustment
Naked eyes cannot effectively see all the errors in a video project, which is the essence of having a vectorscope. A vectorscope provides all the quantitative information about a video image – This lessens work for video editors.
Vectorscope provides extensive details, such as how intense a given color is – This will help you make necessary adjustments to your footage.

5. Use the black and white functionality to change the opacity
Even though you can change your footage to black and white using the hue and saturation functionality, the black and white tool gives you more control.
This functionality feature can make your footage blend with the soft light part. Besides, it is best to first lower the contrast of your image or video to black and white to be able to highlight the unclear parts.

6. Use levels to unveil the whites, blacks, and mids of an image
Levels is a functionality feature that displays the blacks, whites, and mids of footage. With this functionality, you can make the highlight parts lighter and the shadows appear darker, which is essential in making cinematic videos.
In the levels histogram, the left slider defines the darkest part, the right defines the brightest part, and the top defines distributions.
In software such as Adobe After Effects, you can set this functionality to automatic or customize it based on your preference.

7. Use Vibrance to control other levels of saturation
The saturation of video footage or a clip can be regulated using vibrance functionality. With vibrance, you can alter the saturation levels of your clip while simultaneously minimizing clippings for the colors to approach complete saturation.
When you want to use this functionality in After Effects, you drag and drop it right on top of your footage – The exact part you want to apply it.

8. Use a Vignette to fade edges
To increase the point of focus, you need to fade your edges. In color grading, you can only fade your edges with a vignette.
This functionality allows you to center images or certain video parts and make the edges unclear. Your emphasis will be more on the central region.

Bottom line
● Color grading is not a piece of cake. Besides, you should not use it as an excuse for making simple mistakes such as the ones highlighted above. You need to pay close attention when color grading your films, and you will have your video project mapping out its intended meaning.
● Moreover, you need not be a pro to carry out cinematic color grading. You need to follow the above eight tips altogether to apply color grading to your video. You will create stunning video files that leave your viewers’ eyes gorged out.
Also read:
- 2024 Approved Using the Best Templates to Create Slow Motion Videos on CapCut
- Updated Free Ways To Split Video For Whatsapp Status On All Platforms
- New Add Camera Shake to Video in Adobe After Effects for 2024
- AI Has Influenced All Video Editors to Speed up Editing. This Article Discusses the Significance of AI Slow Motion and the Tools that Offer It for 2024
- New The Complete Guide to Converting GIF to SVG With Ease for 2024
- Guide to Making Cinematography for Music Video
- In 2024, Do You Want to Record Videos with a Phantom High-Speed Camera? In This Guide, You Can Get a Detailed Note on the Phantom Camera
- 2024 Approved Thousands Already Know What Ezgif Is and So Can You
- New 10 Mind-Blowing Video Collage Maker for PC
- In 2024, How to Create Sports Intro and Outro for YouTube Video?
- How to Edit Text in Premiere Pro for 2024
- How to Color Grading in Final Cut Pro
- New Are You Looking to Finish Your YouTube Video in Style? The Following Are the Best End Screen Makers to Choose From
- As a Designer, Color Is the Most Powerful and the Most Diverse Tool at Your Disposal. Here Are Ten Matching Color Combinations to Get You Started on Your Next Project
- New What You Should Know About Speech-to-Text Technology
- New What Are the Best 15 Slideshow Presentation Examples Your Audience Will Love for 2024
- How to Create and Add an Adjustment Layer in Final Cut Pro
- New 2024 Approved Guide to Synchronizing Your Audio And Videos Properly?
- In This Article, You Will Learn About Splitting the Video Into the Frames in FFmpeg and Mentioning the Easy Option for Doing the Same Task in a Few Seconds by Wondershare Filmora
- 2024 Approved Guaranteed 10 Storyboard Creators To Make Animation Easier
- New Learn How to Effortlessly Mirror Video Clips in Adobe Premiere Pro with This Step-by-Step Guide. Perfect for Creating a Symmetrical Look in Your Videos
- In 2024, Step by Step to Split a Clip in VLC
- 2024 Approved How To Track and Blur Faces in Premiere Pro
- In 2024, Easy Way to Add Transitions to Videos
- 2024 Approved REVIEW Whats Top 10 Software to Make AI Upscaling Video
- 2024 Approved The Complete Guide to Make a Text Collage
- New Google Meet Green Screen
- New Fixing The Slow Playback Issues in DaVinci Resolve for 2024
- Updated 2024 Approved 6 Best Text to Speech Generators for YouTube Videos Windows, Mac, Android, iPhone & Online
- Updated In 2024, How to Combine Multiple Videos Into One on Instagram
- Updated How to Blur a Still or Moving Part of Video for 2024
- Updated In 2024, 11 Apps To Speed Up A Video On iPhone
- In 2024, Shoot Video with Virtual Green Screen
- New How to Convert Videos to Slow Motion for 2024
- The Best Android SIM Unlock Code Generators Unlock Your Oppo A1x 5G Phone Hassle-Free
- Getting the Pokemon Go GPS Signal Not Found 11 Error in Itel A05s | Dr.fone
- How to use Pokemon Go Joystick on Oppo Find X6? | Dr.fone
- In 2024, Does Life360 Notify When You Log Out On Tecno Spark 10C? | Dr.fone
- Can Life360 Track Or See Text Messages? What Can You Do with Life360 On Realme C53? | Dr.fone
- In 2024, Top Apps and Online Tools To Track Poco Phone With/Without IMEI Number
- How Can Tecno Spark 20Mirror Share to PC? | Dr.fone
- 8 Best Apps for Screen Mirroring Realme GT 5 Pro PC | Dr.fone
- About Honor 70 Lite 5G FRP Bypass
- How To Enable USB Debugging on a Locked Samsung Galaxy XCover 6 Pro Tactical Edition Phone
- In 2024, How to Change Your Oppo Reno 8T 5G Location on life360 Without Anyone Knowing? | Dr.fone
- Solutions to Repair Corrupt PDF v1.1 File
- How to Factory Reset Infinix GT 10 Pro in 5 Easy Ways | Dr.fone
- Proven Ways to Fix There Was A Problem Parsing the Package on Vivo G2 | Dr.fone
- In 2024, How to Transfer Contacts from Asus ROG Phone 7 Ultimate to Other Android Devices Devices? | Dr.fone
- Rootjunky APK To Bypass Google FRP Lock For Vivo V29e
- In 2024, What Is a SIM Network Unlock PIN? Get Your Oppo Reno 11 5G Phone Network-Ready
- In 2024, How to Track WhatsApp Messages on Gionee F3 Pro Without Them Knowing? | Dr.fone
- In 2024, How to Turn Off Find My iPhone 11 when Phone is Broken?
- How to Quickly Fix Bluetooth Not Working on Honor X7b | Dr.fone
- 8 Ultimate Fixes for Google Play Your Motorola Moto G13 Isnt Compatible | Dr.fone
- In 2024, How To Unlock Stolen Apple iPhone 15 Plus In Different Conditionsin | Dr.fone
- How to Transfer Photos from Oppo A58 4G to Laptop Without USB | Dr.fone
- Keyword Grouping Tool
- How To Restore Missing Music Files from Lava Yuva 3
- Best Methods for Realme GT 5 Pro Wont Turn On | Dr.fone
- Why Does My Xiaomi Redmi Note 12 Pro 5G Keep Turning Off By Itself? 6 Fixes Are Here | Dr.fone
- Title: New Free Ways To Split Video For Whatsapp Status On All Platforms
- Author: Chloe
- Created at : 2024-05-20 03:38:31
- Updated at : 2024-05-21 03:38:31
- Link: https://ai-editing-video.techidaily.com/new-free-ways-to-split-video-for-whatsapp-status-on-all-platforms/
- License: This work is licensed under CC BY-NC-SA 4.0.

