
:max_bytes(150000):strip_icc():format(webp)/how-to-view-instagram-without-an-account-5271416-505eeceaf0e142ed8674d2ce2244a8be.jpg)
New Get The Perfect Drone Footage With Free Drone LUTs for 2024
Get The Perfect Drone Footage With Free Drone LUTs
Drone footage is an aerial recording of an event, occasion, or entire town. The quality of these drone recordings may not be good enough. This is why users need to pursue video editing to enhance video quality. Meanwhile, editing videos from scratch can be time-consuming. Utilizing free drone LUTs is ideal for upscaling video quality to optimized standards. In this article, you will find top recommendations for using drone LUTs.
- Part 2: How Can LUTs be Used in Drone Footage Editing?
- Part 3: Best Drone LUTs To Discover In 2024
- Bonus Part: Learn More About Video Editing Through LUTs with Wondershare Filmora
Part 1: What Do You Know About LUTs?
LUTS, or Lookup Tables, do exist in small files. These files have sources to enhance color grading and optimize color correction within videos and images. The sources are special color presets that transform color schemas. The use cases of LUTs typically fall within the video and film industries. Individuals can also use these video-enhancing tools to better visualize their content.
Within LUTs, you will find a range of preset filters that can be applied. Meanwhile, the color grading is executed with more consistency. This way, the colors are accurately applied to all frames of visual content. The colors are mapped into the original footage using pre-determined color options. So, you don’t need to adjust or manually customize individual colors.
Part 2: How Can LUTs be Used in Drone Footage Editing?
Drone technology is a new revolution in this modern world. After all, it allows us to capture aerial photos and videos with greater proximity. While the quality of this footage may not be good, LUTs can help. Here is how you can use LUTs in drone footage editing and make your work easier:
- Color Grading: You can use LUTs for creative color grading solutions. After all, there are different filter presets with unique color styling. This provides new and interesting looks to your visual media.
- Match Colors: If you use different cameras to record drone footage, colors may differ. That’s where LUTs can be useful. They can match colors in all frames with dedicated filter presets.
- Color Correction: Drone footage often faces lighting issues that damage color gradients. When using drone LUTs pack-free, you can correct color schemas with consistency. The color imbalances will rectify.
- Saves Resources: With LUTs, you can save time and money. So, you don’t need to waste long hours on video editing. You don’t even have to spend money on good editing software. Color grading becomes more straightforward with LUTs.
Part 3: Best Drone LUTs To Discover In 2024
Aerial technology in this modern world is evolving, which includes drone usage. In contrast, you may need to upscale video colors using special drone LUTs. Here you’ll find the list of the best drone LUTs to make video upscaling smarter:
1.Moody DJI Drone LUTs
Provide moody styles to your recorded drone footage with this DJI drone LUTs pack free download. There are 15 LUTs preset filters that you can use to upscale video colors. All filters are unique, with different color gradients, contrast, and compositions. You have to import these filters to use them, and they require no extra plugin. The drone LUTs pack is compatible with both Windows and Mac.

2.DJI Drone LUTs Color Preset
Transfrom your aerial video shoot in wildlife, sports, or traveling with this LUTs pack. After all, this DJI Mavic 2 Pro LUTs works with drones, including the DJI Mavic Pro line. There are, in total, 120 color presets that are available in different gradients. The quality for these LUTs is 8K, and they work with LOG and Rec .709.

3.DB - Cinematic Drone LUTs
Enhance aerial videography using color grading using this cinematic drone LUTs-free pack. In this LUTs pack, you’ll find 10 premium LUTs to get started. Each LUTs possesses a special color preset to provide new looks within aerial videos. Meanwhile, this DJI drone LUTs pack free download is ideal for DJI drones. The LUTs work well on types of camera footage.

4. CINEMATIC DRONE LUTS
Apply professional color gradients to your all-important drone visual content. You can transform videos’ visual quality by using these free LUTs for drone footage. In total, you receive 25 color presets in different color schemas and textures. This way, you can blend cinematic touch into your aerial shoot. You can even set a reference point or increase the speed of color grading.

5. JHL Drone LUTs
Aerial videography can be upscaled in a simpler way using JHL drone LUTs. After all, this LUTs pack contains 18 distinctive LUTs preset filters. In general, you can use these LUTs on all software editing platforms. Meanwhile, the LUTs have been tested for DJI drone clips, so expect outstanding results. The LUTs are special because they provide solutions in all weather and light ranges.

6. Drone LUTs
Make your aerial project more enchanting with this drone LUTs pack free. You will get 20 diverse drone LUTs preset filters. In contrast, these filters suit all lighting, weather, and environment. The color gradients of your visual content are optimized with stunning color grading. These LUTs work with any resolution. You need to drag and drop these elements into your content.

7. B&W
Black and white color schemes are always special. Adding them to your aerial videos or photos can enlighten your content’s visualization. By using these B&W LUTs for drones, turn aerial shoots into appealing black-and-white contrasts. This will make your visual content more aesthetic with improved engagement. Using this LUTs pack is very convenient and straightforward.

Bonus Part: Learn More About Video Editing Through LUTs with Wondershare Filmora
Video editing is a way to optimize the quality of videos with perfection. Meanwhile, using LUTs can convincingly simplify video editing. For using cinematic drone LUTs free, you need a good and reliable tool. Wondershare Filmora is the trusted solution in this regard. This is a video editing software that allows video upscaling from broader perspectives.
There are more than 200 LUTs that you can use, and every LUTs is unique. The availability of titles, stickers, transitions, effects, and audio makes this tool special. Meanwhile, Filmora comes with a user-friendly interface to get started.

Key Features of Wondershare Filmora
Regarding video editing, Wondershare Filmora takes the lead over its competitors. There are several functions and various tools to learn about, which can be seen in the critical features of Filmora described below:
1. Instant Mode
Filmora’s instant mode allows you to create videos without requiring editing skills. You have to add your respective media items, and Filmora transforms them into videos. There are more than 115 templates that you can use. The AI algorithm works fast and efficiently.
2. Batch Text Editing
Using batch text editing, you can add subtitles to your video. There are three ways to batch edit the text. First, select all texts in the timeline to edit them at the same time. Second, multiple text styles in the Filmora player. Third, changing fonts in bulk quantity within advanced editing.
3. Screen Recorder
Record your screenplay using the Filmora screen recording facility. So, you can record videos from different areas of a webcam or PC screen. You can also customize the ratio and screen sizes of your videos. Meanwhile, audio is recorded by microphone and system.
4. Adjustment layer
Filmora can also help add general effects to your videos at once. Through the adjustment layer, the same effects could be applied across timeline videos. This improves video editing efficiency as a whole. In addition, the adjustment layer can hold unlimited effects.
Add LUTs on Video For Win 7 or later(64-bit)
Add LUTs on Video For macOS 10.14 or later


Conclusion
Drone technology is evolving modern videography and photography with aerial views. Meanwhile, using a camera may affect the quality of recorded videos. This is why using DJI mini 2 LUTs free is essential. This article discussed 7 drone LUTs pack free help get started with color upscaling. Moreover, you also learned about Wondershare Filmora, which is a best-in-class video editing software.
- Part 3: Best Drone LUTs To Discover In 2024
- Bonus Part: Learn More About Video Editing Through LUTs with Wondershare Filmora
Part 1: What Do You Know About LUTs?
LUTS, or Lookup Tables, do exist in small files. These files have sources to enhance color grading and optimize color correction within videos and images. The sources are special color presets that transform color schemas. The use cases of LUTs typically fall within the video and film industries. Individuals can also use these video-enhancing tools to better visualize their content.
Within LUTs, you will find a range of preset filters that can be applied. Meanwhile, the color grading is executed with more consistency. This way, the colors are accurately applied to all frames of visual content. The colors are mapped into the original footage using pre-determined color options. So, you don’t need to adjust or manually customize individual colors.
Part 2: How Can LUTs be Used in Drone Footage Editing?
Drone technology is a new revolution in this modern world. After all, it allows us to capture aerial photos and videos with greater proximity. While the quality of this footage may not be good, LUTs can help. Here is how you can use LUTs in drone footage editing and make your work easier:
- Color Grading: You can use LUTs for creative color grading solutions. After all, there are different filter presets with unique color styling. This provides new and interesting looks to your visual media.
- Match Colors: If you use different cameras to record drone footage, colors may differ. That’s where LUTs can be useful. They can match colors in all frames with dedicated filter presets.
- Color Correction: Drone footage often faces lighting issues that damage color gradients. When using drone LUTs pack-free, you can correct color schemas with consistency. The color imbalances will rectify.
- Saves Resources: With LUTs, you can save time and money. So, you don’t need to waste long hours on video editing. You don’t even have to spend money on good editing software. Color grading becomes more straightforward with LUTs.
Part 3: Best Drone LUTs To Discover In 2024
Aerial technology in this modern world is evolving, which includes drone usage. In contrast, you may need to upscale video colors using special drone LUTs. Here you’ll find the list of the best drone LUTs to make video upscaling smarter:
1.Moody DJI Drone LUTs
Provide moody styles to your recorded drone footage with this DJI drone LUTs pack free download. There are 15 LUTs preset filters that you can use to upscale video colors. All filters are unique, with different color gradients, contrast, and compositions. You have to import these filters to use them, and they require no extra plugin. The drone LUTs pack is compatible with both Windows and Mac.
2.DJI Drone LUTs Color Preset
Transfrom your aerial video shoot in wildlife, sports, or traveling with this LUTs pack. After all, this DJI Mavic 2 Pro LUTs works with drones, including the DJI Mavic Pro line. There are, in total, 120 color presets that are available in different gradients. The quality for these LUTs is 8K, and they work with LOG and Rec .709.
3.DB - Cinematic Drone LUTs
Enhance aerial videography using color grading using this cinematic drone LUTs-free pack. In this LUTs pack, you’ll find 10 premium LUTs to get started. Each LUTs possesses a special color preset to provide new looks within aerial videos. Meanwhile, this DJI drone LUTs pack free download is ideal for DJI drones. The LUTs work well on types of camera footage.
4. CINEMATIC DRONE LUTS
Apply professional color gradients to your all-important drone visual content. You can transform videos’ visual quality by using these free LUTs for drone footage. In total, you receive 25 color presets in different color schemas and textures. This way, you can blend cinematic touch into your aerial shoot. You can even set a reference point or increase the speed of color grading.
5. JHL Drone LUTs
Aerial videography can be upscaled in a simpler way using JHL drone LUTs. After all, this LUTs pack contains 18 distinctive LUTs preset filters. In general, you can use these LUTs on all software editing platforms. Meanwhile, the LUTs have been tested for DJI drone clips, so expect outstanding results. The LUTs are special because they provide solutions in all weather and light ranges.
6. Drone LUTs
Make your aerial project more enchanting with this drone LUTs pack free. You will get 20 diverse drone LUTs preset filters. In contrast, these filters suit all lighting, weather, and environment. The color gradients of your visual content are optimized with stunning color grading. These LUTs work with any resolution. You need to drag and drop these elements into your content.
7. B&W
Black and white color schemes are always special. Adding them to your aerial videos or photos can enlighten your content’s visualization. By using these B&W LUTs for drones, turn aerial shoots into appealing black-and-white contrasts. This will make your visual content more aesthetic with improved engagement. Using this LUTs pack is very convenient and straightforward.
Bonus Part: Learn More About Video Editing Through LUTs with Wondershare Filmora
Video editing is a way to optimize the quality of videos with perfection. Meanwhile, using LUTs can convincingly simplify video editing. For using cinematic drone LUTs free, you need a good and reliable tool. Wondershare Filmora is the trusted solution in this regard. This is a video editing software that allows video upscaling from broader perspectives.
There are more than 200 LUTs that you can use, and every LUTs is unique. The availability of titles, stickers, transitions, effects, and audio makes this tool special. Meanwhile, Filmora comes with a user-friendly interface to get started.
Key Features of Wondershare Filmora
Regarding video editing, Wondershare Filmora takes the lead over its competitors. There are several functions and various tools to learn about, which can be seen in the critical features of Filmora described below:
1. Instant Mode
Filmora’s instant mode allows you to create videos without requiring editing skills. You have to add your respective media items, and Filmora transforms them into videos. There are more than 115 templates that you can use. The AI algorithm works fast and efficiently.
2. Batch Text Editing
Using batch text editing, you can add subtitles to your video. There are three ways to batch edit the text. First, select all texts in the timeline to edit them at the same time. Second, multiple text styles in the Filmora player. Third, changing fonts in bulk quantity within advanced editing.
3. Screen Recorder
Record your screenplay using the Filmora screen recording facility. So, you can record videos from different areas of a webcam or PC screen. You can also customize the ratio and screen sizes of your videos. Meanwhile, audio is recorded by microphone and system.
4. Adjustment layer
Filmora can also help add general effects to your videos at once. Through the adjustment layer, the same effects could be applied across timeline videos. This improves video editing efficiency as a whole. In addition, the adjustment layer can hold unlimited effects.
Add LUTs on Video For Win 7 or later(64-bit)
Add LUTs on Video For macOS 10.14 or later
Conclusion
Drone technology is evolving modern videography and photography with aerial views. Meanwhile, using a camera may affect the quality of recorded videos. This is why using DJI mini 2 LUTs free is essential. This article discussed 7 drone LUTs pack free help get started with color upscaling. Moreover, you also learned about Wondershare Filmora, which is a best-in-class video editing software.
How to Add Motion Titles
Do you want to make your videos eye-catching instantly? Looking for some cool title animations to make your texts stand out? You should definitely opt for motion title templates that are widely available in popular video editors. Motion title templates come preloaded with animated texts, engaging graphic elements, and even background effects.
You can add them directly to your video and customize them as per you requirements so that your video looks exactly the way you desire. Different video editors have different motion titles, and therefore, you should check them out one by one to find out the templates you are looking for. We will illustrate title motion graphics in all the leading video editors.
Part 1. Add Motion Title with Filmora
The easiest way to add motion title to your video on your computer is through Wondershare Filmora . Filmora is a professional video editor that is available for Windows and Mac users. Filmora has the best collection of motion title templates, and the user interface is super intuitive and anyone can use without any prior experience. Here are the steps to add motion title with Filmora.
Step1Install and launch Wondershare Filmora on your computer. Click on New Project option on the welcome screen or go to File menu and click on New Project option.

Step2Go to File menu and Import Media option to import your video file. Otherwise, you can simply drop the video file into Project Media folder.
Step3Drag the video file from Project Media folder and drop it into the Timeline.

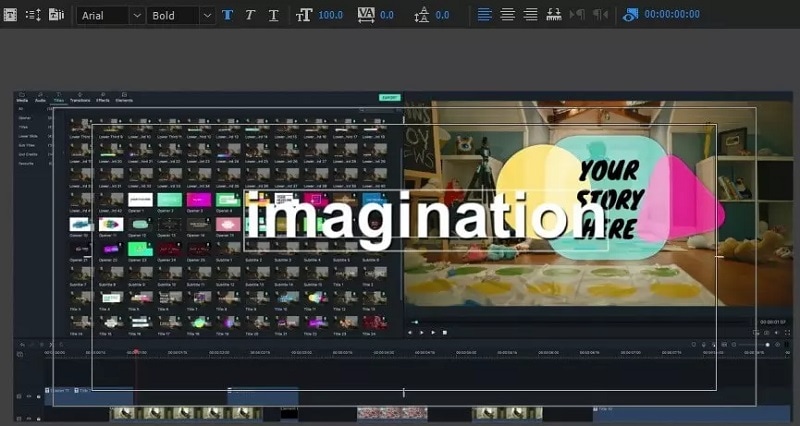
Step4Go to Titles at the top and go to the left panel. You can different categories of motion title templates. Select any desired text effect and drop into the Timeline above the video layer wherever you want.
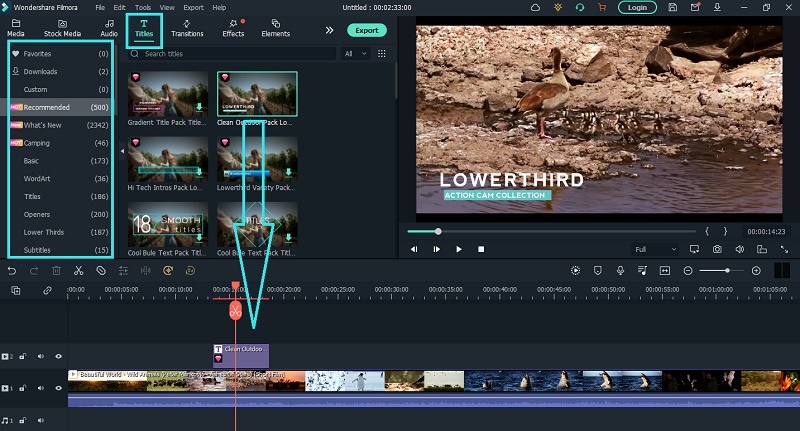
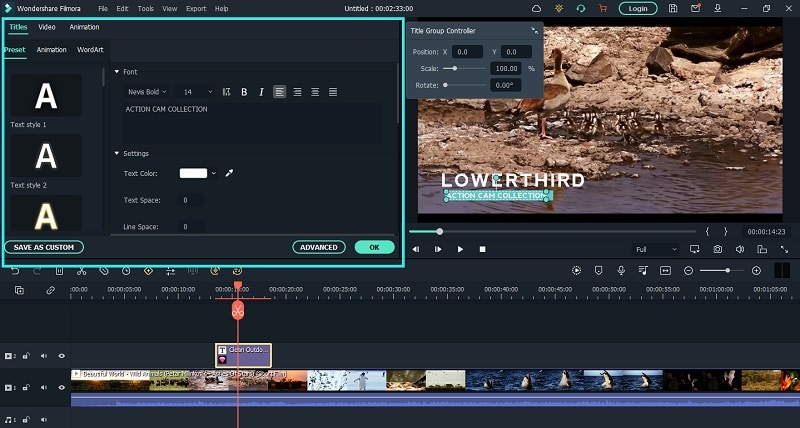
Step5Double clicking on the text layer on Timeline to edit the text and change the styles. Under Preset tab, you can change font, size, and color. Finally, click on OK button to save the edits done.
Part 2. Add Motion Title with Premiere Pro
Adobe Premiere Pro is a renowned video editor that is mostly used by professionals to edit videos and add effects and animations. Even though Premiere Pro has a steep learning curve, you can create motion title in simple steps. You can write any text on the video and select from different effects and animations to create motion title graphics. Here are the steps to add title motion graphics Premiere Pro free.
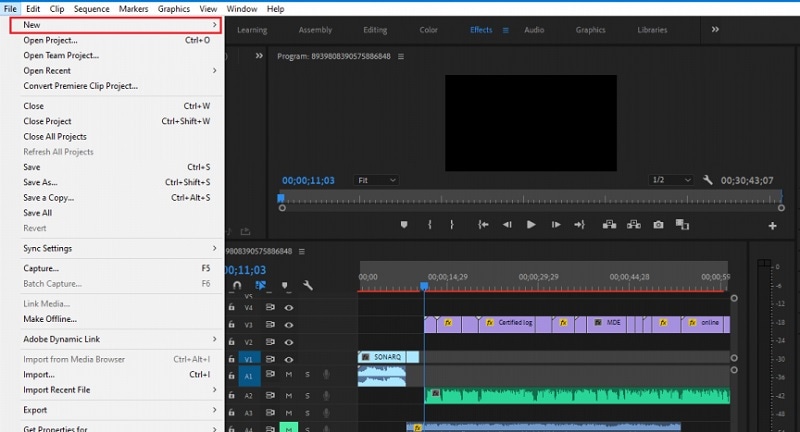
Step1Launch Premiere Pro and go to New> Project option. Import the video file and drop it into Timeline.
Step2Go to Title> New Title> Default Still option and follow the on-screen instructions.

Step3You will see different types of title styles and designs to choose from as you feel.

Step4Click on Type Tool option and click on the area on the video where you want the text to appear. You can customize them from the right panel from Title Styles, Title Properties, Tools and Title Actions.
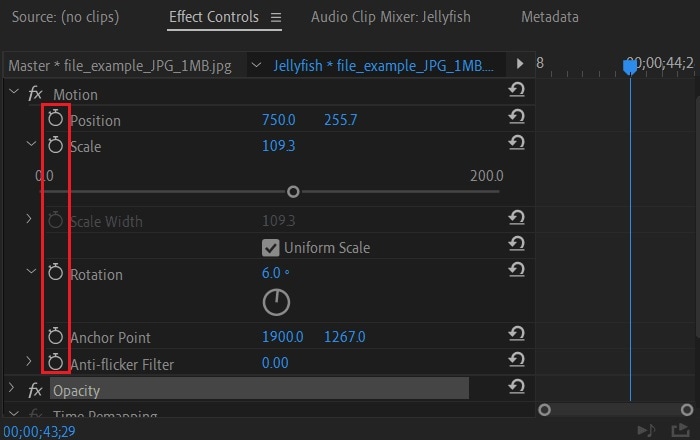
Step5To add motion to the title, click on Effects Control window. Click on any desired animation and turn to Stopwatch icon to apply the effect to the text. There is a dedicated Motion option available.
Part 3. Make motion title with Studio
Studio is a popular video editing software where you can not only apply motion title presets but also create motion title presets from scratch. The reason why video editors choose Studio is because it allows users to customize everything and create different templates and animations for personalization. Here are the steps to create title motion graphics in Studio as per your requirements.
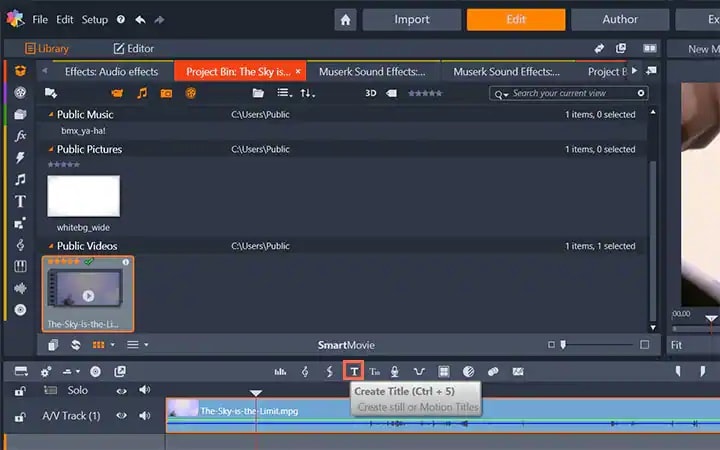
Step1Launch Studio. Import your video file, and you can import single frames such as images from a live video for stop motion titles. Once you have imported, go to the header bar above the Timeline. Click on Create Title option to open Title Editor to create title motion.
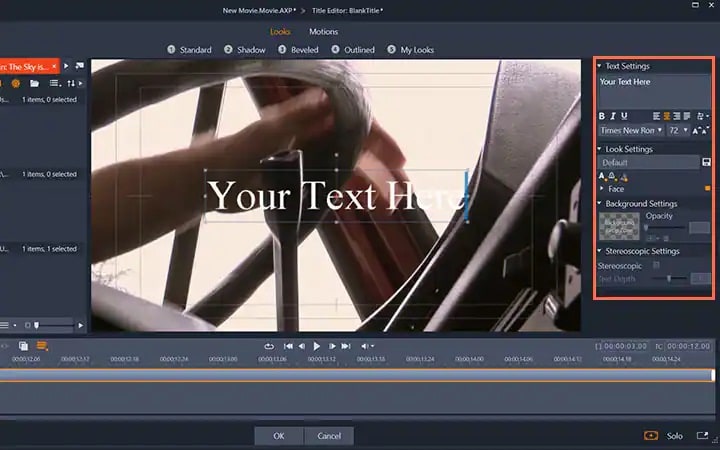
Step2Add your preferred text under Title Editor and adjust font, size, and style as you feel. Go to the right side to make changes to Look, Background, and Stereoscopic Settings to get the perfect text style from the wide range of choices available.
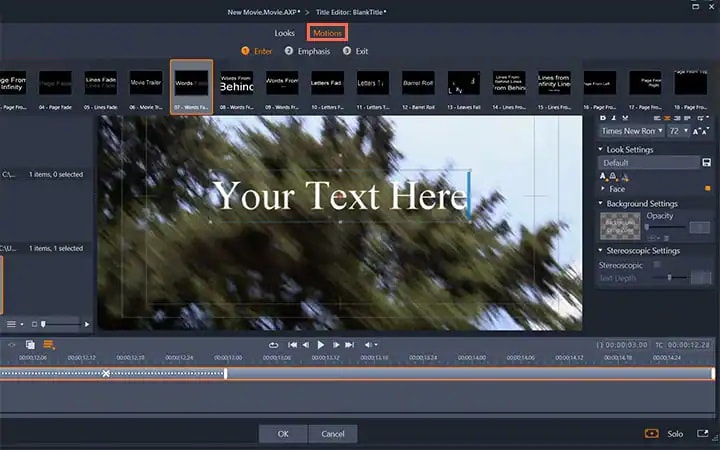
Step3Click on Motion option at the top to add motion to the text. Choose from the different motion title templates as per your preference.
Step4You can adjust the duration of the motion effect from the right panel and click on Ok button.

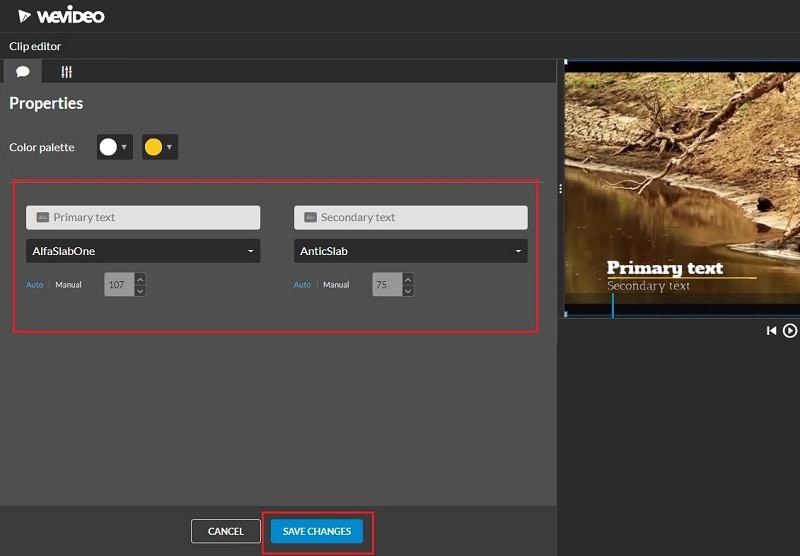
Part 4. Add Motion Title with WeVideo
WeVideo is a popular online video editor that you can use to add title motion graphics Premiere Pro free. You can find many motion titles on WeVideo for free like you get in Premiere Pro and there are many exclusive motion text templates available. You need to create a free account with WeVideo to get started. You can create your video from scratch by selecting from the available video templates. You can even import your recorded video and add motion texts and animations as per your preference. Here are the steps to add motion title with WeVideo.
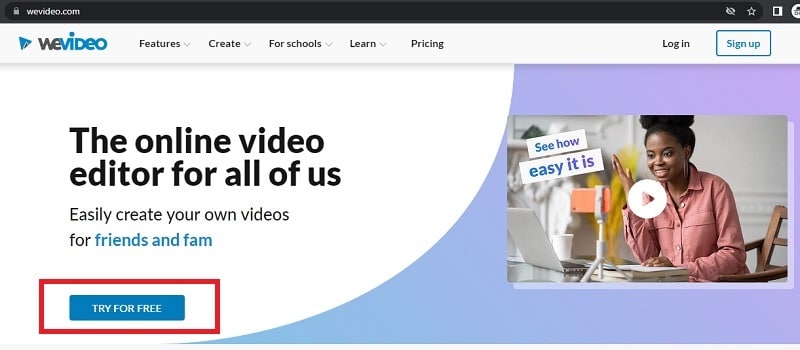
Step1Open your web browser and visit “wevideo.com”. Click on Try For Free button. Sign up for free and go to WeVideo video editor.
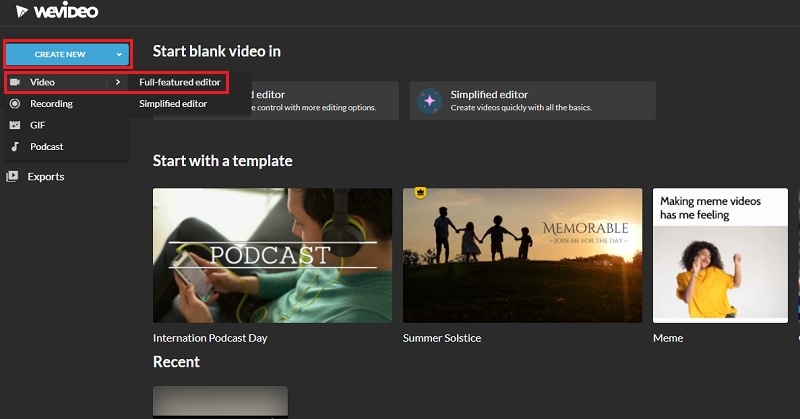
Step2Click on Create New button and select Video option. Click on Full-featured editor option.
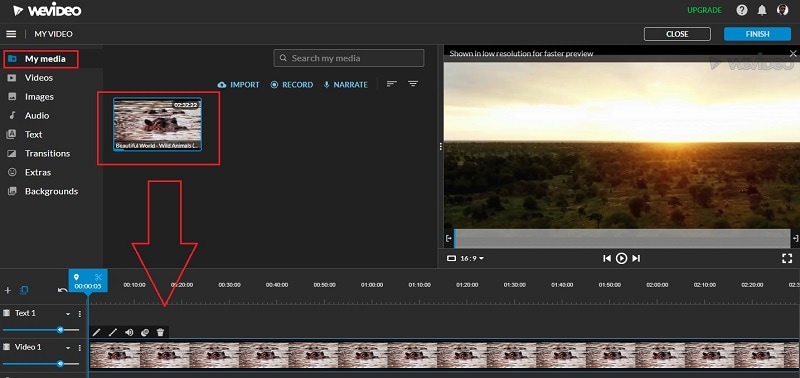
Step3Drag and drop your video file into My Media folder and bring it to Timeline.
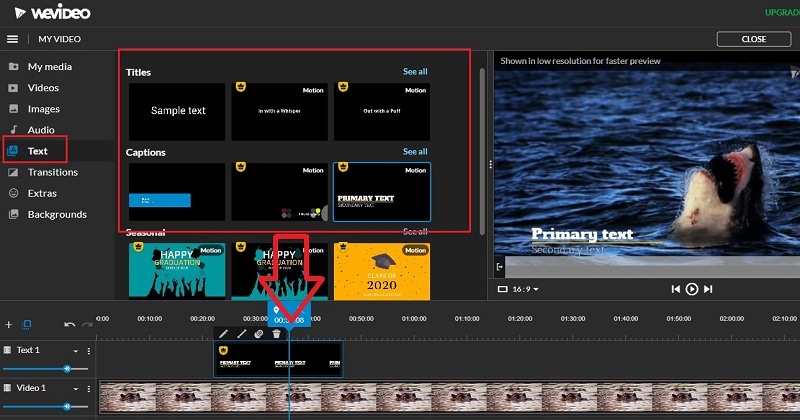
Step4Go to Text tab and you will see all the motion animated titles under Titles section. Click on them to check out their previews in Viewer. If you have selected anyone, drag and drop it into Timeline.
Step5Adjust the position where you want the title to appear on the video and stretch the duration as required. Double-click on the title to edit and customize it as per your preference. Finally, click on Save Changes button.
The Bottom Line
Motion titles are extremely important for any video because they bring in a variety to your video. They make the video eye-catching and help in getting the message across by grabbing the attention of the viewers. We have illustrated how to add motion titles Premiere Pro and Studio. You can also use WeVideo online video editor. We recommend Wondershare Filmora for its extensive collection of motion title templates to choose from and apply to your text.
Free Download For Win 7 or later(64-bit)
Free Download For macOS 10.14 or later
Do You Want to Add an Adjustment Layer to Your Video for Easier Editing? Read This Article to Find Out How to Efficiently Add an Adjustment Layer in After Effects
Have you ever used After Effects for professional video editing? Adobe After Effects is a significant video editing software that is used to add animating effects, transitions, intros, outros, and visual effects. You can launch this software on Windows and Mac effectively. Using this high-end software allows you to work on team projects as it consists of auto-saving features.
Moreover, you can add adjustment layers on After Effects to make your video editing more efficient. If you don’t know what the adjustment layer in After Effects is, this article will help you. By reading this article, you can easily learn how to create adjustment layers in your video clips using After Effects.

Part 1: What is the Adjustment Layer in After Effects?
The adjustment layer can save you time and energy from adding effects to multiple clips individually. It does not alter the composition of your video clip until you start applying the effects. Once you add the effect in the adjustment layer, it will replace the effect on all the layers under it.
You can add the adjustment layers in your timeline for creating visual effects such as film grain or color grading. Using the adjustment layer, you can produce transition effects by adding effects to shorter compositions. However, if you want to use the adjustment layer properly, you should select its position carefully in the layer’s stack.

Moreover, always keep in mind that anything placed under the adjustment layer will have a direct effect. In contrast, anything above the adjustment layer won’t get affected. Hence, you can use adjustment layers in After Effects for your convenience to apply all kinds of effects from color to distortion.
Part 2: How to Add Adjustment Layers in After Effects?
Do you want to learn how to add an adjustment layer in After Effects? In this section, we will shed light on two ways through which you can add an adjustment layer to your video clips in After Effects:
Way 1: After opening After Effects and uploading your project, go to the “Layers” tab. Tap on the “New” button and choose “Adjustment Layer.”

Way 2: Once done with uploading the project on After Effects, go to the blank space in the timeline section on the left side. Right-click using your mouse and select the option “New.” Afterward, click on “Adjustment Layer” to proceed. This will add the adjustment layer on the top of your layers stack.

Tips – Keyboard Shortcuts of Adjustment Layers in After Effects
Do you want to save time while creating an adjustment layer in After Effects? Through the following table, you can learn the shortcuts that you can utilize to generate adjustment layers quickly.
| For Windows | For MacBook |
|---|---|
| Ctrl+Alt+Y | Command+Option+Y |
Part 3: Popular Effects You Can Try With Adjustment Layers in After Effects
In this section, you can find out different effects that you can try with the adjustment layer in After Effects. By applying these effects with an adjustment layer, you can transform your video drastically.
1. Animated Ink Text
Do you want to give a unique sense of style to your added text in the video? This particular effect can add animation to your text to produce engaging and distinctive visuals for your text. To make animated ink text illustrations efficiently, you can check the following steps:
Step1 Once you have uploaded the project on After Effects, you can begin with the process. First, open the composition settings and modify the width, height, frame rate, resolution, and background color according to your choice.
Step2 Make sure to select a suitable text font and color to craft a vibrant output. Afterward, head to the “Effect” tab and select tap on “Transition.” From there, select “Linear Wipe.” Now adjust the settings of the “Linear Wipe” effect from the left panel.

Step3 Now add an adjustment layer to your timeline and select “Distort” from the “Effect” tab. From the “Distort” drop-down menu, choose “Turbulent Displace.” After making its settings, such as adjusting the evolution time, head back to the “Effects” tab and select “Blur and Sharpen.” From there, click on “Fast Box Blur.”
Step4 Manage the threshold value properly and then add a new effect called “Stylize.” From its drop-down menu, click on “Roughen Edges.” Afterward, you can add some elements, such as ink droplets, to create a more vibrant look. To ensure a flawless illustration, make sure to match the color of ink droplets with your text color.
Step5 If you want to give a highlight effect to your animated text, you can add 2nd adjustment layer. Afterward, you can select a bold color for your text, such as black, and add a “Perspective” effect. You can adjust the light color and intensity to create compelling results.
Moreover, you can also add blur and matte effects for more modifications. You can use the blending mode to adjust all the colors. Also, you can apply noise and grain effects to eliminate all the harsh edges from the text.

2. Add Blur Effect
There are various blur effects, such as Gaussian blur, motion blur, radial blur, etc. You can add any of the blur effects in your video clip to craft a smoother look. In After Effects, you can find a variety of blur effects that can help you change your video’s perspective. To use an adjustment layer for adding the blur effect, here are the accurate steps:
Step1 Once you have imported the video clip to the timeline of After Effects, add an adjustment layer. Afterward, go to the “Effects” tab and locate any of your preferred effects, such as Gaussian blur. After locating this effect, apply it to the adjustment layer.

Step2 After applying the effect to the adjustment layer, you can change its settings from the left side. From the left panel, you can change the blurriness value and blur dimensions according to your choice.
3. Color Correction
Color correction effects can add and manage the colors in your videos effortlessly. You can change the basic corrections of your video by adjusting the brightness, contrast, hue, exposure, highlight, and other elements. Here are the simple steps to use the adjustment layer for color correction:
Step1 After uploading the video on After Effects, go to the “Layer” tab and add an adjustment layer from there. Once done, you can search for the color correction effect on this tool.
Step2 Once you have found the suitable color correction effect, apply it to the adjustment layer. You can always change the settings of the applied effect from the left panel.

Conclusion
Many beginners are unaware of the term called adjustment layer in video editing. By reading this article, you can find out brief and authentic details about the adjustment layer. Moreover, we have also addressed how to add an adjustment layer in After Effects in simple and easy steps. You can also check about the common effects that people use in Adobe After Effects, using adjustment layers to enhance their videos.
Part 3: Popular Effects You Can Try With Adjustment Layers in After Effects
In this section, you can find out different effects that you can try with the adjustment layer in After Effects. By applying these effects with an adjustment layer, you can transform your video drastically.
1. Animated Ink Text
Do you want to give a unique sense of style to your added text in the video? This particular effect can add animation to your text to produce engaging and distinctive visuals for your text. To make animated ink text illustrations efficiently, you can check the following steps:
Step1 Once you have uploaded the project on After Effects, you can begin with the process. First, open the composition settings and modify the width, height, frame rate, resolution, and background color according to your choice.
Step2 Make sure to select a suitable text font and color to craft a vibrant output. Afterward, head to the “Effect” tab and select tap on “Transition.” From there, select “Linear Wipe.” Now adjust the settings of the “Linear Wipe” effect from the left panel.
Step3 Now add an adjustment layer to your timeline and select “Distort” from the “Effect” tab. From the “Distort” drop-down menu, choose “Turbulent Displace.” After making its settings, such as adjusting the evolution time, head back to the “Effects” tab and select “Blur and Sharpen.” From there, click on “Fast Box Blur.”
Step4 Manage the threshold value properly and then add a new effect called “Stylize.” From its drop-down menu, click on “Roughen Edges.” Afterward, you can add some elements, such as ink droplets, to create a more vibrant look. To ensure a flawless illustration, make sure to match the color of ink droplets with your text color.
Step5 If you want to give a highlight effect to your animated text, you can add 2nd adjustment layer. Afterward, you can select a bold color for your text, such as black, and add a “Perspective” effect. You can adjust the light color and intensity to create compelling results.
Moreover, you can also add blur and matte effects for more modifications. You can use the blending mode to adjust all the colors. Also, you can apply noise and grain effects to eliminate all the harsh edges from the text.
2. Add Blur Effect
There are various blur effects, such as Gaussian blur, motion blur, radial blur, etc. You can add any of the blur effects in your video clip to craft a smoother look. In After Effects, you can find a variety of blur effects that can help you change your video’s perspective. To use an adjustment layer for adding the blur effect, here are the accurate steps:
Step1 Once you have imported the video clip to the timeline of After Effects, add an adjustment layer. Afterward, go to the “Effects” tab and locate any of your preferred effects, such as Gaussian blur. After locating this effect, apply it to the adjustment layer.
Step2 After applying the effect to the adjustment layer, you can change its settings from the left side. From the left panel, you can change the blurriness value and blur dimensions according to your choice.
3. Color Correction
Color correction effects can add and manage the colors in your videos effortlessly. You can change the basic corrections of your video by adjusting the brightness, contrast, hue, exposure, highlight, and other elements. Here are the simple steps to use the adjustment layer for color correction:
Step1 After uploading the video on After Effects, go to the “Layer” tab and add an adjustment layer from there. Once done, you can search for the color correction effect on this tool.
Step2 Once you have found the suitable color correction effect, apply it to the adjustment layer. You can always change the settings of the applied effect from the left panel.
Conclusion
Many beginners are unaware of the term called adjustment layer in video editing. By reading this article, you can find out brief and authentic details about the adjustment layer. Moreover, we have also addressed how to add an adjustment layer in After Effects in simple and easy steps. You can also check about the common effects that people use in Adobe After Effects, using adjustment layers to enhance their videos.
Easily Sync Audio With Video With Filmora
Syncing audio with video is an integral part of video editing for any video creator. But believe me; it’s not such a difficult task if you know what to do. The point is IF YOU KNOW WHAT TO DO.
That’s why in this brief guide, we’ll show you the simplest way to sync audio with video using a fantastic video editor easily. But wait a minute, some of you might be confused about why we even need to sync separate audio & video when a single camera can record both. So let’s first answer this simple question.
Part 1: Why Do We Need to Sync Separate Audio & Video?
Creating great video needs extraordinary video graphics, content, and top-notch audio. And you can’t expect a single camera to achieve all these goals. That’s why all professional video creators use a specialized camera for recording with a separate audio recording device.
You might think it’s an exaggeration, but this small change can have massive effects on the quality of your video. Especially the background noise removal effect of separate external microphones.

But the downside of using this method is that after the recording is complete, you must sync these audio and video files. And if you don’t do it right, all the effort goes to the drain within a split second. Well, nobody wants to watch a video with an audio lag. Isn’t it?
Correctly synching an audio file with a video is easier than you think. You just need to prepare beforehand and use a suitable video editing tool. So considering these factors, let’s first see what preparations we need. After that, we’ll recommend a top-class video editing tool to achieve this goal in detailed steps. Why are we still waiting? Let’s begin our journey.
Part 2: Preparation for Syncing Audio With Video During Recording
You must make some preparations to sync an audio file with a video properly. It’s to have a sound spike to match the footage properly with the separate audio file. And it might look disturbing, but even a simple Clap might do the job.
And if you want a professional way, just imagine the clapper board. You must have seen it in the film industry. This clapper board is used not only to mark the shot but also to create a sound spike when it claps. We use this audio spike as a reference to sync the audio files with the video.

Every time you cut your shot, remember to clap on camera again the next time you roll. It’s best to clap before you say “Action” or speak so that it’s easy to find and sync when editing. But if you forget, you can also clap at the end of the shot before you cut. That is called a Tail Slate!!!
After you’ve recorded your video like this, the next step is pretty simple. The video editor we recommend is no other than the world’s leading tool in the market, Wondershare Filmora. Let’s move forward and see how to sync audio with video using Filmora .
Part 3: How To Sync Audio With Video Using Filmora
Before we dive into the step-by-step guide, here’s a brief overview of Filmora.
Wondershare Filmora
Filmora is one of the most used video editors that can help all video creators to deliver the best they can. This incredible software from Wondershare contains multiple features that can polish any video.
Free Download For Win 7 or later(64-bit)
Free Download For macOS 10.14 or later
Moreover, the vast arsenal of video effects, images, short clips, AI avatars, and many other things are also available. You just have to pick out the one you like and add it to your video with just a single click.
On top of that, you can also adjust the audio files like audio ducking, silent detection, audio mixing, and synching audio with the video files.

As far as the audio synching is concerned, you can do it either manually or with auto synchronization. And we will explain both of these processes in a stepwise manner to give you complete mastery over your audio synching. Let’s start with the manual process first.
Steps To Manually Sync Audio With Video Using Filmora
Step1Download & install
If you haven’t downloaded the latest version of Filmora yet, click the button below to download it without any cost. And after the download is completed, you can install it on your device right away.
Free Download For Win 7 or later(64-bit)
Free Download For macOS 10.14 or later
Step2Import your files
The next step is to import all the files. Launch the Filmora and click on the “New Project” button from the opening interface.

When a new project is created, you’ll see an “Import Media” section on it. Click on this section to browse your audio and video files from the computer. Or you can also drag and drop these files here to import them.

Step3Prepare your files
Now, it’s time to prepare our files for synchronization. First, drag the video file down to the timeline from the “Import Media” section. After that, drag the audio file in the same way below the video on the panel.

Step4Sync the audio & video files using the audio spike
Now that the video and audio files are on the timeline, you’ll have to find the moment you clap your hands. Look at the waveform from the in-camera audio and the independent audio track. At the moment you clap, we’ll see a spike.
Bonus Tip: If you can’t find the audio spike, zoom the panel to make it easier.

Now take the independent audio clip and align it so that both the spikes match.

That’s it! We just need to remove the in-camera audio now. Let’s see how to do it now.
Step5Remove the audio from the video footage
To detach the audio in the video footage, right-click on this file and select the “Detach Audio” option. Or you can also use the “Ctrl+Alt+D” as the hotkey.

Once the audio file has been separated, you can move forward and delete it. To delete this audio, right-click on it and select “Delete.”

Step6Enjoy your video with the new audio track
So here we go. Our video file has been synced with the high-quality audio file. You can now hit the Export button to get this edited file. But wait a minute. Didn’t we say we’ll show you a method to automatically sync audio with video? Let’s start this method now.
Steps To Automatically Sync Audio With Video Using Filmora
Did you find the above method troubling? Well, be assured because Wondershare Filmora can also automatically sync your audio file with video in a single click. Here are the steps to achieve this feat.
Free Download For Win 7 or later(64-bit)
Free Download For macOS 10.14 or later
Step1Prepare your files
This method’s starting process is the same as the previous one. You’ll need to download the Filmora and prepare your file on the timeline by importing them on a New Project.
Step2Select both audio & video files
Once you’ve got everything ready, select both your audio and files from the timeline.

Step3Click on the auto synchronization icon
When you select these files, you’ll see that the “Auto Synchronization” icon has appeared on the toolbar below the Import Media section. Click on this icon and wait for the magic.

Remember that you need a Premium ID of Wondershare Filmora to use the Auto Synchronization option.
Step4Wait until the syncing is completed
Filmora will start synchronizing your files, and you’ll see the “Synchronization in process” prompt on the screen. Wait until the process is completed.

Step5Finish your editing
You can finish your editing when the separate audio file perfectly aligns with the video file. Delete the audio from the in-camera video file and hit the “Export” button.
Congratulations! We have successfully synced separate audio and video files. Now let’s take a look at some hot FAQs before we end our guide.
Part 4: FAQs About Synching Audio With Video
Is auto synchronization better than manual syncing?
Well, auto synchronization is no doubt easier than manual syncing. But that doesn’t mean you don’t need the manual process anymore. Many situations may arise where you may be left with no choice but to use the manual syncing of separate audio and video files. So make sure to properly learn both these methods, and each one of them will definitely come in handy someday.
How can we sync audio & video for free?
Syncing audio and video files for free is not a difficult task. Download the Filmora right now, and after installation, you can freely sync any Audio file with its corresponding video file by using the manual method described above.
Conclusion
For any video creator, knowing how to sync audio with video is a must. That’s because most creators record audio and video separately for higher quality.
This brief guide has covered all the details about how to sync audio and video files using an outstanding video editor, Wondershare Filmora . We hope it comes in handy.
Free Download For Win 7 or later(64-bit)
Free Download For macOS 10.14 or later
Free Download For macOS 10.14 or later
Moreover, the vast arsenal of video effects, images, short clips, AI avatars, and many other things are also available. You just have to pick out the one you like and add it to your video with just a single click.
On top of that, you can also adjust the audio files like audio ducking, silent detection, audio mixing, and synching audio with the video files.
As far as the audio synching is concerned, you can do it either manually or with auto synchronization. And we will explain both of these processes in a stepwise manner to give you complete mastery over your audio synching. Let’s start with the manual process first.
Steps To Manually Sync Audio With Video Using Filmora
Step1Download & install
If you haven’t downloaded the latest version of Filmora yet, click the button below to download it without any cost. And after the download is completed, you can install it on your device right away.
Free Download For Win 7 or later(64-bit)
Free Download For macOS 10.14 or later
Step2Import your files
The next step is to import all the files. Launch the Filmora and click on the “New Project” button from the opening interface.
When a new project is created, you’ll see an “Import Media” section on it. Click on this section to browse your audio and video files from the computer. Or you can also drag and drop these files here to import them.
Step3Prepare your files
Now, it’s time to prepare our files for synchronization. First, drag the video file down to the timeline from the “Import Media” section. After that, drag the audio file in the same way below the video on the panel.
Step4Sync the audio & video files using the audio spike
Now that the video and audio files are on the timeline, you’ll have to find the moment you clap your hands. Look at the waveform from the in-camera audio and the independent audio track. At the moment you clap, we’ll see a spike.
Bonus Tip: If you can’t find the audio spike, zoom the panel to make it easier.
Now take the independent audio clip and align it so that both the spikes match.
That’s it! We just need to remove the in-camera audio now. Let’s see how to do it now.
Step5Remove the audio from the video footage
To detach the audio in the video footage, right-click on this file and select the “Detach Audio” option. Or you can also use the “Ctrl+Alt+D” as the hotkey.
Once the audio file has been separated, you can move forward and delete it. To delete this audio, right-click on it and select “Delete.”
Step6Enjoy your video with the new audio track
So here we go. Our video file has been synced with the high-quality audio file. You can now hit the Export button to get this edited file. But wait a minute. Didn’t we say we’ll show you a method to automatically sync audio with video? Let’s start this method now.
Steps To Automatically Sync Audio With Video Using Filmora
Did you find the above method troubling? Well, be assured because Wondershare Filmora can also automatically sync your audio file with video in a single click. Here are the steps to achieve this feat.
Free Download For Win 7 or later(64-bit)
Free Download For macOS 10.14 or later
Step1Prepare your files
This method’s starting process is the same as the previous one. You’ll need to download the Filmora and prepare your file on the timeline by importing them on a New Project.
Step2Select both audio & video files
Once you’ve got everything ready, select both your audio and files from the timeline.
Step3Click on the auto synchronization icon
When you select these files, you’ll see that the “Auto Synchronization” icon has appeared on the toolbar below the Import Media section. Click on this icon and wait for the magic.
Remember that you need a Premium ID of Wondershare Filmora to use the Auto Synchronization option.
Step4Wait until the syncing is completed
Filmora will start synchronizing your files, and you’ll see the “Synchronization in process” prompt on the screen. Wait until the process is completed.
Step5Finish your editing
You can finish your editing when the separate audio file perfectly aligns with the video file. Delete the audio from the in-camera video file and hit the “Export” button.
Congratulations! We have successfully synced separate audio and video files. Now let’s take a look at some hot FAQs before we end our guide.
Part 4: FAQs About Synching Audio With Video
Is auto synchronization better than manual syncing?
Well, auto synchronization is no doubt easier than manual syncing. But that doesn’t mean you don’t need the manual process anymore. Many situations may arise where you may be left with no choice but to use the manual syncing of separate audio and video files. So make sure to properly learn both these methods, and each one of them will definitely come in handy someday.
How can we sync audio & video for free?
Syncing audio and video files for free is not a difficult task. Download the Filmora right now, and after installation, you can freely sync any Audio file with its corresponding video file by using the manual method described above.
Conclusion
For any video creator, knowing how to sync audio with video is a must. That’s because most creators record audio and video separately for higher quality.
This brief guide has covered all the details about how to sync audio and video files using an outstanding video editor, Wondershare Filmora . We hope it comes in handy.
Free Download For Win 7 or later(64-bit)
Free Download For macOS 10.14 or later
Also read:
- New How to Create A Freeze Frame Sequence in Video
- New 3D LUT Mobile App Review - A Composite Application for Editing Media for 2024
- How to Animate Text in A Video for 2024
- Updated Detailed Steps to Rotate Videos Using Kdenlive
- New Top 10 Mp3 Visualizers Windows, Mac, Android, iPhone & Online
- Updated In 2024, Full Guide to Discord Boost
- New 2024 Approved Detailed Tutorial to Resize Your Video in VLC
- New In 2024, Detailed Tutorial to Crop a Video Using Openshot?
- In 2024, The Most Efficient Ways to Manage Your Timeline
- How to Use Kahoot! On Zoom for 2024
- Updated In 2024, Top 10 Sound Extractors to Extract Sound From Video
- Updated 2024 Approved How to Denoise in After Effects – Audio & Video Noise Removal
- Updated How to Edit Facebook Video Ads for E-Commerce Business for 2024
- New Best Online GIF to Image (PNG/JPG) Converter
- 2024 Approved Getting Into The Details A Review of Kodak LUTs
- Updated In 2024, Learn Top Best Free LUTs For Premiere Pro
- Updated 2024 Approved Time Bending Brilliance The Ultimate Slow Motion Video Makers
- Do You Want to Watch Videos in QuickTime with Subtitles in Your Desired Language? Here Are Different Ways to Add Subtitles in QuickTime Player
- In 2024, LumaFusion – One of the Best Video Editors for iOS
- Updated Everything About Adding Effects In Kinemaster for 2024
- In 2024, Here Are the Steps to Crop a Video in Sony Vegas Pro Step 1 Click on Import and Import the Video to Be Edited. Click on It and Drag-Drop to Timeline
- Updated In 2024, Gimp Green Screen
- Create Risograph Effect In Photoshop A Beginners Guide
- How to Unlock Infinix Note 30 Bootloader Easily
- In 2024, How To Bypass iCloud By Checkra1n Even From iPhone 13 If Youve Tried Everything
- New In 2024, Top 10 Hindi Video Translators with Step-by-Step Guidance
- In 2024, How to Change/Add Location Filters on Snapchat For your Apple iPhone 14 Pro Max | Dr.fone
- Ultimate guide to get the meltan box pokemon go For Realme 12 Pro+ 5G | Dr.fone
- How To Unlock a Infinix Smart 7 HD Easily?
- Android Unlock Code Sim Unlock Your Realme 12 5G Phone and Remove Locked Screen
- Full Guide How To Fix Connection Is Not Private on Poco M6 Pro 4G | Dr.fone
- In 2024, How to Turn Off Google Location to Stop Tracking You on Lava Yuva 3 | Dr.fone
- In 2024, Does Airplane Mode Turn off GPS Location On Xiaomi 14 Pro? | Dr.fone
- Methods to Change GPS Location On Meizu 21 | Dr.fone
- The way to recover deleted photos on Camon 20 without backup.
- Guide How To Unbrick a Bricked Vivo Y78+ Phone | Dr.fone
- In 2024, Solutions to Spy on Samsung Galaxy Z Flip 5 with and without jailbreak | Dr.fone
- The Ultimate Guide to Get the Rare Candy on Pokemon Go Fire Red On Apple iPhone 6 | Dr.fone
- How to Factory Reset Nokia C210 If I Forgot Security Code or Password? | Dr.fone
- Undelete lost pictures from Tecno .
- Easy Steps on How To Create a New Apple ID Account On iPhone XS
- In 2024, Detailed guide of ispoofer for pogo installation On OnePlus Nord N30 5G | Dr.fone
- How to Track WhatsApp Messages on Oppo Find N3 Flip Without Them Knowing? | Dr.fone
- In 2024, Top 5 Huawei Nova Y91 Bypass FRP Tools for PC That Actually Work
- Looking For A Location Changer On Vivo X90S? Look No Further | Dr.fone
- Complete Review & Guide to Techeligible FRP Bypass and More For Oppo A58 4G
- Title: New Get The Perfect Drone Footage With Free Drone LUTs for 2024
- Author: Chloe
- Created at : 2024-04-24 07:08:33
- Updated at : 2024-04-25 07:08:33
- Link: https://ai-editing-video.techidaily.com/new-get-the-perfect-drone-footage-with-free-drone-luts-for-2024/
- License: This work is licensed under CC BY-NC-SA 4.0.
