
:max_bytes(150000):strip_icc():format(webp)/duetinslides-fd2c11f1a91a4d7388cc25f2f4719cca.jpg)
New Green Screen YouTube Videos for 2024
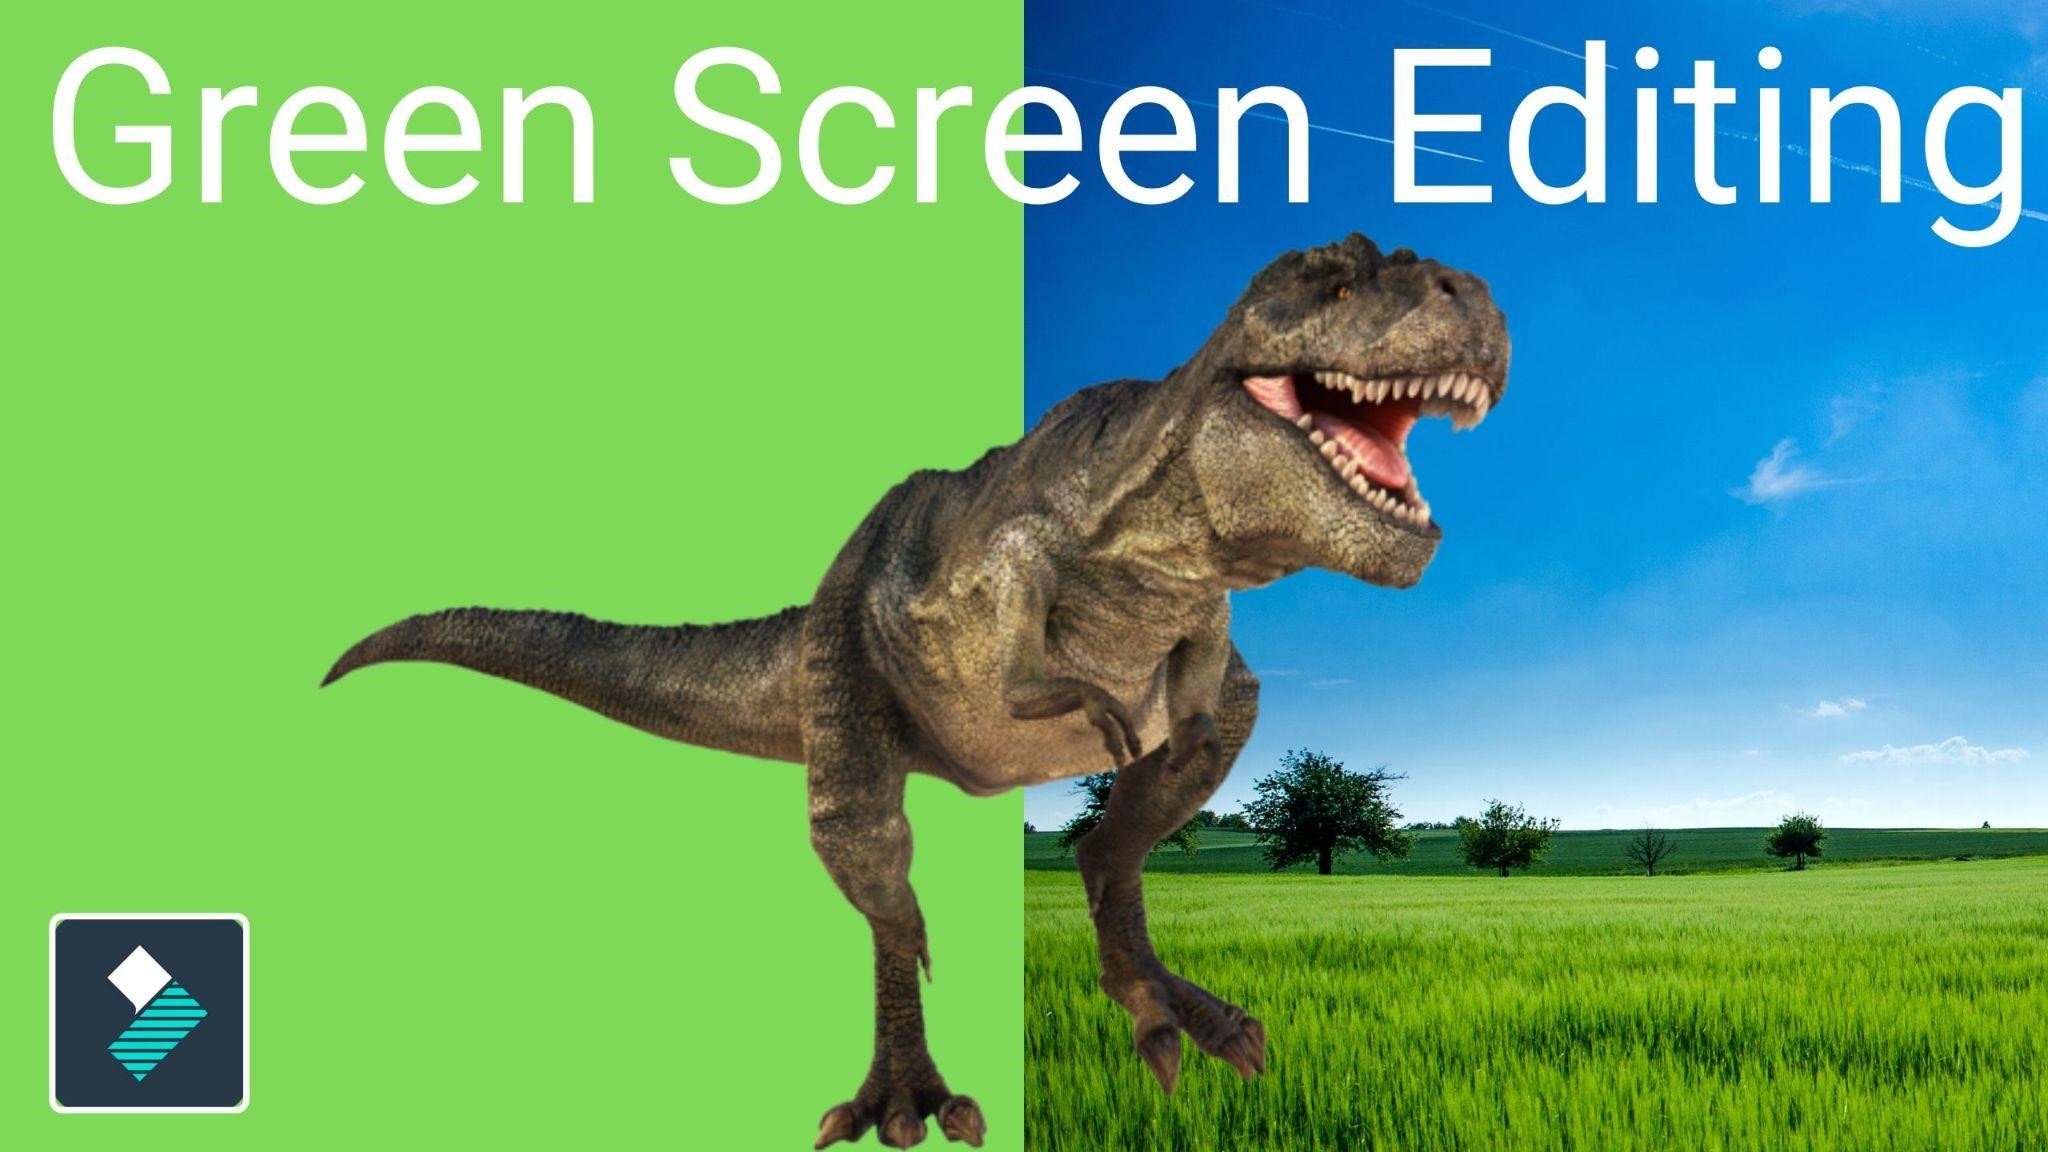
Green Screen YouTube Videos
This is a large green backdrop that is placed in the background of a shot to allow for digital effects later on. A majority of popular YouTube vloggers use green to enhance interesting background views to their videos. Screen replaces the background and adds depth and visually interesting patterns that ends up keeping the viewer captivated.
Why use Green Screen
1. Creativity
There are several effects that can be applied to green screen video editing in the editing process, it gives one a chance to explore their imagination. A good editor can really customize the video to make the production really stand out from those of the competitors.
2. Flexibility
There are portable green screens that can be taken to any location of choice for video shooting. Location allows one endless possibilities without having to spend time and resources doing assembling of different sets and backgrounds. The desired feel to the video can be simply achieved by an image.
3. Budget
Filming YouTube using green screen is a cost effective way of producing professional video content on a small budget. This is a great idea for upcoming YouTube vloggers as expenses catering for travel and location are eliminated.
4. Consistency
At some point in YouTube green screen use, you may be affected by the weather and worse pf all, natural lighting may end up being problematic while you are on location doing your video shots. However, with YouTube Video green screen technology, ambient lighting is blocked out and the screen can be lit the same way every time. This brings consistency over a number of videos the user applies green screen on.
5. Clarity
Youtube video green screen allows for an additional visual ellements and diagrams such as graphics, this can be added on to the video to illustrate what the speaker is saying. This green screen effect helps the viewer to gain a better understanding of any concepts or complex illustrations mentioned by the presenter.
6. Branding
YouTube green screen logo and branding colors can be easily added into the video, this can easily make the viewers to identify the video with your business. Apart from standing out from other competitors, you will also have a professional, high quality and reliable video to use anytime you please.
Best Places to find Green Screen Effects
Filmstock
Filmstock features a massive library full of royalty-free stock video, video effects, sound effects, video templates, and so much more. There are resources on the platform for all kinds of creators, including video editors, content creators, social media influencers, and marketers. You get unlimited access to all these resources for a single price when you subscribe to Filmstock. While there are other marketplaces that offer similar options, Filmstock does things differently.
Green Screen Effects
1. Balance Beam
Ever wanted to walk across a small beam way high up in the air? Me neither, but you can make a cool effect that looks like you did. Throwing a green screen on the ground and then building a balance beam over top of it you can start recording the main shot. Strap a GoPro to your head and look down while walking across the beam.
2. Shrink Effect
Okay this one is really easy. Take some footage of a person walking in front of a green screen, ideally looking at something to be featured in the main shot to sell the effect. Then take a close up of a small object. Key out the green behind the person, take the footage and drop it over your close up, and then scale it to match. Duplicate it, mirror it horizontally to act as a reflection and then drop the opacity and add some blur to make it look more realistic. It’s a fun little trick.
3. Floating Object
This is a simple one, making an object appear to be floating. This is another two clip shot. First, take a shot with the object hanging in front of a blue screen. Then on the same location, take another shot but while pretending to levitate the hammer. Masking around the hammer will get rid of the string for hanging, key out the blue, and then dropping it on top of the other clip is all you need.
Best Green Screen Video Editor for YouTube
Filmora
If you’re just starting out with video editing, or just want a simple program that works, Wondershare Filmora might be what you’re looking for. It has the essential tools, and anyone can learn to use it easily.
Wondershare Filmora is the one of best video editing software with cool features that compares to other competing video editing Softwares. Many video editing programs claim to offer professional results; Filmora is one of a few consumer-level tools that actually delivers.
For Win 7 or later (64-bit)
For macOS 10.12 or later
Installation Steps
- Click the icon in the center of the Media Library to add files directly.
- Go File > Import Media > Import Media Files.
- Drag and drop to the Media Library directly.
While importing a media file, Wondershar Filmora may ask you if you wish to create a proxy file to accelerate the editing process. Select “Yes” to have a fast video editing experience.
You can also import video clips using your Touch Bar controls if your computer has Touch Bar.
Record a media file
Apart from the videos shot by your digital devices, you can also directly import media files by recording video from your webcam, capturing the computer screen, or recording a voice-over.
Find green screen effects: Now you can select the different types of green screen effects.

Apply green screen: drag the effects to the timeline to apply it to your videos.

Save and Export: Then you can save or export the video.
A green screen is a green surface used as a background when filming so that any image can replace the screen behind the actor or presenter. Shooting with a green screen involves filming a person or adding visual effects in front of a solid color. Then, by digitally removing or “keying out” that color, you can drop that scene onto the background of your choice in post-production. Removing the colored background is also referred to as “chroma keying.”
Steps with Images
The first step is to record footage in front of a green screen so that you can import it into WeVideo as a media file. To capture footage that is optimal for the Green Screen effect, please ensure the following:
- There is ample lighting distributed evenly around you with no shadows.
- You are in front of a solid background with no creases. Green or blue is the recommended color for your background.
- The quality of your camera is high enough so that the footage is not pixelated or grainy. 720p HD footage or above is recommended.
Step 2) Add media to the Timeline
Once you’ve captured the footage you want to use for the Green Screen effect, import that media file and add it to the Timeline. Remember to place the green screen footage in the Video 2 track and the clip you would like to use as the background in the Video 1 track.
If you are using more than two video tracks, place the green screen footage in the track above whichever track holds the background footage to ensure proper layering techniques are used.
Step 3) Open the clip editor
Double click on the green screen clip in the Timeline to open the clip editor. In the clip editor, navigate to the Color Keying tab.
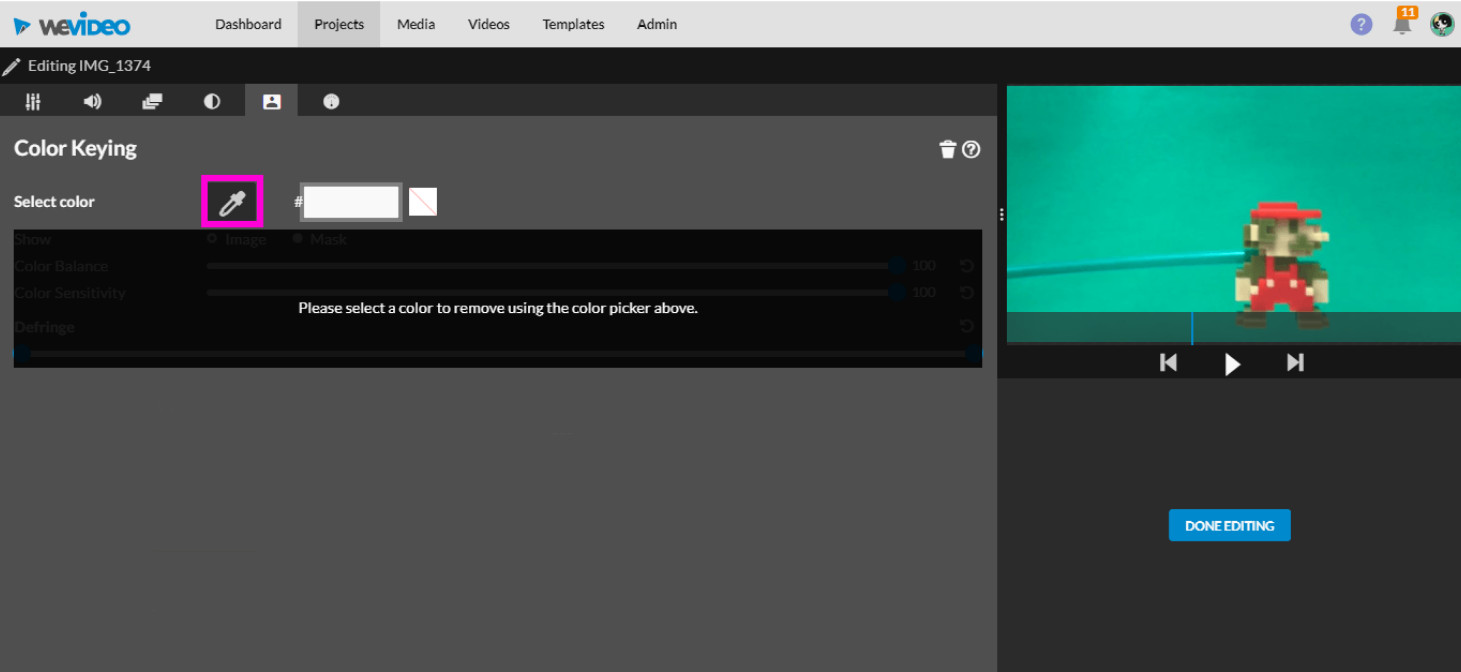
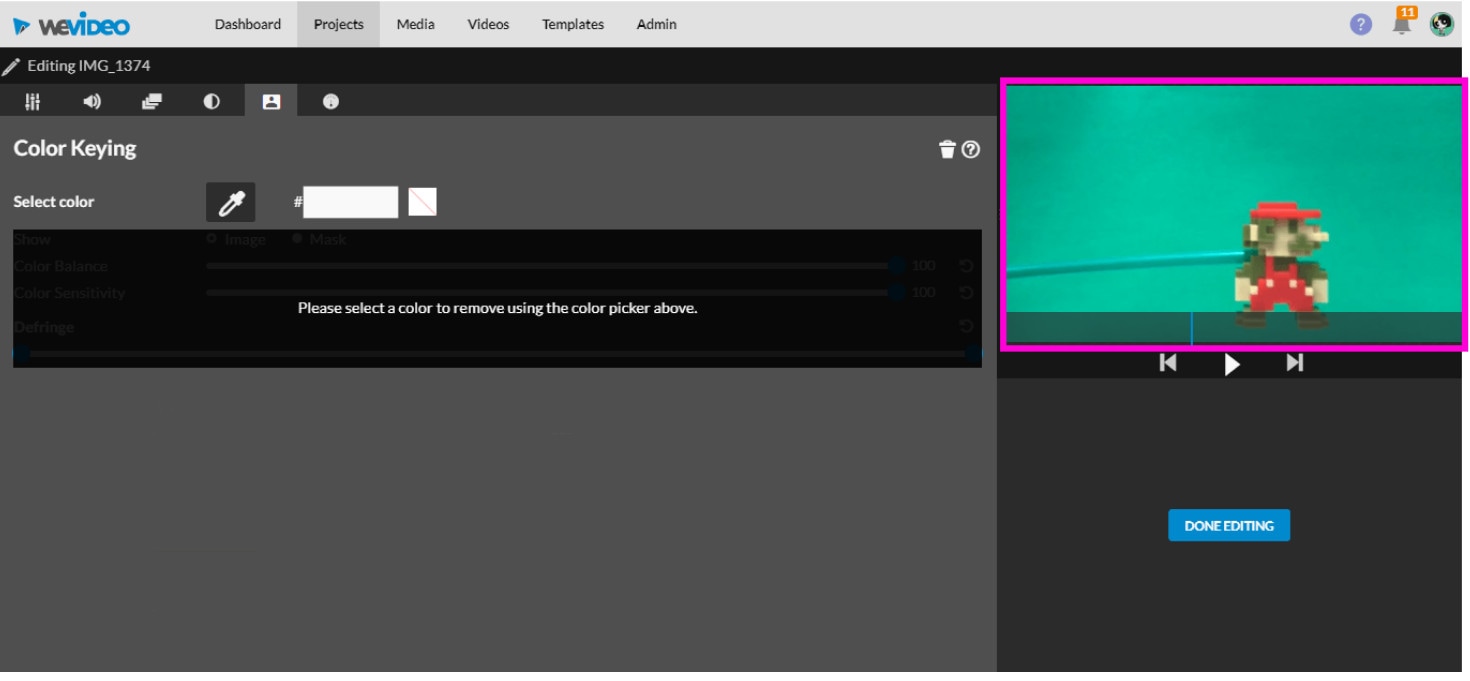
Step 4) Use the color picker tool
Select the color picker tool and then click anywhere on the green screen footage to apply the effect.
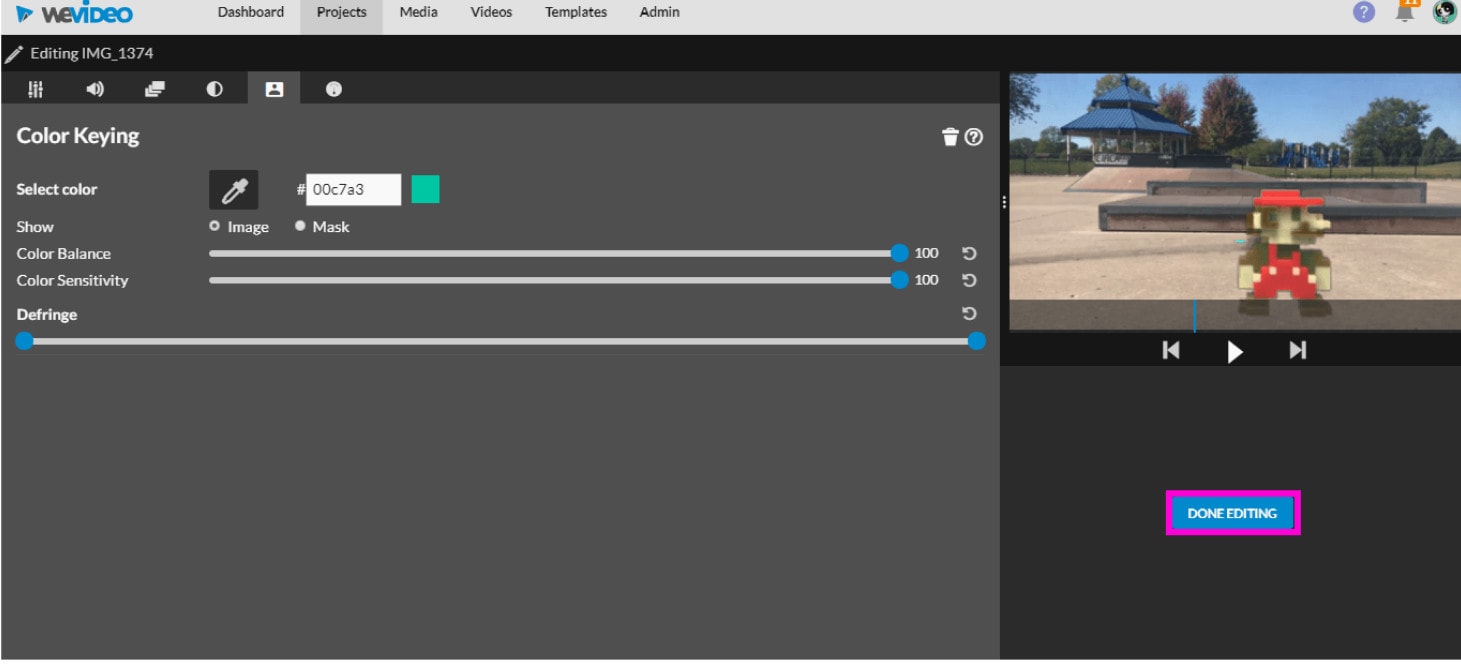
Step 5) _(optional) Adjust the color settings
The Green Screen effect should automatically apply without the need to adjust the color settings. However, if you would like to make these additional modifications, you can use the scroll bars to make the following adjustments:
- **Show- You can select Mask to reveal a black and white representation of the mask you are applying using the color keying tool. Notice that the black area represents transparent sections of your video, while the white area represents opaque sections.
- **Color Balance- This adjusts how selective the effect is. The further right you scroll, the wider the range of tints and shades are removed.
- **Color Sensitivity- This smooths out any pixelation and rough edges of color that remain.
- **Defringe- This helps reduce color bleeding at the edges of your mask. The left and right sliders control the level of white and black respectively to help match the edges of the mask with your new background color.
For macOS 10.12 or later
Installation Steps
- Click the icon in the center of the Media Library to add files directly.
- Go File > Import Media > Import Media Files.
- Drag and drop to the Media Library directly.
While importing a media file, Wondershar Filmora may ask you if you wish to create a proxy file to accelerate the editing process. Select “Yes” to have a fast video editing experience.
You can also import video clips using your Touch Bar controls if your computer has Touch Bar.
Record a media file
Apart from the videos shot by your digital devices, you can also directly import media files by recording video from your webcam, capturing the computer screen, or recording a voice-over.
Find green screen effects: Now you can select the different types of green screen effects.
Apply green screen: drag the effects to the timeline to apply it to your videos.
Save and Export: Then you can save or export the video.
A green screen is a green surface used as a background when filming so that any image can replace the screen behind the actor or presenter. Shooting with a green screen involves filming a person or adding visual effects in front of a solid color. Then, by digitally removing or “keying out” that color, you can drop that scene onto the background of your choice in post-production. Removing the colored background is also referred to as “chroma keying.”
Steps with Images
The first step is to record footage in front of a green screen so that you can import it into WeVideo as a media file. To capture footage that is optimal for the Green Screen effect, please ensure the following:
- There is ample lighting distributed evenly around you with no shadows.
- You are in front of a solid background with no creases. Green or blue is the recommended color for your background.
- The quality of your camera is high enough so that the footage is not pixelated or grainy. 720p HD footage or above is recommended.
Step 2) Add media to the Timeline
Once you’ve captured the footage you want to use for the Green Screen effect, import that media file and add it to the Timeline. Remember to place the green screen footage in the Video 2 track and the clip you would like to use as the background in the Video 1 track.
If you are using more than two video tracks, place the green screen footage in the track above whichever track holds the background footage to ensure proper layering techniques are used.
Step 3) Open the clip editor
Double click on the green screen clip in the Timeline to open the clip editor. In the clip editor, navigate to the Color Keying tab.
Step 4) Use the color picker tool
Select the color picker tool and then click anywhere on the green screen footage to apply the effect.
Step 5) _(optional) Adjust the color settings
The Green Screen effect should automatically apply without the need to adjust the color settings. However, if you would like to make these additional modifications, you can use the scroll bars to make the following adjustments:
- **Show- You can select Mask to reveal a black and white representation of the mask you are applying using the color keying tool. Notice that the black area represents transparent sections of your video, while the white area represents opaque sections.
- **Color Balance- This adjusts how selective the effect is. The further right you scroll, the wider the range of tints and shades are removed.
- **Color Sensitivity- This smooths out any pixelation and rough edges of color that remain.
- **Defringe- This helps reduce color bleeding at the edges of your mask. The left and right sliders control the level of white and black respectively to help match the edges of the mask with your new background color.
7 Best Green Screen Software for Beginners on Mac
Almost every major film released in 2019 used green screen effects for at least one scene. While that is an entirely unscientific assessment that you should not cite in a college paper, given the accessibility and sophistication of today’s green screen technology, it is probably not far off. Everyone has access to expert compositing technology, from Marvel movies to local news stations.
WHAT ARE GREEN SCREEN AND CHROMA KEYING?
The colored background you want to make transparent and remove from your shot is referred to as a green screen. This is typically a single-colored backdrop, which can be any color but is usually bright green because it is the color most dissimilar to human skin tones. (Blue screens were commonly used in the early days of film, and they may still be used in some cases.)
The chroma key is a time-honored and widely used visual effects technique. Simply stated, chroma key is the process of photographing a subject against a solid-color background and then removing that background in post-production and replacing it with transparency. The subject can then be positioned in front of any new background.
BEST FREE GREEN SCREEN SOFTWARE FOR BEGINNERS ON MAC
FILMORA VIDEO EDITOR
Supported OS: Windows, Mac, iOS, Android
Filmora Video Editor has two modes based on your experience with video editing software. Users can use the easy mode or the full feature editor to access the program’s full focus.
The theme focus can also make it easier to select the videos and audio that you want to use. There are a number of features and effects that can be used to complement various themes, which can help improve transitions or find different effects in the program without having to dig around.
The preview mode and music tracks available from the themes make it simple to enhance your video.
The full feature mode gives you even more control; this is where Filmora begins to resemble an actual video editor. You can drag images, sounds, and other media into different tracks and apply advanced effects.
Green screens, premade filters for color correction, cropping, cutting, splitting, and combining with simple tools are all available in the full feature mode. The full-featured editor also has an audio mixer and equalizer, as well as the ability to burn your creations to DVD, Facebook, Vimeo, and other platforms.
For Win 7 or later (64-bit)
For macOS 10.14 or later
Features:
4k Editing Support
Gif Support
Noise Removal
Color Tuning
Advanced Text Editor
Audio Mixer
Video Stabilization
Scene Detection
Audio Equalizer
Chroma Keying
Pros:
- It can be a program that’s easy to master even if you have never used a video editing program before
- There are plenty of visual effects and premade effects that can help you make a great looking video within a few minutes
- The 4k video support is also helpful
Cons:
- It does lack a few advanced features like the option for motion tracking, multi-camera support, and assistance with 360° videos
Steps On How To Chroma Key On Filmora
- Click the “Import Media Files Here“ to import the background video and video with the green screen background into the media library. And then drag and drop the background video and green screen video to the video track in the timeline respectively.
Note: Ensure the video with green screen background is placed as the overlay video.
- Right-click on the overlay video and find the “Green Screen“ option.
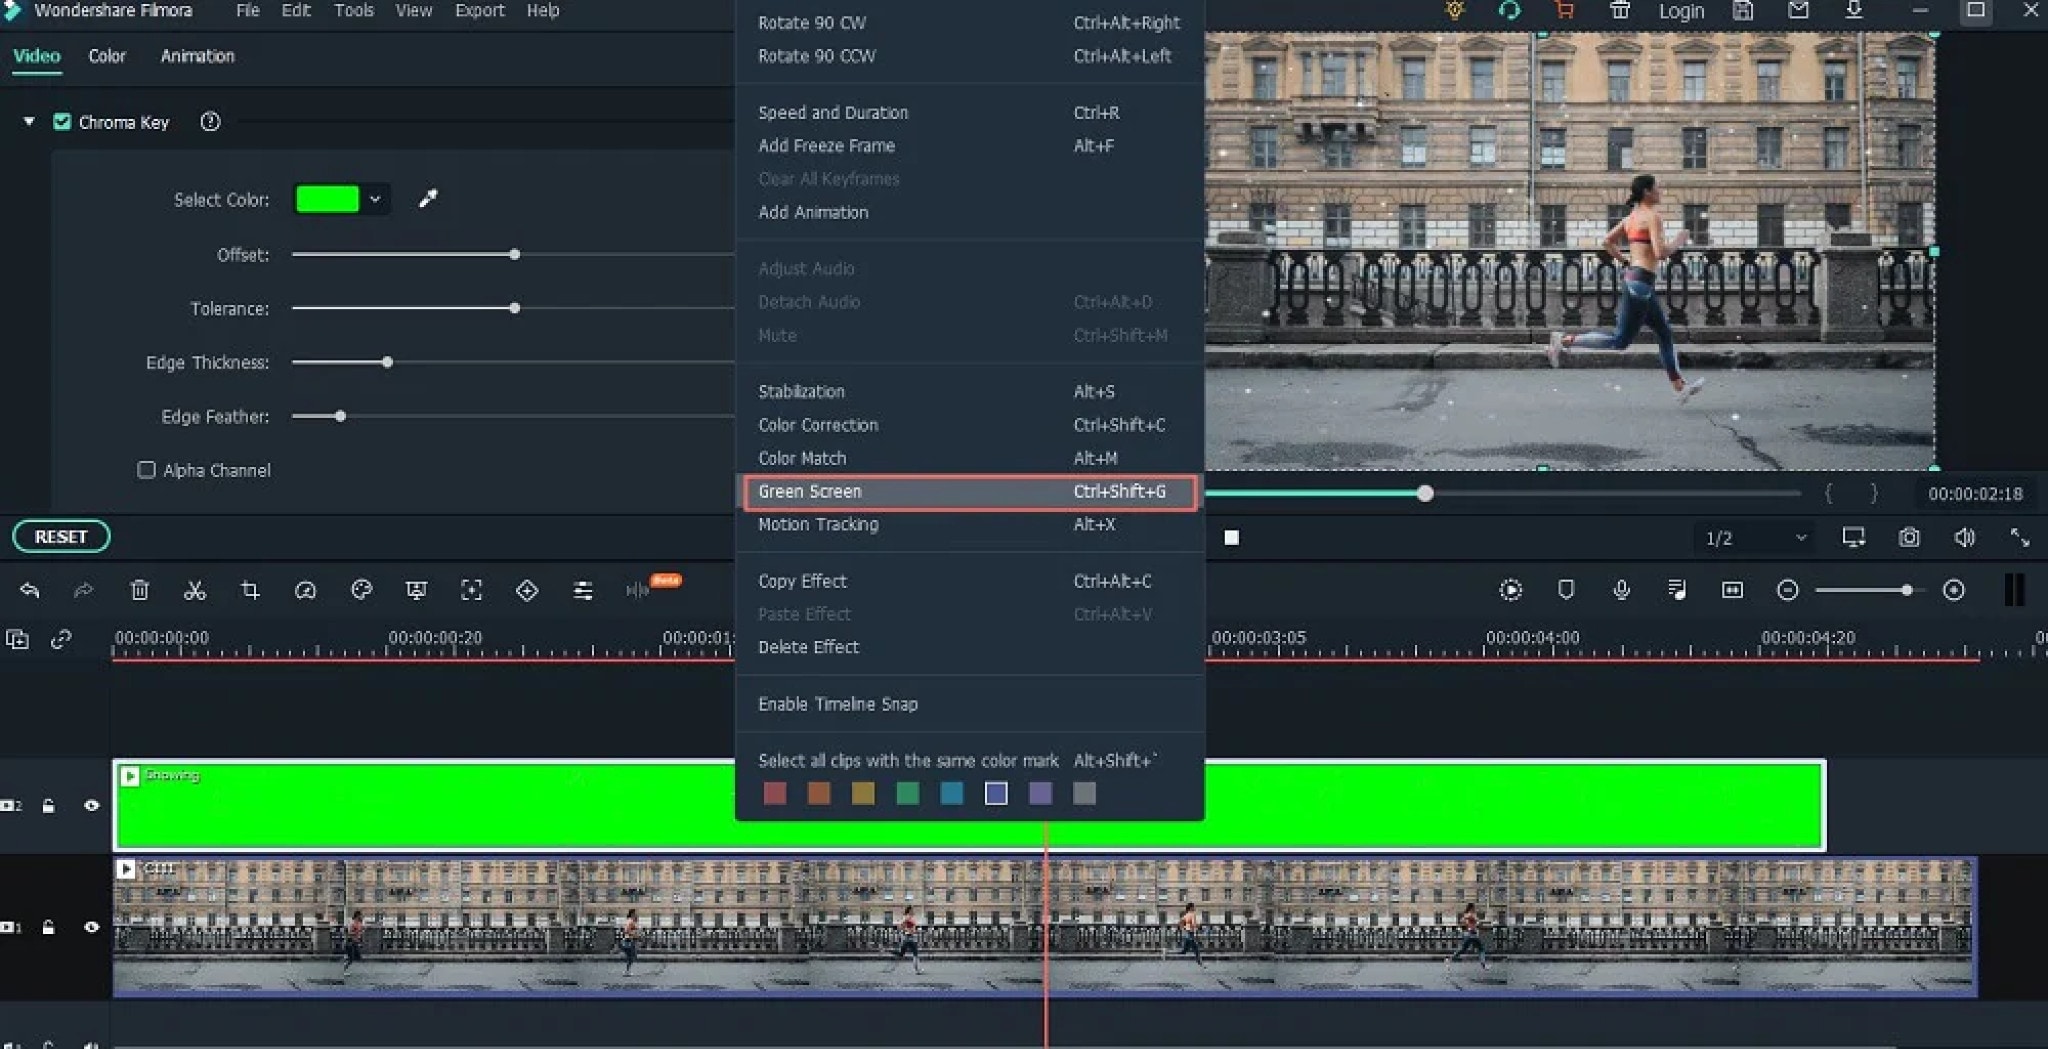
- Click on “Green Screen“ and you’ll open the video editing panel. And the green screen background has been removed.
To open the green screen editing panel, you can also double click the overlay video, then check “Chroma Key” to apply the green screen function. And you can also adjust the offset, tolerance, edge thickness, etc. according to your own needs.
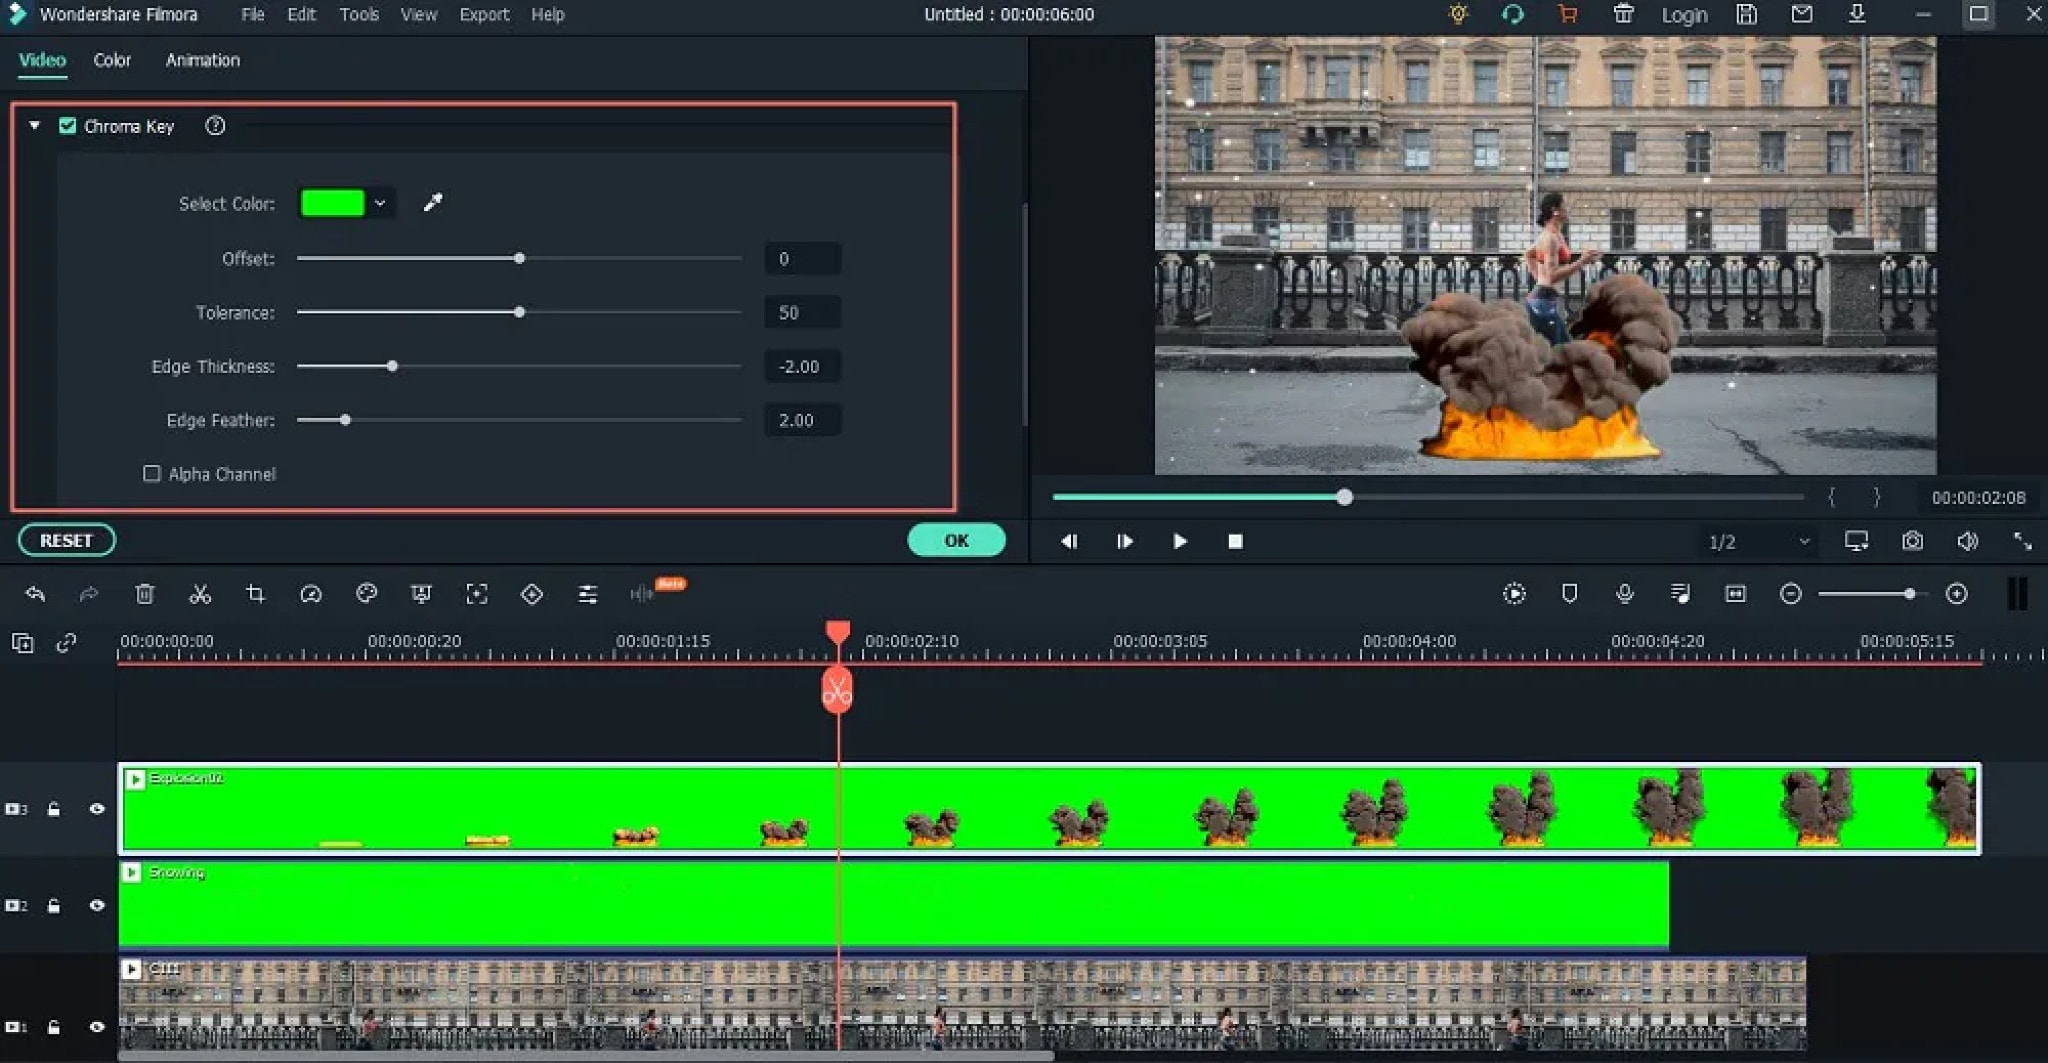
When you’re satisfied with the effect, you can click the “OK“ button to save the changes.
OPENSHOT
OpenShot Video Editor is a free, open-source video editor for Mac and Windows PC that can take your videos, photos, and music files and assist you in creating the film you’ve always wanted to make. Add subtitles, transitions, and effects with ease, and then export your film to DVD, YouTube, Vimeo, Xbox 360, and a variety of other popular formats.
A cross-platform video editing solution designed to help businesses of all sizes edit audios, videos, or images using a drag-and-drop interface. Administrators can use OpenShot Video Editor to enhance videos by adding animation effects such as fade, flying text, snow, and bounce, watermarks, 3D titles, and audio tracks, among other things.
The multilingual platform, which was specifically designed for video editors, allows teams to adjust color contrasts and brightness, as well as add time.
Supported OS: Windows, macOS, Linux
Features:
- Cross-platform (Linux, Mac, and Windows)
- Support for many videos, audio, and image formats (based on FFmpeg)
- Powerful curve-based Key frame animations
- Desktop integration (drag and drop support)
- Unlimited tracks/layers
- Clip resizing, scaling, trimming, snapping, rotation, and cutting
- Video transitions with real-time previews
- Compositing, image overlays, watermarks
- Title templates, title creation, sub-titles
- 2D animation support (image sequences)
- 3D animated titles (and effects)
- SVG friendly, to create and include vector titles and credits
- Scrolling motion picture credits
- Advanced Timeline (including Drag & drop scrolling, panning, zooming, and snapping)
- Frame accuracy (step through each frame of video)
- Time-mapping and speed changes on clips (slow/fast, forward/backward, etc…)
- Audio mixing and editing
- Digital video effects, including brightness, gamma, hue, greyscale, chroma key, and many more!
- Experimental hardware encoding and decoding (VA-API, NVDEC, D3D9, D3D11, VTB)
- Import & Export widely supported formats (EDL, XML)
- Render videos in many codecs and formats (based on FFmpeg)
Pros:
- 3D Titles
- Curve-based Time Mapping
- Non-linear Editor with Infinite Tracks
- No Watermark
- Frequent Update
- Easy to Use
- Multi-lingual
Cons:
- Unstable Performance
- Limited Editing Features
- Less Powerful Hardware Acceleration
- Obsolete Interface
Steps On How To Chroma Key In Openshot
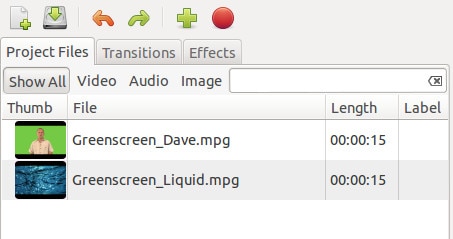
- To create a chroma key (e.g. greenscreen or bluescreen) in OpenShot, begin by importing the files you’re going to use.
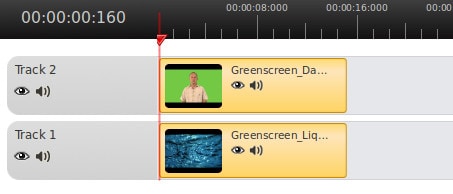
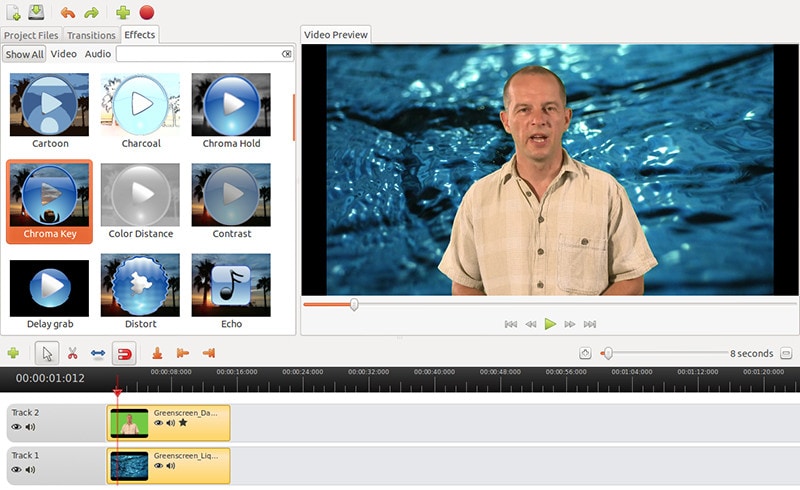
- Drag the file to be keyed onto Track 2 in the timeline, and the file to use as the background onto Track 1. The plan is to make the green part of the upper image transparent so the file underneath becomes visible.
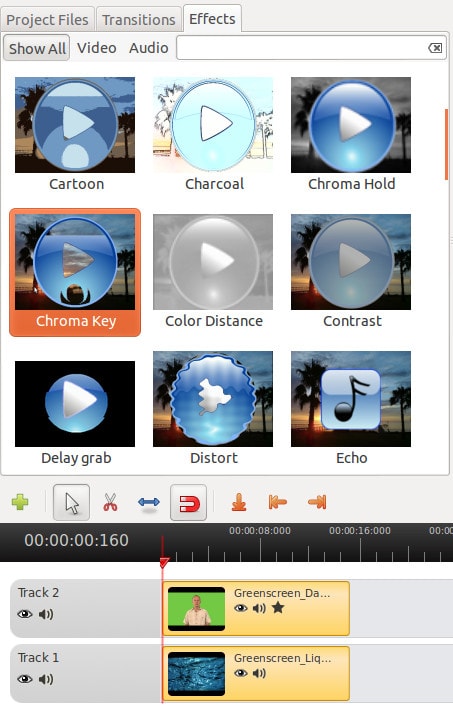
- Click the Effects tab, find the Chroma Key effect, and drag it onto the top file in the timeline. You will see a star appear on the file in the timeline.
- Right-click the top file in the timeline and select Properties. In the Properties window, click the Effects tab and then click the Chroma Key effect.
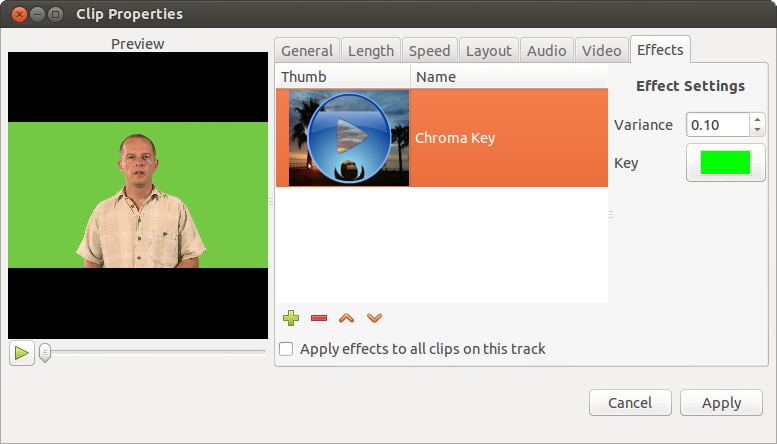
- Click the green-colored area next to the word “Key” (shown above) to bring up the Pick a Color window (shown below). Click the eyedropper tool and then click on a green part of the video image.
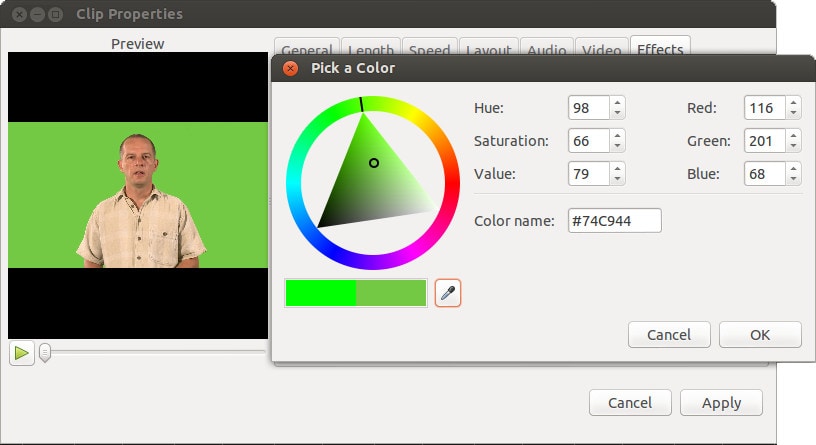
- Click OK, then click Apply in the properties window. You should now be able to scrub through the timeline and see the effect in action.
iMovie
When you record a video against a green screen, you can make the background transparent and replace it with other video clips, graphics, or still images of your choice. It’s easy to overlay any footage with iMovie’s green screen effect. For example, you can transport yourself anywhere or appear in your favorite films.
The green Screen effect, also referred as the Chroma Key effect, is a simple way to combine two clips into one with impressive scenes. You can, for example, fly over a very high mountain. Green Screen is a background that is only one color, usually green. This could be another pure color, such as Blue or Pink. By dragging and dropping, you can apply a green screen video to another in iMovie. It’s incredibly simple to create stunning videos using the iMovie Green Screen effect.
Supported OS: macOS and iOS
Features:
- Options to modify and enhance video color settings
- Crop and rotate video clips
- Stabilize shaky videos
- Add video transitions
- Change the speed of clips.
- iMovie allows you to remove both green and blue screens
Pros:
- Clean, elegant interface
- Well optimized, responsive, and fast on modern Macs
- Effects and titles are all top-notch—especially for a free program
- Robust and useful interactions with other Apple products and software
Cons:
- Doesn’t have some advanced features present in other applications, like 360 video or Multicam
- Sometimes the efforts to keep the interface simple make finding a solution obtuse
- The user interface is not customizable
- Supports fewer export formats than some competing products
Steps On How To Chroma Key In iMovie
- Open an empty project.
- Select the background you would like to use.
- Drag and drop the background video or image into the timeline.
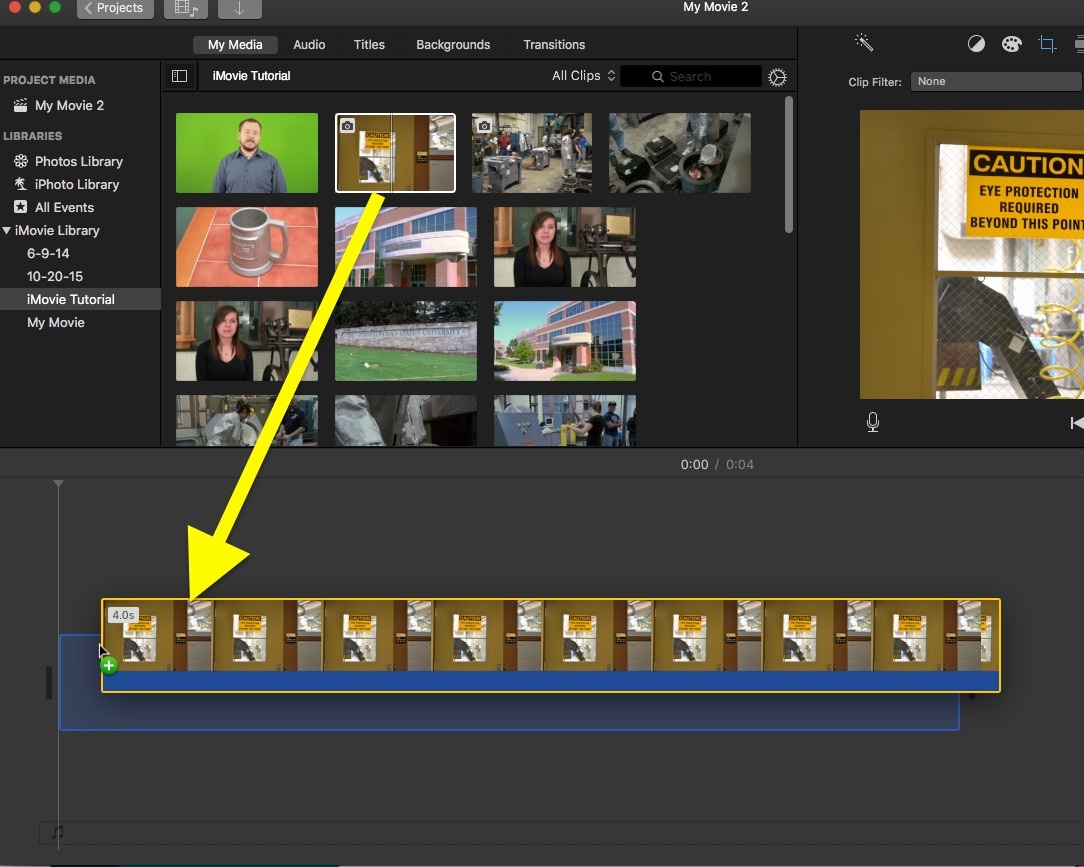
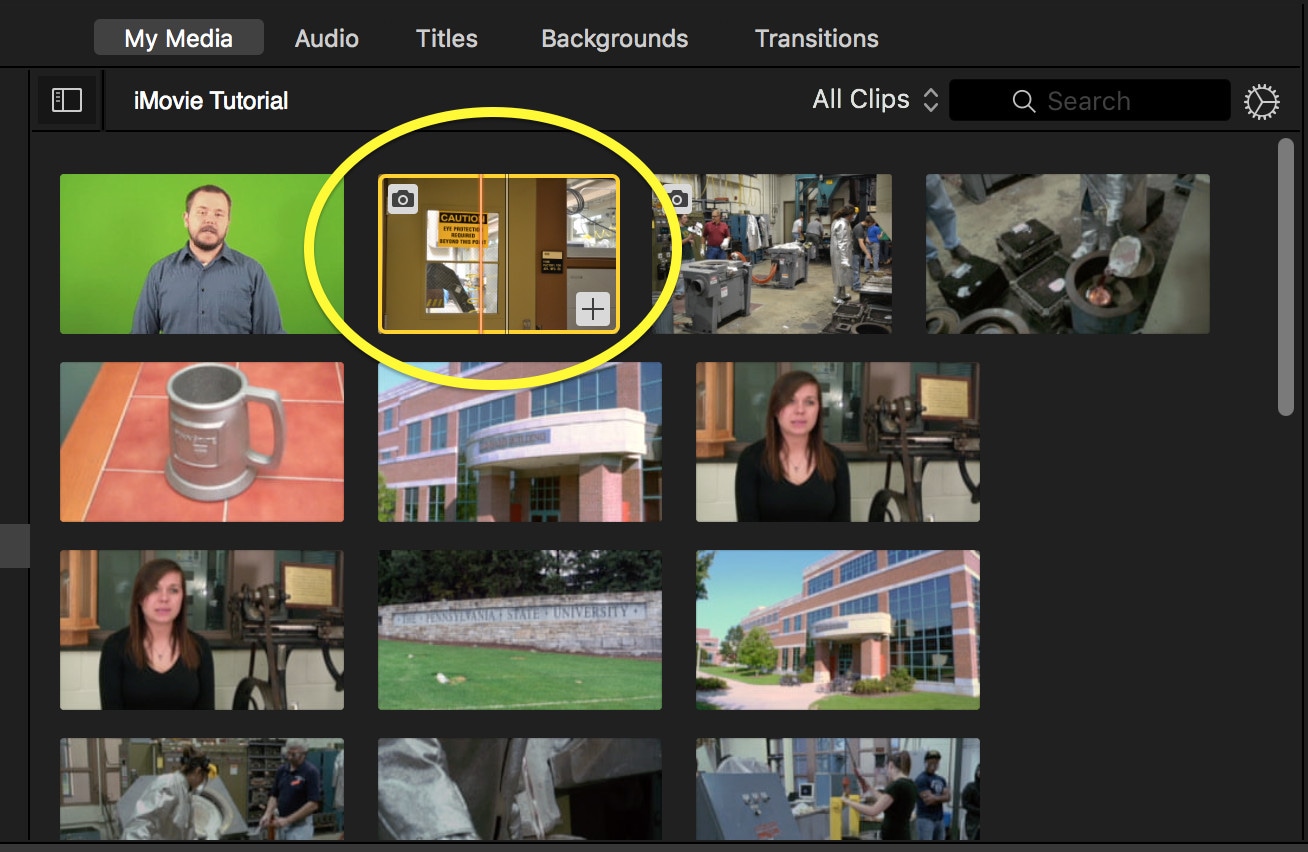
- Select the green screen footage you want to use.
- Drag and drop it above the background.
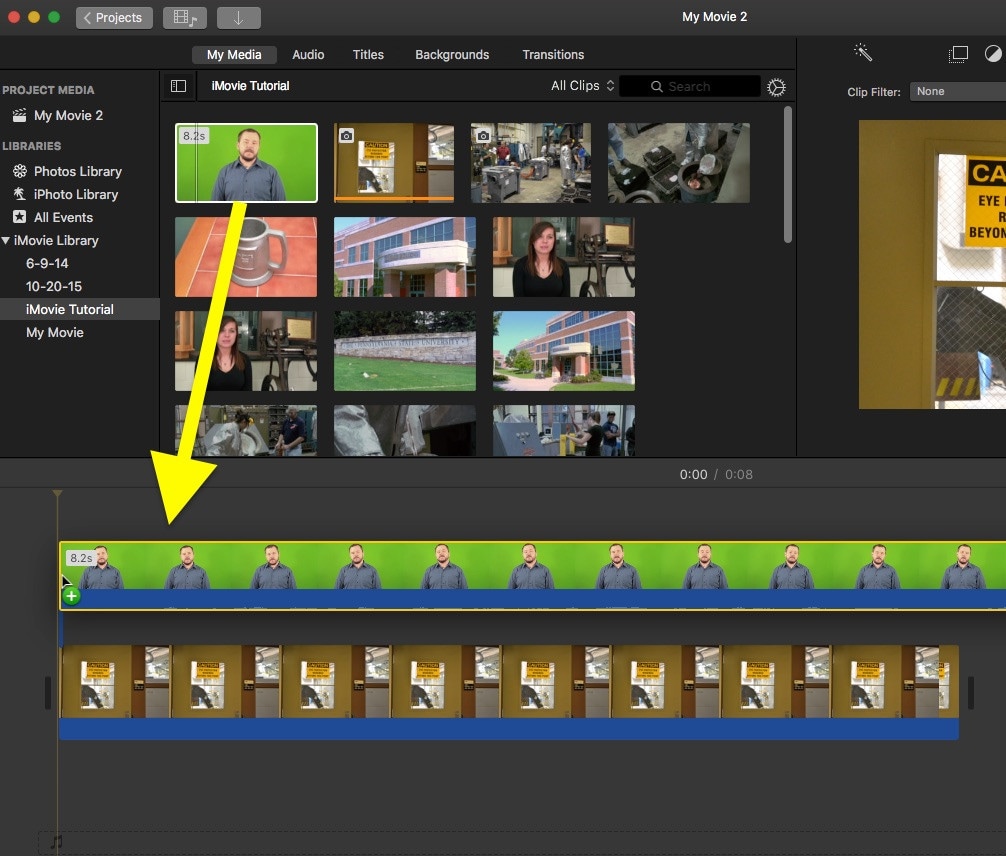
- Drag the edge of the background to make the background longer or shorter to match your green screen footage.
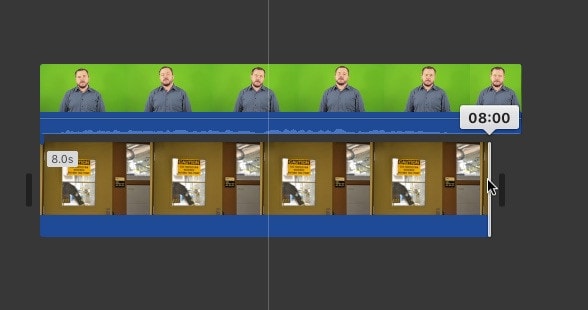
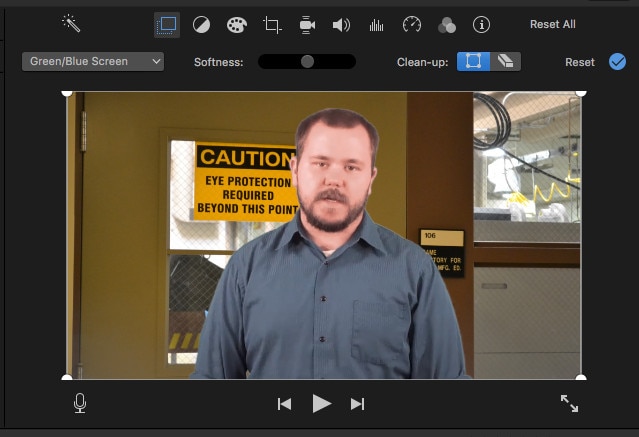
- Click to select the green screen footage in the timeline
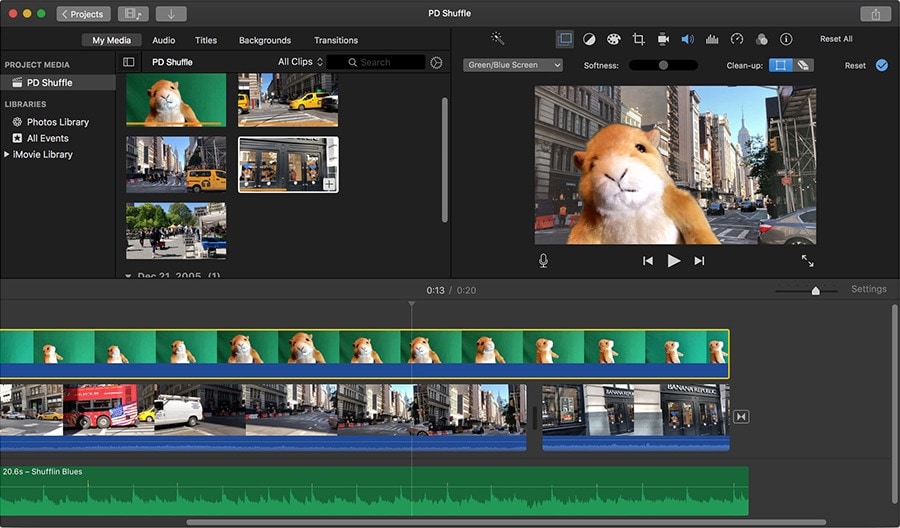
- Select Green/Blue Screen from the drop-down menu that defaults to Cutaway above the left corner of the viewer window.
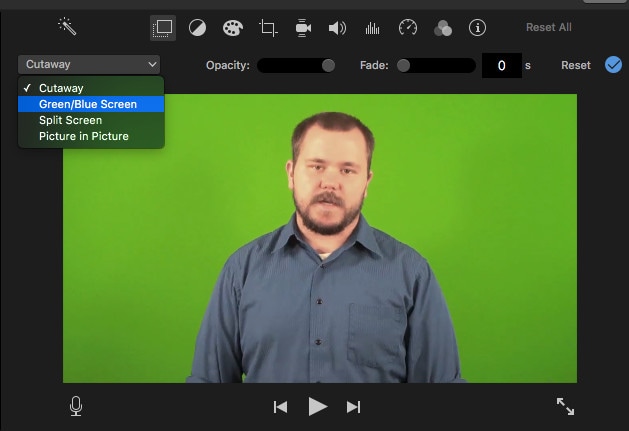
- The green should now be removed to reveal the background behind it.
DA VINCI RESOLVE
Davinci Resolve has two versions including a full studio version which is available for $299. Because some professional tools, such as team collaboration and video noise reduction, cannot be used without a full license, the free program has a surprising number of features. The majority of the features included in the free version are adequate for professionals and hobbyists.
Although the Davinci Resolve program is regarded as a professional grade editor, it does include some advanced tools such as exporting, audio mastering, color correction, and more. The program is also useful for arranging audio and video clips, and it has a large selection of effects and filters. The additional color correction and adjustments available here can also aid in HDR support and produce more professional results when working with camera RAW data.
Davinci Resolve is also well-known for having one of the best color grading programs available. The outcome can be hugely potent when using the accessible chromakey tools. It doesn’t take much to figure out how to use this effect with the quick tutorial on board.
Supported OS: Mac and Windows
Features:
- Options to modify and enhance video color settings
- Crop and rotate video clips
- Stabilize shaky videos
- Add video transitions
- Change the speed of clips.
- iMovie allows you to remove both green and blue screens
Pros:
- Clean, elegant interface
- Well optimized, responsive, and fast on modern Macs
- Effects and titles are all top-notch—especially for a free program
- Robust and useful interactions with other Apple products and software
Cons:
- Doesn’t have some advanced features present in other applications, like 360 video or Multicam
- Sometimes the efforts to keep the interface simple make finding a solution obtuse
- The user interface is not customizable
- Supports fewer export formats than some competing products
Steps On How To Remove the Green Screen in DaVinci Resolve Inside the Color Tab
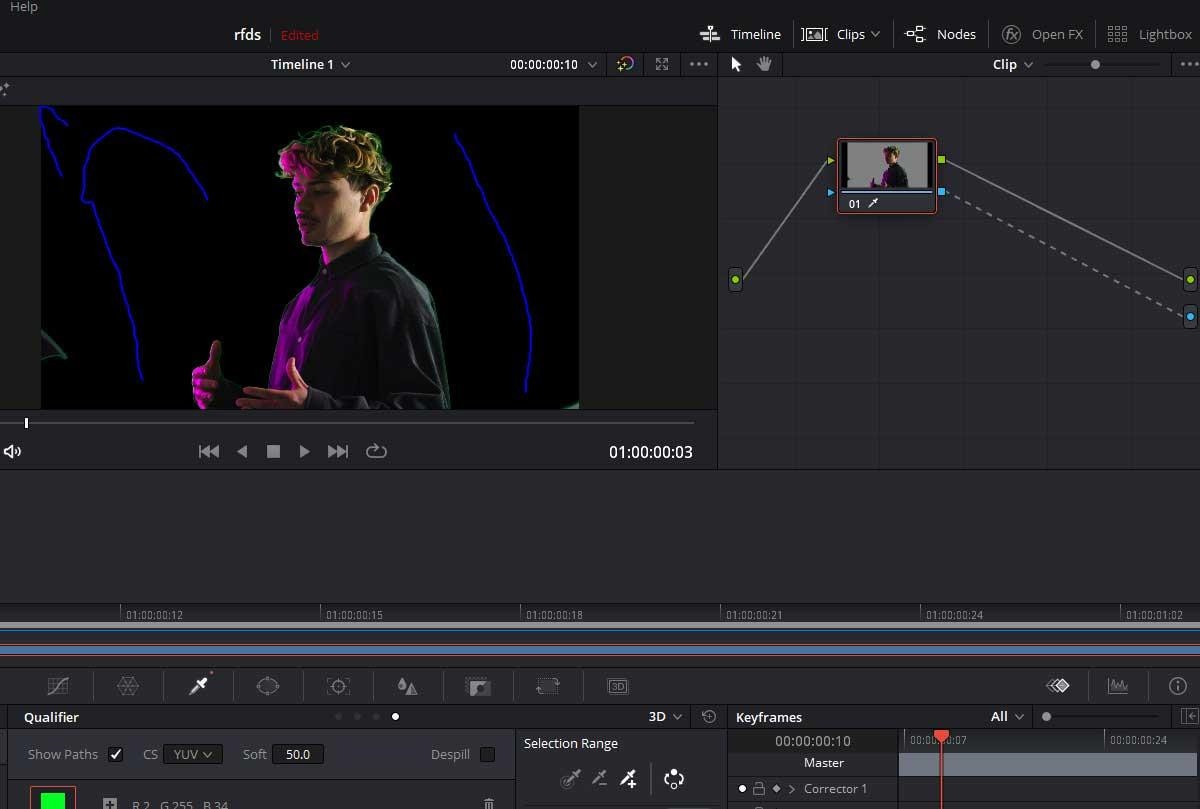
Step 1 – Add the Qualifier Tool & select the color
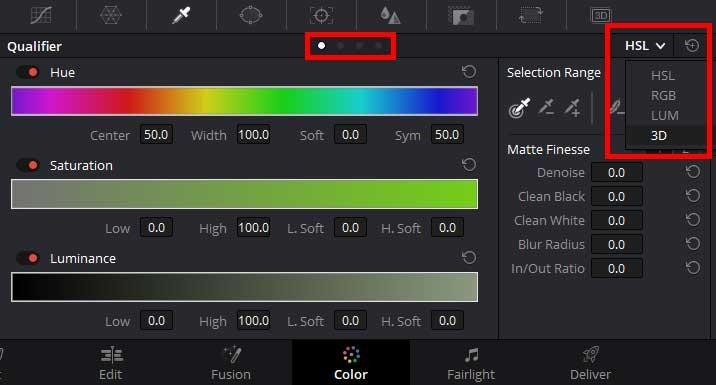
After you finish cutting the video, jump inside the “Color” tab and select the Qualifier Tool. Make sure you set the tool in “3D” mode to enable us to select a bigger range of the green spectrum.
Do this by simply selecting the fourth dot from the middle-upper area of the window or by selecting it from the drop-down mode selector situated in the window’s top-right corner.
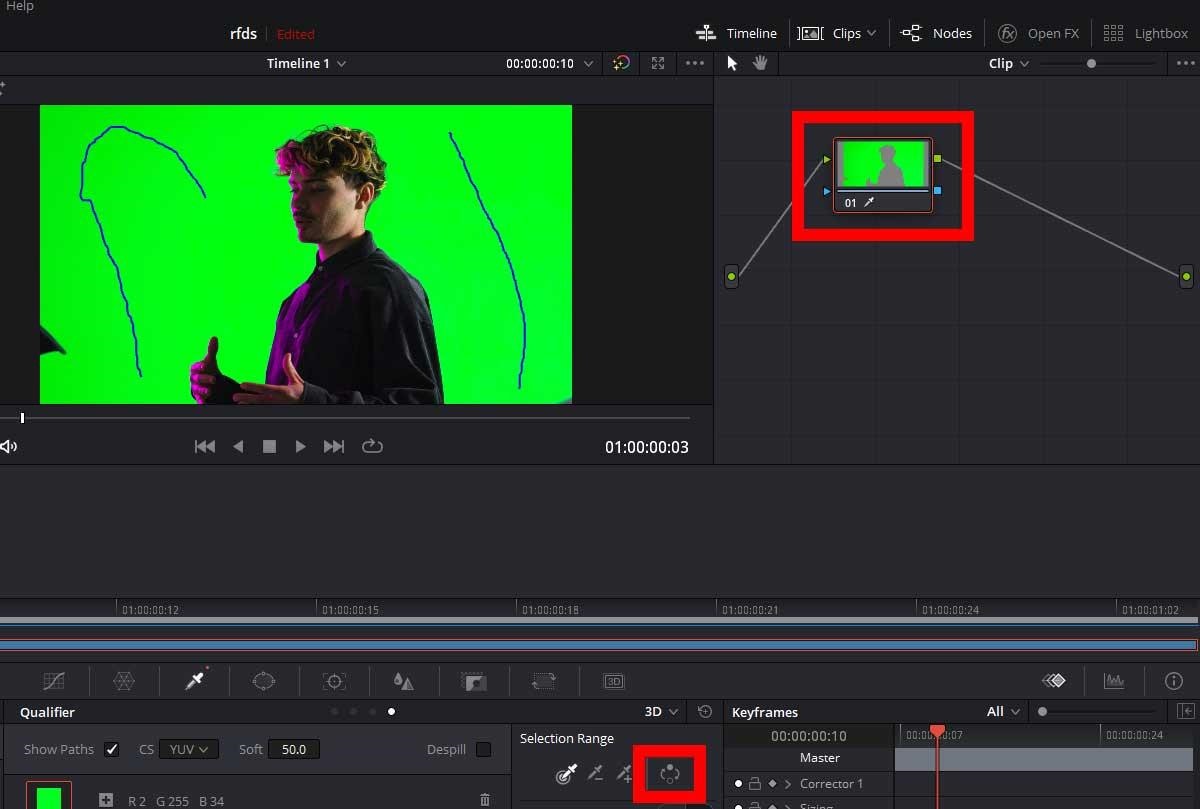
After selecting the 3D mode for the Qualifier Tool, go ahead and select the range of green colors you want to remove by simply drawing lines on top of the screen, similar to the way I did in the image below.
Step 2 – Removing the color
As you can see in the small rectangle, Resolve did the keying, but it doesn’t know what to do with it because we didn’t specify. Right-click underneath the node, select “Add Alpha Output” and then link the node.
Yes, I know it will key out the subject and not the green screen. There is no problem. Go ahead and select the Revert button situated in the “Selection Range” window. Everything should be OK now.
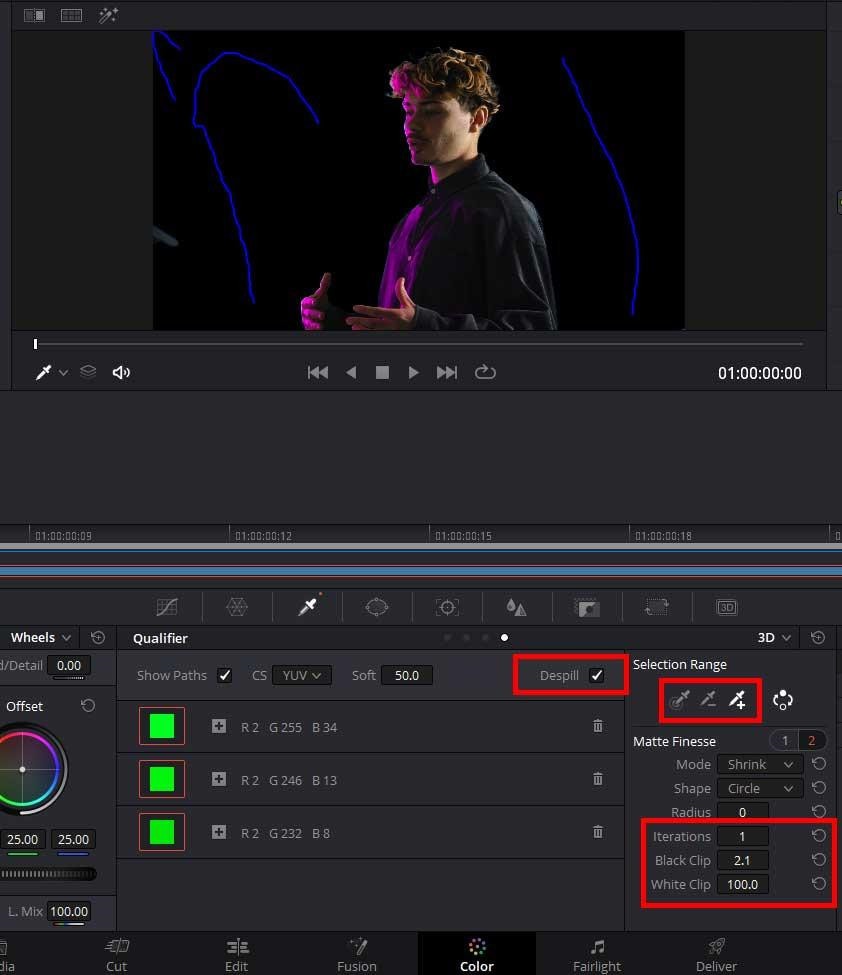
Step 3 – Clean the edges
As you can surely notice, there are still some issues we have to address. In the hair area and on the outline of the subject, there is a noticeable green color spill. We don’t want that! On top of this, there will be many situations where you will still notice some noisy green pixels in the transparent area, around the corners of the screen, or the subject.
To get rid of these problems, we have to jump into the Qualifier window. Here, there are many settings you can play with to tweak the output. Most of the time, you will solve these problems by checking “Despill”, further selecting more of the greens and adding them to the Selection Range, or modifying the shrink, ”Black Clip” and “White Clip”.
Step 3 – Done
This is all for this method! Go ahead and add a background in the “Edit” mode and your job is done! Feel free to watch the video below, where I went through the same steps as above, but faster.
BEST PAID GREEN SCREEN SOFTWARE FOR BEGINNERS ON MAC
WEVIDEO
Supported OS: Windows, Mac, iOS, Android
This program, which costs only $4 per month, has extensive compatibility with nearly 20 different input and output formats. Most common input and output formats, such as NT 4.0, avi, 3gp, and others, are well represented.
If you want to do green screen options online but don’t want to install any software to access a full-featured video editor, this could be one of your best options.
WeVideo is a cloud-based video editing solution that is both powerful and simple to use. There’s a reason it’s one of the most popular online video editors out there. This includes options for photo animations, clip transformations, voiceovers, and more. You can also improve your video by using a variety of premium features such as screencasting, custom branding, and a wide range of free tracks that can be used with copyright-free music.
With this online editor, you can easily control almost everything in a video, from motion effects to green screen technology to scene transitions.
Features:
- 720p video resolution
- Motion titles
- Screencasting
- WeVideo JumpStart
- Cloud storage
- Music library
- Slow motion
- Voiceover
- Guilt in graphics
- Customizable environment
- Green screen
- Advanced text editing
- File & media manager
- Multi-track editing and storyboard
Pros:
- This is a multiplatform video editor that works with intense compatibility online. You can use it on almost any device.
- The interface is also quite simple and it has some tools that are used by the pros as well as a format that most people can easily understand.
- There is a full licensed library of songs with over 100 tracks you can use royalty-free.
- The cloud storage also ensures that you can pick up a project on any device that you won’t. Cloud access anywhere gives you more time for efficiency and handling your workload.
Cons:
- The program only currently supports 720 P resolution in some of the cheaper plans and there are limited minutes allowed with editing if you are only going to use the trial-free plan.
Steps On How To Chroma Key In WeVideo
- When your WeVideo project is open, click on the clip that you wish to remove the green background from.

- The video or image layer underneath the color-keyed clip will show through, as the background.
- Click on the clip editor pencil icon.
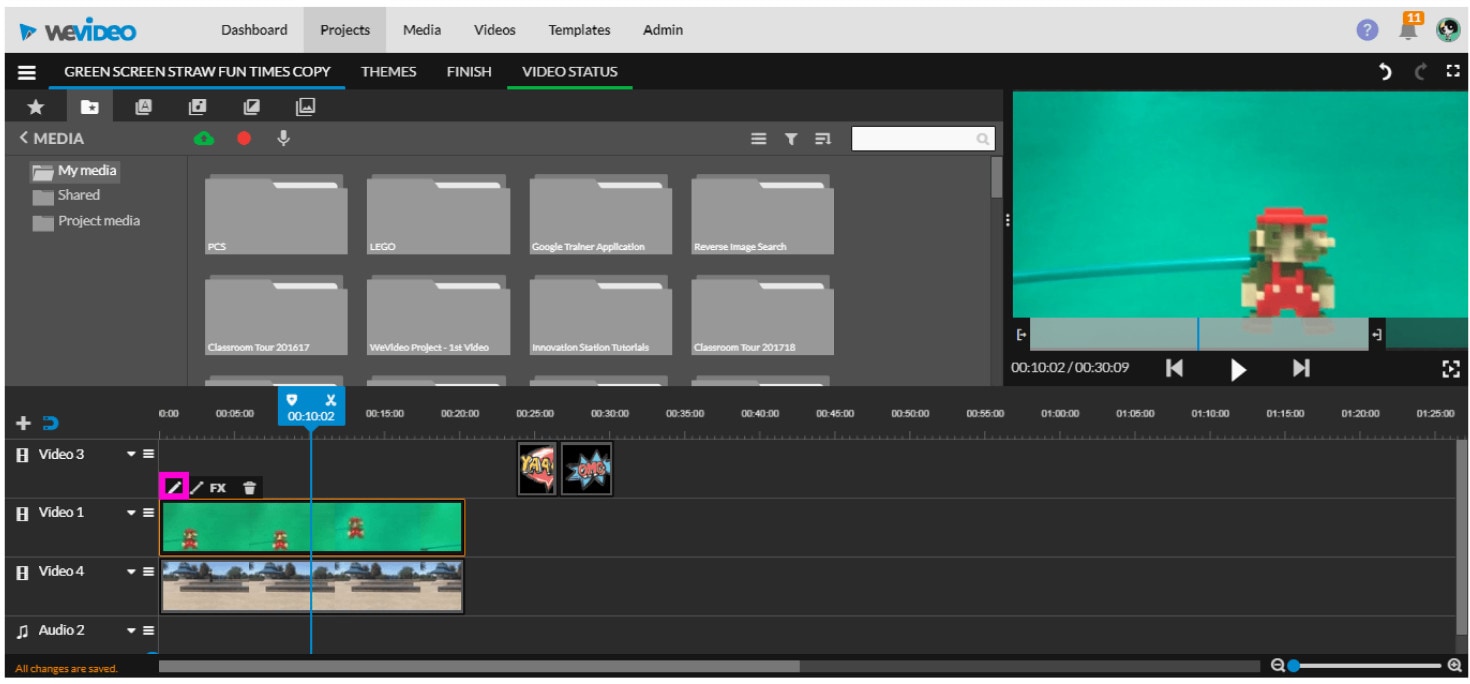
- Click on the eyedropper to choose the color you’re going to remove.
- Click an area that is the color that you would like to remove.
CAMTASIA

Supported OS: Mac and Windows
Camtasia by Techsmith is a simple video editing and screen recording application. Camtasia, designed for beginners, allows users to create professional training videos quickly and easily.
Camtasia is a straightforward video editor and chroma key software (for basic green screen editing) that may meet your needs.
It is the ideal video editor for beginners with little knowledge to editing. It includes numerous features that make it simple to create professional videos, whether you are a student, business owner, or regular YouTube user looking to spice up their content.
Features:
- Intuitive and easy-to-use interface.
- The ability to upload videos straight from the application, via Dropbox or YouTube.
- A wide range of built-in editing templates makes it easier for beginners to create professional-looking video content.
- Screen recording options for capturing live demos and lectures.
- Camtasia for Mac is also available, which makes it an ideal video editor for Apple users.
Pros:
- Very easy to learn
- Amazing screen capture feature
- Impressive cursor effects
- Interactivity features
- Good asset library
- Mobile version
- Great customer service
- Low cost
Cons:
- Constant crashes and bugs
- Limited customization
- No keyframe tracking
- Poor keyboard commands
- Export issues
Steps On How To Chroma Key In Camtasia
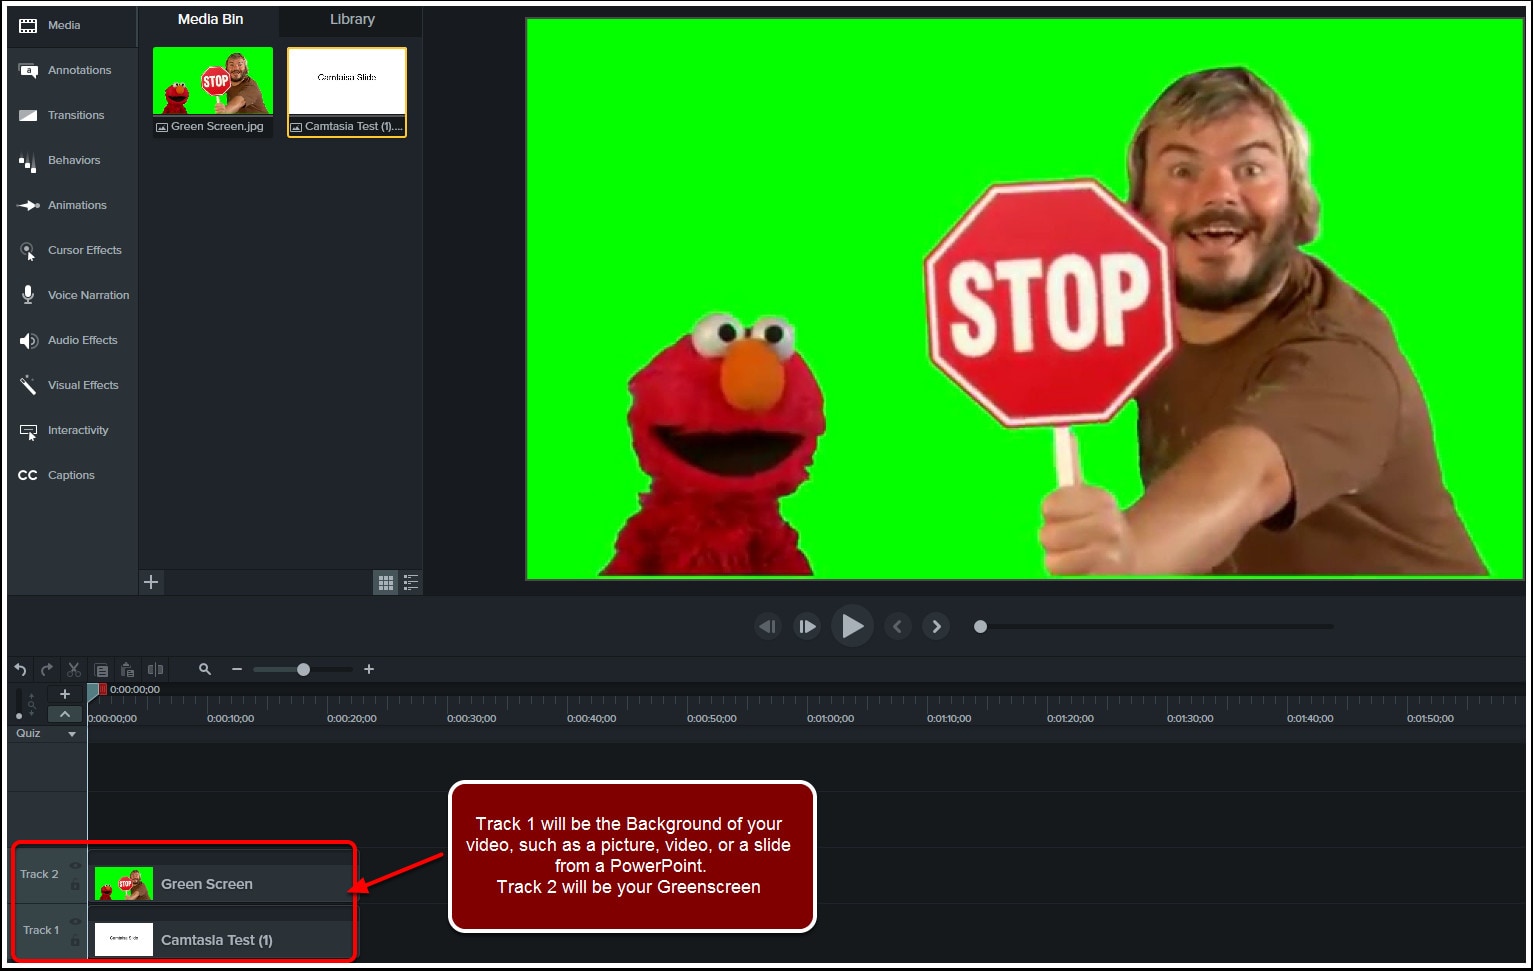
1. Record a video with a green screen
Make sure the green screen fills up the whole background while recording.
After your video is recorded, it will be placed on your Timeline as the recorded Camera and Screen.
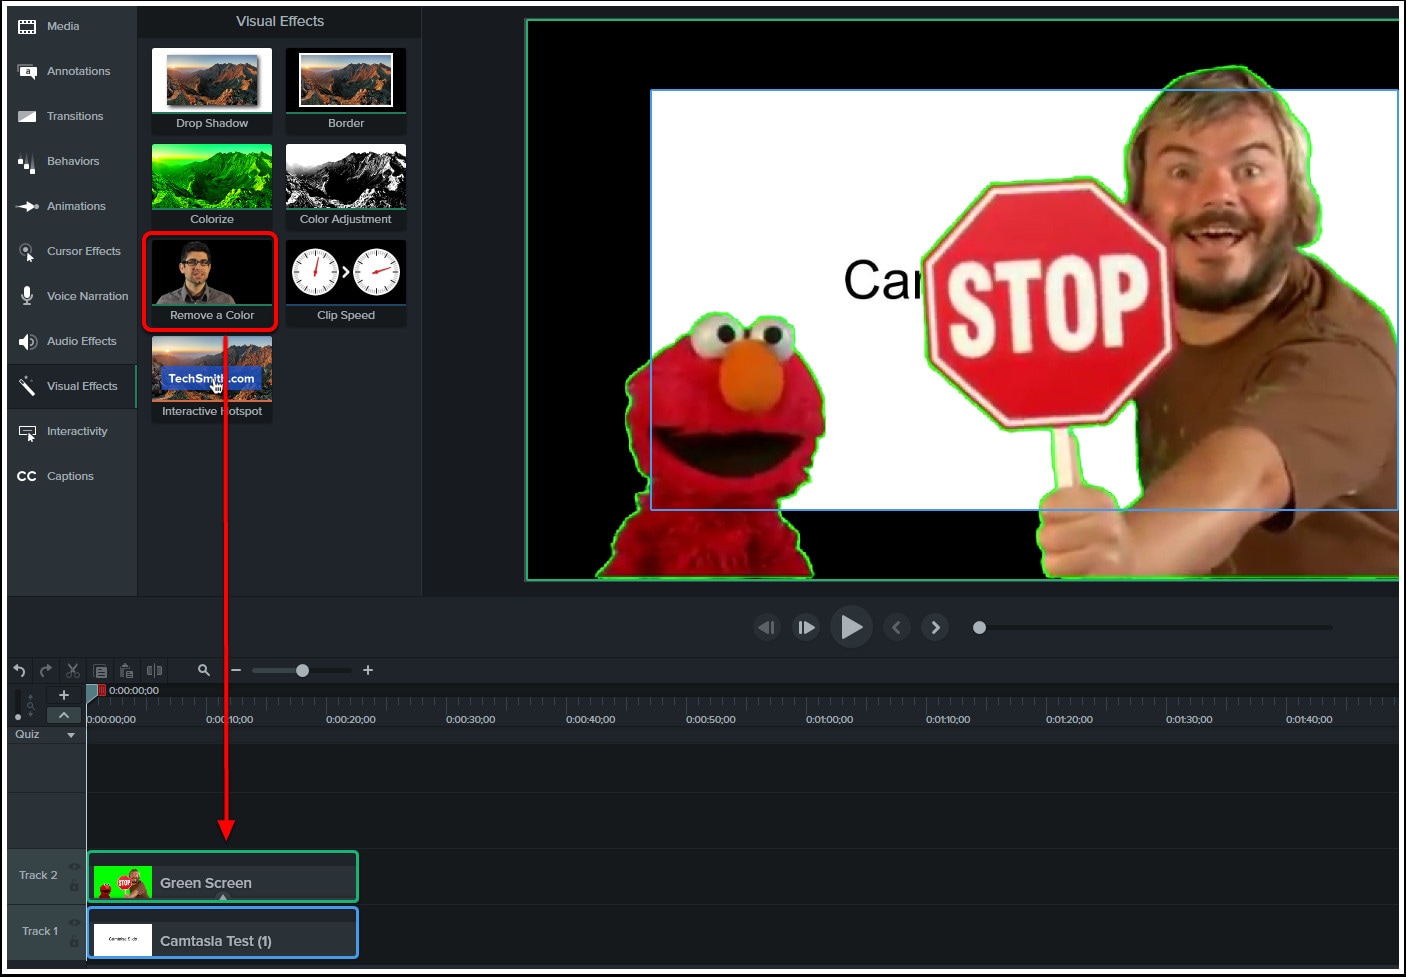
2. Remove the green
Use the Remove a Color tool from the Visual Effects section to remove the green in the background.
Under the properties on the right side, select the color drop-down menu and use the eyedropper tool to select the green color. (Tip: With the Eyedropper tool selected, click on the green part of your Green Screen to select that color for removal.)
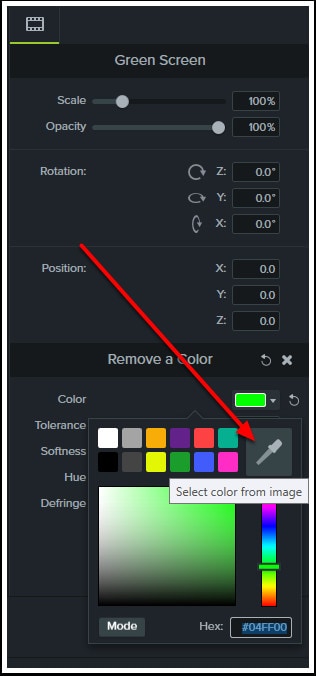
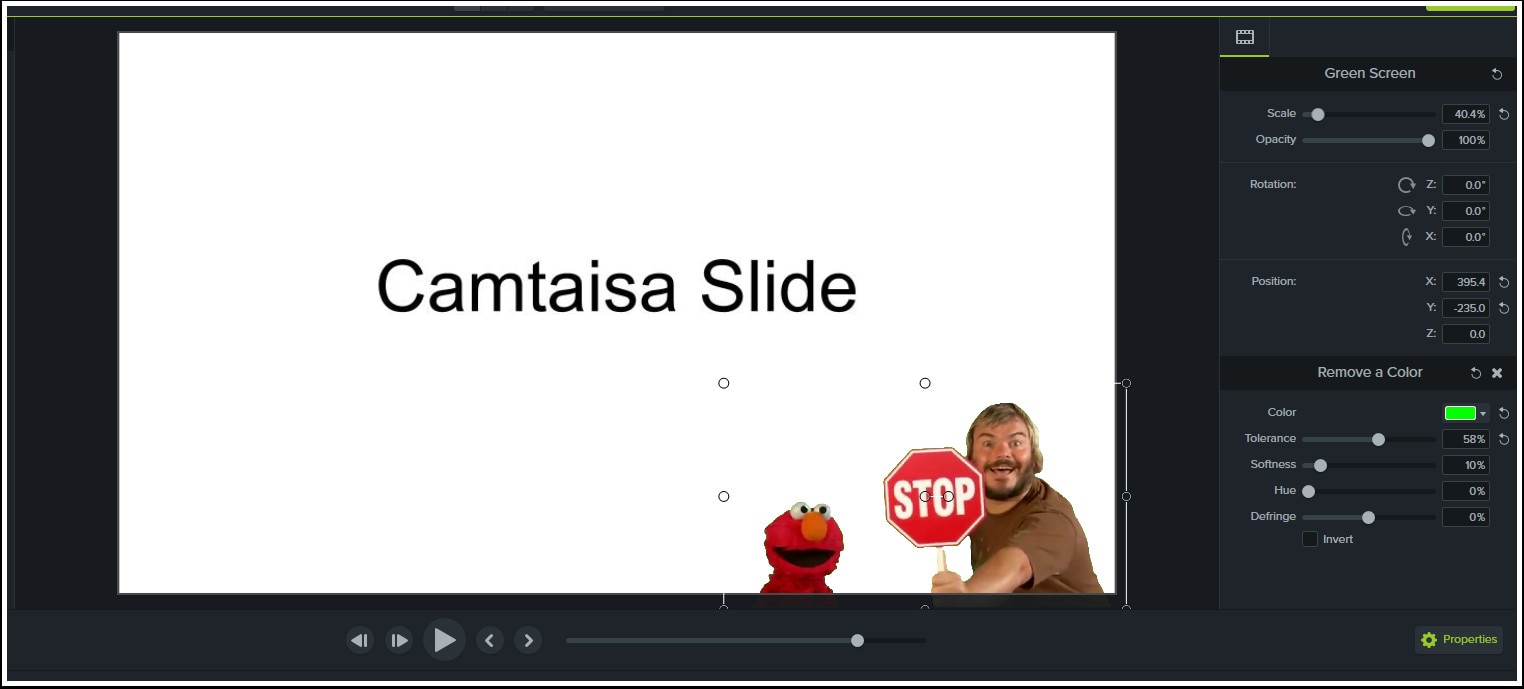
Adjust the Tolerance and Softness to get a clean color removal.

- Adjust the video
Adjust and move your now greenless recording to a desired size and position.
Lightworks

Supported OS: Mac, Windows 8.1, and Linux
Lightworks is ideal for creating real-time effects. The basic package includes free software with green screen editing capabilities. It makes changing the background of your videos simple and effective.
Lightworks provides access to professional-grade features that allow you to create visually appealing videos. The software is quick and adapts quickly to your needs, whether you are a beginner or a pro. It has a learning curve, but there is probably no tool out there that is easier to use once you get used to it.
It offers advanced effects that allow users to enhance videos in real time. You can use a variety of tools, including blurring, masking, and color grading.
You can instantly export videos to YouTube, Vimeo, and other platform services.
Features:
- Works with a wide variety of video formats
- Allows fast export to MPEG4/
- Fully optimized to offer fast speeds
- Multicam editing options
- Realtime effects with the help of inbuilt presets
- Advanced Boris FX Plugin
- Boris Graffiti for text effects
- Fully customizable interface
- Options for real-time collaboration
- Dedicated hardware support
Pros:
- Real-time effects with 4K Editing
- Keyboard shortcuts
- Easy to share videos on the internet
- Access to royalty-free audio and video content
- Histogram tool and 32bit GPU precision
- Lots of ready-to-use effects
Cons:
- The Video Stabilization feature is missing
- 3D Video Editing is not supported
- No Split and Merge features
Steps On How To Chroma Key In Lightworks
1. Record your video
First, you need a green or blue background to shoot against. As we’ll explain later, it doesn’t have to be a very specific shade, but it needs to be substantially different from the subject you’re shooting. You might have seen occasions when a weather presenter’s tie has appeared transparent during a broadcast. This is because the material was too close in color to the backdrop, or the key wasn’t quite set accurately enough.

You can make your backdrop using a sheet, or a large sheet of paper or card. If you’re planning to make videos frequently, there are inexpensive chromakey backdrops available that include a frame to hang the cloth from. If space is limited, collapsible screens are also available starting at around US$40. These screens are also handy for photography.
Good lighting is essential. You need to make sure that the screen is evenly lit so the color is consistent. It’s also important to ensure your subject is far enough from the screen to avoid shadows and color spills (when the blue or green backdrop reflects off your subject).
2. Import and trim
Once you’ve shot your video, download and install Lightworks . It’s free for personal use, but you’ll need to register for a free account if you want to use it for longer than 30 days.
Click the button marked Create a New Project, give it a name, and select a frame rate (you can find this by right-clicking your recorded video and selecting the Details tab). Here we’re using a still image as a background, but you can also use another video. Import this the same way.
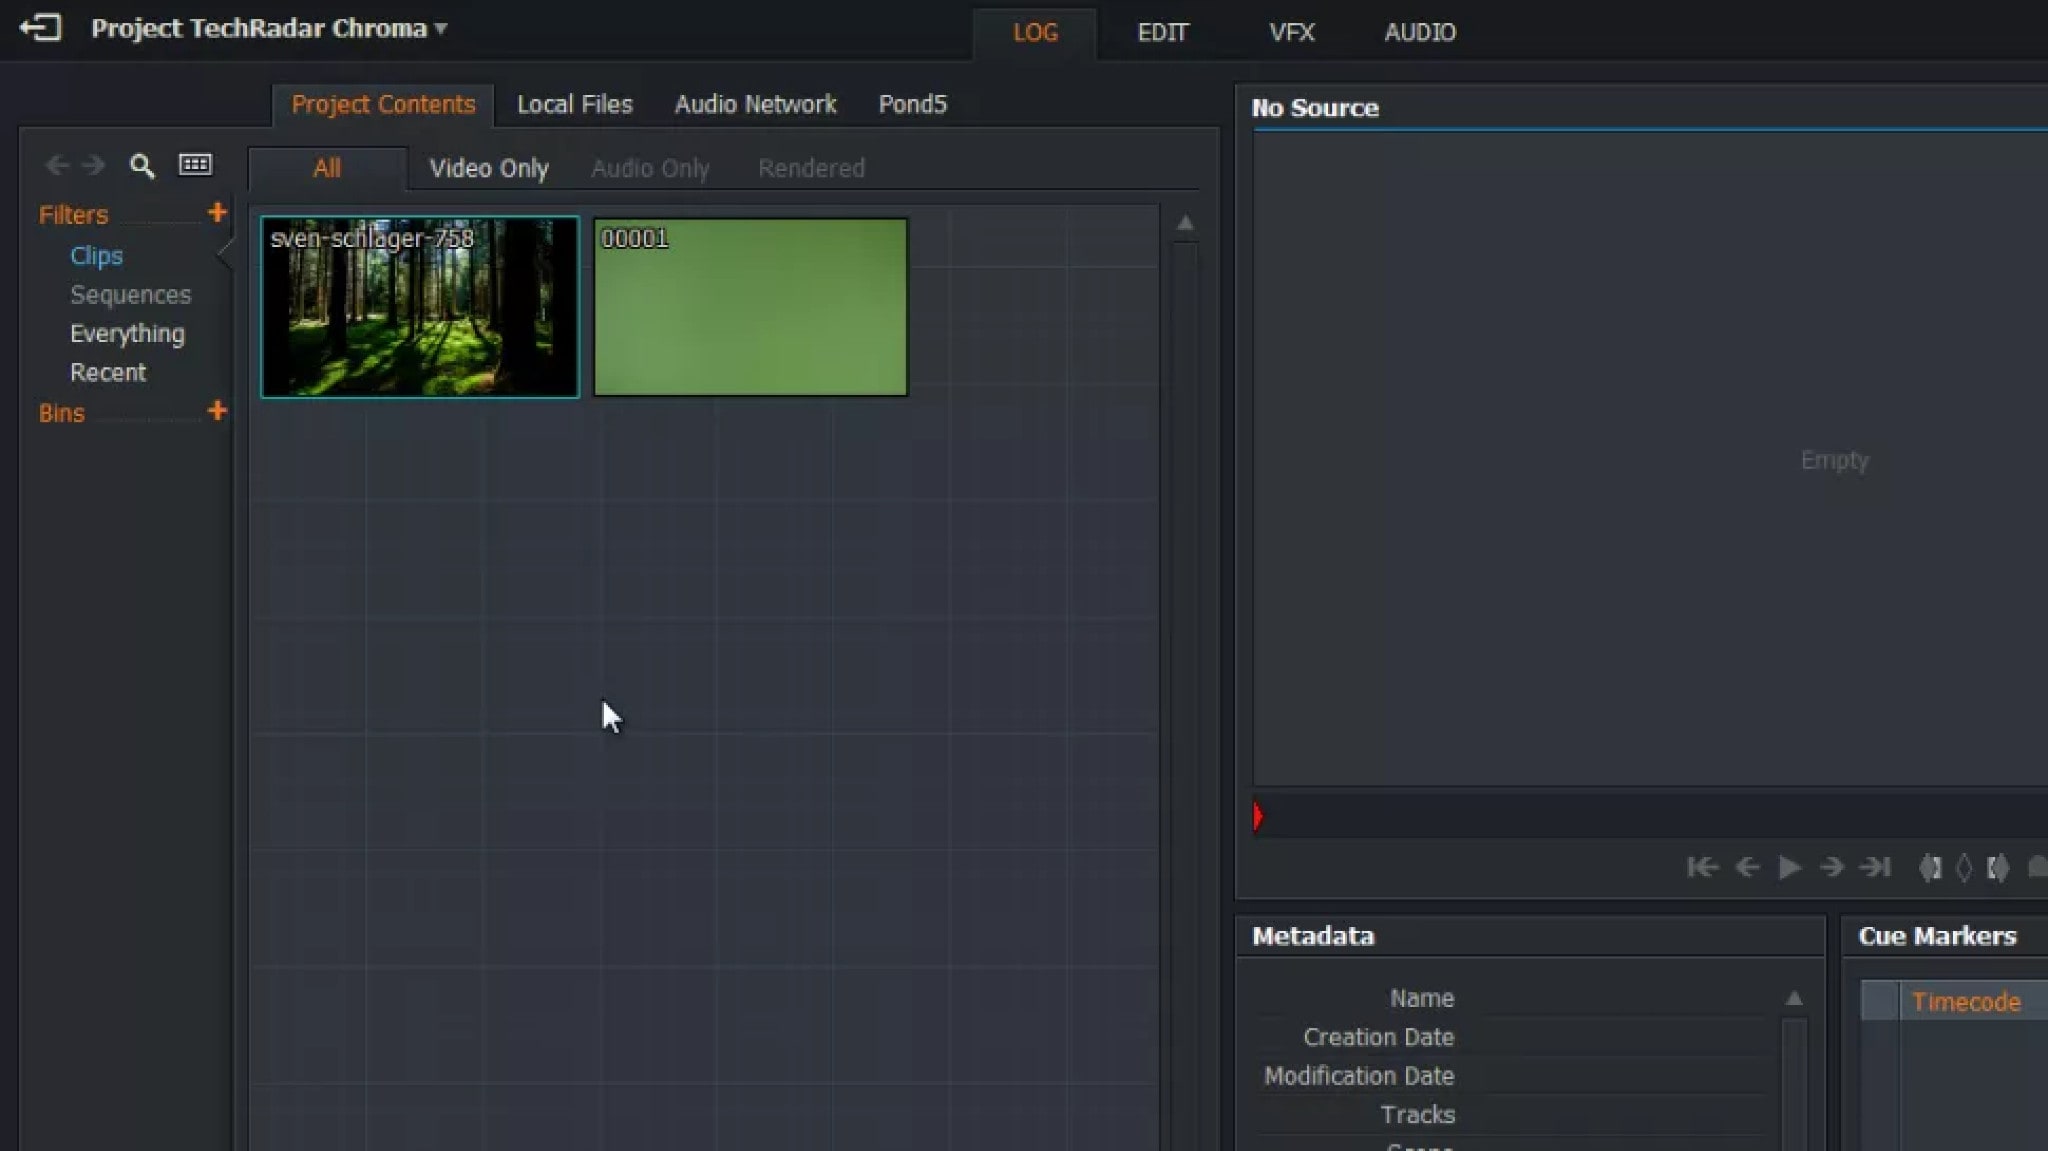
Click the Edit tab and drag your video from the Project Contents panel onto the V1 track of the timeline below. If there’s unwanted footage at the beginning or end of your clip, right-click it and select Trim In or Trim Out, then use the yellow handles to change where the clip starts and finishes.
Right-click the preview window marked Sequence #1 and select Tracks > Add Video. Drag your video clip into the V1 track and your still image into V2. Click and drag the right-hand side of the image in the V2 track until it’s the same length as the video.
3. Set the key
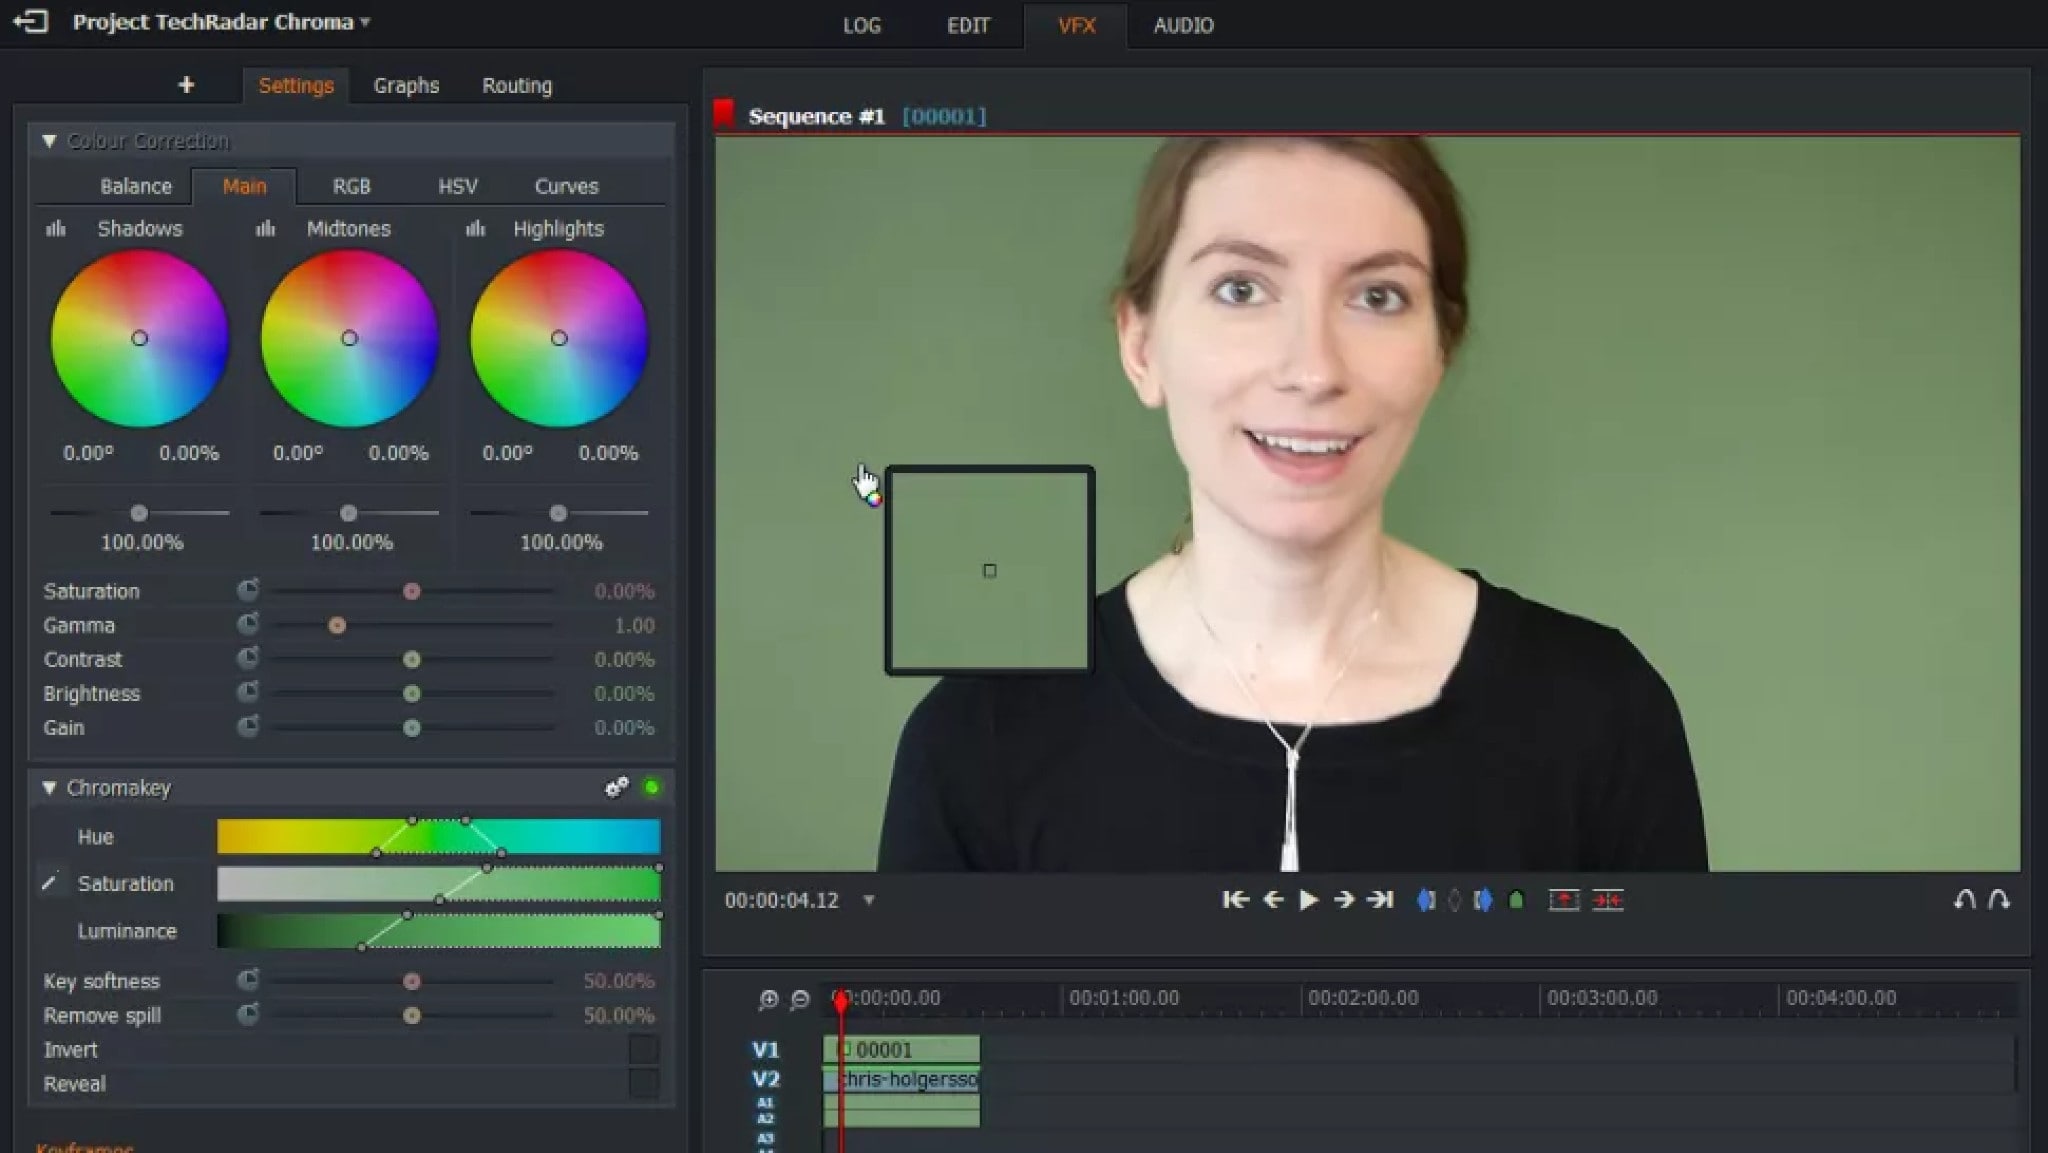
Now click the VFX tab, select the V1 track in the timeline and click the tab marked with a plus icon. Click the Favorites drop-down menu and select Key, followed by Green Screen. Click Add Effect and you’ll see a new panel of settings under the color correction wheels.
Use the eyedropper tool on the left to select the background you want to remove. This will typically do quite a good job by itself, but it will need a little fine-tuning. Try sliding the Saturation and Luminance sliders and adjusting their steepness using the handles that appear when you move your mouse over them. You’ll notice that each adjustment you make has a knock-on effect on the changes you’ve made with the other sliders; it’s a matter of balancing all three to achieve the best effect, preserving detail while minimizing spill.
To see how the filter is working, click the ‘Reveal’ box. The white areas are the parts of the video that will be removed, and the black areas are the parts that will remain.
The Remove Spill slider will add a purple tint to neutralize green tones in areas that need it.
4. Tweak and export
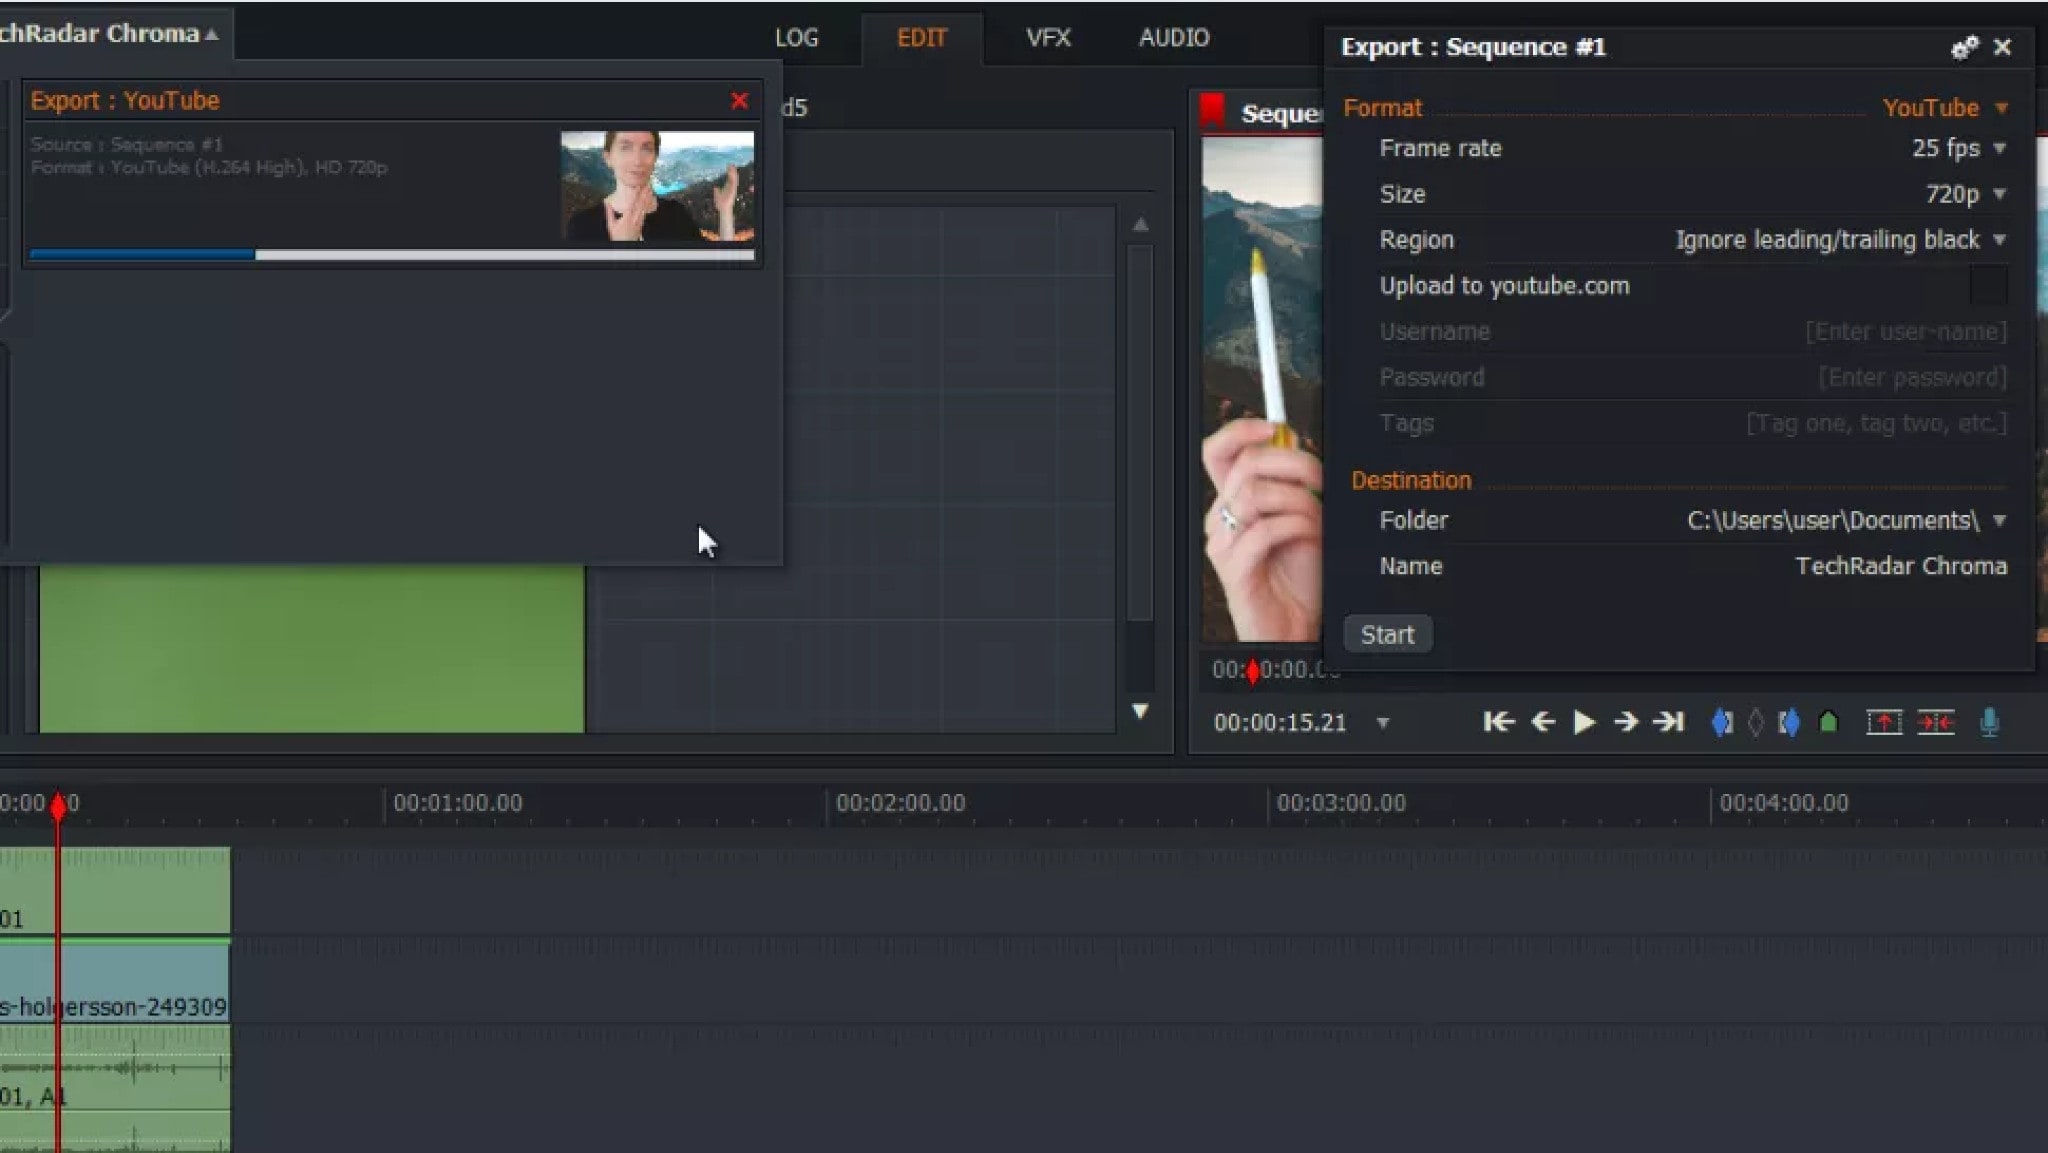
Once you’re happy, you can use Lightworks’ other VFX tools to make other changes like color correction and cropping. When you’re done, return to the Edit tab, right-click the preview window at the top right and select Export.
The only two export options you’ll see in the free version of Lightworks are Vimeo and YouTube, but this is a little misleading. These will save the video to your PC or Mac in an MP4 format, but they won’t do the uploading for you unless you check the appropriate box.
Select a destination folder and name for your video file and click ‘Start’. The processing will begin, and you’ll see a progress bar at the top right. This task will run in the background so you can continue working on your project, and you’ll be notified when it’s complete.
WHICH SHOULD I CHOOSE: FREE OR PAID GREEN SCREEN SOFTWARE?
If you want something quick, cheap, and easy, and having your footage seems to be fairly clean with few shadows or spills, there are several cheap or free apps into which you can import a clip, apply a chroma key, and export without much editing or advanced features.
If your footage calls for attention, extra equipment can be required. If your clip has inconsistent lighting fixtures or poor quality, you may require equipment that permits you to observe a couple of chroma keys to suit the numerous shades of green or color correction equipment to restore your pictures. For even advanced functions, you’ll want to spend a little time and money learning, however the end result will most possibly be worthwhile. More advanced chroma key equipment are normally used inside full-featured NLEs through integrated equipment or expert plug-ins that encompass extra beneficial functions including advanced color correction, noise reduction, HDR (High Dynamic Range) color support, movement and keyframing, extra file layout and high-resolution support, and multi-camera editing.
FAQS ABOUT EDITING GREEN SCREEN
- What is the most important thing when using a green screen?
When lighting your green screen, ensure there is even, soft light on the entirety of the green screen. This is crucial for a proper key. Many filmmakers overlook this essential part and focus on lighting the subject. However, be sure to use whatever lights you have to expose the green screen background evenly.
- Why do filmmakers use green screens?
A green screen basically lets you drop in whatever background images you want behind the actors and/or foreground. It’s used in film production (and also in news and weather reports) to relatively simply place the desired background behind the subject/actor/presenter.
- Why is a green screen not a different color?
The really short answer is that green screens are green because people are not green. For the effect to work, the background must use a color that isn’t used elsewhere in the shot – and green is nothing like human skin tone.
Conclusion:
Green screen video production is not difficult. Anyone, with the right tools can create green screen effects like a pro. Simply follow the precautions listed above and choose the software that best suits your needs.
Whether you’re making a professional film or a simple family video, I’m confident you’ll find something suitable among the options listed above.
Supported OS: Windows, Mac, iOS, Android
Filmora Video Editor has two modes based on your experience with video editing software. Users can use the easy mode or the full feature editor to access the program’s full focus.
The theme focus can also make it easier to select the videos and audio that you want to use. There are a number of features and effects that can be used to complement various themes, which can help improve transitions or find different effects in the program without having to dig around.
The preview mode and music tracks available from the themes make it simple to enhance your video.
The full feature mode gives you even more control; this is where Filmora begins to resemble an actual video editor. You can drag images, sounds, and other media into different tracks and apply advanced effects.
Green screens, premade filters for color correction, cropping, cutting, splitting, and combining with simple tools are all available in the full feature mode. The full-featured editor also has an audio mixer and equalizer, as well as the ability to burn your creations to DVD, Facebook, Vimeo, and other platforms.
For Win 7 or later (64-bit)
For macOS 10.14 or later
Features:
4k Editing Support
Gif Support
Noise Removal
Color Tuning
Advanced Text Editor
Audio Mixer
Video Stabilization
Scene Detection
Audio Equalizer
Chroma Keying
Pros:
- It can be a program that’s easy to master even if you have never used a video editing program before
- There are plenty of visual effects and premade effects that can help you make a great looking video within a few minutes
- The 4k video support is also helpful
Cons:
- It does lack a few advanced features like the option for motion tracking, multi-camera support, and assistance with 360° videos
Steps On How To Chroma Key On Filmora
- Click the “Import Media Files Here“ to import the background video and video with the green screen background into the media library. And then drag and drop the background video and green screen video to the video track in the timeline respectively.
Note: Ensure the video with green screen background is placed as the overlay video.
- Right-click on the overlay video and find the “Green Screen“ option.
- Click on “Green Screen“ and you’ll open the video editing panel. And the green screen background has been removed.
To open the green screen editing panel, you can also double click the overlay video, then check “Chroma Key” to apply the green screen function. And you can also adjust the offset, tolerance, edge thickness, etc. according to your own needs.
When you’re satisfied with the effect, you can click the “OK“ button to save the changes.
OPENSHOT
OpenShot Video Editor is a free, open-source video editor for Mac and Windows PC that can take your videos, photos, and music files and assist you in creating the film you’ve always wanted to make. Add subtitles, transitions, and effects with ease, and then export your film to DVD, YouTube, Vimeo, Xbox 360, and a variety of other popular formats.
A cross-platform video editing solution designed to help businesses of all sizes edit audios, videos, or images using a drag-and-drop interface. Administrators can use OpenShot Video Editor to enhance videos by adding animation effects such as fade, flying text, snow, and bounce, watermarks, 3D titles, and audio tracks, among other things.
The multilingual platform, which was specifically designed for video editors, allows teams to adjust color contrasts and brightness, as well as add time.
Supported OS: Windows, macOS, Linux
Features:
- Cross-platform (Linux, Mac, and Windows)
- Support for many videos, audio, and image formats (based on FFmpeg)
- Powerful curve-based Key frame animations
- Desktop integration (drag and drop support)
- Unlimited tracks/layers
- Clip resizing, scaling, trimming, snapping, rotation, and cutting
- Video transitions with real-time previews
- Compositing, image overlays, watermarks
- Title templates, title creation, sub-titles
- 2D animation support (image sequences)
- 3D animated titles (and effects)
- SVG friendly, to create and include vector titles and credits
- Scrolling motion picture credits
- Advanced Timeline (including Drag & drop scrolling, panning, zooming, and snapping)
- Frame accuracy (step through each frame of video)
- Time-mapping and speed changes on clips (slow/fast, forward/backward, etc…)
- Audio mixing and editing
- Digital video effects, including brightness, gamma, hue, greyscale, chroma key, and many more!
- Experimental hardware encoding and decoding (VA-API, NVDEC, D3D9, D3D11, VTB)
- Import & Export widely supported formats (EDL, XML)
- Render videos in many codecs and formats (based on FFmpeg)
Pros:
- 3D Titles
- Curve-based Time Mapping
- Non-linear Editor with Infinite Tracks
- No Watermark
- Frequent Update
- Easy to Use
- Multi-lingual
Cons:
- Unstable Performance
- Limited Editing Features
- Less Powerful Hardware Acceleration
- Obsolete Interface
Steps On How To Chroma Key In Openshot
- To create a chroma key (e.g. greenscreen or bluescreen) in OpenShot, begin by importing the files you’re going to use.
- Drag the file to be keyed onto Track 2 in the timeline, and the file to use as the background onto Track 1. The plan is to make the green part of the upper image transparent so the file underneath becomes visible.
- Click the Effects tab, find the Chroma Key effect, and drag it onto the top file in the timeline. You will see a star appear on the file in the timeline.
- Right-click the top file in the timeline and select Properties. In the Properties window, click the Effects tab and then click the Chroma Key effect.
- Click the green-colored area next to the word “Key” (shown above) to bring up the Pick a Color window (shown below). Click the eyedropper tool and then click on a green part of the video image.
- Click OK, then click Apply in the properties window. You should now be able to scrub through the timeline and see the effect in action.
iMovie
When you record a video against a green screen, you can make the background transparent and replace it with other video clips, graphics, or still images of your choice. It’s easy to overlay any footage with iMovie’s green screen effect. For example, you can transport yourself anywhere or appear in your favorite films.
The green Screen effect, also referred as the Chroma Key effect, is a simple way to combine two clips into one with impressive scenes. You can, for example, fly over a very high mountain. Green Screen is a background that is only one color, usually green. This could be another pure color, such as Blue or Pink. By dragging and dropping, you can apply a green screen video to another in iMovie. It’s incredibly simple to create stunning videos using the iMovie Green Screen effect.
Supported OS: macOS and iOS
Features:
- Options to modify and enhance video color settings
- Crop and rotate video clips
- Stabilize shaky videos
- Add video transitions
- Change the speed of clips.
- iMovie allows you to remove both green and blue screens
Pros:
- Clean, elegant interface
- Well optimized, responsive, and fast on modern Macs
- Effects and titles are all top-notch—especially for a free program
- Robust and useful interactions with other Apple products and software
Cons:
- Doesn’t have some advanced features present in other applications, like 360 video or Multicam
- Sometimes the efforts to keep the interface simple make finding a solution obtuse
- The user interface is not customizable
- Supports fewer export formats than some competing products
Steps On How To Chroma Key In iMovie
- Open an empty project.
- Select the background you would like to use.
- Drag and drop the background video or image into the timeline.
- Select the green screen footage you want to use.
- Drag and drop it above the background.
- Drag the edge of the background to make the background longer or shorter to match your green screen footage.
- Click to select the green screen footage in the timeline
- Select Green/Blue Screen from the drop-down menu that defaults to Cutaway above the left corner of the viewer window.
- The green should now be removed to reveal the background behind it.
DA VINCI RESOLVE
Davinci Resolve has two versions including a full studio version which is available for $299. Because some professional tools, such as team collaboration and video noise reduction, cannot be used without a full license, the free program has a surprising number of features. The majority of the features included in the free version are adequate for professionals and hobbyists.
Although the Davinci Resolve program is regarded as a professional grade editor, it does include some advanced tools such as exporting, audio mastering, color correction, and more. The program is also useful for arranging audio and video clips, and it has a large selection of effects and filters. The additional color correction and adjustments available here can also aid in HDR support and produce more professional results when working with camera RAW data.
Davinci Resolve is also well-known for having one of the best color grading programs available. The outcome can be hugely potent when using the accessible chromakey tools. It doesn’t take much to figure out how to use this effect with the quick tutorial on board.
Supported OS: Mac and Windows
Features:
- Options to modify and enhance video color settings
- Crop and rotate video clips
- Stabilize shaky videos
- Add video transitions
- Change the speed of clips.
- iMovie allows you to remove both green and blue screens
Pros:
- Clean, elegant interface
- Well optimized, responsive, and fast on modern Macs
- Effects and titles are all top-notch—especially for a free program
- Robust and useful interactions with other Apple products and software
Cons:
- Doesn’t have some advanced features present in other applications, like 360 video or Multicam
- Sometimes the efforts to keep the interface simple make finding a solution obtuse
- The user interface is not customizable
- Supports fewer export formats than some competing products
Steps On How To Remove the Green Screen in DaVinci Resolve Inside the Color Tab
Step 1 – Add the Qualifier Tool & select the color
After you finish cutting the video, jump inside the “Color” tab and select the Qualifier Tool. Make sure you set the tool in “3D” mode to enable us to select a bigger range of the green spectrum.
Do this by simply selecting the fourth dot from the middle-upper area of the window or by selecting it from the drop-down mode selector situated in the window’s top-right corner.
After selecting the 3D mode for the Qualifier Tool, go ahead and select the range of green colors you want to remove by simply drawing lines on top of the screen, similar to the way I did in the image below.
Step 2 – Removing the color
As you can see in the small rectangle, Resolve did the keying, but it doesn’t know what to do with it because we didn’t specify. Right-click underneath the node, select “Add Alpha Output” and then link the node.
Yes, I know it will key out the subject and not the green screen. There is no problem. Go ahead and select the Revert button situated in the “Selection Range” window. Everything should be OK now.
Step 3 – Clean the edges
As you can surely notice, there are still some issues we have to address. In the hair area and on the outline of the subject, there is a noticeable green color spill. We don’t want that! On top of this, there will be many situations where you will still notice some noisy green pixels in the transparent area, around the corners of the screen, or the subject.
To get rid of these problems, we have to jump into the Qualifier window. Here, there are many settings you can play with to tweak the output. Most of the time, you will solve these problems by checking “Despill”, further selecting more of the greens and adding them to the Selection Range, or modifying the shrink, ”Black Clip” and “White Clip”.
Step 3 – Done
This is all for this method! Go ahead and add a background in the “Edit” mode and your job is done! Feel free to watch the video below, where I went through the same steps as above, but faster.
BEST PAID GREEN SCREEN SOFTWARE FOR BEGINNERS ON MAC
WEVIDEO
Supported OS: Windows, Mac, iOS, Android
This program, which costs only $4 per month, has extensive compatibility with nearly 20 different input and output formats. Most common input and output formats, such as NT 4.0, avi, 3gp, and others, are well represented.
If you want to do green screen options online but don’t want to install any software to access a full-featured video editor, this could be one of your best options.
WeVideo is a cloud-based video editing solution that is both powerful and simple to use. There’s a reason it’s one of the most popular online video editors out there. This includes options for photo animations, clip transformations, voiceovers, and more. You can also improve your video by using a variety of premium features such as screencasting, custom branding, and a wide range of free tracks that can be used with copyright-free music.
With this online editor, you can easily control almost everything in a video, from motion effects to green screen technology to scene transitions.
Features:
- 720p video resolution
- Motion titles
- Screencasting
- WeVideo JumpStart
- Cloud storage
- Music library
- Slow motion
- Voiceover
- Guilt in graphics
- Customizable environment
- Green screen
- Advanced text editing
- File & media manager
- Multi-track editing and storyboard
Pros:
- This is a multiplatform video editor that works with intense compatibility online. You can use it on almost any device.
- The interface is also quite simple and it has some tools that are used by the pros as well as a format that most people can easily understand.
- There is a full licensed library of songs with over 100 tracks you can use royalty-free.
- The cloud storage also ensures that you can pick up a project on any device that you won’t. Cloud access anywhere gives you more time for efficiency and handling your workload.
Cons:
- The program only currently supports 720 P resolution in some of the cheaper plans and there are limited minutes allowed with editing if you are only going to use the trial-free plan.
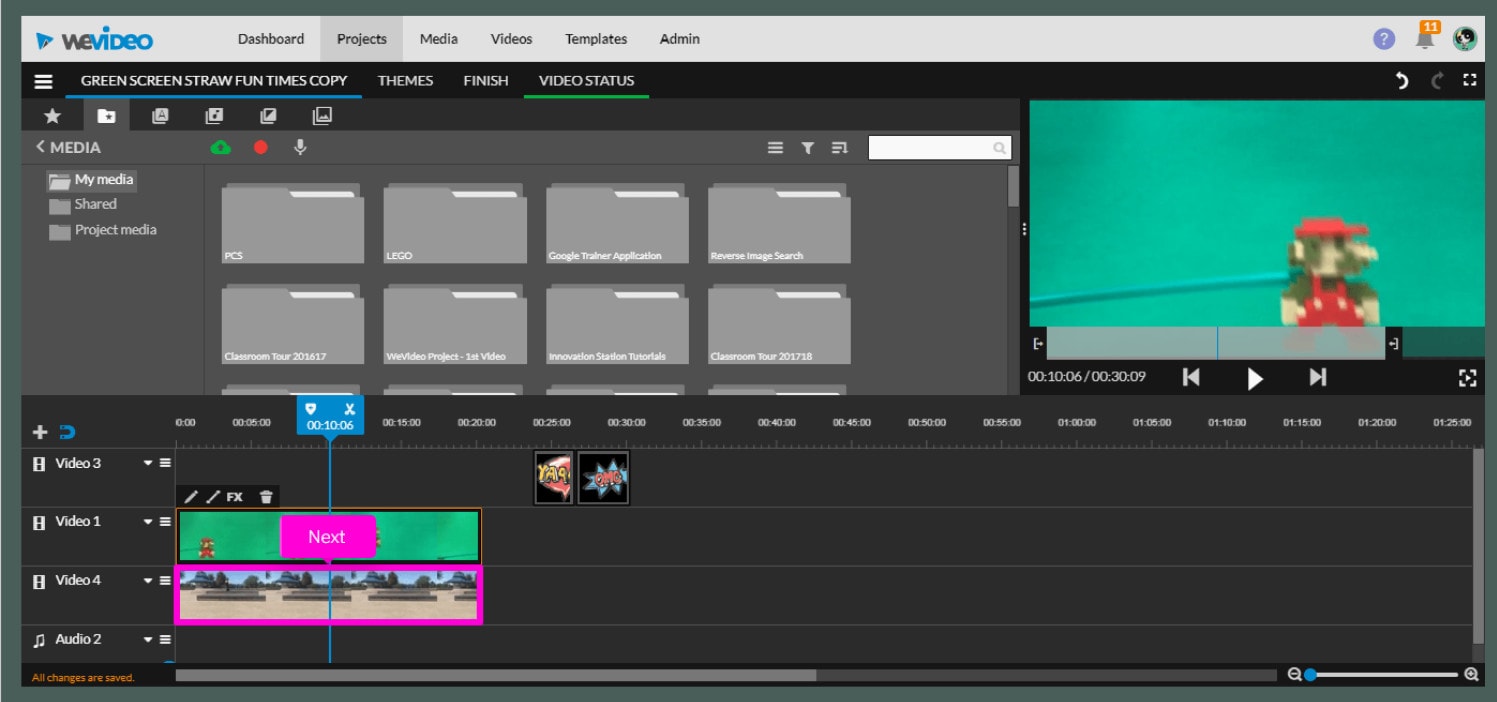
Steps On How To Chroma Key In WeVideo
- When your WeVideo project is open, click on the clip that you wish to remove the green background from.
- The video or image layer underneath the color-keyed clip will show through, as the background.
- Click on the clip editor pencil icon.
- Click on the eyedropper to choose the color you’re going to remove.
- Click an area that is the color that you would like to remove.
CAMTASIA
Supported OS: Mac and Windows
Camtasia by Techsmith is a simple video editing and screen recording application. Camtasia, designed for beginners, allows users to create professional training videos quickly and easily.
Camtasia is a straightforward video editor and chroma key software (for basic green screen editing) that may meet your needs.
It is the ideal video editor for beginners with little knowledge to editing. It includes numerous features that make it simple to create professional videos, whether you are a student, business owner, or regular YouTube user looking to spice up their content.
Features:
- Intuitive and easy-to-use interface.
- The ability to upload videos straight from the application, via Dropbox or YouTube.
- A wide range of built-in editing templates makes it easier for beginners to create professional-looking video content.
- Screen recording options for capturing live demos and lectures.
- Camtasia for Mac is also available, which makes it an ideal video editor for Apple users.
Pros:
- Very easy to learn
- Amazing screen capture feature
- Impressive cursor effects
- Interactivity features
- Good asset library
- Mobile version
- Great customer service
- Low cost
Cons:
- Constant crashes and bugs
- Limited customization
- No keyframe tracking
- Poor keyboard commands
- Export issues
Steps On How To Chroma Key In Camtasia
1. Record a video with a green screen
Make sure the green screen fills up the whole background while recording.
After your video is recorded, it will be placed on your Timeline as the recorded Camera and Screen.
2. Remove the green
Use the Remove a Color tool from the Visual Effects section to remove the green in the background.
Under the properties on the right side, select the color drop-down menu and use the eyedropper tool to select the green color. (Tip: With the Eyedropper tool selected, click on the green part of your Green Screen to select that color for removal.)
Adjust the Tolerance and Softness to get a clean color removal.
- Adjust the video
Adjust and move your now greenless recording to a desired size and position.
Lightworks
Supported OS: Mac, Windows 8.1, and Linux
Lightworks is ideal for creating real-time effects. The basic package includes free software with green screen editing capabilities. It makes changing the background of your videos simple and effective.
Lightworks provides access to professional-grade features that allow you to create visually appealing videos. The software is quick and adapts quickly to your needs, whether you are a beginner or a pro. It has a learning curve, but there is probably no tool out there that is easier to use once you get used to it.
It offers advanced effects that allow users to enhance videos in real time. You can use a variety of tools, including blurring, masking, and color grading.
You can instantly export videos to YouTube, Vimeo, and other platform services.
Features:
- Works with a wide variety of video formats
- Allows fast export to MPEG4/
- Fully optimized to offer fast speeds
- Multicam editing options
- Realtime effects with the help of inbuilt presets
- Advanced Boris FX Plugin
- Boris Graffiti for text effects
- Fully customizable interface
- Options for real-time collaboration
- Dedicated hardware support
Pros:
- Real-time effects with 4K Editing
- Keyboard shortcuts
- Easy to share videos on the internet
- Access to royalty-free audio and video content
- Histogram tool and 32bit GPU precision
- Lots of ready-to-use effects
Cons:
- The Video Stabilization feature is missing
- 3D Video Editing is not supported
- No Split and Merge features
Steps On How To Chroma Key In Lightworks
1. Record your video
First, you need a green or blue background to shoot against. As we’ll explain later, it doesn’t have to be a very specific shade, but it needs to be substantially different from the subject you’re shooting. You might have seen occasions when a weather presenter’s tie has appeared transparent during a broadcast. This is because the material was too close in color to the backdrop, or the key wasn’t quite set accurately enough.
You can make your backdrop using a sheet, or a large sheet of paper or card. If you’re planning to make videos frequently, there are inexpensive chromakey backdrops available that include a frame to hang the cloth from. If space is limited, collapsible screens are also available starting at around US$40. These screens are also handy for photography.
Good lighting is essential. You need to make sure that the screen is evenly lit so the color is consistent. It’s also important to ensure your subject is far enough from the screen to avoid shadows and color spills (when the blue or green backdrop reflects off your subject).
2. Import and trim
Once you’ve shot your video, download and install Lightworks . It’s free for personal use, but you’ll need to register for a free account if you want to use it for longer than 30 days.
Click the button marked Create a New Project, give it a name, and select a frame rate (you can find this by right-clicking your recorded video and selecting the Details tab). Here we’re using a still image as a background, but you can also use another video. Import this the same way.
Click the Edit tab and drag your video from the Project Contents panel onto the V1 track of the timeline below. If there’s unwanted footage at the beginning or end of your clip, right-click it and select Trim In or Trim Out, then use the yellow handles to change where the clip starts and finishes.
Right-click the preview window marked Sequence #1 and select Tracks > Add Video. Drag your video clip into the V1 track and your still image into V2. Click and drag the right-hand side of the image in the V2 track until it’s the same length as the video.
3. Set the key
Now click the VFX tab, select the V1 track in the timeline and click the tab marked with a plus icon. Click the Favorites drop-down menu and select Key, followed by Green Screen. Click Add Effect and you’ll see a new panel of settings under the color correction wheels.
Use the eyedropper tool on the left to select the background you want to remove. This will typically do quite a good job by itself, but it will need a little fine-tuning. Try sliding the Saturation and Luminance sliders and adjusting their steepness using the handles that appear when you move your mouse over them. You’ll notice that each adjustment you make has a knock-on effect on the changes you’ve made with the other sliders; it’s a matter of balancing all three to achieve the best effect, preserving detail while minimizing spill.
To see how the filter is working, click the ‘Reveal’ box. The white areas are the parts of the video that will be removed, and the black areas are the parts that will remain.
The Remove Spill slider will add a purple tint to neutralize green tones in areas that need it.
4. Tweak and export
Once you’re happy, you can use Lightworks’ other VFX tools to make other changes like color correction and cropping. When you’re done, return to the Edit tab, right-click the preview window at the top right and select Export.
The only two export options you’ll see in the free version of Lightworks are Vimeo and YouTube, but this is a little misleading. These will save the video to your PC or Mac in an MP4 format, but they won’t do the uploading for you unless you check the appropriate box.
Select a destination folder and name for your video file and click ‘Start’. The processing will begin, and you’ll see a progress bar at the top right. This task will run in the background so you can continue working on your project, and you’ll be notified when it’s complete.
WHICH SHOULD I CHOOSE: FREE OR PAID GREEN SCREEN SOFTWARE?
If you want something quick, cheap, and easy, and having your footage seems to be fairly clean with few shadows or spills, there are several cheap or free apps into which you can import a clip, apply a chroma key, and export without much editing or advanced features.
If your footage calls for attention, extra equipment can be required. If your clip has inconsistent lighting fixtures or poor quality, you may require equipment that permits you to observe a couple of chroma keys to suit the numerous shades of green or color correction equipment to restore your pictures. For even advanced functions, you’ll want to spend a little time and money learning, however the end result will most possibly be worthwhile. More advanced chroma key equipment are normally used inside full-featured NLEs through integrated equipment or expert plug-ins that encompass extra beneficial functions including advanced color correction, noise reduction, HDR (High Dynamic Range) color support, movement and keyframing, extra file layout and high-resolution support, and multi-camera editing.
FAQS ABOUT EDITING GREEN SCREEN
- What is the most important thing when using a green screen?
When lighting your green screen, ensure there is even, soft light on the entirety of the green screen. This is crucial for a proper key. Many filmmakers overlook this essential part and focus on lighting the subject. However, be sure to use whatever lights you have to expose the green screen background evenly.
- Why do filmmakers use green screens?
A green screen basically lets you drop in whatever background images you want behind the actors and/or foreground. It’s used in film production (and also in news and weather reports) to relatively simply place the desired background behind the subject/actor/presenter.
- Why is a green screen not a different color?
The really short answer is that green screens are green because people are not green. For the effect to work, the background must use a color that isn’t used elsewhere in the shot – and green is nothing like human skin tone.
Conclusion:
Green screen video production is not difficult. Anyone, with the right tools can create green screen effects like a pro. Simply follow the precautions listed above and choose the software that best suits your needs.
Whether you’re making a professional film or a simple family video, I’m confident you’ll find something suitable among the options listed above.
Supported OS: Windows, Mac, iOS, Android
Filmora Video Editor has two modes based on your experience with video editing software. Users can use the easy mode or the full feature editor to access the program’s full focus.
The theme focus can also make it easier to select the videos and audio that you want to use. There are a number of features and effects that can be used to complement various themes, which can help improve transitions or find different effects in the program without having to dig around.
The preview mode and music tracks available from the themes make it simple to enhance your video.
The full feature mode gives you even more control; this is where Filmora begins to resemble an actual video editor. You can drag images, sounds, and other media into different tracks and apply advanced effects.
Green screens, premade filters for color correction, cropping, cutting, splitting, and combining with simple tools are all available in the full feature mode. The full-featured editor also has an audio mixer and equalizer, as well as the ability to burn your creations to DVD, Facebook, Vimeo, and other platforms.
For Win 7 or later (64-bit)
For macOS 10.14 or later
Features:
4k Editing Support
Gif Support
Noise Removal
Color Tuning
Advanced Text Editor
Audio Mixer
Video Stabilization
Scene Detection
Audio Equalizer
Chroma Keying
Pros:
- It can be a program that’s easy to master even if you have never used a video editing program before
- There are plenty of visual effects and premade effects that can help you make a great looking video within a few minutes
- The 4k video support is also helpful
Cons:
- It does lack a few advanced features like the option for motion tracking, multi-camera support, and assistance with 360° videos
Steps On How To Chroma Key On Filmora
- Click the “Import Media Files Here“ to import the background video and video with the green screen background into the media library. And then drag and drop the background video and green screen video to the video track in the timeline respectively.
Note: Ensure the video with green screen background is placed as the overlay video.
- Right-click on the overlay video and find the “Green Screen“ option.
- Click on “Green Screen“ and you’ll open the video editing panel. And the green screen background has been removed.
To open the green screen editing panel, you can also double click the overlay video, then check “Chroma Key” to apply the green screen function. And you can also adjust the offset, tolerance, edge thickness, etc. according to your own needs.
When you’re satisfied with the effect, you can click the “OK“ button to save the changes.
OPENSHOT
OpenShot Video Editor is a free, open-source video editor for Mac and Windows PC that can take your videos, photos, and music files and assist you in creating the film you’ve always wanted to make. Add subtitles, transitions, and effects with ease, and then export your film to DVD, YouTube, Vimeo, Xbox 360, and a variety of other popular formats.
A cross-platform video editing solution designed to help businesses of all sizes edit audios, videos, or images using a drag-and-drop interface. Administrators can use OpenShot Video Editor to enhance videos by adding animation effects such as fade, flying text, snow, and bounce, watermarks, 3D titles, and audio tracks, among other things.
The multilingual platform, which was specifically designed for video editors, allows teams to adjust color contrasts and brightness, as well as add time.
Supported OS: Windows, macOS, Linux
Features:
- Cross-platform (Linux, Mac, and Windows)
- Support for many videos, audio, and image formats (based on FFmpeg)
- Powerful curve-based Key frame animations
- Desktop integration (drag and drop support)
- Unlimited tracks/layers
- Clip resizing, scaling, trimming, snapping, rotation, and cutting
- Video transitions with real-time previews
- Compositing, image overlays, watermarks
- Title templates, title creation, sub-titles
- 2D animation support (image sequences)
- 3D animated titles (and effects)
- SVG friendly, to create and include vector titles and credits
- Scrolling motion picture credits
- Advanced Timeline (including Drag & drop scrolling, panning, zooming, and snapping)
- Frame accuracy (step through each frame of video)
- Time-mapping and speed changes on clips (slow/fast, forward/backward, etc…)
- Audio mixing and editing
- Digital video effects, including brightness, gamma, hue, greyscale, chroma key, and many more!
- Experimental hardware encoding and decoding (VA-API, NVDEC, D3D9, D3D11, VTB)
- Import & Export widely supported formats (EDL, XML)
- Render videos in many codecs and formats (based on FFmpeg)
Pros:
- 3D Titles
- Curve-based Time Mapping
- Non-linear Editor with Infinite Tracks
- No Watermark
- Frequent Update
- Easy to Use
- Multi-lingual
Cons:
- Unstable Performance
- Limited Editing Features
- Less Powerful Hardware Acceleration
- Obsolete Interface
Steps On How To Chroma Key In Openshot
- To create a chroma key (e.g. greenscreen or bluescreen) in OpenShot, begin by importing the files you’re going to use.
- Drag the file to be keyed onto Track 2 in the timeline, and the file to use as the background onto Track 1. The plan is to make the green part of the upper image transparent so the file underneath becomes visible.
- Click the Effects tab, find the Chroma Key effect, and drag it onto the top file in the timeline. You will see a star appear on the file in the timeline.
- Right-click the top file in the timeline and select Properties. In the Properties window, click the Effects tab and then click the Chroma Key effect.
- Click the green-colored area next to the word “Key” (shown above) to bring up the Pick a Color window (shown below). Click the eyedropper tool and then click on a green part of the video image.
- Click OK, then click Apply in the properties window. You should now be able to scrub through the timeline and see the effect in action.
iMovie
When you record a video against a green screen, you can make the background transparent and replace it with other video clips, graphics, or still images of your choice. It’s easy to overlay any footage with iMovie’s green screen effect. For example, you can transport yourself anywhere or appear in your favorite films.
The green Screen effect, also referred as the Chroma Key effect, is a simple way to combine two clips into one with impressive scenes. You can, for example, fly over a very high mountain. Green Screen is a background that is only one color, usually green. This could be another pure color, such as Blue or Pink. By dragging and dropping, you can apply a green screen video to another in iMovie. It’s incredibly simple to create stunning videos using the iMovie Green Screen effect.
Supported OS: macOS and iOS
Features:
- Options to modify and enhance video color settings
- Crop and rotate video clips
- Stabilize shaky videos
- Add video transitions
- Change the speed of clips.
- iMovie allows you to remove both green and blue screens
Pros:
- Clean, elegant interface
- Well optimized, responsive, and fast on modern Macs
- Effects and titles are all top-notch—especially for a free program
- Robust and useful interactions with other Apple products and software
Cons:
- Doesn’t have some advanced features present in other applications, like 360 video or Multicam
- Sometimes the efforts to keep the interface simple make finding a solution obtuse
- The user interface is not customizable
- Supports fewer export formats than some competing products
Steps On How To Chroma Key In iMovie
- Open an empty project.
- Select the background you would like to use.
- Drag and drop the background video or image into the timeline.
- Select the green screen footage you want to use.
- Drag and drop it above the background.
- Drag the edge of the background to make the background longer or shorter to match your green screen footage.
- Click to select the green screen footage in the timeline
- Select Green/Blue Screen from the drop-down menu that defaults to Cutaway above the left corner of the viewer window.
- The green should now be removed to reveal the background behind it.
DA VINCI RESOLVE
Davinci Resolve has two versions including a full studio version which is available for $299. Because some professional tools, such as team collaboration and video noise reduction, cannot be used without a full license, the free program has a surprising number of features. The majority of the features included in the free version are adequate for professionals and hobbyists.
Although the Davinci Resolve program is regarded as a professional grade editor, it does include some advanced tools such as exporting, audio mastering, color correction, and more. The program is also useful for arranging audio and video clips, and it has a large selection of effects and filters. The additional color correction and adjustments available here can also aid in HDR support and produce more professional results when working with camera RAW data.
Davinci Resolve is also well-known for having one of the best color grading programs available. The outcome can be hugely potent when using the accessible chromakey tools. It doesn’t take much to figure out how to use this effect with the quick tutorial on board.
Supported OS: Mac and Windows
Features:
- Options to modify and enhance video color settings
- Crop and rotate video clips
- Stabilize shaky videos
- Add video transitions
- Change the speed of clips.
- iMovie allows you to remove both green and blue screens
Pros:
- Clean, elegant interface
- Well optimized, responsive, and fast on modern Macs
- Effects and titles are all top-notch—especially for a free program
- Robust and useful interactions with other Apple products and software
Cons:
- Doesn’t have some advanced features present in other applications, like 360 video or Multicam
- Sometimes the efforts to keep the interface simple make finding a solution obtuse
- The user interface is not customizable
- Supports fewer export formats than some competing products
Steps On How To Remove the Green Screen in DaVinci Resolve Inside the Color Tab
Step 1 – Add the Qualifier Tool & select the color
After you finish cutting the video, jump inside the “Color” tab and select the Qualifier Tool. Make sure you set the tool in “3D” mode to enable us to select a bigger range of the green spectrum.
Do this by simply selecting the fourth dot from the middle-upper area of the window or by selecting it from the drop-down mode selector situated in the window’s top-right corner.
After selecting the 3D mode for the Qualifier Tool, go ahead and select the range of green colors you want to remove by simply drawing lines on top of the screen, similar to the way I did in the image below.
Step 2 – Removing the color
As you can see in the small rectangle, Resolve did the keying, but it doesn’t know what to do with it because we didn’t specify. Right-click underneath the node, select “Add Alpha Output” and then link the node.
Yes, I know it will key out the subject and not the green screen. There is no problem. Go ahead and select the Revert button situated in the “Selection Range” window. Everything should be OK now.
Step 3 – Clean the edges
As you can surely notice, there are still some issues we have to address. In the hair area and on the outline of the subject, there is a noticeable green color spill. We don’t want that! On top of this, there will be many situations where you will still notice some noisy green pixels in the transparent area, around the corners of the screen, or the subject.
To get rid of these problems, we have to jump into the Qualifier window. Here, there are many settings you can play with to tweak the output. Most of the time, you will solve these problems by checking “Despill”, further selecting more of the greens and adding them to the Selection Range, or modifying the shrink, ”Black Clip” and “White Clip”.
Step 3 – Done
This is all for this method! Go ahead and add a background in the “Edit” mode and your job is done! Feel free to watch the video below, where I went through the same steps as above, but faster.
BEST PAID GREEN SCREEN SOFTWARE FOR BEGINNERS ON MAC
WEVIDEO
Supported OS: Windows, Mac, iOS, Android
This program, which costs only $4 per month, has extensive compatibility with nearly 20 different input and output formats. Most common input and output formats, such as NT 4.0, avi, 3gp, and others, are well represented.
If you want to do green screen options online but don’t want to install any software to access a full-featured video editor, this could be one of your best options.
WeVideo is a cloud-based video editing solution that is both powerful and simple to use. There’s a reason it’s one of the most popular online video editors out there. This includes options for photo animations, clip transformations, voiceovers, and more. You can also improve your video by using a variety of premium features such as screencasting, custom branding, and a wide range of free tracks that can be used with copyright-free music.
With this online editor, you can easily control almost everything in a video, from motion effects to green screen technology to scene transitions.
Features:
- 720p video resolution
- Motion titles
- Screencasting
- WeVideo JumpStart
- Cloud storage
- Music library
- Slow motion
- Voiceover
- Guilt in graphics
- Customizable environment
- Green screen
- Advanced text editing
- File & media manager
- Multi-track editing and storyboard
Pros:
- This is a multiplatform video editor that works with intense compatibility online. You can use it on almost any device.
- The interface is also quite simple and it has some tools that are used by the pros as well as a format that most people can easily understand.
- There is a full licensed library of songs with over 100 tracks you can use royalty-free.
- The cloud storage also ensures that you can pick up a project on any device that you won’t. Cloud access anywhere gives you more time for efficiency and handling your workload.
Cons:
- The program only currently supports 720 P resolution in some of the cheaper plans and there are limited minutes allowed with editing if you are only going to use the trial-free plan.
Steps On How To Chroma Key In WeVideo
- When your WeVideo project is open, click on the clip that you wish to remove the green background from.
- The video or image layer underneath the color-keyed clip will show through, as the background.
- Click on the clip editor pencil icon.
- Click on the eyedropper to choose the color you’re going to remove.
- Click an area that is the color that you would like to remove.
CAMTASIA
Supported OS: Mac and Windows
Camtasia by Techsmith is a simple video editing and screen recording application. Camtasia, designed for beginners, allows users to create professional training videos quickly and easily.
Camtasia is a straightforward video editor and chroma key software (for basic green screen editing) that may meet your needs.
It is the ideal video editor for beginners with little knowledge to editing. It includes numerous features that make it simple to create professional videos, whether you are a student, business owner, or regular YouTube user looking to spice up their content.
Features:
- Intuitive and easy-to-use interface.
- The ability to upload videos straight from the application, via Dropbox or YouTube.
- A wide range of built-in editing templates makes it easier for beginners to create professional-looking video content.
- Screen recording options for capturing live demos and lectures.
- Camtasia for Mac is also available, which makes it an ideal video editor for Apple users.
Pros:
- Very easy to learn
- Amazing screen capture feature
- Impressive cursor effects
- Interactivity features
- Good asset library
- Mobile version
- Great customer service
- Low cost
Cons:
- Constant crashes and bugs
- Limited customization
- No keyframe tracking
- Poor keyboard commands
- Export issues
Steps On How To Chroma Key In Camtasia
1. Record a video with a green screen
Make sure the green screen fills up the whole background while recording.
After your video is recorded, it will be placed on your Timeline as the recorded Camera and Screen.
2. Remove the green
Use the Remove a Color tool from the Visual Effects section to remove the green in the background.
Under the properties on the right side, select the color drop-down menu and use the eyedropper tool to select the green color. (Tip: With the Eyedropper tool selected, click on the green part of your Green Screen to select that color for removal.)
Adjust the Tolerance and Softness to get a clean color removal.
- Adjust the video
Adjust and move your now greenless recording to a desired size and position.
Lightworks
Supported OS: Mac, Windows 8.1, and Linux
Lightworks is ideal for creating real-time effects. The basic package includes free software with green screen editing capabilities. It makes changing the background of your videos simple and effective.
Lightworks provides access to professional-grade features that allow you to create visually appealing videos. The software is quick and adapts quickly to your needs, whether you are a beginner or a pro. It has a learning curve, but there is probably no tool out there that is easier to use once you get used to it.
It offers advanced effects that allow users to enhance videos in real time. You can use a variety of tools, including blurring, masking, and color grading.
You can instantly export videos to YouTube, Vimeo, and other platform services.
Features:
- Works with a wide variety of video formats
- Allows fast export to MPEG4/
- Fully optimized to offer fast speeds
- Multicam editing options
- Realtime effects with the help of inbuilt presets
- Advanced Boris FX Plugin
- Boris Graffiti for text effects
- Fully customizable interface
- Options for real-time collaboration
- Dedicated hardware support
Pros:
- Real-time effects with 4K Editing
- Keyboard shortcuts
- Easy to share videos on the internet
- Access to royalty-free audio and video content
- Histogram tool and 32bit GPU precision
- Lots of ready-to-use effects
Cons:
- The Video Stabilization feature is missing
- 3D Video Editing is not supported
- No Split and Merge features
Steps On How To Chroma Key In Lightworks
1. Record your video
First, you need a green or blue background to shoot against. As we’ll explain later, it doesn’t have to be a very specific shade, but it needs to be substantially different from the subject you’re shooting. You might have seen occasions when a weather presenter’s tie has appeared transparent during a broadcast. This is because the material was too close in color to the backdrop, or the key wasn’t quite set accurately enough.
You can make your backdrop using a sheet, or a large sheet of paper or card. If you’re planning to make videos frequently, there are inexpensive chromakey backdrops available that include a frame to hang the cloth from. If space is limited, collapsible screens are also available starting at around US$40. These screens are also handy for photography.
Good lighting is essential. You need to make sure that the screen is evenly lit so the color is consistent. It’s also important to ensure your subject is far enough from the screen to avoid shadows and color spills (when the blue or green backdrop reflects off your subject).
2. Import and trim
Once you’ve shot your video, download and install Lightworks . It’s free for personal use, but you’ll need to register for a free account if you want to use it for longer than 30 days.
Click the button marked Create a New Project, give it a name, and select a frame rate (you can find this by right-clicking your recorded video and selecting the Details tab). Here we’re using a still image as a background, but you can also use another video. Import this the same way.
Click the Edit tab and drag your video from the Project Contents panel onto the V1 track of the timeline below. If there’s unwanted footage at the beginning or end of your clip, right-click it and select Trim In or Trim Out, then use the yellow handles to change where the clip starts and finishes.
Right-click the preview window marked Sequence #1 and select Tracks > Add Video. Drag your video clip into the V1 track and your still image into V2. Click and drag the right-hand side of the image in the V2 track until it’s the same length as the video.
3. Set the key
Now click the VFX tab, select the V1 track in the timeline and click the tab marked with a plus icon. Click the Favorites drop-down menu and select Key, followed by Green Screen. Click Add Effect and you’ll see a new panel of settings under the color correction wheels.
Use the eyedropper tool on the left to select the background you want to remove. This will typically do quite a good job by itself, but it will need a little fine-tuning. Try sliding the Saturation and Luminance sliders and adjusting their steepness using the handles that appear when you move your mouse over them. You’ll notice that each adjustment you make has a knock-on effect on the changes you’ve made with the other sliders; it’s a matter of balancing all three to achieve the best effect, preserving detail while minimizing spill.
To see how the filter is working, click the ‘Reveal’ box. The white areas are the parts of the video that will be removed, and the black areas are the parts that will remain.
The Remove Spill slider will add a purple tint to neutralize green tones in areas that need it.
4. Tweak and export
Once you’re happy, you can use Lightworks’ other VFX tools to make other changes like color correction and cropping. When you’re done, return to the Edit tab, right-click the preview window at the top right and select Export.
The only two export options you’ll see in the free version of Lightworks are Vimeo and YouTube, but this is a little misleading. These will save the video to your PC or Mac in an MP4 format, but they won’t do the uploading for you unless you check the appropriate box.
Select a destination folder and name for your video file and click ‘Start’. The processing will begin, and you’ll see a progress bar at the top right. This task will run in the background so you can continue working on your project, and you’ll be notified when it’s complete.
WHICH SHOULD I CHOOSE: FREE OR PAID GREEN SCREEN SOFTWARE?
If you want something quick, cheap, and easy, and having your footage seems to be fairly clean with few shadows or spills, there are several cheap or free apps into which you can import a clip, apply a chroma key, and export without much editing or advanced features.
If your footage calls for attention, extra equipment can be required. If your clip has inconsistent lighting fixtures or poor quality, you may require equipment that permits you to observe a couple of chroma keys to suit the numerous shades of green or color correction equipment to restore your pictures. For even advanced functions, you’ll want to spend a little time and money learning, however the end result will most possibly be worthwhile. More advanced chroma key equipment are normally used inside full-featured NLEs through integrated equipment or expert plug-ins that encompass extra beneficial functions including advanced color correction, noise reduction, HDR (High Dynamic Range) color support, movement and keyframing, extra file layout and high-resolution support, and multi-camera editing.
FAQS ABOUT EDITING GREEN SCREEN
- What is the most important thing when using a green screen?
When lighting your green screen, ensure there is even, soft light on the entirety of the green screen. This is crucial for a proper key. Many filmmakers overlook this essential part and focus on lighting the subject. However, be sure to use whatever lights you have to expose the green screen background evenly.
- Why do filmmakers use green screens?
A green screen basically lets you drop in whatever background images you want behind the actors and/or foreground. It’s used in film production (and also in news and weather reports) to relatively simply place the desired background behind the subject/actor/presenter.
- Why is a green screen not a different color?
The really short answer is that green screens are green because people are not green. For the effect to work, the background must use a color that isn’t used elsewhere in the shot – and green is nothing like human skin tone.
Conclusion:
Green screen video production is not difficult. Anyone, with the right tools can create green screen effects like a pro. Simply follow the precautions listed above and choose the software that best suits your needs.
Whether you’re making a professional film or a simple family video, I’m confident you’ll find something suitable among the options listed above.
Why You Should Master Slideshows In Lightroom, Fresh Insight?
Why You Should Master Slideshows in Lightroom, Fresh Insight
An easy yet powerful editor
Numerous effects to choose from
Detailed tutorials provided by the official channel
Adobe Lightroom is an image manipulation software which is developed by Adobe Inc. It is used for editing, importing, saving and sharing a large no. of digital images. Lightroom editing functions include HSL, colour grading, lens correction, white balance, the transformation of spot removal, red-eye correction and adjustment brushing. Lightroom has a feature of slideshow module which you must have heard about it before.
The process of creating a slideshow video can be time-consuming but once you have created it, you can rewind your memories in just 3-4 minutes. If you want you can share the video on your social media accounts.
In this article
01 [What is Lightroom and What Advantages Does It Have for Making Slideshows](#Part 1)
02 [What Does Slideshows in Lightroom Do to Different Groups of People](#Part 2)
03 [How to Create a Professional-looking Slideshow with Lightroom](#Part 3)
04 [Hot FAQs About Slideshows in Lightroom](#Part 4)
Part 1 What is lightroom and what advantages does it have for making slideshows?
Lightroom helps in editing the images and it allows the users to edit the images by using external features. Photographers usually like working on the lightroom because it is a very popular and easy tool. It is perfect for beginners and graphic designers who are looking for an easy and straightforward editor.
Lightroom is used for image retouching. Lightroom includes improving the color tone, color balance, cropping, filters, removing red-eye effect, and many more things. Lightroom supports some the image formats like JPEG, PSD, PNG and TIFF. You can also edit the raw images.
Advantages
● Easy to use - The lightroom interface is less complex, which makes it easy to use especially for the newcomers.
● Tidy interface - In lightroom, it is easier to search for images as it gathers the metadata on each image on its own. So you can find the image with a very specific date, time, resolution, model, etc.
● Editing capabilities - With editing capabilities like contrast, exposure, clarity, warmth, and saturation, Lightroom can give the desired look to the image which photographers want to create.
Part 2 What do slideshows in Lightroom do to a different group of people?
01Enable or Disable People View
If you are a beginner and people view is disabled, all pre-existing face model data is deleted from lightroom servers. Lightroom will no longer analyze new images and will not group them in clusters automatically. You need to enable it so that the lightroom desktop can analyze images in the cloud to identify people and form clusters in people’s view.
02View people in your photos
● In the My Photos panel at the upper-left side of the screen, select People to view the people view. You can access People clusters in which each cluster contains images of a particular person. Below the cover photo of each cluster, you can see the total number of photos for each person.
● To view photos of that person you can click on any cluster. In the cluster at the upper right corner of the screen, you can view the total number of photos.
03Sort options in People View
To sort People clusters follow the steps:
● In the My Photos panel at the upper left side of the screen, select People to view People View.
● Click on the three dots at the upper right corner of the screen, from the drop-down list select Sort By, and then select the following option:
● First Name: Sort the clusters in the alphabetical order of the first name.
● Last Name: Sort the clusters in the alphabetical order of the last name.
● Count: Sort the clusters with the highest number of photos to the least no. of photos in a cluster.
Part 3 How to create a professional-looking slideshow with Lightroom?
Do you know that you can create a professional-looking slideshow using lightroom? Here are some steps that you can follow to make a professional-looking slideshow.
Step 1 - Photo selection
The first thing you have to do is select the images you want to include in making the slideshow. There are a lot of ways to do this in Lightroom.
● In the grid view select the photos you want to include. Select CTRL (CMD) key and click on each image.
● Add those images to Quick Collection because it is easiest to work with. Click the B key to add them to the quick collection.
● It will be added to the collection panel when you will name the collection for the slideshow.

Step 2 - Arrange the photos
Now, it is time for arranging the photos in a sequence in which you want them to watch in a slideshow. If you want to rearrange them simply drag and drop each image in the grid view where you want to make them appear in a slideshow.
Try to arrange the photos in such a way so that they can tell a story to the viewers who are watching it.
Step 3 – Create a slideshow
Once you have arranged the photos in a sequence, then create a slideshow.
● Click on the ‘slideshow’ menu given at the top of your screen.
● This will lead you to the slideshow module view in lightroom.
● Click on the ‘Create Slideshow’ given at the top right of the central panel.
● Add a name to your slideshow and then click on create.
● Once you have created it and named your slideshow, all the changes will be automatically saved in lightroom.

Step 4 – Select a template for a slideshow
From the template browser given on the left-hand side panel, you can select a template for your slideshow. Before adding anything, do a run-through on your slideshow to see how it looks.
Step 5 – Designing the lightroom slideshow
You can customize your slideshow to make it more professional. You can make following changes or enrichments by using the features given at the right-hand side panel:
● Titles - You can add text, company logo, introduction or any other important information. You can easily add these things in your slideshow in lightroom.
● Watermarks and overlays - You can add watermarks and custom overlay text in every slide you want to by using the overlays windows.
● Layout - You can change the spacing for each slide by unselecting the Link All Box and selecting the ratio which you prefer. Although the program automatically sets the spacing for each slide.
● Options – You can add a frame or you can change the border it allows you to select how your images are going to be displayed in each slide.
● Background – You can add a background to enhance an image, not to divert attention from it. You can add an image as your background or add any colour as your background. You can create background by using various options available.
● Music – You can add music of your choice using an mp3 file.
● Transitions - Setting a transitions between the slides can really make a huge impact on your overall experience. You can use the auto option or you can set the transitions manually.
Step - 6 Completion of slideshow
Once you have made all the desired changes, you can press “Play” option to run the slideshow. If you still want to make any changes you can go back and change whatever you like. Once it’s done and you are happy with the results it’s time to export the slideshow in the form of video or PDF.

Part 4 Hot FAQs about slideshow in lightroom
Q1. How can you make a slideshow in lightroom?
A. You can create a slideshow by using the slideshow module in lightroom, where you can select templates, layouts, add tiles or songs, choose transitions and playback options.
Q2. Where is the slideshow module in lightroom?
A. Start by clicking on ‘slideshow’ option given at the top menu of your screen. This will open the slideshow module view in lightroom. The right and left panels in slideshow module will look different than the ones in the library module.
Q3. How can you change the sequence of the photos in slideshow lightroom?
A. You can control the order of the photos in a Lightroom folder by dragging and dropping each image from one place to the other in the filmstrip view. To rearrange grab the image and drag on it until you see a black bar appear between two images.
Q4. What is the transition effect in slideshow?
A. Transitions are often called – the movement you see when slide changes to another slide in a slideshow. They are different from animation effect. You can set it manually or with an auto option.
Q5. How to make your slideshow more attractive?
A. There are a lot of options to make your look slideshow more attractive. By using the beautiful template, layouts, background and adding transitions with the perfect time ratio. This will enhance the look of your slideshow and will make it more attractive.
If you are not able to follow the interface of lightroom you can consider Filmora for making attractive slideshows. Wondershare Filmora Video Editor allows you to crop, pan and zoom the slideshow automatically or manually by applying pan and zoom photo placement. It has its own music track and sound effect gallery that allows you to customize the slideshows. Filmora allows you to record your own voiceovers as well. It has also fade-in, fade-out effects with amazing transitions. It exports the videos at resolutions of up to 4K.
For Win 7 or later (64-bit)
For macOS 10.12 or later
● Ending Thoughts →
● Adobe Lightroom is one of the best software for making slideshows due to its amazing features like color grading, red eye correction, transformation of spot removal, white balance etc.
● Lightroom has a feature of slideshow module in which you can create quality slideshow presentations for your business.
● If you are not able to use lightroom you can consider using Filmora for creating amazing slideshows.
Adobe Lightroom is an image manipulation software which is developed by Adobe Inc. It is used for editing, importing, saving and sharing a large no. of digital images. Lightroom editing functions include HSL, colour grading, lens correction, white balance, the transformation of spot removal, red-eye correction and adjustment brushing. Lightroom has a feature of slideshow module which you must have heard about it before.
The process of creating a slideshow video can be time-consuming but once you have created it, you can rewind your memories in just 3-4 minutes. If you want you can share the video on your social media accounts.
In this article
01 [What is Lightroom and What Advantages Does It Have for Making Slideshows](#Part 1)
02 [What Does Slideshows in Lightroom Do to Different Groups of People](#Part 2)
03 [How to Create a Professional-looking Slideshow with Lightroom](#Part 3)
04 [Hot FAQs About Slideshows in Lightroom](#Part 4)
Part 1 What is lightroom and what advantages does it have for making slideshows?
Lightroom helps in editing the images and it allows the users to edit the images by using external features. Photographers usually like working on the lightroom because it is a very popular and easy tool. It is perfect for beginners and graphic designers who are looking for an easy and straightforward editor.
Lightroom is used for image retouching. Lightroom includes improving the color tone, color balance, cropping, filters, removing red-eye effect, and many more things. Lightroom supports some the image formats like JPEG, PSD, PNG and TIFF. You can also edit the raw images.
Advantages
● Easy to use - The lightroom interface is less complex, which makes it easy to use especially for the newcomers.
● Tidy interface - In lightroom, it is easier to search for images as it gathers the metadata on each image on its own. So you can find the image with a very specific date, time, resolution, model, etc.
● Editing capabilities - With editing capabilities like contrast, exposure, clarity, warmth, and saturation, Lightroom can give the desired look to the image which photographers want to create.
Part 2 What do slideshows in Lightroom do to a different group of people?
01Enable or Disable People View
If you are a beginner and people view is disabled, all pre-existing face model data is deleted from lightroom servers. Lightroom will no longer analyze new images and will not group them in clusters automatically. You need to enable it so that the lightroom desktop can analyze images in the cloud to identify people and form clusters in people’s view.
02View people in your photos
● In the My Photos panel at the upper-left side of the screen, select People to view the people view. You can access People clusters in which each cluster contains images of a particular person. Below the cover photo of each cluster, you can see the total number of photos for each person.
● To view photos of that person you can click on any cluster. In the cluster at the upper right corner of the screen, you can view the total number of photos.
03Sort options in People View
To sort People clusters follow the steps:
● In the My Photos panel at the upper left side of the screen, select People to view People View.
● Click on the three dots at the upper right corner of the screen, from the drop-down list select Sort By, and then select the following option:
● First Name: Sort the clusters in the alphabetical order of the first name.
● Last Name: Sort the clusters in the alphabetical order of the last name.
● Count: Sort the clusters with the highest number of photos to the least no. of photos in a cluster.
Part 3 How to create a professional-looking slideshow with Lightroom?
Do you know that you can create a professional-looking slideshow using lightroom? Here are some steps that you can follow to make a professional-looking slideshow.
Step 1 - Photo selection
The first thing you have to do is select the images you want to include in making the slideshow. There are a lot of ways to do this in Lightroom.
● In the grid view select the photos you want to include. Select CTRL (CMD) key and click on each image.
● Add those images to Quick Collection because it is easiest to work with. Click the B key to add them to the quick collection.
● It will be added to the collection panel when you will name the collection for the slideshow.
Step 2 - Arrange the photos
Now, it is time for arranging the photos in a sequence in which you want them to watch in a slideshow. If you want to rearrange them simply drag and drop each image in the grid view where you want to make them appear in a slideshow.
Try to arrange the photos in such a way so that they can tell a story to the viewers who are watching it.
Step 3 – Create a slideshow
Once you have arranged the photos in a sequence, then create a slideshow.
● Click on the ‘slideshow’ menu given at the top of your screen.
● This will lead you to the slideshow module view in lightroom.
● Click on the ‘Create Slideshow’ given at the top right of the central panel.
● Add a name to your slideshow and then click on create.
● Once you have created it and named your slideshow, all the changes will be automatically saved in lightroom.
Step 4 – Select a template for a slideshow
From the template browser given on the left-hand side panel, you can select a template for your slideshow. Before adding anything, do a run-through on your slideshow to see how it looks.
Step 5 – Designing the lightroom slideshow
You can customize your slideshow to make it more professional. You can make following changes or enrichments by using the features given at the right-hand side panel:
● Titles - You can add text, company logo, introduction or any other important information. You can easily add these things in your slideshow in lightroom.
● Watermarks and overlays - You can add watermarks and custom overlay text in every slide you want to by using the overlays windows.
● Layout - You can change the spacing for each slide by unselecting the Link All Box and selecting the ratio which you prefer. Although the program automatically sets the spacing for each slide.
● Options – You can add a frame or you can change the border it allows you to select how your images are going to be displayed in each slide.
● Background – You can add a background to enhance an image, not to divert attention from it. You can add an image as your background or add any colour as your background. You can create background by using various options available.
● Music – You can add music of your choice using an mp3 file.
● Transitions - Setting a transitions between the slides can really make a huge impact on your overall experience. You can use the auto option or you can set the transitions manually.
Step - 6 Completion of slideshow
Once you have made all the desired changes, you can press “Play” option to run the slideshow. If you still want to make any changes you can go back and change whatever you like. Once it’s done and you are happy with the results it’s time to export the slideshow in the form of video or PDF.
Part 4 Hot FAQs about slideshow in lightroom
Q1. How can you make a slideshow in lightroom?
A. You can create a slideshow by using the slideshow module in lightroom, where you can select templates, layouts, add tiles or songs, choose transitions and playback options.
Q2. Where is the slideshow module in lightroom?
A. Start by clicking on ‘slideshow’ option given at the top menu of your screen. This will open the slideshow module view in lightroom. The right and left panels in slideshow module will look different than the ones in the library module.
Q3. How can you change the sequence of the photos in slideshow lightroom?
A. You can control the order of the photos in a Lightroom folder by dragging and dropping each image from one place to the other in the filmstrip view. To rearrange grab the image and drag on it until you see a black bar appear between two images.
Q4. What is the transition effect in slideshow?
A. Transitions are often called – the movement you see when slide changes to another slide in a slideshow. They are different from animation effect. You can set it manually or with an auto option.
Q5. How to make your slideshow more attractive?
A. There are a lot of options to make your look slideshow more attractive. By using the beautiful template, layouts, background and adding transitions with the perfect time ratio. This will enhance the look of your slideshow and will make it more attractive.
If you are not able to follow the interface of lightroom you can consider Filmora for making attractive slideshows. Wondershare Filmora Video Editor allows you to crop, pan and zoom the slideshow automatically or manually by applying pan and zoom photo placement. It has its own music track and sound effect gallery that allows you to customize the slideshows. Filmora allows you to record your own voiceovers as well. It has also fade-in, fade-out effects with amazing transitions. It exports the videos at resolutions of up to 4K.
For Win 7 or later (64-bit)
For macOS 10.12 or later
● Ending Thoughts →
● Adobe Lightroom is one of the best software for making slideshows due to its amazing features like color grading, red eye correction, transformation of spot removal, white balance etc.
● Lightroom has a feature of slideshow module in which you can create quality slideshow presentations for your business.
● If you are not able to use lightroom you can consider using Filmora for creating amazing slideshows.
How To Make a Photo Collage in Microsoft Word — Step by Step Guide
Any Differences in Making Collages in Different Versions of Microsoft Wor
An easy yet powerful editor
Numerous effects to choose from
Detailed tutorials provided by the official channel
Are you having trouble making a collage Microsoft Word? Well, at times it might prove tricky to make a photo collage using Microsoft Word as it is predominantly software that is used for text. Therefore, if one is trying to make a photo collage in Microsoft Word, one might need to know the purpose and use of Microsoft collage maker as the kit can greatly help to create a photo collage in Word.
There are also other things to know about the process such as the difference between making photo collages in different versions of Microsoft Word or which version of the Microsoft Word is most commonly used by all people.
In this article
01 [Any Differences in Making Collages in Different Versions of Microsoft Word?](#Part 1)
02 [How To Make A Photo Collage In Microsoft Word](#Part 2)
Part 1 Any Differences in Making Collages in Different Versions of Microsoft Word?
The usability of Microsoft Word does not end at simply writing text. It extends to the usage of photos and the creation of photo collages using these photos. Microsoft Word has the right features which you can easily use to organize pictures and photos in a certain way to make a photo collage. The collage maker Microsoft is not a hard operation to access if one knows the various options and operations of Microsoft Word well. There are different versions of Microsoft Word, all of which serve the same purposes but have different options and different icons representing various features. No matter which version you are using, the primary process of creating remains the same in all of those processes as it is simply the collection of the desired pictures, deciding on a particular shape and dimension of the page where you will arrange the pictures, inserting the pictures into the page, and then arranging them in a certain order.
Up until now, Microsoft has launched more than ten versions of Microsoft Word, with the preliminary ones being named “Microsoft Office”. In recent times, the newer version of Microsoft Word has become more user-friendly and thus it has become easier to perform so-called more complex tasks with the software, such as the creation of photo collages. With the addition of options and features to each newer version of Microsoft Word, it has become easier to work with graphics and arrange them or resize them or edit them in the desired way. More templates have been included in the newer versions to make it easy for the users to come to a decision when it comes to the shape of the collage and the number of pictures in it. Thus, it has various collage Microsoft Word options available now, which make the job much easier. There are a variety of options that are offered by the newer versions of Microsoft Word which will surely greatly help the user in creating photo collages as they open up the path to more features.

The difference has been in the quality and the quantity of the features that each of the new versions of Microsoft Word contains. For example, the older versions were predominantly used for text, and thus, there were not any viable options for pictures and arranging them, and creating a collage. The newer versions of Microsoft Word have sections and options entirely dedicated to the creation of collages and thus contain special Microsoft collage maker options which make it much easier to arrange pictures in certain ways and create collages. For example, the newer versions consist of features such as ‘SmartArt” which is a built-in feature to create collages in Microsoft Word. It is available in the newer versions of Word. ‘SmartArt” works as a Microsoft auto collage option.

The 2013 and 2016 versions of Microsoft Word also contain something called the ‘Developer” option, which can be accessed from the ‘Customizing the Ribbon” section. You can use it to specify the number of pictures and then insert pictures from a file. There is also the option of using Word Tables which can be used in any version of Microsoft Word to create a certain arrangement for your photo collage. Word Tables give the user complete control over the layout of the collage and this makes it easier for the user to arrange the pictures of the collage.


There is so something called the ‘Effect” option which can be found in the ‘Format Picture” option, and this can be efficiently used to add various artistic effects and modify the pictures in ways that the user wants.

The most commonly used version of the Microsoft Word software to create photo collages is expectedly the newest as it comes with the maximum features which enable the user to go beyond text and control designs, graphics, and everything else.
Part 2 How To Make A Photo Collage In Microsoft Word
The process to make a photo collage in Microsoft Word consists of several steps and each of them is equally important in this part of the article, we shall take a close look at each of these steps and how you can implement them, and how you can efficiently use the various features that Microsoft Word has to offer. Now, there are many ways in which one can create a collage in Microsoft Word using various Microsoft collage maker options. Read the options given below to understand them in proper details.
● Creating a photo collage by freestyle – This is the simplest method and is quite easy and thus, does not require much expertise to be followed.
● Firstly, go to the Ribbon. From there click on “Developer” option which can be found there. In case the option is not activated, the user can activate it by clicking on the “Customize The Ribbon” From there activate the ‘Developer” option.
● The second step follows the user clicking on the ‘Picture Content Control” button and this can be found easily in the ‘Controls” section of the Ribbon. This option is used to create placeholders for all the desired pictures.
● The cursor is placed on each placeholder and the ‘Picture” option is clicked upon. This gives you access to the pictures and following this, you will need to specify the source from where you shall obtain the pictures to paste them into the Word document.
● Now, the problem arises when each picture is pasted in the document in a random way and sizes and shapes. This can easily be solved by right-clicking on the picture and then clicking on “Wrap Text”, followed by ‘More Layout Options”, ‘In Front Of Text”, and this will enable you to arrange the pictures in whichever way you like.
● Now, the pictures can be organized in any way you want, and thus, the entire collage can be created in any you want. You can go ahead and shrink or stretch a photo without distorting it. You can use the various options of the “Picture Tools” tab to format the images which have borders and preset styles and shadows.

● Creating a collage using ‘SmartArt” – ‘SmartArt” is the easiest way to create a collage in Microsoft Word and in the shortest time possible. It is a pretty straightforward procedure. Let us take a look at the steps.
● Go to the ‘Insert” option and click on ‘SmartArt”, and then go and click on ‘Picture”, and out of the photo collages that appear in front of you, select one that is either photo-only or is photo-and-text and looks perfect for your purpose.
● By clicking on the picture icon on each photo placeholder, and then choosing ‘Insert”, you can choose to insert photos proportionally, as you please.
● Select a photo and click on the ‘Picture Tools” tab, while moving the photo into a placeholder. You can click on the ‘Crop” button to stretch or shrink a picture according to your wish. Thus, you can easily resize and reshape your pictures and photos in any way you like.
● The last and final step of the Microsoft auto collage option is repositioning the pictures by choosing ‘Move Up” or ‘Move Down”, which can be found under the double-arrow in the ‘SmartArt” frame’s the left side. Thus, you can easily change the entire arrangement of the entire photo collage, quite having to do much.

If you are trying to make a photo collage, you can also go with the **Wondershare Filmora **Video Editor, which has some amazing features, to make your job much easier. It has over 10 million stock media, a huge number of preset templates, and a feature called “Speed Ramping”, which you can use to adjust the speed of your video. It has various kinds of stock media such as “Pixabay”, “Giphy” and “Unsplash”.
For Win 7 or later (64-bit)
For macOS 10.12 or later
It works on a variety of operating systems, such as Windows 7, Windows 8.1, Windows 10, and also Windows 1It has a minimum RAM requirement of 4GB, though 8 GB is recommended for 4K and HD videos. It also requires a minimum of Intel HD Graphics 5000 or newer versions.
● Key Takeaways from This Episode →
●Thus, the entire article can be summarized by saying that there are quite a few ways in which you can create a photo collage in Microsoft Word, using collage Microsoft word and various other Microsoft auto collage options which can be used to make photo collages easily in Microsoft Word.
●With the release of newer versions with more and more features and options, it becomes easier to exercise control over graphical content in Microsoft Word.
●So, the processes are quite straightforward and simple and there should not be much problem in following them as mentioned so many times, there are many collage maker Microsoft options which you can use to make a photo collage with pictures and shapes that you desire.
●The immensity of options enables you to create collages in whichever you like.
Are you having trouble making a collage Microsoft Word? Well, at times it might prove tricky to make a photo collage using Microsoft Word as it is predominantly software that is used for text. Therefore, if one is trying to make a photo collage in Microsoft Word, one might need to know the purpose and use of Microsoft collage maker as the kit can greatly help to create a photo collage in Word.
There are also other things to know about the process such as the difference between making photo collages in different versions of Microsoft Word or which version of the Microsoft Word is most commonly used by all people.
In this article
01 [Any Differences in Making Collages in Different Versions of Microsoft Word?](#Part 1)
02 [How To Make A Photo Collage In Microsoft Word](#Part 2)
Part 1 Any Differences in Making Collages in Different Versions of Microsoft Word?
The usability of Microsoft Word does not end at simply writing text. It extends to the usage of photos and the creation of photo collages using these photos. Microsoft Word has the right features which you can easily use to organize pictures and photos in a certain way to make a photo collage. The collage maker Microsoft is not a hard operation to access if one knows the various options and operations of Microsoft Word well. There are different versions of Microsoft Word, all of which serve the same purposes but have different options and different icons representing various features. No matter which version you are using, the primary process of creating remains the same in all of those processes as it is simply the collection of the desired pictures, deciding on a particular shape and dimension of the page where you will arrange the pictures, inserting the pictures into the page, and then arranging them in a certain order.
Up until now, Microsoft has launched more than ten versions of Microsoft Word, with the preliminary ones being named “Microsoft Office”. In recent times, the newer version of Microsoft Word has become more user-friendly and thus it has become easier to perform so-called more complex tasks with the software, such as the creation of photo collages. With the addition of options and features to each newer version of Microsoft Word, it has become easier to work with graphics and arrange them or resize them or edit them in the desired way. More templates have been included in the newer versions to make it easy for the users to come to a decision when it comes to the shape of the collage and the number of pictures in it. Thus, it has various collage Microsoft Word options available now, which make the job much easier. There are a variety of options that are offered by the newer versions of Microsoft Word which will surely greatly help the user in creating photo collages as they open up the path to more features.
The difference has been in the quality and the quantity of the features that each of the new versions of Microsoft Word contains. For example, the older versions were predominantly used for text, and thus, there were not any viable options for pictures and arranging them, and creating a collage. The newer versions of Microsoft Word have sections and options entirely dedicated to the creation of collages and thus contain special Microsoft collage maker options which make it much easier to arrange pictures in certain ways and create collages. For example, the newer versions consist of features such as ‘SmartArt” which is a built-in feature to create collages in Microsoft Word. It is available in the newer versions of Word. ‘SmartArt” works as a Microsoft auto collage option.
The 2013 and 2016 versions of Microsoft Word also contain something called the ‘Developer” option, which can be accessed from the ‘Customizing the Ribbon” section. You can use it to specify the number of pictures and then insert pictures from a file. There is also the option of using Word Tables which can be used in any version of Microsoft Word to create a certain arrangement for your photo collage. Word Tables give the user complete control over the layout of the collage and this makes it easier for the user to arrange the pictures of the collage.
There is so something called the ‘Effect” option which can be found in the ‘Format Picture” option, and this can be efficiently used to add various artistic effects and modify the pictures in ways that the user wants.
The most commonly used version of the Microsoft Word software to create photo collages is expectedly the newest as it comes with the maximum features which enable the user to go beyond text and control designs, graphics, and everything else.
Part 2 How To Make A Photo Collage In Microsoft Word
The process to make a photo collage in Microsoft Word consists of several steps and each of them is equally important in this part of the article, we shall take a close look at each of these steps and how you can implement them, and how you can efficiently use the various features that Microsoft Word has to offer. Now, there are many ways in which one can create a collage in Microsoft Word using various Microsoft collage maker options. Read the options given below to understand them in proper details.
● Creating a photo collage by freestyle – This is the simplest method and is quite easy and thus, does not require much expertise to be followed.
● Firstly, go to the Ribbon. From there click on “Developer” option which can be found there. In case the option is not activated, the user can activate it by clicking on the “Customize The Ribbon” From there activate the ‘Developer” option.
● The second step follows the user clicking on the ‘Picture Content Control” button and this can be found easily in the ‘Controls” section of the Ribbon. This option is used to create placeholders for all the desired pictures.
● The cursor is placed on each placeholder and the ‘Picture” option is clicked upon. This gives you access to the pictures and following this, you will need to specify the source from where you shall obtain the pictures to paste them into the Word document.
● Now, the problem arises when each picture is pasted in the document in a random way and sizes and shapes. This can easily be solved by right-clicking on the picture and then clicking on “Wrap Text”, followed by ‘More Layout Options”, ‘In Front Of Text”, and this will enable you to arrange the pictures in whichever way you like.
● Now, the pictures can be organized in any way you want, and thus, the entire collage can be created in any you want. You can go ahead and shrink or stretch a photo without distorting it. You can use the various options of the “Picture Tools” tab to format the images which have borders and preset styles and shadows.
● Creating a collage using ‘SmartArt” – ‘SmartArt” is the easiest way to create a collage in Microsoft Word and in the shortest time possible. It is a pretty straightforward procedure. Let us take a look at the steps.
● Go to the ‘Insert” option and click on ‘SmartArt”, and then go and click on ‘Picture”, and out of the photo collages that appear in front of you, select one that is either photo-only or is photo-and-text and looks perfect for your purpose.
● By clicking on the picture icon on each photo placeholder, and then choosing ‘Insert”, you can choose to insert photos proportionally, as you please.
● Select a photo and click on the ‘Picture Tools” tab, while moving the photo into a placeholder. You can click on the ‘Crop” button to stretch or shrink a picture according to your wish. Thus, you can easily resize and reshape your pictures and photos in any way you like.
● The last and final step of the Microsoft auto collage option is repositioning the pictures by choosing ‘Move Up” or ‘Move Down”, which can be found under the double-arrow in the ‘SmartArt” frame’s the left side. Thus, you can easily change the entire arrangement of the entire photo collage, quite having to do much.
If you are trying to make a photo collage, you can also go with the **Wondershare Filmora **Video Editor, which has some amazing features, to make your job much easier. It has over 10 million stock media, a huge number of preset templates, and a feature called “Speed Ramping”, which you can use to adjust the speed of your video. It has various kinds of stock media such as “Pixabay”, “Giphy” and “Unsplash”.
For Win 7 or later (64-bit)
For macOS 10.12 or later
It works on a variety of operating systems, such as Windows 7, Windows 8.1, Windows 10, and also Windows 1It has a minimum RAM requirement of 4GB, though 8 GB is recommended for 4K and HD videos. It also requires a minimum of Intel HD Graphics 5000 or newer versions.
● Key Takeaways from This Episode →
●Thus, the entire article can be summarized by saying that there are quite a few ways in which you can create a photo collage in Microsoft Word, using collage Microsoft word and various other Microsoft auto collage options which can be used to make photo collages easily in Microsoft Word.
●With the release of newer versions with more and more features and options, it becomes easier to exercise control over graphical content in Microsoft Word.
●So, the processes are quite straightforward and simple and there should not be much problem in following them as mentioned so many times, there are many collage maker Microsoft options which you can use to make a photo collage with pictures and shapes that you desire.
●The immensity of options enables you to create collages in whichever you like.
Also read:
- In 2024, Funny Content Ideas for YouTube Videos and Funny Music Background
- Updated 5 Tips for Faster Editing in Filmora
- New Top 15 Best Free MP4 Video Rotators Windows, Mac, Android, iPhone & Online for 2024
- In 2024, Creating Testimonial Videos For Health And Wellness Business Industry
- How to Loop Videos with iMovie
- Updated Add some Sci-Fi Touch to Your Next Video Content Using Wondershare Filmora Editing Tools to Create an Alternate Reality Effect for 2024
- Updated Create Chroma Key Written Text Effects in Filmora
- New 2024 Approved Doable Ways to Create Transparent Background in Procreate
- New Want to Take Your Editing Creativity to the Next Level by Designing Top-Class, Professional-Quality Slideshows in Aquasoft? Rest Assured, You Have Landed at the Right Place
- New 2024 Approved How to Add Background to Video With/Without a Green Screen
- 2024 Approved 10 Best Free Spanish Text To Speech Converter Software Windows, Mac, Android, iPhone, & Online
- New 2024 Approved Adobe Lightroom Color Grading Tutorial
- New In 2024, Spooky Halloween with the Best 15+ Halloween Countdown Video Clips
- Updated How to Create Photoshop GIF The 100 Easy Way for 2024
- In 2024, Denoise Video in Adobe Premiere Pro – Audio and Video Noise Removal
- New 2024 Approved Top Things People Know About Wedding Slideshow
- Updated Create an Awesome Logo Reveal with Logo Intro Templates for 2024
- New How to Record Video Streams With FFmpeg on Windows and Mac?
- Updated Boost the Pace of Your Instagram Reels Videos with These Simple Tricks for 2024
- Updated Best Text Animations In After Effects
- Updated 2024 Approved Best 15 Subtitle Apps
- How Can You Get VHS Filter and Glitch Filter to Your Images or Videos?
- Find Out What Keyframe Interval Is, Why It Is Important, and to Change Its Value on OBS Studio with Simple and Easy-to-Follow Instructions for 2024
- 11 Proven Solutions to Fix Google Play Store Not Working Issue on Realme V30 | Dr.fone
- What Legendaries Are In Pokemon Platinum On Tecno Phantom V Flip? | Dr.fone
- How to Unlock AT&T Apple iPhone 11 with 3 Methods
- In 2024, Catch or Beat Sleeping Snorlax on Pokemon Go For Oppo Reno 10 5G | Dr.fone
- Repair broken or corrupt video files of Gionee F3 Pro
- How to Watch Hulu Outside US On Samsung Galaxy M14 5G | Dr.fone
- How To Upgrade or Downgrade iPhone 6 Plus Without Losing Anything? | Dr.fone
- In 2024, How to Track WhatsApp Messages on Vivo X100 Pro Without Them Knowing? | Dr.fone
- In 2024, How To Unlock Stolen Apple iPhone X In Different Conditionsin
- In 2024, The Ultimate Guide to Get the Rare Candy on Pokemon Go Fire Red On Asus ROG Phone 7 Ultimate | Dr.fone
- How Oppo Find X7 Mirror Screen to PC? | Dr.fone
- In 2024, What is the best Pokemon for pokemon pvp ranking On Realme C67 4G? | Dr.fone
- Unlocking Apple iPhone SE (2020) Passcode without a Computer | Dr.fone
- How can I get more stardust in pokemon go On Lava Yuva 2? | Dr.fone
- How Can I Use a Fake GPS Without Mock Location On Samsung Galaxy A14 4G? | Dr.fone
- How to Recover Deleted Photos from Android Gallery App on Vivo X90S
- How to Find iSpoofer Pro Activation Key On Samsung Galaxy A24? | Dr.fone
- How to Use Face ID make purchases on iPhone 8 Plus ?
- Title: New Green Screen YouTube Videos for 2024
- Author: Chloe
- Created at : 2024-04-24 07:08:33
- Updated at : 2024-04-25 07:08:33
- Link: https://ai-editing-video.techidaily.com/new-green-screen-youtube-videos-for-2024/
- License: This work is licensed under CC BY-NC-SA 4.0.
