
New Guide To Using Luts Perfectly in Final Cut Pro for 2024

Guide To Using Luts Perfectly in Final Cut Pro
Final Cut Pro is a powerful video editing software available for Mac OS. You can create professional-looking videos using this tool. To give your videos a more professional touch, you can use LUTs as well. It is a quick way to color grade and improve the feel of your media content. They are essentially a set of instructions that apply a particular color grading to your video.
Moreover, with so many options available, you can choose from any color grading style you want. From cinematic to retro, LUTs offer you a variety of color adjustment tones and overlays. All you have to do is to choose from free LUTs for Final Cut Pro and download your preferred one.
- Part 2: How to Apply LUTs on Final Cut Pro
- Part 3: Discussing Wondershare Filmora LUTs - The Best Video Editing Platform
Part 1: Discovering The Top Best LUTs for FCPX
You are at the right place if you’re having trouble finding the best LUTs for FCPX. This section will provide you with one of the best LUTs you can choose for your videos.
1.Free Cinematic LUTs Pack for Video Editing
This free LUT pack is a perfect choice to give your videos a cinematic look. It features a soft blue color grading with high contrast that can make your footage look like it was shot on film. This LUT is especially effective for outdoor scenes and action shots. Moreover, its color grading enhances the drama and feel of your video footage.

2.10 Free Vintage Color Presets for Final Cut Pro
10 Free Vintage Color Presets for Final Cut Pro is a great pack if you’re looking for a vintage or retro feel. It has a warm, yellowish color grading that can give your videos a nostalgic look. This pack is ideal for footage shot in the 70s, 80s, or 90s. It highlights the muddiness and brown shades in your video to add a touch of authenticity to it.

3. Perfect Green Video LUT
Perfect Green Video LUT is a pack of 3 cinematic-style LUTs. This pack is ideal for travel or nature videos as it increases the green tone in your videos. It has a lush, green color grading that can make your videos look vibrant and lively. Additionally, this pack is effective for outdoor scenes as it improves your video’s natural colors and makes it look more dynamic.

4. Cyberpunk Color Grades
Cyberpunk Color Grades is a pack of modern cyberpunk-style LUTs. It is a fantastic LUT pack if you’re working on a music video or a creative project. It has a bold, colorful grading with high saturation that can make your video stand out. This LUT pack is perfect for scenes with many neon lights or bright backgrounds. Moreover, it adds an extra pop of color and makes your videos look more energetic.

5. Pro Retouching Essentials Pack by Prince Meyson
Prince Meyson offers this skin tone enhancer LUT pack. It has a neutral, balanced color grading that can make your videos look more polished and professional. This LUT is ideal for interviews, documentaries, or corporate videos. Moreover, this pack is perfect for portraits and close-up shots. It can enhance the natural colors of your footage and make it look more refined.

Part 2: How to Apply LUTs on Final Cut Pro
Now that you’ve discovered there are many Final Cut Pro LUTs free to download. The most important thing is to learn how to use these free LUTs on your video using FCPX. Here are some methods to learn to apply LUTs using Final Cut Pro in simple steps.
Method 1 Using Custom Layer
Step1
Open Final Cut Pro and import your video. Once the video is imported, click on the clip you want to apply the LUT.

Step2
Go to the “Effect Browser” and search for the LUT option from the search menu. After selecting it, you will get a “Custom LUT” layer. Select the custom LUT layer and drag and drop it onto your video clip. Then, click on the video clip and go to the “Inspector” window.

Step3
Select the “Custom LUT” option in the inspector window and choose your desired LUT from the LUT drop-down menu. Final Cut Pro will apply your desired LUT to your video clip.

Method 2 Using Adjustment Layer
Step1
Click the plugin button once you’ve imported your video clip and choose RT Adjustment Layer. Furthermore, if you don’t have this plugin, you can download it for free.

Step2
An icon will appear once you’ve selected RT Adjustment Layer. Drag and drop this icon on top of your video clip.

Step3
Drag and drop the “Custom LUT” layer onto your RT Adjustment Layer from the Effect Browser. Click on the RT Adjustment Layer and choose your desired LUT from the “Inspector” menu.

Method 3 Change Settings To Enable LUTs
Step1
Import your video into Final Cut Pro and click on your video in the library and open the inspector window.

Step2
In the section of the “Inspector” menu, click the drop-down menu and select the “General” option. It will open up new options in the menu where you have to choose the “Camera LUT” option and select your preferred LUT. After selecting your LUT, save your video by choosing the option.

Part 3: Discussing Wondershare Filmora LUTs - The Best Video Editing Platform
If you’re looking for a great video editing tool, Wondershare Filmora might be just what you need. With many features embedded in it, it makes it easy to create professional-looking videos. Moreover, you can apply LUTs to add a cinematic touch to your footage. With over 200+ LUTs available, you can improve the color grading of your videos. Additionally, this tool allows you to adjust its intensity as well.
Furthermore, Wondershare Filmora offers options for color adjustments and enhancements. You can add transitions, templates, effects, and filters to your videos. In addition to this, it offers over 10 billion free media assets that you can use to enhance your videos. With Wondershare Filmora, you can play around with different features and options to make your content look fantastic.

Empower your videos with a new mood using different LUTs. Filmora now offers 100+ top-quality 3D LUTs cover a broad range of scenarios. Transform your videos with Filmora’s powerful 3D LUTs.
Apply LUT on Videos Apply LUT on Videos Learn More

Conclusion
In conclusion, Final Cut Pro is a powerful tool for video editing. This tool allows you to make color corrections and color adjustments to your videos. Furthermore, Final Cut Pro offers the option to use LUTs for color grading. You can find many best LUTs for FCPX available online to use in this tool. However, Wondershare Filmora is another amazing tool that you use to color-grade your videos professionally.
Part 1: Discovering The Top Best LUTs for FCPX
You are at the right place if you’re having trouble finding the best LUTs for FCPX. This section will provide you with one of the best LUTs you can choose for your videos.
1.Free Cinematic LUTs Pack for Video Editing
This free LUT pack is a perfect choice to give your videos a cinematic look. It features a soft blue color grading with high contrast that can make your footage look like it was shot on film. This LUT is especially effective for outdoor scenes and action shots. Moreover, its color grading enhances the drama and feel of your video footage.

2.10 Free Vintage Color Presets for Final Cut Pro
10 Free Vintage Color Presets for Final Cut Pro is a great pack if you’re looking for a vintage or retro feel. It has a warm, yellowish color grading that can give your videos a nostalgic look. This pack is ideal for footage shot in the 70s, 80s, or 90s. It highlights the muddiness and brown shades in your video to add a touch of authenticity to it.

3. Perfect Green Video LUT
Perfect Green Video LUT is a pack of 3 cinematic-style LUTs. This pack is ideal for travel or nature videos as it increases the green tone in your videos. It has a lush, green color grading that can make your videos look vibrant and lively. Additionally, this pack is effective for outdoor scenes as it improves your video’s natural colors and makes it look more dynamic.

4. Cyberpunk Color Grades
Cyberpunk Color Grades is a pack of modern cyberpunk-style LUTs. It is a fantastic LUT pack if you’re working on a music video or a creative project. It has a bold, colorful grading with high saturation that can make your video stand out. This LUT pack is perfect for scenes with many neon lights or bright backgrounds. Moreover, it adds an extra pop of color and makes your videos look more energetic.

5. Pro Retouching Essentials Pack by Prince Meyson
Prince Meyson offers this skin tone enhancer LUT pack. It has a neutral, balanced color grading that can make your videos look more polished and professional. This LUT is ideal for interviews, documentaries, or corporate videos. Moreover, this pack is perfect for portraits and close-up shots. It can enhance the natural colors of your footage and make it look more refined.

Part 2: How to Apply LUTs on Final Cut Pro
Now that you’ve discovered there are many Final Cut Pro LUTs free to download. The most important thing is to learn how to use these free LUTs on your video using FCPX. Here are some methods to learn to apply LUTs using Final Cut Pro in simple steps.
Method 1 Using Custom Layer
Step1
Open Final Cut Pro and import your video. Once the video is imported, click on the clip you want to apply the LUT.

Step2
Go to the “Effect Browser” and search for the LUT option from the search menu. After selecting it, you will get a “Custom LUT” layer. Select the custom LUT layer and drag and drop it onto your video clip. Then, click on the video clip and go to the “Inspector” window.

Step3
Select the “Custom LUT” option in the inspector window and choose your desired LUT from the LUT drop-down menu. Final Cut Pro will apply your desired LUT to your video clip.

Method 2 Using Adjustment Layer
Step1
Click the plugin button once you’ve imported your video clip and choose RT Adjustment Layer. Furthermore, if you don’t have this plugin, you can download it for free.

Step2
An icon will appear once you’ve selected RT Adjustment Layer. Drag and drop this icon on top of your video clip.

Step3
Drag and drop the “Custom LUT” layer onto your RT Adjustment Layer from the Effect Browser. Click on the RT Adjustment Layer and choose your desired LUT from the “Inspector” menu.

Method 3 Change Settings To Enable LUTs
Step1
Import your video into Final Cut Pro and click on your video in the library and open the inspector window.

Step2
In the section of the “Inspector” menu, click the drop-down menu and select the “General” option. It will open up new options in the menu where you have to choose the “Camera LUT” option and select your preferred LUT. After selecting your LUT, save your video by choosing the option.

Part 3: Discussing Wondershare Filmora LUTs - The Best Video Editing Platform
If you’re looking for a great video editing tool, Wondershare Filmora might be just what you need. With many features embedded in it, it makes it easy to create professional-looking videos. Moreover, you can apply LUTs to add a cinematic touch to your footage. With over 200+ LUTs available, you can improve the color grading of your videos. Additionally, this tool allows you to adjust its intensity as well.
Furthermore, Wondershare Filmora offers options for color adjustments and enhancements. You can add transitions, templates, effects, and filters to your videos. In addition to this, it offers over 10 billion free media assets that you can use to enhance your videos. With Wondershare Filmora, you can play around with different features and options to make your content look fantastic.

Empower your videos with a new mood using different LUTs. Filmora now offers 100+ top-quality 3D LUTs cover a broad range of scenarios. Transform your videos with Filmora’s powerful 3D LUTs.
Apply LUT on Videos Apply LUT on Videos Learn More

Conclusion
In conclusion, Final Cut Pro is a powerful tool for video editing. This tool allows you to make color corrections and color adjustments to your videos. Furthermore, Final Cut Pro offers the option to use LUTs for color grading. You can find many best LUTs for FCPX available online to use in this tool. However, Wondershare Filmora is another amazing tool that you use to color-grade your videos professionally.
How to Speed Up Video with Canva Online Tool?
Canva video speed-ups are getting popular daily, and so is the art of making viral content.
One of the crucial features that every editing software should have is the ability to adjust the video speed. This is great for those who are creating YouTube shorts or simply looking to play with the slow-motion effects in their content. Now while talking about such edits, Canva is one such name that comes to mind.
It is a popular video editor and graphic designer you probably have heard of. Canva has tons of built-in functions, accompanied by an intuitive layout that users can’t get enough of. However, in terms of things like video speed-ups, it can get a bit complicated.
That’s why today we will go through the Canva video editor in detail and figure out whether it is possible to speed up the video in Canva or not. In the end, you will also discover other alternatives that provide the same functionality without any strings attached. So, let’s get straight into the topic!
Part I. Basic Understanding of Canva
Before jumping to Canva video speed-ups, it’s best to know a little about this tool. So Canva is an online media designing tool that enables you to create amazing content without much technical knowledge. It was launched back in 2013 and, until then, has managed to empower millions of people globally.
Whether it’s image editing, CV creation, or graphic modification, Canva is the forefront of modern tools. They even have a built-in video optimization feature that lets you boost your content without compromising quality. Everything in Canva is clutter-free, and the layout of their main website is beginners friendly.
There are also tons of free templates that you can use in Canva and format according to your preferred size and needs. Besides that, Canva’s native application is now available for all major operating systems. This means you can enjoy this tool as long as you have iOS 10 or higher (<Android 4.1).
Features of Creating and Editing with Canva
Some amazing perks that you get with Filmora include:
- ✅Dozens of customizable templates
- ✅Available with its drag-and-drop layout
- ✅Ability to add custom elements and transitions
- ✅Precise graphic movement
- ✅Supports single-key shortcuts
- ✅Cut and trim access
- ✅On-site recording
- ✅Up-loadable third-party content
- ✅ Mobile phone compatibility
- ✅Wide range of download formats
Part II. How to Speed Up a Video in Canva?
Managing video duration on your preferred domain is so crucial these days, mainly because of our smaller attention spans. This is why you should be looking to change video speed in Canva as soon as you get your hands on the project. Unfortunately, at the time of writing, there are no known features in which you can speed up the video in Canva. However, there are some alternative methods for archiving sped-up videos.
An Ultimate Guide to Speed Up a Canva Video
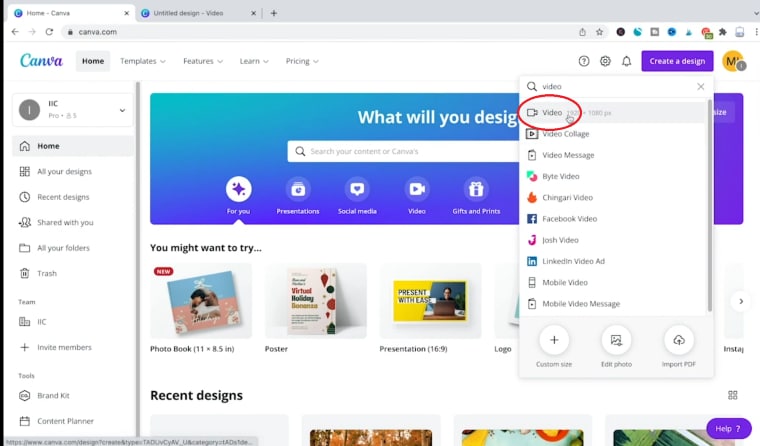
Step1Create a New Video Project with Canva
- Head over to Canva’s official webpage and open a new video project through the “Create“ button in the top right corner.
Step2Upload Your Speed Up Canva Video on the Console
- Now, you can either upload your video project into the console through the “Upload“ tab or use the provided video templates from the “Videos“ section.
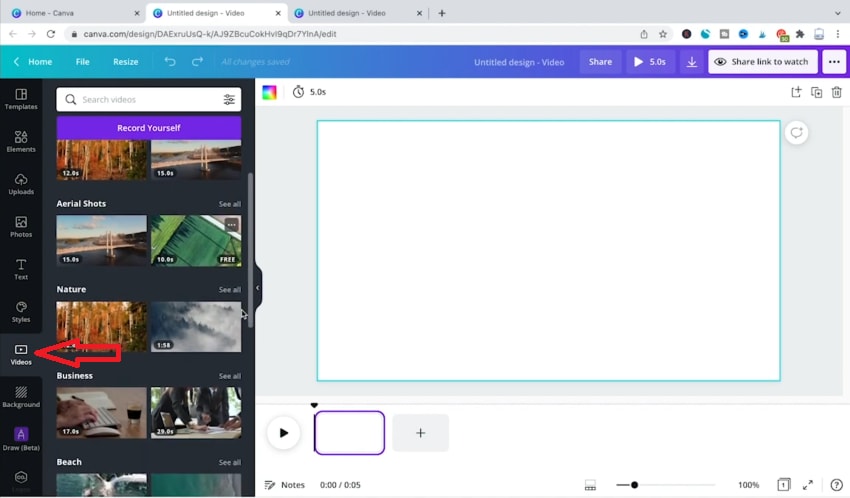
- Once that’s done, drag and drop your clip on the timeline and adjust it according to your requirements.
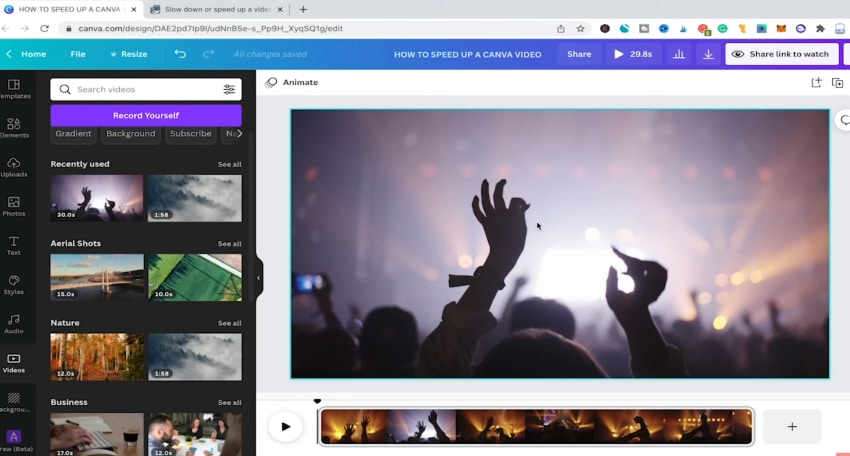
Hit preview once you are comfortable with video positioning
Step3Download the Non-speed Up Video in Canva
After previewing the clip, you will soon realize that your video is going too slow and needs to be adjusted. Unfortunately, no feature as of right now could directly fix the issue. It needs to be revamped in a third-party program requiring video download.
- To download the original video in Canva, move your cursor to the top and select the “share“ button.
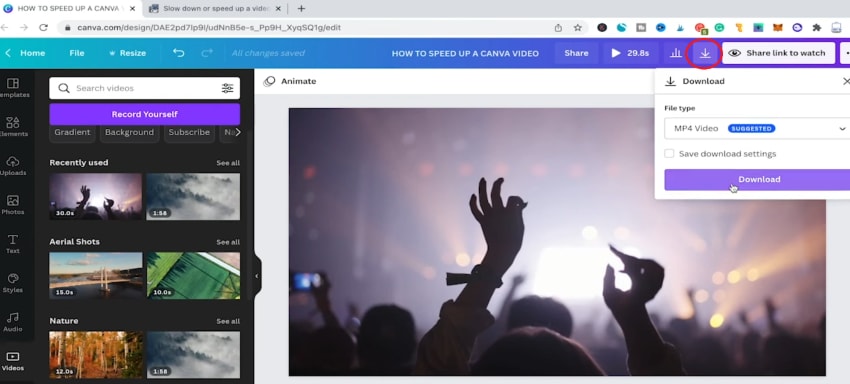
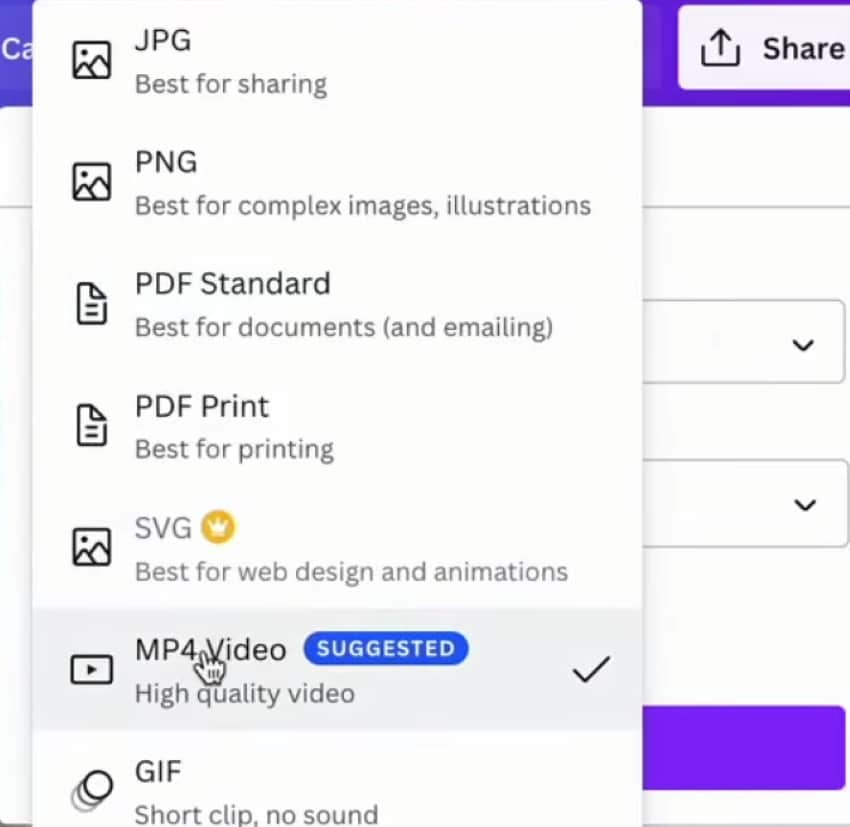
- Before you download the file, make sure that you have the MP4 format selected.
Step4Use Third-Party Software (Eizgif) to Change Video Speed In Canva
- Once you’ve downloaded your video file onto the system, open a new browser tab and search for Eizgif (or related speed-up video in the Canva tool). Now upload the same video on the given window.
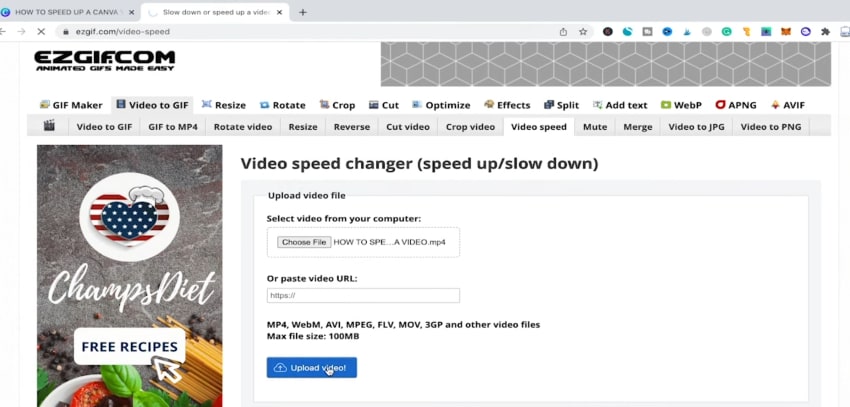
- After the clip has been uploaded, a new tab will open up. Here you will find an option named “multiplier.” Changing its value from greater than one will make your video move fast.
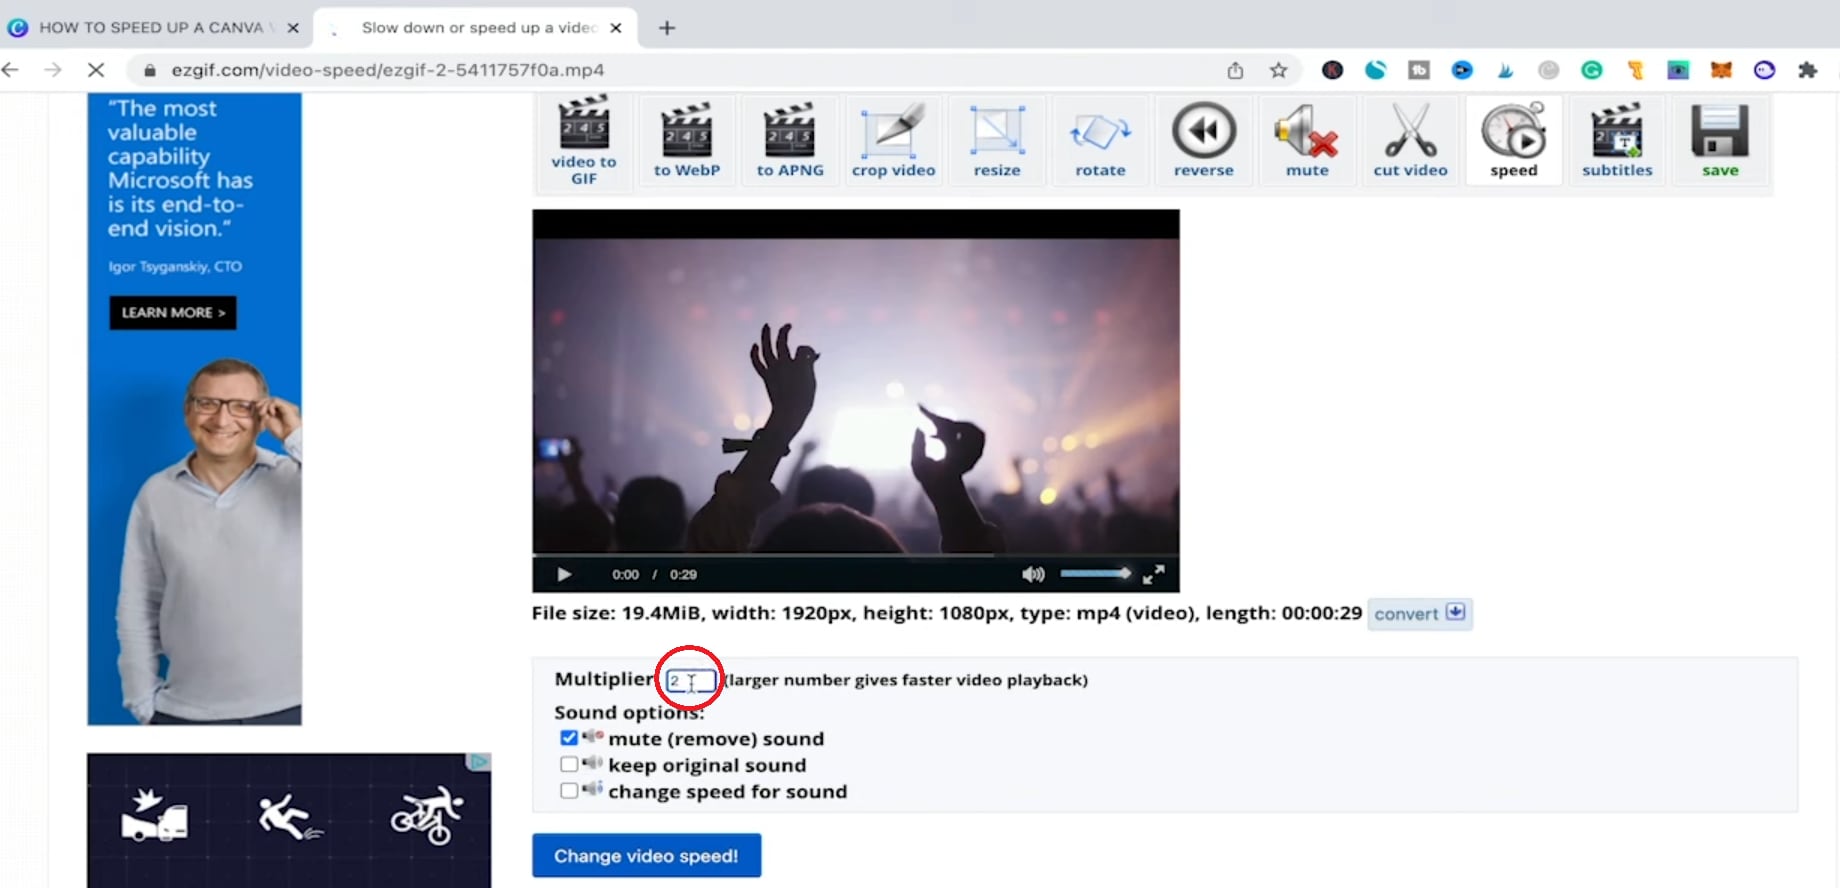
- Adjustust the desired multiplier value and select “change video speed.”
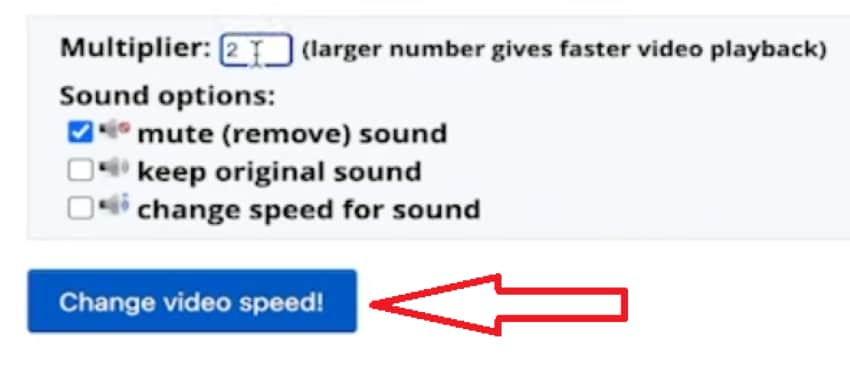
Eizgif also gives you the freedom to adjust sound, if your video has any
Step5Re-upload the Speed-Up Video In Canva Editor
- When you feel like your video has a perfect speed, save it in your system directory.
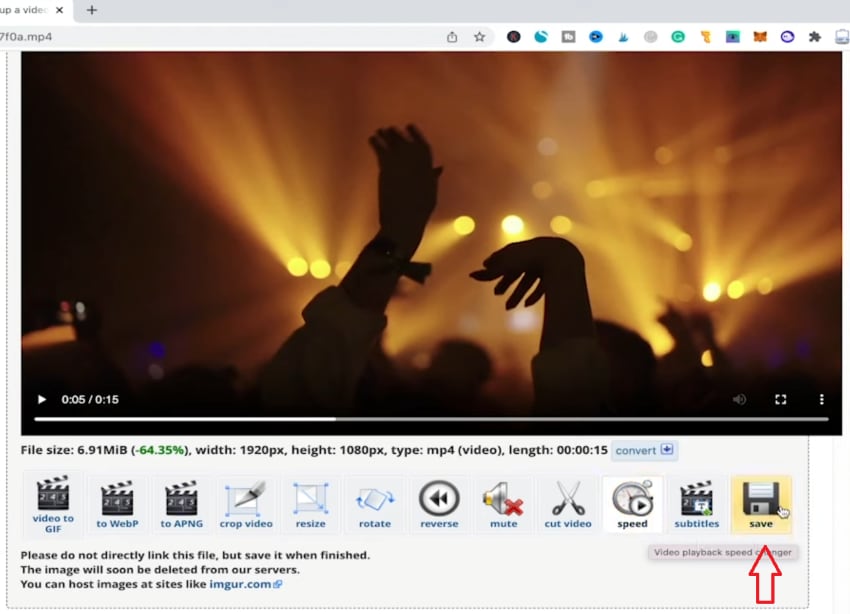
- Now re-upload your changed video speed in Canva and drag it onto the timeline through the “Videos“ tab.
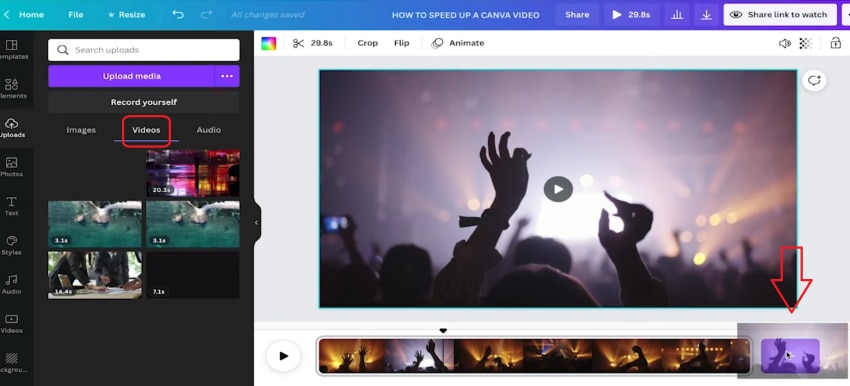
- Review the clip and notice the enhanced video speed from the Canva editor when it’s done.
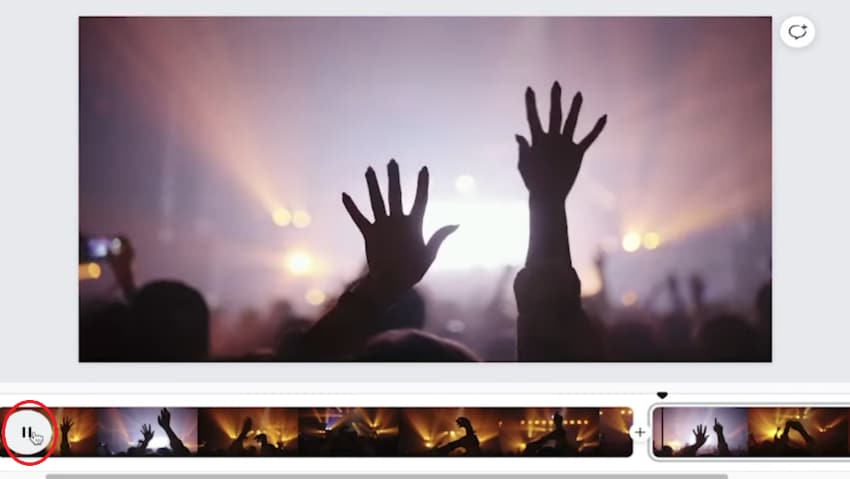
So technically, you can change video speed in Canva, but the process can be time-consuming, especially for starters.
Part III. Wondershare Filmora - The Best All-in-one Video Speed-Up Alternative to Canva
Canva is no doubt a great video and graphic editor, but there are a handful of features that it needs to provide. For once, it can’t store files without internet access. Similarly, you need third-party applications even to use the most basic features, such as video speed-ups.
To work on these downsides, dozens of alternatives are available on the market; one of the better ones is Wondershare Filmora . It’s a full-proof video and audio editing app with tons of customizations under its belt. Individuals can use this powerful tool to create unique media content.
Everything is seamless in Filmora, and it’s supported on all major operating systems. There is no technical jargon in its application, and even beginners will be able to enjoy its interface.
Highlights of Filmora Compared to Canva Video Speed-Ups
- ✅Work on your speed-up projects without an internet connection
- ✅Not limited to download formats
- ✅Lack of template limitation on the free version
- ✅Beginner to advanced level UI
Free Download For Win 7 or later(64-bit)
Free Download For macOS 10.14 or later
How to Speed Up a Video Using Filmora?
Step1Create a New Project With Filmora Video Editor
First, if you don’t have it already, download the latest version of this tool from the web .
Once it’s installed, open the app and upload your new project straight into its console.
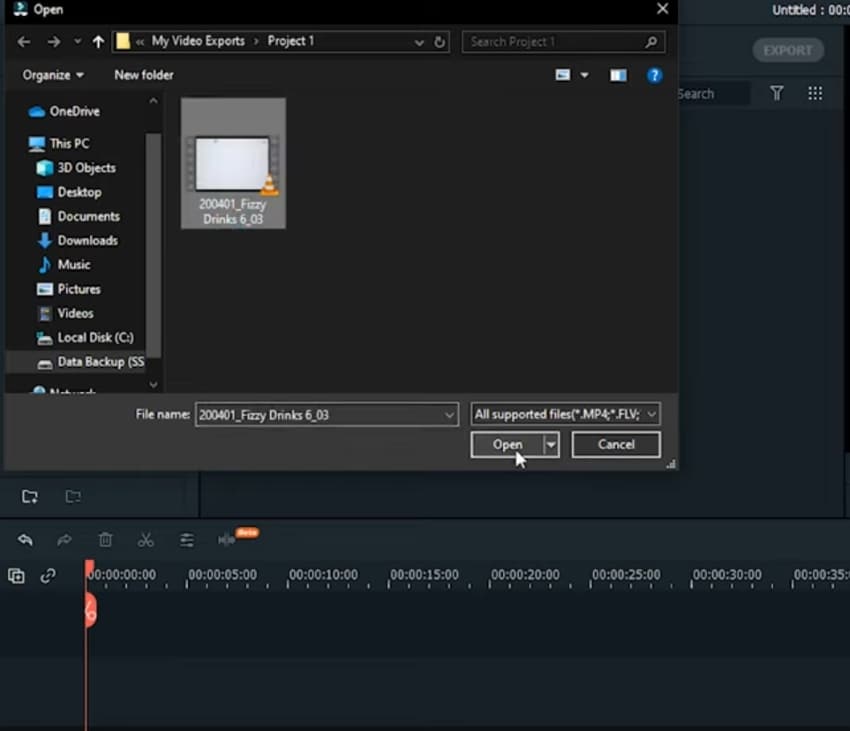
Step2Change the Speed Or Duration of Your Clip
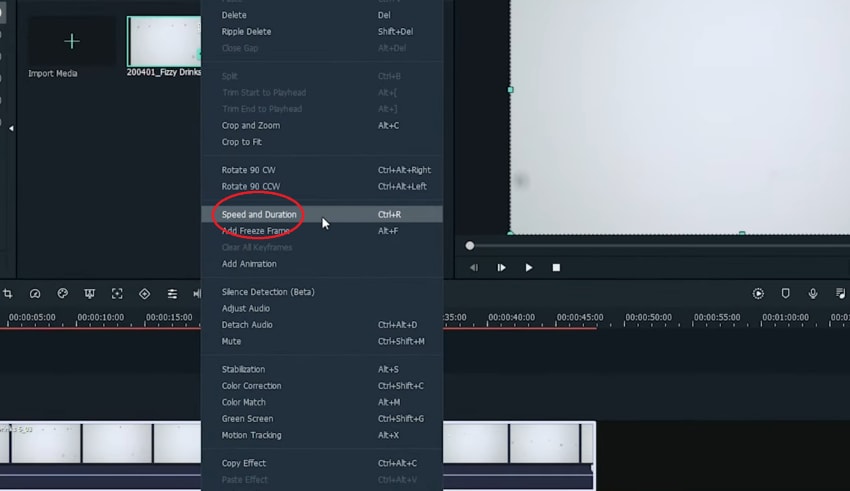
- Now that your video is in the timeline, right-click it and select the custom “Speed & duration“ button.
- In the new window, change the speed value greater than 1, just like you did in the case of Eizgif. You can also adjust the speed slider for better coverage.
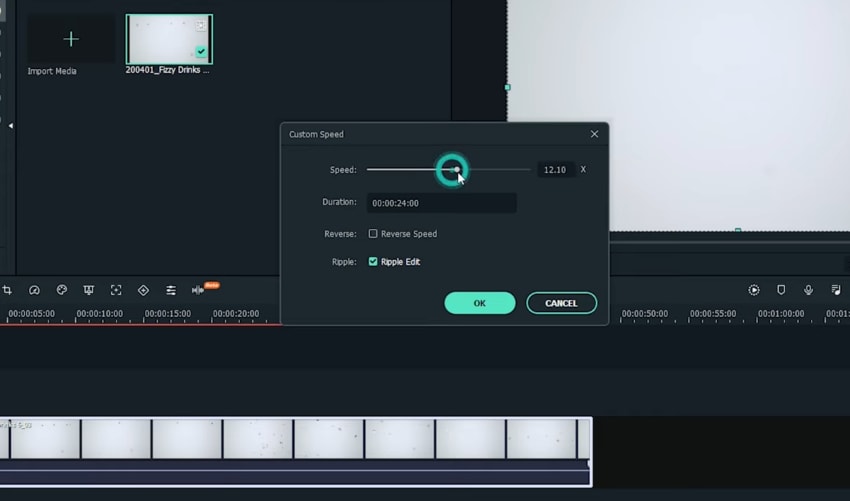
- After finishing, click “Ok“ and preview your clip to see the fast video effect in-placed.
BONUS STEPEnable the Speed Ramping Effects
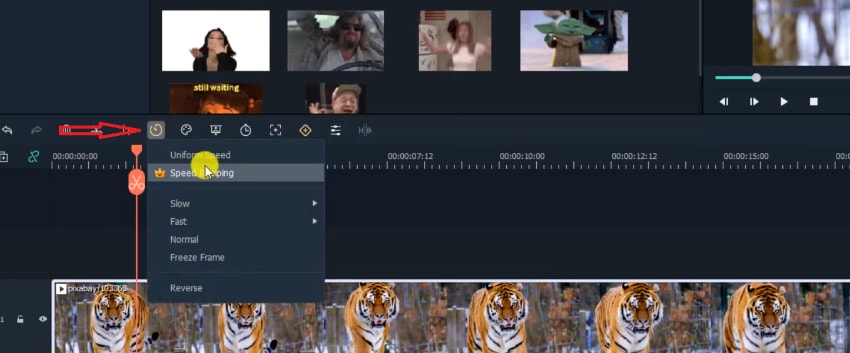
Speed ramp is a unique feature in Filmora which allows you to apply acceleration or deceleration at any point in your clip, creating unique effects. To use these settings, you need to:
- Select your timeline video and choose the “Speed“ button on the bottom bar. After that, click on “Speed Ramping.”
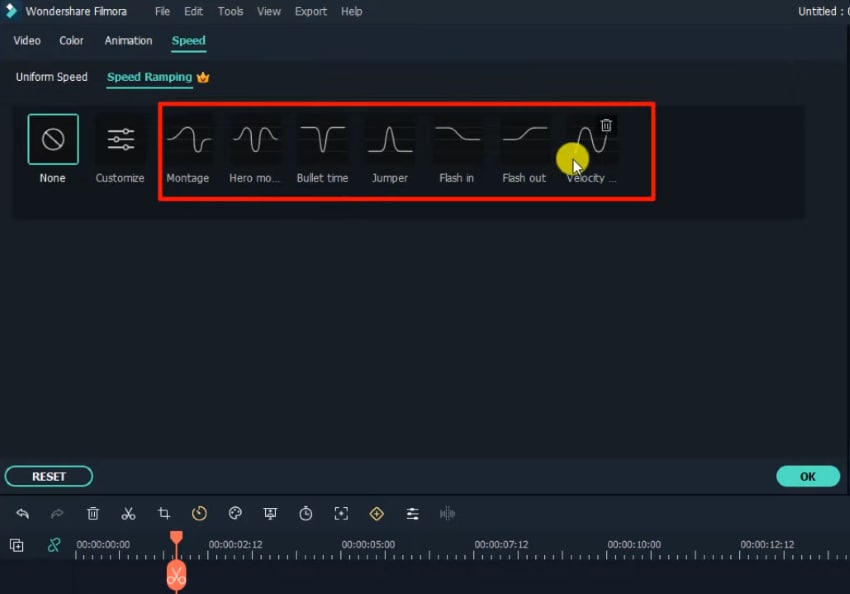
- You can now apply multiple speed ramping effects based on your preference. Select it (for example, flash-out effect), and it will be used for your whole video.
Step3Export the Final Speed-Up Video
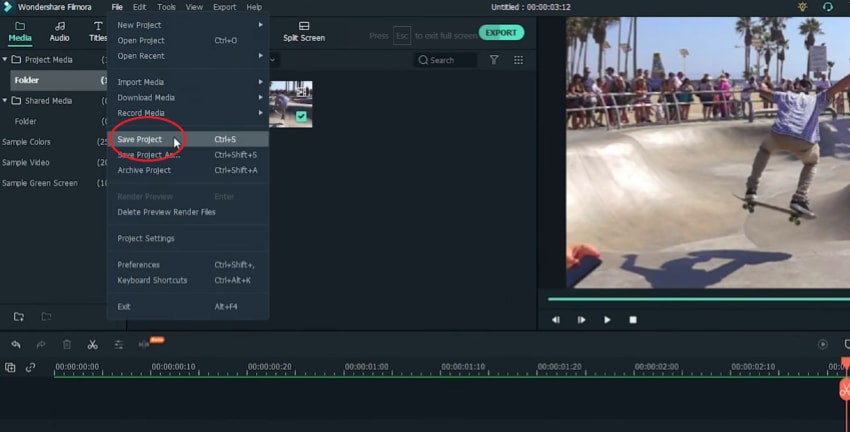
- After changing the video speed in Filmora, save it on your desktop. For that, move to the top left corner and select “File<Save Project.”
- You can also use the “Export“ option to move it to a local folder.
Conclusion
This was our two cents on how you can speed up a video on Canva. In the end, speeding up a video is a great way to keep your audience engaged in video production. It lets you make your content short and precise or introduce dramatic effects. If you want to use such features in your videos, then Filmora is a great way to start. Not only do you get fast video effects, but you can also save them without any internet access. So, give it a try and see the difference yourself!
Free Download For macOS 10.14 or later
How to Speed Up a Video Using Filmora?
Step1Create a New Project With Filmora Video Editor
First, if you don’t have it already, download the latest version of this tool from the web .
Once it’s installed, open the app and upload your new project straight into its console.

Step2Change the Speed Or Duration of Your Clip
- Now that your video is in the timeline, right-click it and select the custom “Speed & duration“ button.

- In the new window, change the speed value greater than 1, just like you did in the case of Eizgif. You can also adjust the speed slider for better coverage.

- After finishing, click “Ok“ and preview your clip to see the fast video effect in-placed.
BONUS STEPEnable the Speed Ramping Effects
Speed ramp is a unique feature in Filmora which allows you to apply acceleration or deceleration at any point in your clip, creating unique effects. To use these settings, you need to:
- Select your timeline video and choose the “Speed“ button on the bottom bar. After that, click on “Speed Ramping.”

- You can now apply multiple speed ramping effects based on your preference. Select it (for example, flash-out effect), and it will be used for your whole video.

Step3Export the Final Speed-Up Video
- After changing the video speed in Filmora, save it on your desktop. For that, move to the top left corner and select “File<Save Project.”

- You can also use the “Export“ option to move it to a local folder.
Conclusion
This was our two cents on how you can speed up a video on Canva. In the end, speeding up a video is a great way to keep your audience engaged in video production. It lets you make your content short and precise or introduce dramatic effects. If you want to use such features in your videos, then Filmora is a great way to start. Not only do you get fast video effects, but you can also save them without any internet access. So, give it a try and see the difference yourself!
3 Best Effects to Appear on Camera
We all want to improve our video editing skills and give them more of a wow factor. A fantastic method of achieving this is using different effects and tricks on Filmora .
Appearance effects are optical illusions used to replicate imagined occurrences in a narrative or made-up universe. These effects can be effective narrative devices. As a result, they are widely employed in the theater, film, television, and video game industries. Here is what you need to do to add appearance effects to your videos:
Part 1: Why are Appearance Effects Important?
A good branding and advertising strategy must include video. You can raise the caliber of clients who utilize your product by improving the image you provide.
How can video help you build your brand? How well do you look? Although there is no quick fix to seem nice on-screen instantly, you can employ several appearance effects to enhance the general flow of your videos. Appearance effects are significant because they add a slight twist to your videos. They can help you stand out, add some humor and draw attention from your audience. These simple tricks could add extra fun and Spark to your videos.
Part 2: How to Make Cloth Appearance
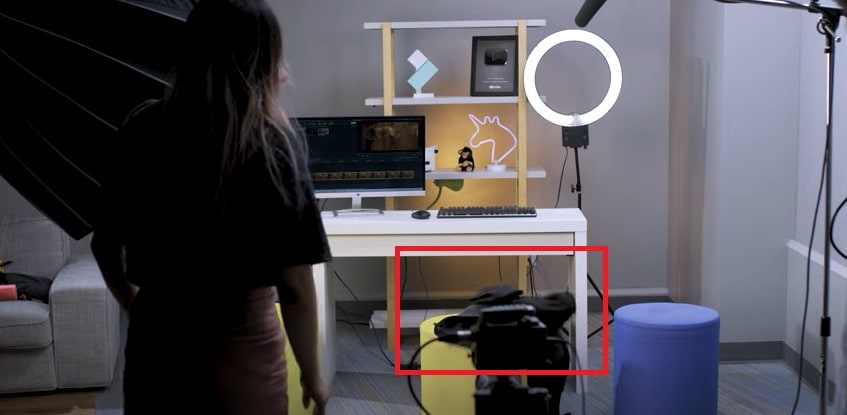
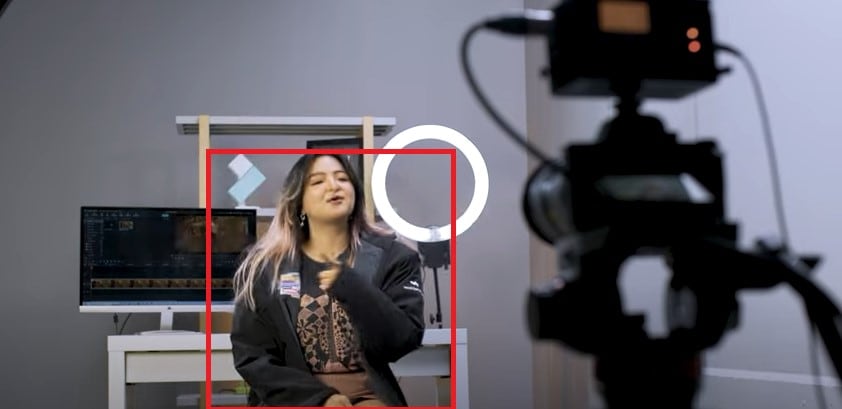
Let’s start with the first one. Before you start, make sure you put the camera on a tripod or a steady surface, so it doesn’t move while filming.
Step1 For the first shot, you must throw a jacket on a stool. Make sure it lands on the stool or wherever your talent is going to sit.
Step2 Make a shot of your talent appearing from where the jacket landed. You can add some acting skills to make this shot more realistic.
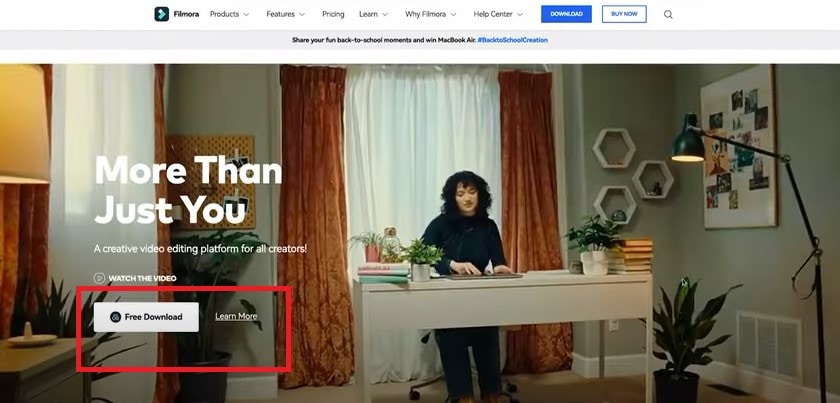
Step3 Download Filmora to edit your footage. You can get started by going to their official website.
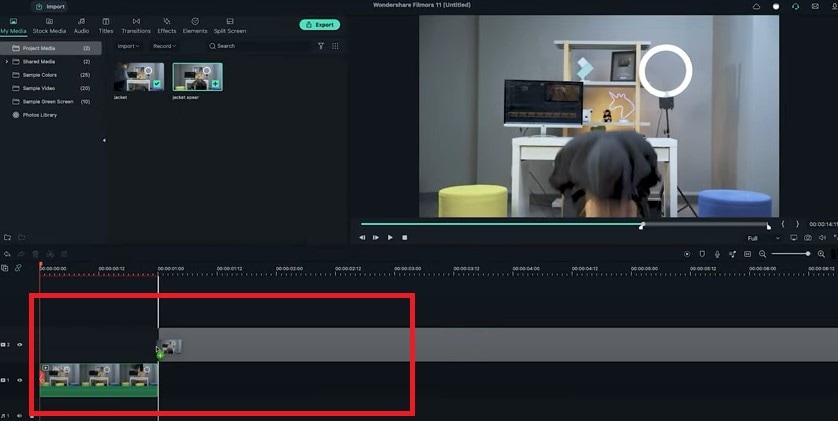
Step4 Now split the first clip on the frame where your jacket lands on the stool. Place it on the first track.
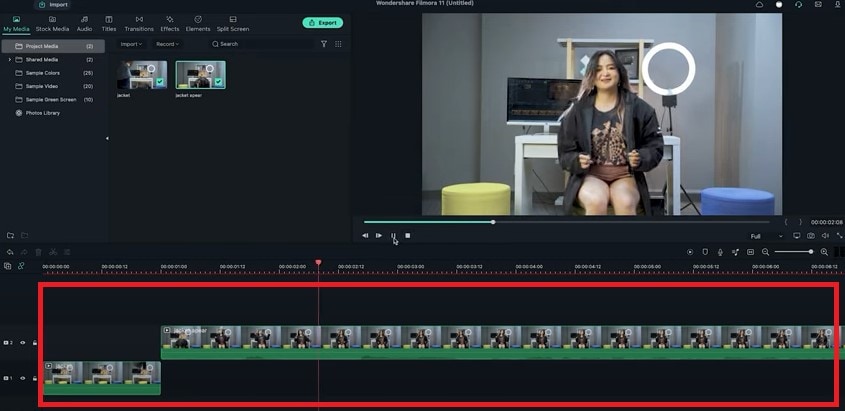
Step5 Trim the second shot until the talents start acting and place it on the second track to match the first clip.
Part 3: How to Make an Explosion Appearance
Step1 This effect is the easiest. You need to film the empty plate with just a background. Then let the talent enter the frame and jump into the place.
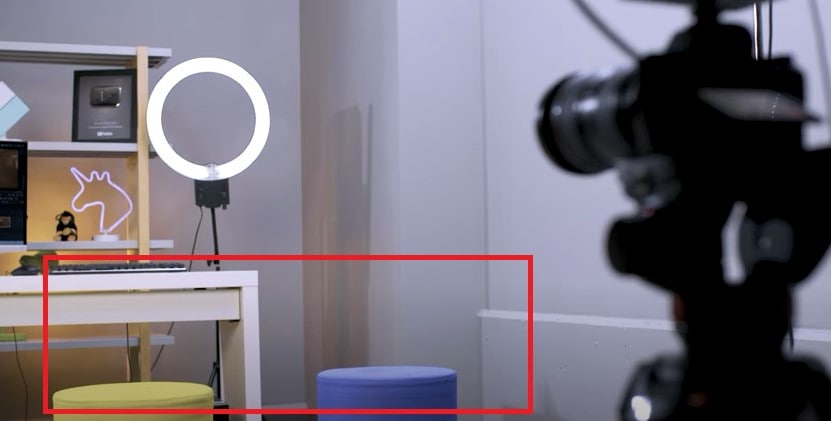
Step2 Now import the clip into Filmora and place it onto the first video track.
Step3 Freeze the frame of the empty plate with just the background and extend it as necessary. Place the clip onto the second video track and trim it until the action of the talent jump starts.
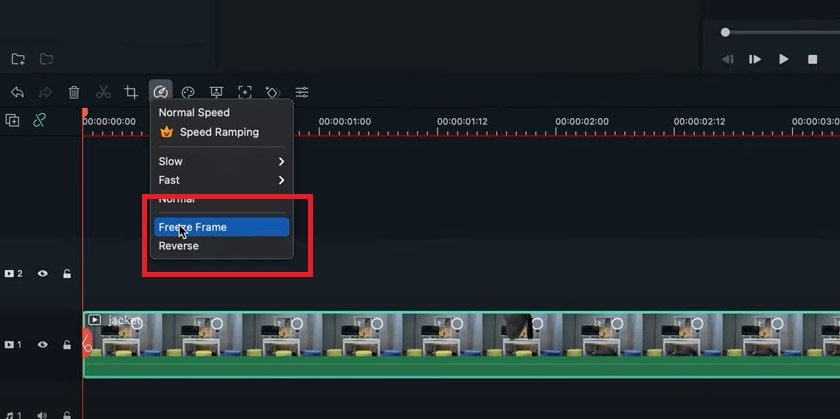
Step4 Delete the rest on the left. The trick is to use some explosion or smoke effect to hide the transition.
Step5 Use the green screen sample in the default menu here. Add some smoke effects available in film stock. Place it on the third video track and move it to hide the transition.
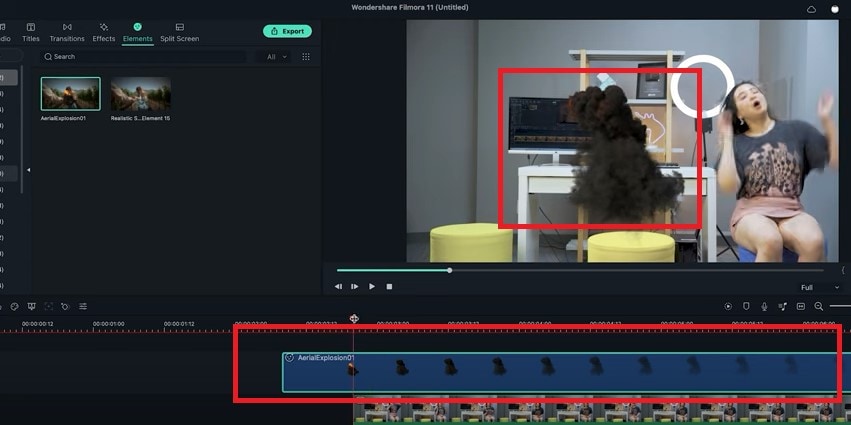
Part 4: How to Make Roof Appearance
The last trick here is combining the techniques from the two previous effects.
Step1 First, record the empty plate with just a background. Let the talent jump in the frame and set up a green screen for the talent to jump in front of it. It will look like they’re falling from the ceiling.
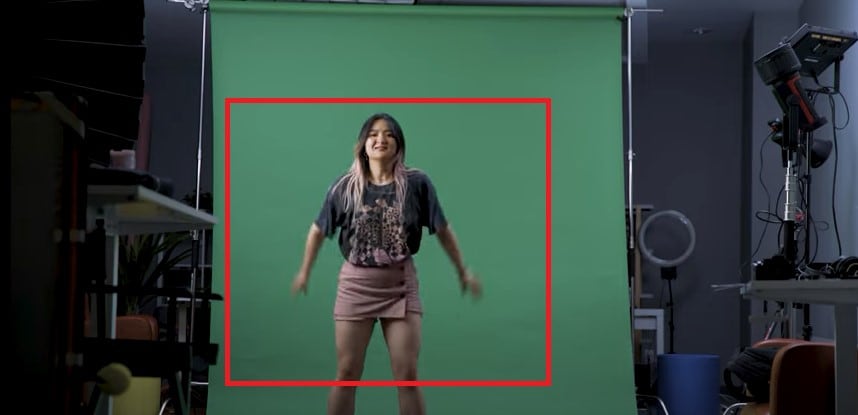
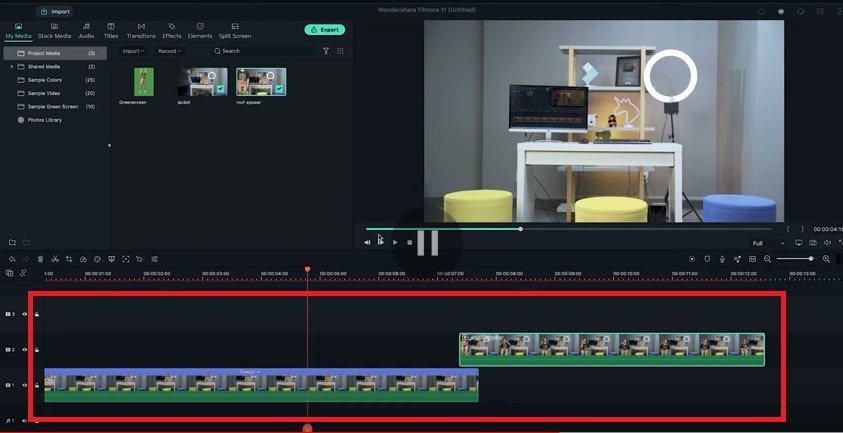
Step2 Now import the clip into Filmora again. Follow the steps from the second example so we have the subject appearing on the screen like this.
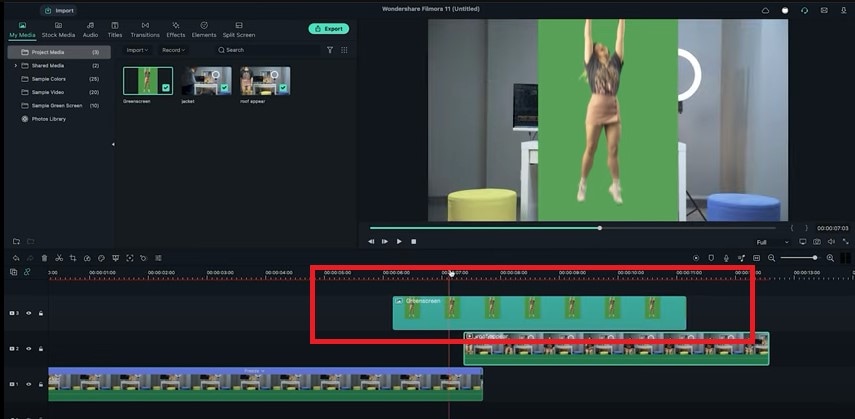
Step3 Add the green screenshot onto the third video track.
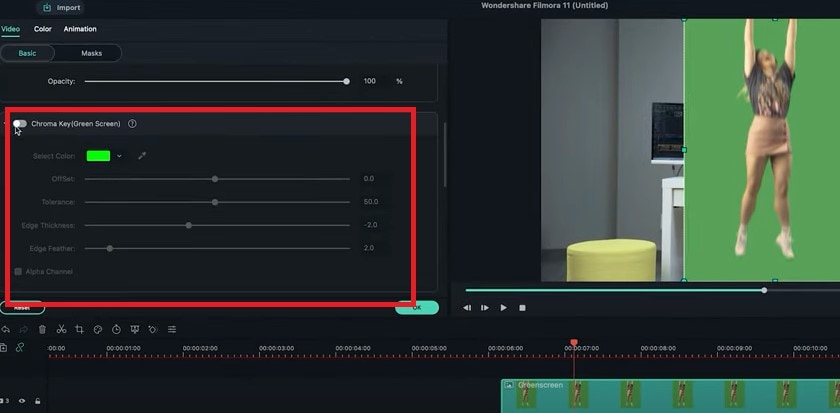
Step4 Double-click on it, activate the setting window and then key out the background using the chroma key feature.
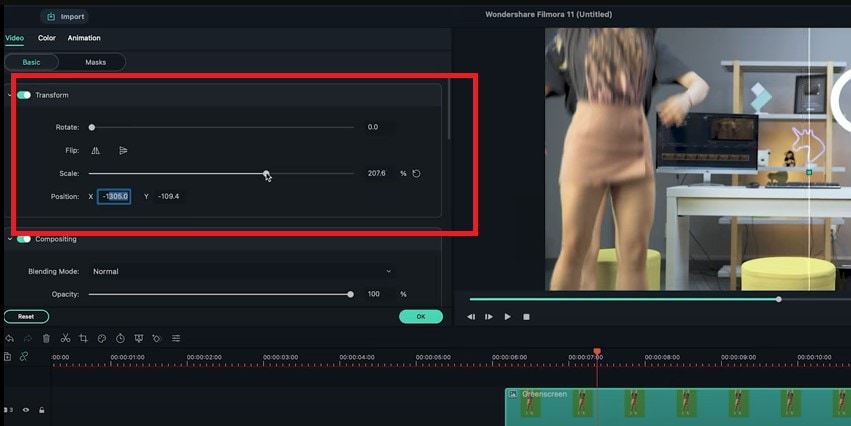
Step5 Move the clip until it covers only the first frame of the appearing clip. Now keyframe the following subject from the outer frame to the final position.
Step6 Now search for some smoke effects and put it upside down. So it looks like the ceiling is broken when the subject falls. Then add some camera shake to the fall.
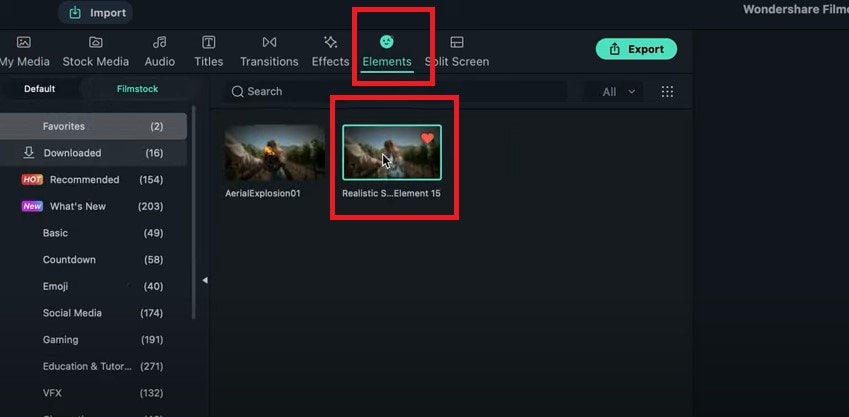
Step7 Drag the camera shake effect back to the top track and shorten it to an ideal length. You can also add some sound effects if you want to this video.
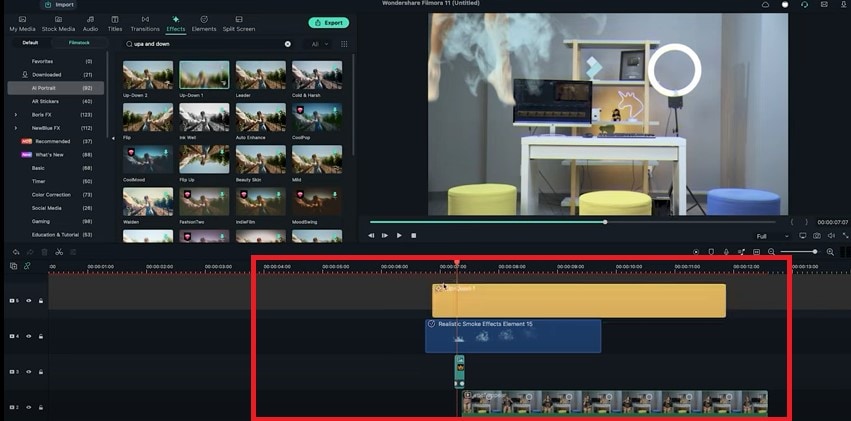
Part 5: Tips to Look Good in Your Next Video
1. Be Clear About the Topic
Intellectuals frequently complain that everyone has attention deficit disorder due to the Internet. According to studies, we only have an attention span of 8 seconds today. You need a punchy, concise message to keep viewers watching your video.
2. Don’t Forget to Smile
Individuals who smile frequently are perceived to be more confident and successful. Therefore, showing your audience that you are confident in your company and services is the best method to gain their trust.
3. Look into the Camera
Direct eye contact with the camera lens is essential. Although it may seem enticing, your sole audience is the person directly in front of you when you’re speaking.
Be mindful of the camera’s confined area. Bring it up to eye level and keep your gaze there rather than elsewhere.
Summary
There are several fantastic camera effects that you can experiment with in your videos. While some are well-known, others are less well-known and often used. We have mentioned the three fun ways to appear on camera above. We suggest using video editing software like Filmora to use these effects more effectively. You can use these appearance effects to create an atmosphere, make your story more understandable, or spice up the video.
Free Download For Win 7 or later(64-bit)
Free Download For macOS 10.14 or later
Free Download For macOS 10.14 or later
How to Add a Lower Third to Your Video
Want to bump up the quality and level of your videos? Adding a lower third is one of the easiest ways to impress your audience and improve the quality of your videos. It makes it look like you spent a ton of money on video editing, but in reality, it’s really easy to do.
When you first start video editing, it may seem like a daunting task with so much to learn. The good news is you can cut that learning curve down significantly by using intuitive editing software like Wondershare’s Filmora. Clear and streamlined, Filmora is the choice of many filmmakers.
Until recently, you needed expensive enterprise level software like Sony Vegas or Final Cut Pro to create lower thirds, especially lower thirds with movement. But Filmora makes it easier than ever.
- Use Readable Font
- Don’t Make It Too Long
- Use Branding
- Use Templates
- Keep It Simple
- Emphasize With Your Lower Third
- Step By Step To Explain Filmora
1. What is a Lower Third?

What is a Lower Third
A lower third is text and/or a graphical element put on top of your video for the purpose of sharing information with your audience.
A lower third provides important information but is done without distracting from the actual video content.
Take a look at the shot below. The lower third is used to convey the speaker’s name and profession. This is a type of lower third often used in documentary films and newscasts.
2. Why Add A Lower Third
So the next question a new filmmaker might ask is, “Why add a lower third?”
Funnily enough, despite its name, a lower third does not have to be in the lower third of the video but can be found in other areas of the screen.
In the shot below, the viewer automatically knows he is looking at the rooftops of Alfama, a neighborhood in Lisbon, without someone having to say it - no distractions from the video content.

Why Add A Lower Third
Lower thirds can also create movement. Many lower thirds come gliding onto the screen and add visual interest to a plain shot.
As simple as it may sound, seeing an overlay on a screen or a moving lower third adds professionalism to even the simplest videos. It gives the audience a sense of polish and high perceived value.
![]()
Tips: A lower third lasts approximately 3-6 seconds and is placed in the “title safe area” of your video. A quick explanation of the “title safe area” is that if the video is cropped to fit certain resolutions, your lower third will still appear without the fear of it being cropped out and losing pertinent information for the audience.
3. 6 Quick Tips to Add A Lower Third
As simple as putting in a lower third sounds, here are 6 quick tips to ensure a lower third is effective and conveys the right message.
Wondershare Filmora Video Editor comes equipped with pre-built video-based lower thirds in a ton of unique styles and colors. The cool thing is that you can customize the text easily and quickly, including changing the text color and font style – so you can match your style perfectly.
Tip #1
Use Readable Font
Part of communicating information without distraction is to make sure the font used in the lower third is readable. A lower third only graces the screen for 3-6 seconds, so you want it to be short and easy to read at a glance.
Tip #2
Don’t Make It Too Long
There is a limited amount of space to use. If you need to communicate more information, consider using a title slide instead which will give you more space to communicate your ideas. Less is more when it comes to lower thirds.
Tip #3
Use Branding
A lower third is another way to have people remember and recognize your brand. If you have your own branding colors and logo, use it in your lower third.
Tip #4
Use Templates
Pick one style and stick with it. Consistency in video editing helps communicate trust to your audience. It’s fun to use different styles sometimes, but it can be disjointed. With Filmora you can add elements like lower thirds and title to your favorites – so they are easy to use on your different video projects.
Tip #5
Keep It Simple
Remember the purpose of your lower third - to convey information without being distracting. Don’t use a lot of text. Brevity is the key. Usually, lower thirds are used to detail a name, profession or a location. The most you want is 2 lines of text. Sometimes you may want to use just one line.
Tip #6
Emphasize With Your Lower Third
Often, I might use a lower third to emphasize a certain point, or to use different wording (than I used in my video) if I think it makes the point clearer. This can be helpful if you make a small mistake in your original video and it makes more sense than adding b-roll over the video.
4. Step By Step To Explain Filmora
Using Wondershare Filmora Video Editor it is extremely easy to create a lower third for your video.
Free Download For Win 7 or later(64-bit)
Free Download For macOS 10.14 or later
The following step-by-step tutorial already assumes that you are familiar with some of the workings of Filmora like how to start a project and how to place your media onto the empty timeline.
So here’s how simple it is to add a lower third.
Step 1: Import The Media
In this step, you will create a new project and then import the media and place it on your timeline.
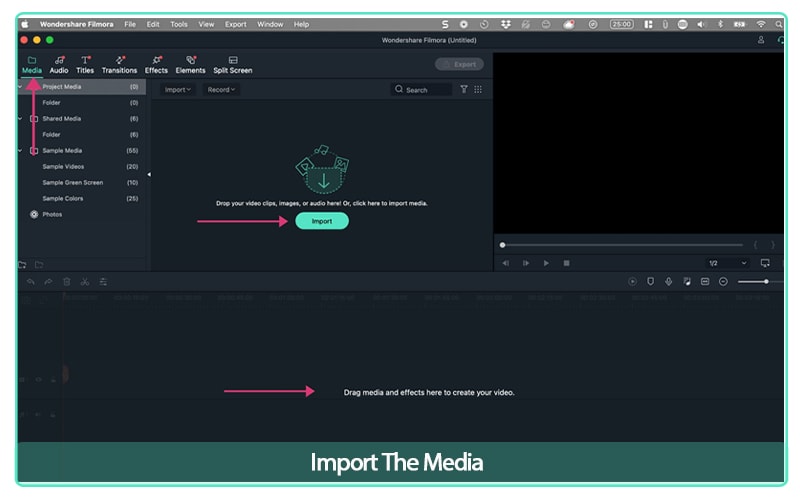
Import The Media
Step 2: Find Title Option
Once you have placed your media onto the project, you will go to the top navigation and click on titles.
It will then open up and you will see a number of choices for titles, including “lower thirds.”
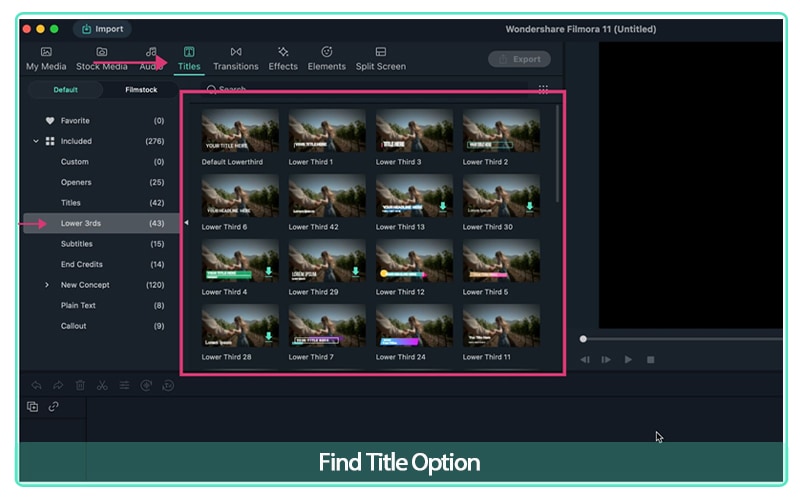
Find Title Option
For lower thirds you want to choose the template that will best compliment your video.
Things to consider are your branding colors and the information you want to convey.
Currently, there are many options to choose from with 43 lower third templates to choose from in Filmora.
Step 3: Choose a Lower Third Template
Choose a lower third template and drag it on top of your media in the timeline. The next step is to edit the template.
Double click on the template and it will allow you to edit the text.
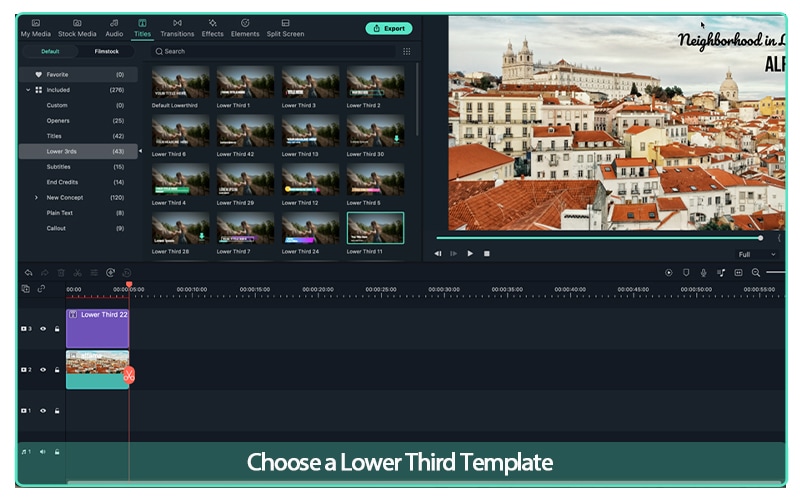
Choose a Lower Third Template
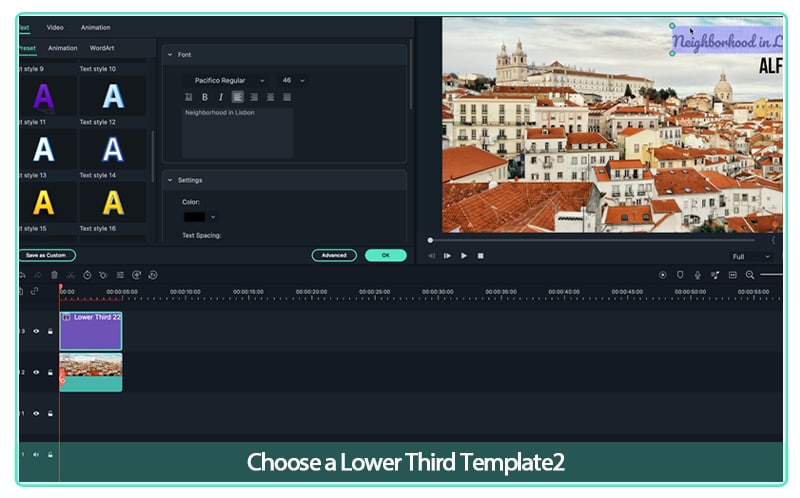
Choose a Lower Third Template2
Also, when deciding how often you need to use a lower third, you only need to use the lower third once - if the speaker appears on the screen again, it only needs to be shown that one time.
You did it. With this new skill you’ve now mastered the quickest way to impress your audience and increase the quality of your videos.
The key is to practice and you’ll get better quickly.
5. Start Using Lower Thirds Today
Lower thirds are a simple but powerful way to enhance your videos.
Using the tips above, start adding lower thirds to your video.
Wrap Up
Whether you are a new filmmaker/editor or a seasoned pro, Wondershare’s Filmora can help take your video editing to the next level. It’s packed with pro-level features that are easy and intuitive to use.
If you’re not using Filmora, download it today and discover how to make your videos look better as you build your audience.
Step By Step To Explain Filmora
1. What is a Lower Third?

What is a Lower Third
A lower third is text and/or a graphical element put on top of your video for the purpose of sharing information with your audience.
A lower third provides important information but is done without distracting from the actual video content.
Take a look at the shot below. The lower third is used to convey the speaker’s name and profession. This is a type of lower third often used in documentary films and newscasts.
2. Why Add A Lower Third
So the next question a new filmmaker might ask is, “Why add a lower third?”
Funnily enough, despite its name, a lower third does not have to be in the lower third of the video but can be found in other areas of the screen.
In the shot below, the viewer automatically knows he is looking at the rooftops of Alfama, a neighborhood in Lisbon, without someone having to say it - no distractions from the video content.

Why Add A Lower Third
Lower thirds can also create movement. Many lower thirds come gliding onto the screen and add visual interest to a plain shot.
As simple as it may sound, seeing an overlay on a screen or a moving lower third adds professionalism to even the simplest videos. It gives the audience a sense of polish and high perceived value.
![]()
Tips: A lower third lasts approximately 3-6 seconds and is placed in the “title safe area” of your video. A quick explanation of the “title safe area” is that if the video is cropped to fit certain resolutions, your lower third will still appear without the fear of it being cropped out and losing pertinent information for the audience.
3. 6 Quick Tips to Add A Lower Third
As simple as putting in a lower third sounds, here are 6 quick tips to ensure a lower third is effective and conveys the right message.
Wondershare Filmora Video Editor comes equipped with pre-built video-based lower thirds in a ton of unique styles and colors. The cool thing is that you can customize the text easily and quickly, including changing the text color and font style – so you can match your style perfectly.
Tip #1
Use Readable Font
Part of communicating information without distraction is to make sure the font used in the lower third is readable. A lower third only graces the screen for 3-6 seconds, so you want it to be short and easy to read at a glance.
Tip #2
Don’t Make It Too Long
There is a limited amount of space to use. If you need to communicate more information, consider using a title slide instead which will give you more space to communicate your ideas. Less is more when it comes to lower thirds.
Tip #3
Use Branding
A lower third is another way to have people remember and recognize your brand. If you have your own branding colors and logo, use it in your lower third.
Tip #4
Use Templates
Pick one style and stick with it. Consistency in video editing helps communicate trust to your audience. It’s fun to use different styles sometimes, but it can be disjointed. With Filmora you can add elements like lower thirds and title to your favorites – so they are easy to use on your different video projects.
Tip #5
Keep It Simple
Remember the purpose of your lower third - to convey information without being distracting. Don’t use a lot of text. Brevity is the key. Usually, lower thirds are used to detail a name, profession or a location. The most you want is 2 lines of text. Sometimes you may want to use just one line.
Tip #6
Emphasize With Your Lower Third
Often, I might use a lower third to emphasize a certain point, or to use different wording (than I used in my video) if I think it makes the point clearer. This can be helpful if you make a small mistake in your original video and it makes more sense than adding b-roll over the video.
4. Step By Step To Explain Filmora
Using Wondershare Filmora Video Editor it is extremely easy to create a lower third for your video.
Free Download For Win 7 or later(64-bit)
Free Download For macOS 10.14 or later
The following step-by-step tutorial already assumes that you are familiar with some of the workings of Filmora like how to start a project and how to place your media onto the empty timeline.
So here’s how simple it is to add a lower third.
Step 1: Import The Media
In this step, you will create a new project and then import the media and place it on your timeline.

Import The Media
Step 2: Find Title Option
Once you have placed your media onto the project, you will go to the top navigation and click on titles.
It will then open up and you will see a number of choices for titles, including “lower thirds.”

Find Title Option
For lower thirds you want to choose the template that will best compliment your video.
Things to consider are your branding colors and the information you want to convey.
Currently, there are many options to choose from with 43 lower third templates to choose from in Filmora.
Step 3: Choose a Lower Third Template
Choose a lower third template and drag it on top of your media in the timeline. The next step is to edit the template.
Double click on the template and it will allow you to edit the text.

Choose a Lower Third Template

Choose a Lower Third Template2
Also, when deciding how often you need to use a lower third, you only need to use the lower third once - if the speaker appears on the screen again, it only needs to be shown that one time.
You did it. With this new skill you’ve now mastered the quickest way to impress your audience and increase the quality of your videos.
The key is to practice and you’ll get better quickly.
5. Start Using Lower Thirds Today
Lower thirds are a simple but powerful way to enhance your videos.
Using the tips above, start adding lower thirds to your video.
Wrap Up
- Whether you are a new filmmaker/editor or a seasoned pro, Wondershare’s Filmora can help take your video editing to the next level. It’s packed with pro-level features that are easy and intuitive to use.
- If you’re not using Filmora, download it today and discover how to make your videos look better as you build your audience.
Also read:
- [Updated] In 2024, Elite Video Capturing Technology for Podcasts
- [Updated] In 2024, Expert Tips for Converting Facebook HD Video Quality to MP4 Online
- [Updated] Unseen Video on Sony A6400 What's Going Wrong for 2024
- 5 Tools to Create a Time-Lapse Video Online
- Everything You Need to Know about Lock Screen Settings on your Realme GT Neo 5 SE
- GTX 950 'Error 43' Fix Guide: A Comprehensive Solution for Windows 11 Users
- In 2024, Detailed Guide to Rotate Videos in Blender
- Navigating the Rising Complexity of 'Ops': How IT Professionals Address Emerging Challenges
- Solved: How to Fix Continuous Cravings in Dread Hunger PC Game
- Updated 2024 Approved Transform Your Footage Expert Video Editing for Sony Camcorder Users
- Want to Save Your Edited Video File in MP4 Format in Windows Movie Maker? Here Are the Simple Steps Along with a Better Alternative
- Title: New Guide To Using Luts Perfectly in Final Cut Pro for 2024
- Author: Chloe
- Created at : 2025-02-27 19:08:22
- Updated at : 2025-03-03 22:47:50
- Link: https://ai-editing-video.techidaily.com/new-guide-to-using-luts-perfectly-in-final-cut-pro-for-2024/
- License: This work is licensed under CC BY-NC-SA 4.0.

