
:max_bytes(150000):strip_icc():format(webp)/GettyImages-585151372-a659baf0c7b441b9b7e7896716b12784.jpg)
New Hard to Remove Black Background in After Effects?
Hard to Remove Black Background in After Effects?
Hard to Remove Black Background in After Effects? Here’s the Best Way to Deal With It
An easy yet powerful editor
Numerous effects to choose from
Detailed tutorials provided by the official channel
Having to adjust with black backgrounds in After Effects is quite annoying, but not anymore. Stay tuned to get through quick and hastle free solutions!
In this article
01 [How to Remove Black Background from After Effects](#Part 1)
02 [How to Export After Effects Transparent Background](#Part 2)
Part 1 How to Remove Black Background from After Effects
Graphic and video editing are enormous domains to explore your creative skills in graphic design and animation. The software market is a pool of editing applications that are packed with extensive libraries to garnish your creations with varieties of exciting after effects. However, the additive black backgrounds are an annoying cringe to your creative artwork.
While these black backgrounds are evident on account of being inherent application properties of video and film editing software, the relaxing note is, there are effective solutions to the removal of these black screens. When browsing through affordable way to take up the removal process, you can adhere to the following procedure for making and exporting after effects transparent background videos:

Step 1: Launch After Effects
This one is an efficient motion graphics template that you can use to add a visible spunk to your graphic design artworks. Begin with launching the template in your system after an official website download of the same.
Step 2: Make Your Film Ready
Before beginning to remove the black background in After Effects template, make sure that your footage is ready to take up the action. The tool you are about to use is known to eliminate black pixels from your clip proportional to the luminous intensity variation in the scene under consideration.
Check for any areas you would like to remain untouched and mask them to retain the dark elements. To ensure effective masking, it is recommended to use the ‘Levels and Curves’ effect for a convenient tweak to the final key at the end.

Step 2: Shift Channels Effect
In the composition panel, navigate to the ‘Shift Channels’ effect and use the ‘Drag and Drop’ method to add it to the dark pixelated layer you wish to remove. You can also use this effect to work with adjustment layers.

Step 3: Luminance Adjustments
While continuing with the ‘Shift Channels’ effect, navigate to the ‘Take Alpha From’ checkbox and set ‘Luminance’ as the ‘Reset’ parameter. You are instantly fetched a footage without the black background. If this does not happen, navigate to the bottom of the composition panel and enable the ‘Transparency Grid’ option with a right side toggle.

Step 4: Color Tweaks
Use the‘Levels and Curves’ effect mentioned in Step 2 to make level adjustments until you get the perfect result. You can experiment with varieties of curve and level variations, both, before and after using the ‘Shift Channels’ effect to get the right tweaks. That’s it! You are now ready to export after effects transparent background video.

Part 2 How to Export After Effects Transparent Background
Videos with transparent backgrounds are trending examples of motion graphic designing and video editing artworks. The cue behind these backgrounds is that they exclusively permit the object of focus to have an opaque or colored pixelation, while leaving the remaining pixels as transparent or colorless. This is beneficial in adding an extra spotlight to the main elements of your creation, while rendering the less important parts behind the scene.
Having known the credibility of transparent backgrounds in video crafting, you may feel motivated to try hands on experimenting with transparent backgrounds to uplift your graphic motion artwork.
Considering the most affordable picks of video editing software to choose from, you can rely on the ‘After Effects’ motion graphic template to kick start the creation process. When using the aforesaid template to export videos with transparent backgrounds, you need to adhere to the following steps:
Step 1: Launch the After Effects Template
Start with downloading the graphic template from its official website and launching the same on your system.
Step 2: Select Your Video
On a successful launch, the template welcomes you with its composition timeline and project panel. Here, you need to select a desired video from either of the two places to export with a transparent background.
Step 3: Add to Queue
Once you have made your choice, navigate to the top toolbar in the composition panel and hit the ‘Composition’ tab. From the drop down menu that follows, choose ‘Add to Render Queue’. You can alternatively use the ‘Ctrl + M’ shortcut to carry out the above task.

“
Step 4: Output Settings
In the ‘Render Queue’ window that pops up after completion of Step 3, navigate to the left and tap ‘Output Module’ to see the ‘Output Module Settings’ window pop up. Here, click on ’Format’ and choose the standard ‘Quicktime’ format.

“
Step 5: Output Channel Selection
In the ‘Output Module’ window itself, navigate to the ‘Video Output’ tab and select ‘Channels’. In the drop down menu that follows, choose ‘RGB + Alpha’. When you are done, tap ‘OK’ at the bottom. Your video is ready for a transparent background export.

“
Exporting Transparent Background Videos in Wondershare Filmora Video Editor
Using the ‘After Effects’ motion graphic template is certainly one among the most affordable and convenient solutions for a transparent video export; however there are other feasible alternatives to adhere to the task. While searching through viable substitutes of the ‘After Effects’ template, you can surely pick Filmora as a reliable choice.
For Win 7 or later (64-bit)
For macOS 10.12 or later
Launched by Wondershare, this one is excellent video creator and editor software, capable of adhering to your requirement of a transparent background video export in the simplest way possible and that too in the quickest time span. You can further apply a plethora amazing effects to your creation from the extensive Filmora video effects library. The software comes with an advanced ‘Green Screen’ feature to create transparent video backgrounds.
It is recommended to create a Green Screen video in the software for excellent transparency. Having done that, you can take the following steps to export videos with transparent backgrounds using Filmora:
Step 1: Launch the Software
Download the free Filmora Video Editor software from its official website and install the same in any of your Windows or MacOS devices. Having done that, launch the software in your system.
Step 2: Import Your Video
In the software’s welcome interface, navigate to and hit the ‘Import’ tab. From the drop don menu that follows, choose the ‘Import Media Files’ option to import your desired background and green screen videos to Filmora’s media library.

“
Step 3: Adding Clips to Timeline
Now you need to add background footage in the timeline’s video track and repeat the process with the green screen footage to add it into a separate timeline track. You can either insert both the clips into different video tracks using the ‘Drag and Drop’ method.

“
Step 4: Chromatic Settings
In the green screen video timeline, double click on the added video to directly access the ‘Chroma Key’ settings. You can alternatively, right click the video footage and choose ‘Green Screen’ to access the ‘Chroma Key’ option.

“
Step 5: Applying Transparency Effect
Enable the Chroma Key by checking in the option boxes. Next, you need to click either the ‘Color Picker’ icon or the ‘Color Picker’ drop down menu for an automatic generation of transparent background for your footage.

“
Step 6: Preview Your Artwork
Once the transparent background is applied, the editor will redirect you to its ‘Preview’ window, where you can play the footage to see the result. You can now save and export the created video with a transparent background to any social media platform of your choice.

“
● Ending Thoughts →
● Videos with transparent backgrounds are capable of attracting much greater attention for the prime object of concern in any footage.
● You can choose from a variety of video editor tools and software, like, the After Effects template, to export videos with transparent backgrounds on various media sharing platforms. if you are looking for suitable alternatives, consider using the Filmora Video Editor software to create and export transparent background videos.
Having to adjust with black backgrounds in After Effects is quite annoying, but not anymore. Stay tuned to get through quick and hastle free solutions!
In this article
01 [How to Remove Black Background from After Effects](#Part 1)
02 [How to Export After Effects Transparent Background](#Part 2)
Part 1 How to Remove Black Background from After Effects
Graphic and video editing are enormous domains to explore your creative skills in graphic design and animation. The software market is a pool of editing applications that are packed with extensive libraries to garnish your creations with varieties of exciting after effects. However, the additive black backgrounds are an annoying cringe to your creative artwork.
While these black backgrounds are evident on account of being inherent application properties of video and film editing software, the relaxing note is, there are effective solutions to the removal of these black screens. When browsing through affordable way to take up the removal process, you can adhere to the following procedure for making and exporting after effects transparent background videos:
Step 1: Launch After Effects
This one is an efficient motion graphics template that you can use to add a visible spunk to your graphic design artworks. Begin with launching the template in your system after an official website download of the same.
Step 2: Make Your Film Ready
Before beginning to remove the black background in After Effects template, make sure that your footage is ready to take up the action. The tool you are about to use is known to eliminate black pixels from your clip proportional to the luminous intensity variation in the scene under consideration.
Check for any areas you would like to remain untouched and mask them to retain the dark elements. To ensure effective masking, it is recommended to use the ‘Levels and Curves’ effect for a convenient tweak to the final key at the end.
Step 2: Shift Channels Effect
In the composition panel, navigate to the ‘Shift Channels’ effect and use the ‘Drag and Drop’ method to add it to the dark pixelated layer you wish to remove. You can also use this effect to work with adjustment layers.
Step 3: Luminance Adjustments
While continuing with the ‘Shift Channels’ effect, navigate to the ‘Take Alpha From’ checkbox and set ‘Luminance’ as the ‘Reset’ parameter. You are instantly fetched a footage without the black background. If this does not happen, navigate to the bottom of the composition panel and enable the ‘Transparency Grid’ option with a right side toggle.
Step 4: Color Tweaks
Use the‘Levels and Curves’ effect mentioned in Step 2 to make level adjustments until you get the perfect result. You can experiment with varieties of curve and level variations, both, before and after using the ‘Shift Channels’ effect to get the right tweaks. That’s it! You are now ready to export after effects transparent background video.
Part 2 How to Export After Effects Transparent Background
Videos with transparent backgrounds are trending examples of motion graphic designing and video editing artworks. The cue behind these backgrounds is that they exclusively permit the object of focus to have an opaque or colored pixelation, while leaving the remaining pixels as transparent or colorless. This is beneficial in adding an extra spotlight to the main elements of your creation, while rendering the less important parts behind the scene.
Having known the credibility of transparent backgrounds in video crafting, you may feel motivated to try hands on experimenting with transparent backgrounds to uplift your graphic motion artwork.
Considering the most affordable picks of video editing software to choose from, you can rely on the ‘After Effects’ motion graphic template to kick start the creation process. When using the aforesaid template to export videos with transparent backgrounds, you need to adhere to the following steps:
Step 1: Launch the After Effects Template
Start with downloading the graphic template from its official website and launching the same on your system.
Step 2: Select Your Video
On a successful launch, the template welcomes you with its composition timeline and project panel. Here, you need to select a desired video from either of the two places to export with a transparent background.
Step 3: Add to Queue
Once you have made your choice, navigate to the top toolbar in the composition panel and hit the ‘Composition’ tab. From the drop down menu that follows, choose ‘Add to Render Queue’. You can alternatively use the ‘Ctrl + M’ shortcut to carry out the above task.
“
Step 4: Output Settings
In the ‘Render Queue’ window that pops up after completion of Step 3, navigate to the left and tap ‘Output Module’ to see the ‘Output Module Settings’ window pop up. Here, click on ’Format’ and choose the standard ‘Quicktime’ format.
“
Step 5: Output Channel Selection
In the ‘Output Module’ window itself, navigate to the ‘Video Output’ tab and select ‘Channels’. In the drop down menu that follows, choose ‘RGB + Alpha’. When you are done, tap ‘OK’ at the bottom. Your video is ready for a transparent background export.
“
Exporting Transparent Background Videos in Wondershare Filmora Video Editor
Using the ‘After Effects’ motion graphic template is certainly one among the most affordable and convenient solutions for a transparent video export; however there are other feasible alternatives to adhere to the task. While searching through viable substitutes of the ‘After Effects’ template, you can surely pick Filmora as a reliable choice.
For Win 7 or later (64-bit)
For macOS 10.12 or later
Launched by Wondershare, this one is excellent video creator and editor software, capable of adhering to your requirement of a transparent background video export in the simplest way possible and that too in the quickest time span. You can further apply a plethora amazing effects to your creation from the extensive Filmora video effects library. The software comes with an advanced ‘Green Screen’ feature to create transparent video backgrounds.
It is recommended to create a Green Screen video in the software for excellent transparency. Having done that, you can take the following steps to export videos with transparent backgrounds using Filmora:
Step 1: Launch the Software
Download the free Filmora Video Editor software from its official website and install the same in any of your Windows or MacOS devices. Having done that, launch the software in your system.
Step 2: Import Your Video
In the software’s welcome interface, navigate to and hit the ‘Import’ tab. From the drop don menu that follows, choose the ‘Import Media Files’ option to import your desired background and green screen videos to Filmora’s media library.
“
Step 3: Adding Clips to Timeline
Now you need to add background footage in the timeline’s video track and repeat the process with the green screen footage to add it into a separate timeline track. You can either insert both the clips into different video tracks using the ‘Drag and Drop’ method.
“
Step 4: Chromatic Settings
In the green screen video timeline, double click on the added video to directly access the ‘Chroma Key’ settings. You can alternatively, right click the video footage and choose ‘Green Screen’ to access the ‘Chroma Key’ option.
“
Step 5: Applying Transparency Effect
Enable the Chroma Key by checking in the option boxes. Next, you need to click either the ‘Color Picker’ icon or the ‘Color Picker’ drop down menu for an automatic generation of transparent background for your footage.
“
Step 6: Preview Your Artwork
Once the transparent background is applied, the editor will redirect you to its ‘Preview’ window, where you can play the footage to see the result. You can now save and export the created video with a transparent background to any social media platform of your choice.
“
● Ending Thoughts →
● Videos with transparent backgrounds are capable of attracting much greater attention for the prime object of concern in any footage.
● You can choose from a variety of video editor tools and software, like, the After Effects template, to export videos with transparent backgrounds on various media sharing platforms. if you are looking for suitable alternatives, consider using the Filmora Video Editor software to create and export transparent background videos.
How to Use Visual Effect for Zoom
Zoom, a video calling software, has been quite popular over the last several months and is still one of the most used videos calling applications by millions of people worldwide. The site is a favorite among working professionals, but it is also utilized by individuals to connect with their friends and loved ones. Additionally, despite the app’s abundance of practical built-in tools and functions, it lacks the fun filters and special effects that the majority of users are used to when using a camera. Zoom has ingrained itself in our vocabulary during the last year. It seemed almost inevitable given that everything, from meetings to parties, has moved online.
You don’t need to seek farther than Zoom visual effects to inject a little jazz into the routine Zoom meetings during these hard times. By making adjustments to your Video configuration either before or during a video call, you may add visual effects in Zoom. Zoom meetings may be tedious to conduct over extended periods of time. Additionally, it would be helpful if you recorded the condition of your room before any Zoom meetings. You wouldn’t want to reveal your disorganized space while in a meeting. In these situations, adding visual effects will keep your private area private while also making your Zoom meetings entertaining and exciting. It will also prevent others from seeing your filthy room. This tutorial will walk you through the process of adding visual effects to Zoom step-by-step. In addition, you will get acquainted with the numerous camera functions and visual effects that you may employ during a Zoom video conversation.
- 1. What apps can add visual effect on Zoom?
- 2. How do I add visual effects to Zoom in Mobile?
- 3. How do you download Zoom effects?
Part 1: Popular Visual Effects you can add to Zoom
You may apply one of four main graphic effects to your Zoom meetings. The visual effects that you may use in your next Zoom video chat are briefly summarized below.
1. Visual Backgrounds
Virtual backdrops may transform any plain wall into an artistic setting. Zoom provides you the choice to add photographs to your backdrop in addition to offering you a few pre-made backdrops. Zoom lets you add a movie to your backdrop in addition to simply photographs. With the help of this imaginative feature, gather your pals and enjoy your favorite meme or video. A presentation’s collection of photos, a video, or a single image may all serve as virtual backdrops. A green screen would often be used as your real backdrop and consistent lighting would be required.
To avoid having to reveal your real surroundings while in a conference, you may add any picture or video as a virtual backdrop in Zoom. You have the option of adding own photos and movies or selecting from the pre-existing backdrop films and images. The file type for video backgrounds should be MP4 or MOV, and the resolution should range from 360p to a maximum of 1080p. Ensure that the mirroring of your video is deselected in the Zoom’s Video settings if your backdrop picture has text that may be read. By using virtual backdrops, you may alter the background of your video as it appears to the audience member with whom you are speaking. During the video conference you’re in, the other participants will be able to view your face and body overlaid on the backdrop of your choice.
2. Filters
With these filters, you can have fun in all of your Zoom meetings! Filters are a fun way to spend time with loved ones who are far away, particularly at a period when maintaining social distance is crucial. Filters are the modifications you make to yourself during Zoom meetings (such as a mustache, beard, etc.). They enliven the proceedings and contribute to the fun and memorability of your Zoom meetings.
Your films’ colors may be changed, and video filters can also add new aspects. By selecting a filter appropriate for each event, like team meetings or game nights, you may create the right atmosphere. You may embellish your face in the video with flowers or animal traits by using Zoom’s various filters. Alternately, you might just convert your video’s color to black and white. The video filters from a different program, however, allow you to apply more vibrant filters and place a greater emphasis on special effects.
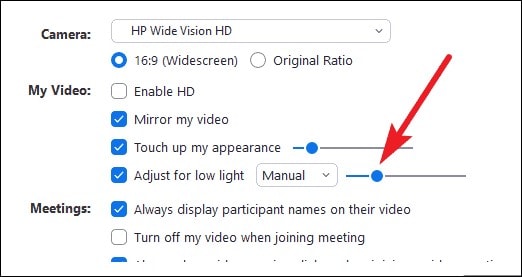
3. Lighting and Touch-ups
The Lighting function enhances lighting effects and makes adjustments for low light situations to make you seem more professional during a Zoom conference. Similar to this, Touch-up enhances your facial characteristics by making your skin shine, erasing wrinkles, and giving your face a radiant appearance.
On your Zoom videos, changing your lighting and applying touch-ups may improve how you seem. By adjusting your lighting, you can make even dim illumination look bright. By doing touch-ups, you may get a smoother skin texture and get rid of any obvious imperfections.
4. Studio Effects
Zoom has been developing on a new feature called Studio Effects that would give customers the option of using virtual cosmetics in their movies. They are still checking it out before formally releasing it since it is still in beta. However, it is still available to users under the Backgrounds & Filters area. You may adjust the opacity as you like. You have the option to choose a new color or one of the predefined colors. Additionally, you may decide to employ the face effects in all of your next meetings, albeit doing so might be problematic if you use Zoom for business. Don’t worry if you’re running late. Zoom can give your face a natural-looking cosmetic makeover in only one minute!
This function is intended for less formal settings, such as gatherings of friends or family. Anyone who wants to seem more professional during meetings has access to Studio Effects, which offers the choice of various eyebrow colors, beards, and lipsticks. These are a few recently added features. You may add mustaches, beards, and brows in a variety of designs, hues, and intensities. Additionally, you have the option of coloring your lips.
Part 2: How to Add Visual Effects to Zoom
Along with facilitating online meetings, the Zoom program also lets you play with its visual effects. You just need to make a few adjustments to the video settings or utilize another third-party program to be ready to go.
Step1Start a Zoom meeting
You can download Zoom, install it on your computer, and log into your account if you don’t already have it if you don’t already have it.
Step2Tap Background and Filters
After logging in to Zoom, use these settings. - Options > Camera > Video

Step3Faucet Filters
Here, you may play with a variety of visual effects and customize them to suit your tastes. Pick one of the numerous filters that are offered. To activate the filter, tap it.
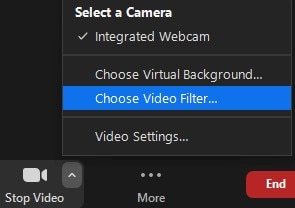
Step4Set Lighting Effects to on
Select “Adjust for low light” in the video options. For your lighting, you may choose between Auto and Manual effects. Zoom will automatically detect and adapt for the lighting in your room if you choose Auto.
Use Zoom’s noise reduction option to keep your conversation focused during your video conference in addition to adding visual elements. To do this, go to “Audio Settings” and choose “High” under “Suppress background noise.” Once you start speaking during the video conference, this essentially cancels out any background noise.
Part 3: Related FAQs
1. What apps can add visual effect on Zoom?
Following is the list of top three apps that you can use to utilize visual effects Zoom application:
Snap Camera is regarded as the most user-friendly. It is a software that you can download for Windows or Mac that works with live broadcasts and video chats. Because it was created by the people who founded Snapchat, it shares a broad variety of filters with that platform.
Link: Snap Camera
The Mac is the only platform on which CamTwist may be used. You may also use it to give your movies additional filters and unique effects. This program lets you pick from a variety of pre-made effects while also allowing you to create your own.
Link: CamTwist
Another desktop application that lets you change and even blur your backdrop is ManyCam. It enables you to apply digital effects, filters, and 3-D masks to your face. Using this tool, you can also build layers and presets.
Link: ManyCam
2. How do I add visual effects to Zoom in Mobile?
Zoom includes a function that might be useful if you don’t want to tidy up or want to add some entertainment to your calls. You may utilize Zoom virtual backdrops to alter your surroundings and take you to a more pleasant location on both the desktop and mobile apps. After joining one on a mobile device, pick Virtual backdrop by tapping the More icon in the bottom right corner. Choose a photo from the list of choices, or click the plus sign (+) to add a photo or video from your gallery.
3. How do you download Zoom effects?
Pressing the Studio Effects button after installing Zoom for the first time will prompt a pop-up asking you to download the Studio Effects package. Several filters, suited for both business meetings and conversations with friends, let you customize the video and audio during your video calls. To start downloading the Effects bundle, click the Download button. The “Studio Effects” window will appear on the right-hand side of the Background & Filter page after the download is finished. All the face components and choices are available in this Studio Effects window.
Conclusion
The most popular video meeting tool worldwide is Zoom. Family, friends, coworkers, and any two people who want to video chat utilize it. Zoom visual effects are the ideal tool for injecting some humor into otherwise dull Zoom sessions and meetings. A few simple steps will get you a striking backdrop, a humorous filter, and some interesting effects. Since the majority of formal work is now completed from home, Zoom has taken over as the standard video conferencing program. Try out as many of the effects as you like, and use this page as a companion and a map to help you along the way.
- 1. What apps can add visual effect on Zoom?
- 2. How do I add visual effects to Zoom in Mobile?
- 3. How do you download Zoom effects?
Part 1: Popular Visual Effects you can add to Zoom
You may apply one of four main graphic effects to your Zoom meetings. The visual effects that you may use in your next Zoom video chat are briefly summarized below.
1. Visual Backgrounds
Virtual backdrops may transform any plain wall into an artistic setting. Zoom provides you the choice to add photographs to your backdrop in addition to offering you a few pre-made backdrops. Zoom lets you add a movie to your backdrop in addition to simply photographs. With the help of this imaginative feature, gather your pals and enjoy your favorite meme or video. A presentation’s collection of photos, a video, or a single image may all serve as virtual backdrops. A green screen would often be used as your real backdrop and consistent lighting would be required.
To avoid having to reveal your real surroundings while in a conference, you may add any picture or video as a virtual backdrop in Zoom. You have the option of adding own photos and movies or selecting from the pre-existing backdrop films and images. The file type for video backgrounds should be MP4 or MOV, and the resolution should range from 360p to a maximum of 1080p. Ensure that the mirroring of your video is deselected in the Zoom’s Video settings if your backdrop picture has text that may be read. By using virtual backdrops, you may alter the background of your video as it appears to the audience member with whom you are speaking. During the video conference you’re in, the other participants will be able to view your face and body overlaid on the backdrop of your choice.
2. Filters
With these filters, you can have fun in all of your Zoom meetings! Filters are a fun way to spend time with loved ones who are far away, particularly at a period when maintaining social distance is crucial. Filters are the modifications you make to yourself during Zoom meetings (such as a mustache, beard, etc.). They enliven the proceedings and contribute to the fun and memorability of your Zoom meetings.
Your films’ colors may be changed, and video filters can also add new aspects. By selecting a filter appropriate for each event, like team meetings or game nights, you may create the right atmosphere. You may embellish your face in the video with flowers or animal traits by using Zoom’s various filters. Alternately, you might just convert your video’s color to black and white. The video filters from a different program, however, allow you to apply more vibrant filters and place a greater emphasis on special effects.
3. Lighting and Touch-ups
The Lighting function enhances lighting effects and makes adjustments for low light situations to make you seem more professional during a Zoom conference. Similar to this, Touch-up enhances your facial characteristics by making your skin shine, erasing wrinkles, and giving your face a radiant appearance.
On your Zoom videos, changing your lighting and applying touch-ups may improve how you seem. By adjusting your lighting, you can make even dim illumination look bright. By doing touch-ups, you may get a smoother skin texture and get rid of any obvious imperfections.
4. Studio Effects
Zoom has been developing on a new feature called Studio Effects that would give customers the option of using virtual cosmetics in their movies. They are still checking it out before formally releasing it since it is still in beta. However, it is still available to users under the Backgrounds & Filters area. You may adjust the opacity as you like. You have the option to choose a new color or one of the predefined colors. Additionally, you may decide to employ the face effects in all of your next meetings, albeit doing so might be problematic if you use Zoom for business. Don’t worry if you’re running late. Zoom can give your face a natural-looking cosmetic makeover in only one minute!
This function is intended for less formal settings, such as gatherings of friends or family. Anyone who wants to seem more professional during meetings has access to Studio Effects, which offers the choice of various eyebrow colors, beards, and lipsticks. These are a few recently added features. You may add mustaches, beards, and brows in a variety of designs, hues, and intensities. Additionally, you have the option of coloring your lips.
Part 2: How to Add Visual Effects to Zoom
Along with facilitating online meetings, the Zoom program also lets you play with its visual effects. You just need to make a few adjustments to the video settings or utilize another third-party program to be ready to go.
Step1Start a Zoom meeting
You can download Zoom, install it on your computer, and log into your account if you don’t already have it if you don’t already have it.
Step2Tap Background and Filters
After logging in to Zoom, use these settings. - Options > Camera > Video
Step3Faucet Filters
Here, you may play with a variety of visual effects and customize them to suit your tastes. Pick one of the numerous filters that are offered. To activate the filter, tap it.
Step4Set Lighting Effects to on
Select “Adjust for low light” in the video options. For your lighting, you may choose between Auto and Manual effects. Zoom will automatically detect and adapt for the lighting in your room if you choose Auto.
Use Zoom’s noise reduction option to keep your conversation focused during your video conference in addition to adding visual elements. To do this, go to “Audio Settings” and choose “High” under “Suppress background noise.” Once you start speaking during the video conference, this essentially cancels out any background noise.
Part 3: Related FAQs
1. What apps can add visual effect on Zoom?
Following is the list of top three apps that you can use to utilize visual effects Zoom application:
Snap Camera is regarded as the most user-friendly. It is a software that you can download for Windows or Mac that works with live broadcasts and video chats. Because it was created by the people who founded Snapchat, it shares a broad variety of filters with that platform.
Link: Snap Camera
The Mac is the only platform on which CamTwist may be used. You may also use it to give your movies additional filters and unique effects. This program lets you pick from a variety of pre-made effects while also allowing you to create your own.
Link: CamTwist
Another desktop application that lets you change and even blur your backdrop is ManyCam. It enables you to apply digital effects, filters, and 3-D masks to your face. Using this tool, you can also build layers and presets.
Link: ManyCam
2. How do I add visual effects to Zoom in Mobile?
Zoom includes a function that might be useful if you don’t want to tidy up or want to add some entertainment to your calls. You may utilize Zoom virtual backdrops to alter your surroundings and take you to a more pleasant location on both the desktop and mobile apps. After joining one on a mobile device, pick Virtual backdrop by tapping the More icon in the bottom right corner. Choose a photo from the list of choices, or click the plus sign (+) to add a photo or video from your gallery.
3. How do you download Zoom effects?
Pressing the Studio Effects button after installing Zoom for the first time will prompt a pop-up asking you to download the Studio Effects package. Several filters, suited for both business meetings and conversations with friends, let you customize the video and audio during your video calls. To start downloading the Effects bundle, click the Download button. The “Studio Effects” window will appear on the right-hand side of the Background & Filter page after the download is finished. All the face components and choices are available in this Studio Effects window.
Conclusion
The most popular video meeting tool worldwide is Zoom. Family, friends, coworkers, and any two people who want to video chat utilize it. Zoom visual effects are the ideal tool for injecting some humor into otherwise dull Zoom sessions and meetings. A few simple steps will get you a striking backdrop, a humorous filter, and some interesting effects. Since the majority of formal work is now completed from home, Zoom has taken over as the standard video conferencing program. Try out as many of the effects as you like, and use this page as a companion and a map to help you along the way.
How to Start a Vlog
I’m Maya of Mayang Dyosa on YouTube channel, vlogger since 2017 and I started my vlogging career out of boredom. I give up my managerial career so that I can watch over my child. That’s the time I thought of videoing what I’m doing at home and uploading it to YouTube for me to watch all over again, I accidentally made the videos public and I was surprised that there were viewers. Until I continued to upload and others requested the video what they want to see on my channel.

How to Start a Vlog
Let us find out what you need to be a vlogger?
You need to be able to add value and focus to the topic. This means that you must tap onto your own experience and talk or showcase that through your vlogs. Do take note you need to ensure that whatever you are voicing out to your vlog is factual and justified. It is easy to others to verify your claims online these days, and the last thing you’ll want to be known for is vlogger who isn’t knowledgeable in his/her field. That is why you need to pick a topic or content that you can explain well and based on your experiences.
Here’s the step or tips on how to start to vlog
- Determine your vlogging Niche
- Create your YouTube channel
- Get the right vlogging equipment
- Shoot & Edit your First Vlog
- Publish and promote your vlog

Determine Your Vlogging Niche
1. Determine Your Vlogging Niche
You can refer to some popular vlogger or vlogging categories on YouTube, like gaming fitness, food, make-up travel etc., just picks the best that suits to your interest and experiences. The audience can easily understand what you want to show from your vlog when you have a clear niche, which will give you a greater chance of getting relevant audience to subscribe to your channel

Determine Your Vlogging Niche2
2. Create Your YouTube Channel
You can now create your YouTube channel through Gmail account on YouTube and its free. Make sure to create a unique name and do more customize to make it look like your channel and not someone else’s. You can put profile pictures and a banner to brand yourself and make your vlog channel stand out from the rest. Also you can add subscribe watermark that appears at the bottom right corner of your every video.

Create Your YouTube Channel
3. Get The Right Vlogging Equipment
If you want to start vlogging make sure to have vlogging equipment, smartphone with clear video and audio to start up will do, a camera tripod or selfie stick, also find a venue or a place where you can vlog without disturbance. Because when your start your first ever vlog, you will be a bit stuttering or you will have difficulty speaking in front of the camera and when there are people you will be ashamed to speak. Last a microphone to ensure you good and clear audio.

Get The Right Vlogging Equipment
4. Shoot And Edit Vlog
When all the equipment is ready you can now start recording your first video. Always make sure to create your intro to attract viewers, be yourself just do want you want to do or to say naturally as if your talking to a friend or a family. Focus on your topic and be true to all information you share to your audience. Don’t forget to have a good lighting and a clear audio so your audience understand what your video all about. And if you’re not comfortable you can try and practice many times. You can say anything and everything, because after that you can also edit and delete unnecessary ones.
5. Edit Vlogs
One of the most important of being a YouTuber or vlogger is on how to edit a vlog you can refer to my article tittle What is my best vlog editing software?
![]()
Tips: Editing is part of being a vlogger, you need to learn to enhance your videos so you can attract more subscriber. There are a lot of editing software that can be downloaded from google.
I recommend the best ending software that I personally used up until now is Wondershare Filmora.
This fort ware is good for the beginners, because this is easy to use and you will enjoy all the great features of this software. Filmora has so many tools that you can use to enhance your videos and be attractive to your viewers. This may help you create a quality, creative and unique video content.

Edit Vlogs
6. Publish And Promote Your Vlogs
It is very important for us to Publish and to Promote our video publicly so that many can see our hard-earned video.
There are many site where you can promote your video example. Facebook, Instagram, Twitter, Tikor etc. This sites always have many users and this is the best site to promote or to post your video content, just make sure to public your post, put link of your videos and a short description of the video so your viewer can easily understand what your video all about.
![]()
Tips: Remember when many people will notice your video, there are many ways you can get another big opportunity like, you can be a brand ambassador or some sponsorship for you channel.
Conclusion
Conclusion Ⅰ
Vlogging remains one of the most popular ways for creative to have their voices heard. in a short two to three minutes’ video, vloggers can not only showcase a skill or a product, but the can also educate their viewers with visual tips and tricks in their respective fields. For some vloggers, this has become a full time career.
Conclusion Ⅱ
Anyone can be a vlogger what is important is that you have a story to tell and a passion for your topic of interest. Starting out will be though, so you need the determination to see it through. For a lot of vloggers, the view counts at the start may be low, and some may give up at this stage. But if you can recognize your uniqueness and showcase that through your vlogs, your viewership and subscribers will steadily climb. Just be patient and enjoy every step of the way and always remember “Success Doesn’t happen overnight”.
Here’s the step or tips on how to start to vlog
- Determine your vlogging Niche
- Create your YouTube channel
- Get the right vlogging equipment
- Shoot & Edit your First Vlog
- Publish and promote your vlog
Determine Your Vlogging Niche
1. Determine Your Vlogging Niche
You can refer to some popular vlogger or vlogging categories on YouTube, like gaming fitness, food, make-up travel etc., just picks the best that suits to your interest and experiences. The audience can easily understand what you want to show from your vlog when you have a clear niche, which will give you a greater chance of getting relevant audience to subscribe to your channel
Determine Your Vlogging Niche2
2. Create Your YouTube Channel
You can now create your YouTube channel through Gmail account on YouTube and its free. Make sure to create a unique name and do more customize to make it look like your channel and not someone else’s. You can put profile pictures and a banner to brand yourself and make your vlog channel stand out from the rest. Also you can add subscribe watermark that appears at the bottom right corner of your every video.
Create Your YouTube Channel
3. Get The Right Vlogging Equipment
If you want to start vlogging make sure to have vlogging equipment, smartphone with clear video and audio to start up will do, a camera tripod or selfie stick, also find a venue or a place where you can vlog without disturbance. Because when your start your first ever vlog, you will be a bit stuttering or you will have difficulty speaking in front of the camera and when there are people you will be ashamed to speak. Last a microphone to ensure you good and clear audio.
Get The Right Vlogging Equipment
4. Shoot And Edit Vlog
When all the equipment is ready you can now start recording your first video. Always make sure to create your intro to attract viewers, be yourself just do want you want to do or to say naturally as if your talking to a friend or a family. Focus on your topic and be true to all information you share to your audience. Don’t forget to have a good lighting and a clear audio so your audience understand what your video all about. And if you’re not comfortable you can try and practice many times. You can say anything and everything, because after that you can also edit and delete unnecessary ones.
5. Edit Vlogs
One of the most important of being a YouTuber or vlogger is on how to edit a vlog you can refer to my article tittle What is my best vlog editing software?
![]()
Tips: Editing is part of being a vlogger, you need to learn to enhance your videos so you can attract more subscriber. There are a lot of editing software that can be downloaded from google.
I recommend the best ending software that I personally used up until now is Wondershare Filmora.
This fort ware is good for the beginners, because this is easy to use and you will enjoy all the great features of this software. Filmora has so many tools that you can use to enhance your videos and be attractive to your viewers. This may help you create a quality, creative and unique video content.
Edit Vlogs
6. Publish And Promote Your Vlogs
It is very important for us to Publish and to Promote our video publicly so that many can see our hard-earned video.
There are many site where you can promote your video example. Facebook, Instagram, Twitter, Tikor etc. This sites always have many users and this is the best site to promote or to post your video content, just make sure to public your post, put link of your videos and a short description of the video so your viewer can easily understand what your video all about.
![]()
Tips: Remember when many people will notice your video, there are many ways you can get another big opportunity like, you can be a brand ambassador or some sponsorship for you channel.
Conclusion
Conclusion Ⅰ
Vlogging remains one of the most popular ways for creative to have their voices heard. in a short two to three minutes’ video, vloggers can not only showcase a skill or a product, but the can also educate their viewers with visual tips and tricks in their respective fields. For some vloggers, this has become a full time career.
Conclusion Ⅱ
Anyone can be a vlogger what is important is that you have a story to tell and a passion for your topic of interest. Starting out will be though, so you need the determination to see it through. For a lot of vloggers, the view counts at the start may be low, and some may give up at this stage. But if you can recognize your uniqueness and showcase that through your vlogs, your viewership and subscribers will steadily climb. Just be patient and enjoy every step of the way and always remember “Success Doesn’t happen overnight”.
How to Clone Yourself in Videos with Filmora?
With the help of video editing programs like Filmora , you can create clones of yourself. Whether you’re looking to create a funny skit or a serious video, cloning yourself can add much production value to your project.
In this article, we’ll walk you through the process of how to clone yourself in videos using Filmora.
Part 1: How to Film Clips for Cloning Effects?
To make cloning effects, you will need to take two different shots and use a tripod to place the camera, so the frame doesn’t change.
Shooting the first clip
For the first shot, stay on one side of the frame and do the first action. For example, you can pretend to yank and take off your jacket. Then, drop the jacket to the other side of the frame.

To make it more realistic, make an interaction by reacting to the “clone” while facing the other direction.

Shooting the second clip
Then, shoot for the second clip without changing the frame. You will have to go to the place where you dropped the jacket from the first shot.

Act as if you have just appeared there and give a reaction to the other side as well.
Part 2: How to Do the Clone Effect with Filmora?
After you have shot the necessary film clips, bring the clips into Filmora 11. If you haven’t installed Filmora yet, you can go to their website and download it here:
Free Download For Win 7 or later(64-bit)
Free Download For macOS 10.14 or later
Once you have opened Filmora 11, follow the steps below:
Step1 Bring the first clip to the timeline and cut the clip where you pretend to yank and take off the jacket. Select and delete the unnecessary clip.

Step2 After you have the first part of the effect ready, let’s start working on the clone part using masking.
First, place the second clip on a different window track, and the starting point is where you react to the “clone.”

Then, double-click the second clip and go to the Filmora setting window. Tap on the Mask section > Single line.

On the preview screen, adjust the position of the mask to only show “the clone.”

Set the blur strength on the setting to make a smoother edge transition.
Step3 If the timing of the two clips doesn’t match, you can fix it using the speed ramping feature on Filmora 11. To use it, double-click the second clip and select Speed > Speed Ramping > Customize.

Move the keyframe up to increase the speed. You can adjust it according to your needs.

Step4 Once you are satisfied, adjust the clip length on the timeline and make sure that both clips finish at the same time.

Extra tip: Add one more effect to make it more magical.
Step1 Open the Effects window and search for “up down 1.”

Step2 Drag and drop the effect onto the timeline where the first cut is set. Adjust the effect length to match the action.

Then, drag and drop the effect again in the transition between the first and the second clip. Adjust it to the appropriate length, then it will give a more dramatic effect.
Step3 You can playback and see how it looks on the preview screen.
Summary
Making a clone effect on video is easy using Filmora. You can use the same trick to create a fashion lookbook video or other creative content to make them more engaging. Let us know if you want to see more tutorials.
Free Download For Win 7 or later(64-bit)
Free Download For macOS 10.14 or later
Free Download For macOS 10.14 or later
Once you have opened Filmora 11, follow the steps below:
Step1 Bring the first clip to the timeline and cut the clip where you pretend to yank and take off the jacket. Select and delete the unnecessary clip.
Step2 After you have the first part of the effect ready, let’s start working on the clone part using masking.
First, place the second clip on a different window track, and the starting point is where you react to the “clone.”
Then, double-click the second clip and go to the Filmora setting window. Tap on the Mask section > Single line.
On the preview screen, adjust the position of the mask to only show “the clone.”
Set the blur strength on the setting to make a smoother edge transition.
Step3 If the timing of the two clips doesn’t match, you can fix it using the speed ramping feature on Filmora 11. To use it, double-click the second clip and select Speed > Speed Ramping > Customize.
Move the keyframe up to increase the speed. You can adjust it according to your needs.
Step4 Once you are satisfied, adjust the clip length on the timeline and make sure that both clips finish at the same time.
Extra tip: Add one more effect to make it more magical.
Step1 Open the Effects window and search for “up down 1.”
Step2 Drag and drop the effect onto the timeline where the first cut is set. Adjust the effect length to match the action.
Then, drag and drop the effect again in the transition between the first and the second clip. Adjust it to the appropriate length, then it will give a more dramatic effect.
Step3 You can playback and see how it looks on the preview screen.
Summary
Making a clone effect on video is easy using Filmora. You can use the same trick to create a fashion lookbook video or other creative content to make them more engaging. Let us know if you want to see more tutorials.
Free Download For Win 7 or later(64-bit)
Free Download For macOS 10.14 or later
Also read:
- New 2024 Approved Guide on VHS Technology and Its Influence on Video Editing
- Updated 2024 Approved The Best Way To Color Grading & Color Correction in Filmora
- 2024 Approved Do You Want to Use a Professional Tool to Add Subtitles? Read This Article to Discover the Best Reliable Tool to Create Subtitles in Your Desired Manner
- How to Make a Video Slideshow in iMovie
- Updated Cropping Video in VLC Step by Step for 2024
- Easy Steps to Make Glitch Effect with Filmora
- Best Slow Motion Camera Apps for Best Content Creation
- For Artists Who Are Making Videos for Show Their Knowledge or Projects, Add some Effects for the Video Can Always Provoke Interests and Attention. This Article Will Show You How to Do that Easily
- New 2024 Approved Detailed Guide to Resize Your Video in VLC
- Updated 2024 Approved How to Start a Vlog
- In 2024, 8 Ways To Live Stream Pre-Recorded Video
- Updated How to Rotate Videos With Media Player Classic
- This Article Discusses What Is Vegas Pro, How to Download, Install and Use It, and Its Key Features. It Further Discusses Its Alternative for Editing Your Videos and More. Check Out Now
- New In 2024, Adding a Spooky Shadow Effect with Filmora
- If You Are Into GIFs and Want to Know a Great Extent of Information About It Then We Have Got You Covered in This Article. Here Is What We Have Learned so Far About It
- In 2024, Know How You Can Get some Cool Discord Animated Icons Through some Simple Steps. Presenting the Latest Tool to Get Animated PFP and Logos Instantly for Discord
- Updated 10 Catchy Pixel Art Wallpapers and How to Custom Your Own with Ease for 2024
- In 2024, How to Remove Audio From Video on Mac? Free and Official Solutions
- New What Is the Selective Color Effect, and How Can You Add This Effect to Your Videos Using Wondershare Filmora? A Complete Guide for Beginners
- How to Make a Slideshow GIF?
- What Is Motion Tracking and How to Use It for 2024
- Updated How to Use Kahoot! On Zoom
- Create a Movie with Windows Movie Maker
- How To Bypass Google FRP on Realme 10T 5G
- Spoofing Life360 How to Do it on Oppo A58 4G? | Dr.fone
- In 2024, How to Use Google Assistant on Your Lock Screen Of Oppo Find N3 Phone
- How to Change Itel P55 Location on Skout | Dr.fone
- This is how you can recover deleted pictures from Realme C53.
- In 2024, 5 Ways To Teach You To Transfer Files from Vivo Y28 5G to Other Android Devices Easily | Dr.fone
- The best electronic signature way to sign .dotm file documents online
- 4 Ways to Fix Android Blue Screen of Death On Infinix Smart 8 | Dr.fone
- How To Remove Passcode From iPhone 7? Complete Guide | Dr.fone
- Unova Stone Pokémon Go Evolution List and How Catch Them For Samsung Galaxy XCover 6 Pro Tactical Edition | Dr.fone
- In 2024, How To Change Country on App Store for iPhone SE (2022) With 7 Methods
- For People Wanting to Mock GPS on Xiaomi 14 Ultra Devices | Dr.fone
- In 2024, How to Transfer Data from OnePlus Nord N30 5G to Other Android Devices? | Dr.fone
- How To Update or Downgrade iPhone 14 Pro Max Without Losing Data? | Dr.fone
- How to Track Motorola G54 5G by Phone Number | Dr.fone
- Ultimate guide to get the meltan box pokemon go For Tecno Camon 30 Pro 5G | Dr.fone
- Forgot iPhone Passcode Again? Unlock iPhone 12 Pro Without Passcode Now | Dr.fone
- 5 Ways to Track Samsung Galaxy S23 FE without App | Dr.fone
- How to Simulate GPS Movement in AR games On Vivo Y02T? | Dr.fone
- In 2024, How to Get and Use Pokemon Go Promo Codes On Vivo G2 | Dr.fone
- 9 Best Phone Monitoring Apps for Motorola Edge 40 Neo | Dr.fone
- Title: New Hard to Remove Black Background in After Effects?
- Author: Chloe
- Created at : 2024-05-20 03:38:32
- Updated at : 2024-05-21 03:38:32
- Link: https://ai-editing-video.techidaily.com/new-hard-to-remove-black-background-in-after-effects/
- License: This work is licensed under CC BY-NC-SA 4.0.
