
:max_bytes(150000):strip_icc():format(webp)/bestfirestickapps-5bcba08546e0fb005177a983-0591296fac8241ccb8497f9f29901acd.jpg)
New Here Are a Number of Tools Used in the Market to Resize the Videos. We Are Going to Teach How to Resize the Video in Davinci Resolve and Fimora Wondershare. Once You Have Mastered How to Resize a Video, It Would Be as Simple as the Click
Here Are a Number of Tools Used in the Market to Resize the Videos. We Are Going to Teach How to Resize the Video in Davinci Resolve and Fimora Wondershare. Once You Have Mastered How to Resize a Video, It Would Be as Simple as the ‘Click’
While editing videos, you may change the aspect ratio of the video to change the size of the video to upload on different platforms like YouTube, Facebook, Pinterest, and Instagram. Videos come in different sizes and shapes. Some videos are portraits while the others are landscapes. Similarly, videos are captured in different places with different devices. So, we need to set a certain size of the video.
Definitely, a very large video can make delays in the work, similarly, a small size video can result in low resolution and bad quality. Resizing a video saves a lot of time and money whether you have a business, a YouTube channel, a short film, or a feature film. Today, we shall discuss how to resize the videos?
The two free ways to resize the video…
Here are a number of tools used in the market to resize the videos. We are going to teach How to resize the video in Davinci resolve and Fimora wondershare. Once you have mastered How to resize a video, it would be as simple as the ‘click’.
Now the good news is, you can dramatically export the videos in the same resolution in a very short time.
Let’s dive in !
Part 1. How to resize video in Davinci Resolve
Davinci Resolve is a very powerful tool to edit videos. Let’s suppose, you have some videos shots and all the videos have different sizes, some of the videos fit in the timeline and some are out of the timeline. No matter, you are going to make a video on the same scale with the same size.
Resize the video can be done in three ways:
- Zoom in zoom out
- Cropping
- Retime and scaling
1. Zoom in and Zoom out
First of all, select the videos in your timeline. You should stay in the middle of the frame to set it because it’s too wide. The timeline moves forward and backward. Let your video be 4k, go to the bottom-right corner and click on timeline format. Select timeline resolution, select ultra HD, or whatever you want from the drop-down list.

Go to the inspector from the up-right corner and select Transform under the video section. Here you can resize your image. Place the mouse over zoom x (Horizontal) and zoom y (vertical) values to drag left or right for zoom in or zoom out. The video can be resized accordingly.
Here you can also change its rotation.

2. Cropping
Go to the inspector from the up-right corner and select Transform. Now choose Cropping. Here are four options Crop left, crop right, crop Bottom, and crop Top. You can drag the scale from left to right to adjust the crop settings according to the desired result.

3. Retime and scaling
Go to the inspector from the up-right corner and select retime and scaling. You can choose stretch, Fit, Fill, or crop for cropping the video from the drop-down list.
- The Crop function is used to remove the unnecessary or uneven part of the video.
- The Fit function is to have the video auto-center and the selected clips are formatted according to the screen dimensions.
- Stretch Function allows changing the length of the certain clip at a certain duration.

After transforming, cropping, and resizing the videos, you can copy the same settings without repeating the above steps for each video.
Part 2. An alternative way to resize videos with Wondershare
Filmora Video Editor is another great video editing software. It is very easy to use. It offers many different features to resize the videos. Moreover, it allows zooming in the video to highlight the best part of your video. It allows the edited video to export on other devices or YouTube channels.
For Win 7 or later (64-bit)
For macOS 10.14 or later
You can resize your video in three ways:
- Resize video by cropping
- Scale in Scale-out
- Resize by changing Aspect Ratio
1. Resize video by cropping
- Import the videos from your storage by using the import button.
- Drag the videos in the timeline.
- Right-click on the desired video, crop and zoom option will appear in the menu.
- Select crop tab.

- Grab the corner of the crop inwards, and move to adjust as desired.
- Press the OK tab and your video is cropped.

2. Scale-in and scale-out
- Select the video in the timeline.
- Select the settings
- Click on the Transform tab under image section**.**

- Move the pointer from left to right on the Scale to zoom in and zoom out the video. You can remove the unwanted portion of the video.
- Press OK tab.

3. Resize video by changing aspect ratio
Some videos are 4k, 6k, and 8k but exporting them in the same resolution and waiting for a long time is really difficult. You need to resize the video to change its width and height. As different social media platforms require a different sizes for videos. We can say, resizing the video in terms of Giga bites and mega bites. You can do it by changing the Project Aspect Ratio. It is a very powerful technique to resize the videos in the timeline.
You can change the Project Aspect ratio like 16:9(wide-screen), 1:1(Instagram), 9:16(Portrait), 4:3(standard), 21:9(Cinema), or custom.

- Select the Aspect Ratio
- Change the ratio 16:9, 1:1, 9:16, 4:3, 21:9, or custom as desired.
- Select OK.

Conclusion
At this time, every business is using marketing to boost the economy, but video marketing is at its climax. Therefore, it is essential to take advantage of video editing tools to increase productivity and efficiency of work.
The Davinci Resolve and Filmora Wonder Share are the best video editing tools to resize the videos. You can easily use these tools on your laptop, tablets, or smartphones in a very short time. Along with this, you can share your compressed videos on different social media platforms like Facebook, Twitter, YouTube, Instagram, and LinkedIn. Moreover, you can enjoy the magical effects of these free tools at the ease of your smartphone. It is beneficial at both small and large businesses for the following
- Time saver
- Economical
- Good video quality
- Presentable
- Increase engagement
Hope the content would be useful for you. If you like the article please leave a comment.
Go to the inspector from the up-right corner and select Transform under the video section. Here you can resize your image. Place the mouse over zoom x (Horizontal) and zoom y (vertical) values to drag left or right for zoom in or zoom out. The video can be resized accordingly.
Here you can also change its rotation.
2. Cropping
Go to the inspector from the up-right corner and select Transform. Now choose Cropping. Here are four options Crop left, crop right, crop Bottom, and crop Top. You can drag the scale from left to right to adjust the crop settings according to the desired result.
3. Retime and scaling
Go to the inspector from the up-right corner and select retime and scaling. You can choose stretch, Fit, Fill, or crop for cropping the video from the drop-down list.
- The Crop function is used to remove the unnecessary or uneven part of the video.
- The Fit function is to have the video auto-center and the selected clips are formatted according to the screen dimensions.
- Stretch Function allows changing the length of the certain clip at a certain duration.
After transforming, cropping, and resizing the videos, you can copy the same settings without repeating the above steps for each video.
Part 2. An alternative way to resize videos with Wondershare
Filmora Video Editor is another great video editing software. It is very easy to use. It offers many different features to resize the videos. Moreover, it allows zooming in the video to highlight the best part of your video. It allows the edited video to export on other devices or YouTube channels.
For Win 7 or later (64-bit)
For macOS 10.14 or later
You can resize your video in three ways:
- Resize video by cropping
- Scale in Scale-out
- Resize by changing Aspect Ratio
1. Resize video by cropping
- Import the videos from your storage by using the import button.
- Drag the videos in the timeline.
- Right-click on the desired video, crop and zoom option will appear in the menu.
- Select crop tab.
- Grab the corner of the crop inwards, and move to adjust as desired.
- Press the OK tab and your video is cropped.
2. Scale-in and scale-out
- Select the video in the timeline.
- Select the settings
- Click on the Transform tab under image section**.**
- Move the pointer from left to right on the Scale to zoom in and zoom out the video. You can remove the unwanted portion of the video.
- Press OK tab.
3. Resize video by changing aspect ratio
Some videos are 4k, 6k, and 8k but exporting them in the same resolution and waiting for a long time is really difficult. You need to resize the video to change its width and height. As different social media platforms require a different sizes for videos. We can say, resizing the video in terms of Giga bites and mega bites. You can do it by changing the Project Aspect Ratio. It is a very powerful technique to resize the videos in the timeline.
You can change the Project Aspect ratio like 16:9(wide-screen), 1:1(Instagram), 9:16(Portrait), 4:3(standard), 21:9(Cinema), or custom.
- Select the Aspect Ratio
- Change the ratio 16:9, 1:1, 9:16, 4:3, 21:9, or custom as desired.
- Select OK.
Conclusion
At this time, every business is using marketing to boost the economy, but video marketing is at its climax. Therefore, it is essential to take advantage of video editing tools to increase productivity and efficiency of work.
The Davinci Resolve and Filmora Wonder Share are the best video editing tools to resize the videos. You can easily use these tools on your laptop, tablets, or smartphones in a very short time. Along with this, you can share your compressed videos on different social media platforms like Facebook, Twitter, YouTube, Instagram, and LinkedIn. Moreover, you can enjoy the magical effects of these free tools at the ease of your smartphone. It is beneficial at both small and large businesses for the following
- Time saver
- Economical
- Good video quality
- Presentable
- Increase engagement
Hope the content would be useful for you. If you like the article please leave a comment.
Add Green Screen Video on TikTok
TikTok is the most popular platform for making short videos. You can create creative short videos and upload to TikTok so that they can entertain your followers and make your videos go viral. To add variety to your video content, the use of green screen in short videos is a great idea. You can replace the green screen with any background in your TikTok video. You need to know how to add green screen video on TikTok.
Adding green screen on TikTok videos has become a trend now as there are several green screen TikTok videos that have gone viral. In fact, creative green screen videos are extremely popular on social media platforms. Instead of replacing the green screen in your video with a single photo, you can replace it with multiple pictures on TikTok. We will illustrate how to add multiple pictures on TikTok green screen.
Part 1. How to Add Green Screen on TikTok?
To add green screen on TikTok video, you need to have a background of uniform color. It does not necessarily have to be a green screen. For example, if you are shooting a video of your legs and the floor tiles have uniform color, you can use green screen on TikTok to replace the tiles with any picture. Instead of using one picture on TikTok short video, you can use multiple pictures in the background to create stunning TikTok videos. Here are the steps on how to add multiple pictures to TikTok green screen.
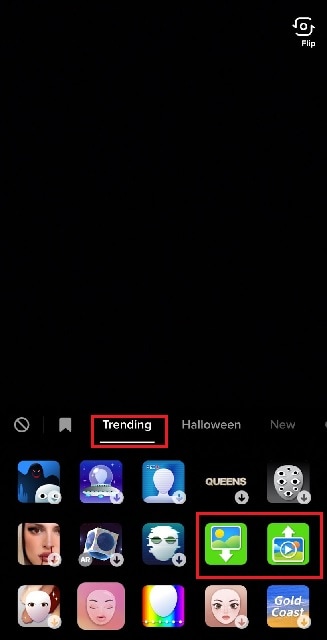
Step1 Open TikTok app on your phone. Tap on Plus icon located at the bottom of the app screen to make a new video.
Step2 Choose the duration of the video as per your preference. Thereafter, tap on Effects option located at the bottom-left corner to see the different effects available on TikTok.
![]()
Step3 Go to Trending tab and you will see Green Screen and Green Screen Video icons. If you want your video to have green screen photo, tap on Green Screen icon. If you want your video to have green screen video, tap on Green Screen Video icon.
Step4 You will get a generic background and you can choose any preset background or select photo or video from your phone gallery by tapping on Plus icon. Once you are done, tap on Record button.
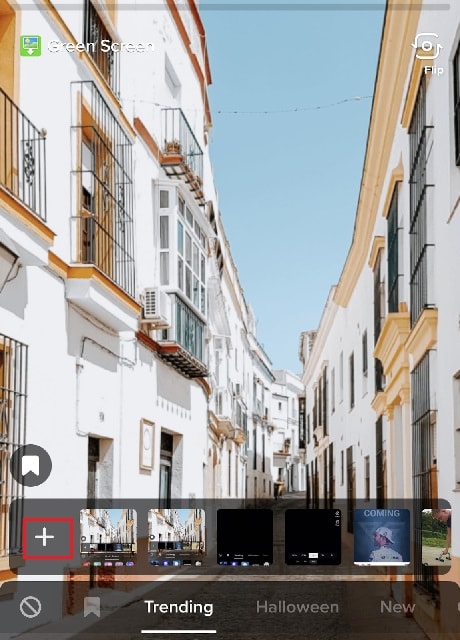
Step5 In order to use multiple pictures, you should stop recording in between and change your green screen image to anything you desire. Then tap on Record button again. TikTok will string your clips and it would appear that you have been changing multiple pictures of your background for your video.
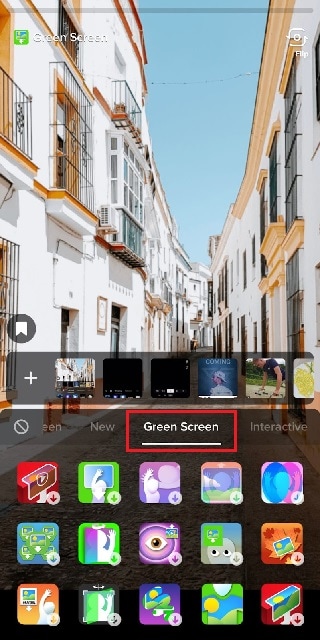
If you want to experiment with green scree effects, you can scroll down after tapping on Green Screen icon under Effects. You will see different types of green screen videos possible on TikTok to choose from.
Part 2. Creative Ideas to Make TikTok Green Screen Video
Now that you know how to add a video on TikTok green screen, you have to make the most out of it. If you are wondering how you can use green screen in your TikTok videos, here are some creative ideas for you.
Walking Out Videos – You can use green screen effect to show that you are walking out of plane, walking vertically on the wall like inception, walking on the roof of a building. In fact, you can show that you are walking out of popular monuments and palaces and trick your viewers into thinking that you were actually there.
Photoshoot Location – Create a TikTok video showing your favorite locations across the world where you dream of doing photoshoot. You can pose differently and place the location in your background through green screen effect.
How-To Video – If your TikTok channel is about tutorial and learning videos, you can explain things better by putting screenshots and multiple relevant pictures in the background so that viewers can get a pictorial representation of what you are speaking to them.
Mystery Story – You can a create short video describing unknowing facts and mysteries around certain places in the world. You can put photos or video clips of those mysterious places in your background to keep your viewers hooked and related to your narration.
Rate Them Video – You can use green screen effect to showcase your old Instagram photos or videos and rate them. This is an extremely popular trend in TikTok where people show their old photos, display work from the past, and rate them today.
Reveal Your Creation – Share your secrets or interesting stories behind some of the photos or videos you took in the past. You can talk about how creatively you took certain photos and put those photos in the background while discussing them.
Part 3. How to Make Green Screen Video on Computer?
If you have a computer and a webcam, you can record a green screen video on your computer. You can place the green screen in the background perfectly and place the webcam so that the background stays within the green screen. You will need a video recorder and a video editor to make green screen video as well as replace the green screen with any photo or video. We recommend Wondershare Filmora where you can record as well as edit green screen video.
Filmora is a professional video editor where you can record your computer screen as well as your webcam video with green screen background in Picture-in-Picture mode. After recording the video, you can replace the green screen with any video clip or photo instantly in a few steps. You can also fine-tune green screen effect for perfection. Therefore, you can save the video in any resolution and file format as per your preference.

Free Download For Win 7 or later(64-bit)
Free Download For macOS 10.14 or later
Conclusion
Adding green screen effect on TikTok videos can make your videos stand out. We have illustrated how to add multiple green screen videos on TikTok and your videos will have a better chance of getting viral. Keep the green screen ideas in mind while making TikTok green screen videos. If you want to make and edit green screen videos on computer, Wondershare Filmora is the best application available for Windows and Mac users.
Learn to Create Custom Sequence Presets in Premiere Pro for Efficient Video Editing. Ensure Consistency and Speed up Your Workflow with Personalized Settings
You’ve probably heard of Adobe Premiere Pro – it’s a top-tier video editing software that’s widely recognized in the market. But have you delved into the nitty-gritty of sequence presets? A custom sequence preset is your best friend for maintaining consistency across projects.
It allows users to save specific settings for sequence attributes like frame rate, resolution, and audio settings. Instead of reconfiguring these settings for each new project, a custom sequence preset lets you jump right into editing. Now, how do you create one? Keep reading!
Part 1: How to Create a Custom Sequence in Premiere Pro
Creating a custom sequence is like tailoring a shirt to fit you perfectly. Here’s a step-by-step guide to help you do just that:
Step 1: Displays the New Sequence Window
Begin by launching Adobe Premiere Pro. Once opened, navigate to the top menu and select File > New > Sequence. This will open up the New Sequence window, where all the magic happens!
Step 2: Change the Editing Mode to Custom in the Settings Panel
You’ll see several tabs in the New Sequence window, but we will focus on the “Settings” tab for our purposes. Click on it.
Here, you’ll find the ‘Editing Mode’ dropdown menu. By default, it’s set to a specific format like ‘DSLR’ or ‘AVCHD.’ Change this to ‘Custom.’ This will unlock a plethora of options for you to play with.
Deep Dive into Settings:
- Frame Size: Define your video’s width and height. Remember, 1920x1080 is Full HD, and 3840x2160 is 4K. Choose based on your project needs.
- Frame Rate: 24fps is the cinematic standard, but if you’re creating content for TV or web, 30fps or 60fps might be more suitable.
- Pixel Aspect Ratio: Stick with ‘Square Pixels’ unless you have a specific reason to do otherwise.
- Fields: Choose ‘No Fields’ for progressive footage. If you’re unsure, this is a safe bet.
- Audio Settings: Here, you can configure the sample rate, among other things. 48000Hz is standard for video.
Step 3: Give the New Preset a Name and Save It
Once you’ve customized the settings to your satisfaction, it’s time to save this configuration for future use. At the bottom of the New Sequence window, you’ll see a ‘Save Preset’ button. Click on it.
A pop-up window will show up, requesting you to provide a name for your new preset. Choose something descriptive so you can easily recognize it later. Once named, click ‘OK’.
Your custom sequence preset is now saved and will appear under the ‘Custom’ folder in the ‘Sequence Presets’ tab.
Part 2: Why Custom Sequence Presets are Essential for Efficient Editing
As you delve deeper into video editing, you’ll begin to appreciate the little things that shave off minutes from your workflow, allowing you to dedicate more time to the creative process. This is precisely where the utility of custom sequence presets in Premiere Pro comes into play. But why are these presets so crucial?
- Consistency Across Projects: If you’re managing multiple projects or a series of videos, having a standard format ensures that all your content has a uniform look and feel. Consistency is a hallmark of professional-grade content. It’s not just about the visuals – maintaining a uniform audio quality and format is equally significant. With a preset, you no longer need to remember the minutiae of each setting, ensuring consistency effortlessly.
- Speed Up Your Workflow: Every minute you spend adjusting the sequence settings is a minute less you have for cutting, color correcting, audio mixing, or adding those special effects that make your videos pop. Over time, those minutes can add up to hours. By using a custom sequence preset, you can jump straight into the creative part of editing without the preliminary setup.
- Avoid Common Mistakes: Have you ever rendered an entire project only to find that the frame rate was off or the audio was set to the wrong sample rate? These kinds of errors can occur when setting up a new sequence from scratch each time. By relying on a preset, you mitigate the risks of such oversights.
- Personalized Templates for Different Platforms: Different platforms may have varying preferred settings. For instance, the ideal video format for YouTube might differ from that of Instagram or TikTok. Instead of Googling these settings each time, you can have a custom sequence preset ready for each platform, ensuring your content is optimized wherever it’s destined.
- Ease of Collaboration: If you’re working as part of a team, having standard sequence presets ensures everyone is on the same page. This is particularly handy when multiple editors are working on different segments of the same project. With custom presets, you’re not just aligning sequences but also visions.
Incorporating this practice into your editing routine might initially seem trivial, but its benefits compound with time.
Part 3: Summary
Creating a custom sequence preset in Adobe Premiere Pro isn’t just about streamlining your workflow – it’s about ensuring consistency across your projects.
By saving your most-used settings, you’re creating a base template that can be pulled up any time, granting you more time for the creative process.
Adobe Premiere Pro’s interface is designed to make tasks like these intuitive, so even if you’re a beginner, with a bit of practice, you’ll be creating custom sequence presets like a pro.
What Should Be Considered to Choose A Nice GoPro for Vlogging?
Vlogging has developed into quite an industry in a short period. We have seen many people building up their image as professional vloggers who have entertained millions of users with their unique content. However, while understanding the dynamics of vlogging, it is particularly important to set up the equipment that would help the user in their vlogging.
This article discusses very proficient equipment, GoPro for YouTubers, which has been considered across various scales for professional vlogging. We shall be providing our readers with an idea of the best GoPro they can be used to cover their vlogs.
In this article
01 What Need to Be Considered Before Choosing a GoPro for Vlogging?
02 8 Best GoPro for Vlogging in 2022
Part 1: What Need to Be Considered Before Choosing a GoPro for Vlogging?
GoPro cameras are known for their versatility. While being simply the best tool for vlogging, they are known for offering several impressive features. This, however, needs to be considered before choosing a GoPro for vlogging. Get ready as we are about to figure them out.

1. Portable and Easy to Carry
Isn’t it great that you are not required to carry heavy equipment everywhere? GoPro cameras offer convenience to their users by providing small sizes and rugged designs. This can prove to be extremely good for vloggers who have rough uses.
2. Multiple Video Features
Are you tired of capturing a simple video? GoPro offers you multiple options while capturing videos, which come in the form of time-lapses. Get creative with the videos that you shoot across your vlogs. Isn’t it great?
3. Affordability
GoPro should never be judged by its size. These tools are considered the most high-end cameras that can be used for vlogging. As they compete for professional cameras, they are considered relatively affordable in their comparison, which makes them a suitable choice in vlogging.
4. Shooting Modes
Have you ever heard about shooting modes? GoPro for vlogging comes up with different modes that can help you manage impressive visuals for your videos. GoPro helps you design content that is visually appealing to the viewers.
5. Quality of Video
Have you ever thought to have video resolutions up to 6K in a small camera? GoPro provides you the opportunity of witnessing history across the cameras with its stunning video resolution features. This is truly exceptional in the video-making industry.
Part 2: 8 Best GoPro for Vlogging in 2022
Once you are aware of what should be kept in mind for selecting a GoPro for vlogging, it is time to come up with some of the best-recommended models according to the use case of the vlogger. Let’s get started on this exceptional journey of finding the best GoPro for yourselves. Come right away!
1. GoPro Hero10 Black
Price: $499.99
The first and foremost model that may come into our mind is the GoPro Hero10 Black, which is, without any discussion, the most advanced model in GoPro cameras. Taking the features to the next level, GoPro Hero10 Black is available with a 5.3K resolution, which is the smoothest resolution in videos you can ask for. It provides faster processors than its predecessors, with features that make it the top-of-the-line choice.
You can find improved stabilization across Hero10; however, the price tag across the camera is as much as a mirrorless camera. Absolutely stunning, it is!

2. GoPro Hero9 Black
Price: $399.99
Another impressive model in the GoPro products is the Hero9 Black model, referred to as the previous iteration of the Hero10. Although it is not as remarkable as the Hero10, it takes up videos with 5K Ultra HD resolution, with a 1080p live streaming facility. Talking about the stabilization of this camera, it isn’t as proficient as the Hero10; however, it still performs better than the previous iterations.
A heavier camera’s multifunctional characteristics are a few major points that need to be considered for Hero9 Black. Do you wish to buy this?

3. GoPro Hero8 Black
Price: $349.98
GoPro cameras are known for their effective sizes and high-performance results. GoPro Hero8 Black is recognized among the most versatile GoPro for YouTubers, accompanied by the small size. Being the first GoPro camera that provides a microphone to its users, GoPro Hero8 changed the dynamics of video making with its effective features. Users can cover 4K Ultra HD video across the device with a 12MP resolution for photos.
The Media Mode offered across the device makes video enhancement possible across GoPro for vlogging, which is commendable.

4. GoPro Hero7 Silver
Price: $299.99
Are you confused about the GoPro that fits your needs? GoPro Hero7 Silver is the most budget-friendly vlogging camera that can be found across the market. GoPro Hero7 Silver can be your perfect companion in tough vlogs with a rugged outlook and waterproofing. It provides voice control, two-mic, slo-mo, time-lapse across a 4K Ultra HD resolution, which broadens the possibility for the users.
This GoPro for YouTubers is still among the people’s favorites, which makes it a consistent choice among newbies. Isn’t it great?

5. GoPro Max
Price: $549.98
Want a camera that captures 360-degree shots? GoPro Max is the camera that you should look for in the market. GoPro Max is a very impressive up-gradation across GoPro cameras, which came to offer more features to it than before. The two 180-degree cameras provide better stabilization, thus crossing cameras like Hero8 quite easily. The details are extremely proficient in this design with improved mic facilities and other characteristics.
If you wish to shift yourselves from a single-camera device, this GoPro for vlogging is the perfect choice you can come by.

6. GoPro Hero7 Black
Price: $319.99
GoPro Hero7 Black, though introduced in 2018, came out to be a quite advanced version of the previous GoPro cameras. This camera allows 4K video resolution shooting under 60fps, stabilizing for smoothing out shakes and vibrations. The video quality from a GoPro is different from the rest, which makes it basic equipment in vlogging.
This GoPro for YouTubers offered excessive controls to its user base, with commands that were able to neutralize and optimize video enhancement. What a great choice!

7. GoPro Fusion
Price: $279.99
This is a hugely different camera across the complete GoPro series. Fusion is known for many things, out of which the size comes out to be the main reason for its popularity. This iteration in GoPro cameras provides 5.2K video resolution quality under a pocket-sized model. Although it is quite durable compared to the other cameras in the market for vlogging, the price tag across this device is usually not much acceptable for users.
It is a bold choice to have Fusion as your GoPro for vlogging, which also allows adding audio across the 360-degree feature. This is sensational.

8. GoPro Hero7 White
Price: $274.49
GoPro Hero7 White is a perfect option to start vlogging. Designed for beginners, it provides Full HD video resolution with a touch screen for better functioning. Although the camera is quite downgraded in terms of the features it offers, it is basically offered for catering to user-friendliness.
It also offers video stabilization for introducing users to a certain environment in video editing. With an affordable price tag, this camera can be the perfect start as your GoPro for vlogging. Do you wish to get started?

Closing Words
Got to know about the best GoPro cameras? Are you ready to select your GoPro for vlogging? We hope that this article has featured the most optimal options. Go through this article to get the perfect start for your vlogging journey. However, if you wish to have a good experience with video editing, you should consider working on Wondershare Filmora .
The tool manages all GoPro videos to perfection. It is truly an exceptional platform to work with. Along with that, Filmora provides a list of impressive video editing functions which can be adopted for making the video look professional. That is why this platform is recommended across multiple stages. Surely the best editor you can use!
Wondershare Filmora
Get started easily with Filmora’s powerful performance, intuitive interface, and countless effects!
Try It Free Try It Free Try It Free Learn More >

02 8 Best GoPro for Vlogging in 2022
Part 1: What Need to Be Considered Before Choosing a GoPro for Vlogging?
GoPro cameras are known for their versatility. While being simply the best tool for vlogging, they are known for offering several impressive features. This, however, needs to be considered before choosing a GoPro for vlogging. Get ready as we are about to figure them out.
1. Portable and Easy to Carry
Isn’t it great that you are not required to carry heavy equipment everywhere? GoPro cameras offer convenience to their users by providing small sizes and rugged designs. This can prove to be extremely good for vloggers who have rough uses.
2. Multiple Video Features
Are you tired of capturing a simple video? GoPro offers you multiple options while capturing videos, which come in the form of time-lapses. Get creative with the videos that you shoot across your vlogs. Isn’t it great?
3. Affordability
GoPro should never be judged by its size. These tools are considered the most high-end cameras that can be used for vlogging. As they compete for professional cameras, they are considered relatively affordable in their comparison, which makes them a suitable choice in vlogging.
4. Shooting Modes
Have you ever heard about shooting modes? GoPro for vlogging comes up with different modes that can help you manage impressive visuals for your videos. GoPro helps you design content that is visually appealing to the viewers.
5. Quality of Video
Have you ever thought to have video resolutions up to 6K in a small camera? GoPro provides you the opportunity of witnessing history across the cameras with its stunning video resolution features. This is truly exceptional in the video-making industry.
Part 2: 8 Best GoPro for Vlogging in 2022
Once you are aware of what should be kept in mind for selecting a GoPro for vlogging, it is time to come up with some of the best-recommended models according to the use case of the vlogger. Let’s get started on this exceptional journey of finding the best GoPro for yourselves. Come right away!
1. GoPro Hero10 Black
Price: $499.99
The first and foremost model that may come into our mind is the GoPro Hero10 Black, which is, without any discussion, the most advanced model in GoPro cameras. Taking the features to the next level, GoPro Hero10 Black is available with a 5.3K resolution, which is the smoothest resolution in videos you can ask for. It provides faster processors than its predecessors, with features that make it the top-of-the-line choice.
You can find improved stabilization across Hero10; however, the price tag across the camera is as much as a mirrorless camera. Absolutely stunning, it is!
2. GoPro Hero9 Black
Price: $399.99
Another impressive model in the GoPro products is the Hero9 Black model, referred to as the previous iteration of the Hero10. Although it is not as remarkable as the Hero10, it takes up videos with 5K Ultra HD resolution, with a 1080p live streaming facility. Talking about the stabilization of this camera, it isn’t as proficient as the Hero10; however, it still performs better than the previous iterations.
A heavier camera’s multifunctional characteristics are a few major points that need to be considered for Hero9 Black. Do you wish to buy this?
3. GoPro Hero8 Black
Price: $349.98
GoPro cameras are known for their effective sizes and high-performance results. GoPro Hero8 Black is recognized among the most versatile GoPro for YouTubers, accompanied by the small size. Being the first GoPro camera that provides a microphone to its users, GoPro Hero8 changed the dynamics of video making with its effective features. Users can cover 4K Ultra HD video across the device with a 12MP resolution for photos.
The Media Mode offered across the device makes video enhancement possible across GoPro for vlogging, which is commendable.
4. GoPro Hero7 Silver
Price: $299.99
Are you confused about the GoPro that fits your needs? GoPro Hero7 Silver is the most budget-friendly vlogging camera that can be found across the market. GoPro Hero7 Silver can be your perfect companion in tough vlogs with a rugged outlook and waterproofing. It provides voice control, two-mic, slo-mo, time-lapse across a 4K Ultra HD resolution, which broadens the possibility for the users.
This GoPro for YouTubers is still among the people’s favorites, which makes it a consistent choice among newbies. Isn’t it great?
5. GoPro Max
Price: $549.98
Want a camera that captures 360-degree shots? GoPro Max is the camera that you should look for in the market. GoPro Max is a very impressive up-gradation across GoPro cameras, which came to offer more features to it than before. The two 180-degree cameras provide better stabilization, thus crossing cameras like Hero8 quite easily. The details are extremely proficient in this design with improved mic facilities and other characteristics.
If you wish to shift yourselves from a single-camera device, this GoPro for vlogging is the perfect choice you can come by.
6. GoPro Hero7 Black
Price: $319.99
GoPro Hero7 Black, though introduced in 2018, came out to be a quite advanced version of the previous GoPro cameras. This camera allows 4K video resolution shooting under 60fps, stabilizing for smoothing out shakes and vibrations. The video quality from a GoPro is different from the rest, which makes it basic equipment in vlogging.
This GoPro for YouTubers offered excessive controls to its user base, with commands that were able to neutralize and optimize video enhancement. What a great choice!
7. GoPro Fusion
Price: $279.99
This is a hugely different camera across the complete GoPro series. Fusion is known for many things, out of which the size comes out to be the main reason for its popularity. This iteration in GoPro cameras provides 5.2K video resolution quality under a pocket-sized model. Although it is quite durable compared to the other cameras in the market for vlogging, the price tag across this device is usually not much acceptable for users.
It is a bold choice to have Fusion as your GoPro for vlogging, which also allows adding audio across the 360-degree feature. This is sensational.
8. GoPro Hero7 White
Price: $274.49
GoPro Hero7 White is a perfect option to start vlogging. Designed for beginners, it provides Full HD video resolution with a touch screen for better functioning. Although the camera is quite downgraded in terms of the features it offers, it is basically offered for catering to user-friendliness.
It also offers video stabilization for introducing users to a certain environment in video editing. With an affordable price tag, this camera can be the perfect start as your GoPro for vlogging. Do you wish to get started?
Closing Words
Got to know about the best GoPro cameras? Are you ready to select your GoPro for vlogging? We hope that this article has featured the most optimal options. Go through this article to get the perfect start for your vlogging journey. However, if you wish to have a good experience with video editing, you should consider working on Wondershare Filmora .
The tool manages all GoPro videos to perfection. It is truly an exceptional platform to work with. Along with that, Filmora provides a list of impressive video editing functions which can be adopted for making the video look professional. That is why this platform is recommended across multiple stages. Surely the best editor you can use!
Wondershare Filmora
Get started easily with Filmora’s powerful performance, intuitive interface, and countless effects!
Try It Free Try It Free Try It Free Learn More >
Also read:
- New 2024 Approved 15 Best CapCut Templates for Slow Motion Editing
- In 2024, 4 Methods to Merge MP4 and MP3
- Want to Make a Single Video From Different Clips? Follow These Ways to Learn About How to Merge Clips in DaVinci Resolve for 2024
- In 2024, Top 5 Tools to Help You Know More Freeze-Frame Video Editing Skills
- New Advancements in Game Recording Software A Comprehensive Overview
- Updated In 2024, 5 Tried-And-True Ways to GIF Making
- Updated In 2024, How Much Wedding Videographer Cost
- The Ultimate Guide to Using AR Emoji Stickers in Your Videos
- How To Make a Timelapse in After Effects for 2024
- New How to Make a Movie with Windows Movie Maker?
- Create Amazing Slow-Motion Videos 8 Affordable Slow-Motion Cameras
- Updated Top 22 Free Video Editing Software for 2024
- Do You Want to Stream and Record at the Same Time but Cant Find an Easy Solution? This Guide Will Help You Get This Done Using Three Easy-to-Follow Methods
- Updated Focusing On The Best Ways To Convert Slow-Motion Video to Normal for 2024
- New How to Create a Custom Slide Show in PowerPoint
- Updated Quick Answer What Is a Transparent Logo and Why Do You Need It
- 2024 Approved An Ultimate Guide on the Significance of Music in Videos and How to Choose the Right Music for Your Videos with Wondershare Filmora
- New In 2024, Complete Guide to Make a Super Easy Rotating Video Effect
- New In 2024, Best Way To Color Grading & Color Correction in Filmora
- In 2024, Ultimate Guide to Making Cinematography for Music Video
- 2 Practical Ways to Combine Videos on TikTok
- New How to Livestream Zoom on Facebook?
- New In 2024, How to Add a Spooky Shadow Effect
- New Learn How to Slow Down Time-Lapse Videos on iPhone to Make Detailed and Captivating Slow-Motion Effects in Your Time-Lapse Captures
- This Article Presents a Guide to Using the Keyframe Feature for Creating Competent Films with Detailed Instructions and Filmoras Grow and Win Program Contest
- New 10+ Royalty-Free 5 Second Countdown Footage HD & 4K Clips Included
- New If You Dont Know How to Blur a Part of a Video, Youre in the Right Place. We Have Provided All the Details You Need to Help You Blur a Still or Moving Portion of Your Video
- 2024 Approved Color Lut in Video - Color Grade Your Video
- Updated 2024 Approved Step by Step to Rotate Video in Google Photos
- Looking for the Different Ar Video Effects to Include in Your Film? Check Out This Article for the Best 10 Augmented Reality Effects and the Fun Ar Effects in Filmora for 2024
- Updated 2024 Approved Add Selective Color Effect to Your Videos Using Filmora
- 2024 Approved How Long Does It Take To Edit A Video
- 2024 Approved Want to Know the Simplest Way to Match the Colors of Your Photos in Photoshop? The Following Discussion Will Help Match Color in Photoshop, Almost Effortlessly
- New Slow Down or Speed Up Videos Easily on PC, Online, and Phone
- Updated In 2024, Free 3D Intro Makers
- The Premiere Pro Video Templates Help Make Original Content of Broadcast Quality. The Article Introduces 10 Free Premiere Pro Templates that Are Sure to Make Your Life Easy
- How to Use Filmora Slideshow Maker for Making Slideshow, In 2024 What Is Slideshow Filmora? Know the Steps to Make Filmora Slideshow. What Are Steps to Make Filmora Slideshow Template?
- 2024 Approved Finding the Best Game Recorder for PC
- Updated In 2024, Discover the Top Slow Motion Camera App to Use
- 2024 Approved You Can Learn How to Color Grade Your Picture in Lightroom Effectively. By Understanding the Process of Color Grading in Lightroom, You Can Create Unique Works, and Improve Your Abilities
- Updated In 2024, Splitting Video Into Frames with the FFmpeg Step by Step
- How to Convert SRT to DOCX
- 2024 Approved How to Save As MP4 File on Windows Movie Maker?
- How to Add a Custom Transition to OBS for 2024
- 2024 Approved Wondering How to Rotate a Video in Windows at Any Desired Angle and Save It Permanently? Find Out All the Different Ways to Rotate Videos Temporarily as Well as Permanently
- Complete Review & Guide to Techeligible FRP Bypass and More For Infinix
- 4 Most-Known Ways to Find Someone on Tinder For Vivo X90S by Name | Dr.fone
- Updated A Detailed Guide to Making Your Pictures Speak
- In 2024, How to Unlock SIM Card on Apple iPhone 13 Pro online without jailbreak
- How to Cast Google Pixel 7a to Computer for iPhone and Android? | Dr.fone
- New Best 10 Anime Websites to Watch Dubbed Anime Free for 2024
- In 2024, How Do You Get Sun Stone Evolutions in Pokémon For OnePlus 11 5G? | Dr.fone
- In 2024, Ultimate Guide to Catch the Regional-Located Pokemon For Nokia 130 Music | Dr.fone
- How to identify malfunctioning your drivers with Windows Device Manager on Windows 11 & 10
- Unlock android phone if you don't have Honor V Purse fingerprint
- Gmail Not Working on Itel A70 7 Common Problems & Fixes | Dr.fone
- How to Mirror PC Screen to Xiaomi Redmi Note 12 Pro 4G Phones? | Dr.fone
- New In 2024, Best GIF Resizers to Reduce GIF Size
- Fake the Location to Get Around the MLB Blackouts on Samsung Galaxy M14 4G | Dr.fone
- In 2024, Unlocking Your Android Phone Everything You Need to Know to Use Any SIM Card
- In 2024, A Step-by-Step Guide on Using ADB and Fastboot to Remove FRP Lock on your Samsung Galaxy M54 5G
- How to Simulate GPS Movement in AR games On Oppo Reno 9A? | Dr.fone
- New How To Use Korean to English Video Translators for Creators for 2024
- Undelete lost call logs from Tecno Camon 30 Pro 5G
- In 2024, How to Bypass iCloud Lock on Apple iPhone 6
- In 2024, 3 Methods to Mirror Infinix Smart 7 to Roku | Dr.fone
- In 2024, 3 Easy Ways to Factory Reset a Locked iPhone 6 Without iTunes
- In 2024, How Can We Unlock Our Xiaomi 13 Ultra Phone Screen?
- Best Fixes For Poco F5 5G Hard Reset | Dr.fone
- Title: New Here Are a Number of Tools Used in the Market to Resize the Videos. We Are Going to Teach How to Resize the Video in Davinci Resolve and Fimora Wondershare. Once You Have Mastered How to Resize a Video, It Would Be as Simple as the Click
- Author: Chloe
- Created at : 2024-04-24 07:08:20
- Updated at : 2024-04-25 07:08:20
- Link: https://ai-editing-video.techidaily.com/new-here-are-a-number-of-tools-used-in-the-market-to-resize-the-videos-we-are-going-to-teach-how-to-resize-the-video-in-davinci-resolve-and-fimora-wondersha/
- License: This work is licensed under CC BY-NC-SA 4.0.
