
:max_bytes(150000):strip_icc():format(webp)/TheWolfAmongUsBigby-793544cded2749488ae1d20113d8d73a.jpg)
New How to Add Background to Video With/Without a Green Screen
How to Add Background to Video With/Without a Green Screen
Versatile Video Editor - Wondershare Filmora
An easy yet powerful editor
Numerous effects to choose from
Detailed tutorials provided by the official channel
Video’s background is the most crucial part of video editing. When filming, the backgrounds cannot be more attractive with the natural background, so editors use background effects to change the background of the video and make it more appealing. Wondershare Filmora is a fantastic software to add background to a video without a green screen. The good news is that Filmora offers various tools to remove background from a video, add a background, add transition effects, and all these by using virtual reality to complete the task. It has several effects and themes and has tools to remove background effectively. Many editors are available in the market for background effects but with limitations. Filmora offers an effective way to add background without a green screen and with a green screen. You will also be able to add a background to the green screen photo online.
Let us discuss the finest tools available in Filmora to change the background easily and quickly. This article will concentrate on two methods to edit background.
● How to put a background on a video without a green screen.
● How to add background to video with green screen.
If you wonder how to add a background to a green screen in after effects, it involves a very long step and quality footage to remove the background.
In this article
01 [Add background to green screen video](#Part 1)
02 [Add background to video without a green screen.](#Part 2)
Part 1 Add background to green screen video
The green screen effect is the advanced feature in overlays. It makes the background of the clips transparent. If you want to add background to green screen video online, there are many websites available but always with some limitations in resolutions and quality while exporting the video. Filmora is a useful tool in video editing to create animatic and superimpose backgrounds like any jet craft or a bird flying. You can easily make these changes to the video using Filmora by using a green screen footage clip or a plain green screen in the background while creating the footage. We will focus on putting a background on a green screen in this part.
Let us discuss how to add background to green screen are pretty simple using Filmora.
Step1 Add Overlay clip to timeline
Select “Create New Project” to start the editing. At first, you have to choose both the overlay clip and background clip and add them to the timeline. You can either import from the library or drag the files to the timeline in the positions shown in the picture.
You can edit the overlay clip individually by adding animation, effects, filterers, mask frame, and blending modes (multiply, darken, or color burn). Let us move to the next step, how to put the background on the green screen.
Step2 Make a Green Screen
Let’s get into the first step to add background to the green screen video. In this part, you will be using a green screen to remove the background. So, import the green screen clips to the media library. Now, add the background green screen to the timeline above the video track as shown in the picture.

● Move the cursor to the green screen on the timeline and double-click on it.
● The settings box will appear on the left.
● You have to tick the Chroma key there.
The green screen effects will be applied automatically.

The video can be refined with many additional tools like Tolerance, Offset, and Alpha channel to make the video background clear. Once satisfied with the results, click on OK. Now that we have discussed how to add background to green screen video with the help of Filmora let’s now discuss how to add a background to a video without a green screen.
Part 2 Add background to video without a green screen
Let us learn how to add a background to a video without a green screen. In Filmora, there is a special effect called the Human segmentation effect to isolate people from the backgrounds without a green screen. All it takes is a few clicks. Once you remove the surround, you can add an image or a video clip to go well with your original video. Another unique feature is that after removing the background from the video clip, you can add it to the overlay of another video clip. It works well when it has a natural and single person in front of the camera.
Let’s discuss how to add background without a green screen.
Wondershare Filmora
Get started easily with Filmora’s powerful performance, intuitive interface, and countless effects!
Try It Free Try It Free Try It Free Learn More about Filmora>

Step1 Import Media to Timeline
Import the video clip from the device. You can also drag the video clip from the timeline. You can use other effects from Filmora to make necessary changes like editing, cutting, trimming, filter and transition.

Step2 Adding Human Segmentation Effect
To see the options to add background to video without a green screen, go to Effects – AI Portrait, and you can see a list of all AI portrait effects here. You can see the human segmentation effect, drag and place it on the top of your video clip in the timeline.

Step3 Preview and Adjust
After the human segmentation effect, the people will be isolated separately from the background, shown in the picture. Double click on the effects in the timeline where you can edit, adjust, thickness, feather, and preview.

Step4 Replace and change video background
If you wish to change the background, import an image or video below your main track. Now, that is how to add a background without a green screen.

Thus, you learned to create your green screen backgrounds and add a background to a green screen video using the favorite video effect software, Filmora.
Conclusion
Thus, in this guide, you learned how to add a background to a video without a green screen, and we hope this will be useful. You can find multiple software online for adding a background to a green screen with additional background effects. However, the Human segmentation available in Filmora is the easiest way to change scenes and clone people. With support to over 100 video tracks, Filmora is by far the best tool that allows you to change the setting with and without a green screen.
Video’s background is the most crucial part of video editing. When filming, the backgrounds cannot be more attractive with the natural background, so editors use background effects to change the background of the video and make it more appealing. Wondershare Filmora is a fantastic software to add background to a video without a green screen. The good news is that Filmora offers various tools to remove background from a video, add a background, add transition effects, and all these by using virtual reality to complete the task. It has several effects and themes and has tools to remove background effectively. Many editors are available in the market for background effects but with limitations. Filmora offers an effective way to add background without a green screen and with a green screen. You will also be able to add a background to the green screen photo online.
Let us discuss the finest tools available in Filmora to change the background easily and quickly. This article will concentrate on two methods to edit background.
● How to put a background on a video without a green screen.
● How to add background to video with green screen.
If you wonder how to add a background to a green screen in after effects, it involves a very long step and quality footage to remove the background.
In this article
01 [Add background to green screen video](#Part 1)
02 [Add background to video without a green screen.](#Part 2)
Part 1 Add background to green screen video
The green screen effect is the advanced feature in overlays. It makes the background of the clips transparent. If you want to add background to green screen video online, there are many websites available but always with some limitations in resolutions and quality while exporting the video. Filmora is a useful tool in video editing to create animatic and superimpose backgrounds like any jet craft or a bird flying. You can easily make these changes to the video using Filmora by using a green screen footage clip or a plain green screen in the background while creating the footage. We will focus on putting a background on a green screen in this part.
Let us discuss how to add background to green screen are pretty simple using Filmora.
Step1 Add Overlay clip to timeline
Select “Create New Project” to start the editing. At first, you have to choose both the overlay clip and background clip and add them to the timeline. You can either import from the library or drag the files to the timeline in the positions shown in the picture.
You can edit the overlay clip individually by adding animation, effects, filterers, mask frame, and blending modes (multiply, darken, or color burn). Let us move to the next step, how to put the background on the green screen.
Step2 Make a Green Screen
Let’s get into the first step to add background to the green screen video. In this part, you will be using a green screen to remove the background. So, import the green screen clips to the media library. Now, add the background green screen to the timeline above the video track as shown in the picture.
● Move the cursor to the green screen on the timeline and double-click on it.
● The settings box will appear on the left.
● You have to tick the Chroma key there.
The green screen effects will be applied automatically.
The video can be refined with many additional tools like Tolerance, Offset, and Alpha channel to make the video background clear. Once satisfied with the results, click on OK. Now that we have discussed how to add background to green screen video with the help of Filmora let’s now discuss how to add a background to a video without a green screen.
Part 2 Add background to video without a green screen
Let us learn how to add a background to a video without a green screen. In Filmora, there is a special effect called the Human segmentation effect to isolate people from the backgrounds without a green screen. All it takes is a few clicks. Once you remove the surround, you can add an image or a video clip to go well with your original video. Another unique feature is that after removing the background from the video clip, you can add it to the overlay of another video clip. It works well when it has a natural and single person in front of the camera.
Let’s discuss how to add background without a green screen.
Wondershare Filmora
Get started easily with Filmora’s powerful performance, intuitive interface, and countless effects!
Try It Free Try It Free Try It Free Learn More about Filmora>
Step1 Import Media to Timeline
Import the video clip from the device. You can also drag the video clip from the timeline. You can use other effects from Filmora to make necessary changes like editing, cutting, trimming, filter and transition.
Step2 Adding Human Segmentation Effect
To see the options to add background to video without a green screen, go to Effects – AI Portrait, and you can see a list of all AI portrait effects here. You can see the human segmentation effect, drag and place it on the top of your video clip in the timeline.
Step3 Preview and Adjust
After the human segmentation effect, the people will be isolated separately from the background, shown in the picture. Double click on the effects in the timeline where you can edit, adjust, thickness, feather, and preview.
Step4 Replace and change video background
If you wish to change the background, import an image or video below your main track. Now, that is how to add a background without a green screen.
Thus, you learned to create your green screen backgrounds and add a background to a green screen video using the favorite video effect software, Filmora.
Conclusion
Thus, in this guide, you learned how to add a background to a video without a green screen, and we hope this will be useful. You can find multiple software online for adding a background to a green screen with additional background effects. However, the Human segmentation available in Filmora is the easiest way to change scenes and clone people. With support to over 100 video tracks, Filmora is by far the best tool that allows you to change the setting with and without a green screen.
How to Change Video Thumbnail on Google Drive
What is a Google drive?
“Google drive is a self-hosted cloud-based site that provides free space to store your files and pictures to share them with your friends and family”.
Google Drive is also used to promote businesses or websites. You can upload a video to Google Drive and embed the file in your blog or any other website.
What is a Thumbnail?
“A Thumbnail is a still image that acts as
a preview image of your video.”
A thumbnail is the first thing seen by the viewers while watching videos. It is the only thing that forces the viewer either to watch the video or not because it previews the video content. It is also shown in the search results. A thumbnail is just like the cover or title of a book. You will read a book by its cover. In the same way, a video is viewed by its thumbnail.
Google drive is also used for the promotion of websites and businesses. It does not offer to add a thumbnail or cover image like YouTube has the option to set and can change the thumbnail of the video. As we all know Google drive is not a streaming platform and has its own boundaries.
Normally, the google drive can generate a thumbnail from the video and uses the generated thumbnail ignoring the one you have uploaded. But on the other hand, if it cannot generate a thumbnail the uploaded thumbnail will be displayed. Usually, the default thumbnail may have weird facial expressions or may not be attractive for the viewers to open the video.
Here we are discussing a few alternatives to change the thumbnail of the video in Google drive.
Select a separate image to be housed in a separate column to set as a thumbnail image and then go into the details, title, and Image settings.

How to Add Thumbnails to the Video Using Wonder Share Filmora 11
Wonder Share Filmora 11 is an all-in-one video editing platform that provides powerful, creative, and simple interphase to edit videos and images in a few clicks. It has a ton of amazing features that make your videos, images, and audio stands out. You can edit your videos and images in a great cinematic form using its effects, transitions, overlays, text, and a lot more. Do not wait, go and download Filmora 11 and there are more tools for you to discover.
I am going to show you how to create a thumbnail of the video in Filmora11.
Let us get started!
- Open Wonder Share Filmora 11 and click on New Project.

- Drag the image of your choice into the timeline.

- Drag the image of your choice into the timeline.
- Click on the AI-Portrait option from the Effects
- Drag the Human Segmentation effect over the clip into the timeline.
Now you see that the subject of the video thumbnail is selected and the background has been removed.
The AI-Portrait is a very useful effect, it allows you to quickly remove the background through artificial intelligence.

Now you can see the subject has been selected and the background has been removed.
- Now Scale up the photo to be visible on the screen.
- You can set the border settings here to make it more smooth and attractive.

I have dragged my image to the left as I want my text to the right side.
- Let’s drag the desired background into the timeline. ( I got this background from Pexel.com)

- Click on sample colors under the media option to add the gradient overlay.
- Drag your favorite Gradient and drop it below the background layer.

- Now select the Overlay option under the Effects tab and then Hit Frames.
- Add your desired frame between a photo layer and a background layer to show depth in your thumbnail.

So, I choose cinema 21.9 frames to add two black bars behind our subject.
Let’s choose your desired Title from the Library. Here are tons of title packs, you can choose from.
- Select the Titles option under the Titles tab then select your desired Title.
- Drag and locate the title in the place of your taste and then write the text you want.
- Adjust your text accordingly, you can change the font size, color, style, and much more

- Now simply click the snapshot button below the preview screen and the snapshot will be saved in default directory and automatically imported to the medium room.
- Right-click on the snapshot in the media pool and click on Reveal in explorer.
- Your thumbnail will be saved in the folder, you can upload it on the Google drive.

Unfortunately, there is no way to change the thumbnail of the video on Google drive. But we can take help from other websites to customize the thumbnail image and then upload it to Google drive. Let us discuss a few free websites used for the thumbnail of a video on Google drive.
Here are the best possible ways to change the thumbnail of the video stored in the Google drive.
1. Change the Thumbnails of Google drive using the Wix.
The Wix editor is a platform that is used to edit and make your own website. It provides easy interphase to customize the site using its amazing features. There are hundreds of features to build your own site or image by adding customizing elements and choosing color and text theme.

You can use the Wix to set or change your thumbnail to make your video attractive and eye-catching. The cover image can be by uploading and a frame can be selected from the video.
Let’s get started!
- Open the Wix editor from the browser.
- Select a video from your video library.
- Hit the Edit icon at the video

- Click on change cover under the cover image.

- Select the desired frame from the list, or you can upload your own by clicking the “+”
- Click on the Set as Cover

- Now upload the video on Google drive.

- If the file fails to upload, clear your cache and cookies and check your internet connection.
2. Change the Thumbnails of Google drive using Canvas.
Canvas is an online graphic design platform that allows and provides you with user-friendly interphase to make eye-catching logos, thumbnails, posters, and a ton of other visual content. You need not download any application and moreover, it is free to use. It saves your previous tasks and has hundreds of frames, and designs to select according to your taste or you can make your own design by editing.
So let’s start!
- Select a template of your choice from the library.
- Canvas provides you with more than 2 million images in the library but you can also upload your own image for Thumbnail.
- Click on the placeholder text to write your own text.
- You can change your image fonts, color, size, and
- You can easily customize your video thumbnail and upload it on Google drive.
- Download the video thumbnail.
- Now upload the Thumbnail on Google Drive.

3. Change the Thumbnails of Google drive using VLC Media Player.
VLC Media Player is a free and open-source media player that plays wide range of media files like images, video files as well as audio and DVDs. It is 100% free software and safe from viruses.

Here are the steps used to change the cover photo of your video using the VLC Media Player.
Let’s dive in…
- Go to the tools and select information from the drop-down list.
- The Current Media Information tab will be shown.
- There will be a picture or VLC icon at the bottom-right corner.
- Right-click on that picture or icon and select the download cover art or add cover art from file.
- Download cover art; if you want to add pictures from the album from the internet.
- Add cover art from file; if you want to put your own thumbnail image and browse from the storage.

The information will be saved automatically and the thumbnail will be changed when you open the file.
Important points.
You can use any other video editor to change the thumbnail of the video but keep a few points in mind.
- Thumbnails should be added at the start of the video.
- The Thumbnail should be a few seconds long so that google drive considers it as a cover image.
- It works for short videos but it can be applied for long videos.
- Use a high-quality HD image for the thumbnail so that Google Drive can accept it as valuable for the thumbnail image.
- Thumbnails should be uploaded in PNG, GIF, or JPG
- The image ratio should be 16:9 and resolution of 1920x1080 pixels for PNG and JPG and 960x480 pixels for GIFs.
- The maximum file size should be
- The minimum width should be 220 pixels.

Even after keeping an eye on these important points, google drive sometimes does not show the thumbnail as a cover photo.
Conclusion.
In the above article, I have discussed a couple of different ways to add a thumbnail of the video and upload it on Google drive. I personally recommend Wonder Share Filmora 11 to make and change thumbnail image of the video as it is a very powerful as well as simple tool.
How to Add Thumbnails to the Video Using Wonder Share Filmora 11
Wonder Share Filmora 11 is an all-in-one video editing platform that provides powerful, creative, and simple interphase to edit videos and images in a few clicks. It has a ton of amazing features that make your videos, images, and audio stands out. You can edit your videos and images in a great cinematic form using its effects, transitions, overlays, text, and a lot more. Do not wait, go and download Filmora 11 and there are more tools for you to discover.
I am going to show you how to create a thumbnail of the video in Filmora11.
Let us get started!
- Open Wonder Share Filmora 11 and click on New Project.
- Drag the image of your choice into the timeline.
- Drag the image of your choice into the timeline.
- Click on the AI-Portrait option from the Effects
- Drag the Human Segmentation effect over the clip into the timeline.
Now you see that the subject of the video thumbnail is selected and the background has been removed.
The AI-Portrait is a very useful effect, it allows you to quickly remove the background through artificial intelligence.
Now you can see the subject has been selected and the background has been removed.
- Now Scale up the photo to be visible on the screen.
- You can set the border settings here to make it more smooth and attractive.
I have dragged my image to the left as I want my text to the right side.
- Let’s drag the desired background into the timeline. ( I got this background from Pexel.com)
- Click on sample colors under the media option to add the gradient overlay.
- Drag your favorite Gradient and drop it below the background layer.
- Now select the Overlay option under the Effects tab and then Hit Frames.
- Add your desired frame between a photo layer and a background layer to show depth in your thumbnail.
So, I choose cinema 21.9 frames to add two black bars behind our subject.
Let’s choose your desired Title from the Library. Here are tons of title packs, you can choose from.
- Select the Titles option under the Titles tab then select your desired Title.
- Drag and locate the title in the place of your taste and then write the text you want.
- Adjust your text accordingly, you can change the font size, color, style, and much more
- Now simply click the snapshot button below the preview screen and the snapshot will be saved in default directory and automatically imported to the medium room.
- Right-click on the snapshot in the media pool and click on Reveal in explorer.
- Your thumbnail will be saved in the folder, you can upload it on the Google drive.
Unfortunately, there is no way to change the thumbnail of the video on Google drive. But we can take help from other websites to customize the thumbnail image and then upload it to Google drive. Let us discuss a few free websites used for the thumbnail of a video on Google drive.
Here are the best possible ways to change the thumbnail of the video stored in the Google drive.
1. Change the Thumbnails of Google drive using the Wix.
The Wix editor is a platform that is used to edit and make your own website. It provides easy interphase to customize the site using its amazing features. There are hundreds of features to build your own site or image by adding customizing elements and choosing color and text theme.
You can use the Wix to set or change your thumbnail to make your video attractive and eye-catching. The cover image can be by uploading and a frame can be selected from the video.
Let’s get started!
- Open the Wix editor from the browser.
- Select a video from your video library.
- Hit the Edit icon at the video
- Click on change cover under the cover image.
- Select the desired frame from the list, or you can upload your own by clicking the “+”
- Click on the Set as Cover
- Now upload the video on Google drive.
- If the file fails to upload, clear your cache and cookies and check your internet connection.
2. Change the Thumbnails of Google drive using Canvas.
Canvas is an online graphic design platform that allows and provides you with user-friendly interphase to make eye-catching logos, thumbnails, posters, and a ton of other visual content. You need not download any application and moreover, it is free to use. It saves your previous tasks and has hundreds of frames, and designs to select according to your taste or you can make your own design by editing.
So let’s start!
- Select a template of your choice from the library.
- Canvas provides you with more than 2 million images in the library but you can also upload your own image for Thumbnail.
- Click on the placeholder text to write your own text.
- You can change your image fonts, color, size, and
- You can easily customize your video thumbnail and upload it on Google drive.
- Download the video thumbnail.
- Now upload the Thumbnail on Google Drive.
3. Change the Thumbnails of Google drive using VLC Media Player.
VLC Media Player is a free and open-source media player that plays wide range of media files like images, video files as well as audio and DVDs. It is 100% free software and safe from viruses.
Here are the steps used to change the cover photo of your video using the VLC Media Player.
Let’s dive in…
- Go to the tools and select information from the drop-down list.
- The Current Media Information tab will be shown.
- There will be a picture or VLC icon at the bottom-right corner.
- Right-click on that picture or icon and select the download cover art or add cover art from file.
- Download cover art; if you want to add pictures from the album from the internet.
- Add cover art from file; if you want to put your own thumbnail image and browse from the storage.
The information will be saved automatically and the thumbnail will be changed when you open the file.
Important points.
You can use any other video editor to change the thumbnail of the video but keep a few points in mind.
- Thumbnails should be added at the start of the video.
- The Thumbnail should be a few seconds long so that google drive considers it as a cover image.
- It works for short videos but it can be applied for long videos.
- Use a high-quality HD image for the thumbnail so that Google Drive can accept it as valuable for the thumbnail image.
- Thumbnails should be uploaded in PNG, GIF, or JPG
- The image ratio should be 16:9 and resolution of 1920x1080 pixels for PNG and JPG and 960x480 pixels for GIFs.
- The maximum file size should be
- The minimum width should be 220 pixels.
Even after keeping an eye on these important points, google drive sometimes does not show the thumbnail as a cover photo.
Conclusion.
In the above article, I have discussed a couple of different ways to add a thumbnail of the video and upload it on Google drive. I personally recommend Wonder Share Filmora 11 to make and change thumbnail image of the video as it is a very powerful as well as simple tool.
How To Add Text In After Effects
In almost every video you come across, you will see text added to the video in different parts. There are various reasons why adding text to videos becomes a necessity. First of all, you can highlight the underlying message or key points in your video. Along with audio and video, the viewers will have another cue point in the form of text that they can retain in their memory for longer. You add animated texts to video to make the video interesting to watch and break the monotony of visual cues only.
Besides, you may have to want credits and add intro as well as outro to your video where adding text is almost a necessity. Text can help your viewer get the context of your video and make sense of the content. After Effects is a popular video editor thanks to its visual effects, text animation animations, and instant video enhancement tools. We will illustrate the different ways of adding text in After Effects in simple steps.
Part 1. Add Text in After Effects with Horizontal Type Tool
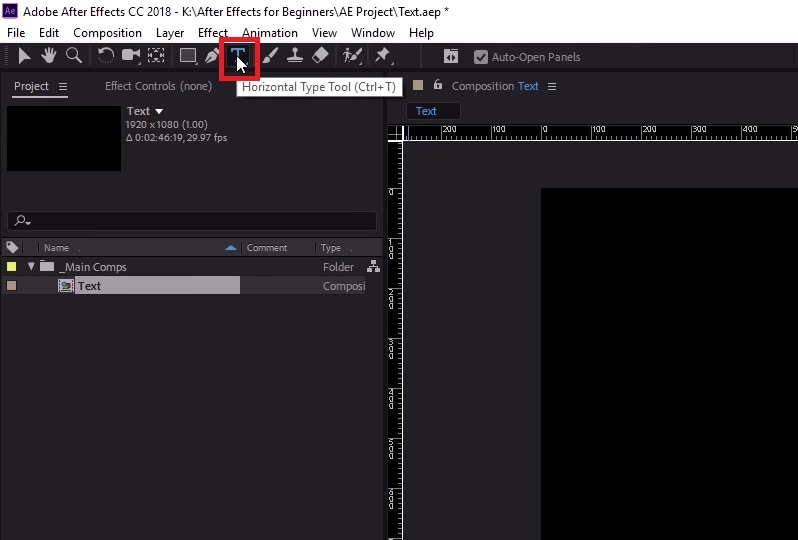
Once you have imported your video clip into the Timeline, there are several ways you can add text to your video. First of all, you can right-click on the Timeline and select New> Text to create an empty text layer and add any text you want. Similarly, you can go to Layer> New> Text option to do the same. But the easiest way of adding text in After Effects is by using Horizontal Type Tool. Here are the steps on how you can add text in AE with the type tool.
Step1Once you have imported your video into the Timeline, click on Horizontal Type Tool located in the top bar to add any text. You can press Ctrl+T(Windows) or Command+H(Mac) to get it instantly.
Step2Click on the video where you want to place the text and type your desired text there. After you are done adding your text, press Enter key in Num pad to exit out of the text field in the video.
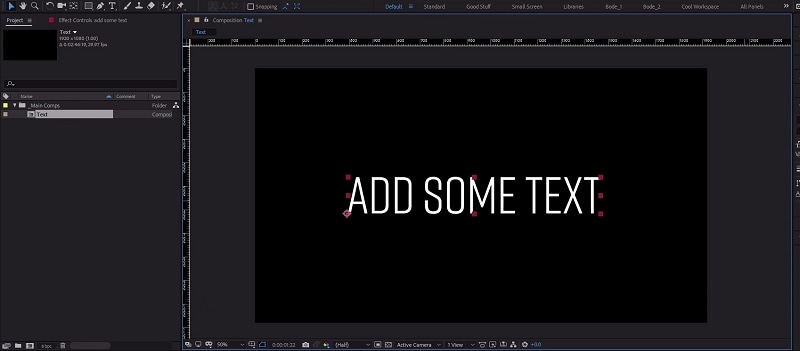
Step3This will automatically create a text layer on Timeline. You can now move the text and place it anywhere you want. You can also modify the text style and add animation which we will illustrate in the next section.
Part 2. Use the Character Panel to Edit Text in AE
When you select Type tool and add your desired text, you get a default style for the text. It is most likely that you have to modify the text style such as changing color, font, and size to fit in your video seamlessly. That is when you have to visit the Character Panel. Character Panel is where you get to edit the font of the text you have typed, increase or decrease the font size, change the font color, and much more. Apart from that, you can increase the spacing between lines when your text is a paragraph instead of a few words. Here are the steps to use Character Panel to edit text in AE.
Step1Once you have typed your text using Horizontal Type tool on the video, click on the text.
Step2Go to Character panel located in the right side of the screen. If it is minimized, click on the panel to expand it.
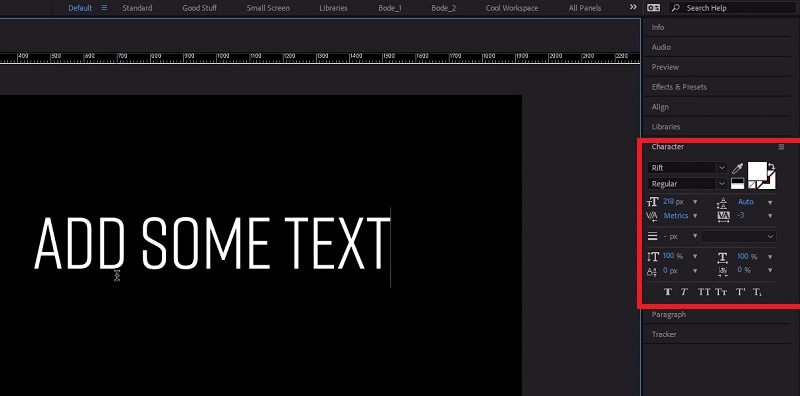
Step3The first option in the panel is the font of the text. By the side of the font is the text color. You can use the color picker tool to choose any color as per your preference.
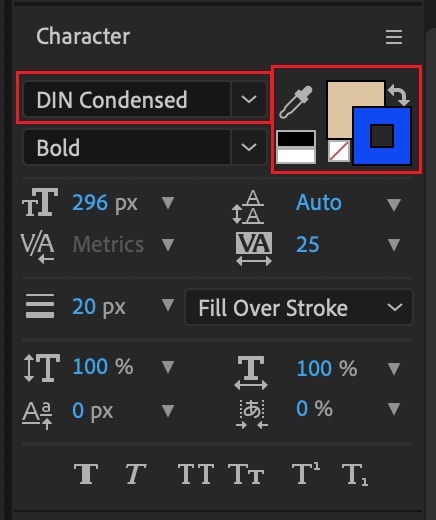
Step4Below the font, you can select the font style such as regular, bold, italics, and likewise. The subsequent part is to change the font size and adjust vertical spacing between lines and horizontal spacing between characters.
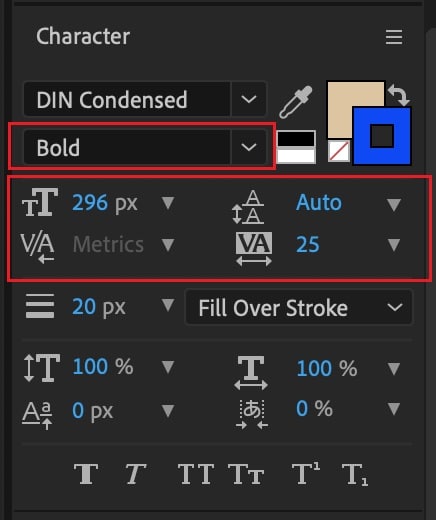
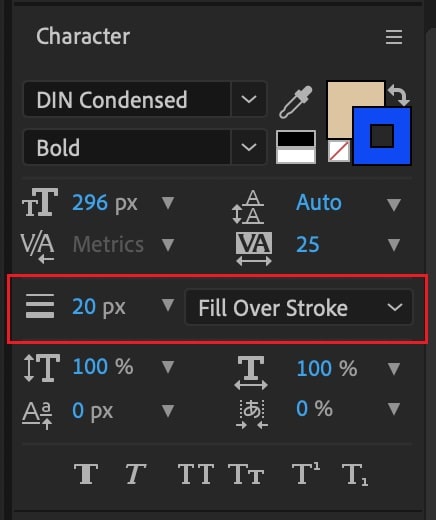
Step5The next section deals with Stroke option as well as fill the text option. You can fill the background of the text with any desired color.
Part 3. Add Animated Text to Video with Animation Presets
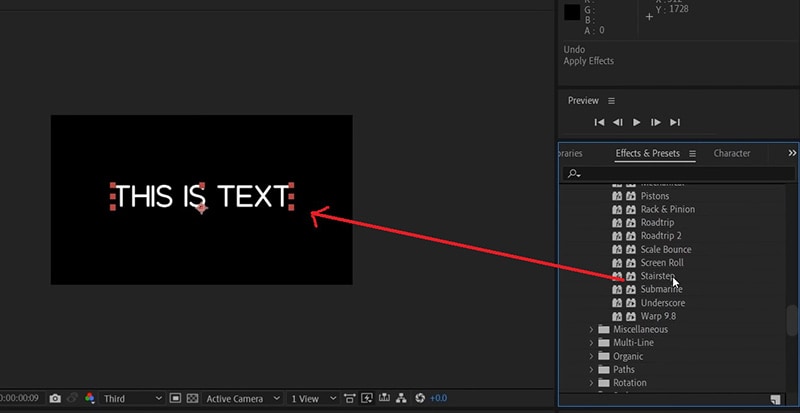
Now that you have added a static text and set the text format as per your preference, it is time to animate the text. A static text in a video does not look appealing, and animated texts make the video eye-catching instantly. You can use text animation presets in After Effects to add animated text to video. Here are the steps to add animated text to video with animation presets and effects.
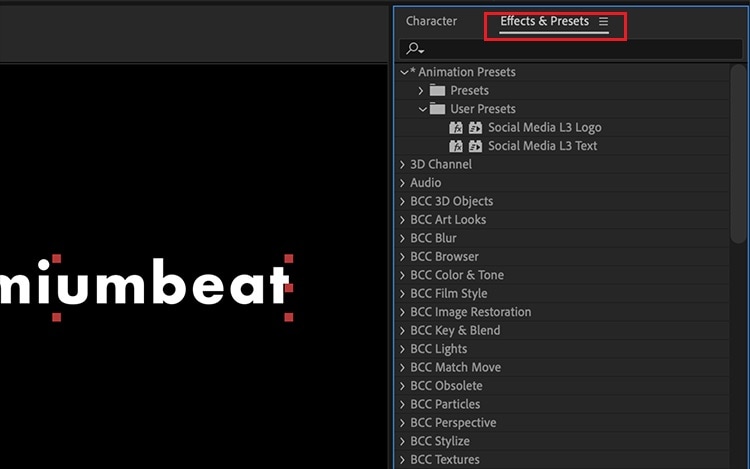
Step1Click on the text on your video that you want to animate. Go to Effects and Presets panel located on the right side.
Step2Under Effects and Presets panel, Click on Text option. This will open all the different categories of animation presets available that you can apply to the text on your video.
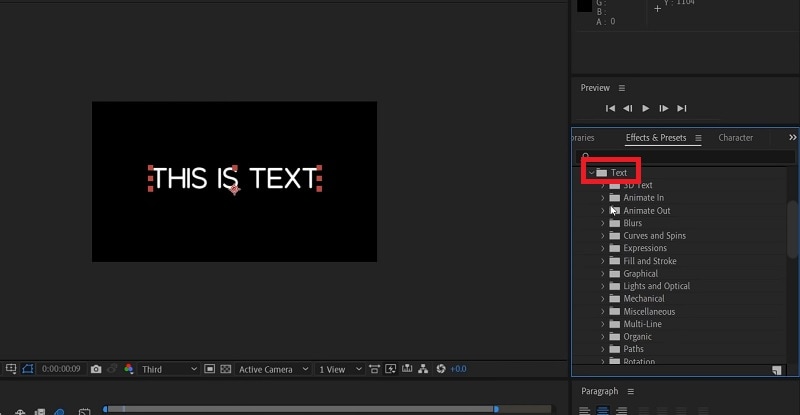
Step3Select any desired animation that you want to apply to the text and drag and drop the animation on the text in the composition window. Play the video and watch the applied animation on the text.
Part 4. Alternative Way to Add Text to Videos
If you are not comfortable with After Effects as a video editor, we recommend Wondershare as the best AE alternative. This is because the user interface of Filmora is super simple and there are loads of text effects and animations available to enhance your video content. Filmora is a professional video editor that is extremely popular among amateur and professional video editors. The application is available for both Windows and Mac users. Here are the steps for adding animated text to video using Filmora.
Step1Install Wondershare Filmora on your computer and launch the application. Click on New Project option on the welcome screen. Otherwise, you can go to File> New Project option.

Step2Go to File> Import Media> Import Media Files to import your video file. You can also drop the video file directly into Project Media folder.

Step3Drag and drop the video file from Project Media folder into the Timeline. If you have multiple video clips, you need to arrange them sequentially on the Timeline.
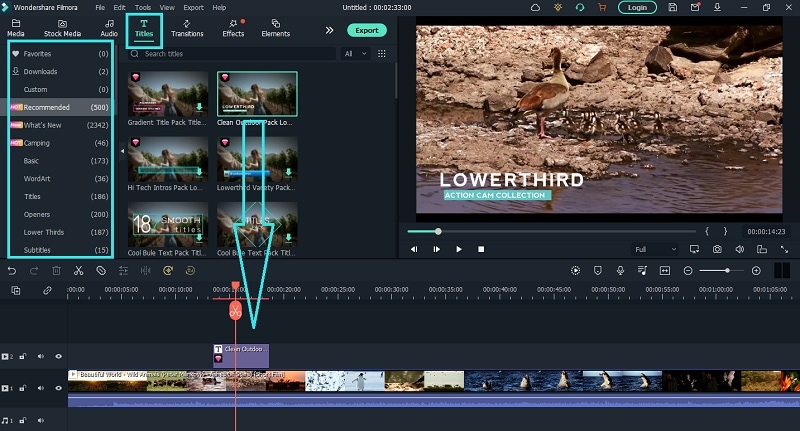
Step4To add text to your video, go to Titles located at the top bar. Check the left panel where you can see different categories of text effects. Select any desired text effect and drop into the Timeline. Make sure that the text layer is above the video layer on Timeline. You can shift the text layer on Timeline to place it where you want it to appear. You can also stretch the duration of the text effect as per your requirements.
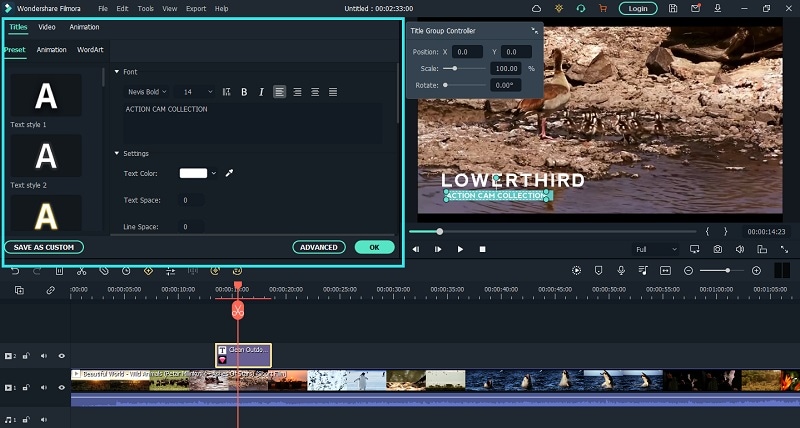
Step5You can edit the text effect by double clicking on the text layer on Timeline. Under Preset tab, you can change the text, font type and size, text color and much more. For further customization, you can click on Advanced button. At last, click on OK button to save the edits done.
The Bottom Line
If you want to add animated text to photo and video, After Effects is a great editor you can use. We have illustrated how you can add text and customize the text and finally, animate it as per your preference. However, if you are looking for AE alternative, we recommend Wondershare Filmora where you can add text to video instantly and choose from a wide range of text effects and animations.
Free Download For Win 7 or later(64-bit)
Free Download For macOS 10.14 or later
Detailed Tutorial to Rotate Videos in Cyberlink PowerDirector
Video Editing is a craft that is highly dependent on various characteristics of your video. But the way one presents it or goes about filming clips also has a profound effect on the end product. And as you may know, not every aspect of a video production activity always goes without hiccups. But editing can come in clutch as it can easily solve minor problems like skewed footage that was shot at the wrong angle or is upside down (an issue that can happen while using mobile phones).
Thus, with this article, we will be looking at steps to rotate a video in Cyberlink PowerDirector to help you when required. We have also mentioned the steps you will need to follow in Wondershare Filmora.
Note: We documented the steps in this guide with PowerDirector 365 and WonderShare Filmora X.
Steps to Rotate Videos with CyberLink PowerDirector
Put yourself in a situation where you’ve just finished filming a project with your smartphone but end up realizing that the footage isn’t in the right orientation by default. While the error has an easy fix on most smartphones, you can also perform this action with video editing tools.
Also, while this form of rotating might be the most basic implementation of the feature, you can often use the feature to add a dynamic nature to your video with Keyframes.
Definition: Keyframes in Video Editing is a software feature that allows an editor to set start and endpoints (denoted by In and Out Markers), presenting the opportunity to custom clip properties between the two positions. The set changes occur gradually as the playhead continues moving through the clip. Properties that can undergo modification with this method are zoom, rotation, colors, positions, etc.
The process of rotating clips is fairly straightforward; once you have PowerDirector 365 open, follow the steps listed below.
If you do not have CyberLink PowerDirector 365, download the software by visiting Cyberlink’s official website.
Step 1: Create a new video project in Cyberlink PowerDirector 365 and choose Full Mode.

Note: Full Mode in Cyberlink PowerDirector 365 will provide users access to a full-featured video editing tool similar in function to Wondershare Filmora. The other option available is Ad Designer.
Step 2: Now, import media onto the Timeline from the Media Library.
For this guide, we used the pre-existing stock footage in Cyberlink PowerDirector.

Step 3: Now, click on the video file on the Timeline; this will activate the video in the Preview Window. And it will provide you with access to the rotation circle, allowing you to change the orientation of the source file.

EXTRA
Rotation added in the PiP Designer will function as a keyframe-based rotation action. Right-click on the video in the preview window, choose Edit and then Modify to access this menu.

Following this, you can click on the Motion Tab, go into Rotation Settings, and modify the angle with greater precision. In the Preview Window, you will now be able to see the rotating video.

An Easier Way to Crop Video with Wondershare Filmora
Though Cyberlink PowerDirector 365 is a powerful video editing tool, we felt its menus were not as simple to navigate. Accessing the rotate function while available in the forefront, the use of PiP Designer didn’t feel intuitive.
In Wondershare Filmora Video Editor , rotating footage only happens via the Edit Option, and this straightforward approach felt simple. As for those who want to use Keyframes, the integration of this feature right above the Timeline is an appreciated convenience.
This emphasis on quick accessibility is present with almost every function in Filmora, and we believe this to be a significant advantage. The use of modern and unique iconography also increases familiarity, an aspect that will always be welcoming to new and budding creators.
If you do not already have Wondershare Filmora, you can download the software by visiting the official website.
To help you learn how to use the rotate function and show you an example of the easy accessibility in Filmora, here is how you can use the feature to get the output you desire.
For Win 7 or later (64-bit)
For macOS 10.14 or later
Once you have a new project open in Filmora, follow the steps listed below.
Step 1: Import a Media File to edit into your Video Project.

Step 2: Drag the video clip onto the Timeline and then select it with a mouse click to activate further interactions.

Step 3: Choose the Edit Option (marked in Red).
This will bring up the Edit Window in the left-top corner of your screen.

Step 4: Click on the Transform Menu and use the Rotation Slider to edit the orientation.

Having read this stretch of the guide, we believe you may have noticed how Filmora is more user-friendly and accessible due to its menu layout.
BONUS
Click on the Keyframe Button (marked in Green) to access the Keyframe Menu that allows you to set points between which a decided amount of rotation can happen.

The Bottom Line
This marks the end of our guide on how to rotate video in PowerDirector 365 and Wondershare Filmora X. Now, while both software are high-capable tools, we feel the keyframe-based working on rotation in Filmora is a lot more intuitive and easy to use. The ability to only have number-based rotation within the edit menu is also a positive, as rotating with a swivel like in PowerDirector isn’t always the most accurate.
And lastly, the modern iconography-based design of Wondershare Filmora is a factor to keep in mind, as this increases usability manifolds.
Note: Full Mode in Cyberlink PowerDirector 365 will provide users access to a full-featured video editing tool similar in function to Wondershare Filmora. The other option available is Ad Designer.
Step 2: Now, import media onto the Timeline from the Media Library.
For this guide, we used the pre-existing stock footage in Cyberlink PowerDirector.
Step 3: Now, click on the video file on the Timeline; this will activate the video in the Preview Window. And it will provide you with access to the rotation circle, allowing you to change the orientation of the source file.
EXTRA
Rotation added in the PiP Designer will function as a keyframe-based rotation action. Right-click on the video in the preview window, choose Edit and then Modify to access this menu.
Following this, you can click on the Motion Tab, go into Rotation Settings, and modify the angle with greater precision. In the Preview Window, you will now be able to see the rotating video.
An Easier Way to Crop Video with Wondershare Filmora
Though Cyberlink PowerDirector 365 is a powerful video editing tool, we felt its menus were not as simple to navigate. Accessing the rotate function while available in the forefront, the use of PiP Designer didn’t feel intuitive.
In Wondershare Filmora Video Editor , rotating footage only happens via the Edit Option, and this straightforward approach felt simple. As for those who want to use Keyframes, the integration of this feature right above the Timeline is an appreciated convenience.
This emphasis on quick accessibility is present with almost every function in Filmora, and we believe this to be a significant advantage. The use of modern and unique iconography also increases familiarity, an aspect that will always be welcoming to new and budding creators.
If you do not already have Wondershare Filmora, you can download the software by visiting the official website.
To help you learn how to use the rotate function and show you an example of the easy accessibility in Filmora, here is how you can use the feature to get the output you desire.
For Win 7 or later (64-bit)
For macOS 10.14 or later
Once you have a new project open in Filmora, follow the steps listed below.
Step 1: Import a Media File to edit into your Video Project.
Step 2: Drag the video clip onto the Timeline and then select it with a mouse click to activate further interactions.
Step 3: Choose the Edit Option (marked in Red).
This will bring up the Edit Window in the left-top corner of your screen.
Step 4: Click on the Transform Menu and use the Rotation Slider to edit the orientation.
Having read this stretch of the guide, we believe you may have noticed how Filmora is more user-friendly and accessible due to its menu layout.
BONUS
Click on the Keyframe Button (marked in Green) to access the Keyframe Menu that allows you to set points between which a decided amount of rotation can happen.
The Bottom Line
This marks the end of our guide on how to rotate video in PowerDirector 365 and Wondershare Filmora X. Now, while both software are high-capable tools, we feel the keyframe-based working on rotation in Filmora is a lot more intuitive and easy to use. The ability to only have number-based rotation within the edit menu is also a positive, as rotating with a swivel like in PowerDirector isn’t always the most accurate.
And lastly, the modern iconography-based design of Wondershare Filmora is a factor to keep in mind, as this increases usability manifolds.
Also read:
- In 2024, Have You Ever Tried DaVinci Resolve for Creating a Motion Blur Effect? Read This Article to Discover How to Use DaVinci Resolve Motion Blur with the Help of Detailed Instructions
- Updated 2024 Approved How to Denoise in After Effects – Audio & Video Noise Removal
- Updated 2 Methods to Crop a Video in VLC
- New 2024 Approved Steps to Add Subtitles in Canva
- 2024 Approved This Easy Hack Using Wondershare Filmora New Masking Feature Will Be a Great Addition to Your Next Horror Video Content
- In 2024, Looking for Free Tools to Create Radial Blur Images Online? Read Our Full Guide to Learn About the 6 Best Programs to Add This Effect to Your Pictures
- Video Course and Online Learning Are Very Popular Nowadays. Here We Are Going to Recommend some of the Best Video Websites for Teachers to Use
- Updated How To Polish Your Music Video Edits Using Filmora for 2024
- New 8 Ways To Live Stream Pre-Recorded Video
- New How to Customize Your Loading Text Effect, In 2024
- 2024 Approved Methods to Make Sure Your Recording Slideshow in Powerpoint Is Not Wro
- In 2024, 6 Websites to Free Download Motivational Video Footage
- How to Create Cinematic Style Videos?
- New 5 Methods to Denoise a Video for 2024
- 2024 Approved 3 Actionable Ways to Create Countdown Animation for Videos
- Looking for Free Tools to Create Radial Blur Images Online? Read Our Full Guide to Learn About the 6 Best Programs to Add This Effect to Your Pictures
- Updated 2024 Approved How To Fix Slow Playback Issues in DaVinci Resolve Finding the Best Solutions
- New Add Effects to Video Online for 2024
- New 2024 Approved How to Create Your Own Subscribe Channel Graphics
- In 2024, Legend Intro Maker – Create Intro Video with Ease
- New How Do You Create In-Camera Transitions in Your Videos? A Complete Guide for Beginners to Create These Transitions Using Their Camera at Home
- How to Rotate AVI in Vertical/Portrait Orientation Windows, Mac,Andro for 2024
- New 2024 Approved Top Applications That Can Help Apply The Best VHS Camera Effect
- 2024 Approved Here Is a Complete Overview of VSCO Video Editor; the Best Photo-Editing App that Helps You Adjust Your Pictures Right After You Capture Them
- Updated Gif to Svg, Svg to Gif, Convert Gif to Svg, Animated Svg to Gif, Convert Svg to Gif, Svg to Gif Converter, Svg to Gif Animation, Svg Animation to Gif, Gif to Svg Converter
- In 2024, Make A Tattoo Disappear Like A Magic
- New The Best 10 AI Video Analytics Companies at a Glance
- New Change Aspect Ratio of Video
- Updated In 2024, How to Do Censor Effects with Filmora
- 2024 Approved Basic Introduction of LumaFusion Color Grading
- Do You Know How Boring a Video Can Be with Silent Moments? Some Tools with Silent Detection Features Help You Delete Those Moments for 2024
- Updated Top Things People Know About Wedding Slideshow for 2024
- AVI Video Format How to Open, Play, Edit AVI File?
- Create Amazing Slow-Motion Videos 8 Affordable Slow-Motion Cameras
- 2024 Approved Learn How to Add Fun and Personalized AR Emoji Stickers to Your Videos. Discover Tips and Tricks for Using These Stickers Like a Pro and Making Your Videos Stand Out
- In 2024, Learn More About the Video Editing Interface of Wondershare Filmora
- In 2024, Repeated Text Animation Tutorial in Filmora
- In 2024, Hacks to do pokemon go trainer battles For Tecno Pova 6 Pro 5G | Dr.fone
- In 2024, How to use Snapchat Location Spoofer to Protect Your Privacy On Oppo A78? | Dr.fone
- How To Do Lava Yuva 2 Screen Sharing | Dr.fone
- How PGSharp Save You from Ban While Spoofing Pokemon Go On Xiaomi Civi 3 Disney 100th Anniversary Edition? | Dr.fone
- In 2024, Set Your Preferred Job Location on LinkedIn App of your Samsung Galaxy A24 | Dr.fone
- How To Transfer Data From iPhone SE (2020) To Other iPhone 14 Pro devices? | Dr.fone
- 8 Workable Fixes to the SIM not provisioned MM#2 Error on Itel A60 | Dr.fone
- In 2024, 15 Best Strongest Pokémon To Use in Pokémon GO PvP Leagues For Realme Narzo 60 Pro 5G | Dr.fone
- In 2024, Best Ways on How to Unlock/Bypass/Swipe/Remove Itel A60s Fingerprint Lock
- Troubleshooting Guide How to Fix an Unresponsive Huawei Nova Y71 Screen | Dr.fone
- Tutorial to Change Nokia C22 IMEI without Root A Comprehensive Guide
- Here Are Some Reliable Ways to Get Pokemon Go Friend Codes For Vivo Y78t | Dr.fone
- What Is AI Marketing for 2024
- New The Ever-Changing Era of AI Video Translation A Reality to Be Fulfilled for 2024
- Fake the Location to Get Around the MLB Blackouts on Vivo V29e | Dr.fone
- 3 Ways to Fake GPS Without Root On Tecno Camon 30 Pro 5G | Dr.fone
- The Updated Method to Bypass Vivo V29 Pro FRP
- In 2024, 4 Feasible Ways to Fake Location on Facebook For your Vivo Y100 | Dr.fone
- How to Reset your Xiaomi Redmi A2+ Lock Screen Password
- A Perfect Guide To Remove or Disable Google Smart Lock On Honor 90 GT
- 8 Safe and Effective Methods to Unlock Your iPhone 12 Pro Max Without a Passcode | Dr.fone
- Will the iPogo Get You Banned and How to Solve It On Samsung Galaxy F15 5G | Dr.fone
- Fix File Not Loaded Completely Error in Excel 2023
- Complete Tutorial to Use VPNa to Fake GPS Location On Vivo Y02T | Dr.fone
- How to get the dragon scale and evolution-enabled pokemon On Realme 11 Pro+? | Dr.fone
- How to Downgrade Apple iPhone 13 to the Previous iOS/iPadOS Version? | Dr.fone
- In 2024, A Quick Guide to Vivo Y100 5G FRP Bypass Instantly
- In 2024, How Xiaomi Redmi Note 13 5G Mirror Screen to PC? | Dr.fone
- Apple ID Unlock On Apple iPhone 15 Plus? How to Fix it?
- Title: New How to Add Background to Video With/Without a Green Screen
- Author: Chloe
- Created at : 2024-05-20 03:38:04
- Updated at : 2024-05-21 03:38:04
- Link: https://ai-editing-video.techidaily.com/new-how-to-add-background-to-video-withwithout-a-green-screen/
- License: This work is licensed under CC BY-NC-SA 4.0.
