:max_bytes(150000):strip_icc():format(webp)/GettyImages-541916248-593842a43df78c537be2cf44.jpg)
New How to Add Customized Transitions to OBS for 2024

How to Add Customized Transitions to OBS
OBS Studio is an open-source video editor that is widely popular for live streaming on online platforms. Even though OBS is a completely free application, its features are comparable to any premium video editor. We always look for available transition effects in a video editor and OBS takes it to the next level by allowing users to add custom transitions.
Among custom transitions, Stinger transitions have gained a lot of traction from the users. Stinger transitions are made popular by sports channels who use Stinger frequently whenever there is a change in the scene. We will illustrate how to add custom transitions in OBS and apply Stinger transitions in your video.
Part 1. What is Stinger in OBS
Stinger is a special type of customized animated video transition effect that is available in the latest version of OBS Studio. It is a combination of a transparent video animation and a cut transition. Stinger begins with the transparent video animation that grows into full-screen overlay, and it is followed by the cut transition. After the cut transition, you place the next scene or video clip. You will notice Stinger transition whenever sports channels show an instant replay during a live match.
The transparent video animation starts on top of the current video you are editing. When the animation expands and covers up the entire screen, you place the cut transition, and thereafter, you place the next video clip or scene as per your requirement. Some customized stinger effect also includes audio effects along with video effect.
Part 2. How to add stinger transitions to OBS
The Stinger transition is available on OBS Studio and Streamlabs, and both of them are open-source and free applications. Before you add stinger transition, you should have a video animation ready that you will play on top of the current video followed by the cut transition effect. You can download several stinger video animations from the internet and include any of them in OBS while adding stinger transition. Here are the steps on how to add a custom transition to OBS.
Step1 Go to Scene Transitions section and click on Effects option to open the drop-down menu.
Step2 From the drop-down menu, click on “Add: Stinger” option.

Step3 Give a name to the Stinger transition and click Ok button.

Step4 You will see Properties window now. Click on Browser button against Video file and select the transparent video animation file that you want to play on top of the current video before applying the cut transition effect.

Step5 For Transition Point Type, select Time(milliseconds) option. In the Transition Point field, add the duration of the transparent video animation so that the transition to the next scene takes place immediately after the video animation gets completed.

Step6 If your video animation has audio, go to Audio Monitoring and select Monitor and Output option from the dropdown. For Audio Fade Style, you can select Crossfade option for better output.

Step7 Scroll down and click on Preview Transition button to check if the stinger transition is taking place as expected. You can adjust the transition point and other parameters to get it perfect.

Step8 Finally, click on Ok button and play the video to check out the stinger transition on the big screen.
The steps on how to add a custom transition to Streamlabs OBS are almost similar, and therefore, you can add stinger transition using Streamlabs comfortably.
Part 3. OBS Alternative to Add Transitions
There is no denying the fact that OBS Studio has a complicated user interface. That is why most amateur video editors find OBS Studio difficult to learn quickly even though there is no dearth of features. Apart from add custom transition OBS, there are very limited effects available on OBS Studio. That is why many users look for an OBS alternative to add transitions to their videos.
We recommend Wondershare Filmora as the best alternative to OBS Studio when it comes to adding transition effects. That is because Filmora is a professional video editor with a wide range of effects. Most importantly, Filmora is widely loved by amateurs and professionals for its intuitive user interface. Here are the steps on how to add transitions to your video in Filmora.
Free Download For Win 7 or later(64-bit)
Free Download For macOS 10.14 or later
Step1 Download and install Filmora as per your operating system. Open Filmora and click on New Project option.

Step2 Import or drop your video clips under Project Media folder. Then drag and drop them on Timeline and place them sequentially as appropriate.

Step3 Go to Transitions tab located at the top of the application screen. You will see different categories of transitions on the left side.

Step4 Check them out and once you have selected one to apply, drag and drop it in between the video clips.

Step5 Play the video and click on Export button to save the video.
Part 4: Related FAQs about OBS Transitions
How do I add a transition overlay in OBS?
You need to go to Scene Transition tab and select any transition overlay effect that is available. Thereafter, you can change the settings and parameters to customize the transition effect as per your requirements. Apart from the built-in transitions, you can download and add plugins for more transitions.
Can you have different scene transitions in OBS?
Yes, you can have different scene transitions in OBS Studio. You can add them directly from Scene Transition tab one by one as per your requirements. You can add them in between scenes so that the transition effects play when you switch between scenes.
How do I download transitions in OBS?
Go to the OBS Forums from where you get to download transitions for OBS Studio. Click on Download button and download plugin installer as per your operating system. Double-click the installer file to install it on your computer. Go to OBS Studio and go to Scene Transition to use the installed transition.
Free Download For macOS 10.14 or later
Step1 Download and install Filmora as per your operating system. Open Filmora and click on New Project option.

Step2 Import or drop your video clips under Project Media folder. Then drag and drop them on Timeline and place them sequentially as appropriate.

Step3 Go to Transitions tab located at the top of the application screen. You will see different categories of transitions on the left side.

Step4 Check them out and once you have selected one to apply, drag and drop it in between the video clips.

Step5 Play the video and click on Export button to save the video.
Part 4: Related FAQs about OBS Transitions
How do I add a transition overlay in OBS?
You need to go to Scene Transition tab and select any transition overlay effect that is available. Thereafter, you can change the settings and parameters to customize the transition effect as per your requirements. Apart from the built-in transitions, you can download and add plugins for more transitions.
Can you have different scene transitions in OBS?
Yes, you can have different scene transitions in OBS Studio. You can add them directly from Scene Transition tab one by one as per your requirements. You can add them in between scenes so that the transition effects play when you switch between scenes.
How do I download transitions in OBS?
Go to the OBS Forums from where you get to download transitions for OBS Studio. Click on Download button and download plugin installer as per your operating system. Double-click the installer file to install it on your computer. Go to OBS Studio and go to Scene Transition to use the installed transition.
How to Make Loop Video in PowerPoint
Loop videos are a great way to showcase your content. They’re easy to make, and they’re also easy to edit. You can have a loop video where the slides keep repeating in the same order, or you can change it up by putting different images on each slide.
You’re probably already familiar with the concept of looping video in PowerPoint. However, there are some instances where looping videos can be a real-time saver. To do this, you need to make sure that your visuals are engaging and unique. You can achieve this by using video loops in PowerPoint presentations.
You can use it if you want to demonstrate an idea or concept by showing several parts of the same thing at once. Or you can use PowerPoint if you have a very long video that you want to show in one go. You can also use it for suggesting different angles for your audience and making their eyes move from one point to another without making them bored.
Part 1: How to Make a Slideshow Loop in PowerPoint
A power-point loop video is the most efficient way to create a slideshow for your presentation. This easy-to-use software utility provides a simple and intuitive interface that lets you add slideshows to your presentations.
This is ideal for creating multi-streaming PowerPoint presentations that can be repeatedly viewed in the same or a different sequence. Create multimedia presentations with an animated slide show, including videos, and music with just a few clicks of the mouse.
The creation of the Slideshow loop in Microsoft PowerPoint is quite easy and simple. To make a looping slideshow, you’ll first need a PowerPoint. A PowerPoint is a set of instructions that allows you to display a series of images and text in the same sequence. This gives your audience the ability to explore the information on the slides in more depth and engage with the content on a more personal level.
If you want to create a looping slideshow in PowerPoint, you can use the following steps.
Step 1: Open Microsoft PowerPoint and select Slide show from Toolbar
The first step is to open Microsoft PowerPoint. To create a looping slideshow in PowerPoint, click on the Slide show feature on the top of the toolbar. Then different features will appear after clicking on it.
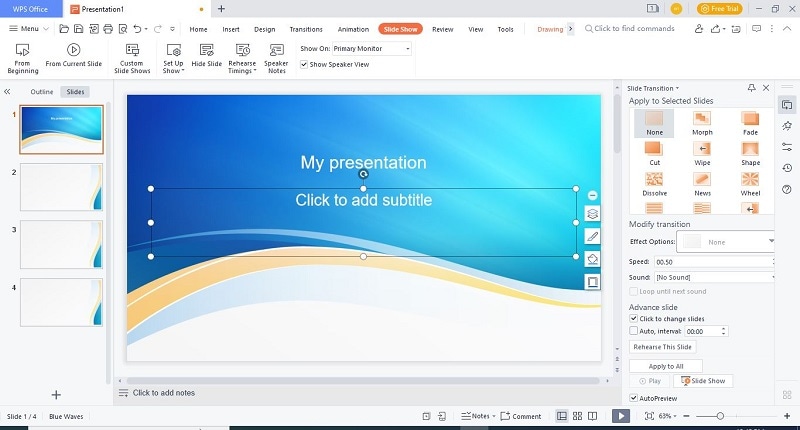
Step 2: Set up the Slide show manually
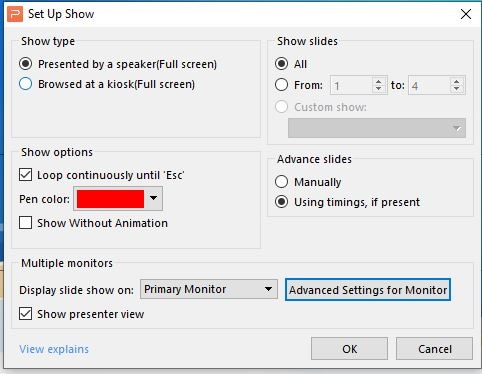
When you open the Slideshow, click on the Set Up Show from the toolbar. Some options will be shown in the drop-down (Manual, Auto, and Set Up Show). Select the option Set Up Show. A dialogue box will appear to select the following check boxes that are shown in the below picture:
Step 3: Select the slides and click on Transition
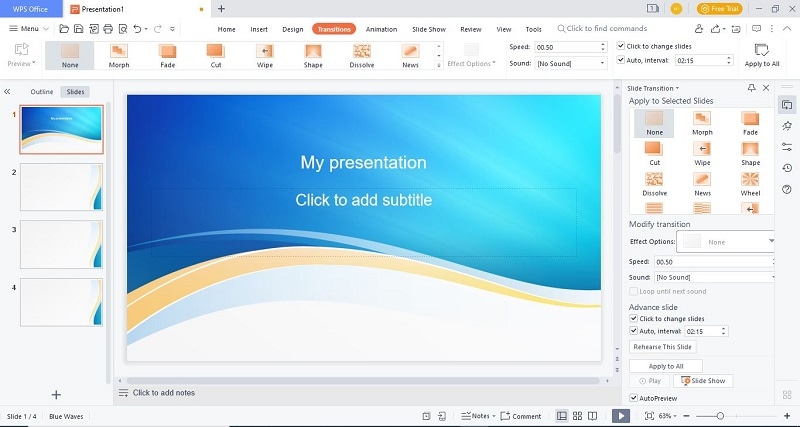
Select overall slides and click on the Transitions tab. You can see an option of Auto, interval. Uncheck the box of Auto, interval, and choose the time according to your requirements. Adding transitions can help to make your PowerPoint presentation more engaging and visually appealing. When you are adding transitions, make sure to think about how they can help to improve your overall presentation.
PowerPoint has the technology to create an endless loop slideshow that keeps playing without your finger. Loop slideshows are best used with information that is short, repeated, and not too repetitious. For example, if you want to play something on a loop it is better to create a looping slideshow than an extended presentation that repeats itself endlessly.
The power of loop slides is in their ability to engage users. You can have a slideshow that plays automatically or you can have it play when the user enters a specific panel. Slideshow Loops on PowerPoint allow you to play one or more slides over and over again by pressing the Play button. You can also create a time-lapse, which pauses the slideshow at a specific point.
Benefits of making a slideshow in PowerPoint
There are many benefits of using a looping slideshow in PowerPoint. There are many benefits of using loop video in PowerPoint presentations. Loop slideshow gives your audience a sense of continuity and connection, which can help them follow the story and understand the information more easily. It also helps to keep people engaged and interested in your presentation. They can be used to promote a product or service, commemorate a special event, or entertain and inform your audience.
- Slides can be played in a continuous loop, allowing the audience to stay engaged with the presentation from beginning to end.
- The looping feature makes it easy to create a presentation that is tailored to the specific needs of your audience. You can choose to have the slides repeat automatically, or you can control when each slide appears.
- It can help to save time. By using loop video, you can avoid having to constantly start and stop your presentation to show different parts of it. This can save you a lot of time and energy, which can be put into more important things.
- They can be used to commemorate a special event.
- They can be used to entertain and inform your audience.
Part 2: Alternative Way to Create Loop Slideshow Video
If you have been searching for the perfect way to create a loop slideshow video, Filmora video editor might be what you need. It is one of the most popular loop slideshow makers on the market and there is an app for all devices, including PCs and Macs to android phones and tablets. Filmora is a slideshow loop maker that allows you to produce video files quickly and easily with simple drag and drop.
Filmora provides you with seamless loop video for your website, youtube, and other channels, You can create content in various formats and image resolution to any social media like Facebook, Twitter, Instagram, and others with the help of our unique features. Filmora is a professional video editor for Windows. It’s an ideal tool for everyone, from beginners to professionals, as well as a great help for students, researchers, and teachers.
In this article, we’ll show you how to make a looping slideshow in PowerPoint. First, you’ll need to download Filmora. This software is used to create professional-looking videos that can be made at any length.
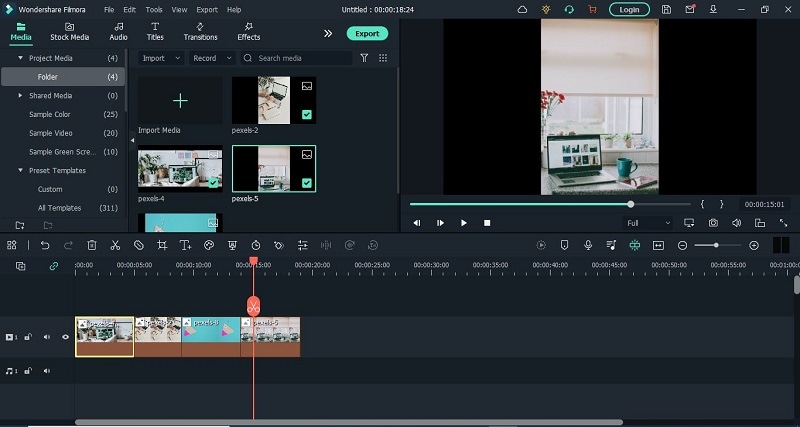
Step 1: Download Filmora and Import images and videos
Free Download For Win 7 or later(64-bit)
Free Download For macOS 10.14 or later
So first off, we need to create a new project. On the left-hand side, you’ll see your media library and on the right-hand side, there’s a green button that says “create new project”. You’ll notice there are three sections: video, audio, and images. These play a key role in creating your final video so let’s talk about each one individually.
Step 2: Add Title and background to your Slideshow video
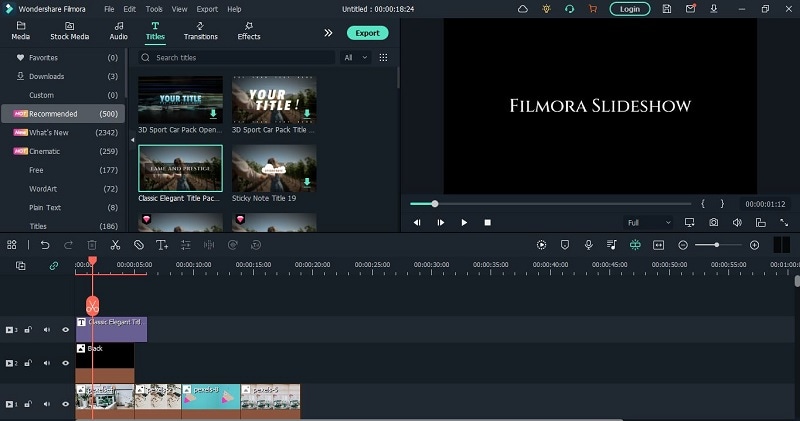
This step is totally up to you in which you can add some titles the starting your slideshow. It is not very necessary but gives your slide show a perfect look. It also allows you to select any plain background of any color. You can use multiple transitions, music, and effects to tell your story in exactly the way you want!
Step 3: Make copies of the Slideshow and add transitions
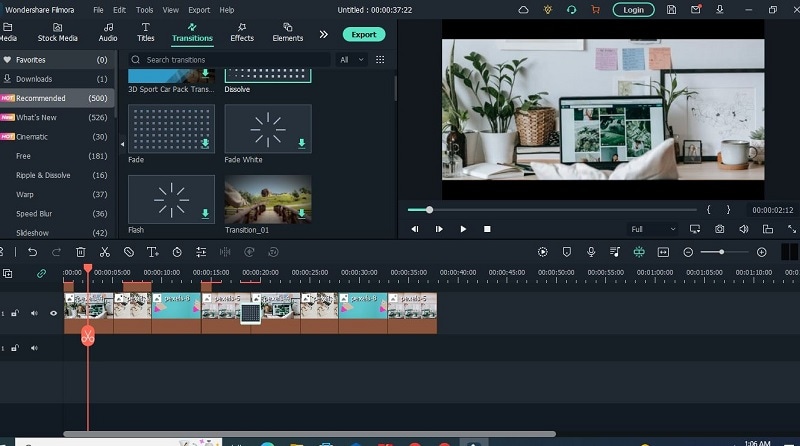
Lastly, make copies of your media or pictures you want to add to your slideshow. Filmora allows you to set the duration of your slideshow. After copying the pictures paste them where the video ends. Then continue pasting according to your requirements. Add a transition “Dissolve” from the Transitions Tab. When you complete your editing export your video to your desktop or where you want to store it.
Benefits of looping Slideshare video in Filmora
There are many benefits of using a loop slideshow video in Filmora. First and foremost, a looping slideshow is a great way to create a presentation or video that is both engaging and professional. Additionally, looping a video makes it easy to keep audiences engaged and on foot, which is especially important for long videos or presentations.
Plus, looping can help to save on file size and memory usage, making it a great option for videos that will be shared online. Finally, looping can add an element of excitement and anticipation to a video, which can help to keep viewers engaged and coming back for more. You could also add animations between the slides that move differently than they would normally do.
Loop Slideshow Video in Filmora is a great option for you. It’s easy to use, and it has a wide range of options that allow you to customize your video output. You can even add music and sound effects to your videos! If you’re looking to make a loop slideshow video, this is the best software for it.
The Bottom Line
Slideshows are very popular, but they can sometimes seem a little boring. If you want to add something new, looping your slideshow will make all the difference. Adding music is easy in PowerPoint. A slideshow loop can be an effective way to keep viewers’ attention, making it an effective tool for presentation. You can renovate your outdated slideshows video with Filmora.
With its loop function, Filmora enables you to incorporate interesting dynamic effects into your videos. So what does it take to set up a PowerPoint loop video? You don’t need a lot of special programs or plugins to make your videos get looped on your presentations. Follow the above simple steps and you’ll have your videos getting looped in no time.
Easily Cut Large Video Faster on Mac
Finding a video cutter that can easily cut large videos on Mac can be difficult. The right video cutter for Mac will make it easy to cut and share videos. It will also be easy to use and offer basic and advanced editing features. Fortunately, some video editing software we found can help you cut and easily edit your videos. These video cutters reviewed in this article cut across different experience levels and are categorized between free and paid. Let’s take a look at the best video cutter for large videos on Mac we could find.
Best Large Video Cutter on Mac - Filmroa Video Editor

Supported System: Mac and Windows
Cutting large videos is not easy if you don’t have the right tools to achieve that. That’s where Filmora Video Editor enters the picture. It combines simplicity and several excellent features to offer you the best video cutter for Mac. It doesn’t just provide you with the basic cutting features but also several editing tools to create fantastic videos. In addition, its user interface is intuitive and easy to navigate by new editors and professionals.
Filmora Video Editor offers several customization features and advanced features to make your video look sleek and professional. This means it provides motion tracking, the addition of images, filters, effects, texts, and several other tools. When exporting your files, you have a wide variety of options as this large video cutter offers different output formats to select from. It also allows you to share your video directly to any social media network you would prefer. Most importantly, it is compatible with every version of MacOS.
For Win 7 or later (64-bit)
For macOS 10.14 or later
Features
- It supports various video formats like AVI, MOV, MP4, MKV, and several others
- It only takes a few clicks to cut, trim, and split videos
- Impressive video editing features
- Intuitive and user-friendly interface that ensures a gentle learning curve
- You can cut your video without losing the quality level
- Several video effects to make your video stunning
- It offers additional features like transitions, motion elements, color corrections, animated titles, etc.
- Allows you to burn video to DVD or share directly
Cons
- It might not have the most advanced features
Steps to Easily Cut Large Videos On Mac Using Filmora Video Editor
Cutting large videos on Filmora is relatively easy when you follow the proper steps. Below, we’ve outlined the steps you should take when you want to cut large videos on Mac using Filmora Video Editor.
· Step One: Import Large Video

Once you Install Filmora on your Mac, launch and click ‘new project’ on the home screen to start your video cutting journey. Now, import the video you want to cut by selecting ‘import’ on the main interface and selecting the files from your computer. Alternatively, you can drag the large video to your timeline.

· Step Two: Manually Cut the Large Video
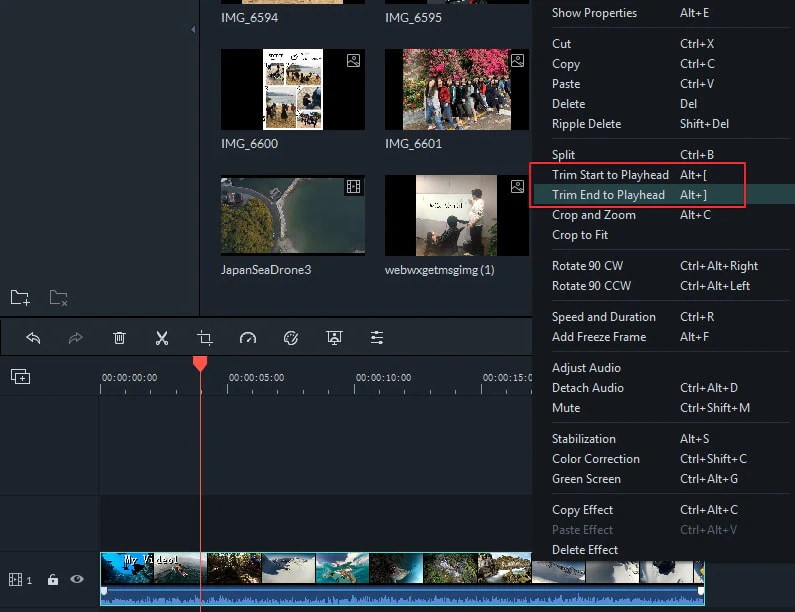
After adding the video to the timeline, drag the playhead at the beginning to the part you would like your large video to begin and right-click on it. You can then select ‘trim start to playhead to cut your video to your preference. Repeat this with the end of your video but select ‘trim end to playhead’ this time.
· Step Three: Export Your Newly Cut Video
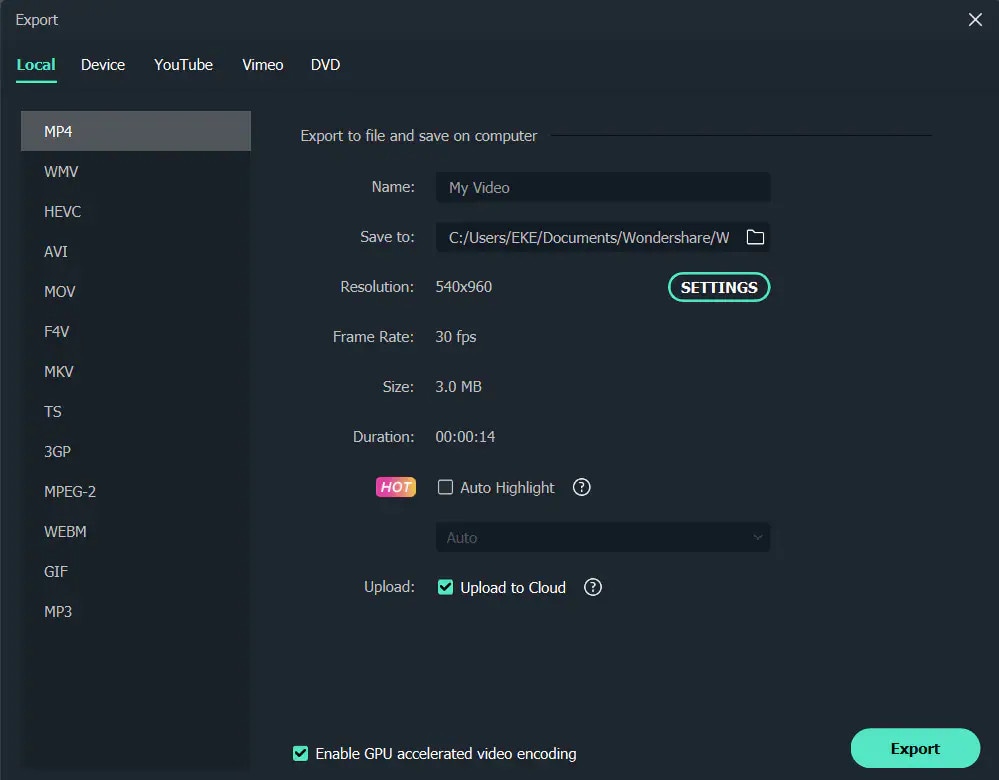
After cutting your video and carrying out basic editing on your video, you can now save your video. Next, click the ‘export’ button, and you can choose the output format of your video, frame rate, and resolution. You can also share directly to YouTube, Vimeo, and other social media platforms or burn the video to a DVD.
More Free Large Video Cutter on Mac to Cut Large Videos Faster
The first large video cutters we’ll be reviewing in this article are available for free. Although they’re not professional video editing software, they can help you easily cut large videos on Mac in just a few minutes. Therefore, if you’re looking for a free video cutter for Mac, you should keep reading.
GihoSoft Free Video Cutter
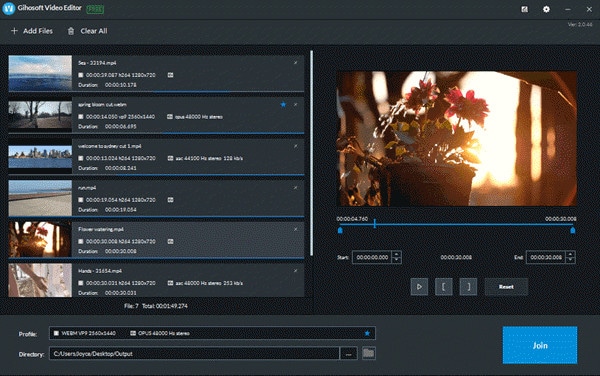
Supported System: Mac and Windows
This free video cutting software helps you cut large video files within a few minutes. You can either cut the video into smaller clips or eliminate all other clips reducing the video into one little clip. This large video cutter is relatively easy to use, and it comes with a friendly user interface which makes it ideal for beginners. The best part is that it supports varying video formats and resolutions. However, as the name implies, you can only use it to cut videos. It doesn’t offer other video editing features.
Gihosoft Video cutter offers a fast processing speed and supports popular video formats like AVI, MOV, FLV, MP4, etc. It also saves your video in the same input format to maintain its quality. You can also cut different clips and join them using this video cutting software for free.
Pros
- It is free to use
- It offers a clean and intuitive user interface
- Ideal for beginners
- Supports different input and output video formats
- Allows you to join clips from various videos
Cons
- There are no editing features
- The saving process can be slow
Steps to Cut Large Videos on Mac Using Gihosoft Free Video Cutter
Gihosoft Video Cutter is relatively easy to use. Below, you’ll find the steps to cut large videos on Mac with this free cutter quickly.
- Firstly, download and install this free video cutter on your Mac. Once you do this, launch the software, and you can begin.
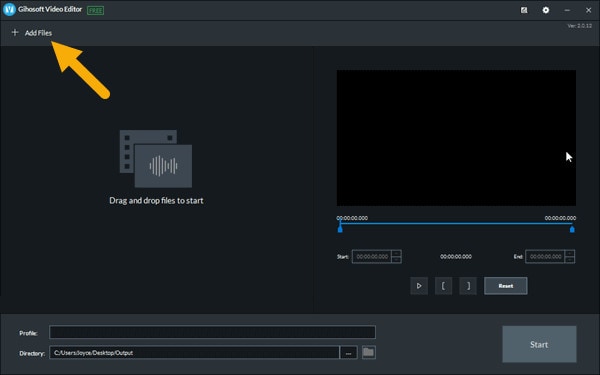
- Add files to the timeline by clicking the ‘add files’ to import a large video file to this video cutter.
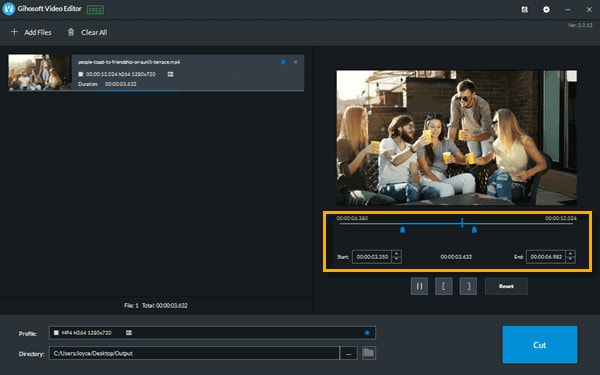
- Next, set the start and endpoint of your video by moving the two sliders in the timeline. Alternatively, you can manually enter the beginning and end times you want.
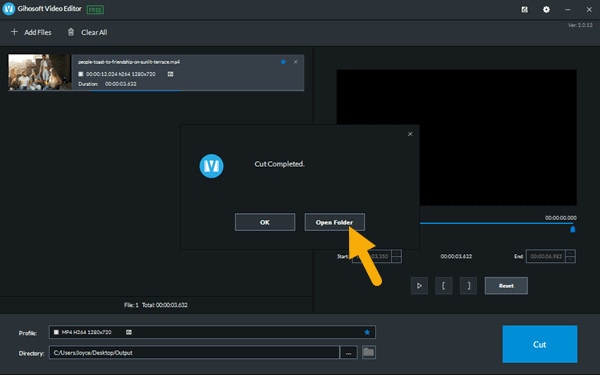
- Hit the ‘cut’ button once you’re satisfied with the timing.
- After cutting, you can save your video in your preferred location on your PC
iMovie
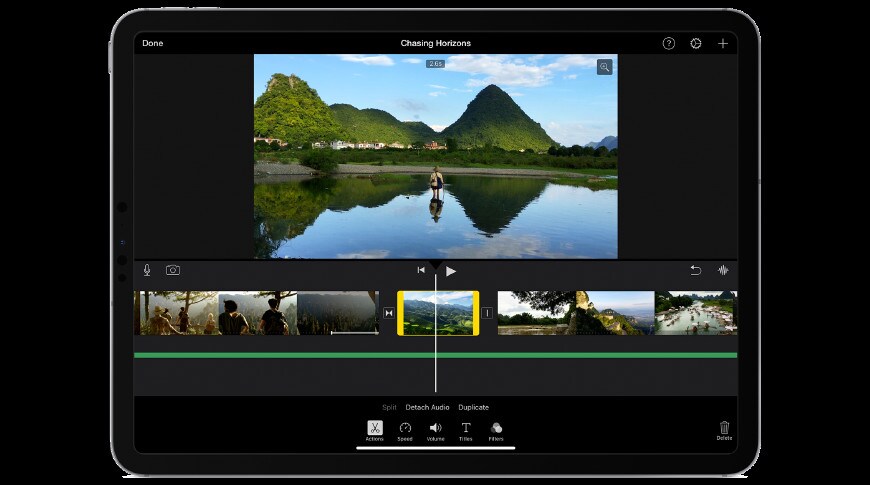
Supported System: Mac
iMovie is a household name in the Apple family due to its popularity amongst Mac owners. Apple device owners commonly use it for editing videos. It is pretty functional and great for making your video clips look professional. Cutting large videos on Mac using iMovie is quite a simple process. This is the best option if you’re using Mac and looking for a free and straightforward video cutter.
One of the reasons this large video cutter is a good choice because it supports high resolutions. This Mac video cutter supports up to 4k video resolution. It also supports different input and output video formats. In addition, its intuitive and user-friendly interface makes it an excellent choice for beginners. However, it lacks advanced editing features if that’s what you’re looking for.
Pros
- It is free to use
- It supports high video resolutions
- Its simple user interface makes it ideal for beginners
- It offers various preset templates to enhance your video
- It supports several input and output formats
Cons
- Lacks advanced editing features
Steps to Cut Large Video on Mac Using iMovie
iMovie is quite a simple editing software that makes it easy for users with little editing experience to cut large videos on Mac. Follow the steps below to cut videos on Mac easily.
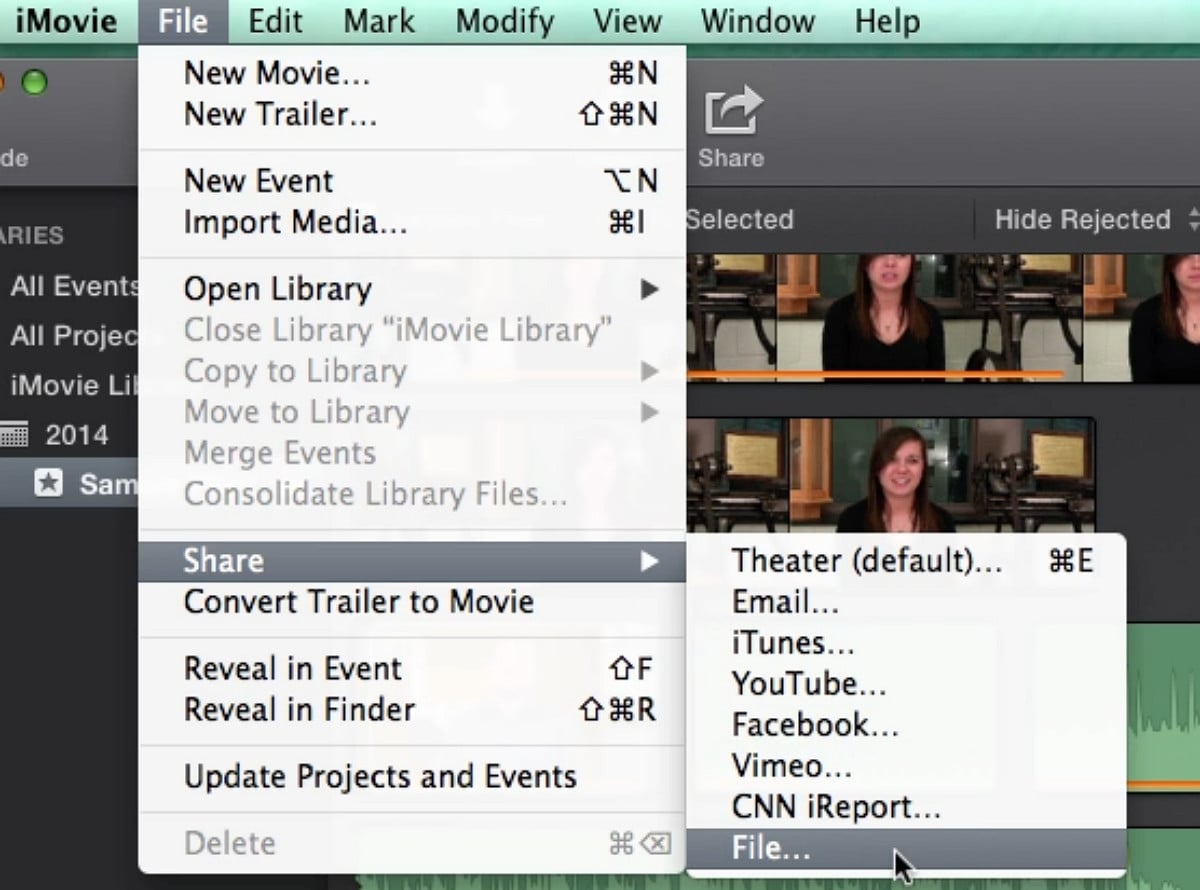
- Open iMovie on your Mac and select ‘file’ on the menu; choose ‘open project’ from the dropdown menu.
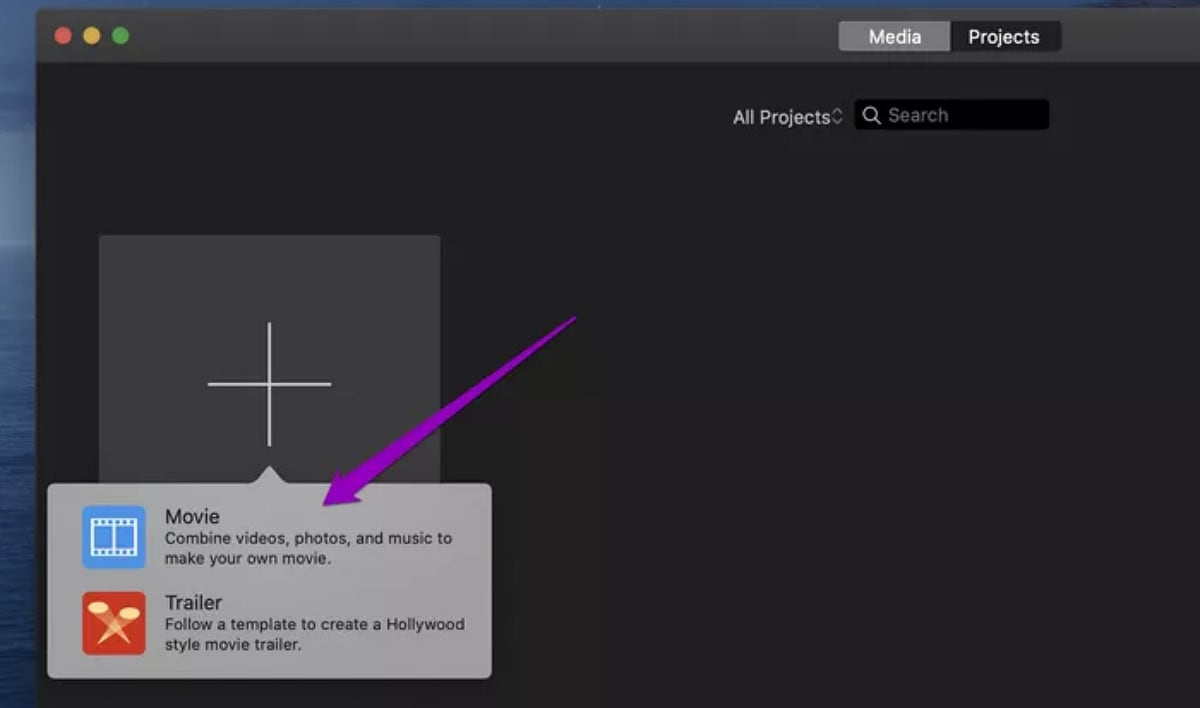
- Next, select the video you would like to cut. Alternatively, you can simply drag it to the timeline to start editing.
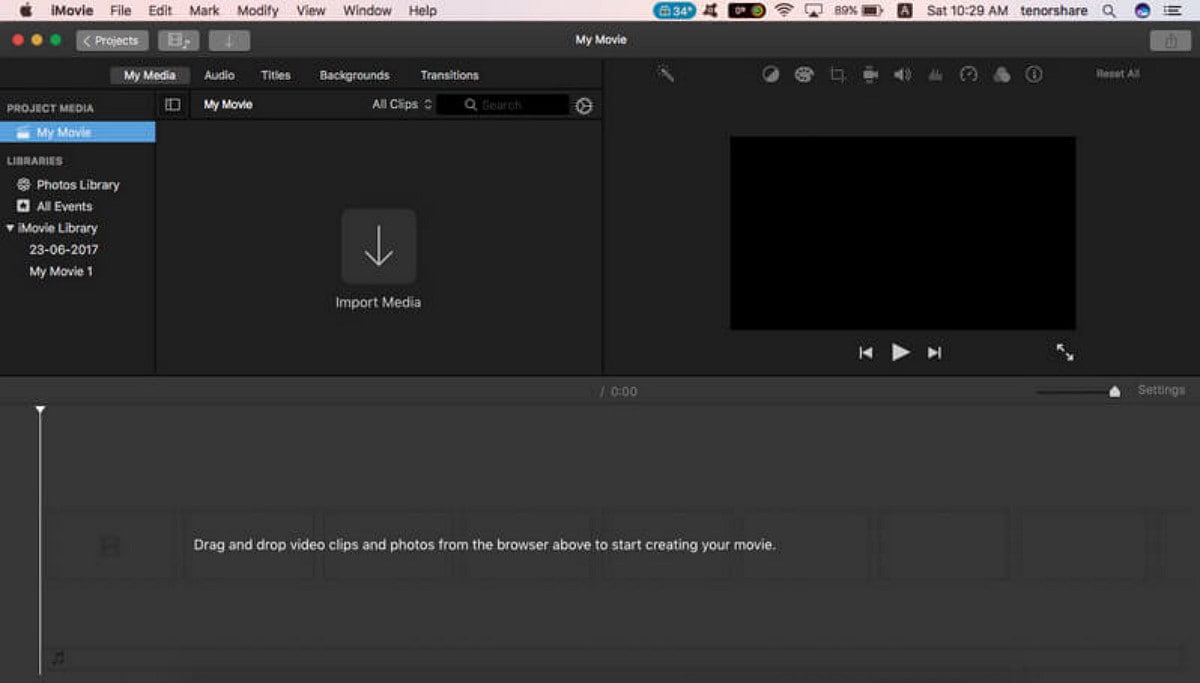
- Drag the playhead to mark off where you would like to cut; repeat this process at the end of the video.
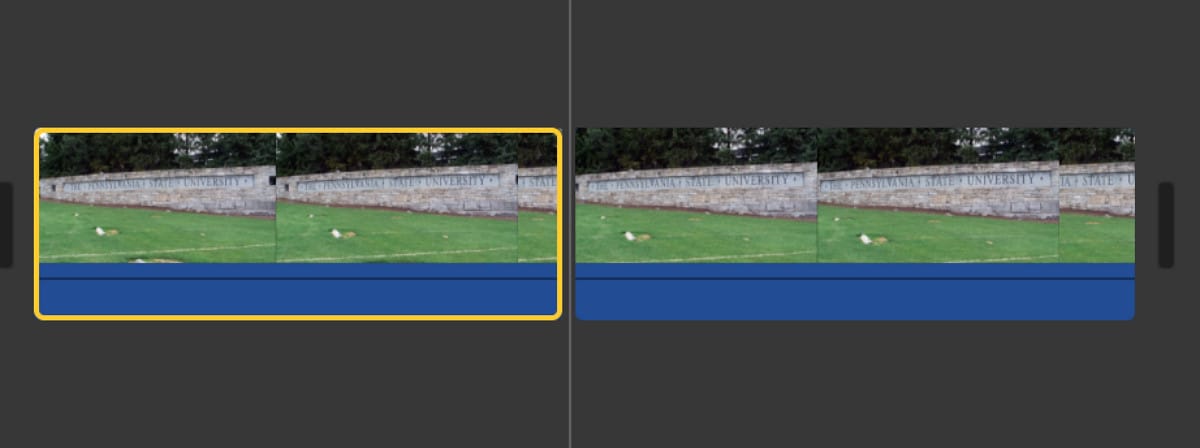
- Afterward, click ‘edit’ and choose ‘split video clip’ to split the clip.
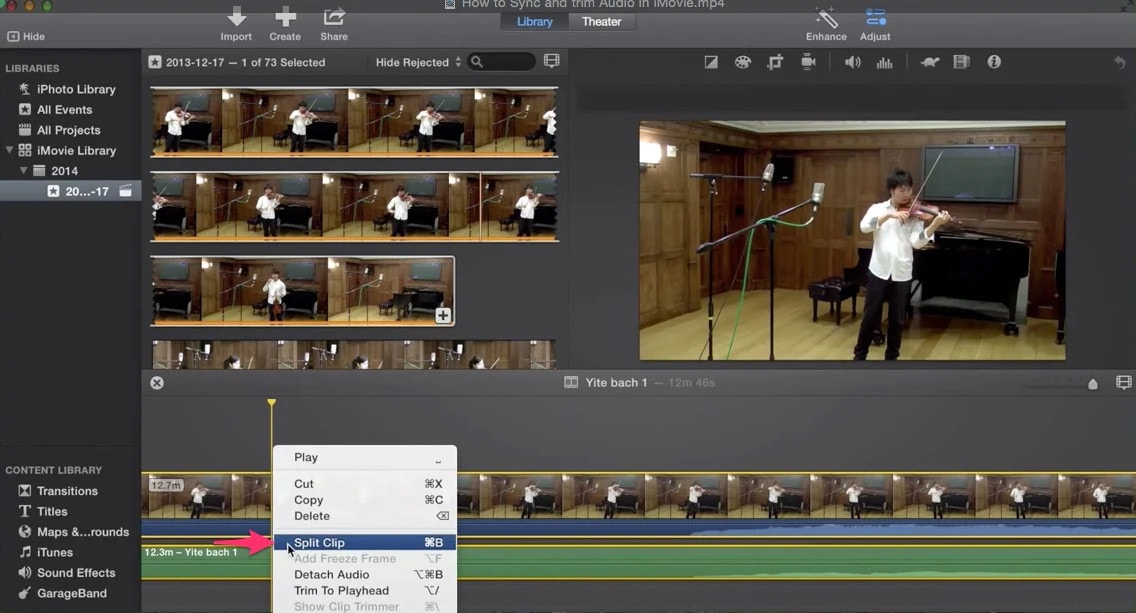
- Next, select the parts you don’t want and hit ‘delete’ on your keyword.
- You can split and delete clips ad many times as you want till you have the portion you’re looking for.
- Afterward, save your file, and you can also share it directly to your social media accounts.
Tuneskit
Supported System: Mac and Windows
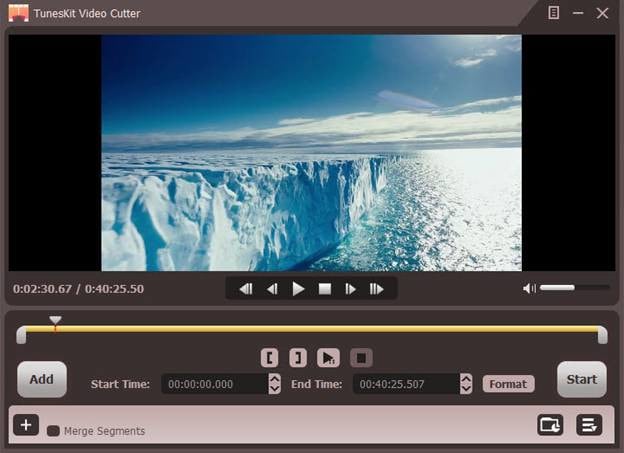
A free video cutter that’s quite useful for cutting large video files is Tuneskit. It is free to use and allows you to cut large video files into smaller clips while maintaining its high quality. It is easy to utilize, and you can cut and trim your videos within a few minutes. The best bast is the lossless quality feature after cutting or combining several clips.
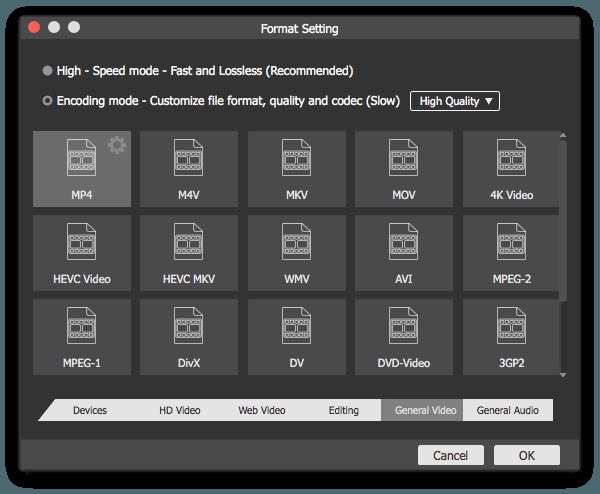
This video cutting tool supports various popular formats like AVI, MP4, FLV, MPEG, etc. The video joining feature also allows you to merge multiple videos you cut without losing the quality of the original quality. You can also convert the video to a new format when saving your video. Tuneskit also allows users to share cut videos to user platforms. You can also utilize its editing tools to customize your videos and add a personalized touch. However, this video cutter only offers essential editing tools, which is ideal for beginners.
Pros
- Superfast video processing
- It supports several input and output video format
- Maintains video quality after editing
- Offers basic editing video
- Simple user interface for easy navigation
Cons
- It only offers basic editing features
Steps to Cut Large Videos on Mac Using Tuneskit
You have to download Tuneskit on your Mac device to get started. Next, install the app and then launch it to begin. Once you launch the app, follow the steps below to cut large videos on Mac.
- Firstly, you have to import the video you want to cut by clicking ‘import’ on the file tab.
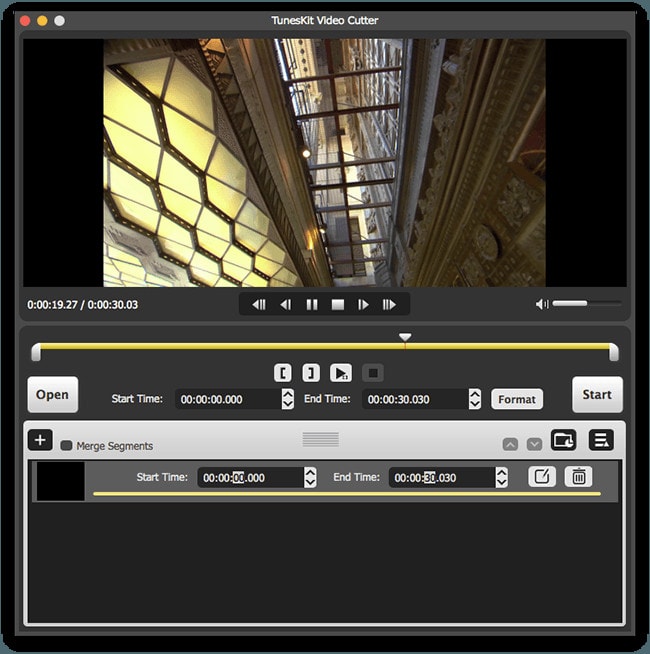
- Next, edit the file by clicking ‘edit,’ which is an icon you can find next to every video segment.
- Now, move the slider at the beginning of the video to your preference. Carry out the same action for the end of the video till you have your desired cut.
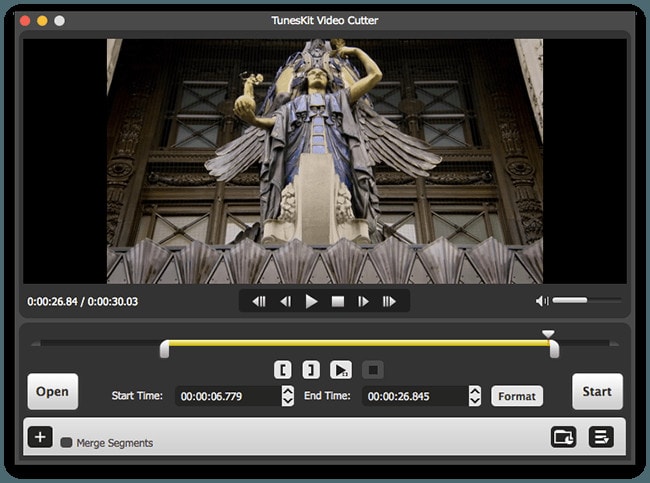
- Now, click ‘cut’ to cut your video. Afterward, save the video and choose the output format you want.
More Paid Large Video Cutter on Mac to Cut Large Videos Faster
Now that you know the best free large video cutter on Mac to cut large videos faster, below are the top three paid large video cutters on Mac.
Final Cut Pro
Supported System: Mac and Windows
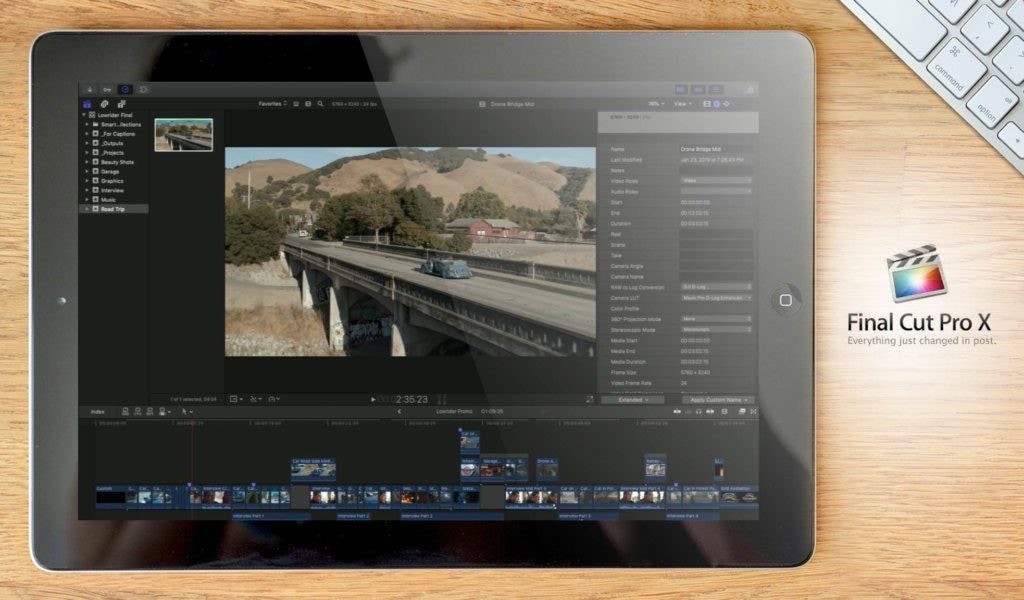
Final Cut Pro is a video cutting software released by Apple, and it is one of the best professional large video cutters you can find. Despite its professionalism, it offers you a basic user interface that makes it easy to navigate the video editor. It is also relatively easy and allows users to efficiently advance their skills to a professional level while using the editing software. Additionally, you can easily add your social media accounts to share edited videos to each platform directly.
Apart from the easy cutting of large videos on Mac, Final Cut Pro offers cutting-edge editing tools that ensure smooth and professional results. Final Cut Pro’s features include project workflow, color correction, trimming, closed caption, audio enhancement, etc. In addition, Final Cut Pro supports various video formats and resolutions to work with. However, it is not a suitable option if you have no previous video editing, as there’s a steep learning curve involved.
Pros
- It provides users with 360-degree video editing
- Final Cut Pro supports various video formats and resolutions
- It offers an intuitive user interface
- It offers fast video processing and saving process
- It provides basic and advanced editing tools
Cons
- It is quite pricey
- It is not the best choice for beginners
Steps to Easily Cut Large Videos on Mac Using Final Cut Pro
- First, download and install Final Cut Pro on your device, and then launch to start the video cutting process.
- Next, import the media you would like to cut by clicking ‘import media file’ and choosing the file you want to edit. You can also drag the video directly to your timeline to start editing.
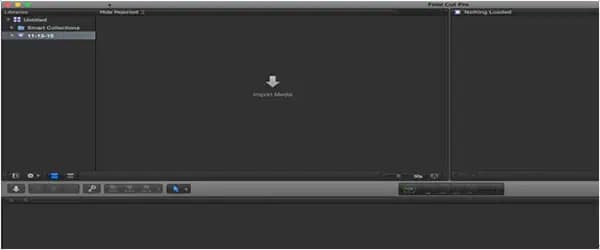
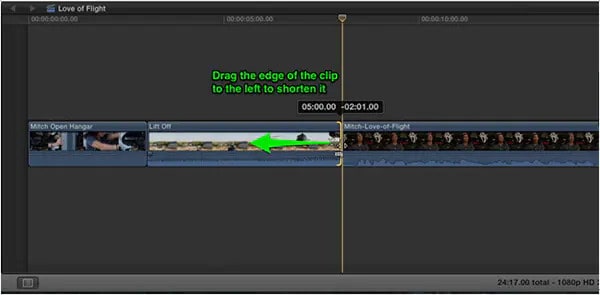
- Once you identify the part you would like to edit, drag the tail of the clip to where you would prefer. Repeat this process at the beginning and the end of the video. Afterward, click ‘cut’ to cut the clip.
- Now you can save the cut video to your Mac by clicking ‘file’ and choosing ‘save’ from the dropdown menu.
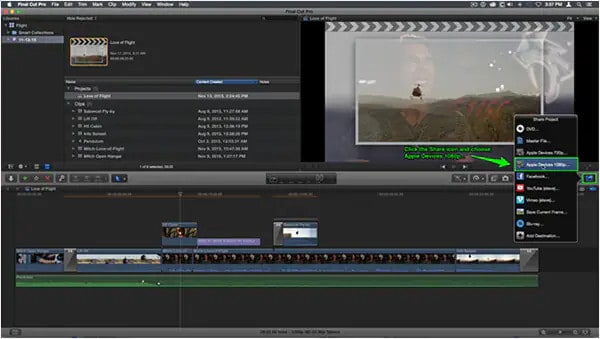
You can also share your cut video directly from Final Cut Pro to your preferred destination. You can change the output video format if you prefer.
VideoPad Video Editor
Supported System: Mac and Windows
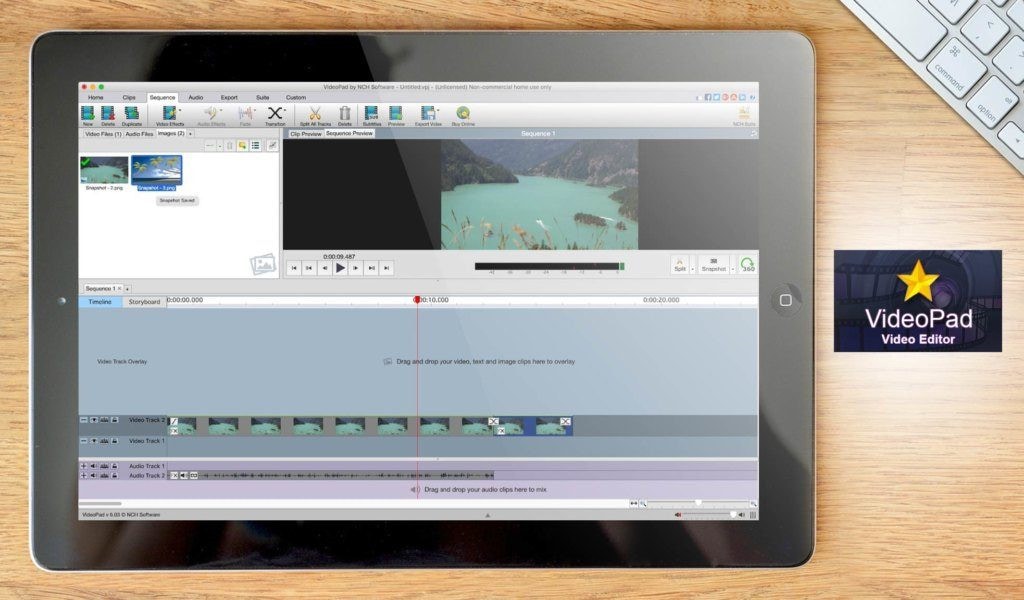
Some large video cutters can be frustrating for new editors; you won’t have that problem with VideoPad. This tool is easy to use even with no prior editing experience. It contains all the essential tools to cut and edit your video. It also supports different file types, including AVI, MOV, MP4, MPEG, etc. It also allows you to change the output format of your video and share it directly on social media platforms. You can also burn the newly cut video to DVD or CD.
With VideoPad Video Editor, you don’t have to worry about losing the quality of your large video after cutting. It offers impressive video editing features like transitions, color correcting, speed adjustment, and various visual elements. You can split large videos easily with its fast-processing system. Its intuitive user interface makes it quite easy to navigate.
Apart from basic editing, professionals would also find this large video cutter impressive as it offers 3D editing, green screen support, 360-degree editing, and video stabilization. Overall, this is an excellent video cutter if you want a versatile editor that offers tools to enhance your video.
Pros
- Ideal for beginners and professionals
- It supports common file types
- Intuitive user interface
- Offers basic and advanced editing tools
Cons
- Relatively high price
Steps to Easily Cut Large Videos on Mac Using VideoPad Video Editor
- First, you have to download and install VideoPad on your device.
- Next, launch the app and click ‘open’ on the home tab. This will allow you to add the video you would like to edit. Alternatively, click Cmd+O or drag the video to the media bin.
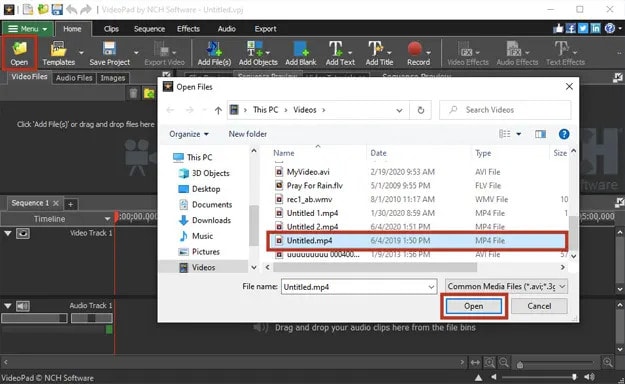
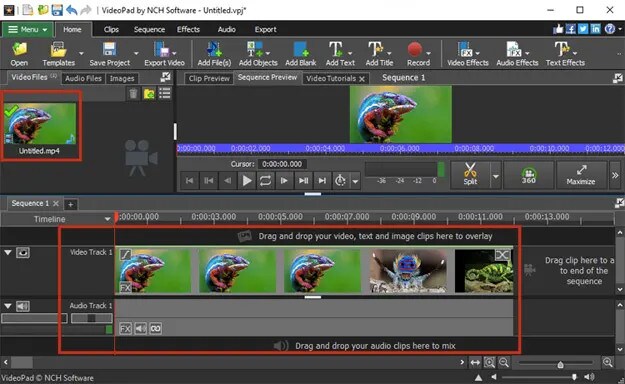
- After adding the video, drag it to the sequence timeline to start cutting your large video.
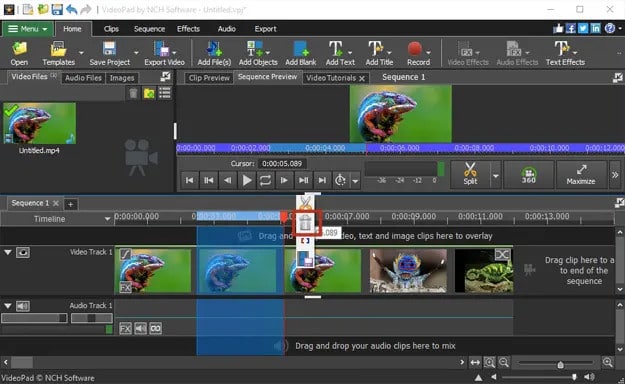
- To cut a part of the video, select it by placing a cursor at the start of the video. Hover over the red line till it changes to a double-sided arrow. Drag the pointer to where you would like the video to begin; repeat this for the end of the video. Right-click over the region and click ‘split’ to separate the clip from other parts.
- Select the fragments and click the trash can button next to the cursor to delete them. Repeat this for all pieces till only your video is left.
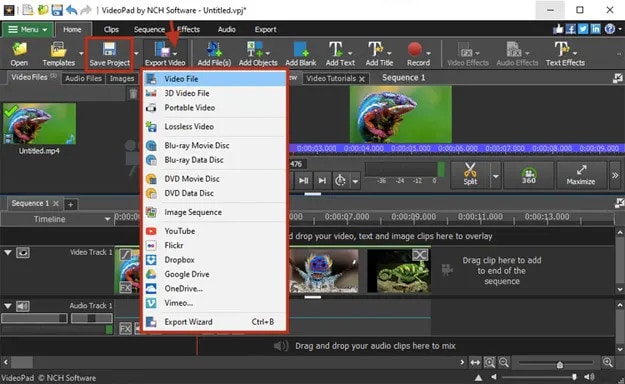
- Once you’re done, click ‘save project’ to save the newly edited video. You can also export the video by clicking ‘export video’ and choosing the platform to which you would like to export.
Adobe Premiere Pro
Supported System: Windows and Mac
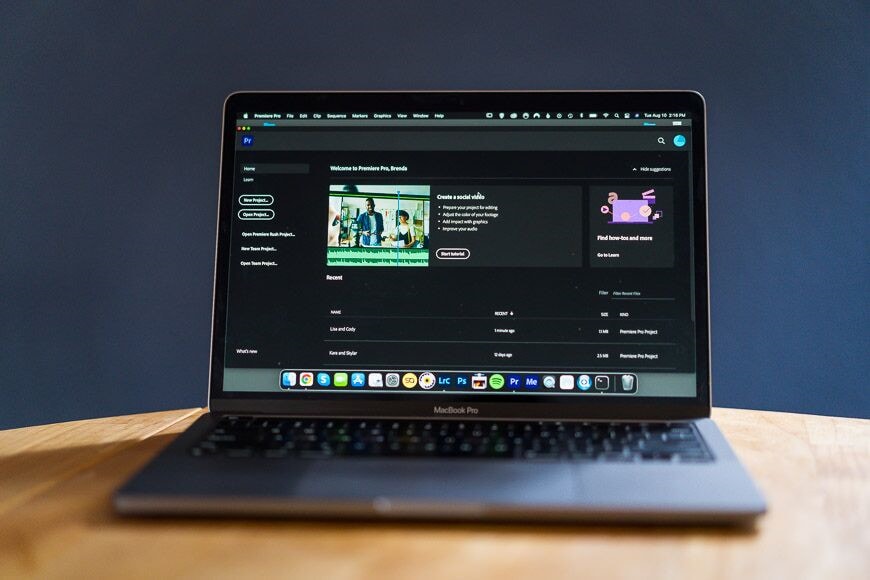
One of the best large video cutters for Mac that you’ll find out there is Adobe Premiere Pro. This video cutting software supports a vast number of video formats and resolutions. It also offers users built-in editing tools that you can use to enhance your video. Most cinematographers find this tool quite useful due to its advanced editing features. It also ensures your video quality is not lost after editing.
Adobe Premiere Pro allows you to add filters, trim audio and video, and add texts and other visual elements to your video. It has an impressive media library that gives you access to a vast range of effects. You can also modify the output format of your video or use any of the existing presets to enhance your video. However, Adobe Premiere Pro has a steep learning curve and might not be suitable for beginners.
Pros
- It offers high-quality tools to edit your video
- Fast processing feature
- Supports vast video formats and resolutions
- Offers basic and advanced editing tools
- Allows you to share your video directly to social media platforms
Cons
- It is too advanced for beginners
Steps for Cutting Large Video on Mac Using Adobe Premiere Pro
Cutting large videos on Adobe Premiere Pro is relatively easy with the steps below.
- Firstly, download and install Adobe Premiere Pro on your Mac. After installation, launch the app to begin.
- Next, create a new Premiere Pro project and create the right name you would like to save it as.
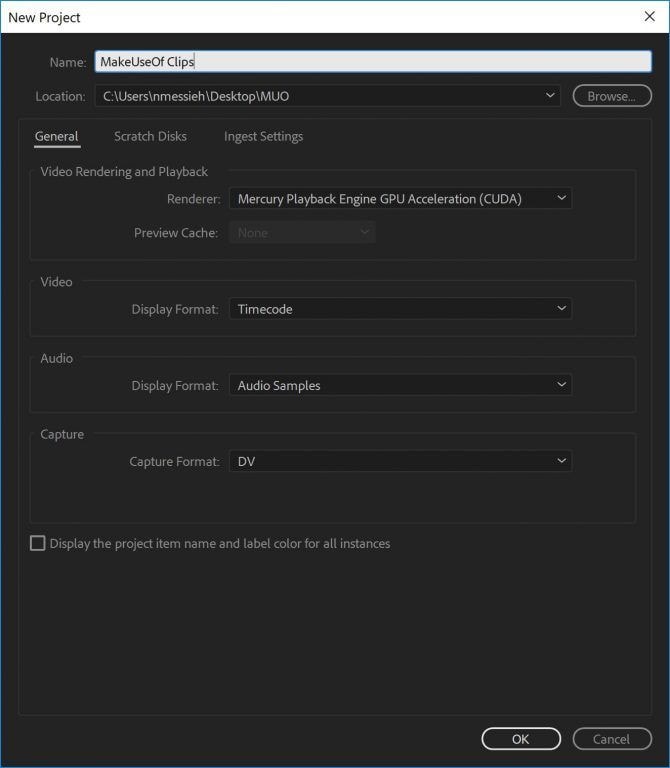
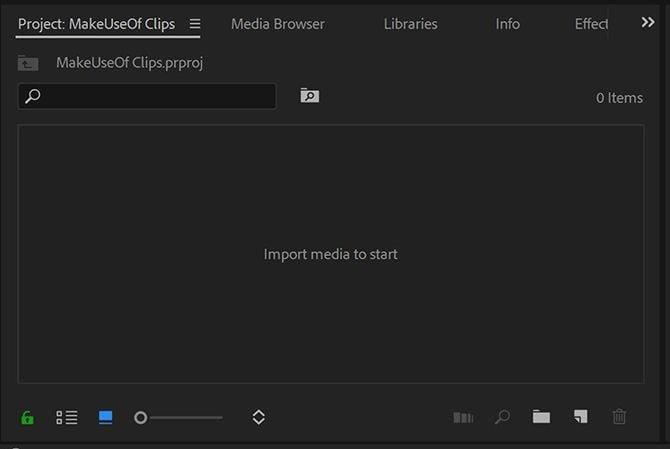
- Now, import the large video you want to cut into Adobe Premiere Pro. You can either drag the video into the project clip tab or go to ‘file’ and choose ‘import’ from the menu. Navigate to the file’s location and choose the video.
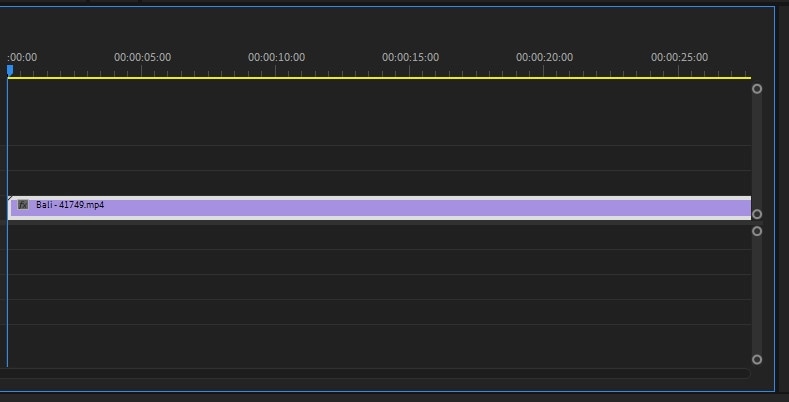
- Now select the video on the timeline; a white border will appear around the clip to show your selection.
- Pick the razor tool on the menu or press C on your keyboard to start cutting the large file.
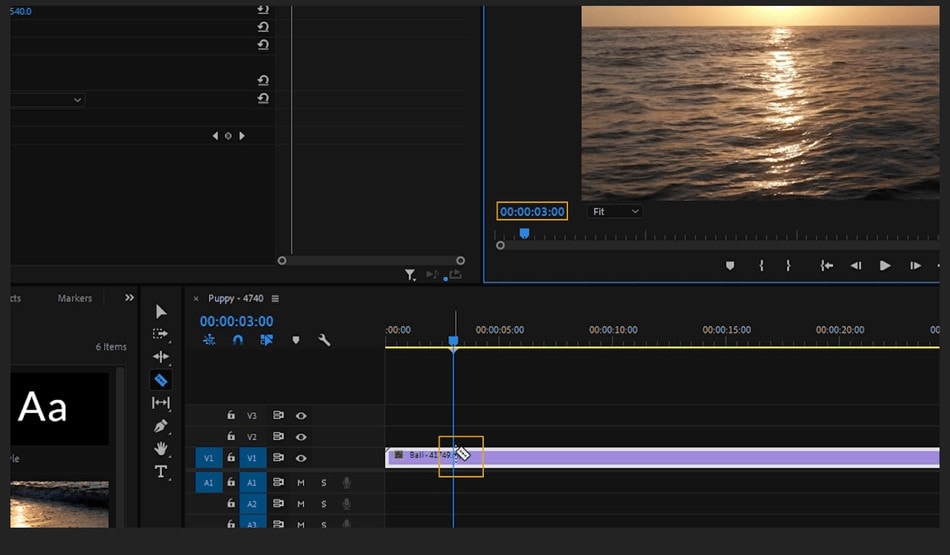
- To cut the video clip, hover the razor over any part of the video and split wherever you prefer. You can make multiple cuts on the video. However, if you want an accurate cut, simply move the playhead to the part you’ll like to begin the cut and then use the razor to cut.

- Now you can delete any fragment you want by selecting it and pressing delete on your PC.

Once you have a clean-cut, you can save or share your video.
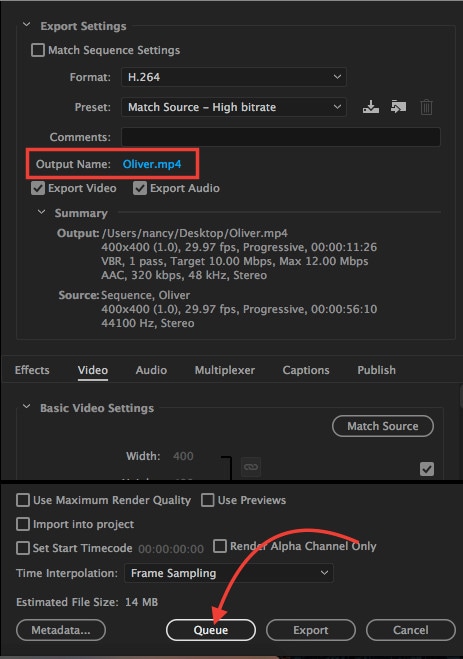
Which Should I Choose, Free or Paid Large Video Cutter on Mac?
There are different video-cutting software available that offer varying editing features to enhance your video. However, some are free, while others require a subscription. Therefore, it can be pretty challenging to figure out the best option for your video cutting needs. Below are some factors to consider when choosing between a paid or free video cutter on Mac.
· Intuitive Workflow
Some software is quite difficult to operate, and you could spend hours figuring out how each tool works. An efficient video cutting software makes all tools easy to use. Ensure the large video cutter you choose ensures a seamless workflow to improve your efficiency. In addition, a fast-processing feature is necessary to reduce the editing time significantly.
· Budget
Another factor that’s important to consider is your budget. You can use free software, but you need to note that the features are limited. If the tool doesn’t offer you the features you’re looking for, you might need to subscribe to a paid video cutter. Always choose a video cutter that falls within your budget.
· Experience Level
Are you looking to develop your editing skills? Then a paid large video cutter is the best option for you. There are usually advanced and basic tools available to help you edit your skills. However, a paid video cutter also offers you more functionality that can help you learn how to create impressive edited videos.
Overall, you want a video editor with an easy learning curve and one that meets your needs effectively. The goal is to get a video editor that will provide you with more editing tools to enhance your video. It is pretty easy to outgrow free video cutters because of their limited features. However, if you’re choosing a paid video cutter, ensure it isn’t made for professionals and, therefore, is challenging to navigate.
FAQs About Cutting Large Videos
- What is video cutting software? This software allows you cut a video into different parts without changing the video quality. This type of software will enable you to cut large-sized videos in no time; you can choose from the video cutters above.
- Does cutting videos affect its quality? This depends on the video cutter used. While some video cutters allow a loss of video quality when cutting videos, some ensure the video quality remains the same throughout the cutting process.
- Are video cutters safe? Yes, most video cutters are safe. The options above are secure and prevent malware attacks on your PC.
Final Thoughts
You’ll find the best large video cutters to cut videos on your Mac above. Most of the video cutters above support various video formats and ensure your video remains in the original quality after saving. Several software reviewed above also offers additional features you can use to upgrade your videos. Finally, we recommend Filmora Video Editor as it provides several basic and advanced features to help you create the best videos.
Supported System: Mac and Windows
Cutting large videos is not easy if you don’t have the right tools to achieve that. That’s where Filmora Video Editor enters the picture. It combines simplicity and several excellent features to offer you the best video cutter for Mac. It doesn’t just provide you with the basic cutting features but also several editing tools to create fantastic videos. In addition, its user interface is intuitive and easy to navigate by new editors and professionals.
Filmora Video Editor offers several customization features and advanced features to make your video look sleek and professional. This means it provides motion tracking, the addition of images, filters, effects, texts, and several other tools. When exporting your files, you have a wide variety of options as this large video cutter offers different output formats to select from. It also allows you to share your video directly to any social media network you would prefer. Most importantly, it is compatible with every version of MacOS.
For Win 7 or later (64-bit)
For macOS 10.14 or later
Features
- It supports various video formats like AVI, MOV, MP4, MKV, and several others
- It only takes a few clicks to cut, trim, and split videos
- Impressive video editing features
- Intuitive and user-friendly interface that ensures a gentle learning curve
- You can cut your video without losing the quality level
- Several video effects to make your video stunning
- It offers additional features like transitions, motion elements, color corrections, animated titles, etc.
- Allows you to burn video to DVD or share directly
Cons
- It might not have the most advanced features
Steps to Easily Cut Large Videos On Mac Using Filmora Video Editor
Cutting large videos on Filmora is relatively easy when you follow the proper steps. Below, we’ve outlined the steps you should take when you want to cut large videos on Mac using Filmora Video Editor.
· Step One: Import Large Video

Once you Install Filmora on your Mac, launch and click ‘new project’ on the home screen to start your video cutting journey. Now, import the video you want to cut by selecting ‘import’ on the main interface and selecting the files from your computer. Alternatively, you can drag the large video to your timeline.

· Step Two: Manually Cut the Large Video

After adding the video to the timeline, drag the playhead at the beginning to the part you would like your large video to begin and right-click on it. You can then select ‘trim start to playhead to cut your video to your preference. Repeat this with the end of your video but select ‘trim end to playhead’ this time.
· Step Three: Export Your Newly Cut Video

After cutting your video and carrying out basic editing on your video, you can now save your video. Next, click the ‘export’ button, and you can choose the output format of your video, frame rate, and resolution. You can also share directly to YouTube, Vimeo, and other social media platforms or burn the video to a DVD.
More Free Large Video Cutter on Mac to Cut Large Videos Faster
The first large video cutters we’ll be reviewing in this article are available for free. Although they’re not professional video editing software, they can help you easily cut large videos on Mac in just a few minutes. Therefore, if you’re looking for a free video cutter for Mac, you should keep reading.
GihoSoft Free Video Cutter

Supported System: Mac and Windows
This free video cutting software helps you cut large video files within a few minutes. You can either cut the video into smaller clips or eliminate all other clips reducing the video into one little clip. This large video cutter is relatively easy to use, and it comes with a friendly user interface which makes it ideal for beginners. The best part is that it supports varying video formats and resolutions. However, as the name implies, you can only use it to cut videos. It doesn’t offer other video editing features.
Gihosoft Video cutter offers a fast processing speed and supports popular video formats like AVI, MOV, FLV, MP4, etc. It also saves your video in the same input format to maintain its quality. You can also cut different clips and join them using this video cutting software for free.
Pros
- It is free to use
- It offers a clean and intuitive user interface
- Ideal for beginners
- Supports different input and output video formats
- Allows you to join clips from various videos
Cons
- There are no editing features
- The saving process can be slow
Steps to Cut Large Videos on Mac Using Gihosoft Free Video Cutter
Gihosoft Video Cutter is relatively easy to use. Below, you’ll find the steps to cut large videos on Mac with this free cutter quickly.
- Firstly, download and install this free video cutter on your Mac. Once you do this, launch the software, and you can begin.
- Add files to the timeline by clicking the ‘add files’ to import a large video file to this video cutter.

- Next, set the start and endpoint of your video by moving the two sliders in the timeline. Alternatively, you can manually enter the beginning and end times you want.

- Hit the ‘cut’ button once you’re satisfied with the timing.
- After cutting, you can save your video in your preferred location on your PC

iMovie

Supported System: Mac
iMovie is a household name in the Apple family due to its popularity amongst Mac owners. Apple device owners commonly use it for editing videos. It is pretty functional and great for making your video clips look professional. Cutting large videos on Mac using iMovie is quite a simple process. This is the best option if you’re using Mac and looking for a free and straightforward video cutter.
One of the reasons this large video cutter is a good choice because it supports high resolutions. This Mac video cutter supports up to 4k video resolution. It also supports different input and output video formats. In addition, its intuitive and user-friendly interface makes it an excellent choice for beginners. However, it lacks advanced editing features if that’s what you’re looking for.
Pros
- It is free to use
- It supports high video resolutions
- Its simple user interface makes it ideal for beginners
- It offers various preset templates to enhance your video
- It supports several input and output formats
Cons
- Lacks advanced editing features
Steps to Cut Large Video on Mac Using iMovie
iMovie is quite a simple editing software that makes it easy for users with little editing experience to cut large videos on Mac. Follow the steps below to cut videos on Mac easily.
- Open iMovie on your Mac and select ‘file’ on the menu; choose ‘open project’ from the dropdown menu.

- Next, select the video you would like to cut. Alternatively, you can simply drag it to the timeline to start editing.

- Drag the playhead to mark off where you would like to cut; repeat this process at the end of the video.

- Afterward, click ‘edit’ and choose ‘split video clip’ to split the clip.

- Next, select the parts you don’t want and hit ‘delete’ on your keyword.
- You can split and delete clips ad many times as you want till you have the portion you’re looking for.
- Afterward, save your file, and you can also share it directly to your social media accounts.

Tuneskit

Supported System: Mac and Windows
A free video cutter that’s quite useful for cutting large video files is Tuneskit. It is free to use and allows you to cut large video files into smaller clips while maintaining its high quality. It is easy to utilize, and you can cut and trim your videos within a few minutes. The best bast is the lossless quality feature after cutting or combining several clips.
This video cutting tool supports various popular formats like AVI, MP4, FLV, MPEG, etc. The video joining feature also allows you to merge multiple videos you cut without losing the quality of the original quality. You can also convert the video to a new format when saving your video. Tuneskit also allows users to share cut videos to user platforms. You can also utilize its editing tools to customize your videos and add a personalized touch. However, this video cutter only offers essential editing tools, which is ideal for beginners.
Pros
- Superfast video processing
- It supports several input and output video format
- Maintains video quality after editing
- Offers basic editing video
- Simple user interface for easy navigation
Cons
- It only offers basic editing features
Steps to Cut Large Videos on Mac Using Tuneskit
You have to download Tuneskit on your Mac device to get started. Next, install the app and then launch it to begin. Once you launch the app, follow the steps below to cut large videos on Mac.
- Firstly, you have to import the video you want to cut by clicking ‘import’ on the file tab.

- Next, edit the file by clicking ‘edit,’ which is an icon you can find next to every video segment.
- Now, move the slider at the beginning of the video to your preference. Carry out the same action for the end of the video till you have your desired cut.

- Now, click ‘cut’ to cut your video. Afterward, save the video and choose the output format you want.

More Paid Large Video Cutter on Mac to Cut Large Videos Faster
Now that you know the best free large video cutter on Mac to cut large videos faster, below are the top three paid large video cutters on Mac.
Final Cut Pro

Supported System: Mac and Windows
Final Cut Pro is a video cutting software released by Apple, and it is one of the best professional large video cutters you can find. Despite its professionalism, it offers you a basic user interface that makes it easy to navigate the video editor. It is also relatively easy and allows users to efficiently advance their skills to a professional level while using the editing software. Additionally, you can easily add your social media accounts to share edited videos to each platform directly.
Apart from the easy cutting of large videos on Mac, Final Cut Pro offers cutting-edge editing tools that ensure smooth and professional results. Final Cut Pro’s features include project workflow, color correction, trimming, closed caption, audio enhancement, etc. In addition, Final Cut Pro supports various video formats and resolutions to work with. However, it is not a suitable option if you have no previous video editing, as there’s a steep learning curve involved.
Pros
- It provides users with 360-degree video editing
- Final Cut Pro supports various video formats and resolutions
- It offers an intuitive user interface
- It offers fast video processing and saving process
- It provides basic and advanced editing tools
Cons
- It is quite pricey
- It is not the best choice for beginners
Steps to Easily Cut Large Videos on Mac Using Final Cut Pro
- First, download and install Final Cut Pro on your device, and then launch to start the video cutting process.
- Next, import the media you would like to cut by clicking ‘import media file’ and choosing the file you want to edit. You can also drag the video directly to your timeline to start editing.

- Once you identify the part you would like to edit, drag the tail of the clip to where you would prefer. Repeat this process at the beginning and the end of the video. Afterward, click ‘cut’ to cut the clip.

- Now you can save the cut video to your Mac by clicking ‘file’ and choosing ‘save’ from the dropdown menu.

You can also share your cut video directly from Final Cut Pro to your preferred destination. You can change the output video format if you prefer.
VideoPad Video Editor

Supported System: Mac and Windows
Some large video cutters can be frustrating for new editors; you won’t have that problem with VideoPad. This tool is easy to use even with no prior editing experience. It contains all the essential tools to cut and edit your video. It also supports different file types, including AVI, MOV, MP4, MPEG, etc. It also allows you to change the output format of your video and share it directly on social media platforms. You can also burn the newly cut video to DVD or CD.
With VideoPad Video Editor, you don’t have to worry about losing the quality of your large video after cutting. It offers impressive video editing features like transitions, color correcting, speed adjustment, and various visual elements. You can split large videos easily with its fast-processing system. Its intuitive user interface makes it quite easy to navigate.
Apart from basic editing, professionals would also find this large video cutter impressive as it offers 3D editing, green screen support, 360-degree editing, and video stabilization. Overall, this is an excellent video cutter if you want a versatile editor that offers tools to enhance your video.
Pros
- Ideal for beginners and professionals
- It supports common file types
- Intuitive user interface
- Offers basic and advanced editing tools
Cons
- Relatively high price
Steps to Easily Cut Large Videos on Mac Using VideoPad Video Editor
- First, you have to download and install VideoPad on your device.
- Next, launch the app and click ‘open’ on the home tab. This will allow you to add the video you would like to edit. Alternatively, click Cmd+O or drag the video to the media bin.

- After adding the video, drag it to the sequence timeline to start cutting your large video.
- To cut a part of the video, select it by placing a cursor at the start of the video. Hover over the red line till it changes to a double-sided arrow. Drag the pointer to where you would like the video to begin; repeat this for the end of the video. Right-click over the region and click ‘split’ to separate the clip from other parts.

- Select the fragments and click the trash can button next to the cursor to delete them. Repeat this for all pieces till only your video is left.

- Once you’re done, click ‘save project’ to save the newly edited video. You can also export the video by clicking ‘export video’ and choosing the platform to which you would like to export.

Adobe Premiere Pro

Supported System: Windows and Mac
One of the best large video cutters for Mac that you’ll find out there is Adobe Premiere Pro. This video cutting software supports a vast number of video formats and resolutions. It also offers users built-in editing tools that you can use to enhance your video. Most cinematographers find this tool quite useful due to its advanced editing features. It also ensures your video quality is not lost after editing.
Adobe Premiere Pro allows you to add filters, trim audio and video, and add texts and other visual elements to your video. It has an impressive media library that gives you access to a vast range of effects. You can also modify the output format of your video or use any of the existing presets to enhance your video. However, Adobe Premiere Pro has a steep learning curve and might not be suitable for beginners.
Pros
- It offers high-quality tools to edit your video
- Fast processing feature
- Supports vast video formats and resolutions
- Offers basic and advanced editing tools
- Allows you to share your video directly to social media platforms
Cons
- It is too advanced for beginners
Steps for Cutting Large Video on Mac Using Adobe Premiere Pro
Cutting large videos on Adobe Premiere Pro is relatively easy with the steps below.
- Firstly, download and install Adobe Premiere Pro on your Mac. After installation, launch the app to begin.
- Next, create a new Premiere Pro project and create the right name you would like to save it as.

- Now, import the large video you want to cut into Adobe Premiere Pro. You can either drag the video into the project clip tab or go to ‘file’ and choose ‘import’ from the menu. Navigate to the file’s location and choose the video.

- Now select the video on the timeline; a white border will appear around the clip to show your selection.

- Pick the razor tool on the menu or press C on your keyboard to start cutting the large file.

- To cut the video clip, hover the razor over any part of the video and split wherever you prefer. You can make multiple cuts on the video. However, if you want an accurate cut, simply move the playhead to the part you’ll like to begin the cut and then use the razor to cut.

- Now you can delete any fragment you want by selecting it and pressing delete on your PC.

Once you have a clean-cut, you can save or share your video.

Which Should I Choose, Free or Paid Large Video Cutter on Mac?
There are different video-cutting software available that offer varying editing features to enhance your video. However, some are free, while others require a subscription. Therefore, it can be pretty challenging to figure out the best option for your video cutting needs. Below are some factors to consider when choosing between a paid or free video cutter on Mac.
· Intuitive Workflow
Some software is quite difficult to operate, and you could spend hours figuring out how each tool works. An efficient video cutting software makes all tools easy to use. Ensure the large video cutter you choose ensures a seamless workflow to improve your efficiency. In addition, a fast-processing feature is necessary to reduce the editing time significantly.
· Budget
Another factor that’s important to consider is your budget. You can use free software, but you need to note that the features are limited. If the tool doesn’t offer you the features you’re looking for, you might need to subscribe to a paid video cutter. Always choose a video cutter that falls within your budget.
· Experience Level
Are you looking to develop your editing skills? Then a paid large video cutter is the best option for you. There are usually advanced and basic tools available to help you edit your skills. However, a paid video cutter also offers you more functionality that can help you learn how to create impressive edited videos.
Overall, you want a video editor with an easy learning curve and one that meets your needs effectively. The goal is to get a video editor that will provide you with more editing tools to enhance your video. It is pretty easy to outgrow free video cutters because of their limited features. However, if you’re choosing a paid video cutter, ensure it isn’t made for professionals and, therefore, is challenging to navigate.
FAQs About Cutting Large Videos
- What is video cutting software? This software allows you cut a video into different parts without changing the video quality. This type of software will enable you to cut large-sized videos in no time; you can choose from the video cutters above.
- Does cutting videos affect its quality? This depends on the video cutter used. While some video cutters allow a loss of video quality when cutting videos, some ensure the video quality remains the same throughout the cutting process.
- Are video cutters safe? Yes, most video cutters are safe. The options above are secure and prevent malware attacks on your PC.
Final Thoughts
You’ll find the best large video cutters to cut videos on your Mac above. Most of the video cutters above support various video formats and ensure your video remains in the original quality after saving. Several software reviewed above also offers additional features you can use to upgrade your videos. Finally, we recommend Filmora Video Editor as it provides several basic and advanced features to help you create the best videos.
Supported System: Mac and Windows
Cutting large videos is not easy if you don’t have the right tools to achieve that. That’s where Filmora Video Editor enters the picture. It combines simplicity and several excellent features to offer you the best video cutter for Mac. It doesn’t just provide you with the basic cutting features but also several editing tools to create fantastic videos. In addition, its user interface is intuitive and easy to navigate by new editors and professionals.
Filmora Video Editor offers several customization features and advanced features to make your video look sleek and professional. This means it provides motion tracking, the addition of images, filters, effects, texts, and several other tools. When exporting your files, you have a wide variety of options as this large video cutter offers different output formats to select from. It also allows you to share your video directly to any social media network you would prefer. Most importantly, it is compatible with every version of MacOS.
For Win 7 or later (64-bit)
For macOS 10.14 or later
Features
- It supports various video formats like AVI, MOV, MP4, MKV, and several others
- It only takes a few clicks to cut, trim, and split videos
- Impressive video editing features
- Intuitive and user-friendly interface that ensures a gentle learning curve
- You can cut your video without losing the quality level
- Several video effects to make your video stunning
- It offers additional features like transitions, motion elements, color corrections, animated titles, etc.
- Allows you to burn video to DVD or share directly
Cons
- It might not have the most advanced features
Steps to Easily Cut Large Videos On Mac Using Filmora Video Editor
Cutting large videos on Filmora is relatively easy when you follow the proper steps. Below, we’ve outlined the steps you should take when you want to cut large videos on Mac using Filmora Video Editor.
· Step One: Import Large Video

Once you Install Filmora on your Mac, launch and click ‘new project’ on the home screen to start your video cutting journey. Now, import the video you want to cut by selecting ‘import’ on the main interface and selecting the files from your computer. Alternatively, you can drag the large video to your timeline.

· Step Two: Manually Cut the Large Video

After adding the video to the timeline, drag the playhead at the beginning to the part you would like your large video to begin and right-click on it. You can then select ‘trim start to playhead to cut your video to your preference. Repeat this with the end of your video but select ‘trim end to playhead’ this time.
· Step Three: Export Your Newly Cut Video

After cutting your video and carrying out basic editing on your video, you can now save your video. Next, click the ‘export’ button, and you can choose the output format of your video, frame rate, and resolution. You can also share directly to YouTube, Vimeo, and other social media platforms or burn the video to a DVD.
More Free Large Video Cutter on Mac to Cut Large Videos Faster
The first large video cutters we’ll be reviewing in this article are available for free. Although they’re not professional video editing software, they can help you easily cut large videos on Mac in just a few minutes. Therefore, if you’re looking for a free video cutter for Mac, you should keep reading.
GihoSoft Free Video Cutter

Supported System: Mac and Windows
This free video cutting software helps you cut large video files within a few minutes. You can either cut the video into smaller clips or eliminate all other clips reducing the video into one little clip. This large video cutter is relatively easy to use, and it comes with a friendly user interface which makes it ideal for beginners. The best part is that it supports varying video formats and resolutions. However, as the name implies, you can only use it to cut videos. It doesn’t offer other video editing features.
Gihosoft Video cutter offers a fast processing speed and supports popular video formats like AVI, MOV, FLV, MP4, etc. It also saves your video in the same input format to maintain its quality. You can also cut different clips and join them using this video cutting software for free.
Pros
- It is free to use
- It offers a clean and intuitive user interface
- Ideal for beginners
- Supports different input and output video formats
- Allows you to join clips from various videos
Cons
- There are no editing features
- The saving process can be slow
Steps to Cut Large Videos on Mac Using Gihosoft Free Video Cutter
Gihosoft Video Cutter is relatively easy to use. Below, you’ll find the steps to cut large videos on Mac with this free cutter quickly.
- Firstly, download and install this free video cutter on your Mac. Once you do this, launch the software, and you can begin.
- Add files to the timeline by clicking the ‘add files’ to import a large video file to this video cutter.

- Next, set the start and endpoint of your video by moving the two sliders in the timeline. Alternatively, you can manually enter the beginning and end times you want.

- Hit the ‘cut’ button once you’re satisfied with the timing.
- After cutting, you can save your video in your preferred location on your PC

iMovie

Supported System: Mac
iMovie is a household name in the Apple family due to its popularity amongst Mac owners. Apple device owners commonly use it for editing videos. It is pretty functional and great for making your video clips look professional. Cutting large videos on Mac using iMovie is quite a simple process. This is the best option if you’re using Mac and looking for a free and straightforward video cutter.
One of the reasons this large video cutter is a good choice because it supports high resolutions. This Mac video cutter supports up to 4k video resolution. It also supports different input and output video formats. In addition, its intuitive and user-friendly interface makes it an excellent choice for beginners. However, it lacks advanced editing features if that’s what you’re looking for.
Pros
- It is free to use
- It supports high video resolutions
- Its simple user interface makes it ideal for beginners
- It offers various preset templates to enhance your video
- It supports several input and output formats
Cons
- Lacks advanced editing features
Steps to Cut Large Video on Mac Using iMovie
iMovie is quite a simple editing software that makes it easy for users with little editing experience to cut large videos on Mac. Follow the steps below to cut videos on Mac easily.
- Open iMovie on your Mac and select ‘file’ on the menu; choose ‘open project’ from the dropdown menu.

- Next, select the video you would like to cut. Alternatively, you can simply drag it to the timeline to start editing.

- Drag the playhead to mark off where you would like to cut; repeat this process at the end of the video.

- Afterward, click ‘edit’ and choose ‘split video clip’ to split the clip.

- Next, select the parts you don’t want and hit ‘delete’ on your keyword.
- You can split and delete clips ad many times as you want till you have the portion you’re looking for.
- Afterward, save your file, and you can also share it directly to your social media accounts.

Tuneskit

Supported System: Mac and Windows
A free video cutter that’s quite useful for cutting large video files is Tuneskit. It is free to use and allows you to cut large video files into smaller clips while maintaining its high quality. It is easy to utilize, and you can cut and trim your videos within a few minutes. The best bast is the lossless quality feature after cutting or combining several clips.
This video cutting tool supports various popular formats like AVI, MP4, FLV, MPEG, etc. The video joining feature also allows you to merge multiple videos you cut without losing the quality of the original quality. You can also convert the video to a new format when saving your video. Tuneskit also allows users to share cut videos to user platforms. You can also utilize its editing tools to customize your videos and add a personalized touch. However, this video cutter only offers essential editing tools, which is ideal for beginners.
Pros
- Superfast video processing
- It supports several input and output video format
- Maintains video quality after editing
- Offers basic editing video
- Simple user interface for easy navigation
Cons
- It only offers basic editing features
Steps to Cut Large Videos on Mac Using Tuneskit
You have to download Tuneskit on your Mac device to get started. Next, install the app and then launch it to begin. Once you launch the app, follow the steps below to cut large videos on Mac.
- Firstly, you have to import the video you want to cut by clicking ‘import’ on the file tab.

- Next, edit the file by clicking ‘edit,’ which is an icon you can find next to every video segment.
- Now, move the slider at the beginning of the video to your preference. Carry out the same action for the end of the video till you have your desired cut.

- Now, click ‘cut’ to cut your video. Afterward, save the video and choose the output format you want.

More Paid Large Video Cutter on Mac to Cut Large Videos Faster
Now that you know the best free large video cutter on Mac to cut large videos faster, below are the top three paid large video cutters on Mac.
Final Cut Pro

Supported System: Mac and Windows
Final Cut Pro is a video cutting software released by Apple, and it is one of the best professional large video cutters you can find. Despite its professionalism, it offers you a basic user interface that makes it easy to navigate the video editor. It is also relatively easy and allows users to efficiently advance their skills to a professional level while using the editing software. Additionally, you can easily add your social media accounts to share edited videos to each platform directly.
Apart from the easy cutting of large videos on Mac, Final Cut Pro offers cutting-edge editing tools that ensure smooth and professional results. Final Cut Pro’s features include project workflow, color correction, trimming, closed caption, audio enhancement, etc. In addition, Final Cut Pro supports various video formats and resolutions to work with. However, it is not a suitable option if you have no previous video editing, as there’s a steep learning curve involved.
Pros
- It provides users with 360-degree video editing
- Final Cut Pro supports various video formats and resolutions
- It offers an intuitive user interface
- It offers fast video processing and saving process
- It provides basic and advanced editing tools
Cons
- It is quite pricey
- It is not the best choice for beginners
Steps to Easily Cut Large Videos on Mac Using Final Cut Pro
- First, download and install Final Cut Pro on your device, and then launch to start the video cutting process.
- Next, import the media you would like to cut by clicking ‘import media file’ and choosing the file you want to edit. You can also drag the video directly to your timeline to start editing.

- Once you identify the part you would like to edit, drag the tail of the clip to where you would prefer. Repeat this process at the beginning and the end of the video. Afterward, click ‘cut’ to cut the clip.

- Now you can save the cut video to your Mac by clicking ‘file’ and choosing ‘save’ from the dropdown menu.

You can also share your cut video directly from Final Cut Pro to your preferred destination. You can change the output video format if you prefer.
VideoPad Video Editor

Supported System: Mac and Windows
Some large video cutters can be frustrating for new editors; you won’t have that problem with VideoPad. This tool is easy to use even with no prior editing experience. It contains all the essential tools to cut and edit your video. It also supports different file types, including AVI, MOV, MP4, MPEG, etc. It also allows you to change the output format of your video and share it directly on social media platforms. You can also burn the newly cut video to DVD or CD.
With VideoPad Video Editor, you don’t have to worry about losing the quality of your large video after cutting. It offers impressive video editing features like transitions, color correcting, speed adjustment, and various visual elements. You can split large videos easily with its fast-processing system. Its intuitive user interface makes it quite easy to navigate.
Apart from basic editing, professionals would also find this large video cutter impressive as it offers 3D editing, green screen support, 360-degree editing, and video stabilization. Overall, this is an excellent video cutter if you want a versatile editor that offers tools to enhance your video.
Pros
- Ideal for beginners and professionals
- It supports common file types
- Intuitive user interface
- Offers basic and advanced editing tools
Cons
- Relatively high price
Steps to Easily Cut Large Videos on Mac Using VideoPad Video Editor
- First, you have to download and install VideoPad on your device.
- Next, launch the app and click ‘open’ on the home tab. This will allow you to add the video you would like to edit. Alternatively, click Cmd+O or drag the video to the media bin.

- After adding the video, drag it to the sequence timeline to start cutting your large video.
- To cut a part of the video, select it by placing a cursor at the start of the video. Hover over the red line till it changes to a double-sided arrow. Drag the pointer to where you would like the video to begin; repeat this for the end of the video. Right-click over the region and click ‘split’ to separate the clip from other parts.

- Select the fragments and click the trash can button next to the cursor to delete them. Repeat this for all pieces till only your video is left.

- Once you’re done, click ‘save project’ to save the newly edited video. You can also export the video by clicking ‘export video’ and choosing the platform to which you would like to export.

Adobe Premiere Pro

Supported System: Windows and Mac
One of the best large video cutters for Mac that you’ll find out there is Adobe Premiere Pro. This video cutting software supports a vast number of video formats and resolutions. It also offers users built-in editing tools that you can use to enhance your video. Most cinematographers find this tool quite useful due to its advanced editing features. It also ensures your video quality is not lost after editing.
Adobe Premiere Pro allows you to add filters, trim audio and video, and add texts and other visual elements to your video. It has an impressive media library that gives you access to a vast range of effects. You can also modify the output format of your video or use any of the existing presets to enhance your video. However, Adobe Premiere Pro has a steep learning curve and might not be suitable for beginners.
Pros
- It offers high-quality tools to edit your video
- Fast processing feature
- Supports vast video formats and resolutions
- Offers basic and advanced editing tools
- Allows you to share your video directly to social media platforms
Cons
- It is too advanced for beginners
Steps for Cutting Large Video on Mac Using Adobe Premiere Pro
Cutting large videos on Adobe Premiere Pro is relatively easy with the steps below.
- Firstly, download and install Adobe Premiere Pro on your Mac. After installation, launch the app to begin.
- Next, create a new Premiere Pro project and create the right name you would like to save it as.

- Now, import the large video you want to cut into Adobe Premiere Pro. You can either drag the video into the project clip tab or go to ‘file’ and choose ‘import’ from the menu. Navigate to the file’s location and choose the video.

- Now select the video on the timeline; a white border will appear around the clip to show your selection.

- Pick the razor tool on the menu or press C on your keyboard to start cutting the large file.

- To cut the video clip, hover the razor over any part of the video and split wherever you prefer. You can make multiple cuts on the video. However, if you want an accurate cut, simply move the playhead to the part you’ll like to begin the cut and then use the razor to cut.

- Now you can delete any fragment you want by selecting it and pressing delete on your PC.

Once you have a clean-cut, you can save or share your video.

Which Should I Choose, Free or Paid Large Video Cutter on Mac?
There are different video-cutting software available that offer varying editing features to enhance your video. However, some are free, while others require a subscription. Therefore, it can be pretty challenging to figure out the best option for your video cutting needs. Below are some factors to consider when choosing between a paid or free video cutter on Mac.
· Intuitive Workflow
Some software is quite difficult to operate, and you could spend hours figuring out how each tool works. An efficient video cutting software makes all tools easy to use. Ensure the large video cutter you choose ensures a seamless workflow to improve your efficiency. In addition, a fast-processing feature is necessary to reduce the editing time significantly.
· Budget
Another factor that’s important to consider is your budget. You can use free software, but you need to note that the features are limited. If the tool doesn’t offer you the features you’re looking for, you might need to subscribe to a paid video cutter. Always choose a video cutter that falls within your budget.
· Experience Level
Are you looking to develop your editing skills? Then a paid large video cutter is the best option for you. There are usually advanced and basic tools available to help you edit your skills. However, a paid video cutter also offers you more functionality that can help you learn how to create impressive edited videos.
Overall, you want a video editor with an easy learning curve and one that meets your needs effectively. The goal is to get a video editor that will provide you with more editing tools to enhance your video. It is pretty easy to outgrow free video cutters because of their limited features. However, if you’re choosing a paid video cutter, ensure it isn’t made for professionals and, therefore, is challenging to navigate.
FAQs About Cutting Large Videos
- What is video cutting software? This software allows you cut a video into different parts without changing the video quality. This type of software will enable you to cut large-sized videos in no time; you can choose from the video cutters above.
- Does cutting videos affect its quality? This depends on the video cutter used. While some video cutters allow a loss of video quality when cutting videos, some ensure the video quality remains the same throughout the cutting process.
- Are video cutters safe? Yes, most video cutters are safe. The options above are secure and prevent malware attacks on your PC.
Final Thoughts
You’ll find the best large video cutters to cut videos on your Mac above. Most of the video cutters above support various video formats and ensure your video remains in the original quality after saving. Several software reviewed above also offers additional features you can use to upgrade your videos. Finally, we recommend Filmora Video Editor as it provides several basic and advanced features to help you create the best videos.
Supported System: Mac and Windows
Cutting large videos is not easy if you don’t have the right tools to achieve that. That’s where Filmora Video Editor enters the picture. It combines simplicity and several excellent features to offer you the best video cutter for Mac. It doesn’t just provide you with the basic cutting features but also several editing tools to create fantastic videos. In addition, its user interface is intuitive and easy to navigate by new editors and professionals.
Filmora Video Editor offers several customization features and advanced features to make your video look sleek and professional. This means it provides motion tracking, the addition of images, filters, effects, texts, and several other tools. When exporting your files, you have a wide variety of options as this large video cutter offers different output formats to select from. It also allows you to share your video directly to any social media network you would prefer. Most importantly, it is compatible with every version of MacOS.
For Win 7 or later (64-bit)
For macOS 10.14 or later
Features
- It supports various video formats like AVI, MOV, MP4, MKV, and several others
- It only takes a few clicks to cut, trim, and split videos
- Impressive video editing features
- Intuitive and user-friendly interface that ensures a gentle learning curve
- You can cut your video without losing the quality level
- Several video effects to make your video stunning
- It offers additional features like transitions, motion elements, color corrections, animated titles, etc.
- Allows you to burn video to DVD or share directly
Cons
- It might not have the most advanced features
Steps to Easily Cut Large Videos On Mac Using Filmora Video Editor
Cutting large videos on Filmora is relatively easy when you follow the proper steps. Below, we’ve outlined the steps you should take when you want to cut large videos on Mac using Filmora Video Editor.
· Step One: Import Large Video

Once you Install Filmora on your Mac, launch and click ‘new project’ on the home screen to start your video cutting journey. Now, import the video you want to cut by selecting ‘import’ on the main interface and selecting the files from your computer. Alternatively, you can drag the large video to your timeline.

· Step Two: Manually Cut the Large Video

After adding the video to the timeline, drag the playhead at the beginning to the part you would like your large video to begin and right-click on it. You can then select ‘trim start to playhead to cut your video to your preference. Repeat this with the end of your video but select ‘trim end to playhead’ this time.
· Step Three: Export Your Newly Cut Video

After cutting your video and carrying out basic editing on your video, you can now save your video. Next, click the ‘export’ button, and you can choose the output format of your video, frame rate, and resolution. You can also share directly to YouTube, Vimeo, and other social media platforms or burn the video to a DVD.
More Free Large Video Cutter on Mac to Cut Large Videos Faster
The first large video cutters we’ll be reviewing in this article are available for free. Although they’re not professional video editing software, they can help you easily cut large videos on Mac in just a few minutes. Therefore, if you’re looking for a free video cutter for Mac, you should keep reading.
GihoSoft Free Video Cutter

Supported System: Mac and Windows
This free video cutting software helps you cut large video files within a few minutes. You can either cut the video into smaller clips or eliminate all other clips reducing the video into one little clip. This large video cutter is relatively easy to use, and it comes with a friendly user interface which makes it ideal for beginners. The best part is that it supports varying video formats and resolutions. However, as the name implies, you can only use it to cut videos. It doesn’t offer other video editing features.
Gihosoft Video cutter offers a fast processing speed and supports popular video formats like AVI, MOV, FLV, MP4, etc. It also saves your video in the same input format to maintain its quality. You can also cut different clips and join them using this video cutting software for free.
Pros
- It is free to use
- It offers a clean and intuitive user interface
- Ideal for beginners
- Supports different input and output video formats
- Allows you to join clips from various videos
Cons
- There are no editing features
- The saving process can be slow
Steps to Cut Large Videos on Mac Using Gihosoft Free Video Cutter
Gihosoft Video Cutter is relatively easy to use. Below, you’ll find the steps to cut large videos on Mac with this free cutter quickly.
- Firstly, download and install this free video cutter on your Mac. Once you do this, launch the software, and you can begin.
- Add files to the timeline by clicking the ‘add files’ to import a large video file to this video cutter.

- Next, set the start and endpoint of your video by moving the two sliders in the timeline. Alternatively, you can manually enter the beginning and end times you want.

- Hit the ‘cut’ button once you’re satisfied with the timing.
- After cutting, you can save your video in your preferred location on your PC

iMovie

Supported System: Mac
iMovie is a household name in the Apple family due to its popularity amongst Mac owners. Apple device owners commonly use it for editing videos. It is pretty functional and great for making your video clips look professional. Cutting large videos on Mac using iMovie is quite a simple process. This is the best option if you’re using Mac and looking for a free and straightforward video cutter.
One of the reasons this large video cutter is a good choice because it supports high resolutions. This Mac video cutter supports up to 4k video resolution. It also supports different input and output video formats. In addition, its intuitive and user-friendly interface makes it an excellent choice for beginners. However, it lacks advanced editing features if that’s what you’re looking for.
Pros
- It is free to use
- It supports high video resolutions
- Its simple user interface makes it ideal for beginners
- It offers various preset templates to enhance your video
- It supports several input and output formats
Cons
- Lacks advanced editing features
Steps to Cut Large Video on Mac Using iMovie
iMovie is quite a simple editing software that makes it easy for users with little editing experience to cut large videos on Mac. Follow the steps below to cut videos on Mac easily.
- Open iMovie on your Mac and select ‘file’ on the menu; choose ‘open project’ from the dropdown menu.

- Next, select the video you would like to cut. Alternatively, you can simply drag it to the timeline to start editing.

- Drag the playhead to mark off where you would like to cut; repeat this process at the end of the video.

- Afterward, click ‘edit’ and choose ‘split video clip’ to split the clip.

- Next, select the parts you don’t want and hit ‘delete’ on your keyword.
- You can split and delete clips ad many times as you want till you have the portion you’re looking for.
- Afterward, save your file, and you can also share it directly to your social media accounts.

Tuneskit

Supported System: Mac and Windows
A free video cutter that’s quite useful for cutting large video files is Tuneskit. It is free to use and allows you to cut large video files into smaller clips while maintaining its high quality. It is easy to utilize, and you can cut and trim your videos within a few minutes. The best bast is the lossless quality feature after cutting or combining several clips.
This video cutting tool supports various popular formats like AVI, MP4, FLV, MPEG, etc. The video joining feature also allows you to merge multiple videos you cut without losing the quality of the original quality. You can also convert the video to a new format when saving your video. Tuneskit also allows users to share cut videos to user platforms. You can also utilize its editing tools to customize your videos and add a personalized touch. However, this video cutter only offers essential editing tools, which is ideal for beginners.
Pros
- Superfast video processing
- It supports several input and output video format
- Maintains video quality after editing
- Offers basic editing video
- Simple user interface for easy navigation
Cons
- It only offers basic editing features
Steps to Cut Large Videos on Mac Using Tuneskit
You have to download Tuneskit on your Mac device to get started. Next, install the app and then launch it to begin. Once you launch the app, follow the steps below to cut large videos on Mac.
- Firstly, you have to import the video you want to cut by clicking ‘import’ on the file tab.

- Next, edit the file by clicking ‘edit,’ which is an icon you can find next to every video segment.
- Now, move the slider at the beginning of the video to your preference. Carry out the same action for the end of the video till you have your desired cut.

- Now, click ‘cut’ to cut your video. Afterward, save the video and choose the output format you want.

More Paid Large Video Cutter on Mac to Cut Large Videos Faster
Now that you know the best free large video cutter on Mac to cut large videos faster, below are the top three paid large video cutters on Mac.
Final Cut Pro

Supported System: Mac and Windows
Final Cut Pro is a video cutting software released by Apple, and it is one of the best professional large video cutters you can find. Despite its professionalism, it offers you a basic user interface that makes it easy to navigate the video editor. It is also relatively easy and allows users to efficiently advance their skills to a professional level while using the editing software. Additionally, you can easily add your social media accounts to share edited videos to each platform directly.
Apart from the easy cutting of large videos on Mac, Final Cut Pro offers cutting-edge editing tools that ensure smooth and professional results. Final Cut Pro’s features include project workflow, color correction, trimming, closed caption, audio enhancement, etc. In addition, Final Cut Pro supports various video formats and resolutions to work with. However, it is not a suitable option if you have no previous video editing, as there’s a steep learning curve involved.
Pros
- It provides users with 360-degree video editing
- Final Cut Pro supports various video formats and resolutions
- It offers an intuitive user interface
- It offers fast video processing and saving process
- It provides basic and advanced editing tools
Cons
- It is quite pricey
- It is not the best choice for beginners
Steps to Easily Cut Large Videos on Mac Using Final Cut Pro
- First, download and install Final Cut Pro on your device, and then launch to start the video cutting process.
- Next, import the media you would like to cut by clicking ‘import media file’ and choosing the file you want to edit. You can also drag the video directly to your timeline to start editing.

- Once you identify the part you would like to edit, drag the tail of the clip to where you would prefer. Repeat this process at the beginning and the end of the video. Afterward, click ‘cut’ to cut the clip.

- Now you can save the cut video to your Mac by clicking ‘file’ and choosing ‘save’ from the dropdown menu.

You can also share your cut video directly from Final Cut Pro to your preferred destination. You can change the output video format if you prefer.
VideoPad Video Editor

Supported System: Mac and Windows
Some large video cutters can be frustrating for new editors; you won’t have that problem with VideoPad. This tool is easy to use even with no prior editing experience. It contains all the essential tools to cut and edit your video. It also supports different file types, including AVI, MOV, MP4, MPEG, etc. It also allows you to change the output format of your video and share it directly on social media platforms. You can also burn the newly cut video to DVD or CD.
With VideoPad Video Editor, you don’t have to worry about losing the quality of your large video after cutting. It offers impressive video editing features like transitions, color correcting, speed adjustment, and various visual elements. You can split large videos easily with its fast-processing system. Its intuitive user interface makes it quite easy to navigate.
Apart from basic editing, professionals would also find this large video cutter impressive as it offers 3D editing, green screen support, 360-degree editing, and video stabilization. Overall, this is an excellent video cutter if you want a versatile editor that offers tools to enhance your video.
Pros
- Ideal for beginners and professionals
- It supports common file types
- Intuitive user interface
- Offers basic and advanced editing tools
Cons
- Relatively high price
Steps to Easily Cut Large Videos on Mac Using VideoPad Video Editor
- First, you have to download and install VideoPad on your device.
- Next, launch the app and click ‘open’ on the home tab. This will allow you to add the video you would like to edit. Alternatively, click Cmd+O or drag the video to the media bin.

- After adding the video, drag it to the sequence timeline to start cutting your large video.
- To cut a part of the video, select it by placing a cursor at the start of the video. Hover over the red line till it changes to a double-sided arrow. Drag the pointer to where you would like the video to begin; repeat this for the end of the video. Right-click over the region and click ‘split’ to separate the clip from other parts.

- Select the fragments and click the trash can button next to the cursor to delete them. Repeat this for all pieces till only your video is left.

- Once you’re done, click ‘save project’ to save the newly edited video. You can also export the video by clicking ‘export video’ and choosing the platform to which you would like to export.

Adobe Premiere Pro

Supported System: Windows and Mac
One of the best large video cutters for Mac that you’ll find out there is Adobe Premiere Pro. This video cutting software supports a vast number of video formats and resolutions. It also offers users built-in editing tools that you can use to enhance your video. Most cinematographers find this tool quite useful due to its advanced editing features. It also ensures your video quality is not lost after editing.
Adobe Premiere Pro allows you to add filters, trim audio and video, and add texts and other visual elements to your video. It has an impressive media library that gives you access to a vast range of effects. You can also modify the output format of your video or use any of the existing presets to enhance your video. However, Adobe Premiere Pro has a steep learning curve and might not be suitable for beginners.
Pros
- It offers high-quality tools to edit your video
- Fast processing feature
- Supports vast video formats and resolutions
- Offers basic and advanced editing tools
- Allows you to share your video directly to social media platforms
Cons
- It is too advanced for beginners
Steps for Cutting Large Video on Mac Using Adobe Premiere Pro
Cutting large videos on Adobe Premiere Pro is relatively easy with the steps below.
- Firstly, download and install Adobe Premiere Pro on your Mac. After installation, launch the app to begin.
- Next, create a new Premiere Pro project and create the right name you would like to save it as.

- Now, import the large video you want to cut into Adobe Premiere Pro. You can either drag the video into the project clip tab or go to ‘file’ and choose ‘import’ from the menu. Navigate to the file’s location and choose the video.

- Now select the video on the timeline; a white border will appear around the clip to show your selection.

- Pick the razor tool on the menu or press C on your keyboard to start cutting the large file.

- To cut the video clip, hover the razor over any part of the video and split wherever you prefer. You can make multiple cuts on the video. However, if you want an accurate cut, simply move the playhead to the part you’ll like to begin the cut and then use the razor to cut.

- Now you can delete any fragment you want by selecting it and pressing delete on your PC.

Once you have a clean-cut, you can save or share your video.

Which Should I Choose, Free or Paid Large Video Cutter on Mac?
There are different video-cutting software available that offer varying editing features to enhance your video. However, some are free, while others require a subscription. Therefore, it can be pretty challenging to figure out the best option for your video cutting needs. Below are some factors to consider when choosing between a paid or free video cutter on Mac.
· Intuitive Workflow
Some software is quite difficult to operate, and you could spend hours figuring out how each tool works. An efficient video cutting software makes all tools easy to use. Ensure the large video cutter you choose ensures a seamless workflow to improve your efficiency. In addition, a fast-processing feature is necessary to reduce the editing time significantly.
· Budget
Another factor that’s important to consider is your budget. You can use free software, but you need to note that the features are limited. If the tool doesn’t offer you the features you’re looking for, you might need to subscribe to a paid video cutter. Always choose a video cutter that falls within your budget.
· Experience Level
Are you looking to develop your editing skills? Then a paid large video cutter is the best option for you. There are usually advanced and basic tools available to help you edit your skills. However, a paid video cutter also offers you more functionality that can help you learn how to create impressive edited videos.
Overall, you want a video editor with an easy learning curve and one that meets your needs effectively. The goal is to get a video editor that will provide you with more editing tools to enhance your video. It is pretty easy to outgrow free video cutters because of their limited features. However, if you’re choosing a paid video cutter, ensure it isn’t made for professionals and, therefore, is challenging to navigate.
FAQs About Cutting Large Videos
- What is video cutting software? This software allows you cut a video into different parts without changing the video quality. This type of software will enable you to cut large-sized videos in no time; you can choose from the video cutters above.
- Does cutting videos affect its quality? This depends on the video cutter used. While some video cutters allow a loss of video quality when cutting videos, some ensure the video quality remains the same throughout the cutting process.
- Are video cutters safe? Yes, most video cutters are safe. The options above are secure and prevent malware attacks on your PC.
Final Thoughts
You’ll find the best large video cutters to cut videos on your Mac above. Most of the video cutters above support various video formats and ensure your video remains in the original quality after saving. Several software reviewed above also offers additional features you can use to upgrade your videos. Finally, we recommend Filmora Video Editor as it provides several basic and advanced features to help you create the best videos.
10 Best Old Film Overlays to Make Your Videos Look Vintage
Versatile Video Editor - Wondershare Filmora
An easy yet powerful editor
Numerous effects to choose from
Detailed tutorials provided by the official channel
If you like the old film mood in your videos and films, then this guide is for you. In this article, we will go through the best old film overlays to make your videos look vintage.
In this article
01 What is the Old Film Effect Called?
02 10 Amazing Old Film Overlays that Deserve a Try
03 How to Make a Video Look Old?
04 Pro Tips to Create Stunning Retro Video
Part 1: What is the Old Film Effect Called?
The old film effect that has been getting popular over the past years is called film grain and is defined as a random optical texture due to small particles appearing in the film. It is usually described as having a grainy effect and appearing old.
Part 2: 10 Amazing Old Film Overlays that Deserve a Try
In this list, we will present you with some great options that deserve your attention if you are looking to add old film aspects to your videos.
1. The Super 8 Film Grain Overlays Collection
With this collection, you have at your disposal 82 high-resolution clips of a real Super 8 film grain. With features that are easy to use in your videos, like 20-second loopable duration, 1080P Quicktime Pro resolution, each overlay has a small difference in texture and tint, and you also get 37 clips that show you visible areas with sprocket holes.
2. The Old Film Look Collection
This collection brings a large variety of film elements. From flash frames, film clutter, light leaks, countdown leader, film sprockets, 16mm and Super 8mm film. Plus, with this collection, you also get 29 video files and ProRes 1080P.
3. The Damaged 35mm Film Collection
With this collection, you have animated scans of damaged slides of 35mm film. The transparency effects are easy to use because of the white areas. You can add a file that you choose over an existing video and “darken” or “multiply” blending modes. Apart from those features, the Damaged 35mm Film Collection comes with 10 ProRes HD files.

4. The 4K 16 mm Film Overlays Collection
These overlays come from Authentic Old 16mm film, and inside this collection, you can find many effects of film dirt, scratches or dust to bring that old vintage look to your videos. It also comes with 79 ProRes video files, 4K (ULTRA HD) 3840 x 2160, 24fps resolution.
5. The Film Dirt and Scratches Collection
This collection comes with a variety of scratches and dirt textures. From authentic 16mm and Super 8mm film to give you a great old film look effect to your videos. The Film Dirt and Scratches collection comes with 28 video files, 13 minutes of footage, and ProRes 1080P.
6. 4K Super 8 Film Burn Overlays Collection - Kodak 50D
A collection like this is rare to come across. These easy-to-use effects are great for any level of expertise in editing videos. Just place them over the video and click “screen” or “lighten” modes. This collection pack comes with 47 ProRes files, 4 minutes of footage, and 4K High-Quality Scans.
7. 4K 16mm Film Grain Overlays
This collection has three great files of real film grain with dust and grain at your disposal. They use a 16mm camera for a better quality of overlays. This amazing package comes with three video files of 16mm film grain plus three bonus files.
8. 4K Film Burn Effects on 16mm
Shot in an authentic 16mm, this collection has real film burning in a projector. It has close-ups that fit a width of 16/9 screen. It also comes with 33 ProRes Files and 4 minutes of footage.
9. The VHS Effects Collection
This collection has real VHS effects to give your videos an old 80’s tape look to your videos. The collection contains many analog textures, tracking problems, and glitches. It also contains 10 minutes of footage, Quicktime ProRes 1080P file support, and 94 HD files of authentic VHS Retro Effects.
10. The Film Leaders Collection - Super 8mm and 16mm Effects
With authentic vintage countdowns, tail leaders, and old retro heads, this bundle offer you a great range of choices to add an old look to your films and videos.
Part 3: How to Make a Video Look Old?
In Filmora, you can make your videos have that old effect with simple steps.
Wondershare Filmora
Get started easily with Filmora’s powerful performance, intuitive interface, and countless effects!
Try It Free Try It Free Try It Free Learn More >

Step 1: Open Filmora and remove all the pieces of the footage. Then arrange the rest of the footage as you see fit. Click on “Effects” on the upper left corner of your screen and then on “Filters”. Click on the Old Video effect and then drop it. After you add the filter on the segment of your video, you can drag the end of it to cover the whole duration of the movies. Click twice on the filter if you want to adjust the filter settings. Enter the desired values on the “Fade” parameter, “Frequency”, and “Alpha” options. Press “OK”, and this step is concluded.

Step 2: You can apply the black and white filters to any project in Filmora. It is very simple. Add one of the filters above the video you want to add the effect and drag one of the corners to adjust the duration. You can change the intensity through the alpha slider.

Step 3: In Filmora, you can add sepia tone rise or sun-kissed filters to your video. You are able to add desaturated filters while keeping colors like blue and green and with that create the old film style. If you want more brown and red tones, you can use the Sun-Kisser filter that highlights those colors. Adjust the filters with the alpha slider to change intensity.

Step 4: Under the black and white subcategory, you can find Ash and Willow filters. What these do is desaturate the contrast or exposure values as well as preset brightness and bring an older tone to your videos.
Step 5: You can correct any kind of filter. With the Advanced Color Correction Tab, you can navigate through features like Preset and Adjustment and desaturate your video. By clicking on the “Preset tab,” you can open a larger variety of presets, including the Old Film and Black & White presets.

Part 4: Pro Tips to Create Stunning Retro Video
You can make your video look retro with a few simple tips:
- Use several vintage apps like Retro VHS, 8mm Camcorder, and others.
- Keep low highlights and low contrasts.
- Keep low saturation and control the hue, saturation, and luminance of your video.
- Film Overlays. With this, you can bring the mood just right. If you add a soft light overall to start with, it will instantly look slightly more vintage.
- By decreasing contrast, you are darkening your videos and giving them a grainier old look.
- If you bring up the black levels, you will leave more space for other tones to shine and turn the mood around your videos.
- In contrast, if you bring down the whites in your videos, making even the brightest colors turn grey.
Conclusion
There are various ways to turn your videos into old relics. Using Filmora, you have a powerful tool in your hands to change any desired media, and with this step-by-step guide, you will get there in no time.
If you like the old film mood in your videos and films, then this guide is for you. In this article, we will go through the best old film overlays to make your videos look vintage.
In this article
01 What is the Old Film Effect Called?
02 10 Amazing Old Film Overlays that Deserve a Try
03 How to Make a Video Look Old?
04 Pro Tips to Create Stunning Retro Video
Part 1: What is the Old Film Effect Called?
The old film effect that has been getting popular over the past years is called film grain and is defined as a random optical texture due to small particles appearing in the film. It is usually described as having a grainy effect and appearing old.
Part 2: 10 Amazing Old Film Overlays that Deserve a Try
In this list, we will present you with some great options that deserve your attention if you are looking to add old film aspects to your videos.
1. The Super 8 Film Grain Overlays Collection
With this collection, you have at your disposal 82 high-resolution clips of a real Super 8 film grain. With features that are easy to use in your videos, like 20-second loopable duration, 1080P Quicktime Pro resolution, each overlay has a small difference in texture and tint, and you also get 37 clips that show you visible areas with sprocket holes.
2. The Old Film Look Collection
This collection brings a large variety of film elements. From flash frames, film clutter, light leaks, countdown leader, film sprockets, 16mm and Super 8mm film. Plus, with this collection, you also get 29 video files and ProRes 1080P.
3. The Damaged 35mm Film Collection
With this collection, you have animated scans of damaged slides of 35mm film. The transparency effects are easy to use because of the white areas. You can add a file that you choose over an existing video and “darken” or “multiply” blending modes. Apart from those features, the Damaged 35mm Film Collection comes with 10 ProRes HD files.

4. The 4K 16 mm Film Overlays Collection
These overlays come from Authentic Old 16mm film, and inside this collection, you can find many effects of film dirt, scratches or dust to bring that old vintage look to your videos. It also comes with 79 ProRes video files, 4K (ULTRA HD) 3840 x 2160, 24fps resolution.
5. The Film Dirt and Scratches Collection
This collection comes with a variety of scratches and dirt textures. From authentic 16mm and Super 8mm film to give you a great old film look effect to your videos. The Film Dirt and Scratches collection comes with 28 video files, 13 minutes of footage, and ProRes 1080P.
6. 4K Super 8 Film Burn Overlays Collection - Kodak 50D
A collection like this is rare to come across. These easy-to-use effects are great for any level of expertise in editing videos. Just place them over the video and click “screen” or “lighten” modes. This collection pack comes with 47 ProRes files, 4 minutes of footage, and 4K High-Quality Scans.
7. 4K 16mm Film Grain Overlays
This collection has three great files of real film grain with dust and grain at your disposal. They use a 16mm camera for a better quality of overlays. This amazing package comes with three video files of 16mm film grain plus three bonus files.
8. 4K Film Burn Effects on 16mm
Shot in an authentic 16mm, this collection has real film burning in a projector. It has close-ups that fit a width of 16/9 screen. It also comes with 33 ProRes Files and 4 minutes of footage.
9. The VHS Effects Collection
This collection has real VHS effects to give your videos an old 80’s tape look to your videos. The collection contains many analog textures, tracking problems, and glitches. It also contains 10 minutes of footage, Quicktime ProRes 1080P file support, and 94 HD files of authentic VHS Retro Effects.
10. The Film Leaders Collection - Super 8mm and 16mm Effects
With authentic vintage countdowns, tail leaders, and old retro heads, this bundle offer you a great range of choices to add an old look to your films and videos.
Part 3: How to Make a Video Look Old?
In Filmora, you can make your videos have that old effect with simple steps.
Wondershare Filmora
Get started easily with Filmora’s powerful performance, intuitive interface, and countless effects!
Try It Free Try It Free Try It Free Learn More >

Step 1: Open Filmora and remove all the pieces of the footage. Then arrange the rest of the footage as you see fit. Click on “Effects” on the upper left corner of your screen and then on “Filters”. Click on the Old Video effect and then drop it. After you add the filter on the segment of your video, you can drag the end of it to cover the whole duration of the movies. Click twice on the filter if you want to adjust the filter settings. Enter the desired values on the “Fade” parameter, “Frequency”, and “Alpha” options. Press “OK”, and this step is concluded.

Step 2: You can apply the black and white filters to any project in Filmora. It is very simple. Add one of the filters above the video you want to add the effect and drag one of the corners to adjust the duration. You can change the intensity through the alpha slider.

Step 3: In Filmora, you can add sepia tone rise or sun-kissed filters to your video. You are able to add desaturated filters while keeping colors like blue and green and with that create the old film style. If you want more brown and red tones, you can use the Sun-Kisser filter that highlights those colors. Adjust the filters with the alpha slider to change intensity.

Step 4: Under the black and white subcategory, you can find Ash and Willow filters. What these do is desaturate the contrast or exposure values as well as preset brightness and bring an older tone to your videos.
Step 5: You can correct any kind of filter. With the Advanced Color Correction Tab, you can navigate through features like Preset and Adjustment and desaturate your video. By clicking on the “Preset tab,” you can open a larger variety of presets, including the Old Film and Black & White presets.

Part 4: Pro Tips to Create Stunning Retro Video
You can make your video look retro with a few simple tips:
- Use several vintage apps like Retro VHS, 8mm Camcorder, and others.
- Keep low highlights and low contrasts.
- Keep low saturation and control the hue, saturation, and luminance of your video.
- Film Overlays. With this, you can bring the mood just right. If you add a soft light overall to start with, it will instantly look slightly more vintage.
- By decreasing contrast, you are darkening your videos and giving them a grainier old look.
- If you bring up the black levels, you will leave more space for other tones to shine and turn the mood around your videos.
- In contrast, if you bring down the whites in your videos, making even the brightest colors turn grey.
Conclusion
There are various ways to turn your videos into old relics. Using Filmora, you have a powerful tool in your hands to change any desired media, and with this step-by-step guide, you will get there in no time.
If you like the old film mood in your videos and films, then this guide is for you. In this article, we will go through the best old film overlays to make your videos look vintage.
In this article
01 What is the Old Film Effect Called?
02 10 Amazing Old Film Overlays that Deserve a Try
03 How to Make a Video Look Old?
04 Pro Tips to Create Stunning Retro Video
Part 1: What is the Old Film Effect Called?
The old film effect that has been getting popular over the past years is called film grain and is defined as a random optical texture due to small particles appearing in the film. It is usually described as having a grainy effect and appearing old.
Part 2: 10 Amazing Old Film Overlays that Deserve a Try
In this list, we will present you with some great options that deserve your attention if you are looking to add old film aspects to your videos.
1. The Super 8 Film Grain Overlays Collection
With this collection, you have at your disposal 82 high-resolution clips of a real Super 8 film grain. With features that are easy to use in your videos, like 20-second loopable duration, 1080P Quicktime Pro resolution, each overlay has a small difference in texture and tint, and you also get 37 clips that show you visible areas with sprocket holes.
2. The Old Film Look Collection
This collection brings a large variety of film elements. From flash frames, film clutter, light leaks, countdown leader, film sprockets, 16mm and Super 8mm film. Plus, with this collection, you also get 29 video files and ProRes 1080P.
3. The Damaged 35mm Film Collection
With this collection, you have animated scans of damaged slides of 35mm film. The transparency effects are easy to use because of the white areas. You can add a file that you choose over an existing video and “darken” or “multiply” blending modes. Apart from those features, the Damaged 35mm Film Collection comes with 10 ProRes HD files.

4. The 4K 16 mm Film Overlays Collection
These overlays come from Authentic Old 16mm film, and inside this collection, you can find many effects of film dirt, scratches or dust to bring that old vintage look to your videos. It also comes with 79 ProRes video files, 4K (ULTRA HD) 3840 x 2160, 24fps resolution.
5. The Film Dirt and Scratches Collection
This collection comes with a variety of scratches and dirt textures. From authentic 16mm and Super 8mm film to give you a great old film look effect to your videos. The Film Dirt and Scratches collection comes with 28 video files, 13 minutes of footage, and ProRes 1080P.
6. 4K Super 8 Film Burn Overlays Collection - Kodak 50D
A collection like this is rare to come across. These easy-to-use effects are great for any level of expertise in editing videos. Just place them over the video and click “screen” or “lighten” modes. This collection pack comes with 47 ProRes files, 4 minutes of footage, and 4K High-Quality Scans.
7. 4K 16mm Film Grain Overlays
This collection has three great files of real film grain with dust and grain at your disposal. They use a 16mm camera for a better quality of overlays. This amazing package comes with three video files of 16mm film grain plus three bonus files.
8. 4K Film Burn Effects on 16mm
Shot in an authentic 16mm, this collection has real film burning in a projector. It has close-ups that fit a width of 16/9 screen. It also comes with 33 ProRes Files and 4 minutes of footage.
9. The VHS Effects Collection
This collection has real VHS effects to give your videos an old 80’s tape look to your videos. The collection contains many analog textures, tracking problems, and glitches. It also contains 10 minutes of footage, Quicktime ProRes 1080P file support, and 94 HD files of authentic VHS Retro Effects.
10. The Film Leaders Collection - Super 8mm and 16mm Effects
With authentic vintage countdowns, tail leaders, and old retro heads, this bundle offer you a great range of choices to add an old look to your films and videos.
Part 3: How to Make a Video Look Old?
In Filmora, you can make your videos have that old effect with simple steps.
Wondershare Filmora
Get started easily with Filmora’s powerful performance, intuitive interface, and countless effects!
Try It Free Try It Free Try It Free Learn More >

Step 1: Open Filmora and remove all the pieces of the footage. Then arrange the rest of the footage as you see fit. Click on “Effects” on the upper left corner of your screen and then on “Filters”. Click on the Old Video effect and then drop it. After you add the filter on the segment of your video, you can drag the end of it to cover the whole duration of the movies. Click twice on the filter if you want to adjust the filter settings. Enter the desired values on the “Fade” parameter, “Frequency”, and “Alpha” options. Press “OK”, and this step is concluded.

Step 2: You can apply the black and white filters to any project in Filmora. It is very simple. Add one of the filters above the video you want to add the effect and drag one of the corners to adjust the duration. You can change the intensity through the alpha slider.

Step 3: In Filmora, you can add sepia tone rise or sun-kissed filters to your video. You are able to add desaturated filters while keeping colors like blue and green and with that create the old film style. If you want more brown and red tones, you can use the Sun-Kisser filter that highlights those colors. Adjust the filters with the alpha slider to change intensity.

Step 4: Under the black and white subcategory, you can find Ash and Willow filters. What these do is desaturate the contrast or exposure values as well as preset brightness and bring an older tone to your videos.
Step 5: You can correct any kind of filter. With the Advanced Color Correction Tab, you can navigate through features like Preset and Adjustment and desaturate your video. By clicking on the “Preset tab,” you can open a larger variety of presets, including the Old Film and Black & White presets.

Part 4: Pro Tips to Create Stunning Retro Video
You can make your video look retro with a few simple tips:
- Use several vintage apps like Retro VHS, 8mm Camcorder, and others.
- Keep low highlights and low contrasts.
- Keep low saturation and control the hue, saturation, and luminance of your video.
- Film Overlays. With this, you can bring the mood just right. If you add a soft light overall to start with, it will instantly look slightly more vintage.
- By decreasing contrast, you are darkening your videos and giving them a grainier old look.
- If you bring up the black levels, you will leave more space for other tones to shine and turn the mood around your videos.
- In contrast, if you bring down the whites in your videos, making even the brightest colors turn grey.
Conclusion
There are various ways to turn your videos into old relics. Using Filmora, you have a powerful tool in your hands to change any desired media, and with this step-by-step guide, you will get there in no time.
If you like the old film mood in your videos and films, then this guide is for you. In this article, we will go through the best old film overlays to make your videos look vintage.
In this article
01 What is the Old Film Effect Called?
02 10 Amazing Old Film Overlays that Deserve a Try
03 How to Make a Video Look Old?
04 Pro Tips to Create Stunning Retro Video
Part 1: What is the Old Film Effect Called?
The old film effect that has been getting popular over the past years is called film grain and is defined as a random optical texture due to small particles appearing in the film. It is usually described as having a grainy effect and appearing old.
Part 2: 10 Amazing Old Film Overlays that Deserve a Try
In this list, we will present you with some great options that deserve your attention if you are looking to add old film aspects to your videos.
1. The Super 8 Film Grain Overlays Collection
With this collection, you have at your disposal 82 high-resolution clips of a real Super 8 film grain. With features that are easy to use in your videos, like 20-second loopable duration, 1080P Quicktime Pro resolution, each overlay has a small difference in texture and tint, and you also get 37 clips that show you visible areas with sprocket holes.
2. The Old Film Look Collection
This collection brings a large variety of film elements. From flash frames, film clutter, light leaks, countdown leader, film sprockets, 16mm and Super 8mm film. Plus, with this collection, you also get 29 video files and ProRes 1080P.
3. The Damaged 35mm Film Collection
With this collection, you have animated scans of damaged slides of 35mm film. The transparency effects are easy to use because of the white areas. You can add a file that you choose over an existing video and “darken” or “multiply” blending modes. Apart from those features, the Damaged 35mm Film Collection comes with 10 ProRes HD files.

4. The 4K 16 mm Film Overlays Collection
These overlays come from Authentic Old 16mm film, and inside this collection, you can find many effects of film dirt, scratches or dust to bring that old vintage look to your videos. It also comes with 79 ProRes video files, 4K (ULTRA HD) 3840 x 2160, 24fps resolution.
5. The Film Dirt and Scratches Collection
This collection comes with a variety of scratches and dirt textures. From authentic 16mm and Super 8mm film to give you a great old film look effect to your videos. The Film Dirt and Scratches collection comes with 28 video files, 13 minutes of footage, and ProRes 1080P.
6. 4K Super 8 Film Burn Overlays Collection - Kodak 50D
A collection like this is rare to come across. These easy-to-use effects are great for any level of expertise in editing videos. Just place them over the video and click “screen” or “lighten” modes. This collection pack comes with 47 ProRes files, 4 minutes of footage, and 4K High-Quality Scans.
7. 4K 16mm Film Grain Overlays
This collection has three great files of real film grain with dust and grain at your disposal. They use a 16mm camera for a better quality of overlays. This amazing package comes with three video files of 16mm film grain plus three bonus files.
8. 4K Film Burn Effects on 16mm
Shot in an authentic 16mm, this collection has real film burning in a projector. It has close-ups that fit a width of 16/9 screen. It also comes with 33 ProRes Files and 4 minutes of footage.
9. The VHS Effects Collection
This collection has real VHS effects to give your videos an old 80’s tape look to your videos. The collection contains many analog textures, tracking problems, and glitches. It also contains 10 minutes of footage, Quicktime ProRes 1080P file support, and 94 HD files of authentic VHS Retro Effects.
10. The Film Leaders Collection - Super 8mm and 16mm Effects
With authentic vintage countdowns, tail leaders, and old retro heads, this bundle offer you a great range of choices to add an old look to your films and videos.
Part 3: How to Make a Video Look Old?
In Filmora, you can make your videos have that old effect with simple steps.
Wondershare Filmora
Get started easily with Filmora’s powerful performance, intuitive interface, and countless effects!
Try It Free Try It Free Try It Free Learn More >

Step 1: Open Filmora and remove all the pieces of the footage. Then arrange the rest of the footage as you see fit. Click on “Effects” on the upper left corner of your screen and then on “Filters”. Click on the Old Video effect and then drop it. After you add the filter on the segment of your video, you can drag the end of it to cover the whole duration of the movies. Click twice on the filter if you want to adjust the filter settings. Enter the desired values on the “Fade” parameter, “Frequency”, and “Alpha” options. Press “OK”, and this step is concluded.

Step 2: You can apply the black and white filters to any project in Filmora. It is very simple. Add one of the filters above the video you want to add the effect and drag one of the corners to adjust the duration. You can change the intensity through the alpha slider.

Step 3: In Filmora, you can add sepia tone rise or sun-kissed filters to your video. You are able to add desaturated filters while keeping colors like blue and green and with that create the old film style. If you want more brown and red tones, you can use the Sun-Kisser filter that highlights those colors. Adjust the filters with the alpha slider to change intensity.

Step 4: Under the black and white subcategory, you can find Ash and Willow filters. What these do is desaturate the contrast or exposure values as well as preset brightness and bring an older tone to your videos.
Step 5: You can correct any kind of filter. With the Advanced Color Correction Tab, you can navigate through features like Preset and Adjustment and desaturate your video. By clicking on the “Preset tab,” you can open a larger variety of presets, including the Old Film and Black & White presets.

Part 4: Pro Tips to Create Stunning Retro Video
You can make your video look retro with a few simple tips:
- Use several vintage apps like Retro VHS, 8mm Camcorder, and others.
- Keep low highlights and low contrasts.
- Keep low saturation and control the hue, saturation, and luminance of your video.
- Film Overlays. With this, you can bring the mood just right. If you add a soft light overall to start with, it will instantly look slightly more vintage.
- By decreasing contrast, you are darkening your videos and giving them a grainier old look.
- If you bring up the black levels, you will leave more space for other tones to shine and turn the mood around your videos.
- In contrast, if you bring down the whites in your videos, making even the brightest colors turn grey.
Conclusion
There are various ways to turn your videos into old relics. Using Filmora, you have a powerful tool in your hands to change any desired media, and with this step-by-step guide, you will get there in no time.
Also read:
- 2024 Approved Best Shortcut Towards Timeline Template
- Detailed Tutorial to Crop Videos Using Openshot, In 2024
- 2024 Approved How to Use LUTS to Color Grade on Your iPhone
- In 2024, Dubbing Videos With Voiceovers | Wondershare Filmora Tutorial
- Record Slow Motion Videos With Phantom Slow-Mo Camera for 2024
- New How to Merge Audio and Video Using FFmpeg for 2024
- 3 Different Methods to Correct Color Distortion in Videos
- In 2024, To Closely Observe the Content on Screen, We Often Zoom in to Catch the Details. This Article Will Provide You with a Brief Note on How to Zoom in on YouTube Videos Quickly on Your Devices
- Updated 2024 Approved 2 Methods to Crop Video in VLC
- 2024 Approved Different Ways To Trim Video In Premiere Pro
- Updated Attaining Slow Motion Video Trend Finding The Best CapCut Templates
- Updated 10 Best Vlogging Cameras for Beginners
- In 2024, How to Make a PowerPoint Looping Slideshow
- Updated Splitting a Video Into Frames with the FFmpeg Step by Step
- New 2024 Approved How to Animate Designs With Canva GIF
- Complete Guide to Make a Super Easy Rotating Video Effect for 2024
- 2024 Approved Are You Thinking of Learning Video Editing in the Final Cut Pro Software? In This Article, You Will Learn Different Ways of Splitting and Merging Multiple Videos at Once as a New Skill to Get Your Business to a New Level
- Updated 5 Simple Tools to Merge Video and Audio Online
- New How to Edit A Time Lapse Video on iPhone for 2024
- Updated 2024 Approved Mix and Match The Ultimate List of 8 Video and Photo Merging Tools
- 2024 Approved Best Ways to Blur Zoom Background for Free
- New 2024 Approved How to Loop Videos with iMovie
- How to Use Blender Green Screen
- New Final Cut Pro - How to Download and Install It, In 2024
- 2024 Approved How to Use Twixtor Effect to Add Slow-Motion Effect to Video?
- New How to Add Filter to Video in Premiere Pro, In 2024
- 2024 Approved Ideas That Help You Out in Making Transparent Image
- Updated Learn Topaz Video Enhance AI Review
- In 2024, Getting the Pokemon Go GPS Signal Not Found 11 Error in Samsung Galaxy A15 5G | Dr.fone
- How to identify malfunctioning your hardware drivers with Windows Device Manager in Windows 10 & 7
- How To Access and Watch Nonstop NBA Live Stream Free Online for 2024
- In 2024, 9 Best Free Android Monitoring Apps to Monitor Phone Remotely For your Honor X50i | Dr.fone
- Possible solutions to restore deleted photos from Nubia Red Magic 9 Pro+.
- Quick Fixes for Why Is My Samsung Galaxy A15 5G Black and White | Dr.fone
- What You Want To Know About Two-Factor Authentication for iCloud On your Apple iPhone 14
- Spoofing Life360 How to Do it on Samsung Galaxy A05? | Dr.fone
- Catch or Beat Sleeping Snorlax on Pokemon Go For Realme 12 Pro 5G | Dr.fone
- In 2024, 5 Ways To Teach You To Transfer Files from Realme C53 to Other Android Devices Easily | Dr.fone
- In 2024, How to Transfer Contacts from Oppo A1 5G to iPhone XS/11 | Dr.fone
- Title: New How to Add Customized Transitions to OBS for 2024
- Author: Chloe
- Created at : 2024-04-24 07:08:34
- Updated at : 2024-04-25 07:08:34
- Link: https://ai-editing-video.techidaily.com/new-how-to-add-customized-transitions-to-obs-for-2024/
- License: This work is licensed under CC BY-NC-SA 4.0.

