
New How to Add Filter to Video in Premiere Pro?

How to Add Filter to Video in Premiere Pro?
When it comes to editing recorded videos like professionals, Adobe Premiere Pro is the most preferred video editor. Editing a video consists of trimming video clips, merging them, adding transitions and video effects, as well as inserting texts and overlays. Another important aspect of video editing is adding filters to your video to enhance the video quality.
Video filters are widely used in the editing phase to correct the color and light imbalances and set the mood for a particular scene so that the audience can reach the desired state of emotion. Premiere Pro has a wide range of preset filters that you can add to your videos to enhance them like never before. We will illustrate how to add filters on Premiere Pro and suggest an alternative way to add video filters for Windows and Mac users.
Part 1. Steps to Add Filter in Premiere Pro?
Premiere Pro comes with a wide range of present filters so that you can adjust the color grading for different scenes in your video. If you are new to using Premiere Pro and you are not a professional video editor, you could find its learning curve on the steeper side. However, you can add video filters in Premiere Pro instantly. Here are the steps on how to add a filter in Premiere Pro.
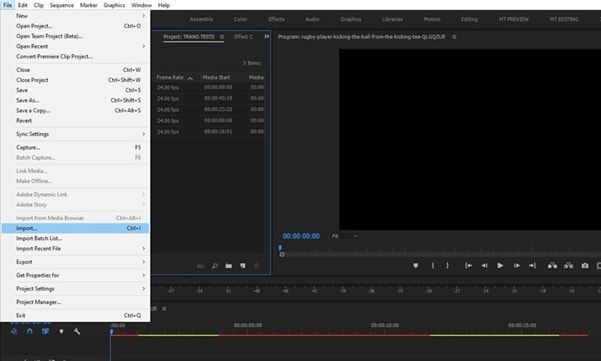
Step1Launch Premiere Pro on your computer. Go to File> Import to bring in the video clip that you want to edit. Move the video clip from Project panel into Timeline.
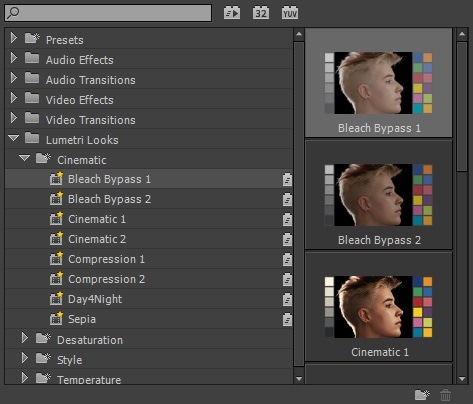
Step2Go to Effects tab from the top and open Lumetri Presets folder. You will find different categories of filters and effects such Cinematic, Desaturation, Style, Temperature and much more. Open up these categories and drag and drop any desired filter into the Timeline. The video filter will get applied to your video automatically.
Step3If you are looking for color grading, go to Color tab from the top. Go to Lumetri Color on the right side, go to Creative> Look > select any Preset filter present.
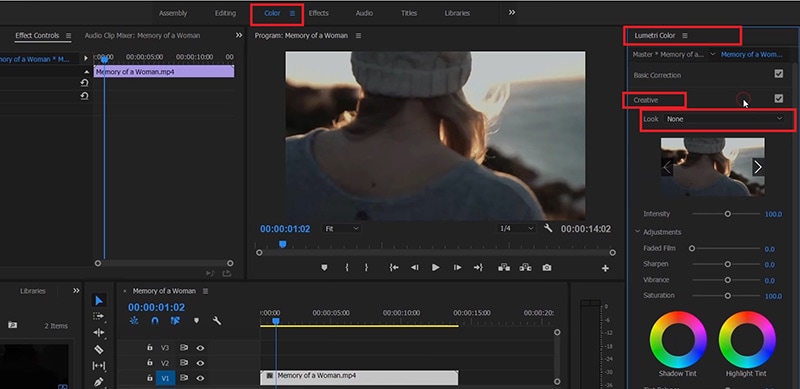
Step4Thereafter, you can adjust certain parameters like intensity, saturation, sharpen as per requirements. You can also go for Basic correction which acts like applying a filter to your videos.
Part 2. Alternative Way to Add Video Filters
If you find the steps on how to add colour filter in Premiere Pro difficult or the filters are not appealing to you, you can opt for an alternative. We recommend Wondershare Filmora as the best alternative to Premiere Pro to add video filters. Filmora comes with a super easy and intuitive and applying filter to your videos cannot get any easier.
The wide range of filters available on Filmora outshines Premiere Pro. Most importantly, trending filters are also available to make your videos follow the current trend on social media and video streaming sites. You can add multiple video filters to one video clip as per your preference. Here are the steps on how to add video filters on Filmora.
Step1Download and install Wondershare Filmora which is available for Windows and Mac users. Launch Filmora and click on New Project option.

Step2Drag and drop your video into Project Media folder and thereafter, into Timeline.

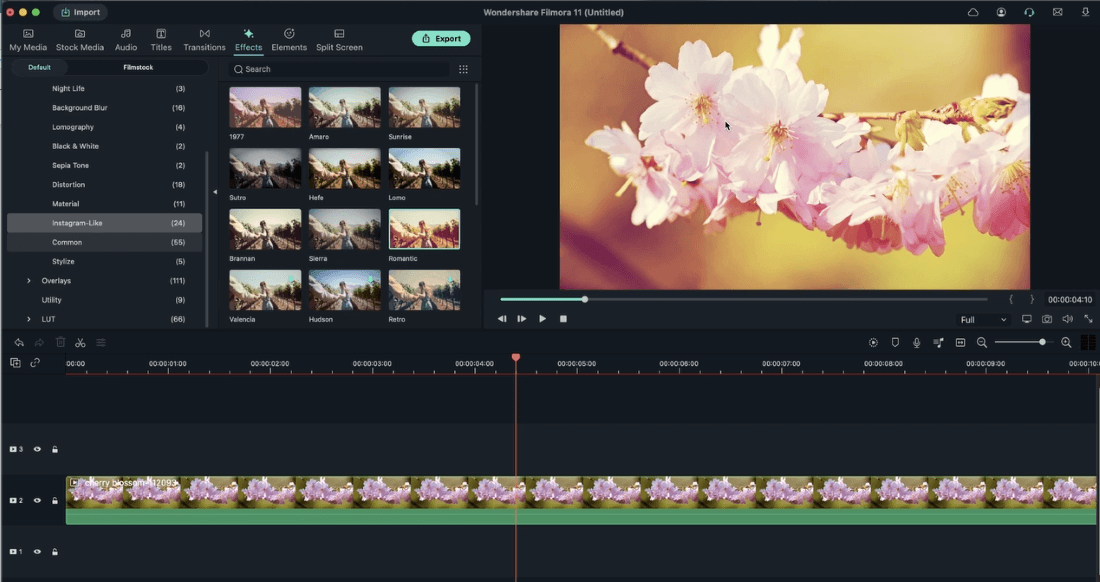
Step3Go Effects located at the top and go to Filters option from the left panel.
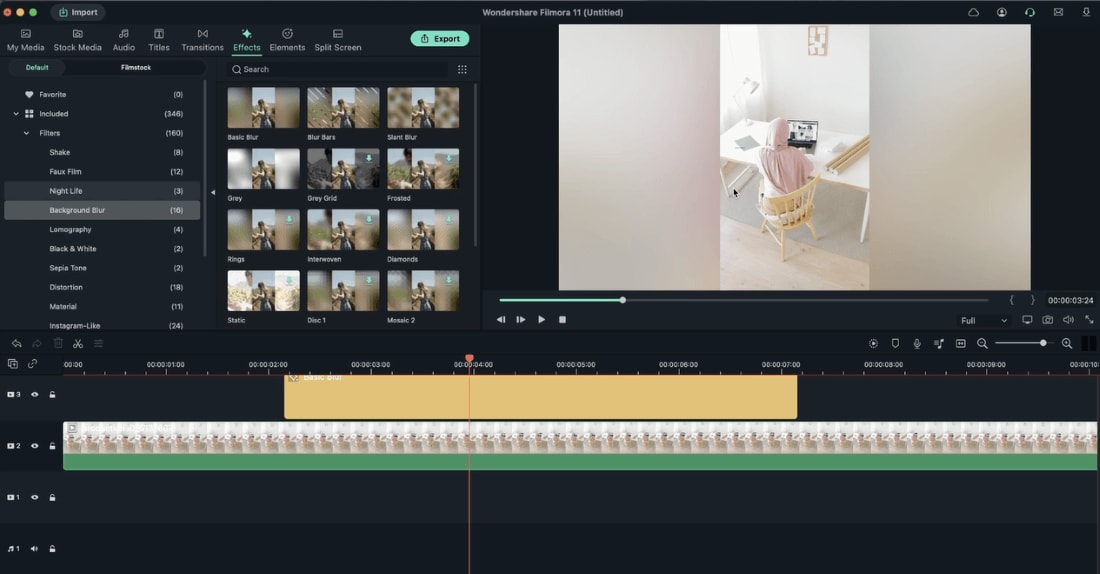
Step4Drag the desired filter into Timeline to apply to your video. You can set the duration of the video filter as per your preference. Play the video and click on Export button to save the edited video.
Part 3. Free Premiere Filter Presets to Use
Adobe Premiere Pro comes with a handful of video filters. However, you can add various free Premiere Pro filter presets and apply them to your video. Here is the list of the free Premiere Pro filter presets to use on your video.
Retro Preset Pack -
There is a craze to have retro filters on the video so that the video looks different and takes the audience back to the golden old days. This is a collection of filter presets where you can get different old-school styles. Starting from VHS filter effect to RGB split, there are ample filter presets to make your video look retro.
Cinematic LUT Pack -
There is no doubt that cinematic videos always look class apart from the rest of the videos and this is the perfect collection of video filters you need. Use these filters to deepen and sharpen colors and cut down brightness so that the video becomes eye-catching and eye-soothing. This is a must-have video filter you should have in Premiere Pro so that you can make regular videos look extraordinary.
Panoramic Transitions Pack -
Transitions are a part of video filters in Premiere Pro and if you want something different in transition effects, you should opt for Panoramic transitions. Starting from fish-eye effect to spinning effect, you can apply them when you move from one scene to another or one clip to another.
Free Animated Text Preset Pack -
Text is an important part of any video and you need video filter presets to apply to the textual part. Instead of the regular text filters, the animated text presets are extremely eye-catching. Starting from shake animations to bounce animations, 13 free animation titles can transform your video especially the part where texts are the main highlights.
Glitch Effects Pack -
If you make videos for social media or you make informational videos, glitch effects must be in your videos. You can get quick attention of your audience with glitch effects, make scene transitions, and add some comedy scenes. Your video will have some extra kick and look more interesting to watch.
Conclusion
If you are using Adobe Premiere Pro to edit your videos, adding filters to your videos could be quite common. We have illustrated how to add filter to video in Premiere Pro to enhance your video quality and outlook. We have also listed the must-have free Premiere Pro filter presents. If you are looking for an alternative to add video filters, we recommend Wondershare Filmora.
Free Download For Win 7 or later(64-bit)
Free Download For macOS 10.14 or later
Free Download For macOS 10.14 or later
This Article Will Address Your Questions About the Easiest Way to Turn a Blog Into a Podcast. Let’s Begin with the Reasons Why You Should Do a Podcast
Being a content creator, either writing or generating videos, requires podcast text-to-speech knowledge. The impact of content depends on how many people see it. It means finding new ways to get it into real and virtual places where customers and users might be.
Depending on the context, podcasting can be a perfect alternative for sharing content.
This article will address your questions about the easiest way to turn a blog into a podcast. Let’s begin with the reasons why you should do a podcast.
Part 1. Why You Should Podcast
Podcasts are one of the simplest and most cost-effective ways. It helps to advertise yourself and your products to a highly targeted audience. Podcasts are also excellent for engaging with potential clients interested in your content. In your field, you can achieve fame and expertise.

Repurposing of Content
Podcasters can maximize their potential for successful episodes and repurposing their podcast into multiple content pieces.
This podcasting strategy can help you reach more people by putting your podcasts on more channels and engaging more people who might be interested.
More Fulfilling than Articles
Unlike music, news, TV, and social media, podcast listeners don’t have to watch the screen like they do with YouTube videos or TV shows. This means they can listen while walking or driving home from work.
Podcasts are the best way to get people to pay attention and make fundamental societal changes. They can keep people interested for a long time, so you can go into detail and get personal without turning off your audience.
Minimal Start-Up Costs
To start a podcast, you can spend a little money. Even some of the most famous podcasts use a microphone, a computer, and software for recording. But it’s common to spend more money on advertising and better hosting.
Starting a podcast doesn’t cost much, as you can get everything you need for about $145.
Expansion of Search Potential
In the past few years, many big brands and small to medium-sized businesses have started using podcasts as a marketing strategy. This is because podcasts are becoming more and more popular and can help raise your company’s profile.
Podcasting is another way to disseminate your study to a broader audience, whether that audience consists of policymakers or interested citizens.
Potential to Monetize
Using an affiliate program podcast, you can earn money. Businesses can increase their income by offering paid advertising sponsorships to monetize podcasts. Suppose you accept an affiliate offer to sell ads. In that case, you become the company’s voice and put recorded ads in your podcast episodes.
The most common way to make money from a podcast is through sponsorship. It’s also the easiest way to make money because you don’t have to make or sell anything. You just have to make a deal with a sponsor.
Part 2. Why Are Writers Hesitant to Start a Podcast?
Even after knowing all these benefits, writers are still hesitant to start a podcast. One of the main reasons a writer may be reluctant to launch a podcast is the cost of the necessary equipment. You will need at least $80 to $500 for this unpromissing business.
However, let me tell you a secret that many podcastors didn’t buy any audio equipment for the launch of their podcast channel on Spotify.
Moreover, many writers don’t want to show their voice through recordings. This is because they couldn’t just make a recording and hand it off to a sound specialist. Besides, finding their voice through the stories they write is the routine.
But we all need to get the truth that many podcastors don’t record a single word of the podcast with their own voice. Due to a solution: text-to-speech, technology like this has been around for a while and continues to improve.
The two important issues have been solved, so what are you waiting for? Platform building has always relied heavily on content marketing. With blog posts and social media, additional support was provided, and now podcasts are becoming more commonplace.
Part 3. How to Turn a Text Into a Podcast?
Text To Speech
To turn your text into audible content, Text-to-speech (TTS) is an assistive technology. With a single click, TTS reads your written text aloud. Many people also use it for writing and editing to maintain audience concentration.
Text-to-speech technology is compatible with all digital devices, including computers, tablets, and smartphones. Increasing numbers of websites and products now have developed this function. For example, you can find it within the trusted video editing software like Filmora. With Filmora’s Text to Speech (TTS) feature , you may add extra aspects to your video by turning your text files into voiceovers.
Why we regard text to speech as a good
For writers, imagination is the only tool to construct their stories. To bring our stories to life, all we need is a laptop. The same holds for text-to-speech technologies, which can significantly assist writing and editing by allowing the author to hear their words without using their voice.
- Text-to-speech applications can assist you in repurposing your material.
Your written work can be converted into spoken language or a podcast. A podcast can be converted into a YouTube video with a few alterations. All of these factors can help you reach new audiences.
Repurposing material permits your audience to consume it in a variety of ways. The audience can read, listen to, or view your content.
- Text-to-speech systems enable authors to create information that is accessible.
As per World Health Organization, there are almost 285 million visually impaired persons and 39 million blind people. We writers can create a more inclusive world by constantly keeping accessibility in mind.
The limitations of text to speech
Text-to-speech software is becoming increasingly lifelike thanks to technological advancements. However, it cannot still express genuine human emotions. However, this should allow you to utilize these tools. The positives significantly exceed the disadvantages, and technology is continually improving.
Easiest Fix: Turn Texts Into Podcasts With TTS in Filmora
So how can you use text-to-speech? Andhow you can turn your texts into audio podcasts in a daily routine? Filmora , a all-in-one video editor, gets you the solution.
Free Download For Win 7 or later(64-bit)
Free Download For macOS 10.14 or later
Step1 Download and install Filmora on your PC or Mac.
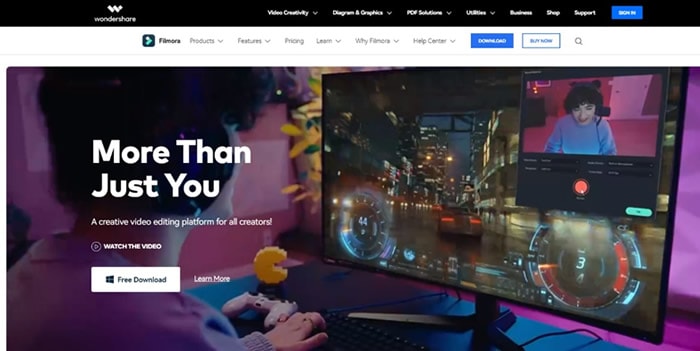
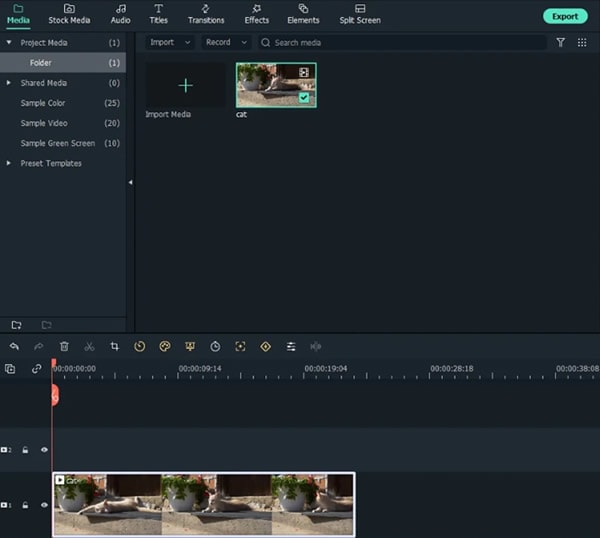
Step2 Open Filmora and select the video on which you wish to add audio.
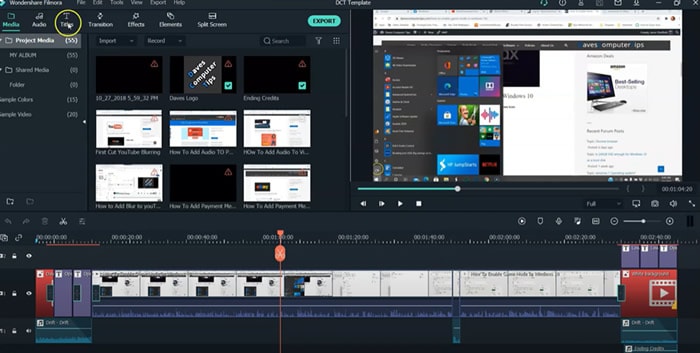
Step3 After adding your selected video, select the option “Titles” to add text to your video.
Step4 Select your favorite position for text in the video, like “lower third,” which is used the most in video titles.
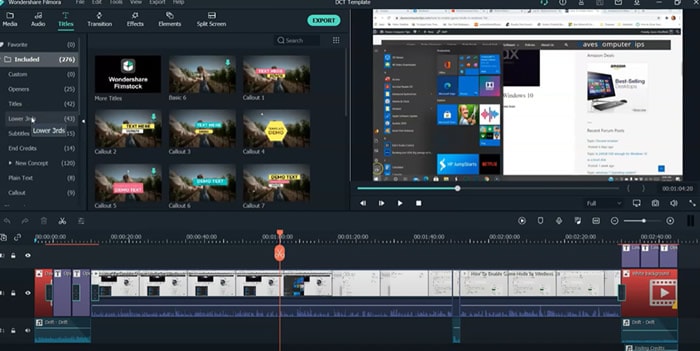
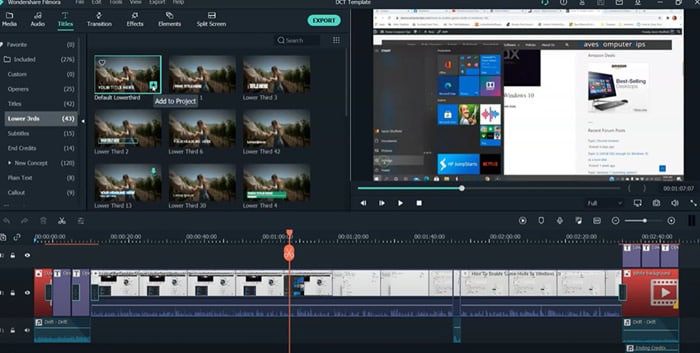
Step5 Add text to the timeline and click “Ok.” You can move the red timeline marker if you want your text in a certain spot.
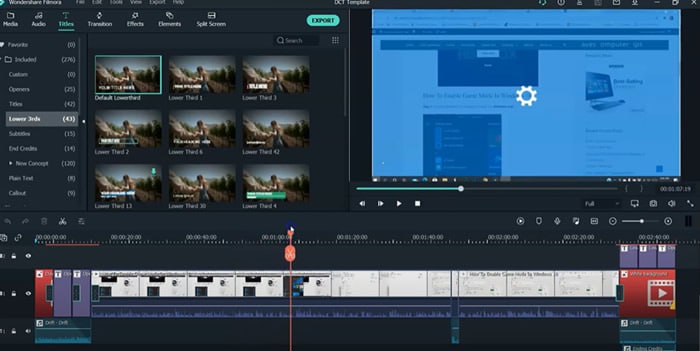
Click the “+” button marked in the picture below to add text.
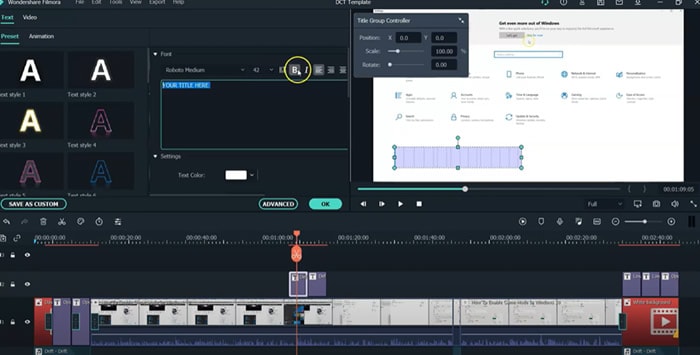
You can also edit the text by changing its style, color, and font or by animating it.
Step6 Press the “Text-to-Speech” button in the lower right side and choose your preferred voice. For example, Lilly’s voice resembles Siri.
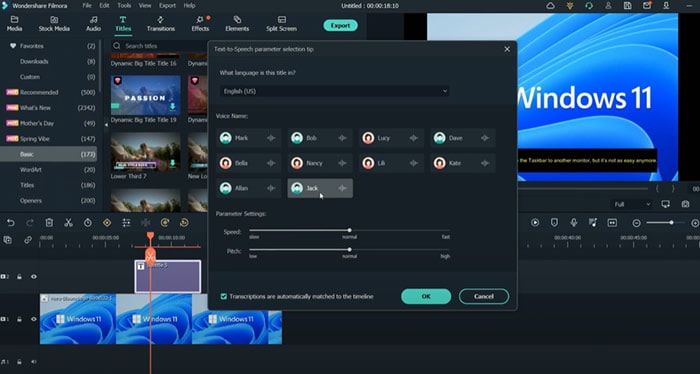
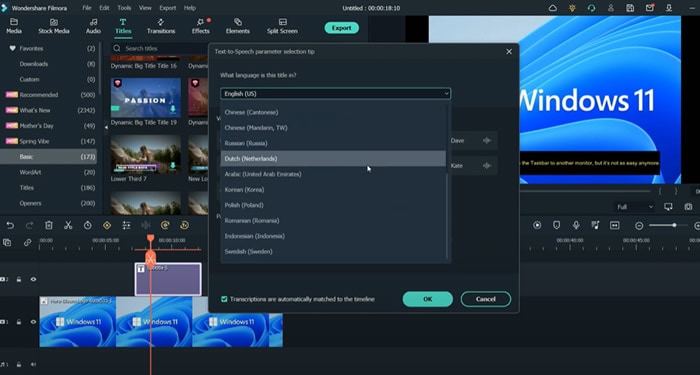
You can also choose another language other than English.
Click “Ok” once you’ve selected everything according to your requirements.
Step7 Once the transcription is completed, go ahead and test the video and audio to see if it’s synching.
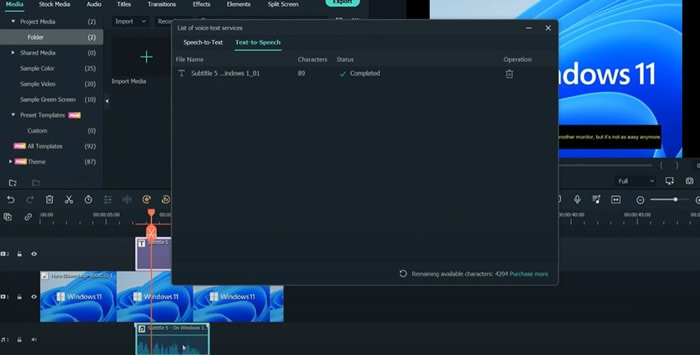
And that’s done. This is how easy it is to turn your texts into speech using Filmora.
Part 4. Hot FAQs on Podcast Text to Speech
How do I convert podcasts to text?
With the help of the smartphone app Google Recorder you can easily convert podcasts to texts for free.
- Open the app on your phone, start recording to it, and start recording your podcast simultaneously.
- The words will be automatically recorded and entered into the application as you talk into your phone’s microphone.
- After you click stop on the app, you can store and share the files once you finish your recording.
You have an option of sharing the text, the audio, or both. Alternatively, you can save them to your Google Drive if you don’t want to share them.
How to turn my podcast into a sound?
To convert your video podcasts into audio through Filmora. Follow these steps:
- Drag the imported video from the media library into the video timeline.
- To extract the audio from the video, right-click the video clip and select “Audio Detach.”
- After a while, audio and video will be seen on separate tracks.
Can I save the sound after converting text to speech?
Once the text has been converted to speech, you can save the sound. Select your preferred format after clicking the “export” option in Filmora.
Conclusion
Many of us wish to launch a podcast and blog. A productive podcast’s essence is turning writing into audio using various podcasting techniques. AI-powered text-to-speech softwares can quickly convert articles into podcasts. Or, you can invite significant people to your podcast to personalize it. Podcasting can give outdated content a new life.
Free Download For macOS 10.14 or later
Step1 Download and install Filmora on your PC or Mac.

Step2 Open Filmora and select the video on which you wish to add audio.

Step3 After adding your selected video, select the option “Titles” to add text to your video.

Step4 Select your favorite position for text in the video, like “lower third,” which is used the most in video titles.

Step5 Add text to the timeline and click “Ok.” You can move the red timeline marker if you want your text in a certain spot.

Click the “+” button marked in the picture below to add text.

You can also edit the text by changing its style, color, and font or by animating it.

Step6 Press the “Text-to-Speech” button in the lower right side and choose your preferred voice. For example, Lilly’s voice resembles Siri.

You can also choose another language other than English.

Click “Ok” once you’ve selected everything according to your requirements.
Step7 Once the transcription is completed, go ahead and test the video and audio to see if it’s synching.

And that’s done. This is how easy it is to turn your texts into speech using Filmora.
Part 4. Hot FAQs on Podcast Text to Speech
How do I convert podcasts to text?
With the help of the smartphone app Google Recorder you can easily convert podcasts to texts for free.
- Open the app on your phone, start recording to it, and start recording your podcast simultaneously.
- The words will be automatically recorded and entered into the application as you talk into your phone’s microphone.
- After you click stop on the app, you can store and share the files once you finish your recording.
You have an option of sharing the text, the audio, or both. Alternatively, you can save them to your Google Drive if you don’t want to share them.
How to turn my podcast into a sound?
To convert your video podcasts into audio through Filmora. Follow these steps:
- Drag the imported video from the media library into the video timeline.
- To extract the audio from the video, right-click the video clip and select “Audio Detach.”
- After a while, audio and video will be seen on separate tracks.
Can I save the sound after converting text to speech?
Once the text has been converted to speech, you can save the sound. Select your preferred format after clicking the “export” option in Filmora.
Conclusion
Many of us wish to launch a podcast and blog. A productive podcast’s essence is turning writing into audio using various podcasting techniques. AI-powered text-to-speech softwares can quickly convert articles into podcasts. Or, you can invite significant people to your podcast to personalize it. Podcasting can give outdated content a new life.
Offering The Best Understanding of Performing iMovie Slow Motion Video
In the past decade, social media has made slow-motion videos wildly popular. When Apple introduced the slow-motion effect in its camera, people went crazy about it. Due to the great demand, many developers introduced this effect in their applications. Slow-mo has been trendy for years, and its use is not ending soon.
This article will guide you about the iMovie slow motion effect and explain the app in detail. Users considering creating a video across their Mac should be aware of slow-mo in iMovie. If you are fascinated by finding more, read this article about slow-down video iMovie.
Slow Motion Video Maker Slow your video’s speed with better control of your keyframes to create unique cinematic effects!
Make A Slow Motion Video Make A Slow Motion Video More Features

Part 1: An Introduction to Slow Motion Videos: A Comprehensive Review
Slow-mo videos are recorded at a frame rate higher than 24 frames per second (fps). After that, they are replayed at a slower pace. This method produces an effect that can bring out special moments. Slow-motion recordings are frequently employed in sports, action, and wildlife cinematography.
What makes it so popular is how it captures fast-moving scenes in better detail. Access to the slow-motion effect was not so common, but with apps like iMovie slow-mo, the effect is accessible to everyone. You can use online video editors or desktop editing software to make slow-motion videos.
Free Download For Win 7 or later(64-bit)
Free Download For macOS 10.14 or later
Part 2: How to Set Slow Motion Settings in iMovie Video Making?
iMovie is a wonderful choice if you want to make slow-motion videos. Also, it allows users to change the speed of video clips per their needs. With slo-mo in iMovie, you can even fine-tune the speed of a single clip by splitting it into intervals, each with a different speed. You can set multiple ranges to cause a clip to speed up and down.
You can freeze a single frame in your film to create the illusion that time has stopped. The app is a fantastic option for Apple users who want to quickly add slow-motion effects to their videos. iMovie is a pretty straightforward tool that gives quick results. Follow the step-by-step guide below to slow down video in iMovie.
Step 1
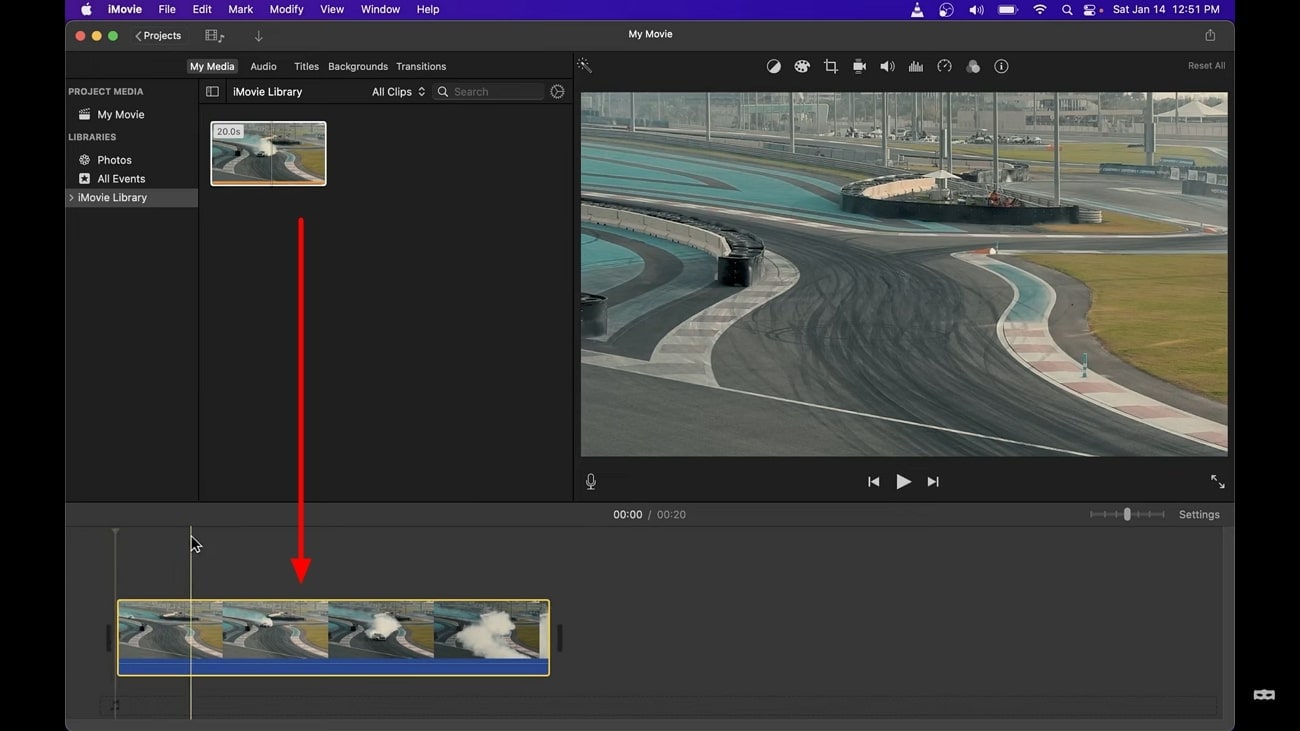
Launch iMovie in your system and click “New Project.” Go to the “Movies” option to import the video you want to edit. Drag the media in the project timeline to make changes to it.
Step 2
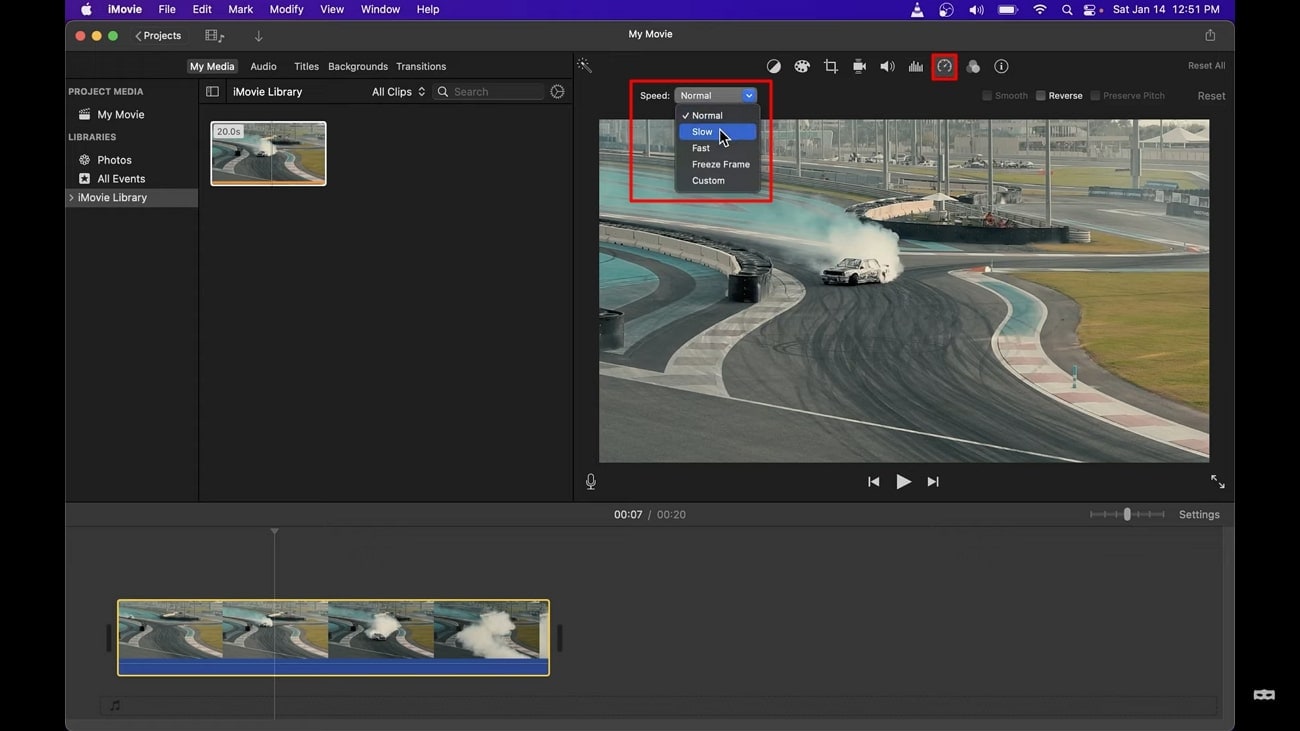
Select the video from the timeline and click the speed icon that looks like a clock. From “Speed,” select the “Slow” option and choose the percentage of slow-motion effect you want to apply in your video. To set a customized slow-mo percentage, click “Speed” again and choose “Custom.” After that, manually add the percentage of how slow you want your video to be.
Part 3: A Great Alternative to Making Slow Motion Videos: Wondershare Filmora
iMovie slow motion is undoubtedly a simple solution for creating slow-mo videos. But sometimes, you need a tool with more advanced features than iMovie. If you want to access professional features with a simple interface, Wondershare Filmora is the right platform. The tool not only provides a precise slow-motion effect, but it has many other features that will leave you amazed.
You can control your video and edit it any way you like. Wondershare Filmora gives you the freedom to be creative. For both beginners and professionals, it is an excellent choice. This software is worth checking if you want to create a cinematic masterpiece.
Step-By-Step Guide to Make Slow Motion Videos with Optical Flow
Unlike the slow-mo in iMovie, the Filmora’s effect is much more advanced and provides professional results. Look at the easy steps below and slow down your video quickly.
Free Download For Win 7 or later(64-bit)
Free Download For macOS 10.14 or later
Step 1Ensure the Latest Version of Filmora and Import Media
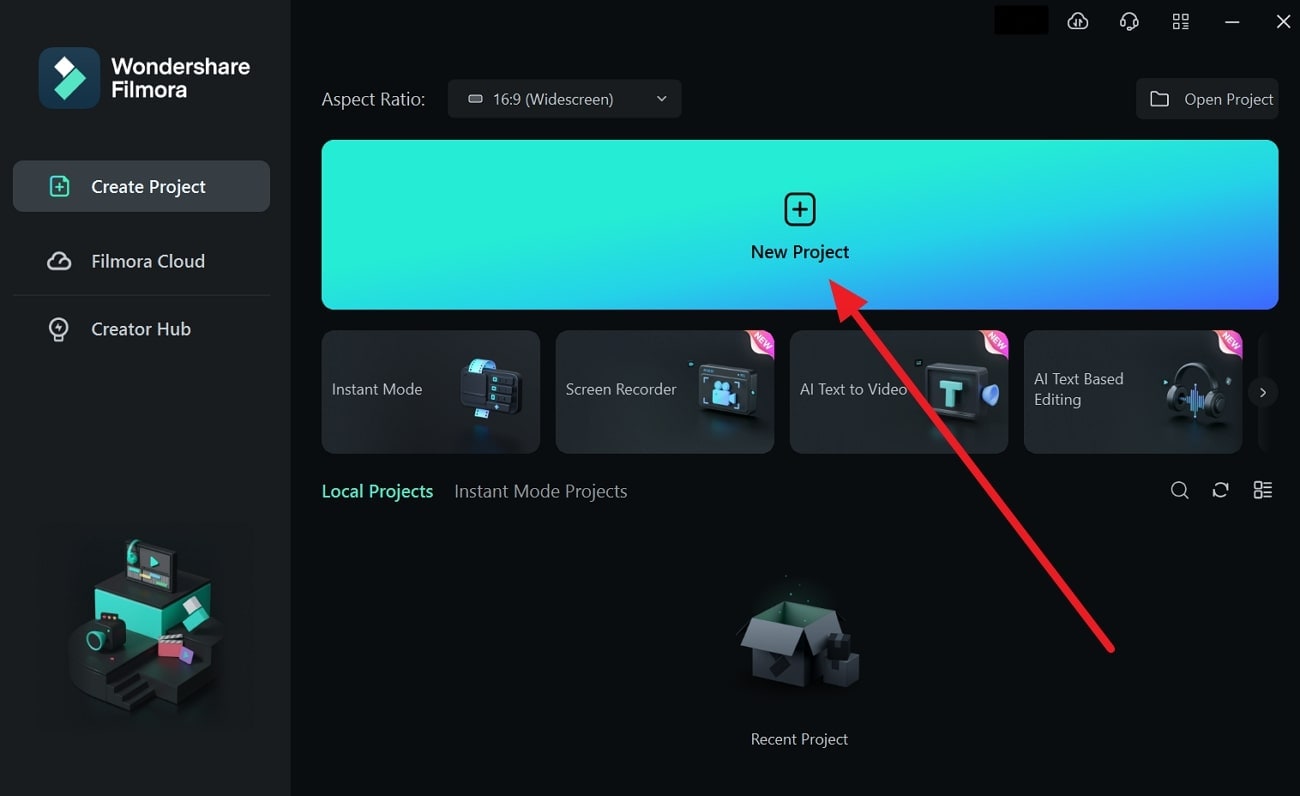
Firstly, ensure that you are using the latest version of Filmora. After launching it in your system, access its editing screen through the “New Project” option in its main interface. Drag and drop your video into the timeline section after importing it. You can simply import by pressing the “Ctrl + I” keys from your keyboard.
Step 2Apply Slow-Motion and Use Optical Flow
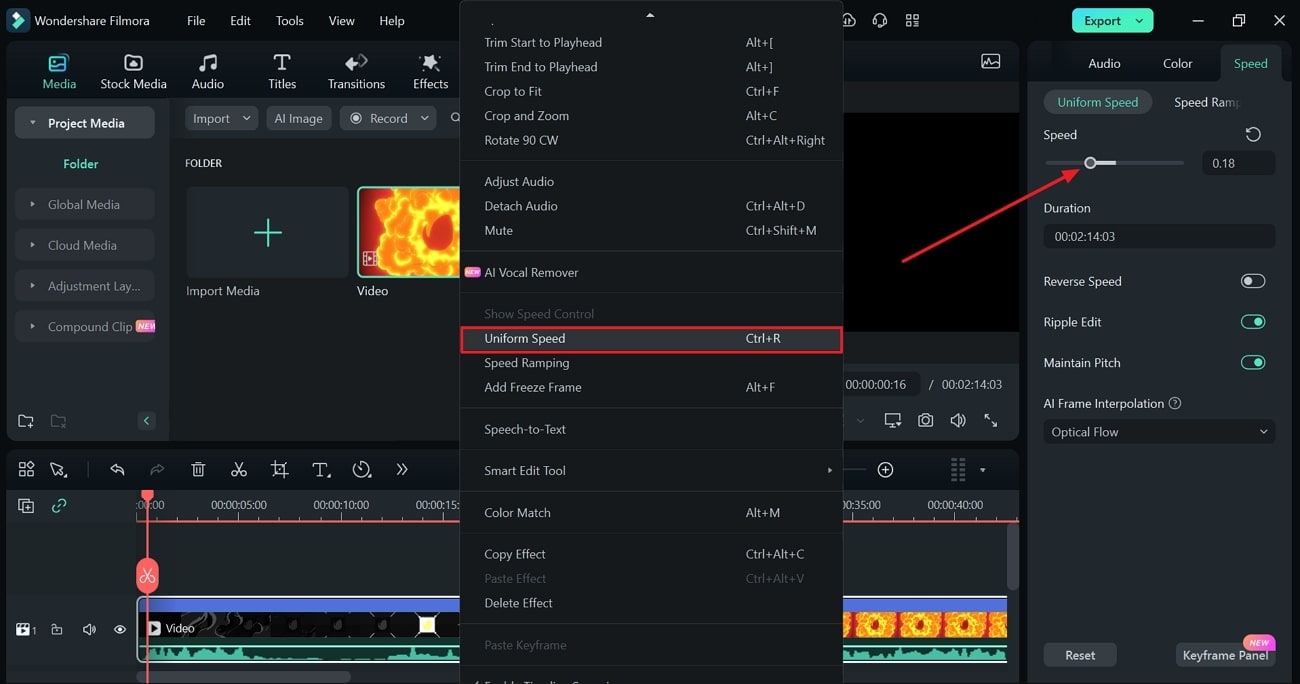
After bringing media into the timeline, right-click on it. From the displayed list, look for the “Uniform Speed” option. Tap on it and get directed toward the right-side editing screen. There, you have to use the “Speed” slider and move to the left for slow videos or to the right for fast-speed videos.
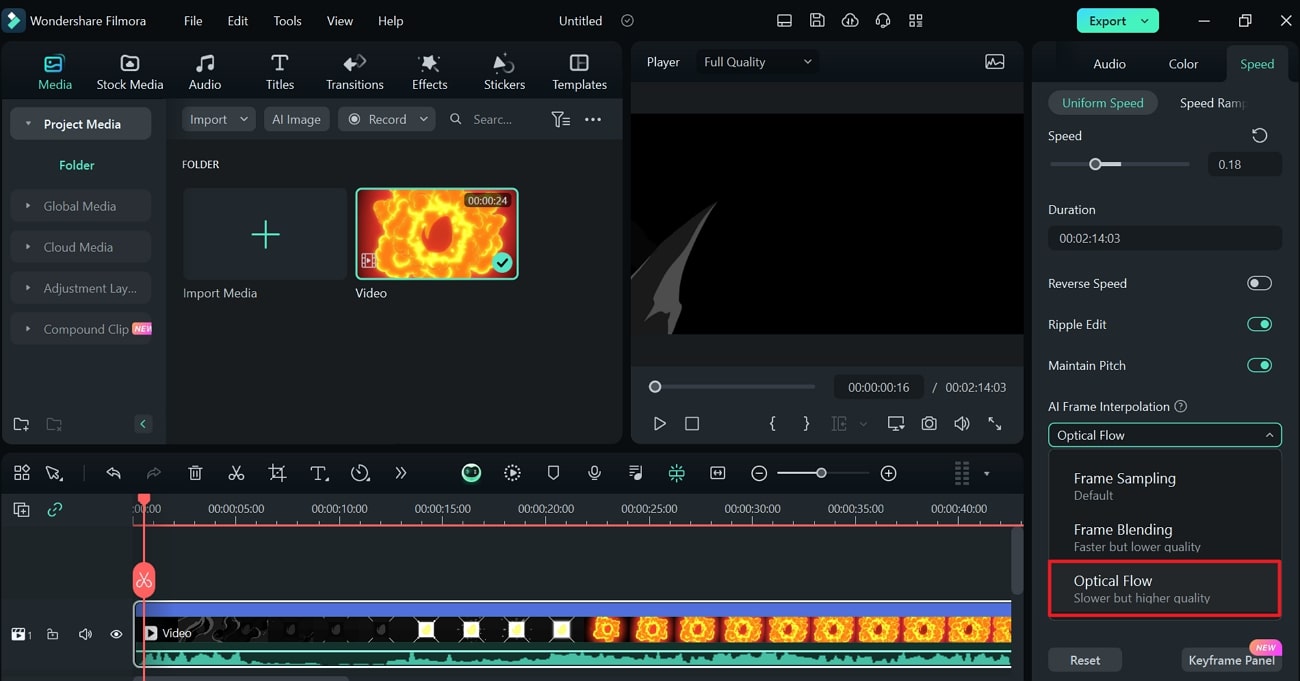
When you are done adjusting speed, head down to the “AI Frame Interpolation” option. Extend its menu and choose “Optical Flow” to reduce the speed of your video while maintaining its quality.
Step 3Analyze and Save the Video by Customizing Export Options
Check if the function has been applied by playing the video. Lastly, select the “Export” button located in the screen’s upper right corner. From the “Export” window, adjust video parameters to save the video your desired way.
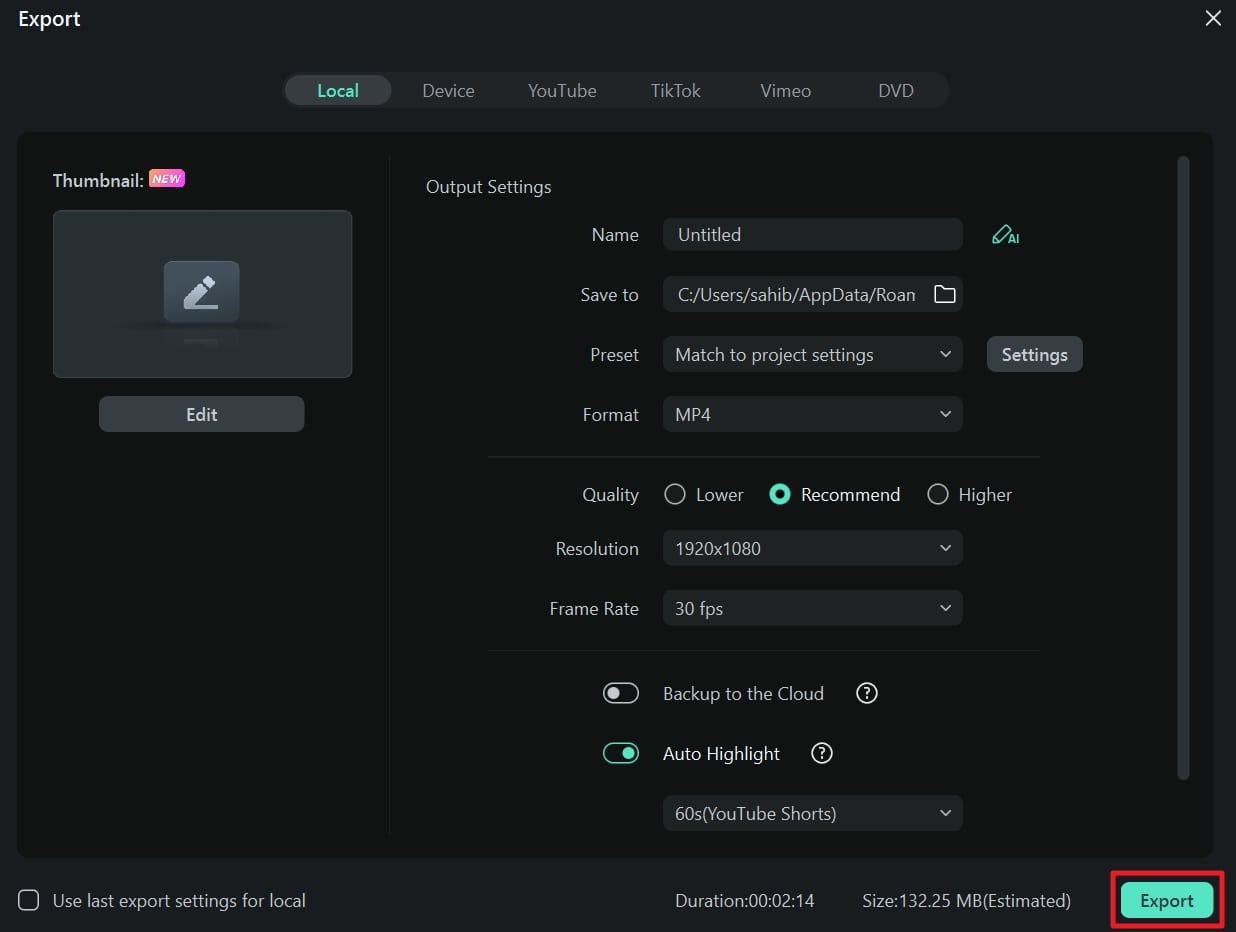
Key Features of Wondershare Filmora
Wondershare Filmora’s impressive tools never cease to impress. Let’s discuss a few of its remarkable features in video editing:
1. Instant Mode
This feature is perfect for creating quick social media videos. You can find a variety of templates and choose the one that best suits your video’s concept. There are more than 115 templates from business, travel, and Vlog categories. Instant mode will help you to rearrange video clips with AI algorithms that cut your 3 hours of editing time.
2. AI Smart Cutout
Removing an object from a video can be challenging while maintaining a natural appearance. Not more with Filmora’s AI smart cutout that can automatically remove unwanted items. It can detect and refine the cutout frame by frame to maintain perfection and high quality. Besides, you get different preview modes to modify certain areas.
3. Auto Beat Sync
Music and film with wonderful rhythm add an entertaining aspect to the content. Utilizing the auto-beat sync feature in Filmora is the way to do it. With this tool, your music and video will automatically match the clips. Furthermore, it can inevitably identify dark sides in your footage to delete them.
4. AI Copywriting
It’s challenging to develop exciting scripts or captions for your films. In situations like this, an AI copywriting tool is invaluable. ChatGPT integration in Filmora lets you get YouTube titles and descriptions that match your needs. To generate one, you must describe the content you want using natural language.
Conclusion
In short, the slow-motion effect is one of the most popular video effects used in movies. Thus, a good video editor is necessary whether you edit videos for entertainment or business purposes. Your video will not look good and will negatively impact the viewers if it is not edited well. Here, you have learned how to slow down video iMovie. If you want an advanced tool, try the alternative Wondershare Filmora.
Make A Slow Motion Video Make A Slow Motion Video More Features

Part 1: An Introduction to Slow Motion Videos: A Comprehensive Review
Slow-mo videos are recorded at a frame rate higher than 24 frames per second (fps). After that, they are replayed at a slower pace. This method produces an effect that can bring out special moments. Slow-motion recordings are frequently employed in sports, action, and wildlife cinematography.
What makes it so popular is how it captures fast-moving scenes in better detail. Access to the slow-motion effect was not so common, but with apps like iMovie slow-mo, the effect is accessible to everyone. You can use online video editors or desktop editing software to make slow-motion videos.
Free Download For Win 7 or later(64-bit)
Free Download For macOS 10.14 or later
Part 2: How to Set Slow Motion Settings in iMovie Video Making?
iMovie is a wonderful choice if you want to make slow-motion videos. Also, it allows users to change the speed of video clips per their needs. With slo-mo in iMovie, you can even fine-tune the speed of a single clip by splitting it into intervals, each with a different speed. You can set multiple ranges to cause a clip to speed up and down.
You can freeze a single frame in your film to create the illusion that time has stopped. The app is a fantastic option for Apple users who want to quickly add slow-motion effects to their videos. iMovie is a pretty straightforward tool that gives quick results. Follow the step-by-step guide below to slow down video in iMovie.
Step 1
Launch iMovie in your system and click “New Project.” Go to the “Movies” option to import the video you want to edit. Drag the media in the project timeline to make changes to it.

Step 2
Select the video from the timeline and click the speed icon that looks like a clock. From “Speed,” select the “Slow” option and choose the percentage of slow-motion effect you want to apply in your video. To set a customized slow-mo percentage, click “Speed” again and choose “Custom.” After that, manually add the percentage of how slow you want your video to be.

Part 3: A Great Alternative to Making Slow Motion Videos: Wondershare Filmora
iMovie slow motion is undoubtedly a simple solution for creating slow-mo videos. But sometimes, you need a tool with more advanced features than iMovie. If you want to access professional features with a simple interface, Wondershare Filmora is the right platform. The tool not only provides a precise slow-motion effect, but it has many other features that will leave you amazed.
You can control your video and edit it any way you like. Wondershare Filmora gives you the freedom to be creative. For both beginners and professionals, it is an excellent choice. This software is worth checking if you want to create a cinematic masterpiece.
Step-By-Step Guide to Make Slow Motion Videos with Optical Flow
Unlike the slow-mo in iMovie, the Filmora’s effect is much more advanced and provides professional results. Look at the easy steps below and slow down your video quickly.
Free Download For Win 7 or later(64-bit)
Free Download For macOS 10.14 or later
Step 1Ensure the Latest Version of Filmora and Import Media
Firstly, ensure that you are using the latest version of Filmora. After launching it in your system, access its editing screen through the “New Project” option in its main interface. Drag and drop your video into the timeline section after importing it. You can simply import by pressing the “Ctrl + I” keys from your keyboard.

Step 2Apply Slow-Motion and Use Optical Flow
After bringing media into the timeline, right-click on it. From the displayed list, look for the “Uniform Speed” option. Tap on it and get directed toward the right-side editing screen. There, you have to use the “Speed” slider and move to the left for slow videos or to the right for fast-speed videos.

When you are done adjusting speed, head down to the “AI Frame Interpolation” option. Extend its menu and choose “Optical Flow” to reduce the speed of your video while maintaining its quality.

Step 3Analyze and Save the Video by Customizing Export Options
Check if the function has been applied by playing the video. Lastly, select the “Export” button located in the screen’s upper right corner. From the “Export” window, adjust video parameters to save the video your desired way.

Key Features of Wondershare Filmora
Wondershare Filmora’s impressive tools never cease to impress. Let’s discuss a few of its remarkable features in video editing:
1. Instant Mode
This feature is perfect for creating quick social media videos. You can find a variety of templates and choose the one that best suits your video’s concept. There are more than 115 templates from business, travel, and Vlog categories. Instant mode will help you to rearrange video clips with AI algorithms that cut your 3 hours of editing time.
2. AI Smart Cutout
Removing an object from a video can be challenging while maintaining a natural appearance. Not more with Filmora’s AI smart cutout that can automatically remove unwanted items. It can detect and refine the cutout frame by frame to maintain perfection and high quality. Besides, you get different preview modes to modify certain areas.
3. Auto Beat Sync
Music and film with wonderful rhythm add an entertaining aspect to the content. Utilizing the auto-beat sync feature in Filmora is the way to do it. With this tool, your music and video will automatically match the clips. Furthermore, it can inevitably identify dark sides in your footage to delete them.
4. AI Copywriting
It’s challenging to develop exciting scripts or captions for your films. In situations like this, an AI copywriting tool is invaluable. ChatGPT integration in Filmora lets you get YouTube titles and descriptions that match your needs. To generate one, you must describe the content you want using natural language.
Conclusion
In short, the slow-motion effect is one of the most popular video effects used in movies. Thus, a good video editor is necessary whether you edit videos for entertainment or business purposes. Your video will not look good and will negatively impact the viewers if it is not edited well. Here, you have learned how to slow down video iMovie. If you want an advanced tool, try the alternative Wondershare Filmora.
4 Ways to Loop a Video on Vimeo
Vimeo is a popular video streaming platform where you can watch videos all day. Vimeo is a close competitor of YouTube. If you are a regular viewer on Vimeo, you may want to watch a video in a loop. Instead of manually playing the video again and again, you can automatically loop the video on Vimeo.
If you are embedding a Vimeo video on your website, you will want to play it on a loop. This will ensure maximum watch time from the audience. Besides, if you are a video creator, you may want to loop Vimeo videos for your video project. We will illustrate how to loop video on Vimeo for all scenarios.
Way 1. Loop A Video on Vimeo Directly
Most online users watch videos on Vimeo directly through the web browser. This is specifically applicable to computer users. If you want Vimeo loop video for any desired video, the steps are simple. You have to make some adjustments and additions to the video URL on the address bar. You should change the URL accurately for looping a video. Here are the steps on how to loop a video on Vimeo directly.
Step 1: On your device, launch the web browser. Open the official website of Vimeo Watch. Play any video of your liking.

Step 2: Now, you need to change the URL of the video you are playing. Here are the changes to make in the address bar.
- Remove everything at the beginning of “vimeo.com”. Add “.player” at the beginning of the URL.
- Add “/video/“ after “vimeo.com”.
- Add “?amp;loop=1:” at the end of the URL.
Therefore, the initial URL of the video was “https://vimeo.com/754255543 “. You have to change it to “player.vimeo.com/video/754255543?amp;loop=1”.
Step 3: After making the changes, press Enter key. The same video will play in a loop until you pause the video or close the web browser’s tab.
Way 2. Loop a Vimeo Video When Embedded on Your Site
You can embed a Vimeo video on your website so that the audience can watch it. The video will play only once when someone lands on your website. After the video ends playing, the embedding will show suggested videos. If you want the same video to play again and again, you have to put it in a loop. Here are the steps on how to loop Vimeo video when embedded on your website.
Step 1: Open the Vimeo video on your web browser. Click on Share icon present inside the player in the top-right corner.
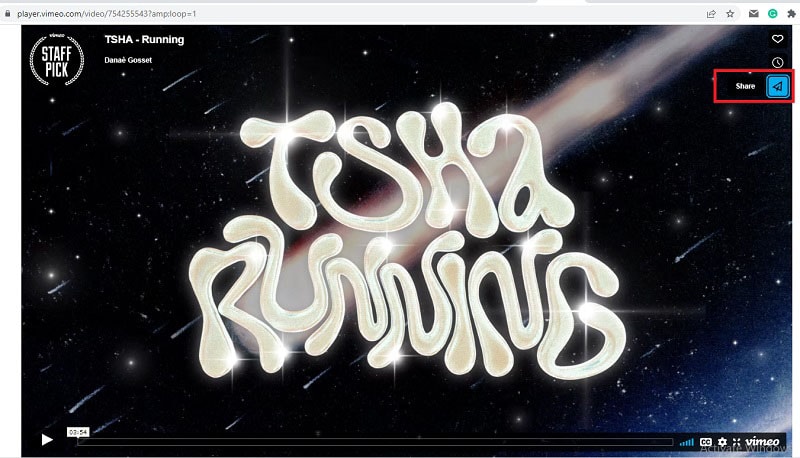
Step 2: You will get to see several options, and you need to click on “Get Embed Code” option.
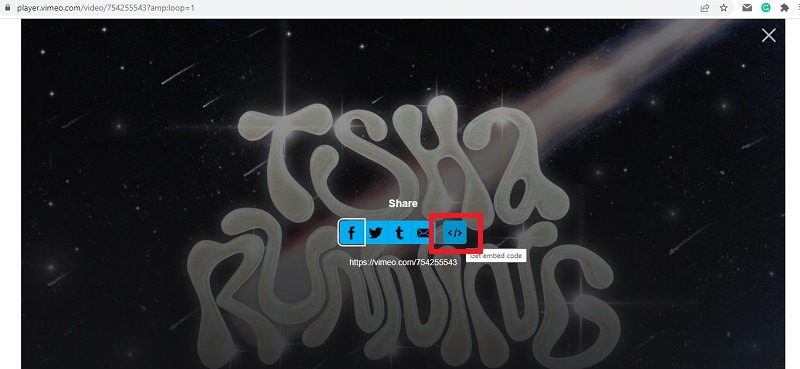
Step 3: On the next screen, you will get the embed code in a pop-up box. Click on Show options.

Step 4: From the expanded section, go to Special Stuff section. Turn on “Loop this video” option.

Step 5: Thereafter, copy the code and paste it into your website to play the video in a loop.
Way 3. How to Loop a Vimeo Video on Mobile
If you are a mobile user, you can use the Vimeo app. But you cannot loop a video on the Vimeo app, quite surprisingly. If you are using the Vimeo app, you can copy the link to the video. Thereafter, you can open the video on your web browser app. You can follow the steps we have mentioned for looping a video on Vimeo directly. Here are the steps for Vimeo loop video on mobile devices.
Step 1: Open the Vimeo app on your mobile device. Play the video that you want in the loop.
Step 2: Tap on the Share icon and tap on Copy URL option.
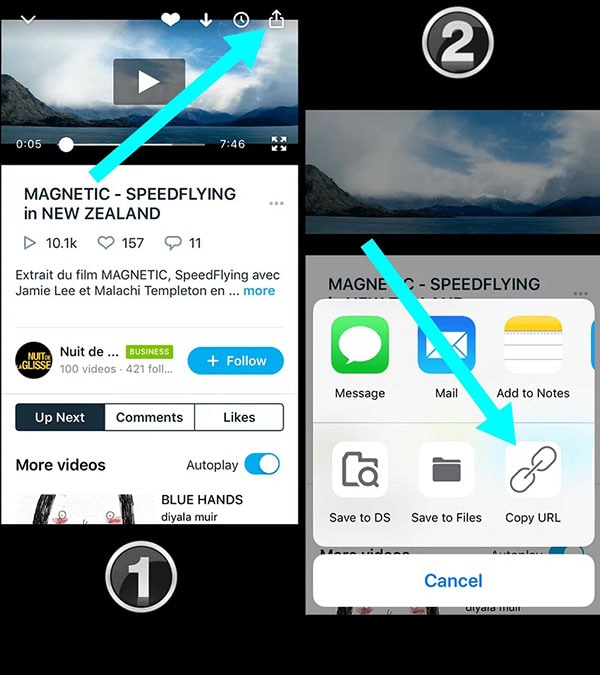
Step 3: Open your web browser and paste the copied URL.
Step 4: Modify the URL in the address bar following the steps we have mentioned in Way 1.
After the modification, the URL of the video should change from “https://vimeo.com/754255543 “ to “player.vimeo.com/video/754255543?amp;loop=1”.
Way 4. How to Loop Vimeo Videos on Computer
If you want to use Vimeo loop video in your video project on your computer, you can use Wondershare Filmora. Filmora is a professional video editor where you can loop any downloaded Vimeo video as long as you want. There are several online Vimeo downloaders available to download any designed Vimeo video.
Thereafter, you can import the downloaded video into Filmora. Then you can extend the duration by looping the video. Filmora is available for Windows and macOS. Apart from looping, you can edit your video like a professional. Here are the steps on how to loop a video on Vimeo.
Free Download For Win 7 or later(64-bit)
Free Download For macOS 10.14 or later
Step 1: Download and install Wondershare Filmora. Download the desired Vimeo video on your computer. Launch Filmora and click on New Project.

Step 2: Drag and drop the downloaded video file into the Project Media folder on Filmora. Thereafter, bring the video file from Project Media folder into the timeline.

Step 3: Drag and drop the video clip into the timeline again. Make sure that there is no gap between the clips and they are on the same channel for looping. Alternative, you can copy and paste the video clip multiple times for looping.

Step 4: You can play the video and watch it in loop. Finally, click on the Export button to save the video in the desired file format.

Wondershare Filmora Best Video Looper Software for Social Media Video Creation.
Free Download Free Download Learn More

Conclusion
There are several ways to loop a video on Vimeo. The best way out is to go for Vimeo loop video directly from the web browser. We have also illustrated how to embed a Vimeo video in a loop into your website. If you want to have a looped Vimeo video in your video project, you can use Filmora on your computer.
Free Download For macOS 10.14 or later
Step 1: Download and install Wondershare Filmora. Download the desired Vimeo video on your computer. Launch Filmora and click on New Project.

Step 2: Drag and drop the downloaded video file into the Project Media folder on Filmora. Thereafter, bring the video file from Project Media folder into the timeline.

Step 3: Drag and drop the video clip into the timeline again. Make sure that there is no gap between the clips and they are on the same channel for looping. Alternative, you can copy and paste the video clip multiple times for looping.

Step 4: You can play the video and watch it in loop. Finally, click on the Export button to save the video in the desired file format.

Wondershare Filmora Best Video Looper Software for Social Media Video Creation.
Free Download Free Download Learn More

Conclusion
There are several ways to loop a video on Vimeo. The best way out is to go for Vimeo loop video directly from the web browser. We have also illustrated how to embed a Vimeo video in a loop into your website. If you want to have a looped Vimeo video in your video project, you can use Filmora on your computer.
Also read:
- [New] The Best Free Speech to Text Apps on Mac You Might Missed
- [Updated] 2024 Approved Prime Steadicams to Elevate UAV Video Production Quality
- [Updated] Transforming Your Vision Into Stunning HDR Portraits for 2024
- 5 Ways to Restart Realme V30 Without Power Button | Dr.fone
- Call of Duty World War II Error Code Woe No More - A Step-by-Step Fix
- Easy Ways to Remove Motion Blur In Photoshop for 2024
- How to Set Up Twitch Green Screen
- How to Upload Videos to Twitch? Heres a Guide for Beginner
- HP 15 Laptop Review: Assessing the Capabilities of an Economical AMD Powered Device
- In 2024, Do You Want to Create a Motion Blur Effect in Your Videos? Read This Well-Described Guide to Learn How to Add Motion Blur on CapCut on iPhone and Android Devices
- In 2024, How to Upload Videos to Twitch? Heres a Guide for Beginner
- In 2024, Kdenlive Is a Free, Open-Source Video Editing Software Application. Kdenlive Is a Powerful Video Editor that Can Be Used to Create Professional-Quality Videos
- New In 2024, 3 Best Effects to Appear on Camera Made with Filmora
- Pioneering Stories on YouTube, 2023 Edition for 2024
- Resolved: Fixing the 'Steam Content File Locked' Issue
- The Best Android Unlock Software For Honor Play 7T Device Top 5 Picks to Remove Android Locks
- Updated 2024 Approved 3 Best Motion Blur Plugins for Adobe After Effects
- Title: New How to Add Filter to Video in Premiere Pro?
- Author: Chloe
- Created at : 2024-12-10 13:16:17
- Updated at : 2024-12-11 16:16:50
- Link: https://ai-editing-video.techidaily.com/new-how-to-add-filter-to-video-in-premiere-pro/
- License: This work is licensed under CC BY-NC-SA 4.0.
