New How to Add Transitions in Adobe Premiere Pro
How to Add Transitions in Adobe Premiere Pro
Shooting a video is a job half done and editing the video is equally important. The way you edit your recorded video determines how good your video will look in the end. When it comes to professional video editing, Adobe Premiere Pro is the most preferred premium video editor. Premiere Pro comes with a wide range of transitions to apply in your videos and make jump-cuts smooth for the eyes.
Premiere Pro is not the most user-friendly video editor, and the learning curve is rather steep. That is why you need to know how to add transitions in Premiere accurately so that the cuts in your videos look eye-soothing. You also need to learn about how to edit the transition effects in Premier Pro to suit your requirements and preferences. We have illustrated how to add and edit transitions in Premium Pro as well as mentioned an alternative way to add video transitions easily.
Part 1. How to add transitions in Premiere
Adding transitions to videos is very common in video editing. Premiere Pro is popular for its variety of video transition effects. Applying video transition effects in Premiere Pro is very easy. You get access to transitions from Effects panel that is located at the topmost bar. Here are the steps on how to add transition effects in Premiere Pro.
Step1 Open Adobe Premiere Pro and go to File> Import. Select a video clip from your hard drive and click on Open button.

Step2 Drag the video clip from the Project panel and drop it to Timeline for adding transitions.

Step3 Go to Effects tab located at the top and click on Video transitions option.

Step4 You will see different categories of video transitions and select your desired transition.
Step5 Click and drag the selected transition and drop it to the Timeline and place it anywhere on the clip where you want the transition to play.

Generally, a video transition is placed in between two video clips so that jumping from one clip to another is seamless. After placing the transition, play the video to check out how it looks.
Part 2. How to edit transitions in Premiere
Now that you know how to add transition Premiere Pro, you should also know how to edit the transitions after applying them. This is because when you drag and drop the transition on the Timeline, the transition comes with default duration. You can edit the duration as per your video requirements. Besides, Premiere Pro lets you edit different settings of the video transitions for customization. Here are the steps on how to edit transitions in Premiere.
Step1 Click on the transition you have applied on the Timeline.
Step2 Go to Effect Controls tab located at the top by the side of Effects tab.
Step3 You will see a mini timeline under Effect Controls and labels A and B denoting the start and end time.

Step4 You can adjust the slider below A label to change the start time of the transition. Similarly, you can change the slider below B label to change the end time of the transition.
Step5 Instead of setting the start and end time of the transition, you can set the duration of the transition as a whole. Go to Duration option located above A and B labels and drag right and left to change the duration.

Step6 You can also change the Alignment to place the transition as a Center at cut, Star at Cut, and End at cut of video clips.

You can play the video and watch the changes you make to the transitions in real-time. Different transitions will have different options under Effect Controls tab.
Part 3. Premiere alternative way to add video transitions
There could be multiple reasons why you are looking for a Premiere alternative ways to add video transitions. You might be finding Premiere Pro difficult to learn. Besides, you may not be satisfied with the collection of video transitions in Premiere Pro. We recommend Wondershare Filmora as the best Premiere alternative to add video transitions to your video clips.
Filmora is a professional video editor like Premiere Pro but there are more transition effects available. Filmora team keeps on adding latest and trending transitions from time to time and you can download them easily. In fact, Filmora is a more user-friendly video editor in comparison to Premiere Pro. That is why Filmora is equally popular among beginners and professionals in video editing. Here is how to add video transitions in Filmora .
Free Download For Win 7 or later(64-bit)
Free Download For macOS 10.14 or later
Step1 Open Filmora and click on New Project. Drag and drop your video clips under Project Media folder.

Step2 Drag and drop the video clips on Timeline. If it is one video clip, you can cut it into multiple clips to add transitions in between them.

Step3 There are different categories of transition effects and drag and drop your desired transition on the Timeline.

Step4 Place the transitions in between video clips and drag the transition as per the duration requirements. Play the video and once you are satisfied, click on Export button to save the video.

Part 4. Related FAQs about Premiere Transitions
How do I add transitions to all clips in Premiere?
Import all the video clips to Timeline in Premiere. Go to Effects> Video Transitions and drag and drop the video transitions of your choice to Timeline. You should place the transitions in between the video clips and adjust their duration as per your requirements for smoother transition for jump cuts.
Where are the transitions in Premiere Pro?
The transitions are present under Effects tab located at the topmost bar. There are different types of video transitions as well as audio transitions available. If you are looking for how to add text transitions in Premiere Pro, you can type the text and add effects from Graphics tab.
How to add transitions to photos in Premiere Pro?
Adding transitions to photos in Premiere Pro is the same as videos. Therefore, you should import photos to Project panel and drag and drop them to Timeline. Go to Effects> Video Transitions and drop the selected transitions in between the photos.
Conclusion
We have illustrated how to add a transition in Premiere in simple steps. Besides, we have also explained how to edit the transitions in Premiere to fit in your video clips perfectly. If you are looking for an alternative to Premiere Pro for adding video transitions, we recommend Wondershare Filmora where there are more transitions, and the user interface is super easy and intuitive.
Free Download For macOS 10.14 or later
Step1 Open Filmora and click on New Project. Drag and drop your video clips under Project Media folder.
Step2 Drag and drop the video clips on Timeline. If it is one video clip, you can cut it into multiple clips to add transitions in between them.
Step3 There are different categories of transition effects and drag and drop your desired transition on the Timeline.
Step4 Place the transitions in between video clips and drag the transition as per the duration requirements. Play the video and once you are satisfied, click on Export button to save the video.
Part 4. Related FAQs about Premiere Transitions
How do I add transitions to all clips in Premiere?
Import all the video clips to Timeline in Premiere. Go to Effects> Video Transitions and drag and drop the video transitions of your choice to Timeline. You should place the transitions in between the video clips and adjust their duration as per your requirements for smoother transition for jump cuts.
Where are the transitions in Premiere Pro?
The transitions are present under Effects tab located at the topmost bar. There are different types of video transitions as well as audio transitions available. If you are looking for how to add text transitions in Premiere Pro, you can type the text and add effects from Graphics tab.
How to add transitions to photos in Premiere Pro?
Adding transitions to photos in Premiere Pro is the same as videos. Therefore, you should import photos to Project panel and drag and drop them to Timeline. Go to Effects> Video Transitions and drop the selected transitions in between the photos.
Conclusion
We have illustrated how to add a transition in Premiere in simple steps. Besides, we have also explained how to edit the transitions in Premiere to fit in your video clips perfectly. If you are looking for an alternative to Premiere Pro for adding video transitions, we recommend Wondershare Filmora where there are more transitions, and the user interface is super easy and intuitive.
Are You Curious About the Functionality of LUTs in LumaFusion? This Article Will Satisfy Your Queries with Ease
LumaFusion is one of the best-known apps to enhance video quality without impacting the overlays. With this app, you can modify the video in several ways, such as applying LUTs to videos and synchronizing MultiCam clips. Yet, many users find it challenging to use LumaFusion to color grade the clips.
In this discussion, we will discuss color grading in LumaFusion and the procedure to use it. Moreover, we will also introduce an app that can streamline your workflow efficiency. The name of this app is Wondershare Filmora, and it will also help you to apply LUTs on computers.
Part 1: How Do LUTs Make Work Operation Easy?
Before getting into the free LUTs for LumaFusion, it is important to know the higher functionality of LUTs. If you are new to the field of video editing, you may have no idea how LUTs can improve your work operation. This section will help you to understand it without complications:
- Modern Styles and Looks: LUTs offers predefined and modernized styles and look that are created by specialists. As these LUTs have prebuilt color grading techniques along with file emulation, you can use them to increase the attractiveness of videos.
- Higher Workflow Efficiency: The prebuilt LUTs can make your work easier than ever. You can apply the LUTs to the videos in the simplest manner, along with saving time and effort.
- Compatibility of LUTs: There are no such device restrictions in LUTs, as you can use them on computers or mobile devices. Above all, LUTs are also compatible with several video editing software.
- Customization and Experimentation: While using the LUTs, you can customize them as per your needs without any problem. Other than this, you can also experiment the creativity and visual styles with LUTs.
Empower your videos with a new mood using different LUTs. Filmora now offers 100+ top-quality 3D LUTs cover a broad range of scenarios. Transform your videos with Filmora’s powerful 3D LUTs.
Apply LUT on Videos Apply LUT on Videos Learn More


Part 2: What Are the Potential Ways to Apply LUTs for LumaFusion?
There are considerable ways to apply LUTs in LumaFusion, but we plan to introduce the most straightforward ways. Don’t fret if you have no video editing skills. By following the below-given steps, you can experience the LumaFusion color grading:
Way 1: Apply LUTs Through Sharing
Step 1: Initially, import the video to LumaFusion and double-tap on a video in “Timeline.” Select the “Color and Effect” icon from the bottom and redirect to the “Cube” icon on the top.

Step 2: Next, tap on the “Import” button, and once you are on the “Thank You” page, select the “Download Link” button. Following this, hit “Copy to ZIP,” and after this, the ZIP folders will be loaded in the app.

Step 3: To proceed, you have to “Unzip the Folder” and locate the LUTs of your choice. Once you find the LUT, press the “Share” icon and tap “Open in LumaFusion.” Following this, the LUT will be added in LumaFusion.

Way 2: Apply LUTs Through LUT Name
Step 1: Open the video with LumaFusion and select “Timeline.” Tap on the “Color and Effect” sign and select the “Import” button. Following this, you need to select a tool for importing LUTs from the options of Box, Dropbox, Google Drive, Files, or Add/Edit Source.

Step 2: After selecting the source, tap on “LUT name” to add it to LumaFusion. To proceed, press the “Share” button and wait a few moments. Once the LUT is added, you can manage its intensity from the “Blend” sliders.

Part 3: Some Best LUTs To Discover For Using in LumaFusion
Now that you know the higher functionality of LUTs and their application procedure, you must be wondering what LUTs are best for LumaFusion. There is no need to be anxious, as this part will introduce some of the free LUTs for LumaFusion. Look below to learn more about these exceptional video editing elements:
1. Color Grading Central Free LUTs
If you want to add the best color grading LumaFusion LUTs, you need to seek help from the color specialist. Thus, you can use the Color Grading free LUTs designed by CGC. Their site is enriched with high definition and optimized color combinate LUTs. You will never get disappointed by using these LUTs as they never impact the content of the videos.

2. Frank Glencairn Free LUT
If you are still a fan of vintage films in this modernized and vibrant-colored world, this LUT is for you. With this, you can add a fantastic and realistic vintage look to any video. Other than this, it is very popular among filmmakers for introducing a backstory scene in films. Not only professional, but you can also use it to give a retro look to your videos.

3. Reverse Tree Media Free LUTs
With this absolutely free LUT, you can upgrade the quality of your videos with little effort. It also has very modernized LUTs utility, such as the Black Bar layer. You can use this to enhance the video quality of several types of videos, such as TV series or movies. It is quite a perfect pick for sad or backstory scenes. In addition to this, it also has 8mm, 16mm, and 35mm overlays.

4. Kodachrome-K-Tone LUT
With the help of this LUT, you can feel yourself in the era of the early 90s. It has mass-marketed colors along with a subtractive method, which makes it a better option. Moreover, this LUT can also escalate the captivity of promotional videos. You can also use it for magazine photo editing. If you are working on a video captured in low light, this can also fix all the coloring issues for you.

5. SmallHD Free LUTs
Another frequently used LumaFusion LUTs is SmallHD-free LUTs which can maximize your video productivity effectively. It can enhance the classical appearance of the videos. You can use it for both pre and postproduction enhancements. These LUTs give you both dramatic and cinematic vibes. You can apply it to action, thriller, melodramatic or other videos.

Part 4: Wondershare Filmora: Apply LUTs Easily on the Computer
Wondershare Filmora is a tool that gives you freedom of creativity without any complications. With this tool, you can modify your videos in several ways on Mac, Windows, or mobile devices. Filmora also has versatile video editing software to help new video editors in their professional journey. The AI tools present in Filmora have stunning effects on every user, as they can make your work easier than ever.
Add LUTs on Video For Win 7 or later(64-bit)
Add LUTs on Video For macOS 10.14 or later
For example, by using its AI Image, you can turn simple words into images. You can also split the screen and manage the keyframes of your video. One of the best things about Filmora is it lets you edit videos with full customization.

Key Features of Wondershare Filmora
- If you want to track the moments of the objects in the video, the Motion Tracking feature of Filmora got you covered. You can also add Mosaic effects to moving characters or objects in a video.
- There are diversified preset templates in Filmora through which you can make the video with a few taps. You are also free to create your own video template and share it with the world.
- With Filmora, you can edit multiple videos at once, as it supports the batch edit feature. Moreover, you can also add adjustment layers in the video to make non-destructive edits.
Conclusion
As this article states, you can turn simple videos into attractive ones with color-grading LumaFusion LUTs. There are several things that define the higher functionality of LUTs, and you can see the points above. Moreover, the instructions to apply LUTs with LumaFusion are also discussed above for the ease of users.
There are two ways available to achieve color grading, out of which you can select any one of your preferences. The other tool that can help you to apply LUTs on the computer is Wondershare Filmora . You can learn more about this from the above discussion.
Add LUTs on Video For Win 7 or later(64-bit)
Add LUTs on Video For macOS 10.14 or later
Apply LUT on Videos Apply LUT on Videos Learn More
Part 2: What Are the Potential Ways to Apply LUTs for LumaFusion?
There are considerable ways to apply LUTs in LumaFusion, but we plan to introduce the most straightforward ways. Don’t fret if you have no video editing skills. By following the below-given steps, you can experience the LumaFusion color grading:
Way 1: Apply LUTs Through Sharing
Step 1: Initially, import the video to LumaFusion and double-tap on a video in “Timeline.” Select the “Color and Effect” icon from the bottom and redirect to the “Cube” icon on the top.
Step 2: Next, tap on the “Import” button, and once you are on the “Thank You” page, select the “Download Link” button. Following this, hit “Copy to ZIP,” and after this, the ZIP folders will be loaded in the app.
Step 3: To proceed, you have to “Unzip the Folder” and locate the LUTs of your choice. Once you find the LUT, press the “Share” icon and tap “Open in LumaFusion.” Following this, the LUT will be added in LumaFusion.
Way 2: Apply LUTs Through LUT Name
Step 1: Open the video with LumaFusion and select “Timeline.” Tap on the “Color and Effect” sign and select the “Import” button. Following this, you need to select a tool for importing LUTs from the options of Box, Dropbox, Google Drive, Files, or Add/Edit Source.
Step 2: After selecting the source, tap on “LUT name” to add it to LumaFusion. To proceed, press the “Share” button and wait a few moments. Once the LUT is added, you can manage its intensity from the “Blend” sliders.
Part 3: Some Best LUTs To Discover For Using in LumaFusion
Now that you know the higher functionality of LUTs and their application procedure, you must be wondering what LUTs are best for LumaFusion. There is no need to be anxious, as this part will introduce some of the free LUTs for LumaFusion. Look below to learn more about these exceptional video editing elements:
1. Color Grading Central Free LUTs
If you want to add the best color grading LumaFusion LUTs, you need to seek help from the color specialist. Thus, you can use the Color Grading free LUTs designed by CGC. Their site is enriched with high definition and optimized color combinate LUTs. You will never get disappointed by using these LUTs as they never impact the content of the videos.
2. Frank Glencairn Free LUT
If you are still a fan of vintage films in this modernized and vibrant-colored world, this LUT is for you. With this, you can add a fantastic and realistic vintage look to any video. Other than this, it is very popular among filmmakers for introducing a backstory scene in films. Not only professional, but you can also use it to give a retro look to your videos.
3. Reverse Tree Media Free LUTs
With this absolutely free LUT, you can upgrade the quality of your videos with little effort. It also has very modernized LUTs utility, such as the Black Bar layer. You can use this to enhance the video quality of several types of videos, such as TV series or movies. It is quite a perfect pick for sad or backstory scenes. In addition to this, it also has 8mm, 16mm, and 35mm overlays.
4. Kodachrome-K-Tone LUT
With the help of this LUT, you can feel yourself in the era of the early 90s. It has mass-marketed colors along with a subtractive method, which makes it a better option. Moreover, this LUT can also escalate the captivity of promotional videos. You can also use it for magazine photo editing. If you are working on a video captured in low light, this can also fix all the coloring issues for you.
5. SmallHD Free LUTs
Another frequently used LumaFusion LUTs is SmallHD-free LUTs which can maximize your video productivity effectively. It can enhance the classical appearance of the videos. You can use it for both pre and postproduction enhancements. These LUTs give you both dramatic and cinematic vibes. You can apply it to action, thriller, melodramatic or other videos.
Part 4: Wondershare Filmora: Apply LUTs Easily on the Computer
Wondershare Filmora is a tool that gives you freedom of creativity without any complications. With this tool, you can modify your videos in several ways on Mac, Windows, or mobile devices. Filmora also has versatile video editing software to help new video editors in their professional journey. The AI tools present in Filmora have stunning effects on every user, as they can make your work easier than ever.
Add LUTs on Video For Win 7 or later(64-bit)
Add LUTs on Video For macOS 10.14 or later
For example, by using its AI Image, you can turn simple words into images. You can also split the screen and manage the keyframes of your video. One of the best things about Filmora is it lets you edit videos with full customization.
Key Features of Wondershare Filmora
- If you want to track the moments of the objects in the video, the Motion Tracking feature of Filmora got you covered. You can also add Mosaic effects to moving characters or objects in a video.
- There are diversified preset templates in Filmora through which you can make the video with a few taps. You are also free to create your own video template and share it with the world.
- With Filmora, you can edit multiple videos at once, as it supports the batch edit feature. Moreover, you can also add adjustment layers in the video to make non-destructive edits.
Conclusion
As this article states, you can turn simple videos into attractive ones with color-grading LumaFusion LUTs. There are several things that define the higher functionality of LUTs, and you can see the points above. Moreover, the instructions to apply LUTs with LumaFusion are also discussed above for the ease of users.
There are two ways available to achieve color grading, out of which you can select any one of your preferences. The other tool that can help you to apply LUTs on the computer is Wondershare Filmora . You can learn more about this from the above discussion.
Add LUTs on Video For Win 7 or later(64-bit)
Add LUTs on Video For macOS 10.14 or later
How To Add Text In After Effects
In almost every video you come across, you will see text added to the video in different parts. There are various reasons why adding text to videos becomes a necessity. First of all, you can highlight the underlying message or key points in your video. Along with audio and video, the viewers will have another cue point in the form of text that they can retain in their memory for longer. You add animated texts to video to make the video interesting to watch and break the monotony of visual cues only.
Besides, you may have to want credits and add intro as well as outro to your video where adding text is almost a necessity. Text can help your viewer get the context of your video and make sense of the content. After Effects is a popular video editor thanks to its visual effects, text animation animations, and instant video enhancement tools. We will illustrate the different ways of adding text in After Effects in simple steps.
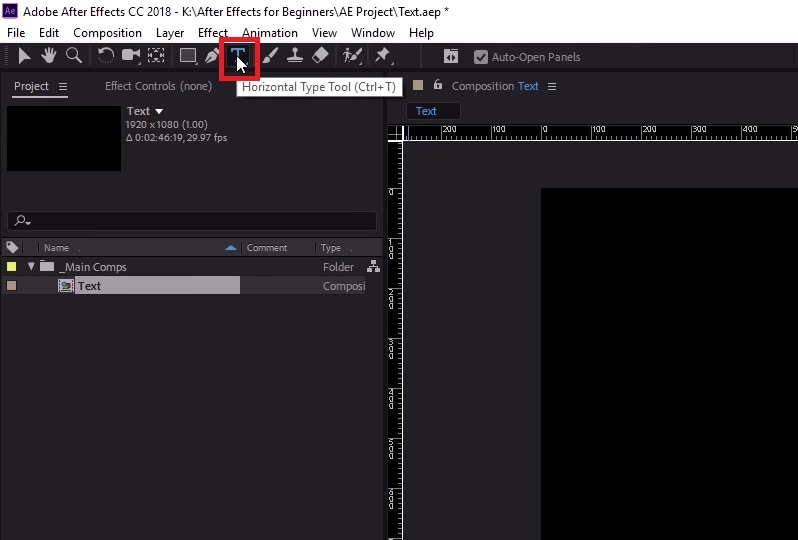
Part 1. Add Text in After Effects with Horizontal Type Tool
Once you have imported your video clip into the Timeline, there are several ways you can add text to your video. First of all, you can right-click on the Timeline and select New> Text to create an empty text layer and add any text you want. Similarly, you can go to Layer> New> Text option to do the same. But the easiest way of adding text in After Effects is by using Horizontal Type Tool. Here are the steps on how you can add text in AE with the type tool.
Step1Once you have imported your video into the Timeline, click on Horizontal Type Tool located in the top bar to add any text. You can press Ctrl+T(Windows) or Command+H(Mac) to get it instantly.
Step2Click on the video where you want to place the text and type your desired text there. After you are done adding your text, press Enter key in Num pad to exit out of the text field in the video.
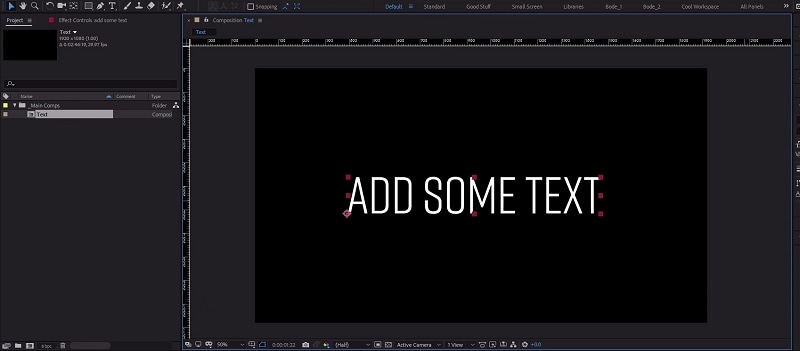
Step3This will automatically create a text layer on Timeline. You can now move the text and place it anywhere you want. You can also modify the text style and add animation which we will illustrate in the next section.
Part 2. Use the Character Panel to Edit Text in AE
When you select Type tool and add your desired text, you get a default style for the text. It is most likely that you have to modify the text style such as changing color, font, and size to fit in your video seamlessly. That is when you have to visit the Character Panel. Character Panel is where you get to edit the font of the text you have typed, increase or decrease the font size, change the font color, and much more. Apart from that, you can increase the spacing between lines when your text is a paragraph instead of a few words. Here are the steps to use Character Panel to edit text in AE.
Step1Once you have typed your text using Horizontal Type tool on the video, click on the text.
Step2Go to Character panel located in the right side of the screen. If it is minimized, click on the panel to expand it.
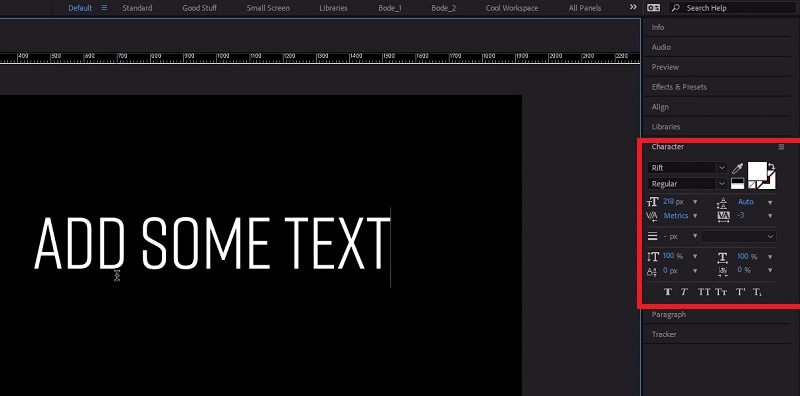
Step3The first option in the panel is the font of the text. By the side of the font is the text color. You can use the color picker tool to choose any color as per your preference.
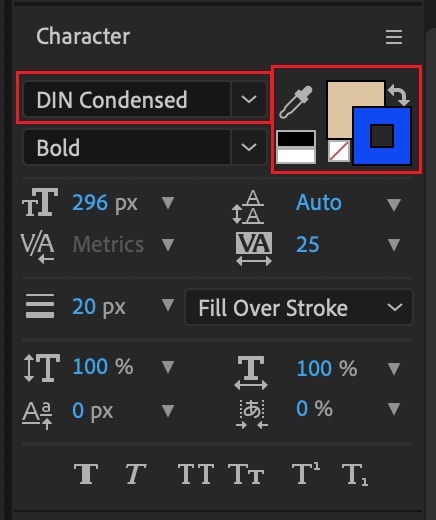
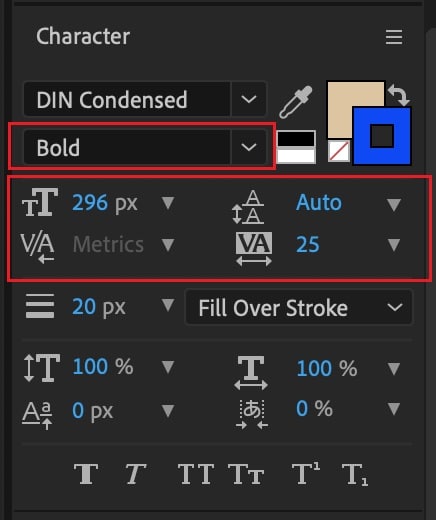
Step4Below the font, you can select the font style such as regular, bold, italics, and likewise. The subsequent part is to change the font size and adjust vertical spacing between lines and horizontal spacing between characters.
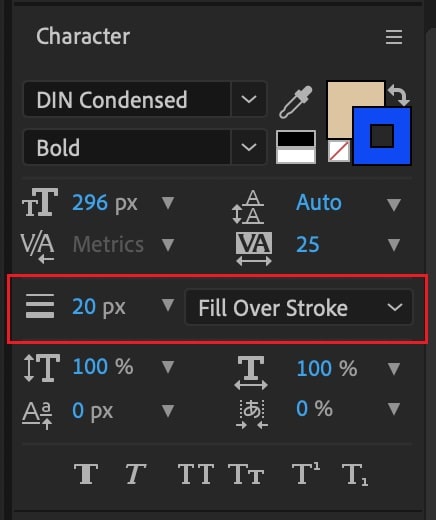
Step5The next section deals with Stroke option as well as fill the text option. You can fill the background of the text with any desired color.
Part 3. Add Animated Text to Video with Animation Presets
Now that you have added a static text and set the text format as per your preference, it is time to animate the text. A static text in a video does not look appealing, and animated texts make the video eye-catching instantly. You can use text animation presets in After Effects to add animated text to video. Here are the steps to add animated text to video with animation presets and effects.
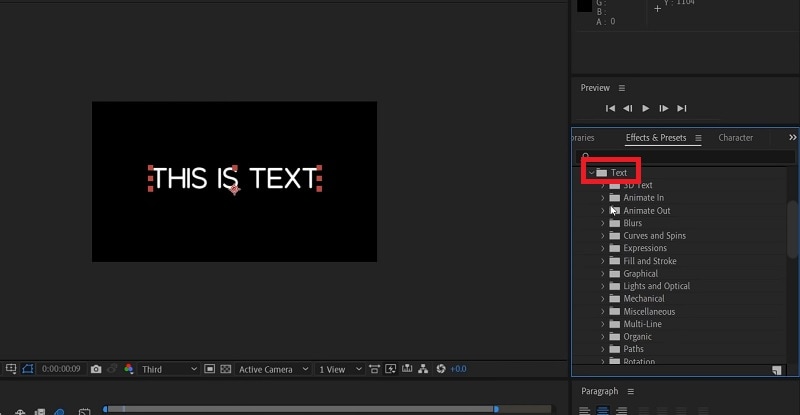
Step1Click on the text on your video that you want to animate. Go to Effects and Presets panel located on the right side.
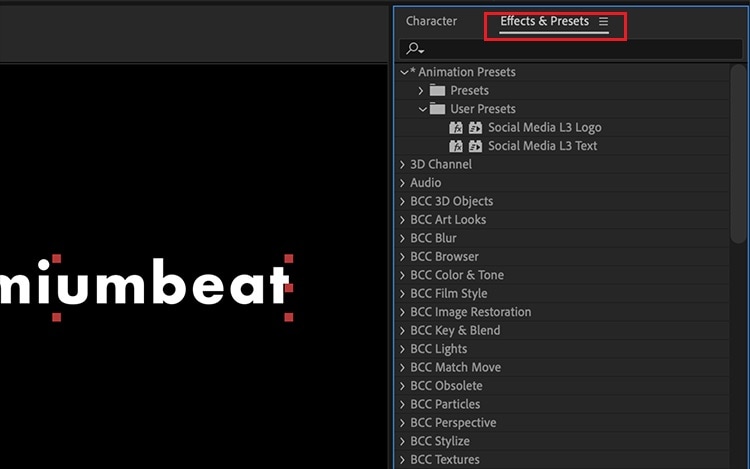
Step2Under Effects and Presets panel, Click on Text option. This will open all the different categories of animation presets available that you can apply to the text on your video.
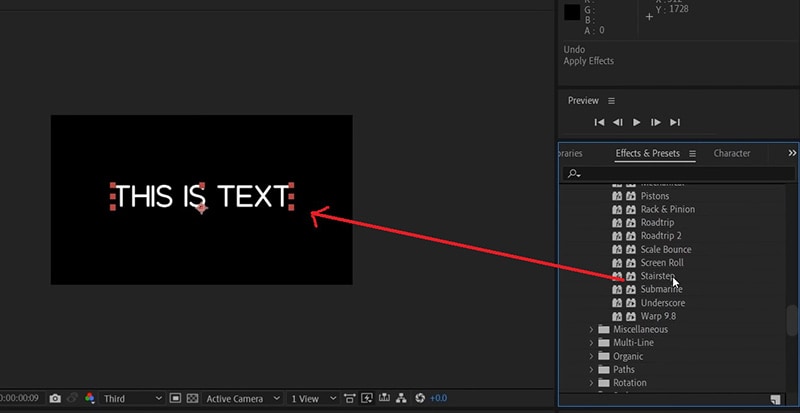
Step3Select any desired animation that you want to apply to the text and drag and drop the animation on the text in the composition window. Play the video and watch the applied animation on the text.
Part 4. Alternative Way to Add Text to Videos
If you are not comfortable with After Effects as a video editor, we recommend Wondershare as the best AE alternative. This is because the user interface of Filmora is super simple and there are loads of text effects and animations available to enhance your video content. Filmora is a professional video editor that is extremely popular among amateur and professional video editors. The application is available for both Windows and Mac users. Here are the steps for adding animated text to video using Filmora.
Step1Install Wondershare Filmora on your computer and launch the application. Click on New Project option on the welcome screen. Otherwise, you can go to File> New Project option.

Step2Go to File> Import Media> Import Media Files to import your video file. You can also drop the video file directly into Project Media folder.

Step3Drag and drop the video file from Project Media folder into the Timeline. If you have multiple video clips, you need to arrange them sequentially on the Timeline.
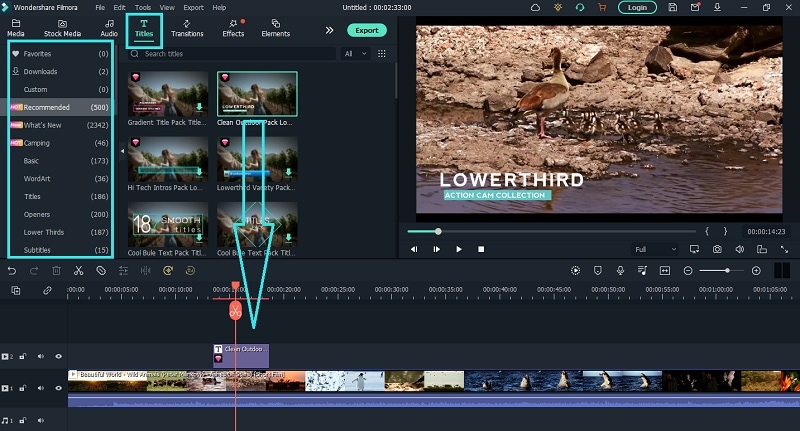
Step4To add text to your video, go to Titles located at the top bar. Check the left panel where you can see different categories of text effects. Select any desired text effect and drop into the Timeline. Make sure that the text layer is above the video layer on Timeline. You can shift the text layer on Timeline to place it where you want it to appear. You can also stretch the duration of the text effect as per your requirements.
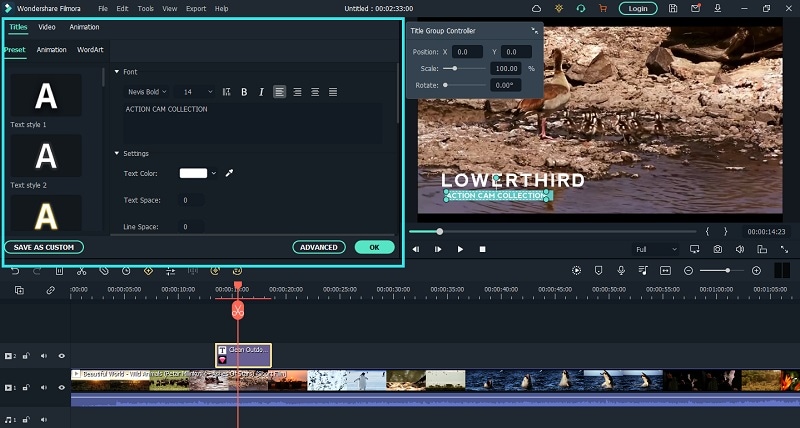
Step5You can edit the text effect by double clicking on the text layer on Timeline. Under Preset tab, you can change the text, font type and size, text color and much more. For further customization, you can click on Advanced button. At last, click on OK button to save the edits done.
The Bottom Line
If you want to add animated text to photo and video, After Effects is a great editor you can use. We have illustrated how you can add text and customize the text and finally, animate it as per your preference. However, if you are looking for AE alternative, we recommend Wondershare Filmora where you can add text to video instantly and choose from a wide range of text effects and animations.
Free Download For Win 7 or later(64-bit)
Free Download For macOS 10.14 or later
Guide to Create a Timelapse Video in After Effects
Time-Lapse movies are great for a variety of projects; you can use them as establishing shots in sitcoms, corporate marketing videos, and they can make lovely backgrounds for animated slideshows. A time-lapse video is essentially a series of photographs taken at regular intervals to depict how the environment changes gradually over a shorter period of time. In this article, we’ll demonstrate how you may quickly and easily build an After Effects time-lapse effect.
With that said, let’s start!
Step 1. Create a new composition
Calculating your composition length to accommodate the frame rate and number of images is the first step in generating a time-lapse video.
- Verify the number of images you have for your Sequence.
- New Composition Creation. Selecting a frame rate: A time lapse film produced at 30 frames per second will flow smoothly, but you can select any frame rate you like.
- To determine the duration of your composition, divide the number of photographs you have by the frame rate you’ve chosen. For instance, if you use 600 photos at 30 frames per second, your composition will last 20 seconds.
Step 2. Import your images
You are prepared to make a time-lapse sequence if all of your photographs are saved to the same folder and are in the same order. If you are working directly from your Camera, you will likely have Camera Raw files, although this procedure works with PNG and JPEG sequences.
- Press Command/Control I on your keyboard or select File > Import. Find the folder holding your image sequence.
- To begin, select the first picture in the sequence. If all of your images have accurate names, After Effects will be able to identify a sequence of images.
- Make sure the Force Alphabetical Order and Camera Raw Sequence checkboxes are selected. Your Time-Lapse Sequence will display in the Project Browser Panel after you click Import.
- Once you’ve watched how it plays, you can adjust the Frame Rate by right-clicking the Sequence in the Project Browser and selecting Interpret Footage > Main.
- To update your time-lapse, modify the Frame Rate setting and click OK.

Step 3. Create movements
- After Effects’ Time-Lapse Sequence can be used just like any other standalone clip. This implies that you may give your time-lapse clip movement by adding Keyframes and Effects.
- Place your Playhead at the beginning of the clip after choosing the Image Sequence. Make a keyframe for the scale or position.
- To generate a second Keyframe for the value of your choice, move to the end of the clip. Make any necessary Clip modifications.
- Right-click on the timeline, choose New > Adjustment Layer, then add your effects to the Adjustment Layer to add effects like noise and grain.
Step 4. Create slow motion from a video
You can import your video after you’ve shot it to prepare it for editing. The same steps, including naming your photos in order, must be taken for the Time Lapse sequence. It may be advantageous to entirely rename both your Image Sequence and Performer clip.
- Drag the finished Time Lapse sequence to your Timeline after completing it as previously explained.
- Over the Time Lapse, add the Performer Clip to the Timeline.
- Choose Time>Time Stretch by performing a right-click on the performer clip.
- You can alter the Stretch Factor or Duration in the dialogue box. When you alter one parameter, the other will reflect the new Stretch Factor or Duration for you.
Step 5. Make an overlay
You can alter the Stretch Factor or Duration in the dialogue box. When you alter one parameter, the other will reflect the new Stretch Factor or Duration for you.
- Find Luma Key in the Effect Control Panel and drag it to your clip.
- Change the Key Type setting in the Effect Control Panel to Key Out Brighter.
- The Threshold, Tolerance, and Edge settings should be adjusted until only the silhouette is visible.
- Use the Pen or Mask Tool to create a circle around the parts you want to delete if you discover any corners of your clip that are still visible.
- Add any Effects, such as Light Leaks, to your Adjustment Layer by choosing “Right-click > New > Adjustment layer.”

After Effects CC must be opened, a new project must be created, the Import File menu option must be selected, and the appropriate folder containing the altered still images must be located and selected before the time-lapse photos can be turned into a film. You need to make sure that the JPEG Series box is checked, as well as the Force Alphabetical Order box.
Once you have clicked on the first image in the sequence. The time-lapse video that you uploaded appears in the project library. After performing a right-click on the filename, select “New Comp from Selection” from the context menu.
Step 6. Exporting your video
After getting our sequence to perform some kind of slow, understated animation so that it appears as though the camera is moving dramatically, we will need to export a video file. Go to File > Export > Add to Render Queue, then open the Render Queue dialog box by going to Window > Render Queue. From there, you can choose the Output Module and change the settings in the options dialog box. Finally, choose the Output To option and select the location on your computer where you would like to save the video clip that we are currently rendering and exporting.

Conclusion
No matter how you make your time lapse videos, After Effects has a ton of features you can use to modify and enhance the way they look. Now that you are familiar with the fundamentals, you can play with the Frame Rates and Composition options. Check out this helpful manual for more information on Time Stretching and Remapping in After Effects.
Free Download For Win 7 or later(64-bit)
Free Download For macOS 10.14 or later
Free Download For macOS 10.14 or later
Also read:
- [New] Comprehensive Breakdown Sony FDR-X1000 Video Gear
- [New] Seamless Skype Call Recordings A Cross-Platform Approach
- 2024 Approved PicsArt's Full Spectrum Exploration
- Empower Every Moment: AI's Role in Shaping an Exceptional Lifestyle
- In 2024, Learn How to Convert MP4 Videos to 60 FPS GIFs with This Easy-to-Follow Tutorial. Get Smooth and Crisp Motion in Your GIFs in Just a Few Simple Steps
- New A Countdown Effect Is Widely Used in Gaming and Report Videos. So How to Create Your Own Countdown Video? This Article Will Tell You some Ideas About Contdown Video Editing for 2024
- New How Do You Create In-Camera Transitions in Your Videos? A Complete Guide for Beginners to Create These Transitions Using Their Camera at Home
- New In This Article Let Me Share with You How to Start a Vlog? Ideas and Any Tips for You to Start Your Own Vlogging Channel
- The Ultimate Guide for Effortless YouTube Shorts Design for 2024
- Title: New How to Add Transitions in Adobe Premiere Pro
- Author: Chloe
- Created at : 2024-12-05 08:06:43
- Updated at : 2024-12-12 06:14:45
- Link: https://ai-editing-video.techidaily.com/new-how-to-add-transitions-in-adobe-premiere-pro/
- License: This work is licensed under CC BY-NC-SA 4.0.