:max_bytes(150000):strip_icc():format(webp)/GettyImages-971165690-1e0af1d9299f4fdba1225c2d20c739f2.jpg)
New How to Be a YouTube Vlogger

How to Be a YouTube Vlogger
Being a vlogger is a lot of fun specially making videos but is not also very easy, there are times you feel giving up specially when no one in the family supports you, there are also times when you get tired because you think no one is interested in your videos, but very fulfilling at the same time being able to do what you love. As you all know making video on YouTube is making also money that is through google AdSense, but if you are into money without the passion of being a vlogger, you will definitely get tired immediately, because being a vlogger requires more effort, patience, love of work, creativity and most specially passion.
![]()
Note: You don’t need to study a career to become a vlogger, but it’s not easy as simply pressing the publishing button. You’ll need a purpose, a message, a platform, an audience and more.
In this article I will share to you my tips and experiences on How to become a YouTube Vlogger and things you need to consider being a Vlogger.
1. What is Vlog?
A Vlog is a piece of video that document a person’s life or expertise, with an average length of around five minutes. The word vlog is “video” and “blog”. Vlog are created to connect with an audience through shared ideas and experiences in the form of video.
2. Tips on How to Become a YouTube Vlogger
- Create a Channel
- Content
- Equipment
- Skills
- Collaborate
3. Create a YouTube Channel
Your channel name is the official name for your channel on YouTube. Your channel name is a big part of how people will define and understand what your channel is about. So, it’s important that your name accurately represents your brand. It’s important that your name stands out from another channel on YouTube or should be unique.
![]()
Note: So before deciding on a name, pop your potential name into YouTube and see what comes up, if you can’t find any similar sounding channels, you’re good to go.
For example, my channel name is Mayang Dyosa, Mayang is what my family and friend called me and Dyosa means Goddess. I find it unique and cute because that’s my dream to be a Goddess.
❶ Content
One of the challenging parts being a YouTuber is finding a right content for your channel.
You can use YouTube’s trending page this is the easiest way to find trending topic for you to have an idea of what topic or content you like. You can always use or share experiences to be your topic content whether it is beauty, make-up tutorial, DIY’s, Skin care ideas, etc. As long as you can share honestly and correctly.
Do whatever you love, do something that you like, expertise, make a relatable videos or timely videos and searchable videos. Create a content that people need or are often searched for online, content that can provide information to people. I suggest you go with “how to” videos, because people always searched for this kind of content.

Vlog Content
❷ Equipment
Gear is essential for making a YouTube video obviously a camera is the most important piece of equipment, you can use anything that can record at least 1080p resolution of video. You can use your mobile phone or a digital camera. Whatever your equipment you have now, you can start your first vlog as long as you can record a video at you have a clear audio you are good to go.
Many of the successful YouTube creators started with very simple equipment so don’t let equipment get in your way. Start your vlog now!
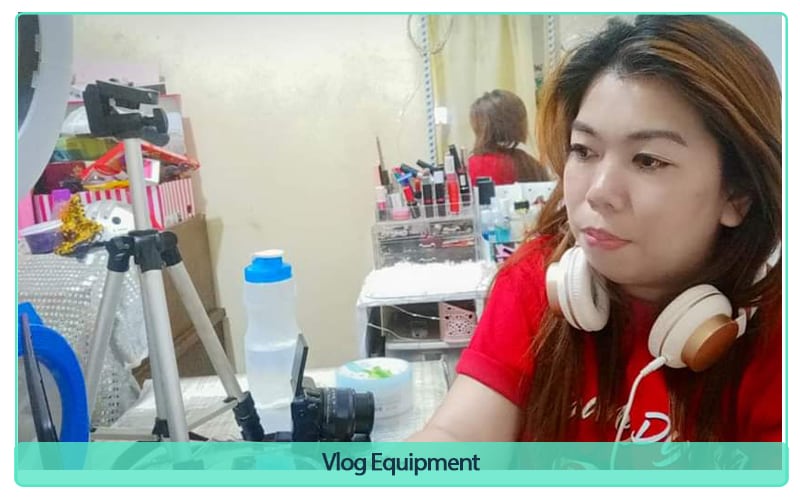
Vlog Equipment
❸ Skills
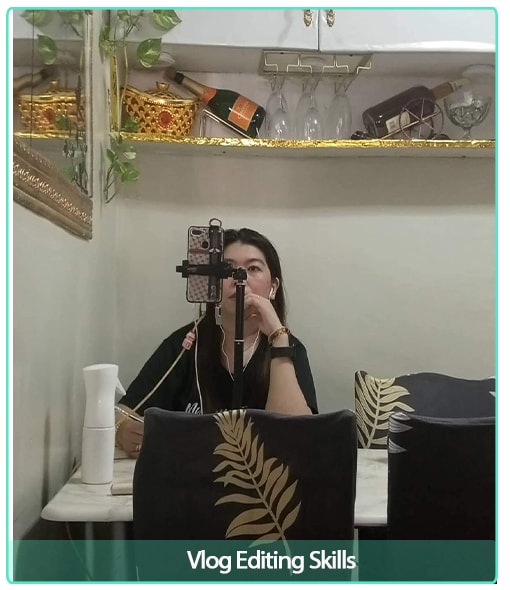
Vlog Editing Skills
Speaking with confident in the front of camera is always a skill of being a vlogger, you must be talkative in order for you to share more information to you viewers but make sure that your ideas are related to your chosen content.
You should be entertaining in front of the camera so that the viewers don’t get bored, because sometimes it’s not just the information that excite them to watch a vlogger, but also on how you entertain the viewers.

Entertain in Front of the Camera
❹ Editing Skils
In Editing skills, there are two ways you can edit your vlog, first on your phones, second on your pc or laptops.
You don’t have to be good at editing but this is one of the things you need to study to make your videos better.
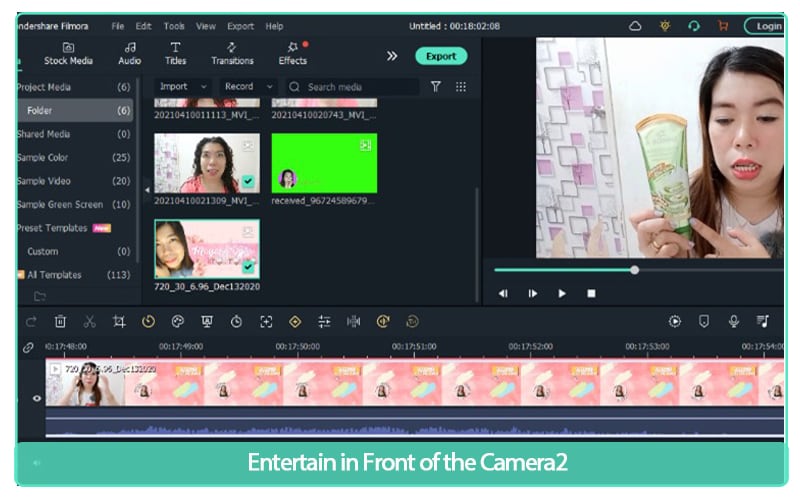
Entertain in Front of the Camera2
Wondershare Filmora Video Editor is one of my personally used editing software, this is considered to be the best option for YouTubers because there is how-to video guide that allows anyone to quickly pick up the pace and start producing or creating an eye-catching video.
Wondershare Filmora 11 The Best video editor that makes your editing experience efficient and playful.
Try It Free Try It Free Learn More

I am using this software for almost 5 years and always satisfied by its performance. It is easy to use software with a lot of tools needed to edit a video in a fast way and it even has animation/affects you can add to your video to look more creative and catchier.
Filmora allows you to export your videos in multiple video formats with lot of customization settings.
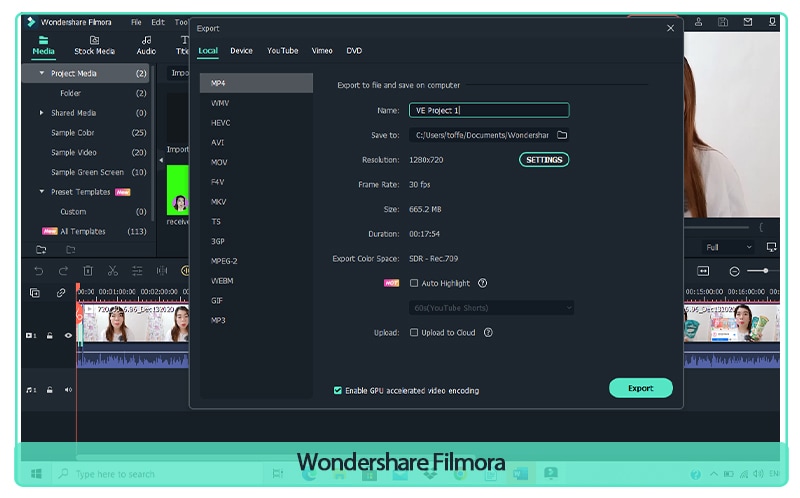
Wondershare Filmora
It also allows you to export your videos directly to your social media platforms like YouTube, Facebook, Vimeo. The speed of exporting videos is also quite fast so not time consuming.
❺ Collaborate
It really helps your channel to grow if you collaborate with someone that is same passion as you, you can share ideas of content and help one another channel grow. Also, this will help others to know that you also have a YouTube channel and this is another way to promote your channel by the help of other content creator. In this way you can gain a friend and someone that you can seek for advice as you are starting for your career.

Wondershare Filmora
Wrap Up
- You must also remember when starting to be a vlogger you should be emotionally and mentally ready because this is not easy as you expected.
- You can earn money by doing a vlog but don’t make the money to be your motivation to be a Vlogger, ask yourself first if this is really you like or is this really your passion? because being a Vlogger comes with great responsibility and it comes with great effort.
- If you are ready to become a vlogger because of the tips I gave, you can start now but you should not expect more subscriber and views immediately because you still need a lot effort and a lot of work to get people get to know your channel. So just keep working and work hard on the content, one day you will be famous and recognized by many.
In this article I will share to you my tips and experiences on How to become a YouTube Vlogger and things you need to consider being a Vlogger.
1. What is Vlog?
A Vlog is a piece of video that document a person’s life or expertise, with an average length of around five minutes. The word vlog is “video” and “blog”. Vlog are created to connect with an audience through shared ideas and experiences in the form of video.
2. Tips on How to Become a YouTube Vlogger
- Create a Channel
- Content
- Equipment
- Skills
- Collaborate
3. Create a YouTube Channel
Your channel name is the official name for your channel on YouTube. Your channel name is a big part of how people will define and understand what your channel is about. So, it’s important that your name accurately represents your brand. It’s important that your name stands out from another channel on YouTube or should be unique.
![]()
Note: So before deciding on a name, pop your potential name into YouTube and see what comes up, if you can’t find any similar sounding channels, you’re good to go.
For example, my channel name is Mayang Dyosa, Mayang is what my family and friend called me and Dyosa means Goddess. I find it unique and cute because that’s my dream to be a Goddess.
❶ Content
One of the challenging parts being a YouTuber is finding a right content for your channel.
You can use YouTube’s trending page this is the easiest way to find trending topic for you to have an idea of what topic or content you like. You can always use or share experiences to be your topic content whether it is beauty, make-up tutorial, DIY’s, Skin care ideas, etc. As long as you can share honestly and correctly.
Do whatever you love, do something that you like, expertise, make a relatable videos or timely videos and searchable videos. Create a content that people need or are often searched for online, content that can provide information to people. I suggest you go with “how to” videos, because people always searched for this kind of content.

Vlog Content
❷ Equipment
Gear is essential for making a YouTube video obviously a camera is the most important piece of equipment, you can use anything that can record at least 1080p resolution of video. You can use your mobile phone or a digital camera. Whatever your equipment you have now, you can start your first vlog as long as you can record a video at you have a clear audio you are good to go.
Many of the successful YouTube creators started with very simple equipment so don’t let equipment get in your way. Start your vlog now!

Vlog Equipment
❸ Skills

Vlog Editing Skills
Speaking with confident in the front of camera is always a skill of being a vlogger, you must be talkative in order for you to share more information to you viewers but make sure that your ideas are related to your chosen content.
You should be entertaining in front of the camera so that the viewers don’t get bored, because sometimes it’s not just the information that excite them to watch a vlogger, but also on how you entertain the viewers.

Entertain in Front of the Camera
❹ Editing Skils
In Editing skills, there are two ways you can edit your vlog, first on your phones, second on your pc or laptops.
You don’t have to be good at editing but this is one of the things you need to study to make your videos better.

Entertain in Front of the Camera2
Wondershare Filmora Video Editor is one of my personally used editing software, this is considered to be the best option for YouTubers because there is how-to video guide that allows anyone to quickly pick up the pace and start producing or creating an eye-catching video.
Wondershare Filmora 11 The Best video editor that makes your editing experience efficient and playful.
Try It Free Try It Free Learn More

I am using this software for almost 5 years and always satisfied by its performance. It is easy to use software with a lot of tools needed to edit a video in a fast way and it even has animation/affects you can add to your video to look more creative and catchier.
Filmora allows you to export your videos in multiple video formats with lot of customization settings.

Wondershare Filmora
It also allows you to export your videos directly to your social media platforms like YouTube, Facebook, Vimeo. The speed of exporting videos is also quite fast so not time consuming.
❺ Collaborate
It really helps your channel to grow if you collaborate with someone that is same passion as you, you can share ideas of content and help one another channel grow. Also, this will help others to know that you also have a YouTube channel and this is another way to promote your channel by the help of other content creator. In this way you can gain a friend and someone that you can seek for advice as you are starting for your career.

Wondershare Filmora
Wrap Up
- You must also remember when starting to be a vlogger you should be emotionally and mentally ready because this is not easy as you expected.
- You can earn money by doing a vlog but don’t make the money to be your motivation to be a Vlogger, ask yourself first if this is really you like or is this really your passion? because being a Vlogger comes with great responsibility and it comes with great effort.
- If you are ready to become a vlogger because of the tips I gave, you can start now but you should not expect more subscriber and views immediately because you still need a lot effort and a lot of work to get people get to know your channel. So just keep working and work hard on the content, one day you will be famous and recognized by many.
TXT to SRT: 3 Effective Ways to Convert TXT to SRT
Adding subtitles to your videos allow more people to understand and relate to your content.
If your video script is in a text file (.txt), and you need to convert the TXT to SRT to create a subtitles file for your video.
You can create your subtitles files just by using plain text that contains your video script. If you are wondering how you can convert text to SRT, then we have all the answers.
Let’s find out.
- Solution 3: How to Edit TXT File and Save It into .SRT Without Any Tools
- Bonus Tip: Editing SRT Subtitles with Fancy Effects to Make Your Video More Impressive
Can You Convert TXT to SRT?
Yes, you can convert .txt to .srt document. Let’s understand a little bit of context first. You can even hardcode your subtitles to your video, and automatically generate subtitle files and transcriptions from any audio and video file format. There are many online and offline tools come to help. And we’ll introduce some in detail in the following part.
Why Do You Need to Convert TXT to SRT?
A word file in TXT format or having a script of the video doesn’t indicate the start and stop time of the subtitle content. An SRT file, on the other hand, has the information about captioning and the start and stop times of the subtitles.
To put it simply, a TXT file is unformatted and needs to be converted into an SRT file so it has all the necessary information to be used as subtitles.
There are different ways to do that, and we’ll discuss three solutions in this article.
Solution 1: Get a TXT-to-SRT Converter Online
Out of the different ways to convert TXT to SRT, using an online converter is the easiest one. You can access it online without having to download it on your computer.
Most online TXT to SRT converters allow drag & drop functionality and are easy to use. While plenty of such tools are available online, we’ll review a few here.
Ebby
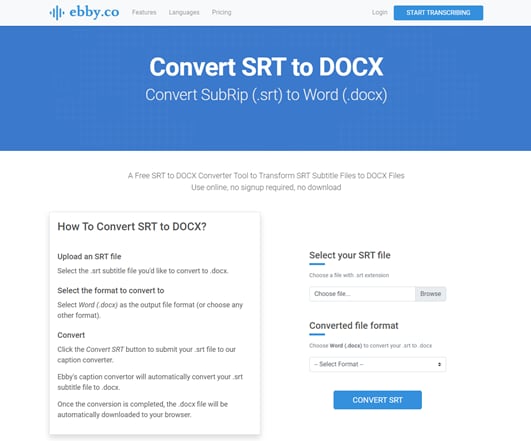
Ebby is essentially a transcription tool that converts audio to text. You can use it to create an automatic transcription and to convert one TXT to SRT format. It uses voice recognition technology to create text with timestamps, making them subtitles for your videos. It supports over 100 languages and dialects. You can export transcripts in different formats.
Pros
- Equipped with speech recognition technology
- Features playback controls
- Offers 24/7 support
- Offers a free trial
Cons
- Only available online
- Not suitable for manual transcription
Features
- You can upload both audio and video files.
- It can create automatic transcriptions.
- Supports multiple languages to produce subtitles in all popular languages.
- It’s equipped with speech recognition technology.
- Apart from subtitles, it produces closed captions as well to help deaf people.
- You can edit the text within the tool.
Best for
Podcasters, lawyers, journalists, authors, and marketing experts.
Rev
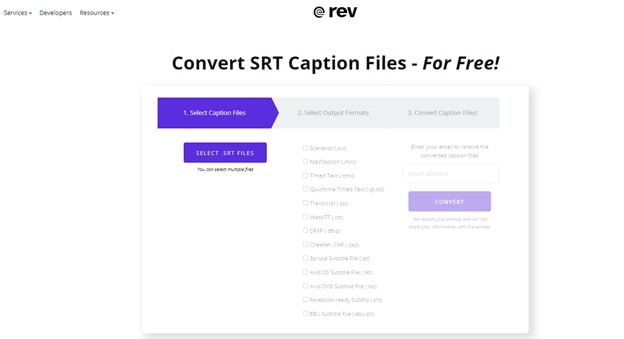
Another transcription tool, Rev is widely used by more than 170,000 users. It can cater to the growing needs of its users. Its pricing model is a bit different from other names in the industry.
Pros
- Supports both automated and manual transcription
- Up to 99% accuracy in manual transcription
- Closed captions
Cons
- Per video-based pricing model
Features
- It works on AI and Machine Learning models to produce accurate subtitles.
- It allows you to annotate subtitles for better understanding.
- File sharing is allowed on Rev.
- You can search particular text using its Full-Text Search functionality.
- It supports 16 different languages.
- It is capable of Natural Language Processing.
Best for
Rev’s users belong to a variety of industries including journalism, video production, medical, podcasters, and writers.
ToolSlick
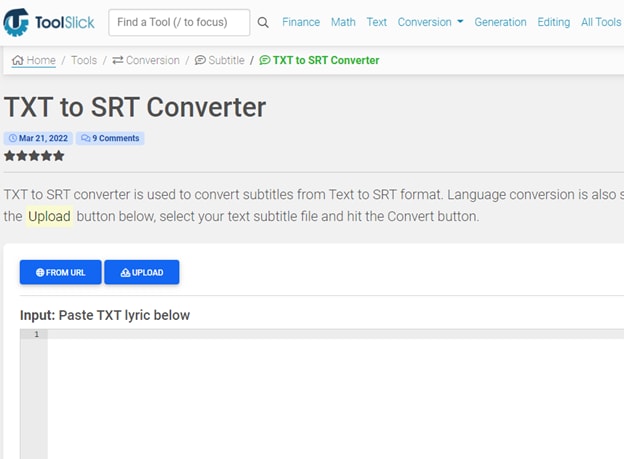
It’s an online platform dedicated to a variety of functions, and converting files from one format to another is one of them. It has tools for handling and processing finance, math, editing, and other tasks.
Pros
- Easy to use
- Supports major languages
- Manually select start and end times
Cons
- Ads on the website can be inconvenient
Features
- It has a dedicated section for financial calculations.
- You can perform mathematics calculations using its Math section.
- It allows you to generate code in different programming languages.
- It has video editing tools.
Best for
ToolSlick is an easy to use online tool to convert TXT to SRT for beginners.
How to Convert Txt to SRT Using an Online Converter
Here, we take ToolSlick as an example to show you how to use an online tool to convert text to an SRT file. Let’s get into it now.
1. Open ToolSlick online converter on your browser. In the below image, you can see how its interface looks. All you need to do is to input or paste the TXT content in the Input box. Make sure to write each line separately.
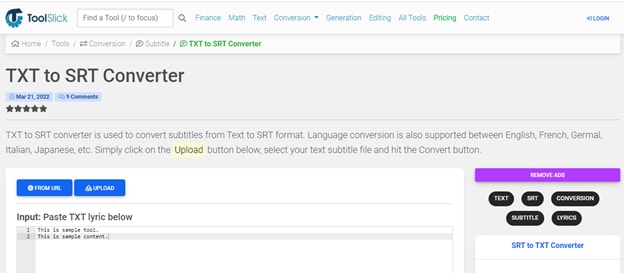
2. After writing the content, go to the Settings section and specify the subtitle’s Start Time and End Time. You can also change the target language.
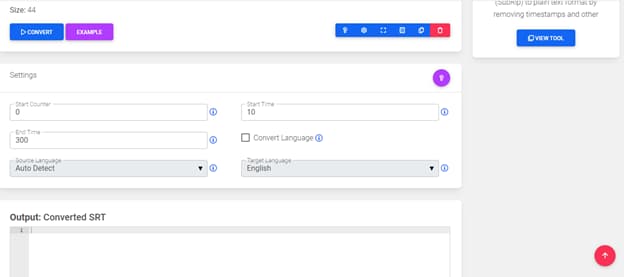
3. Now, you can hit the CONVERT button to convert TXT to SRT. The output file will be automatically downloaded to your computer. Also, the SRT file content appears in the Output box.

Solution 2: Convert TXT to SRT Using Converting Software
Having an online TXT to SRT converter means you can access it online without downloading it on your computer. But, you’ll always have to rely on an internet connection to access one. Instead, you can download and install software on your laptop or computer and have the freedom to convert TXT to SRT on the go.
There’s a variety of converting software available in the market. Let’s review some of them.
UniConverter

Formerly known as Wondershare Video Converter Ultimate, Wondershare Uniconverter is an best subtitle editor for Mac and Windows, and it enables everyone to create subtitles, add, convert subtitles for videos and movies permanently.
Besides, it is also a powerful video file converter, video compressor, video editor, DVD burner, and more.
Pros
- Support converting subtitles in more than 18 formats, export in AAS/SSA/SRT, etc
- 30x faster converting speed without losing information
- Free trial available
Cons
- Not fast while rendering big files
Features
- It’s an all-in-one tool for video, audio and subtitle compression, conversion, download, and more.
- You can preview to check the quality of the output.
- It offers 90x faster-converting speed.
- It can auto-generate subtitles and add them to the video.
- It can solve the problem of video jitter.
- You can convert normal videos to VR videos and enjoy them on your VR headset.
Best for
For download, burn, compress, and conversion.
Batch Subtitles Converter
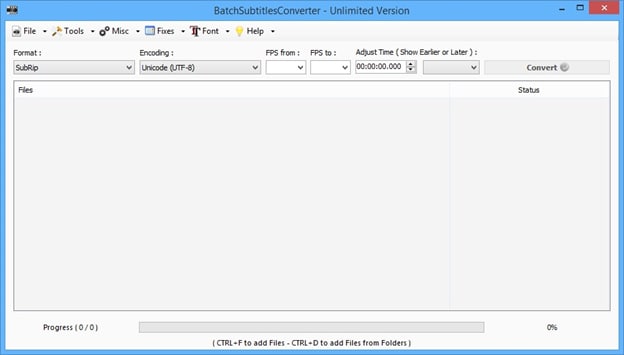
It’s a dedicated subtitles converting program. You can create subtitles in a variety of formats for videos in multiple formats. It’s very easy to use with a simple interface.
Pros
- Supports batch processing
- Free to use
- Framerate and encoding can be set as required
Cons
- It might seem like an outdated tool
Features
- It supports more than 20 output formats.
- You can set custom font sizes for the subtitles.
- You can convert 3 files simultaneously.
- It allows you to change the encoding and frame rate.
Best for
For anyone who’s looking for a free and easy tool
Jubler
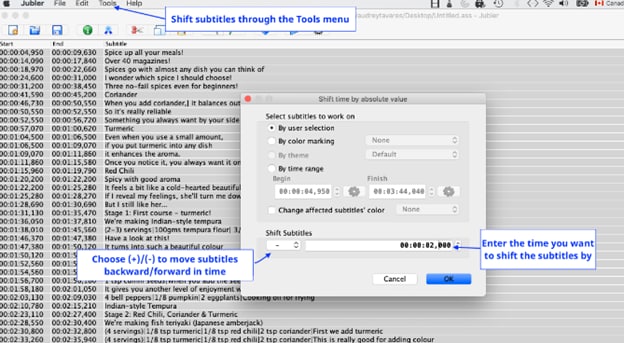
It’s a basic tool that can be used to edit text-based subtitles. You can use it to author new subtitles or convert text files to subtitles. In addition, you can transform, correct, and refine existing subtitles.
Pros
- Free to use
- A powerful tool to create and edit subtitles
Cons
- Outdated interface, not easy-to-use
Features
- It supports most of the popular formats.
- You can preview subtitles to see whether or not they serve the purpose.
- It has spell-checking capabilities to indicate mistakes in your subtitles.
- It has a translation mode to change the language.
Best for
Anyone who’s looking for a powerful and free subtitle creator.
After getting an overview of all of these txt-to-srt converting software, we are here to tell take Wondershare UniConverter as an example to show you concrete how-to steps.
Here’s how you can do it:
1. Download and install UniConverter on your computer and launch it.
2. Access the Subtitle Editor and upload the file you want to add subtitles to.
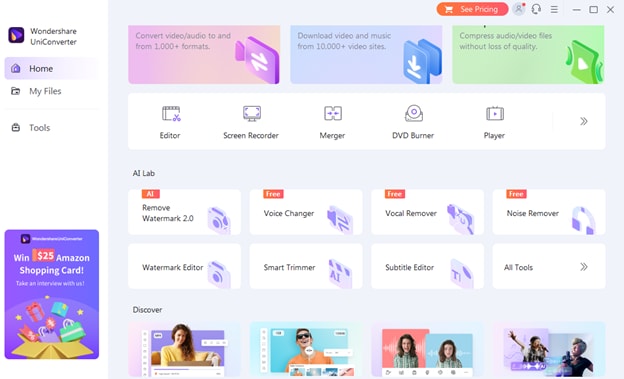
3. Here, you can either import a subtitle file, manually add subtitles, or opt for Text to Subtitles.
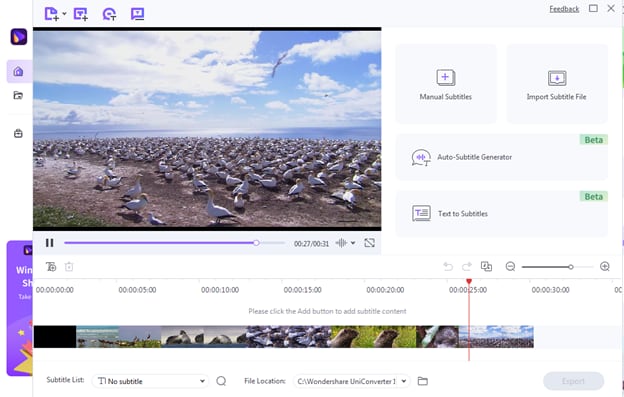
4. You can set the font style, color, size, and timeline as you want.
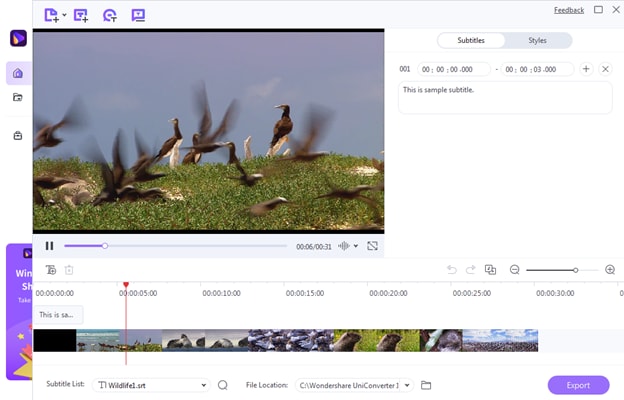
5. Now, hit the Export button and select SRT Files to download the subtitles file. You can also export it as an MP4 video file.
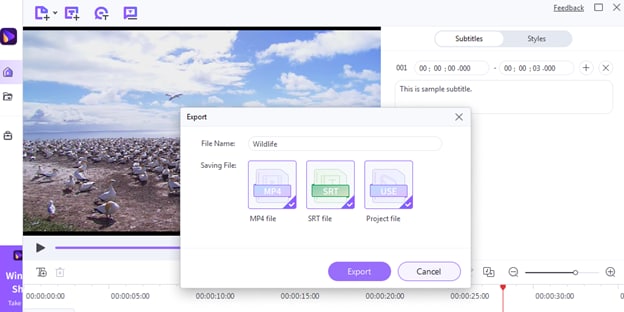
Since you selected to save the file as SRT Files, the text you wrote in the manual subtitles section will convert to an SRT file.
Solution 3: How to Edit TXT File and Save It into .SRT Without Any Tools
While there are different online and downloadable TXT to SRT converting tools available out there, you might not have access to them all the time. That’s when knowing “how to edit TXT file and save it as SRT file” would come in handy.
Here’s how you can edit the TXT file without using any external software and online tools:
- If you’re using a Windows computer, then you can open your TXT document in Microsoft Notepad. For a Mac computer, you can use TextEdit. On the very first line of the document, type a number to identify the subtitle’s section. Each section indicates an individual subtitle, which could be a sound or one sentence from a dialogue.
- The next line would be the timestamp of the subtitle. Timestamp follows this formatting: hours: minutes: seconds, milliseconds.
- In the next line, write your caption.
- Now add double space between the next section and write it as you did for the previous section.
Now that you’ve formatted the TXT file to use it as a subtitle file, let’s save it .SRT format. Here’s how to save your file as .SRT:
1. Go to the File tab and select Save as.
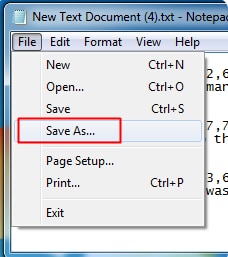
2. Now, save the document with a .**SRT** extension.
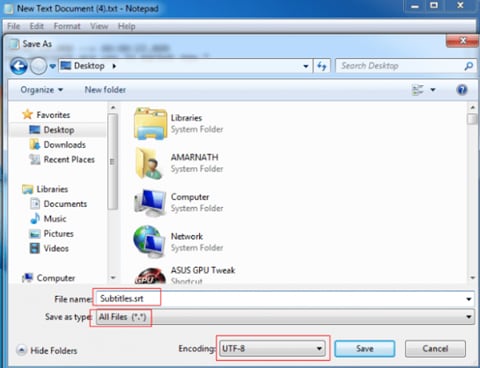
![]()
Note: the advantage of converting TXT file to SRT manually is that it does not require tools and is free, but it does have disadvantages. The bad site is that it is troublesome, time-consuming, and easy to get format mistakes. That is why we recommend professional converting tools most for TXT to SRT conversion.
Now, you can use this file as the subtitle file while watching the video on any video playback software such as the VLC media player.
Bonus Tip: Editing SRT Subtitles with Fancy Effects to Make Your Video More Impressive
When you add subtitles to your video, they typically appear in plain font. If you only need subtitles for their functionality, then a plain font would do the job. However, if you want to make your videos more appealing and engaging, then it calls for adding fancy effects to your subtitles.
No TXT-to-SRT converting tool will make your subtitles fancy by adding effects to them, so you need a professional video editing tool like Filmora .
Wondershare Filmora is a high-quality and professional video editing software with a lot of features. From cut, merge, crop, trim, to transition, effects, and more – a lot can be done using Filmora.
How to Edit SRT Subtitles with Filmora
Following are the steps to add effects to your SRT subtitles and make them look appealing:
Free Download For Win 7 or later(64-bit)
Free Download For macOS 10.14 or later
Step1 Download and install Filmora
Firstly, you need to go to Wondershare Filmora’s official website and download it on your computer. Then, launch the setup and install it on your computer.
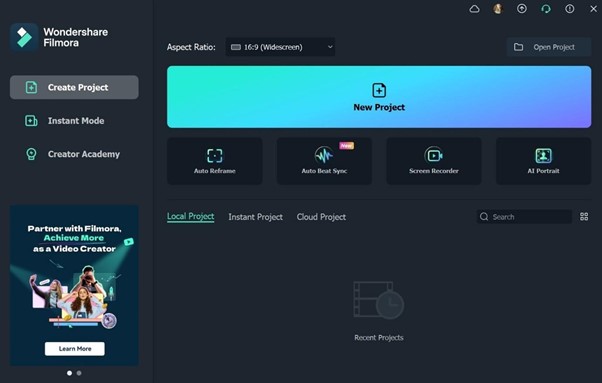
Step2 Open Filmora and import the video
After installation, open Filmora and import the video to which you want to add subtitles.
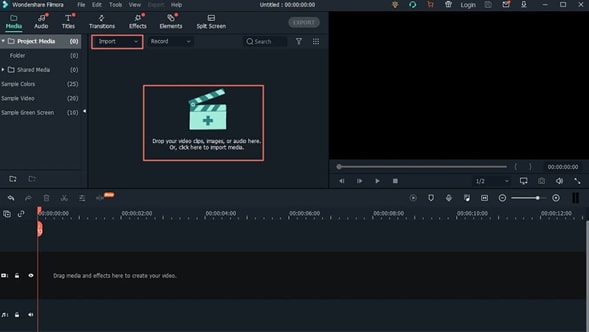
Step3 Add SRT subtitles file
Once your video is open in the editor, use the import option and select your SRT subtitle file, and choose “Advanced Edit” to change styling of the SRT subtitles.
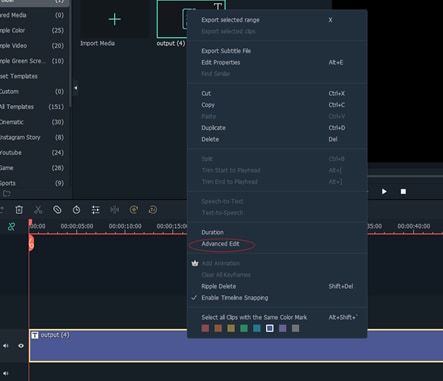
Customize the subtitle styles and then edit it in the subtitle editing window.
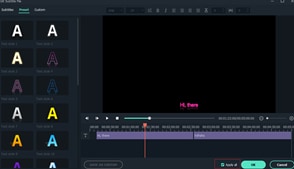
After you’re done editing, click the Export button to save the video.
Hot FAQs on Converting TXT to SRT
1. How to Open and Edit a Text File on a Mac
You can open and edit a text file on a Mac computer using its built-in TextEdit software.
2. What is the difference between SRT and TXT?
TXT is a file format for a text file or Word document. A TXT file might have caption content for a video, but it can’t be used as a subtitle file since it’s unformatted. An SRT file, on the other hand, has the information about captioning and the start and stop times of the subtitles. It’s in a proper format to be used as a subtitle file.
3. Is TXT a subtitle file?
TXT, itself isn’t a subtitle file. It might have the content for subtitles but can’t be used as a subtitle file.
Final Words
This article has shown you some best tools and a concrete step-by-step guide on how you can convert TXT to SRT and use it as your subtitle file. We hope you find it resourceful and are now aware of the different methods to TXT to SRT conversion.
- UniConverter
- Batch Subtitles Converter
- Jubler
- Solution 3: How to Edit TXT File and Save It into .SRT Without Any Tools
- Bonus Tip: Editing SRT Subtitles with Fancy Effects to Make Your Video More Impressive
Can You Convert TXT to SRT?
Yes, you can convert .txt to .srt document. Let’s understand a little bit of context first. You can even hardcode your subtitles to your video, and automatically generate subtitle files and transcriptions from any audio and video file format. There are many online and offline tools come to help. And we’ll introduce some in detail in the following part.
Why Do You Need to Convert TXT to SRT?
A word file in TXT format or having a script of the video doesn’t indicate the start and stop time of the subtitle content. An SRT file, on the other hand, has the information about captioning and the start and stop times of the subtitles.
To put it simply, a TXT file is unformatted and needs to be converted into an SRT file so it has all the necessary information to be used as subtitles.
There are different ways to do that, and we’ll discuss three solutions in this article.
Solution 1: Get a TXT-to-SRT Converter Online
Out of the different ways to convert TXT to SRT, using an online converter is the easiest one. You can access it online without having to download it on your computer.
Most online TXT to SRT converters allow drag & drop functionality and are easy to use. While plenty of such tools are available online, we’ll review a few here.
Ebby

Ebby is essentially a transcription tool that converts audio to text. You can use it to create an automatic transcription and to convert one TXT to SRT format. It uses voice recognition technology to create text with timestamps, making them subtitles for your videos. It supports over 100 languages and dialects. You can export transcripts in different formats.
Pros
- Equipped with speech recognition technology
- Features playback controls
- Offers 24/7 support
- Offers a free trial
Cons
- Only available online
- Not suitable for manual transcription
Features
- You can upload both audio and video files.
- It can create automatic transcriptions.
- Supports multiple languages to produce subtitles in all popular languages.
- It’s equipped with speech recognition technology.
- Apart from subtitles, it produces closed captions as well to help deaf people.
- You can edit the text within the tool.
Best for
Podcasters, lawyers, journalists, authors, and marketing experts.
Rev

Another transcription tool, Rev is widely used by more than 170,000 users. It can cater to the growing needs of its users. Its pricing model is a bit different from other names in the industry.
Pros
- Supports both automated and manual transcription
- Up to 99% accuracy in manual transcription
- Closed captions
Cons
- Per video-based pricing model
Features
- It works on AI and Machine Learning models to produce accurate subtitles.
- It allows you to annotate subtitles for better understanding.
- File sharing is allowed on Rev.
- You can search particular text using its Full-Text Search functionality.
- It supports 16 different languages.
- It is capable of Natural Language Processing.
Best for
Rev’s users belong to a variety of industries including journalism, video production, medical, podcasters, and writers.
ToolSlick

It’s an online platform dedicated to a variety of functions, and converting files from one format to another is one of them. It has tools for handling and processing finance, math, editing, and other tasks.
Pros
- Easy to use
- Supports major languages
- Manually select start and end times
Cons
- Ads on the website can be inconvenient
Features
- It has a dedicated section for financial calculations.
- You can perform mathematics calculations using its Math section.
- It allows you to generate code in different programming languages.
- It has video editing tools.
Best for
ToolSlick is an easy to use online tool to convert TXT to SRT for beginners.
How to Convert Txt to SRT Using an Online Converter
Here, we take ToolSlick as an example to show you how to use an online tool to convert text to an SRT file. Let’s get into it now.
1. Open ToolSlick online converter on your browser. In the below image, you can see how its interface looks. All you need to do is to input or paste the TXT content in the Input box. Make sure to write each line separately.

2. After writing the content, go to the Settings section and specify the subtitle’s Start Time and End Time. You can also change the target language.

3. Now, you can hit the CONVERT button to convert TXT to SRT. The output file will be automatically downloaded to your computer. Also, the SRT file content appears in the Output box.

Solution 2: Convert TXT to SRT Using Converting Software
Having an online TXT to SRT converter means you can access it online without downloading it on your computer. But, you’ll always have to rely on an internet connection to access one. Instead, you can download and install software on your laptop or computer and have the freedom to convert TXT to SRT on the go.
There’s a variety of converting software available in the market. Let’s review some of them.
UniConverter

Formerly known as Wondershare Video Converter Ultimate, Wondershare Uniconverter is an best subtitle editor for Mac and Windows, and it enables everyone to create subtitles, add, convert subtitles for videos and movies permanently.
Besides, it is also a powerful video file converter, video compressor, video editor, DVD burner, and more.
Pros
- Support converting subtitles in more than 18 formats, export in AAS/SSA/SRT, etc
- 30x faster converting speed without losing information
- Free trial available
Cons
- Not fast while rendering big files
Features
- It’s an all-in-one tool for video, audio and subtitle compression, conversion, download, and more.
- You can preview to check the quality of the output.
- It offers 90x faster-converting speed.
- It can auto-generate subtitles and add them to the video.
- It can solve the problem of video jitter.
- You can convert normal videos to VR videos and enjoy them on your VR headset.
Best for
For download, burn, compress, and conversion.
Batch Subtitles Converter

It’s a dedicated subtitles converting program. You can create subtitles in a variety of formats for videos in multiple formats. It’s very easy to use with a simple interface.
Pros
- Supports batch processing
- Free to use
- Framerate and encoding can be set as required
Cons
- It might seem like an outdated tool
Features
- It supports more than 20 output formats.
- You can set custom font sizes for the subtitles.
- You can convert 3 files simultaneously.
- It allows you to change the encoding and frame rate.
Best for
For anyone who’s looking for a free and easy tool
Jubler

It’s a basic tool that can be used to edit text-based subtitles. You can use it to author new subtitles or convert text files to subtitles. In addition, you can transform, correct, and refine existing subtitles.
Pros
- Free to use
- A powerful tool to create and edit subtitles
Cons
- Outdated interface, not easy-to-use
Features
- It supports most of the popular formats.
- You can preview subtitles to see whether or not they serve the purpose.
- It has spell-checking capabilities to indicate mistakes in your subtitles.
- It has a translation mode to change the language.
Best for
Anyone who’s looking for a powerful and free subtitle creator.
After getting an overview of all of these txt-to-srt converting software, we are here to tell take Wondershare UniConverter as an example to show you concrete how-to steps.
Here’s how you can do it:
1. Download and install UniConverter on your computer and launch it.
2. Access the Subtitle Editor and upload the file you want to add subtitles to.

3. Here, you can either import a subtitle file, manually add subtitles, or opt for Text to Subtitles.

4. You can set the font style, color, size, and timeline as you want.

5. Now, hit the Export button and select SRT Files to download the subtitles file. You can also export it as an MP4 video file.

Since you selected to save the file as SRT Files, the text you wrote in the manual subtitles section will convert to an SRT file.
Solution 3: How to Edit TXT File and Save It into .SRT Without Any Tools
While there are different online and downloadable TXT to SRT converting tools available out there, you might not have access to them all the time. That’s when knowing “how to edit TXT file and save it as SRT file” would come in handy.
Here’s how you can edit the TXT file without using any external software and online tools:
- If you’re using a Windows computer, then you can open your TXT document in Microsoft Notepad. For a Mac computer, you can use TextEdit. On the very first line of the document, type a number to identify the subtitle’s section. Each section indicates an individual subtitle, which could be a sound or one sentence from a dialogue.
- The next line would be the timestamp of the subtitle. Timestamp follows this formatting: hours: minutes: seconds, milliseconds.
- In the next line, write your caption.
- Now add double space between the next section and write it as you did for the previous section.
Now that you’ve formatted the TXT file to use it as a subtitle file, let’s save it .SRT format. Here’s how to save your file as .SRT:
1. Go to the File tab and select Save as.

2. Now, save the document with a .**SRT** extension.

![]()
Note: the advantage of converting TXT file to SRT manually is that it does not require tools and is free, but it does have disadvantages. The bad site is that it is troublesome, time-consuming, and easy to get format mistakes. That is why we recommend professional converting tools most for TXT to SRT conversion.
Now, you can use this file as the subtitle file while watching the video on any video playback software such as the VLC media player.
Bonus Tip: Editing SRT Subtitles with Fancy Effects to Make Your Video More Impressive
When you add subtitles to your video, they typically appear in plain font. If you only need subtitles for their functionality, then a plain font would do the job. However, if you want to make your videos more appealing and engaging, then it calls for adding fancy effects to your subtitles.
No TXT-to-SRT converting tool will make your subtitles fancy by adding effects to them, so you need a professional video editing tool like Filmora .
Wondershare Filmora is a high-quality and professional video editing software with a lot of features. From cut, merge, crop, trim, to transition, effects, and more – a lot can be done using Filmora.
How to Edit SRT Subtitles with Filmora
Following are the steps to add effects to your SRT subtitles and make them look appealing:
Free Download For Win 7 or later(64-bit)
Free Download For macOS 10.14 or later
Step1 Download and install Filmora
Firstly, you need to go to Wondershare Filmora’s official website and download it on your computer. Then, launch the setup and install it on your computer.

Step2 Open Filmora and import the video
After installation, open Filmora and import the video to which you want to add subtitles.

Step3 Add SRT subtitles file
Once your video is open in the editor, use the import option and select your SRT subtitle file, and choose “Advanced Edit” to change styling of the SRT subtitles.

Customize the subtitle styles and then edit it in the subtitle editing window.

After you’re done editing, click the Export button to save the video.
Hot FAQs on Converting TXT to SRT
1. How to Open and Edit a Text File on a Mac
You can open and edit a text file on a Mac computer using its built-in TextEdit software.
2. What is the difference between SRT and TXT?
TXT is a file format for a text file or Word document. A TXT file might have caption content for a video, but it can’t be used as a subtitle file since it’s unformatted. An SRT file, on the other hand, has the information about captioning and the start and stop times of the subtitles. It’s in a proper format to be used as a subtitle file.
3. Is TXT a subtitle file?
TXT, itself isn’t a subtitle file. It might have the content for subtitles but can’t be used as a subtitle file.
Final Words
This article has shown you some best tools and a concrete step-by-step guide on how you can convert TXT to SRT and use it as your subtitle file. We hope you find it resourceful and are now aware of the different methods to TXT to SRT conversion.
Detailed Steps to Rotate Videos in Blender
Blender is a 3D animation software that can be used to create stunning 3D models and videos. It is free and open source, which means that it is available to anyone who wants to use it. Blender is also very versatile, and can be used to create anything from simple 3D models to full-blown 3D movies.
One of the biggest benefits of Blender is that it is easy to learn. The interface is intuitive and user-friendly, and there are plenty of tutorials available online that can help you get started. Blender also has a very active community, so if you ever get stuck, there is likely someone out there who can help you. It is a complex software, but there are many online tutorials like this article that can help you get started.
To download Blender, go to https://www.blender.org/download/ . Click on the link that says “Download Blender” and then select the version that you want to download. After you have downloaded Blender, install it on your computer.
Step-by-Step on how to rotate videos in Blender
The first way to rotate a video in Blender is by using the Strip option.
Step 1: To do this, open the video that you want to rotate in Blender.

Step 2: Then, click on the “Strip” menu and select “Transform.”

Step 3: In the Transform Properties window, you will see a list of different tools for the video. Scroll down until you see the “Rotation” property. This is where you can manually rotate the video.

Step 4: Click on Enter to save the rotation of the video.
The second way to rotate a video in Blender is by using the Transform Properties window. To do this…
Step 1: Open the video that you want to rotate in Blender.

Step 2: Next, go to ‘Transform’ in the Active Tool portion of the screen.
Figure 5
Step 3: Go to the ‘Transform’ option in the properties window and adjust based on the rotational angle that you want.

Step 4: Click on ‘Enter’ to apply it to the video.
In this tutorial, we have shown you two different ways to rotate a video in Blender. The first way is by using the Transform Properties window, and the second way is by using the 3D Viewport.
Which method you use is up to you. However, we recommend using the 3D Viewport method, as it is more accurate.
Rotating a video in Blender can be used for other purposes than just rotating it.
Here are some other things that you can do with a rotated video:
- Scale the video up or down
- Flip the video horizontally or vertically
- Change the position of the video in the 3D Viewport
How to rotate videos in Filmora
Meanwhile, you can also use Filmora Video Editor to rotate a video without any watermark. Filmora is a video editing software that lets you rotate videos easily. It is simple to use, and has many powerful features that let you edit your videos like a pro. It also has a built-in video converter that lets you convert your videos to different formats, so they can be played on any device. You can also export your videos in 4K resolution, so they look great no matter what device you are watching them on.
For Win 7 or later (64-bit)
For macOS 10.14 or later
There are two main ways to rotate video in Filmora: through the use of keyframes or by using the Transform Tool.
Step-by-step on how to rotate videos in Filmora
To rotate a video clip using keyframes…
Step 1: Import the video clip you want to rotate to your project.

Step 2: In the timeline, place the playhead at the beginning of the clip.

Step 3: With the playhead still at the beginning of the clip, drag the rotation handle in the preview window to rotate the video.

Step 4: Move the playhead to the end of the clip and drag the rotation handle again to rotate it further.

To rotate a video clip using the Transform Tool…
Select the “Edit” tool from the toolbar.

Go to the “Transform” selection, then select the rotate option.

Adjust the rotation angle using the tool.

Both methods are fairly straightforward and easy to use. Experiment with each to see which works best for your project.
Step 2: Then, click on the “Strip” menu and select “Transform.”

Step 3: In the Transform Properties window, you will see a list of different tools for the video. Scroll down until you see the “Rotation” property. This is where you can manually rotate the video.

Step 4: Click on Enter to save the rotation of the video.
The second way to rotate a video in Blender is by using the Transform Properties window. To do this…
Step 1: Open the video that you want to rotate in Blender.

Step 2: Next, go to ‘Transform’ in the Active Tool portion of the screen.
Figure 5
Step 3: Go to the ‘Transform’ option in the properties window and adjust based on the rotational angle that you want.

Step 4: Click on ‘Enter’ to apply it to the video.
In this tutorial, we have shown you two different ways to rotate a video in Blender. The first way is by using the Transform Properties window, and the second way is by using the 3D Viewport.
Which method you use is up to you. However, we recommend using the 3D Viewport method, as it is more accurate.
Rotating a video in Blender can be used for other purposes than just rotating it.
Here are some other things that you can do with a rotated video:
- Scale the video up or down
- Flip the video horizontally or vertically
- Change the position of the video in the 3D Viewport
How to rotate videos in Filmora
Meanwhile, you can also use Filmora Video Editor to rotate a video without any watermark. Filmora is a video editing software that lets you rotate videos easily. It is simple to use, and has many powerful features that let you edit your videos like a pro. It also has a built-in video converter that lets you convert your videos to different formats, so they can be played on any device. You can also export your videos in 4K resolution, so they look great no matter what device you are watching them on.
For Win 7 or later (64-bit)
For macOS 10.14 or later
There are two main ways to rotate video in Filmora: through the use of keyframes or by using the Transform Tool.
Step-by-step on how to rotate videos in Filmora
To rotate a video clip using keyframes…
Step 1: Import the video clip you want to rotate to your project.

Step 2: In the timeline, place the playhead at the beginning of the clip.

Step 3: With the playhead still at the beginning of the clip, drag the rotation handle in the preview window to rotate the video.

Step 4: Move the playhead to the end of the clip and drag the rotation handle again to rotate it further.

To rotate a video clip using the Transform Tool…
Select the “Edit” tool from the toolbar.

Go to the “Transform” selection, then select the rotate option.

Adjust the rotation angle using the tool.

Both methods are fairly straightforward and easy to use. Experiment with each to see which works best for your project.
Step 2: Then, click on the “Strip” menu and select “Transform.”

Step 3: In the Transform Properties window, you will see a list of different tools for the video. Scroll down until you see the “Rotation” property. This is where you can manually rotate the video.

Step 4: Click on Enter to save the rotation of the video.
The second way to rotate a video in Blender is by using the Transform Properties window. To do this…
Step 1: Open the video that you want to rotate in Blender.

Step 2: Next, go to ‘Transform’ in the Active Tool portion of the screen.
Figure 5
Step 3: Go to the ‘Transform’ option in the properties window and adjust based on the rotational angle that you want.

Step 4: Click on ‘Enter’ to apply it to the video.
In this tutorial, we have shown you two different ways to rotate a video in Blender. The first way is by using the Transform Properties window, and the second way is by using the 3D Viewport.
Which method you use is up to you. However, we recommend using the 3D Viewport method, as it is more accurate.
Rotating a video in Blender can be used for other purposes than just rotating it.
Here are some other things that you can do with a rotated video:
- Scale the video up or down
- Flip the video horizontally or vertically
- Change the position of the video in the 3D Viewport
How to rotate videos in Filmora
Meanwhile, you can also use Filmora Video Editor to rotate a video without any watermark. Filmora is a video editing software that lets you rotate videos easily. It is simple to use, and has many powerful features that let you edit your videos like a pro. It also has a built-in video converter that lets you convert your videos to different formats, so they can be played on any device. You can also export your videos in 4K resolution, so they look great no matter what device you are watching them on.
For Win 7 or later (64-bit)
For macOS 10.14 or later
There are two main ways to rotate video in Filmora: through the use of keyframes or by using the Transform Tool.
Step-by-step on how to rotate videos in Filmora
To rotate a video clip using keyframes…
Step 1: Import the video clip you want to rotate to your project.

Step 2: In the timeline, place the playhead at the beginning of the clip.

Step 3: With the playhead still at the beginning of the clip, drag the rotation handle in the preview window to rotate the video.

Step 4: Move the playhead to the end of the clip and drag the rotation handle again to rotate it further.

To rotate a video clip using the Transform Tool…
Select the “Edit” tool from the toolbar.

Go to the “Transform” selection, then select the rotate option.

Adjust the rotation angle using the tool.

Both methods are fairly straightforward and easy to use. Experiment with each to see which works best for your project.
Step 2: Then, click on the “Strip” menu and select “Transform.”

Step 3: In the Transform Properties window, you will see a list of different tools for the video. Scroll down until you see the “Rotation” property. This is where you can manually rotate the video.

Step 4: Click on Enter to save the rotation of the video.
The second way to rotate a video in Blender is by using the Transform Properties window. To do this…
Step 1: Open the video that you want to rotate in Blender.

Step 2: Next, go to ‘Transform’ in the Active Tool portion of the screen.
Figure 5
Step 3: Go to the ‘Transform’ option in the properties window and adjust based on the rotational angle that you want.

Step 4: Click on ‘Enter’ to apply it to the video.
In this tutorial, we have shown you two different ways to rotate a video in Blender. The first way is by using the Transform Properties window, and the second way is by using the 3D Viewport.
Which method you use is up to you. However, we recommend using the 3D Viewport method, as it is more accurate.
Rotating a video in Blender can be used for other purposes than just rotating it.
Here are some other things that you can do with a rotated video:
- Scale the video up or down
- Flip the video horizontally or vertically
- Change the position of the video in the 3D Viewport
How to rotate videos in Filmora
Meanwhile, you can also use Filmora Video Editor to rotate a video without any watermark. Filmora is a video editing software that lets you rotate videos easily. It is simple to use, and has many powerful features that let you edit your videos like a pro. It also has a built-in video converter that lets you convert your videos to different formats, so they can be played on any device. You can also export your videos in 4K resolution, so they look great no matter what device you are watching them on.
For Win 7 or later (64-bit)
For macOS 10.14 or later
There are two main ways to rotate video in Filmora: through the use of keyframes or by using the Transform Tool.
Step-by-step on how to rotate videos in Filmora
To rotate a video clip using keyframes…
Step 1: Import the video clip you want to rotate to your project.

Step 2: In the timeline, place the playhead at the beginning of the clip.

Step 3: With the playhead still at the beginning of the clip, drag the rotation handle in the preview window to rotate the video.

Step 4: Move the playhead to the end of the clip and drag the rotation handle again to rotate it further.

To rotate a video clip using the Transform Tool…
Select the “Edit” tool from the toolbar.

Go to the “Transform” selection, then select the rotate option.

Adjust the rotation angle using the tool.

Both methods are fairly straightforward and easy to use. Experiment with each to see which works best for your project.
8 Excellent Video and Photo Mergers on Desktop/Mobile/Online
When it comes to creating and sharing visual content, it’s important to have a variety of tools at your disposal. Whether you’re a professional photographer or a hobbyist, merging photos and videos can add a whole new dimension to your work. You can create stunning visuals with the right tools that captivate your audience.
This article will look at some of the best video and photo merging tools available for desktop, mobile, and online use. From free and easy-to-use options to more advanced and feature-rich applications, there’s something for everyone on this list. Whether you’re looking to create a short film, a time-lapse video, or a panorama, these tools will help you take your visual storytelling to the next level.
- Combine Videos and Pictures Using Wondershare Filmora
- Merge Videos and Photos With Windows Movie Maker
- How To Add Photos and Videos Together With iMovie
- Combine Video and Picture With Filmora for Mobile
- BeeCut Video and Picture Combiner
- VN Photo and Video Merger
3 Video and Photo Mergers for Windows/Mac
There are several options available for those looking for a robust video and photo merging tool for their Windows or Mac computer. In this section, we’ll highlight three popular choices that offer a wide range of features and capabilities. Whether you’re a professional photographer or videographer or just looking for a fun and easy way to merge your media, these tools will meet your needs.
1. Combine Videos and Pictures Using Wondershare Filmora
Free Download For Win 7 or later(64-bit)
Free Download For macOS 10.14 or later

Ratings from G2: 4.4 out of 5
Operating Systems: Windows / Mac
Pricing:
- $49.99 - Annual Plan
- $79.99 - Perpetual Plan
Pros
- Easy to use
- Number of transitions and video results
- Beautiful effects
- Can enhance the quality of video
- Can export/import files easily
- Perfect for beginners
Cons
- Watermarking
- Proxy set up
- Compatibility of video importing
- A bit pricey
Wondershare Filmora is a popular video editing software for Windows and Mac. It offers a wide range of features, including merging videos and pictures. With Filmora, you can easily import your photos and videos and then drag and drop them into the timeline to create a cohesive video.
Filmora offers a range of customization options, such as adjusting video speed, adding transitions, and overlaying text and graphics. Additionally, it provides a user-friendly interface which makes it easy for anyone to use and navigate.
To merge video and picture using Wondershare Filmora Video Editor, follow these steps:
Step1 Open the software and select “New Project,” then go to “File“ > “Import Media“ > “Import Media Files“ to add the video and picture files you want to merge.

Step2 Drag the video clip to the timeline, then place the photo on a track above it.

Step3 Press the “Play“ button to preview your video.
Step4 Edit the photo to your liking.
Step5 Once you are satisfied with the result, save your merged video.
Check this video below to learn more in how to add an image to a photo with Filmora.
2. Merge Videos and Photos With Windows Movie Maker

Ratings from G2: 4.0 out of 5
Operating Systems: Windows
Pricing:
- Free
Pros
- Freeware
- Transitions
- Effects auto preview
- Audio features include voiceovers
- Sharing capabilities
Cons
- No way to change saturation or contrast
- No adjustments to visual effects
- Installation challenges
Windows Movie Maker is a free video editing software for Windows users. It offers basic video editing capabilities, including merging videos and pictures.
To merge a video and a picture, you can import the media files into the software, then drag and drop them into the timeline. You can place the photo on top of the video, adjust the duration of the photo and video, and add transitions between them. It also allows you to edit the video and picture by adding text, effects, and music. It provides a simple and intuitive interface which makes it easy for anyone to use.
Follow these steps to merge videos and pictures using Windows Movie Maker:
Step1 Download and install the software on your computer.
Step2 Ensure to tick the “Photo Gallery and Movie Maker“ checkbox during installation.

Step3 Once installed, import the video and picture files you want to merge into the software.

Step4 Organize the videos and pictures in the order you want them to appear in the merged video.

Step5 Once you have arranged the videos and pictures, go to “File“ > “Save movie“ > “Recommended for this project“ to save the merged video.

3. How To Add Photos and Videos Together With iMovie

Ratings from G2: 4.3 out of 5
Operating Systems: Mac
Pricing:
- Free
Pros
- User-friendly interface
- Easy sharing
- Easy to learn
Cons
- Requires a high level of HDD space
- Importing MP4 files for editing is complex
iMovie is a free video editing software for Mac users. It offers various features for creating and editing videos, including merging videos and pictures. It also offers a range of customization options, such as adjusting video speed, adding transitions, and overlaying text and graphics.
One of the most notable features of iMovie is its ability to work seamlessly with other Apple devices such as iPhone, iPad, and Apple TV, which makes it a versatile tool for media editing.
To merge videos and pictures using iMovie, follow these steps:
Step1 Launch the software and press the “Create New“ button.

Step2 From the dropdown menu, choose “Movie.”

Step3 Utilize the “Import Media“ button to bring in the videos and photos you want to merge.

Step4 Use drag-and-drop to organize the videos and photos in the order you want them to appear in the merged video.

Step5 Once you have arranged the videos and photos, edit them as per your preference and save the final merged video to your device.

3 Apps to Merge Video and Photos on iPhone/Android
There are several apps available for those looking for a convenient way to merge videos and photos on their iPhone or Android device. In this section, we’ll highlight three popular mobile apps that offer a wide range of features and capabilities for merging videos and photos. Whether you’re looking for an app that’s easy to use, or one that offers more advanced options, these apps are sure to meet your needs.
4. Combine Video and Picture With Filmora for Mobile

Ratings from App Store: 4.7 out of 5
Ratings from Google Play Store: 4.7 out of 5
Operating Systems: Android / iOS
Pricing:
- Free with In-app purchases
Pros
- Excellent editing interface
- Good range of tools
- The storage options are a bonus
- Multi-platform (Android and iOS)
Cons
- Limited additional features
- Cannot edit effects
- The store is a little bare
Filmora for Mobile is a mobile video editing app that allows you to merge videos and photos on your iPhone or Android device. With this app, you can easily import your photos and videos and then drag and drop them into the timeline to create a cohesive video.
Filmora for Mobile has various customization options, such as adjusting video speed, adding transitions, and overlaying text and graphics. The app also has a user-friendly interface that is easy to navigate, making it simple for anyone without a video editing experience. Once you’ve finished editing, you can quickly share your merged video to various social media platforms with just one click.
To merge videos and pictures using Filmora for Mobile:
Step1 Download and open the app, then tap “New Project“ to access your videos.

Step2 Choose the videos and pictures you want to merge and import them to the timeline.

Step3 Use the “plus“ sign on the right-hand side of the timeline to add more videos to the merge.

Step4 Use the editing tools below the timeline to edit your clip

Step5 Once you are satisfied with your creation, export it and share it to your desired platform.

5. BeeCut Video and Picture Combiner

Ratings from App Store: 3.0 out of 5
Ratings from Google Play Store: 2.4 out of 5
Operating Systems: Android / iOS
Pricing:
- Free with In-app purchases
Pros
- Super simple to use
- It supports multiple video and image formats
- An extensive list of editing tools
Cons
- It doesn’t support 4K rendering
- It’s buggy sometimes
BeeCut is an excellent free app for merging videos and pictures. The app is user-friendly, with a straightforward interface, making it suitable for beginner video editors.
With BeeCut, you can edit and merge various video and image formats such as MOV, MP4, JPG, PNG, and more. In addition, the app offers useful editing tools such as cropping, cutting, and adding transitions. Once you’ve finished editing, you can export your video in 1080p, 720p, or 480p resolution before saving it to your desired social media platform.
To merge videos and pictures using BeeCut:
Step1 Install the app on your mobile and tap the “+” sign icon to import your videos and photos.

Step2 Select all the photos and press “Next step“ on the top right corner, then choose the aspect ratio for your video.

Step3 Edit your clip using the available tools. Once you are done, press the “Export“ button in the top right corner.

6. VN Photo and Video Merger

Ratings from App Store: 4.7 out of 5
Ratings from Google Play Store: 4.7 out of 5
Operating Systems: Android / iOS
Pricing:
- Free with In-app purchases
Pros
- Shifting curves
- 9 different transition modes built-in
- 50+ movie-sensitive filters available
Cons
- Bugs like lagging clips & losing soundtrack
VN is a free and user-friendly video editing app that does not leave any watermark on your edited videos. The app’s interface is intuitive, making it easy for anyone to edit videos, even without prior knowledge. It provides all the necessary features for creating professional and high-quality videos, catering to professional and amateur video editors alike.
To merge videos and pictures using VN Video Editor:
Step1 Launch the app and tap on the “+” icon at the bottom.

Step2 Pick the videos and photos from your phone’s gallery and tap “Next.”

Step3 Use the editing tools to add elements to your clip, then save it to your device.

2 Online Photo and Video Mergers
If you’re looking for a flexible and convenient solution to merge your videos and photos online, you’re in luck! In this section, we’ll showcase two popular online tools perfect for beginners and advanced users. These tools are browser-based, meaning you can access them from anywhere and on any device with an internet connection. So, get ready to elevate your media game and create stunning visuals with ease!
7. Merge Pictures and Videos on Medio.io

Ratings from G2: 4.5 out of 5
Pricing:
- Free - $0
- Basic - $47.40 / monthly
- Pro - $79.99 / annually
Pros
- Fast compression speeds
- No file limits
- No watermarks
- Smart output settings
Cons
- Lacks some functionality
Media.io is an online tool that allows you to merge videos and photos, convert audio and video formats, and more. It’s user-friendly, easy to use, and works on all major browsers. Additionally, it provides a wide range of output options, allowing you to export your merged video in the format of your choice. Media.io is a perfect solution for those looking for an online tool that’s easy to use and offers a wide range of features.
To merge videos and pictures using Media.io:
Step1 Go to the Media.io video editor interface, and click the “Upload“ button to import all the videos and photos to the media library.
Step2 Move the photo above the video in the timeline by using drag-and-drop.
Step3 Press the “Export“ button to download the merged video with photos to your device.
8. Use Movie Maker Online To Combine Photos and Videos

Ratings from G2: 3.0 out of 5
Pricing:
- Free
Pros
- Completely free
- Free photos, music, and sound effects
- Built-in help
- Video and slideshow functions
Cons
- Confusing and clunky interface
- Learning curve
- Ads
Movie Maker Online is an online tool that allows you to easily merge videos and photos. With this tool, you can import your media files and drag and drop them into the timeline to create a single, cohesive video. It also offers a range of customization options, such as adjusting video speed, adding transitions, and overlaying text and graphics.
To merge videos and pictures using Movie Maker Online:
Step1 Drag and drop the files you want to merge onto the webpage.

Step2 Arrange the files in the desired order by dragging and dropping them.

Step3 Enable the “Hold position“ feature and place the files at the desired location.

Step4 Once you are satisfied with the merged video, download it.

Conclusion
There are various options for merging videos and photos on desktop, mobile, and online platforms. Whether you’re looking for professional video editings software like Filmora, or a simple mobile app for quick edits, there’s something for everyone. No matter your needs, there’s a tool that can help you create stunning and cohesive videos with your photos and videos.
- Combine Video and Picture With Filmora for Mobile
- BeeCut Video and Picture Combiner
- VN Photo and Video Merger
- 2 Online Photo and Video Mergers
3 Video and Photo Mergers for Windows/Mac
There are several options available for those looking for a robust video and photo merging tool for their Windows or Mac computer. In this section, we’ll highlight three popular choices that offer a wide range of features and capabilities. Whether you’re a professional photographer or videographer or just looking for a fun and easy way to merge your media, these tools will meet your needs.
1. Combine Videos and Pictures Using Wondershare Filmora
Free Download For Win 7 or later(64-bit)
Free Download For macOS 10.14 or later

Ratings from G2: 4.4 out of 5
Operating Systems: Windows / Mac
Pricing:
- $49.99 - Annual Plan
- $79.99 - Perpetual Plan
Pros
- Easy to use
- Number of transitions and video results
- Beautiful effects
- Can enhance the quality of video
- Can export/import files easily
- Perfect for beginners
Cons
- Watermarking
- Proxy set up
- Compatibility of video importing
- A bit pricey
Wondershare Filmora is a popular video editing software for Windows and Mac. It offers a wide range of features, including merging videos and pictures. With Filmora, you can easily import your photos and videos and then drag and drop them into the timeline to create a cohesive video.
Filmora offers a range of customization options, such as adjusting video speed, adding transitions, and overlaying text and graphics. Additionally, it provides a user-friendly interface which makes it easy for anyone to use and navigate.
To merge video and picture using Wondershare Filmora Video Editor, follow these steps:
Step1 Open the software and select “New Project,” then go to “File“ > “Import Media“ > “Import Media Files“ to add the video and picture files you want to merge.

Step2 Drag the video clip to the timeline, then place the photo on a track above it.

Step3 Press the “Play“ button to preview your video.
Step4 Edit the photo to your liking.
Step5 Once you are satisfied with the result, save your merged video.
Check this video below to learn more in how to add an image to a photo with Filmora.
2. Merge Videos and Photos With Windows Movie Maker

Ratings from G2: 4.0 out of 5
Operating Systems: Windows
Pricing:
- Free
Pros
- Freeware
- Transitions
- Effects auto preview
- Audio features include voiceovers
- Sharing capabilities
Cons
- No way to change saturation or contrast
- No adjustments to visual effects
- Installation challenges
Windows Movie Maker is a free video editing software for Windows users. It offers basic video editing capabilities, including merging videos and pictures.
To merge a video and a picture, you can import the media files into the software, then drag and drop them into the timeline. You can place the photo on top of the video, adjust the duration of the photo and video, and add transitions between them. It also allows you to edit the video and picture by adding text, effects, and music. It provides a simple and intuitive interface which makes it easy for anyone to use.
Follow these steps to merge videos and pictures using Windows Movie Maker:
Step1 Download and install the software on your computer.
Step2 Ensure to tick the “Photo Gallery and Movie Maker“ checkbox during installation.

Step3 Once installed, import the video and picture files you want to merge into the software.

Step4 Organize the videos and pictures in the order you want them to appear in the merged video.

Step5 Once you have arranged the videos and pictures, go to “File“ > “Save movie“ > “Recommended for this project“ to save the merged video.

3. How To Add Photos and Videos Together With iMovie

Ratings from G2: 4.3 out of 5
Operating Systems: Mac
Pricing:
- Free
Pros
- User-friendly interface
- Easy sharing
- Easy to learn
Cons
- Requires a high level of HDD space
- Importing MP4 files for editing is complex
iMovie is a free video editing software for Mac users. It offers various features for creating and editing videos, including merging videos and pictures. It also offers a range of customization options, such as adjusting video speed, adding transitions, and overlaying text and graphics.
One of the most notable features of iMovie is its ability to work seamlessly with other Apple devices such as iPhone, iPad, and Apple TV, which makes it a versatile tool for media editing.
To merge videos and pictures using iMovie, follow these steps:
Step1 Launch the software and press the “Create New“ button.

Step2 From the dropdown menu, choose “Movie.”

Step3 Utilize the “Import Media“ button to bring in the videos and photos you want to merge.

Step4 Use drag-and-drop to organize the videos and photos in the order you want them to appear in the merged video.

Step5 Once you have arranged the videos and photos, edit them as per your preference and save the final merged video to your device.

3 Apps to Merge Video and Photos on iPhone/Android
There are several apps available for those looking for a convenient way to merge videos and photos on their iPhone or Android device. In this section, we’ll highlight three popular mobile apps that offer a wide range of features and capabilities for merging videos and photos. Whether you’re looking for an app that’s easy to use, or one that offers more advanced options, these apps are sure to meet your needs.
4. Combine Video and Picture With Filmora for Mobile

Ratings from App Store: 4.7 out of 5
Ratings from Google Play Store: 4.7 out of 5
Operating Systems: Android / iOS
Pricing:
- Free with In-app purchases
Pros
- Excellent editing interface
- Good range of tools
- The storage options are a bonus
- Multi-platform (Android and iOS)
Cons
- Limited additional features
- Cannot edit effects
- The store is a little bare
Filmora for Mobile is a mobile video editing app that allows you to merge videos and photos on your iPhone or Android device. With this app, you can easily import your photos and videos and then drag and drop them into the timeline to create a cohesive video.
Filmora for Mobile has various customization options, such as adjusting video speed, adding transitions, and overlaying text and graphics. The app also has a user-friendly interface that is easy to navigate, making it simple for anyone without a video editing experience. Once you’ve finished editing, you can quickly share your merged video to various social media platforms with just one click.
To merge videos and pictures using Filmora for Mobile:
Step1 Download and open the app, then tap “New Project“ to access your videos.

Step2 Choose the videos and pictures you want to merge and import them to the timeline.

Step3 Use the “plus“ sign on the right-hand side of the timeline to add more videos to the merge.

Step4 Use the editing tools below the timeline to edit your clip

Step5 Once you are satisfied with your creation, export it and share it to your desired platform.

5. BeeCut Video and Picture Combiner

Ratings from App Store: 3.0 out of 5
Ratings from Google Play Store: 2.4 out of 5
Operating Systems: Android / iOS
Pricing:
- Free with In-app purchases
Pros
- Super simple to use
- It supports multiple video and image formats
- An extensive list of editing tools
Cons
- It doesn’t support 4K rendering
- It’s buggy sometimes
BeeCut is an excellent free app for merging videos and pictures. The app is user-friendly, with a straightforward interface, making it suitable for beginner video editors.
With BeeCut, you can edit and merge various video and image formats such as MOV, MP4, JPG, PNG, and more. In addition, the app offers useful editing tools such as cropping, cutting, and adding transitions. Once you’ve finished editing, you can export your video in 1080p, 720p, or 480p resolution before saving it to your desired social media platform.
To merge videos and pictures using BeeCut:
Step1 Install the app on your mobile and tap the “+” sign icon to import your videos and photos.

Step2 Select all the photos and press “Next step“ on the top right corner, then choose the aspect ratio for your video.

Step3 Edit your clip using the available tools. Once you are done, press the “Export“ button in the top right corner.

6. VN Photo and Video Merger

Ratings from App Store: 4.7 out of 5
Ratings from Google Play Store: 4.7 out of 5
Operating Systems: Android / iOS
Pricing:
- Free with In-app purchases
Pros
- Shifting curves
- 9 different transition modes built-in
- 50+ movie-sensitive filters available
Cons
- Bugs like lagging clips & losing soundtrack
VN is a free and user-friendly video editing app that does not leave any watermark on your edited videos. The app’s interface is intuitive, making it easy for anyone to edit videos, even without prior knowledge. It provides all the necessary features for creating professional and high-quality videos, catering to professional and amateur video editors alike.
To merge videos and pictures using VN Video Editor:
Step1 Launch the app and tap on the “+” icon at the bottom.

Step2 Pick the videos and photos from your phone’s gallery and tap “Next.”

Step3 Use the editing tools to add elements to your clip, then save it to your device.

2 Online Photo and Video Mergers
If you’re looking for a flexible and convenient solution to merge your videos and photos online, you’re in luck! In this section, we’ll showcase two popular online tools perfect for beginners and advanced users. These tools are browser-based, meaning you can access them from anywhere and on any device with an internet connection. So, get ready to elevate your media game and create stunning visuals with ease!
7. Merge Pictures and Videos on Medio.io

Ratings from G2: 4.5 out of 5
Pricing:
- Free - $0
- Basic - $47.40 / monthly
- Pro - $79.99 / annually
Pros
- Fast compression speeds
- No file limits
- No watermarks
- Smart output settings
Cons
- Lacks some functionality
Media.io is an online tool that allows you to merge videos and photos, convert audio and video formats, and more. It’s user-friendly, easy to use, and works on all major browsers. Additionally, it provides a wide range of output options, allowing you to export your merged video in the format of your choice. Media.io is a perfect solution for those looking for an online tool that’s easy to use and offers a wide range of features.
To merge videos and pictures using Media.io:
Step1 Go to the Media.io video editor interface, and click the “Upload“ button to import all the videos and photos to the media library.
Step2 Move the photo above the video in the timeline by using drag-and-drop.
Step3 Press the “Export“ button to download the merged video with photos to your device.
8. Use Movie Maker Online To Combine Photos and Videos

Ratings from G2: 3.0 out of 5
Pricing:
- Free
Pros
- Completely free
- Free photos, music, and sound effects
- Built-in help
- Video and slideshow functions
Cons
- Confusing and clunky interface
- Learning curve
- Ads
Movie Maker Online is an online tool that allows you to easily merge videos and photos. With this tool, you can import your media files and drag and drop them into the timeline to create a single, cohesive video. It also offers a range of customization options, such as adjusting video speed, adding transitions, and overlaying text and graphics.
To merge videos and pictures using Movie Maker Online:
Step1 Drag and drop the files you want to merge onto the webpage.

Step2 Arrange the files in the desired order by dragging and dropping them.

Step3 Enable the “Hold position“ feature and place the files at the desired location.

Step4 Once you are satisfied with the merged video, download it.

Conclusion
There are various options for merging videos and photos on desktop, mobile, and online platforms. Whether you’re looking for professional video editings software like Filmora, or a simple mobile app for quick edits, there’s something for everyone. No matter your needs, there’s a tool that can help you create stunning and cohesive videos with your photos and videos.
Also read:
- New In 2024, A Complete Guideline About QuickTime Player
- Updated 15 Amazing GIF Splitter Examples You Need to Bookmark for 2024
- 2024 Approved Replacing Sky Background Using Adobe Photoshop A Comprehensive Guide
- Premiere Pro Slow Playback Issues Finding The Best Solutions
- 2024 Approved Looking for Simple Steps to Apply Fade in Effect to Your Text in Premiere Pro? Here Are Two Different Methods Along with an Alternative Way to Fade Text in Videos
- Updated 2024 Approved Create a Kickass COD Warzone Thumbnail for Free
- Updated How to Zoom in on PowerPoint Easy Ways
- 2024 Approved In the Realm of Creating Graphic Presentation, People Also Ask About Designing Professionally Sound Slideshow Word Presentations. Heres How You Can Go About the Process
- New Full Guide to Funcall Voice Changer and Its Alternatives
- New Best 15 Subtitle Apps 2023 Windows, Mac, iPhone, Android & Online for 2024
- In 2024, How to Speed Up Pictures on TikTok Slideshow
- 2024 Approved This Article Shares Valuable Insight Into the Best Brand Story Videos. Also, It Highlights the Importance of a Video Maker in Your Brand Story Video Ad-Making Process and Why Filmora Should Be Your Go-To Choice
- In 2024, This Article Aims to Show You How to Export Videos in Filmora
- Updated Are You Looking for a Video Format Converter Free? We Will Introduce the 5 Best Online Converters and Also the 5 Best Video Format Converters for PC
- Updated How to Make a Slideshow with Icecream Slideshow Maker for 2024
- Updated Within the Realm of Graphic Editing, People Also Ask How to Add Emoji to Photo. Stay Tuned to Walk Through the Best Possible Solutions in the IT Market
- Looking Forward to Complement Your Weekend Evenings with a Fantasy Tour to the Anime World? Stay Here to Pick the Most Appealing Alternative From the Best and Timeless Anime Creations for 2024
- In 2024, Tips for Choosing Location and Scheduling Music Video
- 2024 Approved Have You Tried Using a Craig Bot on Discord to Record Audio? Do You Have an Idea of Using a Discord Craig Bot Is Safe? Get Answers to These Questions and More From This Article as You Continue Reading
- Looking for Ways to Enhance Overall Look for Your Contents Professionally? Then Coming up with These Cool PowerPoint Templates Can Help You a Lot for 2024
- 3 Ways to Track Realme 12 Pro+ 5G without Them Knowing | Dr.fone
- In 2024, How to Use Pokémon Emerald Master Ball Cheat On Samsung Galaxy XCover 6 Pro Tactical Edition | Dr.fone
- Delete Gmail Account With/Without Password On Vivo V29e
- Dose Life360 Notify Me When Someone Checks My Location On Realme 12 Pro 5G? | Dr.fone
- In 2024, How to get the dragon scale and evolution-enabled pokemon On Samsung Galaxy S24 Ultra? | Dr.fone
- How to Lock Apps on Xiaomi 14 to Protect Your Individual Information
- Detailed guide of ispoofer for pogo installation On Vivo Y100A | Dr.fone
- The 10 Best Tools to Bypass iCloud Activation Lock From iPhone XS Max You Should Try Out
- How To Bypass Xiaomi Redmi 13C FRP In 3 Different Ways
- 4 Solutions to Fix Unfortunately Your App Has Stopped Error on Vivo V27 | Dr.fone
- In 2024, Does Airplane Mode Turn off GPS Location On Apple iPhone 14 Plus? | Dr.fone
- In 2024, How To Enable USB Debugging on a Locked Vivo Y55s 5G (2023) Phone
- Quick Fixes for Why Is My Vivo G2 Black and White | Dr.fone
- In 2024, Can I Bypass a Forgotten Phone Password Of Poco C55?
- Most Asked Questions about Pokemon Go Battle League Rewards On Apple iPhone 11 | Dr.fone
- 8 Workable Fixes to the SIM not provisioned MM#2 Error on Nokia XR21 | Dr.fone
- In 2024, 10 Free Location Spoofers to Fake GPS Location on your Honor 80 Pro Straight Screen Edition | Dr.fone
- Title: New How to Be a YouTube Vlogger
- Author: Chloe
- Created at : 2024-05-20 03:38:32
- Updated at : 2024-05-21 03:38:32
- Link: https://ai-editing-video.techidaily.com/new-how-to-be-a-youtube-vlogger/
- License: This work is licensed under CC BY-NC-SA 4.0.


