:max_bytes(150000):strip_icc():format(webp)/GettyImages-165567842-58e5bd253df78c51625e84ab.jpg)
New How to Blur a Still or Moving Part of Video

How to Blur a Still or Moving Part of Video
Create High-Quality Video - Wondershare Filmora
An easy and powerful YouTube video editor
Numerous video and audio effects to choose from
Detailed tutorials provided by the official channel
Adding a blur effect to your video is vital, especially if you have added unwanted things that could ruin its quality. It often looks awkward when there’s something wrong in the background of your video. Various video editing programs allow you to blur a moving or still part of your video if you don’t want viewers to see it. With that in mind, we’ll look at how to blur part of a video using Filmora.
In this article
01 How to Blur a Part of a Video Using Filmora
02 How to Blur a Moving Part of a Video Using Filmora
03 How to Blur Part of a Video Using OpenShot
There are several ways you can blur part of a video. Filmora allows you to blur a still and moving part of a video. The software is user-friendly and comes with an aesthetically pleasing interface. You don’t have to be tech-savvy to learn how to blur out part of a video with Filmora. You can also use OpenShot to blur part of a video.
How to Blur a Part of a Video Using Filmora
Both Mac and PC owners can use this video editing software to blur part of a video. Here is how to blur a part of video using Filmora.
- Download and install Wondershare Filmora on your device. If you had already installed Filmora on your computer, double-click the program to launch it.
- Next, you need to drag and drop the video file you wish to blur into the Media Library. Alternatively, you could also navigate to the File tab and click it, then choose Import Media and select the Import Media Files option. Find the video you want to edit and select it. You can now hit the Open button to import the video file to Media Library
- After your video file is on Filmora’s Media Library, drag and drop it into the Timeline; this is where the program allows you to assemble effects and media files for your video project.

- Click on the Effects tab; this will allow you to browse through Filmora’s collection of visual effects. Select Utility on the drop-down menu located on the left side of your screen.

- The program will display a range of effects; select the Mosaic option. You can also type in Mosaic in the search bar to find the effect swiftly.
- Drag the Mosaic effect to above the video clip on your Timeline. Dragging the border of your Mosaic clip allows you to adjust its length.
- A small blurred area will appear in the preview window.

- Lock the main tracks.
- Now, click the Mosaic layer to modify the Mosaic size and area. Move it to the part of the video that you would like to blur.
- Double-clicking on the Mosaic clip will allow you to change the mosaic type and adjust the opacity and blur amount. You can choose from six different Mosaic types. Adjusting the opacity allows you to set the degree to which you can see through the blurred area. The blur amount lets you control the intensity of the blur.

- You can now save your blurred video. Click on the File tab and select ‘Save Project.’ Doing this will save your project to the default file. Choose ‘Save Project As’ to save your video to another destination of your choice.
How to Blur a Moving Part of a Video Using Filmora
You can also blur a moving part of your video with Filmora; this program allows you to add the motion-tracking mosaic to any moving object in your video that you do not want your viewers to see. You can use stickers, mosaic, or anything you download on the internet to hide any unwanted moving object.
With that in mind, here is how to blur a moving part of a video using Filmora:
- Run Filmora on your device.
- Import your video into Filmora’s Media Library.
- Drag your video to the Timeline.

- Now, double-click the video in the Timeline. Doing this will open the editing menu.
- Check the box that’s right next to Motion Tracking; this tool allows you to track movement in a video and then have objects like text, images, videos, or elements follow this movement.

- A tracker box will appear on your preview window; move it over the moving object you would like to track. You can increase or reduce the size of the tracker box. Hit the Start Tracking button to render the effect.

- Wait until the tracking process is complete. The duration of this process will depend on the length of your video. You’ll have to do some trimming if other objects block the moving part you’re tracking from time to time.

- WNow, select the Add Mosaic option.
- Choose the Mosaic type you prefer and adjust the opacity and blur amount to ensure the object is unrecognizable.
- Now, select the moving part of the video you want to blur and click OK.
- The object is now blurred, and the mosaic layer will follow its movement everywhere it goes.
- Playback your video to check the result. Filmora allows you to fine-tune the position and size of the object that’s following the track in your Preview Window without restarting tracking. Additionally, you can switch the follower anytime you want.
- When you have finished blurring the moving part on your video, click File > Save Project or Save Project As to save your video.
For Win 7 or later (64-bit)
For macOS 10.12 or later
How to Blur Part of a Video Using OpenShot
Designed for Windows, Mac, and Linux, OpenShot is a free, open-source, and cross-platform video editor. While there’s no predefined function or filter in this tool to help you blur part of a video, OpenShot has another way of blurring static parts of your video: it uses an image.
OpenShot blur part of video is free, and you’ll use its open-source programs as a base program for the edition of the video and GIMP Image Manipulation software to edit photos. Follow the guide below to learn how to blur out something in a video using OpenShot.
Step 1: Download OpenShot and install it on your device.

Step 2: Take a screenshot from your video, where the part you want to blur is easily visible. You can do this by going to a relevant frame and utilizing Save Current Frame with a camera icon, located on the right side of the video preview window in a standard program configuration.

Step 3: Be sure to save your video screenshot on your computer.
Step 4: Since you have exported a relevant frame from your video as a screenshot, you need to open it in a photo editor that can handle PNG pics and transparency, like the GIMP Image Manipulation program. Use any selection tool to select the area of the picture you want to blur on the video. Depending on your preferences, you can choose the free select tool, the ellipse select tool, or the rectangle select tool.

Step 5: In the blur filters submenu, open the Pixelize tool and adjust the options that suit your preferences. You can use CTRL-Z to cancel the operation, and repeat it until you find the best combination of blurring settings.
Step 6: When you are satisfied with blurring, right-click on the blurred area and select Invert in the Select submenu; this will allow you to select the entire part of the frame that has not been blurred, which is the part you would like to get rid of because you will only have to use the blurred part of your video overlay where necessary.
Step 7: Now, cut the section of the picture you do not want to keep. You can do this by using CTRL-X. The blurred filter for your video is now ready.

Step 8: If after cutting you notice a plain color rather than a checkerboard canvas representing transparency, use CTRL-Z to cancel the cut. Then, use CTRL-I to invert the selection again to get control of the blurred selection again, and copy or cut it using CTRL-X or CTRL-C.
Step 9: Create another image using CTRL-N, and ensure you have navigated to the advanced options and selected transparency as the fill-in color, and paste your selection there.
Step 10: You now have a perfect photo with full transparency, which is represented by a checkerboard canvas, except for the section of the video frames you would like to blur that should be pixelized.
Step 11: Use the Export option under the File menu to export the photo to your PC as a . PNG file. To save a picture with a transparency channel, you need to use the . PNG extension.
Step 12: Now return to OpenShot video editor and import the generated picture with a pixelized portion in the OpenShot video project. Next, add the picture as an overlay track. Make sure it’s above the video track.
Step 13: If the program asks you to import the photo as an image sequence, select the NO option because you need to import a still photo, and not a video sequence.
Step 14: The picture will be displayed before the video, blurring only the portion of the video where you modified the frame. The other parts of the video won’t be touched. You can make adjustments to ensure the picture track is only displayed at required moments. And that’s how to blur part of a video using OpenShot.
Conclusion
● Now that you know how to blur out part of a video, you can have fun and censor anything you want in your clips. Use Filmora to blur moving and still parts on your video.
Adding a blur effect to your video is vital, especially if you have added unwanted things that could ruin its quality. It often looks awkward when there’s something wrong in the background of your video. Various video editing programs allow you to blur a moving or still part of your video if you don’t want viewers to see it. With that in mind, we’ll look at how to blur part of a video using Filmora.
In this article
01 How to Blur a Part of a Video Using Filmora
02 How to Blur a Moving Part of a Video Using Filmora
03 How to Blur Part of a Video Using OpenShot
There are several ways you can blur part of a video. Filmora allows you to blur a still and moving part of a video. The software is user-friendly and comes with an aesthetically pleasing interface. You don’t have to be tech-savvy to learn how to blur out part of a video with Filmora. You can also use OpenShot to blur part of a video.
How to Blur a Part of a Video Using Filmora
Both Mac and PC owners can use this video editing software to blur part of a video. Here is how to blur a part of video using Filmora.
- Download and install Wondershare Filmora on your device. If you had already installed Filmora on your computer, double-click the program to launch it.
- Next, you need to drag and drop the video file you wish to blur into the Media Library. Alternatively, you could also navigate to the File tab and click it, then choose Import Media and select the Import Media Files option. Find the video you want to edit and select it. You can now hit the Open button to import the video file to Media Library
- After your video file is on Filmora’s Media Library, drag and drop it into the Timeline; this is where the program allows you to assemble effects and media files for your video project.

- Click on the Effects tab; this will allow you to browse through Filmora’s collection of visual effects. Select Utility on the drop-down menu located on the left side of your screen.

- The program will display a range of effects; select the Mosaic option. You can also type in Mosaic in the search bar to find the effect swiftly.
- Drag the Mosaic effect to above the video clip on your Timeline. Dragging the border of your Mosaic clip allows you to adjust its length.
- A small blurred area will appear in the preview window.

- Lock the main tracks.
- Now, click the Mosaic layer to modify the Mosaic size and area. Move it to the part of the video that you would like to blur.
- Double-clicking on the Mosaic clip will allow you to change the mosaic type and adjust the opacity and blur amount. You can choose from six different Mosaic types. Adjusting the opacity allows you to set the degree to which you can see through the blurred area. The blur amount lets you control the intensity of the blur.

- You can now save your blurred video. Click on the File tab and select ‘Save Project.’ Doing this will save your project to the default file. Choose ‘Save Project As’ to save your video to another destination of your choice.
How to Blur a Moving Part of a Video Using Filmora
You can also blur a moving part of your video with Filmora; this program allows you to add the motion-tracking mosaic to any moving object in your video that you do not want your viewers to see. You can use stickers, mosaic, or anything you download on the internet to hide any unwanted moving object.
With that in mind, here is how to blur a moving part of a video using Filmora:
- Run Filmora on your device.
- Import your video into Filmora’s Media Library.
- Drag your video to the Timeline.

- Now, double-click the video in the Timeline. Doing this will open the editing menu.
- Check the box that’s right next to Motion Tracking; this tool allows you to track movement in a video and then have objects like text, images, videos, or elements follow this movement.

- A tracker box will appear on your preview window; move it over the moving object you would like to track. You can increase or reduce the size of the tracker box. Hit the Start Tracking button to render the effect.

- Wait until the tracking process is complete. The duration of this process will depend on the length of your video. You’ll have to do some trimming if other objects block the moving part you’re tracking from time to time.

- WNow, select the Add Mosaic option.
- Choose the Mosaic type you prefer and adjust the opacity and blur amount to ensure the object is unrecognizable.
- Now, select the moving part of the video you want to blur and click OK.
- The object is now blurred, and the mosaic layer will follow its movement everywhere it goes.
- Playback your video to check the result. Filmora allows you to fine-tune the position and size of the object that’s following the track in your Preview Window without restarting tracking. Additionally, you can switch the follower anytime you want.
- When you have finished blurring the moving part on your video, click File > Save Project or Save Project As to save your video.
For Win 7 or later (64-bit)
For macOS 10.12 or later
How to Blur Part of a Video Using OpenShot
Designed for Windows, Mac, and Linux, OpenShot is a free, open-source, and cross-platform video editor. While there’s no predefined function or filter in this tool to help you blur part of a video, OpenShot has another way of blurring static parts of your video: it uses an image.
OpenShot blur part of video is free, and you’ll use its open-source programs as a base program for the edition of the video and GIMP Image Manipulation software to edit photos. Follow the guide below to learn how to blur out something in a video using OpenShot.
Step 1: Download OpenShot and install it on your device.

Step 2: Take a screenshot from your video, where the part you want to blur is easily visible. You can do this by going to a relevant frame and utilizing Save Current Frame with a camera icon, located on the right side of the video preview window in a standard program configuration.

Step 3: Be sure to save your video screenshot on your computer.
Step 4: Since you have exported a relevant frame from your video as a screenshot, you need to open it in a photo editor that can handle PNG pics and transparency, like the GIMP Image Manipulation program. Use any selection tool to select the area of the picture you want to blur on the video. Depending on your preferences, you can choose the free select tool, the ellipse select tool, or the rectangle select tool.

Step 5: In the blur filters submenu, open the Pixelize tool and adjust the options that suit your preferences. You can use CTRL-Z to cancel the operation, and repeat it until you find the best combination of blurring settings.
Step 6: When you are satisfied with blurring, right-click on the blurred area and select Invert in the Select submenu; this will allow you to select the entire part of the frame that has not been blurred, which is the part you would like to get rid of because you will only have to use the blurred part of your video overlay where necessary.
Step 7: Now, cut the section of the picture you do not want to keep. You can do this by using CTRL-X. The blurred filter for your video is now ready.

Step 8: If after cutting you notice a plain color rather than a checkerboard canvas representing transparency, use CTRL-Z to cancel the cut. Then, use CTRL-I to invert the selection again to get control of the blurred selection again, and copy or cut it using CTRL-X or CTRL-C.
Step 9: Create another image using CTRL-N, and ensure you have navigated to the advanced options and selected transparency as the fill-in color, and paste your selection there.
Step 10: You now have a perfect photo with full transparency, which is represented by a checkerboard canvas, except for the section of the video frames you would like to blur that should be pixelized.
Step 11: Use the Export option under the File menu to export the photo to your PC as a . PNG file. To save a picture with a transparency channel, you need to use the . PNG extension.
Step 12: Now return to OpenShot video editor and import the generated picture with a pixelized portion in the OpenShot video project. Next, add the picture as an overlay track. Make sure it’s above the video track.
Step 13: If the program asks you to import the photo as an image sequence, select the NO option because you need to import a still photo, and not a video sequence.
Step 14: The picture will be displayed before the video, blurring only the portion of the video where you modified the frame. The other parts of the video won’t be touched. You can make adjustments to ensure the picture track is only displayed at required moments. And that’s how to blur part of a video using OpenShot.
Conclusion
● Now that you know how to blur out part of a video, you can have fun and censor anything you want in your clips. Use Filmora to blur moving and still parts on your video.
Adding a blur effect to your video is vital, especially if you have added unwanted things that could ruin its quality. It often looks awkward when there’s something wrong in the background of your video. Various video editing programs allow you to blur a moving or still part of your video if you don’t want viewers to see it. With that in mind, we’ll look at how to blur part of a video using Filmora.
In this article
01 How to Blur a Part of a Video Using Filmora
02 How to Blur a Moving Part of a Video Using Filmora
03 How to Blur Part of a Video Using OpenShot
There are several ways you can blur part of a video. Filmora allows you to blur a still and moving part of a video. The software is user-friendly and comes with an aesthetically pleasing interface. You don’t have to be tech-savvy to learn how to blur out part of a video with Filmora. You can also use OpenShot to blur part of a video.
How to Blur a Part of a Video Using Filmora
Both Mac and PC owners can use this video editing software to blur part of a video. Here is how to blur a part of video using Filmora.
- Download and install Wondershare Filmora on your device. If you had already installed Filmora on your computer, double-click the program to launch it.
- Next, you need to drag and drop the video file you wish to blur into the Media Library. Alternatively, you could also navigate to the File tab and click it, then choose Import Media and select the Import Media Files option. Find the video you want to edit and select it. You can now hit the Open button to import the video file to Media Library
- After your video file is on Filmora’s Media Library, drag and drop it into the Timeline; this is where the program allows you to assemble effects and media files for your video project.

- Click on the Effects tab; this will allow you to browse through Filmora’s collection of visual effects. Select Utility on the drop-down menu located on the left side of your screen.

- The program will display a range of effects; select the Mosaic option. You can also type in Mosaic in the search bar to find the effect swiftly.
- Drag the Mosaic effect to above the video clip on your Timeline. Dragging the border of your Mosaic clip allows you to adjust its length.
- A small blurred area will appear in the preview window.

- Lock the main tracks.
- Now, click the Mosaic layer to modify the Mosaic size and area. Move it to the part of the video that you would like to blur.
- Double-clicking on the Mosaic clip will allow you to change the mosaic type and adjust the opacity and blur amount. You can choose from six different Mosaic types. Adjusting the opacity allows you to set the degree to which you can see through the blurred area. The blur amount lets you control the intensity of the blur.

- You can now save your blurred video. Click on the File tab and select ‘Save Project.’ Doing this will save your project to the default file. Choose ‘Save Project As’ to save your video to another destination of your choice.
How to Blur a Moving Part of a Video Using Filmora
You can also blur a moving part of your video with Filmora; this program allows you to add the motion-tracking mosaic to any moving object in your video that you do not want your viewers to see. You can use stickers, mosaic, or anything you download on the internet to hide any unwanted moving object.
With that in mind, here is how to blur a moving part of a video using Filmora:
- Run Filmora on your device.
- Import your video into Filmora’s Media Library.
- Drag your video to the Timeline.

- Now, double-click the video in the Timeline. Doing this will open the editing menu.
- Check the box that’s right next to Motion Tracking; this tool allows you to track movement in a video and then have objects like text, images, videos, or elements follow this movement.

- A tracker box will appear on your preview window; move it over the moving object you would like to track. You can increase or reduce the size of the tracker box. Hit the Start Tracking button to render the effect.

- Wait until the tracking process is complete. The duration of this process will depend on the length of your video. You’ll have to do some trimming if other objects block the moving part you’re tracking from time to time.

- WNow, select the Add Mosaic option.
- Choose the Mosaic type you prefer and adjust the opacity and blur amount to ensure the object is unrecognizable.
- Now, select the moving part of the video you want to blur and click OK.
- The object is now blurred, and the mosaic layer will follow its movement everywhere it goes.
- Playback your video to check the result. Filmora allows you to fine-tune the position and size of the object that’s following the track in your Preview Window without restarting tracking. Additionally, you can switch the follower anytime you want.
- When you have finished blurring the moving part on your video, click File > Save Project or Save Project As to save your video.
For Win 7 or later (64-bit)
For macOS 10.12 or later
How to Blur Part of a Video Using OpenShot
Designed for Windows, Mac, and Linux, OpenShot is a free, open-source, and cross-platform video editor. While there’s no predefined function or filter in this tool to help you blur part of a video, OpenShot has another way of blurring static parts of your video: it uses an image.
OpenShot blur part of video is free, and you’ll use its open-source programs as a base program for the edition of the video and GIMP Image Manipulation software to edit photos. Follow the guide below to learn how to blur out something in a video using OpenShot.
Step 1: Download OpenShot and install it on your device.

Step 2: Take a screenshot from your video, where the part you want to blur is easily visible. You can do this by going to a relevant frame and utilizing Save Current Frame with a camera icon, located on the right side of the video preview window in a standard program configuration.

Step 3: Be sure to save your video screenshot on your computer.
Step 4: Since you have exported a relevant frame from your video as a screenshot, you need to open it in a photo editor that can handle PNG pics and transparency, like the GIMP Image Manipulation program. Use any selection tool to select the area of the picture you want to blur on the video. Depending on your preferences, you can choose the free select tool, the ellipse select tool, or the rectangle select tool.

Step 5: In the blur filters submenu, open the Pixelize tool and adjust the options that suit your preferences. You can use CTRL-Z to cancel the operation, and repeat it until you find the best combination of blurring settings.
Step 6: When you are satisfied with blurring, right-click on the blurred area and select Invert in the Select submenu; this will allow you to select the entire part of the frame that has not been blurred, which is the part you would like to get rid of because you will only have to use the blurred part of your video overlay where necessary.
Step 7: Now, cut the section of the picture you do not want to keep. You can do this by using CTRL-X. The blurred filter for your video is now ready.

Step 8: If after cutting you notice a plain color rather than a checkerboard canvas representing transparency, use CTRL-Z to cancel the cut. Then, use CTRL-I to invert the selection again to get control of the blurred selection again, and copy or cut it using CTRL-X or CTRL-C.
Step 9: Create another image using CTRL-N, and ensure you have navigated to the advanced options and selected transparency as the fill-in color, and paste your selection there.
Step 10: You now have a perfect photo with full transparency, which is represented by a checkerboard canvas, except for the section of the video frames you would like to blur that should be pixelized.
Step 11: Use the Export option under the File menu to export the photo to your PC as a . PNG file. To save a picture with a transparency channel, you need to use the . PNG extension.
Step 12: Now return to OpenShot video editor and import the generated picture with a pixelized portion in the OpenShot video project. Next, add the picture as an overlay track. Make sure it’s above the video track.
Step 13: If the program asks you to import the photo as an image sequence, select the NO option because you need to import a still photo, and not a video sequence.
Step 14: The picture will be displayed before the video, blurring only the portion of the video where you modified the frame. The other parts of the video won’t be touched. You can make adjustments to ensure the picture track is only displayed at required moments. And that’s how to blur part of a video using OpenShot.
Conclusion
● Now that you know how to blur out part of a video, you can have fun and censor anything you want in your clips. Use Filmora to blur moving and still parts on your video.
Adding a blur effect to your video is vital, especially if you have added unwanted things that could ruin its quality. It often looks awkward when there’s something wrong in the background of your video. Various video editing programs allow you to blur a moving or still part of your video if you don’t want viewers to see it. With that in mind, we’ll look at how to blur part of a video using Filmora.
In this article
01 How to Blur a Part of a Video Using Filmora
02 How to Blur a Moving Part of a Video Using Filmora
03 How to Blur Part of a Video Using OpenShot
There are several ways you can blur part of a video. Filmora allows you to blur a still and moving part of a video. The software is user-friendly and comes with an aesthetically pleasing interface. You don’t have to be tech-savvy to learn how to blur out part of a video with Filmora. You can also use OpenShot to blur part of a video.
How to Blur a Part of a Video Using Filmora
Both Mac and PC owners can use this video editing software to blur part of a video. Here is how to blur a part of video using Filmora.
- Download and install Wondershare Filmora on your device. If you had already installed Filmora on your computer, double-click the program to launch it.
- Next, you need to drag and drop the video file you wish to blur into the Media Library. Alternatively, you could also navigate to the File tab and click it, then choose Import Media and select the Import Media Files option. Find the video you want to edit and select it. You can now hit the Open button to import the video file to Media Library
- After your video file is on Filmora’s Media Library, drag and drop it into the Timeline; this is where the program allows you to assemble effects and media files for your video project.

- Click on the Effects tab; this will allow you to browse through Filmora’s collection of visual effects. Select Utility on the drop-down menu located on the left side of your screen.

- The program will display a range of effects; select the Mosaic option. You can also type in Mosaic in the search bar to find the effect swiftly.
- Drag the Mosaic effect to above the video clip on your Timeline. Dragging the border of your Mosaic clip allows you to adjust its length.
- A small blurred area will appear in the preview window.

- Lock the main tracks.
- Now, click the Mosaic layer to modify the Mosaic size and area. Move it to the part of the video that you would like to blur.
- Double-clicking on the Mosaic clip will allow you to change the mosaic type and adjust the opacity and blur amount. You can choose from six different Mosaic types. Adjusting the opacity allows you to set the degree to which you can see through the blurred area. The blur amount lets you control the intensity of the blur.

- You can now save your blurred video. Click on the File tab and select ‘Save Project.’ Doing this will save your project to the default file. Choose ‘Save Project As’ to save your video to another destination of your choice.
How to Blur a Moving Part of a Video Using Filmora
You can also blur a moving part of your video with Filmora; this program allows you to add the motion-tracking mosaic to any moving object in your video that you do not want your viewers to see. You can use stickers, mosaic, or anything you download on the internet to hide any unwanted moving object.
With that in mind, here is how to blur a moving part of a video using Filmora:
- Run Filmora on your device.
- Import your video into Filmora’s Media Library.
- Drag your video to the Timeline.

- Now, double-click the video in the Timeline. Doing this will open the editing menu.
- Check the box that’s right next to Motion Tracking; this tool allows you to track movement in a video and then have objects like text, images, videos, or elements follow this movement.

- A tracker box will appear on your preview window; move it over the moving object you would like to track. You can increase or reduce the size of the tracker box. Hit the Start Tracking button to render the effect.

- Wait until the tracking process is complete. The duration of this process will depend on the length of your video. You’ll have to do some trimming if other objects block the moving part you’re tracking from time to time.

- WNow, select the Add Mosaic option.
- Choose the Mosaic type you prefer and adjust the opacity and blur amount to ensure the object is unrecognizable.
- Now, select the moving part of the video you want to blur and click OK.
- The object is now blurred, and the mosaic layer will follow its movement everywhere it goes.
- Playback your video to check the result. Filmora allows you to fine-tune the position and size of the object that’s following the track in your Preview Window without restarting tracking. Additionally, you can switch the follower anytime you want.
- When you have finished blurring the moving part on your video, click File > Save Project or Save Project As to save your video.
For Win 7 or later (64-bit)
For macOS 10.12 or later
How to Blur Part of a Video Using OpenShot
Designed for Windows, Mac, and Linux, OpenShot is a free, open-source, and cross-platform video editor. While there’s no predefined function or filter in this tool to help you blur part of a video, OpenShot has another way of blurring static parts of your video: it uses an image.
OpenShot blur part of video is free, and you’ll use its open-source programs as a base program for the edition of the video and GIMP Image Manipulation software to edit photos. Follow the guide below to learn how to blur out something in a video using OpenShot.
Step 1: Download OpenShot and install it on your device.

Step 2: Take a screenshot from your video, where the part you want to blur is easily visible. You can do this by going to a relevant frame and utilizing Save Current Frame with a camera icon, located on the right side of the video preview window in a standard program configuration.

Step 3: Be sure to save your video screenshot on your computer.
Step 4: Since you have exported a relevant frame from your video as a screenshot, you need to open it in a photo editor that can handle PNG pics and transparency, like the GIMP Image Manipulation program. Use any selection tool to select the area of the picture you want to blur on the video. Depending on your preferences, you can choose the free select tool, the ellipse select tool, or the rectangle select tool.

Step 5: In the blur filters submenu, open the Pixelize tool and adjust the options that suit your preferences. You can use CTRL-Z to cancel the operation, and repeat it until you find the best combination of blurring settings.
Step 6: When you are satisfied with blurring, right-click on the blurred area and select Invert in the Select submenu; this will allow you to select the entire part of the frame that has not been blurred, which is the part you would like to get rid of because you will only have to use the blurred part of your video overlay where necessary.
Step 7: Now, cut the section of the picture you do not want to keep. You can do this by using CTRL-X. The blurred filter for your video is now ready.

Step 8: If after cutting you notice a plain color rather than a checkerboard canvas representing transparency, use CTRL-Z to cancel the cut. Then, use CTRL-I to invert the selection again to get control of the blurred selection again, and copy or cut it using CTRL-X or CTRL-C.
Step 9: Create another image using CTRL-N, and ensure you have navigated to the advanced options and selected transparency as the fill-in color, and paste your selection there.
Step 10: You now have a perfect photo with full transparency, which is represented by a checkerboard canvas, except for the section of the video frames you would like to blur that should be pixelized.
Step 11: Use the Export option under the File menu to export the photo to your PC as a . PNG file. To save a picture with a transparency channel, you need to use the . PNG extension.
Step 12: Now return to OpenShot video editor and import the generated picture with a pixelized portion in the OpenShot video project. Next, add the picture as an overlay track. Make sure it’s above the video track.
Step 13: If the program asks you to import the photo as an image sequence, select the NO option because you need to import a still photo, and not a video sequence.
Step 14: The picture will be displayed before the video, blurring only the portion of the video where you modified the frame. The other parts of the video won’t be touched. You can make adjustments to ensure the picture track is only displayed at required moments. And that’s how to blur part of a video using OpenShot.
Conclusion
● Now that you know how to blur out part of a video, you can have fun and censor anything you want in your clips. Use Filmora to blur moving and still parts on your video.
How To Make a Photo Collage in Microsoft Word — Step by Step Guide
Any Differences in Making Collages in Different Versions of Microsoft Wor
An easy yet powerful editor
Numerous effects to choose from
Detailed tutorials provided by the official channel
Are you having trouble making a collage Microsoft Word? Well, at times it might prove tricky to make a photo collage using Microsoft Word as it is predominantly software that is used for text. Therefore, if one is trying to make a photo collage in Microsoft Word, one might need to know the purpose and use of Microsoft collage maker as the kit can greatly help to create a photo collage in Word.
There are also other things to know about the process such as the difference between making photo collages in different versions of Microsoft Word or which version of the Microsoft Word is most commonly used by all people.
In this article
01 [Any Differences in Making Collages in Different Versions of Microsoft Word?](#Part 1)
02 [How To Make A Photo Collage In Microsoft Word](#Part 2)
Part 1 Any Differences in Making Collages in Different Versions of Microsoft Word?
The usability of Microsoft Word does not end at simply writing text. It extends to the usage of photos and the creation of photo collages using these photos. Microsoft Word has the right features which you can easily use to organize pictures and photos in a certain way to make a photo collage. The collage maker Microsoft is not a hard operation to access if one knows the various options and operations of Microsoft Word well. There are different versions of Microsoft Word, all of which serve the same purposes but have different options and different icons representing various features. No matter which version you are using, the primary process of creating remains the same in all of those processes as it is simply the collection of the desired pictures, deciding on a particular shape and dimension of the page where you will arrange the pictures, inserting the pictures into the page, and then arranging them in a certain order.
Up until now, Microsoft has launched more than ten versions of Microsoft Word, with the preliminary ones being named “Microsoft Office”. In recent times, the newer version of Microsoft Word has become more user-friendly and thus it has become easier to perform so-called more complex tasks with the software, such as the creation of photo collages. With the addition of options and features to each newer version of Microsoft Word, it has become easier to work with graphics and arrange them or resize them or edit them in the desired way. More templates have been included in the newer versions to make it easy for the users to come to a decision when it comes to the shape of the collage and the number of pictures in it. Thus, it has various collage Microsoft Word options available now, which make the job much easier. There are a variety of options that are offered by the newer versions of Microsoft Word which will surely greatly help the user in creating photo collages as they open up the path to more features.
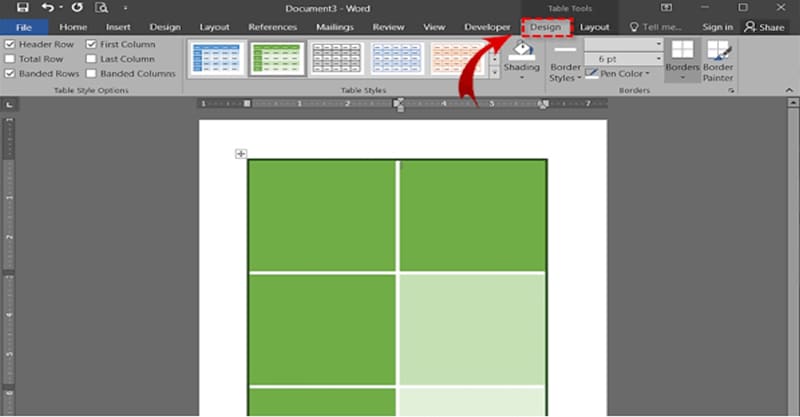
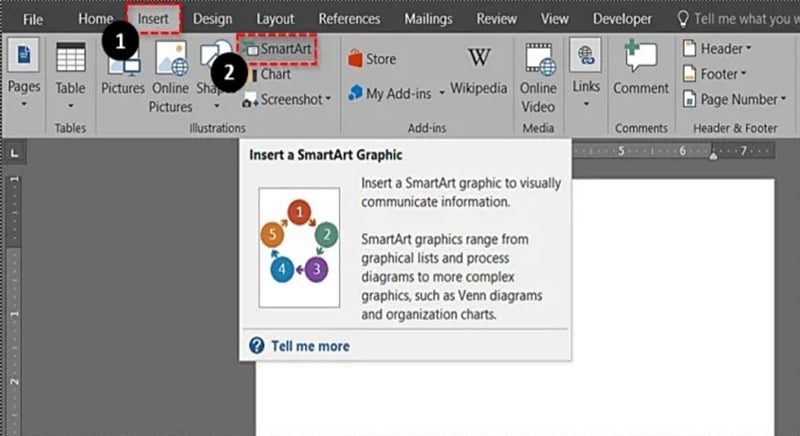
The difference has been in the quality and the quantity of the features that each of the new versions of Microsoft Word contains. For example, the older versions were predominantly used for text, and thus, there were not any viable options for pictures and arranging them, and creating a collage. The newer versions of Microsoft Word have sections and options entirely dedicated to the creation of collages and thus contain special Microsoft collage maker options which make it much easier to arrange pictures in certain ways and create collages. For example, the newer versions consist of features such as ‘SmartArt” which is a built-in feature to create collages in Microsoft Word. It is available in the newer versions of Word. ‘SmartArt” works as a Microsoft auto collage option.
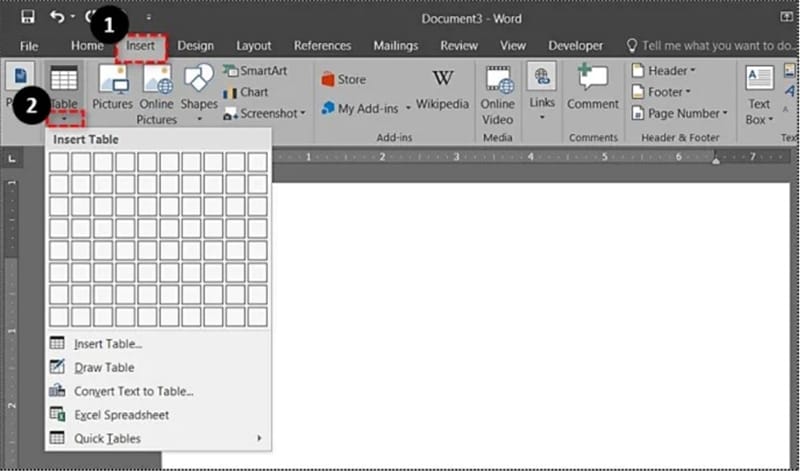
The 2013 and 2016 versions of Microsoft Word also contain something called the ‘Developer” option, which can be accessed from the ‘Customizing the Ribbon” section. You can use it to specify the number of pictures and then insert pictures from a file. There is also the option of using Word Tables which can be used in any version of Microsoft Word to create a certain arrangement for your photo collage. Word Tables give the user complete control over the layout of the collage and this makes it easier for the user to arrange the pictures of the collage.

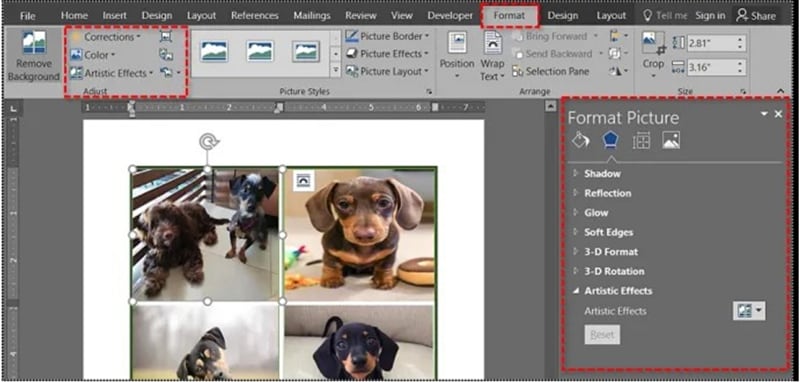
There is so something called the ‘Effect” option which can be found in the ‘Format Picture” option, and this can be efficiently used to add various artistic effects and modify the pictures in ways that the user wants.
The most commonly used version of the Microsoft Word software to create photo collages is expectedly the newest as it comes with the maximum features which enable the user to go beyond text and control designs, graphics, and everything else.
Part 2 How To Make A Photo Collage In Microsoft Word
The process to make a photo collage in Microsoft Word consists of several steps and each of them is equally important in this part of the article, we shall take a close look at each of these steps and how you can implement them, and how you can efficiently use the various features that Microsoft Word has to offer. Now, there are many ways in which one can create a collage in Microsoft Word using various Microsoft collage maker options. Read the options given below to understand them in proper details.
● Creating a photo collage by freestyle – This is the simplest method and is quite easy and thus, does not require much expertise to be followed.
● Firstly, go to the Ribbon. From there click on “Developer” option which can be found there. In case the option is not activated, the user can activate it by clicking on the “Customize The Ribbon” From there activate the ‘Developer” option.
● The second step follows the user clicking on the ‘Picture Content Control” button and this can be found easily in the ‘Controls” section of the Ribbon. This option is used to create placeholders for all the desired pictures.
● The cursor is placed on each placeholder and the ‘Picture” option is clicked upon. This gives you access to the pictures and following this, you will need to specify the source from where you shall obtain the pictures to paste them into the Word document.
● Now, the problem arises when each picture is pasted in the document in a random way and sizes and shapes. This can easily be solved by right-clicking on the picture and then clicking on “Wrap Text”, followed by ‘More Layout Options”, ‘In Front Of Text”, and this will enable you to arrange the pictures in whichever way you like.
● Now, the pictures can be organized in any way you want, and thus, the entire collage can be created in any you want. You can go ahead and shrink or stretch a photo without distorting it. You can use the various options of the “Picture Tools” tab to format the images which have borders and preset styles and shadows.

● Creating a collage using ‘SmartArt” – ‘SmartArt” is the easiest way to create a collage in Microsoft Word and in the shortest time possible. It is a pretty straightforward procedure. Let us take a look at the steps.
● Go to the ‘Insert” option and click on ‘SmartArt”, and then go and click on ‘Picture”, and out of the photo collages that appear in front of you, select one that is either photo-only or is photo-and-text and looks perfect for your purpose.
● By clicking on the picture icon on each photo placeholder, and then choosing ‘Insert”, you can choose to insert photos proportionally, as you please.
● Select a photo and click on the ‘Picture Tools” tab, while moving the photo into a placeholder. You can click on the ‘Crop” button to stretch or shrink a picture according to your wish. Thus, you can easily resize and reshape your pictures and photos in any way you like.
● The last and final step of the Microsoft auto collage option is repositioning the pictures by choosing ‘Move Up” or ‘Move Down”, which can be found under the double-arrow in the ‘SmartArt” frame’s the left side. Thus, you can easily change the entire arrangement of the entire photo collage, quite having to do much.

If you are trying to make a photo collage, you can also go with the **Wondershare Filmora **Video Editor, which has some amazing features, to make your job much easier. It has over 10 million stock media, a huge number of preset templates, and a feature called “Speed Ramping”, which you can use to adjust the speed of your video. It has various kinds of stock media such as “Pixabay”, “Giphy” and “Unsplash”.
For Win 7 or later (64-bit)
For macOS 10.12 or later
It works on a variety of operating systems, such as Windows 7, Windows 8.1, Windows 10, and also Windows 1It has a minimum RAM requirement of 4GB, though 8 GB is recommended for 4K and HD videos. It also requires a minimum of Intel HD Graphics 5000 or newer versions.
● Key Takeaways from This Episode →
●Thus, the entire article can be summarized by saying that there are quite a few ways in which you can create a photo collage in Microsoft Word, using collage Microsoft word and various other Microsoft auto collage options which can be used to make photo collages easily in Microsoft Word.
●With the release of newer versions with more and more features and options, it becomes easier to exercise control over graphical content in Microsoft Word.
●So, the processes are quite straightforward and simple and there should not be much problem in following them as mentioned so many times, there are many collage maker Microsoft options which you can use to make a photo collage with pictures and shapes that you desire.
●The immensity of options enables you to create collages in whichever you like.
Are you having trouble making a collage Microsoft Word? Well, at times it might prove tricky to make a photo collage using Microsoft Word as it is predominantly software that is used for text. Therefore, if one is trying to make a photo collage in Microsoft Word, one might need to know the purpose and use of Microsoft collage maker as the kit can greatly help to create a photo collage in Word.
There are also other things to know about the process such as the difference between making photo collages in different versions of Microsoft Word or which version of the Microsoft Word is most commonly used by all people.
In this article
01 [Any Differences in Making Collages in Different Versions of Microsoft Word?](#Part 1)
02 [How To Make A Photo Collage In Microsoft Word](#Part 2)
Part 1 Any Differences in Making Collages in Different Versions of Microsoft Word?
The usability of Microsoft Word does not end at simply writing text. It extends to the usage of photos and the creation of photo collages using these photos. Microsoft Word has the right features which you can easily use to organize pictures and photos in a certain way to make a photo collage. The collage maker Microsoft is not a hard operation to access if one knows the various options and operations of Microsoft Word well. There are different versions of Microsoft Word, all of which serve the same purposes but have different options and different icons representing various features. No matter which version you are using, the primary process of creating remains the same in all of those processes as it is simply the collection of the desired pictures, deciding on a particular shape and dimension of the page where you will arrange the pictures, inserting the pictures into the page, and then arranging them in a certain order.
Up until now, Microsoft has launched more than ten versions of Microsoft Word, with the preliminary ones being named “Microsoft Office”. In recent times, the newer version of Microsoft Word has become more user-friendly and thus it has become easier to perform so-called more complex tasks with the software, such as the creation of photo collages. With the addition of options and features to each newer version of Microsoft Word, it has become easier to work with graphics and arrange them or resize them or edit them in the desired way. More templates have been included in the newer versions to make it easy for the users to come to a decision when it comes to the shape of the collage and the number of pictures in it. Thus, it has various collage Microsoft Word options available now, which make the job much easier. There are a variety of options that are offered by the newer versions of Microsoft Word which will surely greatly help the user in creating photo collages as they open up the path to more features.

The difference has been in the quality and the quantity of the features that each of the new versions of Microsoft Word contains. For example, the older versions were predominantly used for text, and thus, there were not any viable options for pictures and arranging them, and creating a collage. The newer versions of Microsoft Word have sections and options entirely dedicated to the creation of collages and thus contain special Microsoft collage maker options which make it much easier to arrange pictures in certain ways and create collages. For example, the newer versions consist of features such as ‘SmartArt” which is a built-in feature to create collages in Microsoft Word. It is available in the newer versions of Word. ‘SmartArt” works as a Microsoft auto collage option.

The 2013 and 2016 versions of Microsoft Word also contain something called the ‘Developer” option, which can be accessed from the ‘Customizing the Ribbon” section. You can use it to specify the number of pictures and then insert pictures from a file. There is also the option of using Word Tables which can be used in any version of Microsoft Word to create a certain arrangement for your photo collage. Word Tables give the user complete control over the layout of the collage and this makes it easier for the user to arrange the pictures of the collage.


There is so something called the ‘Effect” option which can be found in the ‘Format Picture” option, and this can be efficiently used to add various artistic effects and modify the pictures in ways that the user wants.

The most commonly used version of the Microsoft Word software to create photo collages is expectedly the newest as it comes with the maximum features which enable the user to go beyond text and control designs, graphics, and everything else.
Part 2 How To Make A Photo Collage In Microsoft Word
The process to make a photo collage in Microsoft Word consists of several steps and each of them is equally important in this part of the article, we shall take a close look at each of these steps and how you can implement them, and how you can efficiently use the various features that Microsoft Word has to offer. Now, there are many ways in which one can create a collage in Microsoft Word using various Microsoft collage maker options. Read the options given below to understand them in proper details.
● Creating a photo collage by freestyle – This is the simplest method and is quite easy and thus, does not require much expertise to be followed.
● Firstly, go to the Ribbon. From there click on “Developer” option which can be found there. In case the option is not activated, the user can activate it by clicking on the “Customize The Ribbon” From there activate the ‘Developer” option.
● The second step follows the user clicking on the ‘Picture Content Control” button and this can be found easily in the ‘Controls” section of the Ribbon. This option is used to create placeholders for all the desired pictures.
● The cursor is placed on each placeholder and the ‘Picture” option is clicked upon. This gives you access to the pictures and following this, you will need to specify the source from where you shall obtain the pictures to paste them into the Word document.
● Now, the problem arises when each picture is pasted in the document in a random way and sizes and shapes. This can easily be solved by right-clicking on the picture and then clicking on “Wrap Text”, followed by ‘More Layout Options”, ‘In Front Of Text”, and this will enable you to arrange the pictures in whichever way you like.
● Now, the pictures can be organized in any way you want, and thus, the entire collage can be created in any you want. You can go ahead and shrink or stretch a photo without distorting it. You can use the various options of the “Picture Tools” tab to format the images which have borders and preset styles and shadows.

● Creating a collage using ‘SmartArt” – ‘SmartArt” is the easiest way to create a collage in Microsoft Word and in the shortest time possible. It is a pretty straightforward procedure. Let us take a look at the steps.
● Go to the ‘Insert” option and click on ‘SmartArt”, and then go and click on ‘Picture”, and out of the photo collages that appear in front of you, select one that is either photo-only or is photo-and-text and looks perfect for your purpose.
● By clicking on the picture icon on each photo placeholder, and then choosing ‘Insert”, you can choose to insert photos proportionally, as you please.
● Select a photo and click on the ‘Picture Tools” tab, while moving the photo into a placeholder. You can click on the ‘Crop” button to stretch or shrink a picture according to your wish. Thus, you can easily resize and reshape your pictures and photos in any way you like.
● The last and final step of the Microsoft auto collage option is repositioning the pictures by choosing ‘Move Up” or ‘Move Down”, which can be found under the double-arrow in the ‘SmartArt” frame’s the left side. Thus, you can easily change the entire arrangement of the entire photo collage, quite having to do much.

If you are trying to make a photo collage, you can also go with the **Wondershare Filmora **Video Editor, which has some amazing features, to make your job much easier. It has over 10 million stock media, a huge number of preset templates, and a feature called “Speed Ramping”, which you can use to adjust the speed of your video. It has various kinds of stock media such as “Pixabay”, “Giphy” and “Unsplash”.
For Win 7 or later (64-bit)
For macOS 10.12 or later
It works on a variety of operating systems, such as Windows 7, Windows 8.1, Windows 10, and also Windows 1It has a minimum RAM requirement of 4GB, though 8 GB is recommended for 4K and HD videos. It also requires a minimum of Intel HD Graphics 5000 or newer versions.
● Key Takeaways from This Episode →
●Thus, the entire article can be summarized by saying that there are quite a few ways in which you can create a photo collage in Microsoft Word, using collage Microsoft word and various other Microsoft auto collage options which can be used to make photo collages easily in Microsoft Word.
●With the release of newer versions with more and more features and options, it becomes easier to exercise control over graphical content in Microsoft Word.
●So, the processes are quite straightforward and simple and there should not be much problem in following them as mentioned so many times, there are many collage maker Microsoft options which you can use to make a photo collage with pictures and shapes that you desire.
●The immensity of options enables you to create collages in whichever you like.
Are you having trouble making a collage Microsoft Word? Well, at times it might prove tricky to make a photo collage using Microsoft Word as it is predominantly software that is used for text. Therefore, if one is trying to make a photo collage in Microsoft Word, one might need to know the purpose and use of Microsoft collage maker as the kit can greatly help to create a photo collage in Word.
There are also other things to know about the process such as the difference between making photo collages in different versions of Microsoft Word or which version of the Microsoft Word is most commonly used by all people.
In this article
01 [Any Differences in Making Collages in Different Versions of Microsoft Word?](#Part 1)
02 [How To Make A Photo Collage In Microsoft Word](#Part 2)
Part 1 Any Differences in Making Collages in Different Versions of Microsoft Word?
The usability of Microsoft Word does not end at simply writing text. It extends to the usage of photos and the creation of photo collages using these photos. Microsoft Word has the right features which you can easily use to organize pictures and photos in a certain way to make a photo collage. The collage maker Microsoft is not a hard operation to access if one knows the various options and operations of Microsoft Word well. There are different versions of Microsoft Word, all of which serve the same purposes but have different options and different icons representing various features. No matter which version you are using, the primary process of creating remains the same in all of those processes as it is simply the collection of the desired pictures, deciding on a particular shape and dimension of the page where you will arrange the pictures, inserting the pictures into the page, and then arranging them in a certain order.
Up until now, Microsoft has launched more than ten versions of Microsoft Word, with the preliminary ones being named “Microsoft Office”. In recent times, the newer version of Microsoft Word has become more user-friendly and thus it has become easier to perform so-called more complex tasks with the software, such as the creation of photo collages. With the addition of options and features to each newer version of Microsoft Word, it has become easier to work with graphics and arrange them or resize them or edit them in the desired way. More templates have been included in the newer versions to make it easy for the users to come to a decision when it comes to the shape of the collage and the number of pictures in it. Thus, it has various collage Microsoft Word options available now, which make the job much easier. There are a variety of options that are offered by the newer versions of Microsoft Word which will surely greatly help the user in creating photo collages as they open up the path to more features.

The difference has been in the quality and the quantity of the features that each of the new versions of Microsoft Word contains. For example, the older versions were predominantly used for text, and thus, there were not any viable options for pictures and arranging them, and creating a collage. The newer versions of Microsoft Word have sections and options entirely dedicated to the creation of collages and thus contain special Microsoft collage maker options which make it much easier to arrange pictures in certain ways and create collages. For example, the newer versions consist of features such as ‘SmartArt” which is a built-in feature to create collages in Microsoft Word. It is available in the newer versions of Word. ‘SmartArt” works as a Microsoft auto collage option.

The 2013 and 2016 versions of Microsoft Word also contain something called the ‘Developer” option, which can be accessed from the ‘Customizing the Ribbon” section. You can use it to specify the number of pictures and then insert pictures from a file. There is also the option of using Word Tables which can be used in any version of Microsoft Word to create a certain arrangement for your photo collage. Word Tables give the user complete control over the layout of the collage and this makes it easier for the user to arrange the pictures of the collage.


There is so something called the ‘Effect” option which can be found in the ‘Format Picture” option, and this can be efficiently used to add various artistic effects and modify the pictures in ways that the user wants.

The most commonly used version of the Microsoft Word software to create photo collages is expectedly the newest as it comes with the maximum features which enable the user to go beyond text and control designs, graphics, and everything else.
Part 2 How To Make A Photo Collage In Microsoft Word
The process to make a photo collage in Microsoft Word consists of several steps and each of them is equally important in this part of the article, we shall take a close look at each of these steps and how you can implement them, and how you can efficiently use the various features that Microsoft Word has to offer. Now, there are many ways in which one can create a collage in Microsoft Word using various Microsoft collage maker options. Read the options given below to understand them in proper details.
● Creating a photo collage by freestyle – This is the simplest method and is quite easy and thus, does not require much expertise to be followed.
● Firstly, go to the Ribbon. From there click on “Developer” option which can be found there. In case the option is not activated, the user can activate it by clicking on the “Customize The Ribbon” From there activate the ‘Developer” option.
● The second step follows the user clicking on the ‘Picture Content Control” button and this can be found easily in the ‘Controls” section of the Ribbon. This option is used to create placeholders for all the desired pictures.
● The cursor is placed on each placeholder and the ‘Picture” option is clicked upon. This gives you access to the pictures and following this, you will need to specify the source from where you shall obtain the pictures to paste them into the Word document.
● Now, the problem arises when each picture is pasted in the document in a random way and sizes and shapes. This can easily be solved by right-clicking on the picture and then clicking on “Wrap Text”, followed by ‘More Layout Options”, ‘In Front Of Text”, and this will enable you to arrange the pictures in whichever way you like.
● Now, the pictures can be organized in any way you want, and thus, the entire collage can be created in any you want. You can go ahead and shrink or stretch a photo without distorting it. You can use the various options of the “Picture Tools” tab to format the images which have borders and preset styles and shadows.

● Creating a collage using ‘SmartArt” – ‘SmartArt” is the easiest way to create a collage in Microsoft Word and in the shortest time possible. It is a pretty straightforward procedure. Let us take a look at the steps.
● Go to the ‘Insert” option and click on ‘SmartArt”, and then go and click on ‘Picture”, and out of the photo collages that appear in front of you, select one that is either photo-only or is photo-and-text and looks perfect for your purpose.
● By clicking on the picture icon on each photo placeholder, and then choosing ‘Insert”, you can choose to insert photos proportionally, as you please.
● Select a photo and click on the ‘Picture Tools” tab, while moving the photo into a placeholder. You can click on the ‘Crop” button to stretch or shrink a picture according to your wish. Thus, you can easily resize and reshape your pictures and photos in any way you like.
● The last and final step of the Microsoft auto collage option is repositioning the pictures by choosing ‘Move Up” or ‘Move Down”, which can be found under the double-arrow in the ‘SmartArt” frame’s the left side. Thus, you can easily change the entire arrangement of the entire photo collage, quite having to do much.

If you are trying to make a photo collage, you can also go with the **Wondershare Filmora **Video Editor, which has some amazing features, to make your job much easier. It has over 10 million stock media, a huge number of preset templates, and a feature called “Speed Ramping”, which you can use to adjust the speed of your video. It has various kinds of stock media such as “Pixabay”, “Giphy” and “Unsplash”.
For Win 7 or later (64-bit)
For macOS 10.12 or later
It works on a variety of operating systems, such as Windows 7, Windows 8.1, Windows 10, and also Windows 1It has a minimum RAM requirement of 4GB, though 8 GB is recommended for 4K and HD videos. It also requires a minimum of Intel HD Graphics 5000 or newer versions.
● Key Takeaways from This Episode →
●Thus, the entire article can be summarized by saying that there are quite a few ways in which you can create a photo collage in Microsoft Word, using collage Microsoft word and various other Microsoft auto collage options which can be used to make photo collages easily in Microsoft Word.
●With the release of newer versions with more and more features and options, it becomes easier to exercise control over graphical content in Microsoft Word.
●So, the processes are quite straightforward and simple and there should not be much problem in following them as mentioned so many times, there are many collage maker Microsoft options which you can use to make a photo collage with pictures and shapes that you desire.
●The immensity of options enables you to create collages in whichever you like.
Are you having trouble making a collage Microsoft Word? Well, at times it might prove tricky to make a photo collage using Microsoft Word as it is predominantly software that is used for text. Therefore, if one is trying to make a photo collage in Microsoft Word, one might need to know the purpose and use of Microsoft collage maker as the kit can greatly help to create a photo collage in Word.
There are also other things to know about the process such as the difference between making photo collages in different versions of Microsoft Word or which version of the Microsoft Word is most commonly used by all people.
In this article
01 [Any Differences in Making Collages in Different Versions of Microsoft Word?](#Part 1)
02 [How To Make A Photo Collage In Microsoft Word](#Part 2)
Part 1 Any Differences in Making Collages in Different Versions of Microsoft Word?
The usability of Microsoft Word does not end at simply writing text. It extends to the usage of photos and the creation of photo collages using these photos. Microsoft Word has the right features which you can easily use to organize pictures and photos in a certain way to make a photo collage. The collage maker Microsoft is not a hard operation to access if one knows the various options and operations of Microsoft Word well. There are different versions of Microsoft Word, all of which serve the same purposes but have different options and different icons representing various features. No matter which version you are using, the primary process of creating remains the same in all of those processes as it is simply the collection of the desired pictures, deciding on a particular shape and dimension of the page where you will arrange the pictures, inserting the pictures into the page, and then arranging them in a certain order.
Up until now, Microsoft has launched more than ten versions of Microsoft Word, with the preliminary ones being named “Microsoft Office”. In recent times, the newer version of Microsoft Word has become more user-friendly and thus it has become easier to perform so-called more complex tasks with the software, such as the creation of photo collages. With the addition of options and features to each newer version of Microsoft Word, it has become easier to work with graphics and arrange them or resize them or edit them in the desired way. More templates have been included in the newer versions to make it easy for the users to come to a decision when it comes to the shape of the collage and the number of pictures in it. Thus, it has various collage Microsoft Word options available now, which make the job much easier. There are a variety of options that are offered by the newer versions of Microsoft Word which will surely greatly help the user in creating photo collages as they open up the path to more features.

The difference has been in the quality and the quantity of the features that each of the new versions of Microsoft Word contains. For example, the older versions were predominantly used for text, and thus, there were not any viable options for pictures and arranging them, and creating a collage. The newer versions of Microsoft Word have sections and options entirely dedicated to the creation of collages and thus contain special Microsoft collage maker options which make it much easier to arrange pictures in certain ways and create collages. For example, the newer versions consist of features such as ‘SmartArt” which is a built-in feature to create collages in Microsoft Word. It is available in the newer versions of Word. ‘SmartArt” works as a Microsoft auto collage option.

The 2013 and 2016 versions of Microsoft Word also contain something called the ‘Developer” option, which can be accessed from the ‘Customizing the Ribbon” section. You can use it to specify the number of pictures and then insert pictures from a file. There is also the option of using Word Tables which can be used in any version of Microsoft Word to create a certain arrangement for your photo collage. Word Tables give the user complete control over the layout of the collage and this makes it easier for the user to arrange the pictures of the collage.


There is so something called the ‘Effect” option which can be found in the ‘Format Picture” option, and this can be efficiently used to add various artistic effects and modify the pictures in ways that the user wants.

The most commonly used version of the Microsoft Word software to create photo collages is expectedly the newest as it comes with the maximum features which enable the user to go beyond text and control designs, graphics, and everything else.
Part 2 How To Make A Photo Collage In Microsoft Word
The process to make a photo collage in Microsoft Word consists of several steps and each of them is equally important in this part of the article, we shall take a close look at each of these steps and how you can implement them, and how you can efficiently use the various features that Microsoft Word has to offer. Now, there are many ways in which one can create a collage in Microsoft Word using various Microsoft collage maker options. Read the options given below to understand them in proper details.
● Creating a photo collage by freestyle – This is the simplest method and is quite easy and thus, does not require much expertise to be followed.
● Firstly, go to the Ribbon. From there click on “Developer” option which can be found there. In case the option is not activated, the user can activate it by clicking on the “Customize The Ribbon” From there activate the ‘Developer” option.
● The second step follows the user clicking on the ‘Picture Content Control” button and this can be found easily in the ‘Controls” section of the Ribbon. This option is used to create placeholders for all the desired pictures.
● The cursor is placed on each placeholder and the ‘Picture” option is clicked upon. This gives you access to the pictures and following this, you will need to specify the source from where you shall obtain the pictures to paste them into the Word document.
● Now, the problem arises when each picture is pasted in the document in a random way and sizes and shapes. This can easily be solved by right-clicking on the picture and then clicking on “Wrap Text”, followed by ‘More Layout Options”, ‘In Front Of Text”, and this will enable you to arrange the pictures in whichever way you like.
● Now, the pictures can be organized in any way you want, and thus, the entire collage can be created in any you want. You can go ahead and shrink or stretch a photo without distorting it. You can use the various options of the “Picture Tools” tab to format the images which have borders and preset styles and shadows.

● Creating a collage using ‘SmartArt” – ‘SmartArt” is the easiest way to create a collage in Microsoft Word and in the shortest time possible. It is a pretty straightforward procedure. Let us take a look at the steps.
● Go to the ‘Insert” option and click on ‘SmartArt”, and then go and click on ‘Picture”, and out of the photo collages that appear in front of you, select one that is either photo-only or is photo-and-text and looks perfect for your purpose.
● By clicking on the picture icon on each photo placeholder, and then choosing ‘Insert”, you can choose to insert photos proportionally, as you please.
● Select a photo and click on the ‘Picture Tools” tab, while moving the photo into a placeholder. You can click on the ‘Crop” button to stretch or shrink a picture according to your wish. Thus, you can easily resize and reshape your pictures and photos in any way you like.
● The last and final step of the Microsoft auto collage option is repositioning the pictures by choosing ‘Move Up” or ‘Move Down”, which can be found under the double-arrow in the ‘SmartArt” frame’s the left side. Thus, you can easily change the entire arrangement of the entire photo collage, quite having to do much.

If you are trying to make a photo collage, you can also go with the **Wondershare Filmora **Video Editor, which has some amazing features, to make your job much easier. It has over 10 million stock media, a huge number of preset templates, and a feature called “Speed Ramping”, which you can use to adjust the speed of your video. It has various kinds of stock media such as “Pixabay”, “Giphy” and “Unsplash”.
For Win 7 or later (64-bit)
For macOS 10.12 or later
It works on a variety of operating systems, such as Windows 7, Windows 8.1, Windows 10, and also Windows 1It has a minimum RAM requirement of 4GB, though 8 GB is recommended for 4K and HD videos. It also requires a minimum of Intel HD Graphics 5000 or newer versions.
● Key Takeaways from This Episode →
●Thus, the entire article can be summarized by saying that there are quite a few ways in which you can create a photo collage in Microsoft Word, using collage Microsoft word and various other Microsoft auto collage options which can be used to make photo collages easily in Microsoft Word.
●With the release of newer versions with more and more features and options, it becomes easier to exercise control over graphical content in Microsoft Word.
●So, the processes are quite straightforward and simple and there should not be much problem in following them as mentioned so many times, there are many collage maker Microsoft options which you can use to make a photo collage with pictures and shapes that you desire.
●The immensity of options enables you to create collages in whichever you like.
Transforming a Slow-Motion Video to Normal: Mastering the Skill
Slow-motion videos bring your videos to life by highlighting the emotions and details of a story. However, transforming a slow motion into a normal video has its benefits. For instance, you can make boomerangs or GIFs with normal videos. In addition, you can introduce limitless transitions and animations to them. Thus, are you also finding how to change slow-motion video to a normal iPhone?
This article is the perfect stop for you as it covers all your slow-motion queries from here. It will focus on how to unslow-mo a video on an iPhone and related tools. We will discuss the iPhone’s pre-built feature and some tools to achieve this. There will be a bonus tip on how to change slow-mo video to normal on iPhone.
Slow Motion Video Maker Slow your video’s speed with better control of your keyframes to create unique cinematic effects!
Make A Slow Motion Video Make A Slow Motion Video More Features

Part 1: Direct Method: Changing Slow Motion Video to Normal on iPhone
You might not be aware of this feature if you are a previous user or have just started using an iPhone. This is Apple’s built-in feature, found in iPhones and iPads. In this section, we have tailored a step-by-step guide to doing this. Here is a brief overview of how to convert a slow-motion video to a normal iPhone:
Step 1
Move to its bottom after opening the “Photos” application on your iPhone. From there, select the “Albums” option and scroll down to the “Slo-mo” option in “Media Types.”

Step 2
In the slow-mo section, find a video you want to reverse and select it to open. Navigate towards the top right corner of this video and click the “Edit” option.

Step 3
An editing panel will appear at the bottom of this video. If you’d notice, a vertical lined bar is under the video timeline. This indicates slow-mo duration, which you can change by repositioning sliders. Afterward, click the “Done” button at the right bottom of this screen to finalize.

Part 2: Top Applications That Can Be Used to Change Slow Motion Video to Normal
The iPhone’s built-in feature is equally effective for reversing a slow-mo back to normal. However, sometimes, one requires a tool for detailed editing. In such cases, we recommend you use a third party to help you achieve the desired results. We have assembled some tools on how to take slow-mo off a video on iPhone below:
- SpeedPro Slow Speed Video Edit
- Slow-Fast Motion Video Editor
- Slow Motion Video Fx Editor
- Reverse Cam – Slow Motion Video
- Slow Motion Video Editor
1. SpeedPro Slow Speed Video Edit
This is a versatile application designed explicitly to resolve the slow speed queries on iPhone. Users can effortlessly manipulate the speed of video during editing. The best part about this editor is that you can select a specific video section. It is up to you to reverse a complete slow-mo video or a part of it.

Key Features
- Facilitates both professionals and amateurs with its reachable user interface.
- After editing a video as super slow or super-fast, you can incorporate music.
- The application offers direct sharing options to vast applications like Instagram or YouTube.
2. Slow-Fast Motion Video Editor
If how to convert slow motion video to normal on an iPhone was a bet, this application would be worth your money. Many content creators have used it, and everyone has positively reviewed it. You can transform a slow-mo into a normal video using its speed option. The highest speed option is 2x, and the slowest speed option is 1/4th. There is no limitation on the video’s length or resolution for conversion.

Key Features
- You can apply different time transitions (fast or slow) to distinct video segments.
- The application doesn’t export with a Watermark addition to maintain professionalism.
- Upon converting a video or reversing it, you can adjust the audio pitch to align with it.
3. SloMo Slow Motion Video Editor
With technological advancements, the editing industry has taken up a notch. This application uses modern algorithms to create or reverse a slow with customizations. To reverse a slow-mo, you just need to upload it and increase the video’s speed. It offers three sorts of speed editing, including slow-mo, time-lapse, and stop-motion. The video speed is adjustable up to 240fps and 12x with quick processing.

Key Features
- With its independent frame manipulation, you can edit specific parts of a video.
- You can incorporate music behind your tracks out of 170+ pre-built music tracks.
- This iPhone editor retains the natural resolution of video to maintain its quality.
4. Reverse Cam – Slow Motion Video
Surfing through the internet to find how to unslow-mo a video on an iPhone? This application assists you in controlling or reversing video speed. You just need to import a previously created slow-mo into the application. In addition to reversing a video, you can also reverse audio tracks with it. There are multiple speed options like 0.25, 0.5x, and more.

Key Features
- After modifying the video speed, you can apply multiple effects to it.
- The application is compatible with iOS 9.0 or newer versions.
- It has a built-in library that users can use to save the edited videos and share them directly.
5. Slow Motion’ Video Editor
Solve all your queries related to how to change slo-mo video to normal on iPhone here. Designed to give your videos a perfect slow-motion or high-speed effect. To convert a slow-mo video into a normal one, it offers speed increase options. You can have complete control over your videos with this application.

Key Features
- It has an accessible and intuitive editing interface for user comprehension.
- It allows you to manipulate the speed of your video from 60 to 240 frames.
- It has multiple subscription options, weekly, monthly, or yearly, that you can avail accordingly.
Bonus Part: Speed Up Your iPhone Video on Desktop Using Wondershare Filmora
All these methods of transforming a slow-mo to normal are accurate and efficient. However, when it comes to perfection, one software stands tall than the others.Wondershare Filmora is a premium video editing software for precise editing. There are two methods of manipulating a slow-motion video to normal in it.
The speed ramping involves slow-mo reverse action from specific video frames. On the other hand, uniform speed modifies the complete video speed. You can add specific values for manipulating the frame rate or change the sliders. In addition, you can also add multiple effects to your video afterward. Moreover, you can also export the video in high resolution and desired format.
Free Download For Win 7 or later(64-bit)
Free Download For macOS 10.14 or later
Step-by-Step Guide to Shift Your Slow-Motion Video to Normal with Filmora
This segment involves a step-by-step guide to reverse a slow-mo. Let’s see how to change slo-mo video to normal on iPhone with Filmora below:
Step 1Import Media Files from iPhone
First, connect your iPhone to the source device you are using Filmora on. Once you have connected the devices, navigate towards the “Import” button. Expand this option, and from the dropdown menu, select “Import from a Camera or Phone.” Select the name of your iPhone in the “Import from” section and click “OK.” Once imported, place the clip in the timeline.

Step 2Access Uniform Speed Option
Then, select the clip in the timeline and navigate towards the settings panel. Afterward, go to the “Speed” tab under “Uniform Speed” set values. Drag the Speed slider towards the right to increase the video speed.

Step 3Export the Edited Video
Hit the “Play” button from the preview window to preview your video. Afterward, navigate towards the “Export” button at the top right corner. You can also set the framerate in the Export window according to preference. Further, hit the “Export” button in the Export window to save the file on the device.

Top Features to Note About Wondershare Filmora
There is more to Filmora than how to unslow-mo a video on an iPhone. The tool shows support with multiple devices like Windows, iOS, Linux, and more. Following are some of the top-notch AI features of Filmora:
1. AI Text-to-Video
Use this tool to craft creative and graphic-based videos along with voice integration. With its generative AI, it allows you to tailor videos in different contexts. It uses text-based instructions to analyze demands and follow them.
2. AI Text-Based Editing
Cutting and Trimming videos in a timeline might be difficult for some people. It requires proper skills; however, there is an alternate option. The text-based editing AI uses voice recognition to convert speech to text. Once the video has been converted, you can eliminate the parts you want.
3. AI Music Generator
If you want to generate music based on your video’s mood or context, use this AI. It asks for a few directions like theme, mood, and language to curate music. The song is efficient in what it is designed for and generates results in seconds.
4. AI Vocal Remover
Background noises always decline the quality of an audio track or overall video. With Filmora, you can separate vocals from background noise and delete the track. Both tracks are shown in the timeline and are easy to remove. Afterward, you can apply effects or introduce music before export.
Conclusion
After reaching a conclusion, one should have fully understood the merits of how to change slow-motion video to a normal iPhone. It provided insights into several useful applications for achieving this effect. Wondershare Filmora emerged as a worthy AI-driven desktop application tailored for crafting such videos. It is recommended to help you with your creative endeavors in this domain.
Make A Slow Motion Video Make A Slow Motion Video More Features

Part 1: Direct Method: Changing Slow Motion Video to Normal on iPhone
You might not be aware of this feature if you are a previous user or have just started using an iPhone. This is Apple’s built-in feature, found in iPhones and iPads. In this section, we have tailored a step-by-step guide to doing this. Here is a brief overview of how to convert a slow-motion video to a normal iPhone:
Step 1
Move to its bottom after opening the “Photos” application on your iPhone. From there, select the “Albums” option and scroll down to the “Slo-mo” option in “Media Types.”

Step 2
In the slow-mo section, find a video you want to reverse and select it to open. Navigate towards the top right corner of this video and click the “Edit” option.

Step 3
An editing panel will appear at the bottom of this video. If you’d notice, a vertical lined bar is under the video timeline. This indicates slow-mo duration, which you can change by repositioning sliders. Afterward, click the “Done” button at the right bottom of this screen to finalize.

Part 2: Top Applications That Can Be Used to Change Slow Motion Video to Normal
The iPhone’s built-in feature is equally effective for reversing a slow-mo back to normal. However, sometimes, one requires a tool for detailed editing. In such cases, we recommend you use a third party to help you achieve the desired results. We have assembled some tools on how to take slow-mo off a video on iPhone below:
- SpeedPro Slow Speed Video Edit
- Slow-Fast Motion Video Editor
- Slow Motion Video Fx Editor
- Reverse Cam – Slow Motion Video
- Slow Motion Video Editor
1. SpeedPro Slow Speed Video Edit
This is a versatile application designed explicitly to resolve the slow speed queries on iPhone. Users can effortlessly manipulate the speed of video during editing. The best part about this editor is that you can select a specific video section. It is up to you to reverse a complete slow-mo video or a part of it.

Key Features
- Facilitates both professionals and amateurs with its reachable user interface.
- After editing a video as super slow or super-fast, you can incorporate music.
- The application offers direct sharing options to vast applications like Instagram or YouTube.
2. Slow-Fast Motion Video Editor
If how to convert slow motion video to normal on an iPhone was a bet, this application would be worth your money. Many content creators have used it, and everyone has positively reviewed it. You can transform a slow-mo into a normal video using its speed option. The highest speed option is 2x, and the slowest speed option is 1/4th. There is no limitation on the video’s length or resolution for conversion.

Key Features
- You can apply different time transitions (fast or slow) to distinct video segments.
- The application doesn’t export with a Watermark addition to maintain professionalism.
- Upon converting a video or reversing it, you can adjust the audio pitch to align with it.
3. SloMo Slow Motion Video Editor
With technological advancements, the editing industry has taken up a notch. This application uses modern algorithms to create or reverse a slow with customizations. To reverse a slow-mo, you just need to upload it and increase the video’s speed. It offers three sorts of speed editing, including slow-mo, time-lapse, and stop-motion. The video speed is adjustable up to 240fps and 12x with quick processing.

Key Features
- With its independent frame manipulation, you can edit specific parts of a video.
- You can incorporate music behind your tracks out of 170+ pre-built music tracks.
- This iPhone editor retains the natural resolution of video to maintain its quality.
4. Reverse Cam – Slow Motion Video
Surfing through the internet to find how to unslow-mo a video on an iPhone? This application assists you in controlling or reversing video speed. You just need to import a previously created slow-mo into the application. In addition to reversing a video, you can also reverse audio tracks with it. There are multiple speed options like 0.25, 0.5x, and more.

Key Features
- After modifying the video speed, you can apply multiple effects to it.
- The application is compatible with iOS 9.0 or newer versions.
- It has a built-in library that users can use to save the edited videos and share them directly.
5. Slow Motion’ Video Editor
Solve all your queries related to how to change slo-mo video to normal on iPhone here. Designed to give your videos a perfect slow-motion or high-speed effect. To convert a slow-mo video into a normal one, it offers speed increase options. You can have complete control over your videos with this application.

Key Features
- It has an accessible and intuitive editing interface for user comprehension.
- It allows you to manipulate the speed of your video from 60 to 240 frames.
- It has multiple subscription options, weekly, monthly, or yearly, that you can avail accordingly.
Bonus Part: Speed Up Your iPhone Video on Desktop Using Wondershare Filmora
All these methods of transforming a slow-mo to normal are accurate and efficient. However, when it comes to perfection, one software stands tall than the others.Wondershare Filmora is a premium video editing software for precise editing. There are two methods of manipulating a slow-motion video to normal in it.
The speed ramping involves slow-mo reverse action from specific video frames. On the other hand, uniform speed modifies the complete video speed. You can add specific values for manipulating the frame rate or change the sliders. In addition, you can also add multiple effects to your video afterward. Moreover, you can also export the video in high resolution and desired format.
Free Download For Win 7 or later(64-bit)
Free Download For macOS 10.14 or later
Step-by-Step Guide to Shift Your Slow-Motion Video to Normal with Filmora
This segment involves a step-by-step guide to reverse a slow-mo. Let’s see how to change slo-mo video to normal on iPhone with Filmora below:
Step 1Import Media Files from iPhone
First, connect your iPhone to the source device you are using Filmora on. Once you have connected the devices, navigate towards the “Import” button. Expand this option, and from the dropdown menu, select “Import from a Camera or Phone.” Select the name of your iPhone in the “Import from” section and click “OK.” Once imported, place the clip in the timeline.

Step 2Access Uniform Speed Option
Then, select the clip in the timeline and navigate towards the settings panel. Afterward, go to the “Speed” tab under “Uniform Speed” set values. Drag the Speed slider towards the right to increase the video speed.

Step 3Export the Edited Video
Hit the “Play” button from the preview window to preview your video. Afterward, navigate towards the “Export” button at the top right corner. You can also set the framerate in the Export window according to preference. Further, hit the “Export” button in the Export window to save the file on the device.

Top Features to Note About Wondershare Filmora
There is more to Filmora than how to unslow-mo a video on an iPhone. The tool shows support with multiple devices like Windows, iOS, Linux, and more. Following are some of the top-notch AI features of Filmora:
1. AI Text-to-Video
Use this tool to craft creative and graphic-based videos along with voice integration. With its generative AI, it allows you to tailor videos in different contexts. It uses text-based instructions to analyze demands and follow them.
2. AI Text-Based Editing
Cutting and Trimming videos in a timeline might be difficult for some people. It requires proper skills; however, there is an alternate option. The text-based editing AI uses voice recognition to convert speech to text. Once the video has been converted, you can eliminate the parts you want.
3. AI Music Generator
If you want to generate music based on your video’s mood or context, use this AI. It asks for a few directions like theme, mood, and language to curate music. The song is efficient in what it is designed for and generates results in seconds.
4. AI Vocal Remover
Background noises always decline the quality of an audio track or overall video. With Filmora, you can separate vocals from background noise and delete the track. Both tracks are shown in the timeline and are easy to remove. Afterward, you can apply effects or introduce music before export.
Conclusion
After reaching a conclusion, one should have fully understood the merits of how to change slow-motion video to a normal iPhone. It provided insights into several useful applications for achieving this effect. Wondershare Filmora emerged as a worthy AI-driven desktop application tailored for crafting such videos. It is recommended to help you with your creative endeavors in this domain.
12 Best Marketing Slideshow Templates
12 Best Marketing Slideshow Templates
An easy yet powerful editor
Numerous effects to choose from
Detailed tutorials provided by the official channel
For any kind of business or organization, marketing plays a major role in the brand introduction, awareness, driving sales, and other purposes. A good marketing plan involves a good slideshow and for creating one, the help of a template can be taken.
So, if you too want to create a marketing template for your business or a brand, keep reading the content below to know about the best places to get templates, tools for creating a marketing plan slideshow, and other related content.
In this article
01 [Importance of a good marketing slideshow](#Part 1)
02 [Tips for creating an effective slideshow](#Part 2)
03 [Best places to search for marketing slideshow templates](#Part 3)
04 [Hassle-free tool for creating an impressive marketing slideshow- Wondershare Filmora](#Part 4)
Part 1 Importance of a good marketing slideshow
A good marketing slideshow serves several benefits and some of them are listed below.
01Building brand awareness and reputation
One of the major purposes and benefits of creating a marketing slideshow is creating brand awareness and recognition among prospective buyers and clients. Using a slideshow, you can present your products and services to your clients and buyers in an interesting and attractive manner.
02Helps in boosting sales
Using a good marketing slideshow presentation, a company can better market their products and reach more clients and prospective buyers which in turn helps in boosting the sales and revenues of the company.
03Helps in creating a reputation
Through a good slideshow, a company can market their products effectively, help the client know about their benefits, and also how it is better than the competitors. Moreover, through a slideshow, you can display the caption, images, and the logo of the company which altogether helps in creating a brand reputation.
04Reaching a wider audience
A slideshow is a technical piece of marketing that can be shared with a huge number of people online. So not only the clients and customers in your vicinity, a marketing slideshow can be sent through mails and other online means which all, in turn, help you to reach people all across the country as well as worldwide.
Part 2 Tips for creating an effective slideshow
As discussed above, there are several benefits of a good marketing slideshow. Now, next comes how can one create an impressive slideshow to get the attention of the clients. Below listed are some useful tips.
01Attractive and impressive
The most important aspect of any slideshow is its presentation and thus while creating one ensure that it is impressive to catch the attention of the clients. An effective presentation must be created to stir the client’s and prospective buyers’ interests in the product and services.
02Powerful message
To strongly build your brand and reputation, the slideshow presentation must have a strong message that holds the attention. The message can revolve around the product, services, or any other relevant thing.
03Make the presentation memorable
It is important for a presentation to be memorable in the minds of the clients and prospective buyers so that it can turn into sales. Ensure that even people with a short attention span can relate to your product and services for a long time.
04Reaching out to a wider audience
Depending on the type of product or service you are promoting, the slideshow presentation is created. Still, try to make a slideshow that can reach out to the maximum number of people in the selected community. The slideshow should be targeted to a wider audience.
05Add multiple elements
To make your slideshow interesting, multiple elements like photos, videos, text, and other elements can be used. With the advanced technology these days there are several tools and software available that can help you get this task done in no time.
06Use templates
Readymade templates in different categories are available for creating a slideshow presentation. These templates not only save time and effort but will also help you create a professional-looking presentation with interesting elements. There are several sites from which you can download the templates of your choice.

Part 3 Best places to search for marketing slideshow templates
There are several sites that have a collection of marketing templates in different styles and designs. Depending on your product, services, and theme, you can choose between these templates and sites. To make your search a little easier, below listed are some of the sites where you can look for a good marketing slideshow presentation template.
● Slidesgo
● SlidesCarnival
● Canva
● Visme
● Grapichmama
● CreativeMarket
● Wondershare Filmora
Part 4 Hassle-free tool for creating an impressive marketing slideshow- Wondershare Filmora
Creating an impressive slideshow can be done in a hassle-free manner using professional software and here we recommend Wondershare Filmora Video Editor as the best choice. This versatile video editing tool is packed in with an array of video customization as well as other functions which also includes creating a slideshow.
For Win 7 or later (64-bit)
For macOS 10.12 or later
A marketing, as well as other templates, can be created in a few simple steps using the software that also has a collection of templates in different categories. There is also a huge collection of stock footage with the tool that can be added to your presentation to make it interesting.
Videos, images, audio, text, as well as other elements, can be added to the slideshow using the software. Some other key features of the software include support for all key formats, multiple editing functions, visual effects, and transitions, split-screen function, speed ramping, masking, audio-beat sync, and many more.

Steps for creating a slideshow using Wondershare Filmora
Step 1. Download, install and launch the Wondershare Filmora software on your system. Tap on the New Project button for creating a new slideshow.
Step 2. Import and add the images, videos, and music files from your system to the Media Library of the software. These files then need to be added to the timeline. As needed, the order and the duration of the files can be changed at the timeline. You can even rotate, and crop the files.
Step 3. Next, you can add the transitions from the wide range of options available. As needed, add a transition between each slide or between selected ones.
Step 4. Add the music or the sound effect to your slideshow. A file from the built-in library can also be selected.
Step 5. Finally, save and export the slideshow created. You can save the presentation to your system, CD, DVD, or can even share it directly to YouTube or Vimeo.
● Ending Thoughts →
● A marketing slideshow is one of the key elements of an overall marketing campaign or a strategy.
● An array of templates is available for creating a marketing slideshow in a hassle-free manner.
● Wondershare Filmora is an excellent tool to check out the templates as well as for creating an eye-catchy slideshow.
For any kind of business or organization, marketing plays a major role in the brand introduction, awareness, driving sales, and other purposes. A good marketing plan involves a good slideshow and for creating one, the help of a template can be taken.

So, if you too want to create a marketing template for your business or a brand, keep reading the content below to know about the best places to get templates, tools for creating a marketing plan slideshow, and other related content.
In this article
01 [Importance of a good marketing slideshow](#Part 1)
02 [Tips for creating an effective slideshow](#Part 2)
03 [Best places to search for marketing slideshow templates](#Part 3)
04 [Hassle-free tool for creating an impressive marketing slideshow- Wondershare Filmora](#Part 4)
Part 1 Importance of a good marketing slideshow
A good marketing slideshow serves several benefits and some of them are listed below.
01Building brand awareness and reputation
One of the major purposes and benefits of creating a marketing slideshow is creating brand awareness and recognition among prospective buyers and clients. Using a slideshow, you can present your products and services to your clients and buyers in an interesting and attractive manner.
02Helps in boosting sales
Using a good marketing slideshow presentation, a company can better market their products and reach more clients and prospective buyers which in turn helps in boosting the sales and revenues of the company.
03Helps in creating a reputation
Through a good slideshow, a company can market their products effectively, help the client know about their benefits, and also how it is better than the competitors. Moreover, through a slideshow, you can display the caption, images, and the logo of the company which altogether helps in creating a brand reputation.
04Reaching a wider audience
A slideshow is a technical piece of marketing that can be shared with a huge number of people online. So not only the clients and customers in your vicinity, a marketing slideshow can be sent through mails and other online means which all, in turn, help you to reach people all across the country as well as worldwide.
Part 2 Tips for creating an effective slideshow
As discussed above, there are several benefits of a good marketing slideshow. Now, next comes how can one create an impressive slideshow to get the attention of the clients. Below listed are some useful tips.
01Attractive and impressive
The most important aspect of any slideshow is its presentation and thus while creating one ensure that it is impressive to catch the attention of the clients. An effective presentation must be created to stir the client’s and prospective buyers’ interests in the product and services.
02Powerful message
To strongly build your brand and reputation, the slideshow presentation must have a strong message that holds the attention. The message can revolve around the product, services, or any other relevant thing.
03Make the presentation memorable
It is important for a presentation to be memorable in the minds of the clients and prospective buyers so that it can turn into sales. Ensure that even people with a short attention span can relate to your product and services for a long time.
04Reaching out to a wider audience
Depending on the type of product or service you are promoting, the slideshow presentation is created. Still, try to make a slideshow that can reach out to the maximum number of people in the selected community. The slideshow should be targeted to a wider audience.
05Add multiple elements
To make your slideshow interesting, multiple elements like photos, videos, text, and other elements can be used. With the advanced technology these days there are several tools and software available that can help you get this task done in no time.
06Use templates
Readymade templates in different categories are available for creating a slideshow presentation. These templates not only save time and effort but will also help you create a professional-looking presentation with interesting elements. There are several sites from which you can download the templates of your choice.

Part 3 Best places to search for marketing slideshow templates
There are several sites that have a collection of marketing templates in different styles and designs. Depending on your product, services, and theme, you can choose between these templates and sites. To make your search a little easier, below listed are some of the sites where you can look for a good marketing slideshow presentation template.
● Slidesgo
● SlidesCarnival
● Canva
● Visme
● Grapichmama
● CreativeMarket
● Wondershare Filmora

Part 4 Hassle-free tool for creating an impressive marketing slideshow- Wondershare Filmora
Creating an impressive slideshow can be done in a hassle-free manner using professional software and here we recommend Wondershare Filmora Video Editor as the best choice. This versatile video editing tool is packed in with an array of video customization as well as other functions which also includes creating a slideshow.
For Win 7 or later (64-bit)
For macOS 10.12 or later
A marketing, as well as other templates, can be created in a few simple steps using the software that also has a collection of templates in different categories. There is also a huge collection of stock footage with the tool that can be added to your presentation to make it interesting.
Videos, images, audio, text, as well as other elements, can be added to the slideshow using the software. Some other key features of the software include support for all key formats, multiple editing functions, visual effects, and transitions, split-screen function, speed ramping, masking, audio-beat sync, and many more.

Steps for creating a slideshow using Wondershare Filmora
Step 1. Download, install and launch the Wondershare Filmora software on your system. Tap on the New Project button for creating a new slideshow.
Step 2. Import and add the images, videos, and music files from your system to the Media Library of the software. These files then need to be added to the timeline. As needed, the order and the duration of the files can be changed at the timeline. You can even rotate, and crop the files.
Step 3. Next, you can add the transitions from the wide range of options available. As needed, add a transition between each slide or between selected ones.
Step 4. Add the music or the sound effect to your slideshow. A file from the built-in library can also be selected.
Step 5. Finally, save and export the slideshow created. You can save the presentation to your system, CD, DVD, or can even share it directly to YouTube or Vimeo.
● Ending Thoughts →
● A marketing slideshow is one of the key elements of an overall marketing campaign or a strategy.
● An array of templates is available for creating a marketing slideshow in a hassle-free manner.
● Wondershare Filmora is an excellent tool to check out the templates as well as for creating an eye-catchy slideshow.
For any kind of business or organization, marketing plays a major role in the brand introduction, awareness, driving sales, and other purposes. A good marketing plan involves a good slideshow and for creating one, the help of a template can be taken.

So, if you too want to create a marketing template for your business or a brand, keep reading the content below to know about the best places to get templates, tools for creating a marketing plan slideshow, and other related content.
In this article
01 [Importance of a good marketing slideshow](#Part 1)
02 [Tips for creating an effective slideshow](#Part 2)
03 [Best places to search for marketing slideshow templates](#Part 3)
04 [Hassle-free tool for creating an impressive marketing slideshow- Wondershare Filmora](#Part 4)
Part 1 Importance of a good marketing slideshow
A good marketing slideshow serves several benefits and some of them are listed below.
01Building brand awareness and reputation
One of the major purposes and benefits of creating a marketing slideshow is creating brand awareness and recognition among prospective buyers and clients. Using a slideshow, you can present your products and services to your clients and buyers in an interesting and attractive manner.
02Helps in boosting sales
Using a good marketing slideshow presentation, a company can better market their products and reach more clients and prospective buyers which in turn helps in boosting the sales and revenues of the company.
03Helps in creating a reputation
Through a good slideshow, a company can market their products effectively, help the client know about their benefits, and also how it is better than the competitors. Moreover, through a slideshow, you can display the caption, images, and the logo of the company which altogether helps in creating a brand reputation.
04Reaching a wider audience
A slideshow is a technical piece of marketing that can be shared with a huge number of people online. So not only the clients and customers in your vicinity, a marketing slideshow can be sent through mails and other online means which all, in turn, help you to reach people all across the country as well as worldwide.
Part 2 Tips for creating an effective slideshow
As discussed above, there are several benefits of a good marketing slideshow. Now, next comes how can one create an impressive slideshow to get the attention of the clients. Below listed are some useful tips.
01Attractive and impressive
The most important aspect of any slideshow is its presentation and thus while creating one ensure that it is impressive to catch the attention of the clients. An effective presentation must be created to stir the client’s and prospective buyers’ interests in the product and services.
02Powerful message
To strongly build your brand and reputation, the slideshow presentation must have a strong message that holds the attention. The message can revolve around the product, services, or any other relevant thing.
03Make the presentation memorable
It is important for a presentation to be memorable in the minds of the clients and prospective buyers so that it can turn into sales. Ensure that even people with a short attention span can relate to your product and services for a long time.
04Reaching out to a wider audience
Depending on the type of product or service you are promoting, the slideshow presentation is created. Still, try to make a slideshow that can reach out to the maximum number of people in the selected community. The slideshow should be targeted to a wider audience.
05Add multiple elements
To make your slideshow interesting, multiple elements like photos, videos, text, and other elements can be used. With the advanced technology these days there are several tools and software available that can help you get this task done in no time.
06Use templates
Readymade templates in different categories are available for creating a slideshow presentation. These templates not only save time and effort but will also help you create a professional-looking presentation with interesting elements. There are several sites from which you can download the templates of your choice.

Part 3 Best places to search for marketing slideshow templates
There are several sites that have a collection of marketing templates in different styles and designs. Depending on your product, services, and theme, you can choose between these templates and sites. To make your search a little easier, below listed are some of the sites where you can look for a good marketing slideshow presentation template.
● Slidesgo
● SlidesCarnival
● Canva
● Visme
● Grapichmama
● CreativeMarket
● Wondershare Filmora

Part 4 Hassle-free tool for creating an impressive marketing slideshow- Wondershare Filmora
Creating an impressive slideshow can be done in a hassle-free manner using professional software and here we recommend Wondershare Filmora Video Editor as the best choice. This versatile video editing tool is packed in with an array of video customization as well as other functions which also includes creating a slideshow.
For Win 7 or later (64-bit)
For macOS 10.12 or later
A marketing, as well as other templates, can be created in a few simple steps using the software that also has a collection of templates in different categories. There is also a huge collection of stock footage with the tool that can be added to your presentation to make it interesting.
Videos, images, audio, text, as well as other elements, can be added to the slideshow using the software. Some other key features of the software include support for all key formats, multiple editing functions, visual effects, and transitions, split-screen function, speed ramping, masking, audio-beat sync, and many more.

Steps for creating a slideshow using Wondershare Filmora
Step 1. Download, install and launch the Wondershare Filmora software on your system. Tap on the New Project button for creating a new slideshow.
Step 2. Import and add the images, videos, and music files from your system to the Media Library of the software. These files then need to be added to the timeline. As needed, the order and the duration of the files can be changed at the timeline. You can even rotate, and crop the files.
Step 3. Next, you can add the transitions from the wide range of options available. As needed, add a transition between each slide or between selected ones.
Step 4. Add the music or the sound effect to your slideshow. A file from the built-in library can also be selected.
Step 5. Finally, save and export the slideshow created. You can save the presentation to your system, CD, DVD, or can even share it directly to YouTube or Vimeo.
● Ending Thoughts →
● A marketing slideshow is one of the key elements of an overall marketing campaign or a strategy.
● An array of templates is available for creating a marketing slideshow in a hassle-free manner.
● Wondershare Filmora is an excellent tool to check out the templates as well as for creating an eye-catchy slideshow.
For any kind of business or organization, marketing plays a major role in the brand introduction, awareness, driving sales, and other purposes. A good marketing plan involves a good slideshow and for creating one, the help of a template can be taken.

So, if you too want to create a marketing template for your business or a brand, keep reading the content below to know about the best places to get templates, tools for creating a marketing plan slideshow, and other related content.
In this article
01 [Importance of a good marketing slideshow](#Part 1)
02 [Tips for creating an effective slideshow](#Part 2)
03 [Best places to search for marketing slideshow templates](#Part 3)
04 [Hassle-free tool for creating an impressive marketing slideshow- Wondershare Filmora](#Part 4)
Part 1 Importance of a good marketing slideshow
A good marketing slideshow serves several benefits and some of them are listed below.
01Building brand awareness and reputation
One of the major purposes and benefits of creating a marketing slideshow is creating brand awareness and recognition among prospective buyers and clients. Using a slideshow, you can present your products and services to your clients and buyers in an interesting and attractive manner.
02Helps in boosting sales
Using a good marketing slideshow presentation, a company can better market their products and reach more clients and prospective buyers which in turn helps in boosting the sales and revenues of the company.
03Helps in creating a reputation
Through a good slideshow, a company can market their products effectively, help the client know about their benefits, and also how it is better than the competitors. Moreover, through a slideshow, you can display the caption, images, and the logo of the company which altogether helps in creating a brand reputation.
04Reaching a wider audience
A slideshow is a technical piece of marketing that can be shared with a huge number of people online. So not only the clients and customers in your vicinity, a marketing slideshow can be sent through mails and other online means which all, in turn, help you to reach people all across the country as well as worldwide.
Part 2 Tips for creating an effective slideshow
As discussed above, there are several benefits of a good marketing slideshow. Now, next comes how can one create an impressive slideshow to get the attention of the clients. Below listed are some useful tips.
01Attractive and impressive
The most important aspect of any slideshow is its presentation and thus while creating one ensure that it is impressive to catch the attention of the clients. An effective presentation must be created to stir the client’s and prospective buyers’ interests in the product and services.
02Powerful message
To strongly build your brand and reputation, the slideshow presentation must have a strong message that holds the attention. The message can revolve around the product, services, or any other relevant thing.
03Make the presentation memorable
It is important for a presentation to be memorable in the minds of the clients and prospective buyers so that it can turn into sales. Ensure that even people with a short attention span can relate to your product and services for a long time.
04Reaching out to a wider audience
Depending on the type of product or service you are promoting, the slideshow presentation is created. Still, try to make a slideshow that can reach out to the maximum number of people in the selected community. The slideshow should be targeted to a wider audience.
05Add multiple elements
To make your slideshow interesting, multiple elements like photos, videos, text, and other elements can be used. With the advanced technology these days there are several tools and software available that can help you get this task done in no time.
06Use templates
Readymade templates in different categories are available for creating a slideshow presentation. These templates not only save time and effort but will also help you create a professional-looking presentation with interesting elements. There are several sites from which you can download the templates of your choice.

Part 3 Best places to search for marketing slideshow templates
There are several sites that have a collection of marketing templates in different styles and designs. Depending on your product, services, and theme, you can choose between these templates and sites. To make your search a little easier, below listed are some of the sites where you can look for a good marketing slideshow presentation template.
● Slidesgo
● SlidesCarnival
● Canva
● Visme
● Grapichmama
● CreativeMarket
● Wondershare Filmora

Part 4 Hassle-free tool for creating an impressive marketing slideshow- Wondershare Filmora
Creating an impressive slideshow can be done in a hassle-free manner using professional software and here we recommend Wondershare Filmora Video Editor as the best choice. This versatile video editing tool is packed in with an array of video customization as well as other functions which also includes creating a slideshow.
For Win 7 or later (64-bit)
For macOS 10.12 or later
A marketing, as well as other templates, can be created in a few simple steps using the software that also has a collection of templates in different categories. There is also a huge collection of stock footage with the tool that can be added to your presentation to make it interesting.
Videos, images, audio, text, as well as other elements, can be added to the slideshow using the software. Some other key features of the software include support for all key formats, multiple editing functions, visual effects, and transitions, split-screen function, speed ramping, masking, audio-beat sync, and many more.

Steps for creating a slideshow using Wondershare Filmora
Step 1. Download, install and launch the Wondershare Filmora software on your system. Tap on the New Project button for creating a new slideshow.
Step 2. Import and add the images, videos, and music files from your system to the Media Library of the software. These files then need to be added to the timeline. As needed, the order and the duration of the files can be changed at the timeline. You can even rotate, and crop the files.
Step 3. Next, you can add the transitions from the wide range of options available. As needed, add a transition between each slide or between selected ones.
Step 4. Add the music or the sound effect to your slideshow. A file from the built-in library can also be selected.
Step 5. Finally, save and export the slideshow created. You can save the presentation to your system, CD, DVD, or can even share it directly to YouTube or Vimeo.
● Ending Thoughts →
● A marketing slideshow is one of the key elements of an overall marketing campaign or a strategy.
● An array of templates is available for creating a marketing slideshow in a hassle-free manner.
● Wondershare Filmora is an excellent tool to check out the templates as well as for creating an eye-catchy slideshow.
Also read:
- Updated What Is an Eye Zoom Transition Effect? Its a Close-Up Video Effect Allowing Viewers to Transit to the Next Clip From the Eye
- Updated In 2024, How to Make an Adobe Slideshow the Easy Way
- In 2024, Tutorial | How to Make a Smooth Speed Ramping in Premiere Pro?
- Updated How to Brighten a Video in Windows 10 | Step-By-Step Guide
- Updated 2024 Approved How to Change Video Resolution in Filmora
- New Finding The Finest Way To Add Subtitles to Videos | Filmora for 2024
- In 2024, Using VN Editor To Add Luts for Video Editing
- Updated In 2024, How Much Wedding Videographer Cost
- New Everything You Need to Know About Color Grading in Photography for 2024
- Updated In 2024, Best Guide for Setting TikTok Countdown Timer
- 7 Solutions to Cut Video on Mac without Using FFmpeg for 2024
- WMV File Format Has Many Benefits over the Video Industry. If You Are Excited to Know More About the Format and Its Pros and Cons, Then Lets Start the Discussion for 2024
- New What Is AI Composite Video App and AI Composite Video Tutorial
- New 10 Matching Color Combination That Works Together for 2024
- Updated Top 15 Slow Motion CapCut Templates to Work With
- Updated Powerpoint Supported Video Format and User Tips for 2024
- New 2024 Approved How to Make GIFs From Videos on Mac
- New Easy Guide to Zoom Video in VLC
- How to Create Video Contents That Convert Sales
- 2024 Approved How To Quick Guide for Creating Google Slideshows
- Updated WebM to GIF Converters (Online and Offline Solutions)
- Updated In 2024, Camtasia Review – Is It The Best Video Editor?
- Updated 4 Ways to Rotate Videos on Windows PC for 2024
- 2024 Approved How to Make a YouTube Intro by Filmora
- 2024 Approved Replacing Sky Background Using Adobe Photoshop A Comprehensive Guide
- Updated How to Add Subtitles to MKV Videos on All Platforms for 2024
- We Will Give You the Best-Suggested List of Color Match Generators to Help You Choose From an Efficient Collection Rather than Finding It Aimlessly for 2024
- In 2024, Keyframes Interval Everything You Need To Know
- In 2024, Want to Find a Good Camera for YouTube? This Article Brings You some of the Best Options of Different Varieties for Your Channel
- 2024 Approved How to Rotate Video in iMovie with Alternative
- In 2024, Do You Want to Explore some Available Opportunities to Create Slow Motion? Discover the Best Slow-Motion Video Editors for Desktop, Android, and iPhone Here
- New How to Splice Videos Together on iPhone
- Updated How to Edit FLV Video Files with FLV Editor Windows, Mac,Android, iPhone & Online for 2024
- New The Most Efficient Ways to Manage Your Timeline for 2024
- New In 2024, Best Ai Generated Memes
- Updated Motion Blur Photo With GIMP Step-By-Step Guide
- Steps to Remove Background Noise From Video Sony Vegas for 2024
- Updated In 2024, How to Change Aspect Ratio of Video?
- In 2024, This Article Aims to Show You How to Improve Your Lighting in the Sun
- 2024 Approved Hitfilm Express - A Guide to Download, Install, Key Features
- 2024 Approved 15 Camera Shake Preset for Premiere Pro to Add Camera Shake with Simple Keyframes. Each Preset Is Editable with Easy Steps. Make Your Video Shocking and Impressive with These Camera Shake Effects
- New 10 Best Free Spanish Text To Speech Converter Websites for 2024
- Do You Need More Time to Explain a Particular Screen or Moment in Your Recording Using an Extended Freeze-Frame? Learn How to Use Camtasia Freeze-Frame to Extend Parts of a Video Effectively
- Updated Best Ideas on Using Filmora Green Screen for 2024
- How Can I Use a Fake GPS Without Mock Location On Realme 12 5G? | Dr.fone
- How to Unlock Apple iPhone 12 Pro Passcode without Computer?
- 10 Best Fake GPS Location Spoofers for Vivo Y55s 5G (2023) | Dr.fone
- How to Unlock Samsung Galaxy A34 5G Phone without Any Data Loss
- Network Locked SIM Card Inserted On Your Lenovo Phone? Unlock It Now
- Android Safe Mode - How to Turn off Safe Mode on Infinix Smart 8 HD? | Dr.fone
- How and Where to Find a Shiny Stone Pokémon For Vivo Y78 5G? | Dr.fone
- Unable to Save Excel 2023 Workbook Issue Fix 2024 | Stellar
- In 2024, How to Transfer Everything from Apple iPhone SE (2020) to iPhone | Dr.fone
- The Updated Method to Bypass ZTE Blade A73 5G FRP
- In 2024, Additional Tips About Sinnoh Stone For Realme GT 3 | Dr.fone
- 11 Best Location Changers for Xiaomi Redmi Note 12R | Dr.fone
- How to Repair corrupt MP4 and MOV files of Vivo Y78 5G using Video Repair Utility on Mac?
- How To Transfer WhatsApp From Apple iPhone 15 Pro to others devices? | Dr.fone
- How To Do Vivo X100 Pro Screen Sharing | Dr.fone
- How to Reset Apple iPhone XS to Factory Settings? | Dr.fone
- A Step-by-Step Guide on Using ADB and Fastboot to Remove FRP Lock from your Vivo V29 Pro
- In 2024, Your Account Has Been Disabled in the App Store and iTunes From Apple iPhone X?
- Title: New How to Blur a Still or Moving Part of Video
- Author: Chloe
- Created at : 2024-05-20 03:38:05
- Updated at : 2024-05-21 03:38:05
- Link: https://ai-editing-video.techidaily.com/new-how-to-blur-a-still-or-moving-part-of-video/
- License: This work is licensed under CC BY-NC-SA 4.0.

