:max_bytes(150000):strip_icc():format(webp)/how-to-make-a-song-your-ringtone-on-android-4777573-5d571b57c5a5436e91ebb7fcae1c2b6b.jpg)
New How to Change Frame Rate in Premiere Pro for 2024

How to Change Frame Rate in Premiere Pro
The video’s frame rate is an important aspect of it. Too high of a frame rate makes the video seem unnatural. On the other hand, too low can make some videos choppy. You can fix that by changing the frame rate using a video editor. And we are here to help you learn how to do that. Here’s how to change the frame rate in Premiere Pro.
The frame rate sometimes makes or breaks the video. So it is important to get this setting right. Suppose you made a mistake and recorded your video in the wrong setting. You can follow this guide to solve your problem.
How To Check Video Frame Rate in Premiere Pro
Before we teach you how to change a video’s frame rate in Premiere Pro, let’s first make sure you know how to check. Maybe you don’t need to modify the video because it is already in the correct setting.
So how do you do that in Premiere Pro?
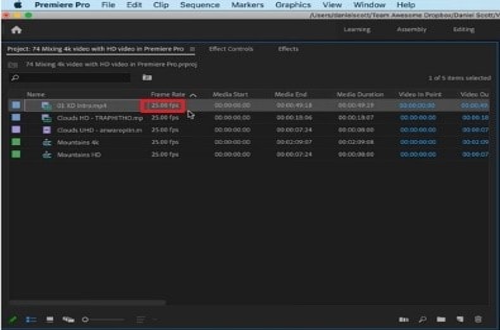
- Import the video to Adobe Premiere Pro.
- Check the “Media” window. Next to the video file name is its frame rate. It is written in the format x.00 fps. FPS stands for “frames per second,” which is used interchangeably with the term frame rate.
Reasons for Changing Frame Rate
Suppose you have an action-packed video. It would not look great at 30 fps - it will look too choppy. That will give your audience a rotten viewing experience. By increasing the frames, you can make the motion more fluid and smoother.
Increasing the frames per second also results in better slow-motion videos. A 30 fps one would not look good with this effect because it does not show smooth motion. Thus, we recommend making the video at least 60 fps.
However, a higher frame rate does not always mean better videos. It can result in what they call the “soap opera effect.” It means the video shows too many details. That makes the videos seem “unnatural” or less cinematic.
High frame rates make videos look more realistic since there is less stuttering and motion blur between frames. That’s great. But for older audiences - the ones used to watching videos at 24 fps, it can be off-putting. So it’s also important to consider your target audience when deciding the right frame rate for your video.
With these reasons in mind, you may want to change your video’s frame rate.
How To Change FPS in Premiere Pro
Let’s dilly-dally no more. Here’s a quick guide on how to change fps in Adobe Premiere Pro. This program gives you two different ways to change fps. One is changing the frame rate of a sequence; the other is changing the frame rate of the video clip. We will teach you how to do both.
l Change the Frame Rate of a Sequence
Suppose you want to keep the frame rate of most of the video the same. Only some parts need adjusting. You can change the frame rate of the sequences that need changing instead. Here are the steps to follow to achieve this:
- Open your project in Adobe Premiere Pro.
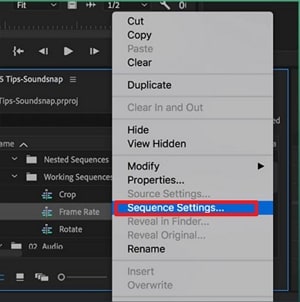
- In the Project panel, select the sequence whose frame rate you want to change. Right-click on that sequence.
- Choose “Sequence Settings” from the menu that appears.
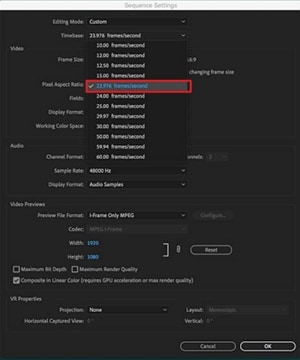
- Click the drop-down menu for “Timebase.”
- Select the frame rate you want the sequence to be in.
- Click “OK.”
l Change the Frame Rate of a Video Clip
Here are the steps you should follow if you want to change the frame rate of an entire video clip.
- Import your video clip to Premiere Pro and drag it to the timeline.
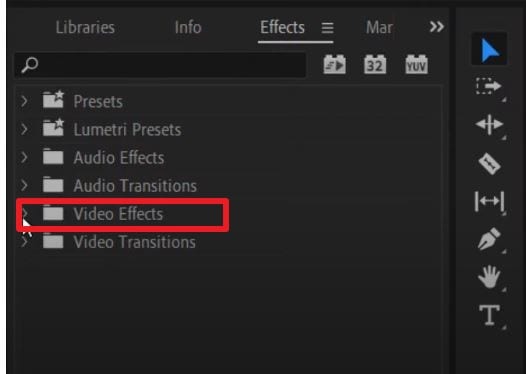
- Go to the “Effects” tab. It’s in the options at the bottom left of the screen.
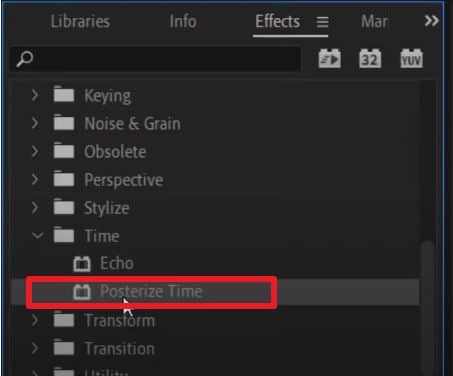
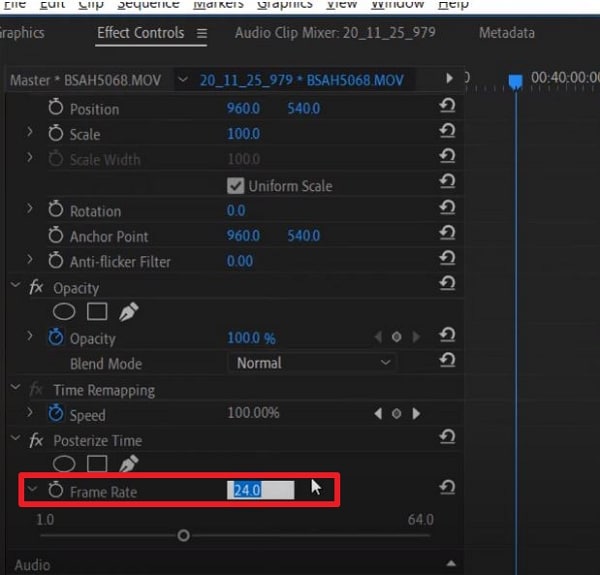
- Select “Video Effects” > “Time” > “Posterize Time.”
- Drag and drop the Posterize Time effect to the clip whose frame rate you want to change.
- Click “Effect Controls” at the top left of the screen.
- Select the small “arrow” button next to the “Frame Rate” text under “Posterize Time.”
- Change the frame rate to your preferred setting. For example, type “60” to make the video 60 fps.
- Click “Sequence” > “Render Selection.”
And that’s it! That is how you change a video clip’s frame rate in Adobe Premiere Pro.
How To Make 120 FPS Videos With Premiere Pro
Videos that are 120 fps are very popular now. If you are a gaming content creator on YouTube, you probably record videos at this frame rate. You’d want to edit that footage and export it at the same frame rate.
Adobe Premiere Pro allows you to do that. But it’s a little bit of a hidden feature. When creating a sequence, you may notice that the highest the frame rate can go is 60 frames per second. That’s obviously not the number that we want. Don’t worry. There is a workaround. The best thing is that it’s super easy.
Follow these steps to change your video to 120 fps:
- Import your 120 fps video to Adobe Premiere Pro.
- Select your footage. Drag it to your timeline or the tab where the text says, “Drop media here to create sequence.”
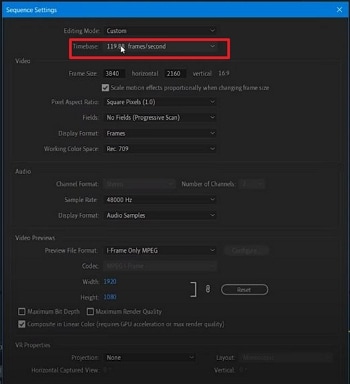
- Select the timeline panel. Click “Sequence” > “Sequence Settings.”
- Check the “Timebase” section. It should say “119.88 frames/second,” 120 fps when rounded off.
- Edit the video as needed and render it. The output should stay at 120 fps.
How To Change Video From 30 FPS to 60 FPS in Premiere Pro
Do you have a video recorded at 30 frames per second, and do you want it at 60? Here’s a simple solution to that. Follow these steps in Adobe Premiere Pro to double the video’s frame rate.
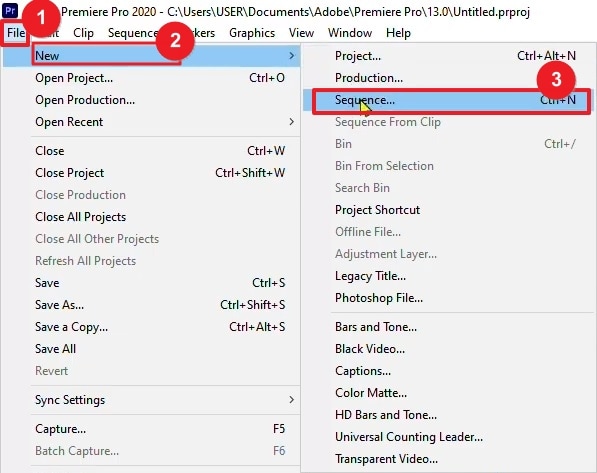
- Open Adobe Premiere Pro. Click “File” > “New” > “Sequence.”
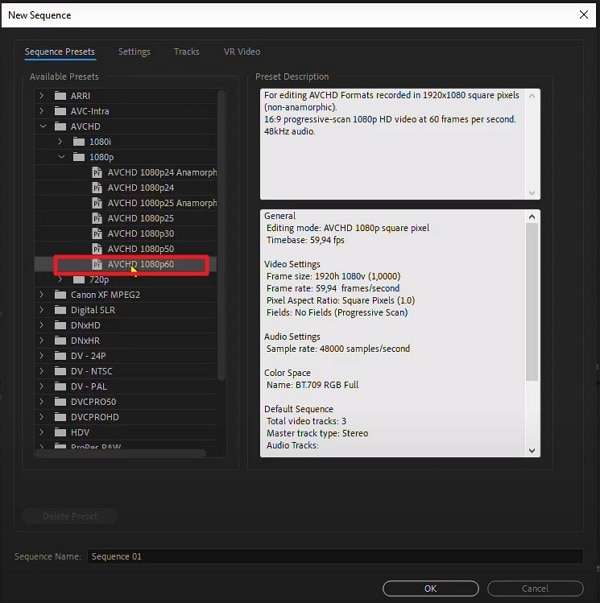
- Click “AVCHD” > “1080p” > “AVCHD 1080p60” > “OK.”
- Import your 30 fps video into Adobe Premiere Pro.
- Drag the video into the timeline.
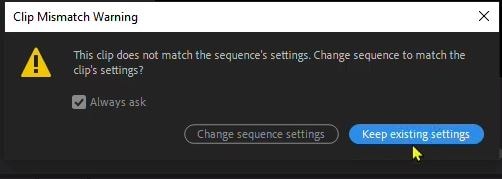
- Click “Keep existing settings.”
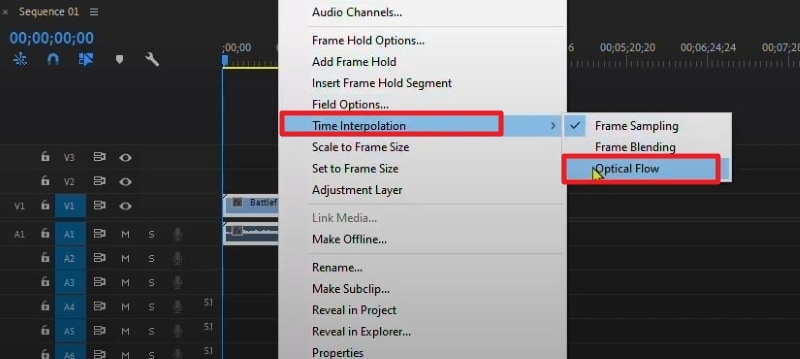
- Right-click the video in the timeline. Select “Time interpolation” > “Optical Flow.”
- Press the “Enter” key. Wait for the processing to finish. This can take hours.
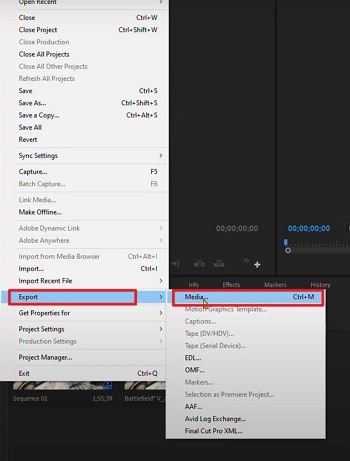
- Click “File” > “Export” > “Media.”
- Select a preset.
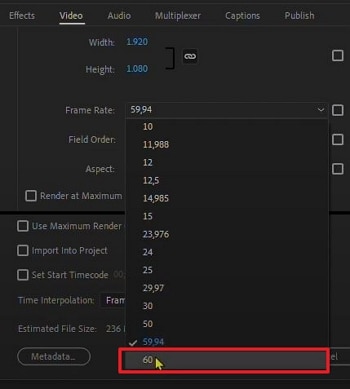
- Scroll down to the “Effects” section to check if the frame rate is at 60 fps. If not, change it to 60 fps.
- Click “Export.”
[Bonus] Wondershare Filmora - Premiere Pro’s Alternative
Free Download For Win 7 or later(64-bit)
Free Download For macOS 10.14 or later
What if you don’t have Adobe Premiere Pro or don’t like this tool? What’s a good alternative? That would be Wondershare Filmora.

Why use Filmora as a substitute for Premiere Pro? This video editor offers lots of great features, basic or advanced. With these at your fingertips, you can bring your videos to the next level and wow your audiences.
Among Filmora’s handy features is the ability to quickly change a video’s frame rate. You don’t even need to be a video editing expert to do it with this software! That’s how straightforward the process is.
How To Change the Frame Rate in Wondershare Filmora
Changing a video’s frame rate in Wondershare Filmora is super easy. Even a child can do it due to how simple the steps are. Here, read this 5-step guide to change a video’s frame rate using this amazing video editor.
- Launch Wondershare Filmora and create a new project.

- Import the video whose frame rate you want to change.
- Drag the video into the timeline.
![]()
- Click “Export.”
- Select the format you want the output file to be in. Find the “Frame Rate” in the options, click the drop-down menu, and select the frame rate that you want. Click “Export.”

Conclusion
Getting the frame rate of a video right is important, so you should not neglect it. It greatly affects your audience’s viewing experience. Thankfully, if you make mistakes, you can correct them with video editors like Premiere Pro. If it’s not to your liking, you can use Wondershare Filmora instead - it’s the best alternative.
Filmora lets you change a video’s frame rate very easily. Also, it gives you a bunch of other features you might enjoy using. And here’s some good news: this software app is affordable! You can also download the free trial to give it a shot.
Free Download For macOS 10.14 or later
What if you don’t have Adobe Premiere Pro or don’t like this tool? What’s a good alternative? That would be Wondershare Filmora.

Why use Filmora as a substitute for Premiere Pro? This video editor offers lots of great features, basic or advanced. With these at your fingertips, you can bring your videos to the next level and wow your audiences.
Among Filmora’s handy features is the ability to quickly change a video’s frame rate. You don’t even need to be a video editing expert to do it with this software! That’s how straightforward the process is.
How To Change the Frame Rate in Wondershare Filmora
Changing a video’s frame rate in Wondershare Filmora is super easy. Even a child can do it due to how simple the steps are. Here, read this 5-step guide to change a video’s frame rate using this amazing video editor.
- Launch Wondershare Filmora and create a new project.

- Import the video whose frame rate you want to change.
- Drag the video into the timeline.
![]()
- Click “Export.”
- Select the format you want the output file to be in. Find the “Frame Rate” in the options, click the drop-down menu, and select the frame rate that you want. Click “Export.”

Conclusion
Getting the frame rate of a video right is important, so you should not neglect it. It greatly affects your audience’s viewing experience. Thankfully, if you make mistakes, you can correct them with video editors like Premiere Pro. If it’s not to your liking, you can use Wondershare Filmora instead - it’s the best alternative.
Filmora lets you change a video’s frame rate very easily. Also, it gives you a bunch of other features you might enjoy using. And here’s some good news: this software app is affordable! You can also download the free trial to give it a shot.
Top 10 Best Free Video Compressors
Powerful Video Editor - Wondershare Filmora
Provide abundant video effects - A creative video editor
Powerful color correction and grading
Detailed tutorials are provided by the official channel
Introduction
Are you aware that the videos you record with your iPad, iPhone, or other camera are often larger than 1GB when captured in high resolution? However, some social-media networks often have video size limitations. Therefore, if your video exceeds the video size limitation of the platform, you will be required to shorten that video’s size to meet the specifications of a particular social network using the best video compressor.
Additionally, there are various video compressors online and some video compression software for Windows 10 and Mac that you can use. So, there is no need to spend a lot of money on professional video editing software if you need a quick way to downsize your videos. Besides, tasks can be performed online for free regardless of the operating system used.
In this article, we will assist you through the best free video compressor that you can choose from and learn:
In this article
01 Best Online Video Compressors
02 How to Compress a Large Video File Online and Free Using Wondershare Media.io?
Part 1: Best Online Video Compressors
1. Wondershare Media.io
This video compressor for free allows you to shrink audio and video files effortlessly. Additionally, it supports more than a thousand audio and video file formats, meaning that you can compress videos with Online Uniconverter recorded on different devices. However, compressing videos more extensive than 100MB is not an option.
Price: 2 Free and 3 pricing plans if you intend to subscribe to the pro version starting at $9.99 / Month
Supported Formats: MP4, MOV, WEBM, AVI, WMV, MP3, etc.
Features:
- Uses HTTPS secure socket layer
- It supports multiple devices
- The free version helps quickly compress up to 100MB file
- Without signing up, upload, and edit unlimited image file size
- No watermark even in the free version
- Conversion speed up to 30 times faster in the premium version.
Pros
- It has a quick download and upload speed
- Over a thousand video and audio files supported
- Supports 5 and 10 file editing per day for non-registered and no sign-up users.
- 100% secure
- Voted 4.7 of 5 in quality.
Cons
- Importing clips from Google Drive or Dropbox is not an option
- The file size limit is 100MB
- The free version of io online video compressorhas limited options
2. FreeConvert
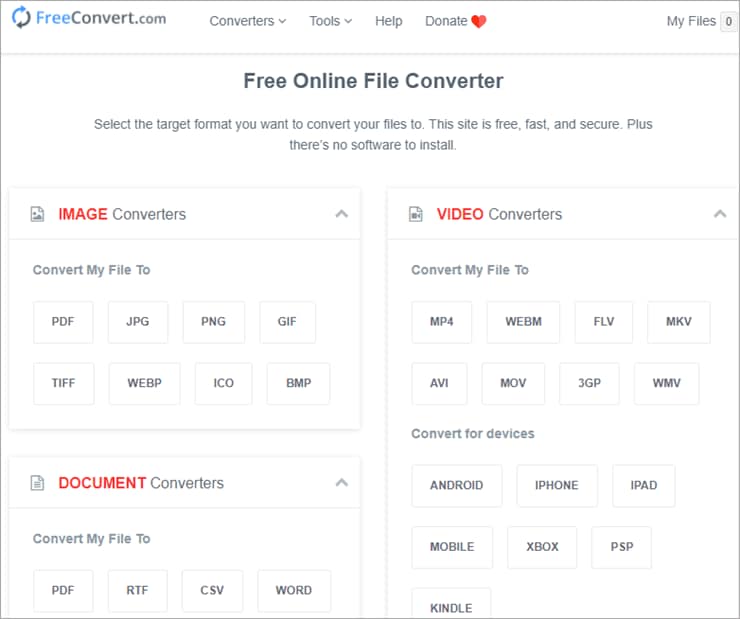
This is a straightforward and primary online compression tool for your content, including audio, images, documents, or videos. Although its outlook is quite intimidating, it is pretty simple and easy to use. It also allows you to convert your audio or video file into any format and size. If you are looking for the top MP4 compressor, go for this.
It also ensures that your privacy remains intact by deleting your uploaded files from their server after the processing.
Price: Free and three pricing plans if you intend to subscribe to the pro version starting at $9.99 / Month
Supported Formats: MP4, MOV, WEBM, AVI, WMV, MP3, etc.
Features
- It is available online only
- Supports many output formats.
- Video, audio, image converter
- Files are uploaded securely via HTTPS protocol.
Pros
- It is effortless, fast, and easy to use
- According to user reviews, this tool is excellent for those looking for free MP4 video compressors.
- No pop-up ads when converting
- It delivers excellent quality compressed videos.
Cons
- You get limited to 25 minutes of converted files in the free version
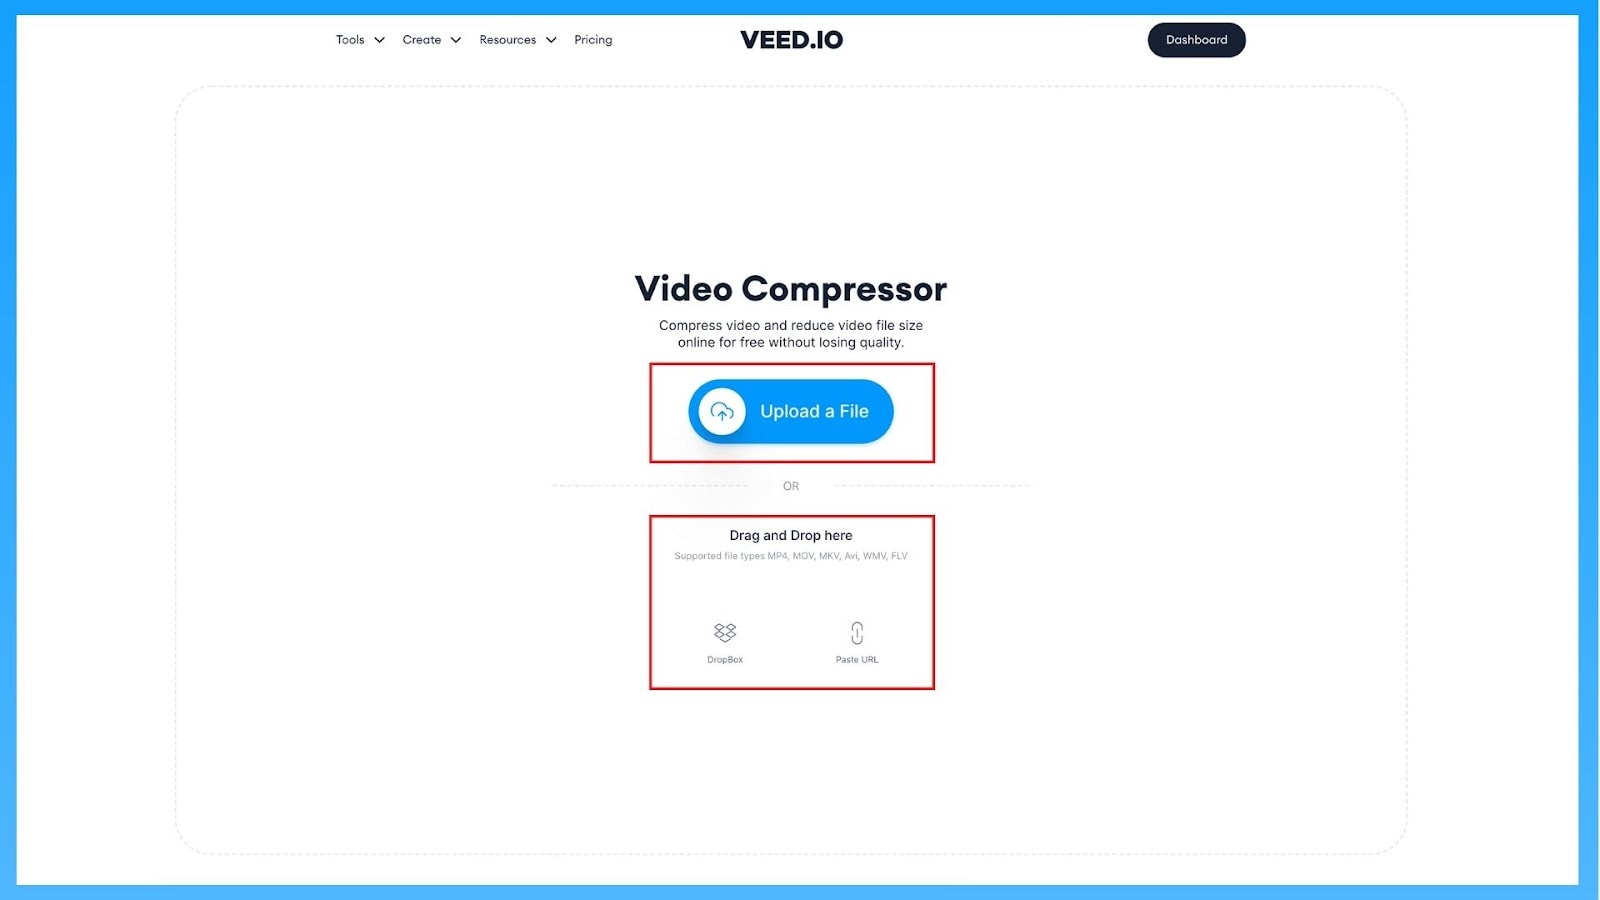
3. VEED.IO Free Online Video Compressor
This online video editing tool offers a free, fast, and easy online video compressor. Since it is online software, you do not need to have a specific type of laptop or desktop to use it. In addition, it does not use up precious storage space since it’s cloud-based.
Price: Free, and a free trial version is available, and three pricing plans if you intend to subscribe to the pro version starting at $12 / Month
Supported Formats: MP4, MKV, MOV, FLV, AVI
Features
- Captions are autogenerated
- Customer service support is excellent
- Add music, text, and photos to videos.
- Offers music visualizer, effects and removes background voices.
- Record via screen, webcam, voice, or even teleprompter.
- Crop, trim, copy, compress, join, loop, or rotate your videos.
- Innumerable features for adding subtitles and transcribing.
Pros
- The best spec is their subtitle tools that automatically generate captions for videos.
- It is swift to use
- It has an excellent support service.
- It’s a straightforward but powerful video editor.
Cons
- The pro version is quite expensive
4. Clideo Video Compressor Online
This web-based video editing application allows users to efficiently perform basic video editing tasks. Aside from rotating, trimming, or merging videos, users can also use Clideo to compress video files.
Price: Pricing plans start at $9,00 per month
Supported Formats: WAV, OGG, MP3, FLAC, AIFF, OOFF, etc.
Features
- There are umpteen features in this tool, like fast compression, previewing the work before saving, etc.
- Easy sign-in process
- Secure as you will only have access to the files.
- Fast and simple online video compressor, so no downloading or installing.
Pros
- The video compression process is quick
- Provides video editing tools
- The easy sign-in process via Facebook or Google
- Offers tons of methods of reducing the size of video files
Cons
- Not possible to choose the video file format
- There is a watermark in the accessible version

5. Compress Video
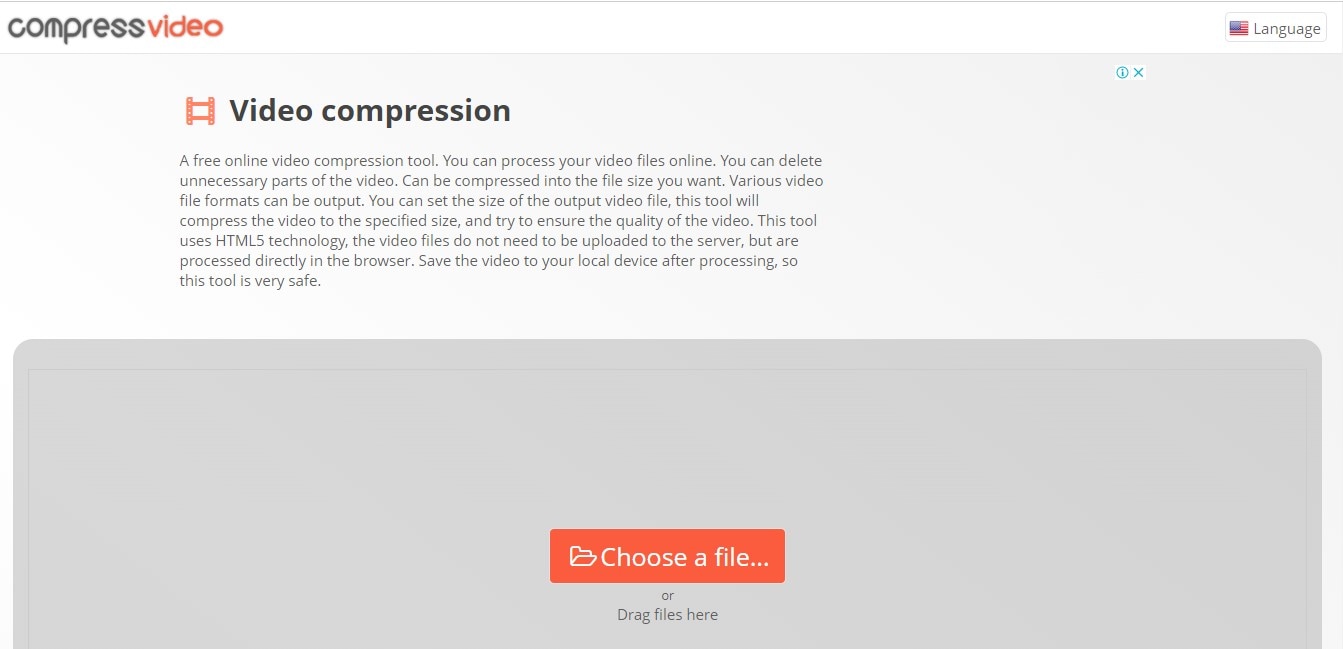
This free online video compression tool lets users process video files online and delete unnecessary video parts to compress them into the file size you want. It offers various video file formats where users can set the size of the output video file. In addition, this tool will compress the video to the specified size and try to ensure quality. Compress video is also very safe as you do not need to upload your files.
Price: Free
Supported Formats: MP4, MOV, WMV, FLV, AVI, AVCHD, WebM, MKV, etc.
Features
- Safe and easy to use
- It uses HTML5 Technology and FFMPEG JS Technology for extra safety
- Available in different formats.
- Works with Windows, Linux, Mac, and other systems.
Pros
- The video files do not need to get uploaded to the server but are processed directly in the browser
- Only four steps to compress your file.
- Save the video to your local device post-processing.
- 100% free tool.
Cons
- Has limited features
6. Online Converter
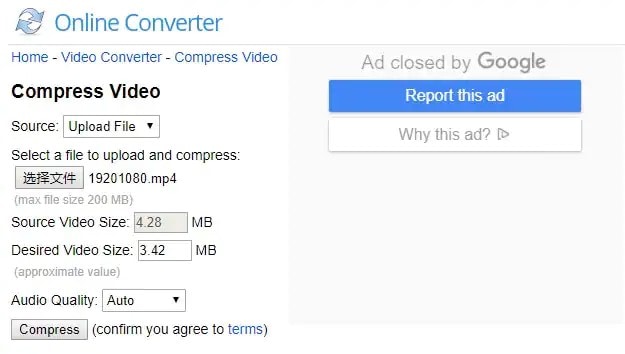
If you need a video compressor that is easy to use and reliable, you should not look much further than the Online Converter. With this tool, users can upload videos saved in MP4, MOV, WMV, and other file formats either from a URL or from your computer.
Price: Free
Supported Formats: MP3 to WAV, M4A to MP3, etc.
Features
- Video size output is set directly
- Support different file format.
- Easy to use, choose a file, select your desired video size and click compress.
- It offers an audio quality of 32kbps to 128kbps.
- No compromise on original audio quality.
Pros
- The uploads are smooth
- Supports a range of video file formats
- Allows users set their desired output video size directly
Cons
- Limit the file size to 200MB
- It slows the video compression process
- It does not allow users to choose the file format of the output video
- There is no support for encrypted video files
7. XConvert
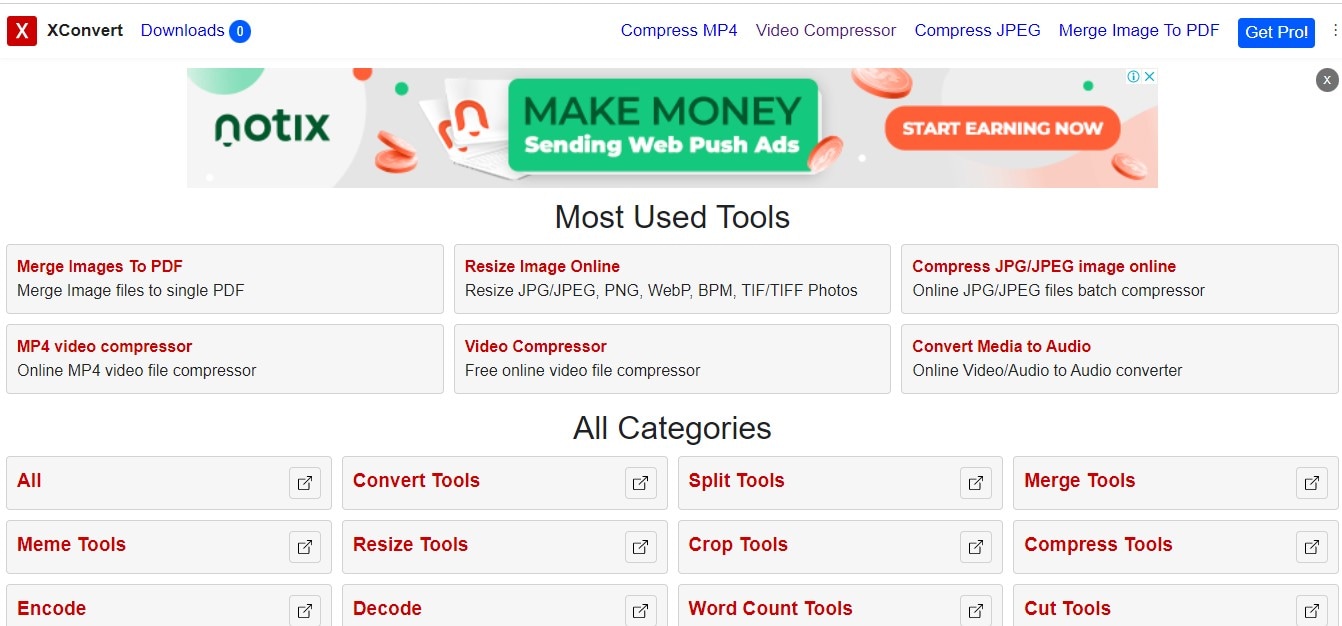
XConvert is a free online file conversion and video compressor tool provider specializing in converting, compressing, and splitting files into various formats.
Price: Free
Supported Formats: WeBM, Mp3, MP4, JPG, PNG
Features:
- Simply add files and start your job.
- A completely free online video compressor.
- Select , , VP8, or VP9 basis convert to file format.
- A rating of 4.7 of 5 by users.
Pros
- Allows the conversion to different files format
- It is a multipurpose editing tool.
- Download files individually or in zip format.
Cons
- The website is compact
- Lots of ads on the interface
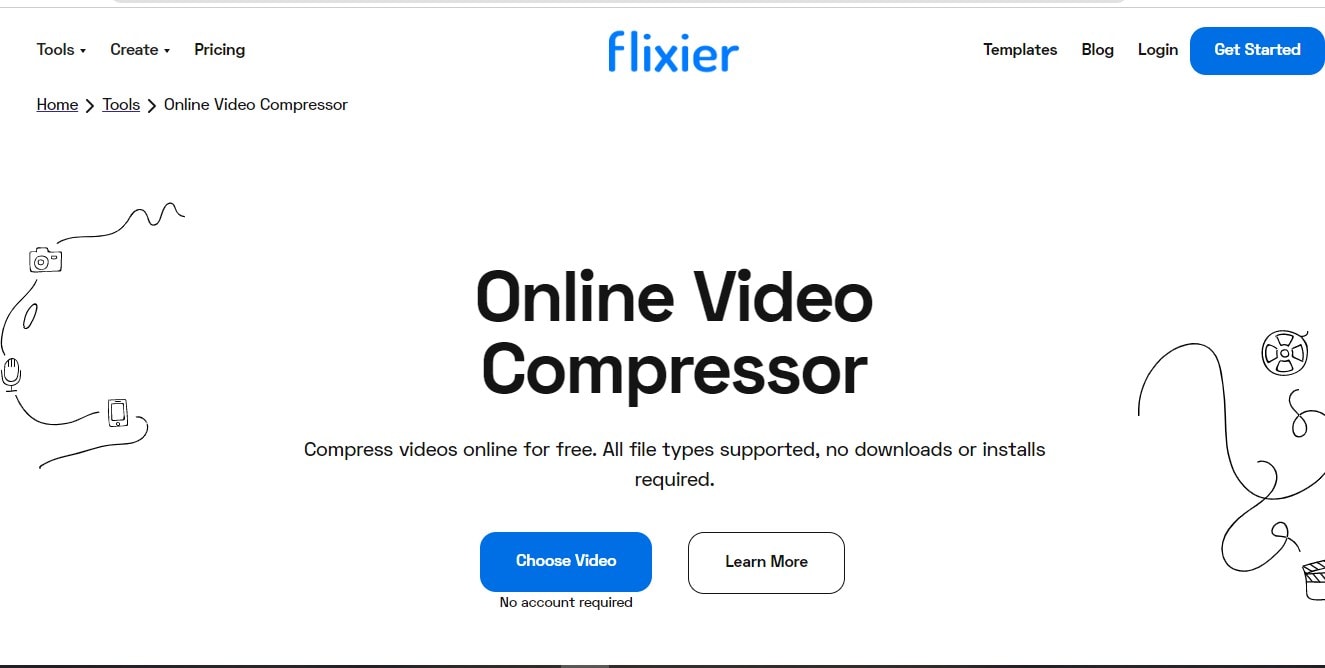
8. Flixier Online Video Compressor
This is a cloud-powered video editor that dramatically speeds up your video editing process. In addition, it processes your videos on powerful cloud computers to enable you to run it smoothly on any device ranging from slower PC or Chromebooks to Macbooks or any powerful desktop PCs.
Also, it is perfect for anyone that wants to grow a YouTube channel and create marketing or sales videos. The interface is smooth but still offers advanced features, including color adjustments, picture in picture, green screen, horizontal, vertical, and square videos to take your content to the next level.
Price: Free, Pricing plans start at $9.00 per month
Supported Formats: MP4, MOV, MKV, and WEBM,
Features
- Perfect for content marketing and sales
- Works on any device
- No need to open an account to start.
- No download or installation needed.
- No loss of audio or video quality with this video compressor.
- You can trim, crop, and add music, images, and text to videos.
- Its advanced settings options let you optimize CRF and bitrate that suits you.
Pros
- Allows users to record and edit their voice on a microphone or webcam
- Users can edit any video content from their smartphone or camera
- Publish to YouTube, Vimeo, Google Drive, or Dropbox in seconds.
- Only a three-step and three minutes, lightning-fast best video compressor.
- You can develop Facebook ads and add text to videos.
Cons
- Watermark in the free version
- Limited feature in free version
9. Fastreel Video Compressor
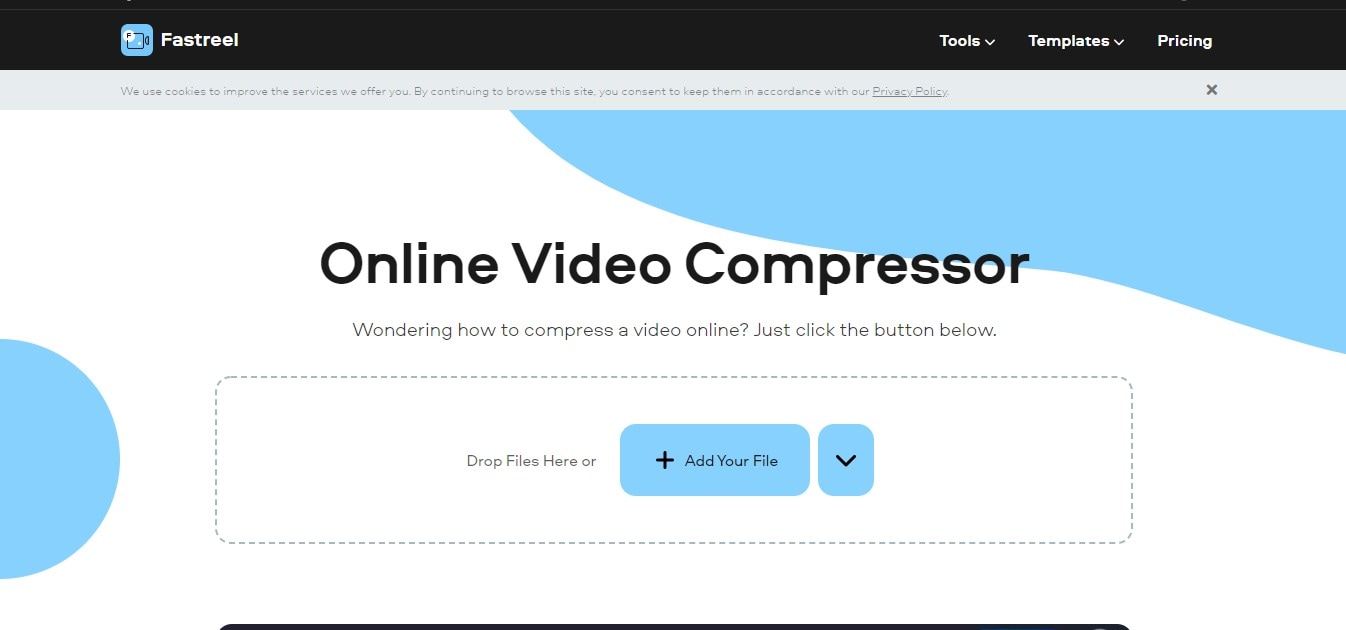
Fastreel Video Compressor, a simple video editor, is available for everyone and is an easy-to-use online video editor. Additionally, it helps create video montages like a pro.
Price: Free
Supported Formats: MP4, MOV, MKV, AVI, and WMV files
Features
- Easy to use
- Perfect for creating a montage
- You get to choose three types of compression quality: high, medium, or low.
- Three steps to video compression, add a video file, choose the level, and export.
- It is free. Just drop or add files to start the process.
Pros
- It is free and straightforward to use
- It has an intuitive interface
- It encourages people to express their creativity and bring business ideas to life
- It helps users promote their brand, get more YouTube subscribers, and increase conversion rates.
- It is fast to use
Cons
- Watermark in the free version
- Limited features in the free version
- The high compression level reduces the quality significantly.
10. VideoSmaller
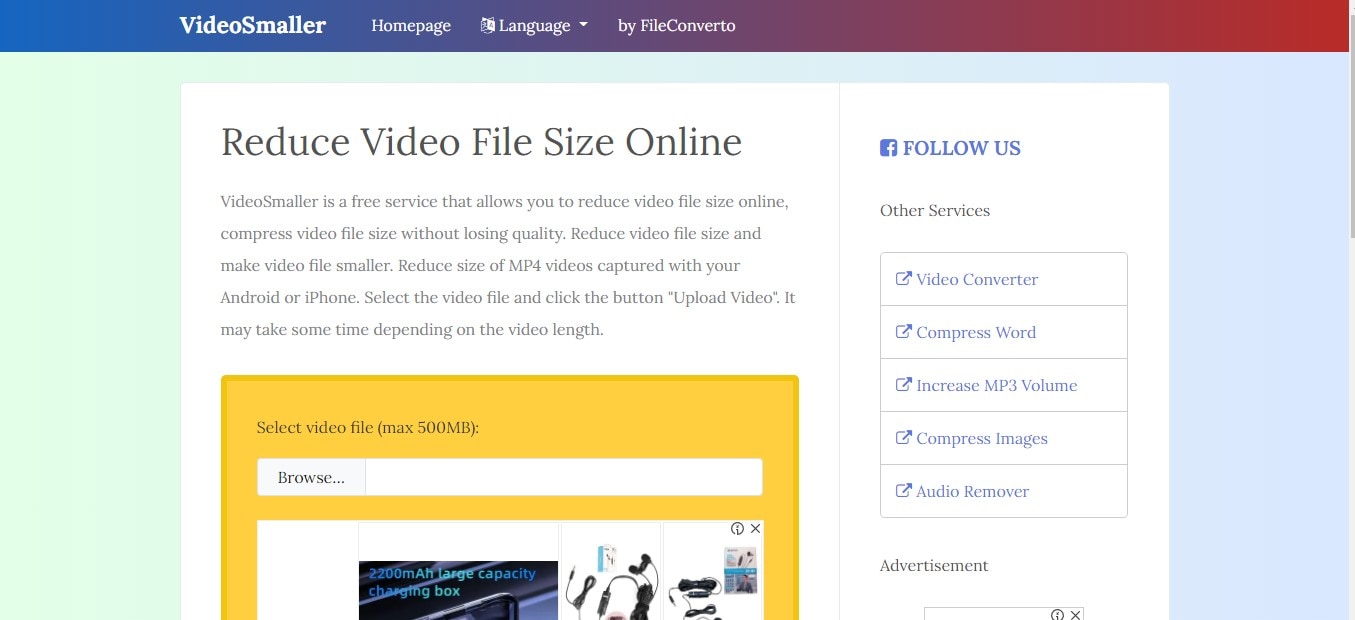
VideoSmaller is an online free service that allows you to reduce video file size online and compress video file size without losing quality. With this service, users can reduce video file size and make video files smaller. Additionally, users can also reduce the size of MP4 videos captured with an iPhone or Android.
Price: Free
Supported Formats: MP4, AVI, MPEG, MOV formats
Features
- Reduce the video size for free.
- Compress the videos right from the browser
- Safe as uploaded files vanish after a few hours.
Pros
- This free online video compressoris simple to use
- VideoSmaller helps compress files without losing quality
Cons
- File upload is limited to 500MB
- Limited features
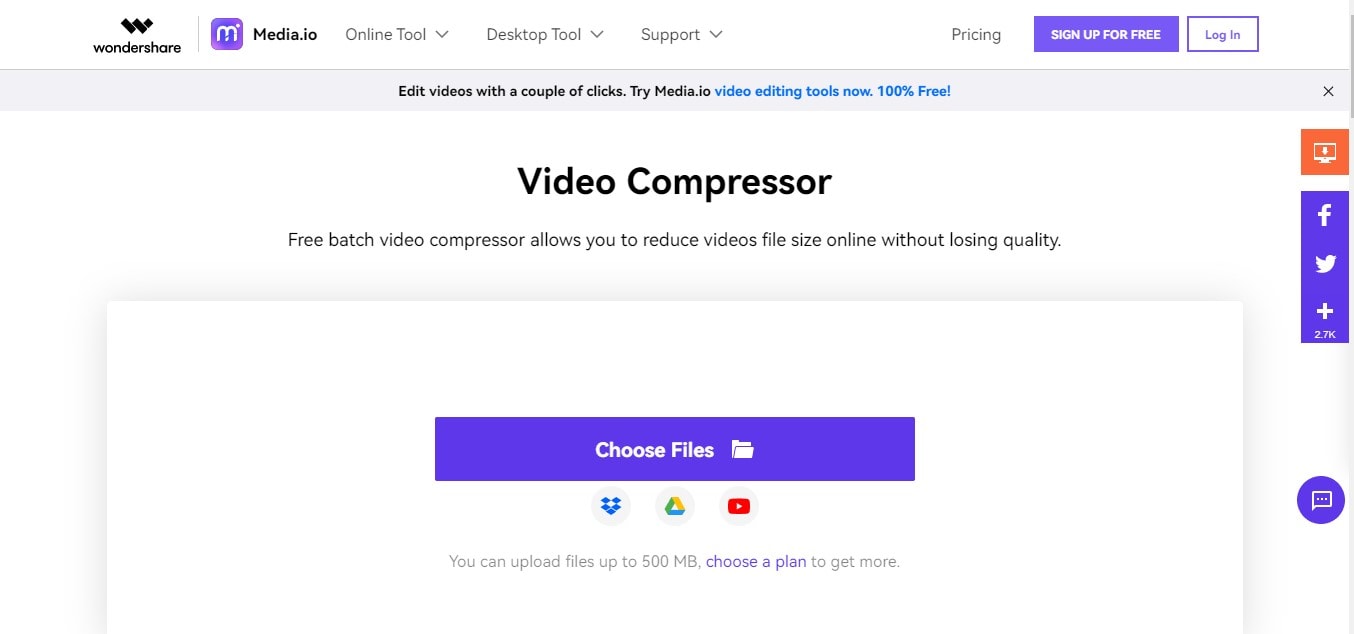
Media.io is the top online video compressor from the 10 that was listed as it allows you to compress video files without losing quality. Additionally, it is simple, accessible, and easy to use.
Part 2: How to Compress a Large Video File Online and Free Using Wondershare Media.io?
Now, let us see how you can use this video compressor in just three quick steps and get an excellent output for your video files.
Step 1: Open Media.io to Add Files
Click on Media.io video compressor and add Video Files, then click on Choose Files button to upload video file(s) from your network disk or library.
Step 2: Edit the Video File
Reduce Video Size Online and set the custom video resolution, size, bitrate, and output format required in compressing the video, then click the Compress button.
Step 3: Export and Save the Compressed Clip
Save your compressed video(s) by clicking on the Download button to save the resultant video(s) locally, to Dropbox or Google Drive.
Thus, with Media.io, you can compress your videos without downloading any software. It is a 100% safe and secure tool from one of the top software companies, called Wondershare. This free video compressor tool is a must-try for a new video maker.
Part 3: People Also Want to Know
This section shall go through some FAQs that you may come across about video compressors.
Which free video compressor is the best?
Media.io is the top online video compressor that allows you to compress video files without losing quality. Additionally, it is simple, accessible, and easy to use.
What is a video compressor used for?
It is a tool used to reduce the total number of bits needed to represent a given video or image sequence. Additionally, it helps to reduce file size so that it does not occupy too much space.
Conclusion
Thus, as you saw, in this report, we clubbed and summarized a few essential points regarding video compressors. You learned:
- The video compressor online for freethat you should know of.
- The ten best video compressorsto choose from.
- Why is Media.io an excellent online video compressor, and how does it work?
- Lastly, a few FAQs to make you understand the process and tool better.
So, use these tips and start sharing your in-house video-making talent with your family and the world.
Introduction
Are you aware that the videos you record with your iPad, iPhone, or other camera are often larger than 1GB when captured in high resolution? However, some social-media networks often have video size limitations. Therefore, if your video exceeds the video size limitation of the platform, you will be required to shorten that video’s size to meet the specifications of a particular social network using the best video compressor.
Additionally, there are various video compressors online and some video compression software for Windows 10 and Mac that you can use. So, there is no need to spend a lot of money on professional video editing software if you need a quick way to downsize your videos. Besides, tasks can be performed online for free regardless of the operating system used.
In this article, we will assist you through the best free video compressor that you can choose from and learn:
In this article
01 Best Online Video Compressors
02 How to Compress a Large Video File Online and Free Using Wondershare Media.io?

Part 1: Best Online Video Compressors
1. Wondershare Media.io
This video compressor for free allows you to shrink audio and video files effortlessly. Additionally, it supports more than a thousand audio and video file formats, meaning that you can compress videos with Online Uniconverter recorded on different devices. However, compressing videos more extensive than 100MB is not an option.
Price: 2 Free and 3 pricing plans if you intend to subscribe to the pro version starting at $9.99 / Month
Supported Formats: MP4, MOV, WEBM, AVI, WMV, MP3, etc.
Features:
- Uses HTTPS secure socket layer
- It supports multiple devices
- The free version helps quickly compress up to 100MB file
- Without signing up, upload, and edit unlimited image file size
- No watermark even in the free version
- Conversion speed up to 30 times faster in the premium version.
Pros
- It has a quick download and upload speed
- Over a thousand video and audio files supported
- Supports 5 and 10 file editing per day for non-registered and no sign-up users.
- 100% secure
- Voted 4.7 of 5 in quality.
Cons
- Importing clips from Google Drive or Dropbox is not an option
- The file size limit is 100MB
- The free version of io online video compressorhas limited options

2. FreeConvert
This is a straightforward and primary online compression tool for your content, including audio, images, documents, or videos. Although its outlook is quite intimidating, it is pretty simple and easy to use. It also allows you to convert your audio or video file into any format and size. If you are looking for the top MP4 compressor, go for this.
It also ensures that your privacy remains intact by deleting your uploaded files from their server after the processing.
Price: Free and three pricing plans if you intend to subscribe to the pro version starting at $9.99 / Month
Supported Formats: MP4, MOV, WEBM, AVI, WMV, MP3, etc.
Features
- It is available online only
- Supports many output formats.
- Video, audio, image converter
- Files are uploaded securely via HTTPS protocol.
Pros
- It is effortless, fast, and easy to use
- According to user reviews, this tool is excellent for those looking for free MP4 video compressors.
- No pop-up ads when converting
- It delivers excellent quality compressed videos.
Cons
- You get limited to 25 minutes of converted files in the free version

3. VEED.IO Free Online Video Compressor
This online video editing tool offers a free, fast, and easy online video compressor. Since it is online software, you do not need to have a specific type of laptop or desktop to use it. In addition, it does not use up precious storage space since it’s cloud-based.
Price: Free, and a free trial version is available, and three pricing plans if you intend to subscribe to the pro version starting at $12 / Month
Supported Formats: MP4, MKV, MOV, FLV, AVI
Features
- Captions are autogenerated
- Customer service support is excellent
- Add music, text, and photos to videos.
- Offers music visualizer, effects and removes background voices.
- Record via screen, webcam, voice, or even teleprompter.
- Crop, trim, copy, compress, join, loop, or rotate your videos.
- Innumerable features for adding subtitles and transcribing.
Pros
- The best spec is their subtitle tools that automatically generate captions for videos.
- It is swift to use
- It has an excellent support service.
- It’s a straightforward but powerful video editor.
Cons
- The pro version is quite expensive

4. Clideo Video Compressor Online
This web-based video editing application allows users to efficiently perform basic video editing tasks. Aside from rotating, trimming, or merging videos, users can also use Clideo to compress video files.
Price: Pricing plans start at $9,00 per month
Supported Formats: WAV, OGG, MP3, FLAC, AIFF, OOFF, etc.
Features
- There are umpteen features in this tool, like fast compression, previewing the work before saving, etc.
- Easy sign-in process
- Secure as you will only have access to the files.
- Fast and simple online video compressor, so no downloading or installing.
Pros
- The video compression process is quick
- Provides video editing tools
- The easy sign-in process via Facebook or Google
- Offers tons of methods of reducing the size of video files
Cons
- Not possible to choose the video file format
- There is a watermark in the accessible version

5. Compress Video
This free online video compression tool lets users process video files online and delete unnecessary video parts to compress them into the file size you want. It offers various video file formats where users can set the size of the output video file. In addition, this tool will compress the video to the specified size and try to ensure quality. Compress video is also very safe as you do not need to upload your files.
Price: Free
Supported Formats: MP4, MOV, WMV, FLV, AVI, AVCHD, WebM, MKV, etc.
Features
- Safe and easy to use
- It uses HTML5 Technology and FFMPEG JS Technology for extra safety
- Available in different formats.
- Works with Windows, Linux, Mac, and other systems.
Pros
- The video files do not need to get uploaded to the server but are processed directly in the browser
- Only four steps to compress your file.
- Save the video to your local device post-processing.
- 100% free tool.
Cons
- Has limited features

6. Online Converter
If you need a video compressor that is easy to use and reliable, you should not look much further than the Online Converter. With this tool, users can upload videos saved in MP4, MOV, WMV, and other file formats either from a URL or from your computer.
Price: Free
Supported Formats: MP3 to WAV, M4A to MP3, etc.
Features
- Video size output is set directly
- Support different file format.
- Easy to use, choose a file, select your desired video size and click compress.
- It offers an audio quality of 32kbps to 128kbps.
- No compromise on original audio quality.
Pros
- The uploads are smooth
- Supports a range of video file formats
- Allows users set their desired output video size directly
Cons
- Limit the file size to 200MB
- It slows the video compression process
- It does not allow users to choose the file format of the output video
- There is no support for encrypted video files

7. XConvert
XConvert is a free online file conversion and video compressor tool provider specializing in converting, compressing, and splitting files into various formats.
Price: Free
Supported Formats: WeBM, Mp3, MP4, JPG, PNG
Features:
- Simply add files and start your job.
- A completely free online video compressor.
- Select , , VP8, or VP9 basis convert to file format.
- A rating of 4.7 of 5 by users.
Pros
- Allows the conversion to different files format
- It is a multipurpose editing tool.
- Download files individually or in zip format.
Cons
- The website is compact
- Lots of ads on the interface

8. Flixier Online Video Compressor
This is a cloud-powered video editor that dramatically speeds up your video editing process. In addition, it processes your videos on powerful cloud computers to enable you to run it smoothly on any device ranging from slower PC or Chromebooks to Macbooks or any powerful desktop PCs.
Also, it is perfect for anyone that wants to grow a YouTube channel and create marketing or sales videos. The interface is smooth but still offers advanced features, including color adjustments, picture in picture, green screen, horizontal, vertical, and square videos to take your content to the next level.
Price: Free, Pricing plans start at $9.00 per month
Supported Formats: MP4, MOV, MKV, and WEBM,
Features
- Perfect for content marketing and sales
- Works on any device
- No need to open an account to start.
- No download or installation needed.
- No loss of audio or video quality with this video compressor.
- You can trim, crop, and add music, images, and text to videos.
- Its advanced settings options let you optimize CRF and bitrate that suits you.
Pros
- Allows users to record and edit their voice on a microphone or webcam
- Users can edit any video content from their smartphone or camera
- Publish to YouTube, Vimeo, Google Drive, or Dropbox in seconds.
- Only a three-step and three minutes, lightning-fast best video compressor.
- You can develop Facebook ads and add text to videos.
Cons
- Watermark in the free version
- Limited feature in free version

9. Fastreel Video Compressor
Fastreel Video Compressor, a simple video editor, is available for everyone and is an easy-to-use online video editor. Additionally, it helps create video montages like a pro.
Price: Free
Supported Formats: MP4, MOV, MKV, AVI, and WMV files
Features
- Easy to use
- Perfect for creating a montage
- You get to choose three types of compression quality: high, medium, or low.
- Three steps to video compression, add a video file, choose the level, and export.
- It is free. Just drop or add files to start the process.
Pros
- It is free and straightforward to use
- It has an intuitive interface
- It encourages people to express their creativity and bring business ideas to life
- It helps users promote their brand, get more YouTube subscribers, and increase conversion rates.
- It is fast to use
Cons
- Watermark in the free version
- Limited features in the free version
- The high compression level reduces the quality significantly.

10. VideoSmaller
VideoSmaller is an online free service that allows you to reduce video file size online and compress video file size without losing quality. With this service, users can reduce video file size and make video files smaller. Additionally, users can also reduce the size of MP4 videos captured with an iPhone or Android.
Price: Free
Supported Formats: MP4, AVI, MPEG, MOV formats
Features
- Reduce the video size for free.
- Compress the videos right from the browser
- Safe as uploaded files vanish after a few hours.
Pros
- This free online video compressoris simple to use
- VideoSmaller helps compress files without losing quality
Cons
- File upload is limited to 500MB
- Limited features

Media.io is the top online video compressor from the 10 that was listed as it allows you to compress video files without losing quality. Additionally, it is simple, accessible, and easy to use.
Part 2: How to Compress a Large Video File Online and Free Using Wondershare Media.io?
Now, let us see how you can use this video compressor in just three quick steps and get an excellent output for your video files.
Step 1: Open Media.io to Add Files
Click on Media.io video compressor and add Video Files, then click on Choose Files button to upload video file(s) from your network disk or library.

Step 2: Edit the Video File
Reduce Video Size Online and set the custom video resolution, size, bitrate, and output format required in compressing the video, then click the Compress button.
Step 3: Export and Save the Compressed Clip
Save your compressed video(s) by clicking on the Download button to save the resultant video(s) locally, to Dropbox or Google Drive.
Thus, with Media.io, you can compress your videos without downloading any software. It is a 100% safe and secure tool from one of the top software companies, called Wondershare. This free video compressor tool is a must-try for a new video maker.
Part 3: People Also Want to Know
This section shall go through some FAQs that you may come across about video compressors.
Which free video compressor is the best?
Media.io is the top online video compressor that allows you to compress video files without losing quality. Additionally, it is simple, accessible, and easy to use.
What is a video compressor used for?
It is a tool used to reduce the total number of bits needed to represent a given video or image sequence. Additionally, it helps to reduce file size so that it does not occupy too much space.
Conclusion
Thus, as you saw, in this report, we clubbed and summarized a few essential points regarding video compressors. You learned:
- The video compressor online for freethat you should know of.
- The ten best video compressorsto choose from.
- Why is Media.io an excellent online video compressor, and how does it work?
- Lastly, a few FAQs to make you understand the process and tool better.
So, use these tips and start sharing your in-house video-making talent with your family and the world.
Introduction
Are you aware that the videos you record with your iPad, iPhone, or other camera are often larger than 1GB when captured in high resolution? However, some social-media networks often have video size limitations. Therefore, if your video exceeds the video size limitation of the platform, you will be required to shorten that video’s size to meet the specifications of a particular social network using the best video compressor.
Additionally, there are various video compressors online and some video compression software for Windows 10 and Mac that you can use. So, there is no need to spend a lot of money on professional video editing software if you need a quick way to downsize your videos. Besides, tasks can be performed online for free regardless of the operating system used.
In this article, we will assist you through the best free video compressor that you can choose from and learn:
In this article
01 Best Online Video Compressors
02 How to Compress a Large Video File Online and Free Using Wondershare Media.io?

Part 1: Best Online Video Compressors
1. Wondershare Media.io
This video compressor for free allows you to shrink audio and video files effortlessly. Additionally, it supports more than a thousand audio and video file formats, meaning that you can compress videos with Online Uniconverter recorded on different devices. However, compressing videos more extensive than 100MB is not an option.
Price: 2 Free and 3 pricing plans if you intend to subscribe to the pro version starting at $9.99 / Month
Supported Formats: MP4, MOV, WEBM, AVI, WMV, MP3, etc.
Features:
- Uses HTTPS secure socket layer
- It supports multiple devices
- The free version helps quickly compress up to 100MB file
- Without signing up, upload, and edit unlimited image file size
- No watermark even in the free version
- Conversion speed up to 30 times faster in the premium version.
Pros
- It has a quick download and upload speed
- Over a thousand video and audio files supported
- Supports 5 and 10 file editing per day for non-registered and no sign-up users.
- 100% secure
- Voted 4.7 of 5 in quality.
Cons
- Importing clips from Google Drive or Dropbox is not an option
- The file size limit is 100MB
- The free version of io online video compressorhas limited options

2. FreeConvert
This is a straightforward and primary online compression tool for your content, including audio, images, documents, or videos. Although its outlook is quite intimidating, it is pretty simple and easy to use. It also allows you to convert your audio or video file into any format and size. If you are looking for the top MP4 compressor, go for this.
It also ensures that your privacy remains intact by deleting your uploaded files from their server after the processing.
Price: Free and three pricing plans if you intend to subscribe to the pro version starting at $9.99 / Month
Supported Formats: MP4, MOV, WEBM, AVI, WMV, MP3, etc.
Features
- It is available online only
- Supports many output formats.
- Video, audio, image converter
- Files are uploaded securely via HTTPS protocol.
Pros
- It is effortless, fast, and easy to use
- According to user reviews, this tool is excellent for those looking for free MP4 video compressors.
- No pop-up ads when converting
- It delivers excellent quality compressed videos.
Cons
- You get limited to 25 minutes of converted files in the free version

3. VEED.IO Free Online Video Compressor
This online video editing tool offers a free, fast, and easy online video compressor. Since it is online software, you do not need to have a specific type of laptop or desktop to use it. In addition, it does not use up precious storage space since it’s cloud-based.
Price: Free, and a free trial version is available, and three pricing plans if you intend to subscribe to the pro version starting at $12 / Month
Supported Formats: MP4, MKV, MOV, FLV, AVI
Features
- Captions are autogenerated
- Customer service support is excellent
- Add music, text, and photos to videos.
- Offers music visualizer, effects and removes background voices.
- Record via screen, webcam, voice, or even teleprompter.
- Crop, trim, copy, compress, join, loop, or rotate your videos.
- Innumerable features for adding subtitles and transcribing.
Pros
- The best spec is their subtitle tools that automatically generate captions for videos.
- It is swift to use
- It has an excellent support service.
- It’s a straightforward but powerful video editor.
Cons
- The pro version is quite expensive

4. Clideo Video Compressor Online
This web-based video editing application allows users to efficiently perform basic video editing tasks. Aside from rotating, trimming, or merging videos, users can also use Clideo to compress video files.
Price: Pricing plans start at $9,00 per month
Supported Formats: WAV, OGG, MP3, FLAC, AIFF, OOFF, etc.
Features
- There are umpteen features in this tool, like fast compression, previewing the work before saving, etc.
- Easy sign-in process
- Secure as you will only have access to the files.
- Fast and simple online video compressor, so no downloading or installing.
Pros
- The video compression process is quick
- Provides video editing tools
- The easy sign-in process via Facebook or Google
- Offers tons of methods of reducing the size of video files
Cons
- Not possible to choose the video file format
- There is a watermark in the accessible version

5. Compress Video
This free online video compression tool lets users process video files online and delete unnecessary video parts to compress them into the file size you want. It offers various video file formats where users can set the size of the output video file. In addition, this tool will compress the video to the specified size and try to ensure quality. Compress video is also very safe as you do not need to upload your files.
Price: Free
Supported Formats: MP4, MOV, WMV, FLV, AVI, AVCHD, WebM, MKV, etc.
Features
- Safe and easy to use
- It uses HTML5 Technology and FFMPEG JS Technology for extra safety
- Available in different formats.
- Works with Windows, Linux, Mac, and other systems.
Pros
- The video files do not need to get uploaded to the server but are processed directly in the browser
- Only four steps to compress your file.
- Save the video to your local device post-processing.
- 100% free tool.
Cons
- Has limited features

6. Online Converter
If you need a video compressor that is easy to use and reliable, you should not look much further than the Online Converter. With this tool, users can upload videos saved in MP4, MOV, WMV, and other file formats either from a URL or from your computer.
Price: Free
Supported Formats: MP3 to WAV, M4A to MP3, etc.
Features
- Video size output is set directly
- Support different file format.
- Easy to use, choose a file, select your desired video size and click compress.
- It offers an audio quality of 32kbps to 128kbps.
- No compromise on original audio quality.
Pros
- The uploads are smooth
- Supports a range of video file formats
- Allows users set their desired output video size directly
Cons
- Limit the file size to 200MB
- It slows the video compression process
- It does not allow users to choose the file format of the output video
- There is no support for encrypted video files

7. XConvert
XConvert is a free online file conversion and video compressor tool provider specializing in converting, compressing, and splitting files into various formats.
Price: Free
Supported Formats: WeBM, Mp3, MP4, JPG, PNG
Features:
- Simply add files and start your job.
- A completely free online video compressor.
- Select , , VP8, or VP9 basis convert to file format.
- A rating of 4.7 of 5 by users.
Pros
- Allows the conversion to different files format
- It is a multipurpose editing tool.
- Download files individually or in zip format.
Cons
- The website is compact
- Lots of ads on the interface

8. Flixier Online Video Compressor
This is a cloud-powered video editor that dramatically speeds up your video editing process. In addition, it processes your videos on powerful cloud computers to enable you to run it smoothly on any device ranging from slower PC or Chromebooks to Macbooks or any powerful desktop PCs.
Also, it is perfect for anyone that wants to grow a YouTube channel and create marketing or sales videos. The interface is smooth but still offers advanced features, including color adjustments, picture in picture, green screen, horizontal, vertical, and square videos to take your content to the next level.
Price: Free, Pricing plans start at $9.00 per month
Supported Formats: MP4, MOV, MKV, and WEBM,
Features
- Perfect for content marketing and sales
- Works on any device
- No need to open an account to start.
- No download or installation needed.
- No loss of audio or video quality with this video compressor.
- You can trim, crop, and add music, images, and text to videos.
- Its advanced settings options let you optimize CRF and bitrate that suits you.
Pros
- Allows users to record and edit their voice on a microphone or webcam
- Users can edit any video content from their smartphone or camera
- Publish to YouTube, Vimeo, Google Drive, or Dropbox in seconds.
- Only a three-step and three minutes, lightning-fast best video compressor.
- You can develop Facebook ads and add text to videos.
Cons
- Watermark in the free version
- Limited feature in free version

9. Fastreel Video Compressor
Fastreel Video Compressor, a simple video editor, is available for everyone and is an easy-to-use online video editor. Additionally, it helps create video montages like a pro.
Price: Free
Supported Formats: MP4, MOV, MKV, AVI, and WMV files
Features
- Easy to use
- Perfect for creating a montage
- You get to choose three types of compression quality: high, medium, or low.
- Three steps to video compression, add a video file, choose the level, and export.
- It is free. Just drop or add files to start the process.
Pros
- It is free and straightforward to use
- It has an intuitive interface
- It encourages people to express their creativity and bring business ideas to life
- It helps users promote their brand, get more YouTube subscribers, and increase conversion rates.
- It is fast to use
Cons
- Watermark in the free version
- Limited features in the free version
- The high compression level reduces the quality significantly.

10. VideoSmaller
VideoSmaller is an online free service that allows you to reduce video file size online and compress video file size without losing quality. With this service, users can reduce video file size and make video files smaller. Additionally, users can also reduce the size of MP4 videos captured with an iPhone or Android.
Price: Free
Supported Formats: MP4, AVI, MPEG, MOV formats
Features
- Reduce the video size for free.
- Compress the videos right from the browser
- Safe as uploaded files vanish after a few hours.
Pros
- This free online video compressoris simple to use
- VideoSmaller helps compress files without losing quality
Cons
- File upload is limited to 500MB
- Limited features

Media.io is the top online video compressor from the 10 that was listed as it allows you to compress video files without losing quality. Additionally, it is simple, accessible, and easy to use.
Part 2: How to Compress a Large Video File Online and Free Using Wondershare Media.io?
Now, let us see how you can use this video compressor in just three quick steps and get an excellent output for your video files.
Step 1: Open Media.io to Add Files
Click on Media.io video compressor and add Video Files, then click on Choose Files button to upload video file(s) from your network disk or library.

Step 2: Edit the Video File
Reduce Video Size Online and set the custom video resolution, size, bitrate, and output format required in compressing the video, then click the Compress button.
Step 3: Export and Save the Compressed Clip
Save your compressed video(s) by clicking on the Download button to save the resultant video(s) locally, to Dropbox or Google Drive.
Thus, with Media.io, you can compress your videos without downloading any software. It is a 100% safe and secure tool from one of the top software companies, called Wondershare. This free video compressor tool is a must-try for a new video maker.
Part 3: People Also Want to Know
This section shall go through some FAQs that you may come across about video compressors.
Which free video compressor is the best?
Media.io is the top online video compressor that allows you to compress video files without losing quality. Additionally, it is simple, accessible, and easy to use.
What is a video compressor used for?
It is a tool used to reduce the total number of bits needed to represent a given video or image sequence. Additionally, it helps to reduce file size so that it does not occupy too much space.
Conclusion
Thus, as you saw, in this report, we clubbed and summarized a few essential points regarding video compressors. You learned:
- The video compressor online for freethat you should know of.
- The ten best video compressorsto choose from.
- Why is Media.io an excellent online video compressor, and how does it work?
- Lastly, a few FAQs to make you understand the process and tool better.
So, use these tips and start sharing your in-house video-making talent with your family and the world.
Introduction
Are you aware that the videos you record with your iPad, iPhone, or other camera are often larger than 1GB when captured in high resolution? However, some social-media networks often have video size limitations. Therefore, if your video exceeds the video size limitation of the platform, you will be required to shorten that video’s size to meet the specifications of a particular social network using the best video compressor.
Additionally, there are various video compressors online and some video compression software for Windows 10 and Mac that you can use. So, there is no need to spend a lot of money on professional video editing software if you need a quick way to downsize your videos. Besides, tasks can be performed online for free regardless of the operating system used.
In this article, we will assist you through the best free video compressor that you can choose from and learn:
In this article
01 Best Online Video Compressors
02 How to Compress a Large Video File Online and Free Using Wondershare Media.io?

Part 1: Best Online Video Compressors
1. Wondershare Media.io
This video compressor for free allows you to shrink audio and video files effortlessly. Additionally, it supports more than a thousand audio and video file formats, meaning that you can compress videos with Online Uniconverter recorded on different devices. However, compressing videos more extensive than 100MB is not an option.
Price: 2 Free and 3 pricing plans if you intend to subscribe to the pro version starting at $9.99 / Month
Supported Formats: MP4, MOV, WEBM, AVI, WMV, MP3, etc.
Features:
- Uses HTTPS secure socket layer
- It supports multiple devices
- The free version helps quickly compress up to 100MB file
- Without signing up, upload, and edit unlimited image file size
- No watermark even in the free version
- Conversion speed up to 30 times faster in the premium version.
Pros
- It has a quick download and upload speed
- Over a thousand video and audio files supported
- Supports 5 and 10 file editing per day for non-registered and no sign-up users.
- 100% secure
- Voted 4.7 of 5 in quality.
Cons
- Importing clips from Google Drive or Dropbox is not an option
- The file size limit is 100MB
- The free version of io online video compressorhas limited options

2. FreeConvert
This is a straightforward and primary online compression tool for your content, including audio, images, documents, or videos. Although its outlook is quite intimidating, it is pretty simple and easy to use. It also allows you to convert your audio or video file into any format and size. If you are looking for the top MP4 compressor, go for this.
It also ensures that your privacy remains intact by deleting your uploaded files from their server after the processing.
Price: Free and three pricing plans if you intend to subscribe to the pro version starting at $9.99 / Month
Supported Formats: MP4, MOV, WEBM, AVI, WMV, MP3, etc.
Features
- It is available online only
- Supports many output formats.
- Video, audio, image converter
- Files are uploaded securely via HTTPS protocol.
Pros
- It is effortless, fast, and easy to use
- According to user reviews, this tool is excellent for those looking for free MP4 video compressors.
- No pop-up ads when converting
- It delivers excellent quality compressed videos.
Cons
- You get limited to 25 minutes of converted files in the free version

3. VEED.IO Free Online Video Compressor
This online video editing tool offers a free, fast, and easy online video compressor. Since it is online software, you do not need to have a specific type of laptop or desktop to use it. In addition, it does not use up precious storage space since it’s cloud-based.
Price: Free, and a free trial version is available, and three pricing plans if you intend to subscribe to the pro version starting at $12 / Month
Supported Formats: MP4, MKV, MOV, FLV, AVI
Features
- Captions are autogenerated
- Customer service support is excellent
- Add music, text, and photos to videos.
- Offers music visualizer, effects and removes background voices.
- Record via screen, webcam, voice, or even teleprompter.
- Crop, trim, copy, compress, join, loop, or rotate your videos.
- Innumerable features for adding subtitles and transcribing.
Pros
- The best spec is their subtitle tools that automatically generate captions for videos.
- It is swift to use
- It has an excellent support service.
- It’s a straightforward but powerful video editor.
Cons
- The pro version is quite expensive

4. Clideo Video Compressor Online
This web-based video editing application allows users to efficiently perform basic video editing tasks. Aside from rotating, trimming, or merging videos, users can also use Clideo to compress video files.
Price: Pricing plans start at $9,00 per month
Supported Formats: WAV, OGG, MP3, FLAC, AIFF, OOFF, etc.
Features
- There are umpteen features in this tool, like fast compression, previewing the work before saving, etc.
- Easy sign-in process
- Secure as you will only have access to the files.
- Fast and simple online video compressor, so no downloading or installing.
Pros
- The video compression process is quick
- Provides video editing tools
- The easy sign-in process via Facebook or Google
- Offers tons of methods of reducing the size of video files
Cons
- Not possible to choose the video file format
- There is a watermark in the accessible version

5. Compress Video
This free online video compression tool lets users process video files online and delete unnecessary video parts to compress them into the file size you want. It offers various video file formats where users can set the size of the output video file. In addition, this tool will compress the video to the specified size and try to ensure quality. Compress video is also very safe as you do not need to upload your files.
Price: Free
Supported Formats: MP4, MOV, WMV, FLV, AVI, AVCHD, WebM, MKV, etc.
Features
- Safe and easy to use
- It uses HTML5 Technology and FFMPEG JS Technology for extra safety
- Available in different formats.
- Works with Windows, Linux, Mac, and other systems.
Pros
- The video files do not need to get uploaded to the server but are processed directly in the browser
- Only four steps to compress your file.
- Save the video to your local device post-processing.
- 100% free tool.
Cons
- Has limited features

6. Online Converter
If you need a video compressor that is easy to use and reliable, you should not look much further than the Online Converter. With this tool, users can upload videos saved in MP4, MOV, WMV, and other file formats either from a URL or from your computer.
Price: Free
Supported Formats: MP3 to WAV, M4A to MP3, etc.
Features
- Video size output is set directly
- Support different file format.
- Easy to use, choose a file, select your desired video size and click compress.
- It offers an audio quality of 32kbps to 128kbps.
- No compromise on original audio quality.
Pros
- The uploads are smooth
- Supports a range of video file formats
- Allows users set their desired output video size directly
Cons
- Limit the file size to 200MB
- It slows the video compression process
- It does not allow users to choose the file format of the output video
- There is no support for encrypted video files

7. XConvert
XConvert is a free online file conversion and video compressor tool provider specializing in converting, compressing, and splitting files into various formats.
Price: Free
Supported Formats: WeBM, Mp3, MP4, JPG, PNG
Features:
- Simply add files and start your job.
- A completely free online video compressor.
- Select , , VP8, or VP9 basis convert to file format.
- A rating of 4.7 of 5 by users.
Pros
- Allows the conversion to different files format
- It is a multipurpose editing tool.
- Download files individually or in zip format.
Cons
- The website is compact
- Lots of ads on the interface

8. Flixier Online Video Compressor
This is a cloud-powered video editor that dramatically speeds up your video editing process. In addition, it processes your videos on powerful cloud computers to enable you to run it smoothly on any device ranging from slower PC or Chromebooks to Macbooks or any powerful desktop PCs.
Also, it is perfect for anyone that wants to grow a YouTube channel and create marketing or sales videos. The interface is smooth but still offers advanced features, including color adjustments, picture in picture, green screen, horizontal, vertical, and square videos to take your content to the next level.
Price: Free, Pricing plans start at $9.00 per month
Supported Formats: MP4, MOV, MKV, and WEBM,
Features
- Perfect for content marketing and sales
- Works on any device
- No need to open an account to start.
- No download or installation needed.
- No loss of audio or video quality with this video compressor.
- You can trim, crop, and add music, images, and text to videos.
- Its advanced settings options let you optimize CRF and bitrate that suits you.
Pros
- Allows users to record and edit their voice on a microphone or webcam
- Users can edit any video content from their smartphone or camera
- Publish to YouTube, Vimeo, Google Drive, or Dropbox in seconds.
- Only a three-step and three minutes, lightning-fast best video compressor.
- You can develop Facebook ads and add text to videos.
Cons
- Watermark in the free version
- Limited feature in free version

9. Fastreel Video Compressor
Fastreel Video Compressor, a simple video editor, is available for everyone and is an easy-to-use online video editor. Additionally, it helps create video montages like a pro.
Price: Free
Supported Formats: MP4, MOV, MKV, AVI, and WMV files
Features
- Easy to use
- Perfect for creating a montage
- You get to choose three types of compression quality: high, medium, or low.
- Three steps to video compression, add a video file, choose the level, and export.
- It is free. Just drop or add files to start the process.
Pros
- It is free and straightforward to use
- It has an intuitive interface
- It encourages people to express their creativity and bring business ideas to life
- It helps users promote their brand, get more YouTube subscribers, and increase conversion rates.
- It is fast to use
Cons
- Watermark in the free version
- Limited features in the free version
- The high compression level reduces the quality significantly.

10. VideoSmaller
VideoSmaller is an online free service that allows you to reduce video file size online and compress video file size without losing quality. With this service, users can reduce video file size and make video files smaller. Additionally, users can also reduce the size of MP4 videos captured with an iPhone or Android.
Price: Free
Supported Formats: MP4, AVI, MPEG, MOV formats
Features
- Reduce the video size for free.
- Compress the videos right from the browser
- Safe as uploaded files vanish after a few hours.
Pros
- This free online video compressoris simple to use
- VideoSmaller helps compress files without losing quality
Cons
- File upload is limited to 500MB
- Limited features

Media.io is the top online video compressor from the 10 that was listed as it allows you to compress video files without losing quality. Additionally, it is simple, accessible, and easy to use.
Part 2: How to Compress a Large Video File Online and Free Using Wondershare Media.io?
Now, let us see how you can use this video compressor in just three quick steps and get an excellent output for your video files.
Step 1: Open Media.io to Add Files
Click on Media.io video compressor and add Video Files, then click on Choose Files button to upload video file(s) from your network disk or library.

Step 2: Edit the Video File
Reduce Video Size Online and set the custom video resolution, size, bitrate, and output format required in compressing the video, then click the Compress button.
Step 3: Export and Save the Compressed Clip
Save your compressed video(s) by clicking on the Download button to save the resultant video(s) locally, to Dropbox or Google Drive.
Thus, with Media.io, you can compress your videos without downloading any software. It is a 100% safe and secure tool from one of the top software companies, called Wondershare. This free video compressor tool is a must-try for a new video maker.
Part 3: People Also Want to Know
This section shall go through some FAQs that you may come across about video compressors.
Which free video compressor is the best?
Media.io is the top online video compressor that allows you to compress video files without losing quality. Additionally, it is simple, accessible, and easy to use.
What is a video compressor used for?
It is a tool used to reduce the total number of bits needed to represent a given video or image sequence. Additionally, it helps to reduce file size so that it does not occupy too much space.
Conclusion
Thus, as you saw, in this report, we clubbed and summarized a few essential points regarding video compressors. You learned:
- The video compressor online for freethat you should know of.
- The ten best video compressorsto choose from.
- Why is Media.io an excellent online video compressor, and how does it work?
- Lastly, a few FAQs to make you understand the process and tool better.
So, use these tips and start sharing your in-house video-making talent with your family and the world.
Replace Sky Background in Video: Figuring Out the Best Options
We live in an era that has been advanced by technology and software. Along with assisting in health and customer service, it enhances video outlook. These editors enhance the colors, audio, and other elements of images and videos. One of the major applications of this software is the ability to replace or remove backgrounds. This article will discuss the sky change video background and its sources.
Sky replacement video backgrounds help in covering up the mess behind a video. These backgrounds give your videos a captivating and refreshing look. Such replacement sky video backgrounds fit most of the image and video contexts. Embark on this journey to explore the importance of backgrounds and some useful sites.
Sky Replacement A cross-platform works like magic for background removal or sky replacement photos!
Free Download Free Download Learn More

Part 1: Why Should You Consider Changing the Background of Your Videos?
There are multiple reasons for changing the background of a video . Backgrounds cover the unnecessary things behind us to enhance videos. In addition, inserting video-relevant backgrounds helps in catching the audience’s attention. Discover this section to learn additional advantages of video backgrounds:
1. Imitates Professionalism
Be it your video content for social media or a Zoom call, setting backgrounds is necessary. These backgrounds reflect the personality of the person who is recording the video. It tells viewers how serious you are about the task and reflects professionalism.
2. Consistent Brand Image
Putting product-relevant backgrounds behind your videos is an important part of marketing. They convey a consistent brand image and tell customers you put in effort. Moreover, a steady background for your videos builds and maintains brand identity.
3. Maintain Privacy and Security
If you are creating videos for a blog, removing backgrounds is compulsory. If you create videos at home, removing backgrounds will maintain privacy. They eliminate any additional people or messy surroundings in your videos.
4. Focused and Appealing Content
When you add a theme-relevant background in the video, it tells users about the product. In addition, not removing unprofessional backgrounds may distract the audience. However, adding such backgrounds keeps the audience’s focus on the product. Inserting an aligning background enhances the overall outlook of a video.
5. Enhanced Storytelling and Clarity
Adding a background with appealing colors and good quality uplifts the brand’s narrative. It immerses viewers in the video and helps them understand the theme better. Moreover, the right background complements the product or video and brings clarity.
Part 2: Best Sites for Accessing Sky Video Templates for Changing
Now that you know why we emphasized the importance of backgrounds, let’s move forward. This section will quote some of the leading sites for sky-change video backgrounds. Keep reading the below section to learn more about these sites:
1. Pexel s
Pexels is an online platform that provides stock images and videos for every context. You can join this platform to upload videos and images from your gallery. In addition, there is no limit to images and videos for content creation. You can add an image to your favorites, or you can save this image in your collection. There are trending and suggested categories for you, or you can also use the search bar.
When you go to videos and search for the sky, you’ll find 28.2k sky background videos. These sky-replace video backgrounds have distinct visual appeals. Some videos include skies, while others have both sky and landscapes. In addition, you can save, download, and share these videos with your team. You can also click on the video to see the preview of the video before downloading.

2. Videezy
Are you looking for a colorful and diverse background range to change the sky in a video online? Use Videezy, as it has a collection of 5000+ sky video backgrounds. All the backgrounds are unique in color tones and styles to serve multiple users. You can try a video before downloading it to be sure about what you’re buying. You can search for simple or specific sky images like night sky or others.
Videezy is a diverse platform for stock images and videos with AI integration. It has unlimited categories of images that you can employ in your content. However, if you don’t find what you had in mind, you can take its AI’s assistance. The AI helps you craft your imagination into an image using prompts. Along with images and videos, you’ll find music, sound effects, and templates in it.

3. Pixabay
Are you looking for royalty-free and realistic sky-change video backgrounds? Pixabay offers more than 7000 sky videos in HD and 4K resolution. In addition, you can select a video to see its preview and other properties. It supports MP4 video format, and you can download videos in 4 different resolutions. You can share these sky videos on social sites or add them to your save collection.
Pixabay does not limit itself to videos; it offers illustrations, music, sound effects, and more. You can add a keyword for what you’re looking for, and it will generate results. The images and other media have vibrant colors with realistic outlooks. In its “Explore” section, you can find out about trendy or popular media and use them.

4. Vecteezy
If you feel that the above-mentioned sites have limited collection, visit Vecteezy. The platform offers more than 90K videos related to sky change in videos. Upon clicking the video for a preview, you can explore its features. It has high-quality HD, 4K resolution videos in MP4, MOV, and other formats.
In addition, the tool has generative AI integration to bring diversity and uniqueness. Use the AI prompt section to add a video description, and AI will generate it. In addition, you can also observe the frame rate of a video in its properties. This will help you adjust the speed or duration of the video accordingly. You can customize and edit your chosen videos and images in the “Create” section.

Part 3: Wondershare Filmora: A Perfect Avenue for Replacing Sky Background in Video
Multiple tools in the market offer video background removal. However, for removing the background with precision, we recommend Wondershare Filmora . This is a professional video editing tool that offers AI integration for this purpose. The AI automates the process, and users must activate this functionality.
For a professional outlook, you don’t need to spend hours setting green screens. After that, you can sky change the video background from Filmora’s background options. It offers built-in solid, gradient, and grid options for this purpose.
Free Download For Win 7 or later(64-bit)
Free Download For macOS 10.14 or later
Video Editing Features of Wondershare Filmora
With its vast editing interface and a range of video editing features, Filmora brings diversity. In this section, we will focus on other video editing features of Filmora. Let’s dive into the process of exploring those features without further delay:
1. AI Text-to-Video
If you have no editing experience but want to generate a video, use this feature. The AI text-to-video functionality offers video generation from scripts. This feature is ideal for creating educational or explainer videos. The AI inserts the graphics and a voiceover in your video.

2. AI Text-Based Editing
Free yourself from the complexity of cutting or trimming a video in a precise manner. This functionality generates a transcript of your video, and you can use it for editing. In the relative window, removing text will also remove the video section.

3. AI Vocal Remover
Why upload videos with unclear audio when you can use Filmora’s vocal remover tool? This tool analyzes and separates the vocals of your videos from background noise. You need to enable it after selecting your video, and AI will do the rest. The separated vocals are editable and enhance audio clarity.

4. AI Music Generator
Are you unable to fit music behind your videos? Use Filmora’s music generator with AI-backed algorithms to help you. The AI enables you to set the theme, tone, or emotion of a video and create results on it. It crafts multiple music tracks for users to select a suitable one.

Steps to Remove Video Background in Filmora
In this section, users will learn a simple method to remove video backgrounds in Filmora. You can remove the background and replace the sky video with it. Here is the step-by-step guide to removing video background in Filmora:
Step 1: Import Your Media and Bring it to Timeline
First, download Filmora on your device and log in to access its features. After that, create a “New Project” using the main display options. Upon reaching Filmora’s editing interface, click the “Import” option. Following that, import media and drag and place it onto the timeline panel.

Step 2: Enable Background Removing AI
Once you have placed media on the timeline, navigate towards the right-side settings panel. In the “Video > AI Tools” tab, enable the “AI Smart Cutout” option and click “Click to start Smart Cutout.”

Step 3: Start Background Removing
In the Smart Cutout Video window, trace the background of your video. Move to the right side and click the “Click to start Smart Cutout” button. The tracking will start, and the options will appear on the screen. Afterward, click the “Save” button to add this edited video to the timeline.

Step 4: Add a Background and Export Video
Hover towards the right-side panel and access the “Video > Basic” tabs. Find the “Background” section, enable it, and choose any given background. Following that, click the “Export” button to download this video on your device.

Free Download For Win 7 or later(64-bit)
Free Download For macOS 10.14 or later
Conclusion
Reading this article has helped readers to understand the value of backgrounds. They learned about how sky change video backgrounds can enhance your content. Such backgrounds are ideal for product marketing and brand image. Moreover, users learned about how to change video backgrounds in Filmora. With its AI integration and diverse tools, one must explore it to upgrade their content.
Free Download Free Download Learn More

Part 1: Why Should You Consider Changing the Background of Your Videos?
There are multiple reasons for changing the background of a video . Backgrounds cover the unnecessary things behind us to enhance videos. In addition, inserting video-relevant backgrounds helps in catching the audience’s attention. Discover this section to learn additional advantages of video backgrounds:
1. Imitates Professionalism
Be it your video content for social media or a Zoom call, setting backgrounds is necessary. These backgrounds reflect the personality of the person who is recording the video. It tells viewers how serious you are about the task and reflects professionalism.
2. Consistent Brand Image
Putting product-relevant backgrounds behind your videos is an important part of marketing. They convey a consistent brand image and tell customers you put in effort. Moreover, a steady background for your videos builds and maintains brand identity.
3. Maintain Privacy and Security
If you are creating videos for a blog, removing backgrounds is compulsory. If you create videos at home, removing backgrounds will maintain privacy. They eliminate any additional people or messy surroundings in your videos.
4. Focused and Appealing Content
When you add a theme-relevant background in the video, it tells users about the product. In addition, not removing unprofessional backgrounds may distract the audience. However, adding such backgrounds keeps the audience’s focus on the product. Inserting an aligning background enhances the overall outlook of a video.
5. Enhanced Storytelling and Clarity
Adding a background with appealing colors and good quality uplifts the brand’s narrative. It immerses viewers in the video and helps them understand the theme better. Moreover, the right background complements the product or video and brings clarity.
Part 2: Best Sites for Accessing Sky Video Templates for Changing
Now that you know why we emphasized the importance of backgrounds, let’s move forward. This section will quote some of the leading sites for sky-change video backgrounds. Keep reading the below section to learn more about these sites:
1. Pexel s
Pexels is an online platform that provides stock images and videos for every context. You can join this platform to upload videos and images from your gallery. In addition, there is no limit to images and videos for content creation. You can add an image to your favorites, or you can save this image in your collection. There are trending and suggested categories for you, or you can also use the search bar.
When you go to videos and search for the sky, you’ll find 28.2k sky background videos. These sky-replace video backgrounds have distinct visual appeals. Some videos include skies, while others have both sky and landscapes. In addition, you can save, download, and share these videos with your team. You can also click on the video to see the preview of the video before downloading.

2. Videezy
Are you looking for a colorful and diverse background range to change the sky in a video online? Use Videezy, as it has a collection of 5000+ sky video backgrounds. All the backgrounds are unique in color tones and styles to serve multiple users. You can try a video before downloading it to be sure about what you’re buying. You can search for simple or specific sky images like night sky or others.
Videezy is a diverse platform for stock images and videos with AI integration. It has unlimited categories of images that you can employ in your content. However, if you don’t find what you had in mind, you can take its AI’s assistance. The AI helps you craft your imagination into an image using prompts. Along with images and videos, you’ll find music, sound effects, and templates in it.

3. Pixabay
Are you looking for royalty-free and realistic sky-change video backgrounds? Pixabay offers more than 7000 sky videos in HD and 4K resolution. In addition, you can select a video to see its preview and other properties. It supports MP4 video format, and you can download videos in 4 different resolutions. You can share these sky videos on social sites or add them to your save collection.
Pixabay does not limit itself to videos; it offers illustrations, music, sound effects, and more. You can add a keyword for what you’re looking for, and it will generate results. The images and other media have vibrant colors with realistic outlooks. In its “Explore” section, you can find out about trendy or popular media and use them.

4. Vecteezy
If you feel that the above-mentioned sites have limited collection, visit Vecteezy. The platform offers more than 90K videos related to sky change in videos. Upon clicking the video for a preview, you can explore its features. It has high-quality HD, 4K resolution videos in MP4, MOV, and other formats.
In addition, the tool has generative AI integration to bring diversity and uniqueness. Use the AI prompt section to add a video description, and AI will generate it. In addition, you can also observe the frame rate of a video in its properties. This will help you adjust the speed or duration of the video accordingly. You can customize and edit your chosen videos and images in the “Create” section.

Part 3: Wondershare Filmora: A Perfect Avenue for Replacing Sky Background in Video
Multiple tools in the market offer video background removal. However, for removing the background with precision, we recommend Wondershare Filmora . This is a professional video editing tool that offers AI integration for this purpose. The AI automates the process, and users must activate this functionality.
For a professional outlook, you don’t need to spend hours setting green screens. After that, you can sky change the video background from Filmora’s background options. It offers built-in solid, gradient, and grid options for this purpose.
Free Download For Win 7 or later(64-bit)
Free Download For macOS 10.14 or later
Video Editing Features of Wondershare Filmora
With its vast editing interface and a range of video editing features, Filmora brings diversity. In this section, we will focus on other video editing features of Filmora. Let’s dive into the process of exploring those features without further delay:
1. AI Text-to-Video
If you have no editing experience but want to generate a video, use this feature. The AI text-to-video functionality offers video generation from scripts. This feature is ideal for creating educational or explainer videos. The AI inserts the graphics and a voiceover in your video.

2. AI Text-Based Editing
Free yourself from the complexity of cutting or trimming a video in a precise manner. This functionality generates a transcript of your video, and you can use it for editing. In the relative window, removing text will also remove the video section.

3. AI Vocal Remover
Why upload videos with unclear audio when you can use Filmora’s vocal remover tool? This tool analyzes and separates the vocals of your videos from background noise. You need to enable it after selecting your video, and AI will do the rest. The separated vocals are editable and enhance audio clarity.

4. AI Music Generator
Are you unable to fit music behind your videos? Use Filmora’s music generator with AI-backed algorithms to help you. The AI enables you to set the theme, tone, or emotion of a video and create results on it. It crafts multiple music tracks for users to select a suitable one.

Steps to Remove Video Background in Filmora
In this section, users will learn a simple method to remove video backgrounds in Filmora. You can remove the background and replace the sky video with it. Here is the step-by-step guide to removing video background in Filmora:
Step 1: Import Your Media and Bring it to Timeline
First, download Filmora on your device and log in to access its features. After that, create a “New Project” using the main display options. Upon reaching Filmora’s editing interface, click the “Import” option. Following that, import media and drag and place it onto the timeline panel.

Step 2: Enable Background Removing AI
Once you have placed media on the timeline, navigate towards the right-side settings panel. In the “Video > AI Tools” tab, enable the “AI Smart Cutout” option and click “Click to start Smart Cutout.”

Step 3: Start Background Removing
In the Smart Cutout Video window, trace the background of your video. Move to the right side and click the “Click to start Smart Cutout” button. The tracking will start, and the options will appear on the screen. Afterward, click the “Save” button to add this edited video to the timeline.

Step 4: Add a Background and Export Video
Hover towards the right-side panel and access the “Video > Basic” tabs. Find the “Background” section, enable it, and choose any given background. Following that, click the “Export” button to download this video on your device.

Free Download For Win 7 or later(64-bit)
Free Download For macOS 10.14 or later
Conclusion
Reading this article has helped readers to understand the value of backgrounds. They learned about how sky change video backgrounds can enhance your content. Such backgrounds are ideal for product marketing and brand image. Moreover, users learned about how to change video backgrounds in Filmora. With its AI integration and diverse tools, one must explore it to upgrade their content.
How to Zoom Desktop Screen
A video port that enables the connection of an external display to a modern laptop is often included in these devices; however, this might require you to learn how to un-zoom desktop. You could wish to use a laptop with a big display as a business professional to present data, images, or other media to users or coworkers during a meeting. However, if sat far away from the display, some individuals could find it difficult to read text or distinguish items on the screen. To better visibility, you may adjust the screen magnification as necessary. Users of the most recent versions of Windows and its programs may zoom in on the screen to expand any areas that are difficult for them to view, hence, learning how to zoom in on desktop is a necessary choice to make. You may zoom out to return to the regular screen after you’ve determined what is in the particular location.
There are methods and keyboard shortcuts that enable users to zoom in on the screen to expand anything that may be tough for certain users to read in Windows or even in various programs. Here are a few ways to zoom in Desktop or out the screen, if you unintentionally zoom on a Windows desktop screen or in an app like a web browser, depending on the circumstance. Have you ever had a zoomed-in screen? Your screen’s text, graphics, and icons all suddenly enlarge dramatically. You may need to zoom out at this point. Both PC and Mac users may change the magnification and resolution of a screen. If you notice bigger text or icons, you can be confused between these two. For further advice on how to zoom desktop screen, keep reading. In conclusion, there are several methods for doing this. We’ll go through the top 5 techniques with you.
- Method 1: Using a Keyboard
- Method 2: Touchscreen Method
- Method 3: Use Keyboard and Mouse Commands
- Method 4: Use the Desktop Magnifier Feature
- Method 5: Web Browser Method
Part 1: The Need to Zoom Computer Screen
You’ve been looking at your screen nonstop, but you can’t figure out what it says. You could find the answer you’re searching for by zooming in on your computer. On your computer screen, reading small type might be too difficult at times. There are several fast and simple methods to magnify your whole screen or zoom in on a specific area, whether you’re using a MacBook or a Windows 10 PC.
Many users who are utilizing the Windows desktop, reading text, or surfing the web claim that the screen suddenly becomes stuck on zoom. Having such huge icons, graphics, and text on your windows computer is annoying. You must zoom out on Windows in order to resolve this problem. Microsoft offers options for customizing desktop display settings, whether you want to keep the zoomed-in desktop or change the display settings. This might alter the settings for Windows’ Magnifier magnification, desktop icon size, or screen resolution.
Additionally, depending on the programs and utilities you have open, your computer’s desktop may sometimes resemble a broad landscape. Its size and expanse provide you a bird’s-eye perspective of the landscape. It may become a little challenging to read what’s on it, particularly if your vision isn’t as good as it once was. Popular desktop operating systems like Windows 10 and macOS include features that enable you to swiftly and eagle-like zoom in on just what you need.
Similar to this, if you aren’t careful and cautious while using your computer, you could accidentally activate a feature like its zoom function. If you’re using a shared computer, another user may utilize the zoom feature to make it easier for them to see tiny type on the screen. In any event, learning how to zoom out once more will allow you to utilize your computer anyway you see fit. Tools that zoom in on the desktop and make icons seem bigger than normal include screen resolution, icon views, and Windows Magnifier. These tools provide the greatest personalized settings to optimize display since they are made to enhance monitor display by making images and text understandable.
Part 2: How to Zoom in/out PC screen
Here are the top 5 methods to know how to zoom out on desktop or subsequently, how to zoom desktop screen. Use the easiest method for you from the guide below:
Method 1: Using a Keyboard
To zoom out or in on a webpage or document, hold down the Ctrl key while pressing the - (minus) or + (plus) key. You may utilize the - and + keys on the numeric keypad as well as those adjacent to the backspace key.
Step1Using the handy keyboard keys listed below is one of the most common methods to zoom in or out just in a certain window, website, or program.
- Ctrl + (+) to zoom in.
- Ctrl + (-) will zoom out.
Step2You may keep holding down the Command key while pressing the - or + keys to zoom as much as you like. Go ahead and try it.
Method 2: Touchscreen Method
You have access to yet another fantastic single window zooming option if you’re using a laptop with a trackpad. Simply squeeze two fingers together or spread them apart on your trackpad to zoom in or out. The Touch Bar at the bottom of your screen may be made bigger and simpler to read by choosing “Enable Touch Bar Zoom.” To try it out, all you have to do is touch and hold the Touch Bar.
Step1You may use a “reverse-pinch” motion on a laptop with a touch screen or trackpad to zoom in or out in a variety of programs as well as on the desktop. This is really simple and will work in most applications (including Microsoft Office apps).
However, this motion may not be supported by all applications. This functionality won’t work if you’ve turned off gestures on your trackpad or touchscreen.
Step2Put two fingers together on the touchscreen or trackpad. On the trackpad, you should place two fingers closely apart (they may even be touching).
Step3Put your fingers together directly over the region you wish to zoom out on while using a touchscreen display to focus in on a certain area.
Step4On the trackpad, spread your two fingers widely apart. The chosen website or app will zoom out to show more content when your two fingers separate from one another on the trackpad or touchscreen.
Method 3: Use Keyboard and Mouse Commands
Using the keyboard and Mouse shortcuts is the easiest method to zoom in and out desktop screen on computers. Follow the steps below to learn this technique hassle-free.
Steps to Use Keyboard and Mouse Method:
Step1To zoom in, scroll your mouse wheel up while holding down the Ctrl key. You may already use this to zoom in on your browser, for instance.
Step2Now for the Zoom out, hold the Ctrl key on the Keyboard and move the mouse wheel down to zoom out to the desired extent as shown here:
Method 4: Use the Desktop Magnifier Feature
The magnifier tool allows you to temporarily increase the size of a specific area of the screen. It is a built-in function of the Windows family. The user may enlarge the screen with the use of the magnifying tool. This function is highly beneficial for those who have hazy vision as well as for enlarging the specific picture shown to viewers through projectors. The magnifier app’s default view, Full Screen, may enlarge the whole screen. However, the user is unable to see the complete screen at once since a section of it enlarges and moves with your mouse pointer. By selecting the “Options” option, the user may modify the Magnifier app’s settings and access a variety of additional capabilities. Anyway, let’s get started to learn the processes.
Steps to Use Magnifier to Zoom Desktop Screen:
Step1Open the Windows search (a magnifier icon or a long search box on the taskbar). To launch Magnifier, enter “magnifier” into Windows search and then click the first result.
Step2The Windows 10 Magnifier window will appear. Then, at any moment, you may zoom in on your app, your web browser, or a few other applications by pressing the + button.

Step3Press the Windows logo key and + to enlarge the view (plus). or use the Magnifier controls’ + (plus) button.
Step4Press the Windows key and - to zoom out (minus). Or use the Magnifier controls’ - (minus) button.
Step5Press Windows logo key + Esc to close the Magnifier. In the top-right corner of the Magnifier controls, click the X (close) button.
Method 5: Web Browser Method
You may enhance your web browser reading experience in a number of different ways. One method is to zoom in on the online sites you wish to read and enlarge the text, photos, and icons. It’s possible that you need to do this since your eyes are weary or the screen’s quality isn’t the best. To restore items to their original state, you may need to reset the zoom level or zoom out at some point. On Windows 10, you may zoom in for a clearer view of the screen if you can’t read the text or the pictures on your computer screen.
Steps to Use Web Browser Method to Zoom Desktop Screen:
You may use the zoom in shortcut on any web browser to increase the browser’s zoom level. In other words, you may zoom in on your web browser using the keyboard.
Step1Launch a web browser. To zoom in on your web browser, hold down the Ctrl key while pressing the “+” key on your keyboard.
Step2Now, within the browser, hit the 3-dot menu at the right top corner. (This is available in every browser).
Step3To enlarge the view in your web browser, click the + sign next to Zoom. Clicking the minus button on your web browser will let you to un-zoom or zoom out.
Conclusion
Numerous features on modern computers are intended to simplify user tasks. The ability to zoom in and out on the screen is one feature that might make using a computer easier. Learning how to zoom in and out may be helpful if you have trouble seeing little text or pictures on your computer or if you need more screen real estate to view many things at once. You can see from reading this that using your computer to zoom in and out is fairly simple. You may simply choose one approach based on your needs to assist you. The zoom settings in Windows may be the cause of the abnormally huge graphics on the desktop.
Part 1: The Need to Zoom Computer Screen
You’ve been looking at your screen nonstop, but you can’t figure out what it says. You could find the answer you’re searching for by zooming in on your computer. On your computer screen, reading small type might be too difficult at times. There are several fast and simple methods to magnify your whole screen or zoom in on a specific area, whether you’re using a MacBook or a Windows 10 PC.
Many users who are utilizing the Windows desktop, reading text, or surfing the web claim that the screen suddenly becomes stuck on zoom. Having such huge icons, graphics, and text on your windows computer is annoying. You must zoom out on Windows in order to resolve this problem. Microsoft offers options for customizing desktop display settings, whether you want to keep the zoomed-in desktop or change the display settings. This might alter the settings for Windows’ Magnifier magnification, desktop icon size, or screen resolution.
Additionally, depending on the programs and utilities you have open, your computer’s desktop may sometimes resemble a broad landscape. Its size and expanse provide you a bird’s-eye perspective of the landscape. It may become a little challenging to read what’s on it, particularly if your vision isn’t as good as it once was. Popular desktop operating systems like Windows 10 and macOS include features that enable you to swiftly and eagle-like zoom in on just what you need.
Similar to this, if you aren’t careful and cautious while using your computer, you could accidentally activate a feature like its zoom function. If you’re using a shared computer, another user may utilize the zoom feature to make it easier for them to see tiny type on the screen. In any event, learning how to zoom out once more will allow you to utilize your computer anyway you see fit. Tools that zoom in on the desktop and make icons seem bigger than normal include screen resolution, icon views, and Windows Magnifier. These tools provide the greatest personalized settings to optimize display since they are made to enhance monitor display by making images and text understandable.
Part 2: How to Zoom in/out PC screen
Here are the top 5 methods to know how to zoom out on desktop or subsequently, how to zoom desktop screen. Use the easiest method for you from the guide below:
Method 1: Using a Keyboard
To zoom out or in on a webpage or document, hold down the Ctrl key while pressing the - (minus) or + (plus) key. You may utilize the - and + keys on the numeric keypad as well as those adjacent to the backspace key.
Step1Using the handy keyboard keys listed below is one of the most common methods to zoom in or out just in a certain window, website, or program.
- Ctrl + (+) to zoom in.
- Ctrl + (-) will zoom out.
Step2You may keep holding down the Command key while pressing the - or + keys to zoom as much as you like. Go ahead and try it.
Method 2: Touchscreen Method
You have access to yet another fantastic single window zooming option if you’re using a laptop with a trackpad. Simply squeeze two fingers together or spread them apart on your trackpad to zoom in or out. The Touch Bar at the bottom of your screen may be made bigger and simpler to read by choosing “Enable Touch Bar Zoom.” To try it out, all you have to do is touch and hold the Touch Bar.
Step1You may use a “reverse-pinch” motion on a laptop with a touch screen or trackpad to zoom in or out in a variety of programs as well as on the desktop. This is really simple and will work in most applications (including Microsoft Office apps).

However, this motion may not be supported by all applications. This functionality won’t work if you’ve turned off gestures on your trackpad or touchscreen.
Step2Put two fingers together on the touchscreen or trackpad. On the trackpad, you should place two fingers closely apart (they may even be touching).
Step3Put your fingers together directly over the region you wish to zoom out on while using a touchscreen display to focus in on a certain area.
Step4On the trackpad, spread your two fingers widely apart. The chosen website or app will zoom out to show more content when your two fingers separate from one another on the trackpad or touchscreen.
Method 3: Use Keyboard and Mouse Commands
Using the keyboard and Mouse shortcuts is the easiest method to zoom in and out desktop screen on computers. Follow the steps below to learn this technique hassle-free.
Steps to Use Keyboard and Mouse Method:
Step1To zoom in, scroll your mouse wheel up while holding down the Ctrl key. You may already use this to zoom in on your browser, for instance.

Step2Now for the Zoom out, hold the Ctrl key on the Keyboard and move the mouse wheel down to zoom out to the desired extent as shown here:
Method 4: Use the Desktop Magnifier Feature
The magnifier tool allows you to temporarily increase the size of a specific area of the screen. It is a built-in function of the Windows family. The user may enlarge the screen with the use of the magnifying tool. This function is highly beneficial for those who have hazy vision as well as for enlarging the specific picture shown to viewers through projectors. The magnifier app’s default view, Full Screen, may enlarge the whole screen. However, the user is unable to see the complete screen at once since a section of it enlarges and moves with your mouse pointer. By selecting the “Options” option, the user may modify the Magnifier app’s settings and access a variety of additional capabilities. Anyway, let’s get started to learn the processes.
Steps to Use Magnifier to Zoom Desktop Screen:
Step1Open the Windows search (a magnifier icon or a long search box on the taskbar). To launch Magnifier, enter “magnifier” into Windows search and then click the first result.
Step2The Windows 10 Magnifier window will appear. Then, at any moment, you may zoom in on your app, your web browser, or a few other applications by pressing the + button.

Step3Press the Windows logo key and + to enlarge the view (plus). or use the Magnifier controls’ + (plus) button.
Step4Press the Windows key and - to zoom out (minus). Or use the Magnifier controls’ - (minus) button.
Step5Press Windows logo key + Esc to close the Magnifier. In the top-right corner of the Magnifier controls, click the X (close) button.
Method 5: Web Browser Method
You may enhance your web browser reading experience in a number of different ways. One method is to zoom in on the online sites you wish to read and enlarge the text, photos, and icons. It’s possible that you need to do this since your eyes are weary or the screen’s quality isn’t the best. To restore items to their original state, you may need to reset the zoom level or zoom out at some point. On Windows 10, you may zoom in for a clearer view of the screen if you can’t read the text or the pictures on your computer screen.
Steps to Use Web Browser Method to Zoom Desktop Screen:
You may use the zoom in shortcut on any web browser to increase the browser’s zoom level. In other words, you may zoom in on your web browser using the keyboard.
Step1Launch a web browser. To zoom in on your web browser, hold down the Ctrl key while pressing the “+” key on your keyboard.

Step2Now, within the browser, hit the 3-dot menu at the right top corner. (This is available in every browser).
Step3To enlarge the view in your web browser, click the + sign next to Zoom. Clicking the minus button on your web browser will let you to un-zoom or zoom out.
Conclusion
Numerous features on modern computers are intended to simplify user tasks. The ability to zoom in and out on the screen is one feature that might make using a computer easier. Learning how to zoom in and out may be helpful if you have trouble seeing little text or pictures on your computer or if you need more screen real estate to view many things at once. You can see from reading this that using your computer to zoom in and out is fairly simple. You may simply choose one approach based on your needs to assist you. The zoom settings in Windows may be the cause of the abnormally huge graphics on the desktop.
Also read:
- Updated Want to Create a Stunning Intro Video on Your Smartphone? Legend Intro Maker Is a Popular Choice. Learn the Steps to Design Intro Video Legend Intro Maker
- In 2024, Five Thoughts on Discord Create Accounts How-To Questions
- What Is the Best MP4 Cutters for YouTubers on Mac for 2024
- Updated Step by Step to Rotate Videos Using OBS
- Updated In 2024, All About GIF Keyboard That You May Want to Know
- New 2024 Approved VSCO Slow Motion
- New In 2024, A Complete Guide to Use Distortion Effect in Premiere Pro
- New Best Tricks for Learning Photo Slideshow for 2024
- New In 2024, Blender - A Video Editor for Every Professional
- New How To Add Text In After Effects
- New What If YouTube Zoom to Fill Not Working, In 2024
- Updated How Long Does It Take To Edit A Video
- New How to Loop Video in Canva for 2024
- 2024 Approved Top 12 Sony Vegas Slideshow Templates for Free Download
- Updated 2024 Approved Live Stream on YouTube Using Zoom
- Add Stylish Text to Videos
- 2024 Approved Kinetic Typography Text Effect 【EASY&FAST】
- Updated In 2024, Create Chroma Key Written Text Effects in Filmora
- Updated How to Create Vintage Film Effect 1990S for 2024
- Read on to Learn About Multi Object Tracking, Its Types, and Requirements. Youll Also Learn About the Different Approaches Toward Object Tracking
- New In 2024, Change Background Color in After Effects
- Bored of Extraneous Software Downloads and Program Installations to Edit Your Videos? The Best Video Editing Online Utilities Are Here at Your Rescue for 2024
- What Is the Best FPS for YouTube Videos for 2024
- In 2024, A Roster of 8 Best Color Match Generators
- New Best Ideas for Time Lapse Video for 2024
- New How to Make Blender Render Transparent Background
- Updated Splitting a Video in VSDC Step by Step
- Updated How to Rotate Video in iMovie with Alternative
- Best MOV to GIF Converters
- In 2024, What Is the Top Filmora Slideshow Templates? Experts Choice
- New 15 Best Video Editing Courses Online with Certificate Free $ Paid
- New In 2024, Voice Changer for Discord | Use Voicemod on Discord
- 2024 Approved 15 Free Cinematic LUTs for Your Film
- Updated 2024 Approved 4 Methods to Resize a WebM File
- Kdenlive Review – Is It The Best Video Editor?
- New 3 In-Camera Transitions Tricks To Make Videos
- An Intro Video Describing You and Your Content Is the First and the Foremost Thing Which a Viewer Sees. Thinking of How to Make an Interesting Intro Video, This Blog Is Surely a Supportive Guide for You. Learn More Here
- In 2024, Best 3 Software to Transfer Files to/from Your Nokia C110 via a USB Cable | Dr.fone
- How to Transfer Data from Xiaomi Redmi 13C to Samsung Phone | Dr.fone
- How To Unlock iPhone 15 Pro Max Without Passcode? 4 Easy Methods | Dr.fone
- Updated Master Deepface Live Download and Train Your Live Model
- How to Factory Reset iPad or iPhone 6s without iCloud Password or Apple ID?
- In 2024, How to Transfer Contacts from Lava Blaze Curve 5G to iPhone XS/11 | Dr.fone
- How to share/fake gps on Uber for Huawei Nova Y91 | Dr.fone
- How To Transfer Data From Apple iPhone 15 Pro Max To Other iPhone 15 Pro devices? | Dr.fone
- 10 Fake GPS Location Apps on Android Of your Infinix Note 30 5G | Dr.fone
- In 2024, Recommended Best Applications for Mirroring Your Poco X6 Screen | Dr.fone
- How To Delete iCloud Account Remove Your Apple ID Permanently From Apple iPhone 6 Plus
- 6 Proven Ways to Unlock Nokia 130 Music Phone When You Forget the Password
- Everything You Need to Know about Lock Screen Settings on your Xiaomi Redmi Note 12 Pro 5G
- Sim Unlock Oppo Find N3 Phones without Code 2 Ways to Remove Android Sim Lock
- In 2024, How to Change Lock Screen Wallpaper on Samsung Galaxy M34
- 9 Mind-Blowing Tricks to Hatch Eggs in Pokemon Go Without Walking On Tecno Spark 20 Pro | Dr.fone
- How To Transfer Data From Apple iPhone 6 To Other iPhone? | Dr.fone
- Title: New How to Change Frame Rate in Premiere Pro for 2024
- Author: Chloe
- Created at : 2024-04-24 07:08:34
- Updated at : 2024-04-25 07:08:34
- Link: https://ai-editing-video.techidaily.com/new-how-to-change-frame-rate-in-premiere-pro-for-2024/
- License: This work is licensed under CC BY-NC-SA 4.0.

