:max_bytes(150000):strip_icc():format(webp)/GettyImages-849896688-6d69f22bcf0a4ff092f444abe6e1c19f.jpg)
New How To Change Speed of Video in Final Cut Pro, In 2024

How To Change Speed of Video in Final Cut Pro?
When there are certain boring but necessary parts in your video, you need to speed them up. Similarly, you may need to reduce the duration of the entire video. Speeding up the video is your only option when you do not want to cut any part. You must have also observed that certain videos look funny when you speed them up. To speed up videos, you will need a video editor that does not degrade the video quality.
Final Cut Pro is a popular choice to speed up video without distorting the pitch. Many think that the video quality can degrade when they change the speed of the video clip. This concern can be taken care of when you alter the video speed with Final Cut Pro. Instead of changing the speed of the entire video, you can change the speed of specific parts. We will illustrate how to speed up the video using Final Cut Pro and suggest a better choice than FCP.
Part I. Speed Up Video using Final Cut Pro
Final Cut Pro by Apple is one of Mac users’ most popular video editors. Many video creators purchase MacBooks for editing their videos in Final Cut Pro. The video editor is suitable for beginners as well as professionals. FCP, as a video editor, is super fast in rendering and processing video while exporting. Here are the steps for the Final Cut Pro speed-up clip.
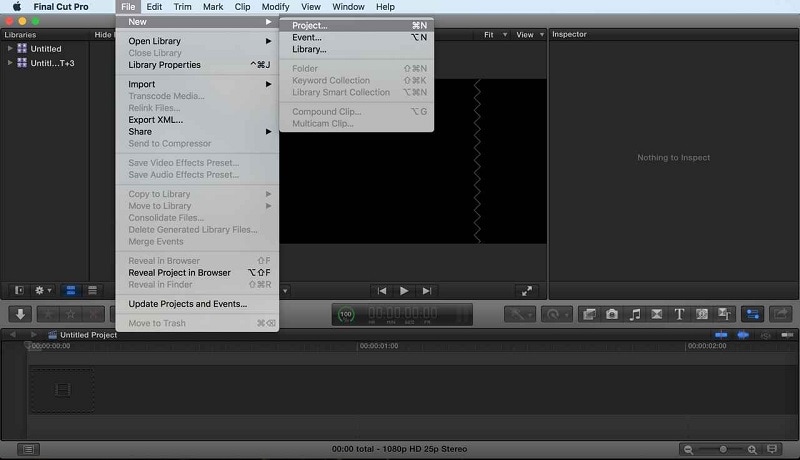
Step1 Open FCP. Navigate to File>New> and tap Project to start a new project.
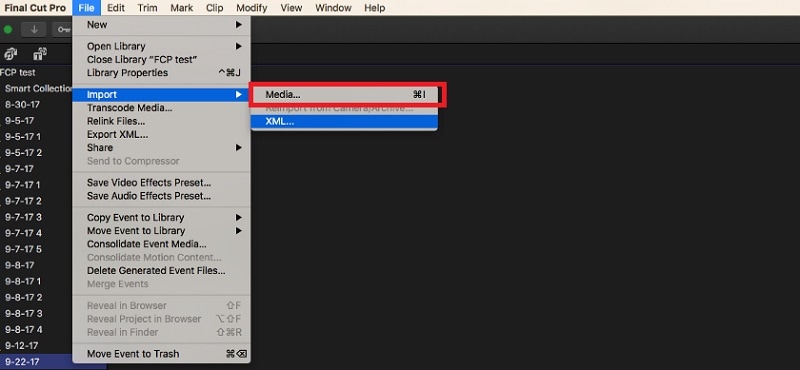
Step2 Go to File>Import> Media and fetch your video clip. After that, drag/drop the video clip into the timeline.
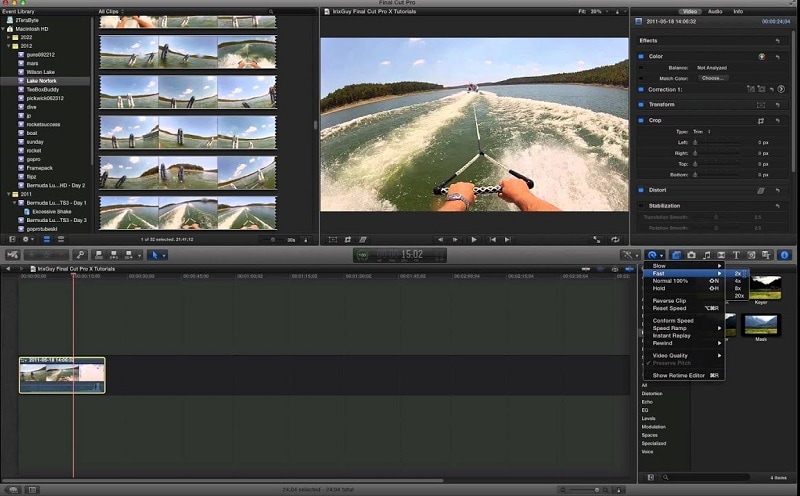
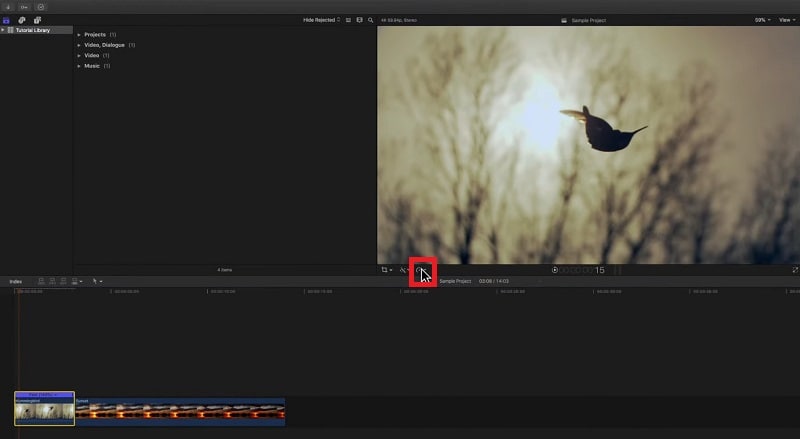
Step3 Choose the video clip from the timeline. Click on the Speedometer(Retime) icon at the top of the timeline.
Step4 Tap the Speedometer icon, to get the drop-drop menu. For the Final Cut Pro speed-up video, go to Fast and select the speed. You get to choose from 2X to 20X.
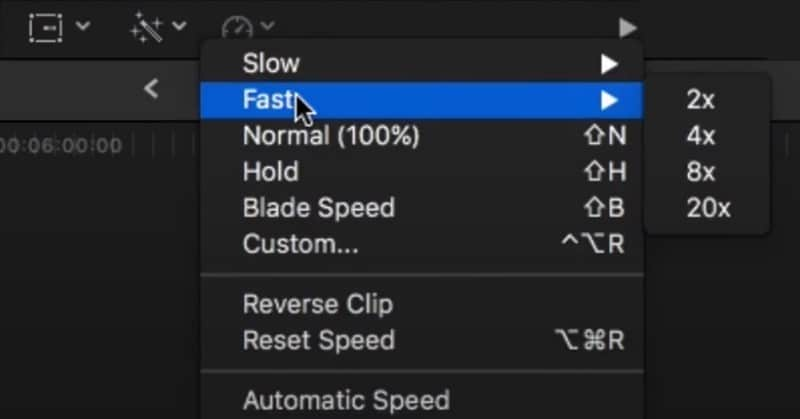
If you want to customize the speed-up rate, you can click on the Custom option. Enter any desired percentage speed.
Step5 Now, play the video.
Part II. Tips for Speeding Up Video in Final Cut Pro
You have to keep a few points in mind when you speed up videos in Final Cut Pro. This ensures that the video does not get distorted while speeding up a section. Here are some tips to follow to speed up the video in FCP.
Adjust The Pitch of Sped-Up Clips -
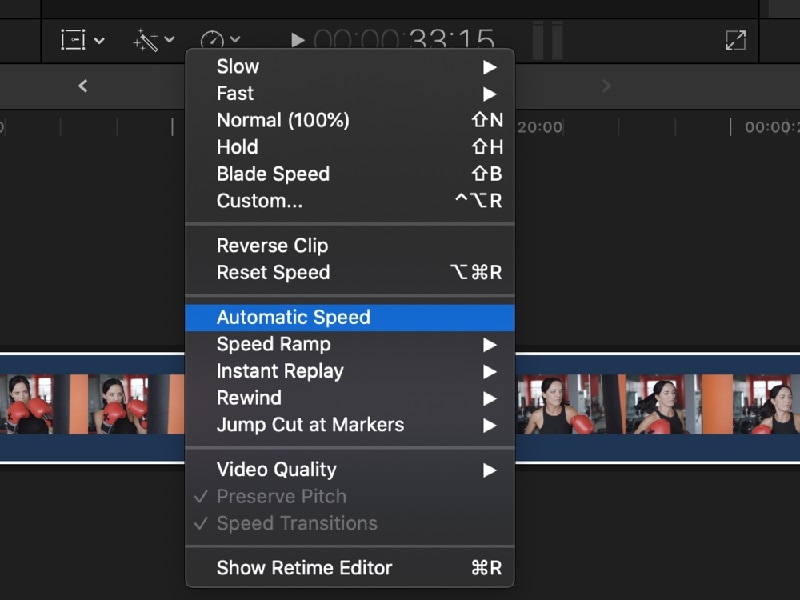
By default, Final Cut Pro preserves the pitch of the audio even when you change the speed of the video. However, you may want to change the pitch per the video’s speed. This is because you might want to make the audio sound funny. You need to turn off the Preserve Pitch option from Retime menu. Once you do that, the pitch of the sped-up clip adjusts itself as per the change in speed.
Speeding Up Video by Adjusting Frame Rate -
You can shoot at a low frame rate for the scene you want to speed up. The frame rate should be lower than the overall video project’s frame rate.
You can add the scene to your video project on the timeline. Then you need to choose Automatic Speed from Retime menu. This will increase the frame rate from the scene to the video project frame rate. Once the frame rate increases, the video will speed up automatically.
Smoothen Out the Sped-Up Video -
Sometimes, the overall video may look old when you speed up a particular portion. That is why there are two options available on Final Cut Pro. The first option is frame blending which is more suitable for the slow-motion clip.
The second option is the optical flow that smoothens out the sped-up clip. It adds in-between frames by analyzing the directional movement of pixels. You can find the option from Video Quality present in the Retime menu.
Part III. The Right Final Cut Pro Alternative for Changing Speed - Filmora
Final Cut Pro has a steep learning curve. Unless you have some experience in video editing, you will find the user interface slightly complicated. Besides, Final Cut Pro is only available for Mac users since it is an Apple product.
Many people look for a Final Cut Pro alternative to change the speed of the video. Wondershare Filmora is the best choice over Final Cut Pro to change the speed of video Final Cut Pro.
Wondershare Filmora is a professional video editor that is available for Windows and Mac users. The video editor is suitable for beginners as well as experienced video creators. The popularity of Filmora is due to its super intuitive user interface. You get almost all the features of FCP in Filmora.
In comparison, there are more video effects, elements, and stock media files available to enhance your videos. You get the latest effects from time to time so that you can have the trending elements in the video, you can also save the edited video in different video file formats as per your requirements, and even record video through a webcam and capture the screen using Filmora.
Several AI effects, stickers, and elements are available to enhance your videos. Most users find it easier to edit videos on Filmora over Final Cut Pro.
Free Download For Win 7 or later(64-bit)
Free Download For macOS 10.14 or later
How to Change Video Speed in Filmora?
Changing video speed in Filmora is super easy. You can speed up your video as per your requirements in a number of ways. That is why Filmora happens to be a better option than Final Cut Pro. We will illustrate all the different methods to change video speed in Filmora.
You can watch this video to understand how to change video speed in Filmora.
Method 1. The Simplest Way - Click “2x-100x” Speed Options
Just like Final Cut Pro, you can choose from preset speed options to change video speed. This is undoubtedly the easiest way to change video speed instantly. While Final Cut Pro offers 2X to 20X speed options, Filmora has 2X to 100X speed presets. Here are the steps to speed up video by choosing a preset speed option.
Step1 Download, install and simply Launch Filmora. Tap Create New Project option.

Step2 Go to File> Import Media> Import Media Files and choose the video file. The selected video will be imported into the Project Media folder. Alternatively, you can also use the drag/drop function.

Step3 Drag and drop the video file onto the timeline. Select the video clip from the timeline and click on the Speed (timer icon) option at the top of the timeline. If you want to speed up a portion of the video, you need to split the video clip.

Step4 From the menu, go to Fast and select any speed option as per your requirements. Thereafter, play the video to see the changes.

Step5 Press Export to save the video file in your desired file format.
Method 2. Use Uniform Speed to Change Speed
If you want to customize the video speed uniformly, there is a dedicated option called Uniform Speed in Filmora. This means you do not want to choose from the preset speed options. You may want to set the speed of the video to 3X, but it is not available in the preset options.
That is where Uniform Speed comes in handy, and you can set any speed from 0.01X to 100X. Here are the steps to follow.
Step1 Once you have dropped the video file onto the timeline, click on the Speed(timer) icon.
Step2 Click on the Uniform Speed option. This will open the Uniform Speed tab above the timeline.

Step3 Adjust the speed slider to set the desired speed as per your requirements. The duration will change as per the speed you set, and you can set the duration below the speed slider. Just like Final Cut Pro, you can turn on Ripple and Audio Pitch as per your preference.

Step4 Once you are satisfied with the speed, click on the Ok button. Thereafter, tap Export to save the edited video file.
Method 3. Use Speed Ramping to Change Speed
There is a unique way to change your video speed called speed ramping. You can speed up some parts and slow down the other parts, like crests and troughs in a graph.
The speed ramping feature comes with several graphical presets. You can choose from the presets and customize the speed as per your requirements. Check the steps to use speed ramping to change your video speed.
Step1 Drag and drop the video file onto the timeline. Click on the Speed(timer) icon at the top of the timeline.
Step2 Click on Speed Ramping option. This will open Speed Ramping above the timeline.

Step3 Select from the available preset as per your requirements. Otherwise, you can select Customize option and edit the nodes as needed.
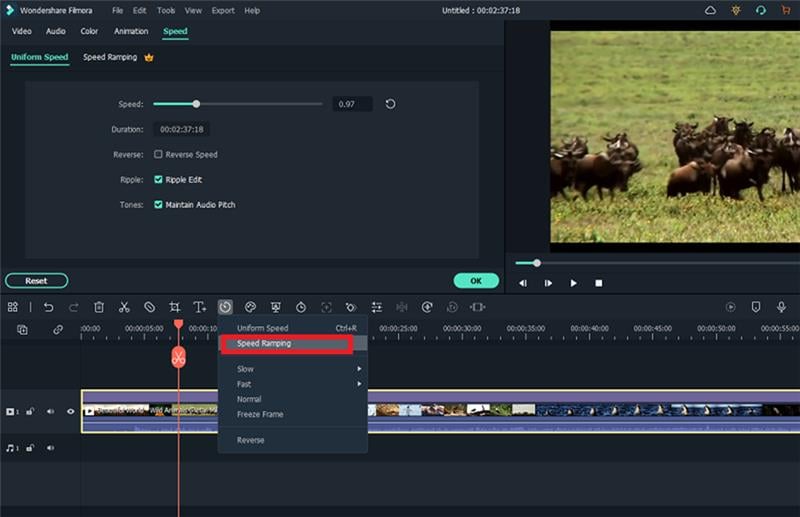
Step4 Once satisfied with the result, click on the Ok button. Finally, tap Export
Conclusion
There are some videos where you may have to speed up certain parts. In detail, we have illustrated how to speed up the video in Final Cut Pro. However, if you do not have Final Cut Pro or are unsatisfied with FCP, Wondershare Filmora is a great choice. Most importantly, the steps for all the different methods are very simple for everyone to follow.
Free Download For macOS 10.14 or later
How to Change Video Speed in Filmora?
Changing video speed in Filmora is super easy. You can speed up your video as per your requirements in a number of ways. That is why Filmora happens to be a better option than Final Cut Pro. We will illustrate all the different methods to change video speed in Filmora.
You can watch this video to understand how to change video speed in Filmora.
Method 1. The Simplest Way - Click “2x-100x” Speed Options
Just like Final Cut Pro, you can choose from preset speed options to change video speed. This is undoubtedly the easiest way to change video speed instantly. While Final Cut Pro offers 2X to 20X speed options, Filmora has 2X to 100X speed presets. Here are the steps to speed up video by choosing a preset speed option.
Step1 Download, install and simply Launch Filmora. Tap Create New Project option.

Step2 Go to File> Import Media> Import Media Files and choose the video file. The selected video will be imported into the Project Media folder. Alternatively, you can also use the drag/drop function.

Step3 Drag and drop the video file onto the timeline. Select the video clip from the timeline and click on the Speed (timer icon) option at the top of the timeline. If you want to speed up a portion of the video, you need to split the video clip.

Step4 From the menu, go to Fast and select any speed option as per your requirements. Thereafter, play the video to see the changes.

Step5 Press Export to save the video file in your desired file format.
Method 2. Use Uniform Speed to Change Speed
If you want to customize the video speed uniformly, there is a dedicated option called Uniform Speed in Filmora. This means you do not want to choose from the preset speed options. You may want to set the speed of the video to 3X, but it is not available in the preset options.
That is where Uniform Speed comes in handy, and you can set any speed from 0.01X to 100X. Here are the steps to follow.
Step1 Once you have dropped the video file onto the timeline, click on the Speed(timer) icon.
Step2 Click on the Uniform Speed option. This will open the Uniform Speed tab above the timeline.

Step3 Adjust the speed slider to set the desired speed as per your requirements. The duration will change as per the speed you set, and you can set the duration below the speed slider. Just like Final Cut Pro, you can turn on Ripple and Audio Pitch as per your preference.

Step4 Once you are satisfied with the speed, click on the Ok button. Thereafter, tap Export to save the edited video file.
Method 3. Use Speed Ramping to Change Speed
There is a unique way to change your video speed called speed ramping. You can speed up some parts and slow down the other parts, like crests and troughs in a graph.
The speed ramping feature comes with several graphical presets. You can choose from the presets and customize the speed as per your requirements. Check the steps to use speed ramping to change your video speed.
Step1 Drag and drop the video file onto the timeline. Click on the Speed(timer) icon at the top of the timeline.
Step2 Click on Speed Ramping option. This will open Speed Ramping above the timeline.

Step3 Select from the available preset as per your requirements. Otherwise, you can select Customize option and edit the nodes as needed.

Step4 Once satisfied with the result, click on the Ok button. Finally, tap Export
Conclusion
There are some videos where you may have to speed up certain parts. In detail, we have illustrated how to speed up the video in Final Cut Pro. However, if you do not have Final Cut Pro or are unsatisfied with FCP, Wondershare Filmora is a great choice. Most importantly, the steps for all the different methods are very simple for everyone to follow.
Best 5 Solutions on How to Add Emojis to iPhone
Top 5 Solutions on How to Add Emojis to iPhone
An easy yet powerful editor
Numerous effects to choose from
Detailed tutorials provided by the official channel
Have you been looking for interesting solutions on how to add emojis to iPhone? Stop you search and take a breath, you have landed at the correct spot!
In this article
01 [Want an Emoji on Your iPhone? Here’s How to Do It](#Part 1)
02 [Add Emojis to iPhone Q&A](#Part 2)
Part 1 Want an Emoji on Your iPhone? Here’s How to Do It
Emojis are known to live up to their name and introduce an emotional connect to the otherwise plain text within your social media posts and conversations. Speaking in the light of the latest and currently existing communication trends, these miniature graphic elements have managed to earn a significant amount of popularity across a diverse range of communication and information sharing platforms.
Moving ahead, the credibility of emojis to uplift the fun and emotional element in personal conversations across the popular chat service programs does not need an explanation. While the most common means of such conversations are smartphones, having a convenient access to these graphic chat elements on your mobile devices becomes quite important.
Recognizing the need to have emojis at your fingertips the next time you initiate a conversation with your friends on social media or across chat applications, let us proceed with learning about some interesting ways of sorting the concern of how to add custom emojis to iPhone in what follows next:
Solutions for Adding Emojis to Your iPhone
01Using the Emoji Keyboard of a Chat Application
The IT market has launched a variety of high end chat service programs that come with a default emoji keyboard to uplift the customary text messages. You can choose to work with any of the available iPhone compatible chat service program, while conveniently accessing their emoji keyboards on your device.
Step 1: Launch the Application
To begin with addressing the concern of how to put emojis on pictures iPhone; start with browsing through the Launchpad of your iPhone and opening a preferred chat application that supports the emoji keyboard. You can start with using the ‘Messages’ or ‘Mail’ applications.
Step 2: Access the Emoji Keyboard
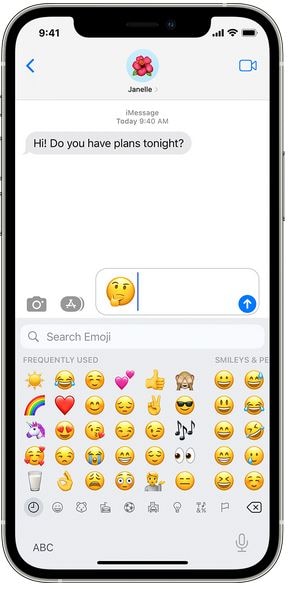
Tap within the text field of the chat application, followed by clicking on either of the ‘Globe’ or ‘Emoji’ icons. The ‘Emoji Keyboard’ will now pop up on the application screen of your iPhone.
Step 3: Select an Emoji
Proceed to choose a desired emoji to add within your conversation by navigating through the diverse range of available emoji themes. You can this by tapping the ‘Gray’ emoji symbols in the bottom toolbar, or making a left-right swipe to access the available choices.
To browse through the collection of emojis that you have used most frequently, tap the ‘Clock’ icon. If you are not finding the exact emoji to depict a particular expression, navigate to the ‘Search Emoji’ box under the text field and type a relevant keyword to open a customized list of emoji options.
Step 4: Play With Different Skin Tones
If you want to alter the default skin tone of a selected emoji, you can do this by tapping on and holding the same to see a display of different skin tones appear above your selection. Click on the one you like, to apply it to the selected emoji.
Step 5: Include the Emoji
When the aforesaid customizations make you happy; click on the emoji once again to include the latter within the text field of the chat service program you are working with.
02Enabling the Emoji Keyboard of Your iPhone
If you are keen towards sorting the issue of how to add emojis to photos iPhone while working with an emoji keyboard explicitly on your iPhone, you can proceed to enable the same on your device. The process is quick and easy, with no rocket science, and allows you to add emoji to picture iPhone. Here’s what you need to do:
Step 1: Launch the Settings Application
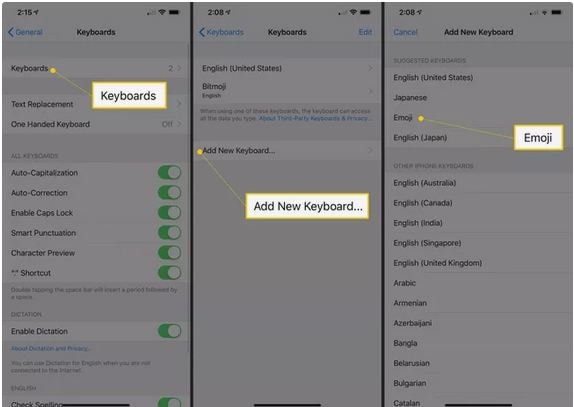
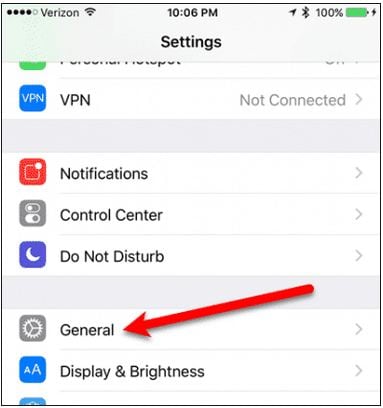
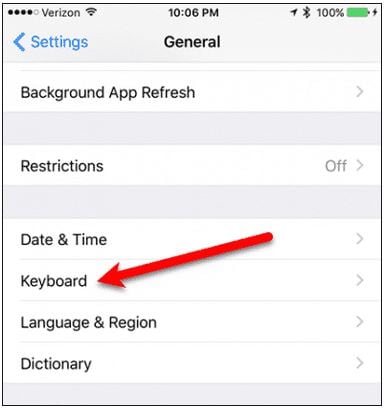
To start with settling the query of how to add emoji keyboard to iPhone, navigate to and click on the ‘Settings’ application on the welcome screen of your iPhone, followed by hitting the ‘General’ tab from the list of categories that appears next. Entering into the ‘General Settings’ interface, pick the ‘Keyboard’ option.
Step 2: Add a New Keyboard
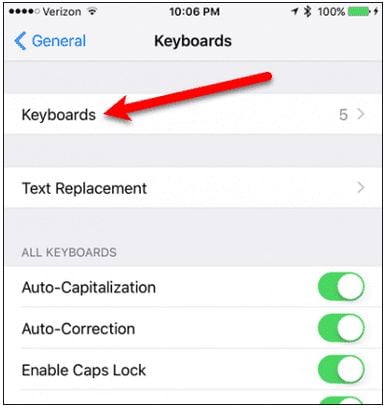
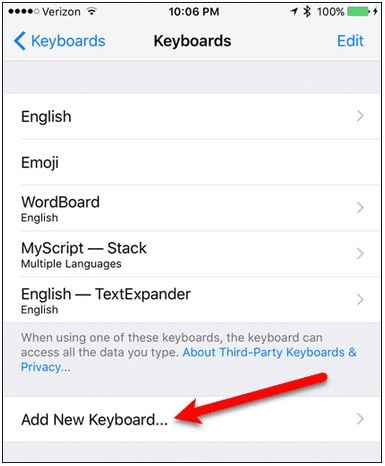
Within the ‘Keyboard’ category of your iPhone settings, you are required to tap on the ‘Keyboards’ subcategory, followed by hitting the ‘Add New Keyboard’ option from the window that pops up next.
As you click on the aforesaid option, a series of keyboard types gets displayed on the screen. Scroll through the list to locate the ‘Emoji’ option, followed by clicking on the same to add emoji keyboard iPhone. That’s it! You can now proceed to use the keyboard to communicate across different conversation platforms.
03Adding Emojis to the Status Bar of Your iPhone
This one is a recently included feature in iOS compatible devices to sort out the issue of working with emojis on iPhones and allied device categories to answer the question of , how to add emoji to iPhone photo. As is obvious, availing the utility requires you to launch an update of your iPhone to iOS 15 or more recent versions. Make sure you adhere to the same before proceeding with the emoji inclusion process.
Without further ado, here’s how you can add the emoji elements to the status bar of your iPhone in just a few quick and simple steps:
Step 1: Launch the Settings Application
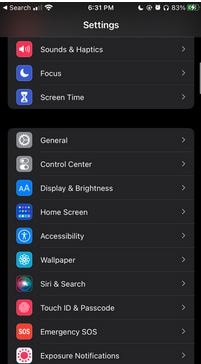
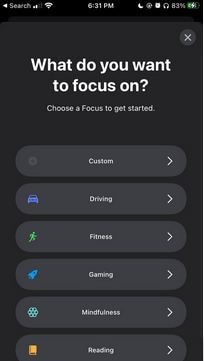
Start with heading to and clicking on the ‘Settings’ icon frame on the Launchpad of your iPhone to be greeted by the app’s welcome interface. In the list of available categories, click on the ‘Focus’ tab.
Step 2: Navigating Through the Focus Feature
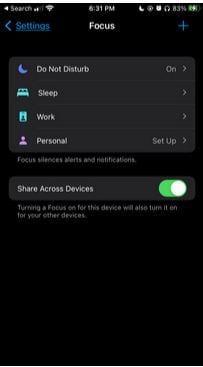
As you hit the ‘Focus’ tab in the previous step, the latter’s interface pops up with a series of utility options. Instead of entering into the options, you however need to just tap the ‘Add’ button depicted by a ‘+’ icon at the top right corner of the ‘Focus’ window.
Step 3: Select an Emoji Category
Clicking on the ‘Add’ button directs you to the ‘Emoji Selection’ interface. All you need to do here is, click on the ‘Custom’ option to open the available emoji categories within the ‘Focus’ feature. Talking of the diversity of emoji options, the feature allows you to add up to 25 emoji categories to the iPhone status bar.
Ahead of the customary variations in smiley faces, you can experiment with adding more specific icons, like; paw prints, stethoscope, fork and knife, light bulb, etc. You can work with these varieties to walk through the subject of how to add emojis to photos iPhone.
Step 4: Name Your Emoji
When you are done with adding the preferred emoji icons, proceed to assign them a specific name. The added names will however, not show up on the status bar of your iPhone, but can be seen on other conversation platform and chat service applications.
If you choose to add the emoji in a specific color to your iPhone’s status bar, you can avail the feature. The color however, won’t reflect on the device’s status bar, but can be seen on the latter’s lock screen.
04Adding Emojis to iPhone Though the Google Messages Application
When aiming to set aside the concern of how to add emoji to iPhone photo, you can seek the help of third party applications. All you need to do is install and run the app on your iPhone and start your editing spree. Browsing through the IT market, you can easily land across a never ending series of third party alternatives to work with emojis on your iPhone.
Picking one from the same, here’s a detailed explanation of using the Google Messages app to include emojis on your iPhone:
Step 1: Download and Install the Application
Start with visiting the Apple App Store to download the Google Messages application in your iPhone. In case the utility already exists in your device, proceed to update the same to the most recent version.
Step 2: Set as Default
Once you are done with the download and installation formalities, proceed to launch the app in your device, followed by setting the latter as your preferred chat application.
Step 3: And…It’s Ready!
The completion of Step 2 will guide you to the Google Messages welcome screen, where you can start conversing with your friends and peers.
Step 4: Select a Contact
To begin chatting with a contact, click on the ‘Start Chat’ option, followed by selecting the contact number or name of a desired person.
Step 5: Type a Message
As you finish Step 4, the app’s chat interface appears where you can type a message within then text field and proceed to complement the same with emojis, stickers and other graphic elements. The app comes with an extensive range of emojis to select and add from. Moving ahead of the basic smileys, you can pick emojis from categories like, Food and Beverages, Travel, Nature, and many more.
Step 6: Send!
Tap the ‘Send’ button when you are done with composing the message, to let it reach the recipient. You can also forward the message to multiple contacts at the same time.
05Adding Emojis to iPhone Through the SwiftKey Keyboard
This one is another entry in list of answers regarding the query of how to add emojis to a picture on iPhone. Essentially a third party keyboard, SwiftKey works to supplement your messages with the latest and most expressive graphic elements, including emojis. The utility comes with a smart feature that predicts the type and style of emojis you will use in future conversations, in line with your current usage pattern.
The following user guide explains the step by step process to work with the SwiftKey keyboard for adding emojis to your iPhone:
Step 1: Download, Install and Launch SwiftKey
Navigate to the Apple App Store in your iPhone and proceed to download and install the SwiftKey application to the device. When you are done, launch the app and click on ‘Get Started’.
Step 2: Sign In to SwiftKey
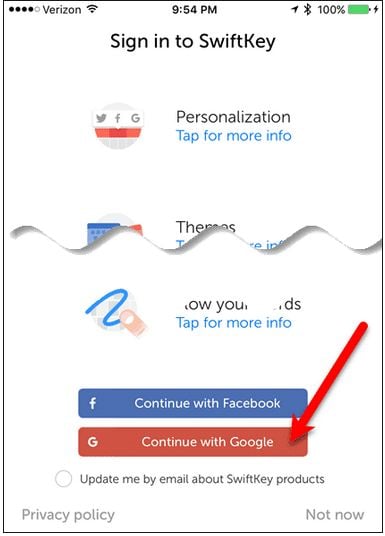
As you launch the SwiftKey keyboard, the latter’s ‘Sign In to SwiftKey’ window pops up, requiring you to select an account for initiating the sign process of the application by clicking on either of the ‘Continue With Google’ or ‘Continue With Facebook’ options. To move ahead, follow the instructions that appear on your device screen.
Step 3: Enable the SwiftKey Keyboard
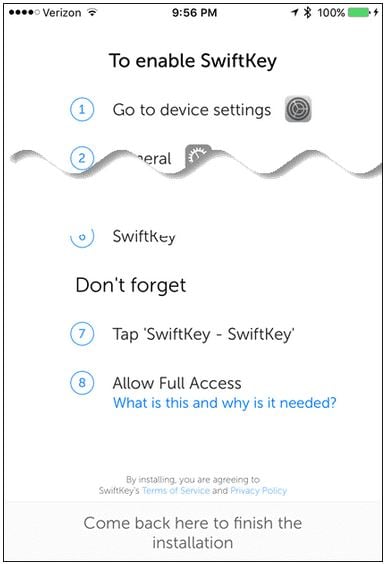
When you have chosen the sign in account, the ‘To Enable SwiftKey’ window appears to explain to you, the process of enabling the SwiftKey keyboard.
Step 4: Accessing SwiftKey Keyboard in iPhone Settings
Launch the iPhone’s ‘Settings’ application, followed by hitting the ‘General’ tab from the list of options within the latter’s opening interface.
As the ‘General’ window pops up, proceed to choose the ‘Keyboard’ option by tapping on the same.
Within the ‘Keyboard’ setting window, navigate to and click on the ‘Keyboards’ option.
Step 5: Make SwiftKey an Additional Keyboard
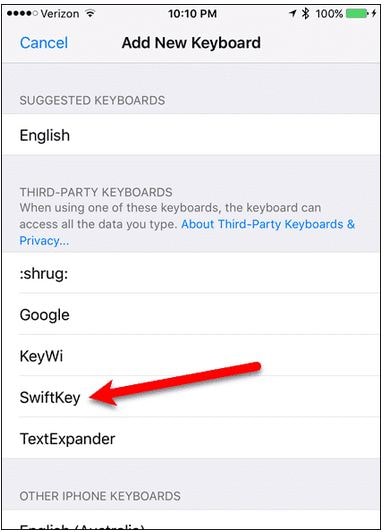
To work with the SwiftKey keyboard on your iPhone, you will need to add the same to your device’s list of preset keyboards. To do this, click on the ‘Add New Keyboard’ option within the list of keyboards that pops up as you complete Step 4.
A series of third party keyboards shows up in the window that appears next. Proceed to select ‘SwiftKey’ from the available keyboard choices. In case you don’t find the aforesaid keyboard among the options, double tap the ‘Home’ button on your device to exit the ‘Settings’ application.
Re-launch the ‘Settings’ app after a few moments and follow Steps 4 and 5 to make the ‘SwiftKey’ option appear within the list.
Step 6: Grant Full Access to SwiftKey
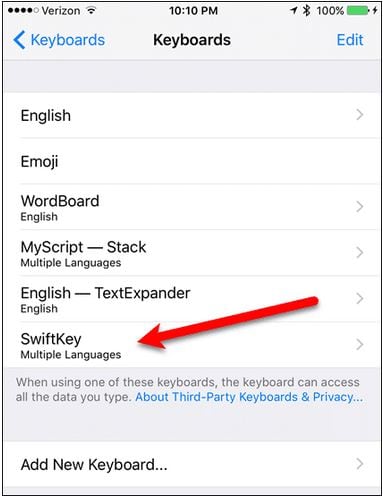
To work with the complete feature bank of the ‘SwiftKey’ application, you will have to allow the latter to fully access your iPhone. To proceed with the process, navigate to the ‘Keyboards’ window of your iPhone settings, where you can see the ‘SwiftKey’ keyboard present in the list of active keyboards of your device. Open the application’s ‘Access’ window by clocking on the keyboard name in the list.
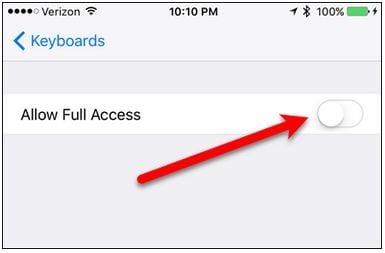
Within the ‘SwiftKey Access’ window that appears, toggle the slider to the right side to enable the ‘Allow Full Access’ option.
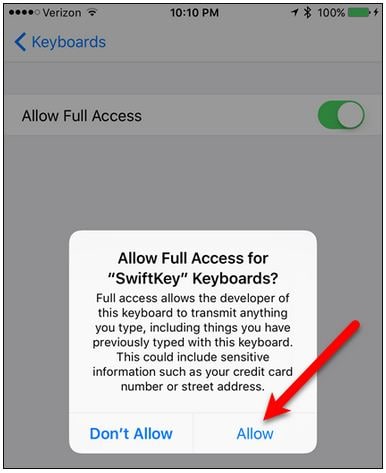
As you enable the ‘Allow Full Access’ option, the ‘App Permissions’ dialog box pops up on your iPhone screen. Click on ‘Allow’ within the same to grant the required app permissions.
Step 7: Switch to the SwiftKey Keyboard
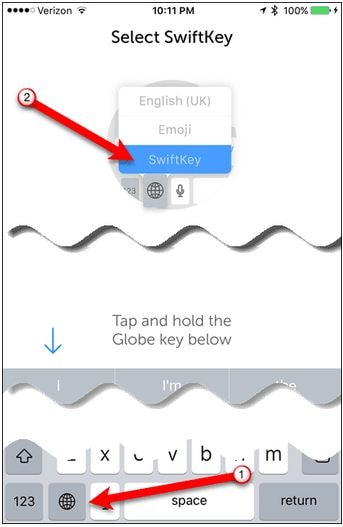
You will now be directed to the ‘Select SwiftKey’ window to change your default keyboard. Here you need to click on the ‘Globe’ icon, followed by choosing ‘SwiftKey’ from the menu that appears next.
Step 8: SwiftKey Is Ready!
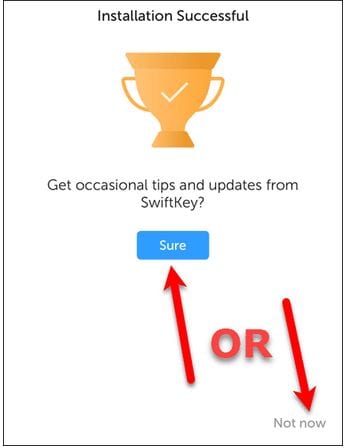
As you finish Step 7, a confirmation window pops up on the iPhone screen, displaying the ‘Installation Successful’ message. If you wish to get regular updates and tips from the SwiftKey application, click on the ‘Save’ button, otherwise, navigate to the bottom right corner of the screen and click on the ‘Not Now’ option.
You can now work towards adding emojis in your chats and conversations on the iPhone, simply by typing a message in the text field of the preferred chat service program, followed by picking a suitable emoji from the diverse range of available options within the SwiftKey keyboard. Talking of additional merits, the utility allows you to introduce customizations to the keyboard in terms of supported languages, theme centered design, access compatibility and settings.
Part 2 Add Emojis to iPhone Q&A
01Why does the emoji utility not show up on an iPhone?
In case you find difficulty in accessing emojis on your iPhone, or the latter does not appear within your communication centered utilities of the device, consider checking the settings of the iPhone to make sure that the feature has been added as well as enabled. If not so, proceed to enable the same in the ‘Settings’ interface itself.
02What is the procedure to download an additional set of emojis to an iPhone?
If you want to spark up your iPhone’s emoji library with an extra set of the latest emojis, the only method that would cater to the concern of how to add more emoji to iPhone is taking the help of third party applications. As an affordable pick, you can rely on the Messages App Store in your iPhone to avail a decent rage of third party emoji packages, both free and paid.
03How can the hidden emoji keyboard be accessed?
In your iPhone settings, open the ‘General’ category, followed by selecting the ‘ Keyboard’ option. Entering in, choose the ‘Keyboards’ subcategory and tap on ‘Add New Keyboard’. From the list of options that drops down, select ‘Japanese’, followed by ‘Kana’. As you proceed to type a message the next time, click on the ‘Globe’ icon at the bottom-left corner of the app screen to toggle between keyboard options.
04How can the hidden emojis on an iPhone be unlocked?
To unlock a hidden emoji, navigate to the ‘Apple Messages’ app in your iPhone and launch the iMessage application. Next, open a conversation thread and enter any emoji in the chat’s text field. Now, press and hold the ‘Send’ button to open a hidden emoji page that lets you choose and add these elements to your text message.
05What is the best software to look for free emojis?
If you are willing to sort out the concern of accessing the best inventory of latest emojis, you can traverse the editor library of the Wondershare Filmora Video Editor graphic designer program. Divided into a hoard of specific categories, the software is known to house the most elaborative variety of emoji elements that undergo a periodic update that can help you to sort the query of how to add emojis to pictures on iPhone.
For Win 7 or later (64-bit)
For macOS 10.12 or later
● Ending Thoughts →
● Including emojis in your social media and chat service conversations works to add an emotional connect to your otherwise normal text messages.
● When looking forward to work towards the constraint of how to add new emojis to iPhone, there are a variety of methods to move ahead with the process.
● If you are on a search of the latest collection of emojis to add to your iPhone, you can take suggestions from the editor library of the Wondershare Filmora graphic designer program.
Mask Tracking with Adobe Premiere Pro: A Detailed Guide
Mask tracking Premiere Pro is a technique that lets you apply effects to a precise frame area. In video editing, mask tracking is crucial because it lets you apply effects to areas of your footage rather than the full frame. This can assist you in producing videos that look more professional by emphasizing crucial details, obscuring delicate content, and using imaginative effects.
This article guides Premiere Pro mask tracking using the right tools and effects. Give it a read if you are interested in tracking mask Premiere.
AI Smart Masking Spice up your video content with the endless possibilities of AI masking functions!
Free Download Free Download Learn More

Part 1. What Do You Know About Mask Tracking in Videos?
Automatic tracking and following a certain object or area during a video clip is known as mask tracking. Usually, the “mask” depicts a designated zone of interest, such as a person’s face, an item, or any other area. Mask tracking is achieved using various methods and algorithms, including computer vision techniques such as optical flow, feature tracking, or machine learning.
The objective of the effect is to track the targeted item consistently over all video frames. Mask tracking Premiere Pro is a common special effect in video editing. It can add visual components, apply filters, or change the color and lighting inside the tracked region.
Part 2. How To Perform Mask Tracking with Adobe Premiere Pro
One of the most widely used industry standard programs for video editing is Adobe Premiere Pro . With the help of this tool, users can alter various aspects of photographs and films. It can tweak effects in nearly every frame according to user preferences using Premiere mask tracking. You will undoubtedly get remarkable outcomes from it in a short amount of time.
The tool is a video editing expert, so many professional video editors rely on it. It offers a huge range of editing features that get together to create an impactful and eye-catching video.
Marked Key Features of Adobe Premiere Pro
- Video Editing: You can combine audio and apply effects and transitions to your video content. The platform also helps you work with color or add animated titles to your videos.
- Text-Based Editing: Text-based editing creates a transcript and automatically highlights text to add clips to your timeline. It can edit and rearrange clips like a text document.
- Color Correction: With the help of AI, you can automatically balance your colors or modify the frame using expert color wheels and curve controls. It also assists in viewing your work using integrated video scopes.
- Audio Editing: With Adobe Premiere Pro, you can explore audio tracks, license them, and utilize AI to adapt them to your clips automatically.
Step-by-Step Guide to Perform Mask Tracking with Premiere Pro
Adobe Premiere mask tracking is one of the many remarkable features of the app. If you want to employ mask tracking in your videos using Adobe Premiere, look at the steps below:
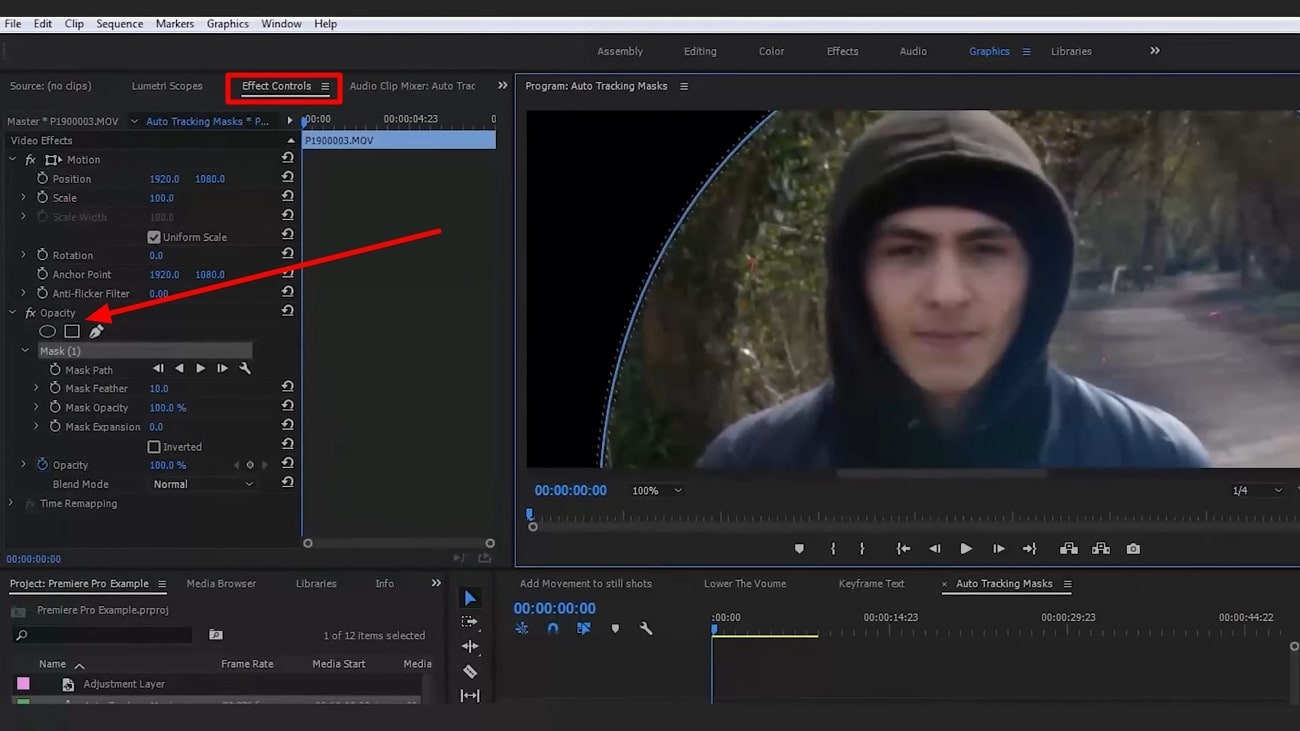
Step 1: To start off with the process, import the video onto the timeline that needs to be edited. Navigate to the top of the screen and select “Effect Controls” to proceed further. Select any specific shape present below the “Opacity” option on the left to add a mask to your clip.
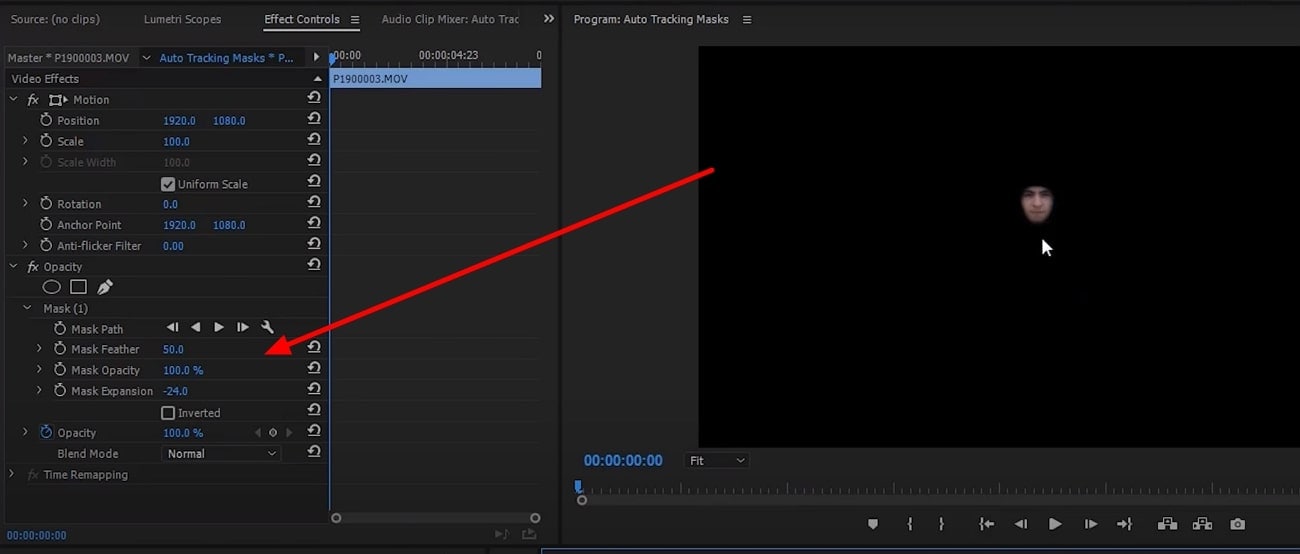
Step 2: Set the shape according to the person or object you will track by masking. Now, under the “Mask” option, you will see the “Mask Feather” option. Click on “Mask Feather” and adjust it so it won’t look too harsh on the edges.
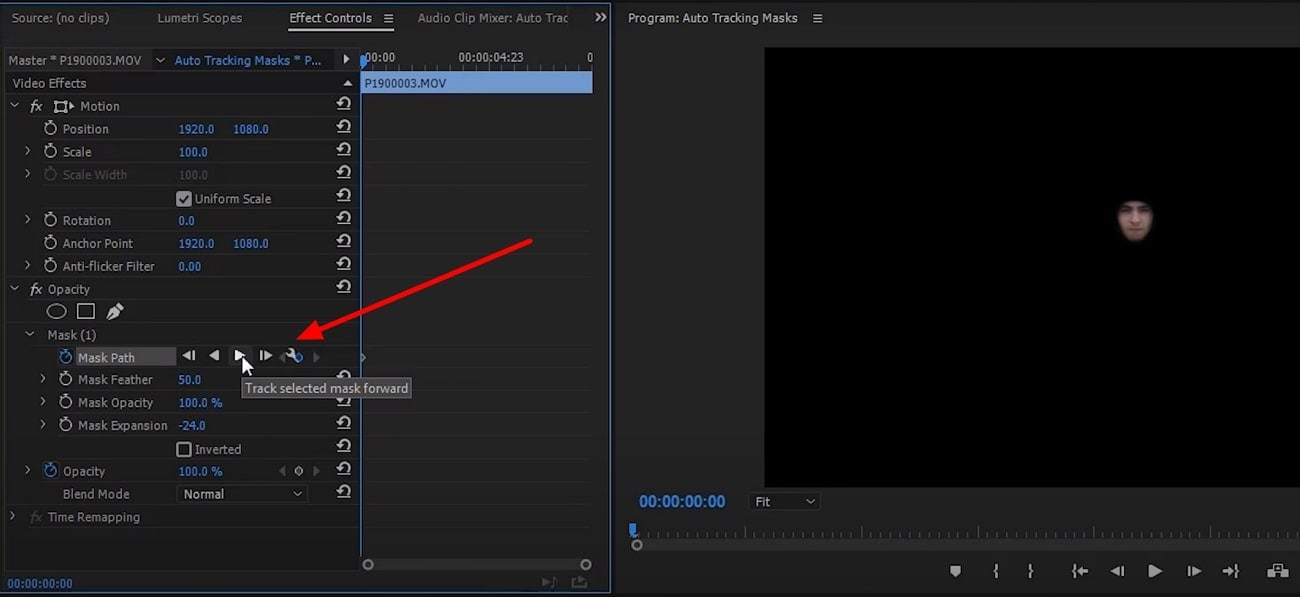
Step 4: Go to the beginning of the video you are editing, return to the editing section, and look for the “Mask Path” option. Now hit the “Track Selected Masked Forward” button and wait for the system to complete the Premiere Pro tracking mask process and save the video.
Part 3. Making Masking Easy with Wondershare Filmora: Reviewing the Details
Adobe Premiere Pro is an incredible tool, without a doubt. However, many users say that it needs to be simpler to use. You cannot generate a good video even after watching tutorials because it’s hard for an amateur to use Adobe Premiere Pro. Because of this, many users look for alternative options to add a premiere tracking mask and make other changes to their videos.
This part is all about the amazing alternative that you’re looking for. Wondershare Filmora is a video editing tool that provides professional quality content editing. The tool is so easy to use that you can start immediately with basic instructions. Its smart editing features, combined with a fast and intelligent system, make it a great choice for everyone.
Free Download For Win 7 or later(64-bit)
Free Download For macOS 10.14 or later
Key Features of Wondershare Filmora
- Compound Clip: This feature will arrange all your clips, combine them, and edit them as a single clip. This strong and intuitive feature improves and edits your video.

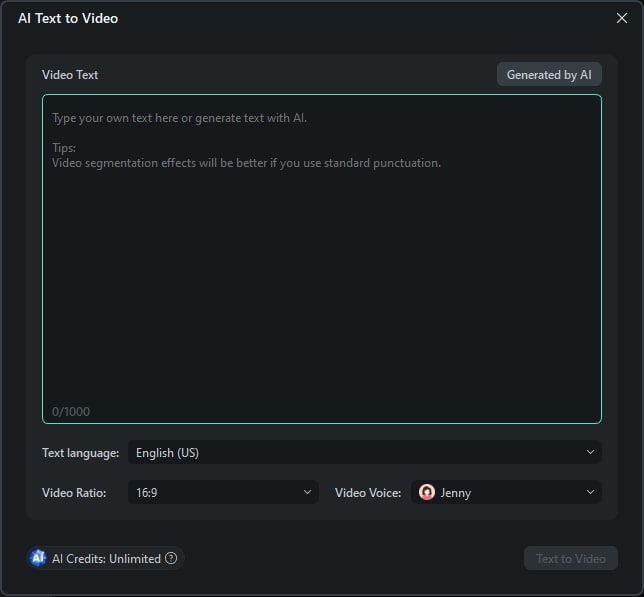
- AI Text-to-Video: You can convert text into engaging visual narratives and instantly turn text inputs into interesting videos. The feature makes ideas into stunning videos with ease.
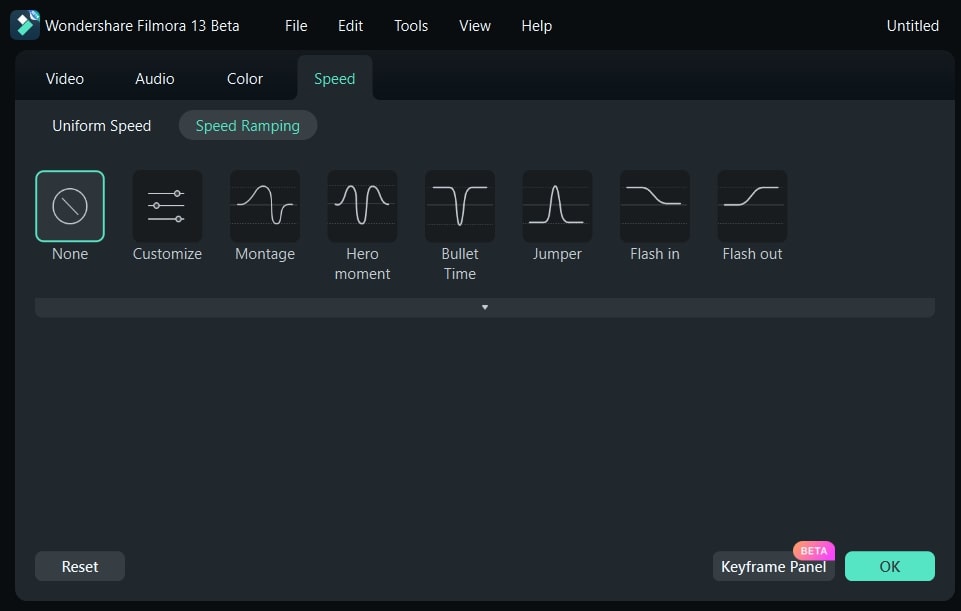
- Speed Ramping: This feature produces distinctive cinematic effects by managing your keyframes and altering the speed of your film.
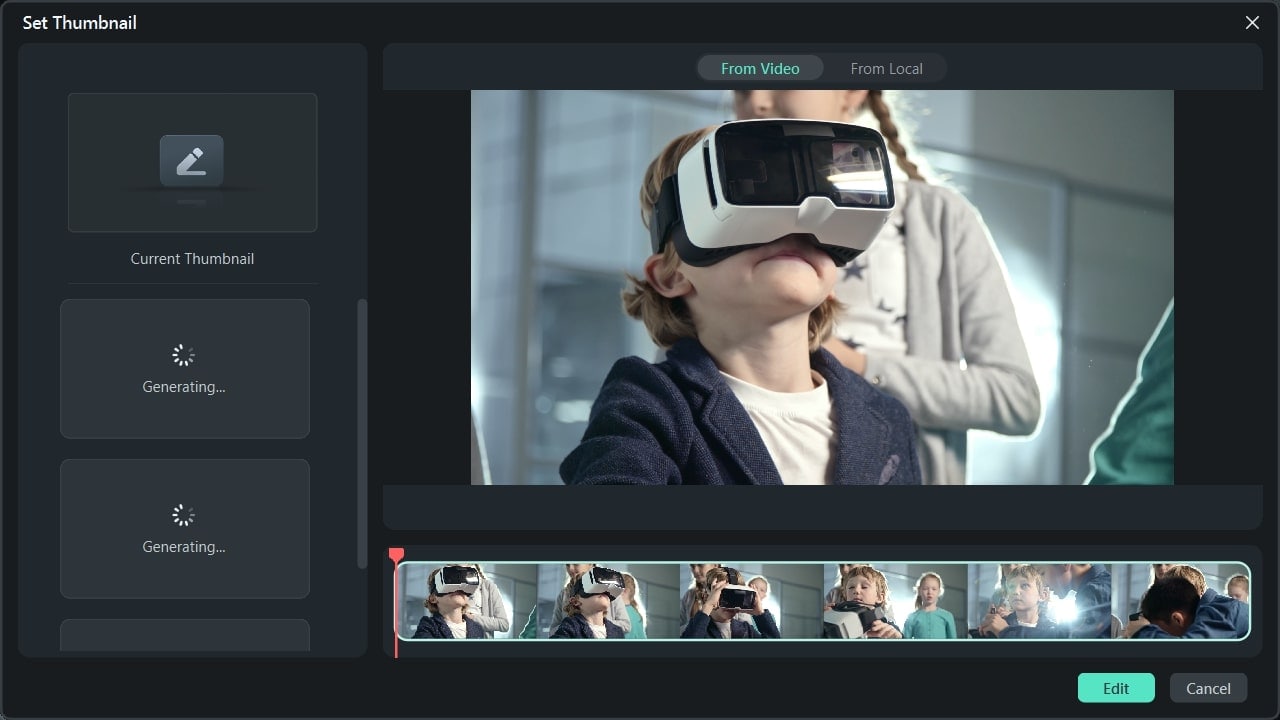
- AI Thumbnail Creator: The tool uses AI to create attractive, engaging thumbnails that get the viewers’ attention. You can use different presets to beautify your thumbnail.
Step-by-Step Guide on How to Perform AI Masking on Filmora
Wondershare Filmora Premiere Pro mask tracking is way easier and provides the same high-end results. Follow the steps below to do mask tracking using Filmora’s unique functions and procedures:
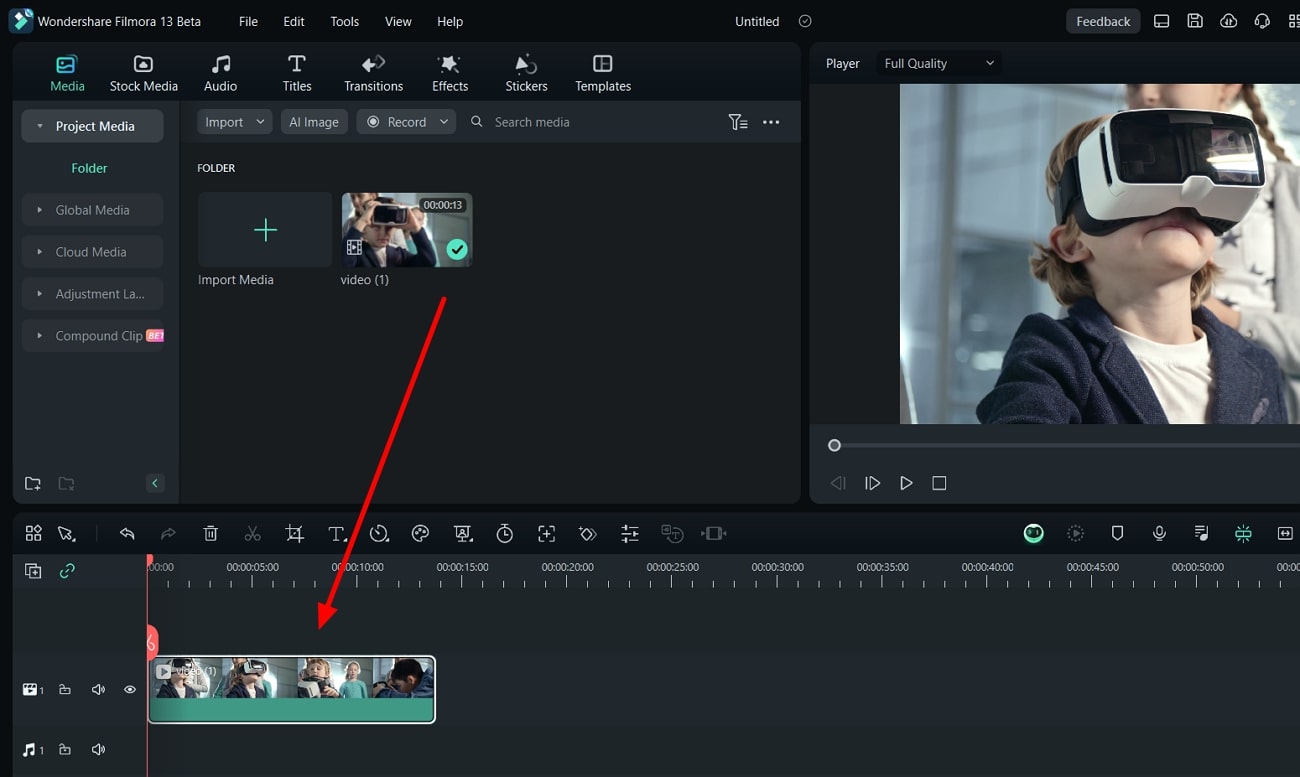
Step 1Add Video Content to Timeline in Filmora
Launch Wondershare Filmora on your computer and proceed by creating a “New Project.” As a new window opens, import your required video clips to the timeline. Double-click and proceed to their respective video settings.
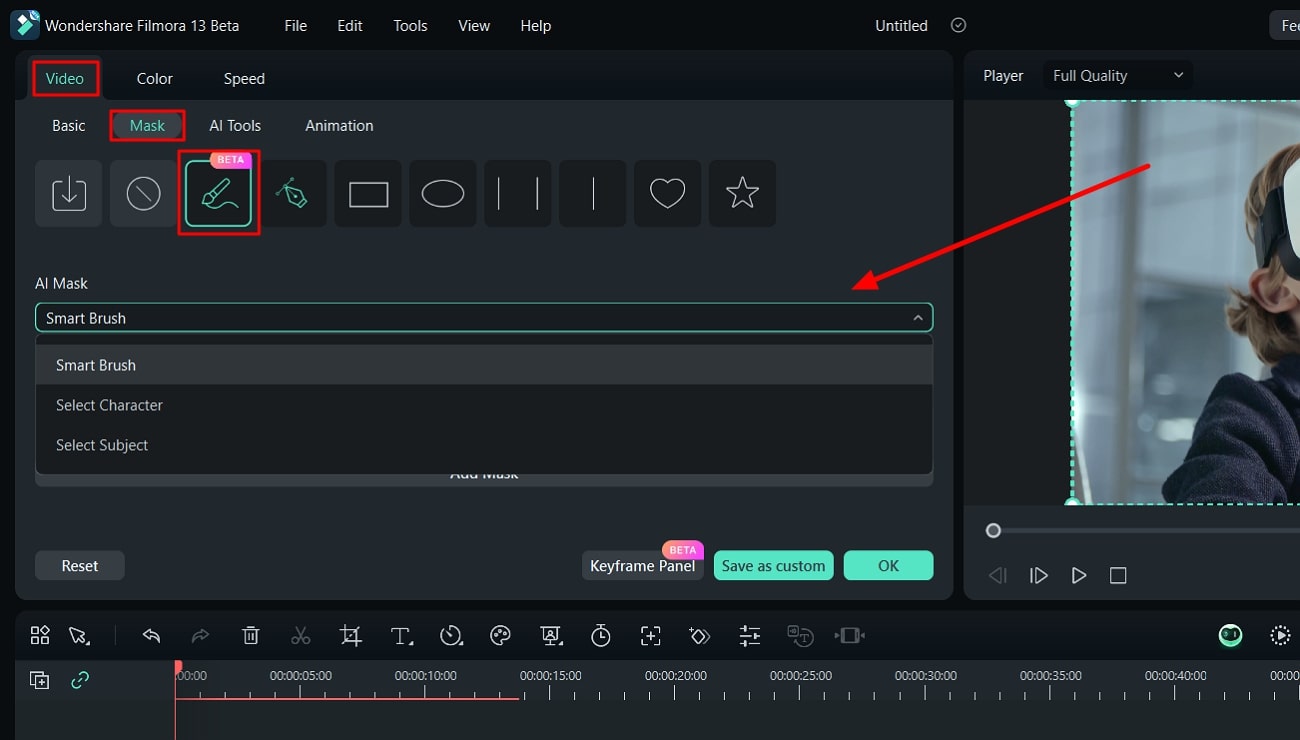
Step 2Use AI Masking Feature on Video
On double-clicking the video, proceed to the “Video” tab from the top and continue into the “Mask” section. Select the “AI Mask” option in the provided list to open further settings. Select any appropriate mode of AI Mask from the bottom options and set the respective parameters accordingly. You can either select “Smart Brush” or go for “Smart Character” or “Smart Subject.”
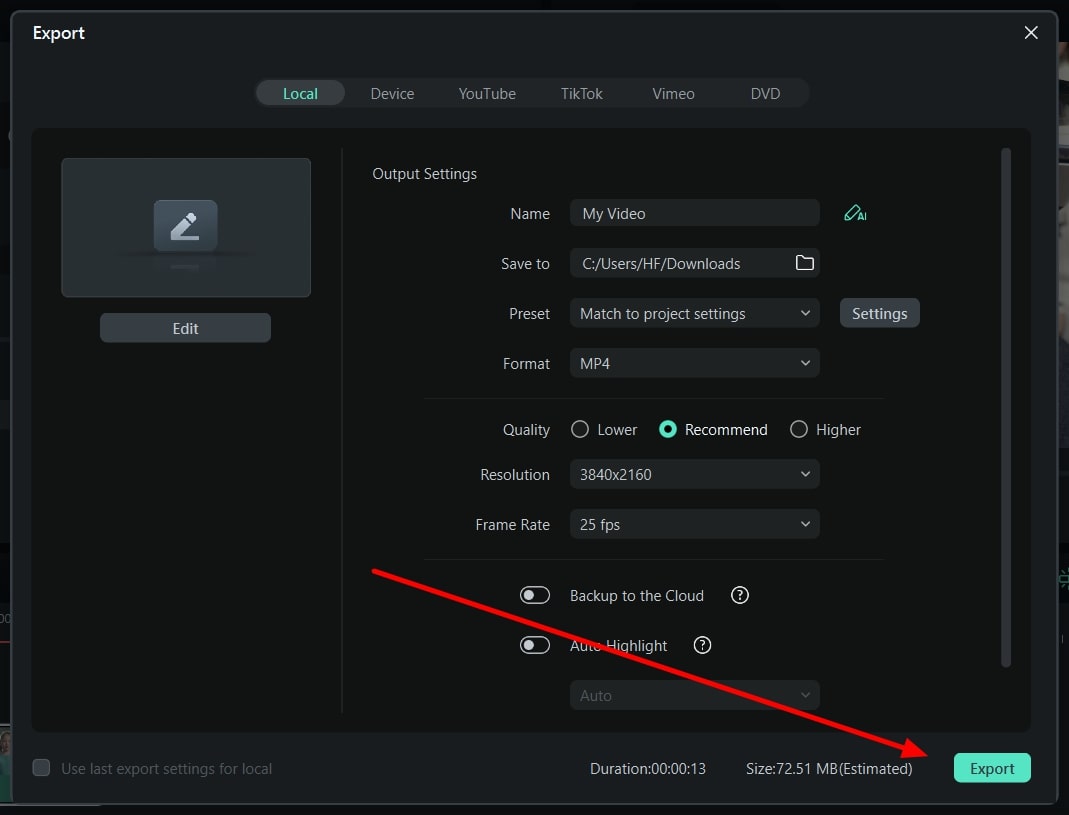
Step 3Save Final Video
On clicking “OK,” all changes are applied to the video. Continue to the “Export” button to save your edited video clip on your computer.
Free Download For Win 7 or later(64-bit)
Free Download For macOS 10.14 or later
Conclusion
Mask tracking is handy for adding effects to a moving object in your video. By tracking the movement, you can ensure the effect persists even as the object moves around the frame. Many professionals use it in their videos to edit and enhance a specific area in their clip. Check out this article if you also seek an app for Premiere mask tracking.
Free Download Free Download Learn More

Part 1. What Do You Know About Mask Tracking in Videos?
Automatic tracking and following a certain object or area during a video clip is known as mask tracking. Usually, the “mask” depicts a designated zone of interest, such as a person’s face, an item, or any other area. Mask tracking is achieved using various methods and algorithms, including computer vision techniques such as optical flow, feature tracking, or machine learning.
The objective of the effect is to track the targeted item consistently over all video frames. Mask tracking Premiere Pro is a common special effect in video editing. It can add visual components, apply filters, or change the color and lighting inside the tracked region.
Part 2. How To Perform Mask Tracking with Adobe Premiere Pro
One of the most widely used industry standard programs for video editing is Adobe Premiere Pro . With the help of this tool, users can alter various aspects of photographs and films. It can tweak effects in nearly every frame according to user preferences using Premiere mask tracking. You will undoubtedly get remarkable outcomes from it in a short amount of time.
The tool is a video editing expert, so many professional video editors rely on it. It offers a huge range of editing features that get together to create an impactful and eye-catching video.
Marked Key Features of Adobe Premiere Pro
- Video Editing: You can combine audio and apply effects and transitions to your video content. The platform also helps you work with color or add animated titles to your videos.
- Text-Based Editing: Text-based editing creates a transcript and automatically highlights text to add clips to your timeline. It can edit and rearrange clips like a text document.
- Color Correction: With the help of AI, you can automatically balance your colors or modify the frame using expert color wheels and curve controls. It also assists in viewing your work using integrated video scopes.
- Audio Editing: With Adobe Premiere Pro, you can explore audio tracks, license them, and utilize AI to adapt them to your clips automatically.
Step-by-Step Guide to Perform Mask Tracking with Premiere Pro
Adobe Premiere mask tracking is one of the many remarkable features of the app. If you want to employ mask tracking in your videos using Adobe Premiere, look at the steps below:
Step 1: To start off with the process, import the video onto the timeline that needs to be edited. Navigate to the top of the screen and select “Effect Controls” to proceed further. Select any specific shape present below the “Opacity” option on the left to add a mask to your clip.

Step 2: Set the shape according to the person or object you will track by masking. Now, under the “Mask” option, you will see the “Mask Feather” option. Click on “Mask Feather” and adjust it so it won’t look too harsh on the edges.

Step 4: Go to the beginning of the video you are editing, return to the editing section, and look for the “Mask Path” option. Now hit the “Track Selected Masked Forward” button and wait for the system to complete the Premiere Pro tracking mask process and save the video.

Part 3. Making Masking Easy with Wondershare Filmora: Reviewing the Details
Adobe Premiere Pro is an incredible tool, without a doubt. However, many users say that it needs to be simpler to use. You cannot generate a good video even after watching tutorials because it’s hard for an amateur to use Adobe Premiere Pro. Because of this, many users look for alternative options to add a premiere tracking mask and make other changes to their videos.
This part is all about the amazing alternative that you’re looking for. Wondershare Filmora is a video editing tool that provides professional quality content editing. The tool is so easy to use that you can start immediately with basic instructions. Its smart editing features, combined with a fast and intelligent system, make it a great choice for everyone.
Free Download For Win 7 or later(64-bit)
Free Download For macOS 10.14 or later
Key Features of Wondershare Filmora
- Compound Clip: This feature will arrange all your clips, combine them, and edit them as a single clip. This strong and intuitive feature improves and edits your video.

- AI Text-to-Video: You can convert text into engaging visual narratives and instantly turn text inputs into interesting videos. The feature makes ideas into stunning videos with ease.

- Speed Ramping: This feature produces distinctive cinematic effects by managing your keyframes and altering the speed of your film.

- AI Thumbnail Creator: The tool uses AI to create attractive, engaging thumbnails that get the viewers’ attention. You can use different presets to beautify your thumbnail.

Step-by-Step Guide on How to Perform AI Masking on Filmora
Wondershare Filmora Premiere Pro mask tracking is way easier and provides the same high-end results. Follow the steps below to do mask tracking using Filmora’s unique functions and procedures:
Step 1Add Video Content to Timeline in Filmora
Launch Wondershare Filmora on your computer and proceed by creating a “New Project.” As a new window opens, import your required video clips to the timeline. Double-click and proceed to their respective video settings.

Step 2Use AI Masking Feature on Video
On double-clicking the video, proceed to the “Video” tab from the top and continue into the “Mask” section. Select the “AI Mask” option in the provided list to open further settings. Select any appropriate mode of AI Mask from the bottom options and set the respective parameters accordingly. You can either select “Smart Brush” or go for “Smart Character” or “Smart Subject.”

Step 3Save Final Video
On clicking “OK,” all changes are applied to the video. Continue to the “Export” button to save your edited video clip on your computer.

Free Download For Win 7 or later(64-bit)
Free Download For macOS 10.14 or later
Conclusion
Mask tracking is handy for adding effects to a moving object in your video. By tracking the movement, you can ensure the effect persists even as the object moves around the frame. Many professionals use it in their videos to edit and enhance a specific area in their clip. Check out this article if you also seek an app for Premiere mask tracking.
How to Make Stunning Glitch Effect in Photoshop?
Many of us are fascinated by glitch art. The aesthetic effect it adds to your content is unmatched. You can add color and class to your pictures with glitch picture effects. Someone who isn’t aware of the glitch effect is inspired by any technical mishap or digital error. The damage that the malfunctioning of a system causes is used as an art and an effect to beautify things.
You can add the glitch image effect to your photos easily. There are multiple cool templates available on the internet that could be used. You can also make your own stunning yet customized glitch effect Photoshop. If this has impressed you, then stay here because we will talk a lot about glitch photo editors.
In this article
01 Part 1. How Do You Do Photo Glitch Effect in Photoshop?
02 Part 2. 5 Awesome Glitch Effect Photoshop Actions.
Part 1. How Do You Do Photo Glitch Effect in Photoshop?
The jagged lines, the colorful pixels, frozen visuals, and also the distorted colors, everything perfectly blends to make a glitch effect. Usually, this is how all the glitch templates are, but if you get an opportunity to customize your image glitch effect and make your special effect, what will you do?
The best option to adopt in any such circumstances is Photoshop. With Photoshop, you can create a stunning and mind-blowing Photoshop VHS effect. If you want to learn about its steps, then continue reading.
Step 1: The process starts by importing the image to Photoshop on which you plan to add the photo glitch effect. Then you should always convert the image from colorful to black and white. This could be done quickly by going into the ‘Image’ menu from the menu bar. Next, go for the ‘Adjustments’ option and select ‘Desaturate.’

Step 2: Now duplicate the image by dragging it onto the New Layer icon in the Layers Panel. Then double click on the duplicated image. This will open a ‘Layer Style’ settings menu. Here, click on the icon for ‘R Channel’ and deselect it.

Step 3: Now, it’s time to add the first glitch element. For that, hold the ‘Shift’ key and move the image by using the left/right cursor keys on the keyboard. This will offset the image layer from the original.

Step 4: You can now select the ‘Mark’ tool from the left side. Make a rectangle anywhere on the image with the Mark tool and then switch back to the ‘Move’ tool. Then again, nudge the rectangular portion left or right to offset it. You can repeat this process multiple times on different areas of the image.

Step 5: At this point, make a New Layer and fill it with White. Now right-click on this white layer and select the option of ‘Convert to Smart Object.’

Step 6: Move to the menu bar at the top and go to the ‘Filter’ section. From there, select the option of ‘Filter Gallery.’ A new window will show up. Head to the ‘Sketch’ category, and there change the ‘Pattern Type’ to ‘Line.’ You can also play with the ‘Contrast’ and the ‘Size’ of the lines.

Step 7: Now, in the ‘Layers Panel,’ select the option of ‘Overlay’ from the dropdown menu so that the different layers can show through. You can adjust the visibility of the lines by adjusting the number on the scale.

Step 8: After setting everything for the glitch effect in your image, you can now add colors using the ‘Gradient Map.’ Or you can also import some graphic textures to Photoshop and add them to the image. Don’t forget to change the ‘Binding Mode’ to ‘Overlay.’ You can then play with the color and graphic settings.

Step 9: Once all the color adjustments have satisfied you, it’s time to add some text to your glitch image. For that, head to the ‘Text’ tool from the left menu and type in your text. Edit it as you did to your image so that you can make a cool glitch text effect Photoshop and with this, you are all done with making the most stunning glitch effect Photoshop.

Part 2. 5 Awesome Glitch Effect Photoshop Actions
With Photoshop, you can create your photo glitch effect as you prefer instead of using the available standard templates. What if you don’t have enough time to create the effect? Are you going to use the basic and standard templates?
If you are looking for some jaw-dropping glitch picture effects rather than using the basic effects, then this section of the article is perfect for you. We are going to talk about 5 fantastic glitch effects Photoshop action.
1. Distorted Glitch Photoshop Action
The first effect we will discuss is Distorted Glitch Photoshop Action. The effect is very easy to use. You can set it with just one click action. The effect allows you to do adjustment settings with very easy steps to edit it.
The effect has all the dark, distorted, and disturbance-related elements that make it an amazing effect to add glitch effect to image.

2. Geometric Glitch Photoshop Action
If glitch effect with lines is too mainstream for you, then this next effect will surely impress you. This effect is the Geometric Glitch Photoshop Action. You can edit this effect. All its colors, layers, and even elements are fully editable.
You can create a modern yet professional glitch image with this stunning effect. The effect lets you add shapes, abstract styles, and also glitch lines to make cool images.

3. Animated Glitch Photoshop Action
If you are looking for a glitch effect to add to animated content, then nothing is better than Animated Glitch Photoshop Action. The effect template is fully editable with 12 distinct color options. The animated effect has a very organized structure of layers, color coding, etc.
By using this effect, you can add a great vibe to your image. The template greatly shows the distortion, digital error, etc. You can play around with RGB to make it look crazy brilliant.

4. Futuristic Photoshop Action
The next effect in line to be discussed is Futuristic Photoshop Action. This effect has all the bright and neon colors. The effect could be added easily to your images regardless of the type of your content. Graphic designers and photographers use the Futuristic Effect to create stunning and professional glitch images.

5. Glitch Art Photoshop Action
The last effect template that we are going to shed light on is Glitch Art Photoshop Action. The effect is fully editable with 10 different abstract elements. The template has absolutely professional results. The effect delivers complete glitchy vibes.
The distortion, the abstract elements, the digital error, and everything else in effect represents all the glitchy vibes.

Final Words
This article is everything one person needs if they want to learn about glitch effect Photoshop. We have talked about creating a jaw-dropping glitch effect in Photoshop. The steps to create a stunning glitch effect have been mentioned above.
We then shared 5 incredible glitch effects that could be used in case you don’t want to create your own effect.
02 Part 2. 5 Awesome Glitch Effect Photoshop Actions.
Part 1. How Do You Do Photo Glitch Effect in Photoshop?
The jagged lines, the colorful pixels, frozen visuals, and also the distorted colors, everything perfectly blends to make a glitch effect. Usually, this is how all the glitch templates are, but if you get an opportunity to customize your image glitch effect and make your special effect, what will you do?
The best option to adopt in any such circumstances is Photoshop. With Photoshop, you can create a stunning and mind-blowing Photoshop VHS effect. If you want to learn about its steps, then continue reading.
Step 1: The process starts by importing the image to Photoshop on which you plan to add the photo glitch effect. Then you should always convert the image from colorful to black and white. This could be done quickly by going into the ‘Image’ menu from the menu bar. Next, go for the ‘Adjustments’ option and select ‘Desaturate.’

Step 2: Now duplicate the image by dragging it onto the New Layer icon in the Layers Panel. Then double click on the duplicated image. This will open a ‘Layer Style’ settings menu. Here, click on the icon for ‘R Channel’ and deselect it.

Step 3: Now, it’s time to add the first glitch element. For that, hold the ‘Shift’ key and move the image by using the left/right cursor keys on the keyboard. This will offset the image layer from the original.

Step 4: You can now select the ‘Mark’ tool from the left side. Make a rectangle anywhere on the image with the Mark tool and then switch back to the ‘Move’ tool. Then again, nudge the rectangular portion left or right to offset it. You can repeat this process multiple times on different areas of the image.

Step 5: At this point, make a New Layer and fill it with White. Now right-click on this white layer and select the option of ‘Convert to Smart Object.’

Step 6: Move to the menu bar at the top and go to the ‘Filter’ section. From there, select the option of ‘Filter Gallery.’ A new window will show up. Head to the ‘Sketch’ category, and there change the ‘Pattern Type’ to ‘Line.’ You can also play with the ‘Contrast’ and the ‘Size’ of the lines.

Step 7: Now, in the ‘Layers Panel,’ select the option of ‘Overlay’ from the dropdown menu so that the different layers can show through. You can adjust the visibility of the lines by adjusting the number on the scale.

Step 8: After setting everything for the glitch effect in your image, you can now add colors using the ‘Gradient Map.’ Or you can also import some graphic textures to Photoshop and add them to the image. Don’t forget to change the ‘Binding Mode’ to ‘Overlay.’ You can then play with the color and graphic settings.

Step 9: Once all the color adjustments have satisfied you, it’s time to add some text to your glitch image. For that, head to the ‘Text’ tool from the left menu and type in your text. Edit it as you did to your image so that you can make a cool glitch text effect Photoshop and with this, you are all done with making the most stunning glitch effect Photoshop.

Part 2. 5 Awesome Glitch Effect Photoshop Actions
With Photoshop, you can create your photo glitch effect as you prefer instead of using the available standard templates. What if you don’t have enough time to create the effect? Are you going to use the basic and standard templates?
If you are looking for some jaw-dropping glitch picture effects rather than using the basic effects, then this section of the article is perfect for you. We are going to talk about 5 fantastic glitch effects Photoshop action.
1. Distorted Glitch Photoshop Action
The first effect we will discuss is Distorted Glitch Photoshop Action. The effect is very easy to use. You can set it with just one click action. The effect allows you to do adjustment settings with very easy steps to edit it.
The effect has all the dark, distorted, and disturbance-related elements that make it an amazing effect to add glitch effect to image.

2. Geometric Glitch Photoshop Action
If glitch effect with lines is too mainstream for you, then this next effect will surely impress you. This effect is the Geometric Glitch Photoshop Action. You can edit this effect. All its colors, layers, and even elements are fully editable.
You can create a modern yet professional glitch image with this stunning effect. The effect lets you add shapes, abstract styles, and also glitch lines to make cool images.

3. Animated Glitch Photoshop Action
If you are looking for a glitch effect to add to animated content, then nothing is better than Animated Glitch Photoshop Action. The effect template is fully editable with 12 distinct color options. The animated effect has a very organized structure of layers, color coding, etc.
By using this effect, you can add a great vibe to your image. The template greatly shows the distortion, digital error, etc. You can play around with RGB to make it look crazy brilliant.

4. Futuristic Photoshop Action
The next effect in line to be discussed is Futuristic Photoshop Action. This effect has all the bright and neon colors. The effect could be added easily to your images regardless of the type of your content. Graphic designers and photographers use the Futuristic Effect to create stunning and professional glitch images.

5. Glitch Art Photoshop Action
The last effect template that we are going to shed light on is Glitch Art Photoshop Action. The effect is fully editable with 10 different abstract elements. The template has absolutely professional results. The effect delivers complete glitchy vibes.
The distortion, the abstract elements, the digital error, and everything else in effect represents all the glitchy vibes.

Final Words
This article is everything one person needs if they want to learn about glitch effect Photoshop. We have talked about creating a jaw-dropping glitch effect in Photoshop. The steps to create a stunning glitch effect have been mentioned above.
We then shared 5 incredible glitch effects that could be used in case you don’t want to create your own effect.
02 Part 2. 5 Awesome Glitch Effect Photoshop Actions.
Part 1. How Do You Do Photo Glitch Effect in Photoshop?
The jagged lines, the colorful pixels, frozen visuals, and also the distorted colors, everything perfectly blends to make a glitch effect. Usually, this is how all the glitch templates are, but if you get an opportunity to customize your image glitch effect and make your special effect, what will you do?
The best option to adopt in any such circumstances is Photoshop. With Photoshop, you can create a stunning and mind-blowing Photoshop VHS effect. If you want to learn about its steps, then continue reading.
Step 1: The process starts by importing the image to Photoshop on which you plan to add the photo glitch effect. Then you should always convert the image from colorful to black and white. This could be done quickly by going into the ‘Image’ menu from the menu bar. Next, go for the ‘Adjustments’ option and select ‘Desaturate.’

Step 2: Now duplicate the image by dragging it onto the New Layer icon in the Layers Panel. Then double click on the duplicated image. This will open a ‘Layer Style’ settings menu. Here, click on the icon for ‘R Channel’ and deselect it.

Step 3: Now, it’s time to add the first glitch element. For that, hold the ‘Shift’ key and move the image by using the left/right cursor keys on the keyboard. This will offset the image layer from the original.

Step 4: You can now select the ‘Mark’ tool from the left side. Make a rectangle anywhere on the image with the Mark tool and then switch back to the ‘Move’ tool. Then again, nudge the rectangular portion left or right to offset it. You can repeat this process multiple times on different areas of the image.

Step 5: At this point, make a New Layer and fill it with White. Now right-click on this white layer and select the option of ‘Convert to Smart Object.’

Step 6: Move to the menu bar at the top and go to the ‘Filter’ section. From there, select the option of ‘Filter Gallery.’ A new window will show up. Head to the ‘Sketch’ category, and there change the ‘Pattern Type’ to ‘Line.’ You can also play with the ‘Contrast’ and the ‘Size’ of the lines.

Step 7: Now, in the ‘Layers Panel,’ select the option of ‘Overlay’ from the dropdown menu so that the different layers can show through. You can adjust the visibility of the lines by adjusting the number on the scale.

Step 8: After setting everything for the glitch effect in your image, you can now add colors using the ‘Gradient Map.’ Or you can also import some graphic textures to Photoshop and add them to the image. Don’t forget to change the ‘Binding Mode’ to ‘Overlay.’ You can then play with the color and graphic settings.

Step 9: Once all the color adjustments have satisfied you, it’s time to add some text to your glitch image. For that, head to the ‘Text’ tool from the left menu and type in your text. Edit it as you did to your image so that you can make a cool glitch text effect Photoshop and with this, you are all done with making the most stunning glitch effect Photoshop.

Part 2. 5 Awesome Glitch Effect Photoshop Actions
With Photoshop, you can create your photo glitch effect as you prefer instead of using the available standard templates. What if you don’t have enough time to create the effect? Are you going to use the basic and standard templates?
If you are looking for some jaw-dropping glitch picture effects rather than using the basic effects, then this section of the article is perfect for you. We are going to talk about 5 fantastic glitch effects Photoshop action.
1. Distorted Glitch Photoshop Action
The first effect we will discuss is Distorted Glitch Photoshop Action. The effect is very easy to use. You can set it with just one click action. The effect allows you to do adjustment settings with very easy steps to edit it.
The effect has all the dark, distorted, and disturbance-related elements that make it an amazing effect to add glitch effect to image.

2. Geometric Glitch Photoshop Action
If glitch effect with lines is too mainstream for you, then this next effect will surely impress you. This effect is the Geometric Glitch Photoshop Action. You can edit this effect. All its colors, layers, and even elements are fully editable.
You can create a modern yet professional glitch image with this stunning effect. The effect lets you add shapes, abstract styles, and also glitch lines to make cool images.

3. Animated Glitch Photoshop Action
If you are looking for a glitch effect to add to animated content, then nothing is better than Animated Glitch Photoshop Action. The effect template is fully editable with 12 distinct color options. The animated effect has a very organized structure of layers, color coding, etc.
By using this effect, you can add a great vibe to your image. The template greatly shows the distortion, digital error, etc. You can play around with RGB to make it look crazy brilliant.

4. Futuristic Photoshop Action
The next effect in line to be discussed is Futuristic Photoshop Action. This effect has all the bright and neon colors. The effect could be added easily to your images regardless of the type of your content. Graphic designers and photographers use the Futuristic Effect to create stunning and professional glitch images.

5. Glitch Art Photoshop Action
The last effect template that we are going to shed light on is Glitch Art Photoshop Action. The effect is fully editable with 10 different abstract elements. The template has absolutely professional results. The effect delivers complete glitchy vibes.
The distortion, the abstract elements, the digital error, and everything else in effect represents all the glitchy vibes.

Final Words
This article is everything one person needs if they want to learn about glitch effect Photoshop. We have talked about creating a jaw-dropping glitch effect in Photoshop. The steps to create a stunning glitch effect have been mentioned above.
We then shared 5 incredible glitch effects that could be used in case you don’t want to create your own effect.
02 Part 2. 5 Awesome Glitch Effect Photoshop Actions.
Part 1. How Do You Do Photo Glitch Effect in Photoshop?
The jagged lines, the colorful pixels, frozen visuals, and also the distorted colors, everything perfectly blends to make a glitch effect. Usually, this is how all the glitch templates are, but if you get an opportunity to customize your image glitch effect and make your special effect, what will you do?
The best option to adopt in any such circumstances is Photoshop. With Photoshop, you can create a stunning and mind-blowing Photoshop VHS effect. If you want to learn about its steps, then continue reading.
Step 1: The process starts by importing the image to Photoshop on which you plan to add the photo glitch effect. Then you should always convert the image from colorful to black and white. This could be done quickly by going into the ‘Image’ menu from the menu bar. Next, go for the ‘Adjustments’ option and select ‘Desaturate.’

Step 2: Now duplicate the image by dragging it onto the New Layer icon in the Layers Panel. Then double click on the duplicated image. This will open a ‘Layer Style’ settings menu. Here, click on the icon for ‘R Channel’ and deselect it.

Step 3: Now, it’s time to add the first glitch element. For that, hold the ‘Shift’ key and move the image by using the left/right cursor keys on the keyboard. This will offset the image layer from the original.

Step 4: You can now select the ‘Mark’ tool from the left side. Make a rectangle anywhere on the image with the Mark tool and then switch back to the ‘Move’ tool. Then again, nudge the rectangular portion left or right to offset it. You can repeat this process multiple times on different areas of the image.

Step 5: At this point, make a New Layer and fill it with White. Now right-click on this white layer and select the option of ‘Convert to Smart Object.’

Step 6: Move to the menu bar at the top and go to the ‘Filter’ section. From there, select the option of ‘Filter Gallery.’ A new window will show up. Head to the ‘Sketch’ category, and there change the ‘Pattern Type’ to ‘Line.’ You can also play with the ‘Contrast’ and the ‘Size’ of the lines.

Step 7: Now, in the ‘Layers Panel,’ select the option of ‘Overlay’ from the dropdown menu so that the different layers can show through. You can adjust the visibility of the lines by adjusting the number on the scale.

Step 8: After setting everything for the glitch effect in your image, you can now add colors using the ‘Gradient Map.’ Or you can also import some graphic textures to Photoshop and add them to the image. Don’t forget to change the ‘Binding Mode’ to ‘Overlay.’ You can then play with the color and graphic settings.

Step 9: Once all the color adjustments have satisfied you, it’s time to add some text to your glitch image. For that, head to the ‘Text’ tool from the left menu and type in your text. Edit it as you did to your image so that you can make a cool glitch text effect Photoshop and with this, you are all done with making the most stunning glitch effect Photoshop.

Part 2. 5 Awesome Glitch Effect Photoshop Actions
With Photoshop, you can create your photo glitch effect as you prefer instead of using the available standard templates. What if you don’t have enough time to create the effect? Are you going to use the basic and standard templates?
If you are looking for some jaw-dropping glitch picture effects rather than using the basic effects, then this section of the article is perfect for you. We are going to talk about 5 fantastic glitch effects Photoshop action.
1. Distorted Glitch Photoshop Action
The first effect we will discuss is Distorted Glitch Photoshop Action. The effect is very easy to use. You can set it with just one click action. The effect allows you to do adjustment settings with very easy steps to edit it.
The effect has all the dark, distorted, and disturbance-related elements that make it an amazing effect to add glitch effect to image.

2. Geometric Glitch Photoshop Action
If glitch effect with lines is too mainstream for you, then this next effect will surely impress you. This effect is the Geometric Glitch Photoshop Action. You can edit this effect. All its colors, layers, and even elements are fully editable.
You can create a modern yet professional glitch image with this stunning effect. The effect lets you add shapes, abstract styles, and also glitch lines to make cool images.

3. Animated Glitch Photoshop Action
If you are looking for a glitch effect to add to animated content, then nothing is better than Animated Glitch Photoshop Action. The effect template is fully editable with 12 distinct color options. The animated effect has a very organized structure of layers, color coding, etc.
By using this effect, you can add a great vibe to your image. The template greatly shows the distortion, digital error, etc. You can play around with RGB to make it look crazy brilliant.

4. Futuristic Photoshop Action
The next effect in line to be discussed is Futuristic Photoshop Action. This effect has all the bright and neon colors. The effect could be added easily to your images regardless of the type of your content. Graphic designers and photographers use the Futuristic Effect to create stunning and professional glitch images.

5. Glitch Art Photoshop Action
The last effect template that we are going to shed light on is Glitch Art Photoshop Action. The effect is fully editable with 10 different abstract elements. The template has absolutely professional results. The effect delivers complete glitchy vibes.
The distortion, the abstract elements, the digital error, and everything else in effect represents all the glitchy vibes.

Final Words
This article is everything one person needs if they want to learn about glitch effect Photoshop. We have talked about creating a jaw-dropping glitch effect in Photoshop. The steps to create a stunning glitch effect have been mentioned above.
We then shared 5 incredible glitch effects that could be used in case you don’t want to create your own effect.
Also read:
- Updated In 2024, Best Options to Replace Sky of Any Photo Online + Offline
- A Guide to Find a High-Quality Video Marketing Agency for 2024
- New How to Change Video Resolution in Filmora
- How to Stabilize Videos with Google Photos App for Free for 2024
- Updated Zoom In and Out on Snapchat for 2024
- New In 2024, AVI Editors for Windows 11/10/8.1/8/7 Easily Edit AVI Files on PC
- New How to Make a Slideshow with Icecream Slideshow Maker for 2024
- In 2024, Having Difficulty in Choosing the Most Affordable 3D Slideshow Software? Stay Here for the Best Application Choices of All Times to Create the Most Stunning Slideshows Ever
- Want to Speed up Your Video to Shorten Its Duration and Make It More Entertaining? Here Is How to Speed up Videos in Final Cut Pro. Get a Better Alternative to FCP to Speed up Videos for 2024
- 2024 Approved Blender Green Screen Effects
- Updated 10 Best Free Spanish Text To Speech Converter Software Windows, Mac, Android, iPhone, & Online
- Editing Videos Was Never so Easy as It Is Now. With Video Enhancer Ai, This Task Is Very Simple to Do and No Trouble Will Be There in Getting the Things Done as Needed. Choose the Right AI Video Enhancer for Task Completion
- How to Create Cooking Video Intro and End Screen for YouTube Channel?
- Updated 6 Best Methods to Make a Video Longer for 2024
- Updated Best Voice Changers for WhatsApp Free Included for 2024
- Updated 2024 Approved Camtasia Vs Captivate Which Is Better
- Updated Freeze Frame Clone Effect Is a Creative Effect to Use for Many Video Creators. This Article Will Show You How to Use Filmora to Make a Frozen Frame Clone Video Effect
- Updated Top 10 Old Film Overlays to Make Your Videos Look Vintage for 2024
- New Top 5 Tips to Freeze-Frame in After Effects for 2024
- New Are You Curious About the Functionality of LUTs in LumaFusion? This Article Will Satisfy Your Queries with Ease
- 2024 Approved What Is the Selective Color Effect, and How Can You Add This Effect to Your Videos Using Wondershare Filmora? A Complete Guide for Beginners
- Updated Templates Take Your Music Video From Drab to Fab and Add some Spice to the Catchy Song. Here Are some Templates You Could Use to Make Your Music Video Popular
- Updated In 2024, Detailed Steps to Add Border to Video Using Premiere Pro
- Updated 2024 Approved How to Create One Click Video Reverse Effect in Filmora
- In 2024, YouTube Algorithm Hacks
- 2024 Approved How Much Information Do You Have About MP4 Digital File Storage? Let Us Tell You More About the MP4 File Format; Get Ready to Increase Your Knowledge
- In 2024, Guide to Synchronizing Your Audio And Videos Properly?
- Updated Good Ways to Make Sure Your Video Editing Course Is Worthing to Watch
- In 2024, How to Transfer Contacts from Samsung Galaxy A14 5G to Other Android Devices Using Bluetooth? | Dr.fone
- 7 Ways to Unlock a Locked Samsung Galaxy XCover 6 Pro Tactical Edition Phone
- How to Make the Most of Your Apple iPhone 12 Pro Lock Screen with Notifications?
- Top 4 Android System Repair Software for Itel P55+ Bricked Devices | Dr.fone
- How and Where to Find a Shiny Stone Pokémon For Honor 100? | Dr.fone
- In 2024, Easy Steps on How To Create a New Apple ID Account On iPhone XS
- In 2024, How to Come up With the Best Pokemon Team On Vivo Y100? | Dr.fone
- In 2024, How to get the dragon scale and evolution-enabled pokemon On Oppo Find X6? | Dr.fone
- New In 2024, Best 10 Apps to Enhance Your Instagram Story Slideshow
- How to Remove Forgotten PIN Of Your Oppo Reno 11 Pro 5G
- What are Location Permissions Life360 On Motorola Edge+ (2023)? | Dr.fone
- Three Solutions to Hard Reset Honor X8b? | Dr.fone
- 7 Ways to Unlock a Locked Samsung Galaxy A15 4G Phone
- Fix the Error of Unfortunately the Process.com.android.phone Has Stopped on Motorola Moto G84 5G | Dr.fone
- Complete Fixes To Solve iPhone 13 mini Randomly Asking for Apple ID Password
- In 2024, 3 Effective Ways to Bypass Activation Lock on Apple iPhone 14 Plus
- Title: New How To Change Speed of Video in Final Cut Pro, In 2024
- Author: Chloe
- Created at : 2024-04-24 07:08:43
- Updated at : 2024-04-25 07:08:43
- Link: https://ai-editing-video.techidaily.com/new-how-to-change-speed-of-video-in-final-cut-pro-in-2024/
- License: This work is licensed under CC BY-NC-SA 4.0.

