:max_bytes(150000):strip_icc():format(webp)/YoungAsianmanusinglaptopandreadingnewspaperonplane-59960904685fbe00103478bd.jpg)
New How to Clone Yourself in Videos with Filmora for 2024

How to Clone Yourself in Videos with Filmora?
With the help of video editing programs like Filmora , you can create clones of yourself. Whether you’re looking to create a funny skit or a serious video, cloning yourself can add much production value to your project.
In this article, we’ll walk you through the process of how to clone yourself in videos using Filmora.
Part 1: How to Film Clips for Cloning Effects?
To make cloning effects, you will need to take two different shots and use a tripod to place the camera, so the frame doesn’t change.
Shooting the first clip
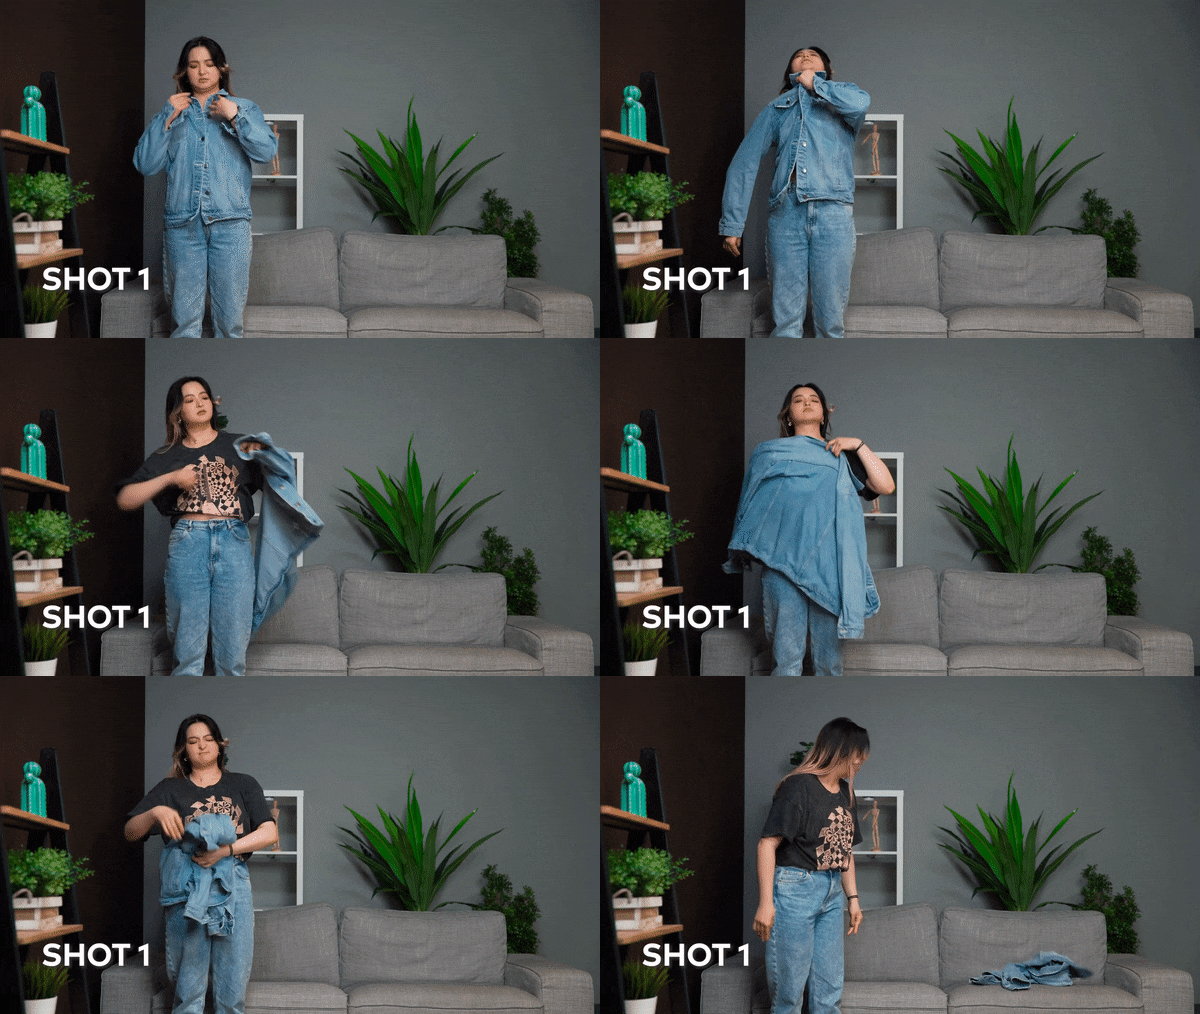
For the first shot, stay on one side of the frame and do the first action. For example, you can pretend to yank and take off your jacket. Then, drop the jacket to the other side of the frame.
To make it more realistic, make an interaction by reacting to the “clone” while facing the other direction.
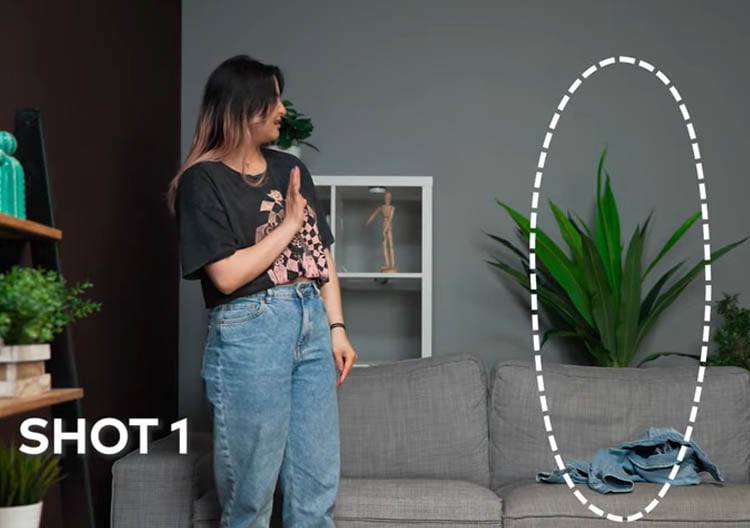
Shooting the second clip
Then, shoot for the second clip without changing the frame. You will have to go to the place where you dropped the jacket from the first shot.

Act as if you have just appeared there and give a reaction to the other side as well.
Part 2: How to Do the Clone Effect with Filmora?
After you have shot the necessary film clips, bring the clips into Filmora 11. If you haven’t installed Filmora yet, you can go to their website and download it here:
Free Download For Win 7 or later(64-bit)
Free Download For macOS 10.14 or later
Once you have opened Filmora 11, follow the steps below:
Step1 Bring the first clip to the timeline and cut the clip where you pretend to yank and take off the jacket. Select and delete the unnecessary clip.
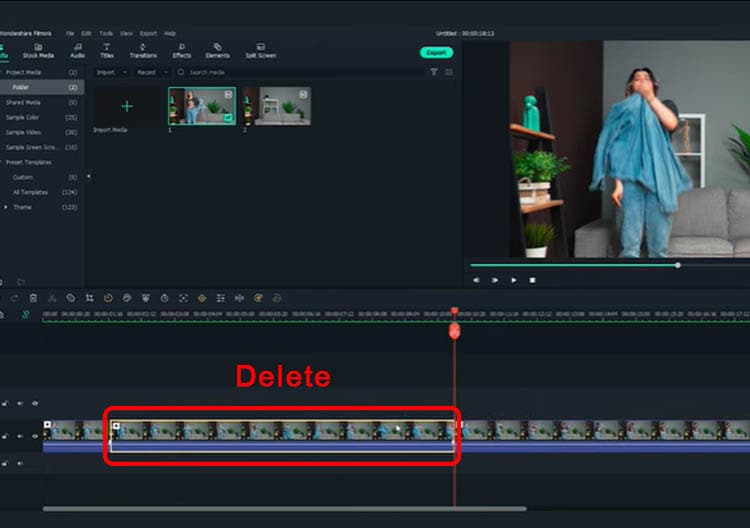
Step2 After you have the first part of the effect ready, let’s start working on the clone part using masking.
First, place the second clip on a different window track, and the starting point is where you react to the “clone.”
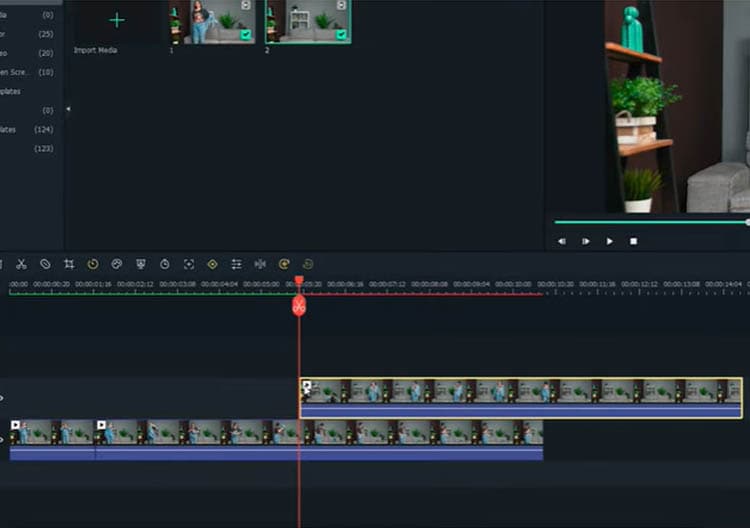
Then, double-click the second clip and go to the Filmora setting window. Tap on the Mask section > Single line.
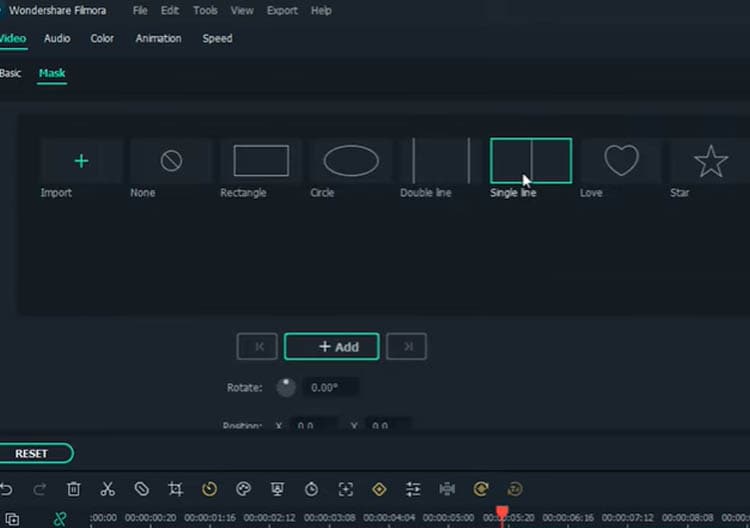
On the preview screen, adjust the position of the mask to only show “the clone.”
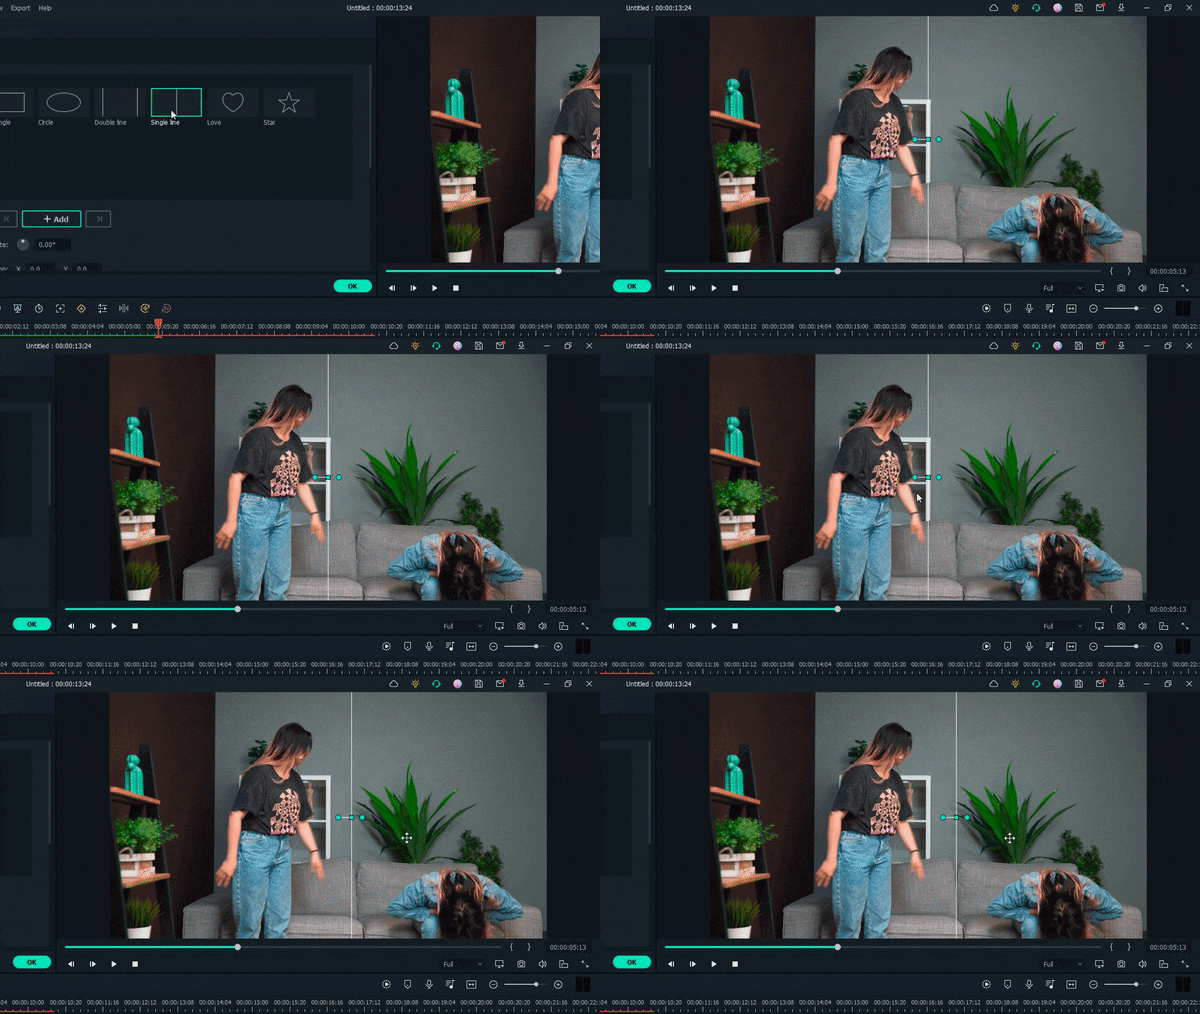
Set the blur strength on the setting to make a smoother edge transition.
Step3 If the timing of the two clips doesn’t match, you can fix it using the speed ramping feature on Filmora 11. To use it, double-click the second clip and select Speed > Speed Ramping > Customize.
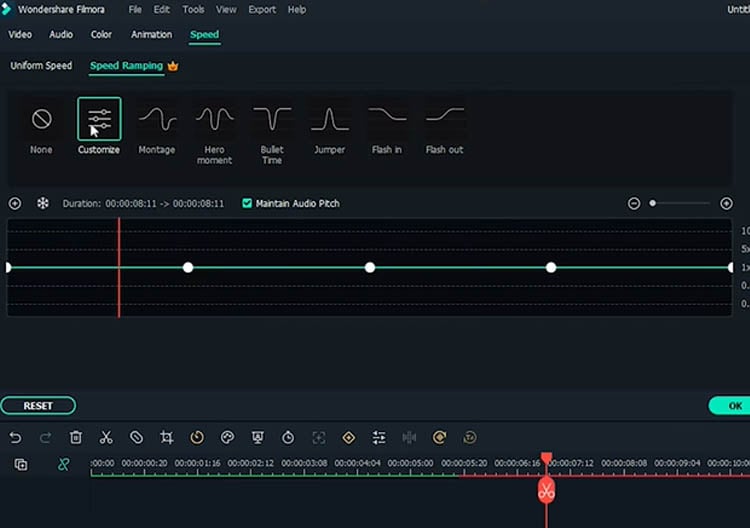
Move the keyframe up to increase the speed. You can adjust it according to your needs.
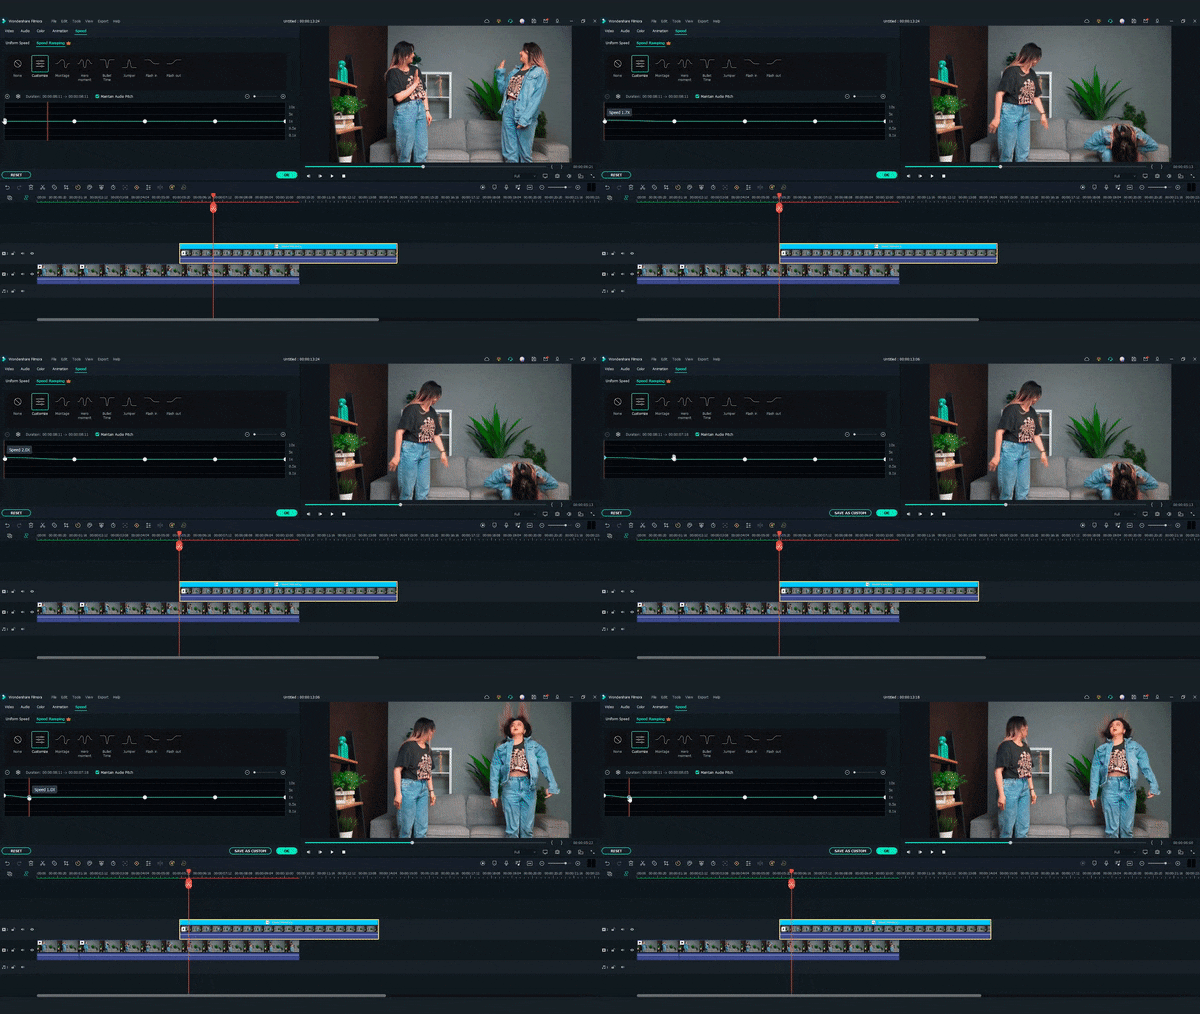
Step4 Once you are satisfied, adjust the clip length on the timeline and make sure that both clips finish at the same time.
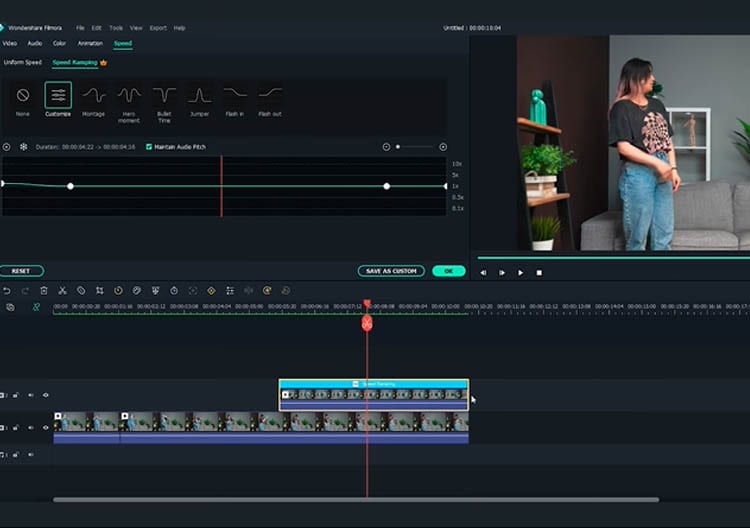
Extra tip: Add one more effect to make it more magical.
Step1 Open the Effects window and search for “up down 1.”
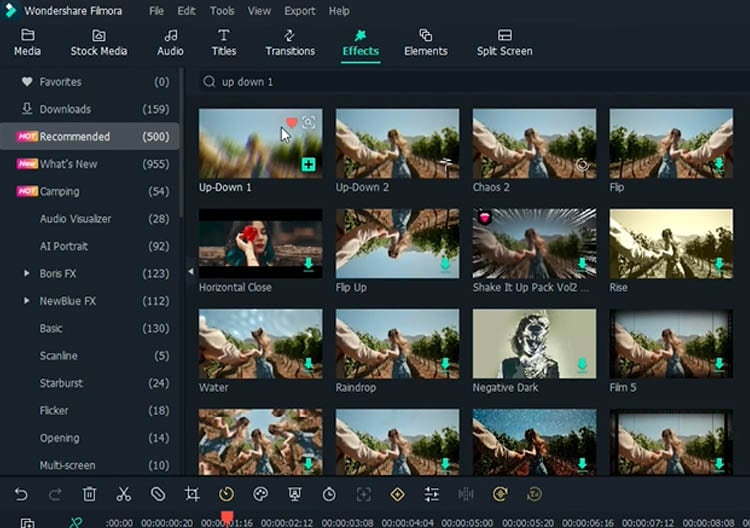
Step2 Drag and drop the effect onto the timeline where the first cut is set. Adjust the effect length to match the action.
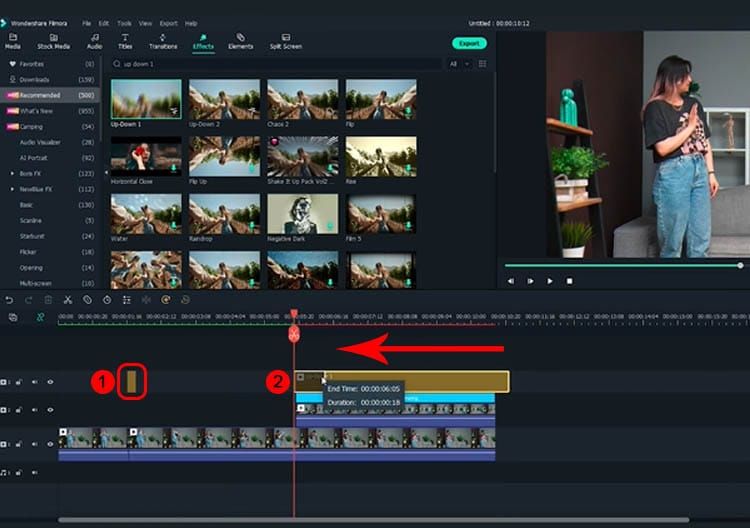
Then, drag and drop the effect again in the transition between the first and the second clip. Adjust it to the appropriate length, then it will give a more dramatic effect.
Step3 You can playback and see how it looks on the preview screen.
Summary
Making a clone effect on video is easy using Filmora. You can use the same trick to create a fashion lookbook video or other creative content to make them more engaging. Let us know if you want to see more tutorials.
Free Download For Win 7 or later(64-bit)
Free Download For macOS 10.14 or later
Free Download For macOS 10.14 or later
Once you have opened Filmora 11, follow the steps below:
Step1 Bring the first clip to the timeline and cut the clip where you pretend to yank and take off the jacket. Select and delete the unnecessary clip.

Step2 After you have the first part of the effect ready, let’s start working on the clone part using masking.
First, place the second clip on a different window track, and the starting point is where you react to the “clone.”

Then, double-click the second clip and go to the Filmora setting window. Tap on the Mask section > Single line.

On the preview screen, adjust the position of the mask to only show “the clone.”

Set the blur strength on the setting to make a smoother edge transition.
Step3 If the timing of the two clips doesn’t match, you can fix it using the speed ramping feature on Filmora 11. To use it, double-click the second clip and select Speed > Speed Ramping > Customize.

Move the keyframe up to increase the speed. You can adjust it according to your needs.

Step4 Once you are satisfied, adjust the clip length on the timeline and make sure that both clips finish at the same time.

Extra tip: Add one more effect to make it more magical.
Step1 Open the Effects window and search for “up down 1.”

Step2 Drag and drop the effect onto the timeline where the first cut is set. Adjust the effect length to match the action.

Then, drag and drop the effect again in the transition between the first and the second clip. Adjust it to the appropriate length, then it will give a more dramatic effect.
Step3 You can playback and see how it looks on the preview screen.
Summary
Making a clone effect on video is easy using Filmora. You can use the same trick to create a fashion lookbook video or other creative content to make them more engaging. Let us know if you want to see more tutorials.
Free Download For Win 7 or later(64-bit)
Free Download For macOS 10.14 or later
Create Perfect Slow Motion Videos With The Best CapCut Templates
Editing from scratch is a time-consuming process, especially when you’re a beginner. Even skilled editors opt for different ways to maintain productivity. One of the means to save time is the use of templates for creating or editing videos. Slow-motion videos require the manipulation of speed or framerate to produce results. Slow-motion CapCut templates prove to be a valuable source.
In this article, readers will learn about slow-mo CapCut templates for crafting slow-motion videos. For those unfamiliar with CapCut, a brief overview of its functions will be provided. In addition, we’ll introduce some remarkable slow-mo CapCut templates. Moreover, you can learn about an extraordinary alternative for fashioning amazing slow-motion videos.
Slow Motion Video Maker Slow your video’s speed with better control of your keyframes to create unique cinematic effects!
Make A Slow Motion Video Make A Slow Motion Video More Features

Part 1. CapCut Video Editor for Smartphone: Reading Out the Detailed Review
CapCut is a content editing platform that acts as a smartphone application and computing software. The application serves in various video editing tasks while giving professional outcomes. Most of CapCut’s features are free to use; however, there is an affordable subscription plan.
It has AI and manual functioning features to help you edit how you like. In its “Explore” section, you can find various effects, text styles, stickers, and audio tracks. Moreover, you can also introduce subtitles and captions with its “Caption” tool. Plus, it offers camera recording where you can adjust record time, effects, multi-clip options, and more. Here are some of CapCut’s limitless editing features:

- Templates: CapCut enables you to access its pre-built templates for distinct purposes. You can access it all from there, be it fast-motion, cinematic effect, or CapCut slow-mo template. Moreover, when you add the keyword for search, it can show you trending templates and hashtags.
- Remove Background: If you couldn’t decide on a good background while recording, CapCut has got you covered. This feature not only removes the background but also offers a setting for bringing precision. You can adjust the edge setting or intensity of these settings accordingly.
- Smart User-Interface: This application has an intuitive, clean, and smart smartphone interface. The themes and the positioning of features are done minimally, where nothing looks stuffed. In addition, you can expand or collapse the display menu accordingly.
- Image Enhancement: As discussed before, CapCut is a content editing app that offers image enhancements as well. The feature automatically compresses your content quality to 1080p. Moreover, you can resize the image post-enhancement and add an AI background to it.
- Cloud Storage and Collaboration: You can edit without any prior account information in CapCut. However, signing up comes with various benefits, such as accessing pre-edited projects. In addition, you can connect with other editors on CapCut and take your editing up a notch.
Part 2. Some Top-Rated CapCut Templates to Try for Creating Perfect Slow-Motion Videos
With a wide range of features and effects, CapCut also has the power to turn videos into slow-mos. You can craft a slow-motion video via manual speed change or be smart with its templates. CapCut slow-motion templates are easily accessible in its Template section. While there are hundreds of slow-mo templates CapCut, take a look at these that we’ve compiled for you:
1. Slowmo
This template is reachable via the CapCut slow-mo edit template gallery and is open for access. The template possesses an aspect ratio of 9:16 and is a suitable fit for your Instagram reels and YouTube shorts. It only requires a video of 16 seconds to get started with this trending template. The template slows down your video at specific durations, giving it a majestic resonance.

2. Slowmotion Smooth
With a catchy song and visually striking filter, this is perfect for aesthetic dress-up videos. This CapCut video slow motion template applies to a single clip of 14 seconds duration. With its 9:16 aspect ratio, it is well-fitted for a majority of social platforms. The template has over 316.3K uses, and you can replace its background song using CapCut.

3. Trend Slowmo
Use this trending slow-motion song CapCut template with over 1.1 million uses to make viral slo-mos. It doesn’t offer a basic Slomo effect but has a trendy background song. In addition, the template is a collaboration between slow motion and blur effect. Users only require a video to employ this effect, offering a 9:16 aspect ratio.

4. Slowmo Aesthetic
Make your modeling and dress-up video look aesthetic with this slow-mo CapCut template. It is a beautiful blend of slow-motion effects on specific scenes with an aesthetic filter. The video will start with a black-and-white look with a smooth transition toward colors and slo-mo. With its 9:16 aspect ratio and 6-second duration, it is perfect for showcasing dresses and fashion.

5. Healing Slowmo
Craft aesthetic travel videos and capture landscapes using this CapCut slow-mo template. It appears as a combination of slow motion and blur effect at multiple periods. You only require a portrait clip to use this template in an efficient way. You can fashion captivating Instagram, Facebook, and Pinterest reels with its 9:16 ratio.

Part 3. How to Create Proper Slow-Motion Videos on CapCut Video Editor?
CapCut slow-mo edit not only slows down video but also helps in post-editing. The user interface is self-explanatory, and you can find the features with ease. However, this section will provide you with a detailed guide on using the template CapCut slow-mo. Here is a step-by-step guide to creating a slo-mo in CapCut via its templates collection:
Step 1. After downloading CapCut on your smartphone, launch it to access its main menu. From there, navigate towards the downward bar and click the “Templates” option.

Step 2. In the templates collection, go to the search bar and type slow motion. Multiple options will appear on the screen in the Trending section. From there, select a template to employ it. Once you have selected the template, observe if it is right for your video. Afterward, click the “Use template” button to start editing with it.

Step 3. Once you have selected a video, click the “Preview” button. Notice that you can only select the number of videos the template offers.

Step 4. Afterward, click on the “Text” option and add text if you want. After all the editing is done, click on the “Export” button to download the video.

Part 4. Smartphone Alternative: Creating Slow Motion Videos with Wondershare Filmora App
Wondershare Filmora is a versatile platform for creating or editing slow motions with smartphone services. You can access the application from the Play Store or App Store and start editing instantly. The Filmora app displays a clearly laid out interface with easy access to features. Here, you can use advanced and basic speed editing to create a slow motion:

Method 1. Using the Normal Speed Option
The normal method in this CapCut slow-mo edit alternative uses playback speed. It involves a simple slider positioning and some enhancement options. Here is how to create a slow motion in the Filmora app using the standard approach:
Step 1. After downloading the Filmora application, navigate towards the top tools. From there, select the “Speed” option and choose a clip for import.

Step 2. Select the “Normal” section and drag the playback towards the left. This will slow down the video, and you can set the speed up to 0.2x for slo-mo. After speed settings, click the “ü” icon, and if you want, do other settings.

Step 3. Once you are done with post-slow motion settings, click the “Export” button.

Method 2. Using the Speed Curve Option
This method involves slightly advanced speed settings for slow-motion creation. This method features many templates alternative to CapCut slow-mo templates. Further, you can use the custom setting template to edit as per your taste. Here is how to create a slow motion using Filmora’s speed curve:
Step 1. Repeat the same process of importing the video and go to the “Curve” section. Select a pre-designed speed template if it fits your video. If not, go for the “Customize” template, and a panel will display.

Step 2. In this panel, adjust the slider position in the downward direction. This will slow down your video at specific durations. You can also enable the “+ Add beat” option for audio adjustments.

Step 3. Click the “ü” icon a couple of times in the respective panels to finalize settings. Afterward, export the video by opting for the “Export” button.

Bonus Part. Make Your Video Editing Perfect with Wondershare Filmora
For beginners, smartphone editing might be satisfactory. However, for a skilled professional with a passion for editing, it’s not enough. For more precise editing and smooth slow motions, we recommend a desktop solution. This CapCut slow-motion edit alternative is Wondershare Filmora’s computing software.
It is an adaptable editing software offering basic as well as advanced video editing features. The features rest on its intuitive interface and are reachable to all. It has a resource library that is filled with transition templates, effects, presets, and more. It has both visual and audio editing options along with AI abilities for production purposes. All in all, the software is an amazing pick for those who prefer high-quality results.
Free Download For Win 7 or later(64-bit)
Free Download For macOS 10.14 or later
AI-Backed Professional Video Editing Features of Filmora
If you are looking to create high-grade slow motions using speed templates, Filmora is for you. There are multiple settings to enhance visuals, audio tracks, and texts. You can do amazing color corrections or add mesmerizing effects to videos. Here are some of its video editing features to consider during editing:
1. AI Copilot Editing
For instance, you are using Filmora for slow motion and don’t know where to start. Employ its copilot assistant and ask it about slo-mo creation. It will direct you towards the speed options with insights on editing. Moreover, the copilot provides one-click access buttons for you to access the feature.
2. AI Text-to-Video
If you are a big fan of AI applications, then Filmora is the right stop for you. Its text-to-video AI allows you to generate videos via prompts or scripts. The function automatically adds graphics and AI voice to videos.
3. Remove Background
The video background remover of Filmora uses high-end AI technology to do the work. It analyzes and cuts out the background with accuracy while providing replacements. You employ three background options: solid color, gradients, and graphics. Users can also add a custom image or video in the timeline to use a background.
4. Instant Mode
If you are not familiar with video and need to start editing videos, this feature is for you. It is an automated video editor for you that uses AI algorithms to edit videos. It color-corrects or enhances any flaws and adds templates and beats to the video. Moreover, it has 115+ multi-contextual templates for diverse video editing.
Conclusion
Slow-motion CapCut templates serve as a powerful resource for creating slo-mos. The con is that with automated templates, there is no room for customizations. However, Wondershare Filmora is a powerful software application with no such limit. It offers visual, audio, and more custom options after some creation. Hence, if you are looking for an editor to broaden your editing game, use Filmora.
Make A Slow Motion Video Make A Slow Motion Video More Features

Part 1. CapCut Video Editor for Smartphone: Reading Out the Detailed Review
CapCut is a content editing platform that acts as a smartphone application and computing software. The application serves in various video editing tasks while giving professional outcomes. Most of CapCut’s features are free to use; however, there is an affordable subscription plan.
It has AI and manual functioning features to help you edit how you like. In its “Explore” section, you can find various effects, text styles, stickers, and audio tracks. Moreover, you can also introduce subtitles and captions with its “Caption” tool. Plus, it offers camera recording where you can adjust record time, effects, multi-clip options, and more. Here are some of CapCut’s limitless editing features:

- Templates: CapCut enables you to access its pre-built templates for distinct purposes. You can access it all from there, be it fast-motion, cinematic effect, or CapCut slow-mo template. Moreover, when you add the keyword for search, it can show you trending templates and hashtags.
- Remove Background: If you couldn’t decide on a good background while recording, CapCut has got you covered. This feature not only removes the background but also offers a setting for bringing precision. You can adjust the edge setting or intensity of these settings accordingly.
- Smart User-Interface: This application has an intuitive, clean, and smart smartphone interface. The themes and the positioning of features are done minimally, where nothing looks stuffed. In addition, you can expand or collapse the display menu accordingly.
- Image Enhancement: As discussed before, CapCut is a content editing app that offers image enhancements as well. The feature automatically compresses your content quality to 1080p. Moreover, you can resize the image post-enhancement and add an AI background to it.
- Cloud Storage and Collaboration: You can edit without any prior account information in CapCut. However, signing up comes with various benefits, such as accessing pre-edited projects. In addition, you can connect with other editors on CapCut and take your editing up a notch.
Part 2. Some Top-Rated CapCut Templates to Try for Creating Perfect Slow-Motion Videos
With a wide range of features and effects, CapCut also has the power to turn videos into slow-mos. You can craft a slow-motion video via manual speed change or be smart with its templates. CapCut slow-motion templates are easily accessible in its Template section. While there are hundreds of slow-mo templates CapCut, take a look at these that we’ve compiled for you:
1. Slowmo
This template is reachable via the CapCut slow-mo edit template gallery and is open for access. The template possesses an aspect ratio of 9:16 and is a suitable fit for your Instagram reels and YouTube shorts. It only requires a video of 16 seconds to get started with this trending template. The template slows down your video at specific durations, giving it a majestic resonance.

2. Slowmotion Smooth
With a catchy song and visually striking filter, this is perfect for aesthetic dress-up videos. This CapCut video slow motion template applies to a single clip of 14 seconds duration. With its 9:16 aspect ratio, it is well-fitted for a majority of social platforms. The template has over 316.3K uses, and you can replace its background song using CapCut.

3. Trend Slowmo
Use this trending slow-motion song CapCut template with over 1.1 million uses to make viral slo-mos. It doesn’t offer a basic Slomo effect but has a trendy background song. In addition, the template is a collaboration between slow motion and blur effect. Users only require a video to employ this effect, offering a 9:16 aspect ratio.

4. Slowmo Aesthetic
Make your modeling and dress-up video look aesthetic with this slow-mo CapCut template. It is a beautiful blend of slow-motion effects on specific scenes with an aesthetic filter. The video will start with a black-and-white look with a smooth transition toward colors and slo-mo. With its 9:16 aspect ratio and 6-second duration, it is perfect for showcasing dresses and fashion.

5. Healing Slowmo
Craft aesthetic travel videos and capture landscapes using this CapCut slow-mo template. It appears as a combination of slow motion and blur effect at multiple periods. You only require a portrait clip to use this template in an efficient way. You can fashion captivating Instagram, Facebook, and Pinterest reels with its 9:16 ratio.

Part 3. How to Create Proper Slow-Motion Videos on CapCut Video Editor?
CapCut slow-mo edit not only slows down video but also helps in post-editing. The user interface is self-explanatory, and you can find the features with ease. However, this section will provide you with a detailed guide on using the template CapCut slow-mo. Here is a step-by-step guide to creating a slo-mo in CapCut via its templates collection:
Step 1. After downloading CapCut on your smartphone, launch it to access its main menu. From there, navigate towards the downward bar and click the “Templates” option.

Step 2. In the templates collection, go to the search bar and type slow motion. Multiple options will appear on the screen in the Trending section. From there, select a template to employ it. Once you have selected the template, observe if it is right for your video. Afterward, click the “Use template” button to start editing with it.

Step 3. Once you have selected a video, click the “Preview” button. Notice that you can only select the number of videos the template offers.

Step 4. Afterward, click on the “Text” option and add text if you want. After all the editing is done, click on the “Export” button to download the video.

Part 4. Smartphone Alternative: Creating Slow Motion Videos with Wondershare Filmora App
Wondershare Filmora is a versatile platform for creating or editing slow motions with smartphone services. You can access the application from the Play Store or App Store and start editing instantly. The Filmora app displays a clearly laid out interface with easy access to features. Here, you can use advanced and basic speed editing to create a slow motion:

Method 1. Using the Normal Speed Option
The normal method in this CapCut slow-mo edit alternative uses playback speed. It involves a simple slider positioning and some enhancement options. Here is how to create a slow motion in the Filmora app using the standard approach:
Step 1. After downloading the Filmora application, navigate towards the top tools. From there, select the “Speed” option and choose a clip for import.

Step 2. Select the “Normal” section and drag the playback towards the left. This will slow down the video, and you can set the speed up to 0.2x for slo-mo. After speed settings, click the “ü” icon, and if you want, do other settings.

Step 3. Once you are done with post-slow motion settings, click the “Export” button.

Method 2. Using the Speed Curve Option
This method involves slightly advanced speed settings for slow-motion creation. This method features many templates alternative to CapCut slow-mo templates. Further, you can use the custom setting template to edit as per your taste. Here is how to create a slow motion using Filmora’s speed curve:
Step 1. Repeat the same process of importing the video and go to the “Curve” section. Select a pre-designed speed template if it fits your video. If not, go for the “Customize” template, and a panel will display.

Step 2. In this panel, adjust the slider position in the downward direction. This will slow down your video at specific durations. You can also enable the “+ Add beat” option for audio adjustments.

Step 3. Click the “ü” icon a couple of times in the respective panels to finalize settings. Afterward, export the video by opting for the “Export” button.

Bonus Part. Make Your Video Editing Perfect with Wondershare Filmora
For beginners, smartphone editing might be satisfactory. However, for a skilled professional with a passion for editing, it’s not enough. For more precise editing and smooth slow motions, we recommend a desktop solution. This CapCut slow-motion edit alternative is Wondershare Filmora’s computing software.
It is an adaptable editing software offering basic as well as advanced video editing features. The features rest on its intuitive interface and are reachable to all. It has a resource library that is filled with transition templates, effects, presets, and more. It has both visual and audio editing options along with AI abilities for production purposes. All in all, the software is an amazing pick for those who prefer high-quality results.
Free Download For Win 7 or later(64-bit)
Free Download For macOS 10.14 or later
AI-Backed Professional Video Editing Features of Filmora
If you are looking to create high-grade slow motions using speed templates, Filmora is for you. There are multiple settings to enhance visuals, audio tracks, and texts. You can do amazing color corrections or add mesmerizing effects to videos. Here are some of its video editing features to consider during editing:
1. AI Copilot Editing
For instance, you are using Filmora for slow motion and don’t know where to start. Employ its copilot assistant and ask it about slo-mo creation. It will direct you towards the speed options with insights on editing. Moreover, the copilot provides one-click access buttons for you to access the feature.
2. AI Text-to-Video
If you are a big fan of AI applications, then Filmora is the right stop for you. Its text-to-video AI allows you to generate videos via prompts or scripts. The function automatically adds graphics and AI voice to videos.
3. Remove Background
The video background remover of Filmora uses high-end AI technology to do the work. It analyzes and cuts out the background with accuracy while providing replacements. You employ three background options: solid color, gradients, and graphics. Users can also add a custom image or video in the timeline to use a background.
4. Instant Mode
If you are not familiar with video and need to start editing videos, this feature is for you. It is an automated video editor for you that uses AI algorithms to edit videos. It color-corrects or enhances any flaws and adds templates and beats to the video. Moreover, it has 115+ multi-contextual templates for diverse video editing.
Conclusion
Slow-motion CapCut templates serve as a powerful resource for creating slo-mos. The con is that with automated templates, there is no room for customizations. However, Wondershare Filmora is a powerful software application with no such limit. It offers visual, audio, and more custom options after some creation. Hence, if you are looking for an editor to broaden your editing game, use Filmora.
Create a Brand Video to Make Your Business Shine
Brand Video Maker - Wondershare Filmora
Provide abundant video effects - A creative video editor
Powerful color correction and grading
Detailed tutorials provided by the official channel
Create a Brand Video to Make Your Business Shine
Did you know that 8 out of 10 people go ahead and purchase a product just by watching brand videos?
I’m sure you are looking for similar success when it comes to your brand video.
But you can’t just compel the audience by making any video!
- It has to be entertaining and inspirational.
- It has to be innovative.
- It needs to have something that grabs the audience’s attention.
And, with all this, it should also successfully share your brand’s core values.
So, how do you create such a video?
It’s not about simply whipping out a camera and pressing the record button. A lot of thought is involved in creating a brand video, but most importantly, you need a high-quality video editor to refine your video and make it more fun, entertaining, and innovative - A video editor like Wondershare Filmora.
And that’s what this article is about - How to use the various basic and advanced editing tools in Filmora to create a brand video that makes a difference!
But first, let’s have a look at…
Wondershare Filmora’s Brand Video
What’s so special about it, you ask?
For starters, it fits right into the criteria we mentioned above. It’s innovative, entertaining, vibrant, and fun and showcases all the features of Filmora 11.
Here, see for yourself…
From all the new effects to the AR sticker themes and other video editing features like speed ramping, masking, and green screen effect, the video successfully lets the audience know how creative they can get with Filmora.
But did you see that they didn’t put the features out there just like that! They actually used all the basic and advanced video editing features in the video to give us an idea of what it looks like when put in action.
And the video quality, the content, and the flow of the video speak for themselves.
I mean, I watched the video all the way to the end without getting bored for even a single second. And, being a video editor, I might as well get Filmora 11 after watching the highly compelling video!
Now, if you’re also wow-ed by the video and would like to create a similar one, here are some tips on making a successful brand video using Wondershare Filmora.
Tips to Make a Compelling Brand Video
Like I said earlier, making a video is not simply about getting out your camera and starting recording. Many aspects need to be considered for your video to make the desired impact.
Therefore, here are some tips that might come in handy when making your brand video:
1. Define Your Objective and Audience
The very first thing that you need to think about before starting work on your brand video is its objective and audience.

What are you trying to achieve from the video? Do you want to create brand awareness, or do you wish to promote a certain product?
Secondly, who’s your target audience? Is your video projected toward people who have no idea who you and your company are? Or are you addressing an existing customer base? Also, are the audience kids or adults? Because you certainly can’t make a video with cartoon characters for an audience who’s looking for something calm and relaxing, and vice versa.
Once you have your objective and audience sorted, it’s time to get busy!
2. Video Scripting
Based on what you’re trying to achieve from your brand video and the target audience, you can decide on the video’s script. This includes the content, the length, and the editing requirements.

Let’s take your video’s content, for instance:
- If you’re creating a video for an audience that doesn’t know you, you’ll have to start from the basics, explaining who you are, what you do, and the services you offer.
- If you’re trying to create a video that tells your brand’s story, you can either keep it inspirational or you could create fun content that will be remembered for years to come!
- If you’re creating something for the kids, you need to keep it short yet interesting, with many effects that help in grabbing their attention.
Once you have decided what to add to the video, how long it will be, and what its content will be like, you can finally record your video!
3. Video Recording
Now, for many people, recording simply means hitting the record button.
Yes, that might work for vlogs, but when it comes to making a brand video, you need to really put in effort when recording.

For instance, you should have all the video clips and images you want to include in the video at hand. And they should resonate with your brand voice and match with each other as well.
If we take Wondershare Filmora’s brand video as an example, you can see that the whole video has a vibrant and warm feel to it, which can be seen throughout. It’s not that one clip is darker and the other is lighter; the whole thing sort of blends into each other.
That’s what you should take care of when recording your video. Make sure the background, hues, and overall feel of the video clips and images match each other.
4. Using Your Brand Colors and Logo
Another thing that you should keep in mind when recording is to incorporate your brand colors in the video and throw in your logo. For instance, if your brand colors are red and green, make sure to use them in the text in the video. However, if you’re not using text, you can use the colors in the video frame by having a wall or something in the background of the same colors.

As for the logo, it can be placed anywhere in the video so that the audience learns to recognize it.
But why is using your brand colors and logo so important?
Because your brand colors and logo represent your brand and become its identity in the long run. For example, yellow and red are McDonald’s brand colors and its logo, the yellow ‘M’ in arch form, is recognizable even from a distance.
5. Video Editing
Now comes the most important part of making a brand video: The editing! The part where you refine your video and add final touches to it. If you’ve got a stellar video editing software like Wondershare Filmora, it can do wonders for your video.
Wondershare Filmora at a Glance

Wondershare Filmora has plenty of basic and advanced video editing features to add that wow factor to your video. It can turn a plain boring video into something fun, exciting, and watch-worthy.
For example, the motion tracking feature lets you add an object that follows a certain movement in the video. Then we have the AR stickers that help enhance emotions and add personality to your video. Also, the green screen feature lets you add amazing background to your video to give the desired effect.
Filmora also has many video effects, templates, speed ramping, masking, auto beat sync, voice recording, and other features that can really take your brand video to the next level.
I’m sure you now have the hang of how to make a brand video that makes your business pop. But, you still might be confused about how to make the most of these features using Wondershare Filmora.
Therefore, here are some helpful tips on using these features to make an effective brand video that creates brand awareness and drives sales!
Creative Ideas to Make Brand Videos Using Filmora
If you’re up for making a video just like the video we shared earlier, you’ll need to download Wondershare Filmora from the website. And, once you’re through with this guide, nothing can stop you from making a brand video that sells!
With that sorted, here are some valuable tips and ideas to help you along the way:
1. Level Up Your Motion Tracking
As we mentioned earlier, motion tracking means tracking the movement of an object in the video and then applying the same movement to a newly added object, like text, image, logo, or any clipart.
But that’s quite a common practice, right? I mean, every video editor out there is doing it!
However, there are some ways in which you can get creative with the motion tracking feature using Filmora.
Like…
Using Motion-Tracked Texts
While the text in a video looks pretty good itself, you can make it even more impressive by motion tracking it.
For example:
- Attach a piece of text to your introductory title. If there’s a logo or brand name in the introduction, you can add a tagline, a website address, or your Instagram or Twitter handle to it.
- If you want to create a context for the audience, add motion-tracked captions in your brand video. This means the captions move with the movement of the subject. It looks stylish, gives relevant information, and helps tell your brand’s story without any narration.
This Fitbit commercial would be an excellent example of motion-tracked captions:
- If your video has an introductory scene where the frame is moving from one side to the other, you can motion-track the credits so that they move along with the scene and disappear gradually instead of dedicating a single clip to the credits.
- Highlighting important aspects in a video, like places or names of objects with motion-tracked text, can make your video truly amazing and fun to watch. This would be quite essential if you’re making a video for the real estate or travel business.
Here’s an example:
Hence, when working with Filmora, you can do plenty with the motion tracking feature to make a truly amazing video.
2. Add a Fun Factor with AR Stickers
Now that you know how to use the motion tracking feature in Filmora, let me tell you a secret!
If you incorporate face-tracking AR stickers into your video, you can succeed in creating a brand video that will have the audience glued to the screen!
The purpose of adding AR stickers to your videos is to emphasize reactions, portray enhanced emotions, and add an element of fun. This feature works best if you’re creating a brand video projected toward kids.

So, how can you make the most of these AR stickers?
Create Multiple Characters
If you don’t have people to play different characters, don’t fret! With the AR sticker effect, you can create multiple characters for your video.
For example:
If your video has 3 animal characters, you can use AR stickers depicting a panda, cat, and bunny to show the different characters. Similarly, you can add the sticker with glasses to show a nerdy character. Or, if you’re really getting into the story-telling mode, you can use the pirate sticker to show a pirate.
Magnify Emotions
Sometimes it gets challenging to portray a certain emotion in your video. This is where AR stickers come to the rescue!
If you want to show someone in love, you can use the heart-eyes effect. Or, if you want to show that someone is being good, you can use the angel sticker to put a halo on their head.
There are many options! You just have to use your creative cells and conjure up something that’s unique and stands out from the rest.
3. Ace Your Shoot with the Green Screen Effect
A green-screen effect is quite important when it comes to making an exceptional brand video. It has been used in almost all blockbuster movies, and if you’re looking to make a video of a similar level, we’ve got some tried and tested tips to use the green screen effect to its fullest!
Make Sure the Lighting is Even
When it comes to a green screen, the lighting plays an important part. Make sure the green screen is one shade of green, and the lighting on the screen is even. If parts of the green screen are darker than the rest, the chroma key effect won’t be able to distinguish the different shades.
Contrasting Colors
Make sure the subject in the video isn’t wearing any green clothing, or there aren’t many green objects around, as they might disappear when you apply the green screen effect.
Prevent Motion Blur with High Shutter Speed
When shooting with a green screen background, make sure you keep the shutter speed high to avoid motion blur. Ideally, it should be 2x your frame rate for optimum results. But, at the same time, it shouldn’t be too high, as it can lead to a change in video exposure.
If you keep these tips in mind when shooting a video, you can easily use the chroma key effect in Wondershare Filmora to add your desired background and create an outstanding video.
4. Be Innovative with Effects
A video without effects is as bland as water! So, make your video innovative with the impressive variety of effects available in Wondershare Filmora.
But you can’t just add effects to your video like that! You need to understand when and where to use a certain effect properly.
For example:
Tell Your Story With Split Screen Effect
If you’re telling your brand story from the perspective of different individuals, using the split-screen effect is recommended. You can also use this effect to showcase how one thing is related to another in a cause-and-effect way.
Take this Lexus commercial, for example:
It shows the view from inside the car and from a viewer’s perspective.
Emphasize with Pan and Zoom Effect
As the topic of concern of this article is brand videos, the pan and zoom is an ideal effect for it.
You can easily emphasize its importance and give off an emotional storytelling vibe by zooming in on a person’s face or any other object in the frame. You can also use pan and zoom to add a transition to your video. Here’s an example:
Add Thrill with Transitions
To move from one shot to another, it’s important to add a transition effect in between. You can add different transition styles to link the shots with one another, for instance, the match cut transition to match scenes that are not otherwise linked visually. Or the whip pan transition, which involves a quick rotation of the camera’s axis to give the impression that the scene was shot in one take, although it is two separate clips.
Take Wondershare Filmora’s brand video, for example. You can see how seamlessly it moves from one effect to another. It adds value and makes the video fun to watch.
With the variety of transitions in Filmora’s library, you can add all the effects discussed above to your video for stunning results.
You’ve added motion tracking, used AR stickers, created a mystical background with the green screen effect, and gone innovative with effects. Now, it’s time to wrap up this article with…
5. Energize Your Videos with Speed Ramping
Did you know that speed ramping can actually improve your videos tenfold? Speeding up and slowing down the footage at certain points can have a significant impact. For example, the bullet dodge scene in “Matrix” wouldn’t have been so famous if it wasn’t for the slo-mo effect!

You can’t just randomly add speed ramps to your video. There has to be a purpose behind it! Do you want to emphasize something? Do you want to show a transition? Regardless, you need to time your speed ramping properly.
And here are a few tips for it!
Use Slo-Mo For Action Sequences
If your video has an amazing action scene in it, slow down the speed at that point to emphasize the action and movement. For example, a karate kick in slow motion very clearly shows us how the move is actually performed.
Don’t Use Slo-Mo For Too Long
Another tip is to use the slow-mo only for a few seconds to emphasize something. If you prolong it, it won’t have the desired impact and might even cause the audience to lose focus.
Speed Up Footage for Long Processes
If your video shows a long process, like a time-lapse, it is the perfect time to speed up the footage. Not only do long shots lose the viewer’s attention, but they can also get boring too. A sped up footage on the other hand makes your video aesthetically pleasing and entertaining.
Add Music
Using music in videos is quite a common practice; however, it becomes quite exciting if you speed ramp your video according to the music. For example, time the slo-mo effect with the more silent or riverbed parts of the music, and speed it up when the crescendo comes.
You can do this easily with the auto beat-sync feature in Filmora that matches the music with the footage.

How’s that for a thrilling video?
Speed Ramp for Transitions
Here’s a bonus tip! Use speed ramping at the end of one clip and the beginning of the next one to create a seamless flow between the two. It’ll also give a transition effect and make your brand video look professional.
So you see, you have ample options to add a touch of creativity to your brand videos. The key is to use a good video editor and the right video editing tools.
Wrapping Up
Shooting a brand video is easy, and it’s even easier to edit it. All you need is to let your creativity flow!
With Wondershare Filmora 11’s new and advanced editing features, making watch-worthy brand videos that give out the desired message and compel the audience to take some action has never been easier!
And, with the useful video editing tips that we have shared, you are just a click away from taking your business to new heights!
So, if you also want to create a video successfully, just like Filmora’s brand video, follow our tips, use the tricks, and edit away!
Create a Brand Video to Make Your Business Shine
Did you know that 8 out of 10 people go ahead and purchase a product just by watching brand videos?
I’m sure you are looking for similar success when it comes to your brand video.
But you can’t just compel the audience by making any video!
- It has to be entertaining and inspirational.
- It has to be innovative.
- It needs to have something that grabs the audience’s attention.
And, with all this, it should also successfully share your brand’s core values.
So, how do you create such a video?
It’s not about simply whipping out a camera and pressing the record button. A lot of thought is involved in creating a brand video, but most importantly, you need a high-quality video editor to refine your video and make it more fun, entertaining, and innovative - A video editor like Wondershare Filmora.
And that’s what this article is about - How to use the various basic and advanced editing tools in Filmora to create a brand video that makes a difference!
But first, let’s have a look at…
Wondershare Filmora’s Brand Video
What’s so special about it, you ask?
For starters, it fits right into the criteria we mentioned above. It’s innovative, entertaining, vibrant, and fun and showcases all the features of Filmora 11.
Here, see for yourself…
From all the new effects to the AR sticker themes and other video editing features like speed ramping, masking, and green screen effect, the video successfully lets the audience know how creative they can get with Filmora.
But did you see that they didn’t put the features out there just like that! They actually used all the basic and advanced video editing features in the video to give us an idea of what it looks like when put in action.
And the video quality, the content, and the flow of the video speak for themselves.
I mean, I watched the video all the way to the end without getting bored for even a single second. And, being a video editor, I might as well get Filmora 11 after watching the highly compelling video!
Now, if you’re also wow-ed by the video and would like to create a similar one, here are some tips on making a successful brand video using Wondershare Filmora.
Tips to Make a Compelling Brand Video
Like I said earlier, making a video is not simply about getting out your camera and starting recording. Many aspects need to be considered for your video to make the desired impact.
Therefore, here are some tips that might come in handy when making your brand video:
1. Define Your Objective and Audience
The very first thing that you need to think about before starting work on your brand video is its objective and audience.

What are you trying to achieve from the video? Do you want to create brand awareness, or do you wish to promote a certain product?
Secondly, who’s your target audience? Is your video projected toward people who have no idea who you and your company are? Or are you addressing an existing customer base? Also, are the audience kids or adults? Because you certainly can’t make a video with cartoon characters for an audience who’s looking for something calm and relaxing, and vice versa.
Once you have your objective and audience sorted, it’s time to get busy!
2. Video Scripting
Based on what you’re trying to achieve from your brand video and the target audience, you can decide on the video’s script. This includes the content, the length, and the editing requirements.

Let’s take your video’s content, for instance:
- If you’re creating a video for an audience that doesn’t know you, you’ll have to start from the basics, explaining who you are, what you do, and the services you offer.
- If you’re trying to create a video that tells your brand’s story, you can either keep it inspirational or you could create fun content that will be remembered for years to come!
- If you’re creating something for the kids, you need to keep it short yet interesting, with many effects that help in grabbing their attention.
Once you have decided what to add to the video, how long it will be, and what its content will be like, you can finally record your video!
3. Video Recording
Now, for many people, recording simply means hitting the record button.
Yes, that might work for vlogs, but when it comes to making a brand video, you need to really put in effort when recording.

For instance, you should have all the video clips and images you want to include in the video at hand. And they should resonate with your brand voice and match with each other as well.
If we take Wondershare Filmora’s brand video as an example, you can see that the whole video has a vibrant and warm feel to it, which can be seen throughout. It’s not that one clip is darker and the other is lighter; the whole thing sort of blends into each other.
That’s what you should take care of when recording your video. Make sure the background, hues, and overall feel of the video clips and images match each other.
4. Using Your Brand Colors and Logo
Another thing that you should keep in mind when recording is to incorporate your brand colors in the video and throw in your logo. For instance, if your brand colors are red and green, make sure to use them in the text in the video. However, if you’re not using text, you can use the colors in the video frame by having a wall or something in the background of the same colors.

As for the logo, it can be placed anywhere in the video so that the audience learns to recognize it.
But why is using your brand colors and logo so important?
Because your brand colors and logo represent your brand and become its identity in the long run. For example, yellow and red are McDonald’s brand colors and its logo, the yellow ‘M’ in arch form, is recognizable even from a distance.
5. Video Editing
Now comes the most important part of making a brand video: The editing! The part where you refine your video and add final touches to it. If you’ve got a stellar video editing software like Wondershare Filmora, it can do wonders for your video.
Wondershare Filmora at a Glance

Wondershare Filmora has plenty of basic and advanced video editing features to add that wow factor to your video. It can turn a plain boring video into something fun, exciting, and watch-worthy.
For example, the motion tracking feature lets you add an object that follows a certain movement in the video. Then we have the AR stickers that help enhance emotions and add personality to your video. Also, the green screen feature lets you add amazing background to your video to give the desired effect.
Filmora also has many video effects, templates, speed ramping, masking, auto beat sync, voice recording, and other features that can really take your brand video to the next level.
I’m sure you now have the hang of how to make a brand video that makes your business pop. But, you still might be confused about how to make the most of these features using Wondershare Filmora.
Therefore, here are some helpful tips on using these features to make an effective brand video that creates brand awareness and drives sales!
Creative Ideas to Make Brand Videos Using Filmora
If you’re up for making a video just like the video we shared earlier, you’ll need to download Wondershare Filmora from the website. And, once you’re through with this guide, nothing can stop you from making a brand video that sells!
With that sorted, here are some valuable tips and ideas to help you along the way:
1. Level Up Your Motion Tracking
As we mentioned earlier, motion tracking means tracking the movement of an object in the video and then applying the same movement to a newly added object, like text, image, logo, or any clipart.
But that’s quite a common practice, right? I mean, every video editor out there is doing it!
However, there are some ways in which you can get creative with the motion tracking feature using Filmora.
Like…
Using Motion-Tracked Texts
While the text in a video looks pretty good itself, you can make it even more impressive by motion tracking it.
For example:
- Attach a piece of text to your introductory title. If there’s a logo or brand name in the introduction, you can add a tagline, a website address, or your Instagram or Twitter handle to it.
- If you want to create a context for the audience, add motion-tracked captions in your brand video. This means the captions move with the movement of the subject. It looks stylish, gives relevant information, and helps tell your brand’s story without any narration.
This Fitbit commercial would be an excellent example of motion-tracked captions:
- If your video has an introductory scene where the frame is moving from one side to the other, you can motion-track the credits so that they move along with the scene and disappear gradually instead of dedicating a single clip to the credits.
- Highlighting important aspects in a video, like places or names of objects with motion-tracked text, can make your video truly amazing and fun to watch. This would be quite essential if you’re making a video for the real estate or travel business.
Here’s an example:
Hence, when working with Filmora, you can do plenty with the motion tracking feature to make a truly amazing video.
2. Add a Fun Factor with AR Stickers
Now that you know how to use the motion tracking feature in Filmora, let me tell you a secret!
If you incorporate face-tracking AR stickers into your video, you can succeed in creating a brand video that will have the audience glued to the screen!
The purpose of adding AR stickers to your videos is to emphasize reactions, portray enhanced emotions, and add an element of fun. This feature works best if you’re creating a brand video projected toward kids.

So, how can you make the most of these AR stickers?
Create Multiple Characters
If you don’t have people to play different characters, don’t fret! With the AR sticker effect, you can create multiple characters for your video.
For example:
If your video has 3 animal characters, you can use AR stickers depicting a panda, cat, and bunny to show the different characters. Similarly, you can add the sticker with glasses to show a nerdy character. Or, if you’re really getting into the story-telling mode, you can use the pirate sticker to show a pirate.
Magnify Emotions
Sometimes it gets challenging to portray a certain emotion in your video. This is where AR stickers come to the rescue!
If you want to show someone in love, you can use the heart-eyes effect. Or, if you want to show that someone is being good, you can use the angel sticker to put a halo on their head.
There are many options! You just have to use your creative cells and conjure up something that’s unique and stands out from the rest.
3. Ace Your Shoot with the Green Screen Effect
A green-screen effect is quite important when it comes to making an exceptional brand video. It has been used in almost all blockbuster movies, and if you’re looking to make a video of a similar level, we’ve got some tried and tested tips to use the green screen effect to its fullest!
Make Sure the Lighting is Even
When it comes to a green screen, the lighting plays an important part. Make sure the green screen is one shade of green, and the lighting on the screen is even. If parts of the green screen are darker than the rest, the chroma key effect won’t be able to distinguish the different shades.
Contrasting Colors
Make sure the subject in the video isn’t wearing any green clothing, or there aren’t many green objects around, as they might disappear when you apply the green screen effect.
Prevent Motion Blur with High Shutter Speed
When shooting with a green screen background, make sure you keep the shutter speed high to avoid motion blur. Ideally, it should be 2x your frame rate for optimum results. But, at the same time, it shouldn’t be too high, as it can lead to a change in video exposure.
If you keep these tips in mind when shooting a video, you can easily use the chroma key effect in Wondershare Filmora to add your desired background and create an outstanding video.
4. Be Innovative with Effects
A video without effects is as bland as water! So, make your video innovative with the impressive variety of effects available in Wondershare Filmora.
But you can’t just add effects to your video like that! You need to understand when and where to use a certain effect properly.
For example:
Tell Your Story With Split Screen Effect
If you’re telling your brand story from the perspective of different individuals, using the split-screen effect is recommended. You can also use this effect to showcase how one thing is related to another in a cause-and-effect way.
Take this Lexus commercial, for example:
It shows the view from inside the car and from a viewer’s perspective.
Emphasize with Pan and Zoom Effect
As the topic of concern of this article is brand videos, the pan and zoom is an ideal effect for it.
You can easily emphasize its importance and give off an emotional storytelling vibe by zooming in on a person’s face or any other object in the frame. You can also use pan and zoom to add a transition to your video. Here’s an example:
Add Thrill with Transitions
To move from one shot to another, it’s important to add a transition effect in between. You can add different transition styles to link the shots with one another, for instance, the match cut transition to match scenes that are not otherwise linked visually. Or the whip pan transition, which involves a quick rotation of the camera’s axis to give the impression that the scene was shot in one take, although it is two separate clips.
Take Wondershare Filmora’s brand video, for example. You can see how seamlessly it moves from one effect to another. It adds value and makes the video fun to watch.
With the variety of transitions in Filmora’s library, you can add all the effects discussed above to your video for stunning results.
You’ve added motion tracking, used AR stickers, created a mystical background with the green screen effect, and gone innovative with effects. Now, it’s time to wrap up this article with…
5. Energize Your Videos with Speed Ramping
Did you know that speed ramping can actually improve your videos tenfold? Speeding up and slowing down the footage at certain points can have a significant impact. For example, the bullet dodge scene in “Matrix” wouldn’t have been so famous if it wasn’t for the slo-mo effect!

You can’t just randomly add speed ramps to your video. There has to be a purpose behind it! Do you want to emphasize something? Do you want to show a transition? Regardless, you need to time your speed ramping properly.
And here are a few tips for it!
Use Slo-Mo For Action Sequences
If your video has an amazing action scene in it, slow down the speed at that point to emphasize the action and movement. For example, a karate kick in slow motion very clearly shows us how the move is actually performed.
Don’t Use Slo-Mo For Too Long
Another tip is to use the slow-mo only for a few seconds to emphasize something. If you prolong it, it won’t have the desired impact and might even cause the audience to lose focus.
Speed Up Footage for Long Processes
If your video shows a long process, like a time-lapse, it is the perfect time to speed up the footage. Not only do long shots lose the viewer’s attention, but they can also get boring too. A sped up footage on the other hand makes your video aesthetically pleasing and entertaining.
Add Music
Using music in videos is quite a common practice; however, it becomes quite exciting if you speed ramp your video according to the music. For example, time the slo-mo effect with the more silent or riverbed parts of the music, and speed it up when the crescendo comes.
You can do this easily with the auto beat-sync feature in Filmora that matches the music with the footage.

How’s that for a thrilling video?
Speed Ramp for Transitions
Here’s a bonus tip! Use speed ramping at the end of one clip and the beginning of the next one to create a seamless flow between the two. It’ll also give a transition effect and make your brand video look professional.
So you see, you have ample options to add a touch of creativity to your brand videos. The key is to use a good video editor and the right video editing tools.
Wrapping Up
Shooting a brand video is easy, and it’s even easier to edit it. All you need is to let your creativity flow!
With Wondershare Filmora 11’s new and advanced editing features, making watch-worthy brand videos that give out the desired message and compel the audience to take some action has never been easier!
And, with the useful video editing tips that we have shared, you are just a click away from taking your business to new heights!
So, if you also want to create a video successfully, just like Filmora’s brand video, follow our tips, use the tricks, and edit away!
Create a Brand Video to Make Your Business Shine
Did you know that 8 out of 10 people go ahead and purchase a product just by watching brand videos?
I’m sure you are looking for similar success when it comes to your brand video.
But you can’t just compel the audience by making any video!
- It has to be entertaining and inspirational.
- It has to be innovative.
- It needs to have something that grabs the audience’s attention.
And, with all this, it should also successfully share your brand’s core values.
So, how do you create such a video?
It’s not about simply whipping out a camera and pressing the record button. A lot of thought is involved in creating a brand video, but most importantly, you need a high-quality video editor to refine your video and make it more fun, entertaining, and innovative - A video editor like Wondershare Filmora.
And that’s what this article is about - How to use the various basic and advanced editing tools in Filmora to create a brand video that makes a difference!
But first, let’s have a look at…
Wondershare Filmora’s Brand Video
What’s so special about it, you ask?
For starters, it fits right into the criteria we mentioned above. It’s innovative, entertaining, vibrant, and fun and showcases all the features of Filmora 11.
Here, see for yourself…
From all the new effects to the AR sticker themes and other video editing features like speed ramping, masking, and green screen effect, the video successfully lets the audience know how creative they can get with Filmora.
But did you see that they didn’t put the features out there just like that! They actually used all the basic and advanced video editing features in the video to give us an idea of what it looks like when put in action.
And the video quality, the content, and the flow of the video speak for themselves.
I mean, I watched the video all the way to the end without getting bored for even a single second. And, being a video editor, I might as well get Filmora 11 after watching the highly compelling video!
Now, if you’re also wow-ed by the video and would like to create a similar one, here are some tips on making a successful brand video using Wondershare Filmora.
Tips to Make a Compelling Brand Video
Like I said earlier, making a video is not simply about getting out your camera and starting recording. Many aspects need to be considered for your video to make the desired impact.
Therefore, here are some tips that might come in handy when making your brand video:
1. Define Your Objective and Audience
The very first thing that you need to think about before starting work on your brand video is its objective and audience.

What are you trying to achieve from the video? Do you want to create brand awareness, or do you wish to promote a certain product?
Secondly, who’s your target audience? Is your video projected toward people who have no idea who you and your company are? Or are you addressing an existing customer base? Also, are the audience kids or adults? Because you certainly can’t make a video with cartoon characters for an audience who’s looking for something calm and relaxing, and vice versa.
Once you have your objective and audience sorted, it’s time to get busy!
2. Video Scripting
Based on what you’re trying to achieve from your brand video and the target audience, you can decide on the video’s script. This includes the content, the length, and the editing requirements.

Let’s take your video’s content, for instance:
- If you’re creating a video for an audience that doesn’t know you, you’ll have to start from the basics, explaining who you are, what you do, and the services you offer.
- If you’re trying to create a video that tells your brand’s story, you can either keep it inspirational or you could create fun content that will be remembered for years to come!
- If you’re creating something for the kids, you need to keep it short yet interesting, with many effects that help in grabbing their attention.
Once you have decided what to add to the video, how long it will be, and what its content will be like, you can finally record your video!
3. Video Recording
Now, for many people, recording simply means hitting the record button.
Yes, that might work for vlogs, but when it comes to making a brand video, you need to really put in effort when recording.

For instance, you should have all the video clips and images you want to include in the video at hand. And they should resonate with your brand voice and match with each other as well.
If we take Wondershare Filmora’s brand video as an example, you can see that the whole video has a vibrant and warm feel to it, which can be seen throughout. It’s not that one clip is darker and the other is lighter; the whole thing sort of blends into each other.
That’s what you should take care of when recording your video. Make sure the background, hues, and overall feel of the video clips and images match each other.
4. Using Your Brand Colors and Logo
Another thing that you should keep in mind when recording is to incorporate your brand colors in the video and throw in your logo. For instance, if your brand colors are red and green, make sure to use them in the text in the video. However, if you’re not using text, you can use the colors in the video frame by having a wall or something in the background of the same colors.

As for the logo, it can be placed anywhere in the video so that the audience learns to recognize it.
But why is using your brand colors and logo so important?
Because your brand colors and logo represent your brand and become its identity in the long run. For example, yellow and red are McDonald’s brand colors and its logo, the yellow ‘M’ in arch form, is recognizable even from a distance.
5. Video Editing
Now comes the most important part of making a brand video: The editing! The part where you refine your video and add final touches to it. If you’ve got a stellar video editing software like Wondershare Filmora, it can do wonders for your video.
Wondershare Filmora at a Glance

Wondershare Filmora has plenty of basic and advanced video editing features to add that wow factor to your video. It can turn a plain boring video into something fun, exciting, and watch-worthy.
For example, the motion tracking feature lets you add an object that follows a certain movement in the video. Then we have the AR stickers that help enhance emotions and add personality to your video. Also, the green screen feature lets you add amazing background to your video to give the desired effect.
Filmora also has many video effects, templates, speed ramping, masking, auto beat sync, voice recording, and other features that can really take your brand video to the next level.
I’m sure you now have the hang of how to make a brand video that makes your business pop. But, you still might be confused about how to make the most of these features using Wondershare Filmora.
Therefore, here are some helpful tips on using these features to make an effective brand video that creates brand awareness and drives sales!
Creative Ideas to Make Brand Videos Using Filmora
If you’re up for making a video just like the video we shared earlier, you’ll need to download Wondershare Filmora from the website. And, once you’re through with this guide, nothing can stop you from making a brand video that sells!
With that sorted, here are some valuable tips and ideas to help you along the way:
1. Level Up Your Motion Tracking
As we mentioned earlier, motion tracking means tracking the movement of an object in the video and then applying the same movement to a newly added object, like text, image, logo, or any clipart.
But that’s quite a common practice, right? I mean, every video editor out there is doing it!
However, there are some ways in which you can get creative with the motion tracking feature using Filmora.
Like…
Using Motion-Tracked Texts
While the text in a video looks pretty good itself, you can make it even more impressive by motion tracking it.
For example:
- Attach a piece of text to your introductory title. If there’s a logo or brand name in the introduction, you can add a tagline, a website address, or your Instagram or Twitter handle to it.
- If you want to create a context for the audience, add motion-tracked captions in your brand video. This means the captions move with the movement of the subject. It looks stylish, gives relevant information, and helps tell your brand’s story without any narration.
This Fitbit commercial would be an excellent example of motion-tracked captions:
- If your video has an introductory scene where the frame is moving from one side to the other, you can motion-track the credits so that they move along with the scene and disappear gradually instead of dedicating a single clip to the credits.
- Highlighting important aspects in a video, like places or names of objects with motion-tracked text, can make your video truly amazing and fun to watch. This would be quite essential if you’re making a video for the real estate or travel business.
Here’s an example:
Hence, when working with Filmora, you can do plenty with the motion tracking feature to make a truly amazing video.
2. Add a Fun Factor with AR Stickers
Now that you know how to use the motion tracking feature in Filmora, let me tell you a secret!
If you incorporate face-tracking AR stickers into your video, you can succeed in creating a brand video that will have the audience glued to the screen!
The purpose of adding AR stickers to your videos is to emphasize reactions, portray enhanced emotions, and add an element of fun. This feature works best if you’re creating a brand video projected toward kids.

So, how can you make the most of these AR stickers?
Create Multiple Characters
If you don’t have people to play different characters, don’t fret! With the AR sticker effect, you can create multiple characters for your video.
For example:
If your video has 3 animal characters, you can use AR stickers depicting a panda, cat, and bunny to show the different characters. Similarly, you can add the sticker with glasses to show a nerdy character. Or, if you’re really getting into the story-telling mode, you can use the pirate sticker to show a pirate.
Magnify Emotions
Sometimes it gets challenging to portray a certain emotion in your video. This is where AR stickers come to the rescue!
If you want to show someone in love, you can use the heart-eyes effect. Or, if you want to show that someone is being good, you can use the angel sticker to put a halo on their head.
There are many options! You just have to use your creative cells and conjure up something that’s unique and stands out from the rest.
3. Ace Your Shoot with the Green Screen Effect
A green-screen effect is quite important when it comes to making an exceptional brand video. It has been used in almost all blockbuster movies, and if you’re looking to make a video of a similar level, we’ve got some tried and tested tips to use the green screen effect to its fullest!
Make Sure the Lighting is Even
When it comes to a green screen, the lighting plays an important part. Make sure the green screen is one shade of green, and the lighting on the screen is even. If parts of the green screen are darker than the rest, the chroma key effect won’t be able to distinguish the different shades.
Contrasting Colors
Make sure the subject in the video isn’t wearing any green clothing, or there aren’t many green objects around, as they might disappear when you apply the green screen effect.
Prevent Motion Blur with High Shutter Speed
When shooting with a green screen background, make sure you keep the shutter speed high to avoid motion blur. Ideally, it should be 2x your frame rate for optimum results. But, at the same time, it shouldn’t be too high, as it can lead to a change in video exposure.
If you keep these tips in mind when shooting a video, you can easily use the chroma key effect in Wondershare Filmora to add your desired background and create an outstanding video.
4. Be Innovative with Effects
A video without effects is as bland as water! So, make your video innovative with the impressive variety of effects available in Wondershare Filmora.
But you can’t just add effects to your video like that! You need to understand when and where to use a certain effect properly.
For example:
Tell Your Story With Split Screen Effect
If you’re telling your brand story from the perspective of different individuals, using the split-screen effect is recommended. You can also use this effect to showcase how one thing is related to another in a cause-and-effect way.
Take this Lexus commercial, for example:
It shows the view from inside the car and from a viewer’s perspective.
Emphasize with Pan and Zoom Effect
As the topic of concern of this article is brand videos, the pan and zoom is an ideal effect for it.
You can easily emphasize its importance and give off an emotional storytelling vibe by zooming in on a person’s face or any other object in the frame. You can also use pan and zoom to add a transition to your video. Here’s an example:
Add Thrill with Transitions
To move from one shot to another, it’s important to add a transition effect in between. You can add different transition styles to link the shots with one another, for instance, the match cut transition to match scenes that are not otherwise linked visually. Or the whip pan transition, which involves a quick rotation of the camera’s axis to give the impression that the scene was shot in one take, although it is two separate clips.
Take Wondershare Filmora’s brand video, for example. You can see how seamlessly it moves from one effect to another. It adds value and makes the video fun to watch.
With the variety of transitions in Filmora’s library, you can add all the effects discussed above to your video for stunning results.
You’ve added motion tracking, used AR stickers, created a mystical background with the green screen effect, and gone innovative with effects. Now, it’s time to wrap up this article with…
5. Energize Your Videos with Speed Ramping
Did you know that speed ramping can actually improve your videos tenfold? Speeding up and slowing down the footage at certain points can have a significant impact. For example, the bullet dodge scene in “Matrix” wouldn’t have been so famous if it wasn’t for the slo-mo effect!

You can’t just randomly add speed ramps to your video. There has to be a purpose behind it! Do you want to emphasize something? Do you want to show a transition? Regardless, you need to time your speed ramping properly.
And here are a few tips for it!
Use Slo-Mo For Action Sequences
If your video has an amazing action scene in it, slow down the speed at that point to emphasize the action and movement. For example, a karate kick in slow motion very clearly shows us how the move is actually performed.
Don’t Use Slo-Mo For Too Long
Another tip is to use the slow-mo only for a few seconds to emphasize something. If you prolong it, it won’t have the desired impact and might even cause the audience to lose focus.
Speed Up Footage for Long Processes
If your video shows a long process, like a time-lapse, it is the perfect time to speed up the footage. Not only do long shots lose the viewer’s attention, but they can also get boring too. A sped up footage on the other hand makes your video aesthetically pleasing and entertaining.
Add Music
Using music in videos is quite a common practice; however, it becomes quite exciting if you speed ramp your video according to the music. For example, time the slo-mo effect with the more silent or riverbed parts of the music, and speed it up when the crescendo comes.
You can do this easily with the auto beat-sync feature in Filmora that matches the music with the footage.

How’s that for a thrilling video?
Speed Ramp for Transitions
Here’s a bonus tip! Use speed ramping at the end of one clip and the beginning of the next one to create a seamless flow between the two. It’ll also give a transition effect and make your brand video look professional.
So you see, you have ample options to add a touch of creativity to your brand videos. The key is to use a good video editor and the right video editing tools.
Wrapping Up
Shooting a brand video is easy, and it’s even easier to edit it. All you need is to let your creativity flow!
With Wondershare Filmora 11’s new and advanced editing features, making watch-worthy brand videos that give out the desired message and compel the audience to take some action has never been easier!
And, with the useful video editing tips that we have shared, you are just a click away from taking your business to new heights!
So, if you also want to create a video successfully, just like Filmora’s brand video, follow our tips, use the tricks, and edit away!
Create a Brand Video to Make Your Business Shine
Did you know that 8 out of 10 people go ahead and purchase a product just by watching brand videos?
I’m sure you are looking for similar success when it comes to your brand video.
But you can’t just compel the audience by making any video!
- It has to be entertaining and inspirational.
- It has to be innovative.
- It needs to have something that grabs the audience’s attention.
And, with all this, it should also successfully share your brand’s core values.
So, how do you create such a video?
It’s not about simply whipping out a camera and pressing the record button. A lot of thought is involved in creating a brand video, but most importantly, you need a high-quality video editor to refine your video and make it more fun, entertaining, and innovative - A video editor like Wondershare Filmora.
And that’s what this article is about - How to use the various basic and advanced editing tools in Filmora to create a brand video that makes a difference!
But first, let’s have a look at…
Wondershare Filmora’s Brand Video
What’s so special about it, you ask?
For starters, it fits right into the criteria we mentioned above. It’s innovative, entertaining, vibrant, and fun and showcases all the features of Filmora 11.
Here, see for yourself…
From all the new effects to the AR sticker themes and other video editing features like speed ramping, masking, and green screen effect, the video successfully lets the audience know how creative they can get with Filmora.
But did you see that they didn’t put the features out there just like that! They actually used all the basic and advanced video editing features in the video to give us an idea of what it looks like when put in action.
And the video quality, the content, and the flow of the video speak for themselves.
I mean, I watched the video all the way to the end without getting bored for even a single second. And, being a video editor, I might as well get Filmora 11 after watching the highly compelling video!
Now, if you’re also wow-ed by the video and would like to create a similar one, here are some tips on making a successful brand video using Wondershare Filmora.
Tips to Make a Compelling Brand Video
Like I said earlier, making a video is not simply about getting out your camera and starting recording. Many aspects need to be considered for your video to make the desired impact.
Therefore, here are some tips that might come in handy when making your brand video:
1. Define Your Objective and Audience
The very first thing that you need to think about before starting work on your brand video is its objective and audience.

What are you trying to achieve from the video? Do you want to create brand awareness, or do you wish to promote a certain product?
Secondly, who’s your target audience? Is your video projected toward people who have no idea who you and your company are? Or are you addressing an existing customer base? Also, are the audience kids or adults? Because you certainly can’t make a video with cartoon characters for an audience who’s looking for something calm and relaxing, and vice versa.
Once you have your objective and audience sorted, it’s time to get busy!
2. Video Scripting
Based on what you’re trying to achieve from your brand video and the target audience, you can decide on the video’s script. This includes the content, the length, and the editing requirements.

Let’s take your video’s content, for instance:
- If you’re creating a video for an audience that doesn’t know you, you’ll have to start from the basics, explaining who you are, what you do, and the services you offer.
- If you’re trying to create a video that tells your brand’s story, you can either keep it inspirational or you could create fun content that will be remembered for years to come!
- If you’re creating something for the kids, you need to keep it short yet interesting, with many effects that help in grabbing their attention.
Once you have decided what to add to the video, how long it will be, and what its content will be like, you can finally record your video!
3. Video Recording
Now, for many people, recording simply means hitting the record button.
Yes, that might work for vlogs, but when it comes to making a brand video, you need to really put in effort when recording.

For instance, you should have all the video clips and images you want to include in the video at hand. And they should resonate with your brand voice and match with each other as well.
If we take Wondershare Filmora’s brand video as an example, you can see that the whole video has a vibrant and warm feel to it, which can be seen throughout. It’s not that one clip is darker and the other is lighter; the whole thing sort of blends into each other.
That’s what you should take care of when recording your video. Make sure the background, hues, and overall feel of the video clips and images match each other.
4. Using Your Brand Colors and Logo
Another thing that you should keep in mind when recording is to incorporate your brand colors in the video and throw in your logo. For instance, if your brand colors are red and green, make sure to use them in the text in the video. However, if you’re not using text, you can use the colors in the video frame by having a wall or something in the background of the same colors.

As for the logo, it can be placed anywhere in the video so that the audience learns to recognize it.
But why is using your brand colors and logo so important?
Because your brand colors and logo represent your brand and become its identity in the long run. For example, yellow and red are McDonald’s brand colors and its logo, the yellow ‘M’ in arch form, is recognizable even from a distance.
5. Video Editing
Now comes the most important part of making a brand video: The editing! The part where you refine your video and add final touches to it. If you’ve got a stellar video editing software like Wondershare Filmora, it can do wonders for your video.
Wondershare Filmora at a Glance

Wondershare Filmora has plenty of basic and advanced video editing features to add that wow factor to your video. It can turn a plain boring video into something fun, exciting, and watch-worthy.
For example, the motion tracking feature lets you add an object that follows a certain movement in the video. Then we have the AR stickers that help enhance emotions and add personality to your video. Also, the green screen feature lets you add amazing background to your video to give the desired effect.
Filmora also has many video effects, templates, speed ramping, masking, auto beat sync, voice recording, and other features that can really take your brand video to the next level.
I’m sure you now have the hang of how to make a brand video that makes your business pop. But, you still might be confused about how to make the most of these features using Wondershare Filmora.
Therefore, here are some helpful tips on using these features to make an effective brand video that creates brand awareness and drives sales!
Creative Ideas to Make Brand Videos Using Filmora
If you’re up for making a video just like the video we shared earlier, you’ll need to download Wondershare Filmora from the website. And, once you’re through with this guide, nothing can stop you from making a brand video that sells!
With that sorted, here are some valuable tips and ideas to help you along the way:
1. Level Up Your Motion Tracking
As we mentioned earlier, motion tracking means tracking the movement of an object in the video and then applying the same movement to a newly added object, like text, image, logo, or any clipart.
But that’s quite a common practice, right? I mean, every video editor out there is doing it!
However, there are some ways in which you can get creative with the motion tracking feature using Filmora.
Like…
Using Motion-Tracked Texts
While the text in a video looks pretty good itself, you can make it even more impressive by motion tracking it.
For example:
- Attach a piece of text to your introductory title. If there’s a logo or brand name in the introduction, you can add a tagline, a website address, or your Instagram or Twitter handle to it.
- If you want to create a context for the audience, add motion-tracked captions in your brand video. This means the captions move with the movement of the subject. It looks stylish, gives relevant information, and helps tell your brand’s story without any narration.
This Fitbit commercial would be an excellent example of motion-tracked captions:
- If your video has an introductory scene where the frame is moving from one side to the other, you can motion-track the credits so that they move along with the scene and disappear gradually instead of dedicating a single clip to the credits.
- Highlighting important aspects in a video, like places or names of objects with motion-tracked text, can make your video truly amazing and fun to watch. This would be quite essential if you’re making a video for the real estate or travel business.
Here’s an example:
Hence, when working with Filmora, you can do plenty with the motion tracking feature to make a truly amazing video.
2. Add a Fun Factor with AR Stickers
Now that you know how to use the motion tracking feature in Filmora, let me tell you a secret!
If you incorporate face-tracking AR stickers into your video, you can succeed in creating a brand video that will have the audience glued to the screen!
The purpose of adding AR stickers to your videos is to emphasize reactions, portray enhanced emotions, and add an element of fun. This feature works best if you’re creating a brand video projected toward kids.

So, how can you make the most of these AR stickers?
Create Multiple Characters
If you don’t have people to play different characters, don’t fret! With the AR sticker effect, you can create multiple characters for your video.
For example:
If your video has 3 animal characters, you can use AR stickers depicting a panda, cat, and bunny to show the different characters. Similarly, you can add the sticker with glasses to show a nerdy character. Or, if you’re really getting into the story-telling mode, you can use the pirate sticker to show a pirate.
Magnify Emotions
Sometimes it gets challenging to portray a certain emotion in your video. This is where AR stickers come to the rescue!
If you want to show someone in love, you can use the heart-eyes effect. Or, if you want to show that someone is being good, you can use the angel sticker to put a halo on their head.
There are many options! You just have to use your creative cells and conjure up something that’s unique and stands out from the rest.
3. Ace Your Shoot with the Green Screen Effect
A green-screen effect is quite important when it comes to making an exceptional brand video. It has been used in almost all blockbuster movies, and if you’re looking to make a video of a similar level, we’ve got some tried and tested tips to use the green screen effect to its fullest!
Make Sure the Lighting is Even
When it comes to a green screen, the lighting plays an important part. Make sure the green screen is one shade of green, and the lighting on the screen is even. If parts of the green screen are darker than the rest, the chroma key effect won’t be able to distinguish the different shades.
Contrasting Colors
Make sure the subject in the video isn’t wearing any green clothing, or there aren’t many green objects around, as they might disappear when you apply the green screen effect.
Prevent Motion Blur with High Shutter Speed
When shooting with a green screen background, make sure you keep the shutter speed high to avoid motion blur. Ideally, it should be 2x your frame rate for optimum results. But, at the same time, it shouldn’t be too high, as it can lead to a change in video exposure.
If you keep these tips in mind when shooting a video, you can easily use the chroma key effect in Wondershare Filmora to add your desired background and create an outstanding video.
4. Be Innovative with Effects
A video without effects is as bland as water! So, make your video innovative with the impressive variety of effects available in Wondershare Filmora.
But you can’t just add effects to your video like that! You need to understand when and where to use a certain effect properly.
For example:
Tell Your Story With Split Screen Effect
If you’re telling your brand story from the perspective of different individuals, using the split-screen effect is recommended. You can also use this effect to showcase how one thing is related to another in a cause-and-effect way.
Take this Lexus commercial, for example:
It shows the view from inside the car and from a viewer’s perspective.
Emphasize with Pan and Zoom Effect
As the topic of concern of this article is brand videos, the pan and zoom is an ideal effect for it.
You can easily emphasize its importance and give off an emotional storytelling vibe by zooming in on a person’s face or any other object in the frame. You can also use pan and zoom to add a transition to your video. Here’s an example:
Add Thrill with Transitions
To move from one shot to another, it’s important to add a transition effect in between. You can add different transition styles to link the shots with one another, for instance, the match cut transition to match scenes that are not otherwise linked visually. Or the whip pan transition, which involves a quick rotation of the camera’s axis to give the impression that the scene was shot in one take, although it is two separate clips.
Take Wondershare Filmora’s brand video, for example. You can see how seamlessly it moves from one effect to another. It adds value and makes the video fun to watch.
With the variety of transitions in Filmora’s library, you can add all the effects discussed above to your video for stunning results.
You’ve added motion tracking, used AR stickers, created a mystical background with the green screen effect, and gone innovative with effects. Now, it’s time to wrap up this article with…
5. Energize Your Videos with Speed Ramping
Did you know that speed ramping can actually improve your videos tenfold? Speeding up and slowing down the footage at certain points can have a significant impact. For example, the bullet dodge scene in “Matrix” wouldn’t have been so famous if it wasn’t for the slo-mo effect!

You can’t just randomly add speed ramps to your video. There has to be a purpose behind it! Do you want to emphasize something? Do you want to show a transition? Regardless, you need to time your speed ramping properly.
And here are a few tips for it!
Use Slo-Mo For Action Sequences
If your video has an amazing action scene in it, slow down the speed at that point to emphasize the action and movement. For example, a karate kick in slow motion very clearly shows us how the move is actually performed.
Don’t Use Slo-Mo For Too Long
Another tip is to use the slow-mo only for a few seconds to emphasize something. If you prolong it, it won’t have the desired impact and might even cause the audience to lose focus.
Speed Up Footage for Long Processes
If your video shows a long process, like a time-lapse, it is the perfect time to speed up the footage. Not only do long shots lose the viewer’s attention, but they can also get boring too. A sped up footage on the other hand makes your video aesthetically pleasing and entertaining.
Add Music
Using music in videos is quite a common practice; however, it becomes quite exciting if you speed ramp your video according to the music. For example, time the slo-mo effect with the more silent or riverbed parts of the music, and speed it up when the crescendo comes.
You can do this easily with the auto beat-sync feature in Filmora that matches the music with the footage.

How’s that for a thrilling video?
Speed Ramp for Transitions
Here’s a bonus tip! Use speed ramping at the end of one clip and the beginning of the next one to create a seamless flow between the two. It’ll also give a transition effect and make your brand video look professional.
So you see, you have ample options to add a touch of creativity to your brand videos. The key is to use a good video editor and the right video editing tools.
Wrapping Up
Shooting a brand video is easy, and it’s even easier to edit it. All you need is to let your creativity flow!
With Wondershare Filmora 11’s new and advanced editing features, making watch-worthy brand videos that give out the desired message and compel the audience to take some action has never been easier!
And, with the useful video editing tips that we have shared, you are just a click away from taking your business to new heights!
So, if you also want to create a video successfully, just like Filmora’s brand video, follow our tips, use the tricks, and edit away!
Splitting Video Into Frames with the FFmpeg [Step by Step]
FFmpeg is the particular framework that is leading in the multimedia industry. It is a complete solution that runs on multiple platforms for converting, recording and streaming videos and audios. FFmpeg allows you to encode, decode, filter, mux, demux, and transcode much better than humans. FFmpeg runs, complies, and tests using the FATE infrastructure on different operating systems.
It includes Mac OS X, Linux, Windows, Solaris and BSDs. This framework works in a number of built-in environment configurations and architectures of the types of machinery from a technical point of view. It is the appropriate solution for the developers for their applications, and the end-users are similar. You can share the codes at the maximum level in the parts of the FFmpeg. Online support is available for your assistance.
In this article, you will learn about splitting the Video into the frames in FFmpeg and mentioning the easy option for doing the same task in a few seconds by Wondershare Filmora.
How can you split the video clips into frames by using FFmpeg?
There is 7 number of ways, or you can say 7 functions are available splitting the video clips in FFmpeg that are as follows:
- Splitting Video into frames
- Splitting Video by their sizes
- Dividing the videos into the parts with the same duration
- Split the videos by width and in the horizontal direction
To split the Video in FFmpeg, you need to use the correct command to fulfil all your tasks. It helps in extracting the particular frames from your Video. These are the files of the images that are making the whole Video. The working of this command is the following:
Step 1:
The first step is opening the terminal in Mac operating system. Enter the command below for navigating the folder of pictures and videos. Must change the directory whenever you are in the terminal. First, change the location wherever the video file is in your system. Remember that you run these commands in the same folder where the source of the videos is.
Cd ~/Videos and press enter.

Step 2:
This specific command is for splitting the videos into frames. It saves every image separately as the thumbnail file. FFmpeg -I video.mp4 thumb%04d.jpg -hide_banner
splitting is done into the frames. Go to your same folder and choose your image according to your requirement.
An easier way to split the video into the frames
As you see above, it is just 2 significant steps for splitting the Video into frames by FFmpeg. But what if you don’t remember the command or are not familiar with the technical background. Then you need to look for better options and even most straightforward than FFmpeg. There is just one answer to all these questions that is Filmora Video Editor . It is not only a powerful tool but also all the tools are right in front of the screen—no need to enter any command or change of the directory.
For Win 7 or later (64-bit)
For macOS 10.14 or later
Features
- Trimming, rotating, resizing of the clips
- Easy to remove the noise in the background
- Simple to export and share the videos
- Splitting of the screens
- Correcting and matching of the colours
- Availability of controls for audio and Video
The best part is that the Video’s quality remains the same in this software. It is just a few clicks, and the extraction will be done. All the images are high resolution, so no worries about losing any frame quality and images saved in your media library. Follow the easy steps below to begin the extraction of the frames from the Video in Wondershare Filmora.
Step 1. First, import the video file or drag and drop it in the window. Videos are visible in the library so that you can select them accordingly. Click on the Video’s thumbnail if you want the same resolution of the frame as the Video.
Click the Play button for the preview. After the preview, click on the Camera icon to extract frames. Automatically, all the frames are saved in the library of media files.
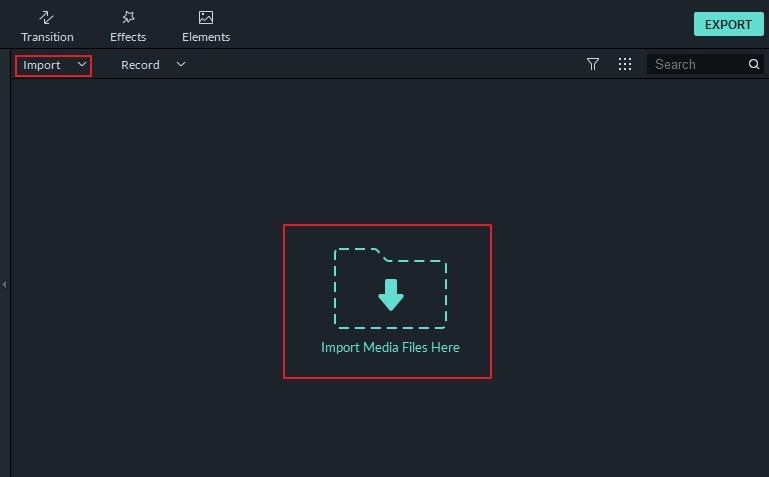
Step 2. Sometimes, you require to see the preview of the Video in the form of frames for extraction purposes. Simply drag and drop the file in the timeline. To begin the preview, press the space bar on the keyboard and take the screenshot whenever the Video starts.
Press the icon of snapshot or press the keys CRTL+ALT+S. Use the left or right keys for playing back the video frame to frame and save it in the form of an image. Select the “Reveal in Explorer” option when you click the screenshot in the library of media files.
The frame extractor of Wondershare Filmora is absolutely free so that you won’t find any watermark on the images. You won’t face any difficulty while extracting your frames as a user. Even you can edit these frames and save them in the format of your own choice.
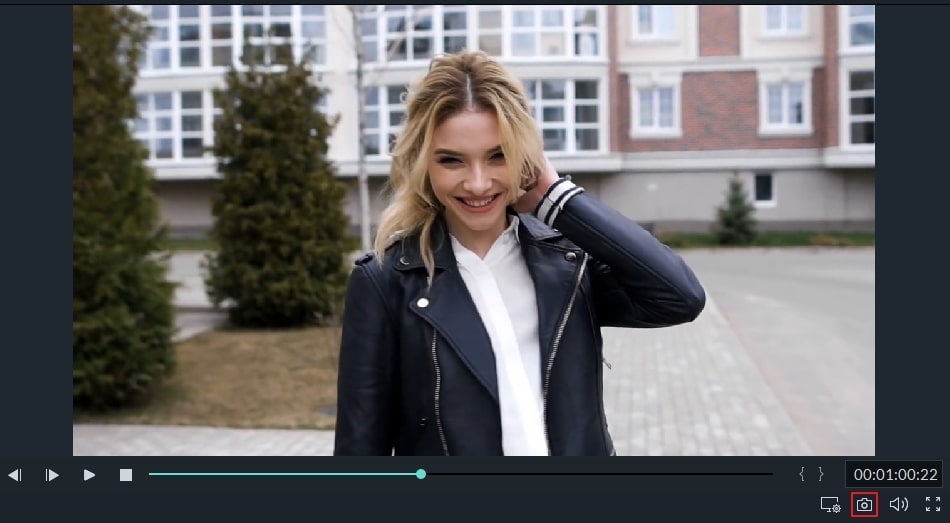
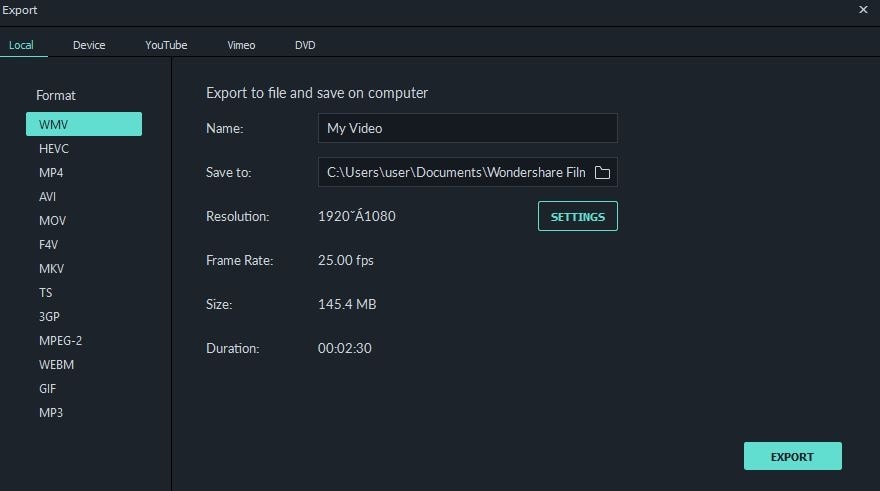
Although there is a huge range of editing software, including FFmpeg, they always have some disadvantages when you keep finding the replacement. Even FFmpeg is an open-source program, and beginners can’t handle it properly.
They need to be familiar with the technicalities. There are many benefits to using Wondershare Filmora for extracting the frames from the videos.
It is supportive to 4K resolution means saving the images in the same resolution. No loss of video quality enables you to explore all the details very clearly. The whole editor appears right before you to edit all the frames.
You can also export these images wherever you want or save them for backup purposes. Even you can upload them on your social networking sites. So, what are you waiting for? No more thinking now; let’s start exploring and using Wondershare Filmora
Step 2:
This specific command is for splitting the videos into frames. It saves every image separately as the thumbnail file. FFmpeg -I video.mp4 thumb%04d.jpg -hide_banner
splitting is done into the frames. Go to your same folder and choose your image according to your requirement.
An easier way to split the video into the frames
As you see above, it is just 2 significant steps for splitting the Video into frames by FFmpeg. But what if you don’t remember the command or are not familiar with the technical background. Then you need to look for better options and even most straightforward than FFmpeg. There is just one answer to all these questions that is Filmora Video Editor . It is not only a powerful tool but also all the tools are right in front of the screen—no need to enter any command or change of the directory.
For Win 7 or later (64-bit)
For macOS 10.14 or later
Features
- Trimming, rotating, resizing of the clips
- Easy to remove the noise in the background
- Simple to export and share the videos
- Splitting of the screens
- Correcting and matching of the colours
- Availability of controls for audio and Video
The best part is that the Video’s quality remains the same in this software. It is just a few clicks, and the extraction will be done. All the images are high resolution, so no worries about losing any frame quality and images saved in your media library. Follow the easy steps below to begin the extraction of the frames from the Video in Wondershare Filmora.
Step 1. First, import the video file or drag and drop it in the window. Videos are visible in the library so that you can select them accordingly. Click on the Video’s thumbnail if you want the same resolution of the frame as the Video.
Click the Play button for the preview. After the preview, click on the Camera icon to extract frames. Automatically, all the frames are saved in the library of media files.

Step 2. Sometimes, you require to see the preview of the Video in the form of frames for extraction purposes. Simply drag and drop the file in the timeline. To begin the preview, press the space bar on the keyboard and take the screenshot whenever the Video starts.
Press the icon of snapshot or press the keys CRTL+ALT+S. Use the left or right keys for playing back the video frame to frame and save it in the form of an image. Select the “Reveal in Explorer” option when you click the screenshot in the library of media files.
The frame extractor of Wondershare Filmora is absolutely free so that you won’t find any watermark on the images. You won’t face any difficulty while extracting your frames as a user. Even you can edit these frames and save them in the format of your own choice.


Although there is a huge range of editing software, including FFmpeg, they always have some disadvantages when you keep finding the replacement. Even FFmpeg is an open-source program, and beginners can’t handle it properly.
They need to be familiar with the technicalities. There are many benefits to using Wondershare Filmora for extracting the frames from the videos.
It is supportive to 4K resolution means saving the images in the same resolution. No loss of video quality enables you to explore all the details very clearly. The whole editor appears right before you to edit all the frames.
You can also export these images wherever you want or save them for backup purposes. Even you can upload them on your social networking sites. So, what are you waiting for? No more thinking now; let’s start exploring and using Wondershare Filmora
Step 2:
This specific command is for splitting the videos into frames. It saves every image separately as the thumbnail file. FFmpeg -I video.mp4 thumb%04d.jpg -hide_banner
splitting is done into the frames. Go to your same folder and choose your image according to your requirement.
An easier way to split the video into the frames
As you see above, it is just 2 significant steps for splitting the Video into frames by FFmpeg. But what if you don’t remember the command or are not familiar with the technical background. Then you need to look for better options and even most straightforward than FFmpeg. There is just one answer to all these questions that is Filmora Video Editor . It is not only a powerful tool but also all the tools are right in front of the screen—no need to enter any command or change of the directory.
For Win 7 or later (64-bit)
For macOS 10.14 or later
Features
- Trimming, rotating, resizing of the clips
- Easy to remove the noise in the background
- Simple to export and share the videos
- Splitting of the screens
- Correcting and matching of the colours
- Availability of controls for audio and Video
The best part is that the Video’s quality remains the same in this software. It is just a few clicks, and the extraction will be done. All the images are high resolution, so no worries about losing any frame quality and images saved in your media library. Follow the easy steps below to begin the extraction of the frames from the Video in Wondershare Filmora.
Step 1. First, import the video file or drag and drop it in the window. Videos are visible in the library so that you can select them accordingly. Click on the Video’s thumbnail if you want the same resolution of the frame as the Video.
Click the Play button for the preview. After the preview, click on the Camera icon to extract frames. Automatically, all the frames are saved in the library of media files.

Step 2. Sometimes, you require to see the preview of the Video in the form of frames for extraction purposes. Simply drag and drop the file in the timeline. To begin the preview, press the space bar on the keyboard and take the screenshot whenever the Video starts.
Press the icon of snapshot or press the keys CRTL+ALT+S. Use the left or right keys for playing back the video frame to frame and save it in the form of an image. Select the “Reveal in Explorer” option when you click the screenshot in the library of media files.
The frame extractor of Wondershare Filmora is absolutely free so that you won’t find any watermark on the images. You won’t face any difficulty while extracting your frames as a user. Even you can edit these frames and save them in the format of your own choice.


Although there is a huge range of editing software, including FFmpeg, they always have some disadvantages when you keep finding the replacement. Even FFmpeg is an open-source program, and beginners can’t handle it properly.
They need to be familiar with the technicalities. There are many benefits to using Wondershare Filmora for extracting the frames from the videos.
It is supportive to 4K resolution means saving the images in the same resolution. No loss of video quality enables you to explore all the details very clearly. The whole editor appears right before you to edit all the frames.
You can also export these images wherever you want or save them for backup purposes. Even you can upload them on your social networking sites. So, what are you waiting for? No more thinking now; let’s start exploring and using Wondershare Filmora
Step 2:
This specific command is for splitting the videos into frames. It saves every image separately as the thumbnail file. FFmpeg -I video.mp4 thumb%04d.jpg -hide_banner
splitting is done into the frames. Go to your same folder and choose your image according to your requirement.
An easier way to split the video into the frames
As you see above, it is just 2 significant steps for splitting the Video into frames by FFmpeg. But what if you don’t remember the command or are not familiar with the technical background. Then you need to look for better options and even most straightforward than FFmpeg. There is just one answer to all these questions that is Filmora Video Editor . It is not only a powerful tool but also all the tools are right in front of the screen—no need to enter any command or change of the directory.
For Win 7 or later (64-bit)
For macOS 10.14 or later
Features
- Trimming, rotating, resizing of the clips
- Easy to remove the noise in the background
- Simple to export and share the videos
- Splitting of the screens
- Correcting and matching of the colours
- Availability of controls for audio and Video
The best part is that the Video’s quality remains the same in this software. It is just a few clicks, and the extraction will be done. All the images are high resolution, so no worries about losing any frame quality and images saved in your media library. Follow the easy steps below to begin the extraction of the frames from the Video in Wondershare Filmora.
Step 1. First, import the video file or drag and drop it in the window. Videos are visible in the library so that you can select them accordingly. Click on the Video’s thumbnail if you want the same resolution of the frame as the Video.
Click the Play button for the preview. After the preview, click on the Camera icon to extract frames. Automatically, all the frames are saved in the library of media files.

Step 2. Sometimes, you require to see the preview of the Video in the form of frames for extraction purposes. Simply drag and drop the file in the timeline. To begin the preview, press the space bar on the keyboard and take the screenshot whenever the Video starts.
Press the icon of snapshot or press the keys CRTL+ALT+S. Use the left or right keys for playing back the video frame to frame and save it in the form of an image. Select the “Reveal in Explorer” option when you click the screenshot in the library of media files.
The frame extractor of Wondershare Filmora is absolutely free so that you won’t find any watermark on the images. You won’t face any difficulty while extracting your frames as a user. Even you can edit these frames and save them in the format of your own choice.


Although there is a huge range of editing software, including FFmpeg, they always have some disadvantages when you keep finding the replacement. Even FFmpeg is an open-source program, and beginners can’t handle it properly.
They need to be familiar with the technicalities. There are many benefits to using Wondershare Filmora for extracting the frames from the videos.
It is supportive to 4K resolution means saving the images in the same resolution. No loss of video quality enables you to explore all the details very clearly. The whole editor appears right before you to edit all the frames.
You can also export these images wherever you want or save them for backup purposes. Even you can upload them on your social networking sites. So, what are you waiting for? No more thinking now; let’s start exploring and using Wondershare Filmora
Also read:
- New 2024 Approved Learn Top Best Free LUTs For Premiere Pro
- New Some Effective Slow Motion Video Editors You Can Try for 2024
- Updated Are You in Search for a Step-by-Step Guide to How to Add Effects in TikTok? Here It Is. To Add some Flavor to Your TikTok Videos. Use These How to Add Effect to TikTok Recommendations
- Add Motion Blur in After Effects for 2024
- New Before & After Editing Trick | Wondershare Filmora Tutorial
- Movavi Slideshow Maker Is a Powerful Video Editing Tool that Can Be Used to Add Rich Effects to Videos Easily. This Guide Will Introduce the Features and Show You How to Apply Effects to Videos with This Tool for 2024
- 2024 Approved How to Brighten a Video in Windows 10 Easily
- New Top 8 AR Apps for Android and iOS | Help You See the World of AR for 2024
- New How to Create Chroma Key Written Text Effects in Filmora
- Updated Do You Wish to Create High-Quality Videos and Experience Effective Videos with Editing? No Problem at All because the Keyboard Shortcuts Listed Here Will Assist You
- Updated Create Slow Motion Videos Using Final Cut Pro with Ease for 2024
- In 2024, How to Use Rule of Thirds in Video
- In 2024, What Slideshow Templates Can Teach You About Aesthetic
- 2024 Approved Different Ways To Trim Video In Premiere Pro
- New How Can You Create Outstanding Educational Teaching Videos, In 2024
- New The Ultimate Guide to Using Shotcut To Rotate Videos
- New Best Free Video Editing Software to Boost Your Content Creation
- In 2024, Are You Eager to Discover the Top-Rated and Reliable LUTs that Can Be Used in Shotcut? This Article Will Help You a Lot with This Matter
- Updated Little Tricks to Create Canva Slideshow No One Is Telling You for 2024
- In 2024, Being a Content Creator Means Creating a Slow-Mo at some Point. Study This Piece to Learn How to Play a Video in Slow Motion on iPhone
- Best 12 Sony Vegas Slideshow Templates for Free Download
- New Online Video Makers for 2024
- Updated How to Create an Aesthetic Slideshow Presentation
- Updated In 2024, Quick Answer What Is a Transparent Logo and Why Do You Need It
- In 2024, How to Add Echo Effect to Video
- Wondering How to Replace Sky in After Effects? Learn How for 2024
- Free Ways To Split Video For Whatsapp Status On All Platforms
- Learn to Use Montage with These Movies
- New How to Apply Gaussian Blur Effect to Videos In Premiere Pro, In 2024
- 2024 Approved The Best Way to Remove Audio From Your Videos
- New Detailed Steps to Rotate Videos in Davinci Resolve for 2024
- New In 2024, 8 Best Free Photo Collage with Music Video Maker
- How to Change Video Thumbnail in Google Drive
- New Want to Make a Funny Vlog on TikTok? Trying to Find the Right Topic for It? This Article Presents some Impressive Options for Making a Funny Vlog for TikTok
- Updated Why You Should Master Slideshows In Lightroom, Fresh Insight, In 2024
- New 2024 Approved How to Apply Video Filters Mobile and Desktop
- Finding The Best Filmic Pro LUTs For Video Editing
- Updated 2024 Approved Cropping Videos in Final Cut Pro Step by Step
- 2024 Approved How to Create Photoshop GIF The 100 Easy Way
- Updated Bored of Extraneous Software Downloads and Program Installations to Edit Your Videos? The Best Video Editing Online Utilities Are Here at Your Rescue
- New Reversing Time Lapse Videos on iPhone Using Top Applications for 2024
- Best Ways to Blur Zoom Background for Free
- Updated Do You Want to Stream and Record at the Same Time but Cant Find an Easy Solution? This Guide Will Help You Get This Done Using Three Easy-to-Follow Methods
- Updated Wondering About Vimeo Slideshow Maker? Know Everything About the Platform Which Is Gaining Much Popularity. Also, Browse some Tips to Create Appealing Video Slideshows
- 2024 Approved Step-by-Step Guide to Storyboard
- FLV Editor for Windows 11/10/8.1/8/7 Easily Edit FLV Videos on PC for 2024
- New 2024 Approved How to Make Flying Objects in Wondershare Filmora
- New 2024 Approved 100 Workable How to Mask Track with Adobe Premiere Pro
- In 2024, How To Make a Video by Mouse in Filmora?
- In 2024, How To Remove the Two Factor Authentication On Apple iPhone 7 Plus
- Forgot iPhone Password? – Here are the Best Solutions | Stellar
- Fix App Not Available in Your Country Play Store Problem on Oppo Find X6 Pro | Dr.fone
- Pokemon Go No GPS Signal? Heres Every Possible Solution On Oppo Find X7 | Dr.fone
- In 2024, How To Check if Your Huawei Is Unlocked
- Here Are Some Reliable Ways to Get Pokemon Go Friend Codes For Motorola Edge 2023 | Dr.fone
- In 2024, About Infinix Note 30 Pro FRP Bypass
- Samsung Galaxy XCover 7 won’t play MKV movies
- The Ultimate Guide to Get the Rare Candy on Pokemon Go Fire Red On Oppo Reno 11 5G | Dr.fone
- How to Change Netflix Location to Get More Country Version On Motorola G24 Power | Dr.fone
- 10 Free Location Spoofers to Fake GPS Location on your Vivo V27e | Dr.fone
- In 2024, 3 Effective Ways to Bypass Activation Lock on iPhone 6s Plus
- How to Bypass Android Lock Screen Using Emergency Call On Vivo Y100?
- A Perfect Guide To Remove or Disable Google Smart Lock On Vivo Y100i
- In 2024, 5 Ways to Track Vivo Y27s without App | Dr.fone
- How To Delete iCloud Account Remove Your Apple ID Permanently On Apple iPhone 6
- In 2024, How Can I Unlock My iPhone 12 Pro Max After Forgetting my PIN Code? | Dr.fone
- How to Hard Reset Asus ROG Phone 7 Without Password | Dr.fone
- How to Remove and Reset Face ID on Apple iPhone 15 Pro
- In 2024, 10 Free Location Spoofers to Fake GPS Location on your Realme 11 Pro | Dr.fone
- In 2024, How to Intercept Text Messages on Vivo S17t | Dr.fone
- Looking For A Location Changer On Oppo A58 4G? Look No Further | Dr.fone
- In 2024, Top 4 Ways to Trace Poco M6 Pro 4G Location | Dr.fone
- In 2024, The Best iSpoofer Alternative to Try On Honor X8b | Dr.fone
- Itel Bypass Tools to Bypass Lock Screen(Itel P55 5G)
- A Quick Guide to Vivo V30 Pro FRP Bypass Instantly
- Why Apple Account Disabled From your iPhone 12? How to Fix
- How to Fix iPhone XS Max Passcode not Working?
- Title: New How to Clone Yourself in Videos with Filmora for 2024
- Author: Chloe
- Created at : 2024-04-24 07:08:34
- Updated at : 2024-04-25 07:08:34
- Link: https://ai-editing-video.techidaily.com/new-how-to-clone-yourself-in-videos-with-filmora-for-2024/
- License: This work is licensed under CC BY-NC-SA 4.0.

