
:max_bytes(150000):strip_icc():format(webp)/SDC18_Keynote_OneUI-5be8d33f46e0fb002d108acf.jpg)
New How to Convert SRT to DOCX
How to Convert SRT to DOCX
SRT to Word: How to Convert an SRT File to Docx file?
The SubRip Text (SRT) format is a popular subtitle format used in many videos. While SRT files are simple text files that can be edited with any text editor, they are not as convenient to work with as MS Word documents.
For one thing, it cannot be easy to format text in a way that is easy to read. In addition, SRT files do not support features such as spell checking and grammar checking.
As a result, converting SRT to Word can be a useful way to improve the quality of subtitles. In addition, it can also make it easier to translate subtitles into other languages.
Other than that, you might need to convert an SRT to a Word document when you need to edit the subtitles for a video you’re working on or you want to create a transcript of a recorded conversation.
You might think that converting a speech to text is difficult or impossible. But it’s not!
Here’s how you can easily convert SRT to DOCX files. Let’s begin.
- Convert SRT to Word file Manually
- How to Edit and merge your Subtitles with Wondershare Filmora
- Hot FAQs on Converting SRT to Word
What is an SRT file?
SRT files are used for subtitles. Subtitles are the audio track of a video or movie. Subtitles are displayed alongside a video or movie on your TV or computer screen. They allow the viewer to understand what is being said in the language they speak.
People have recently begun using online streaming services such as Netflix, Amazon Video, and Hulu to watch movies and television shows. While streaming services offer thousands of movies and shows, there are still many that only exist in a form that can be viewed in their entirety. This requires the user to download the entire file (usually in a format known as a .srt file).
Why do we need to convert SRT files into Word?
Subtitles are a great way to enjoy movies and TV shows in different languages. They provide text on the screen that tells you what the characters are saying, so you can follow along even if you don’t speak the language. However, SRT files can be difficult to work with because they are incompatible with all software programs**.** So, they need to be converted into Word. Some other reasons include:
- It allows your content to be viewed within a web browser or mobile device without downloading .srt file.
- If you need to embed the video into another site, you can do so easily with the.docx file.
- Learning a new language by downloading SRT subtitles from video.
Convert SRT to word file without downloading any software
With the advent of the SRT (SubRip) format, videos can now be enjoyed on both computers and mobile devices. This means that videos can be viewed anywhere and anytime. Converting videos to SRT is relatively easy, but some online converters offer more flexibility than others.
These converters can take an SRT file and convert it into a word document, which can then be edited or saved for future use. Not only do online SRT to word converters save time, but they can also ensure that your captions are accurate and properly formatted. Whether you’re captioning a home video or creating professional subtitles for a film, an online SRT to-word converter can be a valuable tool. Some of them include:
Aspose
Aspose is a simple online tool that can be used to convert SRT files to Docx format. The process is quick and easy, and the results are high quality. To use Aspose to convert your SRT file to a DOCX file, follow these steps:
1. Upload the SRT file inAspose

2. Change the font size as you will

3. In the conversion window that appears, select “DOCX” as the output format and click “Convert”.

4. The conversion will begin immediately, and when it is finished, you will find the “DOWNLOAD” button to download the file. And below, you’ll find a “Send result to:” in which you can email the converted file.

The app is a powerful document conversion tool that supports various formats, making it easy to convert your files for use in different applications. However, its performance is greatly reduced after multiple conversions on the file format.
Happyscribe
With Happyscribe, you can quickly and easily convert SRT files to Docx format. The process is simple with quick results that give high-quality output! Below are the steps to convert an SRT file to a DOCX file using the online tool, Happyscribe.
1. Go to happyscribe

2. First, select your SRT file, second select the format to .docx, and click the convert button.

Using happyscribe converter can also help to reduce your overall costs. By automating the transcription process, you can avoid hiring expensive transcription services. As a result, you can save money while maintaining high quality and accuracy levels. The only drawback of this tool is that it does a poor job at matching times in long videos, resulting in a large amount of reformatting.
Ebby
At first glance, Ebby SRT to DOCX converter may not seem like much. However, this simple tool can be a lifesaver for anyone who needs to convert subtitles from one format to another. Using Ebby is quick and easy; select the file you want to convert, choose your desired output format, and click convert. That’s it! Your file will be converted and ready to download in just a few seconds. Here are the steps:
1. First go to Ebby.co
2. Browse and upload your “SRT file” and change the format to “Word (.docx)”.

3. Then click “CONVERT SRT” after a few seconds, your .docx file will be downloaded to your browser.

Ebby has 100+ languages and dialects, plus its fast transcription and accuracy make it stand out from its competitors. However, the web interface isn’t designed to handle large files. As it has no folder structure and only allows for up to 10 items per page (you can create more by dragging them), you will need another method if your project requires extensive organization or editing before uploading.
Convert .SRT to word file Offline
Converting an SRT file, or SubRip Subtitle file, into a Word document can be helpful if you want to be able to edit the subtitles or captioning for a video.
There are moves online that will do this conversion for you, but you may not want to trust your valuable data to someone else’s server.
Fortunately, some great subtitle editing programs will allow you to make this conversion offline.
These softwares are designed specifically for converting SRT files and usually provide a few different options for how the conversion is done.
They also offer a wide range of features for editing subtitles, and they can export the results as a Word document.
However, some of these programs can be difficult to use, so make sure you read the instructions carefully before trying to convert your file. The most popular softwares are:
Subtitle Edit
Subtitle Edit is a very helpful program for any fan of movies and TV shows who wants to see films and shows in their original language.
This free program can correct various subtitle syncing errors so that you can watch movies and TV shows with perfect subtitles.
Now you know what Subtitle Edit is, let’s discuss its features.
Features:
- It allows you to create or sync subtitle lines.
- You can convert your files in desired format as it supports 300+ formats such as SRT, SBV, advanced Sub station, etc.
- It has an amazing feature of auto translation via google translation.
- You can merge or split the subtitles.
- It enables you to convert your audio into speech with its speech recognition feature.
- You can also adjust your display time.
One of the best part of this software is that it provides a batch converter tool. This tool allows you to convert multiple SRT files to plain Text subtitles files at once. Let’s check out how it works.
Step-by-step guideline to convert SRT to TXT
Step1 Firstly, ensure that Subtitle edit is installed on your device. If not, then download it. After downloading, run this software.
Step2 From its tools menu, open the Batch converter tool.
Step3 Import a folder containing SRT files. You can also drag and drop SRT files to its interface, individually.
Step4 Now, select the output format as Plain Text or any other format and set the encoding option. You can also customize some output configurations including
- Remove formatting
- Add/remove tags
- Redo casing
- Fix some common errors
- Adjust speed, etc.
Step5 Then, provide the output location and hit the convert button to start the conversion process.
Now as we know the method of converting SRT files to Word, let’s discuss its advantages as well as disadvantages.
Pros
- It has friendly and intuitive interface.
- It supports 300+ formats.
- It includes google translate for fast translation.
- It provides open-office spelling correction.
- It has also an audio spectrum.
Cons
- It sometimes seems complex no customization functionality
Best for :
Windows devices
Jubler
Jubler is a powerful text editing tool. It allows you to make or edit existing subtitles and work with almost any video format.
The combination of Jubler and Mplayer allows users to see a preview of subtitles in a movie. In addition, Jubler also includes a tool known as ASpell, which corrects grammar and spelling (works with the English language).
After knowing what Jubler is, let’s move forward to know about its features.
Features:
- It supports multiple formats such as
- SubStation
- SubStation Alpha
- SubRip
- SubViewer
- MicroDVD
- Etc.
- It supports all encodings that are supported by Java platform.
- Jubler also supports translating mode.
- You can mark subtitles with different colors while editing or playing a video.
- It also checks spelling with the support for dictionary selection.
- It offers basic editing skills such as splitting, joining, time shifting, etc.
How to steps with images
Now you know how to convert SRT to Word format, let’s look at its pros and cons.
Pros
- It has a comprehensive interface to sync subtitles.
- You can transcribe your text and run your video at the same time.
- It includes a spell checker.
- It offers good customization possibilities.
- It works in Windows, Linux and Mac.
Cons
- To get a preview of your video, you’ll need to install MP player.
- It’s not really updated anymore.
Best for:
Quick subtitle editing
Subtitle Workshop
Subtitle workshop is a freeware subtitle editing tool that offers a complete, efficient and convenient way to edit subtitles.
It supports all major subtitle formats and provides powerful features such as spell checking, automatic translation, synchronization, timed text preview and more.
Subtitle workshop is constantly being updated with new features and improvements, making it the most complete and convenient subtitle editing tool available.
Features:
- It supports converting, creating, editing and saving over 60 subtitle formats.
- It offers customizable tools and functions for automatic timing and text manipulation.
- It has Multi-Level Undo-Redo system
- It supports the OCR (find-and-replace text) scripts.
- It has comprehensive system for automatically and manually detecting, marking, and fixing subtitle errors.
- It also offers a CPS (Characters per Second) system.
- It supports a variety of audio/video formats.
Now, we’re well aware of this software. Let’s discuss step-by-step guide to convert SRT to Word file with Subtitle Workshop.
Pros
- It’s straightforward to use that makes it ideal for beginners.
- It’s friendly user-interface is customizable and supports multiple language.
- It also supports style and color tags within the subtitle text.
- You can preview your subtitle in full screen mode.
Cons
- It can be difficult while importing transcripts and require a lot of manual lines.
- It shows limited checks on overlaps, reading speeds and duration limits.
Best for:
Small and short SRT files
Convert SRT to Word file Manually
You must first remove the time codes to convert an SRT file to a Word document. Open the SRT file in a text editor (such as Notepad++ or Sublime Text) and delete all the lines that begin with numbers. These lines will typically look something like “00:00:01,000 –> 00:00: 02,000.” Once you have removed the time codes, save the file and open it in Microsoft Word.
The text from the SRT file will now be visible in the Word document. You can then format the text as desired and save the document.
Keep in mind that this manual method will not retain any formatting from the original SRT file, so you may need to do some additional editing to get the final results you want.
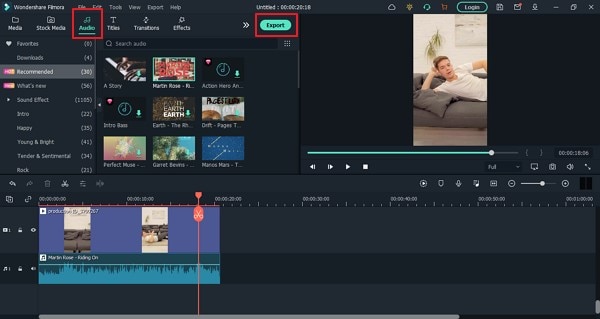
How to Edit and merge your Subtitles with Wondershare Filmora
Wondershare Filmora is one of the most popular video editing software programs available today. One of the reasons for its popularity is that it offers a wide range of features, including the ability to convert SRT files to Word format.
This can be a valuable tool for those who need to edit subtitles or create closed captioning for their videos.
In addition, Wondershare Filmora also offers a wide range of other features that make it an essential tool for any video editor, such as the ability to add transitions, effects, and titles.
As a result, Wondershare Filmora is a valuable tool for anyone who needs to edit videos regularly. Here’s how to convert SRT to a Word file using Filmora:
Free Download For Win 7 or later(64-bit)
Free Download For macOS 10.14 or later
1. Download and install Filmora on your computer.
2. Launch Filmora, then click “Import”> “Import files.” To start the project, you need to right-click on the timeline and select Advanced Edit.

3. At advanced edit you can perform the following tasks:
- Edit Time code.
- Change subtitles.
- Add/remove/merge subtitle strips.
- Change subtitle styles (same as Filmora Advanced Edit Text)

4. Finally, select the SRT file on the timeline, right-click and select “Export Subtitle File”.

Hot FAQs on Converting SRT to Word
1. How do I edit an SRT file in Word?
First, open the SRT file in Word. You may see some strange characters or formatting issues, but don’t worry - these can be fixed later. Next, make your changes to the transcript. Be sure to double-check the timing information to make sure it is still accurate. Finally, save the file and close Word. You should now be able to use the updated SRT file in your video player of choice.
2. How do I open SRT files with text on Mac?
If you have downloaded a movie or TV show with an SRT file, you can open the file using the TextEdit application on your Mac. First, open TextEdit and then go to the File menu. Next, select Open and choose the SRT file you want to open. The text from the SRT file will now be displayed in the TextEdit window. You can then save the file if you wish.
Alternatively, you can use the Quick Look feature on your Mac if you want to view the text from the SRT file. To do this, select the SRT file in the Finder and press the spacebar. The text from the SRT file will then be displayed in a Quick Look window.
Final Words
That’s it! You now know how to convert an SRT file into a DOCX. It is easy to convert SRT files to DOCX format with the help of online tools and offline converters.
However, if you want more control over the editing process or an easy-to-use video editing software with all the bells and whistles, try Wondershare Filmora .
This software has all the features you need to edit your subtitles and merge them with your video content.
Plus, it’s affordable and comes with a free trial, so you can try it before you buy. Have fun creating beautiful videos with perfect subtitles!
- Subtitle Edit
- Jubler
- Subtitle Workshop
- Convert SRT to Word file Manually
- How to Edit and merge your Subtitles with Wondershare Filmora
- Hot FAQs on Converting SRT to Word
What is an SRT file?
SRT files are used for subtitles. Subtitles are the audio track of a video or movie. Subtitles are displayed alongside a video or movie on your TV or computer screen. They allow the viewer to understand what is being said in the language they speak.
People have recently begun using online streaming services such as Netflix, Amazon Video, and Hulu to watch movies and television shows. While streaming services offer thousands of movies and shows, there are still many that only exist in a form that can be viewed in their entirety. This requires the user to download the entire file (usually in a format known as a .srt file).
Why do we need to convert SRT files into Word?
Subtitles are a great way to enjoy movies and TV shows in different languages. They provide text on the screen that tells you what the characters are saying, so you can follow along even if you don’t speak the language. However, SRT files can be difficult to work with because they are incompatible with all software programs**.** So, they need to be converted into Word. Some other reasons include:
- It allows your content to be viewed within a web browser or mobile device without downloading .srt file.
- If you need to embed the video into another site, you can do so easily with the.docx file.
- Learning a new language by downloading SRT subtitles from video.
Convert SRT to word file without downloading any software
With the advent of the SRT (SubRip) format, videos can now be enjoyed on both computers and mobile devices. This means that videos can be viewed anywhere and anytime. Converting videos to SRT is relatively easy, but some online converters offer more flexibility than others.
These converters can take an SRT file and convert it into a word document, which can then be edited or saved for future use. Not only do online SRT to word converters save time, but they can also ensure that your captions are accurate and properly formatted. Whether you’re captioning a home video or creating professional subtitles for a film, an online SRT to-word converter can be a valuable tool. Some of them include:
Aspose
Aspose is a simple online tool that can be used to convert SRT files to Docx format. The process is quick and easy, and the results are high quality. To use Aspose to convert your SRT file to a DOCX file, follow these steps:
1. Upload the SRT file inAspose
2. Change the font size as you will
3. In the conversion window that appears, select “DOCX” as the output format and click “Convert”.
4. The conversion will begin immediately, and when it is finished, you will find the “DOWNLOAD” button to download the file. And below, you’ll find a “Send result to:” in which you can email the converted file.
The app is a powerful document conversion tool that supports various formats, making it easy to convert your files for use in different applications. However, its performance is greatly reduced after multiple conversions on the file format.
Happyscribe
With Happyscribe, you can quickly and easily convert SRT files to Docx format. The process is simple with quick results that give high-quality output! Below are the steps to convert an SRT file to a DOCX file using the online tool, Happyscribe.
1. Go to happyscribe
2. First, select your SRT file, second select the format to .docx, and click the convert button.
Using happyscribe converter can also help to reduce your overall costs. By automating the transcription process, you can avoid hiring expensive transcription services. As a result, you can save money while maintaining high quality and accuracy levels. The only drawback of this tool is that it does a poor job at matching times in long videos, resulting in a large amount of reformatting.
Ebby
At first glance, Ebby SRT to DOCX converter may not seem like much. However, this simple tool can be a lifesaver for anyone who needs to convert subtitles from one format to another. Using Ebby is quick and easy; select the file you want to convert, choose your desired output format, and click convert. That’s it! Your file will be converted and ready to download in just a few seconds. Here are the steps:
1. First go to Ebby.co
2. Browse and upload your “SRT file” and change the format to “Word (.docx)”.
3. Then click “CONVERT SRT” after a few seconds, your .docx file will be downloaded to your browser.
Ebby has 100+ languages and dialects, plus its fast transcription and accuracy make it stand out from its competitors. However, the web interface isn’t designed to handle large files. As it has no folder structure and only allows for up to 10 items per page (you can create more by dragging them), you will need another method if your project requires extensive organization or editing before uploading.
Convert .SRT to word file Offline
Converting an SRT file, or SubRip Subtitle file, into a Word document can be helpful if you want to be able to edit the subtitles or captioning for a video.
There are moves online that will do this conversion for you, but you may not want to trust your valuable data to someone else’s server.
Fortunately, some great subtitle editing programs will allow you to make this conversion offline.
These softwares are designed specifically for converting SRT files and usually provide a few different options for how the conversion is done.
They also offer a wide range of features for editing subtitles, and they can export the results as a Word document.
However, some of these programs can be difficult to use, so make sure you read the instructions carefully before trying to convert your file. The most popular softwares are:
Subtitle Edit
Subtitle Edit is a very helpful program for any fan of movies and TV shows who wants to see films and shows in their original language.
This free program can correct various subtitle syncing errors so that you can watch movies and TV shows with perfect subtitles.
Now you know what Subtitle Edit is, let’s discuss its features.
Features:
- It allows you to create or sync subtitle lines.
- You can convert your files in desired format as it supports 300+ formats such as SRT, SBV, advanced Sub station, etc.
- It has an amazing feature of auto translation via google translation.
- You can merge or split the subtitles.
- It enables you to convert your audio into speech with its speech recognition feature.
- You can also adjust your display time.
One of the best part of this software is that it provides a batch converter tool. This tool allows you to convert multiple SRT files to plain Text subtitles files at once. Let’s check out how it works.
Step-by-step guideline to convert SRT to TXT
Step1 Firstly, ensure that Subtitle edit is installed on your device. If not, then download it. After downloading, run this software.
Step2 From its tools menu, open the Batch converter tool.
Step3 Import a folder containing SRT files. You can also drag and drop SRT files to its interface, individually.
Step4 Now, select the output format as Plain Text or any other format and set the encoding option. You can also customize some output configurations including
- Remove formatting
- Add/remove tags
- Redo casing
- Fix some common errors
- Adjust speed, etc.
Step5 Then, provide the output location and hit the convert button to start the conversion process.
Now as we know the method of converting SRT files to Word, let’s discuss its advantages as well as disadvantages.
Pros
- It has friendly and intuitive interface.
- It supports 300+ formats.
- It includes google translate for fast translation.
- It provides open-office spelling correction.
- It has also an audio spectrum.
Cons
- It sometimes seems complex no customization functionality
Best for :
Windows devices
Jubler
Jubler is a powerful text editing tool. It allows you to make or edit existing subtitles and work with almost any video format.
The combination of Jubler and Mplayer allows users to see a preview of subtitles in a movie. In addition, Jubler also includes a tool known as ASpell, which corrects grammar and spelling (works with the English language).
After knowing what Jubler is, let’s move forward to know about its features.
Features:
- It supports multiple formats such as
- SubStation
- SubStation Alpha
- SubRip
- SubViewer
- MicroDVD
- Etc.
- It supports all encodings that are supported by Java platform.
- Jubler also supports translating mode.
- You can mark subtitles with different colors while editing or playing a video.
- It also checks spelling with the support for dictionary selection.
- It offers basic editing skills such as splitting, joining, time shifting, etc.
How to steps with images
Now you know how to convert SRT to Word format, let’s look at its pros and cons.
Pros
- It has a comprehensive interface to sync subtitles.
- You can transcribe your text and run your video at the same time.
- It includes a spell checker.
- It offers good customization possibilities.
- It works in Windows, Linux and Mac.
Cons
- To get a preview of your video, you’ll need to install MP player.
- It’s not really updated anymore.
Best for:
Quick subtitle editing
Subtitle Workshop
Subtitle workshop is a freeware subtitle editing tool that offers a complete, efficient and convenient way to edit subtitles.
It supports all major subtitle formats and provides powerful features such as spell checking, automatic translation, synchronization, timed text preview and more.
Subtitle workshop is constantly being updated with new features and improvements, making it the most complete and convenient subtitle editing tool available.
Features:
- It supports converting, creating, editing and saving over 60 subtitle formats.
- It offers customizable tools and functions for automatic timing and text manipulation.
- It has Multi-Level Undo-Redo system
- It supports the OCR (find-and-replace text) scripts.
- It has comprehensive system for automatically and manually detecting, marking, and fixing subtitle errors.
- It also offers a CPS (Characters per Second) system.
- It supports a variety of audio/video formats.
Now, we’re well aware of this software. Let’s discuss step-by-step guide to convert SRT to Word file with Subtitle Workshop.
Pros
- It’s straightforward to use that makes it ideal for beginners.
- It’s friendly user-interface is customizable and supports multiple language.
- It also supports style and color tags within the subtitle text.
- You can preview your subtitle in full screen mode.
Cons
- It can be difficult while importing transcripts and require a lot of manual lines.
- It shows limited checks on overlaps, reading speeds and duration limits.
Best for:
Small and short SRT files
Convert SRT to Word file Manually
You must first remove the time codes to convert an SRT file to a Word document. Open the SRT file in a text editor (such as Notepad++ or Sublime Text) and delete all the lines that begin with numbers. These lines will typically look something like “00:00:01,000 –> 00:00: 02,000.” Once you have removed the time codes, save the file and open it in Microsoft Word.
The text from the SRT file will now be visible in the Word document. You can then format the text as desired and save the document.
Keep in mind that this manual method will not retain any formatting from the original SRT file, so you may need to do some additional editing to get the final results you want.
How to Edit and merge your Subtitles with Wondershare Filmora
Wondershare Filmora is one of the most popular video editing software programs available today. One of the reasons for its popularity is that it offers a wide range of features, including the ability to convert SRT files to Word format.
This can be a valuable tool for those who need to edit subtitles or create closed captioning for their videos.
In addition, Wondershare Filmora also offers a wide range of other features that make it an essential tool for any video editor, such as the ability to add transitions, effects, and titles.
As a result, Wondershare Filmora is a valuable tool for anyone who needs to edit videos regularly. Here’s how to convert SRT to a Word file using Filmora:
Free Download For Win 7 or later(64-bit)
Free Download For macOS 10.14 or later
1. Download and install Filmora on your computer.
2. Launch Filmora, then click “Import”> “Import files.” To start the project, you need to right-click on the timeline and select Advanced Edit.
3. At advanced edit you can perform the following tasks:
- Edit Time code.
- Change subtitles.
- Add/remove/merge subtitle strips.
- Change subtitle styles (same as Filmora Advanced Edit Text)
4. Finally, select the SRT file on the timeline, right-click and select “Export Subtitle File”.
Hot FAQs on Converting SRT to Word
1. How do I edit an SRT file in Word?
First, open the SRT file in Word. You may see some strange characters or formatting issues, but don’t worry - these can be fixed later. Next, make your changes to the transcript. Be sure to double-check the timing information to make sure it is still accurate. Finally, save the file and close Word. You should now be able to use the updated SRT file in your video player of choice.
2. How do I open SRT files with text on Mac?
If you have downloaded a movie or TV show with an SRT file, you can open the file using the TextEdit application on your Mac. First, open TextEdit and then go to the File menu. Next, select Open and choose the SRT file you want to open. The text from the SRT file will now be displayed in the TextEdit window. You can then save the file if you wish.
Alternatively, you can use the Quick Look feature on your Mac if you want to view the text from the SRT file. To do this, select the SRT file in the Finder and press the spacebar. The text from the SRT file will then be displayed in a Quick Look window.
Final Words
That’s it! You now know how to convert an SRT file into a DOCX. It is easy to convert SRT files to DOCX format with the help of online tools and offline converters.
However, if you want more control over the editing process or an easy-to-use video editing software with all the bells and whistles, try Wondershare Filmora .
This software has all the features you need to edit your subtitles and merge them with your video content.
Plus, it’s affordable and comes with a free trial, so you can try it before you buy. Have fun creating beautiful videos with perfect subtitles!
3D Ray Traced Settings In After Effects
3D Ray Traced is a hot topic in the world of graphic design and video editing that allows you to create three-dimensional images from scratch or add realistic effects to existing 2D footage.
In After Effects, it is a lightning technique for generating a photorealistic image by tracing the light’s path through a scene in three dimensions. Raytracing lets you have proper reflections, internal refraction, and transparency.
In this comprehensive guide, we’ll explore the basics of Ray Tracing and everything you need to know about 3D Ray Traced in After Effects.
Part 1. What Is Ray Tracing?
Ray Tracing is a powerful rendering technique that can create incredibly realistic lighting and shadows. By tracing the path of light, algorithms can simulate the way that light interacts with virtual objects in a computer-generated world.
This results in more lifelike shadows, reflections, and translucence. Ray Tracing has been responsible for the dramatic increase in realism we’ve seen in video games over the years, and its benefits are only becoming more apparent as technology improves.
In simple words, Ray Tracing is a computer graphics technique for generating realistic images and works by tracing the light’s path from the camera through the scene. This allows for accurate simulations of light interactions, such as reflection, refraction, and shadows.

Part 2. Overview Of Ray Tracing
In this part, we will explain what Ray Tracing is from the following sides and for your better understanding.
History
Albrecht Dürer first gave the idea of Ray Tracing in the 16th century through his invention, the Dürer’s door. However, it was not until 1968 that Arthur Appel used a computer for the first time to create a shaded picture through Ray Tracing.
First conceptualized in 1969, Ray Tracing is a common technique used to create computer-generated graphics for movies and TV shows today. This is because studios can use the processing power of multiple computers to get the job done quickly and efficiently. However, even with this extra processing power, Ray Tracing can be a long and difficult process.
Despite the challenges, Ray Tracing is becoming increasingly popular due to computer hardware and software advances. And as technology continues to improve, we can expect to see even more realistic images in the future.
Advantages
Here’re some advantages of Ray Tracing:
- Realistic Rendering: Ray Tracing can create more realistic images than those created with traditional rendering techniques. This is because it calculates the light path more accurately, resulting in more realistic shadows, refraction, and reflections.
- Anti-aliasing And Depth Of Field: Ray Tracing can help you quickly get the anti-aliasing and depth of field effects.
Disadvantages
The downside of Ray Tracing technology is that it requires a lot of computing power to run, and it can be difficult to create more complex lighting effects like caustics.
Part 3. How Does Ray Tracing Work?
Ray Tracking uses the process of denoising. The algorithm starts with the camera and traces the shades of shadows and lights.
Ray Tracing uses machine learning to fill in the gaps to form a realistic image. The brighter the scene, the higher the graphics quality; the higher the quality, the more expensive it is. This is why Ray Tracing didn’t become popular in the video game industry until recently.
Part 4. Ray Tracing In Adobe After Effects
After the introduction of Ray Tracing, we will combine it with a popular video editor - Adobe After Effects to see how it works. Adobe After Effects is a useful and powerful tool for creating visual effects and animated graphics. Adobe introduced Ray Tracing or Ray-Traced 3D feature in After Effect to help graphic designers create photorealistic 3D images and render light and shadow. This feature was added in 2012 with the release of After Effects CS 6.

However, the Ray Tracing feature was later removed from After Effects in 2020 due to multiple reasons:
- The Ray Tracing tool always faced bugs and glitches.
- This feature did not work correctly if you were not using Adobe Media Encoder.
- NVIDIA would change the standards from time to time.
Functions
Though as mentioned above, the Ray Tracing feature was removed in 2020, its advanced 3D features are still worth of introducing. Here’re some functions of Ray Traced 3D After Effects:
- Ray Traced allows you to generate and place multiple lights.
- You can set a material option for 3D layers.
- Moreover, you can control how shadows are cast.
How Does It Work
3D Ray Tracing in After Effects works by giving your text and paths more depth. Extruded layers have a z-axis depth, making them three-dimensional. This extra dimension is viewable from all angles, even when the layer is rotated. In contrast, non-extruded layers have zero depth on the z-axis. So, they will disappear if you try to rotate them 90 degrees on the x or y-axis.
Part 5. Ray-Traced 3D Settings In Adobe After Effects
The release of the Ray-Traced 3D setting in After Effects CS6 made it easier than ever to create stunning 3D images and animations. Let’s focus on how to use it in After Effects appropriately.
How To Set It
Adobe After Effects has a three-dimensional space animation setting, but this doesn’t include Ray Tracing. You need to change the default settings if you want to use it in your animation. To do so:
Step1 Go to the Composition Settings panel to set up the Ray-Traced 3D composition.
Step2 Open the Advanced tab, and from the “Renderer” option, select “Ray-Traced 3D” from the drop-down menu.

A layer becomes a 3D layer when the 3D checkbox is checked in the timeline and has more options than a normal layer regarding composition. When you open the layer properties timeline, you can access two options: Geometry Options and Material Options.
The former deals with the layer’s depth and edges shape, while the latter deals with the interaction of layers with depth and includes shadow, reflection, refraction, and transparency option.

When To Use It
Here’re some instances of when to use Ray-Traced 3D compositions in After Effects:
- When you want to create true 3D types and animate them.
- If you want to get a logo extruded and present it as if it was a real object.
- When you want to create realistic shadows or reflections to create stunning motion graphics.
- You can also use it to create realistic images or simulate lighting effects.
Ray Traced 3D After Effects Plugin Download
Zaxwerks ProAnimator AE is a 3D animation plugin for After Effects that makes it easier to animate objects in three dimensions. With ProAnimator AE, you don’t have to use keyframes to animate objects.
Instead, you’re given an interface that makes it simpler to learn than traditional 3D animation programs. Moreover, ProAnimator AE is capable of near real-time Ray Tracing so that you can create realistic reflections in very little time.
Video - What is Ray Tracing?
Conclusion
In this article, we’ve discussed Ray Tracing, how it works, and its function in Adobe After Effect. We also shed light on Ray Traced 3D settings in After Effect, how to set it, and when to use it. Moreover, we discussed a plugin to help you create photorealistic reflections and shadows.
Hopefully, your queries have been resolved, and you now fully understand the Ray Tracing technology.
Free Download For Win 7 or later(64-bit)
Free Download For macOS 10.14 or later
Part 1. What Is Ray Tracing?
Ray Tracing is a powerful rendering technique that can create incredibly realistic lighting and shadows. By tracing the path of light, algorithms can simulate the way that light interacts with virtual objects in a computer-generated world.
This results in more lifelike shadows, reflections, and translucence. Ray Tracing has been responsible for the dramatic increase in realism we’ve seen in video games over the years, and its benefits are only becoming more apparent as technology improves.
In simple words, Ray Tracing is a computer graphics technique for generating realistic images and works by tracing the light’s path from the camera through the scene. This allows for accurate simulations of light interactions, such as reflection, refraction, and shadows.
Part 2. Overview Of Ray Tracing
In this part, we will explain what Ray Tracing is from the following sides and for your better understanding.
History
Albrecht Dürer first gave the idea of Ray Tracing in the 16th century through his invention, the Dürer’s door. However, it was not until 1968 that Arthur Appel used a computer for the first time to create a shaded picture through Ray Tracing.
First conceptualized in 1969, Ray Tracing is a common technique used to create computer-generated graphics for movies and TV shows today. This is because studios can use the processing power of multiple computers to get the job done quickly and efficiently. However, even with this extra processing power, Ray Tracing can be a long and difficult process.
Despite the challenges, Ray Tracing is becoming increasingly popular due to computer hardware and software advances. And as technology continues to improve, we can expect to see even more realistic images in the future.
Advantages
Here’re some advantages of Ray Tracing:
- Realistic Rendering: Ray Tracing can create more realistic images than those created with traditional rendering techniques. This is because it calculates the light path more accurately, resulting in more realistic shadows, refraction, and reflections.
- Anti-aliasing And Depth Of Field: Ray Tracing can help you quickly get the anti-aliasing and depth of field effects.
Disadvantages
The downside of Ray Tracing technology is that it requires a lot of computing power to run, and it can be difficult to create more complex lighting effects like caustics.
Part 3. How Does Ray Tracing Work?
Ray Tracking uses the process of denoising. The algorithm starts with the camera and traces the shades of shadows and lights.
Ray Tracing uses machine learning to fill in the gaps to form a realistic image. The brighter the scene, the higher the graphics quality; the higher the quality, the more expensive it is. This is why Ray Tracing didn’t become popular in the video game industry until recently.
Part 4. Ray Tracing In Adobe After Effects
After the introduction of Ray Tracing, we will combine it with a popular video editor - Adobe After Effects to see how it works. Adobe After Effects is a useful and powerful tool for creating visual effects and animated graphics. Adobe introduced Ray Tracing or Ray-Traced 3D feature in After Effect to help graphic designers create photorealistic 3D images and render light and shadow. This feature was added in 2012 with the release of After Effects CS 6.
However, the Ray Tracing feature was later removed from After Effects in 2020 due to multiple reasons:
- The Ray Tracing tool always faced bugs and glitches.
- This feature did not work correctly if you were not using Adobe Media Encoder.
- NVIDIA would change the standards from time to time.
Functions
Though as mentioned above, the Ray Tracing feature was removed in 2020, its advanced 3D features are still worth of introducing. Here’re some functions of Ray Traced 3D After Effects:
- Ray Traced allows you to generate and place multiple lights.
- You can set a material option for 3D layers.
- Moreover, you can control how shadows are cast.
How Does It Work
3D Ray Tracing in After Effects works by giving your text and paths more depth. Extruded layers have a z-axis depth, making them three-dimensional. This extra dimension is viewable from all angles, even when the layer is rotated. In contrast, non-extruded layers have zero depth on the z-axis. So, they will disappear if you try to rotate them 90 degrees on the x or y-axis.
Part 5. Ray-Traced 3D Settings In Adobe After Effects
The release of the Ray-Traced 3D setting in After Effects CS6 made it easier than ever to create stunning 3D images and animations. Let’s focus on how to use it in After Effects appropriately.
How To Set It
Adobe After Effects has a three-dimensional space animation setting, but this doesn’t include Ray Tracing. You need to change the default settings if you want to use it in your animation. To do so:
Step1 Go to the Composition Settings panel to set up the Ray-Traced 3D composition.
Step2 Open the Advanced tab, and from the “Renderer” option, select “Ray-Traced 3D” from the drop-down menu.
A layer becomes a 3D layer when the 3D checkbox is checked in the timeline and has more options than a normal layer regarding composition. When you open the layer properties timeline, you can access two options: Geometry Options and Material Options.
The former deals with the layer’s depth and edges shape, while the latter deals with the interaction of layers with depth and includes shadow, reflection, refraction, and transparency option.
When To Use It
Here’re some instances of when to use Ray-Traced 3D compositions in After Effects:
- When you want to create true 3D types and animate them.
- If you want to get a logo extruded and present it as if it was a real object.
- When you want to create realistic shadows or reflections to create stunning motion graphics.
- You can also use it to create realistic images or simulate lighting effects.
Ray Traced 3D After Effects Plugin Download
Zaxwerks ProAnimator AE is a 3D animation plugin for After Effects that makes it easier to animate objects in three dimensions. With ProAnimator AE, you don’t have to use keyframes to animate objects.
Instead, you’re given an interface that makes it simpler to learn than traditional 3D animation programs. Moreover, ProAnimator AE is capable of near real-time Ray Tracing so that you can create realistic reflections in very little time.
Video - What is Ray Tracing?
Conclusion
In this article, we’ve discussed Ray Tracing, how it works, and its function in Adobe After Effect. We also shed light on Ray Traced 3D settings in After Effect, how to set it, and when to use it. Moreover, we discussed a plugin to help you create photorealistic reflections and shadows.
Hopefully, your queries have been resolved, and you now fully understand the Ray Tracing technology.
Free Download For Win 7 or later(64-bit)
Free Download For macOS 10.14 or later
How to Make A Funny Vlog for TikTok?
TikTok has been among the few social media platforms that have gained an exponential following in a truly short time. Regardless of this stunted digital environment, the platform made its statement of becoming part of the all-time greats.
TikTok became known as a short-video platform that influenced the making of funny vlogs. If you are interested in making a funny vlog, you are at the right place.
In this article
01 Ideas for Creating A Funny Vlog for TikTok
02 5 Popular Funny Vloggers on TikTok
Part 1: Ideas for Creating A Funny Vlog for TikTok
When creating a funny vlog across TikTok, there are numerous ideas that one can think of. However, since TikTok videos are of small lengths, achieving diversity is difficult yet possible. You’ll surely get your break if you understand the following ideas for creating a funny vlog.
React to Other Videos
While it may seem the most mainstream style of creating funny content across TikTok, it is also the most effective way of making people laugh while watching your video. This will also bring recurring viewers across your channel.
Display Failure Videos
It is always great to see people trying and doing something funny across the video. Failure videos are believed to be the other way of creating content for a funny vlog on your TikTok, which shall make people laugh hard.
Use Goofy and Peculiar Voices
Unrealistic and weird voices can make your short video seem funny. If you consider talking about something in a silly voice, it will make people burst out of laughter.
Trolling Family Members
One of the best ways to make something good out of TikTok is creating candid moments. This can always be done if you troll or prank your family members out of nowhere. Just keep reminding that you have to ensure no one gets injured due to it.
Impersonations
Making impersonated videos of major celebrities is another way of showing funny content to the viewers on TikTok. If you consider some funny examples for this, it will surely bring you effective results.
Make Puns and Funny Statements
Another great way to create a funny vlog for your TikTok is to be good at making puns. This is purely hilarious content and needs someone to be highly great in it.
Physical Challenges
This can be a bit risky, but it can become quite fun to make and show to the world if executed with care. However, this can be conducted individually or in a group of people, as you find it appropriate.
Use Effects of TikTok
TikTok makes sure to provide something funny in effects to its users. The use of effects for TikTok is an excellent technique to make funny vlogs; however, it can get funny if the elements used across it have a dubious meaning.
Run Everything in Reverse
One of the most straightforward techniques to make a funny vlog is to run everything in reverse order. The simplest thing of a video becomes the funniest to watch.
Part 2: 5 Popular Funny Vloggers on TikTok
This part will provide some popular examples of TikTokers who have made a considerate performance in providing funny content to people across the platform.
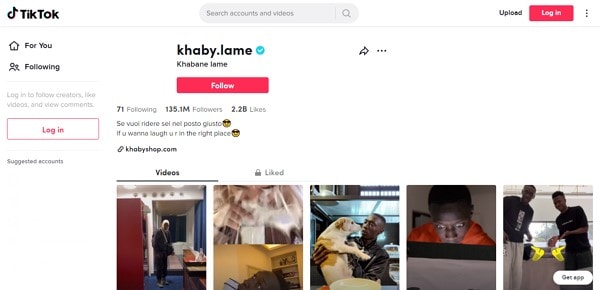
Khaby Lame
This is, without a doubt, the first-choice in TikTok accounts that would always come while relating to funny content. Khaby started his journey as a TikToker with a remarkably simple motive of pointing out the simplicity in different tasks, which were displayed to be difficult. Although it sounds pretty basic, the technique taken by Khaby has been so considerate it brought him millions of followers for creating funny content.
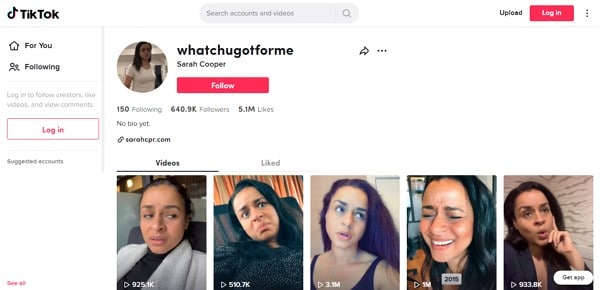
Sarah Cooper
Want to see a great impersonation of Donald Trump? It is undoubtedly great to see every time. With Sarah Cooper, it just becomes an entirely different story. Her impersonation has been so perfect that she has been referred to as one of the best funny vloggers on TikTok. Her likes across the platform may not be that great, but she has shown some stature in presenting funny content in a great way.
Dobre Twins
This twin duo is known across many social media platforms for its funny content. As the twins started using TikTok, they started creating good funny vlogs, which gained quite the traction for them. Their unique ideas to present different things have presented the following worth 23 million likes across TikTok, which is quite commendable. However, Lucas and Marcus are only known to operate this TikTok account.

Image alt: dobre twins funny tiktoker
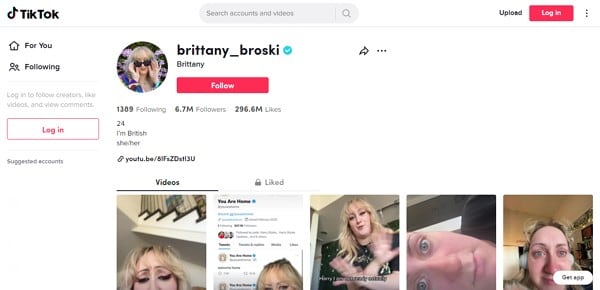
Brittany Broski
Quite a few TikTokers actually make funny videos with impressive comedy. Brittany Broski is a celebrity in this genre, where she has taken great use of her comedy skills to present great vlogs with different and unique topics. Her take on comedy is entirely different, which makes her funny vlog unique and better than others.
Cole LeBrant
This TikToker makes a good collection of funny vlogs across his account with his family. The variety and variability in his videos make him a different version of fun compared to other TikTokers. He has built a great reach across the account, which makes him an impressive choice.
Part 3: How to Make a Funny Vlog?
Funny vlogs are a fabulous way to interact with people of different tastes. It can be something that cherishes the moods of the viewers, regardless of their current emotions. To make this happen, you need a good platform that helps you create a video for your viewers to watch. Wondershare Filmora fulfills the needs of a video editor by providing you with the perfect options while editing the video for TikTok.
For Win 7 or later (64-bit)
For macOS 10.12 or later
If you are looking forward to understanding how to create a funny vlog for your TikTok using Filmora, you need to follow a set of simple steps. These are shown as follows:
Step 1: Launch and Import Video
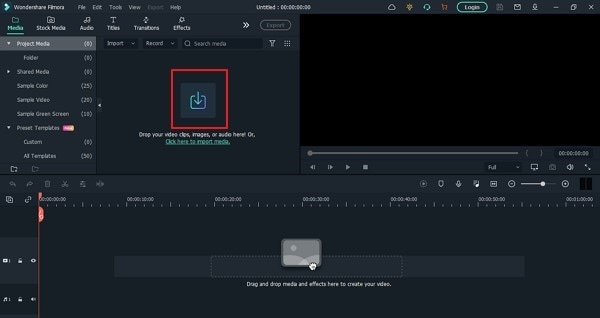
To start, you need to have Wondershare Filmora installed across your device. Launch the tool and click on “New Project” to start from scratch. Once the screen opens up, you need to click on the “Arrow Head” icon across the ‘Media’ Tab to import the audio you wish to amend for TikTok.
Step 2: Perform Basic Editing
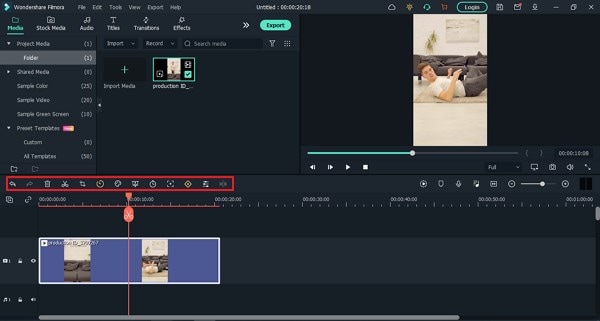
Wondershare Filmora provides users with multiple options for editing their files. At first, drag the file onto the timeline. Following this, you can merge different videos or enhance the video by trimming it. Along with that, you can also consider splitting the image or changing its playback speed for different results.
Step 3: Add Effects and Transitions
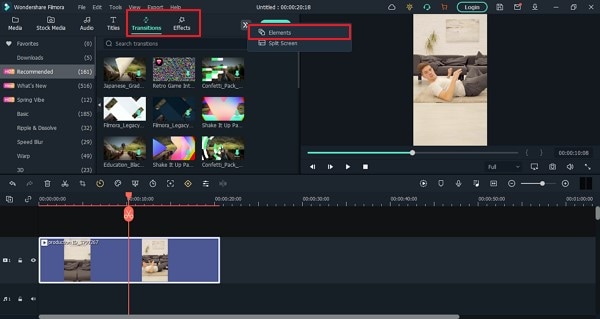
After you are done with some basic editing, you can add different effects from the “Effects” section. To make the video look exclusive, you can also include “Transitions” across it. Use the “Elements” tab to include stickers and emojis to enhance your TikTok video.
Step 4: Manage the Audio
For managing the audio of your video, you can make several changes across it. You can detach audio and change the audio with another soundtrack. Filmora also allows you to add audio from the “Audio” section, which contains royalty-free music to add. Once you are done, click on the “Export” button to set the settings of the video before exporting it back onto the device.
Closing Words
This article has presented some of the finest tips that can be utilized for creating funny vlogs on your TikTok. If you coherently use these tips, you can get significant results across your account in the name of the followers. Along with that, you can also use Filmora for making the best funny vlog with different editing tools.
Wondershare Filmora
Get started easily with Filmora’s powerful performance, intuitive interface, and countless effects!
Try It Free Try It Free Try It Free Learn More >

02 5 Popular Funny Vloggers on TikTok
Part 1: Ideas for Creating A Funny Vlog for TikTok
When creating a funny vlog across TikTok, there are numerous ideas that one can think of. However, since TikTok videos are of small lengths, achieving diversity is difficult yet possible. You’ll surely get your break if you understand the following ideas for creating a funny vlog.
React to Other Videos
While it may seem the most mainstream style of creating funny content across TikTok, it is also the most effective way of making people laugh while watching your video. This will also bring recurring viewers across your channel.
Display Failure Videos
It is always great to see people trying and doing something funny across the video. Failure videos are believed to be the other way of creating content for a funny vlog on your TikTok, which shall make people laugh hard.
Use Goofy and Peculiar Voices
Unrealistic and weird voices can make your short video seem funny. If you consider talking about something in a silly voice, it will make people burst out of laughter.
Trolling Family Members
One of the best ways to make something good out of TikTok is creating candid moments. This can always be done if you troll or prank your family members out of nowhere. Just keep reminding that you have to ensure no one gets injured due to it.
Impersonations
Making impersonated videos of major celebrities is another way of showing funny content to the viewers on TikTok. If you consider some funny examples for this, it will surely bring you effective results.
Make Puns and Funny Statements
Another great way to create a funny vlog for your TikTok is to be good at making puns. This is purely hilarious content and needs someone to be highly great in it.
Physical Challenges
This can be a bit risky, but it can become quite fun to make and show to the world if executed with care. However, this can be conducted individually or in a group of people, as you find it appropriate.
Use Effects of TikTok
TikTok makes sure to provide something funny in effects to its users. The use of effects for TikTok is an excellent technique to make funny vlogs; however, it can get funny if the elements used across it have a dubious meaning.
Run Everything in Reverse
One of the most straightforward techniques to make a funny vlog is to run everything in reverse order. The simplest thing of a video becomes the funniest to watch.
Part 2: 5 Popular Funny Vloggers on TikTok
This part will provide some popular examples of TikTokers who have made a considerate performance in providing funny content to people across the platform.
Khaby Lame
This is, without a doubt, the first-choice in TikTok accounts that would always come while relating to funny content. Khaby started his journey as a TikToker with a remarkably simple motive of pointing out the simplicity in different tasks, which were displayed to be difficult. Although it sounds pretty basic, the technique taken by Khaby has been so considerate it brought him millions of followers for creating funny content.
Sarah Cooper
Want to see a great impersonation of Donald Trump? It is undoubtedly great to see every time. With Sarah Cooper, it just becomes an entirely different story. Her impersonation has been so perfect that she has been referred to as one of the best funny vloggers on TikTok. Her likes across the platform may not be that great, but she has shown some stature in presenting funny content in a great way.
Dobre Twins
This twin duo is known across many social media platforms for its funny content. As the twins started using TikTok, they started creating good funny vlogs, which gained quite the traction for them. Their unique ideas to present different things have presented the following worth 23 million likes across TikTok, which is quite commendable. However, Lucas and Marcus are only known to operate this TikTok account.
Image alt: dobre twins funny tiktoker
Brittany Broski
Quite a few TikTokers actually make funny videos with impressive comedy. Brittany Broski is a celebrity in this genre, where she has taken great use of her comedy skills to present great vlogs with different and unique topics. Her take on comedy is entirely different, which makes her funny vlog unique and better than others.
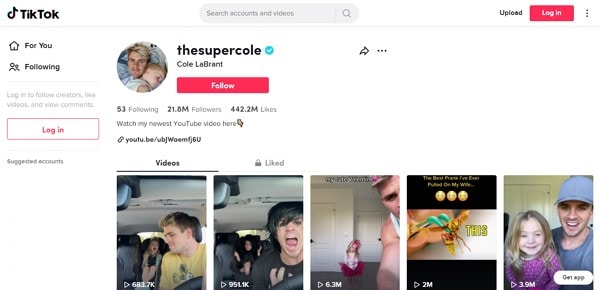
Cole LeBrant
This TikToker makes a good collection of funny vlogs across his account with his family. The variety and variability in his videos make him a different version of fun compared to other TikTokers. He has built a great reach across the account, which makes him an impressive choice.
Part 3: How to Make a Funny Vlog?
Funny vlogs are a fabulous way to interact with people of different tastes. It can be something that cherishes the moods of the viewers, regardless of their current emotions. To make this happen, you need a good platform that helps you create a video for your viewers to watch. Wondershare Filmora fulfills the needs of a video editor by providing you with the perfect options while editing the video for TikTok.
For Win 7 or later (64-bit)
For macOS 10.12 or later
If you are looking forward to understanding how to create a funny vlog for your TikTok using Filmora, you need to follow a set of simple steps. These are shown as follows:
Step 1: Launch and Import Video
To start, you need to have Wondershare Filmora installed across your device. Launch the tool and click on “New Project” to start from scratch. Once the screen opens up, you need to click on the “Arrow Head” icon across the ‘Media’ Tab to import the audio you wish to amend for TikTok.
Step 2: Perform Basic Editing
Wondershare Filmora provides users with multiple options for editing their files. At first, drag the file onto the timeline. Following this, you can merge different videos or enhance the video by trimming it. Along with that, you can also consider splitting the image or changing its playback speed for different results.
Step 3: Add Effects and Transitions
After you are done with some basic editing, you can add different effects from the “Effects” section. To make the video look exclusive, you can also include “Transitions” across it. Use the “Elements” tab to include stickers and emojis to enhance your TikTok video.
Step 4: Manage the Audio
For managing the audio of your video, you can make several changes across it. You can detach audio and change the audio with another soundtrack. Filmora also allows you to add audio from the “Audio” section, which contains royalty-free music to add. Once you are done, click on the “Export” button to set the settings of the video before exporting it back onto the device.
Closing Words
This article has presented some of the finest tips that can be utilized for creating funny vlogs on your TikTok. If you coherently use these tips, you can get significant results across your account in the name of the followers. Along with that, you can also use Filmora for making the best funny vlog with different editing tools.
Wondershare Filmora
Get started easily with Filmora’s powerful performance, intuitive interface, and countless effects!
Try It Free Try It Free Try It Free Learn More >
02 5 Popular Funny Vloggers on TikTok
Part 1: Ideas for Creating A Funny Vlog for TikTok
When creating a funny vlog across TikTok, there are numerous ideas that one can think of. However, since TikTok videos are of small lengths, achieving diversity is difficult yet possible. You’ll surely get your break if you understand the following ideas for creating a funny vlog.
React to Other Videos
While it may seem the most mainstream style of creating funny content across TikTok, it is also the most effective way of making people laugh while watching your video. This will also bring recurring viewers across your channel.
Display Failure Videos
It is always great to see people trying and doing something funny across the video. Failure videos are believed to be the other way of creating content for a funny vlog on your TikTok, which shall make people laugh hard.
Use Goofy and Peculiar Voices
Unrealistic and weird voices can make your short video seem funny. If you consider talking about something in a silly voice, it will make people burst out of laughter.
Trolling Family Members
One of the best ways to make something good out of TikTok is creating candid moments. This can always be done if you troll or prank your family members out of nowhere. Just keep reminding that you have to ensure no one gets injured due to it.
Impersonations
Making impersonated videos of major celebrities is another way of showing funny content to the viewers on TikTok. If you consider some funny examples for this, it will surely bring you effective results.
Make Puns and Funny Statements
Another great way to create a funny vlog for your TikTok is to be good at making puns. This is purely hilarious content and needs someone to be highly great in it.
Physical Challenges
This can be a bit risky, but it can become quite fun to make and show to the world if executed with care. However, this can be conducted individually or in a group of people, as you find it appropriate.
Use Effects of TikTok
TikTok makes sure to provide something funny in effects to its users. The use of effects for TikTok is an excellent technique to make funny vlogs; however, it can get funny if the elements used across it have a dubious meaning.
Run Everything in Reverse
One of the most straightforward techniques to make a funny vlog is to run everything in reverse order. The simplest thing of a video becomes the funniest to watch.
Part 2: 5 Popular Funny Vloggers on TikTok
This part will provide some popular examples of TikTokers who have made a considerate performance in providing funny content to people across the platform.
Khaby Lame
This is, without a doubt, the first-choice in TikTok accounts that would always come while relating to funny content. Khaby started his journey as a TikToker with a remarkably simple motive of pointing out the simplicity in different tasks, which were displayed to be difficult. Although it sounds pretty basic, the technique taken by Khaby has been so considerate it brought him millions of followers for creating funny content.
Sarah Cooper
Want to see a great impersonation of Donald Trump? It is undoubtedly great to see every time. With Sarah Cooper, it just becomes an entirely different story. Her impersonation has been so perfect that she has been referred to as one of the best funny vloggers on TikTok. Her likes across the platform may not be that great, but she has shown some stature in presenting funny content in a great way.
Dobre Twins
This twin duo is known across many social media platforms for its funny content. As the twins started using TikTok, they started creating good funny vlogs, which gained quite the traction for them. Their unique ideas to present different things have presented the following worth 23 million likes across TikTok, which is quite commendable. However, Lucas and Marcus are only known to operate this TikTok account.
Image alt: dobre twins funny tiktoker
Brittany Broski
Quite a few TikTokers actually make funny videos with impressive comedy. Brittany Broski is a celebrity in this genre, where she has taken great use of her comedy skills to present great vlogs with different and unique topics. Her take on comedy is entirely different, which makes her funny vlog unique and better than others.
Cole LeBrant
This TikToker makes a good collection of funny vlogs across his account with his family. The variety and variability in his videos make him a different version of fun compared to other TikTokers. He has built a great reach across the account, which makes him an impressive choice.
Part 3: How to Make a Funny Vlog?
Funny vlogs are a fabulous way to interact with people of different tastes. It can be something that cherishes the moods of the viewers, regardless of their current emotions. To make this happen, you need a good platform that helps you create a video for your viewers to watch. Wondershare Filmora fulfills the needs of a video editor by providing you with the perfect options while editing the video for TikTok.
For Win 7 or later (64-bit)
For macOS 10.12 or later
If you are looking forward to understanding how to create a funny vlog for your TikTok using Filmora, you need to follow a set of simple steps. These are shown as follows:
Step 1: Launch and Import Video
To start, you need to have Wondershare Filmora installed across your device. Launch the tool and click on “New Project” to start from scratch. Once the screen opens up, you need to click on the “Arrow Head” icon across the ‘Media’ Tab to import the audio you wish to amend for TikTok.
Step 2: Perform Basic Editing
Wondershare Filmora provides users with multiple options for editing their files. At first, drag the file onto the timeline. Following this, you can merge different videos or enhance the video by trimming it. Along with that, you can also consider splitting the image or changing its playback speed for different results.
Step 3: Add Effects and Transitions
After you are done with some basic editing, you can add different effects from the “Effects” section. To make the video look exclusive, you can also include “Transitions” across it. Use the “Elements” tab to include stickers and emojis to enhance your TikTok video.
Step 4: Manage the Audio
For managing the audio of your video, you can make several changes across it. You can detach audio and change the audio with another soundtrack. Filmora also allows you to add audio from the “Audio” section, which contains royalty-free music to add. Once you are done, click on the “Export” button to set the settings of the video before exporting it back onto the device.
Closing Words
This article has presented some of the finest tips that can be utilized for creating funny vlogs on your TikTok. If you coherently use these tips, you can get significant results across your account in the name of the followers. Along with that, you can also use Filmora for making the best funny vlog with different editing tools.
Wondershare Filmora
Get started easily with Filmora’s powerful performance, intuitive interface, and countless effects!
Try It Free Try It Free Try It Free Learn More >
Learn How to Use and Download KineMaster Templates Like a Pro. Discover Alternative Video Templates to Elevate Your Video Creation
Creating videos has always been challenging, especially with the advent of mobile video editing apps like KineMaster. This app is for professionals and amateur content creators who want to take their videos to the next level. With KineMaster, you can easily edit, enhance and share your videos in no time. One of the best features that KineMaster offers is the ability to use video templates.
This article will guide you through using and downloading KineMaster templates. We will also share some alternative templates that you can use to elevate your video creation. Whether you’re a beginner or an advanced user, this guide will give you all the information you need to create stunning videos with KineMaster. So, let’s get started!

Overview of KineMaster & Its Video Templates
KineMaster is a powerful video editing app that allows users to create professional-looking videos on their mobile devices. It is available on both Android and iOS platforms.
With a wide range of features like multi-layer video, chroma key, and blending modes, KineMaster empowers users to edit their videos with precision and creativity. It is also one of the first mobile video editing apps that supports multiple video layers and audio keyframes.
KineMaster also provides a variety of video templates for different purposes, such as intro, outro, social media posts, and more. These templates are pre-designed and include different elements such as animation, text, and effects.
KineMaster templates provide an easy way for users to create videos with professional looks and styles. Templates are also customizable, so you can add photos, videos, and text to match your brand or style. This feature of KineMaster saves time for users to create the video from scratch and make the editing process much more seamless.
How To Use & Download KineMaster Video Templates?
KineMaster video templates are a great way to quickly create professional-looking videos without starting from scratch. With a wide range of templates to choose from, you can easily find one that suits your needs.
Whether you’re a beginner or an advanced user, these steps will provide you with all the information you need to get the most out of KineMaster’s video templates.
Step 1. Launch the KineMaster app and go to “Video Templates.“

Step 2. Search for a template category you want to use.

Step 3. Choose your template design.

Step 4. Tap the “Mix“ button to download the template.

Step 5. Edit the template to your preference. You can replace the clips with your video.

Step 6. Change the resolution of your video and tap the “Save as Video“ button to save your work.

Filmora for Mobile - KineMaster’s Alternative
Filmora for mobile is an alternative video editing app that provides features similar to KineMaster. It is a user-friendly app designed for amateur and professional content creators. The app is available on both Android and iOS platforms. Some of its key features include:
- A wide range of video effects, including filters, overlays, and elements.
- A library of music and sound effects to enhance your videos
- A variety of text and title templates for adding captions and subtitles.
- Multi-layer video editing allows you to add text, stickers, and more to your videos.
- A dedicated social media export feature that allows you to quickly share your videos on different platforms.
- A wide range of resolution and aspect ratio options.
- In-app purchase options for extra features and assets
Video Templates of Filmora - Alternative to KineMaster Template
Just like KineMaster, Filmora also offers a wide range of video templates to help users create professional-looking videos quickly. These templates include different elements such as animations, text, and effects. These templates are pre-designed and customizable, allowing users to add photos, videos, and text to match their brand or style.
Filmora also provides the feature of customizing these templates according to the user’s preference, making them flexible and versatile. The templates are regularly updated with new options and designs to match the latest trends and styles.
How To Use Video Templates of Filmora for Mobile in Video Editing?
This section will show you how to use Filmora’s video templates to enhance your video editing skills. With step-by-step instructions and visual aids, this guide will make it easy for you to use Filmora’s video templates to take your videos to the next level.
Step 1. Install and launch the Filmora app on your device.
Step 2. Tap the “Template“ button on the lower right part of the interface.

Step 3. Choose the template you want to use.

Step 4. Tap the “Make Video“ button to download the template.

Step 5. Add the required number of clips to edit the template, then tap “Next.”

Step 6. You can preview the video and edit it if necessary.

Step 7. Tap the “Export“ button to save your video.

KineMaster vs. Filmora Comparison
KineMaster and Filmora are powerful video editing apps that offer a wide range of features and tools for creating professional-looking videos. In the table below, we will compare the two apps side-by-side, highlighting the similarities and differences between the two. This will help you decide which app best fits your video editing needs.
| KineMaster | Wondershare Filmora | |
|---|---|---|
| Operating System | Android and iOS | Android and iOS |
| App Store Rating | 4.7 out of 5 | 4.7 out of 5 |
| Google Play Store Rating | 4.1 out of 5 | 4.7 out of 5 |
| Pricing | Free and offers In-App PurchasesPremium Subscriptions - $79.99 | Free and offers In-App Purchases |
| Number of Templates | 800+ Templates | 1000+ Templates |
KineMaster is a powerful video editing app available on Android and iOS platforms. It has a rating of 4.7 out of 5 on the App Store and 4.1 out of 5 on the Google Play Store. The app is free to download and use but offers in-app purchases for additional features and assets. Users can also opt for a premium subscription, priced at $79.99 per year.
One of the key features of KineMaster is its templates. These templates are suitable for various purposes, like intros, outros, social media posts, etc. It offers more than 1000 templates, giving the user more options.
KineMaster is an ideal app for amateur and professional content creators who want to take their videos to the next level. This app is great for YouTubers, Social media influencers, and small businesses looking to create engaging video content.
Filmora is another alternative video editing app available on Android and iOS platforms. It has a 4.7 out of 5 on both the App Store and the Google Play Store. Like KineMaster, Filmora is free to download and use, but it also offers in-app purchases for additional features and assets.
Filmora’s key feature is also its templates. It offers a wide range of pre-designed video templates, including animations, text, and effects. Users can customize these templates by adding photos, videos, and text to match their brand or style. It also offers more than 1000 templates, making it a great choice for users looking for various options.
Filmora is an ideal app for both amateur and professional content creators. Its user-friendly interface makes it perfect for beginners new to video editing, while its powerful features make it suitable for advanced users.
People Also Ask
Whether you’re a beginner or an advanced user, this section will provide the answers you need to make an informed decision.
Q1. Does KineMaster Have Watermarks?
KineMaster does have a watermark feature for the free version of the app. When you edit a video using the app’s free version, it will add a KineMaster watermark to the bottom-right corner of your video. However, you can remove this watermark by purchasing the full version of the app or by subscribing to the KineMaster Premium.
Q2. Is KineMaster Copyright Free?
KineMaster is not a copyright-free app, but it allows you to use copyright-free music and other media within the app. KineMaster has a library of royalty-free music and sound effects that you can use in your videos without fearing copyright infringement. However, you are responsible for ensuring that all media you use within the app is not protected by copyright.
Q3. Can KineMaster Videos Be Monetized on YouTube?
Yes, KineMaster videos can be monetized on YouTube. As long as your videos adhere to YouTube’s community guidelines and terms of service, you can monetize them on the platform.
Conclusion
KineMaster and Filmora are both powerful and versatile video editing apps that are great options for anyone looking to create professional-looking videos quickly and easily. Both apps offer a wide range of features, including templates, and are available on Android and iOS platforms.
Ultimately, the best app for you will depend on your specific needs and preferences. Consider factors such as pricing, features, and the number of templates when making your decision. Both apps are great choices, but Filmora may be more suitable for beginners.
Also read:
- 2024 Approved Add Green Screen Effects in Final Cut Pro
- New Kdenlive Review – Is It The Best Video Editor?
- Updated 2024 Approved Find The Best Free Canon LUTs
- New Top 15 Best Free MP4 Video Rotators Windows, Mac, Android, iPhone & Online for 2024
- Discover How You Can Use Vectorscope to Adjust Luminance, Color Grading, and More in Your Video Editing Projects
- If You Want to Record Video Streams on Windows or Mac Using FFmpeg, Read Our Guide and Learn How to Do This with Easy Step-by-Step Instructions for 2024
- New 2024 Approved How to Make Video Fade to Black in Movie Maker Easily
- Updated How Long Does It Take To Edit A Video
- New 2024 Approved Introduction to The Best Cinematic LUTs in The Market
- Updated Beginners Guide About WMV Format and Best WMV Video Editor
- Do You Need to Create a Video for Your Business Online but Feel You Do Not Have the Skill and Time to Do That? Try Out These AI Video Generators that Will Work for You to Carry Out Tasks Effectively
- In 2024, Here We Are Going to Show You the Best Effects to Appear on Camera Made with Filmora
- Wondering How to Make a Perfect Love Video to Express Your Love for Your Special One and Share with the World? Here Are the Best Love Video Makers with Music
- New Perfect Moody LUTs for VN Editor An Overview
- In 2024, Do You Want to Get Green Screen Effects on Your Video without Green Screen Setup in Your Background? Learn How to Get Virtual Green Screen Background and Shoot Videos Like a Pro
- New In 2024, Add Camera Shake to Video in Adobe After Effects
- The Quick and Simple Way to Mirror Video in Premiere Pro for 2024
- How to Be a YouTube Vlogger
- The Ultimate Guide to GIF for Discord Profile for 2024
- New How To Make a Timelapse in After Effects for 2024
- New Top 5 Free Online Video Filter Editors Improve Your Videos with Filters for 2024
- Updated 2024 Approved All About GIF Keyboard That You May Want to Know
- In 2024, How to Unlock SIM Card on Nokia G42 5G online without jailbreak
- New 2024S Top 8 Live Selling Platforms Beginners Tool Tip
- Lock Your Nubia Phone in Style The Top 5 Gesture Lock Screen Apps
- 8 Solutions to Solve YouTube App Crashing on Infinix Zero 30 5G | Dr.fone
- How to recover deleted photos from Motorola Edge 40 Pro.
- How Can We Bypass Motorola Edge 40 Pro FRP?
- In 2024, The Updated Method to Bypass Vivo Y27 5G FRP
- In 2024, How to Make GIF Instagram | Quick Tips
- In 2024, Apple ID Unlock On Apple iPhone 14 Plus? How to Fix it?
- 5 Ways to Restart Samsung Galaxy A23 5G Without Power Button | Dr.fone
- In 2024, 9 Best Free Android Monitoring Apps to Monitor Phone Remotely For your OnePlus 12 | Dr.fone
- In 2024, 5 Ways to Send Ringtones from Apple iPhone SE to iPhone Including iPhone 15 | Dr.fone
- How to Track a Lost HTC U23 for Free? | Dr.fone
- Can I Remove the Apple Watch Activation Lock By iPhone 15 without the Previous Owner?
- How to Use Phone Clone to Migrate Your Infinix Smart 8 Data? | Dr.fone
- In 2024, How to Track Realme C51 Location by Number | Dr.fone
- Process of Screen Sharing Honor X50 to PC- Detailed Steps | Dr.fone
- 7 Solutions to Fix Error Code 963 on Google Play Of Xiaomi Civi 3 | Dr.fone
- In 2024, Latest Guide How To Bypass Vivo Y56 5G FRP Without Computer
- Top IMEI Unlokers for Apple iPhone 12 mini and Android Phones
- Updated Convert Animated GIF From Video for 2024
- In 2024, Ultimate Guide to Catch the Regional-Located Pokemon For Xiaomi Redmi Note 12 5G | Dr.fone
- Title: New How to Convert SRT to DOCX
- Author: Chloe
- Created at : 2024-05-20 03:38:33
- Updated at : 2024-05-21 03:38:33
- Link: https://ai-editing-video.techidaily.com/new-how-to-convert-srt-to-docx/
- License: This work is licensed under CC BY-NC-SA 4.0.
