:max_bytes(150000):strip_icc():format(webp)/AnneParkShedloskytvOS-2d4178dd6b7d46a08c34ab8b750fe23e.jpg)
New How to Create a Special Animated Transition in Filmora in Just 2 Minutes. This Simple Step-by-Step Guide Will Show You the Easy Way

How to Create a Special Animated Transition in Filmora in Just 2 Minutes. This Simple Step-by-Step Guide Will Show You the Easy Way
Preparation
What you need to prepare:
- A computer (Windows or macOS)
- Your video materials.
- Filmora video editor
Step 1
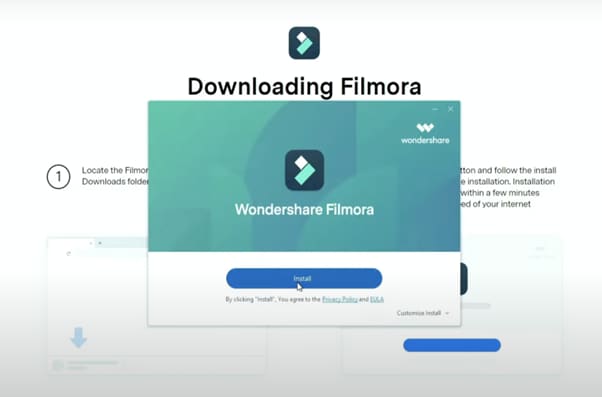
First off, download the Filmora video editor . After it downloads, click install and follow the provided steps.
Step 2
After installing, the editor will start automatically. When it does, click on the “New Project” button to finally open the editor.

Step 3
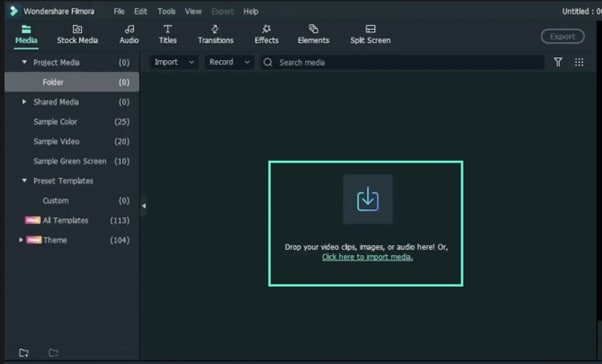
From the upper-left side of the screen, click the highlighted text to import media. This is where you insert your video files into the editor. Once the folder opens, select the videos you want to import and click “Open”.
Step 4
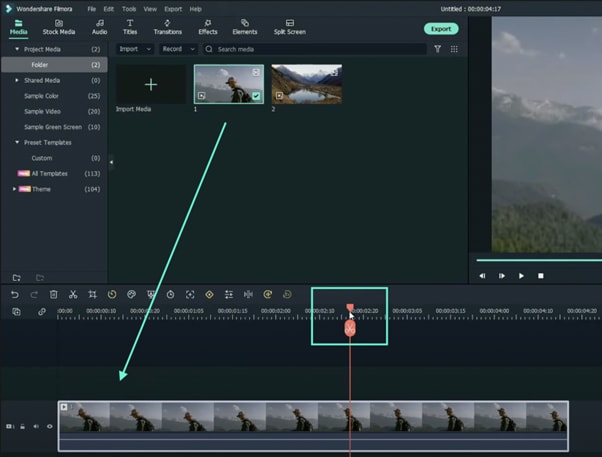
Drag your first clip to the timeline. Then, move the Playhead to where you want to start your transition.
Step 5
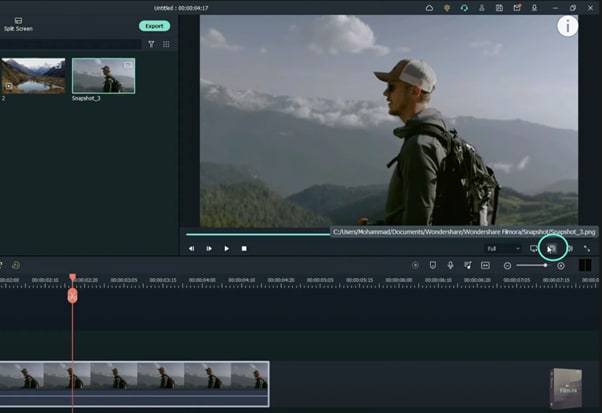
Take a snapshot of this frame.
Step 6
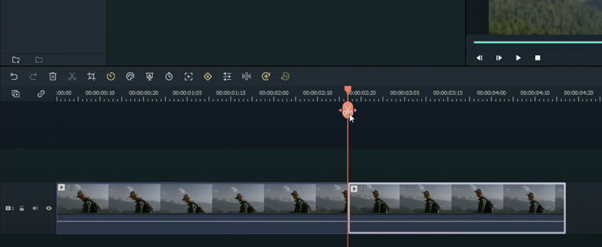
Split the footage and delete the part on the right side of the Playhead.
Step 7
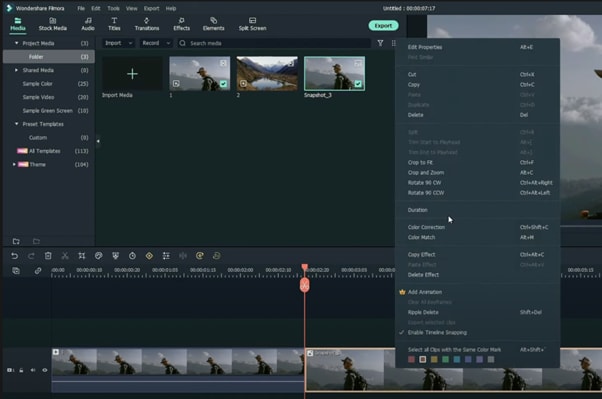
Without moving the Playhead, simply drag the snapshot you took earlier. Right-click on the snapshot in the timeline and click on “Duration”. Then, set the duration to 1 second. Finally, click “OK”.
Step 8
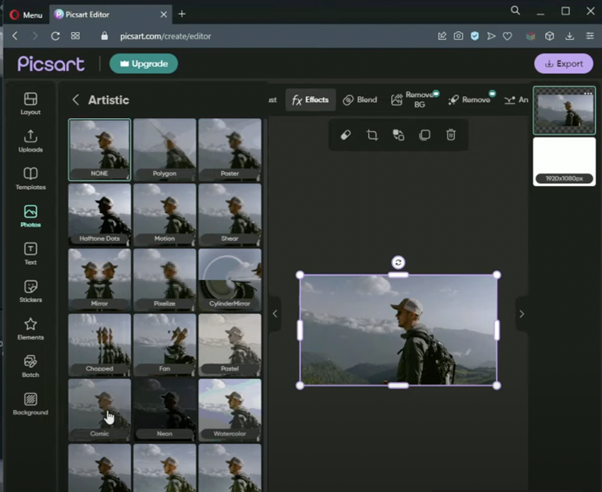
Open your browser and go to the Picsart photo effects editor . Upload the same snapshot we made in Filmora and apply the “Comic” preset on it. Then, download the photo and import it back into Filmora.
Step 9
Drag the snapshot with the Comic preset to the Timeline and set its duration to 1 second as well.
Step 10
Repeat the same process with the second clip. Take a snapshot, add the Comic effect, and import it back into Filmora. But this time, align the clips as follows: Add the snapshot with the comic preset first, then the snapshot without any effects, and then the video. It should look like this.

Step 11
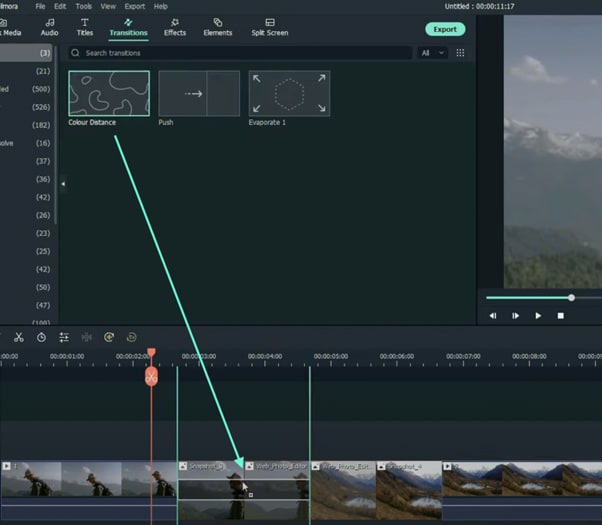
Go to the Transitions tab and drag the “Color Distance” transition between the first and second snapshot on your Timeline. Then, right-click on the transition box in the timeline and select “Edit Properties”. From there, change the duration of the transition to 1 second and click “OK”.
Step 12
Drag the “Push” transition between the next two snapshots. Set its duration to 1 second as well by right clicking the transition and going to “Edit Properties”.
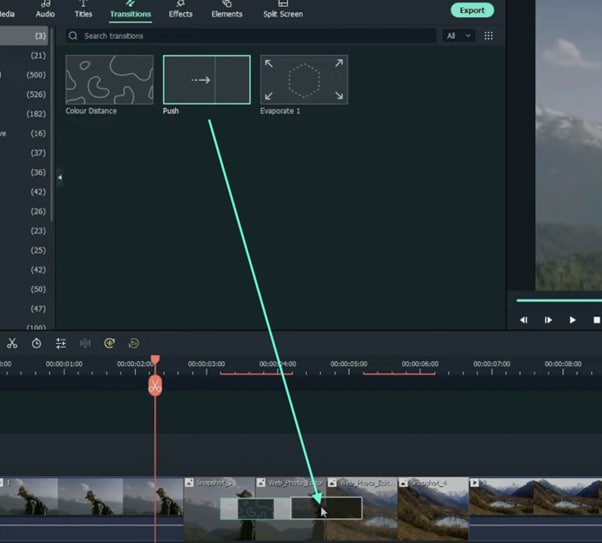
Step 13
Place the last transition between the last two snapshots in your timeline. This time, we’re going to use the “Evaporate” transition. Set its duration to 1 second as well.
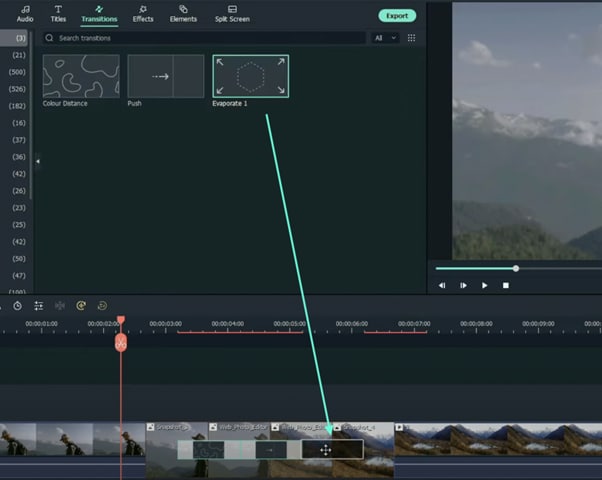
Step 14
The final step is to render the video. Click this button and you will finally be done.
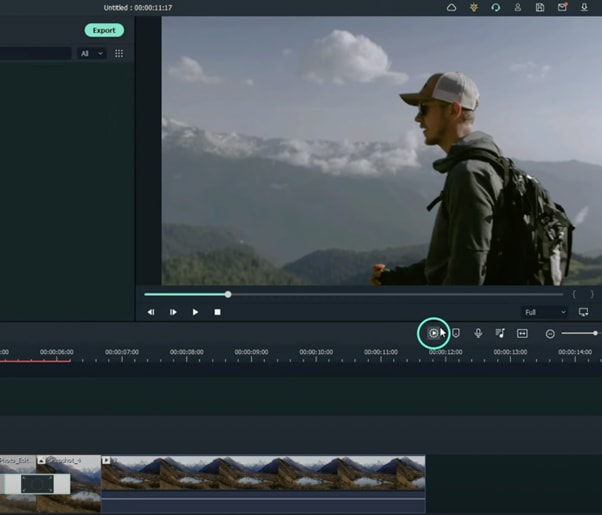
Summary
What you’ve learned:
- How to add any type of transition to video clips and images in Filmora
- How to take quick snapshots of any frame in Filmora
- A quick way to Render videos and watch the final preview
- Add custom effects to images
What you need to prepare:
- A computer (Windows or macOS)
- Your video materials.
- Filmora video editor
Step 1
First off, download the Filmora video editor . After it downloads, click install and follow the provided steps.

Step 2
After installing, the editor will start automatically. When it does, click on the “New Project” button to finally open the editor.

Step 3
From the upper-left side of the screen, click the highlighted text to import media. This is where you insert your video files into the editor. Once the folder opens, select the videos you want to import and click “Open”.

Step 4
Drag your first clip to the timeline. Then, move the Playhead to where you want to start your transition.

Step 5
Take a snapshot of this frame.

Step 6
Split the footage and delete the part on the right side of the Playhead.

Step 7
Without moving the Playhead, simply drag the snapshot you took earlier. Right-click on the snapshot in the timeline and click on “Duration”. Then, set the duration to 1 second. Finally, click “OK”.

Step 8
Open your browser and go to the Picsart photo effects editor . Upload the same snapshot we made in Filmora and apply the “Comic” preset on it. Then, download the photo and import it back into Filmora.

Step 9
Drag the snapshot with the Comic preset to the Timeline and set its duration to 1 second as well.
Step 10
Repeat the same process with the second clip. Take a snapshot, add the Comic effect, and import it back into Filmora. But this time, align the clips as follows: Add the snapshot with the comic preset first, then the snapshot without any effects, and then the video. It should look like this.

Step 11
Go to the Transitions tab and drag the “Color Distance” transition between the first and second snapshot on your Timeline. Then, right-click on the transition box in the timeline and select “Edit Properties”. From there, change the duration of the transition to 1 second and click “OK”.

Step 12
Drag the “Push” transition between the next two snapshots. Set its duration to 1 second as well by right clicking the transition and going to “Edit Properties”.

Step 13
Place the last transition between the last two snapshots in your timeline. This time, we’re going to use the “Evaporate” transition. Set its duration to 1 second as well.

Step 14
The final step is to render the video. Click this button and you will finally be done.

Summary
What you’ve learned:
- How to add any type of transition to video clips and images in Filmora
- How to take quick snapshots of any frame in Filmora
- A quick way to Render videos and watch the final preview
- Add custom effects to images
What you need to prepare:
- A computer (Windows or macOS)
- Your video materials.
- Filmora video editor
Step 1
First off, download the Filmora video editor . After it downloads, click install and follow the provided steps.

Step 2
After installing, the editor will start automatically. When it does, click on the “New Project” button to finally open the editor.

Step 3
From the upper-left side of the screen, click the highlighted text to import media. This is where you insert your video files into the editor. Once the folder opens, select the videos you want to import and click “Open”.

Step 4
Drag your first clip to the timeline. Then, move the Playhead to where you want to start your transition.

Step 5
Take a snapshot of this frame.

Step 6
Split the footage and delete the part on the right side of the Playhead.

Step 7
Without moving the Playhead, simply drag the snapshot you took earlier. Right-click on the snapshot in the timeline and click on “Duration”. Then, set the duration to 1 second. Finally, click “OK”.

Step 8
Open your browser and go to the Picsart photo effects editor . Upload the same snapshot we made in Filmora and apply the “Comic” preset on it. Then, download the photo and import it back into Filmora.

Step 9
Drag the snapshot with the Comic preset to the Timeline and set its duration to 1 second as well.
Step 10
Repeat the same process with the second clip. Take a snapshot, add the Comic effect, and import it back into Filmora. But this time, align the clips as follows: Add the snapshot with the comic preset first, then the snapshot without any effects, and then the video. It should look like this.

Step 11
Go to the Transitions tab and drag the “Color Distance” transition between the first and second snapshot on your Timeline. Then, right-click on the transition box in the timeline and select “Edit Properties”. From there, change the duration of the transition to 1 second and click “OK”.

Step 12
Drag the “Push” transition between the next two snapshots. Set its duration to 1 second as well by right clicking the transition and going to “Edit Properties”.

Step 13
Place the last transition between the last two snapshots in your timeline. This time, we’re going to use the “Evaporate” transition. Set its duration to 1 second as well.

Step 14
The final step is to render the video. Click this button and you will finally be done.

Summary
What you’ve learned:
- How to add any type of transition to video clips and images in Filmora
- How to take quick snapshots of any frame in Filmora
- A quick way to Render videos and watch the final preview
- Add custom effects to images
What you need to prepare:
- A computer (Windows or macOS)
- Your video materials.
- Filmora video editor
Step 1
First off, download the Filmora video editor . After it downloads, click install and follow the provided steps.

Step 2
After installing, the editor will start automatically. When it does, click on the “New Project” button to finally open the editor.

Step 3
From the upper-left side of the screen, click the highlighted text to import media. This is where you insert your video files into the editor. Once the folder opens, select the videos you want to import and click “Open”.

Step 4
Drag your first clip to the timeline. Then, move the Playhead to where you want to start your transition.

Step 5
Take a snapshot of this frame.

Step 6
Split the footage and delete the part on the right side of the Playhead.

Step 7
Without moving the Playhead, simply drag the snapshot you took earlier. Right-click on the snapshot in the timeline and click on “Duration”. Then, set the duration to 1 second. Finally, click “OK”.

Step 8
Open your browser and go to the Picsart photo effects editor . Upload the same snapshot we made in Filmora and apply the “Comic” preset on it. Then, download the photo and import it back into Filmora.

Step 9
Drag the snapshot with the Comic preset to the Timeline and set its duration to 1 second as well.
Step 10
Repeat the same process with the second clip. Take a snapshot, add the Comic effect, and import it back into Filmora. But this time, align the clips as follows: Add the snapshot with the comic preset first, then the snapshot without any effects, and then the video. It should look like this.

Step 11
Go to the Transitions tab and drag the “Color Distance” transition between the first and second snapshot on your Timeline. Then, right-click on the transition box in the timeline and select “Edit Properties”. From there, change the duration of the transition to 1 second and click “OK”.

Step 12
Drag the “Push” transition between the next two snapshots. Set its duration to 1 second as well by right clicking the transition and going to “Edit Properties”.

Step 13
Place the last transition between the last two snapshots in your timeline. This time, we’re going to use the “Evaporate” transition. Set its duration to 1 second as well.

Step 14
The final step is to render the video. Click this button and you will finally be done.

Summary
What you’ve learned:
- How to add any type of transition to video clips and images in Filmora
- How to take quick snapshots of any frame in Filmora
- A quick way to Render videos and watch the final preview
- Add custom effects to images
AVI Editors for Windows 11/10/8.1/8/7: Easily Edit AVI Files on PC
Video is continually changing the way we express and communicate with the world. Several people record vlogs and share them with their family and friends. The same goes for YouTubers and business owners who create videos to boost their business online. Due to this, different video editors are available for various video formats. A common video format is AVI, and if you’re wondering what the best AVI editor for different Window versions is, you’re in luck.
If you’re new to the video editing space, you might be wondering which is the best choice for your Windows format. This article explores the best AVI editors available. We cover both paid and free editors that you can use to edit AVI files on PC easily. So without further ado, let’s begin.
Best AVI Editor to Edit AVI Video on Windows - Filmroa Video Editor
Supported System: Windows and Mac
Most free editing software is usually too simple to meet your immediate demands, or they’re too challenging for you to understand the workflow. Some AVI editors for Windows lack crucial editing features like audio editing and color correction features. An AVI editor that successfully bridges the gap to become the best AVI editor for Windows on our list is Filmora Video Editor .
This editor offers excellent performance and a fast editing process that takes user experience to a new level. It is ideal for beginners because of its intuitive interface. Additionally, intermediate and professional AVI editors can also use this video editor to create stylish videos and utilize its built-in professional effects.
For Win 7 or later (64-bit)
For macOS 10.14 or later
Wondershare Filmora Features
- It is versatile and supports other video formats like MKV, MP4, MOV, etc.
- Users can crop, cut, trim, split, and combine with just a few clicks.
- Access to advanced video effects like motion elements, royalty-free music, transition, animated titles, and more
- Footage can look like Hollywood videos with Filmora color tuning features.
- With background noise removal, audio keyframing, and the audio equalizer tool, you can edit sounds.
- It provides you with real-time rending to ensure a smooth editing experience.
- You can burn videos to DVD, transfer them to various devices or upload them on YouTube or other video streaming platforms.
How to Edit Videos on Windows 11/10/8/7 Using Wondershare Filmora
Editing your videos on Filmora is relatively easy and takes just a few minutes. Keep reading to learn how to edit AVI videos on Windows 11/10/8/7 using Wondershare Filmora.
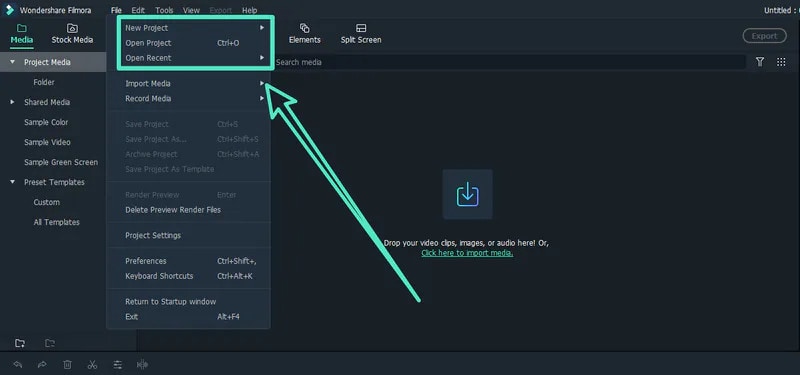
Step 1: Import AVI Video
The first step you have to take is adding the AVI video you would like to edit with Filmora. You can do this by creating a new project. Then, click on New Project on the homepage.
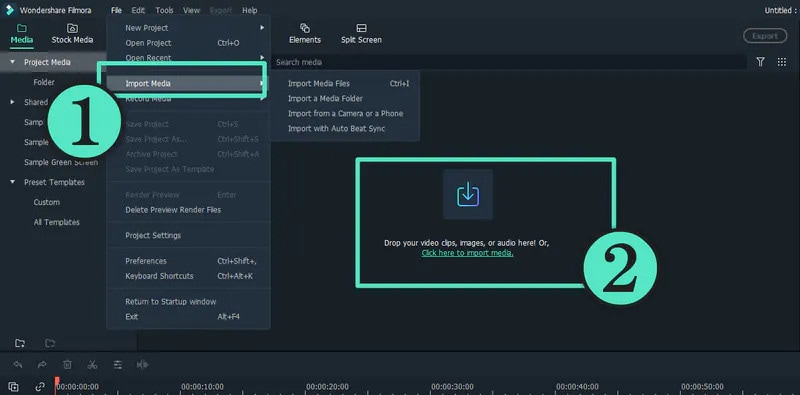
Once it opens a new page, click the + icon to browse the files on your device or import them from an external device.
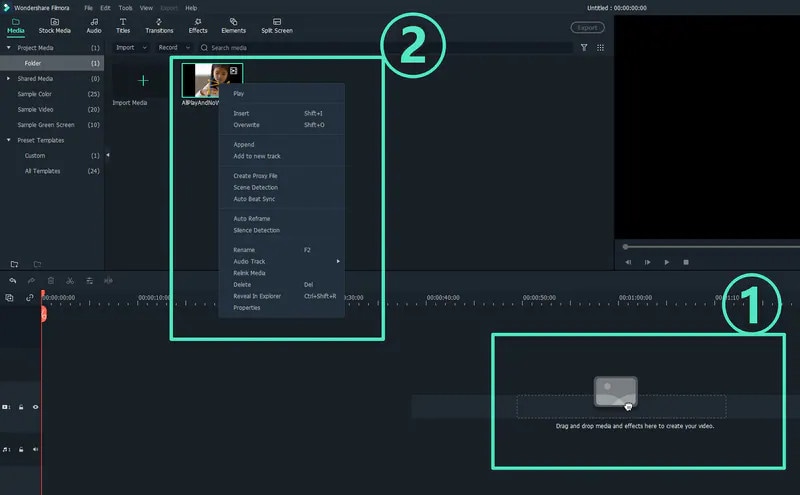
Step 2: Edit AVI Videos
After importing your videos, you can start editing and arranging elements in your video timeline. You can overwrite, append, and carry out other editing options.
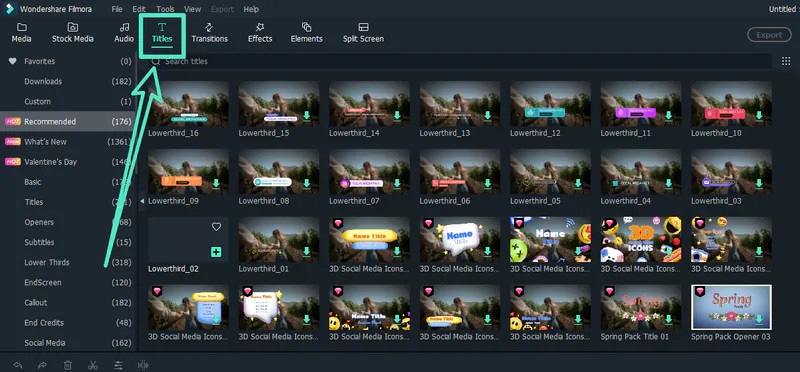
You can also add effects, titles, filters, and music using Filmora.
Step 3: Save and Share Edited AVI Video Files
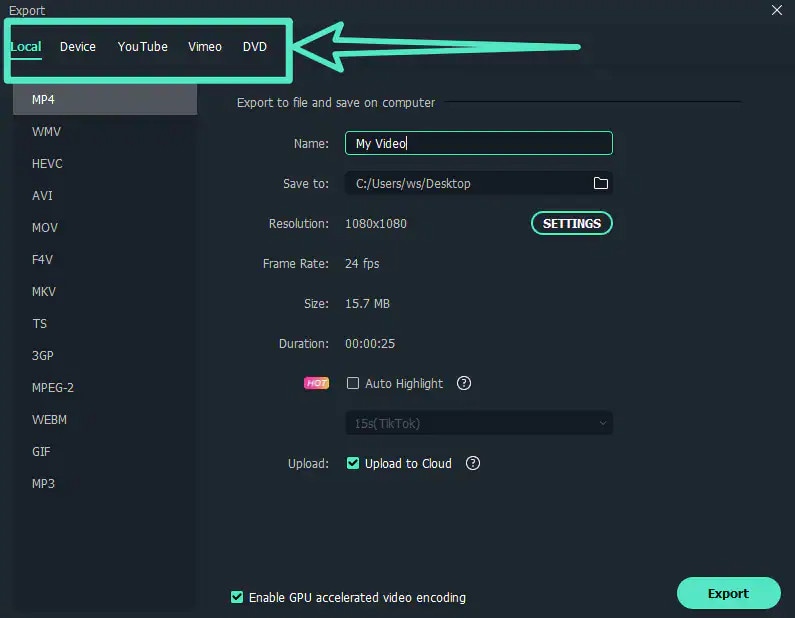
Once you’re done editing your video using Filmora Video Editor, you’re ready to save your file. You can choose to save your video in a new format. There are different video formats available to choose from. You can either save it to a select location on your PC or export it to any preferred device. Filmora Video Editor also allows you to upload directly to a video streaming platform or burn to a DVD.
More Free AVI Editor for Windows to Edit AVI Videos
This section will list some of the best free AVI editors for Windows to successfully edit your AVI editors. You would have to download these programs as they offer you more editing tools than an online AVI editor.
Microsoft Windows 10/11 Photos App
Supported System: Windows
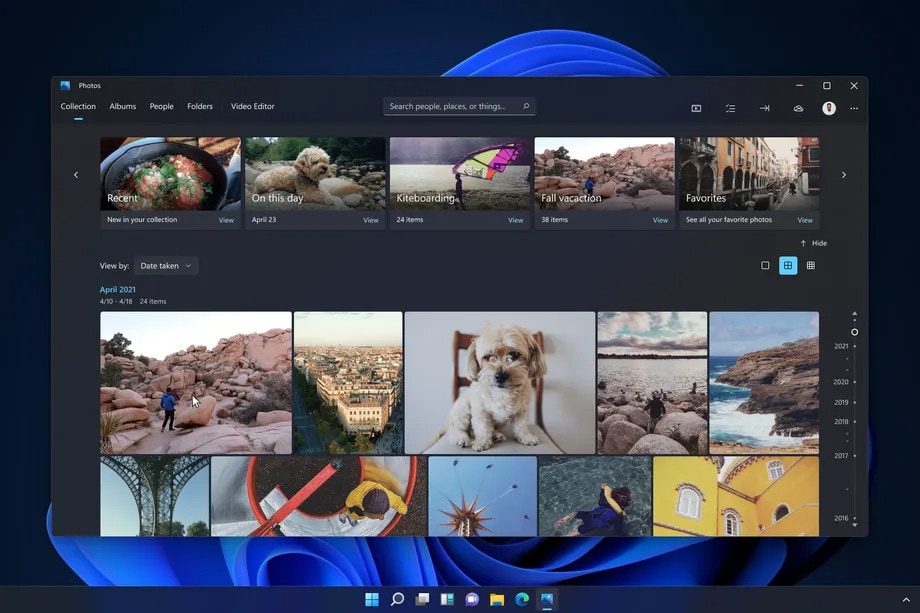
This free AVI video editor is compatible with Windows 10/11 and comes prebuilt into your Windows 10 PC. If you’re looking for free AVI editing software, this is one of the best options you would find. One of the benefits of using this AVI video editor is that it eliminates the need for additional downloads. It comes pre-installed. However, if you can’t find this Photos App on your Windows 10/11, you can download it from Microsoft Store.
It is lightweight and allows you easily edit your AVI videos. You can also convert images into an AVI video under the Automatic Video mode. This helps save time if you don’t want to do much editing. However, if there are features you would like to edit in your video, you can use the custom video mode to trim, change audio volume, resize video, and include filters, motion, text, and several 3D effects in your AVI video.
However, you should note that there’s no timeline, and there are some advanced features like video stabilization, split tools, and much more missing on this free AVI editor for Windows. However, it is versatile and supports several other video formats.
Pros
- It supports several video formats, including AVI, MPE, MPG, ASF, MP2, and many more
- It is entirely free
- Ideal for beginners with few editing needs
- There’s no need for a new download as it comes built-in
Cons
- It doesn’t support several modern file formats
- The output formats are limited
- It lacks advanced video editing features
How to Edit Using Microsoft Windows 10/11 Photos App
Editing your AVI video with Microsoft Photos App is relatively easy; follow the steps below.
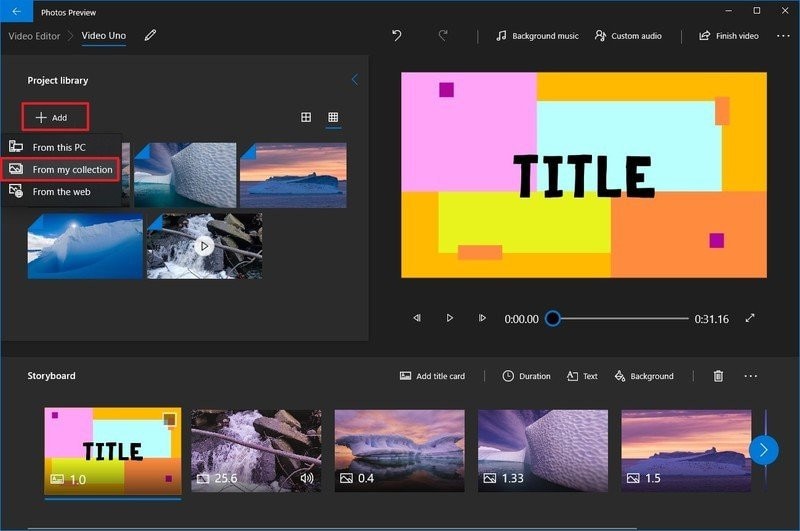
- First, click the ‘add’ button in the left corner of the page and select the video you want to edit
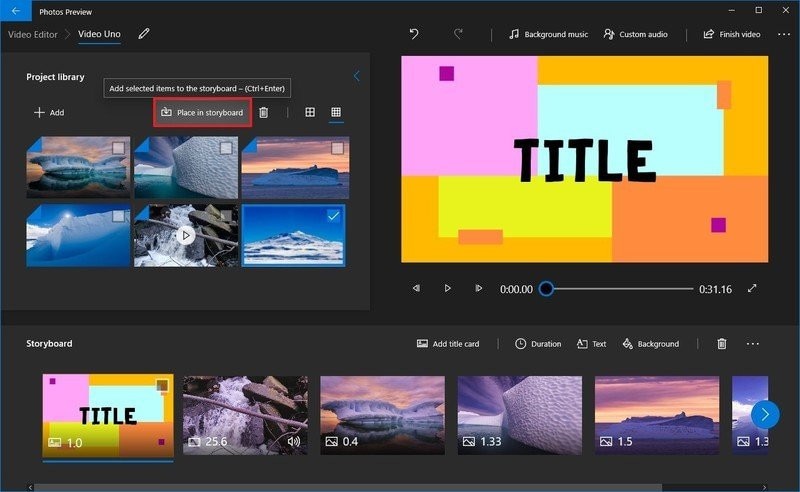
- Next, check the media elements necessary for your video and then tap on ‘place in storyboard.’
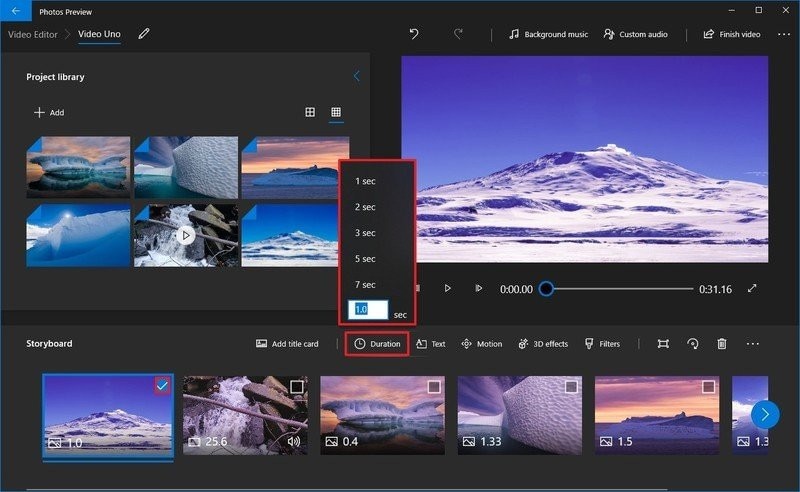
- Now you can start editing your video. One of the ways to edit your video is to extend the duration of your video by clicking the duration button.
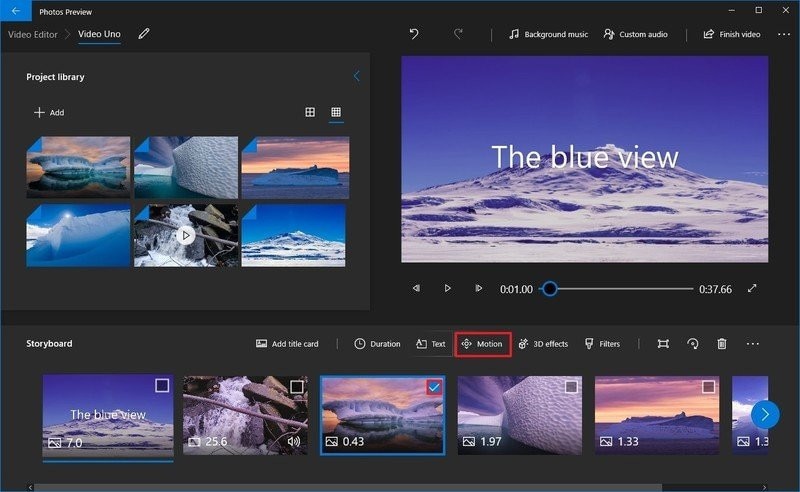
- You can also add motion to the video under the ‘storyboard’ section. Select the media element you would like to edit and hit the ‘motions’ button. You can then select different motion effects.
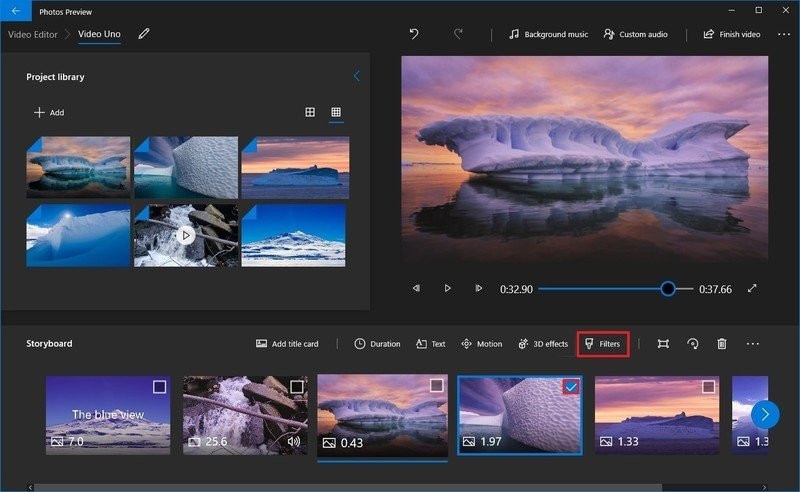
- Additionally, you can add filters under the storyboard section.
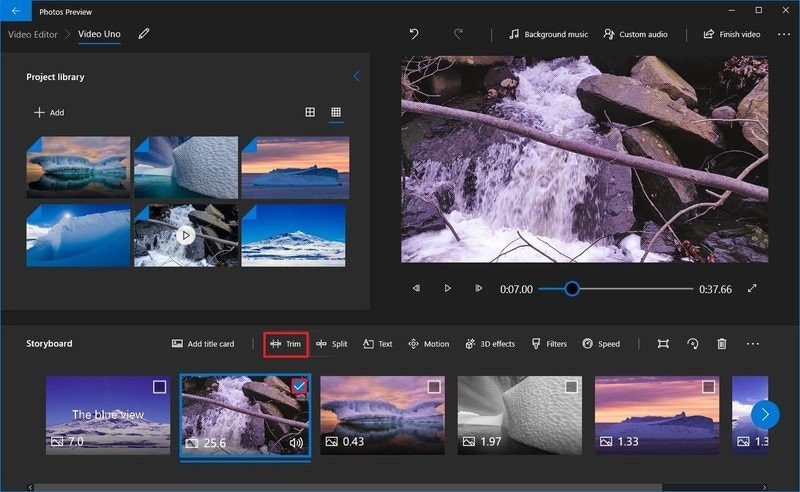
- Editors can also trim and split AVI video on this Photos app.
- Once you’re done editing, click on ‘save as’ to save your edited AVI video.
OpenShot – Open Source Video Editor
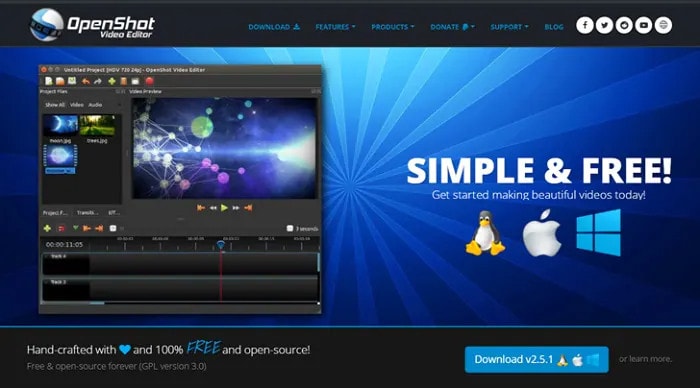
Supported System: Windows, Mac and Linus
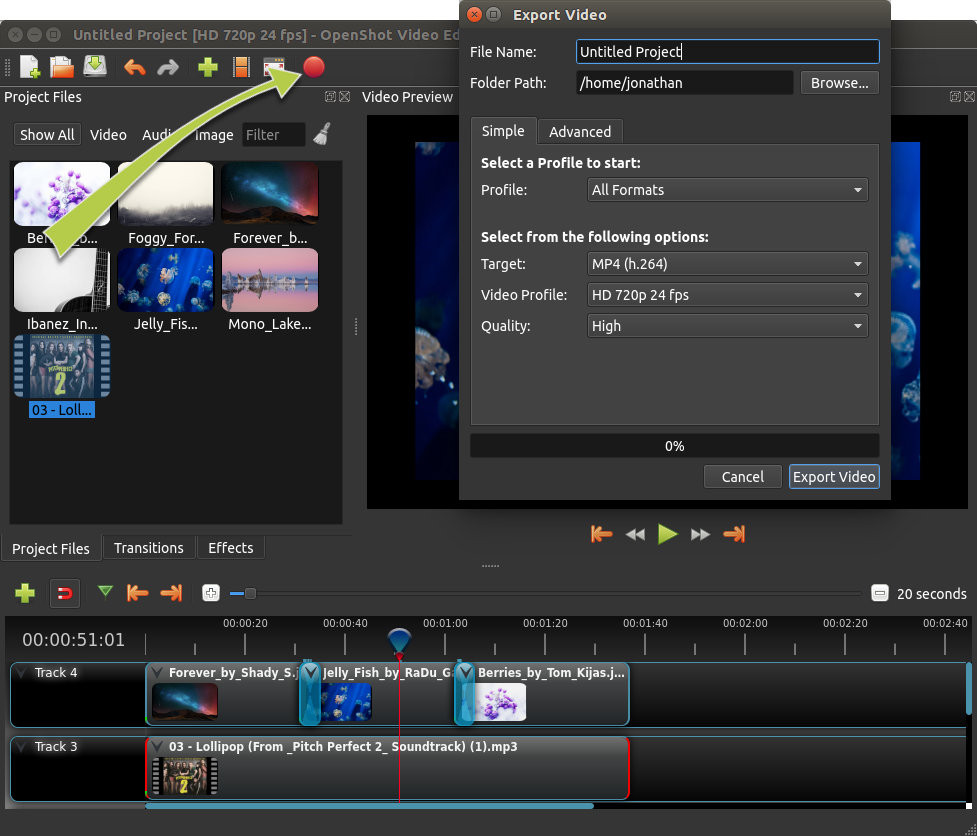
If you want an AVI editor compatible with Windows 10/11/8/7, you should try OpenShot – Open Source Video Editor. It is ideal for carrying out basic video editing like trimming and slicing. This video editor also offers several transitions and audio effects to help you make simple videos.
There are unlimited video tracks available on OpenShot; this means you can add as many audio and video clips.
It also offers you tile templates and video formats. If you want to add more touches to your video, this free AVI editor for Windows will help you achieve that. Other impressive editing features are available on this AVI editor, like slow-motion effects, blending modes, 3D animations, and many more. Additionally, the frame and keyframes accuracy feature helps you create detailed edits. You’ll easily customize your AVI video to your preference with this platform.
When exporting your file, you can export it in varying formats. You can also upload your AVI video directly to YouTube or your social media accounts. Despite the professional-level tool, the user interface is intuitive, which simplifies the editing process. However, you might find that it lacks some of the advanced editing features you would find in other AVI editors.
Pros
- It features an intuitive user interface
- It offers several editing tools for beginners and intermediate users
- It allows you to add as many audio and video tracks as you would prefer
- It is entirely free
- There are varying output formats for your selection
Cons
- Limited advanced editing tools
- OpenShot can be slow and laggy sometimes
How to Edit AVI Video With OpenShot
Using OpenShot to edit your AVI videos is relatively easy. The steps below will explain the basics and how you can edit within minutes.
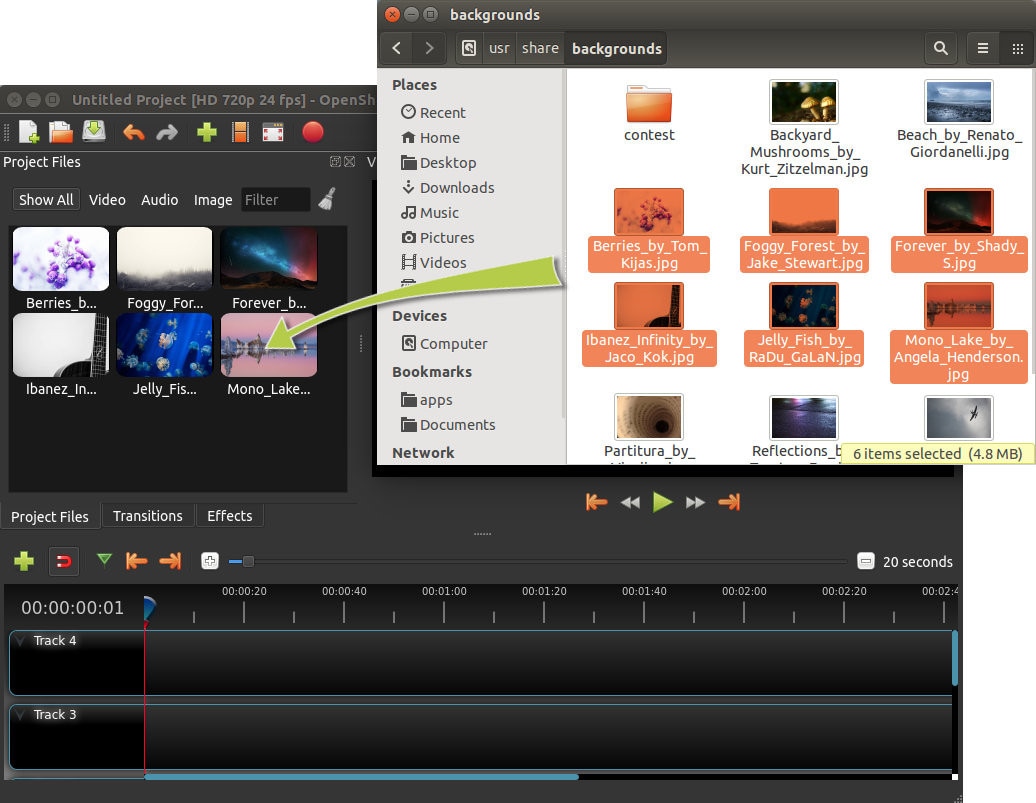
- First, you have to import your media file into OpenShot.
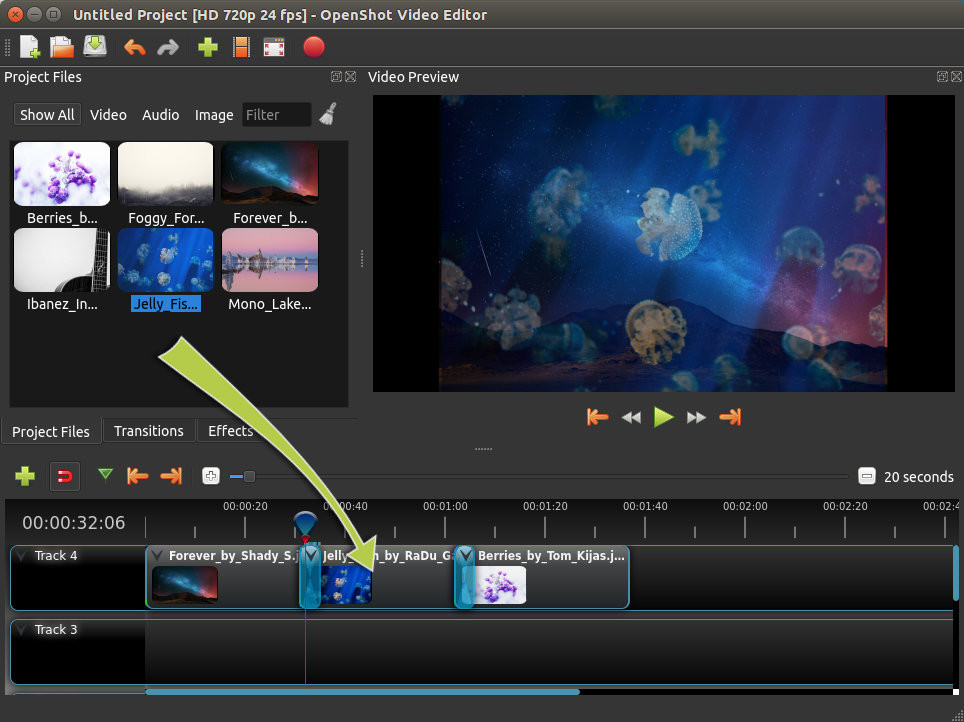
- Next, arrange the videos on the timeline. If two or more clips overlap, this AVI editor automatically creates a smooth fade between them.
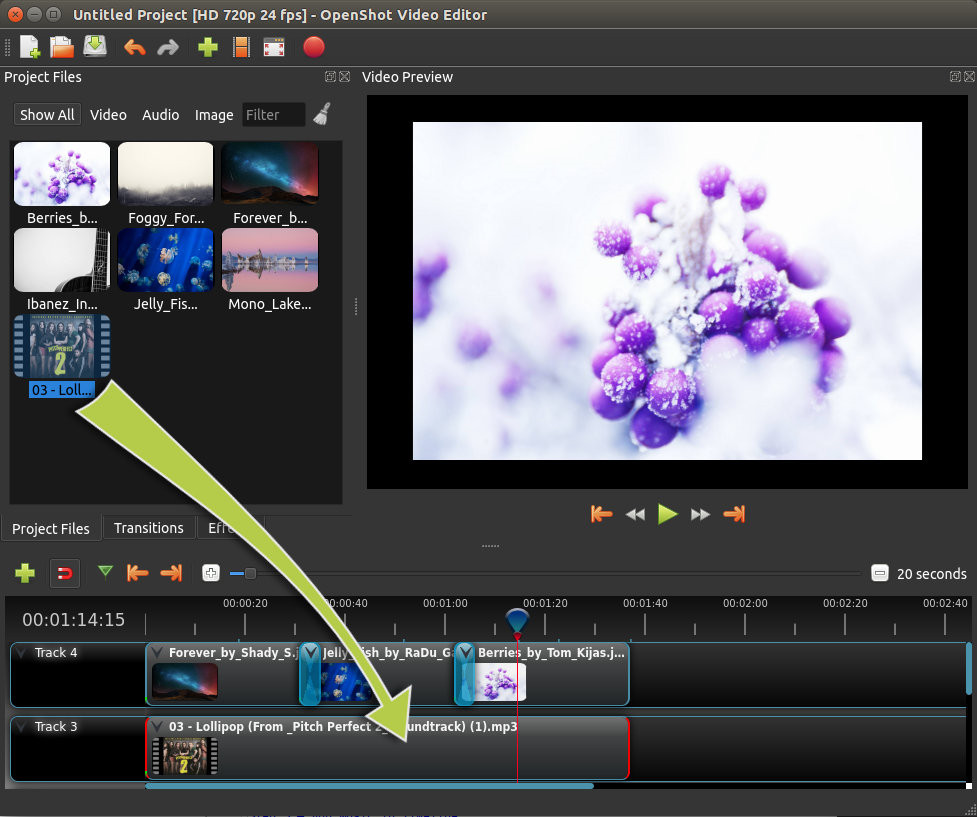
- You can then edit using the different available tools. OpenShot also allows you to add music to the timeline.
- After editing, preview the video project and export. You can also share directly to streaming platforms like YouTube, Vimeo, and more.
VSDC Video Editor – Free Movie Editor
Supported System: Windows and Mac
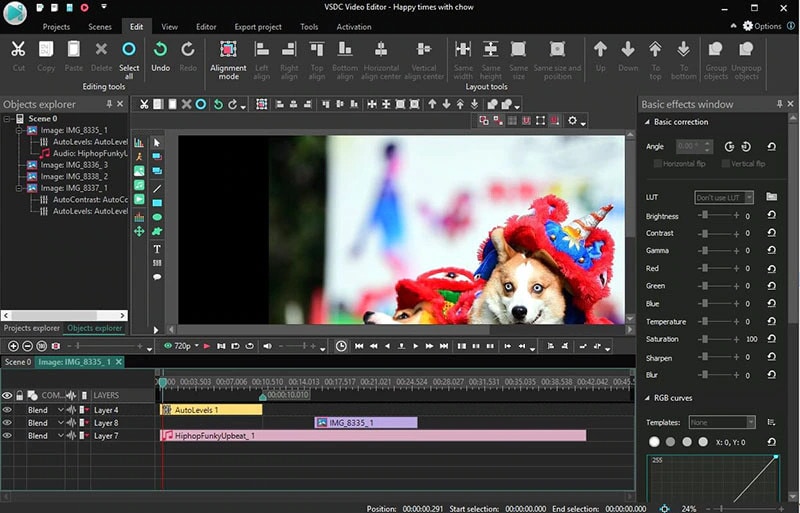
This AVI video editor is designed to ensure an excelling editing process for users on Windows 10. Therefore, even beginners can utilize this video editor to edit their media projects. Although it is free, it offers powerful editing features to take your AVI video to the next level. There are many features like filters, transition effects, overlays, color correction, and many more you can use.
Although it supports AVI video files, it also supports several popular media file formats. You can also save your AVI video in a new format after editing due to its effective video converter tools. Additionally, VSDC Video Editor is a non-linear tool that allows you to easily place video clips in the timeline.
You can save your edited AVI videos to your PC or upload them directly to different video streaming platforms like YouTube, Instagram, Vimeo, etc. We also love that it allows you to edit HD and 4k videos without compromising the quality. This isn’t a common feature with most free AVI video editing software.
Pros
- It is a free video editing software for Windows 10
- It is versatile and supports different video and audio formats
- There is an excellent selection of filters, effects, and transitions
- You can convert AVI videos to a new format with its built-in video converter
- It features an intuitive interface that’s friendly to beginners
Cons
- Technical support isn’t free
- It doesn’t offer professional video editing tools
Steps to Edit AVI Videos Using VSDC Video Editor
This is a simple AVI editor to use, and the steps below simplify the process for you even further; let’s take a look.
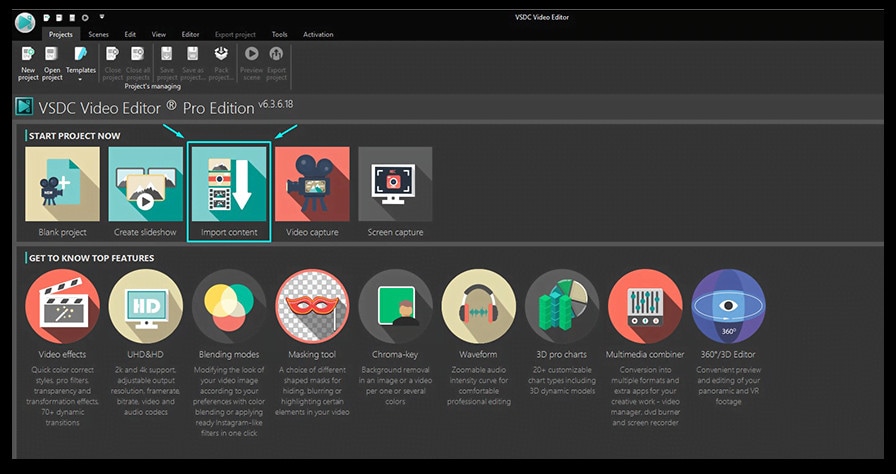
- Firstly, import your video into the VSDC Video editor by clicking the ‘import content’ button.
- Once you choose a file on your Windows PC, the app will ask if you would like to change the resolution and several more parameters.
- You can start editing your videos with the different tools available, like cutting and splitting.
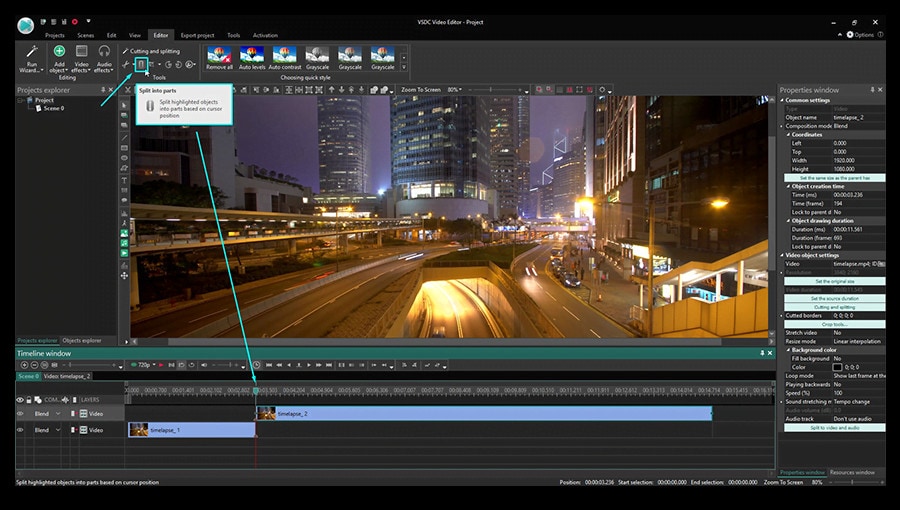
- You can also crop the video if necessary.
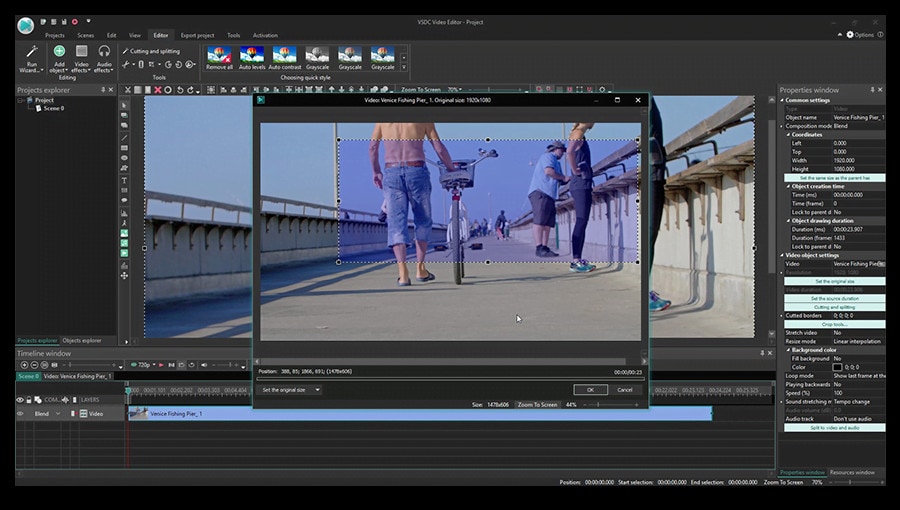
- Another option is to apply different effects and transitions to your AVI video.
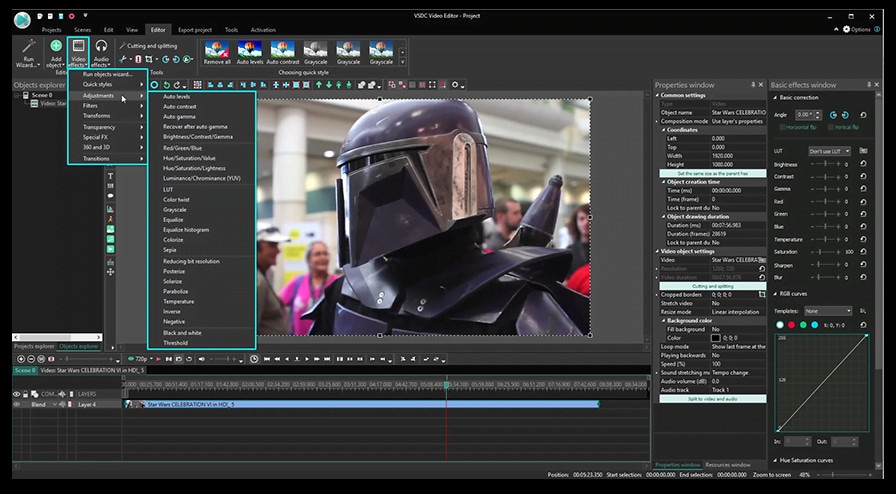
- Once you’re done editing your video, you can then export it. VSDC allows you to choose the output format. This is the best time to select a different format if that’s the goal.
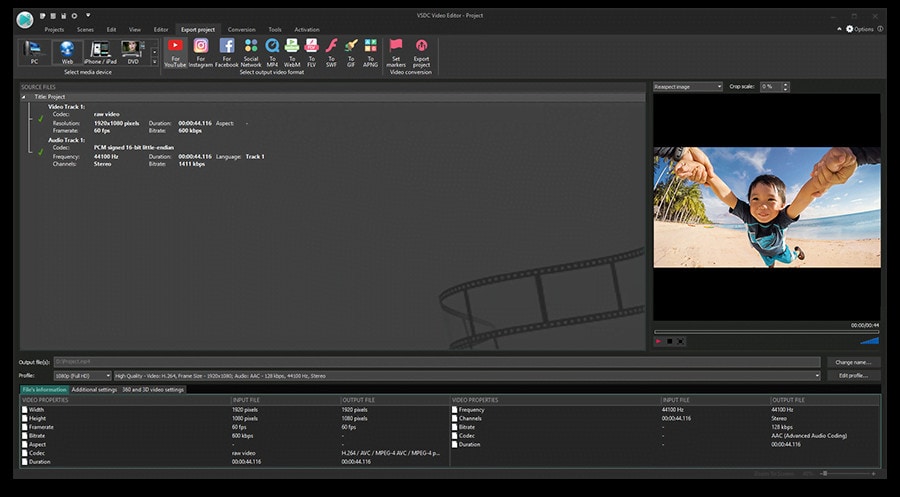
- Alternatively, you can share your video directly to YouTube and other video streaming platforms.
More Paid AVI Editor for Windows to Edit AVI Videos
Although there are free AVI editors, they usually come with limited editing features. If you want an AVI editor that offers more editing features for professionals, you should try paid AVI editor for Windows. This section explores the top three paid AVI editors you can use to edit AVI videos on Windows.
Movavi Video Editor Plus
Supported System: Windows and Mac
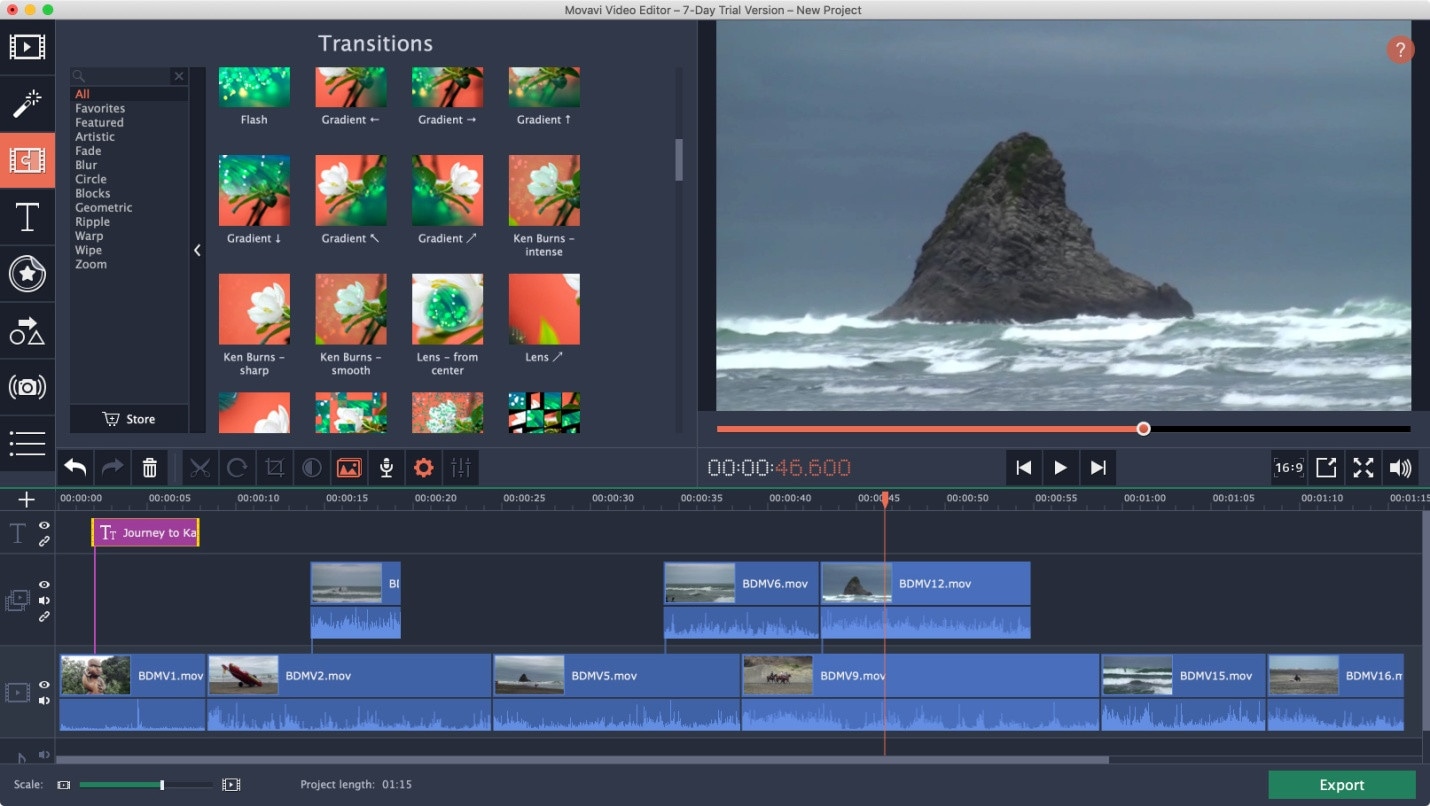
This paid AVI video editor is compatible with Windows 10 and higher. It is an AVI editing tool that offers a user-friendly interface and advanced editing features for professionals. This video editor is compatible with Windows and Mac and supports all the popular video codecs to provide more options. It is pretty easy to navigate and master, so beginners can also utilize this AVI editor to improve their editing skills.
The best part is that you don’t need it offers all you need for basic editing and advanced video enhancement. You can expect a professional quality when you utilize this editing tool. It is great for all experience levels. You can integrate various visual and audio effects in your video using Movavi Video Editor Plus. It also allows you easily edit, trim, crop, and rotate your videos. Additionally, you can include subtitles, headings, and titles in your AVI video.
If you want to take your video to the next level, you can explore the different media options like filters, animations, music, transitions, and many more from its library. You can also save your AVI video to your PC or share it directly to YouTube to save space on your PC.
Pros
- It offers you an easy to use and intuitive interface
- Ideal for beginners and professionals
- Ensures professional and top-quality results
- It supports various file formats
- Allows direct sharing to video streaming platforms
Cons
- The free trial is relatively limited
- It doesn’t allow more than one project at a time
Steps to Edit AVI Video Using Movavi Video Editor Plus
Using this AVI editor for Windows is quite easy. However, the step-by-step guide below will help you get through the editing process within minutes.
- First, install the Movavi Video Editor Plus software on your PC
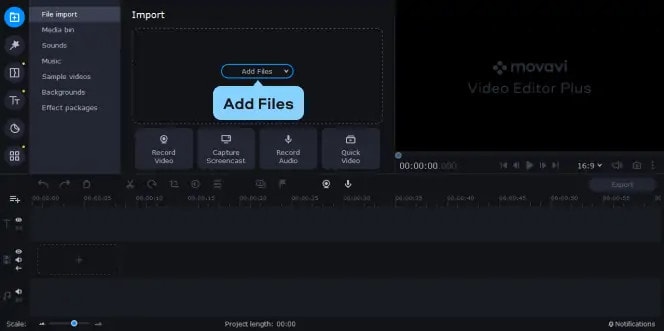
- Next, click ‘add files’ to add your AVI video files. Afterward, drag the selected video into the video editor timeline.
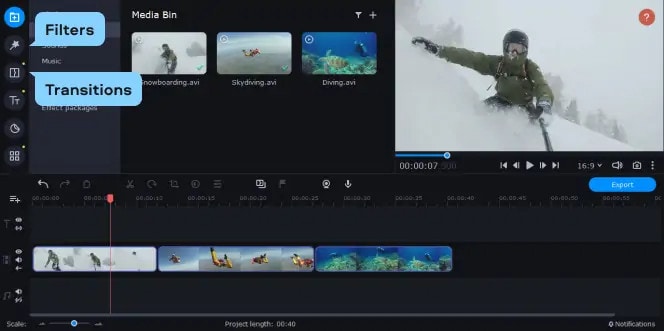
- You can then start editing your video by applying filters, enhancing the quality, adding filters and transitions, etc.
- After editing, save your video by hitting the ‘export’ button. Choose how you would like to save your video and hit ‘start.
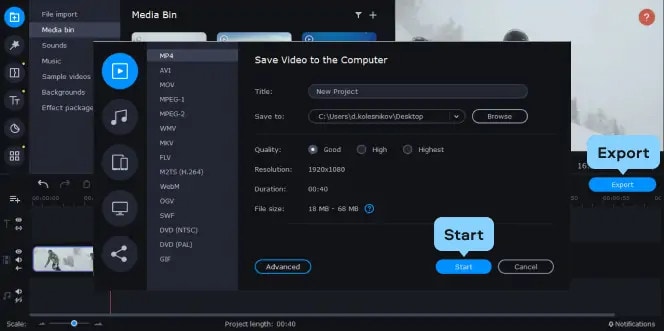
This will save your video to your chosen location.
PowerDirector 365
Supported System: Windows and Mac
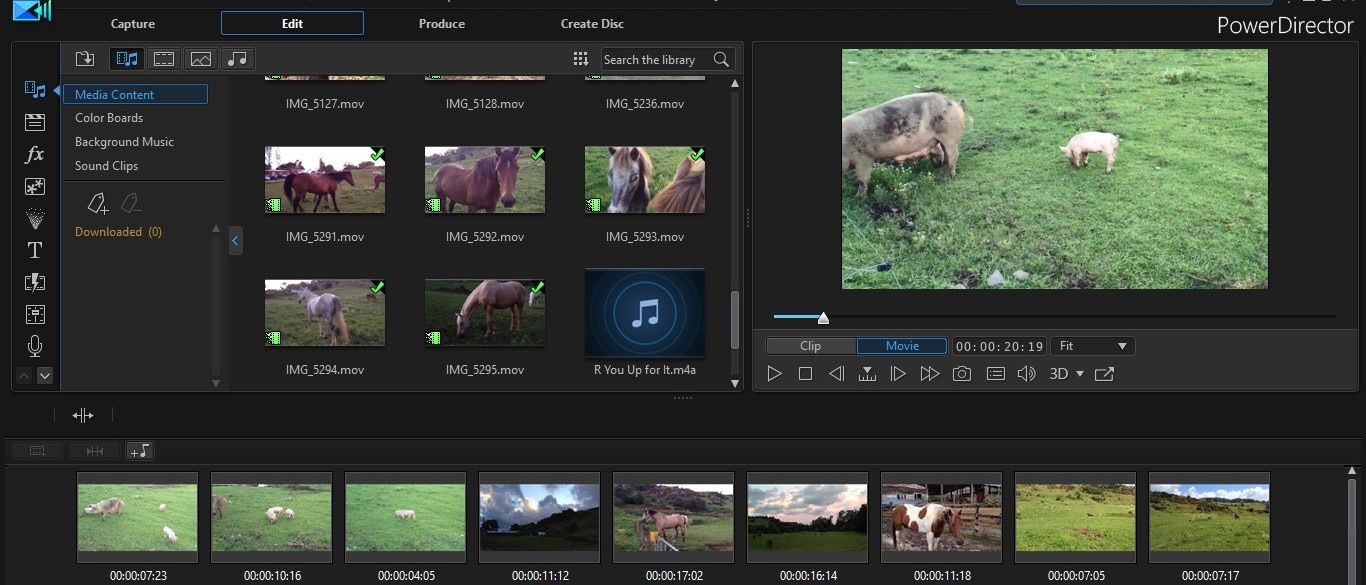
An AVI editor compatible with Windows 11/10/8/8.1 or 7 is PowerDirector 365. It offers an intuitive user interface and advanced video editing features. Using this editing software is quite easy, making it ideal for beginners, intermediates, and professionals. In addition, it is compatible with Windows and Mac OS, making it a versatile choice. You can easily create Hollywood-level videos from your Windows computer using PowerDirector 365.
Some of the editing features on this AVI editor include green-screen, royalty-free music, and many more advanced visual filters. It also offers thousands of templates, overlay effects, and built-in transitions to speed up the editing process. It is an excellent option if you’re looking to enhance your raw footage using cool filters and graphics. Additionally, PowerDirector 365 offers users a dual-screen and customizable editing workspace for streamlining your AVI video editing process.
While it preserves the quality of your AVI video, it allows you to save the output in other high-resolution formats like Ultra HD 4K and many more. You can also share your video directly to various streaming platforms to save you time and space on your device.
Pros
- User-friendly interface and ideal for professionals, intermediate, and beginners
- Access to built-in transitions and overlay effects
- Compatible with Windows and Mac
- Allows users to save output AVI files in higher resolution video formats
- Access to royalty-free iStock and Shutterstock library
Cons
- Limited free version
- It can be complex for beginners to understand
Steps to Edit Using PowerDirector 365
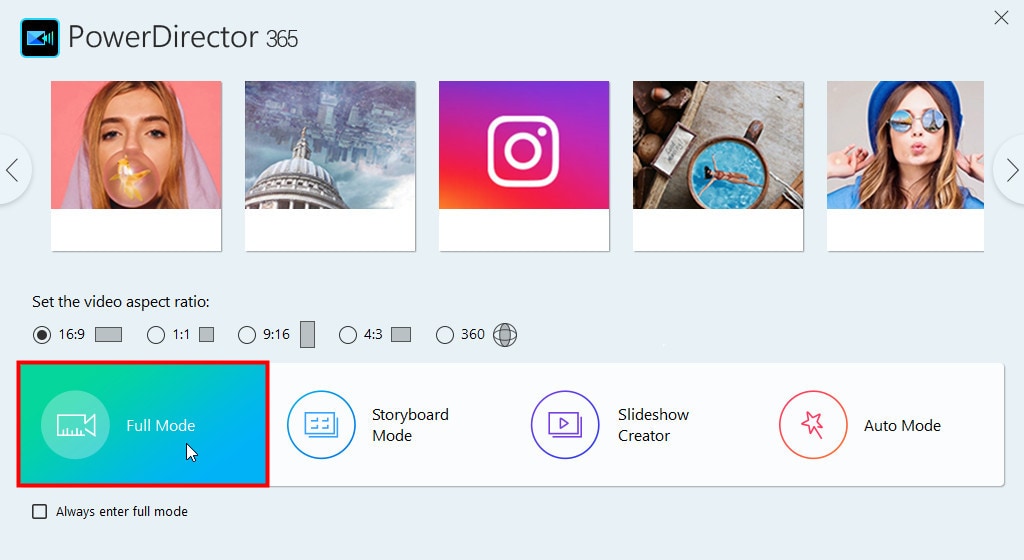
- Firstly, launch the app and choose ‘full mode’ to begin the editing process.
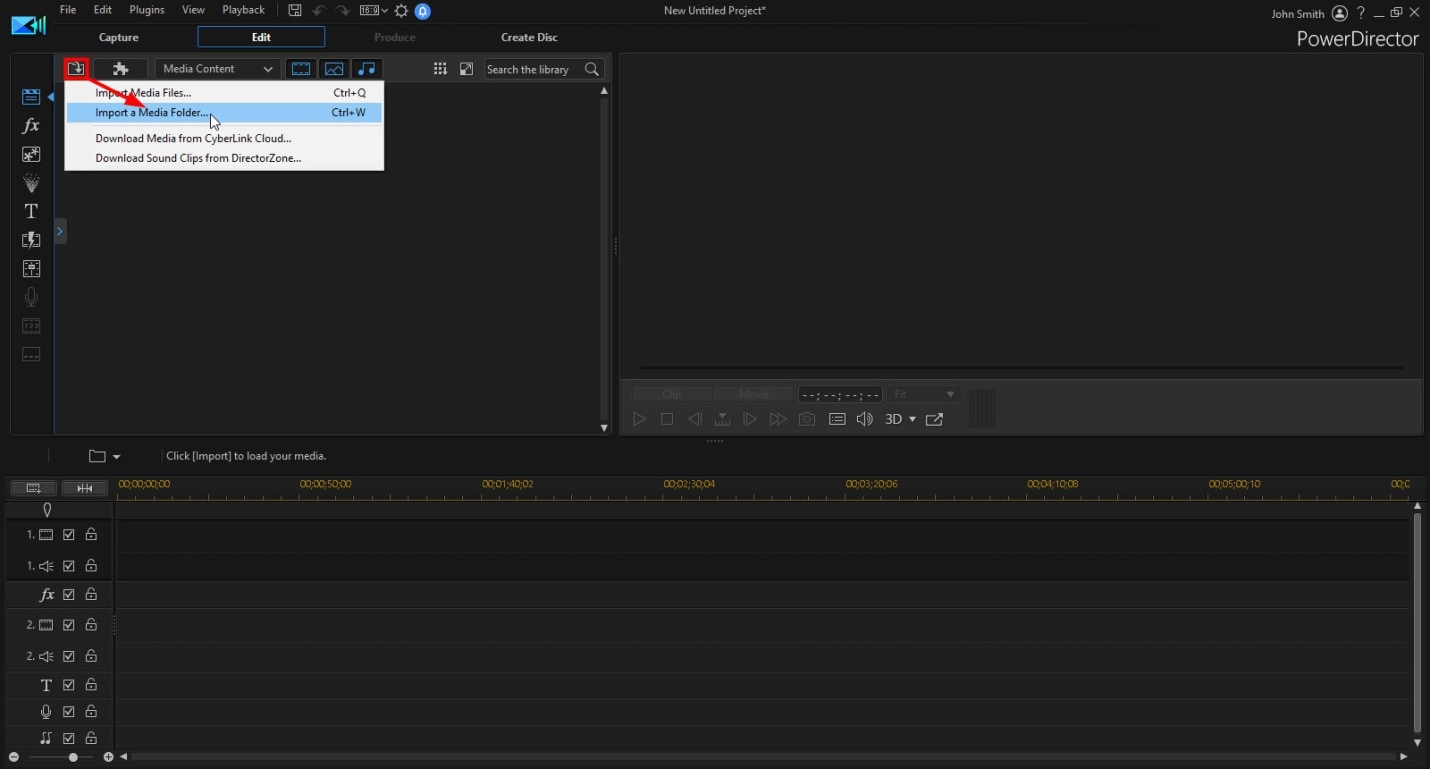
- Next, select ‘import media folder’ to import the media files you want to edit.
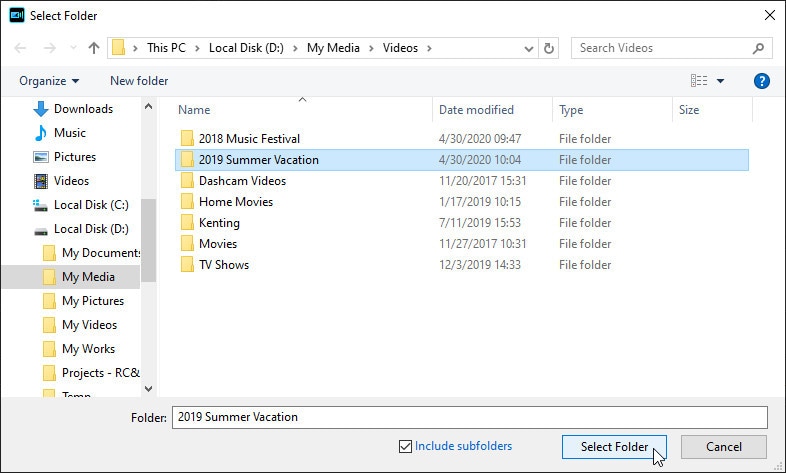
- Browse the folders on your PC and choose the folder with the videos you want; click ‘select folder’ to import them into the editor’s media library.
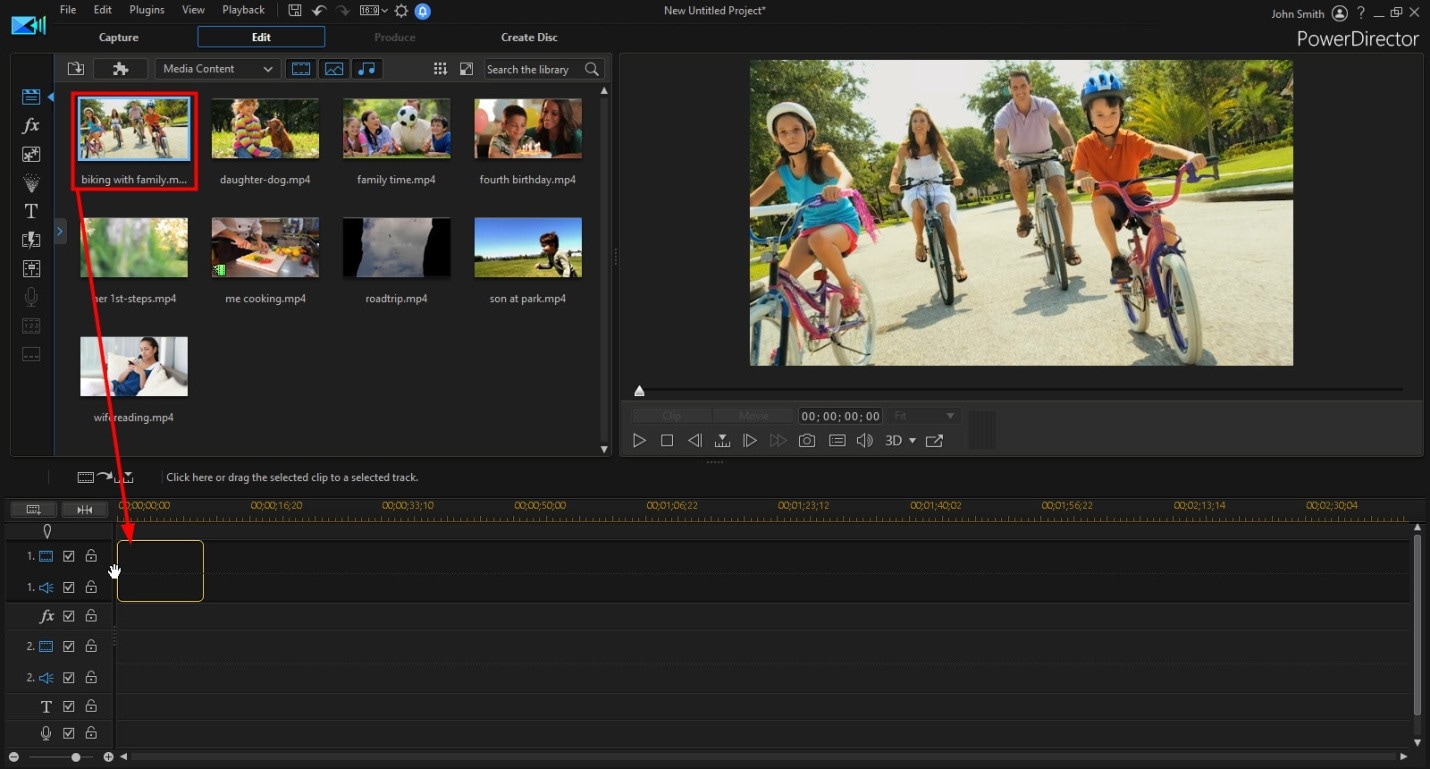
- Now you can select the video you want to edit from the media library and drag it into the video timeline.
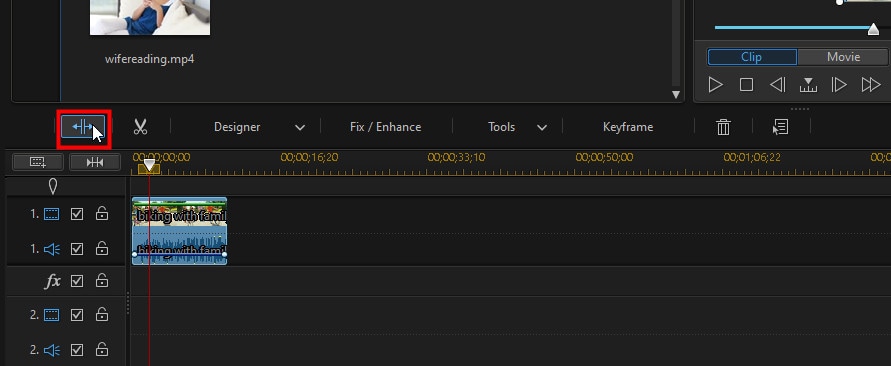
- The editing process can begin. PowerDirector 365 allows you to split and trim your video clips.
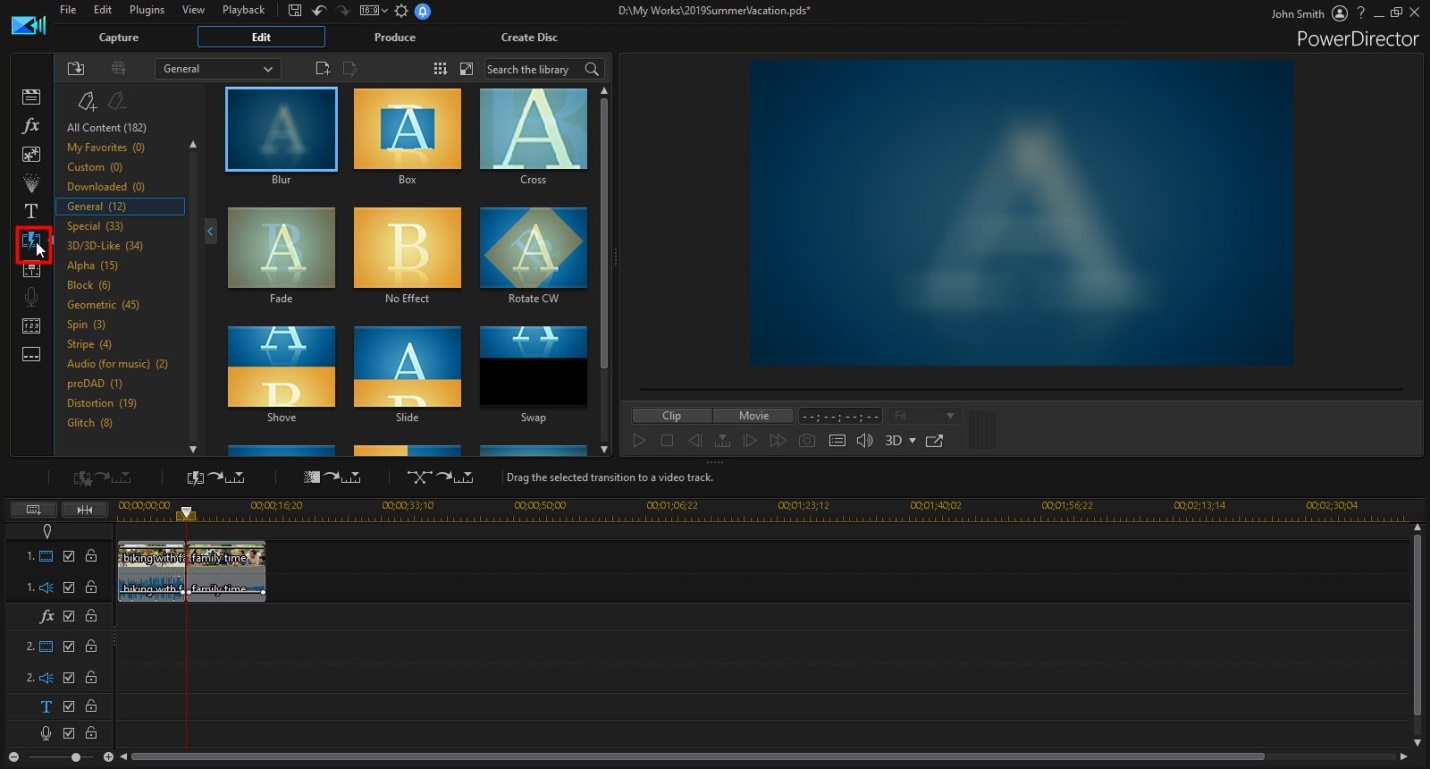
- You can also add transitions between the clips by selecting the transition room.
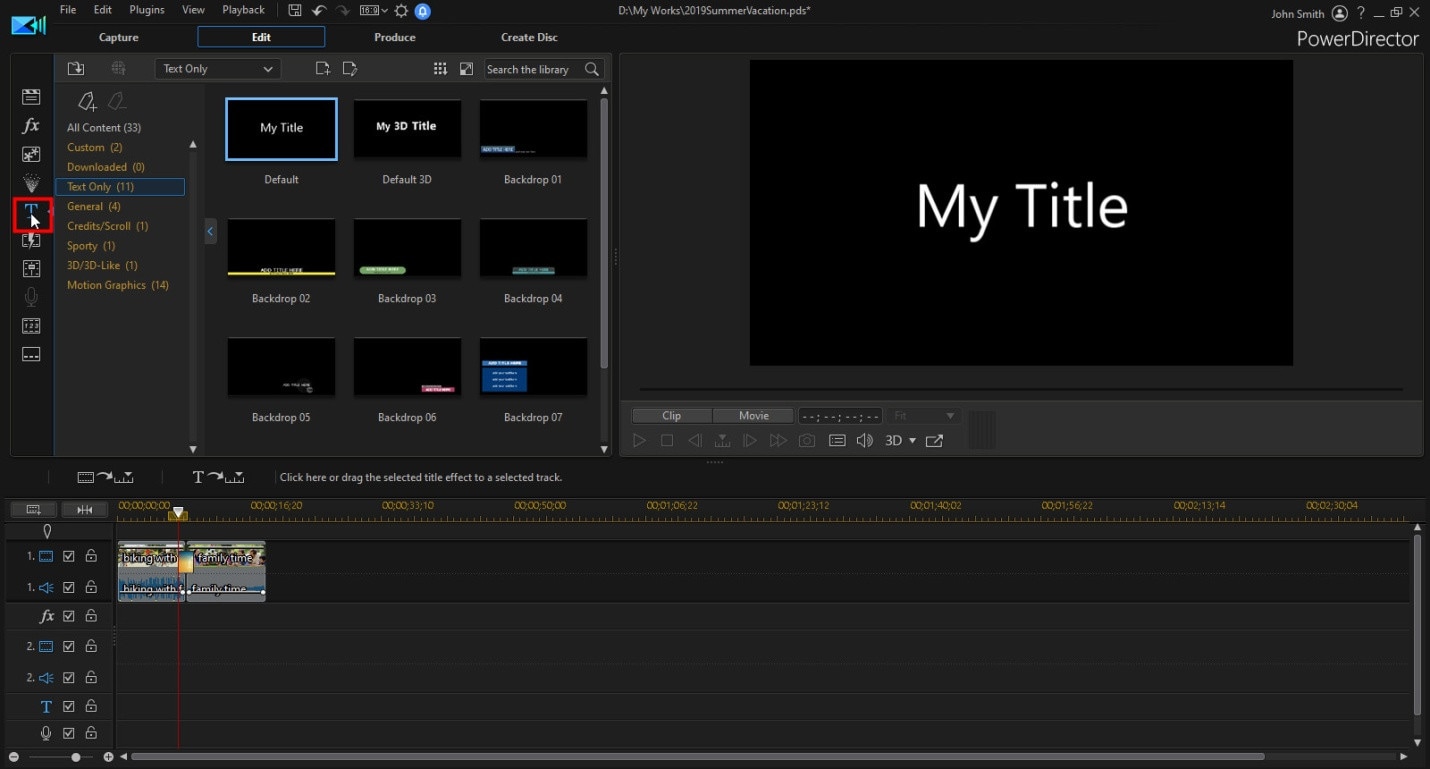
- You can also add title texts to your AVI video if you prefer.
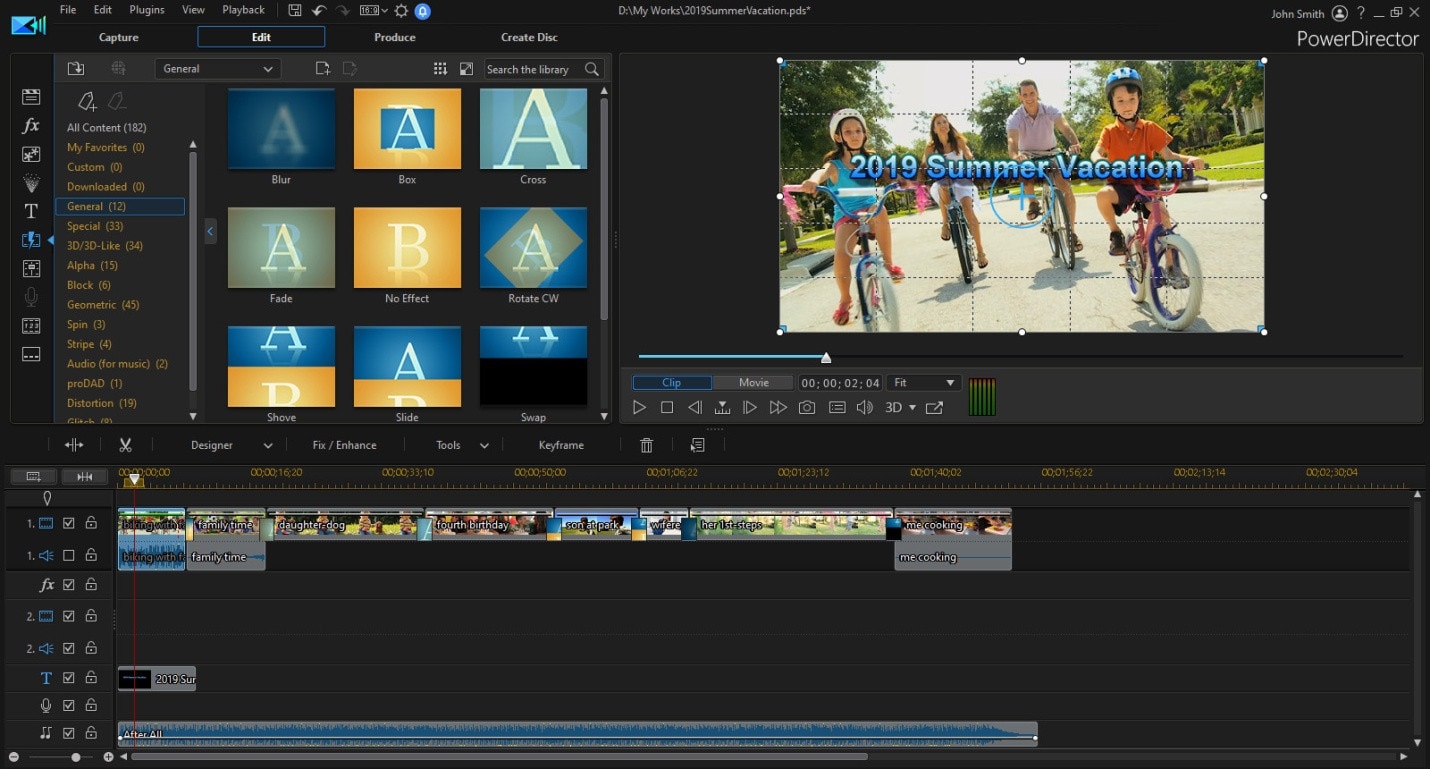
- After editing, select the ‘produce’ tab to export your video.
- You can choose to change the video format before exporting.
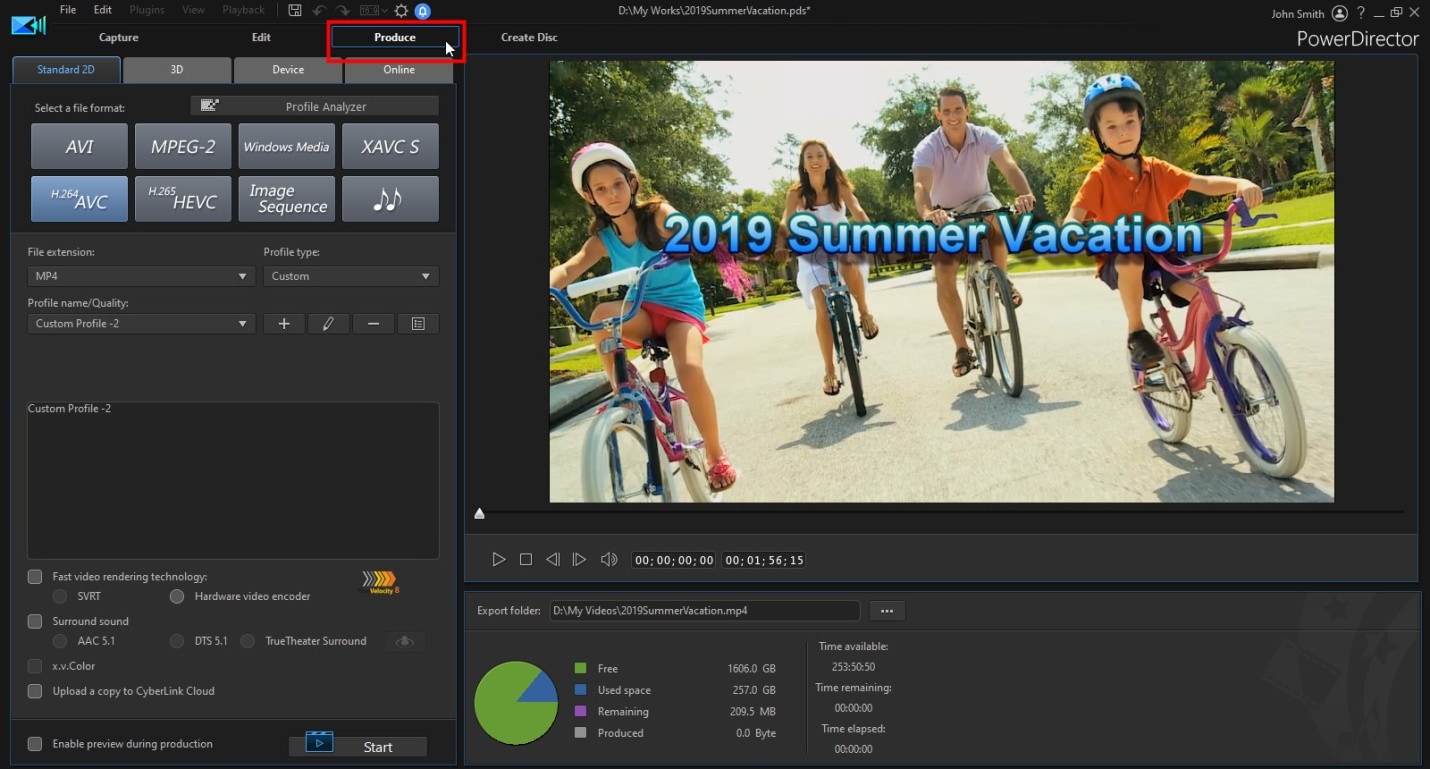
- Once you choose your preferred format, it will save your edited AVI video file.
Which Should I Choose: Free or Paid AVI Editor?
Many AVI editors for Windows (free and paid) are available on the internet. Therefore, it can be pretty challenging to determine the right AVI editor for Windows to choose. You need to consider many factors to make your choice, and below are some of them.
- Experience Level: One of the most crucial features you need to consider is your experience level. If you’re a beginner, you don’t want an AVI editor that offers complex features you can use. The same goes for professionals; you don’t want an editor without comprehensive editing tools to meet your editing needs. You should lookout for an editor that supports beginners and professionals. This will eliminate the need to look for a new editor once your skills improve.
- Interface: You also need to consider the user interface of your video editor before choosing between paid and free AVI editors for Windows. A friendly user interface can save you a lot of time getting familiar with the editing software. Check out the user interface to determine how easy it would be to navigate when editing your AVI videos.
- Formats: Ensure that the software you choose doesn’t limit you to specific video formats. You want an AVI editor that also supports the common and modern video formats. This allows you to convert your AVI videos when you need to share your video to streaming platforms that don’t support AVI file formats.
Most free AVI editors offer limited features to users, limiting your editing process. Additionally, some paid AVI editors focuses on professional and makes it difficult for beginners to use. Always opt for an AVI editor that succinctly supports all your editing needs and allows you to develop your skills.
Conclusion
Although AVI is an old video format, it is quite popular. Therefore, it’s crucial to have an AVI video editor if you prefer this file format. This article covered the best free and paid AVI editor for Windows. Most of the reviewed editing software offers you unique features to fulfill your editing needs. We also mentioned the pros and cons of each AVI editor for Windows to help you determine which option suits you best. If you want a video editor that will help you take your videos to the next level, you will need an editor that provides you with access to many special effects and unique editing tools. Filmora Video Editor provides you with an intuitive interface and a feature-packed library to start editing your AVI videos.
FAQs About Editing AVI Video
- How can I edit AVI videos like a pro? To edit an AVI video like a pro, you need to learn to use advanced editing features. One of the ideal ways is to pick an AVI editor with an intuitive interface that allows you to master professional concepts.
- What is the best AVI video editor for Windows 10? The best AVI editor for Windows 10 depends on your experience and if you’re looking for free or paid software.
- Can I edit an AVI file? Yes, you can. You need to find an AVI editing software compatible with your operating system and version. Also, you need to ensure it is ideal for your level of experience.
Supported System: Windows and Mac
Most free editing software is usually too simple to meet your immediate demands, or they’re too challenging for you to understand the workflow. Some AVI editors for Windows lack crucial editing features like audio editing and color correction features. An AVI editor that successfully bridges the gap to become the best AVI editor for Windows on our list is Filmora Video Editor .
This editor offers excellent performance and a fast editing process that takes user experience to a new level. It is ideal for beginners because of its intuitive interface. Additionally, intermediate and professional AVI editors can also use this video editor to create stylish videos and utilize its built-in professional effects.
For Win 7 or later (64-bit)
For macOS 10.14 or later
Wondershare Filmora Features
- It is versatile and supports other video formats like MKV, MP4, MOV, etc.
- Users can crop, cut, trim, split, and combine with just a few clicks.
- Access to advanced video effects like motion elements, royalty-free music, transition, animated titles, and more
- Footage can look like Hollywood videos with Filmora color tuning features.
- With background noise removal, audio keyframing, and the audio equalizer tool, you can edit sounds.
- It provides you with real-time rending to ensure a smooth editing experience.
- You can burn videos to DVD, transfer them to various devices or upload them on YouTube or other video streaming platforms.
How to Edit Videos on Windows 11/10/8/7 Using Wondershare Filmora
Editing your videos on Filmora is relatively easy and takes just a few minutes. Keep reading to learn how to edit AVI videos on Windows 11/10/8/7 using Wondershare Filmora.
Step 1: Import AVI Video
The first step you have to take is adding the AVI video you would like to edit with Filmora. You can do this by creating a new project. Then, click on New Project on the homepage.

Once it opens a new page, click the + icon to browse the files on your device or import them from an external device.

Step 2: Edit AVI Videos
After importing your videos, you can start editing and arranging elements in your video timeline. You can overwrite, append, and carry out other editing options.

You can also add effects, titles, filters, and music using Filmora.

Step 3: Save and Share Edited AVI Video Files

Once you’re done editing your video using Filmora Video Editor, you’re ready to save your file. You can choose to save your video in a new format. There are different video formats available to choose from. You can either save it to a select location on your PC or export it to any preferred device. Filmora Video Editor also allows you to upload directly to a video streaming platform or burn to a DVD.
More Free AVI Editor for Windows to Edit AVI Videos
This section will list some of the best free AVI editors for Windows to successfully edit your AVI editors. You would have to download these programs as they offer you more editing tools than an online AVI editor.
Microsoft Windows 10/11 Photos App

Supported System: Windows
This free AVI video editor is compatible with Windows 10/11 and comes prebuilt into your Windows 10 PC. If you’re looking for free AVI editing software, this is one of the best options you would find. One of the benefits of using this AVI video editor is that it eliminates the need for additional downloads. It comes pre-installed. However, if you can’t find this Photos App on your Windows 10/11, you can download it from Microsoft Store.
It is lightweight and allows you easily edit your AVI videos. You can also convert images into an AVI video under the Automatic Video mode. This helps save time if you don’t want to do much editing. However, if there are features you would like to edit in your video, you can use the custom video mode to trim, change audio volume, resize video, and include filters, motion, text, and several 3D effects in your AVI video.
However, you should note that there’s no timeline, and there are some advanced features like video stabilization, split tools, and much more missing on this free AVI editor for Windows. However, it is versatile and supports several other video formats.
Pros
- It supports several video formats, including AVI, MPE, MPG, ASF, MP2, and many more
- It is entirely free
- Ideal for beginners with few editing needs
- There’s no need for a new download as it comes built-in
Cons
- It doesn’t support several modern file formats
- The output formats are limited
- It lacks advanced video editing features
How to Edit Using Microsoft Windows 10/11 Photos App
Editing your AVI video with Microsoft Photos App is relatively easy; follow the steps below.
- First, click the ‘add’ button in the left corner of the page and select the video you want to edit

- Next, check the media elements necessary for your video and then tap on ‘place in storyboard.’

- Now you can start editing your video. One of the ways to edit your video is to extend the duration of your video by clicking the duration button.

- You can also add motion to the video under the ‘storyboard’ section. Select the media element you would like to edit and hit the ‘motions’ button. You can then select different motion effects.

- Additionally, you can add filters under the storyboard section.

- Editors can also trim and split AVI video on this Photos app.

- Once you’re done editing, click on ‘save as’ to save your edited AVI video.
OpenShot – Open Source Video Editor

Supported System: Windows, Mac and Linus
If you want an AVI editor compatible with Windows 10/11/8/7, you should try OpenShot – Open Source Video Editor. It is ideal for carrying out basic video editing like trimming and slicing. This video editor also offers several transitions and audio effects to help you make simple videos.
There are unlimited video tracks available on OpenShot; this means you can add as many audio and video clips.
It also offers you tile templates and video formats. If you want to add more touches to your video, this free AVI editor for Windows will help you achieve that. Other impressive editing features are available on this AVI editor, like slow-motion effects, blending modes, 3D animations, and many more. Additionally, the frame and keyframes accuracy feature helps you create detailed edits. You’ll easily customize your AVI video to your preference with this platform.
When exporting your file, you can export it in varying formats. You can also upload your AVI video directly to YouTube or your social media accounts. Despite the professional-level tool, the user interface is intuitive, which simplifies the editing process. However, you might find that it lacks some of the advanced editing features you would find in other AVI editors.
Pros
- It features an intuitive user interface
- It offers several editing tools for beginners and intermediate users
- It allows you to add as many audio and video tracks as you would prefer
- It is entirely free
- There are varying output formats for your selection
Cons
- Limited advanced editing tools
- OpenShot can be slow and laggy sometimes
How to Edit AVI Video With OpenShot
Using OpenShot to edit your AVI videos is relatively easy. The steps below will explain the basics and how you can edit within minutes.
- First, you have to import your media file into OpenShot.

- Next, arrange the videos on the timeline. If two or more clips overlap, this AVI editor automatically creates a smooth fade between them.

- You can then edit using the different available tools. OpenShot also allows you to add music to the timeline.

- After editing, preview the video project and export. You can also share directly to streaming platforms like YouTube, Vimeo, and more.

VSDC Video Editor – Free Movie Editor

Supported System: Windows and Mac
This AVI video editor is designed to ensure an excelling editing process for users on Windows 10. Therefore, even beginners can utilize this video editor to edit their media projects. Although it is free, it offers powerful editing features to take your AVI video to the next level. There are many features like filters, transition effects, overlays, color correction, and many more you can use.
Although it supports AVI video files, it also supports several popular media file formats. You can also save your AVI video in a new format after editing due to its effective video converter tools. Additionally, VSDC Video Editor is a non-linear tool that allows you to easily place video clips in the timeline.
You can save your edited AVI videos to your PC or upload them directly to different video streaming platforms like YouTube, Instagram, Vimeo, etc. We also love that it allows you to edit HD and 4k videos without compromising the quality. This isn’t a common feature with most free AVI video editing software.
Pros
- It is a free video editing software for Windows 10
- It is versatile and supports different video and audio formats
- There is an excellent selection of filters, effects, and transitions
- You can convert AVI videos to a new format with its built-in video converter
- It features an intuitive interface that’s friendly to beginners
Cons
- Technical support isn’t free
- It doesn’t offer professional video editing tools
Steps to Edit AVI Videos Using VSDC Video Editor
This is a simple AVI editor to use, and the steps below simplify the process for you even further; let’s take a look.
- Firstly, import your video into the VSDC Video editor by clicking the ‘import content’ button.

- Once you choose a file on your Windows PC, the app will ask if you would like to change the resolution and several more parameters.
- You can start editing your videos with the different tools available, like cutting and splitting.

- You can also crop the video if necessary.

- Another option is to apply different effects and transitions to your AVI video.

- Once you’re done editing your video, you can then export it. VSDC allows you to choose the output format. This is the best time to select a different format if that’s the goal.

- Alternatively, you can share your video directly to YouTube and other video streaming platforms.
More Paid AVI Editor for Windows to Edit AVI Videos
Although there are free AVI editors, they usually come with limited editing features. If you want an AVI editor that offers more editing features for professionals, you should try paid AVI editor for Windows. This section explores the top three paid AVI editors you can use to edit AVI videos on Windows.
Movavi Video Editor Plus

Supported System: Windows and Mac
This paid AVI video editor is compatible with Windows 10 and higher. It is an AVI editing tool that offers a user-friendly interface and advanced editing features for professionals. This video editor is compatible with Windows and Mac and supports all the popular video codecs to provide more options. It is pretty easy to navigate and master, so beginners can also utilize this AVI editor to improve their editing skills.
The best part is that you don’t need it offers all you need for basic editing and advanced video enhancement. You can expect a professional quality when you utilize this editing tool. It is great for all experience levels. You can integrate various visual and audio effects in your video using Movavi Video Editor Plus. It also allows you easily edit, trim, crop, and rotate your videos. Additionally, you can include subtitles, headings, and titles in your AVI video.
If you want to take your video to the next level, you can explore the different media options like filters, animations, music, transitions, and many more from its library. You can also save your AVI video to your PC or share it directly to YouTube to save space on your PC.
Pros
- It offers you an easy to use and intuitive interface
- Ideal for beginners and professionals
- Ensures professional and top-quality results
- It supports various file formats
- Allows direct sharing to video streaming platforms
Cons
- The free trial is relatively limited
- It doesn’t allow more than one project at a time
Steps to Edit AVI Video Using Movavi Video Editor Plus
Using this AVI editor for Windows is quite easy. However, the step-by-step guide below will help you get through the editing process within minutes.
- First, install the Movavi Video Editor Plus software on your PC
- Next, click ‘add files’ to add your AVI video files. Afterward, drag the selected video into the video editor timeline.

- You can then start editing your video by applying filters, enhancing the quality, adding filters and transitions, etc.

- After editing, save your video by hitting the ‘export’ button. Choose how you would like to save your video and hit ‘start.

This will save your video to your chosen location.
PowerDirector 365

Supported System: Windows and Mac
An AVI editor compatible with Windows 11/10/8/8.1 or 7 is PowerDirector 365. It offers an intuitive user interface and advanced video editing features. Using this editing software is quite easy, making it ideal for beginners, intermediates, and professionals. In addition, it is compatible with Windows and Mac OS, making it a versatile choice. You can easily create Hollywood-level videos from your Windows computer using PowerDirector 365.
Some of the editing features on this AVI editor include green-screen, royalty-free music, and many more advanced visual filters. It also offers thousands of templates, overlay effects, and built-in transitions to speed up the editing process. It is an excellent option if you’re looking to enhance your raw footage using cool filters and graphics. Additionally, PowerDirector 365 offers users a dual-screen and customizable editing workspace for streamlining your AVI video editing process.
While it preserves the quality of your AVI video, it allows you to save the output in other high-resolution formats like Ultra HD 4K and many more. You can also share your video directly to various streaming platforms to save you time and space on your device.
Pros
- User-friendly interface and ideal for professionals, intermediate, and beginners
- Access to built-in transitions and overlay effects
- Compatible with Windows and Mac
- Allows users to save output AVI files in higher resolution video formats
- Access to royalty-free iStock and Shutterstock library
Cons
- Limited free version
- It can be complex for beginners to understand
Steps to Edit Using PowerDirector 365
- Firstly, launch the app and choose ‘full mode’ to begin the editing process.

- Next, select ‘import media folder’ to import the media files you want to edit.

- Browse the folders on your PC and choose the folder with the videos you want; click ‘select folder’ to import them into the editor’s media library.

- Now you can select the video you want to edit from the media library and drag it into the video timeline.

- The editing process can begin. PowerDirector 365 allows you to split and trim your video clips.

- You can also add transitions between the clips by selecting the transition room.

- You can also add title texts to your AVI video if you prefer.

- After editing, select the ‘produce’ tab to export your video.

- You can choose to change the video format before exporting.

- Once you choose your preferred format, it will save your edited AVI video file.
Which Should I Choose: Free or Paid AVI Editor?
Many AVI editors for Windows (free and paid) are available on the internet. Therefore, it can be pretty challenging to determine the right AVI editor for Windows to choose. You need to consider many factors to make your choice, and below are some of them.
- Experience Level: One of the most crucial features you need to consider is your experience level. If you’re a beginner, you don’t want an AVI editor that offers complex features you can use. The same goes for professionals; you don’t want an editor without comprehensive editing tools to meet your editing needs. You should lookout for an editor that supports beginners and professionals. This will eliminate the need to look for a new editor once your skills improve.
- Interface: You also need to consider the user interface of your video editor before choosing between paid and free AVI editors for Windows. A friendly user interface can save you a lot of time getting familiar with the editing software. Check out the user interface to determine how easy it would be to navigate when editing your AVI videos.
- Formats: Ensure that the software you choose doesn’t limit you to specific video formats. You want an AVI editor that also supports the common and modern video formats. This allows you to convert your AVI videos when you need to share your video to streaming platforms that don’t support AVI file formats.
Most free AVI editors offer limited features to users, limiting your editing process. Additionally, some paid AVI editors focuses on professional and makes it difficult for beginners to use. Always opt for an AVI editor that succinctly supports all your editing needs and allows you to develop your skills.
Conclusion
Although AVI is an old video format, it is quite popular. Therefore, it’s crucial to have an AVI video editor if you prefer this file format. This article covered the best free and paid AVI editor for Windows. Most of the reviewed editing software offers you unique features to fulfill your editing needs. We also mentioned the pros and cons of each AVI editor for Windows to help you determine which option suits you best. If you want a video editor that will help you take your videos to the next level, you will need an editor that provides you with access to many special effects and unique editing tools. Filmora Video Editor provides you with an intuitive interface and a feature-packed library to start editing your AVI videos.
FAQs About Editing AVI Video
- How can I edit AVI videos like a pro? To edit an AVI video like a pro, you need to learn to use advanced editing features. One of the ideal ways is to pick an AVI editor with an intuitive interface that allows you to master professional concepts.
- What is the best AVI video editor for Windows 10? The best AVI editor for Windows 10 depends on your experience and if you’re looking for free or paid software.
- Can I edit an AVI file? Yes, you can. You need to find an AVI editing software compatible with your operating system and version. Also, you need to ensure it is ideal for your level of experience.
Supported System: Windows and Mac
Most free editing software is usually too simple to meet your immediate demands, or they’re too challenging for you to understand the workflow. Some AVI editors for Windows lack crucial editing features like audio editing and color correction features. An AVI editor that successfully bridges the gap to become the best AVI editor for Windows on our list is Filmora Video Editor .
This editor offers excellent performance and a fast editing process that takes user experience to a new level. It is ideal for beginners because of its intuitive interface. Additionally, intermediate and professional AVI editors can also use this video editor to create stylish videos and utilize its built-in professional effects.
For Win 7 or later (64-bit)
For macOS 10.14 or later
Wondershare Filmora Features
- It is versatile and supports other video formats like MKV, MP4, MOV, etc.
- Users can crop, cut, trim, split, and combine with just a few clicks.
- Access to advanced video effects like motion elements, royalty-free music, transition, animated titles, and more
- Footage can look like Hollywood videos with Filmora color tuning features.
- With background noise removal, audio keyframing, and the audio equalizer tool, you can edit sounds.
- It provides you with real-time rending to ensure a smooth editing experience.
- You can burn videos to DVD, transfer them to various devices or upload them on YouTube or other video streaming platforms.
How to Edit Videos on Windows 11/10/8/7 Using Wondershare Filmora
Editing your videos on Filmora is relatively easy and takes just a few minutes. Keep reading to learn how to edit AVI videos on Windows 11/10/8/7 using Wondershare Filmora.
Step 1: Import AVI Video
The first step you have to take is adding the AVI video you would like to edit with Filmora. You can do this by creating a new project. Then, click on New Project on the homepage.

Once it opens a new page, click the + icon to browse the files on your device or import them from an external device.

Step 2: Edit AVI Videos
After importing your videos, you can start editing and arranging elements in your video timeline. You can overwrite, append, and carry out other editing options.

You can also add effects, titles, filters, and music using Filmora.

Step 3: Save and Share Edited AVI Video Files

Once you’re done editing your video using Filmora Video Editor, you’re ready to save your file. You can choose to save your video in a new format. There are different video formats available to choose from. You can either save it to a select location on your PC or export it to any preferred device. Filmora Video Editor also allows you to upload directly to a video streaming platform or burn to a DVD.
More Free AVI Editor for Windows to Edit AVI Videos
This section will list some of the best free AVI editors for Windows to successfully edit your AVI editors. You would have to download these programs as they offer you more editing tools than an online AVI editor.
Microsoft Windows 10/11 Photos App

Supported System: Windows
This free AVI video editor is compatible with Windows 10/11 and comes prebuilt into your Windows 10 PC. If you’re looking for free AVI editing software, this is one of the best options you would find. One of the benefits of using this AVI video editor is that it eliminates the need for additional downloads. It comes pre-installed. However, if you can’t find this Photos App on your Windows 10/11, you can download it from Microsoft Store.
It is lightweight and allows you easily edit your AVI videos. You can also convert images into an AVI video under the Automatic Video mode. This helps save time if you don’t want to do much editing. However, if there are features you would like to edit in your video, you can use the custom video mode to trim, change audio volume, resize video, and include filters, motion, text, and several 3D effects in your AVI video.
However, you should note that there’s no timeline, and there are some advanced features like video stabilization, split tools, and much more missing on this free AVI editor for Windows. However, it is versatile and supports several other video formats.
Pros
- It supports several video formats, including AVI, MPE, MPG, ASF, MP2, and many more
- It is entirely free
- Ideal for beginners with few editing needs
- There’s no need for a new download as it comes built-in
Cons
- It doesn’t support several modern file formats
- The output formats are limited
- It lacks advanced video editing features
How to Edit Using Microsoft Windows 10/11 Photos App
Editing your AVI video with Microsoft Photos App is relatively easy; follow the steps below.
- First, click the ‘add’ button in the left corner of the page and select the video you want to edit

- Next, check the media elements necessary for your video and then tap on ‘place in storyboard.’

- Now you can start editing your video. One of the ways to edit your video is to extend the duration of your video by clicking the duration button.

- You can also add motion to the video under the ‘storyboard’ section. Select the media element you would like to edit and hit the ‘motions’ button. You can then select different motion effects.

- Additionally, you can add filters under the storyboard section.

- Editors can also trim and split AVI video on this Photos app.

- Once you’re done editing, click on ‘save as’ to save your edited AVI video.
OpenShot – Open Source Video Editor

Supported System: Windows, Mac and Linus
If you want an AVI editor compatible with Windows 10/11/8/7, you should try OpenShot – Open Source Video Editor. It is ideal for carrying out basic video editing like trimming and slicing. This video editor also offers several transitions and audio effects to help you make simple videos.
There are unlimited video tracks available on OpenShot; this means you can add as many audio and video clips.
It also offers you tile templates and video formats. If you want to add more touches to your video, this free AVI editor for Windows will help you achieve that. Other impressive editing features are available on this AVI editor, like slow-motion effects, blending modes, 3D animations, and many more. Additionally, the frame and keyframes accuracy feature helps you create detailed edits. You’ll easily customize your AVI video to your preference with this platform.
When exporting your file, you can export it in varying formats. You can also upload your AVI video directly to YouTube or your social media accounts. Despite the professional-level tool, the user interface is intuitive, which simplifies the editing process. However, you might find that it lacks some of the advanced editing features you would find in other AVI editors.
Pros
- It features an intuitive user interface
- It offers several editing tools for beginners and intermediate users
- It allows you to add as many audio and video tracks as you would prefer
- It is entirely free
- There are varying output formats for your selection
Cons
- Limited advanced editing tools
- OpenShot can be slow and laggy sometimes
How to Edit AVI Video With OpenShot
Using OpenShot to edit your AVI videos is relatively easy. The steps below will explain the basics and how you can edit within minutes.
- First, you have to import your media file into OpenShot.

- Next, arrange the videos on the timeline. If two or more clips overlap, this AVI editor automatically creates a smooth fade between them.

- You can then edit using the different available tools. OpenShot also allows you to add music to the timeline.

- After editing, preview the video project and export. You can also share directly to streaming platforms like YouTube, Vimeo, and more.

VSDC Video Editor – Free Movie Editor

Supported System: Windows and Mac
This AVI video editor is designed to ensure an excelling editing process for users on Windows 10. Therefore, even beginners can utilize this video editor to edit their media projects. Although it is free, it offers powerful editing features to take your AVI video to the next level. There are many features like filters, transition effects, overlays, color correction, and many more you can use.
Although it supports AVI video files, it also supports several popular media file formats. You can also save your AVI video in a new format after editing due to its effective video converter tools. Additionally, VSDC Video Editor is a non-linear tool that allows you to easily place video clips in the timeline.
You can save your edited AVI videos to your PC or upload them directly to different video streaming platforms like YouTube, Instagram, Vimeo, etc. We also love that it allows you to edit HD and 4k videos without compromising the quality. This isn’t a common feature with most free AVI video editing software.
Pros
- It is a free video editing software for Windows 10
- It is versatile and supports different video and audio formats
- There is an excellent selection of filters, effects, and transitions
- You can convert AVI videos to a new format with its built-in video converter
- It features an intuitive interface that’s friendly to beginners
Cons
- Technical support isn’t free
- It doesn’t offer professional video editing tools
Steps to Edit AVI Videos Using VSDC Video Editor
This is a simple AVI editor to use, and the steps below simplify the process for you even further; let’s take a look.
- Firstly, import your video into the VSDC Video editor by clicking the ‘import content’ button.

- Once you choose a file on your Windows PC, the app will ask if you would like to change the resolution and several more parameters.
- You can start editing your videos with the different tools available, like cutting and splitting.

- You can also crop the video if necessary.

- Another option is to apply different effects and transitions to your AVI video.

- Once you’re done editing your video, you can then export it. VSDC allows you to choose the output format. This is the best time to select a different format if that’s the goal.

- Alternatively, you can share your video directly to YouTube and other video streaming platforms.
More Paid AVI Editor for Windows to Edit AVI Videos
Although there are free AVI editors, they usually come with limited editing features. If you want an AVI editor that offers more editing features for professionals, you should try paid AVI editor for Windows. This section explores the top three paid AVI editors you can use to edit AVI videos on Windows.
Movavi Video Editor Plus

Supported System: Windows and Mac
This paid AVI video editor is compatible with Windows 10 and higher. It is an AVI editing tool that offers a user-friendly interface and advanced editing features for professionals. This video editor is compatible with Windows and Mac and supports all the popular video codecs to provide more options. It is pretty easy to navigate and master, so beginners can also utilize this AVI editor to improve their editing skills.
The best part is that you don’t need it offers all you need for basic editing and advanced video enhancement. You can expect a professional quality when you utilize this editing tool. It is great for all experience levels. You can integrate various visual and audio effects in your video using Movavi Video Editor Plus. It also allows you easily edit, trim, crop, and rotate your videos. Additionally, you can include subtitles, headings, and titles in your AVI video.
If you want to take your video to the next level, you can explore the different media options like filters, animations, music, transitions, and many more from its library. You can also save your AVI video to your PC or share it directly to YouTube to save space on your PC.
Pros
- It offers you an easy to use and intuitive interface
- Ideal for beginners and professionals
- Ensures professional and top-quality results
- It supports various file formats
- Allows direct sharing to video streaming platforms
Cons
- The free trial is relatively limited
- It doesn’t allow more than one project at a time
Steps to Edit AVI Video Using Movavi Video Editor Plus
Using this AVI editor for Windows is quite easy. However, the step-by-step guide below will help you get through the editing process within minutes.
- First, install the Movavi Video Editor Plus software on your PC
- Next, click ‘add files’ to add your AVI video files. Afterward, drag the selected video into the video editor timeline.

- You can then start editing your video by applying filters, enhancing the quality, adding filters and transitions, etc.

- After editing, save your video by hitting the ‘export’ button. Choose how you would like to save your video and hit ‘start.

This will save your video to your chosen location.
PowerDirector 365

Supported System: Windows and Mac
An AVI editor compatible with Windows 11/10/8/8.1 or 7 is PowerDirector 365. It offers an intuitive user interface and advanced video editing features. Using this editing software is quite easy, making it ideal for beginners, intermediates, and professionals. In addition, it is compatible with Windows and Mac OS, making it a versatile choice. You can easily create Hollywood-level videos from your Windows computer using PowerDirector 365.
Some of the editing features on this AVI editor include green-screen, royalty-free music, and many more advanced visual filters. It also offers thousands of templates, overlay effects, and built-in transitions to speed up the editing process. It is an excellent option if you’re looking to enhance your raw footage using cool filters and graphics. Additionally, PowerDirector 365 offers users a dual-screen and customizable editing workspace for streamlining your AVI video editing process.
While it preserves the quality of your AVI video, it allows you to save the output in other high-resolution formats like Ultra HD 4K and many more. You can also share your video directly to various streaming platforms to save you time and space on your device.
Pros
- User-friendly interface and ideal for professionals, intermediate, and beginners
- Access to built-in transitions and overlay effects
- Compatible with Windows and Mac
- Allows users to save output AVI files in higher resolution video formats
- Access to royalty-free iStock and Shutterstock library
Cons
- Limited free version
- It can be complex for beginners to understand
Steps to Edit Using PowerDirector 365
- Firstly, launch the app and choose ‘full mode’ to begin the editing process.

- Next, select ‘import media folder’ to import the media files you want to edit.

- Browse the folders on your PC and choose the folder with the videos you want; click ‘select folder’ to import them into the editor’s media library.

- Now you can select the video you want to edit from the media library and drag it into the video timeline.

- The editing process can begin. PowerDirector 365 allows you to split and trim your video clips.

- You can also add transitions between the clips by selecting the transition room.

- You can also add title texts to your AVI video if you prefer.

- After editing, select the ‘produce’ tab to export your video.

- You can choose to change the video format before exporting.

- Once you choose your preferred format, it will save your edited AVI video file.
Which Should I Choose: Free or Paid AVI Editor?
Many AVI editors for Windows (free and paid) are available on the internet. Therefore, it can be pretty challenging to determine the right AVI editor for Windows to choose. You need to consider many factors to make your choice, and below are some of them.
- Experience Level: One of the most crucial features you need to consider is your experience level. If you’re a beginner, you don’t want an AVI editor that offers complex features you can use. The same goes for professionals; you don’t want an editor without comprehensive editing tools to meet your editing needs. You should lookout for an editor that supports beginners and professionals. This will eliminate the need to look for a new editor once your skills improve.
- Interface: You also need to consider the user interface of your video editor before choosing between paid and free AVI editors for Windows. A friendly user interface can save you a lot of time getting familiar with the editing software. Check out the user interface to determine how easy it would be to navigate when editing your AVI videos.
- Formats: Ensure that the software you choose doesn’t limit you to specific video formats. You want an AVI editor that also supports the common and modern video formats. This allows you to convert your AVI videos when you need to share your video to streaming platforms that don’t support AVI file formats.
Most free AVI editors offer limited features to users, limiting your editing process. Additionally, some paid AVI editors focuses on professional and makes it difficult for beginners to use. Always opt for an AVI editor that succinctly supports all your editing needs and allows you to develop your skills.
Conclusion
Although AVI is an old video format, it is quite popular. Therefore, it’s crucial to have an AVI video editor if you prefer this file format. This article covered the best free and paid AVI editor for Windows. Most of the reviewed editing software offers you unique features to fulfill your editing needs. We also mentioned the pros and cons of each AVI editor for Windows to help you determine which option suits you best. If you want a video editor that will help you take your videos to the next level, you will need an editor that provides you with access to many special effects and unique editing tools. Filmora Video Editor provides you with an intuitive interface and a feature-packed library to start editing your AVI videos.
FAQs About Editing AVI Video
- How can I edit AVI videos like a pro? To edit an AVI video like a pro, you need to learn to use advanced editing features. One of the ideal ways is to pick an AVI editor with an intuitive interface that allows you to master professional concepts.
- What is the best AVI video editor for Windows 10? The best AVI editor for Windows 10 depends on your experience and if you’re looking for free or paid software.
- Can I edit an AVI file? Yes, you can. You need to find an AVI editing software compatible with your operating system and version. Also, you need to ensure it is ideal for your level of experience.
Supported System: Windows and Mac
Most free editing software is usually too simple to meet your immediate demands, or they’re too challenging for you to understand the workflow. Some AVI editors for Windows lack crucial editing features like audio editing and color correction features. An AVI editor that successfully bridges the gap to become the best AVI editor for Windows on our list is Filmora Video Editor .
This editor offers excellent performance and a fast editing process that takes user experience to a new level. It is ideal for beginners because of its intuitive interface. Additionally, intermediate and professional AVI editors can also use this video editor to create stylish videos and utilize its built-in professional effects.
For Win 7 or later (64-bit)
For macOS 10.14 or later
Wondershare Filmora Features
- It is versatile and supports other video formats like MKV, MP4, MOV, etc.
- Users can crop, cut, trim, split, and combine with just a few clicks.
- Access to advanced video effects like motion elements, royalty-free music, transition, animated titles, and more
- Footage can look like Hollywood videos with Filmora color tuning features.
- With background noise removal, audio keyframing, and the audio equalizer tool, you can edit sounds.
- It provides you with real-time rending to ensure a smooth editing experience.
- You can burn videos to DVD, transfer them to various devices or upload them on YouTube or other video streaming platforms.
How to Edit Videos on Windows 11/10/8/7 Using Wondershare Filmora
Editing your videos on Filmora is relatively easy and takes just a few minutes. Keep reading to learn how to edit AVI videos on Windows 11/10/8/7 using Wondershare Filmora.
Step 1: Import AVI Video
The first step you have to take is adding the AVI video you would like to edit with Filmora. You can do this by creating a new project. Then, click on New Project on the homepage.

Once it opens a new page, click the + icon to browse the files on your device or import them from an external device.

Step 2: Edit AVI Videos
After importing your videos, you can start editing and arranging elements in your video timeline. You can overwrite, append, and carry out other editing options.

You can also add effects, titles, filters, and music using Filmora.

Step 3: Save and Share Edited AVI Video Files

Once you’re done editing your video using Filmora Video Editor, you’re ready to save your file. You can choose to save your video in a new format. There are different video formats available to choose from. You can either save it to a select location on your PC or export it to any preferred device. Filmora Video Editor also allows you to upload directly to a video streaming platform or burn to a DVD.
More Free AVI Editor for Windows to Edit AVI Videos
This section will list some of the best free AVI editors for Windows to successfully edit your AVI editors. You would have to download these programs as they offer you more editing tools than an online AVI editor.
Microsoft Windows 10/11 Photos App

Supported System: Windows
This free AVI video editor is compatible with Windows 10/11 and comes prebuilt into your Windows 10 PC. If you’re looking for free AVI editing software, this is one of the best options you would find. One of the benefits of using this AVI video editor is that it eliminates the need for additional downloads. It comes pre-installed. However, if you can’t find this Photos App on your Windows 10/11, you can download it from Microsoft Store.
It is lightweight and allows you easily edit your AVI videos. You can also convert images into an AVI video under the Automatic Video mode. This helps save time if you don’t want to do much editing. However, if there are features you would like to edit in your video, you can use the custom video mode to trim, change audio volume, resize video, and include filters, motion, text, and several 3D effects in your AVI video.
However, you should note that there’s no timeline, and there are some advanced features like video stabilization, split tools, and much more missing on this free AVI editor for Windows. However, it is versatile and supports several other video formats.
Pros
- It supports several video formats, including AVI, MPE, MPG, ASF, MP2, and many more
- It is entirely free
- Ideal for beginners with few editing needs
- There’s no need for a new download as it comes built-in
Cons
- It doesn’t support several modern file formats
- The output formats are limited
- It lacks advanced video editing features
How to Edit Using Microsoft Windows 10/11 Photos App
Editing your AVI video with Microsoft Photos App is relatively easy; follow the steps below.
- First, click the ‘add’ button in the left corner of the page and select the video you want to edit

- Next, check the media elements necessary for your video and then tap on ‘place in storyboard.’

- Now you can start editing your video. One of the ways to edit your video is to extend the duration of your video by clicking the duration button.

- You can also add motion to the video under the ‘storyboard’ section. Select the media element you would like to edit and hit the ‘motions’ button. You can then select different motion effects.

- Additionally, you can add filters under the storyboard section.

- Editors can also trim and split AVI video on this Photos app.

- Once you’re done editing, click on ‘save as’ to save your edited AVI video.
OpenShot – Open Source Video Editor

Supported System: Windows, Mac and Linus
If you want an AVI editor compatible with Windows 10/11/8/7, you should try OpenShot – Open Source Video Editor. It is ideal for carrying out basic video editing like trimming and slicing. This video editor also offers several transitions and audio effects to help you make simple videos.
There are unlimited video tracks available on OpenShot; this means you can add as many audio and video clips.
It also offers you tile templates and video formats. If you want to add more touches to your video, this free AVI editor for Windows will help you achieve that. Other impressive editing features are available on this AVI editor, like slow-motion effects, blending modes, 3D animations, and many more. Additionally, the frame and keyframes accuracy feature helps you create detailed edits. You’ll easily customize your AVI video to your preference with this platform.
When exporting your file, you can export it in varying formats. You can also upload your AVI video directly to YouTube or your social media accounts. Despite the professional-level tool, the user interface is intuitive, which simplifies the editing process. However, you might find that it lacks some of the advanced editing features you would find in other AVI editors.
Pros
- It features an intuitive user interface
- It offers several editing tools for beginners and intermediate users
- It allows you to add as many audio and video tracks as you would prefer
- It is entirely free
- There are varying output formats for your selection
Cons
- Limited advanced editing tools
- OpenShot can be slow and laggy sometimes
How to Edit AVI Video With OpenShot
Using OpenShot to edit your AVI videos is relatively easy. The steps below will explain the basics and how you can edit within minutes.
- First, you have to import your media file into OpenShot.

- Next, arrange the videos on the timeline. If two or more clips overlap, this AVI editor automatically creates a smooth fade between them.

- You can then edit using the different available tools. OpenShot also allows you to add music to the timeline.

- After editing, preview the video project and export. You can also share directly to streaming platforms like YouTube, Vimeo, and more.

VSDC Video Editor – Free Movie Editor

Supported System: Windows and Mac
This AVI video editor is designed to ensure an excelling editing process for users on Windows 10. Therefore, even beginners can utilize this video editor to edit their media projects. Although it is free, it offers powerful editing features to take your AVI video to the next level. There are many features like filters, transition effects, overlays, color correction, and many more you can use.
Although it supports AVI video files, it also supports several popular media file formats. You can also save your AVI video in a new format after editing due to its effective video converter tools. Additionally, VSDC Video Editor is a non-linear tool that allows you to easily place video clips in the timeline.
You can save your edited AVI videos to your PC or upload them directly to different video streaming platforms like YouTube, Instagram, Vimeo, etc. We also love that it allows you to edit HD and 4k videos without compromising the quality. This isn’t a common feature with most free AVI video editing software.
Pros
- It is a free video editing software for Windows 10
- It is versatile and supports different video and audio formats
- There is an excellent selection of filters, effects, and transitions
- You can convert AVI videos to a new format with its built-in video converter
- It features an intuitive interface that’s friendly to beginners
Cons
- Technical support isn’t free
- It doesn’t offer professional video editing tools
Steps to Edit AVI Videos Using VSDC Video Editor
This is a simple AVI editor to use, and the steps below simplify the process for you even further; let’s take a look.
- Firstly, import your video into the VSDC Video editor by clicking the ‘import content’ button.

- Once you choose a file on your Windows PC, the app will ask if you would like to change the resolution and several more parameters.
- You can start editing your videos with the different tools available, like cutting and splitting.

- You can also crop the video if necessary.

- Another option is to apply different effects and transitions to your AVI video.

- Once you’re done editing your video, you can then export it. VSDC allows you to choose the output format. This is the best time to select a different format if that’s the goal.

- Alternatively, you can share your video directly to YouTube and other video streaming platforms.
More Paid AVI Editor for Windows to Edit AVI Videos
Although there are free AVI editors, they usually come with limited editing features. If you want an AVI editor that offers more editing features for professionals, you should try paid AVI editor for Windows. This section explores the top three paid AVI editors you can use to edit AVI videos on Windows.
Movavi Video Editor Plus

Supported System: Windows and Mac
This paid AVI video editor is compatible with Windows 10 and higher. It is an AVI editing tool that offers a user-friendly interface and advanced editing features for professionals. This video editor is compatible with Windows and Mac and supports all the popular video codecs to provide more options. It is pretty easy to navigate and master, so beginners can also utilize this AVI editor to improve their editing skills.
The best part is that you don’t need it offers all you need for basic editing and advanced video enhancement. You can expect a professional quality when you utilize this editing tool. It is great for all experience levels. You can integrate various visual and audio effects in your video using Movavi Video Editor Plus. It also allows you easily edit, trim, crop, and rotate your videos. Additionally, you can include subtitles, headings, and titles in your AVI video.
If you want to take your video to the next level, you can explore the different media options like filters, animations, music, transitions, and many more from its library. You can also save your AVI video to your PC or share it directly to YouTube to save space on your PC.
Pros
- It offers you an easy to use and intuitive interface
- Ideal for beginners and professionals
- Ensures professional and top-quality results
- It supports various file formats
- Allows direct sharing to video streaming platforms
Cons
- The free trial is relatively limited
- It doesn’t allow more than one project at a time
Steps to Edit AVI Video Using Movavi Video Editor Plus
Using this AVI editor for Windows is quite easy. However, the step-by-step guide below will help you get through the editing process within minutes.
- First, install the Movavi Video Editor Plus software on your PC
- Next, click ‘add files’ to add your AVI video files. Afterward, drag the selected video into the video editor timeline.

- You can then start editing your video by applying filters, enhancing the quality, adding filters and transitions, etc.

- After editing, save your video by hitting the ‘export’ button. Choose how you would like to save your video and hit ‘start.

This will save your video to your chosen location.
PowerDirector 365

Supported System: Windows and Mac
An AVI editor compatible with Windows 11/10/8/8.1 or 7 is PowerDirector 365. It offers an intuitive user interface and advanced video editing features. Using this editing software is quite easy, making it ideal for beginners, intermediates, and professionals. In addition, it is compatible with Windows and Mac OS, making it a versatile choice. You can easily create Hollywood-level videos from your Windows computer using PowerDirector 365.
Some of the editing features on this AVI editor include green-screen, royalty-free music, and many more advanced visual filters. It also offers thousands of templates, overlay effects, and built-in transitions to speed up the editing process. It is an excellent option if you’re looking to enhance your raw footage using cool filters and graphics. Additionally, PowerDirector 365 offers users a dual-screen and customizable editing workspace for streamlining your AVI video editing process.
While it preserves the quality of your AVI video, it allows you to save the output in other high-resolution formats like Ultra HD 4K and many more. You can also share your video directly to various streaming platforms to save you time and space on your device.
Pros
- User-friendly interface and ideal for professionals, intermediate, and beginners
- Access to built-in transitions and overlay effects
- Compatible with Windows and Mac
- Allows users to save output AVI files in higher resolution video formats
- Access to royalty-free iStock and Shutterstock library
Cons
- Limited free version
- It can be complex for beginners to understand
Steps to Edit Using PowerDirector 365
- Firstly, launch the app and choose ‘full mode’ to begin the editing process.

- Next, select ‘import media folder’ to import the media files you want to edit.

- Browse the folders on your PC and choose the folder with the videos you want; click ‘select folder’ to import them into the editor’s media library.

- Now you can select the video you want to edit from the media library and drag it into the video timeline.

- The editing process can begin. PowerDirector 365 allows you to split and trim your video clips.

- You can also add transitions between the clips by selecting the transition room.

- You can also add title texts to your AVI video if you prefer.

- After editing, select the ‘produce’ tab to export your video.

- You can choose to change the video format before exporting.

- Once you choose your preferred format, it will save your edited AVI video file.
Which Should I Choose: Free or Paid AVI Editor?
Many AVI editors for Windows (free and paid) are available on the internet. Therefore, it can be pretty challenging to determine the right AVI editor for Windows to choose. You need to consider many factors to make your choice, and below are some of them.
- Experience Level: One of the most crucial features you need to consider is your experience level. If you’re a beginner, you don’t want an AVI editor that offers complex features you can use. The same goes for professionals; you don’t want an editor without comprehensive editing tools to meet your editing needs. You should lookout for an editor that supports beginners and professionals. This will eliminate the need to look for a new editor once your skills improve.
- Interface: You also need to consider the user interface of your video editor before choosing between paid and free AVI editors for Windows. A friendly user interface can save you a lot of time getting familiar with the editing software. Check out the user interface to determine how easy it would be to navigate when editing your AVI videos.
- Formats: Ensure that the software you choose doesn’t limit you to specific video formats. You want an AVI editor that also supports the common and modern video formats. This allows you to convert your AVI videos when you need to share your video to streaming platforms that don’t support AVI file formats.
Most free AVI editors offer limited features to users, limiting your editing process. Additionally, some paid AVI editors focuses on professional and makes it difficult for beginners to use. Always opt for an AVI editor that succinctly supports all your editing needs and allows you to develop your skills.
Conclusion
Although AVI is an old video format, it is quite popular. Therefore, it’s crucial to have an AVI video editor if you prefer this file format. This article covered the best free and paid AVI editor for Windows. Most of the reviewed editing software offers you unique features to fulfill your editing needs. We also mentioned the pros and cons of each AVI editor for Windows to help you determine which option suits you best. If you want a video editor that will help you take your videos to the next level, you will need an editor that provides you with access to many special effects and unique editing tools. Filmora Video Editor provides you with an intuitive interface and a feature-packed library to start editing your AVI videos.
FAQs About Editing AVI Video
- How can I edit AVI videos like a pro? To edit an AVI video like a pro, you need to learn to use advanced editing features. One of the ideal ways is to pick an AVI editor with an intuitive interface that allows you to master professional concepts.
- What is the best AVI video editor for Windows 10? The best AVI editor for Windows 10 depends on your experience and if you’re looking for free or paid software.
- Can I edit an AVI file? Yes, you can. You need to find an AVI editing software compatible with your operating system and version. Also, you need to ensure it is ideal for your level of experience.
Explore the List of the Top Six Online Video Speed Controllers for Chrome, Safari, and Firefox
Social media and video streaming apps like Facebook, Instagram and YouTube let the user control the video speed, but the speed controls are not smart enough. What if you want to watch the YouTube video at more than 2x speed? That’s where the video speed controller comes in.
AI speed control For Win 7 or later(64-bit)
AI speed control For macOS 10.14 or later
These speed controllers let you speed control video at your liking. If you want to take control of video playback speeds, you can go for the video speed controller download options. Let’s discuss some of the best speed controllers apps and extensions.
- Video Speed Controller
- YouTube Playback Speed Control
- Accelerate for Safari
- Playback Speed
- SpeedUp
- PlayerFab All-in-One
TOP 6 Online Video Speed Controller
01 Video Speed Controller
Video speed controller Chrome extension is one of the best speed control video extensions. You can adjust the playback speed, navigate forward or backward, and control HTML5 audio/video using keyboard shortcuts. The best thing about this speed controller extension is its ability to rewind video for a few seconds without changing playback speeds.
Customizable speed control video adjustments.
Easy shortcuts using a keyboard.
Simple user interface to control the video speed.
Sometime forget settings
02 YouTube Playback Speed Control
If you are looking for the video speed controller download, YouTube Playback Speed Control comes with plenty of speed control video options. The simple pressing of ‘+’ key to increase and ‘-’ to decrease playback speed makes it a favorite extension of every browser user. It is one of the best speed controller extension without any annoying popups on your streaming screen.
Control YouTube video playback speed using keyboard shortcuts.
Customize the keyboard buttons used for controlling playback speed.
Functional with HTML5 YouTube players embedded in other websites.
Doesn’t work with other video streaming options.
03 Accelerate for Safari
If you are a Mac, iPhone or iPad user, you can also download the video speed controller Safari. Accelate for Safari also supports Picture-in-Picture and AirPlay, which means you are not bound to stay in Safari browser to stream the video at your preferred pace. You can play the video in the background and continue browsing. The great thing about this video speed controller Safari extension is that it works with all the streaming and video platforms.
Customize video playback speed and controls in Safari.
Supports keyboard shortcuts for various video controls including play/pause and speed adjustment.
Compatible with major video platforms like YouTube, Netflix, Hulu, and more.
First time setup could be a hassle if you are not techie enough. 04 Playback Speed
04 Playback Speed
If you use Firefox like millions of others but feel sad that we haven’t mentioned video speed controller Firefox extension, well, you shouldn’t be. Playback Speed is one of the best speed controller extension on Firefox that lets you customize the playback controls. Another great thing, you won’t see annoying pop ups as its control center is next to the video link search bar. The setup is easier and the settings user interface is pleasing on the eyes with slider controls.
Play HTML5 videos on YouTube at customizable speeds.
Simple and one touch user interface to control settings
Slow playback speed options are limited.
Limited function availability across other streaming platforms.
05 SpeedUp
SpeedUp is a popular video speed controller Firefox extension with hundreds of downloads. There are many extensions that ask for tracking permission across all websites but SpeedUp doesn’t track any activity even on the video platform. Another great thing is that you can enable in-video buttons to control the video as per your preference. If you use a Firefox browser, you use go for the video speed controller download.
Control speed of all the video streaming platforms and websites.
Support for HTML5 videos on any website.
simple user interface provided by Speedify. Disadvantages
The speed playback buttons could be clumsy sometimes.
06 PlayerFab All-in-One
PlayerFab lets you play back local videos, DVD/Blu-ray/UHD discs, and videos from Amazon and Netflix, and other streaming platforms. As a streaming playback platform, it lets you watch and play videos in one place. All you have to do is type the name of the movie/show, and it will play the video while giving you access to video playback controls.
You can watch videos in FHD, and it supports EAC3 5.1 audio quality.
All in one solution for all the streaming platforms.
Lets you adjust the playback speed.
Hi-Res Audio and Video support.
Lifetime license for premium features needs one time purchase.
Conclusion
If you are looking for a video speed controller that lets you speed control video, we have discussed some of the best video speed controller download options. We have chosen some of the best speed controller extensions for Google Chrome, Mozilla Firefox and Safari.
If you are looking for a speed controller extension, you can download any of the extensions mentioned. However, all these free chrome extensions have some compromises. If you don’t want to compromise on features and control access, you can purchase PlayerFab All-in-One.
Change Aspect Ratio of Video
Versatile Video Editor - Wondershare Filmora
Videos are a great way to complete the whole story in one go. In social media, videography, entertainment, educational video sharing, or many more areas, viewers and their viewing experience matter a lot. For instance, if a person visited YouTube to see some educational content but finds it out that the overall view of the video content is not up to the mark. Then, what will happen? That person will switch to another channel, which is not good for your business area. Thus, knowing the correct aspect ratio for your video is very important. Here, the aspect ratio refers to the ratio of width to the height of the Video or image visible on the screen. So, here you will learn about ways to change the ratio of a video and how to change video dimensions on premiere pro or iOS devices.

In this article
01 [Change aspect Ratio with Softwares](#Part 1)
02 [Change Video aspect Ratio Online](#Part 2)
03 [Make sure which aspect Ratio You Want to Change](#Part 3)
Part 1 Change aspect Ratio with Softwares
1.1 For beginners & most people
This part is for beginners or people who are not aware of the technicalities related to video size, dimensions, or changing the ratio of Video. A quick and easy-to-use application is Wondershare Filmora, one of the widely used platforms for video editing and adopting it s per the video requirement.
Thus, let’s try to understand how you can change the Video’s aspect ratio using Filmora.
Step1 Download and open the Software
First, visit the official link of Wondershare Filmora and download, install and lunch the tool on your system.
Step2 Set the aspect ratio and upload your file
Right from the main interface, you will find the aspect ratio option. Using the drop-down menu, select the desired one to change the ratio of Video. After that, click on the new project to upload your video file.
Step3 Save and Export
Now, when you upload the video file, it will automatically modify the chosen aspect ratio for the video. Then export the file to save at the desired location on your system.

1.2 For Professional People
Now, here comes the guidance to those professional videographers, movie maker who needs an advanced version to change video size or aspect ratio.
Since you are already aware of technicalities to a certain extent, it becomes easy to use some advanced tools to change the aspect ratio of Video using adobe and OBS Software.
● Adobe PR
The first tool that we shall discuss is Adobe PR, and we will learn how to use Adobe Premiere Pro to change the Video’s aspect ratio. This tool is valuable for worldwide users explicitly working in the video editing field or dedicated professionals who need some technical knowledge to understand the interface. Here are the required steps to handle the adobe PR to change aspect Ratio iPhone Video devices.
Open the ‘File’ Menu> then Go to the ‘New’ Folder > after that, visit the ‘Sequence’ (dialog box) That will give the option of ‘Settings,’ select it> then visit the ‘Video’ section. Then, from the Video section, you need to adjust the Frame size for height and the Horizontal value for width.
Then opt for ‘OK.’
● OBS Studio
Those who know are pretty aware of the professional OBS studio full of features and technical detailing. In this part, you shall see how to use OBS software to change the iMovie aspect ratio following the mentioned steps.
Here, you need to open the ‘Settings .’ Under the ‘Video’ subsection, you will see ‘Output Resolution’ (click on drop-down), then from the given aspect ratios, change the ratio of your Video. Then, press the OK button to apply the changes at the end. That’s it.
Using this professional software will make you able to change the aspect ratio on iPhone Video and change the aspect ratio MP4, MKV, FLV, or other formats. The only need is to have a basic understanding of the technical knowledge related to the software. If you’re already a professional video maker, this software will be the most option.
Part 2 Change Video aspect Ratio Online
Till now, we have covered different software as per the user requirements. Suppose you are not comfortable with downloading any software on your devices. In that case, there are some alternatives for Online Video Editors to change video aspect ratio with ease. Let’s take a look over some of the easy-to-use online tools to change the ratio of the Video. Such tools are quick to use and accessible worldwide. Some of them are mentioned below:
1. veed.io
You can effortlessly change the aspect ratio of your video using ‘Veed.io’. Which supports multiple video formats such as .wmv, .mp4, .mkv, .flv, .3gp and many more. While uploading the video, you need to mention the required width and height of the video and then click on the ‘Resize’ button.
2. Kapwing (kapwing.com)
Another helpful tool while searching for some quick tools to change the ratio of Video through online mode is Kapwing Online Convertor. You can scale, resize your Video by simply uploading your file or pasting the URL there. The interface is quite simple to use and changes the aspect ratio of MP4 or other format videosThere is noNo doubt accessing some online tools to change the Video’s aspect ratio in quick and easy steps. Though there exist certain limitations such as internet connection speed should be good to upload or download the Video. In addition, there is a certain limitation in terms of the size of the Video or other factors. Otherwise, it comes out to be a practical option for small files.
Part 3 Make sure which aspect Ratio You Want to Change
Technical specifications needed by different online platforms are different, such as YouTube, Instagram, Facebook, or other social media platform that needed a video with different aspect ratios to make them suitable s per their criteria. Thus, accordingly, you need to modify or change the aspect ratio on MP4 as per these social media requirements. Here are some famous social media platforms, and their aspect ratio requirements are listed. Let’s check them out one by one:
Twitter: The aspect ratio range that works for Twitter is between 1.1 to 2.1
Instagram: For it, the standard ratios are: 1.91:1, 4:5
Tiktok: Required ratio is 9:16 (Smartphone screen)
YouTube: Standard aspect Ratio for YouTube is 16:9. If the video uploaded is not in this ratio, then YouTube will make an internal adjustment and show the video with an outer band of the black or white strip around the video screen.
Vimeo: Both the options are available with Vimeo that is 16:9, 4:3
Wondershare Filmora
Get started easily with Filmora’s powerful performance, intuitive interface, and countless effects!
Try It Free Try It Free Try It Free Learn More >

Conclusion
Getting the correct information about the iMovie aspect ratio change and Adobe premiere pro-change aspect ratio is crucial to uplift the viewer base to your Video. Furthermore, to a great extent, it matters which platform your Video will launch on as different devices need different aspect ratios. Thus, this article focused on covering all the points covered under how to change the Aspect Ratio of MP4 videos. Thus, whether you are a novice in video making or a professional videographer, or a moviemaker, learn about changing the ratio of Video to open new vistas to your efforts with Wondershare Filmora, Adobe, and OBS web applications.
Videos are a great way to complete the whole story in one go. In social media, videography, entertainment, educational video sharing, or many more areas, viewers and their viewing experience matter a lot. For instance, if a person visited YouTube to see some educational content but finds it out that the overall view of the video content is not up to the mark. Then, what will happen? That person will switch to another channel, which is not good for your business area. Thus, knowing the correct aspect ratio for your video is very important. Here, the aspect ratio refers to the ratio of width to the height of the Video or image visible on the screen. So, here you will learn about ways to change the ratio of a video and how to change video dimensions on premiere pro or iOS devices.

In this article
01 [Change aspect Ratio with Softwares](#Part 1)
02 [Change Video aspect Ratio Online](#Part 2)
03 [Make sure which aspect Ratio You Want to Change](#Part 3)
Part 1 Change aspect Ratio with Softwares
1.1 For beginners & most people
This part is for beginners or people who are not aware of the technicalities related to video size, dimensions, or changing the ratio of Video. A quick and easy-to-use application is Wondershare Filmora, one of the widely used platforms for video editing and adopting it s per the video requirement.
Thus, let’s try to understand how you can change the Video’s aspect ratio using Filmora.
Step1 Download and open the Software
First, visit the official link of Wondershare Filmora and download, install and lunch the tool on your system.
Step2 Set the aspect ratio and upload your file
Right from the main interface, you will find the aspect ratio option. Using the drop-down menu, select the desired one to change the ratio of Video. After that, click on the new project to upload your video file.
Step3 Save and Export
Now, when you upload the video file, it will automatically modify the chosen aspect ratio for the video. Then export the file to save at the desired location on your system.

1.2 For Professional People
Now, here comes the guidance to those professional videographers, movie maker who needs an advanced version to change video size or aspect ratio.
Since you are already aware of technicalities to a certain extent, it becomes easy to use some advanced tools to change the aspect ratio of Video using adobe and OBS Software.
● Adobe PR
The first tool that we shall discuss is Adobe PR, and we will learn how to use Adobe Premiere Pro to change the Video’s aspect ratio. This tool is valuable for worldwide users explicitly working in the video editing field or dedicated professionals who need some technical knowledge to understand the interface. Here are the required steps to handle the adobe PR to change aspect Ratio iPhone Video devices.
Open the ‘File’ Menu> then Go to the ‘New’ Folder > after that, visit the ‘Sequence’ (dialog box) That will give the option of ‘Settings,’ select it> then visit the ‘Video’ section. Then, from the Video section, you need to adjust the Frame size for height and the Horizontal value for width.
Then opt for ‘OK.’
● OBS Studio
Those who know are pretty aware of the professional OBS studio full of features and technical detailing. In this part, you shall see how to use OBS software to change the iMovie aspect ratio following the mentioned steps.
Here, you need to open the ‘Settings .’ Under the ‘Video’ subsection, you will see ‘Output Resolution’ (click on drop-down), then from the given aspect ratios, change the ratio of your Video. Then, press the OK button to apply the changes at the end. That’s it.
Using this professional software will make you able to change the aspect ratio on iPhone Video and change the aspect ratio MP4, MKV, FLV, or other formats. The only need is to have a basic understanding of the technical knowledge related to the software. If you’re already a professional video maker, this software will be the most option.
Part 2 Change Video aspect Ratio Online
Till now, we have covered different software as per the user requirements. Suppose you are not comfortable with downloading any software on your devices. In that case, there are some alternatives for Online Video Editors to change video aspect ratio with ease. Let’s take a look over some of the easy-to-use online tools to change the ratio of the Video. Such tools are quick to use and accessible worldwide. Some of them are mentioned below:
1. veed.io
You can effortlessly change the aspect ratio of your video using ‘Veed.io’. Which supports multiple video formats such as .wmv, .mp4, .mkv, .flv, .3gp and many more. While uploading the video, you need to mention the required width and height of the video and then click on the ‘Resize’ button.
2. Kapwing (kapwing.com)
Another helpful tool while searching for some quick tools to change the ratio of Video through online mode is Kapwing Online Convertor. You can scale, resize your Video by simply uploading your file or pasting the URL there. The interface is quite simple to use and changes the aspect ratio of MP4 or other format videosThere is noNo doubt accessing some online tools to change the Video’s aspect ratio in quick and easy steps. Though there exist certain limitations such as internet connection speed should be good to upload or download the Video. In addition, there is a certain limitation in terms of the size of the Video or other factors. Otherwise, it comes out to be a practical option for small files.
Part 3 Make sure which aspect Ratio You Want to Change
Technical specifications needed by different online platforms are different, such as YouTube, Instagram, Facebook, or other social media platform that needed a video with different aspect ratios to make them suitable s per their criteria. Thus, accordingly, you need to modify or change the aspect ratio on MP4 as per these social media requirements. Here are some famous social media platforms, and their aspect ratio requirements are listed. Let’s check them out one by one:
Twitter: The aspect ratio range that works for Twitter is between 1.1 to 2.1
Instagram: For it, the standard ratios are: 1.91:1, 4:5
Tiktok: Required ratio is 9:16 (Smartphone screen)
YouTube: Standard aspect Ratio for YouTube is 16:9. If the video uploaded is not in this ratio, then YouTube will make an internal adjustment and show the video with an outer band of the black or white strip around the video screen.
Vimeo: Both the options are available with Vimeo that is 16:9, 4:3
Wondershare Filmora
Get started easily with Filmora’s powerful performance, intuitive interface, and countless effects!
Try It Free Try It Free Try It Free Learn More >

Conclusion
Getting the correct information about the iMovie aspect ratio change and Adobe premiere pro-change aspect ratio is crucial to uplift the viewer base to your Video. Furthermore, to a great extent, it matters which platform your Video will launch on as different devices need different aspect ratios. Thus, this article focused on covering all the points covered under how to change the Aspect Ratio of MP4 videos. Thus, whether you are a novice in video making or a professional videographer, or a moviemaker, learn about changing the ratio of Video to open new vistas to your efforts with Wondershare Filmora, Adobe, and OBS web applications.
Videos are a great way to complete the whole story in one go. In social media, videography, entertainment, educational video sharing, or many more areas, viewers and their viewing experience matter a lot. For instance, if a person visited YouTube to see some educational content but finds it out that the overall view of the video content is not up to the mark. Then, what will happen? That person will switch to another channel, which is not good for your business area. Thus, knowing the correct aspect ratio for your video is very important. Here, the aspect ratio refers to the ratio of width to the height of the Video or image visible on the screen. So, here you will learn about ways to change the ratio of a video and how to change video dimensions on premiere pro or iOS devices.

In this article
01 [Change aspect Ratio with Softwares](#Part 1)
02 [Change Video aspect Ratio Online](#Part 2)
03 [Make sure which aspect Ratio You Want to Change](#Part 3)
Part 1 Change aspect Ratio with Softwares
1.1 For beginners & most people
This part is for beginners or people who are not aware of the technicalities related to video size, dimensions, or changing the ratio of Video. A quick and easy-to-use application is Wondershare Filmora, one of the widely used platforms for video editing and adopting it s per the video requirement.
Thus, let’s try to understand how you can change the Video’s aspect ratio using Filmora.
Step1 Download and open the Software
First, visit the official link of Wondershare Filmora and download, install and lunch the tool on your system.
Step2 Set the aspect ratio and upload your file
Right from the main interface, you will find the aspect ratio option. Using the drop-down menu, select the desired one to change the ratio of Video. After that, click on the new project to upload your video file.
Step3 Save and Export
Now, when you upload the video file, it will automatically modify the chosen aspect ratio for the video. Then export the file to save at the desired location on your system.

1.2 For Professional People
Now, here comes the guidance to those professional videographers, movie maker who needs an advanced version to change video size or aspect ratio.
Since you are already aware of technicalities to a certain extent, it becomes easy to use some advanced tools to change the aspect ratio of Video using adobe and OBS Software.
● Adobe PR
The first tool that we shall discuss is Adobe PR, and we will learn how to use Adobe Premiere Pro to change the Video’s aspect ratio. This tool is valuable for worldwide users explicitly working in the video editing field or dedicated professionals who need some technical knowledge to understand the interface. Here are the required steps to handle the adobe PR to change aspect Ratio iPhone Video devices.
Open the ‘File’ Menu> then Go to the ‘New’ Folder > after that, visit the ‘Sequence’ (dialog box) That will give the option of ‘Settings,’ select it> then visit the ‘Video’ section. Then, from the Video section, you need to adjust the Frame size for height and the Horizontal value for width.
Then opt for ‘OK.’
● OBS Studio
Those who know are pretty aware of the professional OBS studio full of features and technical detailing. In this part, you shall see how to use OBS software to change the iMovie aspect ratio following the mentioned steps.
Here, you need to open the ‘Settings .’ Under the ‘Video’ subsection, you will see ‘Output Resolution’ (click on drop-down), then from the given aspect ratios, change the ratio of your Video. Then, press the OK button to apply the changes at the end. That’s it.
Using this professional software will make you able to change the aspect ratio on iPhone Video and change the aspect ratio MP4, MKV, FLV, or other formats. The only need is to have a basic understanding of the technical knowledge related to the software. If you’re already a professional video maker, this software will be the most option.
Part 2 Change Video aspect Ratio Online
Till now, we have covered different software as per the user requirements. Suppose you are not comfortable with downloading any software on your devices. In that case, there are some alternatives for Online Video Editors to change video aspect ratio with ease. Let’s take a look over some of the easy-to-use online tools to change the ratio of the Video. Such tools are quick to use and accessible worldwide. Some of them are mentioned below:
1. veed.io
You can effortlessly change the aspect ratio of your video using ‘Veed.io’. Which supports multiple video formats such as .wmv, .mp4, .mkv, .flv, .3gp and many more. While uploading the video, you need to mention the required width and height of the video and then click on the ‘Resize’ button.
2. Kapwing (kapwing.com)
Another helpful tool while searching for some quick tools to change the ratio of Video through online mode is Kapwing Online Convertor. You can scale, resize your Video by simply uploading your file or pasting the URL there. The interface is quite simple to use and changes the aspect ratio of MP4 or other format videosThere is noNo doubt accessing some online tools to change the Video’s aspect ratio in quick and easy steps. Though there exist certain limitations such as internet connection speed should be good to upload or download the Video. In addition, there is a certain limitation in terms of the size of the Video or other factors. Otherwise, it comes out to be a practical option for small files.
Part 3 Make sure which aspect Ratio You Want to Change
Technical specifications needed by different online platforms are different, such as YouTube, Instagram, Facebook, or other social media platform that needed a video with different aspect ratios to make them suitable s per their criteria. Thus, accordingly, you need to modify or change the aspect ratio on MP4 as per these social media requirements. Here are some famous social media platforms, and their aspect ratio requirements are listed. Let’s check them out one by one:
Twitter: The aspect ratio range that works for Twitter is between 1.1 to 2.1
Instagram: For it, the standard ratios are: 1.91:1, 4:5
Tiktok: Required ratio is 9:16 (Smartphone screen)
YouTube: Standard aspect Ratio for YouTube is 16:9. If the video uploaded is not in this ratio, then YouTube will make an internal adjustment and show the video with an outer band of the black or white strip around the video screen.
Vimeo: Both the options are available with Vimeo that is 16:9, 4:3
Wondershare Filmora
Get started easily with Filmora’s powerful performance, intuitive interface, and countless effects!
Try It Free Try It Free Try It Free Learn More >

Conclusion
Getting the correct information about the iMovie aspect ratio change and Adobe premiere pro-change aspect ratio is crucial to uplift the viewer base to your Video. Furthermore, to a great extent, it matters which platform your Video will launch on as different devices need different aspect ratios. Thus, this article focused on covering all the points covered under how to change the Aspect Ratio of MP4 videos. Thus, whether you are a novice in video making or a professional videographer, or a moviemaker, learn about changing the ratio of Video to open new vistas to your efforts with Wondershare Filmora, Adobe, and OBS web applications.
Videos are a great way to complete the whole story in one go. In social media, videography, entertainment, educational video sharing, or many more areas, viewers and their viewing experience matter a lot. For instance, if a person visited YouTube to see some educational content but finds it out that the overall view of the video content is not up to the mark. Then, what will happen? That person will switch to another channel, which is not good for your business area. Thus, knowing the correct aspect ratio for your video is very important. Here, the aspect ratio refers to the ratio of width to the height of the Video or image visible on the screen. So, here you will learn about ways to change the ratio of a video and how to change video dimensions on premiere pro or iOS devices.

In this article
01 [Change aspect Ratio with Softwares](#Part 1)
02 [Change Video aspect Ratio Online](#Part 2)
03 [Make sure which aspect Ratio You Want to Change](#Part 3)
Part 1 Change aspect Ratio with Softwares
1.1 For beginners & most people
This part is for beginners or people who are not aware of the technicalities related to video size, dimensions, or changing the ratio of Video. A quick and easy-to-use application is Wondershare Filmora, one of the widely used platforms for video editing and adopting it s per the video requirement.
Thus, let’s try to understand how you can change the Video’s aspect ratio using Filmora.
Step1 Download and open the Software
First, visit the official link of Wondershare Filmora and download, install and lunch the tool on your system.
Step2 Set the aspect ratio and upload your file
Right from the main interface, you will find the aspect ratio option. Using the drop-down menu, select the desired one to change the ratio of Video. After that, click on the new project to upload your video file.
Step3 Save and Export
Now, when you upload the video file, it will automatically modify the chosen aspect ratio for the video. Then export the file to save at the desired location on your system.

1.2 For Professional People
Now, here comes the guidance to those professional videographers, movie maker who needs an advanced version to change video size or aspect ratio.
Since you are already aware of technicalities to a certain extent, it becomes easy to use some advanced tools to change the aspect ratio of Video using adobe and OBS Software.
● Adobe PR
The first tool that we shall discuss is Adobe PR, and we will learn how to use Adobe Premiere Pro to change the Video’s aspect ratio. This tool is valuable for worldwide users explicitly working in the video editing field or dedicated professionals who need some technical knowledge to understand the interface. Here are the required steps to handle the adobe PR to change aspect Ratio iPhone Video devices.
Open the ‘File’ Menu> then Go to the ‘New’ Folder > after that, visit the ‘Sequence’ (dialog box) That will give the option of ‘Settings,’ select it> then visit the ‘Video’ section. Then, from the Video section, you need to adjust the Frame size for height and the Horizontal value for width.
Then opt for ‘OK.’
● OBS Studio
Those who know are pretty aware of the professional OBS studio full of features and technical detailing. In this part, you shall see how to use OBS software to change the iMovie aspect ratio following the mentioned steps.
Here, you need to open the ‘Settings .’ Under the ‘Video’ subsection, you will see ‘Output Resolution’ (click on drop-down), then from the given aspect ratios, change the ratio of your Video. Then, press the OK button to apply the changes at the end. That’s it.
Using this professional software will make you able to change the aspect ratio on iPhone Video and change the aspect ratio MP4, MKV, FLV, or other formats. The only need is to have a basic understanding of the technical knowledge related to the software. If you’re already a professional video maker, this software will be the most option.
Part 2 Change Video aspect Ratio Online
Till now, we have covered different software as per the user requirements. Suppose you are not comfortable with downloading any software on your devices. In that case, there are some alternatives for Online Video Editors to change video aspect ratio with ease. Let’s take a look over some of the easy-to-use online tools to change the ratio of the Video. Such tools are quick to use and accessible worldwide. Some of them are mentioned below:
1. veed.io
You can effortlessly change the aspect ratio of your video using ‘Veed.io’. Which supports multiple video formats such as .wmv, .mp4, .mkv, .flv, .3gp and many more. While uploading the video, you need to mention the required width and height of the video and then click on the ‘Resize’ button.
2. Kapwing (kapwing.com)
Another helpful tool while searching for some quick tools to change the ratio of Video through online mode is Kapwing Online Convertor. You can scale, resize your Video by simply uploading your file or pasting the URL there. The interface is quite simple to use and changes the aspect ratio of MP4 or other format videosThere is noNo doubt accessing some online tools to change the Video’s aspect ratio in quick and easy steps. Though there exist certain limitations such as internet connection speed should be good to upload or download the Video. In addition, there is a certain limitation in terms of the size of the Video or other factors. Otherwise, it comes out to be a practical option for small files.
Part 3 Make sure which aspect Ratio You Want to Change
Technical specifications needed by different online platforms are different, such as YouTube, Instagram, Facebook, or other social media platform that needed a video with different aspect ratios to make them suitable s per their criteria. Thus, accordingly, you need to modify or change the aspect ratio on MP4 as per these social media requirements. Here are some famous social media platforms, and their aspect ratio requirements are listed. Let’s check them out one by one:
Twitter: The aspect ratio range that works for Twitter is between 1.1 to 2.1
Instagram: For it, the standard ratios are: 1.91:1, 4:5
Tiktok: Required ratio is 9:16 (Smartphone screen)
YouTube: Standard aspect Ratio for YouTube is 16:9. If the video uploaded is not in this ratio, then YouTube will make an internal adjustment and show the video with an outer band of the black or white strip around the video screen.
Vimeo: Both the options are available with Vimeo that is 16:9, 4:3
Wondershare Filmora
Get started easily with Filmora’s powerful performance, intuitive interface, and countless effects!
Try It Free Try It Free Try It Free Learn More >

Conclusion
Getting the correct information about the iMovie aspect ratio change and Adobe premiere pro-change aspect ratio is crucial to uplift the viewer base to your Video. Furthermore, to a great extent, it matters which platform your Video will launch on as different devices need different aspect ratios. Thus, this article focused on covering all the points covered under how to change the Aspect Ratio of MP4 videos. Thus, whether you are a novice in video making or a professional videographer, or a moviemaker, learn about changing the ratio of Video to open new vistas to your efforts with Wondershare Filmora, Adobe, and OBS web applications.
Also read:
- 6 Instant Mp4 to GIF Online Tools
- How to Make a Transparent Background in Paint. How 3D Paint Transparent Background Can Be Made. How to Save an Image with Transparent Background for 2024
- Using Slow Motion in Adobe After Effects A Step-by-Step Procession
- Steps to Denoise in Final Cut Pro – Reduce Video and Audio Noise
- New Make A Countdown Video
- Trailer Guide for Creators and Developers for 2024
- In 2024, How to Create Sports Intro and Outro for YouTube Video?
- How to Share YouTube Video on Zoom?
- Updated 2024 Approved Change Aspect Ratio of Video
- New OBS Green Screen Guide
- New Best 12 AI Video Generators to Pick
- Updated 2024 Approved Finding the Best Voice Changers for WhatsApp Free and Paid
- Updated Fast Method to Match Color in Photoshop for 2024
- 2024 Approved With Looping Videos, People Stay on Your Site Longer, Boosting Engagement. With Video Being Watched on Mobile over 3X More than Any Other Content, Its an Essential Part of Mobile Advertising
- Recording Videos with Your Smartphones Is Fun and Fantastic. But Did You Know that Recording in Slo-Mo Has Become a Trend Nowadays? Read More to Learn About How to Convert Videos to Slow Motion Here
- New The Power of Music in Videos for 2024
- Updated Track Mattes The Ultimate Guide For After Effects
- New In 2024, Best Video Title Generators
- New 2024 Approved 3 Methods to Combine 2 or 3 Videos Into 1
- New 2024 Approved How to Combine Videos Into One on Instagram
- New In 2024, What Are the Best Video Background Changers Online?
- Updated In 2024, Top Things People Know About Wedding Slideshow
- Convert Your Videos to 60 FPS Using These Excellent Tools for 2024
- Updated Working Out All Important Details of Slowing Down Video in After Effects
- Kdenlive Video Editor Review
- Best 5 Apps To Add Song To Video for 2024
- New In 2024, Best Audio Plug-Ins For Video Editors
- In 2024, Do You Know Everything Related to Wondershare Filmoras Video Editing Interface? If You Are Unaware of It, Read and Learn About Filmoras Interface
- New 3 Ways to Combine 2 or 3 Videos Into 1 for 2024
- How to Add Slideshow in PowerPoint for 2024
- New Discover How to Download Mobile Phone Green Screen Videos and Pictures for Free. Elevate Your Content with HD Quality Green Screen Frames
- In 2024, 4 solution to get rid of pokemon fail to detect location On Realme 12 5G | Dr.fone
- How to recover deleted photos from Android Gallery without backup on Pixel Fold
- Ultimate Guide on iPhone 6s iCloud Activation Lock Bypass
- How to play AVCHD MTS files on Galaxy F34 5G?
- How to Use Pokémon Emerald Master Ball Cheat On Realme Narzo N55 | Dr.fone
- Fixed Were Sorry But Excel Has Run into an Error
- Full Guide to Unlock iPhone 8 Plus with iTunes | Dr.fone
- 3 Ways to Fake GPS Without Root On Google Pixel 8 | Dr.fone
- Life360 Learn How Everything Works On Xiaomi Redmi K70E | Dr.fone
- In 2024, The Ultimate Guide to Oppo A38 Pattern Lock Screen Everything You Need to Know
- In 2024, Hacks to do pokemon go trainer battles For Itel P55 | Dr.fone
- In 2024, How to Fake GPS on Android without Mock Location For your Nubia Red Magic 8S Pro | Dr.fone
- The way to get back lost messages from Honor
- In 2024, The Best iSpoofer Alternative to Try On Apple iPhone 15 Pro Max | Dr.fone
- In 2024, Is Your iPhone SE (2020) in Security Lockout? Proper Ways To Unlock | Dr.fone
- In 2024, Full Guide to Bypass Vivo Y78+ FRP
- Title: New How to Create a Special Animated Transition in Filmora in Just 2 Minutes. This Simple Step-by-Step Guide Will Show You the Easy Way
- Author: Chloe
- Created at : 2024-04-24 07:08:20
- Updated at : 2024-04-25 07:08:20
- Link: https://ai-editing-video.techidaily.com/new-how-to-create-a-special-animated-transition-in-filmora-in-just-2-minutes-this-simple-step-by-step-guide-will-show-you-the-easy-way/
- License: This work is licensed under CC BY-NC-SA 4.0.

