:max_bytes(150000):strip_icc():format(webp)/homeweatherstation-34f9e9a9aaf64446a8f21ff05991c079.jpg)
New How to Create and Add an Adjustment Layer in Final Cut Pro

How to Create and Add an Adjustment Layer in Final Cut Pro
Final Cut Pro is an advanced editing software that is available for Mac users exclusively. Using this high-end software, you can create compelling storytelling in your video clips. It offers different features through which you can effortlessly add audio and motion graphics to your videos. You can also add cinematic effects to your videos using Final Cut Pro to modify their focus points.
You can also add adjustment layers in Final Cut Pro to efficiently add the effects in video clips. By reading this article, you will learn how to add an adjustment layer in Final Cut Pro.

Part 1: What is Adjustment Layer in Final Cut Pro?
The adjustment layer in video editing can provide you with great ease as you can apply effects to multiple videos using this particular layer. Using the adjustment layer, you can apply effects and color grading to your video clips that come beneath this layer. So, apart from adding effects and executing color correction to individual clips, you can use an adjustment layer to generate quicker results.
After creating an adjustment layer in any video editor, you can easily cut and extend it like any other clip. You can also remove it anytime from your timeline with a single tap. In Final Cut Pro, you cannot insert adjustment layers in its timeline directly, like in Premiere Pro or After Effects.
To do so, you have to use third-party tools to create adjustment layers from scratch in Final Cut Pro. The process of creating an adjustment layer in Final Cut Pro is a little bit longer compared to other editors. To learn more about the adjustment layer in FCPX, continue reading this article.

Part 2: How to Add an Adjustment Layer in Final Cut Pro?
Are you eager to know how to add adjustment layers in Final Cut Pro? In this section, you can find simple instructions to generate an adjustment layer in Final Cut Pro without hassle.
Step1 First, click on this link to download the adjustment layer in your MacBook. Once done, copy your “Adjustment Layer” folder to the “User” folder. Afterward, move it to “Movies” and then “Motion Templates.” Once done, copy it to the “Titles” folder eventually.

Step2 Now open Final Cut Pro and locate the “Adjustment Layer” under the “Titles” section. After locating it, drag and drop it into the timeline. This adjustment layer was created as a title layer in Apple Motion that got published in Final Cut Pro using the built-in publishing tools.

Step3 Once you have created the adjustment layer, you can apply any sort of effects to the video clips. However, you should make sure to place the adjustment layer above in the layers stack.

Bonus Tips – How to Use Adjustment Layers in the Best Alternative to FCPX?
If you want to use an alternative to Final Cut Pro for creating the adjustment layer, you can try Wondershare Filmora 12 . You can edit your videos in an advanced and secure environment using this tool. It supports all multiple platforms, such as Windows, Mac, Android, and iOS. You can do color correction in your videos to manage the saturation, brightness, contrast, exposure, and other factors in Filmora.
Free Download For Win 7 or later(64-bit)
Free Download For macOS 10.14 or later
Moreover, you can also create 3D animated titles in Filmora to give your project a unique look. It also provides a wide range of keyboard shortcut presets through which you can make your editing easier and faster. Apart from editing and modifying your videos, you can also increase their vibrancy by using Filmora effects. You can explore and select a diverse range of visual effects in Filmora to give a new dimension to your video clips.
Key Features of Filmora
- Filmora offers cloud services that allow you to collaborate with your team members effectively. On its workspace cloud platform, you can share and review the edited video clips with your team members in a comfortable environment.
- It offers a pen tool through which you can draw complex mask shapes, such as straight lines or curves around the objects.
- Using the AI Smart Cutout feature, you can use advanced technology to select people or objects in the video effectively.
- Are you annoyed by the background noises in your video clips? You can try the AI Denoise feature of Filmora that can help you to eradicate background noises from the video clips precisely.
How to Add an Adjustment Layer Using Filmora
To create and use the adjustment layer in Wondershare Filmora 12, you can proceed to the following steps:
Step1 Import the Video Clip
Launch Filmora and click on the “New Project” button. Afterward, upload the video file on the project media and then drag and drop it into the timeline.

Step2 Add the Adjustment Layer
Now head to the “Media” section on the left side, where you can find the option of the “Adjustment Layer.” Next, drag and drop the adjustment layer into the timeline. You can double-click on it to change its settings effectively.

Step3 Add Multiple Presets to Adjustment Layer
From the settings, you can change blending mode, rotation, position, and opacity easily. Moreover, you can add different presets to the adjustment layer for more modifications. You can use the color match tool to adjust the colors in your video clip. With this tool, you can also add a border across the video clips using the adjustment layer. Also, you can color code the adjustment layer to create a more attractive look in the video clip.

Conclusion
Adjustment layers can make your editing process easy and fast. If you want to pursue video editing as your profession, you should know how to use the adjustment layer in famous tools like Final Cut Pro. After reading this article, you have learned how to create an adjustment layer in Final Cut Pro without complications.
However, if you want a more compatible and easier-to-use tool to generate adjustment layers, you can try Wondershare Filmora. It’s a powerful video editor that you can use to perform professional editing using adjustment layers.
Free Download For macOS 10.14 or later
Moreover, you can also create 3D animated titles in Filmora to give your project a unique look. It also provides a wide range of keyboard shortcut presets through which you can make your editing easier and faster. Apart from editing and modifying your videos, you can also increase their vibrancy by using Filmora effects. You can explore and select a diverse range of visual effects in Filmora to give a new dimension to your video clips.
Key Features of Filmora
- Filmora offers cloud services that allow you to collaborate with your team members effectively. On its workspace cloud platform, you can share and review the edited video clips with your team members in a comfortable environment.
- It offers a pen tool through which you can draw complex mask shapes, such as straight lines or curves around the objects.
- Using the AI Smart Cutout feature, you can use advanced technology to select people or objects in the video effectively.
- Are you annoyed by the background noises in your video clips? You can try the AI Denoise feature of Filmora that can help you to eradicate background noises from the video clips precisely.
How to Add an Adjustment Layer Using Filmora
To create and use the adjustment layer in Wondershare Filmora 12, you can proceed to the following steps:
Step1 Import the Video Clip
Launch Filmora and click on the “New Project” button. Afterward, upload the video file on the project media and then drag and drop it into the timeline.

Step2 Add the Adjustment Layer
Now head to the “Media” section on the left side, where you can find the option of the “Adjustment Layer.” Next, drag and drop the adjustment layer into the timeline. You can double-click on it to change its settings effectively.

Step3 Add Multiple Presets to Adjustment Layer
From the settings, you can change blending mode, rotation, position, and opacity easily. Moreover, you can add different presets to the adjustment layer for more modifications. You can use the color match tool to adjust the colors in your video clip. With this tool, you can also add a border across the video clips using the adjustment layer. Also, you can color code the adjustment layer to create a more attractive look in the video clip.

Conclusion
Adjustment layers can make your editing process easy and fast. If you want to pursue video editing as your profession, you should know how to use the adjustment layer in famous tools like Final Cut Pro. After reading this article, you have learned how to create an adjustment layer in Final Cut Pro without complications.
However, if you want a more compatible and easier-to-use tool to generate adjustment layers, you can try Wondershare Filmora. It’s a powerful video editor that you can use to perform professional editing using adjustment layers.
A Comprehensive Guide to Slow Motion YouTube Videos and How to Manage Them
Everyone loves slow-mo scenes, dance videos, and content in related genres. Creativity is embedded in slow-motion videos to elevate your content. Not only do they refine the quality of your videos, but they also improve comprehension. YouTube is one of the well-known sources for gaining information. To understand a practical procedure, it offers a YouTube slow-motion option.
This option involves adjusting the playback speed of video for YouTube slo-mo. This article sheds light on how to slow down a YouTube video . There will be a detailed discussion on reducing YouTube video speed. In addition, we will introduce a high-performance video editor to perform this task. Keep reading this article to expand your creative horizons about slow YouTube videos.
Slow Motion Video Maker Slow your video’s speed with better control of your keyframes to create unique cinematic effects!
Make A Slow Motion Video Make A Slow Motion Video More Features

Part 1: How to Slow Down Videos in YouTube?
If you watch YouTube videos often, you must have been aware of the YouTube slow-down feature. The playback adjustment option on YouTube helps with that. By enabling that option, the whole YouTube video slows down. For adding slow-motion effects at specific durations, you can use Wondershare Filmora . In this part, we’ll explore both methods of slowing down a YouTube video:
Method 1. Direct Method
If you have the YouTube application, you can commence this action straight. If not, you can also open YouTube on your browser. Given below are the steps to play YouTube in slow motion:
Step 1
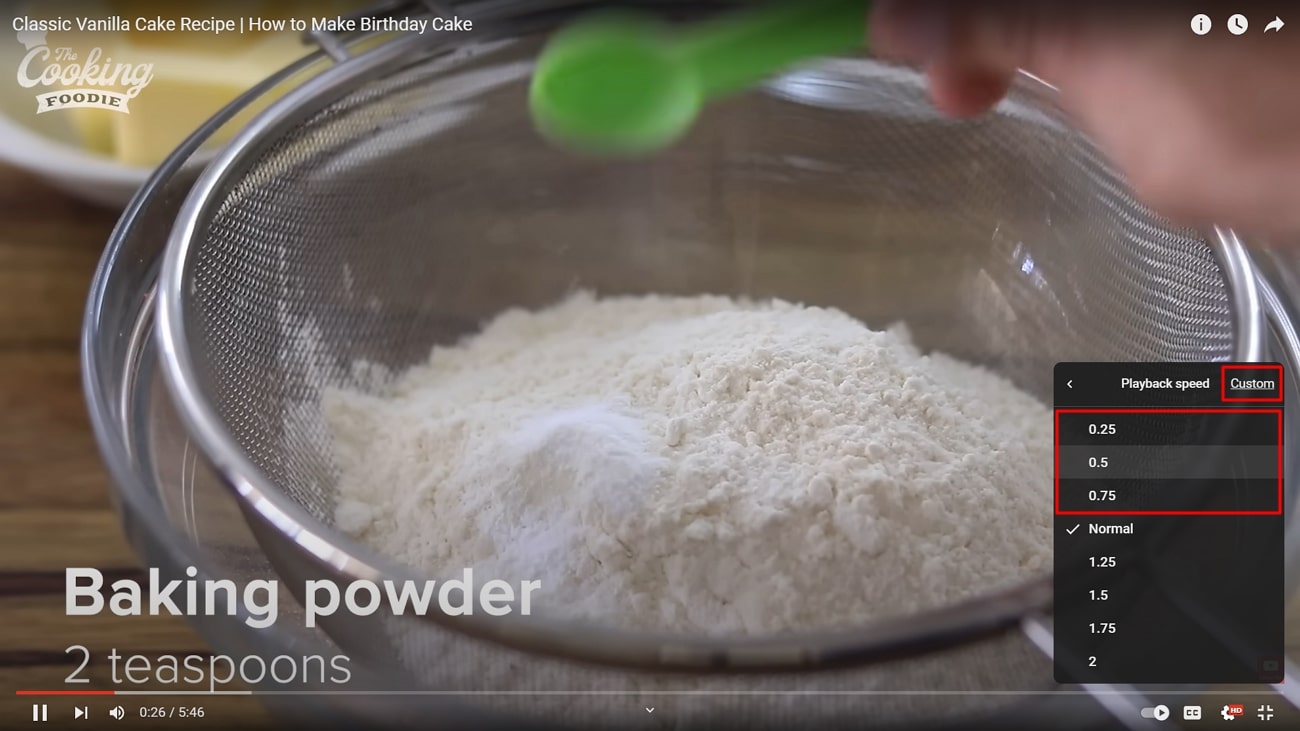
Once you play a YouTube video, navigate towards the bottom of this video. Afterward, click on the “Settings” option and select the “Playback speed” option.

Step 2
From the expansion menu, select a playback speed option as per preferences. You can select a speed between 0.75, 0.5, and 0.25. Afterward, play your video and see if the speed is right. This is the simplest method for YouTube video slow motion.
Method 2. Using Wondershare Filmora
In Wondershare Filmora, there are two methods to slow down YouTube videos. You can either use the Uniform Speed option or the Speed Ramping option. Moreover, you can add the Optical Flow effect to ensure a smooth, slow motion. In this section, we will first familiarize you with downloading a YouTube video. Here are the three major steps to create slow-motion in Filmora:
Free Download For Win 7 or later(64-bit)
Free Download For macOS 10.14 or later
Step 1Downloading a YouTube Video
YouTube doesn’t allow users to download a YouTube video on their devices. Hence, you will need third-party support to do so. Many sites offer YouTube video download services. We are using the y2mate.com , and here are the steps for it:
1. Copy the YouTube Video Link
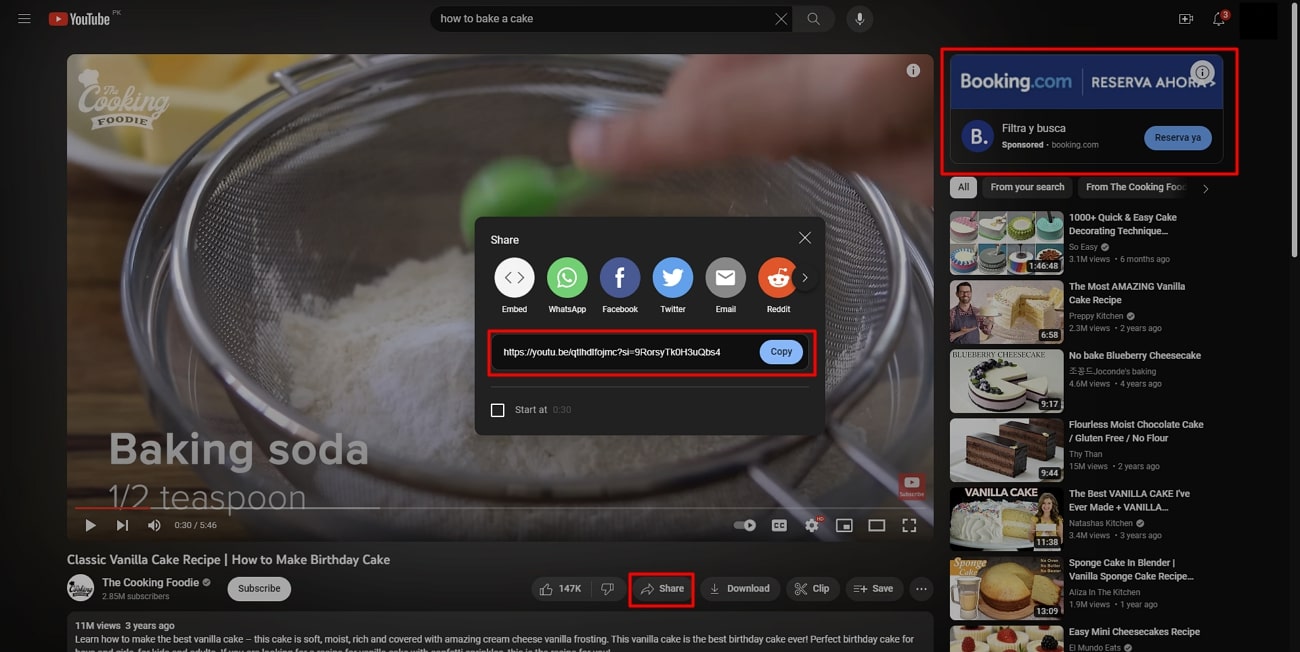
First, access the respective video that you want to download from YouTube. Locate the “Share” option at the bottom of this video and select it. Then click the “Copy” option to copy your video’s link.
2. Access the Site
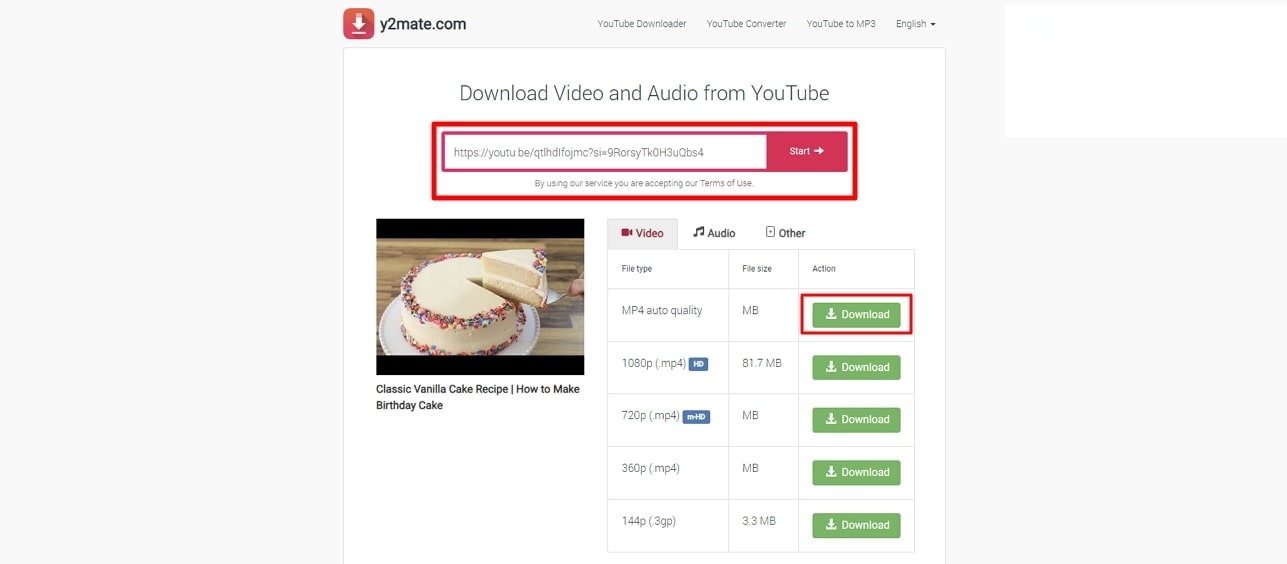
After copying the video’s link, access the site using your web browser. In the “Search or paste link here” box, paste the video link and click “Start.” From the download options appearing at the bottom, select a suitable option. Click on the “Download” button adjacent to your option.
Step 2Slow Down YouTube Video in Filmora
Once you have downloaded the video on your device, it is time to slow down the YouTube video. Filmora offers a plain and simple method to slow down a video. Here is a step-by-step guide to help you create video slow-mo in Filmora:
1. Import the YouTube Video
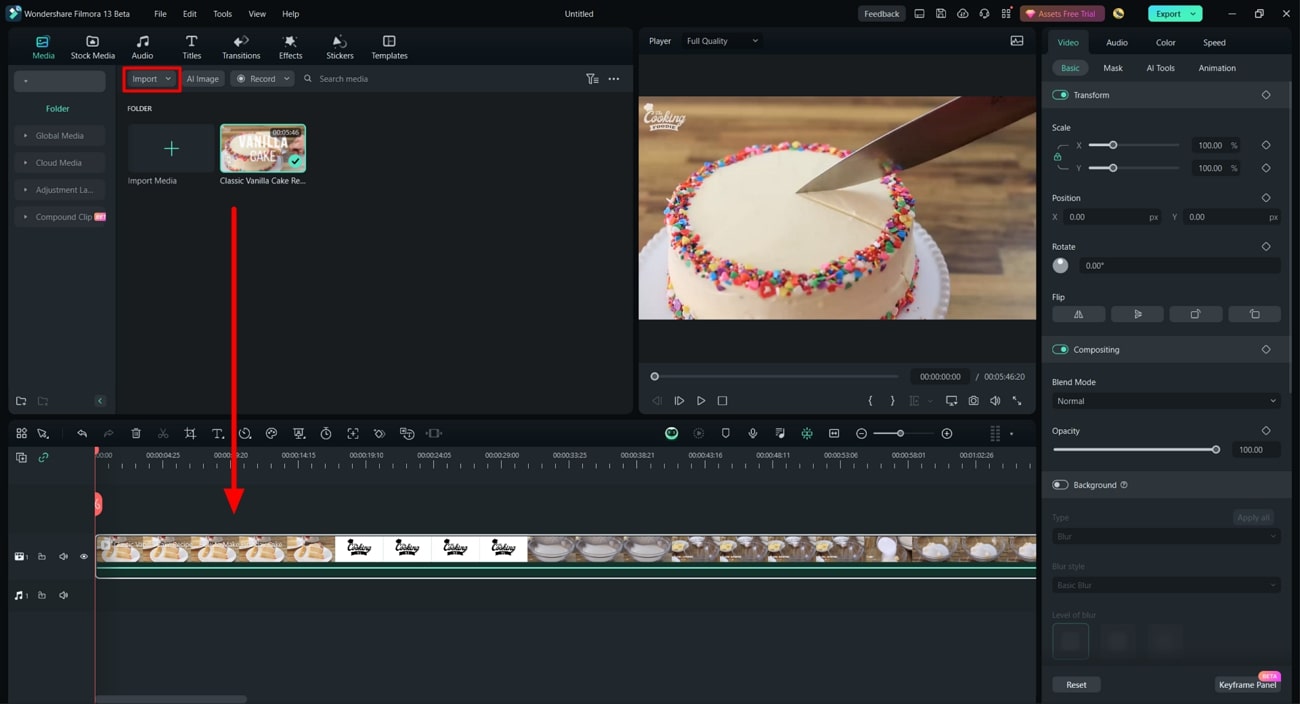
Since Wondershare Filmora is a desktop tool, you must download it first. Initiate it and click the “New Project” option to reach its editing interface. Click on the “Import” option to import the video you downloaded. Afterward, bring this video to the timeline using the drag-and-drop technique.
2. Access Uniform Speed
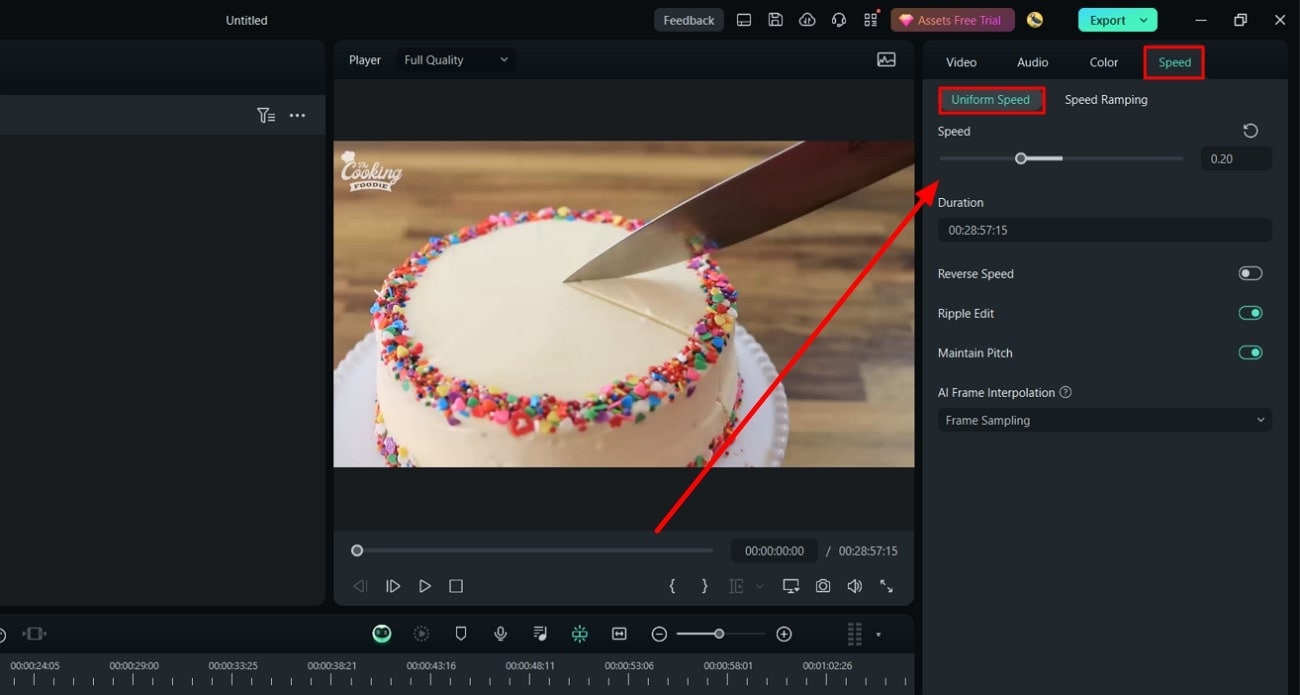
Select the video in the timeline and direct it toward the settings panel appearing on the right side. From the given tabs, go to the “Speed” tab and select “Uniform Speed.” Further, adjust the “Speed” slider or its value in the given box. This will slow down your video, and you can preview it to adjust further.
Step 3Smoothing Out the YouTube Slow-Mo
Upon previewing the YouTube slo-mo, you might notice some roughness in it. For creating a smooth slow-mo, use the Optical Flow option. Here are the steps to enable this option in Filmora:
1. Enable the Optical Flow Option
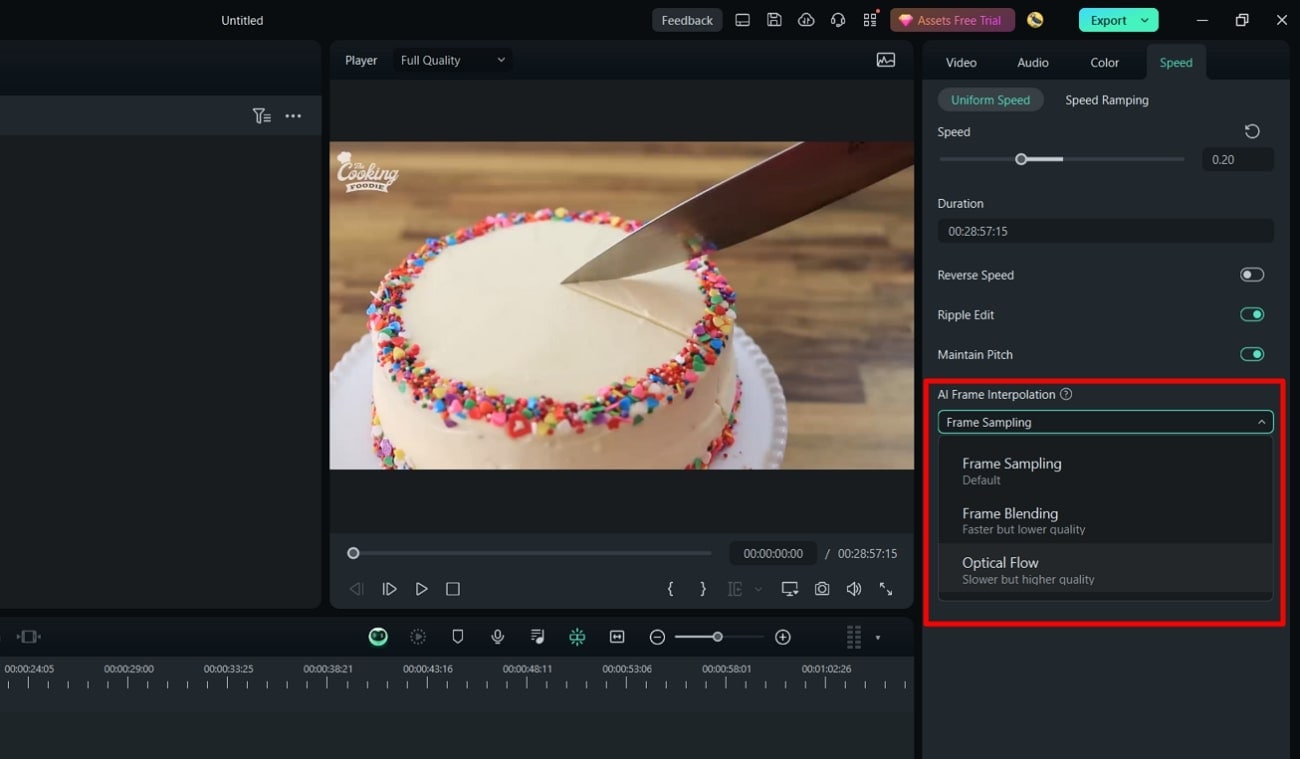
Navigate toward the “AI Frame Interpolation” section. You can find it at the bottom of the Uniform Speed tab. Afterward, expand this section and select the “Optical Flow” option.
2. Render the YouTube Slow-Mo
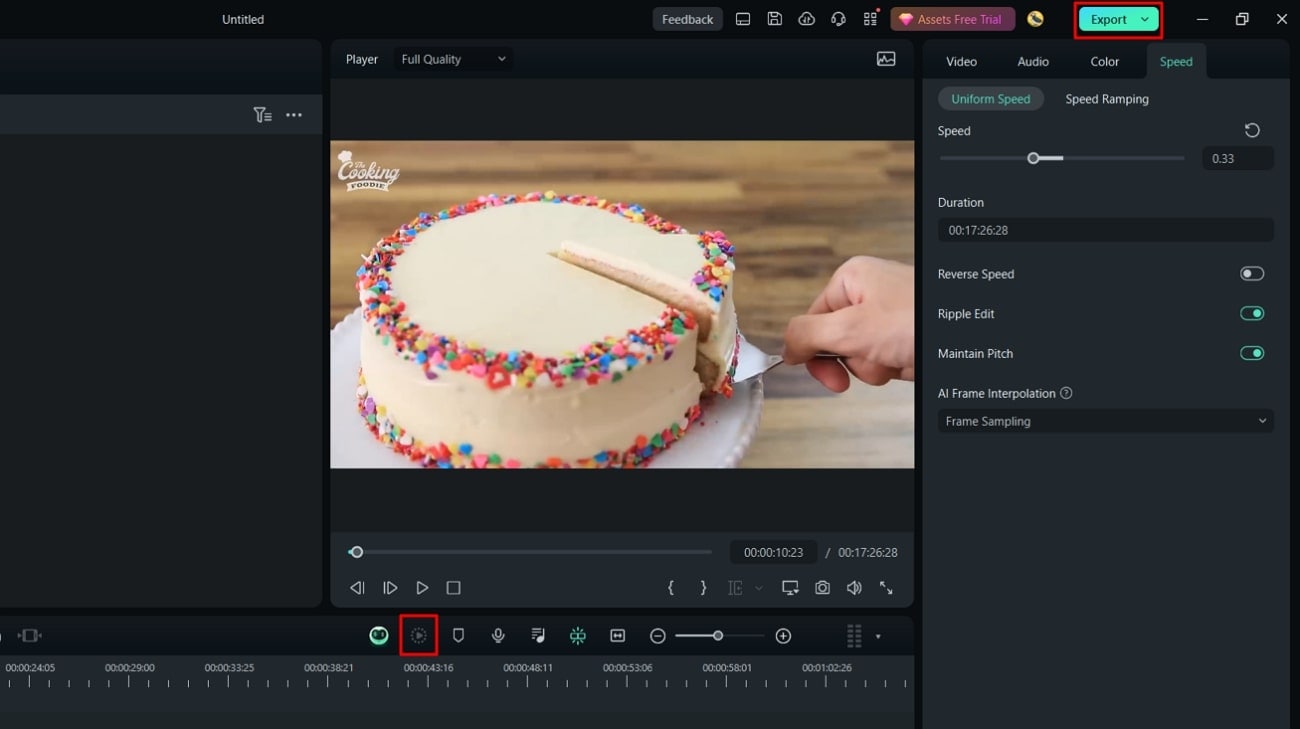
Once you have enabled optical flow, direct it toward the timeline tool panel. Select the “Render Preview” option from there and see your video afterward. You’ll have a professional-level slow YouTube slow-motion video.
Part 2: Other Features Offered by Wondershare Filmora
Wondershare Filmora is a professional video editor that offers AI editing options. You can bring so much creativity to your videos with its effects and colors. It offers AI Chroma Key or AI Background Remover features to change backgrounds. Moreover, it runs on a timeline editing interface that helps with precise cut and trim.
You can slow down a video and increase its speed to save time. Wondershare Filmora is all about video editing, and there is no limit to its creativity. Let’s dive into this section to learn about some of those AI features below:
1. AI Thumbnail Creator
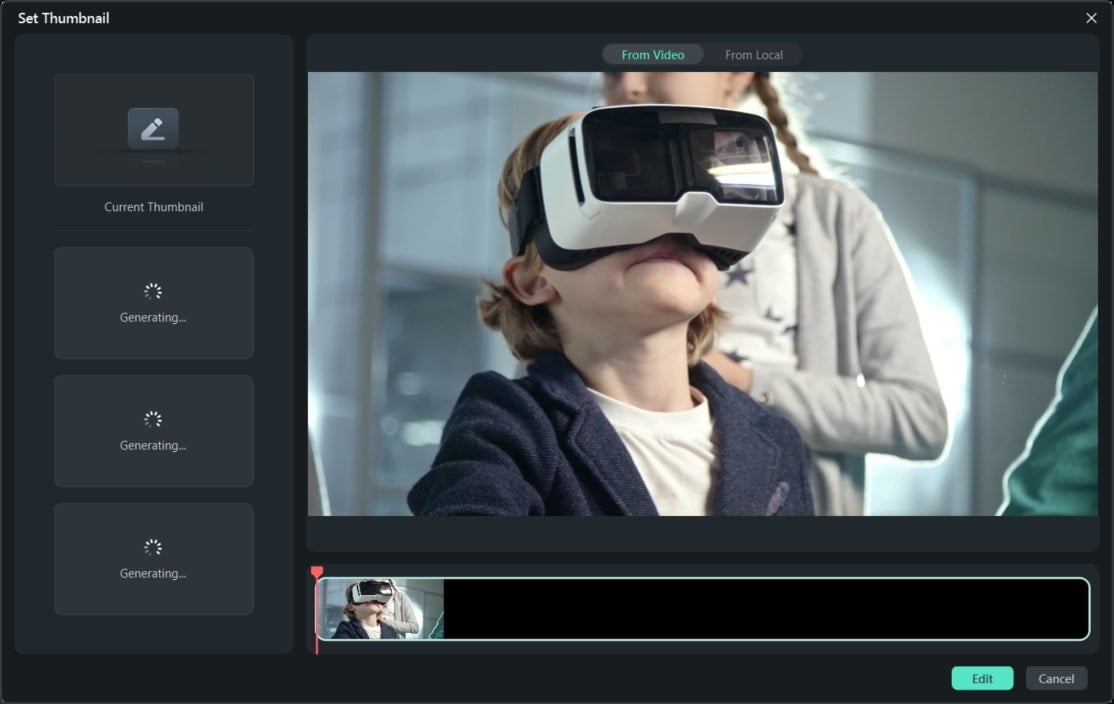
When creating a YouTube video for your channel, thumbnails play an important role. Filmora allows you to generate creative thumbnails for your videos. Through the support of AI, it opts for the finest frame out of your video as a thumbnail. Afterward, it offers you built-in templates that fit many content categories.
2. Speed Ramping
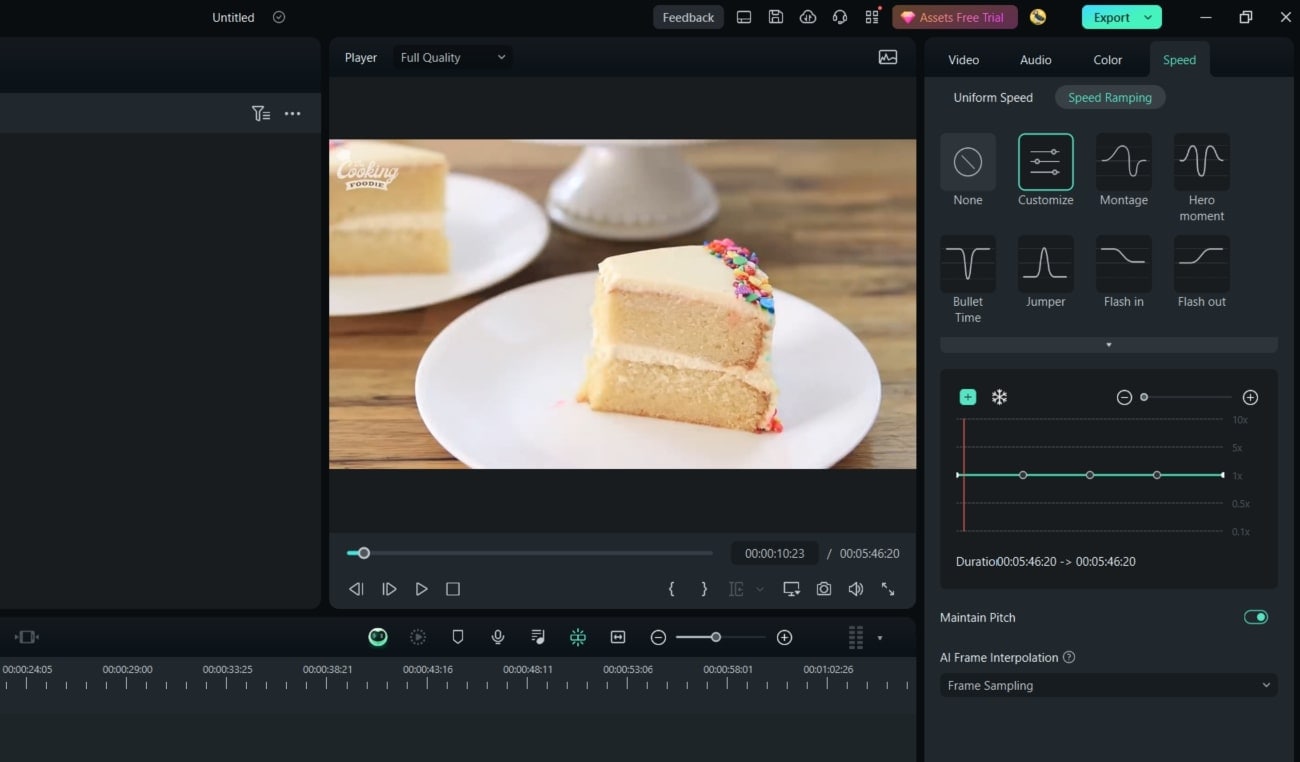
This function also allows you to slow down YouTube videos precisely. Using this feature, you can slow down specific parts of a video. It offers pre-designed speed options; however, you can also customize it. Montage, Hero moment, Bullet Time, Jumper, and other options exist as presets. Afterward, you can manipulate the frame speed option for a smooth outlook.
3. Silence Detection
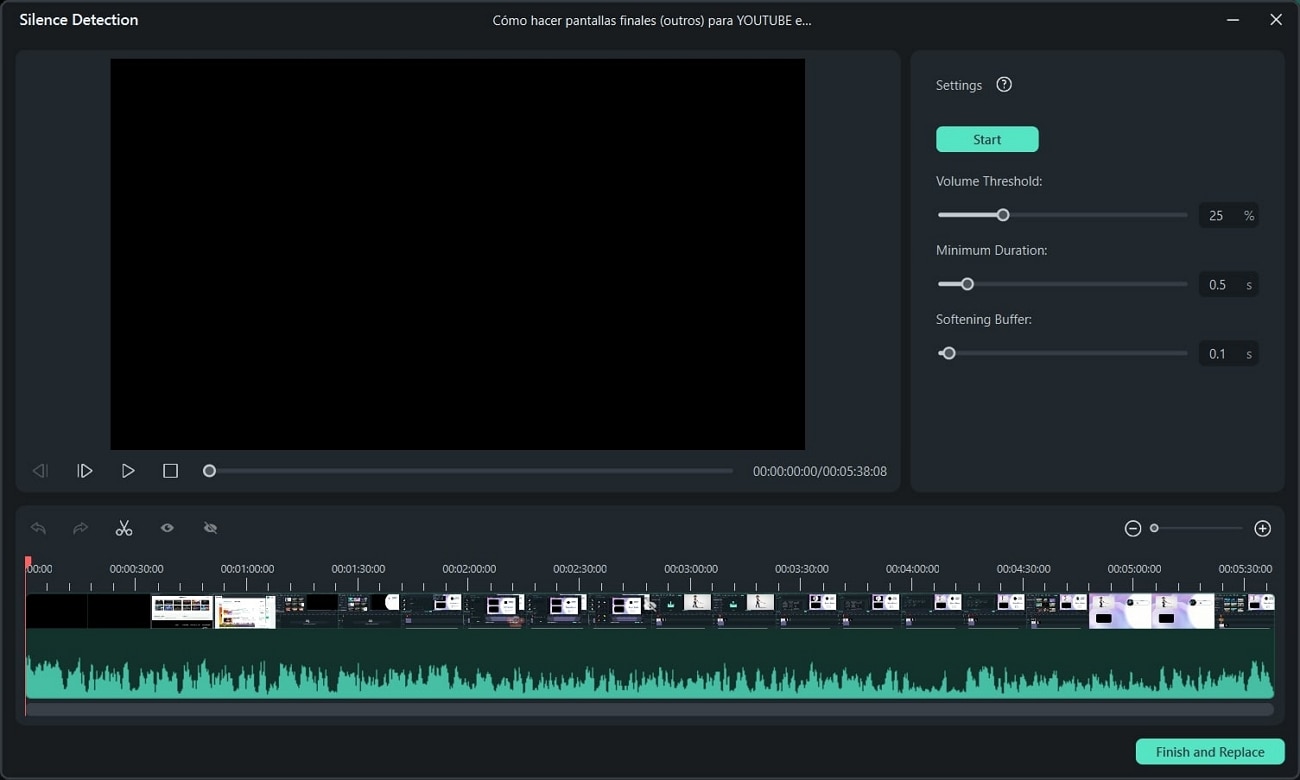
Silent pauses or loud breath noise in videos is often disturbing. Such elements decrease the audio and overall quality of a video clip or audio track. To avoid this, Filmora offers a Silence Detection feature backed by AI. It robotically spots the silent pauses, hums, and breaths in audio and eliminates them. This will save you from audience backlash and maintain content quality.
4. Speech-to-Text
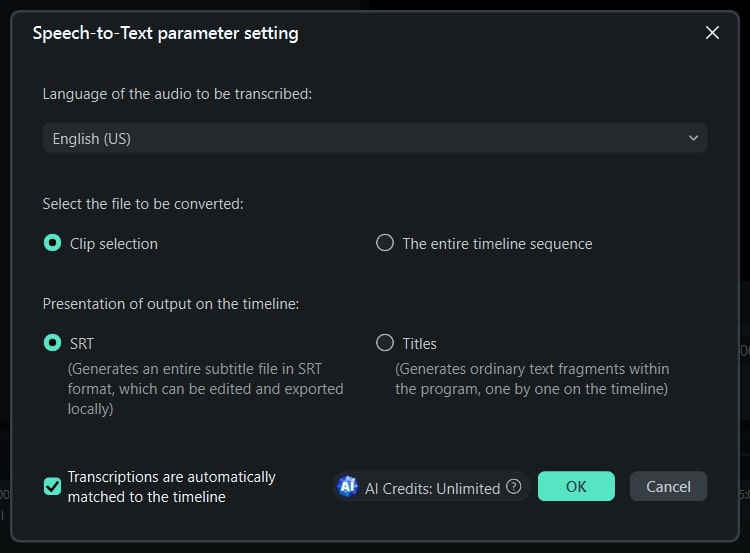
This feature belongs in the text editing category of Wondershare Filmora. The STT tool of Filmora has many applications in the field of filmmaking. It uses AI technology and NLP systems to analyze speech and convert it to text. You can use this text to create captions and subtitles for YouTube videos. In addition, you can use this feature for text-based editing in Filmora or other tools.
Conclusion
After reading this article, users have a comprehensive knowledge of YouTube slow motion. We discussed certain advantages of slowing down videos. The article also discussed how to slow down a YouTube video with precision. It was explained using a professional-grade video editor with a detailed guide. If you want to create a perfect YouTube slow-mo or slow down a specific part, use Filmora.
Make A Slow Motion Video Make A Slow Motion Video More Features

Part 1: How to Slow Down Videos in YouTube?
If you watch YouTube videos often, you must have been aware of the YouTube slow-down feature. The playback adjustment option on YouTube helps with that. By enabling that option, the whole YouTube video slows down. For adding slow-motion effects at specific durations, you can use Wondershare Filmora . In this part, we’ll explore both methods of slowing down a YouTube video:
Method 1. Direct Method
If you have the YouTube application, you can commence this action straight. If not, you can also open YouTube on your browser. Given below are the steps to play YouTube in slow motion:
Step 1
Once you play a YouTube video, navigate towards the bottom of this video. Afterward, click on the “Settings” option and select the “Playback speed” option.

Step 2
From the expansion menu, select a playback speed option as per preferences. You can select a speed between 0.75, 0.5, and 0.25. Afterward, play your video and see if the speed is right. This is the simplest method for YouTube video slow motion.

Method 2. Using Wondershare Filmora
In Wondershare Filmora, there are two methods to slow down YouTube videos. You can either use the Uniform Speed option or the Speed Ramping option. Moreover, you can add the Optical Flow effect to ensure a smooth, slow motion. In this section, we will first familiarize you with downloading a YouTube video. Here are the three major steps to create slow-motion in Filmora:
Free Download For Win 7 or later(64-bit)
Free Download For macOS 10.14 or later
Step 1Downloading a YouTube Video
YouTube doesn’t allow users to download a YouTube video on their devices. Hence, you will need third-party support to do so. Many sites offer YouTube video download services. We are using the y2mate.com , and here are the steps for it:
1. Copy the YouTube Video Link
First, access the respective video that you want to download from YouTube. Locate the “Share” option at the bottom of this video and select it. Then click the “Copy” option to copy your video’s link.

2. Access the Site
After copying the video’s link, access the site using your web browser. In the “Search or paste link here” box, paste the video link and click “Start.” From the download options appearing at the bottom, select a suitable option. Click on the “Download” button adjacent to your option.

Step 2Slow Down YouTube Video in Filmora
Once you have downloaded the video on your device, it is time to slow down the YouTube video. Filmora offers a plain and simple method to slow down a video. Here is a step-by-step guide to help you create video slow-mo in Filmora:
1. Import the YouTube Video
Since Wondershare Filmora is a desktop tool, you must download it first. Initiate it and click the “New Project” option to reach its editing interface. Click on the “Import” option to import the video you downloaded. Afterward, bring this video to the timeline using the drag-and-drop technique.

2. Access Uniform Speed
Select the video in the timeline and direct it toward the settings panel appearing on the right side. From the given tabs, go to the “Speed” tab and select “Uniform Speed.” Further, adjust the “Speed” slider or its value in the given box. This will slow down your video, and you can preview it to adjust further.

Step 3Smoothing Out the YouTube Slow-Mo
Upon previewing the YouTube slo-mo, you might notice some roughness in it. For creating a smooth slow-mo, use the Optical Flow option. Here are the steps to enable this option in Filmora:
1. Enable the Optical Flow Option
Navigate toward the “AI Frame Interpolation” section. You can find it at the bottom of the Uniform Speed tab. Afterward, expand this section and select the “Optical Flow” option.

2. Render the YouTube Slow-Mo
Once you have enabled optical flow, direct it toward the timeline tool panel. Select the “Render Preview” option from there and see your video afterward. You’ll have a professional-level slow YouTube slow-motion video.

Part 2: Other Features Offered by Wondershare Filmora
Wondershare Filmora is a professional video editor that offers AI editing options. You can bring so much creativity to your videos with its effects and colors. It offers AI Chroma Key or AI Background Remover features to change backgrounds. Moreover, it runs on a timeline editing interface that helps with precise cut and trim.
You can slow down a video and increase its speed to save time. Wondershare Filmora is all about video editing, and there is no limit to its creativity. Let’s dive into this section to learn about some of those AI features below:
1. AI Thumbnail Creator
When creating a YouTube video for your channel, thumbnails play an important role. Filmora allows you to generate creative thumbnails for your videos. Through the support of AI, it opts for the finest frame out of your video as a thumbnail. Afterward, it offers you built-in templates that fit many content categories.

2. Speed Ramping
This function also allows you to slow down YouTube videos precisely. Using this feature, you can slow down specific parts of a video. It offers pre-designed speed options; however, you can also customize it. Montage, Hero moment, Bullet Time, Jumper, and other options exist as presets. Afterward, you can manipulate the frame speed option for a smooth outlook.

3. Silence Detection
Silent pauses or loud breath noise in videos is often disturbing. Such elements decrease the audio and overall quality of a video clip or audio track. To avoid this, Filmora offers a Silence Detection feature backed by AI. It robotically spots the silent pauses, hums, and breaths in audio and eliminates them. This will save you from audience backlash and maintain content quality.

4. Speech-to-Text
This feature belongs in the text editing category of Wondershare Filmora. The STT tool of Filmora has many applications in the field of filmmaking. It uses AI technology and NLP systems to analyze speech and convert it to text. You can use this text to create captions and subtitles for YouTube videos. In addition, you can use this feature for text-based editing in Filmora or other tools.

Conclusion
After reading this article, users have a comprehensive knowledge of YouTube slow motion. We discussed certain advantages of slowing down videos. The article also discussed how to slow down a YouTube video with precision. It was explained using a professional-grade video editor with a detailed guide. If you want to create a perfect YouTube slow-mo or slow down a specific part, use Filmora.
How to Create Datamoshing Effect to Your Footage in After Effects?
Experimenting with new effects and filters has become part and parcel of life, especially for creative professionals. Datamoshing is a similar effect that displays errors and flaws in the video clips to leave an impression on the audience. In most terms, the datamoshing effect shares similarities with the glitch effect.
Henceforth, the write-up shall focus on the introduction of this effect along with its workability. The procedure to create datamosh After Effects would also be covered. So, let us begin!
In this article
01 What is the Datamoshing Effect?
02 How Does Datamoshing Effect Work?
03 Step by Step to Create Datamoshing Effect in After Effects (Without Plugin)
04 How to Do Datamoshing Effect with Datamosh Plugin in After Effects
Part 1: What is the Datamoshing Effect?
Before going into the depths of workability and operation of the datamoshing effect in After Effects, let us understand the effect in detail. The datamoshing effect plays with the video compression to corrupt the pixels of the footage.
In this effect, the pixels glitch and appear to melt, duplicate, and create a projection organically. Also known as databending, it is a complicated technique in which movement of one layer is introduced to another layer of the video clip.
Lossy compression and removed frames help develop a psychedelic result effortlessly. Presently, datamosh After Effects has gained popularity as it helps bring change to the video and engages the audience.
Part 2: How Does Datamoshing Effect Work?
The sub-section informs the content creators and creative professionals regarding the workability of the datamoshing effect in video clips. Hence, let us commence this.
Datamoshing eliminates the new picture frame and keeps those frames that control the movement of the pixels. It leads to the picture pixels going into different directions instead of the usual one, thus, creating a glitch effect. These glitch effects are used in unique mediums to create a classy yet ancient vibe.
The datamoshing effect can be noticed between the cuts and motion. It is the process of corrupting the imagery in which the I-frames are replaced and P-frames are applied in the wrong picture. Let us dive right into two types of datamoshing.
The first type of datamoshing is created when the I-frame of the video is removed. In this scenario, the pixels from the previous scene are projected into the next scene smoothly. It gives the impression that the pixels have been tracked into the next shot.
The second kind of datamoshing, known to humankind, is when the d-frame of the video is duplicated. It leads the footage to show images and colors being bloomed together as the pixels are equivalent, coming through the same motion path.
Part 3: Step by Step to Create Datamoshing Effect in After Effects (Without Plugin)
Understanding the datamosh After Effects is one thing, and incorporating it in your footage is another. The section shall walk you through the step-by-step guide to create the After Effects’ datamoshing effect without a plugin. So, let’s go, shall we?
Step 1: Preliminary Process
The first step is easy. Open After Effects from your system. Import the targeted video that needs the datamosh effect. After that, head to the “Content-Aware Fill” to begin the process.

Step 2: Creating the Reference Frame
Use the playhead where you wish to create the effect, and then click on “Create Reference Frame.” The picture frame opens in Photoshop, and the user is expected to save it. Now, go back to the After Effects.

Step 3: Smearing Process
Now, hide the top layer so that the smearing can occur. Turn the Masks to “None” so that you can perform the masking. Split the second layer to duplicate the layer as we make changes to it. Set the “Masks” to “Subtract and then add a refine soft matte.

Step 4: Pre-composing the Clip
It is important to pre-compose the clip, so right-click on the timeline and hit “Pre-compose” to the menu list that appears. Tick mark “Move all attributes into the new composition” and rename the clip afterward. Hit “OK.”

Step 5: Rendering Queue
Double-click on the timeline, hold shift and drag it until the clip snaps. Press “B” on your keyboard and “N” on the other side to snap the work area. Navigate to “File” and “Export” and then click on “Render Queue.”

Step 6: Generating Fill Layer
Import the file when it is done rendering and drag it to the timeline. Trim the work area again using B and N buttons from the keyboard. Ensure that the fill method is “Surface,” and the range is “Work Area.” Click on “Generate Fill Layer” to start the analyzing process.

Step 7: Creating the Transition
The user is expected to create a transition between the two shots. Use the track matte to make solid and fractal noise. In the “Noise and Grain” section, click on “Fractal noise” and then switch the fractal type to “Basic.” Now, keyframe the “Brightness” and simultaneously turn its level to black and white to create a transition.

Step 8: Achieving a Glitchy Effect
To give the glitchy effect, head to the “Effects and Presets” and hit “Posterize,” and reduce its level to a couple of integers. Pull the transition down to the fill layer and set it to “Luma Matte.” It will showcase the halo sign that we masked around the image.

Step 9: Have a Finer Imprint
To eliminate it, use the “Set Matte” channel and alter its layer to the one we pre-composed. Now, invert the matte. Moving on, navigate to the “Simple Choker” and reduce it to one pixel. For perfection, duplicate it and get a finer imprint.

Step 10: Final Process
Duplicate the grey solid and then extend the second clip to our fill. In the last step, change the layer of the second clip to “Luma Matte” and save the video. You are done with the process.

Part 4: How to Do Datamoshing Effect with Datamosh Plugin in After Effects
With its plugin, this sub-section revolves around creating the datamosh effect in After Effects. So, let us begin!
Step 1: Rendering the Work Area
Open After Effects and click on the (+) sign to set the in and out points. Click on the “Datamosh” to render the work area. The timeline will showcase the clip. Click on “Remove Frames” from the left panel and add a new mosh marker by pressing the (+) button beside “Remove Frames.”

Step 2: I-Frame Removal
The new remove frame marker will be on the timeline. Drag it to the new scene and then hit “Datamosh.” The I-frame removal effect can be shown on the screen. Again, click on (+) to add a new mosh module. Press “Multiply” and then “Average” from the menus that appear. Hit “Average previous 3” afterward.

Step 3: Using the Hold Frames Function
Set the in and out points of this mosh marker and again hit “Datamosh.” The work area will be rendered. Now, open the mosh module and toggle on the “Hold Frames” feature. Also, toggle on the previous render. Press the “Datamosh” again.

Step 4: Injecting the Frames
Toggle the “Inject Frames” on and press use previous render. Hit “Datamosh” afterward. In this way, the clip will hold the frames and inject them into the transition. Enhance the intensity of the moshing algorithm and eliminate “Remove Frames” and “Inject Frames.” Use the previous render and again hit “Datamosh.”

Step 5: Playing with the Acceleration
Increase the acceleration and bring the intensity back to what it was. Again, use the previous render and click “Datamosh.” Now, improve the intensity and set the acceleration back to 0. Alter the “Blend” as much you need to mix the original and present motion of the transition. Press the “Datamosh.”

Step 6: Changing the Threshold
Moving on to the threshold feature, this function is a gatekeeper and decides if a pixel will be moshed. Inverse the intensity of the clip, change the blend to be 0, and set the threshold to be a small integer to find out the impact first. It can be enhanced later on. Uncheck the previous render if you are using the new clip for threshold. Hit “Datamosh” again. Now, export the video, and you are done with the datamoshing.

Conclusion
YouTubers and content creators use the Datamoshing effect to offer magic to the workplace. The article offered an extensive guide to effortlessly adding this effect in After Effects. The foundation and workability of the datamosh effect were also the cruces of the article. It is recommended that the user properly know the software before getting into the process.
02 How Does Datamoshing Effect Work?
03 Step by Step to Create Datamoshing Effect in After Effects (Without Plugin)
04 How to Do Datamoshing Effect with Datamosh Plugin in After Effects
Part 1: What is the Datamoshing Effect?
Before going into the depths of workability and operation of the datamoshing effect in After Effects, let us understand the effect in detail. The datamoshing effect plays with the video compression to corrupt the pixels of the footage.
In this effect, the pixels glitch and appear to melt, duplicate, and create a projection organically. Also known as databending, it is a complicated technique in which movement of one layer is introduced to another layer of the video clip.
Lossy compression and removed frames help develop a psychedelic result effortlessly. Presently, datamosh After Effects has gained popularity as it helps bring change to the video and engages the audience.
Part 2: How Does Datamoshing Effect Work?
The sub-section informs the content creators and creative professionals regarding the workability of the datamoshing effect in video clips. Hence, let us commence this.
Datamoshing eliminates the new picture frame and keeps those frames that control the movement of the pixels. It leads to the picture pixels going into different directions instead of the usual one, thus, creating a glitch effect. These glitch effects are used in unique mediums to create a classy yet ancient vibe.
The datamoshing effect can be noticed between the cuts and motion. It is the process of corrupting the imagery in which the I-frames are replaced and P-frames are applied in the wrong picture. Let us dive right into two types of datamoshing.
The first type of datamoshing is created when the I-frame of the video is removed. In this scenario, the pixels from the previous scene are projected into the next scene smoothly. It gives the impression that the pixels have been tracked into the next shot.
The second kind of datamoshing, known to humankind, is when the d-frame of the video is duplicated. It leads the footage to show images and colors being bloomed together as the pixels are equivalent, coming through the same motion path.
Part 3: Step by Step to Create Datamoshing Effect in After Effects (Without Plugin)
Understanding the datamosh After Effects is one thing, and incorporating it in your footage is another. The section shall walk you through the step-by-step guide to create the After Effects’ datamoshing effect without a plugin. So, let’s go, shall we?
Step 1: Preliminary Process
The first step is easy. Open After Effects from your system. Import the targeted video that needs the datamosh effect. After that, head to the “Content-Aware Fill” to begin the process.

Step 2: Creating the Reference Frame
Use the playhead where you wish to create the effect, and then click on “Create Reference Frame.” The picture frame opens in Photoshop, and the user is expected to save it. Now, go back to the After Effects.

Step 3: Smearing Process
Now, hide the top layer so that the smearing can occur. Turn the Masks to “None” so that you can perform the masking. Split the second layer to duplicate the layer as we make changes to it. Set the “Masks” to “Subtract and then add a refine soft matte.

Step 4: Pre-composing the Clip
It is important to pre-compose the clip, so right-click on the timeline and hit “Pre-compose” to the menu list that appears. Tick mark “Move all attributes into the new composition” and rename the clip afterward. Hit “OK.”

Step 5: Rendering Queue
Double-click on the timeline, hold shift and drag it until the clip snaps. Press “B” on your keyboard and “N” on the other side to snap the work area. Navigate to “File” and “Export” and then click on “Render Queue.”

Step 6: Generating Fill Layer
Import the file when it is done rendering and drag it to the timeline. Trim the work area again using B and N buttons from the keyboard. Ensure that the fill method is “Surface,” and the range is “Work Area.” Click on “Generate Fill Layer” to start the analyzing process.

Step 7: Creating the Transition
The user is expected to create a transition between the two shots. Use the track matte to make solid and fractal noise. In the “Noise and Grain” section, click on “Fractal noise” and then switch the fractal type to “Basic.” Now, keyframe the “Brightness” and simultaneously turn its level to black and white to create a transition.

Step 8: Achieving a Glitchy Effect
To give the glitchy effect, head to the “Effects and Presets” and hit “Posterize,” and reduce its level to a couple of integers. Pull the transition down to the fill layer and set it to “Luma Matte.” It will showcase the halo sign that we masked around the image.

Step 9: Have a Finer Imprint
To eliminate it, use the “Set Matte” channel and alter its layer to the one we pre-composed. Now, invert the matte. Moving on, navigate to the “Simple Choker” and reduce it to one pixel. For perfection, duplicate it and get a finer imprint.

Step 10: Final Process
Duplicate the grey solid and then extend the second clip to our fill. In the last step, change the layer of the second clip to “Luma Matte” and save the video. You are done with the process.

Part 4: How to Do Datamoshing Effect with Datamosh Plugin in After Effects
With its plugin, this sub-section revolves around creating the datamosh effect in After Effects. So, let us begin!
Step 1: Rendering the Work Area
Open After Effects and click on the (+) sign to set the in and out points. Click on the “Datamosh” to render the work area. The timeline will showcase the clip. Click on “Remove Frames” from the left panel and add a new mosh marker by pressing the (+) button beside “Remove Frames.”

Step 2: I-Frame Removal
The new remove frame marker will be on the timeline. Drag it to the new scene and then hit “Datamosh.” The I-frame removal effect can be shown on the screen. Again, click on (+) to add a new mosh module. Press “Multiply” and then “Average” from the menus that appear. Hit “Average previous 3” afterward.

Step 3: Using the Hold Frames Function
Set the in and out points of this mosh marker and again hit “Datamosh.” The work area will be rendered. Now, open the mosh module and toggle on the “Hold Frames” feature. Also, toggle on the previous render. Press the “Datamosh” again.

Step 4: Injecting the Frames
Toggle the “Inject Frames” on and press use previous render. Hit “Datamosh” afterward. In this way, the clip will hold the frames and inject them into the transition. Enhance the intensity of the moshing algorithm and eliminate “Remove Frames” and “Inject Frames.” Use the previous render and again hit “Datamosh.”

Step 5: Playing with the Acceleration
Increase the acceleration and bring the intensity back to what it was. Again, use the previous render and click “Datamosh.” Now, improve the intensity and set the acceleration back to 0. Alter the “Blend” as much you need to mix the original and present motion of the transition. Press the “Datamosh.”

Step 6: Changing the Threshold
Moving on to the threshold feature, this function is a gatekeeper and decides if a pixel will be moshed. Inverse the intensity of the clip, change the blend to be 0, and set the threshold to be a small integer to find out the impact first. It can be enhanced later on. Uncheck the previous render if you are using the new clip for threshold. Hit “Datamosh” again. Now, export the video, and you are done with the datamoshing.

Conclusion
YouTubers and content creators use the Datamoshing effect to offer magic to the workplace. The article offered an extensive guide to effortlessly adding this effect in After Effects. The foundation and workability of the datamosh effect were also the cruces of the article. It is recommended that the user properly know the software before getting into the process.
02 How Does Datamoshing Effect Work?
03 Step by Step to Create Datamoshing Effect in After Effects (Without Plugin)
04 How to Do Datamoshing Effect with Datamosh Plugin in After Effects
Part 1: What is the Datamoshing Effect?
Before going into the depths of workability and operation of the datamoshing effect in After Effects, let us understand the effect in detail. The datamoshing effect plays with the video compression to corrupt the pixels of the footage.
In this effect, the pixels glitch and appear to melt, duplicate, and create a projection organically. Also known as databending, it is a complicated technique in which movement of one layer is introduced to another layer of the video clip.
Lossy compression and removed frames help develop a psychedelic result effortlessly. Presently, datamosh After Effects has gained popularity as it helps bring change to the video and engages the audience.
Part 2: How Does Datamoshing Effect Work?
The sub-section informs the content creators and creative professionals regarding the workability of the datamoshing effect in video clips. Hence, let us commence this.
Datamoshing eliminates the new picture frame and keeps those frames that control the movement of the pixels. It leads to the picture pixels going into different directions instead of the usual one, thus, creating a glitch effect. These glitch effects are used in unique mediums to create a classy yet ancient vibe.
The datamoshing effect can be noticed between the cuts and motion. It is the process of corrupting the imagery in which the I-frames are replaced and P-frames are applied in the wrong picture. Let us dive right into two types of datamoshing.
The first type of datamoshing is created when the I-frame of the video is removed. In this scenario, the pixels from the previous scene are projected into the next scene smoothly. It gives the impression that the pixels have been tracked into the next shot.
The second kind of datamoshing, known to humankind, is when the d-frame of the video is duplicated. It leads the footage to show images and colors being bloomed together as the pixels are equivalent, coming through the same motion path.
Part 3: Step by Step to Create Datamoshing Effect in After Effects (Without Plugin)
Understanding the datamosh After Effects is one thing, and incorporating it in your footage is another. The section shall walk you through the step-by-step guide to create the After Effects’ datamoshing effect without a plugin. So, let’s go, shall we?
Step 1: Preliminary Process
The first step is easy. Open After Effects from your system. Import the targeted video that needs the datamosh effect. After that, head to the “Content-Aware Fill” to begin the process.

Step 2: Creating the Reference Frame
Use the playhead where you wish to create the effect, and then click on “Create Reference Frame.” The picture frame opens in Photoshop, and the user is expected to save it. Now, go back to the After Effects.

Step 3: Smearing Process
Now, hide the top layer so that the smearing can occur. Turn the Masks to “None” so that you can perform the masking. Split the second layer to duplicate the layer as we make changes to it. Set the “Masks” to “Subtract and then add a refine soft matte.

Step 4: Pre-composing the Clip
It is important to pre-compose the clip, so right-click on the timeline and hit “Pre-compose” to the menu list that appears. Tick mark “Move all attributes into the new composition” and rename the clip afterward. Hit “OK.”

Step 5: Rendering Queue
Double-click on the timeline, hold shift and drag it until the clip snaps. Press “B” on your keyboard and “N” on the other side to snap the work area. Navigate to “File” and “Export” and then click on “Render Queue.”

Step 6: Generating Fill Layer
Import the file when it is done rendering and drag it to the timeline. Trim the work area again using B and N buttons from the keyboard. Ensure that the fill method is “Surface,” and the range is “Work Area.” Click on “Generate Fill Layer” to start the analyzing process.

Step 7: Creating the Transition
The user is expected to create a transition between the two shots. Use the track matte to make solid and fractal noise. In the “Noise and Grain” section, click on “Fractal noise” and then switch the fractal type to “Basic.” Now, keyframe the “Brightness” and simultaneously turn its level to black and white to create a transition.

Step 8: Achieving a Glitchy Effect
To give the glitchy effect, head to the “Effects and Presets” and hit “Posterize,” and reduce its level to a couple of integers. Pull the transition down to the fill layer and set it to “Luma Matte.” It will showcase the halo sign that we masked around the image.

Step 9: Have a Finer Imprint
To eliminate it, use the “Set Matte” channel and alter its layer to the one we pre-composed. Now, invert the matte. Moving on, navigate to the “Simple Choker” and reduce it to one pixel. For perfection, duplicate it and get a finer imprint.

Step 10: Final Process
Duplicate the grey solid and then extend the second clip to our fill. In the last step, change the layer of the second clip to “Luma Matte” and save the video. You are done with the process.

Part 4: How to Do Datamoshing Effect with Datamosh Plugin in After Effects
With its plugin, this sub-section revolves around creating the datamosh effect in After Effects. So, let us begin!
Step 1: Rendering the Work Area
Open After Effects and click on the (+) sign to set the in and out points. Click on the “Datamosh” to render the work area. The timeline will showcase the clip. Click on “Remove Frames” from the left panel and add a new mosh marker by pressing the (+) button beside “Remove Frames.”

Step 2: I-Frame Removal
The new remove frame marker will be on the timeline. Drag it to the new scene and then hit “Datamosh.” The I-frame removal effect can be shown on the screen. Again, click on (+) to add a new mosh module. Press “Multiply” and then “Average” from the menus that appear. Hit “Average previous 3” afterward.

Step 3: Using the Hold Frames Function
Set the in and out points of this mosh marker and again hit “Datamosh.” The work area will be rendered. Now, open the mosh module and toggle on the “Hold Frames” feature. Also, toggle on the previous render. Press the “Datamosh” again.

Step 4: Injecting the Frames
Toggle the “Inject Frames” on and press use previous render. Hit “Datamosh” afterward. In this way, the clip will hold the frames and inject them into the transition. Enhance the intensity of the moshing algorithm and eliminate “Remove Frames” and “Inject Frames.” Use the previous render and again hit “Datamosh.”

Step 5: Playing with the Acceleration
Increase the acceleration and bring the intensity back to what it was. Again, use the previous render and click “Datamosh.” Now, improve the intensity and set the acceleration back to 0. Alter the “Blend” as much you need to mix the original and present motion of the transition. Press the “Datamosh.”

Step 6: Changing the Threshold
Moving on to the threshold feature, this function is a gatekeeper and decides if a pixel will be moshed. Inverse the intensity of the clip, change the blend to be 0, and set the threshold to be a small integer to find out the impact first. It can be enhanced later on. Uncheck the previous render if you are using the new clip for threshold. Hit “Datamosh” again. Now, export the video, and you are done with the datamoshing.

Conclusion
YouTubers and content creators use the Datamoshing effect to offer magic to the workplace. The article offered an extensive guide to effortlessly adding this effect in After Effects. The foundation and workability of the datamosh effect were also the cruces of the article. It is recommended that the user properly know the software before getting into the process.
02 How Does Datamoshing Effect Work?
03 Step by Step to Create Datamoshing Effect in After Effects (Without Plugin)
04 How to Do Datamoshing Effect with Datamosh Plugin in After Effects
Part 1: What is the Datamoshing Effect?
Before going into the depths of workability and operation of the datamoshing effect in After Effects, let us understand the effect in detail. The datamoshing effect plays with the video compression to corrupt the pixels of the footage.
In this effect, the pixels glitch and appear to melt, duplicate, and create a projection organically. Also known as databending, it is a complicated technique in which movement of one layer is introduced to another layer of the video clip.
Lossy compression and removed frames help develop a psychedelic result effortlessly. Presently, datamosh After Effects has gained popularity as it helps bring change to the video and engages the audience.
Part 2: How Does Datamoshing Effect Work?
The sub-section informs the content creators and creative professionals regarding the workability of the datamoshing effect in video clips. Hence, let us commence this.
Datamoshing eliminates the new picture frame and keeps those frames that control the movement of the pixels. It leads to the picture pixels going into different directions instead of the usual one, thus, creating a glitch effect. These glitch effects are used in unique mediums to create a classy yet ancient vibe.
The datamoshing effect can be noticed between the cuts and motion. It is the process of corrupting the imagery in which the I-frames are replaced and P-frames are applied in the wrong picture. Let us dive right into two types of datamoshing.
The first type of datamoshing is created when the I-frame of the video is removed. In this scenario, the pixels from the previous scene are projected into the next scene smoothly. It gives the impression that the pixels have been tracked into the next shot.
The second kind of datamoshing, known to humankind, is when the d-frame of the video is duplicated. It leads the footage to show images and colors being bloomed together as the pixels are equivalent, coming through the same motion path.
Part 3: Step by Step to Create Datamoshing Effect in After Effects (Without Plugin)
Understanding the datamosh After Effects is one thing, and incorporating it in your footage is another. The section shall walk you through the step-by-step guide to create the After Effects’ datamoshing effect without a plugin. So, let’s go, shall we?
Step 1: Preliminary Process
The first step is easy. Open After Effects from your system. Import the targeted video that needs the datamosh effect. After that, head to the “Content-Aware Fill” to begin the process.

Step 2: Creating the Reference Frame
Use the playhead where you wish to create the effect, and then click on “Create Reference Frame.” The picture frame opens in Photoshop, and the user is expected to save it. Now, go back to the After Effects.

Step 3: Smearing Process
Now, hide the top layer so that the smearing can occur. Turn the Masks to “None” so that you can perform the masking. Split the second layer to duplicate the layer as we make changes to it. Set the “Masks” to “Subtract and then add a refine soft matte.

Step 4: Pre-composing the Clip
It is important to pre-compose the clip, so right-click on the timeline and hit “Pre-compose” to the menu list that appears. Tick mark “Move all attributes into the new composition” and rename the clip afterward. Hit “OK.”

Step 5: Rendering Queue
Double-click on the timeline, hold shift and drag it until the clip snaps. Press “B” on your keyboard and “N” on the other side to snap the work area. Navigate to “File” and “Export” and then click on “Render Queue.”

Step 6: Generating Fill Layer
Import the file when it is done rendering and drag it to the timeline. Trim the work area again using B and N buttons from the keyboard. Ensure that the fill method is “Surface,” and the range is “Work Area.” Click on “Generate Fill Layer” to start the analyzing process.

Step 7: Creating the Transition
The user is expected to create a transition between the two shots. Use the track matte to make solid and fractal noise. In the “Noise and Grain” section, click on “Fractal noise” and then switch the fractal type to “Basic.” Now, keyframe the “Brightness” and simultaneously turn its level to black and white to create a transition.

Step 8: Achieving a Glitchy Effect
To give the glitchy effect, head to the “Effects and Presets” and hit “Posterize,” and reduce its level to a couple of integers. Pull the transition down to the fill layer and set it to “Luma Matte.” It will showcase the halo sign that we masked around the image.

Step 9: Have a Finer Imprint
To eliminate it, use the “Set Matte” channel and alter its layer to the one we pre-composed. Now, invert the matte. Moving on, navigate to the “Simple Choker” and reduce it to one pixel. For perfection, duplicate it and get a finer imprint.

Step 10: Final Process
Duplicate the grey solid and then extend the second clip to our fill. In the last step, change the layer of the second clip to “Luma Matte” and save the video. You are done with the process.

Part 4: How to Do Datamoshing Effect with Datamosh Plugin in After Effects
With its plugin, this sub-section revolves around creating the datamosh effect in After Effects. So, let us begin!
Step 1: Rendering the Work Area
Open After Effects and click on the (+) sign to set the in and out points. Click on the “Datamosh” to render the work area. The timeline will showcase the clip. Click on “Remove Frames” from the left panel and add a new mosh marker by pressing the (+) button beside “Remove Frames.”

Step 2: I-Frame Removal
The new remove frame marker will be on the timeline. Drag it to the new scene and then hit “Datamosh.” The I-frame removal effect can be shown on the screen. Again, click on (+) to add a new mosh module. Press “Multiply” and then “Average” from the menus that appear. Hit “Average previous 3” afterward.

Step 3: Using the Hold Frames Function
Set the in and out points of this mosh marker and again hit “Datamosh.” The work area will be rendered. Now, open the mosh module and toggle on the “Hold Frames” feature. Also, toggle on the previous render. Press the “Datamosh” again.

Step 4: Injecting the Frames
Toggle the “Inject Frames” on and press use previous render. Hit “Datamosh” afterward. In this way, the clip will hold the frames and inject them into the transition. Enhance the intensity of the moshing algorithm and eliminate “Remove Frames” and “Inject Frames.” Use the previous render and again hit “Datamosh.”

Step 5: Playing with the Acceleration
Increase the acceleration and bring the intensity back to what it was. Again, use the previous render and click “Datamosh.” Now, improve the intensity and set the acceleration back to 0. Alter the “Blend” as much you need to mix the original and present motion of the transition. Press the “Datamosh.”

Step 6: Changing the Threshold
Moving on to the threshold feature, this function is a gatekeeper and decides if a pixel will be moshed. Inverse the intensity of the clip, change the blend to be 0, and set the threshold to be a small integer to find out the impact first. It can be enhanced later on. Uncheck the previous render if you are using the new clip for threshold. Hit “Datamosh” again. Now, export the video, and you are done with the datamoshing.

Conclusion
YouTubers and content creators use the Datamoshing effect to offer magic to the workplace. The article offered an extensive guide to effortlessly adding this effect in After Effects. The foundation and workability of the datamosh effect were also the cruces of the article. It is recommended that the user properly know the software before getting into the process.
Green Screens Are a Fun Way for Creators to Bring Their Personality to Their Stream, Allowing Them to Dynamically Alter Their Stream Background and Make Their Content Appear Even More Engaging and Polished
Green screens are a fun way for creators to bring their personality to their stream, allowing them to dynamically alter their stream background and make their content appear even more engaging and polished. With Twitch green screen background, you can easily configure Chroma key settings and detect your green screen with a single click.
The twitch green screen attaches directly to the back of your chair. You don’t have to worry about stands, or spacing behind your chair. Just attach it and go. This portable green screen can fit on the back of your chair a feature that makes it easy to assemble and use for start-up twitchers.
How to set up a Green Screen with Twitch Studio
**Set Up Your Camera
First things first, make sure that your camera is being detected on Twitch Studio. If you do not already have a layer with your webcam on your scene, click Edit Scene and add a webcam layer by clicking the + icon on the left next to Layers.
Once your webcam layer has been created, make sure that the desired device is selected, plugged in, and that you have not turned off every webcam (Camera icon on the bottom left of Twitch Studio).
**Set Up Your Green Screen
Once your green screen is set up in your background, select your webcam layers to display your webcam settings.
We recommend using the Auto-Detect Color feature as it will automatically detect the best color code for you and will be a great base to work from. If you prefer, you can manually pick the color code by either providing the color code in the Color to Remove field or clicking on the colored square to display a color spectrum that you can select from.
The Chroma Key section is located at the bottom of the webcam settings, and you will be able to toggle the chroma key on and off by clicking the eye icon.
To adjust the chroma key settings, you can click on Edit Chroma Key. You will be able to change the color code and change similarity, edge transparency and color correction for the perfect fit.
Other free ways to set up green screen for Twitch streams
OBS
OBS Studio is a free and open-source app for screen-casting and live streaming. Written in C/C++ and built with Qt, OBS Studio provides real-time capture, scene composition, recording, encoding, and broadcasting via the Real Time Messaging Protocol(RTMP).It can stream Videos to any RTMP supporting destination including YouTube, Twitch, Instagram and Facebook.
OBS Green Screen Set-up Steps
- Make sure you have the following equipment prepared: a solid green background, webcam or video camera, lighting, and OBS Studio.
- Download the latest stable version of OBS Studio from the official website and install the software. Open OBS and let the Auto-Configuration Wizard optimize the software’s settings based on your hardware.
- Now you can add a video source.
- Right-click on the video source you’ve created and select Filter.
- Click the +button under the Effects Filters section and select Chroma Key.
- Type in a name for this effect layer.
- After you add a chroma key, OBS will automatically create and adjust the baseline settings for the filter. You can experiment with the sliders and settle when you are satisfied with the result.
- Make sure you aren’t wearing any green or reflective material. You can double-checkthe performance on the preview screen.
- If things are working smoothly, you are all set to start streamingwith the green screen on.
Pro tip:
You can follow the instructions above and live stream to multiple platforms at once with Restream. Multistreaming to platforms like YouTube, Facebook, Twitter, Twitch, and LinkedIn allows you to drastically increase the audience reach and grow your followers.
XBOX
It is a video gaming brand created and owned by Microsoft. The brand consists of five video game consoles, as well as applications(games), streaming services, an online service by the name of Xbox network, and the development arm by the name of Xbox Game Studios. The brand was first introduced in the United States in November 2001, with the launch of the original Xbox console.
Steps on Using Xbox Green Screen
Make your Xbox console reflect your personal style by changing its look and feel. Choose a favourite colour, update your background with game art or a customised image, or select a different theme.
Choose your color
The color you choose will appear in tiles and accents on your Xbox. It also follows you to any console you sign in to.
- Press the Xboxbutton on your controller to open the guide, and then select Profile & system > Settings > General > Personalisation > My color & theme > My color.
- Select a color, and then select OK.
**Choose your background
Your background appears where you’d expect it to—in the background of Home. It can be a solid color or an image, such as game art, achievement art, a screenshot, or a customized image. Achievement art follows you to any Xbox, but screenshots and customized images stay on the console that they’re set to.
To choose your background, press the Xbox button on your controller to open the guide, and then select Profile & system > Settings > General > Personalization > My background.
From here, choose from the following options:
**Solid color and game art
Select a background color, and then select OK. To then add game art, choose the game most recently played and the game art will appear as the background.
**Achievement art
- Select Achievement art> Gaming.
- Select a game from your list of games with achievements.
- Select the achievement with the background art you want.
- Select Set as background.
**Custom image
Note Customized images must be smaller than 3 MB, and the best size for backgrounds is 1920 x 1080.
- Copy a JPG or PNG file that you want to use to a USB device, and then plug it into your Xbox.
- On your Xbox, select Customized image. A dialogue box appears that shows the contents of your console and attached USB device.
- Select the USB device, and then choose your image.
**Screenshot
- Select Screenshot, then choose the one you want.
- Select More actions> Set as background.
**Dynamic background
Note Dynamic backgrounds are only available on Xbox Series X|S.
- Select Dynamic background.
- Select the background art you want.
- Select Apply.
Note Some dynamic backgrounds are only available through promotions with special edition hardware (like the 20th Anniversary Special Edition controller). To see one of these special dynamic backgrounds in your list of options, make sure your special edition hardware is turned on and in use with your console when you set your background.
**Remove customized background
If you want to remove your background, select Remove customized background.
**Choose your theme
Themes can be set to dark or light and can also be scheduled. To set a theme:
- Press the Xboxbutton on your controller to open the guide, and then select Profile & system > Settings > General > Personalization.
- Select My color & theme.
- Under System theme, select Darkor Light. Select Scheduled to activate your theme according to specific times, or to start at sunrise and sunset.
Themes stay on the console they’re set to.
Solid Color
Achievement Art
Custom Image
Remove Custom Background
Filmora
Wondershare Filmora is the one of best video editing software with cool features that compares to other competing video editing Softwares. Many video editing programs claim to offer professional results; Filmora is one of a few consumer-level tools that actually delivers.
For Win 7 or later (64-bit)
For macOS 10.12 or later
Key Features
4k editing support
GIF support
Noise removal
Color tuning
Advanced tech editor
Audio mixer
Video stabilization
Scene detection
Conclusion
You probably already have an idea of how to use a green screen, at least in principle. You film something or someone in front of a colored background — the green screen — then you replace everything that’s in the color of the screen with other footage, images, charts, presentations, or whatever visuals you want. However, Chroma keying a live stream works almost the same way. The main difference is that you have to replace the green screen as you’re filming, rather than during editing.
Also read:
- In 2024, Best Ways to Add Meme Text to Videos
- Updated In 2024, Detailed Steps to Resize Video in Davinci Resolve
- Updated 10 Top Vloggers on YouTube
- New Ll About GIF Keyboard That You Want to Know for 2024
- Updated 2 Solutions to Crop a Video Using After Effects
- List of Supported Whatsapp Video Format You May Want to Know
- New How to Use Color Grading in Final Cut Pro
- Updated Do You Want to Know How to Make a Collage in Lightroom? It Doesnt Matter Whether You Are a Novice or a Professional; This Guide Will Teach You to Do It Well
- How to Fade to Black Premiere Pro for 2024
- Updated 2024 Approved AI Features of Wondershare Filmora - Silence Detection in Videos
- How to Easily Create a Free Eye-Catching Intro Videos with Invideo
- In 2024, Do You Want to Know How to Add a VHS Effect Premiere Look? You Can Easily Apply the VHS Effect to Your Videos Using Adobe Premiere Pro
- Updated In 2024, How To Make Flying Objects in Wondershare Filmora
- New 2024 Approved 7 Best MP4 Editors for Mac Edit MP4 in Mac
- How to Create an Adobe Slideshow the Easy Way for 2024
- Updated 2024 Approved Change Aspect Ratio of Video
- Do You Know Everything Related to Wondershare Filmoras Video Editing Interface? If You Are Unaware of It, Read and Learn About Filmoras Interface for 2024
- New 2024 Approved How To Add Motion Blur On CapCut? (IPhone & Android)
- 2024 Approved What Is a Memoji and How to Make a Memoji? You Can Learn Top 8 Memoji Makers for PC, Android, or iOS, and the Steps to Make a Memoji
- Adobe Lightroom Color Grading Tutorial for 2024
- New In 2024, Whatre the Best Alternatives to Pexels?
- New An Ultimate Guide to Flexclip Online Trimmer for 2024
- 2024 Approved In This Article, You Will Learn How to Create an Attractive and Engaging Slideshow Video Using Tools Available in the Wondershare Filmora
- New Complete Guide to Converting GIF to SVG With Ease for 2024
- Final Cut Pro - How to Download and Install It, In 2024
- New Do You Want to Know How to Add LUTs to Premiere Pro? In This Guide, You Will Find Details and Easy Steps to Proceed with Using LUTs in Premiere Pro
- 2024 Approved How to Create Cooking Video Intro and Outro for YouTube Channel?
- 2024 Approved How Windows Movie Maker Save MP4 File
- Finding LUTs Made by Danny Gevirtz for 2024
- New 6 Ways to Mimic Professional Filming Gears
- New Color Lut in Video -How to Color Grade Your Video for 2024
- Updated 2024 Approved Top 15 Best Free MP4 Video Rotators Windows, Mac, Android, iPhone & Online
- Kdenlive Review – Is It The Best Video Editor for 2024
- Mix and Match The Ultimate List of 8 Video and Photo Merging Tools
- In 2024, Finding The Finest Way To Add Subtitles to Videos | Filmora
- Updated Final Cut Pro - How to Download and Install It for 2024
- In 2024, Some Effective Slow Motion Video Editors You Can Try
- Updated 2024 Approved 10 Best Music Video Templates to Make Your Video Popular
- In 2024, There Are 10 Slideshow Makers Coming with Beautiful Music for Creating a Stunning Slideshow
- How to Lock Apps on Infinix Smart 7 to Protect Your Individual Information
- How To Transfer WhatsApp From iPhone SE (2020) to others devices? | Dr.fone
- Update your drivers with Device Manager on Windows 11/10
- In 2024, Two Ways to Track My Boyfriends Realme Narzo 60 5G without Him Knowing | Dr.fone
- How to Use Phone Clone to Migrate Your Itel A70 Data? | Dr.fone
- In 2024, 5 Ways to Track Oppo A18 without App | Dr.fone
- Edit and Send Fake Location on Telegram For your Lava Agni 2 5G in 3 Ways | Dr.fone
- iPogo will be the new iSpoofer On Vivo Y78+ (T1) Edition? | Dr.fone
- How to Fake Snapchat Location without Jailbreak On Oppo A56s 5G | Dr.fone
- Want to Uninstall Google Play Service from Motorola Defy 2? Here is How | Dr.fone
- Hassle-Free Ways to Remove FRP Lock on Nokia C210with/without a PC
- Guide How To Unbrick a Bricked Poco X6 Phone | Dr.fone
- In 2024, How To Unlock a Vivo Y100i Easily?
- 3 Things You Must Know about Fake Snapchat Location On Vivo X100 Pro | Dr.fone
- How To Unlock Any Samsung Galaxy S23 FE Phone Password Using Emergency Call
- In 2024, Overview of the Best Nokia C02 Screen Mirroring App | Dr.fone
- How to identify some outdated hardware drivers with Windows Device Manager on Windows 10
- How to Mirror PC Screen to Asus ROG Phone 8 Phones? | Dr.fone
- Recover lost data from Vivo Y27s
- In 2024, How To Leave a Life360 Group On Oppo Find X7 Ultra Without Anyone Knowing? | Dr.fone
- Ways to trade pokemon go from far away On Realme Narzo 60 5G? | Dr.fone
- In 2024, Mastering Android Device Manager The Ultimate Guide to Unlocking Your Motorola G24 Power Device
- How Do You Unlock your iPhone XS Max? Learn All 4 Methods | Dr.fone
- Title: New How to Create and Add an Adjustment Layer in Final Cut Pro
- Author: Chloe
- Created at : 2024-05-20 03:38:06
- Updated at : 2024-05-21 03:38:06
- Link: https://ai-editing-video.techidaily.com/new-how-to-create-and-add-an-adjustment-layer-in-final-cut-pro/
- License: This work is licensed under CC BY-NC-SA 4.0.

