:max_bytes(150000):strip_icc():format(webp)/GettyImages-140173628BetsieVanDerMeer-5927117e5f9b5859509a476c.jpg)
New How to Create Loop Videos Using Filmora

How to Create Loop Videos Using Filmora
A loop fashion lookbook will be familiar to you if you are a fashion YouTuber. Here we will show you how to record shots and make a creative lookbook to show off your best outfits in an excellent way with Wondershare Filmora.
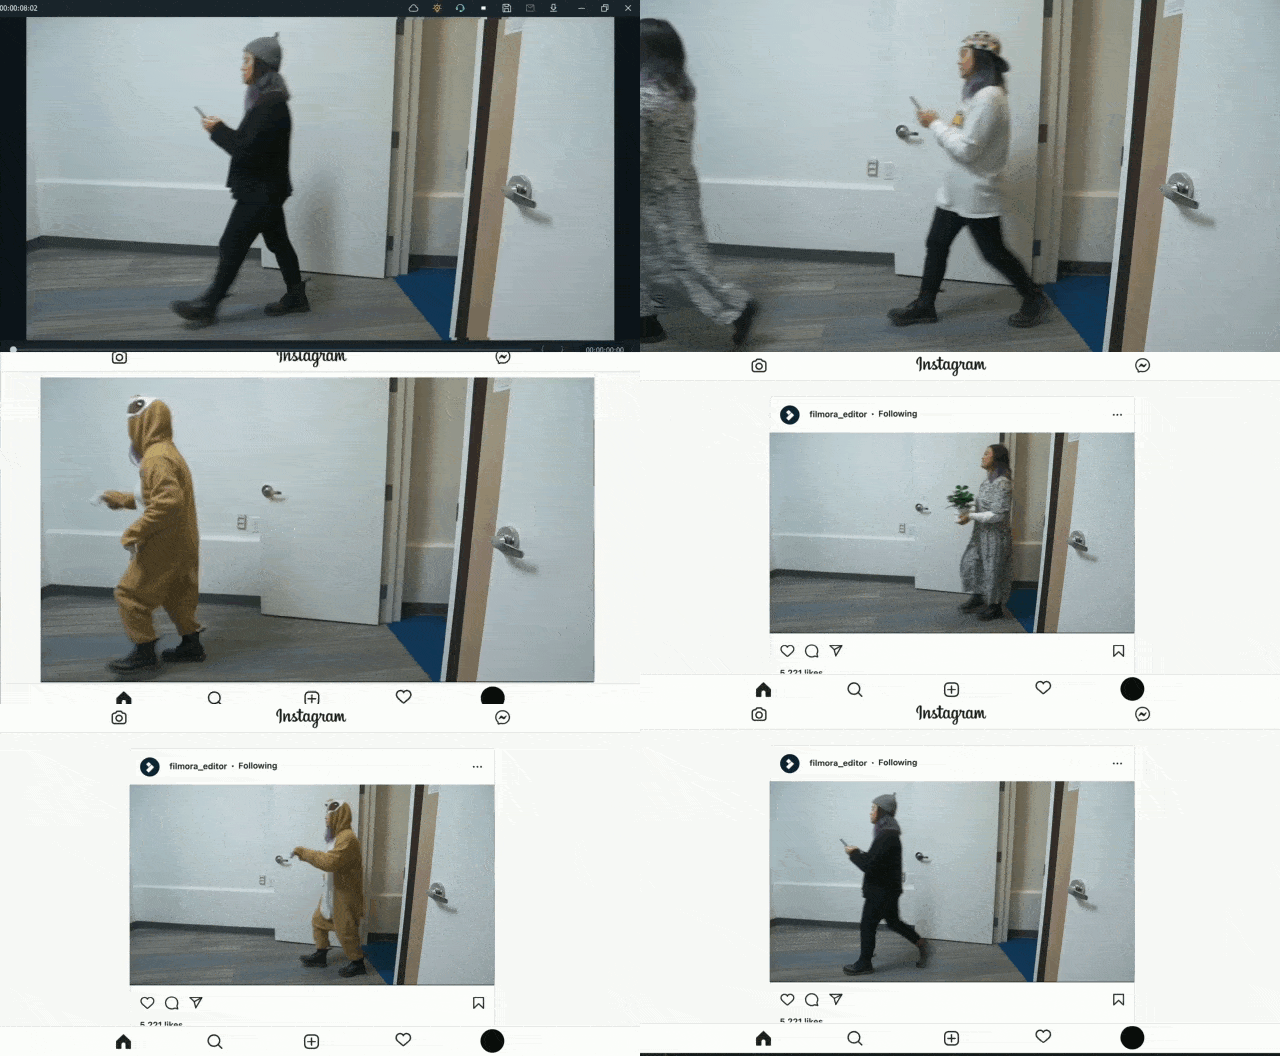
Shots recording for loop masking
The first and most crucial step for creating a good loop video is to record perfect shots. Here are the steps to record video shots for loop videos.
How to create a loop video
Step1 Set your camera or phone on a tripod. Make sure it stands still and does not move.

Step2 Set it so that you have a door on one side and enough room for the subject to walk through the door and move out of the frame.

Step3 Make sure all your outfits are ready.

Step4 Start recording on your camera. Walk through the door wearing the first outfit. Change your outfits and repeat the step with all your dresses. It would help if you kept the camera rolling while recording all these clips. Turning the recording on and off with every shot will result in many small movements.
Editing footage with a professional video editor - Wondershare Filmora
After recording the shots, the next step is to edit them. Wondershare Filmora is the best software for this purpose. Creating a loop video using filmora is an easy task.
Free Download For Win 7 or later(64-bit)
Free Download For macOS 10.14 or later
Below is the step-by-step guide on using Wondershare Filmora to create a loop masking or lookbook video.
How to edit a loop lookbook video
Step1 Download and install Wondershare Filmora on your PC or Mac.
Step2 Launch Wondershare Filmora, import the video clip into Filmora and place it on the first track.
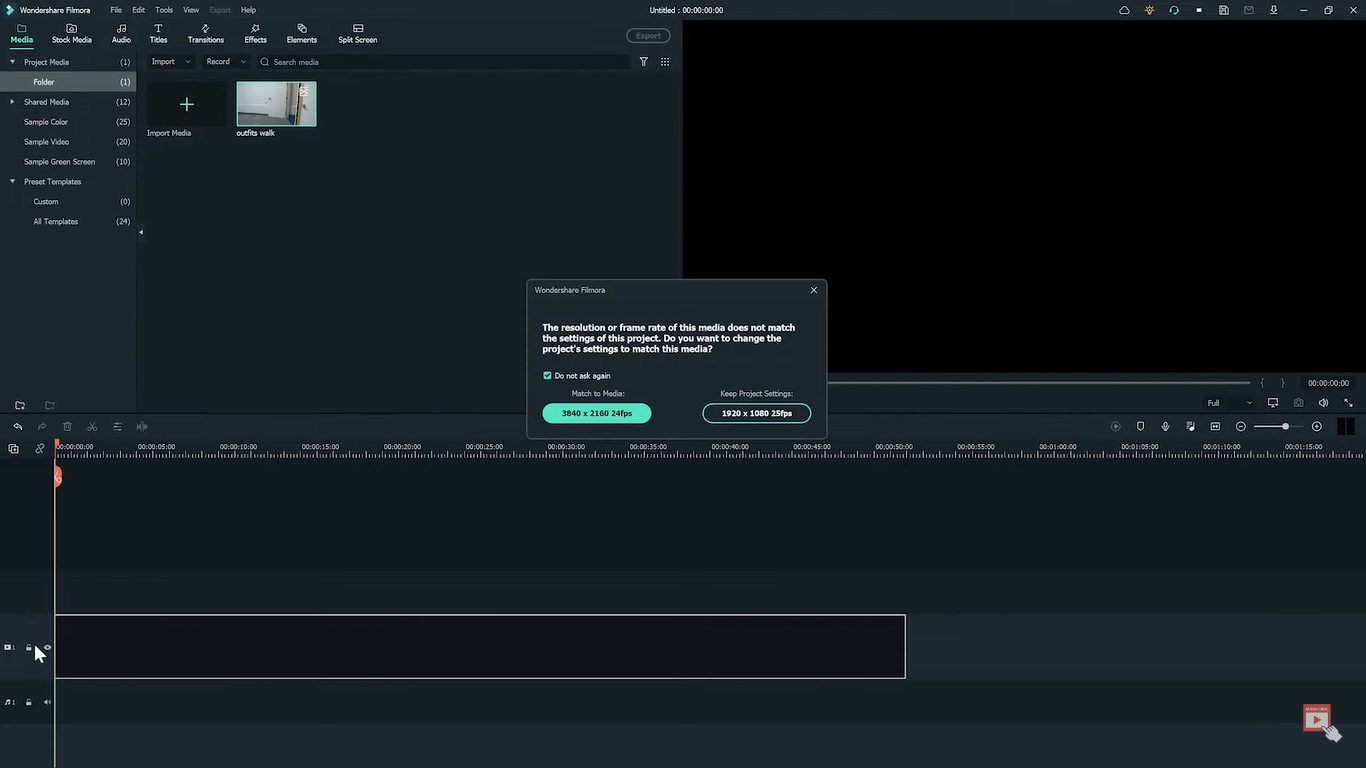
Step3 Find a frame with an empty background, i.e., without the subject, and freeze the frame.
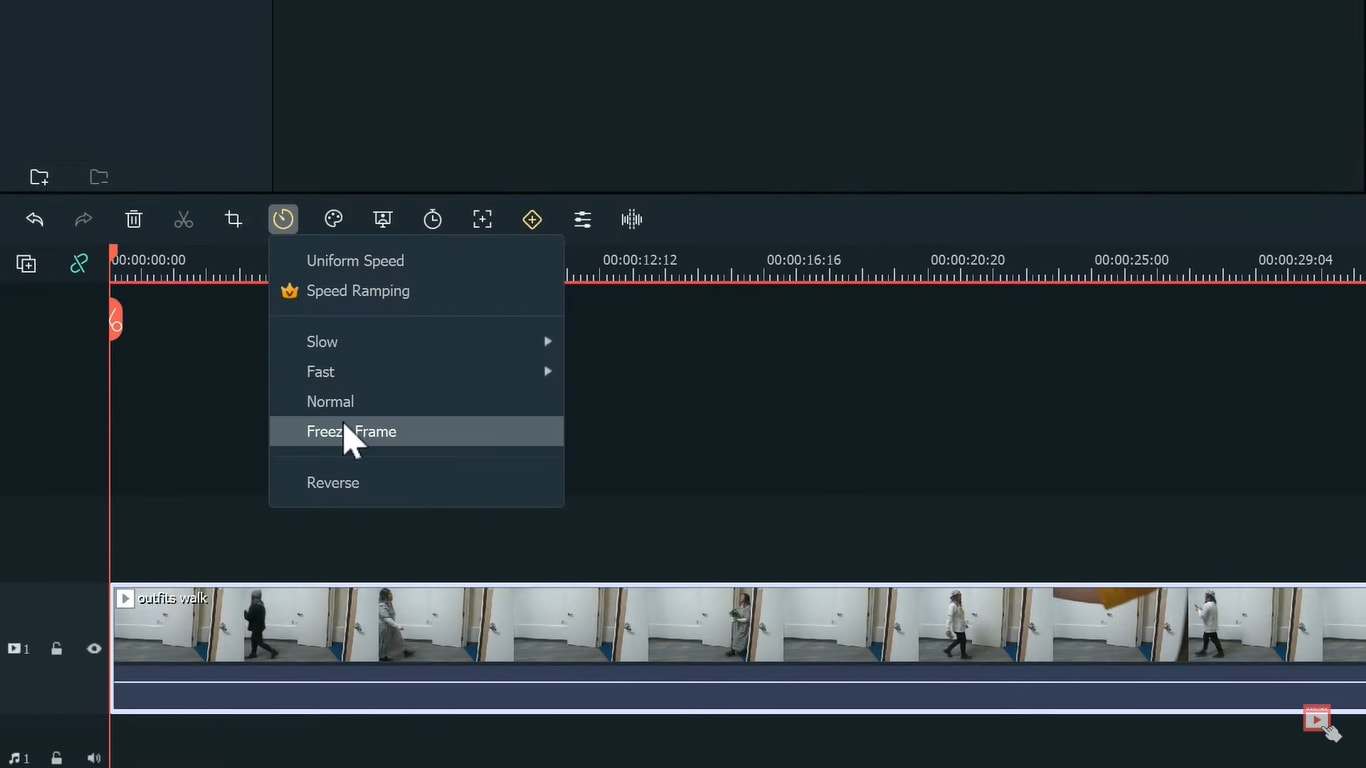
Step4 Extend the frozen frame and cut out the rest of the video.
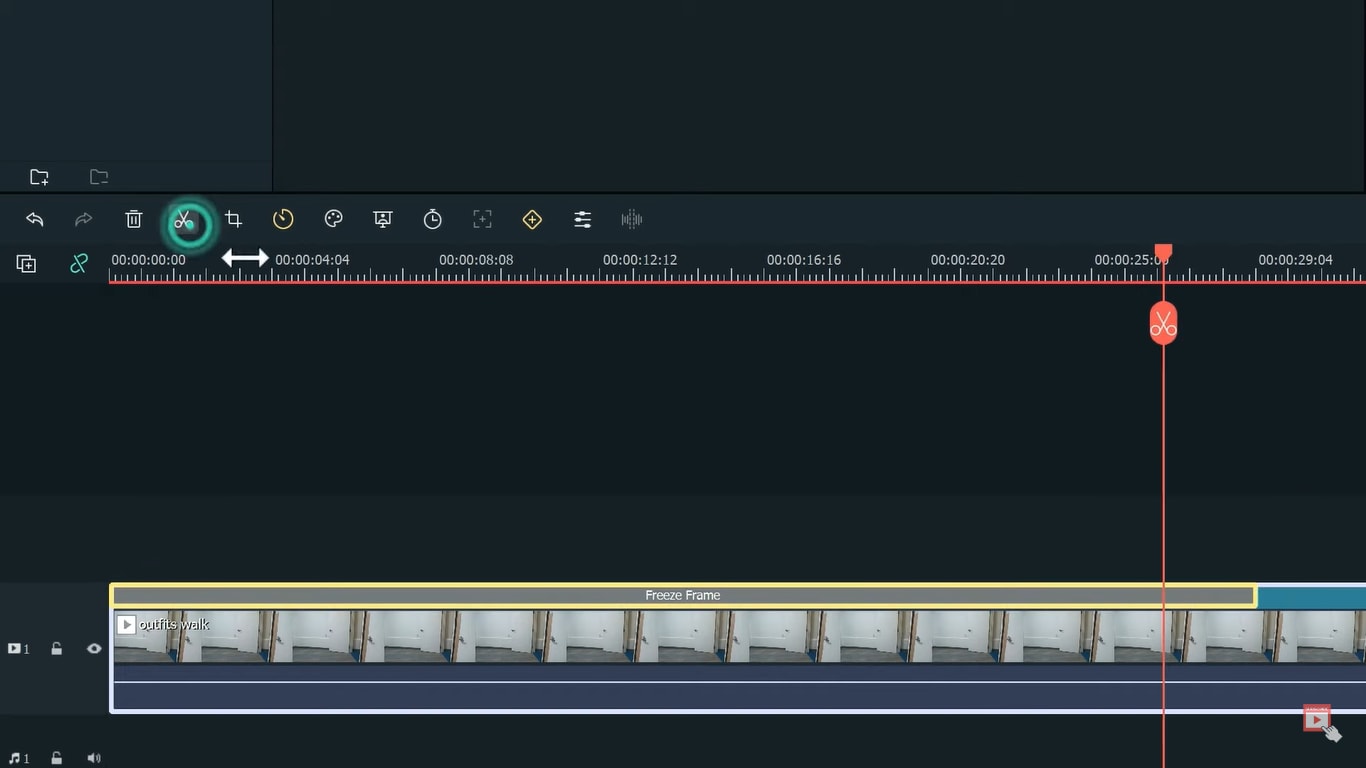
Step5 We are done with the first track so lock it.
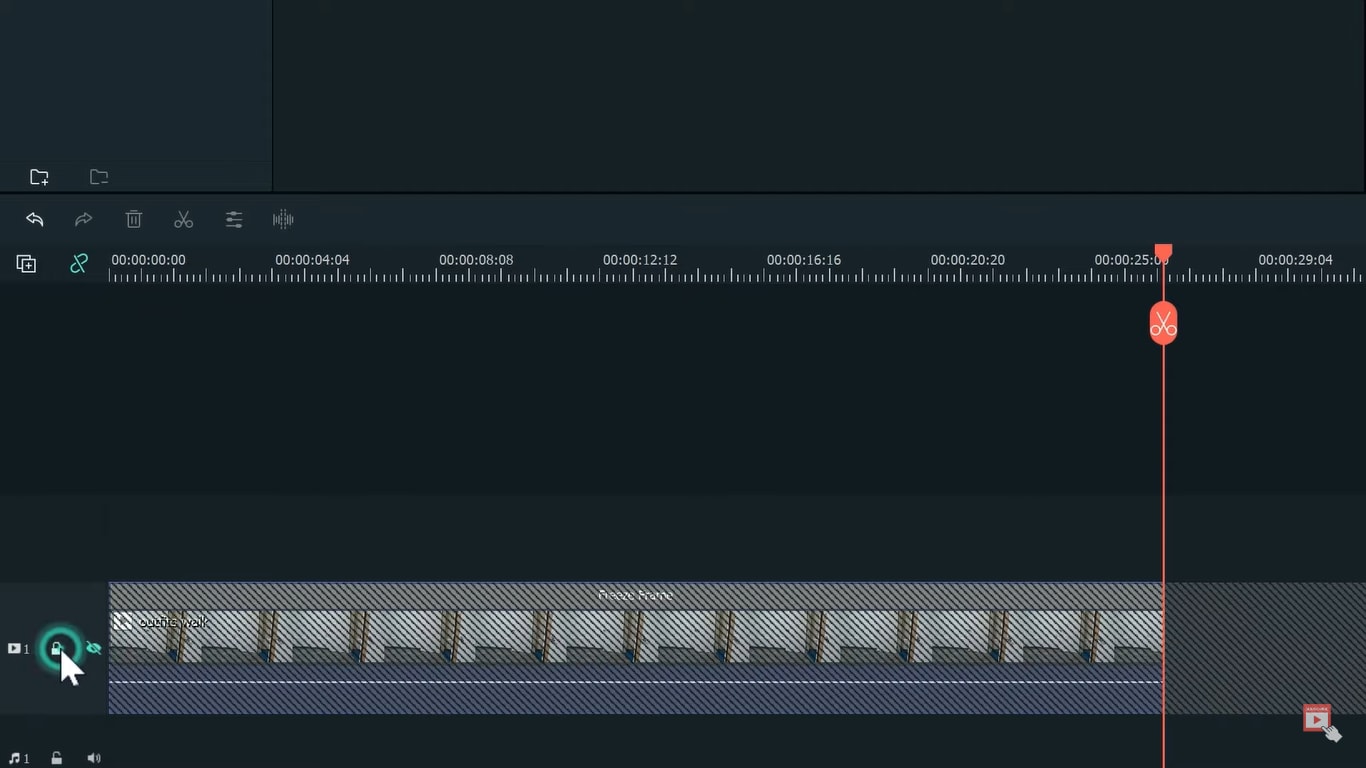
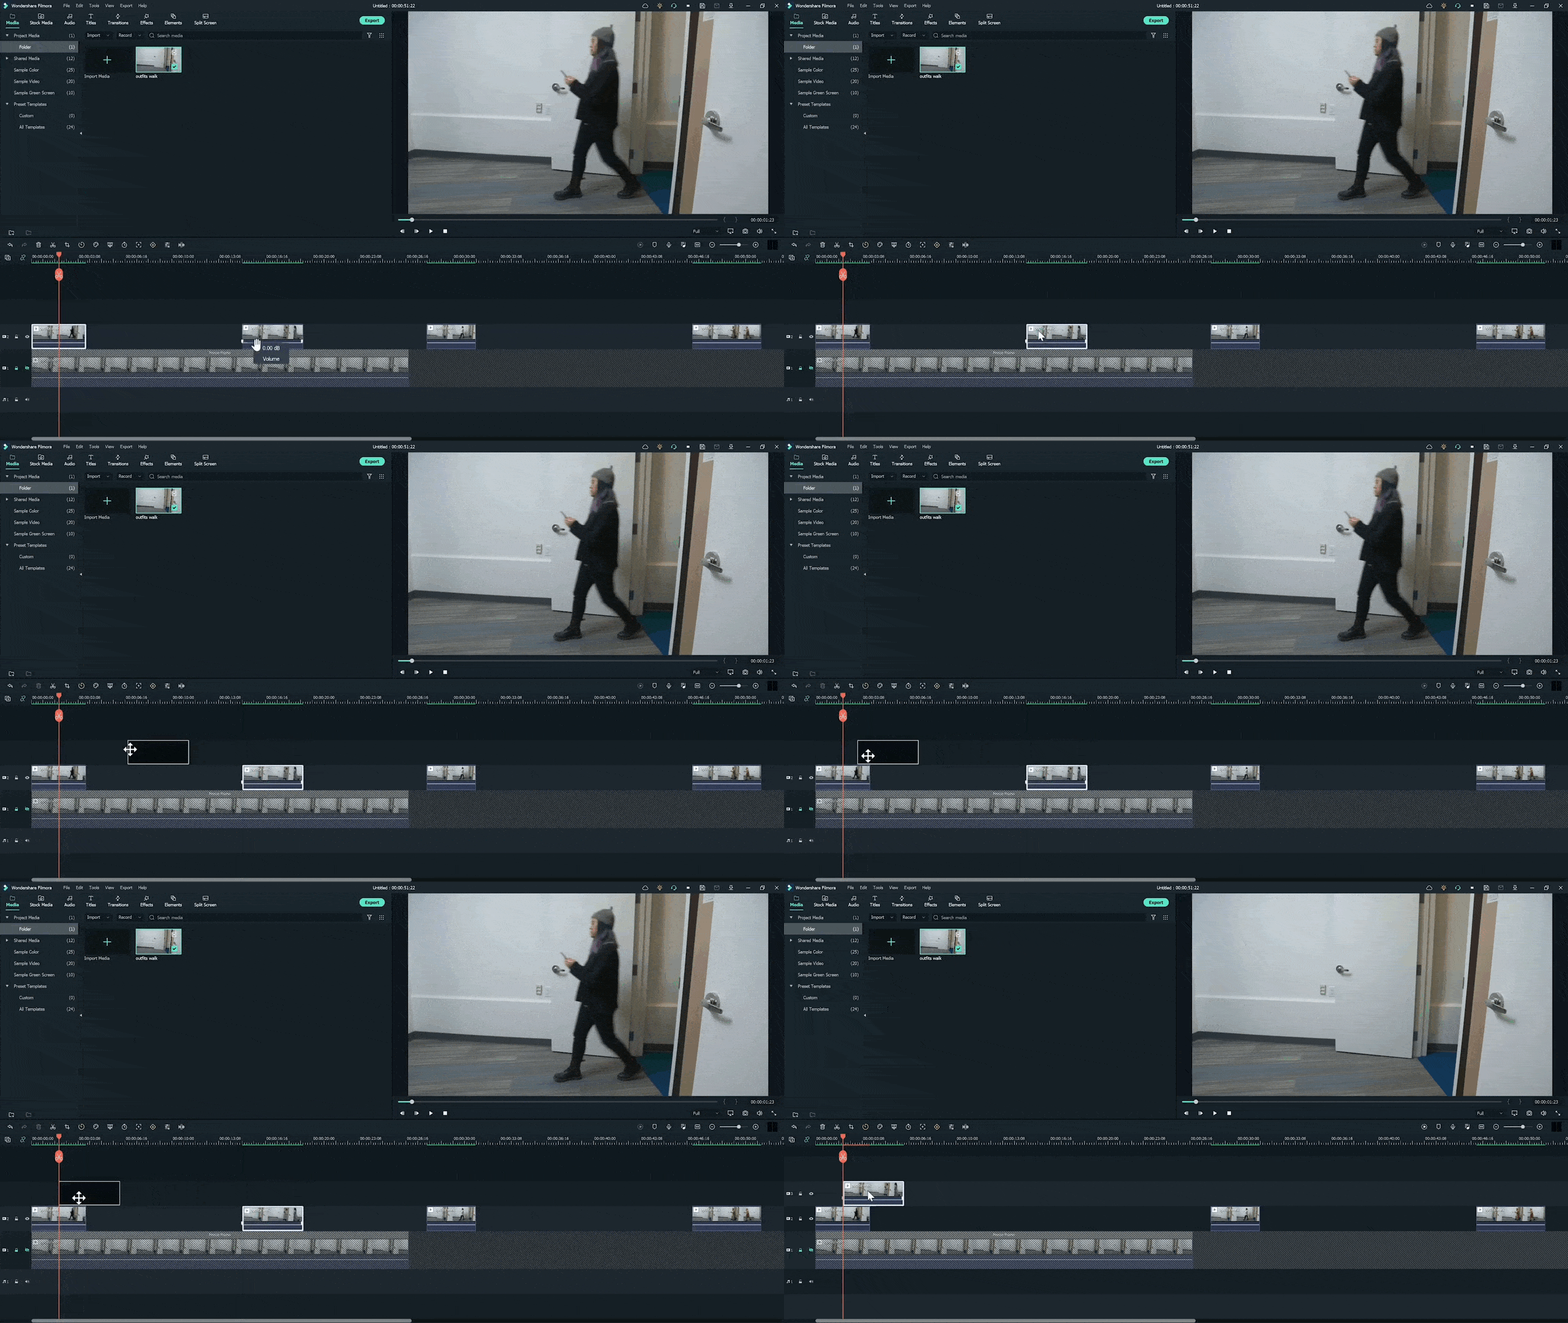
Step6 Import the clip again on the second track. And find the sections of the clips where the subject is walking in the video. Cut the remaining part.
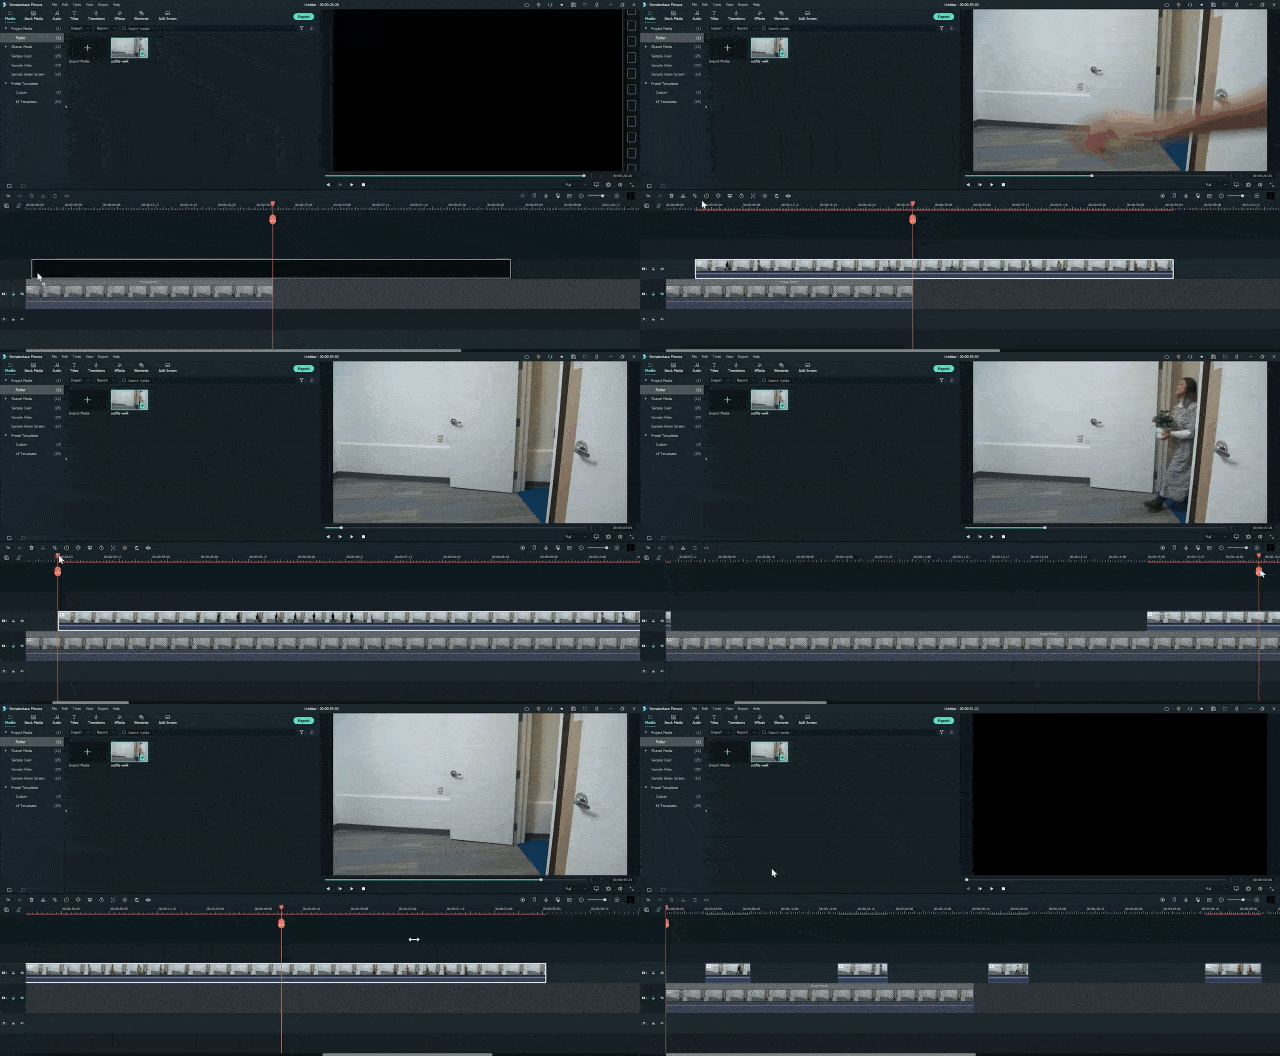
Step7 It will create several small sections on the second track.
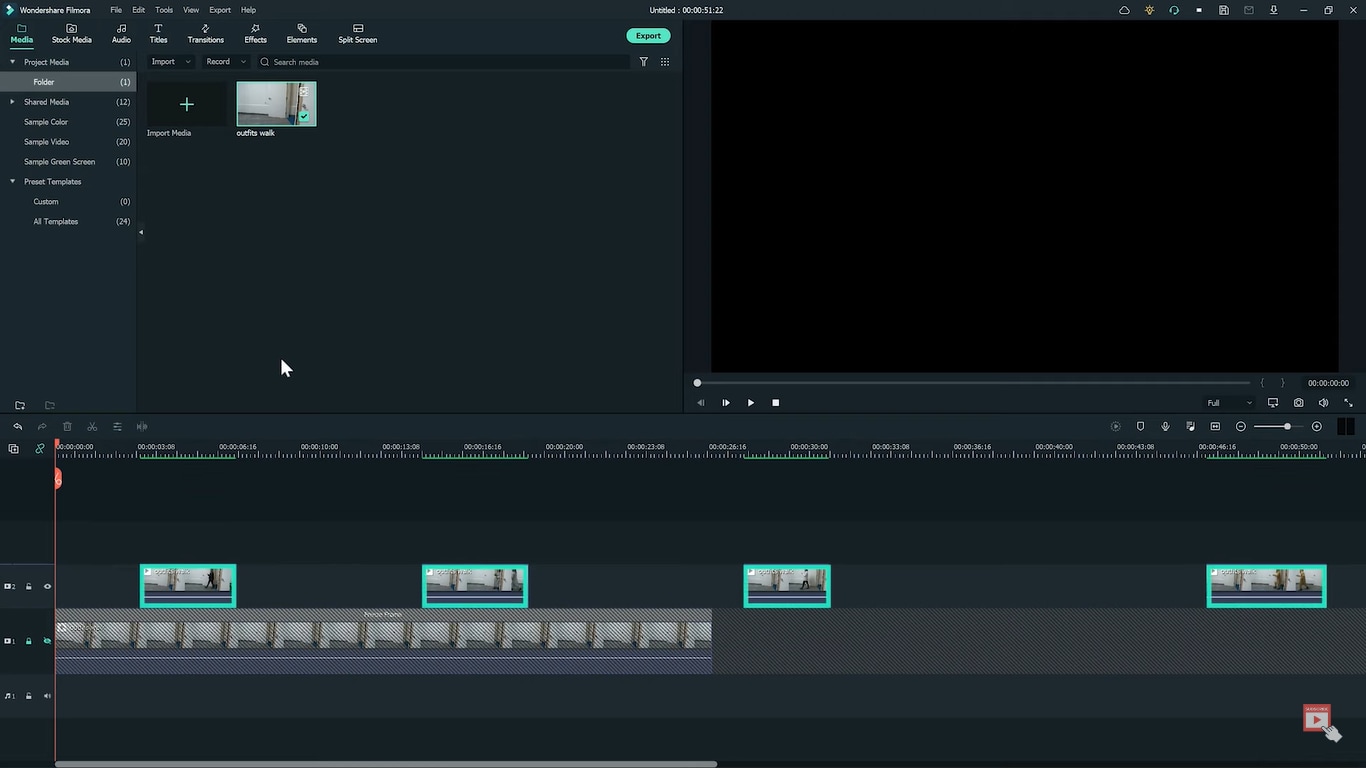
Step8 Put the first clip at the start of the timeline and move the playhead to find the frame containing enough room for the second outfit.
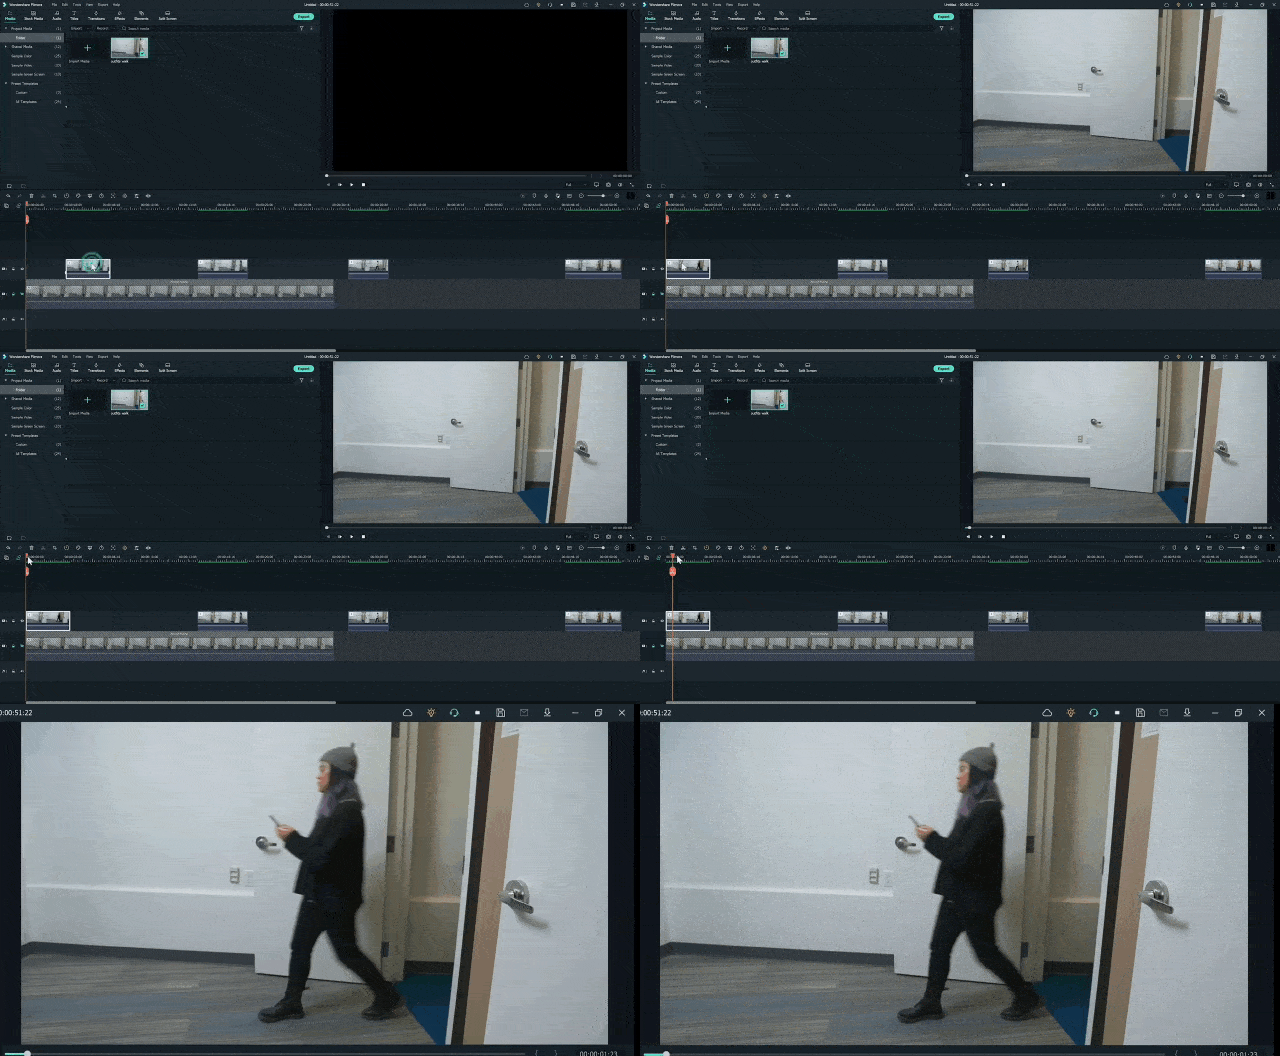
Step9 Move the second outfit to that playhead area.
Step10 Double-click on the clip, go to effects, and choose a single-line mask.
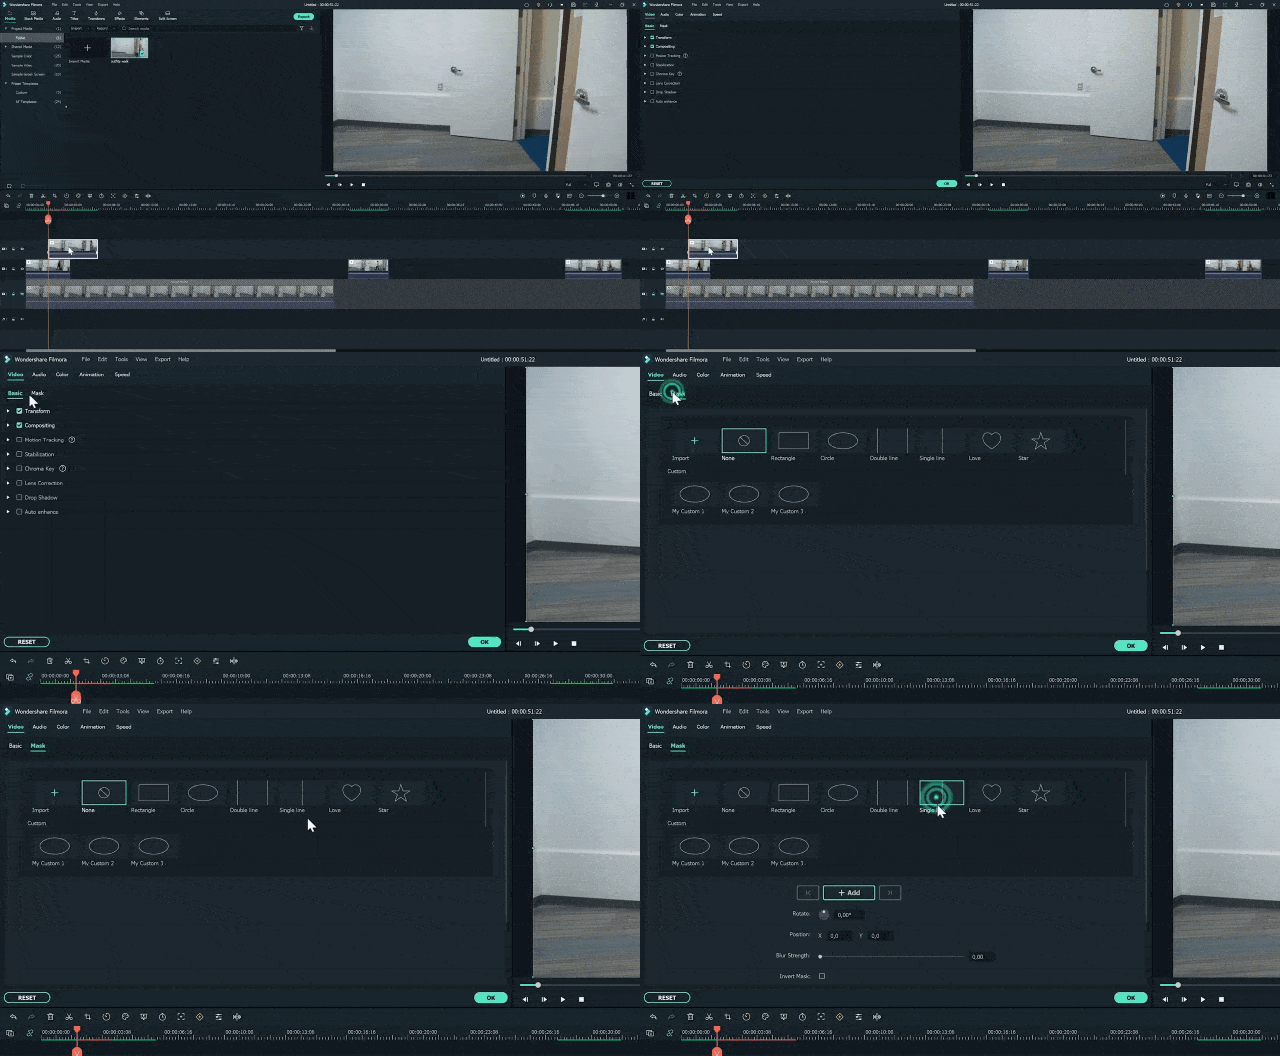
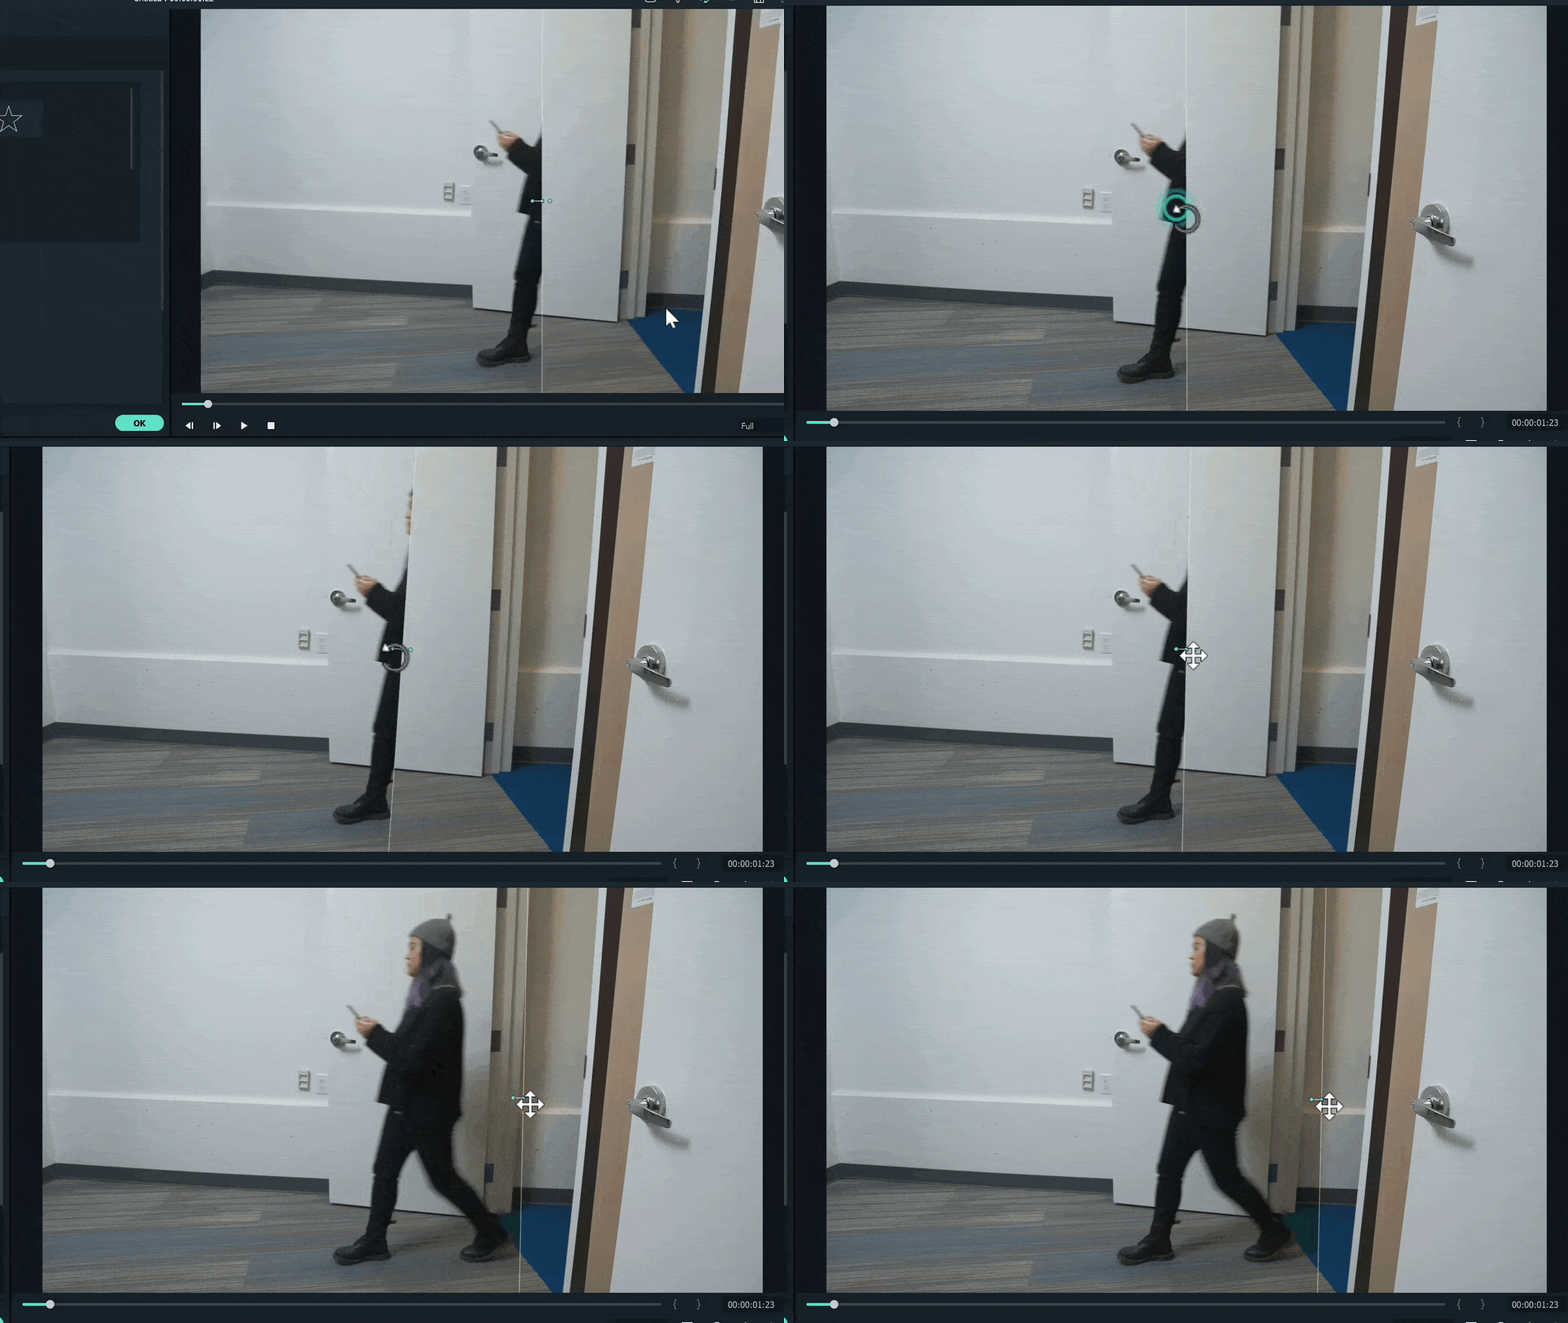
Step11 Drag the mask to the point where it shows the outfit on its right side.
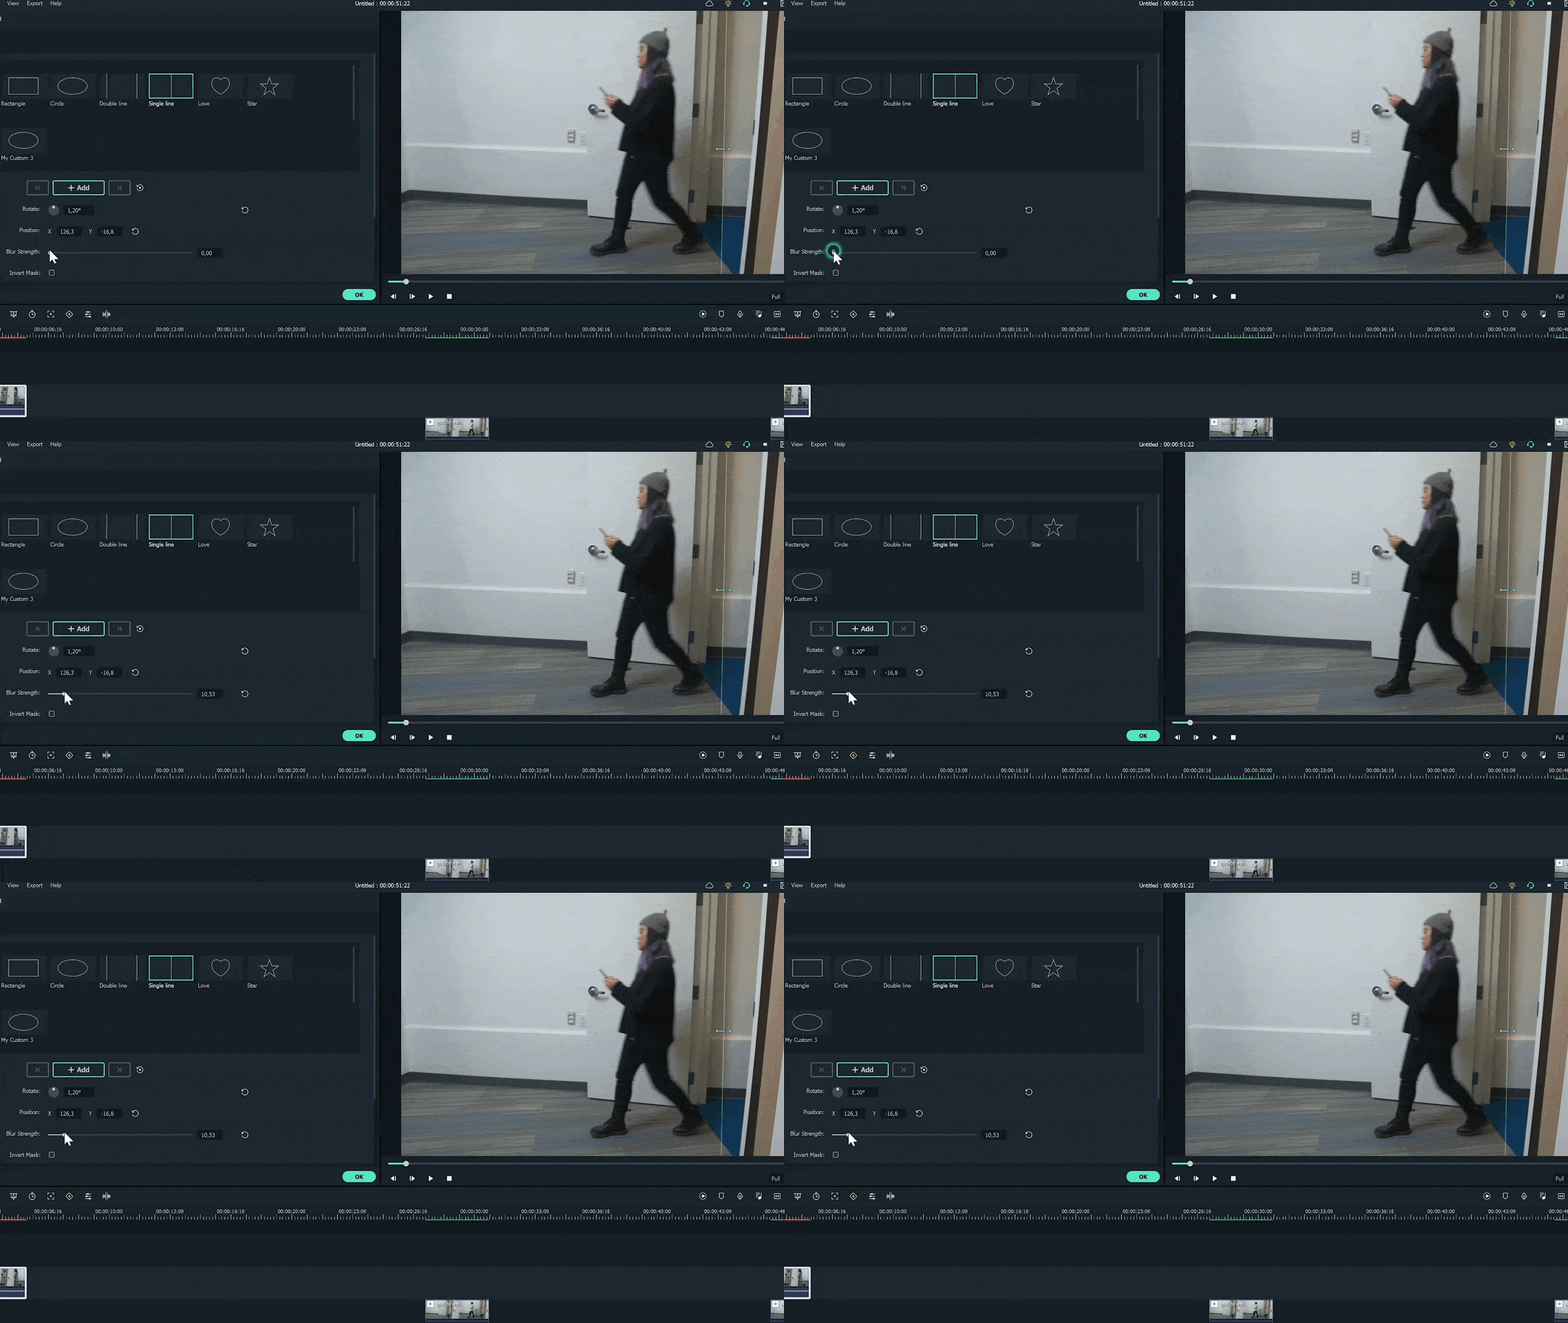
Step12 Blur the mask edges by increasing blur numbers.
Step13 Click on the add button to add a mask keyframe and move the play head forward until the first outfit leaves the frame.
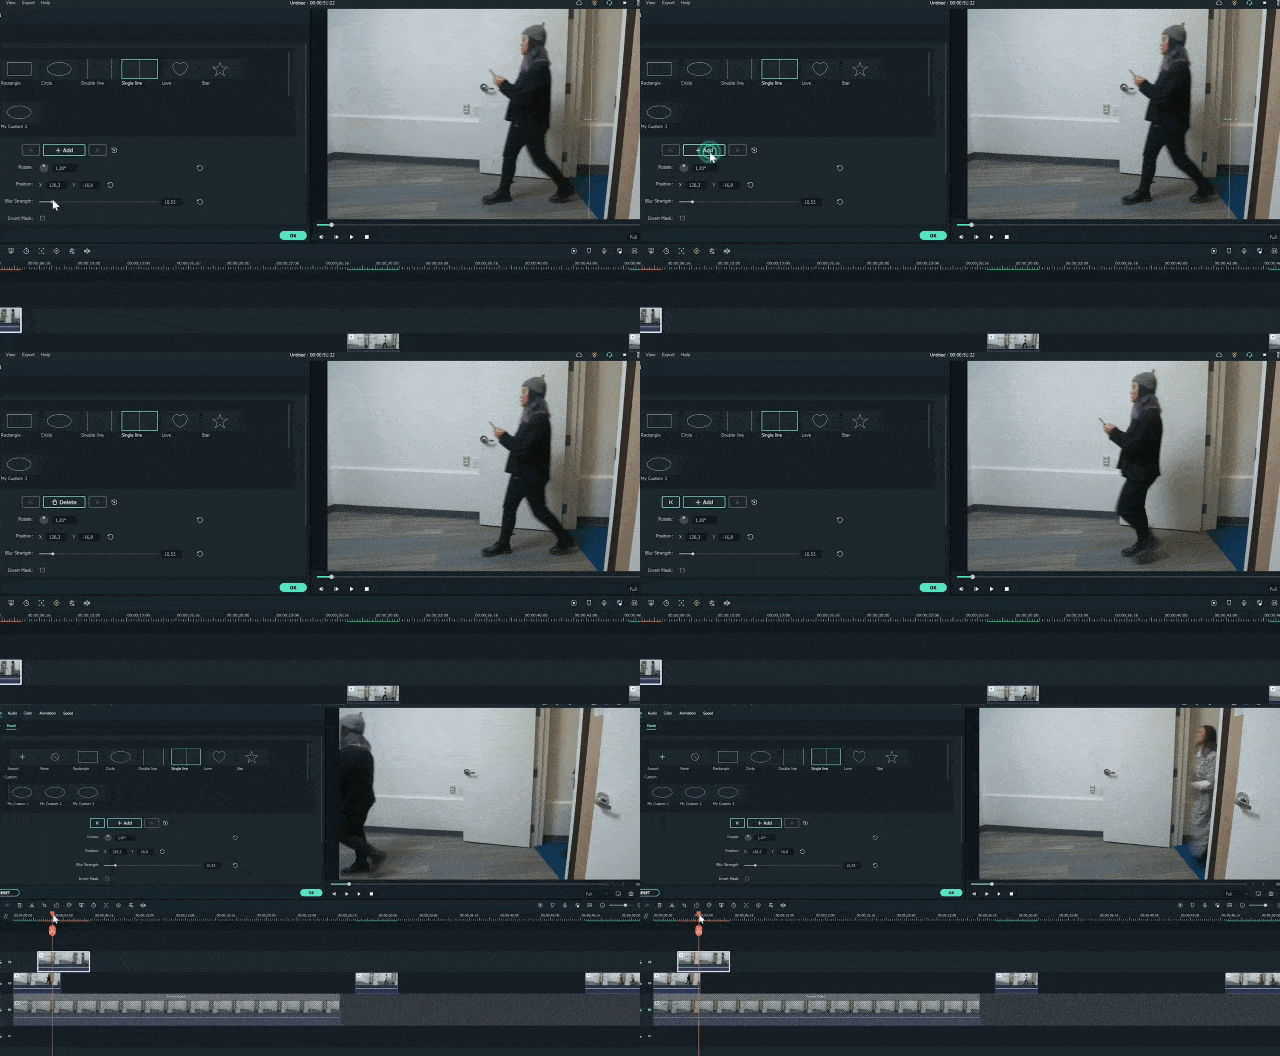
Step14 Move the mask to the left to reveal the entire frame, and repeat the same process with all outfits.
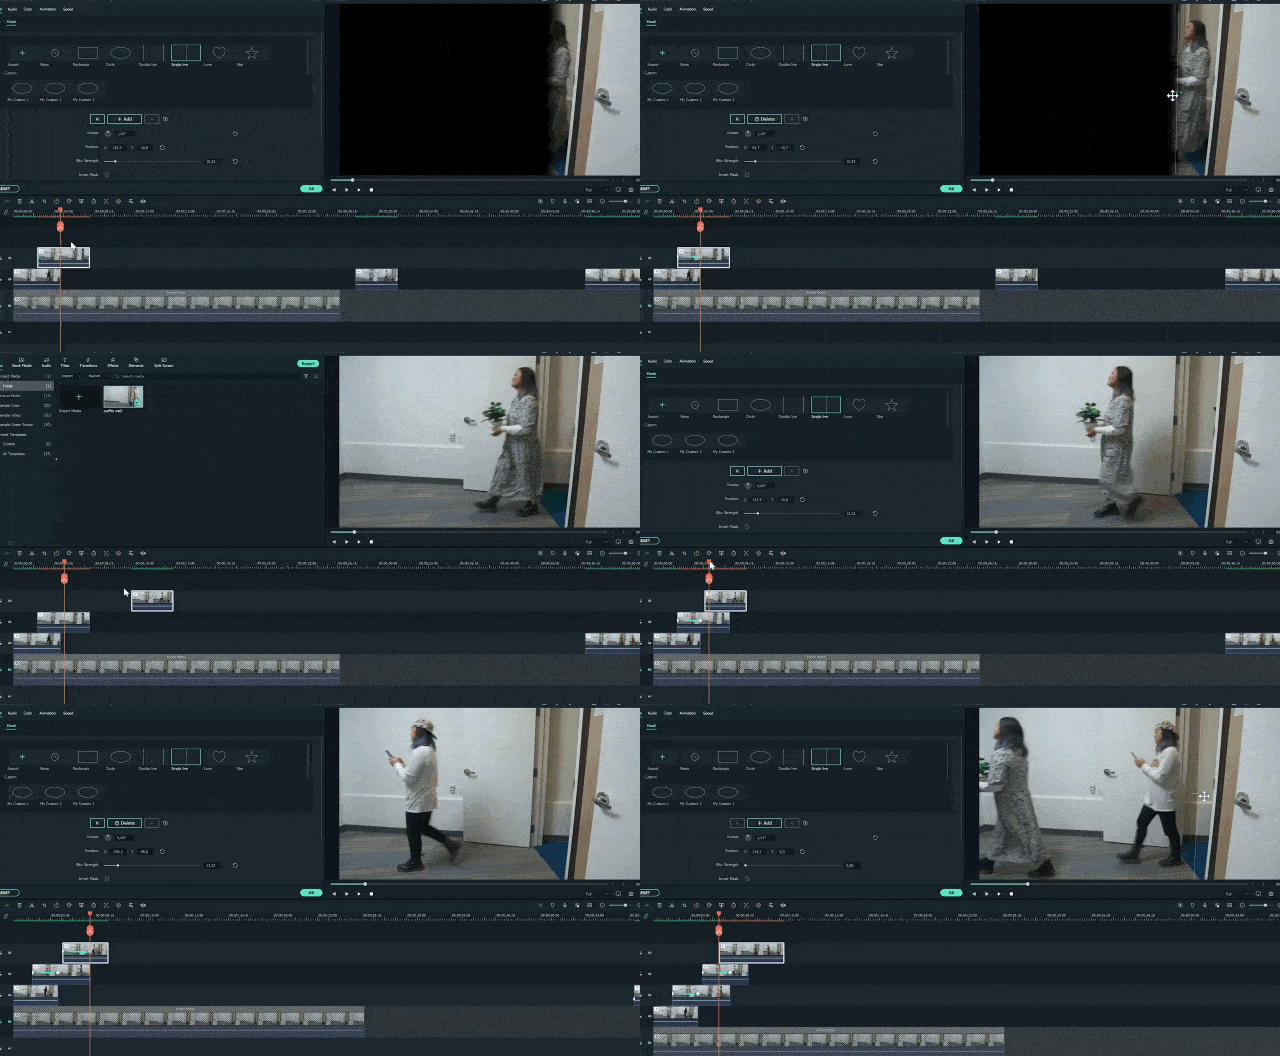
Step15 After finishing all outfits, copy the clip from the first outfit. And paste it on top of all the tracks after the last outfit. And add a mask keyframe to this section too.
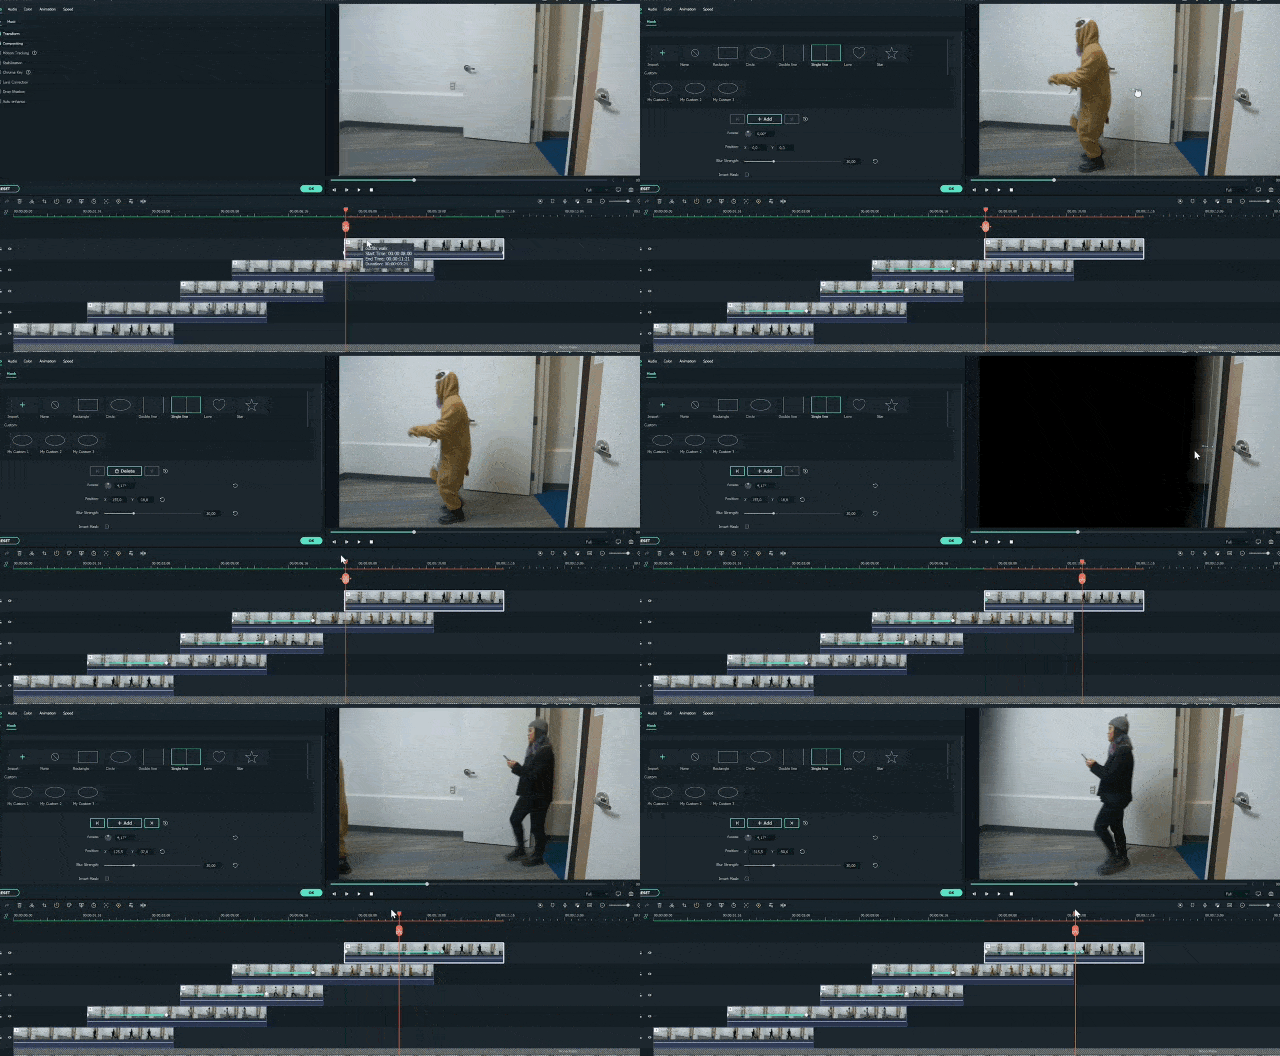
Step16 Unlock the first track and move the playhead to find the point where the subject with 4th outfit moves out of the frame. Then, cut the remaining part of the freeze frame on the right.
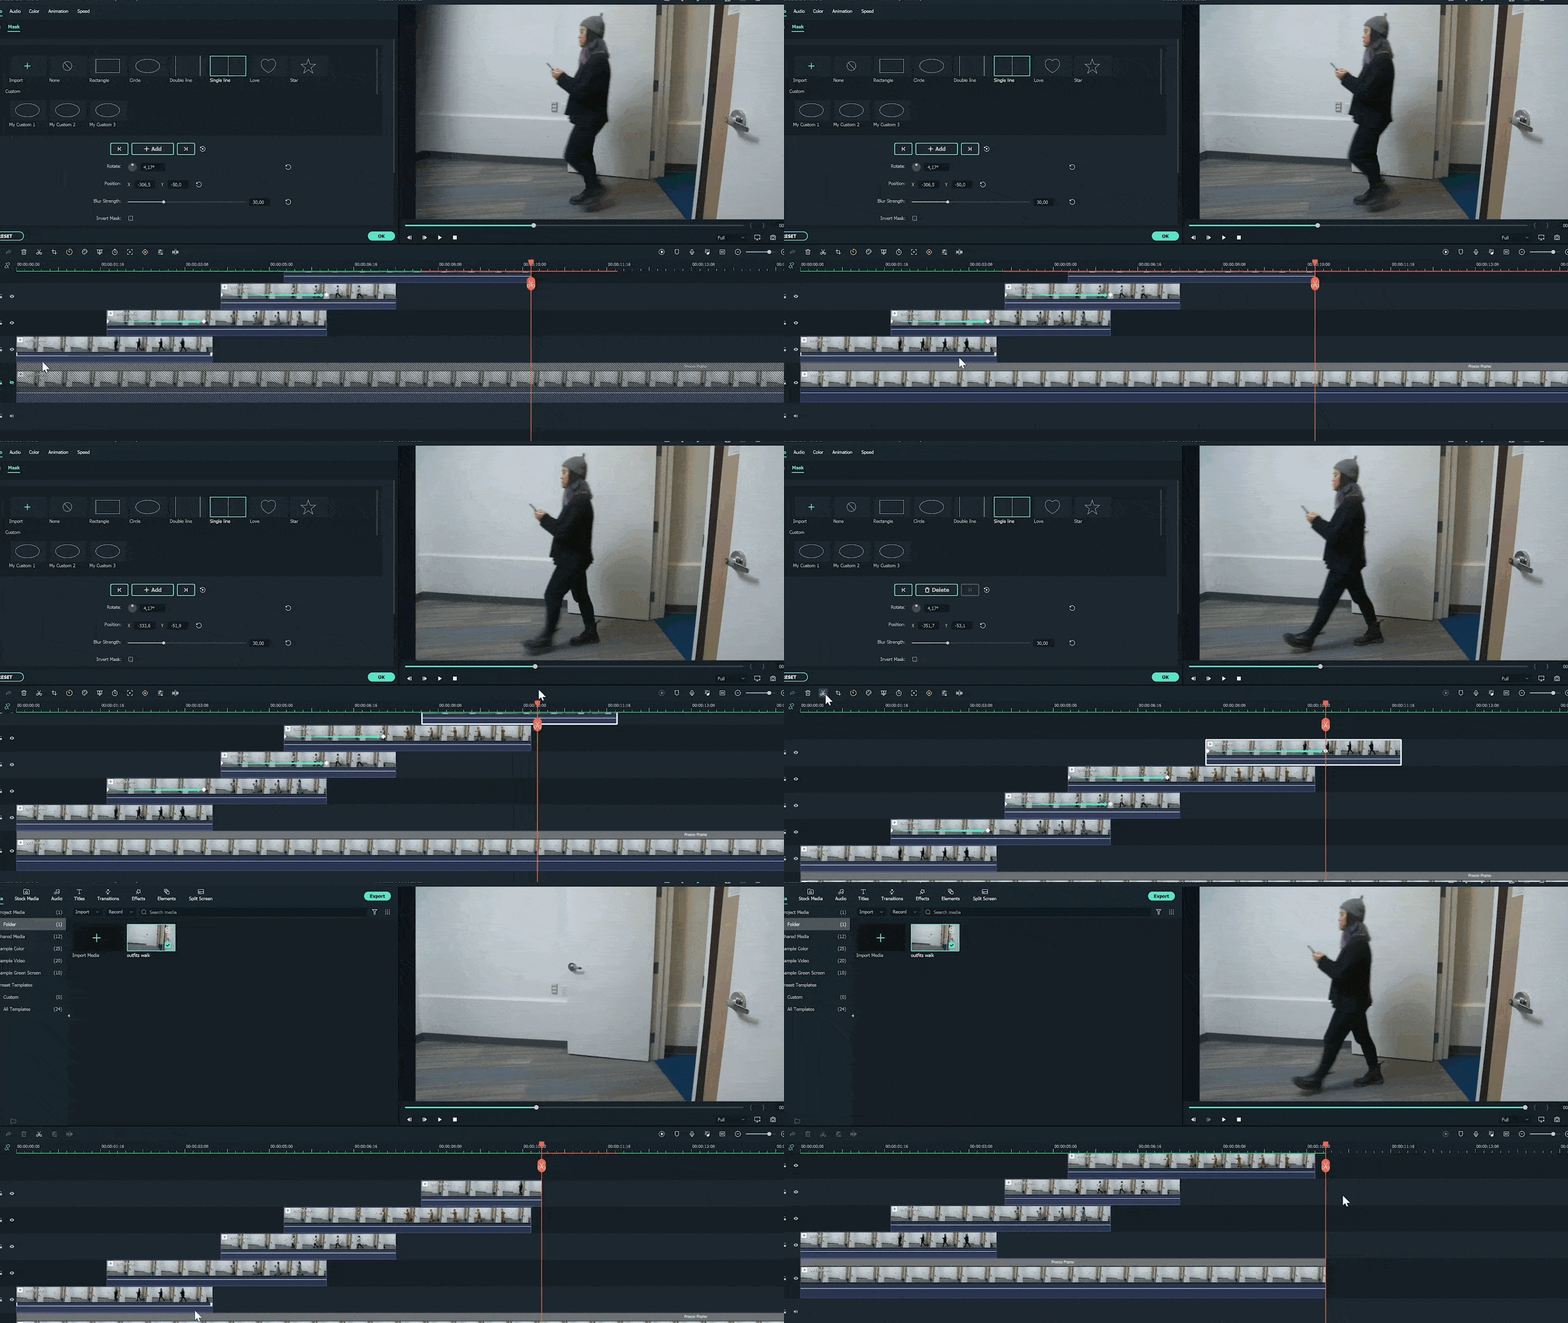
Step17 Now move the playhead to the first frame and find where it coincides with the last part of the final frame. Cut the previous piece.
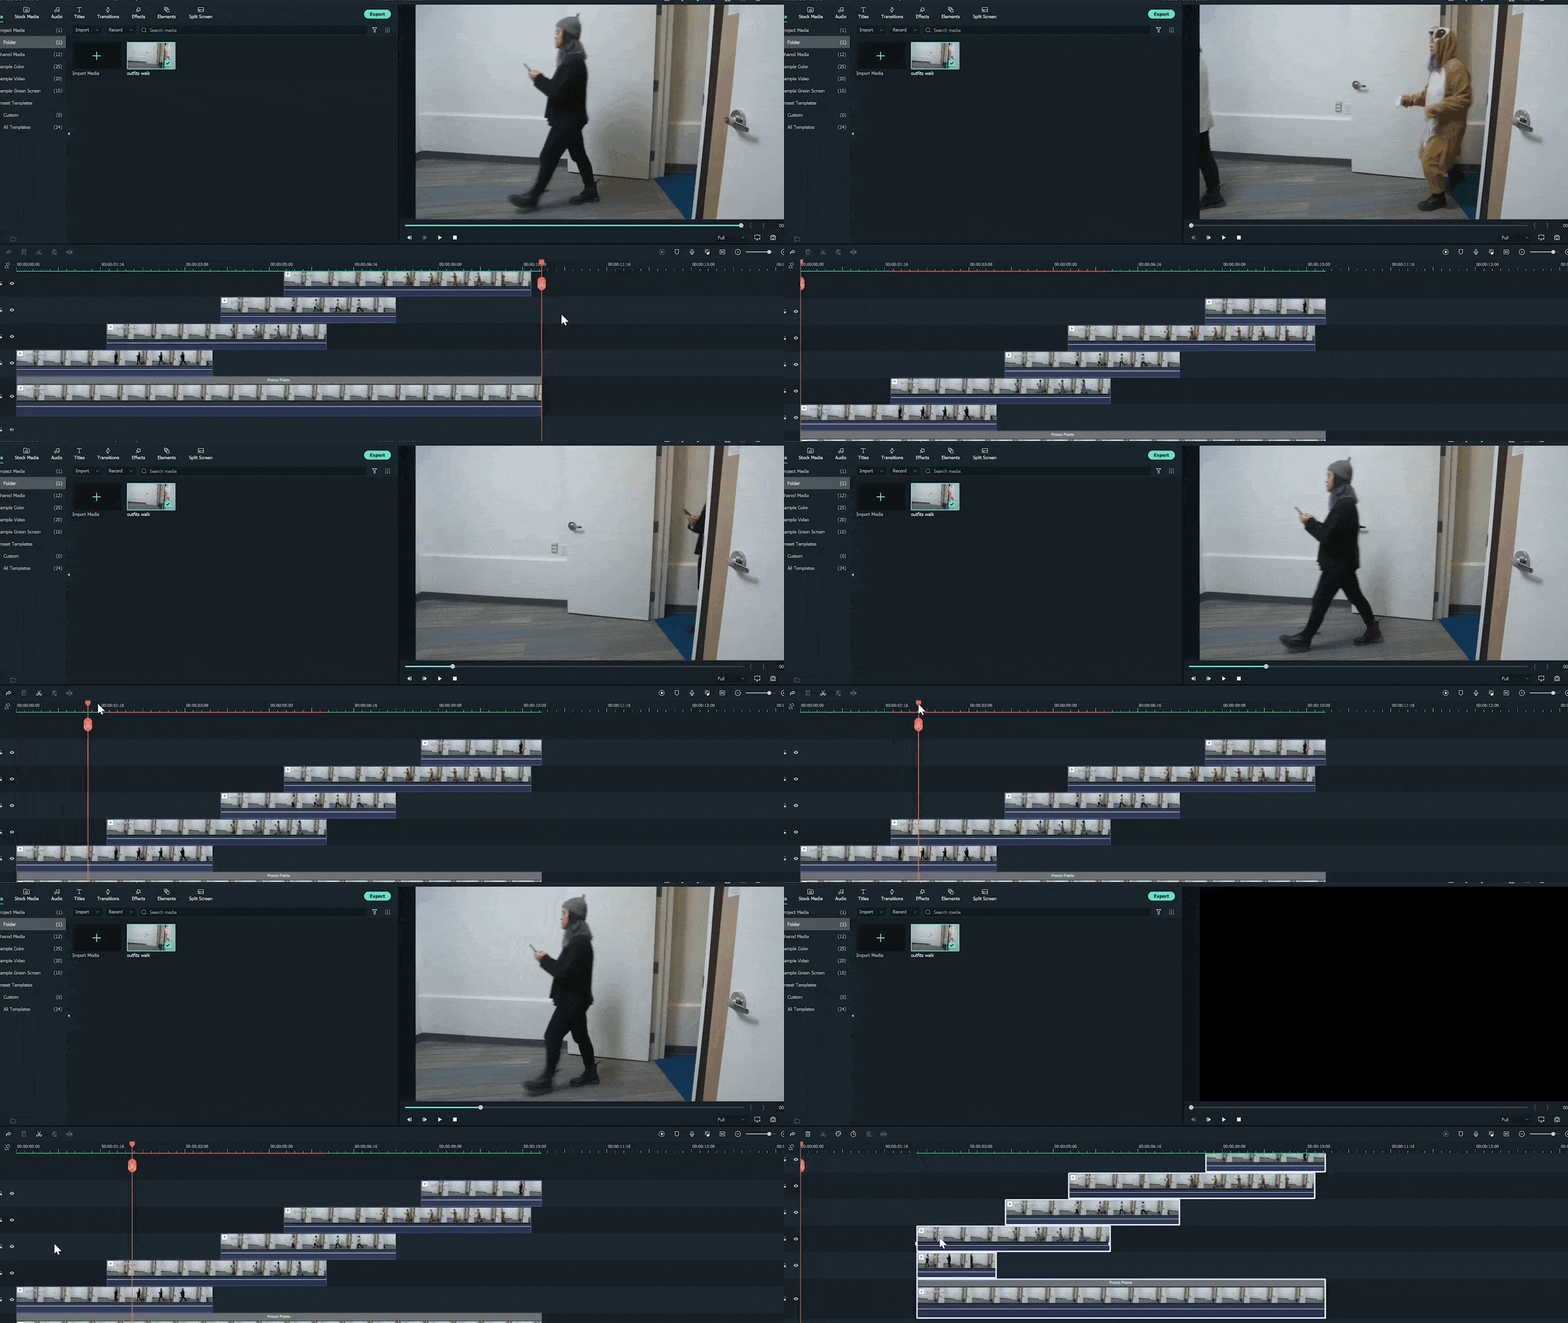
Post it on Instagram, and it will keep playing automatically and act like a loop video. Otherwise, duplicate this edited clip several times to create a longer loop video. Background music plays a vital role in these videos, setting the tone and pace. Follow all the steps in the correct order. Then, create and post loop videos on your social media platforms.
Free Download For macOS 10.14 or later
Below is the step-by-step guide on using Wondershare Filmora to create a loop masking or lookbook video.
How to edit a loop lookbook video
Step1 Download and install Wondershare Filmora on your PC or Mac.
Step2 Launch Wondershare Filmora, import the video clip into Filmora and place it on the first track.

Step3 Find a frame with an empty background, i.e., without the subject, and freeze the frame.

Step4 Extend the frozen frame and cut out the rest of the video.

Step5 We are done with the first track so lock it.

Step6 Import the clip again on the second track. And find the sections of the clips where the subject is walking in the video. Cut the remaining part.

Step7 It will create several small sections on the second track.

Step8 Put the first clip at the start of the timeline and move the playhead to find the frame containing enough room for the second outfit.

Step9 Move the second outfit to that playhead area.

Step10 Double-click on the clip, go to effects, and choose a single-line mask.

Step11 Drag the mask to the point where it shows the outfit on its right side.

Step12 Blur the mask edges by increasing blur numbers.

Step13 Click on the add button to add a mask keyframe and move the play head forward until the first outfit leaves the frame.

Step14 Move the mask to the left to reveal the entire frame, and repeat the same process with all outfits.

Step15 After finishing all outfits, copy the clip from the first outfit. And paste it on top of all the tracks after the last outfit. And add a mask keyframe to this section too.

Step16 Unlock the first track and move the playhead to find the point where the subject with 4th outfit moves out of the frame. Then, cut the remaining part of the freeze frame on the right.

Step17 Now move the playhead to the first frame and find where it coincides with the last part of the final frame. Cut the previous piece.

Post it on Instagram, and it will keep playing automatically and act like a loop video. Otherwise, duplicate this edited clip several times to create a longer loop video. Background music plays a vital role in these videos, setting the tone and pace. Follow all the steps in the correct order. Then, create and post loop videos on your social media platforms.
15 Amazing GIF Splitter Examples You Need to Bookmark
15 Amazing GIF Splitter Examples You Need to Bookmark in 2024
An easy yet powerful editor
Numerous effects to choose from
Detailed tutorials provided by the official channel
GIF has been in consideration for a very long time, and right now, it is used for various purposes. From sending animated messages to friends to advertising a business, GIF is playing a great role. But sometimes, it happens that we are in need of getting a particular frame from the file and have no clue how to do it.
If you are stuck in this confusion that how will you be able to split GIFs into frames, use the GIF Splitters available.
The GIF Splitters are the tools available to help users to create frames from the GIF. There will be no problem in using these tools because all of them have an innovative interface. The best part is if a user is looking forward to doing any particular editing considering the frame, they can do it too. Well, for better understanding, keep reading. Here we are discussing GIF split into Frames and some splitters too. Let’s get started!
In this article
01 [15 Free Animated GIF Splitters - Split GIF into Frames Efficiently](#Part 1)
02 [5 Rules You Need to Follow When Splitting GIF into Frames](#Part 2)
03 [How to Split GIF into Frames into 3 Steps](#Part 3)
Part 1 Free Animated GIF Splitters - Split GIF into Frames Efficiently
In this section, you will find out some free gif splitter online available. This list has some interesting tools available that will help you to complete the task easily. Let’s have a look:-
01GIF Viewer
A GIF viewer is a tool that allows people to view GIFs in an easier and faster way. It splits up the GIF into frames so that it can be played at any speed, paused, or reversed. This tool also allows you to add text captions and stickers to your GIFs. This is useful when you want to add some context or commentary about what is happening in the GIF. Furthermore, after splitting the GIF into the frame, the quality of it is also retained.

02Animated GIF Frame Extractor by Softpedia
Animated GIF Frame Extractor is a free online tool to extract frames from a gif. It can extract the first frame, last frame, or any number of frames in between. This GIF tool is useful for those who need to create animated graphics for presentations or other purposes. It can also be used by web developers who need to create animations on their websites.
This also extracts frames from a gif file and saves them as separate images. Furthermore, it is also useful for creating animated graphics and animations with different frame rates, resolutions, or sizes.

03IrfanView
The IrfanView’s GIF Splitter into Frames tool splits the GIF into individual frames. In general, users can extract individual frames from an animation or change the order of frames in it. It is right to conclude that this tool provides an easy way to edit animated GIFs by extracting individual frames or creating new animations from scratch with images imported from other sources.

04EZGIF.com
EZGIF.com is a GIF tool that lets you create animated GIFs from start to finish. It also lets you edit the GIFs, adds text and stickers, save them, and share them on social media sites like Facebook or Twitter. Furthermore, it lets you split the video into frames, and then it allows you to edit the frames as per your need.

05ImageMagick
ImageMagick is a GIF splitter tool that allows you to extract frames from a GIF animation. It’s easy to use, simple, and intuitive interface that lets you extract individual frames from your GIF animation. It’s also possible to extract all frames or just one frame at a time.
It is available for free download on their website, and it’s compatible with Windows and macOS X operating systems.

067GIF
7GIF is a tool that can be used to split an animation into individual frames, which can then be exported as individual GIF files. This GIF Splitter is a tool that allows you to break a GIF into individual frames.
It does this by analyzing the GIF and then breaking it up into its component parts, which are the frames. It then saves these frames as individual images and produces links to each of them.

07AniView
AniView is a free online animation maker that allows you to create animated videos with your own photos or videos, text, and music. You can upload your own media or use their library of public domain content for free. Furthermore, if you are thinking of splitting GIFs into frames, this tool has the option for it.

08GifSplitter
GifSplitter is a free online tool that splits an animated GIF into individual frames. This tool is very useful for people who want to extract a single frame from the GIF or convert it to a video file. The interface of the portal is quite easy to understand, and users will be able to do the editing as they need.
09GIFGIFs.com
GIFGIFs.com is an online website that allows users to upload GIFs and split them into frames, which can be easily shared on social media or other websites. This tool helps people make their own GIF animations, which are very popular nowadays.

10FFmpeg
FFmpeg is an open-source software used for video and audio processing. This tool has many different features, but its most popular use is to split a GIF into a series of frames. This makes it easier to edit the individual frames of a GIF in Photoshop or another photo editing software.

11GIF Image Tools
The GIF Image tools act as a Splitter to split GIFs into Frames. This tool can be found in many different types of programs, including Adobe Photoshop, GIMP, and Windows Movie Maker. It is usually listed under the “Tools” tab in these programs. The tool is very easy to use, and it does not require any installation. All you need to do is upload the GIF file and then click on “Split.” It will automatically generate a folder with all the frames of your GIF image.

12Picasion
Picasion is a free online GIF maker. It allows you to create GIFs from your video files and then split them into frames in order to make them more engaging. Users can upload their video files or use the video from YouTube and then crop the frame they want to animate. They can also edit the duration of each frame and add text over their GIFs for a personalized touch.

13GIFMaker Pro
GIFMaker Pro is a free and easy-to-use GIF animation tool. It has a simple interface, and it doesn’t require any installation or sign-in. You can easily create animated GIFs with this tool.
It is a free, easy-to-use, and powerful GIF animation creator that allows you to create high-quality animated GIF splits into frames quickly. The best thing about this tool is that it does not require any installation or sign-in, so you can start using it right away!

14ImgFlip
ImgFlip is a GIF animation tool that is used to create and edit animated GIFs. It has the ability to convert videos into GIFs, as well as allow users to edit the frames and export them.
To use ImgFlip, all you need to do is open the app and select a video from your gallery or record one with your device’s camera. Once you have selected the video, ImgFlip will automatically convert it into an animated GIF that can be shared on social media platforms like Twitter and Facebook.

15GIFPAL
GIFPAL is a free GIF animation maker that splits GIF animations into frames. It is a great tool for creating cool animated GIFs from videos, images, and clips. It gives you the option to customize the frame rate, repeat playback, play order, and looping of your animation. It also lets you add text captions and change the colors of your frames.

Part 2 Rules You Need to Follow When Splitting GIF into Frames
Rules are important to follow when one is splitting GIFs into Frames. These are as follows:
● When you are splitting a GIF into frames, it is important to keep the size of each frame as close as possible to the original size of the GIF.
● The first frame should be the same size or slightly bigger than the original frame, and subsequent frames should be smaller than this.
● You can use tools to crop and resize your frames for your GIFs if needed.
● If you want to keep your GIF on its original aspect ratio, you need to make sure that all of your frames are in the same aspect ratio as well.
● Make sure you are splitting the subject in a way that makes sense for the GIF and for the viewer.
Part 3 How to Split GIF into Frames into 3 Steps
There is a possibility that you might be looking forward to splitting GIFs into frames and wish to know the best steps too. Well, there are only 3 steps that you need to follow. This includes:
Step 1: First of all, choose a GIF Splitter and browse through the frames options available in it to see whether the options you want are there or not.
Step 2: Upload the GIF from your system and choose the frame you wish to apply in order to split it. After choosing it, you need to hit on the “Split button.”
Step 3: Wait until the splitting is done, and on the top of the tool, there is a “downloading button” available click on it to download the GIF Splitted file you have created!
Note: So many options are available when you look for GIF Splitting tools. It is not important that every time you are going for some fancy options. There are some tools like “Filmora” available at reasonable prices and catering to your GIF Splitting needs too.)
Part 4 Other Frequently Asked Questions on GIF Splitter
01How Long Does It Take to Split GIF?
It can be done in a few seconds. Yes, with the help of splitter tools, the task can be done easily. If you are in search of a tool to split GIF, consider “Filmora.”
“Wondershare Filmora Video Editor is one of the best tools available for users out there to fulfill their image or video editing needs. So many options are there in it making it the best tool to have. Also, this tool has a simple to understand interface and even a layman can use this. If you are searching for a tool to split GIF, go for it right away!”

Wondershare Filmora - Best Video Editor for Mac/Windows
5,481,435 people have downloaded it.
Build unique custom animations without breaking a sweat.
Focus on creating epic stories and leave the details to Filmora’s auto features.
Start a creative adventure with drag & drop effects and endless possibilities.
Filmora simplifies advanced features to save you time and effort.
Filmora cuts out repetition so you can move on to your next creative breakthrough.
02Is It Safe to Split GIF Using Free Splitter App?
Somewhere the free splitter App is safe, and sometimes not. First of all, it is important to check whether the particular app is safe to use or not. Some free GIF Splitters are there that claim to be safe, but in reality, these are not. It is recommended to go for paid files because these are safe to use.
03Can I Split GIF on Mac OS, Android, or Linux?
If you have a GIF Splitter tool compatible with the operating system you are using, then you can split the GIFs on your system easily. For instance, do know if you are using Linux, the GIF Splitter you are choosing must be compatible with it.
● Ending Thoughts →
● GIF splitting is fun and easy to do. We made every possible effort to bring the best to you. The detailed discussion on GIF splitters will help you serve the purpose when you need it.
● Filmora is the best GIF Splitter to date. You should give a try on it if you want a great editing experience.
● GIF splitting can be done in 3 simple steps. We hope you can now do it on your own.
GIF has been in consideration for a very long time, and right now, it is used for various purposes. From sending animated messages to friends to advertising a business, GIF is playing a great role. But sometimes, it happens that we are in need of getting a particular frame from the file and have no clue how to do it.
If you are stuck in this confusion that how will you be able to split GIFs into frames, use the GIF Splitters available.
The GIF Splitters are the tools available to help users to create frames from the GIF. There will be no problem in using these tools because all of them have an innovative interface. The best part is if a user is looking forward to doing any particular editing considering the frame, they can do it too. Well, for better understanding, keep reading. Here we are discussing GIF split into Frames and some splitters too. Let’s get started!
In this article
01 [15 Free Animated GIF Splitters - Split GIF into Frames Efficiently](#Part 1)
02 [5 Rules You Need to Follow When Splitting GIF into Frames](#Part 2)
03 [How to Split GIF into Frames into 3 Steps](#Part 3)
Part 1 Free Animated GIF Splitters - Split GIF into Frames Efficiently
In this section, you will find out some free gif splitter online available. This list has some interesting tools available that will help you to complete the task easily. Let’s have a look:-
01GIF Viewer
A GIF viewer is a tool that allows people to view GIFs in an easier and faster way. It splits up the GIF into frames so that it can be played at any speed, paused, or reversed. This tool also allows you to add text captions and stickers to your GIFs. This is useful when you want to add some context or commentary about what is happening in the GIF. Furthermore, after splitting the GIF into the frame, the quality of it is also retained.

02Animated GIF Frame Extractor by Softpedia
Animated GIF Frame Extractor is a free online tool to extract frames from a gif. It can extract the first frame, last frame, or any number of frames in between. This GIF tool is useful for those who need to create animated graphics for presentations or other purposes. It can also be used by web developers who need to create animations on their websites.
This also extracts frames from a gif file and saves them as separate images. Furthermore, it is also useful for creating animated graphics and animations with different frame rates, resolutions, or sizes.

03IrfanView
The IrfanView’s GIF Splitter into Frames tool splits the GIF into individual frames. In general, users can extract individual frames from an animation or change the order of frames in it. It is right to conclude that this tool provides an easy way to edit animated GIFs by extracting individual frames or creating new animations from scratch with images imported from other sources.

04EZGIF.com
EZGIF.com is a GIF tool that lets you create animated GIFs from start to finish. It also lets you edit the GIFs, adds text and stickers, save them, and share them on social media sites like Facebook or Twitter. Furthermore, it lets you split the video into frames, and then it allows you to edit the frames as per your need.

05ImageMagick
ImageMagick is a GIF splitter tool that allows you to extract frames from a GIF animation. It’s easy to use, simple, and intuitive interface that lets you extract individual frames from your GIF animation. It’s also possible to extract all frames or just one frame at a time.
It is available for free download on their website, and it’s compatible with Windows and macOS X operating systems.

067GIF
7GIF is a tool that can be used to split an animation into individual frames, which can then be exported as individual GIF files. This GIF Splitter is a tool that allows you to break a GIF into individual frames.
It does this by analyzing the GIF and then breaking it up into its component parts, which are the frames. It then saves these frames as individual images and produces links to each of them.

07AniView
AniView is a free online animation maker that allows you to create animated videos with your own photos or videos, text, and music. You can upload your own media or use their library of public domain content for free. Furthermore, if you are thinking of splitting GIFs into frames, this tool has the option for it.

08GifSplitter
GifSplitter is a free online tool that splits an animated GIF into individual frames. This tool is very useful for people who want to extract a single frame from the GIF or convert it to a video file. The interface of the portal is quite easy to understand, and users will be able to do the editing as they need.

09GIFGIFs.com
GIFGIFs.com is an online website that allows users to upload GIFs and split them into frames, which can be easily shared on social media or other websites. This tool helps people make their own GIF animations, which are very popular nowadays.

10FFmpeg
FFmpeg is an open-source software used for video and audio processing. This tool has many different features, but its most popular use is to split a GIF into a series of frames. This makes it easier to edit the individual frames of a GIF in Photoshop or another photo editing software.

11GIF Image Tools
The GIF Image tools act as a Splitter to split GIFs into Frames. This tool can be found in many different types of programs, including Adobe Photoshop, GIMP, and Windows Movie Maker. It is usually listed under the “Tools” tab in these programs. The tool is very easy to use, and it does not require any installation. All you need to do is upload the GIF file and then click on “Split.” It will automatically generate a folder with all the frames of your GIF image.

12Picasion
Picasion is a free online GIF maker. It allows you to create GIFs from your video files and then split them into frames in order to make them more engaging. Users can upload their video files or use the video from YouTube and then crop the frame they want to animate. They can also edit the duration of each frame and add text over their GIFs for a personalized touch.

13GIFMaker Pro
GIFMaker Pro is a free and easy-to-use GIF animation tool. It has a simple interface, and it doesn’t require any installation or sign-in. You can easily create animated GIFs with this tool.
It is a free, easy-to-use, and powerful GIF animation creator that allows you to create high-quality animated GIF splits into frames quickly. The best thing about this tool is that it does not require any installation or sign-in, so you can start using it right away!

14ImgFlip
ImgFlip is a GIF animation tool that is used to create and edit animated GIFs. It has the ability to convert videos into GIFs, as well as allow users to edit the frames and export them.
To use ImgFlip, all you need to do is open the app and select a video from your gallery or record one with your device’s camera. Once you have selected the video, ImgFlip will automatically convert it into an animated GIF that can be shared on social media platforms like Twitter and Facebook.

15GIFPAL
GIFPAL is a free GIF animation maker that splits GIF animations into frames. It is a great tool for creating cool animated GIFs from videos, images, and clips. It gives you the option to customize the frame rate, repeat playback, play order, and looping of your animation. It also lets you add text captions and change the colors of your frames.

Part 2 Rules You Need to Follow When Splitting GIF into Frames
Rules are important to follow when one is splitting GIFs into Frames. These are as follows:
● When you are splitting a GIF into frames, it is important to keep the size of each frame as close as possible to the original size of the GIF.
● The first frame should be the same size or slightly bigger than the original frame, and subsequent frames should be smaller than this.
● You can use tools to crop and resize your frames for your GIFs if needed.
● If you want to keep your GIF on its original aspect ratio, you need to make sure that all of your frames are in the same aspect ratio as well.
● Make sure you are splitting the subject in a way that makes sense for the GIF and for the viewer.
Part 3 How to Split GIF into Frames into 3 Steps
There is a possibility that you might be looking forward to splitting GIFs into frames and wish to know the best steps too. Well, there are only 3 steps that you need to follow. This includes:
Step 1: First of all, choose a GIF Splitter and browse through the frames options available in it to see whether the options you want are there or not.
Step 2: Upload the GIF from your system and choose the frame you wish to apply in order to split it. After choosing it, you need to hit on the “Split button.”
Step 3: Wait until the splitting is done, and on the top of the tool, there is a “downloading button” available click on it to download the GIF Splitted file you have created!
Note: So many options are available when you look for GIF Splitting tools. It is not important that every time you are going for some fancy options. There are some tools like “Filmora” available at reasonable prices and catering to your GIF Splitting needs too.)
Part 4 Other Frequently Asked Questions on GIF Splitter
01How Long Does It Take to Split GIF?
It can be done in a few seconds. Yes, with the help of splitter tools, the task can be done easily. If you are in search of a tool to split GIF, consider “Filmora.”
“Wondershare Filmora Video Editor is one of the best tools available for users out there to fulfill their image or video editing needs. So many options are there in it making it the best tool to have. Also, this tool has a simple to understand interface and even a layman can use this. If you are searching for a tool to split GIF, go for it right away!”

Wondershare Filmora - Best Video Editor for Mac/Windows
5,481,435 people have downloaded it.
Build unique custom animations without breaking a sweat.
Focus on creating epic stories and leave the details to Filmora’s auto features.
Start a creative adventure with drag & drop effects and endless possibilities.
Filmora simplifies advanced features to save you time and effort.
Filmora cuts out repetition so you can move on to your next creative breakthrough.
02Is It Safe to Split GIF Using Free Splitter App?
Somewhere the free splitter App is safe, and sometimes not. First of all, it is important to check whether the particular app is safe to use or not. Some free GIF Splitters are there that claim to be safe, but in reality, these are not. It is recommended to go for paid files because these are safe to use.
03Can I Split GIF on Mac OS, Android, or Linux?
If you have a GIF Splitter tool compatible with the operating system you are using, then you can split the GIFs on your system easily. For instance, do know if you are using Linux, the GIF Splitter you are choosing must be compatible with it.
● Ending Thoughts →
● GIF splitting is fun and easy to do. We made every possible effort to bring the best to you. The detailed discussion on GIF splitters will help you serve the purpose when you need it.
● Filmora is the best GIF Splitter to date. You should give a try on it if you want a great editing experience.
● GIF splitting can be done in 3 simple steps. We hope you can now do it on your own.
GIF has been in consideration for a very long time, and right now, it is used for various purposes. From sending animated messages to friends to advertising a business, GIF is playing a great role. But sometimes, it happens that we are in need of getting a particular frame from the file and have no clue how to do it.
If you are stuck in this confusion that how will you be able to split GIFs into frames, use the GIF Splitters available.
The GIF Splitters are the tools available to help users to create frames from the GIF. There will be no problem in using these tools because all of them have an innovative interface. The best part is if a user is looking forward to doing any particular editing considering the frame, they can do it too. Well, for better understanding, keep reading. Here we are discussing GIF split into Frames and some splitters too. Let’s get started!
In this article
01 [15 Free Animated GIF Splitters - Split GIF into Frames Efficiently](#Part 1)
02 [5 Rules You Need to Follow When Splitting GIF into Frames](#Part 2)
03 [How to Split GIF into Frames into 3 Steps](#Part 3)
Part 1 Free Animated GIF Splitters - Split GIF into Frames Efficiently
In this section, you will find out some free gif splitter online available. This list has some interesting tools available that will help you to complete the task easily. Let’s have a look:-
01GIF Viewer
A GIF viewer is a tool that allows people to view GIFs in an easier and faster way. It splits up the GIF into frames so that it can be played at any speed, paused, or reversed. This tool also allows you to add text captions and stickers to your GIFs. This is useful when you want to add some context or commentary about what is happening in the GIF. Furthermore, after splitting the GIF into the frame, the quality of it is also retained.

02Animated GIF Frame Extractor by Softpedia
Animated GIF Frame Extractor is a free online tool to extract frames from a gif. It can extract the first frame, last frame, or any number of frames in between. This GIF tool is useful for those who need to create animated graphics for presentations or other purposes. It can also be used by web developers who need to create animations on their websites.
This also extracts frames from a gif file and saves them as separate images. Furthermore, it is also useful for creating animated graphics and animations with different frame rates, resolutions, or sizes.

03IrfanView
The IrfanView’s GIF Splitter into Frames tool splits the GIF into individual frames. In general, users can extract individual frames from an animation or change the order of frames in it. It is right to conclude that this tool provides an easy way to edit animated GIFs by extracting individual frames or creating new animations from scratch with images imported from other sources.

04EZGIF.com
EZGIF.com is a GIF tool that lets you create animated GIFs from start to finish. It also lets you edit the GIFs, adds text and stickers, save them, and share them on social media sites like Facebook or Twitter. Furthermore, it lets you split the video into frames, and then it allows you to edit the frames as per your need.

05ImageMagick
ImageMagick is a GIF splitter tool that allows you to extract frames from a GIF animation. It’s easy to use, simple, and intuitive interface that lets you extract individual frames from your GIF animation. It’s also possible to extract all frames or just one frame at a time.
It is available for free download on their website, and it’s compatible with Windows and macOS X operating systems.

067GIF
7GIF is a tool that can be used to split an animation into individual frames, which can then be exported as individual GIF files. This GIF Splitter is a tool that allows you to break a GIF into individual frames.
It does this by analyzing the GIF and then breaking it up into its component parts, which are the frames. It then saves these frames as individual images and produces links to each of them.

07AniView
AniView is a free online animation maker that allows you to create animated videos with your own photos or videos, text, and music. You can upload your own media or use their library of public domain content for free. Furthermore, if you are thinking of splitting GIFs into frames, this tool has the option for it.

08GifSplitter
GifSplitter is a free online tool that splits an animated GIF into individual frames. This tool is very useful for people who want to extract a single frame from the GIF or convert it to a video file. The interface of the portal is quite easy to understand, and users will be able to do the editing as they need.

09GIFGIFs.com
GIFGIFs.com is an online website that allows users to upload GIFs and split them into frames, which can be easily shared on social media or other websites. This tool helps people make their own GIF animations, which are very popular nowadays.

10FFmpeg
FFmpeg is an open-source software used for video and audio processing. This tool has many different features, but its most popular use is to split a GIF into a series of frames. This makes it easier to edit the individual frames of a GIF in Photoshop or another photo editing software.

11GIF Image Tools
The GIF Image tools act as a Splitter to split GIFs into Frames. This tool can be found in many different types of programs, including Adobe Photoshop, GIMP, and Windows Movie Maker. It is usually listed under the “Tools” tab in these programs. The tool is very easy to use, and it does not require any installation. All you need to do is upload the GIF file and then click on “Split.” It will automatically generate a folder with all the frames of your GIF image.

12Picasion
Picasion is a free online GIF maker. It allows you to create GIFs from your video files and then split them into frames in order to make them more engaging. Users can upload their video files or use the video from YouTube and then crop the frame they want to animate. They can also edit the duration of each frame and add text over their GIFs for a personalized touch.

13GIFMaker Pro
GIFMaker Pro is a free and easy-to-use GIF animation tool. It has a simple interface, and it doesn’t require any installation or sign-in. You can easily create animated GIFs with this tool.
It is a free, easy-to-use, and powerful GIF animation creator that allows you to create high-quality animated GIF splits into frames quickly. The best thing about this tool is that it does not require any installation or sign-in, so you can start using it right away!

14ImgFlip
ImgFlip is a GIF animation tool that is used to create and edit animated GIFs. It has the ability to convert videos into GIFs, as well as allow users to edit the frames and export them.
To use ImgFlip, all you need to do is open the app and select a video from your gallery or record one with your device’s camera. Once you have selected the video, ImgFlip will automatically convert it into an animated GIF that can be shared on social media platforms like Twitter and Facebook.

15GIFPAL
GIFPAL is a free GIF animation maker that splits GIF animations into frames. It is a great tool for creating cool animated GIFs from videos, images, and clips. It gives you the option to customize the frame rate, repeat playback, play order, and looping of your animation. It also lets you add text captions and change the colors of your frames.

Part 2 Rules You Need to Follow When Splitting GIF into Frames
Rules are important to follow when one is splitting GIFs into Frames. These are as follows:
● When you are splitting a GIF into frames, it is important to keep the size of each frame as close as possible to the original size of the GIF.
● The first frame should be the same size or slightly bigger than the original frame, and subsequent frames should be smaller than this.
● You can use tools to crop and resize your frames for your GIFs if needed.
● If you want to keep your GIF on its original aspect ratio, you need to make sure that all of your frames are in the same aspect ratio as well.
● Make sure you are splitting the subject in a way that makes sense for the GIF and for the viewer.
Part 3 How to Split GIF into Frames into 3 Steps
There is a possibility that you might be looking forward to splitting GIFs into frames and wish to know the best steps too. Well, there are only 3 steps that you need to follow. This includes:
Step 1: First of all, choose a GIF Splitter and browse through the frames options available in it to see whether the options you want are there or not.
Step 2: Upload the GIF from your system and choose the frame you wish to apply in order to split it. After choosing it, you need to hit on the “Split button.”
Step 3: Wait until the splitting is done, and on the top of the tool, there is a “downloading button” available click on it to download the GIF Splitted file you have created!
Note: So many options are available when you look for GIF Splitting tools. It is not important that every time you are going for some fancy options. There are some tools like “Filmora” available at reasonable prices and catering to your GIF Splitting needs too.)
Part 4 Other Frequently Asked Questions on GIF Splitter
01How Long Does It Take to Split GIF?
It can be done in a few seconds. Yes, with the help of splitter tools, the task can be done easily. If you are in search of a tool to split GIF, consider “Filmora.”
“Wondershare Filmora Video Editor is one of the best tools available for users out there to fulfill their image or video editing needs. So many options are there in it making it the best tool to have. Also, this tool has a simple to understand interface and even a layman can use this. If you are searching for a tool to split GIF, go for it right away!”

Wondershare Filmora - Best Video Editor for Mac/Windows
5,481,435 people have downloaded it.
Build unique custom animations without breaking a sweat.
Focus on creating epic stories and leave the details to Filmora’s auto features.
Start a creative adventure with drag & drop effects and endless possibilities.
Filmora simplifies advanced features to save you time and effort.
Filmora cuts out repetition so you can move on to your next creative breakthrough.
02Is It Safe to Split GIF Using Free Splitter App?
Somewhere the free splitter App is safe, and sometimes not. First of all, it is important to check whether the particular app is safe to use or not. Some free GIF Splitters are there that claim to be safe, but in reality, these are not. It is recommended to go for paid files because these are safe to use.
03Can I Split GIF on Mac OS, Android, or Linux?
If you have a GIF Splitter tool compatible with the operating system you are using, then you can split the GIFs on your system easily. For instance, do know if you are using Linux, the GIF Splitter you are choosing must be compatible with it.
● Ending Thoughts →
● GIF splitting is fun and easy to do. We made every possible effort to bring the best to you. The detailed discussion on GIF splitters will help you serve the purpose when you need it.
● Filmora is the best GIF Splitter to date. You should give a try on it if you want a great editing experience.
● GIF splitting can be done in 3 simple steps. We hope you can now do it on your own.
GIF has been in consideration for a very long time, and right now, it is used for various purposes. From sending animated messages to friends to advertising a business, GIF is playing a great role. But sometimes, it happens that we are in need of getting a particular frame from the file and have no clue how to do it.
If you are stuck in this confusion that how will you be able to split GIFs into frames, use the GIF Splitters available.
The GIF Splitters are the tools available to help users to create frames from the GIF. There will be no problem in using these tools because all of them have an innovative interface. The best part is if a user is looking forward to doing any particular editing considering the frame, they can do it too. Well, for better understanding, keep reading. Here we are discussing GIF split into Frames and some splitters too. Let’s get started!
In this article
01 [15 Free Animated GIF Splitters - Split GIF into Frames Efficiently](#Part 1)
02 [5 Rules You Need to Follow When Splitting GIF into Frames](#Part 2)
03 [How to Split GIF into Frames into 3 Steps](#Part 3)
Part 1 Free Animated GIF Splitters - Split GIF into Frames Efficiently
In this section, you will find out some free gif splitter online available. This list has some interesting tools available that will help you to complete the task easily. Let’s have a look:-
01GIF Viewer
A GIF viewer is a tool that allows people to view GIFs in an easier and faster way. It splits up the GIF into frames so that it can be played at any speed, paused, or reversed. This tool also allows you to add text captions and stickers to your GIFs. This is useful when you want to add some context or commentary about what is happening in the GIF. Furthermore, after splitting the GIF into the frame, the quality of it is also retained.

02Animated GIF Frame Extractor by Softpedia
Animated GIF Frame Extractor is a free online tool to extract frames from a gif. It can extract the first frame, last frame, or any number of frames in between. This GIF tool is useful for those who need to create animated graphics for presentations or other purposes. It can also be used by web developers who need to create animations on their websites.
This also extracts frames from a gif file and saves them as separate images. Furthermore, it is also useful for creating animated graphics and animations with different frame rates, resolutions, or sizes.

03IrfanView
The IrfanView’s GIF Splitter into Frames tool splits the GIF into individual frames. In general, users can extract individual frames from an animation or change the order of frames in it. It is right to conclude that this tool provides an easy way to edit animated GIFs by extracting individual frames or creating new animations from scratch with images imported from other sources.

04EZGIF.com
EZGIF.com is a GIF tool that lets you create animated GIFs from start to finish. It also lets you edit the GIFs, adds text and stickers, save them, and share them on social media sites like Facebook or Twitter. Furthermore, it lets you split the video into frames, and then it allows you to edit the frames as per your need.

05ImageMagick
ImageMagick is a GIF splitter tool that allows you to extract frames from a GIF animation. It’s easy to use, simple, and intuitive interface that lets you extract individual frames from your GIF animation. It’s also possible to extract all frames or just one frame at a time.
It is available for free download on their website, and it’s compatible with Windows and macOS X operating systems.

067GIF
7GIF is a tool that can be used to split an animation into individual frames, which can then be exported as individual GIF files. This GIF Splitter is a tool that allows you to break a GIF into individual frames.
It does this by analyzing the GIF and then breaking it up into its component parts, which are the frames. It then saves these frames as individual images and produces links to each of them.

07AniView
AniView is a free online animation maker that allows you to create animated videos with your own photos or videos, text, and music. You can upload your own media or use their library of public domain content for free. Furthermore, if you are thinking of splitting GIFs into frames, this tool has the option for it.

08GifSplitter
GifSplitter is a free online tool that splits an animated GIF into individual frames. This tool is very useful for people who want to extract a single frame from the GIF or convert it to a video file. The interface of the portal is quite easy to understand, and users will be able to do the editing as they need.

09GIFGIFs.com
GIFGIFs.com is an online website that allows users to upload GIFs and split them into frames, which can be easily shared on social media or other websites. This tool helps people make their own GIF animations, which are very popular nowadays.

10FFmpeg
FFmpeg is an open-source software used for video and audio processing. This tool has many different features, but its most popular use is to split a GIF into a series of frames. This makes it easier to edit the individual frames of a GIF in Photoshop or another photo editing software.

11GIF Image Tools
The GIF Image tools act as a Splitter to split GIFs into Frames. This tool can be found in many different types of programs, including Adobe Photoshop, GIMP, and Windows Movie Maker. It is usually listed under the “Tools” tab in these programs. The tool is very easy to use, and it does not require any installation. All you need to do is upload the GIF file and then click on “Split.” It will automatically generate a folder with all the frames of your GIF image.

12Picasion
Picasion is a free online GIF maker. It allows you to create GIFs from your video files and then split them into frames in order to make them more engaging. Users can upload their video files or use the video from YouTube and then crop the frame they want to animate. They can also edit the duration of each frame and add text over their GIFs for a personalized touch.

13GIFMaker Pro
GIFMaker Pro is a free and easy-to-use GIF animation tool. It has a simple interface, and it doesn’t require any installation or sign-in. You can easily create animated GIFs with this tool.
It is a free, easy-to-use, and powerful GIF animation creator that allows you to create high-quality animated GIF splits into frames quickly. The best thing about this tool is that it does not require any installation or sign-in, so you can start using it right away!

14ImgFlip
ImgFlip is a GIF animation tool that is used to create and edit animated GIFs. It has the ability to convert videos into GIFs, as well as allow users to edit the frames and export them.
To use ImgFlip, all you need to do is open the app and select a video from your gallery or record one with your device’s camera. Once you have selected the video, ImgFlip will automatically convert it into an animated GIF that can be shared on social media platforms like Twitter and Facebook.

15GIFPAL
GIFPAL is a free GIF animation maker that splits GIF animations into frames. It is a great tool for creating cool animated GIFs from videos, images, and clips. It gives you the option to customize the frame rate, repeat playback, play order, and looping of your animation. It also lets you add text captions and change the colors of your frames.

Part 2 Rules You Need to Follow When Splitting GIF into Frames
Rules are important to follow when one is splitting GIFs into Frames. These are as follows:
● When you are splitting a GIF into frames, it is important to keep the size of each frame as close as possible to the original size of the GIF.
● The first frame should be the same size or slightly bigger than the original frame, and subsequent frames should be smaller than this.
● You can use tools to crop and resize your frames for your GIFs if needed.
● If you want to keep your GIF on its original aspect ratio, you need to make sure that all of your frames are in the same aspect ratio as well.
● Make sure you are splitting the subject in a way that makes sense for the GIF and for the viewer.
Part 3 How to Split GIF into Frames into 3 Steps
There is a possibility that you might be looking forward to splitting GIFs into frames and wish to know the best steps too. Well, there are only 3 steps that you need to follow. This includes:
Step 1: First of all, choose a GIF Splitter and browse through the frames options available in it to see whether the options you want are there or not.
Step 2: Upload the GIF from your system and choose the frame you wish to apply in order to split it. After choosing it, you need to hit on the “Split button.”
Step 3: Wait until the splitting is done, and on the top of the tool, there is a “downloading button” available click on it to download the GIF Splitted file you have created!
Note: So many options are available when you look for GIF Splitting tools. It is not important that every time you are going for some fancy options. There are some tools like “Filmora” available at reasonable prices and catering to your GIF Splitting needs too.)
Part 4 Other Frequently Asked Questions on GIF Splitter
01How Long Does It Take to Split GIF?
It can be done in a few seconds. Yes, with the help of splitter tools, the task can be done easily. If you are in search of a tool to split GIF, consider “Filmora.”
“Wondershare Filmora Video Editor is one of the best tools available for users out there to fulfill their image or video editing needs. So many options are there in it making it the best tool to have. Also, this tool has a simple to understand interface and even a layman can use this. If you are searching for a tool to split GIF, go for it right away!”

Wondershare Filmora - Best Video Editor for Mac/Windows
5,481,435 people have downloaded it.
Build unique custom animations without breaking a sweat.
Focus on creating epic stories and leave the details to Filmora’s auto features.
Start a creative adventure with drag & drop effects and endless possibilities.
Filmora simplifies advanced features to save you time and effort.
Filmora cuts out repetition so you can move on to your next creative breakthrough.
02Is It Safe to Split GIF Using Free Splitter App?
Somewhere the free splitter App is safe, and sometimes not. First of all, it is important to check whether the particular app is safe to use or not. Some free GIF Splitters are there that claim to be safe, but in reality, these are not. It is recommended to go for paid files because these are safe to use.
03Can I Split GIF on Mac OS, Android, or Linux?
If you have a GIF Splitter tool compatible with the operating system you are using, then you can split the GIFs on your system easily. For instance, do know if you are using Linux, the GIF Splitter you are choosing must be compatible with it.
● Ending Thoughts →
● GIF splitting is fun and easy to do. We made every possible effort to bring the best to you. The detailed discussion on GIF splitters will help you serve the purpose when you need it.
● Filmora is the best GIF Splitter to date. You should give a try on it if you want a great editing experience.
● GIF splitting can be done in 3 simple steps. We hope you can now do it on your own.
Here We Will Discuss About Both the Methods Which You Can Choose One to Get Rid of Unwanted Portions From Your Videos or Photos
Video cropping refers to delete unwanted parts from your videos with software like Lightworks. It is also known as clipping which ultimately result in cutting off something, cropping or reducing an image. The very important question here is how to crop video in lightworks?
Video cropping can be done with the help of various methods, some are free while others are paid. Here we will discuss about both the methods which you can choose one to get rid of unwanted portions from your videos or photos.
About Lightworks
Today, there are so many video editing software available on the internet that can be used to crop videos. Most of them are free but have limited features only, some may contain ads which you do not want to see at all. One such best free video editor is Lightworks that does not have any watermark, ad or free trail period. It is completely free for life time and the best part is that you do not need to register or subscribe here.
Lightworks is a professional non-linear editing system (NLE) created by EditShare, a technology company based in London. The software allows both amateur and professional video editors to create and edit videos like movies, TV shows, music videos etc. Lightworks has been used in over 500 Hollywood feature films including “The Wolf of Wall Street”, “Jack Ryan: Shadow Recruit” and “Edge of Tomorrow”.
Step-by-step on how to crop video in Lightworks?
Step 1: Open any video or photo. You can easily add media files in the Project panel and it will start appearing in the preview/program monitor. Once you have added your videos to the timeline, you can view them in both waveform display and Vectorscope format. You also get an option to see a live filmstrip preview, to see what is happening in the video.

Step 2: After importing your videos into Lightworks, you can now proceed towards cropping them. For this purpose, click on the video editing tab and select the “DVE” (Dynamic Video Effect) tool.


Step 3: How to crop videos using the DVE tool? You can now go to the ‘Crop’ option under the DVE tab and move your cursor over any unwanted portion of the video and click-and-drag it down and in the right direction. This will distort and stretch the video to remove that particular portion from there while preserving its overall appearance and quality.

Step 4: You can now preview what your video looks like after cropping it by hitting the “Play” button. Hit play to view any changes you have made to your videos.
Step 5: Hit the “Close” button and save your project.
So, this is how you can edit or remove part of a video clip in Lightworks easily. You can also go for some other online tools which are available on the internet and offer great services at no cost for life time. Many of these tools are free to use, easy to handle and have amazing features that can be used by professionals to get their work done beautifully.
There are many video cropping tools available on the internet which can be used for free. Those who are looking for a free, easy to use video editor can download and use this tool without any hassle. That is why; Filmora is best alternative of Lightworks, which offers free version of simple editing tools with all the features you need for your home videos. The free version of this tool is available for Windows; Mac; and Linux operating systems.
An Easier Way to Crop Video Using Filmora
Filmora Video Editor is an easy to use free video editing software that can be used for cropping videos. It allows users to upload their videos online and create new ones or edit existing ones. The steps involved in cropping videos in Filmora are very easy and to the point so you can follow them without any hassle.
It also comes in two versions; free and paid. The free version has less editing tools than the paid one but offers a good enough range of options for beginners who are not looking to make pro-quality movies just yet.
Filmora (video editor) is a power software that allows you to make the most impressive video clips with few steps. This video editing tool gives users various tools to edit videos. It also offers the user-friendly interface that anyone can use to edit home videos on Windows PC, Mac, and Linux devices.
You can download Filmora free video editor from the official website easily. Just visit the behind the link and click on ‘Download’ to get the installer file. Once you have downloaded it, you need to install Filmora software on your computer to start using it. Or install it using the link below:
For Win 7 or later (64-bit)
For macOS 10.14 or later
Step-by-step on how to crop videos using Filmora?
Step 1: Open a video that you want to edit.

Step 2: Open the Filmora editing tool and select the “Crop and Zoom” icon.

Step 3: Drag the cursor from any corner of your video preview window so as to adjust the size of the crop frame.

Step 4: Once you have adjusted it as per your needs hit the green “OK” button. So, this is how you can add or remove any part of a video clip on Filmora easily.
This free video editing tool offers great features for users and helps them edit home videos without any hassle.
Those who are looking for an easy to use online tool with user-friendly interface and advanced features can go for Wondershare Filmora. It is one of the best video editing software for beginners which will help them edit videos quickly and efficiently.
Step 2: After importing your videos into Lightworks, you can now proceed towards cropping them. For this purpose, click on the video editing tab and select the “DVE” (Dynamic Video Effect) tool.


Step 3: How to crop videos using the DVE tool? You can now go to the ‘Crop’ option under the DVE tab and move your cursor over any unwanted portion of the video and click-and-drag it down and in the right direction. This will distort and stretch the video to remove that particular portion from there while preserving its overall appearance and quality.

Step 4: You can now preview what your video looks like after cropping it by hitting the “Play” button. Hit play to view any changes you have made to your videos.
Step 5: Hit the “Close” button and save your project.
So, this is how you can edit or remove part of a video clip in Lightworks easily. You can also go for some other online tools which are available on the internet and offer great services at no cost for life time. Many of these tools are free to use, easy to handle and have amazing features that can be used by professionals to get their work done beautifully.
There are many video cropping tools available on the internet which can be used for free. Those who are looking for a free, easy to use video editor can download and use this tool without any hassle. That is why; Filmora is best alternative of Lightworks, which offers free version of simple editing tools with all the features you need for your home videos. The free version of this tool is available for Windows; Mac; and Linux operating systems.
An Easier Way to Crop Video Using Filmora
Filmora Video Editor is an easy to use free video editing software that can be used for cropping videos. It allows users to upload their videos online and create new ones or edit existing ones. The steps involved in cropping videos in Filmora are very easy and to the point so you can follow them without any hassle.
It also comes in two versions; free and paid. The free version has less editing tools than the paid one but offers a good enough range of options for beginners who are not looking to make pro-quality movies just yet.
Filmora (video editor) is a power software that allows you to make the most impressive video clips with few steps. This video editing tool gives users various tools to edit videos. It also offers the user-friendly interface that anyone can use to edit home videos on Windows PC, Mac, and Linux devices.
You can download Filmora free video editor from the official website easily. Just visit the behind the link and click on ‘Download’ to get the installer file. Once you have downloaded it, you need to install Filmora software on your computer to start using it. Or install it using the link below:
For Win 7 or later (64-bit)
For macOS 10.14 or later
Step-by-step on how to crop videos using Filmora?
Step 1: Open a video that you want to edit.

Step 2: Open the Filmora editing tool and select the “Crop and Zoom” icon.

Step 3: Drag the cursor from any corner of your video preview window so as to adjust the size of the crop frame.

Step 4: Once you have adjusted it as per your needs hit the green “OK” button. So, this is how you can add or remove any part of a video clip on Filmora easily.
This free video editing tool offers great features for users and helps them edit home videos without any hassle.
Those who are looking for an easy to use online tool with user-friendly interface and advanced features can go for Wondershare Filmora. It is one of the best video editing software for beginners which will help them edit videos quickly and efficiently.
Step 2: After importing your videos into Lightworks, you can now proceed towards cropping them. For this purpose, click on the video editing tab and select the “DVE” (Dynamic Video Effect) tool.


Step 3: How to crop videos using the DVE tool? You can now go to the ‘Crop’ option under the DVE tab and move your cursor over any unwanted portion of the video and click-and-drag it down and in the right direction. This will distort and stretch the video to remove that particular portion from there while preserving its overall appearance and quality.

Step 4: You can now preview what your video looks like after cropping it by hitting the “Play” button. Hit play to view any changes you have made to your videos.
Step 5: Hit the “Close” button and save your project.
So, this is how you can edit or remove part of a video clip in Lightworks easily. You can also go for some other online tools which are available on the internet and offer great services at no cost for life time. Many of these tools are free to use, easy to handle and have amazing features that can be used by professionals to get their work done beautifully.
There are many video cropping tools available on the internet which can be used for free. Those who are looking for a free, easy to use video editor can download and use this tool without any hassle. That is why; Filmora is best alternative of Lightworks, which offers free version of simple editing tools with all the features you need for your home videos. The free version of this tool is available for Windows; Mac; and Linux operating systems.
An Easier Way to Crop Video Using Filmora
Filmora Video Editor is an easy to use free video editing software that can be used for cropping videos. It allows users to upload their videos online and create new ones or edit existing ones. The steps involved in cropping videos in Filmora are very easy and to the point so you can follow them without any hassle.
It also comes in two versions; free and paid. The free version has less editing tools than the paid one but offers a good enough range of options for beginners who are not looking to make pro-quality movies just yet.
Filmora (video editor) is a power software that allows you to make the most impressive video clips with few steps. This video editing tool gives users various tools to edit videos. It also offers the user-friendly interface that anyone can use to edit home videos on Windows PC, Mac, and Linux devices.
You can download Filmora free video editor from the official website easily. Just visit the behind the link and click on ‘Download’ to get the installer file. Once you have downloaded it, you need to install Filmora software on your computer to start using it. Or install it using the link below:
For Win 7 or later (64-bit)
For macOS 10.14 or later
Step-by-step on how to crop videos using Filmora?
Step 1: Open a video that you want to edit.

Step 2: Open the Filmora editing tool and select the “Crop and Zoom” icon.

Step 3: Drag the cursor from any corner of your video preview window so as to adjust the size of the crop frame.

Step 4: Once you have adjusted it as per your needs hit the green “OK” button. So, this is how you can add or remove any part of a video clip on Filmora easily.
This free video editing tool offers great features for users and helps them edit home videos without any hassle.
Those who are looking for an easy to use online tool with user-friendly interface and advanced features can go for Wondershare Filmora. It is one of the best video editing software for beginners which will help them edit videos quickly and efficiently.
Step 2: After importing your videos into Lightworks, you can now proceed towards cropping them. For this purpose, click on the video editing tab and select the “DVE” (Dynamic Video Effect) tool.


Step 3: How to crop videos using the DVE tool? You can now go to the ‘Crop’ option under the DVE tab and move your cursor over any unwanted portion of the video and click-and-drag it down and in the right direction. This will distort and stretch the video to remove that particular portion from there while preserving its overall appearance and quality.

Step 4: You can now preview what your video looks like after cropping it by hitting the “Play” button. Hit play to view any changes you have made to your videos.
Step 5: Hit the “Close” button and save your project.
So, this is how you can edit or remove part of a video clip in Lightworks easily. You can also go for some other online tools which are available on the internet and offer great services at no cost for life time. Many of these tools are free to use, easy to handle and have amazing features that can be used by professionals to get their work done beautifully.
There are many video cropping tools available on the internet which can be used for free. Those who are looking for a free, easy to use video editor can download and use this tool without any hassle. That is why; Filmora is best alternative of Lightworks, which offers free version of simple editing tools with all the features you need for your home videos. The free version of this tool is available for Windows; Mac; and Linux operating systems.
An Easier Way to Crop Video Using Filmora
Filmora Video Editor is an easy to use free video editing software that can be used for cropping videos. It allows users to upload their videos online and create new ones or edit existing ones. The steps involved in cropping videos in Filmora are very easy and to the point so you can follow them without any hassle.
It also comes in two versions; free and paid. The free version has less editing tools than the paid one but offers a good enough range of options for beginners who are not looking to make pro-quality movies just yet.
Filmora (video editor) is a power software that allows you to make the most impressive video clips with few steps. This video editing tool gives users various tools to edit videos. It also offers the user-friendly interface that anyone can use to edit home videos on Windows PC, Mac, and Linux devices.
You can download Filmora free video editor from the official website easily. Just visit the behind the link and click on ‘Download’ to get the installer file. Once you have downloaded it, you need to install Filmora software on your computer to start using it. Or install it using the link below:
For Win 7 or later (64-bit)
For macOS 10.14 or later
Step-by-step on how to crop videos using Filmora?
Step 1: Open a video that you want to edit.

Step 2: Open the Filmora editing tool and select the “Crop and Zoom” icon.

Step 3: Drag the cursor from any corner of your video preview window so as to adjust the size of the crop frame.

Step 4: Once you have adjusted it as per your needs hit the green “OK” button. So, this is how you can add or remove any part of a video clip on Filmora easily.
This free video editing tool offers great features for users and helps them edit home videos without any hassle.
Those who are looking for an easy to use online tool with user-friendly interface and advanced features can go for Wondershare Filmora. It is one of the best video editing software for beginners which will help them edit videos quickly and efficiently.
Do You Know that Google Photos App Can Be Used to Edit and Stabilize Shaky Videos? In This Article, I Will Show You a Step by Step Tutorial About How to Use Google Photos to Stabilize Videos
While recording a video, it is pretty normal if you don’t end up having a stabilized clip due to camera shakes or movements on an unstable and unpaved road. This is where the Google stabilizer video editing feature comes into play. You can stabilize a video with the Google Photos app that has a built-in video stabilizer and other editing tools to give a finishing touch to your media files before they are shared online or with family, friends, and/or colleagues.
In this article, we will show you how to use Google Photos as a stabilizer video Google offers to its consumer. In addition, you will also learn about one of the most trusted and efficient third-party tools to stabilize the clips if Google video stabilizer fails to produce quality output.
In this article
01 What is Google Photos and How Does It Work?
02 How to Stabilize Videos with Google Photos on Android and iPhone?
03 How to Stabilize Videos with Google Photos Online?
04 How to Use Google Photos to Edit Video?
Part 1: What is Google Photos and How Does It Work?
Google Photos is an app that can be obtained from Play Store or App Store to be installed on an Android-based smartphone or iPhone or iPad respectively.
The program can store photos and videos from your phone, and ensures that those media files are well-backed up so they can be recovered easily if/when lost due to some mishaps. Furthermore, the tool even lets you edit, customize, and share your photos and videos with ease.
1. History and Current Policies
Earlier, Google Photos used to offer unlimited storage to the users where they can save as many photos as they want, as long as the images were saved in ‘high-quality’ resolution. However, from June 01, 2021, Google changed its policies of using the app, and now the tool offers limited storage. If more space is needed, the users must subscribe to a paid plan.
2. Accessibility
Google Photos can be accessed from a web browser, Google Drive desktop program, and smartphone app. While you can make only minor changes to the videos such as editing date, time, and location when accessing Google Photos via a web browser, the smartphone app allows you to edit the clips comparatively more sophisticatedly.
3. Deletion
The files that are stored in Google Photos remain there for an indefinite duration, of course until the entire space is completely consumed. When you delete something, it is moved to the Trash and stays there for another 60 days, after which it is automatically deleted from the Cloud forever.
Part 2: How to Stabilize Videos with Google Photos on Android and iPhone?
Google Photos is available for both Android and iPhone smartphones, and as explained earlier, the app can be downloaded from Play Store and App Store respectively. Using the built-in Google stabilizer video editor of the Photos app on both platforms is almost identical and extremely easy.
You can learn how to work with Google video stabilizer to stabilize a video by following the steps that are given below:
Step 1: Locate and Open the Source Video in Google Photos
Download and install Google Photos on your smartphone (Samsung Galaxy Note 10+ is used here for illustrations). Launch the app, tap Library from the bottom-right corner of the interface, and tap to open the source video that you want to stabilize with Google video stabilizer.

Step 2: Stabilize the Video
After the video opens in the app and the playback begins, tap Edit from the bottom. On the next screen, ensure that the Video section is selected. Tap the Stabilize icon from the lower-left area of the window, and wait while Google Photos stabilize video.

Step 3: Save the Video
Once the stabilization process is complete, click Save copy from the bottom-right corner to save the modified video as a separate copy, thus leaving the original instance intact.

Part 3: How to Stabilize Videos with Google Photos Online?
Unfortunately, Google Photos doesn’t have many editing options when accessed via a web browser, and therefore, at the time of this writing, you cannot stabilize a video with the tool’s web interface. But if you are using a Windows or Mac computer, you can try some free online video stabilization software , or use Wondershare Filmora video editor to stabilize video with one click.
For Win 7 or later (64-bit)
For macOS 10.12 or later
Wondershare Filmora video editor is available for Windows and Mac platforms, and gives a tough competition to other industry-standard video editing applications like Final Cut Pro X and Adobe Premiere Pro, etc. You can learn how to stabilize a clip with Filmora instead of using Google stabilizer video editor by following the step-by-step instructions that are explained below:
Step 1: Add the Source Video to the Timeline
After downloading and installing Wondershare Filmora on your Mac or Windows computer (a Windows 11 PC is used here for illustrations), launch the program, and click the New Project tile from the first screen that appears.

When on the main interface, ensure that Media is selected from the standard toolbar at the top, and click anywhere inside the Media window that is present at the upper-left corner. Next, locate, select, and import the source video from your PC that you want to stabilize.

Now, drag and drop the video to the timeline, or hover the mouse over the clip’s thumbnail in the Media window, click the + icon from the bottom-right area. Click the button under the Match to Media or Keep Project Settings label when the confirmation box comes up to add the film to the Timeline using the preferences that you selected.

Step 2: Stabilize the Video
Double click the video in the timeline, and then enable the Stabilization category under video editing pane. Wait while Filmora video editor stabilizes the video without Google video stabilizer. Click OK when done.

Step 3: Export the Stabilized Video
Back on the main interface, click Export from the center-top. On the Export box that opens up next, go to your preferred tab, pick an output format, define output preferences, and click Export from the bottom-right corner to export the stabilized clip without even using Google stabilizer video.

Part 4: How to Use Google Photos to Edit Video?
Google Photos doesn’t only work as a Google video stabilizer app but it also enables you to edit your media clips much more professionally. Some post-production tasks that you can perform while using Google Photos include:
1. Trimming
The trimming handles can be seen when you are on the ‘Video’ section after tapping ‘Edit’ in Google Photos after opening the video. You can drag these handles inwards to get rid of the unwanted starting and ending parts of a clip.

2. Cropping
The ‘Crop’ section enables you to crop the videos in a particular aspect ratio that can be selected from the available list, or drag the handles manually to get custom results.

3. Rotating
The ‘Crop’ section also has an option to rotate the video. Each time you tap the ‘Rotate’ icon, the screen rotates 90o in the counterclockwise direction.

4. Color Correction
The ‘Adjust’ section allows you to adjust the display of a video such as its brightness, contrast, shadows, etc.

5. Filters
You can even add a filter using the presets available in the ‘Filters’ section.

6. Annotations
The ‘Markup’ section enables you to annotate the video. You can either use the ‘Pen’ tool or ‘Highlighter’ to write text on the video or give the screen a different shade respectively.

Depending on the type of modifications you want in your video, you can use Google Photos to get the job done easily and quickly.
Conclusion
Google video stabilizer is a built-in tool in Google Photos. Google Photos can be obtained from Play Store or App Store for your Android or iOS smart devices respectively. In addition to stabilizing your videos, Google Photos app also enables you to make other modifications such as trimming, cropping, applying filters, and much more.
02 How to Stabilize Videos with Google Photos on Android and iPhone?
03 How to Stabilize Videos with Google Photos Online?
04 How to Use Google Photos to Edit Video?
Part 1: What is Google Photos and How Does It Work?
Google Photos is an app that can be obtained from Play Store or App Store to be installed on an Android-based smartphone or iPhone or iPad respectively.
The program can store photos and videos from your phone, and ensures that those media files are well-backed up so they can be recovered easily if/when lost due to some mishaps. Furthermore, the tool even lets you edit, customize, and share your photos and videos with ease.
1. History and Current Policies
Earlier, Google Photos used to offer unlimited storage to the users where they can save as many photos as they want, as long as the images were saved in ‘high-quality’ resolution. However, from June 01, 2021, Google changed its policies of using the app, and now the tool offers limited storage. If more space is needed, the users must subscribe to a paid plan.
2. Accessibility
Google Photos can be accessed from a web browser, Google Drive desktop program, and smartphone app. While you can make only minor changes to the videos such as editing date, time, and location when accessing Google Photos via a web browser, the smartphone app allows you to edit the clips comparatively more sophisticatedly.
3. Deletion
The files that are stored in Google Photos remain there for an indefinite duration, of course until the entire space is completely consumed. When you delete something, it is moved to the Trash and stays there for another 60 days, after which it is automatically deleted from the Cloud forever.
Part 2: How to Stabilize Videos with Google Photos on Android and iPhone?
Google Photos is available for both Android and iPhone smartphones, and as explained earlier, the app can be downloaded from Play Store and App Store respectively. Using the built-in Google stabilizer video editor of the Photos app on both platforms is almost identical and extremely easy.
You can learn how to work with Google video stabilizer to stabilize a video by following the steps that are given below:
Step 1: Locate and Open the Source Video in Google Photos
Download and install Google Photos on your smartphone (Samsung Galaxy Note 10+ is used here for illustrations). Launch the app, tap Library from the bottom-right corner of the interface, and tap to open the source video that you want to stabilize with Google video stabilizer.

Step 2: Stabilize the Video
After the video opens in the app and the playback begins, tap Edit from the bottom. On the next screen, ensure that the Video section is selected. Tap the Stabilize icon from the lower-left area of the window, and wait while Google Photos stabilize video.

Step 3: Save the Video
Once the stabilization process is complete, click Save copy from the bottom-right corner to save the modified video as a separate copy, thus leaving the original instance intact.

Part 3: How to Stabilize Videos with Google Photos Online?
Unfortunately, Google Photos doesn’t have many editing options when accessed via a web browser, and therefore, at the time of this writing, you cannot stabilize a video with the tool’s web interface. But if you are using a Windows or Mac computer, you can try some free online video stabilization software , or use Wondershare Filmora video editor to stabilize video with one click.
For Win 7 or later (64-bit)
For macOS 10.12 or later
Wondershare Filmora video editor is available for Windows and Mac platforms, and gives a tough competition to other industry-standard video editing applications like Final Cut Pro X and Adobe Premiere Pro, etc. You can learn how to stabilize a clip with Filmora instead of using Google stabilizer video editor by following the step-by-step instructions that are explained below:
Step 1: Add the Source Video to the Timeline
After downloading and installing Wondershare Filmora on your Mac or Windows computer (a Windows 11 PC is used here for illustrations), launch the program, and click the New Project tile from the first screen that appears.

When on the main interface, ensure that Media is selected from the standard toolbar at the top, and click anywhere inside the Media window that is present at the upper-left corner. Next, locate, select, and import the source video from your PC that you want to stabilize.

Now, drag and drop the video to the timeline, or hover the mouse over the clip’s thumbnail in the Media window, click the + icon from the bottom-right area. Click the button under the Match to Media or Keep Project Settings label when the confirmation box comes up to add the film to the Timeline using the preferences that you selected.

Step 2: Stabilize the Video
Double click the video in the timeline, and then enable the Stabilization category under video editing pane. Wait while Filmora video editor stabilizes the video without Google video stabilizer. Click OK when done.

Step 3: Export the Stabilized Video
Back on the main interface, click Export from the center-top. On the Export box that opens up next, go to your preferred tab, pick an output format, define output preferences, and click Export from the bottom-right corner to export the stabilized clip without even using Google stabilizer video.

Part 4: How to Use Google Photos to Edit Video?
Google Photos doesn’t only work as a Google video stabilizer app but it also enables you to edit your media clips much more professionally. Some post-production tasks that you can perform while using Google Photos include:
1. Trimming
The trimming handles can be seen when you are on the ‘Video’ section after tapping ‘Edit’ in Google Photos after opening the video. You can drag these handles inwards to get rid of the unwanted starting and ending parts of a clip.

2. Cropping
The ‘Crop’ section enables you to crop the videos in a particular aspect ratio that can be selected from the available list, or drag the handles manually to get custom results.

3. Rotating
The ‘Crop’ section also has an option to rotate the video. Each time you tap the ‘Rotate’ icon, the screen rotates 90o in the counterclockwise direction.

4. Color Correction
The ‘Adjust’ section allows you to adjust the display of a video such as its brightness, contrast, shadows, etc.

5. Filters
You can even add a filter using the presets available in the ‘Filters’ section.

6. Annotations
The ‘Markup’ section enables you to annotate the video. You can either use the ‘Pen’ tool or ‘Highlighter’ to write text on the video or give the screen a different shade respectively.

Depending on the type of modifications you want in your video, you can use Google Photos to get the job done easily and quickly.
Conclusion
Google video stabilizer is a built-in tool in Google Photos. Google Photos can be obtained from Play Store or App Store for your Android or iOS smart devices respectively. In addition to stabilizing your videos, Google Photos app also enables you to make other modifications such as trimming, cropping, applying filters, and much more.
02 How to Stabilize Videos with Google Photos on Android and iPhone?
03 How to Stabilize Videos with Google Photos Online?
04 How to Use Google Photos to Edit Video?
Part 1: What is Google Photos and How Does It Work?
Google Photos is an app that can be obtained from Play Store or App Store to be installed on an Android-based smartphone or iPhone or iPad respectively.
The program can store photos and videos from your phone, and ensures that those media files are well-backed up so they can be recovered easily if/when lost due to some mishaps. Furthermore, the tool even lets you edit, customize, and share your photos and videos with ease.
1. History and Current Policies
Earlier, Google Photos used to offer unlimited storage to the users where they can save as many photos as they want, as long as the images were saved in ‘high-quality’ resolution. However, from June 01, 2021, Google changed its policies of using the app, and now the tool offers limited storage. If more space is needed, the users must subscribe to a paid plan.
2. Accessibility
Google Photos can be accessed from a web browser, Google Drive desktop program, and smartphone app. While you can make only minor changes to the videos such as editing date, time, and location when accessing Google Photos via a web browser, the smartphone app allows you to edit the clips comparatively more sophisticatedly.
3. Deletion
The files that are stored in Google Photos remain there for an indefinite duration, of course until the entire space is completely consumed. When you delete something, it is moved to the Trash and stays there for another 60 days, after which it is automatically deleted from the Cloud forever.
Part 2: How to Stabilize Videos with Google Photos on Android and iPhone?
Google Photos is available for both Android and iPhone smartphones, and as explained earlier, the app can be downloaded from Play Store and App Store respectively. Using the built-in Google stabilizer video editor of the Photos app on both platforms is almost identical and extremely easy.
You can learn how to work with Google video stabilizer to stabilize a video by following the steps that are given below:
Step 1: Locate and Open the Source Video in Google Photos
Download and install Google Photos on your smartphone (Samsung Galaxy Note 10+ is used here for illustrations). Launch the app, tap Library from the bottom-right corner of the interface, and tap to open the source video that you want to stabilize with Google video stabilizer.

Step 2: Stabilize the Video
After the video opens in the app and the playback begins, tap Edit from the bottom. On the next screen, ensure that the Video section is selected. Tap the Stabilize icon from the lower-left area of the window, and wait while Google Photos stabilize video.

Step 3: Save the Video
Once the stabilization process is complete, click Save copy from the bottom-right corner to save the modified video as a separate copy, thus leaving the original instance intact.

Part 3: How to Stabilize Videos with Google Photos Online?
Unfortunately, Google Photos doesn’t have many editing options when accessed via a web browser, and therefore, at the time of this writing, you cannot stabilize a video with the tool’s web interface. But if you are using a Windows or Mac computer, you can try some free online video stabilization software , or use Wondershare Filmora video editor to stabilize video with one click.
For Win 7 or later (64-bit)
For macOS 10.12 or later
Wondershare Filmora video editor is available for Windows and Mac platforms, and gives a tough competition to other industry-standard video editing applications like Final Cut Pro X and Adobe Premiere Pro, etc. You can learn how to stabilize a clip with Filmora instead of using Google stabilizer video editor by following the step-by-step instructions that are explained below:
Step 1: Add the Source Video to the Timeline
After downloading and installing Wondershare Filmora on your Mac or Windows computer (a Windows 11 PC is used here for illustrations), launch the program, and click the New Project tile from the first screen that appears.

When on the main interface, ensure that Media is selected from the standard toolbar at the top, and click anywhere inside the Media window that is present at the upper-left corner. Next, locate, select, and import the source video from your PC that you want to stabilize.

Now, drag and drop the video to the timeline, or hover the mouse over the clip’s thumbnail in the Media window, click the + icon from the bottom-right area. Click the button under the Match to Media or Keep Project Settings label when the confirmation box comes up to add the film to the Timeline using the preferences that you selected.

Step 2: Stabilize the Video
Double click the video in the timeline, and then enable the Stabilization category under video editing pane. Wait while Filmora video editor stabilizes the video without Google video stabilizer. Click OK when done.

Step 3: Export the Stabilized Video
Back on the main interface, click Export from the center-top. On the Export box that opens up next, go to your preferred tab, pick an output format, define output preferences, and click Export from the bottom-right corner to export the stabilized clip without even using Google stabilizer video.

Part 4: How to Use Google Photos to Edit Video?
Google Photos doesn’t only work as a Google video stabilizer app but it also enables you to edit your media clips much more professionally. Some post-production tasks that you can perform while using Google Photos include:
1. Trimming
The trimming handles can be seen when you are on the ‘Video’ section after tapping ‘Edit’ in Google Photos after opening the video. You can drag these handles inwards to get rid of the unwanted starting and ending parts of a clip.

2. Cropping
The ‘Crop’ section enables you to crop the videos in a particular aspect ratio that can be selected from the available list, or drag the handles manually to get custom results.

3. Rotating
The ‘Crop’ section also has an option to rotate the video. Each time you tap the ‘Rotate’ icon, the screen rotates 90o in the counterclockwise direction.

4. Color Correction
The ‘Adjust’ section allows you to adjust the display of a video such as its brightness, contrast, shadows, etc.

5. Filters
You can even add a filter using the presets available in the ‘Filters’ section.

6. Annotations
The ‘Markup’ section enables you to annotate the video. You can either use the ‘Pen’ tool or ‘Highlighter’ to write text on the video or give the screen a different shade respectively.

Depending on the type of modifications you want in your video, you can use Google Photos to get the job done easily and quickly.
Conclusion
Google video stabilizer is a built-in tool in Google Photos. Google Photos can be obtained from Play Store or App Store for your Android or iOS smart devices respectively. In addition to stabilizing your videos, Google Photos app also enables you to make other modifications such as trimming, cropping, applying filters, and much more.
02 How to Stabilize Videos with Google Photos on Android and iPhone?
03 How to Stabilize Videos with Google Photos Online?
04 How to Use Google Photos to Edit Video?
Part 1: What is Google Photos and How Does It Work?
Google Photos is an app that can be obtained from Play Store or App Store to be installed on an Android-based smartphone or iPhone or iPad respectively.
The program can store photos and videos from your phone, and ensures that those media files are well-backed up so they can be recovered easily if/when lost due to some mishaps. Furthermore, the tool even lets you edit, customize, and share your photos and videos with ease.
1. History and Current Policies
Earlier, Google Photos used to offer unlimited storage to the users where they can save as many photos as they want, as long as the images were saved in ‘high-quality’ resolution. However, from June 01, 2021, Google changed its policies of using the app, and now the tool offers limited storage. If more space is needed, the users must subscribe to a paid plan.
2. Accessibility
Google Photos can be accessed from a web browser, Google Drive desktop program, and smartphone app. While you can make only minor changes to the videos such as editing date, time, and location when accessing Google Photos via a web browser, the smartphone app allows you to edit the clips comparatively more sophisticatedly.
3. Deletion
The files that are stored in Google Photos remain there for an indefinite duration, of course until the entire space is completely consumed. When you delete something, it is moved to the Trash and stays there for another 60 days, after which it is automatically deleted from the Cloud forever.
Part 2: How to Stabilize Videos with Google Photos on Android and iPhone?
Google Photos is available for both Android and iPhone smartphones, and as explained earlier, the app can be downloaded from Play Store and App Store respectively. Using the built-in Google stabilizer video editor of the Photos app on both platforms is almost identical and extremely easy.
You can learn how to work with Google video stabilizer to stabilize a video by following the steps that are given below:
Step 1: Locate and Open the Source Video in Google Photos
Download and install Google Photos on your smartphone (Samsung Galaxy Note 10+ is used here for illustrations). Launch the app, tap Library from the bottom-right corner of the interface, and tap to open the source video that you want to stabilize with Google video stabilizer.

Step 2: Stabilize the Video
After the video opens in the app and the playback begins, tap Edit from the bottom. On the next screen, ensure that the Video section is selected. Tap the Stabilize icon from the lower-left area of the window, and wait while Google Photos stabilize video.

Step 3: Save the Video
Once the stabilization process is complete, click Save copy from the bottom-right corner to save the modified video as a separate copy, thus leaving the original instance intact.

Part 3: How to Stabilize Videos with Google Photos Online?
Unfortunately, Google Photos doesn’t have many editing options when accessed via a web browser, and therefore, at the time of this writing, you cannot stabilize a video with the tool’s web interface. But if you are using a Windows or Mac computer, you can try some free online video stabilization software , or use Wondershare Filmora video editor to stabilize video with one click.
For Win 7 or later (64-bit)
For macOS 10.12 or later
Wondershare Filmora video editor is available for Windows and Mac platforms, and gives a tough competition to other industry-standard video editing applications like Final Cut Pro X and Adobe Premiere Pro, etc. You can learn how to stabilize a clip with Filmora instead of using Google stabilizer video editor by following the step-by-step instructions that are explained below:
Step 1: Add the Source Video to the Timeline
After downloading and installing Wondershare Filmora on your Mac or Windows computer (a Windows 11 PC is used here for illustrations), launch the program, and click the New Project tile from the first screen that appears.

When on the main interface, ensure that Media is selected from the standard toolbar at the top, and click anywhere inside the Media window that is present at the upper-left corner. Next, locate, select, and import the source video from your PC that you want to stabilize.

Now, drag and drop the video to the timeline, or hover the mouse over the clip’s thumbnail in the Media window, click the + icon from the bottom-right area. Click the button under the Match to Media or Keep Project Settings label when the confirmation box comes up to add the film to the Timeline using the preferences that you selected.

Step 2: Stabilize the Video
Double click the video in the timeline, and then enable the Stabilization category under video editing pane. Wait while Filmora video editor stabilizes the video without Google video stabilizer. Click OK when done.

Step 3: Export the Stabilized Video
Back on the main interface, click Export from the center-top. On the Export box that opens up next, go to your preferred tab, pick an output format, define output preferences, and click Export from the bottom-right corner to export the stabilized clip without even using Google stabilizer video.

Part 4: How to Use Google Photos to Edit Video?
Google Photos doesn’t only work as a Google video stabilizer app but it also enables you to edit your media clips much more professionally. Some post-production tasks that you can perform while using Google Photos include:
1. Trimming
The trimming handles can be seen when you are on the ‘Video’ section after tapping ‘Edit’ in Google Photos after opening the video. You can drag these handles inwards to get rid of the unwanted starting and ending parts of a clip.

2. Cropping
The ‘Crop’ section enables you to crop the videos in a particular aspect ratio that can be selected from the available list, or drag the handles manually to get custom results.

3. Rotating
The ‘Crop’ section also has an option to rotate the video. Each time you tap the ‘Rotate’ icon, the screen rotates 90o in the counterclockwise direction.

4. Color Correction
The ‘Adjust’ section allows you to adjust the display of a video such as its brightness, contrast, shadows, etc.

5. Filters
You can even add a filter using the presets available in the ‘Filters’ section.

6. Annotations
The ‘Markup’ section enables you to annotate the video. You can either use the ‘Pen’ tool or ‘Highlighter’ to write text on the video or give the screen a different shade respectively.

Depending on the type of modifications you want in your video, you can use Google Photos to get the job done easily and quickly.
Conclusion
Google video stabilizer is a built-in tool in Google Photos. Google Photos can be obtained from Play Store or App Store for your Android or iOS smart devices respectively. In addition to stabilizing your videos, Google Photos app also enables you to make other modifications such as trimming, cropping, applying filters, and much more.
Also read:
- Updated Discover the Art of Masking in After Effects A Comprehensive Guide for 2024
- 3 Best Effects to Appear on Camera Made with Filmora
- How to Split Videos - 33 Best Video Splitter Recommend
- In 2024, How to Create After Effects Gifs
- In 2024, 8 Ways To Live Stream Pre-Recorded Video
- Updated In 2024, 100 Workable How to Mask Track with Adobe Premiere Pro
- In 2024, Beginners Guide About WMV Format and Best WMV Video Editor
- In 2024, Find Out What Track Mattes Are in After Effects and Learn How to Find and Use It with Simple and Easy-to-Follow Instructions
- How to Create a Glitch Text Effect?
- New IMovie Review – Is It The Best Video Editor for Mac Users?
- Updated 2024 Approved How to Speed Up and Slow Down a Video
- New 2024 Approved Learning The Details Of How To Replace Sky in Lightroom
- Updated In 2024, Everything That You Need to Know About Video Montages- Ideas, Techniques, and Software
- 2024 Approved How to Make Eye Zoom Transition Effect with Filmora
- New How to Add Filter to Video in Premiere Pro for 2024
- Have You Tried Using a Craig Bot on Discord to Record Audio? Do You Have an Idea of Using a Discord Craig Bot Is Safe? Get Answers to These Questions and More From This Article as You Continue Reading
- Updated 2024 Approved Progressive Solutions to Add VHS Effects to Video with Ease
- How to Bypass Activation Lock on Apple iPhone XS Max or iPad?
- In 2024, Best 3 Software to Transfer Files to/from Your Xiaomi Redmi Note 12 Pro+ 5G via a USB Cable | Dr.fone
- Guide How To Unbrick a Bricked Google Pixel 7a Phone | Dr.fone
- How To Bypass OnePlus Ace 2 Pro FRP In 3 Different Ways
- Bricked Your Infinix Smart 8 Pro? Heres A Full Solution | Dr.fone
- Three Ways to Sim Unlock Xiaomi Redmi Note 12 Pro+ 5G
- Your Account Has Been Disabled in the App Store and iTunes From iPhone 12 Pro?
- How to Fix My Oppo A59 5G Location Is Wrong | Dr.fone
- How to Fix It Xiaomi Mix Fold 3 Wont Turn On | Dr.fone
- How to Transfer Videos from Oppo Find N3 to iPad | Dr.fone
- Title: New How to Create Loop Videos Using Filmora
- Author: Chloe
- Created at : 2024-05-20 03:38:07
- Updated at : 2024-05-21 03:38:07
- Link: https://ai-editing-video.techidaily.com/new-how-to-create-loop-videos-using-filmora/
- License: This work is licensed under CC BY-NC-SA 4.0.

