
New How To Create Quiz Videos Detailed Guide

How To Create Quiz Videos: Detailed Guide
Quiz videos are becoming popular on YouTube but creating good content takes work. You’ll have to spend time on it, find the right questions and spend resources on powerful video editing software. In this guide, we’ll show you what a quiz video is, its advantages, and how you can use Filmora to make interactive video quizzes.
So, what are you waiting for? Read on to learn how to create quiz videos for Youtube!
Part 1. What Is A Quiz Video?
A quiz video is a type of content that provides viewers with a series of questions that are typically about a particular topic or subject matter and may also provide additional information about the topic. You can use the video for various purposes, including educational, entertainment, and marketing.

To make an appealing video quiz, you have to look at it from various angles, such as its purpose, type, and relevancy.
Moreover, a well-made quiz video will demand the viewer’s attention and encourage them to take action without being intrusive or annoying. One of the best ways is to provide visual captions that can explain the point being made in an engaging, fast-paced, and entertaining way.
Part 2. What Are The Advantages Of A Quiz And How To Use It?
Quizzing is a great way to engage your audience and encourage them to interact with your content. They can be used to create thought-provoking content, impart knowledge, and improve learning outcomes.
When used correctly, a quiz can be a powerful learning tool. But how do you use it effectively? And what are some of the advantages?
To answer these questions, we’ve provided some advantages of creating video quizzes and some scenarios where you can use them.
Advantages
Here are some advantages of video quizzes:
Draw Attention
A quiz can draw the viewer’s attention to the topic under discussion. Specifically, if you are a teacher, you can use GK question videos in your classroom to emphasize the content you are teaching and can better assess your students’ knowledge.
Increase Interactivity
Quizzes are a great way to increase engagement and interaction with your audience. By incorporating video into your questions, you can add an element of excitement and increase the likelihood that people will want to participate.

A Good Way To Introduce A Topic
Quizzes are an excellent way to introduce a new topic or subject matter. They can help you provide context and background information to help people understand the concepts you’re trying to teach or introduce.
Increase One’s Impressions Of Your Content
By adding a quiz, you can increase the time that someone spends on your page or channel as they work to answer the questions. This is valuable because it allows you to introduce a new topic in a fun and interactive way, along with getting more impressions on your content.
Scene
Here are some scenes where you can use the quizzes:
Educational
You can use quizzes in any educational setting, such as a classroom, online course, or YouTube video, to provide knowledge to others and assess their understanding.
Speech
Quizzes can also be used in speeches to add interest and engagement. For instance, a motivational speaker can play a quiz during their talks to the audience to help them understand his point better and get their response.
Presentation
Adding a fun quiz to your presentation can help to break the monotony and keep your audience engaged throughout the session.
Social media
Quizzes can aid in generating engagement on your social media page. For example, you can use them to drive traffic to your website or blog or simply to get people talking about your brand.
Part 3. How To Make An Interactive Quiz Video In Filmora?
Suppose the above advantages have compelled you to create an interactive quiz video to engage your audience and get them involved in your content. In that case, you can use Filmora software which makes it easy to make quiz videos with its built-in interactive video editing tools.
Here’s how you can make an interactive quiz video using Filmora :
Free Download For Win 7 or later(64-bit)
Free Download For macOS 10.14 or later
Step1 Upload Your Materials
In the first step, it is essential that you complete in-depth research and find reliable information for your quiz video. Afterward, go to the Filmora website and download the software that is compatible with your system. Install the program on your PC/laptop and launch it.
On the homepage, select the “Create New Project” option, and choose “Click here to upload a media file” to upload your video. Alternatively, you can drag and drop the background video from your system to the Filmora interface.
Finally, drag and drop the background video into the timeline.

Step2 Make An Intro
Now, start by creating an introduction. You can do this by opening the “Media” tab, selecting a template, and dropping it in the timeline once it is downloaded.
Then, go to the “Titles” tab, choose a text style you like, and drop it in the timeline. Finally, align both the template and your video file.
To add text to your intro, click on the text track in the timeline. Enter the intro text, ideally the quiz topic, then customize the text color and style as desired. The Advanced option also lets you animate your text. Save the changes by clicking “OK.”
Step3 Add A Quiz To The Timeline
Next, add the GK questions and answers to your video using the “Titles” tab. You should adjust the display time and text on the timeline as needed.

Step4 Increase Interactivity In Your Quiz Video
To make your video more engaging, go to the “Transition” tab and add an interesting transition effect. You can also add effects or countdown elements between questions or reveal the answer.
Step5 Repeat The Process And Export Your Final Video
After completing the previous steps, you can now create the entire quiz video by repeating the above steps.
Once you are done, click the “Play” icon to preview your work, and select the “Export” icon to either save the clip to your device or upload it directly to your YouTube channel.
Conclusion
In this detailed guide, we’ve explored what a video quiz is, its advantages, and scenes where you can use them. We’ve also walked you through the step-by-step process of making an interactive video quiz using the Wondershare Filmora software.
Hopefully, you’ve enjoyed reading this article and can now create quiz videos for your presentation, classroom, or YouTube videos.
Free Download For macOS 10.14 or later
Step1 Upload Your Materials
In the first step, it is essential that you complete in-depth research and find reliable information for your quiz video. Afterward, go to the Filmora website and download the software that is compatible with your system. Install the program on your PC/laptop and launch it.
On the homepage, select the “Create New Project” option, and choose “Click here to upload a media file” to upload your video. Alternatively, you can drag and drop the background video from your system to the Filmora interface.
Finally, drag and drop the background video into the timeline.

Step2 Make An Intro
Now, start by creating an introduction. You can do this by opening the “Media” tab, selecting a template, and dropping it in the timeline once it is downloaded.
Then, go to the “Titles” tab, choose a text style you like, and drop it in the timeline. Finally, align both the template and your video file.
To add text to your intro, click on the text track in the timeline. Enter the intro text, ideally the quiz topic, then customize the text color and style as desired. The Advanced option also lets you animate your text. Save the changes by clicking “OK.”
Step3 Add A Quiz To The Timeline
Next, add the GK questions and answers to your video using the “Titles” tab. You should adjust the display time and text on the timeline as needed.

Step4 Increase Interactivity In Your Quiz Video
To make your video more engaging, go to the “Transition” tab and add an interesting transition effect. You can also add effects or countdown elements between questions or reveal the answer.
Step5 Repeat The Process And Export Your Final Video
After completing the previous steps, you can now create the entire quiz video by repeating the above steps.
Once you are done, click the “Play” icon to preview your work, and select the “Export” icon to either save the clip to your device or upload it directly to your YouTube channel.
Conclusion
In this detailed guide, we’ve explored what a video quiz is, its advantages, and scenes where you can use them. We’ve also walked you through the step-by-step process of making an interactive video quiz using the Wondershare Filmora software.
Hopefully, you’ve enjoyed reading this article and can now create quiz videos for your presentation, classroom, or YouTube videos.
Frame Blending Is a Great Way to Smooth Out Your Video Footage in Adobe Premiere Pro. Using This Technique, You Can Create a More Natural Looking Motion by Averaging Out the Frames in Your Clips
Create High-Quality Video - Wondershare Filmora
An easy and powerful YouTube video editor
Numerous video and audio effects to choose from
Detailed tutorials are provided by the official channel
Frame blending is a video editing technique used to create smooth transitions between two video frames. This process is often used to create special effects or transition between two different video clips. Frame blending can be done manually or with the help of software.
When frame blending is done manually, the editor will take two consecutive frames and blend them. This is done by using a process called cross-fading. Cross-fading is when the first frame gradually fades out while the second frame gradually fades in. The result is a seamless transition between the two frames.
Frame blending can also be done with the help of software. Many software programs offer frame blending capabilities Like Adobe Premiere Pro and more. These software programs typically have a user interface that allows the user to select the two frames that they want to blend. The software will then perform the cross-fading process automatically.

In this article
01 What is frame blending in Premiere Pro?
02 How to Choose from Frame Blending/ Frame Sampling/ Optical Flow
03 How to use Frame Blanding in Adobe Premiere Pro?
What is frame blending in Premiere Pro?
In Adobe Premiere Pro, frame blending is a built-in feature that can be used to create smooth transitions between two video frames. This feature can be accessed by selecting the “Effects” tab and choosing the “Frame Blending” option.
When using frame blending in Premiere Pro, the user will first need to select the two frames they want to blend. The user can then specify the amount of cross-fade they want to apply. The software will then automatically perform the frame blending process.

How to Choose from Frame Blending/ Frame Sampling/ Optical Flow
The different types of frame blending are:
- Frame Sampling: best for smooth movements, no image distortion.
- Optical Flow: smoother results but can cause image distortion.
- Frame Blending: a mix of the two, some image distortion but smoother results.
So, choosing which type of frame blending to use depends on the footage and the desired results. If you want smooth results with no image distortion, frame sampling is the best option. However, if you don’t mind some image distortion in exchange for smoother results, optical flow or frame blending would be better choices.
How to decide which option is the best for your use? Let’s explain more, and It depends on the footage and the desired results. If you want smooth results with no image distortion, frame sampling is the best option. However, if you don’t mind some image distortion in exchange for smoother results, optical flow or frame blending would be better choices.

How to use Frame Blanding in Adobe Premiere Pro?
Step 1\
Using frame blending in Adobe Premiere Pro is a simple process. First, the user will need to select the two frames that they want to blend. The user can then specify the amount of cross-fade they want to apply. The software will then automatically perform the frame blending process.
Open up Adobe Premiere Pro and load the two frames that you want to blend to get started. Once the frames are loaded, select the “Effects” tab and then choose the “Frame Blending” option.
Step 2\
Next, select the two frames that you want to blend. You can perform this by clicking on the first frame and then holding down the “Shift” key while clicking on the second frame.
Once the two frames are selected, specify the amount of cross-fade that you want to apply. You can do this by adjusting the “Crossfade Duration” slider. The software will then automatically perform the frame blending process.

Frame blending is a simple and effective way to create smooth transitions between two video frames. This technique can create a variety of different effects, such as dissolves, fades, and more. Frame blending is a built-in feature in Adobe Premiere Pro and can be accessed by selecting the “Effects” tab and then choosing the “Frame Blending” option. To use frame blending, simply select the two frames you want to blend and specify the amount of cross-fade you want to apply. The software will then automatically perform the frame blending process.
You can also consider Filmora for Blending Frame
Filmora is a video editing software that allows you to create, edit, and export videos. The software includes various features, such as the ability to add text, transitions, and effects. You can also use Filmora to create titles, lower thirds, etc.
How to use Filmora?
To use Filmora, simply load the video you want to edit and make the changes you want. Once you’re happy with the results, export the video, and it will be saved in the format of your choice.
How to use Frame Blending in Filmora?
There are things to keep in mind when using frame blending in Filmora.
First, the software only supports AVI and WMV files. Second, the frame blending feature is only available in the paid version of the software. Lastly, frame blending can only be used on two video frames at a time.
The video is made up of distinct layers blended together to create a unique and appealing look. There is a craft of making a running frame out of more than one video or picture. Even though the technique is considerably older, and individuals undertake it with much work, it has recently become simpler. We now have the easier method of combining two or more clips in a single frame, which we term Blend Modes.

How to composite with blending modes?
- Choose the videos and effects that you wish to overlay.
- Double-click the overlay clip on the timeline to view and adjust the video options for the split-screen effect.
- Go to the Compositing section and choose Blending Mode from the drop-down menu to apply an effect. Select Screen from the drop-down menu if you’d like to overlay an effect over a video.
Frame blending is a simple and effective way to create smooth transitions between two video frames. This technique can create a variety of different effects, such as dissolves, fades, and more. Frame blending is a built-in feature in Filmora and can be accessed by loading the video you want to edit and then making the changes you want. Once you’re happy with the results, export the video, and it will be saved in the format of your choice.
Advance features in Filmora 11
The latest version of Filmora (11.2.1) includes several new and improved features, such as:
- The ability to add textured background images
- An updated user interface
- A wider variety of title templates
- More video and audio effects
- Improved performance and stability
Filmora is a good choice for video editors who want to do more with their software. The program contains all of the essential functions of a video editor, such as the ability to add text, transitions, and effects. In addition, Filmora also includes some more advanced features, such as the ability to add textured background images and the ability to create titles, lower thirds, and more.
For Win 7 or later (64-bit)
For macOS 10.12 or later
Conclusion
● Frame blending is a simple and effective way to create smooth transitions between two video frames. This technique can be used to create a variety of different effects, such as dissolves, fades, and more. Frame blending is a built-in feature in Filmora and can be accessed by loading the video you want to edit and then making the changes you want. Once you’re happy with the results, export the video, and it will be saved in the format of your choice.
Frame blending is a video editing technique used to create smooth transitions between two video frames. This process is often used to create special effects or transition between two different video clips. Frame blending can be done manually or with the help of software.
When frame blending is done manually, the editor will take two consecutive frames and blend them. This is done by using a process called cross-fading. Cross-fading is when the first frame gradually fades out while the second frame gradually fades in. The result is a seamless transition between the two frames.
Frame blending can also be done with the help of software. Many software programs offer frame blending capabilities Like Adobe Premiere Pro and more. These software programs typically have a user interface that allows the user to select the two frames that they want to blend. The software will then perform the cross-fading process automatically.

In this article
01 What is frame blending in Premiere Pro?
02 How to Choose from Frame Blending/ Frame Sampling/ Optical Flow
03 How to use Frame Blanding in Adobe Premiere Pro?
What is frame blending in Premiere Pro?
In Adobe Premiere Pro, frame blending is a built-in feature that can be used to create smooth transitions between two video frames. This feature can be accessed by selecting the “Effects” tab and choosing the “Frame Blending” option.
When using frame blending in Premiere Pro, the user will first need to select the two frames they want to blend. The user can then specify the amount of cross-fade they want to apply. The software will then automatically perform the frame blending process.

How to Choose from Frame Blending/ Frame Sampling/ Optical Flow
The different types of frame blending are:
- Frame Sampling: best for smooth movements, no image distortion.
- Optical Flow: smoother results but can cause image distortion.
- Frame Blending: a mix of the two, some image distortion but smoother results.
So, choosing which type of frame blending to use depends on the footage and the desired results. If you want smooth results with no image distortion, frame sampling is the best option. However, if you don’t mind some image distortion in exchange for smoother results, optical flow or frame blending would be better choices.
How to decide which option is the best for your use? Let’s explain more, and It depends on the footage and the desired results. If you want smooth results with no image distortion, frame sampling is the best option. However, if you don’t mind some image distortion in exchange for smoother results, optical flow or frame blending would be better choices.

How to use Frame Blanding in Adobe Premiere Pro?
Step 1\
Using frame blending in Adobe Premiere Pro is a simple process. First, the user will need to select the two frames that they want to blend. The user can then specify the amount of cross-fade they want to apply. The software will then automatically perform the frame blending process.
Open up Adobe Premiere Pro and load the two frames that you want to blend to get started. Once the frames are loaded, select the “Effects” tab and then choose the “Frame Blending” option.
Step 2\
Next, select the two frames that you want to blend. You can perform this by clicking on the first frame and then holding down the “Shift” key while clicking on the second frame.
Once the two frames are selected, specify the amount of cross-fade that you want to apply. You can do this by adjusting the “Crossfade Duration” slider. The software will then automatically perform the frame blending process.

Frame blending is a simple and effective way to create smooth transitions between two video frames. This technique can create a variety of different effects, such as dissolves, fades, and more. Frame blending is a built-in feature in Adobe Premiere Pro and can be accessed by selecting the “Effects” tab and then choosing the “Frame Blending” option. To use frame blending, simply select the two frames you want to blend and specify the amount of cross-fade you want to apply. The software will then automatically perform the frame blending process.
You can also consider Filmora for Blending Frame
Filmora is a video editing software that allows you to create, edit, and export videos. The software includes various features, such as the ability to add text, transitions, and effects. You can also use Filmora to create titles, lower thirds, etc.
How to use Filmora?
To use Filmora, simply load the video you want to edit and make the changes you want. Once you’re happy with the results, export the video, and it will be saved in the format of your choice.
How to use Frame Blending in Filmora?
There are things to keep in mind when using frame blending in Filmora.
First, the software only supports AVI and WMV files. Second, the frame blending feature is only available in the paid version of the software. Lastly, frame blending can only be used on two video frames at a time.
The video is made up of distinct layers blended together to create a unique and appealing look. There is a craft of making a running frame out of more than one video or picture. Even though the technique is considerably older, and individuals undertake it with much work, it has recently become simpler. We now have the easier method of combining two or more clips in a single frame, which we term Blend Modes.

How to composite with blending modes?
- Choose the videos and effects that you wish to overlay.
- Double-click the overlay clip on the timeline to view and adjust the video options for the split-screen effect.
- Go to the Compositing section and choose Blending Mode from the drop-down menu to apply an effect. Select Screen from the drop-down menu if you’d like to overlay an effect over a video.
Frame blending is a simple and effective way to create smooth transitions between two video frames. This technique can create a variety of different effects, such as dissolves, fades, and more. Frame blending is a built-in feature in Filmora and can be accessed by loading the video you want to edit and then making the changes you want. Once you’re happy with the results, export the video, and it will be saved in the format of your choice.
Advance features in Filmora 11
The latest version of Filmora (11.2.1) includes several new and improved features, such as:
- The ability to add textured background images
- An updated user interface
- A wider variety of title templates
- More video and audio effects
- Improved performance and stability
Filmora is a good choice for video editors who want to do more with their software. The program contains all of the essential functions of a video editor, such as the ability to add text, transitions, and effects. In addition, Filmora also includes some more advanced features, such as the ability to add textured background images and the ability to create titles, lower thirds, and more.
For Win 7 or later (64-bit)
For macOS 10.12 or later
Conclusion
● Frame blending is a simple and effective way to create smooth transitions between two video frames. This technique can be used to create a variety of different effects, such as dissolves, fades, and more. Frame blending is a built-in feature in Filmora and can be accessed by loading the video you want to edit and then making the changes you want. Once you’re happy with the results, export the video, and it will be saved in the format of your choice.
Frame blending is a video editing technique used to create smooth transitions between two video frames. This process is often used to create special effects or transition between two different video clips. Frame blending can be done manually or with the help of software.
When frame blending is done manually, the editor will take two consecutive frames and blend them. This is done by using a process called cross-fading. Cross-fading is when the first frame gradually fades out while the second frame gradually fades in. The result is a seamless transition between the two frames.
Frame blending can also be done with the help of software. Many software programs offer frame blending capabilities Like Adobe Premiere Pro and more. These software programs typically have a user interface that allows the user to select the two frames that they want to blend. The software will then perform the cross-fading process automatically.

In this article
01 What is frame blending in Premiere Pro?
02 How to Choose from Frame Blending/ Frame Sampling/ Optical Flow
03 How to use Frame Blanding in Adobe Premiere Pro?
What is frame blending in Premiere Pro?
In Adobe Premiere Pro, frame blending is a built-in feature that can be used to create smooth transitions between two video frames. This feature can be accessed by selecting the “Effects” tab and choosing the “Frame Blending” option.
When using frame blending in Premiere Pro, the user will first need to select the two frames they want to blend. The user can then specify the amount of cross-fade they want to apply. The software will then automatically perform the frame blending process.

How to Choose from Frame Blending/ Frame Sampling/ Optical Flow
The different types of frame blending are:
- Frame Sampling: best for smooth movements, no image distortion.
- Optical Flow: smoother results but can cause image distortion.
- Frame Blending: a mix of the two, some image distortion but smoother results.
So, choosing which type of frame blending to use depends on the footage and the desired results. If you want smooth results with no image distortion, frame sampling is the best option. However, if you don’t mind some image distortion in exchange for smoother results, optical flow or frame blending would be better choices.
How to decide which option is the best for your use? Let’s explain more, and It depends on the footage and the desired results. If you want smooth results with no image distortion, frame sampling is the best option. However, if you don’t mind some image distortion in exchange for smoother results, optical flow or frame blending would be better choices.

How to use Frame Blanding in Adobe Premiere Pro?
Step 1\
Using frame blending in Adobe Premiere Pro is a simple process. First, the user will need to select the two frames that they want to blend. The user can then specify the amount of cross-fade they want to apply. The software will then automatically perform the frame blending process.
Open up Adobe Premiere Pro and load the two frames that you want to blend to get started. Once the frames are loaded, select the “Effects” tab and then choose the “Frame Blending” option.
Step 2\
Next, select the two frames that you want to blend. You can perform this by clicking on the first frame and then holding down the “Shift” key while clicking on the second frame.
Once the two frames are selected, specify the amount of cross-fade that you want to apply. You can do this by adjusting the “Crossfade Duration” slider. The software will then automatically perform the frame blending process.

Frame blending is a simple and effective way to create smooth transitions between two video frames. This technique can create a variety of different effects, such as dissolves, fades, and more. Frame blending is a built-in feature in Adobe Premiere Pro and can be accessed by selecting the “Effects” tab and then choosing the “Frame Blending” option. To use frame blending, simply select the two frames you want to blend and specify the amount of cross-fade you want to apply. The software will then automatically perform the frame blending process.
You can also consider Filmora for Blending Frame
Filmora is a video editing software that allows you to create, edit, and export videos. The software includes various features, such as the ability to add text, transitions, and effects. You can also use Filmora to create titles, lower thirds, etc.
How to use Filmora?
To use Filmora, simply load the video you want to edit and make the changes you want. Once you’re happy with the results, export the video, and it will be saved in the format of your choice.
How to use Frame Blending in Filmora?
There are things to keep in mind when using frame blending in Filmora.
First, the software only supports AVI and WMV files. Second, the frame blending feature is only available in the paid version of the software. Lastly, frame blending can only be used on two video frames at a time.
The video is made up of distinct layers blended together to create a unique and appealing look. There is a craft of making a running frame out of more than one video or picture. Even though the technique is considerably older, and individuals undertake it with much work, it has recently become simpler. We now have the easier method of combining two or more clips in a single frame, which we term Blend Modes.

How to composite with blending modes?
- Choose the videos and effects that you wish to overlay.
- Double-click the overlay clip on the timeline to view and adjust the video options for the split-screen effect.
- Go to the Compositing section and choose Blending Mode from the drop-down menu to apply an effect. Select Screen from the drop-down menu if you’d like to overlay an effect over a video.
Frame blending is a simple and effective way to create smooth transitions between two video frames. This technique can create a variety of different effects, such as dissolves, fades, and more. Frame blending is a built-in feature in Filmora and can be accessed by loading the video you want to edit and then making the changes you want. Once you’re happy with the results, export the video, and it will be saved in the format of your choice.
Advance features in Filmora 11
The latest version of Filmora (11.2.1) includes several new and improved features, such as:
- The ability to add textured background images
- An updated user interface
- A wider variety of title templates
- More video and audio effects
- Improved performance and stability
Filmora is a good choice for video editors who want to do more with their software. The program contains all of the essential functions of a video editor, such as the ability to add text, transitions, and effects. In addition, Filmora also includes some more advanced features, such as the ability to add textured background images and the ability to create titles, lower thirds, and more.
For Win 7 or later (64-bit)
For macOS 10.12 or later
Conclusion
● Frame blending is a simple and effective way to create smooth transitions between two video frames. This technique can be used to create a variety of different effects, such as dissolves, fades, and more. Frame blending is a built-in feature in Filmora and can be accessed by loading the video you want to edit and then making the changes you want. Once you’re happy with the results, export the video, and it will be saved in the format of your choice.
Frame blending is a video editing technique used to create smooth transitions between two video frames. This process is often used to create special effects or transition between two different video clips. Frame blending can be done manually or with the help of software.
When frame blending is done manually, the editor will take two consecutive frames and blend them. This is done by using a process called cross-fading. Cross-fading is when the first frame gradually fades out while the second frame gradually fades in. The result is a seamless transition between the two frames.
Frame blending can also be done with the help of software. Many software programs offer frame blending capabilities Like Adobe Premiere Pro and more. These software programs typically have a user interface that allows the user to select the two frames that they want to blend. The software will then perform the cross-fading process automatically.

In this article
01 What is frame blending in Premiere Pro?
02 How to Choose from Frame Blending/ Frame Sampling/ Optical Flow
03 How to use Frame Blanding in Adobe Premiere Pro?
What is frame blending in Premiere Pro?
In Adobe Premiere Pro, frame blending is a built-in feature that can be used to create smooth transitions between two video frames. This feature can be accessed by selecting the “Effects” tab and choosing the “Frame Blending” option.
When using frame blending in Premiere Pro, the user will first need to select the two frames they want to blend. The user can then specify the amount of cross-fade they want to apply. The software will then automatically perform the frame blending process.

How to Choose from Frame Blending/ Frame Sampling/ Optical Flow
The different types of frame blending are:
- Frame Sampling: best for smooth movements, no image distortion.
- Optical Flow: smoother results but can cause image distortion.
- Frame Blending: a mix of the two, some image distortion but smoother results.
So, choosing which type of frame blending to use depends on the footage and the desired results. If you want smooth results with no image distortion, frame sampling is the best option. However, if you don’t mind some image distortion in exchange for smoother results, optical flow or frame blending would be better choices.
How to decide which option is the best for your use? Let’s explain more, and It depends on the footage and the desired results. If you want smooth results with no image distortion, frame sampling is the best option. However, if you don’t mind some image distortion in exchange for smoother results, optical flow or frame blending would be better choices.

How to use Frame Blanding in Adobe Premiere Pro?
Step 1\
Using frame blending in Adobe Premiere Pro is a simple process. First, the user will need to select the two frames that they want to blend. The user can then specify the amount of cross-fade they want to apply. The software will then automatically perform the frame blending process.
Open up Adobe Premiere Pro and load the two frames that you want to blend to get started. Once the frames are loaded, select the “Effects” tab and then choose the “Frame Blending” option.
Step 2\
Next, select the two frames that you want to blend. You can perform this by clicking on the first frame and then holding down the “Shift” key while clicking on the second frame.
Once the two frames are selected, specify the amount of cross-fade that you want to apply. You can do this by adjusting the “Crossfade Duration” slider. The software will then automatically perform the frame blending process.

Frame blending is a simple and effective way to create smooth transitions between two video frames. This technique can create a variety of different effects, such as dissolves, fades, and more. Frame blending is a built-in feature in Adobe Premiere Pro and can be accessed by selecting the “Effects” tab and then choosing the “Frame Blending” option. To use frame blending, simply select the two frames you want to blend and specify the amount of cross-fade you want to apply. The software will then automatically perform the frame blending process.
You can also consider Filmora for Blending Frame
Filmora is a video editing software that allows you to create, edit, and export videos. The software includes various features, such as the ability to add text, transitions, and effects. You can also use Filmora to create titles, lower thirds, etc.
How to use Filmora?
To use Filmora, simply load the video you want to edit and make the changes you want. Once you’re happy with the results, export the video, and it will be saved in the format of your choice.
How to use Frame Blending in Filmora?
There are things to keep in mind when using frame blending in Filmora.
First, the software only supports AVI and WMV files. Second, the frame blending feature is only available in the paid version of the software. Lastly, frame blending can only be used on two video frames at a time.
The video is made up of distinct layers blended together to create a unique and appealing look. There is a craft of making a running frame out of more than one video or picture. Even though the technique is considerably older, and individuals undertake it with much work, it has recently become simpler. We now have the easier method of combining two or more clips in a single frame, which we term Blend Modes.

How to composite with blending modes?
- Choose the videos and effects that you wish to overlay.
- Double-click the overlay clip on the timeline to view and adjust the video options for the split-screen effect.
- Go to the Compositing section and choose Blending Mode from the drop-down menu to apply an effect. Select Screen from the drop-down menu if you’d like to overlay an effect over a video.
Frame blending is a simple and effective way to create smooth transitions between two video frames. This technique can create a variety of different effects, such as dissolves, fades, and more. Frame blending is a built-in feature in Filmora and can be accessed by loading the video you want to edit and then making the changes you want. Once you’re happy with the results, export the video, and it will be saved in the format of your choice.
Advance features in Filmora 11
The latest version of Filmora (11.2.1) includes several new and improved features, such as:
- The ability to add textured background images
- An updated user interface
- A wider variety of title templates
- More video and audio effects
- Improved performance and stability
Filmora is a good choice for video editors who want to do more with their software. The program contains all of the essential functions of a video editor, such as the ability to add text, transitions, and effects. In addition, Filmora also includes some more advanced features, such as the ability to add textured background images and the ability to create titles, lower thirds, and more.
For Win 7 or later (64-bit)
For macOS 10.12 or later
Conclusion
● Frame blending is a simple and effective way to create smooth transitions between two video frames. This technique can be used to create a variety of different effects, such as dissolves, fades, and more. Frame blending is a built-in feature in Filmora and can be accessed by loading the video you want to edit and then making the changes you want. Once you’re happy with the results, export the video, and it will be saved in the format of your choice.
How to Edit Recorded Video
The most critical component of post-production for a video marketer is editing. Your video will seem unfinished and repel your viewers if you cannot effortlessly weave your images together or get your cut to reach the proper frame. Learning to edit a video may soon become a never-ending task. While each project you work on will have somewhat different editing needs, the principles of video editing remain basically the same. You don’t need to spend a lot on costly equipment to have a professional appearance; if you pay attention to a few important things, you can produce excellent movies with whatever you have right now.
Content producers, entrepreneurs, and influencers can have much too much material to include into a single YouTube video. You may not be able to buy video editing software if you’re on a tight budget. So, what does a video marketer do if they don’t have editing software? To assist you with the process of video editing, we’ve put up this thorough tutorial that covers everything you’ll need to know to make stunning films, even if you’ve never done it before. We’ll also demonstrate how to utilize the super-intuitive and user-friendly editor to create a video.
Part 1. Edit Recorded Video in OBS
OBS is a video streaming and recording application. It’s open source, free, and works on Macs, Windows, and Linux. It is a strong and adaptable screencast video creation tool when paired with competent audio and video editing tools. Unfortunately, OBS doesn’t support editing feature and hence, we’re enlisting the recording steps so you can edit them by using a third-party toolkit mentioned in the guide.
Step 1. Download and Install OBS
Install OBS according to the instructions for your operating system by downloading it from the link below.
Step 2. Setup Screen Recording
The window is divided into separate parts called “docks” when you initially launch the app. Every dock has a distinct function. Scenes, Sources, Mixer, and Controls are the areas to pay attention to. OBS employs a Scenes and Sources system, which will be discussed in more depth in a later lesson. These two tools operate in tandem to help you keep track of your video, audio, and other production materials. When you first start OBS, you’ll see that a scene is already loaded, which you can locate in the bottom left corner of the interface.
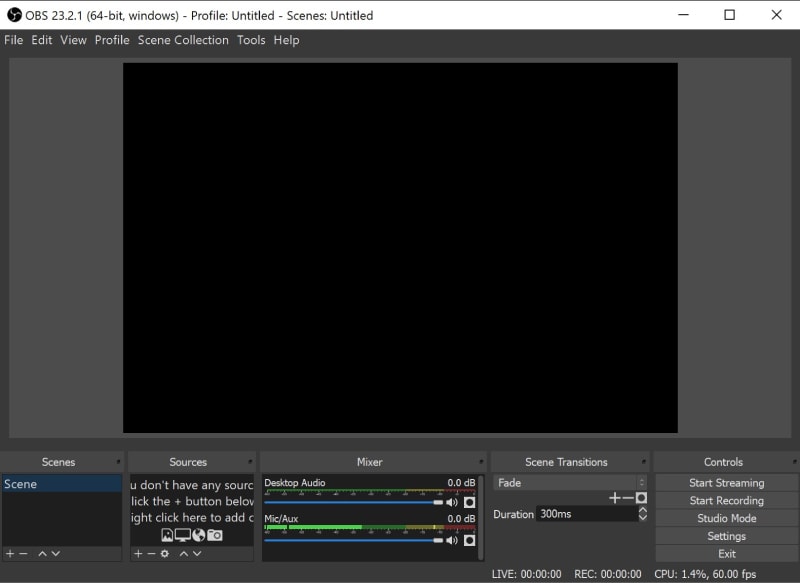
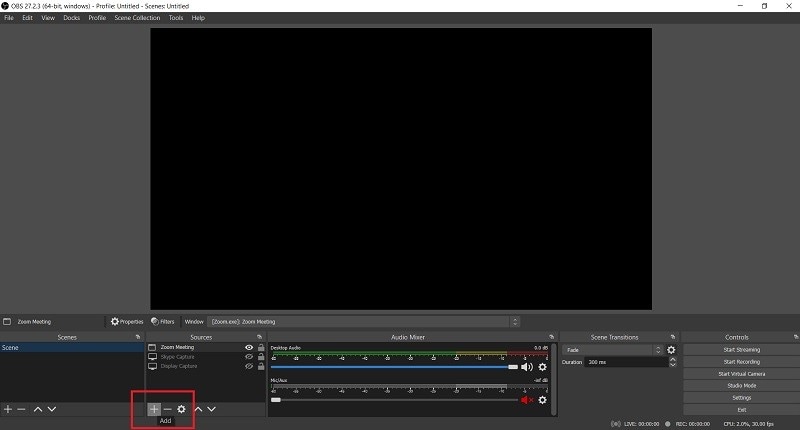
You’ll also need to add a source to this scene before you can begin recording. Click the Add button at the bottom of the Sources panel, then pick Screen Capture on Linux or Display Capture on Mac and Windows with the default Scene chosen (it will be highlighted).
Step 3. Customize the Recording Source
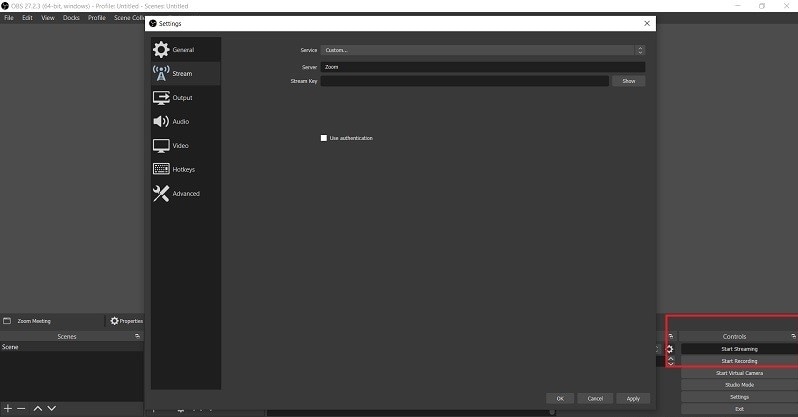
You’ll need to create a new source before you can begin recording your desktop screen. Select “Display Capture” by clicking the “+” icon on the Sources dock. You will be prompted to name the Display source in a popup window. Click “OK”. At the bottom right of the screen, click the Settings icon. Take note of the Recording Path field under the Output tab. This is where your recorded video will be kept on your computer.
Step 4. Start/Stop Recording
You’ll be able to choose the computer screen display you wish to capture in the following window. If you just have one monitor, make that the default. OBS Studios should show you the screen in the window after a valid display has been chosen. We need to change your graphics settings if OBS is unable to successfully load the screen video. Click the Start Recording button in the bottom right corner when you’re ready to begin recording. When you’re finished, click Stop Recording, and a movie will be saved to the folder you chose in the preferences.
Part 2. Edit Recorded Video in Filmora
Wondershare Filmora is a powerful screen recording application that includes a video editing suite, screen sketching tools, AI face recognition, built-in video effect packs, customizable branding watermark, and more. It may not only make recording movies simpler, but it may also provide you more possibilities for making your films more professional, creative, and attractive. Filmora is a great tool for beginners who want to make high-quality explainer films, training videos, demo videos, and more quickly. Because of the excellent video templates, screen recording is more appealing. To highlight important information, people might utilize annotation tools like as callouts, arrows, and drawing motions.
Steps to Record and Edit with Filmora
Step 1: Install Filmora on your laptop
To begin, you must first download this software program to your system from the following links:
For Win 7 or later (64-bit)
For macOS 10.12 or later
After you’ve finished downloading it, you’ll need to install it on your computer so that you can start using it with your laptop.
Step 2: Launch the Program and Begin Customizing It
The next step is to launch the software application and start recording your screen. Simply click the New Recording button in the start-up box to start recording. You may totally alter your screen recordings using the tools included in Filmora. You may also incorporate your laptop’s Webcam or a microphone as an audio source in your recordings.

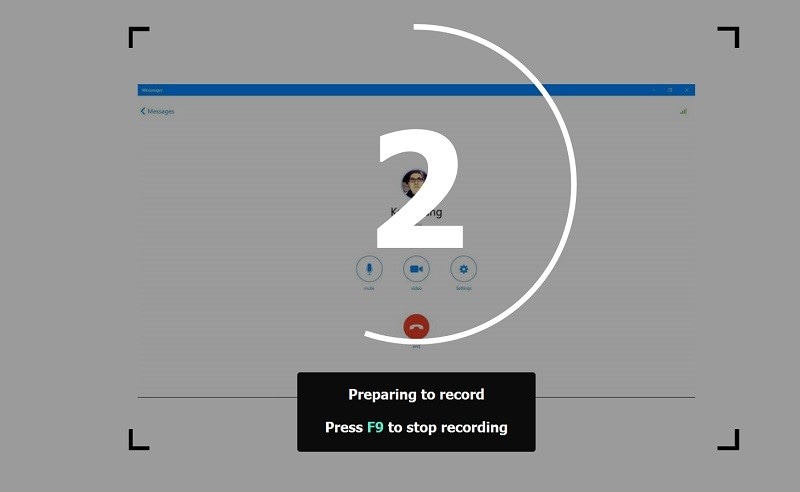
Step 3: Start/Stop Screen Recording
Now is the time to begin recording your audio, which you can accomplish by hitting the red circular recording button. Press the Square-shaped button on your laptop’s screen to end the recording.
Step 4: Edit the Recordings and Save Them
Finally, you may adjust your audio recordings with entirely configurable editing tools. To do so, use Filmora’s editor and utilize easy to complicated editing ways to edit your recorded audio files. Filmora’s Editor lets you add Animated Titles, amazing effects, Audio Enhancements, and more to your recorded video to make it more polished.

Step 5: Add Special Effects to Your Video
Wondershare Filmora was designed specifically to provide a professional touch to your videos. It includes a number of eye-catching and adaptable effects that you can use to make your video projects stand out from the crowd. We’ve gone through some of the greatest effects for giving life to your drab and amateurish videos in this section.

Step 6: Save or Share the Videos
Finally, after you’ve finished editing the recorded video, you may utilize the Filmora editor in its entirety, as described before. Click the Export option and select the platform where you wish to share your video clip to post your work of art immediately to YouTube or another well-known website. You may even alter the movie before sharing it if you desire.

Part 3. Edit Recorded Video with Zoom
Trimming and editing Zoom recordings is a necessary for digging out value-packed nuggets from captured footage. But although you already know this, you’re probably putting off doing so as you’re anticipating you’ll need to learn a ton of new tools to edit Zoom recordings.
Steps to Record Videos with Zoom
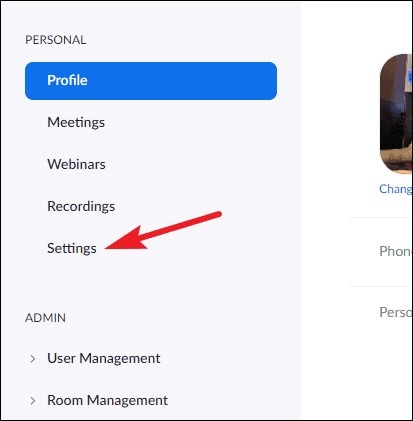
Step 1For the cloud recordings, go to zoom.us and log in to your account. Then, navigate to ‘Settings’ from the navigation menu on the left.
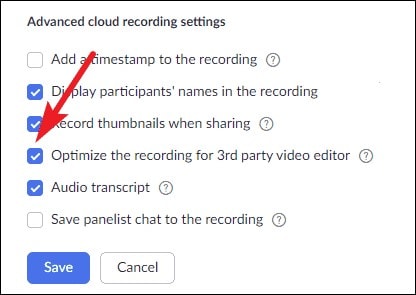
Step 2 Under Advanced cloud recording options, tick the option for ‘Optimize the recording for 3rd party video editor’ and click ‘Save’.
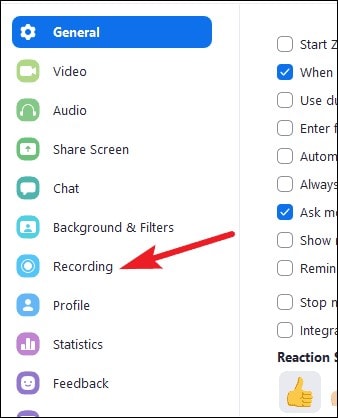
Step 3Then, navigate to ‘Recording’ from the navigation menu on the left. Check the option for ‘Optimize for 3rd party video editor.
Step 4To really edit a Zoom recording, whether it’s stored on your PC or Zoom cloud, you need to utilize third-party video editing software. But no worries, you don’t need any sophisticated equipment or software here.
Part 4. Edit Recorded Video in Teams
Teams gives the opportunity to record your online meetings. This may be especially beneficial for sharing meeting recordings with individuals unable to attend live, to preserve instructional material for future use, or to enable participants to revisit prior meeting topics. At the top of the meeting window, a message will appear stating that the recording has begun, which alerts participants that their interactions in the meeting may be recorded by the recording. You will also notice a recording sign and the duration of the recording in the top-left corner of the meeting window.
Steps to Record Videos with Teams
Step 1 Open Microsoft Teams on Windows and Mac.
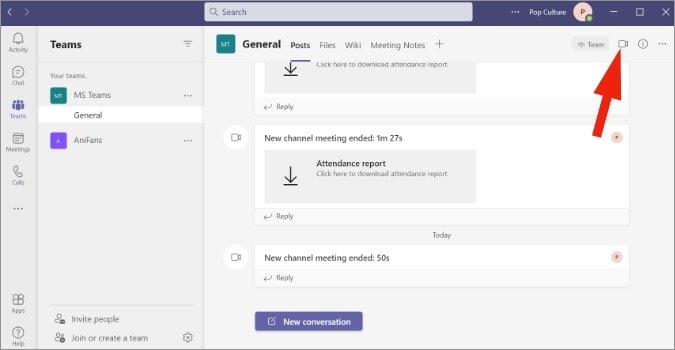
Step 2 Go to appropriate Teams or Channel and click on the Video button at the top to create a video call.
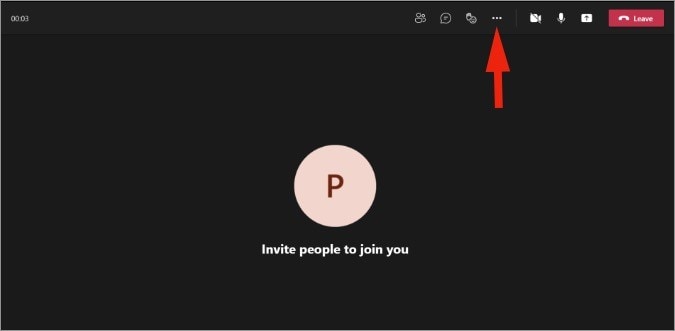
Step 3Invite people and organize a meeting. Whenever you feel you need to record any significant point, click on the three-dot menu at the top.
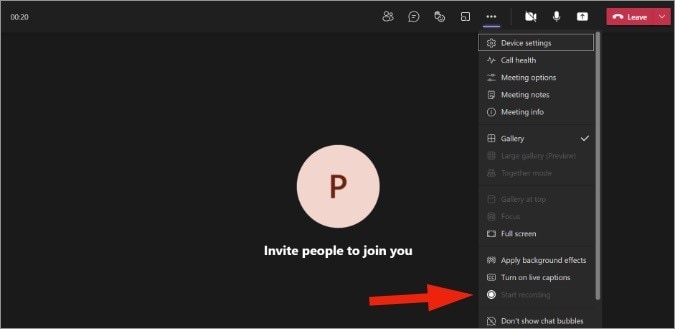
Step 4 Click on Start recording and Microsoft Teams will start recording the video/voice call. As soon as you start recording, every participant will be told about it.
At any moment, you may stop recording from the same. Once the meeting as concluded, your recording will display in the Chat panel in the main Teams window. Please note that depending on the length of the recording it might take some time for the recording to complete and display in the meeting chat. To find the recording, pick the Chat panel, open the correct meeting from the chat list and the recording will display in the chat window once processed.
Part 5. Edit Recorded Video in Google Meet
With more individuals working from home these days, services like Google Meet are rising in popularity. You may have an online video conference, see everyone’s face, communicate, and take care of business. As with in-office meetings, notes with action items and summaries for online meetings are just as crucial. Unfortunately, it doesn’t always happen. To have formal documentation for your meeting or share it with people who couldn’t attend, try recording your Google Meet.
Steps to Record and Edit Videos by Meet
Step 1. Launch Meet
Visit Google Meet and sign in to join or start your meeting.
Step 2. Start Recording
Select the Activities symbol on the bottom right and pick Recording when you’re ready to start recording.
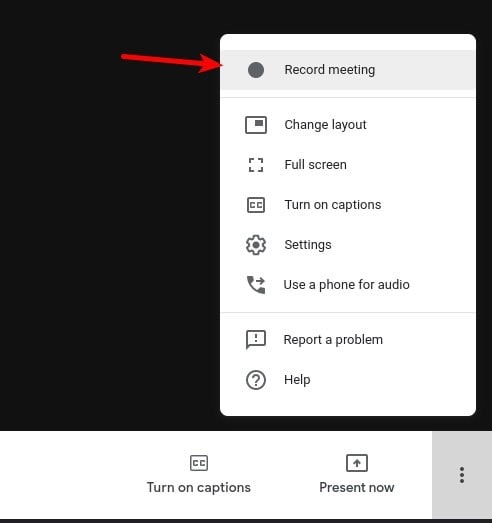
Step 3. Stop/Save Recording
Visit Google Drive and login in if required. Navigate to My Drive on the left and search for the Meet Recordings folder on the right. It may take several minutes for the recording to show. If you do not already have a Meet Recordings folder, Google Drive will create one. You’ll notice the recording named with the meeting identifier along with the date and hour. If Chat took occurred during the meeting, you’d view this as a distinct text file.
To get a preview of your recording or chat transcript, just double-click the file in the Meet Recordings folder on Google Drive. You may download, distribute, or acquire a link to the recording (or chat) file from the Meet Recordings folder or the File Preview. In the folder, right-click the file and pick an action from the menu. Notice you may execute further options such as Rename, Make a copy, and Open with.

Step 4. Use WeVideo to Edit Videos
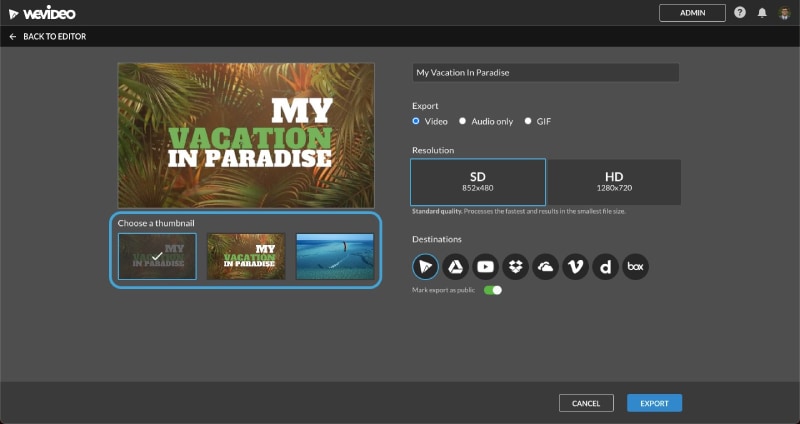
WeVideo is the cloud-based video production tool that supports student creativity, narrative, engagement and multimodal learning. Video projects develop deep knowledge about a subject through creating abilities like teamwork, communication and critical thinking. Log in and click Create New. Choose what you want to make (video, recording, etc.) and a format. Upload your media or search the Stock media repository. Make any extra modifications and preview your movie one final time. All done? Click Finish to export, download and share your video!
Part 6: Related FAQs
1. How do I edit video recordings?
Most individuals have the tools they need to film and edit small videos. With a smartphone or tablet and access to a computer, you can get the job done without even checking out equipment, much less employing a key grip. A laptop isn’t the finest equipment to film a movie–that would be extremely uncomfortable. Smartphone or tablet is easy to use. This topic is for those with access to an iPhone and a PC. Android, iPad, and Mac users will have a distinct process. Smartphones and tablets often default to recording video at a very high-Quality level, which takes up a lot of memory and results in big file sizes. Most likely you will want to lessen the resolution that you photograph.
Can you edit an already uploaded video?
If you have found yourself in this circumstance, your initial instinct could be to worry and assume you must repair the issue, delete the uploaded video, and re-upload the new one. However, this procedure will make your prior video URL dead, and any embeds of your video will display the following graphic to visitors. Nevertheless, these aforementioned sites recognizes that artists occasionally make small honest errors, or someone included in the uploaded video may demand that they be removed from it. So, to permit that, makers may chop away sections from their film without resetting a video’s metrics.
How to edit recorded video on iPhone?
If you have iOS 13 or later, you can edit films in the built-in Photos app… much as you edit your images. You may cut, crop, and straighten your films. And you may make your film more attractive by altering brightness, color, or even making it black and white. Filming films on iPhone has gotten more popular as iPhone camera lenses have progressed over the years. Many iPhone filmmakers desire the capacity to edit their video directly from their phone for simple social sharing. Using a video editing software for iPhone is a terrific method to effortlessly produce and upload videos. just open the video you want to modify, then press Edit at the upper right to get it done.
Conclusion:
If you routinely use Google Meet or Zoom, it can be a good idea to record your conferences so you can still return to them at a later period. Recording these conversations and meetings may be a big assistance when it’s time for later evaluations, updates, and enabling absent team members catch up on the meeting topic. For instance, do you wish to share meeting minutes or information with people missing in this meeting? Essentially the call recording is for other co-workers to view afterwards. Instead, you may use the recommended screen recorders to capture every moment and then use a specialist video editor like Filmora to make the required edits before sharing it with others.
For macOS 10.12 or later
After you’ve finished downloading it, you’ll need to install it on your computer so that you can start using it with your laptop.
Step 2: Launch the Program and Begin Customizing It
The next step is to launch the software application and start recording your screen. Simply click the New Recording button in the start-up box to start recording. You may totally alter your screen recordings using the tools included in Filmora. You may also incorporate your laptop’s Webcam or a microphone as an audio source in your recordings.

Step 3: Start/Stop Screen Recording
Now is the time to begin recording your audio, which you can accomplish by hitting the red circular recording button. Press the Square-shaped button on your laptop’s screen to end the recording.

Step 4: Edit the Recordings and Save Them
Finally, you may adjust your audio recordings with entirely configurable editing tools. To do so, use Filmora’s editor and utilize easy to complicated editing ways to edit your recorded audio files. Filmora’s Editor lets you add Animated Titles, amazing effects, Audio Enhancements, and more to your recorded video to make it more polished.

Step 5: Add Special Effects to Your Video
Wondershare Filmora was designed specifically to provide a professional touch to your videos. It includes a number of eye-catching and adaptable effects that you can use to make your video projects stand out from the crowd. We’ve gone through some of the greatest effects for giving life to your drab and amateurish videos in this section.

Step 6: Save or Share the Videos
Finally, after you’ve finished editing the recorded video, you may utilize the Filmora editor in its entirety, as described before. Click the Export option and select the platform where you wish to share your video clip to post your work of art immediately to YouTube or another well-known website. You may even alter the movie before sharing it if you desire.

Part 3. Edit Recorded Video with Zoom
Trimming and editing Zoom recordings is a necessary for digging out value-packed nuggets from captured footage. But although you already know this, you’re probably putting off doing so as you’re anticipating you’ll need to learn a ton of new tools to edit Zoom recordings.
Steps to Record Videos with Zoom
Step 1For the cloud recordings, go to zoom.us and log in to your account. Then, navigate to ‘Settings’ from the navigation menu on the left.

Step 2 Under Advanced cloud recording options, tick the option for ‘Optimize the recording for 3rd party video editor’ and click ‘Save’.

Step 3Then, navigate to ‘Recording’ from the navigation menu on the left. Check the option for ‘Optimize for 3rd party video editor.

Step 4To really edit a Zoom recording, whether it’s stored on your PC or Zoom cloud, you need to utilize third-party video editing software. But no worries, you don’t need any sophisticated equipment or software here.
Part 4. Edit Recorded Video in Teams
Teams gives the opportunity to record your online meetings. This may be especially beneficial for sharing meeting recordings with individuals unable to attend live, to preserve instructional material for future use, or to enable participants to revisit prior meeting topics. At the top of the meeting window, a message will appear stating that the recording has begun, which alerts participants that their interactions in the meeting may be recorded by the recording. You will also notice a recording sign and the duration of the recording in the top-left corner of the meeting window.
Steps to Record Videos with Teams
Step 1 Open Microsoft Teams on Windows and Mac.
Step 2 Go to appropriate Teams or Channel and click on the Video button at the top to create a video call.

Step 3Invite people and organize a meeting. Whenever you feel you need to record any significant point, click on the three-dot menu at the top.

Step 4 Click on Start recording and Microsoft Teams will start recording the video/voice call. As soon as you start recording, every participant will be told about it.
At any moment, you may stop recording from the same. Once the meeting as concluded, your recording will display in the Chat panel in the main Teams window. Please note that depending on the length of the recording it might take some time for the recording to complete and display in the meeting chat. To find the recording, pick the Chat panel, open the correct meeting from the chat list and the recording will display in the chat window once processed.

Part 5. Edit Recorded Video in Google Meet
With more individuals working from home these days, services like Google Meet are rising in popularity. You may have an online video conference, see everyone’s face, communicate, and take care of business. As with in-office meetings, notes with action items and summaries for online meetings are just as crucial. Unfortunately, it doesn’t always happen. To have formal documentation for your meeting or share it with people who couldn’t attend, try recording your Google Meet.
Steps to Record and Edit Videos by Meet
Step 1. Launch Meet
Visit Google Meet and sign in to join or start your meeting.
Step 2. Start Recording
Select the Activities symbol on the bottom right and pick Recording when you’re ready to start recording.

Step 3. Stop/Save Recording
Visit Google Drive and login in if required. Navigate to My Drive on the left and search for the Meet Recordings folder on the right. It may take several minutes for the recording to show. If you do not already have a Meet Recordings folder, Google Drive will create one. You’ll notice the recording named with the meeting identifier along with the date and hour. If Chat took occurred during the meeting, you’d view this as a distinct text file.
To get a preview of your recording or chat transcript, just double-click the file in the Meet Recordings folder on Google Drive. You may download, distribute, or acquire a link to the recording (or chat) file from the Meet Recordings folder or the File Preview. In the folder, right-click the file and pick an action from the menu. Notice you may execute further options such as Rename, Make a copy, and Open with.

Step 4. Use WeVideo to Edit Videos
WeVideo is the cloud-based video production tool that supports student creativity, narrative, engagement and multimodal learning. Video projects develop deep knowledge about a subject through creating abilities like teamwork, communication and critical thinking. Log in and click Create New. Choose what you want to make (video, recording, etc.) and a format. Upload your media or search the Stock media repository. Make any extra modifications and preview your movie one final time. All done? Click Finish to export, download and share your video!

Part 6: Related FAQs
1. How do I edit video recordings?
Most individuals have the tools they need to film and edit small videos. With a smartphone or tablet and access to a computer, you can get the job done without even checking out equipment, much less employing a key grip. A laptop isn’t the finest equipment to film a movie–that would be extremely uncomfortable. Smartphone or tablet is easy to use. This topic is for those with access to an iPhone and a PC. Android, iPad, and Mac users will have a distinct process. Smartphones and tablets often default to recording video at a very high-Quality level, which takes up a lot of memory and results in big file sizes. Most likely you will want to lessen the resolution that you photograph.
Can you edit an already uploaded video?
If you have found yourself in this circumstance, your initial instinct could be to worry and assume you must repair the issue, delete the uploaded video, and re-upload the new one. However, this procedure will make your prior video URL dead, and any embeds of your video will display the following graphic to visitors. Nevertheless, these aforementioned sites recognizes that artists occasionally make small honest errors, or someone included in the uploaded video may demand that they be removed from it. So, to permit that, makers may chop away sections from their film without resetting a video’s metrics.
How to edit recorded video on iPhone?
If you have iOS 13 or later, you can edit films in the built-in Photos app… much as you edit your images. You may cut, crop, and straighten your films. And you may make your film more attractive by altering brightness, color, or even making it black and white. Filming films on iPhone has gotten more popular as iPhone camera lenses have progressed over the years. Many iPhone filmmakers desire the capacity to edit their video directly from their phone for simple social sharing. Using a video editing software for iPhone is a terrific method to effortlessly produce and upload videos. just open the video you want to modify, then press Edit at the upper right to get it done.
Conclusion:
If you routinely use Google Meet or Zoom, it can be a good idea to record your conferences so you can still return to them at a later period. Recording these conversations and meetings may be a big assistance when it’s time for later evaluations, updates, and enabling absent team members catch up on the meeting topic. For instance, do you wish to share meeting minutes or information with people missing in this meeting? Essentially the call recording is for other co-workers to view afterwards. Instead, you may use the recommended screen recorders to capture every moment and then use a specialist video editor like Filmora to make the required edits before sharing it with others.
For macOS 10.12 or later
After you’ve finished downloading it, you’ll need to install it on your computer so that you can start using it with your laptop.
Step 2: Launch the Program and Begin Customizing It
The next step is to launch the software application and start recording your screen. Simply click the New Recording button in the start-up box to start recording. You may totally alter your screen recordings using the tools included in Filmora. You may also incorporate your laptop’s Webcam or a microphone as an audio source in your recordings.

Step 3: Start/Stop Screen Recording
Now is the time to begin recording your audio, which you can accomplish by hitting the red circular recording button. Press the Square-shaped button on your laptop’s screen to end the recording.

Step 4: Edit the Recordings and Save Them
Finally, you may adjust your audio recordings with entirely configurable editing tools. To do so, use Filmora’s editor and utilize easy to complicated editing ways to edit your recorded audio files. Filmora’s Editor lets you add Animated Titles, amazing effects, Audio Enhancements, and more to your recorded video to make it more polished.

Step 5: Add Special Effects to Your Video
Wondershare Filmora was designed specifically to provide a professional touch to your videos. It includes a number of eye-catching and adaptable effects that you can use to make your video projects stand out from the crowd. We’ve gone through some of the greatest effects for giving life to your drab and amateurish videos in this section.

Step 6: Save or Share the Videos
Finally, after you’ve finished editing the recorded video, you may utilize the Filmora editor in its entirety, as described before. Click the Export option and select the platform where you wish to share your video clip to post your work of art immediately to YouTube or another well-known website. You may even alter the movie before sharing it if you desire.

Part 3. Edit Recorded Video with Zoom
Trimming and editing Zoom recordings is a necessary for digging out value-packed nuggets from captured footage. But although you already know this, you’re probably putting off doing so as you’re anticipating you’ll need to learn a ton of new tools to edit Zoom recordings.
Steps to Record Videos with Zoom
Step 1For the cloud recordings, go to zoom.us and log in to your account. Then, navigate to ‘Settings’ from the navigation menu on the left.

Step 2 Under Advanced cloud recording options, tick the option for ‘Optimize the recording for 3rd party video editor’ and click ‘Save’.

Step 3Then, navigate to ‘Recording’ from the navigation menu on the left. Check the option for ‘Optimize for 3rd party video editor.

Step 4To really edit a Zoom recording, whether it’s stored on your PC or Zoom cloud, you need to utilize third-party video editing software. But no worries, you don’t need any sophisticated equipment or software here.
Part 4. Edit Recorded Video in Teams
Teams gives the opportunity to record your online meetings. This may be especially beneficial for sharing meeting recordings with individuals unable to attend live, to preserve instructional material for future use, or to enable participants to revisit prior meeting topics. At the top of the meeting window, a message will appear stating that the recording has begun, which alerts participants that their interactions in the meeting may be recorded by the recording. You will also notice a recording sign and the duration of the recording in the top-left corner of the meeting window.
Steps to Record Videos with Teams
Step 1 Open Microsoft Teams on Windows and Mac.
Step 2 Go to appropriate Teams or Channel and click on the Video button at the top to create a video call.

Step 3Invite people and organize a meeting. Whenever you feel you need to record any significant point, click on the three-dot menu at the top.

Step 4 Click on Start recording and Microsoft Teams will start recording the video/voice call. As soon as you start recording, every participant will be told about it.
At any moment, you may stop recording from the same. Once the meeting as concluded, your recording will display in the Chat panel in the main Teams window. Please note that depending on the length of the recording it might take some time for the recording to complete and display in the meeting chat. To find the recording, pick the Chat panel, open the correct meeting from the chat list and the recording will display in the chat window once processed.

Part 5. Edit Recorded Video in Google Meet
With more individuals working from home these days, services like Google Meet are rising in popularity. You may have an online video conference, see everyone’s face, communicate, and take care of business. As with in-office meetings, notes with action items and summaries for online meetings are just as crucial. Unfortunately, it doesn’t always happen. To have formal documentation for your meeting or share it with people who couldn’t attend, try recording your Google Meet.
Steps to Record and Edit Videos by Meet
Step 1. Launch Meet
Visit Google Meet and sign in to join or start your meeting.
Step 2. Start Recording
Select the Activities symbol on the bottom right and pick Recording when you’re ready to start recording.

Step 3. Stop/Save Recording
Visit Google Drive and login in if required. Navigate to My Drive on the left and search for the Meet Recordings folder on the right. It may take several minutes for the recording to show. If you do not already have a Meet Recordings folder, Google Drive will create one. You’ll notice the recording named with the meeting identifier along with the date and hour. If Chat took occurred during the meeting, you’d view this as a distinct text file.
To get a preview of your recording or chat transcript, just double-click the file in the Meet Recordings folder on Google Drive. You may download, distribute, or acquire a link to the recording (or chat) file from the Meet Recordings folder or the File Preview. In the folder, right-click the file and pick an action from the menu. Notice you may execute further options such as Rename, Make a copy, and Open with.

Step 4. Use WeVideo to Edit Videos
WeVideo is the cloud-based video production tool that supports student creativity, narrative, engagement and multimodal learning. Video projects develop deep knowledge about a subject through creating abilities like teamwork, communication and critical thinking. Log in and click Create New. Choose what you want to make (video, recording, etc.) and a format. Upload your media or search the Stock media repository. Make any extra modifications and preview your movie one final time. All done? Click Finish to export, download and share your video!

Part 6: Related FAQs
1. How do I edit video recordings?
Most individuals have the tools they need to film and edit small videos. With a smartphone or tablet and access to a computer, you can get the job done without even checking out equipment, much less employing a key grip. A laptop isn’t the finest equipment to film a movie–that would be extremely uncomfortable. Smartphone or tablet is easy to use. This topic is for those with access to an iPhone and a PC. Android, iPad, and Mac users will have a distinct process. Smartphones and tablets often default to recording video at a very high-Quality level, which takes up a lot of memory and results in big file sizes. Most likely you will want to lessen the resolution that you photograph.
Can you edit an already uploaded video?
If you have found yourself in this circumstance, your initial instinct could be to worry and assume you must repair the issue, delete the uploaded video, and re-upload the new one. However, this procedure will make your prior video URL dead, and any embeds of your video will display the following graphic to visitors. Nevertheless, these aforementioned sites recognizes that artists occasionally make small honest errors, or someone included in the uploaded video may demand that they be removed from it. So, to permit that, makers may chop away sections from their film without resetting a video’s metrics.
How to edit recorded video on iPhone?
If you have iOS 13 or later, you can edit films in the built-in Photos app… much as you edit your images. You may cut, crop, and straighten your films. And you may make your film more attractive by altering brightness, color, or even making it black and white. Filming films on iPhone has gotten more popular as iPhone camera lenses have progressed over the years. Many iPhone filmmakers desire the capacity to edit their video directly from their phone for simple social sharing. Using a video editing software for iPhone is a terrific method to effortlessly produce and upload videos. just open the video you want to modify, then press Edit at the upper right to get it done.
Conclusion:
If you routinely use Google Meet or Zoom, it can be a good idea to record your conferences so you can still return to them at a later period. Recording these conversations and meetings may be a big assistance when it’s time for later evaluations, updates, and enabling absent team members catch up on the meeting topic. For instance, do you wish to share meeting minutes or information with people missing in this meeting? Essentially the call recording is for other co-workers to view afterwards. Instead, you may use the recommended screen recorders to capture every moment and then use a specialist video editor like Filmora to make the required edits before sharing it with others.
For macOS 10.12 or later
After you’ve finished downloading it, you’ll need to install it on your computer so that you can start using it with your laptop.
Step 2: Launch the Program and Begin Customizing It
The next step is to launch the software application and start recording your screen. Simply click the New Recording button in the start-up box to start recording. You may totally alter your screen recordings using the tools included in Filmora. You may also incorporate your laptop’s Webcam or a microphone as an audio source in your recordings.

Step 3: Start/Stop Screen Recording
Now is the time to begin recording your audio, which you can accomplish by hitting the red circular recording button. Press the Square-shaped button on your laptop’s screen to end the recording.

Step 4: Edit the Recordings and Save Them
Finally, you may adjust your audio recordings with entirely configurable editing tools. To do so, use Filmora’s editor and utilize easy to complicated editing ways to edit your recorded audio files. Filmora’s Editor lets you add Animated Titles, amazing effects, Audio Enhancements, and more to your recorded video to make it more polished.

Step 5: Add Special Effects to Your Video
Wondershare Filmora was designed specifically to provide a professional touch to your videos. It includes a number of eye-catching and adaptable effects that you can use to make your video projects stand out from the crowd. We’ve gone through some of the greatest effects for giving life to your drab and amateurish videos in this section.

Step 6: Save or Share the Videos
Finally, after you’ve finished editing the recorded video, you may utilize the Filmora editor in its entirety, as described before. Click the Export option and select the platform where you wish to share your video clip to post your work of art immediately to YouTube or another well-known website. You may even alter the movie before sharing it if you desire.

Part 3. Edit Recorded Video with Zoom
Trimming and editing Zoom recordings is a necessary for digging out value-packed nuggets from captured footage. But although you already know this, you’re probably putting off doing so as you’re anticipating you’ll need to learn a ton of new tools to edit Zoom recordings.
Steps to Record Videos with Zoom
Step 1For the cloud recordings, go to zoom.us and log in to your account. Then, navigate to ‘Settings’ from the navigation menu on the left.

Step 2 Under Advanced cloud recording options, tick the option for ‘Optimize the recording for 3rd party video editor’ and click ‘Save’.

Step 3Then, navigate to ‘Recording’ from the navigation menu on the left. Check the option for ‘Optimize for 3rd party video editor.

Step 4To really edit a Zoom recording, whether it’s stored on your PC or Zoom cloud, you need to utilize third-party video editing software. But no worries, you don’t need any sophisticated equipment or software here.
Part 4. Edit Recorded Video in Teams
Teams gives the opportunity to record your online meetings. This may be especially beneficial for sharing meeting recordings with individuals unable to attend live, to preserve instructional material for future use, or to enable participants to revisit prior meeting topics. At the top of the meeting window, a message will appear stating that the recording has begun, which alerts participants that their interactions in the meeting may be recorded by the recording. You will also notice a recording sign and the duration of the recording in the top-left corner of the meeting window.
Steps to Record Videos with Teams
Step 1 Open Microsoft Teams on Windows and Mac.
Step 2 Go to appropriate Teams or Channel and click on the Video button at the top to create a video call.

Step 3Invite people and organize a meeting. Whenever you feel you need to record any significant point, click on the three-dot menu at the top.

Step 4 Click on Start recording and Microsoft Teams will start recording the video/voice call. As soon as you start recording, every participant will be told about it.
At any moment, you may stop recording from the same. Once the meeting as concluded, your recording will display in the Chat panel in the main Teams window. Please note that depending on the length of the recording it might take some time for the recording to complete and display in the meeting chat. To find the recording, pick the Chat panel, open the correct meeting from the chat list and the recording will display in the chat window once processed.

Part 5. Edit Recorded Video in Google Meet
With more individuals working from home these days, services like Google Meet are rising in popularity. You may have an online video conference, see everyone’s face, communicate, and take care of business. As with in-office meetings, notes with action items and summaries for online meetings are just as crucial. Unfortunately, it doesn’t always happen. To have formal documentation for your meeting or share it with people who couldn’t attend, try recording your Google Meet.
Steps to Record and Edit Videos by Meet
Step 1. Launch Meet
Visit Google Meet and sign in to join or start your meeting.
Step 2. Start Recording
Select the Activities symbol on the bottom right and pick Recording when you’re ready to start recording.

Step 3. Stop/Save Recording
Visit Google Drive and login in if required. Navigate to My Drive on the left and search for the Meet Recordings folder on the right. It may take several minutes for the recording to show. If you do not already have a Meet Recordings folder, Google Drive will create one. You’ll notice the recording named with the meeting identifier along with the date and hour. If Chat took occurred during the meeting, you’d view this as a distinct text file.
To get a preview of your recording or chat transcript, just double-click the file in the Meet Recordings folder on Google Drive. You may download, distribute, or acquire a link to the recording (or chat) file from the Meet Recordings folder or the File Preview. In the folder, right-click the file and pick an action from the menu. Notice you may execute further options such as Rename, Make a copy, and Open with.

Step 4. Use WeVideo to Edit Videos
WeVideo is the cloud-based video production tool that supports student creativity, narrative, engagement and multimodal learning. Video projects develop deep knowledge about a subject through creating abilities like teamwork, communication and critical thinking. Log in and click Create New. Choose what you want to make (video, recording, etc.) and a format. Upload your media or search the Stock media repository. Make any extra modifications and preview your movie one final time. All done? Click Finish to export, download and share your video!

Part 6: Related FAQs
1. How do I edit video recordings?
Most individuals have the tools they need to film and edit small videos. With a smartphone or tablet and access to a computer, you can get the job done without even checking out equipment, much less employing a key grip. A laptop isn’t the finest equipment to film a movie–that would be extremely uncomfortable. Smartphone or tablet is easy to use. This topic is for those with access to an iPhone and a PC. Android, iPad, and Mac users will have a distinct process. Smartphones and tablets often default to recording video at a very high-Quality level, which takes up a lot of memory and results in big file sizes. Most likely you will want to lessen the resolution that you photograph.
Can you edit an already uploaded video?
If you have found yourself in this circumstance, your initial instinct could be to worry and assume you must repair the issue, delete the uploaded video, and re-upload the new one. However, this procedure will make your prior video URL dead, and any embeds of your video will display the following graphic to visitors. Nevertheless, these aforementioned sites recognizes that artists occasionally make small honest errors, or someone included in the uploaded video may demand that they be removed from it. So, to permit that, makers may chop away sections from their film without resetting a video’s metrics.
How to edit recorded video on iPhone?
If you have iOS 13 or later, you can edit films in the built-in Photos app… much as you edit your images. You may cut, crop, and straighten your films. And you may make your film more attractive by altering brightness, color, or even making it black and white. Filming films on iPhone has gotten more popular as iPhone camera lenses have progressed over the years. Many iPhone filmmakers desire the capacity to edit their video directly from their phone for simple social sharing. Using a video editing software for iPhone is a terrific method to effortlessly produce and upload videos. just open the video you want to modify, then press Edit at the upper right to get it done.
Conclusion:
If you routinely use Google Meet or Zoom, it can be a good idea to record your conferences so you can still return to them at a later period. Recording these conversations and meetings may be a big assistance when it’s time for later evaluations, updates, and enabling absent team members catch up on the meeting topic. For instance, do you wish to share meeting minutes or information with people missing in this meeting? Essentially the call recording is for other co-workers to view afterwards. Instead, you may use the recommended screen recorders to capture every moment and then use a specialist video editor like Filmora to make the required edits before sharing it with others.
TOP 10 Types of Video Framing: From Novice to Master
Are you in search of the best practice to frame a video? If yes, then cheer up, as we have got you covered! In this guide, we will share the top 6 types of video framing that even novice and expert users can master.
Framing videos involves focusing on a specific subject and blocking out the irrelevant things in the background. Depending on the results you want, video framing can differ a lot. The information below will help you learn about different frames and how to utilize them effectively.
So, without further ado, let’s get into the deets.
- 01 Establishing Shots
- 02 Single Shot
- 03 Two Shot/Group Shot
- 04 Over-the-shoulder (OTS)
- 05 Insert Shot
- 06 POV Shot (OTS)
Part1 Basic Knowledge About Different Framing
Because framing is related to capturing or focusing an object by the camera lens, it can vary depending on your desired shot. Let’s start with the full-shot first and understand how it works.
01 Full Shot (FS)
Remember the shot of Marvel’s Guardians of the Galaxy, where all the players are focused in one wide frame? This excerpt is a practical example of what a full shot looks like. Full-shot video framing is particularly common in action or thriller movies where the creator wants to generate suspense in the audience.
As the name indicates, a full shot often emphasizes the scenery as your subject fills the frame. Like the background isn’t ignored or blurred out; instead, it isn’t overly stressed as well. In most cases, the camera starts with a wide-angle shot and then eventually ends with focusing on the subject.
A full-camera shot greatly emphasizes the physical presence of the character. It tracks the subject’s movements, gestures, or body language, making it the focal point. As a result, the shot obtained delivers a better understanding of actions and interactions among the character and its surroundings.
02 Medium Shot (MS)
We often see friends in movies, going to a casino, or playing cards at a bar. What do we observe in that shot? Hand movements, facial expressions, body language, and a little context of what is happening in the background. This shot is known as the medium shot and is often called the ¾ shot.
Using the medium shot video framing technique, the camera lens allows the viewers to see the background while still focusing on the main character. It’s like you will know what is happening at the back but still remain close to the character’s emotions and gestures.
A medium shot usually begins by showing the subject from the knees to his face. In other cases, the shot can also start from the character’s waist to the top of their head. Compared to long shots, a medium shot takes you closer to the subject’s emotions.
For example, in The Princess Diary, you can see how medium-shot video framing has been useful in portraying comedic scenes. You can see Mia reaching out for plates and glasses around the tables and her eyes squinting to concentrate on the process. The medium shot captures even the smallest emotions while focusing on the background.
03 Close-Up (CU)
When the subject’s head and face take up most of the frame, framing videos is known as a close-up shot. And a particular example of this shot can be spotted in the airport scene in “Casablanca.” This scene shows how the camera lens takes various shots before ending up on the actor’s face, showcasing a number of emotions and intimacy.
A close-up shot is an eye-level shot, and as a result, it takes the subject to the forefront. As a result, this shot establishes a distinct sense of connection between the audience and the character. Additionally, the environmental distraction is kept minimal throughout this shot. This setup helps maintain the emotional impact that the shot will portray.
Some of the common emotions that would be captured using close-up video framing techniques include:
- Tear-filled gaze
- Furrowed brow
- Subtle smile
Cinematographers often use such shots to intensify climaxes. These shots can be viewed as a window to the characters’ souls, allowing viewers to adapt the emotions on another level.
04 Extreme Close-Up (XCU)
To understand the extreme close-up video framing technique, let us illustrate the movie that remained our favorite action thriller while growing up: Minority Report (2002). In this movie, the shots briefly focus on the character’s eyes before hopping into the future view. This extreme close shot serves as a crucial plot to develop thematic elements in the audience.
So, an extremely close shot focuses on specific details of a character. This can be either the subject’s eyes, ears, or mouth. However, the shot is not often employed casually. Instead, it is used in a stance where it is appropriate and when there is a need to develop heightened emotion among the viewers.
You can see this shot as a magnifying glass that draws attention to even the smallest emotion that would have gone unnoticed otherwise.
Part2 Master framing types
Don’t know how to master framing types? No worries, we have a comprehensive guide on that! First of all, let’s start with the most basic way to frame a video:
01 Establishing Shots
An establishing shot is usually used to develop a context for the next upcoming scene. It is often a movie’s first scene and portrays an extremely wide shot of the context. This frame on the video indicates the location and time of the scene to the audience to engage with them on a deeper level.
One of the least-known things about an establishing shot is that it doesn’t require a narrative to explain what is happening. Instead, it is shot alone, and the context is shot so that the audience gets to know everything as soon as they see the excerpt.
An amazing example of establishing a shot can be seen in Stanely Kubrick’s horror film, The Shining. In the movie’s opening scene, the camera goes through the forest and mountains before getting onto the mountaintop hotel where the action occurs.
02 Single Shot
A single shot frames a video that includes a single subject or character. It occurs when a character is talking or reacting to a scenario. Here, remember that if the lens shifts focus from a subject, it is not a single shot.
In the movie Extraction 2020, you can see a single shot being utilized when the character goes on to rescue his son from the kidnappers. The shot extends a long way, including through a car crash, weapon chasing, and that iconic Hemsworth sliding off a building into a brutal fight. And the incredible part was that all of this was captured in a single shot.
03 Two Shot/Group Shot
As the name indicates, a two-shot or a group shot is used to frame a video that involves more than one character. It could be two people conversing or friends sitting at a cafe gossiping. This shot is particularly helpful in portraying the relationship between the characters in the frame.
A good example of two-shot video framing can be seen in the movie Silverado. During the final shooting scene, you can see two cowboys standing far apart while facing each other. Here, the two-shot technique emphasizes tension before the cowboys draw their guns.
04 Over-the-shoulder (OTS)
OTS, or Over-the-shoulder, is the most used shot in framing videos for making movies. To understand how this shot works, let us take an example of two subjects, one named A and the other named B. Now, A is sitting right in front of subject B. Here; the shot is executed by focusing on subject A from the shoulder of subject B. The basic purpose of the shot is to fill the conversation or the meeting between the subjects.
To understand this situation better, let’s take an example from the movie How to Train Your Dragon. In the scene, Hiccup is seen having a conversation with his father. Here, when Hiccup is talking, the camera is focused on him over his father’s shoulder. And when his father talks, the shot is taken over the shoulder of Hiccup.
05 Insert Shot
Insert short framing technique uses selective focus to draw the audience’s attention to the subject. Whether it be an object or merely a piece of information, insert shot has always been effective in emphasizing details.
For example, in The X-Files, an insert shot is used to provide the audience with a look at the file of Scully. This insert shot reveals the most shocking revelations in the file, including a tissue sample. Additionally, the file insert shot also shows how shady Mulder is.
06 POV Shot
A POV shot is used to frame a video in a way that shows what a character is doing. You can take this as a shot showing the world from the character’s perspective. Our modern-day games, including Call of Duty Black Ops, are a common example of such POV shots.
The movie Friday the 13th is an iconic example of a POV shot frame on video. If you remember, the movie revolved around a killer who wasn’t identified until the end. So, the audience watched the film from the killer’s perspective until he was recognized.
Conclusion
To sum it up, mastering the art of video framing, from full shots to POV shots, is an exciting journey that helps you to weave exciting stories. Understanding these techniques will empower you to craft a compelling narrative to captivate your audience, whether you are a beginner or a professional.
So, begin with framing videos now and let your work speak volumes!
Also read:
- Updated Guide to Making Cinematography for Music Video for 2024
- This Article Covers a Lot of Information About the Freeze-Frame Effect. It Includes Its Power, Its Usage in Films, and How to Create It in Your Videos Using Filmora. It Will Get You a Super Exciting Cinematic Effect for 2024
- Updated 4 Methods to Merge MP4 and MP3
- How to Get the Most Out of KineMaster Video Templates for 2024
- New Guide to Add Transition Effects in Premiere Pro
- Updated In 2024, Guide To Cropping and Combining Content in Wondershare Filmora Latest
- Updated Find Out What Ray Tracing Is in After Effects, How It Works, and Learn About Ray-Traced 3D Settings with Simple Instructions
- New Top 10 Free WhatsApp Video Converter for 2024
- Updated Detailed Steps to Rotate Videos in Davinci Resolve
- New Steps to Rotate Videos in Lightworks for 2024
- Powerpoint Supported Video Format and User Tips
- Best Ways to Blur Zoom Background for Free
- New Best 5 GIF to Video Converters You Cant-Miss
- New Create a Stunning Light Sweep Effect in Filmora. Use Simple and Easy Steps to Export a High-Quality Video that Will Impress Even Pro Video Editors
- New How to Make Vintage Film Effect 1980S
- Updated Stunning Glitch Effect and Its Creation Guideline for Premiere Pro
- Dollar-Store DIY Hacks to Use for Filmmaking on a Budget for 2024
- Apply These Techniques to Improve How to Detect Fake GPS Location On Infinix Note 30 Pro | Dr.fone
- How to Transfer Data from Huawei Nova Y71 to Other Android Devices? | Dr.fone
- 3 Effective Ways to Bypass Activation Lock on Apple iPhone 12 Pro
- Complete guide for recovering contacts files on HTC .
- Spoofing Life360 How to Do it on Oppo F23 5G? | Dr.fone
- How to Unlock iPhone 14 Pro Max Passcode Screen?
- Here are Some of the Best Pokemon Discord Servers to Join On Oppo Find X6 | Dr.fone
- How to Wipe iPhone 7 Plus Data Permanently? | Stellar
- What to Do if Google Play Services Keeps Stopping on Vivo Y200 | Dr.fone
- Apply These Techniques to Improve How to Detect Fake GPS Location On Nubia Z50 Ultra | Dr.fone
- Updated Whats the Best 10 Photo Animator Templates That Bring Your Images to Life, In 2024
- Why Your OnePlus Nord CE 3 Lite 5G Screen Might be Unresponsive and How to Fix It | Dr.fone
- How to Remove a Previously Synced Google Account from Your Vivo Y78+
- Title: New How To Create Quiz Videos Detailed Guide
- Author: Chloe
- Created at : 2024-06-09 16:15:22
- Updated at : 2024-06-10 16:15:22
- Link: https://ai-editing-video.techidaily.com/new-how-to-create-quiz-videos-detailed-guide/
- License: This work is licensed under CC BY-NC-SA 4.0.

