:max_bytes(150000):strip_icc():format(webp)/GettyImages-1353420724-65161751b9924195880d3273e327cb54.jpg)
New How to Denoise in Final Cut Pro – Reduce Video and Audio Noise

How to Denoise in Final Cut Pro – Reduce Video and Audio Noise
Whenever it comes to the term denoise, we usually get kind of “lost in translation” – does it mean to remove or reduce just the background noise in terms of audio, or does it intend noise effect on the actual scene which we see visually? Anyway, using video editors, denoising is possible in both ways. And why should we denoise at all? – to find out, we will touch upon both issues, and learn how to do those two things in Final Cut Pro.
How to remove background noise in Final Cut Pro?
It doesn’t really matter if you are preparing a video for youtube, a podcast, or any other content with audio in it – for your listeners to be engaged, you need a clear audio, but sometimes that is not the case. You might even find unnecessary background noise after recording the video or audio, and it can be really annoying – that kind of recording gives your audio tracks an unprofessional touch, which can lead to disengaged listeners, the viewers who just don’t want to listen to it anymore. But it’s always possible to turn the tables – and for it, using video editors might really give us a hand. So, Final Cut Pro, which is developed only for Macs (so, you will not be able to use this software on the PC), can solve this problem for you.
So, if you are using Final Cut Pro 10.6, it’s possible to achieve your goal without using any plug-ins. In such a case, there are special effects to use. First of all, let us say that you have an audio file which you want to be corrected because it has some echo, hum, background noise; so you import that one into the programme, namely, timeline.
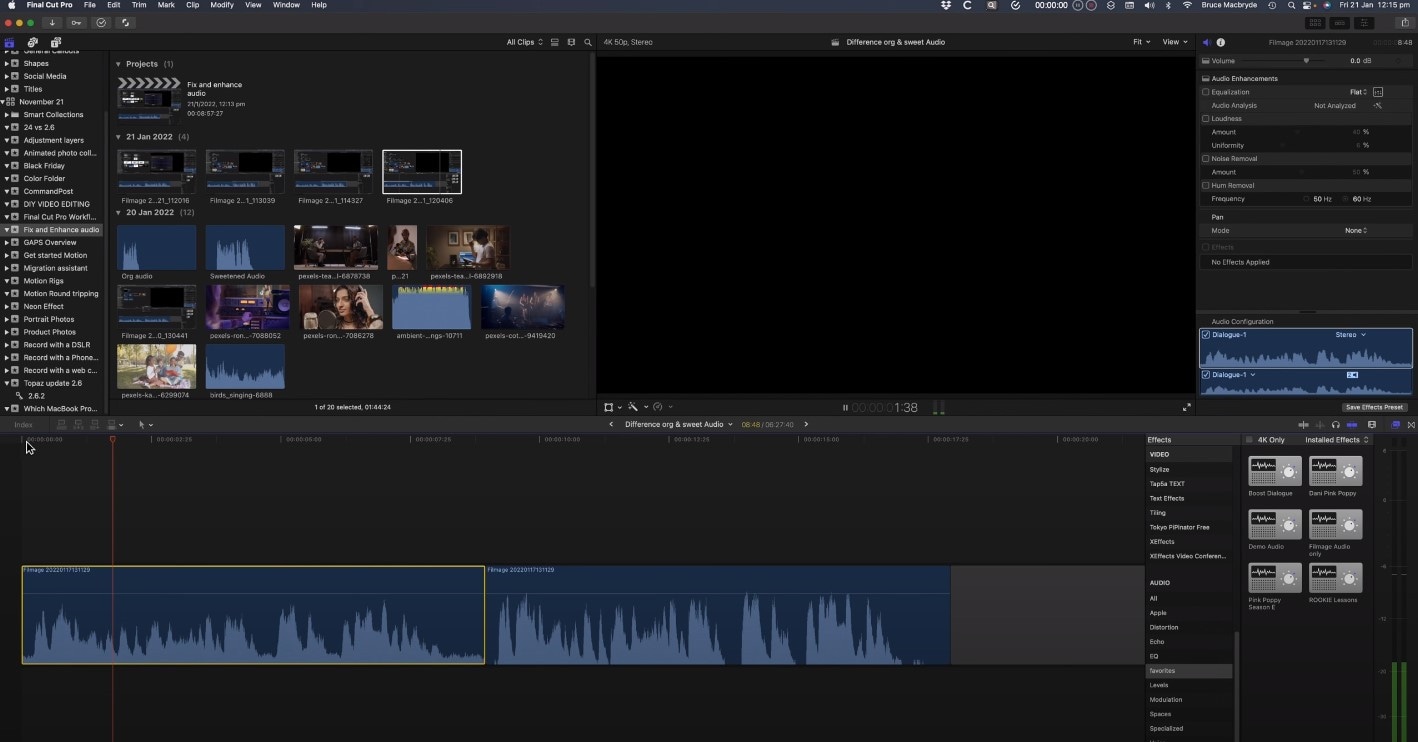
You will need to first use Equalatization, which is under the Audio Enhancements.
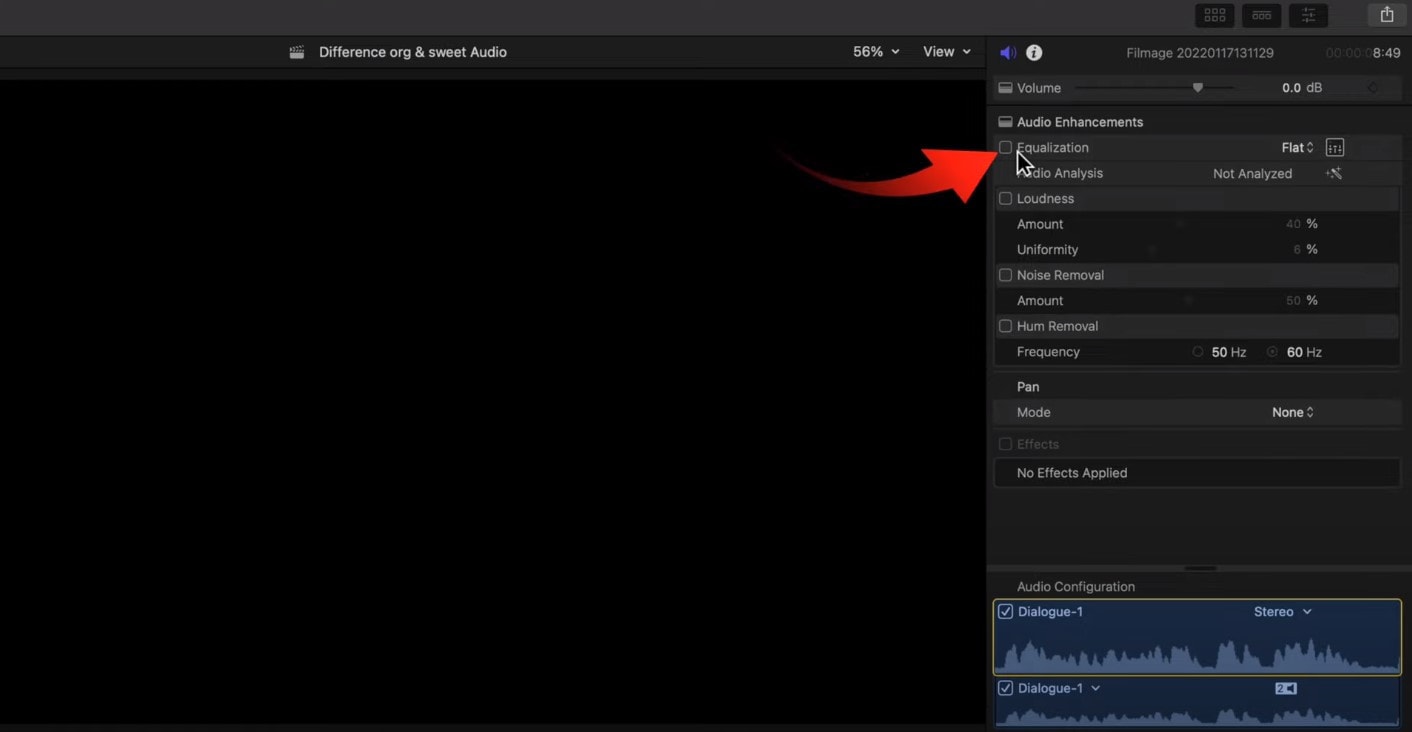
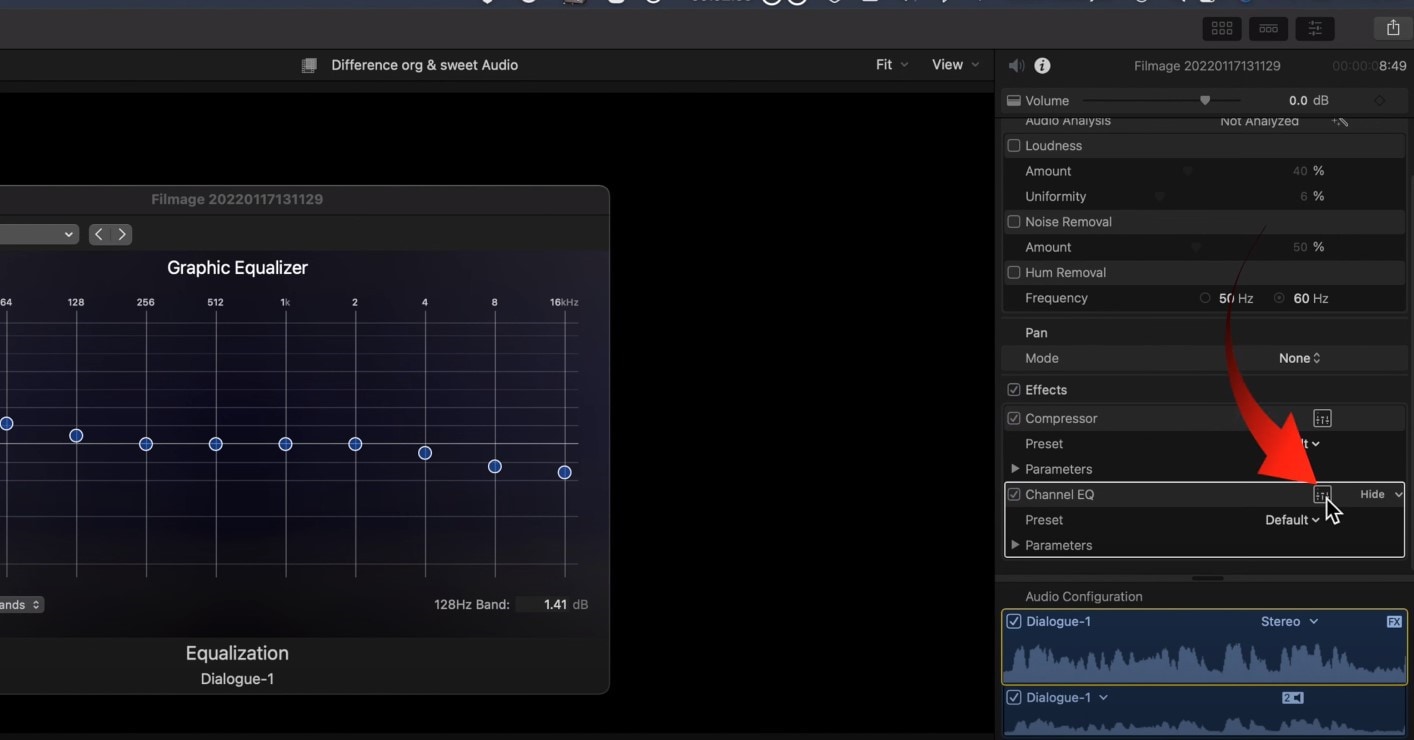
You will need to check the square that opens the equalizer and shows graphics for it. The high frequencies are on the right, and the low ones you will find on the left. Lower the highs and raise the points a little on the left side.
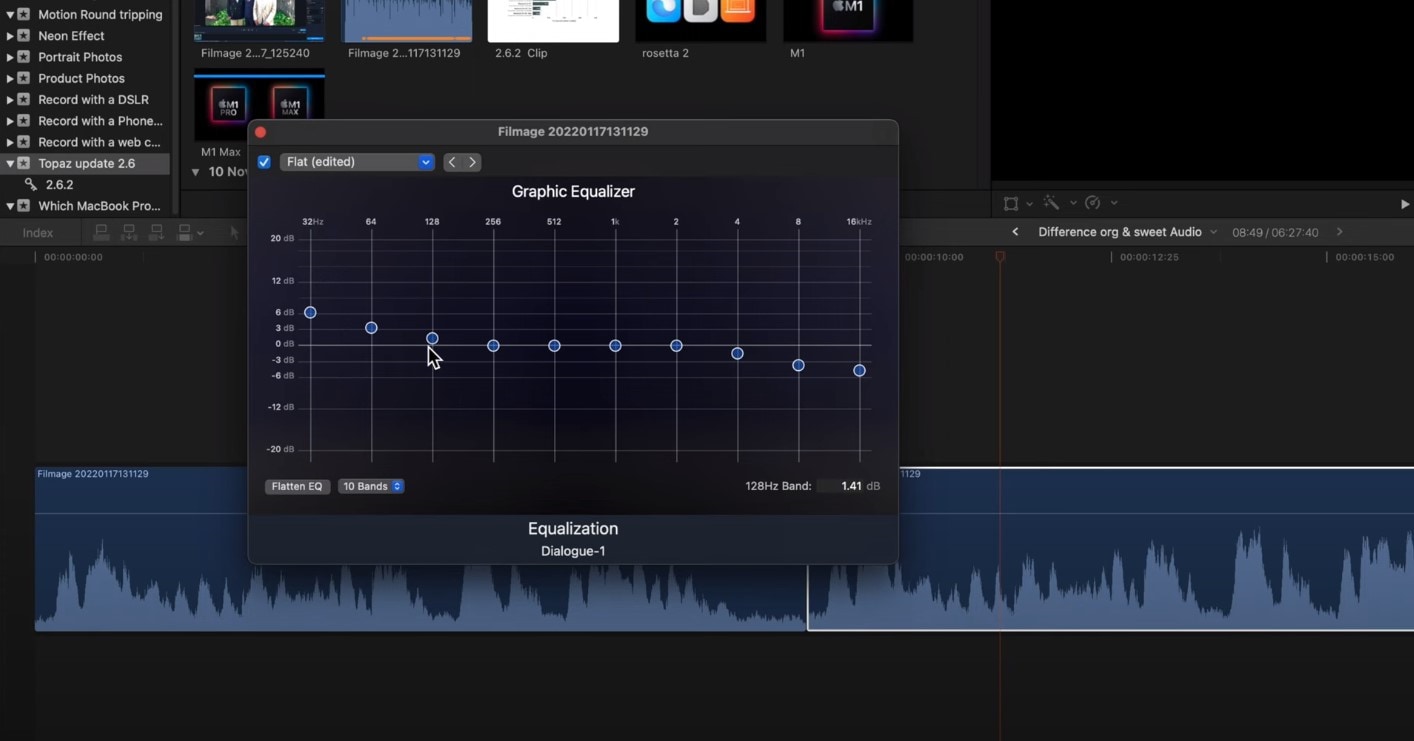
Next step would be to level out the lows and highs of the voice using a Compressor. You will find this effect in Installed Effects, which you need to drag and drop on the audio, and it will raise the whispers and lower the shouts in the audio.
Some background noise will still be there, so you then can find Channel EQ effect you will find in the effects. You need to drag it on the clip, then click on the equalize button in the inspector, and this time, reduce the lower levels on the left, while you also lower the highs on the right.
Lastly, you will need to use the Noise Gate effect. This will cut out all of the sounds between words, so when someone in the audio is not speaking, there will be no background noise at all.
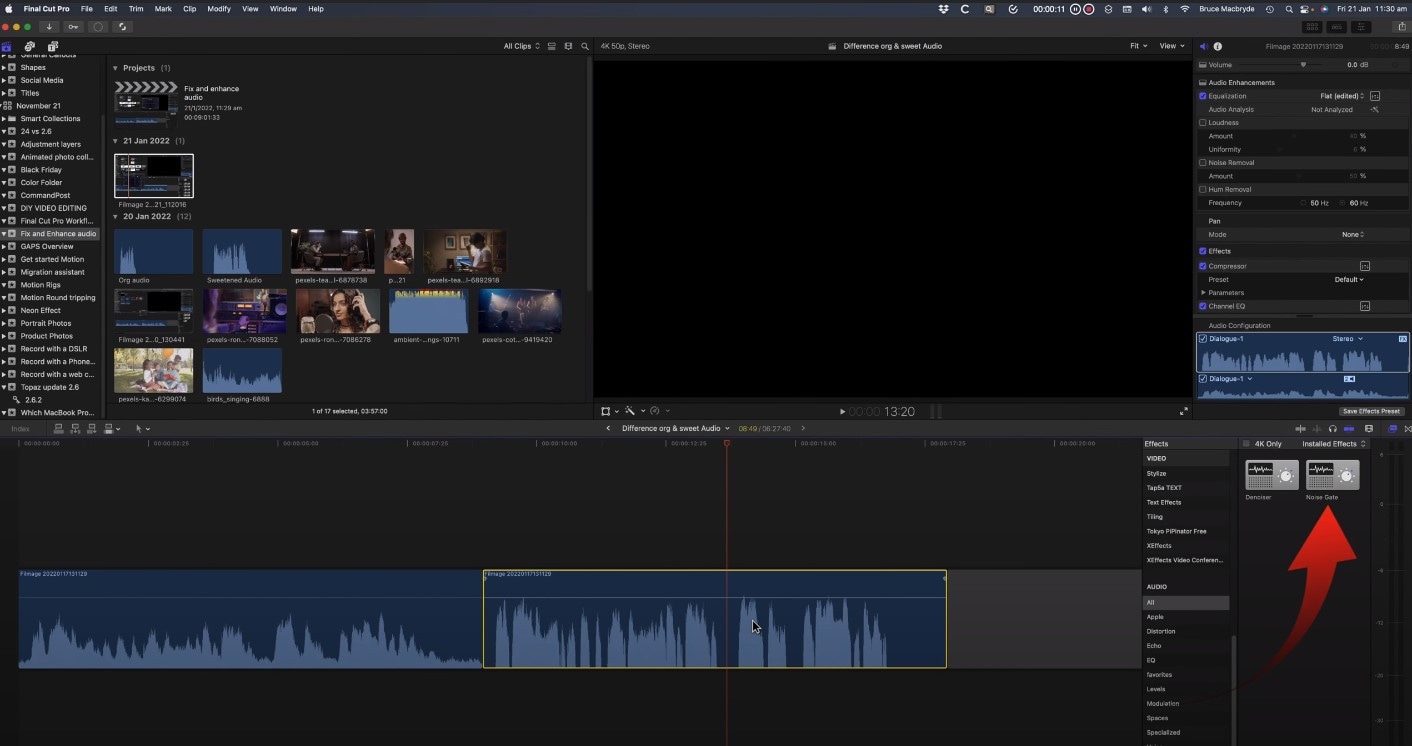
In case this kind of cutting noise out doesn’t sound natural, you can look into Noise Gate Parameters and concentrate on two of them – reduction and release. If you drag the latter right, the noise will raise, and reduction will also raise noise a little, in order to reduce the clipping.
How to denoise a video in Final Cut Pro?
But what is noise in terms of videos? It means that the video is not clear, but instead, the clip has grains on it, which is not so pleasant to see (unless you use noise/grain effect with some purpose!). the noise usually appear when the shot was taken in an environment with not enough white, or, in other cases, when the video was taken with small-sensory equipment, for example, smartphone or action camera.
And Final Cut Pro is one of the video editors where you can remove or reduce the noise and make your footage look clearer than it would have been originally, and it will guarantee that people who are interested and watch your clip will have a better experience. So, let’s learn step by step how to denoise the video in our beloved Final Cut Pro, which added this feature only starting from Final Cut Pro 10.4.4 – it means that before, the task was only done by using some expensive plug-ins, but starting from this version of the program, the software has video noise reduction effect itself.
So, choose the video which has some noise and grain and you wish to edit. Bring it in the program, and click on it in the timeline, in order to select it. The video should appear in the viewer, and you will be able to see the noise right away or whenever you zoom in a little. Then, you will need to find the Effects – you can just use the shortcut and click on Command and 5, or find the panel in the top-right corner of the timeline. Whenever Effects appear, you will need to select the Basic category, and then double-click the icon to apply the noise reduction filter, and close the window. It might take a while to analyze the clip for noise.
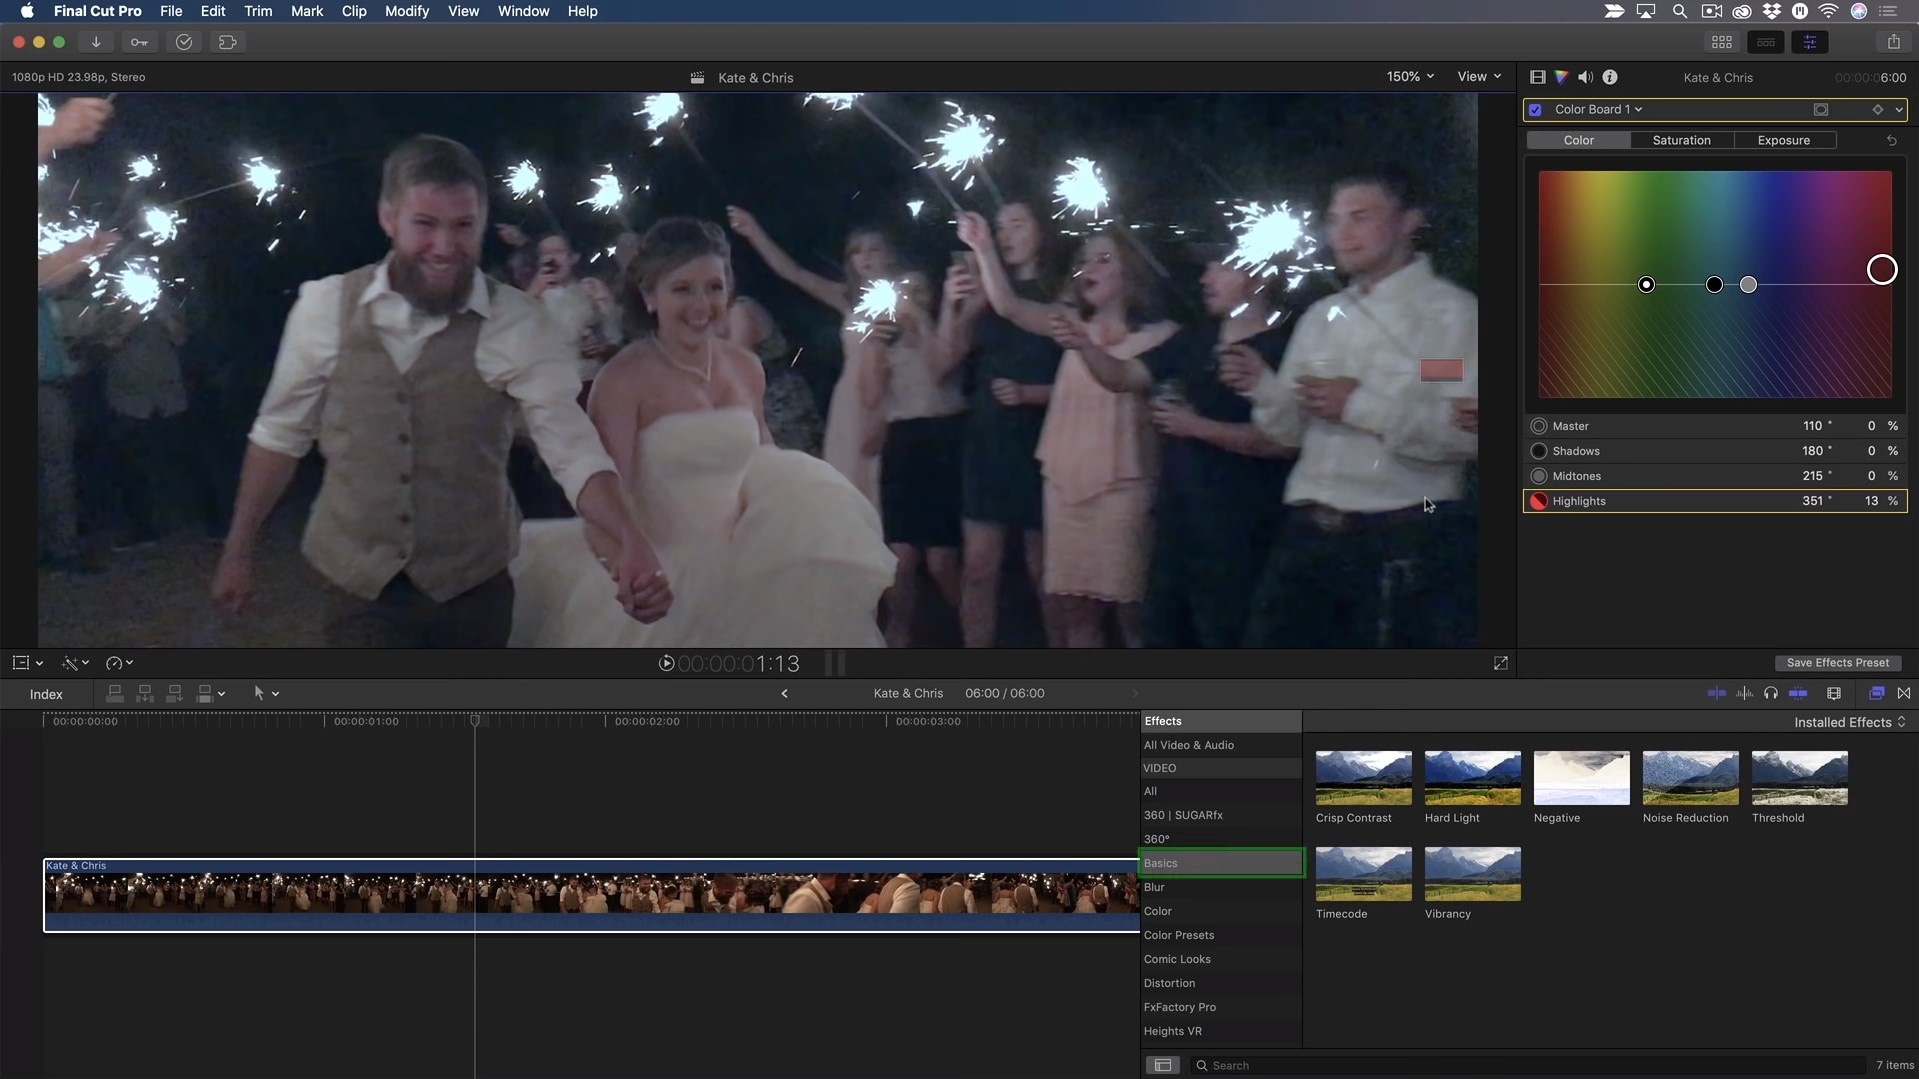
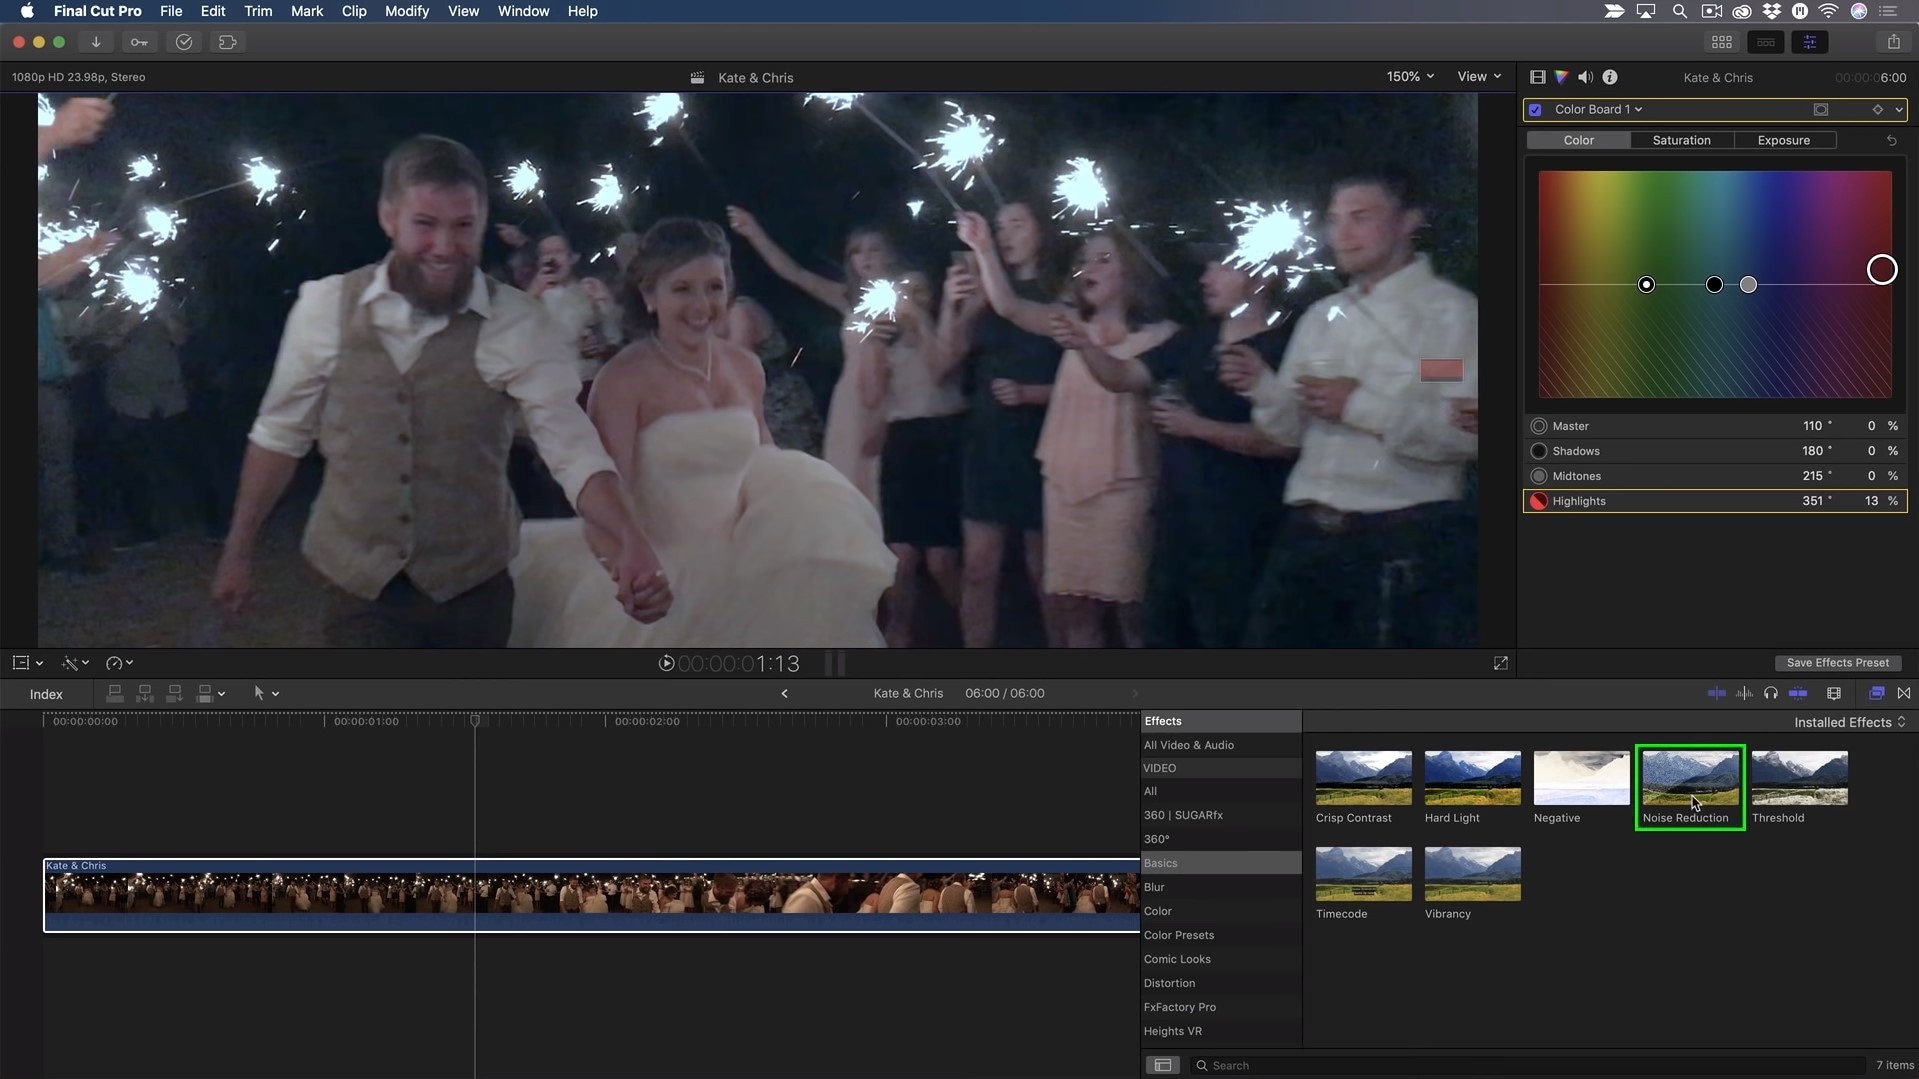
In the inspector, you will find the controls for noise reduction, which only include the Amount and Sharpness.
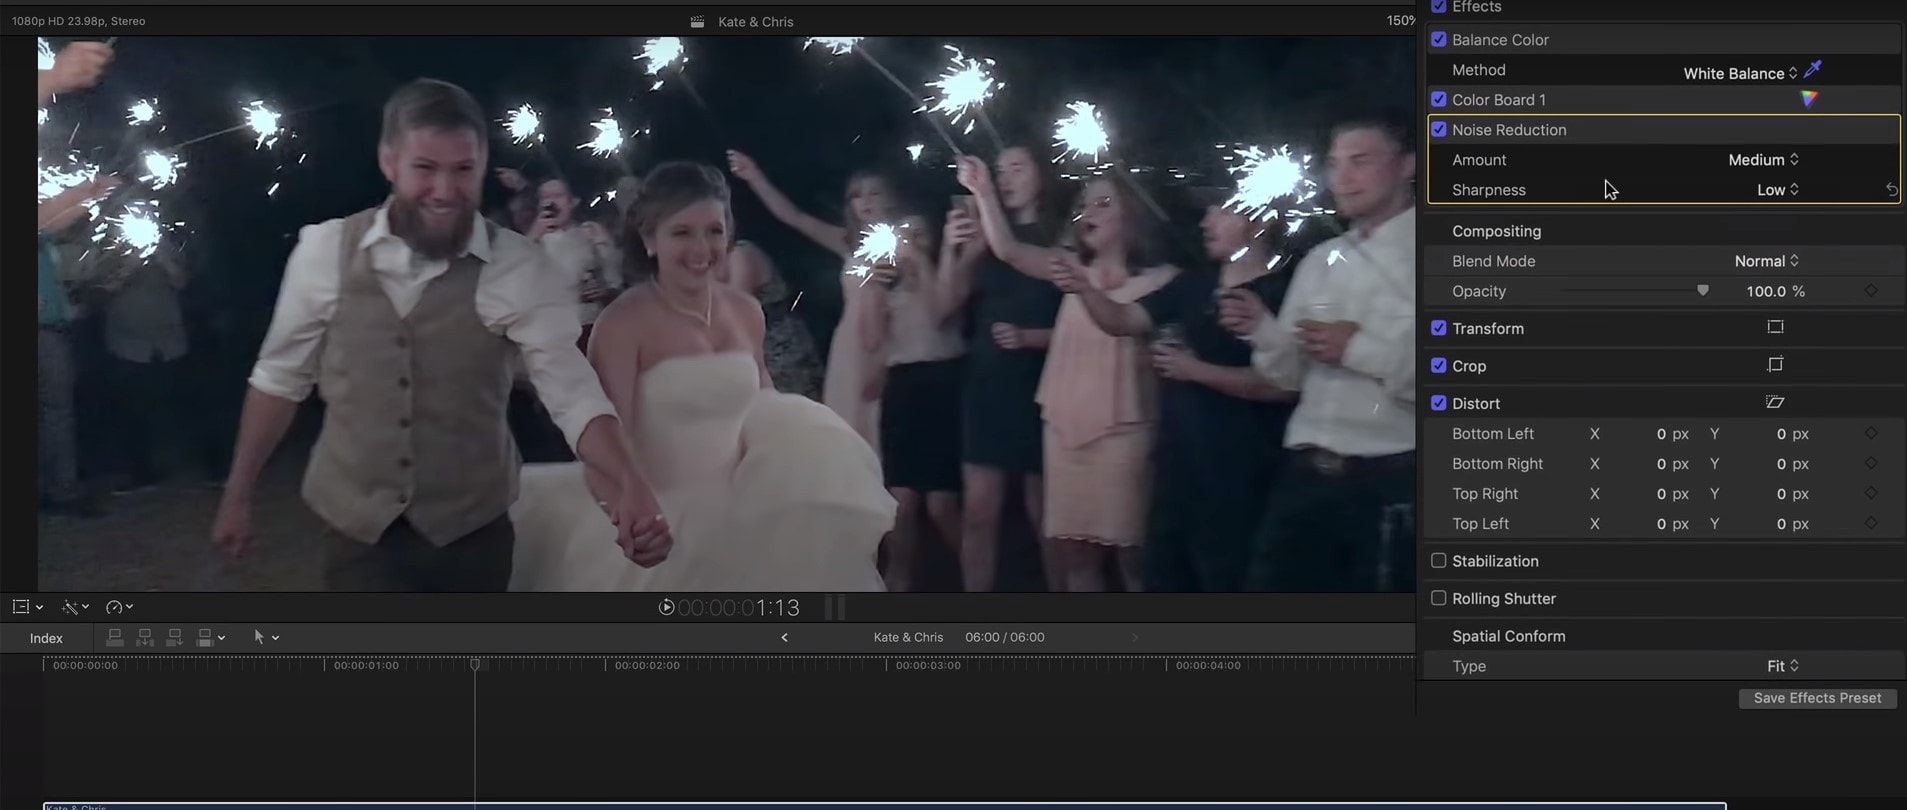
You might as well boost the amount to high, then you can take a look at the image to evaluate the result. One way to do the last step is to uncheck the box next to the Noise Reduction as well, which will disable the filter until you check the box again.
You can also change the Sharpness to Medium, which will compensate for the soft look the effect produces.
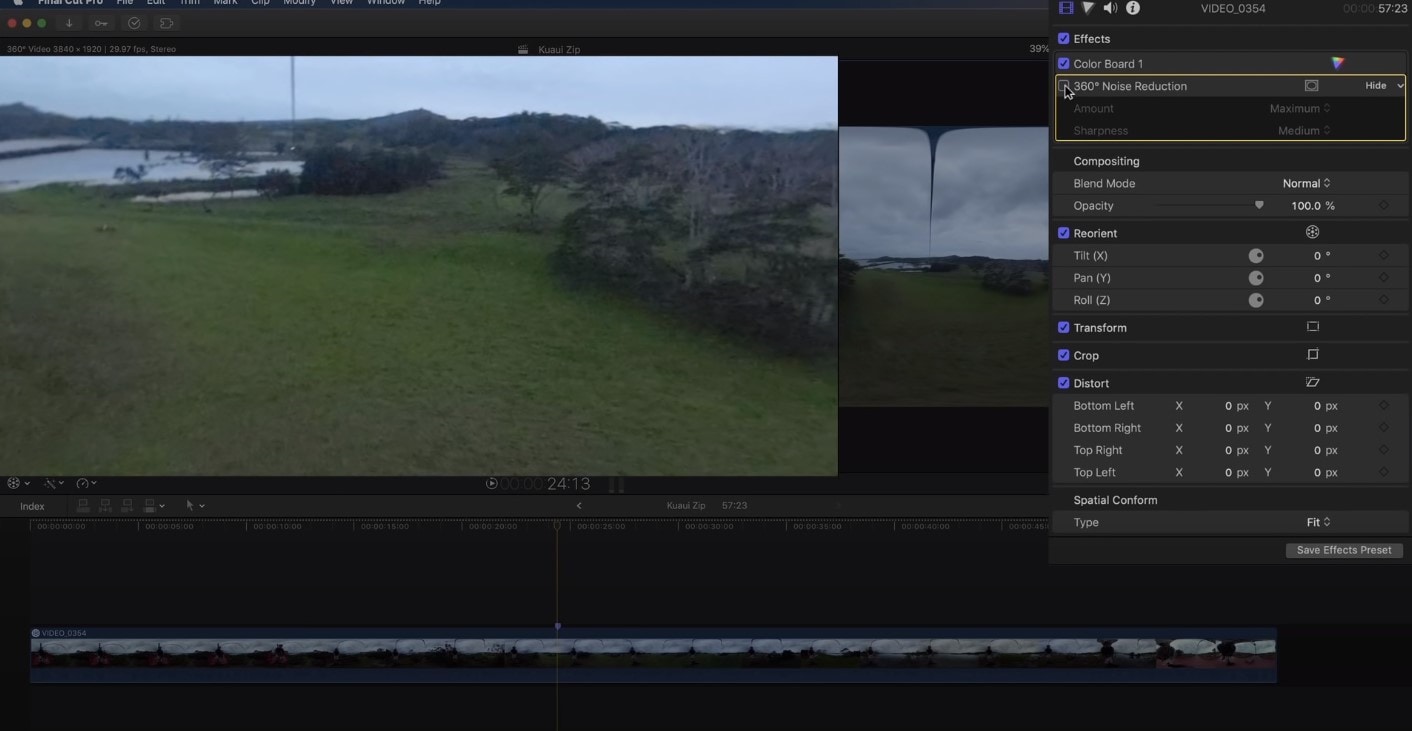
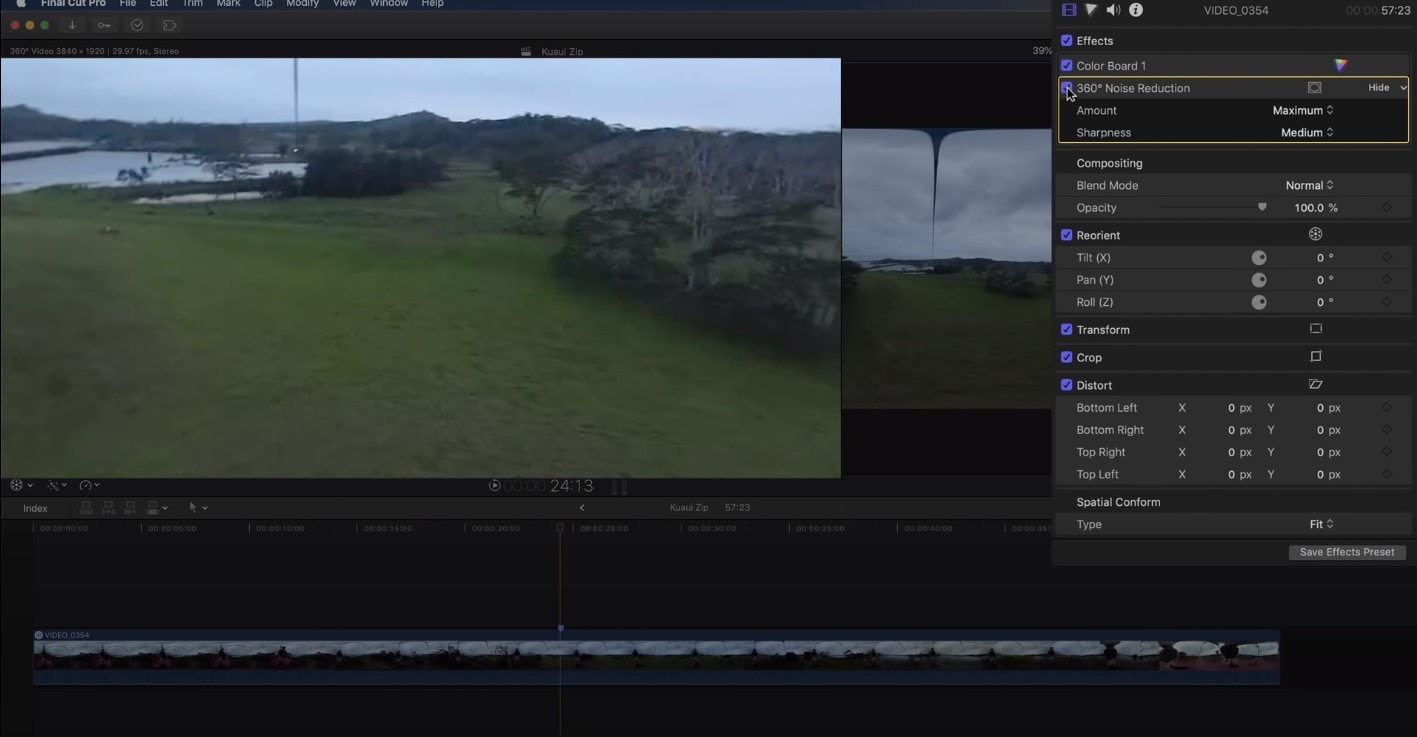
And, there is also a noise reduction effect dedicated to 360 viewers, which is called 360 Noise Reduction. As you can see, the effect removes a lot of noise and makes the grainy video look clearer and more enjoyable, besides, if you move around the sphere in the viewer, the effect seems quite seamless!
Bonus tip: how to remove audio noise in video with Filmora
In case you don’t own Mac or just want to operate in another computer program, then Wondershare Filmora would make a great alternative – it’s one of the software that can help you get rid of the background noise. How to do it there? Follow this guideline:
First off, of course, you need to drag and drop the video into the timeline. Then, in order to edit the audio of the video separately, you’ll need to right-click on the video and find Detach Audio.

Double-clicking on the audio track in the sequence will show the editing panel, where you can find – Remove background noise, which, as it is obvious, will remove the noise directly.

So, in this article, we learned how to denoise in Final Cut Pro – both in terms of audio background noise, and noise and grain on the video, and we learned how to get rid of audio noise in Wondershare Filmora in the easiest and fastest way!
You will need to first use Equalatization, which is under the Audio Enhancements.

You will need to check the square that opens the equalizer and shows graphics for it. The high frequencies are on the right, and the low ones you will find on the left. Lower the highs and raise the points a little on the left side.

Next step would be to level out the lows and highs of the voice using a Compressor. You will find this effect in Installed Effects, which you need to drag and drop on the audio, and it will raise the whispers and lower the shouts in the audio.

Some background noise will still be there, so you then can find Channel EQ effect you will find in the effects. You need to drag it on the clip, then click on the equalize button in the inspector, and this time, reduce the lower levels on the left, while you also lower the highs on the right.

Lastly, you will need to use the Noise Gate effect. This will cut out all of the sounds between words, so when someone in the audio is not speaking, there will be no background noise at all.

In case this kind of cutting noise out doesn’t sound natural, you can look into Noise Gate Parameters and concentrate on two of them – reduction and release. If you drag the latter right, the noise will raise, and reduction will also raise noise a little, in order to reduce the clipping.
How to denoise a video in Final Cut Pro?
But what is noise in terms of videos? It means that the video is not clear, but instead, the clip has grains on it, which is not so pleasant to see (unless you use noise/grain effect with some purpose!). the noise usually appear when the shot was taken in an environment with not enough white, or, in other cases, when the video was taken with small-sensory equipment, for example, smartphone or action camera.
And Final Cut Pro is one of the video editors where you can remove or reduce the noise and make your footage look clearer than it would have been originally, and it will guarantee that people who are interested and watch your clip will have a better experience. So, let’s learn step by step how to denoise the video in our beloved Final Cut Pro, which added this feature only starting from Final Cut Pro 10.4.4 – it means that before, the task was only done by using some expensive plug-ins, but starting from this version of the program, the software has video noise reduction effect itself.
So, choose the video which has some noise and grain and you wish to edit. Bring it in the program, and click on it in the timeline, in order to select it. The video should appear in the viewer, and you will be able to see the noise right away or whenever you zoom in a little. Then, you will need to find the Effects – you can just use the shortcut and click on Command and 5, or find the panel in the top-right corner of the timeline. Whenever Effects appear, you will need to select the Basic category, and then double-click the icon to apply the noise reduction filter, and close the window. It might take a while to analyze the clip for noise.


In the inspector, you will find the controls for noise reduction, which only include the Amount and Sharpness.

You might as well boost the amount to high, then you can take a look at the image to evaluate the result. One way to do the last step is to uncheck the box next to the Noise Reduction as well, which will disable the filter until you check the box again.
You can also change the Sharpness to Medium, which will compensate for the soft look the effect produces.
And, there is also a noise reduction effect dedicated to 360 viewers, which is called 360 Noise Reduction. As you can see, the effect removes a lot of noise and makes the grainy video look clearer and more enjoyable, besides, if you move around the sphere in the viewer, the effect seems quite seamless!


Bonus tip: how to remove audio noise in video with Filmora
In case you don’t own Mac or just want to operate in another computer program, then Wondershare Filmora would make a great alternative – it’s one of the software that can help you get rid of the background noise. How to do it there? Follow this guideline:
First off, of course, you need to drag and drop the video into the timeline. Then, in order to edit the audio of the video separately, you’ll need to right-click on the video and find Detach Audio.

Double-clicking on the audio track in the sequence will show the editing panel, where you can find – Remove background noise, which, as it is obvious, will remove the noise directly.

So, in this article, we learned how to denoise in Final Cut Pro – both in terms of audio background noise, and noise and grain on the video, and we learned how to get rid of audio noise in Wondershare Filmora in the easiest and fastest way!
You will need to first use Equalatization, which is under the Audio Enhancements.

You will need to check the square that opens the equalizer and shows graphics for it. The high frequencies are on the right, and the low ones you will find on the left. Lower the highs and raise the points a little on the left side.

Next step would be to level out the lows and highs of the voice using a Compressor. You will find this effect in Installed Effects, which you need to drag and drop on the audio, and it will raise the whispers and lower the shouts in the audio.

Some background noise will still be there, so you then can find Channel EQ effect you will find in the effects. You need to drag it on the clip, then click on the equalize button in the inspector, and this time, reduce the lower levels on the left, while you also lower the highs on the right.

Lastly, you will need to use the Noise Gate effect. This will cut out all of the sounds between words, so when someone in the audio is not speaking, there will be no background noise at all.

In case this kind of cutting noise out doesn’t sound natural, you can look into Noise Gate Parameters and concentrate on two of them – reduction and release. If you drag the latter right, the noise will raise, and reduction will also raise noise a little, in order to reduce the clipping.
How to denoise a video in Final Cut Pro?
But what is noise in terms of videos? It means that the video is not clear, but instead, the clip has grains on it, which is not so pleasant to see (unless you use noise/grain effect with some purpose!). the noise usually appear when the shot was taken in an environment with not enough white, or, in other cases, when the video was taken with small-sensory equipment, for example, smartphone or action camera.
And Final Cut Pro is one of the video editors where you can remove or reduce the noise and make your footage look clearer than it would have been originally, and it will guarantee that people who are interested and watch your clip will have a better experience. So, let’s learn step by step how to denoise the video in our beloved Final Cut Pro, which added this feature only starting from Final Cut Pro 10.4.4 – it means that before, the task was only done by using some expensive plug-ins, but starting from this version of the program, the software has video noise reduction effect itself.
So, choose the video which has some noise and grain and you wish to edit. Bring it in the program, and click on it in the timeline, in order to select it. The video should appear in the viewer, and you will be able to see the noise right away or whenever you zoom in a little. Then, you will need to find the Effects – you can just use the shortcut and click on Command and 5, or find the panel in the top-right corner of the timeline. Whenever Effects appear, you will need to select the Basic category, and then double-click the icon to apply the noise reduction filter, and close the window. It might take a while to analyze the clip for noise.


In the inspector, you will find the controls for noise reduction, which only include the Amount and Sharpness.

You might as well boost the amount to high, then you can take a look at the image to evaluate the result. One way to do the last step is to uncheck the box next to the Noise Reduction as well, which will disable the filter until you check the box again.
You can also change the Sharpness to Medium, which will compensate for the soft look the effect produces.
And, there is also a noise reduction effect dedicated to 360 viewers, which is called 360 Noise Reduction. As you can see, the effect removes a lot of noise and makes the grainy video look clearer and more enjoyable, besides, if you move around the sphere in the viewer, the effect seems quite seamless!


Bonus tip: how to remove audio noise in video with Filmora
In case you don’t own Mac or just want to operate in another computer program, then Wondershare Filmora would make a great alternative – it’s one of the software that can help you get rid of the background noise. How to do it there? Follow this guideline:
First off, of course, you need to drag and drop the video into the timeline. Then, in order to edit the audio of the video separately, you’ll need to right-click on the video and find Detach Audio.

Double-clicking on the audio track in the sequence will show the editing panel, where you can find – Remove background noise, which, as it is obvious, will remove the noise directly.

So, in this article, we learned how to denoise in Final Cut Pro – both in terms of audio background noise, and noise and grain on the video, and we learned how to get rid of audio noise in Wondershare Filmora in the easiest and fastest way!
You will need to first use Equalatization, which is under the Audio Enhancements.

You will need to check the square that opens the equalizer and shows graphics for it. The high frequencies are on the right, and the low ones you will find on the left. Lower the highs and raise the points a little on the left side.

Next step would be to level out the lows and highs of the voice using a Compressor. You will find this effect in Installed Effects, which you need to drag and drop on the audio, and it will raise the whispers and lower the shouts in the audio.

Some background noise will still be there, so you then can find Channel EQ effect you will find in the effects. You need to drag it on the clip, then click on the equalize button in the inspector, and this time, reduce the lower levels on the left, while you also lower the highs on the right.

Lastly, you will need to use the Noise Gate effect. This will cut out all of the sounds between words, so when someone in the audio is not speaking, there will be no background noise at all.

In case this kind of cutting noise out doesn’t sound natural, you can look into Noise Gate Parameters and concentrate on two of them – reduction and release. If you drag the latter right, the noise will raise, and reduction will also raise noise a little, in order to reduce the clipping.
How to denoise a video in Final Cut Pro?
But what is noise in terms of videos? It means that the video is not clear, but instead, the clip has grains on it, which is not so pleasant to see (unless you use noise/grain effect with some purpose!). the noise usually appear when the shot was taken in an environment with not enough white, or, in other cases, when the video was taken with small-sensory equipment, for example, smartphone or action camera.
And Final Cut Pro is one of the video editors where you can remove or reduce the noise and make your footage look clearer than it would have been originally, and it will guarantee that people who are interested and watch your clip will have a better experience. So, let’s learn step by step how to denoise the video in our beloved Final Cut Pro, which added this feature only starting from Final Cut Pro 10.4.4 – it means that before, the task was only done by using some expensive plug-ins, but starting from this version of the program, the software has video noise reduction effect itself.
So, choose the video which has some noise and grain and you wish to edit. Bring it in the program, and click on it in the timeline, in order to select it. The video should appear in the viewer, and you will be able to see the noise right away or whenever you zoom in a little. Then, you will need to find the Effects – you can just use the shortcut and click on Command and 5, or find the panel in the top-right corner of the timeline. Whenever Effects appear, you will need to select the Basic category, and then double-click the icon to apply the noise reduction filter, and close the window. It might take a while to analyze the clip for noise.


In the inspector, you will find the controls for noise reduction, which only include the Amount and Sharpness.

You might as well boost the amount to high, then you can take a look at the image to evaluate the result. One way to do the last step is to uncheck the box next to the Noise Reduction as well, which will disable the filter until you check the box again.
You can also change the Sharpness to Medium, which will compensate for the soft look the effect produces.
And, there is also a noise reduction effect dedicated to 360 viewers, which is called 360 Noise Reduction. As you can see, the effect removes a lot of noise and makes the grainy video look clearer and more enjoyable, besides, if you move around the sphere in the viewer, the effect seems quite seamless!


Bonus tip: how to remove audio noise in video with Filmora
In case you don’t own Mac or just want to operate in another computer program, then Wondershare Filmora would make a great alternative – it’s one of the software that can help you get rid of the background noise. How to do it there? Follow this guideline:
First off, of course, you need to drag and drop the video into the timeline. Then, in order to edit the audio of the video separately, you’ll need to right-click on the video and find Detach Audio.

Double-clicking on the audio track in the sequence will show the editing panel, where you can find – Remove background noise, which, as it is obvious, will remove the noise directly.

So, in this article, we learned how to denoise in Final Cut Pro – both in terms of audio background noise, and noise and grain on the video, and we learned how to get rid of audio noise in Wondershare Filmora in the easiest and fastest way!
Here’s All About GIF Keyboard You’ll Ever Want to Know
All About GIF Keyboard That You Want to Know
An easy yet powerful editor
Numerous effects to choose from
Detailed tutorials provided by the official channel
Add more thrill to the meme sharing fun with the GIF keyboard!
GIFs are absolutely stunning means of mass information sharing. Talking of exact GIF meaning, these are short, motion snippets you can use to make your messages more expressive and precise. A variety of GIF images are available across the web, allowing you to emote and convey exactly what you feel in the most unique and interesting manner.
In this article
01 [The Best 8 GIF Keyboards for Your iPhone](#Part 1)
02 [How to Text Gifs on Android](#Part 2)
03 [How to Get the Imessage GIF Keyboard](#Part 3)
Part 1 The Best 8 GIF Keyboards for Your iPhone
GIFs are already known to add spice to the immense varieties of the ‘content share’ dish. You can boost up your information credibility to the next level with exciting, relatable and impactful GIFs. Adding to the preset resourcefulness, makers have introduced the GIF keyboard, which is all set to fetch the exact GIFs with your specified keyword, making you access the content that you precisely want.
Having understood the reliability of GIF keyboards, let us browse through the best ones you can use in your iPhone:
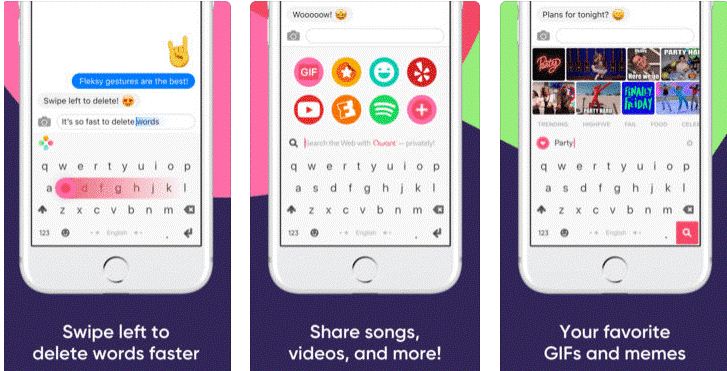
01Fleksy Keyboard
This one is an inventive and exciting GIF keyboard that you can use for making fun-filled conversations and sharing amazing content with your social media peers and communities. You can conveniently customize the extensions of this keyboard and use its expressive stickers and emojis to emote your chats in the most perfect way.
Fleksy comes with 3 different GIF keyboards supports around 40 different languages with over 50 vibrant themes and has a quick and smart user interface.
Pros
● Fleksy is the fastest GIF keyboard currently available for iPhone.
● It has an exclusive GIF sharing feature
● Loaded with numerous GIF extension features, like, hotkey, stickers, etc.
Cons
● You can use this keyboard only on iPhones with iOS version 8.0 onwards.
● You need an internet connection to download this keyboard from the Apple App Store.
● It does not have the facility of swipe input.
Cost
This one is free application and does not cost you a penny to download and use.
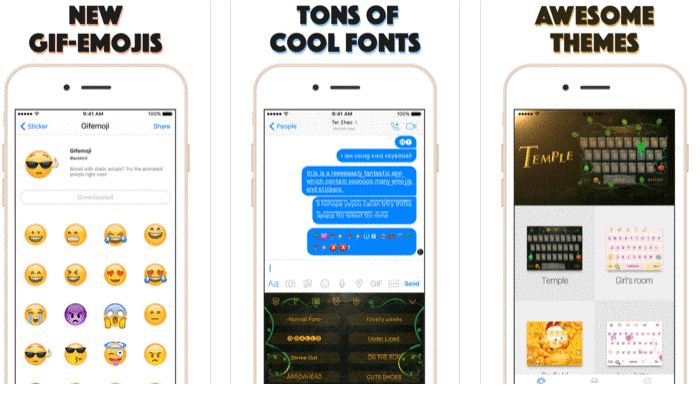
02Kika Keyboard
This one falls among the most loved GIF keyboards by iPhone users. Using this keyboard you can share memes, emojis, fonts, etc., with other iPhone users. Preferred by 20 million plus users, this keyboard supports 150 languages and comes with an Autocorrect feature that never lets you make any typing mistakes. It has a huge inventory of over 3000 GIFs and emoticons.
Pros
● It has a top grade security for personal information and community chat data.
● It has a heap of impactful keyboard themes.
● Pop up GIFs and emojis are there to give you the freedom of exact expression.
Cons
● This keyboard is compatible with iOS devices having versions successive to 9.0.
● Downloading this keyboard from the Apple App Store requires an internet connection.
● Most of the keyboard styles are accessible in the paid version of the application.
Cost
This keyboard is available to you absolutely free of cost in its basic version. However, you need to pay some amount to get the paid version with premium features.
03GIF Keyboard
This is an absolute heaven for GIF lovers. You can use this keyboard on any of iOS devices to either create or share fun filled GIFs and memes to express your precise feelings and emotions with your friends. The keyboard has a user cohesive interface with a vast library of latest GIFs to explore and use.
Pros
● It assures hassle free Gif creation and sharing.
● You can create sticker and GIF packs to share with friends and family.
● You can share GIFs on a various media sharing platforms, like, SnapChat, WhatsApp, Twitter, Facebook, etc.
Cons
● You cannot use this keyboard on devices with iOS versions prior to 9.0.
● This application has a data security risk.
● You need an internet connectivity to get this one from the Apple App Store.
Cost
The app is primarily free to download and use, but cones with a few in-app purchases.
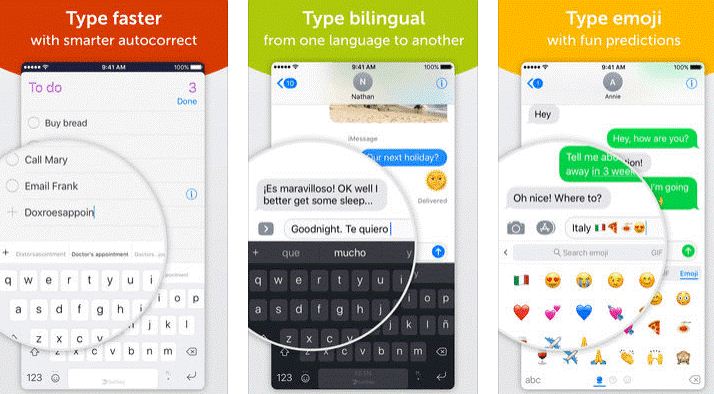
04SwiftKey Keyboard
This is also one of the top ranked GIF keyboards and undergoes continuous upgrades to increase app productivity among over 250 million loyal users across the world. You can add an extra punch to your conversations with living GIFs and emojis from its extensive content library. You can enjoy seamless typing and get the perfect themes, colors, designs and patterns to uplift your precious moments.
Pros
● This GIF keyboard supports a bilingual autocorrect feature with smart AI predictions.
● It comes with a quick access toolbar for speedy access and supports 90 different languages.
● It has a content reserve of over 1000 GIFs and emojis.
Cons
● This keyboard is compatible with iOS versions 9.3 and later.
● This keyboard lacks the ‘Save’ feature for your favorite GIFs.
● You cannot see the GIFs that you had recently sent in your conversations.
Cost
This application is free to use in its basic version, but asks you for a paid premium membership to access some advances features.
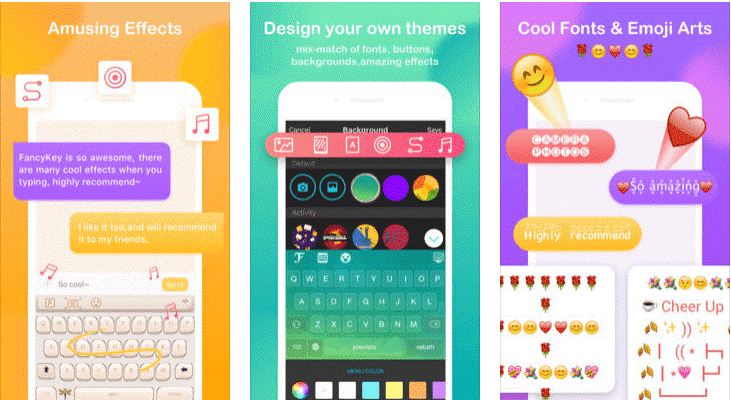
05FancyKey Keyboard
This is a smart choice to make among GIF keyboards for iPhone on account of being packed with explicitly customizable features, over 100 beautiful fonts and 50 vibrant themes. The best part is, the application is backed up with enhanced security and data privacy features. You can choose from the best auto suggest emoticons to express exactly what you feel.
Pros
● It allows you to make swipe inputs with accurate word predictions.
● Its integrated emoji art keyboard suggests exact and expressive facial expressions.
● It is compatible with almost every iOS device.
Cons
● The interface is loaded with quite a large number of access options.
● Finding your perfect content can be a bit time taking.
● You need an internet connection to download and use this keyboard.
Cost
You can get this keyboard for free on the Apple App Store.
06Gfycat
This is also quite ban efficient GIF keyboard you can use to share immense varieties of top quality GIFs, memes and stickers across your Instagram, Facebook and SnapChat accounts. Available in the most convenient user interface, this keyboard is packed with millions of GIFs and emojis to choose from.
Pros
● You can share content in various languages
● Its library is packed with GIFs and memes of HD quality.
● You can create GIFs of your own using your device’s camera.
Cons
● Keyboard features other than GIFs ate absent.
● Though high on quality, but the GIF images are quite small in size.
● You cannot save and view GIFs in the application.
Cost
You can use this keyboard absolutely free of cost on the Apple App Store.
07RainbowKey
As is evident from the name, this keyboard is packed with a range of vibrant themes to beautify the app background. Additionally, you can use still images from your device to create themes of your own. Its interactive interface shows pop up animations and emojis related to the content you type. You can find exciting GIF varieties from popular, trending and hashtag content categories.
Pros
● You can save your favorite GIFs and use them in future.
● You can create your own keyboard themes from locally saved images.
● Its smart AI feature predicts emojis and autocorrect suggestions as you type.
Cons
● It comes with a little tricky interface.
● The application may occasionally crash in between successive tan switches.
● It is supported on iOS versions later than 8.0.
Cost
The application is primarily free, but contains a few in-app purchases.
08Tenor GIF Keyboard
This is an extensive and smart GIF keyboard that allows you to make a number of GIF customizations in addition to sharing GIFs. You are granted the liberty to add captions to GIFs and save your favorite ones for later use by adding them to the exclusive GIF pack. The keyboard is launched by Tenor, which is apparently the most extensive GIF library across the web.
Pros
● You can caption your GIFs and save them locally to your device.
● You can make your explicit GIF pack to save and organize favorite GIFs for quick access.
● You can export your GIFs to almost all major media sharing platforms.
Cons
● The app has restricted keyboard functions
● The app interface may appear a bit crowded.
● You need internet connectivity to use this application
Cost
You can access and use this app for free.
Part 2 How to Text GIFs on Android
All Android devices cone with an inbuilt GIF sharing feature and it is more or less similar to sharing GIFs on iOS devices. The minor different encountered, is on account of using the Google keyboard for GIF texting via Android devices.
Now that you are accustomed to using GIFs keyboards for iPhone, let’s dive into methods of working with GIF texting on Android devices. After all, GIFs are a content credibility that is worthy of exploring beyond platform boundaries. Discussed below are some super easy steps of texting GIFs on Android devices:
● Navigate to, and open the inbuilt messaging application of your Android device.
● Tap any suitable emoticon on the keyboard.
● You will see a few file format options. Choose and tap the ‘GIF’ option.
● Look for your required GIF in the search bar or select one from the default or locally saved collections.
● Tap any suitable GIF to get its preview, followed by pressing the ‘Send’ button.
Part 1 How to Get the iMessage GIF Keyboard
Adding GIFs to iMessage is quite simple and handy, as the application opens up an extensive GIF library to save and share GIFs. While iPhone 10 and later version users are gifted with #images, the default GIF keyboard; there are alternatives too to get the iMessage GIF Keyboard for other versions.
Discussed below is a quick and convenient method to get the iMessage GIF keyboard for your iOS device:
● Reach to the ‘Messages’ application in your iPhone and open a new or an existing conversation.
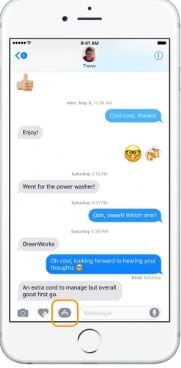
● In the text field, click on the ‘Apps’ button (‘A’ symbol) at the left side and you will see the #images keyboard pops up.
● In an otherwise case, navigate to the bottom of the app screen and hit the 4-bubble icon at the left to see the #images icon appear.
● Click on the icon to explore, search and select a suitable GIF.
● Before you send the selected GIF to your friends, you can make it more impactful by adding relatable texts.
Filmora GIF Creator
DIF keyboards are one exciting trend, but creating GIFs is equally interesting. If you are thinking to try hands on making GIFs of your own, the W**Wondershare Filmora Video Editor ** is at your instant service. This one is excellent GIF creator software, to say the least, available on the web today. You can conveniently depend on this to create stunning GIFs that would leave viewers jaw dropped on your creativity.

Wondershare Filmora - Best Video Editor for Mac/Windows
5,481,435 people have downloaded it.
Build unique custom animations without breaking a sweat.
Focus on creating epic stories and leave the details to Filmora’s auto features.
Start a creative adventure with drag & drop effects and endless possibilities.
Filmora simplifies advanced features to save you time and effort.
Filmora cuts out repetition so you can move on to your next creative breakthrough.
Key Features
Filmora lands amongst the top rated GIF creator software on account of the following features:
● This one is a quick and smart GIF maker, allowing you to create catchy GIFs within minutes.
● Filmora editor library has the most extensive inventory of audio-visual effects, editing features and filters that are all set to give your creation that stunning and perfect professional look.
● The extremely user cohesive interface of this software promises you a seamless GIF creation experience.
● Key Takeaways from This Episode →
● GIF keyboards are the latest trends in adding impact to community conversations via Instant Messaging apps.
● Be it iPhones or Android devices, these keyboards are ready to intensify your chats with the most exact expressions.
● From a pool of welcoming choices, you can certainly pick the Filmora GIF creator to create interesting content in the GIF format and add that extra spunk to your normal conversations.
Add more thrill to the meme sharing fun with the GIF keyboard!
GIFs are absolutely stunning means of mass information sharing. Talking of exact GIF meaning, these are short, motion snippets you can use to make your messages more expressive and precise. A variety of GIF images are available across the web, allowing you to emote and convey exactly what you feel in the most unique and interesting manner.
In this article
01 [The Best 8 GIF Keyboards for Your iPhone](#Part 1)
02 [How to Text Gifs on Android](#Part 2)
03 [How to Get the Imessage GIF Keyboard](#Part 3)
Part 1 The Best 8 GIF Keyboards for Your iPhone
GIFs are already known to add spice to the immense varieties of the ‘content share’ dish. You can boost up your information credibility to the next level with exciting, relatable and impactful GIFs. Adding to the preset resourcefulness, makers have introduced the GIF keyboard, which is all set to fetch the exact GIFs with your specified keyword, making you access the content that you precisely want.
Having understood the reliability of GIF keyboards, let us browse through the best ones you can use in your iPhone:
01Fleksy Keyboard
This one is an inventive and exciting GIF keyboard that you can use for making fun-filled conversations and sharing amazing content with your social media peers and communities. You can conveniently customize the extensions of this keyboard and use its expressive stickers and emojis to emote your chats in the most perfect way.
Fleksy comes with 3 different GIF keyboards supports around 40 different languages with over 50 vibrant themes and has a quick and smart user interface.
Pros
● Fleksy is the fastest GIF keyboard currently available for iPhone.
● It has an exclusive GIF sharing feature
● Loaded with numerous GIF extension features, like, hotkey, stickers, etc.
Cons
● You can use this keyboard only on iPhones with iOS version 8.0 onwards.
● You need an internet connection to download this keyboard from the Apple App Store.
● It does not have the facility of swipe input.
Cost
This one is free application and does not cost you a penny to download and use.
02Kika Keyboard
This one falls among the most loved GIF keyboards by iPhone users. Using this keyboard you can share memes, emojis, fonts, etc., with other iPhone users. Preferred by 20 million plus users, this keyboard supports 150 languages and comes with an Autocorrect feature that never lets you make any typing mistakes. It has a huge inventory of over 3000 GIFs and emoticons.
Pros
● It has a top grade security for personal information and community chat data.
● It has a heap of impactful keyboard themes.
● Pop up GIFs and emojis are there to give you the freedom of exact expression.
Cons
● This keyboard is compatible with iOS devices having versions successive to 9.0.
● Downloading this keyboard from the Apple App Store requires an internet connection.
● Most of the keyboard styles are accessible in the paid version of the application.
Cost
This keyboard is available to you absolutely free of cost in its basic version. However, you need to pay some amount to get the paid version with premium features.
03GIF Keyboard
This is an absolute heaven for GIF lovers. You can use this keyboard on any of iOS devices to either create or share fun filled GIFs and memes to express your precise feelings and emotions with your friends. The keyboard has a user cohesive interface with a vast library of latest GIFs to explore and use.
Pros
● It assures hassle free Gif creation and sharing.
● You can create sticker and GIF packs to share with friends and family.
● You can share GIFs on a various media sharing platforms, like, SnapChat, WhatsApp, Twitter, Facebook, etc.
Cons
● You cannot use this keyboard on devices with iOS versions prior to 9.0.
● This application has a data security risk.
● You need an internet connectivity to get this one from the Apple App Store.
Cost
The app is primarily free to download and use, but cones with a few in-app purchases.
04SwiftKey Keyboard
This is also one of the top ranked GIF keyboards and undergoes continuous upgrades to increase app productivity among over 250 million loyal users across the world. You can add an extra punch to your conversations with living GIFs and emojis from its extensive content library. You can enjoy seamless typing and get the perfect themes, colors, designs and patterns to uplift your precious moments.
Pros
● This GIF keyboard supports a bilingual autocorrect feature with smart AI predictions.
● It comes with a quick access toolbar for speedy access and supports 90 different languages.
● It has a content reserve of over 1000 GIFs and emojis.
Cons
● This keyboard is compatible with iOS versions 9.3 and later.
● This keyboard lacks the ‘Save’ feature for your favorite GIFs.
● You cannot see the GIFs that you had recently sent in your conversations.
Cost
This application is free to use in its basic version, but asks you for a paid premium membership to access some advances features.
05FancyKey Keyboard
This is a smart choice to make among GIF keyboards for iPhone on account of being packed with explicitly customizable features, over 100 beautiful fonts and 50 vibrant themes. The best part is, the application is backed up with enhanced security and data privacy features. You can choose from the best auto suggest emoticons to express exactly what you feel.
Pros
● It allows you to make swipe inputs with accurate word predictions.
● Its integrated emoji art keyboard suggests exact and expressive facial expressions.
● It is compatible with almost every iOS device.
Cons
● The interface is loaded with quite a large number of access options.
● Finding your perfect content can be a bit time taking.
● You need an internet connection to download and use this keyboard.
Cost
You can get this keyboard for free on the Apple App Store.
06Gfycat
This is also quite ban efficient GIF keyboard you can use to share immense varieties of top quality GIFs, memes and stickers across your Instagram, Facebook and SnapChat accounts. Available in the most convenient user interface, this keyboard is packed with millions of GIFs and emojis to choose from.
Pros
● You can share content in various languages
● Its library is packed with GIFs and memes of HD quality.
● You can create GIFs of your own using your device’s camera.
Cons
● Keyboard features other than GIFs ate absent.
● Though high on quality, but the GIF images are quite small in size.
● You cannot save and view GIFs in the application.
Cost
You can use this keyboard absolutely free of cost on the Apple App Store.
07RainbowKey
As is evident from the name, this keyboard is packed with a range of vibrant themes to beautify the app background. Additionally, you can use still images from your device to create themes of your own. Its interactive interface shows pop up animations and emojis related to the content you type. You can find exciting GIF varieties from popular, trending and hashtag content categories.
Pros
● You can save your favorite GIFs and use them in future.
● You can create your own keyboard themes from locally saved images.
● Its smart AI feature predicts emojis and autocorrect suggestions as you type.
Cons
● It comes with a little tricky interface.
● The application may occasionally crash in between successive tan switches.
● It is supported on iOS versions later than 8.0.
Cost
The application is primarily free, but contains a few in-app purchases.
08Tenor GIF Keyboard
This is an extensive and smart GIF keyboard that allows you to make a number of GIF customizations in addition to sharing GIFs. You are granted the liberty to add captions to GIFs and save your favorite ones for later use by adding them to the exclusive GIF pack. The keyboard is launched by Tenor, which is apparently the most extensive GIF library across the web.
Pros
● You can caption your GIFs and save them locally to your device.
● You can make your explicit GIF pack to save and organize favorite GIFs for quick access.
● You can export your GIFs to almost all major media sharing platforms.
Cons
● The app has restricted keyboard functions
● The app interface may appear a bit crowded.
● You need internet connectivity to use this application
Cost
You can access and use this app for free.
Part 2 How to Text GIFs on Android
All Android devices cone with an inbuilt GIF sharing feature and it is more or less similar to sharing GIFs on iOS devices. The minor different encountered, is on account of using the Google keyboard for GIF texting via Android devices.
Now that you are accustomed to using GIFs keyboards for iPhone, let’s dive into methods of working with GIF texting on Android devices. After all, GIFs are a content credibility that is worthy of exploring beyond platform boundaries. Discussed below are some super easy steps of texting GIFs on Android devices:
● Navigate to, and open the inbuilt messaging application of your Android device.
● Tap any suitable emoticon on the keyboard.
● You will see a few file format options. Choose and tap the ‘GIF’ option.
● Look for your required GIF in the search bar or select one from the default or locally saved collections.
● Tap any suitable GIF to get its preview, followed by pressing the ‘Send’ button.
Part 1 How to Get the iMessage GIF Keyboard
Adding GIFs to iMessage is quite simple and handy, as the application opens up an extensive GIF library to save and share GIFs. While iPhone 10 and later version users are gifted with #images, the default GIF keyboard; there are alternatives too to get the iMessage GIF Keyboard for other versions.
Discussed below is a quick and convenient method to get the iMessage GIF keyboard for your iOS device:
● Reach to the ‘Messages’ application in your iPhone and open a new or an existing conversation.
● In the text field, click on the ‘Apps’ button (‘A’ symbol) at the left side and you will see the #images keyboard pops up.
● In an otherwise case, navigate to the bottom of the app screen and hit the 4-bubble icon at the left to see the #images icon appear.
● Click on the icon to explore, search and select a suitable GIF.
● Before you send the selected GIF to your friends, you can make it more impactful by adding relatable texts.
Filmora GIF Creator
DIF keyboards are one exciting trend, but creating GIFs is equally interesting. If you are thinking to try hands on making GIFs of your own, the W**Wondershare Filmora Video Editor ** is at your instant service. This one is excellent GIF creator software, to say the least, available on the web today. You can conveniently depend on this to create stunning GIFs that would leave viewers jaw dropped on your creativity.

Wondershare Filmora - Best Video Editor for Mac/Windows
5,481,435 people have downloaded it.
Build unique custom animations without breaking a sweat.
Focus on creating epic stories and leave the details to Filmora’s auto features.
Start a creative adventure with drag & drop effects and endless possibilities.
Filmora simplifies advanced features to save you time and effort.
Filmora cuts out repetition so you can move on to your next creative breakthrough.
Key Features
Filmora lands amongst the top rated GIF creator software on account of the following features:
● This one is a quick and smart GIF maker, allowing you to create catchy GIFs within minutes.
● Filmora editor library has the most extensive inventory of audio-visual effects, editing features and filters that are all set to give your creation that stunning and perfect professional look.
● The extremely user cohesive interface of this software promises you a seamless GIF creation experience.
● Key Takeaways from This Episode →
● GIF keyboards are the latest trends in adding impact to community conversations via Instant Messaging apps.
● Be it iPhones or Android devices, these keyboards are ready to intensify your chats with the most exact expressions.
● From a pool of welcoming choices, you can certainly pick the Filmora GIF creator to create interesting content in the GIF format and add that extra spunk to your normal conversations.
Add more thrill to the meme sharing fun with the GIF keyboard!
GIFs are absolutely stunning means of mass information sharing. Talking of exact GIF meaning, these are short, motion snippets you can use to make your messages more expressive and precise. A variety of GIF images are available across the web, allowing you to emote and convey exactly what you feel in the most unique and interesting manner.
In this article
01 [The Best 8 GIF Keyboards for Your iPhone](#Part 1)
02 [How to Text Gifs on Android](#Part 2)
03 [How to Get the Imessage GIF Keyboard](#Part 3)
Part 1 The Best 8 GIF Keyboards for Your iPhone
GIFs are already known to add spice to the immense varieties of the ‘content share’ dish. You can boost up your information credibility to the next level with exciting, relatable and impactful GIFs. Adding to the preset resourcefulness, makers have introduced the GIF keyboard, which is all set to fetch the exact GIFs with your specified keyword, making you access the content that you precisely want.
Having understood the reliability of GIF keyboards, let us browse through the best ones you can use in your iPhone:
01Fleksy Keyboard
This one is an inventive and exciting GIF keyboard that you can use for making fun-filled conversations and sharing amazing content with your social media peers and communities. You can conveniently customize the extensions of this keyboard and use its expressive stickers and emojis to emote your chats in the most perfect way.
Fleksy comes with 3 different GIF keyboards supports around 40 different languages with over 50 vibrant themes and has a quick and smart user interface.
Pros
● Fleksy is the fastest GIF keyboard currently available for iPhone.
● It has an exclusive GIF sharing feature
● Loaded with numerous GIF extension features, like, hotkey, stickers, etc.
Cons
● You can use this keyboard only on iPhones with iOS version 8.0 onwards.
● You need an internet connection to download this keyboard from the Apple App Store.
● It does not have the facility of swipe input.
Cost
This one is free application and does not cost you a penny to download and use.
02Kika Keyboard
This one falls among the most loved GIF keyboards by iPhone users. Using this keyboard you can share memes, emojis, fonts, etc., with other iPhone users. Preferred by 20 million plus users, this keyboard supports 150 languages and comes with an Autocorrect feature that never lets you make any typing mistakes. It has a huge inventory of over 3000 GIFs and emoticons.
Pros
● It has a top grade security for personal information and community chat data.
● It has a heap of impactful keyboard themes.
● Pop up GIFs and emojis are there to give you the freedom of exact expression.
Cons
● This keyboard is compatible with iOS devices having versions successive to 9.0.
● Downloading this keyboard from the Apple App Store requires an internet connection.
● Most of the keyboard styles are accessible in the paid version of the application.
Cost
This keyboard is available to you absolutely free of cost in its basic version. However, you need to pay some amount to get the paid version with premium features.
03GIF Keyboard
This is an absolute heaven for GIF lovers. You can use this keyboard on any of iOS devices to either create or share fun filled GIFs and memes to express your precise feelings and emotions with your friends. The keyboard has a user cohesive interface with a vast library of latest GIFs to explore and use.
Pros
● It assures hassle free Gif creation and sharing.
● You can create sticker and GIF packs to share with friends and family.
● You can share GIFs on a various media sharing platforms, like, SnapChat, WhatsApp, Twitter, Facebook, etc.
Cons
● You cannot use this keyboard on devices with iOS versions prior to 9.0.
● This application has a data security risk.
● You need an internet connectivity to get this one from the Apple App Store.
Cost
The app is primarily free to download and use, but cones with a few in-app purchases.
04SwiftKey Keyboard
This is also one of the top ranked GIF keyboards and undergoes continuous upgrades to increase app productivity among over 250 million loyal users across the world. You can add an extra punch to your conversations with living GIFs and emojis from its extensive content library. You can enjoy seamless typing and get the perfect themes, colors, designs and patterns to uplift your precious moments.
Pros
● This GIF keyboard supports a bilingual autocorrect feature with smart AI predictions.
● It comes with a quick access toolbar for speedy access and supports 90 different languages.
● It has a content reserve of over 1000 GIFs and emojis.
Cons
● This keyboard is compatible with iOS versions 9.3 and later.
● This keyboard lacks the ‘Save’ feature for your favorite GIFs.
● You cannot see the GIFs that you had recently sent in your conversations.
Cost
This application is free to use in its basic version, but asks you for a paid premium membership to access some advances features.
05FancyKey Keyboard
This is a smart choice to make among GIF keyboards for iPhone on account of being packed with explicitly customizable features, over 100 beautiful fonts and 50 vibrant themes. The best part is, the application is backed up with enhanced security and data privacy features. You can choose from the best auto suggest emoticons to express exactly what you feel.
Pros
● It allows you to make swipe inputs with accurate word predictions.
● Its integrated emoji art keyboard suggests exact and expressive facial expressions.
● It is compatible with almost every iOS device.
Cons
● The interface is loaded with quite a large number of access options.
● Finding your perfect content can be a bit time taking.
● You need an internet connection to download and use this keyboard.
Cost
You can get this keyboard for free on the Apple App Store.
06Gfycat
This is also quite ban efficient GIF keyboard you can use to share immense varieties of top quality GIFs, memes and stickers across your Instagram, Facebook and SnapChat accounts. Available in the most convenient user interface, this keyboard is packed with millions of GIFs and emojis to choose from.
Pros
● You can share content in various languages
● Its library is packed with GIFs and memes of HD quality.
● You can create GIFs of your own using your device’s camera.
Cons
● Keyboard features other than GIFs ate absent.
● Though high on quality, but the GIF images are quite small in size.
● You cannot save and view GIFs in the application.
Cost
You can use this keyboard absolutely free of cost on the Apple App Store.
07RainbowKey
As is evident from the name, this keyboard is packed with a range of vibrant themes to beautify the app background. Additionally, you can use still images from your device to create themes of your own. Its interactive interface shows pop up animations and emojis related to the content you type. You can find exciting GIF varieties from popular, trending and hashtag content categories.
Pros
● You can save your favorite GIFs and use them in future.
● You can create your own keyboard themes from locally saved images.
● Its smart AI feature predicts emojis and autocorrect suggestions as you type.
Cons
● It comes with a little tricky interface.
● The application may occasionally crash in between successive tan switches.
● It is supported on iOS versions later than 8.0.
Cost
The application is primarily free, but contains a few in-app purchases.
08Tenor GIF Keyboard
This is an extensive and smart GIF keyboard that allows you to make a number of GIF customizations in addition to sharing GIFs. You are granted the liberty to add captions to GIFs and save your favorite ones for later use by adding them to the exclusive GIF pack. The keyboard is launched by Tenor, which is apparently the most extensive GIF library across the web.
Pros
● You can caption your GIFs and save them locally to your device.
● You can make your explicit GIF pack to save and organize favorite GIFs for quick access.
● You can export your GIFs to almost all major media sharing platforms.
Cons
● The app has restricted keyboard functions
● The app interface may appear a bit crowded.
● You need internet connectivity to use this application
Cost
You can access and use this app for free.
Part 2 How to Text GIFs on Android
All Android devices cone with an inbuilt GIF sharing feature and it is more or less similar to sharing GIFs on iOS devices. The minor different encountered, is on account of using the Google keyboard for GIF texting via Android devices.
Now that you are accustomed to using GIFs keyboards for iPhone, let’s dive into methods of working with GIF texting on Android devices. After all, GIFs are a content credibility that is worthy of exploring beyond platform boundaries. Discussed below are some super easy steps of texting GIFs on Android devices:
● Navigate to, and open the inbuilt messaging application of your Android device.
● Tap any suitable emoticon on the keyboard.
● You will see a few file format options. Choose and tap the ‘GIF’ option.
● Look for your required GIF in the search bar or select one from the default or locally saved collections.
● Tap any suitable GIF to get its preview, followed by pressing the ‘Send’ button.
Part 1 How to Get the iMessage GIF Keyboard
Adding GIFs to iMessage is quite simple and handy, as the application opens up an extensive GIF library to save and share GIFs. While iPhone 10 and later version users are gifted with #images, the default GIF keyboard; there are alternatives too to get the iMessage GIF Keyboard for other versions.
Discussed below is a quick and convenient method to get the iMessage GIF keyboard for your iOS device:
● Reach to the ‘Messages’ application in your iPhone and open a new or an existing conversation.
● In the text field, click on the ‘Apps’ button (‘A’ symbol) at the left side and you will see the #images keyboard pops up.
● In an otherwise case, navigate to the bottom of the app screen and hit the 4-bubble icon at the left to see the #images icon appear.
● Click on the icon to explore, search and select a suitable GIF.
● Before you send the selected GIF to your friends, you can make it more impactful by adding relatable texts.
Filmora GIF Creator
DIF keyboards are one exciting trend, but creating GIFs is equally interesting. If you are thinking to try hands on making GIFs of your own, the W**Wondershare Filmora Video Editor ** is at your instant service. This one is excellent GIF creator software, to say the least, available on the web today. You can conveniently depend on this to create stunning GIFs that would leave viewers jaw dropped on your creativity.

Wondershare Filmora - Best Video Editor for Mac/Windows
5,481,435 people have downloaded it.
Build unique custom animations without breaking a sweat.
Focus on creating epic stories and leave the details to Filmora’s auto features.
Start a creative adventure with drag & drop effects and endless possibilities.
Filmora simplifies advanced features to save you time and effort.
Filmora cuts out repetition so you can move on to your next creative breakthrough.
Key Features
Filmora lands amongst the top rated GIF creator software on account of the following features:
● This one is a quick and smart GIF maker, allowing you to create catchy GIFs within minutes.
● Filmora editor library has the most extensive inventory of audio-visual effects, editing features and filters that are all set to give your creation that stunning and perfect professional look.
● The extremely user cohesive interface of this software promises you a seamless GIF creation experience.
● Key Takeaways from This Episode →
● GIF keyboards are the latest trends in adding impact to community conversations via Instant Messaging apps.
● Be it iPhones or Android devices, these keyboards are ready to intensify your chats with the most exact expressions.
● From a pool of welcoming choices, you can certainly pick the Filmora GIF creator to create interesting content in the GIF format and add that extra spunk to your normal conversations.
Add more thrill to the meme sharing fun with the GIF keyboard!
GIFs are absolutely stunning means of mass information sharing. Talking of exact GIF meaning, these are short, motion snippets you can use to make your messages more expressive and precise. A variety of GIF images are available across the web, allowing you to emote and convey exactly what you feel in the most unique and interesting manner.
In this article
01 [The Best 8 GIF Keyboards for Your iPhone](#Part 1)
02 [How to Text Gifs on Android](#Part 2)
03 [How to Get the Imessage GIF Keyboard](#Part 3)
Part 1 The Best 8 GIF Keyboards for Your iPhone
GIFs are already known to add spice to the immense varieties of the ‘content share’ dish. You can boost up your information credibility to the next level with exciting, relatable and impactful GIFs. Adding to the preset resourcefulness, makers have introduced the GIF keyboard, which is all set to fetch the exact GIFs with your specified keyword, making you access the content that you precisely want.
Having understood the reliability of GIF keyboards, let us browse through the best ones you can use in your iPhone:
01Fleksy Keyboard
This one is an inventive and exciting GIF keyboard that you can use for making fun-filled conversations and sharing amazing content with your social media peers and communities. You can conveniently customize the extensions of this keyboard and use its expressive stickers and emojis to emote your chats in the most perfect way.
Fleksy comes with 3 different GIF keyboards supports around 40 different languages with over 50 vibrant themes and has a quick and smart user interface.
Pros
● Fleksy is the fastest GIF keyboard currently available for iPhone.
● It has an exclusive GIF sharing feature
● Loaded with numerous GIF extension features, like, hotkey, stickers, etc.
Cons
● You can use this keyboard only on iPhones with iOS version 8.0 onwards.
● You need an internet connection to download this keyboard from the Apple App Store.
● It does not have the facility of swipe input.
Cost
This one is free application and does not cost you a penny to download and use.
02Kika Keyboard
This one falls among the most loved GIF keyboards by iPhone users. Using this keyboard you can share memes, emojis, fonts, etc., with other iPhone users. Preferred by 20 million plus users, this keyboard supports 150 languages and comes with an Autocorrect feature that never lets you make any typing mistakes. It has a huge inventory of over 3000 GIFs and emoticons.
Pros
● It has a top grade security for personal information and community chat data.
● It has a heap of impactful keyboard themes.
● Pop up GIFs and emojis are there to give you the freedom of exact expression.
Cons
● This keyboard is compatible with iOS devices having versions successive to 9.0.
● Downloading this keyboard from the Apple App Store requires an internet connection.
● Most of the keyboard styles are accessible in the paid version of the application.
Cost
This keyboard is available to you absolutely free of cost in its basic version. However, you need to pay some amount to get the paid version with premium features.
03GIF Keyboard
This is an absolute heaven for GIF lovers. You can use this keyboard on any of iOS devices to either create or share fun filled GIFs and memes to express your precise feelings and emotions with your friends. The keyboard has a user cohesive interface with a vast library of latest GIFs to explore and use.
Pros
● It assures hassle free Gif creation and sharing.
● You can create sticker and GIF packs to share with friends and family.
● You can share GIFs on a various media sharing platforms, like, SnapChat, WhatsApp, Twitter, Facebook, etc.
Cons
● You cannot use this keyboard on devices with iOS versions prior to 9.0.
● This application has a data security risk.
● You need an internet connectivity to get this one from the Apple App Store.
Cost
The app is primarily free to download and use, but cones with a few in-app purchases.
04SwiftKey Keyboard
This is also one of the top ranked GIF keyboards and undergoes continuous upgrades to increase app productivity among over 250 million loyal users across the world. You can add an extra punch to your conversations with living GIFs and emojis from its extensive content library. You can enjoy seamless typing and get the perfect themes, colors, designs and patterns to uplift your precious moments.
Pros
● This GIF keyboard supports a bilingual autocorrect feature with smart AI predictions.
● It comes with a quick access toolbar for speedy access and supports 90 different languages.
● It has a content reserve of over 1000 GIFs and emojis.
Cons
● This keyboard is compatible with iOS versions 9.3 and later.
● This keyboard lacks the ‘Save’ feature for your favorite GIFs.
● You cannot see the GIFs that you had recently sent in your conversations.
Cost
This application is free to use in its basic version, but asks you for a paid premium membership to access some advances features.
05FancyKey Keyboard
This is a smart choice to make among GIF keyboards for iPhone on account of being packed with explicitly customizable features, over 100 beautiful fonts and 50 vibrant themes. The best part is, the application is backed up with enhanced security and data privacy features. You can choose from the best auto suggest emoticons to express exactly what you feel.
Pros
● It allows you to make swipe inputs with accurate word predictions.
● Its integrated emoji art keyboard suggests exact and expressive facial expressions.
● It is compatible with almost every iOS device.
Cons
● The interface is loaded with quite a large number of access options.
● Finding your perfect content can be a bit time taking.
● You need an internet connection to download and use this keyboard.
Cost
You can get this keyboard for free on the Apple App Store.
06Gfycat
This is also quite ban efficient GIF keyboard you can use to share immense varieties of top quality GIFs, memes and stickers across your Instagram, Facebook and SnapChat accounts. Available in the most convenient user interface, this keyboard is packed with millions of GIFs and emojis to choose from.
Pros
● You can share content in various languages
● Its library is packed with GIFs and memes of HD quality.
● You can create GIFs of your own using your device’s camera.
Cons
● Keyboard features other than GIFs ate absent.
● Though high on quality, but the GIF images are quite small in size.
● You cannot save and view GIFs in the application.
Cost
You can use this keyboard absolutely free of cost on the Apple App Store.
07RainbowKey
As is evident from the name, this keyboard is packed with a range of vibrant themes to beautify the app background. Additionally, you can use still images from your device to create themes of your own. Its interactive interface shows pop up animations and emojis related to the content you type. You can find exciting GIF varieties from popular, trending and hashtag content categories.
Pros
● You can save your favorite GIFs and use them in future.
● You can create your own keyboard themes from locally saved images.
● Its smart AI feature predicts emojis and autocorrect suggestions as you type.
Cons
● It comes with a little tricky interface.
● The application may occasionally crash in between successive tan switches.
● It is supported on iOS versions later than 8.0.
Cost
The application is primarily free, but contains a few in-app purchases.
08Tenor GIF Keyboard
This is an extensive and smart GIF keyboard that allows you to make a number of GIF customizations in addition to sharing GIFs. You are granted the liberty to add captions to GIFs and save your favorite ones for later use by adding them to the exclusive GIF pack. The keyboard is launched by Tenor, which is apparently the most extensive GIF library across the web.
Pros
● You can caption your GIFs and save them locally to your device.
● You can make your explicit GIF pack to save and organize favorite GIFs for quick access.
● You can export your GIFs to almost all major media sharing platforms.
Cons
● The app has restricted keyboard functions
● The app interface may appear a bit crowded.
● You need internet connectivity to use this application
Cost
You can access and use this app for free.
Part 2 How to Text GIFs on Android
All Android devices cone with an inbuilt GIF sharing feature and it is more or less similar to sharing GIFs on iOS devices. The minor different encountered, is on account of using the Google keyboard for GIF texting via Android devices.
Now that you are accustomed to using GIFs keyboards for iPhone, let’s dive into methods of working with GIF texting on Android devices. After all, GIFs are a content credibility that is worthy of exploring beyond platform boundaries. Discussed below are some super easy steps of texting GIFs on Android devices:
● Navigate to, and open the inbuilt messaging application of your Android device.
● Tap any suitable emoticon on the keyboard.
● You will see a few file format options. Choose and tap the ‘GIF’ option.
● Look for your required GIF in the search bar or select one from the default or locally saved collections.
● Tap any suitable GIF to get its preview, followed by pressing the ‘Send’ button.
Part 1 How to Get the iMessage GIF Keyboard
Adding GIFs to iMessage is quite simple and handy, as the application opens up an extensive GIF library to save and share GIFs. While iPhone 10 and later version users are gifted with #images, the default GIF keyboard; there are alternatives too to get the iMessage GIF Keyboard for other versions.
Discussed below is a quick and convenient method to get the iMessage GIF keyboard for your iOS device:
● Reach to the ‘Messages’ application in your iPhone and open a new or an existing conversation.
● In the text field, click on the ‘Apps’ button (‘A’ symbol) at the left side and you will see the #images keyboard pops up.
● In an otherwise case, navigate to the bottom of the app screen and hit the 4-bubble icon at the left to see the #images icon appear.
● Click on the icon to explore, search and select a suitable GIF.
● Before you send the selected GIF to your friends, you can make it more impactful by adding relatable texts.
Filmora GIF Creator
DIF keyboards are one exciting trend, but creating GIFs is equally interesting. If you are thinking to try hands on making GIFs of your own, the W**Wondershare Filmora Video Editor ** is at your instant service. This one is excellent GIF creator software, to say the least, available on the web today. You can conveniently depend on this to create stunning GIFs that would leave viewers jaw dropped on your creativity.

Wondershare Filmora - Best Video Editor for Mac/Windows
5,481,435 people have downloaded it.
Build unique custom animations without breaking a sweat.
Focus on creating epic stories and leave the details to Filmora’s auto features.
Start a creative adventure with drag & drop effects and endless possibilities.
Filmora simplifies advanced features to save you time and effort.
Filmora cuts out repetition so you can move on to your next creative breakthrough.
Key Features
Filmora lands amongst the top rated GIF creator software on account of the following features:
● This one is a quick and smart GIF maker, allowing you to create catchy GIFs within minutes.
● Filmora editor library has the most extensive inventory of audio-visual effects, editing features and filters that are all set to give your creation that stunning and perfect professional look.
● The extremely user cohesive interface of this software promises you a seamless GIF creation experience.
● Key Takeaways from This Episode →
● GIF keyboards are the latest trends in adding impact to community conversations via Instant Messaging apps.
● Be it iPhones or Android devices, these keyboards are ready to intensify your chats with the most exact expressions.
● From a pool of welcoming choices, you can certainly pick the Filmora GIF creator to create interesting content in the GIF format and add that extra spunk to your normal conversations.
How to Loop a Video in Canva Editor
Looping a video is a great way to make your content stand out from the competition. The looped video will repeat the same section of the video, which gives it an eerie feeling like an old-timely music box. For example, if you are creating a series of videos about a product launch, you could use loops to create anticipation for when the product will be available.
You can use this feature on Canva to create an eye-catching looped video that you can use in your social media posts and ads. It is great if you need to use a video in your project, but don’t have time to do the editing. In this article, we’ll walk you through how to Loop a video on Canva.
Part 1: How to Loop Video in Canva
Canva is a great video editing tool that allows users to create stunning videos. It has a simple interface that makes it easy to use even for beginners. Looping a video is a great way to make your content more engaging. You can add a looping effect to any video, whether it’s yours or one you find online. Creating the looping video is super easy!
Canva is a great way to create custom designs for your business. It’s also a great way to make a video for your brand. The looping feature in Canva is a great way to create more engaging infographics. By using this feature, you can create a custom loop, which allows you to create an infographic that repeats itself in the same or different sizes.
Step 1: Create an account on Canva and select the video:
Log in to Canva and click on “Create a design”. Import your video into Canva. You can find the import button on the right side of the screen when you’re editing a new project or opening an existing project by clicking “Open.”, then click on the “Add Video” button. The new video will appear underneath your other assets.
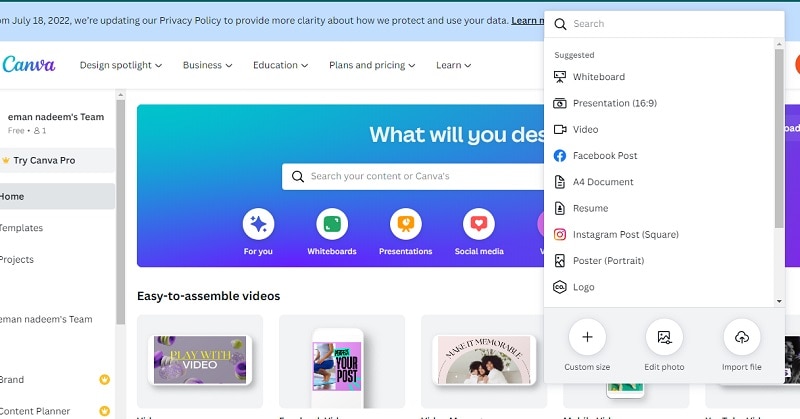
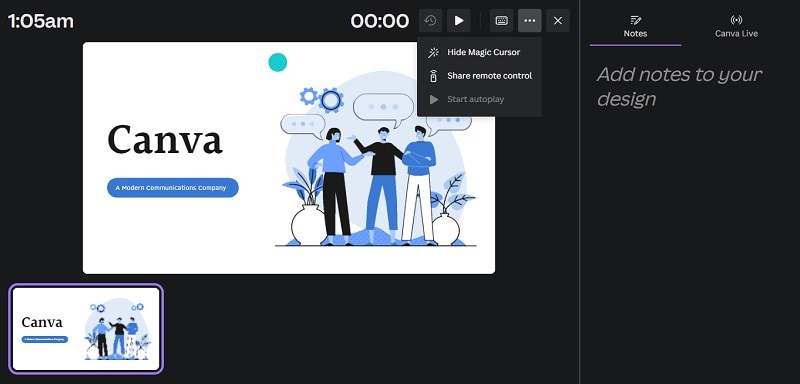
Step 2: Choose the “Present” option by clicking on Share:
Click on the drop-down arrow next to the title bar and select “Present” from the list of available options. Then you can select the feature of Present that how your video will appear in front of you or your audience.

Step 3: Loop your video by choosing the feature “Start auto play”:
A new window will pop up and allow you to customize where in your project this loop will be placed: by default, it will start at 0 seconds and play until it reaches 500 seconds; however, you can change this if needed!
Why should we need the Loop video in Canva?
If you’re looking for a way to make your video stand out from the crowd, then you’ve come to the right place! Here are three ways that you can use looping videos in Canva software to create a more compelling piece of content.
- It adds more value to your content because viewers can watch it over and over again without having to do anything else.
- It helps attract new viewers because they’ll feel compelled to watch the whole thing or at least take action after watching part of it (like clicking on a button).
- It increases retention rates because people will remember something much better than just a static image or text string because there’s movement involved in each frame of the image.
Part 2: Alternative Way to Loop a Video
If you’re using a video editing software like Adobe Premiere or Final Cut Pro, it is likely that you have seen the generic technique of looping a video is by splitting it in two and pasting it together again. What if you need to put on repeat just one individual cut? This is where Filmora steps in! It is a handy tool for trimming and adding clips into your recordings.
The Filmora software can be used to quickly create continual sequences of any duration, irrespective of how long the footage is. It makes possible to synchronize sound and video clips, splice them into one another, and even add titles and motion graphics for a special effect. If you utilize Filmora, you do not need to be an expert in video editing to make professional-looking results. Let us explore why Filmora is necessary for video editing.
Filmora is a video editing software that allows you to make professional-looking videos from your footage. It has a loop feature that lets you create seamless loops where each clip in the sequence plays over and over until you stop it. This can be useful for creating music videos, for example, or for creating small clips that loop seamlessly through the whole video.
The loop feature in Filmora software is a great way to put your video editing skills to the test. It allows you to edit a clip of any length and then play it back over and over again, which can be useful when you’re looking for an ideal looping point or want to see how long a clip is before going back to find out why it didn’t work.
Let’s have a look that how can we loop the video on Filmora:
Step 1: Download Filmora for free and Create a project in it:
Free Download For Win 7 or later(64-bit)
Free Download For macOS 10.14 or later
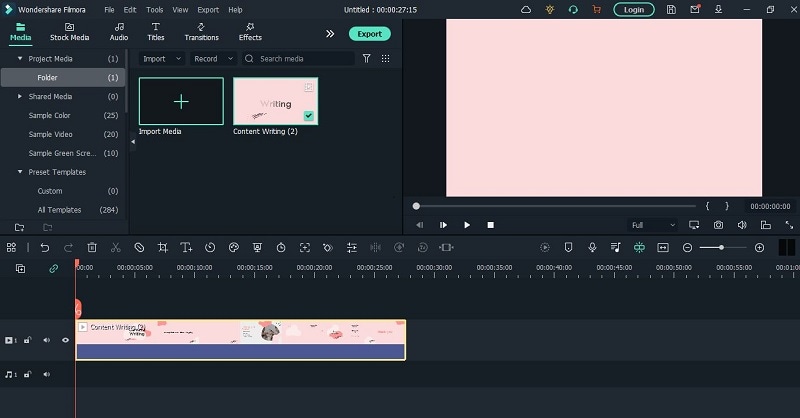
Download the Filmora software from any browser. After installation opens the software and clicks on create a project. Just add a video in your timeline that you would like to loop. With the Loop tool, you can easily add titles and credits, as well as transitions and effects to your videos.
Step 2: Select the video and make copies of it:
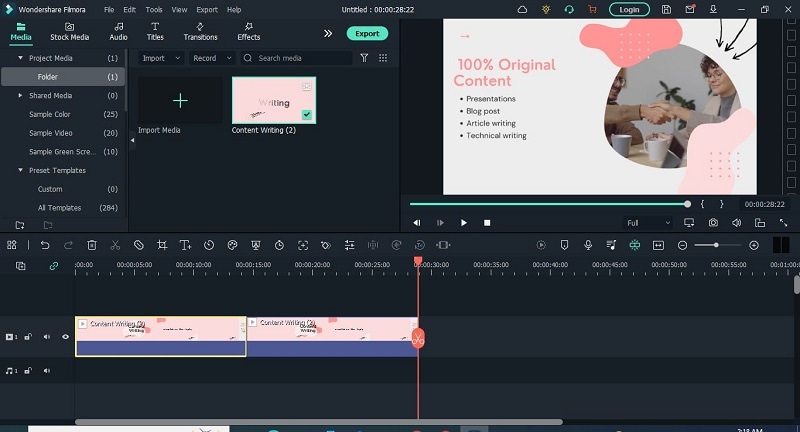
Move the play head to the end of your clip and press right-click to copy the video then use CTRL + V to paste the clip and continue pasting as many copies as you want to create.
Step 3: Add Transition to the video to make it more seamless
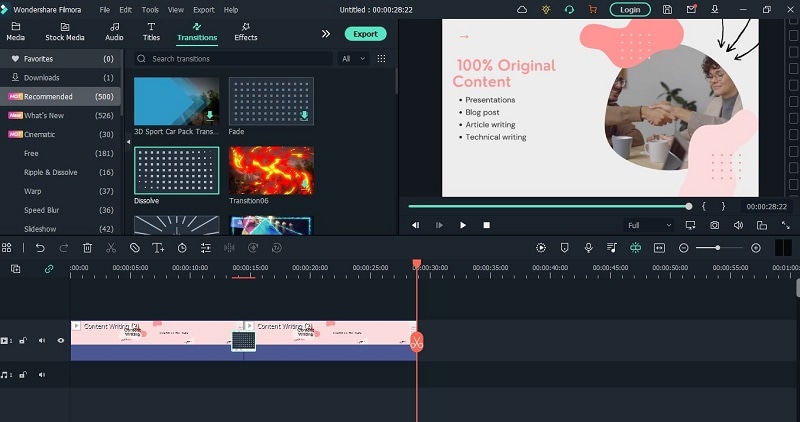
Lastly, If you want to make your loop more seamless then go to the Transitions tab and type dissolve in the search bar. Drag the dissolve transition between the two clips on the timeline. This can be useful when you want viewers to watch the video repeatedly.
Part 3: FAQs About Video Loop
1. Can you loop animation in Canva?
Yes, we can make loop animation in Canva. Looping animation in Canva software is not difficult, but it does require a little bit of practice. To loop animation in Canva, follow these steps:
- Go to the Animation tab on the left side of the screen.
- Click on the New Animation button in the top right corner of your screen.
- Select the type of animation you want to create from the drop-down menu next to “Create New Animation From.” This will open up a window that allows you to select between several different options for how your animation will appear, choose one that appeals most to you!
2. How do I loop an mp4 video?
Looping the mp4 video is a fairly simple process. First, you need to import the video into your computer. The easiest way to do this is using the .mp4 files that come with your camera or phone. You can also use any other audio file or a preview of the video as an indicator of where you want to start and end your looping.
Once you have imported your video, you can begin looping it. To do this, click on the “play” button and wait until all the videos have been played. Then, click on one of the two buttons below. The bottom button will play one frame forward in time while the top button will play one frame backward in time.
3. How do I make Canva videos longer?
We’ve got a special function in Canva that lets you crop your video while making it longer. Here’s how:
- Go to the video editor by clicking the cog icon on the top right of your screen.
- Select “Crop Video” from the menu.
- Choose how much footage you want to cut out and press “OK.”
- You’re done! Your video is now cropped and longer than before!
Wondershare Filmora Easy Video Looper Software for PC and Mac Users.
Free Download Free Download Learn More

Conclusion
Looping video generates interest and emotion in the minds of viewers and it is a great tool. According to research, over 80% of internet users watch videos online to get information or because they want to gain knowledge. People’s attention span has diminished significantly, since the invention of gadgets and all these must-have devices. The video will seem like you are editing the video in real-time.
Free Download For macOS 10.14 or later
Download the Filmora software from any browser. After installation opens the software and clicks on create a project. Just add a video in your timeline that you would like to loop. With the Loop tool, you can easily add titles and credits, as well as transitions and effects to your videos.
Step 2: Select the video and make copies of it:
Move the play head to the end of your clip and press right-click to copy the video then use CTRL + V to paste the clip and continue pasting as many copies as you want to create.
Step 3: Add Transition to the video to make it more seamless
Lastly, If you want to make your loop more seamless then go to the Transitions tab and type dissolve in the search bar. Drag the dissolve transition between the two clips on the timeline. This can be useful when you want viewers to watch the video repeatedly.
Part 3: FAQs About Video Loop
1. Can you loop animation in Canva?
Yes, we can make loop animation in Canva. Looping animation in Canva software is not difficult, but it does require a little bit of practice. To loop animation in Canva, follow these steps:
- Go to the Animation tab on the left side of the screen.
- Click on the New Animation button in the top right corner of your screen.
- Select the type of animation you want to create from the drop-down menu next to “Create New Animation From.” This will open up a window that allows you to select between several different options for how your animation will appear, choose one that appeals most to you!
2. How do I loop an mp4 video?
Looping the mp4 video is a fairly simple process. First, you need to import the video into your computer. The easiest way to do this is using the .mp4 files that come with your camera or phone. You can also use any other audio file or a preview of the video as an indicator of where you want to start and end your looping.
Once you have imported your video, you can begin looping it. To do this, click on the “play” button and wait until all the videos have been played. Then, click on one of the two buttons below. The bottom button will play one frame forward in time while the top button will play one frame backward in time.
3. How do I make Canva videos longer?
We’ve got a special function in Canva that lets you crop your video while making it longer. Here’s how:
- Go to the video editor by clicking the cog icon on the top right of your screen.
- Select “Crop Video” from the menu.
- Choose how much footage you want to cut out and press “OK.”
- You’re done! Your video is now cropped and longer than before!
Wondershare Filmora Easy Video Looper Software for PC and Mac Users.
Free Download Free Download Learn More

Conclusion
Looping video generates interest and emotion in the minds of viewers and it is a great tool. According to research, over 80% of internet users watch videos online to get information or because they want to gain knowledge. People’s attention span has diminished significantly, since the invention of gadgets and all these must-have devices. The video will seem like you are editing the video in real-time.
An Ultimate Guide To Edit a Music Video: Aspect Ratio and First Cut
Are you planning to edit your music video? Do you need on out how to edit your first music video draft? Editing a music video is a creative task but can be challenging.
One of the key elements of this process is selecting the aspect ratio and making the first cut. In this blog, we will explore these steps in detail, providing important tips and tricks. Whether you’re a beginner or an experienced editor, get ready to take your music video to the next level. Let’s get started.
Which software will you need?
As we have a lot of software in the market, we must select the right software for high-quality editing. Wondershare Filmora is an amazing video editing software. It offers a ton of video editing tools. You can add special effects, transitions, and more to make your music video captivating.
Free Download For Win 7 or later(64-bit)
Free Download For macOS 10.14 or later
![]()
Note: Before you start editing your project, make sure that you have a backup. You can copy the project to an external USB or hard drive for a backup.
Adjust the aspect ratio
The aspect ratio is known as the size of the video frame. For example, the most common aspect ratios are 16:9 and 4:3. The first number represents the width, and the second represents the height.
You should always ask your cinematographer about the aspect ratio. There are chances when cameras won’t shoot at the intended aspect ratio they were framed for. In that case, you’ll need to crop or letterbox them when editing.

How to find the width/height of the frame?
Most of the frames that are being shot on the camera are 3424 pixels wide, which is a little under 4k. If you have a measurement of one side of the frame, you can find the other by using some math. Let’s suppose your frame is 3424 pixels wide. You can use this formula to find the height.
Formula: 3424 pixels wide x 1 high / 2.35 wide (or whatever your aspect ratio)

Now you can cancel out the width from the multiplier and the denominator.
= 3424 pixels wide x 1 high / 2.35 wide

Now you are left with the equation:
= 3424 pixels high / 2.35
After solving this equation, you will get the answer which is: 1457 pixels high. Let’s adjust it on the music video as well, follow the steps given below:
Free Download For Win 7 or later(64-bit)
Free Download For macOS 10.14 or later
Step1Open the aspect ratio setting tab
Open your music video project in Filmora and click on the screen icon, as shown in the picture.
![]()
Then select the Change Project Aspect Ratio.

Step2Add values
Now set the project Width to 3424 pixels and its Height to 1457 pixels. You can also adjust the frame rate by selecting the one in which you shot the video. Then click OK.

Assembly
The next step is assembly. You will arrange the shots, clips, and elements in this process and get everything in order. It can be daunting and inspiring for you, as it’s a blank canvas you are going to start with. Before editing, you can also get some guidance from your art director.
If your music video has shots of the band performing, drop them off first and sync them with the audio. On the contrary, if you are doing a narrative style, you can arrange the shots according to the story you want to portray.

Step1Drop the media
You can start by dragging and dropping the music onto the audio timeline. Then you can add the shots of your music video.

Step2Arrange the shots
Arrange the shots according to the storyboard you created and sync them with the audio.

Step3Add the title
Once you arrange all shots in order, you can add the title of your music video. Click on the Titles, then choose your desired style and add the name of your music video in the title box. You can also change the text’s size, font, and color.

Step4Flip the clip
One last thing is, if you shot any scene in mirror-image format, you can flip it. Click on the clip you want to flip and select the flip icon in the video properties.

Send your first draft
The first draft is the video in which you added audio and re-ordered the shots. You decided on the pace and flow of the video to create a basic structure. You made changes to make it interesting and captivating.
Before you put too much effort into editing your video, send it to your director, producer, or client for review. It will help ensure that any big changes can be made before you invest too much time in the edit.
For first drafts, you don’t need anything fancy. A lower-resolution and more compressed file can make sending it to a director or client much easier. You can also add a timer on the music video, so the person reviewing it can give you accurate timing on where he wants any revision.
How to add the timer in the music video?
- Click on Effects and search for Timecode in the search bar.
- Choose the timer style you like and drop it onto the new timeline.
- Extend the timer to the end of the video.
- Adjust the position and add the duration of your music video.

Now you are all set to export the first draft of your music video. You can also adjust the video format on the export option, but MP4 is recommended.
Conclusion
We hope this blog has helped you edit the initials of your music video. By adjusting the aspect ratio to fit the desired screen size and properly planning the first cut, you can lay a solid foundation for the rest of the editing process.
These two steps can greatly impact the overall look and feel of the final product. Remember to communicate with your director, producer, or client throughout the process to ensure that the final product meets their expectations.
Free Download For macOS 10.14 or later
![]()
Note: Before you start editing your project, make sure that you have a backup. You can copy the project to an external USB or hard drive for a backup.
Adjust the aspect ratio
The aspect ratio is known as the size of the video frame. For example, the most common aspect ratios are 16:9 and 4:3. The first number represents the width, and the second represents the height.
You should always ask your cinematographer about the aspect ratio. There are chances when cameras won’t shoot at the intended aspect ratio they were framed for. In that case, you’ll need to crop or letterbox them when editing.

How to find the width/height of the frame?
Most of the frames that are being shot on the camera are 3424 pixels wide, which is a little under 4k. If you have a measurement of one side of the frame, you can find the other by using some math. Let’s suppose your frame is 3424 pixels wide. You can use this formula to find the height.
Formula: 3424 pixels wide x 1 high / 2.35 wide (or whatever your aspect ratio)

Now you can cancel out the width from the multiplier and the denominator.
= 3424 pixels wide x 1 high / 2.35 wide

Now you are left with the equation:
= 3424 pixels high / 2.35
After solving this equation, you will get the answer which is: 1457 pixels high. Let’s adjust it on the music video as well, follow the steps given below:
Free Download For Win 7 or later(64-bit)
Free Download For macOS 10.14 or later
Step1Open the aspect ratio setting tab
Open your music video project in Filmora and click on the screen icon, as shown in the picture.
![]()
Then select the Change Project Aspect Ratio.

Step2Add values
Now set the project Width to 3424 pixels and its Height to 1457 pixels. You can also adjust the frame rate by selecting the one in which you shot the video. Then click OK.

Assembly
The next step is assembly. You will arrange the shots, clips, and elements in this process and get everything in order. It can be daunting and inspiring for you, as it’s a blank canvas you are going to start with. Before editing, you can also get some guidance from your art director.
If your music video has shots of the band performing, drop them off first and sync them with the audio. On the contrary, if you are doing a narrative style, you can arrange the shots according to the story you want to portray.

Step1Drop the media
You can start by dragging and dropping the music onto the audio timeline. Then you can add the shots of your music video.

Step2Arrange the shots
Arrange the shots according to the storyboard you created and sync them with the audio.

Step3Add the title
Once you arrange all shots in order, you can add the title of your music video. Click on the Titles, then choose your desired style and add the name of your music video in the title box. You can also change the text’s size, font, and color.

Step4Flip the clip
One last thing is, if you shot any scene in mirror-image format, you can flip it. Click on the clip you want to flip and select the flip icon in the video properties.

Send your first draft
The first draft is the video in which you added audio and re-ordered the shots. You decided on the pace and flow of the video to create a basic structure. You made changes to make it interesting and captivating.
Before you put too much effort into editing your video, send it to your director, producer, or client for review. It will help ensure that any big changes can be made before you invest too much time in the edit.
For first drafts, you don’t need anything fancy. A lower-resolution and more compressed file can make sending it to a director or client much easier. You can also add a timer on the music video, so the person reviewing it can give you accurate timing on where he wants any revision.
How to add the timer in the music video?
- Click on Effects and search for Timecode in the search bar.
- Choose the timer style you like and drop it onto the new timeline.
- Extend the timer to the end of the video.
- Adjust the position and add the duration of your music video.

Now you are all set to export the first draft of your music video. You can also adjust the video format on the export option, but MP4 is recommended.
Conclusion
We hope this blog has helped you edit the initials of your music video. By adjusting the aspect ratio to fit the desired screen size and properly planning the first cut, you can lay a solid foundation for the rest of the editing process.
These two steps can greatly impact the overall look and feel of the final product. Remember to communicate with your director, producer, or client throughout the process to ensure that the final product meets their expectations.
Also read:
- Updated 4 Ways to Add White Borders on Mobile and Desktop
- 2024 Approved How to Change Video Thumbnail on Google Drive
- 2024 Approved Live Stream on YouTube Using Zoom
- In 2024, How to Make Blender Render Transparent Background
- Updated Have You Been Looking for Online YouTube Video Trimmer? You Will Be Introduced to Different Ways to Trim YouTube Videos as Introduced by YouTube Itself and some Online and Desktop Software to Help You Learn Video Trimming in This Article
- New In 2024, How To Blur The Video Background in After Effects
- In 2024, Mix and Match The Ultimate List of 8 Video and Photo Merging Tools
- New 2024 Approved Top 10 3D Slideshow Software Review
- In 2024, A Roster of 8 Top Color Match Generators
- How to Edit Text in Premiere Pro for 2024
- 2024 Approved 8 Frame Rate Video Converters for a Professional Finish
- New In 2024, How to Speed Up and Slow Down a Video
- New 2024 Approved How To Create Quiz Videos Detailed Guide
- New Top Tools To Create Blend Image Collage
- New Quickly Turn Any Video Into a Paper Rip Effect for 2024
- New Finding LUTs Made by Danny Gevirtz
- 2024 Approved Doable Ways to Make Transparent Background in Procreate
- Mastering OpenCV Object Tracking A Comprehensive Guide for Beginners and Experts for 2024
- 2024 Approved How to Make Fortnite Thumbnail with Motion Blur?
- New 2024 Approved Convert MP4 to 60 FPS GIF A Step-by-Step Guide
- New How to Customize Your Loading Text Effect, In 2024
- Updated 2024 Approved Add Neon Effects to Your Dance Videos with the Help of Wondershare Filmora After Reading This Article. It Will Give a More Thrilling and Exciting Appearance
- Updated 2024 Approved End This Problem! Make Transparent Background Video Today
- FLV Editors for Windows 11/10/8.1/8/7 Easily Edit FLV Videos on PC for 2024
- Updated Camtasia Review – Is It The Best Video Editor, In 2024
- New Looking For the Best VHS Video Effect Makers? Get To Know the Top List for 2024
- 2024 Approved How to Color Grade Your Picture in LightRoom
- How to Add Text to Video
- Guide to Making Cinematography for Music Video
- New In 2024, Thousands Already Know Ezgif and So Can You
- In 2024, How to Split Videos - 33 Best Video Splitter Recommend
- In 2024, Looking for the Best Alternatives of iPad Compatible Slideshow Applications to Design High End Graphic Presentations? Rest Assured, You Have Landed at the Correct Spot
- In 2024, Working Out All Important Details of Slowing Down Video in After Effects
- In 2024, Full Guide to Bypass Tecno Spark 20C FRP
- Latest Guide How To Bypass Lava Agni 2 5G FRP Without Computer
- 8 Solutions to Solve YouTube App Crashing on Tecno Camon 20 Premier 5G | Dr.fone
- How to Retrieve deleted photos on Honor X50
- In 2024, 2 Ways to Transfer Text Messages from Realme Narzo 60 5G to iPhone 15/14/13/12/11/X/8/ | Dr.fone
- Updated Top 10 Hindi Video Translators with Step-by-Step Guidance for 2024
- What Legendaries Are In Pokemon Platinum On Apple iPhone 8 Plus? | Dr.fone
- How do I reset my Nubia Red Magic 9 Pro+ Phone without technical knowledge? | Dr.fone
- How to Find iSpoofer Pro Activation Key On Oppo A59 5G? | Dr.fone
- In 2024, Sim Unlock Vivo Y36 Phones without Code 2 Ways to Remove Android Sim Lock
- In 2024, How to Unlock Apple iPhone 13 mini With an Apple Watch & What to Do if It Doesnt Work | Dr.fone
- How to Screen Mirroring Asus ROG Phone 7? | Dr.fone
- 10 Free Location Spoofers to Fake GPS Location on your Honor Magic 5 Lite | Dr.fone
- In 2024, How Vivo Y100 Mirror Screen to PC? | Dr.fone
- How to Recover Deleted Videos from iPhone 13 mini Without Backup? | Stellar
- In 2024, 4 Feasible Ways to Fake Location on Facebook For your Asus ROG Phone 8 | Dr.fone
- In 2024, Top 10 Best Spy Watches For your Oppo A58 4G | Dr.fone
- In 2024, How Can I Use a Fake GPS Without Mock Location On Sony Xperia 10 V? | Dr.fone
- Title: New How to Denoise in Final Cut Pro – Reduce Video and Audio Noise
- Author: Chloe
- Created at : 2024-05-20 03:38:08
- Updated at : 2024-05-21 03:38:08
- Link: https://ai-editing-video.techidaily.com/new-how-to-denoise-in-final-cut-pro-reduce-video-and-audio-noise/
- License: This work is licensed under CC BY-NC-SA 4.0.

