:max_bytes(150000):strip_icc():format(webp)/the-best-halloween-live-wallpaper-for-2019-4691483-019a40e91504436ca9fc9f1944d89c15.jpg)
New How to Fade in Text in Adobe Premiere Pro

How to Fade in Text in Adobe Premiere Pro
Every video is unappealing until you edit the video properly. Editing videos not only means trimming out unnecessary parts but also adding effects and animations. There are certain effects and transitions that are commonly used in most videos. Fade in effect is widely used in texts, objects, as well as clips. Fade in effect is very eye-soothing that does not distract the audience from the overall video content.
Fade in effect is available in all video editors. Among video editors, Adobe Premiere Pro is one of the best professional video editors. However, the learning curve of Premiere Pro is steep and hence, you have to know the exact steps to add fade in text Premiere Pro. We will illustrate how to apply fade in text effect Pro as well as add fade in and fade out transition effects in Premiere Pro. We will also state an alternative way to fade in texts in your videos.
Part 1. Fade in text in Premiere Pro with Opacity option
If you have added any text or any graphical object in your video on Premiere Pro, you can apply fade in effect to your text and object easily. When you add fade in effect to your text or object, they slowly appear on the screen which is very soothing to watch instead of sudden and abrupt appearance. Here are the steps on how to fade text in Premiere Pro.
Step1 You must have your video clip as well as text clip on the Timeline of Premiere Pro. Make sure that you add text from Essential Graphics panel. Select the text clip from the Timeline to proceed.
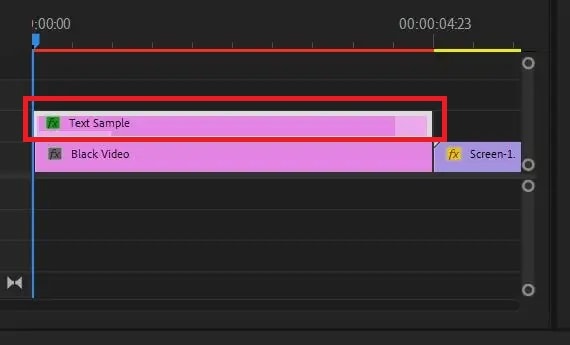
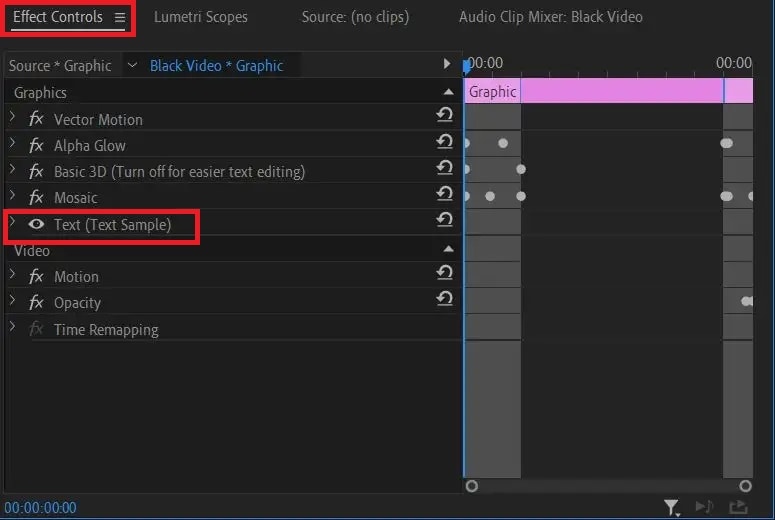
Step2 Go to Effect Controls and click on Text option to expand it. Click on Opacity option from the dropdown menu.
Step3 Put the timeline cursor at the beginning of the selected text clip. Thereafter, make the Opacity value to zero. Click on Stopwatch icon beside Opacity to add a keyframe.
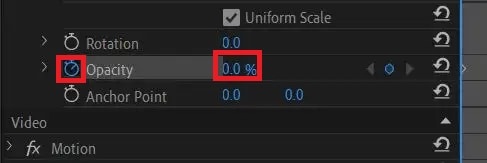
Step4 Put the timeline cursor at that point in the clip where you want the text to appear completely. Now make the Opacity value to 100. Click on Stopwatch to add a keyframe here.

Step5 Play the video to watch the fade in effect on your selected text. You can move the keyframes to speed up or slow down fade in effect.
Part 2. Make fade in or out with transition effects
If you have multiple video clips or scenes, you should add fade in and fade out transition effects so that the transition from one clip to another or one scene to another is smooth. The fade in or fade out effect for video clips look similar to fade text Premiere Pro. In fact, you can use the steps of how to fade in text in Premiere Pro to get the job done. But there is an easier way available with Video Transitions option. Here are the steps on how to apply fade in or out effect on your video clips in Premiere Pro.
Step1 You should have multiple video clips added to Timeline. Select the video clip to which you want to apply Fade in effect.
Step2 Go to Effects panel and click on Video Transitions option.
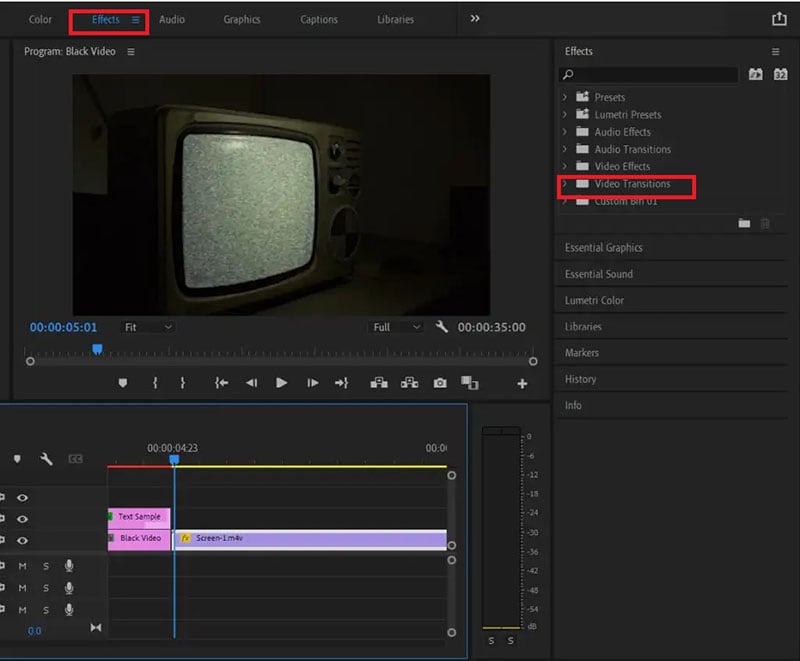
Step3 Click on Dissolve and from the dropdown list, drag and drop Film Dissolve to the beginning of the selected video clip for fade in effect.
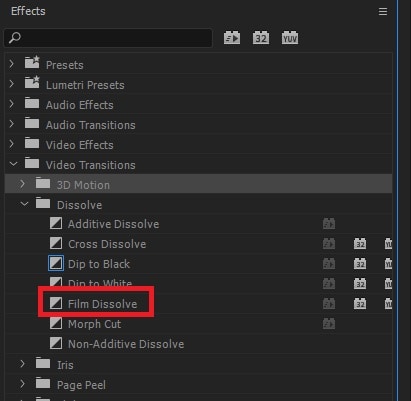
Step4 Click on the added effect on Timeline to adjust speed, duration, and alignment of the effect.

Step5 Play the video to ensure that the effect looks perfect. Therefore, go to File> Share> Export File to save the video.
You can place the transition at the end of the video for fading out effect. Instead of Film Dissolve, you can use Crossfade or Dip to Black effect for fade in and fade out effect on video clips.
Part 3. Alternative way to fade in text in videos
If you do not have Adobe Premiere Pro or you find the steps difficult to fade in text in videos using Premiere Pro, we recommend Wondershare Filmora . Filmora is a professional video editor that is available for Windows as well as Mac users. There is a wide range of video effects available in Filmora in comparison to Premiere Pro. Most importantly, Filmora is super easy and intuitive to use, and even amateur users can use it comfortably. Here are the steps to fade in text in videos using Filmora.
Free Download For Win 7 or later(64-bit)
Free Download For macOS 10.14 or later
Step1 Download and install Filmora . Launch Filmora and click on New Project option.

Step2 Import the video clip under Project Media folder. Drag and drop the video clip to Timeline.

Step3 Go to Titles located at the top and drag and drop any title style on Timeline. Double-click on the Title clip on Timeline and type in your required text in the Viewer. You can stretch the Title clip to extend its duration as per your requirement.

Step4 Double-click on Title clip again on the Timeline and go to Text> Animation tab located at the top-left corner. Scroll down to go to Fade1 option and double-click Fade1 to apply it to your text.
Step5 You can go to settings by clicking on Advanced button and adjust parameters such as speed and duration of the fade effect for better visibility.
Step6 Once you are done, play the video and thereafter, click on Export to save the video on your hard drive.
Conclusion
We have stated the steps on how to fade text in Premiere Pro. You can use the same steps to apply the effect to graphical objects. We have also illustrated how to apply fade in and fade out effects between video clips and scenes using transition effects. If you are looking for an alternative and easier way to fade in texts in your videos, we recommend Wondershare Filmora .
Free Download For macOS 10.14 or later
Step1 Download and install Filmora . Launch Filmora and click on New Project option.

Step2 Import the video clip under Project Media folder. Drag and drop the video clip to Timeline.

Step3 Go to Titles located at the top and drag and drop any title style on Timeline. Double-click on the Title clip on Timeline and type in your required text in the Viewer. You can stretch the Title clip to extend its duration as per your requirement.

Step4 Double-click on Title clip again on the Timeline and go to Text> Animation tab located at the top-left corner. Scroll down to go to Fade1 option and double-click Fade1 to apply it to your text.
Step5 You can go to settings by clicking on Advanced button and adjust parameters such as speed and duration of the fade effect for better visibility.
Step6 Once you are done, play the video and thereafter, click on Export to save the video on your hard drive.
Conclusion
We have stated the steps on how to fade text in Premiere Pro. You can use the same steps to apply the effect to graphical objects. We have also illustrated how to apply fade in and fade out effects between video clips and scenes using transition effects. If you are looking for an alternative and easier way to fade in texts in your videos, we recommend Wondershare Filmora .
Create Your Own Subscribe Channel Graphics
Professional video creators earn billions from YouTube, Tick Tock, and such platforms today. That strongly encourages newcomers to create their video content. But is it that easy? Of course not. To create a successful video and catch people’s attention, subscribe channel graphics are essential.
We have introduced how to create a simple custom subscribe button animation for beginners. We are here to give a more advanced and fully animated graphic that will provide your video with a professional look. Let’s start with knowing what a Subscription channel graphic is.
What Is a Subscribe Channel Graphic?
We here give a simple explanation for those new to a subscribe channel graphic. Have you ever watched videos on a platform like YouTube? If yes, you must have noticed some unique pictures encouraging viewers to subscribe to the channel. That is exactly what a subscribe channel graphic is. It looks like as below.
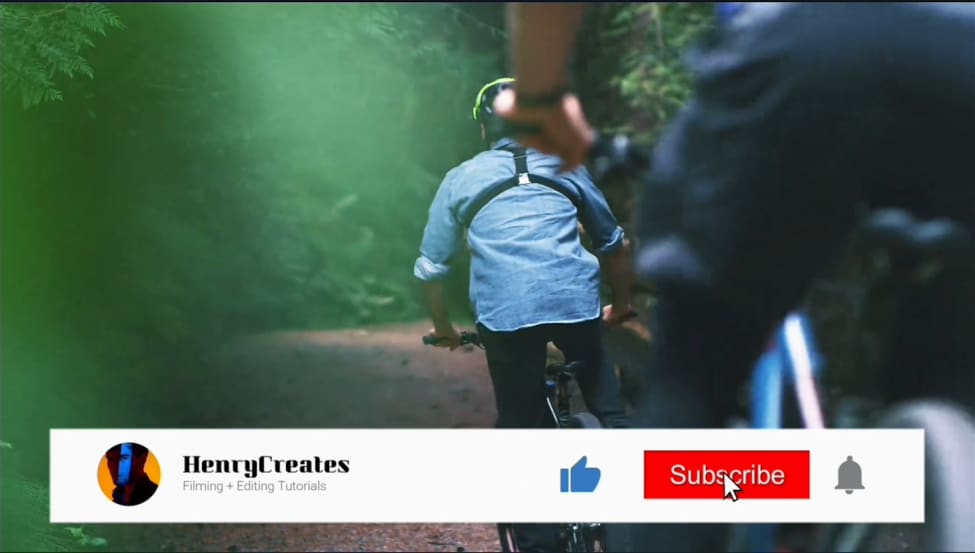
Every video crater incorporates such graphics on their videos before posting them. However, the hardest part is how to create one. We are now moving forward to see how we can make some outstanding subscribe button graphics using Wondershare Filmora.
Create Advanced Subscription Channel Graphics With Wondershare Filmora
Before we dive into our step-by-step guide, let’s first have an overview of our video editor. Wondershare Filmora is an incredible video editor with robust editing features. These features will transform your video into a stunning one within minutes. It also comes with a powerful screen recorder and a large filmstock of templates.
So using these templates, icons, and other features, here are the steps you need to follow to make an advanced subscribe channel graphic.
Free Download For Win 7 or later(64-bit)
Free Download For macOS 10.14 or later
Step1 Download and install Wondershare Filmora
First, you need to download and install the video editor, Filmora. If you’ve already done that, then launch the software right away. But if you haven’t, then download it below. Once the download finishes, install the software on your computer.
When you launch the Filmora, click on “New Project.”
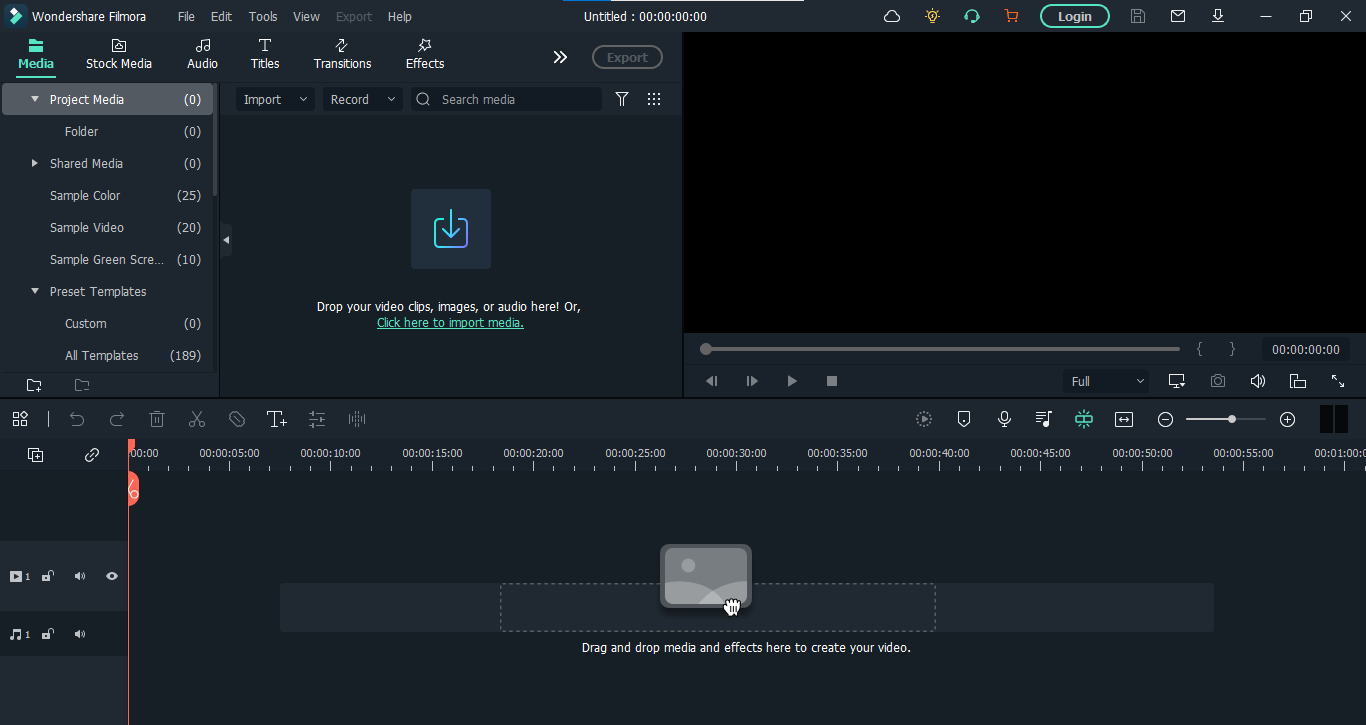
Step2 Make the structure of your graphics
For creating anything, we first need a flawless structure. Here, we can make the structure of Subscribe channel graphics using different colors, icons, texts, and channel photos. We’ll start by adding color layers.
1. Add color layers
- Go to the “Media” on the top left corner of the interface and Click on “Sample Color.” Here find the Green color and add it in the panel below as the first video layer by the drag-n-drop function.
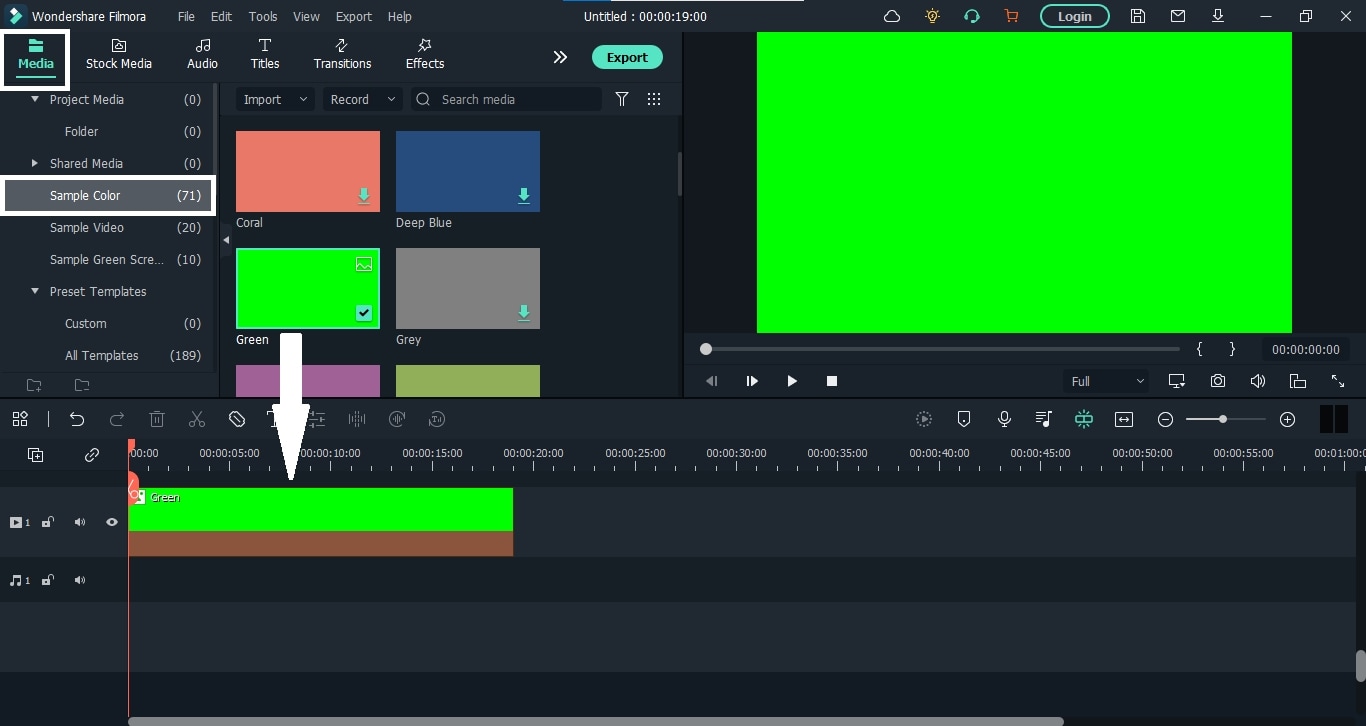
- We will key this layer at the end, so make sure not to use any other green graphics for your animation.
- Let’s lock this layer because we will no longer use it. For this, click on the “Lock” icon on the layer’s left side.
- Add white and red colors and stack them on top of the green color layer.
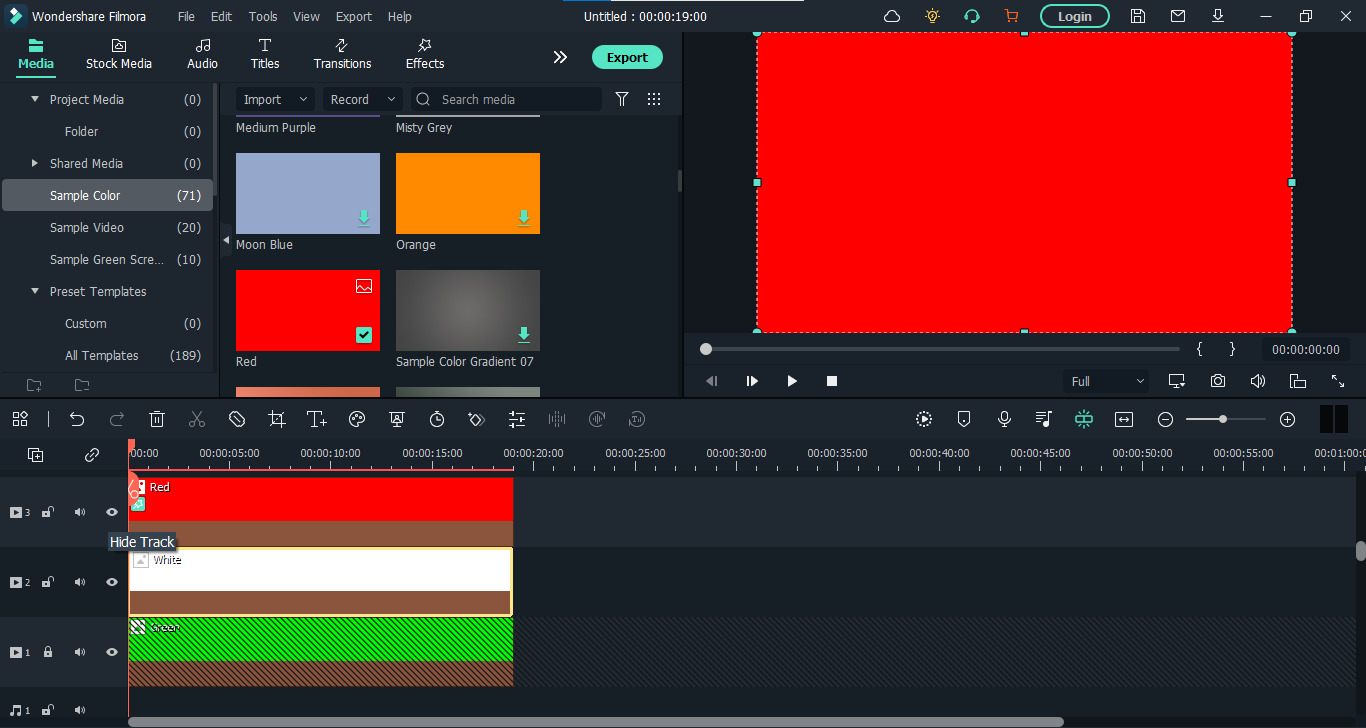
After adding all three color layers, it’s time to crop these layers to make the structure of our graphic.
Crop the Color Layers
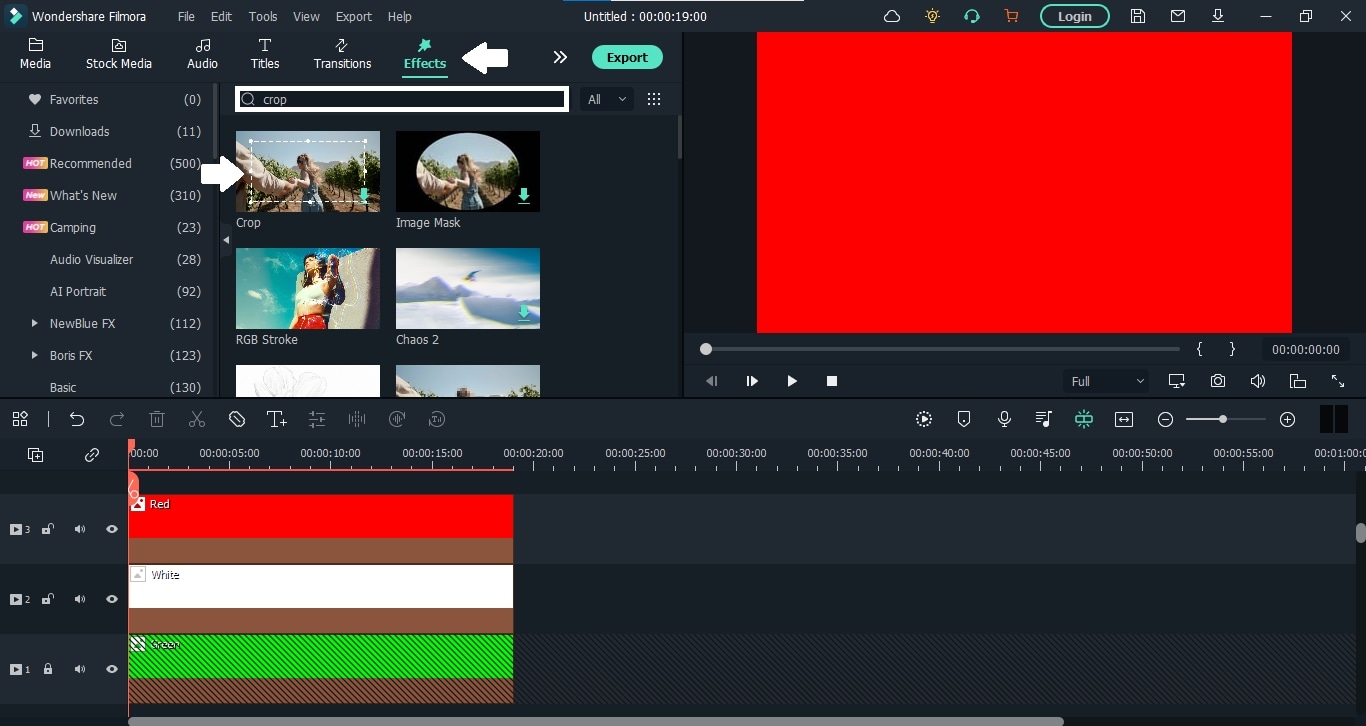
- Go to the “Effects” tab from the top bar and search for the “Crop” effect. Then drag the effect and add it to the white and red layers on the panel.
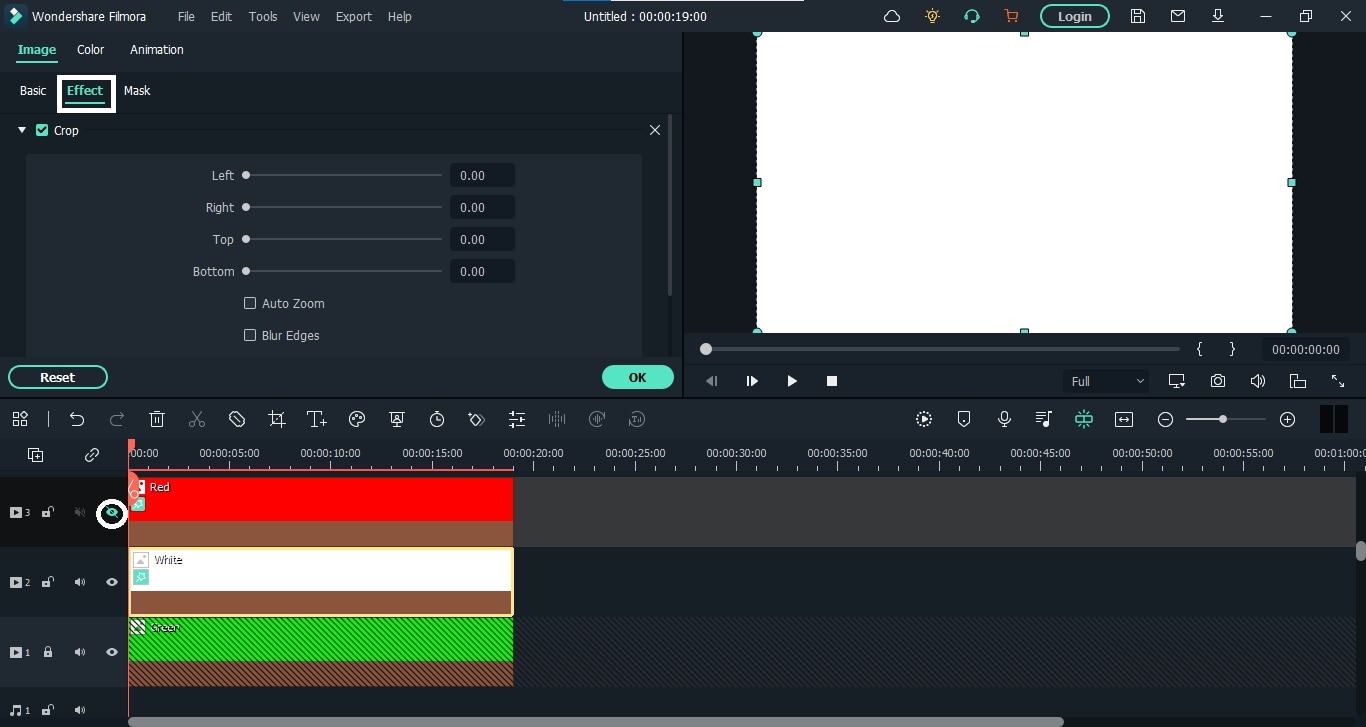
- First, click on the “Eye” icon beside the red color layer to hide it. Then double-click the white layer to see its properties. When the properties appear, select “Effects” from there.
- You can also enable the safe zones from the display settings on the right side of the panel. After that, crop the white layer first, then show the red layer and crop it too. It will look like this.
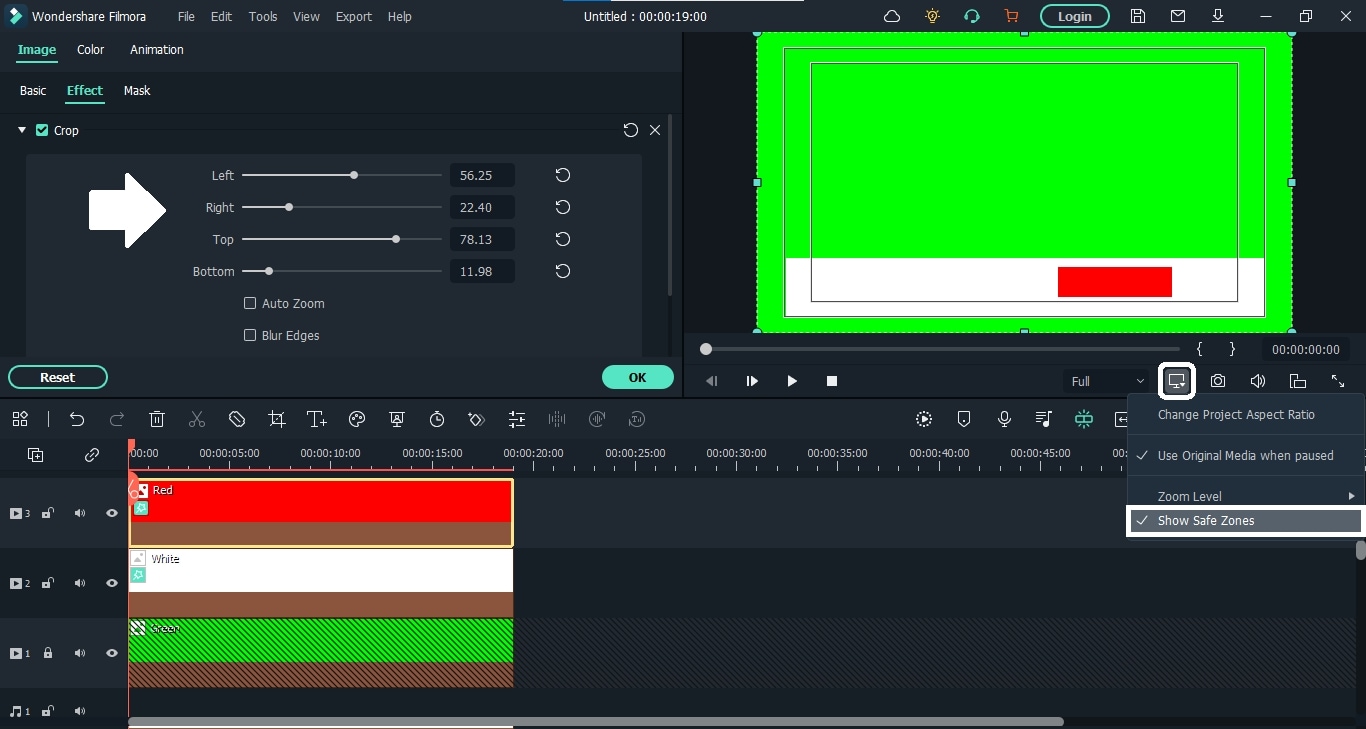
That’s it, folks. Our color backgrounds are here. Now we have to add our channel photo to this. So let’s move on to see how to do it.
2. Add a channel photo
- To add the channel photo, you can upload the image. Here we are going to use some images from the stock media. No matter the image, drop it down on the panel above the red color layer.
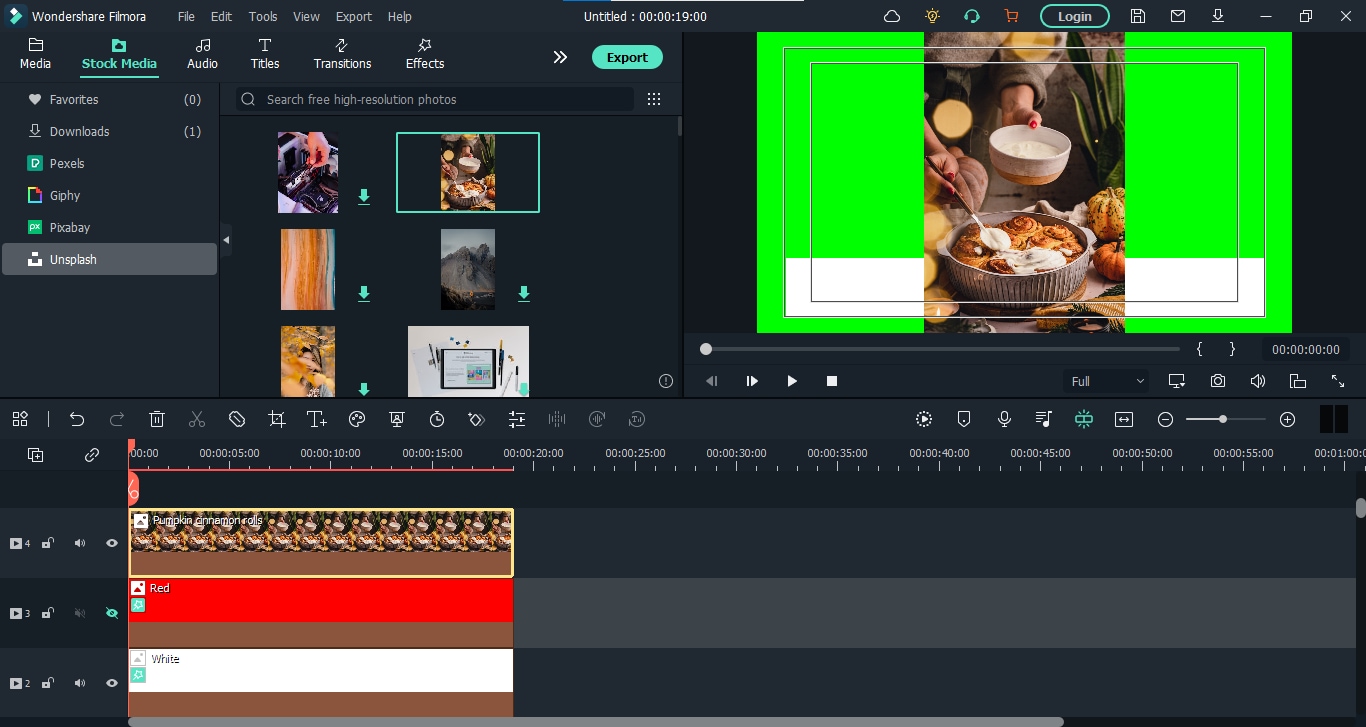
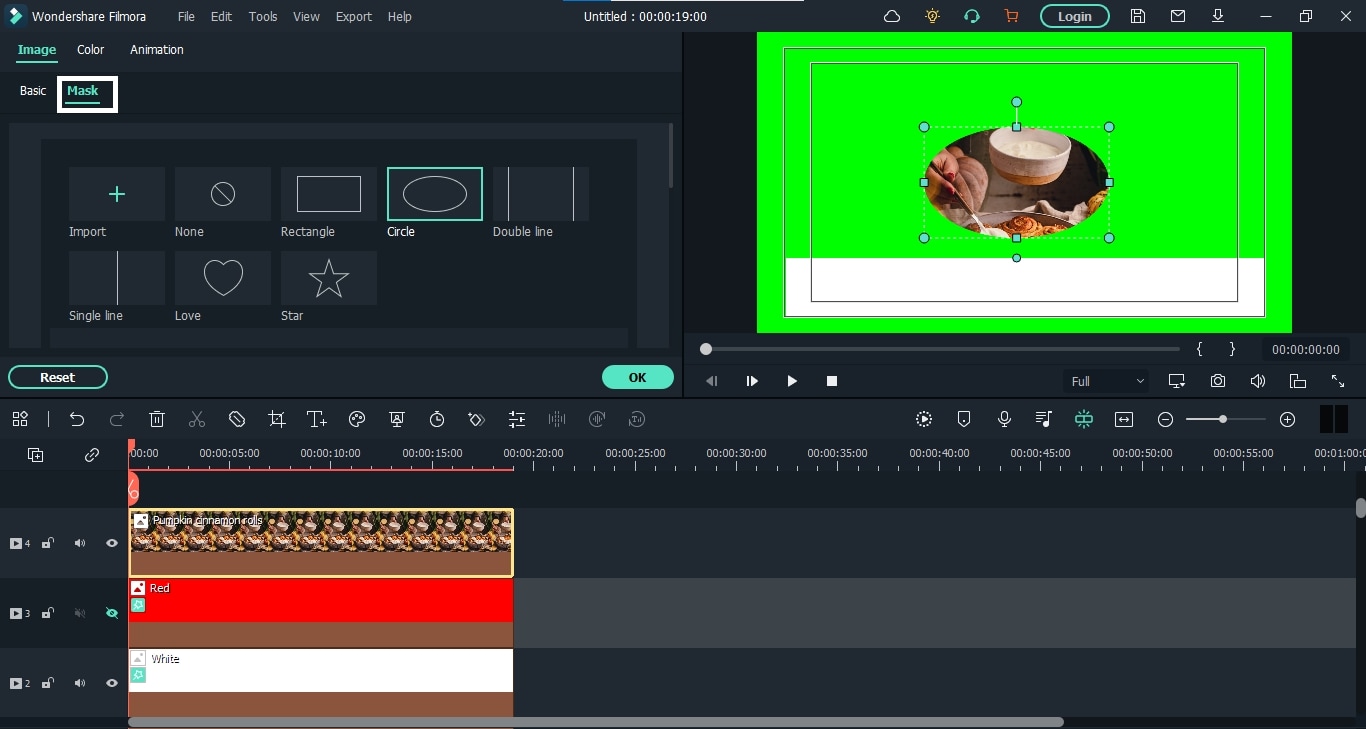
- Now double-click on the image layer, and from the properties, go to the “Mask” option and select the circle. You can also select any other shape you like.
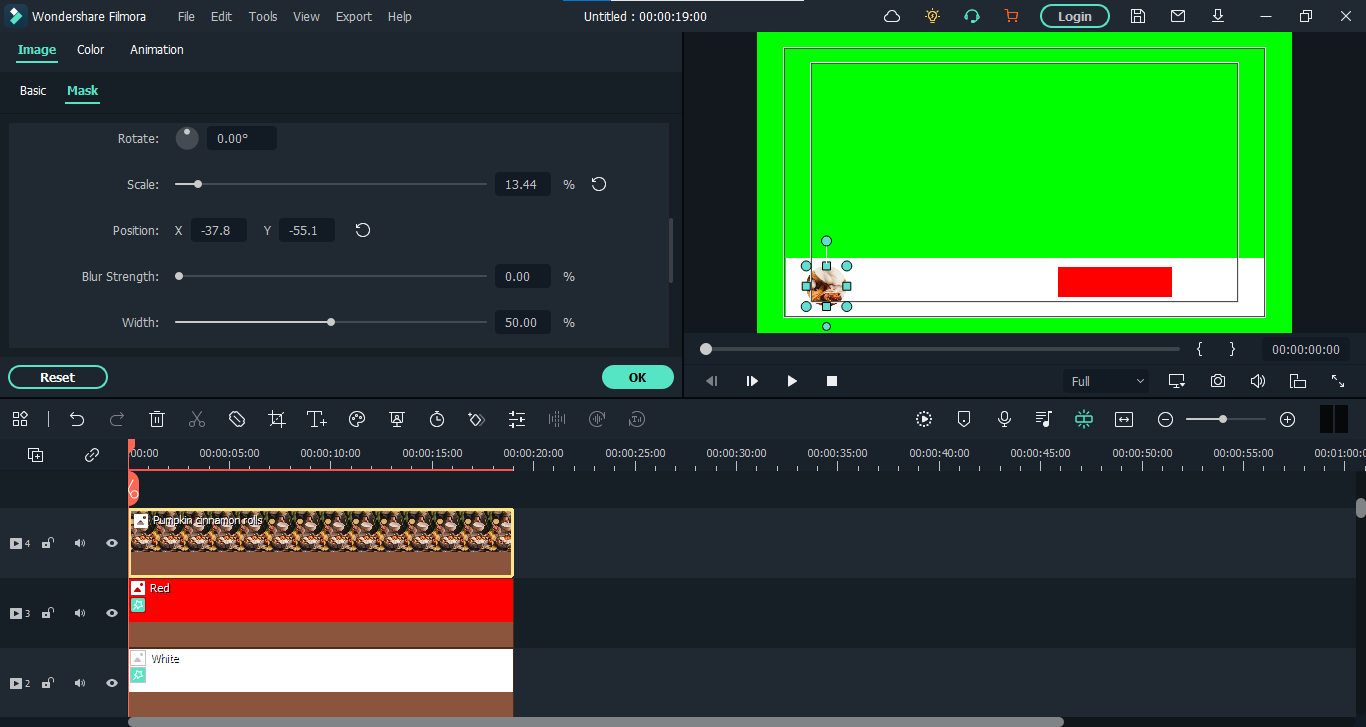
- After that, scroll down and make the circle even by matching all numbers. Then scale it down and place it on the left corner of the white layer.
It’s done. Let’s add our channel text now.
3. Add texts
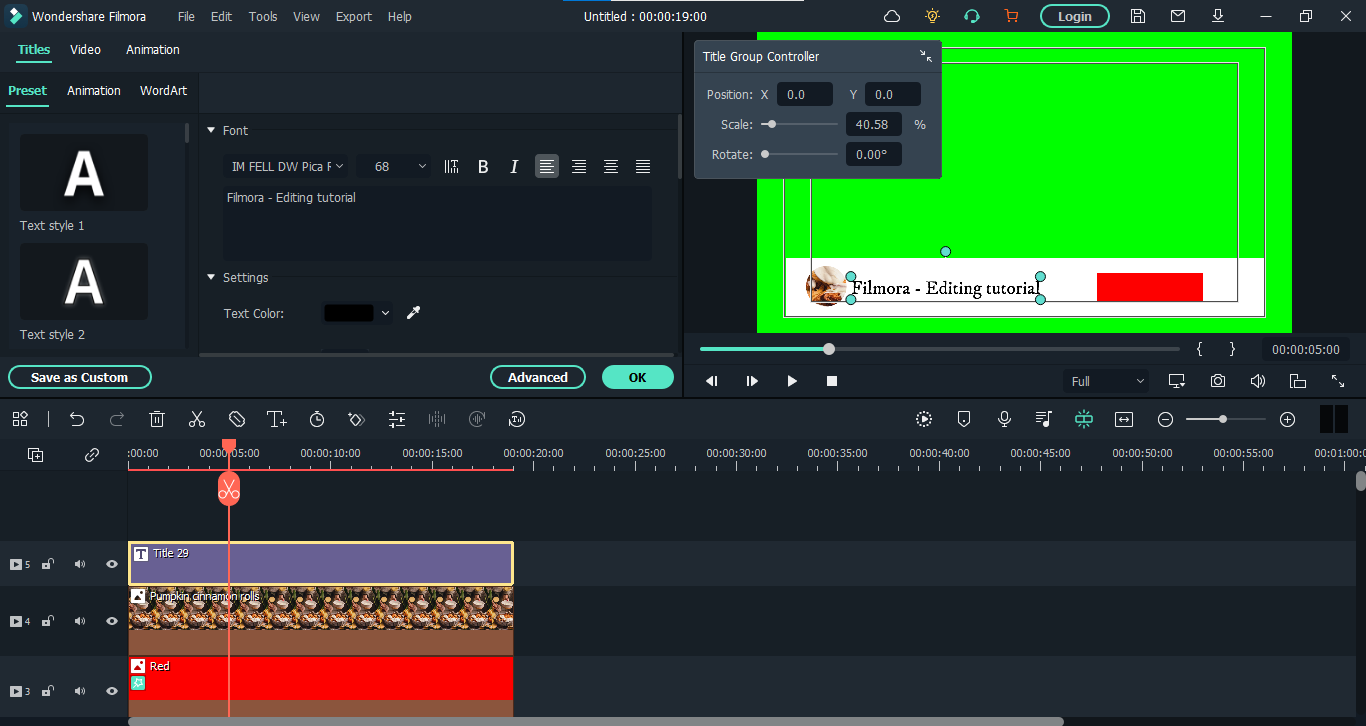
- For adding text, go to the “Titles” from the top bar and add the title you like to the panel.
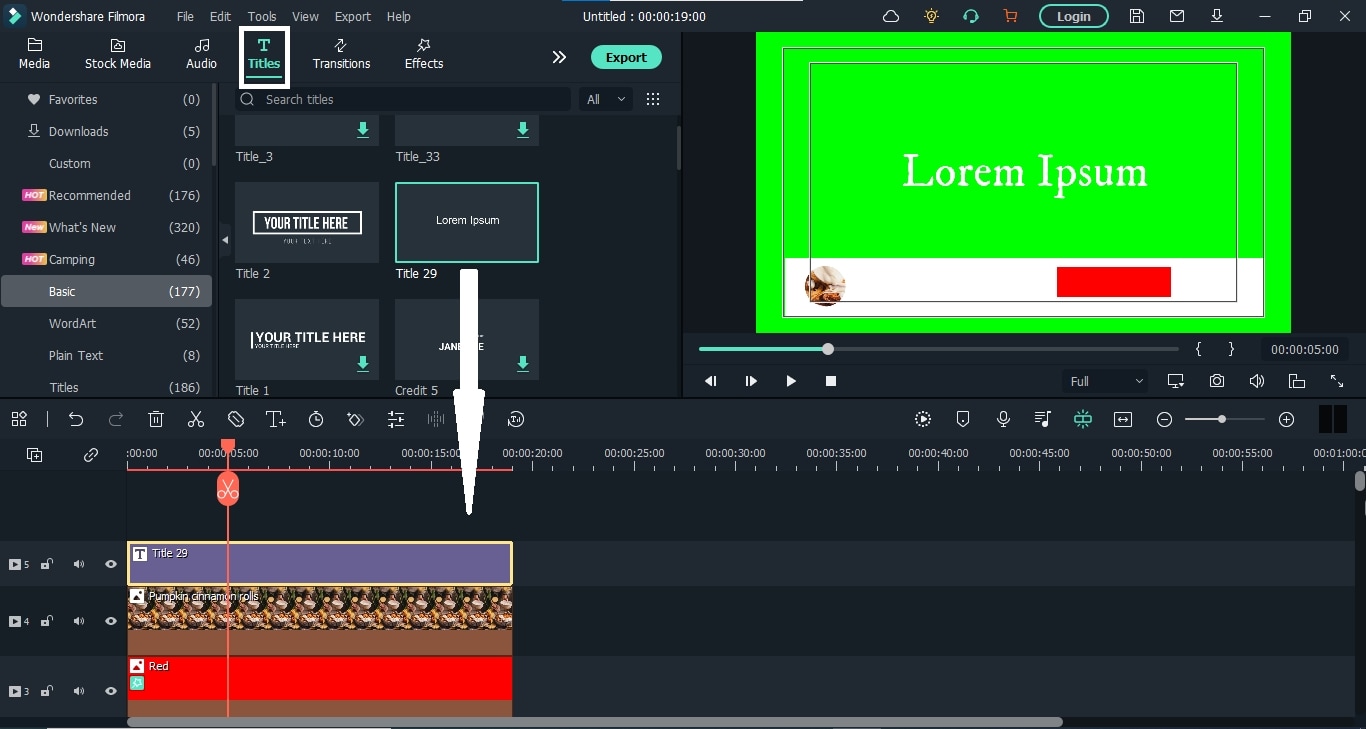
- Now double-click this layer and add the text you want. You can also change the color of the text, scale it down and place it where ever you want.
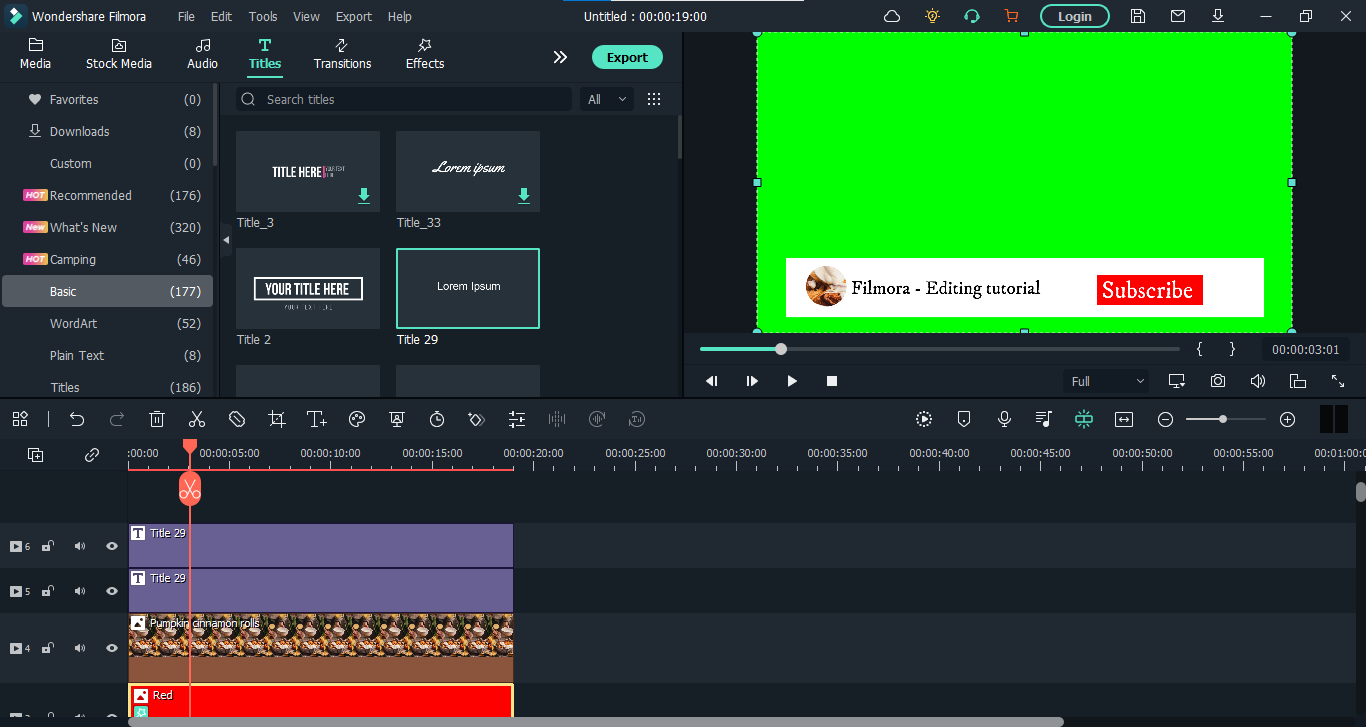
- Now, let’s add another title for the subscribe button. You have to place it on the red layer.
We can’t finish our structure without icons, can we? So let’s move on to them.
4. Add icons
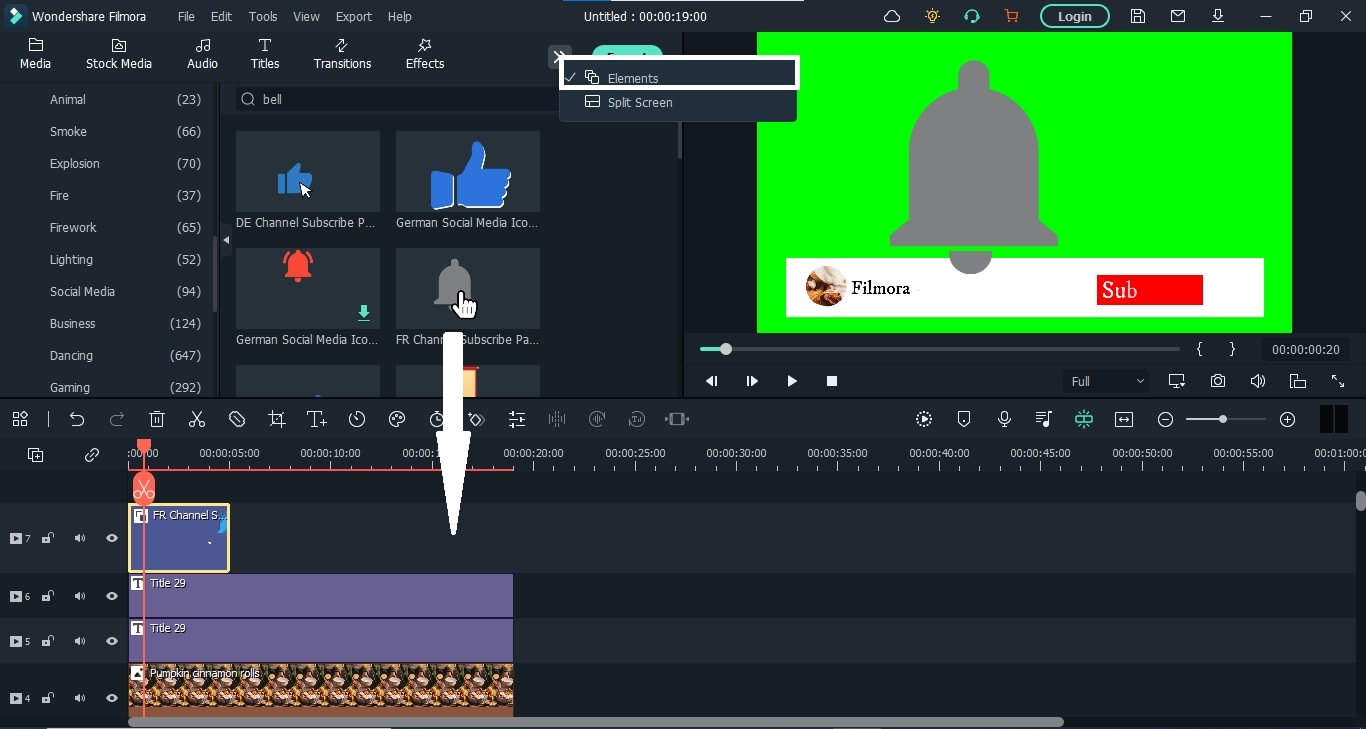
- Hit the “Element” from the top bar and search for the “Bell” icon. You will find the short animations of the bell. Add the suitable one to the panel.
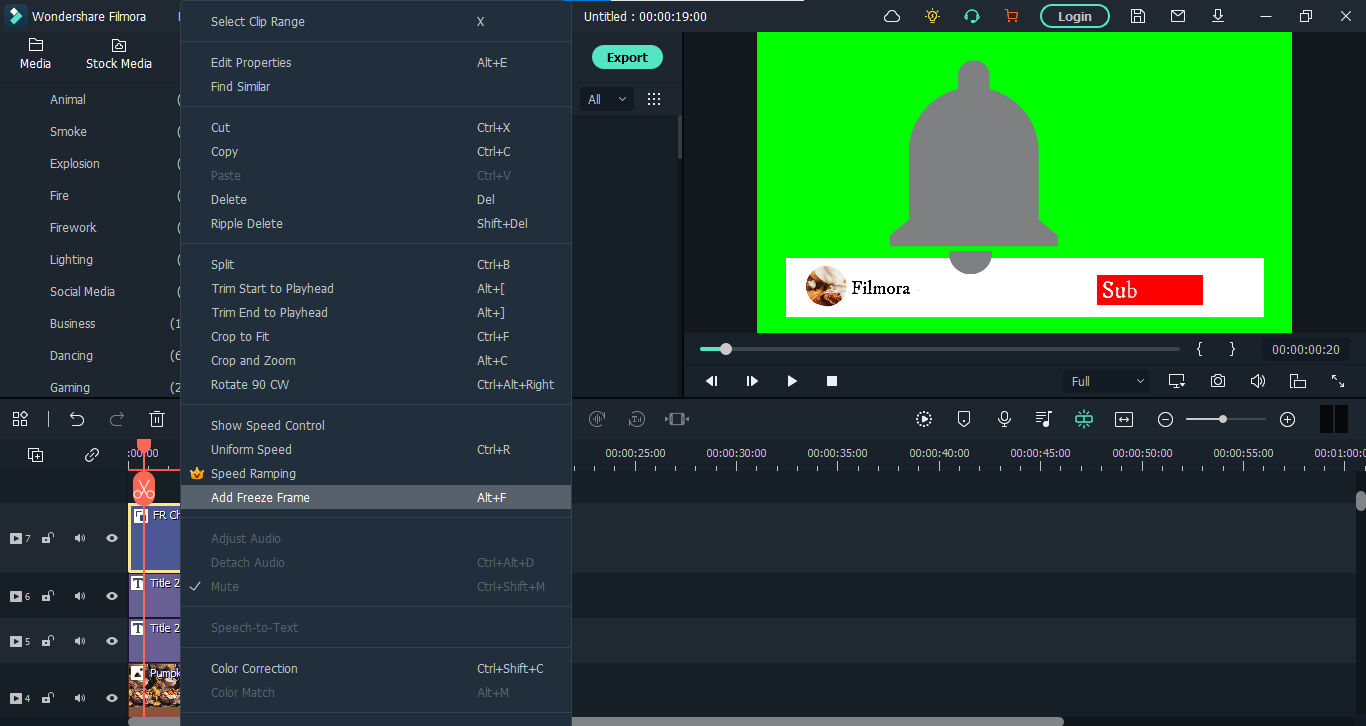
- Now find a suitable place in the animation, stop it at that point, right-click on the element layer and add a freeze frame.
- You can also extend the freeze frame and remove the other parts. Then reduce its size and place it beside the “Subscribe” text.
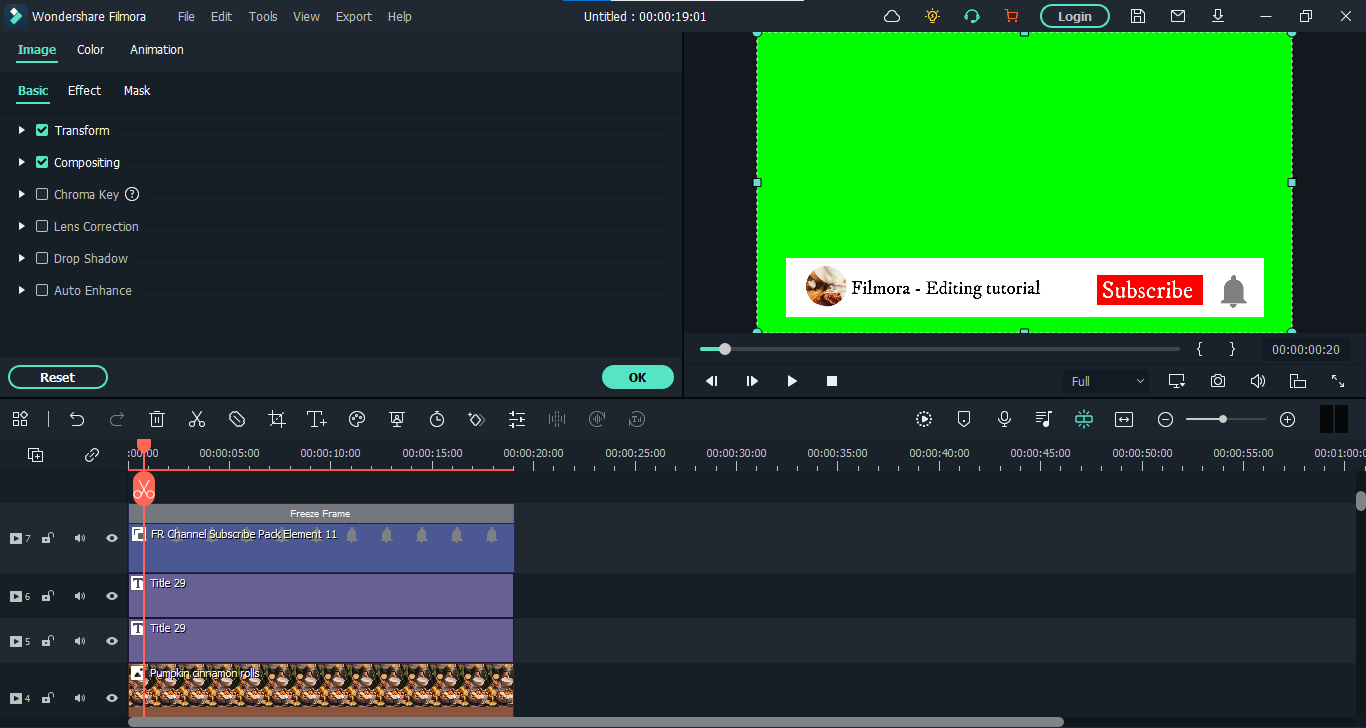
- Similarly, add “Thumbs Up” and “Mouse Cursor” icons on the panel.
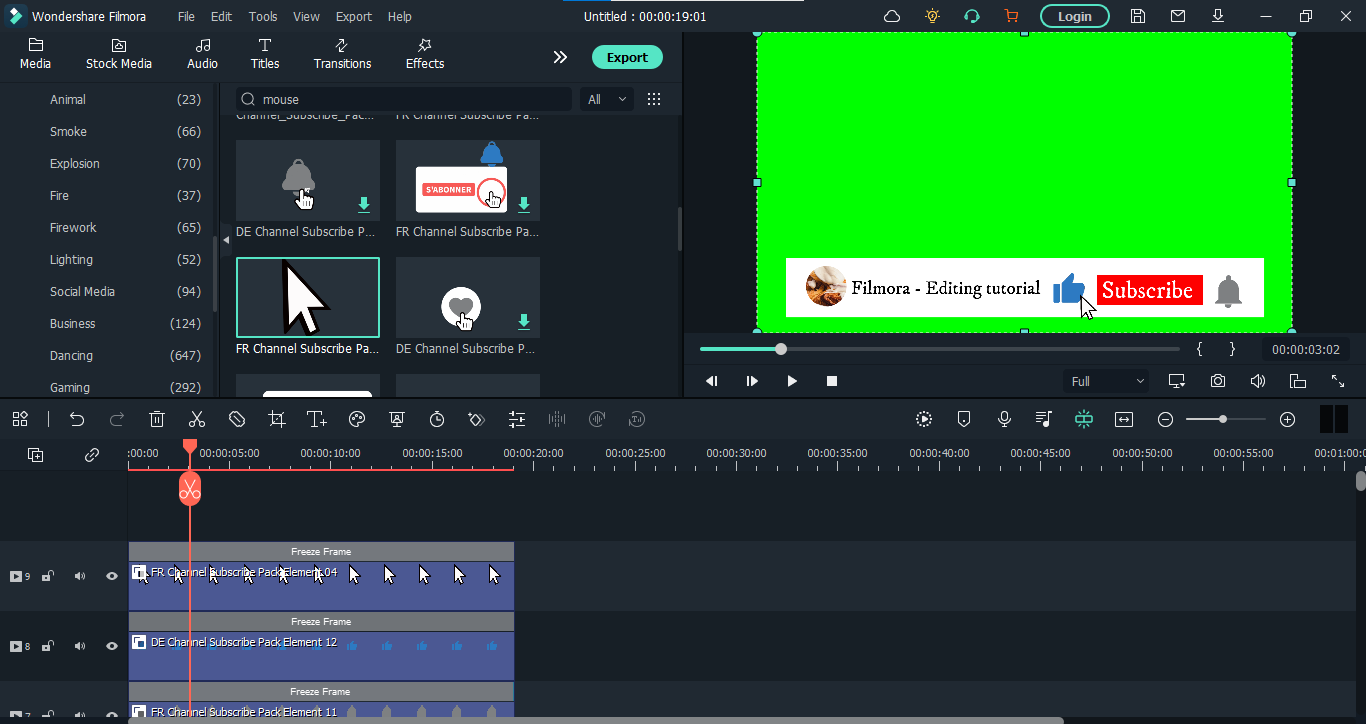
Finally, our structure is finished. Now let’s start animating.
Step3 Animate the graphics
First, we’ll make it so that all these graphics come in from below the view.
- Go to the white layer first and double-click on it. Then hit the “Animation” option and scroll down. Here add a new keyframe by clicking “Add.” Now move the playhead to the beginning and place the white color layer out of the frame.
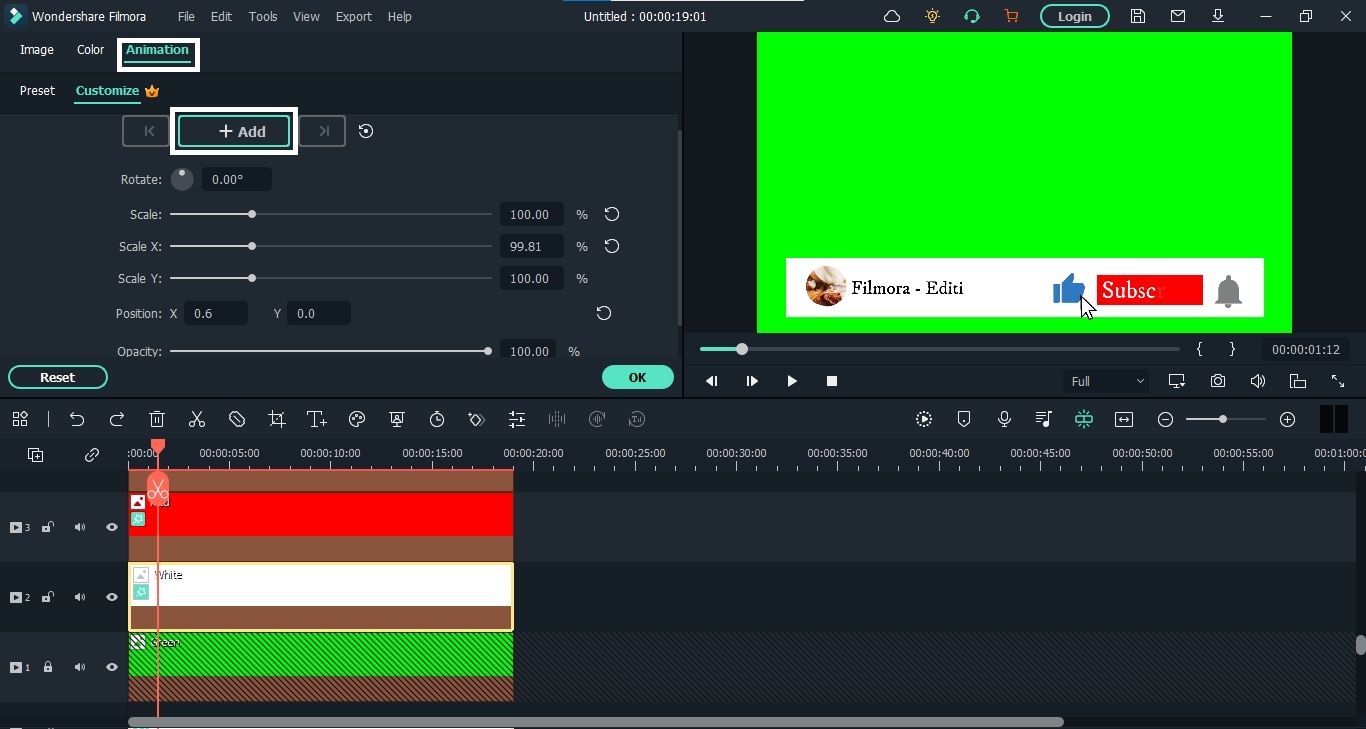
- Now, do the same for channel photos and icons. The whole animation will look like this.
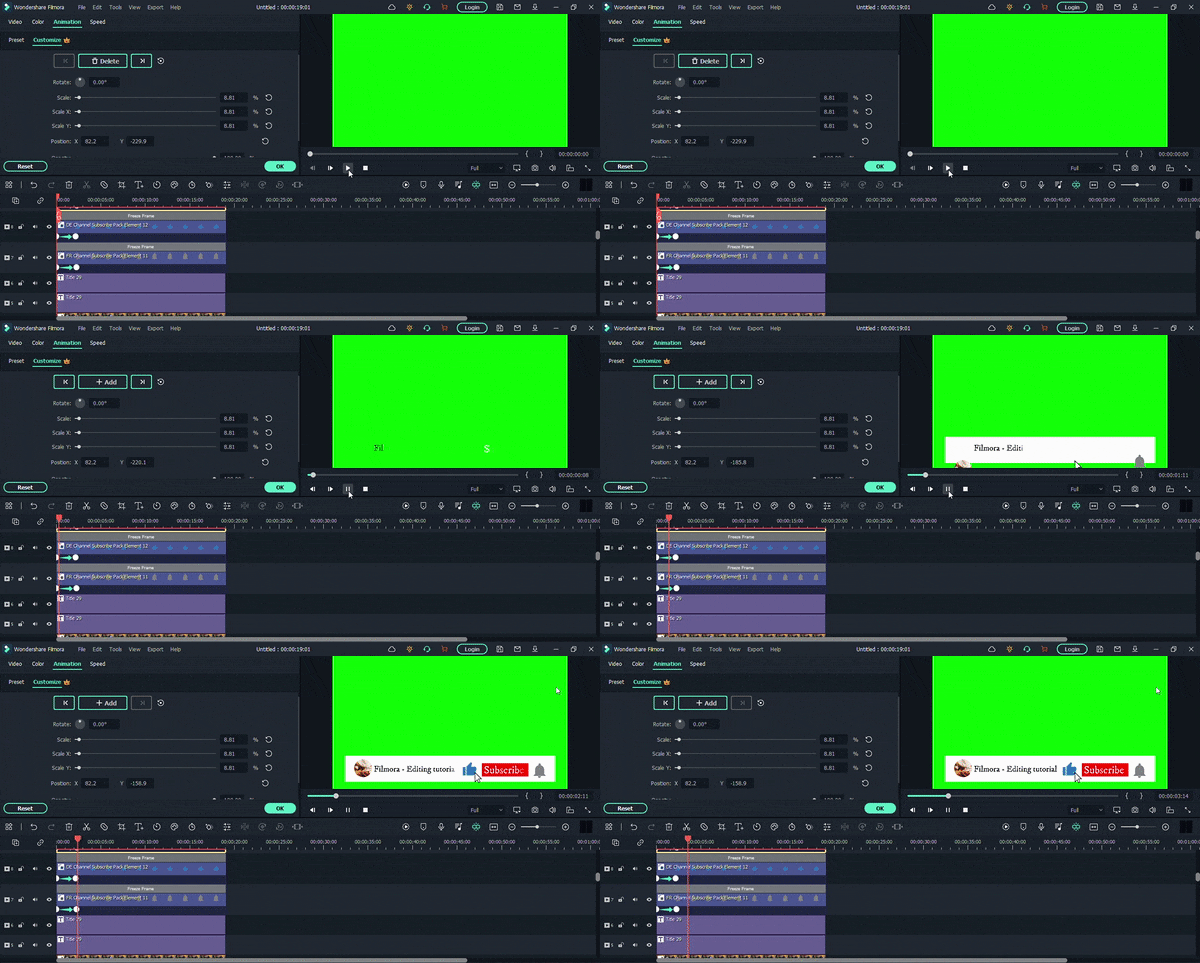
- As you can see, the text appears before the color layers. Let’s correct it. Double-click the text layer. Select the” Type Writer’ form and hit the “Advanced option.
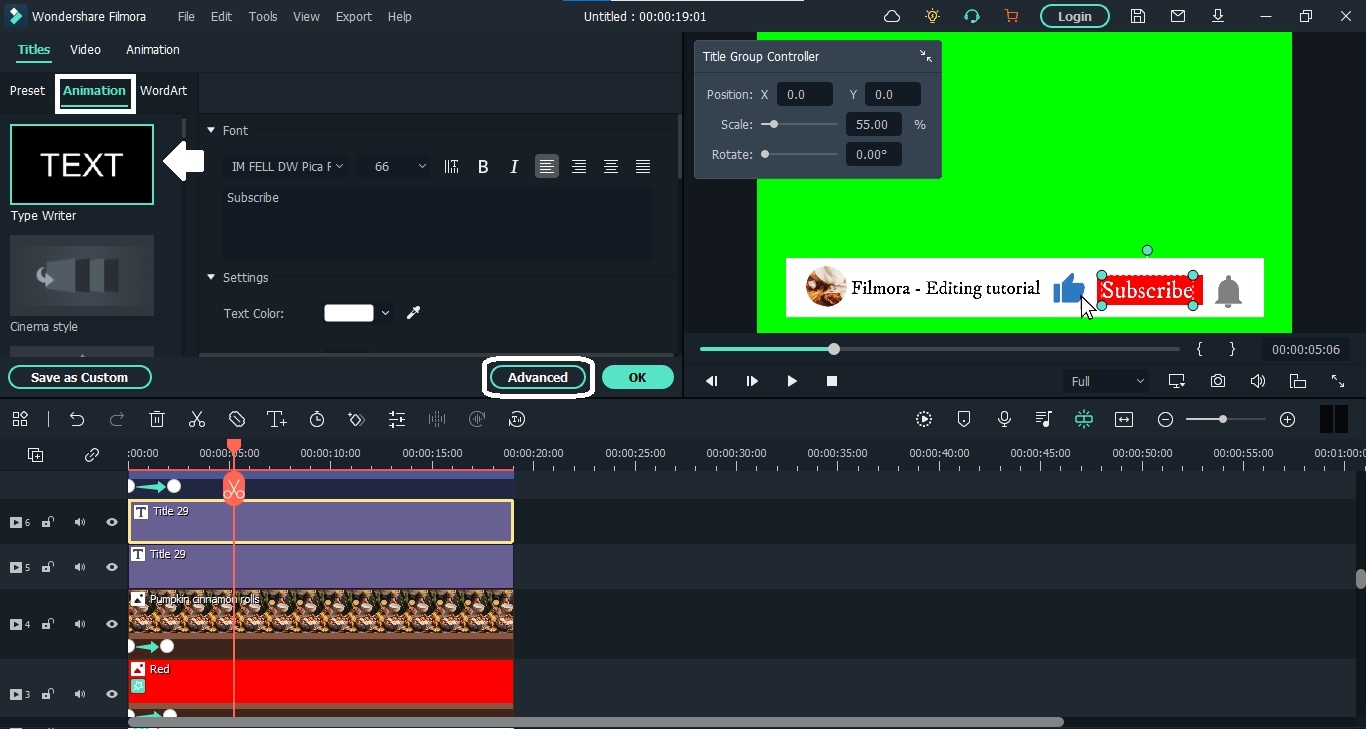
- Here, you can adjust the text with the color layers.
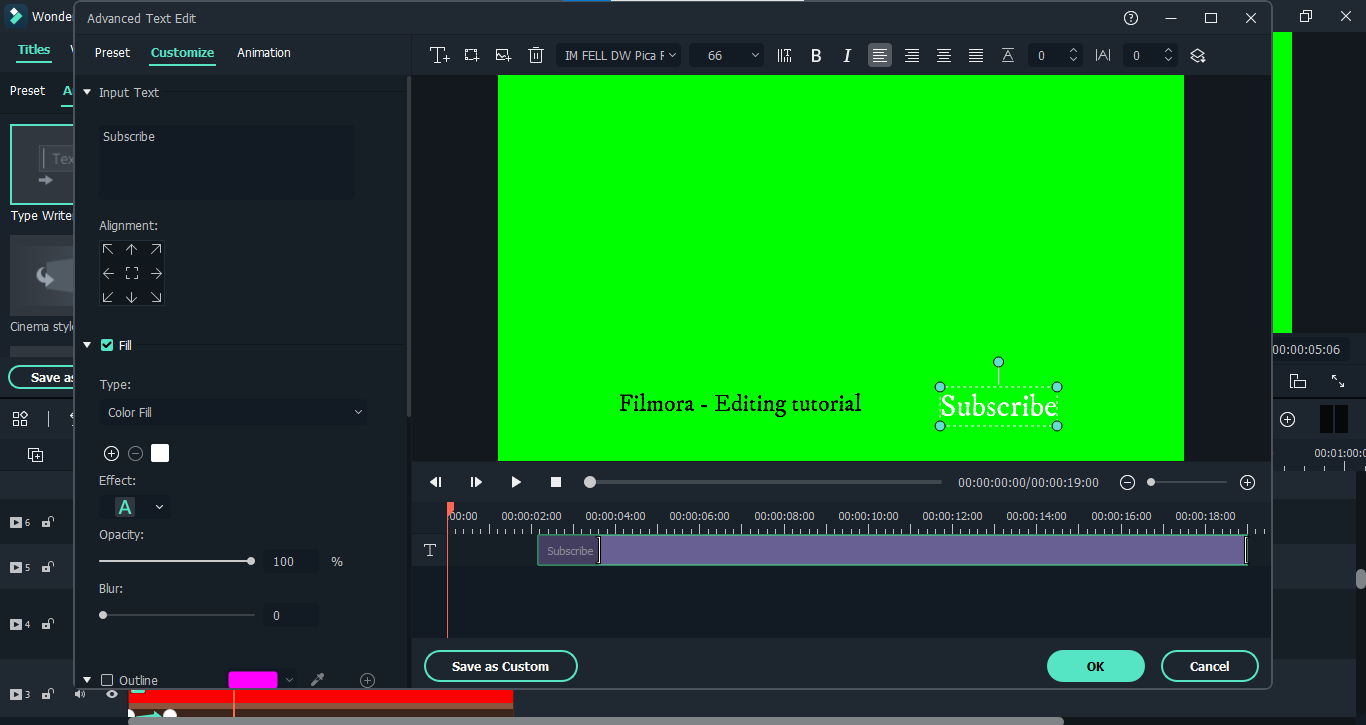
- After adjusting both the channel name and subscribe button texts, your animation will appear like this.
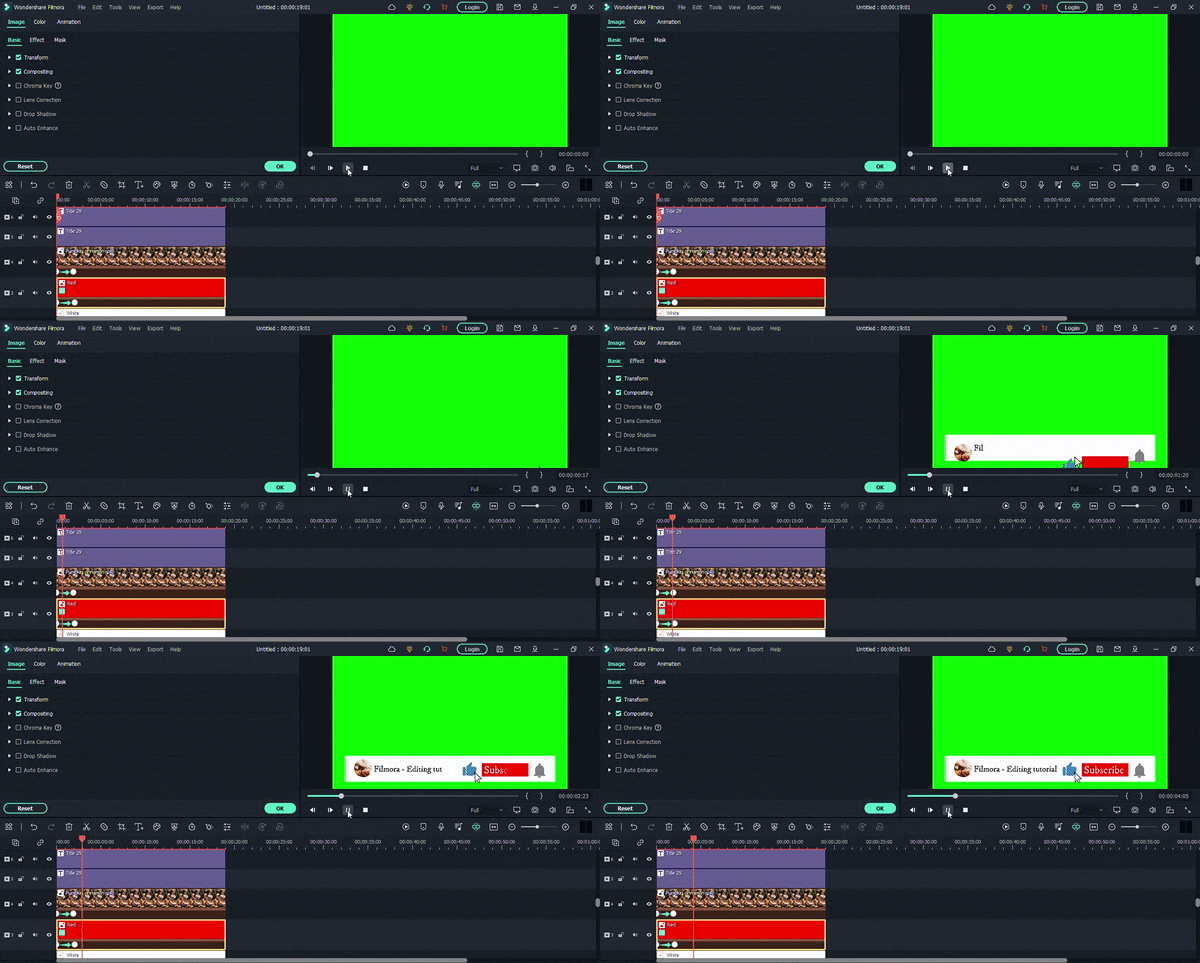
If you’ve managed so far, then that’s great. We have done most of the work. Now we need to animate the graphics of the mouse cursor so that it clicks on the bell icon, thumb icon, and our subscribe button. The process is somewhat similar because we will need to add different keyframes. But still, let’s see it in detail.
Step4 Animate the mouse cursor
- Go to the “Mouse Cursor” icon layer and double-click on it. First, place the icon on the “Thumbs Up” so that when it animates in, it goes directly to the said icon. Then you have to add another keyframe after some time. And when you add a third one, place the “Mouse Cursor” icon on the subscribe button text.
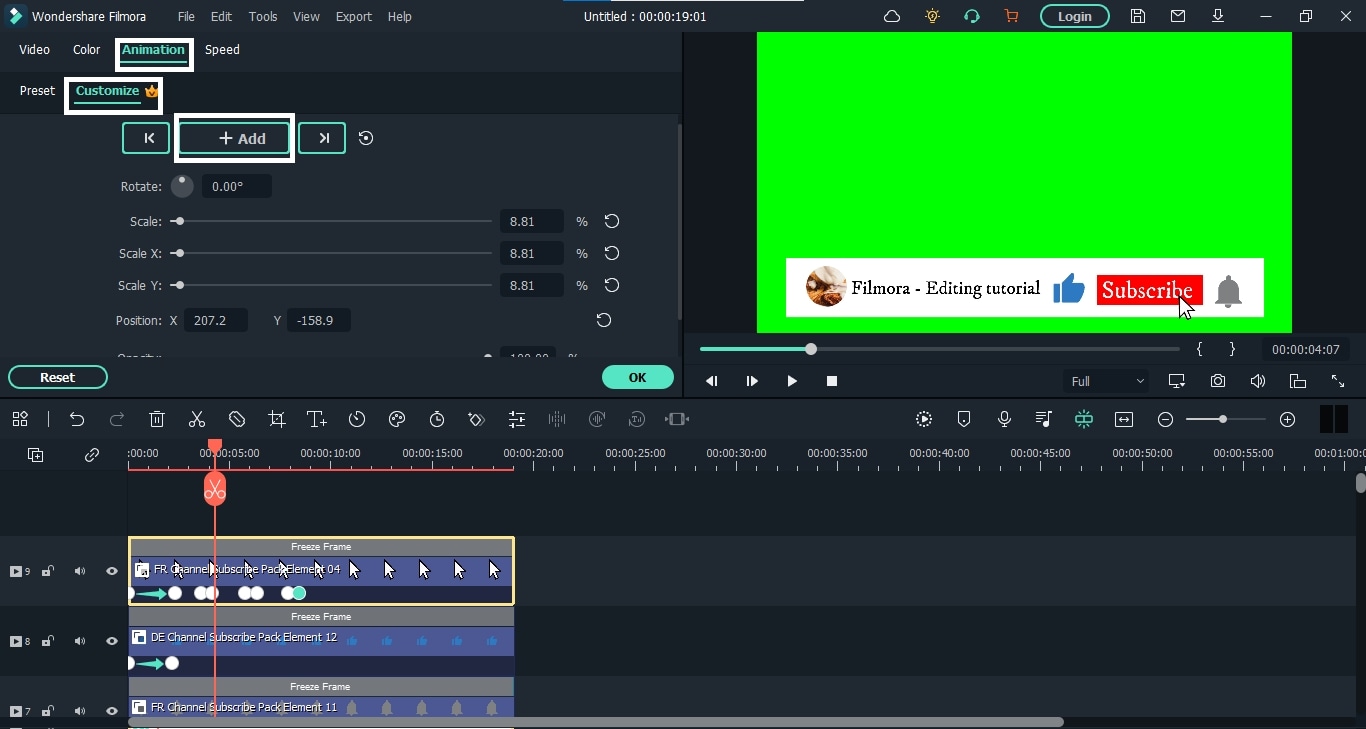
- Then add a similar pair of keyframes with some space from the last one and place the “Mouse Cursor” icon on the “Bell” icon.
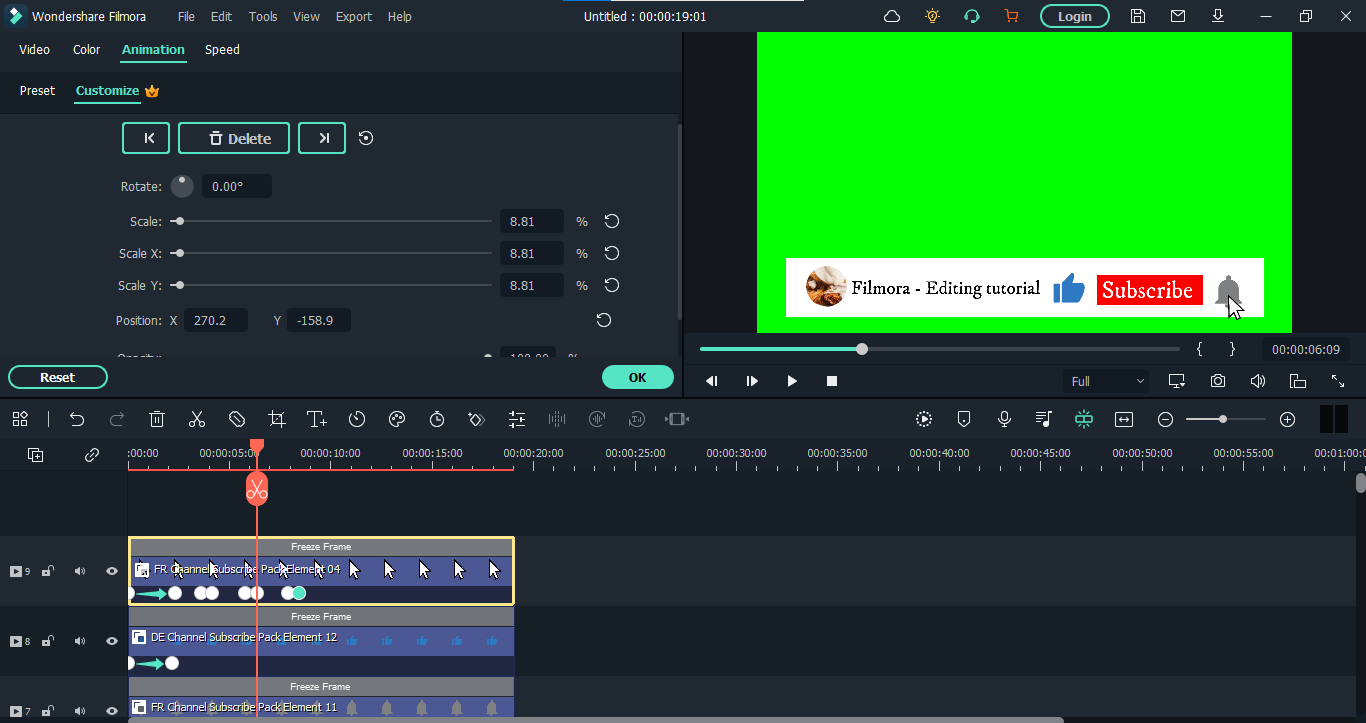
- The last keyframe we have to add will place this “Mouse Cursor” icon out of our view. After that, you need to adjust these keyframes to set the speed of the moving “Mouse Cursor’ icon according to your taste.
The final product up till now will be like this.
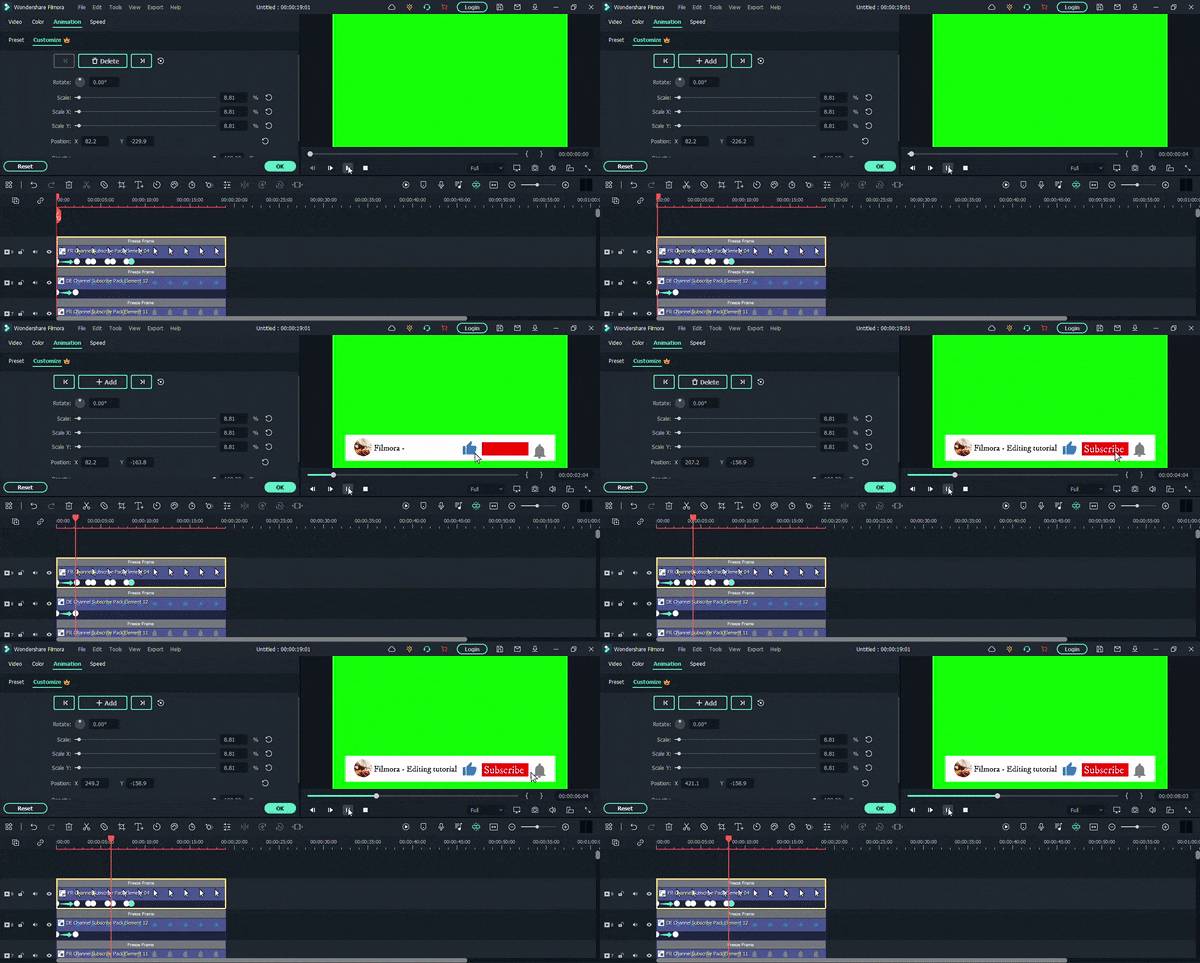
We are nearing our end, guys. Now we just need to make the graphics animate out of our view, and our work will be done. So let’s dive right into it.
Step5 Animate the graphics out
The process of animating out your graphics is like how we animated in our video. We just need to reverse those steps. So here’s how it’s done.
- Go to the white color layer and double-click on it to open its properties.
- Now, from the “Animation” option, add a new keyframe a little before the end of the video.
- After that, you have to add another keyframe at the end of your video. But in this keyframe, place the white color layer out of your view. Like this,
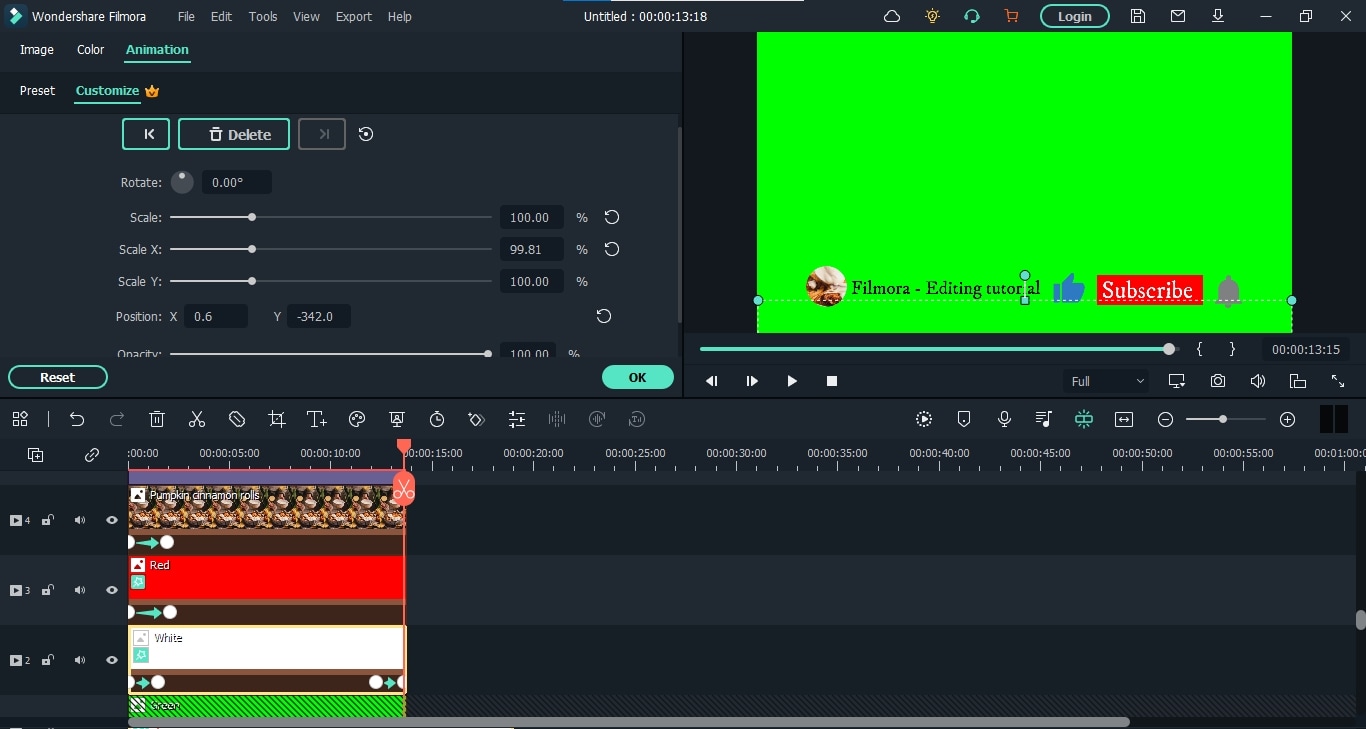
- Repeat the same steps for the red color layer, channel image layer, and icons layer.
- After it’s done, the whole graphics will look like this.
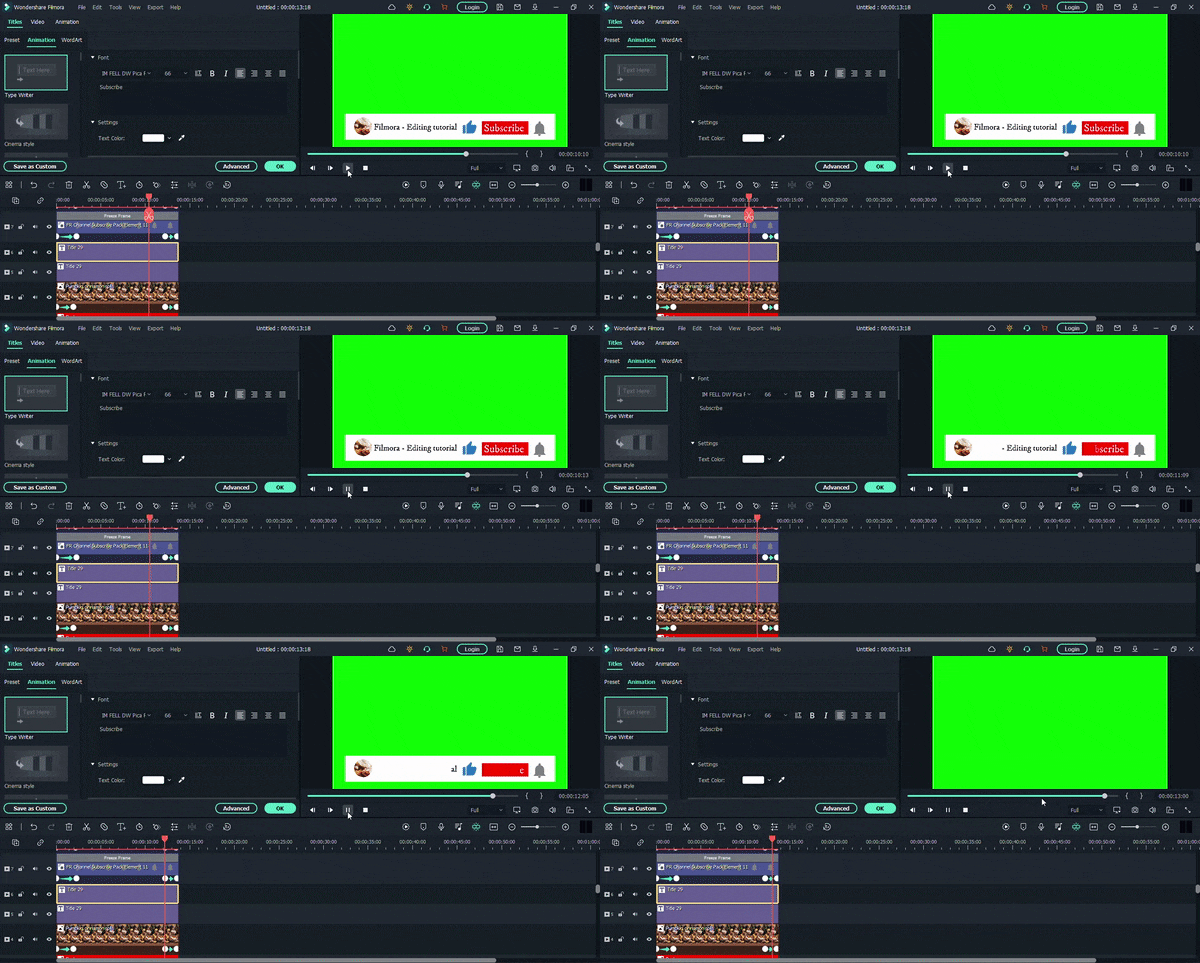
- The only thing that remains is to fix the text layers. For this, double-click on the channel text layer and go to the “Advanced” settings, just like before.
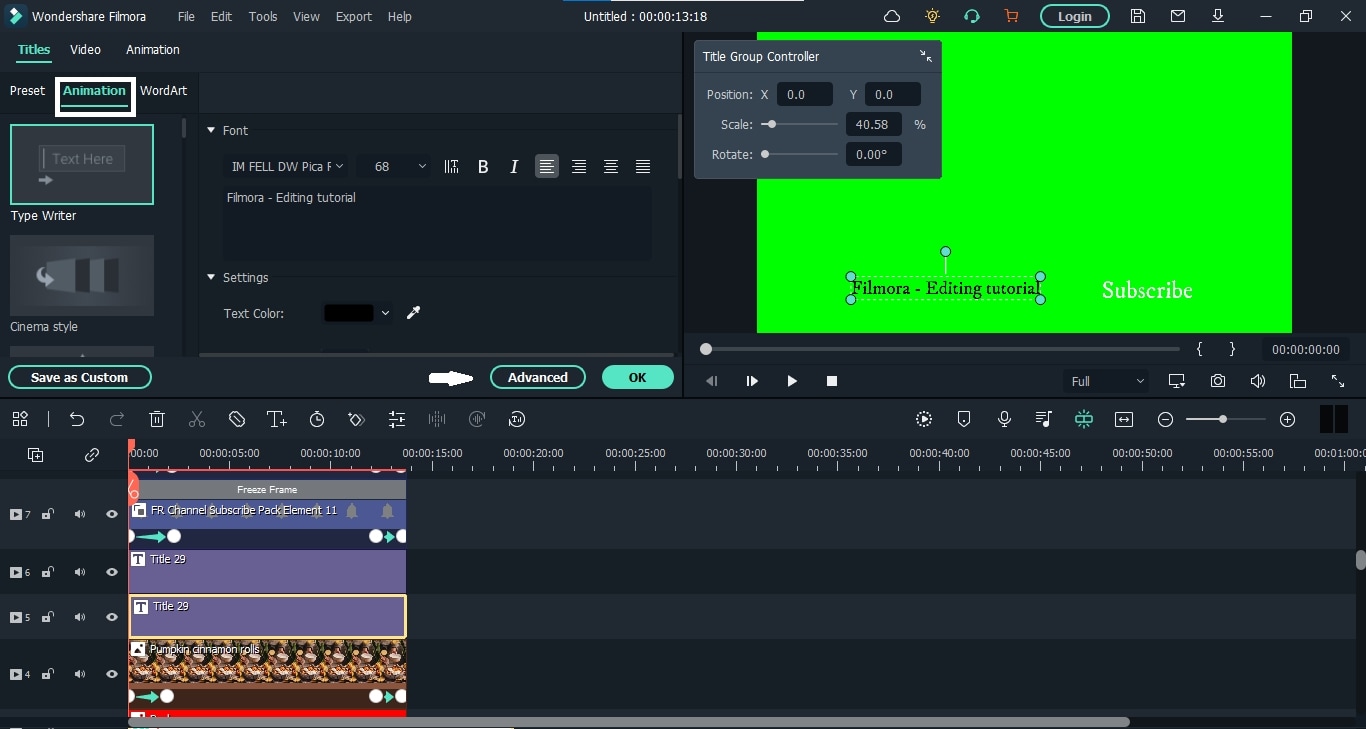
- From here, fix the text speed and end with your other graphic elements. After it’s done, we will do the same for the “Subscribe” button text.
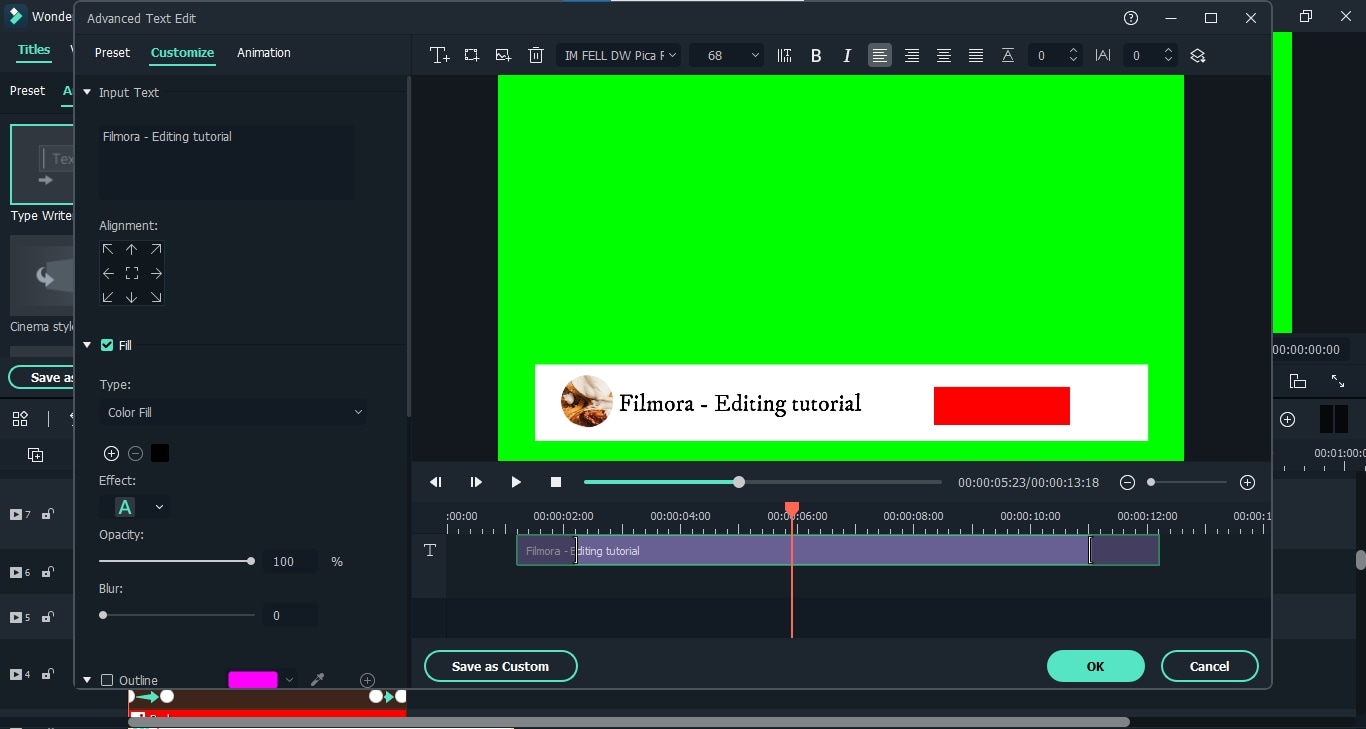
Finally, our graphic is completed. “Export” it from the software to your computer.

Whenever you want to use this graphic on your video, you have to import it first and enable the “Green Screen” option. It will remove the green background color. Then you can upload your video and place this graphic on it to add to the video. And that’s all.
Conclusion
Creating the Subscribe channel graphics is like picking stars from the sky for any video creator, especially if you are a beginner. However, now you don’t need to go for the professionals anymore. Wondershare Filmora has got you covered. So follow this detailed guide and create excellent subscribe channel graphics for your videos.
Free Download For macOS 10.14 or later
Step1 Download and install Wondershare Filmora
First, you need to download and install the video editor, Filmora. If you’ve already done that, then launch the software right away. But if you haven’t, then download it below. Once the download finishes, install the software on your computer.
When you launch the Filmora, click on “New Project.”

Step2 Make the structure of your graphics
For creating anything, we first need a flawless structure. Here, we can make the structure of Subscribe channel graphics using different colors, icons, texts, and channel photos. We’ll start by adding color layers.
1. Add color layers
- Go to the “Media” on the top left corner of the interface and Click on “Sample Color.” Here find the Green color and add it in the panel below as the first video layer by the drag-n-drop function.

- We will key this layer at the end, so make sure not to use any other green graphics for your animation.
- Let’s lock this layer because we will no longer use it. For this, click on the “Lock” icon on the layer’s left side.
- Add white and red colors and stack them on top of the green color layer.

After adding all three color layers, it’s time to crop these layers to make the structure of our graphic.
Crop the Color Layers
- Go to the “Effects” tab from the top bar and search for the “Crop” effect. Then drag the effect and add it to the white and red layers on the panel.

- First, click on the “Eye” icon beside the red color layer to hide it. Then double-click the white layer to see its properties. When the properties appear, select “Effects” from there.

- You can also enable the safe zones from the display settings on the right side of the panel. After that, crop the white layer first, then show the red layer and crop it too. It will look like this.

That’s it, folks. Our color backgrounds are here. Now we have to add our channel photo to this. So let’s move on to see how to do it.
2. Add a channel photo
- To add the channel photo, you can upload the image. Here we are going to use some images from the stock media. No matter the image, drop it down on the panel above the red color layer.

- Now double-click on the image layer, and from the properties, go to the “Mask” option and select the circle. You can also select any other shape you like.

- After that, scroll down and make the circle even by matching all numbers. Then scale it down and place it on the left corner of the white layer.

It’s done. Let’s add our channel text now.
3. Add texts
- For adding text, go to the “Titles” from the top bar and add the title you like to the panel.

- Now double-click this layer and add the text you want. You can also change the color of the text, scale it down and place it where ever you want.

- Now, let’s add another title for the subscribe button. You have to place it on the red layer.

We can’t finish our structure without icons, can we? So let’s move on to them.
4. Add icons
- Hit the “Element” from the top bar and search for the “Bell” icon. You will find the short animations of the bell. Add the suitable one to the panel.

- Now find a suitable place in the animation, stop it at that point, right-click on the element layer and add a freeze frame.

- You can also extend the freeze frame and remove the other parts. Then reduce its size and place it beside the “Subscribe” text.

- Similarly, add “Thumbs Up” and “Mouse Cursor” icons on the panel.

Finally, our structure is finished. Now let’s start animating.
Step3 Animate the graphics
First, we’ll make it so that all these graphics come in from below the view.
- Go to the white layer first and double-click on it. Then hit the “Animation” option and scroll down. Here add a new keyframe by clicking “Add.” Now move the playhead to the beginning and place the white color layer out of the frame.

- Now, do the same for channel photos and icons. The whole animation will look like this.

- As you can see, the text appears before the color layers. Let’s correct it. Double-click the text layer. Select the” Type Writer’ form and hit the “Advanced option.

- Here, you can adjust the text with the color layers.

- After adjusting both the channel name and subscribe button texts, your animation will appear like this.

If you’ve managed so far, then that’s great. We have done most of the work. Now we need to animate the graphics of the mouse cursor so that it clicks on the bell icon, thumb icon, and our subscribe button. The process is somewhat similar because we will need to add different keyframes. But still, let’s see it in detail.
Step4 Animate the mouse cursor
- Go to the “Mouse Cursor” icon layer and double-click on it. First, place the icon on the “Thumbs Up” so that when it animates in, it goes directly to the said icon. Then you have to add another keyframe after some time. And when you add a third one, place the “Mouse Cursor” icon on the subscribe button text.

- Then add a similar pair of keyframes with some space from the last one and place the “Mouse Cursor” icon on the “Bell” icon.

- The last keyframe we have to add will place this “Mouse Cursor” icon out of our view. After that, you need to adjust these keyframes to set the speed of the moving “Mouse Cursor’ icon according to your taste.
The final product up till now will be like this.

We are nearing our end, guys. Now we just need to make the graphics animate out of our view, and our work will be done. So let’s dive right into it.
Step5 Animate the graphics out
The process of animating out your graphics is like how we animated in our video. We just need to reverse those steps. So here’s how it’s done.
- Go to the white color layer and double-click on it to open its properties.
- Now, from the “Animation” option, add a new keyframe a little before the end of the video.
- After that, you have to add another keyframe at the end of your video. But in this keyframe, place the white color layer out of your view. Like this,

- Repeat the same steps for the red color layer, channel image layer, and icons layer.
- After it’s done, the whole graphics will look like this.

- The only thing that remains is to fix the text layers. For this, double-click on the channel text layer and go to the “Advanced” settings, just like before.

- From here, fix the text speed and end with your other graphic elements. After it’s done, we will do the same for the “Subscribe” button text.

Finally, our graphic is completed. “Export” it from the software to your computer.

Whenever you want to use this graphic on your video, you have to import it first and enable the “Green Screen” option. It will remove the green background color. Then you can upload your video and place this graphic on it to add to the video. And that’s all.
Conclusion
Creating the Subscribe channel graphics is like picking stars from the sky for any video creator, especially if you are a beginner. However, now you don’t need to go for the professionals anymore. Wondershare Filmora has got you covered. So follow this detailed guide and create excellent subscribe channel graphics for your videos.
Before & After Editing Trick - Filmora
How do travel vloggers instantly grab everyone’s attention with their magical content? The unique animation preset is the answer. Video makers use them to morph video clips into scenic views that make viewers’ jaws drop in awe. Also, these edits can cover up any flaws made during the production of the original video clip. Isn’t it cool?
You might be wondering how to add these effects to the video. Keep reading to discover some of the simplest effects that are bound to add soul to your content. Before diving into the details, let’s first understand these effects.
Part 1. What are the before/after effects?
After-effects are visual effects that are used to enhance the aesthetic appeal of videos. You might have encountered these effects several times during watching YouTube videos or movies. These transitions make the videos more appealing to the audience.
In films, for example, the dissolve effect is employed to signify a time change. It informs viewers that there is a time difference between the two shots. You can see how this effect is used to dissolve one scene into another in the video clip mentioned below.
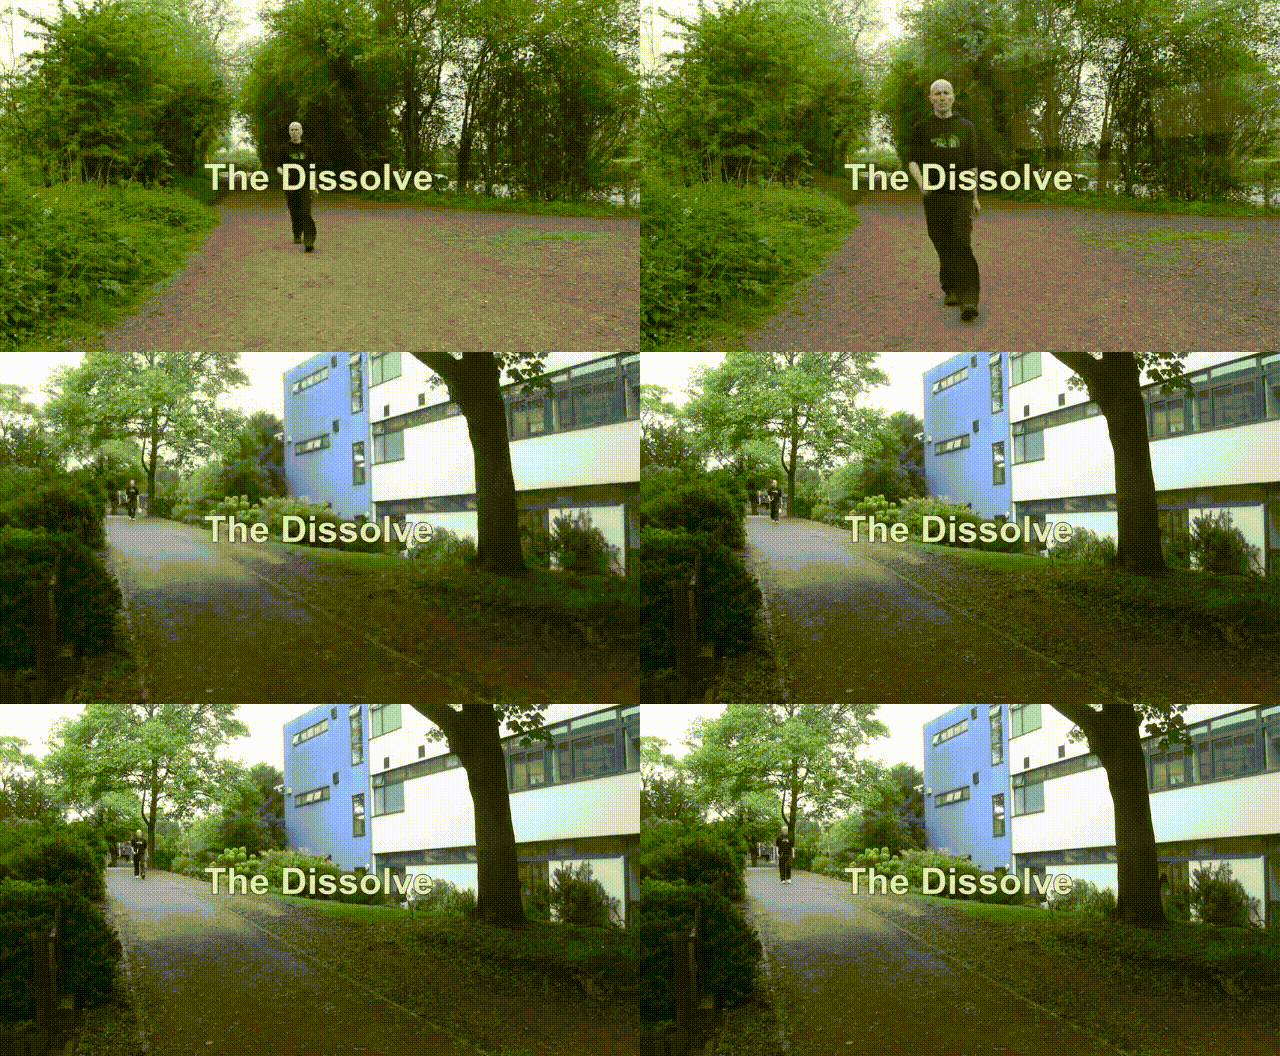
The history of after-effects can be traced back to 1993. These effects enabled the crew to mix 3D and 2D images to produce virtual dinosaur motion visuals in the Jurassic Park film, which we all love. Now that you have a fundamental understanding of the origins of after-effects, let’s take a look at where they might be applied!
Part 2. Where can you use these before/after effects?
If you are a fan of fiction movies, then you must have noticed that some of their scenes though fake, look so realistic that they blow our minds. And now you might have an idea of how these shots are created!
Whether it be shooting a movie or a commercial, these transitions have the power to make our content irresistible. Once you are familiar with the purpose of these after-effects, it’s time to show you how you can edit your videos using these effects.
Part 3. How to edit your videos using before/after effects?
If you’re new to editing and don’t know much about video graphics, Filmora video editor is the finest platform for you. It is not only easier to use but also more entertaining than other online video editors. Filmora is a free video editor that is accessible for both Windows and macOS.
Steps for installing the Filmora video editor
To install the Filmora video editor, follow these steps
Step1 Go to the official site of Filmora.
Step2 Click on the download button.
Step3 Install the application on your PC.
Step4 Now, you can use the Filmora video editor to beautify your content.
Now, let’s explore some of the coolest transition effects that you can use in your videos for before and after comparison.
Part 4. Filmora’s top three transition effects for beginners
Wondershare Filmora can help video editors achieve their goals in the most basic and economical fashion. The best three transition effects that may completely transform your videos are shown below.
Wipe Effect
Wipe transition is used to produce an apparent transformation to videos with similar frames for the before/after comparison. Travel vloggers mostly use this effect to create a retro vibe in their videos. This transition is frequently used in movies to demonstrate the influence of time on any place.
The wipe effect’s fundamental goal is to transition from one shot into another via a sliding animation, giving the video an elegant vibe. For instance, we can use the wipe effect to convert the raw film to colored corrected footage.
Steps to apply the Wipe effect
Step1 Drag and drop the video clip ‘before color correction’ onto the timeline’s first video track.
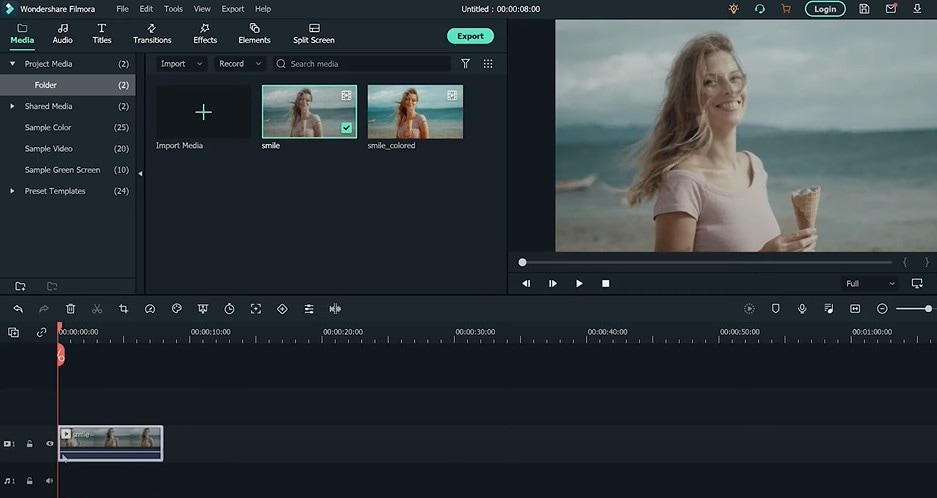
Step2 Then, drag and drop the color-corrected video clip on the second video track. Ensure that the clips are piled on top of one another so they may all be played simultaneously. It will make it easier for us to trim the footage.
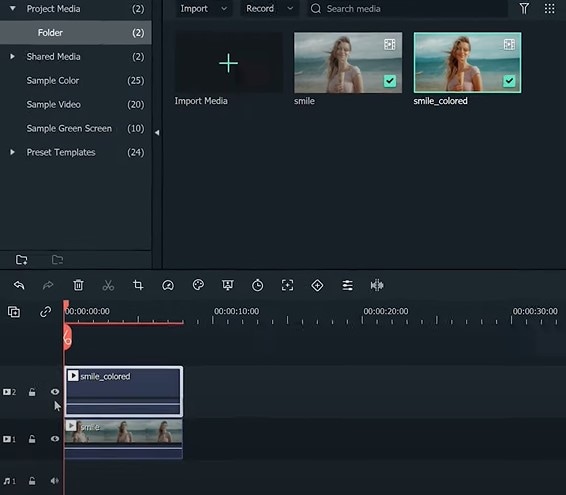
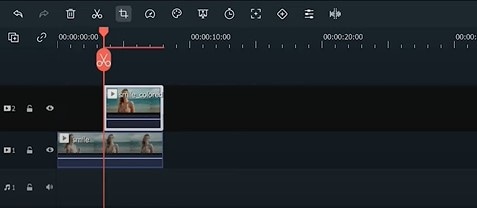
Step3 Place the play head where we want the transformation to begin. Then trim the second clip.
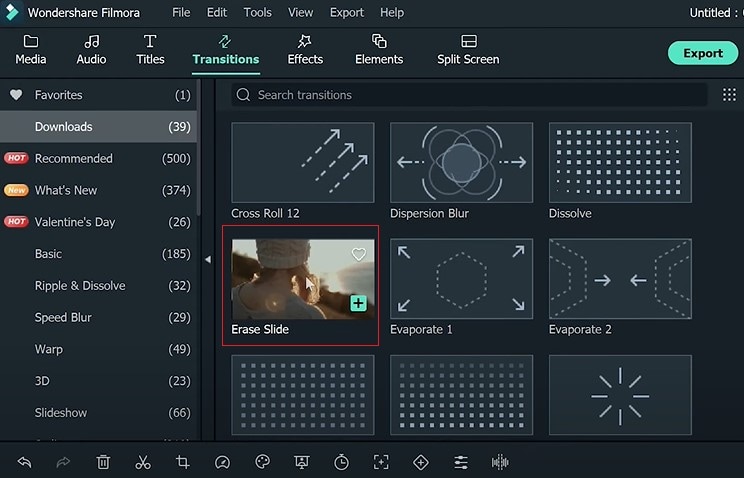
Step4 Go to the Transitions window and select “Erase slide.” Drag the transition to the start of the second video clip. Then, double-click the transition on the timeline to open the settings box.
Step5 Adjust the length of the “Erase slide.” Let’s see how it turns out!
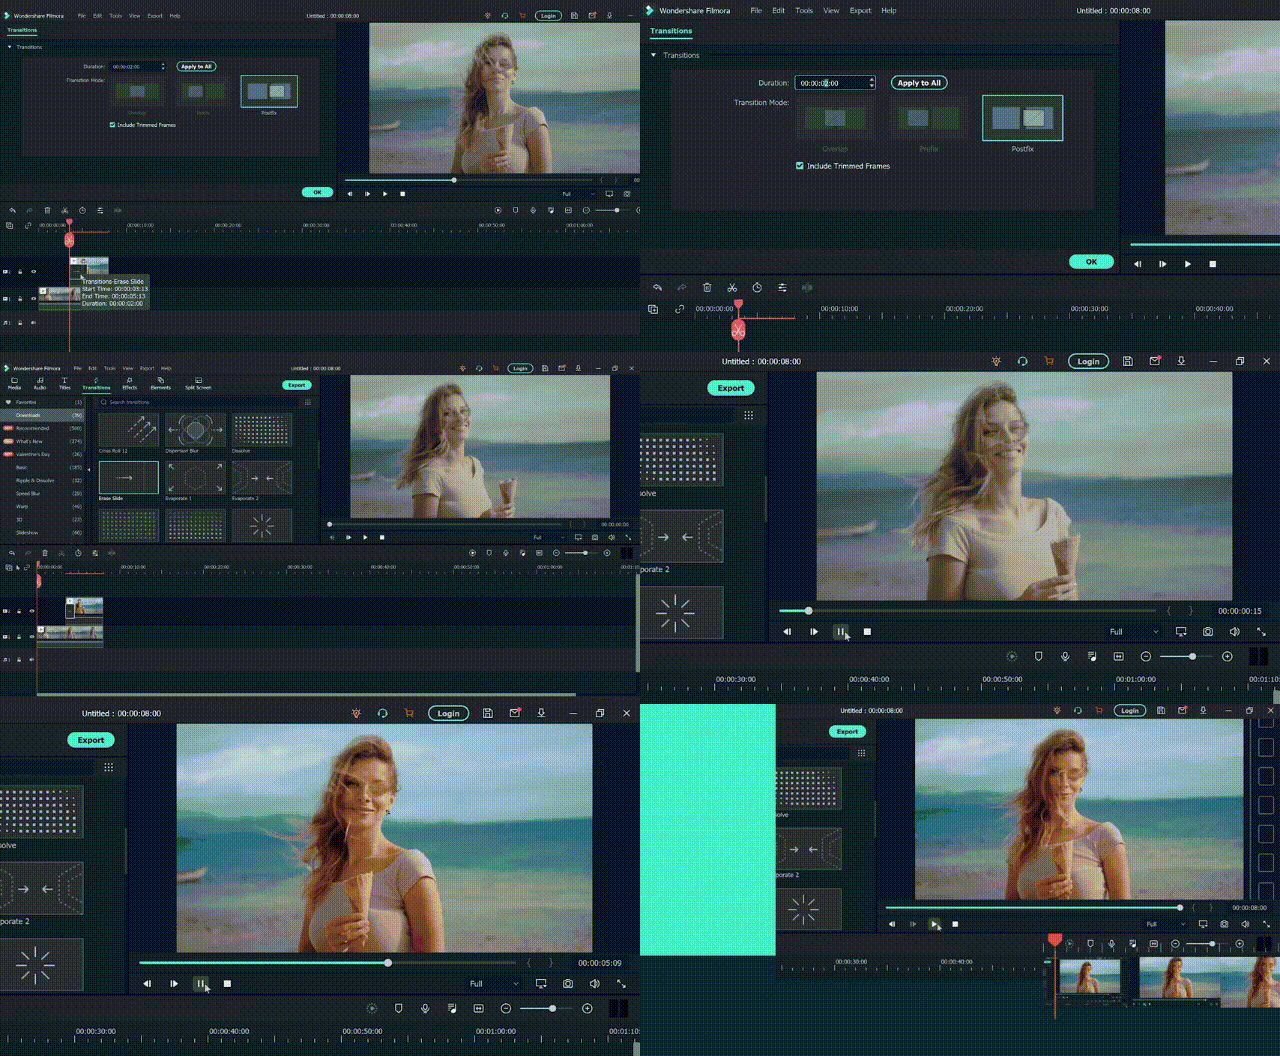
Dissolve Effect
The dissolve effect allows us to shift from one shot to another by using slow block dissolution. It gives the impression that one scene is being morphed into another. And, it is frequently used in documentaries.
We may utilize the dissolve transition to display the differences between two video segments more naturally. To explain the objective of the dissolve effect, we used two clips of the same place shot at separate times. The first film is current, but the second is from the same place but was taken a few years back.
Steps to apply the Dissolve effect
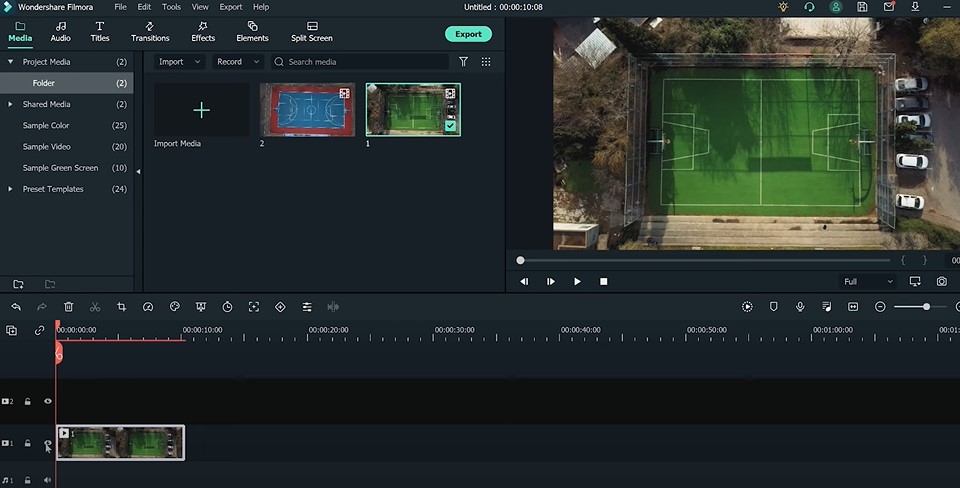
Step1 Drag and drop the first video clip onto the timeline’s first video track.
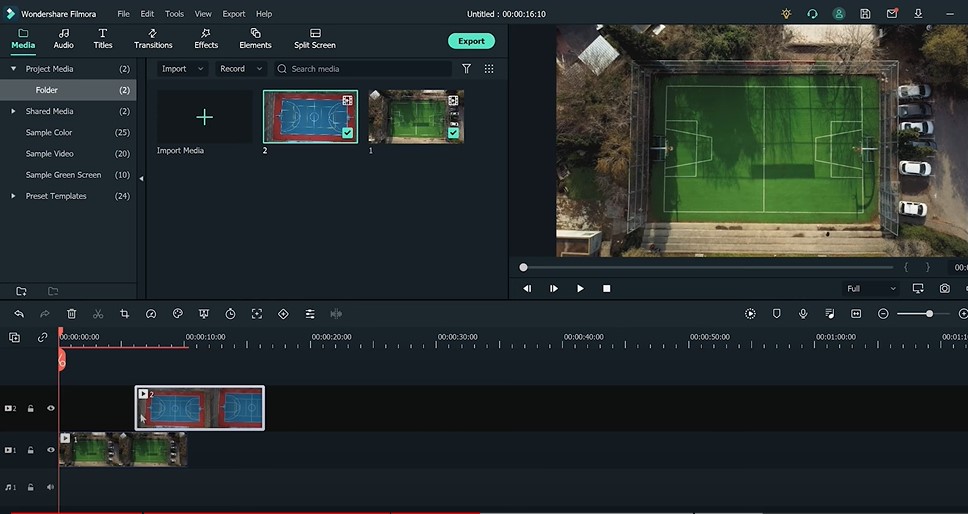
Step2 Then, on the second video track, drag and drop the second video clip. Make sure the start of the second clip is where you want the transition to begin.
Step3 Then Go to the Transitions window and choose the “Dissolve” effect.
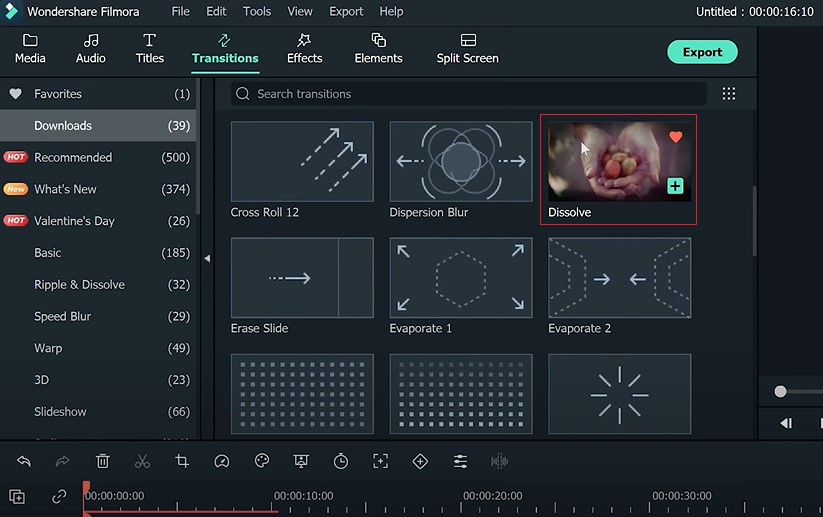
Step4 Drag the transition to the start of the second video clip.
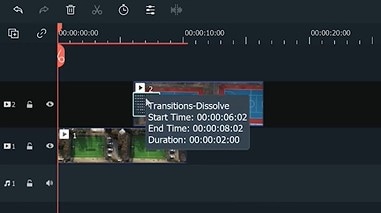
Step5 Then, on the timeline, double-click the transition to open the settings box. If necessary, adjust the duration of the “Dissolve “ effect as needed.
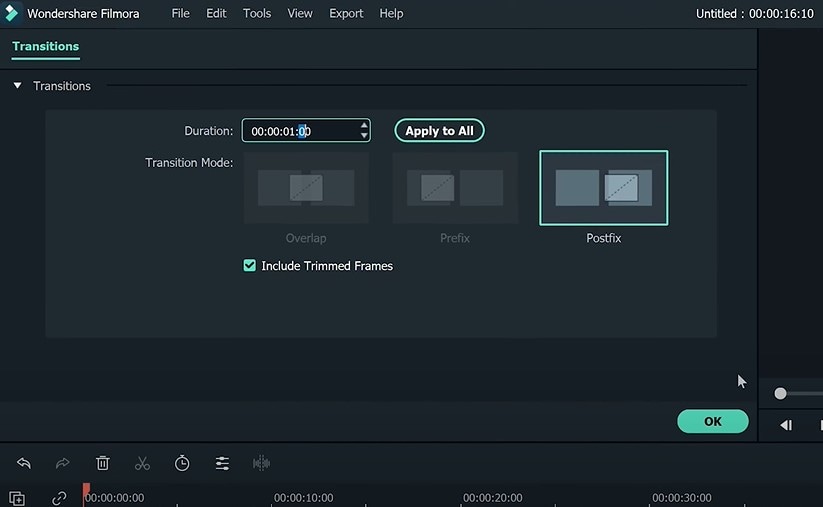
You can see how it looks in the image below. If we play the timeline, we can watch the green court convert into the old basketball court. However, the two visuals don’t truly match each other during the transformation.
Steps to adjust the frames of the clips
Step1 We may fix it by adjusting the location and scale of the clips.
Step2 Move the play head to the transition section to watch both video segments.
Step3 To open the settings window, double-click on the first video.
Step4 Find the transform section and scale it to 110%.
Step5 Then, move the first video’s frame to match the second video’s placement. We may notice a more natural transition when we replay the timeline.
Split Screen Effect
The split-screen technique first appeared in the film “The Queen of Spades,” which was released in 1949. It depicted a man suffering from a psychological illness. The split-screen effect was used to demonstrate the contrast between reality and his hallucinations. It made the viewer more aware of what was actually happening in the film.
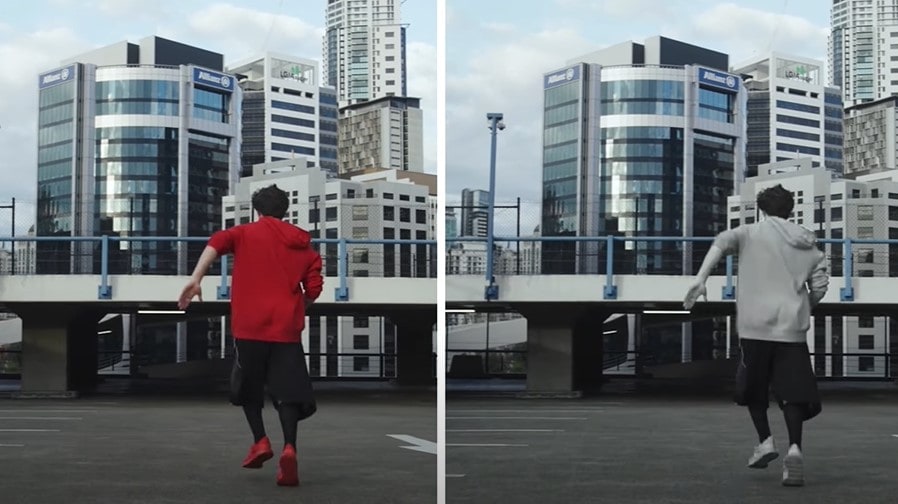
Since then, the split screen has been used as the simplest technique to demonstrate the before/after comparison. This effect is also ideal for emphasizing the changes in only one section of the video.
Because the split screen effect does not display the whole frame of the video clips, you may eliminate the top and bottom bars of the video clips using this effect.
How to apply a split screen effect?
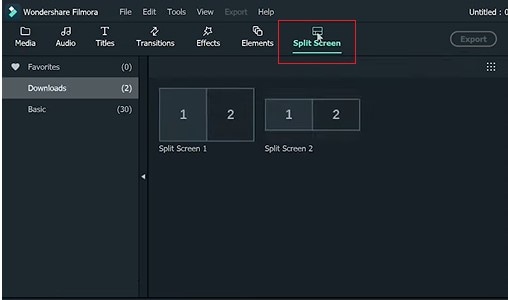
Step1 Find “Split Screen1” in the window by clicking “Split Screen.”
Step2 Drag it over to the timeline.
Step3 You’ll see the split-screen template in the preview box when you double-click it.
Step4 Drag the two video clips you wish to compare to the template’s left and right sides.
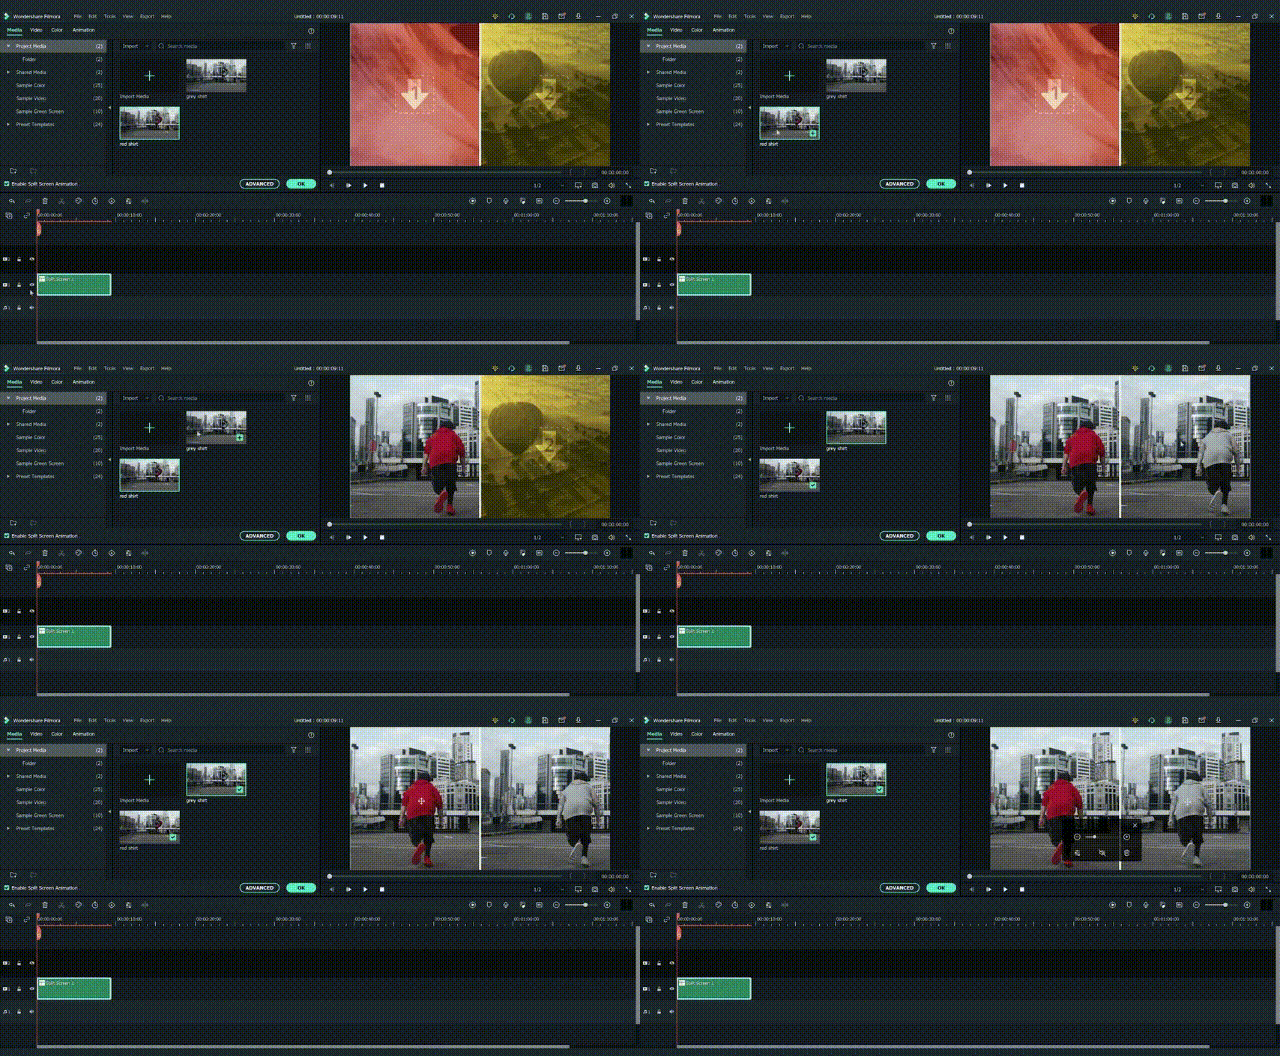
Step5 If necessary, you may also adjust the location of the videos in the preview clip.
Step6 Finally, uncheck the option labeled “allow split screen animation.”
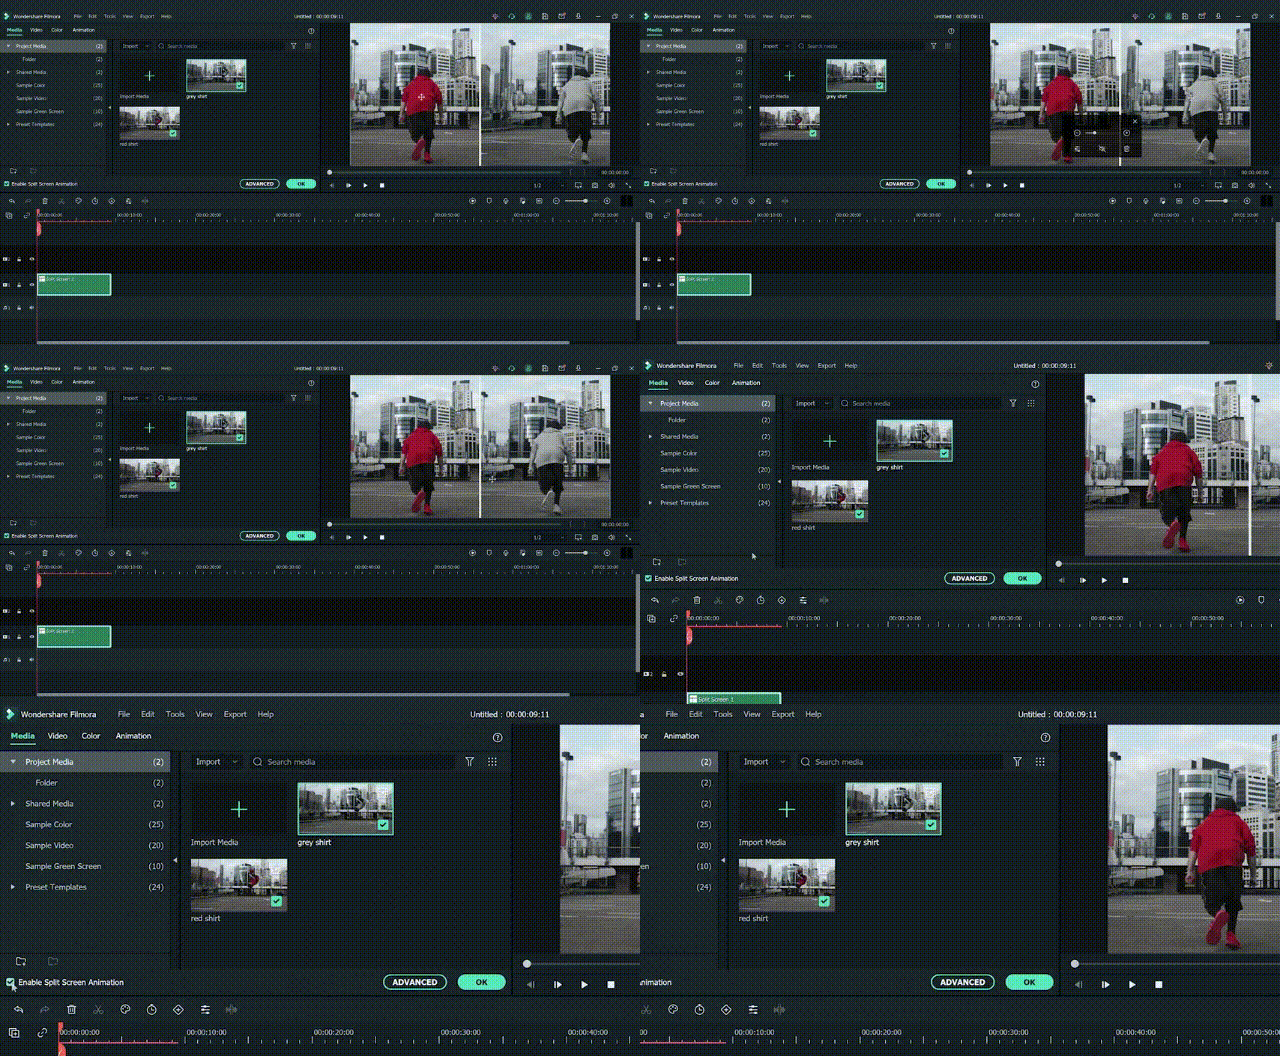
Step7 All of the steps for the before/after split screen are now complete.
Step8 Let’s wait and see how it turns out!
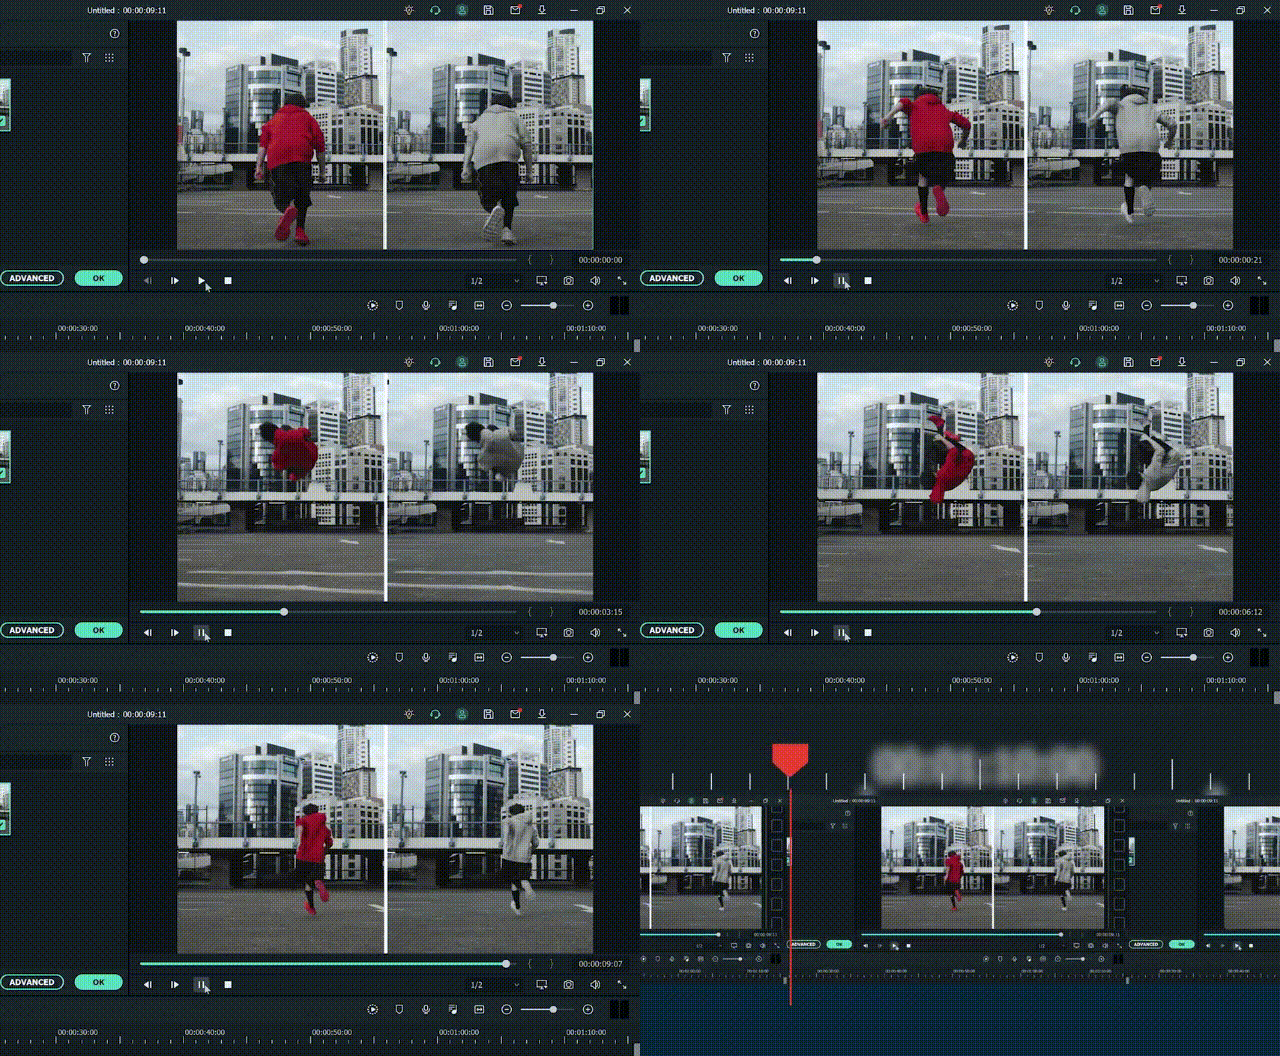
Final words
If you are a vlogger and you desire to add an aesthetic touch to your videos, you should try Filmora. It offers a variety of unique transitions, so you can use it to build your own trademark style that will represent your content.
By the end of this article, you must understand how to employ the wipe effect, the dissolve effect, or the split screen effect in your videos to give them an elegant and professional vibe.
Free Download For Win 7 or later(64-bit)
Free Download For macOS 10.14 or later
Free Download For macOS 10.14 or later
Top-Rated Android Apps For Slowing Down Motion
Creating slow-motion videos has been a trend followed by millions across social platforms. For designing the perfect video as a slow-motion video, people seek a good option. Android slow motion video apps are one remedy to this requirement. Google Play Store offers a diversity of applications for making video slow motion Android.
This article is all about figuring out the top Android applications that can feature the best slow motion. For that, go through the content provided to find out the most suitable slow motion video in Android.
Slow Motion Video Maker Slow your video’s speed with better control of your keyframes to create unique cinematic effects!
Make A Slow Motion Video Make A Slow Motion Video More Features

Part 1. Top 10 Android Apps For Slowing Down Motion in Video
When searching for a slow motion video app for Android, there are many options to go by. Provided next is a composite list of mobile apps that serve the purpose of slow-motion video creation:
- Slow Motion Video – Fast&Slow Mo
- Slow Motion Video Maker
- Video Editor & Maker – InShot
- Video Maker & Editor - Vidma
- VivaVideo - Video Editor&Maker
- VivaVideo - Video Editor&Maker
- VivaVideo - Video Editor&Maker
- VivaVideo - Video Editor&Maker
- VivaVideo - Video Editor&Maker
- VivaVideo - Video Editor&Maker
1. Slow Motion Video – Fast&Slow Mo
This Android slow-motion video converter offers an intuitive user interface and simple functions. Users can craft slow motion via drag and adjust the action of the slider in a downward direction. The video’s playback speed is customizable, ranging from 0.25x to 4.0x. Additionally, the software empowers users to apply slow motion to specific video segments to enhance precision.
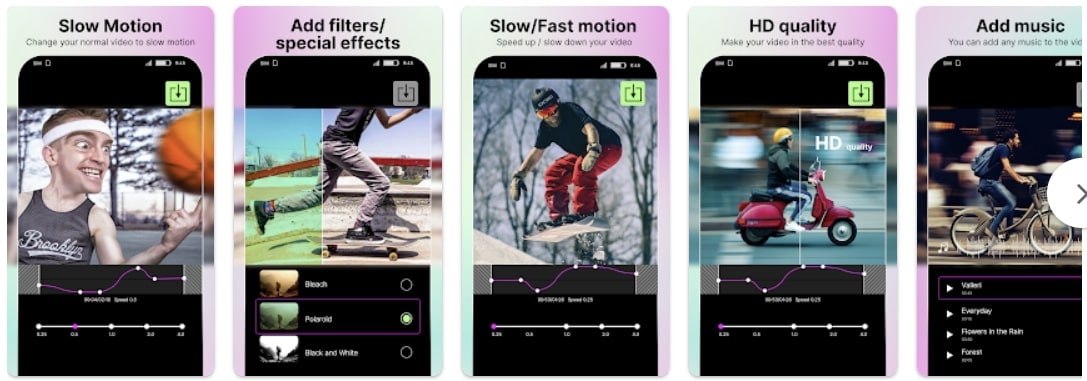
Key Features
- The application offers pre-installed filters and special effects to elevate visual aesthetics.
- It preserves video quality and transforms video resolution to high definition (HD).
- Incorporate high-quality music into your videos with its built-in music collection.
2. Slow Motion Video Maker
This slow-mo video Android editor offers advanced functionalities to craft perfect videos. With its timeline editing interface, it simplifies the application of slow-motion effects to specific scenes. The application showcases three distinct slow-motion speed options: 0.5x, 0.3x, and 0.25x, ensuring perfection.
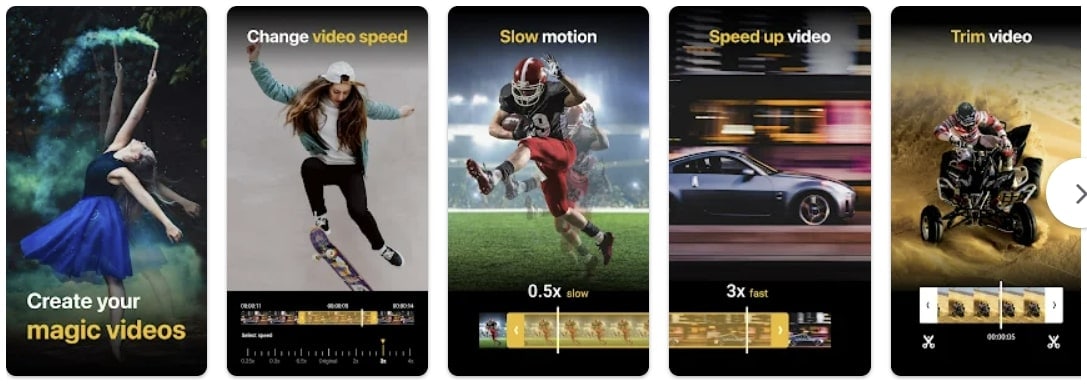
Key Features
- Accelerate your videos up to 4x with its high-speed options and get high-quality results.
- The video trimming feature and timeline editing enable accurate segmentation of a video.
- It is equipped with pre-existing music tracks to create the perfect slow-motion video on Android.
3. Video Editor & Maker - InShot
Embark upon the journey to create video slow motion Android with this multifunctional app. It extends a straightforward approach to slow video speed through slider manipulation. Timeline editing and selective playhead options empower users to adjust the speed of specific segments. This exceeds the conventional approach of a slo-mo creation, unlocking creative possibilities.

Key Features
- Elevate the artistic expression of videos by integrating a wide range of animations and text.
- Enhance your reels with a collection of transition effects like Fade in, Fade out, basics, and more.
- This editor has AI capabilities and background removal options with a heightened level of accuracy.
4. Video Maker & Editor - Vidma
This slow-mo app for Android facilitates individuals seeking a video editor capable of producing convincing results. It acts as a Velocity Edit Maker, offering diverse playback speed and positioning controls. The interface resembles a velocity graph, providing a visual representation of speed adjustments.
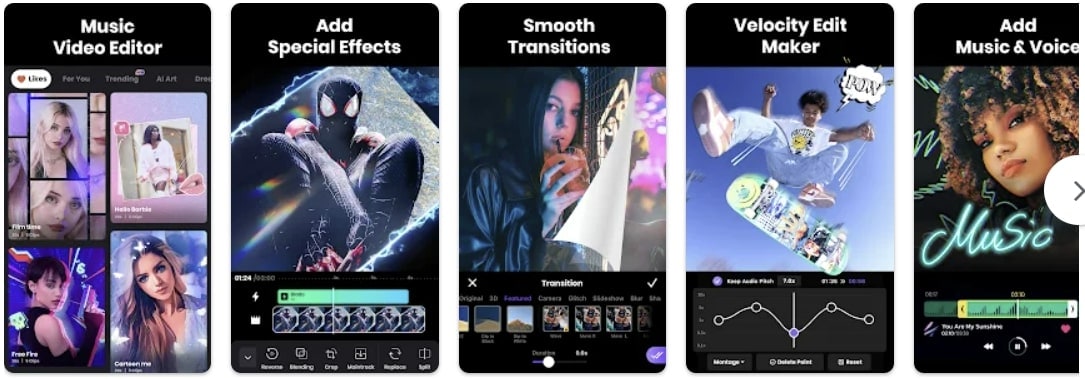
Key Features
- Introduces an automated “Keep Audio Pitch” option, ensuring high-quality audio.
- Enhance the creative factor in your images and videos with its built-in text and stickers.
- Comes with a variety of visual filters with an intensity control option.
5. VivaVideo - Video Editor&Maker
If you are seeking the best Slomo app for Android, this editor provides diverse speed-setting presets for creating slow-motion and fast-motion effects. Among presets such as Montage, Hero, Bullet, and others, it offers a Custom preset option to help you adjust everything accordingly. With its ability to apply speed settings at specific periods, your slow motions are bound to be perfect.
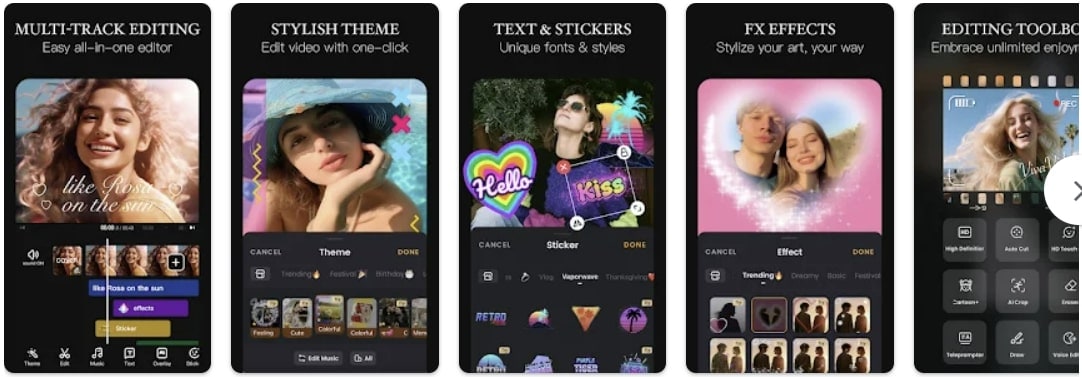
Key Features
- The non-uniform timeline editor allows you to incorporate multiple assets at once.
- A range of texts, animations, themes, effects, and music tracks are in its Stock Library.
- This video maker also incorporates a Voice Editor to uphold the audio track’s quality.
6. Smart Video Crop - Video Cut
Although this video maker is specified for resizing videos, it also offers speed change options. To make a video slow motion on Android, you can change both playback speed and framerate. Once you have edited your video, you can make changes to the export options. In addition, the application updates its mechanism and shows compatibility with Android 4.4 and higher versions.

Key Features
- The application shows multi-format video support, i.e., MP4, 3GP, and AVI.
- Proposes multiple video crop options like 1:1, 4:3, 16:9, and 3:2.
- You can select to crop the whole video or apply the crop to a specific part of it.
7. Video Editor - Video.Guru
What would be better than a slow-motion video app for Android that can change speed and enhance video? To access this functionality, users need to switch to its PRO version. The speed change options that it offers are from 0.2x to 100x, with 0.2x being the slowest. In addition, the tool doesn’t decline video quality but enhances it to 4K.
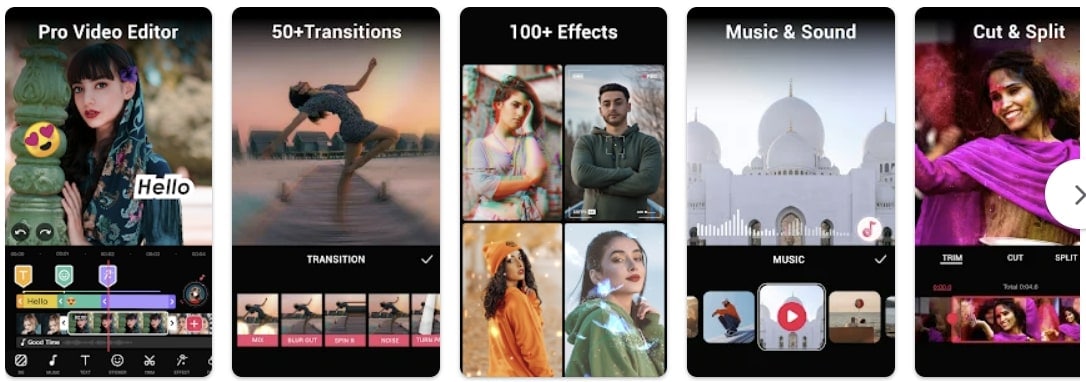
Key Features
- If you are a YouTuber, then this editor affects and filters for Vloggers and offers to remove Watermark.
- You can crop a video into available ratios while keeping its HD quality.
- Can add 30+ video transition effects and incorporate music to enhance their quality.
8. Slow Motion - Slow Mo, Fast Mo
Make video slow motion Android effortlessly with this application, which is specified for speed change. It offers 10 playback speed options for creating slow motions with precision. The playback speed ranges from 0.95x to 0.1x. Once you have created a slow motion with it, you can easily preview it to observe if any changes are needed.
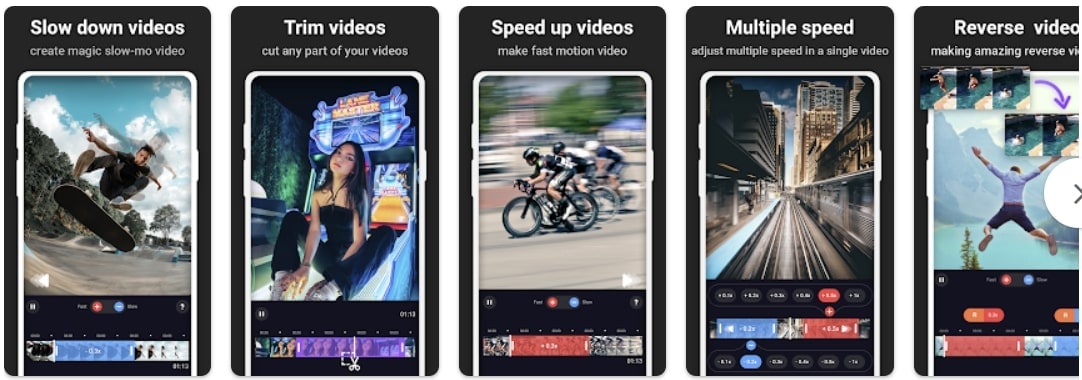
Key Features
- Along with precise slo-mo options, it also offers extensive fast motion option speed ranges.
- You can mix and match both fast and slow-motion effects in a video at once.
- It also offers a watermark removal option to avoid any visual weakening.
9. Slow Motion Video FX-camera
Not only video frame rates but also slow down your speech with this slow-motion app for Android. You can add dramatic or funny effects to your voices using the application. It offers to slow down video speed up to 0.25x. It uses the standard slider approach to manipulate the playback speed of your videos. You can apply the slow-mo effect to the overall video or to some specific parts of it.
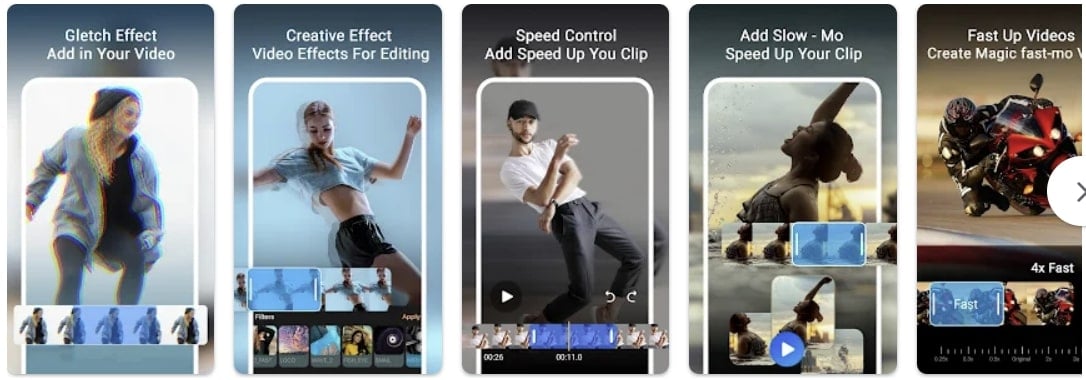
Key Features
- An intuitive user interface with a velocity graph to observe the changes in speed and duration.
- Transform your low-quality videos to HD quality with this slow-motion app for Android.
- Use the application’s built-in music library to incorporate music tracks.
10. Slow Motion
Decrease your video speed up to 1/4th of its original speed with this Android slow-motion video editor. The speed options are customizable, and you can apply them to multiple video scenes. As the name indicates, the tool is specifically fashioned for slow-motion effects; hence, it offers an accessible user interface.

Key Features
- Export your videos in landscape or portrait mode; the choice is yours.
- In any mode, the application retains video quality and exports it in full resolution.
- It is excellent to slow down YouTube videos as there is no watermark addition.
Bonus Part: Wondershare Filmora: A Perfect Desktop Solution To Slow Down Video
Making slow motion videos in Android is like keeping creativity in your hand anywhere. This facility is good for basic effects but not for professional and advanced slow-motion effects. That’s where you need to shift to a more equipped alternative, which is Wondershare Filmora . Using Filmora means turning imagination into the real picture.
It is a video editing platform with artificial intelligence integration. You can create slow-motion videos with automation in Filmora. The interactive interface of Filmora caters to all users’ needs in simple steps. Freelancers, content creators, and educationists use this platform for diverse needs.
Free Download For Win 7 or later(64-bit)
Free Download For macOS 10.14 or later
How to Make Video Slow Motion Android in Filmora
As you are familiar with Filmora, let’s make a slow-motion video. It is quite easy if compared with Android slow-motion video making. Without further delay, delve into the given step-by-step guide:
Step 1Import Your Project After Successful Launch
Unleash your creativity in Filmora after downloading it. In this regard, you must go to Wondershare Filmora’s official site. Open the main interface of Filmora and tap “New Project” to enter the editing window. To start working, import a file in the media panel and drag it into the timeline section.
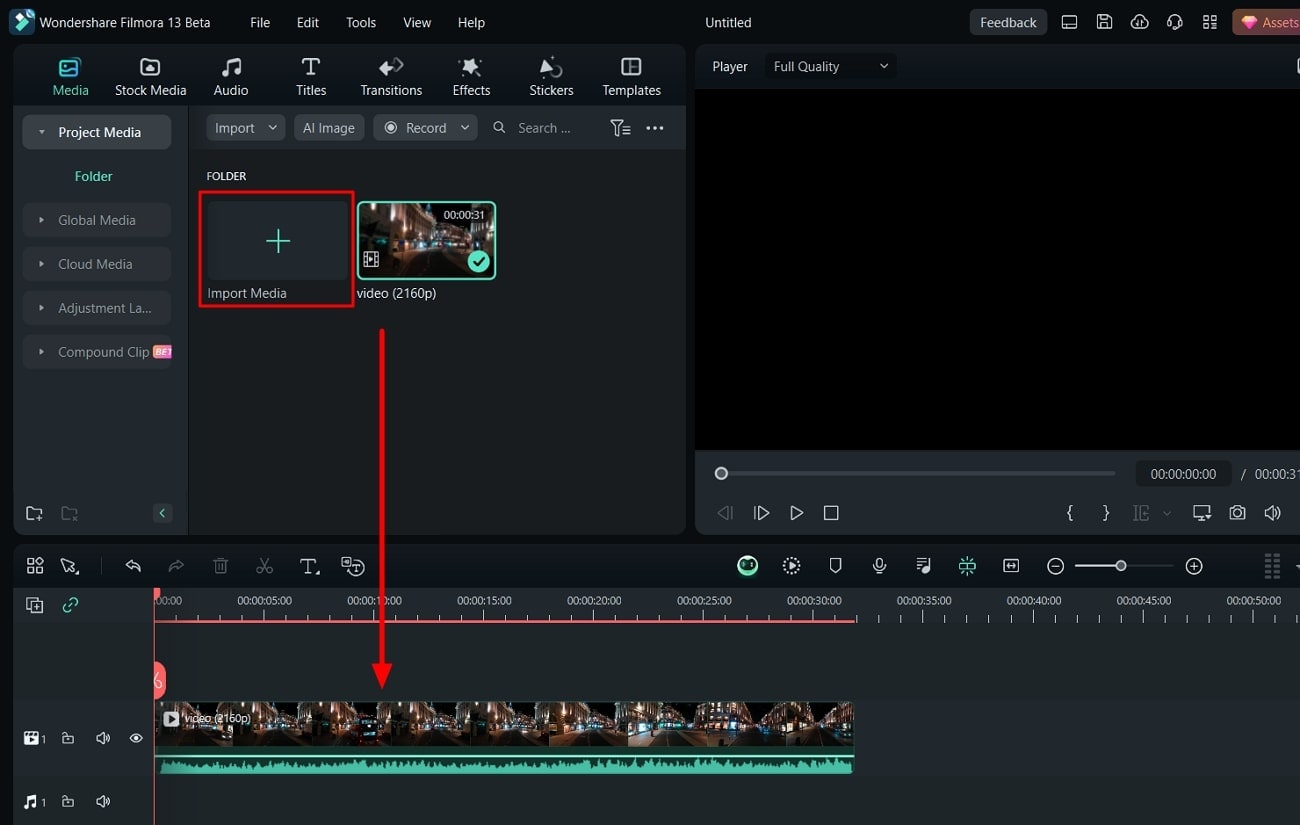
Step 2Slow Down the Video with Uniform Speed
After successful importing, right-click on your video and an extended list. Choose the “Uniform Speed” option from the list and find an editing panel towards your right. You will see the slider under the speed option. Hold on to the circle and drag it to the left if you want to slow down the videos. Move downward and toggle the “Ripple Edit” and “Maintain Pitch” for good results.
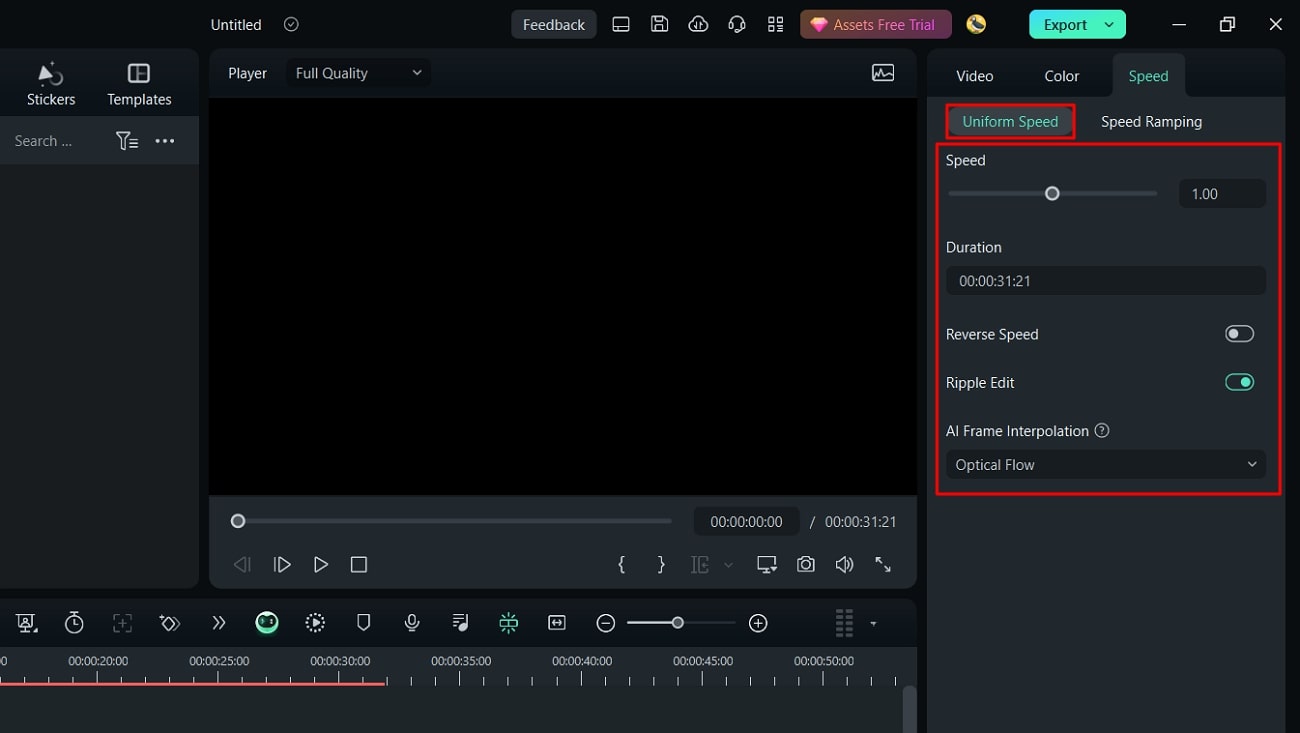
Step 3Enhance Video with Optical Flow
Towards the end, you will find the “AI Frame Interpolation.” Click on its downward symbol and select the “Optical Flow” option from the list. It will automatically boost your video quality. You can choose the “Reverse Speed” option if your video is required.
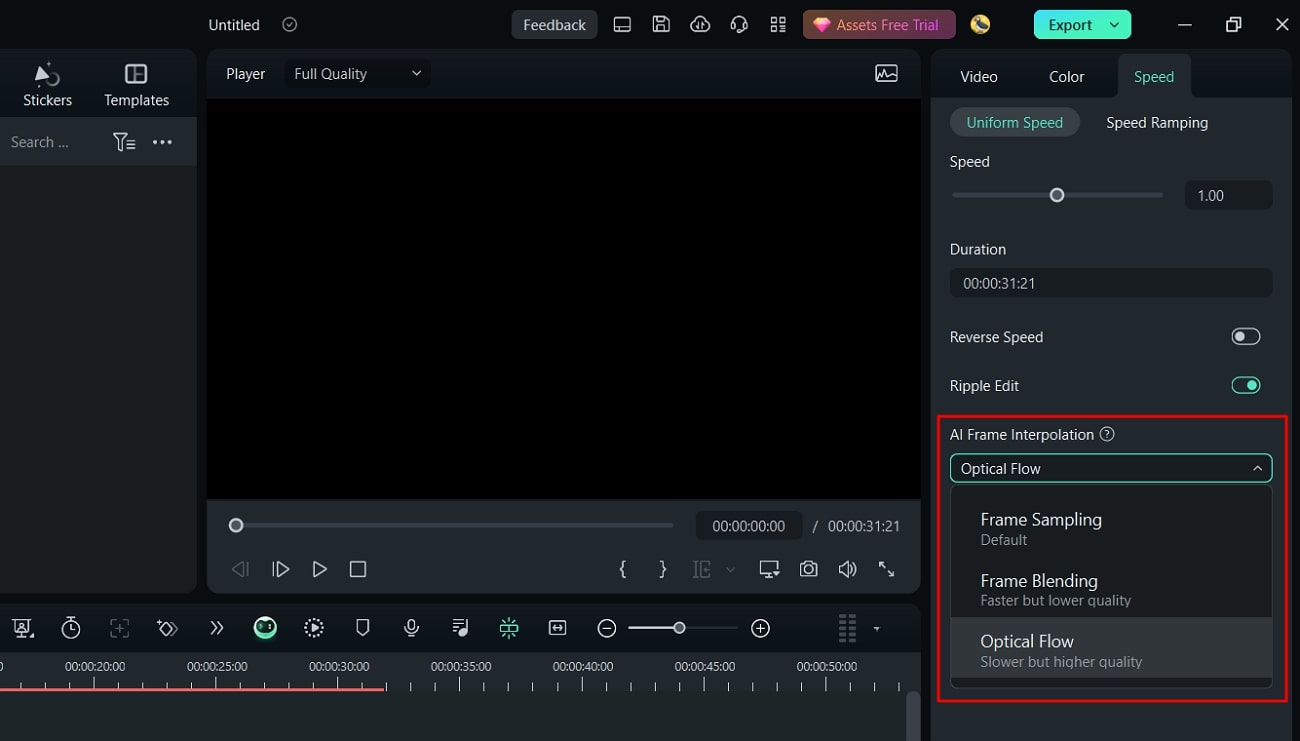
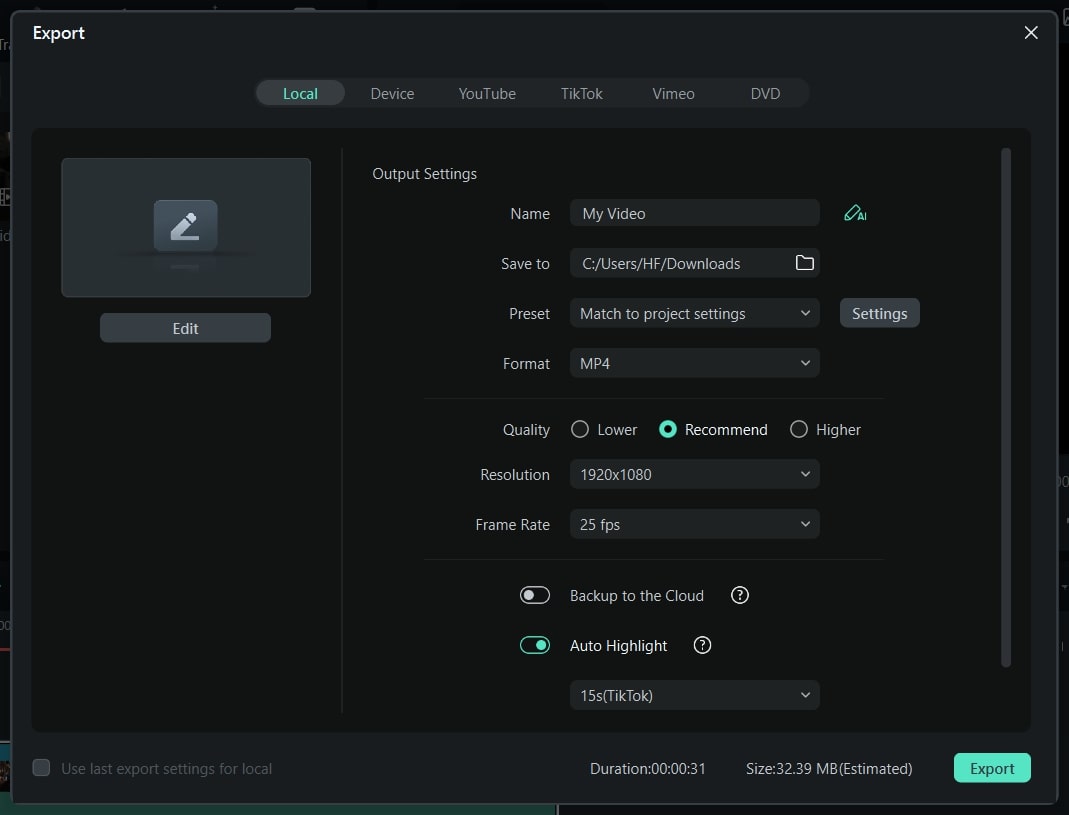
Step 4End Editing and Move to Export
Now, it’s up to you if you want to continue editing with Filmora or want to export the media. To end editing, you can hit the “Export” button from the top right.
Remarkable Key Functionalities of Filmora
If you want to understand the amazing features of Filmora better, this section is for you. Keep reading and find some integral functionalities of Filmora. This platform offers more than just creating slow-motion video Android:
1. AI Smart Cutout
Artificial intelligence in Filmora can amazingly assist you in making flawless videos. Unlike other tools, Filmora allows you to remove unwanted objects, people, and icons from videos. Besides, users can refine their cutout frame by frame using its’ advanced editing options. You can preview the modified media in four ways, such as Transparency grid and Alpha Mode.
2. AI Audio Stretch
This AI-based feature is new to the market and saves hours of rippling and cutting audio. It aims to match the length of your audio with videos. From Vlog videos to blockbuster audio effects, you can use this feature almost everywhere. This option allows you to re-time your audio tracks after detecting vocals in the music.
3. Speech-to-Text
Video captions make the content accessible to international viewers. That’s where Filmora proves vital in removing language barriers. It supports over 26 languages and adds subtitles to your videos with one click. This built-in feature in Filmora recognizes speech swiftly to guarantee accuracy. You can also export your SRT file of subtitles to make any edits.
4. AI Portrait
Beautify faces in your videos to set a new trend on social media with Filmora. To do so, an AI Portrait feature can automatically detect faces to apply changes. You can choose a sticker effect from more than 70 AI portrait AR stickers. Besides, it can remove video backgrounds by retaining the human beings there.
Conclusion
With all marked details, this article concludes with a note that there are always different calibers of tools that we can work with. While discovering the best Android application in the market, you got to know many slow motion videos on Android. Along with that, we also discussed DemoCreator as a comprehensive solution to the entire use of mobile apps.
Make A Slow Motion Video Make A Slow Motion Video More Features

Part 1. Top 10 Android Apps For Slowing Down Motion in Video
When searching for a slow motion video app for Android, there are many options to go by. Provided next is a composite list of mobile apps that serve the purpose of slow-motion video creation:
- Slow Motion Video – Fast&Slow Mo
- Slow Motion Video Maker
- Video Editor & Maker – InShot
- Video Maker & Editor - Vidma
- VivaVideo - Video Editor&Maker
- VivaVideo - Video Editor&Maker
- VivaVideo - Video Editor&Maker
- VivaVideo - Video Editor&Maker
- VivaVideo - Video Editor&Maker
- VivaVideo - Video Editor&Maker
1. Slow Motion Video – Fast&Slow Mo
This Android slow-motion video converter offers an intuitive user interface and simple functions. Users can craft slow motion via drag and adjust the action of the slider in a downward direction. The video’s playback speed is customizable, ranging from 0.25x to 4.0x. Additionally, the software empowers users to apply slow motion to specific video segments to enhance precision.

Key Features
- The application offers pre-installed filters and special effects to elevate visual aesthetics.
- It preserves video quality and transforms video resolution to high definition (HD).
- Incorporate high-quality music into your videos with its built-in music collection.
2. Slow Motion Video Maker
This slow-mo video Android editor offers advanced functionalities to craft perfect videos. With its timeline editing interface, it simplifies the application of slow-motion effects to specific scenes. The application showcases three distinct slow-motion speed options: 0.5x, 0.3x, and 0.25x, ensuring perfection.

Key Features
- Accelerate your videos up to 4x with its high-speed options and get high-quality results.
- The video trimming feature and timeline editing enable accurate segmentation of a video.
- It is equipped with pre-existing music tracks to create the perfect slow-motion video on Android.
3. Video Editor & Maker - InShot
Embark upon the journey to create video slow motion Android with this multifunctional app. It extends a straightforward approach to slow video speed through slider manipulation. Timeline editing and selective playhead options empower users to adjust the speed of specific segments. This exceeds the conventional approach of a slo-mo creation, unlocking creative possibilities.

Key Features
- Elevate the artistic expression of videos by integrating a wide range of animations and text.
- Enhance your reels with a collection of transition effects like Fade in, Fade out, basics, and more.
- This editor has AI capabilities and background removal options with a heightened level of accuracy.
4. Video Maker & Editor - Vidma
This slow-mo app for Android facilitates individuals seeking a video editor capable of producing convincing results. It acts as a Velocity Edit Maker, offering diverse playback speed and positioning controls. The interface resembles a velocity graph, providing a visual representation of speed adjustments.

Key Features
- Introduces an automated “Keep Audio Pitch” option, ensuring high-quality audio.
- Enhance the creative factor in your images and videos with its built-in text and stickers.
- Comes with a variety of visual filters with an intensity control option.
5. VivaVideo - Video Editor&Maker
If you are seeking the best Slomo app for Android, this editor provides diverse speed-setting presets for creating slow-motion and fast-motion effects. Among presets such as Montage, Hero, Bullet, and others, it offers a Custom preset option to help you adjust everything accordingly. With its ability to apply speed settings at specific periods, your slow motions are bound to be perfect.

Key Features
- The non-uniform timeline editor allows you to incorporate multiple assets at once.
- A range of texts, animations, themes, effects, and music tracks are in its Stock Library.
- This video maker also incorporates a Voice Editor to uphold the audio track’s quality.
6. Smart Video Crop - Video Cut
Although this video maker is specified for resizing videos, it also offers speed change options. To make a video slow motion on Android, you can change both playback speed and framerate. Once you have edited your video, you can make changes to the export options. In addition, the application updates its mechanism and shows compatibility with Android 4.4 and higher versions.

Key Features
- The application shows multi-format video support, i.e., MP4, 3GP, and AVI.
- Proposes multiple video crop options like 1:1, 4:3, 16:9, and 3:2.
- You can select to crop the whole video or apply the crop to a specific part of it.
7. Video Editor - Video.Guru
What would be better than a slow-motion video app for Android that can change speed and enhance video? To access this functionality, users need to switch to its PRO version. The speed change options that it offers are from 0.2x to 100x, with 0.2x being the slowest. In addition, the tool doesn’t decline video quality but enhances it to 4K.

Key Features
- If you are a YouTuber, then this editor affects and filters for Vloggers and offers to remove Watermark.
- You can crop a video into available ratios while keeping its HD quality.
- Can add 30+ video transition effects and incorporate music to enhance their quality.
8. Slow Motion - Slow Mo, Fast Mo
Make video slow motion Android effortlessly with this application, which is specified for speed change. It offers 10 playback speed options for creating slow motions with precision. The playback speed ranges from 0.95x to 0.1x. Once you have created a slow motion with it, you can easily preview it to observe if any changes are needed.

Key Features
- Along with precise slo-mo options, it also offers extensive fast motion option speed ranges.
- You can mix and match both fast and slow-motion effects in a video at once.
- It also offers a watermark removal option to avoid any visual weakening.
9. Slow Motion Video FX-camera
Not only video frame rates but also slow down your speech with this slow-motion app for Android. You can add dramatic or funny effects to your voices using the application. It offers to slow down video speed up to 0.25x. It uses the standard slider approach to manipulate the playback speed of your videos. You can apply the slow-mo effect to the overall video or to some specific parts of it.

Key Features
- An intuitive user interface with a velocity graph to observe the changes in speed and duration.
- Transform your low-quality videos to HD quality with this slow-motion app for Android.
- Use the application’s built-in music library to incorporate music tracks.
10. Slow Motion
Decrease your video speed up to 1/4th of its original speed with this Android slow-motion video editor. The speed options are customizable, and you can apply them to multiple video scenes. As the name indicates, the tool is specifically fashioned for slow-motion effects; hence, it offers an accessible user interface.

Key Features
- Export your videos in landscape or portrait mode; the choice is yours.
- In any mode, the application retains video quality and exports it in full resolution.
- It is excellent to slow down YouTube videos as there is no watermark addition.
Bonus Part: Wondershare Filmora: A Perfect Desktop Solution To Slow Down Video
Making slow motion videos in Android is like keeping creativity in your hand anywhere. This facility is good for basic effects but not for professional and advanced slow-motion effects. That’s where you need to shift to a more equipped alternative, which is Wondershare Filmora . Using Filmora means turning imagination into the real picture.
It is a video editing platform with artificial intelligence integration. You can create slow-motion videos with automation in Filmora. The interactive interface of Filmora caters to all users’ needs in simple steps. Freelancers, content creators, and educationists use this platform for diverse needs.
Free Download For Win 7 or later(64-bit)
Free Download For macOS 10.14 or later
How to Make Video Slow Motion Android in Filmora
As you are familiar with Filmora, let’s make a slow-motion video. It is quite easy if compared with Android slow-motion video making. Without further delay, delve into the given step-by-step guide:
Step 1Import Your Project After Successful Launch
Unleash your creativity in Filmora after downloading it. In this regard, you must go to Wondershare Filmora’s official site. Open the main interface of Filmora and tap “New Project” to enter the editing window. To start working, import a file in the media panel and drag it into the timeline section.

Step 2Slow Down the Video with Uniform Speed
After successful importing, right-click on your video and an extended list. Choose the “Uniform Speed” option from the list and find an editing panel towards your right. You will see the slider under the speed option. Hold on to the circle and drag it to the left if you want to slow down the videos. Move downward and toggle the “Ripple Edit” and “Maintain Pitch” for good results.

Step 3Enhance Video with Optical Flow
Towards the end, you will find the “AI Frame Interpolation.” Click on its downward symbol and select the “Optical Flow” option from the list. It will automatically boost your video quality. You can choose the “Reverse Speed” option if your video is required.

Step 4End Editing and Move to Export
Now, it’s up to you if you want to continue editing with Filmora or want to export the media. To end editing, you can hit the “Export” button from the top right.

Remarkable Key Functionalities of Filmora
If you want to understand the amazing features of Filmora better, this section is for you. Keep reading and find some integral functionalities of Filmora. This platform offers more than just creating slow-motion video Android:
1. AI Smart Cutout
Artificial intelligence in Filmora can amazingly assist you in making flawless videos. Unlike other tools, Filmora allows you to remove unwanted objects, people, and icons from videos. Besides, users can refine their cutout frame by frame using its’ advanced editing options. You can preview the modified media in four ways, such as Transparency grid and Alpha Mode.
2. AI Audio Stretch
This AI-based feature is new to the market and saves hours of rippling and cutting audio. It aims to match the length of your audio with videos. From Vlog videos to blockbuster audio effects, you can use this feature almost everywhere. This option allows you to re-time your audio tracks after detecting vocals in the music.
3. Speech-to-Text
Video captions make the content accessible to international viewers. That’s where Filmora proves vital in removing language barriers. It supports over 26 languages and adds subtitles to your videos with one click. This built-in feature in Filmora recognizes speech swiftly to guarantee accuracy. You can also export your SRT file of subtitles to make any edits.
4. AI Portrait
Beautify faces in your videos to set a new trend on social media with Filmora. To do so, an AI Portrait feature can automatically detect faces to apply changes. You can choose a sticker effect from more than 70 AI portrait AR stickers. Besides, it can remove video backgrounds by retaining the human beings there.
Conclusion
With all marked details, this article concludes with a note that there are always different calibers of tools that we can work with. While discovering the best Android application in the market, you got to know many slow motion videos on Android. Along with that, we also discussed DemoCreator as a comprehensive solution to the entire use of mobile apps.
Also read:
- 2024 Approved Learn About How You Can Create a Smooth Speed Ramp with Premiere Pro. Also, Find Alternative Software “WonderShare Filmora” For the Same Purpose with a Much Easier User Interface
- New 5 Tips for Faster Editing in Filmora Video Editor
- 2024 Approved Learn How to Make Interactive and Fun Video Collages Using Kapwing Collage Maker, an Easy-to-Use Tool for All Your Collage-Making Needs
- Updated Easy Guide to Use a Stabilization Tool in Filmora for 2024
- New How to Create Motion Text Effects for Your Video?
- Updated In 2024, 8 Best Video Editor with Useful Masking
- Updated Are You a Gaming YouTuber or Content Creator Whose Main Game Is COD Warzone? How Kickass Are Your Warzone Thumbnails? Heres a Guide on How to Make One for Free
- Dollar-Store DIY Hacks to Use for Filmmaking on a Budget
- New Best Animated Text Generator for 2024
- Updated 2024 Approved Best 22 Video Editing Tips to Know
- Updated A Complete Guideline To Better Use QuickTime Player
- Updated Guide Adopting Lumetri Color Presets in Effective Color Grading for 2024
- How to Use Lumetri Color in Adobe After Effects
- Minecraft Pixel Art A Complete Guide for Die-Hard Fans for 2024
- New 2024 Approved Top 20 Best Text To Speech Software Windows, Mac, Android, iPhone & Online
- Updated VSCO Slow Motion for 2024
- In 2024, Little Tricks to Create Canva Slideshow No One Is Telling You
- New Get The Perfect Drone Footage With Free Drone LUTs
- Updated In 2024, How to Add Text Animation Online
- New 2024 Approved How to Make a GIF With Transparent Background?
- Updated 2024 Approved How to Get VHS Filter and Glitch Filter to Your Images or Videos?
- 2024 Approved Why You Should Master Slideshows In Lightroom?
- The Availability of the Slow-Motion Feature on the iPhone Is Often Debated. This Article Will Guide You on How to Slow Down a Video on iPhone for 2024
- New Do You Want to Create Adjustment Layers in Final Cut Pro? This Article Will Discuss a Simple yet Efficient Method to Generate Adjustment Layers in Final Cut Pro
- Updated 2024 Approved 30+ Amazing Templates for VN Video Editor
- 2024 Approved The Glitch Effect Shows Errors and Flaws in the Image or a Video. The Write-Up Presents the Complete Procedure of Adding Premiere Pros Glitch Effect and Introduces Eight Free Glitch Effects
- 2024 Approved Discover the Best Game Recording Software for Your PC in This Developing Industry. Record Your Gameplay in Real Time and Enjoy the Benefits that Come with It
- Updated In 2024, Best 9 Amv Makers for Computer
- In 2024, How to Use Deep Fried Meme Maker
- New In 2024, Best Free Slow Motion Apps For Android and iPhone
- New 8 Excellent Video and Photo Mergers on Desktop/Mobile/Online
- 2024 Approved Slow Down Videos on Instagram With Perfection A Guide
- New In 2024, Simple Tricks Make 3D GIF Production of Inspiration Pop up Constantly
- This Well-Written Article Will Share a Descriptive Method on How to Stream Zoom to YouTube Quickly. By Doing so, You Can Share Your Zoom Session Live with Your YouTube Audience Effortlessly for 2024
- Updated The Best Peter McKinnon LUTs Recommendation
- New A Countdown Effect Is Widely Used in Gaming and Report Videos. So How to Create Your Own Countdown Video? This Article Will Tell You some Ideas About Contdown Video Editing for 2024
- New In 2024, How to Remove Background From a Video in Premier Pro
- 2024 Approved Mastering the Technique Playing Videos in Slow Motion on Your iPhone Like a Pro
- Updated How to Crop a Video in Windows Media Player for 2024
- In 2024, How Much Information Do You Have About MP4 Digital File Storage? Let Us Tell You More About the MP4 File Format; Get Ready to Increase Your Knowledge
- New Are You Looking for the Best Way to Add Subtitles to Your Video? The Top SRT File Creators Can Help You Do That
- 6 Instant Mp4 to GIF Online Tools for 2024
- To Add SRT to MP4 Is Not as Hard as You Might Think. All You Just Need Is the Right Tool to Help You Get the Job Done. Read This Article and Learn the 8 Latest Methods to Merge SRT with MP4 Effortlessly for 2024
- New How to Make a Slideshow with Icecream Slideshow Maker
- You May Want to Change the Speed of Certain Portions of Your Video. This Article Enlightens You on How to Splice and Speed up the Video in Simple Ways for 2024
- In 2024, How to Start a Vlog
- New How to Create After Effects Gifs
- Updated Scaling and Setting Videos in Filmora | Tutorial
- Complete guide for recovering pictures files on Tecno Camon 30 Pro 5G.
- In 2024, Ways To Find Unlocking Codes For Oppo Find X7 Phones
- A Perfect Guide To Remove or Disable Google Smart Lock On Realme 12+ 5G
- 10 Best Fake GPS Location Spoofers for Samsung Galaxy S23+ | Dr.fone
- Best Anti Tracker Software For Vivo Y78t | Dr.fone
- How to Fix My Samsung Galaxy F04 Location Is Wrong | Dr.fone
- Locked Out of Apple iPhone 13 Pro Max? 5 Ways to get into a Locked Apple iPhone 13 Pro Max | Dr.fone
- How To Unlock Samsung Galaxy S23 Phone Without Password?
- New In 2024, RTMP Streaming on Instagram A Comprehensive Tutorial
- Realme C53 Camera Not Working Unexpected Error? Fix It Now | Dr.fone
- How to Factory Reset Infinix Note 30 VIP Racing Edition in 5 Easy Ways | Dr.fone
- Top 5 Udemy Subtitle Translation Tools for Seamless Auto Translations for 2024
- How to Upgrade Apple iPhone 15 Pro Max to the Latest iOS Version? | Dr.fone
- How to Flash Dead Lava Blaze Curve 5G Safely | Dr.fone
- In 2024, Unova Stone Pokémon Go Evolution List and How Catch Them For Vivo Y56 5G | Dr.fone
- How to share/fake gps on Uber for Infinix Note 30 Pro | Dr.fone
- Top 10 Password Cracking Tools For Motorola Moto G34 5G
- Ultimate Guide to Catch the Regional-Located Pokemon For Honor X7b | Dr.fone
- Full Guide to Catch 100 IV Pokémon Using a Map On Motorola Moto E13 | Dr.fone
- In 2024, How to Bypass FRP on Motorola Edge 40?
- How to Find iSpoofer Pro Activation Key On Samsung Galaxy F04? | Dr.fone
- Top 5 AI Movie Script Generators
- Gmail Not Working on Nokia C300 7 Common Problems & Fixes | Dr.fone
- In 2024, A Complete Guide To OEM Unlocking on Infinix Note 30 Pro
- Title: New How to Fade in Text in Adobe Premiere Pro
- Author: Chloe
- Created at : 2024-05-20 03:38:09
- Updated at : 2024-05-21 03:38:09
- Link: https://ai-editing-video.techidaily.com/new-how-to-fade-in-text-in-adobe-premiere-pro/
- License: This work is licensed under CC BY-NC-SA 4.0.

