
:max_bytes(150000):strip_icc():format(webp)/sofya-NomETWcv2Fo-unsplash-be3fc2855a7e477db0273993fd22e822.jpg)
New How to Get Zoom on TV Easy Solutions
How to Get Zoom on TV [Easy Solutions]
The modern workforce needs adaptable alternatives to the conventional room-to-room conferencing. The latest integrated online collaboration platform is called Zoom. What’s more, now you can get Zoom on TV. Being one of the most well-known conferencing programs, it offers reliable and efficient hosting of online meetings. In a same vein, you may set up conference rooms, do video seminars, and use instant messaging to receive real-time communications. Moreover, can you get zoom on your tv? Then the answer is Yes! The ideal technique to expand a small conference is to mirror it on TV using Zoom meetings. Additionally, sharing across all platforms and devices is possible. Sharing HD video, audio, and material from your desktop and mobile devices to conference rooms and phone systems is simple, dependable, and safe with Zoom Meetings.
Zoom is one of the top videos calling applications available, however, in terms of functionality, dependability, and stability. Special features include screen sharing for multi-user annotation and local and cloud recording with transcription. With just a single click, you may share any file with supported and encrypted settings for increased security and communicate across all platforms. Zoom has now come to represent meetings for those who do their business remotely. For almost all platforms, including Android, iOS, macOS, Windows, Smart TVs, etc., the Zoom app is officially accessible. For the query how to get zoom on portal tv? you may activate Zoom screen casting whether you’re using a Windows 10 or a Mac laptop with the Chrome browser. This section will be useful to you if you want to benefit from Zoom on a TV. You may thus do so. Continue reading the article to learn more about how to get zoom on tv.
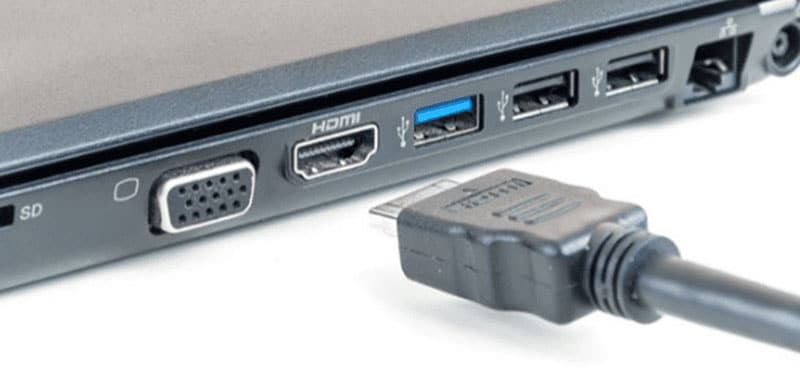
Part 1: Get Zoom on TV with HDMI Cable
Although Zoom provides companies and bigger organizations with a professional solution like Zoom Rooms, if you’re at home, you don’t need to put anything on your TV to use Zoom. You may start using Zoom right away by simply connecting your Zoom device to your TV. Connect your TV to your laptop’s HDMI port if it has one. Simple as that, however if the laptop doesn’t figure it out on its own you may need to explain what is going on with the second display. Although more reliable, connecting via cable means your source device is linked to the TV and you can’t go for a stroll. It also means you don’t have to worry about the wireless connection fading.
Steps to Get Zoom on TV with HDMI
Step1Connect the HDMI End to the TV and the Other End to Your Device
You may use this in its place if you don’t have an HDMI but do have a USB-C port. To connect to the HDMI cable coming into your TV, you’ll need a dongle, but you’ll need to make sure it’s compatible.
Step2Turn On your TV
Turn on your TV, then switch the video source to the HDMI port you just connected in your device to using the TV remote.
Step3Launch Zoom Meeting
Start or join a meeting by using the Zoom app on your smartphone (available for Android, iOS, Windows, and macOS).
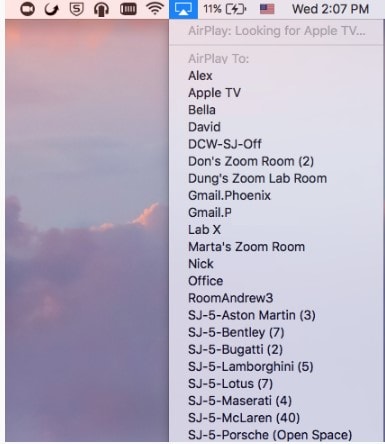
Part 2: Use AirPlay to Connect Zoom to TV
Using AirPlay mirroring, MacOS or iOS devices may share content with Zoom rooms. On MacOS and iOS, Airplay is used to communicate between the Zoom client and the Zoom room. There may be a great potential for your own business requirements if you can figure out how to utilize Airplay to Zoom mirror your screen to your Apple TV. By default, AirPlay sends audio to the Apple TV. Depending on how loud your speakers are set to play and where your input device’s microphone is located, this may cause echoing and ever-louder feedback loops. Without further ado, let’s look at some of the important strategies you may use to maximize live screen streaming on your Apple TV device.
Steps to Use AirPlay to Connect Zoom to TV
Step1Navigate to the Airplay Display in the Apple menu’s top right corner. Choose your Apple TV from the list of AirPlay Display options in the Displays preference pane. The “Show mirroring option in the menu bar when available” checkbox makes it easier to reach the AirPlay menu.

Step2Select Room Management > Zoom Rooms after logging into the Zoom online interface to manage your current Zoom Rooms. Then, modify the account settings and turn on Apple screen mirroring using the location hierarchy system.
Step3Turn on Apple Screen Mirroring by going to the Meetings tab. If this happens, you may need to activate it from the verification dialog box; otherwise, screen mirroring ought to start immediately on your device and let you see Zoom on your Apple TV. A shared password will be required of you.
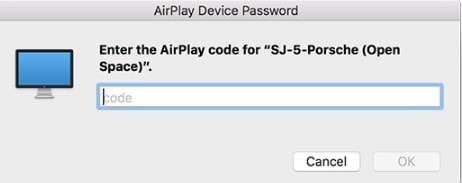
Step4Enter the passcode that is shown on the Zoom room’s screen. You may start using Airplay on your smartphone after enabling Apple screen mirroring.

Step5After that, turn off AirPlay Display by using the option in the preference pane or the system menu bar. To stop sharing, click Disconnect Airplay.
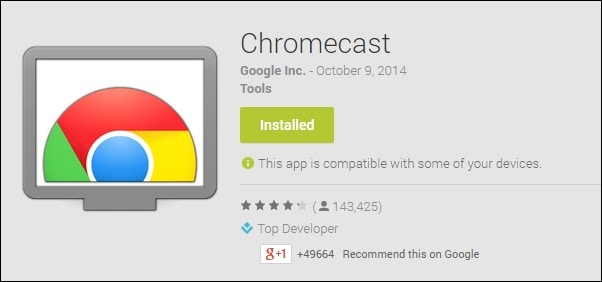
Part 3: Mirror Screen with Chromecast
The Chromecast gadgets from Google are well constructed. They should be able to cast more than just standard streaming services to your TV, logically speaking. Using a Chromecast device is one of the simplest methods to cast a Zoom conference to your TV. They are affordable, and any Google browser and the Google Home app for your Android or iOS smartphone both contain the cast capability. Between a device, such as your phone or computer, and the television, Chromecast offers the perfect connection. Chromecast makes it easy to cast Zoom meetings, particularly conferences with many of participants, since it can virtually reflect everything on your phone, tablet, or computer screen to your TV. For meetings with bigger attendance, it is advantageous to be able to cast Zoom meetings to almost any device, even a smart TV, using Chromecast.
Steps to Mirror Screen with Chromecast
Step1Install the Chromecast
Connect your Google Chromecast to the same internet source as your casting device by plugging it in.
Step2Manage Cast Settings
Locate the casting option on your device and search for recipients. Get the Zoom Cloud Meetings app for iOS or Android. You’ll also need to download the third-party software if you use an iPad or iPhone. After that, sign up for a Zoom account and log in to get started.
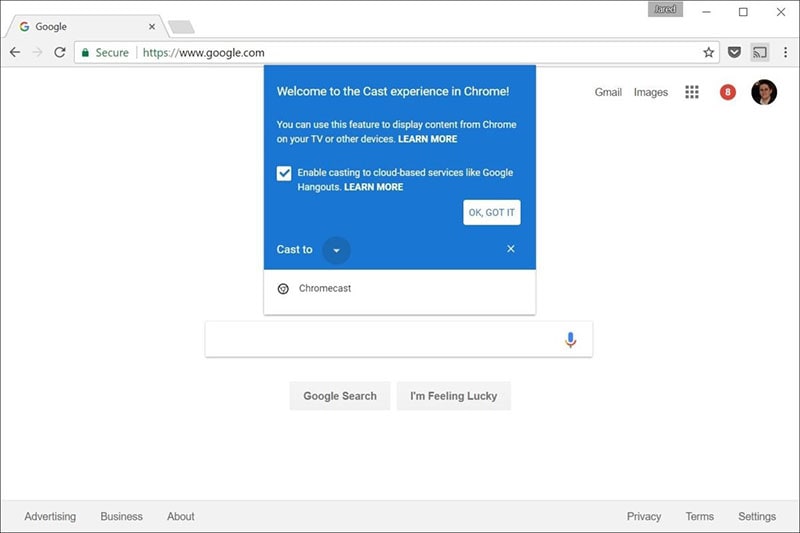
Step3Start Mirroring Zoom
The screen of your phone will show up on your TV when you tap your Chromecast. The best view is obtained by turning your phone into landscape after opening Zoom as usual. Once you place a call from here, the video will cast to your TV. Go to the next screen and click Start Broadcasting. You may now start casting to your Chromecast device by opening the Zoom Cloud Meeting app.
You must download the third-party app if you use an iPhone or iPad. The Chromecast Streamer software will let you cast a Zoom meeting on your Chromecast device as Zoom doesn’t provide a casting option.
Conclusion
Zoom’s popularity has skyrocketed as a result of the Pandemic. Zoom has emerged as the preferred video conferencing solution as the bulk of the global workforce shifts to a “work from home” environment. Now that more individuals than ever before work from home, video conferencing has emerged as a vital tool for marketing and corporate communication. Mirroring Zoom meetings to TV has never been this simple. In light of this, we hope that this guide has helped you come up with some of the greatest ideas and approaches for your personal zoom sharing needs. We really hope that this information has been helpful to you if you’ve been interested in learning more about screen sharing your Zoom to TV. Thanks to these methods, you can now mirror any device platform on TV.
The modern workforce needs adaptable alternatives to the conventional room-to-room conferencing. The latest integrated online collaboration platform is called Zoom. What’s more, now you can get Zoom on TV. Being one of the most well-known conferencing programs, it offers reliable and efficient hosting of online meetings. In a same vein, you may set up conference rooms, do video seminars, and use instant messaging to receive real-time communications. Moreover, can you get zoom on your tv? Then the answer is Yes! The ideal technique to expand a small conference is to mirror it on TV using Zoom meetings. Additionally, sharing across all platforms and devices is possible. Sharing HD video, audio, and material from your desktop and mobile devices to conference rooms and phone systems is simple, dependable, and safe with Zoom Meetings.
Zoom is one of the top videos calling applications available, however, in terms of functionality, dependability, and stability. Special features include screen sharing for multi-user annotation and local and cloud recording with transcription. With just a single click, you may share any file with supported and encrypted settings for increased security and communicate across all platforms. Zoom has now come to represent meetings for those who do their business remotely. For almost all platforms, including Android, iOS, macOS, Windows, Smart TVs, etc., the Zoom app is officially accessible. For the query how to get zoom on portal tv? you may activate Zoom screen casting whether you’re using a Windows 10 or a Mac laptop with the Chrome browser. This section will be useful to you if you want to benefit from Zoom on a TV. You may thus do so. Continue reading the article to learn more about how to get zoom on tv.
Part 1: Get Zoom on TV with HDMI Cable
Although Zoom provides companies and bigger organizations with a professional solution like Zoom Rooms, if you’re at home, you don’t need to put anything on your TV to use Zoom. You may start using Zoom right away by simply connecting your Zoom device to your TV. Connect your TV to your laptop’s HDMI port if it has one. Simple as that, however if the laptop doesn’t figure it out on its own you may need to explain what is going on with the second display. Although more reliable, connecting via cable means your source device is linked to the TV and you can’t go for a stroll. It also means you don’t have to worry about the wireless connection fading.
Steps to Get Zoom on TV with HDMI
Step1Connect the HDMI End to the TV and the Other End to Your Device
You may use this in its place if you don’t have an HDMI but do have a USB-C port. To connect to the HDMI cable coming into your TV, you’ll need a dongle, but you’ll need to make sure it’s compatible.
Step2Turn On your TV
Turn on your TV, then switch the video source to the HDMI port you just connected in your device to using the TV remote.
Step3Launch Zoom Meeting
Start or join a meeting by using the Zoom app on your smartphone (available for Android, iOS, Windows, and macOS).
Part 2: Use AirPlay to Connect Zoom to TV
Using AirPlay mirroring, MacOS or iOS devices may share content with Zoom rooms. On MacOS and iOS, Airplay is used to communicate between the Zoom client and the Zoom room. There may be a great potential for your own business requirements if you can figure out how to utilize Airplay to Zoom mirror your screen to your Apple TV. By default, AirPlay sends audio to the Apple TV. Depending on how loud your speakers are set to play and where your input device’s microphone is located, this may cause echoing and ever-louder feedback loops. Without further ado, let’s look at some of the important strategies you may use to maximize live screen streaming on your Apple TV device.
Steps to Use AirPlay to Connect Zoom to TV
Step1Navigate to the Airplay Display in the Apple menu’s top right corner. Choose your Apple TV from the list of AirPlay Display options in the Displays preference pane. The “Show mirroring option in the menu bar when available” checkbox makes it easier to reach the AirPlay menu.
Step2Select Room Management > Zoom Rooms after logging into the Zoom online interface to manage your current Zoom Rooms. Then, modify the account settings and turn on Apple screen mirroring using the location hierarchy system.
Step3Turn on Apple Screen Mirroring by going to the Meetings tab. If this happens, you may need to activate it from the verification dialog box; otherwise, screen mirroring ought to start immediately on your device and let you see Zoom on your Apple TV. A shared password will be required of you.
Step4Enter the passcode that is shown on the Zoom room’s screen. You may start using Airplay on your smartphone after enabling Apple screen mirroring.
Step5After that, turn off AirPlay Display by using the option in the preference pane or the system menu bar. To stop sharing, click Disconnect Airplay.
Part 3: Mirror Screen with Chromecast
The Chromecast gadgets from Google are well constructed. They should be able to cast more than just standard streaming services to your TV, logically speaking. Using a Chromecast device is one of the simplest methods to cast a Zoom conference to your TV. They are affordable, and any Google browser and the Google Home app for your Android or iOS smartphone both contain the cast capability. Between a device, such as your phone or computer, and the television, Chromecast offers the perfect connection. Chromecast makes it easy to cast Zoom meetings, particularly conferences with many of participants, since it can virtually reflect everything on your phone, tablet, or computer screen to your TV. For meetings with bigger attendance, it is advantageous to be able to cast Zoom meetings to almost any device, even a smart TV, using Chromecast.
Steps to Mirror Screen with Chromecast
Step1Install the Chromecast
Connect your Google Chromecast to the same internet source as your casting device by plugging it in.
Step2Manage Cast Settings
Locate the casting option on your device and search for recipients. Get the Zoom Cloud Meetings app for iOS or Android. You’ll also need to download the third-party software if you use an iPad or iPhone. After that, sign up for a Zoom account and log in to get started.
Step3Start Mirroring Zoom
The screen of your phone will show up on your TV when you tap your Chromecast. The best view is obtained by turning your phone into landscape after opening Zoom as usual. Once you place a call from here, the video will cast to your TV. Go to the next screen and click Start Broadcasting. You may now start casting to your Chromecast device by opening the Zoom Cloud Meeting app.
You must download the third-party app if you use an iPhone or iPad. The Chromecast Streamer software will let you cast a Zoom meeting on your Chromecast device as Zoom doesn’t provide a casting option.
Conclusion
Zoom’s popularity has skyrocketed as a result of the Pandemic. Zoom has emerged as the preferred video conferencing solution as the bulk of the global workforce shifts to a “work from home” environment. Now that more individuals than ever before work from home, video conferencing has emerged as a vital tool for marketing and corporate communication. Mirroring Zoom meetings to TV has never been this simple. In light of this, we hope that this guide has helped you come up with some of the greatest ideas and approaches for your personal zoom sharing needs. We really hope that this information has been helpful to you if you’ve been interested in learning more about screen sharing your Zoom to TV. Thanks to these methods, you can now mirror any device platform on TV.
10+ Royalty-Free 5 Second Countdown Footage HD & 4K Clips Included
Countdown footage, lately, has become one of the core elements that content creators use in their videos. While some use it to promote special live streams others use it to grab their viewer’s attention. Plus, some also use it as a means of updating their own when a live stream will start.
Perhaps you’re looking for a five-second countdown timer for your video or live stream, chances are you’ll find a lot online. But, sadly, not all of them online is copyrighted free. So, to help you out, we’ve compiled a list of different five seconds countdown footage ranging from HD to 4k that is worth trying.
- Blue Round 5-Second Countdown Timer HD
- Yellow Loading Bar HD
- Red Round 5-second countdown timer HD
- Multi-color Round 5-second Countdown Timer HD
- White Number 5-seconds countdown timer 4K
- Solid Yellow 5-second Countdown Timer HD
- Yellow Round 5-second Countdown Timer HD
- Round Loading 5-second Countdown timer HD
- Minute-Second-Countdown Timer 4K
- 3D 5-second Countdown Timer 4K
- Battery Percentage Countdown Timer HD
- White Loading Bar HD
- How to Find and Apply those 5-second countdown clips to videos?
- Hot FAQs on the 5-second countdown timer
Part 1: 12 Animated 5-second timer Clips for Your Project
After taking our time to search for 5-second timer clips available online, here is a list of the 12 gorgeous animated 5-second countdown timer clips that can be used in any project. All thanks to the Wondershare Filmora video editing software for giving us access to such unique designs of countdown clips. Don’t hesitate to check them out in Filmora because they all look amazing.
1. Blue Round 5-Second Countdown Timer HD
The first 5 seconds countdown video effect on our list is this adorable all-black background HD quality countdown timer that counts in an ascending manner.

2. Yellow Loading Bar HD
This 5-second countdown footage is a loading bar. Yes, a loading bar just like you’re trying install a tool on your PC.

3. Red Round 5-second countdown timer HD
This a simple but gorgeous red round 5-second countdown timer effect with a black background. Honestly, no matter the project you use this for, the viewer will surely fancy this countdown effect.

4. Multi-color Round 5-second Countdown Timer HD
The round circle of this countdown timer displays different colors when it’s played to begin a countdown. Its lemon background color makes it look really attractive for videos.

5. White Number 5-seconds countdown timer 4K
This is another all-black background 5-second countdown timer on this list. It’s great for anyone looking for a very simple 5-second countdown footage for a video.

6. Solid Yellow 5-second Countdown Timer HD
The color of this countdown timer is what makes it very adorable. Honestly, it’s worth mentioning on this list. You should try it for your colorful video,

7. Yellow Round 5-second Countdown Timer HD
A lot of folks fancy black background countdown timers, and we can’t get tired of mentioning any special one we find. This black background timer looks cool.

8. Round Loading 5-second Countdown timer HD
This 5-seconds countdown footage is like a round loading bar. Its background color and all just have the perfect blend.

9. Minute-Second-Countdown Timer 4K
Up next is a minute-second-based countdown timer, and it’s also in 4K resolution.

10. 3D 5-second Countdown Timer 4K
This countdown timer with a hi-tech sense. It can be used for a good transition to spice up your explainer videos.

11. Battery Percentage Countdown Timer HD
If you’re looking for a countdown timer like a battery percentage, this one is for you, and it looks really great.

12. White Loading Bar HD
Our final 5-second background timer is a loading bar. But, this time, a white one, and it’s similar to the previously mentioned one.

![]()
Note: Some of the clips introduced above are not typically 5-second countdown footage. Some are up to 10 seconds or even longer. However, the good thing is you can make the clip shorter when embedding it in your video by cutting it according to your requirement.
We would teach you how to make the above 5-seconds shorter if you keep reading.
Part 2: How to Find and Apply those 5-second countdown clips to videos?
I bet you fancy the 5-seconds countdown videos discussed above. But the big question is where can you find them and how do you apply the ones you need to your videos? Well, here is where the help of video editing software like Wondershare Filmora comes into the game.
Wondershare Filmora is a top-leading software that offers users at all levels the best tools needed to execute different types of video editing operations ranging from transitions, resizing, background removal, auto-reframe, and lots more without hassles.
Besides, the boasts lots of modern tools that facilitate not just video editing but also audio editing and screen recording operation. You don’t even need technical knowledge to utilize both the advanced and basic features of the tool.
Let’s proceed to learn the step-by-step process to find all the 5-seconds countdown videos introduced on this page;
Step1 Download the latest version of Filmora software from the official website and install it.
Step2 Launch the tool and use the Import button to upload the video to that you want to add the countdown clip. Alternatively, you can just drag-n-drop the video.

Step3 Drag-n-drop the video to the timeline.

Step4 Navigate to the top-left corner of the screen and click ‘Stock Media’. Then, select ‘Pexels’ or ‘Pixbay’ from the left side of the screen and type ‘Countdown’ in the search bar. After that, find a preferred Countdown effect and move it to the timeline where your video is.

Step5 If the countdown effect you added is more than five seconds, adjust it to five seconds from the timeline. Then, move it to the section of your video where you want it to be displayed.

Play your video to preview the countdown effect you added.
Step6 Once you’re satisfied with the editing, navigate to the top of the screen and click Export, then, select ‘Burn DVD’.

Step7 Enter a preferred name for your video in the pop-up that appears on your screen, then in the Folder Path, choose the location where you want the file to be saved. After that, click the ‘Export’ button to complete the operation.

Hot FAQs on the 5-second countdown timer
There are more FAQs on 5-second countdown timer that you should know about.
1. What is a dynamic countdown?
A dynamic countdown is a countdown used to display the total time left for visitors to claim an offer available on a website.
2. How do you make a countdown video?
To make a countdown video, you need the help of advanced video editing software like Filmora. Filmora offers sophisticated video editing tools that make it easy for folks to make high-quality countdown videos. You can refer to the steps explained on this page to make a countdown video.
3. What are the benefits of adding a 5 seconds countdown for videos?
- It’s a great way to push your audience to make fast decisions that will be in your favor.
- It’s efficient for promoting Livestream.
- It helps to grab viewers’ attention in videos.
Final Words
If you’re looking for beautiful 5-seconds countdown footage for your video, live stream, or whatsoever, the ones introduced on this page are really great. All thanks to the Wondershare tech experts for integrating these special countdown effects into the Filmora video editing tool. The tool is also ideal for applying 5-second countdown footage in your videos or live streams.
Free Download For Win 7 or later(64-bit)
Free Download For macOS 10.14 or later
Part 1: 12 Animated 5-second timer Clips for Your Project
After taking our time to search for 5-second timer clips available online, here is a list of the 12 gorgeous animated 5-second countdown timer clips that can be used in any project. All thanks to the Wondershare Filmora video editing software for giving us access to such unique designs of countdown clips. Don’t hesitate to check them out in Filmora because they all look amazing.
1. Blue Round 5-Second Countdown Timer HD
The first 5 seconds countdown video effect on our list is this adorable all-black background HD quality countdown timer that counts in an ascending manner.
2. Yellow Loading Bar HD
This 5-second countdown footage is a loading bar. Yes, a loading bar just like you’re trying install a tool on your PC.
3. Red Round 5-second countdown timer HD
This a simple but gorgeous red round 5-second countdown timer effect with a black background. Honestly, no matter the project you use this for, the viewer will surely fancy this countdown effect.
4. Multi-color Round 5-second Countdown Timer HD
The round circle of this countdown timer displays different colors when it’s played to begin a countdown. Its lemon background color makes it look really attractive for videos.
5. White Number 5-seconds countdown timer 4K
This is another all-black background 5-second countdown timer on this list. It’s great for anyone looking for a very simple 5-second countdown footage for a video.
6. Solid Yellow 5-second Countdown Timer HD
The color of this countdown timer is what makes it very adorable. Honestly, it’s worth mentioning on this list. You should try it for your colorful video,
7. Yellow Round 5-second Countdown Timer HD
A lot of folks fancy black background countdown timers, and we can’t get tired of mentioning any special one we find. This black background timer looks cool.
8. Round Loading 5-second Countdown timer HD
This 5-seconds countdown footage is like a round loading bar. Its background color and all just have the perfect blend.
9. Minute-Second-Countdown Timer 4K
Up next is a minute-second-based countdown timer, and it’s also in 4K resolution.
10. 3D 5-second Countdown Timer 4K
This countdown timer with a hi-tech sense. It can be used for a good transition to spice up your explainer videos.
11. Battery Percentage Countdown Timer HD
If you’re looking for a countdown timer like a battery percentage, this one is for you, and it looks really great.
12. White Loading Bar HD
Our final 5-second background timer is a loading bar. But, this time, a white one, and it’s similar to the previously mentioned one.
![]()
Note: Some of the clips introduced above are not typically 5-second countdown footage. Some are up to 10 seconds or even longer. However, the good thing is you can make the clip shorter when embedding it in your video by cutting it according to your requirement.
We would teach you how to make the above 5-seconds shorter if you keep reading.
Part 2: How to Find and Apply those 5-second countdown clips to videos?
I bet you fancy the 5-seconds countdown videos discussed above. But the big question is where can you find them and how do you apply the ones you need to your videos? Well, here is where the help of video editing software like Wondershare Filmora comes into the game.
Wondershare Filmora is a top-leading software that offers users at all levels the best tools needed to execute different types of video editing operations ranging from transitions, resizing, background removal, auto-reframe, and lots more without hassles.
Besides, the boasts lots of modern tools that facilitate not just video editing but also audio editing and screen recording operation. You don’t even need technical knowledge to utilize both the advanced and basic features of the tool.
Let’s proceed to learn the step-by-step process to find all the 5-seconds countdown videos introduced on this page;
Step1 Download the latest version of Filmora software from the official website and install it.
Step2 Launch the tool and use the Import button to upload the video to that you want to add the countdown clip. Alternatively, you can just drag-n-drop the video.
Step3 Drag-n-drop the video to the timeline.
Step4 Navigate to the top-left corner of the screen and click ‘Stock Media’. Then, select ‘Pexels’ or ‘Pixbay’ from the left side of the screen and type ‘Countdown’ in the search bar. After that, find a preferred Countdown effect and move it to the timeline where your video is.
Step5 If the countdown effect you added is more than five seconds, adjust it to five seconds from the timeline. Then, move it to the section of your video where you want it to be displayed.
Play your video to preview the countdown effect you added.
Step6 Once you’re satisfied with the editing, navigate to the top of the screen and click Export, then, select ‘Burn DVD’.
Step7 Enter a preferred name for your video in the pop-up that appears on your screen, then in the Folder Path, choose the location where you want the file to be saved. After that, click the ‘Export’ button to complete the operation.
Hot FAQs on the 5-second countdown timer
There are more FAQs on 5-second countdown timer that you should know about.
1. What is a dynamic countdown?
A dynamic countdown is a countdown used to display the total time left for visitors to claim an offer available on a website.
2. How do you make a countdown video?
To make a countdown video, you need the help of advanced video editing software like Filmora. Filmora offers sophisticated video editing tools that make it easy for folks to make high-quality countdown videos. You can refer to the steps explained on this page to make a countdown video.
3. What are the benefits of adding a 5 seconds countdown for videos?
- It’s a great way to push your audience to make fast decisions that will be in your favor.
- It’s efficient for promoting Livestream.
- It helps to grab viewers’ attention in videos.
Final Words
If you’re looking for beautiful 5-seconds countdown footage for your video, live stream, or whatsoever, the ones introduced on this page are really great. All thanks to the Wondershare tech experts for integrating these special countdown effects into the Filmora video editing tool. The tool is also ideal for applying 5-second countdown footage in your videos or live streams.
Free Download For Win 7 or later(64-bit)
Free Download For macOS 10.14 or later
Knowing All Ways To Slow Down Video With Adobe Premiere Pro
Play with time and craft an epic action sequence in videos. Speed ramping is a technique that video editors use for this purpose. You might be thinking that it’s a simple slow-motion effect, but it’s slightly different. In reality, speed ramping is the process of ensuring a smoother transition in speed of scenes. Countless movies and sports videos use slow and fast motion for several reasons.
Premiere Pro Slow Motion allows creative expression in videos. To do so, editors rely on Adobe Premiere Pro software for well-crafted videos. Careful editing is required to maintain continuity and cohesiveness in clips through motion Adobe. This article will guide you on how to use slow motion on Adobe Premiere. Explore this feature and all the necessary details for a polished video outlook.
Slow Motion Video Maker Slow your video’s speed with better control of your keyframes to create unique cinematic effects!
Make A Slow Motion Video Make A Slow Motion Video More Features

Part 1: Explaining the Slow-Motion Feature of Adobe Premiere Pro
Adobe Premiere Pro is a video editing software part of Adobe Creative Suite. Professional editors and beginners both use this tool to make their content creative. Whether you are reworking a previous art piece or a new project, it can alter colors for good. You can insert background music, animations, and other forms of multimedia using Adobe.
Among its limitless features is a speed-ramping or slow-motion function. To unlock Adobe Premiere slow-motion in detail, you can head into the below details:
- Using this option, you can adjust the speed of the video as required. For instance, if you set it to 50%, your video will play at half speed compared to the original clips.
- Apart from the speed, users can adjust the duration of slow motion. This adjustment delivers a stylized and customized look to your clips.
- Make the slow-motion transition smoother with the optical flow feature. It can intelligently generate new frames to make your clips look like shots at a higher frame rate.
- Not all clips are worth slowing down, so there are many frame rates to do this. You can set the frame rate from 30fps, 120fps, 240fps, and 960fps.
Part 2: Understanding the Operations of Performing Slow Motion on Adobe Premiere Pro
If you want to perform speed ramping in videos, first access Adobe Premiere Pro. Many users find video editing difficult in Adobe. For their ease, this section will explain the slow-mo Adobe Premiere in simple steps:
Step 1
After getting into the Adobe Premiere Pro, enter to its editing screen. Import your video clip and move towards its timeline section. There, right-click on the FX icon and choose “Time Remapping” to go to “Speed.” Now, you can see the white speed ramping line.

Step 2
Add the keyframe by clicking the left-side circle icon next to the speed ramping line. Zoom in the section and add another keyframe.

Step 3
Click on the middle of the keyframe and pull it down slowly. To add a slow ramp instead of an abrupt change in speed, hit on the start and drag towards the right. Repeat the same to the other end of the keyframe. You can see a slow shift in speed. Later, you can adjust the speed and the ramp.

Part 3: What Are Some Potential Disadvantages of Using Adobe Premiere Pro for Performing Such Operations?
Many people might initially find the above steps intense and difficult to understand. Slow motion in Premiere Pro is useful in speed ramping, but you can face some issues using it. As everything has some bad side, this operation also does. You should read forward and know such disadvantages to avoid any inconvenience:
- Playback Lagging: Adobe causes lagging and major issues in playback. If you don’t use optical flow and render frames freeze, you cannot make any speed ramps.
- System Compatibility Issues: Speed ramping requires a system with a good GPU. Otherwise, problems might occur when it doesn’t interact well with the computer’s GPU.
- Complex Processing: This feature will interrupt your workflow if you are not a professional editor. As you will have to watch several tutorial videos to use just one feature.
- Frame Rate Adjustment Problems: Premiere Pro can show bugs if you use a high frame rate. It will start troubling when you use 120fps slow motion in clips.
Generally, it also requires strong computer specs and uses RAM of at least 8GB. The majority of editors look for an alternative due to its high learning curve and system requirements.
Part 5: Wondershare Filmora: Comprehending the Best Ways to Slow Down Videos
In search of a substitute, there could be many options on the internet. If someone is looking for easy-to-use software, they should use Wondershare Filmora . This video editor is the real game changer in adjusting speed ramping without laggings. Surprisingly, it does not require system requirements, and you can quickly launch it.
Filmora uses AI for a smooth optical flow compared with Adobe Premiere slow motion. It also ensures high quality and optimization of videos. With new AI features, you don’t need any help from experts, as AI can do it for you.
Free Download For Win 7 or later(64-bit)
Free Download For macOS 10.14 or later
Step-by-Step Guide to Slow Down Video Using Filmora
If you want more creative slow-motion videos, then keep reading. Here, you will find the easiest way to slow down videos in Filmora:
Step 1Install Filmora and Import Your Project in the Timeline
Launch the Filmora 13 in your system within simple steps. Access its main interface and hit the “New Project” button. Enter the editing window and import your project. Press the “Ctrl + I” keys from your keyboard to import the video. Browse the video and click “Open” to bring the video to Filmora. Then, drag and drop the video in the timeline section.

Step 2Explore Speed Ramping to Make Videos Super Slow
Place your cursor on the video and right-click on it. From the list, choose “Speed Ramping” and navigate toward the right-side panel. There, tap on “Customize” to open the further settings. Look for the “AI Frame Interpolation” and expand it to choose the “Optical Flow” option. You can adjust the speed manually from the graphical section on the right.

Step 3Get Render Review and Look for Export Button
Go to the timeline section toolbar for a smoother playback. Explore the “Render Preview” icon next to a green robotic icon. Finally, you can click the “Export” button at the top right corner to shift the video to your computer.

Conclusion
To conclude, speed ramping is a unique way to slow down video scenes. In this regard, professional video editors prefer Adobe Premiere Pro Slow Motion. On the contrary, this software is not a good choice for beginners and non-tech persons. That’s where Wondershare Filmora can make the process easier for all users. The plus point is it ensures quality with dedicated customization.
Make A Slow Motion Video Make A Slow Motion Video More Features
Part 1: Explaining the Slow-Motion Feature of Adobe Premiere Pro
Adobe Premiere Pro is a video editing software part of Adobe Creative Suite. Professional editors and beginners both use this tool to make their content creative. Whether you are reworking a previous art piece or a new project, it can alter colors for good. You can insert background music, animations, and other forms of multimedia using Adobe.
Among its limitless features is a speed-ramping or slow-motion function. To unlock Adobe Premiere slow-motion in detail, you can head into the below details:
- Using this option, you can adjust the speed of the video as required. For instance, if you set it to 50%, your video will play at half speed compared to the original clips.
- Apart from the speed, users can adjust the duration of slow motion. This adjustment delivers a stylized and customized look to your clips.
- Make the slow-motion transition smoother with the optical flow feature. It can intelligently generate new frames to make your clips look like shots at a higher frame rate.
- Not all clips are worth slowing down, so there are many frame rates to do this. You can set the frame rate from 30fps, 120fps, 240fps, and 960fps.
Part 2: Understanding the Operations of Performing Slow Motion on Adobe Premiere Pro
If you want to perform speed ramping in videos, first access Adobe Premiere Pro. Many users find video editing difficult in Adobe. For their ease, this section will explain the slow-mo Adobe Premiere in simple steps:
Step 1
After getting into the Adobe Premiere Pro, enter to its editing screen. Import your video clip and move towards its timeline section. There, right-click on the FX icon and choose “Time Remapping” to go to “Speed.” Now, you can see the white speed ramping line.
Step 2
Add the keyframe by clicking the left-side circle icon next to the speed ramping line. Zoom in the section and add another keyframe.
Step 3
Click on the middle of the keyframe and pull it down slowly. To add a slow ramp instead of an abrupt change in speed, hit on the start and drag towards the right. Repeat the same to the other end of the keyframe. You can see a slow shift in speed. Later, you can adjust the speed and the ramp.
Part 3: What Are Some Potential Disadvantages of Using Adobe Premiere Pro for Performing Such Operations?
Many people might initially find the above steps intense and difficult to understand. Slow motion in Premiere Pro is useful in speed ramping, but you can face some issues using it. As everything has some bad side, this operation also does. You should read forward and know such disadvantages to avoid any inconvenience:
- Playback Lagging: Adobe causes lagging and major issues in playback. If you don’t use optical flow and render frames freeze, you cannot make any speed ramps.
- System Compatibility Issues: Speed ramping requires a system with a good GPU. Otherwise, problems might occur when it doesn’t interact well with the computer’s GPU.
- Complex Processing: This feature will interrupt your workflow if you are not a professional editor. As you will have to watch several tutorial videos to use just one feature.
- Frame Rate Adjustment Problems: Premiere Pro can show bugs if you use a high frame rate. It will start troubling when you use 120fps slow motion in clips.
Generally, it also requires strong computer specs and uses RAM of at least 8GB. The majority of editors look for an alternative due to its high learning curve and system requirements.
Part 5: Wondershare Filmora: Comprehending the Best Ways to Slow Down Videos
In search of a substitute, there could be many options on the internet. If someone is looking for easy-to-use software, they should use Wondershare Filmora . This video editor is the real game changer in adjusting speed ramping without laggings. Surprisingly, it does not require system requirements, and you can quickly launch it.
Filmora uses AI for a smooth optical flow compared with Adobe Premiere slow motion. It also ensures high quality and optimization of videos. With new AI features, you don’t need any help from experts, as AI can do it for you.
Free Download For Win 7 or later(64-bit)
Free Download For macOS 10.14 or later
Step-by-Step Guide to Slow Down Video Using Filmora
If you want more creative slow-motion videos, then keep reading. Here, you will find the easiest way to slow down videos in Filmora:
Step 1Install Filmora and Import Your Project in the Timeline
Launch the Filmora 13 in your system within simple steps. Access its main interface and hit the “New Project” button. Enter the editing window and import your project. Press the “Ctrl + I” keys from your keyboard to import the video. Browse the video and click “Open” to bring the video to Filmora. Then, drag and drop the video in the timeline section.
Step 2Explore Speed Ramping to Make Videos Super Slow
Place your cursor on the video and right-click on it. From the list, choose “Speed Ramping” and navigate toward the right-side panel. There, tap on “Customize” to open the further settings. Look for the “AI Frame Interpolation” and expand it to choose the “Optical Flow” option. You can adjust the speed manually from the graphical section on the right.
Step 3Get Render Review and Look for Export Button
Go to the timeline section toolbar for a smoother playback. Explore the “Render Preview” icon next to a green robotic icon. Finally, you can click the “Export” button at the top right corner to shift the video to your computer.
Conclusion
To conclude, speed ramping is a unique way to slow down video scenes. In this regard, professional video editors prefer Adobe Premiere Pro Slow Motion. On the contrary, this software is not a good choice for beginners and non-tech persons. That’s where Wondershare Filmora can make the process easier for all users. The plus point is it ensures quality with dedicated customization.
How to Correct Lens Distortion With Filmora
The distortion in your video may irritate you when you’re working on the video’s edit. When you take images or record sound, you frequently end up with distorted results due to lens distortion. In this article, we will discuss what lens distortion is, how it may be fixed, and the factors you need to pay attention to avoid lens distortion when taking or recording videos.
Part 1: Basic introduction to lens distortion
1. What is lens distortion
Distortion means that the straight rectilinear projection is not straight. In the pinhole camera model, lens distortion is measured by how far from the image’s ideal projection is. From a geometric optics point of view, the scene’s straight lines don’t look straight in the image.
When you take a picture, the camera lens can somehow change the shape of the image. It is called camera lens distortion. In simple terms, we can tell you that this is the case because distortion in-camera is when the lens makes curved lines in an image and doesn’t show the straight lines from the scene.
2. What cause it
Lens distortion happens with all lenses. It is because of several things, such as how the lens is curved, how far away the subject is, and the angle at which the photo was taken. Furthermore, it changes the image in many ways, but you can see it most when straight lines at the frame’s edges are no longer parallel.
Most geometric lens distortions happen when the focal distance is short (barrel distortion), long (pincushion distortion), or when a fish-eye lens is used to take a picture from a low angle (keystone distortion).
Part 2: How to correct a distorted lens?
A lot of times, with lower-end wide-angle lenses, especially action cams like GoPro, you get pretty gnarly distortion when you’re filming. As we know, the Earth is round, but it shouldn’t look like this when you take a picture. Indeed, it’s very distorted, it has the horizon line bending all over the place, and basically, all of the lines in the video have some level of curvature.
Hence, follow all the steps below to know how to fix it:
Step1 Import your video to Filmora .

Free Download For Win 7 or later(64-bit)
Free Download For macOS 10.14 or later
Step2 Click on the clip and head over to the lens correction. Choose the “Camera model” based on what you used, but in this tutorial, the video was taken with a GoPro Hero 7. However, you can choose some other camera model options there.

Step3 To adjust the distortion, you can slide the bar to the left or the right. If you slide the bar to the right (maximum level), there will be no adjustment. However, if you slide the bar to the left, you can see it pulling those lines as high up as possible.
You can see a bit of curvature, but it looks much more natural, and all of the lines in the video look so much better.

Step4 Lastly, if you play the video back, you will see the video look much better than before.

Part 3: How to avoid distorted lens while shooting?
1. Avoid very wide-angle lenses
The more distortion there is in a lens, like a 15mm prime, the wider it is. Sometimes you need a very wide-angle lens, and distortion is unavoidable. If you have room to move back, you could try using a lens with a different focal length.
2. Avoid getting too close
Doing so will enhance optical distortion in many lenses and the likelihood of perspective distortion in all lenses.
3. Be mindful of your composition
There are numerous instances where distortion is acceptable or even intended. Others must be carefully examined, such as utilizing a wide-angle lens to photograph a row of people. When you get too close to a group, the distortion makes the people at each end appear considerably wider! Therefore, consider your composition. Stand back and add space around your group; if necessary, you can trim the image afterward.
4. Use a 50mm lens
50mm lenses are often called “all-purpose” lenses. There is a good reason
for this. A 50mm lens is great for portraits, street photography, and many other kinds of photography, including architecture. If your subject is big, you just need space to stand back. You will see that a 50mm lens rarely distorts the image.
Free Download For macOS 10.14 or later
Step2 Click on the clip and head over to the lens correction. Choose the “Camera model” based on what you used, but in this tutorial, the video was taken with a GoPro Hero 7. However, you can choose some other camera model options there.
Step3 To adjust the distortion, you can slide the bar to the left or the right. If you slide the bar to the right (maximum level), there will be no adjustment. However, if you slide the bar to the left, you can see it pulling those lines as high up as possible.
You can see a bit of curvature, but it looks much more natural, and all of the lines in the video look so much better.
Step4 Lastly, if you play the video back, you will see the video look much better than before.
Part 3: How to avoid distorted lens while shooting?
1. Avoid very wide-angle lenses
The more distortion there is in a lens, like a 15mm prime, the wider it is. Sometimes you need a very wide-angle lens, and distortion is unavoidable. If you have room to move back, you could try using a lens with a different focal length.
2. Avoid getting too close
Doing so will enhance optical distortion in many lenses and the likelihood of perspective distortion in all lenses.
3. Be mindful of your composition
There are numerous instances where distortion is acceptable or even intended. Others must be carefully examined, such as utilizing a wide-angle lens to photograph a row of people. When you get too close to a group, the distortion makes the people at each end appear considerably wider! Therefore, consider your composition. Stand back and add space around your group; if necessary, you can trim the image afterward.
4. Use a 50mm lens
50mm lenses are often called “all-purpose” lenses. There is a good reason
for this. A 50mm lens is great for portraits, street photography, and many other kinds of photography, including architecture. If your subject is big, you just need space to stand back. You will see that a 50mm lens rarely distorts the image.
Also read:
- Updated Learn How to Seamlessly Merge Audio and Video in VLC Media Player with This Easy-to-Follow Guide. Step-by-Step Instructions Are Included
- Deep Learning of AI Video Recognition
- New 2 Actionable Ways to Extract Subtitles From MKV Videos without Quality Loss
- Updated Some Top Methods to Create AI Slow Motion Videos for 2024
- Updated Best Ideas on Using Green Screen with Filmora for 2024
- New How to Download and Use Windows Movie Maker 10
- In 2024, If You Are Looking Forward to Make Attractive and Customized Slideshows, Lightroom Is One of the Best Options that You Can Consider
- Updated Fast and Easy Method to Match Color in Photoshop for 2024
- In 2024, Looking for the Best Alternatives of iPad Compatible Slideshow Applications to Design High End Graphic Presentations? Rest Assured, You Have Landed at the Correct Spot
- How Can You Get VHS Filter and Glitch Filter to Your Images or Videos for 2024
- In 2024, SRT Not Displaying How to Open and Use SRT File in VLC?
- Updated for 2024
- New The Best Peter McKinnon LUTs Recommendation
- Updated Top 10 Free WhatsApp Video Converter for 2024
- Slow Down or Speed Up Videos Easily on PC, Online, and Phone
- Updated In 2024, How to Create a Custom Slide Show in PowerPoint
- New Top 22 Free Video Editing Software
- New Tips That Show Anybody How To Create Youtube Slideshow – Guaranteed
- Updated In 2024, Adding Slow Motion in DaVinci Resolve A Comprehensive Overview
- 2024 Approved Transparent Logo and Images Look Cool when You Are Planning to Create a Brand Identity. An Image with Unique Features Catches the Attention of Viewers and Leaves Impression
- New 8 Excellent Video and Photo Mergers on Desktop/Mobile/Online
- In 2024, To Determine or Change the Video Aspect Ratio Online. Use a Ratio Calculator to Calculate Pixel Dimensions and Aspect Ratios of Images or Videos
- Is Augmented Reality Conferencing the Future of Workplace Collaboratio
- A Normal Video Brings More Editing Opportunities than a Slow-Motion One. This Text Explores How to Convert Slow Motion Video to Normal on iPhone
- New How to Create Your Own LOL Montage Video for 2024
- Updated In 2024, How To Make Boring Videos Look Cool By B Rolls
- Updated Having Issues Trying to View SRT Files when You Add Subtitle Files for VLC? Learn the Right Ways to Do so and the Best Alternative Solution
- Updated In 2024, Easy Way to Inset Text in Video
- Updated Step by Step to Rotate Videos in Davinci Resolve
- Best 6 WebM to GIF Converters for 2024
- Can I Remove the Apple Watch Activation Lock By Apple iPhone 6s Plus without the Previous Owner?
- How To Delete iCloud Account Remove Your Apple ID Permanently From iPhone 7
- How to Successfully Bypass iCloud Activation Lock from Apple iPhone 14
- In 2024, Unova Stone Pokémon Go Evolution List and How Catch Them For Honor X50i | Dr.fone
- In 2024, Top 10 Best Spy Watches For your Samsung Galaxy M34 5G | Dr.fone
- Recover Apple iPhone 14 Data From iOS iTunes Backup | Dr.fone
- How to Unlock Nokia C12 Pro Phone without PIN
- Life360 Learn How Everything Works On Honor 100 Pro | Dr.fone
- Top-Notch Solutions for Disabled Apple ID On iPhone 13 Pro Making It Possible
- Guide to Mirror Your Samsung Galaxy S24 to Other Android devices | Dr.fone
- 2024 Approved How To Convert Video Voice to Text Online for Free?
- In 2024, Top 5 Tracking Apps to Track Xiaomi Redmi A2 without Them Knowing | Dr.fone
- Title: New How to Get Zoom on TV Easy Solutions
- Author: Chloe
- Created at : 2024-04-24 07:08:11
- Updated at : 2024-04-25 07:08:11
- Link: https://ai-editing-video.techidaily.com/new-how-to-get-zoom-on-tv-easy-solutions/
- License: This work is licensed under CC BY-NC-SA 4.0.
