
:max_bytes(150000):strip_icc():format(webp)/coffeecup-free-html-editor-profile-3467555-8876645f89c444c8b94addcf4307b22d.png)
New How to Loop a Video on Android for 2024
How to Loop a Video on Android
Looping video is a great way to keep your audience engaged, and it can help you stand out from the crowd. The best part about looping video is that it doesn’t require any special equipment or software, so you don’t have to spend money or time learning how to do it! You can use looped clips as part of a larger advertisement campaign by repeating the same content.
Looping a video on Android is a great way to watch your favorite shows or movies without having to go through the hassle of downloading each episode or movie. You can also use it to share videos with others, which can be perfect for when you want to show off your new movie collection but don’t want to bother downloading it on your phone.
Looping a video on Android can be helpful for several reasons. First, it’s just plain fun to watch a video over and over again! Your phone doesn’t have to work as hard to keep the video playing. This means that your battery life will last longer and you’ll be able to use your phone more often without worrying about it running out of battery life quickly.
Part 1: Steps to Loop a Video on Android
Looping videos can also come in handy when trying to find something specific in a series of videos. For example, if you want to see how long it takes before someone gets hit by a car while crossing the street, then looping through the first few seconds of each clip might help find exactly what you’re looking for!
Loop a video on android is quite simple and easy. You not only can loop a video but also customize it according to your choice. Let’s take an example if you install a reverse or loop app on your mobile phone. Firstly, we install an app whose name is Boomerate reverse or loop app.
Step1 Open the app and record or select the video from the gallery
You can install it from the play-store after installation opens the app. You can record a live video by clicking on the white circle or selecting any media from your gallery. These apps allow you to create short video loops that play over and over again. They’re perfect for setting up as a screensaver or for use as a fun way to show off your favorite photos.

Step2 Crop or select the duration of the video
After selecting the video, you can trim your video or select the duration of your video. Suppose you have a video of 30 seconds so you can also make that video of 1 minute.

Step3 Select the loop option
Several options appear below where you can edit effects to your video or loop your video without any interruption. You can loop your video 3 to 4 times or so on.

Step4 Save the video to the gallery
After editing the video click on the save button in the top left corner. To save the video to your phone, you can use the Save button on the video player or the Save button on the phone’s media player. You can easily access and watch your videos anytime you want.

One of the great things about Android is that you can use it to record looping videos. This can be helpful if you want to create a video that you can share with others or use as a background on your device. If you have a lot of videos that you want to keep on your phone, then you can use loop video to help you save space.
Part 2: How to Edit Time-Lapse Video on a Computer
There are a few things to keep in mind when creating a time-lapse video on a computer. First, make sure the video resolution is high enough to create a good image. Second, make sure the video is smooth and free from any choppy or jittery movements. Finally, make sure the video is timed correctly so that the scenes move in smooth, chronological order.
Here’s how you can make a time-lapse video on your computer:
Step1 Install a program like Final Cut Pro or Filmora. These programs allow you to set up scenes and transitions in advance so that when you start filming, everything is ready to go.
Step2 Get started by choosing a period and location this will help you decide what kind of scenery will make sense for your scene. The longer the period, the more important it is to pick one that has a lot of natural light. If there are no natural light sources available, consider shooting on an overcast day or at night instead.
Step3 Next, choose what type of camera angle works best for showing off your subject matter; this could be static shots or moving ones that mimic motion through time or space. Also, consider how far away from your subject matter you want viewers to see them from before deciding on which angle works best for showing both sides equally well without making either side too large.
Benefits of editing time-lapse on computer
Time-lapse videos are a great way to capture incredible footage of your life with minimal effort. You can set the speed of your camera, and then sit back and watch as it moves through time in real-time.
You can play with the speed of the camera to get just the right look. You might find that you want it to go faster or slower, or even stop altogether so that you can get a good shot of something specific in your life (like the chirping of birds or water droplets).
Editing time-lapses on your computer allows you to zoom in and out at will you don’t have to worry about adjusting the zoom on your camera when you’re filming something out of frame, which means less work for you!
Time-lapses are great for making movies that go from beginning to end you can make one movie that shows how you spend each day from sunrise until sunset or one where every hour is its scene. This way, people who watch your videos will see exactly what they need without having to listen over and over again about all things related to everyday life (which would be boring!).
Filmora editing software:
Filmora is the best editing software for video. We can help you edit your videos in a way that will make them look professional and polished. We provide an easy-to-use interface that makes it simple for any level of user to edit their videos. The interface is clean and intuitive, making it easy for even beginner users to learn how to use the software.
Filmora is designed around simplicity, so you don’t have to worry about being overwhelmed by all the features available on other editing software. You can quickly find what you’re looking for by searching through our library of over 50 000 videos or by browsing through our library of categories such as music videos, TV commercials, wedding videos, movie trailers, and much more!
Steps for editing video on Filmora:
You can use Filmora on your desktop or laptop, which makes it easy for people who want to edit their videos in the comfort of their home but don’t want to spend an arm and a leg on an expensive computer system. If you’re looking for a great way to start editing videos, look no further than Filmora!
Free Download For Win 7 or later(64-bit)
Free Download For macOS 10.14 or later
Step1 Download the Filmora software
Install Filmora from its official website and open it. Click on create a new project and then start doing your editing.

Step2 Select a video from its location
Click on the plus symbol and select the specific video you want to edit. Or you just simply drag and drop the video into the software.

Step3 Put the video on the timeline
After selecting the video place it on a timeline or drop it on the timeline. If you have multiple clips then place them in a sequence.

Step4 Customize the video
You can add different effects to your video. You can select a title page according to your choice or select any transition.

Step5 Set duration and export it
Set the duration of your video, you can also trim your video or set the time of each clip. Lastly, export the video to your desktop.
Conclusion
The use of looping video on android is a trend that works for pretty much every type of app, from gaming to streaming video to social apps and beyond. It offers another level of engagement for users, as well as something more cinematic and exciting. Furthermore, it offers an easy way to improve your app’s functionality.
After making a loop video, you must require some editing tools. But not need to worry about it, Filmora is the best editing software for your needs. First, it’s easy to use. It has a lot of features that make it so simple to get started and make you look like an expert. You can simply install it and use it, with no need for any registration.
Free Download For macOS 10.14 or later
Step1 Download the Filmora software
Install Filmora from its official website and open it. Click on create a new project and then start doing your editing.
Step2 Select a video from its location
Click on the plus symbol and select the specific video you want to edit. Or you just simply drag and drop the video into the software.
Step3 Put the video on the timeline
After selecting the video place it on a timeline or drop it on the timeline. If you have multiple clips then place them in a sequence.
Step4 Customize the video
You can add different effects to your video. You can select a title page according to your choice or select any transition.
Step5 Set duration and export it
Set the duration of your video, you can also trim your video or set the time of each clip. Lastly, export the video to your desktop.
Conclusion
The use of looping video on android is a trend that works for pretty much every type of app, from gaming to streaming video to social apps and beyond. It offers another level of engagement for users, as well as something more cinematic and exciting. Furthermore, it offers an easy way to improve your app’s functionality.
After making a loop video, you must require some editing tools. But not need to worry about it, Filmora is the best editing software for your needs. First, it’s easy to use. It has a lot of features that make it so simple to get started and make you look like an expert. You can simply install it and use it, with no need for any registration.
How to Create Datamoshing Effect to Your Footage in After Effects?
Experimenting with new effects and filters has become part and parcel of life, especially for creative professionals. Datamoshing is a similar effect that displays errors and flaws in the video clips to leave an impression on the audience. In most terms, the datamoshing effect shares similarities with the glitch effect.
Henceforth, the write-up shall focus on the introduction of this effect along with its workability. The procedure to create datamosh After Effects would also be covered. So, let us begin!
In this article
01 What is the Datamoshing Effect?
02 How Does Datamoshing Effect Work?
03 Step by Step to Create Datamoshing Effect in After Effects (Without Plugin)
04 How to Do Datamoshing Effect with Datamosh Plugin in After Effects
Part 1: What is the Datamoshing Effect?
Before going into the depths of workability and operation of the datamoshing effect in After Effects, let us understand the effect in detail. The datamoshing effect plays with the video compression to corrupt the pixels of the footage.
In this effect, the pixels glitch and appear to melt, duplicate, and create a projection organically. Also known as databending, it is a complicated technique in which movement of one layer is introduced to another layer of the video clip.
Lossy compression and removed frames help develop a psychedelic result effortlessly. Presently, datamosh After Effects has gained popularity as it helps bring change to the video and engages the audience.
Part 2: How Does Datamoshing Effect Work?
The sub-section informs the content creators and creative professionals regarding the workability of the datamoshing effect in video clips. Hence, let us commence this.
Datamoshing eliminates the new picture frame and keeps those frames that control the movement of the pixels. It leads to the picture pixels going into different directions instead of the usual one, thus, creating a glitch effect. These glitch effects are used in unique mediums to create a classy yet ancient vibe.
The datamoshing effect can be noticed between the cuts and motion. It is the process of corrupting the imagery in which the I-frames are replaced and P-frames are applied in the wrong picture. Let us dive right into two types of datamoshing.
The first type of datamoshing is created when the I-frame of the video is removed. In this scenario, the pixels from the previous scene are projected into the next scene smoothly. It gives the impression that the pixels have been tracked into the next shot.
The second kind of datamoshing, known to humankind, is when the d-frame of the video is duplicated. It leads the footage to show images and colors being bloomed together as the pixels are equivalent, coming through the same motion path.
Part 3: Step by Step to Create Datamoshing Effect in After Effects (Without Plugin)
Understanding the datamosh After Effects is one thing, and incorporating it in your footage is another. The section shall walk you through the step-by-step guide to create the After Effects’ datamoshing effect without a plugin. So, let’s go, shall we?
Step 1: Preliminary Process
The first step is easy. Open After Effects from your system. Import the targeted video that needs the datamosh effect. After that, head to the “Content-Aware Fill” to begin the process.

Step 2: Creating the Reference Frame
Use the playhead where you wish to create the effect, and then click on “Create Reference Frame.” The picture frame opens in Photoshop, and the user is expected to save it. Now, go back to the After Effects.

Step 3: Smearing Process
Now, hide the top layer so that the smearing can occur. Turn the Masks to “None” so that you can perform the masking. Split the second layer to duplicate the layer as we make changes to it. Set the “Masks” to “Subtract and then add a refine soft matte.

Step 4: Pre-composing the Clip
It is important to pre-compose the clip, so right-click on the timeline and hit “Pre-compose” to the menu list that appears. Tick mark “Move all attributes into the new composition” and rename the clip afterward. Hit “OK.”

Step 5: Rendering Queue
Double-click on the timeline, hold shift and drag it until the clip snaps. Press “B” on your keyboard and “N” on the other side to snap the work area. Navigate to “File” and “Export” and then click on “Render Queue.”

Step 6: Generating Fill Layer
Import the file when it is done rendering and drag it to the timeline. Trim the work area again using B and N buttons from the keyboard. Ensure that the fill method is “Surface,” and the range is “Work Area.” Click on “Generate Fill Layer” to start the analyzing process.

Step 7: Creating the Transition
The user is expected to create a transition between the two shots. Use the track matte to make solid and fractal noise. In the “Noise and Grain” section, click on “Fractal noise” and then switch the fractal type to “Basic.” Now, keyframe the “Brightness” and simultaneously turn its level to black and white to create a transition.

Step 8: Achieving a Glitchy Effect
To give the glitchy effect, head to the “Effects and Presets” and hit “Posterize,” and reduce its level to a couple of integers. Pull the transition down to the fill layer and set it to “Luma Matte.” It will showcase the halo sign that we masked around the image.

Step 9: Have a Finer Imprint
To eliminate it, use the “Set Matte” channel and alter its layer to the one we pre-composed. Now, invert the matte. Moving on, navigate to the “Simple Choker” and reduce it to one pixel. For perfection, duplicate it and get a finer imprint.

Step 10: Final Process
Duplicate the grey solid and then extend the second clip to our fill. In the last step, change the layer of the second clip to “Luma Matte” and save the video. You are done with the process.

Part 4: How to Do Datamoshing Effect with Datamosh Plugin in After Effects
With its plugin, this sub-section revolves around creating the datamosh effect in After Effects. So, let us begin!
Step 1: Rendering the Work Area
Open After Effects and click on the (+) sign to set the in and out points. Click on the “Datamosh” to render the work area. The timeline will showcase the clip. Click on “Remove Frames” from the left panel and add a new mosh marker by pressing the (+) button beside “Remove Frames.”

Step 2: I-Frame Removal
The new remove frame marker will be on the timeline. Drag it to the new scene and then hit “Datamosh.” The I-frame removal effect can be shown on the screen. Again, click on (+) to add a new mosh module. Press “Multiply” and then “Average” from the menus that appear. Hit “Average previous 3” afterward.

Step 3: Using the Hold Frames Function
Set the in and out points of this mosh marker and again hit “Datamosh.” The work area will be rendered. Now, open the mosh module and toggle on the “Hold Frames” feature. Also, toggle on the previous render. Press the “Datamosh” again.

Step 4: Injecting the Frames
Toggle the “Inject Frames” on and press use previous render. Hit “Datamosh” afterward. In this way, the clip will hold the frames and inject them into the transition. Enhance the intensity of the moshing algorithm and eliminate “Remove Frames” and “Inject Frames.” Use the previous render and again hit “Datamosh.”

Step 5: Playing with the Acceleration
Increase the acceleration and bring the intensity back to what it was. Again, use the previous render and click “Datamosh.” Now, improve the intensity and set the acceleration back to 0. Alter the “Blend” as much you need to mix the original and present motion of the transition. Press the “Datamosh.”

Step 6: Changing the Threshold
Moving on to the threshold feature, this function is a gatekeeper and decides if a pixel will be moshed. Inverse the intensity of the clip, change the blend to be 0, and set the threshold to be a small integer to find out the impact first. It can be enhanced later on. Uncheck the previous render if you are using the new clip for threshold. Hit “Datamosh” again. Now, export the video, and you are done with the datamoshing.

Conclusion
YouTubers and content creators use the Datamoshing effect to offer magic to the workplace. The article offered an extensive guide to effortlessly adding this effect in After Effects. The foundation and workability of the datamosh effect were also the cruces of the article. It is recommended that the user properly know the software before getting into the process.
02 How Does Datamoshing Effect Work?
03 Step by Step to Create Datamoshing Effect in After Effects (Without Plugin)
04 How to Do Datamoshing Effect with Datamosh Plugin in After Effects
Part 1: What is the Datamoshing Effect?
Before going into the depths of workability and operation of the datamoshing effect in After Effects, let us understand the effect in detail. The datamoshing effect plays with the video compression to corrupt the pixels of the footage.
In this effect, the pixels glitch and appear to melt, duplicate, and create a projection organically. Also known as databending, it is a complicated technique in which movement of one layer is introduced to another layer of the video clip.
Lossy compression and removed frames help develop a psychedelic result effortlessly. Presently, datamosh After Effects has gained popularity as it helps bring change to the video and engages the audience.
Part 2: How Does Datamoshing Effect Work?
The sub-section informs the content creators and creative professionals regarding the workability of the datamoshing effect in video clips. Hence, let us commence this.
Datamoshing eliminates the new picture frame and keeps those frames that control the movement of the pixels. It leads to the picture pixels going into different directions instead of the usual one, thus, creating a glitch effect. These glitch effects are used in unique mediums to create a classy yet ancient vibe.
The datamoshing effect can be noticed between the cuts and motion. It is the process of corrupting the imagery in which the I-frames are replaced and P-frames are applied in the wrong picture. Let us dive right into two types of datamoshing.
The first type of datamoshing is created when the I-frame of the video is removed. In this scenario, the pixels from the previous scene are projected into the next scene smoothly. It gives the impression that the pixels have been tracked into the next shot.
The second kind of datamoshing, known to humankind, is when the d-frame of the video is duplicated. It leads the footage to show images and colors being bloomed together as the pixels are equivalent, coming through the same motion path.
Part 3: Step by Step to Create Datamoshing Effect in After Effects (Without Plugin)
Understanding the datamosh After Effects is one thing, and incorporating it in your footage is another. The section shall walk you through the step-by-step guide to create the After Effects’ datamoshing effect without a plugin. So, let’s go, shall we?
Step 1: Preliminary Process
The first step is easy. Open After Effects from your system. Import the targeted video that needs the datamosh effect. After that, head to the “Content-Aware Fill” to begin the process.
Step 2: Creating the Reference Frame
Use the playhead where you wish to create the effect, and then click on “Create Reference Frame.” The picture frame opens in Photoshop, and the user is expected to save it. Now, go back to the After Effects.
Step 3: Smearing Process
Now, hide the top layer so that the smearing can occur. Turn the Masks to “None” so that you can perform the masking. Split the second layer to duplicate the layer as we make changes to it. Set the “Masks” to “Subtract and then add a refine soft matte.
Step 4: Pre-composing the Clip
It is important to pre-compose the clip, so right-click on the timeline and hit “Pre-compose” to the menu list that appears. Tick mark “Move all attributes into the new composition” and rename the clip afterward. Hit “OK.”
Step 5: Rendering Queue
Double-click on the timeline, hold shift and drag it until the clip snaps. Press “B” on your keyboard and “N” on the other side to snap the work area. Navigate to “File” and “Export” and then click on “Render Queue.”
Step 6: Generating Fill Layer
Import the file when it is done rendering and drag it to the timeline. Trim the work area again using B and N buttons from the keyboard. Ensure that the fill method is “Surface,” and the range is “Work Area.” Click on “Generate Fill Layer” to start the analyzing process.
Step 7: Creating the Transition
The user is expected to create a transition between the two shots. Use the track matte to make solid and fractal noise. In the “Noise and Grain” section, click on “Fractal noise” and then switch the fractal type to “Basic.” Now, keyframe the “Brightness” and simultaneously turn its level to black and white to create a transition.
Step 8: Achieving a Glitchy Effect
To give the glitchy effect, head to the “Effects and Presets” and hit “Posterize,” and reduce its level to a couple of integers. Pull the transition down to the fill layer and set it to “Luma Matte.” It will showcase the halo sign that we masked around the image.
Step 9: Have a Finer Imprint
To eliminate it, use the “Set Matte” channel and alter its layer to the one we pre-composed. Now, invert the matte. Moving on, navigate to the “Simple Choker” and reduce it to one pixel. For perfection, duplicate it and get a finer imprint.
Step 10: Final Process
Duplicate the grey solid and then extend the second clip to our fill. In the last step, change the layer of the second clip to “Luma Matte” and save the video. You are done with the process.
Part 4: How to Do Datamoshing Effect with Datamosh Plugin in After Effects
With its plugin, this sub-section revolves around creating the datamosh effect in After Effects. So, let us begin!
Step 1: Rendering the Work Area
Open After Effects and click on the (+) sign to set the in and out points. Click on the “Datamosh” to render the work area. The timeline will showcase the clip. Click on “Remove Frames” from the left panel and add a new mosh marker by pressing the (+) button beside “Remove Frames.”
Step 2: I-Frame Removal
The new remove frame marker will be on the timeline. Drag it to the new scene and then hit “Datamosh.” The I-frame removal effect can be shown on the screen. Again, click on (+) to add a new mosh module. Press “Multiply” and then “Average” from the menus that appear. Hit “Average previous 3” afterward.
Step 3: Using the Hold Frames Function
Set the in and out points of this mosh marker and again hit “Datamosh.” The work area will be rendered. Now, open the mosh module and toggle on the “Hold Frames” feature. Also, toggle on the previous render. Press the “Datamosh” again.
Step 4: Injecting the Frames
Toggle the “Inject Frames” on and press use previous render. Hit “Datamosh” afterward. In this way, the clip will hold the frames and inject them into the transition. Enhance the intensity of the moshing algorithm and eliminate “Remove Frames” and “Inject Frames.” Use the previous render and again hit “Datamosh.”
Step 5: Playing with the Acceleration
Increase the acceleration and bring the intensity back to what it was. Again, use the previous render and click “Datamosh.” Now, improve the intensity and set the acceleration back to 0. Alter the “Blend” as much you need to mix the original and present motion of the transition. Press the “Datamosh.”
Step 6: Changing the Threshold
Moving on to the threshold feature, this function is a gatekeeper and decides if a pixel will be moshed. Inverse the intensity of the clip, change the blend to be 0, and set the threshold to be a small integer to find out the impact first. It can be enhanced later on. Uncheck the previous render if you are using the new clip for threshold. Hit “Datamosh” again. Now, export the video, and you are done with the datamoshing.
Conclusion
YouTubers and content creators use the Datamoshing effect to offer magic to the workplace. The article offered an extensive guide to effortlessly adding this effect in After Effects. The foundation and workability of the datamosh effect were also the cruces of the article. It is recommended that the user properly know the software before getting into the process.
Top 7 Easy Ways to Convert a Video to a GIF Online
Looking for the best video to gif online conversion tools? No worries, as we have done all the research work and have shortlisted the best tools that can assist you with the task. GIF is short and cute animated files that help in interestingly conveying a message. These short-animated visuals help in reaching and creating an impact on the target audience. So, if you have some videos, GIF animations can be created from them using a good converter tool which can be an online program or system software.
Online programs are preferred by the users owing to their simple and hassle-free use, support for basic features, and cost-saving options. So, here in this topic, we will discuss the top and easy ways to convert video to GIF online.

Part 1: Top 7 Easy Ways to Convert a Video to a GIF Online
Several online tools can be used for converting a video file into GIF, but all do not stand up to the tall claims it makes. So, if you are in search of an easy yet effective tool, shortlisted below are the top 7 tools for video into GIF online conversion.
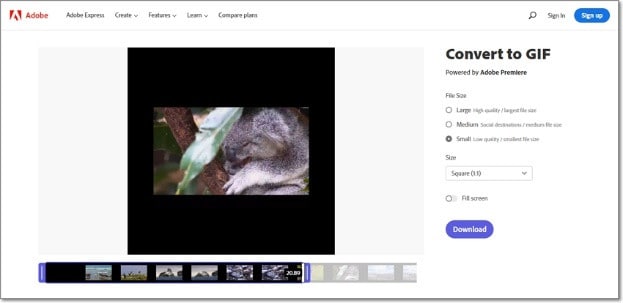
1. Adobe Express
Powered by Adobe Premiere, this is an excellent online tool that allows converting videos in all key formats in GIF format. The free version allows adding videos for up to 1 hour and the processed files can be downloaded to the local system.
Key features
- Video files in all key formats can be converted to GIF.
- Allows selecting the aspect ratio and the file size of the target file.
- This video to GIF converter online tool support drag and drop feature.
- Allows trimming the video so that the file portion can be selected.
Pros:
- Simple and clean interface.
- Quick file processing.
- Allows selecting aspect ratio and file size.
Cons:
- Only one file at a time can be processed.
- Only desktop files can be added.
- To download the file, you need to free sign-up.
User Review:
A good online multi-platform service that works with interesting features. -TechRadar
This is one of the best programs that comes packed with wide range of features that can assist you in getting the target customized files.
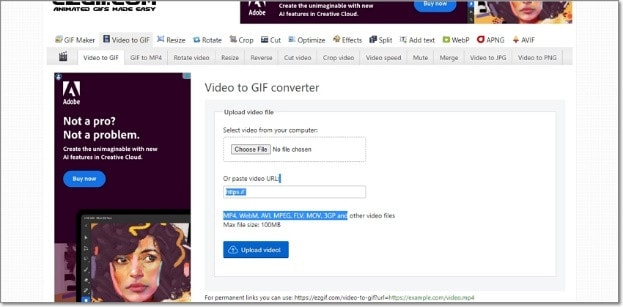
2. Ezgif
Using this browser-based tool, local as well as online videos in key formats can be converted to GIFs. The interface is simple where you just need to add the file and the conversion will be done automatically.
Key features
- GIF can be created from the local and online video files in all key formats.
- Choose the video part for creating the GIF file else by default, the first 5 seconds of the video are used.
Pros:
- All popular video formats like MP4, MPEG, FLV, MOV, and others are supported for conversion to GIF.
- Local, as well as file links in case of online files, can be added.
- Allows selecting the video part for which the GIF has to be created.
- Allows choosing the frame rate, and the size of the video.
This online GIF converter has an option to set static background.
Cons:
- File size limitation of 100 MB.
- Internet dependency.
User Review
“A website with many important and good tools that facilitates making your task easier. You get all features in one place. -Sasa011, Mywot.
This simple online tool is a pocket friendly option for converting your videos into GIF with added option for editing them. Supporting all key formats, the program supports additional tools as well.
3. Img2Go
Your videos on the system, cloud storage, as well as using URLs can be added to this online tool for conversion to GIF format. The look and the quality of GIFs can be adjusted by making changes in the file parameters.

Key features
- Convert all key video files like MP4, MOV, MPEG, and others to GIF.
- Customize the GIF look by editing the file size and applying the color filter.
- This online video to GIF converter allows to choose to enhance, sharpen, equalize, and edit files in other ways.
- Files to be converted can be added from the desktop, Google Drive, Dropbox, as well as URL.
- Processed files can be saved to the cloud storage in addition to the local system.
Pros:
- Multiple sources to add the video file.
- Customize the file parameters and enhance its look.
- Converted file is downloaded automatically to the local system.
Cons:
- Free version allows converting only 3 files at a time.
- Dependency on internet connectivity.
User review:
“This is the best online converter app I have discovered. It is really easy and fast to use. I absolutely recommend it and it really works.”-Maria Ancil, ChromeStats
When you need to convert only a few files at a time in a hassle-free manner consider this simple online tool. After the conversion is done, you would not have any hassles of file downloading as it is automatically saved to the system.
4. CloudConvert
Convert your videos in MP4, FLV, WebM, and other key formats to GIF using this browser-based tool that is simple and free to use. Multiple file parameters can be changed using the tool to get the desired file.

Key Features:
- Allows converting all key video formats.
- Files to be converted can be added from the desktop, URL, Dropbox, Google Drive, and OneDrive.
- Allows adjusting the fit, codec, resolution, aspect ratio, and fps.
- Option to trim the file and also add a watermark.
Pros:
- Files to be converted can be added from multiple sources.
- All key video formats supported.
- Option to control the video size, quality, and aspect ratio.
Cons:
- Free version allows only 25 conversions per day.
- Converted files need to be downloaded.
User Review
“Instant way of converting small-sized files online in many different formats.”
-Sushil, SoftwareAdvice
When conversion of cloud-based files is needed, this works a good online tool that also allows you to edit and change the key file parameters.
5. io
This is a free browser-based tool that allows creating of animated GIF files from videos. There are several video editing options also supported by the tool like split, cut, adding text, and more. You can even add a YouTube video or its link to create a GIF.

Key features:
- Free online tool for creating a GIF file.
- Support all key video formats like MP4, MOV, FLV, and others.
- Local, YouTube as well as videos from Dropbox can be added.
- Option to record the video and create its GIF.
- ‘Allows choosing the size, duration, background color, and several other file parameters.
Pros:
- Videos from multiple sources can be added.
- YouTube videos can also be converted to GIFs.
- Option to record the video and create its GIF.
- Support multiple video editing options.
Cons:
- Slow processing speed.
- Files processed through the free version have a watermark.
- Free version allows processing files under 10 minutes and of 250Mb in size.
User Review:
“It is just a perfect tool and easy to use. It supports a wide variety of media files.” - Koi, Trustpilot.
Option to convert the YouTube videos as well as the recorded videos make this tool different from the others. All popular file formats are supported and you can even customize and change the file parameters as per your requirements.
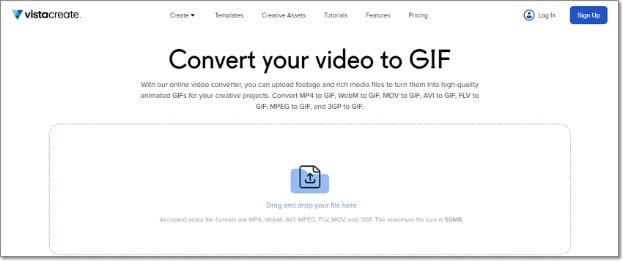
6. VistaCreate
This is another simple-to-use tool that allows converting all key video formats to a GIF file. The program allows setting various parameters as needed.
Key Features
- Convert MP4, WebM, AVI, MPEG, FLV, MOV, and 3GP to GIF.
- Support Drag and Drop feature.
- Videos up to 50MB can be processed.
- Allows choosing the video start and the end time for which GIF is to be created. If no time is selected, the first 5 seconds of the video are used.
Pros:
- Simple user interface.
- Allows selecting the video part for which GIF is to be created.
- Choose the frame rate and the speed.
Cons:
- Limited format support.
- Free version has a limitation of 50Mb file size.
- Processing speed is slow.
User Review:
“It is a simple and fast online tool that works. The program allows creating eye-catchy visuals and is free to use.”-Kshitij T, G2. Com
Simple to use, this online tool is apt when you need selected parts of the video for creating a GIF. Though it is compatible with a few selected formats, the process of conversion is simple.
7. XConvert
This online tool support conversion of wide range of file types and formats including videos to GIF. The supported video formats are MP4, WebM, MOV, and MKV. The tool also allows changing the target file parameters.

Key Features
- Free to use online tool with a simple interface.
- Allows converting MO4, MOV, WebM, and MKV videos to GIF.
- Frame Rate and resolution of the target GIF file can be selected.
- Allows adding local as well as files saved to the cloud storage.
Pros:
- Add videos from the desktop, Google Drive, and Dropbox.
- Choose the desired frame rate and resolution.
- Option to save the processed file to the system or Dropbox. Option to get the converted file download link.
Cons:
- Limited file support.
- Converted files need to be downloaded.
- Internet dependency.
User Review:
Portable, nice UI, cross-platform tool and has a lot of actions and run fast. -Roflpancake, Alternativeto
When simple conversion with basic file editing is needed, consider this online tool for your task. In addition to the local system, you can even save the files to your cloud storage.
Part 2: Comparison Table of the Best Video to GIF Converters
The table below compares the above 7 listed tools based on the formats supports, speed of file processing, and the watermark on the processed files.
| Features/Tool | Supported Format | Free Version with watermark or not | Speed of conversion |
|---|---|---|---|
| Adobe Express | All key video formats | No watermark | 2 (Fast) |
| Ezgif | All key formats including MP4, MPEG, FLV, MOV, and others. | No watermark. | 4 (Slow) |
| Img2Go | MP4, FLV, MOV, and all key video formats. | No Watermark | 2 (Fast) |
| CloudConvert | All popular video formats including MP4, MOV, FLV, MPEG, and more. | No Watermark | 2(Fast) |
| Veed.io | All key formats | Yes, free version has a watermark. | 5 (very Slow) |
| VistaCreate | MP4, WebM, AVI, MPEG, FLV, MOV, and 3GP. | No watermark | 5 (Very Slow) |
| XConvert | MP4, WebM, MOV, MKV. | No watermark | 3 (Average) |
Part 3: Best Solution to Convert Video to GIF on Windows/Mac
To convert videos to GIF on your Windows and Mac without worrying about any limitations or internet dependency, desktop software works as the best option. If you too have been looking for one such desktop program, we recommend Filmora Video Editor as the best choice. Though the software is used majorly for advanced video editing options, it is capable of performing a variety of other tasks as well including video to GIF conversion. The software allows file conversion through its export feature.
For Win 7 or later (64-bit)
For macOS 10.14 or later
Key Features
- Almost all video formats like MOV, MP4, MKV, FLV, and others can be converted to GIF.
- High-quality conversion at a fast speed.
- Support batch processing so that multiple files can be processed at a time.
- Allows editing and customizing videos using the built-in features of the software like effects, subtitles, crop, cut, and more.
Pros:
- The interface is simple which makes the software suitable even for beginners.
- Almost all popular video formats are supported.
- High-quality conversion in a hassle-free manner.
- Windows and Mac support.
Cons:
- Being a desktop software, it needs download and installation.
- Need to purchase the software subscription.
Steps to convert videos to GIF using Wondershare Filmora
Step 1. Launch the installed software on your system and the main interface select Create Project > New Project.

Step 2. Click on Import Media Files Here option under the Media tab to browse and add the local video file. Multiple files for batch processing can be added here.

Step 3. After the files are added, now it’s time to move them to the time and for this, you can simply drag and drop them to the bottom. Now at the timeline, using the built-in editing features, customization can be done as required.

Step 4. Finally, tap on the Export button and then choose GIF as the desired target format and also the location to save the converted files.

Conclusion
If one of the above-listed online tools serves your videos for GIF conversion purposes, it’s great. If not, you can use the Wondershare Filmora software. Once downloaded, the software can be used for several editing and other video-related tasks.
For macOS 10.14 or later
Key Features
- Almost all video formats like MOV, MP4, MKV, FLV, and others can be converted to GIF.
- High-quality conversion at a fast speed.
- Support batch processing so that multiple files can be processed at a time.
- Allows editing and customizing videos using the built-in features of the software like effects, subtitles, crop, cut, and more.
Pros:
- The interface is simple which makes the software suitable even for beginners.
- Almost all popular video formats are supported.
- High-quality conversion in a hassle-free manner.
- Windows and Mac support.
Cons:
- Being a desktop software, it needs download and installation.
- Need to purchase the software subscription.
Steps to convert videos to GIF using Wondershare Filmora
Step 1. Launch the installed software on your system and the main interface select Create Project > New Project.
Step 2. Click on Import Media Files Here option under the Media tab to browse and add the local video file. Multiple files for batch processing can be added here.
Step 3. After the files are added, now it’s time to move them to the time and for this, you can simply drag and drop them to the bottom. Now at the timeline, using the built-in editing features, customization can be done as required.
Step 4. Finally, tap on the Export button and then choose GIF as the desired target format and also the location to save the converted files.
Conclusion
If one of the above-listed online tools serves your videos for GIF conversion purposes, it’s great. If not, you can use the Wondershare Filmora software. Once downloaded, the software can be used for several editing and other video-related tasks.
VSDC Free Video Editor Review
If you are a Window user and you are looking for a free video editor without a watermark, VSDC free video editor is definitely a great application. There are only a handful of free video editors available where the output video will not have a watermark, and there is no limitation on the video length. VSDC video editor belongs to the non-liner video editor group where you can combine video clips, photos, objects, and blend and overlap them as per your requirements.
For a beginner, VSDC free video editor is undoubtedly one of the best video editors. It supports different types of video and audio formats as well as codes. The system requirements are very basic, and hence, it is perfect for low-end computers? But can you rely on VSDC editor when you need slightly advanced video editing? Check out our VSDC editor review and find a better alternative.
Part 1. How to Download and Install VSDC?
VSDC editor download is only available for Windows users. It is tailor-made for those who have a low-end computer with older Windows version OS. The software is compatible with Windows 2000 to Windows 11. The minimum RAM requirement is 128MB and free disk space of 200 MB. Here are the steps to download and install VSDC editor.
Step 1: Open your web browser and visit ‘www.videosoftdev.com/free-video-editor/download” .
Step 2: Click on Download Video Editor button based on 32-bit or 64-bit version of your computer. If you have Windows XP, you have to download VDSC video editor version 6.4 instead of the latest version for compatibility.
Step 3: Give some time for the installer file to get downloaded. It is merely 100 MB and it should not take long. After downloading the installer, launch it and follow the on-screen instruction to complete the installation.
Step 4: After proper installation, launch VSDC video editor. You will get the options to create a new project and capture screen, start editing an existing video and export the finished project in a proper video format.
Part 2. Key Features of VSDC
There are two versions of VSDC video editor available – Free video editor and Pro video editor. The free version has limited features while Pro version has advanced features. Here are going to discuss the key features of VSDC Free Video Editor.
Low System Requirements – One of the reasons for the wide popularity of VSDC video editor is that it does not demand high system configurations like most other video editors. If you have a low-end computer with an outdated Windows operating system, you can use VSDC video editor without any issue.
Basic Editing – Among the basic editing tools, you can cut, trim, split and join video clips. There are options for rotating and resizing videos. You can also go for color correction and put overlays on videos as applicable. Besides, you can edit 36-degree videos with zoom and chart tools.
Effects – VSDC has a wide collection of video, audio and text effects. You can also add objects to your video and apply different ready-made filters. There are also transitions to apply in between video clips and slides. You can also use green screen effect to change your background. The special split-screen effect and picture-in-picture effects are quite eye-catching.
Capture Video – VSDC video editor is equally competent in capturing videos from your webcam as well as recording your screen video. In fact, there is a dedicated option available for creating slideshow videos from photos. You can even record your voiceover if you want to.
File Formats - VSDC supports all the popular file formats for importing and exporting video and audio files. There are different export profiles available so that you can save your edited video for different devices conveniently.
Apart from these, if you opt for the Pro version, you get motion tracking, video masking, video stabilization, and much more such advanced video editing tools.
Part 3. How to Edit Videos with VSDC
If you have the recorded video and you want to edit it with VSDC video editor, the steps are quite simple. You can even record your webcam and screen video with audio if you want to start from scratch. Coming to the editing part, you can split large video files, merge video clips, add transitions in between, add objects in the video as well as crop and rotate videos. There are different effects you can apply to uplift video content. Here are the steps to edit videos with VSDC editor.
Step 1: Open VSDC Video Editor and click on Blank Project option. Name the project and change parameters, and click on Finish.

Step 2: Click on Add Object option at the top and select Video. Import the video clips saved on your hard drive. Similarly, you can go to Add Objects> Audio to import audio files.

Step 3: All the imported media files will appear on the timeline. If you have multiple video clips, you can shift the position of clips on the timeline so that one video clip ends and the other begins.
Step 4: If you want to add transitions in between the video clips, go to Video Effects> Transitions> select the effect you want to apply. Check the on-screen parameters such as duration and click on Ok button.

Step 5: If you want to add objects, go to Add Object and select shapes, texts, animations, charts, and much more. You can also add Audio Effects as well as Text Effects from the top bar.
Step 6: Once you are happy with the preview of the edited video, go to Export Project and check all the parameters. Click on Export Project option.

Part 4. Best VSDC Alternative Video Editor
Since VSDC video editor is available completely free, there is no hard in downloading the application and trying it out. But soon, you will understand that the video editor is limited as far as tools and features are concerned. If you want to get more than just basic tools, you will have to upgrade to its Pro version. However, there are better premium video editors available. We recommend Wondershare Filmora as a better alternative to VSDC video editor.
Filmora is extremely popular in the professional video editing world as it has an intuitive interface and does not demand high-end computers. There are tons of transitions, effects, filters, and objects available to add to your edit. You can perform all standard and advanced video editing to take your video to the next level. Here are all the steps to edit videos on Filmora.
For Win 7 or later (64-bit)
For macOS 10.12 or later
Step 1: Download and install Filmora and it is available for Windows and Mac. Launch Filmora and click on New Project. Import all your media files into Project Media folder by drag and drop action.

Step 2: Arrange the video clips and audio clips on the timeline by drag and drop action. You should be placing the video and audio files on different tracks. This is where you can do all the basic editing such as trimming, cutting, splitting, and merging.
Step 3: To add transitions in between the video clips, go to Transitions from the top bar and drag and drop any transition in between the clips. Check out Titles, Effects, and Elements from the top bar and insert them on the timeline as you think appropriate.

Step 4: Play the video to see if everything is perfect and click on Export button to save your video to your hard drive.

Part 5. FAQs about VSDC
1. Is VSDC video editor really free?
Yes, VSDC video editor is completely free to use. However, there is a pro version available where more features are present. But the free version does not put watermark on the output video and has all the standard tools for video editing without any limitation.
2. Is VSDC better than Adobe Premiere Pro?
No, VSDC is not better than Adobe Premiere Pro. VSDC is a free video tor while Adobe Premiere Pro is a premium one. Naturally, Adobe Premiere Pro has more features and functionalities. However, VSDC is better for beginners and those who have low-end computers if you compare it with Adobe Premiere Pro.
3. Is VSDC safe?
Yes VSDC video editor is safe and stable to use. However, there was an incident in 2019 where VSDC video editor’s official website was hacked, but the software itself is safe to use on Windows computers.
For macOS 10.12 or later
Step 1: Download and install Filmora and it is available for Windows and Mac. Launch Filmora and click on New Project. Import all your media files into Project Media folder by drag and drop action.
Step 2: Arrange the video clips and audio clips on the timeline by drag and drop action. You should be placing the video and audio files on different tracks. This is where you can do all the basic editing such as trimming, cutting, splitting, and merging.
Step 3: To add transitions in between the video clips, go to Transitions from the top bar and drag and drop any transition in between the clips. Check out Titles, Effects, and Elements from the top bar and insert them on the timeline as you think appropriate.
Step 4: Play the video to see if everything is perfect and click on Export button to save your video to your hard drive.
Part 5. FAQs about VSDC
1. Is VSDC video editor really free?
Yes, VSDC video editor is completely free to use. However, there is a pro version available where more features are present. But the free version does not put watermark on the output video and has all the standard tools for video editing without any limitation.
2. Is VSDC better than Adobe Premiere Pro?
No, VSDC is not better than Adobe Premiere Pro. VSDC is a free video tor while Adobe Premiere Pro is a premium one. Naturally, Adobe Premiere Pro has more features and functionalities. However, VSDC is better for beginners and those who have low-end computers if you compare it with Adobe Premiere Pro.
3. Is VSDC safe?
Yes VSDC video editor is safe and stable to use. However, there was an incident in 2019 where VSDC video editor’s official website was hacked, but the software itself is safe to use on Windows computers.
Also read:
- Updated Discover the Top 5 Free Online Video Filter Editors to Transform Your Videos with Captivating Color Grading and Correction Presets. Elevate Your Digital Storytelling Effortlessly
- In 2024, Ideas to Make A Perfect Café Vlog
- New 2024 Approved The Ultimate Guide to GIF for Discord Profile
- 2024 Approved Best 5 PDF to GIF Converters You Should Know
- Updated A Complete Guideline To Better Use QuickTime Player for 2024
- New AR Is a Trend These Days. Here, You Can Browse the List of Top 10 Picks for AR Video Editing Apps
- 2024 Approved Do You Still Waste Time Making Transparent Background in Paint
- New 2024 Approved 4 Ways to Loop a Video on Vimeo
- New In 2024, How to Create Educational Teaching Videos in An Outstanding Way?
- New 2024 Approved Step by Step to Split Clips in VLC
- Updated Best Method to Split Video Into Parts Online for 2024
- 2024 Approved How to Rotate Video in iMovie with Alternative
- Do You Want to Learn How to Use Premiere Pro Distortion Effects in Your Videos? We Have Provided a List of Distortion Premiere Pro Effects and How to Use Them
- Speed Up/Down Videos in VLC for 2024
- New 2024 Approved What Are the Best Video Background Changers Online?
- New How to Make a Movie with Windows Movie Maker?
- Updated 2024 Approved Best Tricks for Learning Photo Slideshow
- Spooky Halloween with the Best 15+ Halloween Countdown Video Clips
- How to Use Visual Effect for Zoom for 2024
- New In 2024, Adobe Premiere Pro Rec 709 LUTs Finding The Best Choices
- New 2024 Approved A Vacation Slideshow Is a Great Way to Relive the Vacation Memories and Also Share Them with Your Loved Ones. If You Are Looking for Ways to Create a Slideshow in Just a Few Minutes, We Will Help You with the Best Tool
- New How to Make a GIF With Transparent Background?
- Updated Do You Wish to Convert GIF to Animated PNG? Then, You Need to Know About Using a GIF to APNG Converter to Help You Carry This Process Out in No Time. Read On
- App Wont Open on Your Vivo S17? Here Are All Fixes | Dr.fone
- Recover Apple iPhone 6s Data From iCloud | Dr.fone
- How To Transfer WhatsApp From iPhone 12 to Android? | Dr.fone
- How Can We Unlock Our Nokia C12 Pro Phone Screen?
- In 2024, Unlock Your Boost Mobile iPhone 14 Pro Max Before the Plan Expires
- How To Restore Missing Photos Files from Tecno Spark 20 Pro.
- Top 11 Free Apps to Check IMEI on Samsung Galaxy A15 4G Phones
- Reasons why Pokémon GPS does not Work On Motorola Moto G34 5G? | Dr.fone
- In 2024, Dose Life360 Notify Me When Someone Checks My Location On Oppo A18? | Dr.fone
- In 2024, The Ultimate Guide to Get the Rare Candy on Pokemon Go Fire Red On Realme GT 5 Pro | Dr.fone
- How to See Someones Location on Apple iPhone 13 mini | Dr.fone
- Home Button Not Working on Honor 70 Lite 5G? Here Are Real Fixes | Dr.fone
- List of Pokémon Go Joysticks On Xiaomi Redmi Note 12 4G | Dr.fone
- How to Unlock Vivo X90S PIN Code/Pattern Lock/Password
- In 2024, 5 Easy Ways to Transfer Contacts from Apple iPhone 15 Pro to Android | Dr.fone
- In 2024, How To Fix Apple iPhone XS Unavailable Issue With Ease | Dr.fone
- 2024 Approved 10 Best Romance Anime Movies You Need to Watch
- How to Bypass FRP on Vivo Y78+ (T1) Edition?
- In 2024, How To Reset the Security Questions of Your Apple ID From Your Apple iPhone 15
- Title: New How to Loop a Video on Android for 2024
- Author: Chloe
- Created at : 2024-04-24 07:08:35
- Updated at : 2024-04-25 07:08:35
- Link: https://ai-editing-video.techidaily.com/new-how-to-loop-a-video-on-android-for-2024/
- License: This work is licensed under CC BY-NC-SA 4.0.
