
New How to Loop a Video with iMovie on Mac and iPhone

How to Loop a Video with iMovie on Mac and iPhone
If you are a video creator, there are times when you have to loop a video. This is to extend the duration of the original video. For instance, you have a stock video of a short duration. You want it to be the background in your video throughout. You have to extend the duration of the stock video by playing it in a loop.
If you are a macOS user, you can use iMovie to loop your video. iMovie comes pre-install on macOS devices. iMovie happens to be one of the most preferred video editors among beginners. In fact, iMovie comes pre-installed on iPhones and iPads. You can easily loop your video on your mobile devices as well. We will illustrate how to loop a video on iMovie on iPhone as well as on Mac.
Part 1. How to loop a video on iMovie iPhone
iMovie by Apple comes pre-installed on iPhone and iPad. Naturally, it is one of the most widely used video editors by iPhone users. iMovie app has options for basic and even advanced levels of video editing. Looping a video on iMovie involves a few simple steps that everyone can perform easily. Here are the steps on how to loop a video in the iMovie app on your iPhone.
Step1 Launch the iMovie app on your iPhone. If you have uninstalled or disabled the app, you can always go to App Store to install it again.
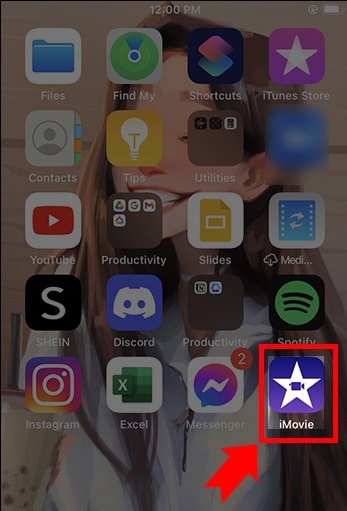
Step2 If you are opening the app for the first time, you will get a welcome screen. Follow the on-screen instructions to land on the home screen of the app.
Step3 Tap on New Project “+” icon and select the Movie option to get started. This will take you to the phone media gallery to select a media file to get started.
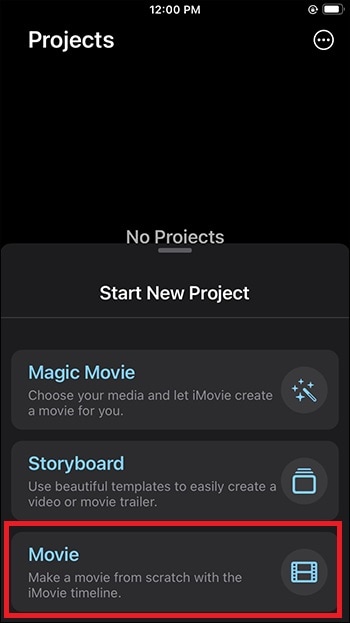
Step4 You should tap on the Video option and select the video that you want to put into a loop. After selecting a video, tap on Create Movie option.
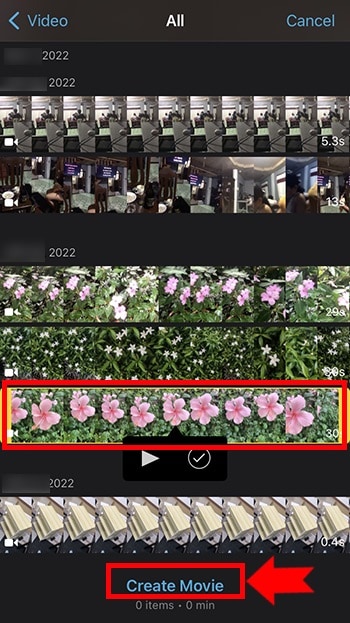
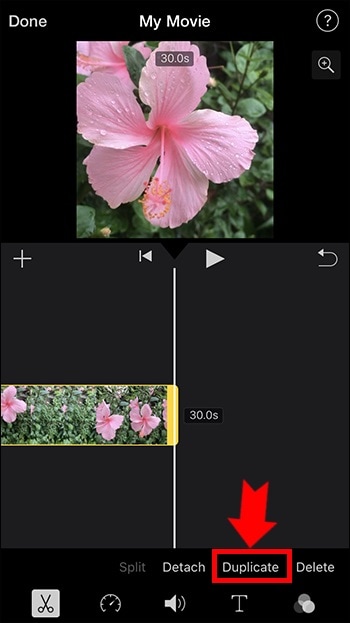
Step5 Tap on the video on the timeline to select the video and tap on the Duplicate option. You will see that the duration of the video has doubled. You can tap on Duplicate as many times as you want to increase the video duration.
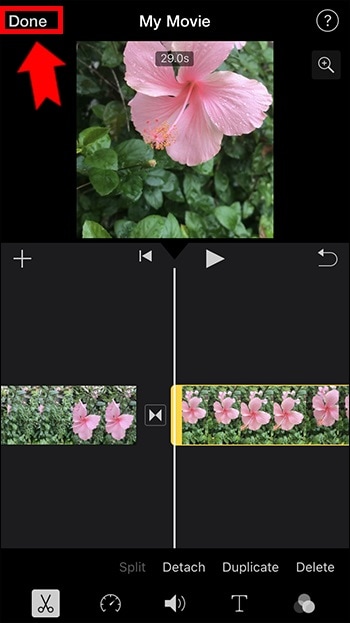
Step6 Once you are done with the iMovie loop, tap on the Done option located in the top-left corner. Thereafter, tap on the Share icon at the bottom.
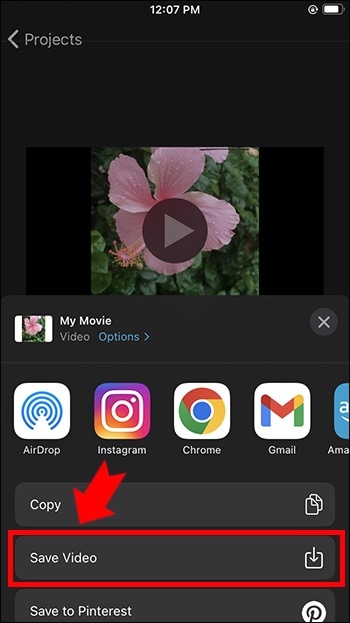
Step7 You will get a pop-up where you have to tap on the Save Video option. The edited video will be saved on your iPhone. You can open the new video from the Photos app.
Part 2. Loop Videos on Mac with iMovie
Editing a video on a Mac is always more comfortable than on an iPhone because of the larger screen. iMovie from Apple comes pre-installed on Mac as well, and hence, you can get started right away. It is completely free to use, and hence, you do not need to install any third-party video editor. Here are the steps on how to loop an iMovie video in simple steps.
Step1 Open the iMovie app from the Applications folder.
Step2 Click on Create New option and then click on the Movie option.

Step3 Bring in the required video under Movie Library by dragging the file from Finder on your Mac. You can also go to File> Import Media option and select the required video. You can also select the required media file from Events or Photos under the Libraries section.

Step4 Drag and drop the video on your timeline. When you want to loop the video, drag and drop the video clip again on the timeline. Make sure there is no gap between the first clip and the second clip on the timeline. You can drag and drop the video clip multiple times on the timeline to increase its duration.

Step5 Once you are done, go to File> Share> File option. Choose the destination to save the edited video.

Part 3. iMovie Alternative to Loop Videos on Mac
If you are looking for an iMovie alternative to perform iMovie loop video action easily, we recommend Wondershare Filmora . Filmora is available for both Mac and Windows. Filmora is a better video editor than iMovie. It is a premium video editor and it has more features and functionalities.
You can loop any video as many times as you want instantly. Besides, you can edit your video clip as per your requirements before looping the edited video. The user interface is highly intuitive for everyone. Hence, it has huge popularity among Mac users. You can also save the looped video in different file formats. Here are the steps to loop a video on Filmora.
Free Download For Win 7 or later(64-bit)
Free Download For macOS 10.14 or later
Step1 Download and install Wondershare Filmora. Launch Filmora and click on New Project on the welcome screen.

Step2 Drag and drop the video file from Finder on Mac to the Project Media folder on Filmora. Thereafter, drop the video file into the timeline.

Step3 Drag and drop the video clip into the timeline again. Make sure that there is no gap between the clips. Besides, make sure that they are on the same channel for looping. You can drag and drop the video into the timeline multiple times.
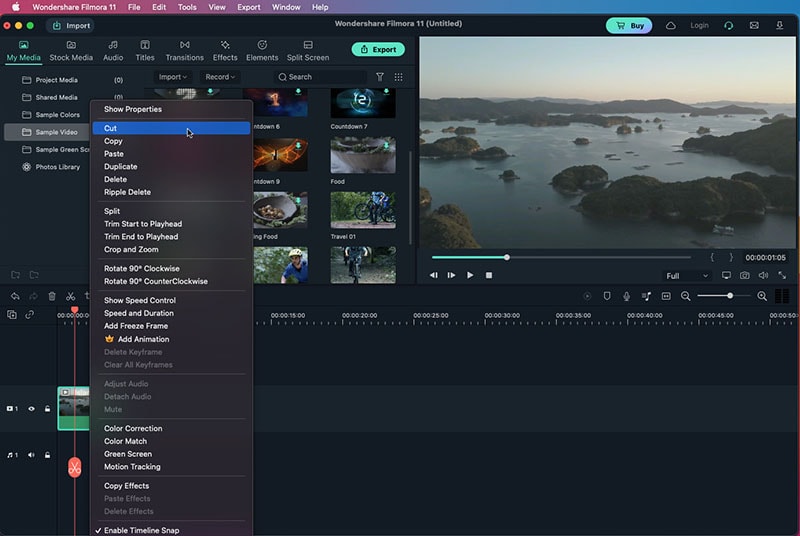
Step4 You can zoom out the timeline for better viewing. Play the video to check its output on Viewer. Finally, click on the Export button and save the video in the desired file format on your Mac.
The Bottom Line
If you want to loop a video on your Mac, iMovie is the most preferred option. The same is applicable to iPhone users as well. iMovie comes pre-installed, and it is completely free to use. That is why you can loop any video instantly. Wondershare Filmora is the best alternative to iMovie to edit and loop your video.
Free Download For macOS 10.14 or later
Step1 Download and install Wondershare Filmora. Launch Filmora and click on New Project on the welcome screen.

Step2 Drag and drop the video file from Finder on Mac to the Project Media folder on Filmora. Thereafter, drop the video file into the timeline.

Step3 Drag and drop the video clip into the timeline again. Make sure that there is no gap between the clips. Besides, make sure that they are on the same channel for looping. You can drag and drop the video into the timeline multiple times.

Step4 You can zoom out the timeline for better viewing. Play the video to check its output on Viewer. Finally, click on the Export button and save the video in the desired file format on your Mac.
The Bottom Line
If you want to loop a video on your Mac, iMovie is the most preferred option. The same is applicable to iPhone users as well. iMovie comes pre-installed, and it is completely free to use. That is why you can loop any video instantly. Wondershare Filmora is the best alternative to iMovie to edit and loop your video.
Boost Your Spirit: Creating Motivational Status Videos
The rise in social media’s popularity has brought about a fresh era of creating and enjoying content. Among this plethora of content, one category has managed to stand out prominently - motivational videos. These snippets of inspiration, often not more than a few minutes long, have become a staple of many users’ daily feeds. But what makes them so universally loved?
To begin with, let’s consider the times we live in. The modern world is fast-paced and filled with challenges and hurdles. This is where “motivational video status” or “motivation status video” comes into play. They serve as a brief pause, a moment of reflection, and a powerful jolt of motivation for many. They remind people of their worth, potential, and the strength they possess to overcome adversities. Plus, given their short length, they’re easily digestible, making them perfect for quick breaks.
Moreover, these videos are often shared during specific times of the year, such as the Republic Day. “Republic Day status videos,” for instance, fuse motivation with patriotism, making them a hit among the masses.
For content creators and marketers, the appeal lies in the sheer virality of these videos. A compelling “motivational status video download” can quickly gain traction, garnering thousands, if not millions, of views in a short span. With the right mix of powerful imagery, stirring words, and evocative music, these videos can resonate with a vast audience, driving engagement and shares.
Part 1: 6 Websites to Free Download Motivational Video Footage
Finding the right footage for crafting that perfect motivational video is crucial. The imagery must align with the message, ensuring it’s impactful. For those on the lookout, here are six renowned platforms where one can source high-quality footage for free or at a cost:
Adobe Stock
Adobe Stock is a treasure trove of high-quality videos. While it’s primarily a paid platform, the range and quality of clips available make it a top choice for professionals.
iStock
Another premium platform, iStock by Getty Images, offers a diverse collection of video clips. From breathtaking landscapes to poignant human moments, you’ll find a plethora of options here.
Shutterstock
Shutterstock is a household name in the world of digital media. With an extensive library, this platform provides clips that can cater to virtually any theme or mood you’re aiming for.
Videezy
For those on a budget, Videezy offers a mix of free and premium video clips. It’s a community-driven platform, so you’ll find a unique array of footage not available elsewhere.
Pixabay
Pixabay is an entirely free platform, making it perfect for beginners or those not looking to invest heavily. The site hosts a variety of footage, from nature scenes to urban landscapes.
Pexels
Similar to Pixabay, Pexels offers a rich collection of free video clips. With its user-friendly interface and diverse catalog, it’s a favorite among many content creators.
In essence, whether you’re crafting a “motivation status video download” for a broad audience or a personalized “motivational status video” for a niche group, these platforms have got you covered. Dive in, explore, and let your creativity flow!
Part 2: Using Filmora to Edit Motivational Video Footage
Filmora has steadily risen in popularity, becoming a go-to choice for many when it comes to video editing. Whether you have tons of experience or you’re just starting out in the world of video creation, Filmora provides a user-friendly interface along with a wide range of useful tools. Let’s delve into how you can use Filmora to craft that perfect “motivation status video.”
Step1 Importing Your Footage
Start by importing your selected motivational video footage from platforms like Pixabay, Pexels, or any of the previously mentioned sites. Exactly! Just click on the ‘Import’ button and choose the clips you’d like.
Step2 Trimming and Merging
Once imported, you may want to trim the videos or merge multiple clips to make your motivational status video coherent. Use Filmora’s easy drag-and-drop timeline for this purpose.
Step3 Adding Music
**”motivational video status”**without inspiring music is like a cake without frosting. Filmora boasts an extensive library of music tracks. Alternatively, import your own to perfectly match the tone of your video.
Step4 Text and Titles
If you’re aiming for a “Republic Day status videos”theme or any other, adding text or titles can amplify your message. Filmora offers a range of customizable text options, from sleek and professional to fun and quirky.
Create AI Captions For Win 7 or later(64-bit)
Create AI Captions For macOS 10.14 or later
Step5 Transitions and Effects
Give your**”motivation status video download”**a polished feel with smooth transitions between clips. Add effects like slow motion or color grading to enhance the visual appeal further.
Step6 Export and Share
Once satisfied, export your video in the desired format. With Filmora, you can also directly share your **”motivational status video download”**to various social media platforms, amplifying its reach.
Filmora’s versatility ensures that you not only create a compelling “motivation status video” but also enjoy the process. Its user-friendly tools are perfect for crafting videos that resonate and inspire.
Part 3: Summary
In the age of social media, where content is consumed voraciously, motivational videos have carved a unique niche. They inspire, uplift, and connect with audiences, offering solace in trying times or propelling one towards their goals. Platforms like Adobe Stock, iStock, and Shutterstock, among others, offer a goldmine of footage for crafting these videos. But the magic truly comes alive in the editing room.
Filmora, with its rich array of tools and features, stands out as an excellent choice for editing. Whether you’re crafting a poignant “Republic Day status video” or a general “motivation status video,” Filmora’s capabilities can help bring your vision to fruition.
While sourcing the right footage lays the foundation, it’s the editing that breathes life into a “motivational status video.” So, dive in, explore the world of video creation, and let your stories inspire the world.
Detailed Steps to Rotate Videos in Lightworks
Lightworks is a professional non-linear video editing software application developed by EditShare. It supports Windows and Linux, and macOS.
Lightworks has a very simple and intuitive user interface. The basic workflow is: import your media files into the project, then edit them using the various tools available. When you’re finished, export your project as a video file.
Lightworks can be used for a variety of purposes, including creating videos for social media, corporate videos, documentaries, and more. It’s also been used to edit some major Hollywood films, such as The Wolf of Wall Street and The King’s Speech.
In this article, we will discuss how to rotate videos in the Lightworks application. Below is a way to rotate videos in Lightworks manually, here, we will use the Z-axis rotation.
Step-by-step on how to rotate videos in Lightworks
How to Manually Rotate a Video in Lightworks
To manually rotate a video in Lightworks, follow these steps:
Step 1: Import your video into the project.
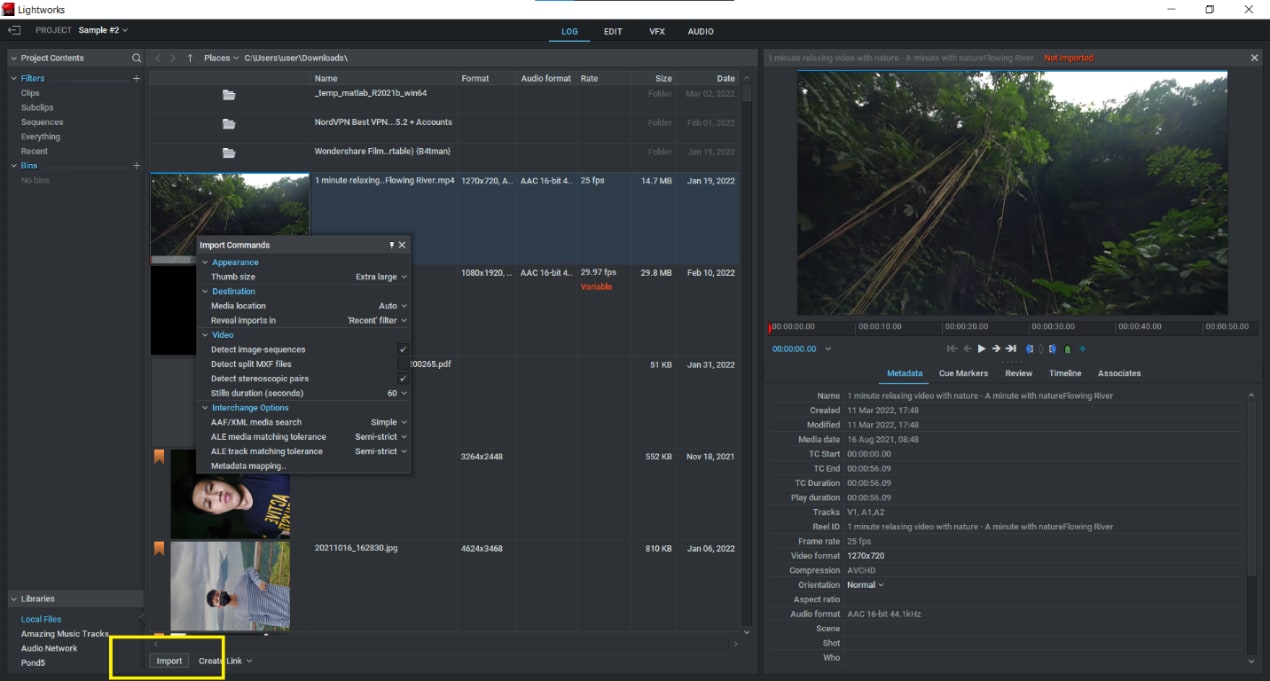
Step 2: Choose the portion of the video you want to rotate; if you want to rotate the entire movie, simply choose the entire video instead of a specific portion.

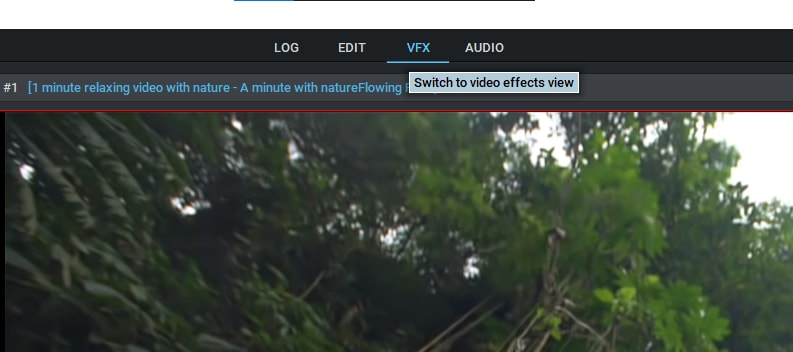
Step 3: Click on the “VFX” tab and go to the “3D DVE” section.
Step 4: Choose the Z axis and rotate the video to the desired degree. You can also modify the orientation of the video by entering a value in the box provided in front of the Z-axis.

Step 5: Click on the Enter in the keyboard button.
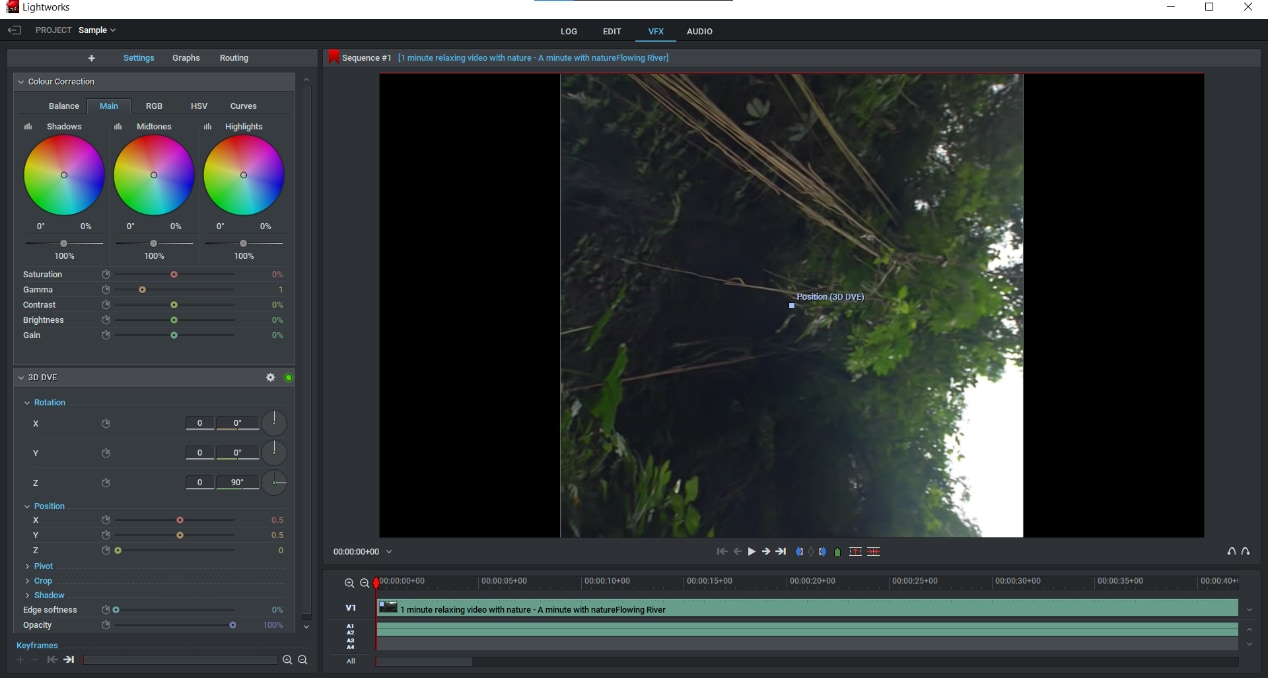
Your video will now be rotated by the selected number of degrees.
How to Rotate Videos in Filmora
On the other hand, Lightworks has an alternative video editing tool which is Filmora Video Editor . If you are looking for a lightweight video editor with an easy-to-use interface, then Filmora is the best option for you. It offers powerful features such as motion graphics, text editing, and audio editing, while still being very easy to use.
You can try it for free by downloading the trial version from the Filmora website. Filmora also offers a wide range of export options, so you can easily share your videos with others. You can export your video as an MP4 or MOV file, or upload it directly to YouTube or Facebook.
For Win 7 or later (64-bit)
For macOS 10.14 or later
Step-by-step on how to rotate videos in Filmora
How to Manually Rotate a Video in Filmora
To rotate videos in Filmora manually…
Step 1: Import your video into the project.

Step 2: Click the video clip you want to rotate.
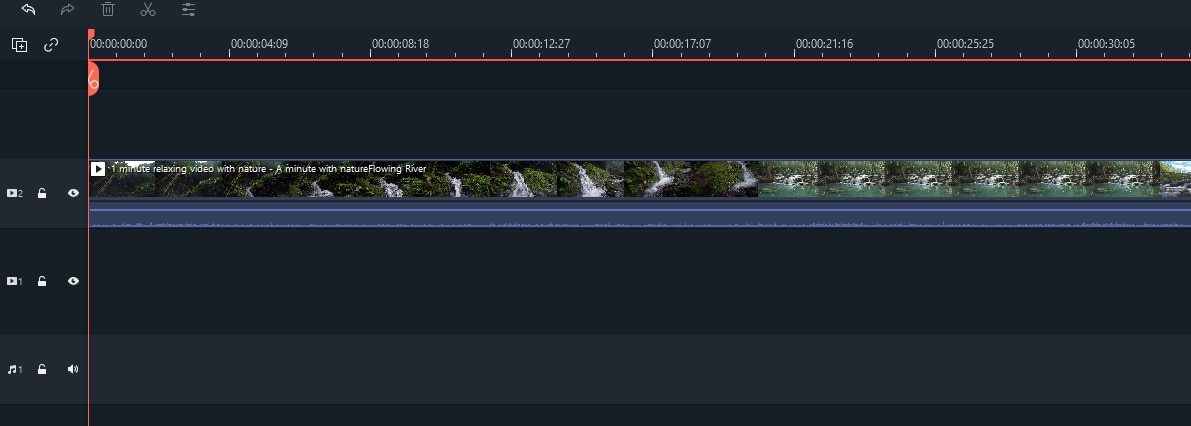
Step 3: Click on the “Edit” tool above the timeline and go to the “Transform” section. Then, select the “Rotate” option.
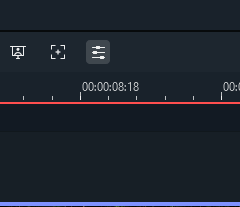

Step 4: Select the desired rotation option.

Step 5: Click on the “Ok” button.

Your video will now be rotated by the selected number of degrees.
In conclusion, Lightworks is a powerful video editing application that offers a lot of features and options. If you’re looking for something with all the features you need, then it’s a great choice. However, if you’re on a tight budget, there are other applications available that may be more suitable for your needs.
Filmora is a lightweight video editor that is easy to use and offers powerful features such as motion graphics, text editing, and audio editing. You can try it for free by downloading the trial version from the Filmora website.
Step 2: Choose the portion of the video you want to rotate; if you want to rotate the entire movie, simply choose the entire video instead of a specific portion.

Step 3: Click on the “VFX” tab and go to the “3D DVE” section.

Step 4: Choose the Z axis and rotate the video to the desired degree. You can also modify the orientation of the video by entering a value in the box provided in front of the Z-axis.

Step 5: Click on the Enter in the keyboard button.

Your video will now be rotated by the selected number of degrees.
How to Rotate Videos in Filmora
On the other hand, Lightworks has an alternative video editing tool which is Filmora Video Editor . If you are looking for a lightweight video editor with an easy-to-use interface, then Filmora is the best option for you. It offers powerful features such as motion graphics, text editing, and audio editing, while still being very easy to use.
You can try it for free by downloading the trial version from the Filmora website. Filmora also offers a wide range of export options, so you can easily share your videos with others. You can export your video as an MP4 or MOV file, or upload it directly to YouTube or Facebook.
For Win 7 or later (64-bit)
For macOS 10.14 or later
Step-by-step on how to rotate videos in Filmora
How to Manually Rotate a Video in Filmora
To rotate videos in Filmora manually…
Step 1: Import your video into the project.

Step 2: Click the video clip you want to rotate.

Step 3: Click on the “Edit” tool above the timeline and go to the “Transform” section. Then, select the “Rotate” option.


Step 4: Select the desired rotation option.

Step 5: Click on the “Ok” button.

Your video will now be rotated by the selected number of degrees.
In conclusion, Lightworks is a powerful video editing application that offers a lot of features and options. If you’re looking for something with all the features you need, then it’s a great choice. However, if you’re on a tight budget, there are other applications available that may be more suitable for your needs.
Filmora is a lightweight video editor that is easy to use and offers powerful features such as motion graphics, text editing, and audio editing. You can try it for free by downloading the trial version from the Filmora website.
Step 2: Choose the portion of the video you want to rotate; if you want to rotate the entire movie, simply choose the entire video instead of a specific portion.

Step 3: Click on the “VFX” tab and go to the “3D DVE” section.

Step 4: Choose the Z axis and rotate the video to the desired degree. You can also modify the orientation of the video by entering a value in the box provided in front of the Z-axis.

Step 5: Click on the Enter in the keyboard button.

Your video will now be rotated by the selected number of degrees.
How to Rotate Videos in Filmora
On the other hand, Lightworks has an alternative video editing tool which is Filmora Video Editor . If you are looking for a lightweight video editor with an easy-to-use interface, then Filmora is the best option for you. It offers powerful features such as motion graphics, text editing, and audio editing, while still being very easy to use.
You can try it for free by downloading the trial version from the Filmora website. Filmora also offers a wide range of export options, so you can easily share your videos with others. You can export your video as an MP4 or MOV file, or upload it directly to YouTube or Facebook.
For Win 7 or later (64-bit)
For macOS 10.14 or later
Step-by-step on how to rotate videos in Filmora
How to Manually Rotate a Video in Filmora
To rotate videos in Filmora manually…
Step 1: Import your video into the project.

Step 2: Click the video clip you want to rotate.

Step 3: Click on the “Edit” tool above the timeline and go to the “Transform” section. Then, select the “Rotate” option.


Step 4: Select the desired rotation option.

Step 5: Click on the “Ok” button.

Your video will now be rotated by the selected number of degrees.
In conclusion, Lightworks is a powerful video editing application that offers a lot of features and options. If you’re looking for something with all the features you need, then it’s a great choice. However, if you’re on a tight budget, there are other applications available that may be more suitable for your needs.
Filmora is a lightweight video editor that is easy to use and offers powerful features such as motion graphics, text editing, and audio editing. You can try it for free by downloading the trial version from the Filmora website.
Step 2: Choose the portion of the video you want to rotate; if you want to rotate the entire movie, simply choose the entire video instead of a specific portion.

Step 3: Click on the “VFX” tab and go to the “3D DVE” section.

Step 4: Choose the Z axis and rotate the video to the desired degree. You can also modify the orientation of the video by entering a value in the box provided in front of the Z-axis.

Step 5: Click on the Enter in the keyboard button.

Your video will now be rotated by the selected number of degrees.
How to Rotate Videos in Filmora
On the other hand, Lightworks has an alternative video editing tool which is Filmora Video Editor . If you are looking for a lightweight video editor with an easy-to-use interface, then Filmora is the best option for you. It offers powerful features such as motion graphics, text editing, and audio editing, while still being very easy to use.
You can try it for free by downloading the trial version from the Filmora website. Filmora also offers a wide range of export options, so you can easily share your videos with others. You can export your video as an MP4 or MOV file, or upload it directly to YouTube or Facebook.
For Win 7 or later (64-bit)
For macOS 10.14 or later
Step-by-step on how to rotate videos in Filmora
How to Manually Rotate a Video in Filmora
To rotate videos in Filmora manually…
Step 1: Import your video into the project.

Step 2: Click the video clip you want to rotate.

Step 3: Click on the “Edit” tool above the timeline and go to the “Transform” section. Then, select the “Rotate” option.


Step 4: Select the desired rotation option.

Step 5: Click on the “Ok” button.

Your video will now be rotated by the selected number of degrees.
In conclusion, Lightworks is a powerful video editing application that offers a lot of features and options. If you’re looking for something with all the features you need, then it’s a great choice. However, if you’re on a tight budget, there are other applications available that may be more suitable for your needs.
Filmora is a lightweight video editor that is easy to use and offers powerful features such as motion graphics, text editing, and audio editing. You can try it for free by downloading the trial version from the Filmora website.
How to Slow-Mo YouTube Videos
Everyone loves slow-mo scenes, dance videos, and content in related genres. Creativity is embedded in slow-motion videos to elevate your content. Not only do they refine the quality of your videos, but they also improve comprehension. YouTube is one of the well-known sources for gaining information. To understand a practical procedure, it offers a YouTube slow-motion option.
This option involves adjusting the playback speed of video for YouTube slo-mo. This article sheds light on how to slow down a YouTube video . There will be a detailed discussion on reducing YouTube video speed. In addition, we will introduce a high-performance video editor to perform this task. Keep reading this article to expand your creative horizons about slow YouTube videos.
Slow Motion Video Maker Slow your video’s speed with better control of your keyframes to create unique cinematic effects!
Make A Slow Motion Video Make A Slow Motion Video More Features

Part 1: How to Slow Down Videos in YouTube?
If you watch YouTube videos often, you must have been aware of the YouTube slow-down feature. The playback adjustment option on YouTube helps with that. By enabling that option, the whole YouTube video slows down. For adding slow-motion effects at specific durations, you can use Wondershare Filmora . In this part, we’ll explore both methods of slowing down a YouTube video:
Method 1. Direct Method
If you have the YouTube application, you can commence this action straight. If not, you can also open YouTube on your browser. Given below are the steps to play YouTube in slow motion:
Step 1
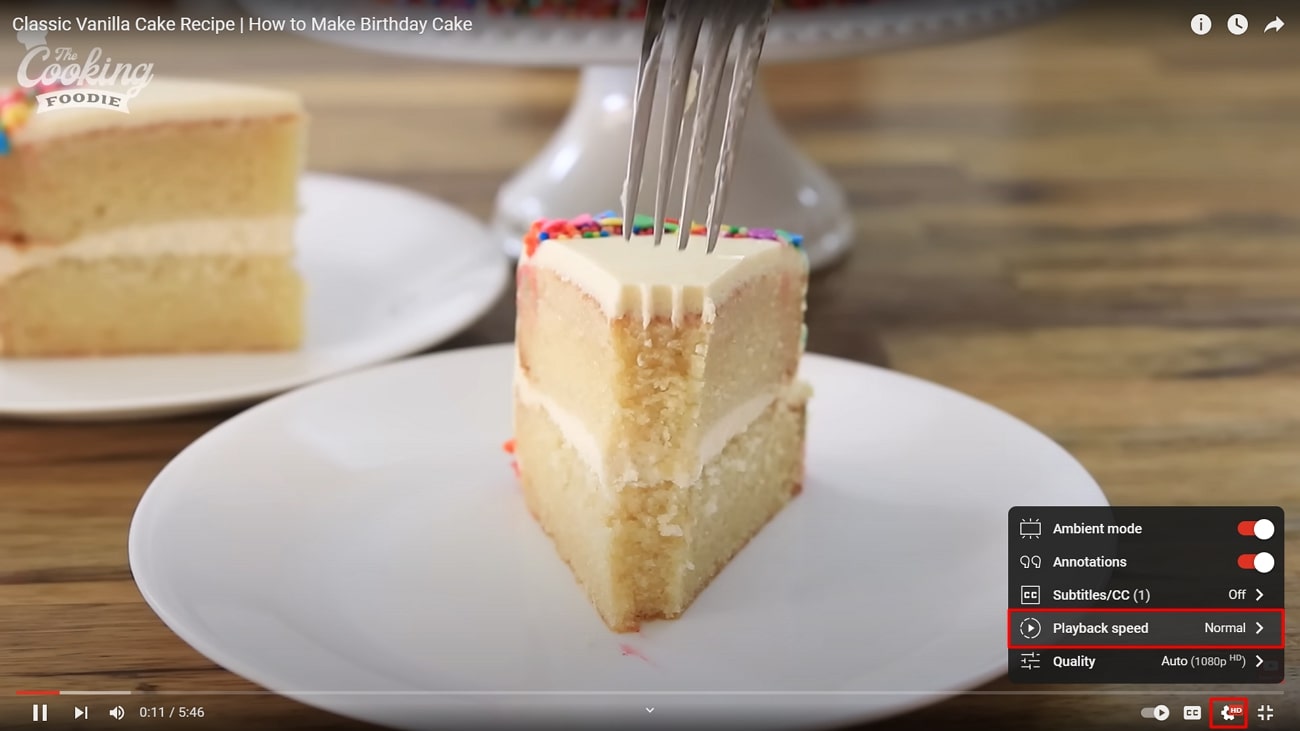
Once you play a YouTube video, navigate towards the bottom of this video. Afterward, click on the “Settings” option and select the “Playback speed” option.
Step 2
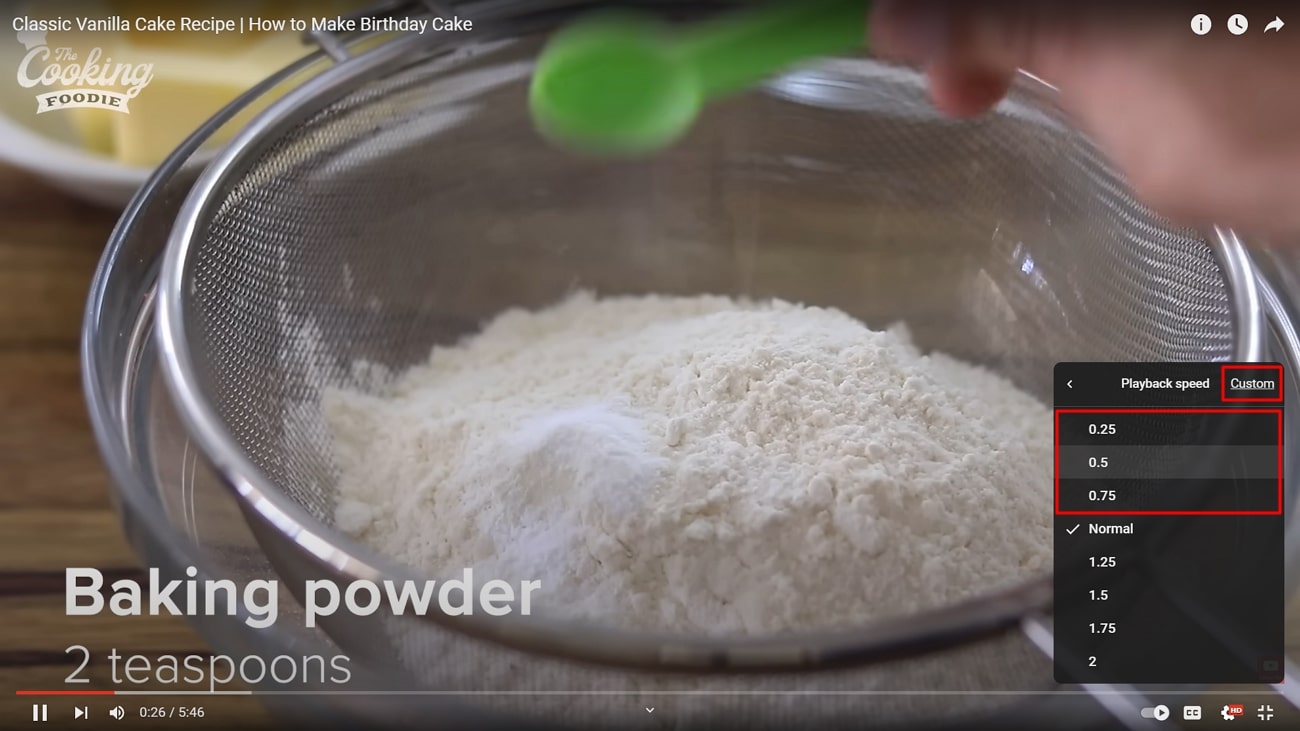
From the expansion menu, select a playback speed option as per preferences. You can select a speed between 0.75, 0.5, and 0.25. Afterward, play your video and see if the speed is right. This is the simplest method for YouTube video slow motion.
Method 2. Using Wondershare Filmora
In Wondershare Filmora, there are two methods to slow down YouTube videos. You can either use the Uniform Speed option or the Speed Ramping option. Moreover, you can add the Optical Flow effect to ensure a smooth, slow motion. In this section, we will first familiarize you with downloading a YouTube video. Here are the three major steps to create slow-motion in Filmora:
Free Download For Win 7 or later(64-bit)
Free Download For macOS 10.14 or later
Step 1Downloading a YouTube Video
YouTube doesn’t allow users to download a YouTube video on their devices. Hence, you will need third-party support to do so. Many sites offer YouTube video download services. We are using the y2mate.com , and here are the steps for it:
1. Copy the YouTube Video Link
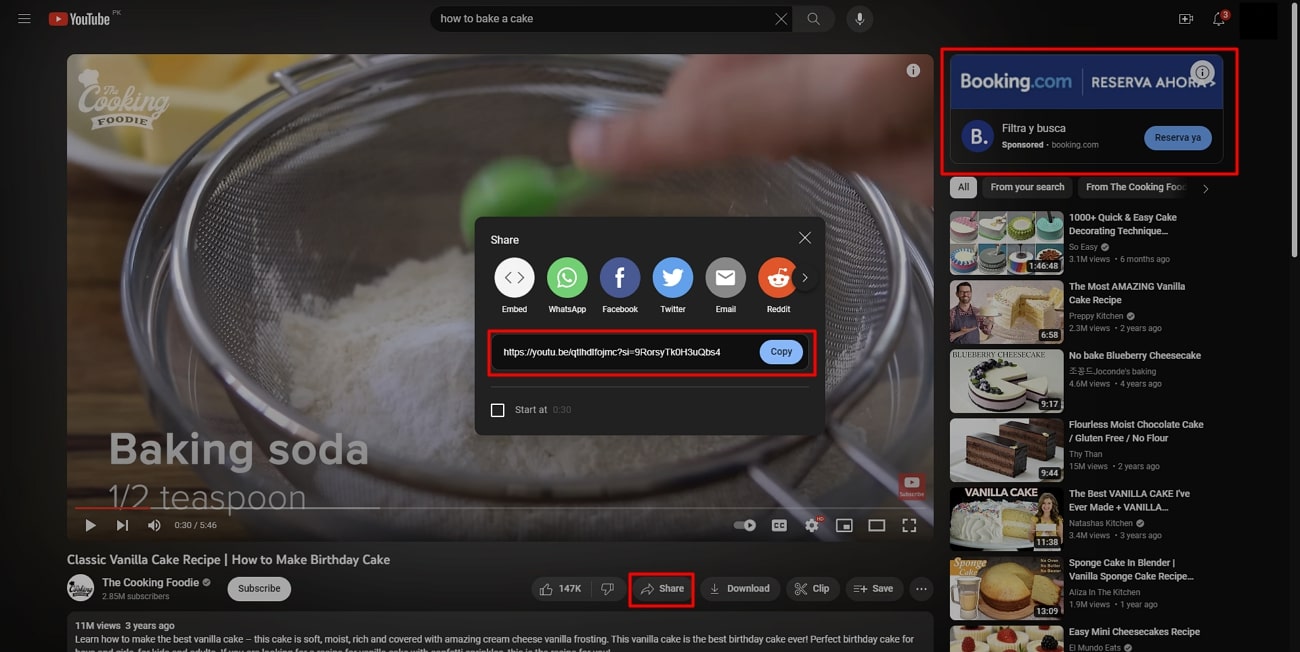
First, access the respective video that you want to download from YouTube. Locate the “Share” option at the bottom of this video and select it. Then click the “Copy” option to copy your video’s link.
2. Access the Site
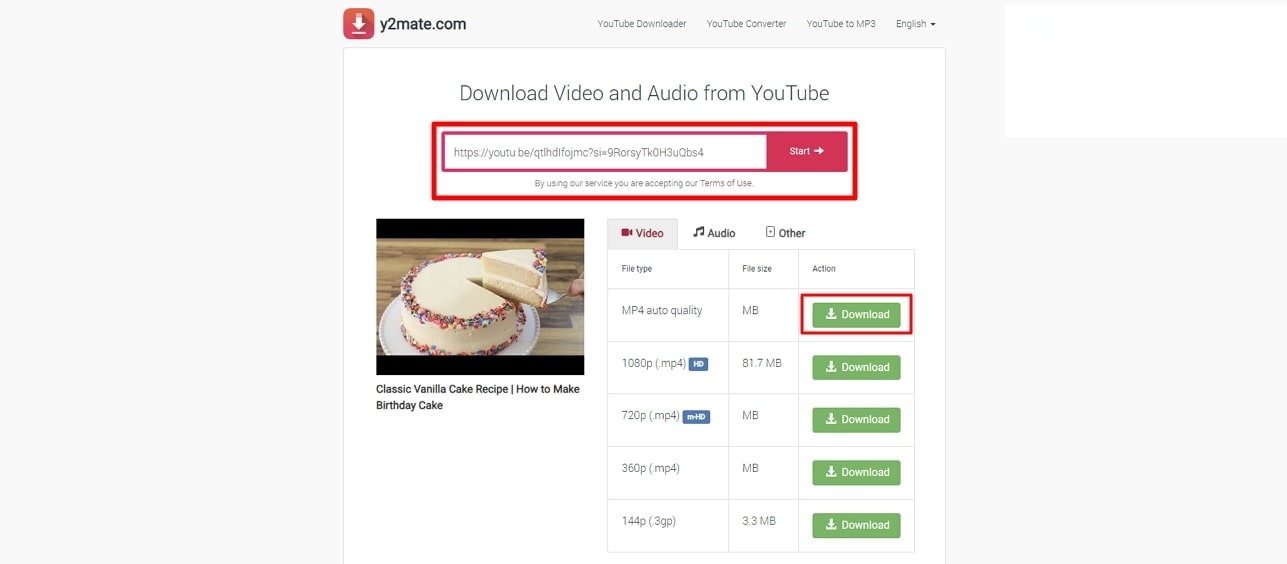
After copying the video’s link, access the site using your web browser. In the “Search or paste link here” box, paste the video link and click “Start.” From the download options appearing at the bottom, select a suitable option. Click on the “Download” button adjacent to your option.
Step 2Slow Down YouTube Video in Filmora
Once you have downloaded the video on your device, it is time to slow down the YouTube video. Filmora offers a plain and simple method to slow down a video. Here is a step-by-step guide to help you create video slow-mo in Filmora:
1. Import the YouTube Video
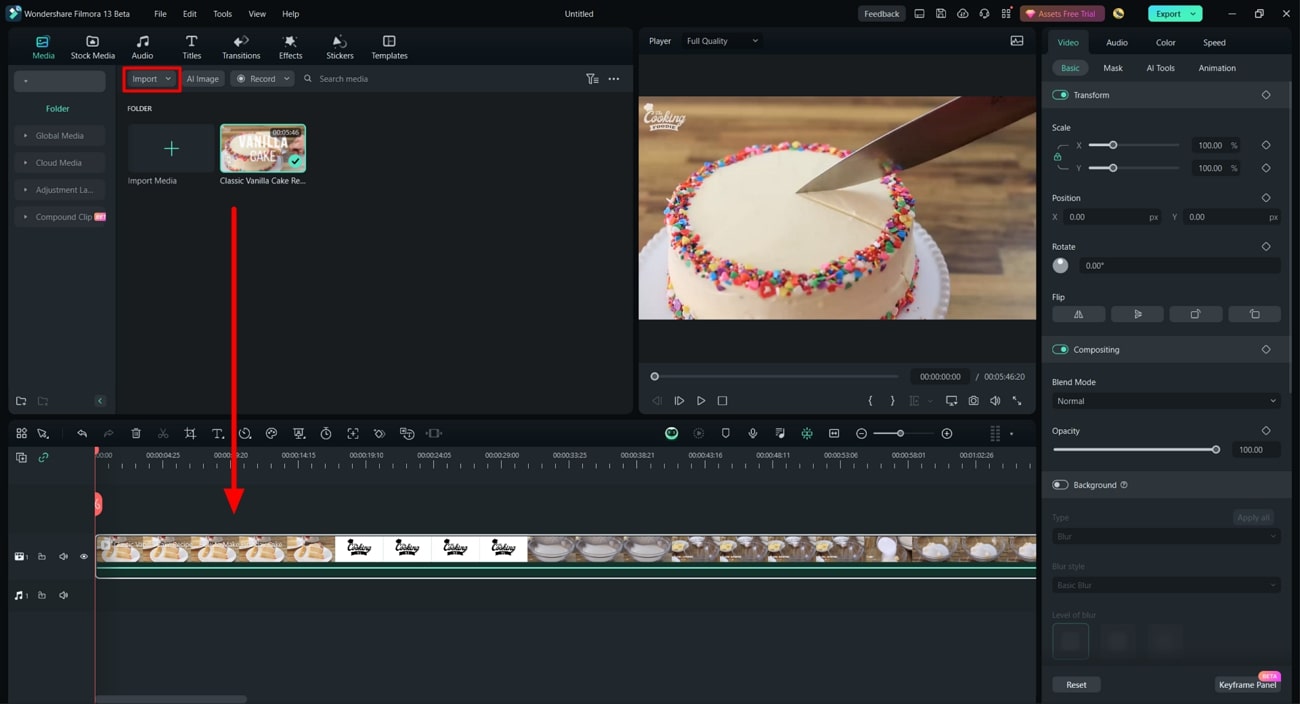
Since Wondershare Filmora is a desktop tool, you must download it first. Initiate it and click the “New Project” option to reach its editing interface. Click on the “Import” option to import the video you downloaded. Afterward, bring this video to the timeline using the drag-and-drop technique.
2. Access Uniform Speed
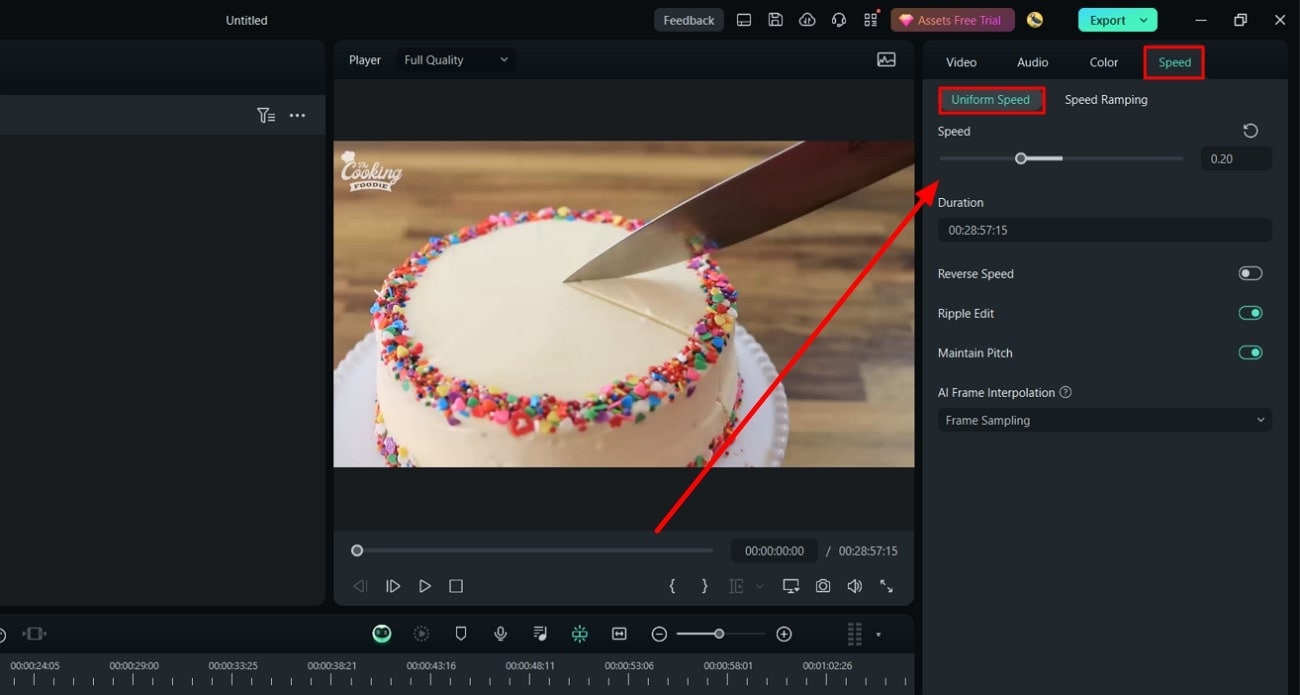
Select the video in the timeline and direct it toward the settings panel appearing on the right side. From the given tabs, go to the “Speed” tab and select “Uniform Speed.” Further, adjust the “Speed” slider or its value in the given box. This will slow down your video, and you can preview it to adjust further.
Step 3Smoothing Out the YouTube Slow-Mo
Upon previewing the YouTube slo-mo, you might notice some roughness in it. For creating a smooth slow-mo, use the Optical Flow option. Here are the steps to enable this option in Filmora:
1. Enable the Optical Flow Option
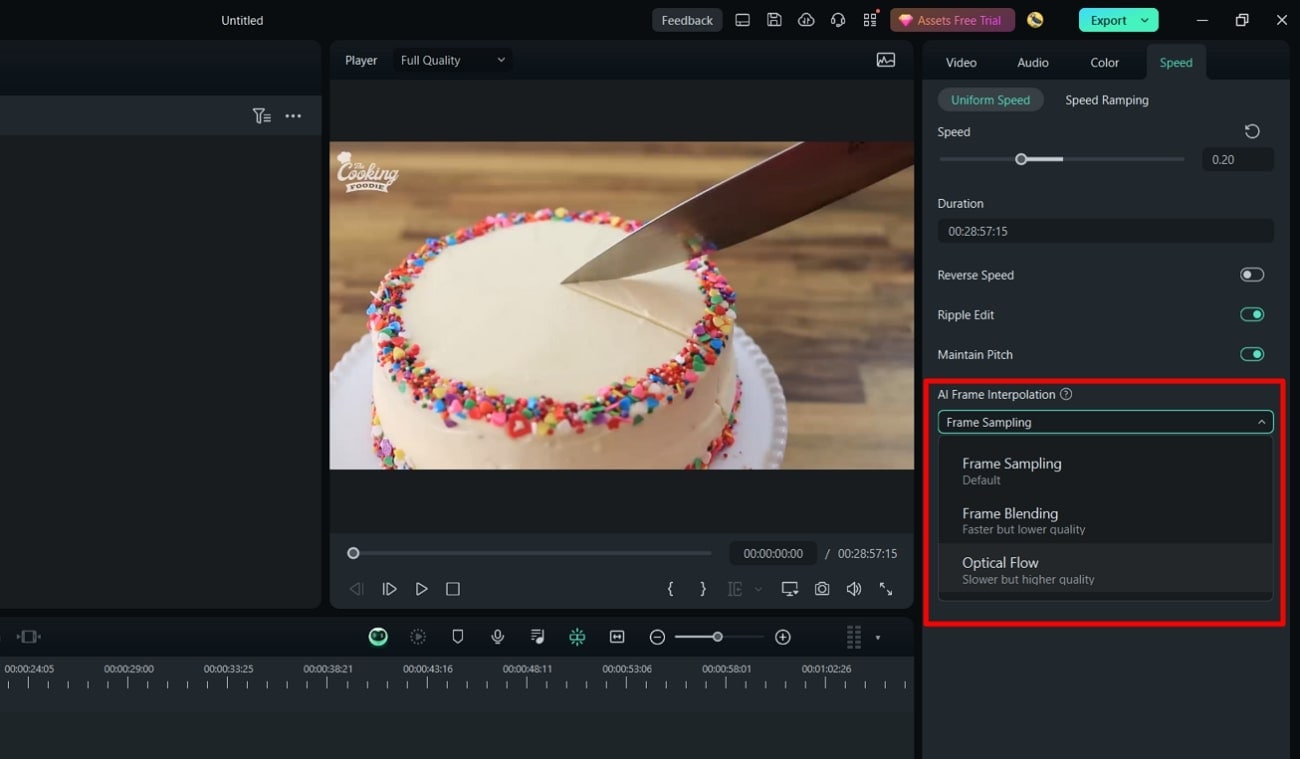
Navigate toward the “AI Frame Interpolation” section. You can find it at the bottom of the Uniform Speed tab. Afterward, expand this section and select the “Optical Flow” option.
2. Render the YouTube Slow-Mo
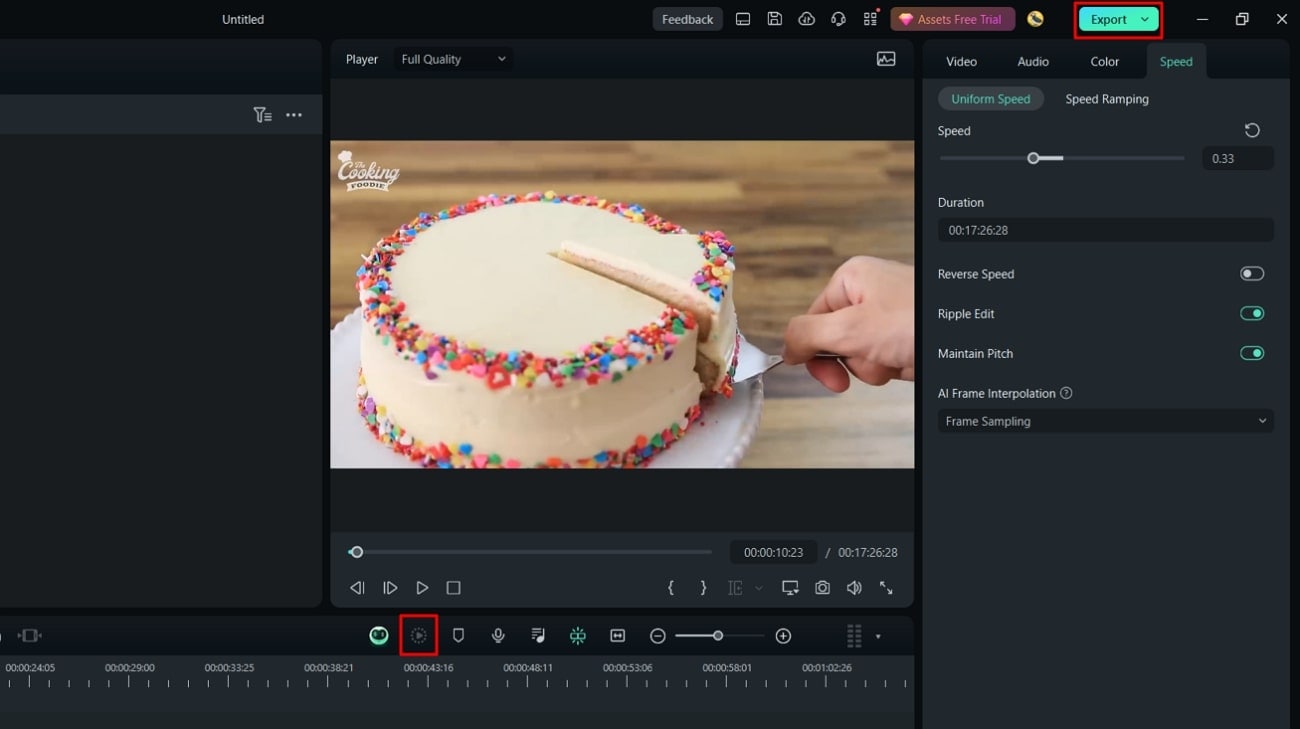
Once you have enabled optical flow, direct it toward the timeline tool panel. Select the “Render Preview” option from there and see your video afterward. You’ll have a professional-level slow YouTube slow-motion video.
Part 2: Other Features Offered by Wondershare Filmora
Wondershare Filmora is a professional video editor that offers AI editing options. You can bring so much creativity to your videos with its effects and colors. It offers AI Chroma Key or AI Background Remover features to change backgrounds. Moreover, it runs on a timeline editing interface that helps with precise cut and trim.
You can slow down a video and increase its speed to save time. Wondershare Filmora is all about video editing, and there is no limit to its creativity. Let’s dive into this section to learn about some of those AI features below:
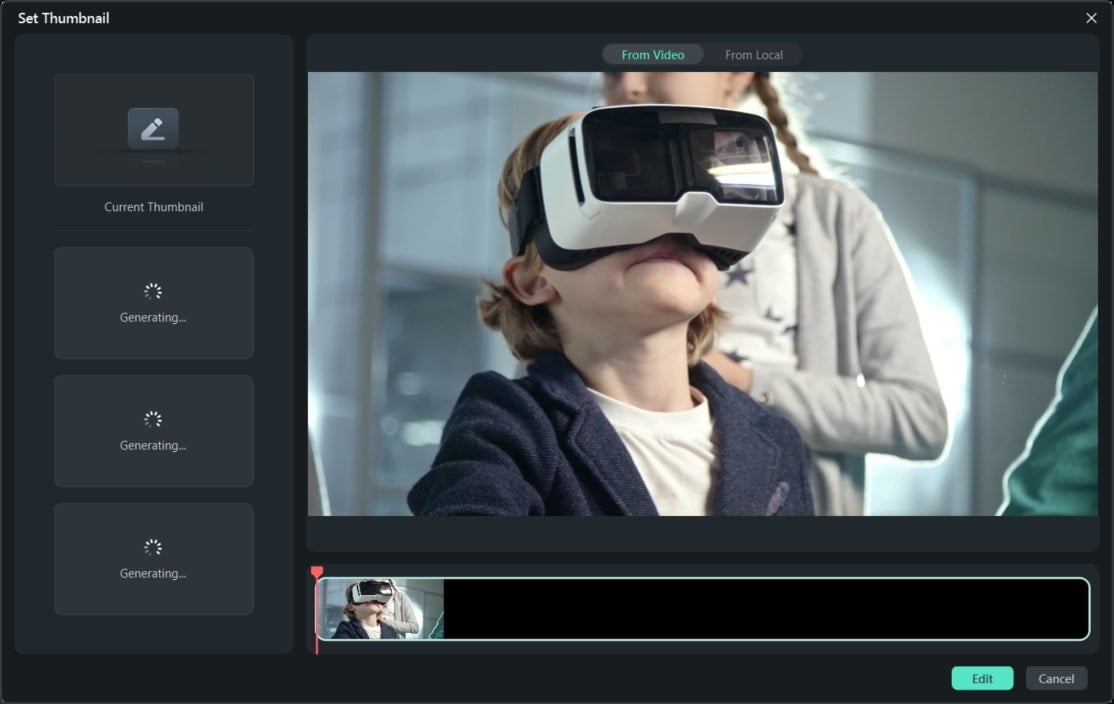
1. AI Thumbnail Creator
When creating a YouTube video for your channel, thumbnails play an important role. Filmora allows you to generate creative thumbnails for your videos. Through the support of AI, it opts for the finest frame out of your video as a thumbnail. Afterward, it offers you built-in templates that fit many content categories.
2. Speed Ramping
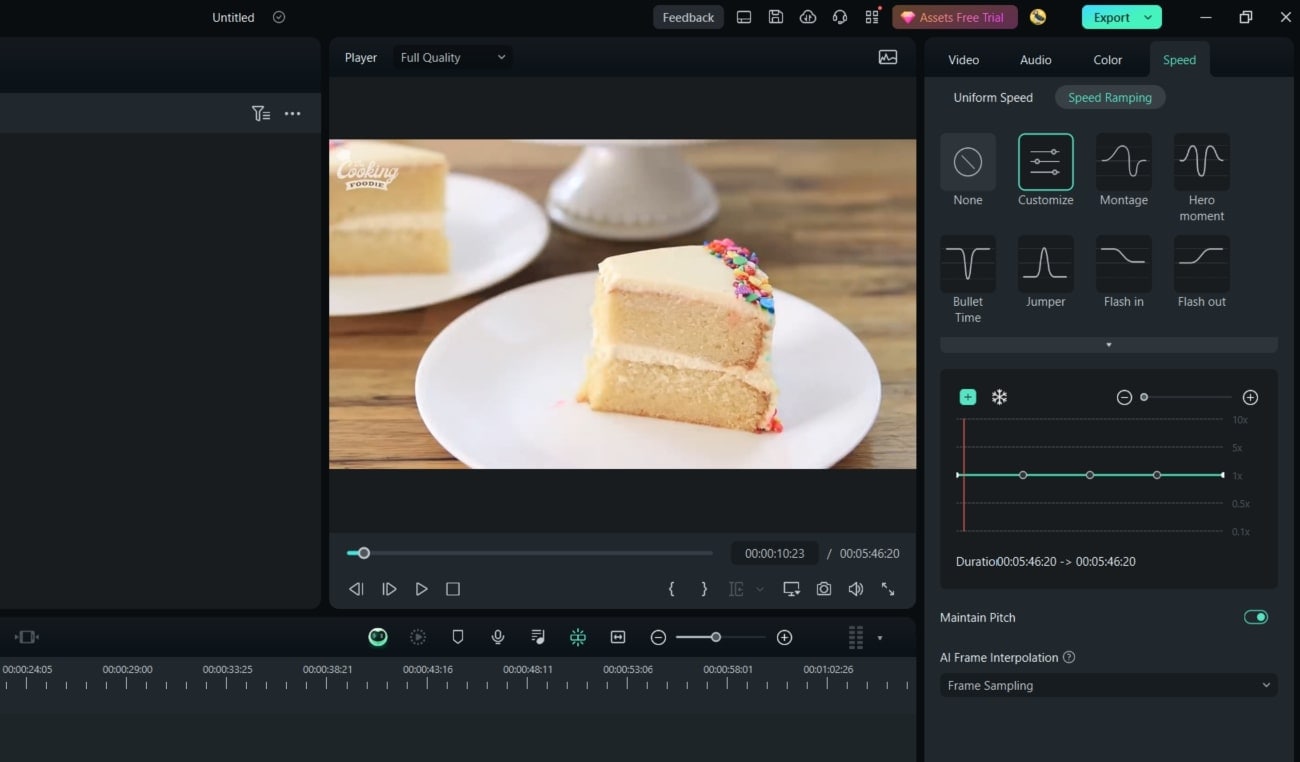
This function also allows you to slow down YouTube videos precisely. Using this feature, you can slow down specific parts of a video. It offers pre-designed speed options; however, you can also customize it. Montage, Hero moment, Bullet Time, Jumper, and other options exist as presets. Afterward, you can manipulate the frame speed option for a smooth outlook.
3. Silence Detection
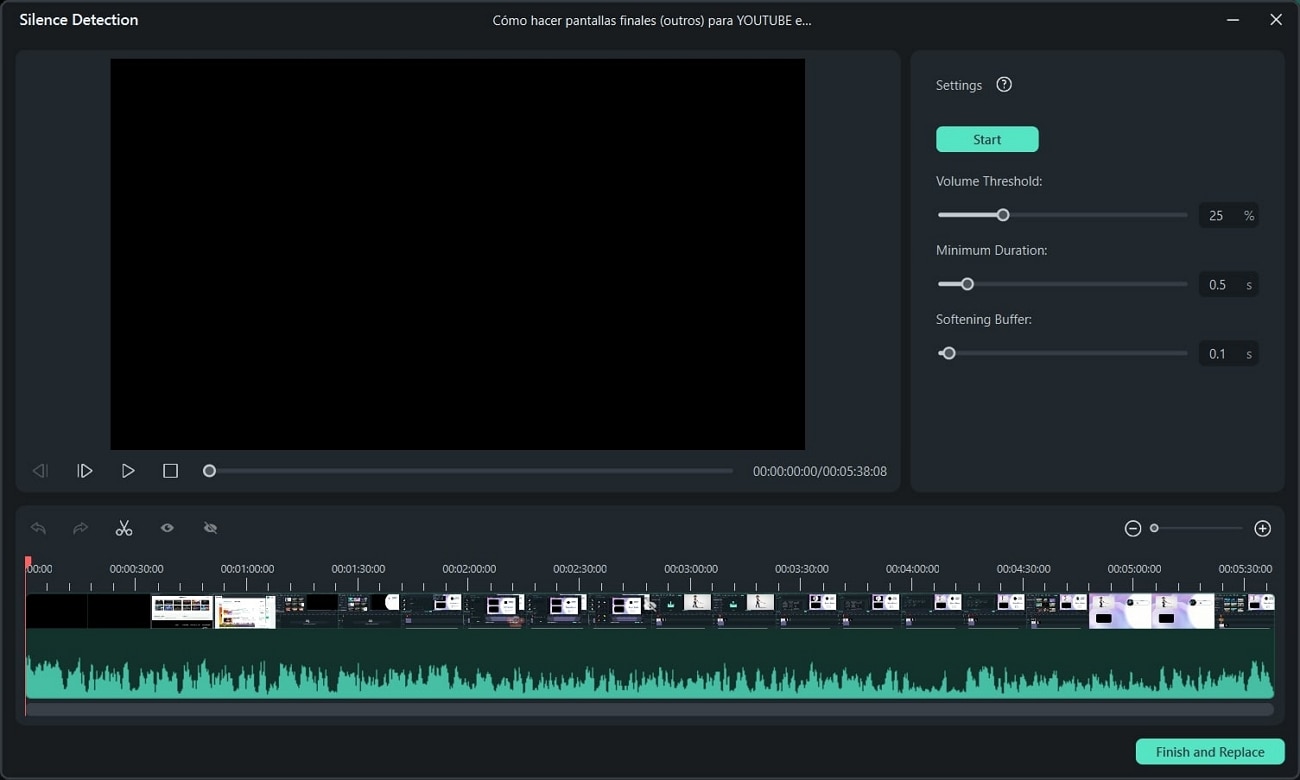
Silent pauses or loud breath noise in videos is often disturbing. Such elements decrease the audio and overall quality of a video clip or audio track. To avoid this, Filmora offers a Silence Detection feature backed by AI. It robotically spots the silent pauses, hums, and breaths in audio and eliminates them. This will save you from audience backlash and maintain content quality.
4. Speech-to-Text
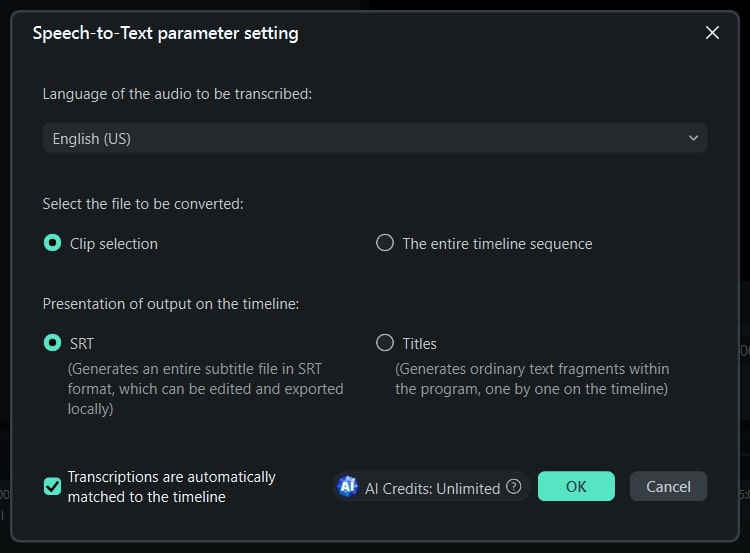
This feature belongs in the text editing category of Wondershare Filmora. The STT tool of Filmora has many applications in the field of filmmaking. It uses AI technology and NLP systems to analyze speech and convert it to text. You can use this text to create captions and subtitles for YouTube videos. In addition, you can use this feature for text-based editing in Filmora or other tools.
Conclusion
After reading this article, users have a comprehensive knowledge of YouTube slow motion. We discussed certain advantages of slowing down videos. The article also discussed how to slow down a YouTube video with precision. It was explained using a professional-grade video editor with a detailed guide. If you want to create a perfect YouTube slow-mo or slow down a specific part, use Filmora.
Make A Slow Motion Video Make A Slow Motion Video More Features

Part 1: How to Slow Down Videos in YouTube?
If you watch YouTube videos often, you must have been aware of the YouTube slow-down feature. The playback adjustment option on YouTube helps with that. By enabling that option, the whole YouTube video slows down. For adding slow-motion effects at specific durations, you can use Wondershare Filmora . In this part, we’ll explore both methods of slowing down a YouTube video:
Method 1. Direct Method
If you have the YouTube application, you can commence this action straight. If not, you can also open YouTube on your browser. Given below are the steps to play YouTube in slow motion:
Step 1
Once you play a YouTube video, navigate towards the bottom of this video. Afterward, click on the “Settings” option and select the “Playback speed” option.

Step 2
From the expansion menu, select a playback speed option as per preferences. You can select a speed between 0.75, 0.5, and 0.25. Afterward, play your video and see if the speed is right. This is the simplest method for YouTube video slow motion.

Method 2. Using Wondershare Filmora
In Wondershare Filmora, there are two methods to slow down YouTube videos. You can either use the Uniform Speed option or the Speed Ramping option. Moreover, you can add the Optical Flow effect to ensure a smooth, slow motion. In this section, we will first familiarize you with downloading a YouTube video. Here are the three major steps to create slow-motion in Filmora:
Free Download For Win 7 or later(64-bit)
Free Download For macOS 10.14 or later
Step 1Downloading a YouTube Video
YouTube doesn’t allow users to download a YouTube video on their devices. Hence, you will need third-party support to do so. Many sites offer YouTube video download services. We are using the y2mate.com , and here are the steps for it:
1. Copy the YouTube Video Link
First, access the respective video that you want to download from YouTube. Locate the “Share” option at the bottom of this video and select it. Then click the “Copy” option to copy your video’s link.

2. Access the Site
After copying the video’s link, access the site using your web browser. In the “Search or paste link here” box, paste the video link and click “Start.” From the download options appearing at the bottom, select a suitable option. Click on the “Download” button adjacent to your option.

Step 2Slow Down YouTube Video in Filmora
Once you have downloaded the video on your device, it is time to slow down the YouTube video. Filmora offers a plain and simple method to slow down a video. Here is a step-by-step guide to help you create video slow-mo in Filmora:
1. Import the YouTube Video
Since Wondershare Filmora is a desktop tool, you must download it first. Initiate it and click the “New Project” option to reach its editing interface. Click on the “Import” option to import the video you downloaded. Afterward, bring this video to the timeline using the drag-and-drop technique.

2. Access Uniform Speed
Select the video in the timeline and direct it toward the settings panel appearing on the right side. From the given tabs, go to the “Speed” tab and select “Uniform Speed.” Further, adjust the “Speed” slider or its value in the given box. This will slow down your video, and you can preview it to adjust further.

Step 3Smoothing Out the YouTube Slow-Mo
Upon previewing the YouTube slo-mo, you might notice some roughness in it. For creating a smooth slow-mo, use the Optical Flow option. Here are the steps to enable this option in Filmora:
1. Enable the Optical Flow Option
Navigate toward the “AI Frame Interpolation” section. You can find it at the bottom of the Uniform Speed tab. Afterward, expand this section and select the “Optical Flow” option.

2. Render the YouTube Slow-Mo
Once you have enabled optical flow, direct it toward the timeline tool panel. Select the “Render Preview” option from there and see your video afterward. You’ll have a professional-level slow YouTube slow-motion video.

Part 2: Other Features Offered by Wondershare Filmora
Wondershare Filmora is a professional video editor that offers AI editing options. You can bring so much creativity to your videos with its effects and colors. It offers AI Chroma Key or AI Background Remover features to change backgrounds. Moreover, it runs on a timeline editing interface that helps with precise cut and trim.
You can slow down a video and increase its speed to save time. Wondershare Filmora is all about video editing, and there is no limit to its creativity. Let’s dive into this section to learn about some of those AI features below:
1. AI Thumbnail Creator
When creating a YouTube video for your channel, thumbnails play an important role. Filmora allows you to generate creative thumbnails for your videos. Through the support of AI, it opts for the finest frame out of your video as a thumbnail. Afterward, it offers you built-in templates that fit many content categories.

2. Speed Ramping
This function also allows you to slow down YouTube videos precisely. Using this feature, you can slow down specific parts of a video. It offers pre-designed speed options; however, you can also customize it. Montage, Hero moment, Bullet Time, Jumper, and other options exist as presets. Afterward, you can manipulate the frame speed option for a smooth outlook.

3. Silence Detection
Silent pauses or loud breath noise in videos is often disturbing. Such elements decrease the audio and overall quality of a video clip or audio track. To avoid this, Filmora offers a Silence Detection feature backed by AI. It robotically spots the silent pauses, hums, and breaths in audio and eliminates them. This will save you from audience backlash and maintain content quality.

4. Speech-to-Text
This feature belongs in the text editing category of Wondershare Filmora. The STT tool of Filmora has many applications in the field of filmmaking. It uses AI technology and NLP systems to analyze speech and convert it to text. You can use this text to create captions and subtitles for YouTube videos. In addition, you can use this feature for text-based editing in Filmora or other tools.

Conclusion
After reading this article, users have a comprehensive knowledge of YouTube slow motion. We discussed certain advantages of slowing down videos. The article also discussed how to slow down a YouTube video with precision. It was explained using a professional-grade video editor with a detailed guide. If you want to create a perfect YouTube slow-mo or slow down a specific part, use Filmora.
Also read:
- [Updated] A Kinemaster Editor's Roadmap for Flawless Transitions
- [Updated] Crafting a Captivated Audience with Strategic Voiceovers
- [Updated] In 2024, Transforming Dull Interviews Into Engaging Assessments
- [Updated] Investigating Financial Gains From Product Reviews
- [Updated] Spectral Skillset Professionals' Pathway to Change for 2024
- [Updated] Top 10 Flawless Web-Based Vimeo Video Extractors for 2024
- 2024 Approved Create Slow Motion Videos Using Final Cut Pro with Ease
- 2024 Approved How to Overlay Video in Premiere Pro
- In 2024, 25 Top-Rated, Gratis Online Photography Tools
- In 2024, Combining YouTube Tunes and Film Vectors
- Learn to Use Montage with These Movies
- New In 2024, No More Wobbles The Top 10 Free Online Video Stabilizers
- Shotcut Review – Is It The Best Free Video Editor for 2024
- Solving the Issue: Why Your YouTube Comments Are Not Appearing
- Updated 2024 Approved Achieving GoPro Slow Motion with Quality An In-Depth Overview
- Updated How to Remove Audio From Video Without Watermark?
- Updated In 2024, Guide to Create a Timelapse Video in After Effects
- Vintage Film Effect 1990S - How to Make
- You Can Easily Film Rotating Video Illusions From Your Smartphone and Edit Them on Wondershare Filmora in Just a Few Clicks for 2024
- Title: New How to Loop a Video with iMovie on Mac and iPhone
- Author: Chloe
- Created at : 2025-01-22 21:00:05
- Updated at : 2025-01-24 03:31:46
- Link: https://ai-editing-video.techidaily.com/new-how-to-loop-a-video-with-imovie-on-mac-and-iphone/
- License: This work is licensed under CC BY-NC-SA 4.0.