
New How To Make a Video by Mouse in Filmora for 2024
How To Make a Video by Mouse in Filmora?
Have you ever wondered, what if somehow your keyboard just broken or disappeared? And you’re stuck in the middle of your project with just a mouse. Don’t know how to proceed remaining project with a mouse? Then no worries! We got you.
This article will guide you how to use stock videos and stock audio to create a music video. The catch, you say? We will be doing that only with a use of a mouse.
Things To Know Before Editing
Let us be honest, most shortcuts are not available without the keyboard. To counter that, our approach will need to be more general. General here means you need to know all the necessary controls and panels.

Take the challenge and find a solution together
To counter these difficulties, even if you have a keyboard, you can imagine yourself in a situation. A situation in which we have a keyboard but will not be using it.
Therefore, presenting us with a challenge, so if you someday come across a situation like this, you will be prepared. All in all, you would be learning more things by returning to the roots of your practice, which in most cases, can prove helpful.
Get Ready With the Professional Editing Tool
Before getting into the editing process handicapped from resources, you need to be familiar with the software that we will use. We will use Wondershare Filmora You can click the link below and catch it up.

Create a Music Video Without a Keyboard
Let us get started! Whether you have a real mouseless experience or want to take it as a challenge, let’s get the things clear first.
- We need to create a 20 seconds music video.
- We will only be using the footage from the stock library.
- We will be using music from the Wondershare Filmora library.
- We will have 5 minutes to review the footage and the music available.
- And most importantly, we don’t have a keyboard.
Step 1. Review your footage
Our first and most crucial step will be to use our imagination and creativity. So get those neurons firing, and let us go!

- Head to the stock media folder on the bar mentioned above, the Wondershare Filmora.
- Or you can simply look towards the left window, where you will find the sample videos tab.
- Click on the sample videos tab, and a new window will appear on the library screen.
- Here you will find almost more than 20 videos.
- So apart from using the actual recorded footage, we will work our way with what we have from default.
- For the music, we would be scrolling in the stock audio library.
- Click on the audio tab above and start scrolling.
- You will also find some categories in the left window.
- Choose the category of your choice and listen to the audio.
Do whatever suit you best. Keep in mind you only have 5 minutes.
Step 2. Pick music for your clips
Suppose you have found audio that speaks your vibe. The next step would be to find a video that tallies that audio. Let us suppose we have audio that is of the hip-hop genre. Let that creativity shine now!

If you like to add a more classical vibe, pick a classical song or audio from the audio library.
- After picking the song, move on to the sample videos tab and search for videos that match a classic vibe.
- Now random close-up shots of a piano, cinematic footage of a big orchestra, or simple landscapes with minimalistic movement while focusing on a single object, consider the example below.

Now that a scenario is constructed, our next step is to arrange these clips in the Wondershare Filmora timeline.
Step 3. Download the clips and audio
You have 15 minutes to create the music video. Start the timer! Once you have selected a sample video and audio that matches your scenario, you can download them from the bottom right icon on the thumbnail. Only if you still need to download them.
Step 4. Insert the audio into the timeline
- The first step is to drag the audio to the timeline.
- Now play the audio from the start. If you can work with the audio as a whole, then it’s perfect.
If you want your audio to start at a certain point. You have to follow the below-mentioned steps. It is as simple as that!

- Add your audio to the timeline.
- Then move the timer or the slider where you want your audio to start.
- Right-click on the audio file. Select split.
- Your audio file will split into two parts.
- Delete the prior file and drag the file ahead to the start of the timeline.
The next step is to add the videos to the timeline.
Step 5. Add the video to the timeline
When you have your audio in the timeline, your next step is adding the video. After you have trimmed or split your audio to your wish, follow the below steps.

- Click and drag to drop the video clips where you want the video to start.
- Play the audio first is a good feature for where you want your video to insert.
- Then adjust the timeline slider on that point.
- Simply drag your video and drop it into the timeline.
![]()
Note: now, remember you have multiple videos to match the audio length as we create a music video. The more, the more optimistic. Now, remember you have multiple videos to match the audio length as we create a music video. The more, the more optimistic.
Download the remaining videos that you would wish to be added to the music and follow the steps mentioned above to add the clips where you desire.
Step 6. Finishing touches
You can add some transitions to give your music video a fine touch**.** To add transitions, you can follow the below steps:

- First, click on the transition icon on the bar above. Then, browse as far as your imagination takes you.
- If the effect you want still needs to be downloaded, click on the download icon in the bottom right corner and download the effect.
- Click on the effect and drag it to drop it on your video. It will create a smooth transition while shifting from one video to the other.
Keep going you are almost there!
- Do this for all the videos in the timeline above the audio file.
If you have time, you can also add a few of the effects in the Wondershare Filmora.
- To do so, click on the effect icon on the top bar.
- A window will open to your left, indicating different available effects categories. Select any tab you want that fits your music video scenario.
- Download the effect mentioned above by clicking on the download icon in the bottom right corner of the effect thumbnail.
- Click to drag and drop it on top of your video.
![]()
Note: you can do so as many times as you want for the remaining video clips in the timeline.
It seems our 15 minutes are running out! Play the music video from the beginning and review the edits you made. Then, finalize your edits and Voila. You have successfully created a music video using a mouse on Wondershare Filmora.
So in a rare scenario when you don’t have a keyboard, you can just use your mouse to browse the Wondershare Filmora and put those creative ideas to work.
Conclusion
With just a mouse, you have created a music video! How easy is that? Try different music, audio, and video, and then enjoy the rest! Creativity has no limits if you know how to make the most of it by using the tools at your hand. Tell out more about your creative ideas! We love to hear from your side!
Free Download For Win 7 or later(64-bit)
Free Download For macOS 10.14 or later
Download the remaining videos that you would wish to be added to the music and follow the steps mentioned above to add the clips where you desire.
Step 6. Finishing touches
You can add some transitions to give your music video a fine touch**.** To add transitions, you can follow the below steps:
- First, click on the transition icon on the bar above. Then, browse as far as your imagination takes you.
- If the effect you want still needs to be downloaded, click on the download icon in the bottom right corner and download the effect.
- Click on the effect and drag it to drop it on your video. It will create a smooth transition while shifting from one video to the other.
Keep going you are almost there!
- Do this for all the videos in the timeline above the audio file.
If you have time, you can also add a few of the effects in the Wondershare Filmora.
- To do so, click on the effect icon on the top bar.
- A window will open to your left, indicating different available effects categories. Select any tab you want that fits your music video scenario.
- Download the effect mentioned above by clicking on the download icon in the bottom right corner of the effect thumbnail.
- Click to drag and drop it on top of your video.
![]()
Note: you can do so as many times as you want for the remaining video clips in the timeline.
It seems our 15 minutes are running out! Play the music video from the beginning and review the edits you made. Then, finalize your edits and Voila. You have successfully created a music video using a mouse on Wondershare Filmora.
So in a rare scenario when you don’t have a keyboard, you can just use your mouse to browse the Wondershare Filmora and put those creative ideas to work.
Conclusion
With just a mouse, you have created a music video! How easy is that? Try different music, audio, and video, and then enjoy the rest! Creativity has no limits if you know how to make the most of it by using the tools at your hand. Tell out more about your creative ideas! We love to hear from your side!
Free Download For Win 7 or later(64-bit)
Free Download For macOS 10.14 or later
How to Use Visual Effect for Zoom
Zoom, a video calling software, has been quite popular over the last several months and is still one of the most used videos calling applications by millions of people worldwide. The site is a favorite among working professionals, but it is also utilized by individuals to connect with their friends and loved ones. Additionally, despite the app’s abundance of practical built-in tools and functions, it lacks the fun filters and special effects that the majority of users are used to when using a camera. Zoom has ingrained itself in our vocabulary during the last year. It seemed almost inevitable given that everything, from meetings to parties, has moved online.
You don’t need to seek farther than Zoom visual effects to inject a little jazz into the routine Zoom meetings during these hard times. By making adjustments to your Video configuration either before or during a video call, you may add visual effects in Zoom. Zoom meetings may be tedious to conduct over extended periods of time. Additionally, it would be helpful if you recorded the condition of your room before any Zoom meetings. You wouldn’t want to reveal your disorganized space while in a meeting. In these situations, adding visual effects will keep your private area private while also making your Zoom meetings entertaining and exciting. It will also prevent others from seeing your filthy room. This tutorial will walk you through the process of adding visual effects to Zoom step-by-step. In addition, you will get acquainted with the numerous camera functions and visual effects that you may employ during a Zoom video conversation.
- 1. What apps can add visual effect on Zoom?
- 2. How do I add visual effects to Zoom in Mobile?
- 3. How do you download Zoom effects?
Part 1: Popular Visual Effects you can add to Zoom
You may apply one of four main graphic effects to your Zoom meetings. The visual effects that you may use in your next Zoom video chat are briefly summarized below.
1. Visual Backgrounds
Virtual backdrops may transform any plain wall into an artistic setting. Zoom provides you the choice to add photographs to your backdrop in addition to offering you a few pre-made backdrops. Zoom lets you add a movie to your backdrop in addition to simply photographs. With the help of this imaginative feature, gather your pals and enjoy your favorite meme or video. A presentation’s collection of photos, a video, or a single image may all serve as virtual backdrops. A green screen would often be used as your real backdrop and consistent lighting would be required.
To avoid having to reveal your real surroundings while in a conference, you may add any picture or video as a virtual backdrop in Zoom. You have the option of adding own photos and movies or selecting from the pre-existing backdrop films and images. The file type for video backgrounds should be MP4 or MOV, and the resolution should range from 360p to a maximum of 1080p. Ensure that the mirroring of your video is deselected in the Zoom’s Video settings if your backdrop picture has text that may be read. By using virtual backdrops, you may alter the background of your video as it appears to the audience member with whom you are speaking. During the video conference you’re in, the other participants will be able to view your face and body overlaid on the backdrop of your choice.
2. Filters
With these filters, you can have fun in all of your Zoom meetings! Filters are a fun way to spend time with loved ones who are far away, particularly at a period when maintaining social distance is crucial. Filters are the modifications you make to yourself during Zoom meetings (such as a mustache, beard, etc.). They enliven the proceedings and contribute to the fun and memorability of your Zoom meetings.
Your films’ colors may be changed, and video filters can also add new aspects. By selecting a filter appropriate for each event, like team meetings or game nights, you may create the right atmosphere. You may embellish your face in the video with flowers or animal traits by using Zoom’s various filters. Alternately, you might just convert your video’s color to black and white. The video filters from a different program, however, allow you to apply more vibrant filters and place a greater emphasis on special effects.
3. Lighting and Touch-ups
The Lighting function enhances lighting effects and makes adjustments for low light situations to make you seem more professional during a Zoom conference. Similar to this, Touch-up enhances your facial characteristics by making your skin shine, erasing wrinkles, and giving your face a radiant appearance.
On your Zoom videos, changing your lighting and applying touch-ups may improve how you seem. By adjusting your lighting, you can make even dim illumination look bright. By doing touch-ups, you may get a smoother skin texture and get rid of any obvious imperfections.
4. Studio Effects
Zoom has been developing on a new feature called Studio Effects that would give customers the option of using virtual cosmetics in their movies. They are still checking it out before formally releasing it since it is still in beta. However, it is still available to users under the Backgrounds & Filters area. You may adjust the opacity as you like. You have the option to choose a new color or one of the predefined colors. Additionally, you may decide to employ the face effects in all of your next meetings, albeit doing so might be problematic if you use Zoom for business. Don’t worry if you’re running late. Zoom can give your face a natural-looking cosmetic makeover in only one minute!
This function is intended for less formal settings, such as gatherings of friends or family. Anyone who wants to seem more professional during meetings has access to Studio Effects, which offers the choice of various eyebrow colors, beards, and lipsticks. These are a few recently added features. You may add mustaches, beards, and brows in a variety of designs, hues, and intensities. Additionally, you have the option of coloring your lips.
Part 2: How to Add Visual Effects to Zoom
Along with facilitating online meetings, the Zoom program also lets you play with its visual effects. You just need to make a few adjustments to the video settings or utilize another third-party program to be ready to go.
Step1Start a Zoom meeting
You can download Zoom, install it on your computer, and log into your account if you don’t already have it if you don’t already have it.
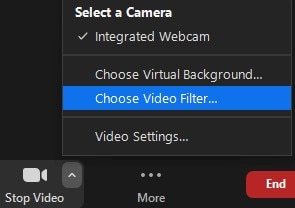
Step2Tap Background and Filters
After logging in to Zoom, use these settings. - Options > Camera > Video

Step3Faucet Filters
Here, you may play with a variety of visual effects and customize them to suit your tastes. Pick one of the numerous filters that are offered. To activate the filter, tap it.
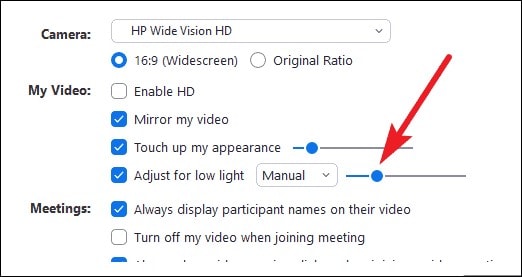
Step4Set Lighting Effects to on
Select “Adjust for low light” in the video options. For your lighting, you may choose between Auto and Manual effects. Zoom will automatically detect and adapt for the lighting in your room if you choose Auto.
Use Zoom’s noise reduction option to keep your conversation focused during your video conference in addition to adding visual elements. To do this, go to “Audio Settings” and choose “High” under “Suppress background noise.” Once you start speaking during the video conference, this essentially cancels out any background noise.
Part 3: Related FAQs
1. What apps can add visual effect on Zoom?
Following is the list of top three apps that you can use to utilize visual effects Zoom application:
Snap Camera is regarded as the most user-friendly. It is a software that you can download for Windows or Mac that works with live broadcasts and video chats. Because it was created by the people who founded Snapchat, it shares a broad variety of filters with that platform.
Link: Snap Camera
The Mac is the only platform on which CamTwist may be used. You may also use it to give your movies additional filters and unique effects. This program lets you pick from a variety of pre-made effects while also allowing you to create your own.
Link: CamTwist
Another desktop application that lets you change and even blur your backdrop is ManyCam. It enables you to apply digital effects, filters, and 3-D masks to your face. Using this tool, you can also build layers and presets.
Link: ManyCam
2. How do I add visual effects to Zoom in Mobile?
Zoom includes a function that might be useful if you don’t want to tidy up or want to add some entertainment to your calls. You may utilize Zoom virtual backdrops to alter your surroundings and take you to a more pleasant location on both the desktop and mobile apps. After joining one on a mobile device, pick Virtual backdrop by tapping the More icon in the bottom right corner. Choose a photo from the list of choices, or click the plus sign (+) to add a photo or video from your gallery.
3. How do you download Zoom effects?
Pressing the Studio Effects button after installing Zoom for the first time will prompt a pop-up asking you to download the Studio Effects package. Several filters, suited for both business meetings and conversations with friends, let you customize the video and audio during your video calls. To start downloading the Effects bundle, click the Download button. The “Studio Effects” window will appear on the right-hand side of the Background & Filter page after the download is finished. All the face components and choices are available in this Studio Effects window.
Conclusion
The most popular video meeting tool worldwide is Zoom. Family, friends, coworkers, and any two people who want to video chat utilize it. Zoom visual effects are the ideal tool for injecting some humor into otherwise dull Zoom sessions and meetings. A few simple steps will get you a striking backdrop, a humorous filter, and some interesting effects. Since the majority of formal work is now completed from home, Zoom has taken over as the standard video conferencing program. Try out as many of the effects as you like, and use this page as a companion and a map to help you along the way.
- 1. What apps can add visual effect on Zoom?
- 2. How do I add visual effects to Zoom in Mobile?
- 3. How do you download Zoom effects?
Part 1: Popular Visual Effects you can add to Zoom
You may apply one of four main graphic effects to your Zoom meetings. The visual effects that you may use in your next Zoom video chat are briefly summarized below.
1. Visual Backgrounds
Virtual backdrops may transform any plain wall into an artistic setting. Zoom provides you the choice to add photographs to your backdrop in addition to offering you a few pre-made backdrops. Zoom lets you add a movie to your backdrop in addition to simply photographs. With the help of this imaginative feature, gather your pals and enjoy your favorite meme or video. A presentation’s collection of photos, a video, or a single image may all serve as virtual backdrops. A green screen would often be used as your real backdrop and consistent lighting would be required.
To avoid having to reveal your real surroundings while in a conference, you may add any picture or video as a virtual backdrop in Zoom. You have the option of adding own photos and movies or selecting from the pre-existing backdrop films and images. The file type for video backgrounds should be MP4 or MOV, and the resolution should range from 360p to a maximum of 1080p. Ensure that the mirroring of your video is deselected in the Zoom’s Video settings if your backdrop picture has text that may be read. By using virtual backdrops, you may alter the background of your video as it appears to the audience member with whom you are speaking. During the video conference you’re in, the other participants will be able to view your face and body overlaid on the backdrop of your choice.
2. Filters
With these filters, you can have fun in all of your Zoom meetings! Filters are a fun way to spend time with loved ones who are far away, particularly at a period when maintaining social distance is crucial. Filters are the modifications you make to yourself during Zoom meetings (such as a mustache, beard, etc.). They enliven the proceedings and contribute to the fun and memorability of your Zoom meetings.
Your films’ colors may be changed, and video filters can also add new aspects. By selecting a filter appropriate for each event, like team meetings or game nights, you may create the right atmosphere. You may embellish your face in the video with flowers or animal traits by using Zoom’s various filters. Alternately, you might just convert your video’s color to black and white. The video filters from a different program, however, allow you to apply more vibrant filters and place a greater emphasis on special effects.
3. Lighting and Touch-ups
The Lighting function enhances lighting effects and makes adjustments for low light situations to make you seem more professional during a Zoom conference. Similar to this, Touch-up enhances your facial characteristics by making your skin shine, erasing wrinkles, and giving your face a radiant appearance.
On your Zoom videos, changing your lighting and applying touch-ups may improve how you seem. By adjusting your lighting, you can make even dim illumination look bright. By doing touch-ups, you may get a smoother skin texture and get rid of any obvious imperfections.
4. Studio Effects
Zoom has been developing on a new feature called Studio Effects that would give customers the option of using virtual cosmetics in their movies. They are still checking it out before formally releasing it since it is still in beta. However, it is still available to users under the Backgrounds & Filters area. You may adjust the opacity as you like. You have the option to choose a new color or one of the predefined colors. Additionally, you may decide to employ the face effects in all of your next meetings, albeit doing so might be problematic if you use Zoom for business. Don’t worry if you’re running late. Zoom can give your face a natural-looking cosmetic makeover in only one minute!
This function is intended for less formal settings, such as gatherings of friends or family. Anyone who wants to seem more professional during meetings has access to Studio Effects, which offers the choice of various eyebrow colors, beards, and lipsticks. These are a few recently added features. You may add mustaches, beards, and brows in a variety of designs, hues, and intensities. Additionally, you have the option of coloring your lips.
Part 2: How to Add Visual Effects to Zoom
Along with facilitating online meetings, the Zoom program also lets you play with its visual effects. You just need to make a few adjustments to the video settings or utilize another third-party program to be ready to go.
Step1Start a Zoom meeting
You can download Zoom, install it on your computer, and log into your account if you don’t already have it if you don’t already have it.
Step2Tap Background and Filters
After logging in to Zoom, use these settings. - Options > Camera > Video
Step3Faucet Filters
Here, you may play with a variety of visual effects and customize them to suit your tastes. Pick one of the numerous filters that are offered. To activate the filter, tap it.
Step4Set Lighting Effects to on
Select “Adjust for low light” in the video options. For your lighting, you may choose between Auto and Manual effects. Zoom will automatically detect and adapt for the lighting in your room if you choose Auto.
Use Zoom’s noise reduction option to keep your conversation focused during your video conference in addition to adding visual elements. To do this, go to “Audio Settings” and choose “High” under “Suppress background noise.” Once you start speaking during the video conference, this essentially cancels out any background noise.
Part 3: Related FAQs
1. What apps can add visual effect on Zoom?
Following is the list of top three apps that you can use to utilize visual effects Zoom application:
Snap Camera is regarded as the most user-friendly. It is a software that you can download for Windows or Mac that works with live broadcasts and video chats. Because it was created by the people who founded Snapchat, it shares a broad variety of filters with that platform.
Link: Snap Camera
The Mac is the only platform on which CamTwist may be used. You may also use it to give your movies additional filters and unique effects. This program lets you pick from a variety of pre-made effects while also allowing you to create your own.
Link: CamTwist
Another desktop application that lets you change and even blur your backdrop is ManyCam. It enables you to apply digital effects, filters, and 3-D masks to your face. Using this tool, you can also build layers and presets.
Link: ManyCam
2. How do I add visual effects to Zoom in Mobile?
Zoom includes a function that might be useful if you don’t want to tidy up or want to add some entertainment to your calls. You may utilize Zoom virtual backdrops to alter your surroundings and take you to a more pleasant location on both the desktop and mobile apps. After joining one on a mobile device, pick Virtual backdrop by tapping the More icon in the bottom right corner. Choose a photo from the list of choices, or click the plus sign (+) to add a photo or video from your gallery.
3. How do you download Zoom effects?
Pressing the Studio Effects button after installing Zoom for the first time will prompt a pop-up asking you to download the Studio Effects package. Several filters, suited for both business meetings and conversations with friends, let you customize the video and audio during your video calls. To start downloading the Effects bundle, click the Download button. The “Studio Effects” window will appear on the right-hand side of the Background & Filter page after the download is finished. All the face components and choices are available in this Studio Effects window.
Conclusion
The most popular video meeting tool worldwide is Zoom. Family, friends, coworkers, and any two people who want to video chat utilize it. Zoom visual effects are the ideal tool for injecting some humor into otherwise dull Zoom sessions and meetings. A few simple steps will get you a striking backdrop, a humorous filter, and some interesting effects. Since the majority of formal work is now completed from home, Zoom has taken over as the standard video conferencing program. Try out as many of the effects as you like, and use this page as a companion and a map to help you along the way.
ReVisionFX ReelSmart Motion Blur Plugin For Premiere Pro
Premiere Pro is an exceptional tool for editing videos flawlessly by using various advanced features. For instance, you can use Adobe Premiere Pro to add extraordinary effects to your videos, such as motion blur. However, if you want a more smooth and flawless effect, you can use a plugin known as ReelSmart Motion Blur. By reading this article, you can learn about the ReelSmart Motion Blur Plugin Premiere Pro and its related instructions for usage.
Part 1: What is ReVisionFX ReelSmart Motion Blur?
You must be wondering why it’s essential to use the motion blur plugin for Premiere Pro. The reason is that using a plugin like ReelSmart Motion Blur can offer more advanced capabilities and options to create professional results. The ReelSmart Motion Blur plugin uses advanced algorithms to track each pixel automatically. As a result, it provides a more compelling and natural outlook to the video. Hence, you can easily apply the motion blur effect to your videos using RSMB without hard work.
Key Features
- Offers Automatic Tracking: To provide accurate and precise results, RSMB uses automatic tracking. This function allows the plugin to track every pixel automatically from one frame to another efficiently.
- Ability to Adjust Blur: You can add refinements by adjusting the amount of blur according to your preference. By doing so, you can generate the desired final output easily.
- Removing Motion Blur: Apart from adding and adjusting the motion blur effect, you can also remove the blur effect using RSMB effortlessly.
- Add Motion Blur to 360 Videos: RSMB is also capable of adding a motion blur to 360 videos properly. It can recognize the edges of sides along with the top and bottom to create a motion blur effect appropriately.
Part 2: Is It Worth Trying ReelSmart Motion Blur Pro?
As we have discussed the regular version of ReelSmart Motion Blur, now we will also shed light on its Pro version. To help you in choosing the best version, we will draw a comparison between the regular and pro versions of RSMB in this section.
Pricing Price
| Regular Version | Pro Version |
|---|---|
| $104.95 | $164.95 |
Supported Hosts
| ReelSmart Motion Blur | Regular Version | Pro Version |
|---|---|---|
| Adobe: After Effects, Premiere Pro | Adobe: After Effects, Premiere Pro | |
| Apple: Final Cut Pro, Motion | Apple: Final Cut Pro, Motion | |
| / | Avid: Media Composer | |
| OFX: Catalyst Edit, DaVinci Resolve, Final Cut Pro, HitFilm, Movie Studio, Natron, and Vegas Pro | Supports all Regular version Hosts Plus the Following:OFX: Baselight, Flame, Fusion Studio, Smoke, Nucoda, Scratch, Nuke, and Silhouette |
New Features
- Separates the Object: RSMB Pro has the additional capability to isolate the background and foreground effectively. It utilizes a specified matte that can help in object separation to create motion blur with great precision. (Not available with Movie Studio, Vegas Pro, Catalyst Edit, Smoke, Media Composer, Flame, or Nucoda)
- Blur with Motion Vectors: If you have imported a 3D animation video, the pro version can blur the motion vectors provided by you. Thus, it can work on a 3D animation system perfectly. (Not available with Vegas Pro, DaVinci Resolve, Movie Studio, Media Composer, Catalyst Edit, or Nucoda)
- RGB+A Tracking: This option is used to recognize and track dark images with mattes by using the alpha channel. You can use this option for masked or CG stuff. (Not available with Media Composer)
- Use of Tracking Points: To help the RSMB’s calculation of motion vectors, you can provide tracking points. By defining the tracking points, you can tell RSMB about the movement of one pixel from one frame to another efficiently. (Not available with Vegas Pro, Media Composer, Catalyst Edit, DaVinci Resolve, Smoke, Flame, Movie Studio, or Nucoda)
- Spline Guidance: If RSMB encounters problems related to tracking, you can draw and animate shapes to tell about the object’s movement. Thus, it can help the RSMB find the object movement easily. (Not available with Premiere Pro, Nucoda, Vegas Pro, HitFilm, Movie Studio, Smoke, Sihouette, Flame, Scratch, Nuke, Motion, Media Composer, DaVinci Resolve, Catalyst Edit, FCPX)
Rating
- 7 out of 5
Our Verdict
The new features in the pro version of RSMB are really compelling and beneficial. However, there are various restrictions when it comes to the supported hosts of the pro version. So, if you are using any common software for video editing that is not recognized by the pro version, we will recommend you use the regular version of RSMB. The regular version of RSMB is cost-effective and works proficiently.
Part 3: How to Use ReelSmart Motion Blur Plugin in Premiere Pro?
Are you eager to know how to use the Premiere Pro motion blur plugin? Read and follow the steps provided below to craft flawless results.
Step1 Import Video Clip
Open Adobe Premiere Pro in your system and start with a new project. On the newly displayed window, import the video clip by browsing through your computer. After importing the desired video file, make sure to drag and drop it into the timeline to begin editing.

Step2 Search for RSMB Effect
Once you have dropped the video into the timeline, navigate to the “Effects” tab given on the right side. On the search box, type “RSMB.” From the fetched results, select RSMB and apply it to the above layer of your video clip in the timeline.

Step3 Adjust the Plugin Settings
Now head to the settings on the left side and enable the GPU settings. Moreover, you can increase the blur amount to 1 or 1.5. By doing so, you can create a smoother look in your video. Once done with the settings, make sure to render your video to produce a smooth finish. Once done with rendering, you can preview and save the video easily.

Conclusion
Motion blur effect can drastically transform your video clip. If you are using Premiere Pro to add motion blur, we will recommend you use the plugin called ReVisionFX ReelSmart Motion Blur. If you are unaware of the motion blur plugin Premiere Pro, this article has fetched all the related details. This article has provided all the significance and instructions to use the RSMB plugin.
Supported Hosts
| ReelSmart Motion Blur | Regular Version | Pro Version |
|---|---|---|
| Adobe: After Effects, Premiere Pro | Adobe: After Effects, Premiere Pro | |
| Apple: Final Cut Pro, Motion | Apple: Final Cut Pro, Motion | |
| / | Avid: Media Composer | |
| OFX: Catalyst Edit, DaVinci Resolve, Final Cut Pro, HitFilm, Movie Studio, Natron, and Vegas Pro | Supports all Regular version Hosts Plus the Following:OFX: Baselight, Flame, Fusion Studio, Smoke, Nucoda, Scratch, Nuke, and Silhouette |
New Features
- Separates the Object: RSMB Pro has the additional capability to isolate the background and foreground effectively. It utilizes a specified matte that can help in object separation to create motion blur with great precision. (Not available with Movie Studio, Vegas Pro, Catalyst Edit, Smoke, Media Composer, Flame, or Nucoda)
- Blur with Motion Vectors: If you have imported a 3D animation video, the pro version can blur the motion vectors provided by you. Thus, it can work on a 3D animation system perfectly. (Not available with Vegas Pro, DaVinci Resolve, Movie Studio, Media Composer, Catalyst Edit, or Nucoda)
- RGB+A Tracking: This option is used to recognize and track dark images with mattes by using the alpha channel. You can use this option for masked or CG stuff. (Not available with Media Composer)
- Use of Tracking Points: To help the RSMB’s calculation of motion vectors, you can provide tracking points. By defining the tracking points, you can tell RSMB about the movement of one pixel from one frame to another efficiently. (Not available with Vegas Pro, Media Composer, Catalyst Edit, DaVinci Resolve, Smoke, Flame, Movie Studio, or Nucoda)
- Spline Guidance: If RSMB encounters problems related to tracking, you can draw and animate shapes to tell about the object’s movement. Thus, it can help the RSMB find the object movement easily. (Not available with Premiere Pro, Nucoda, Vegas Pro, HitFilm, Movie Studio, Smoke, Sihouette, Flame, Scratch, Nuke, Motion, Media Composer, DaVinci Resolve, Catalyst Edit, FCPX)
Rating
- 7 out of 5
Our Verdict
The new features in the pro version of RSMB are really compelling and beneficial. However, there are various restrictions when it comes to the supported hosts of the pro version. So, if you are using any common software for video editing that is not recognized by the pro version, we will recommend you use the regular version of RSMB. The regular version of RSMB is cost-effective and works proficiently.
Part 3: How to Use ReelSmart Motion Blur Plugin in Premiere Pro?
Are you eager to know how to use the Premiere Pro motion blur plugin? Read and follow the steps provided below to craft flawless results.
Step1 Import Video Clip
Open Adobe Premiere Pro in your system and start with a new project. On the newly displayed window, import the video clip by browsing through your computer. After importing the desired video file, make sure to drag and drop it into the timeline to begin editing.
Step2 Search for RSMB Effect
Once you have dropped the video into the timeline, navigate to the “Effects” tab given on the right side. On the search box, type “RSMB.” From the fetched results, select RSMB and apply it to the above layer of your video clip in the timeline.
Step3 Adjust the Plugin Settings
Now head to the settings on the left side and enable the GPU settings. Moreover, you can increase the blur amount to 1 or 1.5. By doing so, you can create a smoother look in your video. Once done with the settings, make sure to render your video to produce a smooth finish. Once done with rendering, you can preview and save the video easily.
Conclusion
Motion blur effect can drastically transform your video clip. If you are using Premiere Pro to add motion blur, we will recommend you use the plugin called ReVisionFX ReelSmart Motion Blur. If you are unaware of the motion blur plugin Premiere Pro, this article has fetched all the related details. This article has provided all the significance and instructions to use the RSMB plugin.
How to Use Rule of Thirds in Video
So you have your work flow sorted out and you’re well on your way with Filmora but you’re not quite happy with your results or something just seems off when you watch your videos back. You may be missing an important element of all visual media and that’s composition. This is where the building blocks of every frame come together to make a visually pleasing piece for the viewer and helps the eyes concentrate on the content rather than trying to figure out what they are looking at.
I’m sure you may have heard of the rule of thirds for art or photography and you may not know or understand what it is. You may even be wondering how the rule of thirds can help you with your video creation. Well, that is what I’m going to show and explain to you today.
What is the rule of thirds
At its core the rule of thirds is a guide to follow whenever you create something visual.
You break an image into thirds both horizontally and vertically, in doing this you are left with nine boxes and four gridlines, the rule states that by placing key elements in line with gridlines you will have an overall better composition.
To gain a better understanding of this here is a visual example of the gridlines and nine boxes.

This may seem simple but is often overlooked due to time restraints and eagerness to get that video out there. By following these guidelines your overall composition will gain interesting and pleasing results that can help with viewer engagement. This is only one piece of the puzzle but as any photography professional or artist will tell you, It’s the small things that add up.
How to use the rule of thirds
To show how to use the rule of thirds I will be showing an image with and without the use of the guidelines. In doing this you will be able to see how impactful this system is and how it can help with your own creations within Filmora .
This will be our scene example, you can see buildings, boats, water and skyline. This may be typical of a backdrop or an insert for a holiday picture amongst many other things.
I will now show this picture with no compositional thought and without the use of the thirds system.

Notice how all the elements are in the scene but it just looks interesting and something just seems off when you look at it. You may find yourself searching for understanding of the image rather than taking the image in and concentrating on what the creator intended. This is seen commonly due to the need to fit every element in the scene but sometimes it is best to sacrifice something you may see as important for the sake of the whole picture.
We will now look at the example image with the rule of thirds in place and see if overall this makes a more interesting scene.

We have aligned the skyline with the first horizontal grid line and aligned the boats with the vertical grid lines. We have sacrificed the crane in the scene but overall I’m sure you can agree that this is more pleasing and makes more sense when you’re viewing this. The whole middle section of the scene now has information within it and the contrast between the middle and the rest of the scene directs your eyes to what was intended to be viewed, This is called effect use of empty space. In doing this you save yourself time from adding more information to direct the viewer.
Placing key elements directly in the center of your scene can seem static and boring but by placing elements to one side or using the first and second horizontal grid lines you create something called Dynamism , where the viewer sees an element along the grid and takes a journey through the rest of the image.
Studies have shown that this is the humans natural way of viewing imagery, we first find something interesting to look at and then journey around that. So by using this rule you are creating a more natural process for your viewer.
Tips when starting using the rule of thirds
The first tip I would say is to view other videos, YouTube is a good starting point. Watch interviews and notice where the chairs are aligned. Watch reviewers and notice where they position themselves in the scene. Lastly watch movies and pause on an interesting scene and try to deconstruct where everything is placed and why they chose that composition.
The idea with the rule is to have it become something you do naturally, by always considering the form you save yourself time in the editing process. The key things you have in your mind whenever you make a scene should be.
1. What is the key element in my scene or what am I trying to make the viewer focus on.
2. where do I intend to place these in my scene?
3. Have I created a balanced scene with enough negative space to direct the eye.
If you consider this with every video you make then in time this will become as natural as drinking water on a hot day. As a practice you could open some old projects and apply this rule to your video to see the results and you may find yourself impressed with the change.
When is it best to not use the rule of thirds?
The rule is very useful when you’re aiming to grab the attention towards a certain element but that being said, when you have a symmetrical scene you can get away with not using the rule as your eyes can make sense of symmetry very well.
Even when working with a symmetrical scene you can incorporate the rule within for elements such as people or key figures but in this situation it is down to the creator to figure what they feel is best in any given shot.
How to Use Rule of Thirds in Filmora
The tools provided within Filmora are generous and one great feature is the crop and size tool.
When inserting an image or movie file you can right click on the timeline and select crop and size bringing up a handy screen with the gridlines already there for you. It’s just a matter of aligning your shot for the best composition.
For reference I will show you what this looks like.
First right click the timeline on the image you want to reposition. Alternatively you can select the desired insert and press Alt+C this will also bring up the same editing box.

Now click on the crop and zoom option and this editor will appear.

As you can see you are able to align the shot and change the aspect ratio to align with your project. For a better look at the built in grid lines see image below.

Conclusion
To conclude, the rule of thirds is very important within visual media and is tough within the fundamentals of art and photography from beginner level right up to the highest point of education, Practice thinking about your placement of key elements within your videos and how this affects your overall composition. The goal is to have this as an automatic thought when shooting your videos or still images. This is a small change you can make but has a big impact on how a viewer engages your content and in return leaves a positive opinion towards your creativity and eye for detail.
Free Download For Win 7 or later(64-bit)
Free Download For macOS 10.14 or later
Free Download For macOS 10.14 or later
Also read:
- [New] AnimatedApp Full Guide '24 Edition
- [New] Elevate Your Vids Top YouTube SEO Gadgets
- [New] Top Picks Exploring the Best Screen Recorder Apps
- 2024 Approved The Art of Audio Integration in Online Journals
- All About YouTube TV Your Comprehensive Resource
- In 2024, Demystifying YouTube's SEO A Keyword Research Guide
- New How To Create A Green Screen Video In After Effects
- New How To Film a Slow Motion Video for 2024
- New Learn How to Create Animated Titles and Text in the Filmora Video Editor. This Is a Simple Step-by-Step Tutorial for Any Skill Level
- New Top List of Best VHS Video Effect Makers
- Troubleshooting Techniques for Sudden Facebook Live Freezes for 2024
- Updated 2024 Approved Guide to Add Transition Effects in Premiere Pro
- What Is the Difference Between an iPad and a Tablet?
- Title: New How To Make a Video by Mouse in Filmora for 2024
- Author: Chloe
- Created at : 2025-02-25 23:43:38
- Updated at : 2025-03-03 21:34:51
- Link: https://ai-editing-video.techidaily.com/new-how-to-make-a-video-by-mouse-in-filmora-for-2024/
- License: This work is licensed under CC BY-NC-SA 4.0.