:max_bytes(150000):strip_icc():format(webp)/the-17-best-graphic-design-software-2024-1dd6c15b34124b25b65e4b096e4e6ba4.jpg)
New How to Make Foggy Text Reflection Effect

How to Make Foggy Text Reflection Effect
Preparation
What you need to prepare:
- A computer (Windows or macOS)
- Your video materials.
- Filmora video editor
Step 1
Download the Filmora video editor → run it → and click on “New Project”.
Step 2
Go to Titles → drag the Default Title to the Timeline below. Double-click on the clip to open its settings. Here, type in your text → change the font to Montserrat Light. Scroll down and increase Text Spacing to 5.0. Now, select only the first word in the box where you typed your text. Then, change its font to Montserrat Bold. Click OK.

Step 3
Take a Snapshot of the text you just created. Now, delete the Default Title clip from the Timeline and drag the Snapshot you took to the Timeline.

Step 4
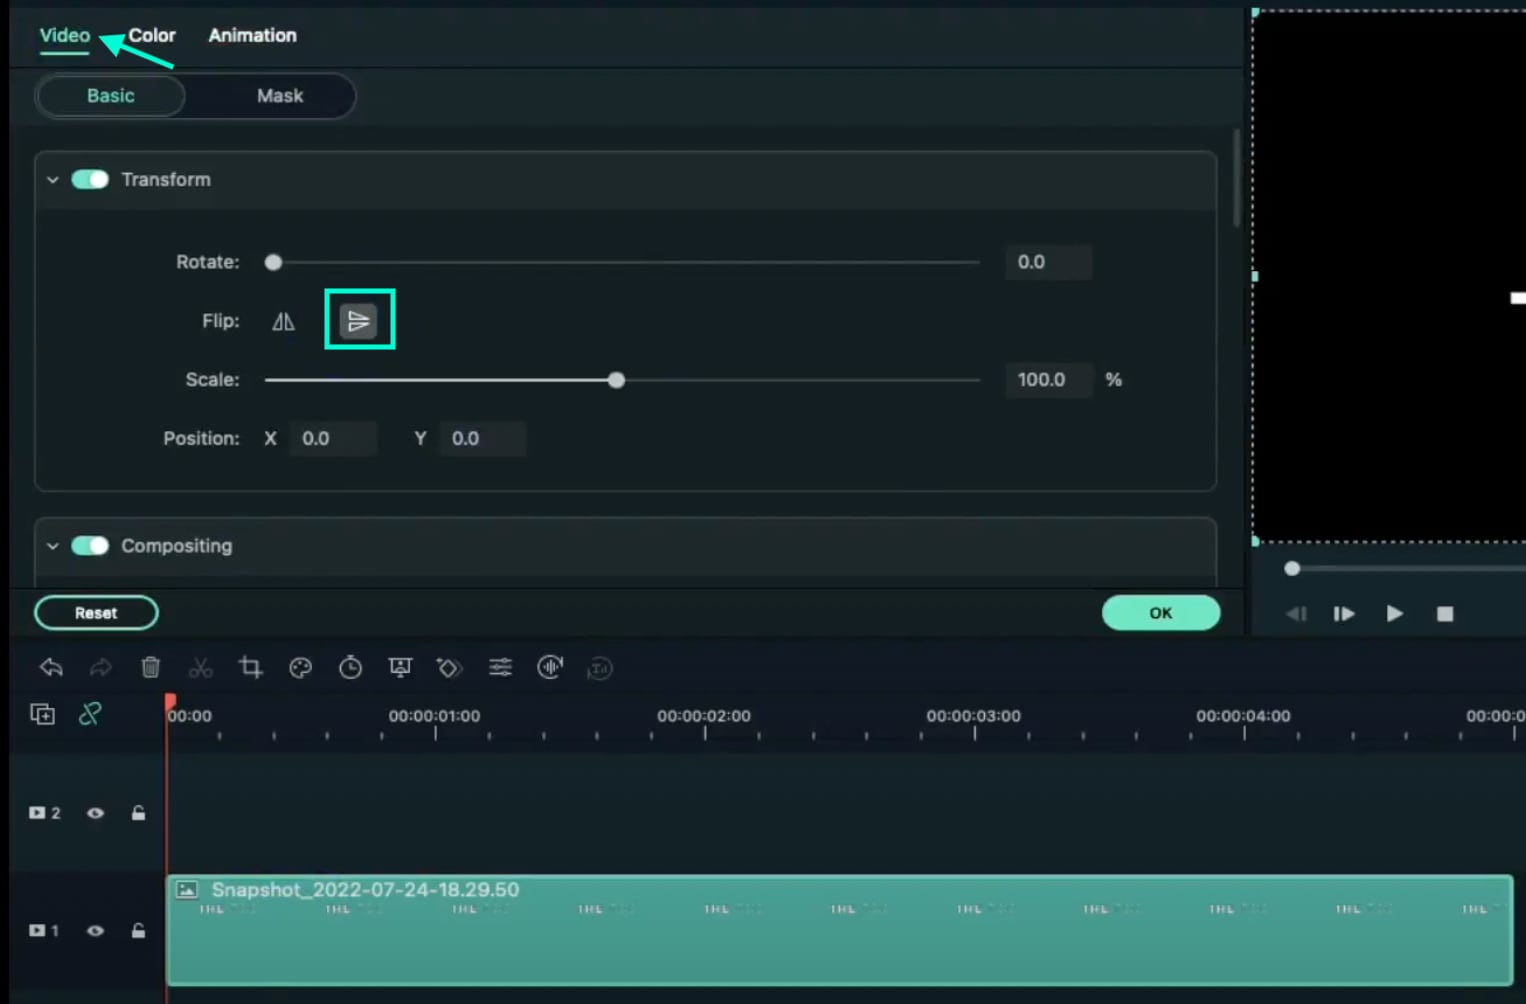
Double-click the Snapshot clip → go to the Video tab → click the highlighted button below to flip the text. Then, take a Snapshot of this flipped version of the text and delete the clip from the Timeline.
Step 5
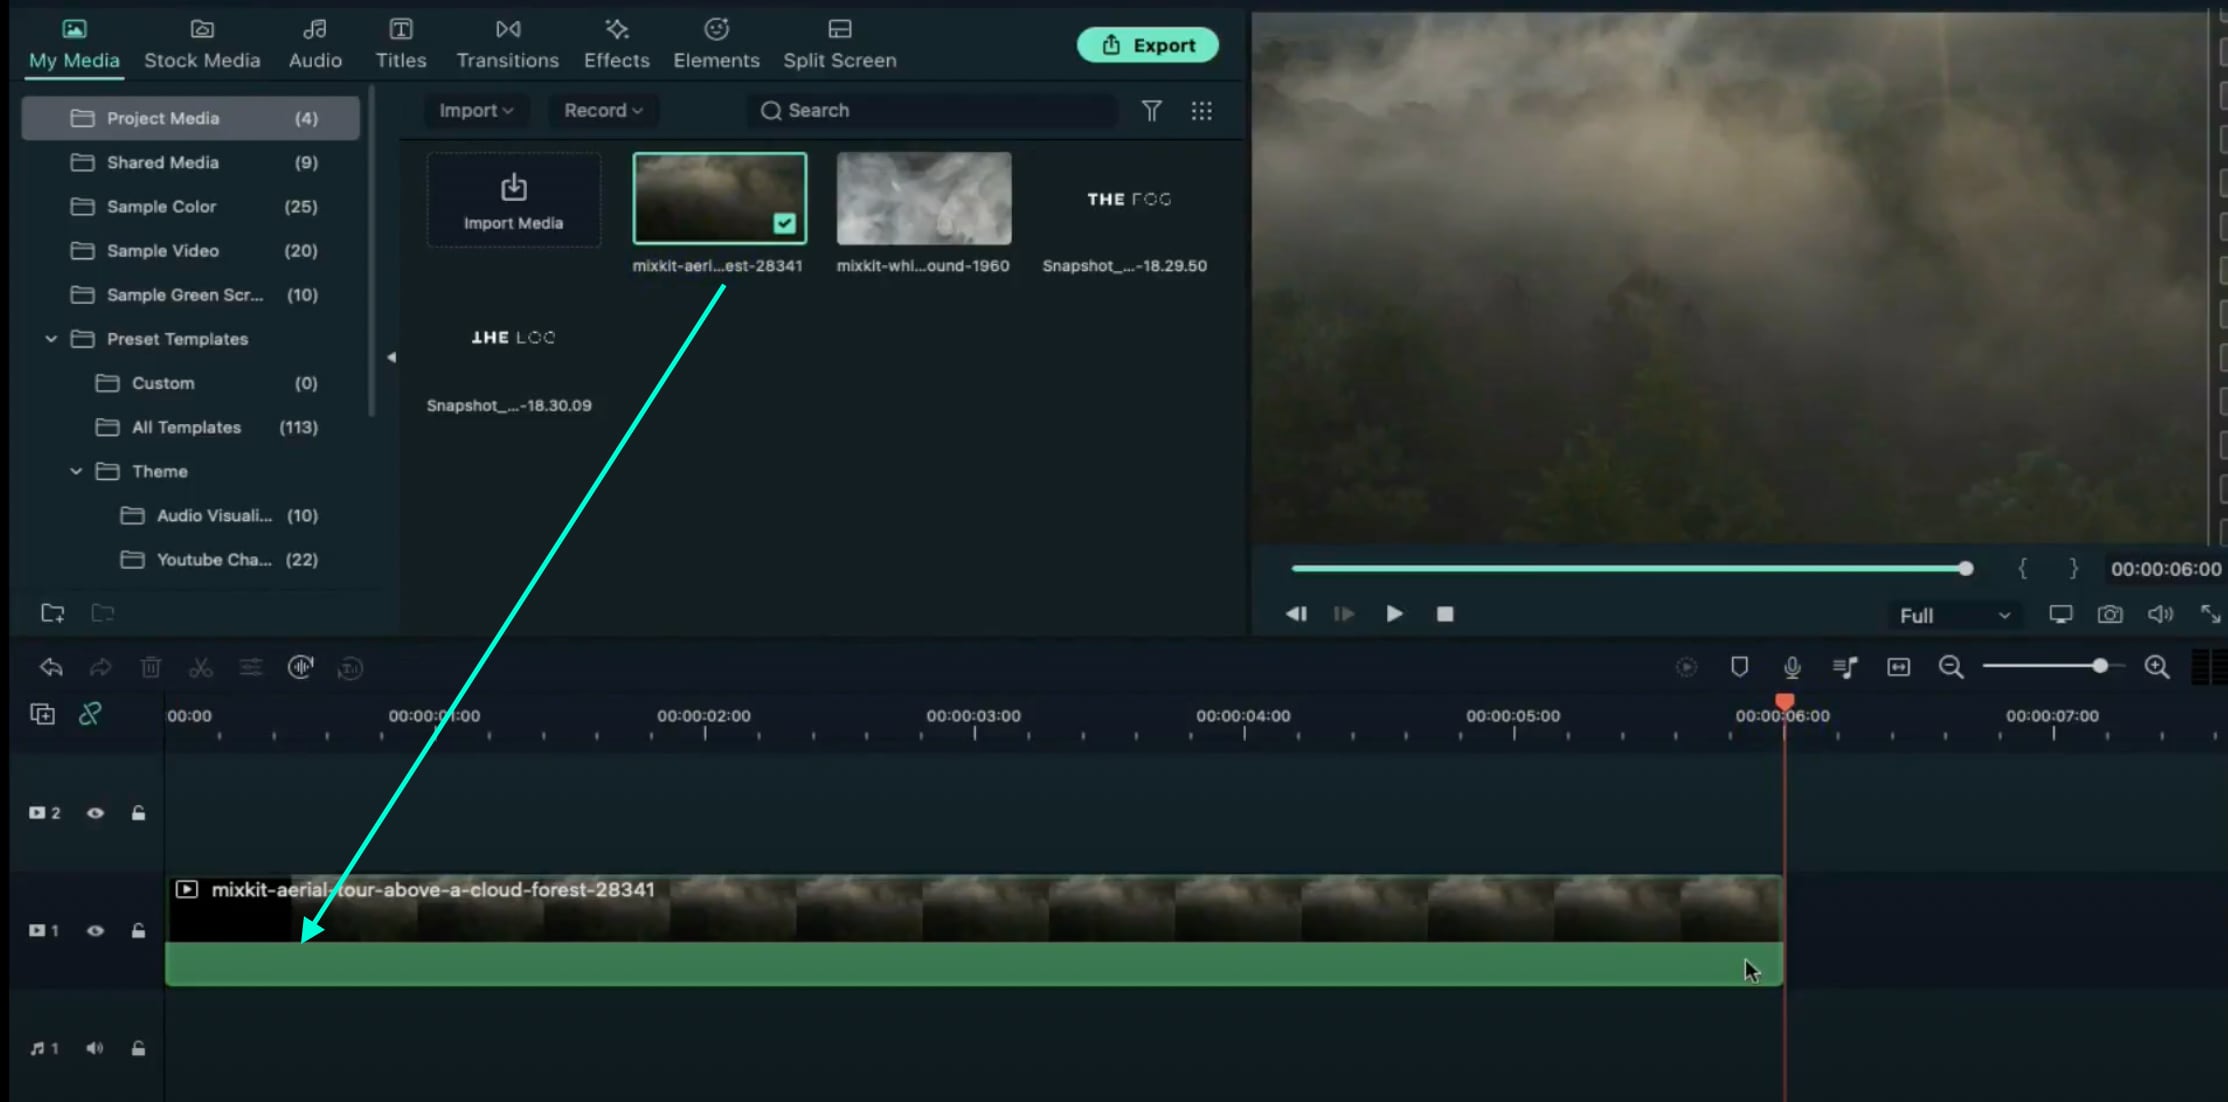
Visit the free stock footage site Mixkit and download any smoke or fog background video you like. Then, go to Filmora → My Media → Import Media → and select the footage you downloaded to import it into the video editor. Then, drag the Smoke clip to the Timeline and make it 6 seconds long.
Step 6
Double-click on the clip → go to Color. Now, change Contrast to “49”, Saturation to “100”, and Brightness to “18”. Below, set the 3D LUT option to “Game of Thrones”. Click OK.

Step 7
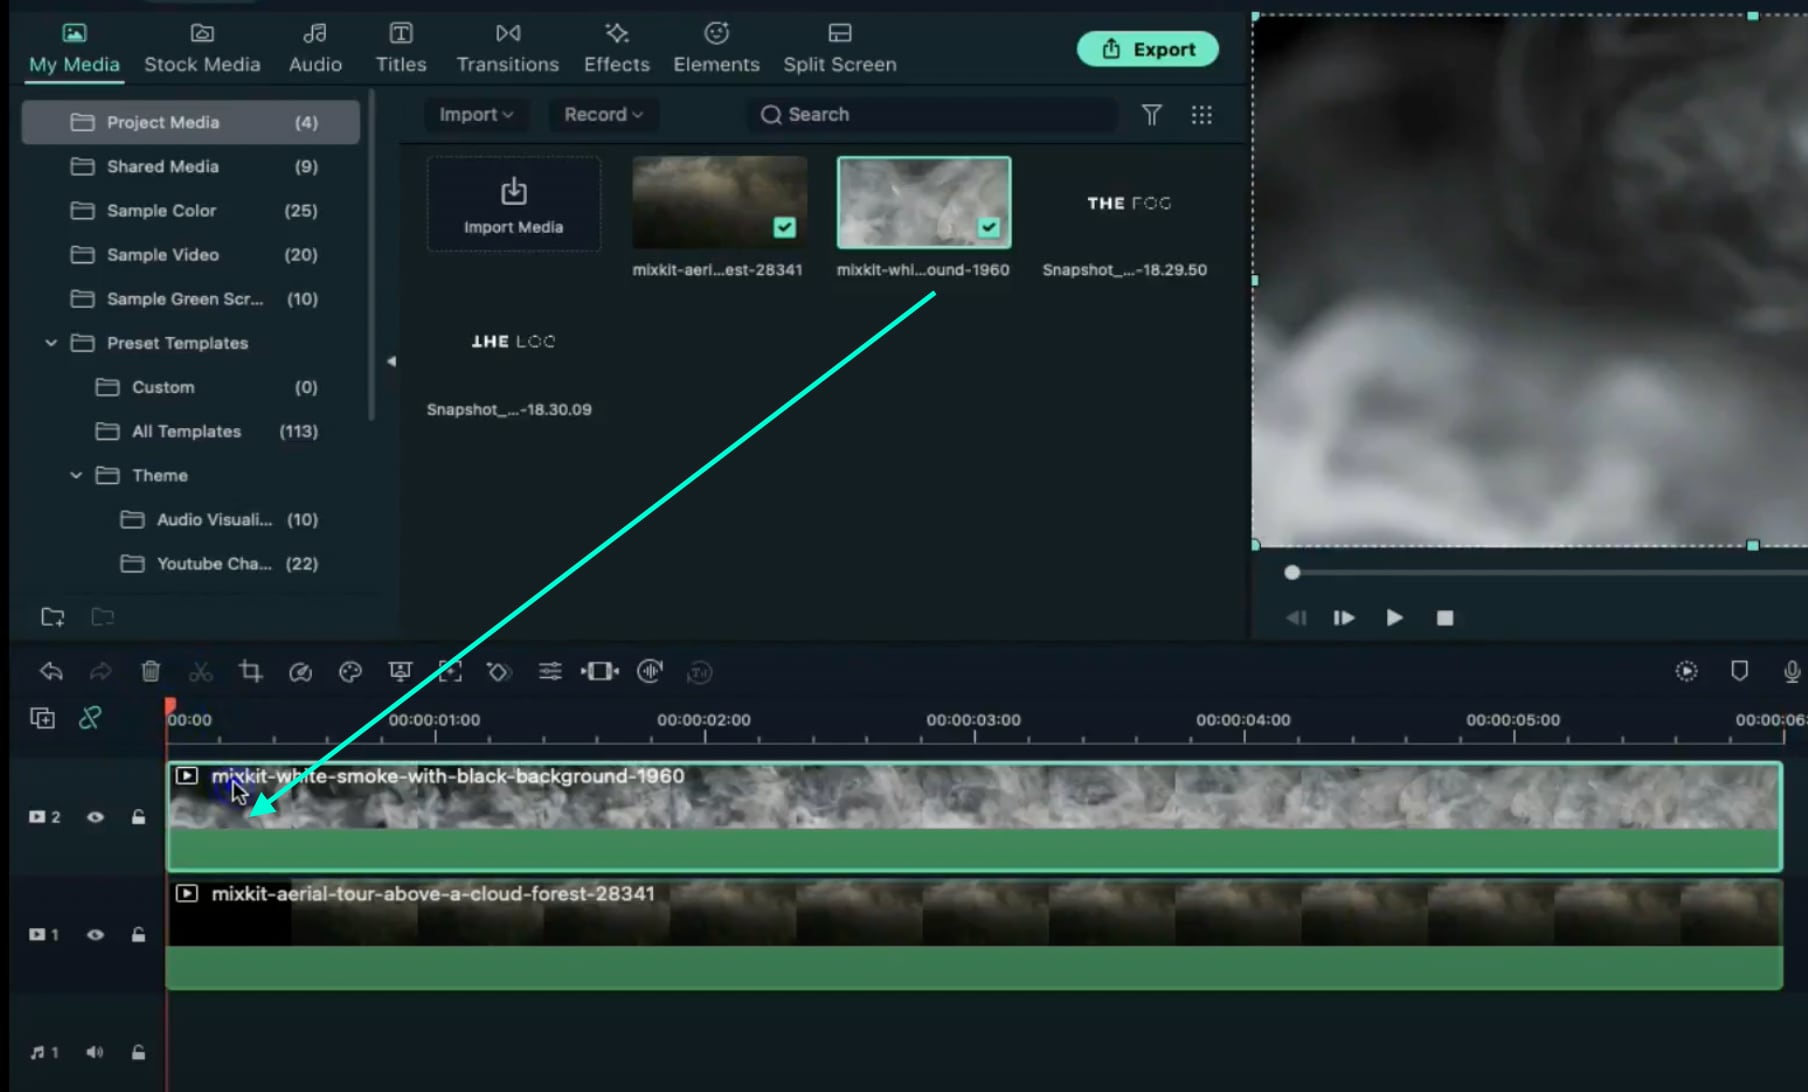
Drag the other Smoke clip to Track 2 of the Timeline. Make it 6 seconds long. Then, move the Playhead to the starting point of the video.
Step 8
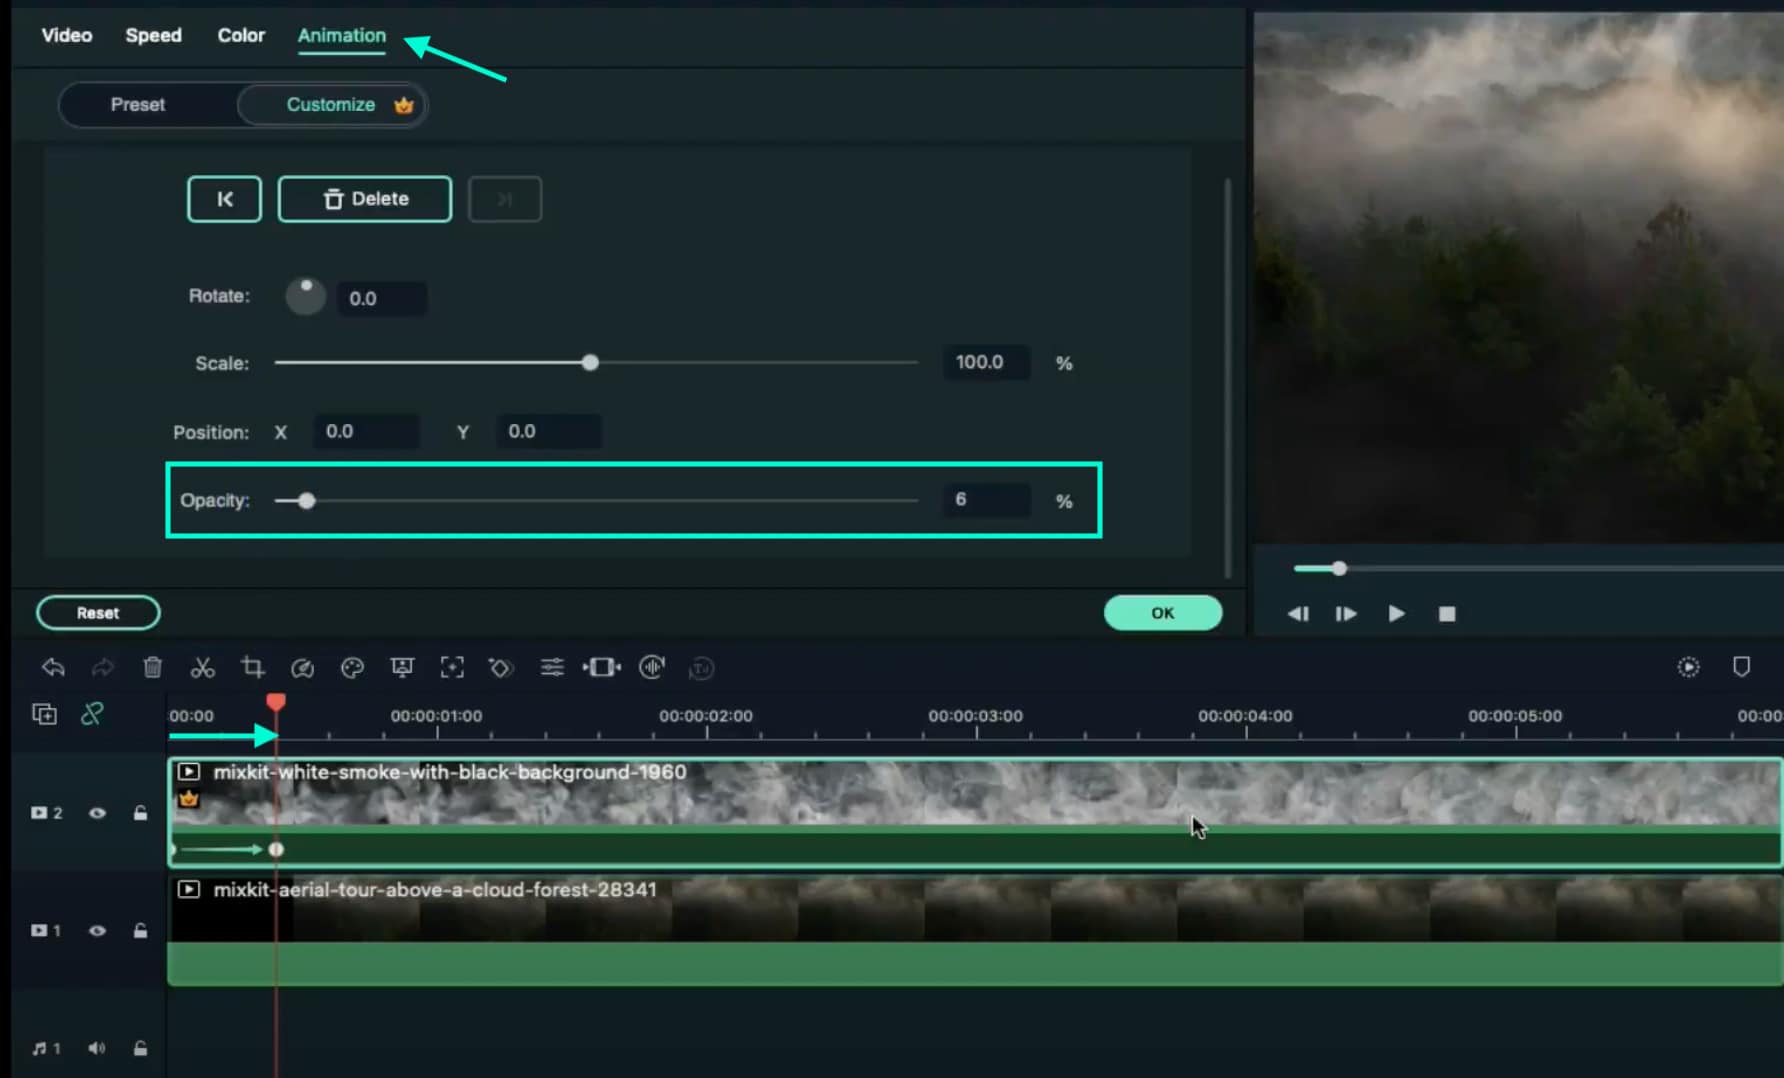
Double-click on the new smoke clip. Go to Animation. Decrease the Opacity to 0%. Move the Playhead 10 frames forward → increase the Opacity to 6%. Don’t click OK yet.
Step 9
Move the Playhead to 5 seconds. Click on “**+Add**” to add a keyframe to the clip. Then, move the Playhead to the next-to-last frame and increase the Opacity to 100%. Click OK.

Step 10
Set the Playhead to the second frame and drop the first Snapshot we took earlier at that starting point. Drag the clip to be 6 seconds long. Then, double-click on the clip and adjust the settings exactly as you see in this image here. Don’t click on OK yet.

Step 11
Move the Playhead at the 17th frame → increase the Opacity to 6%. Move the Playhead to 5 seconds and 23rd frame → change the X-axis value to “1973”. Click OK.
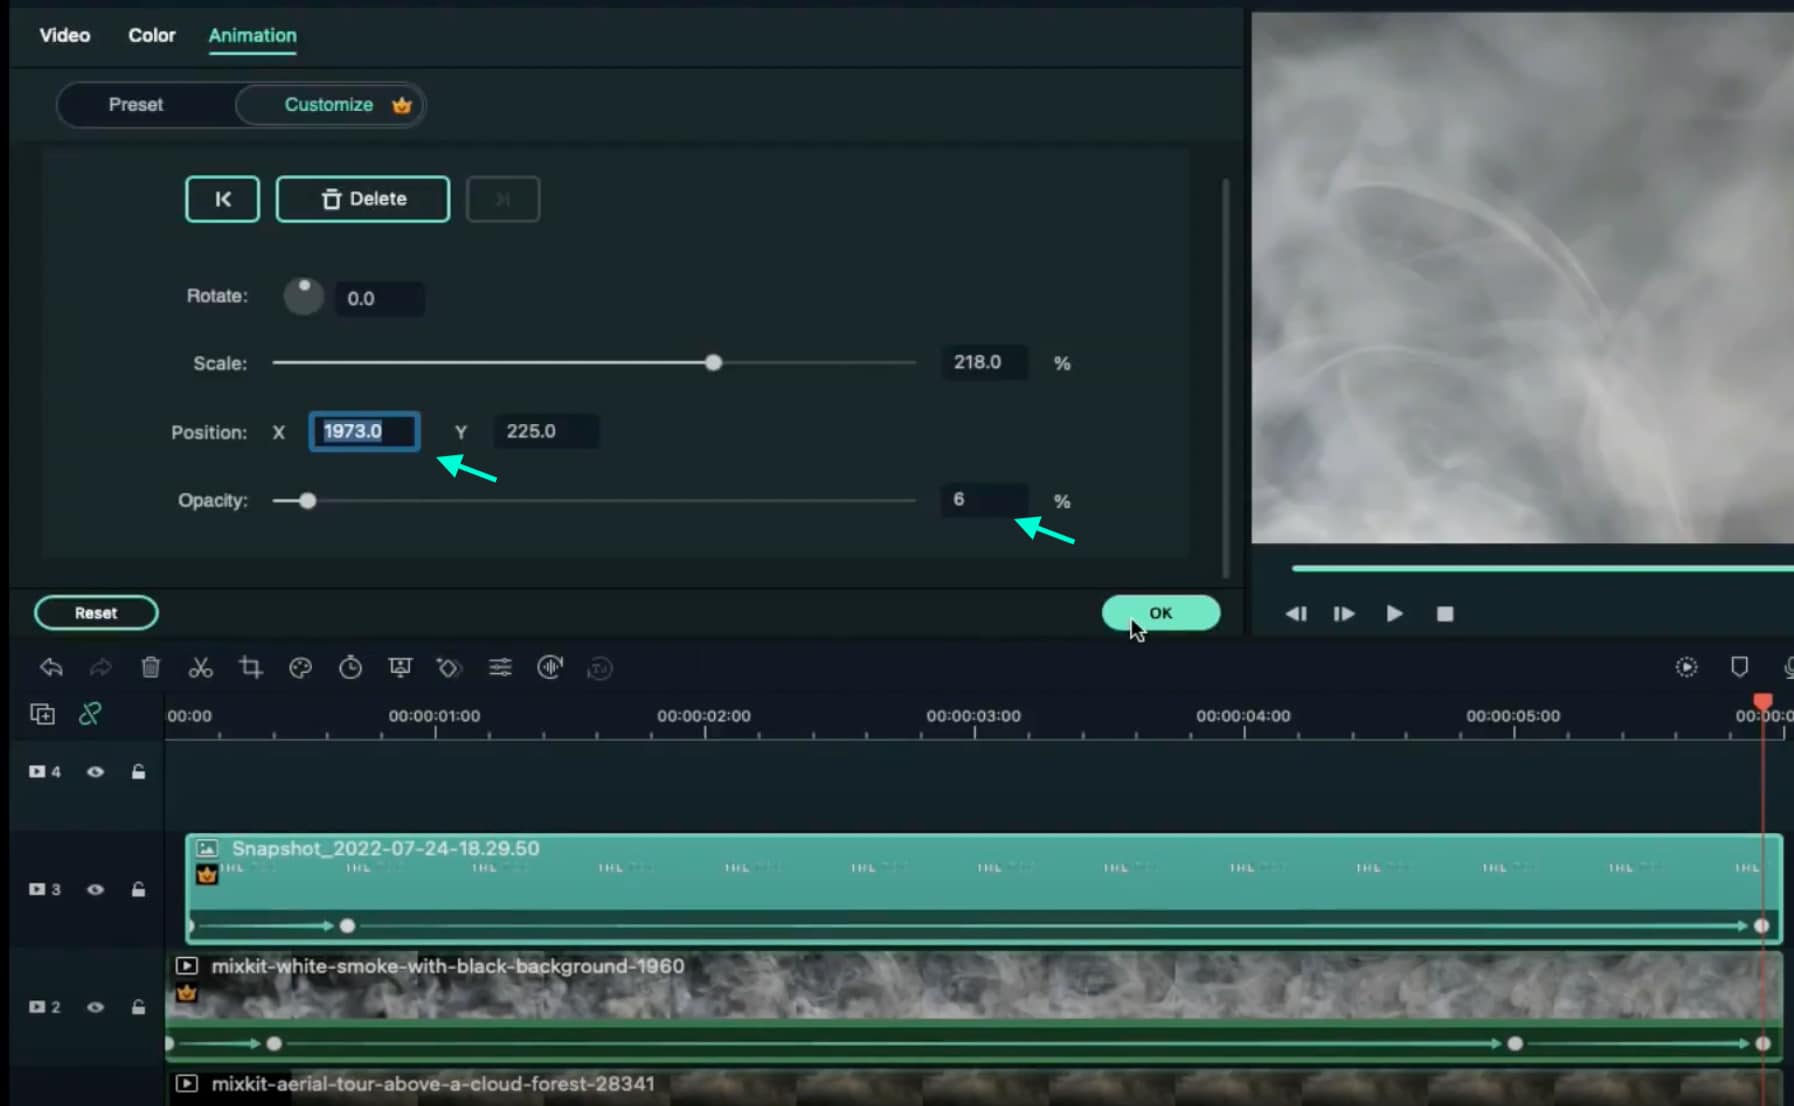
Step 12
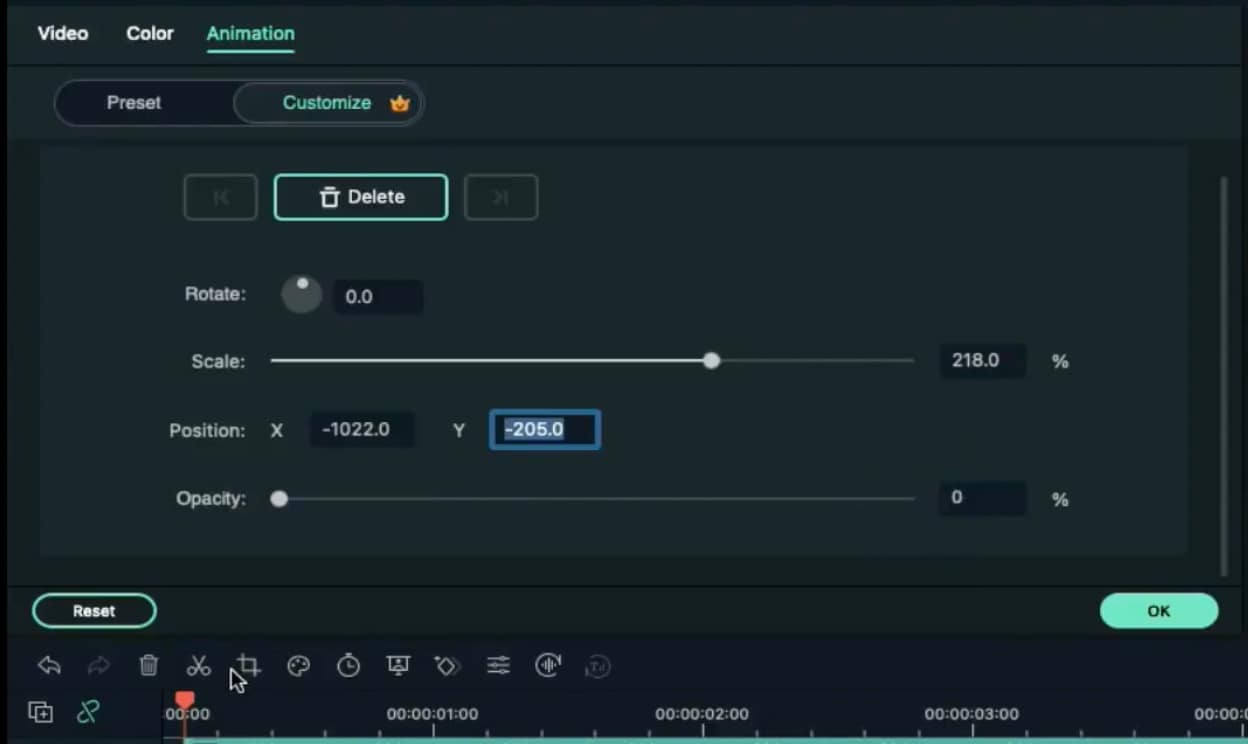
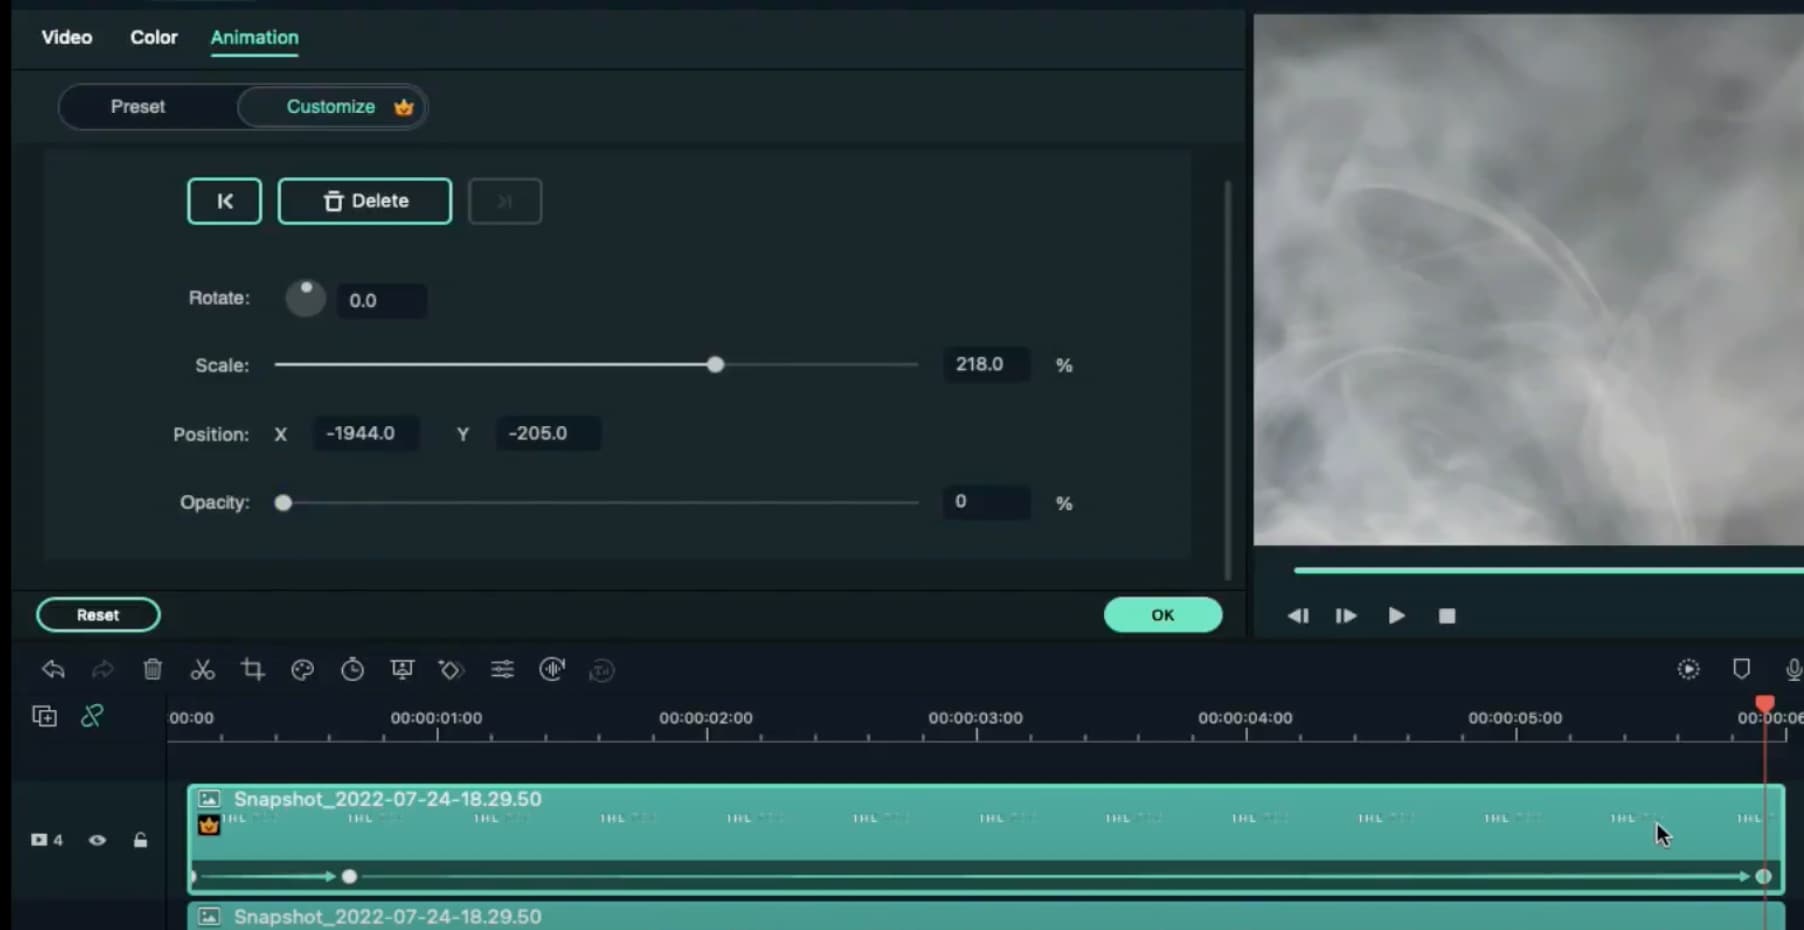
Drag the same Snapshot file to Track 4, directly on top of the clip in Track 3. Make its duration the same too. Now, double-click on this clip and apply the exact same settings as in the image here. Don’t click on OK yet.
Step 13
Move the Playhead to the 17th frame → increase the Opacity to 6%. Now, move the Playhead to 5 seconds and 23rd frame → change X-axis value to “-1944” and the Opacity to 0%. Click OK.
Step 14
Go to Sample Color and drag the White color on Track 6 in the Timeline. Place this clip at the same starting point as the snapshots below it. Set its duration the same as the clips below too. Then, move the Playhead at its starting point.

Step 15
Double-click on the Sample Color clip → go to Video → Mask → Import. Here, select the first Snapshot we created earlier in this tutorial.

Step 16
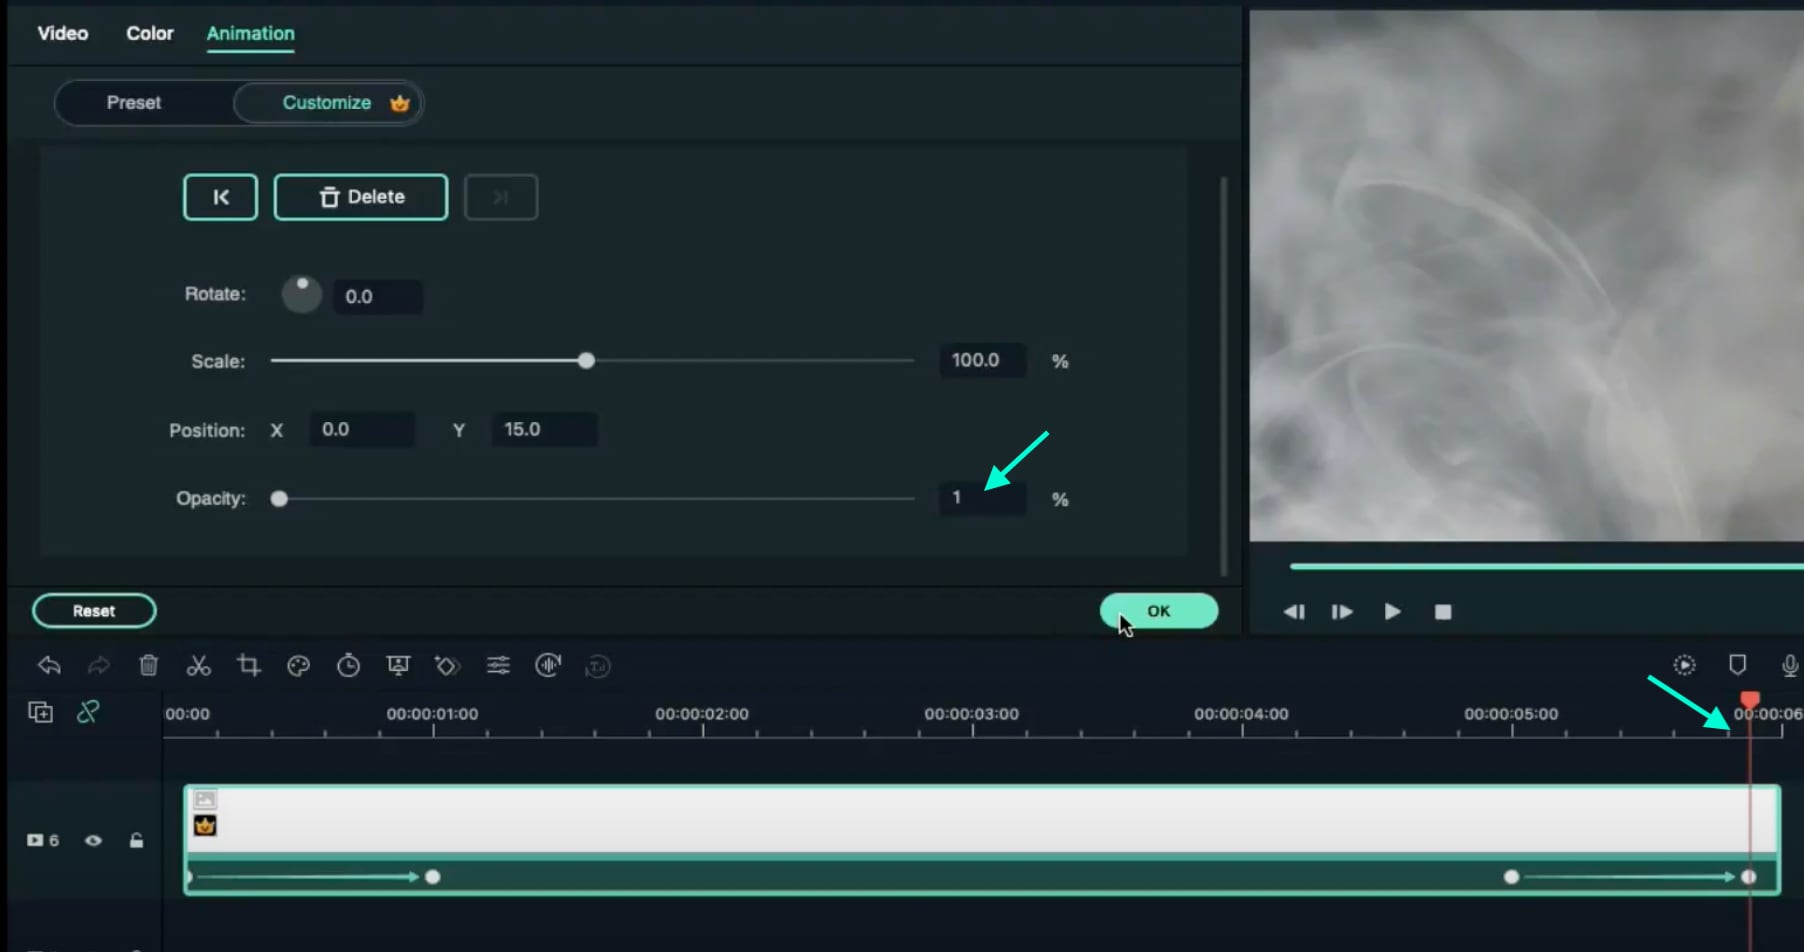
Now, go straight to the Animation tab and click the “**+Add**” button to add a keyframe. Then, compress the text in the preview screen until it’s not visible anymore on the screen.

Step 17
Add keyframes at the 1-second position and at the 5-second position. Then, move the Playhead once more to the 5-second and 22nd frame. Reduce the Opacity to 1%. Click OK.
Step 18
Drag another White Sample Color to Track 5 this time. Adjust its duration and starting point to be the same as the clip above it. Double-click on it → go to Video → Mask → Import. Here, select the flipped text Snapshot we created earlier.
Step 19
Now, go to Animation and add a keyframe at the starting point. Then, compress the text on the preview screen exactly as we did before with the other one. Then, add a keyframe at the 1-second position of the clip. Then, adjust the Y-axis position to create a reflection effect, just like this.

Step 20
Move the Playhead to the 5-second position and add a keyframe. Now, move the Playhead directly to 5-seconds and 22 frames. Here, reduce the Opacity to 0%.
Step 21
Go back to the Video tab from the upper-left corner of the panel. Now, move the Playhead to the clip’s starting point. Select the Mask tab. Add a keyframe. Move the Playhead to 1 second and set the Blur Strength to 6%.

Step 22
Move the Playhead to 3 seconds. Scroll down and set Vertical to 259%. Set Y-axis to “-157”. Then, increase Blur Strength to 25%. Click OK.

Step 23
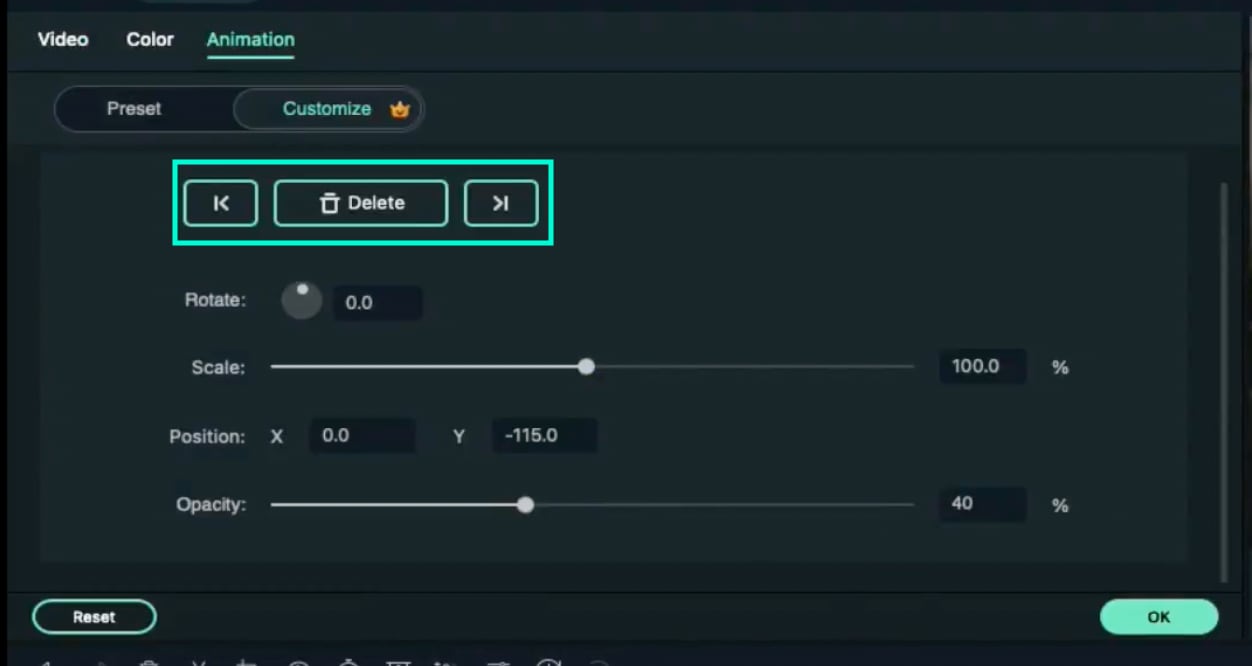
Click on the Sample Color in Track 5 and change the Opacity to 40% for the second and third keyframes. You can move between the keyframes on the arrows highlighted below. Click OK.
Step 24
Go to Sample Color and drag the “Gradient 4” color to Track 7 on the Timeline. Allow this clip to start from the very beginning and adjust its end time to be the same as all the other clips.
Step 25
Double-click on the Gradient 4 clip → go to Video → Basic. Change the Blending Mode to “Soft Light”. Reduce the Opacity to 42%. Click OK.

Step 26
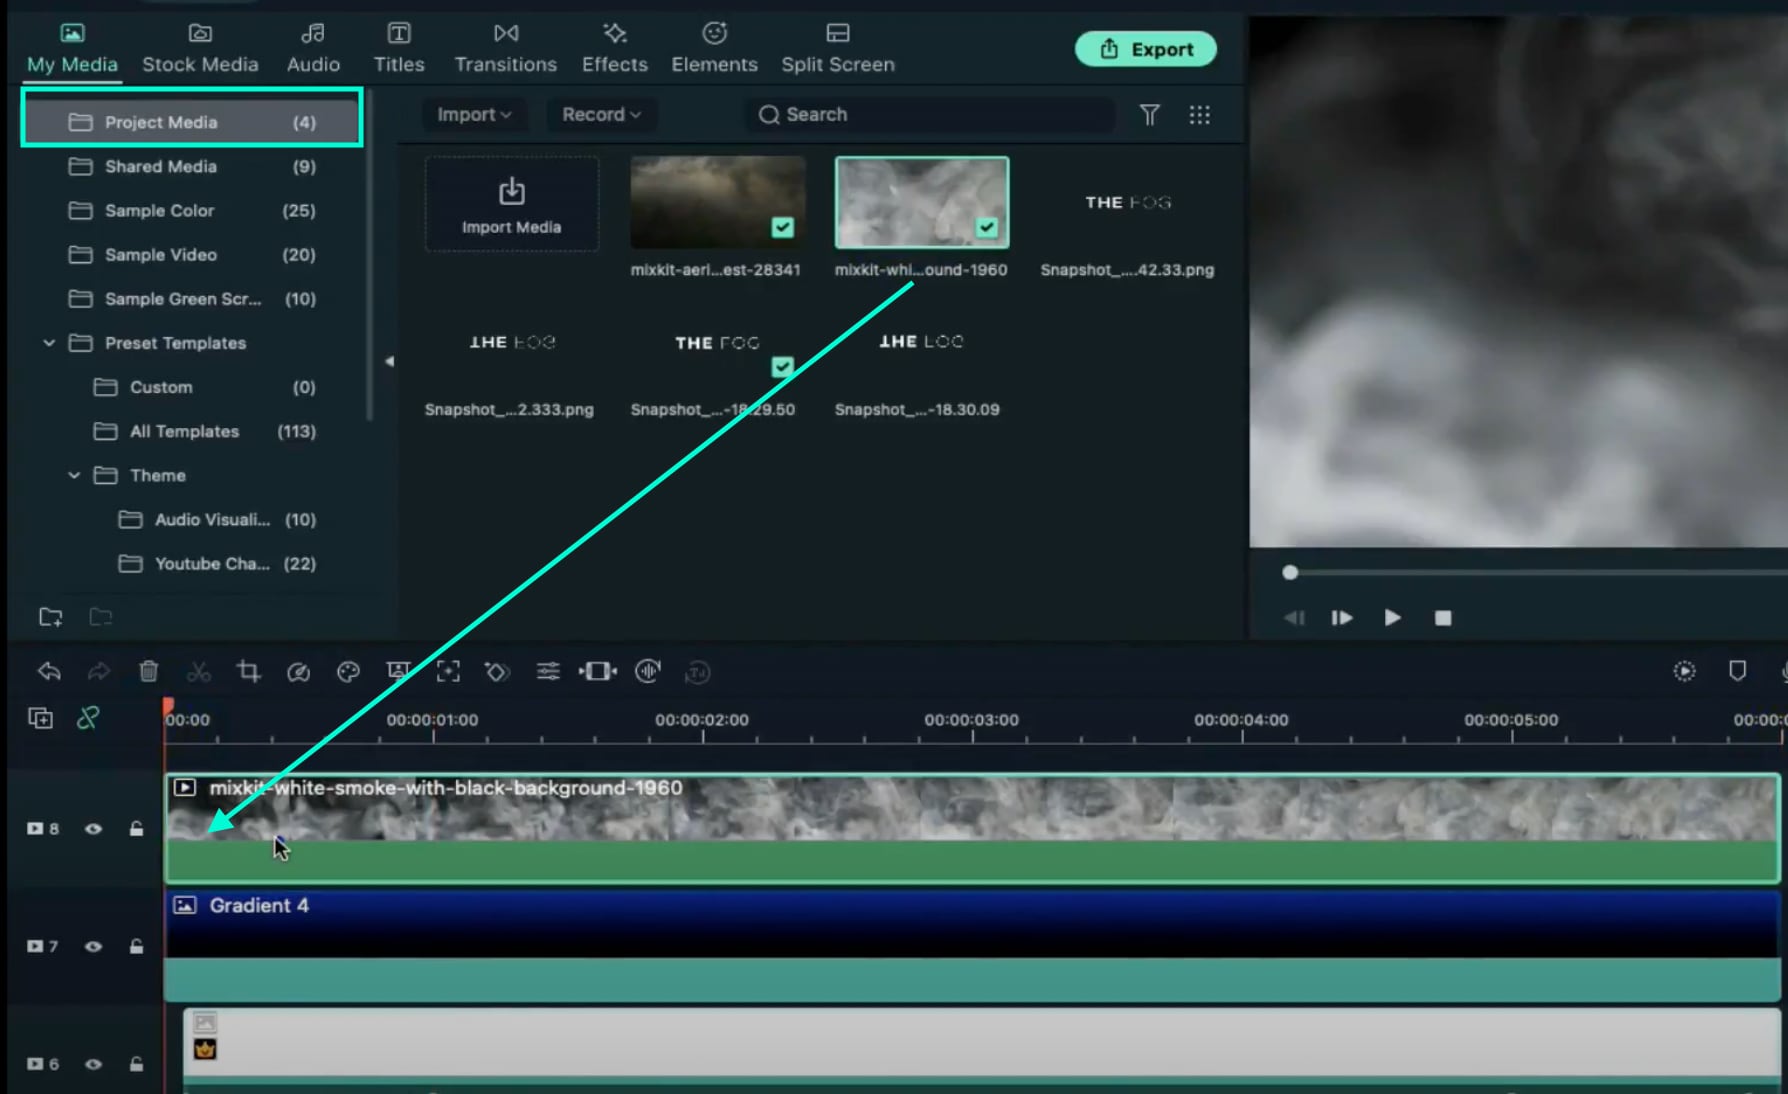
Go to Project Media and drag the white smoke clip on Track 8. Place the Playhead at the starting point and double-click on the clip.
Step 27
Change its Blending Mode to “Screen”. Go to the Animation tab and decrease the Opacity to 0%. Move the Playhead to frame 10 → increase Opacity to 12%. Move the Playhead to the 5-second position → add a keyframe. Then, move the Playhead at 5 seconds and 23rd frame → increase the Opacity back to 100%. Click OK.
Step 28
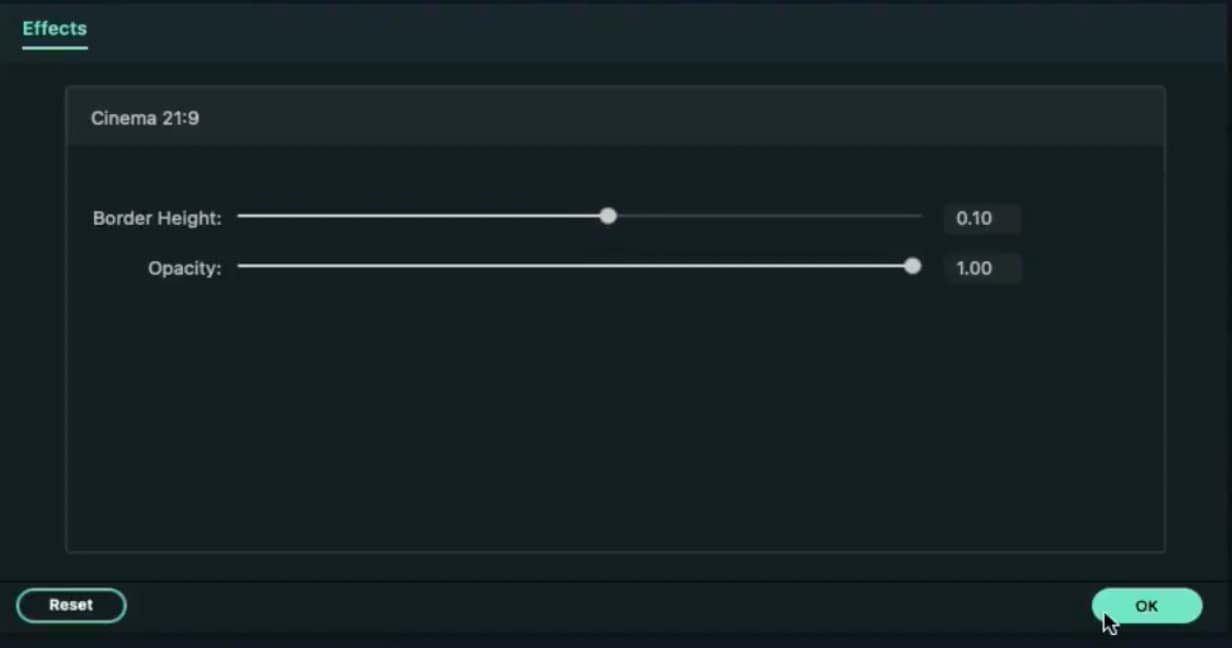
Go to Effects and drag the Cinema effect to Track 9. Adjust its duration to match all the other clips. Double-click on the clip and increase its Border Height to “0.10”. Click OK.
Step 29
Finally, Render the video and watch the final result. You’re done! Congratulations on resting a foggy text reflection effect in Filmora.

Summary
What you’ve learned:
- Create a foggy text reflection effect in the Filmora video editor
- Add and adjust keyframes to clips
- Edit and customize text
- Take and edit snapshots
What you need to prepare:
- A computer (Windows or macOS)
- Your video materials.
- Filmora video editor
Step 1
Download the Filmora video editor → run it → and click on “New Project”.
Step 2
Go to Titles → drag the Default Title to the Timeline below. Double-click on the clip to open its settings. Here, type in your text → change the font to Montserrat Light. Scroll down and increase Text Spacing to 5.0. Now, select only the first word in the box where you typed your text. Then, change its font to Montserrat Bold. Click OK.

Step 3
Take a Snapshot of the text you just created. Now, delete the Default Title clip from the Timeline and drag the Snapshot you took to the Timeline.

Step 4
Double-click the Snapshot clip → go to the Video tab → click the highlighted button below to flip the text. Then, take a Snapshot of this flipped version of the text and delete the clip from the Timeline.

Step 5
Visit the free stock footage site Mixkit and download any smoke or fog background video you like. Then, go to Filmora → My Media → Import Media → and select the footage you downloaded to import it into the video editor. Then, drag the Smoke clip to the Timeline and make it 6 seconds long.

Step 6
Double-click on the clip → go to Color. Now, change Contrast to “49”, Saturation to “100”, and Brightness to “18”. Below, set the 3D LUT option to “Game of Thrones”. Click OK.

Step 7
Drag the other Smoke clip to Track 2 of the Timeline. Make it 6 seconds long. Then, move the Playhead to the starting point of the video.

Step 8
Double-click on the new smoke clip. Go to Animation. Decrease the Opacity to 0%. Move the Playhead 10 frames forward → increase the Opacity to 6%. Don’t click OK yet.

Step 9
Move the Playhead to 5 seconds. Click on “**+Add**” to add a keyframe to the clip. Then, move the Playhead to the next-to-last frame and increase the Opacity to 100%. Click OK.

Step 10
Set the Playhead to the second frame and drop the first Snapshot we took earlier at that starting point. Drag the clip to be 6 seconds long. Then, double-click on the clip and adjust the settings exactly as you see in this image here. Don’t click on OK yet.

Step 11
Move the Playhead at the 17th frame → increase the Opacity to 6%. Move the Playhead to 5 seconds and 23rd frame → change the X-axis value to “1973”. Click OK.

Step 12
Drag the same Snapshot file to Track 4, directly on top of the clip in Track 3. Make its duration the same too. Now, double-click on this clip and apply the exact same settings as in the image here. Don’t click on OK yet.

Step 13
Move the Playhead to the 17th frame → increase the Opacity to 6%. Now, move the Playhead to 5 seconds and 23rd frame → change X-axis value to “-1944” and the Opacity to 0%. Click OK.

Step 14
Go to Sample Color and drag the White color on Track 6 in the Timeline. Place this clip at the same starting point as the snapshots below it. Set its duration the same as the clips below too. Then, move the Playhead at its starting point.

Step 15
Double-click on the Sample Color clip → go to Video → Mask → Import. Here, select the first Snapshot we created earlier in this tutorial.

Step 16
Now, go straight to the Animation tab and click the “**+Add**” button to add a keyframe. Then, compress the text in the preview screen until it’s not visible anymore on the screen.

Step 17
Add keyframes at the 1-second position and at the 5-second position. Then, move the Playhead once more to the 5-second and 22nd frame. Reduce the Opacity to 1%. Click OK.

Step 18
Drag another White Sample Color to Track 5 this time. Adjust its duration and starting point to be the same as the clip above it. Double-click on it → go to Video → Mask → Import. Here, select the flipped text Snapshot we created earlier.
Step 19
Now, go to Animation and add a keyframe at the starting point. Then, compress the text on the preview screen exactly as we did before with the other one. Then, add a keyframe at the 1-second position of the clip. Then, adjust the Y-axis position to create a reflection effect, just like this.

Step 20
Move the Playhead to the 5-second position and add a keyframe. Now, move the Playhead directly to 5-seconds and 22 frames. Here, reduce the Opacity to 0%.
Step 21
Go back to the Video tab from the upper-left corner of the panel. Now, move the Playhead to the clip’s starting point. Select the Mask tab. Add a keyframe. Move the Playhead to 1 second and set the Blur Strength to 6%.

Step 22
Move the Playhead to 3 seconds. Scroll down and set Vertical to 259%. Set Y-axis to “-157”. Then, increase Blur Strength to 25%. Click OK.

Step 23
Click on the Sample Color in Track 5 and change the Opacity to 40% for the second and third keyframes. You can move between the keyframes on the arrows highlighted below. Click OK.

Step 24
Go to Sample Color and drag the “Gradient 4” color to Track 7 on the Timeline. Allow this clip to start from the very beginning and adjust its end time to be the same as all the other clips.
Step 25
Double-click on the Gradient 4 clip → go to Video → Basic. Change the Blending Mode to “Soft Light”. Reduce the Opacity to 42%. Click OK.

Step 26
Go to Project Media and drag the white smoke clip on Track 8. Place the Playhead at the starting point and double-click on the clip.

Step 27
Change its Blending Mode to “Screen”. Go to the Animation tab and decrease the Opacity to 0%. Move the Playhead to frame 10 → increase Opacity to 12%. Move the Playhead to the 5-second position → add a keyframe. Then, move the Playhead at 5 seconds and 23rd frame → increase the Opacity back to 100%. Click OK.
Step 28
Go to Effects and drag the Cinema effect to Track 9. Adjust its duration to match all the other clips. Double-click on the clip and increase its Border Height to “0.10”. Click OK.

Step 29
Finally, Render the video and watch the final result. You’re done! Congratulations on resting a foggy text reflection effect in Filmora.

Summary
What you’ve learned:
- Create a foggy text reflection effect in the Filmora video editor
- Add and adjust keyframes to clips
- Edit and customize text
- Take and edit snapshots
What you need to prepare:
- A computer (Windows or macOS)
- Your video materials.
- Filmora video editor
Step 1
Download the Filmora video editor → run it → and click on “New Project”.
Step 2
Go to Titles → drag the Default Title to the Timeline below. Double-click on the clip to open its settings. Here, type in your text → change the font to Montserrat Light. Scroll down and increase Text Spacing to 5.0. Now, select only the first word in the box where you typed your text. Then, change its font to Montserrat Bold. Click OK.

Step 3
Take a Snapshot of the text you just created. Now, delete the Default Title clip from the Timeline and drag the Snapshot you took to the Timeline.

Step 4
Double-click the Snapshot clip → go to the Video tab → click the highlighted button below to flip the text. Then, take a Snapshot of this flipped version of the text and delete the clip from the Timeline.

Step 5
Visit the free stock footage site Mixkit and download any smoke or fog background video you like. Then, go to Filmora → My Media → Import Media → and select the footage you downloaded to import it into the video editor. Then, drag the Smoke clip to the Timeline and make it 6 seconds long.

Step 6
Double-click on the clip → go to Color. Now, change Contrast to “49”, Saturation to “100”, and Brightness to “18”. Below, set the 3D LUT option to “Game of Thrones”. Click OK.

Step 7
Drag the other Smoke clip to Track 2 of the Timeline. Make it 6 seconds long. Then, move the Playhead to the starting point of the video.

Step 8
Double-click on the new smoke clip. Go to Animation. Decrease the Opacity to 0%. Move the Playhead 10 frames forward → increase the Opacity to 6%. Don’t click OK yet.

Step 9
Move the Playhead to 5 seconds. Click on “**+Add**” to add a keyframe to the clip. Then, move the Playhead to the next-to-last frame and increase the Opacity to 100%. Click OK.

Step 10
Set the Playhead to the second frame and drop the first Snapshot we took earlier at that starting point. Drag the clip to be 6 seconds long. Then, double-click on the clip and adjust the settings exactly as you see in this image here. Don’t click on OK yet.

Step 11
Move the Playhead at the 17th frame → increase the Opacity to 6%. Move the Playhead to 5 seconds and 23rd frame → change the X-axis value to “1973”. Click OK.

Step 12
Drag the same Snapshot file to Track 4, directly on top of the clip in Track 3. Make its duration the same too. Now, double-click on this clip and apply the exact same settings as in the image here. Don’t click on OK yet.

Step 13
Move the Playhead to the 17th frame → increase the Opacity to 6%. Now, move the Playhead to 5 seconds and 23rd frame → change X-axis value to “-1944” and the Opacity to 0%. Click OK.

Step 14
Go to Sample Color and drag the White color on Track 6 in the Timeline. Place this clip at the same starting point as the snapshots below it. Set its duration the same as the clips below too. Then, move the Playhead at its starting point.

Step 15
Double-click on the Sample Color clip → go to Video → Mask → Import. Here, select the first Snapshot we created earlier in this tutorial.

Step 16
Now, go straight to the Animation tab and click the “**+Add**” button to add a keyframe. Then, compress the text in the preview screen until it’s not visible anymore on the screen.

Step 17
Add keyframes at the 1-second position and at the 5-second position. Then, move the Playhead once more to the 5-second and 22nd frame. Reduce the Opacity to 1%. Click OK.

Step 18
Drag another White Sample Color to Track 5 this time. Adjust its duration and starting point to be the same as the clip above it. Double-click on it → go to Video → Mask → Import. Here, select the flipped text Snapshot we created earlier.
Step 19
Now, go to Animation and add a keyframe at the starting point. Then, compress the text on the preview screen exactly as we did before with the other one. Then, add a keyframe at the 1-second position of the clip. Then, adjust the Y-axis position to create a reflection effect, just like this.

Step 20
Move the Playhead to the 5-second position and add a keyframe. Now, move the Playhead directly to 5-seconds and 22 frames. Here, reduce the Opacity to 0%.
Step 21
Go back to the Video tab from the upper-left corner of the panel. Now, move the Playhead to the clip’s starting point. Select the Mask tab. Add a keyframe. Move the Playhead to 1 second and set the Blur Strength to 6%.

Step 22
Move the Playhead to 3 seconds. Scroll down and set Vertical to 259%. Set Y-axis to “-157”. Then, increase Blur Strength to 25%. Click OK.

Step 23
Click on the Sample Color in Track 5 and change the Opacity to 40% for the second and third keyframes. You can move between the keyframes on the arrows highlighted below. Click OK.

Step 24
Go to Sample Color and drag the “Gradient 4” color to Track 7 on the Timeline. Allow this clip to start from the very beginning and adjust its end time to be the same as all the other clips.
Step 25
Double-click on the Gradient 4 clip → go to Video → Basic. Change the Blending Mode to “Soft Light”. Reduce the Opacity to 42%. Click OK.

Step 26
Go to Project Media and drag the white smoke clip on Track 8. Place the Playhead at the starting point and double-click on the clip.

Step 27
Change its Blending Mode to “Screen”. Go to the Animation tab and decrease the Opacity to 0%. Move the Playhead to frame 10 → increase Opacity to 12%. Move the Playhead to the 5-second position → add a keyframe. Then, move the Playhead at 5 seconds and 23rd frame → increase the Opacity back to 100%. Click OK.
Step 28
Go to Effects and drag the Cinema effect to Track 9. Adjust its duration to match all the other clips. Double-click on the clip and increase its Border Height to “0.10”. Click OK.

Step 29
Finally, Render the video and watch the final result. You’re done! Congratulations on resting a foggy text reflection effect in Filmora.

Summary
What you’ve learned:
- Create a foggy text reflection effect in the Filmora video editor
- Add and adjust keyframes to clips
- Edit and customize text
- Take and edit snapshots
What you need to prepare:
- A computer (Windows or macOS)
- Your video materials.
- Filmora video editor
Step 1
Download the Filmora video editor → run it → and click on “New Project”.
Step 2
Go to Titles → drag the Default Title to the Timeline below. Double-click on the clip to open its settings. Here, type in your text → change the font to Montserrat Light. Scroll down and increase Text Spacing to 5.0. Now, select only the first word in the box where you typed your text. Then, change its font to Montserrat Bold. Click OK.

Step 3
Take a Snapshot of the text you just created. Now, delete the Default Title clip from the Timeline and drag the Snapshot you took to the Timeline.

Step 4
Double-click the Snapshot clip → go to the Video tab → click the highlighted button below to flip the text. Then, take a Snapshot of this flipped version of the text and delete the clip from the Timeline.

Step 5
Visit the free stock footage site Mixkit and download any smoke or fog background video you like. Then, go to Filmora → My Media → Import Media → and select the footage you downloaded to import it into the video editor. Then, drag the Smoke clip to the Timeline and make it 6 seconds long.

Step 6
Double-click on the clip → go to Color. Now, change Contrast to “49”, Saturation to “100”, and Brightness to “18”. Below, set the 3D LUT option to “Game of Thrones”. Click OK.

Step 7
Drag the other Smoke clip to Track 2 of the Timeline. Make it 6 seconds long. Then, move the Playhead to the starting point of the video.

Step 8
Double-click on the new smoke clip. Go to Animation. Decrease the Opacity to 0%. Move the Playhead 10 frames forward → increase the Opacity to 6%. Don’t click OK yet.

Step 9
Move the Playhead to 5 seconds. Click on “**+Add**” to add a keyframe to the clip. Then, move the Playhead to the next-to-last frame and increase the Opacity to 100%. Click OK.

Step 10
Set the Playhead to the second frame and drop the first Snapshot we took earlier at that starting point. Drag the clip to be 6 seconds long. Then, double-click on the clip and adjust the settings exactly as you see in this image here. Don’t click on OK yet.

Step 11
Move the Playhead at the 17th frame → increase the Opacity to 6%. Move the Playhead to 5 seconds and 23rd frame → change the X-axis value to “1973”. Click OK.

Step 12
Drag the same Snapshot file to Track 4, directly on top of the clip in Track 3. Make its duration the same too. Now, double-click on this clip and apply the exact same settings as in the image here. Don’t click on OK yet.

Step 13
Move the Playhead to the 17th frame → increase the Opacity to 6%. Now, move the Playhead to 5 seconds and 23rd frame → change X-axis value to “-1944” and the Opacity to 0%. Click OK.

Step 14
Go to Sample Color and drag the White color on Track 6 in the Timeline. Place this clip at the same starting point as the snapshots below it. Set its duration the same as the clips below too. Then, move the Playhead at its starting point.

Step 15
Double-click on the Sample Color clip → go to Video → Mask → Import. Here, select the first Snapshot we created earlier in this tutorial.

Step 16
Now, go straight to the Animation tab and click the “**+Add**” button to add a keyframe. Then, compress the text in the preview screen until it’s not visible anymore on the screen.

Step 17
Add keyframes at the 1-second position and at the 5-second position. Then, move the Playhead once more to the 5-second and 22nd frame. Reduce the Opacity to 1%. Click OK.

Step 18
Drag another White Sample Color to Track 5 this time. Adjust its duration and starting point to be the same as the clip above it. Double-click on it → go to Video → Mask → Import. Here, select the flipped text Snapshot we created earlier.
Step 19
Now, go to Animation and add a keyframe at the starting point. Then, compress the text on the preview screen exactly as we did before with the other one. Then, add a keyframe at the 1-second position of the clip. Then, adjust the Y-axis position to create a reflection effect, just like this.

Step 20
Move the Playhead to the 5-second position and add a keyframe. Now, move the Playhead directly to 5-seconds and 22 frames. Here, reduce the Opacity to 0%.
Step 21
Go back to the Video tab from the upper-left corner of the panel. Now, move the Playhead to the clip’s starting point. Select the Mask tab. Add a keyframe. Move the Playhead to 1 second and set the Blur Strength to 6%.

Step 22
Move the Playhead to 3 seconds. Scroll down and set Vertical to 259%. Set Y-axis to “-157”. Then, increase Blur Strength to 25%. Click OK.

Step 23
Click on the Sample Color in Track 5 and change the Opacity to 40% for the second and third keyframes. You can move between the keyframes on the arrows highlighted below. Click OK.

Step 24
Go to Sample Color and drag the “Gradient 4” color to Track 7 on the Timeline. Allow this clip to start from the very beginning and adjust its end time to be the same as all the other clips.
Step 25
Double-click on the Gradient 4 clip → go to Video → Basic. Change the Blending Mode to “Soft Light”. Reduce the Opacity to 42%. Click OK.

Step 26
Go to Project Media and drag the white smoke clip on Track 8. Place the Playhead at the starting point and double-click on the clip.

Step 27
Change its Blending Mode to “Screen”. Go to the Animation tab and decrease the Opacity to 0%. Move the Playhead to frame 10 → increase Opacity to 12%. Move the Playhead to the 5-second position → add a keyframe. Then, move the Playhead at 5 seconds and 23rd frame → increase the Opacity back to 100%. Click OK.
Step 28
Go to Effects and drag the Cinema effect to Track 9. Adjust its duration to match all the other clips. Double-click on the clip and increase its Border Height to “0.10”. Click OK.

Step 29
Finally, Render the video and watch the final result. You’re done! Congratulations on resting a foggy text reflection effect in Filmora.

Summary
What you’ve learned:
- Create a foggy text reflection effect in the Filmora video editor
- Add and adjust keyframes to clips
- Edit and customize text
- Take and edit snapshots
Unleash the Power of Video Slow Motion with Wondershare Filmora. Find Out How to Create Slow Motion Video with the Effective Speed Ramping Feature on Filmora
How to make a video slow motion on your PC and other devices? It is easier than most people think. Slow-motion videos are cool and exciting. You could be watching a CGI fight scene or a dog making a face when trying to catch a treat. The slow-moving objects make it more exciting and intriguing. Probably it is a gender reveal party or a dramatic waterfall, and you are wondering how do I make a video slow motion. In this article, we provide you with a guide on how to make video to slow motion quickly and the easy way.
Slow Motion Video Maker Slow your video’s speed with better control of your keyframes to create unique cinematic effects!
Make A Slow Motion Video Make A Slow Motion Video More Features

Part 1. Introducing Wondershare Filmora: A Great Help for Making Slow Motion Videos
If you are looking for a solution on how to put videos in slow mo, you need to try Wondershare Filmora. The recent Filmora V13 comes with some brilliant tools that make editing videos easier and fun. The fully-equipped suite is now powered by AI allowing users to effortlessly create outstanding videos in minutes. With new features to realize your ideas and bring them to life, Filmora empowers you to work smarter and not harder.
Free Download For Win 7 or later(64-bit)
Free Download For macOS 10.14 or later
How do you make a video slow motion with Filmora? The solution lies in the unique video editing features of the software. From manually editing the speed of the video to using slo mo effects, Filmora is a great choice. Using Filmora for creating slow motion videos has various advantages to your video editing journey:
- Precise speed control: Filmora allows you to precisely set the speed of your videos up to a single frame, giving you creative control over your slo mo effects.
- AI-powered capabilities: Powered by artificial intelligence, FIlmora gives you accurate results quickly and efficiently
- Easy to Use: Filmora is a versatile video editing software that is easy to learn and use
- High-quality output: Filmora offers a wide range of editing features, allowing you to export slo mo video without compromising the quality
- Multiple slow-motion effects: Get access to a variety of slo mo video effects, including speed ramp, time remap, optical flow, and more
Ready to add some epic slow-motion action to your videos? In the next section, we’ll guide you step-by-step through how to make a slo mo video in just a few clicks. You will be turning your ordinary footage into amazing slo-mo clips in the simplest way possible.
Part 2. How to Make a Video Slow Motion: Step-by-Step Guide
Wondershare Filmora allows users to create a video slow motion using the Speed Ramping feature. This feature is specifically designed for adjusting the speed of videos with better control of keyframes, allowing you to create unique cinematic effects. You may want your YouTube clips to look cool or slow down your video for particular reasons. Take your video editing skills to the next level with the Speed Ramping feature. Filmora makes it possible to create slow motions of high quality with smooth transitions for incredible results.
The Speed Ramping feature is effective in:
- Applying Professional Speed Effect: Quickly change the speed of your video by making it more creative.
- Speed Ramping Template Presets: Get access to Filmora’s six present speed ramping effects. They include Bullet Time, Hero Moment, Montage, Flash in, and Jumper. These effects help in creating a professional speed change effect with ease.
- Support for Customized Speed Ramping Template: Filmora allows you to create a unique speed ramping effect for your own and save it for later use.
- Maintaining the Audio Pitch: The Speed Ramping feature by Filmora allows you to maintain the original audio pitch even after changing the speed of the video.
The Speed Ramping feature is quite effective in making video slow motion with Filmora. Let’s have a look at the steps you will need to follow:
Step 1: Find the Speed Ramping Tab
Once you have launched Filmora and imported your files, double clip on the video clip or audio clip you want to create a slow motion from. Then click, Speed followed by Speed Ramping in the pop-up editing window. You may also right-click on the video clip on the timeline and choose Speed Ramping, or click on the Speed icon on the toolbar followed by Speed Ramping.
Step 2: Customize the Speed Ramps
After starting the feature, you need to customize the speed ramps to achieve the desired results. The quickest way is to select a speed ramp present from the available Hero Moment, Montage, Jumper, Bullet Time, Flash Out, and Flash In. Customizing the speed ramps will, however, give you more creative outcomes.
Strp 3: Apply the Speed Ramping
With the speed ramp ready, place the play head where you want to create a slo mo video. Then click the Add icon to add the speed keyframes. Drag the keyframe dot downward or upward as desired to control the point speed. This will give you the specific slow motion video that you want while maintaining the audio pitch. When you are satisfied with the adjustments, click OK to save the settings and export your creation.
Creating slow motion videos with the speed ramping feature can be beneficial in many ways. The slow-motion effects draw attention to specific details of the video. It could be a big reveal happening or a flashback that allows viewers to realize the clues you were giving all along. When you slow down scenes in your video, it lets people focus on specific details, gestures, or objects.
Conclusion
Creating a slow motion video can be exciting. There’s just something that makes slo mo fun and interesting to watch. How to do video slow motion you may ask. With the right software, slowing down videos is a fun and thrilling effect. To this effect, we recommend using Wondershare Filmora to create slow motions in your projects and keep your audience engaged. The Speed ramping feature of Filmors is easy to use and can be customized to achieve specific results.
Make A Slow Motion Video Make A Slow Motion Video More Features

Part 1. Introducing Wondershare Filmora: A Great Help for Making Slow Motion Videos
If you are looking for a solution on how to put videos in slow mo, you need to try Wondershare Filmora. The recent Filmora V13 comes with some brilliant tools that make editing videos easier and fun. The fully-equipped suite is now powered by AI allowing users to effortlessly create outstanding videos in minutes. With new features to realize your ideas and bring them to life, Filmora empowers you to work smarter and not harder.
Free Download For Win 7 or later(64-bit)
Free Download For macOS 10.14 or later
How do you make a video slow motion with Filmora? The solution lies in the unique video editing features of the software. From manually editing the speed of the video to using slo mo effects, Filmora is a great choice. Using Filmora for creating slow motion videos has various advantages to your video editing journey:
- Precise speed control: Filmora allows you to precisely set the speed of your videos up to a single frame, giving you creative control over your slo mo effects.
- AI-powered capabilities: Powered by artificial intelligence, FIlmora gives you accurate results quickly and efficiently
- Easy to Use: Filmora is a versatile video editing software that is easy to learn and use
- High-quality output: Filmora offers a wide range of editing features, allowing you to export slo mo video without compromising the quality
- Multiple slow-motion effects: Get access to a variety of slo mo video effects, including speed ramp, time remap, optical flow, and more
Ready to add some epic slow-motion action to your videos? In the next section, we’ll guide you step-by-step through how to make a slo mo video in just a few clicks. You will be turning your ordinary footage into amazing slo-mo clips in the simplest way possible.
Part 2. How to Make a Video Slow Motion: Step-by-Step Guide
Wondershare Filmora allows users to create a video slow motion using the Speed Ramping feature. This feature is specifically designed for adjusting the speed of videos with better control of keyframes, allowing you to create unique cinematic effects. You may want your YouTube clips to look cool or slow down your video for particular reasons. Take your video editing skills to the next level with the Speed Ramping feature. Filmora makes it possible to create slow motions of high quality with smooth transitions for incredible results.
The Speed Ramping feature is effective in:
- Applying Professional Speed Effect: Quickly change the speed of your video by making it more creative.
- Speed Ramping Template Presets: Get access to Filmora’s six present speed ramping effects. They include Bullet Time, Hero Moment, Montage, Flash in, and Jumper. These effects help in creating a professional speed change effect with ease.
- Support for Customized Speed Ramping Template: Filmora allows you to create a unique speed ramping effect for your own and save it for later use.
- Maintaining the Audio Pitch: The Speed Ramping feature by Filmora allows you to maintain the original audio pitch even after changing the speed of the video.
The Speed Ramping feature is quite effective in making video slow motion with Filmora. Let’s have a look at the steps you will need to follow:
Step 1: Find the Speed Ramping Tab
Once you have launched Filmora and imported your files, double clip on the video clip or audio clip you want to create a slow motion from. Then click, Speed followed by Speed Ramping in the pop-up editing window. You may also right-click on the video clip on the timeline and choose Speed Ramping, or click on the Speed icon on the toolbar followed by Speed Ramping.
Step 2: Customize the Speed Ramps
After starting the feature, you need to customize the speed ramps to achieve the desired results. The quickest way is to select a speed ramp present from the available Hero Moment, Montage, Jumper, Bullet Time, Flash Out, and Flash In. Customizing the speed ramps will, however, give you more creative outcomes.
Strp 3: Apply the Speed Ramping
With the speed ramp ready, place the play head where you want to create a slo mo video. Then click the Add icon to add the speed keyframes. Drag the keyframe dot downward or upward as desired to control the point speed. This will give you the specific slow motion video that you want while maintaining the audio pitch. When you are satisfied with the adjustments, click OK to save the settings and export your creation.
Creating slow motion videos with the speed ramping feature can be beneficial in many ways. The slow-motion effects draw attention to specific details of the video. It could be a big reveal happening or a flashback that allows viewers to realize the clues you were giving all along. When you slow down scenes in your video, it lets people focus on specific details, gestures, or objects.
Conclusion
Creating a slow motion video can be exciting. There’s just something that makes slo mo fun and interesting to watch. How to do video slow motion you may ask. With the right software, slowing down videos is a fun and thrilling effect. To this effect, we recommend using Wondershare Filmora to create slow motions in your projects and keep your audience engaged. The Speed ramping feature of Filmors is easy to use and can be customized to achieve specific results.
All Things About Adding Effects In Kinemaster
These days the usage of video editors and related software is getting increased quickly. Kinemaster appears as one of the popular and highly used video editors. It can be used for several purposes, such as – adding effects to videos, trimming, etc. Many individuals are considering its option for making different types of edits to the videos and achieving desired objectives with ease. Some people love to consider Kinemaster but they don’t know how to add effects in kinemaster. These types of individuals are regularly looking for the perfect guides and sources that can help them in getting some guidance and make things easier.
If you are also looking for such guidance and instructions, you should be focused on the upcoming details. In the upcoming paragraphs, we will discuss some crucial aspects of the Kinemaster and its procedure to add effects in a video.
In this article
01 [Effects In KineMaster You Should Know](#Part 1)
02 [How To Add Effects On Kinemaster?](#Part 2)
03 [FAQs Of KineMaster Effects](#Part 3)
Part 1 Effects In KineMaster You Should Know
KineMaster is serving video editing services in two different ways; free and paid. You can find out multiple differences in both versions. There are some advanced features that can be unlocked by using a paid version only. By using the free version, you can get your basic done without any kind of issue. If you choose the option of the free version of Kinemaster, you will be limited to two effects only, such as –
● Mosaic
● Gaussian Blur
In case you are interested in applying some blur effects to the video clips or layers, you can pick the option of the Gaussian Blur effect. If you are interested in applying blur effects with some pixelated appearance, you should consider the Mosaic effect. Many people are looking for more than these two effects, you need to consider the paid versions.
When it comes to getting paid version of Kinemaster, you can get its subscriptions by choosing a monthly or annual subscription. Once you get paid version of Kinemaster, you can get several effects unlocked. Here, we are listing some major ones.
● Mirror
● Ripple
● Cartoon
● Interference
● Mirror warp
● Pop out
● Anaglyph slide
● Split spectrum
● Auto HDR
● Poster perfect
● Rolling ball
● Rayburst
● Bulge / Pinch
● Bulge / Pinch
● Wave warp
● Radial blur
● Kaleidoscope
● Digital crash
● Prismatic
● Focus blur 2.0
● Sketch 2.0
● Swirl 2.0
● Neon outline
● Thermogram
● Square halftone
All with these, there are several other effects available on the Kinemaster that can make your video impressive. With a paid version, you can easily explore and present your creativity. Along with it, everyone also does not know how to add effects on kinemaster in a few minutes only. If you also want to figure it out, you should keep reading the article. In upcoming paragraphs, we are discussing a step-by-step procedure.
Part 2 How To Add Effects On Kinemaster?
Step-By-Step Procedure
Step1 Access KineMaster
Firstly, you should be focused on accessing KineMaster. Here, you can start importing videos or images with ease. You can also use your images as clips for an impressive outcome.
Step2 Import Images

For importing images, you should follow a small procedure. Here, firstly, you should click on MEDIA BUTTON to YOUR FOLDER to GO FOR IMAGES. Now, you should be focused on choosing images by marking them with check symbols. Afterward you can finalize the action and import all images.
Step3 Access Effects Menu

Now, it’s time to focus on adding effects to clips for an impressive video. For such a thing, you should proceed by focusing on the LAYER button on the interface. By clicking the LAYER button, you can access a specific menu with multiple options. One of these options is the EFFECT button. When you click on this particular button, it will take you to the effect menus. In case you have the paid version you can go with the GET MORE option in the EFFECT menu. It will be useful in getting more effective options. You can also download the effects to keep using them regularly.
Step4 Apply Effects

As per your application capability and subscriptions, you can see the availability of effects. You should choose the desired effect by clicking on it. Here, the most interesting thing is that when you apply any effect, it will not overlap the existing layer or anything like that but it will create a new layer. With it, you can use animations for both in and out purposes.
By following this small procedure, you can easily make things easier and add effects in a video by using KineMaster. In case you have any doubt regarding the procedure, you can be focused on guides and tutorials.
Part 3 FAQs Of KineMaster Effects
Are Effects In KineMaster Free?
KineMaster is providing video editing services in paid and free versions. While accessing services in both versions, you can see a big difference. In the paid version of KineMaster, you will get several effects that can make your video clip amazing. If we talk about the free version, you will get only 2 effects. These effects are – Mosaic and Gaussian Blur. In case you want more than these effects, you need to get paid subscription to KineMaster.
KineMaster Effects Alternative On PC
Some individuals are not satisfied with the services of KineMaster because of several reasons, such as – paid service options. If you are one of these individuals, you can consider the option of Filmora. It is a free video editor that will allow you to edit and modify a video in several possible ways. Filmora also has a big library that allows getting multiple effects and built-in video editing elements.
Is It Worth Paying For Extra Effects In KineMaster?
As we discussed earlier, with KineMaster you will get only two effects for free. For more, you need to spend money. In case you want several effects without spending any money, you can go with Filmora. It has a big built-in library to facilitate the users.
Can I Add Effects If I’m Working With Chroma Key?
Yes, the KineMaster users can easily apply Chrom Key while using video effects. It’s all about layering. By focusing on how to add chroma key in kinemaster guide, you can understand how it can be possible for creating an impressive video.
Final Words
By paying attention to all these things, you can understand everything about the KineMaster and its usability. You can also check out an alternative that can help you avoid the option of spending some money. It depends on you that what your requirements are and how want to get them fulfilled.
02 [How To Add Effects On Kinemaster?](#Part 2)
03 [FAQs Of KineMaster Effects](#Part 3)
Part 1 Effects In KineMaster You Should Know
KineMaster is serving video editing services in two different ways; free and paid. You can find out multiple differences in both versions. There are some advanced features that can be unlocked by using a paid version only. By using the free version, you can get your basic done without any kind of issue. If you choose the option of the free version of Kinemaster, you will be limited to two effects only, such as –
● Mosaic
● Gaussian Blur
In case you are interested in applying some blur effects to the video clips or layers, you can pick the option of the Gaussian Blur effect. If you are interested in applying blur effects with some pixelated appearance, you should consider the Mosaic effect. Many people are looking for more than these two effects, you need to consider the paid versions.
When it comes to getting paid version of Kinemaster, you can get its subscriptions by choosing a monthly or annual subscription. Once you get paid version of Kinemaster, you can get several effects unlocked. Here, we are listing some major ones.
● Mirror
● Ripple
● Cartoon
● Interference
● Mirror warp
● Pop out
● Anaglyph slide
● Split spectrum
● Auto HDR
● Poster perfect
● Rolling ball
● Rayburst
● Bulge / Pinch
● Bulge / Pinch
● Wave warp
● Radial blur
● Kaleidoscope
● Digital crash
● Prismatic
● Focus blur 2.0
● Sketch 2.0
● Swirl 2.0
● Neon outline
● Thermogram
● Square halftone
All with these, there are several other effects available on the Kinemaster that can make your video impressive. With a paid version, you can easily explore and present your creativity. Along with it, everyone also does not know how to add effects on kinemaster in a few minutes only. If you also want to figure it out, you should keep reading the article. In upcoming paragraphs, we are discussing a step-by-step procedure.
Part 2 How To Add Effects On Kinemaster?
Step-By-Step Procedure
Step1 Access KineMaster
Firstly, you should be focused on accessing KineMaster. Here, you can start importing videos or images with ease. You can also use your images as clips for an impressive outcome.
Step2 Import Images

For importing images, you should follow a small procedure. Here, firstly, you should click on MEDIA BUTTON to YOUR FOLDER to GO FOR IMAGES. Now, you should be focused on choosing images by marking them with check symbols. Afterward you can finalize the action and import all images.
Step3 Access Effects Menu

Now, it’s time to focus on adding effects to clips for an impressive video. For such a thing, you should proceed by focusing on the LAYER button on the interface. By clicking the LAYER button, you can access a specific menu with multiple options. One of these options is the EFFECT button. When you click on this particular button, it will take you to the effect menus. In case you have the paid version you can go with the GET MORE option in the EFFECT menu. It will be useful in getting more effective options. You can also download the effects to keep using them regularly.
Step4 Apply Effects

As per your application capability and subscriptions, you can see the availability of effects. You should choose the desired effect by clicking on it. Here, the most interesting thing is that when you apply any effect, it will not overlap the existing layer or anything like that but it will create a new layer. With it, you can use animations for both in and out purposes.
By following this small procedure, you can easily make things easier and add effects in a video by using KineMaster. In case you have any doubt regarding the procedure, you can be focused on guides and tutorials.
Part 3 FAQs Of KineMaster Effects
Are Effects In KineMaster Free?
KineMaster is providing video editing services in paid and free versions. While accessing services in both versions, you can see a big difference. In the paid version of KineMaster, you will get several effects that can make your video clip amazing. If we talk about the free version, you will get only 2 effects. These effects are – Mosaic and Gaussian Blur. In case you want more than these effects, you need to get paid subscription to KineMaster.
KineMaster Effects Alternative On PC
Some individuals are not satisfied with the services of KineMaster because of several reasons, such as – paid service options. If you are one of these individuals, you can consider the option of Filmora. It is a free video editor that will allow you to edit and modify a video in several possible ways. Filmora also has a big library that allows getting multiple effects and built-in video editing elements.
Is It Worth Paying For Extra Effects In KineMaster?
As we discussed earlier, with KineMaster you will get only two effects for free. For more, you need to spend money. In case you want several effects without spending any money, you can go with Filmora. It has a big built-in library to facilitate the users.
Can I Add Effects If I’m Working With Chroma Key?
Yes, the KineMaster users can easily apply Chrom Key while using video effects. It’s all about layering. By focusing on how to add chroma key in kinemaster guide, you can understand how it can be possible for creating an impressive video.
Final Words
By paying attention to all these things, you can understand everything about the KineMaster and its usability. You can also check out an alternative that can help you avoid the option of spending some money. It depends on you that what your requirements are and how want to get them fulfilled.
02 [How To Add Effects On Kinemaster?](#Part 2)
03 [FAQs Of KineMaster Effects](#Part 3)
Part 1 Effects In KineMaster You Should Know
KineMaster is serving video editing services in two different ways; free and paid. You can find out multiple differences in both versions. There are some advanced features that can be unlocked by using a paid version only. By using the free version, you can get your basic done without any kind of issue. If you choose the option of the free version of Kinemaster, you will be limited to two effects only, such as –
● Mosaic
● Gaussian Blur
In case you are interested in applying some blur effects to the video clips or layers, you can pick the option of the Gaussian Blur effect. If you are interested in applying blur effects with some pixelated appearance, you should consider the Mosaic effect. Many people are looking for more than these two effects, you need to consider the paid versions.
When it comes to getting paid version of Kinemaster, you can get its subscriptions by choosing a monthly or annual subscription. Once you get paid version of Kinemaster, you can get several effects unlocked. Here, we are listing some major ones.
● Mirror
● Ripple
● Cartoon
● Interference
● Mirror warp
● Pop out
● Anaglyph slide
● Split spectrum
● Auto HDR
● Poster perfect
● Rolling ball
● Rayburst
● Bulge / Pinch
● Bulge / Pinch
● Wave warp
● Radial blur
● Kaleidoscope
● Digital crash
● Prismatic
● Focus blur 2.0
● Sketch 2.0
● Swirl 2.0
● Neon outline
● Thermogram
● Square halftone
All with these, there are several other effects available on the Kinemaster that can make your video impressive. With a paid version, you can easily explore and present your creativity. Along with it, everyone also does not know how to add effects on kinemaster in a few minutes only. If you also want to figure it out, you should keep reading the article. In upcoming paragraphs, we are discussing a step-by-step procedure.
Part 2 How To Add Effects On Kinemaster?
Step-By-Step Procedure
Step1 Access KineMaster
Firstly, you should be focused on accessing KineMaster. Here, you can start importing videos or images with ease. You can also use your images as clips for an impressive outcome.
Step2 Import Images

For importing images, you should follow a small procedure. Here, firstly, you should click on MEDIA BUTTON to YOUR FOLDER to GO FOR IMAGES. Now, you should be focused on choosing images by marking them with check symbols. Afterward you can finalize the action and import all images.
Step3 Access Effects Menu

Now, it’s time to focus on adding effects to clips for an impressive video. For such a thing, you should proceed by focusing on the LAYER button on the interface. By clicking the LAYER button, you can access a specific menu with multiple options. One of these options is the EFFECT button. When you click on this particular button, it will take you to the effect menus. In case you have the paid version you can go with the GET MORE option in the EFFECT menu. It will be useful in getting more effective options. You can also download the effects to keep using them regularly.
Step4 Apply Effects

As per your application capability and subscriptions, you can see the availability of effects. You should choose the desired effect by clicking on it. Here, the most interesting thing is that when you apply any effect, it will not overlap the existing layer or anything like that but it will create a new layer. With it, you can use animations for both in and out purposes.
By following this small procedure, you can easily make things easier and add effects in a video by using KineMaster. In case you have any doubt regarding the procedure, you can be focused on guides and tutorials.
Part 3 FAQs Of KineMaster Effects
Are Effects In KineMaster Free?
KineMaster is providing video editing services in paid and free versions. While accessing services in both versions, you can see a big difference. In the paid version of KineMaster, you will get several effects that can make your video clip amazing. If we talk about the free version, you will get only 2 effects. These effects are – Mosaic and Gaussian Blur. In case you want more than these effects, you need to get paid subscription to KineMaster.
KineMaster Effects Alternative On PC
Some individuals are not satisfied with the services of KineMaster because of several reasons, such as – paid service options. If you are one of these individuals, you can consider the option of Filmora. It is a free video editor that will allow you to edit and modify a video in several possible ways. Filmora also has a big library that allows getting multiple effects and built-in video editing elements.
Is It Worth Paying For Extra Effects In KineMaster?
As we discussed earlier, with KineMaster you will get only two effects for free. For more, you need to spend money. In case you want several effects without spending any money, you can go with Filmora. It has a big built-in library to facilitate the users.
Can I Add Effects If I’m Working With Chroma Key?
Yes, the KineMaster users can easily apply Chrom Key while using video effects. It’s all about layering. By focusing on how to add chroma key in kinemaster guide, you can understand how it can be possible for creating an impressive video.
Final Words
By paying attention to all these things, you can understand everything about the KineMaster and its usability. You can also check out an alternative that can help you avoid the option of spending some money. It depends on you that what your requirements are and how want to get them fulfilled.
02 [How To Add Effects On Kinemaster?](#Part 2)
03 [FAQs Of KineMaster Effects](#Part 3)
Part 1 Effects In KineMaster You Should Know
KineMaster is serving video editing services in two different ways; free and paid. You can find out multiple differences in both versions. There are some advanced features that can be unlocked by using a paid version only. By using the free version, you can get your basic done without any kind of issue. If you choose the option of the free version of Kinemaster, you will be limited to two effects only, such as –
● Mosaic
● Gaussian Blur
In case you are interested in applying some blur effects to the video clips or layers, you can pick the option of the Gaussian Blur effect. If you are interested in applying blur effects with some pixelated appearance, you should consider the Mosaic effect. Many people are looking for more than these two effects, you need to consider the paid versions.
When it comes to getting paid version of Kinemaster, you can get its subscriptions by choosing a monthly or annual subscription. Once you get paid version of Kinemaster, you can get several effects unlocked. Here, we are listing some major ones.
● Mirror
● Ripple
● Cartoon
● Interference
● Mirror warp
● Pop out
● Anaglyph slide
● Split spectrum
● Auto HDR
● Poster perfect
● Rolling ball
● Rayburst
● Bulge / Pinch
● Bulge / Pinch
● Wave warp
● Radial blur
● Kaleidoscope
● Digital crash
● Prismatic
● Focus blur 2.0
● Sketch 2.0
● Swirl 2.0
● Neon outline
● Thermogram
● Square halftone
All with these, there are several other effects available on the Kinemaster that can make your video impressive. With a paid version, you can easily explore and present your creativity. Along with it, everyone also does not know how to add effects on kinemaster in a few minutes only. If you also want to figure it out, you should keep reading the article. In upcoming paragraphs, we are discussing a step-by-step procedure.
Part 2 How To Add Effects On Kinemaster?
Step-By-Step Procedure
Step1 Access KineMaster
Firstly, you should be focused on accessing KineMaster. Here, you can start importing videos or images with ease. You can also use your images as clips for an impressive outcome.
Step2 Import Images

For importing images, you should follow a small procedure. Here, firstly, you should click on MEDIA BUTTON to YOUR FOLDER to GO FOR IMAGES. Now, you should be focused on choosing images by marking them with check symbols. Afterward you can finalize the action and import all images.
Step3 Access Effects Menu

Now, it’s time to focus on adding effects to clips for an impressive video. For such a thing, you should proceed by focusing on the LAYER button on the interface. By clicking the LAYER button, you can access a specific menu with multiple options. One of these options is the EFFECT button. When you click on this particular button, it will take you to the effect menus. In case you have the paid version you can go with the GET MORE option in the EFFECT menu. It will be useful in getting more effective options. You can also download the effects to keep using them regularly.
Step4 Apply Effects

As per your application capability and subscriptions, you can see the availability of effects. You should choose the desired effect by clicking on it. Here, the most interesting thing is that when you apply any effect, it will not overlap the existing layer or anything like that but it will create a new layer. With it, you can use animations for both in and out purposes.
By following this small procedure, you can easily make things easier and add effects in a video by using KineMaster. In case you have any doubt regarding the procedure, you can be focused on guides and tutorials.
Part 3 FAQs Of KineMaster Effects
Are Effects In KineMaster Free?
KineMaster is providing video editing services in paid and free versions. While accessing services in both versions, you can see a big difference. In the paid version of KineMaster, you will get several effects that can make your video clip amazing. If we talk about the free version, you will get only 2 effects. These effects are – Mosaic and Gaussian Blur. In case you want more than these effects, you need to get paid subscription to KineMaster.
KineMaster Effects Alternative On PC
Some individuals are not satisfied with the services of KineMaster because of several reasons, such as – paid service options. If you are one of these individuals, you can consider the option of Filmora. It is a free video editor that will allow you to edit and modify a video in several possible ways. Filmora also has a big library that allows getting multiple effects and built-in video editing elements.
Is It Worth Paying For Extra Effects In KineMaster?
As we discussed earlier, with KineMaster you will get only two effects for free. For more, you need to spend money. In case you want several effects without spending any money, you can go with Filmora. It has a big built-in library to facilitate the users.
Can I Add Effects If I’m Working With Chroma Key?
Yes, the KineMaster users can easily apply Chrom Key while using video effects. It’s all about layering. By focusing on how to add chroma key in kinemaster guide, you can understand how it can be possible for creating an impressive video.
Final Words
By paying attention to all these things, you can understand everything about the KineMaster and its usability. You can also check out an alternative that can help you avoid the option of spending some money. It depends on you that what your requirements are and how want to get them fulfilled.
Creative Ways to Add Green Screen Effects In Photoshop
Removing green screen backgrounds and replacing them with stunning videos is a common practice in video and movie making. The same process is applicable to still photos as well. You can take a photo with a green screen background and replace the screen with any photo as per your preference and requirement. You will need a high-quality photo editor to add green screen effects to your photo. There is no better photo editor in the world than Adobe Photoshop.
First, you have to opt for remove green screen Photoshop and then add anything you want in place of the green screen. The difference between Chroma key Photoshop and any other photo editor is that you can pay attention to details and remove the entire green screen halo effect around the main subject or object on the photo. Therefore, there will be no jittery green edges and green patches to disturb the overall photo quality. Here are the steps to use green screen effect in Adobe Photoshop.
1. How To Use Green Screen in Photoshop?
There are various ways available to remove greenscreen Photoshop. The beginners prefer using the Magic Wand tool but there will always be green patches around the main object on the photo. These green patches will get highlighted when you insert any image in the background. Therefore, we are using the best method to Chroma key Photoshop and that is through Color Range option. Here are the detailed steps to use color keying in Photoshop to use green screen effect.
Step 1: Launch Adobe Photoshop and open your photo with green screen background.
Step 2: Go to Select menu and click on Color Range.

Step 3: Pick the Eyedropper tool. Hold Shift key to select the green background. You can also hold Alt key to remove any selection that you might have done by mistake. When you are perfectly ok with the selection of the green screen background, you should click on OK button.

Step 3: Go to Select menu and click on Inverse. Now, the selection will be on the main subject instead of the background.

Step 4: If you want to see a preview of the selection in your photo, you should select Image radio button and from Selection Preview, select any option other than None.

Step 5: Go to Select menu again and click on Refine Edge. Use the sliders to fine-tune the selection so that the selection is smooth on the edges of the main subject of the photo. Once done, click on OK button.

Step 6: Go to Select menu and click on Inverse again.
Step 7: Press Delete key to delete the green screen background selection.
Step 8: Open the replacement image which you want to put in the place of the green screen background that you have just deleted.
Step 9: Select the entire replacement image and copy the replacement. Come back to your photo and paste the replacement image. Make sure that the layer of the replacement image must be placed below the layer of your photo.

Step 10: You can adjust the size of the images as per your requirement so that everything fits perfectly in the frame. Similarly, you should adjust the color scheme so that the superimposition does not look awkward.
2. Best Way To Add Green Screen Effect To Video
In the previous section, we have stated how to remove the green screen background in any image and replace that with a stunning background photo. In this section, we will state how to add green screen effects in a video. There are many who think that adding green screen effects in a video takes a lot of expertise, but it is not the case.
If you select the suitable video editor, it is a matter of a few steps only. We recommend Wondershare Filmora to add green screen effects to your video where you have shot the scenes with green screen backgrounds. Here are the steps to follow to remove green screen backgrounds and replace with any photo or video as per your preference.
For Win 7 or later (64-bit)
For macOS 10.12 or later
Step 1: Download and install Wondershare Filmora.
Step 2: Launch Filmora and go for Create New Project option to get started.
Step 3: Import your video with green screen background and move it to the Timeline.
Step 4: Import the replacement photo or video and put it directly on the Timeline.
On the Timeline, your recorded video should be below the replacement photo or video.

Step 5: Double-click on your video, and you will come across a panel on the upper-left side. From that panel, you have to turn on Chroma Key option. This will enable the green screen effect due to which you will see the replacement photo or video superimposed on your recorded video in the green screen background.

Step 6: Finally, adjust the parameters available to fine-tune the overall green screen effect. Lastly, click on Ok button.
Conclusion
If you are looking to add green screen effects to your photo, you can opt for Chroma key Photoshop. Adobe Photoshop is the best photo editor to remove the green screen backgrounds on your photo and replace them with any image you want. Color keying in Photoshop enables you to change any solid color background to anything you want. Similarly, you can use Wondershare Filmora to add green screen effects to your video in simple steps.
For macOS 10.12 or later
Step 1: Download and install Wondershare Filmora.
Step 2: Launch Filmora and go for Create New Project option to get started.
Step 3: Import your video with green screen background and move it to the Timeline.
Step 4: Import the replacement photo or video and put it directly on the Timeline.
On the Timeline, your recorded video should be below the replacement photo or video.

Step 5: Double-click on your video, and you will come across a panel on the upper-left side. From that panel, you have to turn on Chroma Key option. This will enable the green screen effect due to which you will see the replacement photo or video superimposed on your recorded video in the green screen background.

Step 6: Finally, adjust the parameters available to fine-tune the overall green screen effect. Lastly, click on Ok button.
Conclusion
If you are looking to add green screen effects to your photo, you can opt for Chroma key Photoshop. Adobe Photoshop is the best photo editor to remove the green screen backgrounds on your photo and replace them with any image you want. Color keying in Photoshop enables you to change any solid color background to anything you want. Similarly, you can use Wondershare Filmora to add green screen effects to your video in simple steps.
For macOS 10.12 or later
Step 1: Download and install Wondershare Filmora.
Step 2: Launch Filmora and go for Create New Project option to get started.
Step 3: Import your video with green screen background and move it to the Timeline.
Step 4: Import the replacement photo or video and put it directly on the Timeline.
On the Timeline, your recorded video should be below the replacement photo or video.

Step 5: Double-click on your video, and you will come across a panel on the upper-left side. From that panel, you have to turn on Chroma Key option. This will enable the green screen effect due to which you will see the replacement photo or video superimposed on your recorded video in the green screen background.

Step 6: Finally, adjust the parameters available to fine-tune the overall green screen effect. Lastly, click on Ok button.
Conclusion
If you are looking to add green screen effects to your photo, you can opt for Chroma key Photoshop. Adobe Photoshop is the best photo editor to remove the green screen backgrounds on your photo and replace them with any image you want. Color keying in Photoshop enables you to change any solid color background to anything you want. Similarly, you can use Wondershare Filmora to add green screen effects to your video in simple steps.
For macOS 10.12 or later
Step 1: Download and install Wondershare Filmora.
Step 2: Launch Filmora and go for Create New Project option to get started.
Step 3: Import your video with green screen background and move it to the Timeline.
Step 4: Import the replacement photo or video and put it directly on the Timeline.
On the Timeline, your recorded video should be below the replacement photo or video.

Step 5: Double-click on your video, and you will come across a panel on the upper-left side. From that panel, you have to turn on Chroma Key option. This will enable the green screen effect due to which you will see the replacement photo or video superimposed on your recorded video in the green screen background.

Step 6: Finally, adjust the parameters available to fine-tune the overall green screen effect. Lastly, click on Ok button.
Conclusion
If you are looking to add green screen effects to your photo, you can opt for Chroma key Photoshop. Adobe Photoshop is the best photo editor to remove the green screen backgrounds on your photo and replace them with any image you want. Color keying in Photoshop enables you to change any solid color background to anything you want. Similarly, you can use Wondershare Filmora to add green screen effects to your video in simple steps.
Also read:
- Updated What Is HDRI? Everything You Need to Know About HDRI
- 2024 Approved Something About Skin Care Vlog Ideas
- New In 2024, Top 20 Slideshow Makers for Win/Mac/Online Review
- Do You Want to Experiment with Various Sky Backgrounds for Your Footage? Learn About Sky Replacement After Effects in This Article with a Step-by-Step Guide
- 2024 Approved Special Animated Transition Tutorial【SUPER EASY】
- New In 2024, How to Start a Vlog
- Updated How to Add Camera Shake to Video in Adobe After Effects
- Edit FLV Video Files with FLV Editor Windows, Mac,Android, iPhone for 2024
- In 2024, Ideas to Make A Perfect Café Vlog
- New How Can You Import and Adjust the Video Clips on Wondershare Filmora, In 2024
- Updated 2024 Approved How To Create Quiz Videos Detailed Guide
- 2024 Approved How to Add a Green Screen to Zoom
- Updated Basic Knowledge About WMV Format and Best WMV Video Editor
- 2024 Approved Top List The Best Slow Motion Video Editors Available
- In 2024, Which Is the Best Video Slideshow Maker Available Online? Methods to Prepare Custom Slideshows for Google Presentation. How to Make a Slide Show Video?
- Updated How to Edit A Time Lapse Video on iPhone?
- New In 2024, How to Make GIFs From Videos on Mac
- In 2024, How to Add Text Animation Online
- Updated Top 4 Free 3D Intro Maker to Use
- New 2024 Approved Best 15 Subtitle Apps 2023 Windows, Mac, iPhone, Android & Online
- In 2024, 2 Methods to Cut Video in VLC on Windows
- New Art of Time Manipulation A Guide to After Effects Slow Motion Mastery
- Video Editors Use the Loading Text Effect to Create Impressive and Descriptive Videos. Let Us Understand the Detailed Steps to Customize the Loading Text Effect in Wondershare Filmora
- Updated Add Stylish Text to Videos
- New How to Livestream Zoom on Facebook?
- New 2024 Approved Use Path Blur In Photoshop To Create Motion Effect
- Updated Guide to Create Freeze Frame Clone Effect Video
- In 2024, The Ultimate Guide to Slideshow Maker with Music
- Detailed Steps to Rotate Videos Using OBS for 2024
- Updated Reviewing Efectum App and The Best Alternatives for Smartphone Users for 2024
- Updated Learn How to Create Quiz Videos for YouTube that Are Interactive and Can Get Your Audience Engaged with Your Content
- In 2024, Phone Aspect Ratio Vertical Definition, Types and Tips
- Updated Fixes | What If YouTube Zoom to Fill Not Working?
- New Top 5 Tips to Freeze-Frame in After Effects for 2024
- Updated 4K Videos Are the in Thing because of Their Flexibility and High Resolution. Stick Around to Learn How to Choose the Best Frame Rate for 4K Videos for 2024
- 2024 Approved Learn How to Extract Sound From Video Using the Different Online and Software Tools. Details About Their Features, Pros/Cons, and More Are Given
- New 2 Actionable Ways to Extract Subtitles From MKV Videos without Quality Loss for 2024
- 2024 Approved Looking for a Great Way to Make Your Own Anime Music Video? The Following Are the Top AMV Makers to Choose From
- New In 2024, Best Ever Ways Make Tiktok Slideshow Solved
- In 2024, Learn Color Correction in After Effects with These YouTube Videos
- Updated How to Perfectly Use Canva Color Match for 2024
- In 2024, 5 Ways to Transfer Music from Oppo A59 5G to Other Android Devices Easily | Dr.fone
- Getting the Pokemon Go GPS Signal Not Found 11 Error in Oppo Reno 8T | Dr.fone
- User Choice Top Free Streaming Sites for Sports
- A Full Review for iTools Virtual Location and Top 5 Alternatives For Apple iPhone 14/iPad | Dr.fone
- The Ultimate Guide to Get the Rare Candy on Pokemon Go Fire Red On Nokia G42 5G | Dr.fone
- Samsung won’t play HEVC H.265 media, how to fix?
- Top 7 Phone Number Locators To Track Samsung Galaxy M34 5G Location | Dr.fone
- Does Airplane Mode Turn off GPS Location On OnePlus Nord N30 SE? | Dr.fone
- In 2024, Does Life360 Notify When You Log Out On Xiaomi Civi 3? | Dr.fone
- In 2024, Best Free iPhone 7 IMEI Checker
- Step-by-Step Tutorial How To Bypass Tecno Phantom V Flip FRP
- How to Track Motorola Defy 2 by Phone Number | Dr.fone
- What is Fake GPS Location Pro and Is It Good On Realme GT 3? | Dr.fone
- In 2024, How Do You Unlock your iPhone 8? Learn All 4 Methods | Dr.fone
- Disable screen lock on Xiaomi
- In 2024, Hassle-Free Ways to Remove FRP Lock on Google Pixel 8 Prowith/without a PC
- In 2024, Ultimate Guide from Xiaomi Redmi K70E FRP Bypass
- OnePlus Nord N30 SE Tutorial - Bypass Lock Screen,Security Password Pin,Fingerprint,Pattern
- How to restore wiped music on Y100i
- How to Retrieve Deleted Calendar Events iPhone SE (2020)? | Stellar
- In 2024, How to Remove iPhone X Activation Lock
- How to Track a Lost Apple iPhone 15 Pro for Free? | Dr.fone
- How to Recover Deleted Photos from Android Gallery App on Camon 20 Pro 5G
- Rootjunky APK To Bypass Google FRP Lock For Itel S23
- In 2024, 4 Ways to Transfer Music from Tecno Spark 20 Pro+ to iPhone | Dr.fone
- How Do You Get Sun Stone Evolutions in Pokémon For Apple iPhone 8? | Dr.fone
- In 2024, Top 5 Vivo Y36 Bypass FRP Tools for PC That Actually Work
- How to Stop Life360 from Tracking You On Apple iPhone 13? | Dr.fone
- In 2024, How to Unlock Realme GT Neo 5 SE Phone without Google Account?
- In 2024, The Best Android SIM Unlock Code Generators Unlock Your Xiaomi Redmi Note 12 5G Phone Hassle-Free
- How to Bypass Activation Lock from iPhone 6 Plus or iPad?
- Title: New How to Make Foggy Text Reflection Effect
- Author: Chloe
- Created at : 2024-04-24 07:08:12
- Updated at : 2024-04-25 07:08:12
- Link: https://ai-editing-video.techidaily.com/new-how-to-make-foggy-text-reflection-effect/
- License: This work is licensed under CC BY-NC-SA 4.0.


