
New How to Make Text Reveal Effect Easily

How to Make Text Reveal Effect Easily
Have you ever seen the text reveal led by a subject when moving across the frame? It’s one of the most common text-revealing effects in video editing. This technique is often used to add titles or credits to a scene for cinematic vibes and creative effects.
While it may look complicated, it’s actually quite easy to create with a video editing program like Filmora. Filmora’s masking feature allows users to create impressive and eye-catching text reveals in their videos. For those looking for a tutorial on how to make text reveal, here’s a step-by-step guide to help you out.
How to add text reveal effect using Filmora’s masking tool
Free Download For Win 7 or later(64-bit)
Free Download For macOS 10.14 or later
First, make sure the video clips you are using are clear, with the subject moving across the frame. It will help the text to stand out and be more easily seen. Now, follow the step-by-step guides below:
Step 1 Add video tracks
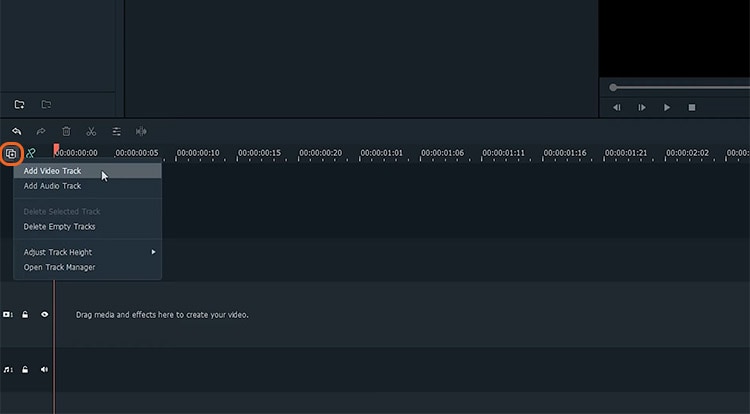
You will need three video tracks in order to create this effect, so click the (+) icon above the timeline > Add Video Track and add two more video tracks.
Step 2 Import the clip to the timeline
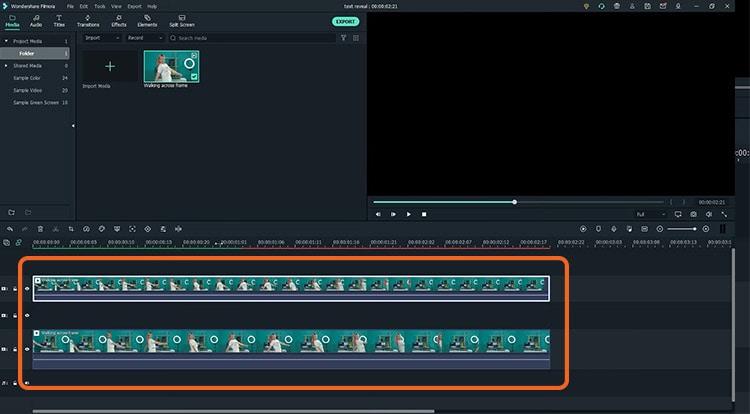
Drag and drop your clip onto the first and third video tracks of the timeline. Then, align them with each other.
Step 3 Make a cut at the beginning of the text
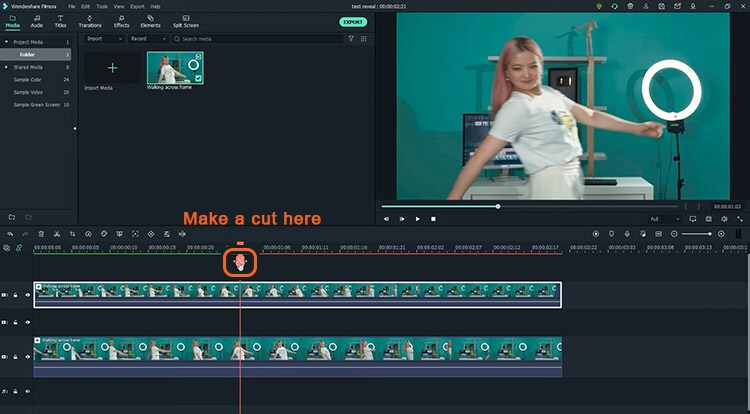
Find the spot where you want the text reveals to start, then click the scissor icon to make a cut on the clip from the first video track.
Step 4 Add and adjust the text
Go to Title > Plain Text > select which text styles suit you best. Then, drag the title to the second video track.
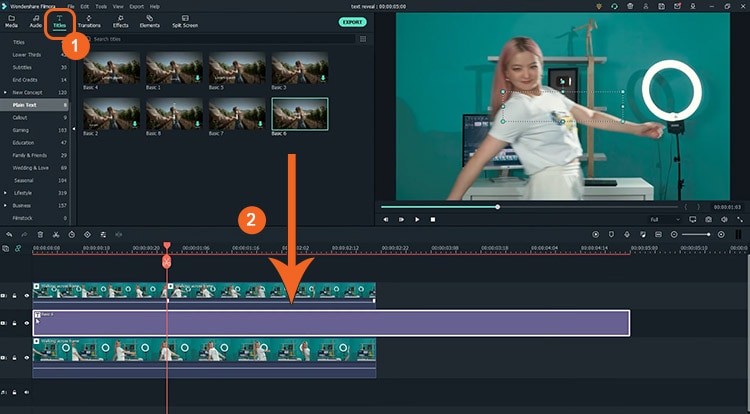
Double-click on the title clip and type out your text. Then, adjust the text position and align it to the cut you have made.
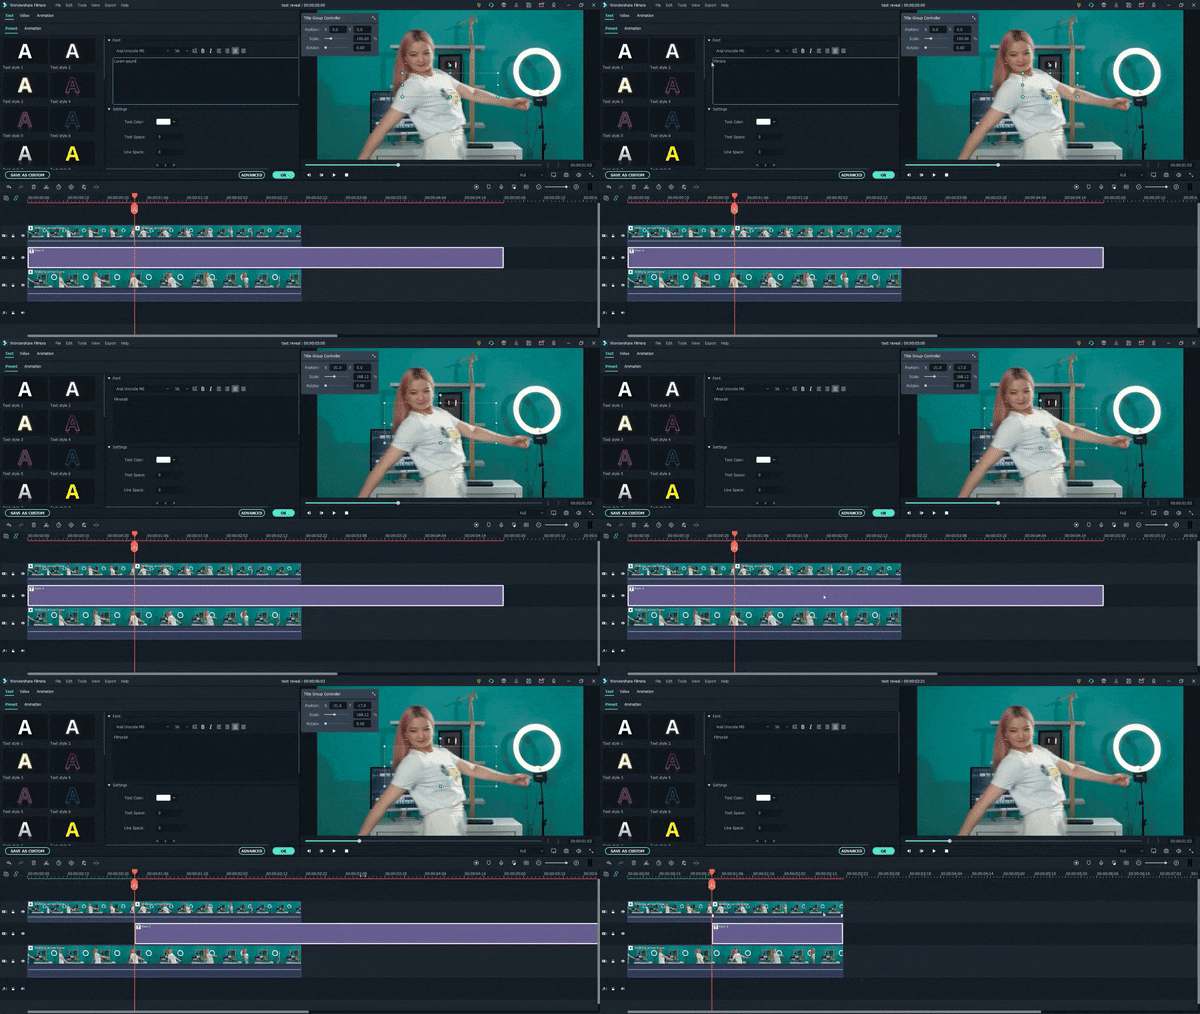
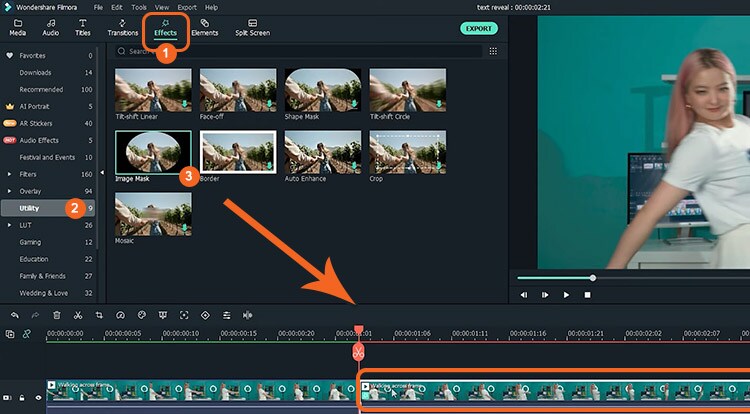
Step 5 Use the masking tool
Go to Effects > Utility > Image Mask, then drag and drop it onto the latter half of the top video clip.
Make more cuts on the top latter clip, frame by frame, starting from the first cut you have made.
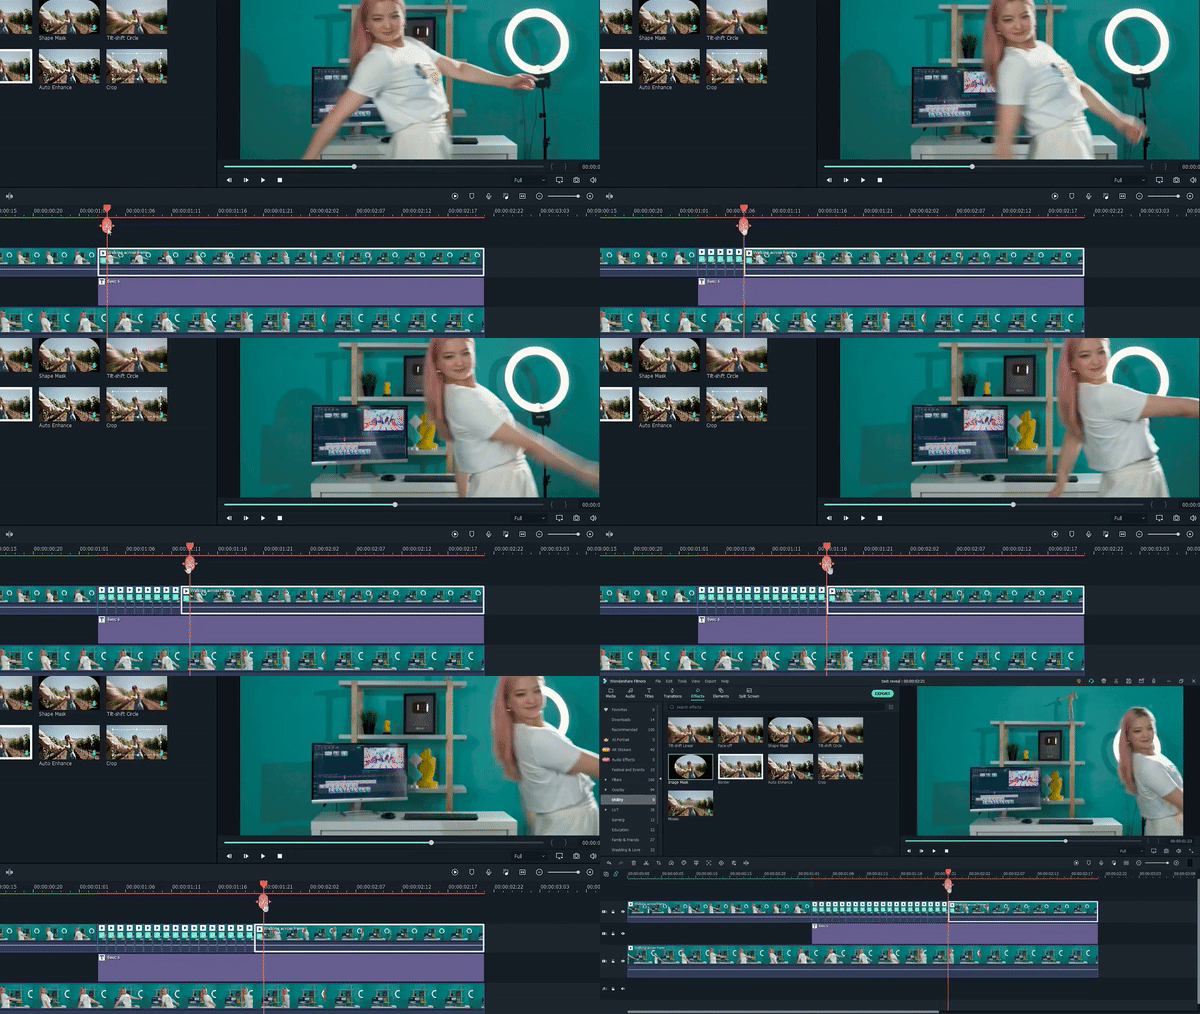
Double-click on each of the smaller clips and find the mask settings.
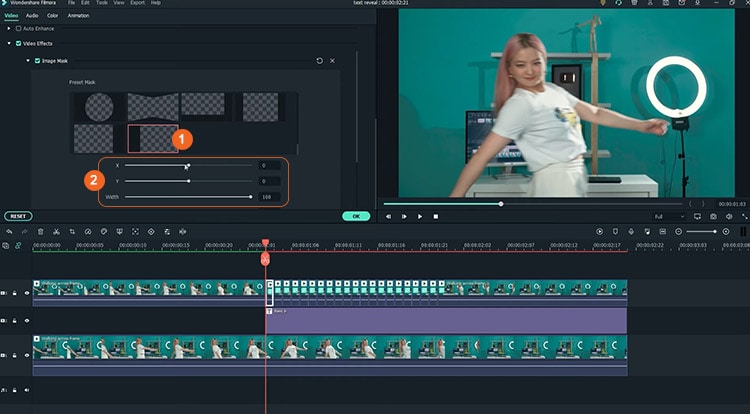
Since the subject in this tutorial is moving from side to side, we are going to match the mask’s y-axis setting, which is also the revealed text portion, with the subject’s movement. Starting from the first clip, adjust the y-axis number to a smaller/bigger number.
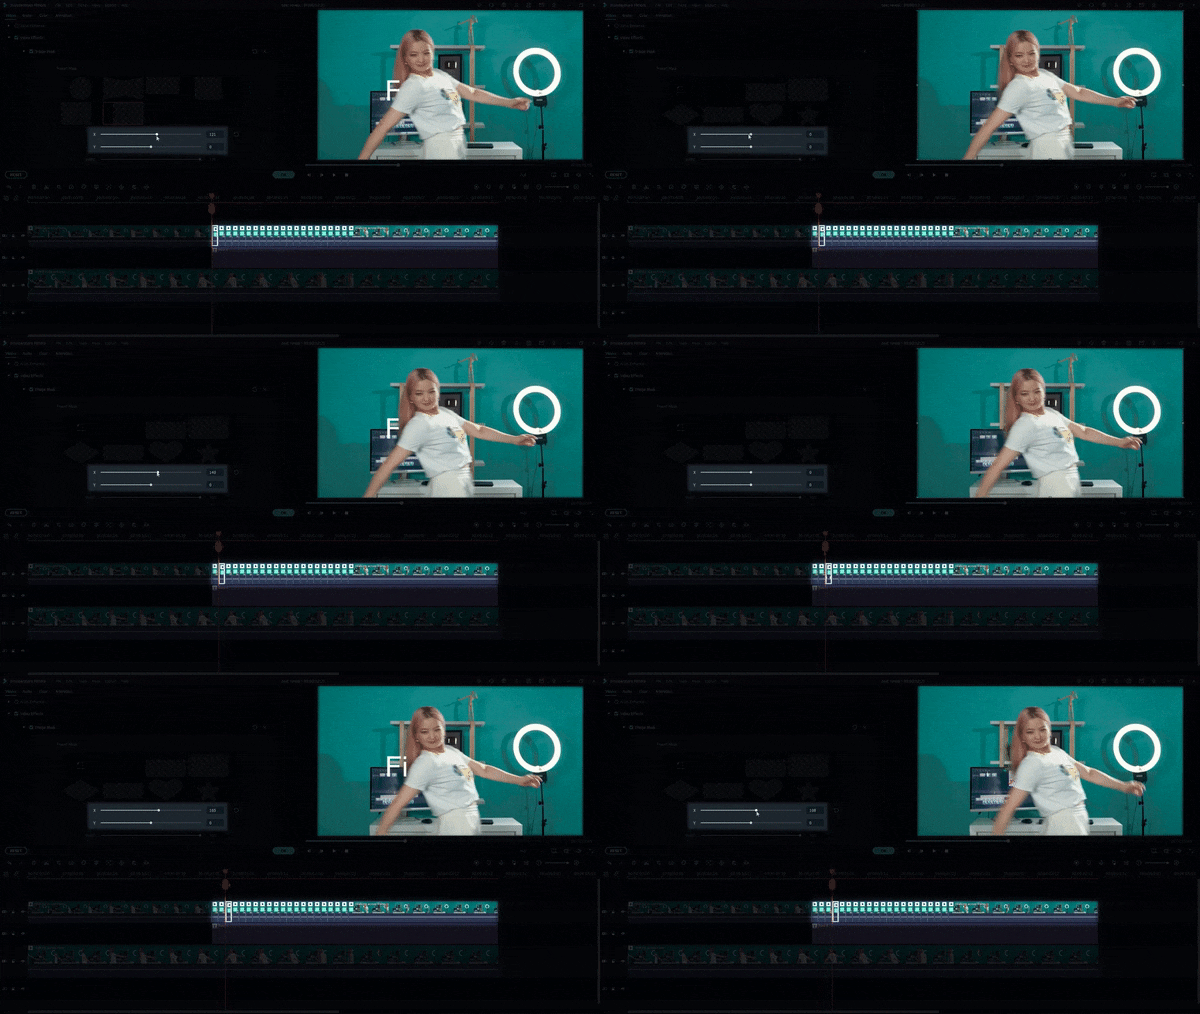
There we go! The final look should look like this:

Summary
That is how we can create the text reveal effect using Wondershare Filmora. Using Filmora’s masking tool, it’s easy to create a text reveal the effect that can add flair and interest to your videos. Just follow the simple steps, and you’ll be able to get the desired result with a few clicks of your mouse. Give it a try, and share your thoughts with us.
Free Download For macOS 10.14 or later
First, make sure the video clips you are using are clear, with the subject moving across the frame. It will help the text to stand out and be more easily seen. Now, follow the step-by-step guides below:
Step 1 Add video tracks
You will need three video tracks in order to create this effect, so click the (+) icon above the timeline > Add Video Track and add two more video tracks.

Step 2 Import the clip to the timeline
Drag and drop your clip onto the first and third video tracks of the timeline. Then, align them with each other.

Step 3 Make a cut at the beginning of the text
Find the spot where you want the text reveals to start, then click the scissor icon to make a cut on the clip from the first video track.

Step 4 Add and adjust the text
Go to Title > Plain Text > select which text styles suit you best. Then, drag the title to the second video track.

Double-click on the title clip and type out your text. Then, adjust the text position and align it to the cut you have made.

Step 5 Use the masking tool
Go to Effects > Utility > Image Mask, then drag and drop it onto the latter half of the top video clip.

Make more cuts on the top latter clip, frame by frame, starting from the first cut you have made.

Double-click on each of the smaller clips and find the mask settings.

Since the subject in this tutorial is moving from side to side, we are going to match the mask’s y-axis setting, which is also the revealed text portion, with the subject’s movement. Starting from the first clip, adjust the y-axis number to a smaller/bigger number.

There we go! The final look should look like this:

Summary
That is how we can create the text reveal effect using Wondershare Filmora. Using Filmora’s masking tool, it’s easy to create a text reveal the effect that can add flair and interest to your videos. Just follow the simple steps, and you’ll be able to get the desired result with a few clicks of your mouse. Give it a try, and share your thoughts with us.
Free Download For macOS 10.14 or later
First, make sure the video clips you are using are clear, with the subject moving across the frame. It will help the text to stand out and be more easily seen. Now, follow the step-by-step guides below:
Step 1 Add video tracks
You will need three video tracks in order to create this effect, so click the (+) icon above the timeline > Add Video Track and add two more video tracks.

Step 2 Import the clip to the timeline
Drag and drop your clip onto the first and third video tracks of the timeline. Then, align them with each other.

Step 3 Make a cut at the beginning of the text
Find the spot where you want the text reveals to start, then click the scissor icon to make a cut on the clip from the first video track.

Step 4 Add and adjust the text
Go to Title > Plain Text > select which text styles suit you best. Then, drag the title to the second video track.

Double-click on the title clip and type out your text. Then, adjust the text position and align it to the cut you have made.

Step 5 Use the masking tool
Go to Effects > Utility > Image Mask, then drag and drop it onto the latter half of the top video clip.

Make more cuts on the top latter clip, frame by frame, starting from the first cut you have made.

Double-click on each of the smaller clips and find the mask settings.

Since the subject in this tutorial is moving from side to side, we are going to match the mask’s y-axis setting, which is also the revealed text portion, with the subject’s movement. Starting from the first clip, adjust the y-axis number to a smaller/bigger number.

There we go! The final look should look like this:

Summary
That is how we can create the text reveal effect using Wondershare Filmora. Using Filmora’s masking tool, it’s easy to create a text reveal the effect that can add flair and interest to your videos. Just follow the simple steps, and you’ll be able to get the desired result with a few clicks of your mouse. Give it a try, and share your thoughts with us.
Free Download For macOS 10.14 or later
First, make sure the video clips you are using are clear, with the subject moving across the frame. It will help the text to stand out and be more easily seen. Now, follow the step-by-step guides below:
Step 1 Add video tracks
You will need three video tracks in order to create this effect, so click the (+) icon above the timeline > Add Video Track and add two more video tracks.

Step 2 Import the clip to the timeline
Drag and drop your clip onto the first and third video tracks of the timeline. Then, align them with each other.

Step 3 Make a cut at the beginning of the text
Find the spot where you want the text reveals to start, then click the scissor icon to make a cut on the clip from the first video track.

Step 4 Add and adjust the text
Go to Title > Plain Text > select which text styles suit you best. Then, drag the title to the second video track.

Double-click on the title clip and type out your text. Then, adjust the text position and align it to the cut you have made.

Step 5 Use the masking tool
Go to Effects > Utility > Image Mask, then drag and drop it onto the latter half of the top video clip.

Make more cuts on the top latter clip, frame by frame, starting from the first cut you have made.

Double-click on each of the smaller clips and find the mask settings.

Since the subject in this tutorial is moving from side to side, we are going to match the mask’s y-axis setting, which is also the revealed text portion, with the subject’s movement. Starting from the first clip, adjust the y-axis number to a smaller/bigger number.

There we go! The final look should look like this:

Summary
That is how we can create the text reveal effect using Wondershare Filmora. Using Filmora’s masking tool, it’s easy to create a text reveal the effect that can add flair and interest to your videos. Just follow the simple steps, and you’ll be able to get the desired result with a few clicks of your mouse. Give it a try, and share your thoughts with us.
How to Use LUTs in Lumafusion & Free LUTs Resource
LumaFusion is one of the most complex iPad and iPhone video editing apps. Many of its customers adore it, and it has some incredible capabilities that you’d find incompetent editing software. They’ve effectively opened up the realm of LUTs to iPhone and iPad users.
LumaFusion LUTs are individual files that act as containers in LumaFusion. This container file includes standard LUT data as well as LumaFusion-specific color preset data. A LumaFusion LUT Preset file is similar to a Super LUT. LumaFusion can only employ one standard LUT at a time; however, LumaFusion LUT presets enable simultaneous Color Grading and Color Corrections.
How will LUTs help with color correction in Lumafusion
Colors in today’s cameras are vibrant, but they may continuously be improved. Color correction corrects the color that’s already there, whether it’s boosting the exposure to brighten a darker photo or increasing the saturation to make the colors pop. Color correction in other NLEs can be difficult, but not in LumaFusion.
The Color Presets tab in the Color & Effects section is where you begin color correcting footage. There are various presets from which to pick. I wouldn’t use these settings on my videos because they’re too stylized, but they’re there. You may alter any of the presets to your taste, so some of the more dramatic ones can be toned down. By picking the original setting, purists can color-fix their raw footage without using LumaFusion. Moving the sliders till the color seems perfect is all that’s required from there.
Exposure, contrast, highlights, shadows, mid-tones, and saturation and hue are all controlled by sliders. The color sliders can be used for a more forceful approach. But proceed with caution. The sliders are delicate, and it’s easy to overdo them. Play around with the sliders until you get the look you want. If you don’t like it, toss it in the trashcan and start over.
Color grading and color correction are not interchangeable terms. Color correction is a technical requirement, but color grading is primarily creative. You’ll have no command over the color grading process if you’re working with film material where primary colors aren’t even visible. Before diving into the creative LUTs, make sure you complete adequate color correcting.
Color grading, unlike color correction, adjusts the shot’s color to modify the atmosphere or feel. The only way to do that in LumaFusion is to play around with the color sliders under the Color Presets tab, but that’s not ideal. As previously stated, the three sliders are sensitive and limited. LumaFusion isn’t designed for color grading, which is OK. Thankfully, LumaFusion allows you to use LUTs.
Always color correct your footage before utilizing any LUTS, which entails changing the White-balance, Highlights, Contrast, and Shadows. Do not apply the LUTS to your footage directly.
How to use LUTs in Lumafusion?
Videographers, colorists, and editors use LUTs because they are efficient. Rather than starting from zero every time you work on a video editing project, you may speed up the color grading process using a LUT with predefined color profiles. It’s elementary to import LUTs. Simply import the preset files into LumaFusion and add the preset to your footage like an Instagram filter.
The Import button in the Color & Effects editor is the easiest way to load LUTs.
- Double click on any video/photo clip on the timeline to access the Clip Editors.
- At the bottom of the Clip Editor UI, select the Color & Effects tab.
- The import button is located directly below the effect preset library.
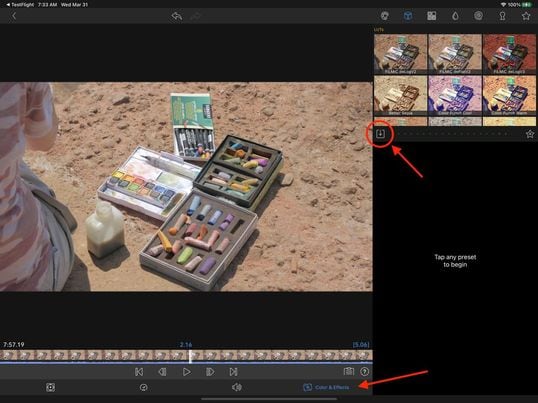
How to use LUTs in Lumafuison
LUTs must be loaded via the LumaFX clip editor at the moment. Follow the steps below to accomplish this:
- To access the LumaFX UI, double-tap any video/photo clip in the timeline.
- At the bottom of the LumaFX UI, select the ‘Color & Effects’ tool.
- In the upper right panel, press the cube icon.
- The import button is located directly below the effect preset library.
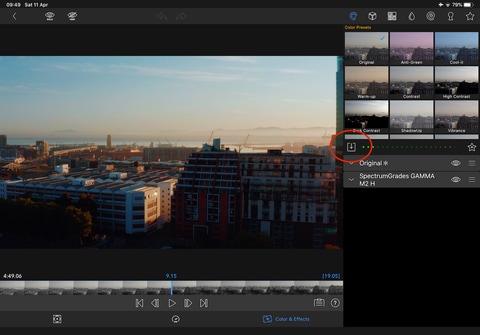
Load LumaFX LUTs
- Once hit, it will display your transfer site options; select your desired transfer site and navigate to the folder where your LUTs are stored.
- Select and import all of the LUTs in the folder.
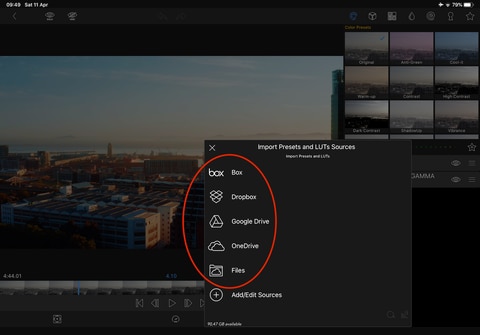
Import LUTs
Free LUTs Resource for Lumafusion
Choosing the appropriate LUT pack will boost your photography and videography immediately. With our quick guide to the top free LUTs available, you can find the appropriate one for you.
1. Jaun Melara free LUTs
LUTs aren’t simply for stylizing video. They’re frequently employed as a color correction tool to ensure that your colors are shown correctly in various formats. Juan Melara has provided a free LUT set to assist you in color correcting your footage for printing on film stock. These free LUTs will provide modest stylization to your footage if you don’t want to send it to print.
Melara developed this video to demonstrate his free LUTs in action. The colors are more subdued than in the other LUTs on this list. This free LUT pack is ideal if you’re looking to produce a modern-style cinematic color grade. Melara also has a great article about using LUTs to create a lovely color grade. DaVinci PowerGrades are available for several of these LUTs. They color correct your film in the same way as LUTs do, but you’ll have more flexibility over individual PowerGrade components.

Jaun Melara free LUTs
2. Small Hd free LUTs
SmallHD, a company that makes small, full HD on-camera monitors, is giving away a free set of color grades that reproduce the appearance of seven classic movies. The company is also releasing a series of video lessons that show how to get the most out of these effects throughout production and post-production. Everything is completely free. The color grades are provided as a.zip file and are in the form of 3D LUT files created in DaVinci Resolve. If you’re unfamiliar with SmallHD, the company offers free LUTs for on-set monitoring in real-time. This free set of Movie Look LUTs is inspired by seven recent films, including Apocalypse Now’s warmth and The Matrix’s green overtones. Take use of SmallHD’s free LUT set if you want to give your footage a dramatic and cinematic vibe.

Small Hd free LUTs
3. Color Grading Central free LUTs
Color Grading Central is essential knowledge for any aspiring colorist or video editor who takes color seriously. CGC is a company that specializes in color grading. Their website has a wide range of outstanding color-related products, from grain to LUTs. They also provide their email members with a wealth of free color grading information. Free trials of some LUTs are also available, so you may try them out before you buy. They’re giving away an array of color presets, grains, and burns exclusively to their email list and the seven free color LUTs. We strongly recommend them if you want to give your footage a shot-on-film look.

Color Grading Central free LUTs
4. PremiumBeat Free LUTs
PremiumBeat has freely given countless LUT packs as well as other assets to any video editor or filmmaker over the years. Todd Blankenship has designed a fresh new set of FREE LUTs for Shutterstock, which is their latest addition. Todd chose distinct looks from films and pictures that inspire his daily work to create this bundle with attention and love. There are many options, and these looks will offer you a great place to start when it comes to grading your footage. They recently published an in-depth evaluation of Photon.io, a new color grading tool. Todd Blankenship, who ended up utilizing the tool to create these LUTs, wrote the initial review. The pack has been fine-tuned to replicate some clean, cinematic looks that you may use as a jumping-off point for your video.

PremiumBeat Free LUTs
5. Frank Glencairn free LUT
Despite having access to the most advanced filming gear, there’s something about a vintage film aesthetic that looks fantastic. Frank Glencairn has made a nice K-Tone LUT that is meant to look like vintage Kodachrome film. This film grade, which was formerly popular among photographers and filmmakers, has fallen out of favor due to the rise of digital cameras. With this free LUT, you can get the appearance of retro-looking reds, blues, and yellows.

Frank Glencairn free LUT
6. Reverse Tree Media free LUTs
Reverse Tree Media is releasing a new LUTS bundle that is absolutely free. In addition to LUTS, this LUTS collection includes utility LUTS, film grains, and a Black-Bar layer. For the color-grading procedure, this is critical. This bundle contains 56 free LUTS for various scenarios like weddings, television commercials, travel films, landscapes, Rec.709, and so on. It also has several useful LUTS and film grain overlays for 8mm, 16mm, and 35mm video, as well as a cinematic black bar PNG file with a ratio of 2.35:1 to assist you in achieving a more cinematic appearance quickly and save time. Check out the link to learn more about LUTS and to obtain their previous cinematic LUTS bundle, which is also free.

Reverse Tree
Wondershare Filmora11 Express Better
Achieve More
Grow Together
Free Download Free Download Learn More

Closing Thoughts:
LUTs are most typically used to build and store color profiles that can be utilized in other film projects. By using contrast and design, you can bring logs and flat materials to life. Everything you need to know is right here. You can now rush to your desk and fix your video.
Free Download Free Download Learn More

Closing Thoughts:
LUTs are most typically used to build and store color profiles that can be utilized in other film projects. By using contrast and design, you can bring logs and flat materials to life. Everything you need to know is right here. You can now rush to your desk and fix your video.
How to Turn On/Off Motion Blur in Fortnite? Is It Good for Fortnite?
Fortnite is a special and popular game as it allows people to flaunt their skills in an enjoyable environment. It’s a multiplayer game that can be played with your friends or loved ones to spend quality time. It offers four different modes in which you can strategize with your friends to fight off zombies and enemies.
While playing Fortnite, many players like to turn on and off the motion blur effect to create a smooth effect. By reading this article, you can find out about Fortnite motion blur on or off in a detailed manner.

Part 1: What is Motion Blur in Games?
Video games display a wide variety of fast-moving animated objects. To make these movements look realistic and smooth, many game lovers prefer to add motion blur in the games. This effect has become a part of the trend in recent years as it helps to enhance the quality of the game. Moreover, the motion blur effect also increases the size of the game, due to which you would require more efficient equipment.
With the addition of the motion blur effect, the sudden movements of fast-moving objects have become smoother. However, you need to consider the FPS rate of the video to add a motion blur effect appropriately. Thus, this particular effect has drastically enhanced the video game effects that eventually improve the gaming experience.
Part 2: What is Motion Blur in Fortnite?
Are you wondering if motion blur is good for Fortnite? To know about Fortnite motion blur on or off in detail, you can watch this quick video tutorial . This video will guide you about the difference motion blur makes in Fortnite.
After watching this video, you will come to know how motion blur changes the outlook of your video gameplay. By adding this effect, you can enjoy the gameplay more aesthetically. The reason is that the motion blur quickly smoothens the video, especially for fast-moving objects.
However, the application of the motion blur effect has some minor drawbacks that you should know. Through this particular effect, it may become hard to locate other players as the background looks blurry when you move in the game.

Part 3: How to Turn On/Off Motion Blur in Fortnite?
After knowing what motion blur is in Fortnite, let’s proceed further. In this section, we will shed light on the instructions for turning on and off the motion blur effect in Fortnite easily.
Step1 Access the Fortnite Menu
To begin, open and load your Fortnite game on your PC properly. Now click on the “Three Lines” icon in the top left corner and open the menu.

Step2 Locate the Motion Blur Option
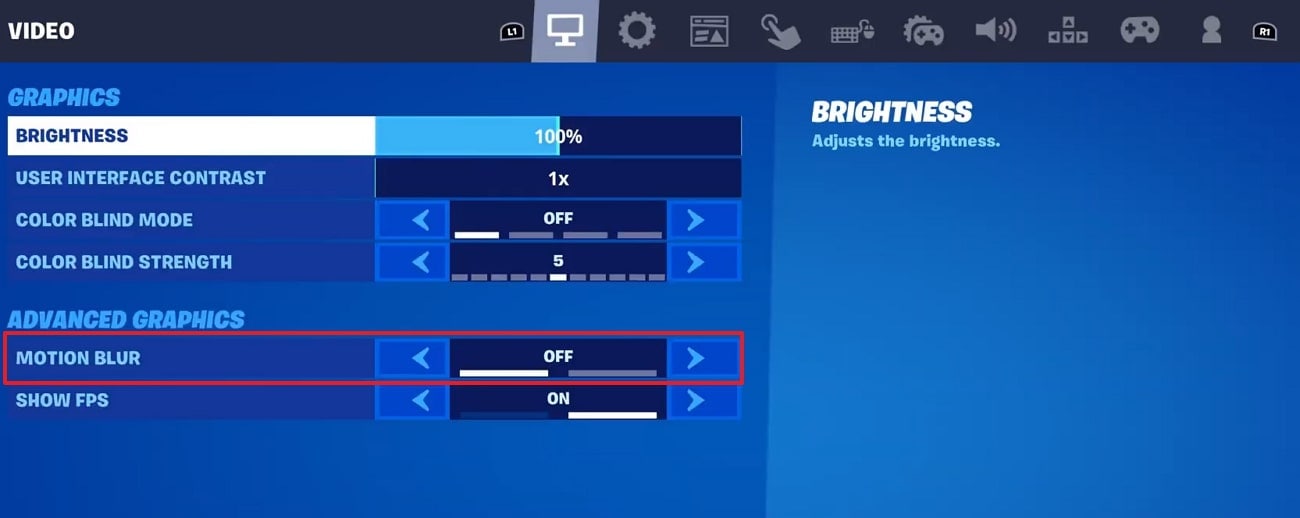
From the menu section, click on “Settings” to move further. Afterward, locate the “Advanced Graphics” section and select the “Motion Blur” option. Now you can turn it on and off according to your need.
Bonus Tips – How to Add Motion Blur to Your Fortnite Gaming Video
Do you want to add motion blur in Fortnite flawlessly? Wondershare Filmora is a professional tool that contains tons of features for video editing and enhancement. Using this tool, you can apply various trending effects and transitions to your videos with a single click. You can also create multiple adjustment layers on this tool to edit your videos professionally and accurately.
Free Download For Win 7 or later(64-bit)
Free Download For macOS 10.14 or later
Filmora can also help you in performing basic editing on your video clips. For example, you can cut and trim the unnecessary parts from your video on this platform without difficulty. Moreover, you can create keyboard shortcuts on this tool to increase the speed of your video editing. Apart from editing the video, you can also add text, graphics, images, and stickers to your videos flawlessly.
When it comes to the offered effects in Filmora, you can find various options and diversity. To add motion blur effect in your games such as Fortnite, Filmora is the best professional choice that you can consider. To learn more about Filmora, let’s highlight some of its distinct key features below:
Prominent Features of Filmora
- This tool provides various AI-powered options such as AI Smart Cutout, AI Audio Stretch, AI Audio Denoise, etc. Using these advanced options; you can make immense differences in your videos.
- You can use color grading options on Filmora to manage and adjust the brightness, saturation, contrast, hue, and other significant elements easily.
- Filmora allows you to use its Pen tool to draw complex shapes and lines accurately. After drawing them, you can also enhance and modify them efficiently.
- On this platform, you can find out various soundtracks and audio clips in its library to make your videos engaging and attractive. After choosing the soundtrack, you can also edit it according to your preferences.
Steps to Add Motion Blur Effect in Fortnite Video Recording through Filmora
To create a motion blur effect in your Fortnite recording on Filmora, you can use the below steps:
Step1 Create New Project
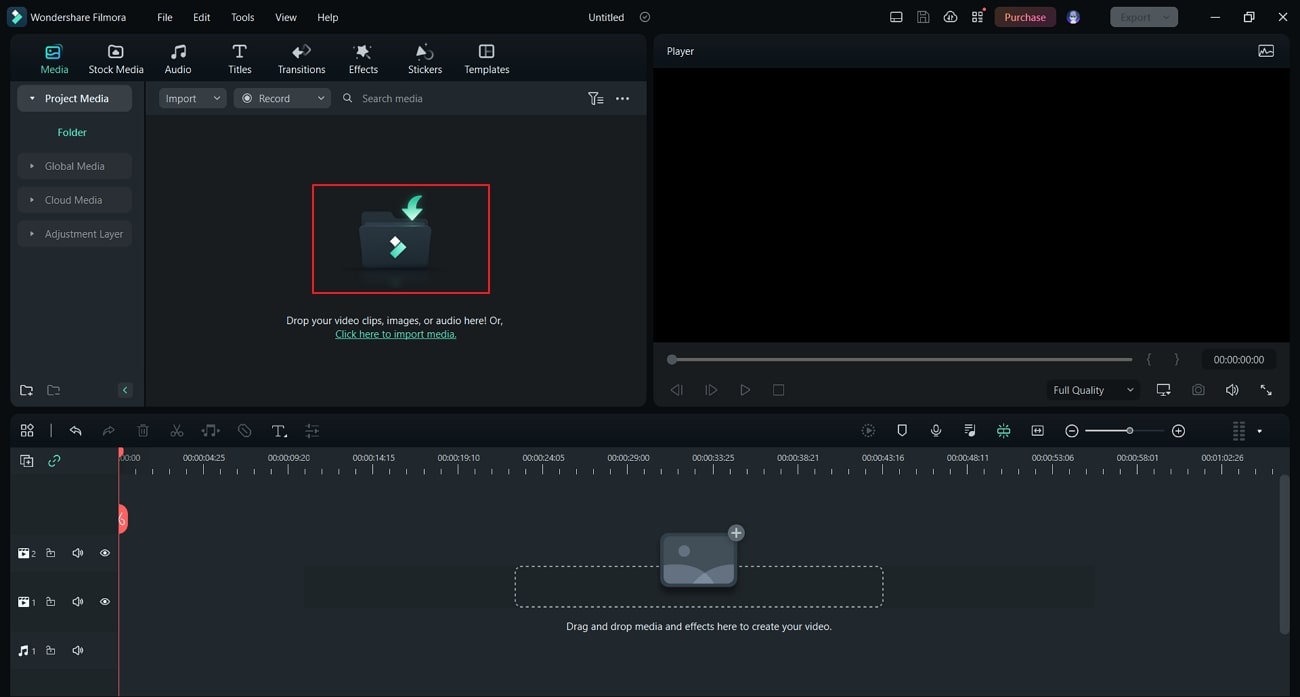
After launching Filmora, click on “New Project” to proceed. It will instantly open a new window where you can begin with the editing. Now tap on the “Import” button to upload the Fortnite recorded video on the project media.
Step2 Split the Fortnite Video
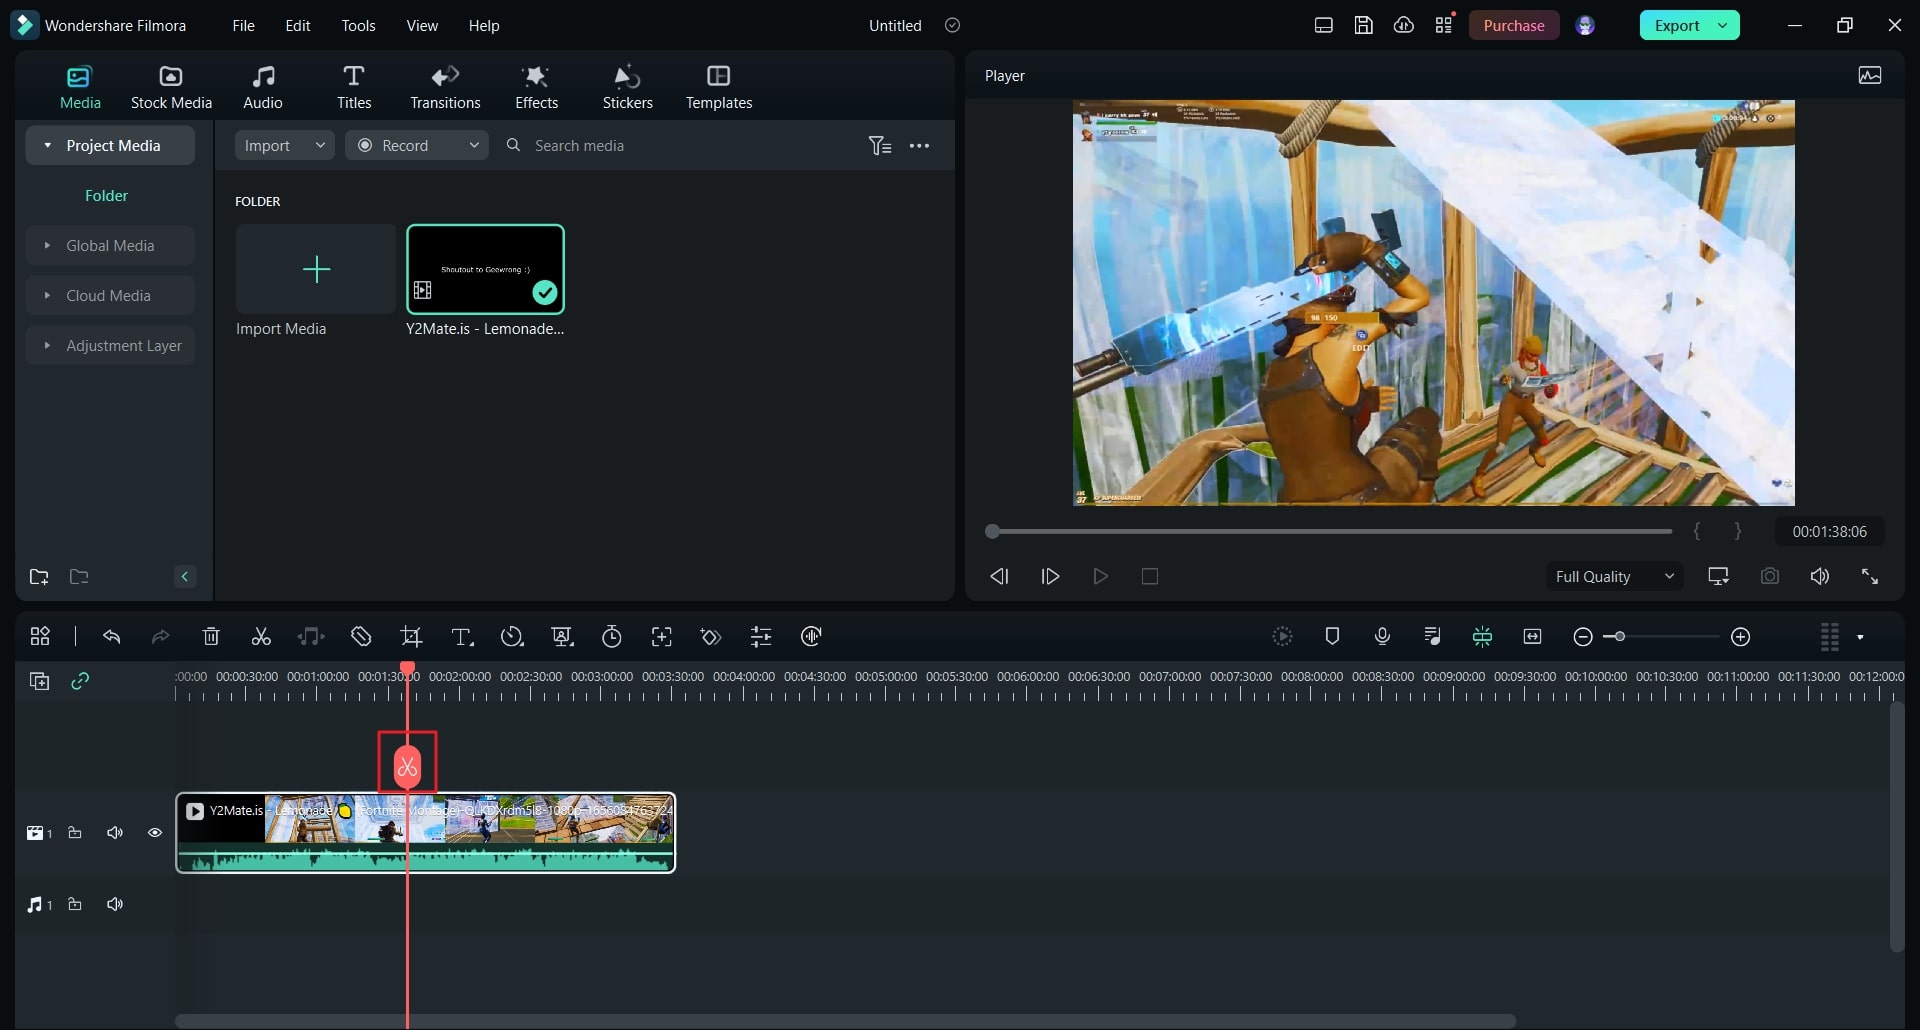
Once done with adding the recorded video, drag and drop it into the timeline. Now place the play head to the point where you want to add the motion blur effect. Now click on the “Scissors” icon to split the video successfully.
Step3 Locate the Blur Effect
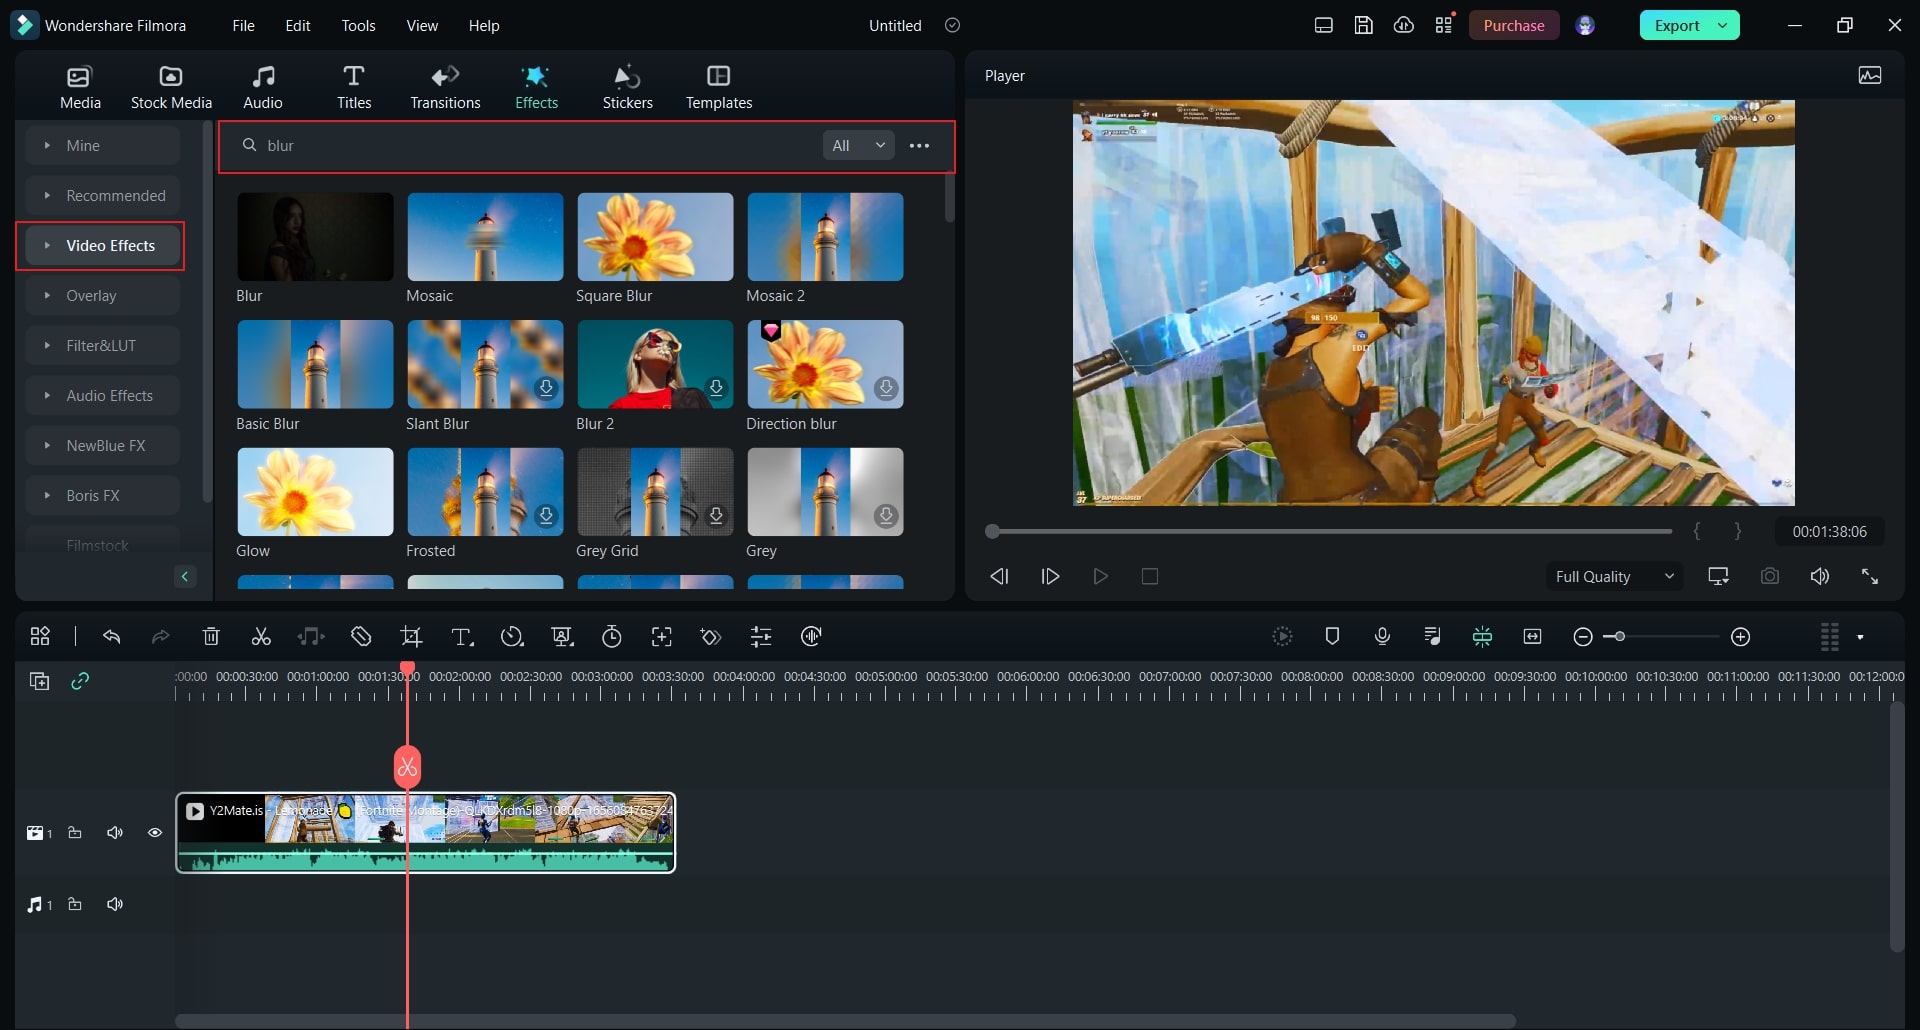
After splitting the video, head to the “Effects” tab and click on “Video Effects” from the left side of Filmora’s interface. Afterward, type “Blur” on the search bar. From the results, drag the blur effect to the video on the timeline.
Step4 Add the Transition
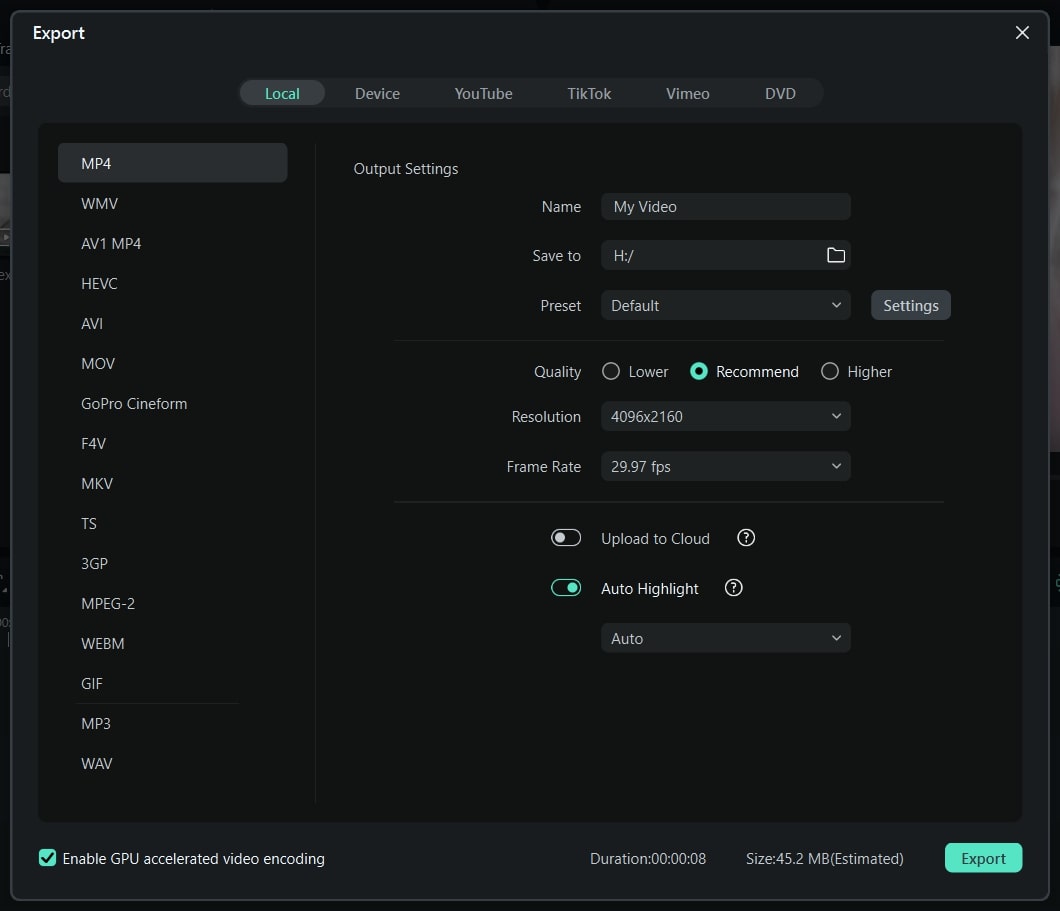
To make your video look smooth after adding the effect, go to the “Transitions” tab and search for the “Dissolve” option. After finding this transition, apply it to the timeline. Once you are done with all the modifications, you can hit the “Export” button.
Conclusion
Motion blur effects in games can make a huge difference. If you want a clean and smooth display of fast-moving objects in your games, such as Fortnite, you can apply the motion blur effect. This article has guided you on how to add motion blur in Fortnite successfully. We have also suggested a powerful and professional tool called Filmora that can also create a motion blur effect in videos effectively.
Free Download For macOS 10.14 or later
Filmora can also help you in performing basic editing on your video clips. For example, you can cut and trim the unnecessary parts from your video on this platform without difficulty. Moreover, you can create keyboard shortcuts on this tool to increase the speed of your video editing. Apart from editing the video, you can also add text, graphics, images, and stickers to your videos flawlessly.
When it comes to the offered effects in Filmora, you can find various options and diversity. To add motion blur effect in your games such as Fortnite, Filmora is the best professional choice that you can consider. To learn more about Filmora, let’s highlight some of its distinct key features below:
Prominent Features of Filmora
- This tool provides various AI-powered options such as AI Smart Cutout, AI Audio Stretch, AI Audio Denoise, etc. Using these advanced options; you can make immense differences in your videos.
- You can use color grading options on Filmora to manage and adjust the brightness, saturation, contrast, hue, and other significant elements easily.
- Filmora allows you to use its Pen tool to draw complex shapes and lines accurately. After drawing them, you can also enhance and modify them efficiently.
- On this platform, you can find out various soundtracks and audio clips in its library to make your videos engaging and attractive. After choosing the soundtrack, you can also edit it according to your preferences.
Steps to Add Motion Blur Effect in Fortnite Video Recording through Filmora
To create a motion blur effect in your Fortnite recording on Filmora, you can use the below steps:
Step1 Create New Project
After launching Filmora, click on “New Project” to proceed. It will instantly open a new window where you can begin with the editing. Now tap on the “Import” button to upload the Fortnite recorded video on the project media.

Step2 Split the Fortnite Video
Once done with adding the recorded video, drag and drop it into the timeline. Now place the play head to the point where you want to add the motion blur effect. Now click on the “Scissors” icon to split the video successfully.

Step3 Locate the Blur Effect
After splitting the video, head to the “Effects” tab and click on “Video Effects” from the left side of Filmora’s interface. Afterward, type “Blur” on the search bar. From the results, drag the blur effect to the video on the timeline.

Step4 Add the Transition
To make your video look smooth after adding the effect, go to the “Transitions” tab and search for the “Dissolve” option. After finding this transition, apply it to the timeline. Once you are done with all the modifications, you can hit the “Export” button.

Conclusion
Motion blur effects in games can make a huge difference. If you want a clean and smooth display of fast-moving objects in your games, such as Fortnite, you can apply the motion blur effect. This article has guided you on how to add motion blur in Fortnite successfully. We have also suggested a powerful and professional tool called Filmora that can also create a motion blur effect in videos effectively.
What Is the Best MP4 Cutter for YouTuber on Mac?
Most times, Youtubers need to cut out unnecessary parts from their videos while customizing intros and outros. A common reason is to ensure that videos are engaging and interactive while preventing any lagging. In addition, an aesthetically pleasing video keeps its viewers hooked throughout the video. That’s why cutting MP4 videos are essential for being a Youtuber. However, the question becomes, which is the best MP4 cutter for Youtubers on Mac? This article answers that question succinctly; let’s take a look.
What You Should Know About YouTube Video

YouTubers upload over 300 hours of video content to the platform every second. These videos cut across every niche and topic. There’s scarcely a topic you’re looking for that you won’t find a video or two discussing on YouTube. So as a YouTuber, you have to find ways to keep up and stand out from the crowd. You’ll need engaging videos that will hold your target audience’s attention so much that they will subscribe for more.
However, if the video is too long or your car doesn’t hit the right frame, it will disengage your audience. Additionally, you want a video seamlessly woven together to form a polished video. This makes MP4 cutting an essential part of the YouTube video creation process. There’s no need to purchase pricey editing equipment anymore; you can simply cut your MP4 videos from the comfort of your home. This article explores the best MP4 cutters for YouTubers on Mac; let’s take a look.
Best MP4 Cutter for YouTubers on Mac - Filmroa Video Editor

Supported System: Mac and Windows
Filmora Video Editor makes it relatively easy to cut and edit your videos like a professional. This MP4 cutter is a great option, even if you don’t have video editing skills. It offers an intuitive user interface that makes it an excellent choice for experts and novices. It also provides you with the crucial editing tools to create amazing YouTube videos after cutting your MP4 video files. With this editing tool, you’re sure to produce videos your subscribers enjoy.
With Filmora, you can add effects, color grades, and texts to your videos. There’s also a library filled with royalty-free audio you can explore. After cutting your MP4, you can use templates from this MP4 cutter to create an intro for your YouTube videos. Filmora has many features that will save you a lot of time, and using it to cut MP4 is relatively easy.
For Win 7 or later (64-bit)
For macOS 10.14 or later
Pros
- It offers an intuitive user interface
- There are several effects and overlays to utilize
- Fast rendering of videos
- Offers varying output formats
- Ideal for beginners and experts
Cons
- No DVD Menu
Steps to Cut MP4 Video for YouTubers on Mac Using Filmora
Cutting videos on Filmora is relatively easy. You have to first download and install Filmora on your device. Below are the steps to cut MP4 videos to your preference using Wondershare Filmora.
Step 1: Import MP4 Files
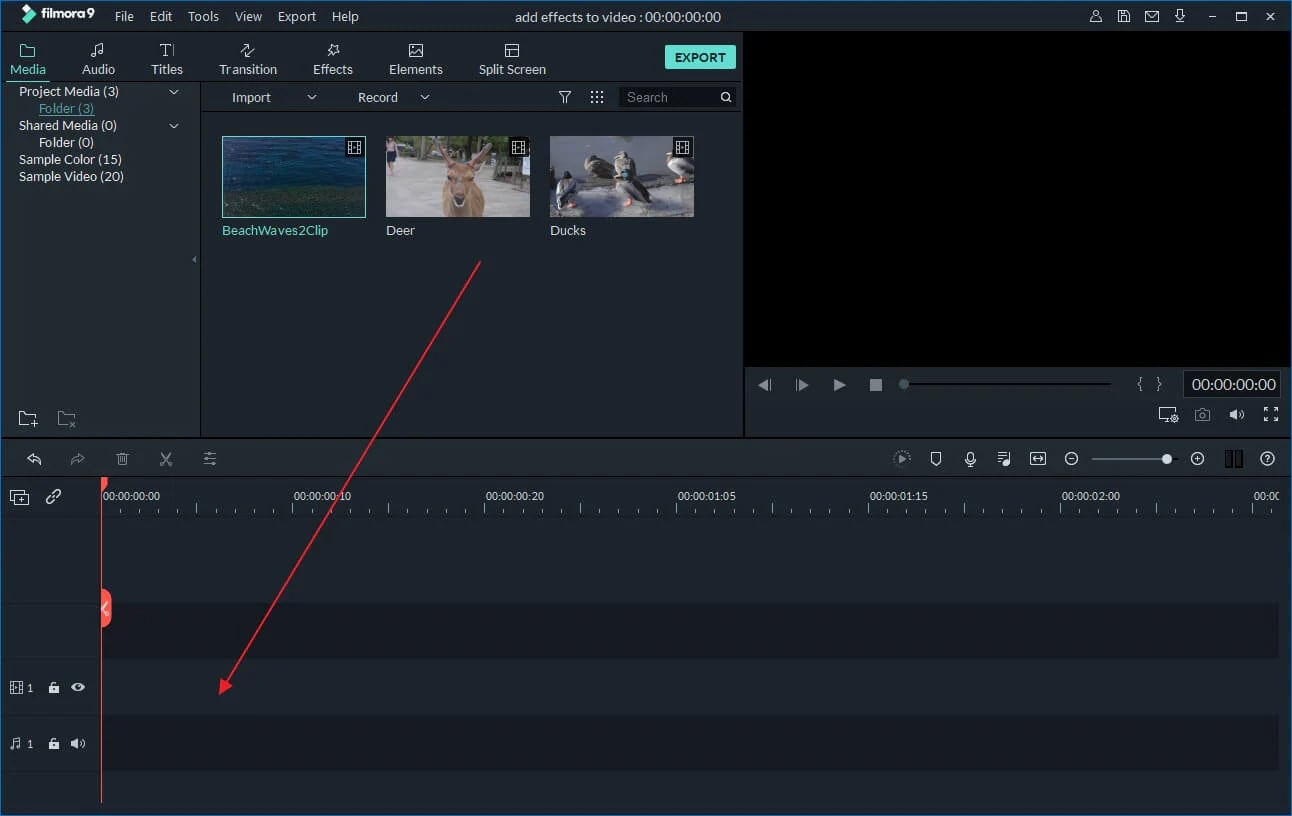
There are two ways you can add MP4 files to this MP4 cutter. You can either click the ‘import’ button and choose the file from your media library or drag the mp4 file to your album. After dragging to the album, drag from the album to the timeline.
Step 2: Cut MP4 Files

After importing your file, you’re ready to cut. First, simply move the indicator to the ideal position you want by dragging the top of the indicator and slider bar. Then, click the scissor button to cut once you move to your preferred time.
You can also delete any part of the MP4 file you don’t want by hitting the ‘delete’ option. If you cut various clips out of the MP4 file, you can rearrange them with the ‘drag and drop tool.
Step 3: Save and Share Cut MP4 File
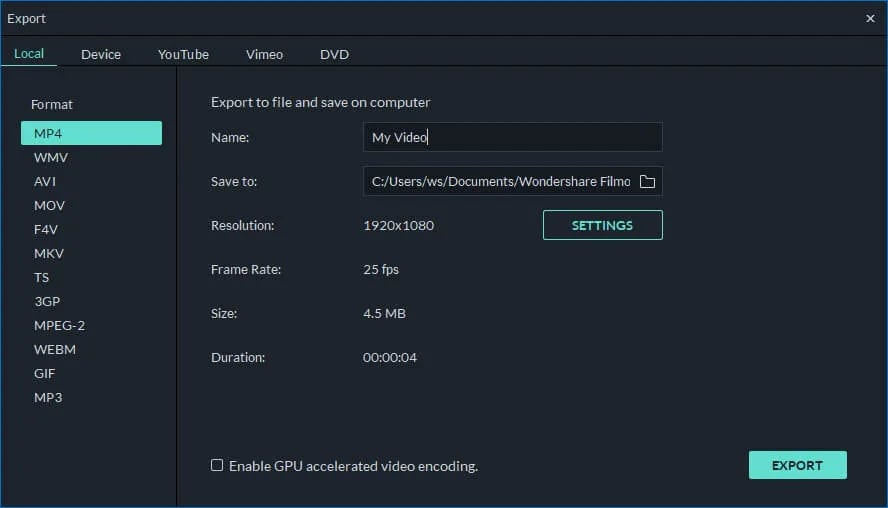
Now, you can save your newly cut video file by clicking the ‘file’ button at the left corner of the Filmora software and selecting ‘save as’ from the options. The output window will appear, and you can choose the format and if you want to share directly to YouTube. Pick the option that meets your need, and you’re good to go.
More Free MP4 Cutter for YouTubers on Mac to Cut MP4 Videos
Although Wondershare Filmora is the best video cutter for YouTubers on Mac, there are free MP4 cutters you can utilize to cut your videos from the comfort of your home easily. Below, we’ve reviewed the top three options you should consider.
PowerDirector Essential
Supported System: Windows and Mac
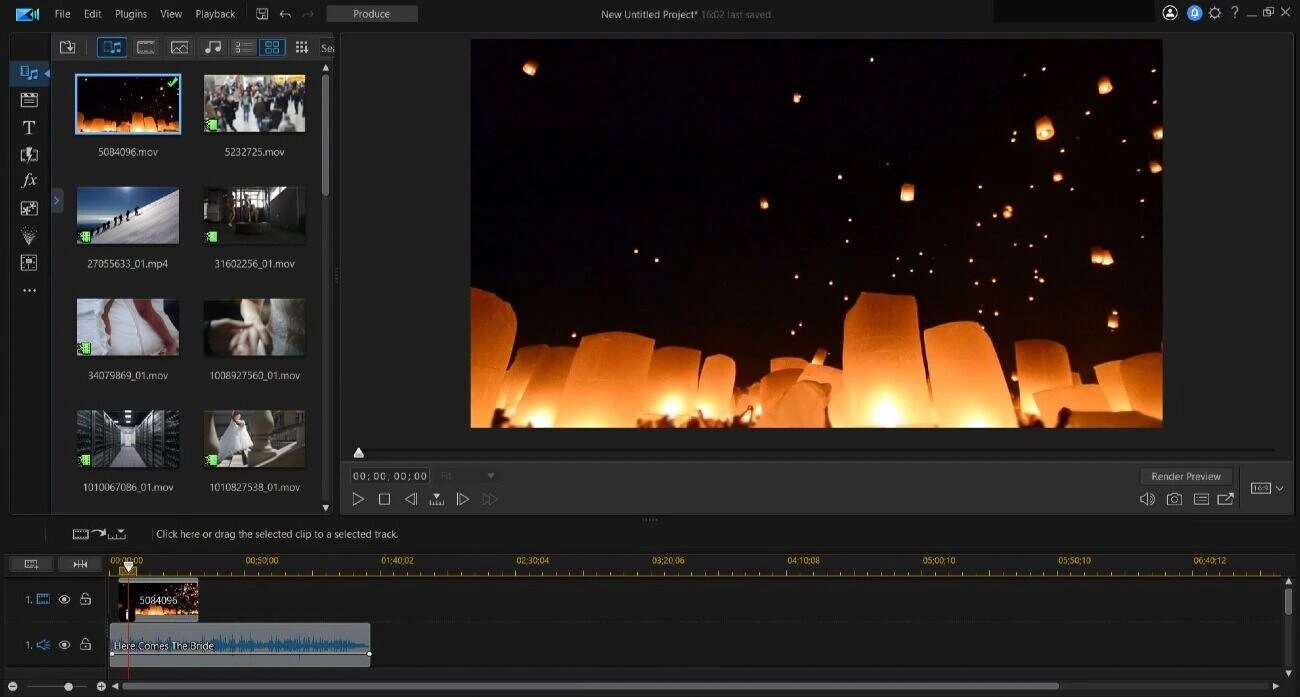
If you’re looking for a free MP4 video cutter that ensures fast processing of videos, you should try PowerDirector Essential. This MP4 cutter allows you easily cut your YouTube videos irrespective of your experience level. You’ll be able to cut and edit your YouTube videos within a couple of minutes. In addition, PowerDirector Essential is versatile and allows you to either use the storyboard mode or timeline editor for your cutting needs.
Apart from splitting and cutting tools, you can also explore its library of stylized transitions if you want to significantly upgrade the appearance of your YouTube video professionally. YouTubers want a video cutter that offers video editing features to create your visual effects. This MP4 cutter is excellent for beginners because of its intuitive interface that you can master in minutes. You can also ensure your video has amazing audio and clear video before sharing it on YouTube. If you want high-quality, Hollywood-style videos, this is the best free MP4 cutter to achieve that.
Pros
- It supports several input and output video formats
- Easy cutting and exporting process
- Intuitive and user-friendly interface
- Ideal for beginners
- It offers various video editing tools to enhance your video
Cons
- Some features are only available on the Windows version
How to Cut Video for YouTube on Mac Using PowerDirector Essential
If you want to learn how to easily cut MP4 files using PowerDirector on a Mac computer, follow the steps below.
- Step 1: You have to download PowerDirector software on your Mac and install it. After installation, launch the software, and you’re ready to begin the cutting process.
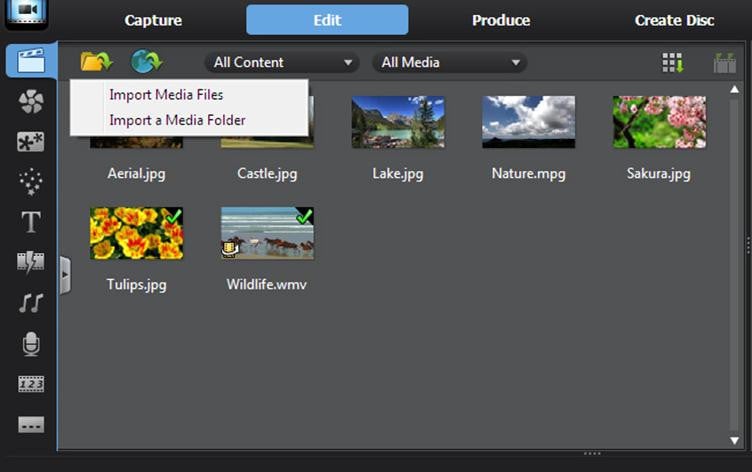
- Step 2: Now, import the video into PowerDirector by clicking ‘import media file’ and choosing the ideal video file from your media library.
- Step 3: Add the video to your timeline and hover over the right or left edge of the video track. This would make an adjustment arrow appear on both sides of the video file.
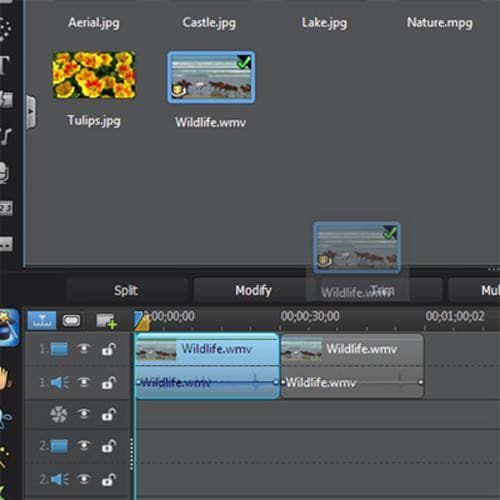
- Step 4: Drag the arrows to the point you would like to cut and choose the ‘scissors’ button.

- Step 5: After cutting, go to the ‘produce’ tab and choose ‘online’ if you want to upload a video directly to YouTube. You can also choose to save to your Mac. Choose the output format and location and click ‘start’ to save your newly cut video.
iMovie
Supported System: Mac
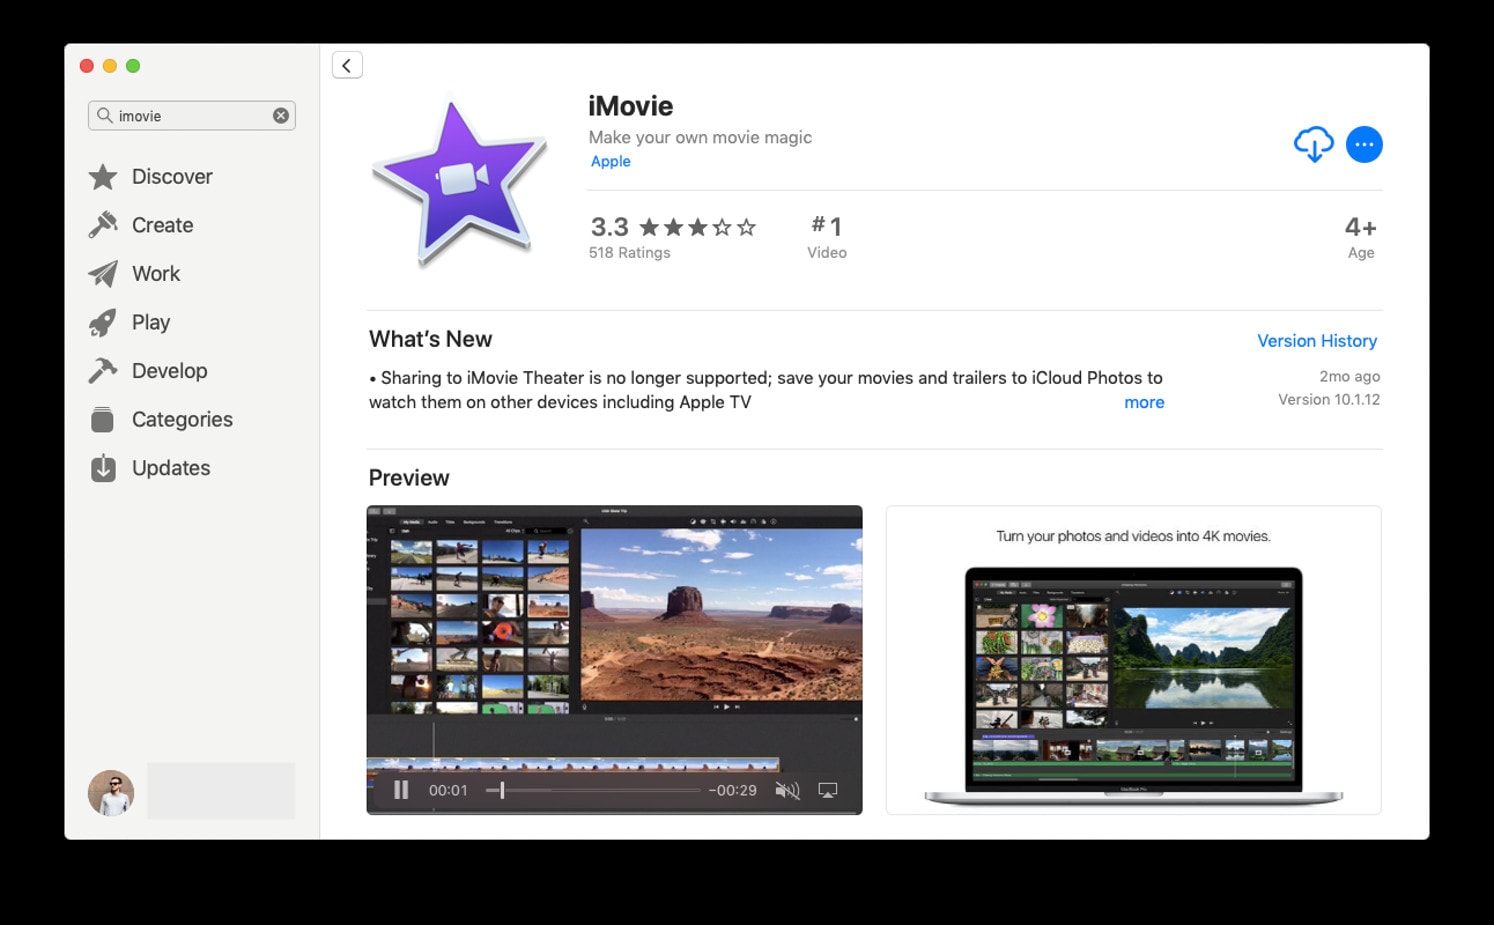
iMovie is a free MP4 cutter that’s built into Mac. Therefore, there’s no need to carry out downloads or installation to utilize this editing software. Although it only offers basic editing features, it is excellent if you only want to cut MP4 video files. iMovie is great for beginners as it features a user-friendly interface that’s easy to navigate.
It is the best option for YouTubers because it allows you to crop, trim and arrange video clips in just a few minutes. Additionally, you can add visual effects to your video while also editing the audio file to enhance your video. It also allows you to link your YouTube account to share directly. Therefore, if you’re looking for an MP4 cutter to carry out quick trimming on your videos, iMovie is amongst the best free MP4 cutters.
Pros
- Easy to use and ideal for beginners
- It supports major video formats and allows you to change the output format
- Allows you to store videos in iCloud or share them directly to YouTube
- Free on Mac device
- It offers essential editing tools to enhance your video
Cons
- Editing features are limited
Steps to Cut MP4 Video for YouTube on Mac Using iMovie
This section will explain how you can cut a clip in iMovie within a few minutes. Below are the easy steps you have to follow.
- Step 1: Launch iMovie on Mac and choose ‘import file’ to select the video you want to cut.
- Step 2: To enter full-editing windows, double-click the project. At the end of the video editor, you’ll see the video editor.
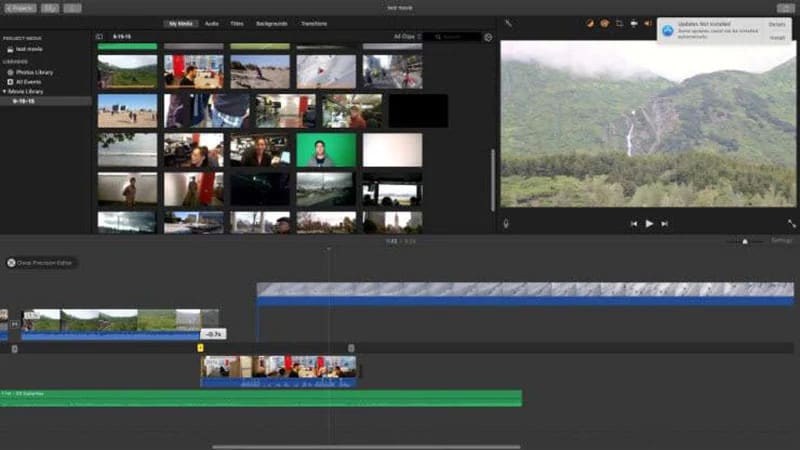
- Step 3: Drag the playhead to the position you would like to cut from, and then click on it. Do this for both sides of the video.
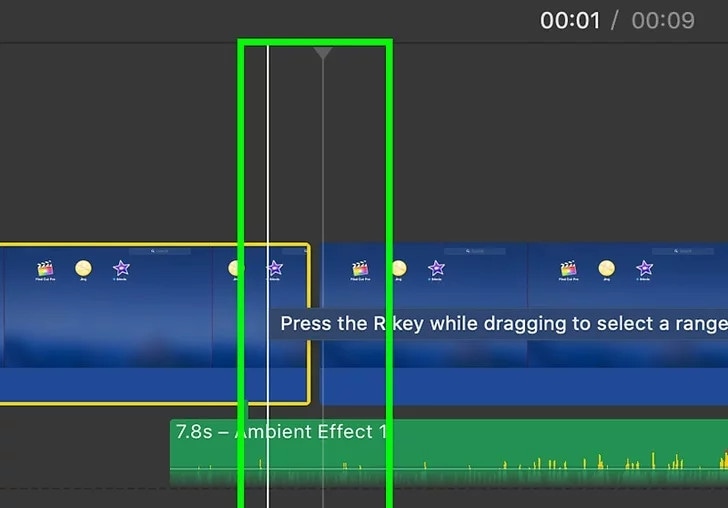
- Step 4: Now, click ‘modify’ and choose the ‘split clip’ option to cut the selected part out.
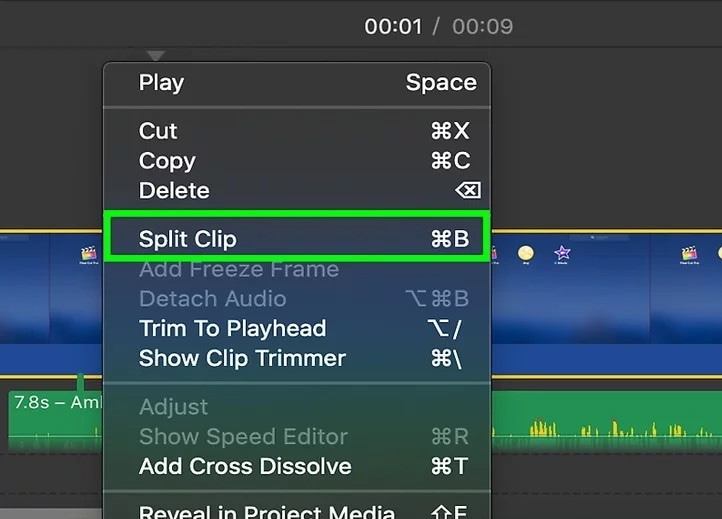
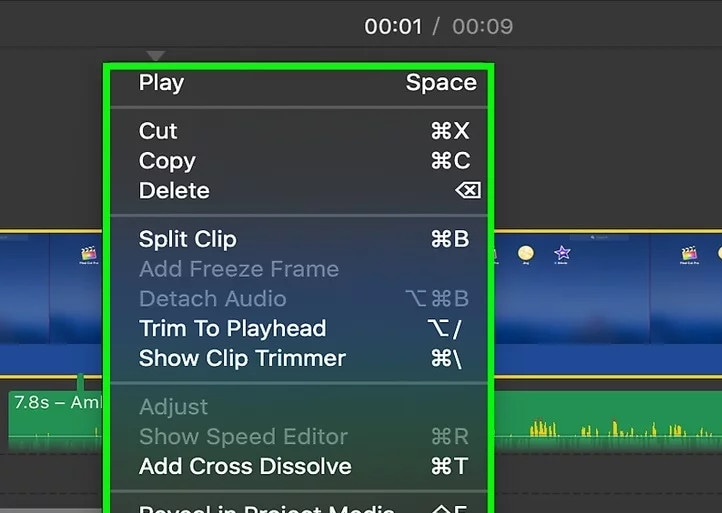
You can delete the rest of the video by selecting it and hitting ‘delete’ on your keyboard.
- Step 5: Finally, save your newly cut video or export it to YouTube directly by clicking ‘export’ under the ‘file’ section.
OpenShot
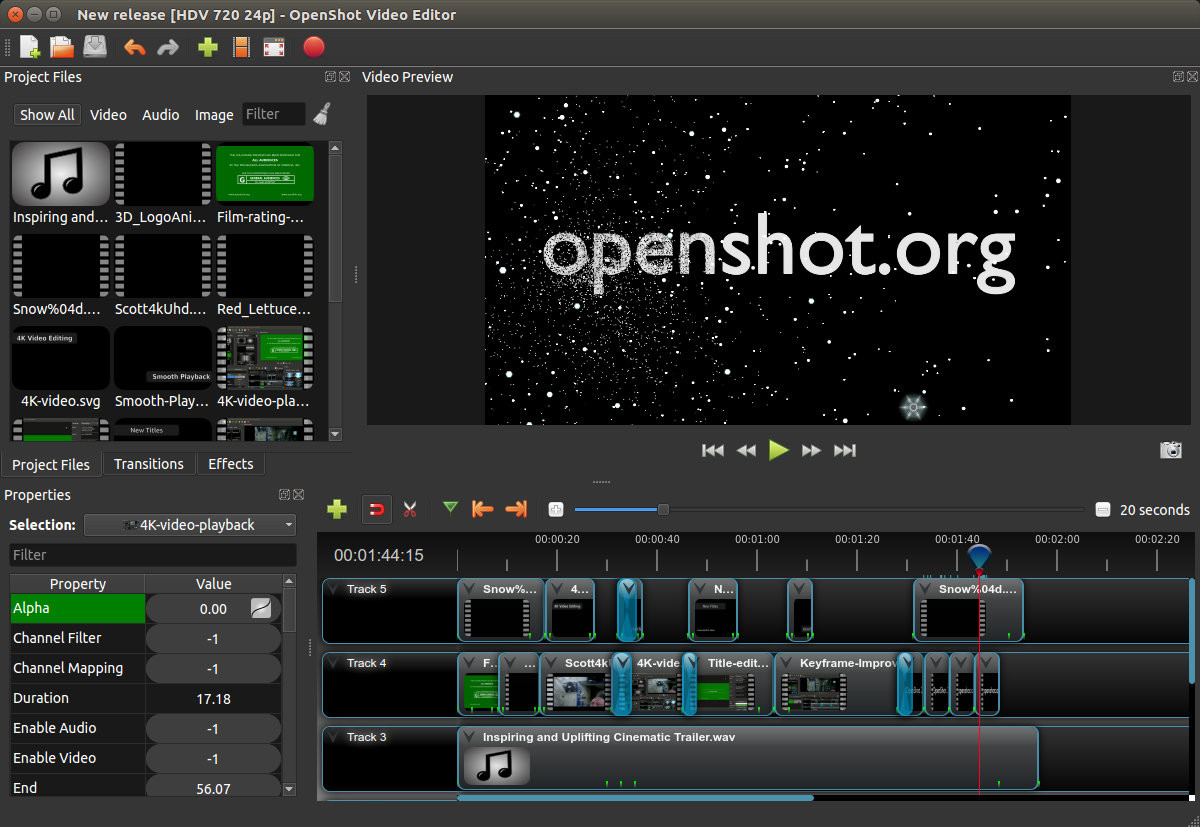
Supported System: Windows, Mac, and Linux
OpenShot is another free, open-source MP4 cutter that you can easily use on your Mac device. It offers an intuitive interface that makes it easy to drag videos to the interface. Apart from cutting videos, other features are available like scaling, resizing, rotation, trimming, and many more. This YouTube video cutter also provides hundreds of transitions and effects to enhance your YouTube video and make it stand out amongst other Youtube videos. However, this video cutter is only an excellent choice for beginners because it lacks many advanced features.
Pros
- It is easy to use and ideal for beginners
- It offers a sleek interface for easy navigation
- Offers basic editing features
- Versatile and a cross-platform MP4 cutter
Cons
- No advanced features
- It crashes easily
Steps to Cut MP4 for YouTube on Mac Using OpenShot
OpenShot is relatively easy to use and only requires a few steps to cut your MP4 file and upload it to YouTube. Below are the easy steps to follow to cut MP4 for YouTube on Openshot.
- Step 1: First, download the MP4 cutter on your Mac and install it to begin.
- Step 2: Afterward, launch the app and add the video to cut by clicking’ import.’ Alternatively, you can simply drag the video into the app to begin.
- Step 3: Once you get the video on the timeline, drag the red line on both sides of the video to the position you want the video to start and begin.
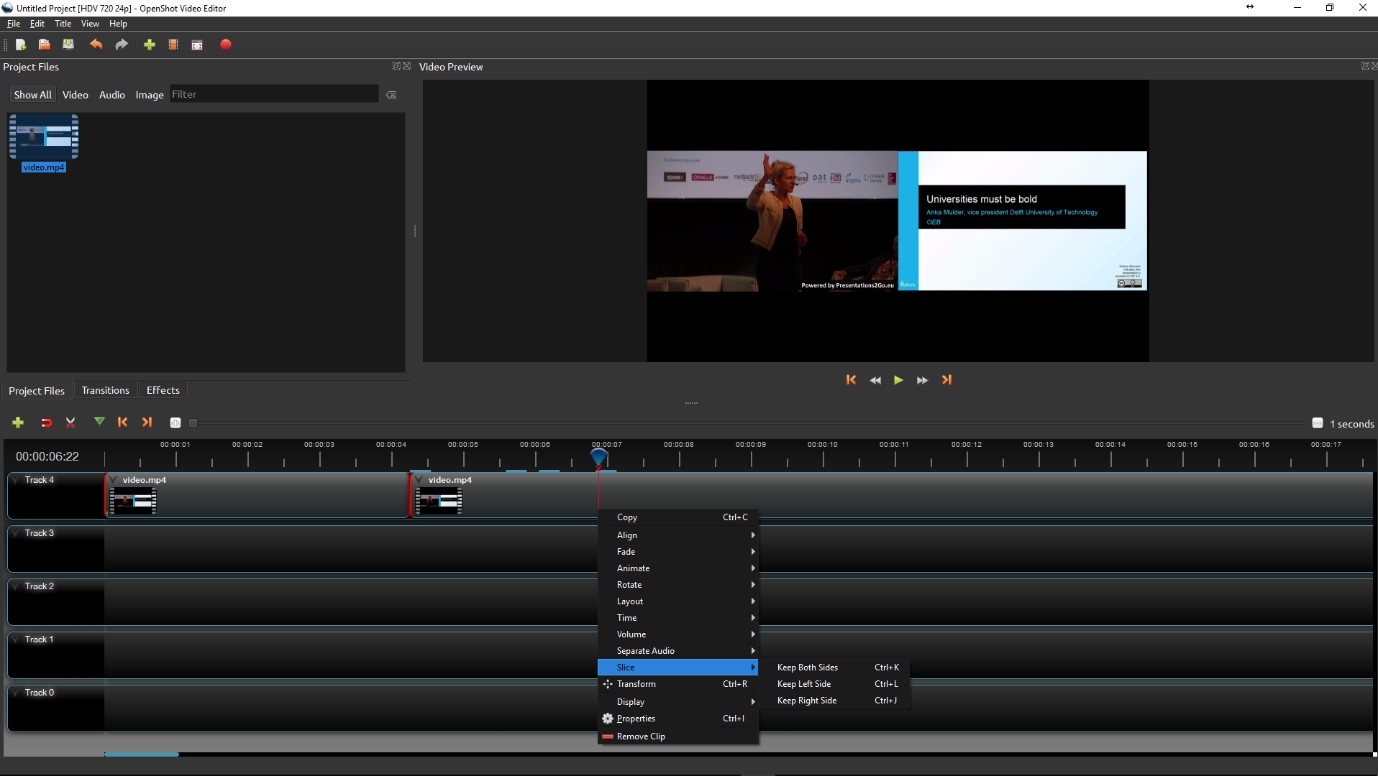
- Step 4: Right-click on the marker and choose what you want to keep. Next, isolate the fragments from the clip you would like to keep.
- Step 5: Click the fragment you want to delete and press delete on your keyboard. You have to remove the fragments manually until your preferred result remains.
- Step 6: Choose ‘export video’ from the File tab to save your MP4 file. You can change the output format or save it as an MP4.

- Step 7: you can also share videos to your YouTube account; you have to link the YouTube account first.
More Paid MP4 Cutter for YouTubers on Mac to Cut MP4 Videos
Most times, free MP4 cutters offer limited features to enhance your YouTube video. However, there are paid MP4 cutters that will efficiently cut your MP4 files and provide advanced editing tools.
Adobe Premiere Pro
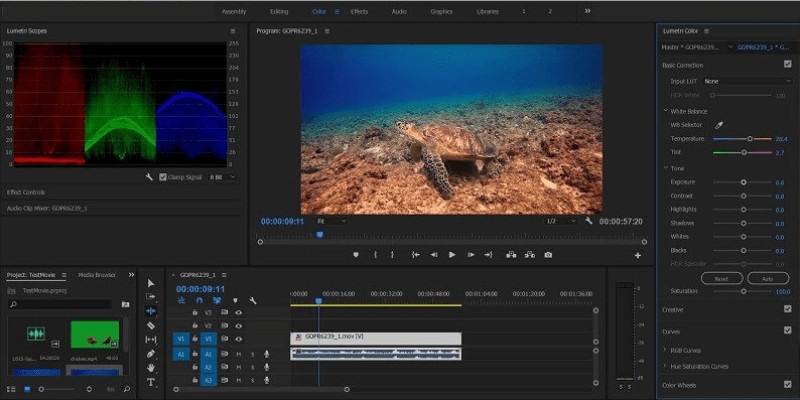
Supported System: Mac and Windows
Advanced editing software that supports different file types, including MP4, is Adobe Premier Pro. This MP4 cutter allows you to quickly trim, split, and cut your MP4. Its intuitive and fast-responding interface ensures that your video is ready within a few minutes. Beyond cutting, there are several other advanced editing features that the editing software offers you. Some include filters, chroma-key, VR editing, color adjustment, and audio editing tools to take your YouTube video to the next level.
Adobe Premiere Pro is not the best option for beginners because of its steep learning curve. However, if you have ample experience with video editing tools and want to professionally cut and edit your YouTube video, this paid MP4 cutter is worth the cost and effort. ‘
Pros
- Advanced video editing features
- Intuitive user interface
- Responsive speed
- Ideal for professional editing
Cons
- Steep learning curve
- Quite pricey
Step to Cut MP4 for YouTube on Mac Using Adobe Premiere Pro
Although Adobe Premiere Pro has an interface that’s quite intimidating to non-professionals, the steps below help simplify cutting your MP4 files for YouTube.
- Firstly, download Adobe Premiere Pro on your Mac and install it.
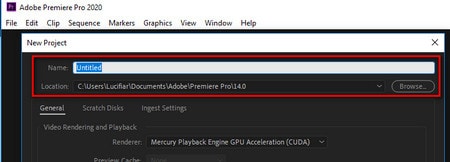
- After installation, launch the app and select ‘new project’ on the homepage. It will require you to name the new project and choose where you want to save it. Afterward, click ‘ok’ to begin.
- Next, go to ‘file’ and select ‘import from media’ to import the MP4 file you would like to cut. Alternatively, you can simply drag the file to the timeline.
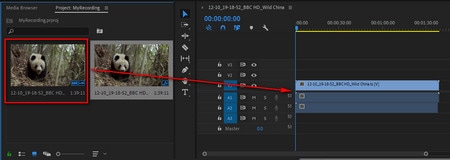
- Next, pick the ripple edit tool and go to the beginning of the video. Drag the handle with the arrow to your desired point. Repeat this at the end of the video.
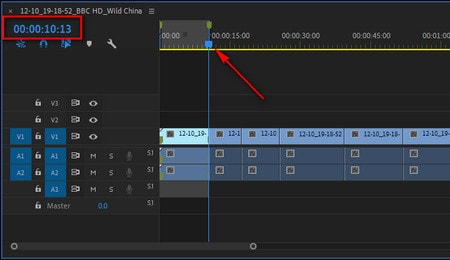
- Finally, press Q to cut the MP4 clip to the left of the blade. Next, press W to cut the clip to the right.
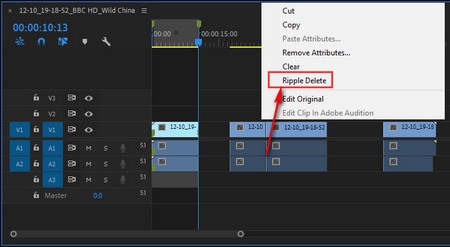
- Now you can save your file to your preferred file location.
Movavi Video Editor
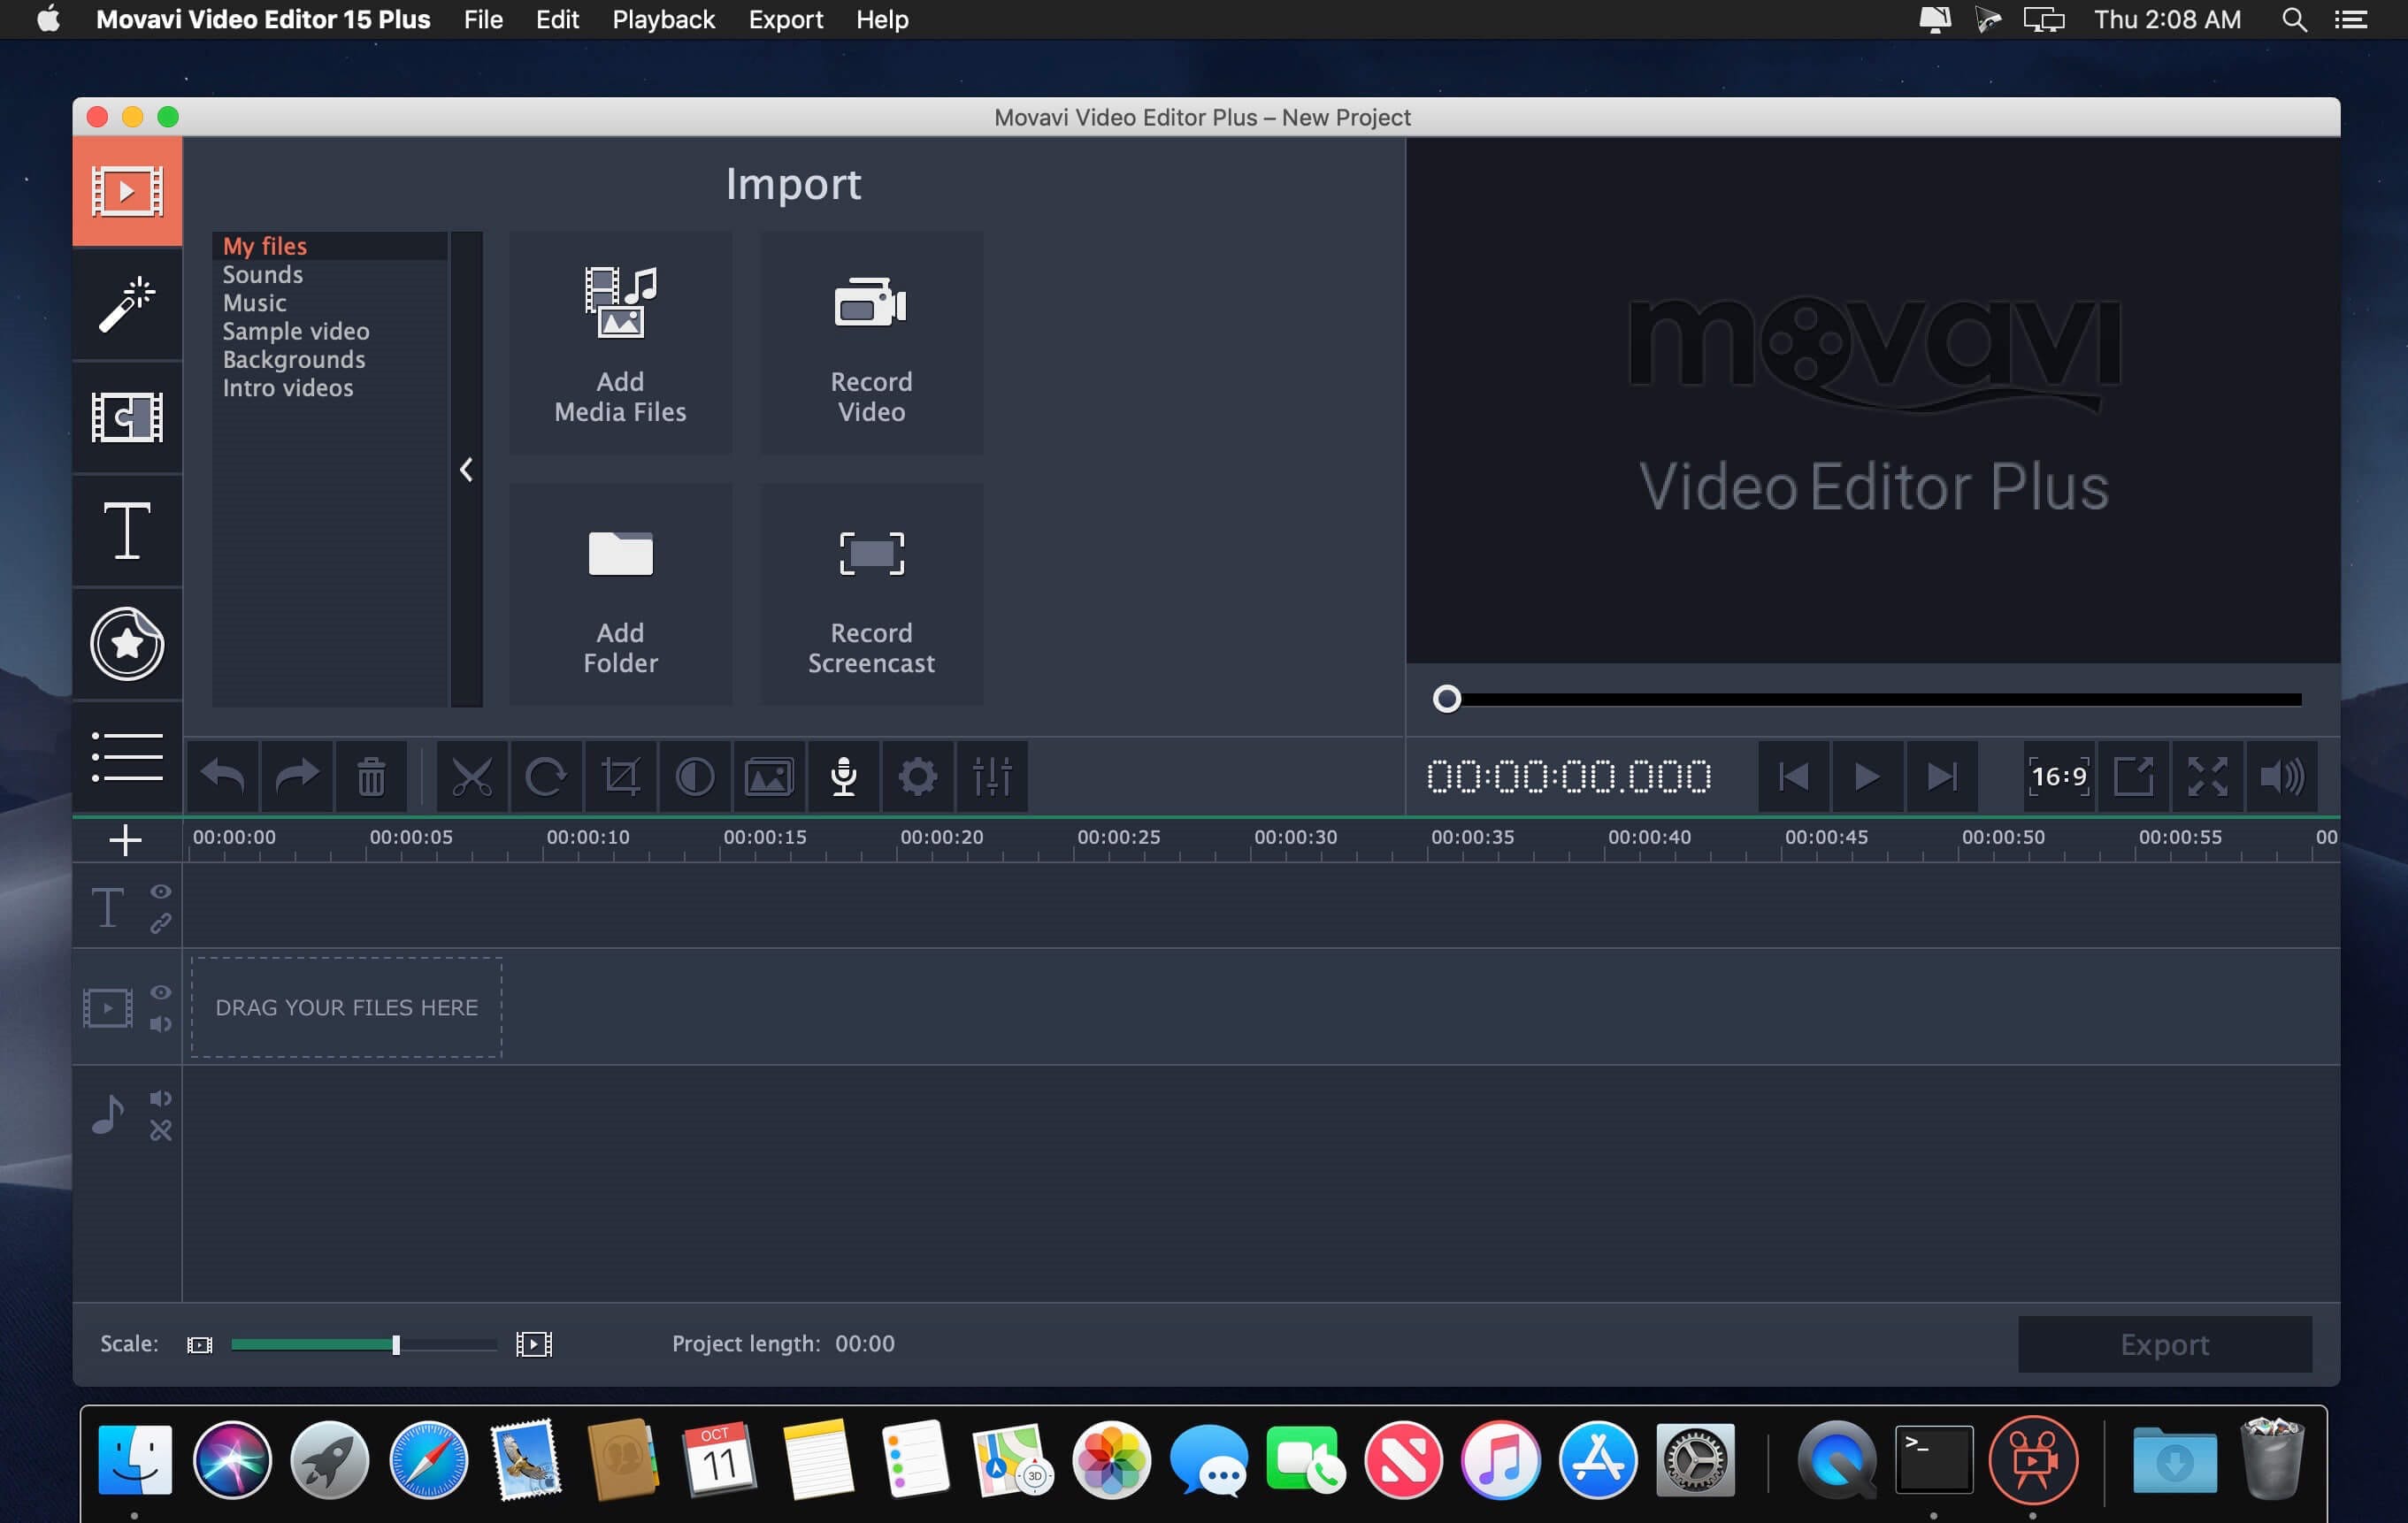
Supported System: Mac and Windows
This is an efficient MP4 cutter that helps you remove unnecessary scenes from your YouTube videos. The timeline offers you markers that allow you easily locate the start and end scene of the video you would like to remove. Apart from cutting videos, this tool provides several premium features you can use to make your video look professional. Movavi offers a free trial you can use to determine if this editor is the best option for you. However, it comes with a Movavi watermark that you can only eliminate with the paid option.
Movavi Video Editor can add transitions, music tracks, chroma-key effects, special effects, and many more exciting features to ensure a top-quality result. Furthermore, its intuitive interface makes it relatively easy for beginners and professionals to use. Therefore, you don’t have to worry about a stiff learning curve. With Movavi, you can also change the output format to switch from MP4 to another commonly supported format.
Pros
- Simple and easy to use
- Supports various input and output formats
- Provides YouTubers with basic and advanced features
- Ideal for beginners and professionals
Cons
- Video rendering is slow for large files
- The trial version comes with a Movavi watermark
Steps to Cut MP4 for YouTube on Mac Using Movavi Video Editor
For cutting your video on Mac using Movavi video editor, you can follow the steps outlined below.
- First, download and install Movavi Video Editor on your Mac.
- After installing Movavi, launch the editor and click the ‘add files’ button to add your MP4 file.
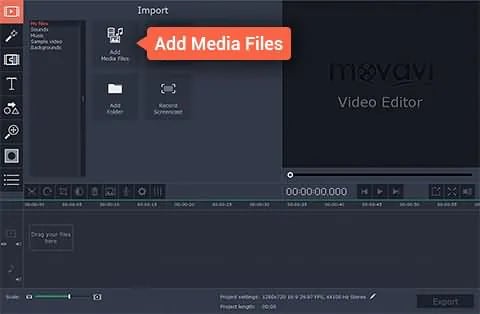
- Once the file shows up in the media bin, drag it to the timeline to start editing your video.
- To cut your MP4 video, move the red marker at the beginning of the video to where you would like to cut. Repeat this process at the end of the video by moving to where you prefer your video to end.
- Next, click the split button to cut this clip from the rest of the video.
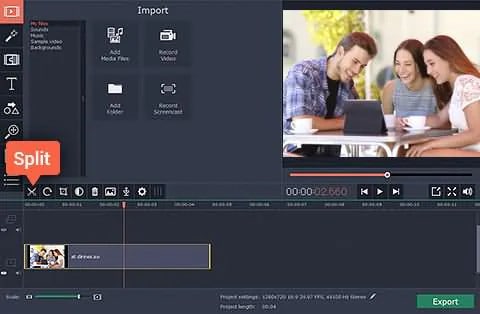
- Now, select the fragments you don’t want and hit the delete button to remove them immediately.
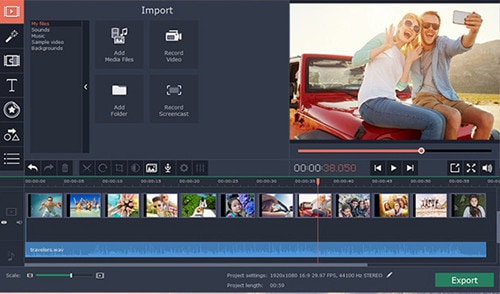
- You can also add several filters to your video if you would like to enhance your video.
- You can now save your video by hitting the ‘export’ button. You can choose different formats and video quality for your newly cut video. Select the folder to save to and click the ‘save’ button.

Davinci Resolve
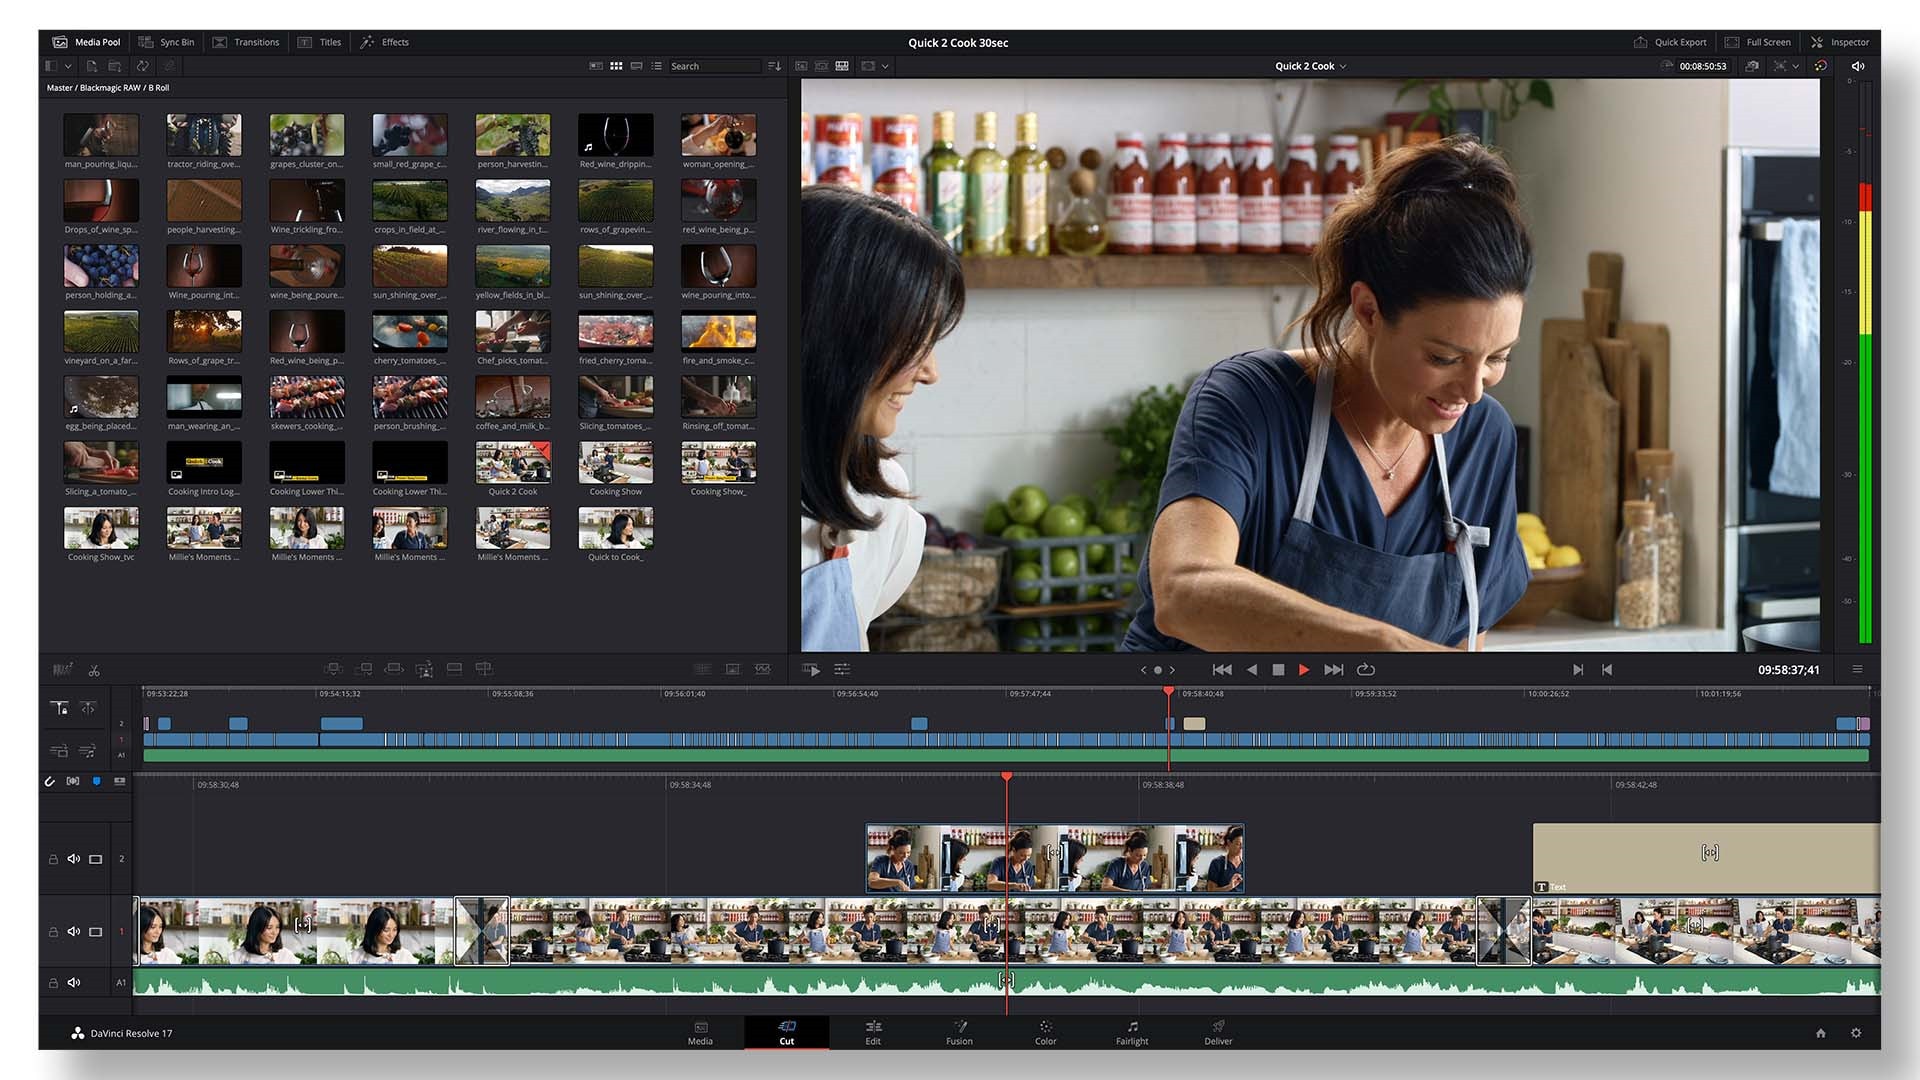
Supported System: Windows and Mac
Davinci Resolve is a favorite for YouTubers who want their videos to look like Hollywood videos. However, this MP4 cutter is aimed at the professional market and supports different input and output formats for your video. Davinci Resolve offers you a variety of professional features and also supports 8k videos. In addition, it provides advanced video cutting features to ensure your video looks excellent even after cutting. You can also combine video clips after cutting without it looking unprofessional.
Although this video cutter software isn’t the best option for beginners, professional editors are sure to be satisfied with the features this editor offers. It also allows you to export directly to various social media platforms, including YouTube, to save space and time.
Pros
- Basic and advanced editing tools
- Fast rendering of videos
- Supports major video formats and video resolutions
- It offers several special effects to make your video more engaging
Cons
- Not the right option for amateurs
Steps to Cut MP4 for YouTube on Mac Using Davinci Resolve
Cutting your MP4 file on Davinci Resolve is relatively easy. The cut tool helps you cut your YouTube video within seconds. Simply follow the steps outlined below.
- First, download and install the Davinci Resolve on your Mac. After installation, launch the MP4 cutter to begin.
- Next, create a new timeline and choose the ‘edit’ mode to begin.
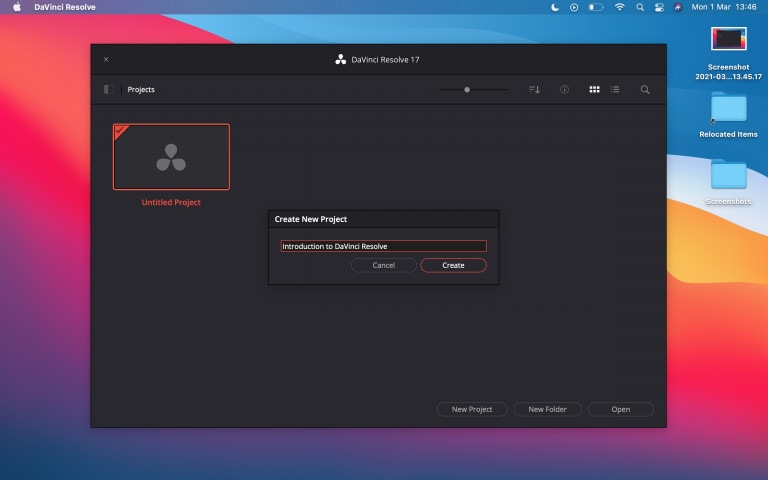
- Import your video by pressing ‘Command+I’ on your keyboard. Alternatively, you can simply drag the video on the timeline.
- Now, select the cut tool and drag the marker from the beginning to where you would like to cut. Repeat this process at the end of the video.
- Afterward, click the blade button to cut your file to your desired size.
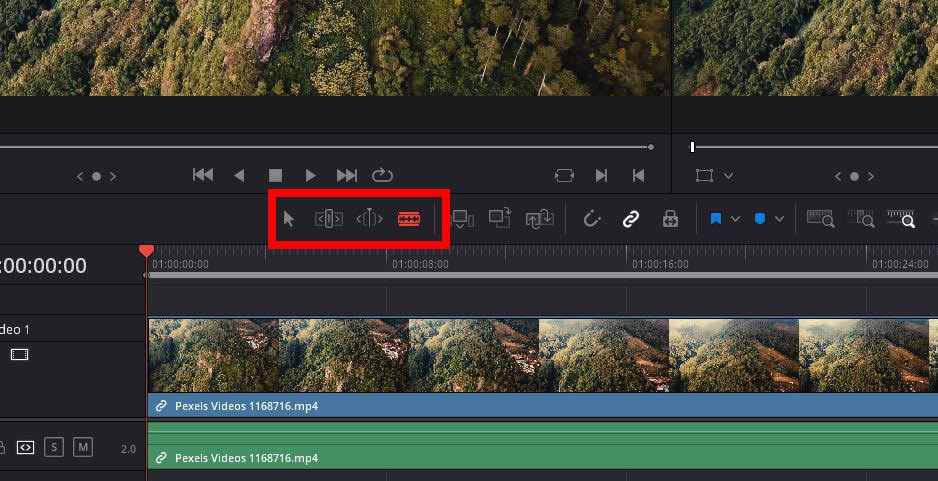
- You can now save your file by hitting the ‘export’ button and choosing your preferred file location.
Which Should I Choose, Free or Paid MP4 Cutter?
You need to consider several factors when you’re choosing the right MP4 cutter. First, you have to consider the type of video you would be editing. For YouTube, you need an MP4 cutter that also offers several video editing features you can use to enhance your video. There’s also a need to consider the available formats and quality you can export in and if the MP4 cutter allows you to add visual effects to make your video stand out on YouTube.
Another factor to consider when choosing between a paid or free MP4 cutter for YouTubers on Mac is your experience level. Are you a professional, or you’re looking for some basic app to simply cut your video? Some paid options take you step-by-step through the process of cutting your MP4 file. This type of MP4 cutter helps you advance your skill. This feature is essential because the more you know, the more you’re willing to learn.
Note that most free MP4 cutters offer limited features. Alternatively, some paid MP4 cutters are only suitable for professionals or have a steep subscription to consider. Consider your budget and if any of the editors offer you the tools you need while being affordable. You need to carefully consider if a free tool is what you’re looking for or if you don’t mind paying for more functionality.
FAQs about cutting MP4 video
- What tools should I look for in an MP4 cutter? You should look for basic cutting tools like trimming, slicing and joining. However, you also want an MP4 cutter that offers several editing features to enhance your YouTube video.
- What do most YouTubers use in cutting their videos? From our experience, most YouTubers use the MP4 cutters provided below. You need to note that some are free while some are paid. Simply pick the cutter that fits your needs.
- How can I improve my video cutting and editing skills? You need a lot of practice to learn how to cut and edit videos professionally. It’s also vital to pick software that allows you to develop your editing and cutting skills with time.
- What is the best video cutting and editing software for YouTube novices? If you’re a novice on YouTube, you can start with any basic MP4 cutter on your device. However, we recommend Wondershare Filmora if you want to develop your cutting and editing skills.
Final Thoughts
Cutting MP4 for your YouTube content is a part of becoming a professional YouTuber. When looking for an MP4 cutter that’s reliable and versatile, the goal is to get the job done without any issue. We’ve reviewed the best MP4 cutters for YouTubers on Mac in this guide. You can choose between free or paid software, depending on your needs. However, the best MP4 cutter for YouTubers on Mac is Wondershare Filmore because it is ideal for beginners and professionals. It also offers you a variety of editing features at an affordable cost.
YouTubers upload over 300 hours of video content to the platform every second. These videos cut across every niche and topic. There’s scarcely a topic you’re looking for that you won’t find a video or two discussing on YouTube. So as a YouTuber, you have to find ways to keep up and stand out from the crowd. You’ll need engaging videos that will hold your target audience’s attention so much that they will subscribe for more.
However, if the video is too long or your car doesn’t hit the right frame, it will disengage your audience. Additionally, you want a video seamlessly woven together to form a polished video. This makes MP4 cutting an essential part of the YouTube video creation process. There’s no need to purchase pricey editing equipment anymore; you can simply cut your MP4 videos from the comfort of your home. This article explores the best MP4 cutters for YouTubers on Mac; let’s take a look.
Best MP4 Cutter for YouTubers on Mac - Filmroa Video Editor

Supported System: Mac and Windows
Filmora Video Editor makes it relatively easy to cut and edit your videos like a professional. This MP4 cutter is a great option, even if you don’t have video editing skills. It offers an intuitive user interface that makes it an excellent choice for experts and novices. It also provides you with the crucial editing tools to create amazing YouTube videos after cutting your MP4 video files. With this editing tool, you’re sure to produce videos your subscribers enjoy.
With Filmora, you can add effects, color grades, and texts to your videos. There’s also a library filled with royalty-free audio you can explore. After cutting your MP4, you can use templates from this MP4 cutter to create an intro for your YouTube videos. Filmora has many features that will save you a lot of time, and using it to cut MP4 is relatively easy.
For Win 7 or later (64-bit)
For macOS 10.14 or later
Pros
- It offers an intuitive user interface
- There are several effects and overlays to utilize
- Fast rendering of videos
- Offers varying output formats
- Ideal for beginners and experts
Cons
- No DVD Menu
Steps to Cut MP4 Video for YouTubers on Mac Using Filmora
Cutting videos on Filmora is relatively easy. You have to first download and install Filmora on your device. Below are the steps to cut MP4 videos to your preference using Wondershare Filmora.
Step 1: Import MP4 Files
There are two ways you can add MP4 files to this MP4 cutter. You can either click the ‘import’ button and choose the file from your media library or drag the mp4 file to your album. After dragging to the album, drag from the album to the timeline.

Step 2: Cut MP4 Files

After importing your file, you’re ready to cut. First, simply move the indicator to the ideal position you want by dragging the top of the indicator and slider bar. Then, click the scissor button to cut once you move to your preferred time.
You can also delete any part of the MP4 file you don’t want by hitting the ‘delete’ option. If you cut various clips out of the MP4 file, you can rearrange them with the ‘drag and drop tool.
Step 3: Save and Share Cut MP4 File

Now, you can save your newly cut video file by clicking the ‘file’ button at the left corner of the Filmora software and selecting ‘save as’ from the options. The output window will appear, and you can choose the format and if you want to share directly to YouTube. Pick the option that meets your need, and you’re good to go.
More Free MP4 Cutter for YouTubers on Mac to Cut MP4 Videos
Although Wondershare Filmora is the best video cutter for YouTubers on Mac, there are free MP4 cutters you can utilize to cut your videos from the comfort of your home easily. Below, we’ve reviewed the top three options you should consider.
PowerDirector Essential

Supported System: Windows and Mac
If you’re looking for a free MP4 video cutter that ensures fast processing of videos, you should try PowerDirector Essential. This MP4 cutter allows you easily cut your YouTube videos irrespective of your experience level. You’ll be able to cut and edit your YouTube videos within a couple of minutes. In addition, PowerDirector Essential is versatile and allows you to either use the storyboard mode or timeline editor for your cutting needs.
Apart from splitting and cutting tools, you can also explore its library of stylized transitions if you want to significantly upgrade the appearance of your YouTube video professionally. YouTubers want a video cutter that offers video editing features to create your visual effects. This MP4 cutter is excellent for beginners because of its intuitive interface that you can master in minutes. You can also ensure your video has amazing audio and clear video before sharing it on YouTube. If you want high-quality, Hollywood-style videos, this is the best free MP4 cutter to achieve that.
Pros
- It supports several input and output video formats
- Easy cutting and exporting process
- Intuitive and user-friendly interface
- Ideal for beginners
- It offers various video editing tools to enhance your video
Cons
- Some features are only available on the Windows version
How to Cut Video for YouTube on Mac Using PowerDirector Essential
If you want to learn how to easily cut MP4 files using PowerDirector on a Mac computer, follow the steps below.
- Step 1: You have to download PowerDirector software on your Mac and install it. After installation, launch the software, and you’re ready to begin the cutting process.
- Step 2: Now, import the video into PowerDirector by clicking ‘import media file’ and choosing the ideal video file from your media library.

- Step 3: Add the video to your timeline and hover over the right or left edge of the video track. This would make an adjustment arrow appear on both sides of the video file.

- Step 4: Drag the arrows to the point you would like to cut and choose the ‘scissors’ button.

- Step 5: After cutting, go to the ‘produce’ tab and choose ‘online’ if you want to upload a video directly to YouTube. You can also choose to save to your Mac. Choose the output format and location and click ‘start’ to save your newly cut video.
iMovie

Supported System: Mac
iMovie is a free MP4 cutter that’s built into Mac. Therefore, there’s no need to carry out downloads or installation to utilize this editing software. Although it only offers basic editing features, it is excellent if you only want to cut MP4 video files. iMovie is great for beginners as it features a user-friendly interface that’s easy to navigate.
It is the best option for YouTubers because it allows you to crop, trim and arrange video clips in just a few minutes. Additionally, you can add visual effects to your video while also editing the audio file to enhance your video. It also allows you to link your YouTube account to share directly. Therefore, if you’re looking for an MP4 cutter to carry out quick trimming on your videos, iMovie is amongst the best free MP4 cutters.
Pros
- Easy to use and ideal for beginners
- It supports major video formats and allows you to change the output format
- Allows you to store videos in iCloud or share them directly to YouTube
- Free on Mac device
- It offers essential editing tools to enhance your video
Cons
- Editing features are limited
Steps to Cut MP4 Video for YouTube on Mac Using iMovie
This section will explain how you can cut a clip in iMovie within a few minutes. Below are the easy steps you have to follow.
- Step 1: Launch iMovie on Mac and choose ‘import file’ to select the video you want to cut.
- Step 2: To enter full-editing windows, double-click the project. At the end of the video editor, you’ll see the video editor.

- Step 3: Drag the playhead to the position you would like to cut from, and then click on it. Do this for both sides of the video.

- Step 4: Now, click ‘modify’ and choose the ‘split clip’ option to cut the selected part out.

You can delete the rest of the video by selecting it and hitting ‘delete’ on your keyboard.

- Step 5: Finally, save your newly cut video or export it to YouTube directly by clicking ‘export’ under the ‘file’ section.
OpenShot

Supported System: Windows, Mac, and Linux
OpenShot is another free, open-source MP4 cutter that you can easily use on your Mac device. It offers an intuitive interface that makes it easy to drag videos to the interface. Apart from cutting videos, other features are available like scaling, resizing, rotation, trimming, and many more. This YouTube video cutter also provides hundreds of transitions and effects to enhance your YouTube video and make it stand out amongst other Youtube videos. However, this video cutter is only an excellent choice for beginners because it lacks many advanced features.
Pros
- It is easy to use and ideal for beginners
- It offers a sleek interface for easy navigation
- Offers basic editing features
- Versatile and a cross-platform MP4 cutter
Cons
- No advanced features
- It crashes easily
Steps to Cut MP4 for YouTube on Mac Using OpenShot
OpenShot is relatively easy to use and only requires a few steps to cut your MP4 file and upload it to YouTube. Below are the easy steps to follow to cut MP4 for YouTube on Openshot.
- Step 1: First, download the MP4 cutter on your Mac and install it to begin.
- Step 2: Afterward, launch the app and add the video to cut by clicking’ import.’ Alternatively, you can simply drag the video into the app to begin.
- Step 3: Once you get the video on the timeline, drag the red line on both sides of the video to the position you want the video to start and begin.

- Step 4: Right-click on the marker and choose what you want to keep. Next, isolate the fragments from the clip you would like to keep.
- Step 5: Click the fragment you want to delete and press delete on your keyboard. You have to remove the fragments manually until your preferred result remains.
- Step 6: Choose ‘export video’ from the File tab to save your MP4 file. You can change the output format or save it as an MP4.

- Step 7: you can also share videos to your YouTube account; you have to link the YouTube account first.
More Paid MP4 Cutter for YouTubers on Mac to Cut MP4 Videos
Most times, free MP4 cutters offer limited features to enhance your YouTube video. However, there are paid MP4 cutters that will efficiently cut your MP4 files and provide advanced editing tools.
Adobe Premiere Pro

Supported System: Mac and Windows
Advanced editing software that supports different file types, including MP4, is Adobe Premier Pro. This MP4 cutter allows you to quickly trim, split, and cut your MP4. Its intuitive and fast-responding interface ensures that your video is ready within a few minutes. Beyond cutting, there are several other advanced editing features that the editing software offers you. Some include filters, chroma-key, VR editing, color adjustment, and audio editing tools to take your YouTube video to the next level.
Adobe Premiere Pro is not the best option for beginners because of its steep learning curve. However, if you have ample experience with video editing tools and want to professionally cut and edit your YouTube video, this paid MP4 cutter is worth the cost and effort. ‘
Pros
- Advanced video editing features
- Intuitive user interface
- Responsive speed
- Ideal for professional editing
Cons
- Steep learning curve
- Quite pricey
Step to Cut MP4 for YouTube on Mac Using Adobe Premiere Pro
Although Adobe Premiere Pro has an interface that’s quite intimidating to non-professionals, the steps below help simplify cutting your MP4 files for YouTube.
- Firstly, download Adobe Premiere Pro on your Mac and install it.
- After installation, launch the app and select ‘new project’ on the homepage. It will require you to name the new project and choose where you want to save it. Afterward, click ‘ok’ to begin.

- Next, go to ‘file’ and select ‘import from media’ to import the MP4 file you would like to cut. Alternatively, you can simply drag the file to the timeline.

- Next, pick the ripple edit tool and go to the beginning of the video. Drag the handle with the arrow to your desired point. Repeat this at the end of the video.

- Finally, press Q to cut the MP4 clip to the left of the blade. Next, press W to cut the clip to the right.

- Now you can save your file to your preferred file location.
Movavi Video Editor

Supported System: Mac and Windows
This is an efficient MP4 cutter that helps you remove unnecessary scenes from your YouTube videos. The timeline offers you markers that allow you easily locate the start and end scene of the video you would like to remove. Apart from cutting videos, this tool provides several premium features you can use to make your video look professional. Movavi offers a free trial you can use to determine if this editor is the best option for you. However, it comes with a Movavi watermark that you can only eliminate with the paid option.
Movavi Video Editor can add transitions, music tracks, chroma-key effects, special effects, and many more exciting features to ensure a top-quality result. Furthermore, its intuitive interface makes it relatively easy for beginners and professionals to use. Therefore, you don’t have to worry about a stiff learning curve. With Movavi, you can also change the output format to switch from MP4 to another commonly supported format.
Pros
- Simple and easy to use
- Supports various input and output formats
- Provides YouTubers with basic and advanced features
- Ideal for beginners and professionals
Cons
- Video rendering is slow for large files
- The trial version comes with a Movavi watermark
Steps to Cut MP4 for YouTube on Mac Using Movavi Video Editor
For cutting your video on Mac using Movavi video editor, you can follow the steps outlined below.
- First, download and install Movavi Video Editor on your Mac.
- After installing Movavi, launch the editor and click the ‘add files’ button to add your MP4 file.

- Once the file shows up in the media bin, drag it to the timeline to start editing your video.
- To cut your MP4 video, move the red marker at the beginning of the video to where you would like to cut. Repeat this process at the end of the video by moving to where you prefer your video to end.
- Next, click the split button to cut this clip from the rest of the video.

- Now, select the fragments you don’t want and hit the delete button to remove them immediately.

- You can also add several filters to your video if you would like to enhance your video.
- You can now save your video by hitting the ‘export’ button. You can choose different formats and video quality for your newly cut video. Select the folder to save to and click the ‘save’ button.

Davinci Resolve

Supported System: Windows and Mac
Davinci Resolve is a favorite for YouTubers who want their videos to look like Hollywood videos. However, this MP4 cutter is aimed at the professional market and supports different input and output formats for your video. Davinci Resolve offers you a variety of professional features and also supports 8k videos. In addition, it provides advanced video cutting features to ensure your video looks excellent even after cutting. You can also combine video clips after cutting without it looking unprofessional.
Although this video cutter software isn’t the best option for beginners, professional editors are sure to be satisfied with the features this editor offers. It also allows you to export directly to various social media platforms, including YouTube, to save space and time.
Pros
- Basic and advanced editing tools
- Fast rendering of videos
- Supports major video formats and video resolutions
- It offers several special effects to make your video more engaging
Cons
- Not the right option for amateurs
Steps to Cut MP4 for YouTube on Mac Using Davinci Resolve
Cutting your MP4 file on Davinci Resolve is relatively easy. The cut tool helps you cut your YouTube video within seconds. Simply follow the steps outlined below.
- First, download and install the Davinci Resolve on your Mac. After installation, launch the MP4 cutter to begin.
- Next, create a new timeline and choose the ‘edit’ mode to begin.

- Import your video by pressing ‘Command+I’ on your keyboard. Alternatively, you can simply drag the video on the timeline.
- Now, select the cut tool and drag the marker from the beginning to where you would like to cut. Repeat this process at the end of the video.
- Afterward, click the blade button to cut your file to your desired size.

- You can now save your file by hitting the ‘export’ button and choosing your preferred file location.
Which Should I Choose, Free or Paid MP4 Cutter?
You need to consider several factors when you’re choosing the right MP4 cutter. First, you have to consider the type of video you would be editing. For YouTube, you need an MP4 cutter that also offers several video editing features you can use to enhance your video. There’s also a need to consider the available formats and quality you can export in and if the MP4 cutter allows you to add visual effects to make your video stand out on YouTube.
Another factor to consider when choosing between a paid or free MP4 cutter for YouTubers on Mac is your experience level. Are you a professional, or you’re looking for some basic app to simply cut your video? Some paid options take you step-by-step through the process of cutting your MP4 file. This type of MP4 cutter helps you advance your skill. This feature is essential because the more you know, the more you’re willing to learn.
Note that most free MP4 cutters offer limited features. Alternatively, some paid MP4 cutters are only suitable for professionals or have a steep subscription to consider. Consider your budget and if any of the editors offer you the tools you need while being affordable. You need to carefully consider if a free tool is what you’re looking for or if you don’t mind paying for more functionality.
FAQs about cutting MP4 video
- What tools should I look for in an MP4 cutter? You should look for basic cutting tools like trimming, slicing and joining. However, you also want an MP4 cutter that offers several editing features to enhance your YouTube video.
- What do most YouTubers use in cutting their videos? From our experience, most YouTubers use the MP4 cutters provided below. You need to note that some are free while some are paid. Simply pick the cutter that fits your needs.
- How can I improve my video cutting and editing skills? You need a lot of practice to learn how to cut and edit videos professionally. It’s also vital to pick software that allows you to develop your editing and cutting skills with time.
- What is the best video cutting and editing software for YouTube novices? If you’re a novice on YouTube, you can start with any basic MP4 cutter on your device. However, we recommend Wondershare Filmora if you want to develop your cutting and editing skills.
Final Thoughts
Cutting MP4 for your YouTube content is a part of becoming a professional YouTuber. When looking for an MP4 cutter that’s reliable and versatile, the goal is to get the job done without any issue. We’ve reviewed the best MP4 cutters for YouTubers on Mac in this guide. You can choose between free or paid software, depending on your needs. However, the best MP4 cutter for YouTubers on Mac is Wondershare Filmore because it is ideal for beginners and professionals. It also offers you a variety of editing features at an affordable cost.
YouTubers upload over 300 hours of video content to the platform every second. These videos cut across every niche and topic. There’s scarcely a topic you’re looking for that you won’t find a video or two discussing on YouTube. So as a YouTuber, you have to find ways to keep up and stand out from the crowd. You’ll need engaging videos that will hold your target audience’s attention so much that they will subscribe for more.
However, if the video is too long or your car doesn’t hit the right frame, it will disengage your audience. Additionally, you want a video seamlessly woven together to form a polished video. This makes MP4 cutting an essential part of the YouTube video creation process. There’s no need to purchase pricey editing equipment anymore; you can simply cut your MP4 videos from the comfort of your home. This article explores the best MP4 cutters for YouTubers on Mac; let’s take a look.
Best MP4 Cutter for YouTubers on Mac - Filmroa Video Editor

Supported System: Mac and Windows
Filmora Video Editor makes it relatively easy to cut and edit your videos like a professional. This MP4 cutter is a great option, even if you don’t have video editing skills. It offers an intuitive user interface that makes it an excellent choice for experts and novices. It also provides you with the crucial editing tools to create amazing YouTube videos after cutting your MP4 video files. With this editing tool, you’re sure to produce videos your subscribers enjoy.
With Filmora, you can add effects, color grades, and texts to your videos. There’s also a library filled with royalty-free audio you can explore. After cutting your MP4, you can use templates from this MP4 cutter to create an intro for your YouTube videos. Filmora has many features that will save you a lot of time, and using it to cut MP4 is relatively easy.
For Win 7 or later (64-bit)
For macOS 10.14 or later
Pros
- It offers an intuitive user interface
- There are several effects and overlays to utilize
- Fast rendering of videos
- Offers varying output formats
- Ideal for beginners and experts
Cons
- No DVD Menu
Steps to Cut MP4 Video for YouTubers on Mac Using Filmora
Cutting videos on Filmora is relatively easy. You have to first download and install Filmora on your device. Below are the steps to cut MP4 videos to your preference using Wondershare Filmora.
Step 1: Import MP4 Files
There are two ways you can add MP4 files to this MP4 cutter. You can either click the ‘import’ button and choose the file from your media library or drag the mp4 file to your album. After dragging to the album, drag from the album to the timeline.

Step 2: Cut MP4 Files

After importing your file, you’re ready to cut. First, simply move the indicator to the ideal position you want by dragging the top of the indicator and slider bar. Then, click the scissor button to cut once you move to your preferred time.
You can also delete any part of the MP4 file you don’t want by hitting the ‘delete’ option. If you cut various clips out of the MP4 file, you can rearrange them with the ‘drag and drop tool.
Step 3: Save and Share Cut MP4 File

Now, you can save your newly cut video file by clicking the ‘file’ button at the left corner of the Filmora software and selecting ‘save as’ from the options. The output window will appear, and you can choose the format and if you want to share directly to YouTube. Pick the option that meets your need, and you’re good to go.
More Free MP4 Cutter for YouTubers on Mac to Cut MP4 Videos
Although Wondershare Filmora is the best video cutter for YouTubers on Mac, there are free MP4 cutters you can utilize to cut your videos from the comfort of your home easily. Below, we’ve reviewed the top three options you should consider.
PowerDirector Essential

Supported System: Windows and Mac
If you’re looking for a free MP4 video cutter that ensures fast processing of videos, you should try PowerDirector Essential. This MP4 cutter allows you easily cut your YouTube videos irrespective of your experience level. You’ll be able to cut and edit your YouTube videos within a couple of minutes. In addition, PowerDirector Essential is versatile and allows you to either use the storyboard mode or timeline editor for your cutting needs.
Apart from splitting and cutting tools, you can also explore its library of stylized transitions if you want to significantly upgrade the appearance of your YouTube video professionally. YouTubers want a video cutter that offers video editing features to create your visual effects. This MP4 cutter is excellent for beginners because of its intuitive interface that you can master in minutes. You can also ensure your video has amazing audio and clear video before sharing it on YouTube. If you want high-quality, Hollywood-style videos, this is the best free MP4 cutter to achieve that.
Pros
- It supports several input and output video formats
- Easy cutting and exporting process
- Intuitive and user-friendly interface
- Ideal for beginners
- It offers various video editing tools to enhance your video
Cons
- Some features are only available on the Windows version
How to Cut Video for YouTube on Mac Using PowerDirector Essential
If you want to learn how to easily cut MP4 files using PowerDirector on a Mac computer, follow the steps below.
- Step 1: You have to download PowerDirector software on your Mac and install it. After installation, launch the software, and you’re ready to begin the cutting process.
- Step 2: Now, import the video into PowerDirector by clicking ‘import media file’ and choosing the ideal video file from your media library.

- Step 3: Add the video to your timeline and hover over the right or left edge of the video track. This would make an adjustment arrow appear on both sides of the video file.

- Step 4: Drag the arrows to the point you would like to cut and choose the ‘scissors’ button.

- Step 5: After cutting, go to the ‘produce’ tab and choose ‘online’ if you want to upload a video directly to YouTube. You can also choose to save to your Mac. Choose the output format and location and click ‘start’ to save your newly cut video.
iMovie

Supported System: Mac
iMovie is a free MP4 cutter that’s built into Mac. Therefore, there’s no need to carry out downloads or installation to utilize this editing software. Although it only offers basic editing features, it is excellent if you only want to cut MP4 video files. iMovie is great for beginners as it features a user-friendly interface that’s easy to navigate.
It is the best option for YouTubers because it allows you to crop, trim and arrange video clips in just a few minutes. Additionally, you can add visual effects to your video while also editing the audio file to enhance your video. It also allows you to link your YouTube account to share directly. Therefore, if you’re looking for an MP4 cutter to carry out quick trimming on your videos, iMovie is amongst the best free MP4 cutters.
Pros
- Easy to use and ideal for beginners
- It supports major video formats and allows you to change the output format
- Allows you to store videos in iCloud or share them directly to YouTube
- Free on Mac device
- It offers essential editing tools to enhance your video
Cons
- Editing features are limited
Steps to Cut MP4 Video for YouTube on Mac Using iMovie
This section will explain how you can cut a clip in iMovie within a few minutes. Below are the easy steps you have to follow.
- Step 1: Launch iMovie on Mac and choose ‘import file’ to select the video you want to cut.
- Step 2: To enter full-editing windows, double-click the project. At the end of the video editor, you’ll see the video editor.

- Step 3: Drag the playhead to the position you would like to cut from, and then click on it. Do this for both sides of the video.

- Step 4: Now, click ‘modify’ and choose the ‘split clip’ option to cut the selected part out.

You can delete the rest of the video by selecting it and hitting ‘delete’ on your keyboard.

- Step 5: Finally, save your newly cut video or export it to YouTube directly by clicking ‘export’ under the ‘file’ section.
OpenShot

Supported System: Windows, Mac, and Linux
OpenShot is another free, open-source MP4 cutter that you can easily use on your Mac device. It offers an intuitive interface that makes it easy to drag videos to the interface. Apart from cutting videos, other features are available like scaling, resizing, rotation, trimming, and many more. This YouTube video cutter also provides hundreds of transitions and effects to enhance your YouTube video and make it stand out amongst other Youtube videos. However, this video cutter is only an excellent choice for beginners because it lacks many advanced features.
Pros
- It is easy to use and ideal for beginners
- It offers a sleek interface for easy navigation
- Offers basic editing features
- Versatile and a cross-platform MP4 cutter
Cons
- No advanced features
- It crashes easily
Steps to Cut MP4 for YouTube on Mac Using OpenShot
OpenShot is relatively easy to use and only requires a few steps to cut your MP4 file and upload it to YouTube. Below are the easy steps to follow to cut MP4 for YouTube on Openshot.
- Step 1: First, download the MP4 cutter on your Mac and install it to begin.
- Step 2: Afterward, launch the app and add the video to cut by clicking’ import.’ Alternatively, you can simply drag the video into the app to begin.
- Step 3: Once you get the video on the timeline, drag the red line on both sides of the video to the position you want the video to start and begin.

- Step 4: Right-click on the marker and choose what you want to keep. Next, isolate the fragments from the clip you would like to keep.
- Step 5: Click the fragment you want to delete and press delete on your keyboard. You have to remove the fragments manually until your preferred result remains.
- Step 6: Choose ‘export video’ from the File tab to save your MP4 file. You can change the output format or save it as an MP4.

- Step 7: you can also share videos to your YouTube account; you have to link the YouTube account first.
More Paid MP4 Cutter for YouTubers on Mac to Cut MP4 Videos
Most times, free MP4 cutters offer limited features to enhance your YouTube video. However, there are paid MP4 cutters that will efficiently cut your MP4 files and provide advanced editing tools.
Adobe Premiere Pro

Supported System: Mac and Windows
Advanced editing software that supports different file types, including MP4, is Adobe Premier Pro. This MP4 cutter allows you to quickly trim, split, and cut your MP4. Its intuitive and fast-responding interface ensures that your video is ready within a few minutes. Beyond cutting, there are several other advanced editing features that the editing software offers you. Some include filters, chroma-key, VR editing, color adjustment, and audio editing tools to take your YouTube video to the next level.
Adobe Premiere Pro is not the best option for beginners because of its steep learning curve. However, if you have ample experience with video editing tools and want to professionally cut and edit your YouTube video, this paid MP4 cutter is worth the cost and effort. ‘
Pros
- Advanced video editing features
- Intuitive user interface
- Responsive speed
- Ideal for professional editing
Cons
- Steep learning curve
- Quite pricey
Step to Cut MP4 for YouTube on Mac Using Adobe Premiere Pro
Although Adobe Premiere Pro has an interface that’s quite intimidating to non-professionals, the steps below help simplify cutting your MP4 files for YouTube.
- Firstly, download Adobe Premiere Pro on your Mac and install it.
- After installation, launch the app and select ‘new project’ on the homepage. It will require you to name the new project and choose where you want to save it. Afterward, click ‘ok’ to begin.

- Next, go to ‘file’ and select ‘import from media’ to import the MP4 file you would like to cut. Alternatively, you can simply drag the file to the timeline.

- Next, pick the ripple edit tool and go to the beginning of the video. Drag the handle with the arrow to your desired point. Repeat this at the end of the video.

- Finally, press Q to cut the MP4 clip to the left of the blade. Next, press W to cut the clip to the right.

- Now you can save your file to your preferred file location.
Movavi Video Editor

Supported System: Mac and Windows
This is an efficient MP4 cutter that helps you remove unnecessary scenes from your YouTube videos. The timeline offers you markers that allow you easily locate the start and end scene of the video you would like to remove. Apart from cutting videos, this tool provides several premium features you can use to make your video look professional. Movavi offers a free trial you can use to determine if this editor is the best option for you. However, it comes with a Movavi watermark that you can only eliminate with the paid option.
Movavi Video Editor can add transitions, music tracks, chroma-key effects, special effects, and many more exciting features to ensure a top-quality result. Furthermore, its intuitive interface makes it relatively easy for beginners and professionals to use. Therefore, you don’t have to worry about a stiff learning curve. With Movavi, you can also change the output format to switch from MP4 to another commonly supported format.
Pros
- Simple and easy to use
- Supports various input and output formats
- Provides YouTubers with basic and advanced features
- Ideal for beginners and professionals
Cons
- Video rendering is slow for large files
- The trial version comes with a Movavi watermark
Steps to Cut MP4 for YouTube on Mac Using Movavi Video Editor
For cutting your video on Mac using Movavi video editor, you can follow the steps outlined below.
- First, download and install Movavi Video Editor on your Mac.
- After installing Movavi, launch the editor and click the ‘add files’ button to add your MP4 file.

- Once the file shows up in the media bin, drag it to the timeline to start editing your video.
- To cut your MP4 video, move the red marker at the beginning of the video to where you would like to cut. Repeat this process at the end of the video by moving to where you prefer your video to end.
- Next, click the split button to cut this clip from the rest of the video.

- Now, select the fragments you don’t want and hit the delete button to remove them immediately.

- You can also add several filters to your video if you would like to enhance your video.
- You can now save your video by hitting the ‘export’ button. You can choose different formats and video quality for your newly cut video. Select the folder to save to and click the ‘save’ button.

Davinci Resolve

Supported System: Windows and Mac
Davinci Resolve is a favorite for YouTubers who want their videos to look like Hollywood videos. However, this MP4 cutter is aimed at the professional market and supports different input and output formats for your video. Davinci Resolve offers you a variety of professional features and also supports 8k videos. In addition, it provides advanced video cutting features to ensure your video looks excellent even after cutting. You can also combine video clips after cutting without it looking unprofessional.
Although this video cutter software isn’t the best option for beginners, professional editors are sure to be satisfied with the features this editor offers. It also allows you to export directly to various social media platforms, including YouTube, to save space and time.
Pros
- Basic and advanced editing tools
- Fast rendering of videos
- Supports major video formats and video resolutions
- It offers several special effects to make your video more engaging
Cons
- Not the right option for amateurs
Steps to Cut MP4 for YouTube on Mac Using Davinci Resolve
Cutting your MP4 file on Davinci Resolve is relatively easy. The cut tool helps you cut your YouTube video within seconds. Simply follow the steps outlined below.
- First, download and install the Davinci Resolve on your Mac. After installation, launch the MP4 cutter to begin.
- Next, create a new timeline and choose the ‘edit’ mode to begin.

- Import your video by pressing ‘Command+I’ on your keyboard. Alternatively, you can simply drag the video on the timeline.
- Now, select the cut tool and drag the marker from the beginning to where you would like to cut. Repeat this process at the end of the video.
- Afterward, click the blade button to cut your file to your desired size.

- You can now save your file by hitting the ‘export’ button and choosing your preferred file location.
Which Should I Choose, Free or Paid MP4 Cutter?
You need to consider several factors when you’re choosing the right MP4 cutter. First, you have to consider the type of video you would be editing. For YouTube, you need an MP4 cutter that also offers several video editing features you can use to enhance your video. There’s also a need to consider the available formats and quality you can export in and if the MP4 cutter allows you to add visual effects to make your video stand out on YouTube.
Another factor to consider when choosing between a paid or free MP4 cutter for YouTubers on Mac is your experience level. Are you a professional, or you’re looking for some basic app to simply cut your video? Some paid options take you step-by-step through the process of cutting your MP4 file. This type of MP4 cutter helps you advance your skill. This feature is essential because the more you know, the more you’re willing to learn.
Note that most free MP4 cutters offer limited features. Alternatively, some paid MP4 cutters are only suitable for professionals or have a steep subscription to consider. Consider your budget and if any of the editors offer you the tools you need while being affordable. You need to carefully consider if a free tool is what you’re looking for or if you don’t mind paying for more functionality.
FAQs about cutting MP4 video
- What tools should I look for in an MP4 cutter? You should look for basic cutting tools like trimming, slicing and joining. However, you also want an MP4 cutter that offers several editing features to enhance your YouTube video.
- What do most YouTubers use in cutting their videos? From our experience, most YouTubers use the MP4 cutters provided below. You need to note that some are free while some are paid. Simply pick the cutter that fits your needs.
- How can I improve my video cutting and editing skills? You need a lot of practice to learn how to cut and edit videos professionally. It’s also vital to pick software that allows you to develop your editing and cutting skills with time.
- What is the best video cutting and editing software for YouTube novices? If you’re a novice on YouTube, you can start with any basic MP4 cutter on your device. However, we recommend Wondershare Filmora if you want to develop your cutting and editing skills.
Final Thoughts
Cutting MP4 for your YouTube content is a part of becoming a professional YouTuber. When looking for an MP4 cutter that’s reliable and versatile, the goal is to get the job done without any issue. We’ve reviewed the best MP4 cutters for YouTubers on Mac in this guide. You can choose between free or paid software, depending on your needs. However, the best MP4 cutter for YouTubers on Mac is Wondershare Filmore because it is ideal for beginners and professionals. It also offers you a variety of editing features at an affordable cost.
YouTubers upload over 300 hours of video content to the platform every second. These videos cut across every niche and topic. There’s scarcely a topic you’re looking for that you won’t find a video or two discussing on YouTube. So as a YouTuber, you have to find ways to keep up and stand out from the crowd. You’ll need engaging videos that will hold your target audience’s attention so much that they will subscribe for more.
However, if the video is too long or your car doesn’t hit the right frame, it will disengage your audience. Additionally, you want a video seamlessly woven together to form a polished video. This makes MP4 cutting an essential part of the YouTube video creation process. There’s no need to purchase pricey editing equipment anymore; you can simply cut your MP4 videos from the comfort of your home. This article explores the best MP4 cutters for YouTubers on Mac; let’s take a look.
Best MP4 Cutter for YouTubers on Mac - Filmroa Video Editor

Supported System: Mac and Windows
Filmora Video Editor makes it relatively easy to cut and edit your videos like a professional. This MP4 cutter is a great option, even if you don’t have video editing skills. It offers an intuitive user interface that makes it an excellent choice for experts and novices. It also provides you with the crucial editing tools to create amazing YouTube videos after cutting your MP4 video files. With this editing tool, you’re sure to produce videos your subscribers enjoy.
With Filmora, you can add effects, color grades, and texts to your videos. There’s also a library filled with royalty-free audio you can explore. After cutting your MP4, you can use templates from this MP4 cutter to create an intro for your YouTube videos. Filmora has many features that will save you a lot of time, and using it to cut MP4 is relatively easy.
For Win 7 or later (64-bit)
For macOS 10.14 or later
Pros
- It offers an intuitive user interface
- There are several effects and overlays to utilize
- Fast rendering of videos
- Offers varying output formats
- Ideal for beginners and experts
Cons
- No DVD Menu
Steps to Cut MP4 Video for YouTubers on Mac Using Filmora
Cutting videos on Filmora is relatively easy. You have to first download and install Filmora on your device. Below are the steps to cut MP4 videos to your preference using Wondershare Filmora.
Step 1: Import MP4 Files
There are two ways you can add MP4 files to this MP4 cutter. You can either click the ‘import’ button and choose the file from your media library or drag the mp4 file to your album. After dragging to the album, drag from the album to the timeline.

Step 2: Cut MP4 Files

After importing your file, you’re ready to cut. First, simply move the indicator to the ideal position you want by dragging the top of the indicator and slider bar. Then, click the scissor button to cut once you move to your preferred time.
You can also delete any part of the MP4 file you don’t want by hitting the ‘delete’ option. If you cut various clips out of the MP4 file, you can rearrange them with the ‘drag and drop tool.
Step 3: Save and Share Cut MP4 File

Now, you can save your newly cut video file by clicking the ‘file’ button at the left corner of the Filmora software and selecting ‘save as’ from the options. The output window will appear, and you can choose the format and if you want to share directly to YouTube. Pick the option that meets your need, and you’re good to go.
More Free MP4 Cutter for YouTubers on Mac to Cut MP4 Videos
Although Wondershare Filmora is the best video cutter for YouTubers on Mac, there are free MP4 cutters you can utilize to cut your videos from the comfort of your home easily. Below, we’ve reviewed the top three options you should consider.
PowerDirector Essential

Supported System: Windows and Mac
If you’re looking for a free MP4 video cutter that ensures fast processing of videos, you should try PowerDirector Essential. This MP4 cutter allows you easily cut your YouTube videos irrespective of your experience level. You’ll be able to cut and edit your YouTube videos within a couple of minutes. In addition, PowerDirector Essential is versatile and allows you to either use the storyboard mode or timeline editor for your cutting needs.
Apart from splitting and cutting tools, you can also explore its library of stylized transitions if you want to significantly upgrade the appearance of your YouTube video professionally. YouTubers want a video cutter that offers video editing features to create your visual effects. This MP4 cutter is excellent for beginners because of its intuitive interface that you can master in minutes. You can also ensure your video has amazing audio and clear video before sharing it on YouTube. If you want high-quality, Hollywood-style videos, this is the best free MP4 cutter to achieve that.
Pros
- It supports several input and output video formats
- Easy cutting and exporting process
- Intuitive and user-friendly interface
- Ideal for beginners
- It offers various video editing tools to enhance your video
Cons
- Some features are only available on the Windows version
How to Cut Video for YouTube on Mac Using PowerDirector Essential
If you want to learn how to easily cut MP4 files using PowerDirector on a Mac computer, follow the steps below.
- Step 1: You have to download PowerDirector software on your Mac and install it. After installation, launch the software, and you’re ready to begin the cutting process.
- Step 2: Now, import the video into PowerDirector by clicking ‘import media file’ and choosing the ideal video file from your media library.

- Step 3: Add the video to your timeline and hover over the right or left edge of the video track. This would make an adjustment arrow appear on both sides of the video file.

- Step 4: Drag the arrows to the point you would like to cut and choose the ‘scissors’ button.

- Step 5: After cutting, go to the ‘produce’ tab and choose ‘online’ if you want to upload a video directly to YouTube. You can also choose to save to your Mac. Choose the output format and location and click ‘start’ to save your newly cut video.
iMovie

Supported System: Mac
iMovie is a free MP4 cutter that’s built into Mac. Therefore, there’s no need to carry out downloads or installation to utilize this editing software. Although it only offers basic editing features, it is excellent if you only want to cut MP4 video files. iMovie is great for beginners as it features a user-friendly interface that’s easy to navigate.
It is the best option for YouTubers because it allows you to crop, trim and arrange video clips in just a few minutes. Additionally, you can add visual effects to your video while also editing the audio file to enhance your video. It also allows you to link your YouTube account to share directly. Therefore, if you’re looking for an MP4 cutter to carry out quick trimming on your videos, iMovie is amongst the best free MP4 cutters.
Pros
- Easy to use and ideal for beginners
- It supports major video formats and allows you to change the output format
- Allows you to store videos in iCloud or share them directly to YouTube
- Free on Mac device
- It offers essential editing tools to enhance your video
Cons
- Editing features are limited
Steps to Cut MP4 Video for YouTube on Mac Using iMovie
This section will explain how you can cut a clip in iMovie within a few minutes. Below are the easy steps you have to follow.
- Step 1: Launch iMovie on Mac and choose ‘import file’ to select the video you want to cut.
- Step 2: To enter full-editing windows, double-click the project. At the end of the video editor, you’ll see the video editor.

- Step 3: Drag the playhead to the position you would like to cut from, and then click on it. Do this for both sides of the video.

- Step 4: Now, click ‘modify’ and choose the ‘split clip’ option to cut the selected part out.

You can delete the rest of the video by selecting it and hitting ‘delete’ on your keyboard.

- Step 5: Finally, save your newly cut video or export it to YouTube directly by clicking ‘export’ under the ‘file’ section.
OpenShot

Supported System: Windows, Mac, and Linux
OpenShot is another free, open-source MP4 cutter that you can easily use on your Mac device. It offers an intuitive interface that makes it easy to drag videos to the interface. Apart from cutting videos, other features are available like scaling, resizing, rotation, trimming, and many more. This YouTube video cutter also provides hundreds of transitions and effects to enhance your YouTube video and make it stand out amongst other Youtube videos. However, this video cutter is only an excellent choice for beginners because it lacks many advanced features.
Pros
- It is easy to use and ideal for beginners
- It offers a sleek interface for easy navigation
- Offers basic editing features
- Versatile and a cross-platform MP4 cutter
Cons
- No advanced features
- It crashes easily
Steps to Cut MP4 for YouTube on Mac Using OpenShot
OpenShot is relatively easy to use and only requires a few steps to cut your MP4 file and upload it to YouTube. Below are the easy steps to follow to cut MP4 for YouTube on Openshot.
- Step 1: First, download the MP4 cutter on your Mac and install it to begin.
- Step 2: Afterward, launch the app and add the video to cut by clicking’ import.’ Alternatively, you can simply drag the video into the app to begin.
- Step 3: Once you get the video on the timeline, drag the red line on both sides of the video to the position you want the video to start and begin.

- Step 4: Right-click on the marker and choose what you want to keep. Next, isolate the fragments from the clip you would like to keep.
- Step 5: Click the fragment you want to delete and press delete on your keyboard. You have to remove the fragments manually until your preferred result remains.
- Step 6: Choose ‘export video’ from the File tab to save your MP4 file. You can change the output format or save it as an MP4.

- Step 7: you can also share videos to your YouTube account; you have to link the YouTube account first.
More Paid MP4 Cutter for YouTubers on Mac to Cut MP4 Videos
Most times, free MP4 cutters offer limited features to enhance your YouTube video. However, there are paid MP4 cutters that will efficiently cut your MP4 files and provide advanced editing tools.
Adobe Premiere Pro

Supported System: Mac and Windows
Advanced editing software that supports different file types, including MP4, is Adobe Premier Pro. This MP4 cutter allows you to quickly trim, split, and cut your MP4. Its intuitive and fast-responding interface ensures that your video is ready within a few minutes. Beyond cutting, there are several other advanced editing features that the editing software offers you. Some include filters, chroma-key, VR editing, color adjustment, and audio editing tools to take your YouTube video to the next level.
Adobe Premiere Pro is not the best option for beginners because of its steep learning curve. However, if you have ample experience with video editing tools and want to professionally cut and edit your YouTube video, this paid MP4 cutter is worth the cost and effort. ‘
Pros
- Advanced video editing features
- Intuitive user interface
- Responsive speed
- Ideal for professional editing
Cons
- Steep learning curve
- Quite pricey
Step to Cut MP4 for YouTube on Mac Using Adobe Premiere Pro
Although Adobe Premiere Pro has an interface that’s quite intimidating to non-professionals, the steps below help simplify cutting your MP4 files for YouTube.
- Firstly, download Adobe Premiere Pro on your Mac and install it.
- After installation, launch the app and select ‘new project’ on the homepage. It will require you to name the new project and choose where you want to save it. Afterward, click ‘ok’ to begin.

- Next, go to ‘file’ and select ‘import from media’ to import the MP4 file you would like to cut. Alternatively, you can simply drag the file to the timeline.

- Next, pick the ripple edit tool and go to the beginning of the video. Drag the handle with the arrow to your desired point. Repeat this at the end of the video.

- Finally, press Q to cut the MP4 clip to the left of the blade. Next, press W to cut the clip to the right.

- Now you can save your file to your preferred file location.
Movavi Video Editor

Supported System: Mac and Windows
This is an efficient MP4 cutter that helps you remove unnecessary scenes from your YouTube videos. The timeline offers you markers that allow you easily locate the start and end scene of the video you would like to remove. Apart from cutting videos, this tool provides several premium features you can use to make your video look professional. Movavi offers a free trial you can use to determine if this editor is the best option for you. However, it comes with a Movavi watermark that you can only eliminate with the paid option.
Movavi Video Editor can add transitions, music tracks, chroma-key effects, special effects, and many more exciting features to ensure a top-quality result. Furthermore, its intuitive interface makes it relatively easy for beginners and professionals to use. Therefore, you don’t have to worry about a stiff learning curve. With Movavi, you can also change the output format to switch from MP4 to another commonly supported format.
Pros
- Simple and easy to use
- Supports various input and output formats
- Provides YouTubers with basic and advanced features
- Ideal for beginners and professionals
Cons
- Video rendering is slow for large files
- The trial version comes with a Movavi watermark
Steps to Cut MP4 for YouTube on Mac Using Movavi Video Editor
For cutting your video on Mac using Movavi video editor, you can follow the steps outlined below.
- First, download and install Movavi Video Editor on your Mac.
- After installing Movavi, launch the editor and click the ‘add files’ button to add your MP4 file.

- Once the file shows up in the media bin, drag it to the timeline to start editing your video.
- To cut your MP4 video, move the red marker at the beginning of the video to where you would like to cut. Repeat this process at the end of the video by moving to where you prefer your video to end.
- Next, click the split button to cut this clip from the rest of the video.

- Now, select the fragments you don’t want and hit the delete button to remove them immediately.

- You can also add several filters to your video if you would like to enhance your video.
- You can now save your video by hitting the ‘export’ button. You can choose different formats and video quality for your newly cut video. Select the folder to save to and click the ‘save’ button.

Davinci Resolve

Supported System: Windows and Mac
Davinci Resolve is a favorite for YouTubers who want their videos to look like Hollywood videos. However, this MP4 cutter is aimed at the professional market and supports different input and output formats for your video. Davinci Resolve offers you a variety of professional features and also supports 8k videos. In addition, it provides advanced video cutting features to ensure your video looks excellent even after cutting. You can also combine video clips after cutting without it looking unprofessional.
Although this video cutter software isn’t the best option for beginners, professional editors are sure to be satisfied with the features this editor offers. It also allows you to export directly to various social media platforms, including YouTube, to save space and time.
Pros
- Basic and advanced editing tools
- Fast rendering of videos
- Supports major video formats and video resolutions
- It offers several special effects to make your video more engaging
Cons
- Not the right option for amateurs
Steps to Cut MP4 for YouTube on Mac Using Davinci Resolve
Cutting your MP4 file on Davinci Resolve is relatively easy. The cut tool helps you cut your YouTube video within seconds. Simply follow the steps outlined below.
- First, download and install the Davinci Resolve on your Mac. After installation, launch the MP4 cutter to begin.
- Next, create a new timeline and choose the ‘edit’ mode to begin.

- Import your video by pressing ‘Command+I’ on your keyboard. Alternatively, you can simply drag the video on the timeline.
- Now, select the cut tool and drag the marker from the beginning to where you would like to cut. Repeat this process at the end of the video.
- Afterward, click the blade button to cut your file to your desired size.

- You can now save your file by hitting the ‘export’ button and choosing your preferred file location.
Which Should I Choose, Free or Paid MP4 Cutter?
You need to consider several factors when you’re choosing the right MP4 cutter. First, you have to consider the type of video you would be editing. For YouTube, you need an MP4 cutter that also offers several video editing features you can use to enhance your video. There’s also a need to consider the available formats and quality you can export in and if the MP4 cutter allows you to add visual effects to make your video stand out on YouTube.
Another factor to consider when choosing between a paid or free MP4 cutter for YouTubers on Mac is your experience level. Are you a professional, or you’re looking for some basic app to simply cut your video? Some paid options take you step-by-step through the process of cutting your MP4 file. This type of MP4 cutter helps you advance your skill. This feature is essential because the more you know, the more you’re willing to learn.
Note that most free MP4 cutters offer limited features. Alternatively, some paid MP4 cutters are only suitable for professionals or have a steep subscription to consider. Consider your budget and if any of the editors offer you the tools you need while being affordable. You need to carefully consider if a free tool is what you’re looking for or if you don’t mind paying for more functionality.
FAQs about cutting MP4 video
- What tools should I look for in an MP4 cutter? You should look for basic cutting tools like trimming, slicing and joining. However, you also want an MP4 cutter that offers several editing features to enhance your YouTube video.
- What do most YouTubers use in cutting their videos? From our experience, most YouTubers use the MP4 cutters provided below. You need to note that some are free while some are paid. Simply pick the cutter that fits your needs.
- How can I improve my video cutting and editing skills? You need a lot of practice to learn how to cut and edit videos professionally. It’s also vital to pick software that allows you to develop your editing and cutting skills with time.
- What is the best video cutting and editing software for YouTube novices? If you’re a novice on YouTube, you can start with any basic MP4 cutter on your device. However, we recommend Wondershare Filmora if you want to develop your cutting and editing skills.
Final Thoughts
Cutting MP4 for your YouTube content is a part of becoming a professional YouTuber. When looking for an MP4 cutter that’s reliable and versatile, the goal is to get the job done without any issue. We’ve reviewed the best MP4 cutters for YouTubers on Mac in this guide. You can choose between free or paid software, depending on your needs. However, the best MP4 cutter for YouTubers on Mac is Wondershare Filmore because it is ideal for beginners and professionals. It also offers you a variety of editing features at an affordable cost.
Also read:
- Updated How to Create a Slideshow with Movavi Slideshow Maker for 2024
- New How to Concatenate Videos Using FFmpeg
- New Best Dark Moody LUTs During Editing for 2024
- New 2024 Approved Guide to Create an Intro Video with Filmora
- In 2024, Guide Add LUTs in Premiere Pro with Ease
- Updated In 2024, Create Realistic Fire Effects by Filmora
- Updated Are You Looking for a Voice Changer to Make Your Gaming Experience More Fun? Here Is a List of the Top 6 Best Alternatives of Clownfish Voice Changers to Use
- New In 2024, How to Convert Videos to Slow Motion?
- In 2024, This Article Will Focus on Understanding the Secret Tips in Wondershare Filmora that You Can Use to Edit Videos Faster and More Efficiently
- New How to Add a Spooky Shadow Effect
- 2024 Approved How to Choose A Nice GoPro for Vlogging?
- Want to Take Your Editing Creativity to the Next Level by Designing Top-Class, Professional-Quality Slideshows in Aquasoft? Rest Assured, You Have Landed at the Right Place for 2024
- In 2024, Best Tools To Create Blend Image Collage
- Updated Hard to Remove Black Background in After Effects?
- New Add Effects to Video Online for 2024
- Updated 2024 Approved 5 Tips for Aquasoft Slideshow
- What Is the Top Filmora Slideshow Templates? Experts Choice
- New In 2024, Best 12 AI Video Generators to Pick
- 2024 Approved 2 Ways to Add Custom Subtitles to Netflix
- How Can Vivo X100Mirror Share to PC? | Dr.fone
- Undelete lost contacts from Infinix Smart 7 HD.
- In 2024, How to Change Location On Facebook Dating for your Vivo Y100A | Dr.fone
- In 2024, How to Unlock Oppo Find N3 Phone without PIN
- In 2024, How to Reset Apple ID and Apple Password From Apple iPhone 6
- How to Delete iCloud Account with or without Password from your Apple iPhone 13/Windows/Mac
- In 2024, How to Change Location On Facebook Dating for your Apple iPhone XS Max | Dr.fone
- In 2024, Ways To Find Unlocking Codes For Sony Xperia 5 V Phones
- Downloading SamFw FRP Tool 3.0 for Vivo V29 Pro
- In 2024, Ultimate guide to get the meltan box pokemon go For Oppo Reno 11F 5G | Dr.fone
- How to Delete All Photos from iPhone 15 Pro Max Beyond Scope of Recovery? | Stellar
- Title: New How to Make Text Reveal Effect Easily
- Author: Chloe
- Created at : 2024-06-09 16:15:28
- Updated at : 2024-06-10 16:15:28
- Link: https://ai-editing-video.techidaily.com/new-how-to-make-text-reveal-effect-easily/
- License: This work is licensed under CC BY-NC-SA 4.0.


