:max_bytes(150000):strip_icc():format(webp)/F8conferencelogo-7ec4475dc6624114aea076c2611df199.jpg)
New How to Make Text Reveal Effect for Your Video

How to Make Text Reveal Effect for Your Video
Have you ever seen the text reveal led by a subject when moving across the frame? It’s one of the most common text-revealing effects in video editing. This technique is often used to add titles or credits to a scene for cinematic vibes and creative effects.
While it may look complicated, it’s actually quite easy to create with a video editing program like Filmora. Filmora’s masking feature allows users to create impressive and eye-catching text reveals in their videos. For those looking for a tutorial on how to make text reveal, here’s a step-by-step guide to help you out.
How to add text reveal effect using Filmora’s masking tool
Free Download For Win 7 or later(64-bit)
Free Download For macOS 10.14 or later
First, make sure the video clips you are using are clear, with the subject moving across the frame. It will help the text to stand out and be more easily seen. Now, follow the step-by-step guides below:
Step 1 Add video tracks
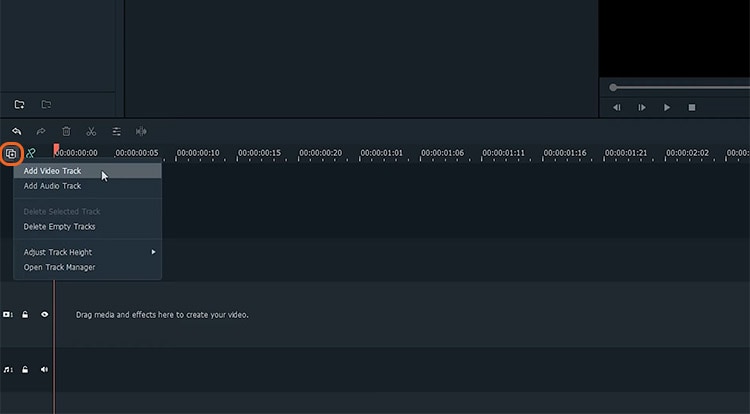
You will need three video tracks in order to create this effect, so click the (+) icon above the timeline > Add Video Track and add two more video tracks.
Step 2 Import the clip to the timeline
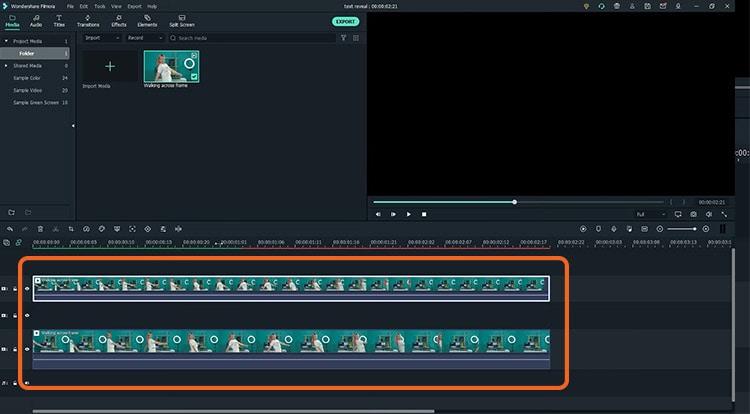
Drag and drop your clip onto the first and third video tracks of the timeline. Then, align them with each other.
Step 3 Make a cut at the beginning of the text
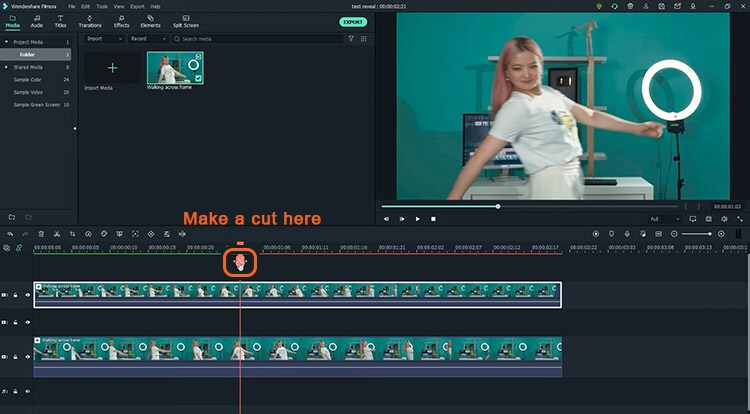
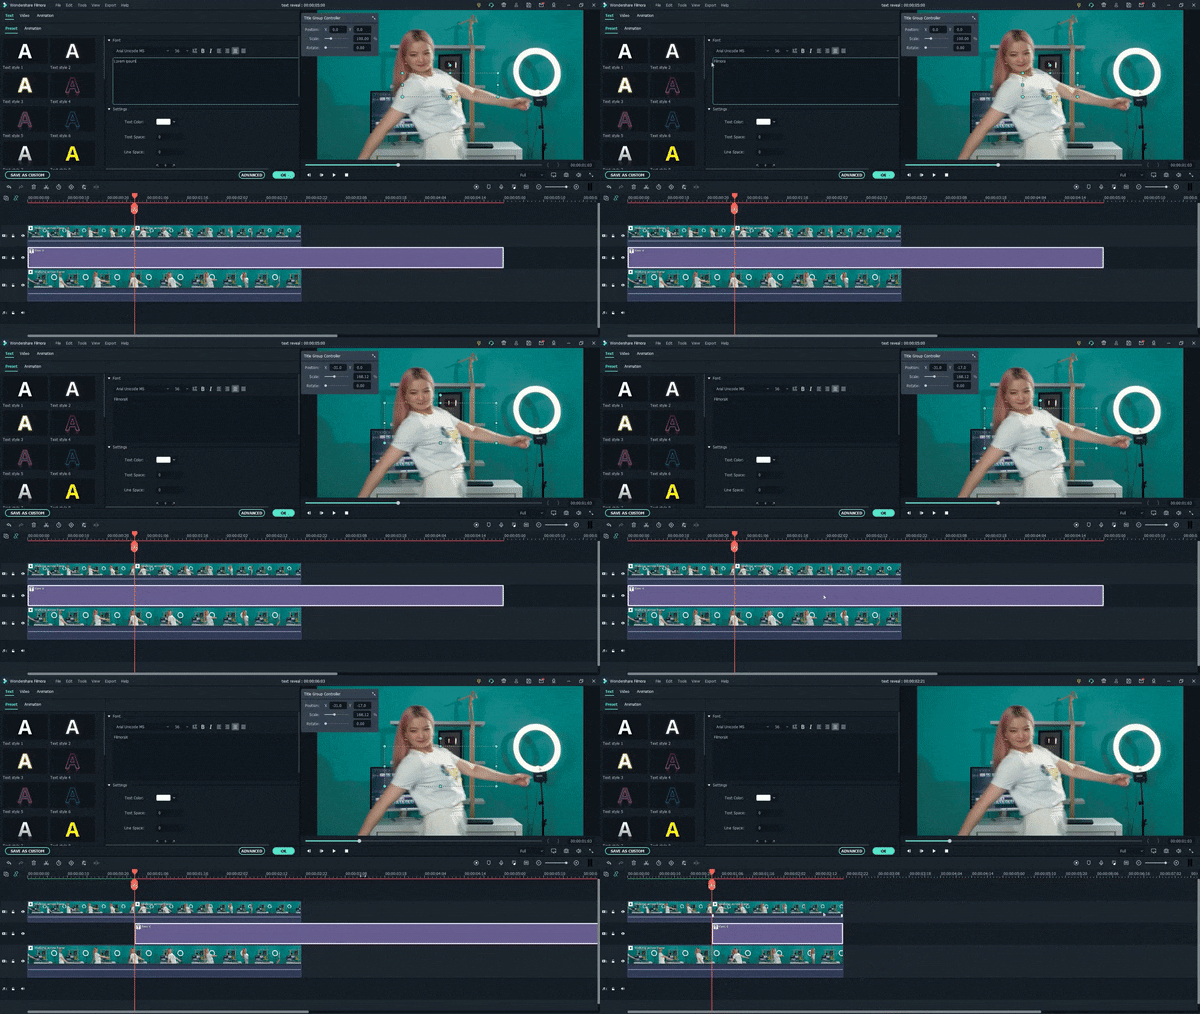
Find the spot where you want the text reveals to start, then click the scissor icon to make a cut on the clip from the first video track.
Step 4 Add and adjust the text
Go to Title > Plain Text > select which text styles suit you best. Then, drag the title to the second video track.
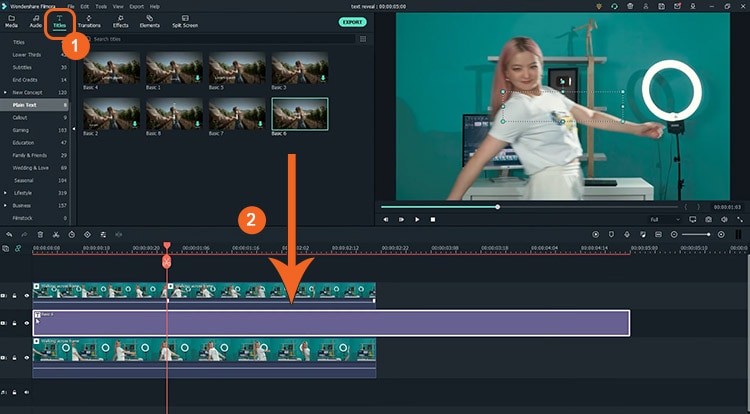
Double-click on the title clip and type out your text. Then, adjust the text position and align it to the cut you have made.
Step 5 Use the masking tool
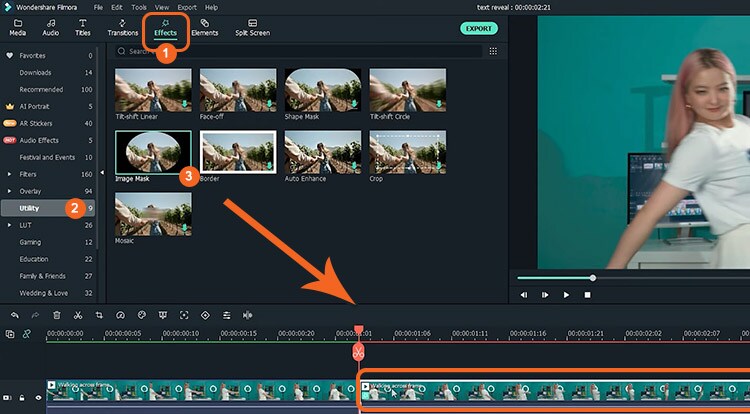
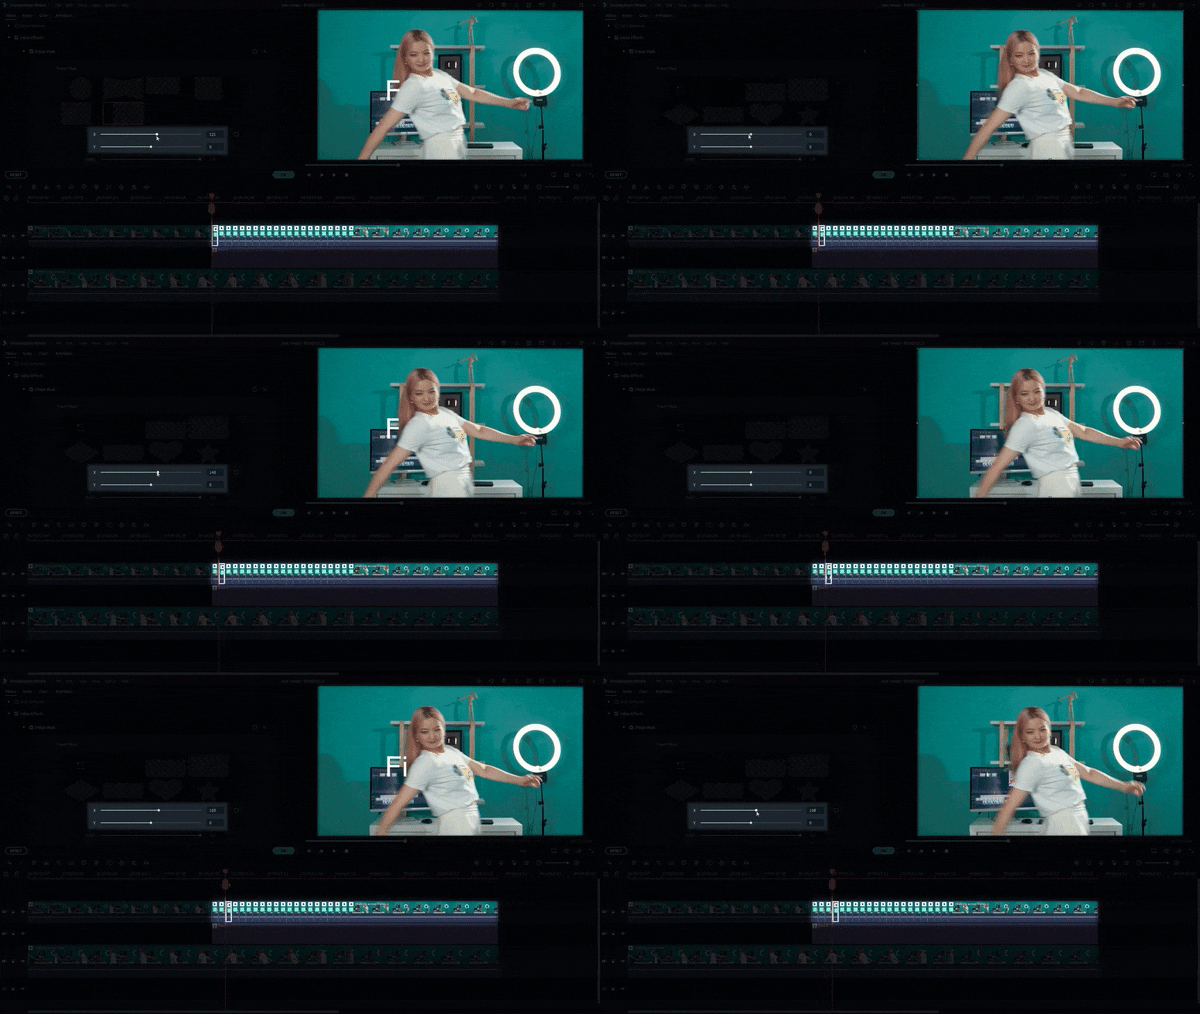
Go to Effects > Utility > Image Mask, then drag and drop it onto the latter half of the top video clip.
Make more cuts on the top latter clip, frame by frame, starting from the first cut you have made.
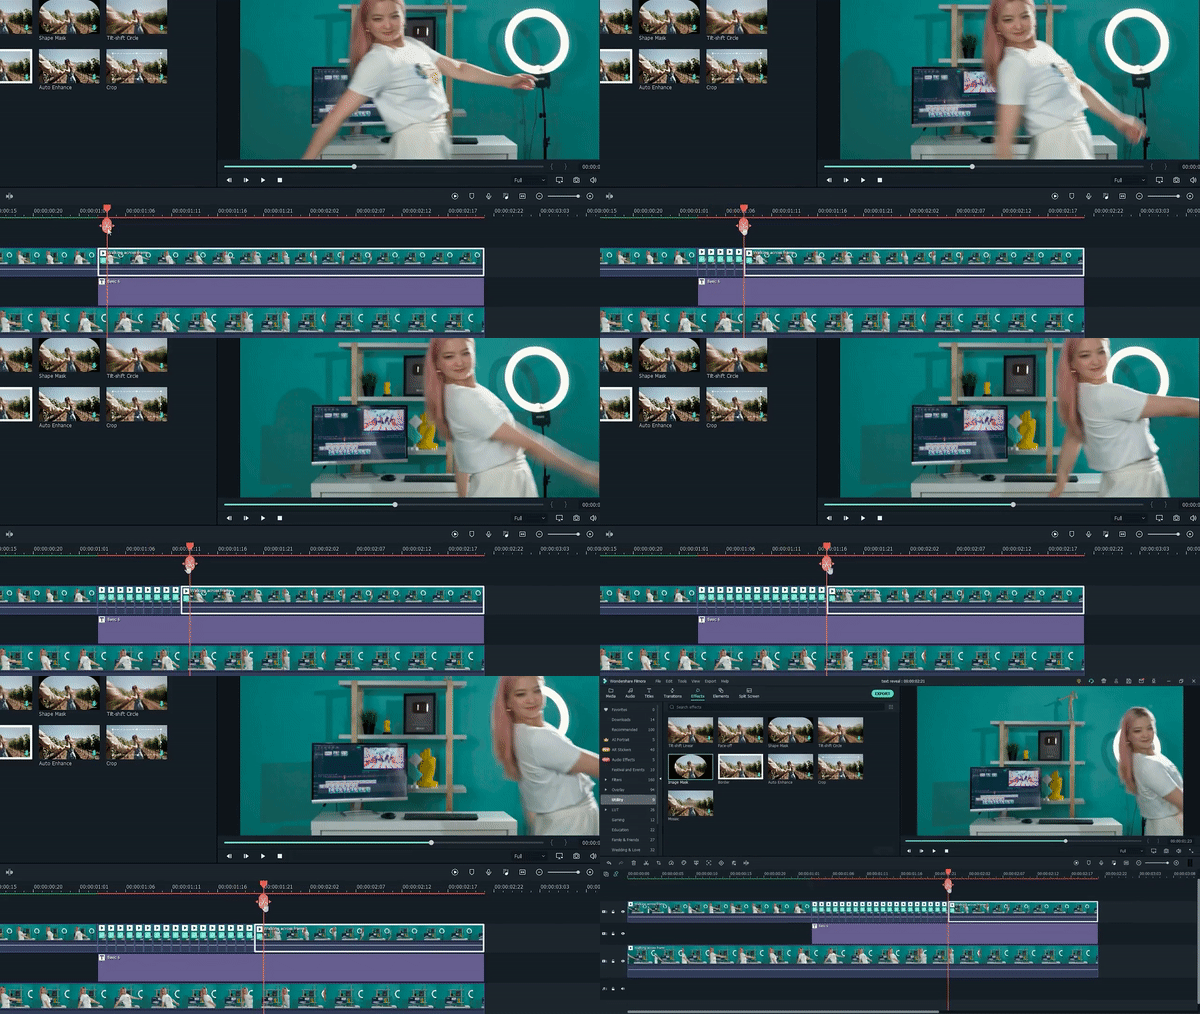
Double-click on each of the smaller clips and find the mask settings.
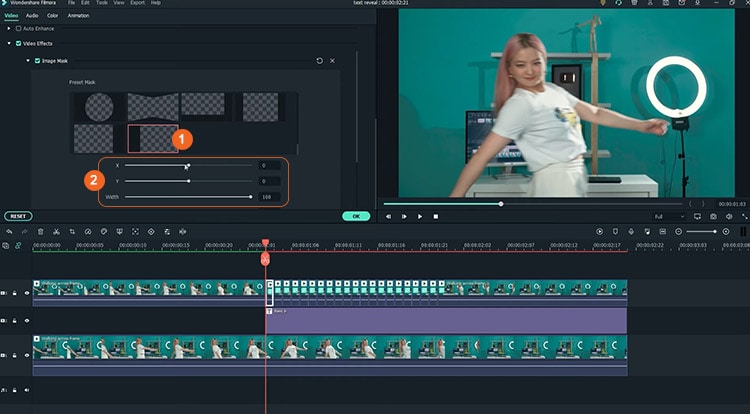
Since the subject in this tutorial is moving from side to side, we are going to match the mask’s y-axis setting, which is also the revealed text portion, with the subject’s movement. Starting from the first clip, adjust the y-axis number to a smaller/bigger number.
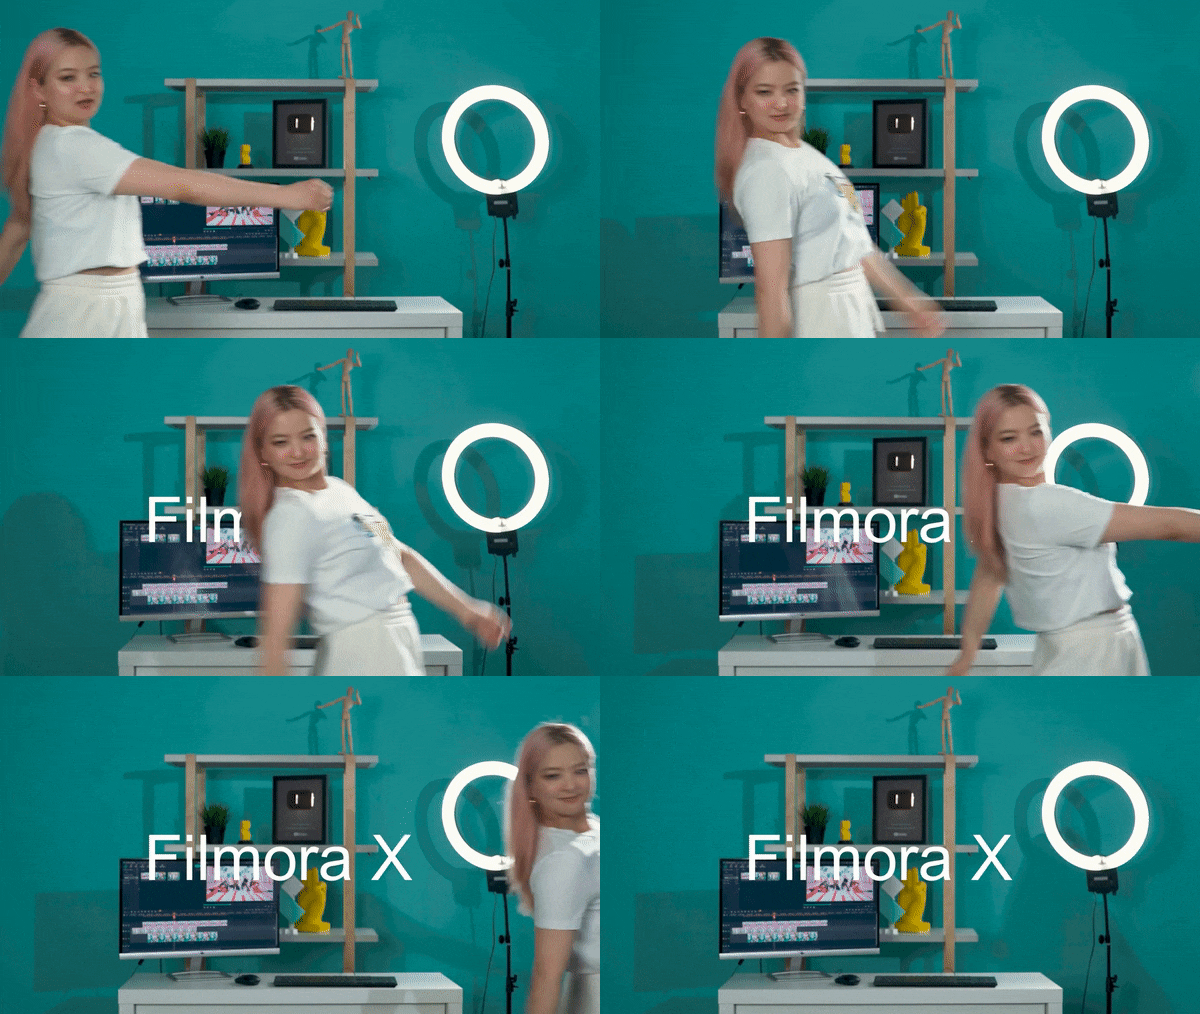
There we go! The final look should look like this:
Summary
That is how we can create the text reveal effect using Wondershare Filmora. Using Filmora’s masking tool, it’s easy to create a text reveal the effect that can add flair and interest to your videos. Just follow the simple steps, and you’ll be able to get the desired result with a few clicks of your mouse. Give it a try, and share your thoughts with us.
Free Download For macOS 10.14 or later
First, make sure the video clips you are using are clear, with the subject moving across the frame. It will help the text to stand out and be more easily seen. Now, follow the step-by-step guides below:
Step 1 Add video tracks
You will need three video tracks in order to create this effect, so click the (+) icon above the timeline > Add Video Track and add two more video tracks.

Step 2 Import the clip to the timeline
Drag and drop your clip onto the first and third video tracks of the timeline. Then, align them with each other.

Step 3 Make a cut at the beginning of the text
Find the spot where you want the text reveals to start, then click the scissor icon to make a cut on the clip from the first video track.

Step 4 Add and adjust the text
Go to Title > Plain Text > select which text styles suit you best. Then, drag the title to the second video track.

Double-click on the title clip and type out your text. Then, adjust the text position and align it to the cut you have made.

Step 5 Use the masking tool
Go to Effects > Utility > Image Mask, then drag and drop it onto the latter half of the top video clip.

Make more cuts on the top latter clip, frame by frame, starting from the first cut you have made.

Double-click on each of the smaller clips and find the mask settings.

Since the subject in this tutorial is moving from side to side, we are going to match the mask’s y-axis setting, which is also the revealed text portion, with the subject’s movement. Starting from the first clip, adjust the y-axis number to a smaller/bigger number.

There we go! The final look should look like this:

Summary
That is how we can create the text reveal effect using Wondershare Filmora. Using Filmora’s masking tool, it’s easy to create a text reveal the effect that can add flair and interest to your videos. Just follow the simple steps, and you’ll be able to get the desired result with a few clicks of your mouse. Give it a try, and share your thoughts with us.
Free Download For macOS 10.14 or later
First, make sure the video clips you are using are clear, with the subject moving across the frame. It will help the text to stand out and be more easily seen. Now, follow the step-by-step guides below:
Step 1 Add video tracks
You will need three video tracks in order to create this effect, so click the (+) icon above the timeline > Add Video Track and add two more video tracks.

Step 2 Import the clip to the timeline
Drag and drop your clip onto the first and third video tracks of the timeline. Then, align them with each other.

Step 3 Make a cut at the beginning of the text
Find the spot where you want the text reveals to start, then click the scissor icon to make a cut on the clip from the first video track.

Step 4 Add and adjust the text
Go to Title > Plain Text > select which text styles suit you best. Then, drag the title to the second video track.

Double-click on the title clip and type out your text. Then, adjust the text position and align it to the cut you have made.

Step 5 Use the masking tool
Go to Effects > Utility > Image Mask, then drag and drop it onto the latter half of the top video clip.

Make more cuts on the top latter clip, frame by frame, starting from the first cut you have made.

Double-click on each of the smaller clips and find the mask settings.

Since the subject in this tutorial is moving from side to side, we are going to match the mask’s y-axis setting, which is also the revealed text portion, with the subject’s movement. Starting from the first clip, adjust the y-axis number to a smaller/bigger number.

There we go! The final look should look like this:

Summary
That is how we can create the text reveal effect using Wondershare Filmora. Using Filmora’s masking tool, it’s easy to create a text reveal the effect that can add flair and interest to your videos. Just follow the simple steps, and you’ll be able to get the desired result with a few clicks of your mouse. Give it a try, and share your thoughts with us.
Free Download For macOS 10.14 or later
First, make sure the video clips you are using are clear, with the subject moving across the frame. It will help the text to stand out and be more easily seen. Now, follow the step-by-step guides below:
Step 1 Add video tracks
You will need three video tracks in order to create this effect, so click the (+) icon above the timeline > Add Video Track and add two more video tracks.

Step 2 Import the clip to the timeline
Drag and drop your clip onto the first and third video tracks of the timeline. Then, align them with each other.

Step 3 Make a cut at the beginning of the text
Find the spot where you want the text reveals to start, then click the scissor icon to make a cut on the clip from the first video track.

Step 4 Add and adjust the text
Go to Title > Plain Text > select which text styles suit you best. Then, drag the title to the second video track.

Double-click on the title clip and type out your text. Then, adjust the text position and align it to the cut you have made.

Step 5 Use the masking tool
Go to Effects > Utility > Image Mask, then drag and drop it onto the latter half of the top video clip.

Make more cuts on the top latter clip, frame by frame, starting from the first cut you have made.

Double-click on each of the smaller clips and find the mask settings.

Since the subject in this tutorial is moving from side to side, we are going to match the mask’s y-axis setting, which is also the revealed text portion, with the subject’s movement. Starting from the first clip, adjust the y-axis number to a smaller/bigger number.

There we go! The final look should look like this:

Summary
That is how we can create the text reveal effect using Wondershare Filmora. Using Filmora’s masking tool, it’s easy to create a text reveal the effect that can add flair and interest to your videos. Just follow the simple steps, and you’ll be able to get the desired result with a few clicks of your mouse. Give it a try, and share your thoughts with us.
8 Free Photo Collage with Music Video Maker
8 Free Photo Collage with Music Video Maker
An easy yet powerful editor
Numerous effects to choose from
Detailed tutorials provided by the official channel
It is definitely possible Usually, people use video collage makers for this reason. But you can also create an actual photo collage with music as well (no need to use actual video clips if you don’t want to.)
In the end, it all depends on the collage maker you’re using to be completely honest. In this case, the collage maker in question would have to have video editing functionalities advanced enough to allow you to create a video consisting of a picture collage with music Learn more about the different tools that you can check out below as we break down some of the best of the best available
01 Wondershare Filmora Video Editor
The first of the video makers that we’re going to be introducing is called Filmora. This is a professional editor that’s equipped with just about everything you need for creating high-quality video content. That includes the things that you will need in order to create a music photo collage
For your reference, that means that you can use it to create a video showing off a picture collage with music. Usually by making use of the templates provided by the software and uploading your own images (although, in the newest version of Filmora, Filmora V11, there is a ‘Stock Media’ option that includes an endless supply of photographs, videos, music, etc. for adding to your content.)
For Win 7 or later (64-bit)
For macOS 10.12 or later
02 Canva
Canva is really more of a photo editor than anything else. But it has a timeline function that you can use for more advanced things. Which, in this case, would be creating a picture collage with music
Note, just like with Filmora, Canva is not an entirely FREE program. But it is free to try. And, just like Filmora, it comes with a stock media library that you can use as a resource for your projects (i.e., images, clip arts, etc.) Canva also comes with a Pro version that you can unlock if you want some of its more advanced features (highly recommended if you’re looking to create content for work or entrepreneurial reasons and not just for posting on social media. Especially since it will allow you to collaborate with others.)

03 Express It
You can say that “Express It” is Adobe’s version of Canva. It is available as an online tool and as a photo collage with music app that you can use for your smartphone or tablet.
Much like with Canva, this program has a built-in stock media library that you can use for your projects. It’s also primarily FREE to use, although you’ll need to pay in order to unlock some of its more advanced resources. It comes with the usual layouts for creating quick templates, but it’s most prized for its ‘free-style’ mode, which will allow you to create a collage that looks exactly how you want it to look.
04 Smilebox
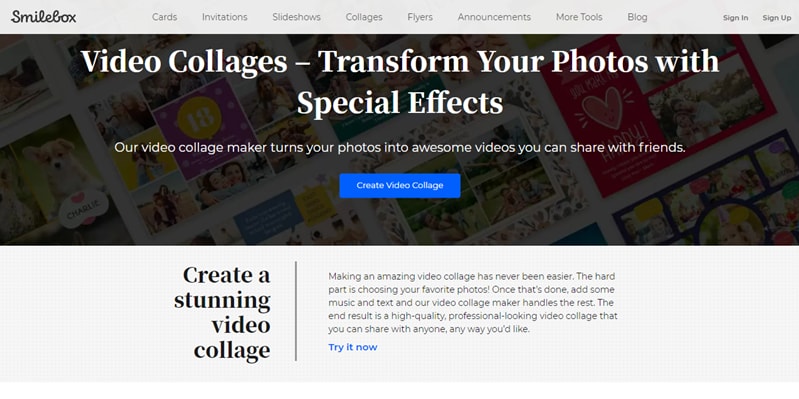
Smilebox is an automatic video collage maker that is capable of turning photographs into a video collage without much input from you It’s the tool to use if all you’re looking for is a quick solution. By that, we of course mean the solution of the ‘upload-and-then-download’ variety
It is also an online tool, so Sign-Up is required. But once you’re signed up, the only thing you really have to do is provide the images that you want to use for your music photo collage
05 Fotojet
Next is ‘Fotojet’, which is an online collage maker that is incredibly popular for those that are looking for an easy solution. It works pretty much how you expect a collage maker to work. You choose from a list of ‘collage layouts’, choose the images that you want to place in the layout that you’ve chosen, pick out your music, maybe decorate the pic collage a bit (for example, you can add text, clipart stickers, etc.) and then you’re done
Much like some of the programs on this list, Fotojet isn’t an entirely free music photo collage tool. However, a FREE trial is available if you want to try it out for a quick project or two.

06 Vimeo
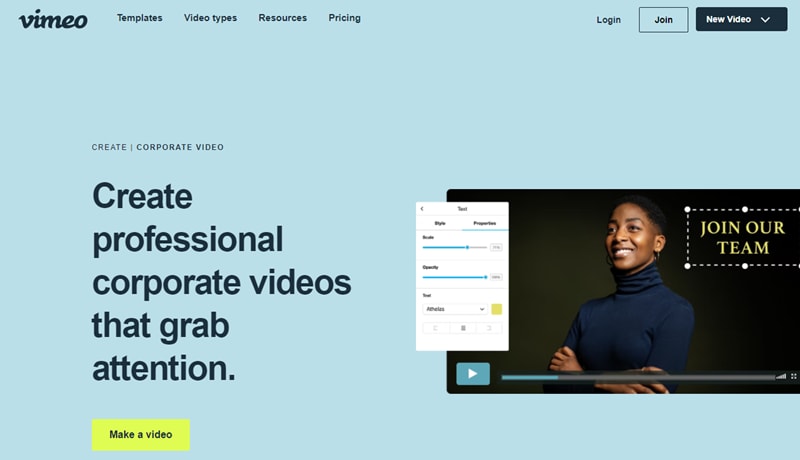
Video is a professional online photo editing tool that’s incredibly popular with entrepreneurs. It actually works very similarly with all the other tools that we’ve introduced so far. That means that it comes with templates that you can use in order to create projects, it also comes with a ‘resources’ library that you can take advantage of in order to fill up said projects
As for creating a photo collage with music by using this tool. You will need to sign up to start creating, but it’s FREE to try — with some elements locked under the premium version.
07 Kapwing
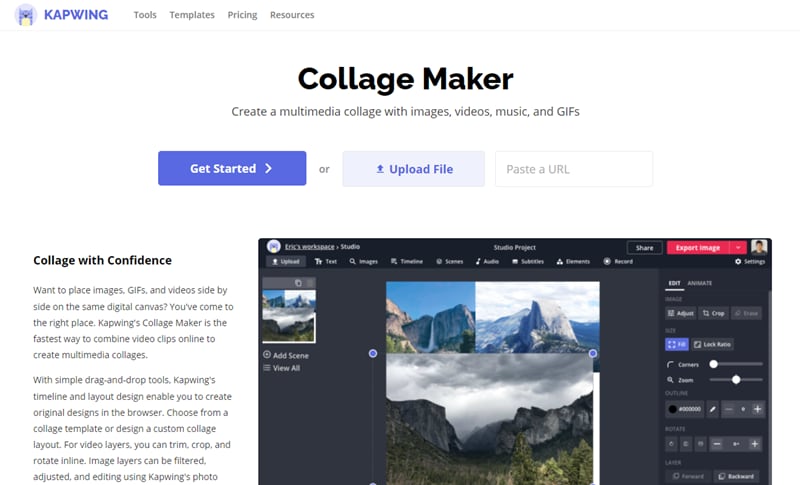
KapWing is exactly what it looks like, it’s an online photo editor The best part about it is that it comes with quick collage layouts that you can use and the usual resources library. The layouts in question are customizable, allowing you to control what your music photo collages look like in the end. You also have the choice of creating said collage with photos, videos, GIFs, and music
08 VEED.IO
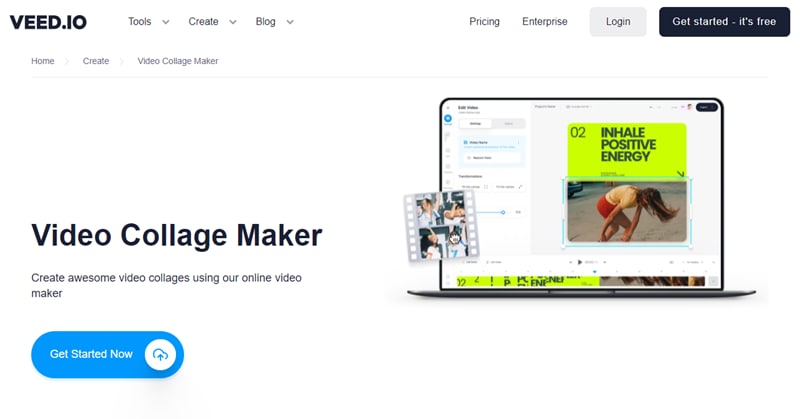
Similar to KapWing, VEED.IO offers a video collage maker that comes with customizable layouts that you can use to easily create a pic collage with music. The program is of course also free to try (though certain elements are locked in the FREE version).
● Key Takeaways from This Episode →
● Collages are a fun way to preserve memories of a fun event with friends and families Traditionally, of course, photo collages were created with printed still images.
● Now, however, not only can you create a moving collage (with images, videos, GIFs, etc.) but you can even add music to it
● These types of music photo collages are really fun to share with friends and family online. And, these days, there are even digital picture frames that will allow you to display them in your home (and yes, some of these picture frames do come with speakers for playing music)
It is definitely possible Usually, people use video collage makers for this reason. But you can also create an actual photo collage with music as well (no need to use actual video clips if you don’t want to.)
In the end, it all depends on the collage maker you’re using to be completely honest. In this case, the collage maker in question would have to have video editing functionalities advanced enough to allow you to create a video consisting of a picture collage with music Learn more about the different tools that you can check out below as we break down some of the best of the best available
01 Wondershare Filmora Video Editor
The first of the video makers that we’re going to be introducing is called Filmora. This is a professional editor that’s equipped with just about everything you need for creating high-quality video content. That includes the things that you will need in order to create a music photo collage
For your reference, that means that you can use it to create a video showing off a picture collage with music. Usually by making use of the templates provided by the software and uploading your own images (although, in the newest version of Filmora, Filmora V11, there is a ‘Stock Media’ option that includes an endless supply of photographs, videos, music, etc. for adding to your content.)

For Win 7 or later (64-bit)
For macOS 10.12 or later
02 Canva
Canva is really more of a photo editor than anything else. But it has a timeline function that you can use for more advanced things. Which, in this case, would be creating a picture collage with music
Note, just like with Filmora, Canva is not an entirely FREE program. But it is free to try. And, just like Filmora, it comes with a stock media library that you can use as a resource for your projects (i.e., images, clip arts, etc.) Canva also comes with a Pro version that you can unlock if you want some of its more advanced features (highly recommended if you’re looking to create content for work or entrepreneurial reasons and not just for posting on social media. Especially since it will allow you to collaborate with others.)

03 Express It
You can say that “Express It” is Adobe’s version of Canva. It is available as an online tool and as a photo collage with music app that you can use for your smartphone or tablet.
Much like with Canva, this program has a built-in stock media library that you can use for your projects. It’s also primarily FREE to use, although you’ll need to pay in order to unlock some of its more advanced resources. It comes with the usual layouts for creating quick templates, but it’s most prized for its ‘free-style’ mode, which will allow you to create a collage that looks exactly how you want it to look.

04 Smilebox
Smilebox is an automatic video collage maker that is capable of turning photographs into a video collage without much input from you It’s the tool to use if all you’re looking for is a quick solution. By that, we of course mean the solution of the ‘upload-and-then-download’ variety
It is also an online tool, so Sign-Up is required. But once you’re signed up, the only thing you really have to do is provide the images that you want to use for your music photo collage

05 Fotojet
Next is ‘Fotojet’, which is an online collage maker that is incredibly popular for those that are looking for an easy solution. It works pretty much how you expect a collage maker to work. You choose from a list of ‘collage layouts’, choose the images that you want to place in the layout that you’ve chosen, pick out your music, maybe decorate the pic collage a bit (for example, you can add text, clipart stickers, etc.) and then you’re done
Much like some of the programs on this list, Fotojet isn’t an entirely free music photo collage tool. However, a FREE trial is available if you want to try it out for a quick project or two.

06 Vimeo
Video is a professional online photo editing tool that’s incredibly popular with entrepreneurs. It actually works very similarly with all the other tools that we’ve introduced so far. That means that it comes with templates that you can use in order to create projects, it also comes with a ‘resources’ library that you can take advantage of in order to fill up said projects
As for creating a photo collage with music by using this tool. You will need to sign up to start creating, but it’s FREE to try — with some elements locked under the premium version.

07 Kapwing
KapWing is exactly what it looks like, it’s an online photo editor The best part about it is that it comes with quick collage layouts that you can use and the usual resources library. The layouts in question are customizable, allowing you to control what your music photo collages look like in the end. You also have the choice of creating said collage with photos, videos, GIFs, and music

08 VEED.IO
Similar to KapWing, VEED.IO offers a video collage maker that comes with customizable layouts that you can use to easily create a pic collage with music. The program is of course also free to try (though certain elements are locked in the FREE version).

● Key Takeaways from This Episode →
● Collages are a fun way to preserve memories of a fun event with friends and families Traditionally, of course, photo collages were created with printed still images.
● Now, however, not only can you create a moving collage (with images, videos, GIFs, etc.) but you can even add music to it
● These types of music photo collages are really fun to share with friends and family online. And, these days, there are even digital picture frames that will allow you to display them in your home (and yes, some of these picture frames do come with speakers for playing music)
It is definitely possible Usually, people use video collage makers for this reason. But you can also create an actual photo collage with music as well (no need to use actual video clips if you don’t want to.)
In the end, it all depends on the collage maker you’re using to be completely honest. In this case, the collage maker in question would have to have video editing functionalities advanced enough to allow you to create a video consisting of a picture collage with music Learn more about the different tools that you can check out below as we break down some of the best of the best available
01 Wondershare Filmora Video Editor
The first of the video makers that we’re going to be introducing is called Filmora. This is a professional editor that’s equipped with just about everything you need for creating high-quality video content. That includes the things that you will need in order to create a music photo collage
For your reference, that means that you can use it to create a video showing off a picture collage with music. Usually by making use of the templates provided by the software and uploading your own images (although, in the newest version of Filmora, Filmora V11, there is a ‘Stock Media’ option that includes an endless supply of photographs, videos, music, etc. for adding to your content.)

For Win 7 or later (64-bit)
For macOS 10.12 or later
02 Canva
Canva is really more of a photo editor than anything else. But it has a timeline function that you can use for more advanced things. Which, in this case, would be creating a picture collage with music
Note, just like with Filmora, Canva is not an entirely FREE program. But it is free to try. And, just like Filmora, it comes with a stock media library that you can use as a resource for your projects (i.e., images, clip arts, etc.) Canva also comes with a Pro version that you can unlock if you want some of its more advanced features (highly recommended if you’re looking to create content for work or entrepreneurial reasons and not just for posting on social media. Especially since it will allow you to collaborate with others.)

03 Express It
You can say that “Express It” is Adobe’s version of Canva. It is available as an online tool and as a photo collage with music app that you can use for your smartphone or tablet.
Much like with Canva, this program has a built-in stock media library that you can use for your projects. It’s also primarily FREE to use, although you’ll need to pay in order to unlock some of its more advanced resources. It comes with the usual layouts for creating quick templates, but it’s most prized for its ‘free-style’ mode, which will allow you to create a collage that looks exactly how you want it to look.

04 Smilebox
Smilebox is an automatic video collage maker that is capable of turning photographs into a video collage without much input from you It’s the tool to use if all you’re looking for is a quick solution. By that, we of course mean the solution of the ‘upload-and-then-download’ variety
It is also an online tool, so Sign-Up is required. But once you’re signed up, the only thing you really have to do is provide the images that you want to use for your music photo collage

05 Fotojet
Next is ‘Fotojet’, which is an online collage maker that is incredibly popular for those that are looking for an easy solution. It works pretty much how you expect a collage maker to work. You choose from a list of ‘collage layouts’, choose the images that you want to place in the layout that you’ve chosen, pick out your music, maybe decorate the pic collage a bit (for example, you can add text, clipart stickers, etc.) and then you’re done
Much like some of the programs on this list, Fotojet isn’t an entirely free music photo collage tool. However, a FREE trial is available if you want to try it out for a quick project or two.

06 Vimeo
Video is a professional online photo editing tool that’s incredibly popular with entrepreneurs. It actually works very similarly with all the other tools that we’ve introduced so far. That means that it comes with templates that you can use in order to create projects, it also comes with a ‘resources’ library that you can take advantage of in order to fill up said projects
As for creating a photo collage with music by using this tool. You will need to sign up to start creating, but it’s FREE to try — with some elements locked under the premium version.

07 Kapwing
KapWing is exactly what it looks like, it’s an online photo editor The best part about it is that it comes with quick collage layouts that you can use and the usual resources library. The layouts in question are customizable, allowing you to control what your music photo collages look like in the end. You also have the choice of creating said collage with photos, videos, GIFs, and music

08 VEED.IO
Similar to KapWing, VEED.IO offers a video collage maker that comes with customizable layouts that you can use to easily create a pic collage with music. The program is of course also free to try (though certain elements are locked in the FREE version).

● Key Takeaways from This Episode →
● Collages are a fun way to preserve memories of a fun event with friends and families Traditionally, of course, photo collages were created with printed still images.
● Now, however, not only can you create a moving collage (with images, videos, GIFs, etc.) but you can even add music to it
● These types of music photo collages are really fun to share with friends and family online. And, these days, there are even digital picture frames that will allow you to display them in your home (and yes, some of these picture frames do come with speakers for playing music)
It is definitely possible Usually, people use video collage makers for this reason. But you can also create an actual photo collage with music as well (no need to use actual video clips if you don’t want to.)
In the end, it all depends on the collage maker you’re using to be completely honest. In this case, the collage maker in question would have to have video editing functionalities advanced enough to allow you to create a video consisting of a picture collage with music Learn more about the different tools that you can check out below as we break down some of the best of the best available
01 Wondershare Filmora Video Editor
The first of the video makers that we’re going to be introducing is called Filmora. This is a professional editor that’s equipped with just about everything you need for creating high-quality video content. That includes the things that you will need in order to create a music photo collage
For your reference, that means that you can use it to create a video showing off a picture collage with music. Usually by making use of the templates provided by the software and uploading your own images (although, in the newest version of Filmora, Filmora V11, there is a ‘Stock Media’ option that includes an endless supply of photographs, videos, music, etc. for adding to your content.)

For Win 7 or later (64-bit)
For macOS 10.12 or later
02 Canva
Canva is really more of a photo editor than anything else. But it has a timeline function that you can use for more advanced things. Which, in this case, would be creating a picture collage with music
Note, just like with Filmora, Canva is not an entirely FREE program. But it is free to try. And, just like Filmora, it comes with a stock media library that you can use as a resource for your projects (i.e., images, clip arts, etc.) Canva also comes with a Pro version that you can unlock if you want some of its more advanced features (highly recommended if you’re looking to create content for work or entrepreneurial reasons and not just for posting on social media. Especially since it will allow you to collaborate with others.)

03 Express It
You can say that “Express It” is Adobe’s version of Canva. It is available as an online tool and as a photo collage with music app that you can use for your smartphone or tablet.
Much like with Canva, this program has a built-in stock media library that you can use for your projects. It’s also primarily FREE to use, although you’ll need to pay in order to unlock some of its more advanced resources. It comes with the usual layouts for creating quick templates, but it’s most prized for its ‘free-style’ mode, which will allow you to create a collage that looks exactly how you want it to look.

04 Smilebox
Smilebox is an automatic video collage maker that is capable of turning photographs into a video collage without much input from you It’s the tool to use if all you’re looking for is a quick solution. By that, we of course mean the solution of the ‘upload-and-then-download’ variety
It is also an online tool, so Sign-Up is required. But once you’re signed up, the only thing you really have to do is provide the images that you want to use for your music photo collage

05 Fotojet
Next is ‘Fotojet’, which is an online collage maker that is incredibly popular for those that are looking for an easy solution. It works pretty much how you expect a collage maker to work. You choose from a list of ‘collage layouts’, choose the images that you want to place in the layout that you’ve chosen, pick out your music, maybe decorate the pic collage a bit (for example, you can add text, clipart stickers, etc.) and then you’re done
Much like some of the programs on this list, Fotojet isn’t an entirely free music photo collage tool. However, a FREE trial is available if you want to try it out for a quick project or two.

06 Vimeo
Video is a professional online photo editing tool that’s incredibly popular with entrepreneurs. It actually works very similarly with all the other tools that we’ve introduced so far. That means that it comes with templates that you can use in order to create projects, it also comes with a ‘resources’ library that you can take advantage of in order to fill up said projects
As for creating a photo collage with music by using this tool. You will need to sign up to start creating, but it’s FREE to try — with some elements locked under the premium version.

07 Kapwing
KapWing is exactly what it looks like, it’s an online photo editor The best part about it is that it comes with quick collage layouts that you can use and the usual resources library. The layouts in question are customizable, allowing you to control what your music photo collages look like in the end. You also have the choice of creating said collage with photos, videos, GIFs, and music

08 VEED.IO
Similar to KapWing, VEED.IO offers a video collage maker that comes with customizable layouts that you can use to easily create a pic collage with music. The program is of course also free to try (though certain elements are locked in the FREE version).

● Key Takeaways from This Episode →
● Collages are a fun way to preserve memories of a fun event with friends and families Traditionally, of course, photo collages were created with printed still images.
● Now, however, not only can you create a moving collage (with images, videos, GIFs, etc.) but you can even add music to it
● These types of music photo collages are really fun to share with friends and family online. And, these days, there are even digital picture frames that will allow you to display them in your home (and yes, some of these picture frames do come with speakers for playing music)
How to Add a Custom Transition to OBS
OBS Studio is an open-source video editor that is widely popular for live streaming on online platforms. Even though OBS is a completely free application, its features are comparable to any premium video editor. We always look for available transition effects in a video editor and OBS takes it to the next level by allowing users to add custom transitions.
Among custom transitions, Stinger transitions have gained a lot of traction from the users. Stinger transitions are made popular by sports channels who use Stinger frequently whenever there is a change in the scene. We will illustrate how to add custom transitions in OBS and apply Stinger transitions in your video.
Part 1. What is Stinger in OBS
Stinger is a special type of customized animated video transition effect that is available in the latest version of OBS Studio. It is a combination of a transparent video animation and a cut transition. Stinger begins with the transparent video animation that grows into full-screen overlay, and it is followed by the cut transition. After the cut transition, you place the next scene or video clip. You will notice Stinger transition whenever sports channels show an instant replay during a live match.
The transparent video animation starts on top of the current video you are editing. When the animation expands and covers up the entire screen, you place the cut transition, and thereafter, you place the next video clip or scene as per your requirement. Some customized stinger effect also includes audio effects along with video effect.
Part 2. How to add stinger transitions to OBS
The Stinger transition is available on OBS Studio and Streamlabs, and both of them are open-source and free applications. Before you add stinger transition, you should have a video animation ready that you will play on top of the current video followed by the cut transition effect. You can download several stinger video animations from the internet and include any of them in OBS while adding stinger transition. Here are the steps on how to add a custom transition to OBS.
Step1 Go to Scene Transitions section and click on Effects option to open the drop-down menu.
Step2 From the drop-down menu, click on “Add: Stinger” option.

Step3 Give a name to the Stinger transition and click Ok button.

Step4 You will see Properties window now. Click on Browser button against Video file and select the transparent video animation file that you want to play on top of the current video before applying the cut transition effect.

Step5 For Transition Point Type, select Time(milliseconds) option. In the Transition Point field, add the duration of the transparent video animation so that the transition to the next scene takes place immediately after the video animation gets completed.

Step6 If your video animation has audio, go to Audio Monitoring and select Monitor and Output option from the dropdown. For Audio Fade Style, you can select Crossfade option for better output.

Step7 Scroll down and click on Preview Transition button to check if the stinger transition is taking place as expected. You can adjust the transition point and other parameters to get it perfect.

Step8 Finally, click on Ok button and play the video to check out the stinger transition on the big screen.
The steps on how to add a custom transition to Streamlabs OBS are almost similar, and therefore, you can add stinger transition using Streamlabs comfortably.
Part 3. OBS Alternative to Add Transitions
There is no denying the fact that OBS Studio has a complicated user interface. That is why most amateur video editors find OBS Studio difficult to learn quickly even though there is no dearth of features. Apart from add custom transition OBS, there are very limited effects available on OBS Studio. That is why many users look for an OBS alternative to add transitions to their videos.
We recommend Wondershare Filmora as the best alternative to OBS Studio when it comes to adding transition effects. That is because Filmora is a professional video editor with a wide range of effects. Most importantly, Filmora is widely loved by amateurs and professionals for its intuitive user interface. Here are the steps on how to add transitions to your video in Filmora.
Free Download For Win 7 or later(64-bit)
Free Download For macOS 10.14 or later
Step1 Download and install Filmora as per your operating system. Open Filmora and click on New Project option.

Step2 Import or drop your video clips under Project Media folder. Then drag and drop them on Timeline and place them sequentially as appropriate.

Step3 Go to Transitions tab located at the top of the application screen. You will see different categories of transitions on the left side.

Step4 Check them out and once you have selected one to apply, drag and drop it in between the video clips.

Step5 Play the video and click on Export button to save the video.
Part 4: Related FAQs about OBS Transitions
How do I add a transition overlay in OBS?
You need to go to Scene Transition tab and select any transition overlay effect that is available. Thereafter, you can change the settings and parameters to customize the transition effect as per your requirements. Apart from the built-in transitions, you can download and add plugins for more transitions.
Can you have different scene transitions in OBS?
Yes, you can have different scene transitions in OBS Studio. You can add them directly from Scene Transition tab one by one as per your requirements. You can add them in between scenes so that the transition effects play when you switch between scenes.
How do I download transitions in OBS?
Go to the OBS Forums from where you get to download transitions for OBS Studio. Click on Download button and download plugin installer as per your operating system. Double-click the installer file to install it on your computer. Go to OBS Studio and go to Scene Transition to use the installed transition.
Free Download For macOS 10.14 or later
Step1 Download and install Filmora as per your operating system. Open Filmora and click on New Project option.

Step2 Import or drop your video clips under Project Media folder. Then drag and drop them on Timeline and place them sequentially as appropriate.

Step3 Go to Transitions tab located at the top of the application screen. You will see different categories of transitions on the left side.

Step4 Check them out and once you have selected one to apply, drag and drop it in between the video clips.

Step5 Play the video and click on Export button to save the video.
Part 4: Related FAQs about OBS Transitions
How do I add a transition overlay in OBS?
You need to go to Scene Transition tab and select any transition overlay effect that is available. Thereafter, you can change the settings and parameters to customize the transition effect as per your requirements. Apart from the built-in transitions, you can download and add plugins for more transitions.
Can you have different scene transitions in OBS?
Yes, you can have different scene transitions in OBS Studio. You can add them directly from Scene Transition tab one by one as per your requirements. You can add them in between scenes so that the transition effects play when you switch between scenes.
How do I download transitions in OBS?
Go to the OBS Forums from where you get to download transitions for OBS Studio. Click on Download button and download plugin installer as per your operating system. Double-click the installer file to install it on your computer. Go to OBS Studio and go to Scene Transition to use the installed transition.
How to Make a Video Loop in QuickTime
If you are a Mac user, QuickTime Player is where you play and watch videos. QuickTime by Apple comes pre-installed on every Mac. It happens to be the default video player for macOS users. Under normal circumstances, QuickTime plays a video only once. However, there are times when you want to watch a video repeatedly in a loop.
When you have a short video clip, it is usual that you want to watch it in a loop. The same is applicable to music videos. You may want to listen to the song repeatedly in the background while you work on your Mac. You may also want to show a demonstration video endlessly on the display screen. In all such scenarios, you have to play a loop video on QuickTime. We will illustrate how to play a video in a loop on QuickTime.
Part 1. Steps to Loop Video with QuickTime Player
You can play any video on your Mac via QuickTime Player. But the video player plays the video only once by default. If you want to watch the video again, you have to play it again. Instead of manually playing it over and over again, you can put the video in a loop. Here are the steps on how to loop QuickTime video.
Step 1: Play the video of your choice on QuickTime Player.
Step 2: Click on the View menu from the top menu bar.
Step 3: Click on the Loop option located at the bottom of the View menu. Alternatively, you can press the Option + Command + L shortcut keys to loop the video.

Thereafter, the video you are playing won’t stop at its end mark. It will restart again and again until your pause or close the QuickTime player.
Part 2. QuickTime Alternatives to Loop Video
QuickTime Player is where you can play videos in a loop. However, if you want to loop videos for your video project, you will need a video editor. If you are looking for QuickTime Player alternatives to loop video on your Mac, we have the following options.
1. iMovie
iMovie by Apple comes pre-installed on Mac as well. iMovie is a video editing application. You can import videos on your Mac and extend the video durations by looping. This is useful when you want to play a video clips in your video project multiple times. Here are the steps on how to loop video via iMovie similar to QuickTime loop video.
Step 1: Launch the iMovie app on your Mac. Once iMovie opens, click on Create New option. Thereafter, click on the Movie option to get started.

Step 2: Go to the File menu and click on the Import Media option. Select the desired video from your Mac. Alternatively, select any media file from All Events or Photos under the Libraries section.
Step 3: Drop the video on the timeline. You can drag and drop the video clip multiple times on the timeline. This will loop the video and extend the video duration. There should be no gap between the clips on the timeline.

Step 4: Once you have looped the desired video, go to File> Share> File option to save the video file.
2. Filmora for Mac
You already know how to loop video in QuickTime Player. But you cannot extend the video duration by looping permanently in QuickTime Player. You can do that on iMovie, but iMovie has limitations as it is a free app. If you are looking for a premium QuickTime Player alternative, Wondershare Filmora is for you.
Filmora is a premium video editor with a wide range of video editing features. It has a user-friendly interface so that everyone can operate it easily. You can trim a video and add transitions between the loops. Here are the steps on how to loop a video on Filmora for Mac.
Step 1: Download and install Wondershare Filmora. Open Filmora and click on New Project.

Free Download For Win 7 or later(64-bit)
Free Download For macOS 10.14 or later
Step 2: Drag and drop the desired video file from your device into the Project Media folder. Thereafter, drag and drop the video file into the timeline.

Step 3: Drag and drop the video clip into the timeline again. Place it by the side of the first video clip. There should not be any gap and they should be in the same channel on the timeline. Alternative, you can also copy and paste the video clip for looping.

Step 4: Play the video and watch it in a loop through the Viewer on Filmora. If you are satisfied, click on the Export button to save the video in any file format as per your preference.
Part 3. Related FAQs
How do I make my video player loop?
If you are a Mac user, the default video player is QuickTime Player. Go to View> Loop to make your Mac video player loop a video. If you are using any other video player like VLC Media Player, you can look at the View menu. Alternatively, you can look for a Loop icon to repeatedly play the video.
How to loop YouTube video on Mac?
On your Mac, open the video on YouTube that you want to put in a loop. Once you are on the watch screen of the video, right-click on the video. Choose the Loop option to play the video repeatedly.
Can QuickTime player loop audio?
Yes, you can loop any audio file on QuickTime Player. The steps are the same for looping a video. You need to play the audio and go to View> Loop option to play the audio file repeatedly. However, some have complained that looping audio may leave a gap at the beginning of the audio track.
Conclusion
Looping a video that we like to the highest degree is quite common. If you are playing any desired video on QuickTime Player, we have illustrated how to go for it. We have also provided you with a free and a premium QuickTime Player alternative. You can choose any of them as per your requirements to loop a video.
Free Download For macOS 10.14 or later
Step 2: Drag and drop the desired video file from your device into the Project Media folder. Thereafter, drag and drop the video file into the timeline.

Step 3: Drag and drop the video clip into the timeline again. Place it by the side of the first video clip. There should not be any gap and they should be in the same channel on the timeline. Alternative, you can also copy and paste the video clip for looping.

Step 4: Play the video and watch it in a loop through the Viewer on Filmora. If you are satisfied, click on the Export button to save the video in any file format as per your preference.
Part 3. Related FAQs
How do I make my video player loop?
If you are a Mac user, the default video player is QuickTime Player. Go to View> Loop to make your Mac video player loop a video. If you are using any other video player like VLC Media Player, you can look at the View menu. Alternatively, you can look for a Loop icon to repeatedly play the video.
How to loop YouTube video on Mac?
On your Mac, open the video on YouTube that you want to put in a loop. Once you are on the watch screen of the video, right-click on the video. Choose the Loop option to play the video repeatedly.
Can QuickTime player loop audio?
Yes, you can loop any audio file on QuickTime Player. The steps are the same for looping a video. You need to play the audio and go to View> Loop option to play the audio file repeatedly. However, some have complained that looping audio may leave a gap at the beginning of the audio track.
Conclusion
Looping a video that we like to the highest degree is quite common. If you are playing any desired video on QuickTime Player, we have illustrated how to go for it. We have also provided you with a free and a premium QuickTime Player alternative. You can choose any of them as per your requirements to loop a video.
Free Download For macOS 10.14 or later
Step 2: Drag and drop the desired video file from your device into the Project Media folder. Thereafter, drag and drop the video file into the timeline.

Step 3: Drag and drop the video clip into the timeline again. Place it by the side of the first video clip. There should not be any gap and they should be in the same channel on the timeline. Alternative, you can also copy and paste the video clip for looping.

Step 4: Play the video and watch it in a loop through the Viewer on Filmora. If you are satisfied, click on the Export button to save the video in any file format as per your preference.
Part 3. Related FAQs
How do I make my video player loop?
If you are a Mac user, the default video player is QuickTime Player. Go to View> Loop to make your Mac video player loop a video. If you are using any other video player like VLC Media Player, you can look at the View menu. Alternatively, you can look for a Loop icon to repeatedly play the video.
How to loop YouTube video on Mac?
On your Mac, open the video on YouTube that you want to put in a loop. Once you are on the watch screen of the video, right-click on the video. Choose the Loop option to play the video repeatedly.
Can QuickTime player loop audio?
Yes, you can loop any audio file on QuickTime Player. The steps are the same for looping a video. You need to play the audio and go to View> Loop option to play the audio file repeatedly. However, some have complained that looping audio may leave a gap at the beginning of the audio track.
Conclusion
Looping a video that we like to the highest degree is quite common. If you are playing any desired video on QuickTime Player, we have illustrated how to go for it. We have also provided you with a free and a premium QuickTime Player alternative. You can choose any of them as per your requirements to loop a video.
Free Download For macOS 10.14 or later
Step 2: Drag and drop the desired video file from your device into the Project Media folder. Thereafter, drag and drop the video file into the timeline.

Step 3: Drag and drop the video clip into the timeline again. Place it by the side of the first video clip. There should not be any gap and they should be in the same channel on the timeline. Alternative, you can also copy and paste the video clip for looping.

Step 4: Play the video and watch it in a loop through the Viewer on Filmora. If you are satisfied, click on the Export button to save the video in any file format as per your preference.
Part 3. Related FAQs
How do I make my video player loop?
If you are a Mac user, the default video player is QuickTime Player. Go to View> Loop to make your Mac video player loop a video. If you are using any other video player like VLC Media Player, you can look at the View menu. Alternatively, you can look for a Loop icon to repeatedly play the video.
How to loop YouTube video on Mac?
On your Mac, open the video on YouTube that you want to put in a loop. Once you are on the watch screen of the video, right-click on the video. Choose the Loop option to play the video repeatedly.
Can QuickTime player loop audio?
Yes, you can loop any audio file on QuickTime Player. The steps are the same for looping a video. You need to play the audio and go to View> Loop option to play the audio file repeatedly. However, some have complained that looping audio may leave a gap at the beginning of the audio track.
Conclusion
Looping a video that we like to the highest degree is quite common. If you are playing any desired video on QuickTime Player, we have illustrated how to go for it. We have also provided you with a free and a premium QuickTime Player alternative. You can choose any of them as per your requirements to loop a video.
Also read:
- Updated Ultimate Guide To Make A Political Video
- Updated 2024 Approved Ultimate Guidelines to Help You Better Use VLC Media Player
- New In 2024, How Does Sonys S&Q Feature Help Recording Slow-Motion Video
- Best GIF to AVI Converters (Online + Software Solutions) for 2024
- How to Use Canva Color Match
- In 2024, Best Video Editing Courses Online with Certificate
- 2024 Approved Track Mattes The Ultimate Guide For After Effects
- New In 2024, How to Create Vintage Film Effect 1990S
- Find a Solution for Effortless Sky Replacement Photoshop in This Comprehensive Guide. Also, Use the Easiest Video Editing Tool to Make Your Media Stunning for 2024
- Updated 2024 Approved Top 7 MP4 Video Editors on Mac Edit MP4 Videos Easily
- 2024 Approved How To Zoom In On TikTok Videos?
- New An Ultimate Guide to Flexclip Online Trimmer for 2024
- Updated 2024 Approved Easy Ways to Make Procreate GIFs
- How to Merge FLV Files Windows, Mac,Android, iPhone & Online
- New Bandicut Video Editor Download and Review for 2024
- Have You Ever Wondered How to Add Camera Shake to Video in Adobe After Effects? Let Us Share with You some Tips and Tricks on How to Do Just That for 2024
- Updated Control Playback Speed in Premiere Pro
- 2024 Approved 6 Ways to Mimic Professional Filming Gears
- In 2024, Best Tools To Create Blend Image Collage
- New 2024 Approved How To Add Motion Blur On CapCut? (IPhone & Android)
- New The Way to Make Dynamic Video Collages?
- Updated 2024 Approved Best Free LUTs to Use
- 2024 Approved Things You Need to Know About Transparent PNG Remove and Convert
- In 2024, Wondering How to Make a Perfect Love Video to Express Your Love for Your Special One and Share with the World? Here Are the Best Love Video Makers with Music
- In 2024, Do You Know How to Create a Lol Montage Video? Had You Ever Tried that Video Type Before? Connect with This Article to Study the Tips and Tricks Associated with the Making of Montage Videos
- New To Find the Best Tool Out of Hundreds of Online and Offline GIF to Video Converters, You Need to Check These Specifications. Read This Review and Get the Best Out of the Best
- In 2024, Do You Have Any Idea About Changing the Video Speed Using the Editors? Had You Worked with the VLC Playback Speed? This Article Enlightens You with the Best Video Edits Using the Perfect Tool in the Digital Space
- New In 2024, All Things About Adding Effects In Kinemaster
- Is your Xiaomi Redmi A2+ working too slow? Heres how you can hard reset it | Dr.fone
- Reasons for Xiaomi Redmi K70 Stuck on Startup Screen and Ways To Fix Them | Dr.fone
- In 2024, For People Wanting to Mock GPS on Xiaomi Redmi Note 12 Pro+ 5G Devices | Dr.fone
- In 2024, Tips and Tricks for Setting Up your ZTE Blade A73 5G Phone Pattern Lock
- Updated In 2024, 10 Free Football Streaming Sites To Bookmark
- 6 Ways to Change Spotify Location On Your Samsung Galaxy Z Flip 5 | Dr.fone
- In 2024, Pokemon Go No GPS Signal? Heres Every Possible Solution On Poco X5 Pro | Dr.fone
- Aiseesoft FoneLab Android Data Recovery
- In 2024, 2 Ways to Monitor Apple iPhone 11 Pro Activity | Dr.fone
- Hacks to do pokemon go trainer battles For Tecno Pop 8 | Dr.fone
- How to Downgrade iPhone SE (2020) to an Older iOS Version? | Dr.fone
- In 2024, How to Unlock Apple iPhone 13, Apples New iPhone | Dr.fone
- In 2024, Is GSM Flasher ADB Legit? Full Review To Bypass Your Nokia C300FRP Lock
- Getting the Pokemon Go GPS Signal Not Found 11 Error in Samsung Galaxy S21 FE 5G (2023) | Dr.fone
- How to jailbreak iCloud locked iPhone 12 Pro
- 2024 Approved Best 9 French Video Translators Online and Download Options
- How to Fix Excel has Encountered a Problem
- Where Is the Best Place to Catch Dratini On Samsung Galaxy M34 5G | Dr.fone
- Top 7 Phone Number Locators To Track Vivo V30 Lite 5G Location | Dr.fone
- Identify malfunctioning hardware drivers with Windows Device Manager on Windows 7
- Super Easy Ways To Deal with Vivo Y02T Unresponsive Screen | Dr.fone
- The way to convert MTS for Redmi Note 13 Pro 5G
- In 2024, How To Unlock A Found iPhone XS? | Dr.fone
- Title: New How to Make Text Reveal Effect for Your Video
- Author: Chloe
- Created at : 2024-04-24 07:08:12
- Updated at : 2024-04-25 07:08:12
- Link: https://ai-editing-video.techidaily.com/new-how-to-make-text-reveal-effect-for-your-video/
- License: This work is licensed under CC BY-NC-SA 4.0.


