:max_bytes(150000):strip_icc():format(webp)/GettyImages-1250476440-2ff779100e984029aa752236f9791b11.jpg)
New How to Make Video Slow Motion for 2024

How to Make Video Slow Motion?
Slow-motion videos are in trend now, especially when shooting for Instagram Reels , TikTok videos, or YouTube Shorts . While many users record the entire video in slow motion, there are others who need only a particular section of a clip to play at a reduced speed. Nevertheless, slowing down footage is no longer rocket science, thanks to the advancements in technology, and the availability and ease of access to relevant apps.
That said, here you will learn what is needed to record a video in slow motion, and how to get the job done in a simple way. In addition, you will also learn how to reduce the playback speed of an already existing video if it was recorded at a normal pace.
In this article
01 How to Make Slow Motion Videos via Recording?
02 How to Apply the Smooth Slow-Motion Effect in Post-Production?
Part 1: How to Make Slow Motion Videos via Recording?
The fact is, the playback speed of a video is inversely proportional to the frames per second (FPS) it has been recorded in. Usually, to have a video play at normal speed, it is recorded at 24 FPS or 30 FPS. On the other hand, if you increase the frame rate (FPS) to 120 or 240, the playback speed slows down. You can easily check this if you have access to a DSLR camera or an iPhone. These devices allow you to adjust the FPS so the videos can be recorded in slow motion.
For your convenience and learning, the step-by-step procedure on how to record a video in slow motion using an iPhone is explained below:
Step 1: Get to the SLO-MO Mode
Launch the Camera app on your iPhone (iPhone 13 Pro Max is used here for illustrations), and swipe the screen to the left to get to the SLO-MO mode.

Step 2: Adjust Recording Preferences
Tap the number at the top-right corner to switch between 120 FPS and 240 FPS as needed. Tap 1x from the lower-middle section of the screen, and use the rotator to adjust your preferred zoom level.

Step 3: Start and Stop Recording
Tap the Record button from the bottom-center of the screen to begin recording the video in slow motion. Tap Stop when you are done. You can access the recorded video from the Videos container of the Photos app in your iPhone.
If you are using Android phone, you can check this article to find out more details about How to Record Super Slow Motion Videos on Your Phone.
You may also like: Best Slo-mo Camera Apps for Android And iPhone
Part 2: How to Apply the Smooth Slow-Motion Effect in Post-Production?
If you don’t have access to a camera that can record videos in slow motion, or in case you want to capture the footage at normal playback speed and then slow it down later, you need a dedicated tool to get the job done. Even though several post-production applications are available in the market, the one that is most versatile, has an intuitive interface, and is quite easy to use is Filmora video editor from Wondershare .
The latest version of the app, i.e., Wondershare Filmora 11 has a new feature called Speed Ramping that enables you to graphically manage the speed of the clips. While using the feature, you can either slow down the entire video or certain parts of it according to your requirements. For your learning, both the methods are explained below:
Method 1: Add Slow Motion Effect to the Whole Clip
For Win 7 or later (64-bit)
For macOS 10.12 or later
Step 1: Import the Source Video and Add to Timeline
Launch Wondershare Filmora on your Windows or Mac computer (a Windows 11 PC is used here for illustrations), click New Project from the first screen that appears. Make sure that the Media tool is selected from the standard tool bar at the top, click anywhere inside the Media window, and select and import the source clip to the program.
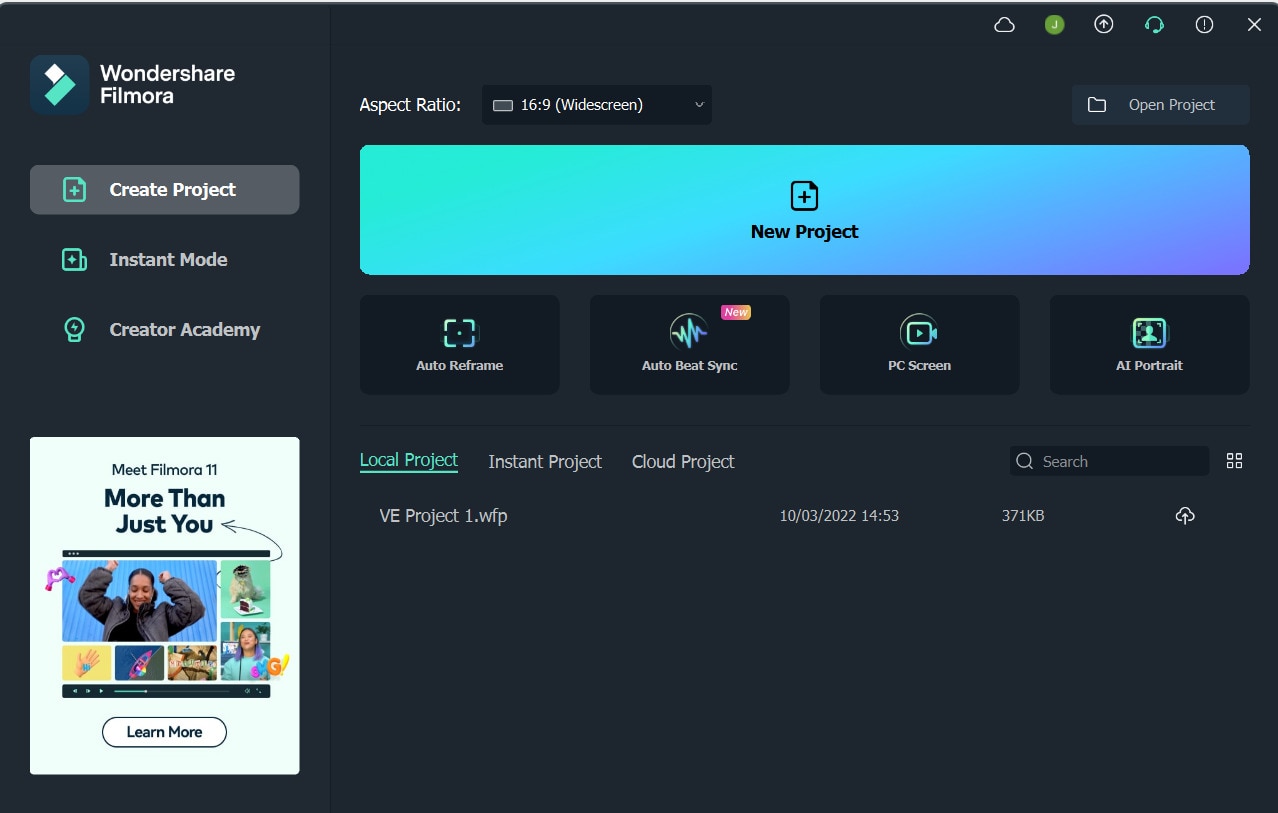
Next, hover the mouse over the thumbnail of the imported video in the Media window, and click the + icon present at its bottom-right corner. When the confirmation box comes up, click the Match to Media or Keep Project Settings button to change the project settings to match the resolution of the video, or change the footage to meet the project settings respectively.
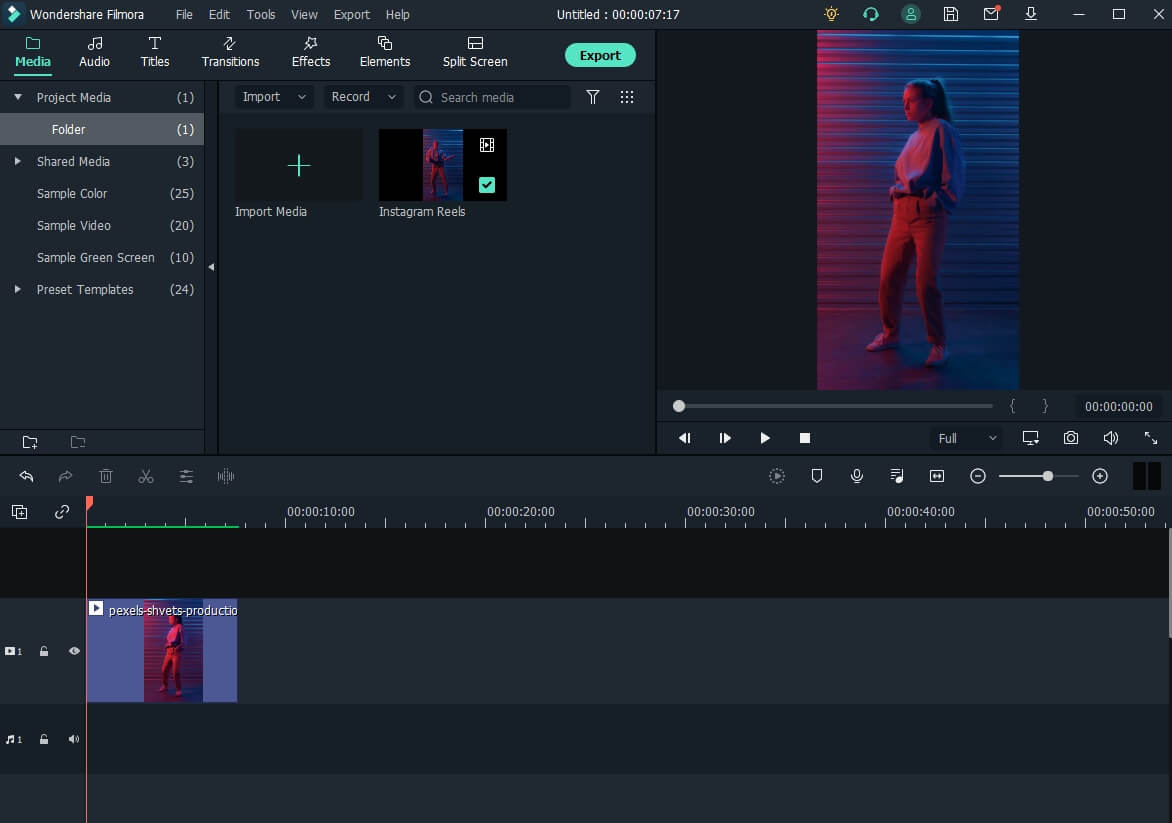
Step 2: Add Slow Motion Effect to the Whole Clip
Once the media is added to the timeline, click on it and then click the Speed icon on the toolbar. Scroll down to the Slow menu and then you will see 0.5x, 0.25x, 0.1x, 0.05x and 0.01x presets. Select one to add slo-mo effects to the whole select clip. and click Speed Ramping from the menu that drops down.
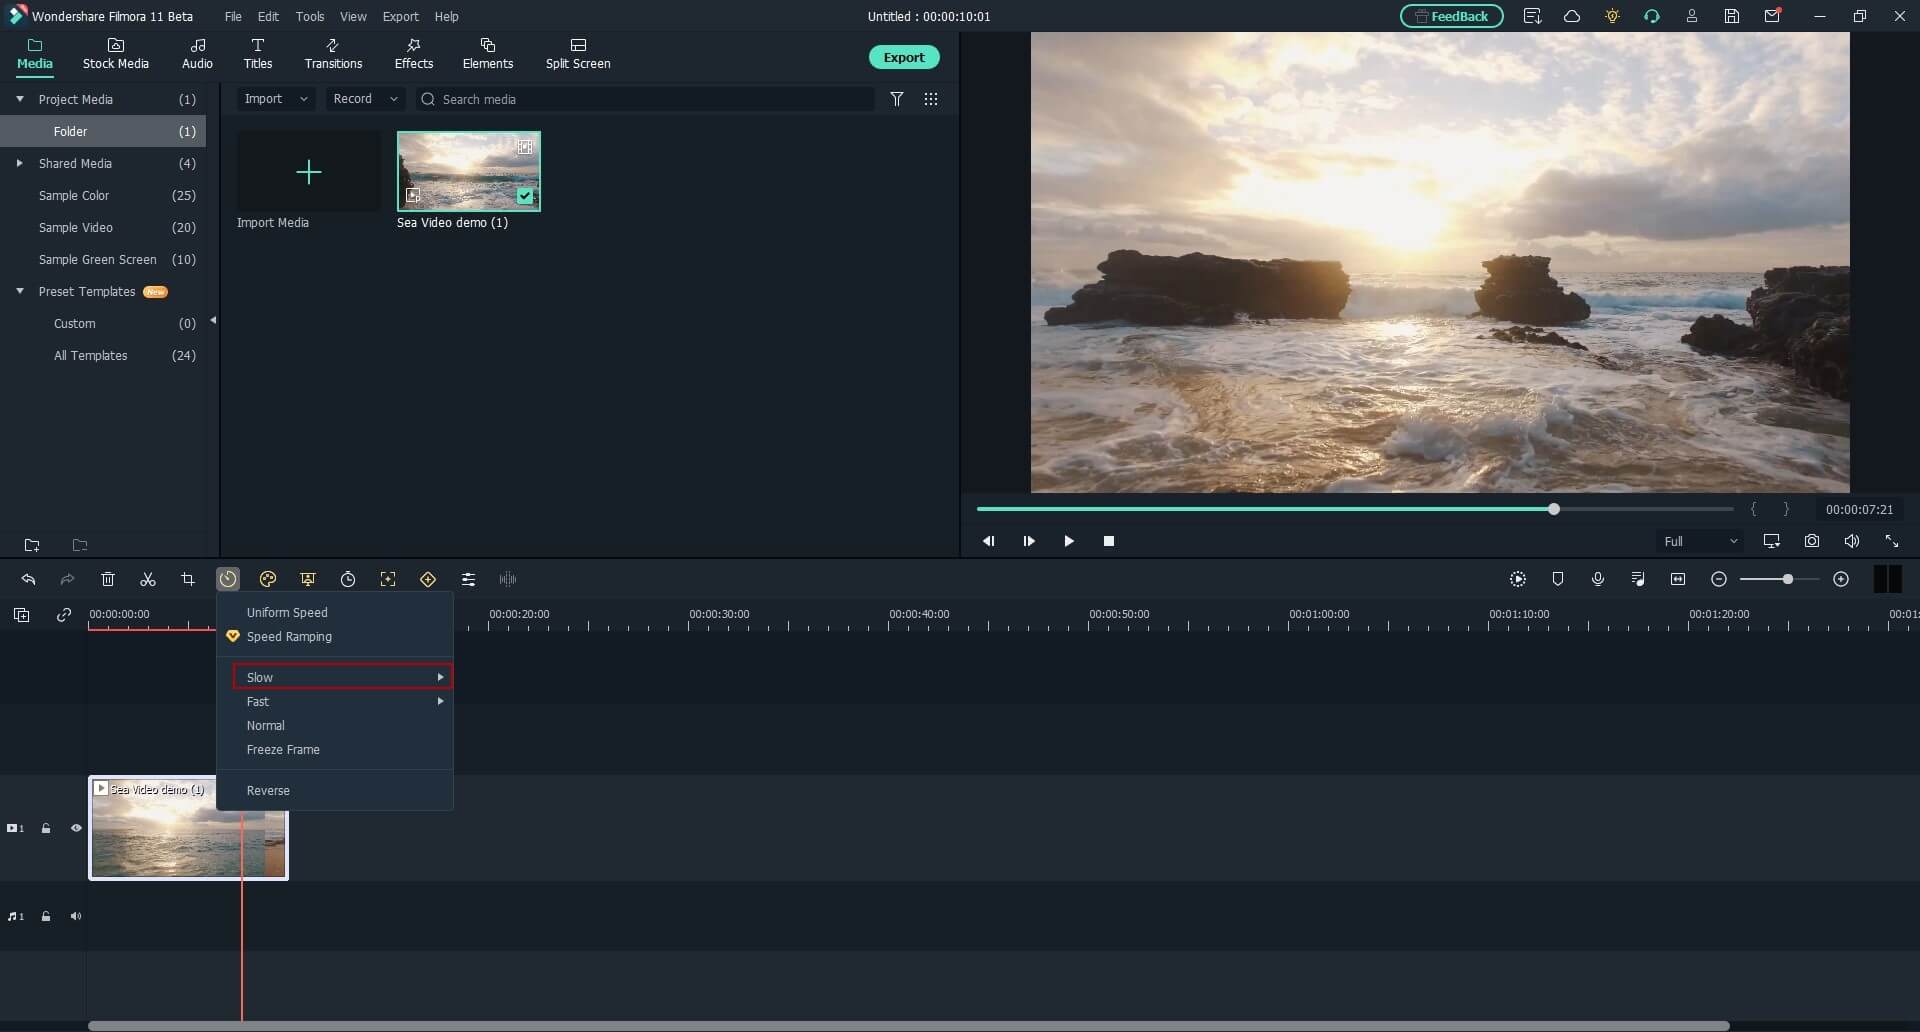
You can also right click the video in the timeline, and hover over to Speed option to select Uniform Speed to adjust the speed of the video to make a slo-mo effect video. Drag the speed slider to the left to slow down the video and you will see how many times it slowed down in the next field.
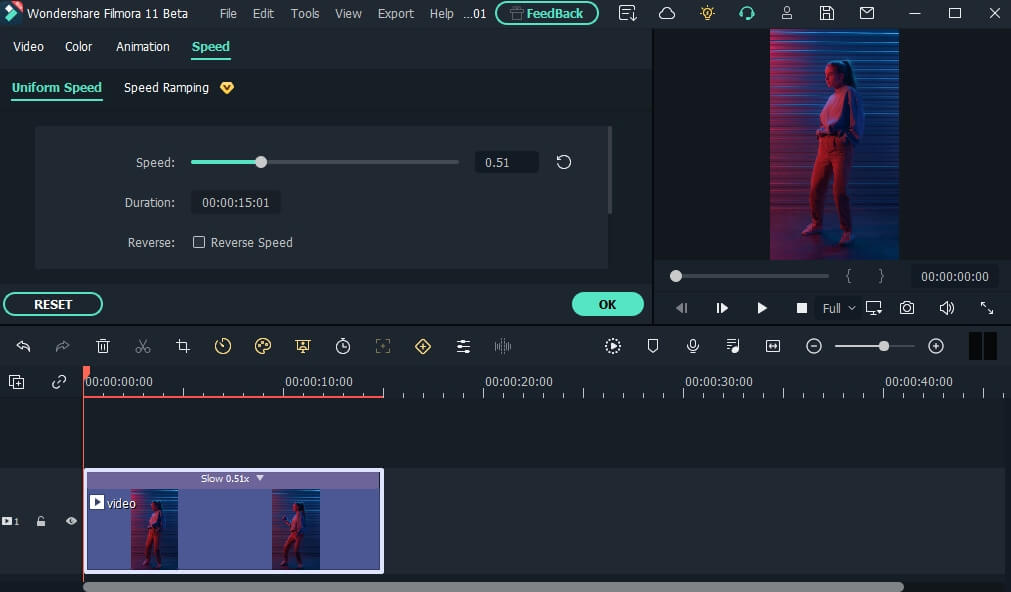
Method 2: Use Speed Ramping to Add Slow Motion Effect
For Win 7 or later (64-bit)
For macOS 10.12 or later
Speed Ramping enables you to add the slow-motion effect at different parts of a video and even freeze the screen for the duration that you specify. The processes to get these done are given below in detail:
Step 1: Add Source Video to Timeline and Get to the Speed Ramping Window
Use the process given in the previous method to import a source video to Wondershare Filmora 11 and add it to the Timeline. Then use the process given in the second step of the previous method to get to the Speed Ramping window.
Step 2: Add Slow Motion Effect to Different Parts of the Clip
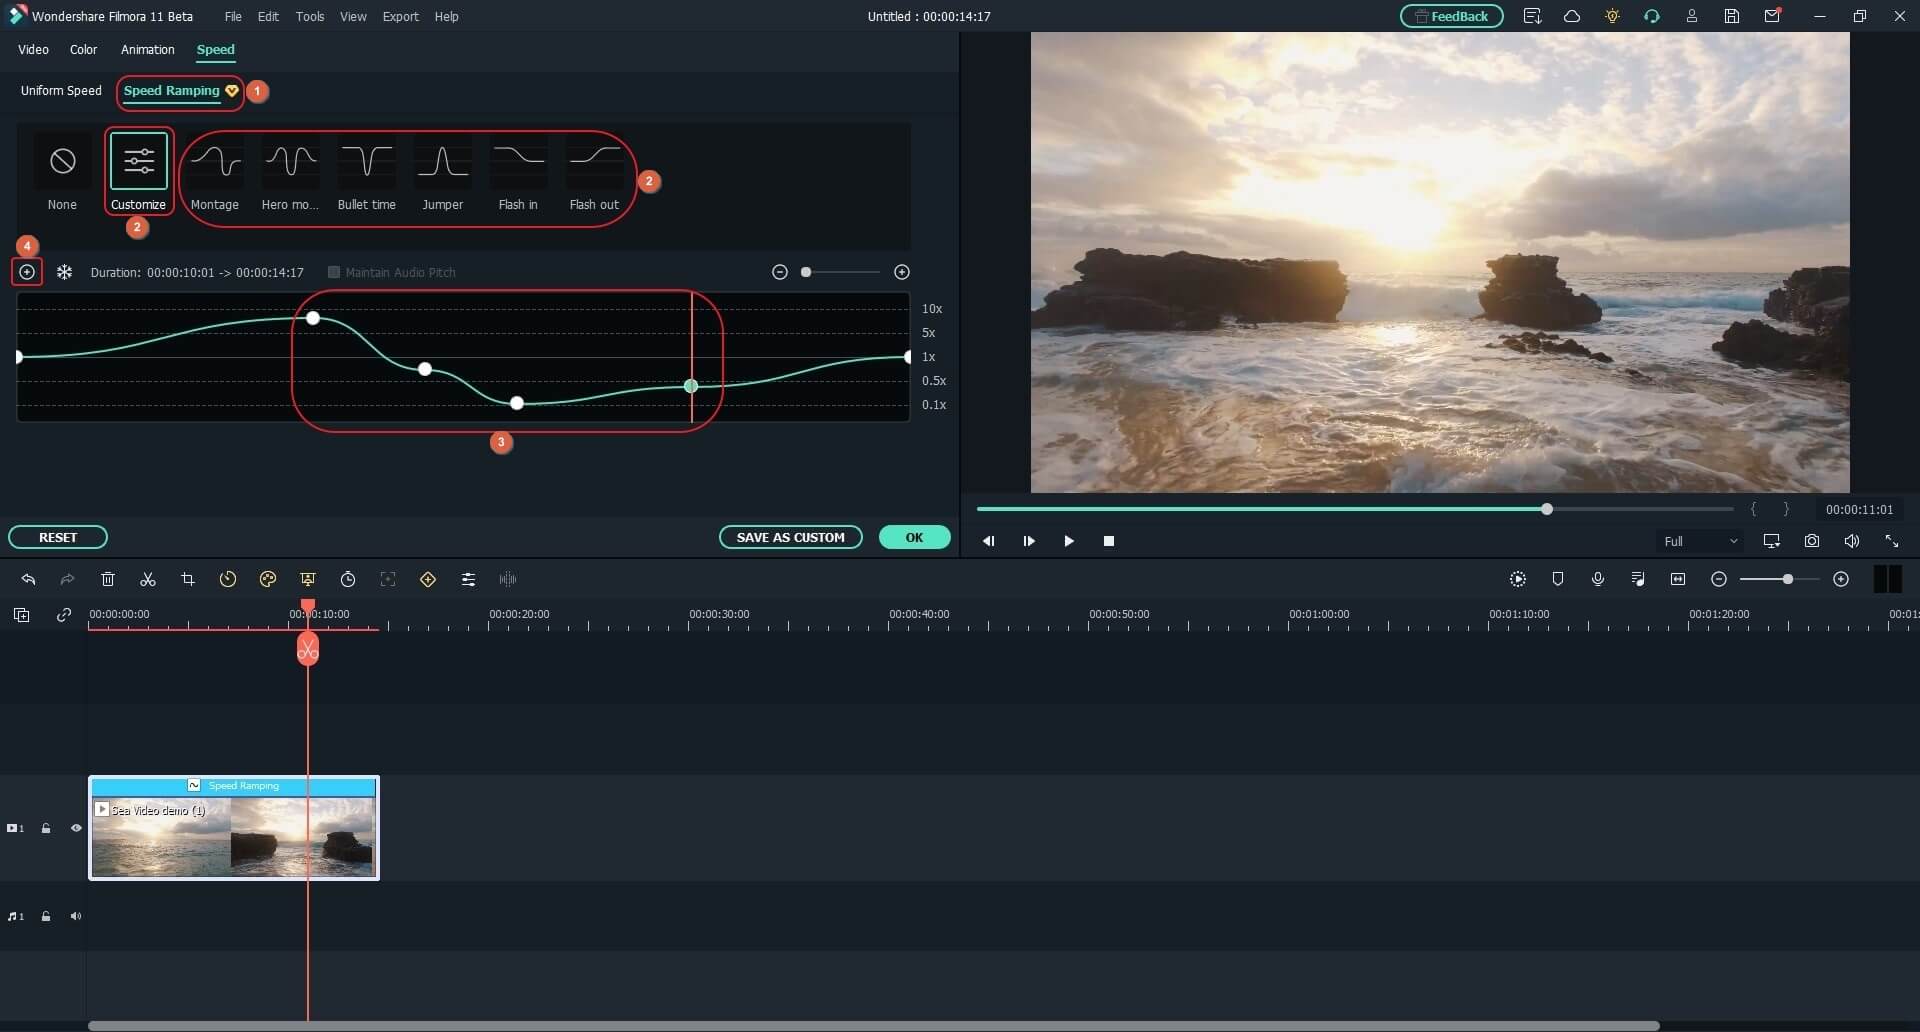
Go to the Speed Ramping tab if it is not already selected, click Custom from the available options, and drag the adjustment points below the center line to reduce the playback speed for that particular section of the clip. Optionally, you can click any of the available presets to automatically add the slow-motion effect to the video.
Note: You can also drag the adjustment points above the line to increase the playback speed.
To add an adjustment point on the frame where it is not already present, place the playhead (skimmer) at the correct position, and click Add Adjust Point from the left of the Speed Ramping window itself. Once added, you can drag it downward to reduce the playback speed of that part of the clip.
Step 3: Freeze the Video
Place the skimmer on the frame where you want to freeze the video for a while, and click Add Freeze Frame from the left of the Speed Ramping window. When the time box appears, in the Freeze Time field, enter the duration in seconds you want to freeze the screen for, and click OK.
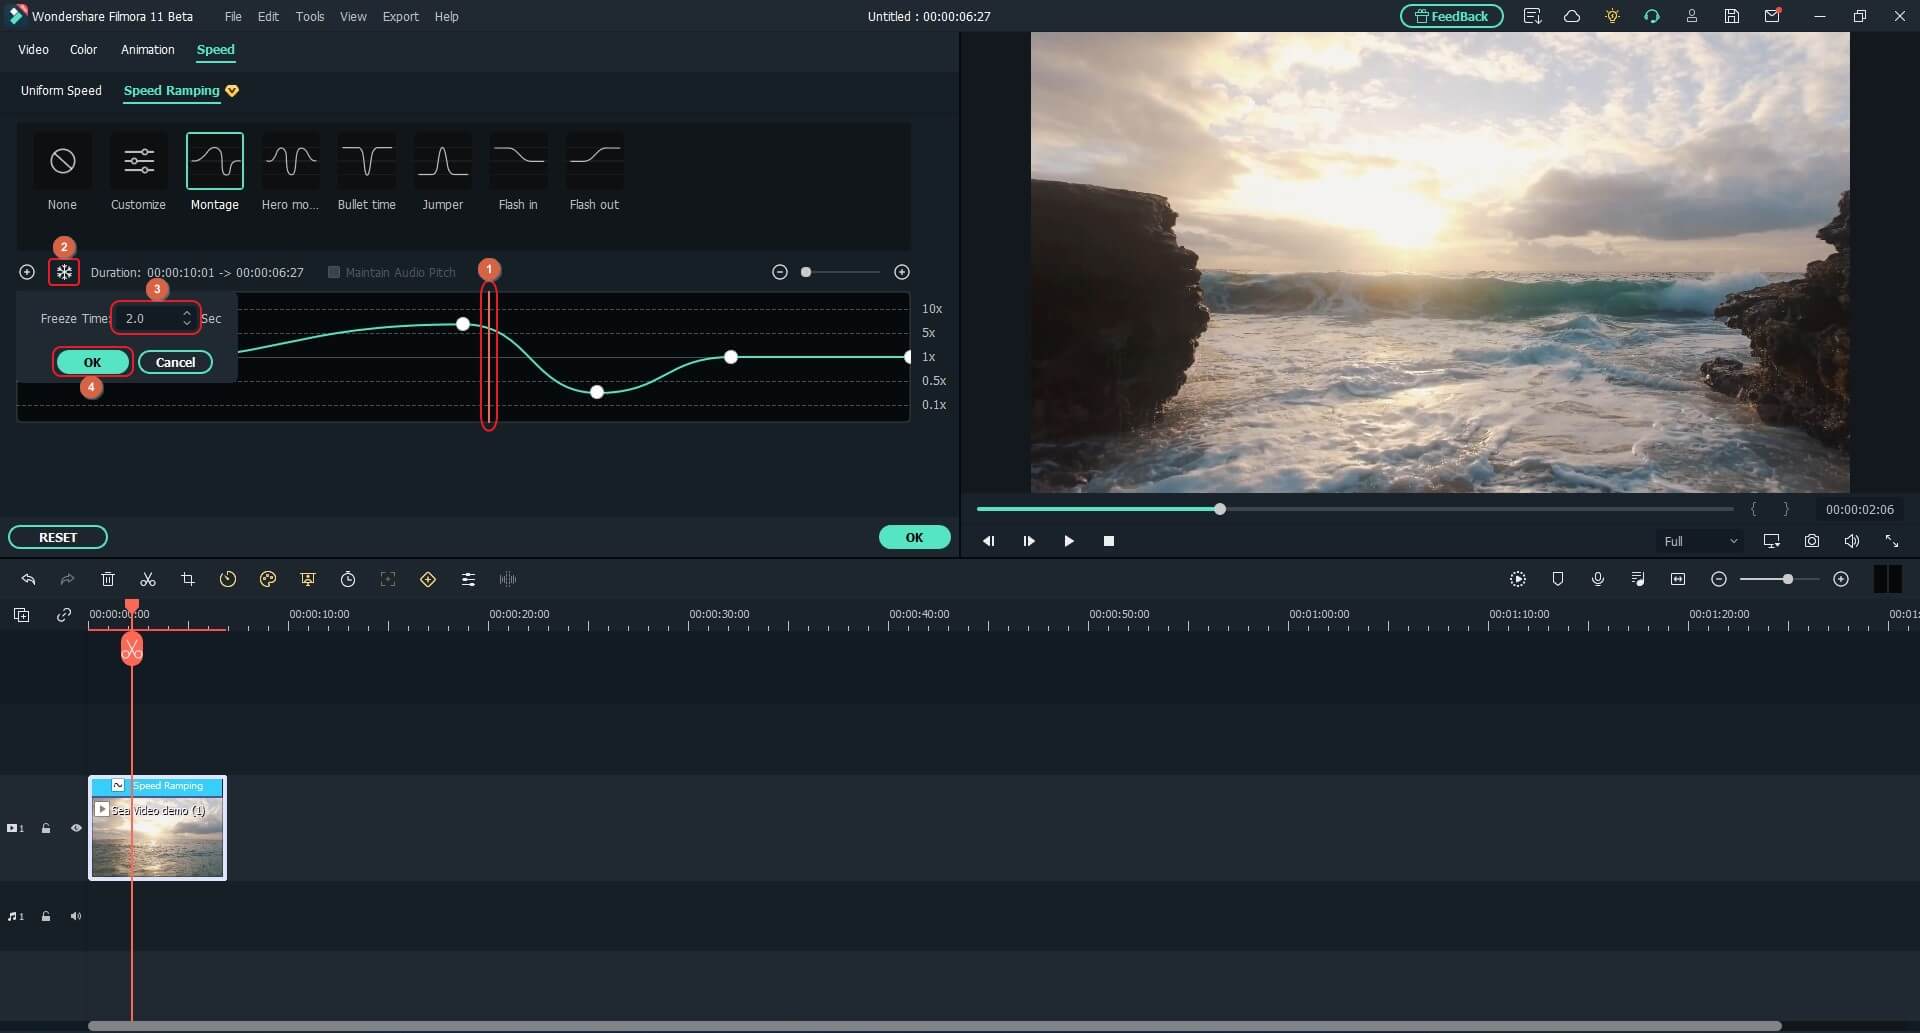
After adding a freeze point, optionally, you can drag and reposition it in the Speed Ramping timeline as needed. Finally, click OK from the bottom-right area to save the changes.
Part 3: When to Use Slow Motion?
There could be many instances when you want to add a slow-motion effect to your videos. Some of the most common ones include:
- Add Focus
If there is a particular scene in a clip that you want the audience to focus on, it would be a good idea to add the slow-motion effect right before that action appears on the screen, and bring the speed back to normal when the section is over.
- Skill or Style Demonstration
When a clip is playing at a normal speed, many times, the audience isn’t able to see the skills that you want to display. This is where you may want to add the slow-motion effect so that every detail can be noticed clearly and in detail.
- Replays
Mostly used for tournaments and matches where the actual action is to replayed so the audience, umpires, and other viewers can see the movements in detail before making the right decision.
- Observation
Some natural phenomena such as a deer running in the woods, a balloon full of water bursting, etc. occur quite quickly. If you want to witness such things clearly and in detail, it would be good to record them, and then reduce the playback speed for better viewing.
- Add Suspense
When you add the slow-motion effect to a scene, the impulse of the audience is automatically increased, and they take that particular section more seriously and with a thrill.
Conclusion
The slow-motion effect is inversely proportional to the framerate, i.e., frames per second or FPS. Almost all DSLR cameras that are available nowadays allow you to switch between different FPS values (typically 120 and 240) before recording. Also, if you have access to an iPhone, its Camera app has a built-in SLO-MO mode that can capture the footage in slow motion.
In addition, if you already have a video that has been recorded at a normal speed, you can use an efficient post-production software like Wondershare Filmora 11, and exploit its Speed Ramping feature to add the slow-motion effect at different scenes of a clip.
02 How to Apply the Smooth Slow-Motion Effect in Post-Production?
Part 1: How to Make Slow Motion Videos via Recording?
The fact is, the playback speed of a video is inversely proportional to the frames per second (FPS) it has been recorded in. Usually, to have a video play at normal speed, it is recorded at 24 FPS or 30 FPS. On the other hand, if you increase the frame rate (FPS) to 120 or 240, the playback speed slows down. You can easily check this if you have access to a DSLR camera or an iPhone. These devices allow you to adjust the FPS so the videos can be recorded in slow motion.
For your convenience and learning, the step-by-step procedure on how to record a video in slow motion using an iPhone is explained below:
Step 1: Get to the SLO-MO Mode
Launch the Camera app on your iPhone (iPhone 13 Pro Max is used here for illustrations), and swipe the screen to the left to get to the SLO-MO mode.

Step 2: Adjust Recording Preferences
Tap the number at the top-right corner to switch between 120 FPS and 240 FPS as needed. Tap 1x from the lower-middle section of the screen, and use the rotator to adjust your preferred zoom level.

Step 3: Start and Stop Recording
Tap the Record button from the bottom-center of the screen to begin recording the video in slow motion. Tap Stop when you are done. You can access the recorded video from the Videos container of the Photos app in your iPhone.
If you are using Android phone, you can check this article to find out more details about How to Record Super Slow Motion Videos on Your Phone.
You may also like: Best Slo-mo Camera Apps for Android And iPhone
Part 2: How to Apply the Smooth Slow-Motion Effect in Post-Production?
If you don’t have access to a camera that can record videos in slow motion, or in case you want to capture the footage at normal playback speed and then slow it down later, you need a dedicated tool to get the job done. Even though several post-production applications are available in the market, the one that is most versatile, has an intuitive interface, and is quite easy to use is Filmora video editor from Wondershare .
The latest version of the app, i.e., Wondershare Filmora 11 has a new feature called Speed Ramping that enables you to graphically manage the speed of the clips. While using the feature, you can either slow down the entire video or certain parts of it according to your requirements. For your learning, both the methods are explained below:
Method 1: Add Slow Motion Effect to the Whole Clip
For Win 7 or later (64-bit)
For macOS 10.12 or later
Step 1: Import the Source Video and Add to Timeline
Launch Wondershare Filmora on your Windows or Mac computer (a Windows 11 PC is used here for illustrations), click New Project from the first screen that appears. Make sure that the Media tool is selected from the standard tool bar at the top, click anywhere inside the Media window, and select and import the source clip to the program.

Next, hover the mouse over the thumbnail of the imported video in the Media window, and click the + icon present at its bottom-right corner. When the confirmation box comes up, click the Match to Media or Keep Project Settings button to change the project settings to match the resolution of the video, or change the footage to meet the project settings respectively.

Step 2: Add Slow Motion Effect to the Whole Clip
Once the media is added to the timeline, click on it and then click the Speed icon on the toolbar. Scroll down to the Slow menu and then you will see 0.5x, 0.25x, 0.1x, 0.05x and 0.01x presets. Select one to add slo-mo effects to the whole select clip. and click Speed Ramping from the menu that drops down.

You can also right click the video in the timeline, and hover over to Speed option to select Uniform Speed to adjust the speed of the video to make a slo-mo effect video. Drag the speed slider to the left to slow down the video and you will see how many times it slowed down in the next field.

Method 2: Use Speed Ramping to Add Slow Motion Effect
For Win 7 or later (64-bit)
For macOS 10.12 or later
Speed Ramping enables you to add the slow-motion effect at different parts of a video and even freeze the screen for the duration that you specify. The processes to get these done are given below in detail:
Step 1: Add Source Video to Timeline and Get to the Speed Ramping Window
Use the process given in the previous method to import a source video to Wondershare Filmora 11 and add it to the Timeline. Then use the process given in the second step of the previous method to get to the Speed Ramping window.
Step 2: Add Slow Motion Effect to Different Parts of the Clip
Go to the Speed Ramping tab if it is not already selected, click Custom from the available options, and drag the adjustment points below the center line to reduce the playback speed for that particular section of the clip. Optionally, you can click any of the available presets to automatically add the slow-motion effect to the video.
Note: You can also drag the adjustment points above the line to increase the playback speed.
To add an adjustment point on the frame where it is not already present, place the playhead (skimmer) at the correct position, and click Add Adjust Point from the left of the Speed Ramping window itself. Once added, you can drag it downward to reduce the playback speed of that part of the clip.

Step 3: Freeze the Video
Place the skimmer on the frame where you want to freeze the video for a while, and click Add Freeze Frame from the left of the Speed Ramping window. When the time box appears, in the Freeze Time field, enter the duration in seconds you want to freeze the screen for, and click OK.

After adding a freeze point, optionally, you can drag and reposition it in the Speed Ramping timeline as needed. Finally, click OK from the bottom-right area to save the changes.
Part 3: When to Use Slow Motion?
There could be many instances when you want to add a slow-motion effect to your videos. Some of the most common ones include:
- Add Focus
If there is a particular scene in a clip that you want the audience to focus on, it would be a good idea to add the slow-motion effect right before that action appears on the screen, and bring the speed back to normal when the section is over.
- Skill or Style Demonstration
When a clip is playing at a normal speed, many times, the audience isn’t able to see the skills that you want to display. This is where you may want to add the slow-motion effect so that every detail can be noticed clearly and in detail.
- Replays
Mostly used for tournaments and matches where the actual action is to replayed so the audience, umpires, and other viewers can see the movements in detail before making the right decision.
- Observation
Some natural phenomena such as a deer running in the woods, a balloon full of water bursting, etc. occur quite quickly. If you want to witness such things clearly and in detail, it would be good to record them, and then reduce the playback speed for better viewing.
- Add Suspense
When you add the slow-motion effect to a scene, the impulse of the audience is automatically increased, and they take that particular section more seriously and with a thrill.
Conclusion
The slow-motion effect is inversely proportional to the framerate, i.e., frames per second or FPS. Almost all DSLR cameras that are available nowadays allow you to switch between different FPS values (typically 120 and 240) before recording. Also, if you have access to an iPhone, its Camera app has a built-in SLO-MO mode that can capture the footage in slow motion.
In addition, if you already have a video that has been recorded at a normal speed, you can use an efficient post-production software like Wondershare Filmora 11, and exploit its Speed Ramping feature to add the slow-motion effect at different scenes of a clip.
02 How to Apply the Smooth Slow-Motion Effect in Post-Production?
Part 1: How to Make Slow Motion Videos via Recording?
The fact is, the playback speed of a video is inversely proportional to the frames per second (FPS) it has been recorded in. Usually, to have a video play at normal speed, it is recorded at 24 FPS or 30 FPS. On the other hand, if you increase the frame rate (FPS) to 120 or 240, the playback speed slows down. You can easily check this if you have access to a DSLR camera or an iPhone. These devices allow you to adjust the FPS so the videos can be recorded in slow motion.
For your convenience and learning, the step-by-step procedure on how to record a video in slow motion using an iPhone is explained below:
Step 1: Get to the SLO-MO Mode
Launch the Camera app on your iPhone (iPhone 13 Pro Max is used here for illustrations), and swipe the screen to the left to get to the SLO-MO mode.

Step 2: Adjust Recording Preferences
Tap the number at the top-right corner to switch between 120 FPS and 240 FPS as needed. Tap 1x from the lower-middle section of the screen, and use the rotator to adjust your preferred zoom level.

Step 3: Start and Stop Recording
Tap the Record button from the bottom-center of the screen to begin recording the video in slow motion. Tap Stop when you are done. You can access the recorded video from the Videos container of the Photos app in your iPhone.
If you are using Android phone, you can check this article to find out more details about How to Record Super Slow Motion Videos on Your Phone.
You may also like: Best Slo-mo Camera Apps for Android And iPhone
Part 2: How to Apply the Smooth Slow-Motion Effect in Post-Production?
If you don’t have access to a camera that can record videos in slow motion, or in case you want to capture the footage at normal playback speed and then slow it down later, you need a dedicated tool to get the job done. Even though several post-production applications are available in the market, the one that is most versatile, has an intuitive interface, and is quite easy to use is Filmora video editor from Wondershare .
The latest version of the app, i.e., Wondershare Filmora 11 has a new feature called Speed Ramping that enables you to graphically manage the speed of the clips. While using the feature, you can either slow down the entire video or certain parts of it according to your requirements. For your learning, both the methods are explained below:
Method 1: Add Slow Motion Effect to the Whole Clip
For Win 7 or later (64-bit)
For macOS 10.12 or later
Step 1: Import the Source Video and Add to Timeline
Launch Wondershare Filmora on your Windows or Mac computer (a Windows 11 PC is used here for illustrations), click New Project from the first screen that appears. Make sure that the Media tool is selected from the standard tool bar at the top, click anywhere inside the Media window, and select and import the source clip to the program.

Next, hover the mouse over the thumbnail of the imported video in the Media window, and click the + icon present at its bottom-right corner. When the confirmation box comes up, click the Match to Media or Keep Project Settings button to change the project settings to match the resolution of the video, or change the footage to meet the project settings respectively.

Step 2: Add Slow Motion Effect to the Whole Clip
Once the media is added to the timeline, click on it and then click the Speed icon on the toolbar. Scroll down to the Slow menu and then you will see 0.5x, 0.25x, 0.1x, 0.05x and 0.01x presets. Select one to add slo-mo effects to the whole select clip. and click Speed Ramping from the menu that drops down.

You can also right click the video in the timeline, and hover over to Speed option to select Uniform Speed to adjust the speed of the video to make a slo-mo effect video. Drag the speed slider to the left to slow down the video and you will see how many times it slowed down in the next field.

Method 2: Use Speed Ramping to Add Slow Motion Effect
For Win 7 or later (64-bit)
For macOS 10.12 or later
Speed Ramping enables you to add the slow-motion effect at different parts of a video and even freeze the screen for the duration that you specify. The processes to get these done are given below in detail:
Step 1: Add Source Video to Timeline and Get to the Speed Ramping Window
Use the process given in the previous method to import a source video to Wondershare Filmora 11 and add it to the Timeline. Then use the process given in the second step of the previous method to get to the Speed Ramping window.
Step 2: Add Slow Motion Effect to Different Parts of the Clip
Go to the Speed Ramping tab if it is not already selected, click Custom from the available options, and drag the adjustment points below the center line to reduce the playback speed for that particular section of the clip. Optionally, you can click any of the available presets to automatically add the slow-motion effect to the video.
Note: You can also drag the adjustment points above the line to increase the playback speed.
To add an adjustment point on the frame where it is not already present, place the playhead (skimmer) at the correct position, and click Add Adjust Point from the left of the Speed Ramping window itself. Once added, you can drag it downward to reduce the playback speed of that part of the clip.

Step 3: Freeze the Video
Place the skimmer on the frame where you want to freeze the video for a while, and click Add Freeze Frame from the left of the Speed Ramping window. When the time box appears, in the Freeze Time field, enter the duration in seconds you want to freeze the screen for, and click OK.

After adding a freeze point, optionally, you can drag and reposition it in the Speed Ramping timeline as needed. Finally, click OK from the bottom-right area to save the changes.
Part 3: When to Use Slow Motion?
There could be many instances when you want to add a slow-motion effect to your videos. Some of the most common ones include:
- Add Focus
If there is a particular scene in a clip that you want the audience to focus on, it would be a good idea to add the slow-motion effect right before that action appears on the screen, and bring the speed back to normal when the section is over.
- Skill or Style Demonstration
When a clip is playing at a normal speed, many times, the audience isn’t able to see the skills that you want to display. This is where you may want to add the slow-motion effect so that every detail can be noticed clearly and in detail.
- Replays
Mostly used for tournaments and matches where the actual action is to replayed so the audience, umpires, and other viewers can see the movements in detail before making the right decision.
- Observation
Some natural phenomena such as a deer running in the woods, a balloon full of water bursting, etc. occur quite quickly. If you want to witness such things clearly and in detail, it would be good to record them, and then reduce the playback speed for better viewing.
- Add Suspense
When you add the slow-motion effect to a scene, the impulse of the audience is automatically increased, and they take that particular section more seriously and with a thrill.
Conclusion
The slow-motion effect is inversely proportional to the framerate, i.e., frames per second or FPS. Almost all DSLR cameras that are available nowadays allow you to switch between different FPS values (typically 120 and 240) before recording. Also, if you have access to an iPhone, its Camera app has a built-in SLO-MO mode that can capture the footage in slow motion.
In addition, if you already have a video that has been recorded at a normal speed, you can use an efficient post-production software like Wondershare Filmora 11, and exploit its Speed Ramping feature to add the slow-motion effect at different scenes of a clip.
02 How to Apply the Smooth Slow-Motion Effect in Post-Production?
Part 1: How to Make Slow Motion Videos via Recording?
The fact is, the playback speed of a video is inversely proportional to the frames per second (FPS) it has been recorded in. Usually, to have a video play at normal speed, it is recorded at 24 FPS or 30 FPS. On the other hand, if you increase the frame rate (FPS) to 120 or 240, the playback speed slows down. You can easily check this if you have access to a DSLR camera or an iPhone. These devices allow you to adjust the FPS so the videos can be recorded in slow motion.
For your convenience and learning, the step-by-step procedure on how to record a video in slow motion using an iPhone is explained below:
Step 1: Get to the SLO-MO Mode
Launch the Camera app on your iPhone (iPhone 13 Pro Max is used here for illustrations), and swipe the screen to the left to get to the SLO-MO mode.

Step 2: Adjust Recording Preferences
Tap the number at the top-right corner to switch between 120 FPS and 240 FPS as needed. Tap 1x from the lower-middle section of the screen, and use the rotator to adjust your preferred zoom level.

Step 3: Start and Stop Recording
Tap the Record button from the bottom-center of the screen to begin recording the video in slow motion. Tap Stop when you are done. You can access the recorded video from the Videos container of the Photos app in your iPhone.
If you are using Android phone, you can check this article to find out more details about How to Record Super Slow Motion Videos on Your Phone.
You may also like: Best Slo-mo Camera Apps for Android And iPhone
Part 2: How to Apply the Smooth Slow-Motion Effect in Post-Production?
If you don’t have access to a camera that can record videos in slow motion, or in case you want to capture the footage at normal playback speed and then slow it down later, you need a dedicated tool to get the job done. Even though several post-production applications are available in the market, the one that is most versatile, has an intuitive interface, and is quite easy to use is Filmora video editor from Wondershare .
The latest version of the app, i.e., Wondershare Filmora 11 has a new feature called Speed Ramping that enables you to graphically manage the speed of the clips. While using the feature, you can either slow down the entire video or certain parts of it according to your requirements. For your learning, both the methods are explained below:
Method 1: Add Slow Motion Effect to the Whole Clip
For Win 7 or later (64-bit)
For macOS 10.12 or later
Step 1: Import the Source Video and Add to Timeline
Launch Wondershare Filmora on your Windows or Mac computer (a Windows 11 PC is used here for illustrations), click New Project from the first screen that appears. Make sure that the Media tool is selected from the standard tool bar at the top, click anywhere inside the Media window, and select and import the source clip to the program.

Next, hover the mouse over the thumbnail of the imported video in the Media window, and click the + icon present at its bottom-right corner. When the confirmation box comes up, click the Match to Media or Keep Project Settings button to change the project settings to match the resolution of the video, or change the footage to meet the project settings respectively.

Step 2: Add Slow Motion Effect to the Whole Clip
Once the media is added to the timeline, click on it and then click the Speed icon on the toolbar. Scroll down to the Slow menu and then you will see 0.5x, 0.25x, 0.1x, 0.05x and 0.01x presets. Select one to add slo-mo effects to the whole select clip. and click Speed Ramping from the menu that drops down.

You can also right click the video in the timeline, and hover over to Speed option to select Uniform Speed to adjust the speed of the video to make a slo-mo effect video. Drag the speed slider to the left to slow down the video and you will see how many times it slowed down in the next field.

Method 2: Use Speed Ramping to Add Slow Motion Effect
For Win 7 or later (64-bit)
For macOS 10.12 or later
Speed Ramping enables you to add the slow-motion effect at different parts of a video and even freeze the screen for the duration that you specify. The processes to get these done are given below in detail:
Step 1: Add Source Video to Timeline and Get to the Speed Ramping Window
Use the process given in the previous method to import a source video to Wondershare Filmora 11 and add it to the Timeline. Then use the process given in the second step of the previous method to get to the Speed Ramping window.
Step 2: Add Slow Motion Effect to Different Parts of the Clip
Go to the Speed Ramping tab if it is not already selected, click Custom from the available options, and drag the adjustment points below the center line to reduce the playback speed for that particular section of the clip. Optionally, you can click any of the available presets to automatically add the slow-motion effect to the video.
Note: You can also drag the adjustment points above the line to increase the playback speed.
To add an adjustment point on the frame where it is not already present, place the playhead (skimmer) at the correct position, and click Add Adjust Point from the left of the Speed Ramping window itself. Once added, you can drag it downward to reduce the playback speed of that part of the clip.

Step 3: Freeze the Video
Place the skimmer on the frame where you want to freeze the video for a while, and click Add Freeze Frame from the left of the Speed Ramping window. When the time box appears, in the Freeze Time field, enter the duration in seconds you want to freeze the screen for, and click OK.

After adding a freeze point, optionally, you can drag and reposition it in the Speed Ramping timeline as needed. Finally, click OK from the bottom-right area to save the changes.
Part 3: When to Use Slow Motion?
There could be many instances when you want to add a slow-motion effect to your videos. Some of the most common ones include:
- Add Focus
If there is a particular scene in a clip that you want the audience to focus on, it would be a good idea to add the slow-motion effect right before that action appears on the screen, and bring the speed back to normal when the section is over.
- Skill or Style Demonstration
When a clip is playing at a normal speed, many times, the audience isn’t able to see the skills that you want to display. This is where you may want to add the slow-motion effect so that every detail can be noticed clearly and in detail.
- Replays
Mostly used for tournaments and matches where the actual action is to replayed so the audience, umpires, and other viewers can see the movements in detail before making the right decision.
- Observation
Some natural phenomena such as a deer running in the woods, a balloon full of water bursting, etc. occur quite quickly. If you want to witness such things clearly and in detail, it would be good to record them, and then reduce the playback speed for better viewing.
- Add Suspense
When you add the slow-motion effect to a scene, the impulse of the audience is automatically increased, and they take that particular section more seriously and with a thrill.
Conclusion
The slow-motion effect is inversely proportional to the framerate, i.e., frames per second or FPS. Almost all DSLR cameras that are available nowadays allow you to switch between different FPS values (typically 120 and 240) before recording. Also, if you have access to an iPhone, its Camera app has a built-in SLO-MO mode that can capture the footage in slow motion.
In addition, if you already have a video that has been recorded at a normal speed, you can use an efficient post-production software like Wondershare Filmora 11, and exploit its Speed Ramping feature to add the slow-motion effect at different scenes of a clip.
How Much Wedding Videographer Cost
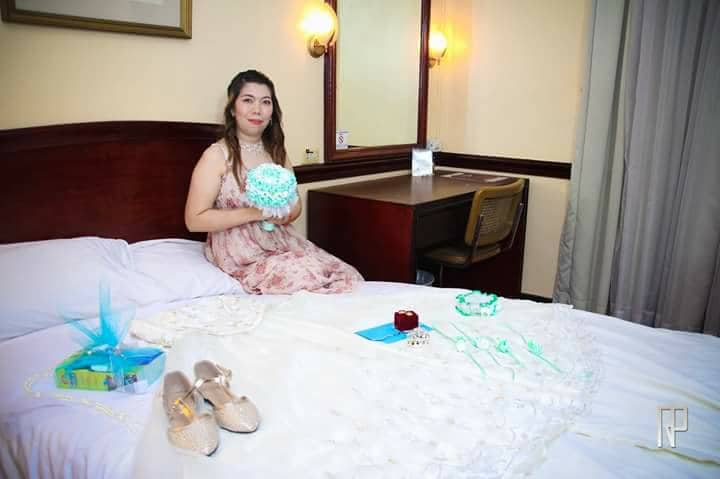
A wedding is one of the exciting parts that will happen in your life. It’s not that easy to plan a wedding, there’s a lot to be consider like wedding dress, food, venue, videographer etc. Everyone wants the best for their wedding and this includes videos that will record and capture important aspects of the event for years to come.
It’s probably hard to fast-forward your imagination ahead to see what you’ll be like in a decade, but if you and your spouse have your own children, as they grow it can be very special to be able to share your special memories with them, while you can certainly describe the flower archway where you exchange vows and tell them about the wedding care adorned with fresh flowers, your words can’t compare to the joy you’ll feel when you can show all of this first hand through your wedding video.
In this article will talk about how much does wedding videographer cost, how important to have your wedding day covered by the professional videographer and tips on how to save money in planning a wedding, because in your wedding day you want every moment that happens on that day will be captured.

How much a wedding videographer costs
Hiring a photographer for your wedding day is likely a given, but you might be wondering about the cost to hire a videographer and if it’s worth the extra expense.
Keep in mind that the average cost of a wedding videographer will largely depend on where you live, how many hours of coverage you want the videographer to capture, and how experienced the professional is. The longer they
’ve been in the business, the more likely the cost will increase.
It is recommended that you start with a standard package and customised it from there to make sure all your bases are covered. You can often get a better bargain this way.
Peak wedding season may also affect the cost some vendors, making coverage from June through December a bit pricier and harder to secure. The range can often run between $1000 and $1,500
Nationwide or as much as $12,500 for a luxury shoot that turns you into a celebrity wedding coverage.
What include in the packages
Videographers, like wedding photographers, will have a variety of wedding packages for you to choose from.
Here’s what you can expect to see in a basic package
- Three-to-five-minute highlight video
- A 20–30-minute full wedding video with wedding ceremony and speeches
- Two cinematographers
- An assistant to the videographer
There are also extra. Some videographer offers extras such as
- Drone footage– Drones are popular, especially at destination weddings. They have the ability to film hundreds of feet in the air which also makes your wedding video more unique. The extra equipment needed for this can cost you anywhere from $1,000 to $3,000
- Travel– Just because you’re getting married in a far-off place doesn’t mean you can’t have your dream videographer. Just be prepared to pay for their travel. You will likely pay for their accommodations, meals, and travel
- Extra edits– Videographers spend hours editing your final wedding video, so if you request any additional edits, it’s likely going to cost you
- Filming before and after the wedding– Whether your wedding is a weekend long affair or you host a brunch for your friends and family the day of the wedding, filming these moments is going to be additional cost. Discuss plans with your videographer as soon as possible so they can check their availability and they can give you a total for a wedding budget
- Tipping– tips are always welcomed even if they’re not expected. Your videographer puts in a lot of time and effort into capturing the beauty of the day, so any gesture of your appreciation will be welcomed.
And know what additional time can cost as much as $200-$500 per half hour, which pays for the videographer’s and assistant time, time spent editing additional footage, and video cards.
These included highlights and wedding videos will be professionally edited and they will also be set to music and delivered to you either via USB or through an online platform.
Typical videography prices also depend on the package you choose during the wedding planning process. Of course, you’re paying for a certain number of hours of coverage on your wedding day, but the post production editing process is even more time consuming and costly. While most videographers will produce an edited wedding movie, some may offer multiple clips at different lengths, like a wedding trailer for social media and a longer cinematic feature. Others might also be willing to give you the raw footage for your own personal use. Be sure to read your contract before making any final decisions so you know exactly what to get after the wedding day.
This one might sound strange. But the most experienced wedding videographer’s typically charge more than the going market rate. Price is a good way to tell who is the longest standing wedding videographer in an area. As the adage goes…you get what you pay for
Tips on saving money on wedding videographer
While you would need a professional videographer for your wedding and this does cost quite a penny, there are a few tips you could employ in saving on videography costs.
Time
As mentioned before, the more time the videographer spends at your event the more it would cost. Therefore, if you are looking to minimize the average cost of a wedding videographer, you could have him stay for only the most important aspects of the wedding. You could skip the pre-wedding prep part and also the last part of the reception. Because everyone now has mobile phone and can tag you what they captured on your social media. You can also use a hashtag where your friends can tag all of your wedding photo captured by them.
No extras
Such extras as cinematic effects, drone footage, personalised packaging and extra coppies of the finished product all add up in cost. Leaving extras out will go a long way uncutting costs.
No editing
Since post-production is the most time-consuming aspect, accepting the raw footage instead of an edited one would definitely cost less. You could choose to do the editing much later if desired.
You can also do your own editing, it’s also different from the feeling of editing your own wedding footage, because you can actually see the raw footage and personalised the editing.
For your editing software, you can never go wrong with Wondershare Filmora editing software. Offers easy to navigate features for beginners, expert editors and everyone in between. It includes professional tools that can turn your videos into professional level works of arts. Users new to the editing world will appreciate the programme intuitive interface and free video tutorials that walk you through its features step by step
Free Download For Win 7 or later(64-bit)
Free Download For macOS 10.14 or later
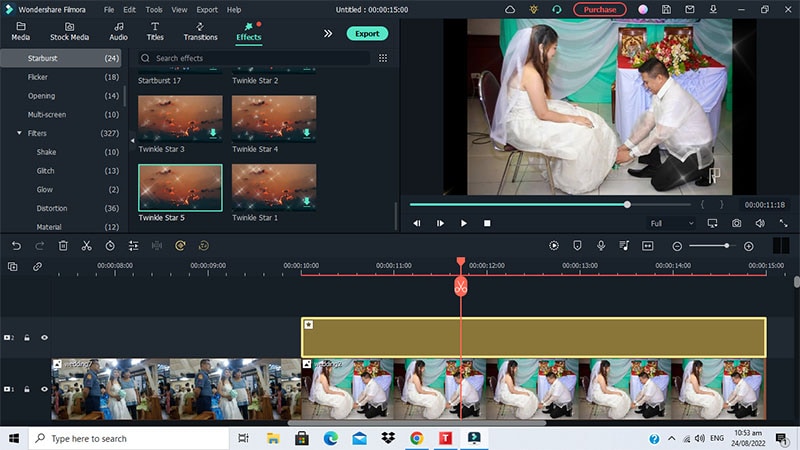
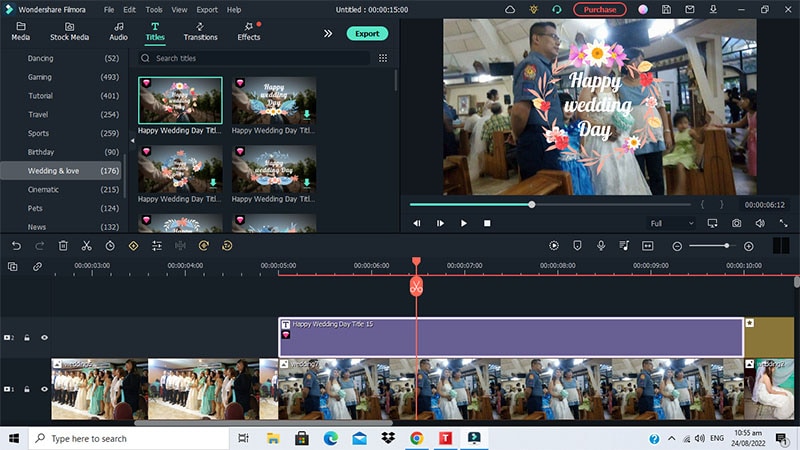
Filmora Wedding Video Editor Key Features:
- 300+effects
- Customised/animated text and titles
- Title tool
- Color grading
- Royalty-free music tracks
- Split screen
- Music library
Why need to hire a videographer on wedding day
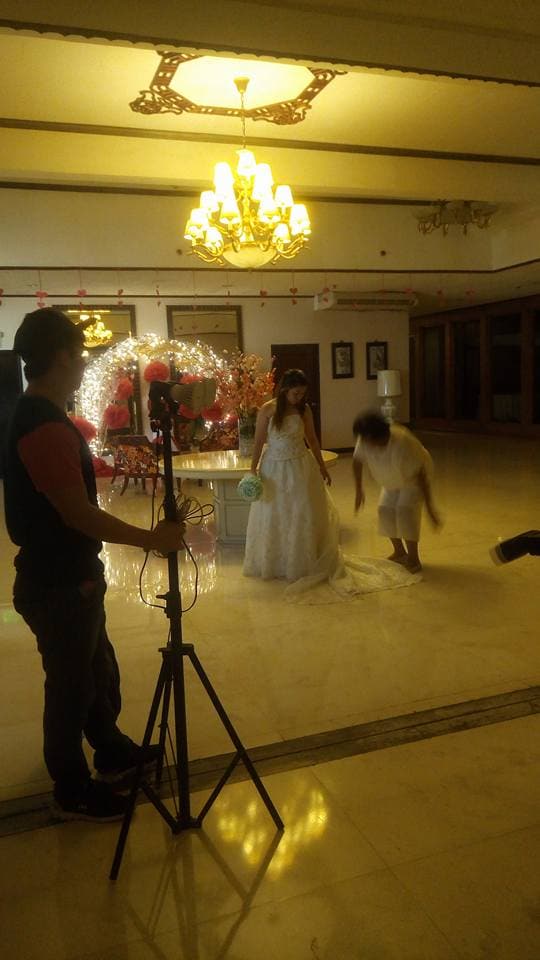
A wedding video is the best way to capture your celebration on the biggest day of your life. This is a chance for family and friends who were unable to attend to see you exchange vows, party with everyone else, dance, eat cake etc.
Wedding videos are an excellent way for your family and friends to relive the magic moment of your special day. Your guest can watch them repeatedly; you won’t believe how many times even your own wedding video has been viewed.
Having an videographer allows you to stress less about your wedding video. You will be in good hands when you hire and experienced wedding videographer. they will familiarize themselves with your wedding timeline and make sure that they are in sync with your photographer. They will know exactly where to be, at exactly the right time to get the perfect shot. Even an expensive camera can’t replace the gut instinct a long-time wedding.
Keep in mind that different wedding videographer’s will have different artistic styles, so you’ll also need to be sure the person you hire will be a good fit for your taste.
Conclusion
Your wedding video will capture the magical moments of your wedding day and help keep those memories for years to come. While we can’t place a price on quality, it is still helpful to know the average cost of a wedding videographer. If its fits in your wedding budget, a videographer is a great addition to your line up of vendors because after all, re-watching your nuptials will be priceless.
Capture the moments you can’t remember, your wedding day is a blur of excitement, love, and happiness. But what about all those special moments that happen when you’re not looking? What about the speeches, the first dance, or your dad’s toast? You might be able to recall some of these memories if they were captured on video but chances are you’ll never know for sure.
How much a wedding videographer costs
Hiring a photographer for your wedding day is likely a given, but you might be wondering about the cost to hire a videographer and if it’s worth the extra expense.
Keep in mind that the average cost of a wedding videographer will largely depend on where you live, how many hours of coverage you want the videographer to capture, and how experienced the professional is. The longer they
’ve been in the business, the more likely the cost will increase.
It is recommended that you start with a standard package and customised it from there to make sure all your bases are covered. You can often get a better bargain this way.
Peak wedding season may also affect the cost some vendors, making coverage from June through December a bit pricier and harder to secure. The range can often run between $1000 and $1,500
Nationwide or as much as $12,500 for a luxury shoot that turns you into a celebrity wedding coverage.

What include in the packages
Videographers, like wedding photographers, will have a variety of wedding packages for you to choose from.
Here’s what you can expect to see in a basic package
- Three-to-five-minute highlight video
- A 20–30-minute full wedding video with wedding ceremony and speeches
- Two cinematographers
- An assistant to the videographer
There are also extra. Some videographer offers extras such as
- Drone footage– Drones are popular, especially at destination weddings. They have the ability to film hundreds of feet in the air which also makes your wedding video more unique. The extra equipment needed for this can cost you anywhere from $1,000 to $3,000
- Travel– Just because you’re getting married in a far-off place doesn’t mean you can’t have your dream videographer. Just be prepared to pay for their travel. You will likely pay for their accommodations, meals, and travel
- Extra edits– Videographers spend hours editing your final wedding video, so if you request any additional edits, it’s likely going to cost you
- Filming before and after the wedding– Whether your wedding is a weekend long affair or you host a brunch for your friends and family the day of the wedding, filming these moments is going to be additional cost. Discuss plans with your videographer as soon as possible so they can check their availability and they can give you a total for a wedding budget
- Tipping– tips are always welcomed even if they’re not expected. Your videographer puts in a lot of time and effort into capturing the beauty of the day, so any gesture of your appreciation will be welcomed.
And know what additional time can cost as much as $200-$500 per half hour, which pays for the videographer’s and assistant time, time spent editing additional footage, and video cards.
These included highlights and wedding videos will be professionally edited and they will also be set to music and delivered to you either via USB or through an online platform.
Typical videography prices also depend on the package you choose during the wedding planning process. Of course, you’re paying for a certain number of hours of coverage on your wedding day, but the post production editing process is even more time consuming and costly. While most videographers will produce an edited wedding movie, some may offer multiple clips at different lengths, like a wedding trailer for social media and a longer cinematic feature. Others might also be willing to give you the raw footage for your own personal use. Be sure to read your contract before making any final decisions so you know exactly what to get after the wedding day.
This one might sound strange. But the most experienced wedding videographer’s typically charge more than the going market rate. Price is a good way to tell who is the longest standing wedding videographer in an area. As the adage goes…you get what you pay for
Tips on saving money on wedding videographer
While you would need a professional videographer for your wedding and this does cost quite a penny, there are a few tips you could employ in saving on videography costs.
Time
As mentioned before, the more time the videographer spends at your event the more it would cost. Therefore, if you are looking to minimize the average cost of a wedding videographer, you could have him stay for only the most important aspects of the wedding. You could skip the pre-wedding prep part and also the last part of the reception. Because everyone now has mobile phone and can tag you what they captured on your social media. You can also use a hashtag where your friends can tag all of your wedding photo captured by them.
No extras
Such extras as cinematic effects, drone footage, personalised packaging and extra coppies of the finished product all add up in cost. Leaving extras out will go a long way uncutting costs.
No editing
Since post-production is the most time-consuming aspect, accepting the raw footage instead of an edited one would definitely cost less. You could choose to do the editing much later if desired.
You can also do your own editing, it’s also different from the feeling of editing your own wedding footage, because you can actually see the raw footage and personalised the editing.
For your editing software, you can never go wrong with Wondershare Filmora editing software. Offers easy to navigate features for beginners, expert editors and everyone in between. It includes professional tools that can turn your videos into professional level works of arts. Users new to the editing world will appreciate the programme intuitive interface and free video tutorials that walk you through its features step by step
Free Download For Win 7 or later(64-bit)
Free Download For macOS 10.14 or later

Filmora Wedding Video Editor Key Features:
- 300+effects
- Customised/animated text and titles
- Title tool
- Color grading
- Royalty-free music tracks
- Split screen
- Music library

Why need to hire a videographer on wedding day
A wedding video is the best way to capture your celebration on the biggest day of your life. This is a chance for family and friends who were unable to attend to see you exchange vows, party with everyone else, dance, eat cake etc.
Wedding videos are an excellent way for your family and friends to relive the magic moment of your special day. Your guest can watch them repeatedly; you won’t believe how many times even your own wedding video has been viewed.
Having an videographer allows you to stress less about your wedding video. You will be in good hands when you hire and experienced wedding videographer. they will familiarize themselves with your wedding timeline and make sure that they are in sync with your photographer. They will know exactly where to be, at exactly the right time to get the perfect shot. Even an expensive camera can’t replace the gut instinct a long-time wedding.
Keep in mind that different wedding videographer’s will have different artistic styles, so you’ll also need to be sure the person you hire will be a good fit for your taste.

Conclusion
Your wedding video will capture the magical moments of your wedding day and help keep those memories for years to come. While we can’t place a price on quality, it is still helpful to know the average cost of a wedding videographer. If its fits in your wedding budget, a videographer is a great addition to your line up of vendors because after all, re-watching your nuptials will be priceless.
Capture the moments you can’t remember, your wedding day is a blur of excitement, love, and happiness. But what about all those special moments that happen when you’re not looking? What about the speeches, the first dance, or your dad’s toast? You might be able to recall some of these memories if they were captured on video but chances are you’ll never know for sure.
Vintage Film Effect 1990S - How to Make
In the 90s, movie production technology improved a lot. This decade saw horror movies become much more fun and immersive than in the 80s and 50s because they were more psychological. In fact, we can say that the horror movies of the 90s laid the foundation for current horror movies. So, without wasting time, let’s create a 1990s horror movie similar to The Blair Witch Project.
Preparation

The preparation for this horror film production is relatively self-explanatory if you’ve watched The Blair Witch Project. Simply shoot footage inside a dark room and apply some light to your face. It’s even better if you can shoot the video inside the woods. Just add some drama and a few screaming scenes to evoke emotions.
How to create a 1990s horror film with Filmora :
Free Download For Win 7 or later(64-bit)
Free Download For macOS 10.14 or later
Step1 Add the horror video to the timeline

Open Wondershare Filmora on your computer, then load the video you want to edit. After adding the video, drag it to the editing timeline, then move it a few keyframes to the right. The idea is to apply some black screen to add drama and fear before the film starts playing.
Step2 Apply color grading

Next, double-click the horror clip and go to the Color menu. Then, click the Tone arrow before lowering the Saturation to -50%. This will give us a less saturated look popularly used in horror films.

Now click the 3D LUT option and choose a LUT that works for your film. For this horror film project, we’ll select the Dark Film option.
Step3 Add creepiness to the video

Obviously, you’ll want your horror film to look as creepy as possible. To achieve that, click the Elements tab, then search for the Smokescreen 1 effect. Move the effect to the timeline above the video track before trimming the effect clip to fit with the original horror video.

We’ll now change the size and positioning of the smokescreen effect to match the feature video. To do that, double-click the effect track. You can also reduce the opacity to around 30% to make the smoke more visible.
Step4 Add a retro filming effect

Now we’ll make the film more believable by adding a retro overlay. Click the Effects tab, then search for Retro Film Overlay 15 before dragging and dropping the effect above all the tracks in the editing timeline.

Summary
That’s it! With these tips and tricks, you can effortlessly create a retro-style 1990s horror film. Follow this tutorial and play around with the movie effects to find what works best for you. Remember, Filmstock is the ultimate resource for video and movie effects. Give it a try!
Free Download For macOS 10.14 or later
Step1 Add the horror video to the timeline

Open Wondershare Filmora on your computer, then load the video you want to edit. After adding the video, drag it to the editing timeline, then move it a few keyframes to the right. The idea is to apply some black screen to add drama and fear before the film starts playing.
Step2 Apply color grading

Next, double-click the horror clip and go to the Color menu. Then, click the Tone arrow before lowering the Saturation to -50%. This will give us a less saturated look popularly used in horror films.

Now click the 3D LUT option and choose a LUT that works for your film. For this horror film project, we’ll select the Dark Film option.
Step3 Add creepiness to the video

Obviously, you’ll want your horror film to look as creepy as possible. To achieve that, click the Elements tab, then search for the Smokescreen 1 effect. Move the effect to the timeline above the video track before trimming the effect clip to fit with the original horror video.

We’ll now change the size and positioning of the smokescreen effect to match the feature video. To do that, double-click the effect track. You can also reduce the opacity to around 30% to make the smoke more visible.
Step4 Add a retro filming effect

Now we’ll make the film more believable by adding a retro overlay. Click the Effects tab, then search for Retro Film Overlay 15 before dragging and dropping the effect above all the tracks in the editing timeline.

Summary
That’s it! With these tips and tricks, you can effortlessly create a retro-style 1990s horror film. Follow this tutorial and play around with the movie effects to find what works best for you. Remember, Filmstock is the ultimate resource for video and movie effects. Give it a try!
Free Download For macOS 10.14 or later
Step1 Add the horror video to the timeline

Open Wondershare Filmora on your computer, then load the video you want to edit. After adding the video, drag it to the editing timeline, then move it a few keyframes to the right. The idea is to apply some black screen to add drama and fear before the film starts playing.
Step2 Apply color grading

Next, double-click the horror clip and go to the Color menu. Then, click the Tone arrow before lowering the Saturation to -50%. This will give us a less saturated look popularly used in horror films.

Now click the 3D LUT option and choose a LUT that works for your film. For this horror film project, we’ll select the Dark Film option.
Step3 Add creepiness to the video

Obviously, you’ll want your horror film to look as creepy as possible. To achieve that, click the Elements tab, then search for the Smokescreen 1 effect. Move the effect to the timeline above the video track before trimming the effect clip to fit with the original horror video.

We’ll now change the size and positioning of the smokescreen effect to match the feature video. To do that, double-click the effect track. You can also reduce the opacity to around 30% to make the smoke more visible.
Step4 Add a retro filming effect

Now we’ll make the film more believable by adding a retro overlay. Click the Effects tab, then search for Retro Film Overlay 15 before dragging and dropping the effect above all the tracks in the editing timeline.

Summary
That’s it! With these tips and tricks, you can effortlessly create a retro-style 1990s horror film. Follow this tutorial and play around with the movie effects to find what works best for you. Remember, Filmstock is the ultimate resource for video and movie effects. Give it a try!
Free Download For macOS 10.14 or later
Step1 Add the horror video to the timeline

Open Wondershare Filmora on your computer, then load the video you want to edit. After adding the video, drag it to the editing timeline, then move it a few keyframes to the right. The idea is to apply some black screen to add drama and fear before the film starts playing.
Step2 Apply color grading

Next, double-click the horror clip and go to the Color menu. Then, click the Tone arrow before lowering the Saturation to -50%. This will give us a less saturated look popularly used in horror films.

Now click the 3D LUT option and choose a LUT that works for your film. For this horror film project, we’ll select the Dark Film option.
Step3 Add creepiness to the video

Obviously, you’ll want your horror film to look as creepy as possible. To achieve that, click the Elements tab, then search for the Smokescreen 1 effect. Move the effect to the timeline above the video track before trimming the effect clip to fit with the original horror video.

We’ll now change the size and positioning of the smokescreen effect to match the feature video. To do that, double-click the effect track. You can also reduce the opacity to around 30% to make the smoke more visible.
Step4 Add a retro filming effect

Now we’ll make the film more believable by adding a retro overlay. Click the Effects tab, then search for Retro Film Overlay 15 before dragging and dropping the effect above all the tracks in the editing timeline.

Summary
That’s it! With these tips and tricks, you can effortlessly create a retro-style 1990s horror film. Follow this tutorial and play around with the movie effects to find what works best for you. Remember, Filmstock is the ultimate resource for video and movie effects. Give it a try!
Do You Want Your Photo and Video Edits to Look Like Peter McKinnon’s? Color-Grade Your Media Files with Peter McKinnon LUTs to Make Your Content Stand Out
Peter McKinnon is a highly talented video editor and YouTuber. He gained widespread recognition for his amazing video editing skills. Furthermore, his content always stands out from others for his exceptional color-grading abilities. Additionally, he has a keen eye for choosing the perfect color tones and contrasts to make his videos look impressive.
One of the secrets behind Peter’s impressive color grading is his use of LUTs. Peter McKinnon has developed his collection of LUTs. By using Peter McKinnon LUTs, you can easily apply his signature color grading style to your videos. These LUTs can enhance the colors, add depth and dimension, and give your videos that cinematic feel.
Part 1: Why Should You Use LUTs in Video Editing?
If you need Peter McKinnon LUT packs, you must know how effective LUTs are. Using Look-Up Tables in video editing has several advantages that can make your editing process easier, which are discussed as follows:
Save Time on Color Grading
LUTs offer a quick way to adjust the colors in your videos. Instead of manually tweaking each color parameter, you can apply a LUT with a few clicks. It saves time and lets you easily try different styles. Moreover, it makes the color grading process more convenient for beginners.
Maintain Consistency
Applying the same LUT to multiple clips ensures a consistent look throughout your video. It is constructive when you have different scenes or shots. Furthermore, you don’t need to edit each clip separately. Moreover, you can save time and effort by applying the same LUT to your project.
Professional and Creative Looks
LUTs are created by experts and provide a range of creative styles. They can imitate the look of different films, genres, or specific grading techniques. Additionally, using LUTs helps you achieve a particular mood or style. Furthermore, LUTs enhance your storytelling or align with your creative vision.
Match Footage from Different Sources
When working with footage from different cameras or lighting conditions, LUTs can help. They can help match the color and tone of the clips. Each camera may capture colors; lighting variations can affect the overall look. However, applying a LUT gives you a consistent result throughout.
Preview and Communicate Ideas
Another advantage is that LUTs offer real-time previews of the final look as you edit. Moreover, it helps you visualize the aesthetic and make informed creative decisions. Sharing LUTs with your team or collaborators communicates your creative ideas. Furthermore, it ensures everyone understands the desired look of the project.
Streamline Workflow
LUTs can be integrated into your editing software, allowing you to apply and modify them. They can be combined with other adjustments like exposure, contrast, and saturation. In addition to this, it streamlines your workflow, freeing up time to focus on other editing tasks.
Empower your videos with a new mood using different LUTs. Filmora now offers 100+ top-quality 3D LUTs cover a broad range of scenarios. Transform your videos with Filmora’s powerful 3D LUTs.
Apply LUT on Videos Apply LUT on Videos Learn More

Part 2: Top Peter McKinnon Influenced LUTs for Videos
Peter McKinnon is a great content creator with exceptional video editing skills. Here is a list of Peter McKinnon LUT Pack free and paid ones, which you can download. Make your videos look like Peter McKinnon’s and get the praise you deserve.
1. Cine LUTS V2
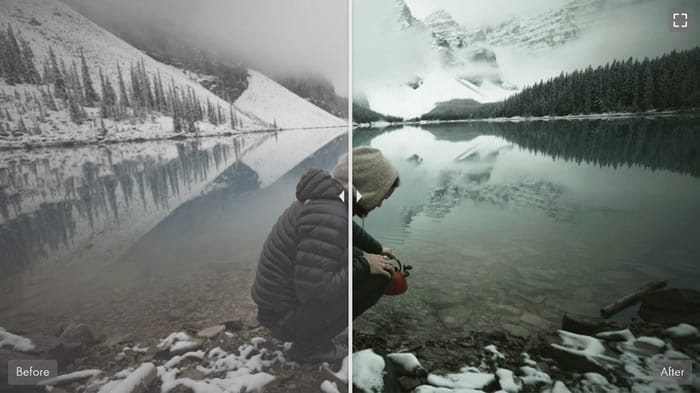
Cine LUTS V2 is a pack of 15 cinematic-style LUTs to color grade your videos. With these LUTs, you can achieve various cinematic looks, such as Dawn, Dusk, Elemental, and Ember. Moreover, the Dawn LUT adds a warm and soft color tone to your video. However, the Elemental LUT brings out vibrant colors, making your content appear bold and impactful. Furthermore, each LUT in this pack offers a unique color grading style.
2. Cine LUTS V1
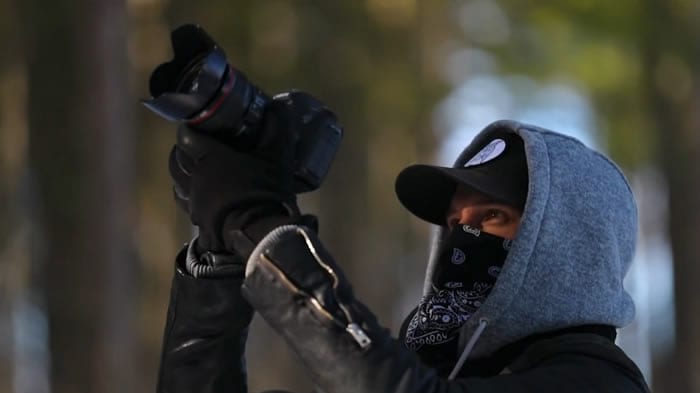
With the Cine LUTs V1 pack, you’ll have access to 7 unique LUTs. This Peter McKinnon LUT pack gives your videos a cinematic look. Furthermore, this pack has different LUTs, including Orange & Teal and Noir. The Orange & Teal LUT adds a warm orange tone to the highlights and a cool teal tone to the shadows. However, you can use the Noir LUT to add a more dramatic look to your video.
3. Arctic Shade
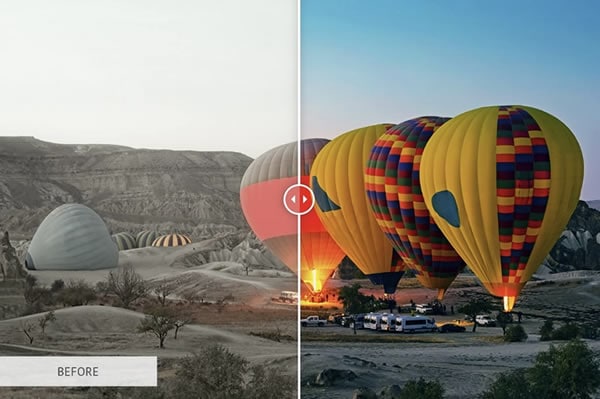
Arctic Shade LUT is a color grading tool inspired by Peter McKinnon’s technique. Applying this LUT adjusts the white balance to give your video a balanced white exposure. Furthermore, it increases saturation and enhances contrast to make your colors pop. It’s a great option to experiment with and matches the color grading style of Peter McKinnon.
4. Bleak Galaxy
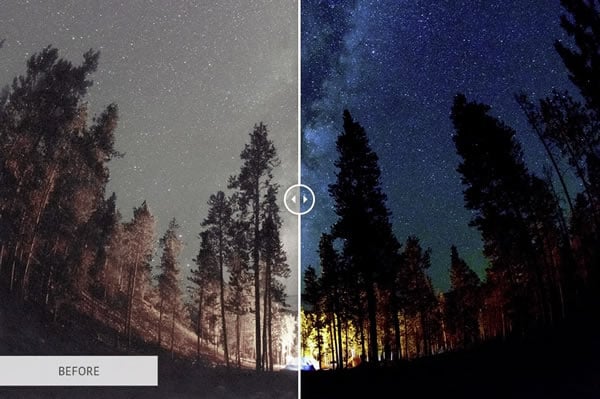
Bleak Galaxy is a fantastic LUT pack inspired by Peter McKinnon. This LUT is perfect for enhancing your night sky footage. It amplifies the blue tones, making the night sky even more beautiful. Additionally, it boosts saturation, bringing out the vibrant colors in the scene. With Bleak Galaxy, you can capture the details of the stunning night sky in all its beauty.
Part 3: Wondershare Filmora: Get Free LUTs on an Alternative Platform
Are you a fan of Peter McKinnon and want to make your content look professional and cinematic? It would be best to use professional video editing software like Wondershare Filmora . Filmora is an excellent tool that helps you in editing videos. Moreover, Filmora offers simple enhancement and adjustment tools for more advanced AI features.
Add LUTs on Video For Win 7 or later(64-bit)
Add LUTs on Video For macOS 10.14 or later
Besides video editing capabilities, you can color grade your videos like Peter McKinnon. In the same way, this tool offers paid and free LUTs that you can use. Additionally, Filmora has over 200 LUTs, each with a unique set of styles and color tones. You can download similar-looking Peter McKinnon LUTs free LUTs to apply on your digital media using Filmora.

Conclusion
In conclusion, Peter McKinnon is an impressive content creator and professional. There are many different LUTs inspired by Peter McKinnon LUT packs. Furthermore, these LUTs allow you to experiment and find the perfect color grading for your videos. Moreover, you can use these LUTs pack for a travel vlog, B-roll, or even a short film. With these LUTs, your videos will look better than ever.
Add LUTs on Video For Win 7 or later(64-bit)
Add LUTs on Video For macOS 10.14 or later
Apply LUT on Videos Apply LUT on Videos Learn More

Part 2: Top Peter McKinnon Influenced LUTs for Videos
Peter McKinnon is a great content creator with exceptional video editing skills. Here is a list of Peter McKinnon LUT Pack free and paid ones, which you can download. Make your videos look like Peter McKinnon’s and get the praise you deserve.
1. Cine LUTS V2
Cine LUTS V2 is a pack of 15 cinematic-style LUTs to color grade your videos. With these LUTs, you can achieve various cinematic looks, such as Dawn, Dusk, Elemental, and Ember. Moreover, the Dawn LUT adds a warm and soft color tone to your video. However, the Elemental LUT brings out vibrant colors, making your content appear bold and impactful. Furthermore, each LUT in this pack offers a unique color grading style.

2. Cine LUTS V1
With the Cine LUTs V1 pack, you’ll have access to 7 unique LUTs. This Peter McKinnon LUT pack gives your videos a cinematic look. Furthermore, this pack has different LUTs, including Orange & Teal and Noir. The Orange & Teal LUT adds a warm orange tone to the highlights and a cool teal tone to the shadows. However, you can use the Noir LUT to add a more dramatic look to your video.

3. Arctic Shade
Arctic Shade LUT is a color grading tool inspired by Peter McKinnon’s technique. Applying this LUT adjusts the white balance to give your video a balanced white exposure. Furthermore, it increases saturation and enhances contrast to make your colors pop. It’s a great option to experiment with and matches the color grading style of Peter McKinnon.

4. Bleak Galaxy
Bleak Galaxy is a fantastic LUT pack inspired by Peter McKinnon. This LUT is perfect for enhancing your night sky footage. It amplifies the blue tones, making the night sky even more beautiful. Additionally, it boosts saturation, bringing out the vibrant colors in the scene. With Bleak Galaxy, you can capture the details of the stunning night sky in all its beauty.

Part 3: Wondershare Filmora: Get Free LUTs on an Alternative Platform
Are you a fan of Peter McKinnon and want to make your content look professional and cinematic? It would be best to use professional video editing software like Wondershare Filmora . Filmora is an excellent tool that helps you in editing videos. Moreover, Filmora offers simple enhancement and adjustment tools for more advanced AI features.
Add LUTs on Video For Win 7 or later(64-bit)
Add LUTs on Video For macOS 10.14 or later
Besides video editing capabilities, you can color grade your videos like Peter McKinnon. In the same way, this tool offers paid and free LUTs that you can use. Additionally, Filmora has over 200 LUTs, each with a unique set of styles and color tones. You can download similar-looking Peter McKinnon LUTs free LUTs to apply on your digital media using Filmora.

Conclusion
In conclusion, Peter McKinnon is an impressive content creator and professional. There are many different LUTs inspired by Peter McKinnon LUT packs. Furthermore, these LUTs allow you to experiment and find the perfect color grading for your videos. Moreover, you can use these LUTs pack for a travel vlog, B-roll, or even a short film. With these LUTs, your videos will look better than ever.
Add LUTs on Video For Win 7 or later(64-bit)
Add LUTs on Video For macOS 10.14 or later
Also read:
- New 2024 Approved 12 Top Marketing Slideshow Templates
- New Best 8 Online MPEG to GIF Converters
- New 5 Tips for Faster Editing in Filmora Video Editor
- Updated Guide Adding Audio in Wondershare Filmora
- Cropping a Video in Davinci Resolve Step by Step for 2024
- Updated In 2024, Best Ways to Slow Down Motion in CapCut
- In 2024, Would You Like to Know How to Change the Ratio of the Video or Which Is the Correct Aspect Ratio for Uploading to the Online Platform? Then, Go Through the Article to Get Complete Details About the Video Aspect Ratio
- New 3 In-Camera Transitions Tricks To Make Videos for 2024
- New 2 Methods to Crop a Video Using After Effects for 2024
- New Easy Way to Create an Alternate Reality Effect for 2024
- Updated How to Make a Vacation Slideshow in 5 Minutes
- 2024 Approved How to Create an Aesthetic Slideshow Presentation
- New Blender Is a 3D Animation Software that Can Be Used to Create Stunning 3D Models and Videos
- Updated 2024 Approved A Guide to Use Distortion Effect in Premeiere Pro
- New In 2024, Applying the Effect of Camera Shake in Video Creation
- New 2024 Approved Guide to Create a Timelapse Video in After Effects
- Detailed Tutorial to Crop a Video in KineMaster for 2024
- In 2024, 6 Instant Mp4 to GIF Online Tools for You
- 2024 Approved Are You a Teacher? Are You Looking for Educational Background Music? This Article Has Everything You Will Need to Know for Creating Outstanding Educational Teaching Videos
- Detailed Steps to Cut a Video in QuickTime for 2024
- In 2024, Hassle-Free Ways to Remove FRP Lock from Itel P55 5G Phones with/without a PC
- How To Fix Unresponsive Touch Screen on Xiaomi Redmi A2 | Dr.fone
- 5 Best Route Generator Apps You Should Try On Samsung Galaxy F34 5G | Dr.fone
- Vivo V29e Not Receiving Texts? 10 Hassle-Free Solutions Here | Dr.fone
- Super Easy Ways To Deal with Huawei Nova Y91 Unresponsive Screen | Dr.fone
- Use Device Manager to update your drivers on Windows 11 & 10
- 5 Ways Change Your Home Address in Google/Apple Map on Apple iPhone 13/iPad | Dr.fone
- Complete Guide to Hard Reset Your Oppo Reno 10 5G | Dr.fone
- Bypass iCloud Activation Lock with IMEI Code On iPhone SE (2020)
- New In 2024, Mastering Facebook Live Your Complete Guide to Successful Streaming
- In 2024, How to Successfully Bypass iCloud Activation Lock from Apple iPhone 8
- How To Do Realme Narzo 60x 5G Screen Sharing | Dr.fone
- New 2024 Approved Tutorial Guide to Animate Pictures in Canva
- New Best 10 Animated Templates in Canva for 2024
- In 2024, Full Guide to Catch 100 IV Pokémon Using a Map On Lava Blaze Pro 5G | Dr.fone
- How to Unlock a Network Locked Realme 12 Pro 5G Phone?
- In 2024, What Is a SIM Network Unlock PIN? Get Your Motorola Defy 2 Phone Network-Ready
- This is how you can recover deleted pictures from P55+.
- In 2024, How To Remove Screen Lock PIN On Samsung Galaxy S23 Like A Pro 5 Easy Ways
- Title: New How to Make Video Slow Motion for 2024
- Author: Chloe
- Created at : 2024-04-24 07:08:31
- Updated at : 2024-04-25 07:08:31
- Link: https://ai-editing-video.techidaily.com/new-how-to-make-video-slow-motion-for-2024/
- License: This work is licensed under CC BY-NC-SA 4.0.


