
:max_bytes(150000):strip_icc():format(webp)/178665671_HighRes-56a532a83df78cf77286de1b.jpg)
New How to Remove Motion Blur In Photoshop for 2024
How to Remove Motion Blur In Photoshop
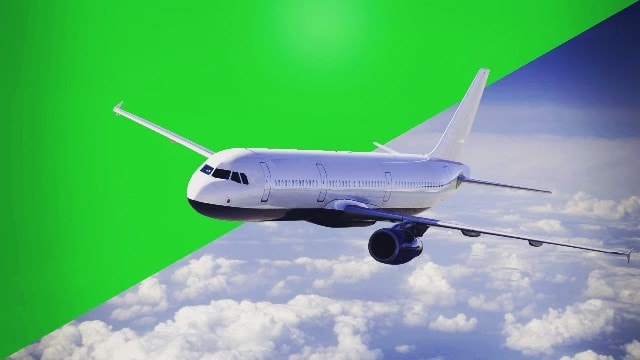
The motion blur effect is created in photos when the picture is taken in poor light conditions or due to a fast-moving object. Moreover, if the shutter speed of the camera is too low, it will also produce a motion blur effect. In such a situation, the captured picture may look out of focus and tedious. In order to fix this issue, this article can help you.
By reading this article, you can learn how to remove motion blur in Photoshop with simple steps. Moreover, we will also provide the best alternatives to Photoshop that you can utilize to remove motion blur from your photos.
Part 1: How to Remove the Motion Blur in Photoshop?
To fix a motion blur in an image, you would require a professional tool such as Adobe Photoshop . Photoshop is a well-recognized tool comprising tons of features for image editing and graphic designing. It offers selection tools that enable you to choose the specific parts of a photo efficiently. You can also add layers to your photo to modify and edit specific areas of the image.
You can also apply appealing filters from this platform to transform an ordinary image drastically. Moreover, using this precise tool, you can also fix motion blur in Photoshop. You can choose the blurry areas of your photo through its selection tools. Thus, with a few clicks, you can eliminate the flaws from your image easily.
Steps to Fix Motion Blur in Photos Using Photoshop
If you are new to Photoshop and don’t know how to fix motion blur in photos, then follow the instructions described below:
Step1 Open the Photoshop tool on your PC or Mac and upload your photo. From the “Layers” section, press “Ctrl + J” or “Command + J” to copy the first layer. Afterward, convert the first layer by choosing the option “Smart Object.”

Step2 Now head to the “Filter” section and tap on “Sharpen” to proceed. Afterward, proceed with the option of “Shake Reduction” by clicking on it. Now Photoshop will automatically reduce the blur effect. From the displayed panel, uncheck the option called “Artifact Suppression.”

Step3 To continue, open the “Advanced” tab from the left panel and enhance the size of your rectangular. Manage the position of the rectangle according to your preference. By doing so, you can see the details of the image clearly.

Step4 From the left panel, manage the options like “Blur Trace Bounds” and “Smoothing” according to your desire. Once done, press the “OK” button. For adding more modifications, add a blank layer and choose the “Clone Stamp Tool.” Afterward, select “Soft Round Brush” from the general brushes.

Step5 Now adjust the Opacity to 100% and Flow to 50%. Moreover, select “Current & Below” as the sample. Press the Alt key to take a sample of any flawless part of your photo and apply it to the blurry area. Make sure that the color of the sample taken is the same as the blurry area in the photo.

Part 2: Remove the Motion Blur with an Alternative to Photoshop
It may be possible that you don’t get satisfactory results from Photoshop removing motion blur. Or, if you find the interface of Photoshop intimidating, it can affect your productivity. For your assistance, this section will bring you the best alternatives to Photoshop.
1. IMAGamigo
IMAGamigo is an online tool that allows you to perform different operations on pictures efficiently. To fix motion blur, it offers a Deblurrer feature. Using this feature, you can automatically remove blur from your photos without any external effort. It also provides other distinct features such as Background Remover, Restorer, Colorizer, Upscale, etc.
To use this tool, first, navigate to its official website. From its tools, select “Deblurrer” to proceed. A new window will open on your screen instantly. Scroll down a little bit and locate the area saying, “Drop Image Here.” Click on this area and upload your image. Afterward, the tool will automatically start analyzing the picture. Once the process gets finished, click on the Download button to save your photo.

2. Vance.AI
This online platform is also a well-trusted tool by professionals and content creators. It provides AI-supported tools such as AI Image Denoiser, AI Image Upscaler, AI Photo Enhancer, etc. You can use its AI Image Sharpener to eliminate motion blur from pictures. It supports all popular image file formats, such as JPEG, PNG, and JPG. Thus, without any installations, you can quickly utilize this tool to fix motion blur photos.
To use this tool, access the official webpage of Vance.AI and select the “AI Image Sharpener” feature. Once done, click on the “Upload Image” option and import your blurry photo. Afterward, a new window will be open from which you can adjust the settings. Select the “Sharpen” option and choose the preferred Sharpen Mode. Afterward, click on the “Start to Process” option. Once the process ends, you can download the picture with a single click.

3. AKVIS Refocus AI
AKVIS is an offline tool that produces high-end results at a fast processing speed. You can find multiple options in this tool, such as Airbrush, Retoucher, Sketch, Decorator, etc. When it comes to fixing blurry pictures, this tool provides an exclusive feature called “Refocus AI.” Through this feature, you can instantly increase the sharpness of your photo. Also, it offers different modes such as Motion Blur, Radial Blur, Refocus-AI, and Tilt-Shift.
To fix motion blur:
Step1 Launch this tool and navigate to its Refocus AI option.
Step2 Select Refocus AI as your mode and upload the blurry picture. The default preset will be AKVIS Default AI.
Step3 Disable the “Image Sharpening” feature and navigate to the “Motion Deblur AI” section.
Step4 From there, adjust your Focus accordingly.
Step5 For more enhancements, enable the Image Sharpening feature and adjust the parameters.

Bonus Tip – How to Add Motion Blur to Your Images?
Do you want to add motion blur to your images? Many people like to intentionally add a motion blur effect in their images to add an artistic element. If you are interested in doing so, the best desktop tool you can try is Wondershare Filmora . This tool offers trending and high-quality effects that you can easily apply to your images.
Free Download For Win 7 or later(64-bit)
Free Download For macOS 10.14 or later
To add a motion blur effect:
Step1 Launch Filmora and create a new project.
Step2 Import your photo on this tool and drop it into the timeline.
Step3 Split the clip where you want to add the blur effect.
Once done, go to the Effects tab and search “Blur.” By doing so, you would be able to check all the blur effects on your screen. Choose and apply the blur effect to the split part of your clip. Once done, hit the Export button.

Conclusion
Photoshop is an excellent tool to edit and modify your pictures in great quality. You can use this article to take guidance to remove motion blur from photos. However, if you are not getting desired results from Photoshop, we have also provided the best alternatives to Photoshop to remove motion blur. Moreover, to create a motion blur effect in your images, you can explore the Wondershare Filmora tool.
Part 1: How to Remove the Motion Blur in Photoshop?
To fix a motion blur in an image, you would require a professional tool such as Adobe Photoshop . Photoshop is a well-recognized tool comprising tons of features for image editing and graphic designing. It offers selection tools that enable you to choose the specific parts of a photo efficiently. You can also add layers to your photo to modify and edit specific areas of the image.
You can also apply appealing filters from this platform to transform an ordinary image drastically. Moreover, using this precise tool, you can also fix motion blur in Photoshop. You can choose the blurry areas of your photo through its selection tools. Thus, with a few clicks, you can eliminate the flaws from your image easily.
Steps to Fix Motion Blur in Photos Using Photoshop
If you are new to Photoshop and don’t know how to fix motion blur in photos, then follow the instructions described below:
Step1 Open the Photoshop tool on your PC or Mac and upload your photo. From the “Layers” section, press “Ctrl + J” or “Command + J” to copy the first layer. Afterward, convert the first layer by choosing the option “Smart Object.”
Step2 Now head to the “Filter” section and tap on “Sharpen” to proceed. Afterward, proceed with the option of “Shake Reduction” by clicking on it. Now Photoshop will automatically reduce the blur effect. From the displayed panel, uncheck the option called “Artifact Suppression.”
Step3 To continue, open the “Advanced” tab from the left panel and enhance the size of your rectangular. Manage the position of the rectangle according to your preference. By doing so, you can see the details of the image clearly.
Step4 From the left panel, manage the options like “Blur Trace Bounds” and “Smoothing” according to your desire. Once done, press the “OK” button. For adding more modifications, add a blank layer and choose the “Clone Stamp Tool.” Afterward, select “Soft Round Brush” from the general brushes.
Step5 Now adjust the Opacity to 100% and Flow to 50%. Moreover, select “Current & Below” as the sample. Press the Alt key to take a sample of any flawless part of your photo and apply it to the blurry area. Make sure that the color of the sample taken is the same as the blurry area in the photo.
Part 2: Remove the Motion Blur with an Alternative to Photoshop
It may be possible that you don’t get satisfactory results from Photoshop removing motion blur. Or, if you find the interface of Photoshop intimidating, it can affect your productivity. For your assistance, this section will bring you the best alternatives to Photoshop.
1. IMAGamigo
IMAGamigo is an online tool that allows you to perform different operations on pictures efficiently. To fix motion blur, it offers a Deblurrer feature. Using this feature, you can automatically remove blur from your photos without any external effort. It also provides other distinct features such as Background Remover, Restorer, Colorizer, Upscale, etc.
To use this tool, first, navigate to its official website. From its tools, select “Deblurrer” to proceed. A new window will open on your screen instantly. Scroll down a little bit and locate the area saying, “Drop Image Here.” Click on this area and upload your image. Afterward, the tool will automatically start analyzing the picture. Once the process gets finished, click on the Download button to save your photo.
2. Vance.AI
This online platform is also a well-trusted tool by professionals and content creators. It provides AI-supported tools such as AI Image Denoiser, AI Image Upscaler, AI Photo Enhancer, etc. You can use its AI Image Sharpener to eliminate motion blur from pictures. It supports all popular image file formats, such as JPEG, PNG, and JPG. Thus, without any installations, you can quickly utilize this tool to fix motion blur photos.
To use this tool, access the official webpage of Vance.AI and select the “AI Image Sharpener” feature. Once done, click on the “Upload Image” option and import your blurry photo. Afterward, a new window will be open from which you can adjust the settings. Select the “Sharpen” option and choose the preferred Sharpen Mode. Afterward, click on the “Start to Process” option. Once the process ends, you can download the picture with a single click.
3. AKVIS Refocus AI
AKVIS is an offline tool that produces high-end results at a fast processing speed. You can find multiple options in this tool, such as Airbrush, Retoucher, Sketch, Decorator, etc. When it comes to fixing blurry pictures, this tool provides an exclusive feature called “Refocus AI.” Through this feature, you can instantly increase the sharpness of your photo. Also, it offers different modes such as Motion Blur, Radial Blur, Refocus-AI, and Tilt-Shift.
To fix motion blur:
Step1 Launch this tool and navigate to its Refocus AI option.
Step2 Select Refocus AI as your mode and upload the blurry picture. The default preset will be AKVIS Default AI.
Step3 Disable the “Image Sharpening” feature and navigate to the “Motion Deblur AI” section.
Step4 From there, adjust your Focus accordingly.
Step5 For more enhancements, enable the Image Sharpening feature and adjust the parameters.
Bonus Tip – How to Add Motion Blur to Your Images?
Do you want to add motion blur to your images? Many people like to intentionally add a motion blur effect in their images to add an artistic element. If you are interested in doing so, the best desktop tool you can try is Wondershare Filmora . This tool offers trending and high-quality effects that you can easily apply to your images.
Free Download For Win 7 or later(64-bit)
Free Download For macOS 10.14 or later
To add a motion blur effect:
Step1 Launch Filmora and create a new project.
Step2 Import your photo on this tool and drop it into the timeline.
Step3 Split the clip where you want to add the blur effect.
Once done, go to the Effects tab and search “Blur.” By doing so, you would be able to check all the blur effects on your screen. Choose and apply the blur effect to the split part of your clip. Once done, hit the Export button.
Conclusion
Photoshop is an excellent tool to edit and modify your pictures in great quality. You can use this article to take guidance to remove motion blur from photos. However, if you are not getting desired results from Photoshop, we have also provided the best alternatives to Photoshop to remove motion blur. Moreover, to create a motion blur effect in your images, you can explore the Wondershare Filmora tool.
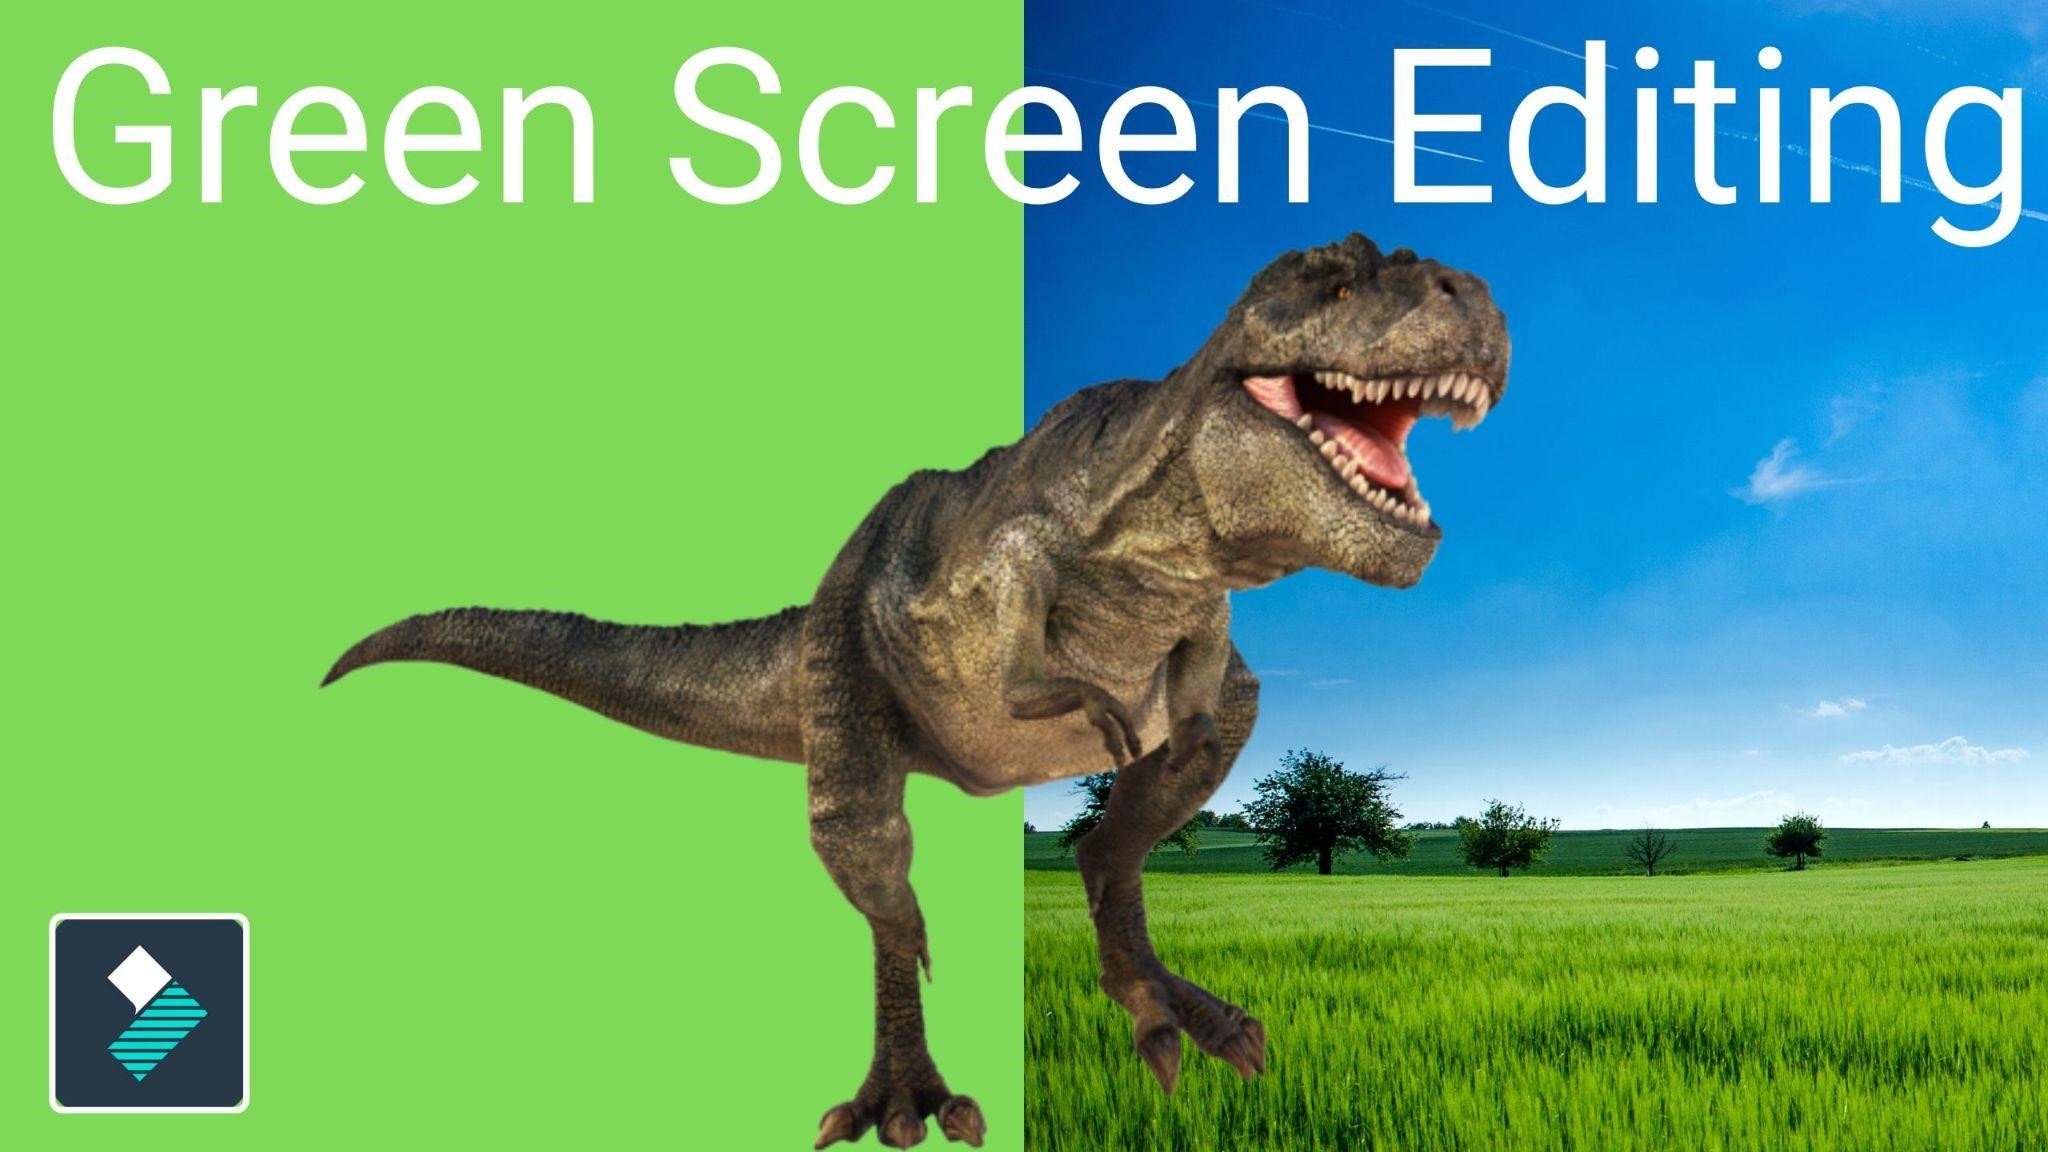
Best Green Screen Software for Beginner on Mac
Almost every major film released in 2019 used green screen effects for at least one scene. While that is an entirely unscientific assessment that you should not cite in a college paper, given the accessibility and sophistication of today’s green screen technology, it is probably not far off. Everyone has access to expert compositing technology, from Marvel movies to local news stations.
WHAT ARE GREEN SCREEN AND CHROMA KEYING?
The colored background you want to make transparent and remove from your shot is referred to as a green screen. This is typically a single-colored backdrop, which can be any color but is usually bright green because it is the color most dissimilar to human skin tones. (Blue screens were commonly used in the early days of film, and they may still be used in some cases.)
The chroma key is a time-honored and widely used visual effects technique. Simply stated, chroma key is the process of photographing a subject against a solid-color background and then removing that background in post-production and replacing it with transparency. The subject can then be positioned in front of any new background.
BEST FREE GREEN SCREEN SOFTWARE FOR BEGINNERS ON MAC
FILMORA VIDEO EDITOR
Supported OS: Windows, Mac, iOS, Android
Filmora Video Editor has two modes based on your experience with video editing software. Users can use the easy mode or the full feature editor to access the program’s full focus.
The theme focus can also make it easier to select the videos and audio that you want to use. There are a number of features and effects that can be used to complement various themes, which can help improve transitions or find different effects in the program without having to dig around.
The preview mode and music tracks available from the themes make it simple to enhance your video.
The full feature mode gives you even more control; this is where Filmora begins to resemble an actual video editor. You can drag images, sounds, and other media into different tracks and apply advanced effects.
Green screens, premade filters for color correction, cropping, cutting, splitting, and combining with simple tools are all available in the full feature mode. The full-featured editor also has an audio mixer and equalizer, as well as the ability to burn your creations to DVD, Facebook, Vimeo, and other platforms.
For Win 7 or later (64-bit)
For macOS 10.14 or later
Features:
4k Editing Support
Gif Support
Noise Removal
Color Tuning
Advanced Text Editor
Audio Mixer
Video Stabilization
Scene Detection
Audio Equalizer
Chroma Keying
Pros:
- It can be a program that’s easy to master even if you have never used a video editing program before
- There are plenty of visual effects and premade effects that can help you make a great looking video within a few minutes
- The 4k video support is also helpful
Cons:
- It does lack a few advanced features like the option for motion tracking, multi-camera support, and assistance with 360° videos
Steps On How To Chroma Key On Filmora
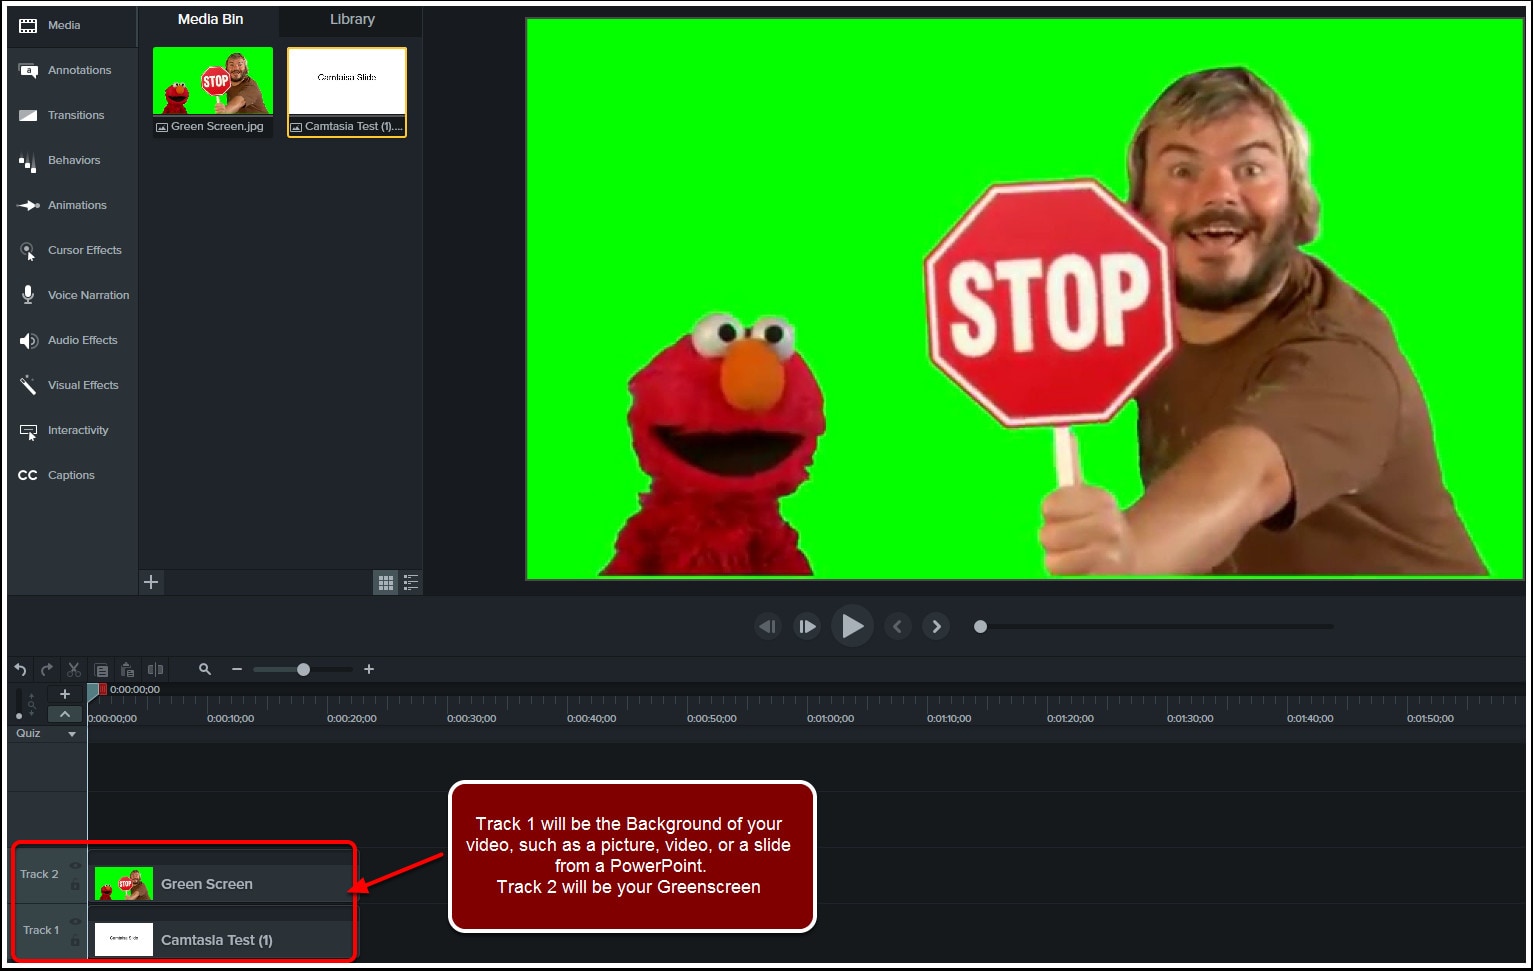
- Click the “Import Media Files Here“ to import the background video and video with the green screen background into the media library. And then drag and drop the background video and green screen video to the video track in the timeline respectively.
Note: Ensure the video with green screen background is placed as the overlay video.
- Right-click on the overlay video and find the “Green Screen“ option.
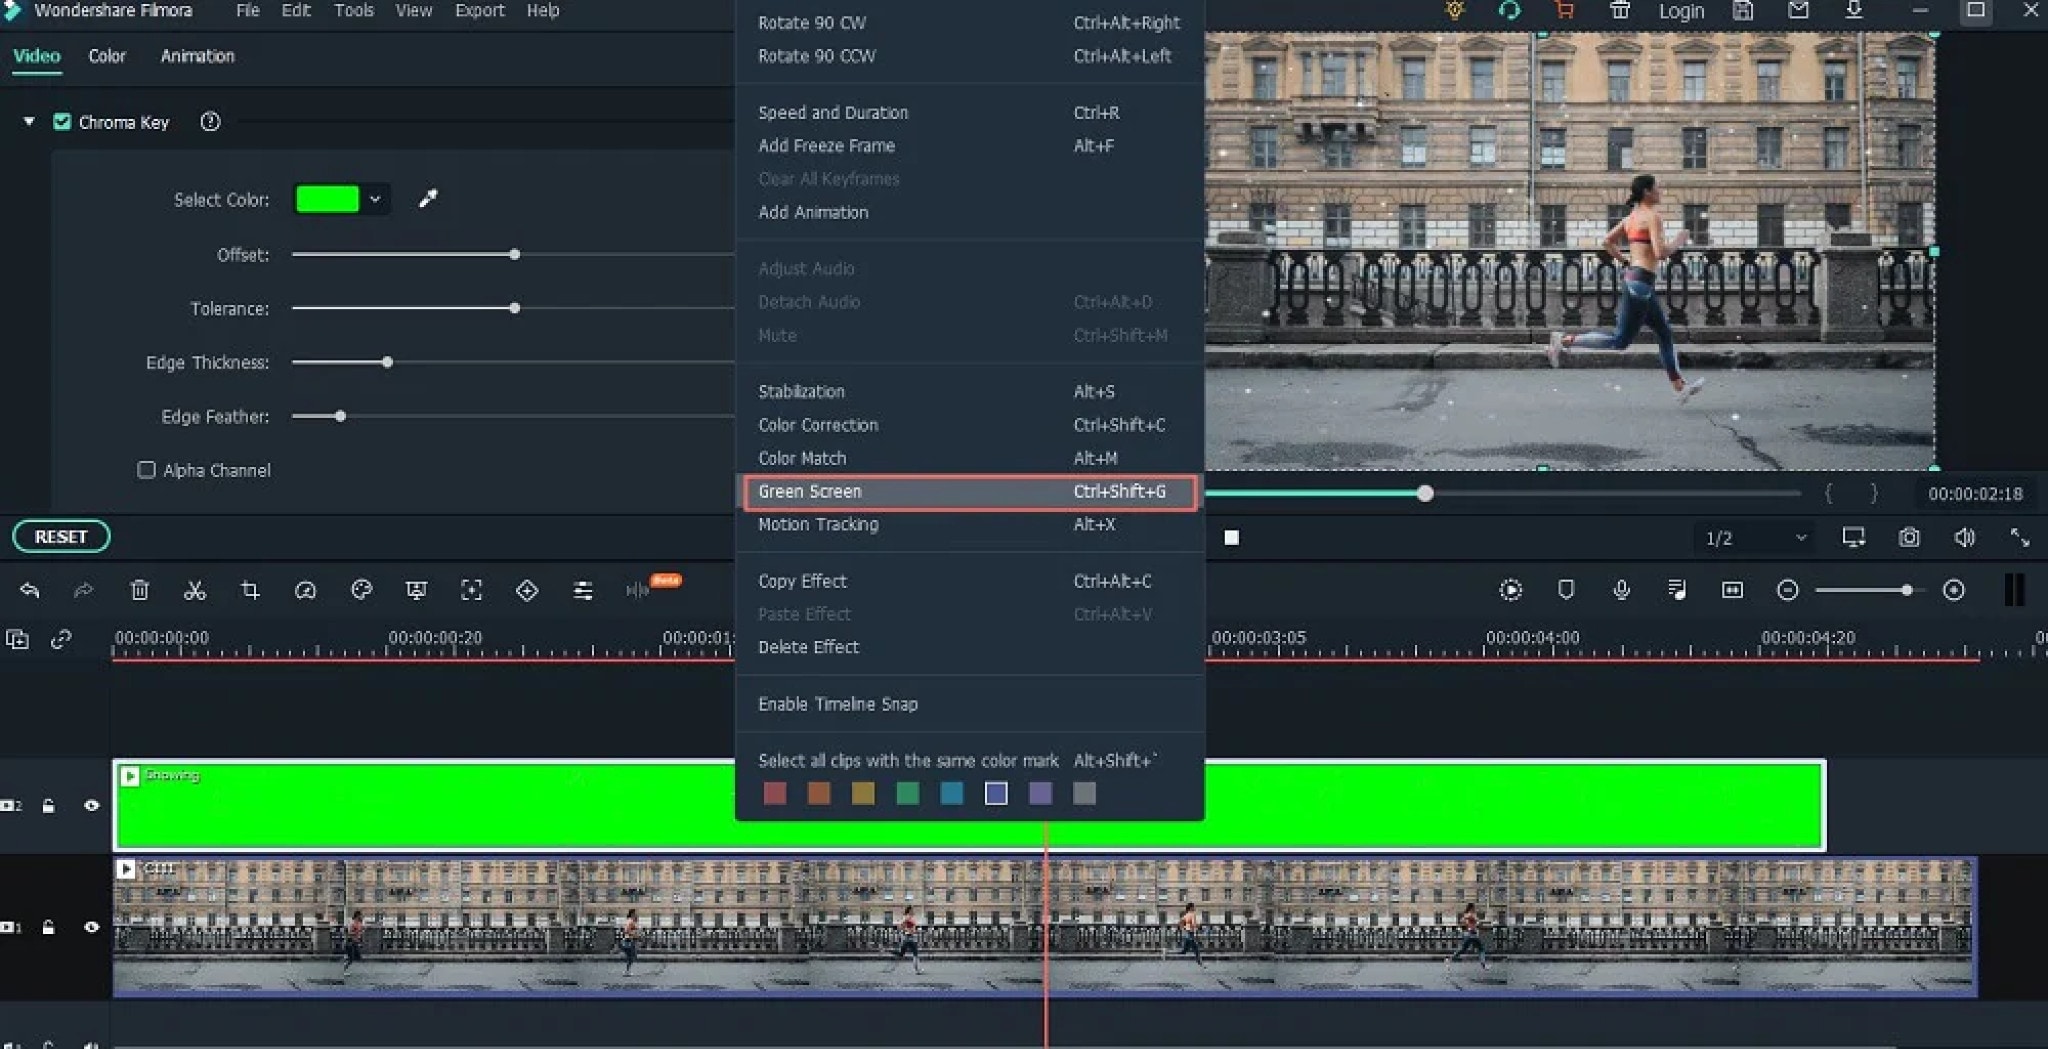
- Click on “Green Screen“ and you’ll open the video editing panel. And the green screen background has been removed.
To open the green screen editing panel, you can also double click the overlay video, then check “Chroma Key” to apply the green screen function. And you can also adjust the offset, tolerance, edge thickness, etc. according to your own needs.
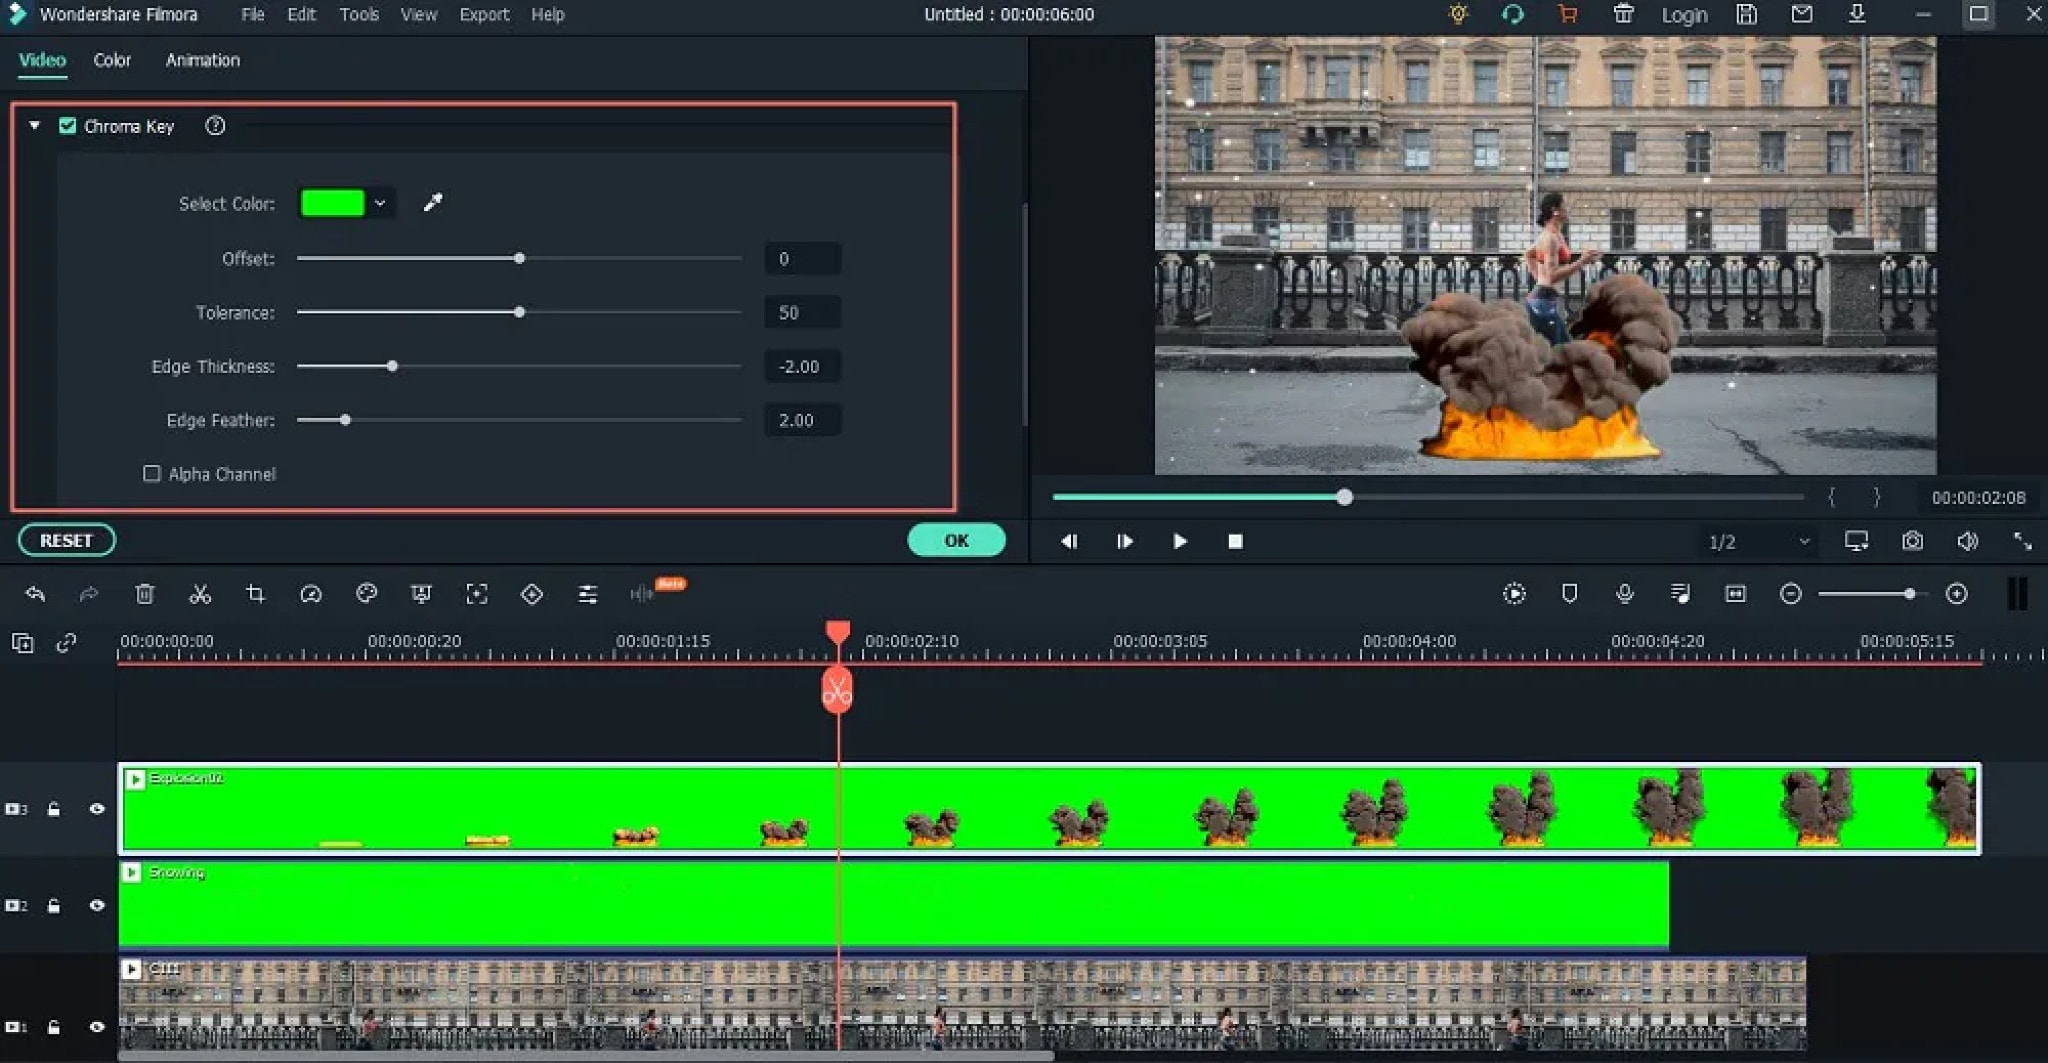
When you’re satisfied with the effect, you can click the “OK“ button to save the changes.
OPENSHOT
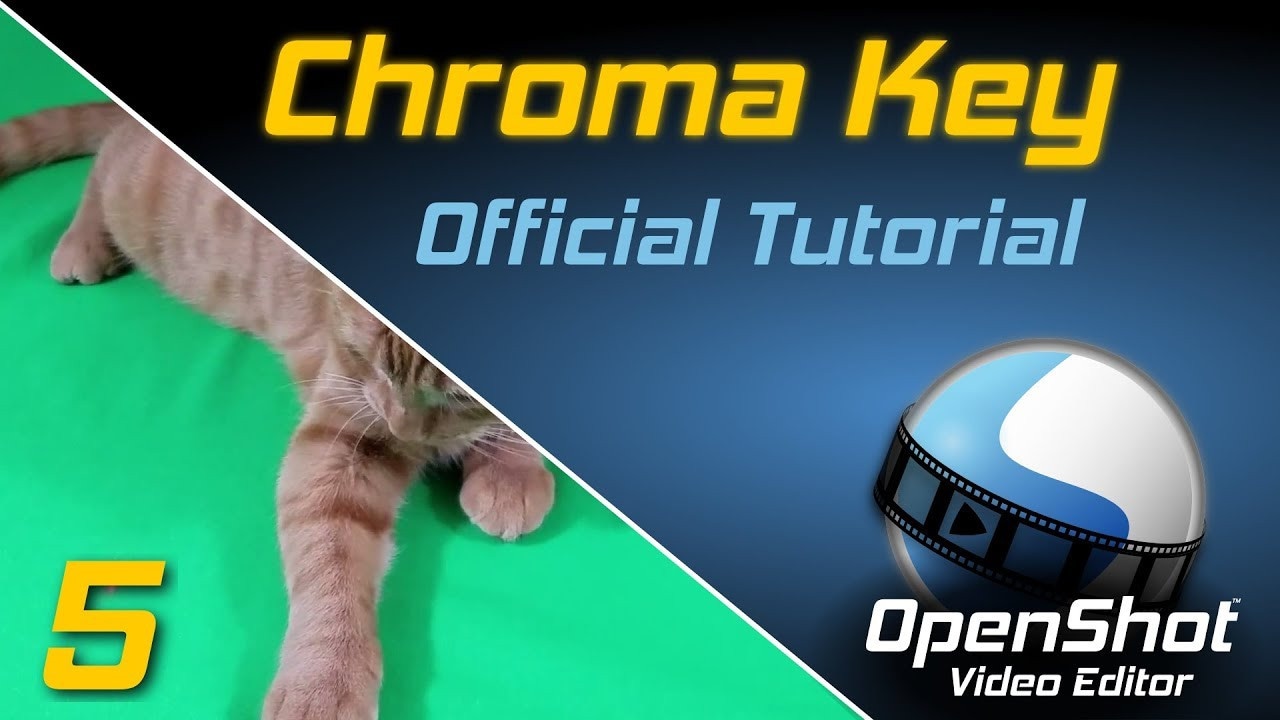
OpenShot Video Editor is a free, open-source video editor for Mac and Windows PC that can take your videos, photos, and music files and assist you in creating the film you’ve always wanted to make. Add subtitles, transitions, and effects with ease, and then export your film to DVD, YouTube, Vimeo, Xbox 360, and a variety of other popular formats.
A cross-platform video editing solution designed to help businesses of all sizes edit audios, videos, or images using a drag-and-drop interface. Administrators can use OpenShot Video Editor to enhance videos by adding animation effects such as fade, flying text, snow, and bounce, watermarks, 3D titles, and audio tracks, among other things.
The multilingual platform, which was specifically designed for video editors, allows teams to adjust color contrasts and brightness, as well as add time.
Supported OS: Windows, macOS, Linux
Features:
- Cross-platform (Linux, Mac, and Windows)
- Support for many videos, audio, and image formats (based on FFmpeg)
- Powerful curve-based Key frame animations
- Desktop integration (drag and drop support)
- Unlimited tracks/layers
- Clip resizing, scaling, trimming, snapping, rotation, and cutting
- Video transitions with real-time previews
- Compositing, image overlays, watermarks
- Title templates, title creation, sub-titles
- 2D animation support (image sequences)
- 3D animated titles (and effects)
- SVG friendly, to create and include vector titles and credits
- Scrolling motion picture credits
- Advanced Timeline (including Drag & drop scrolling, panning, zooming, and snapping)
- Frame accuracy (step through each frame of video)
- Time-mapping and speed changes on clips (slow/fast, forward/backward, etc…)
- Audio mixing and editing
- Digital video effects, including brightness, gamma, hue, greyscale, chroma key, and many more!
- Experimental hardware encoding and decoding (VA-API, NVDEC, D3D9, D3D11, VTB)
- Import & Export widely supported formats (EDL, XML)
- Render videos in many codecs and formats (based on FFmpeg)
Pros:
- 3D Titles
- Curve-based Time Mapping
- Non-linear Editor with Infinite Tracks
- No Watermark
- Frequent Update
- Easy to Use
- Multi-lingual
Cons:
- Unstable Performance
- Limited Editing Features
- Less Powerful Hardware Acceleration
- Obsolete Interface
Steps On How To Chroma Key In Openshot
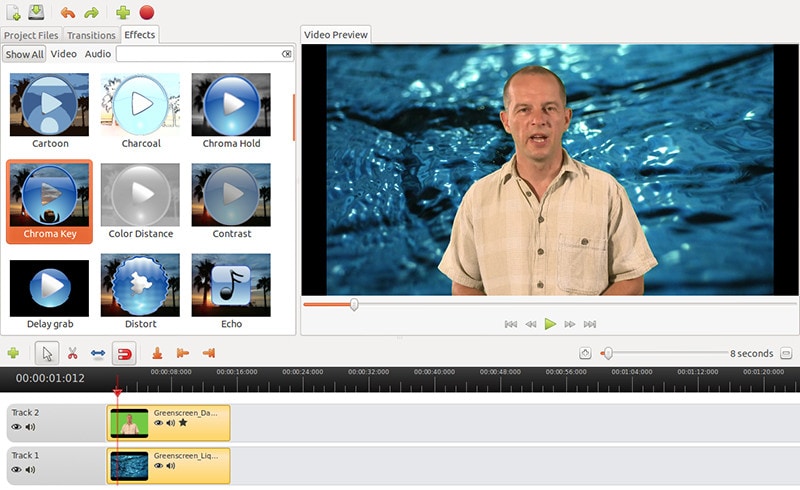
- To create a chroma key (e.g. greenscreen or bluescreen) in OpenShot, begin by importing the files you’re going to use.
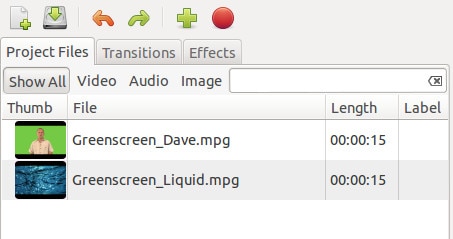
- Drag the file to be keyed onto Track 2 in the timeline, and the file to use as the background onto Track 1. The plan is to make the green part of the upper image transparent so the file underneath becomes visible.
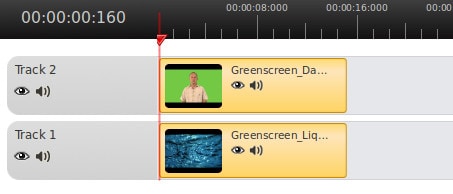
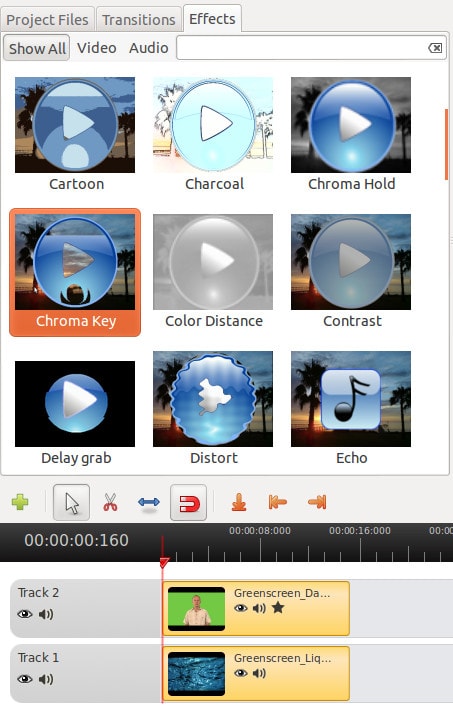
- Click the Effects tab, find the Chroma Key effect, and drag it onto the top file in the timeline. You will see a star appear on the file in the timeline.
- Right-click the top file in the timeline and select Properties. In the Properties window, click the Effects tab and then click the Chroma Key effect.
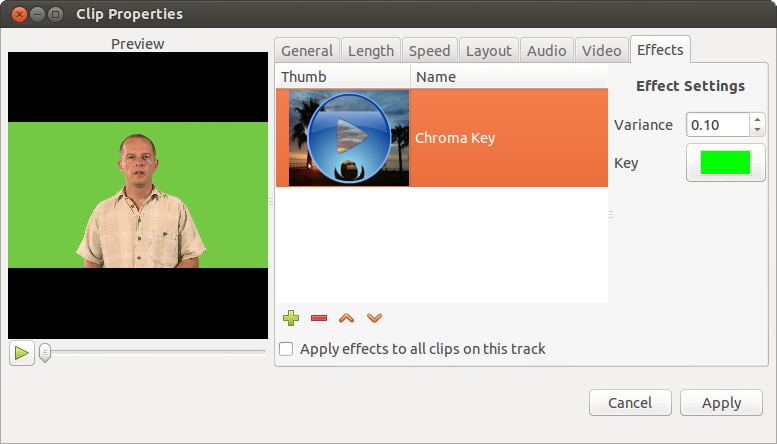
- Click the green-colored area next to the word “Key” (shown above) to bring up the Pick a Color window (shown below). Click the eyedropper tool and then click on a green part of the video image.
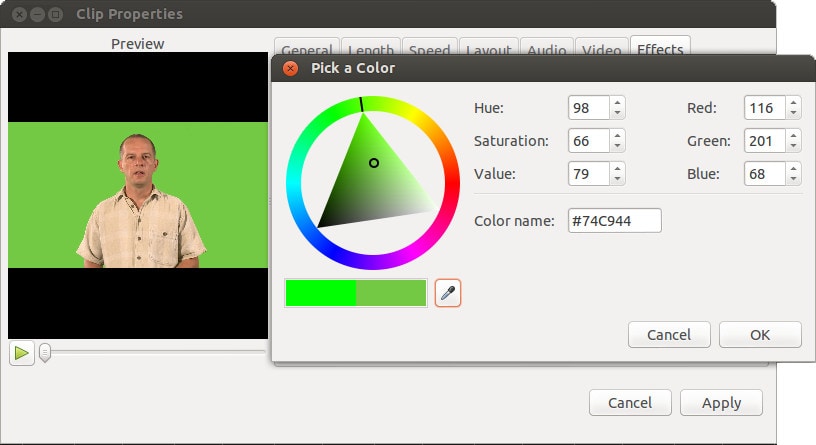
- Click OK, then click Apply in the properties window. You should now be able to scrub through the timeline and see the effect in action.
iMovie
When you record a video against a green screen, you can make the background transparent and replace it with other video clips, graphics, or still images of your choice. It’s easy to overlay any footage with iMovie’s green screen effect. For example, you can transport yourself anywhere or appear in your favorite films.
The green Screen effect, also referred as the Chroma Key effect, is a simple way to combine two clips into one with impressive scenes. You can, for example, fly over a very high mountain. Green Screen is a background that is only one color, usually green. This could be another pure color, such as Blue or Pink. By dragging and dropping, you can apply a green screen video to another in iMovie. It’s incredibly simple to create stunning videos using the iMovie Green Screen effect.
Supported OS: macOS and iOS
Features:
- Options to modify and enhance video color settings
- Crop and rotate video clips
- Stabilize shaky videos
- Add video transitions
- Change the speed of clips.
- iMovie allows you to remove both green and blue screens
Pros:
- Clean, elegant interface
- Well optimized, responsive, and fast on modern Macs
- Effects and titles are all top-notch—especially for a free program
- Robust and useful interactions with other Apple products and software
Cons:
- Doesn’t have some advanced features present in other applications, like 360 video or Multicam
- Sometimes the efforts to keep the interface simple make finding a solution obtuse
- The user interface is not customizable
- Supports fewer export formats than some competing products
Steps On How To Chroma Key In iMovie
- Open an empty project.
- Select the background you would like to use.
- Drag and drop the background video or image into the timeline.
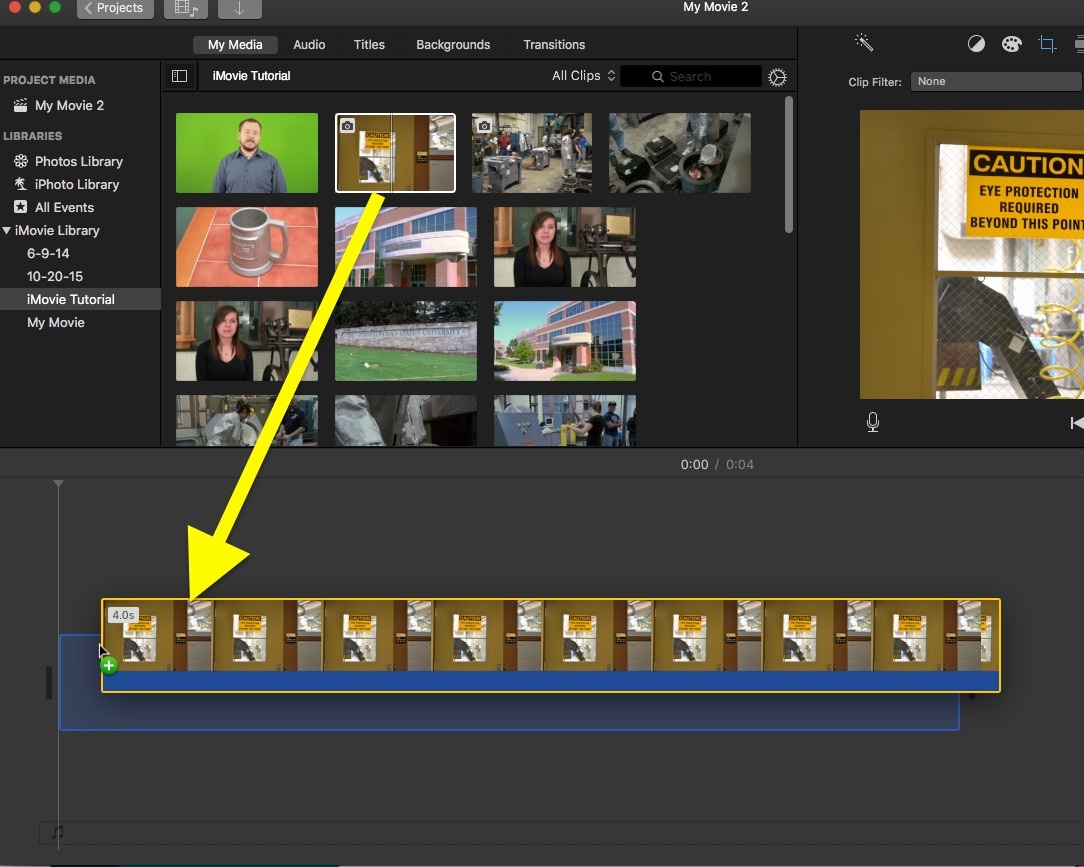
- Select the green screen footage you want to use.
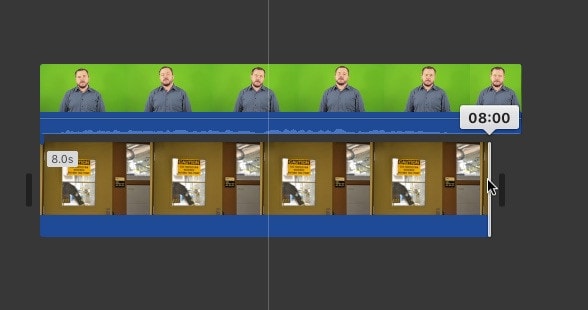
- Drag and drop it above the background.
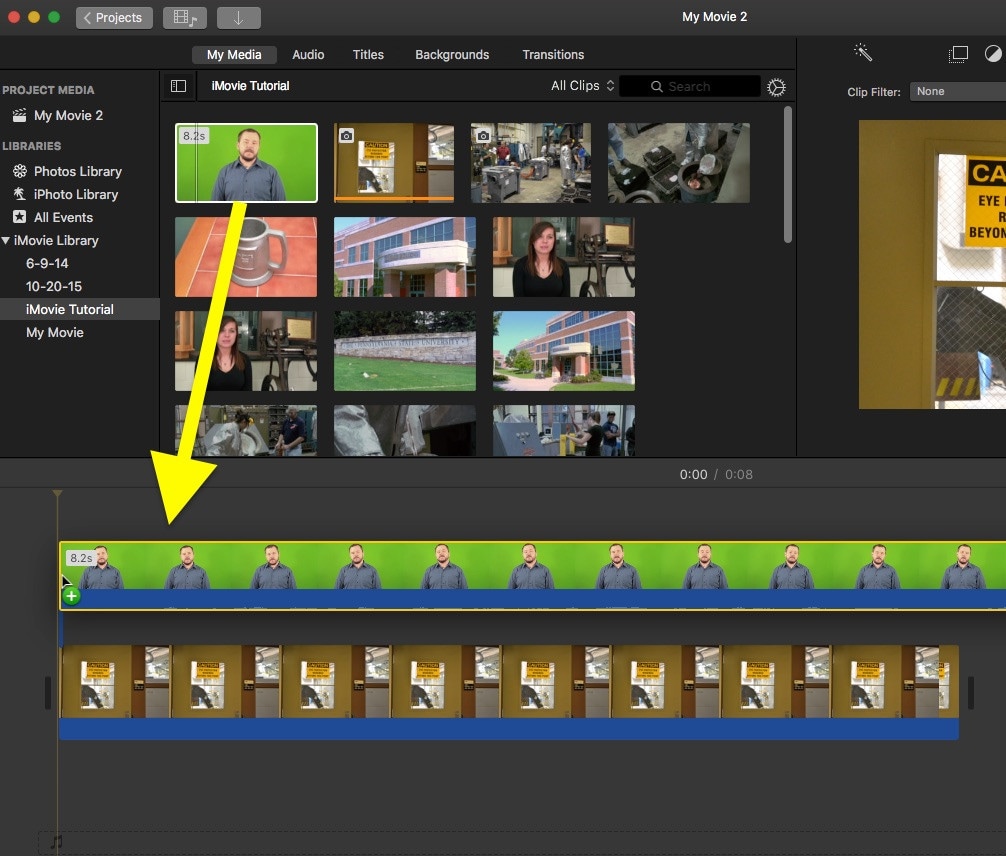
- Drag the edge of the background to make the background longer or shorter to match your green screen footage.
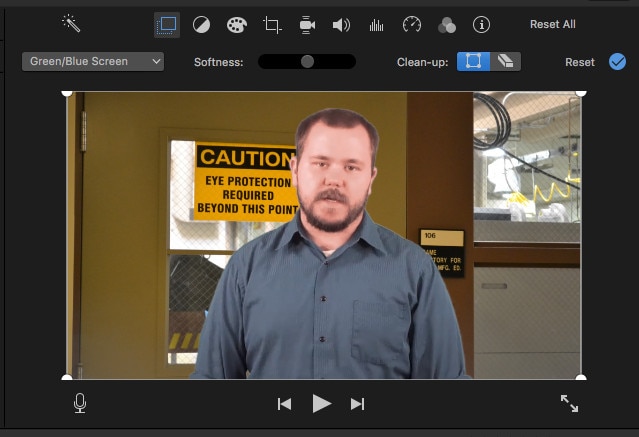
- Click to select the green screen footage in the timeline
- Select Green/Blue Screen from the drop-down menu that defaults to Cutaway above the left corner of the viewer window.
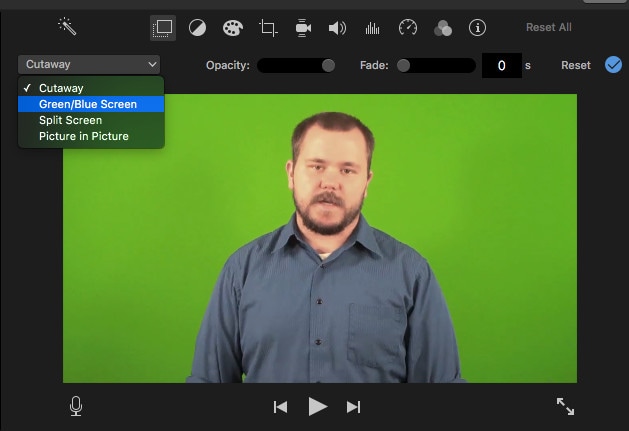
- The green should now be removed to reveal the background behind it.
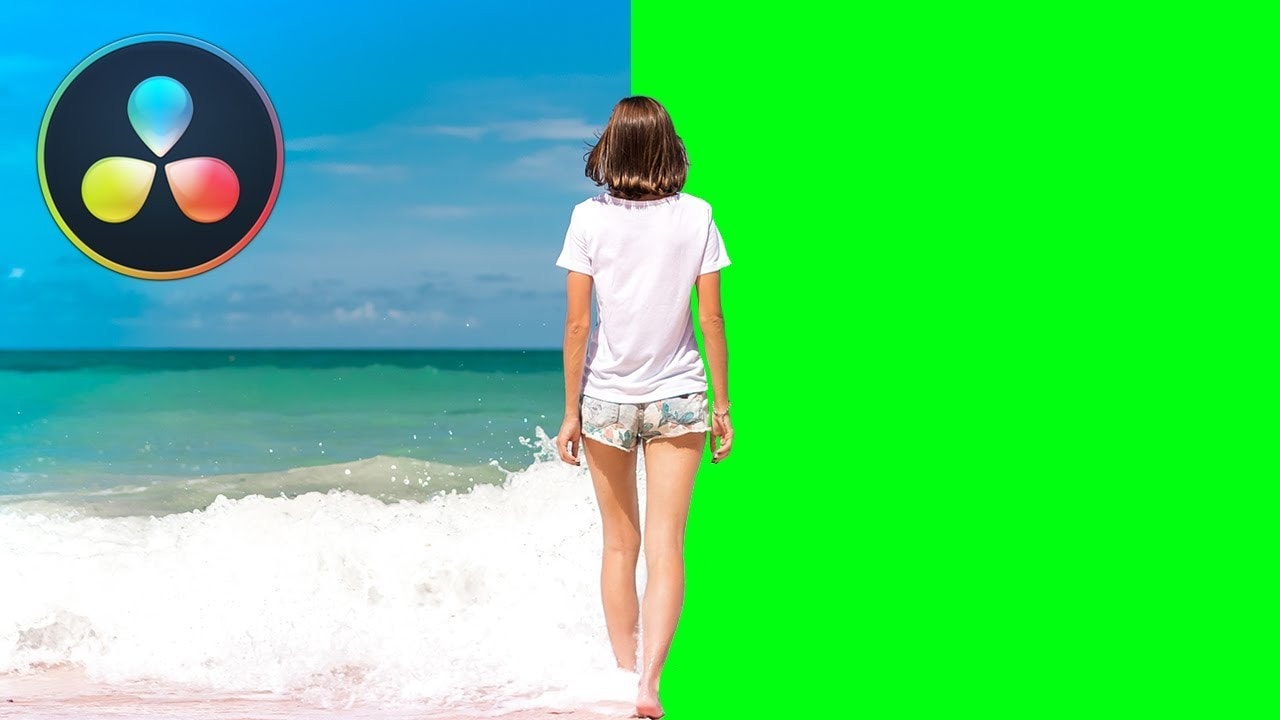
DA VINCI RESOLVE
Davinci Resolve has two versions including a full studio version which is available for $299. Because some professional tools, such as team collaboration and video noise reduction, cannot be used without a full license, the free program has a surprising number of features. The majority of the features included in the free version are adequate for professionals and hobbyists.
Although the Davinci Resolve program is regarded as a professional grade editor, it does include some advanced tools such as exporting, audio mastering, color correction, and more. The program is also useful for arranging audio and video clips, and it has a large selection of effects and filters. The additional color correction and adjustments available here can also aid in HDR support and produce more professional results when working with camera RAW data.
Davinci Resolve is also well-known for having one of the best color grading programs available. The outcome can be hugely potent when using the accessible chromakey tools. It doesn’t take much to figure out how to use this effect with the quick tutorial on board.
Supported OS: Mac and Windows
Features:
- Options to modify and enhance video color settings
- Crop and rotate video clips
- Stabilize shaky videos
- Add video transitions
- Change the speed of clips.
- iMovie allows you to remove both green and blue screens
Pros:
- Clean, elegant interface
- Well optimized, responsive, and fast on modern Macs
- Effects and titles are all top-notch—especially for a free program
- Robust and useful interactions with other Apple products and software
Cons:
- Doesn’t have some advanced features present in other applications, like 360 video or Multicam
- Sometimes the efforts to keep the interface simple make finding a solution obtuse
- The user interface is not customizable
- Supports fewer export formats than some competing products
Steps On How To Remove the Green Screen in DaVinci Resolve Inside the Color Tab
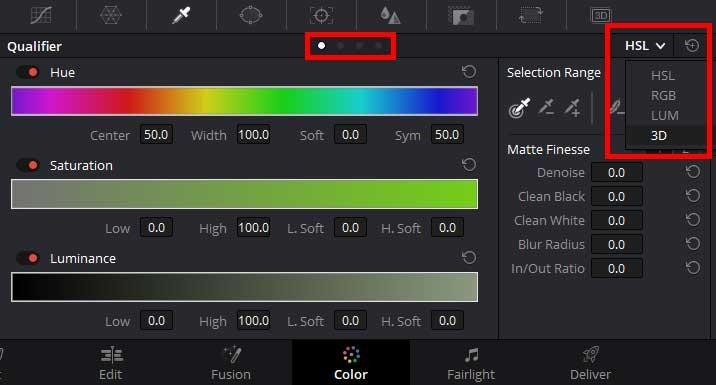
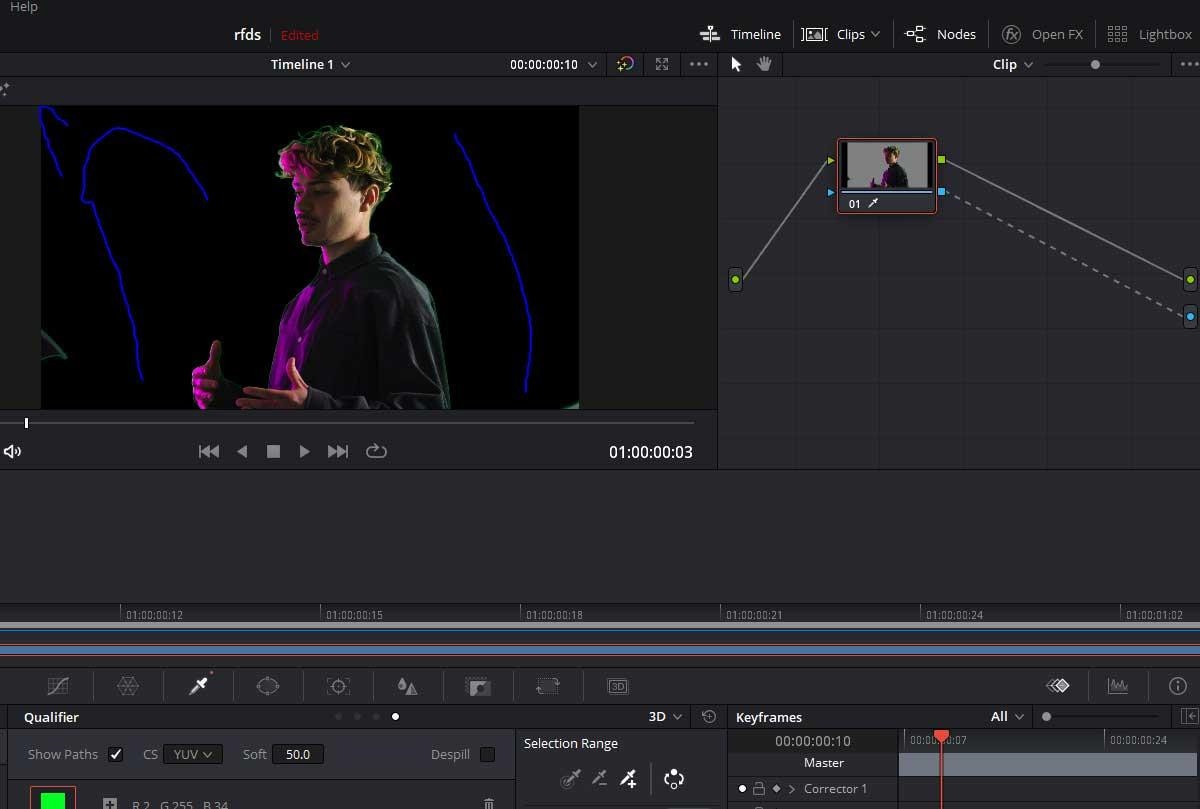
Step 1 – Add the Qualifier Tool & select the color
After you finish cutting the video, jump inside the “Color” tab and select the Qualifier Tool. Make sure you set the tool in “3D” mode to enable us to select a bigger range of the green spectrum.
Do this by simply selecting the fourth dot from the middle-upper area of the window or by selecting it from the drop-down mode selector situated in the window’s top-right corner.
After selecting the 3D mode for the Qualifier Tool, go ahead and select the range of green colors you want to remove by simply drawing lines on top of the screen, similar to the way I did in the image below.
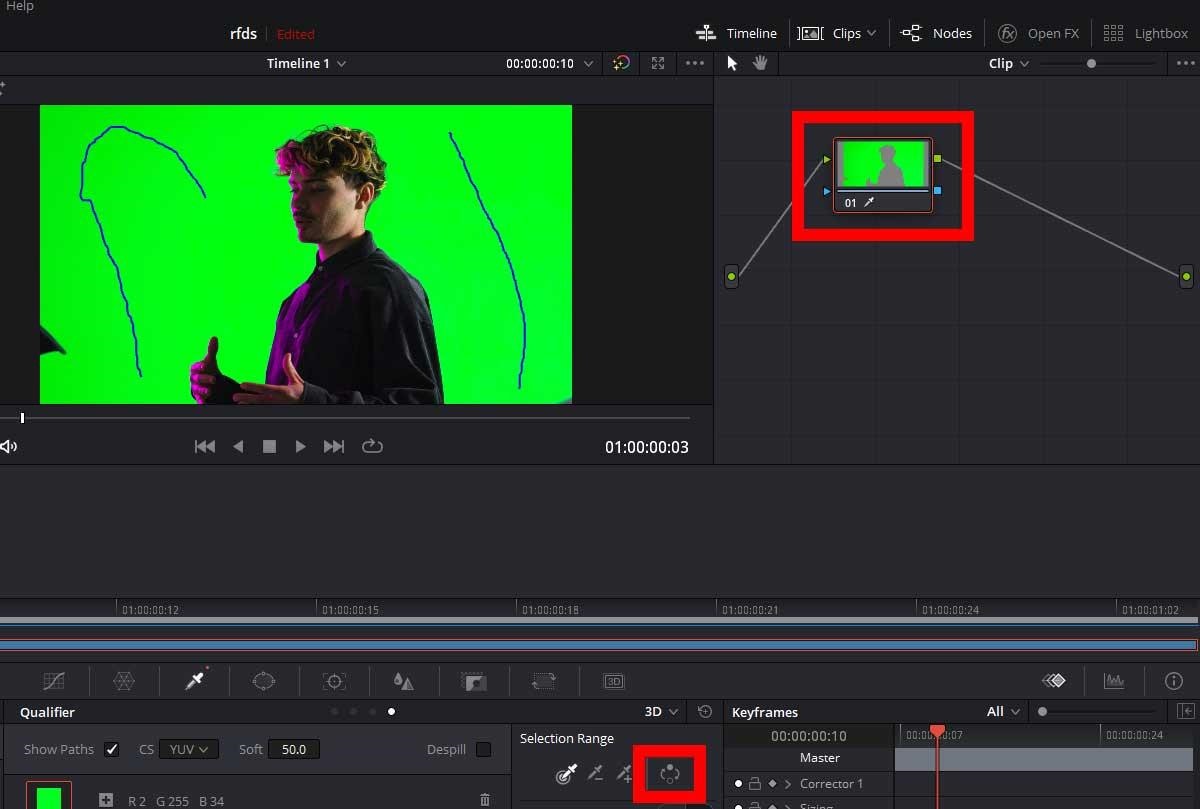
Step 2 – Removing the color
As you can see in the small rectangle, Resolve did the keying, but it doesn’t know what to do with it because we didn’t specify. Right-click underneath the node, select “Add Alpha Output” and then link the node.
Yes, I know it will key out the subject and not the green screen. There is no problem. Go ahead and select the Revert button situated in the “Selection Range” window. Everything should be OK now.
Step 3 – Clean the edges
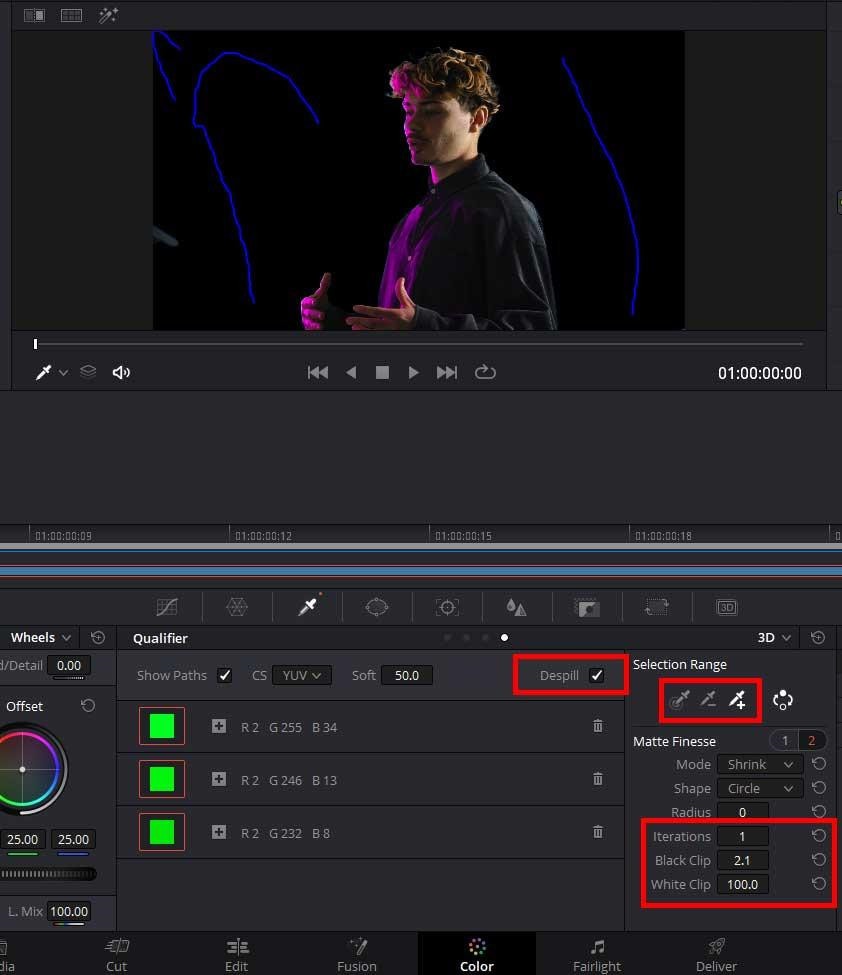
As you can surely notice, there are still some issues we have to address. In the hair area and on the outline of the subject, there is a noticeable green color spill. We don’t want that! On top of this, there will be many situations where you will still notice some noisy green pixels in the transparent area, around the corners of the screen, or the subject.
To get rid of these problems, we have to jump into the Qualifier window. Here, there are many settings you can play with to tweak the output. Most of the time, you will solve these problems by checking “Despill”, further selecting more of the greens and adding them to the Selection Range, or modifying the shrink, ”Black Clip” and “White Clip”.
Step 3 – Done
This is all for this method! Go ahead and add a background in the “Edit” mode and your job is done! Feel free to watch the video below, where I went through the same steps as above, but faster.
BEST PAID GREEN SCREEN SOFTWARE FOR BEGINNERS ON MAC
WEVIDEO
Supported OS: Windows, Mac, iOS, Android
This program, which costs only $4 per month, has extensive compatibility with nearly 20 different input and output formats. Most common input and output formats, such as NT 4.0, avi, 3gp, and others, are well represented.
If you want to do green screen options online but don’t want to install any software to access a full-featured video editor, this could be one of your best options.
WeVideo is a cloud-based video editing solution that is both powerful and simple to use. There’s a reason it’s one of the most popular online video editors out there. This includes options for photo animations, clip transformations, voiceovers, and more. You can also improve your video by using a variety of premium features such as screencasting, custom branding, and a wide range of free tracks that can be used with copyright-free music.
With this online editor, you can easily control almost everything in a video, from motion effects to green screen technology to scene transitions.
Features:
- 720p video resolution
- Motion titles
- Screencasting
- WeVideo JumpStart
- Cloud storage
- Music library
- Slow motion
- Voiceover
- Guilt in graphics
- Customizable environment
- Green screen
- Advanced text editing
- File & media manager
- Multi-track editing and storyboard
Pros:
- This is a multiplatform video editor that works with intense compatibility online. You can use it on almost any device.
- The interface is also quite simple and it has some tools that are used by the pros as well as a format that most people can easily understand.
- There is a full licensed library of songs with over 100 tracks you can use royalty-free.
- The cloud storage also ensures that you can pick up a project on any device that you won’t. Cloud access anywhere gives you more time for efficiency and handling your workload.
Cons:
- The program only currently supports 720 P resolution in some of the cheaper plans and there are limited minutes allowed with editing if you are only going to use the trial-free plan.
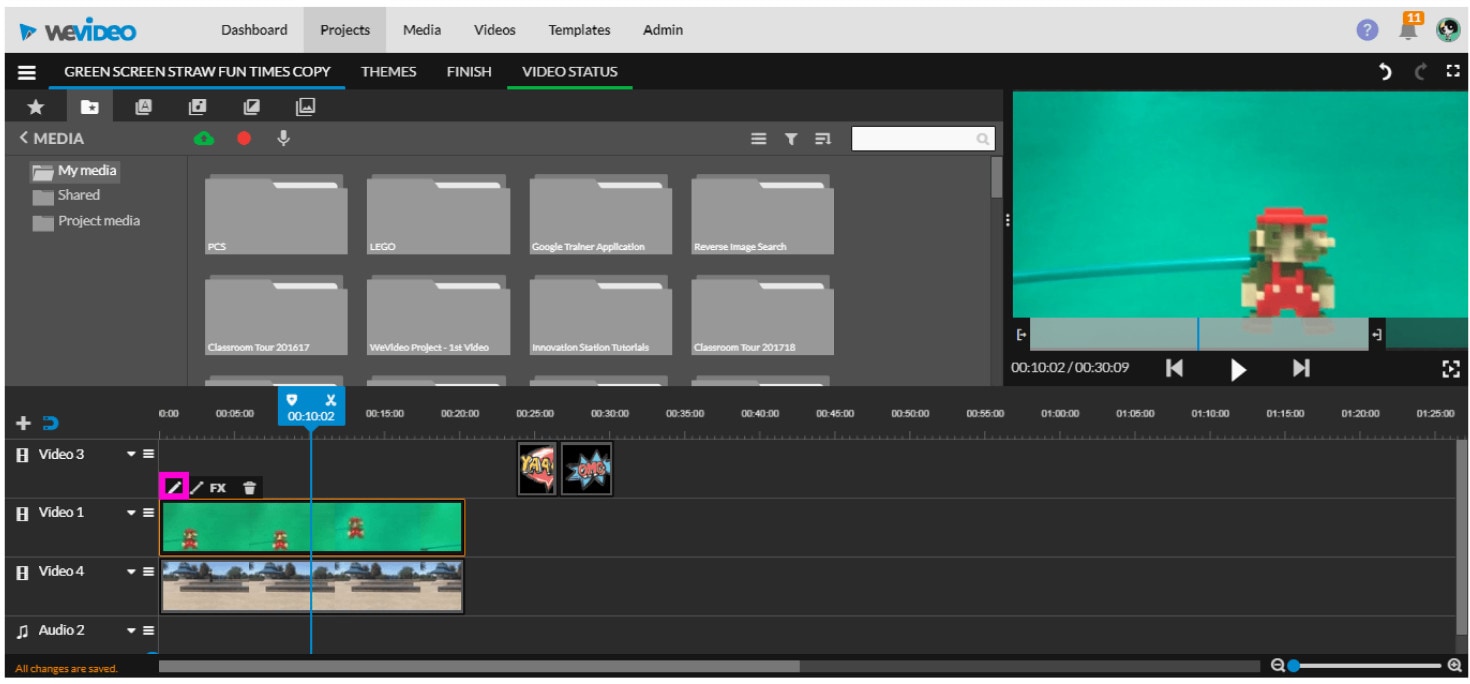
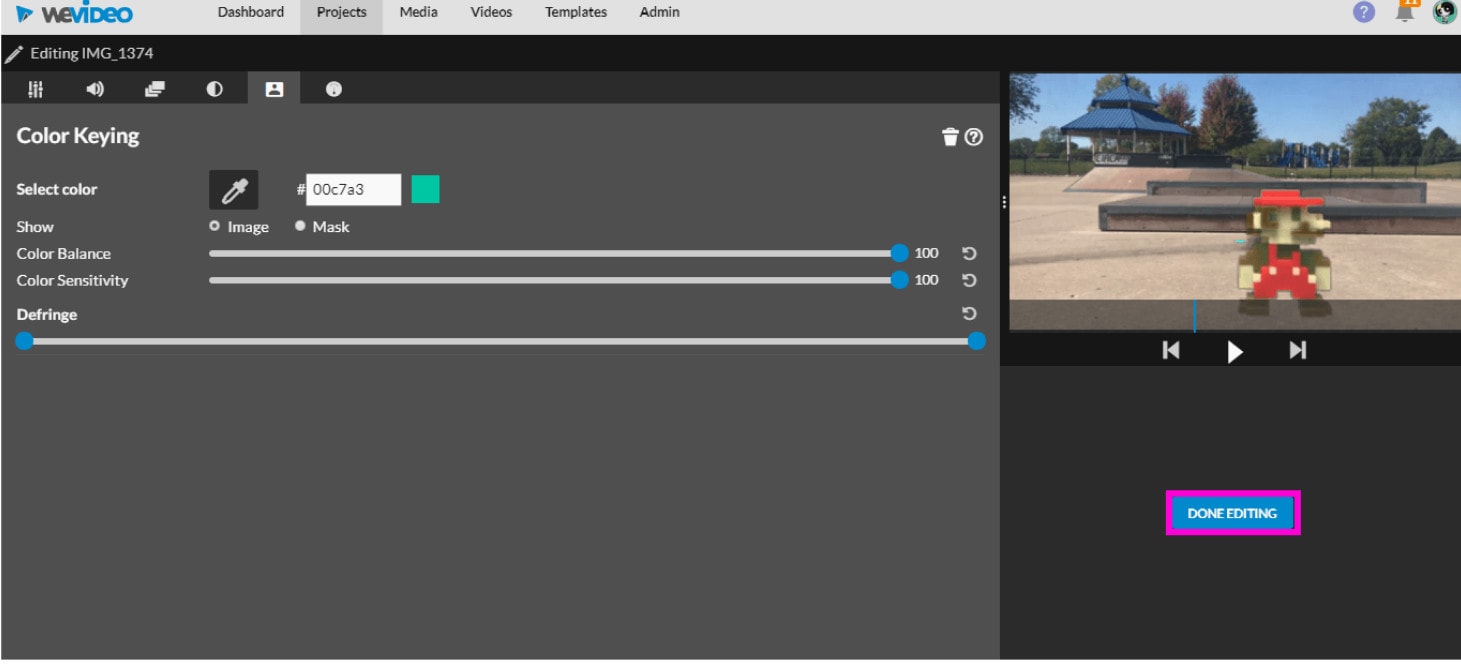
Steps On How To Chroma Key In WeVideo
- When your WeVideo project is open, click on the clip that you wish to remove the green background from.

- The video or image layer underneath the color-keyed clip will show through, as the background.
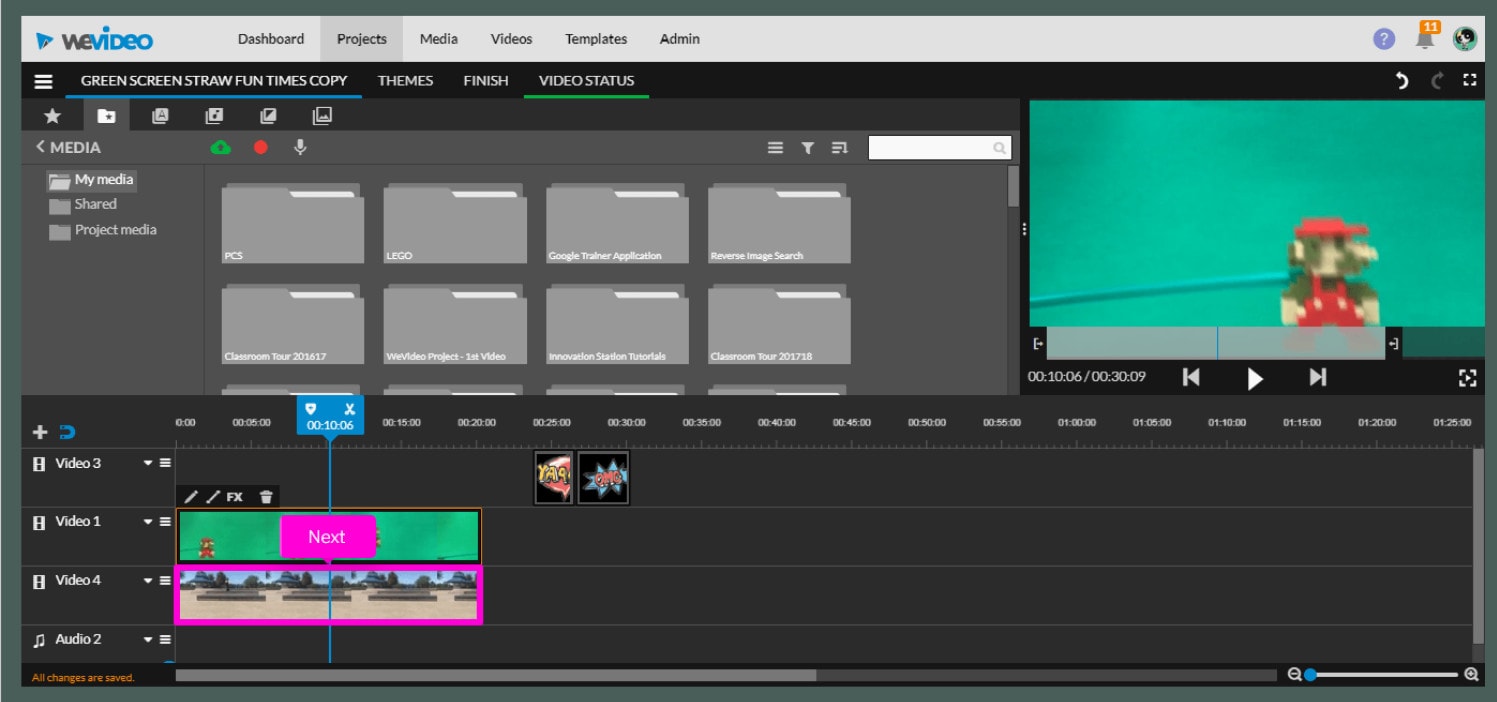
- Click on the clip editor pencil icon.
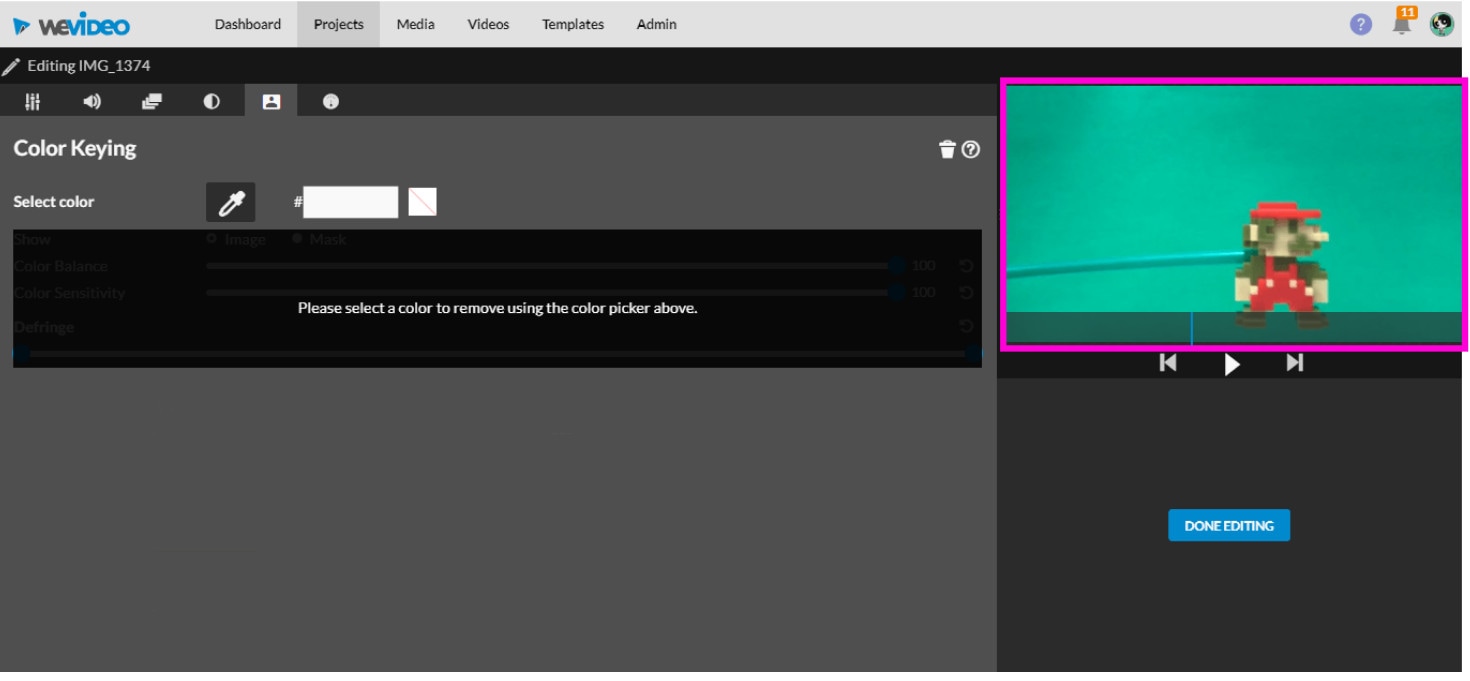
- Click on the eyedropper to choose the color you’re going to remove.
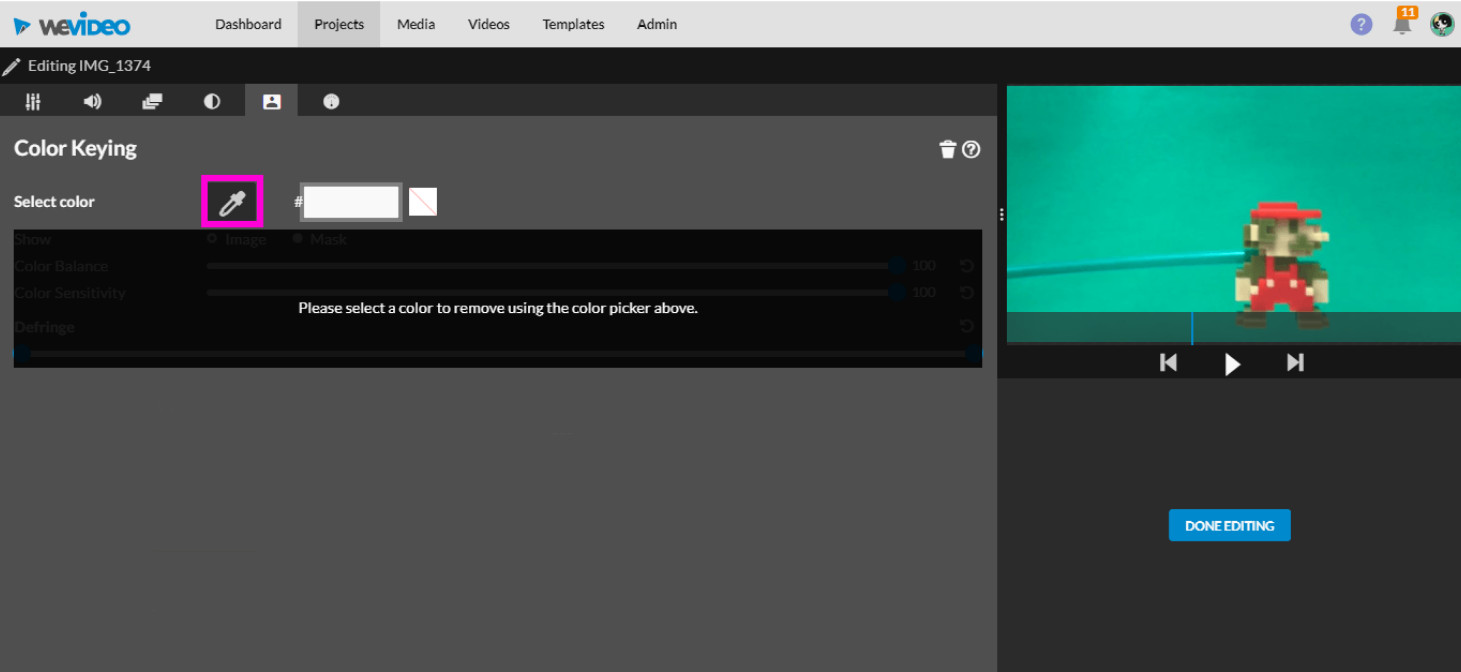
- Click an area that is the color that you would like to remove.
CAMTASIA
Supported OS: Mac and Windows
Camtasia by Techsmith is a simple video editing and screen recording application. Camtasia, designed for beginners, allows users to create professional training videos quickly and easily.
Camtasia is a straightforward video editor and chroma key software (for basic green screen editing) that may meet your needs.
It is the ideal video editor for beginners with little knowledge to editing. It includes numerous features that make it simple to create professional videos, whether you are a student, business owner, or regular YouTube user looking to spice up their content.
Features:
- Intuitive and easy-to-use interface.
- The ability to upload videos straight from the application, via Dropbox or YouTube.
- A wide range of built-in editing templates makes it easier for beginners to create professional-looking video content.
- Screen recording options for capturing live demos and lectures.
- Camtasia for Mac is also available, which makes it an ideal video editor for Apple users.
Pros:
- Very easy to learn
- Amazing screen capture feature
- Impressive cursor effects
- Interactivity features
- Good asset library
- Mobile version
- Great customer service
- Low cost
Cons:
- Constant crashes and bugs
- Limited customization
- No keyframe tracking
- Poor keyboard commands
- Export issues
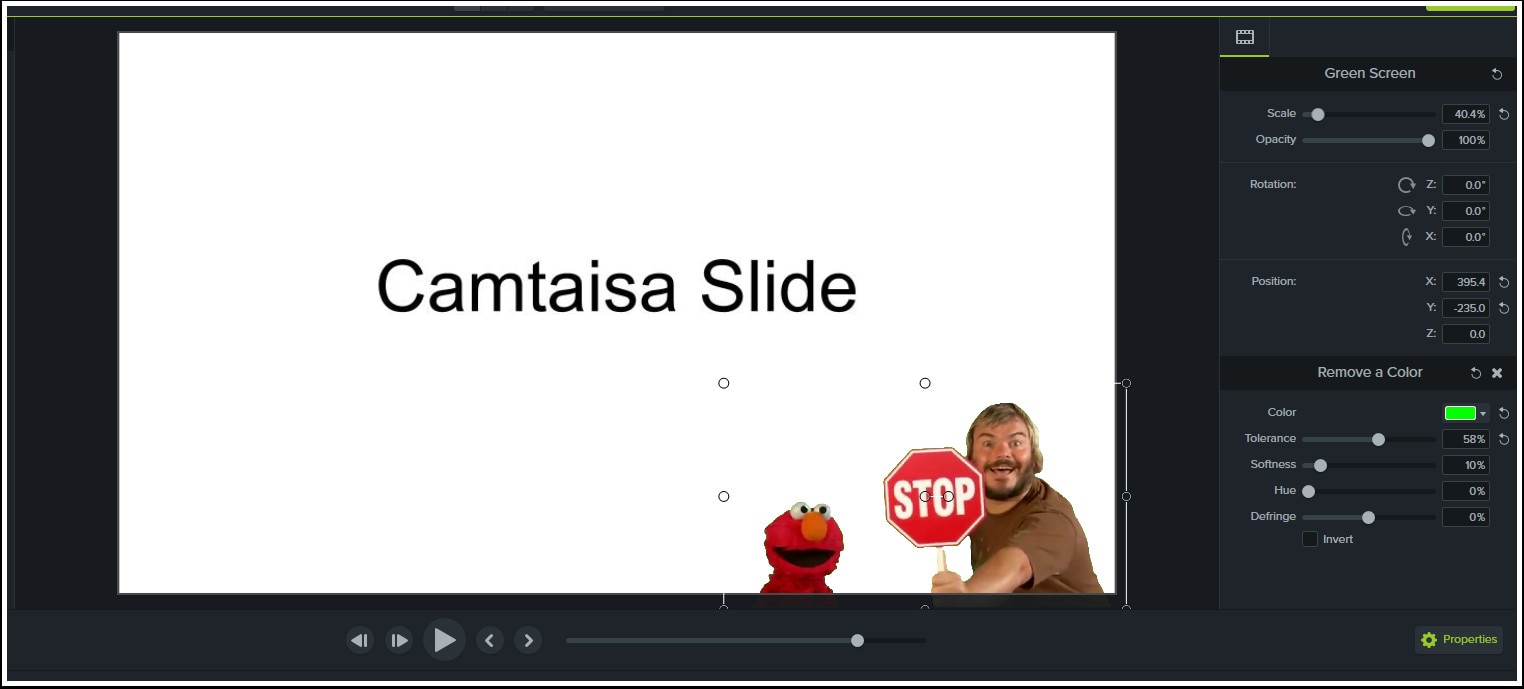
Steps On How To Chroma Key In Camtasia
1. Record a video with a green screen
Make sure the green screen fills up the whole background while recording.
After your video is recorded, it will be placed on your Timeline as the recorded Camera and Screen.
2. Remove the green
Use the Remove a Color tool from the Visual Effects section to remove the green in the background.
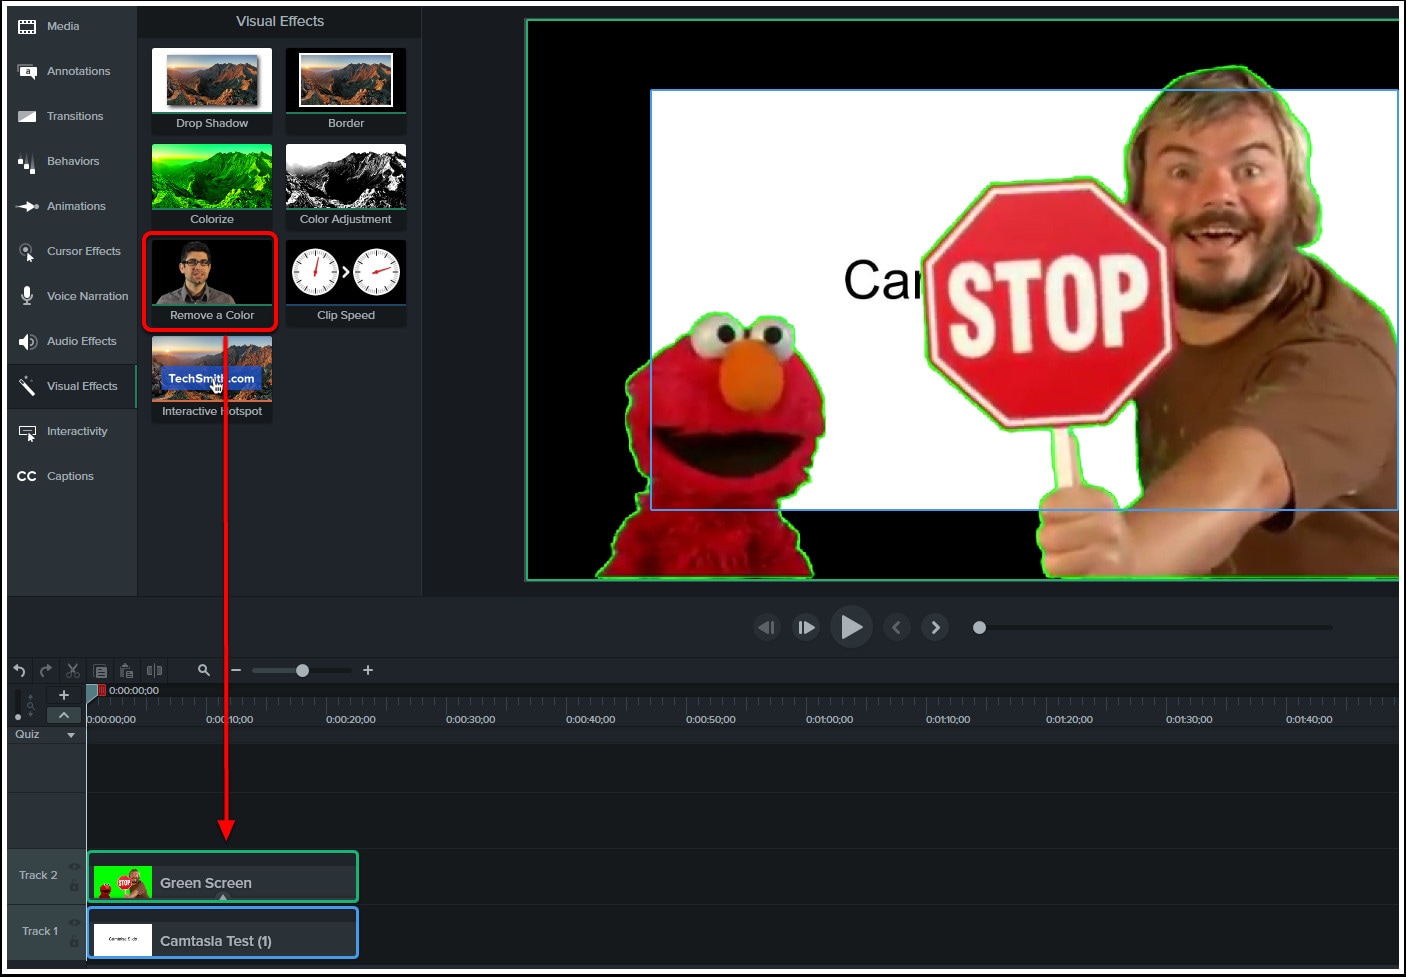
Under the properties on the right side, select the color drop-down menu and use the eyedropper tool to select the green color. (Tip: With the Eyedropper tool selected, click on the green part of your Green Screen to select that color for removal.)
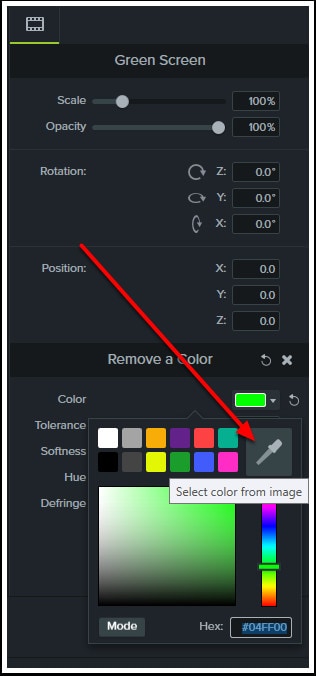
Adjust the Tolerance and Softness to get a clean color removal.

- Adjust the video
Adjust and move your now greenless recording to a desired size and position.
Lightworks

Supported OS: Mac, Windows 8.1, and Linux
Lightworks is ideal for creating real-time effects. The basic package includes free software with green screen editing capabilities. It makes changing the background of your videos simple and effective.
Lightworks provides access to professional-grade features that allow you to create visually appealing videos. The software is quick and adapts quickly to your needs, whether you are a beginner or a pro. It has a learning curve, but there is probably no tool out there that is easier to use once you get used to it.
It offers advanced effects that allow users to enhance videos in real time. You can use a variety of tools, including blurring, masking, and color grading.
You can instantly export videos to YouTube, Vimeo, and other platform services.
Features:
- Works with a wide variety of video formats
- Allows fast export to MPEG4/
- Fully optimized to offer fast speeds
- Multicam editing options
- Realtime effects with the help of inbuilt presets
- Advanced Boris FX Plugin
- Boris Graffiti for text effects
- Fully customizable interface
- Options for real-time collaboration
- Dedicated hardware support
Pros:
- Real-time effects with 4K Editing
- Keyboard shortcuts
- Easy to share videos on the internet
- Access to royalty-free audio and video content
- Histogram tool and 32bit GPU precision
- Lots of ready-to-use effects
Cons:
- The Video Stabilization feature is missing
- 3D Video Editing is not supported
- No Split and Merge features
Steps On How To Chroma Key In Lightworks
1. Record your video
First, you need a green or blue background to shoot against. As we’ll explain later, it doesn’t have to be a very specific shade, but it needs to be substantially different from the subject you’re shooting. You might have seen occasions when a weather presenter’s tie has appeared transparent during a broadcast. This is because the material was too close in color to the backdrop, or the key wasn’t quite set accurately enough.

You can make your backdrop using a sheet, or a large sheet of paper or card. If you’re planning to make videos frequently, there are inexpensive chromakey backdrops available that include a frame to hang the cloth from. If space is limited, collapsible screens are also available starting at around US$40. These screens are also handy for photography.
Good lighting is essential. You need to make sure that the screen is evenly lit so the color is consistent. It’s also important to ensure your subject is far enough from the screen to avoid shadows and color spills (when the blue or green backdrop reflects off your subject).
2. Import and trim
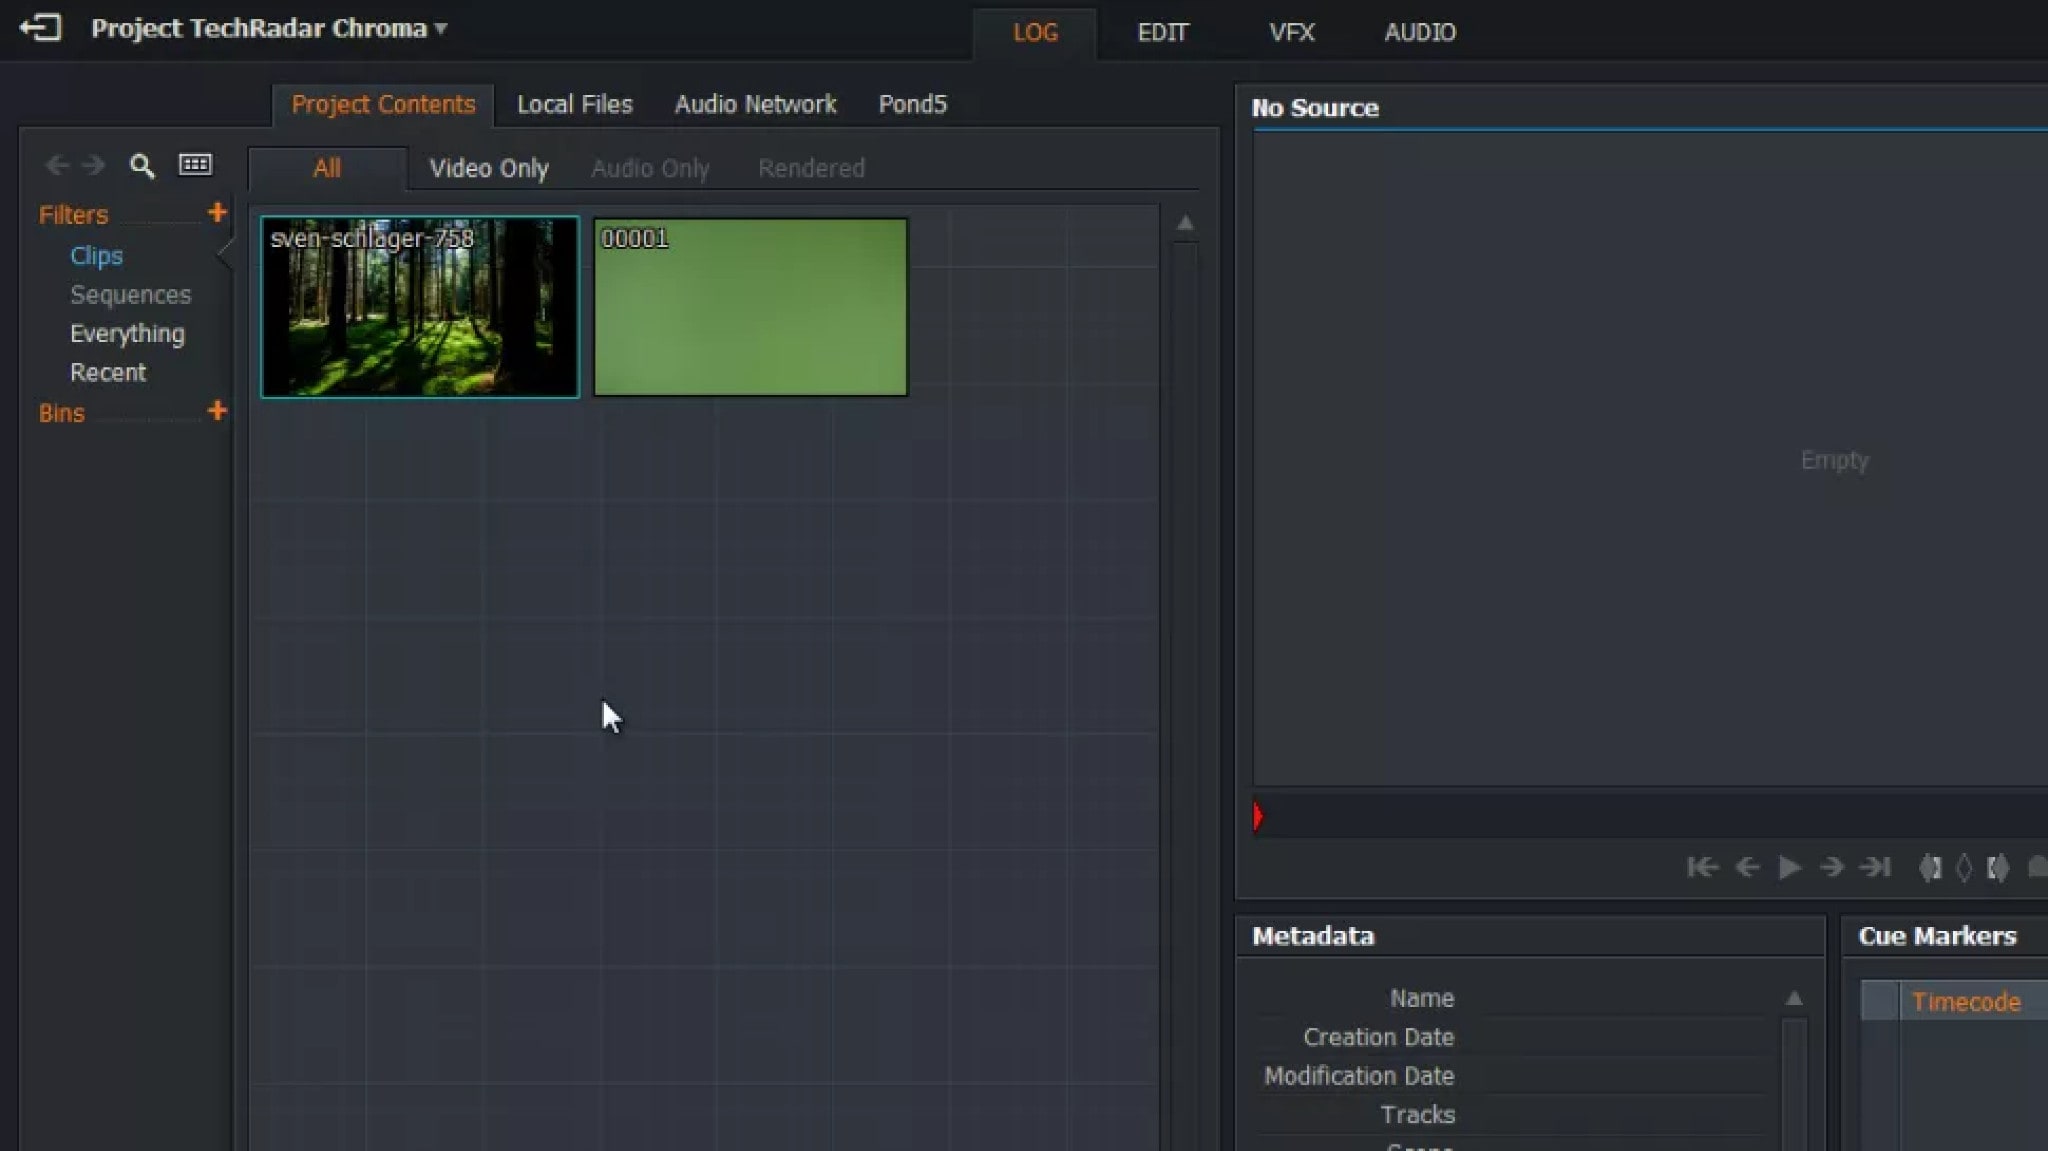
Once you’ve shot your video, download and install Lightworks . It’s free for personal use, but you’ll need to register for a free account if you want to use it for longer than 30 days.
Click the button marked Create a New Project, give it a name, and select a frame rate (you can find this by right-clicking your recorded video and selecting the Details tab). Here we’re using a still image as a background, but you can also use another video. Import this the same way.
Click the Edit tab and drag your video from the Project Contents panel onto the V1 track of the timeline below. If there’s unwanted footage at the beginning or end of your clip, right-click it and select Trim In or Trim Out, then use the yellow handles to change where the clip starts and finishes.
Right-click the preview window marked Sequence #1 and select Tracks > Add Video. Drag your video clip into the V1 track and your still image into V2. Click and drag the right-hand side of the image in the V2 track until it’s the same length as the video.
3. Set the key
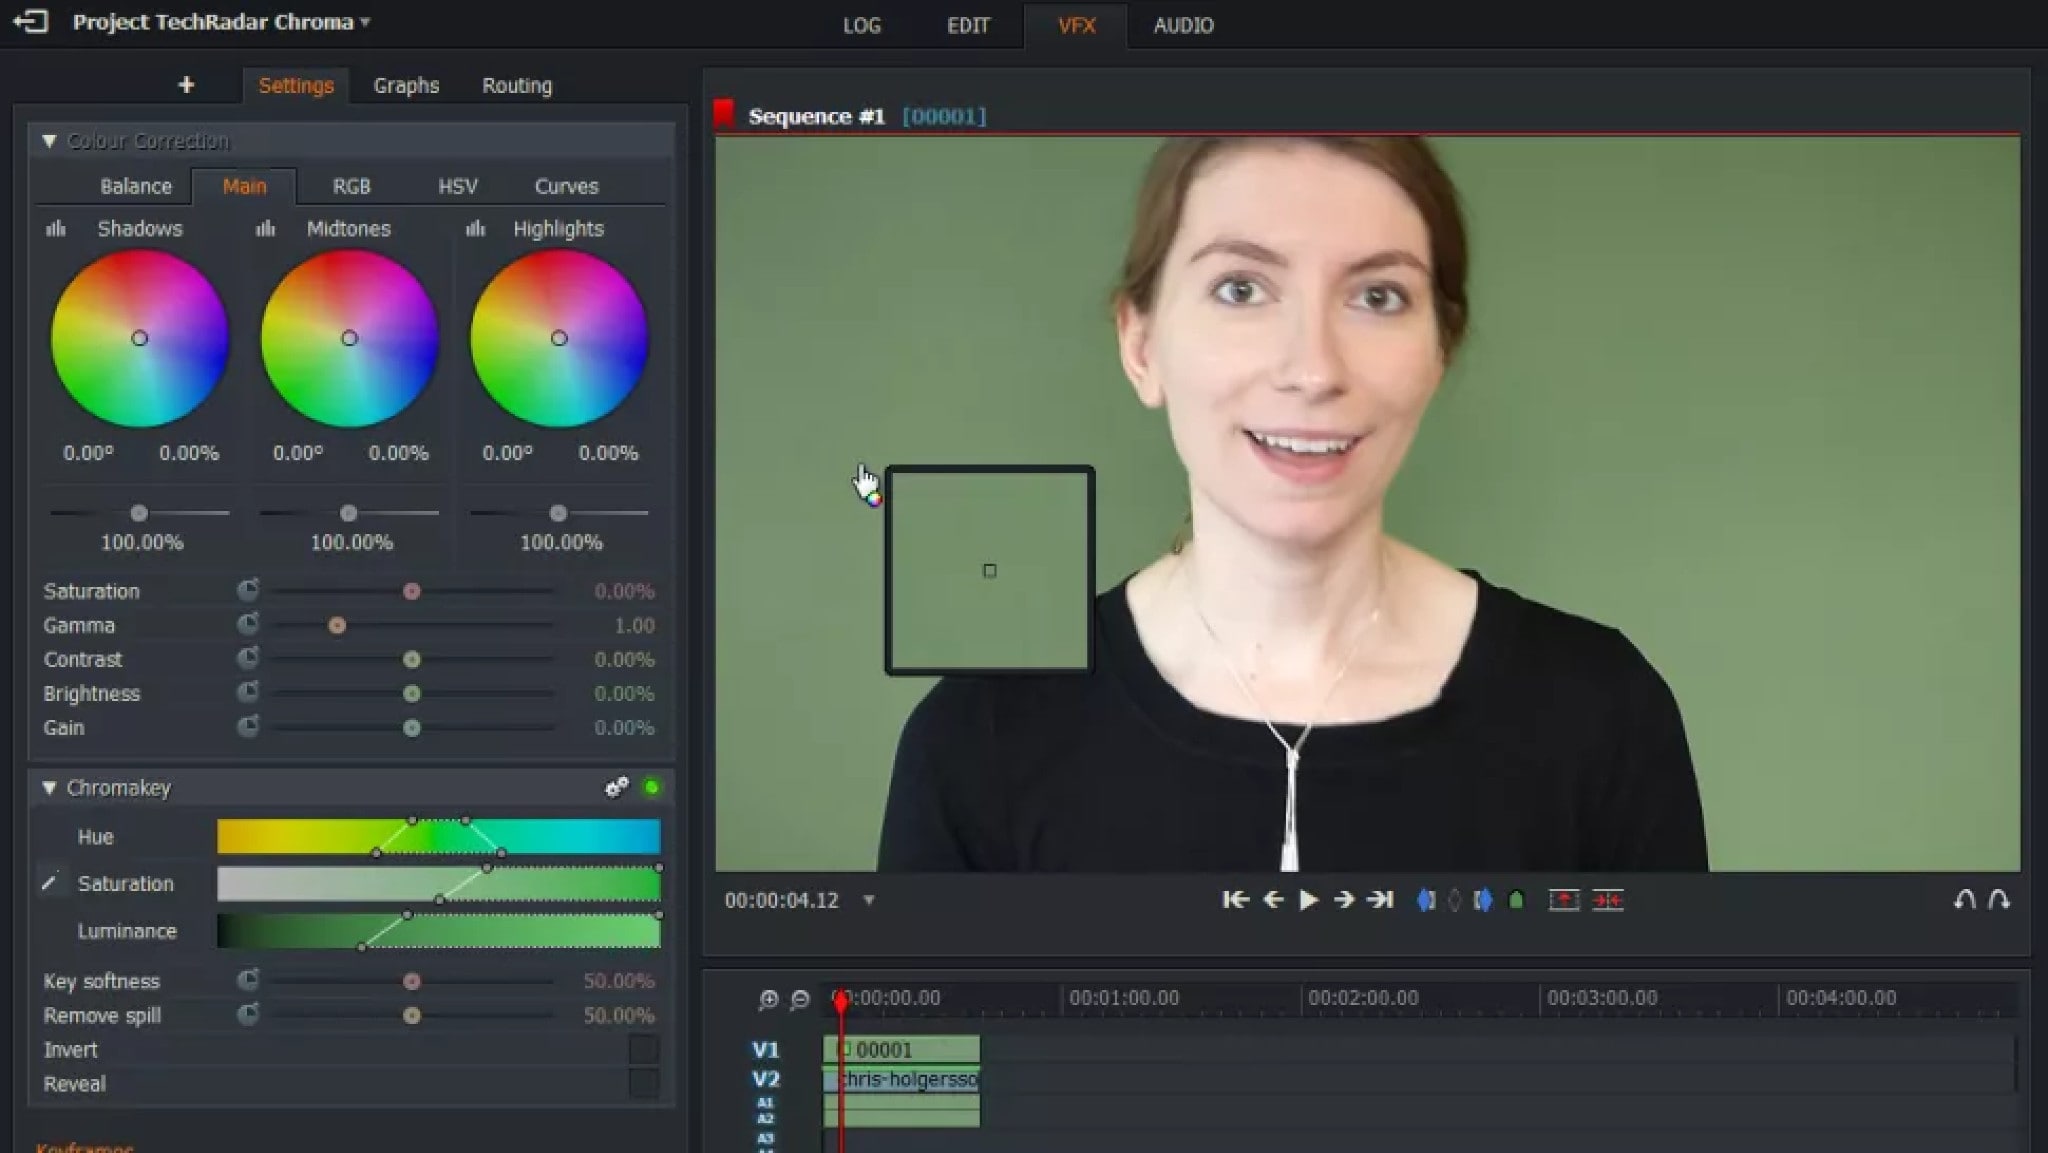
Now click the VFX tab, select the V1 track in the timeline and click the tab marked with a plus icon. Click the Favorites drop-down menu and select Key, followed by Green Screen. Click Add Effect and you’ll see a new panel of settings under the color correction wheels.
Use the eyedropper tool on the left to select the background you want to remove. This will typically do quite a good job by itself, but it will need a little fine-tuning. Try sliding the Saturation and Luminance sliders and adjusting their steepness using the handles that appear when you move your mouse over them. You’ll notice that each adjustment you make has a knock-on effect on the changes you’ve made with the other sliders; it’s a matter of balancing all three to achieve the best effect, preserving detail while minimizing spill.
To see how the filter is working, click the ‘Reveal’ box. The white areas are the parts of the video that will be removed, and the black areas are the parts that will remain.
The Remove Spill slider will add a purple tint to neutralize green tones in areas that need it.
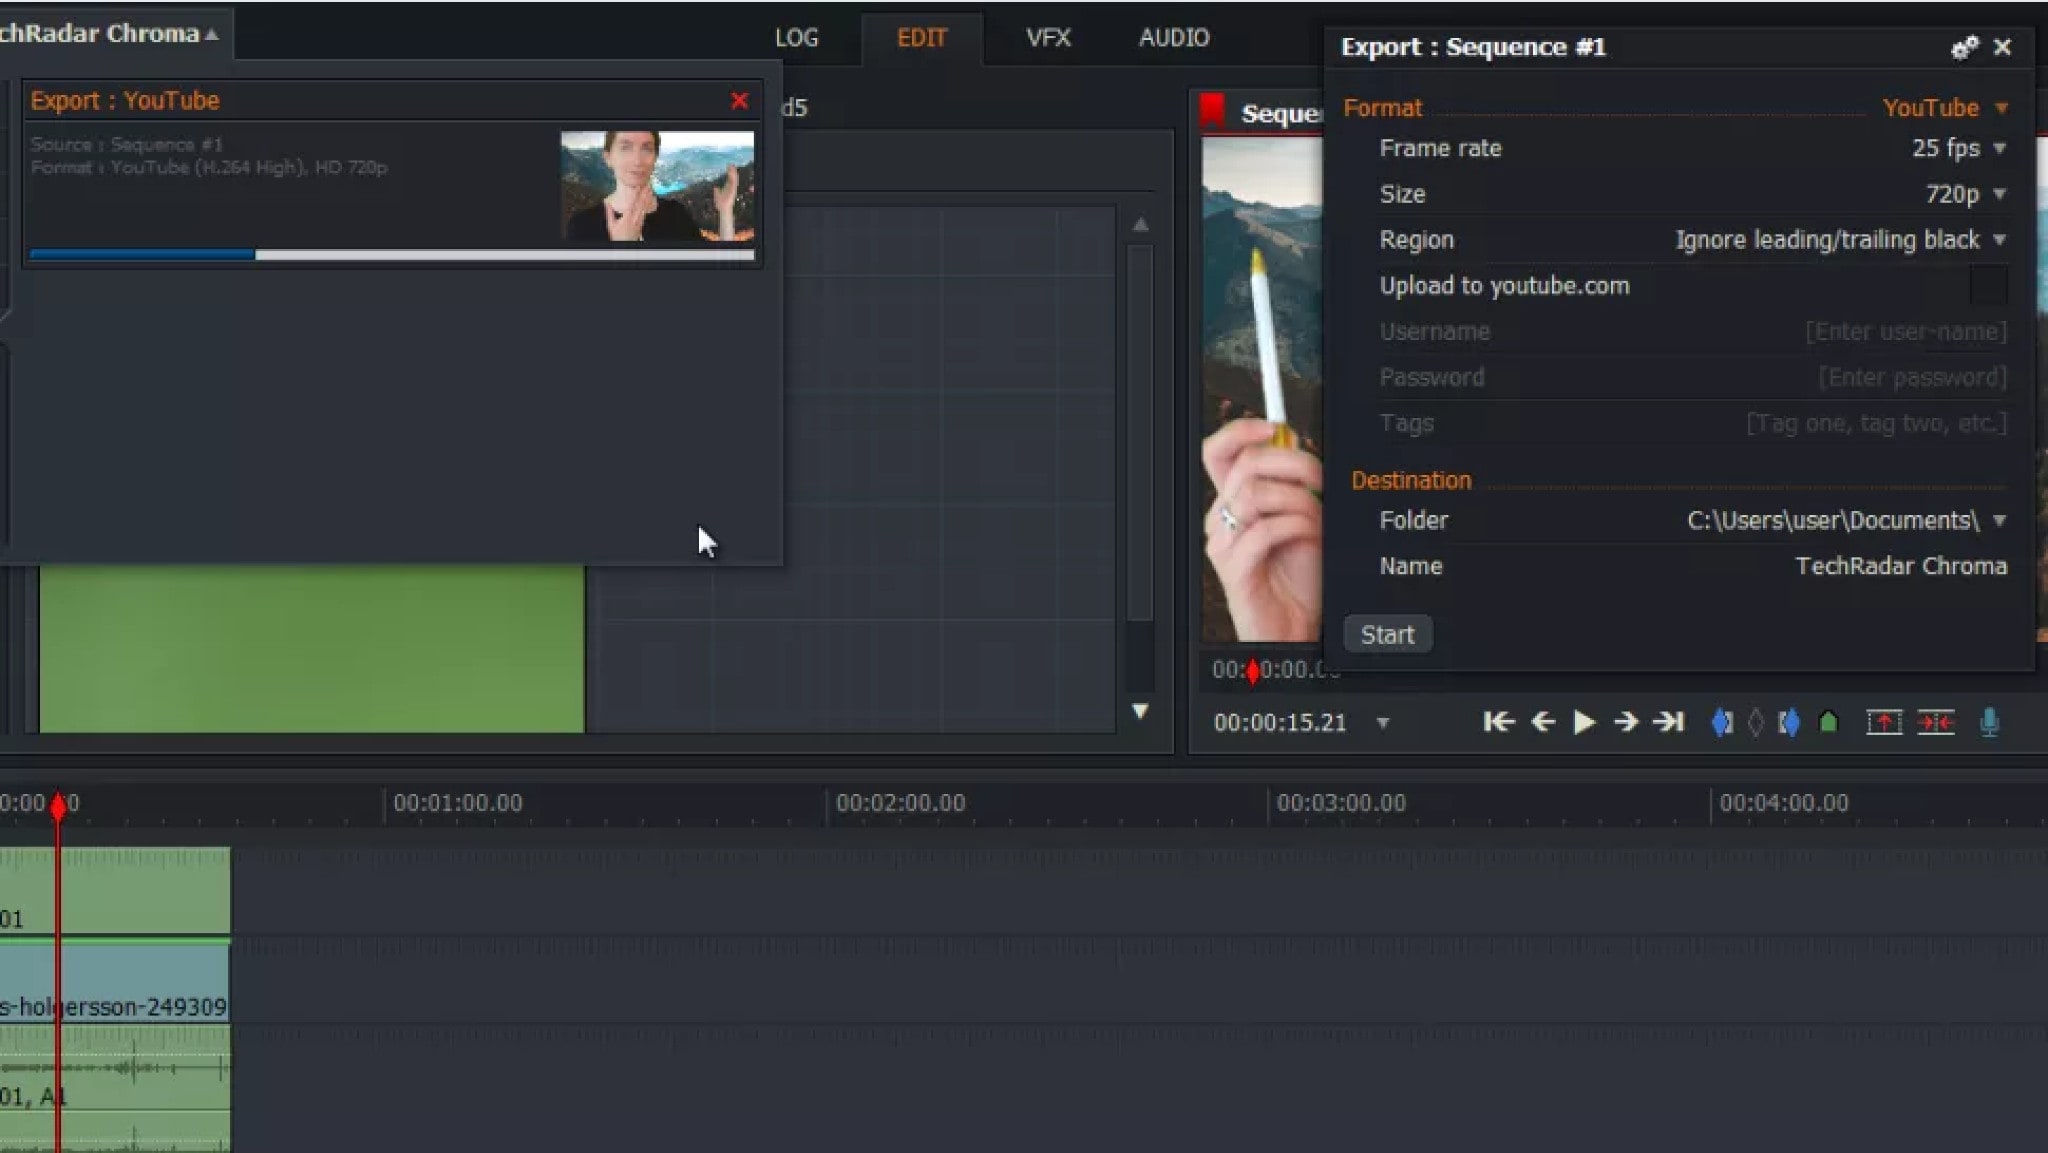
4. Tweak and export
Once you’re happy, you can use Lightworks’ other VFX tools to make other changes like color correction and cropping. When you’re done, return to the Edit tab, right-click the preview window at the top right and select Export.
The only two export options you’ll see in the free version of Lightworks are Vimeo and YouTube, but this is a little misleading. These will save the video to your PC or Mac in an MP4 format, but they won’t do the uploading for you unless you check the appropriate box.
Select a destination folder and name for your video file and click ‘Start’. The processing will begin, and you’ll see a progress bar at the top right. This task will run in the background so you can continue working on your project, and you’ll be notified when it’s complete.
WHICH SHOULD I CHOOSE: FREE OR PAID GREEN SCREEN SOFTWARE?
If you want something quick, cheap, and easy, and having your footage seems to be fairly clean with few shadows or spills, there are several cheap or free apps into which you can import a clip, apply a chroma key, and export without much editing or advanced features.
If your footage calls for attention, extra equipment can be required. If your clip has inconsistent lighting fixtures or poor quality, you may require equipment that permits you to observe a couple of chroma keys to suit the numerous shades of green or color correction equipment to restore your pictures. For even advanced functions, you’ll want to spend a little time and money learning, however the end result will most possibly be worthwhile. More advanced chroma key equipment are normally used inside full-featured NLEs through integrated equipment or expert plug-ins that encompass extra beneficial functions including advanced color correction, noise reduction, HDR (High Dynamic Range) color support, movement and keyframing, extra file layout and high-resolution support, and multi-camera editing.
FAQS ABOUT EDITING GREEN SCREEN
- What is the most important thing when using a green screen?
When lighting your green screen, ensure there is even, soft light on the entirety of the green screen. This is crucial for a proper key. Many filmmakers overlook this essential part and focus on lighting the subject. However, be sure to use whatever lights you have to expose the green screen background evenly.
- Why do filmmakers use green screens?
A green screen basically lets you drop in whatever background images you want behind the actors and/or foreground. It’s used in film production (and also in news and weather reports) to relatively simply place the desired background behind the subject/actor/presenter.
- Why is a green screen not a different color?
The really short answer is that green screens are green because people are not green. For the effect to work, the background must use a color that isn’t used elsewhere in the shot – and green is nothing like human skin tone.
Conclusion:
Green screen video production is not difficult. Anyone, with the right tools can create green screen effects like a pro. Simply follow the precautions listed above and choose the software that best suits your needs.
Whether you’re making a professional film or a simple family video, I’m confident you’ll find something suitable among the options listed above.
Supported OS: Windows, Mac, iOS, Android
Filmora Video Editor has two modes based on your experience with video editing software. Users can use the easy mode or the full feature editor to access the program’s full focus.
The theme focus can also make it easier to select the videos and audio that you want to use. There are a number of features and effects that can be used to complement various themes, which can help improve transitions or find different effects in the program without having to dig around.
The preview mode and music tracks available from the themes make it simple to enhance your video.
The full feature mode gives you even more control; this is where Filmora begins to resemble an actual video editor. You can drag images, sounds, and other media into different tracks and apply advanced effects.
Green screens, premade filters for color correction, cropping, cutting, splitting, and combining with simple tools are all available in the full feature mode. The full-featured editor also has an audio mixer and equalizer, as well as the ability to burn your creations to DVD, Facebook, Vimeo, and other platforms.
For Win 7 or later (64-bit)
For macOS 10.14 or later
Features:
4k Editing Support
Gif Support
Noise Removal
Color Tuning
Advanced Text Editor
Audio Mixer
Video Stabilization
Scene Detection
Audio Equalizer
Chroma Keying
Pros:
- It can be a program that’s easy to master even if you have never used a video editing program before
- There are plenty of visual effects and premade effects that can help you make a great looking video within a few minutes
- The 4k video support is also helpful
Cons:
- It does lack a few advanced features like the option for motion tracking, multi-camera support, and assistance with 360° videos
Steps On How To Chroma Key On Filmora
- Click the “Import Media Files Here“ to import the background video and video with the green screen background into the media library. And then drag and drop the background video and green screen video to the video track in the timeline respectively.
Note: Ensure the video with green screen background is placed as the overlay video.
- Right-click on the overlay video and find the “Green Screen“ option.
- Click on “Green Screen“ and you’ll open the video editing panel. And the green screen background has been removed.
To open the green screen editing panel, you can also double click the overlay video, then check “Chroma Key” to apply the green screen function. And you can also adjust the offset, tolerance, edge thickness, etc. according to your own needs.
When you’re satisfied with the effect, you can click the “OK“ button to save the changes.
OPENSHOT
OpenShot Video Editor is a free, open-source video editor for Mac and Windows PC that can take your videos, photos, and music files and assist you in creating the film you’ve always wanted to make. Add subtitles, transitions, and effects with ease, and then export your film to DVD, YouTube, Vimeo, Xbox 360, and a variety of other popular formats.
A cross-platform video editing solution designed to help businesses of all sizes edit audios, videos, or images using a drag-and-drop interface. Administrators can use OpenShot Video Editor to enhance videos by adding animation effects such as fade, flying text, snow, and bounce, watermarks, 3D titles, and audio tracks, among other things.
The multilingual platform, which was specifically designed for video editors, allows teams to adjust color contrasts and brightness, as well as add time.
Supported OS: Windows, macOS, Linux
Features:
- Cross-platform (Linux, Mac, and Windows)
- Support for many videos, audio, and image formats (based on FFmpeg)
- Powerful curve-based Key frame animations
- Desktop integration (drag and drop support)
- Unlimited tracks/layers
- Clip resizing, scaling, trimming, snapping, rotation, and cutting
- Video transitions with real-time previews
- Compositing, image overlays, watermarks
- Title templates, title creation, sub-titles
- 2D animation support (image sequences)
- 3D animated titles (and effects)
- SVG friendly, to create and include vector titles and credits
- Scrolling motion picture credits
- Advanced Timeline (including Drag & drop scrolling, panning, zooming, and snapping)
- Frame accuracy (step through each frame of video)
- Time-mapping and speed changes on clips (slow/fast, forward/backward, etc…)
- Audio mixing and editing
- Digital video effects, including brightness, gamma, hue, greyscale, chroma key, and many more!
- Experimental hardware encoding and decoding (VA-API, NVDEC, D3D9, D3D11, VTB)
- Import & Export widely supported formats (EDL, XML)
- Render videos in many codecs and formats (based on FFmpeg)
Pros:
- 3D Titles
- Curve-based Time Mapping
- Non-linear Editor with Infinite Tracks
- No Watermark
- Frequent Update
- Easy to Use
- Multi-lingual
Cons:
- Unstable Performance
- Limited Editing Features
- Less Powerful Hardware Acceleration
- Obsolete Interface
Steps On How To Chroma Key In Openshot
- To create a chroma key (e.g. greenscreen or bluescreen) in OpenShot, begin by importing the files you’re going to use.
- Drag the file to be keyed onto Track 2 in the timeline, and the file to use as the background onto Track 1. The plan is to make the green part of the upper image transparent so the file underneath becomes visible.
- Click the Effects tab, find the Chroma Key effect, and drag it onto the top file in the timeline. You will see a star appear on the file in the timeline.
- Right-click the top file in the timeline and select Properties. In the Properties window, click the Effects tab and then click the Chroma Key effect.
- Click the green-colored area next to the word “Key” (shown above) to bring up the Pick a Color window (shown below). Click the eyedropper tool and then click on a green part of the video image.
- Click OK, then click Apply in the properties window. You should now be able to scrub through the timeline and see the effect in action.
iMovie
When you record a video against a green screen, you can make the background transparent and replace it with other video clips, graphics, or still images of your choice. It’s easy to overlay any footage with iMovie’s green screen effect. For example, you can transport yourself anywhere or appear in your favorite films.
The green Screen effect, also referred as the Chroma Key effect, is a simple way to combine two clips into one with impressive scenes. You can, for example, fly over a very high mountain. Green Screen is a background that is only one color, usually green. This could be another pure color, such as Blue or Pink. By dragging and dropping, you can apply a green screen video to another in iMovie. It’s incredibly simple to create stunning videos using the iMovie Green Screen effect.
Supported OS: macOS and iOS
Features:
- Options to modify and enhance video color settings
- Crop and rotate video clips
- Stabilize shaky videos
- Add video transitions
- Change the speed of clips.
- iMovie allows you to remove both green and blue screens
Pros:
- Clean, elegant interface
- Well optimized, responsive, and fast on modern Macs
- Effects and titles are all top-notch—especially for a free program
- Robust and useful interactions with other Apple products and software
Cons:
- Doesn’t have some advanced features present in other applications, like 360 video or Multicam
- Sometimes the efforts to keep the interface simple make finding a solution obtuse
- The user interface is not customizable
- Supports fewer export formats than some competing products
Steps On How To Chroma Key In iMovie
- Open an empty project.
- Select the background you would like to use.
- Drag and drop the background video or image into the timeline.
- Select the green screen footage you want to use.
- Drag and drop it above the background.
- Drag the edge of the background to make the background longer or shorter to match your green screen footage.
- Click to select the green screen footage in the timeline
- Select Green/Blue Screen from the drop-down menu that defaults to Cutaway above the left corner of the viewer window.
- The green should now be removed to reveal the background behind it.
DA VINCI RESOLVE
Davinci Resolve has two versions including a full studio version which is available for $299. Because some professional tools, such as team collaboration and video noise reduction, cannot be used without a full license, the free program has a surprising number of features. The majority of the features included in the free version are adequate for professionals and hobbyists.
Although the Davinci Resolve program is regarded as a professional grade editor, it does include some advanced tools such as exporting, audio mastering, color correction, and more. The program is also useful for arranging audio and video clips, and it has a large selection of effects and filters. The additional color correction and adjustments available here can also aid in HDR support and produce more professional results when working with camera RAW data.
Davinci Resolve is also well-known for having one of the best color grading programs available. The outcome can be hugely potent when using the accessible chromakey tools. It doesn’t take much to figure out how to use this effect with the quick tutorial on board.
Supported OS: Mac and Windows
Features:
- Options to modify and enhance video color settings
- Crop and rotate video clips
- Stabilize shaky videos
- Add video transitions
- Change the speed of clips.
- iMovie allows you to remove both green and blue screens
Pros:
- Clean, elegant interface
- Well optimized, responsive, and fast on modern Macs
- Effects and titles are all top-notch—especially for a free program
- Robust and useful interactions with other Apple products and software
Cons:
- Doesn’t have some advanced features present in other applications, like 360 video or Multicam
- Sometimes the efforts to keep the interface simple make finding a solution obtuse
- The user interface is not customizable
- Supports fewer export formats than some competing products
Steps On How To Remove the Green Screen in DaVinci Resolve Inside the Color Tab
Step 1 – Add the Qualifier Tool & select the color
After you finish cutting the video, jump inside the “Color” tab and select the Qualifier Tool. Make sure you set the tool in “3D” mode to enable us to select a bigger range of the green spectrum.
Do this by simply selecting the fourth dot from the middle-upper area of the window or by selecting it from the drop-down mode selector situated in the window’s top-right corner.
After selecting the 3D mode for the Qualifier Tool, go ahead and select the range of green colors you want to remove by simply drawing lines on top of the screen, similar to the way I did in the image below.
Step 2 – Removing the color
As you can see in the small rectangle, Resolve did the keying, but it doesn’t know what to do with it because we didn’t specify. Right-click underneath the node, select “Add Alpha Output” and then link the node.
Yes, I know it will key out the subject and not the green screen. There is no problem. Go ahead and select the Revert button situated in the “Selection Range” window. Everything should be OK now.
Step 3 – Clean the edges
As you can surely notice, there are still some issues we have to address. In the hair area and on the outline of the subject, there is a noticeable green color spill. We don’t want that! On top of this, there will be many situations where you will still notice some noisy green pixels in the transparent area, around the corners of the screen, or the subject.
To get rid of these problems, we have to jump into the Qualifier window. Here, there are many settings you can play with to tweak the output. Most of the time, you will solve these problems by checking “Despill”, further selecting more of the greens and adding them to the Selection Range, or modifying the shrink, ”Black Clip” and “White Clip”.
Step 3 – Done
This is all for this method! Go ahead and add a background in the “Edit” mode and your job is done! Feel free to watch the video below, where I went through the same steps as above, but faster.
BEST PAID GREEN SCREEN SOFTWARE FOR BEGINNERS ON MAC
WEVIDEO
Supported OS: Windows, Mac, iOS, Android
This program, which costs only $4 per month, has extensive compatibility with nearly 20 different input and output formats. Most common input and output formats, such as NT 4.0, avi, 3gp, and others, are well represented.
If you want to do green screen options online but don’t want to install any software to access a full-featured video editor, this could be one of your best options.
WeVideo is a cloud-based video editing solution that is both powerful and simple to use. There’s a reason it’s one of the most popular online video editors out there. This includes options for photo animations, clip transformations, voiceovers, and more. You can also improve your video by using a variety of premium features such as screencasting, custom branding, and a wide range of free tracks that can be used with copyright-free music.
With this online editor, you can easily control almost everything in a video, from motion effects to green screen technology to scene transitions.
Features:
- 720p video resolution
- Motion titles
- Screencasting
- WeVideo JumpStart
- Cloud storage
- Music library
- Slow motion
- Voiceover
- Guilt in graphics
- Customizable environment
- Green screen
- Advanced text editing
- File & media manager
- Multi-track editing and storyboard
Pros:
- This is a multiplatform video editor that works with intense compatibility online. You can use it on almost any device.
- The interface is also quite simple and it has some tools that are used by the pros as well as a format that most people can easily understand.
- There is a full licensed library of songs with over 100 tracks you can use royalty-free.
- The cloud storage also ensures that you can pick up a project on any device that you won’t. Cloud access anywhere gives you more time for efficiency and handling your workload.
Cons:
- The program only currently supports 720 P resolution in some of the cheaper plans and there are limited minutes allowed with editing if you are only going to use the trial-free plan.
Steps On How To Chroma Key In WeVideo
- When your WeVideo project is open, click on the clip that you wish to remove the green background from.
- The video or image layer underneath the color-keyed clip will show through, as the background.
- Click on the clip editor pencil icon.
- Click on the eyedropper to choose the color you’re going to remove.
- Click an area that is the color that you would like to remove.
CAMTASIA
Supported OS: Mac and Windows
Camtasia by Techsmith is a simple video editing and screen recording application. Camtasia, designed for beginners, allows users to create professional training videos quickly and easily.
Camtasia is a straightforward video editor and chroma key software (for basic green screen editing) that may meet your needs.
It is the ideal video editor for beginners with little knowledge to editing. It includes numerous features that make it simple to create professional videos, whether you are a student, business owner, or regular YouTube user looking to spice up their content.
Features:
- Intuitive and easy-to-use interface.
- The ability to upload videos straight from the application, via Dropbox or YouTube.
- A wide range of built-in editing templates makes it easier for beginners to create professional-looking video content.
- Screen recording options for capturing live demos and lectures.
- Camtasia for Mac is also available, which makes it an ideal video editor for Apple users.
Pros:
- Very easy to learn
- Amazing screen capture feature
- Impressive cursor effects
- Interactivity features
- Good asset library
- Mobile version
- Great customer service
- Low cost
Cons:
- Constant crashes and bugs
- Limited customization
- No keyframe tracking
- Poor keyboard commands
- Export issues
Steps On How To Chroma Key In Camtasia
1. Record a video with a green screen
Make sure the green screen fills up the whole background while recording.
After your video is recorded, it will be placed on your Timeline as the recorded Camera and Screen.
2. Remove the green
Use the Remove a Color tool from the Visual Effects section to remove the green in the background.
Under the properties on the right side, select the color drop-down menu and use the eyedropper tool to select the green color. (Tip: With the Eyedropper tool selected, click on the green part of your Green Screen to select that color for removal.)
Adjust the Tolerance and Softness to get a clean color removal.
- Adjust the video
Adjust and move your now greenless recording to a desired size and position.
Lightworks
Supported OS: Mac, Windows 8.1, and Linux
Lightworks is ideal for creating real-time effects. The basic package includes free software with green screen editing capabilities. It makes changing the background of your videos simple and effective.
Lightworks provides access to professional-grade features that allow you to create visually appealing videos. The software is quick and adapts quickly to your needs, whether you are a beginner or a pro. It has a learning curve, but there is probably no tool out there that is easier to use once you get used to it.
It offers advanced effects that allow users to enhance videos in real time. You can use a variety of tools, including blurring, masking, and color grading.
You can instantly export videos to YouTube, Vimeo, and other platform services.
Features:
- Works with a wide variety of video formats
- Allows fast export to MPEG4/
- Fully optimized to offer fast speeds
- Multicam editing options
- Realtime effects with the help of inbuilt presets
- Advanced Boris FX Plugin
- Boris Graffiti for text effects
- Fully customizable interface
- Options for real-time collaboration
- Dedicated hardware support
Pros:
- Real-time effects with 4K Editing
- Keyboard shortcuts
- Easy to share videos on the internet
- Access to royalty-free audio and video content
- Histogram tool and 32bit GPU precision
- Lots of ready-to-use effects
Cons:
- The Video Stabilization feature is missing
- 3D Video Editing is not supported
- No Split and Merge features
Steps On How To Chroma Key In Lightworks
1. Record your video
First, you need a green or blue background to shoot against. As we’ll explain later, it doesn’t have to be a very specific shade, but it needs to be substantially different from the subject you’re shooting. You might have seen occasions when a weather presenter’s tie has appeared transparent during a broadcast. This is because the material was too close in color to the backdrop, or the key wasn’t quite set accurately enough.
You can make your backdrop using a sheet, or a large sheet of paper or card. If you’re planning to make videos frequently, there are inexpensive chromakey backdrops available that include a frame to hang the cloth from. If space is limited, collapsible screens are also available starting at around US$40. These screens are also handy for photography.
Good lighting is essential. You need to make sure that the screen is evenly lit so the color is consistent. It’s also important to ensure your subject is far enough from the screen to avoid shadows and color spills (when the blue or green backdrop reflects off your subject).
2. Import and trim
Once you’ve shot your video, download and install Lightworks . It’s free for personal use, but you’ll need to register for a free account if you want to use it for longer than 30 days.
Click the button marked Create a New Project, give it a name, and select a frame rate (you can find this by right-clicking your recorded video and selecting the Details tab). Here we’re using a still image as a background, but you can also use another video. Import this the same way.
Click the Edit tab and drag your video from the Project Contents panel onto the V1 track of the timeline below. If there’s unwanted footage at the beginning or end of your clip, right-click it and select Trim In or Trim Out, then use the yellow handles to change where the clip starts and finishes.
Right-click the preview window marked Sequence #1 and select Tracks > Add Video. Drag your video clip into the V1 track and your still image into V2. Click and drag the right-hand side of the image in the V2 track until it’s the same length as the video.
3. Set the key
Now click the VFX tab, select the V1 track in the timeline and click the tab marked with a plus icon. Click the Favorites drop-down menu and select Key, followed by Green Screen. Click Add Effect and you’ll see a new panel of settings under the color correction wheels.
Use the eyedropper tool on the left to select the background you want to remove. This will typically do quite a good job by itself, but it will need a little fine-tuning. Try sliding the Saturation and Luminance sliders and adjusting their steepness using the handles that appear when you move your mouse over them. You’ll notice that each adjustment you make has a knock-on effect on the changes you’ve made with the other sliders; it’s a matter of balancing all three to achieve the best effect, preserving detail while minimizing spill.
To see how the filter is working, click the ‘Reveal’ box. The white areas are the parts of the video that will be removed, and the black areas are the parts that will remain.
The Remove Spill slider will add a purple tint to neutralize green tones in areas that need it.
4. Tweak and export
Once you’re happy, you can use Lightworks’ other VFX tools to make other changes like color correction and cropping. When you’re done, return to the Edit tab, right-click the preview window at the top right and select Export.
The only two export options you’ll see in the free version of Lightworks are Vimeo and YouTube, but this is a little misleading. These will save the video to your PC or Mac in an MP4 format, but they won’t do the uploading for you unless you check the appropriate box.
Select a destination folder and name for your video file and click ‘Start’. The processing will begin, and you’ll see a progress bar at the top right. This task will run in the background so you can continue working on your project, and you’ll be notified when it’s complete.
WHICH SHOULD I CHOOSE: FREE OR PAID GREEN SCREEN SOFTWARE?
If you want something quick, cheap, and easy, and having your footage seems to be fairly clean with few shadows or spills, there are several cheap or free apps into which you can import a clip, apply a chroma key, and export without much editing or advanced features.
If your footage calls for attention, extra equipment can be required. If your clip has inconsistent lighting fixtures or poor quality, you may require equipment that permits you to observe a couple of chroma keys to suit the numerous shades of green or color correction equipment to restore your pictures. For even advanced functions, you’ll want to spend a little time and money learning, however the end result will most possibly be worthwhile. More advanced chroma key equipment are normally used inside full-featured NLEs through integrated equipment or expert plug-ins that encompass extra beneficial functions including advanced color correction, noise reduction, HDR (High Dynamic Range) color support, movement and keyframing, extra file layout and high-resolution support, and multi-camera editing.
FAQS ABOUT EDITING GREEN SCREEN
- What is the most important thing when using a green screen?
When lighting your green screen, ensure there is even, soft light on the entirety of the green screen. This is crucial for a proper key. Many filmmakers overlook this essential part and focus on lighting the subject. However, be sure to use whatever lights you have to expose the green screen background evenly.
- Why do filmmakers use green screens?
A green screen basically lets you drop in whatever background images you want behind the actors and/or foreground. It’s used in film production (and also in news and weather reports) to relatively simply place the desired background behind the subject/actor/presenter.
- Why is a green screen not a different color?
The really short answer is that green screens are green because people are not green. For the effect to work, the background must use a color that isn’t used elsewhere in the shot – and green is nothing like human skin tone.
Conclusion:
Green screen video production is not difficult. Anyone, with the right tools can create green screen effects like a pro. Simply follow the precautions listed above and choose the software that best suits your needs.
Whether you’re making a professional film or a simple family video, I’m confident you’ll find something suitable among the options listed above.
Finding Best GIF Websites Is Easy as Pie
Finding Best GIF Websites Is Easy as Pie — Here’s What You Should Know
An easy yet powerful editor
Numerous effects to choose from
Detailed tutorials provided by the official channel
Want a heap of the most exiting GIFs? Here are the best websites to visit.
In this article
01 [10 Sites for Finding the Perfect GIF](#Part 1)
02 [How to Use Animated GIF Makers](#Part 2)
03 [5 Stunning Examples of Gifs in Web Design](#Part 3)
Part 1 Sites for Finding the Perfect GIF
Information was never so expressive until GIFs came up as delivery platform. Looking through the frame of content diversity and effective delivery, there’s possibly nothing that is left untouched by these short, precise and creative snippets. When the talk is about long term user credibility, creativity is one thing, while reach is the other.
No doubt about the creative aspect, but the convenient availability holds equal importance. However captivating a utility nay be, you would certainly not be interested to spend quality time searching the apt content. Let’s take a look at some of the most popular and convenient GIF website that will surely put a full stop on your search spree for a relatable GIF.
01GIPHY
Initially launched as a GIF search engine, thin is a complete storehouse on almost everything that you can possibly think of. The extensive content library of this site is all set to meet your most specific content requirements in less than a blink’s time. You get an access to quality content in music, science, nature and what not on this free GIF website.
Talking of search flexibility, GIPHY is known to have the most advanced and updated search bar that ensures that top quality and fresh content is always at the hand of its users. You can browse through the vast GIF categories of the site or look for your exact content using a specific search keyword.
02Reddit
You can regard this site as a GIF membership community, where you can find a variety of impressive sub-reddits in the GIF category. The best part is, you will never find recursive content on any two or more sub-reddits as each one is developed and updated keeping different content specifications in mind.

You are given access to even finer content libraries in some particular sub-reddits that follow a sequential guideline to filter their entries according to user preferences. Some popular sub-reddits are listed below:
03Tumblr
Originally a blogging site, Tumblr is simply heaven for creating and sharing GIFs across media platforms. What’s interesting about the site is its content categorization, where bloggers on the site group relatable content under specific categories, which facilitates an easy, quick and hassle free search. Most of the GIF content on the site is either created in Photoshop or taken from across the web.
While the site has exciting GIF content for almost every scenario, the comedy genre is the st5arb attraction of this GIF platform. The huge comic content library of the site has hilarious memes and GIFs that will certainly leave you rolling over the floor. To enjoy your favorite content daily, you just need to search a relatable hashtag and follow some blogs on your searched content.

04Gfycat
This one lands among the most preferred GIF sites and is packed with an enormous inventory of memes and GIFs. Not just this, this one is a free GIF maker website that allows you to convert videos from almost every media platform into GIFs, independent of the video file format via its ‘Video to GIF Converter’ tool.
You can set a daily dose of your favorite, exciting GIF content by using either the search bar or the ‘Selection Menu’ in the left of the site’s Home page. You can even browse through latest GIF categories by navigating to the ‘Trending’ and ‘Explore’ sections.

05Tenor
You can prefer this site to enjoy your favorite GIFs on your PC or iOS device. The site gives you the liberty to share GIFs and memes directly from its library into any of your Instant Messaging chats or community conversations on social media platforms.
All you need to do is navigate to the Tenor search bar, put in a suitable keyword and there you can see loads of GIF content on your screen in less than a second’s time. With periodic updates and a cohesive interface, this site is your storehouse of latest and trendy GIFs, anytime and anywhere.
06Reaction GIFs
This site is known for having an exact content database for almost every thought that crosses your mind. It serves you with a refined search mechanism, having a different pathway for every search, depending on the content you are looking for. This is a perfect aid to get exactly what you want, without having to fuss out with unwanted stuff.
Talking of search methods, you will find a drop-down menu at the right to search GIFs that express ‘Emotions’ or one word answers (preferably a ‘Yes’ or a ‘No’). If you want something related to a more specific category, you can browse through the ‘Galleries’ and ‘Tags’ of the site (categories, like, OMG, LOL, etc).

07GIFbin
This is again a trunk of latest, funny and entertaining GIFs tom watch and share. On this site, you get to add search filters, like, ‘Most Viewed’, ‘Latest’, ‘Top Rated’, etc., that refine your search to fetch exactly what you are looking for. You are also free to use ‘Search Tags’ grouped according to name and search count on the site.
The tag names are standard keywords (like, animals, sports, nature, etc.) and the count feature keeps a track of the most frequent searches, thus allowing you to find out your favorite GIFs in a more explicit manner. If you are clueless about anything specific, don’t worry. Hit the ‘Random GIFs’ button to explore a whole new world of fun and excitement.
08Imgur
This site is popular in the meme world as a GIF sub-reddit that has explicitly no text threads. You can take this one as a free, GIF hosting and sharing website. While you can find loads of quality content on the site convenient to almost any genre, it is a leader in comic and funny GIFs. You can use different search tags for hilarious movie snippets, or some other fun element of your liking. This site’s image library is a hub of latest and nostalgic content.

09Imgflip
This is one more hotspot for relatable GIFs and memes. The best thing about the site is that it has separate search pathways to refine your search in cohesion with your content preference. Some common pathways are explained below:
● Browse the site’s homepage for the latest and trending GIF content.
● Simplify your search on specific content pages using the ‘Random’, ‘Next’ or ‘Previous’ navigation options.
● Prefer using ‘Image Hotkeys’ on the content pages.
● Try on ‘Tagging’ specific content pages (sunrise, snowfall, cats, etc.).
If you like competing with fellow visitors on the site, you can experiment with creating GIFs of your own and get ranked on the creator scoreboard. Bag a high vote count to get your GIF trending on the site.
10Gyazo
Last on the list, this is a somewhat different site in terms of features and search constraints. The exclusively unique ’Screen Capture’ feature of this site allows you to take a video of your device screen and use it to create a GIF of your own, making itself a quick and effective ‘Video to GIF Converter’ tool.
You will require creating an account on the site to maintain a library of your searched contents, which you can either tag on the site or downloaded to your device. You can further, export and share your creations across media platforms through this site.

Part 2 How to Use Animated GIF Makers
Landing into the creative and exciting world of GIFs, you can easily get motivated to try hands on making your own GIFs. The online market is a pool of solutions that claim of adhering to this concern in the most effective ways. When looking for the best GIF maker tools and software, you can definitely count upon the following choices:
01**Wondershare Filmora Video Editor **
This one is undoubtedly the best GIF creator software in current times. Using the plethora of audio-visual features, effects and image filters that are offered by this tool, creating animated GIFs is a spic and span process. The software grants you the liberty to play with and explore your editing skills to generate professional quality GIFs within minutes.

Wondershare Filmora - Best Video Editor for Mac/Windows
5,481,435 people have downloaded it.
Build unique custom animations without breaking a sweat.
Focus on creating epic stories and leave the details to Filmora’s auto features.
Start a creative adventure with drag & drop effects and endless possibilities.
Filmora simplifies advanced features to save you time and effort.
Filmora cuts out repetition so you can move on to your next creative breakthrough.
Here’s how you can use this software to become a pro at creating GIFs:
● Step 1: Import Required Media Files
To begin with, select any desired set of images or a particular video file to the Filmora timeline. You don’t need to be format specific; the software is compatible with over 150 different file formats.
● Step 2: Drag Files to Edit
Once you are done with selecting the files, you need to drag the same to the Filmora Editor Timeline, where you can transform the file contents with your editing skills.
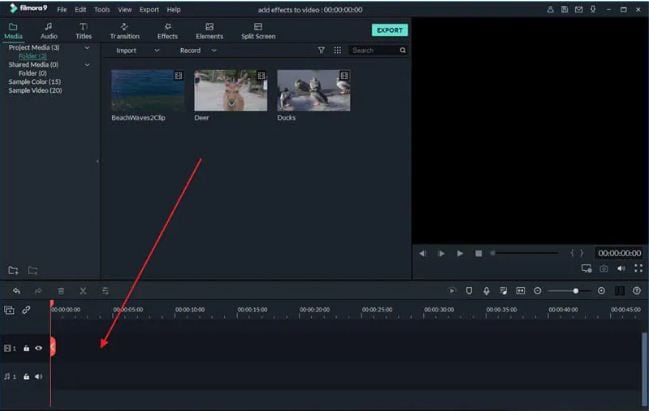
● Step 3: Let’s Get Editing.
In the editor window, you are free tom choose from a range of effects, tools and filters suitable to your GIF content to give your artwork a new and engaging look. You can experiment with the cutting, cropping and trimming tools or play with effects, like, overlays, rotation and speed adjustments and even add texts to deliver messages that intensify your GIF.
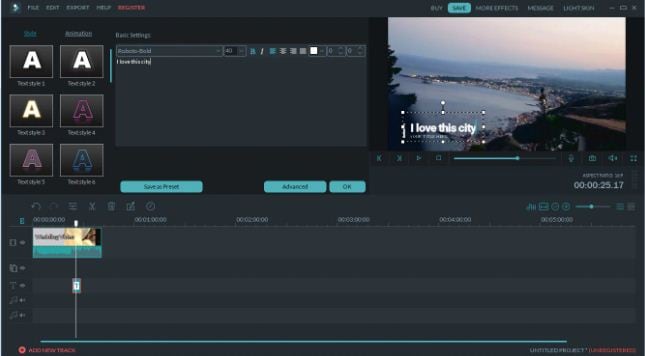
● Step 4: Time to Save and Share.
Now is the time to save your work locally to your device using the .gif extension with your created file, as well as share it among your peers on social communities.

03Deal With It
This one is an online GIF maker tool that allows you to make top quality animated GIFs within a few seconds and you don’t even need to take up any third party software installation. Creating GIFs with this user friendly, clean interface and quick GIF generator utility is an absolute fun, to say the least.
Once you are done creating, the tools gives you the liberty to experiment with effects like, texts and glasses that would further intensify your GIF to the next level, and the best part is, all of this is available to you without having to spend a penny out of your pocket.
Explained below is the step wise user guide to use this tool for creating GIFs:
● Step 1:
Navigate to official website of the GIF creator tool.
● Step 2:
Choose a desired locally saved image from your device and upload it in the tool’s editor window. To do this, click on the ‘Load Image’ button.
● Step 3:
You can now modify the uploaded image with text and glasses. This is it. Your GIF is ready to save and export.

03LunaPic
This one lands among the most preferred GIF maker tools available across the web. It comes with a clean interface, is free to use and does not require any third party software installation. You can create catchy and interesting GIF banners, or make captivating, animated GIF files with a series of still images using this tool. However, this GIF maker does not give you the liberty to take up editing and speed or accuracy modifications on your creation.
You need to follow the steps explained below to create your own GIF with LunaPic:
● Step 1:
Open the official site of LunaPic in your web browser.
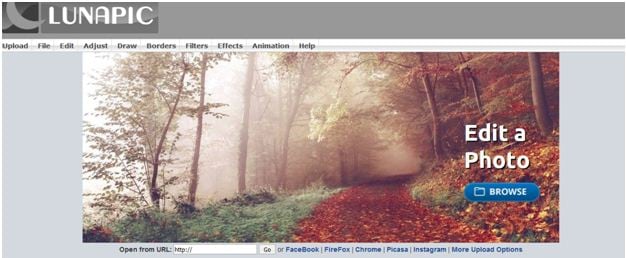
● Step 2:
Upload a desired one or a set of images you wish to use for making your GIF on the site. To do this, select a group of images from your device and tap ‘Upload’
.

● Step 3:
Once uploaded, you can use your creativity to play with the effects library of the site and edit your images in its editing interface.
● Step 4:
When satisfied, choose the file type as GIF and hit the ‘Save’ option at the bottom. This will save your creation locally in your device, once the file conversion gets completed.
Image Name: Finding-best-gif-websites-is-easy-as-pie—here’s-what-you-should-know-22
04Wondershare TunesGo
This one is another efficient animated GIF creator utility on the internet. Available to you as free online software, this tool promises you an amazing and hassle free GIF making experience. You can either create stunning GIFs of your own, or convert video files and even live photos into the same using this software. It allows you to set time slots for file conversions and make speed and flow adjustments for GIF frames, along with offering a plethora of editing effects to play with.
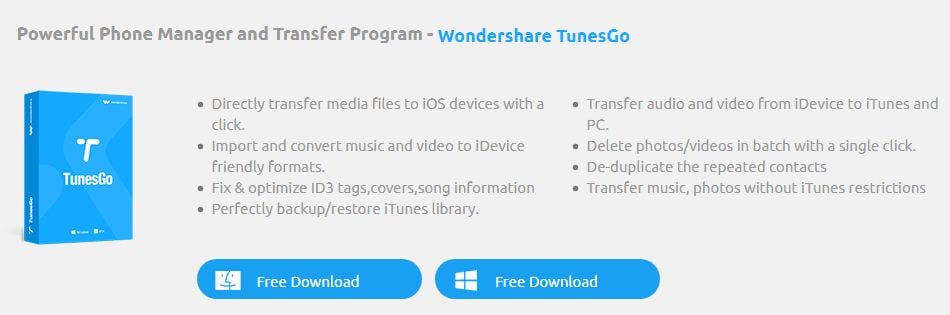
Here’s the know-how of using this software to create top quality animated GIFs:
● Step 1: Download and Launch the Software
Pay a visit to the official TunesGo website to download the software. Begin with installing and launching the same on your preferred device. When you finish, click on the ‘Toolbox’ tab at the top in the welcome screen.
● Step 2: Upload Media Files
In the software’s opening interface, choose the GIF Maker tool. In the following window that pops-up, click on ‘Add’ to upload the desired media files saved in your device, you want to create a GIF with.
● Step 3: Convert to GIF
Set the media file to GIF conversion time and tap the ‘Create GIF’ button in the bottom-right to initiate the conversion process.

05Wave.video
This one is among the latest GIF maker tools that allow you to create animated GIFs from videos. What’s quite interesting about this Gif creation platform is, you can trim videos to the exact part depending on your content preference before beginning with the conversion process. You can also save your creation as a group of trimmed clips. It is a user friendly, free access online tool that does not ask you to install any third party software, and GIF creation with its mess-free interface is absolute fun.

Take the steps listed below to make GIFs with this online tool:
● Step 1: Choose a Project
To start working with this tool, you need to create an account on its official site. Having done that, just log into your account and upload a desired video you would like to use for creating a GIF. You have a choice to select a locally saved video, choose one from the templates available on the site or create something of your own.
● Step 2: Customization and Publishing
It is now time to try hands on editing your video with stunning effects like, overlays glasses, etc., or add impactful elements, such as, texts, stickers, etc., to make your artwork more impressive. When you are happy, navigate to the top-right and tap ‘Publish’. From the menu that drops down, select ‘GIF’.
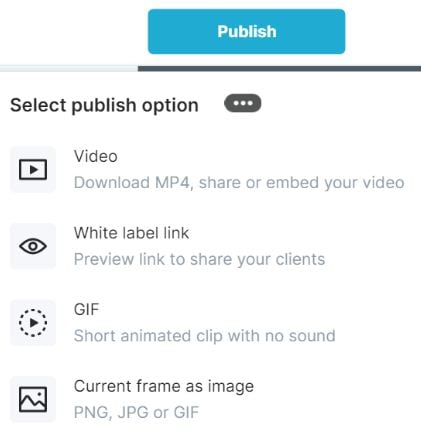
● Step 3: Download Your Creation
Select the section of your video you wish to convert into a GIF and proceed to fix the GIF start time and play duration. Check for any frame resize requirements, set an adequate frame rate and lastly, click on the ‘Loop Clip’ checkbox. This will produce an infinite loop GIF. When everything seems perfect, tap on ‘Generate’ followed by ‘Download’ to save your creation and share it on social media.
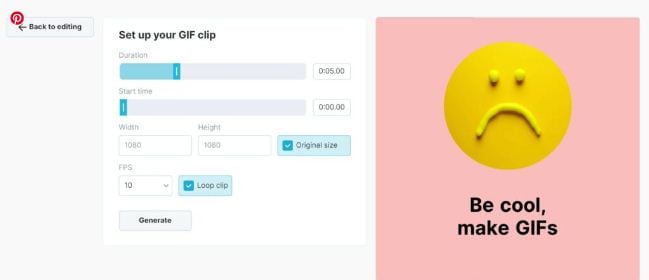
Part 3 5 Stunning Examples of Gifs in Web Design
The credibility of GIFs in market oriented content sharing and information publishing evidently does not require an introduction. These attractive snippets are expert means of business growth and customer appealing strategy planning to address attract a massive target audience within seconds.
Now that you are quite accustomed with the market reliability of GIFs, you may visibly feel motivated to use them to improvise your product websites for a next level market approach. However, before you plunge into using GIFs for your brand promotion, consider sparing a few minutes to browse through some top class product based GIFs to enhance your GIF creation and implementation aptitude.
Described below are some eye-catching examples of GIF for website background, you should certainly look forward to using in your business campaigns:
01Headscape
Having its roots in the United Kingdom, this is a top rated, digital media design corporation that excels in providing web design solutions to a diverse global clientele. Their unique idea of using GIFs in grayscale to depict conducive business settings is just perfect.
The monochromatic color balance with parallax scrolls makes this GIF all the more impactful. You can find impressive ways of using GIFs with a professional instinct on the company website and begin to add appeal to your market buildup strategies.
02Invision
This is another high ranked application marketing site that uses GIF for website background to improvise its product promotion. Equipped with a preset world class page makeover, the site’s look and appeal simply gets a boost with floating-text animated GIFs on an otherwise normal webpage.
As you move further on the Invision homepage, you will get to see a demonstration of the site’s prototype tool through GIFs that explain its working functionalities in the most interesting and convenient manner, thus putting forward and outrageously professional and effective marketing strategy.
03Macaw
This one is an excellent design utility that is equally suited to both web designers as well as site developers. On visiting the tool’s homepage, you are welcomed with a streamlined text setting on a black and white theme. Move a bit downwards, and there you see a cluster of animated GIFs in action to get you familiar with the interface and usage pattern of the Macaw design utility with utmost ease. It is convenient enough to make you feel as if you are actually using the tool.

04Giant Ant
Established as a creative firm, this one is known for its appealing website design. As you navigate through the site, you will find a still image complemented by cohesive text overlays. Beneath that, there are caricature forms of everyday objects, but the real magic happens when you click on a particular object and woosh. It instantly turns into an animated GIF. This explicit style of infusing dynamism to your website is simply awesome, to say the least.
05Tinke
This is intuitively a fitness tracker that keeps a record of your system vitals in the most effective manner. But that’s not all. The tracker website is equally amazing, setting the perfect example of using GIFs to improve market buildup. The site majorly utilizes the parallax scroll effect with animated GIFs to facilitate a live demonstration of the tracker functionality, coupled with an iPhone user guide and ways of sharing relatable content with fellow users.
● Key Takeaways from This Episode →
● Surfing the internet, you will land across some of the best GIF creator and downloader sites that are flooded with brilliant GIF content suited for almost every purpose.
● You can create your own animated GIFs on any GIF maker website or enjoy pre-made stuff to your heart’s content, where using Filmora is certainly the best choice. To explore something more exciting, try hands on using GIFs for product marketing and brand promotions on your business sites.
Want a heap of the most exiting GIFs? Here are the best websites to visit.
In this article
01 [10 Sites for Finding the Perfect GIF](#Part 1)
02 [How to Use Animated GIF Makers](#Part 2)
03 [5 Stunning Examples of Gifs in Web Design](#Part 3)
Part 1 Sites for Finding the Perfect GIF
Information was never so expressive until GIFs came up as delivery platform. Looking through the frame of content diversity and effective delivery, there’s possibly nothing that is left untouched by these short, precise and creative snippets. When the talk is about long term user credibility, creativity is one thing, while reach is the other.
No doubt about the creative aspect, but the convenient availability holds equal importance. However captivating a utility nay be, you would certainly not be interested to spend quality time searching the apt content. Let’s take a look at some of the most popular and convenient GIF website that will surely put a full stop on your search spree for a relatable GIF.
01GIPHY
Initially launched as a GIF search engine, thin is a complete storehouse on almost everything that you can possibly think of. The extensive content library of this site is all set to meet your most specific content requirements in less than a blink’s time. You get an access to quality content in music, science, nature and what not on this free GIF website.
Talking of search flexibility, GIPHY is known to have the most advanced and updated search bar that ensures that top quality and fresh content is always at the hand of its users. You can browse through the vast GIF categories of the site or look for your exact content using a specific search keyword.
02Reddit
You can regard this site as a GIF membership community, where you can find a variety of impressive sub-reddits in the GIF category. The best part is, you will never find recursive content on any two or more sub-reddits as each one is developed and updated keeping different content specifications in mind.
You are given access to even finer content libraries in some particular sub-reddits that follow a sequential guideline to filter their entries according to user preferences. Some popular sub-reddits are listed below:
03Tumblr
Originally a blogging site, Tumblr is simply heaven for creating and sharing GIFs across media platforms. What’s interesting about the site is its content categorization, where bloggers on the site group relatable content under specific categories, which facilitates an easy, quick and hassle free search. Most of the GIF content on the site is either created in Photoshop or taken from across the web.
While the site has exciting GIF content for almost every scenario, the comedy genre is the st5arb attraction of this GIF platform. The huge comic content library of the site has hilarious memes and GIFs that will certainly leave you rolling over the floor. To enjoy your favorite content daily, you just need to search a relatable hashtag and follow some blogs on your searched content.
04Gfycat
This one lands among the most preferred GIF sites and is packed with an enormous inventory of memes and GIFs. Not just this, this one is a free GIF maker website that allows you to convert videos from almost every media platform into GIFs, independent of the video file format via its ‘Video to GIF Converter’ tool.
You can set a daily dose of your favorite, exciting GIF content by using either the search bar or the ‘Selection Menu’ in the left of the site’s Home page. You can even browse through latest GIF categories by navigating to the ‘Trending’ and ‘Explore’ sections.
05Tenor
You can prefer this site to enjoy your favorite GIFs on your PC or iOS device. The site gives you the liberty to share GIFs and memes directly from its library into any of your Instant Messaging chats or community conversations on social media platforms.
All you need to do is navigate to the Tenor search bar, put in a suitable keyword and there you can see loads of GIF content on your screen in less than a second’s time. With periodic updates and a cohesive interface, this site is your storehouse of latest and trendy GIFs, anytime and anywhere.
06Reaction GIFs
This site is known for having an exact content database for almost every thought that crosses your mind. It serves you with a refined search mechanism, having a different pathway for every search, depending on the content you are looking for. This is a perfect aid to get exactly what you want, without having to fuss out with unwanted stuff.
Talking of search methods, you will find a drop-down menu at the right to search GIFs that express ‘Emotions’ or one word answers (preferably a ‘Yes’ or a ‘No’). If you want something related to a more specific category, you can browse through the ‘Galleries’ and ‘Tags’ of the site (categories, like, OMG, LOL, etc).
07GIFbin
This is again a trunk of latest, funny and entertaining GIFs tom watch and share. On this site, you get to add search filters, like, ‘Most Viewed’, ‘Latest’, ‘Top Rated’, etc., that refine your search to fetch exactly what you are looking for. You are also free to use ‘Search Tags’ grouped according to name and search count on the site.
The tag names are standard keywords (like, animals, sports, nature, etc.) and the count feature keeps a track of the most frequent searches, thus allowing you to find out your favorite GIFs in a more explicit manner. If you are clueless about anything specific, don’t worry. Hit the ‘Random GIFs’ button to explore a whole new world of fun and excitement.
08Imgur
This site is popular in the meme world as a GIF sub-reddit that has explicitly no text threads. You can take this one as a free, GIF hosting and sharing website. While you can find loads of quality content on the site convenient to almost any genre, it is a leader in comic and funny GIFs. You can use different search tags for hilarious movie snippets, or some other fun element of your liking. This site’s image library is a hub of latest and nostalgic content.
09Imgflip
This is one more hotspot for relatable GIFs and memes. The best thing about the site is that it has separate search pathways to refine your search in cohesion with your content preference. Some common pathways are explained below:
● Browse the site’s homepage for the latest and trending GIF content.
● Simplify your search on specific content pages using the ‘Random’, ‘Next’ or ‘Previous’ navigation options.
● Prefer using ‘Image Hotkeys’ on the content pages.
● Try on ‘Tagging’ specific content pages (sunrise, snowfall, cats, etc.).
If you like competing with fellow visitors on the site, you can experiment with creating GIFs of your own and get ranked on the creator scoreboard. Bag a high vote count to get your GIF trending on the site.
10Gyazo
Last on the list, this is a somewhat different site in terms of features and search constraints. The exclusively unique ’Screen Capture’ feature of this site allows you to take a video of your device screen and use it to create a GIF of your own, making itself a quick and effective ‘Video to GIF Converter’ tool.
You will require creating an account on the site to maintain a library of your searched contents, which you can either tag on the site or downloaded to your device. You can further, export and share your creations across media platforms through this site.
Part 2 How to Use Animated GIF Makers
Landing into the creative and exciting world of GIFs, you can easily get motivated to try hands on making your own GIFs. The online market is a pool of solutions that claim of adhering to this concern in the most effective ways. When looking for the best GIF maker tools and software, you can definitely count upon the following choices:
01**Wondershare Filmora Video Editor **
This one is undoubtedly the best GIF creator software in current times. Using the plethora of audio-visual features, effects and image filters that are offered by this tool, creating animated GIFs is a spic and span process. The software grants you the liberty to play with and explore your editing skills to generate professional quality GIFs within minutes.
Wondershare Filmora - Best Video Editor for Mac/Windows
5,481,435 people have downloaded it.
Build unique custom animations without breaking a sweat.
Focus on creating epic stories and leave the details to Filmora’s auto features.
Start a creative adventure with drag & drop effects and endless possibilities.
Filmora simplifies advanced features to save you time and effort.
Filmora cuts out repetition so you can move on to your next creative breakthrough.
Here’s how you can use this software to become a pro at creating GIFs:
● Step 1: Import Required Media Files
To begin with, select any desired set of images or a particular video file to the Filmora timeline. You don’t need to be format specific; the software is compatible with over 150 different file formats.
● Step 2: Drag Files to Edit
Once you are done with selecting the files, you need to drag the same to the Filmora Editor Timeline, where you can transform the file contents with your editing skills.
● Step 3: Let’s Get Editing.
In the editor window, you are free tom choose from a range of effects, tools and filters suitable to your GIF content to give your artwork a new and engaging look. You can experiment with the cutting, cropping and trimming tools or play with effects, like, overlays, rotation and speed adjustments and even add texts to deliver messages that intensify your GIF.
● Step 4: Time to Save and Share.
Now is the time to save your work locally to your device using the .gif extension with your created file, as well as share it among your peers on social communities.
03Deal With It
This one is an online GIF maker tool that allows you to make top quality animated GIFs within a few seconds and you don’t even need to take up any third party software installation. Creating GIFs with this user friendly, clean interface and quick GIF generator utility is an absolute fun, to say the least.
Once you are done creating, the tools gives you the liberty to experiment with effects like, texts and glasses that would further intensify your GIF to the next level, and the best part is, all of this is available to you without having to spend a penny out of your pocket.
Explained below is the step wise user guide to use this tool for creating GIFs:
● Step 1:
Navigate to official website of the GIF creator tool.
● Step 2:
Choose a desired locally saved image from your device and upload it in the tool’s editor window. To do this, click on the ‘Load Image’ button.
● Step 3:
You can now modify the uploaded image with text and glasses. This is it. Your GIF is ready to save and export.
03LunaPic
This one lands among the most preferred GIF maker tools available across the web. It comes with a clean interface, is free to use and does not require any third party software installation. You can create catchy and interesting GIF banners, or make captivating, animated GIF files with a series of still images using this tool. However, this GIF maker does not give you the liberty to take up editing and speed or accuracy modifications on your creation.
You need to follow the steps explained below to create your own GIF with LunaPic:
● Step 1:
Open the official site of LunaPic in your web browser.
● Step 2:
Upload a desired one or a set of images you wish to use for making your GIF on the site. To do this, select a group of images from your device and tap ‘Upload’
.
● Step 3:
Once uploaded, you can use your creativity to play with the effects library of the site and edit your images in its editing interface.
● Step 4:
When satisfied, choose the file type as GIF and hit the ‘Save’ option at the bottom. This will save your creation locally in your device, once the file conversion gets completed.
Image Name: Finding-best-gif-websites-is-easy-as-pie—here’s-what-you-should-know-22
04Wondershare TunesGo
This one is another efficient animated GIF creator utility on the internet. Available to you as free online software, this tool promises you an amazing and hassle free GIF making experience. You can either create stunning GIFs of your own, or convert video files and even live photos into the same using this software. It allows you to set time slots for file conversions and make speed and flow adjustments for GIF frames, along with offering a plethora of editing effects to play with.
Here’s the know-how of using this software to create top quality animated GIFs:
● Step 1: Download and Launch the Software
Pay a visit to the official TunesGo website to download the software. Begin with installing and launching the same on your preferred device. When you finish, click on the ‘Toolbox’ tab at the top in the welcome screen.
● Step 2: Upload Media Files
In the software’s opening interface, choose the GIF Maker tool. In the following window that pops-up, click on ‘Add’ to upload the desired media files saved in your device, you want to create a GIF with.
● Step 3: Convert to GIF
Set the media file to GIF conversion time and tap the ‘Create GIF’ button in the bottom-right to initiate the conversion process.
05Wave.video
This one is among the latest GIF maker tools that allow you to create animated GIFs from videos. What’s quite interesting about this Gif creation platform is, you can trim videos to the exact part depending on your content preference before beginning with the conversion process. You can also save your creation as a group of trimmed clips. It is a user friendly, free access online tool that does not ask you to install any third party software, and GIF creation with its mess-free interface is absolute fun.
Take the steps listed below to make GIFs with this online tool:
● Step 1: Choose a Project
To start working with this tool, you need to create an account on its official site. Having done that, just log into your account and upload a desired video you would like to use for creating a GIF. You have a choice to select a locally saved video, choose one from the templates available on the site or create something of your own.
● Step 2: Customization and Publishing
It is now time to try hands on editing your video with stunning effects like, overlays glasses, etc., or add impactful elements, such as, texts, stickers, etc., to make your artwork more impressive. When you are happy, navigate to the top-right and tap ‘Publish’. From the menu that drops down, select ‘GIF’.
● Step 3: Download Your Creation
Select the section of your video you wish to convert into a GIF and proceed to fix the GIF start time and play duration. Check for any frame resize requirements, set an adequate frame rate and lastly, click on the ‘Loop Clip’ checkbox. This will produce an infinite loop GIF. When everything seems perfect, tap on ‘Generate’ followed by ‘Download’ to save your creation and share it on social media.
Part 3 5 Stunning Examples of Gifs in Web Design
The credibility of GIFs in market oriented content sharing and information publishing evidently does not require an introduction. These attractive snippets are expert means of business growth and customer appealing strategy planning to address attract a massive target audience within seconds.
Now that you are quite accustomed with the market reliability of GIFs, you may visibly feel motivated to use them to improvise your product websites for a next level market approach. However, before you plunge into using GIFs for your brand promotion, consider sparing a few minutes to browse through some top class product based GIFs to enhance your GIF creation and implementation aptitude.
Described below are some eye-catching examples of GIF for website background, you should certainly look forward to using in your business campaigns:
01Headscape
Having its roots in the United Kingdom, this is a top rated, digital media design corporation that excels in providing web design solutions to a diverse global clientele. Their unique idea of using GIFs in grayscale to depict conducive business settings is just perfect.
The monochromatic color balance with parallax scrolls makes this GIF all the more impactful. You can find impressive ways of using GIFs with a professional instinct on the company website and begin to add appeal to your market buildup strategies.
02Invision
This is another high ranked application marketing site that uses GIF for website background to improvise its product promotion. Equipped with a preset world class page makeover, the site’s look and appeal simply gets a boost with floating-text animated GIFs on an otherwise normal webpage.
As you move further on the Invision homepage, you will get to see a demonstration of the site’s prototype tool through GIFs that explain its working functionalities in the most interesting and convenient manner, thus putting forward and outrageously professional and effective marketing strategy.
03Macaw
This one is an excellent design utility that is equally suited to both web designers as well as site developers. On visiting the tool’s homepage, you are welcomed with a streamlined text setting on a black and white theme. Move a bit downwards, and there you see a cluster of animated GIFs in action to get you familiar with the interface and usage pattern of the Macaw design utility with utmost ease. It is convenient enough to make you feel as if you are actually using the tool.
04Giant Ant
Established as a creative firm, this one is known for its appealing website design. As you navigate through the site, you will find a still image complemented by cohesive text overlays. Beneath that, there are caricature forms of everyday objects, but the real magic happens when you click on a particular object and woosh. It instantly turns into an animated GIF. This explicit style of infusing dynamism to your website is simply awesome, to say the least.
05Tinke
This is intuitively a fitness tracker that keeps a record of your system vitals in the most effective manner. But that’s not all. The tracker website is equally amazing, setting the perfect example of using GIFs to improve market buildup. The site majorly utilizes the parallax scroll effect with animated GIFs to facilitate a live demonstration of the tracker functionality, coupled with an iPhone user guide and ways of sharing relatable content with fellow users.
● Key Takeaways from This Episode →
● Surfing the internet, you will land across some of the best GIF creator and downloader sites that are flooded with brilliant GIF content suited for almost every purpose.
● You can create your own animated GIFs on any GIF maker website or enjoy pre-made stuff to your heart’s content, where using Filmora is certainly the best choice. To explore something more exciting, try hands on using GIFs for product marketing and brand promotions on your business sites.
5 Best Video Denoisers
We all know that our recorded videos are not always perfect – when we use a mobile phone or digital cameras to shoot, our clips may contain hiss, compression and particles. These are the impurities that make our videos look uncomfortable, but it’s not a final result impossible to altar – help can come in the form of several video denoise software.
Editing is the guarantor that makes sure we can do different operations and achieve our desired results – computer programs, tools, opportunities that give us a hand in this process are kind of endless.
So, sometimes it’s really difficult to choose among so many options that come into waves. And if we choose our preferred ways, some people might not agree with us. Even so that it is quite subjective, we can still explain which tools and software we like to modify our videos, and fight with the impurities they have.
It looks amateur if the video is grainy, even if it is night shooting. We can get rid of the noise when we add lights or shoot in well-lit places, but there are some situations we can just depend on the ISO. So, for these grainy videos, there is a thing called denoising – when you get rid of the grains and make your shots as clear as possible. There are different ways to do this, and that happens in different software as well. What are the 5 best video denoisers in 2024 for us to work with? That, as we have already mentioned, might be something very subjective, but here is our selection: Wondershare Filmora, Neat Video, Shotcut, Adobe Premiere Pro, and DaVinci Resolve
Wondershare Filmora X
Wondershare Filmora X offers to change our damaged scene into something more acceptable. How to operate it? - You need to go to the Effects panel and type: “Smart Denoise”. right-click on the video and choose Edit Properties.

This ensures you see the Smart Denoise, where you can change opacity of the clip, threshold and radius.

Reduce Opacity until you are satisfied with the result. The box next to Smart Denoise will show you the scene before and after the effect.
Bonus tip: Wondershare Filmora audio denoise
We already explained how video denoising works, and we will go on with our selection and explanatory article about the process, but, as we are on the Filmora topic, we might as well mention that denoising might mean another thing too – which, in this case, regards audio background noise. It means to remove unwanted hum from the audio in order for it to become more hearable. So, doing this in Wondershare Filmora works in a quite easy way. Use the guideline:
Drag and drop your video into the timeline. Right-click on the clip and hit Detach Audio, which will let you separate audio and video from one another and make sure you can work on them one by one.

Double-click on the audio track and have access to the editing panel, where you can see Remove background noise – it is not needed to emphasize what this option does for you!

That’s it – you are done, but keep in mind that there is a second way to achieve the same result as well, but this in case you don’t want to detach the audio: Double-click on the video clip in the timeline, the editing panel opens, so switch to Audio. Checking the box next to Remove background noise will show that there are three levels – weak, mid, and strong, and of course, you can choose to your liking!
If the voice recording doesn’t sound natural anymore, you can do the following: Click on Customize and Customize Equalizer window will open.

On the left, you can see the low tunes, while the highs are on the right. Background noises are often on the left, so you can lower them to get rid of them, but in order to have a more natural sound, raise the middle ones a little – and you are done when you are content with the sound!

So, hmm… back to the original topic – denoising a video, shall we?..
Neat video
Neat Video kind of, speaks for itself… it is a powerful video editing tool suitable for Windows, macOS and Linux. It aims to reduce the digital noise, flicker, dust, scratches and other defects in the captured videos to improve the visual quality of the videos.
It is a plug-in for Premiere Pro, that does more or less what the product noise says: it makes grainy video look neater. It’s very easy to use and
How to do that in Neat Video? Here are the steps:
Find the clip you want to reduce the noise of and search for the neat video effect in the Effects Panel.

The video editors mostly use the SR version of it, because it seems faster and has kind of a better performance.

Then, you’ll have to drag the neat video plug-in to the clip to your choosing, take your attention to the Effect Controls panel on the left, and find: fx Reduce Noise v5 (SR) – press the button saying Prepare and this will open up the Build button as well, which wil open the Neat video effect window.

There, you’ll need to click on the Auto Profile. Selection window will appear, which you can move around the scene and resize, in order to select the noisy area of your footage. It is recommended to find the darkest or grainiest area there and select judging by this.

On the left side, you will find Filter Settings: under Spatial, you can play with the Noise Reduction Amount and Noise Level.

Then, you will hit Apply and – done, you can instantly see the results!
Shotcut
What about Shotcut? It is a free, open-source and cross-platform video denoiser for Windows operating system. It is also an outstanding video editor with trimming, splitting, color correction and other tools.
In order to reduce the noise there, do the following: first off, find filters, open that window and type in: Noise. This will open the options, and several of them are for noise reduction.


Choose Reduce Noise: Wavelet, add it to the Video and then feel free to modify the settings, such as: Decompose, Threshold, Percent. You can check and uncheck the effect in order to see the before-after difference. Then, click Apply button and it is ready to go!
Anyway, you can also try other similar effects such as Reduce Noise: HQDN3D and Reduce Noise: Smart Blur.
Adobe Premiere Pro
Even though we discussed video denoising in Adobe Premier Pro but with the help of a plug-in called Neat Video, reducing the noise in the video in this software can be achieved without the plug-in as well, through using effect which is called Median. And, Premiere Pro kind of deserves to be mentioned, so, let’s go for it!
Add the desired footage into the Timeline of Premiere Pro. Then, find the Effects Panel, where our wanted Median can be found –drag and drop the effect to the clip.

The Median should modify the grainiest parts of the whole clip, so in order to do this, we need to use masks. In the Effects Control panel, select the mask shape for the clip – the options are: rectangle, circle, or pen tool. With Pen tool, you move the Mask around the screen and resize it – the covered area will be affected.

If you change Feather setting to 100, the effect will lose a sharp edge and instead, there will be a smooth border.

So, you might think it is needed to repeat these steps several time to create masks in different areas, in order to cover all of the grainy space of the scene.
And, at last, to reduce the noise, adjust the effect settings.

Actually, Median just blurs the grainy parts, without directly taking them away. Lastly, you can get to know the Radios settings, which will help you to achieve your most desired look!
Davinci Resolve
DaVinci Resolve is also worth mentioning in this list, in a way because it is also different from other video editors. Let’s see how it works and, meanwhile, differs:
Add the footage into the timeline. Find the fusion tab underneath the timeline panel.

There, MediaIn1 and MediaOut1 will appear, and first, click on MediaIn1, - the scene will be shown in the first viewer – and MediaOut1 by default is appearing in the second. So, stay on MediaIn1, hit shift+spacebar, and find Remove Noise (RN). Click Add, which adds the Remove Noise1 node. On the top right corner there is an Inspector, which opens all the properties you can modify.

After going only into the second viewer, and in the top bar there is channel icons. Open it and click on red, but don’t get alarmed when your footage turns black and white – it’s just for a while. Go back to the Inspector, increase Softness Red and Detail Red.

This step helps remove grain from the red channel. Then repeat the same for green and blue channels. After finishing go to the same channel button and set it to “back to color”. The clip will be colorized again and now be clearer, compared to the first viewer.

So, Evrika – we hot to know 5 best video denoisers in 2024, with the addition of audio background noise removal in Wondershare Filmora – hope you enjoyed it, and hope this will help you create better videos for yourself and your viewers!
This ensures you see the Smart Denoise, where you can change opacity of the clip, threshold and radius.
Reduce Opacity until you are satisfied with the result. The box next to Smart Denoise will show you the scene before and after the effect.
Bonus tip: Wondershare Filmora audio denoise
We already explained how video denoising works, and we will go on with our selection and explanatory article about the process, but, as we are on the Filmora topic, we might as well mention that denoising might mean another thing too – which, in this case, regards audio background noise. It means to remove unwanted hum from the audio in order for it to become more hearable. So, doing this in Wondershare Filmora works in a quite easy way. Use the guideline:
Drag and drop your video into the timeline. Right-click on the clip and hit Detach Audio, which will let you separate audio and video from one another and make sure you can work on them one by one.
Double-click on the audio track and have access to the editing panel, where you can see Remove background noise – it is not needed to emphasize what this option does for you!
That’s it – you are done, but keep in mind that there is a second way to achieve the same result as well, but this in case you don’t want to detach the audio: Double-click on the video clip in the timeline, the editing panel opens, so switch to Audio. Checking the box next to Remove background noise will show that there are three levels – weak, mid, and strong, and of course, you can choose to your liking!
If the voice recording doesn’t sound natural anymore, you can do the following: Click on Customize and Customize Equalizer window will open.
On the left, you can see the low tunes, while the highs are on the right. Background noises are often on the left, so you can lower them to get rid of them, but in order to have a more natural sound, raise the middle ones a little – and you are done when you are content with the sound!
So, hmm… back to the original topic – denoising a video, shall we?..
Neat video
Neat Video kind of, speaks for itself… it is a powerful video editing tool suitable for Windows, macOS and Linux. It aims to reduce the digital noise, flicker, dust, scratches and other defects in the captured videos to improve the visual quality of the videos.
It is a plug-in for Premiere Pro, that does more or less what the product noise says: it makes grainy video look neater. It’s very easy to use and
How to do that in Neat Video? Here are the steps:
Find the clip you want to reduce the noise of and search for the neat video effect in the Effects Panel.
The video editors mostly use the SR version of it, because it seems faster and has kind of a better performance.
Then, you’ll have to drag the neat video plug-in to the clip to your choosing, take your attention to the Effect Controls panel on the left, and find: fx Reduce Noise v5 (SR) – press the button saying Prepare and this will open up the Build button as well, which wil open the Neat video effect window.
There, you’ll need to click on the Auto Profile. Selection window will appear, which you can move around the scene and resize, in order to select the noisy area of your footage. It is recommended to find the darkest or grainiest area there and select judging by this.
On the left side, you will find Filter Settings: under Spatial, you can play with the Noise Reduction Amount and Noise Level.
Then, you will hit Apply and – done, you can instantly see the results!
Shotcut
What about Shotcut? It is a free, open-source and cross-platform video denoiser for Windows operating system. It is also an outstanding video editor with trimming, splitting, color correction and other tools.
In order to reduce the noise there, do the following: first off, find filters, open that window and type in: Noise. This will open the options, and several of them are for noise reduction.
Choose Reduce Noise: Wavelet, add it to the Video and then feel free to modify the settings, such as: Decompose, Threshold, Percent. You can check and uncheck the effect in order to see the before-after difference. Then, click Apply button and it is ready to go!
Anyway, you can also try other similar effects such as Reduce Noise: HQDN3D and Reduce Noise: Smart Blur.
Adobe Premiere Pro
Even though we discussed video denoising in Adobe Premier Pro but with the help of a plug-in called Neat Video, reducing the noise in the video in this software can be achieved without the plug-in as well, through using effect which is called Median. And, Premiere Pro kind of deserves to be mentioned, so, let’s go for it!
Add the desired footage into the Timeline of Premiere Pro. Then, find the Effects Panel, where our wanted Median can be found –drag and drop the effect to the clip.
The Median should modify the grainiest parts of the whole clip, so in order to do this, we need to use masks. In the Effects Control panel, select the mask shape for the clip – the options are: rectangle, circle, or pen tool. With Pen tool, you move the Mask around the screen and resize it – the covered area will be affected.
If you change Feather setting to 100, the effect will lose a sharp edge and instead, there will be a smooth border.
So, you might think it is needed to repeat these steps several time to create masks in different areas, in order to cover all of the grainy space of the scene.
And, at last, to reduce the noise, adjust the effect settings.
Actually, Median just blurs the grainy parts, without directly taking them away. Lastly, you can get to know the Radios settings, which will help you to achieve your most desired look!
Davinci Resolve
DaVinci Resolve is also worth mentioning in this list, in a way because it is also different from other video editors. Let’s see how it works and, meanwhile, differs:
Add the footage into the timeline. Find the fusion tab underneath the timeline panel.
There, MediaIn1 and MediaOut1 will appear, and first, click on MediaIn1, - the scene will be shown in the first viewer – and MediaOut1 by default is appearing in the second. So, stay on MediaIn1, hit shift+spacebar, and find Remove Noise (RN). Click Add, which adds the Remove Noise1 node. On the top right corner there is an Inspector, which opens all the properties you can modify.
After going only into the second viewer, and in the top bar there is channel icons. Open it and click on red, but don’t get alarmed when your footage turns black and white – it’s just for a while. Go back to the Inspector, increase Softness Red and Detail Red.
This step helps remove grain from the red channel. Then repeat the same for green and blue channels. After finishing go to the same channel button and set it to “back to color”. The clip will be colorized again and now be clearer, compared to the first viewer.
So, Evrika – we hot to know 5 best video denoisers in 2024, with the addition of audio background noise removal in Wondershare Filmora – hope you enjoyed it, and hope this will help you create better videos for yourself and your viewers!
Also read:
- 2024 Approved How to Add Text Behind Objects in Video
- 2024 Approved Cropping Videos in Final Cut Pro Step by Step
- Updated The Article Shall Offer an Overview to Create a Promising Sports Intro and Edit a YouTube Outro for a Sports Channel. There Will Also Be Three Recommended Apps to Download Background Music for Exercise
- New Top List Best VHS Sound Effect That You Can Use in Video Making for 2024
- Updated Ultimate Guidelines to Help You Better Use VLC Media Player for 2024
- New In 2024, Best Phantom Slow-Mo Camera For Recording Slow Motion Videos
- Updated 10 Top Free GIF Background Remover for PC and Online for 2024
- In 2024, Got No Luck with MP4 Video Joining Software? Try These 6 Best MP4 Mergers to Combine Videos on Your MAC and Windows
- Learn How to Make Your CSGO Montage Impressive
- 2024 Approved How to Use OBS Chroma Key With/Without Green Screen
- 2024 Approved How to Create an Adobe Slideshow the Easy Way
- New How To Split Screen On Tiktok
- Updated How to Create Emoji on Mac That Take Less Than 10 Mins
- Updated 2024 Approved How to Make Your CSGO Montage Impressive
- In 2024, Zoom In and Zoom Out on YouTube
- New MP3 Cutter Download for 2024
- Beginners Guide About WMV Format and Best WMV Video Editor for 2024
- 2024 Approved Step by Step to Rotate Videos Using Kdenlive
- New In This Article, You Will Learn About Splitting the Video Into the Frames in FFmpeg and Mentioning the Easy Option for Doing the Same Task in a Few Seconds by Wondershare Filmora
- New Best Video Title Generators
- How to Use OBS Chroma Key With/Without Green Screen Easy Solutions for 2024
- New A Review of 3D LUT Mobile App - A Composite Application for Editing Media
- In 2024, How To Use Motion Blur On Video Star?
- 2024 Approved Things You Need to Know About Color Grading in Photography
- 3 Different Methods to Correct Color Distortion in Videos for 2024
- In 2024, Tips And Tricks To Tell if Your Apple iPhone 12 Pro Max Is Unlocked
- In 2024, How To Reset the Security Questions of Your Apple ID On Your iPhone 7 Plus
- 7 Solutions to Fix Chrome Crashes or Wont Open on Oppo A78 | Dr.fone
- How to Fix the Soft Bricked Honor Magic 5? | Dr.fone
- In 2024, The Best iSpoofer Alternative to Try On Realme V30T | Dr.fone
- Top 15 Augmented Reality Games Like Pokémon GO To Play On Apple iPhone 6 Plus | Dr.fone
- In 2024, 3 Effective Methods to Fake GPS location on Android For your Tecno Camon 20 | Dr.fone
- In 2024, Will Pokémon Go Ban the Account if You Use PGSharp On Oppo A2 | Dr.fone
- AddROM Bypass An Android Tool to Unlock FRP Lock Screen For your Oppo Find N3 Flip
- In 2024, How to Fake Snapchat Location on Realme Narzo N53 | Dr.fone
- In 2024, 3 Ways of How to Get Someones Apple ID Off iPhone XS Max without Password
- 4 Easy Ways for Your Xiaomi Redmi Note 12T Pro Hard Reset | Dr.fone
- How to Track Oppo Reno 8T 5G Location by Number | Dr.fone
- In 2024, Complete Review & Guide to Techeligible FRP Bypass and More For Poco
- How to Retrieve deleted photos on Itel A60s
- In 2024, A Step-by-Step Guide to Finding Your Apple ID On Your Apple iPhone SE (2022)
- How to sign a .xlb file document online
- How to Transfer Data from Itel P40+ to Other Android Devices? | Dr.fone
- 4 Most-Known Ways to Find Someone on Tinder For Samsung Galaxy A15 5G by Name | Dr.fone
- Title: New How to Remove Motion Blur In Photoshop for 2024
- Author: Chloe
- Created at : 2024-04-24 07:08:36
- Updated at : 2024-04-25 07:08:36
- Link: https://ai-editing-video.techidaily.com/new-how-to-remove-motion-blur-in-photoshop-for-2024/
- License: This work is licensed under CC BY-NC-SA 4.0.
