:max_bytes(150000):strip_icc():format(webp)/movie-night-at-home-with-popcorn_t20_yv3PA9-5c815f7fc9e77c0001fd5b49.jpg)
New How to Slow Down a Video on iPhone and Android The Easy Way

How to Slow Down a Video on iPhone and Android The Easy Way
How to edit a video to slow motion on iPhone and Android? Slow motion is an important part of video editing. You would be enhancing your feature-length films or simply preparing cool stuff for posting on social media. By slowing down some or all the scenes of your video, you make it appear cool and more interesting. The slo mo allows viewers to notice specific details of your videos or focus on what you want them to. To show you how to make slow motion video in Android and iPhone, we are going to introduce a versatile video editing app that works well on both platforms. This article will provide the step-by-step process on how to edit video to slow motion on iPhone and Android using Wondershare Filmora.
Slow Motion Maker Slow your video’s speed with better control of your keyframes to create unique cinematic effects!
Free Download Free Download Learn More

Part 1. How to Make Slow Motion Videos on iPhone With Filmora : 2 Ways
Creating slo mo videos is a staple in video editing, which helps make videos more cinematic and engaging. Understanding how to edit iPhone slow motion video will help you to create quality videos on the go. It also gives you more freedom in how you tell your visual story or keeping the attention of your viewers throughout the video.
Free Download For Win 7 or later(64-bit)
Free Download For macOS 10.14 or later
When you slow motion a video, you make it easier for your viewers to observe details in every minute. This is also an effective way to add emotional weight or a dramatic flair to your videos. Let’s explore how to edit a video slow motion on iPhone with Wondershare Filmora.
Step 1: Download Wondershare Filmora
Open the App Store on your phone. Search for Wondershare Filmora, download and launch the app on your phone. Follow the instructions on the screen to create a Filmora account or log in to an existing one to start using the app.

Step 2: Import Video to Filmora
Once you open the Filmora app, tap the + button and import the video you want to edit from your photo library.

Step 3: Slow Down the Video
Once you have imported the video, slow it down to your desired speed. You have two ways to achieve this with Filmora for iPhone:
Method 1Use the Uniform Speed Slider
Tap on the video clip, and at the bottom of the screen, select the speed slider. Adjust the slider to the right or left to adjust the speed of your video. Then tap Done, and save your video.

Method 2Use the Speed Ramping Feature
The speed ramping feature will gradually change the speed of your video. When done right, speed ramps in a video add a cinematic feel and look. Tap on the video clip. Then tap on the Speed Ramping feature at the bottom of the screen. Use the graph that appears to set the speed ramp for your video. You may choose the presets already available or customize the speed based on your own desired setting. Tap Done when you are satisfied and save the video.

Part 2. How to Make Slow Motion Videos on Android with Filmora : 2 Ways
The Android operating systems does allow you to slow down or speed up video. However, third-party apps like Wondershare Filmors provide more versatile and better outcomes. The app helps you quickly change the playback speed of a video. It is a great choice for anyone wondering how to make slow motion video in Android.
You can opt for speeding up or slowing down the video based on what you specifically want to achieve. There is also the option to use the Speed Ramp feature which allows you to customize different speed rates for the same clip. In some circumstances, combining the two features can produce exceptional results in your video editing projects. Let’s have a look at how you can use this app on your Android phone.
Free Download For Win 7 or later(64-bit)
Free Download For macOS 10.14 or later
Step 1: Download and Install Filmora
Search for Wondershare Filmora in the Google Play Store. The app is available for Android devices running Android 7.0 or higher, making it compatible with a wide range of devices. Download and install the Filmora: AI Video Editor and Maker app on your Android phone. Start the app and follow the instructions to create a new or sign into an existing account.

Step 2: Import Your Video into Filmora
Once you start the Filmora app on your Android device, tap the + button and select the video you want to import. This will add the video files in Filmora to start editing its specific components, including speed.

Step 3: Adjust the Speed with Filmora
Filmora for Android offers two methods to edit the speed of your video. You can use the speed slider for direct editing or the Speed Ramping feature for a more creative approach.
Method 1Use the Uniform Speed Slider
Tap the video that you have imported. Then, select the speed slider at the bottom of the screen. Adjust the speed of the video by dragging the speed slider to the left or right. Once satisfied, tap the Check button and save your video.

Method 2Use the Speed Ramping Feature
With the Speed Ramping feature, adjust the speed of your Android video gradually in a more creative manner. You may slow it down at the beginning or the end while accelerating the middle. This makes the video fun and more engaging to your audience.
To use this feature on Filmora for Android, tap on the video clip and select the Speed Ramping icon at the bottom of the screen. Use the graph that appears to adjust how you want the video to slow down or speed up when playing it back. Tap on the Check button once done and save your video.

Conclusion
Creating slow-motion videos is a vital skill in video editing. It improves visual storytelling and keeps your audience more engaging by focusing on the most important aspects of your videos. Wondering how to edit slo mo video on iPhone and Android devices, Wondershare Filmora offers an intuitive feature to do this. The user-friendly tool is effective in slowing down videos on both iPhone and Android phones. Download the app App Store for iPhone and Play Store for Android to enhance your slow-motion videos and unleash the creativity of mobile phone video editing.
Free Download Free Download Learn More

Part 1. How to Make Slow Motion Videos on iPhone With Filmora : 2 Ways
Creating slo mo videos is a staple in video editing, which helps make videos more cinematic and engaging. Understanding how to edit iPhone slow motion video will help you to create quality videos on the go. It also gives you more freedom in how you tell your visual story or keeping the attention of your viewers throughout the video.
Free Download For Win 7 or later(64-bit)
Free Download For macOS 10.14 or later
When you slow motion a video, you make it easier for your viewers to observe details in every minute. This is also an effective way to add emotional weight or a dramatic flair to your videos. Let’s explore how to edit a video slow motion on iPhone with Wondershare Filmora.
Step 1: Download Wondershare Filmora
Open the App Store on your phone. Search for Wondershare Filmora, download and launch the app on your phone. Follow the instructions on the screen to create a Filmora account or log in to an existing one to start using the app.

Step 2: Import Video to Filmora
Once you open the Filmora app, tap the + button and import the video you want to edit from your photo library.

Step 3: Slow Down the Video
Once you have imported the video, slow it down to your desired speed. You have two ways to achieve this with Filmora for iPhone:
Method 1Use the Uniform Speed Slider
Tap on the video clip, and at the bottom of the screen, select the speed slider. Adjust the slider to the right or left to adjust the speed of your video. Then tap Done, and save your video.

Method 2Use the Speed Ramping Feature
The speed ramping feature will gradually change the speed of your video. When done right, speed ramps in a video add a cinematic feel and look. Tap on the video clip. Then tap on the Speed Ramping feature at the bottom of the screen. Use the graph that appears to set the speed ramp for your video. You may choose the presets already available or customize the speed based on your own desired setting. Tap Done when you are satisfied and save the video.

Part 2. How to Make Slow Motion Videos on Android with Filmora : 2 Ways
The Android operating systems does allow you to slow down or speed up video. However, third-party apps like Wondershare Filmors provide more versatile and better outcomes. The app helps you quickly change the playback speed of a video. It is a great choice for anyone wondering how to make slow motion video in Android.
You can opt for speeding up or slowing down the video based on what you specifically want to achieve. There is also the option to use the Speed Ramp feature which allows you to customize different speed rates for the same clip. In some circumstances, combining the two features can produce exceptional results in your video editing projects. Let’s have a look at how you can use this app on your Android phone.
Free Download For Win 7 or later(64-bit)
Free Download For macOS 10.14 or later
Step 1: Download and Install Filmora
Search for Wondershare Filmora in the Google Play Store. The app is available for Android devices running Android 7.0 or higher, making it compatible with a wide range of devices. Download and install the Filmora: AI Video Editor and Maker app on your Android phone. Start the app and follow the instructions to create a new or sign into an existing account.

Step 2: Import Your Video into Filmora
Once you start the Filmora app on your Android device, tap the + button and select the video you want to import. This will add the video files in Filmora to start editing its specific components, including speed.

Step 3: Adjust the Speed with Filmora
Filmora for Android offers two methods to edit the speed of your video. You can use the speed slider for direct editing or the Speed Ramping feature for a more creative approach.
Method 1Use the Uniform Speed Slider
Tap the video that you have imported. Then, select the speed slider at the bottom of the screen. Adjust the speed of the video by dragging the speed slider to the left or right. Once satisfied, tap the Check button and save your video.

Method 2Use the Speed Ramping Feature
With the Speed Ramping feature, adjust the speed of your Android video gradually in a more creative manner. You may slow it down at the beginning or the end while accelerating the middle. This makes the video fun and more engaging to your audience.
To use this feature on Filmora for Android, tap on the video clip and select the Speed Ramping icon at the bottom of the screen. Use the graph that appears to adjust how you want the video to slow down or speed up when playing it back. Tap on the Check button once done and save your video.

Conclusion
Creating slow-motion videos is a vital skill in video editing. It improves visual storytelling and keeps your audience more engaging by focusing on the most important aspects of your videos. Wondering how to edit slo mo video on iPhone and Android devices, Wondershare Filmora offers an intuitive feature to do this. The user-friendly tool is effective in slowing down videos on both iPhone and Android phones. Download the app App Store for iPhone and Play Store for Android to enhance your slow-motion videos and unleash the creativity of mobile phone video editing.
AI Features of Filmora - Silence Detection in Videos
Sometimes awkward silent moments can make a video look cringe and boring. Silence in videos can often be a major drawback, making the content dull and unengaging. However, fear not because there are ways to eliminate them and keep your viewers hooked. One effective solution is to utilize certain features that help in removing silence from videos.
Silence detection is a feature that lets you detect silence and awkward pauses in your content. It can detect those instances where there is no audio or any significant sound present. By utilizing this feature, you can easily identify and remove these silent parts from your videos. Wondershare Filmora is a tool that offers this AI-powered feature to remove silence from videos.
Part 1: How Can Silencing in Videos Damage It?
Silence can negatively affect videos, making them less engaging and captivating. Many video silence removers are available, but first, learn how silence affects video content. Let’s explore some of how silence can damage the quality of video content:
1. Loss of Interest
When viewers encounter long silent moments in a video, they lose interest. Silence fails to hold their attention and leaves them craving for something more stimulating. As a result, they may lose interest in the content and look for other videos. This is somewhat discouraging for a content creator. That’s why short and meaningful content is what the audience demand.
2. Lack of Emotional Connection
Sound and audio play an essential role in creating an emotional connection with the audience. Silence, on the other hand, fails to start any emotional response. Without appropriate sound effects or dialogue, videos can feel empty and emotionless. The absence of audio elements also fails to establish a connection with the viewer.
3. Breaks the Flow
Silent moments in videos can disrupt the natural flow and rhythm of the content. Viewers expect a seamless progression from one scene to another. However, sudden silences in a video may create frustration for some individuals. It may also lead to a disjointed viewing experience for the viewer. Meanwhile, the audience sometimes couldn’t understand the intended message.
4. Awkwardness and Uncomfortable Silence
Silence can create awkward moments in videos, especially when it’s unexpected or prolonged. These silent gaps can make viewers feel uncomfortable. The viewer becomes unsure of what to expect or how to interpret the situation. Moreover, awkward silences can detract from the overall viewing experience. It also leaves a negative impression and makes the content less enjoyable.
5. Reduced Engagement and Sharing
Videos that contain excessive silence are less likely to be shared or discussed among viewers. Silent moments fail to generate excitement or spark conversations. In contrast, videos with dynamic audio elements are more likely to capture attention. If your video has long pauses or awkward silent moments, it may not get the expected response.
Video Slience Detector
Easily and precisely detect slience in video with Filmora Video Editor ! Experience the magic of cool to make great videos.
Detect Slience in Video Detect Slience in Video Learn More >

Part 2: Silence Detection Feature of Wondershare Filmora - An Understanding
Wondershare Filmora Video Editor always surprises you with its unique editing options and features. Its many features make it easy and pretty straightforward for you like. With another excellent feature, you can detect silence in audio files and videos. This unique feature will automatically detect awkward silence or long pauses.
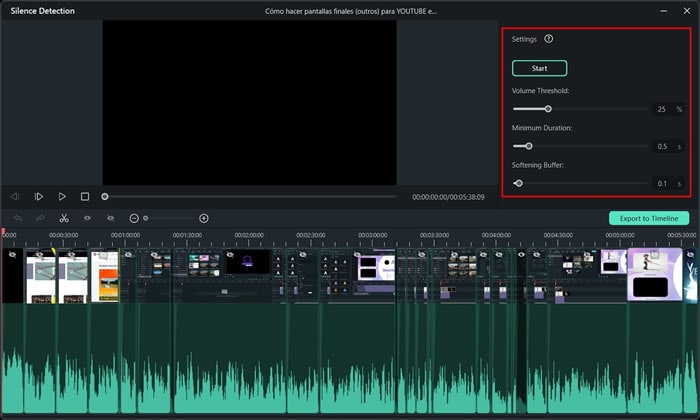
Furthermore, you can remove those moments from your project to create a seamless experience. This video silence remover uses AI to find silent intervals in your video. You can also change the volume threshold by helping the tool find more such moments in your project. Additionally, you can change the minimum duration of such silent intervals of your video.
Part 3: Gathering Details About the Other AI Features of Filmora
Wondershare Filmora can auto remove silence in videos, but it has other AI features too. Learn more about Filmora’s AI features in this section.
Edit Video with AI For Win 7 or later(64-bit)
Edit Video with AI For macOS 10.14 or later
AI Image
This feature of the Wondershare Filmora employs AI to improve the appearance of images in videos. It automatically fixes imperfections like noise and color asymmetry. Furthermore, it also corrects brightness, giving your videos a better, more polished appearance. You can fast and easily enhance the quality of your video with the help of this feature.
Auto Reframe
If you want to change the aspect ratio of your video automatically, then this is the feature for you. The Auto Reframe function in Filmora automatically modifies aspect ratios for your video .
Motion Tracking
Filmora’s motion tracking feature tracks and follows moving objects in videos . It allows you to add effects, text, or graphics that move along with the object. Furthermore, this feature makes it easy to highlight and enhance specific elements in a video. You can even create engaging and professional-looking effects using the motion tracking feature. This feature makes it simple to add dynamic elements to videos.
Instant Mode
Wondershare Filmora has an Instant Mode feature that lets users create videos easily and quickly. You can choose a template, import your video, and let the software will edit it automatically. This feature can automatically apply transitions, effects, and music to your videos. It’s a simple and convenient way to make polished videos without needing advanced editing skills.
Auto Beat Sync
It is a feature that synchronizes video clips and effects with the beats of background music. This feature can automatically detect the rhythm and aligns the visuals accordingly. Moreover, it can save you time and make your videos more engaging. You can edit and synchronize audio with video without having expertise by using this AI feature of Filmora.
Part 4: Tutorial: Using The Silence Detection Feature in Filmora
Wondershare Filmora can automatically remove silence from videos in no time. With its silent detection feature, you can easily remove awkward silence from your videos. Follow these guided steps to remove such moments from your videos.
Detect Slience in Video For Win 7 or later(64-bit)
Detect Slience in Video For macOS 10.14 or later
Step 1Open Wondershare Filmora
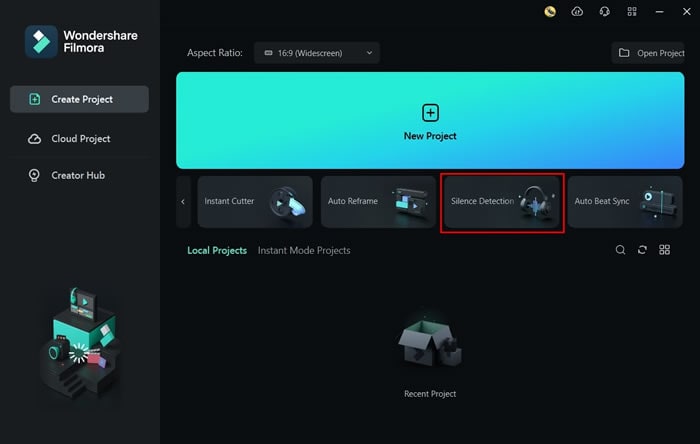
To auto remove silence in videos, start by opening Wondershare Filmora on your system. Look for the “Silence Detection” button located just beneath the “New Project” option.
Step 2Import and Detect Silence
Click on the “Silence Detection“ button, and then import your video file into the tool. If needed, you can adjust the parameters in the “Settings” menu according to your requirements. Continue to select the “Start” button, and Filmora will automatically detect any silent intervals in your video or audio file.
Step 3Delete Silence and Merge Clips
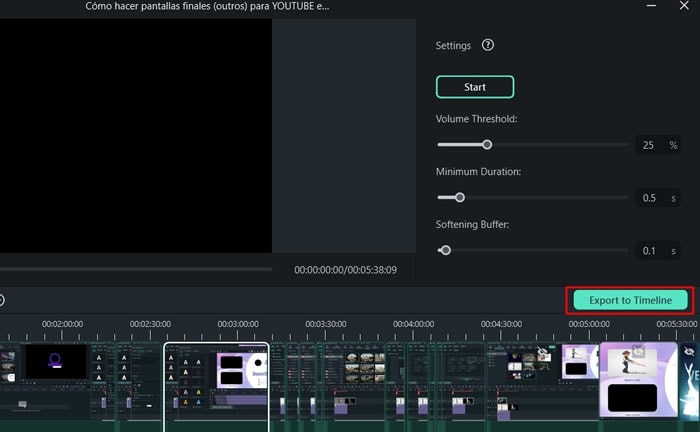
Continue to remove the silent portions from the timeline by merging the clips together. To merge the remaining clips together, drag and place each clip right next to each other. Once done, click the “Export to Timeline” button to lead into the main interface.
Conclusion
To conclude, silence detection eliminates boring stretches of silence from a video. Additionally, it allows you to enhance the overall flow of your video. By removing such intervals, you can maintain a consistent pace throughout your video. Wondershare Filmora is a fantastic tool that automatically removes silence from video and audio files.
Detect Slience in Video Detect Slience in Video Learn More >

Part 2: Silence Detection Feature of Wondershare Filmora - An Understanding
Wondershare Filmora Video Editor always surprises you with its unique editing options and features. Its many features make it easy and pretty straightforward for you like. With another excellent feature, you can detect silence in audio files and videos. This unique feature will automatically detect awkward silence or long pauses.
Furthermore, you can remove those moments from your project to create a seamless experience. This video silence remover uses AI to find silent intervals in your video. You can also change the volume threshold by helping the tool find more such moments in your project. Additionally, you can change the minimum duration of such silent intervals of your video.
Part 3: Gathering Details About the Other AI Features of Filmora
Wondershare Filmora can auto remove silence in videos, but it has other AI features too. Learn more about Filmora’s AI features in this section.
Edit Video with AI For Win 7 or later(64-bit)
Edit Video with AI For macOS 10.14 or later
AI Image
This feature of the Wondershare Filmora employs AI to improve the appearance of images in videos. It automatically fixes imperfections like noise and color asymmetry. Furthermore, it also corrects brightness, giving your videos a better, more polished appearance. You can fast and easily enhance the quality of your video with the help of this feature.
Auto Reframe
If you want to change the aspect ratio of your video automatically, then this is the feature for you. The Auto Reframe function in Filmora automatically modifies aspect ratios for your video .
Motion Tracking
Filmora’s motion tracking feature tracks and follows moving objects in videos . It allows you to add effects, text, or graphics that move along with the object. Furthermore, this feature makes it easy to highlight and enhance specific elements in a video. You can even create engaging and professional-looking effects using the motion tracking feature. This feature makes it simple to add dynamic elements to videos.
Instant Mode
Wondershare Filmora has an Instant Mode feature that lets users create videos easily and quickly. You can choose a template, import your video, and let the software will edit it automatically. This feature can automatically apply transitions, effects, and music to your videos. It’s a simple and convenient way to make polished videos without needing advanced editing skills.
Auto Beat Sync
It is a feature that synchronizes video clips and effects with the beats of background music. This feature can automatically detect the rhythm and aligns the visuals accordingly. Moreover, it can save you time and make your videos more engaging. You can edit and synchronize audio with video without having expertise by using this AI feature of Filmora.
Part 4: Tutorial: Using The Silence Detection Feature in Filmora
Wondershare Filmora can automatically remove silence from videos in no time. With its silent detection feature, you can easily remove awkward silence from your videos. Follow these guided steps to remove such moments from your videos.
Detect Slience in Video For Win 7 or later(64-bit)
Detect Slience in Video For macOS 10.14 or later
Step 1Open Wondershare Filmora
To auto remove silence in videos, start by opening Wondershare Filmora on your system. Look for the “Silence Detection” button located just beneath the “New Project” option.

Step 2Import and Detect Silence
Click on the “Silence Detection“ button, and then import your video file into the tool. If needed, you can adjust the parameters in the “Settings” menu according to your requirements. Continue to select the “Start” button, and Filmora will automatically detect any silent intervals in your video or audio file.

Step 3Delete Silence and Merge Clips
Continue to remove the silent portions from the timeline by merging the clips together. To merge the remaining clips together, drag and place each clip right next to each other. Once done, click the “Export to Timeline” button to lead into the main interface.

Conclusion
To conclude, silence detection eliminates boring stretches of silence from a video. Additionally, it allows you to enhance the overall flow of your video. By removing such intervals, you can maintain a consistent pace throughout your video. Wondershare Filmora is a fantastic tool that automatically removes silence from video and audio files.
How to Rotate AVI in Vertical/Portrait Orientation [Windows, Mac,Android, iPhone & Online]

Video editing is the process of cutting and rearranging multiple clips or segments of video to create a new and more improved video. This involves adding titles, animations, sound effects, music and more. Video editing has not ceased to follow the trend of technology as it keeps thriving tirelessly through the ages. With advancement springing forth from many sides, video editing followed every pace to ensure it’s not left behind. This largely involves gadgets, computers and smartphones.
Before the advent of smartphones, computers have been the only video editing tools, and that culture is preserved even till date as its use has spread round the world. It is therefore evident that film making cannot bypass this process. Improvements have been made over the years on video editing softwares for computers to stay up to date as regards features and usability. There are other video editors which were introduced, and are still being updated such as Adobe Premiere Pro, Final Cut, Filmora and so on. As the case is today, smartphones have proven to be relevant in the process; they have also come up with video editing applications such as Power Video Director, InShot, Filmora for Android, Kinemaster and many more for Android, iPhone and iPads.
This article aims at giving guides and steps on how to rotate AVI videos using different softwares on different PCs (Windows and Mac) and smartphones (Android and iPhone). This does not leave online video editing softwares behind also.
WHAT IS AVI?

AVI means Audio Video Interleave. It’s a multimedia container format introduced by Microsoft in November 1992 as part of its video for Windows technology. AVI files can contain both audio and video data in a file container that allows synchronous audio-with-video playback.
KDENLIVE – FREE FOR WINDOWS

Introduced in 2002, Kdenlive has a good quality and design. The design is straightforward, user-friendly which makes you know what you are getting into, as well as the actual quality of the effects that you might want to apply to your video while editing. Overall, it looks really professional, neat and organized.
HOW TO ROTATE AVI VIDEO IN KDENLIVE
- STEP 1 - Launch Kdenlive on your Windows and import the video from where you have saved it locally. Drag and drop video on timeline
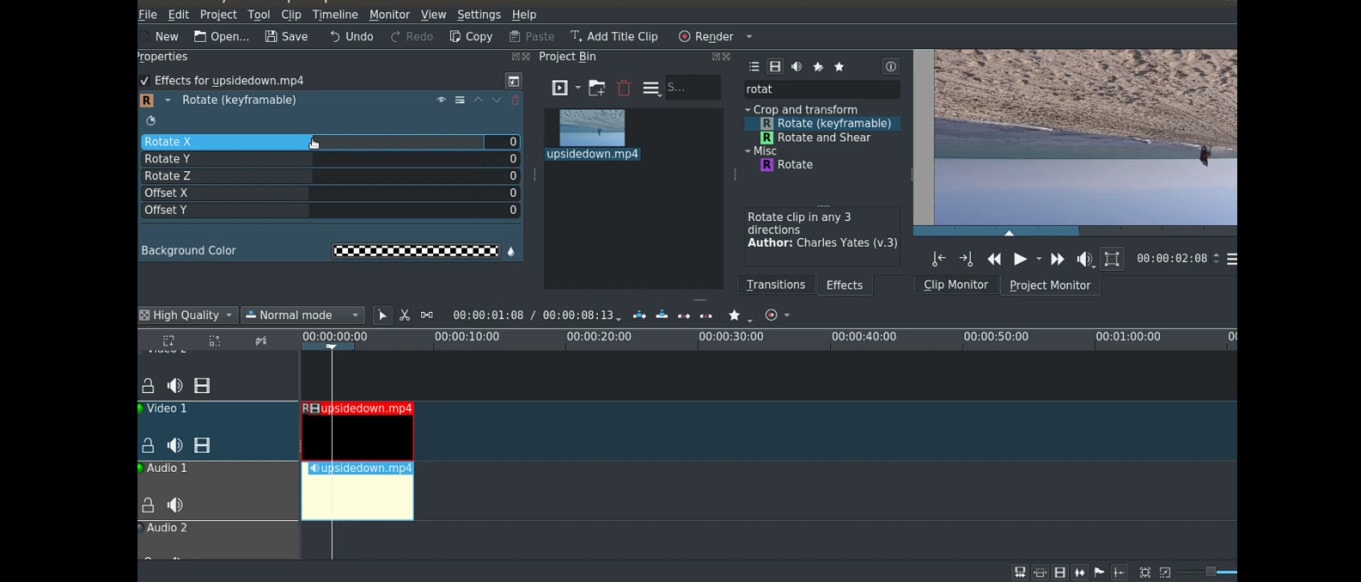
- STEP 2 - Select video effects and in the search box, type ‘rotate’ and click on it. Click on effects, then select video effects
- STEP 3 - Drag the video to the timeline and go to effects, then drag and drop the ‘rotate’ effect on the clip.
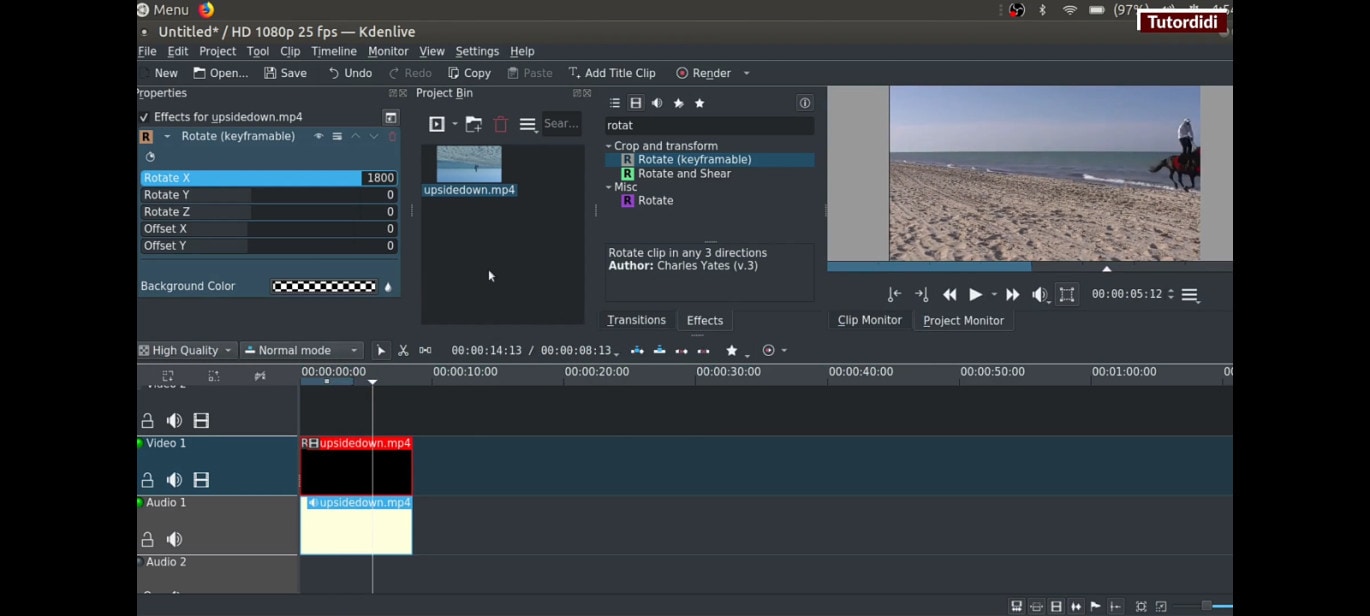
ALTERNATIVE WAY TO ROTATE AVI VIDEO ON KDENLIVE
- STEP 1 - Create a vertical project: create profile, select size, 1080 x 1920 and select aspect ratio: 9:16. Afterwards, there will be a vertical outline on your program window. Import your video to the project bin and drag it to the timeline
- STEP 2 - Go to effects, then click on ‘transform’ and double-click on it
- STEP 3 - Go to the down-right part of your screen and click on ‘rotation’ and highlight to change the number to whichever is ideal for your screen; you can change it to 270. This will make it rotate but will not fill the screen yet. Highlight the size and change it to 180 an hit the ‘enter’ key.
OPENSHOT – FREE FOR WINDOWS
OpenShot Video Editor is a free and open-source video editor for Windows, macOS, Linux, and Chrome OS. The project started in August 2008 by Jonathan Thomas, with the objective of providing a stable, free, and friendly to use video editor.

HOW TO ROTATE AVI VIDEO ON OPENSHOT
- STEP 1 - Launch OpenShot on your Windows and import your clip form where you’ve saved it locally
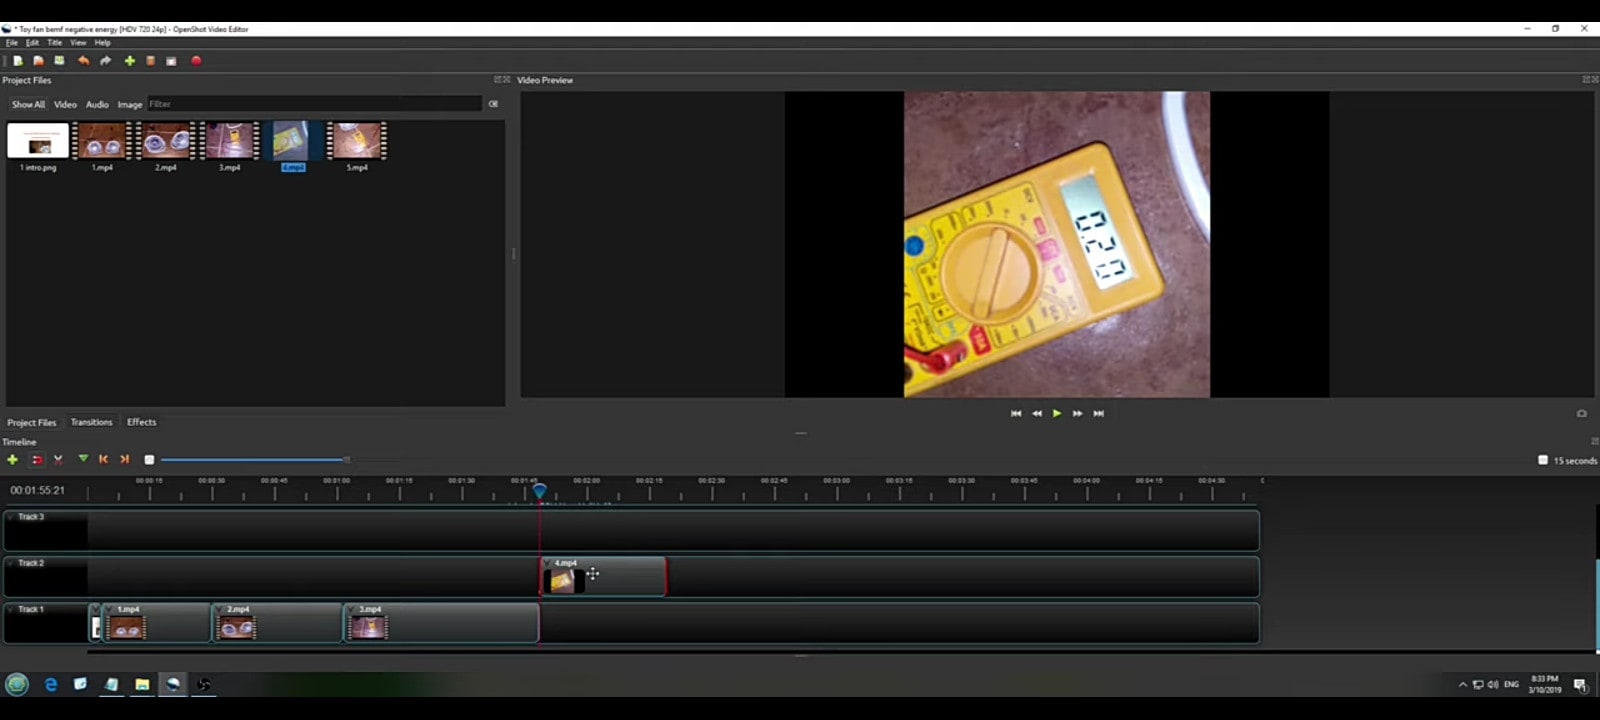
- STEP 2 - Drag and drop footage on your timeline and click on the ‘play’ button to check your footage. Right click on the footage and an option box will appear
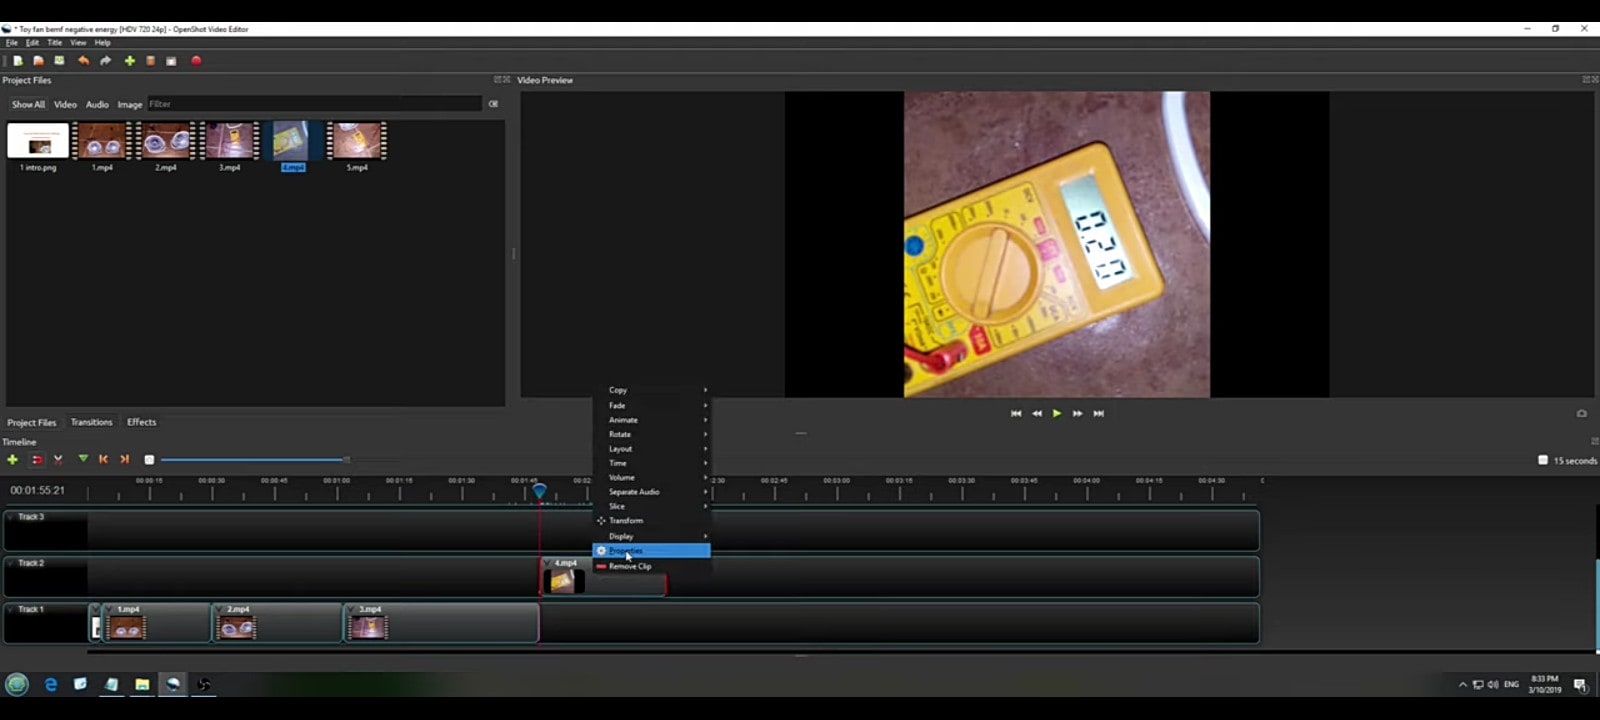
- STEP 3 - Click on rotate; you can choose to rotate either left or right. Rotate till it ideally fits the screen
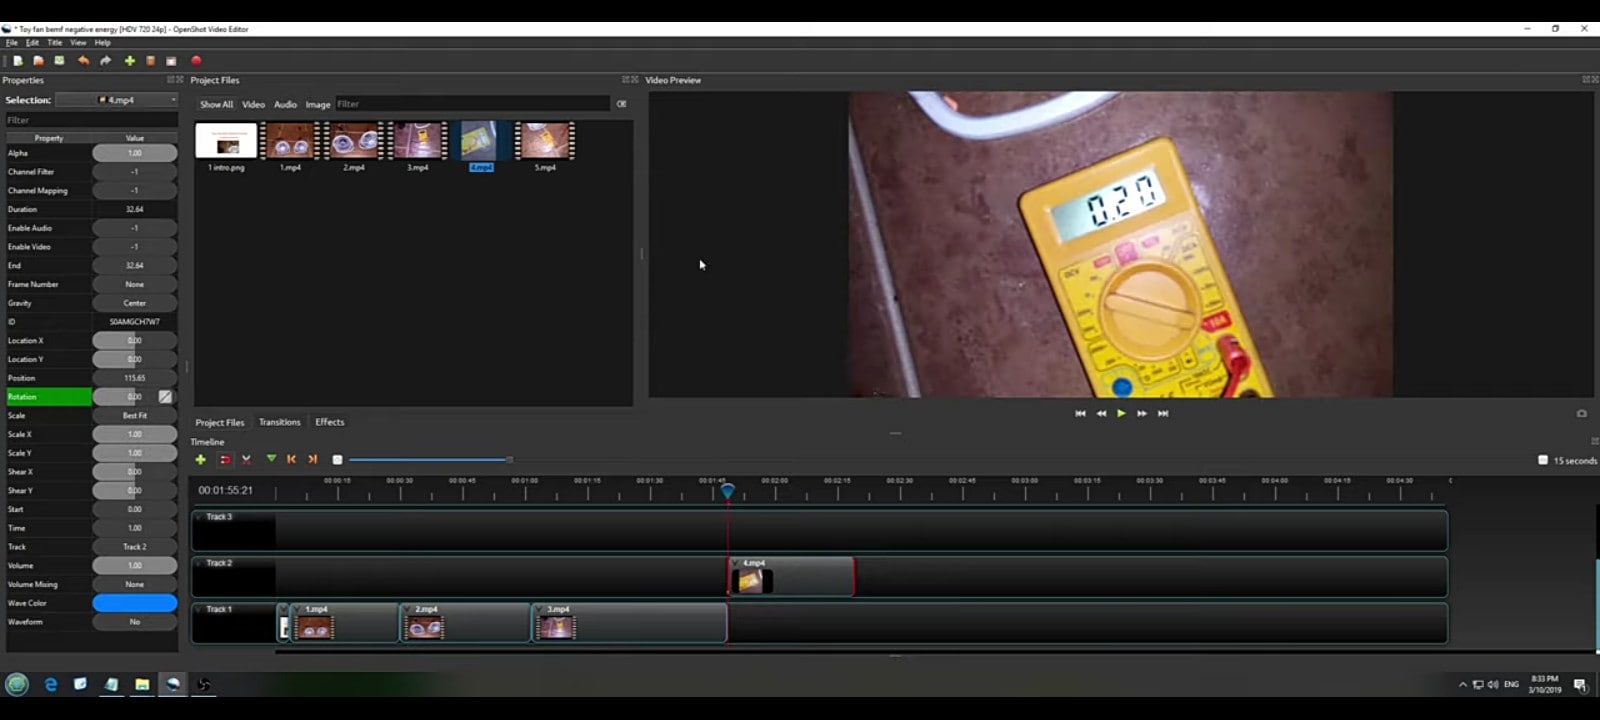
ALTERNATIVE WAY TO ROTATE AVI VIDEO ON OPEN SHOT
- STEP 1 - Launch OpenShot on your Windows and drag your footage to the timeline.
- STEP 2 - Right click on your video and select properties.
- STEP 3 - Go to rotation and change the value, and your video will rotate
ADOBE PREMIERE PRO – PAID FOR WINDOWS

Introduced in 2003, Adobe Premiere Pro is known to be a video editing software. It has a lot of features that can be used in the process of editing. It’s capable of editing feature movies such as Hollywood and the likes.
HOW TO ROTATE AVI VIDEO ON ADOBE PREMIERE PRO – FIXING A LANDSCAPE SHOT
- STEP 1 - Go to sequence and click on sequence settings
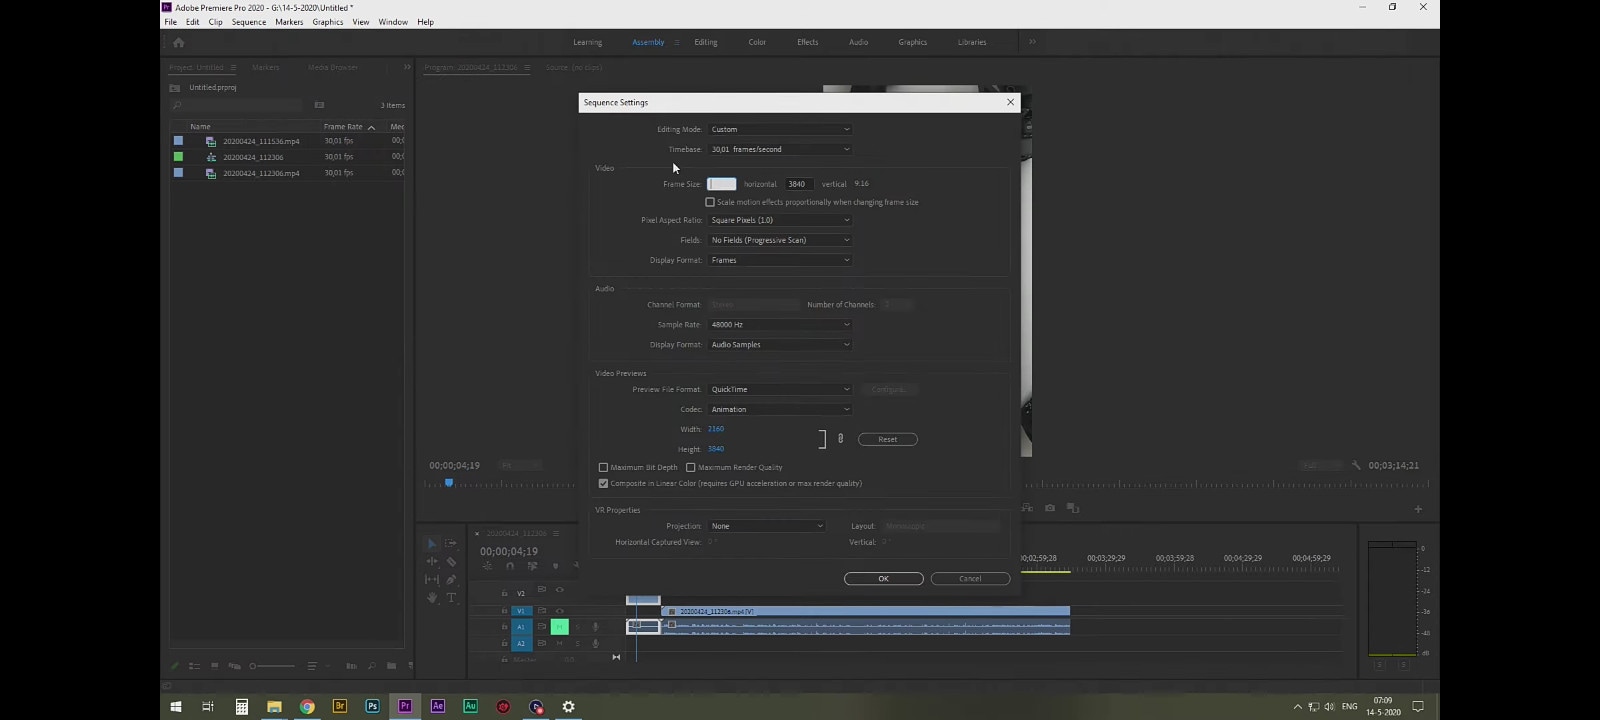
- STEP 2 - Click on frame size and type in 3840; for the horizontal, type in 2160 and then proceed to click ok
FIXING A PORTRAIT SHOT
- Put your play-head (the thin line that moves over the clips on your timeline) on the clip on the timeline
- Go to the top and click on ‘Editing’, then you go to effects control
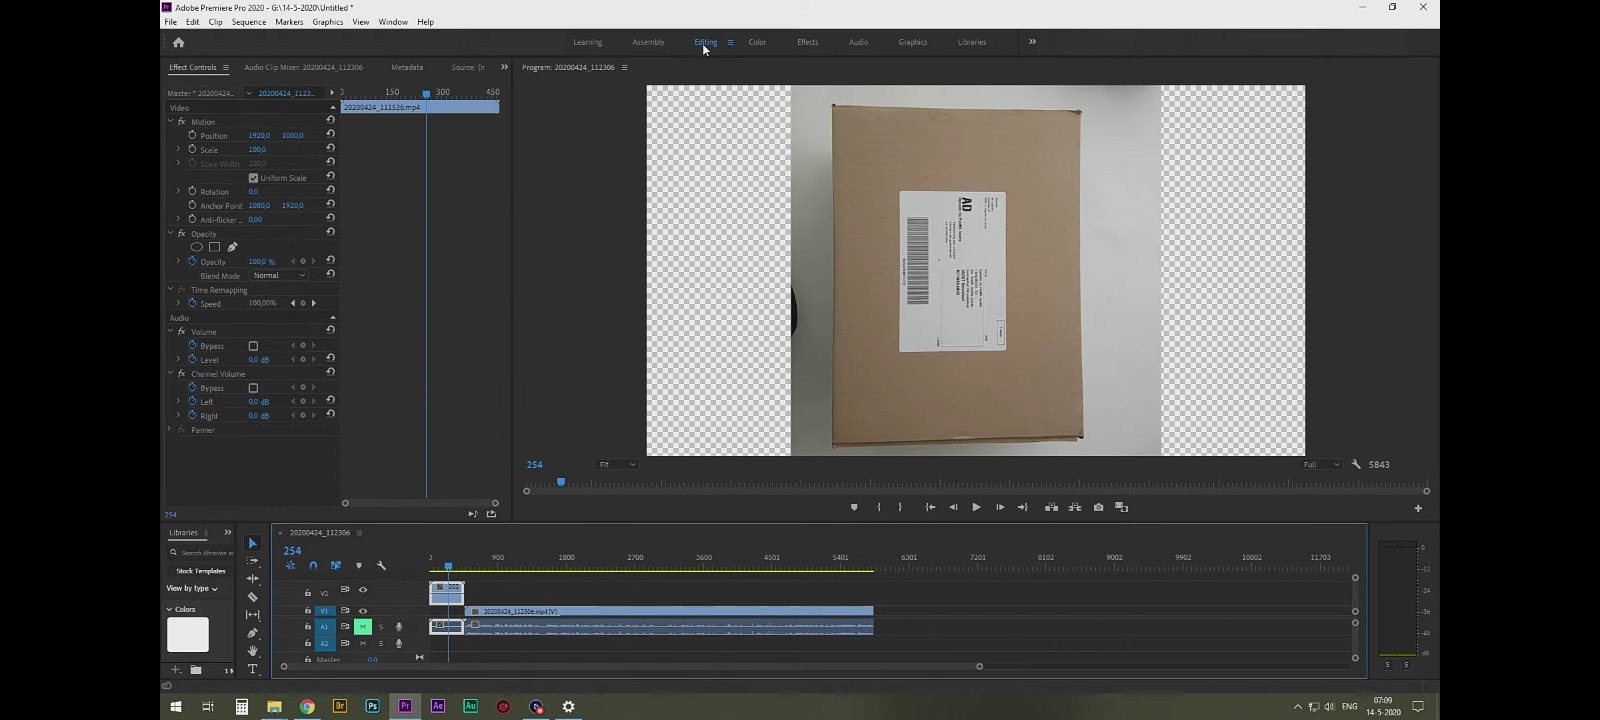
- Go to ‘scale’, and type in the number according to the degree you desire to effect
your rotation. However, your video will be just perfect if you type in -90
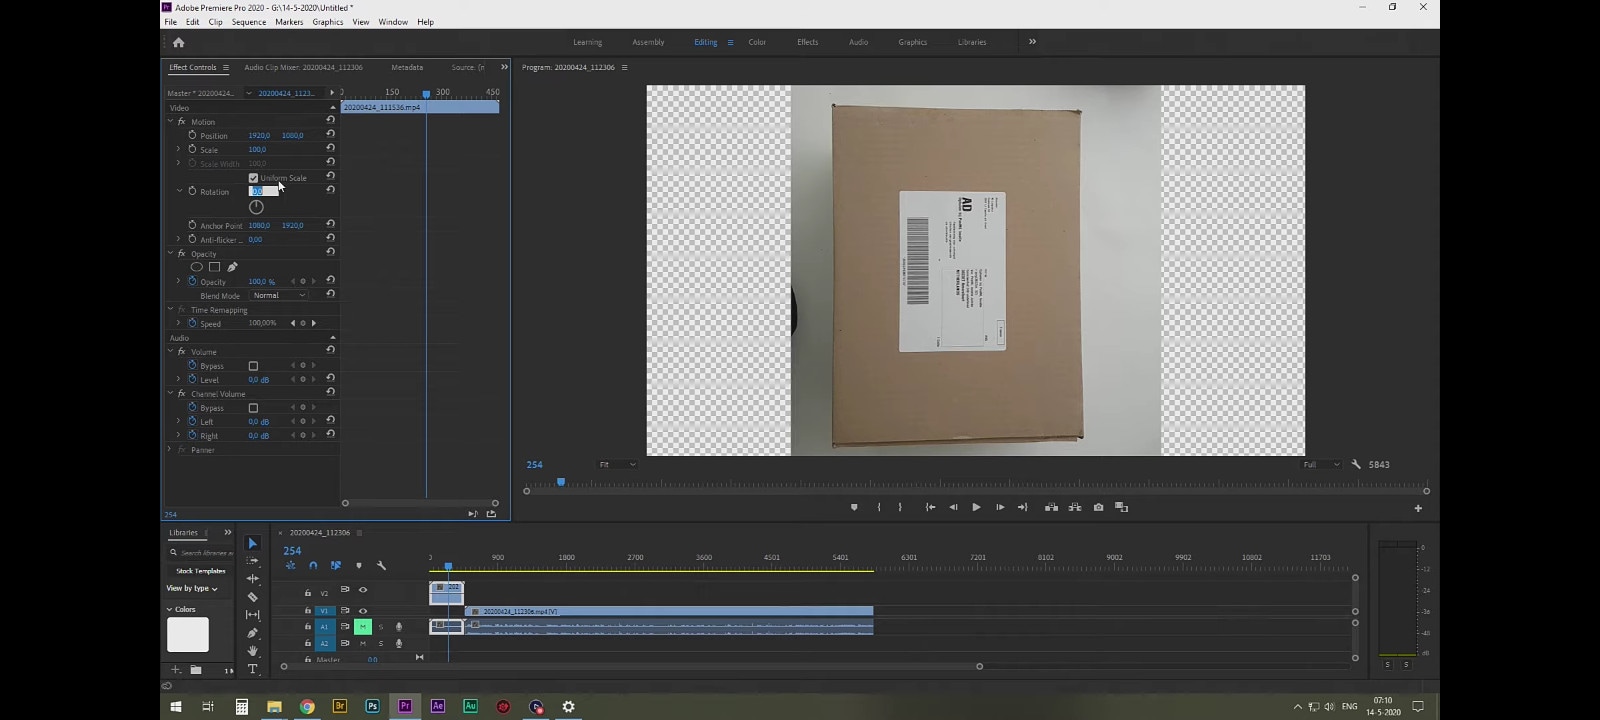
ALTERNATIVE WAY TO ROTATE AVI VIDEO ON ADOBE PREMIERE PRO
- STEP 1 - Go to the effects window and search for ‘flip’
- STEP 2 - Click on ‘Transform’. You can then decide to do a horizontal flip or a vertical flip
- STEP 3 - All you need to do is click and drag it on to your clip and it will flip, whether horizontal or vertical
- STEP 4 - It is easy to remedy when you click and drag the other to place on your footage, whether horizontal or vertical.
TO ROTATE YOUR CLIP
- STEP 1 - Highlight your footage on the timeline and go to your effects controls window. Underneath ‘motion’, there is the perimeter of rotation. If you click and drag the mouse on the number, it will rotate either clockwise or counter-clockwise. Also, you can type in whatever rotation amount you want
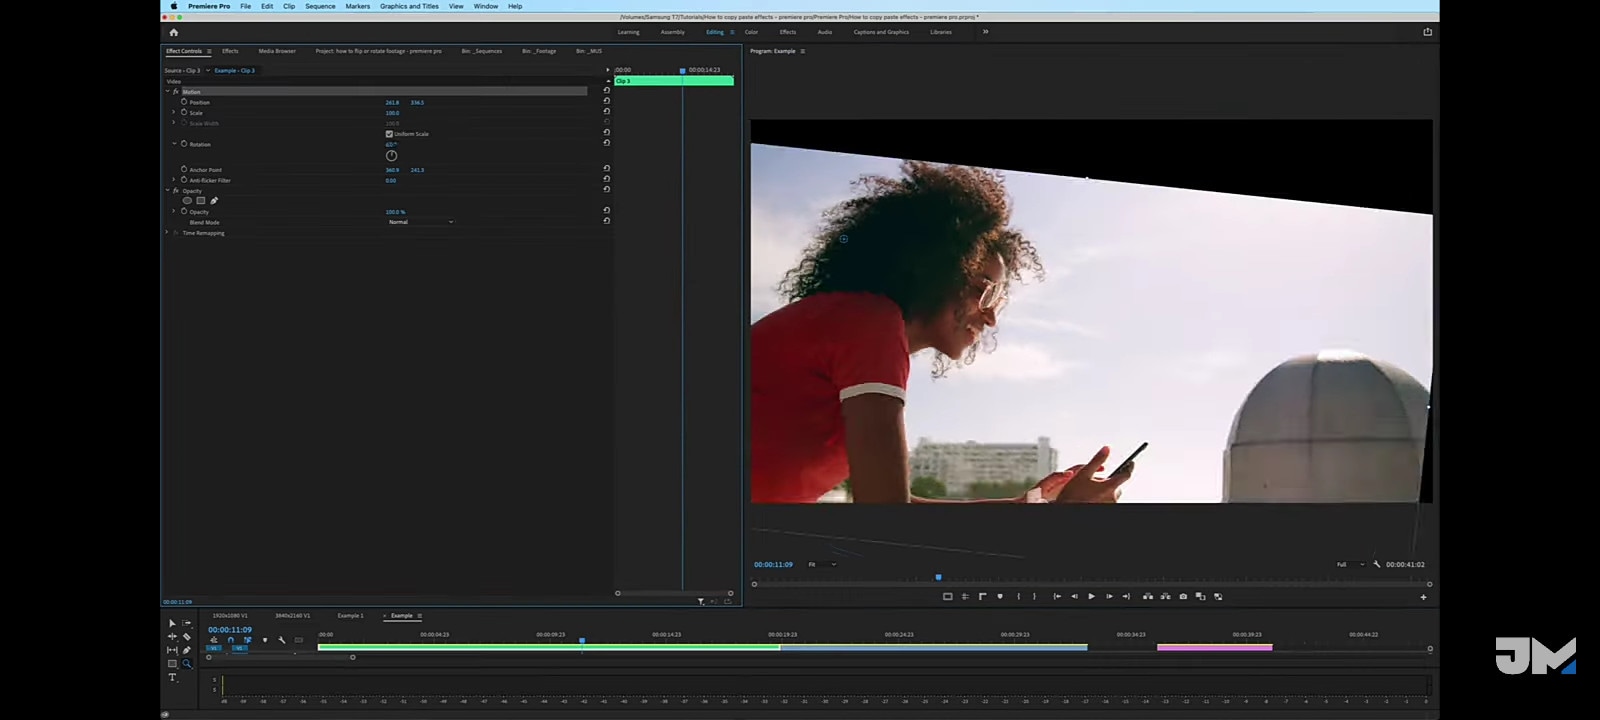
- STEP 2 - It’s also worth mentioning that when you rotate a clip, you’re always rotating around the inker point (the little blue cross in a circle). You can click and drag this through the program monitor to any point on the clip and start rotating it around the inker point. In fact, it doesn’t have to be on the clip; you can make the inker point up further and rotate, and will still rotate around the inker point. If you don’t see this on your program monitor, that’s because you haven’t highlighted the motion.

- STEP 3 - A good tip is using guides to help you level and horizontal or whether you are working with on-screen. To get a slant perfectly leveled, there’s an easy way to reference a straight line on your program monitor. On the bottom right of your program monitor is the button [a plus (+) button] editor. Click on it and a box full of tools will pop up which you can work with. Click ‘add show rulers’, ‘show guides’ and ‘safe margins’
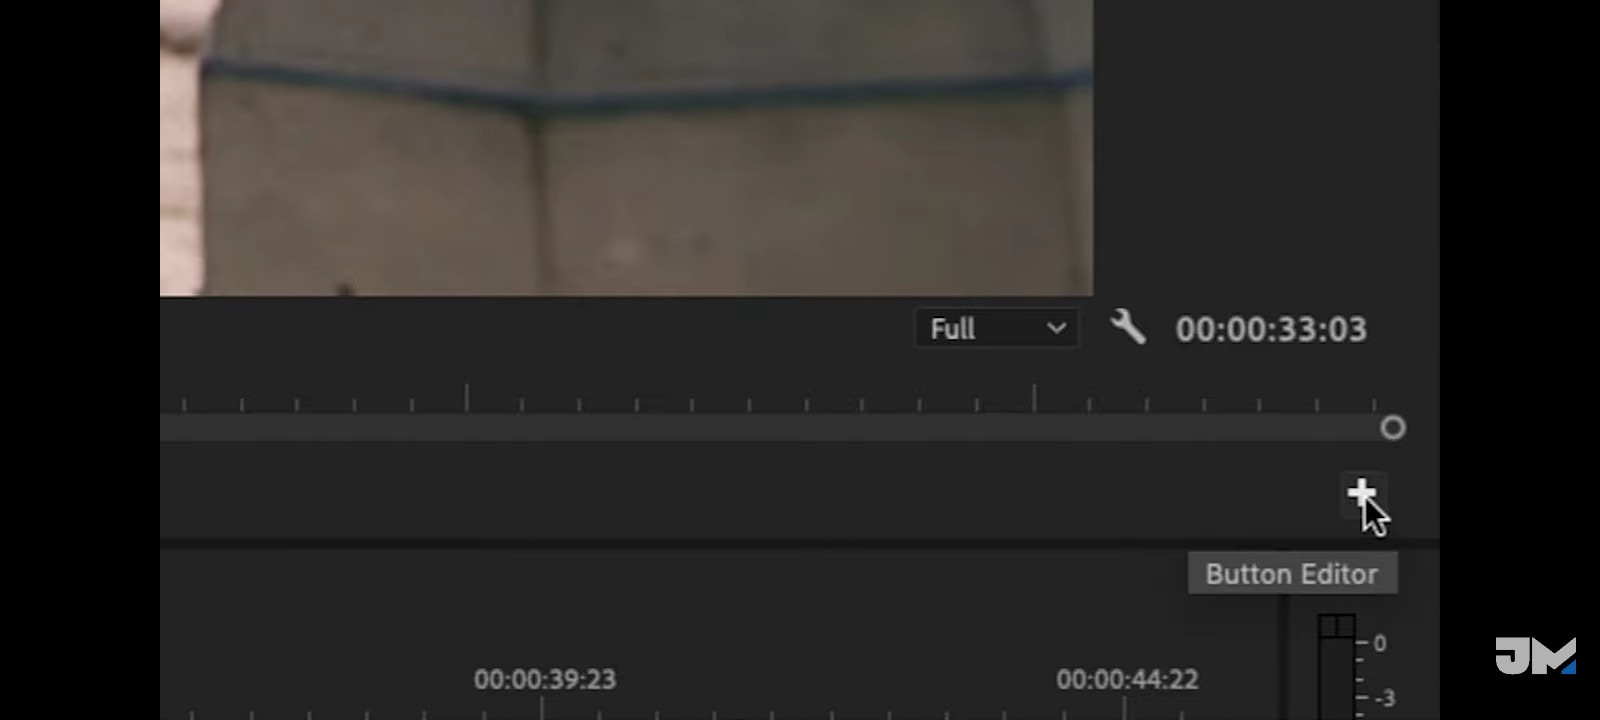
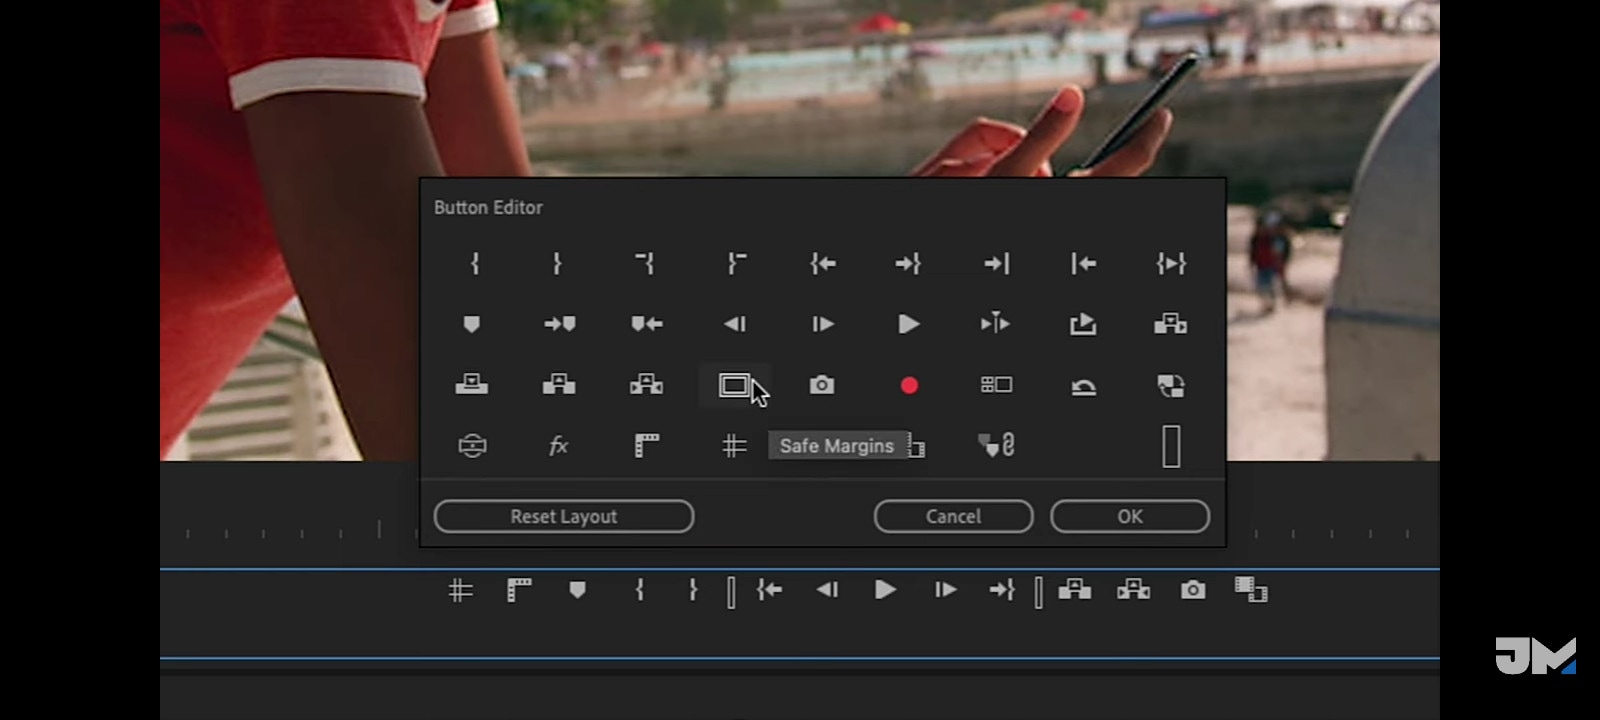
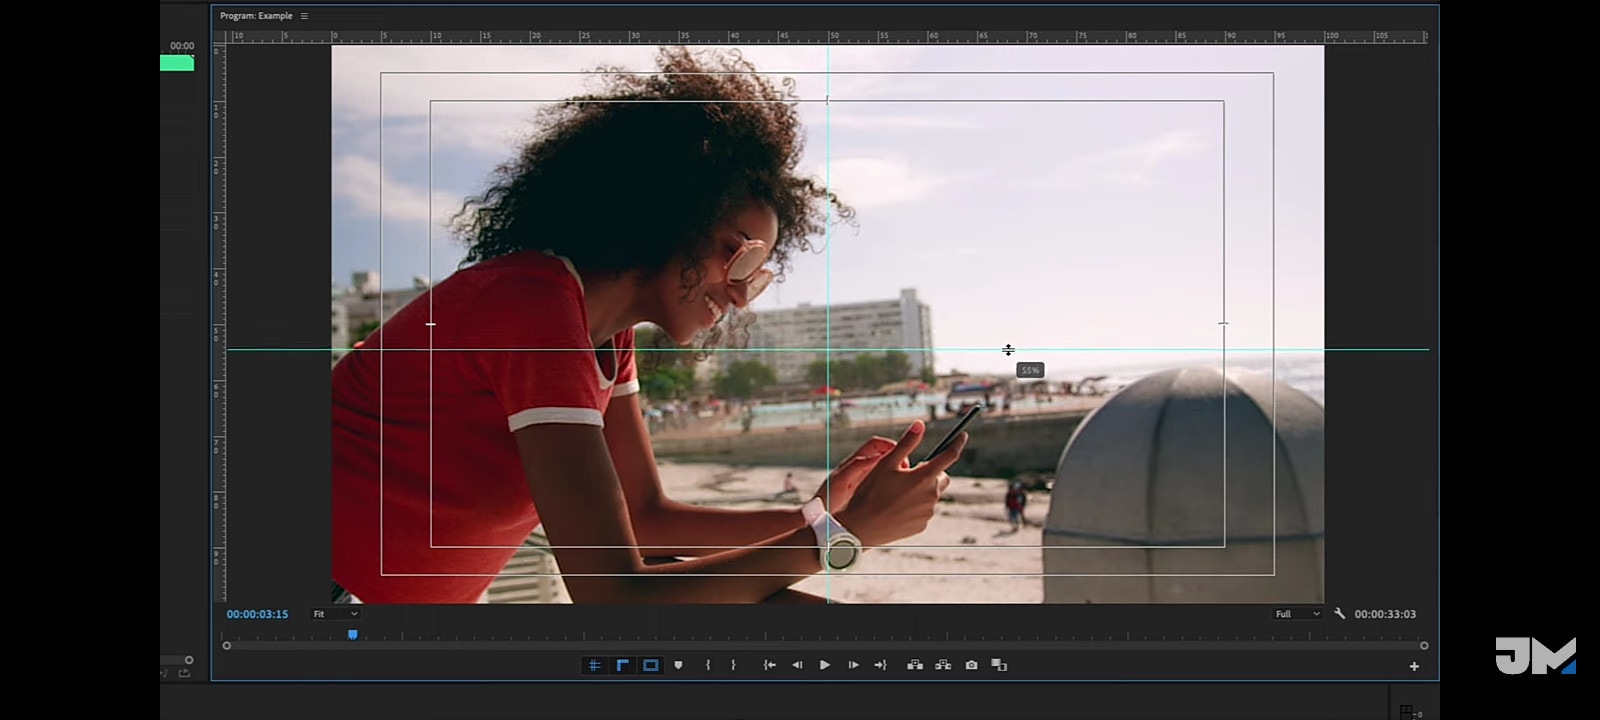
- STEP 4 - In the ruler section, take your mouse, click and drag it down to the little crosses of your safe margins. The same goes for the vertical ruler; click and drag over. That will create a new guide. For your footage, what you might need to do is get your horizontal guide down to your horizon view. You can go to your rotation and rotate your footage to get straight with your guide. If you are left with black bars at the corners, take off your safe margin rulers and guides and then zoom in on your footage and take off the black bars. To do this, go back to your effect controls
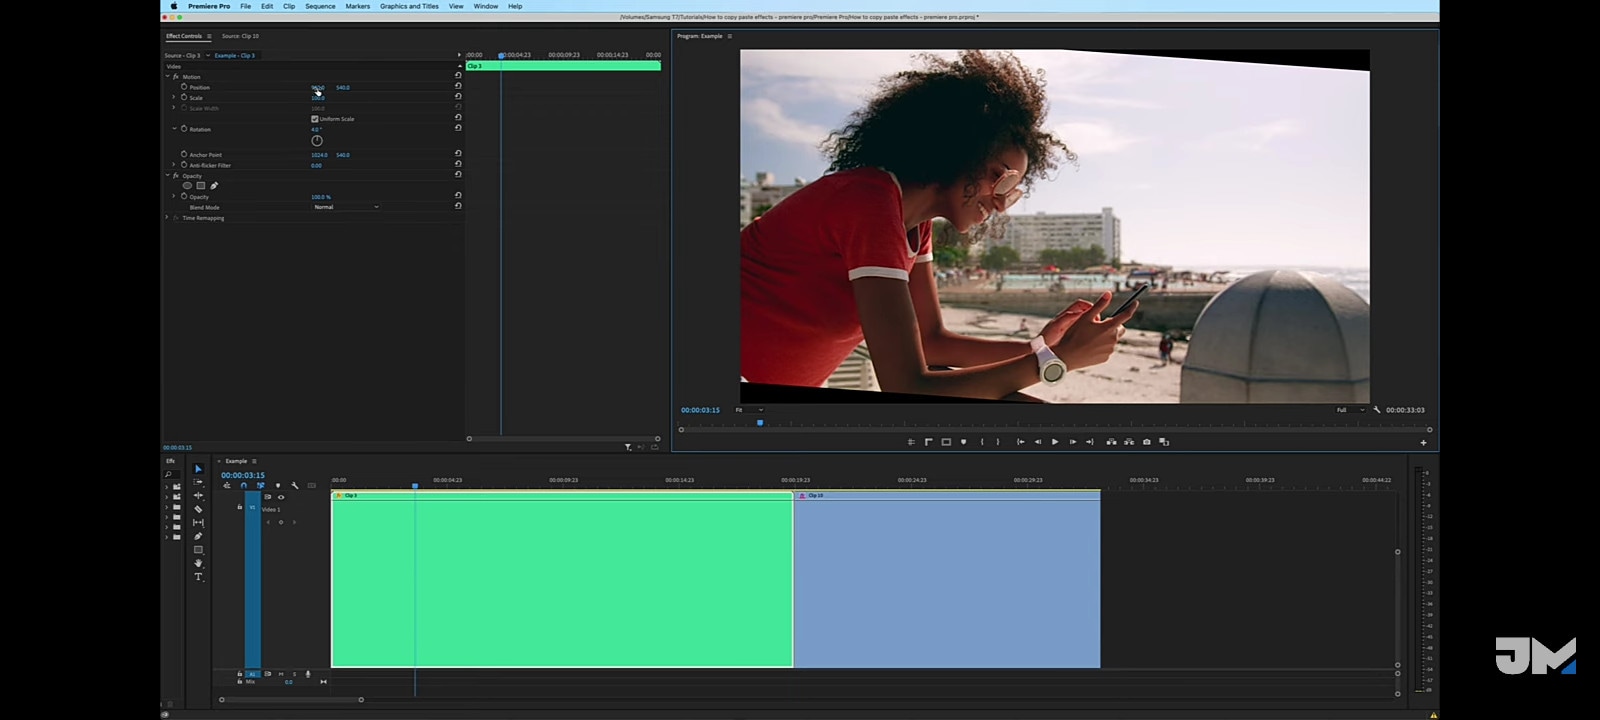
- STEP 5 - Instead of doing rotation, you scale by clicking and sliding the mouse on the number to the right
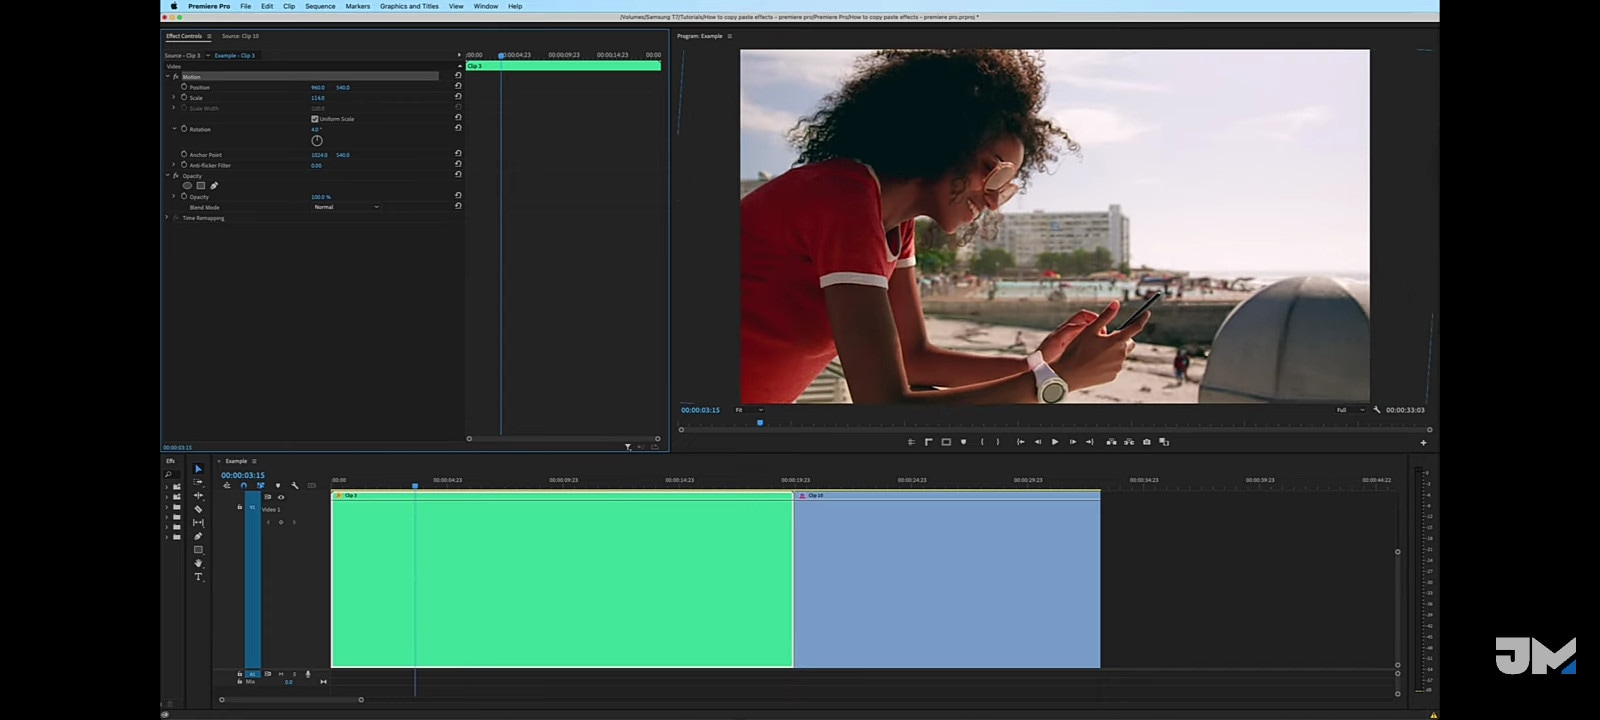
iMOVIE – FREE FOR MAC

iMovie is a preinstalled video editing application developed by Apple Inc. for macOS, Ios, and iPadOS devices. It was originally released in 1999 as a Mac OS 8 application bundle with the first FireWire-enabled consumer Mac model, the iMac DV. With iMovie, you can create professional-looking videos without an editing degree.
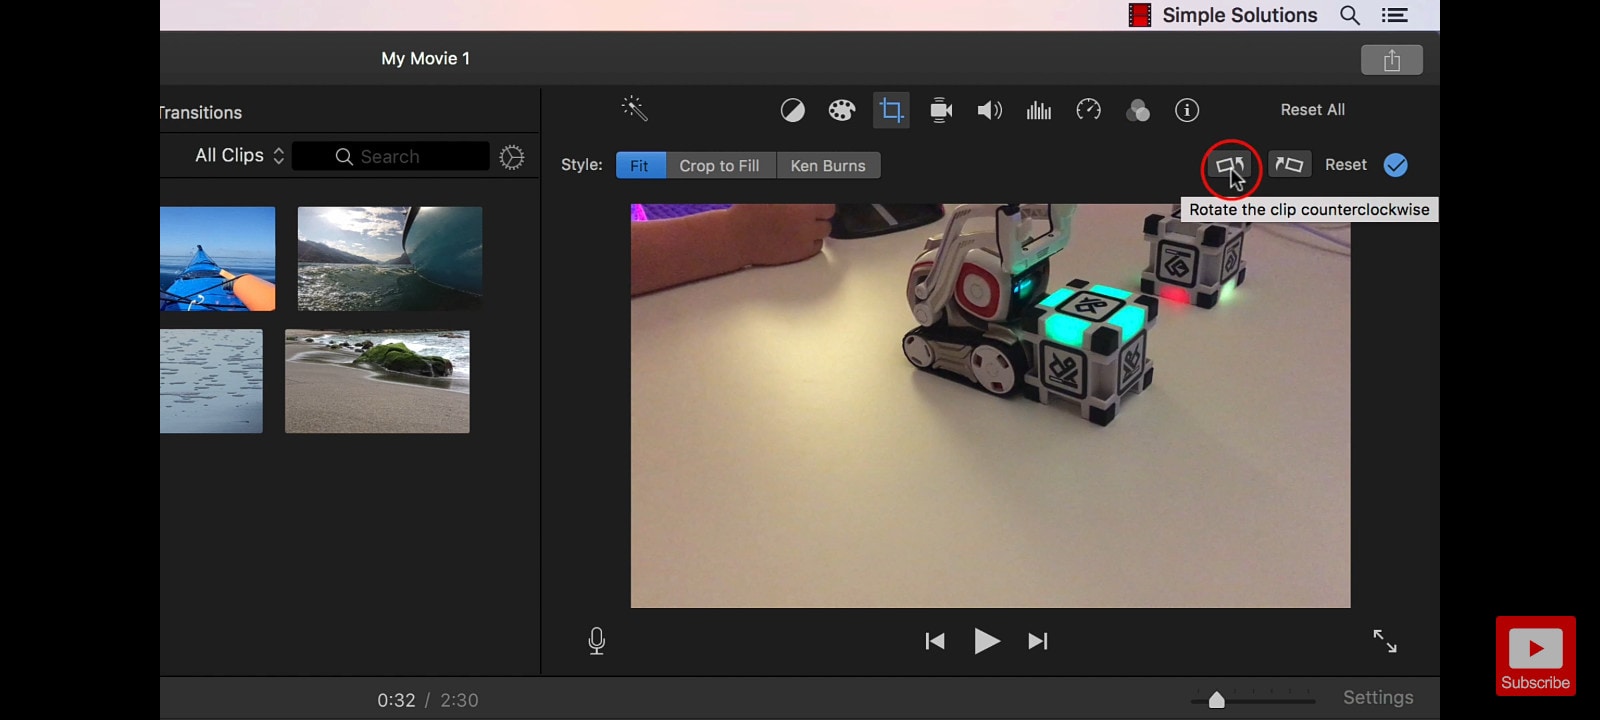
HOW TO ROTATE AVI VIDEO IN iMOVIE
- STEP 1 - Run iMovie on your PC and create a new project by clicking ‘create new’ and selecting ‘movie’. Import your footage: Click on the arrow pointing downwards just below your menu bar, and select the video from wherever it is saved locally.
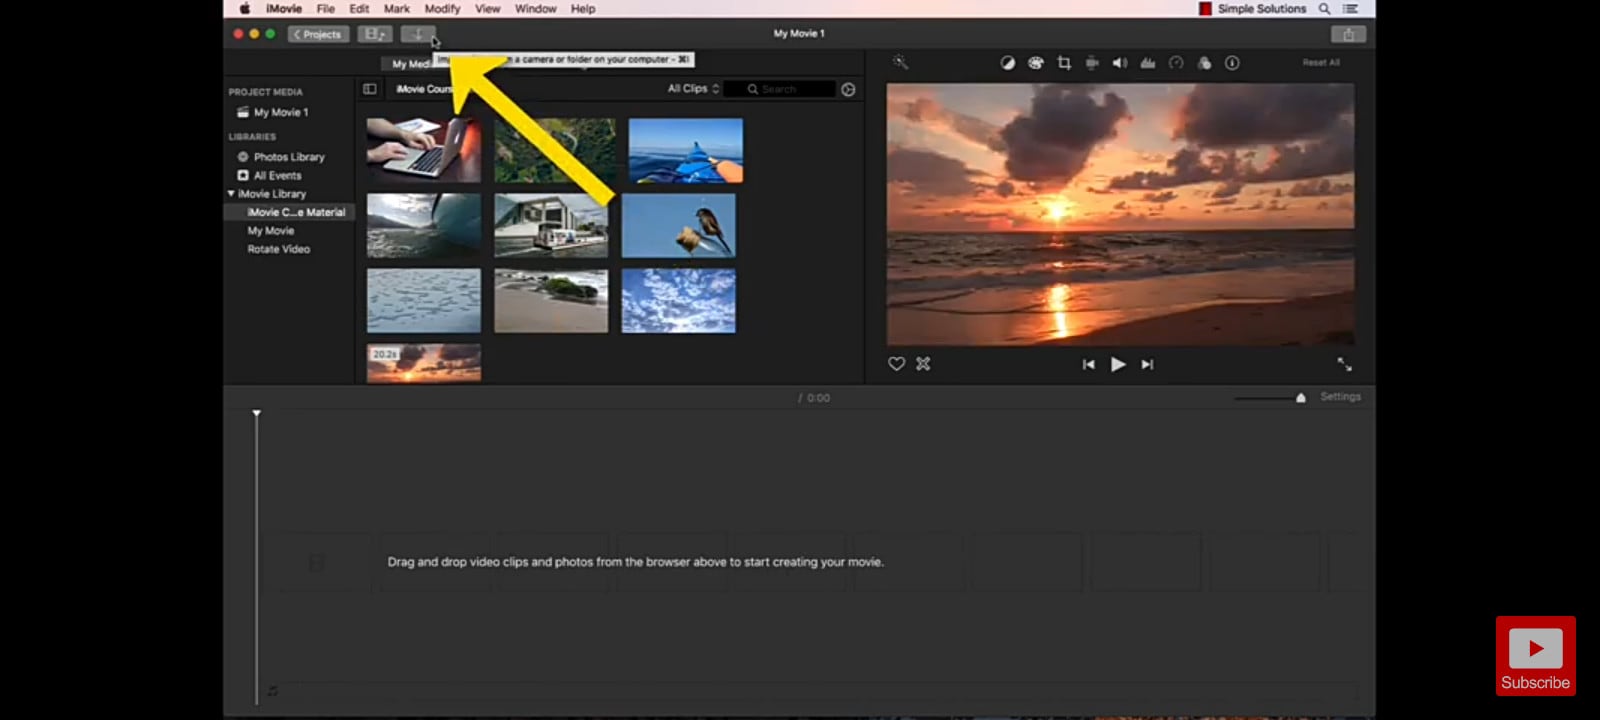
- STEP 2 - Click on the video once it’s imported; make sure it has the yellow boundary on it. Click and drag it onto the timeline
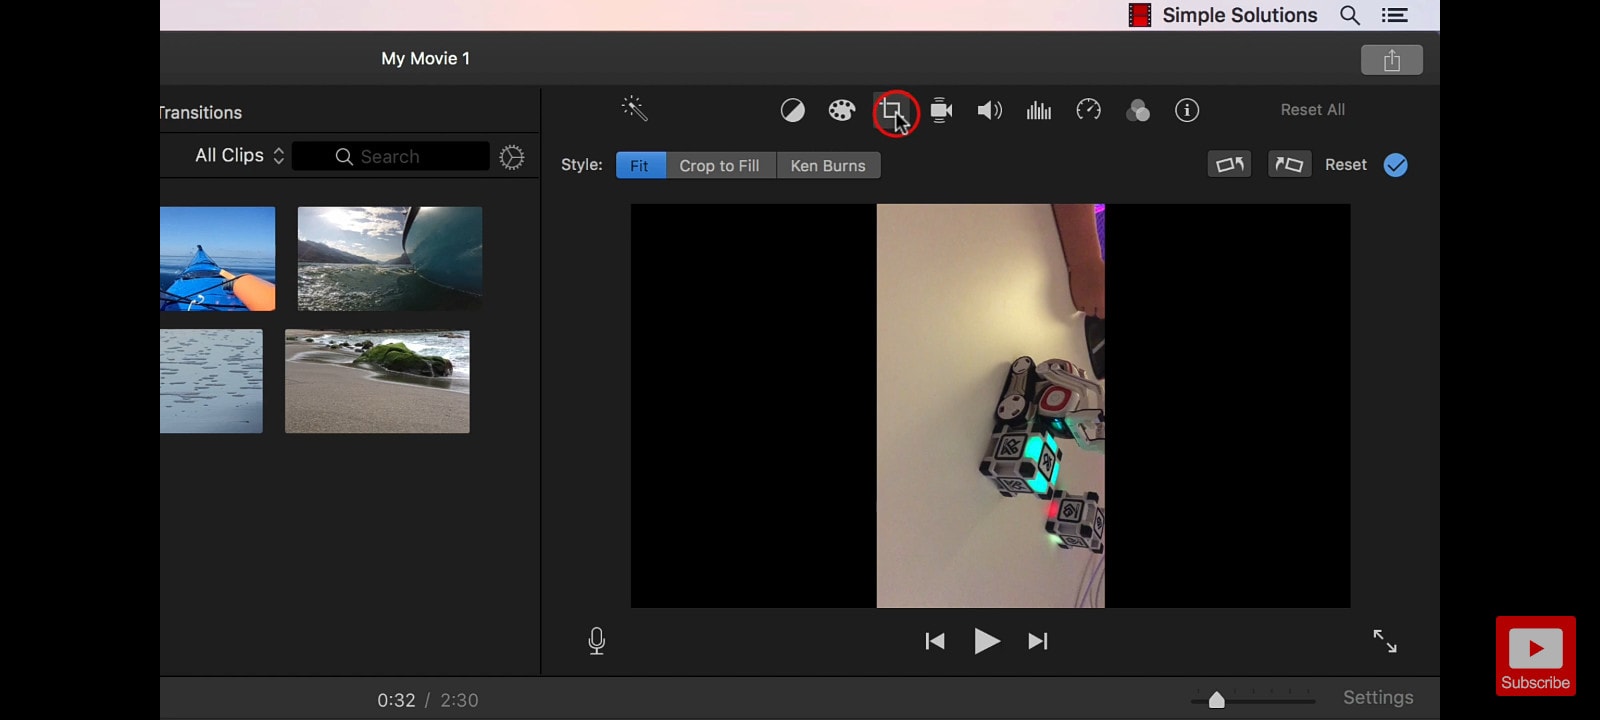
- STEP 3 - Leave your play-head on the footage and go just above your program window and click on the crop icon, the third from the left. Afterwards, a rotate ion will show just by the right above the program monitor. There are actually two buttons to rotate in either direction. You can save time by clicking the correct direction for whichever way your videos need to be rotated
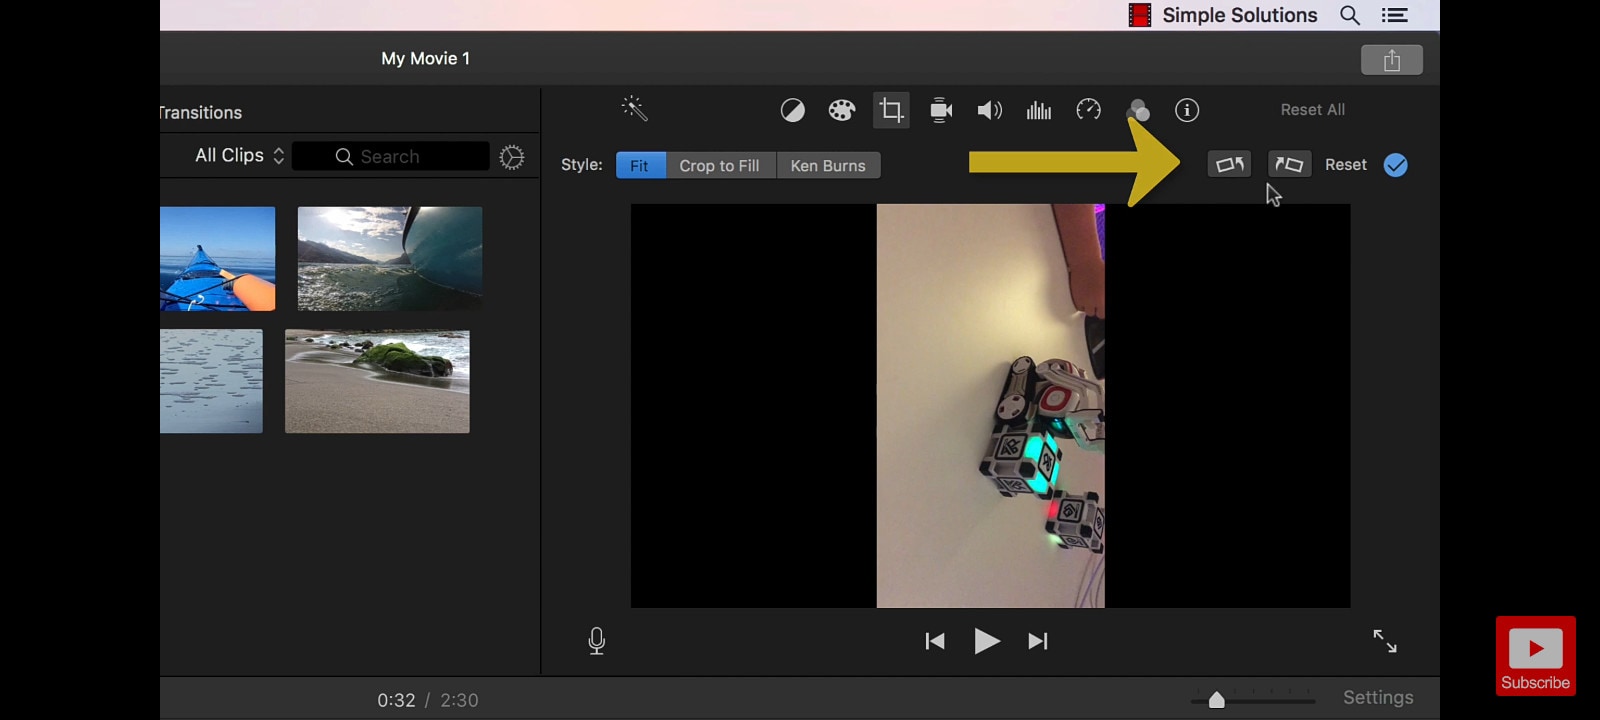
- STEP 4 - Your videos is rotated; you can go ahead and save
FILMORA – PAID FOR MAC

Formerly known as Wondershare Video Editor as at when it first launched in 2015, Filmora Video Editor is a video editing software that helps businesses create and distribute white-labeled marketing videos. Filmora is an easy-to-use video editing software for a beginner. It supports 50 above formats, 4k editing, Filmstock effects store, all basic and advanced editing tools in the most easily accessible and used manner.
For Win 7 or later (64-bit)
For macOS 10.14 or later
HOW TO ROTATE AVI VIDEO IN FILMORA
- STEP 1 - Run Filmora on your PC, import your video from where it has been locally saved and drag to the timeline
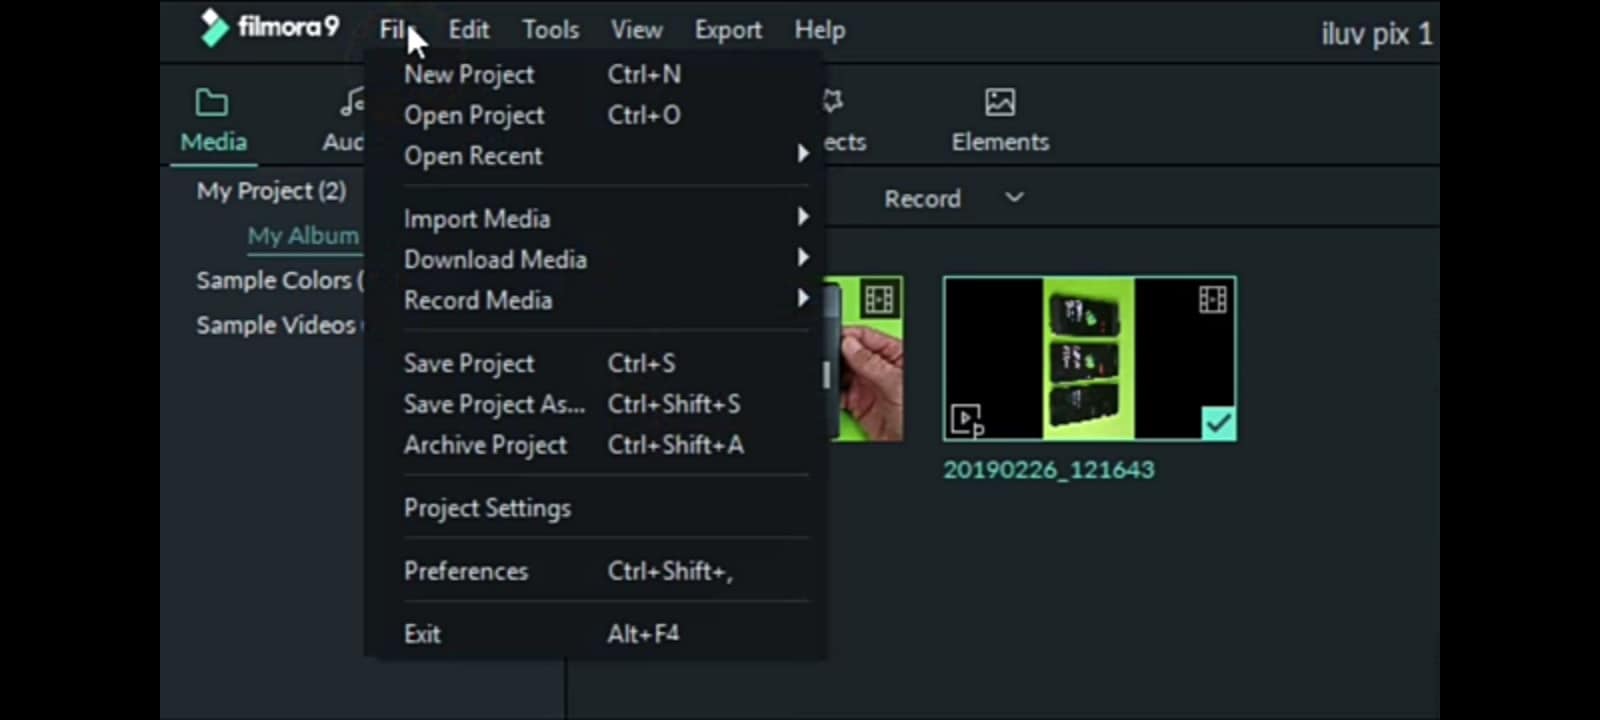
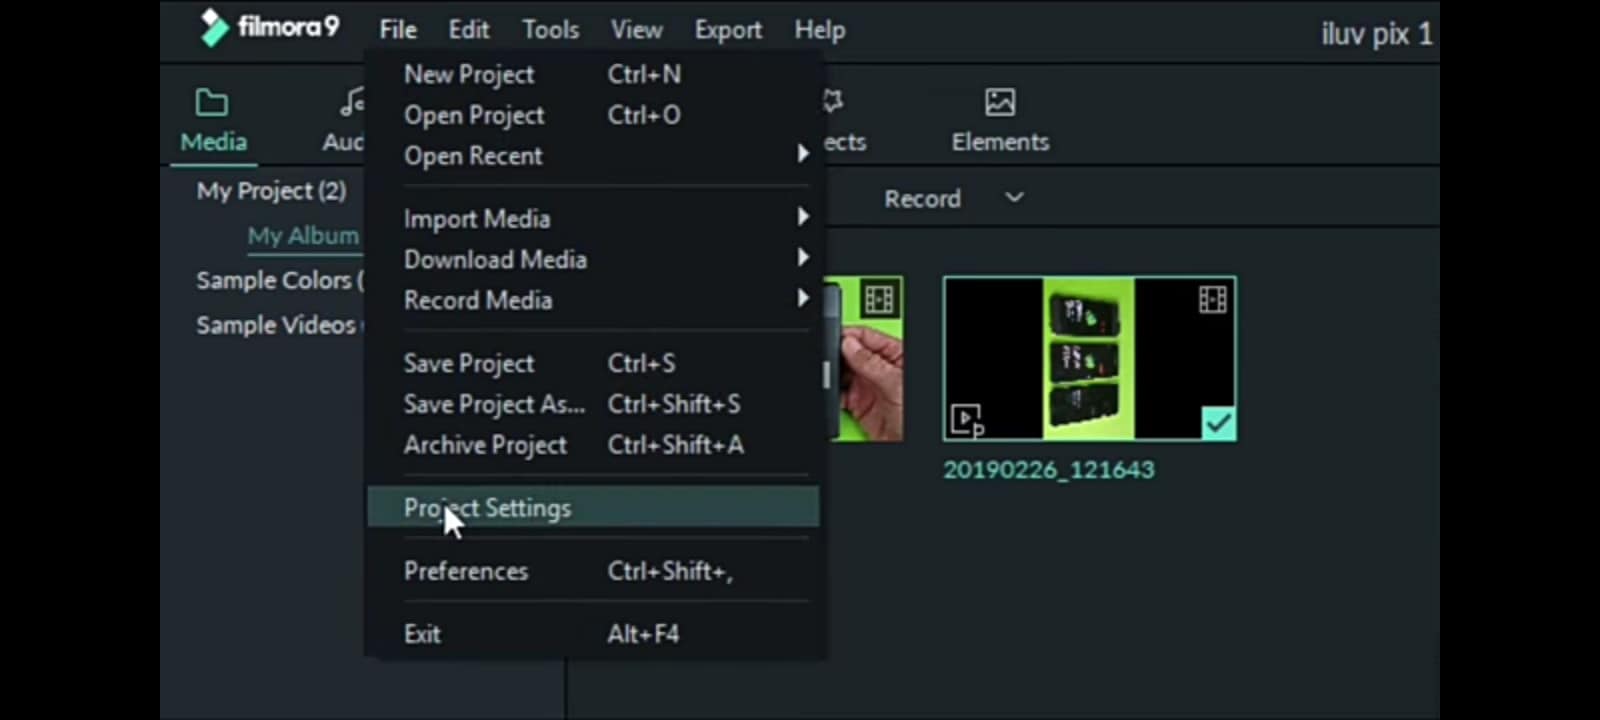
- STEP 2 - Go to file, and select ‘project settings’. By default, the video is recorded on portrait – 9:11, so change the aspect ratio to 16:9
- STEP 3 - Go to your timeline and double-click your footage. A box of options will pop up beside the program monitor. Simply go to rotate and click and slide to rotate. It may be difficult to line it up even and straight. Just go to the program monitor and click on the little line and drag; it makes it easier to align
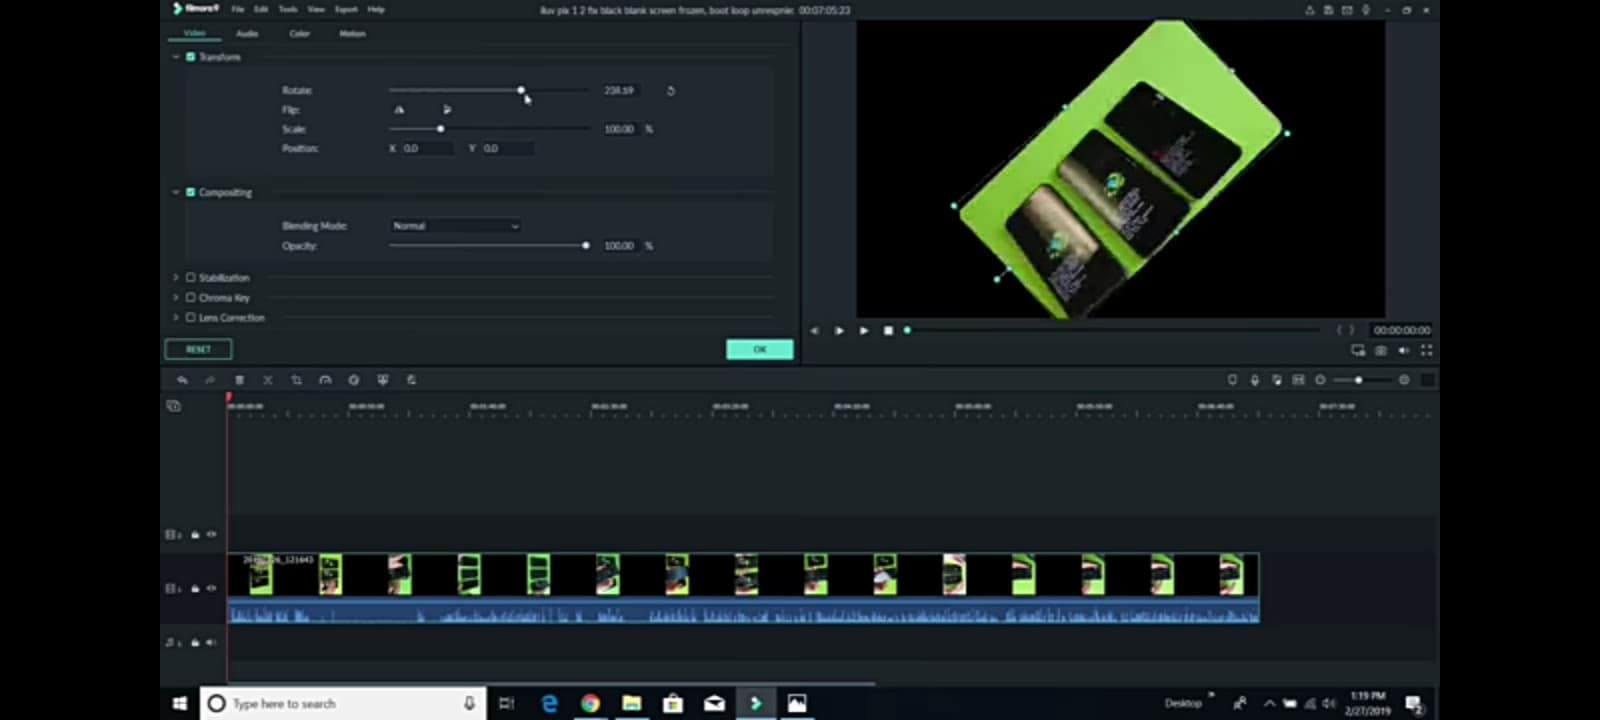
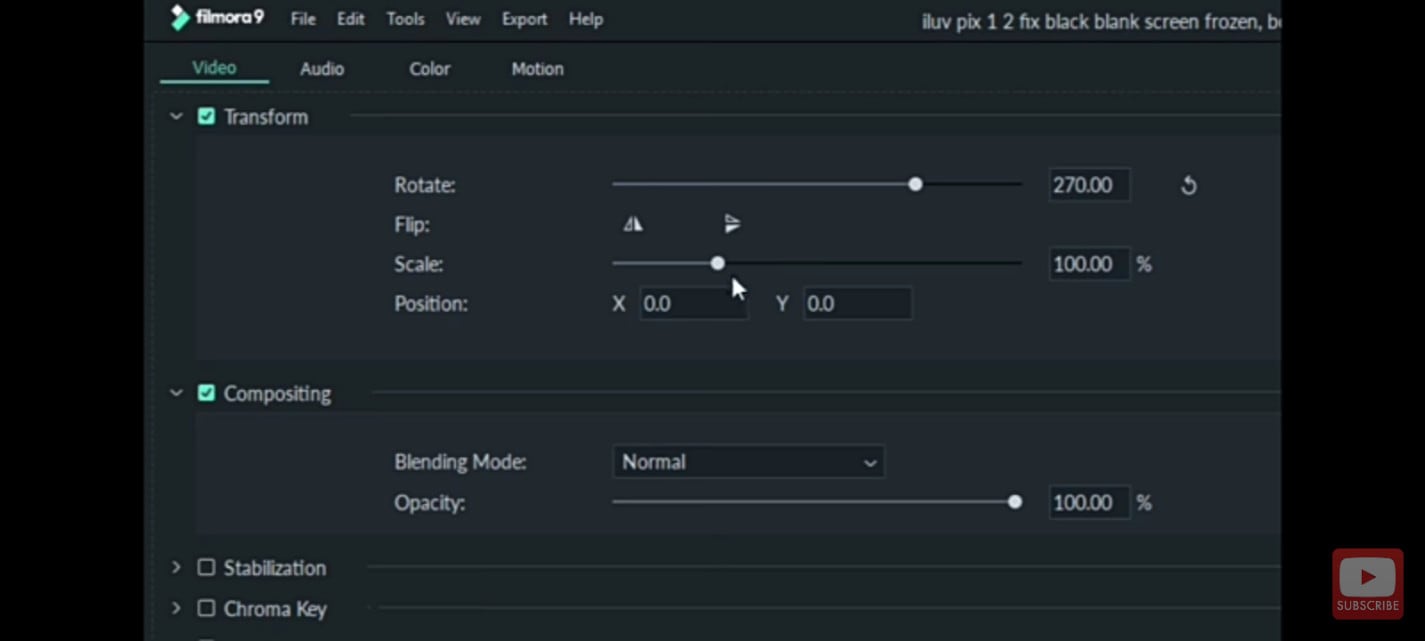
- STEP 4 - Go to ‘scale’ and slide it to the right to make it fill the screen. Your video is rotated and ready to be previewed
VIDEOLEAP – PAID FOR ANDROID AND iPHONE

Videoleap includes the usual basic cutting and pasting tools, plus greenscreen aspect ratios, slow-mo and fast motion, audio editing, and unlimited undo and redo actions. Access to the app and premium features is available with a subscription for $7.99/month, or with additional discounts if bought as a one-time purchase or multiple month bundles.
HOW TO ROTATE AVI VIDEO IN VIDEOLEAP
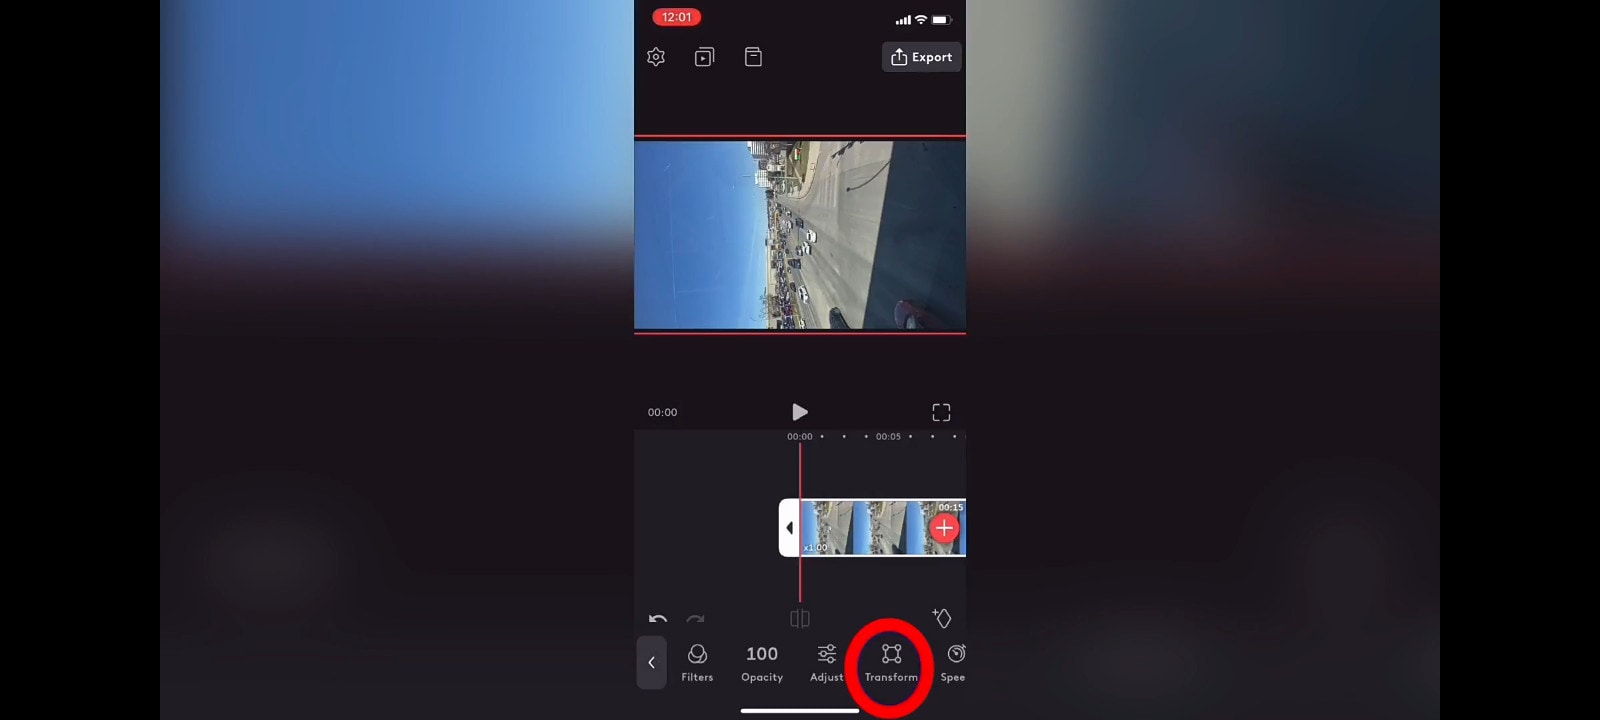
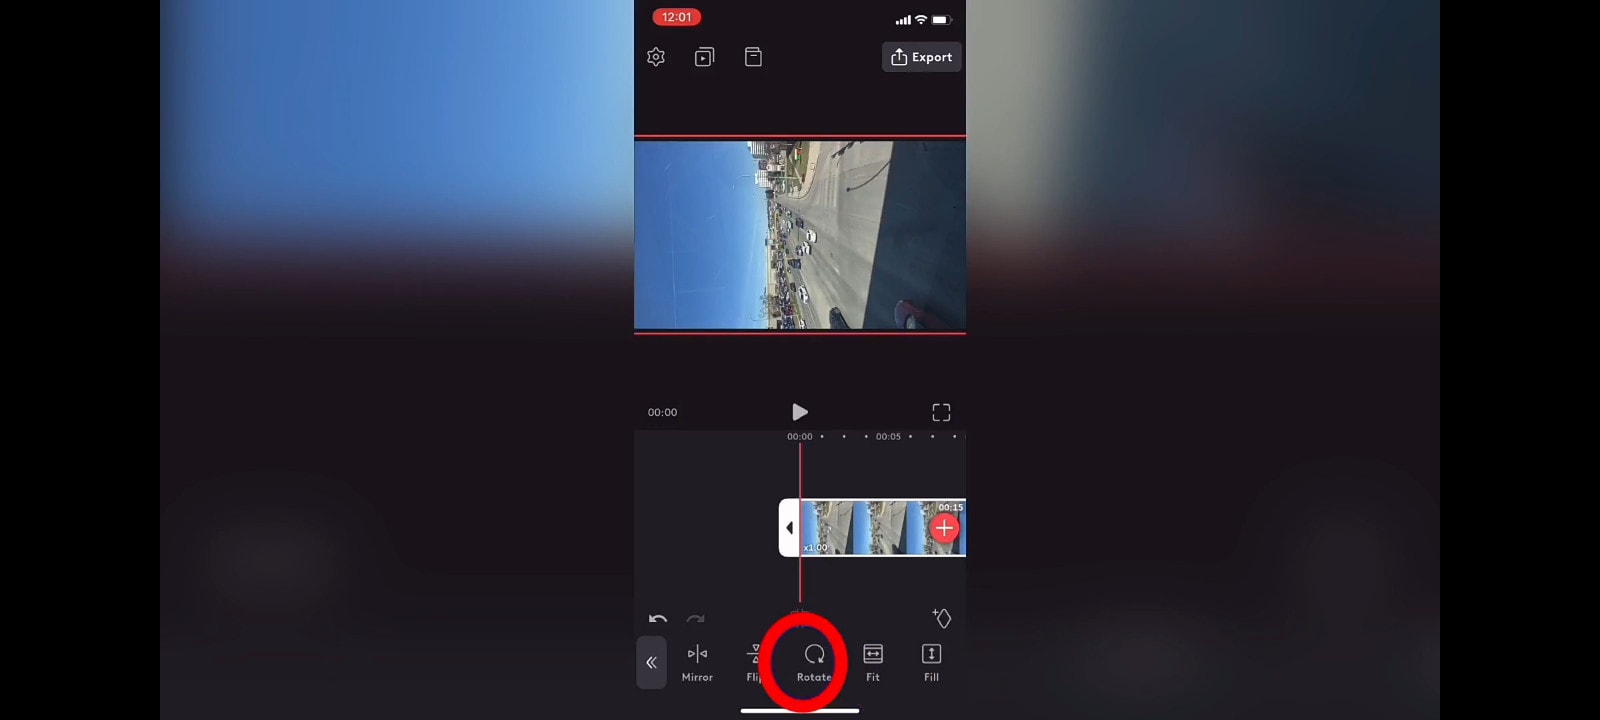
- STEP 1 - Launch Videoleap on your android and Import your footage from where you have saved it locally. Tap on ‘transform’, and then tap on rotate, then tap on rotate as many times as it takes so that it can be ideally fit

- STEP 2 - Change the format from 16:9 (YouTube format) to 9:16 (for TikTok). To do that, deselect the clip, tap on canvas, and then choose 9:16. Play the clip to preview and save.

INSHOT – FREE FOR ANDROID

InShot app is an all-in-one visual content editing app. It allows you to create videos, edit photos, and create image collages. The app has plenty of features too. You can trim clips, change the speed of your footage, and add filters, music and text. InShot is a free mobile application that you can download on your Windows to create or edit videos and photos.
HOW TO ROTATE AVI VIDEO ON INSHOT
- STEP 1 - Import your video from where you have locally saved it
- STEP 2 - Tap on the clip, and swipe the toolbar to the left to find the ‘rotate’ icon. When you tap on ‘rotate’, it will rotate your video to your left; you can keep rotating till it’s ideally fit


QUICKTIME VIDEO EDITOR – FREE FOR MAC

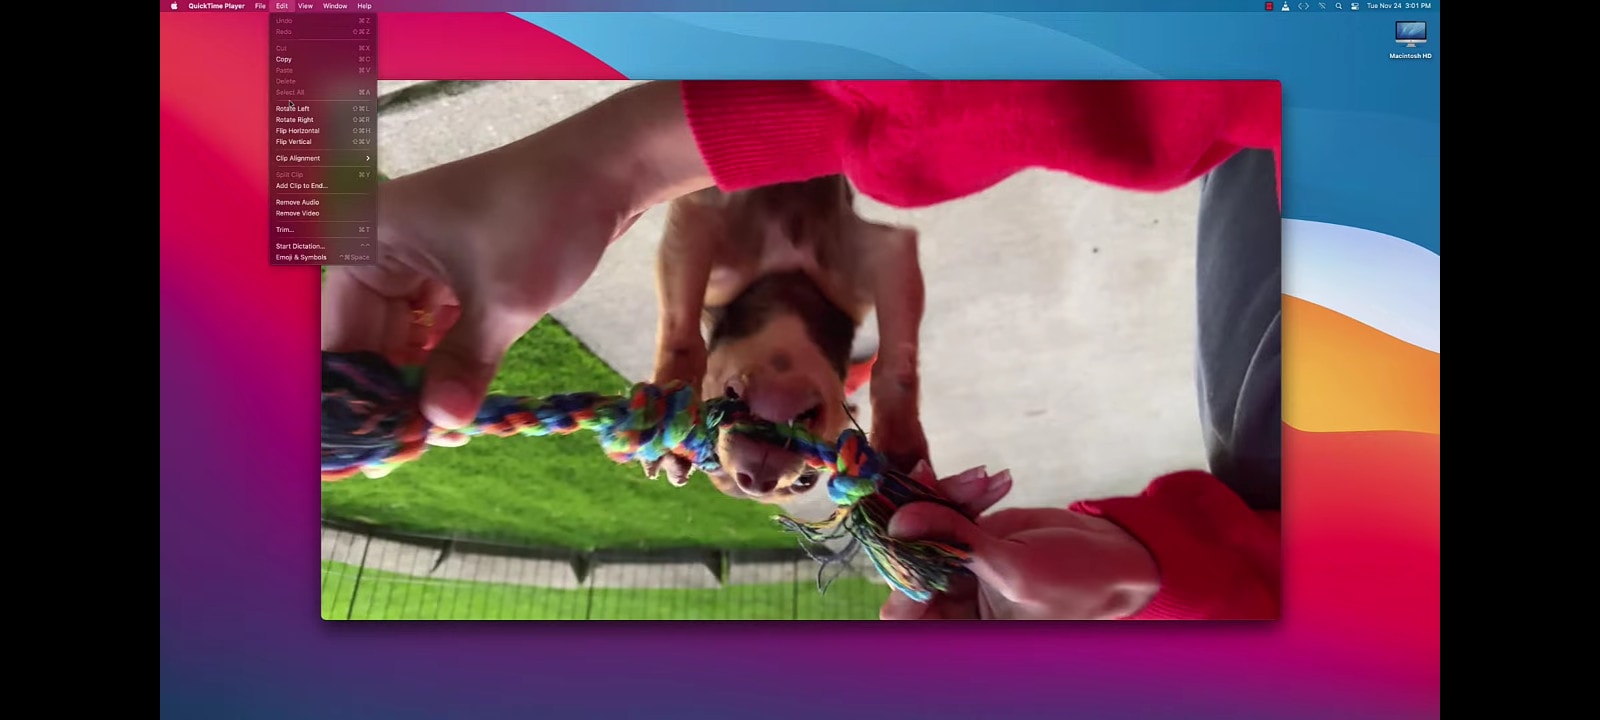
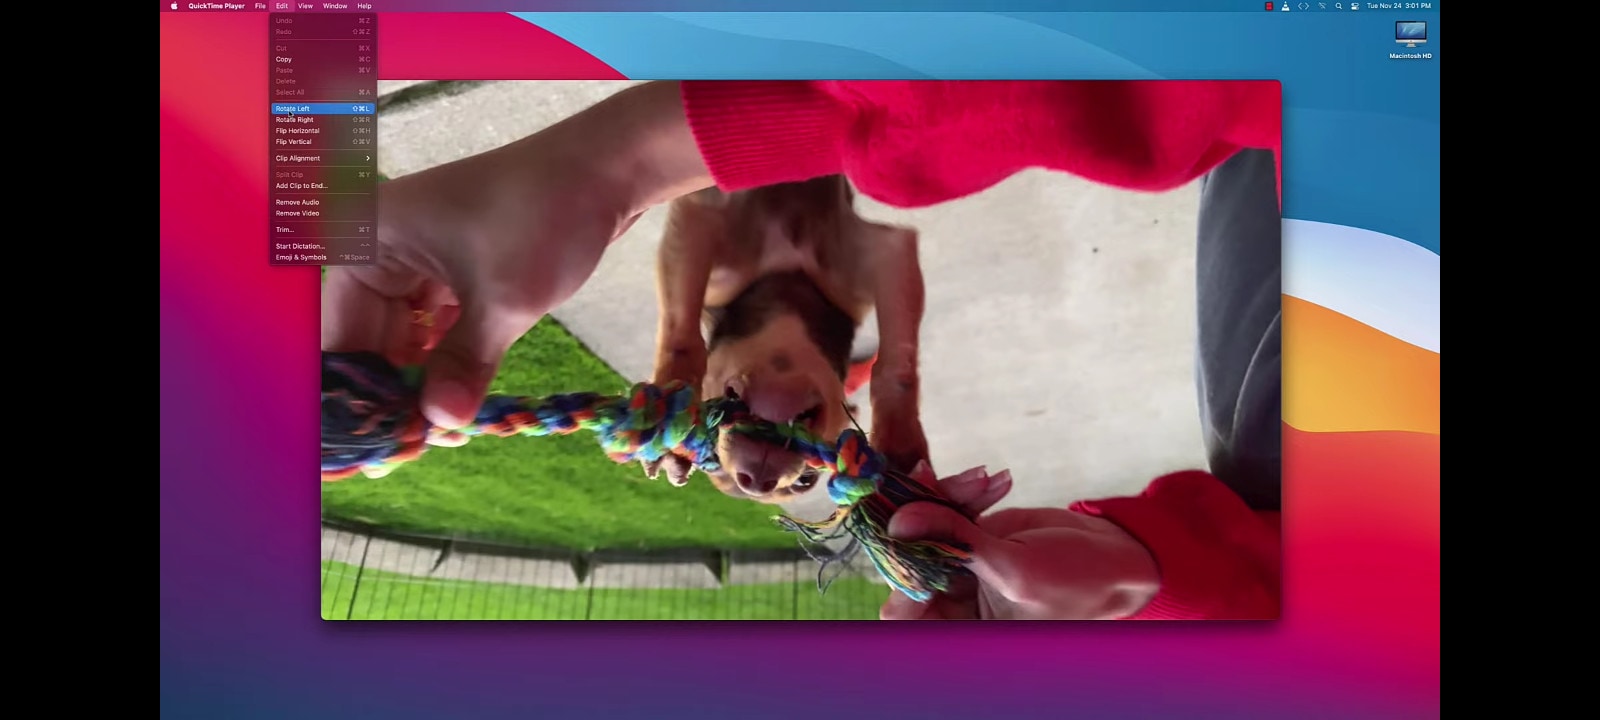
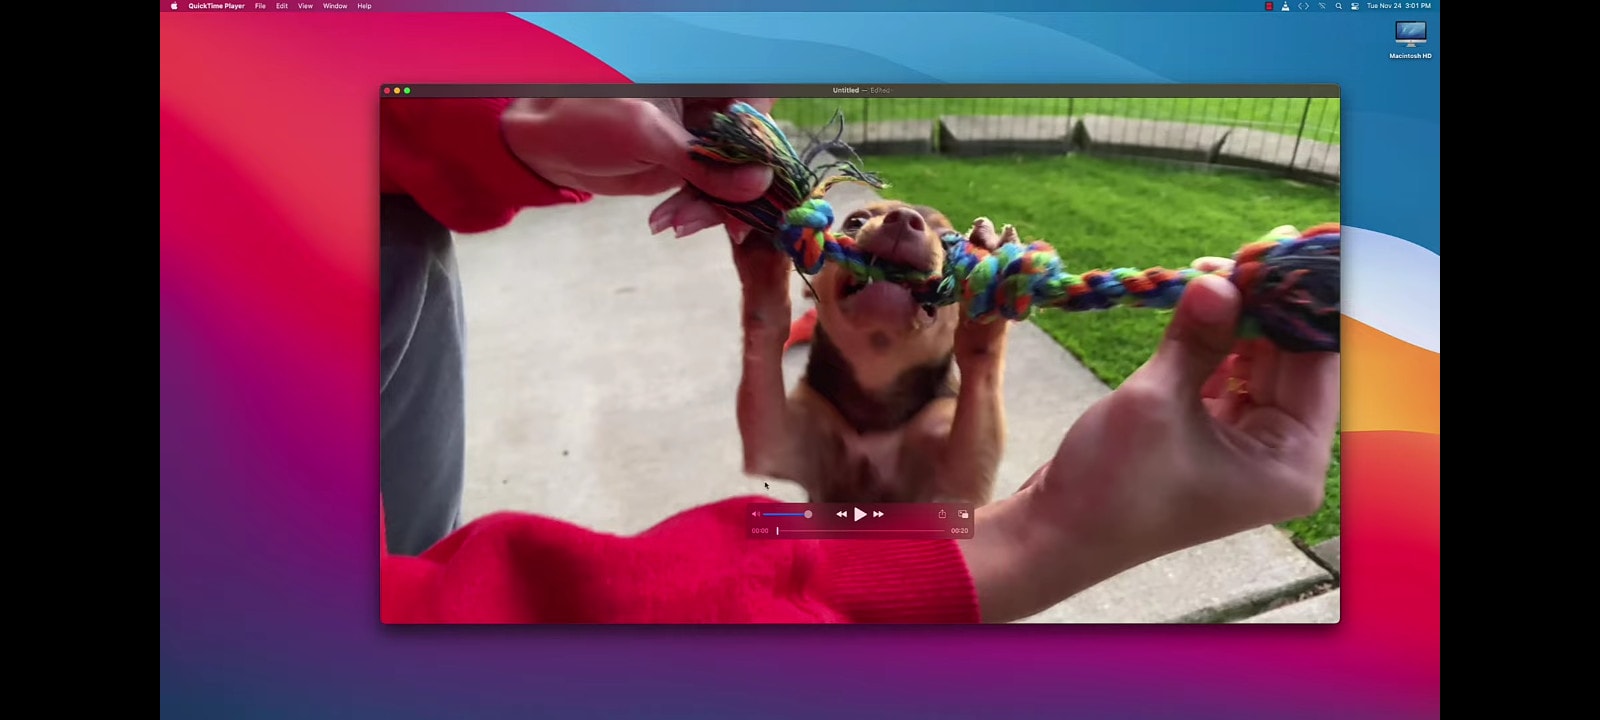
- Open your video on your PC using the Quicktime program. Go to ‘edit’ and click on ‘rotate left’; keep clicking until your video ideally fits the screen. Your video is rotated successfully. Preview, save and export your video.
VLLO – PAID FOR ANDROID

VLLO is a super easy video editor. Beginner and casual users will enjoy editing video with its intuitive but precise control abled split, txt, BGM and transition. For the pro editors, premium paid features are also ready with Chroma-Key, PIP, mosaic and keyframe animations.
HOW TO ROTATE AVI VIDEO IN VLLO – LANDSCAPE TO PORTRAIT
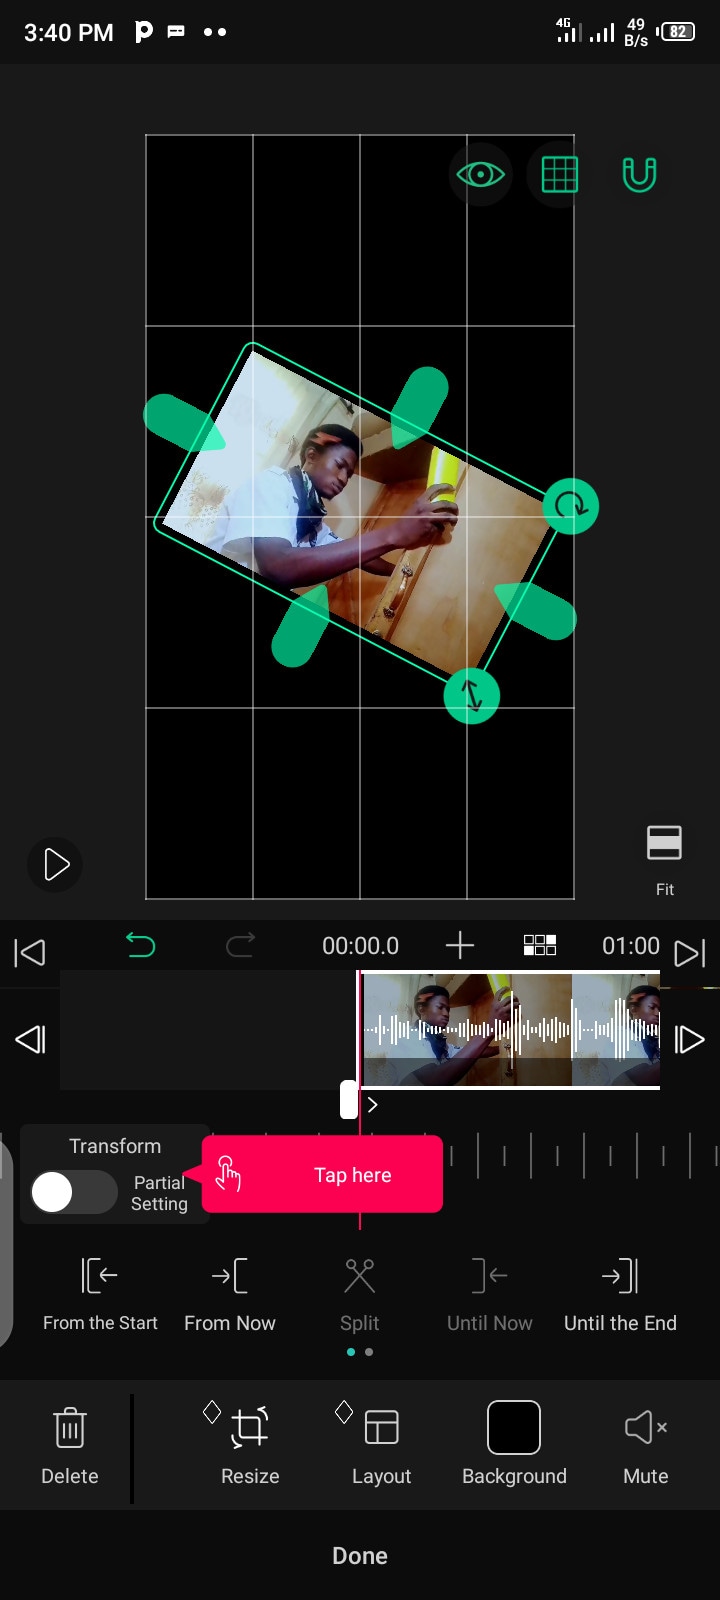
- STEP 1 - Import your footage from where you have saved it locally and change aspect ratio to 16:9 and select the ‘fill’ icon.

- STEP 2 - On your timeline, click on the footage and select the curved arrow icon to rotate as you click and drag. You can choose to rotate either ways, and your video is rotated, and ready to be previewed and saved
VEED – ONLINE/CLOUD-BASED VIDEO EDITOR

VEED.IO is an online video editing platform that makes creating videos easy and accessible to everyone. Millions of creators around the world use our products to tell stories, create content, grow their audience and more.
HOW TO ROTATE AVI VIDEO ONLINE USING VEED – PORTRAIT TO LANDSCAPE
- STEP 1 - Create an account online on Veed – Visit <www.veed.io>
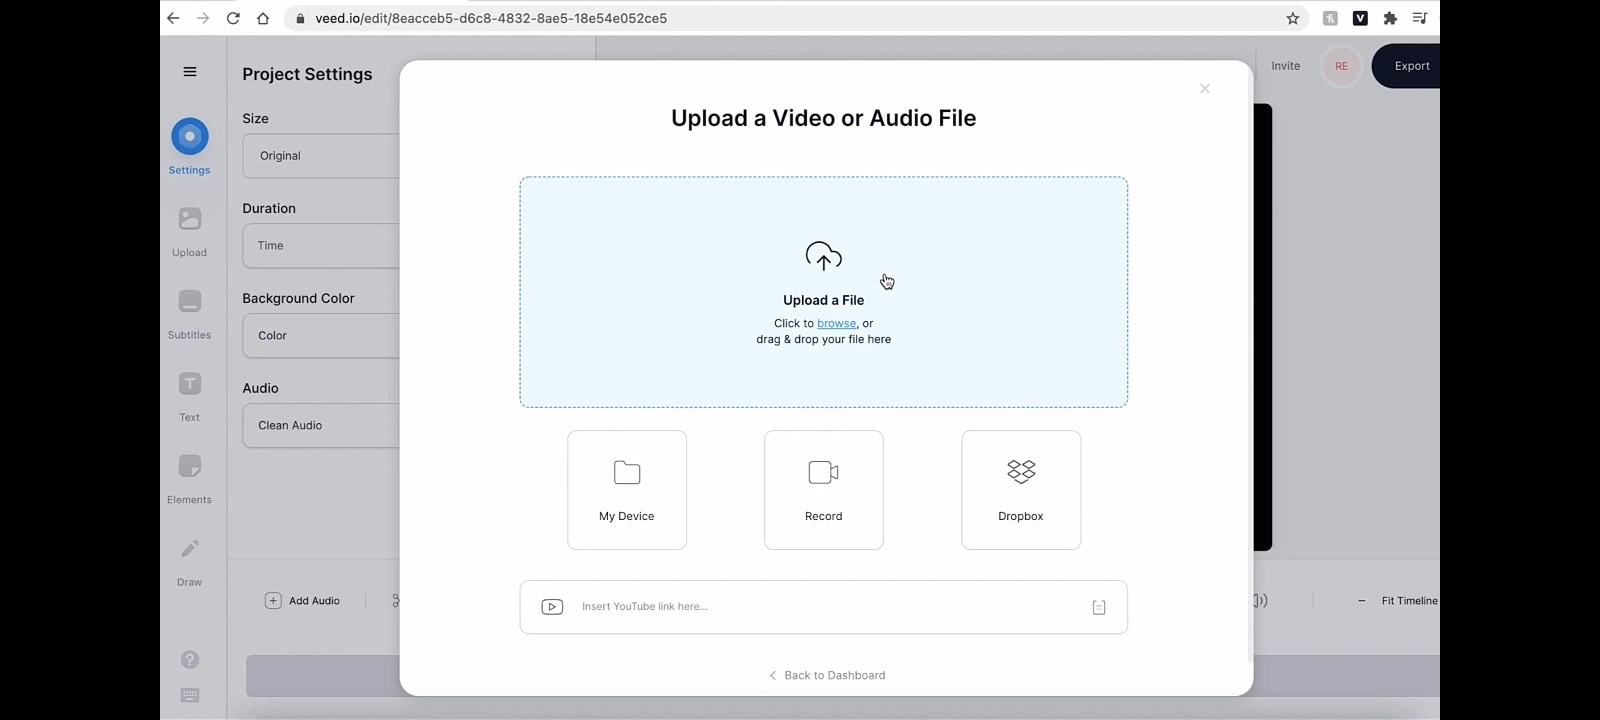
- STEP 2 - Click the ‘view project’ button and import/upload footage form where it has been saved locally
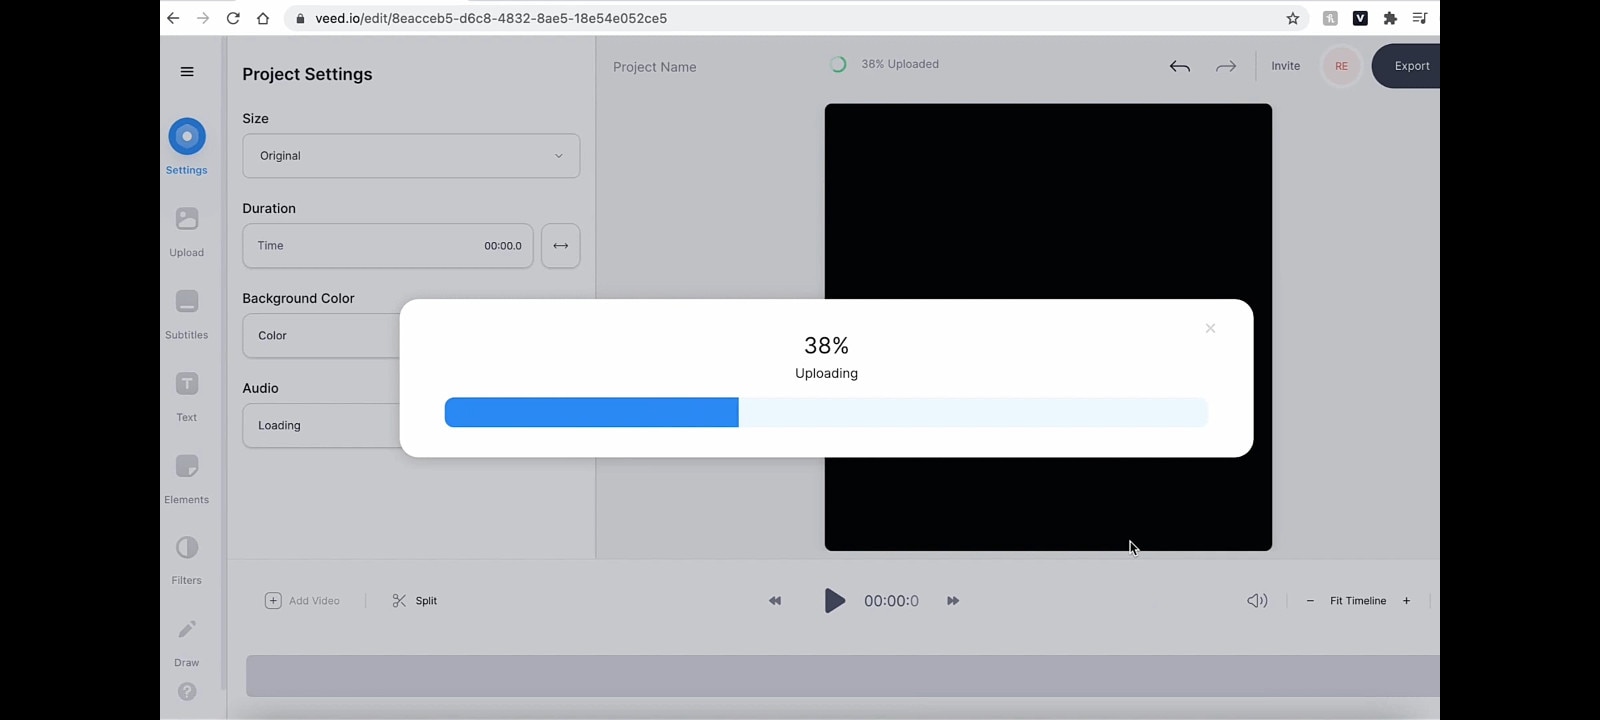
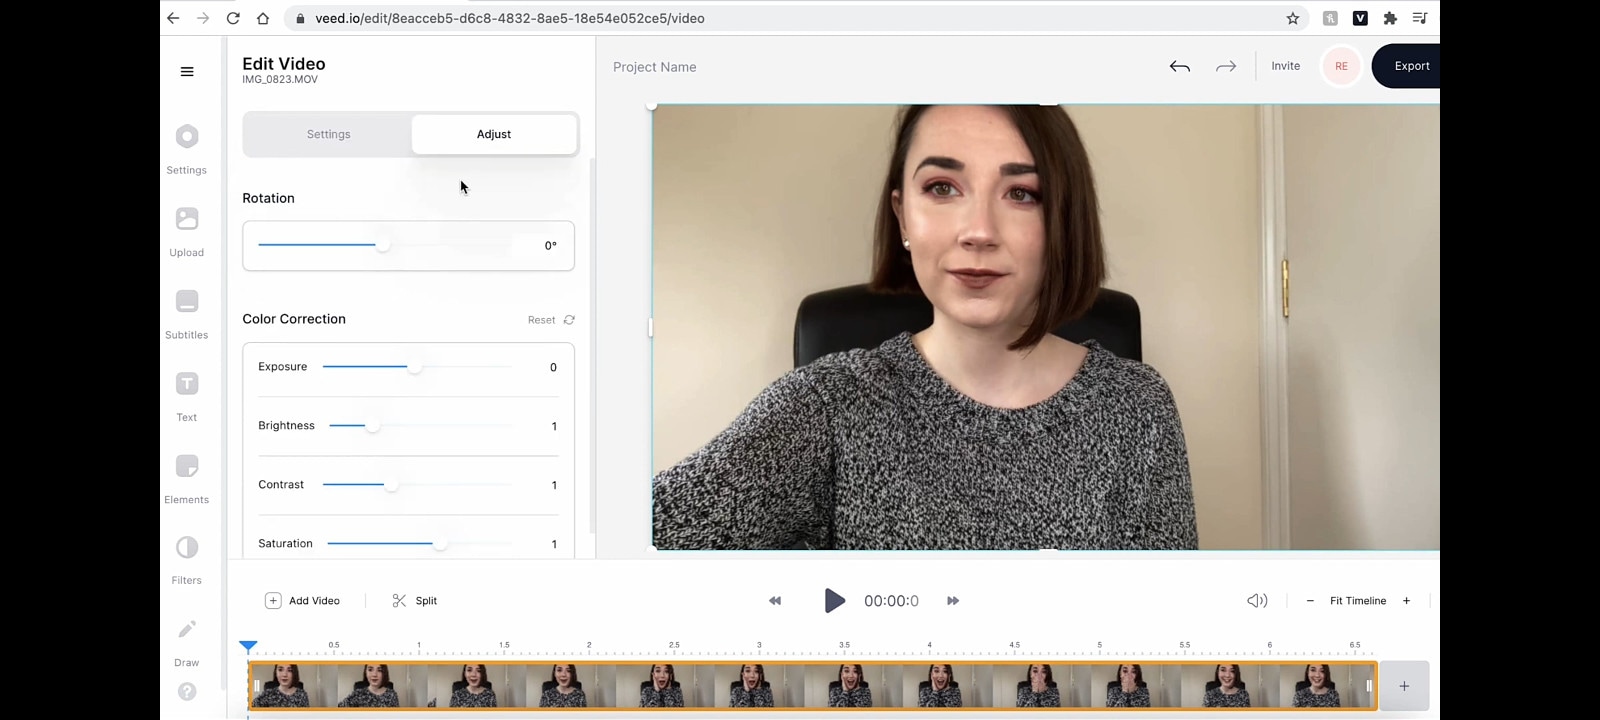
- STEP 3 - Go to ‘edit video’ and select ‘adjust’. Go to rotation and click and drag to the right and to the left for your video to fit ideally
- STEP 4 - You can export your video once it is rotated
ALTRNATIVE WAY TO ROTATE AVI VIDEO ONLINE USING VEED
- STEP 1 - Import your footage and drag it to the timeline
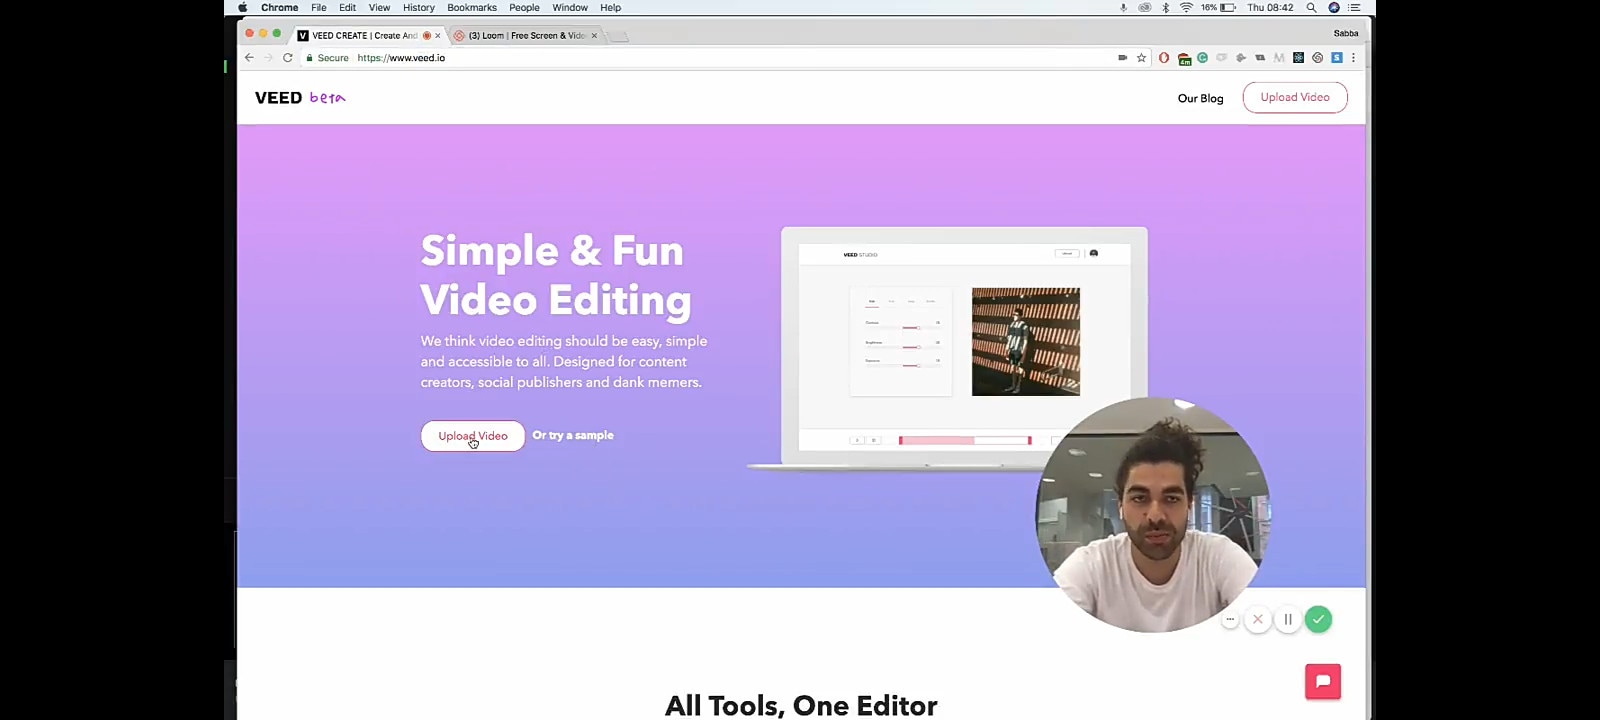
- STEP 2 - Click on ‘try sample’ or ‘upload video’
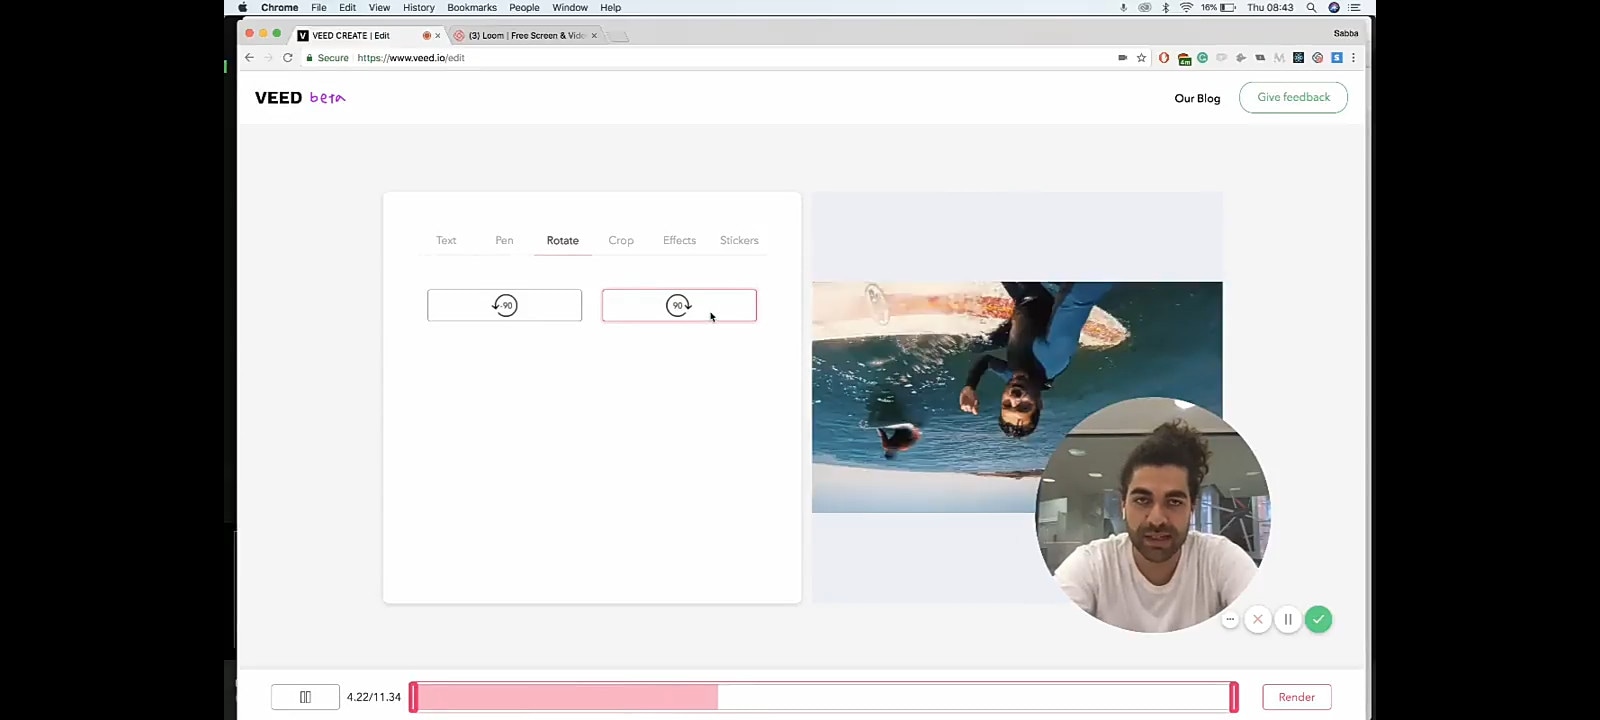
- STEP 3 - Click on ‘rotate’. Click to rotate either ways, 90 degrees
- STEP 4 - Go to crop and choose whether ‘vertical’ or ‘landscape’ to get rid of the bars
WEVIDEO – ONLINE/CLOUD-BASED VIDEO EDITOR
WeVideo is an online, cloud-based video editing platform that works in web browsers and on mobile devices. The company was originally founded in 2011 in Europe. Their main headquarters is in Mountain View, California with a team based in Romania.
HOW TO ROTATE AVI VIDEO ON WEVIDEO ONLINE
- STEP 1 - Import your footage and drag it to the timeline
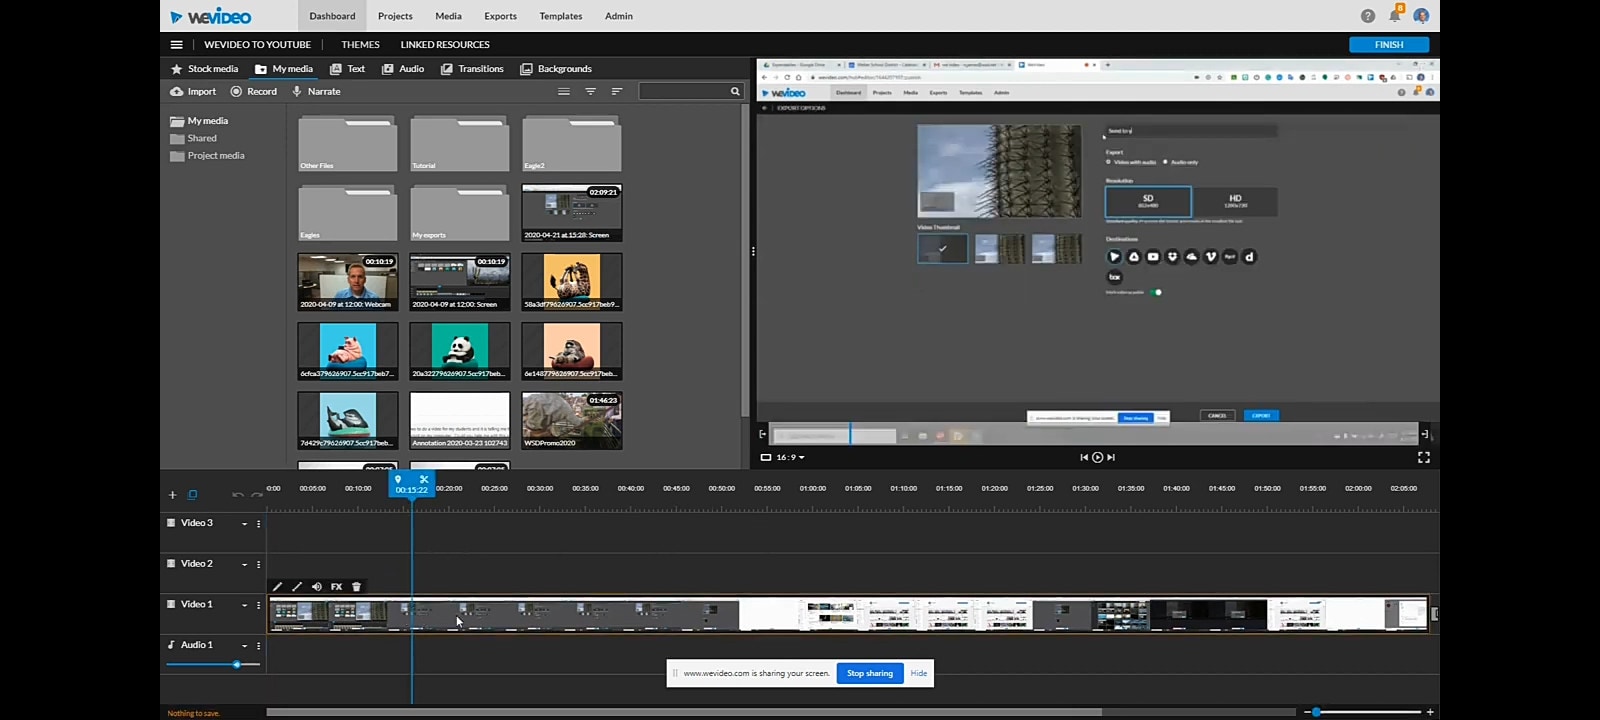
- STEP 2 - Click on the little pencil icon right above the timeline
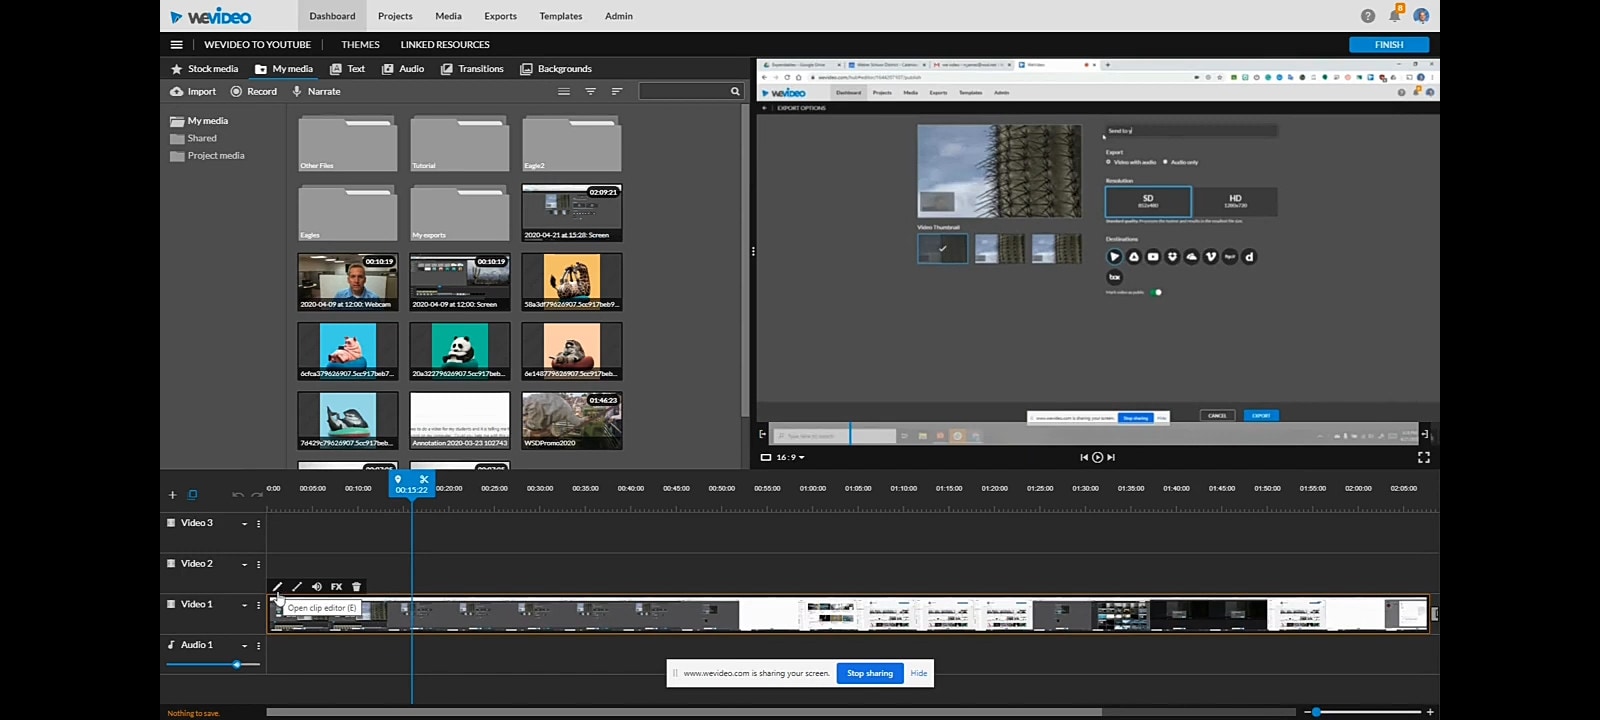
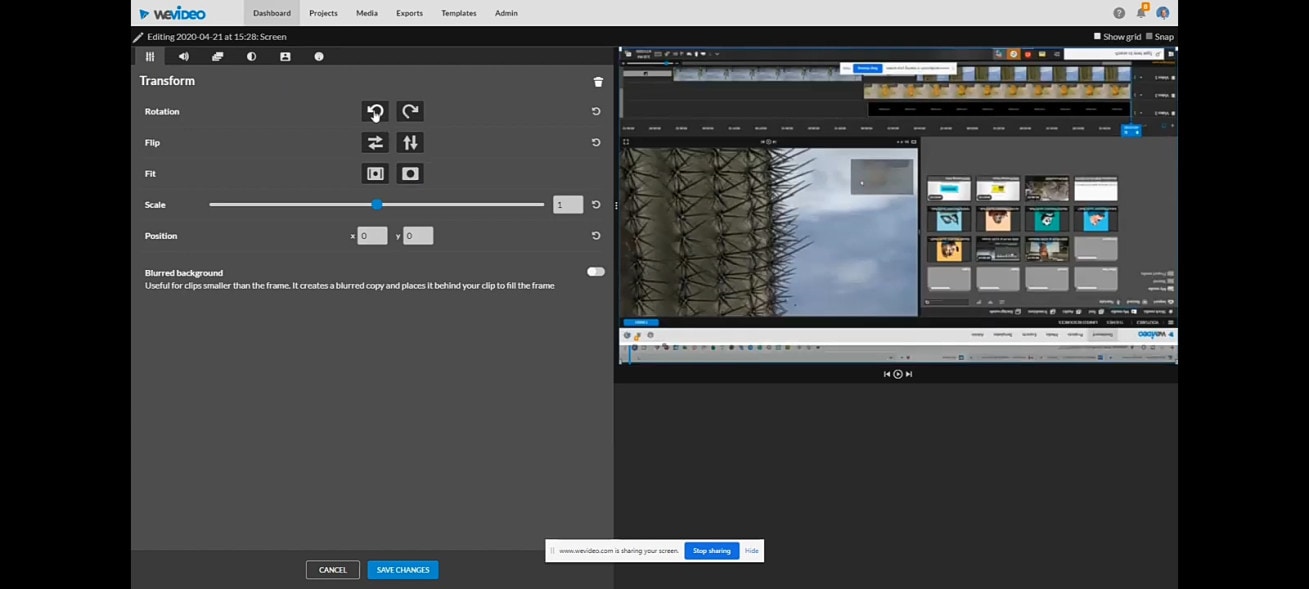
- STEP 3 - That will open up your editor, popping up a box full of option. Select the ‘transform’ tab, then two arrows right in front of ‘rotation’ till it fits: two clicks for 180, and one click for 90. Adjust it as needed, and save changes to preview.
Video editing is the process of cutting and rearranging multiple clips or segments of video to create a new and more improved video. This involves adding titles, animations, sound effects, music and more. Video editing has not ceased to follow the trend of technology as it keeps thriving tirelessly through the ages. With advancement springing forth from many sides, video editing followed every pace to ensure it’s not left behind. This largely involves gadgets, computers and smartphones.
Before the advent of smartphones, computers have been the only video editing tools, and that culture is preserved even till date as its use has spread round the world. It is therefore evident that film making cannot bypass this process. Improvements have been made over the years on video editing softwares for computers to stay up to date as regards features and usability. There are other video editors which were introduced, and are still being updated such as Adobe Premiere Pro, Final Cut, Filmora and so on. As the case is today, smartphones have proven to be relevant in the process; they have also come up with video editing applications such as Power Video Director, InShot, Filmora for Android, Kinemaster and many more for Android, iPhone and iPads.
This article aims at giving guides and steps on how to rotate AVI videos using different softwares on different PCs (Windows and Mac) and smartphones (Android and iPhone). This does not leave online video editing softwares behind also.
WHAT IS AVI?

AVI means Audio Video Interleave. It’s a multimedia container format introduced by Microsoft in November 1992 as part of its video for Windows technology. AVI files can contain both audio and video data in a file container that allows synchronous audio-with-video playback.
KDENLIVE – FREE FOR WINDOWS

Introduced in 2002, Kdenlive has a good quality and design. The design is straightforward, user-friendly which makes you know what you are getting into, as well as the actual quality of the effects that you might want to apply to your video while editing. Overall, it looks really professional, neat and organized.
HOW TO ROTATE AVI VIDEO IN KDENLIVE
- STEP 1 - Launch Kdenlive on your Windows and import the video from where you have saved it locally. Drag and drop video on timeline

- STEP 2 - Select video effects and in the search box, type ‘rotate’ and click on it. Click on effects, then select video effects
- STEP 3 - Drag the video to the timeline and go to effects, then drag and drop the ‘rotate’ effect on the clip.

ALTERNATIVE WAY TO ROTATE AVI VIDEO ON KDENLIVE
- STEP 1 - Create a vertical project: create profile, select size, 1080 x 1920 and select aspect ratio: 9:16. Afterwards, there will be a vertical outline on your program window. Import your video to the project bin and drag it to the timeline
- STEP 2 - Go to effects, then click on ‘transform’ and double-click on it
- STEP 3 - Go to the down-right part of your screen and click on ‘rotation’ and highlight to change the number to whichever is ideal for your screen; you can change it to 270. This will make it rotate but will not fill the screen yet. Highlight the size and change it to 180 an hit the ‘enter’ key.
OPENSHOT – FREE FOR WINDOWS
OpenShot Video Editor is a free and open-source video editor for Windows, macOS, Linux, and Chrome OS. The project started in August 2008 by Jonathan Thomas, with the objective of providing a stable, free, and friendly to use video editor.

HOW TO ROTATE AVI VIDEO ON OPENSHOT
- STEP 1 - Launch OpenShot on your Windows and import your clip form where you’ve saved it locally

- STEP 2 - Drag and drop footage on your timeline and click on the ‘play’ button to check your footage. Right click on the footage and an option box will appear

- STEP 3 - Click on rotate; you can choose to rotate either left or right. Rotate till it ideally fits the screen

ALTERNATIVE WAY TO ROTATE AVI VIDEO ON OPEN SHOT
- STEP 1 - Launch OpenShot on your Windows and drag your footage to the timeline.
- STEP 2 - Right click on your video and select properties.
- STEP 3 - Go to rotation and change the value, and your video will rotate
ADOBE PREMIERE PRO – PAID FOR WINDOWS

Introduced in 2003, Adobe Premiere Pro is known to be a video editing software. It has a lot of features that can be used in the process of editing. It’s capable of editing feature movies such as Hollywood and the likes.
HOW TO ROTATE AVI VIDEO ON ADOBE PREMIERE PRO – FIXING A LANDSCAPE SHOT
- STEP 1 - Go to sequence and click on sequence settings

- STEP 2 - Click on frame size and type in 3840; for the horizontal, type in 2160 and then proceed to click ok
FIXING A PORTRAIT SHOT
- Put your play-head (the thin line that moves over the clips on your timeline) on the clip on the timeline
- Go to the top and click on ‘Editing’, then you go to effects control

- Go to ‘scale’, and type in the number according to the degree you desire to effect
your rotation. However, your video will be just perfect if you type in -90

ALTERNATIVE WAY TO ROTATE AVI VIDEO ON ADOBE PREMIERE PRO
- STEP 1 - Go to the effects window and search for ‘flip’
- STEP 2 - Click on ‘Transform’. You can then decide to do a horizontal flip or a vertical flip
- STEP 3 - All you need to do is click and drag it on to your clip and it will flip, whether horizontal or vertical
- STEP 4 - It is easy to remedy when you click and drag the other to place on your footage, whether horizontal or vertical.
TO ROTATE YOUR CLIP
- STEP 1 - Highlight your footage on the timeline and go to your effects controls window. Underneath ‘motion’, there is the perimeter of rotation. If you click and drag the mouse on the number, it will rotate either clockwise or counter-clockwise. Also, you can type in whatever rotation amount you want

- STEP 2 - It’s also worth mentioning that when you rotate a clip, you’re always rotating around the inker point (the little blue cross in a circle). You can click and drag this through the program monitor to any point on the clip and start rotating it around the inker point. In fact, it doesn’t have to be on the clip; you can make the inker point up further and rotate, and will still rotate around the inker point. If you don’t see this on your program monitor, that’s because you haven’t highlighted the motion.

- STEP 3 - A good tip is using guides to help you level and horizontal or whether you are working with on-screen. To get a slant perfectly leveled, there’s an easy way to reference a straight line on your program monitor. On the bottom right of your program monitor is the button [a plus (+) button] editor. Click on it and a box full of tools will pop up which you can work with. Click ‘add show rulers’, ‘show guides’ and ‘safe margins’


- STEP 4 - In the ruler section, take your mouse, click and drag it down to the little crosses of your safe margins. The same goes for the vertical ruler; click and drag over. That will create a new guide. For your footage, what you might need to do is get your horizontal guide down to your horizon view. You can go to your rotation and rotate your footage to get straight with your guide. If you are left with black bars at the corners, take off your safe margin rulers and guides and then zoom in on your footage and take off the black bars. To do this, go back to your effect controls

- STEP 5 - Instead of doing rotation, you scale by clicking and sliding the mouse on the number to the right


iMOVIE – FREE FOR MAC

iMovie is a preinstalled video editing application developed by Apple Inc. for macOS, Ios, and iPadOS devices. It was originally released in 1999 as a Mac OS 8 application bundle with the first FireWire-enabled consumer Mac model, the iMac DV. With iMovie, you can create professional-looking videos without an editing degree.
HOW TO ROTATE AVI VIDEO IN iMOVIE
- STEP 1 - Run iMovie on your PC and create a new project by clicking ‘create new’ and selecting ‘movie’. Import your footage: Click on the arrow pointing downwards just below your menu bar, and select the video from wherever it is saved locally.

- STEP 2 - Click on the video once it’s imported; make sure it has the yellow boundary on it. Click and drag it onto the timeline
- STEP 3 - Leave your play-head on the footage and go just above your program window and click on the crop icon, the third from the left. Afterwards, a rotate ion will show just by the right above the program monitor. There are actually two buttons to rotate in either direction. You can save time by clicking the correct direction for whichever way your videos need to be rotated


- STEP 4 - Your videos is rotated; you can go ahead and save

FILMORA – PAID FOR MAC

Formerly known as Wondershare Video Editor as at when it first launched in 2015, Filmora Video Editor is a video editing software that helps businesses create and distribute white-labeled marketing videos. Filmora is an easy-to-use video editing software for a beginner. It supports 50 above formats, 4k editing, Filmstock effects store, all basic and advanced editing tools in the most easily accessible and used manner.
For Win 7 or later (64-bit)
For macOS 10.14 or later
HOW TO ROTATE AVI VIDEO IN FILMORA
- STEP 1 - Run Filmora on your PC, import your video from where it has been locally saved and drag to the timeline
- STEP 2 - Go to file, and select ‘project settings’. By default, the video is recorded on portrait – 9:11, so change the aspect ratio to 16:9


- STEP 3 - Go to your timeline and double-click your footage. A box of options will pop up beside the program monitor. Simply go to rotate and click and slide to rotate. It may be difficult to line it up even and straight. Just go to the program monitor and click on the little line and drag; it makes it easier to align


- STEP 4 - Go to ‘scale’ and slide it to the right to make it fill the screen. Your video is rotated and ready to be previewed
VIDEOLEAP – PAID FOR ANDROID AND iPHONE

Videoleap includes the usual basic cutting and pasting tools, plus greenscreen aspect ratios, slow-mo and fast motion, audio editing, and unlimited undo and redo actions. Access to the app and premium features is available with a subscription for $7.99/month, or with additional discounts if bought as a one-time purchase or multiple month bundles.
HOW TO ROTATE AVI VIDEO IN VIDEOLEAP
- STEP 1 - Launch Videoleap on your android and Import your footage from where you have saved it locally. Tap on ‘transform’, and then tap on rotate, then tap on rotate as many times as it takes so that it can be ideally fit


- STEP 2 - Change the format from 16:9 (YouTube format) to 9:16 (for TikTok). To do that, deselect the clip, tap on canvas, and then choose 9:16. Play the clip to preview and save.

INSHOT – FREE FOR ANDROID

InShot app is an all-in-one visual content editing app. It allows you to create videos, edit photos, and create image collages. The app has plenty of features too. You can trim clips, change the speed of your footage, and add filters, music and text. InShot is a free mobile application that you can download on your Windows to create or edit videos and photos.
HOW TO ROTATE AVI VIDEO ON INSHOT
- STEP 1 - Import your video from where you have locally saved it
- STEP 2 - Tap on the clip, and swipe the toolbar to the left to find the ‘rotate’ icon. When you tap on ‘rotate’, it will rotate your video to your left; you can keep rotating till it’s ideally fit


QUICKTIME VIDEO EDITOR – FREE FOR MAC

- Open your video on your PC using the Quicktime program. Go to ‘edit’ and click on ‘rotate left’; keep clicking until your video ideally fits the screen. Your video is rotated successfully. Preview, save and export your video.


VLLO – PAID FOR ANDROID

VLLO is a super easy video editor. Beginner and casual users will enjoy editing video with its intuitive but precise control abled split, txt, BGM and transition. For the pro editors, premium paid features are also ready with Chroma-Key, PIP, mosaic and keyframe animations.
HOW TO ROTATE AVI VIDEO IN VLLO – LANDSCAPE TO PORTRAIT
- STEP 1 - Import your footage from where you have saved it locally and change aspect ratio to 16:9 and select the ‘fill’ icon.

- STEP 2 - On your timeline, click on the footage and select the curved arrow icon to rotate as you click and drag. You can choose to rotate either ways, and your video is rotated, and ready to be previewed and saved

VEED – ONLINE/CLOUD-BASED VIDEO EDITOR

VEED.IO is an online video editing platform that makes creating videos easy and accessible to everyone. Millions of creators around the world use our products to tell stories, create content, grow their audience and more.
HOW TO ROTATE AVI VIDEO ONLINE USING VEED – PORTRAIT TO LANDSCAPE
- STEP 1 - Create an account online on Veed – Visit <www.veed.io>

- STEP 2 - Click the ‘view project’ button and import/upload footage form where it has been saved locally

- STEP 3 - Go to ‘edit video’ and select ‘adjust’. Go to rotation and click and drag to the right and to the left for your video to fit ideally

- STEP 4 - You can export your video once it is rotated
ALTRNATIVE WAY TO ROTATE AVI VIDEO ONLINE USING VEED
- STEP 1 - Import your footage and drag it to the timeline
- STEP 2 - Click on ‘try sample’ or ‘upload video’

- STEP 3 - Click on ‘rotate’. Click to rotate either ways, 90 degrees
- STEP 4 - Go to crop and choose whether ‘vertical’ or ‘landscape’ to get rid of the bars

WEVIDEO – ONLINE/CLOUD-BASED VIDEO EDITOR
WeVideo is an online, cloud-based video editing platform that works in web browsers and on mobile devices. The company was originally founded in 2011 in Europe. Their main headquarters is in Mountain View, California with a team based in Romania.
HOW TO ROTATE AVI VIDEO ON WEVIDEO ONLINE
- STEP 1 - Import your footage and drag it to the timeline

- STEP 2 - Click on the little pencil icon right above the timeline

- STEP 3 - That will open up your editor, popping up a box full of option. Select the ‘transform’ tab, then two arrows right in front of ‘rotation’ till it fits: two clicks for 180, and one click for 90. Adjust it as needed, and save changes to preview.

Video editing is the process of cutting and rearranging multiple clips or segments of video to create a new and more improved video. This involves adding titles, animations, sound effects, music and more. Video editing has not ceased to follow the trend of technology as it keeps thriving tirelessly through the ages. With advancement springing forth from many sides, video editing followed every pace to ensure it’s not left behind. This largely involves gadgets, computers and smartphones.
Before the advent of smartphones, computers have been the only video editing tools, and that culture is preserved even till date as its use has spread round the world. It is therefore evident that film making cannot bypass this process. Improvements have been made over the years on video editing softwares for computers to stay up to date as regards features and usability. There are other video editors which were introduced, and are still being updated such as Adobe Premiere Pro, Final Cut, Filmora and so on. As the case is today, smartphones have proven to be relevant in the process; they have also come up with video editing applications such as Power Video Director, InShot, Filmora for Android, Kinemaster and many more for Android, iPhone and iPads.
This article aims at giving guides and steps on how to rotate AVI videos using different softwares on different PCs (Windows and Mac) and smartphones (Android and iPhone). This does not leave online video editing softwares behind also.
WHAT IS AVI?

AVI means Audio Video Interleave. It’s a multimedia container format introduced by Microsoft in November 1992 as part of its video for Windows technology. AVI files can contain both audio and video data in a file container that allows synchronous audio-with-video playback.
KDENLIVE – FREE FOR WINDOWS

Introduced in 2002, Kdenlive has a good quality and design. The design is straightforward, user-friendly which makes you know what you are getting into, as well as the actual quality of the effects that you might want to apply to your video while editing. Overall, it looks really professional, neat and organized.
HOW TO ROTATE AVI VIDEO IN KDENLIVE
- STEP 1 - Launch Kdenlive on your Windows and import the video from where you have saved it locally. Drag and drop video on timeline

- STEP 2 - Select video effects and in the search box, type ‘rotate’ and click on it. Click on effects, then select video effects
- STEP 3 - Drag the video to the timeline and go to effects, then drag and drop the ‘rotate’ effect on the clip.

ALTERNATIVE WAY TO ROTATE AVI VIDEO ON KDENLIVE
- STEP 1 - Create a vertical project: create profile, select size, 1080 x 1920 and select aspect ratio: 9:16. Afterwards, there will be a vertical outline on your program window. Import your video to the project bin and drag it to the timeline
- STEP 2 - Go to effects, then click on ‘transform’ and double-click on it
- STEP 3 - Go to the down-right part of your screen and click on ‘rotation’ and highlight to change the number to whichever is ideal for your screen; you can change it to 270. This will make it rotate but will not fill the screen yet. Highlight the size and change it to 180 an hit the ‘enter’ key.
OPENSHOT – FREE FOR WINDOWS
OpenShot Video Editor is a free and open-source video editor for Windows, macOS, Linux, and Chrome OS. The project started in August 2008 by Jonathan Thomas, with the objective of providing a stable, free, and friendly to use video editor.

HOW TO ROTATE AVI VIDEO ON OPENSHOT
- STEP 1 - Launch OpenShot on your Windows and import your clip form where you’ve saved it locally

- STEP 2 - Drag and drop footage on your timeline and click on the ‘play’ button to check your footage. Right click on the footage and an option box will appear

- STEP 3 - Click on rotate; you can choose to rotate either left or right. Rotate till it ideally fits the screen

ALTERNATIVE WAY TO ROTATE AVI VIDEO ON OPEN SHOT
- STEP 1 - Launch OpenShot on your Windows and drag your footage to the timeline.
- STEP 2 - Right click on your video and select properties.
- STEP 3 - Go to rotation and change the value, and your video will rotate
ADOBE PREMIERE PRO – PAID FOR WINDOWS

Introduced in 2003, Adobe Premiere Pro is known to be a video editing software. It has a lot of features that can be used in the process of editing. It’s capable of editing feature movies such as Hollywood and the likes.
HOW TO ROTATE AVI VIDEO ON ADOBE PREMIERE PRO – FIXING A LANDSCAPE SHOT
- STEP 1 - Go to sequence and click on sequence settings

- STEP 2 - Click on frame size and type in 3840; for the horizontal, type in 2160 and then proceed to click ok
FIXING A PORTRAIT SHOT
- Put your play-head (the thin line that moves over the clips on your timeline) on the clip on the timeline
- Go to the top and click on ‘Editing’, then you go to effects control

- Go to ‘scale’, and type in the number according to the degree you desire to effect
your rotation. However, your video will be just perfect if you type in -90

ALTERNATIVE WAY TO ROTATE AVI VIDEO ON ADOBE PREMIERE PRO
- STEP 1 - Go to the effects window and search for ‘flip’
- STEP 2 - Click on ‘Transform’. You can then decide to do a horizontal flip or a vertical flip
- STEP 3 - All you need to do is click and drag it on to your clip and it will flip, whether horizontal or vertical
- STEP 4 - It is easy to remedy when you click and drag the other to place on your footage, whether horizontal or vertical.
TO ROTATE YOUR CLIP
- STEP 1 - Highlight your footage on the timeline and go to your effects controls window. Underneath ‘motion’, there is the perimeter of rotation. If you click and drag the mouse on the number, it will rotate either clockwise or counter-clockwise. Also, you can type in whatever rotation amount you want

- STEP 2 - It’s also worth mentioning that when you rotate a clip, you’re always rotating around the inker point (the little blue cross in a circle). You can click and drag this through the program monitor to any point on the clip and start rotating it around the inker point. In fact, it doesn’t have to be on the clip; you can make the inker point up further and rotate, and will still rotate around the inker point. If you don’t see this on your program monitor, that’s because you haven’t highlighted the motion.

- STEP 3 - A good tip is using guides to help you level and horizontal or whether you are working with on-screen. To get a slant perfectly leveled, there’s an easy way to reference a straight line on your program monitor. On the bottom right of your program monitor is the button [a plus (+) button] editor. Click on it and a box full of tools will pop up which you can work with. Click ‘add show rulers’, ‘show guides’ and ‘safe margins’


- STEP 4 - In the ruler section, take your mouse, click and drag it down to the little crosses of your safe margins. The same goes for the vertical ruler; click and drag over. That will create a new guide. For your footage, what you might need to do is get your horizontal guide down to your horizon view. You can go to your rotation and rotate your footage to get straight with your guide. If you are left with black bars at the corners, take off your safe margin rulers and guides and then zoom in on your footage and take off the black bars. To do this, go back to your effect controls

- STEP 5 - Instead of doing rotation, you scale by clicking and sliding the mouse on the number to the right


iMOVIE – FREE FOR MAC

iMovie is a preinstalled video editing application developed by Apple Inc. for macOS, Ios, and iPadOS devices. It was originally released in 1999 as a Mac OS 8 application bundle with the first FireWire-enabled consumer Mac model, the iMac DV. With iMovie, you can create professional-looking videos without an editing degree.
HOW TO ROTATE AVI VIDEO IN iMOVIE
- STEP 1 - Run iMovie on your PC and create a new project by clicking ‘create new’ and selecting ‘movie’. Import your footage: Click on the arrow pointing downwards just below your menu bar, and select the video from wherever it is saved locally.

- STEP 2 - Click on the video once it’s imported; make sure it has the yellow boundary on it. Click and drag it onto the timeline
- STEP 3 - Leave your play-head on the footage and go just above your program window and click on the crop icon, the third from the left. Afterwards, a rotate ion will show just by the right above the program monitor. There are actually two buttons to rotate in either direction. You can save time by clicking the correct direction for whichever way your videos need to be rotated


- STEP 4 - Your videos is rotated; you can go ahead and save

FILMORA – PAID FOR MAC

Formerly known as Wondershare Video Editor as at when it first launched in 2015, Filmora Video Editor is a video editing software that helps businesses create and distribute white-labeled marketing videos. Filmora is an easy-to-use video editing software for a beginner. It supports 50 above formats, 4k editing, Filmstock effects store, all basic and advanced editing tools in the most easily accessible and used manner.
For Win 7 or later (64-bit)
For macOS 10.14 or later
HOW TO ROTATE AVI VIDEO IN FILMORA
- STEP 1 - Run Filmora on your PC, import your video from where it has been locally saved and drag to the timeline
- STEP 2 - Go to file, and select ‘project settings’. By default, the video is recorded on portrait – 9:11, so change the aspect ratio to 16:9


- STEP 3 - Go to your timeline and double-click your footage. A box of options will pop up beside the program monitor. Simply go to rotate and click and slide to rotate. It may be difficult to line it up even and straight. Just go to the program monitor and click on the little line and drag; it makes it easier to align


- STEP 4 - Go to ‘scale’ and slide it to the right to make it fill the screen. Your video is rotated and ready to be previewed
VIDEOLEAP – PAID FOR ANDROID AND iPHONE

Videoleap includes the usual basic cutting and pasting tools, plus greenscreen aspect ratios, slow-mo and fast motion, audio editing, and unlimited undo and redo actions. Access to the app and premium features is available with a subscription for $7.99/month, or with additional discounts if bought as a one-time purchase or multiple month bundles.
HOW TO ROTATE AVI VIDEO IN VIDEOLEAP
- STEP 1 - Launch Videoleap on your android and Import your footage from where you have saved it locally. Tap on ‘transform’, and then tap on rotate, then tap on rotate as many times as it takes so that it can be ideally fit


- STEP 2 - Change the format from 16:9 (YouTube format) to 9:16 (for TikTok). To do that, deselect the clip, tap on canvas, and then choose 9:16. Play the clip to preview and save.

INSHOT – FREE FOR ANDROID

InShot app is an all-in-one visual content editing app. It allows you to create videos, edit photos, and create image collages. The app has plenty of features too. You can trim clips, change the speed of your footage, and add filters, music and text. InShot is a free mobile application that you can download on your Windows to create or edit videos and photos.
HOW TO ROTATE AVI VIDEO ON INSHOT
- STEP 1 - Import your video from where you have locally saved it
- STEP 2 - Tap on the clip, and swipe the toolbar to the left to find the ‘rotate’ icon. When you tap on ‘rotate’, it will rotate your video to your left; you can keep rotating till it’s ideally fit


QUICKTIME VIDEO EDITOR – FREE FOR MAC

- Open your video on your PC using the Quicktime program. Go to ‘edit’ and click on ‘rotate left’; keep clicking until your video ideally fits the screen. Your video is rotated successfully. Preview, save and export your video.


VLLO – PAID FOR ANDROID

VLLO is a super easy video editor. Beginner and casual users will enjoy editing video with its intuitive but precise control abled split, txt, BGM and transition. For the pro editors, premium paid features are also ready with Chroma-Key, PIP, mosaic and keyframe animations.
HOW TO ROTATE AVI VIDEO IN VLLO – LANDSCAPE TO PORTRAIT
- STEP 1 - Import your footage from where you have saved it locally and change aspect ratio to 16:9 and select the ‘fill’ icon.

- STEP 2 - On your timeline, click on the footage and select the curved arrow icon to rotate as you click and drag. You can choose to rotate either ways, and your video is rotated, and ready to be previewed and saved

VEED – ONLINE/CLOUD-BASED VIDEO EDITOR

VEED.IO is an online video editing platform that makes creating videos easy and accessible to everyone. Millions of creators around the world use our products to tell stories, create content, grow their audience and more.
HOW TO ROTATE AVI VIDEO ONLINE USING VEED – PORTRAIT TO LANDSCAPE
- STEP 1 - Create an account online on Veed – Visit <www.veed.io>

- STEP 2 - Click the ‘view project’ button and import/upload footage form where it has been saved locally

- STEP 3 - Go to ‘edit video’ and select ‘adjust’. Go to rotation and click and drag to the right and to the left for your video to fit ideally

- STEP 4 - You can export your video once it is rotated
ALTRNATIVE WAY TO ROTATE AVI VIDEO ONLINE USING VEED
- STEP 1 - Import your footage and drag it to the timeline
- STEP 2 - Click on ‘try sample’ or ‘upload video’

- STEP 3 - Click on ‘rotate’. Click to rotate either ways, 90 degrees
- STEP 4 - Go to crop and choose whether ‘vertical’ or ‘landscape’ to get rid of the bars

WEVIDEO – ONLINE/CLOUD-BASED VIDEO EDITOR
WeVideo is an online, cloud-based video editing platform that works in web browsers and on mobile devices. The company was originally founded in 2011 in Europe. Their main headquarters is in Mountain View, California with a team based in Romania.
HOW TO ROTATE AVI VIDEO ON WEVIDEO ONLINE
- STEP 1 - Import your footage and drag it to the timeline

- STEP 2 - Click on the little pencil icon right above the timeline

- STEP 3 - That will open up your editor, popping up a box full of option. Select the ‘transform’ tab, then two arrows right in front of ‘rotation’ till it fits: two clicks for 180, and one click for 90. Adjust it as needed, and save changes to preview.

Video editing is the process of cutting and rearranging multiple clips or segments of video to create a new and more improved video. This involves adding titles, animations, sound effects, music and more. Video editing has not ceased to follow the trend of technology as it keeps thriving tirelessly through the ages. With advancement springing forth from many sides, video editing followed every pace to ensure it’s not left behind. This largely involves gadgets, computers and smartphones.
Before the advent of smartphones, computers have been the only video editing tools, and that culture is preserved even till date as its use has spread round the world. It is therefore evident that film making cannot bypass this process. Improvements have been made over the years on video editing softwares for computers to stay up to date as regards features and usability. There are other video editors which were introduced, and are still being updated such as Adobe Premiere Pro, Final Cut, Filmora and so on. As the case is today, smartphones have proven to be relevant in the process; they have also come up with video editing applications such as Power Video Director, InShot, Filmora for Android, Kinemaster and many more for Android, iPhone and iPads.
This article aims at giving guides and steps on how to rotate AVI videos using different softwares on different PCs (Windows and Mac) and smartphones (Android and iPhone). This does not leave online video editing softwares behind also.
WHAT IS AVI?

AVI means Audio Video Interleave. It’s a multimedia container format introduced by Microsoft in November 1992 as part of its video for Windows technology. AVI files can contain both audio and video data in a file container that allows synchronous audio-with-video playback.
KDENLIVE – FREE FOR WINDOWS

Introduced in 2002, Kdenlive has a good quality and design. The design is straightforward, user-friendly which makes you know what you are getting into, as well as the actual quality of the effects that you might want to apply to your video while editing. Overall, it looks really professional, neat and organized.
HOW TO ROTATE AVI VIDEO IN KDENLIVE
- STEP 1 - Launch Kdenlive on your Windows and import the video from where you have saved it locally. Drag and drop video on timeline

- STEP 2 - Select video effects and in the search box, type ‘rotate’ and click on it. Click on effects, then select video effects
- STEP 3 - Drag the video to the timeline and go to effects, then drag and drop the ‘rotate’ effect on the clip.

ALTERNATIVE WAY TO ROTATE AVI VIDEO ON KDENLIVE
- STEP 1 - Create a vertical project: create profile, select size, 1080 x 1920 and select aspect ratio: 9:16. Afterwards, there will be a vertical outline on your program window. Import your video to the project bin and drag it to the timeline
- STEP 2 - Go to effects, then click on ‘transform’ and double-click on it
- STEP 3 - Go to the down-right part of your screen and click on ‘rotation’ and highlight to change the number to whichever is ideal for your screen; you can change it to 270. This will make it rotate but will not fill the screen yet. Highlight the size and change it to 180 an hit the ‘enter’ key.
OPENSHOT – FREE FOR WINDOWS
OpenShot Video Editor is a free and open-source video editor for Windows, macOS, Linux, and Chrome OS. The project started in August 2008 by Jonathan Thomas, with the objective of providing a stable, free, and friendly to use video editor.

HOW TO ROTATE AVI VIDEO ON OPENSHOT
- STEP 1 - Launch OpenShot on your Windows and import your clip form where you’ve saved it locally

- STEP 2 - Drag and drop footage on your timeline and click on the ‘play’ button to check your footage. Right click on the footage and an option box will appear

- STEP 3 - Click on rotate; you can choose to rotate either left or right. Rotate till it ideally fits the screen

ALTERNATIVE WAY TO ROTATE AVI VIDEO ON OPEN SHOT
- STEP 1 - Launch OpenShot on your Windows and drag your footage to the timeline.
- STEP 2 - Right click on your video and select properties.
- STEP 3 - Go to rotation and change the value, and your video will rotate
ADOBE PREMIERE PRO – PAID FOR WINDOWS

Introduced in 2003, Adobe Premiere Pro is known to be a video editing software. It has a lot of features that can be used in the process of editing. It’s capable of editing feature movies such as Hollywood and the likes.
HOW TO ROTATE AVI VIDEO ON ADOBE PREMIERE PRO – FIXING A LANDSCAPE SHOT
- STEP 1 - Go to sequence and click on sequence settings

- STEP 2 - Click on frame size and type in 3840; for the horizontal, type in 2160 and then proceed to click ok
FIXING A PORTRAIT SHOT
- Put your play-head (the thin line that moves over the clips on your timeline) on the clip on the timeline
- Go to the top and click on ‘Editing’, then you go to effects control

- Go to ‘scale’, and type in the number according to the degree you desire to effect
your rotation. However, your video will be just perfect if you type in -90

ALTERNATIVE WAY TO ROTATE AVI VIDEO ON ADOBE PREMIERE PRO
- STEP 1 - Go to the effects window and search for ‘flip’
- STEP 2 - Click on ‘Transform’. You can then decide to do a horizontal flip or a vertical flip
- STEP 3 - All you need to do is click and drag it on to your clip and it will flip, whether horizontal or vertical
- STEP 4 - It is easy to remedy when you click and drag the other to place on your footage, whether horizontal or vertical.
TO ROTATE YOUR CLIP
- STEP 1 - Highlight your footage on the timeline and go to your effects controls window. Underneath ‘motion’, there is the perimeter of rotation. If you click and drag the mouse on the number, it will rotate either clockwise or counter-clockwise. Also, you can type in whatever rotation amount you want

- STEP 2 - It’s also worth mentioning that when you rotate a clip, you’re always rotating around the inker point (the little blue cross in a circle). You can click and drag this through the program monitor to any point on the clip and start rotating it around the inker point. In fact, it doesn’t have to be on the clip; you can make the inker point up further and rotate, and will still rotate around the inker point. If you don’t see this on your program monitor, that’s because you haven’t highlighted the motion.

- STEP 3 - A good tip is using guides to help you level and horizontal or whether you are working with on-screen. To get a slant perfectly leveled, there’s an easy way to reference a straight line on your program monitor. On the bottom right of your program monitor is the button [a plus (+) button] editor. Click on it and a box full of tools will pop up which you can work with. Click ‘add show rulers’, ‘show guides’ and ‘safe margins’


- STEP 4 - In the ruler section, take your mouse, click and drag it down to the little crosses of your safe margins. The same goes for the vertical ruler; click and drag over. That will create a new guide. For your footage, what you might need to do is get your horizontal guide down to your horizon view. You can go to your rotation and rotate your footage to get straight with your guide. If you are left with black bars at the corners, take off your safe margin rulers and guides and then zoom in on your footage and take off the black bars. To do this, go back to your effect controls

- STEP 5 - Instead of doing rotation, you scale by clicking and sliding the mouse on the number to the right


iMOVIE – FREE FOR MAC

iMovie is a preinstalled video editing application developed by Apple Inc. for macOS, Ios, and iPadOS devices. It was originally released in 1999 as a Mac OS 8 application bundle with the first FireWire-enabled consumer Mac model, the iMac DV. With iMovie, you can create professional-looking videos without an editing degree.
HOW TO ROTATE AVI VIDEO IN iMOVIE
- STEP 1 - Run iMovie on your PC and create a new project by clicking ‘create new’ and selecting ‘movie’. Import your footage: Click on the arrow pointing downwards just below your menu bar, and select the video from wherever it is saved locally.

- STEP 2 - Click on the video once it’s imported; make sure it has the yellow boundary on it. Click and drag it onto the timeline
- STEP 3 - Leave your play-head on the footage and go just above your program window and click on the crop icon, the third from the left. Afterwards, a rotate ion will show just by the right above the program monitor. There are actually two buttons to rotate in either direction. You can save time by clicking the correct direction for whichever way your videos need to be rotated


- STEP 4 - Your videos is rotated; you can go ahead and save

FILMORA – PAID FOR MAC

Formerly known as Wondershare Video Editor as at when it first launched in 2015, Filmora Video Editor is a video editing software that helps businesses create and distribute white-labeled marketing videos. Filmora is an easy-to-use video editing software for a beginner. It supports 50 above formats, 4k editing, Filmstock effects store, all basic and advanced editing tools in the most easily accessible and used manner.
For Win 7 or later (64-bit)
For macOS 10.14 or later
HOW TO ROTATE AVI VIDEO IN FILMORA
- STEP 1 - Run Filmora on your PC, import your video from where it has been locally saved and drag to the timeline
- STEP 2 - Go to file, and select ‘project settings’. By default, the video is recorded on portrait – 9:11, so change the aspect ratio to 16:9


- STEP 3 - Go to your timeline and double-click your footage. A box of options will pop up beside the program monitor. Simply go to rotate and click and slide to rotate. It may be difficult to line it up even and straight. Just go to the program monitor and click on the little line and drag; it makes it easier to align


- STEP 4 - Go to ‘scale’ and slide it to the right to make it fill the screen. Your video is rotated and ready to be previewed
VIDEOLEAP – PAID FOR ANDROID AND iPHONE

Videoleap includes the usual basic cutting and pasting tools, plus greenscreen aspect ratios, slow-mo and fast motion, audio editing, and unlimited undo and redo actions. Access to the app and premium features is available with a subscription for $7.99/month, or with additional discounts if bought as a one-time purchase or multiple month bundles.
HOW TO ROTATE AVI VIDEO IN VIDEOLEAP
- STEP 1 - Launch Videoleap on your android and Import your footage from where you have saved it locally. Tap on ‘transform’, and then tap on rotate, then tap on rotate as many times as it takes so that it can be ideally fit


- STEP 2 - Change the format from 16:9 (YouTube format) to 9:16 (for TikTok). To do that, deselect the clip, tap on canvas, and then choose 9:16. Play the clip to preview and save.

INSHOT – FREE FOR ANDROID

InShot app is an all-in-one visual content editing app. It allows you to create videos, edit photos, and create image collages. The app has plenty of features too. You can trim clips, change the speed of your footage, and add filters, music and text. InShot is a free mobile application that you can download on your Windows to create or edit videos and photos.
HOW TO ROTATE AVI VIDEO ON INSHOT
- STEP 1 - Import your video from where you have locally saved it
- STEP 2 - Tap on the clip, and swipe the toolbar to the left to find the ‘rotate’ icon. When you tap on ‘rotate’, it will rotate your video to your left; you can keep rotating till it’s ideally fit


QUICKTIME VIDEO EDITOR – FREE FOR MAC

- Open your video on your PC using the Quicktime program. Go to ‘edit’ and click on ‘rotate left’; keep clicking until your video ideally fits the screen. Your video is rotated successfully. Preview, save and export your video.


VLLO – PAID FOR ANDROID

VLLO is a super easy video editor. Beginner and casual users will enjoy editing video with its intuitive but precise control abled split, txt, BGM and transition. For the pro editors, premium paid features are also ready with Chroma-Key, PIP, mosaic and keyframe animations.
HOW TO ROTATE AVI VIDEO IN VLLO – LANDSCAPE TO PORTRAIT
- STEP 1 - Import your footage from where you have saved it locally and change aspect ratio to 16:9 and select the ‘fill’ icon.

- STEP 2 - On your timeline, click on the footage and select the curved arrow icon to rotate as you click and drag. You can choose to rotate either ways, and your video is rotated, and ready to be previewed and saved

VEED – ONLINE/CLOUD-BASED VIDEO EDITOR

VEED.IO is an online video editing platform that makes creating videos easy and accessible to everyone. Millions of creators around the world use our products to tell stories, create content, grow their audience and more.
HOW TO ROTATE AVI VIDEO ONLINE USING VEED – PORTRAIT TO LANDSCAPE
- STEP 1 - Create an account online on Veed – Visit <www.veed.io>

- STEP 2 - Click the ‘view project’ button and import/upload footage form where it has been saved locally

- STEP 3 - Go to ‘edit video’ and select ‘adjust’. Go to rotation and click and drag to the right and to the left for your video to fit ideally

- STEP 4 - You can export your video once it is rotated
ALTRNATIVE WAY TO ROTATE AVI VIDEO ONLINE USING VEED
- STEP 1 - Import your footage and drag it to the timeline
- STEP 2 - Click on ‘try sample’ or ‘upload video’

- STEP 3 - Click on ‘rotate’. Click to rotate either ways, 90 degrees
- STEP 4 - Go to crop and choose whether ‘vertical’ or ‘landscape’ to get rid of the bars

WEVIDEO – ONLINE/CLOUD-BASED VIDEO EDITOR
WeVideo is an online, cloud-based video editing platform that works in web browsers and on mobile devices. The company was originally founded in 2011 in Europe. Their main headquarters is in Mountain View, California with a team based in Romania.
HOW TO ROTATE AVI VIDEO ON WEVIDEO ONLINE
- STEP 1 - Import your footage and drag it to the timeline

- STEP 2 - Click on the little pencil icon right above the timeline

- STEP 3 - That will open up your editor, popping up a box full of option. Select the ‘transform’ tab, then two arrows right in front of ‘rotation’ till it fits: two clicks for 180, and one click for 90. Adjust it as needed, and save changes to preview.

How to Create Video Contents That Convert Sales
It is no secret that videos are a powerful marketing tool. In fact, studies have shown that including video on a landing page can increase conversion rates by up to 80%.

Powerful Marketing Tool
Sales videos are all about encouraging potential customers to buy a product or service. They usually include persuasive tactics, such as an authoritative voice, logical arguments, and emotional appeals. By effectively communicating the benefits of a product or service, sales videos can be highly effective in influencing someone to make a purchase.
Sales videos
A sales video is a powerful tool that can help you to generate sales leads and close more deals. By providing potential customers with an overview of your products or services, you can give them the information they need to make an informed purchase decision. In addition, a sales video can help to build trust and credibility with your audience. By featuring testimonials from satisfied customers, you can show potential buyers that your products or services deliver on their promises.
Moreover, a sales video can be an excellent way to showcase your company’s unique strengths and capabilities. By highlighting your company’s unique selling points, you can give potential customers a good reason to choose your business over the competition. When used effectively, a sales video can be a powerful tool for generating new sales and increasing your bottom line.
But maybe you are wondering what’s the key to creating videos that actually generate sales?
Key to Creating Videos
1. Understand Audience
The first thing that you need to do when creating a sales video is to understand your audience. Who are they? What do they want? What are their problems?
Once you know who your target audience is, it’ll be a lot easier to create a video that will appeal to them and sell your product or service.
2. Explain What It is and How It Works
Now, let’s say that you’re selling a new type of product or service. In this case, it’s best to create a video that introduces your product or service and explains what it is and how it works.
3. Case Studies
You can also use case studies or testimonials from happy customers to help boost the credibility of your product or service and convince potential buyers that it’s worth investing in.
4. Create Video Content
Once you know who your target audience are, then it’s time for you to create a video content

Target Audience
1. Start with a Strong Hook
A strong hook is the key to creating a video that converts into sales. You have to make sure that your video is engaging and informative, while also offering something that viewers can’t find elsewhere. A good hook will grab attention and keep viewers engaged throughout the entire video. There are a few different things you can do to create a strong hook for your video such as:

Strong Hook
- Attention-grabbing headline. This should be something that makes viewers want to learn more.
- Give a brief overview of what they can expect from the video.
- Targeting the most common pain of your audience.

Attention-Grabbing Headline
You only have a few seconds to make a strong impression. Use a strong wisely and you’ll soon see your sales start to climb.
2. Keep It Short And Sweet
In a fast-paced world, it can be tempting to try and pack as much information into a video as possible. However, when it comes to creating a video that converts into sales, less is definitely more. Keep your video short and sweet, focusing on one key message that you want your viewers to remember. Highlight the features and benefits of your product or service, and include a call to action that is clear and concise. By keeping your video focused and to the point, you will be more likely to engage your viewers and persuade them to take the next step.

Keep Short and Sweet
3. Focus on the Viewer
When creating a video that is designed to convert viewers into paying customers, it is important to focus on the needs and wants of the viewer. What problem are they trying to solve? What are they looking for in a solution? How can your product or service help them achieve their goals? Answering these questions will help you create a video that resonates with viewers and helps guide them through the purchase process. In addition, make sure to include a call to action at the end of the video so that viewers know how to take the next step. By focusing on the viewer and providing them with the information they need, you can create a video that leads to sales.

Focus on the Viewer
4. Use Persuasive Language
There’s no denying it – persuasive language is a powerful tool for sales. By speaking in a way that encourages your audience to take action, you can convince them to buy your product or service. And when it comes to sales, every little bit counts.
But what exactly is persuasive language? In essence, it’s a way of speaking that inspires your listeners to take action. It can be used to encourage people to buy something, sign up for a service, or even vote for a particular candidate. But whatever the goal may be, persuasive language is an incredibly effective tool.
So how can you use it effectively in your own sales pitches? Here are 35 words customers love to hear when making a decision:

Use Persuasive Language
- Free
- You
- 100%
- Value
- Opportunity
- Limited (Implies scarcity)
- Only
- Life Time
- Best Selling
- New
- Revealed
- Immediately
- Special
- Now
- Easy-to-use
- How to
- Extraordinary
- Best
- Proven Tested
- Risk-free
- Money back
- Guarantee
- Help
- One-time payment
- Without
- Results
- Discover
- Bonus
- Exclusive
- Today
- Secret
- Receive/Get
- Discount
- Cancel anytime
5. Include a Strong Call to Action
Tell audience exactly what you want them to do after watching your video - such as subscribing to your channel, visiting your website or sending a message to your social media page. Make it easy for them to take action by including clickable links.

Call to Action
The right call to action can mean the difference between a successful sale and a missed opportunity. Choose your words carefully to ensure that your message is clear and powerful. manipulate or coerce your customers into buying from you.
Below are some of the most common call to action verbs broken down by intention. Simply pair them with the offering of your business.
| PURPOSE | CTAs |
|---|---|
| Ecommerce | Buy, Shop, Order, Reserve, Save, Add to Cart, Pick, View |
| Non-Profit Conversion | Donate, Commit, Volunteer, Adopt, Give, Support |
| Newsletter or Community | Subscribe, Join, Sign Up, Refer |
| Freebie Giveaway | Download, Get, Grab, Claim, Take Advantage of |
| General | Message us now, Learn More, See More, See How, Start, Find out, Check it Out, Click here, Continue, Swipe |
Wrap Up
- Creating a video that covertly sells can be an effective way to improve your product sales.
- By starting with a strong hook, keeping the video short, and focusing on the viewer, you can create a persuasive video that encourages people to buy your product.
- Make sure to include a strong call to action so viewers know what they need to do next. Have you tried creating videos like this? What results did you see?

Powerful Marketing Tool
Sales videos are all about encouraging potential customers to buy a product or service. They usually include persuasive tactics, such as an authoritative voice, logical arguments, and emotional appeals. By effectively communicating the benefits of a product or service, sales videos can be highly effective in influencing someone to make a purchase.

Sales videos
A sales video is a powerful tool that can help you to generate sales leads and close more deals. By providing potential customers with an overview of your products or services, you can give them the information they need to make an informed purchase decision. In addition, a sales video can help to build trust and credibility with your audience. By featuring testimonials from satisfied customers, you can show potential buyers that your products or services deliver on their promises.
Moreover, a sales video can be an excellent way to showcase your company’s unique strengths and capabilities. By highlighting your company’s unique selling points, you can give potential customers a good reason to choose your business over the competition. When used effectively, a sales video can be a powerful tool for generating new sales and increasing your bottom line.
But maybe you are wondering what’s the key to creating videos that actually generate sales?
Key to Creating Videos
1. Understand Audience
The first thing that you need to do when creating a sales video is to understand your audience. Who are they? What do they want? What are their problems?
Once you know who your target audience is, it’ll be a lot easier to create a video that will appeal to them and sell your product or service.
2. Explain What It is and How It Works
Now, let’s say that you’re selling a new type of product or service. In this case, it’s best to create a video that introduces your product or service and explains what it is and how it works.
3. Case Studies
You can also use case studies or testimonials from happy customers to help boost the credibility of your product or service and convince potential buyers that it’s worth investing in.
4. Create Video Content
Once you know who your target audience are, then it’s time for you to create a video content

Target Audience
1. Start with a Strong Hook
A strong hook is the key to creating a video that converts into sales. You have to make sure that your video is engaging and informative, while also offering something that viewers can’t find elsewhere. A good hook will grab attention and keep viewers engaged throughout the entire video. There are a few different things you can do to create a strong hook for your video such as:

Strong Hook
- Attention-grabbing headline. This should be something that makes viewers want to learn more.
- Give a brief overview of what they can expect from the video.
- Targeting the most common pain of your audience.

Attention-Grabbing Headline
You only have a few seconds to make a strong impression. Use a strong wisely and you’ll soon see your sales start to climb.
2. Keep It Short And Sweet
In a fast-paced world, it can be tempting to try and pack as much information into a video as possible. However, when it comes to creating a video that converts into sales, less is definitely more. Keep your video short and sweet, focusing on one key message that you want your viewers to remember. Highlight the features and benefits of your product or service, and include a call to action that is clear and concise. By keeping your video focused and to the point, you will be more likely to engage your viewers and persuade them to take the next step.

Keep Short and Sweet
3. Focus on the Viewer
When creating a video that is designed to convert viewers into paying customers, it is important to focus on the needs and wants of the viewer. What problem are they trying to solve? What are they looking for in a solution? How can your product or service help them achieve their goals? Answering these questions will help you create a video that resonates with viewers and helps guide them through the purchase process. In addition, make sure to include a call to action at the end of the video so that viewers know how to take the next step. By focusing on the viewer and providing them with the information they need, you can create a video that leads to sales.

Focus on the Viewer
4. Use Persuasive Language
There’s no denying it – persuasive language is a powerful tool for sales. By speaking in a way that encourages your audience to take action, you can convince them to buy your product or service. And when it comes to sales, every little bit counts.
But what exactly is persuasive language? In essence, it’s a way of speaking that inspires your listeners to take action. It can be used to encourage people to buy something, sign up for a service, or even vote for a particular candidate. But whatever the goal may be, persuasive language is an incredibly effective tool.
So how can you use it effectively in your own sales pitches? Here are 35 words customers love to hear when making a decision:

Use Persuasive Language
- Free
- You
- 100%
- Value
- Opportunity
- Limited (Implies scarcity)
- Only
- Life Time
- Best Selling
- New
- Revealed
- Immediately
- Special
- Now
- Easy-to-use
- How to
- Extraordinary
- Best
- Proven Tested
- Risk-free
- Money back
- Guarantee
- Help
- One-time payment
- Without
- Results
- Discover
- Bonus
- Exclusive
- Today
- Secret
- Receive/Get
- Discount
- Cancel anytime
5. Include a Strong Call to Action
Tell audience exactly what you want them to do after watching your video - such as subscribing to your channel, visiting your website or sending a message to your social media page. Make it easy for them to take action by including clickable links.

Call to Action
The right call to action can mean the difference between a successful sale and a missed opportunity. Choose your words carefully to ensure that your message is clear and powerful. manipulate or coerce your customers into buying from you.
Below are some of the most common call to action verbs broken down by intention. Simply pair them with the offering of your business.
| PURPOSE | CTAs |
|---|---|
| Ecommerce | Buy, Shop, Order, Reserve, Save, Add to Cart, Pick, View |
| Non-Profit Conversion | Donate, Commit, Volunteer, Adopt, Give, Support |
| Newsletter or Community | Subscribe, Join, Sign Up, Refer |
| Freebie Giveaway | Download, Get, Grab, Claim, Take Advantage of |
| General | Message us now, Learn More, See More, See How, Start, Find out, Check it Out, Click here, Continue, Swipe |
Wrap Up
- Creating a video that covertly sells can be an effective way to improve your product sales.
- By starting with a strong hook, keeping the video short, and focusing on the viewer, you can create a persuasive video that encourages people to buy your product.
- Make sure to include a strong call to action so viewers know what they need to do next. Have you tried creating videos like this? What results did you see?
Also read:
- New Create a Brand Video to Make Your Business Shine
- New 2024 Approved Useful Guide to Speed Up/Down Videos in VLC
- Looking for Final Cut Pro Alternative App for Your Android Smartphone or iPhone? Here Is the List of the Best FCP Alternative Apps for Android and iOS Users
- In 2024, Before & After Editing Trick | Wondershare Filmora Tutorial
- Best Slow Motion Camera Apps for Best Content Creation for 2024
- 2024 Approved The Frames per Second Can Enhance or Hamper Your Ability to Enjoy Watching a Video on YouTube. This Article Will Define Frame Rates and Help You Choose the Best FPS
- Updated 2024 Approved Create Promotional Video
- New You Can Create a Photo Video Slideshow on YouTube. In Slideshow on YouTube You Can Add Photos and Videos, Effects and Transitions and Make a Quality Slideshow
- 2024 Approved Best 8 Animated Video Makers
- In 2024, Have the Desire to Create a Stylish Glitch Effect to a Text on Your Video? Use Filmora for the Editing, Following the Given Steps Explained in Detail
- 2024 Approved How to Make Vintage Film Effect 1980S
- This Article Is Regarding the Guideline for Splitting the Video Clips in Adobe After Effects. Here, You Will Also Know About the Most Appropriate Substitute, Wondershare Filmora. Being Economical, You Can Also Use It Practically for 2024
- Updated 2024 Approved Reviewing Efectum App and The Best Alternatives for Smartphone Users
- 2024 Approved Do You Know What Is Motion Blur in Fortnite? Read This Article to Find Out How to Apply Motion Blur in Fortnite Efficiently and with Ease
- New 2024 Approved Best Free Video Editing Software for Reddit
- Updated In 2024, Adobe Premiere Pro Download and Use Guide In Depth
- Powerpoint Supported Video Format and Advanced User Tips
- 6 Ways to Mimic Professional Filming Gears
- Updated In 2024, 8 Tips to Apply Cinematic Color Grading to Your Video
- New In 2024, Benefits of Live Streaming on YouTube
- New How To Change Text Color In Premiere Pro for 2024
- 2024 Approved Are You Finding It Challenging to Upload and Create a Link for Your Video? Well, This Detailed Upload Video to Link Guide Will Help You with This. Check It Out Now
- Updated In 2024, Camtasia Video Editor Review
- New How to Find Free Online Slideshow Maker with No Watermark for 2024
- New Want to Find a Good Camera for YouTube? This Article Brings You some of the Best Options of Different Varieties for Your Channel
- In 2024, Do You Want to Give Your Videos and Photos a Cinematic Look but Couldnt Find How? Here Are Different Cinematic LUTs Discussed that You Can Try and Use
- Everything That You Need to Know About Video Montages- Ideas, Techniques, and Software for 2024
- Updated 2024 Approved How to Cut Videos on Mac without Using FFmpeg?
- New Dollar-Store DIY Hacks to Use for Filmmaking
- New 15 Best Travel Vloggers That You Should Follow
- New Create a Stunning Light Sweep Effect in Filmora. Use Simple and Easy Steps to Export a High-Quality Video that Will Impress Even Pro Video Editors
- Do You Have an Idea on How to Zoom in on Snapchat? Using This Article, You Will Find the Easiest Way to Zoom in and Out on Snapchat Videos for Different Purposes
- Updated How to Create Your Own LUTs for Your Video with Filmora
- Updated 2024 Approved Top Fixes to Resolve Issues with Premiere Pro Slow Playback
- REVIEW Whats Top 10 Software to Make AI Upscaling Video for 2024
- This Blog Post Will Walk You Through How to Resize Videos Using VLC. Well Cover What the Default Settings Are for Video Resolutions, How to Change Them, and Why Its Important to Know What Size of Video Youre Uploading Before Uploading It
- How to Change Aspect Ratio of Video for 2024
- New In 2024, 7 Ways Add Subtitles to MKV Videos on All Platforms
- Updated 2024 Approved 4 Ways to Rotate Videos on Windows PC
- 2024 Approved 8 Apps to Custom Your GIF Stickers
- How to Delete White Background in Photoshop. How to Create a Transparent Background in Photoshop? Steps to Get Rid of White Background in Photoshop
- Updated In 2024, How to Add Custom Subtitles to Netflix
- How To Make A Do-It-Yourself Video
- How to Achieve GoPro Slow Motion With Quality for 2024
- New A Guide to Use Distortion Effect in Premeiere Pro
- Updated 18 Video Editors Weve Tested Heres What We Learned
- 2024 Approved Best 5 PDF to GIF Converters You Should Know
- Updated Guide Adding Audio in Wondershare Filmora
- Updated Quickly Turn Any Video Into a Paper Rip Effect for 2024
- Top Things People Know About Wedding Slideshow for 2024
- In 2024, Recommended Best Applications for Mirroring Your Motorola Edge 40 Pro Screen | Dr.fone
- Thinking About Changing Your Netflix Region Without a VPN On Lava Storm 5G? | Dr.fone
- How to Use Pokémon Emerald Master Ball Cheat On Vivo V27 | Dr.fone
- Your Selling Strategy With LazLive Live Selling for 2024
- Where Is the Best Place to Catch Dratini On Samsung Galaxy S23 Tactical Edition | Dr.fone
- How To Change Samsung Galaxy S23 FE Lock Screen Password?
- New Useful Tips for Canva Animated Elements
- How to Recover Apple iPhone 12 Pro Max Data From iOS iTunes? | Dr.fone
- In 2024, Does Samsung Galaxy A14 5G Have Find My Friends? | Dr.fone
- New How to Make a Funny Meme on MacBook for 2024
- 7 Solutions to Fix Error Code 963 on Google Play Of Samsung Galaxy Z Fold 5 | Dr.fone
- Full Tutorial to Bypass Your Vivo Y78 5G Face Lock?
- Proven Ways to Fix There Was A Problem Parsing the Package on Motorola Moto G73 5G | Dr.fone
- 4 Solutions to Fix Unfortunately Your App Has Stopped Error on Realme 12 5G | Dr.fone
- Guide How To Unbrick a Bricked Nubia Red Magic 8S Pro+ Phone | Dr.fone
- How To Teleport Your GPS Location On Honor Magic 6? | Dr.fone
- Strategies for Apps That Wont Download From Play Store On Samsung Galaxy S24 Ultra | Dr.fone
- In 2024, How to Watch Hulu Outside US On Apple iPhone SE (2020) | Dr.fone
- The Easiest Methods to Hard Reset Motorola Moto G34 5G | Dr.fone
- 3 Solutions to Find Your Realme 12 Pro+ 5G Current Location of a Mobile Number | Dr.fone
- In 2024, Your Account Has Been Disabled in the App Store and iTunes On iPhone 12 Pro Max?
- In 2024, iPhone XS Backup Password Never Set But Still Asking? Heres the Fix | Dr.fone
- How to use Snapchat Location Spoofer to Protect Your Privacy On Samsung Galaxy S23? | Dr.fone
- In 2024, How to Change Location On Facebook Dating for your Huawei Nova Y91 | Dr.fone
- Best Lava Blaze 2 5G Pattern Lock Removal Tools Remove Android Pattern Lock Without Losing Data
- In 2024, How to Track Huawei Nova Y71 Location without Installing Software? | Dr.fone
- Remove Samsung Lock Screen without Password(Samsung Galaxy A54 5G)
- Preparation to Beat Giovani in Pokemon Go For Vivo V27 Pro | Dr.fone
- Top 10 Best Spy Watches For your Xiaomi Redmi K70 | Dr.fone
- Top 4 Android System Repair Software for Honor Magic 6 Pro Bricked Devices | Dr.fone
- In 2024, Why is iPogo not working On Poco C51? Fixed | Dr.fone
- How to Repair corrupt MP4 and MOV files of Honor X50?
- Updated In 2024, How to Make an Animated Explainer Video
- In 2024, FRP Hijacker by Hagard Download and Bypass your Tecno Spark 20 FRP Locks
- Full Guide to Hard Reset Your Honor 100 Pro | Dr.fone
- How to Successfully Bypass iCloud Activation Lock on iPhone 7
- Android Call History Recovery - recover deleted call logs from Poco M6 5G
- Title: New How to Slow Down a Video on iPhone and Android The Easy Way
- Author: Chloe
- Created at : 2024-04-24 07:08:12
- Updated at : 2024-04-25 07:08:12
- Link: https://ai-editing-video.techidaily.com/new-how-to-slow-down-a-video-on-iphone-and-android-the-easy-way/
- License: This work is licensed under CC BY-NC-SA 4.0.


