
New How To Split Screen On Tiktok
How To Split Screen On Tiktok
TikTok is probably the most popular video-sharing app in the world right now. Many TikTokers have become famous for making videos that have a significant impact and encourage creativity and new ideas. One of the most popular TikTok trends is the split-screen effect. You’ve probably seen a lot of TikTok split-screen videos with cool effects that made you wonder how the user split their screen. Becoming skilled in using TikTok effects is not as difficult as it might look. It only requires a significant amount of practice. Read on as we show you how to make a TikTok split-screen video.
Using CapCut To Split Screen
CapCut is the official free TikTok Video Maker and Video Editor with Music for TikTok that is multifunctional. Its interface is quite similar and easy to use.
CapCut includes free advanced capabilities such as keyframe animation, stabilization, and Picture-in-Picture (PIP). These are in addition to its fundamental functions, such as video editing, adding stickers, text, and music.
Steps to Split Screen Video with CapCut On Android and IOS Devices
- To use the app, you need to install it first. iPhone and Android users can download CapCut. Navigate to the appropriate app store of your choice and download CapCut.
- After installation, launch the app.
- Then go ahead and grant CapCut permission to view your camera roll. Incorporating video clips into your project has never been easier. Go to the app’s main screen and select “New Project“ from the drop-down menu.
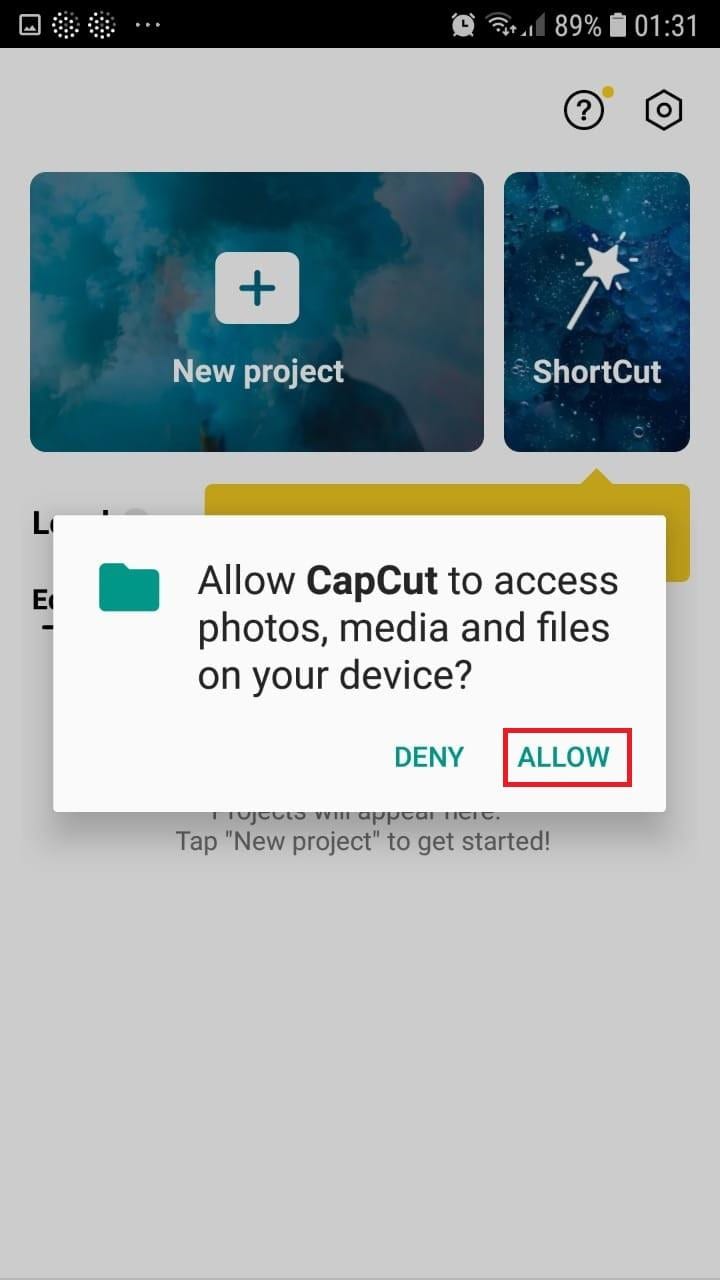
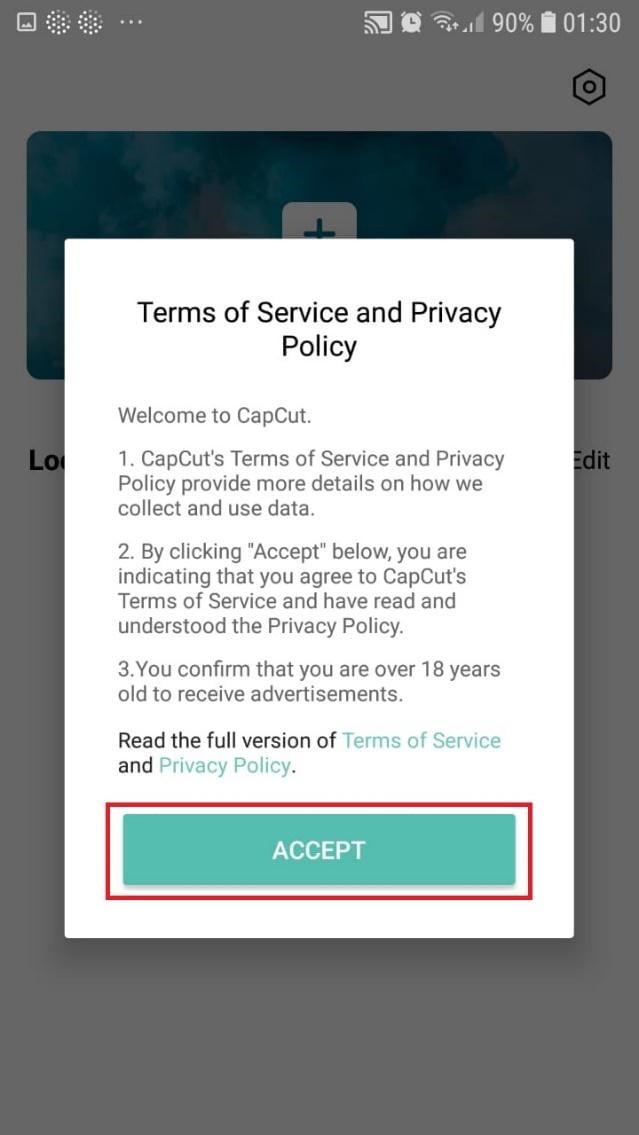
- To confirm your selection, click the green Accept This confirms that CapCut requires access to your photographs to function correctly. Tap on the button on the following pop-up window to gain access to all the photos. This is a one-time process that must be carried out the first time you launch the application.
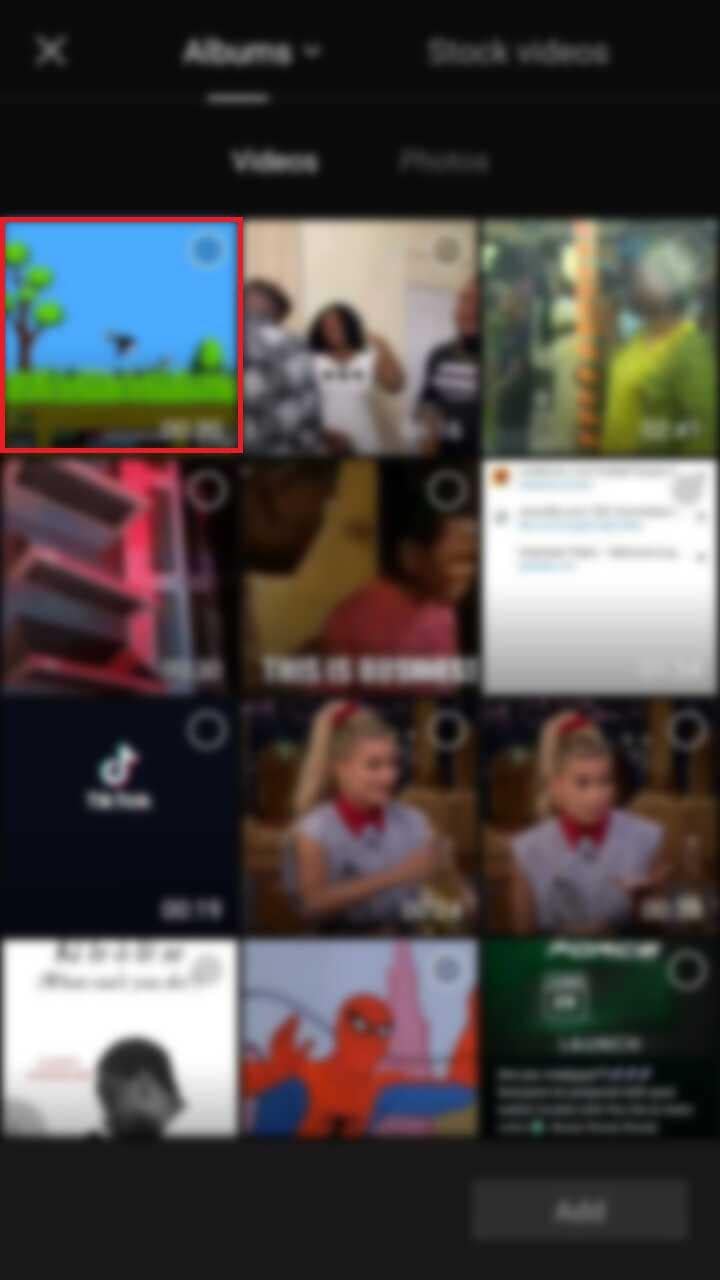
- Begin a New Project. After opening the app, press the “New Project“ icon to bring up a new screen showing your device’s videos.

- Choose a video clip. Locate the desired video clip for your project by scrolling through the pages displaying your camera roll. Tap the video’s thumbnail and then tap the “Add“ icon in the screen’s lower part.
- Get familiar with your workspace. Upon uploading your first clip, CapCut leads you to the primary workspace. This is where you will spend most of your time within the app. The preview panel, the timeline, and the toolbar are in order from top to bottom.
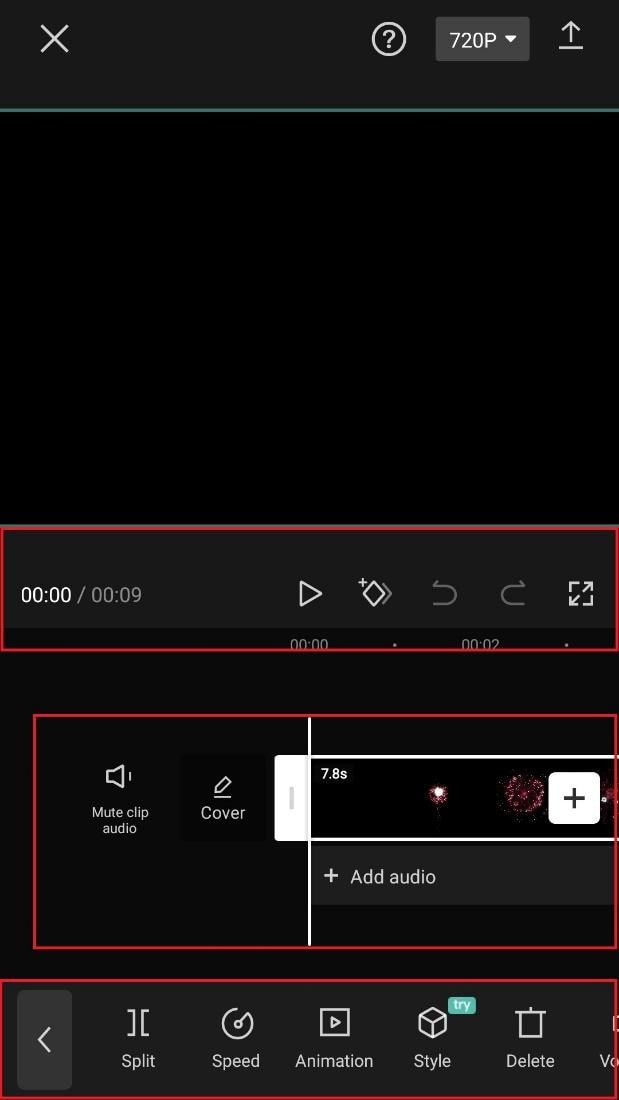
- View the toolbar and timeline. They represent your screen’s bottom half. The timeline, located below the preview panel, is where you’ll make all your adjustments. You can access all your video editing tools, including split, text, audio, effects, stickers, and more, on the toolbar at the bottom of your screen.
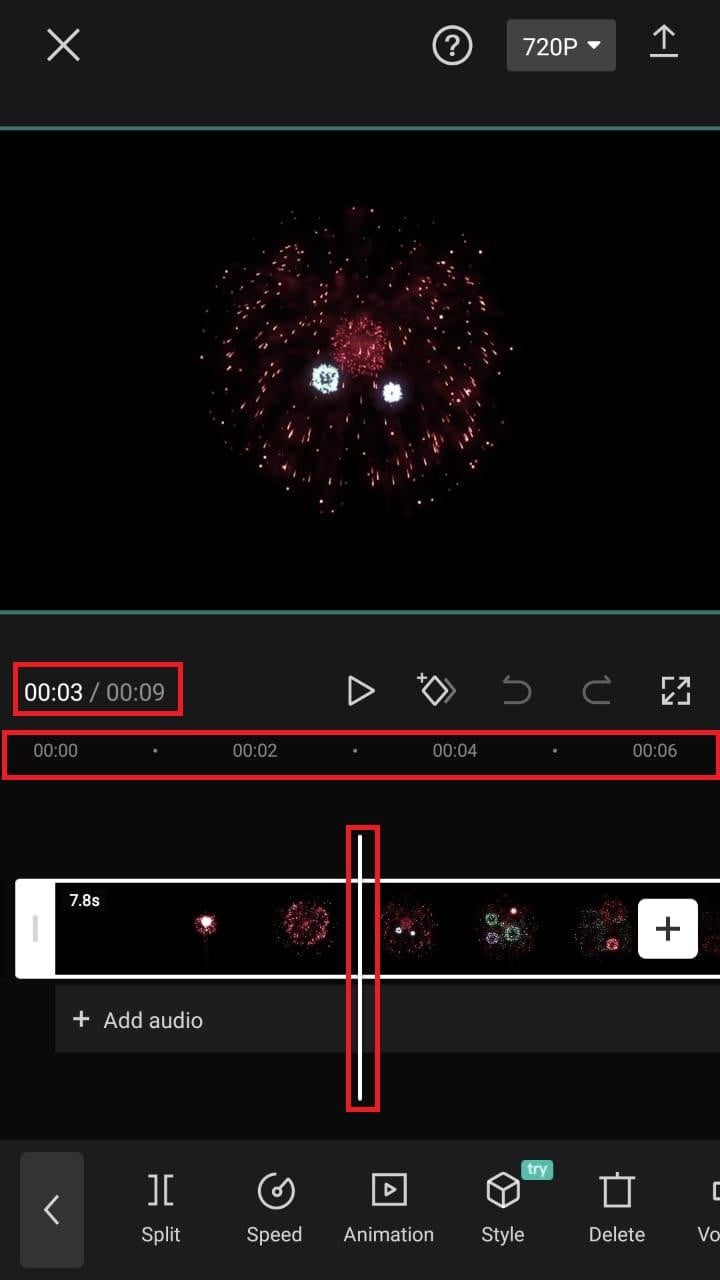
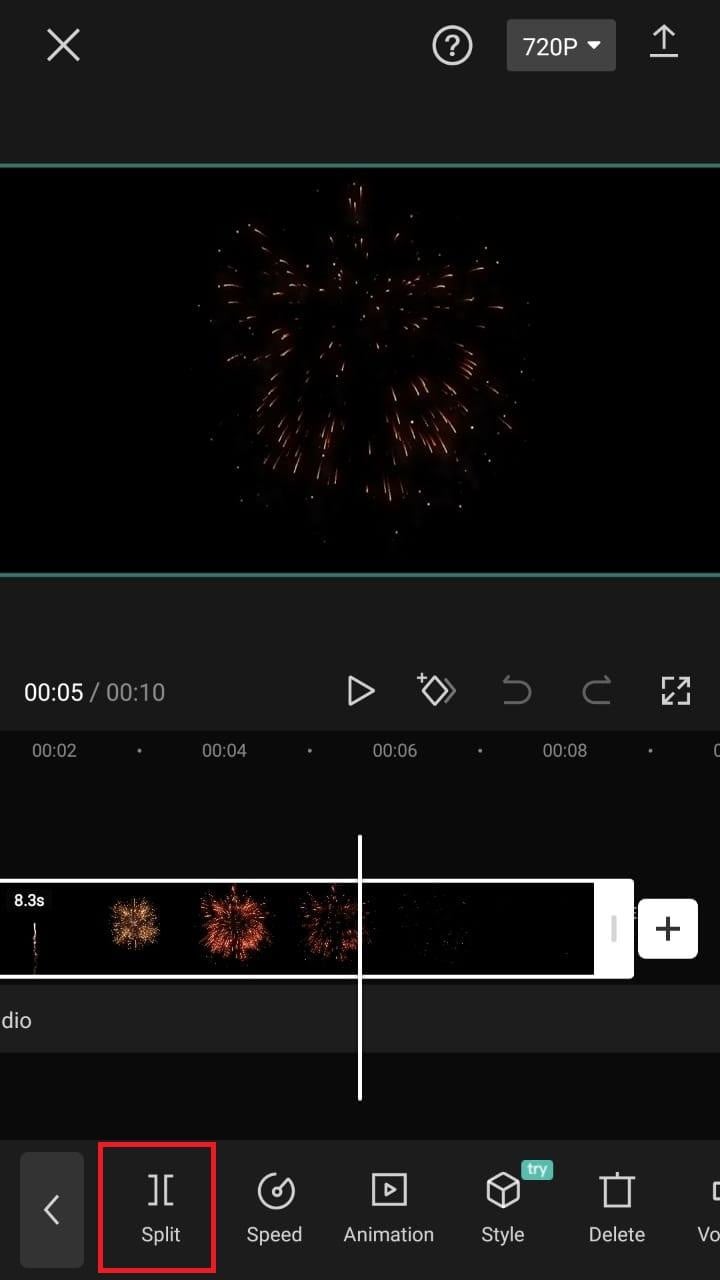
- Split video clips. To split a video clip in half, move the play head to the desired location on the timeline. Tap on your clip, then press the “Split“ toolbar icon. Your result now shows two different clips, not just one.
A Better Split-Screen Effect Video Editor
Filmora is one of the best free HD video makers and video editors with several functionalities, including text, backgrounds, filters, special effects, emoji, audio, and special effects.
Filmora is a feature-packed video editor which has a variety of tools to work with. With this video editor, producing memes, videos with images, pictures, music, stickers, and sound effects and editing videos for YouTube, Twitter, WhatsApp, Facebook, TikTok, and Instagram is simple and entertaining.
Free Download For Win 7 or later(64-bit)
Free Download For macOS 10.14 or later
Steps to Split Screen Video with Filmora
- Download Filmora from the App store
- After installation, launch it.
- Click on “Continue” to continue to use the app.

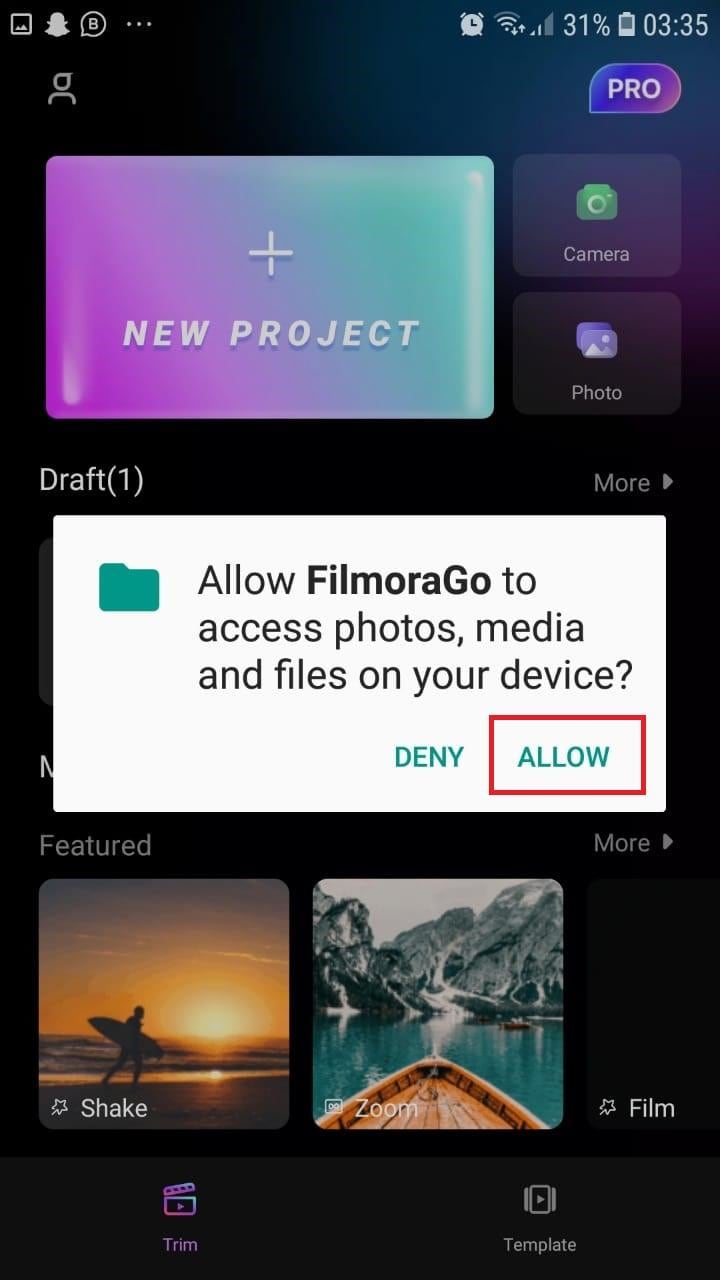
- Click on Allow to grant Filmora access to your photos and videos.
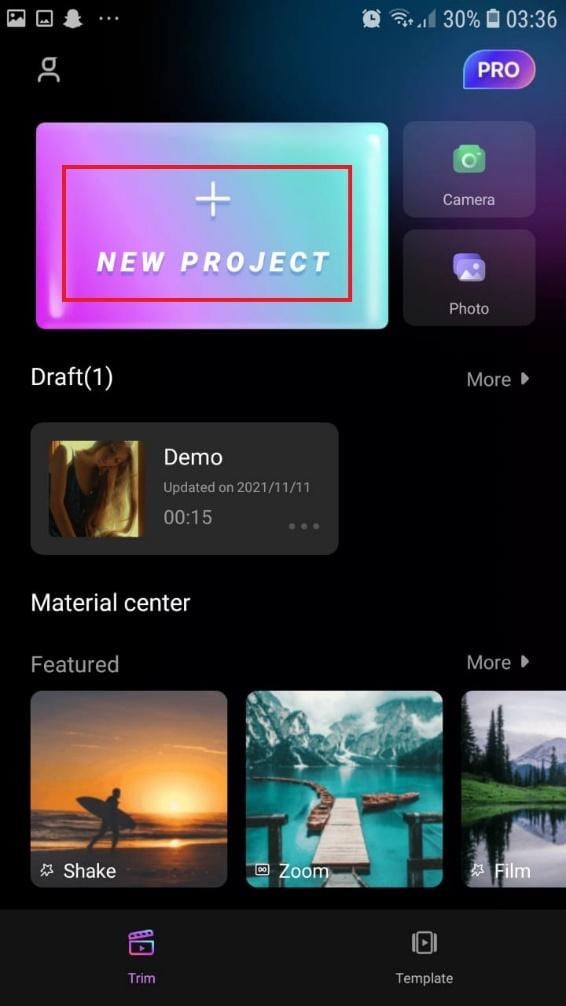
- You can now tap on “New Project” with the + Symbol.
- Select your desired video and tap on “Next” at the bottom right of your screen
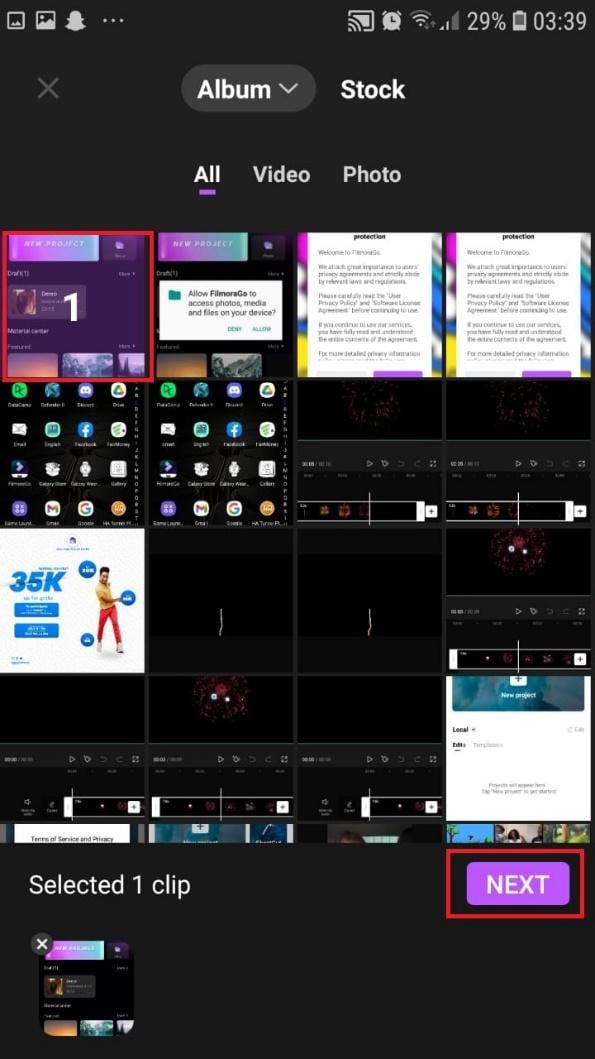
- You can select various options from the bottom of your screen to edit the selected video the way you like.

- Click on trim, and then you will see the different split-screen and collage feature options. Pick any that appeals to you.
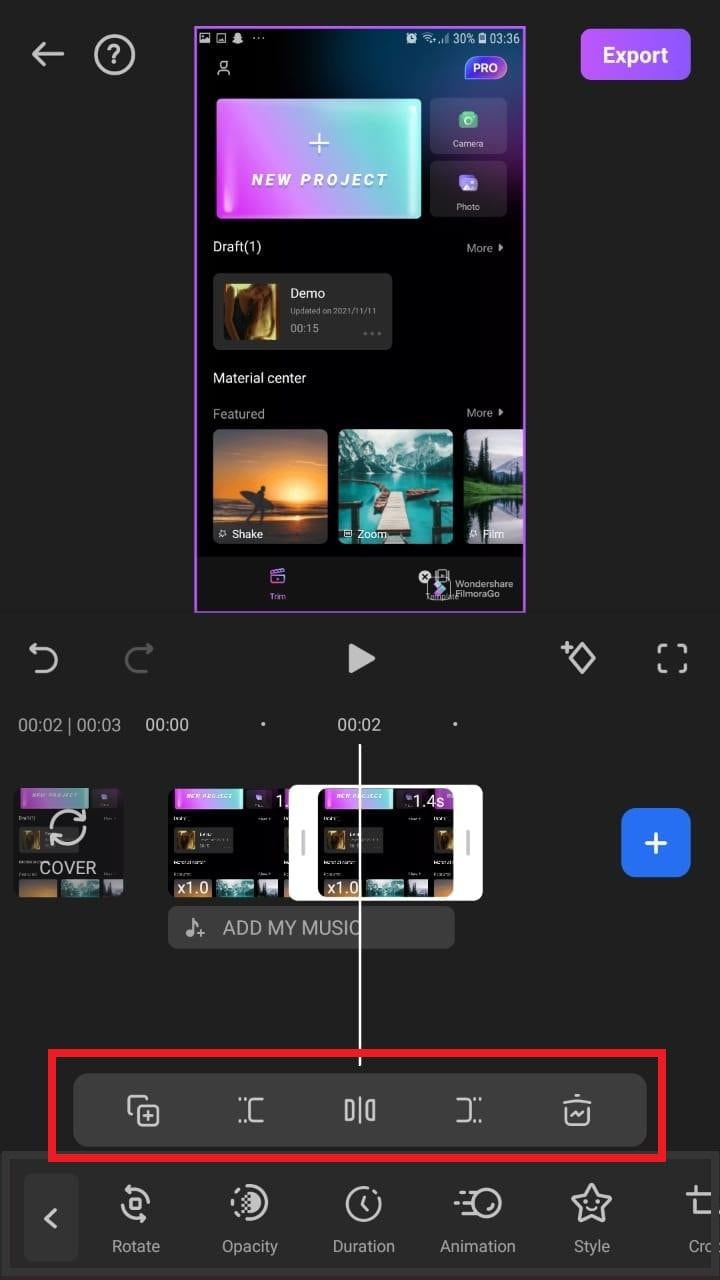
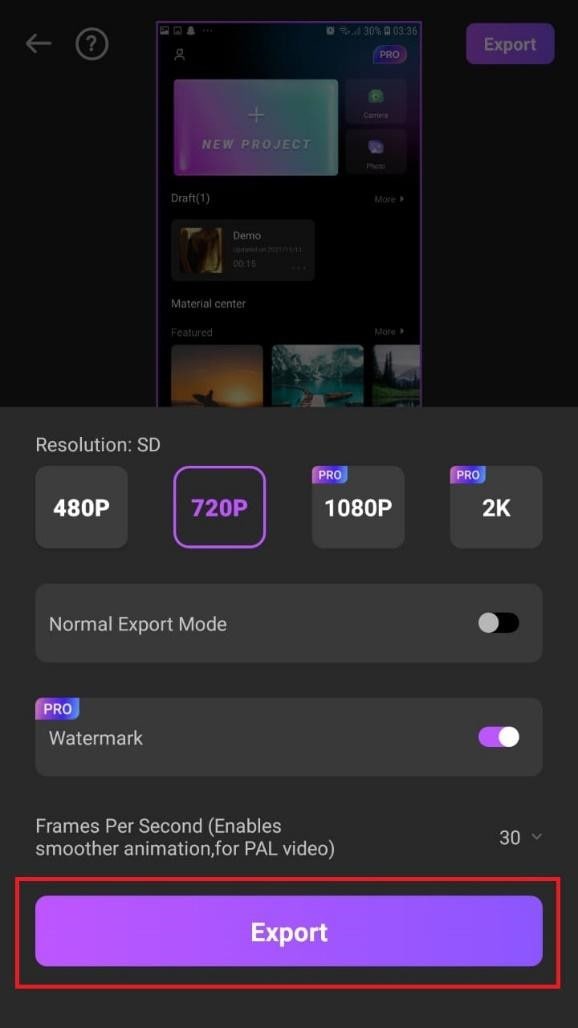
- When you are done with the editing, tap on “Export” at the top right of your screen.

- Go ahead and tap on “Export” on the next screen. Your video will be successfully exported and saved to your camera roll.
Using Filmora is very efficient in splitting your videos and making collage features for TikTok. It is a very simplified app available on both the Google Play Store and Apple Appstore.
Conclusion
TikTok is a platform that users use worldwide to create and share content. It could be pictures, videos, reels, or any other media type. Some people create videos for their audience on TikTok to educate them, while others do it to entertain them.
In any case, the goal is to build a more significant following on TikTok and garner greater attention from its users. You could even make money off the app.
One of the methods to impress your fans and explore multiple possibilities to build unique reels is to use the TikTok split-screen and collage feature effect available on TikTok. Although there are a few different ways to create a Split Screen on TikTok, the steps highlighted in this article are the most straightforward.
Free Download For macOS 10.14 or later
Steps to Split Screen Video with Filmora
- Download Filmora from the App store
- After installation, launch it.
- Click on “Continue” to continue to use the app.
- Click on Allow to grant Filmora access to your photos and videos.
- You can now tap on “New Project” with the + Symbol.
- Select your desired video and tap on “Next” at the bottom right of your screen
- You can select various options from the bottom of your screen to edit the selected video the way you like.
- Click on trim, and then you will see the different split-screen and collage feature options. Pick any that appeals to you.
- When you are done with the editing, tap on “Export” at the top right of your screen.
- Go ahead and tap on “Export” on the next screen. Your video will be successfully exported and saved to your camera roll.
Using Filmora is very efficient in splitting your videos and making collage features for TikTok. It is a very simplified app available on both the Google Play Store and Apple Appstore.
Conclusion
TikTok is a platform that users use worldwide to create and share content. It could be pictures, videos, reels, or any other media type. Some people create videos for their audience on TikTok to educate them, while others do it to entertain them.
In any case, the goal is to build a more significant following on TikTok and garner greater attention from its users. You could even make money off the app.
One of the methods to impress your fans and explore multiple possibilities to build unique reels is to use the TikTok split-screen and collage feature effect available on TikTok. Although there are a few different ways to create a Split Screen on TikTok, the steps highlighted in this article are the most straightforward.
Best Animated Text Generator
Text in a video has become an essential part to highlight important points so that the viewers get the message you want to convey through your video. Showing static text may not always get the attention of the viewers immediately. Subconsciously, they may ignore or forget the text you have displayed in your video very quickly. That is where animated text can be impactful.
When you show animated text in your video, it grabs the attention of the viewers instantly and they get intrigued to see the text displayed. Besides, if the animation is eye-catching, it is very likely that they will remember the text shown in the video. In order to create animated text, you will need an animated text generator. Here is the list of the top 10 best animated text makers.
1. Filmora
Wondershare Filmora is an extremely popular text animation software where there are literally unlimited animated text templates available. The templates are categorized so that you can get the appropriate text animated depending on your video category. Most importantly, you will get all the latest and trendy text animations.

The user interface is extremely intuitive and hence, it is equally suitable for amateurs and professionals. The software is available for both Mac and Windows users. You can simply drag and drop the text animations on your video and edit them instantly to get the perfect outcome. Here are some key features of Wondershare Filmora.
- Wide range of text animation templates
- Different categories transitions and effects
- Choose from variety of graphical elements
- Easy to operate with intuitive user interface
- Record your screen and webcam with greenscreen
- Keyframing, motion tracking, and auto reframe
- Extensive audio editing, color matching and correction
- Edit 4K videos, export in any desired file format
2. Adobe Express
Adobe has a wide range of video editors and it is the most reliable brand among professional video editors. Adobe Express is a premium text animation online tool where you can add animated text to your photos instantly and export them as MP4 file. Therefore, the online tool is extremely useful for social media enthusiasts. However, the platform does not support adding animated text to video.

Adobe Express is labelled as the branding tool where you can create trendy images with templates and choose from different animated text presets. You can access the online tool from all devices from your web browser. Most importantly, it is a completely free animated text generator from Adobe and you can add animated text to your images within a few minutes.
- Funky and trendy animated text templates
- Wide range of text styles and effects
- Different color presets for colourful video
- Several text animation styles to choose from.
- Different aspect ratios for different videos
3. Animaker
Animaker is one of the leading animated text makers online. You can make short videos with animated text just by drag and drop technique. The user interface is super easy to operate and it is the reason behind its popularity. There are unlimited templates to choose from and get started with your animated text video. In fact, the platform has the best photo and video asset library that you can use in your video to make it more attractive.

You can publish your video in 4K resolution and resize them for different platforms where you are going to publish them. Unlike Adobe Express, you can add music to your animated text videos. There are also characters that you can use in your text animation for eye-catching video making. Here are the key features of Animaker.
- Drag and drop user interface
- Tons of ready-made templates
- Millions of stock photos and videos
- Access to stock music library
- Simple but powerful character builder
- Edit 4K videos and adjust aspect ratio
4. Textanim
Textanim is a true animated text generator GIF online. All you need to do is type your text and select a text style from the templates available. Thereafter, you can adjust certain text style and format such as background color, animation motion direction, animation duration and likewise. After setting all the parameters, click on Generate button and you will see the animated text generated on your screen. You can simply download the animated text in GIF format or you can get embed code to integrate anywhere including social media platforms. Here are the key features of Textanim.
- Create limited but beautiful text animations
- Tons of fonts and text styles to choose from
- Customize animation and background
- Supports different native language for text
- Export in GIF as well as get embed code

5. MakerMoon
MakerMoon comes with a dedicated animated text generator even though there is a full-featured video editor available online. The platform is suitable for creating animated text for websites that you can use for headers and titles. Choose from the available animated text templates and customize them as per your requirements. You can animate words as well as individual letters. You can save animated text video in GIF as well as get embed code. Here are the key features of MakerMoon.
- Different animation effects to select from
- Customize certain parameters of animation
- Different text shadow styles and formats
- Several fonts, animate letters and words
- Get multiple slides and shuffle animation

6. Loading.io
Loading.io is a dedicated animated text generator GIF online platform. There are demo effects available that you can choose and customize as per your preference. The user interface is as easy as it can get and hence, it is suitable for amateurs as well. Starting from color palette and background color to font style and speed of animation, you can edit everything so that you can personalize the animated text. You can save your animated text in different file formats including GIF. There are several advanced options available to customize the animation on the text. Here are the key features of Loading.io.
- Choose from different templates to get started
- Different types of text animations to pick from
- Customize almost every aspect of the templates
- Advanced options to edit animation and change parameters
- Different output file formats to save your animated text video
- Super intuitive user interface and embed animated text in websites

7. FlexClip Animated Text Generator
FlexClip is a renowned online video editor and it features a free animated text generator. You can create engaging and attractive animated text video conveniently. There are different categories of customizable text animation templates available to get started. In fact, there are different text styles available with animations that you can apply to your video and customize them instantly.
There is a wide array of stock photos and videos along with music that you can use on your video for better content and traction. There are also hundreds of fonts to choose from and you can create promo and storyboard videos instantly. Here are the key features of FlexClip Animated Text Generator.
- Wide array of animation text templates
- Different text styles in different categories
- Dynamic graphical elements to enhance text
- Free stock assets to enhance video content
- You can upload your customized fonts and styles

8. RenderForest Animated Text Generator
RenderForest is a stylish animated text generator that is highly useful for creating brand videos. There are different templates and packs available to pick from to get started. The templates are extremely trendy and eye-catching and there is a high chance that your video will get extremely high traction. You can create engaging promo for social media platforms. You can customize the templates and change font styles as well as add music to enhance the video content. Here are the key features of RenderForest Animated Text Generator.
- Several stunning animated text templates
- Stylish typography which you can personalize
- Add stock music to your video
- Add different scenes to the templates
- Change color presets and palettes
- Download HD videos in different file format

9. TextStudio
TextStudio is a popular 3D text animation generator platform. There are hundreds of text templates and fonts to pick from to get started with your animated text creation. There are not many dedicated and legitimate 3D text animation generators available online. In fact, you can also create 3D logos with the text generator for social media platforms.
There are literally unlimited 3D text animation templates. The user interface is easy to operate and you can customize the texts and animations quickly. The only issue is that the platform has annoying ads across the website. The platform supports many native languages in which you can create text animations. Here are the key features that stand out for TextStudio.
- Unlimited stunning 3D text templates
- Different text styles available to apply
- Choose from different animations
- Supports HD video creation with customized background
- Supports multiple native languages
- Save animated text video in different file formats

10. Kapwing
You can create stunning animated text videos with Kapwing animated text video editor. Kapwing is a full-featured online video editor and you can choose from various templates available. Thereafter, you can customize them as per your requirements. Alternatively, you can upload your video and add different animated text effects to enhance your video content. In fact, you can create animated text videos from scratch for different devices and platforms. Here are the key features of Kapwing animated text video editor.
- Choose from a wide range of animated text templates.
- Select from different text styles and add them to your video.
- Different categories of video elements and animations.
- Add audio effects to animated text for better impact.
- Wide range of graphical elements to enhance text content.

Editor’s Pick: Wondershare Filmora
If you are serious about adding animated text to your video so that your video gets attention and engagement, you have to opt for Filmora. No other animated text generator in the above list has as many animated text templates as Filmora. Most importantly, the templates are trendy and modern to get immediate attention from the viewers. You can customize them to fit seamlessly in your video.
You can create customized animated text with keyframing and motion tracking. Besides, you can add audio effects while showing animated text to make it more impactful. Moreover, there are unlimited effects and elements that will enhance your animated text. You can save you video in any resolution, aspect ratio, and file format. We highly recommend Wondershare Filmora as the text animation software for designing stunning animated text for your video.
The Verdict
Getting animated text for your video is no more a job of experts. You can generate animated texts and create short videos that you can upload on social media platforms. Besides, you can choose from ready-made templates and create professional videos instantly. If you want to add animated text to your video, we recommend Wondershare Filmora for its wide range of animated text effects and super intuitive user interface.
Free Download For Win 7 or later(64-bit)
Free Download For macOS 10.14 or later
Add Flesh to Your Video Content Before Posting Them for Your Audience to See Using Meme Texts. Use the Tutorial Guide Shared in This Post
Need to add meme text to a video clip but don’t know how to?
As we all know, visuals are the best way to engage, entertain, and pass knowledge across. But do you know you can make it better, as in more understandable, by including meme texts? Adding meme text to your video clips makes the storyline easy and quick to comprehend. Also, it makes your content appealing to your audience.
Performing this operation is easy, however, many people find it challenging because they do not have the idea. Is this the same for you? There is a simple guide you could follow to accomplish that here in this post. Here, we will introduce you to the top 2 ways to add meme text to videos.
Part 1. What Is the Most Used Fonts for Memes?
The font type and style you use in designing memes are crucial. With the right font, you can easily express yourself to your audience or viewers via memes. Find below the popular fonts often used for memes:
- Impact
The Impact is a famous font widely used in memes. This font stands out in meme pictures because of the boldness, and thickness. Viewers are able to read and understand the message you are passing across.

- Arial
Here is another font type that makes your meme appealing to the receiver. The round edge coupled with the smooth shape makes your meme photos easy to comprehend.

- Montserrat
If you are looking for a font with a modern look, Montserrat should be your choice. The Montserrat font is thin and squaric giving your meme that modern vibes.

Part 2. How to Add Meme Feel Text to Videos?
Here are the best two ways to add meme text to your video clips with complete ease:
Method 1: With Filmora Meme Maker
Wondershare Filmora is a wonderful video editor famous for its impressive editing features. This simple yet effective software lets you add text to videos easily and quickly. With the interactive user interface, you can easily add meme text to videos within the snap of a finger. It’s a powerful video editing tool compatible with Windows and Mac computers.
Beginners and professionals find it simple to operate. The software provides you with several meme editing features. From countless font types & styles to freedom to customize texts and lots more. Wondershare Filmora makes your meme appear stunning. Unlike its competitors in the same industry, this software is lightweight, fast, and secure. It exports edited files directly to your local storage.
Besides creating meme texts, this software permits you to edit your audio file. It supports audio editing tools like the silence detector, audio sync, audio ducking, and more. This software allows you to add/delete backgrounds from videos, create slideshows, record your display screen, etc. Wondershare Filmora holds everything you need in a video editor.
How to Add Meme Text to Videos with Filmora
Download, and install Filmora from the official website. Upon the successful installation, launch the software and follow the detailed stepwise guide below to add meme text to videos with Filmora Video Editor:
Step1 When Filmora opens, you will get an interface as below on your display screen:

Click on the New Project icon to enter the software main screen. Locate the Files icon at the top left corner of your screen, click on it and a couple of options will pop up underneath:

Scroll to the Import Media drop-down menu, click on it and select Import Media Files.
Wondershare Filmora will direct you to your local storage, and the window below will come up:

Alternatively, you can use the hotkeys: Ctrl + I to upload a new file.
Step2 Next, you have to move the video to the timeline panel so you can edit it. To do that, drag-and-drop the video to the section labeled Drag and drop media and effects here to create your video.
On adding the clip to timeline panel, you will get an interface as below:

Step3 Now click on the Titles button at the top menu bar. Immediately, the Text & Title preset will pop up on the left sidebar. There are over 200 text effects available on Filmora, select your preferred choice from the list. You can preview the text effect before applying it. To do that, double-click on one of them and check the result in the right hand panel.

Should the title suit your desire, drag and drop it in the timeline above the video timeline panel. To understand the step better, here is an image to help you out:

Step4 Once the step above is complete, double click on the Title frame in the timeline, and the window below will appear on your display screen:

To change font style, click on the Font type drop-down menu just as in the image below:

Scroll down and choose a font. Adjust font color clicking on the corresponding key to proceed. For advanced settings, click on ADVANCED to make necessary adjustments.

Step5 After completing the aforementioned step, click on the File, and select Save Project from the options that pops up. Choose your preferred destination path to save the file to your local drive.

Method 2: Use Clipchamp Meme Maker To Add the Text You Need
Although Wondershare Filmora is the ultimate video editing solution to add text to videos, Climchamp is another good tool to use. Climchamp is web-based video editor with no operating system limitations. The program allows you to upload video content of any format, add meme text to it and share with friends like Facebook.
This program is well-customized with a straightforward interface that allows amateurs and professionals to navigate easily. Climchamp comes with a library of video templates that you can choose from to customize your videos. It allows you to trim, cut, spli, crop, rotate, add audio & images, and flip videos conveniently.
Climchamp offers free and premium subscription video editing services. Mind you, the free version gives you access to limited features. If you wish to enjoy all of the amazing features the program holds, try subscribing to a premium package. Climchamp is internet depend. Thus, if you need a stable data connection for it to work effectively.
How to Add Meme Text to Videos with Climchamp
Step1 Ensure you are connected to a stable internet connection, open a web browser on your PC, and navigate your way to the official website for Climchamp video meme generator. The page below should pop up:

Click on the Create a video meme icon to proceed.

Climchamp video editing program will direct you to a new page where you have to create a profile. Fill out the form, and click on the appropriate button to proceed. Verify your profile, and login.

Step2 Locate the Templates icon on the left hand panel. Select a template, and Climchamp will request whether you want to go on with the chosen template.

Tap Add template to import it to the video editing program timeline. The interface below will come up:

Step3 Next, proceed to add a video content.
Click the + Create a Video tab at the top right corner of your screen. A new screen will come up just as below:

Tap on the + icon on the left sidebar.

Click on the appropriate key to import your desired video file.
Step4 Now drag-and-drop the content you just uploaded to the timeline panel, and click on the Play icon to view it.

Locate Export at the top right panel on your computer display screen, click it, and choose your preferred destination path.
Part 3. FAQs
Q1. What’s the best app to add texts to videos?
Adding texts to videos shouldn’t be a big deal when you have a professional video editing software. Many apps/software claims to provide quality video editing services, however, Filmora Video Editor is the best option. The software allows you to edit videos without distorting the quality. Additionally, it lets you export your edited files in several formats.
Q2. How do I add text to videos?
With Filmora, you can add text to videos. The detailed stepwise guide you need to follow is shared in the article above. Read through it to add text to your clips now.
Conclusion
With the detailed tutorial guide shared above, adding meme text to your videos shouldn’t be a difficult task to engage in anymore. There are two powerful tools introduced in the guide, Filmora is the best. It’s an offline video editing software that lets you manipulate your videos easily. The software comes with rich editing tools that you need to create stunning clips with professional results.
Free Download For Win 7 or later(64-bit)
Free Download For macOS 10.14 or later
Free Download For macOS 10.14 or later
Free LUTs for OBS: How to Use Them?
LUTs are powerful tools that can significantly enhance the visual appeal of your content. You can use this tool to change the look and feel of your images and videos. Moreover, you can use LUTs to bring out the desired mood, style, and tone to your media content. Additionally, LUTs provide endless possibilities for creativity with different color adjustments and grading.
There are many software and tools available on the market to apply LUTs. These tools let you import and apply LUTs to your images and videos. Furthermore, you can apply LUTs even using streaming software like OBS. Moreover, you can improve live streams, videos, and recordings by applying LUTs using OBS. However, many paid and free LUTs for OBS are available for usage.
Part 1: Why Do We Need to Use LUTs for Editing in OBS?
There are many free OBS LUTs available that you can download and use for your content. The real question is the utility of LUTs in OBS. Here are some of the reasons to use LUTs in this tool.
Efficiency and Consistency
LUTs provide a quick and consistent way to apply color transformations. Instead of manually adjusting individual color settings, you can use LUTs. Similarly, it allows you to instantly and precisely grade and correct colors.
Time-Saving
Using LUTs saves time because they offer pre-defined color transformations. Instead of adjusting colors for each project or image, you can use LUTs. Additionally, they allow you to match your desired look or style easily.
Artistic Control and Creative Freedom
Furthermore, it gives artists, filmmakers, and photographers more control over their work. They allow for experimentation and exploration of different looks and styles. You can be more creative by experimenting with varying tones of color to the same content.
Consistent Color Reproduction
LUTs are essential for maintaining consistent color tones. The good part is it maintains consistency across different devices, software, and platforms. They ensure that colors look the same, no matter what the viewing medium, like monitors, projectors, or mobile screens.
Film Emulation and Replication
Moreover, it can replicate classic film stocks’ characteristics and aesthetics. They allow filmmakers and photographers to recreate iconic films’ color response and tonal range. In this way, everyone can experiment with color tones inspired by famous movies.
Workflow Flexibility and Collaboration
Lookup tables offer flexibility and facilitate collaboration in post-production workflows. They can be easily shared and applied to different projects or sequences. Similarly, it ensures consistent color grading across multiple editors or teams.
Calibration and Color Management
Additionally, LUTs play an important role in color calibration and management processes. It allows you to align color spaces, correct color variations, and maintain color accuracy. Furthermore, it will maintain consistent color grading throughout the project.
Real-time Color Processing
Lastly, LUTs are valuable in applications that require real-time color processing. It can be used in live broadcasts, video streaming, or video games. You can make instant adjustments and enhancements in real time.
Empower your videos with a new mood using different LUTs. Filmora now offers 100+ top-quality 3D LUTs cover a broad range of scenarios. Transform your videos with Filmora’s powerful 3D LUTs.
Apply LUT on Videos Apply LUT on Videos Learn More


Part 2: Discussing Some Top-Notch Best LUTs for OBS?
If you are searching for the best LUTs for OBS, you’re at the right place. Here is a list of some of the best LUTs you can apply using OBS. You can choose from different styles and tones according to your preference:
1. Vintage LUTs
Take a step back in time with this pack of Vintage LUTs. This pack gives your videos and images a nostalgic, retro feel. Moreover, this pack has different classic film presets, including monochrome and b&w. It enhances warm tones, adds a vignette, and introduces a gentle fade effect. Furthermore, this pack gives your media content the perfect retro feel.

2. 13 FREE Custom LUTs for Log Footage
Using these 13 cinematic LUTs, you can unleash the power of the silver screen. With these LUTs, you can bring Hollywood magic to your videos. Additionally, this pack enhances contrast and saturation to create a dramatic and cinematic look. Moreover, it enhances your media with rich colors, deep shadows, and vibrant highlights giving them a movie-like feel.

3. Vibrant Nature LUTs for Photo & Video
Vibrant Nature LUTs is an excellent pack that enhances the beauty of nature and the outdoors. It is a pack of five different LUTs specifically used to enhance natural landscapes and environmental shots. Furthermore, this pack highlights the earthy tones, adds depth to greens, and brings out the details of nature. Additionally, you can use this pack to improve the scenery in your pictures and videos.

4. Coastal Haze
Coastal Haze is a fantastic LUT to celebrate love and romance with its color grading. It is an excellent free LUT that enhances the colors and emotions of wedding videos and romantic moments. Moreover, it adds a soft and dreamy touch by improving skin tones. Furthermore, it creates a warm and intimate atmosphere allowing you to beautify your special moments.

5. 20 Dark Moody LUTs Pack
Dive into the world of moody dark colors with this 20 Dark Moody LUTs Pack. Each LUT has a different tone and feel to it. These LUTs add darkness to create a mysterious and serious ambiance. It enhances shadows, deepens blacks, and adds a subtle color grading to create an intense look. With this Moody LUT pack, you can make more professional-looking dark videos.

Part 3: How to Use LUTs in OBS Studio Properly?
If you’ve found the best free LUTs for OBS, you can apply them directly to your video feed. Here are simple steps to apply LUTs using OBS Studio. Following these steps, you can easily apply a LUT effect to your video feed or live stream in OBS.
Step 1: Open OBS and start your video feed or live stream using a webcam or capture card. Once your video stream is running, right-click the “Video Capture Device” option. After that, select “Filters” from the options that appear. In the Filters menu, locate the “Effect Filters” section and click the “+” button. Choose the “Apply LUT” option from the options that appear to add the LUT effect to your video stream.

Step 2: A new window will pop up where you can specify the name of your LUT. To select your desired LUT, click the “Browse” button and navigate to its location on your device. Once you’ve found your LUT, click the “Open” button to apply it directly to your video stream. If needed, you can adjust the intensity of the LUT by making changes in the “Preview” screen.

Part 4: Wondershare Filmora: Another Efficient Platform for Adding LUTs on Videos
Wondershare Filmora is an exceptional video editing tool with the additional ability of color grading. With this powerful tool, you can color grade your videos by manually adjusting settings or applying LUTs. The latest update of Wondershare Filmora includes a library of over 200+ LUTs that you can apply to your media files. Furthermore, you can also customize the intensity of the applied LUTs.
Add LUTs on Video For Win 7 or later(64-bit)
Add LUTs on Video For macOS 10.14 or later
Besides color grading, Filmora also provides a variety of effects, filters, and overlays for your videos. These tools allow you to add artistic touches and improve the overall feel of your content. Additionally, it offers professional-grade features such as AI Cutout. This feature enables you to effortlessly select your subject in a video and change their background.

Conclusion
In conclusion, LUTs are useful tools for color-correcting live streams and video editing projects. You can apply LUTs directly to your live streams, and video feeds with OBS. Many free LUTs for OBS are available, each with a different tone and feel. Furthermore, LUTs can also be used in popular video editing tools like Wondershare Filmora. Lastly, LUTs are essential tools to make your content stand out.
Add LUTs on Video For Win 7 or later(64-bit)
Add LUTs on Video For macOS 10.14 or later
Apply LUT on Videos Apply LUT on Videos Learn More
Part 2: Discussing Some Top-Notch Best LUTs for OBS?
If you are searching for the best LUTs for OBS, you’re at the right place. Here is a list of some of the best LUTs you can apply using OBS. You can choose from different styles and tones according to your preference:
1. Vintage LUTs
Take a step back in time with this pack of Vintage LUTs. This pack gives your videos and images a nostalgic, retro feel. Moreover, this pack has different classic film presets, including monochrome and b&w. It enhances warm tones, adds a vignette, and introduces a gentle fade effect. Furthermore, this pack gives your media content the perfect retro feel.
2. 13 FREE Custom LUTs for Log Footage
Using these 13 cinematic LUTs, you can unleash the power of the silver screen. With these LUTs, you can bring Hollywood magic to your videos. Additionally, this pack enhances contrast and saturation to create a dramatic and cinematic look. Moreover, it enhances your media with rich colors, deep shadows, and vibrant highlights giving them a movie-like feel.
3. Vibrant Nature LUTs for Photo & Video
Vibrant Nature LUTs is an excellent pack that enhances the beauty of nature and the outdoors. It is a pack of five different LUTs specifically used to enhance natural landscapes and environmental shots. Furthermore, this pack highlights the earthy tones, adds depth to greens, and brings out the details of nature. Additionally, you can use this pack to improve the scenery in your pictures and videos.
4. Coastal Haze
Coastal Haze is a fantastic LUT to celebrate love and romance with its color grading. It is an excellent free LUT that enhances the colors and emotions of wedding videos and romantic moments. Moreover, it adds a soft and dreamy touch by improving skin tones. Furthermore, it creates a warm and intimate atmosphere allowing you to beautify your special moments.
5. 20 Dark Moody LUTs Pack
Dive into the world of moody dark colors with this 20 Dark Moody LUTs Pack. Each LUT has a different tone and feel to it. These LUTs add darkness to create a mysterious and serious ambiance. It enhances shadows, deepens blacks, and adds a subtle color grading to create an intense look. With this Moody LUT pack, you can make more professional-looking dark videos.
Part 3: How to Use LUTs in OBS Studio Properly?
If you’ve found the best free LUTs for OBS, you can apply them directly to your video feed. Here are simple steps to apply LUTs using OBS Studio. Following these steps, you can easily apply a LUT effect to your video feed or live stream in OBS.
Step 1: Open OBS and start your video feed or live stream using a webcam or capture card. Once your video stream is running, right-click the “Video Capture Device” option. After that, select “Filters” from the options that appear. In the Filters menu, locate the “Effect Filters” section and click the “+” button. Choose the “Apply LUT” option from the options that appear to add the LUT effect to your video stream.
Step 2: A new window will pop up where you can specify the name of your LUT. To select your desired LUT, click the “Browse” button and navigate to its location on your device. Once you’ve found your LUT, click the “Open” button to apply it directly to your video stream. If needed, you can adjust the intensity of the LUT by making changes in the “Preview” screen.
Part 4: Wondershare Filmora: Another Efficient Platform for Adding LUTs on Videos
Wondershare Filmora is an exceptional video editing tool with the additional ability of color grading. With this powerful tool, you can color grade your videos by manually adjusting settings or applying LUTs. The latest update of Wondershare Filmora includes a library of over 200+ LUTs that you can apply to your media files. Furthermore, you can also customize the intensity of the applied LUTs.
Add LUTs on Video For Win 7 or later(64-bit)
Add LUTs on Video For macOS 10.14 or later
Besides color grading, Filmora also provides a variety of effects, filters, and overlays for your videos. These tools allow you to add artistic touches and improve the overall feel of your content. Additionally, it offers professional-grade features such as AI Cutout. This feature enables you to effortlessly select your subject in a video and change their background.
Conclusion
In conclusion, LUTs are useful tools for color-correcting live streams and video editing projects. You can apply LUTs directly to your live streams, and video feeds with OBS. Many free LUTs for OBS are available, each with a different tone and feel. Furthermore, LUTs can also be used in popular video editing tools like Wondershare Filmora. Lastly, LUTs are essential tools to make your content stand out.
Add LUTs on Video For Win 7 or later(64-bit)
Add LUTs on Video For macOS 10.14 or later
Also read:
- [New] Top 10 Instagram Insights Tools Detailed Data Analysis Made Simple for 2024
- [Updated] 2024 Approved Navigating iPhone Album Organizing Techniques and iCloud Uploads
- [Updated] In 2024, Mastering Wide Angle Postings Integrating 360 Photos on Mobile Apps
- 2024 Approved Event Videography Is Popular in Weddings, Graduation, Family Reunion and Other Great Moments. Here Im Going to Share some of the Tips to Make a Better Event Videography
- Die Ursache Und Behebung Eines Defekten Lautsprechers Bei Der Start-Up Von Festplatten
- Discovering 10 Ultimate Pic Finder Portals
- Easy Downloading Process for SanDisk SSD Drives - Driver Setup Made Simple
- Guide to Add Transition Effects in Premiere Pro
- How to Migrate Android Data From Nokia C32 to New Android Phone? | Dr.fone
- In 2024, How to Control the Speed of Video
- In 2024, How to Mirror PC Screen to Infinix Note 30 VIP Racing Edition Phones? | Dr.fone
- New Steps to Rotate Videos in Lightworks for 2024
- New This Article Aim to Teach You How to Make a Night to Day Effect Video with Filmora. Follow the Steps to Figure It Out
- Step-by-Step Solution: Resolving GTFO Software Failures
- Top-Rated UPS Battery Systems : Your Essential Guide
- Updated 2024 Approved Step by Step to Crop Videos Using Lightworks
- Updated How To Add Fade In Windows Video Editor for 2024
- Updated How to Make Random Letter Reveal Intro?
- Updated In 2024, How to Correct Lens Distortion With Filmora
- Title: New How To Split Screen On Tiktok
- Author: Chloe
- Created at : 2025-01-18 19:46:17
- Updated at : 2025-01-24 12:08:28
- Link: https://ai-editing-video.techidaily.com/new-how-to-split-screen-on-tiktok/
- License: This work is licensed under CC BY-NC-SA 4.0.