
:max_bytes(150000):strip_icc():format(webp)/kids-ipad-580f65635f9b58564cc0fc91-5c5cbb6ac9e77c0001d92aa4.jpg)
New How to Zoom In and Out on Mac
How to Zoom In and Out on Mac
Having difficulties seeing the small print on your Mac’s screen? You can easily enlarge the whole screen with just a few clicks with this guide of how-to un-zoom on mac; which is useful for anybody with poor vision in particular. Users of the macOS operating system may zoom in and out on tiny, difficult-to-read text and pictures in a variety of ways. Would you want to interact closely with anything on your Mac? Maybe you’d like to see things from a broader angle so you would require a how to zoom out on Mac tutorial.
In any case, you have our support. There are various ways to zoom in and out on a Mac, whether you want to do it for the whole screen or just a specific window. For your benefit, we went through many different methods to zoom out on a Mac today. Apple provides a wide range of customizing possibilities. We’ll provide you practical advice on how to utilize your keyboard, mouse, trackpad, or browser to zoom in MacBook. Let’s get started straight now without further ado.
Way 1: Use Keyboard Shortcuts
When using an app, holding down Command key while using the plus (+) or minus (-) keys will allow you to zoom in or out as needed. Using the keyboard on your Mac, you may zoom in and out at intervals of 10%; when you do, a pop-up menu with the option to reset (i.e., return to the default, or 100%, zoom level) will display at the top of the screen. Instead of touching or repeating the shortcut, just keep holding the plus or minus key to zoom farther. Accessibility Zoom, which was created as a tool for the blind and enables you to zoom in on a Mac to see tiny text and precisely change settings with checkboxes, must be enabled if you wish to zoom in on the whole screen rather than just an app window (such as Utilities).
Steps to Use Keyboard Shortcut to Zoom in MacBook
Step1Go to Accessibility > System Preferences > Zoom, then click Zoom in the sidebar. Check the check next to “Use keyboard shortcuts to zoom” after that. Click the command key (located on either side of the space bar).

Step2Press the plus/equal sign (“+ =”) button, which is adjacent to the delete button on the top right side of the keyboard, while continuing to hold down the command button to zoom in.
Step3Press the dash/underscore button (“- _“), which is situated next to the “+ =” button on the top right side of the keyboard, while still holding down the command button, to zoom out.
Way 2: Use Trackpad Gestures
You may quickly learn how to zoom in on a Mac using trackpad movements if you prefer using a touchpad versus learning any kind of keyboard shortcuts. With a MacBook, there is another, maybe simpler way to zoom in and out in addition to the approach mentioned above. If your keyboard isn’t entirely working, it may still be helpful. However, make sure that gesture support is turned on in the settings on your Mac. Although a Mac still supports the usage of a mouse, new Mac software is designed to be used with a trackpad. Apple is abandoning the mouse. And with a little practice, you can do it too. What you must do is as follows:
Steps to Enable Trackpad Gestures
Step1Open System Preferences and choose Trackpad. Next, choose the Scroll & Zoom tab and select the “Smart zoom” checkbox. Zooming in on web sites, photos, and documents couldn’t be much simpler after gesture support was set up:

Step2You can zoom in or out on Mac by placing two fingers on the touchpad and moving one finger closer to the other or further apart (repeat for additional zooming)
Step3Another option is to simply zoom in and out by double-tapping the touchpad with two fingers.
Way 3: Use Scroll Gesture
If you’d like to use your mouse, you may utilize the screen zoom option, which enlarges everything on your screen rather than just the app window you’re now viewing. This would need holding down one of the designated modifier keys while scrolling in order to zoom in on a Mac. Just like on an iPhone or iPad, you can zoom in and out by pinching and un-pinching. The smart zoom motion, on the other hand, is executed by double-tapping with two fingers. This immediately zooms into or immediately zooms out of a web page or pdf.
Steps to Enable Scroll Gesture
Step1To make this feature active, from the Apple menu, choose System Preferences and select Accessibility. Choose Zoom from the sidebar.

Step2Select “Use scroll motion with modifier keys to zoom” from the drop-down menu as shown above.
Step3Select the desired modifier key from the dropdown menu.
Way 4: Enable Hover Text to Zoom
Use the wonderful assistive feature called Hover Text to enlarge a single macOS user interface piece without zooming out the whole Mac screen. One of your alternatives is to enable zooming while hovering over text. The “Enable Hover Text” option is part of the Zoom menu but does not directly magnify the display. The function allows users to use the Command key to momentarily enlarge just the text below the pointer and is accessible without Zoom having to be activated. When Hover Text is enabled on your Mac, you may drag the cursor over anything on the screen, such as text, input fields, menu items, or buttons, and a high-resolution magnified version of those objects will appear in a new window. Find out here how to make Hover Text available on your Mac:
Steps to Use Hover Text to Zoom
Step1When you choose this option, a larger, higher-resolution picture of the text your cursor is over will show as long as you press and hold down the “Command” key. Click “Options” to modify the text’s appearance.

Step2Additional customization options are available in the Options menu, including the ability to alter the font, the size of the zoomed-in text (which may range from 14pt to 128pt), the font’s appearance surrounding the cursor, and the modifier key that activates the function.

Way 5: Enable Touch Bar
This substitute is only accessible on Macs equipped with Touch Bars. A handy feature is the Touch Bar. The Touch Bar is a feature on every current MacBook Pro model, including the 13-inch and 16-inch versions. On the Touch Bar, there is a mix of App Controls and a Control Strip. To use with your compatible MacBook Pro, the Touch Bar has additional features. Although it is helpful right out of the box, some customization may be required for your advantage. Fortunately, Apple makes modifications rather straightforward. You may change your default by following the instructions below.
Steps to Enable Touch Bar on MacBook
Step1The Touch Bar at the bottom of your display will grow and become easier to view if you choose the “Enable Touch Bar zoom” option. Now all you have to do is touch and hold the Touch Bar to test it out.
Step2Click the Apple symbol in the upper left corner of your screen and choose “System Preferences” to activate the touch bar in another method.
Step3Select “Keyboard” > “Keyboard” and then select “Touch Bar shows” under the Touch Bar settings. Then choose an option from the menu, which also includes the larger Control Strip and app buttons.

Conclusion
Even the most experienced Mac users sometimes get lost and google topics that should be obvious, like how to zoom in and out on a Mac. But it’s also not as evident as you may believe. You’ll be astonished by how many options there are for zooming on a Mac. Use the Zoom accessibility tool on your Mac’s desktop to enlarge the area of the screen you need if you’re having problems seeing certain components. We’re certain that this article will help you learn something new and use your Mac to its fullest potential. Check out the useful guide to Mac zoom above to see how these zoom tips and solutions may help you make the most of your time on a Mac.
Having difficulties seeing the small print on your Mac’s screen? You can easily enlarge the whole screen with just a few clicks with this guide of how-to un-zoom on mac; which is useful for anybody with poor vision in particular. Users of the macOS operating system may zoom in and out on tiny, difficult-to-read text and pictures in a variety of ways. Would you want to interact closely with anything on your Mac? Maybe you’d like to see things from a broader angle so you would require a how to zoom out on Mac tutorial.
In any case, you have our support. There are various ways to zoom in and out on a Mac, whether you want to do it for the whole screen or just a specific window. For your benefit, we went through many different methods to zoom out on a Mac today. Apple provides a wide range of customizing possibilities. We’ll provide you practical advice on how to utilize your keyboard, mouse, trackpad, or browser to zoom in MacBook. Let’s get started straight now without further ado.
Way 1: Use Keyboard Shortcuts
When using an app, holding down Command key while using the plus (+) or minus (-) keys will allow you to zoom in or out as needed. Using the keyboard on your Mac, you may zoom in and out at intervals of 10%; when you do, a pop-up menu with the option to reset (i.e., return to the default, or 100%, zoom level) will display at the top of the screen. Instead of touching or repeating the shortcut, just keep holding the plus or minus key to zoom farther. Accessibility Zoom, which was created as a tool for the blind and enables you to zoom in on a Mac to see tiny text and precisely change settings with checkboxes, must be enabled if you wish to zoom in on the whole screen rather than just an app window (such as Utilities).
Steps to Use Keyboard Shortcut to Zoom in MacBook
Step1Go to Accessibility > System Preferences > Zoom, then click Zoom in the sidebar. Check the check next to “Use keyboard shortcuts to zoom” after that. Click the command key (located on either side of the space bar).
Step2Press the plus/equal sign (“+ =”) button, which is adjacent to the delete button on the top right side of the keyboard, while continuing to hold down the command button to zoom in.
Step3Press the dash/underscore button (“- _“), which is situated next to the “+ =” button on the top right side of the keyboard, while still holding down the command button, to zoom out.
Way 2: Use Trackpad Gestures
You may quickly learn how to zoom in on a Mac using trackpad movements if you prefer using a touchpad versus learning any kind of keyboard shortcuts. With a MacBook, there is another, maybe simpler way to zoom in and out in addition to the approach mentioned above. If your keyboard isn’t entirely working, it may still be helpful. However, make sure that gesture support is turned on in the settings on your Mac. Although a Mac still supports the usage of a mouse, new Mac software is designed to be used with a trackpad. Apple is abandoning the mouse. And with a little practice, you can do it too. What you must do is as follows:
Steps to Enable Trackpad Gestures
Step1Open System Preferences and choose Trackpad. Next, choose the Scroll & Zoom tab and select the “Smart zoom” checkbox. Zooming in on web sites, photos, and documents couldn’t be much simpler after gesture support was set up:
Step2You can zoom in or out on Mac by placing two fingers on the touchpad and moving one finger closer to the other or further apart (repeat for additional zooming)
Step3Another option is to simply zoom in and out by double-tapping the touchpad with two fingers.
Way 3: Use Scroll Gesture
If you’d like to use your mouse, you may utilize the screen zoom option, which enlarges everything on your screen rather than just the app window you’re now viewing. This would need holding down one of the designated modifier keys while scrolling in order to zoom in on a Mac. Just like on an iPhone or iPad, you can zoom in and out by pinching and un-pinching. The smart zoom motion, on the other hand, is executed by double-tapping with two fingers. This immediately zooms into or immediately zooms out of a web page or pdf.
Steps to Enable Scroll Gesture
Step1To make this feature active, from the Apple menu, choose System Preferences and select Accessibility. Choose Zoom from the sidebar.
Step2Select “Use scroll motion with modifier keys to zoom” from the drop-down menu as shown above.
Step3Select the desired modifier key from the dropdown menu.
Way 4: Enable Hover Text to Zoom
Use the wonderful assistive feature called Hover Text to enlarge a single macOS user interface piece without zooming out the whole Mac screen. One of your alternatives is to enable zooming while hovering over text. The “Enable Hover Text” option is part of the Zoom menu but does not directly magnify the display. The function allows users to use the Command key to momentarily enlarge just the text below the pointer and is accessible without Zoom having to be activated. When Hover Text is enabled on your Mac, you may drag the cursor over anything on the screen, such as text, input fields, menu items, or buttons, and a high-resolution magnified version of those objects will appear in a new window. Find out here how to make Hover Text available on your Mac:
Steps to Use Hover Text to Zoom
Step1When you choose this option, a larger, higher-resolution picture of the text your cursor is over will show as long as you press and hold down the “Command” key. Click “Options” to modify the text’s appearance.
Step2Additional customization options are available in the Options menu, including the ability to alter the font, the size of the zoomed-in text (which may range from 14pt to 128pt), the font’s appearance surrounding the cursor, and the modifier key that activates the function.
Way 5: Enable Touch Bar
This substitute is only accessible on Macs equipped with Touch Bars. A handy feature is the Touch Bar. The Touch Bar is a feature on every current MacBook Pro model, including the 13-inch and 16-inch versions. On the Touch Bar, there is a mix of App Controls and a Control Strip. To use with your compatible MacBook Pro, the Touch Bar has additional features. Although it is helpful right out of the box, some customization may be required for your advantage. Fortunately, Apple makes modifications rather straightforward. You may change your default by following the instructions below.
Steps to Enable Touch Bar on MacBook
Step1The Touch Bar at the bottom of your display will grow and become easier to view if you choose the “Enable Touch Bar zoom” option. Now all you have to do is touch and hold the Touch Bar to test it out.
Step2Click the Apple symbol in the upper left corner of your screen and choose “System Preferences” to activate the touch bar in another method.
Step3Select “Keyboard” > “Keyboard” and then select “Touch Bar shows” under the Touch Bar settings. Then choose an option from the menu, which also includes the larger Control Strip and app buttons.
Conclusion
Even the most experienced Mac users sometimes get lost and google topics that should be obvious, like how to zoom in and out on a Mac. But it’s also not as evident as you may believe. You’ll be astonished by how many options there are for zooming on a Mac. Use the Zoom accessibility tool on your Mac’s desktop to enlarge the area of the screen you need if you’re having problems seeing certain components. We’re certain that this article will help you learn something new and use your Mac to its fullest potential. Check out the useful guide to Mac zoom above to see how these zoom tips and solutions may help you make the most of your time on a Mac.
Best 5 Apps To Add Song To Video
Versatile Video Editor - Wondershare Filmora
Are you interested in video editing? Do you want to create some awesome videos with lots of sounds and visual effects? If you are interested in all these things, you should be focused on choosing a good video editing tool. For example, if you search for the best app to add a song to a video, you will get hundreds of options immediately. But, the most significant factor is which one is the best application to consider.
Before choosing an application or finalizing the decision, you should focus on multiple aspects, such as which device you want to use, what kind of features you like, what purpose you want to serve, etc. In this blog, you will get introduced to one of the best video applications for mobile platforms, both iOS and Android. For creating this list, we conduct proper research and analysis.
In this article
01 [Tops Mobile Applications For Adding Song To Video](#Part 1)
02 [How To Add Song In Video App?](#Part 2)
Part 1 Tops Mobile Applications For Adding Song To Video
Filmora

Filmora is the best video editing application that can help you create videos as per your requirements and explore creativity as you want. The platform provides top-notch services with more than 1000 music options, 5000 stickers, emojis, text, filters, backgrounds, etc. These things will help you gain lots of benefits and create a perfect video that can impress the audience with ease.
The application has multiple features to facilitate the client’s different requirements. The most important thing about Filmora is that it provides only 100% free services. You don’t need to spend a penny on video editing and related factors.
VivaVideo

VivaVideo is also a free video editor. It can be used for different purposes, such as – video editing, video merger, video joiner, video splitter & cutter, video maker with song, video speed control, video creator app, add music to video, adding text & stickers to video, video effect editors, video sound effects, and download & edited share results. You can easily do all these things by considering the option of VivaVideo.
When it comes to downloading the video, you will get multiple options. You can download videos up to 4K optical resolution quality. The users can also share videos directly to other platforms, such as – Instagram, YouTube, Twitter, WhatsApp, etc. For availing of top-notch services with all features, you can take its subscription.
Magisto

If you are looking for a video editor with some modern features, you can go with the option of Magisto. It will help you edit videos as you want by adding multiple visual and musical effects. If you want to create a video using different types of photographs, you can also consider its option. You can create image slide show-based videos by adding music in the background. The most important thing about this particular video editor is that it has a user-friendly interface to proceed. The process of using the application is easy and simpler as compared to some other options.
You can also choose Magisto for some other activities, such as – creating photo collages, video collages, featuring good background music, etc.
InShot

Many individuals are looking for a tool that can help them remove original sound or music from a video and replace it with an impressive one. A video is highly dependent on the background music or sound effects. By using InShot, it can become more accessible for everyone to proceed as they want. Inshot also has a music library that provides you access to multiple audio files and tracks for making your video much better. You can also use it for conversion procedures, such as – video to audio.
Video Editor – Glitch Video Effects

It is an influential video editor with several benefits. The application is created by adding a user-friendly and easy-to-use interface that can help you get desired results after following a minor and essential procedure. Using the application, you can quickly get work done on adding a song to a video with some fantastic effects. You can also use external audio files from the device to merge with the video.
These are some significant options regarding a good add song to the video app. You can pick one as per your preference and suitability. By paying attention to the following details, you can gather details about one of the best applications and how to use it.
Part 2 How To Add Song In Video App?
When adding a song to a video, everyone does not have complete technical knowledge. Due to it, people are looking for the best options by which they can make it possible easily and experience multiple benefits. Here, we are going to share a complete guide regarding one of the best video editing apps for mobile devices i.e. Filmora.
Step-By-Step Procedure
Step1 Video Selection

Firstly, you should proceed by choosing the video you want to edit. For such a task, you should access the Filmora application. In the first interaction, you can see the CREATE NEW VIDEO button on the interface. You should click the button and select the desired video from the device. After choosing the video, you should click the ADD button.
Step2 Add Audio To Video

When the video is selected and added to the application, you should proceed with editing functionalities. Here, you should try to add audio to the videos. Here, you can see the option of MUSIC in the right toolbar. You can get an interface for choosing a song or audio file you want to add to the video by clicking such a button. The users will also get an option to listen to audio carefully to figure out the lyrics and outputs to make sure it is perfect for the video. After testing and confirming the audio, you should proceed further.
Step3 Export

After adding the audio and merging it with video, you should preview it once and then proceed by saving the changes. Now, you should focus on exporting the final files. While exporting files, you should be focused on some basic settings as well, such as – choosing the video format, etc.
Additional Tip: Add Song To Video On PC
In case you are looking for the best options that can be useful in making lots of things easier while editing a video, you should choose a good platform. Filmora is a good application for such a purpose, but you may lack some important features due to its accessibility on mobile devices. Here, please consider the option of a PC to proceed with all these things.
When considering PC options, you will not find a better video editor than Filmora. It is one of the best video editors. It provides multiple features and facilities to edit and process a video file. Filmora also has an extensive music library that allows you to access numerous audio files without any problem. You will get various visual effects to feature in the video and make it impressive and effective. In case you face any problem or confusion while using the application, you can access the official sources and easily go through the textual guides.
Wondershare Filmora
Get started easily with Filmora’s powerful performance, intuitive interface, and countless effects!
Try It Free Try It Free Try It Free Learn More >

Conclusion
Final Words
All these details will help you understand lots of things about the procedures and methods of adding a song to a video. In case you still have any confusion or problem regarding how to add songs in a video app procedure, you can check some tutorials or guides on the internet. It can be useful in understanding things more perfectly and getting proper clarity about everything. Having proper knowledge of using a video editing application can help you get quality results in the form of an impressive video as well.
Are you interested in video editing? Do you want to create some awesome videos with lots of sounds and visual effects? If you are interested in all these things, you should be focused on choosing a good video editing tool. For example, if you search for the best app to add a song to a video, you will get hundreds of options immediately. But, the most significant factor is which one is the best application to consider.
Before choosing an application or finalizing the decision, you should focus on multiple aspects, such as which device you want to use, what kind of features you like, what purpose you want to serve, etc. In this blog, you will get introduced to one of the best video applications for mobile platforms, both iOS and Android. For creating this list, we conduct proper research and analysis.
In this article
01 [Tops Mobile Applications For Adding Song To Video](#Part 1)
02 [How To Add Song In Video App?](#Part 2)
Part 1 Tops Mobile Applications For Adding Song To Video
Filmora
Filmora is the best video editing application that can help you create videos as per your requirements and explore creativity as you want. The platform provides top-notch services with more than 1000 music options, 5000 stickers, emojis, text, filters, backgrounds, etc. These things will help you gain lots of benefits and create a perfect video that can impress the audience with ease.
The application has multiple features to facilitate the client’s different requirements. The most important thing about Filmora is that it provides only 100% free services. You don’t need to spend a penny on video editing and related factors.
VivaVideo
VivaVideo is also a free video editor. It can be used for different purposes, such as – video editing, video merger, video joiner, video splitter & cutter, video maker with song, video speed control, video creator app, add music to video, adding text & stickers to video, video effect editors, video sound effects, and download & edited share results. You can easily do all these things by considering the option of VivaVideo.
When it comes to downloading the video, you will get multiple options. You can download videos up to 4K optical resolution quality. The users can also share videos directly to other platforms, such as – Instagram, YouTube, Twitter, WhatsApp, etc. For availing of top-notch services with all features, you can take its subscription.
Magisto
If you are looking for a video editor with some modern features, you can go with the option of Magisto. It will help you edit videos as you want by adding multiple visual and musical effects. If you want to create a video using different types of photographs, you can also consider its option. You can create image slide show-based videos by adding music in the background. The most important thing about this particular video editor is that it has a user-friendly interface to proceed. The process of using the application is easy and simpler as compared to some other options.
You can also choose Magisto for some other activities, such as – creating photo collages, video collages, featuring good background music, etc.
InShot
Many individuals are looking for a tool that can help them remove original sound or music from a video and replace it with an impressive one. A video is highly dependent on the background music or sound effects. By using InShot, it can become more accessible for everyone to proceed as they want. Inshot also has a music library that provides you access to multiple audio files and tracks for making your video much better. You can also use it for conversion procedures, such as – video to audio.
Video Editor – Glitch Video Effects
It is an influential video editor with several benefits. The application is created by adding a user-friendly and easy-to-use interface that can help you get desired results after following a minor and essential procedure. Using the application, you can quickly get work done on adding a song to a video with some fantastic effects. You can also use external audio files from the device to merge with the video.
These are some significant options regarding a good add song to the video app. You can pick one as per your preference and suitability. By paying attention to the following details, you can gather details about one of the best applications and how to use it.
Part 2 How To Add Song In Video App?
When adding a song to a video, everyone does not have complete technical knowledge. Due to it, people are looking for the best options by which they can make it possible easily and experience multiple benefits. Here, we are going to share a complete guide regarding one of the best video editing apps for mobile devices i.e. Filmora.
Step-By-Step Procedure
Step1 Video Selection
Firstly, you should proceed by choosing the video you want to edit. For such a task, you should access the Filmora application. In the first interaction, you can see the CREATE NEW VIDEO button on the interface. You should click the button and select the desired video from the device. After choosing the video, you should click the ADD button.
Step2 Add Audio To Video
When the video is selected and added to the application, you should proceed with editing functionalities. Here, you should try to add audio to the videos. Here, you can see the option of MUSIC in the right toolbar. You can get an interface for choosing a song or audio file you want to add to the video by clicking such a button. The users will also get an option to listen to audio carefully to figure out the lyrics and outputs to make sure it is perfect for the video. After testing and confirming the audio, you should proceed further.
Step3 Export
After adding the audio and merging it with video, you should preview it once and then proceed by saving the changes. Now, you should focus on exporting the final files. While exporting files, you should be focused on some basic settings as well, such as – choosing the video format, etc.
Additional Tip: Add Song To Video On PC
In case you are looking for the best options that can be useful in making lots of things easier while editing a video, you should choose a good platform. Filmora is a good application for such a purpose, but you may lack some important features due to its accessibility on mobile devices. Here, please consider the option of a PC to proceed with all these things.
When considering PC options, you will not find a better video editor than Filmora. It is one of the best video editors. It provides multiple features and facilities to edit and process a video file. Filmora also has an extensive music library that allows you to access numerous audio files without any problem. You will get various visual effects to feature in the video and make it impressive and effective. In case you face any problem or confusion while using the application, you can access the official sources and easily go through the textual guides.
Wondershare Filmora
Get started easily with Filmora’s powerful performance, intuitive interface, and countless effects!
Try It Free Try It Free Try It Free Learn More >
Conclusion
Final Words
All these details will help you understand lots of things about the procedures and methods of adding a song to a video. In case you still have any confusion or problem regarding how to add songs in a video app procedure, you can check some tutorials or guides on the internet. It can be useful in understanding things more perfectly and getting proper clarity about everything. Having proper knowledge of using a video editing application can help you get quality results in the form of an impressive video as well.
Easy Guide to Use a Stabilization Tool in Filmora
Does your video shake so much? Shaking movement on your camera is often inevitable, especially if you don’t use a camera stabilizer or a camera with no built-in image stabilization. As a result, it can make your video look distracting and difficult to watch.
But you don’t need to worry. You can use a stabilization tool in Filmora . A stabilization tool is a feature that can help to correct for camera shake and other types of movement. If you are a handheld shooter, you will find this tool extremely helpful.
Part 1: When do you need to stabilize your video?
Now, let’s talk about when you should stabilize your video. If you’re shooting something that is moving, like people or animals, you will definitely want to stabilize your video. This will help ensure that the video is smooth and steady.
Another time you may want to stabilize your video is if you’re shooting in a low-light situation. It will help to ensure that your video is not too shaky.
Finally, if you’re shooting a video that’s going to be displayed on a large screen, you may want to stabilize your video. Stabilizing your video will help ensure the output is crisp and clear.
Part 2: How to stabilize your video with Filmora
Filmora has a stabilization feature that can help to smooth your video and make it look more professional. If you haven’t installed Filmora yet, you can download it for free.
Free Download For Win 7 or later(64-bit)
Free Download For macOS 10.14 or later
So, should you have a wobble movement in your video, follow these steps to make it smoother in no time:
Step1 Launch Filmora 11 and create a new project.
Step2 Import your video to Filmora.

Step3 After you import your video to Filmora, the Stabilization must have been off. So, switch the Stabilization toggle on, then a loading bar will start going up to analyze the clip.

Step4 Once it finishes analyzing, the smooth level will default to 10. See the preview whether you like how it turns out.
Before

After

Please note that the center point of your image will always be the most stable. The more shaky a clip is, the more it will crop into that image.
If you are unsatisfied with the default setting, increasing the Smoothness Level will result in more cropping to the image. On the contrary, if you put the Smoothness Level down to zero, you are no longer cropping into the image, but the result won’t be as smooth.

Should the cropping bother you, such as it crops the subject’s hair out of the frame, you can adjust it with Edge Processing.
If you change it to None, you will see the black bars that simulate how it stabilizes the clip. Try to hit play on the preview screen, and then you can see more clearly how the tool keeps the center of the frame to make it stable and less shaky.

As Reflect is the default, the Extend uses artificial intelligence to extend the pixels, as you are often aware in Photoshop.

Besides the three, there is also the Tile option. Each of them would give a different result. You can try and use the one that works best for you.
Summary
When you’re shooting a video, you must have wanted it to be as smooth and stable as possible. By stabilizing your video, you can help ensure it’s smooth and easy to watch.
Filmora offers a Stabilization feature that allows you to easily improve your video’s quality. Simply select the video clip you want to stabilize and click the stabilization button. Filmora will do the rest, giving you a smooth and stable video.
Free Download For macOS 10.14 or later
So, should you have a wobble movement in your video, follow these steps to make it smoother in no time:
Step1 Launch Filmora 11 and create a new project.
Step2 Import your video to Filmora.
Step3 After you import your video to Filmora, the Stabilization must have been off. So, switch the Stabilization toggle on, then a loading bar will start going up to analyze the clip.
Step4 Once it finishes analyzing, the smooth level will default to 10. See the preview whether you like how it turns out.
Before
After
Please note that the center point of your image will always be the most stable. The more shaky a clip is, the more it will crop into that image.
If you are unsatisfied with the default setting, increasing the Smoothness Level will result in more cropping to the image. On the contrary, if you put the Smoothness Level down to zero, you are no longer cropping into the image, but the result won’t be as smooth.
Should the cropping bother you, such as it crops the subject’s hair out of the frame, you can adjust it with Edge Processing.
If you change it to None, you will see the black bars that simulate how it stabilizes the clip. Try to hit play on the preview screen, and then you can see more clearly how the tool keeps the center of the frame to make it stable and less shaky.
As Reflect is the default, the Extend uses artificial intelligence to extend the pixels, as you are often aware in Photoshop.
Besides the three, there is also the Tile option. Each of them would give a different result. You can try and use the one that works best for you.
Summary
When you’re shooting a video, you must have wanted it to be as smooth and stable as possible. By stabilizing your video, you can help ensure it’s smooth and easy to watch.
Filmora offers a Stabilization feature that allows you to easily improve your video’s quality. Simply select the video clip you want to stabilize and click the stabilization button. Filmora will do the rest, giving you a smooth and stable video.
How To Add Text In After Effects
In almost every video you come across, you will see text added to the video in different parts. There are various reasons why adding text to videos becomes a necessity. First of all, you can highlight the underlying message or key points in your video. Along with audio and video, the viewers will have another cue point in the form of text that they can retain in their memory for longer. You add animated texts to video to make the video interesting to watch and break the monotony of visual cues only.
Besides, you may have to want credits and add intro as well as outro to your video where adding text is almost a necessity. Text can help your viewer get the context of your video and make sense of the content. After Effects is a popular video editor thanks to its visual effects, text animation animations, and instant video enhancement tools. We will illustrate the different ways of adding text in After Effects in simple steps.
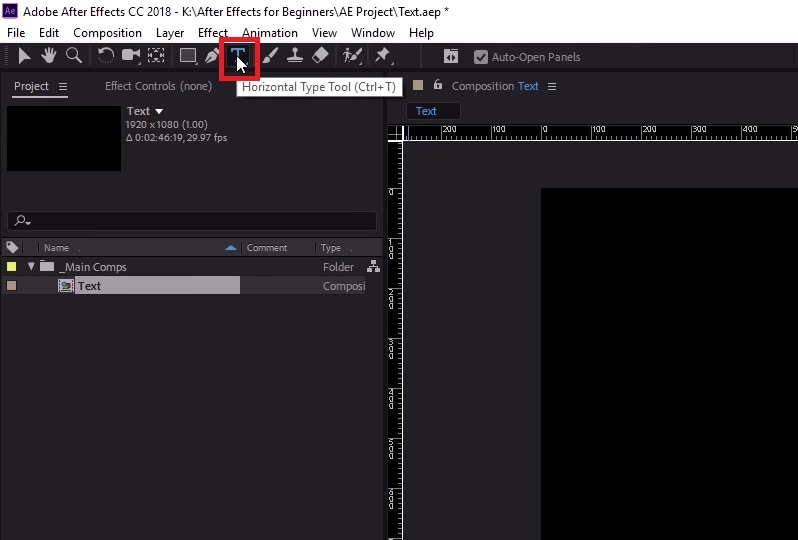
Part 1. Add Text in After Effects with Horizontal Type Tool
Once you have imported your video clip into the Timeline, there are several ways you can add text to your video. First of all, you can right-click on the Timeline and select New> Text to create an empty text layer and add any text you want. Similarly, you can go to Layer> New> Text option to do the same. But the easiest way of adding text in After Effects is by using Horizontal Type Tool. Here are the steps on how you can add text in AE with the type tool.
Step1Once you have imported your video into the Timeline, click on Horizontal Type Tool located in the top bar to add any text. You can press Ctrl+T(Windows) or Command+H(Mac) to get it instantly.
Step2Click on the video where you want to place the text and type your desired text there. After you are done adding your text, press Enter key in Num pad to exit out of the text field in the video.
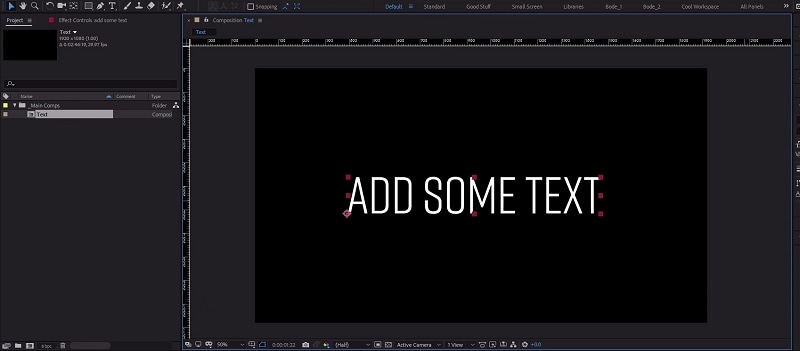
Step3This will automatically create a text layer on Timeline. You can now move the text and place it anywhere you want. You can also modify the text style and add animation which we will illustrate in the next section.
Part 2. Use the Character Panel to Edit Text in AE
When you select Type tool and add your desired text, you get a default style for the text. It is most likely that you have to modify the text style such as changing color, font, and size to fit in your video seamlessly. That is when you have to visit the Character Panel. Character Panel is where you get to edit the font of the text you have typed, increase or decrease the font size, change the font color, and much more. Apart from that, you can increase the spacing between lines when your text is a paragraph instead of a few words. Here are the steps to use Character Panel to edit text in AE.
Step1Once you have typed your text using Horizontal Type tool on the video, click on the text.
Step2Go to Character panel located in the right side of the screen. If it is minimized, click on the panel to expand it.
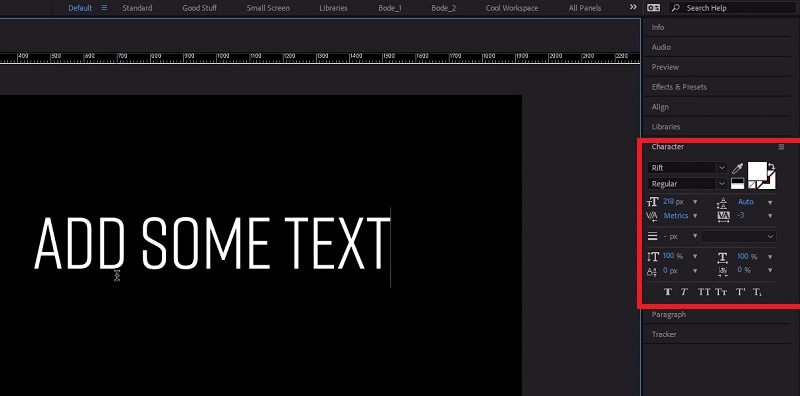
Step3The first option in the panel is the font of the text. By the side of the font is the text color. You can use the color picker tool to choose any color as per your preference.
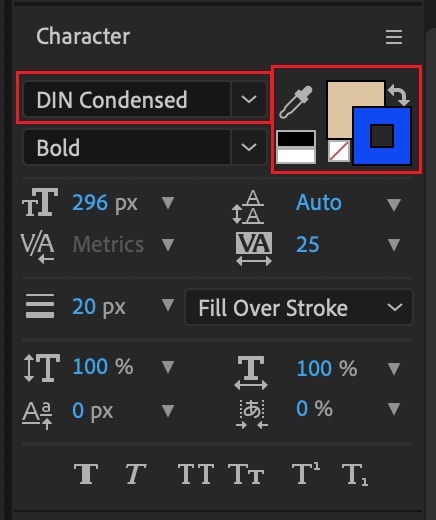
Step4Below the font, you can select the font style such as regular, bold, italics, and likewise. The subsequent part is to change the font size and adjust vertical spacing between lines and horizontal spacing between characters.
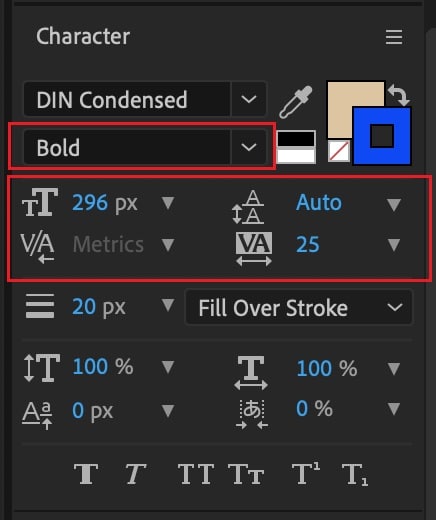
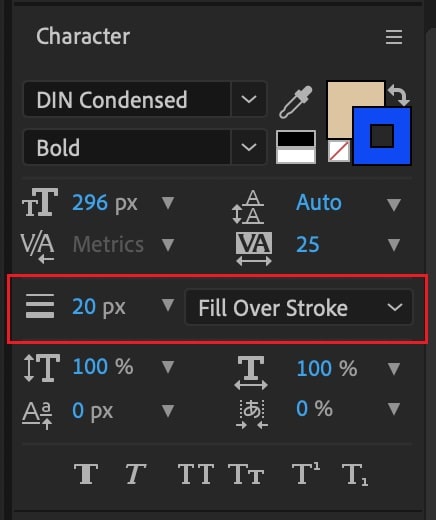
Step5The next section deals with Stroke option as well as fill the text option. You can fill the background of the text with any desired color.
Part 3. Add Animated Text to Video with Animation Presets
Now that you have added a static text and set the text format as per your preference, it is time to animate the text. A static text in a video does not look appealing, and animated texts make the video eye-catching instantly. You can use text animation presets in After Effects to add animated text to video. Here are the steps to add animated text to video with animation presets and effects.
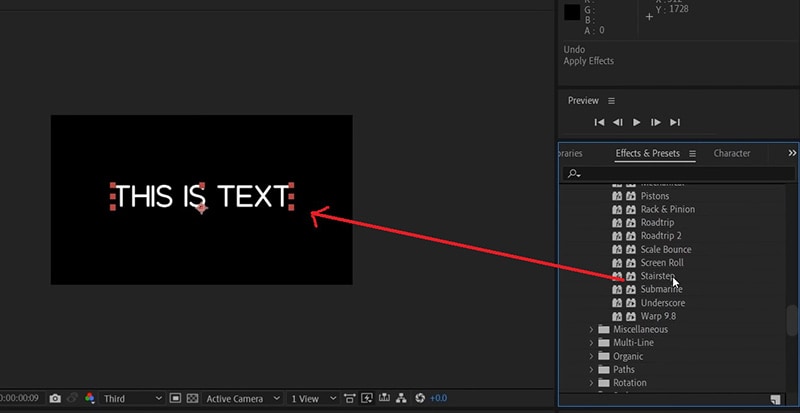
Step1Click on the text on your video that you want to animate. Go to Effects and Presets panel located on the right side.
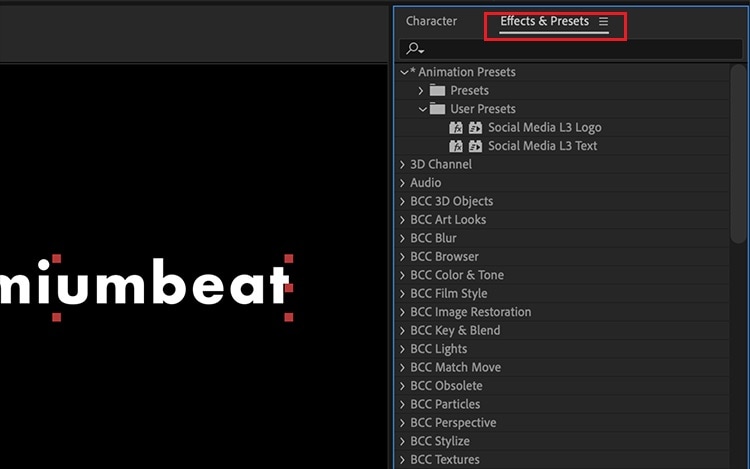
Step2Under Effects and Presets panel, Click on Text option. This will open all the different categories of animation presets available that you can apply to the text on your video.
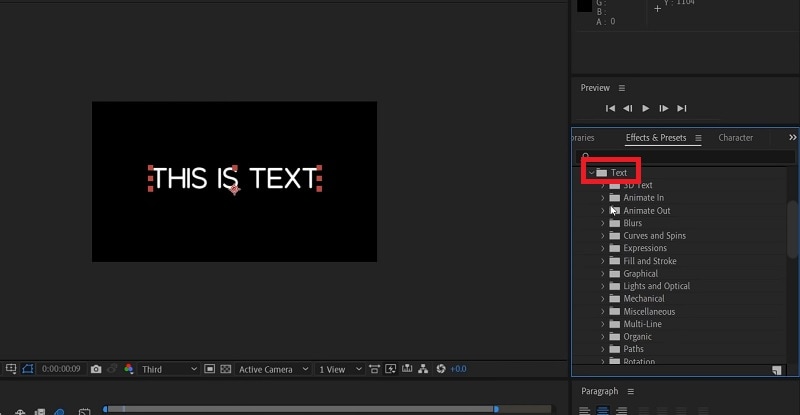
Step3Select any desired animation that you want to apply to the text and drag and drop the animation on the text in the composition window. Play the video and watch the applied animation on the text.
Part 4. Alternative Way to Add Text to Videos
If you are not comfortable with After Effects as a video editor, we recommend Wondershare as the best AE alternative. This is because the user interface of Filmora is super simple and there are loads of text effects and animations available to enhance your video content. Filmora is a professional video editor that is extremely popular among amateur and professional video editors. The application is available for both Windows and Mac users. Here are the steps for adding animated text to video using Filmora.
Step1Install Wondershare Filmora on your computer and launch the application. Click on New Project option on the welcome screen. Otherwise, you can go to File> New Project option.

Step2Go to File> Import Media> Import Media Files to import your video file. You can also drop the video file directly into Project Media folder.

Step3Drag and drop the video file from Project Media folder into the Timeline. If you have multiple video clips, you need to arrange them sequentially on the Timeline.
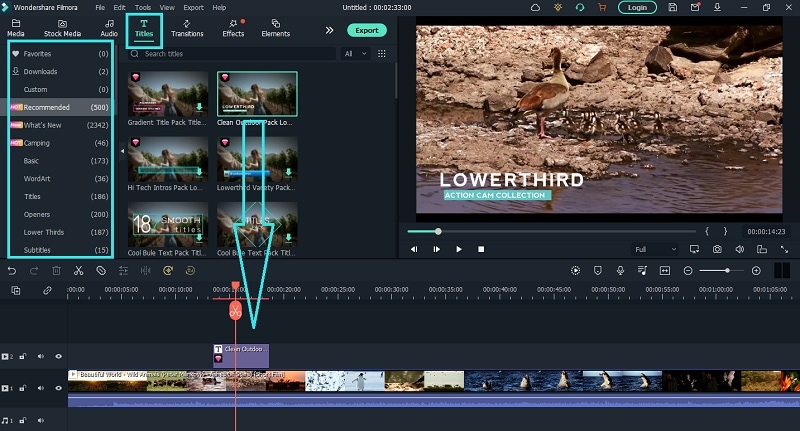
Step4To add text to your video, go to Titles located at the top bar. Check the left panel where you can see different categories of text effects. Select any desired text effect and drop into the Timeline. Make sure that the text layer is above the video layer on Timeline. You can shift the text layer on Timeline to place it where you want it to appear. You can also stretch the duration of the text effect as per your requirements.
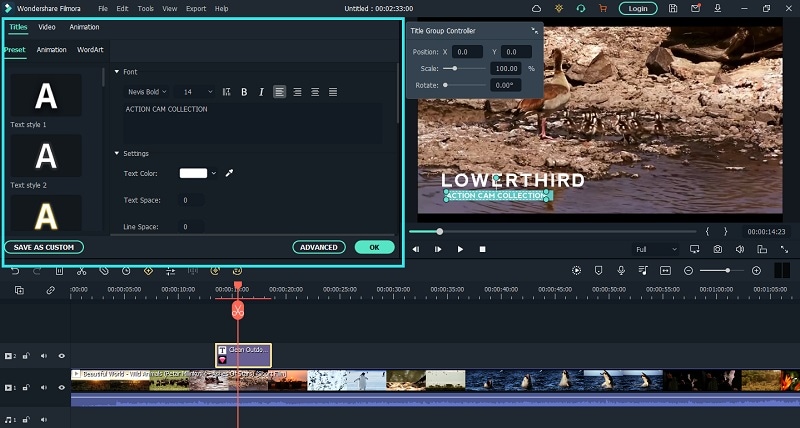
Step5You can edit the text effect by double clicking on the text layer on Timeline. Under Preset tab, you can change the text, font type and size, text color and much more. For further customization, you can click on Advanced button. At last, click on OK button to save the edits done.
The Bottom Line
If you want to add animated text to photo and video, After Effects is a great editor you can use. We have illustrated how you can add text and customize the text and finally, animate it as per your preference. However, if you are looking for AE alternative, we recommend Wondershare Filmora where you can add text to video instantly and choose from a wide range of text effects and animations.
Free Download For Win 7 or later(64-bit)
Free Download For macOS 10.14 or later
Also read:
- Updated How to Make A Jaw-Dropping Time Lapse Video, In 2024
- Updated Best Photo Video Maker Apps with Song PC, Mobile, Online for 2024
- In 2024, With an SRT Editor Online, You Can Synchronize the Subtitles with the Video, Change the Font, and Make Them More Readable. Read on to Know Your Options
- What Is AI Composite Video App and AI Composite Video Guide
- New In 2024, MP3 Cutter Download
- How to Get Motion Blur in Valorant for 2024
- Updated 2024 Approved 3 Actionable Ways to Create Countdown Animation for Videos
- Want to Play a Video in the Loop on Your Mac? Here Is How You Can Make a Video Loop in QuickTime in Simple Steps
- In 2024, How to Make Video Fade to Black in Movie Maker Easily
- New Shotcut Review – Is It The Best Free Video Editor?
- New In 2024, Steps to Create Gold Text Effects After Effects
- Updated In 2024, 2 Solutions to Crop a Video Using After Effects
- Updated In 2024, 15 Best Free MP4 Video Rotators Windows,Mac, Android, iPhone & Online
- Detailed Guide to the Best Convertors for Turning GIF Into PDF Files. Know Their Features, Pros, Cons, and More
- New 2024 Approved How to Create Vintage Film Effect 1950S
- The Ultimate Guide to Slideshow Maker with Music
- Updated Why You Should Master Slideshows In Lightroom, Fresh Insight for 2024
- New A Comprehensive Guide to Slow Motion YouTube Videos and How to Manage Them
- How to Find a High-Quality Video Marketing Agency?
- 2024 Approved How to Make Vintage Film Effect 1980S
- In 2024, Wondering About How to Easily Create a Slideshow on Your iPhone? Well, Take Note of some of the Finest Apps to Turn Your Vision Into Reality
- 2024 Approved How to Create Intro Video with Filmora
- New Ways to Make Canva Collages
- What If YouTube Zoom to Fill Not Working for 2024
- New 4 Ways to Loop a Video on Vimeo
- How to Make a Slideshow on iPhone
- In 2024, Separate Audio From Video in DaVinci Resolve Step by Step
- In 2024, Editing Videos Was Never so Easy as It Is Now. With Video Enhancer Ai, This Task Is Very Simple to Do and No Trouble Will Be There in Getting the Things Done as Needed. Choose the Right AI Video Enhancer for Task Completion
- Updated In 2024, How to Add Green Screen in OBS
- New Replacing Sky in Your Pictures Using Online and Offline Tools for 2024
- 2024 Approved Confused About Which GoPro Should You Use? This Article Introduces and Provides a Detailed Overview of the Best GoPro for YouTubers You Can Find in the Market for Vlogging
- In 2024, Basic Introduction of LumaFusion Color Grading
- Updated Make Time-Lapse Video on MacBook Complete Guide for 2024
- New Step by Step to Resize Video in Davinci Resolve
- Updated 4 Methods How To Make a Recap Video for 2024
- Updated 2024 Approved How Can You Create Outstanding Educational Teaching Videos?
- In 2024, Ideas That Help You Out in Making Transparent Image
- 2024 Approved Guide Create The Perfect VHS Effect Look in Premiere Pro
- 2024 Approved Repeated Text Animation Tutorial
- New 2024 Approved How To Make a Timelapse in After Effects
- 2024 Approved Best Youtube Video Meme Maker
- In 2024, How to Create Fantastic Glitch Effects with Filmora? Read This Guide to Find Out How to Apply Glitch Effects on Your Videos and Make Custom Glitch Effects
- Updated How to Use Twixtor Effect to Create Super Slow-Motion Video, In 2024
- 2024 Approved 7 Tips to Create Teaching Videos
- Free for 2024
- 2024 Approved What Is First Impression Review Video
- Updated In 2024, Blender - A Video Editor for Every Professional
- In 2024, 2 Ways to Transfer Text Messages from Samsung Galaxy M34 to iPhone 15/14/13/12/11/X/8/ | Dr.fone
- Planning to Use a Pokemon Go Joystick on Samsung Galaxy M14 5G? | Dr.fone
- In 2024, How to Reset a Locked Samsung Galaxy XCover 7 Phone
- In 2024, Easy Ways to Manage Your Honor 90 Lite Location Settings | Dr.fone
- Fix Unfortunately Settings Has Stopped on Realme GT 5 Pro Quickly | Dr.fone
- How To Reset iPhone SE Without iTunes? | Dr.fone
- How to Come up With the Best Pokemon Team On Nubia Red Magic 8S Pro+? | Dr.fone
- Thinking About Changing Your Netflix Region Without a VPN On Oppo Reno 10 5G? | Dr.fone
- 10 Best Fake GPS Location Spoofers for OnePlus Ace 2V | Dr.fone
- What is Fake GPS Location Pro and Is It Good On Apple iPhone 14 Pro Max? | Dr.fone
- In 2024, Easily Unlock Your Oppo Find X6 Device SIM
- Title: New How to Zoom In and Out on Mac
- Author: Chloe
- Created at : 2024-04-24 07:08:13
- Updated at : 2024-04-25 07:08:13
- Link: https://ai-editing-video.techidaily.com/new-how-to-zoom-in-and-out-on-mac/
- License: This work is licensed under CC BY-NC-SA 4.0.
