:max_bytes(150000):strip_icc():format(webp)/the-11-best-whatsapp-tricks-and-tips-in-2020-4782877-fd12628437f34b85ac38f1a9ac95637e.jpg)
New Ideas for Time-Lapse Video

Ideas for Time-Lapse Video
Are you thinking of stepping out of the familiar world of still photography to make a time-lapse video?
As you all know I am a fan of travel videos and time-lapse video because why not? There is no denying that time-lapse techniques are a perfect medium for travel videos.
In this article will give you some ideas to get started in time-lapse video or photography and let’s define what a time-lapse video and what makes them great.
What is Time Lapse
Time-lapse is a creative filming and video editing technique that manipulates how the frame rate is captured. Frame rate is the number of images or frames appearing in a second of video. In most videos, the frame rate and playback speed are the same. In a time-lapse video, the frame rate is stretched out far more: when played back at average speed, time appears to be sped up.
Time-lapse can also refer to a camera’s shutter speed (How long the camera’s shutter remains open to let light in). A similar effect to time-lapse is found in stop-motion videos. The subject doesn’t move but seems to be in motion because it’s manually or repeatedly moved and then photographed. The images are then strung together to create video-like motion.

How Time-lapse Works
Time-lapse photography is a technique that records a scene or objects that change at a slow speed and turns it into a video that plays back at high speed.
Most time-lapse videos are projected at a speed of 30 frames per second. The frame rate of your time-lapse video can be determined in the editing process, but you will need to account for how quickly the action is taking place in the camera or your video will be a collection if stills. Consider what FPS you want to use in your video. You need to capture that many frames per second to create a time-lapse effect. If you’re shooting a 10 second video at 30fps, you should end up with 300 images.
What equipment needed for time-lapse video?
Time-lapse photography requires only a few special pieces of equipment.
1. Camera / Smartphones
Technically any point and shoot camera or smartphone can be used for time-lapse video, the easiest ones to work are DSLR or mirrorless cameras, some even have an in camera intervalometer (often called a time-lapse feature or time-lapse mode), which means you’ll need less equipment to take great time-lapse video.
2. High-capacity Memory Card
For the best results, shoot in RAW format which takes image in the highest resolution with actual image dimensions. You’ll need to prepare for very large RAW file sizes, so bring multiple high capacity memory cards.
3.Tripod
A tripod is essential to time-lapse video or photography, because the camera needs to stay perfectly still in order to emphasize the steady movement of your subject and to avoid overlay blurry videos or photos.
How to Capture Times-lapse Video
A technique that was once found only in video editing software is now on nearly every mobile device. So what’s the best way to make an amazing time-lapse video that stands apart from the rest? That depends on how you plan to capture the footage.
Smartphones:
Most phones have a time-lapse feature in their camera app. Be advised: you will need to record for an extended period, as 30 minutes equates to about 10 seconds of footage. Like a video camera, you will need a tripod to steady your shots. On an iPhone, you can either film a time-lapse or stitch one together from your photo collection, all without a video editor.
DSLR Camera
For DSLR camera you’ll need a tripod and a device called intervalometer. The first is essential to make sure your camera is stationary and is taking photos if the exact same location without moving anywhere.
An intervalometer, or a remote control, is a device that allows you to set your camera to hit the shutter button at an interval of your choice. In other words, an intervalometer is there to let you rest aside without having a manually click the shutter button yourself.
Here are some video ideas for your time-lapse
- Ice melting
- Flower and plants
- Clouds moving
- Sunrise/sunset
- Star movement
- Traffic movement
Ice melting
Time-lapse is an ideal way to capture the mesmerizing transition between water and ice. Even something as simple as watching ice melt can be appealing.
Flower and plants
Flowers and plants can be beautiful to behold, but their transformation from seed to adult plant is often absolutely breathtaking. If you have an indoor plant that you are about to start growing you can set up a camera on a mount of a tripod at the angle with which you want to capture. As you water, groom or fertilize on a regular schedule, you can incorporate taking a photograph at the same time.
Clouds moving
The clouds can provide a whole host of phenomena that will both enlighten the observer to the complexities of the atmosphere or cosmos but will also provide a beautiful spectacle in the daytime, the movement of clouds can be quite spell binding and the rolling in of rain or a thunderstorm can be particularly interesting.
Sunrise/Sunset
Shooting a sunset is more difficult. The light changes during the selected time period.
To overcome this, use remote control camera software. This can be compensated by increasing the ISO or decreasing the shutter speed as the light dims.

Star movement
At night, if the sky is clear and you are in an area dark enough, the stars in the sky can provide a beautiful time-lapse as the stars move in relation to the observer due to earths rotations.
Traffic movement
The interconnectedness of vehicles moving along busy roads, trailing light patterns, and the general hustle and bustle of city life can be brought to you in a dynamic way via time-lapse videos.
It is the smooth impression of motion which time-lapse is able to produce that can emphasize and help to invigorate something as ordinary and everyday as the coming and going of traffic.

Edit your video with Wondershare Filmora
Wondershare Filmora has the action camera tool that allows you to fasten up your video without re-encoding. This means the quality of the video remains intact without any change after exporting. Here is how to convert a standard video to a time-lapse:
Step1 Download Wondershare Filmora from the official website
Free Download For Win 7 or later(64-bit)
Free Download For macOS 10.14 or later
Step2 Open Filmora, then click action camera tool
Step3 Click import action cam video to import your file

Step4 click on the speed icon add marker button. Then drag the marker all the way over the target video.

Step5 Next drag the slider under the speed tool to speed up the video according to your desire.

Step6 Lastly when done, export and save the final video.

Conclusion
Hope this article can give you an idea on how to make a good time-lapse video. It’s so fun doing it you will see how the things change that fast. Time-lapse content is typically just that, shorter, more visually interesting content, unlike most conventional video, time-lapse video can tell a story within just a few second. Start creating nice and creative time-lapse video now and make it as one content on your you tube channel.
Free Download For macOS 10.14 or later
Step2 Open Filmora, then click action camera tool
Step3 Click import action cam video to import your file

Step4 click on the speed icon add marker button. Then drag the marker all the way over the target video.

Step5 Next drag the slider under the speed tool to speed up the video according to your desire.

Step6 Lastly when done, export and save the final video.

Conclusion
Hope this article can give you an idea on how to make a good time-lapse video. It’s so fun doing it you will see how the things change that fast. Time-lapse content is typically just that, shorter, more visually interesting content, unlike most conventional video, time-lapse video can tell a story within just a few second. Start creating nice and creative time-lapse video now and make it as one content on your you tube channel.
How to Color Correct in OBS
Create High-Quality Video - Wondershare Filmora
An easy and powerful YouTube video editor
Numerous video and audio effects to choose from
Detailed tutorials are provided by the official channel
Color Correction is an outstanding functionality that allows editing photos and videos by altering their consistency to match a particular standard. Besides, color correction is available in the premium tool and free applications. And one of the established free software tools with color correction is the OBS.
Even though the Open Broadcaster Software is mainly known for live streaming and offline video recording, it also offers color correction functionality from its open canvas. Read this article to completion and get to the bottom line of how to do color correction in OBS.
More about OBS
In this article
01 What is OBS?
What is OBS?
Open Broadcaster Software (OBS) is free and open-source software that allows users to record videos and live stream events right at their comfort. The software functions effectively on Mac, Windows, and Linux computers.
Open Broadcaster Software (OBS) is free and open-source software that allows users to record videos and live stream events right at their comfort. The software functions effectively on Mac, Windows, and Linux computers.
Since its initial launch in 2012, OBS has made tremendous moves – This is not only from the constant release of its new versions but also the relentless increase in the functionality features. Besides, OBS is equipped with a robust API that enables plugins and scripts which provide extensive customization to precisely suit one’s needs.
However, OBS being a free application can function to date due to enough support from sponsors and backers.
How to Apply Color Correction in OBS
When you carry out basic edits to your videos or images with OBS and realize that your project has poor shade, color, or tone, you don’t have to export it to another software to correct it. Instead, you can use filters for color correction in OBS.
Apart from using OBS filters to color correct video clips and images, you can correct games, browser sources, and video capture devices.
There are various aspects of color correction in OBS. It includes:
1. Gamma
Gamma is a fundamental aspect in OBS that functions by balancing the brightness of an image through contrast. To be precise, Gamma works almost similarly to change in brightness while simultaneously increasing or decreasing the contrast.
In editing, Gamma is applicable mainly for removing shiny foreheads and webcam footage in gaming and browsing.
High Gamma is represented by “L,” whereas low Gamm is represented by “R.”
2. Contrast
Contrast is the difference in the degree of colors and tones in an image. Usually, the low contrast image has a narrow color range, whereas the high contrast images have dark shadows and bright highlights.
“L” represents high contrast in OBS contrast, whereas “R” represents low contrast.
3. Brightness
Brightness is the degree to how light or dark a picture is. To be able to understand an image clearly, it is best to correct its brightness. A change in brightness of a picture has a simultaneous change in pixels of that image.
High brightness in OBS is denounced by the letter “L,” whereas Low brightness is denounced by “R.”
4. Saturation
Saturation is the intensity of colors in a video or an image. High saturated images are bright, strong, and are rich, whereas the low saturated photos appear washed out. Black and white (grayscale) photos have no color saturation. In OBS, high saturation and low saturation are represented as “L” and “R.”
5. Hue Shift
Hue shift is the change in an image’s saturation, lightness, and hue colors. Hue shifting occurs when highlighting or shading images. In OBS, you can use the hue shift functionality to reimage your image with a completely different color palette.
With the hue shift functionality in OBS, you can place the image on top of another and have an 80% opacity. It means that you will still see the first image when you place the second one on top of it.
The “L” sign in the OBS hue shift represents 50% opacity, while the “R” represents 100% Opacity.
Color Grade in OBS
Color grading is the process of enhancing the appearance of an image through attributes such as contrast, saturation, and color, making them enchanting for presentations. Color grading is not only done for still images but also for motion pictures and images.
Color grading functionality in OBS is encompassed with several tools – This includes:
1. Lift tool
As the name suggests, lift tools are used in lifting or removing specific colors from an image. It does so without necessarily affecting other colors in an image.
With this tool, you can selectively remove unwanted colors from your image or video, replace them with your desired ones, and create astonishing results.
2. Offset
Offset is another outstanding tool in OBS color grading that controls the blacks/Shadows of an image. It functions by altering the brightness levels and leaving the highlights and the mid-tones unaffected.
3. Gain
A gain is a tool in OBS color correction that functions by only adjusting the white levels in an image. With the gain tool, brighter colors become brighter or darker.
Many people, especially beginner editors, experience difficulty differentiating between the Gamma and Offset tools. Yes, there is a closer similarity between the two, and for you to be on the safe side, you need to know that Gamma goes with the mid-tones (middle gray levels) whereas the Gain goes with highlights/whites.
How to Apply LUTs in OBS
Look up tables (LUTs) is a functionality feature that allows editors, colorists, and filmmakers to save certain colors as their templates. Therefore, when working on a particular project, they don’t have to create new working color grades; instead, you pick it from your LUT.
Using LUTs OBS is not rocket science. With LUTs, you can create unique projects with a vibrant feel. Here are the simple steps of using LUTs in OBS.
Step 1. Prepare your LUT
First, check and establish whether you have your LUT ready. If you don’t have it, you can download one from the internet. Make sure you download it as a folder. Even though OBS has LUT, It has limited color grades; therefore, it is best to download one. You can extract it to an OBS folder if you downloaded it in a zip file.
Step 2. Add your project to the OBS timeline
Open your OBS software and add your project file. Drag and drop your file to the OBS timeline.
Step 3. Add LUTs to your project
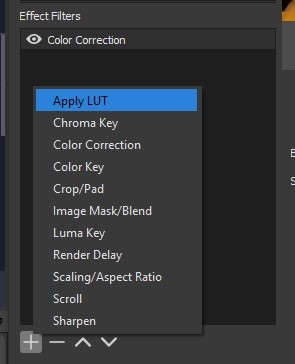
Right-click on the area in your project that you wish to apply LUTs, then click on “Filters.” Select “Apply LUT” from the drop-down menu,” which is usually at the top of the list.
Step 4. Apply your LUT as a filter
On the LUTs section, click on the browser, then open your downloaded LUT folder. Usually, the LUT is in the form of a .cube file. You can adjust your LUT by simply clicking on the “Adjust” option.
Bonus! How to Apply Color Correction for Webcam and Camera
People who primarily use their computers for recording sessions often find it difficult to capture quality videos. It is because most computer cameras are not straightforward. To do away with purchasing a new camera due to poor quality video capture, they can freely use OBS LUTs. For their camera and webcam. LUTs for webcam play a vital role in correcting the quality of photos and videos by using filters.
Here are the simple steps on how to use LUTs for color correction in webcam and camera
Step 1. Check whether your camera has additional software
Most webcams and cameras are controlled by external software, so you first need to check whether yours is also controlled. A thing with these cameras are controlled by their software is that the software determines the color settings and the specific image.
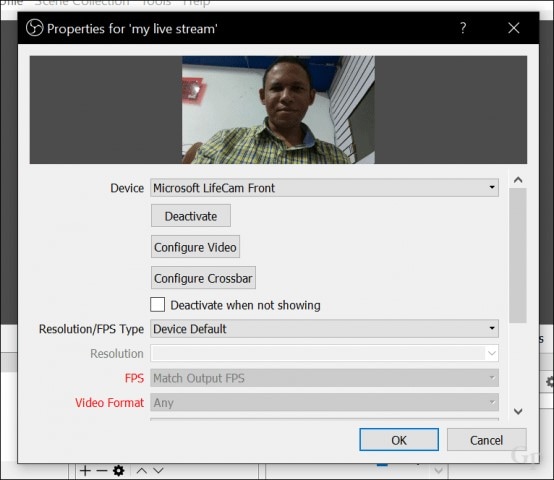
Double click on camera source and select “Configure video.” Computers with external software cameras will have a pop-up window that displays various customizable settings. Here, you can adjust the different settings based on your preference.
Step 2. Download your LUTs
Download online the LUTs you want to use. Download them as folders and extract the files you downloaded as zip files. Save them in the OBS folder.
Step 3. Apply your LUTs
Still, in your OBS software, open your camera and then right-click on it. From the displayed menu, click on “Filters.”
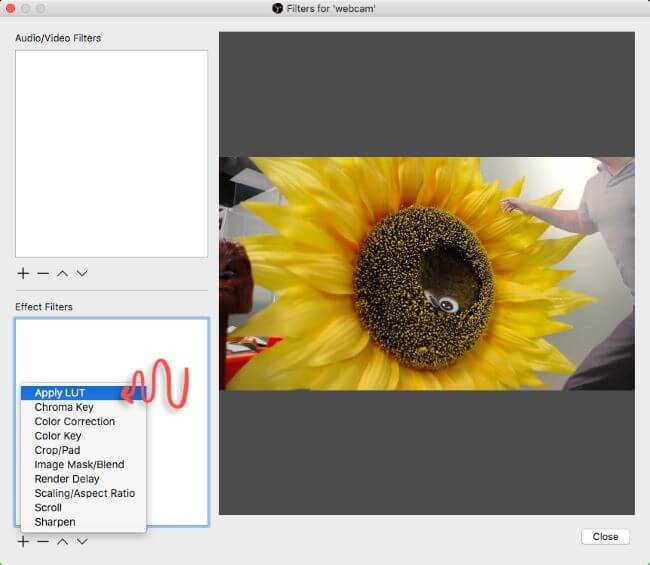
On the bottom left corner of your interface, hit the “+” sign, then select “Apply LUTs” > “Browse.”
Open your already downloaded OBS files. Usually, there is an “Adjust” that allows you to regulate the intensity of the LUT by sliding it.
Step 4. Start recording with LUTs on
After turning on your LUT, you can start recording videos and taking photos. There is an eye icon on the left-hand side of your screen. You can use it to turn on or off LUT.
Conclusion
● And that is how to do color correction in OBS. Besides, you do not have to go to the extremes of getting a new camera because of your webcam faultiness. With OBS, you can correct your camera and webcam and get outstanding results.
● Download LUTs from the internet and use them as a template in OBS. Besides, you don’t have to pay for the LUTs, but you can use the free ones.
Color Correction is an outstanding functionality that allows editing photos and videos by altering their consistency to match a particular standard. Besides, color correction is available in the premium tool and free applications. And one of the established free software tools with color correction is the OBS.
Even though the Open Broadcaster Software is mainly known for live streaming and offline video recording, it also offers color correction functionality from its open canvas. Read this article to completion and get to the bottom line of how to do color correction in OBS.
More about OBS
In this article
01 What is OBS?
What is OBS?
Open Broadcaster Software (OBS) is free and open-source software that allows users to record videos and live stream events right at their comfort. The software functions effectively on Mac, Windows, and Linux computers.
Open Broadcaster Software (OBS) is free and open-source software that allows users to record videos and live stream events right at their comfort. The software functions effectively on Mac, Windows, and Linux computers.
Since its initial launch in 2012, OBS has made tremendous moves – This is not only from the constant release of its new versions but also the relentless increase in the functionality features. Besides, OBS is equipped with a robust API that enables plugins and scripts which provide extensive customization to precisely suit one’s needs.
However, OBS being a free application can function to date due to enough support from sponsors and backers.
How to Apply Color Correction in OBS
When you carry out basic edits to your videos or images with OBS and realize that your project has poor shade, color, or tone, you don’t have to export it to another software to correct it. Instead, you can use filters for color correction in OBS.
Apart from using OBS filters to color correct video clips and images, you can correct games, browser sources, and video capture devices.
There are various aspects of color correction in OBS. It includes:
1. Gamma
Gamma is a fundamental aspect in OBS that functions by balancing the brightness of an image through contrast. To be precise, Gamma works almost similarly to change in brightness while simultaneously increasing or decreasing the contrast.
In editing, Gamma is applicable mainly for removing shiny foreheads and webcam footage in gaming and browsing.
High Gamma is represented by “L,” whereas low Gamm is represented by “R.”
2. Contrast
Contrast is the difference in the degree of colors and tones in an image. Usually, the low contrast image has a narrow color range, whereas the high contrast images have dark shadows and bright highlights.
“L” represents high contrast in OBS contrast, whereas “R” represents low contrast.
3. Brightness
Brightness is the degree to how light or dark a picture is. To be able to understand an image clearly, it is best to correct its brightness. A change in brightness of a picture has a simultaneous change in pixels of that image.
High brightness in OBS is denounced by the letter “L,” whereas Low brightness is denounced by “R.”
4. Saturation
Saturation is the intensity of colors in a video or an image. High saturated images are bright, strong, and are rich, whereas the low saturated photos appear washed out. Black and white (grayscale) photos have no color saturation. In OBS, high saturation and low saturation are represented as “L” and “R.”
5. Hue Shift
Hue shift is the change in an image’s saturation, lightness, and hue colors. Hue shifting occurs when highlighting or shading images. In OBS, you can use the hue shift functionality to reimage your image with a completely different color palette.
With the hue shift functionality in OBS, you can place the image on top of another and have an 80% opacity. It means that you will still see the first image when you place the second one on top of it.
The “L” sign in the OBS hue shift represents 50% opacity, while the “R” represents 100% Opacity.
Color Grade in OBS
Color grading is the process of enhancing the appearance of an image through attributes such as contrast, saturation, and color, making them enchanting for presentations. Color grading is not only done for still images but also for motion pictures and images.
Color grading functionality in OBS is encompassed with several tools – This includes:
1. Lift tool
As the name suggests, lift tools are used in lifting or removing specific colors from an image. It does so without necessarily affecting other colors in an image.
With this tool, you can selectively remove unwanted colors from your image or video, replace them with your desired ones, and create astonishing results.
2. Offset
Offset is another outstanding tool in OBS color grading that controls the blacks/Shadows of an image. It functions by altering the brightness levels and leaving the highlights and the mid-tones unaffected.
3. Gain
A gain is a tool in OBS color correction that functions by only adjusting the white levels in an image. With the gain tool, brighter colors become brighter or darker.
Many people, especially beginner editors, experience difficulty differentiating between the Gamma and Offset tools. Yes, there is a closer similarity between the two, and for you to be on the safe side, you need to know that Gamma goes with the mid-tones (middle gray levels) whereas the Gain goes with highlights/whites.
How to Apply LUTs in OBS
Look up tables (LUTs) is a functionality feature that allows editors, colorists, and filmmakers to save certain colors as their templates. Therefore, when working on a particular project, they don’t have to create new working color grades; instead, you pick it from your LUT.
Using LUTs OBS is not rocket science. With LUTs, you can create unique projects with a vibrant feel. Here are the simple steps of using LUTs in OBS.
Step 1. Prepare your LUT
First, check and establish whether you have your LUT ready. If you don’t have it, you can download one from the internet. Make sure you download it as a folder. Even though OBS has LUT, It has limited color grades; therefore, it is best to download one. You can extract it to an OBS folder if you downloaded it in a zip file.
Step 2. Add your project to the OBS timeline
Open your OBS software and add your project file. Drag and drop your file to the OBS timeline.

Step 3. Add LUTs to your project
Right-click on the area in your project that you wish to apply LUTs, then click on “Filters.” Select “Apply LUT” from the drop-down menu,” which is usually at the top of the list.

Step 4. Apply your LUT as a filter
On the LUTs section, click on the browser, then open your downloaded LUT folder. Usually, the LUT is in the form of a .cube file. You can adjust your LUT by simply clicking on the “Adjust” option.
Bonus! How to Apply Color Correction for Webcam and Camera
People who primarily use their computers for recording sessions often find it difficult to capture quality videos. It is because most computer cameras are not straightforward. To do away with purchasing a new camera due to poor quality video capture, they can freely use OBS LUTs. For their camera and webcam. LUTs for webcam play a vital role in correcting the quality of photos and videos by using filters.
Here are the simple steps on how to use LUTs for color correction in webcam and camera
Step 1. Check whether your camera has additional software
Most webcams and cameras are controlled by external software, so you first need to check whether yours is also controlled. A thing with these cameras are controlled by their software is that the software determines the color settings and the specific image.
Double click on camera source and select “Configure video.” Computers with external software cameras will have a pop-up window that displays various customizable settings. Here, you can adjust the different settings based on your preference.

Step 2. Download your LUTs
Download online the LUTs you want to use. Download them as folders and extract the files you downloaded as zip files. Save them in the OBS folder.
Step 3. Apply your LUTs
Still, in your OBS software, open your camera and then right-click on it. From the displayed menu, click on “Filters.”
On the bottom left corner of your interface, hit the “+” sign, then select “Apply LUTs” > “Browse.”
Open your already downloaded OBS files. Usually, there is an “Adjust” that allows you to regulate the intensity of the LUT by sliding it.

Step 4. Start recording with LUTs on
After turning on your LUT, you can start recording videos and taking photos. There is an eye icon on the left-hand side of your screen. You can use it to turn on or off LUT.
Conclusion
● And that is how to do color correction in OBS. Besides, you do not have to go to the extremes of getting a new camera because of your webcam faultiness. With OBS, you can correct your camera and webcam and get outstanding results.
● Download LUTs from the internet and use them as a template in OBS. Besides, you don’t have to pay for the LUTs, but you can use the free ones.
Color Correction is an outstanding functionality that allows editing photos and videos by altering their consistency to match a particular standard. Besides, color correction is available in the premium tool and free applications. And one of the established free software tools with color correction is the OBS.
Even though the Open Broadcaster Software is mainly known for live streaming and offline video recording, it also offers color correction functionality from its open canvas. Read this article to completion and get to the bottom line of how to do color correction in OBS.
More about OBS
In this article
01 What is OBS?
What is OBS?
Open Broadcaster Software (OBS) is free and open-source software that allows users to record videos and live stream events right at their comfort. The software functions effectively on Mac, Windows, and Linux computers.
Open Broadcaster Software (OBS) is free and open-source software that allows users to record videos and live stream events right at their comfort. The software functions effectively on Mac, Windows, and Linux computers.
Since its initial launch in 2012, OBS has made tremendous moves – This is not only from the constant release of its new versions but also the relentless increase in the functionality features. Besides, OBS is equipped with a robust API that enables plugins and scripts which provide extensive customization to precisely suit one’s needs.
However, OBS being a free application can function to date due to enough support from sponsors and backers.
How to Apply Color Correction in OBS
When you carry out basic edits to your videos or images with OBS and realize that your project has poor shade, color, or tone, you don’t have to export it to another software to correct it. Instead, you can use filters for color correction in OBS.
Apart from using OBS filters to color correct video clips and images, you can correct games, browser sources, and video capture devices.
There are various aspects of color correction in OBS. It includes:
1. Gamma
Gamma is a fundamental aspect in OBS that functions by balancing the brightness of an image through contrast. To be precise, Gamma works almost similarly to change in brightness while simultaneously increasing or decreasing the contrast.
In editing, Gamma is applicable mainly for removing shiny foreheads and webcam footage in gaming and browsing.
High Gamma is represented by “L,” whereas low Gamm is represented by “R.”
2. Contrast
Contrast is the difference in the degree of colors and tones in an image. Usually, the low contrast image has a narrow color range, whereas the high contrast images have dark shadows and bright highlights.
“L” represents high contrast in OBS contrast, whereas “R” represents low contrast.
3. Brightness
Brightness is the degree to how light or dark a picture is. To be able to understand an image clearly, it is best to correct its brightness. A change in brightness of a picture has a simultaneous change in pixels of that image.
High brightness in OBS is denounced by the letter “L,” whereas Low brightness is denounced by “R.”
4. Saturation
Saturation is the intensity of colors in a video or an image. High saturated images are bright, strong, and are rich, whereas the low saturated photos appear washed out. Black and white (grayscale) photos have no color saturation. In OBS, high saturation and low saturation are represented as “L” and “R.”
5. Hue Shift
Hue shift is the change in an image’s saturation, lightness, and hue colors. Hue shifting occurs when highlighting or shading images. In OBS, you can use the hue shift functionality to reimage your image with a completely different color palette.
With the hue shift functionality in OBS, you can place the image on top of another and have an 80% opacity. It means that you will still see the first image when you place the second one on top of it.
The “L” sign in the OBS hue shift represents 50% opacity, while the “R” represents 100% Opacity.
Color Grade in OBS
Color grading is the process of enhancing the appearance of an image through attributes such as contrast, saturation, and color, making them enchanting for presentations. Color grading is not only done for still images but also for motion pictures and images.
Color grading functionality in OBS is encompassed with several tools – This includes:
1. Lift tool
As the name suggests, lift tools are used in lifting or removing specific colors from an image. It does so without necessarily affecting other colors in an image.
With this tool, you can selectively remove unwanted colors from your image or video, replace them with your desired ones, and create astonishing results.
2. Offset
Offset is another outstanding tool in OBS color grading that controls the blacks/Shadows of an image. It functions by altering the brightness levels and leaving the highlights and the mid-tones unaffected.
3. Gain
A gain is a tool in OBS color correction that functions by only adjusting the white levels in an image. With the gain tool, brighter colors become brighter or darker.
Many people, especially beginner editors, experience difficulty differentiating between the Gamma and Offset tools. Yes, there is a closer similarity between the two, and for you to be on the safe side, you need to know that Gamma goes with the mid-tones (middle gray levels) whereas the Gain goes with highlights/whites.
How to Apply LUTs in OBS
Look up tables (LUTs) is a functionality feature that allows editors, colorists, and filmmakers to save certain colors as their templates. Therefore, when working on a particular project, they don’t have to create new working color grades; instead, you pick it from your LUT.
Using LUTs OBS is not rocket science. With LUTs, you can create unique projects with a vibrant feel. Here are the simple steps of using LUTs in OBS.
Step 1. Prepare your LUT
First, check and establish whether you have your LUT ready. If you don’t have it, you can download one from the internet. Make sure you download it as a folder. Even though OBS has LUT, It has limited color grades; therefore, it is best to download one. You can extract it to an OBS folder if you downloaded it in a zip file.
Step 2. Add your project to the OBS timeline
Open your OBS software and add your project file. Drag and drop your file to the OBS timeline.

Step 3. Add LUTs to your project
Right-click on the area in your project that you wish to apply LUTs, then click on “Filters.” Select “Apply LUT” from the drop-down menu,” which is usually at the top of the list.

Step 4. Apply your LUT as a filter
On the LUTs section, click on the browser, then open your downloaded LUT folder. Usually, the LUT is in the form of a .cube file. You can adjust your LUT by simply clicking on the “Adjust” option.
Bonus! How to Apply Color Correction for Webcam and Camera
People who primarily use their computers for recording sessions often find it difficult to capture quality videos. It is because most computer cameras are not straightforward. To do away with purchasing a new camera due to poor quality video capture, they can freely use OBS LUTs. For their camera and webcam. LUTs for webcam play a vital role in correcting the quality of photos and videos by using filters.
Here are the simple steps on how to use LUTs for color correction in webcam and camera
Step 1. Check whether your camera has additional software
Most webcams and cameras are controlled by external software, so you first need to check whether yours is also controlled. A thing with these cameras are controlled by their software is that the software determines the color settings and the specific image.
Double click on camera source and select “Configure video.” Computers with external software cameras will have a pop-up window that displays various customizable settings. Here, you can adjust the different settings based on your preference.

Step 2. Download your LUTs
Download online the LUTs you want to use. Download them as folders and extract the files you downloaded as zip files. Save them in the OBS folder.
Step 3. Apply your LUTs
Still, in your OBS software, open your camera and then right-click on it. From the displayed menu, click on “Filters.”
On the bottom left corner of your interface, hit the “+” sign, then select “Apply LUTs” > “Browse.”
Open your already downloaded OBS files. Usually, there is an “Adjust” that allows you to regulate the intensity of the LUT by sliding it.

Step 4. Start recording with LUTs on
After turning on your LUT, you can start recording videos and taking photos. There is an eye icon on the left-hand side of your screen. You can use it to turn on or off LUT.
Conclusion
● And that is how to do color correction in OBS. Besides, you do not have to go to the extremes of getting a new camera because of your webcam faultiness. With OBS, you can correct your camera and webcam and get outstanding results.
● Download LUTs from the internet and use them as a template in OBS. Besides, you don’t have to pay for the LUTs, but you can use the free ones.
Color Correction is an outstanding functionality that allows editing photos and videos by altering their consistency to match a particular standard. Besides, color correction is available in the premium tool and free applications. And one of the established free software tools with color correction is the OBS.
Even though the Open Broadcaster Software is mainly known for live streaming and offline video recording, it also offers color correction functionality from its open canvas. Read this article to completion and get to the bottom line of how to do color correction in OBS.
More about OBS
In this article
01 What is OBS?
What is OBS?
Open Broadcaster Software (OBS) is free and open-source software that allows users to record videos and live stream events right at their comfort. The software functions effectively on Mac, Windows, and Linux computers.
Open Broadcaster Software (OBS) is free and open-source software that allows users to record videos and live stream events right at their comfort. The software functions effectively on Mac, Windows, and Linux computers.
Since its initial launch in 2012, OBS has made tremendous moves – This is not only from the constant release of its new versions but also the relentless increase in the functionality features. Besides, OBS is equipped with a robust API that enables plugins and scripts which provide extensive customization to precisely suit one’s needs.
However, OBS being a free application can function to date due to enough support from sponsors and backers.
How to Apply Color Correction in OBS
When you carry out basic edits to your videos or images with OBS and realize that your project has poor shade, color, or tone, you don’t have to export it to another software to correct it. Instead, you can use filters for color correction in OBS.
Apart from using OBS filters to color correct video clips and images, you can correct games, browser sources, and video capture devices.
There are various aspects of color correction in OBS. It includes:
1. Gamma
Gamma is a fundamental aspect in OBS that functions by balancing the brightness of an image through contrast. To be precise, Gamma works almost similarly to change in brightness while simultaneously increasing or decreasing the contrast.
In editing, Gamma is applicable mainly for removing shiny foreheads and webcam footage in gaming and browsing.
High Gamma is represented by “L,” whereas low Gamm is represented by “R.”
2. Contrast
Contrast is the difference in the degree of colors and tones in an image. Usually, the low contrast image has a narrow color range, whereas the high contrast images have dark shadows and bright highlights.
“L” represents high contrast in OBS contrast, whereas “R” represents low contrast.
3. Brightness
Brightness is the degree to how light or dark a picture is. To be able to understand an image clearly, it is best to correct its brightness. A change in brightness of a picture has a simultaneous change in pixels of that image.
High brightness in OBS is denounced by the letter “L,” whereas Low brightness is denounced by “R.”
4. Saturation
Saturation is the intensity of colors in a video or an image. High saturated images are bright, strong, and are rich, whereas the low saturated photos appear washed out. Black and white (grayscale) photos have no color saturation. In OBS, high saturation and low saturation are represented as “L” and “R.”
5. Hue Shift
Hue shift is the change in an image’s saturation, lightness, and hue colors. Hue shifting occurs when highlighting or shading images. In OBS, you can use the hue shift functionality to reimage your image with a completely different color palette.
With the hue shift functionality in OBS, you can place the image on top of another and have an 80% opacity. It means that you will still see the first image when you place the second one on top of it.
The “L” sign in the OBS hue shift represents 50% opacity, while the “R” represents 100% Opacity.
Color Grade in OBS
Color grading is the process of enhancing the appearance of an image through attributes such as contrast, saturation, and color, making them enchanting for presentations. Color grading is not only done for still images but also for motion pictures and images.
Color grading functionality in OBS is encompassed with several tools – This includes:
1. Lift tool
As the name suggests, lift tools are used in lifting or removing specific colors from an image. It does so without necessarily affecting other colors in an image.
With this tool, you can selectively remove unwanted colors from your image or video, replace them with your desired ones, and create astonishing results.
2. Offset
Offset is another outstanding tool in OBS color grading that controls the blacks/Shadows of an image. It functions by altering the brightness levels and leaving the highlights and the mid-tones unaffected.
3. Gain
A gain is a tool in OBS color correction that functions by only adjusting the white levels in an image. With the gain tool, brighter colors become brighter or darker.
Many people, especially beginner editors, experience difficulty differentiating between the Gamma and Offset tools. Yes, there is a closer similarity between the two, and for you to be on the safe side, you need to know that Gamma goes with the mid-tones (middle gray levels) whereas the Gain goes with highlights/whites.
How to Apply LUTs in OBS
Look up tables (LUTs) is a functionality feature that allows editors, colorists, and filmmakers to save certain colors as their templates. Therefore, when working on a particular project, they don’t have to create new working color grades; instead, you pick it from your LUT.
Using LUTs OBS is not rocket science. With LUTs, you can create unique projects with a vibrant feel. Here are the simple steps of using LUTs in OBS.
Step 1. Prepare your LUT
First, check and establish whether you have your LUT ready. If you don’t have it, you can download one from the internet. Make sure you download it as a folder. Even though OBS has LUT, It has limited color grades; therefore, it is best to download one. You can extract it to an OBS folder if you downloaded it in a zip file.
Step 2. Add your project to the OBS timeline
Open your OBS software and add your project file. Drag and drop your file to the OBS timeline.

Step 3. Add LUTs to your project
Right-click on the area in your project that you wish to apply LUTs, then click on “Filters.” Select “Apply LUT” from the drop-down menu,” which is usually at the top of the list.

Step 4. Apply your LUT as a filter
On the LUTs section, click on the browser, then open your downloaded LUT folder. Usually, the LUT is in the form of a .cube file. You can adjust your LUT by simply clicking on the “Adjust” option.
Bonus! How to Apply Color Correction for Webcam and Camera
People who primarily use their computers for recording sessions often find it difficult to capture quality videos. It is because most computer cameras are not straightforward. To do away with purchasing a new camera due to poor quality video capture, they can freely use OBS LUTs. For their camera and webcam. LUTs for webcam play a vital role in correcting the quality of photos and videos by using filters.
Here are the simple steps on how to use LUTs for color correction in webcam and camera
Step 1. Check whether your camera has additional software
Most webcams and cameras are controlled by external software, so you first need to check whether yours is also controlled. A thing with these cameras are controlled by their software is that the software determines the color settings and the specific image.
Double click on camera source and select “Configure video.” Computers with external software cameras will have a pop-up window that displays various customizable settings. Here, you can adjust the different settings based on your preference.

Step 2. Download your LUTs
Download online the LUTs you want to use. Download them as folders and extract the files you downloaded as zip files. Save them in the OBS folder.
Step 3. Apply your LUTs
Still, in your OBS software, open your camera and then right-click on it. From the displayed menu, click on “Filters.”
On the bottom left corner of your interface, hit the “+” sign, then select “Apply LUTs” > “Browse.”
Open your already downloaded OBS files. Usually, there is an “Adjust” that allows you to regulate the intensity of the LUT by sliding it.

Step 4. Start recording with LUTs on
After turning on your LUT, you can start recording videos and taking photos. There is an eye icon on the left-hand side of your screen. You can use it to turn on or off LUT.
Conclusion
● And that is how to do color correction in OBS. Besides, you do not have to go to the extremes of getting a new camera because of your webcam faultiness. With OBS, you can correct your camera and webcam and get outstanding results.
● Download LUTs from the internet and use them as a template in OBS. Besides, you don’t have to pay for the LUTs, but you can use the free ones.
Shoot Video with Virtual Green Screen
We have seen video creators on YouTube using green screen effects to beautify their background to make the video look professional and eye-catching. The same is applicable for gamers who live stream their gameplay on Twitch. Instead of physically hanging green screens in the background, some video creators opt for virtual green screens. Yes, it is possible to shoot videos with a virtual green background, and you do not have to buy screen greens and deal with the problem of hanging them in the background.
The concept of using virtual greenscreen is rather new, but it is getting popular among amateur video creators who do not want to invest in purchasing green screens initially. When you use a virtual background to shoot your video, the actual physical background is replaced completely with a virtual green background. Thereafter, you have to replace this virtual background with anything by using a video editor. In this article, we will illustrate how to use a virtual green screen to shoot video.
1. Free Virtual Green Screen
In order to shoot a video with green virtual background, you cannot shoot your video with your regular camera app. Otherwise, your physical background will get recorded, and replacing that through video editor is going to be time-consuming. Therefore, there are specific apps available through which you have to shoot your video so that your physical background gets completely replaced by virtual greenscreen in real-time.
Snap Camera from Snapchat is a free app through which you can shoot your video to get a virtual green background. The app comes with a Green Screen filter that makes this virtual background effect possible. However, you will need a camera recording app that can record your video with green screen effects from Snap Camera. We will be using OBS Studio for recording the video which is also available for free. Snap Camera is compatible with Windows 10 and Mac 10.11+, and hence, you can use it to shoot video from your computer webcam. Here are the steps to follow –
Step 1: Download and install Snap Camera app on your computer.
Step 2: Set up your webcam perfectly so that its angle is direct to your face.
Step 3: Open Snap Camera app and you will see yourself on the app through your webcam. Select the appropriate Lens(filter) and you have to select Green Screen Snap Filter.

Step 4: You should see a green virtual background by now. Now, you have to launch OBS Studio (webcam recording software).
Step 5: Go to Sources and click on “+” icon and select Video Capture Device option.

Step 6: While configuration the new device, select Snap Camera as Device. This will enable green screen virtual backgrounds and you can start recording. After recording is done, save the file on your hard drive.

Now that you have recorded the video with green virtual background without green screen, it is time to edit the virtual greenscreen out with the video editor.
2. Best Way To Apply Green Screen Effect To Your Recorded Video
The best video editor to add green effect to your recorded video with virtual green screen is Wondershare Filmora. There are loads of video editors available with green screen feature but Filmora has the simplest steps to add green screen effects. That is why you do not have to be an expert video editor to add green screen effects to your video.
Apart from green screen effects, you can enhance the video quality by adjusting different parameters and adding other video effects to make the video interesting. Here are the steps to follow to add green screen effects to the recorded video with green virtual background.
For Win 7 or later (64-bit)
For macOS 10.12 or later
Step 1: Download and install Wondershare Filmora. Launch the video editor and select Create New Project option to get started.
Step 2: Import the recorded video with virtual green screen and drag it onto the Timeline.
Step 3: Get the stunning photo or video effect with which you want to replace the virtual background without green screen in the recorded video. Put it directly on the Timeline.
Please note that your recorded green screen video is above the replacement video on the Timeline.

Step 4: Double-click on the recorded video and you will see a panel on the upper-left side. From that panel, turn on Chroma Key option. We have already stated that green screen effect is technically referred to as Chroma Key.
Now you will the superimposed version of the replacement video effect on the green screen background of your recorded video.

Step 5: You can adjust several parameters available to fine tune the green screen effect. When you are done, click on Ok button.
Conclusion
You can now have virtual background without green screen purchase on your video. All you need is a proper application to replace your physical background with a virtual green screen and record the entire video. We have recommended free Snap Camera app and OBS Studio for this job. Then you need to edit the green screen virtual backgrounds with a video editor for which we have recommended Wondershare Filmora.
For macOS 10.12 or later
Step 1: Download and install Wondershare Filmora. Launch the video editor and select Create New Project option to get started.
Step 2: Import the recorded video with virtual green screen and drag it onto the Timeline.
Step 3: Get the stunning photo or video effect with which you want to replace the virtual background without green screen in the recorded video. Put it directly on the Timeline.
Please note that your recorded green screen video is above the replacement video on the Timeline.

Step 4: Double-click on the recorded video and you will see a panel on the upper-left side. From that panel, turn on Chroma Key option. We have already stated that green screen effect is technically referred to as Chroma Key.
Now you will the superimposed version of the replacement video effect on the green screen background of your recorded video.

Step 5: You can adjust several parameters available to fine tune the green screen effect. When you are done, click on Ok button.
Conclusion
You can now have virtual background without green screen purchase on your video. All you need is a proper application to replace your physical background with a virtual green screen and record the entire video. We have recommended free Snap Camera app and OBS Studio for this job. Then you need to edit the green screen virtual backgrounds with a video editor for which we have recommended Wondershare Filmora.
For macOS 10.12 or later
Step 1: Download and install Wondershare Filmora. Launch the video editor and select Create New Project option to get started.
Step 2: Import the recorded video with virtual green screen and drag it onto the Timeline.
Step 3: Get the stunning photo or video effect with which you want to replace the virtual background without green screen in the recorded video. Put it directly on the Timeline.
Please note that your recorded green screen video is above the replacement video on the Timeline.

Step 4: Double-click on the recorded video and you will see a panel on the upper-left side. From that panel, turn on Chroma Key option. We have already stated that green screen effect is technically referred to as Chroma Key.
Now you will the superimposed version of the replacement video effect on the green screen background of your recorded video.

Step 5: You can adjust several parameters available to fine tune the green screen effect. When you are done, click on Ok button.
Conclusion
You can now have virtual background without green screen purchase on your video. All you need is a proper application to replace your physical background with a virtual green screen and record the entire video. We have recommended free Snap Camera app and OBS Studio for this job. Then you need to edit the green screen virtual backgrounds with a video editor for which we have recommended Wondershare Filmora.
For macOS 10.12 or later
Step 1: Download and install Wondershare Filmora. Launch the video editor and select Create New Project option to get started.
Step 2: Import the recorded video with virtual green screen and drag it onto the Timeline.
Step 3: Get the stunning photo or video effect with which you want to replace the virtual background without green screen in the recorded video. Put it directly on the Timeline.
Please note that your recorded green screen video is above the replacement video on the Timeline.

Step 4: Double-click on the recorded video and you will see a panel on the upper-left side. From that panel, turn on Chroma Key option. We have already stated that green screen effect is technically referred to as Chroma Key.
Now you will the superimposed version of the replacement video effect on the green screen background of your recorded video.

Step 5: You can adjust several parameters available to fine tune the green screen effect. When you are done, click on Ok button.
Conclusion
You can now have virtual background without green screen purchase on your video. All you need is a proper application to replace your physical background with a virtual green screen and record the entire video. We have recommended free Snap Camera app and OBS Studio for this job. Then you need to edit the green screen virtual backgrounds with a video editor for which we have recommended Wondershare Filmora.
Step by Step to Rotate Videos Using Kdenlive
Kdenlive is a free, open-source video editing software application. Kdenlive is a powerful video editor that can be used to create professional-quality videos. It supports all of the major video formats and has a wide range of features. Kdenlive is available for Linux, Mac OS X, and Windows. Kdenlive is a great choice for anyone looking for a powerful, yet easy-to-use video editor. It is perfect for creating professional-quality videos, and its wide range of features makes it suitable for a variety of different tasks. It is perfect for anyone who wants a versatile video editor that works on all major platforms.
Kdenlive’s user interface is divided into three main areas: the timeline, the clip monitor, and the effects stack. The timeline is where you add and arrange your clips. The clip monitor shows your video as it will appear in your final project. The effects stack allows you to apply a range of video effects to your clips.
Step-by-step on how to rotate videos using Kdenlive
There are two ways to rotate videos using Kdenlive: by using the rotate filter or by changing the project settings. The rotate filter is a video effect that allows you to rotate your video clip around its vertical and horizontal axes. To apply the rotate filter…
Step 1: Import your video clip to the timeline.
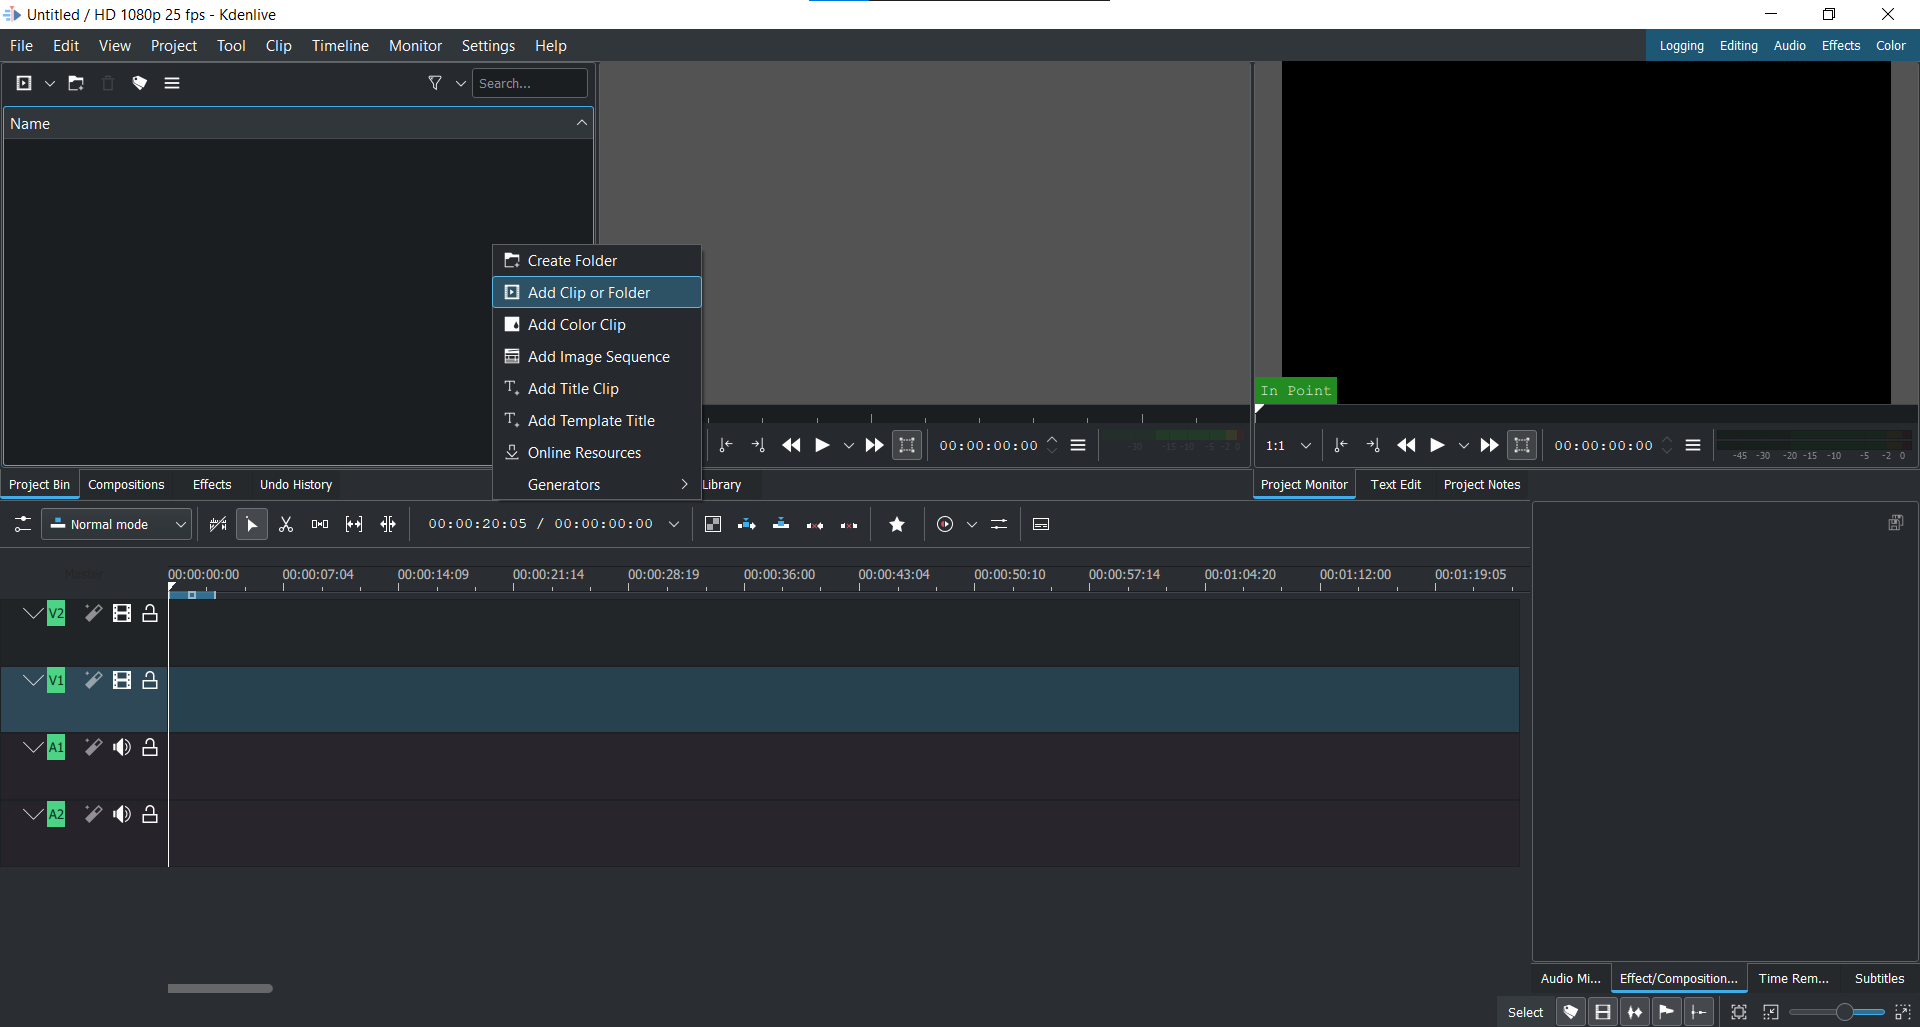
Step 2: Open the Effects tab and expand the Transform, Distort Perspective tab.
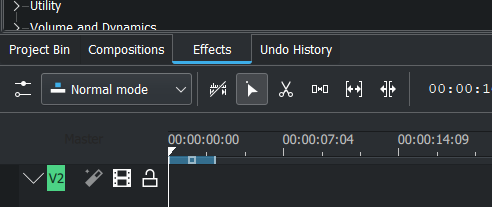
Step 3: Drag the Rotate filter onto your clip.
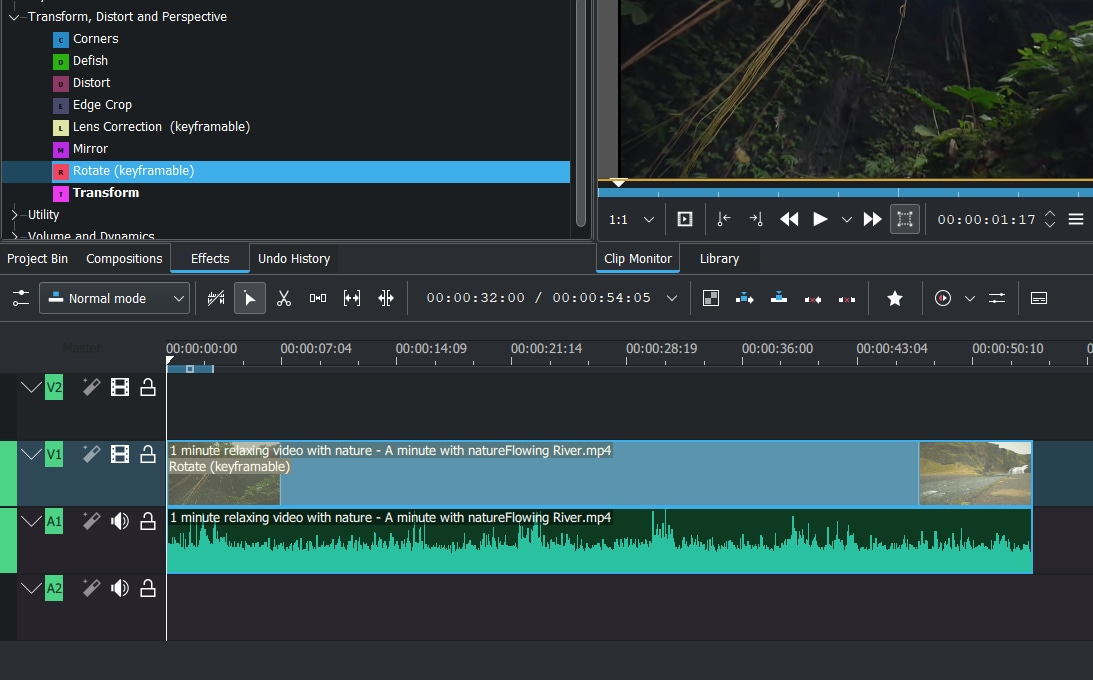
Step 4: The Rotate filter will open in the Effects Editor.
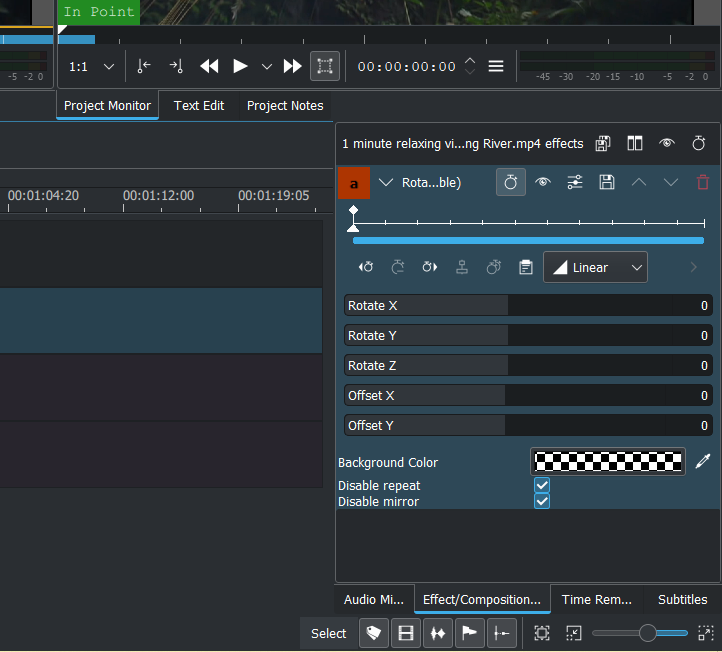
Step 5: Use the sliders to rotate your video clip.
Step 6: Click the ‘Save’ Icon to apply the filter.
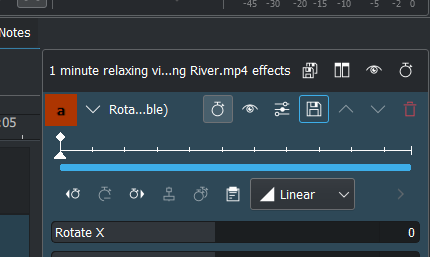
The rotate filter is a great way to quickly rotate your video clip. However, it does have some limitations. For example, you can’t…
- use the rotate filter on clips that are already rotated
- use the rotate filter to create a 360-degree rotation
- change the rotation orientation of your clip.
If you need to rotate your video clip in a different direction, or if you want to create a 360-degree rotation, you can change the project settings. The rotate filter can be used to rotate your video clip in 90-degree increments. If you need to rotate your video clip by a different amount, you can change the project settings. To change the project settings…
Step 1: Import your video clip to the timeline.
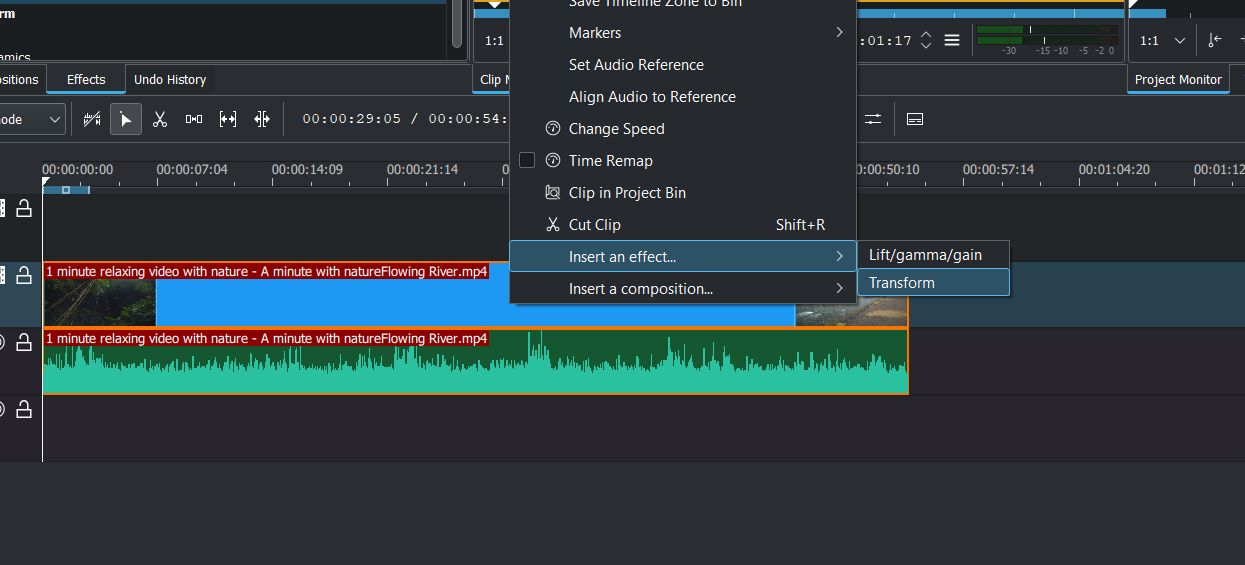
Step 2: Right-click on the clip and select Apply an Effect > Transform from the menu.
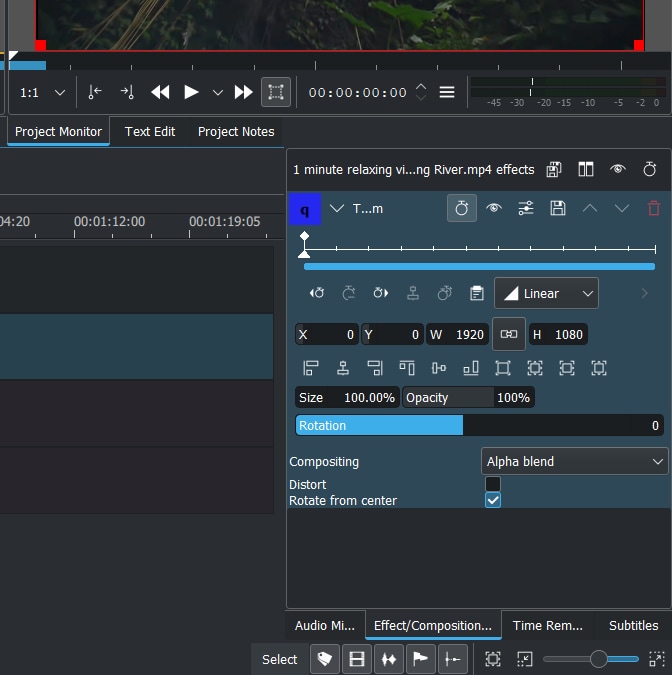
Step 3: The Properties window will open. Select the Rotate tab.

Step 4: Use the slider to set the amount of rotation you need.
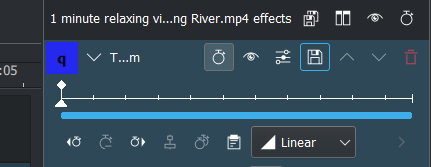
Step 5: Click the ‘Save’ Icon to apply the changes.
The project settings allow you to rotate your video clip in any direction you need.
How to rotate videos using Filmora?
Meanwhile, you can also use Filmora Video Editor to rotate your video. Filmora is a powerful video editor that can be used to create professional-quality videos. It supports all of the major video formats and has a wide range of features. Filmora is available for Windows and Mac OS X. Filmora’s user interface is divided into three main areas: the timeline, the preview window and the effects panel. The timeline is where you add and arrange your clips. The preview window shows your video as it will appear in your final project. The effects panel allows you to apply a range of video effects to your clips.
For Win 7 or later (64-bit)
For macOS 10.14 or later
Step-by-step on how to rotate videos using Filmora
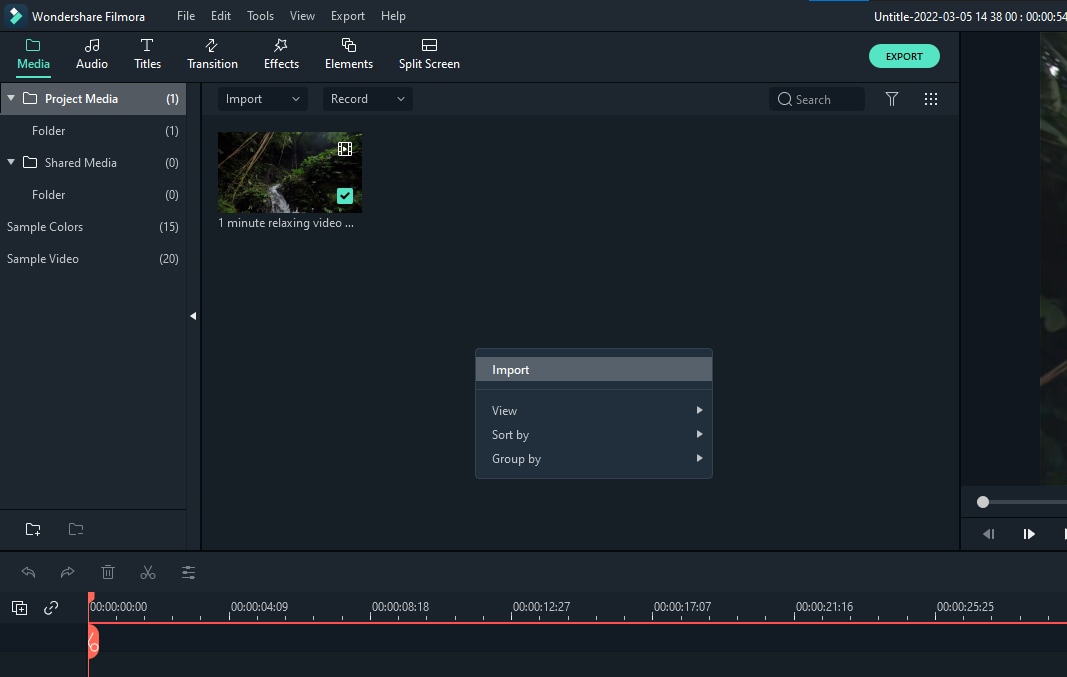
Two ways to rotate your videos using Filmora: by using the rotate option when you right click it or changing the project settings. The rotate filter is a video effect that allows you to rotate your video clip around its vertical and horizontal axes.
To apply the rotate filter…
Step 1: Import your video clip into Filmora.
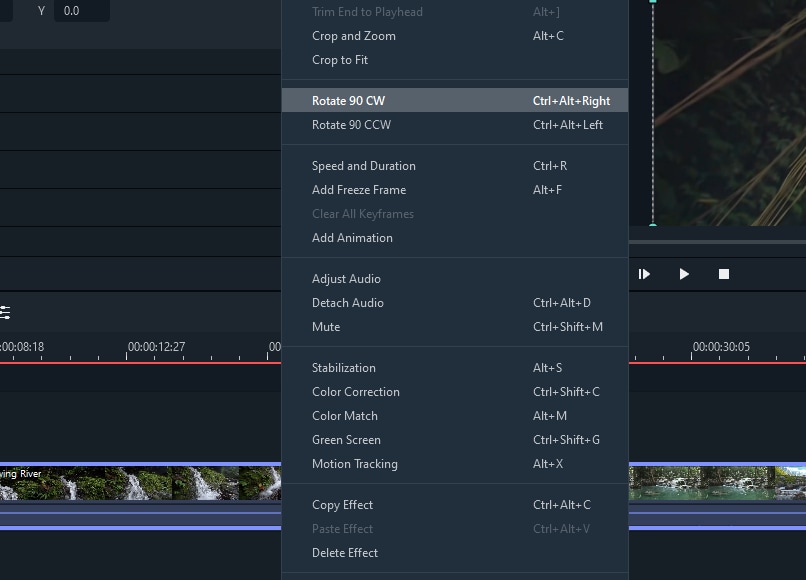
Step 2: Right-click on the video.
Step 3: Select ‘Rotate 90 CW’ or click Ctrl + Alt + Right to rotate the video 90 degrees clockwise.
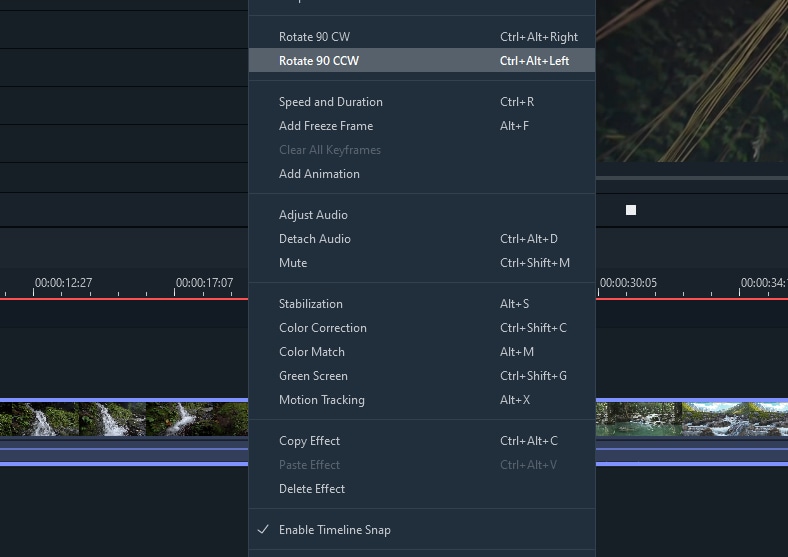
Step 4: Select ‘Rotate 90 CCW’ or click Ctrl + Alt + Left to rotate the video 90 degrees counterclockwise.
Step 5: Repeat the steps until you are satisfied. Note: It can only rotate the video in the degrees of multiples of 90.
Step 6: The video is now rotated.
Filmora’s rotate filter is very similar to Kdenlive’s. However, there are a few differences. For example…
- you can use the rotate filter on clips that are already rotated
- you can change the rotation orientation of your clip.
If you need to rotate your video clip in a different direction, or if you want to create a 360-degree rotation, follow the below steps:
Click on the ‘Edit’ option in the tool above the timeline.
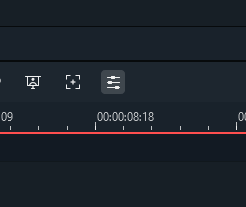
Select the ‘Transform’ option, then go to ‘Rotate’
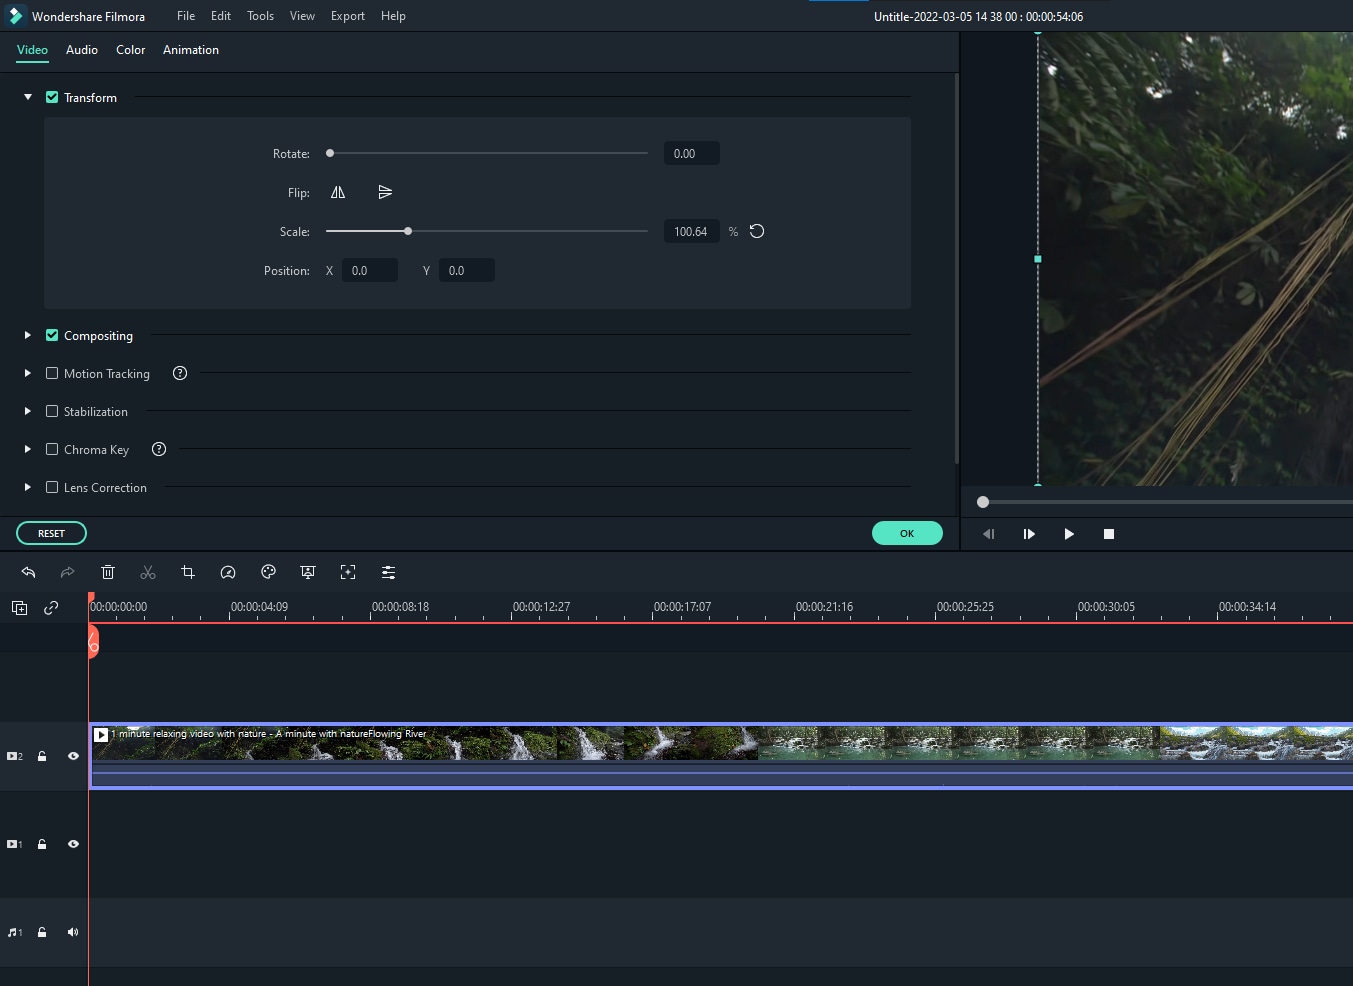
Use the slider to set the amount of rotation you need.

Click OK to apply the changes.
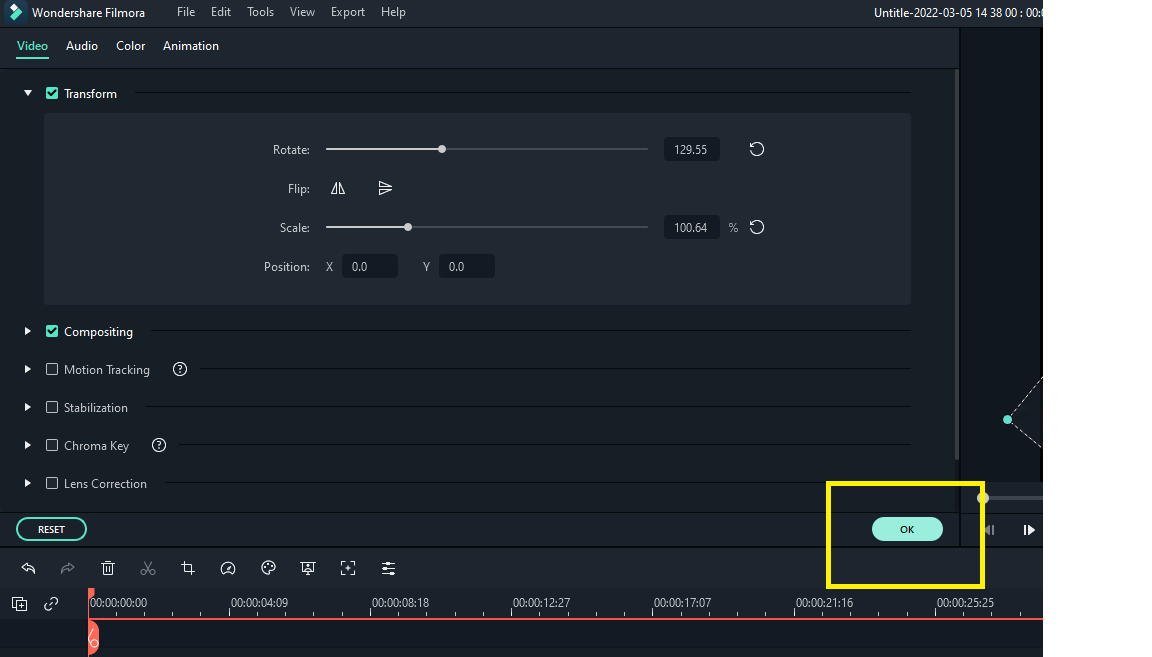
The project settings allow you to rotate your video clip in any direction you need.
Both Filmora and Kdenlive offer a rotate filter that allows you to rotate your video clip by a certain amount. However, only Filmora offers the ability to rotate your video clip in any direction you need. Additionally, Filmora offers a wide range of features that can be used to create professional-quality videos. If you need to rotate your video clip in a different direction, or if you want to create a 360-degree rotation, Filmora is the best option.
Step 2: Open the Effects tab and expand the Transform, Distort Perspective tab.

Step 3: Drag the Rotate filter onto your clip.

Step 4: The Rotate filter will open in the Effects Editor.

Step 5: Use the sliders to rotate your video clip.
Step 6: Click the ‘Save’ Icon to apply the filter.

The rotate filter is a great way to quickly rotate your video clip. However, it does have some limitations. For example, you can’t…
- use the rotate filter on clips that are already rotated
- use the rotate filter to create a 360-degree rotation
- change the rotation orientation of your clip.
If you need to rotate your video clip in a different direction, or if you want to create a 360-degree rotation, you can change the project settings. The rotate filter can be used to rotate your video clip in 90-degree increments. If you need to rotate your video clip by a different amount, you can change the project settings. To change the project settings…
Step 1: Import your video clip to the timeline.

Step 2: Right-click on the clip and select Apply an Effect > Transform from the menu.

Step 3: The Properties window will open. Select the Rotate tab.

Step 4: Use the slider to set the amount of rotation you need.

Step 5: Click the ‘Save’ Icon to apply the changes.

The project settings allow you to rotate your video clip in any direction you need.
How to rotate videos using Filmora?
Meanwhile, you can also use Filmora Video Editor to rotate your video. Filmora is a powerful video editor that can be used to create professional-quality videos. It supports all of the major video formats and has a wide range of features. Filmora is available for Windows and Mac OS X. Filmora’s user interface is divided into three main areas: the timeline, the preview window and the effects panel. The timeline is where you add and arrange your clips. The preview window shows your video as it will appear in your final project. The effects panel allows you to apply a range of video effects to your clips.
For Win 7 or later (64-bit)
For macOS 10.14 or later
Step-by-step on how to rotate videos using Filmora
Two ways to rotate your videos using Filmora: by using the rotate option when you right click it or changing the project settings. The rotate filter is a video effect that allows you to rotate your video clip around its vertical and horizontal axes.
To apply the rotate filter…
Step 1: Import your video clip into Filmora.

Step 2: Right-click on the video.
Step 3: Select ‘Rotate 90 CW’ or click Ctrl + Alt + Right to rotate the video 90 degrees clockwise.

Step 4: Select ‘Rotate 90 CCW’ or click Ctrl + Alt + Left to rotate the video 90 degrees counterclockwise.
Step 5: Repeat the steps until you are satisfied. Note: It can only rotate the video in the degrees of multiples of 90.
Step 6: The video is now rotated.
Filmora’s rotate filter is very similar to Kdenlive’s. However, there are a few differences. For example…
- you can use the rotate filter on clips that are already rotated
- you can change the rotation orientation of your clip.
If you need to rotate your video clip in a different direction, or if you want to create a 360-degree rotation, follow the below steps:
Click on the ‘Edit’ option in the tool above the timeline.

Select the ‘Transform’ option, then go to ‘Rotate’

Use the slider to set the amount of rotation you need.

Click OK to apply the changes.

The project settings allow you to rotate your video clip in any direction you need.
Both Filmora and Kdenlive offer a rotate filter that allows you to rotate your video clip by a certain amount. However, only Filmora offers the ability to rotate your video clip in any direction you need. Additionally, Filmora offers a wide range of features that can be used to create professional-quality videos. If you need to rotate your video clip in a different direction, or if you want to create a 360-degree rotation, Filmora is the best option.
Step 2: Open the Effects tab and expand the Transform, Distort Perspective tab.

Step 3: Drag the Rotate filter onto your clip.

Step 4: The Rotate filter will open in the Effects Editor.

Step 5: Use the sliders to rotate your video clip.
Step 6: Click the ‘Save’ Icon to apply the filter.

The rotate filter is a great way to quickly rotate your video clip. However, it does have some limitations. For example, you can’t…
- use the rotate filter on clips that are already rotated
- use the rotate filter to create a 360-degree rotation
- change the rotation orientation of your clip.
If you need to rotate your video clip in a different direction, or if you want to create a 360-degree rotation, you can change the project settings. The rotate filter can be used to rotate your video clip in 90-degree increments. If you need to rotate your video clip by a different amount, you can change the project settings. To change the project settings…
Step 1: Import your video clip to the timeline.

Step 2: Right-click on the clip and select Apply an Effect > Transform from the menu.

Step 3: The Properties window will open. Select the Rotate tab.

Step 4: Use the slider to set the amount of rotation you need.

Step 5: Click the ‘Save’ Icon to apply the changes.

The project settings allow you to rotate your video clip in any direction you need.
How to rotate videos using Filmora?
Meanwhile, you can also use Filmora Video Editor to rotate your video. Filmora is a powerful video editor that can be used to create professional-quality videos. It supports all of the major video formats and has a wide range of features. Filmora is available for Windows and Mac OS X. Filmora’s user interface is divided into three main areas: the timeline, the preview window and the effects panel. The timeline is where you add and arrange your clips. The preview window shows your video as it will appear in your final project. The effects panel allows you to apply a range of video effects to your clips.
For Win 7 or later (64-bit)
For macOS 10.14 or later
Step-by-step on how to rotate videos using Filmora
Two ways to rotate your videos using Filmora: by using the rotate option when you right click it or changing the project settings. The rotate filter is a video effect that allows you to rotate your video clip around its vertical and horizontal axes.
To apply the rotate filter…
Step 1: Import your video clip into Filmora.

Step 2: Right-click on the video.
Step 3: Select ‘Rotate 90 CW’ or click Ctrl + Alt + Right to rotate the video 90 degrees clockwise.

Step 4: Select ‘Rotate 90 CCW’ or click Ctrl + Alt + Left to rotate the video 90 degrees counterclockwise.
Step 5: Repeat the steps until you are satisfied. Note: It can only rotate the video in the degrees of multiples of 90.
Step 6: The video is now rotated.
Filmora’s rotate filter is very similar to Kdenlive’s. However, there are a few differences. For example…
- you can use the rotate filter on clips that are already rotated
- you can change the rotation orientation of your clip.
If you need to rotate your video clip in a different direction, or if you want to create a 360-degree rotation, follow the below steps:
Click on the ‘Edit’ option in the tool above the timeline.

Select the ‘Transform’ option, then go to ‘Rotate’

Use the slider to set the amount of rotation you need.

Click OK to apply the changes.

The project settings allow you to rotate your video clip in any direction you need.
Both Filmora and Kdenlive offer a rotate filter that allows you to rotate your video clip by a certain amount. However, only Filmora offers the ability to rotate your video clip in any direction you need. Additionally, Filmora offers a wide range of features that can be used to create professional-quality videos. If you need to rotate your video clip in a different direction, or if you want to create a 360-degree rotation, Filmora is the best option.
Step 2: Open the Effects tab and expand the Transform, Distort Perspective tab.

Step 3: Drag the Rotate filter onto your clip.

Step 4: The Rotate filter will open in the Effects Editor.

Step 5: Use the sliders to rotate your video clip.
Step 6: Click the ‘Save’ Icon to apply the filter.

The rotate filter is a great way to quickly rotate your video clip. However, it does have some limitations. For example, you can’t…
- use the rotate filter on clips that are already rotated
- use the rotate filter to create a 360-degree rotation
- change the rotation orientation of your clip.
If you need to rotate your video clip in a different direction, or if you want to create a 360-degree rotation, you can change the project settings. The rotate filter can be used to rotate your video clip in 90-degree increments. If you need to rotate your video clip by a different amount, you can change the project settings. To change the project settings…
Step 1: Import your video clip to the timeline.

Step 2: Right-click on the clip and select Apply an Effect > Transform from the menu.

Step 3: The Properties window will open. Select the Rotate tab.

Step 4: Use the slider to set the amount of rotation you need.

Step 5: Click the ‘Save’ Icon to apply the changes.

The project settings allow you to rotate your video clip in any direction you need.
How to rotate videos using Filmora?
Meanwhile, you can also use Filmora Video Editor to rotate your video. Filmora is a powerful video editor that can be used to create professional-quality videos. It supports all of the major video formats and has a wide range of features. Filmora is available for Windows and Mac OS X. Filmora’s user interface is divided into three main areas: the timeline, the preview window and the effects panel. The timeline is where you add and arrange your clips. The preview window shows your video as it will appear in your final project. The effects panel allows you to apply a range of video effects to your clips.
For Win 7 or later (64-bit)
For macOS 10.14 or later
Step-by-step on how to rotate videos using Filmora
Two ways to rotate your videos using Filmora: by using the rotate option when you right click it or changing the project settings. The rotate filter is a video effect that allows you to rotate your video clip around its vertical and horizontal axes.
To apply the rotate filter…
Step 1: Import your video clip into Filmora.

Step 2: Right-click on the video.
Step 3: Select ‘Rotate 90 CW’ or click Ctrl + Alt + Right to rotate the video 90 degrees clockwise.

Step 4: Select ‘Rotate 90 CCW’ or click Ctrl + Alt + Left to rotate the video 90 degrees counterclockwise.
Step 5: Repeat the steps until you are satisfied. Note: It can only rotate the video in the degrees of multiples of 90.
Step 6: The video is now rotated.
Filmora’s rotate filter is very similar to Kdenlive’s. However, there are a few differences. For example…
- you can use the rotate filter on clips that are already rotated
- you can change the rotation orientation of your clip.
If you need to rotate your video clip in a different direction, or if you want to create a 360-degree rotation, follow the below steps:
Click on the ‘Edit’ option in the tool above the timeline.

Select the ‘Transform’ option, then go to ‘Rotate’

Use the slider to set the amount of rotation you need.

Click OK to apply the changes.

The project settings allow you to rotate your video clip in any direction you need.
Both Filmora and Kdenlive offer a rotate filter that allows you to rotate your video clip by a certain amount. However, only Filmora offers the ability to rotate your video clip in any direction you need. Additionally, Filmora offers a wide range of features that can be used to create professional-quality videos. If you need to rotate your video clip in a different direction, or if you want to create a 360-degree rotation, Filmora is the best option.
Also read:
- How to Zoom Webcam on PC for 2024
- Some of the Top Sites to Replace a Sky Background in Videos
- The Quick and Simple Way to Mirror Video in Premiere Pro
- Updated This Article Talks in Detail About How to Edit Videos with Windows Movie Maker 10, How to Download or Install It, and so On. It Further Involves the Use of an Alternative to This Tool. Check Out Now
- All About GIF Keyboard That You May Want to Know for 2024
- Updated 2024 Approved Guide To Scaling and Setting Videos in Filmora | Tutorial
- Updated How to Create Text Animation for Videos
- Do You Want to Know How to Add a VHS Effect Premiere Look? You Can Easily Apply the VHS Effect to Your Videos Using Adobe Premiere Pro
- Updated 2024 Approved How to Trim/Crop Video in Microsoft Powerpoint
- New In 2024, Competitive Guide To Use Slow Motion in After Effects
- Updated In 2024, How to Add Expression in After Effects
- Updated 2024 Approved Best Ideas on Using Green Screen with Filmora
- 2024 Approved How to Create a Dynamic Text Animation in Filmora — Step-By-Step
- Are You Working on Editing a Video and Youd Like to Add Text to It? Learn the Various Ways that You Can Add Text to a Video
- New How to Edit Recorded Video for 2024
- New Merge MP4 Online? Its Easy With These 5 Tools for 2024
- Updated Enhance Your Video Color Accuracy with Video Scopes
- New Top LUTs for Sony HLG
- Guide To Make a YouTube Intro by Filmora
- How to Use a Stabilization Tool in Filmora for 2024
- Updated Finding The Best LUTs for Wondershare Filmora for 2024
- New 2024 Approved VN Video Editor Templates A Game-Changer for Your Videos
- In 2024, For Converting GIF to MOV Format, You Dont Need to Search From A-Z. Here Is an Amazing Guide, that Gives You Complete Details About Both Offline and Online Gif-to-MOV Converters. Catch Them Below and Experience a Pro Editing Time
- 2024 Approved 6 Best Text to Speech Generators for YouTube Videos Windows, Mac, Android, iPhone & Online
- Updated Having Issues Trying to View SRT Files when You Add Subtitle Files for VLC? Learn the Right Ways to Do so and the Best Alternative Solution
- Updated In 2024, Best 12 Best Freeze Frame Video Editing Examples
- In 2024, What Is Animated GIF | GIF Example & Advantages of GIF
- New How to Make Video Slow Motion?
- Updated 10 Best Photoshop Cartoon Effects For Creatives for 2024
- Updated How to Make a Funny Meme on MacBook
- In 2024, How to use Pokemon Go Joystick on Oppo Reno 9A? | Dr.fone
- In 2024, Top 12 Prominent Xiaomi Redmi 12 5G Fingerprint Not Working Solutions
- How to Quickly Fix Bluetooth Not Working on OnePlus Nord 3 5G | Dr.fone
- Easy steps to recover deleted photos from Xiaomi 14 Ultra.
- All About Factory Reset, What Is It and What It Does to Your Motorola Moto G13? | Dr.fone
- How to Factory Reset Poco F5 Pro 5G If I Forgot Security Code or Password? | Dr.fone
- In 2024, How to Unlock ZTE Nubia Flip 5G Bootloader Easily
- 4 Feasible Ways to Fake Location on Facebook For your Apple iPhone 11 Pro Max | Dr.fone
- In 2024, How to Mirror PC Screen to Samsung Galaxy A24 Phones? | Dr.fone
- 4 Feasible Ways to Fake Location on Facebook For your Apple iPhone 11 Pro | Dr.fone
- How to Transfer Photos From Nubia Z50S Pro to Samsung Galaxy S21 Ultra | Dr.fone
- How to play AVCHD MTS files on Razr 40?
- Full Guide to Fix iToolab AnyGO Not Working On Xiaomi 14 Ultra | Dr.fone
- 5 Ways to Track Realme 11 Pro without App | Dr.fone
- In 2024, How to Turn Off Google Location to Stop Tracking You on Vivo Y78t | Dr.fone
- Remove OnePlus unlock screen
- 5 Hassle-Free Solutions to Fake Location on Find My Friends Of Honor 90 | Dr.fone
- In 2024, How to Transfer Contacts from Oppo A59 5G to Other Android Devices Devices? | Dr.fone
- What To Do When Vivo S17e Has Black Screen of Death? | Dr.fone
- Fixing Foneazy MockGo Not Working On Honor 70 Lite 5G | Dr.fone
- Title: New Ideas for Time-Lapse Video
- Author: Chloe
- Created at : 2024-05-20 03:38:13
- Updated at : 2024-05-21 03:38:13
- Link: https://ai-editing-video.techidaily.com/new-ideas-for-time-lapse-video/
- License: This work is licensed under CC BY-NC-SA 4.0.

