:max_bytes(150000):strip_icc():format(webp)/how-to-see-who-viewed-your-tiktok-5271090-e2cb663541b8484a8a2e80ffbdd98db3.jpg)
New In 2024, 4 Ways to Loop a Video on Vimeo

4 Ways to Loop a Video on Vimeo
Vimeo is a popular video streaming platform where you can watch videos all day. Vimeo is a close competitor of YouTube. If you are a regular viewer on Vimeo, you may want to watch a video in a loop. Instead of manually playing the video again and again, you can automatically loop the video on Vimeo.
If you are embedding a Vimeo video on your website, you will want to play it on a loop. This will ensure maximum watch time from the audience. Besides, if you are a video creator, you may want to loop Vimeo videos for your video project. We will illustrate how to loop video on Vimeo for all scenarios.
Way 1. Loop A Video on Vimeo Directly
Most online users watch videos on Vimeo directly through the web browser. This is specifically applicable to computer users. If you want Vimeo loop video for any desired video, the steps are simple. You have to make some adjustments and additions to the video URL on the address bar. You should change the URL accurately for looping a video. Here are the steps on how to loop a video on Vimeo directly.
Step 1: On your device, launch the web browser. Open the official website of Vimeo Watch. Play any video of your liking.

Step 2: Now, you need to change the URL of the video you are playing. Here are the changes to make in the address bar.
- Remove everything at the beginning of “vimeo.com”. Add “.player” at the beginning of the URL.
- Add “/video/“ after “vimeo.com”.
- Add “?amp;loop=1:” at the end of the URL.
Therefore, the initial URL of the video was “https://vimeo.com/754255543 “. You have to change it to “player.vimeo.com/video/754255543?amp;loop=1”.
Step 3: After making the changes, press Enter key. The same video will play in a loop until you pause the video or close the web browser’s tab.
Way 2. Loop a Vimeo Video When Embedded on Your Site
You can embed a Vimeo video on your website so that the audience can watch it. The video will play only once when someone lands on your website. After the video ends playing, the embedding will show suggested videos. If you want the same video to play again and again, you have to put it in a loop. Here are the steps on how to loop Vimeo video when embedded on your website.
Step 1: Open the Vimeo video on your web browser. Click on Share icon present inside the player in the top-right corner.
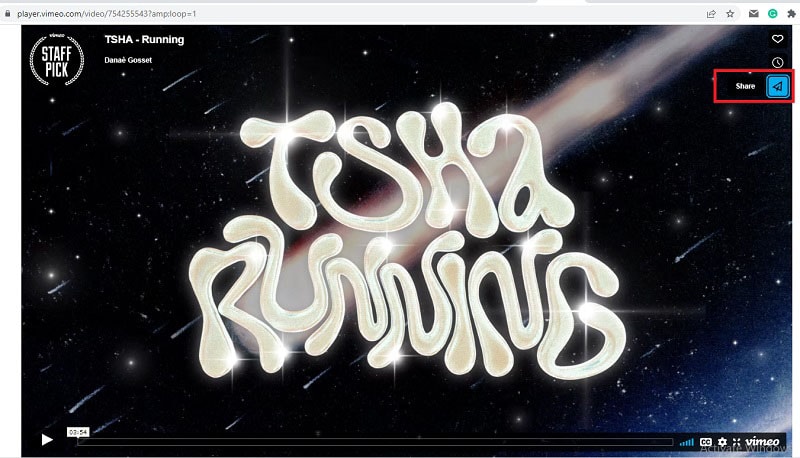
Step 2: You will get to see several options, and you need to click on “Get Embed Code” option.
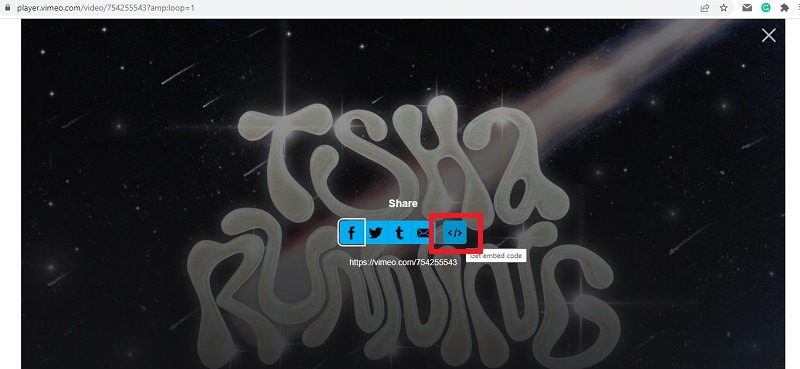
Step 3: On the next screen, you will get the embed code in a pop-up box. Click on Show options.

Step 4: From the expanded section, go to Special Stuff section. Turn on “Loop this video” option.

Step 5: Thereafter, copy the code and paste it into your website to play the video in a loop.
Way 3. How to Loop a Vimeo Video on Mobile
If you are a mobile user, you can use the Vimeo app. But you cannot loop a video on the Vimeo app, quite surprisingly. If you are using the Vimeo app, you can copy the link to the video. Thereafter, you can open the video on your web browser app. You can follow the steps we have mentioned for looping a video on Vimeo directly. Here are the steps for Vimeo loop video on mobile devices.
Step 1: Open the Vimeo app on your mobile device. Play the video that you want in the loop.
Step 2: Tap on the Share icon and tap on Copy URL option.
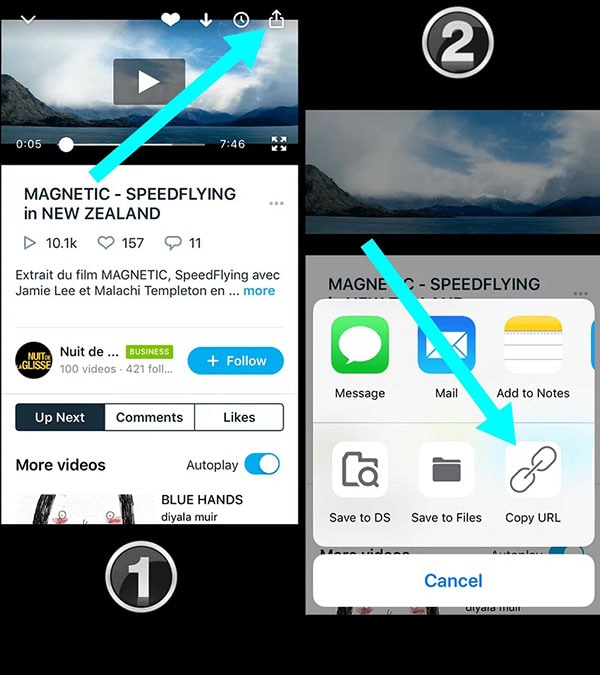
Step 3: Open your web browser and paste the copied URL.
Step 4: Modify the URL in the address bar following the steps we have mentioned in Way 1.
After the modification, the URL of the video should change from “https://vimeo.com/754255543 “ to “player.vimeo.com/video/754255543?amp;loop=1”.
Way 4. How to Loop Vimeo Videos on Computer
If you want to use Vimeo loop video in your video project on your computer, you can use Wondershare Filmora. Filmora is a professional video editor where you can loop any downloaded Vimeo video as long as you want. There are several online Vimeo downloaders available to download any designed Vimeo video.
Thereafter, you can import the downloaded video into Filmora. Then you can extend the duration by looping the video. Filmora is available for Windows and macOS. Apart from looping, you can edit your video like a professional. Here are the steps on how to loop a video on Vimeo.
Free Download For Win 7 or later(64-bit)
Free Download For macOS 10.14 or later
Step 1: Download and install Wondershare Filmora. Download the desired Vimeo video on your computer. Launch Filmora and click on New Project.

Step 2: Drag and drop the downloaded video file into the Project Media folder on Filmora. Thereafter, bring the video file from Project Media folder into the timeline.

Step 3: Drag and drop the video clip into the timeline again. Make sure that there is no gap between the clips and they are on the same channel for looping. Alternative, you can copy and paste the video clip multiple times for looping.

Step 4: You can play the video and watch it in loop. Finally, click on the Export button to save the video in the desired file format.

Wondershare Filmora Best Video Looper Software for Social Media Video Creation.
Free Download Free Download Learn More

Conclusion
There are several ways to loop a video on Vimeo. The best way out is to go for Vimeo loop video directly from the web browser. We have also illustrated how to embed a Vimeo video in a loop into your website. If you want to have a looped Vimeo video in your video project, you can use Filmora on your computer.
Free Download For macOS 10.14 or later
Step 1: Download and install Wondershare Filmora. Download the desired Vimeo video on your computer. Launch Filmora and click on New Project.

Step 2: Drag and drop the downloaded video file into the Project Media folder on Filmora. Thereafter, bring the video file from Project Media folder into the timeline.

Step 3: Drag and drop the video clip into the timeline again. Make sure that there is no gap between the clips and they are on the same channel for looping. Alternative, you can copy and paste the video clip multiple times for looping.

Step 4: You can play the video and watch it in loop. Finally, click on the Export button to save the video in the desired file format.

Wondershare Filmora Best Video Looper Software for Social Media Video Creation.
Free Download Free Download Learn More

Conclusion
There are several ways to loop a video on Vimeo. The best way out is to go for Vimeo loop video directly from the web browser. We have also illustrated how to embed a Vimeo video in a loop into your website. If you want to have a looped Vimeo video in your video project, you can use Filmora on your computer.
Learn About Open Broadcaster Software and How to Perform Obs Color Correction. Also, Explore the Various Aspects of Color Correction Like Contrast, Brightness, Saturation, Among Others
Create High-Quality Video - Wondershare Filmora
An easy and powerful YouTube video editor
Numerous video and audio effects to choose from
Detailed tutorials are provided by the official channel
Color Correction is an outstanding functionality that allows editing photos and videos by altering their consistency to match a particular standard. Besides, color correction is available in the premium tool and free applications. And one of the established free software tools with color correction is the OBS.
Even though the Open Broadcaster Software is mainly known for live streaming and offline video recording, it also offers color correction functionality from its open canvas. Read this article to completion and get to the bottom line of how to do color correction in OBS.
More about OBS
In this article
01 What is OBS?
What is OBS?
Open Broadcaster Software (OBS) is free and open-source software that allows users to record videos and live stream events right at their comfort. The software functions effectively on Mac, Windows, and Linux computers.
Open Broadcaster Software (OBS) is free and open-source software that allows users to record videos and live stream events right at their comfort. The software functions effectively on Mac, Windows, and Linux computers.
Since its initial launch in 2012, OBS has made tremendous moves – This is not only from the constant release of its new versions but also the relentless increase in the functionality features. Besides, OBS is equipped with a robust API that enables plugins and scripts which provide extensive customization to precisely suit one’s needs.
However, OBS being a free application can function to date due to enough support from sponsors and backers.
How to Apply Color Correction in OBS
When you carry out basic edits to your videos or images with OBS and realize that your project has poor shade, color, or tone, you don’t have to export it to another software to correct it. Instead, you can use filters for color correction in OBS.
Apart from using OBS filters to color correct video clips and images, you can correct games, browser sources, and video capture devices.
There are various aspects of color correction in OBS. It includes:
1. Gamma
Gamma is a fundamental aspect in OBS that functions by balancing the brightness of an image through contrast. To be precise, Gamma works almost similarly to change in brightness while simultaneously increasing or decreasing the contrast.
In editing, Gamma is applicable mainly for removing shiny foreheads and webcam footage in gaming and browsing.
High Gamma is represented by “L,” whereas low Gamm is represented by “R.”
2. Contrast
Contrast is the difference in the degree of colors and tones in an image. Usually, the low contrast image has a narrow color range, whereas the high contrast images have dark shadows and bright highlights.
“L” represents high contrast in OBS contrast, whereas “R” represents low contrast.
3. Brightness
Brightness is the degree to how light or dark a picture is. To be able to understand an image clearly, it is best to correct its brightness. A change in brightness of a picture has a simultaneous change in pixels of that image.
High brightness in OBS is denounced by the letter “L,” whereas Low brightness is denounced by “R.”
4. Saturation
Saturation is the intensity of colors in a video or an image. High saturated images are bright, strong, and are rich, whereas the low saturated photos appear washed out. Black and white (grayscale) photos have no color saturation. In OBS, high saturation and low saturation are represented as “L” and “R.”
5. Hue Shift
Hue shift is the change in an image’s saturation, lightness, and hue colors. Hue shifting occurs when highlighting or shading images. In OBS, you can use the hue shift functionality to reimage your image with a completely different color palette.
With the hue shift functionality in OBS, you can place the image on top of another and have an 80% opacity. It means that you will still see the first image when you place the second one on top of it.
The “L” sign in the OBS hue shift represents 50% opacity, while the “R” represents 100% Opacity.
Color Grade in OBS
Color grading is the process of enhancing the appearance of an image through attributes such as contrast, saturation, and color, making them enchanting for presentations. Color grading is not only done for still images but also for motion pictures and images.
Color grading functionality in OBS is encompassed with several tools – This includes:
1. Lift tool
As the name suggests, lift tools are used in lifting or removing specific colors from an image. It does so without necessarily affecting other colors in an image.
With this tool, you can selectively remove unwanted colors from your image or video, replace them with your desired ones, and create astonishing results.
2. Offset
Offset is another outstanding tool in OBS color grading that controls the blacks/Shadows of an image. It functions by altering the brightness levels and leaving the highlights and the mid-tones unaffected.
3. Gain
A gain is a tool in OBS color correction that functions by only adjusting the white levels in an image. With the gain tool, brighter colors become brighter or darker.
Many people, especially beginner editors, experience difficulty differentiating between the Gamma and Offset tools. Yes, there is a closer similarity between the two, and for you to be on the safe side, you need to know that Gamma goes with the mid-tones (middle gray levels) whereas the Gain goes with highlights/whites.
How to Apply LUTs in OBS
Look up tables (LUTs) is a functionality feature that allows editors, colorists, and filmmakers to save certain colors as their templates. Therefore, when working on a particular project, they don’t have to create new working color grades; instead, you pick it from your LUT.
Using LUTs OBS is not rocket science. With LUTs, you can create unique projects with a vibrant feel. Here are the simple steps of using LUTs in OBS.
Step 1. Prepare your LUT
First, check and establish whether you have your LUT ready. If you don’t have it, you can download one from the internet. Make sure you download it as a folder. Even though OBS has LUT, It has limited color grades; therefore, it is best to download one. You can extract it to an OBS folder if you downloaded it in a zip file.
Step 2. Add your project to the OBS timeline
Open your OBS software and add your project file. Drag and drop your file to the OBS timeline.

Step 3. Add LUTs to your project
Right-click on the area in your project that you wish to apply LUTs, then click on “Filters.” Select “Apply LUT” from the drop-down menu,” which is usually at the top of the list.

Step 4. Apply your LUT as a filter
On the LUTs section, click on the browser, then open your downloaded LUT folder. Usually, the LUT is in the form of a .cube file. You can adjust your LUT by simply clicking on the “Adjust” option.
Bonus! How to Apply Color Correction for Webcam and Camera
People who primarily use their computers for recording sessions often find it difficult to capture quality videos. It is because most computer cameras are not straightforward. To do away with purchasing a new camera due to poor quality video capture, they can freely use OBS LUTs. For their camera and webcam. LUTs for webcam play a vital role in correcting the quality of photos and videos by using filters.
Here are the simple steps on how to use LUTs for color correction in webcam and camera
Step 1. Check whether your camera has additional software
Most webcams and cameras are controlled by external software, so you first need to check whether yours is also controlled. A thing with these cameras are controlled by their software is that the software determines the color settings and the specific image.
Double click on camera source and select “Configure video.” Computers with external software cameras will have a pop-up window that displays various customizable settings. Here, you can adjust the different settings based on your preference.

Step 2. Download your LUTs
Download online the LUTs you want to use. Download them as folders and extract the files you downloaded as zip files. Save them in the OBS folder.
Step 3. Apply your LUTs
Still, in your OBS software, open your camera and then right-click on it. From the displayed menu, click on “Filters.”
On the bottom left corner of your interface, hit the “+” sign, then select “Apply LUTs” > “Browse.”
Open your already downloaded OBS files. Usually, there is an “Adjust” that allows you to regulate the intensity of the LUT by sliding it.

Step 4. Start recording with LUTs on
After turning on your LUT, you can start recording videos and taking photos. There is an eye icon on the left-hand side of your screen. You can use it to turn on or off LUT.
Conclusion
● And that is how to do color correction in OBS. Besides, you do not have to go to the extremes of getting a new camera because of your webcam faultiness. With OBS, you can correct your camera and webcam and get outstanding results.
● Download LUTs from the internet and use them as a template in OBS. Besides, you don’t have to pay for the LUTs, but you can use the free ones.
Color Correction is an outstanding functionality that allows editing photos and videos by altering their consistency to match a particular standard. Besides, color correction is available in the premium tool and free applications. And one of the established free software tools with color correction is the OBS.
Even though the Open Broadcaster Software is mainly known for live streaming and offline video recording, it also offers color correction functionality from its open canvas. Read this article to completion and get to the bottom line of how to do color correction in OBS.
More about OBS
In this article
01 What is OBS?
What is OBS?
Open Broadcaster Software (OBS) is free and open-source software that allows users to record videos and live stream events right at their comfort. The software functions effectively on Mac, Windows, and Linux computers.
Open Broadcaster Software (OBS) is free and open-source software that allows users to record videos and live stream events right at their comfort. The software functions effectively on Mac, Windows, and Linux computers.
Since its initial launch in 2012, OBS has made tremendous moves – This is not only from the constant release of its new versions but also the relentless increase in the functionality features. Besides, OBS is equipped with a robust API that enables plugins and scripts which provide extensive customization to precisely suit one’s needs.
However, OBS being a free application can function to date due to enough support from sponsors and backers.
How to Apply Color Correction in OBS
When you carry out basic edits to your videos or images with OBS and realize that your project has poor shade, color, or tone, you don’t have to export it to another software to correct it. Instead, you can use filters for color correction in OBS.
Apart from using OBS filters to color correct video clips and images, you can correct games, browser sources, and video capture devices.
There are various aspects of color correction in OBS. It includes:
1. Gamma
Gamma is a fundamental aspect in OBS that functions by balancing the brightness of an image through contrast. To be precise, Gamma works almost similarly to change in brightness while simultaneously increasing or decreasing the contrast.
In editing, Gamma is applicable mainly for removing shiny foreheads and webcam footage in gaming and browsing.
High Gamma is represented by “L,” whereas low Gamm is represented by “R.”
2. Contrast
Contrast is the difference in the degree of colors and tones in an image. Usually, the low contrast image has a narrow color range, whereas the high contrast images have dark shadows and bright highlights.
“L” represents high contrast in OBS contrast, whereas “R” represents low contrast.
3. Brightness
Brightness is the degree to how light or dark a picture is. To be able to understand an image clearly, it is best to correct its brightness. A change in brightness of a picture has a simultaneous change in pixels of that image.
High brightness in OBS is denounced by the letter “L,” whereas Low brightness is denounced by “R.”
4. Saturation
Saturation is the intensity of colors in a video or an image. High saturated images are bright, strong, and are rich, whereas the low saturated photos appear washed out. Black and white (grayscale) photos have no color saturation. In OBS, high saturation and low saturation are represented as “L” and “R.”
5. Hue Shift
Hue shift is the change in an image’s saturation, lightness, and hue colors. Hue shifting occurs when highlighting or shading images. In OBS, you can use the hue shift functionality to reimage your image with a completely different color palette.
With the hue shift functionality in OBS, you can place the image on top of another and have an 80% opacity. It means that you will still see the first image when you place the second one on top of it.
The “L” sign in the OBS hue shift represents 50% opacity, while the “R” represents 100% Opacity.
Color Grade in OBS
Color grading is the process of enhancing the appearance of an image through attributes such as contrast, saturation, and color, making them enchanting for presentations. Color grading is not only done for still images but also for motion pictures and images.
Color grading functionality in OBS is encompassed with several tools – This includes:
1. Lift tool
As the name suggests, lift tools are used in lifting or removing specific colors from an image. It does so without necessarily affecting other colors in an image.
With this tool, you can selectively remove unwanted colors from your image or video, replace them with your desired ones, and create astonishing results.
2. Offset
Offset is another outstanding tool in OBS color grading that controls the blacks/Shadows of an image. It functions by altering the brightness levels and leaving the highlights and the mid-tones unaffected.
3. Gain
A gain is a tool in OBS color correction that functions by only adjusting the white levels in an image. With the gain tool, brighter colors become brighter or darker.
Many people, especially beginner editors, experience difficulty differentiating between the Gamma and Offset tools. Yes, there is a closer similarity between the two, and for you to be on the safe side, you need to know that Gamma goes with the mid-tones (middle gray levels) whereas the Gain goes with highlights/whites.
How to Apply LUTs in OBS
Look up tables (LUTs) is a functionality feature that allows editors, colorists, and filmmakers to save certain colors as their templates. Therefore, when working on a particular project, they don’t have to create new working color grades; instead, you pick it from your LUT.
Using LUTs OBS is not rocket science. With LUTs, you can create unique projects with a vibrant feel. Here are the simple steps of using LUTs in OBS.
Step 1. Prepare your LUT
First, check and establish whether you have your LUT ready. If you don’t have it, you can download one from the internet. Make sure you download it as a folder. Even though OBS has LUT, It has limited color grades; therefore, it is best to download one. You can extract it to an OBS folder if you downloaded it in a zip file.
Step 2. Add your project to the OBS timeline
Open your OBS software and add your project file. Drag and drop your file to the OBS timeline.

Step 3. Add LUTs to your project
Right-click on the area in your project that you wish to apply LUTs, then click on “Filters.” Select “Apply LUT” from the drop-down menu,” which is usually at the top of the list.

Step 4. Apply your LUT as a filter
On the LUTs section, click on the browser, then open your downloaded LUT folder. Usually, the LUT is in the form of a .cube file. You can adjust your LUT by simply clicking on the “Adjust” option.
Bonus! How to Apply Color Correction for Webcam and Camera
People who primarily use their computers for recording sessions often find it difficult to capture quality videos. It is because most computer cameras are not straightforward. To do away with purchasing a new camera due to poor quality video capture, they can freely use OBS LUTs. For their camera and webcam. LUTs for webcam play a vital role in correcting the quality of photos and videos by using filters.
Here are the simple steps on how to use LUTs for color correction in webcam and camera
Step 1. Check whether your camera has additional software
Most webcams and cameras are controlled by external software, so you first need to check whether yours is also controlled. A thing with these cameras are controlled by their software is that the software determines the color settings and the specific image.
Double click on camera source and select “Configure video.” Computers with external software cameras will have a pop-up window that displays various customizable settings. Here, you can adjust the different settings based on your preference.

Step 2. Download your LUTs
Download online the LUTs you want to use. Download them as folders and extract the files you downloaded as zip files. Save them in the OBS folder.
Step 3. Apply your LUTs
Still, in your OBS software, open your camera and then right-click on it. From the displayed menu, click on “Filters.”
On the bottom left corner of your interface, hit the “+” sign, then select “Apply LUTs” > “Browse.”
Open your already downloaded OBS files. Usually, there is an “Adjust” that allows you to regulate the intensity of the LUT by sliding it.

Step 4. Start recording with LUTs on
After turning on your LUT, you can start recording videos and taking photos. There is an eye icon on the left-hand side of your screen. You can use it to turn on or off LUT.
Conclusion
● And that is how to do color correction in OBS. Besides, you do not have to go to the extremes of getting a new camera because of your webcam faultiness. With OBS, you can correct your camera and webcam and get outstanding results.
● Download LUTs from the internet and use them as a template in OBS. Besides, you don’t have to pay for the LUTs, but you can use the free ones.
Color Correction is an outstanding functionality that allows editing photos and videos by altering their consistency to match a particular standard. Besides, color correction is available in the premium tool and free applications. And one of the established free software tools with color correction is the OBS.
Even though the Open Broadcaster Software is mainly known for live streaming and offline video recording, it also offers color correction functionality from its open canvas. Read this article to completion and get to the bottom line of how to do color correction in OBS.
More about OBS
In this article
01 What is OBS?
What is OBS?
Open Broadcaster Software (OBS) is free and open-source software that allows users to record videos and live stream events right at their comfort. The software functions effectively on Mac, Windows, and Linux computers.
Open Broadcaster Software (OBS) is free and open-source software that allows users to record videos and live stream events right at their comfort. The software functions effectively on Mac, Windows, and Linux computers.
Since its initial launch in 2012, OBS has made tremendous moves – This is not only from the constant release of its new versions but also the relentless increase in the functionality features. Besides, OBS is equipped with a robust API that enables plugins and scripts which provide extensive customization to precisely suit one’s needs.
However, OBS being a free application can function to date due to enough support from sponsors and backers.
How to Apply Color Correction in OBS
When you carry out basic edits to your videos or images with OBS and realize that your project has poor shade, color, or tone, you don’t have to export it to another software to correct it. Instead, you can use filters for color correction in OBS.
Apart from using OBS filters to color correct video clips and images, you can correct games, browser sources, and video capture devices.
There are various aspects of color correction in OBS. It includes:
1. Gamma
Gamma is a fundamental aspect in OBS that functions by balancing the brightness of an image through contrast. To be precise, Gamma works almost similarly to change in brightness while simultaneously increasing or decreasing the contrast.
In editing, Gamma is applicable mainly for removing shiny foreheads and webcam footage in gaming and browsing.
High Gamma is represented by “L,” whereas low Gamm is represented by “R.”
2. Contrast
Contrast is the difference in the degree of colors and tones in an image. Usually, the low contrast image has a narrow color range, whereas the high contrast images have dark shadows and bright highlights.
“L” represents high contrast in OBS contrast, whereas “R” represents low contrast.
3. Brightness
Brightness is the degree to how light or dark a picture is. To be able to understand an image clearly, it is best to correct its brightness. A change in brightness of a picture has a simultaneous change in pixels of that image.
High brightness in OBS is denounced by the letter “L,” whereas Low brightness is denounced by “R.”
4. Saturation
Saturation is the intensity of colors in a video or an image. High saturated images are bright, strong, and are rich, whereas the low saturated photos appear washed out. Black and white (grayscale) photos have no color saturation. In OBS, high saturation and low saturation are represented as “L” and “R.”
5. Hue Shift
Hue shift is the change in an image’s saturation, lightness, and hue colors. Hue shifting occurs when highlighting or shading images. In OBS, you can use the hue shift functionality to reimage your image with a completely different color palette.
With the hue shift functionality in OBS, you can place the image on top of another and have an 80% opacity. It means that you will still see the first image when you place the second one on top of it.
The “L” sign in the OBS hue shift represents 50% opacity, while the “R” represents 100% Opacity.
Color Grade in OBS
Color grading is the process of enhancing the appearance of an image through attributes such as contrast, saturation, and color, making them enchanting for presentations. Color grading is not only done for still images but also for motion pictures and images.
Color grading functionality in OBS is encompassed with several tools – This includes:
1. Lift tool
As the name suggests, lift tools are used in lifting or removing specific colors from an image. It does so without necessarily affecting other colors in an image.
With this tool, you can selectively remove unwanted colors from your image or video, replace them with your desired ones, and create astonishing results.
2. Offset
Offset is another outstanding tool in OBS color grading that controls the blacks/Shadows of an image. It functions by altering the brightness levels and leaving the highlights and the mid-tones unaffected.
3. Gain
A gain is a tool in OBS color correction that functions by only adjusting the white levels in an image. With the gain tool, brighter colors become brighter or darker.
Many people, especially beginner editors, experience difficulty differentiating between the Gamma and Offset tools. Yes, there is a closer similarity between the two, and for you to be on the safe side, you need to know that Gamma goes with the mid-tones (middle gray levels) whereas the Gain goes with highlights/whites.
How to Apply LUTs in OBS
Look up tables (LUTs) is a functionality feature that allows editors, colorists, and filmmakers to save certain colors as their templates. Therefore, when working on a particular project, they don’t have to create new working color grades; instead, you pick it from your LUT.
Using LUTs OBS is not rocket science. With LUTs, you can create unique projects with a vibrant feel. Here are the simple steps of using LUTs in OBS.
Step 1. Prepare your LUT
First, check and establish whether you have your LUT ready. If you don’t have it, you can download one from the internet. Make sure you download it as a folder. Even though OBS has LUT, It has limited color grades; therefore, it is best to download one. You can extract it to an OBS folder if you downloaded it in a zip file.
Step 2. Add your project to the OBS timeline
Open your OBS software and add your project file. Drag and drop your file to the OBS timeline.

Step 3. Add LUTs to your project
Right-click on the area in your project that you wish to apply LUTs, then click on “Filters.” Select “Apply LUT” from the drop-down menu,” which is usually at the top of the list.

Step 4. Apply your LUT as a filter
On the LUTs section, click on the browser, then open your downloaded LUT folder. Usually, the LUT is in the form of a .cube file. You can adjust your LUT by simply clicking on the “Adjust” option.
Bonus! How to Apply Color Correction for Webcam and Camera
People who primarily use their computers for recording sessions often find it difficult to capture quality videos. It is because most computer cameras are not straightforward. To do away with purchasing a new camera due to poor quality video capture, they can freely use OBS LUTs. For their camera and webcam. LUTs for webcam play a vital role in correcting the quality of photos and videos by using filters.
Here are the simple steps on how to use LUTs for color correction in webcam and camera
Step 1. Check whether your camera has additional software
Most webcams and cameras are controlled by external software, so you first need to check whether yours is also controlled. A thing with these cameras are controlled by their software is that the software determines the color settings and the specific image.
Double click on camera source and select “Configure video.” Computers with external software cameras will have a pop-up window that displays various customizable settings. Here, you can adjust the different settings based on your preference.

Step 2. Download your LUTs
Download online the LUTs you want to use. Download them as folders and extract the files you downloaded as zip files. Save them in the OBS folder.
Step 3. Apply your LUTs
Still, in your OBS software, open your camera and then right-click on it. From the displayed menu, click on “Filters.”
On the bottom left corner of your interface, hit the “+” sign, then select “Apply LUTs” > “Browse.”
Open your already downloaded OBS files. Usually, there is an “Adjust” that allows you to regulate the intensity of the LUT by sliding it.

Step 4. Start recording with LUTs on
After turning on your LUT, you can start recording videos and taking photos. There is an eye icon on the left-hand side of your screen. You can use it to turn on or off LUT.
Conclusion
● And that is how to do color correction in OBS. Besides, you do not have to go to the extremes of getting a new camera because of your webcam faultiness. With OBS, you can correct your camera and webcam and get outstanding results.
● Download LUTs from the internet and use them as a template in OBS. Besides, you don’t have to pay for the LUTs, but you can use the free ones.
Color Correction is an outstanding functionality that allows editing photos and videos by altering their consistency to match a particular standard. Besides, color correction is available in the premium tool and free applications. And one of the established free software tools with color correction is the OBS.
Even though the Open Broadcaster Software is mainly known for live streaming and offline video recording, it also offers color correction functionality from its open canvas. Read this article to completion and get to the bottom line of how to do color correction in OBS.
More about OBS
In this article
01 What is OBS?
What is OBS?
Open Broadcaster Software (OBS) is free and open-source software that allows users to record videos and live stream events right at their comfort. The software functions effectively on Mac, Windows, and Linux computers.
Open Broadcaster Software (OBS) is free and open-source software that allows users to record videos and live stream events right at their comfort. The software functions effectively on Mac, Windows, and Linux computers.
Since its initial launch in 2012, OBS has made tremendous moves – This is not only from the constant release of its new versions but also the relentless increase in the functionality features. Besides, OBS is equipped with a robust API that enables plugins and scripts which provide extensive customization to precisely suit one’s needs.
However, OBS being a free application can function to date due to enough support from sponsors and backers.
How to Apply Color Correction in OBS
When you carry out basic edits to your videos or images with OBS and realize that your project has poor shade, color, or tone, you don’t have to export it to another software to correct it. Instead, you can use filters for color correction in OBS.
Apart from using OBS filters to color correct video clips and images, you can correct games, browser sources, and video capture devices.
There are various aspects of color correction in OBS. It includes:
1. Gamma
Gamma is a fundamental aspect in OBS that functions by balancing the brightness of an image through contrast. To be precise, Gamma works almost similarly to change in brightness while simultaneously increasing or decreasing the contrast.
In editing, Gamma is applicable mainly for removing shiny foreheads and webcam footage in gaming and browsing.
High Gamma is represented by “L,” whereas low Gamm is represented by “R.”
2. Contrast
Contrast is the difference in the degree of colors and tones in an image. Usually, the low contrast image has a narrow color range, whereas the high contrast images have dark shadows and bright highlights.
“L” represents high contrast in OBS contrast, whereas “R” represents low contrast.
3. Brightness
Brightness is the degree to how light or dark a picture is. To be able to understand an image clearly, it is best to correct its brightness. A change in brightness of a picture has a simultaneous change in pixels of that image.
High brightness in OBS is denounced by the letter “L,” whereas Low brightness is denounced by “R.”
4. Saturation
Saturation is the intensity of colors in a video or an image. High saturated images are bright, strong, and are rich, whereas the low saturated photos appear washed out. Black and white (grayscale) photos have no color saturation. In OBS, high saturation and low saturation are represented as “L” and “R.”
5. Hue Shift
Hue shift is the change in an image’s saturation, lightness, and hue colors. Hue shifting occurs when highlighting or shading images. In OBS, you can use the hue shift functionality to reimage your image with a completely different color palette.
With the hue shift functionality in OBS, you can place the image on top of another and have an 80% opacity. It means that you will still see the first image when you place the second one on top of it.
The “L” sign in the OBS hue shift represents 50% opacity, while the “R” represents 100% Opacity.
Color Grade in OBS
Color grading is the process of enhancing the appearance of an image through attributes such as contrast, saturation, and color, making them enchanting for presentations. Color grading is not only done for still images but also for motion pictures and images.
Color grading functionality in OBS is encompassed with several tools – This includes:
1. Lift tool
As the name suggests, lift tools are used in lifting or removing specific colors from an image. It does so without necessarily affecting other colors in an image.
With this tool, you can selectively remove unwanted colors from your image or video, replace them with your desired ones, and create astonishing results.
2. Offset
Offset is another outstanding tool in OBS color grading that controls the blacks/Shadows of an image. It functions by altering the brightness levels and leaving the highlights and the mid-tones unaffected.
3. Gain
A gain is a tool in OBS color correction that functions by only adjusting the white levels in an image. With the gain tool, brighter colors become brighter or darker.
Many people, especially beginner editors, experience difficulty differentiating between the Gamma and Offset tools. Yes, there is a closer similarity between the two, and for you to be on the safe side, you need to know that Gamma goes with the mid-tones (middle gray levels) whereas the Gain goes with highlights/whites.
How to Apply LUTs in OBS
Look up tables (LUTs) is a functionality feature that allows editors, colorists, and filmmakers to save certain colors as their templates. Therefore, when working on a particular project, they don’t have to create new working color grades; instead, you pick it from your LUT.
Using LUTs OBS is not rocket science. With LUTs, you can create unique projects with a vibrant feel. Here are the simple steps of using LUTs in OBS.
Step 1. Prepare your LUT
First, check and establish whether you have your LUT ready. If you don’t have it, you can download one from the internet. Make sure you download it as a folder. Even though OBS has LUT, It has limited color grades; therefore, it is best to download one. You can extract it to an OBS folder if you downloaded it in a zip file.
Step 2. Add your project to the OBS timeline
Open your OBS software and add your project file. Drag and drop your file to the OBS timeline.

Step 3. Add LUTs to your project
Right-click on the area in your project that you wish to apply LUTs, then click on “Filters.” Select “Apply LUT” from the drop-down menu,” which is usually at the top of the list.

Step 4. Apply your LUT as a filter
On the LUTs section, click on the browser, then open your downloaded LUT folder. Usually, the LUT is in the form of a .cube file. You can adjust your LUT by simply clicking on the “Adjust” option.
Bonus! How to Apply Color Correction for Webcam and Camera
People who primarily use their computers for recording sessions often find it difficult to capture quality videos. It is because most computer cameras are not straightforward. To do away with purchasing a new camera due to poor quality video capture, they can freely use OBS LUTs. For their camera and webcam. LUTs for webcam play a vital role in correcting the quality of photos and videos by using filters.
Here are the simple steps on how to use LUTs for color correction in webcam and camera
Step 1. Check whether your camera has additional software
Most webcams and cameras are controlled by external software, so you first need to check whether yours is also controlled. A thing with these cameras are controlled by their software is that the software determines the color settings and the specific image.
Double click on camera source and select “Configure video.” Computers with external software cameras will have a pop-up window that displays various customizable settings. Here, you can adjust the different settings based on your preference.

Step 2. Download your LUTs
Download online the LUTs you want to use. Download them as folders and extract the files you downloaded as zip files. Save them in the OBS folder.
Step 3. Apply your LUTs
Still, in your OBS software, open your camera and then right-click on it. From the displayed menu, click on “Filters.”
On the bottom left corner of your interface, hit the “+” sign, then select “Apply LUTs” > “Browse.”
Open your already downloaded OBS files. Usually, there is an “Adjust” that allows you to regulate the intensity of the LUT by sliding it.

Step 4. Start recording with LUTs on
After turning on your LUT, you can start recording videos and taking photos. There is an eye icon on the left-hand side of your screen. You can use it to turn on or off LUT.
Conclusion
● And that is how to do color correction in OBS. Besides, you do not have to go to the extremes of getting a new camera because of your webcam faultiness. With OBS, you can correct your camera and webcam and get outstanding results.
● Download LUTs from the internet and use them as a template in OBS. Besides, you don’t have to pay for the LUTs, but you can use the free ones.
Easy Way to Add Effects to Art Video
Filmora is a powerful tool and with the know-how can make your art be more than just a still image. Whether it is for a music video or a portfolio showreel, there are better ways than just inserting an image and letting it fade to the next still image. We can make use of effects and transitions to put our art to better use.
In this guide I’m going to show a couple of ways to enhance your images within Filmora for your videos.
Transitions
By inserting a transition to your image, you can add some diversity to how the viewer first see’s your image, You may want to emphasis a certain element of your art and therefore would select a transition that zooms in on that element before zooming out to the whole image or maybe you have a painting of a cyberpunk angel and wish to have the image enter in a grid formation. The point is that by experimenting with transitions and trying to select the best ones based on the element in your work you will achieve a better first impression. This is true for all aspects of video creation.
Having multiple transitions can create a unique look for your videos with minimal understanding of how to create a transition but there needs to be an understanding of how the layers work in Filmora being that a layer on top is in front of the one below, remember this when you start to add transitions as sometime you may need to duplicate your art as to keep it in the shot.
Free Download For Win 7 or later(64-bit)
Free Download For macOS 10.14 or later
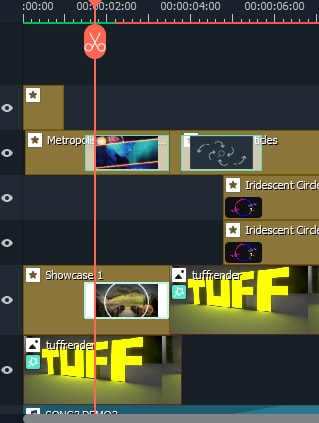
As you can see here, I have duplicated my image onto separate channels as to always keep the image in the scene.
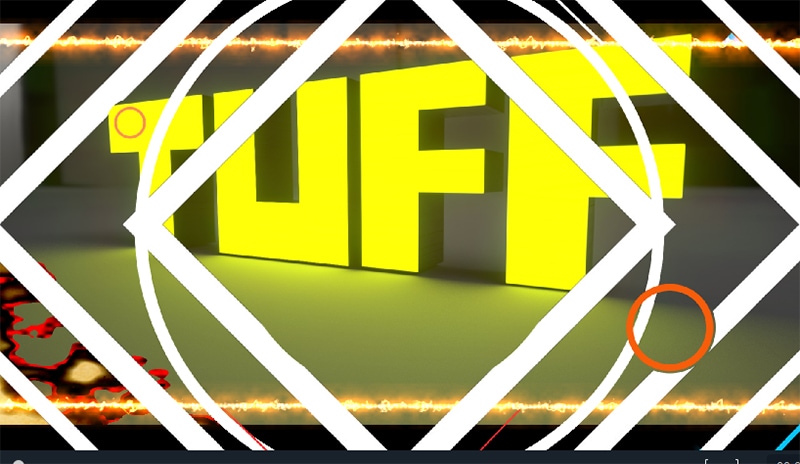
In the image above you can see how I used multiple transitions, I did this as my image is off center and I wanted to emphasize that, I picked transitions that had clear symmetry and lines so that the viewer had a reference point of where center was without me having to place that in my art. This is a very useful way of adding information to your art without telling the viewer directly. As for the color theory, I went with oranges and yellows predominantly here as they are neighboring colors on the color wheel and we know they work well together with my main color of yellow. As for the composition I have tried to keep all the eye-catching points along the top third of the image as to create a piece more pleasing to the eye even with all this information going on.
Effects
The inclusion of effect onto your art should not be discouraged depending on what the art is used for, in my example i created this as though it was album art and the musician wanted to upload a simple music video using that art, on its own it is static and can loose engagement but by applying relevant effects you can capture the viewer’s eye and make the listening experience more enjoyable. Effects can also be stacked to create unique assets for your art and help tell a story, if your art includes fire why not add a fire effect breaking the stillness of the image or maybe your art has motion, you could include a motion effect to your still image and give the viewer more information.
Even when using effects you can use fundamentals such as color theory or composition to better enhance your imagery.

In this image you can see I have added an audio visualizer effect as well as a spectral light effect. I did this to reinforce the face of my image having a strong light source, it creates dynamic movement and the audio visualizer was added due to the nature of the video being music oriented but I felt this could have been done better. The composition of the audio visualizer was front and center and seemed boring and uninteresting. This is where the research into art fundamentals comes into play as remembering the rule of thirds and how all the main features of the image are in the top horizontal third, we can make use of the vertical thirds to gain a better composition and hopefully create more engagement.
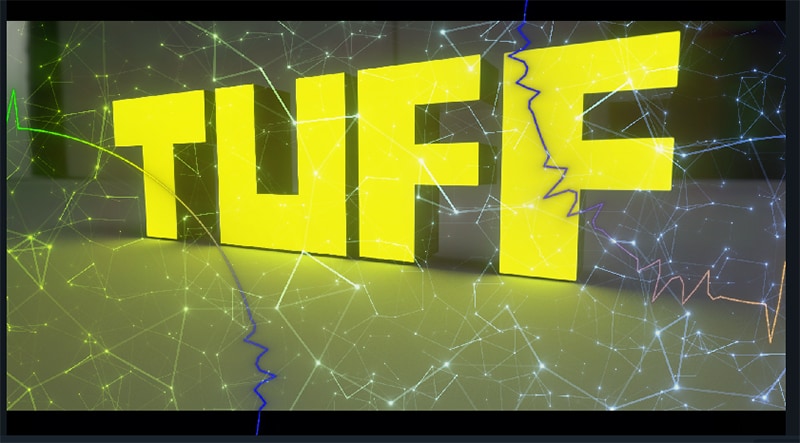
As you can see, we have duplicated the audio visualizer and made better use of the thirds nor having opposing placement within the scene, the same information is being given by the effect but we have managed to use the space more effectively and created a visually pleasing aesthetic to our video. Trick like this can make your still image feel more animated and have more purpose within the video itself.
Adding Titles and Text
Adding text is another way of adding information to your art. It’s said an image can speak a thousand words but sometimes you need words to talk for an image. When words are needed for your video, there should be some thought into how them words are presented as just selecting any text and inserting that to your video may look jarring to the viewer and result in a loss of interest towards your videos. Selecting the right transition for your text or the color or even the font can have different results and can help with affordance depending on what you’re looking to portray.
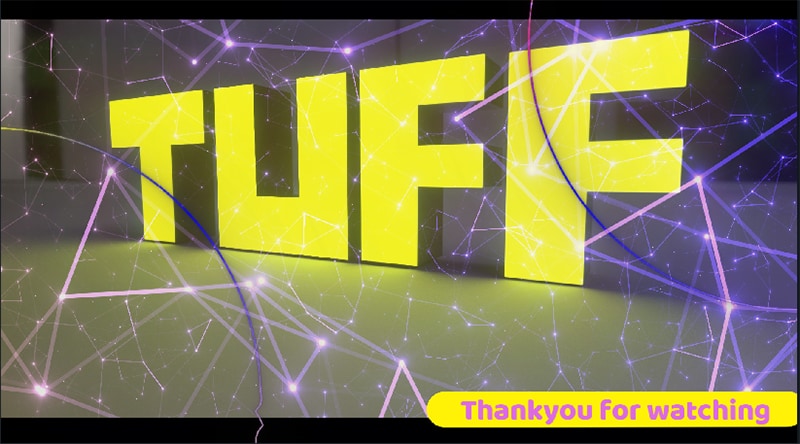
In my example I wanted to say thank you and felt sharp edges would seem formal and because of the main image it would be too similar so I went with a font that was more rounded. When inserting text onto a scene such as this one you are given a lot of information for your selections, we already have color in there to help us choose our font and background color, I went with yellow and pink due to the fact it was already in the scene and I didn’t want to take the attention away from the focus. The way the text transitions onto the screen secures just enough attention to itself that the viewer knows it’s there and can read it if they wish to. If I wanted to gain full attention i would have picked a transition that overlaps the key element and picked complementary colors on the opposite sides of the color wheel guaranteeing the viewer’s eyes would notice and engage with the motion.
Conclusion
By incorporating all the art fundamentals and skills we have learned we can use the tools provided by Filmora more effectively and create dynamic and engaging videos that are aesthetically pleasing for our audience. Upon learning the many different types and styles of transitions, effects, and titles we can enhance our artwork for use within our video. This includes artwork specifically made for use in video or even to show off your art and gain a wider audience. These are forever evolving and what you find is pleasing now may change in the future but that’s part of the fun with learning a new skill as you will find what you like and progress from there creating an identifiable style that viewers will recognize and associate you with.
Free Download For macOS 10.14 or later

As you can see here, I have duplicated my image onto separate channels as to always keep the image in the scene.

In the image above you can see how I used multiple transitions, I did this as my image is off center and I wanted to emphasize that, I picked transitions that had clear symmetry and lines so that the viewer had a reference point of where center was without me having to place that in my art. This is a very useful way of adding information to your art without telling the viewer directly. As for the color theory, I went with oranges and yellows predominantly here as they are neighboring colors on the color wheel and we know they work well together with my main color of yellow. As for the composition I have tried to keep all the eye-catching points along the top third of the image as to create a piece more pleasing to the eye even with all this information going on.
Effects
The inclusion of effect onto your art should not be discouraged depending on what the art is used for, in my example i created this as though it was album art and the musician wanted to upload a simple music video using that art, on its own it is static and can loose engagement but by applying relevant effects you can capture the viewer’s eye and make the listening experience more enjoyable. Effects can also be stacked to create unique assets for your art and help tell a story, if your art includes fire why not add a fire effect breaking the stillness of the image or maybe your art has motion, you could include a motion effect to your still image and give the viewer more information.
Even when using effects you can use fundamentals such as color theory or composition to better enhance your imagery.

In this image you can see I have added an audio visualizer effect as well as a spectral light effect. I did this to reinforce the face of my image having a strong light source, it creates dynamic movement and the audio visualizer was added due to the nature of the video being music oriented but I felt this could have been done better. The composition of the audio visualizer was front and center and seemed boring and uninteresting. This is where the research into art fundamentals comes into play as remembering the rule of thirds and how all the main features of the image are in the top horizontal third, we can make use of the vertical thirds to gain a better composition and hopefully create more engagement.

As you can see, we have duplicated the audio visualizer and made better use of the thirds nor having opposing placement within the scene, the same information is being given by the effect but we have managed to use the space more effectively and created a visually pleasing aesthetic to our video. Trick like this can make your still image feel more animated and have more purpose within the video itself.
Adding Titles and Text
Adding text is another way of adding information to your art. It’s said an image can speak a thousand words but sometimes you need words to talk for an image. When words are needed for your video, there should be some thought into how them words are presented as just selecting any text and inserting that to your video may look jarring to the viewer and result in a loss of interest towards your videos. Selecting the right transition for your text or the color or even the font can have different results and can help with affordance depending on what you’re looking to portray.

In my example I wanted to say thank you and felt sharp edges would seem formal and because of the main image it would be too similar so I went with a font that was more rounded. When inserting text onto a scene such as this one you are given a lot of information for your selections, we already have color in there to help us choose our font and background color, I went with yellow and pink due to the fact it was already in the scene and I didn’t want to take the attention away from the focus. The way the text transitions onto the screen secures just enough attention to itself that the viewer knows it’s there and can read it if they wish to. If I wanted to gain full attention i would have picked a transition that overlaps the key element and picked complementary colors on the opposite sides of the color wheel guaranteeing the viewer’s eyes would notice and engage with the motion.
Conclusion
By incorporating all the art fundamentals and skills we have learned we can use the tools provided by Filmora more effectively and create dynamic and engaging videos that are aesthetically pleasing for our audience. Upon learning the many different types and styles of transitions, effects, and titles we can enhance our artwork for use within our video. This includes artwork specifically made for use in video or even to show off your art and gain a wider audience. These are forever evolving and what you find is pleasing now may change in the future but that’s part of the fun with learning a new skill as you will find what you like and progress from there creating an identifiable style that viewers will recognize and associate you with.
Also read:
- New In 2024, Top 15 Best Free MP4 Video Rotators Windows, Mac, Android, iPhone & Online
- Updated A Roster of 8 Top Color Match Generators for 2024
- New 2024 Approved How to Combine Multiple Videos Into One on Instagram
- In 2024, 11 Best Video Editing Apps for iPhone
- New In 2024, Adjust the TikTok Videos Length to Make Them Captivating
- In 2024, How to Create a Slideshow on iPhone
- Updated FLV Editor for Windows 11/10/8.1/8/7 Easily Edit FLV Videos on PC for 2024
- Updated 2024 Approved Achieving GoPro Slow Motion with Quality An In-Depth Overview
- New Unlock Your Video Editing Potential With Filmora From Wondershare
- In 2024, Create Slow Motion Videos Using Final Cut Pro with Ease
- New In 2024, Vintage Film Effect 1990S - How to Make
- Updated Easy Ways to Make Procreate GIFs
- New In 2024, Simple Tricks Make 3D GIF Production of Inspiration Pop Up
- New In 2024, Want to Immediately Know All About Discord GIF?
- How to Make Vintage Film Effect 1950S
- Updated Now, You Can Also Apply the Stranger Things Upside Down Effect to Your Video! This Effect Combines Camera Tricks and Video Editing Within Filmora to Transition From the Normal World Into the Upside Down
- In 2024, Progressive Solutions to Add VHS Effects to Video with Ease
- 2024 Approved Best Audio Plug-Ins For Video Editors
- In 2024, Tactics to Make Transparent Image in Minimal Steps
- In 2024, How to Add Font Effects to Videos
- Updated 10 Catchy Pixel Art Wallpapers and How to Custom Your Own with Ease
- New Wondering How to Rotate a Video in Windows at Any Desired Angle and Save It Permanently? Find Out All the Different Ways to Rotate Videos Temporarily as Well as Permanently
- New 2024 Approved How to Add Expression in After Effects
- Separating Audio From Video in DaVinci Resolve Step by Step
- New How to Color Grading in Final Cut Pro for 2024
- New In 2024, How to Rotate AVI in Vertical/Portrait Orientation Windows, Mac,Android, iPhone & Online
- Updated 20 Best Video Background Templates for 2024
- 2024 Approved Are You Looking for a Video Format Converter Free? We Will Introduce the 5 Best Online Converters and Also the 5 Best Video Format Converters for PC
- 2024 Approved The Best Way To Color Grading & Color Correction in Filmora
- List of Pokémon Go Joysticks On Asus ROG Phone 8 Pro | Dr.fone
- In 2024, How To Unlock Any Realme V30T Phone Password Using Emergency Call
- Locked Out of Apple iPhone 8? 5 Ways to get into a Locked Apple iPhone 8
- Step-by-Step Tutorial How To Bypass Gionee F3 Pro FRP
- Updated 2024 Approved 12 Top Stop Motion Studios Worth Recommending
- In 2024, The Top 5 Android Apps That Use Fingerprint Sensor to Lock Your Apps On Infinix Hot 30i
- In 2024, The Best Methods to Unlock the iPhone Locked to Owner for iPhone SE (2022)
- In 2024, Proven Ways in How To Hide Location on Life360 For Vivo Y100i Power 5G | Dr.fone
- How to Track Nokia C210 Location by Number | Dr.fone
- Failed to play MP4 movies with Motorola Moto G14
- Play Store Stuck on Downloading Of Sony Xperia 10 V? 7 Ways to Resolve | Dr.fone
- How To Restore Missing Messages Files from Poco M6 5G
- In 2024, How to Turn Off Google Location to Stop Tracking You on Realme 12 5G | Dr.fone
- How to Cast Samsung Galaxy A25 5G Screen to PC Using WiFi | Dr.fone
- Methods to Change GPS Location On Samsung Galaxy A14 4G | Dr.fone
- What To Do When Realme Narzo 60 5G Has Black Screen of Death? | Dr.fone
- Pokémon Go Cooldown Chart On Motorola Moto G73 5G | Dr.fone
- Undelete lost music from Vivo S17 Pro
- Resolve Your Apple iPhone 8 Plus Keeps Asking for Outlook Password | Dr.fone
- How To Transfer Data From iPhone 13 Pro Max To Other iPhone 13 Pro devices? | Dr.fone
- Easy steps to recover deleted music from Infinix Hot 40i
- Thinking About Changing Your Netflix Region Without a VPN On Poco X5 Pro? | Dr.fone
- Samsung Galaxy A15 5G won’t play HEVC H.265 media, how to fix?
- OnePlus Ace 2 Pro Not Connecting to Wi-Fi? 12 Quick Ways to Fix | Dr.fone
- 5 Ways to Track Honor Play 8T without App | Dr.fone
- 5 Ways to Transfer Music from Apple iPhone 15 Pro to Android | Dr.fone
- In 2024, Apple iPhone 12 Pro Max Backup Password Never Set But Still Asking? Heres the Fix
- In 2024, How To Bypass OnePlus FRP In 3 Different Ways
- Title: New In 2024, 4 Ways to Loop a Video on Vimeo
- Author: Chloe
- Created at : 2024-04-24 07:08:27
- Updated at : 2024-04-25 07:08:27
- Link: https://ai-editing-video.techidaily.com/new-in-2024-4-ways-to-loop-a-video-on-vimeo/
- License: This work is licensed under CC BY-NC-SA 4.0.


