
:max_bytes(150000):strip_icc():format(webp)/dts-play-fi-lifestyle-aaa-5a4c211daad52b00366a3575.jpg)
New In 2024, 5 Ways to Make a Fake Facetime Call Video
5 Ways to Make a Fake Facetime Call Video
Creating fake video call clips for entertainment has been a new norm on social media platforms. If you are looking for a software to create a fake Facetime call video, then let’s get started:
5 ways to make a fake facetime call video
1. Filmora
Compatibility: Windows/Mac
Wondershare Filmora is the greatest video editor on the market, without a doubt, and it deserves to be at the top of our list.
You’ll discover some professional tools to help you improve video quality and over 300 creative filters and effects to give your movie a new, fresh look without putting in a lot of effort with the Filmora video editor. This tool is one of the most dependable, aside from the features that allow you to modify video rotation easily.
Steps
Step 1: Import the photo or video files
Import all your media files, including video, photos, and music. You have two options for importing your videos: drag and drop directly into our software or click import to select the media files you wish to upload.

Step 2: Edit the video
Wondershare Filmora’s video templates can be added. You can apply music, text, filters and overlays, and motion effects by right-clicking on them and selecting apply. After adding video resources such as text and elements, you may customize the texts by changing the size, placement, etc.
Also, you can add overlay video clips using templates of a video call to make it look like a real call.

Step 3: Export and Save
Quickly export your project to a new video. After you’ve applied the video resources to your videos and clicked Export, you’ll have a whole new video that you can share at birthday parties, weddings, or for marketing purposes, just like any other video you’ve created.

2. Kapwing
Compatibility: Online
Kapwing is a powerful online video editor with a non-linear editing methodology. Upload photos, audio, and video files, then edit them all in one spot.
Creators may view and alter their content from any device or location because Kapwing is entirely online. Work is automatically saved in the cloud, eliminating the need to transfer data locally. When you’re ready to export, sit back and relax because everything is handled in the cloud.
This template allows you to blend two videos into one like an iPhone Facetime call. First, put two videos in a photo and arrange them in a picture arrangement. Then, as a video overlay in the upper corner, layer one on top of the other.
Steps
Step 1: Open Kapwing Fake Video Call Template

Step 2: Import video files
Click on ‘Add Media’ to add video clips.


Step 3: Save and Export Video
Once you are done editing the template with the images you want, click on ‘Export Project’ to Export and save the video.

3. VITA App
Compatibility: Android/Mac

VITA is a program that allows you to make visually appealing videos by combining several filters and other features. The program comes with a large template library, so making films will be a breeze. The best part is that no prior experience is required.
All of VITA’s templates are divided into categories is one of its most noticeable features. This makes it simple to locate the desired impact. It’s critical to stress that you must have all the audiovisual materials you intend to use in your smartphone’s gallery. VITA also allows you to include text in your designs, making them fascinating.
Steps
Step 1: Import the file
Download the application from Google Play Store or Apple Store. Then, launch the application and import the video files.

Step 2: Edit the video
Download PNG images that will help you add all the call elements. Choose a picture-in-picture template. Add Subtitles.

Step 3: Export the video
Once you are done with editing, you can export the file by selecting the ‘Export’ option on the top right corner of the screen.

4. Clipchamp
Compatibility: Windows/Mac
Clipchamp is a free online video editor that makes movie creation simple for anyone, even if they have no prior editing knowledge. It lets you blend films, photos, and audio files and add text and effects before saving the finished product to your computer.
Steps
Step 1: To get started, log into your Clipchamp account or create a free account.

Step 2: Click the ‘Create a video’ button on the left sidebar. There are five different forms from which to pick. First, choose the video aspect ratio that works best for your project. For example, if you wish to upload to YouTube, we recommend shooting in widescreen 16:9.

Step 3: Click ‘Add media’ and drag and drop your films, audio, and photographs into the media box if you already have filmed footage you’d like to utilize in your project. You may also add media by clicking ‘Browse my files.’ If you wish to use free stock footage, go to ‘Stock’ and upload your films to the project by clicking the ‘+’ button. All your films will be saved in your library.

Step 4: You can now find your videos in your media library. Drag and drop the picture-in-picture videos you want to alter to the editing timeline. As shown in the sample below, arrange the two videos one over the other. Make sure both clips are precisely underneath one another.

Step 5: Now that your movies are aligned, select the one you want to shrink. The video you’re reducing must be at the top of the screen. To move it from the bottom to the top, drag and drop it. A small box will appear on the timeline in the bottom left corner of the clip. The clip will shrink when you click the box once. When you click the box once again, modifying choices will appear. You can move the smaller video around and increase or decrease its size.

Step 6: Export your project once you’ve completed editing your video. Save to your preferred place or folder. You can share the video straight on social media or embed it in a document.

5. Movavi
Compatibility: Windows/Mac
Movavi Video Editor is a video editing tool for Windows that is powerful and simple to use. Apply stunning video effects and filters, add music and titles, and more! Yet, despite its enormous features, Movavi’s video editing program is quite simple to use: add a sprinkle of fantasy and some spare time, and you’ll have a Hollywood-style video with far less effort.
Steps
Step 1: Download the software.
Download the installation file and run it. Follow the on-screen directions. Following the setup, the PiP editor will launch.
Step 2: Import files
Select two files: the one you want to use as a background and the one you want to display over it by clicking Add Files.

Step 3: Create a video track
Make an extra video track before you begin video editing. To do so, go to the Plus menu and select Add Video Track. Then, drag one of the videos to the secondary track and the other to the primary track.
From the menu, select the Picture in Picture option. To change the size of the video, drag the boundaries. Then, drag it to the desired location on the background video by clicking and holding.

Step 4: Export and Save
Save your PiP video once you’ve finished editing it. First, select the video format, quality, and folder where the file will be saved by clicking Export and adjusting the parameters in the display popup. Then press the Start button. The picture-in-picture video editor will open the folder holding the file after the Export is complete.

FAQs
1. How do you make a facetime video call?
Tap New FaceTime towards the top of the screen in FaceTime.
Tap to make a video call or an audio call after typing the name or number you wish to call in the top field (not available in all countries or regions). You can also tap instead.
2. How do you add a virtual background on Facetime?
To change the background, use a filter: s
- Tap your tile, then tap during a FaceTime video call (supported models).
- Open the filters by tapping.
- Select your look by tapping a filter at the bottom of the screen (swipe left or right to preview them).
4. Does Facetime have virtual backgrounds?
No. Facetime does have virtual backgrounds, but it allows the users to blur the background.
5. Can you get fake facetime calls?
There is less probability of getting fake facetime calls, but you might spam FaceTime calls from random numbers.
6. Can you Facetime a random number?
FaceTime isn’t any different. A caller could try their luck by FaceTime a random phone number or email address, and if they belong to an iPhone user or an Apple ID, the FaceTime call will be accepted.
7. Can you Facetime from an unknown number?
Switching to your email address for FaceTime audio and video chats is the way to go if you always want to keep your phone number private. You may even go a step further and only receive FaceTime calls via email, with your phone number serving as your FaceTime caller ID.
8. How do I call someone on Facetime?
Launch FaceTime. In the search field, type the names, phone numbers, or email addresses of the persons you wish to contact. Then, click the video or audio icon, depending on the type of call you wish to make. To begin the call, press the video or audio button in the screen’s bottom-left corner.
9. Can you create a background on Facetime?
No. However, FaceTime allows you to apply camera effects on video calls.
Step 2: Edit the video
Wondershare Filmora’s video templates can be added. You can apply music, text, filters and overlays, and motion effects by right-clicking on them and selecting apply. After adding video resources such as text and elements, you may customize the texts by changing the size, placement, etc.
Also, you can add overlay video clips using templates of a video call to make it look like a real call.
Step 3: Export and Save
Quickly export your project to a new video. After you’ve applied the video resources to your videos and clicked Export, you’ll have a whole new video that you can share at birthday parties, weddings, or for marketing purposes, just like any other video you’ve created.
2. Kapwing
Compatibility: Online
Kapwing is a powerful online video editor with a non-linear editing methodology. Upload photos, audio, and video files, then edit them all in one spot.
Creators may view and alter their content from any device or location because Kapwing is entirely online. Work is automatically saved in the cloud, eliminating the need to transfer data locally. When you’re ready to export, sit back and relax because everything is handled in the cloud.
This template allows you to blend two videos into one like an iPhone Facetime call. First, put two videos in a photo and arrange them in a picture arrangement. Then, as a video overlay in the upper corner, layer one on top of the other.
Steps
Step 1: Open Kapwing Fake Video Call Template
Step 2: Import video files
Click on ‘Add Media’ to add video clips.
Step 3: Save and Export Video
Once you are done editing the template with the images you want, click on ‘Export Project’ to Export and save the video.
3. VITA App
Compatibility: Android/Mac
VITA is a program that allows you to make visually appealing videos by combining several filters and other features. The program comes with a large template library, so making films will be a breeze. The best part is that no prior experience is required.
All of VITA’s templates are divided into categories is one of its most noticeable features. This makes it simple to locate the desired impact. It’s critical to stress that you must have all the audiovisual materials you intend to use in your smartphone’s gallery. VITA also allows you to include text in your designs, making them fascinating.
Steps
Step 1: Import the file
Download the application from Google Play Store or Apple Store. Then, launch the application and import the video files.
Step 2: Edit the video
Download PNG images that will help you add all the call elements. Choose a picture-in-picture template. Add Subtitles.
Step 3: Export the video
Once you are done with editing, you can export the file by selecting the ‘Export’ option on the top right corner of the screen.
4. Clipchamp
Compatibility: Windows/Mac
Clipchamp is a free online video editor that makes movie creation simple for anyone, even if they have no prior editing knowledge. It lets you blend films, photos, and audio files and add text and effects before saving the finished product to your computer.
Steps
Step 1: To get started, log into your Clipchamp account or create a free account.
Step 2: Click the ‘Create a video’ button on the left sidebar. There are five different forms from which to pick. First, choose the video aspect ratio that works best for your project. For example, if you wish to upload to YouTube, we recommend shooting in widescreen 16:9.
Step 3: Click ‘Add media’ and drag and drop your films, audio, and photographs into the media box if you already have filmed footage you’d like to utilize in your project. You may also add media by clicking ‘Browse my files.’ If you wish to use free stock footage, go to ‘Stock’ and upload your films to the project by clicking the ‘+’ button. All your films will be saved in your library.
Step 4: You can now find your videos in your media library. Drag and drop the picture-in-picture videos you want to alter to the editing timeline. As shown in the sample below, arrange the two videos one over the other. Make sure both clips are precisely underneath one another.
Step 5: Now that your movies are aligned, select the one you want to shrink. The video you’re reducing must be at the top of the screen. To move it from the bottom to the top, drag and drop it. A small box will appear on the timeline in the bottom left corner of the clip. The clip will shrink when you click the box once. When you click the box once again, modifying choices will appear. You can move the smaller video around and increase or decrease its size.
Step 6: Export your project once you’ve completed editing your video. Save to your preferred place or folder. You can share the video straight on social media or embed it in a document.
5. Movavi
Compatibility: Windows/Mac
Movavi Video Editor is a video editing tool for Windows that is powerful and simple to use. Apply stunning video effects and filters, add music and titles, and more! Yet, despite its enormous features, Movavi’s video editing program is quite simple to use: add a sprinkle of fantasy and some spare time, and you’ll have a Hollywood-style video with far less effort.
Steps
Step 1: Download the software.
Download the installation file and run it. Follow the on-screen directions. Following the setup, the PiP editor will launch.
Step 2: Import files
Select two files: the one you want to use as a background and the one you want to display over it by clicking Add Files.
Step 3: Create a video track
Make an extra video track before you begin video editing. To do so, go to the Plus menu and select Add Video Track. Then, drag one of the videos to the secondary track and the other to the primary track.
From the menu, select the Picture in Picture option. To change the size of the video, drag the boundaries. Then, drag it to the desired location on the background video by clicking and holding.
Step 4: Export and Save
Save your PiP video once you’ve finished editing it. First, select the video format, quality, and folder where the file will be saved by clicking Export and adjusting the parameters in the display popup. Then press the Start button. The picture-in-picture video editor will open the folder holding the file after the Export is complete.
FAQs
1. How do you make a facetime video call?
Tap New FaceTime towards the top of the screen in FaceTime.
Tap to make a video call or an audio call after typing the name or number you wish to call in the top field (not available in all countries or regions). You can also tap instead.
2. How do you add a virtual background on Facetime?
To change the background, use a filter: s
- Tap your tile, then tap during a FaceTime video call (supported models).
- Open the filters by tapping.
- Select your look by tapping a filter at the bottom of the screen (swipe left or right to preview them).
4. Does Facetime have virtual backgrounds?
No. Facetime does have virtual backgrounds, but it allows the users to blur the background.
5. Can you get fake facetime calls?
There is less probability of getting fake facetime calls, but you might spam FaceTime calls from random numbers.
6. Can you Facetime a random number?
FaceTime isn’t any different. A caller could try their luck by FaceTime a random phone number or email address, and if they belong to an iPhone user or an Apple ID, the FaceTime call will be accepted.
7. Can you Facetime from an unknown number?
Switching to your email address for FaceTime audio and video chats is the way to go if you always want to keep your phone number private. You may even go a step further and only receive FaceTime calls via email, with your phone number serving as your FaceTime caller ID.
8. How do I call someone on Facetime?
Launch FaceTime. In the search field, type the names, phone numbers, or email addresses of the persons you wish to contact. Then, click the video or audio icon, depending on the type of call you wish to make. To begin the call, press the video or audio button in the screen’s bottom-left corner.
9. Can you create a background on Facetime?
No. However, FaceTime allows you to apply camera effects on video calls.
How To Import and Adjust the Video Clips on Wondershare Filmora?
Video editing surely improves the quality and impact of your video projects. By refining and polishing your video, editing can elevate your content from ordinary to extraordinary. It not only improves the overall look of the video but also enhances the narrative as well. Additionally, this makes the video more appealing, and more and more people want to see your video.
The editing process in a video project is essential as it allows you to present your video uniformly. It helps you remove unwanted sections, rearrange clips, and more to create a seamless flow. Editing might be difficult initially, but you can start from the basics and gradually build your skills. Begin by learning how to import and adjust clips. In this way, you will learn video editing step by step and get to a professional level.
Part 1: How Should Video Clips Be Integrated To Make the Perfect Video?
Video Clip Editor Use Wondershare Filmora to Import and Adjust the Video Clips to Make the Perfect Video.
Free Download Free Download Learn More

You can make YouTube video clips or clips for other platforms by integrating video clips. If you want to know how combining clips can help you, this portion will help you. In this part, you will learn a few tips on making a perfect video by integrating videos.
1. Establish a Clear Narrative
You can determine the purpose and message of your video. It doesn’t matter whether it’s a story, tutorial, promotional content, or documentary. However, having a clear narrative or message will guide your clip selection and arrangement.
2. Plan the Storyboard or Structure
Before editing, create a storyboard or outline to visualize the flow and structure of your video. It will help you organize your clips and determine the sequencing of scenes. Additionally, similar shots support the narrative of your project.
3. Start with a Strong Opening
If you want to grab the viewer’s attention from the beginning, follow this trick. It would be best to choose a compelling opening shot or sequence for your project. It can set the tone and hook the audience, encouraging them to continue watching.
4. Maintain Visual Continuity
Ensure visual continuity between clips by considering different factors. Lighting, color, composition, and camera angles are a few factors to be considered. Furthermore, smooth transitions between shots help maintain a seamless viewing experience.
5. Vary Shot Types and Perspectives
Incorporate various shot types and perspectives to add visual interest and engagement. You can use a mix of wide shots, close-ups, and medium shots. Additionally, unique camera angles also matter to provide a dynamic viewing experience.
6. Consider Shot Length and Pacing
What else you can do is pay attention to each clip’s duration and arrangement to maintain pace. Longer shots can create a sense of calmness or allow for more detailed storytelling. However, short video clips can create a sense of energy and keep the viewer’s attention.
7. Use Transitions Wisely
Choose appropriate transitions to connect different clips smoothly. Transitions like cuts, fades, dissolves, or wipes can help create continuity. Furthermore, such transitions indicate time or location changes or add a stylistic touch. However, avoid overusing flashy transitions that may distract from the content.
8. Sync Video with Audio
Some videos include audio, so ensure the video clips are synchronized properly. Moreover, align dialogue, music, or sound effects with the corresponding video. This will enhance the overall impact and coherence of your video project.
9. Enhance with Visual Effects or Graphics
Consider using effects, graphics, or text overlays to improve your video. It will even improve the storytelling or provide additional information. Additionally, you can use these elements purposefully to complement the narrative.
10. End Strong
The ending of a video with a memorable and impactful closing shot or sequence also matters. By doing so, your video will surely leave a lasting impression. It can summarize the main message, provide a call to action, or create an emotional impact.
11. Smooth Transitions Between Scenes
Another way is to add smooth transitions if your video includes multiple scenes or locations. Use techniques like matching action or complementary visuals to create seamless transitions. It will surely enhance the viewer’s experience.
12. Test and Refine
Lastly, preview your edited video and gather feedback from others to ensure its effectiveness. Adjust the sequence, pacing, or elements as necessary to improve the overall flow and impact. It will help you to finalize your video with a little touch-up using the feedback.
Part 2: Wondershare Filmora and Video Editing: A Heaven For Video Editors
Wondershare Filmora is a video editing solution for all of your boring videos. If you’re a content creator and want to up your game, use a good editing tool like Filmora. This platform provides you with different templates and presets that you can apply to your content. Furthermore, you don’t need extensive training to learn this tool, as it is pretty straightforward.
However, this tool has a lot to offer, including its new AI-powered features and options. You can automatically audio duct using this tool and much more. If you can’t find any suitable music for your video, simply search, listen, and use audio files in the tool. Wondershare Filmora is indeed heaven for video editors and enthusiasts, as it offers so much. Be it long or short video clips; this tool will help you easily edit them.
Free Download For Win 7 or later(64-bit)
Free Download For macOS 10.14 or later
Part 3: Learning Different Ways of Importing Video Clips in Filmora
If you’re searching for ways to import videos in Wondershare Filmora, you’re in luck. This portion is going to discuss different ways to import long and short video clips in the tool.
Filmora Tutorial - Import And Organize Media Files
Step 1Launch Wondershare Filmora and Create a New Project
Access Wondershare Filmora on your system. Start a new project by selecting “New Project.”

Step 2Select the Import Option
In the new window, select “Click here to import media” and choose the files you want to import into the tool.

Step 3Import Files by Drag and Down
Alternatively, drag and drop your media files into the Media Import section. In this way, you can choose your media using dragging and dropping.

Step 4Import Your Media Files from Drop-Down Menu
Another way to import files is by locating the Media Import section and clicking the “Import” drop-down menu. Then select “Import Media Files” and browse to choose your media file.

Step 5Import Using Shortcut Keys
You can use shortcut keys by launching the tool and pressing “Ctrl + I.” A new window will appear where you can add media files.

Step 6Import Your Media Folder
To import a media folder, go to the Media Import section and click the “Import” drop-down menu. Then, select “Import a Media Folder” and choose the media you want to import.

Step 7Import from a Device
Wondershare Filmora also allows you to import media directly from an external camera or phone. Attach the device, go to the “Import” drop-down menu, and select “Import from a Camera or a Phone.” Next, choose the media from your device folder and click “OK.”

Step 8Import from Your Cloud Storage
You can also import media files from your cloud storage. In the “Import” drop-down menu, find “Import from other Apps” and select it. Further, select the storage app from where you want to import your media files. Once your storage account is linked to your computer, you can easily import media files from there as well.

Part 4: Adjustment Layers: A New Thing in Filmora?
Wondershare Filmora is the ultimate editing tool that even lets you add layers to your video. The Filmora adjustment layer will allow you to make changes without changing the original footage.
Filmroa Tutorial - Adjustment Layers in Filmora Files
Free Download For Win 7 or later(64-bit)
Free Download For macOS 10.14 or later
Step 1Add an Adjustment Layer
To create a video slideshow using a Filmora adjustment layer, open the tool and create a new project. Once you’ve imported all the video clips in the timeline then, select the “Media” button. Proceed next by choosing the “Adjustment Layer” tab in the bottom panel. Then, click on the layer and drop it in the timeline above your video.

Step 2Apply Effects to the Adjustment Layer
If you want to add effects, select the adjustment layer and locate the “Effects” button. Next, drag and drop the effect onto the adjustment layer.

Step 3Color Correct Your Adjustment Layer
Adjust the color toning of your video by finding the “Histogram” icon in the “Preview” section. Modify the curves according to your preference while turning on this function. Continue to select the “Adjustment Layer” and lead to the “Color” tab to look for the “Curves” option.

Step 4Add Multiple Adjustment Layers
Additionally, you can apply different effects at different durations and drag the adjustment layer to the end of the layer. Further, split the adjustment layer using the “Playhead” slider at the desired duration to add a new effect. To make your slideshow better, you can also add transition effects by dragging and dropping them between two clips.

Step 5Save as a Preset
You can also save your adjustment layer as a preset. Select your adjustment layer, locate the “Save as Custom” option in the right panel, and click on it. This will save the adjustment layer as a preset. Your preset will be in the “Adjustment Layer” section of the “Media” tab.

Conclusion
Video editing might not be as easy as you think. It is a skill that requires time, effort, and even knowledge. There are many people who took video editing and post-production as a professional career. You can also learn to edit videos like a professional by taking baby steps. Firstly you can learn how to adjust clips and import them in Wondershare Filmora, a great tool.
Free Download Free Download Learn More
You can make YouTube video clips or clips for other platforms by integrating video clips. If you want to know how combining clips can help you, this portion will help you. In this part, you will learn a few tips on making a perfect video by integrating videos.
1. Establish a Clear Narrative
You can determine the purpose and message of your video. It doesn’t matter whether it’s a story, tutorial, promotional content, or documentary. However, having a clear narrative or message will guide your clip selection and arrangement.
2. Plan the Storyboard or Structure
Before editing, create a storyboard or outline to visualize the flow and structure of your video. It will help you organize your clips and determine the sequencing of scenes. Additionally, similar shots support the narrative of your project.
3. Start with a Strong Opening
If you want to grab the viewer’s attention from the beginning, follow this trick. It would be best to choose a compelling opening shot or sequence for your project. It can set the tone and hook the audience, encouraging them to continue watching.
4. Maintain Visual Continuity
Ensure visual continuity between clips by considering different factors. Lighting, color, composition, and camera angles are a few factors to be considered. Furthermore, smooth transitions between shots help maintain a seamless viewing experience.
5. Vary Shot Types and Perspectives
Incorporate various shot types and perspectives to add visual interest and engagement. You can use a mix of wide shots, close-ups, and medium shots. Additionally, unique camera angles also matter to provide a dynamic viewing experience.
6. Consider Shot Length and Pacing
What else you can do is pay attention to each clip’s duration and arrangement to maintain pace. Longer shots can create a sense of calmness or allow for more detailed storytelling. However, short video clips can create a sense of energy and keep the viewer’s attention.
7. Use Transitions Wisely
Choose appropriate transitions to connect different clips smoothly. Transitions like cuts, fades, dissolves, or wipes can help create continuity. Furthermore, such transitions indicate time or location changes or add a stylistic touch. However, avoid overusing flashy transitions that may distract from the content.
8. Sync Video with Audio
Some videos include audio, so ensure the video clips are synchronized properly. Moreover, align dialogue, music, or sound effects with the corresponding video. This will enhance the overall impact and coherence of your video project.
9. Enhance with Visual Effects or Graphics
Consider using effects, graphics, or text overlays to improve your video. It will even improve the storytelling or provide additional information. Additionally, you can use these elements purposefully to complement the narrative.
10. End Strong
The ending of a video with a memorable and impactful closing shot or sequence also matters. By doing so, your video will surely leave a lasting impression. It can summarize the main message, provide a call to action, or create an emotional impact.
11. Smooth Transitions Between Scenes
Another way is to add smooth transitions if your video includes multiple scenes or locations. Use techniques like matching action or complementary visuals to create seamless transitions. It will surely enhance the viewer’s experience.
12. Test and Refine
Lastly, preview your edited video and gather feedback from others to ensure its effectiveness. Adjust the sequence, pacing, or elements as necessary to improve the overall flow and impact. It will help you to finalize your video with a little touch-up using the feedback.
Part 2: Wondershare Filmora and Video Editing: A Heaven For Video Editors
Wondershare Filmora is a video editing solution for all of your boring videos. If you’re a content creator and want to up your game, use a good editing tool like Filmora. This platform provides you with different templates and presets that you can apply to your content. Furthermore, you don’t need extensive training to learn this tool, as it is pretty straightforward.
However, this tool has a lot to offer, including its new AI-powered features and options. You can automatically audio duct using this tool and much more. If you can’t find any suitable music for your video, simply search, listen, and use audio files in the tool. Wondershare Filmora is indeed heaven for video editors and enthusiasts, as it offers so much. Be it long or short video clips; this tool will help you easily edit them.
Free Download For Win 7 or later(64-bit)
Free Download For macOS 10.14 or later
Part 3: Learning Different Ways of Importing Video Clips in Filmora
If you’re searching for ways to import videos in Wondershare Filmora, you’re in luck. This portion is going to discuss different ways to import long and short video clips in the tool.
Filmora Tutorial - Import And Organize Media Files
Step 1Launch Wondershare Filmora and Create a New Project
Access Wondershare Filmora on your system. Start a new project by selecting “New Project.”
Step 2Select the Import Option
In the new window, select “Click here to import media” and choose the files you want to import into the tool.
Step 3Import Files by Drag and Down
Alternatively, drag and drop your media files into the Media Import section. In this way, you can choose your media using dragging and dropping.
Step 4Import Your Media Files from Drop-Down Menu
Another way to import files is by locating the Media Import section and clicking the “Import” drop-down menu. Then select “Import Media Files” and browse to choose your media file.
Step 5Import Using Shortcut Keys
You can use shortcut keys by launching the tool and pressing “Ctrl + I.” A new window will appear where you can add media files.
Step 6Import Your Media Folder
To import a media folder, go to the Media Import section and click the “Import” drop-down menu. Then, select “Import a Media Folder” and choose the media you want to import.
Step 7Import from a Device
Wondershare Filmora also allows you to import media directly from an external camera or phone. Attach the device, go to the “Import” drop-down menu, and select “Import from a Camera or a Phone.” Next, choose the media from your device folder and click “OK.”
Step 8Import from Your Cloud Storage
You can also import media files from your cloud storage. In the “Import” drop-down menu, find “Import from other Apps” and select it. Further, select the storage app from where you want to import your media files. Once your storage account is linked to your computer, you can easily import media files from there as well.
Part 4: Adjustment Layers: A New Thing in Filmora?
Wondershare Filmora is the ultimate editing tool that even lets you add layers to your video. The Filmora adjustment layer will allow you to make changes without changing the original footage.
Filmroa Tutorial - Adjustment Layers in Filmora Files
Free Download For Win 7 or later(64-bit)
Free Download For macOS 10.14 or later
Step 1Add an Adjustment Layer
To create a video slideshow using a Filmora adjustment layer, open the tool and create a new project. Once you’ve imported all the video clips in the timeline then, select the “Media” button. Proceed next by choosing the “Adjustment Layer” tab in the bottom panel. Then, click on the layer and drop it in the timeline above your video.
Step 2Apply Effects to the Adjustment Layer
If you want to add effects, select the adjustment layer and locate the “Effects” button. Next, drag and drop the effect onto the adjustment layer.
Step 3Color Correct Your Adjustment Layer
Adjust the color toning of your video by finding the “Histogram” icon in the “Preview” section. Modify the curves according to your preference while turning on this function. Continue to select the “Adjustment Layer” and lead to the “Color” tab to look for the “Curves” option.
Step 4Add Multiple Adjustment Layers
Additionally, you can apply different effects at different durations and drag the adjustment layer to the end of the layer. Further, split the adjustment layer using the “Playhead” slider at the desired duration to add a new effect. To make your slideshow better, you can also add transition effects by dragging and dropping them between two clips.
Step 5Save as a Preset
You can also save your adjustment layer as a preset. Select your adjustment layer, locate the “Save as Custom” option in the right panel, and click on it. This will save the adjustment layer as a preset. Your preset will be in the “Adjustment Layer” section of the “Media” tab.
Conclusion
Video editing might not be as easy as you think. It is a skill that requires time, effort, and even knowledge. There are many people who took video editing and post-production as a professional career. You can also learn to edit videos like a professional by taking baby steps. Firstly you can learn how to adjust clips and import them in Wondershare Filmora, a great tool.
Top Animated Title Makers
You know that your video needs a title, but rather than just type in some bland text to introduce the video, you can create an animated title page that is far more attractive. Animated titles make a video more attractive and when done correctly, they can even guarantee that your target audience will stick around long enough to watch the entire video. They can also be very useful for introducing the content of the video.
But to make an effective animated title, you need a tool that is designed to do just that. In this article, we look at some of the top animated title makers that you can use to create the perfect animated title for your video.
Part 1. Animated Title Maker Online
If you don’t want to install software on your computer to create the animated title, the following are the top online tools to choose from;
Animaker
Link: https://www.animaker.com/text-animation-maker
Rating: 4.5/5
Animaker is an online tool that is specifically designed to help you create text animations that you can then add to your video project. Available online on all browsers, Animaker has a simple user interface that makes it easy to create text animations in a matter of minutes. It is so easy to use that even the average beginner can create stunning text animations.
If you don’t want to create the animations from scratch, Animaker has numerous pre-designed templates for you to choose from that you can then just edit to fit your design. It also has a lot of customizable infographics that you can repurpose.

Animatron Studio
Link: https://www.animatron.com/studio
Rating: 4.5/5
The Animatron Studio is a one-stop solution for generating all types of animated texts. You can use it to create the perfect animated title for your video, but its numerous features also mean that it is one of the best ways to create attention-grabbing animated banner ads that can be posted on various ad sites,
It has a wealth of resources that you can use to create the title including more than 500,000 royalty-free images, videos, and audio to include in your project. If you don’t want to build the animated content from the ground up, you can select from the 200 pre-animated sets that Animatron Studio provides.
Kapwing Title Maker
Link: https://www.kapwing.com/animated-text-video-maker
Rating: 4.5/5
If your goal is to do more than just create an animated title for your video, Kapwing is a good solution. It is a complete online video editor that can also be used to create animated titles. As such, you can expect Kapwing to have more advanced features that allow you to customize the animated title in various ways.
For instance, it has a huge selection of animations that you can apply to the text. But you also get the option to upload your own animations, colors, and fonts. But please note that the free version of Kapwing will add a watermark to the video.

Biteable Animated Text Maker
Link: https://biteable.com/animated/text/
Rating: 4.5/5
Biteable is one of the most popular solutions that you can use to create all kinds of animated texts. It is simple enough to use that it is useful to both professionals and amateur video creators. It has numerous useful features including custom scenes, foundations, backgrounds, and characters all of which can work together to create the perfect animated title.
One of the main benefits of choosing Biteable is that you can share the videos you edit directly on social media without having to download the video.

Flexclip Video Maker
Link: https://www.flexclip.com/editor/
Rating: 4.5/5
Flexclip is another very easy-to-use and easily accessible solution to create animated texts for videos. Rather than create the texts from scratch, Flexclip allows you to create stunning animated texts just by selecting several parameters.
There are also a lot of pre-made designer text templates that are fully customizable. All you have to do is select one of the templates, and change the text, font, and any images to make it unique to you and your video.

Part 2. Animated Title Maker for Computer
Online tools can be useful, especially since they are more easily accessible. But if you want additional features and more ways to customize your animated title, the following desktop solutions may be more applicable to you;
Filmora
Rating: 4.5/5
Wondershare Filmora is a complete suite of video editing tools that can also come in handy when creating animated titles for videos. It is a very simple video editor with a simple user interface, making it an ideal solution even for beginner users. Adding a title to your video is easy and you get to choose from more than 200 different animations that you can apply to bring the text to life.
Filmora is also very useful because it comes with advanced editing features for the professional editor. You can use it to edit all aspects of the video including the clips and even any audio that may be on the project.

Adobe Animate
Rating: 4.5/5
Adobe Animate is a great option to create various animations for your video project, including animated texts. Used by animators to create 2D animated content, Adobe Animate has a lot of features designed to facilitate this kind of animation and is, therefore, one of the go-to solutions for designers looking to create illustrations like logos and infographics.
But like other Adobe programs, Adobe Animate is not very easy to use and the beginner may find that it takes quite a long time to figure out how it works. But once you figure it out, the 800+ web fonts can make it very easy for you to customize your animated title in various ways.

Express Animate
Rating: 4.5/5
Express Animate is a completely free program that you can download on your computer. It is a complete video editor which means that you can use it to animate text and characters, but it is also a great way to edit other aspects of the video including the audio tracks and adding digital effects.
With a simple user interface, Express Animate allows users to create 2D animations that can be used to create unique videos. It is also a good way to create GIFs and memes.
Movavi Video Editor
Rating: 4.5/5
Movavi Video Editor is another complete suite of editing tools that can also come in handy when you want to create an animated title for your video. Designed for both professionals and beginners, this video has all the advanced features you will need to edit all aspects of your video, including a built-in audio editor.
When it comes to animation, Movavi has a lot of effects and transitions as well as pre-made title templates to choose from. Once you have selected the title, you can easily customize the font and color to fit into your project.

Windows Movie Maker
Rating: 4.5/5
For PC users Windows Movie Maker is a simple to use and free way to edit videos. Included with the Windows OS, you likely don’t need to install any software to use and even though it is a free solution, Windows Movie Maker does have the necessary features to create and add animated titles to any video.
It comes with numerous effects, transitions, and templates to choose from when animating text. And it can also be used to edit videos in other ways including trimming and merging clips.

Part 3. Animated Title Maker Apps
If you are editing your videos on your mobile device, the following are the top animated title-making apps to choose from;
Tomo
Rating: 4.5/5
Link: https://m.apkpure.com/tomo-animate-text-in-video/com.entzeners.app.tomo
Tomo is one of the best apps that you can use to animate text in a video. It has robust features that allow you to easily add text to the video and then animate the text using various transitions and effects. Once the edits are complete, Tomo allows you to share the completed video directly on social media apps like Instagram and Twitter.

Adobe Spark
Rating: 4.5/5
Link:https://apps.apple.com/us/app/adobe-spark-post-design-maker/id1051937863
Available for both Android and iOS devices, Adobe Spark is a video editing tool that has numerous tools to add and edit texts on videos. You can use the professionally designed templates that you have access to when using Adobe Spark to create stunning animation titles. And since it easily integrates with other apps on the device, sharing the videos is very easy.
Quik
Rating: 4.5/5
Link: https://play.google.com/store/apps/details?id=com.gopro.smarty&hl=en&gl=US
Quik is an app that is dedicated to text animations and therefore one of the best solutions when you want to add and edit texts on videos. It is available for both iOS and Android and although the free version of the app is slightly limited, its basic editing features are still better than what you find on other more expensive solutions.
Hyper-type Animated Text Videos
Rating: 4.5/5
Link: https://itunes.apple.com/us/app/hype-type-animated-text-videos
This app gives you two options when it comes to animating the text on your video; auto-motion and typography. It focuses on just adding and editing text on a video and as such may not have any of the other video editing features you will find on some of the other apps. But if your goal is to create an interactive animated video title, Hyper-type Animated Text Videos is a great solution.
Vimeo
Rating: 4.5/5
Link: https://play.google.com/store/apps/details?id=com.vimeo.android.videoapp&hl=en&gl=US
Also available for both iOS and Android devices, Vimeo can also be a handy solution for the creation and editing of animated titles for videos. It has a lot of features to edit not just the text in videos, but also all other elements including audio. You even get a wide selection of royalty-free music that you can add to the video and motion stickers to make your title stand out even more. But the free version of Vimeo will add a watermark to the video.

Free Download For Win 7 or later(64-bit)
Free Download For macOS 10.14 or later
How to Use LUTs in VN Editor – Complete Guide and Best LUTs Download
Hello and welcome to another article full of information and excitement. The topic of this article is LUT for the VN editor. So it will be exciting for those who want to use LUTs in their video to make them look nice and well. As we will discuss today that what is VN editor and how you can add LUTs to your videos using it on the devices it is compatible for. Moreover, where you can download some fantastic LUTs like moody LUTs, which help your videos to look nice, and which software you should use for this purpose if you are running a device on which the VN editor is not compatible. So let’s begin!
Part 1. What is VN editor?
VN editor is one of the best choices for video editing on mobiles and Mac. Fast editing, transitions, effects, filters, colors, subtitles, music, and many other features make the VN video editing app a great tool for producing and editing videos. It aims to make editing shorter and more feature-rich, empowering everyone to take control of their own lives. You cannot only produce great videos but good films as well. In the following, we will discuss how you can add LUTs to your videos using it.

Part 2. How to use LUTs in VN editor?
First, we must know that it is compatible with which platforms. So, it is now available for Android, iOS, and Mac OS only. However, you can also use it on Windows with some Android or iOS emulators, but it is not a very continent way in our suggestions. Even after doing this, it does not work well on your Windows. Maybe you will face some glitches or malfunctioning problems. So it is better to use it on only those platforms for which it is primarily available. Please read the instructions below since we will go through how to use LUTs in it later on.
On Mac:
First of all, we will learn how you can do it on Mac:
- Download the VN Editor for Mac and open it.
- Add your video and then tap the filters option.
- Now choose custom filters and then select the LUTs pack.

- Select the desired LUT and apply.
On Mobile:
Secondly, we will discuss how we can do this on our mobiles (Android or iOS). The procedure on both devices (Android or iOS) is almost comparable. Therefore, we will discuss the steps from the perspective of both of these here:
- First, download the VN editor from your mobile app store (Android or iOS) and the LUTs pack you want to use in your video.
- After downloading them on your mobile, open the VN editor application.
- Create a new project and add your video to it.

- Then click on the Filters option and select add external or custom filters option next to the existing filters.
- It will take you to the File manager of your mobile, from which you have to find the folder in which you have stored your LUTs.
- After finding them, you can select those LUTs you want to use in your video and then click on the done or select button.
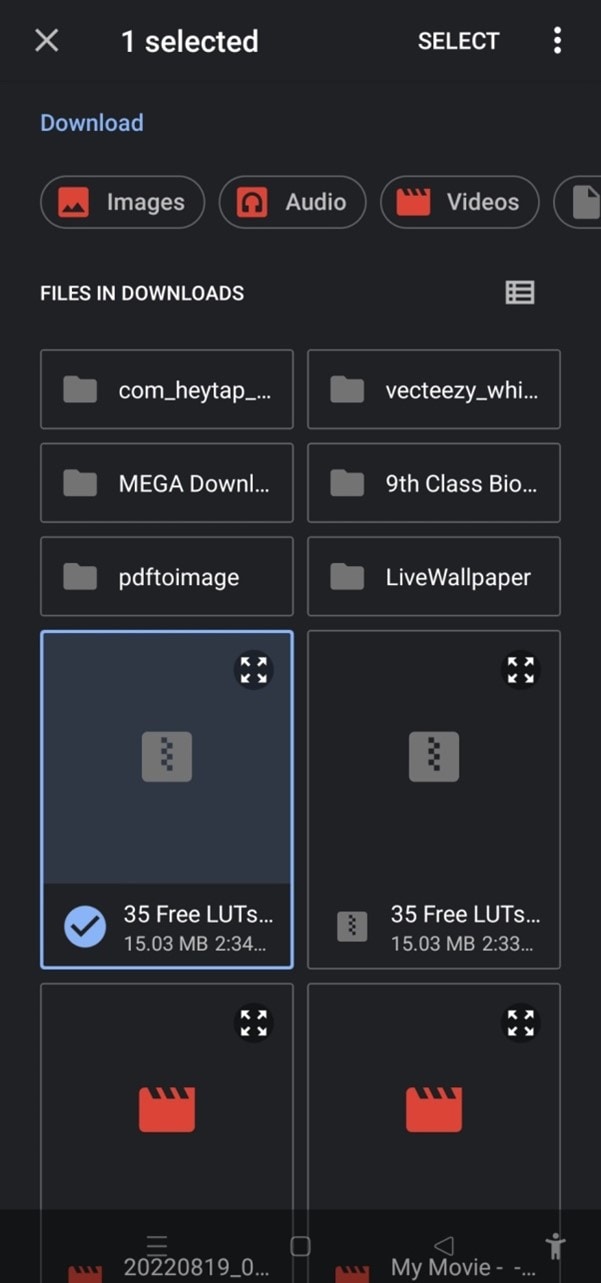
- Your downloaded LUTs start showing in the VN editor, and you can use them in your videos as you want.
Part 3. Best LUTs resource for VN video editor
1. Presets Store
Presets Store is an online platform that helps you with various Filters, LUTs, and other presets. So you can download LUTs for your videos for the VN editor using it. However, it’s not a free service. You have to pay for the LUTs you want to download from here. You can visit their YouTube channel to follow the latest LUTs, Filters and other presets on this platform.
2. Apna Editz
Apna Editz is another online platform you can use for this purpose. It also provides you with a fantastic variety of Presets like LUTs, Filters, and many other similar effects, which you can use in your video using the VN editor. The main Pros of this recommendation are that it’s a free website. So you can download LUTs for your videos from it for free. Keep an eye on their YouTube channel to be updated about the latest LUTs.
3. Lut Preset
Lut Preset is another alternative to all the above ones. You can get almost all your favorite LUTs for VN editor for free here and then use them in your videos as you want. They also share the latest LUTs on their YouTube Channel.
4. Pencil Hub
Pencil Hub is also a good option in this concern. However, it does not have too much variety of VN LUTs, but you can still use it to download some of the best LUTs for VN editors. To get informed of their every new effect and LUTs, their YouTube channel is the primary source.
5. YRP EDITZ
YRP ETIDZ is another good option if you are still looking for some fantastic VN LUTs. They, too not have a large variety of presets and LUTs. However, if you want some most commonly used LUTs for VN Editor, then they are a good option. You’ll notify of their most website updates by checking their YouTube channel.
Part 4. How to add LUTs to the best alternative to the VN editor?
VN Editor is undoubtedly an excellent choice to add LUTs to your videos. However, the VN editor is best suitable for mobile devices. To enhance your LUTs and effects, it would be great if you used some desktop software. Wondershare Filmora offers a great variety of built-in LUTs to choose from. Let’s look at how we can use Filmora to add LUTs:
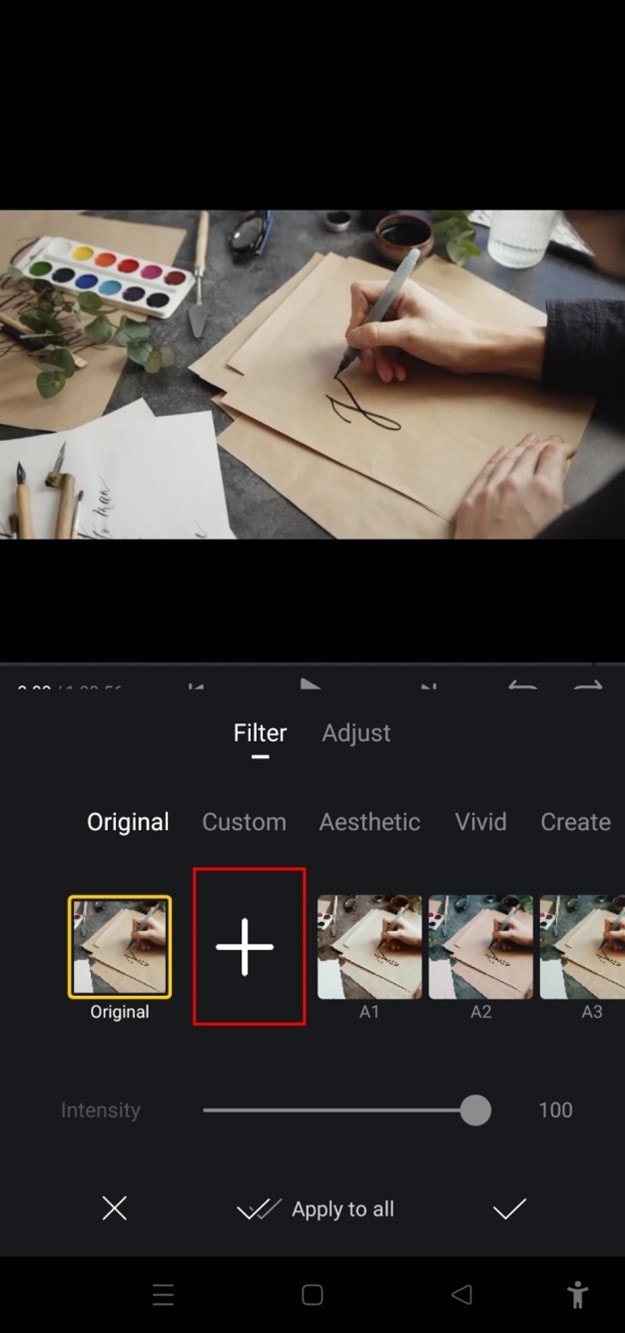
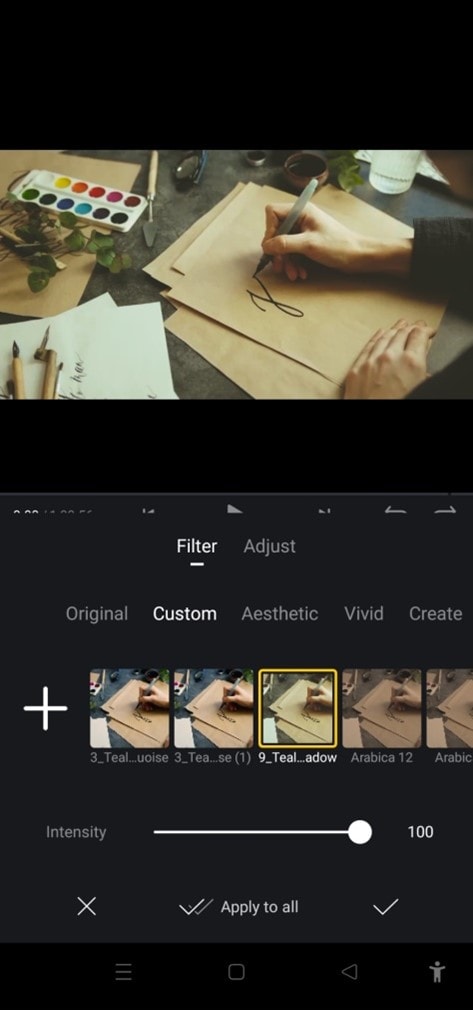
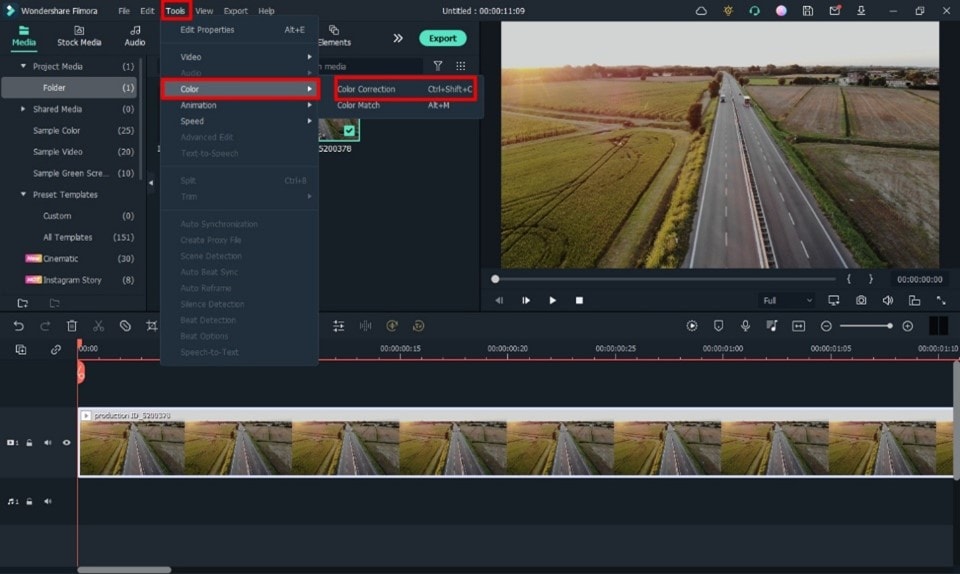
- Add your video and tap the tools, then click the Color option.
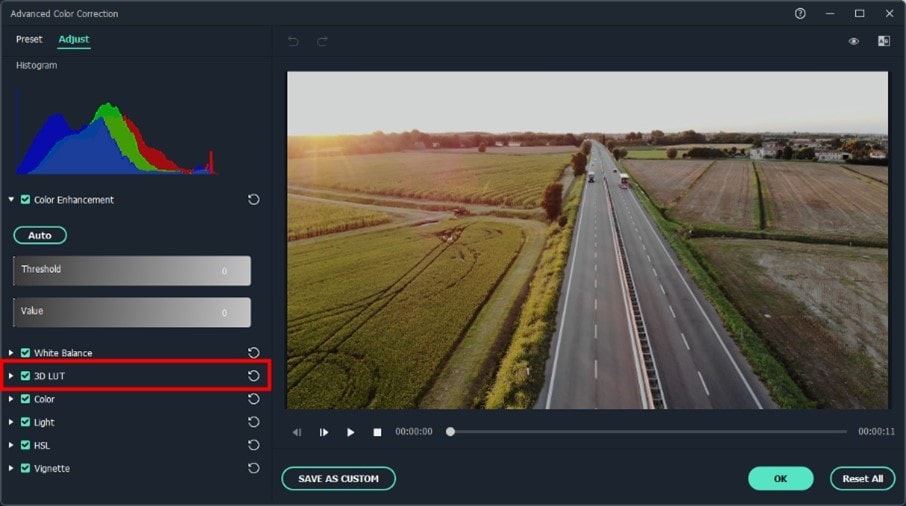
- Now select the Color Correction option and then choose 3D LUT.
- Click the drop-down menu and select the Load new LUT option. Here you can import other downloaded preset LUTs to use
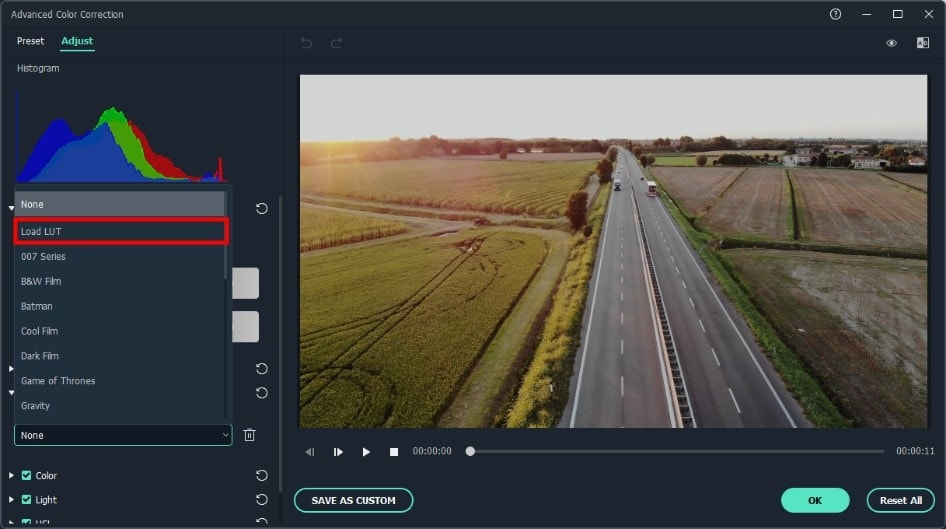
- Choose the LUT and click OK. Your new fantastic video is ready now.

Closing Thoughts
This post recommends several lut resources and demonstrates how to import them if you are a devoted user of VN editor and want to learn how to utilize it for video color grading. The more potent desktop editor Wondershare Filmora, which offers a range of built-in LUT sources and supports color grading settings, is of course recommended if you want to take your videos to the next level. Thanks for reading.
Free Download For Win 7 or later(64-bit)
Free Download For macOS 10.14 or later
2. Apna Editz
Apna Editz is another online platform you can use for this purpose. It also provides you with a fantastic variety of Presets like LUTs, Filters, and many other similar effects, which you can use in your video using the VN editor. The main Pros of this recommendation are that it’s a free website. So you can download LUTs for your videos from it for free. Keep an eye on their YouTube channel to be updated about the latest LUTs.
3. Lut Preset
Lut Preset is another alternative to all the above ones. You can get almost all your favorite LUTs for VN editor for free here and then use them in your videos as you want. They also share the latest LUTs on their YouTube Channel.
4. Pencil Hub
Pencil Hub is also a good option in this concern. However, it does not have too much variety of VN LUTs, but you can still use it to download some of the best LUTs for VN editors. To get informed of their every new effect and LUTs, their YouTube channel is the primary source.
5. YRP EDITZ
YRP ETIDZ is another good option if you are still looking for some fantastic VN LUTs. They, too not have a large variety of presets and LUTs. However, if you want some most commonly used LUTs for VN Editor, then they are a good option. You’ll notify of their most website updates by checking their YouTube channel.
Part 4. How to add LUTs to the best alternative to the VN editor?
VN Editor is undoubtedly an excellent choice to add LUTs to your videos. However, the VN editor is best suitable for mobile devices. To enhance your LUTs and effects, it would be great if you used some desktop software. Wondershare Filmora offers a great variety of built-in LUTs to choose from. Let’s look at how we can use Filmora to add LUTs:
- Add your video and tap the tools, then click the Color option.
- Now select the Color Correction option and then choose 3D LUT.
- Click the drop-down menu and select the Load new LUT option. Here you can import other downloaded preset LUTs to use
- Choose the LUT and click OK. Your new fantastic video is ready now.
Closing Thoughts
This post recommends several lut resources and demonstrates how to import them if you are a devoted user of VN editor and want to learn how to utilize it for video color grading. The more potent desktop editor Wondershare Filmora, which offers a range of built-in LUT sources and supports color grading settings, is of course recommended if you want to take your videos to the next level. Thanks for reading.
Free Download For Win 7 or later(64-bit)
Free Download For macOS 10.14 or later
Also read:
- 2024 Approved How to Color-Correct an S-Log Footage
- New All You Need to Know About Transparent Logos and How You Can Make Them. Top Transparent Logos You Can Take Inspiration From
- New Intro Videos Have the Potential to Make a First Impression on Viewers, and You Know How They Say that the First Impression Is the Last Impression
- How to Turn Text Into a Podcast
- Updated 10 Apps to Make Videos with Pictures and Music for 2024
- How to Trim/Crop Video in Microsoft Powerpoint for 2024
- New How to Loop a Video on Android
- New In 2024, Top 9 Sparkle Effects Photo and Video Editors You Should Know
- 2024 Approved Minecraft Pixel Art A Complete Guide for Die-Hard Fans
- 2024 Approved How to Make Simple Slideshow Word
- In 2024, How to Create Intro Video with Filmora
- New In 2024, A Detailed Guid to Remove Background From a Video in Premier Pro
- 2024 Approved Make A Tattoo Disappear Like A Magic
- Updated How to Add Adjustment Layer in Premiere Pro
- New 2024 Approved A Guide to Adding Audio in Wondershare Filmora
- New 2024 Approved Best 12 AI Video Generators to Pick
- In 2024, Want to Capture Captivating, Detailed Videos? If Yes, Then You Need to Learn the Recording of Super Slow Motion Videos. In This Article, I Will Show You How to Record a Super Slow-Motion Video on Your Android and iPhone
- New 4 Ways to Add White Borders on Mobile and Desktop for 2024
- In 2024, Top 10 Sony LUT for Different Purposes
- Updated In 2024, Ways to Make Sure Your Video Editing Course Is Worthing to Watch
- New How to Convert Videos to Slow Motion for 2024
- In 2024, Do You Want to Enable the Motion Blur Effect While Playing Dying Light 2? Read This Article to Find Out How to Use Dying Light 2 Motion Blur for a Great Gaming Experience
- New In 2024, Explore the List of the Top Six Online Video Speed Controllers for Chrome, Safari, and Firefox
- How to Make Stunning Glitch Effect in Photoshop, In 2024
- Home Button Not Working on Oppo A18? Here Are Real Fixes | Dr.fone
- Where Is the Best Place to Catch Dratini On OnePlus Nord N30 SE | Dr.fone
- The Best Android SIM Unlock Code Generators Unlock Your Samsung Galaxy S23 Tactical Edition Phone Hassle-Free
- 9 Best Free Android Monitoring Apps to Monitor Phone Remotely For your Realme GT 5 Pro | Dr.fone
- Dose Life360 Notify Me When Someone Checks My Location On Lava Yuva 2? | Dr.fone
- What Legendaries Are In Pokemon Platinum On Tecno Spark 20 Pro? | Dr.fone
- In 2024, AddROM Bypass An Android Tool to Unlock FRP Lock Screen For your Infinix Note 30 5G
- iPhone SE (2022)® Data Recovery Software to Recover Lost iOS® Data | Stellar
- In 2024, How to Transfer Contacts from Realme GT Neo 5 to Outlook | Dr.fone
- In 2024, Downloading SamFw FRP Tool 3.0 for Infinix Note 30i
- In 2024, How Do You Get Sun Stone Evolutions in Pokémon For Vivo S18? | Dr.fone
- What Pokémon Evolve with A Dawn Stone For Apple iPhone 12? | Dr.fone
- Unlocking iPhone XS Passcode without a Computer
- In 2024, How to Screen Mirroring OnePlus Nord CE 3 5G? | Dr.fone
- How Can We Bypass Samsung Galaxy A24 FRP?
- Remove FRP Lock on Oppo
- How To Deal With the Oppo A58 4G Screen Black But Still Works? | Dr.fone
- In 2024, How to Bypass FRP from Itel P55+?
- In 2024, How to Lock Apps on Samsung Galaxy M34 to Protect Your Individual Information
- Top 4 Ways to Trace Huawei P60 Location | Dr.fone
- How To Restore Missing Contacts Files from Pixel Fold.
- Title: New In 2024, 5 Ways to Make a Fake Facetime Call Video
- Author: Chloe
- Created at : 2024-04-24 07:08:27
- Updated at : 2024-04-25 07:08:27
- Link: https://ai-editing-video.techidaily.com/new-in-2024-5-ways-to-make-a-fake-facetime-call-video/
- License: This work is licensed under CC BY-NC-SA 4.0.
