
:max_bytes(150000):strip_icc():format(webp)/6-best-parental-control-apps-of-2019-featured-c5b50932ab9c4c0fbc0757665e46b6b2.jpg)
New In 2024, A Guide to Use Distortion Effect in Premeiere Pro
A Guide to Use Distortion Effect in Premeiere Pro
Create High-Quality Video - Wondershare Filmora
An easy and powerful YouTube video editor
Numerous video and audio effects to choose from
Detailed tutorials are provided by the official channel
Premiere Pro is one of the most popular timeline-based video editing software, with over 9 million users. It’s the successor to Adobe Premiere, and it comes with cool distortion effects. We’ll look at Premiere Pro distortion effects and how to use them.
In this article
01 How to Use Distortion Effect in Premiere Pro?
02 Bonus! Free Distortion Effects for Premiere Pro
Adobe Premiere Pro offers a wide variety of beneficial editing tools and effects. Below are some of the impressive distortion effects you’ll find in Premiere Pro and how to use them in your project.
1. Corner Pin Effect
This effect distorts your image by simply changing the position of its corners. You can use the Corner pin effect to twist, skew, shrink, or stretch an image. Additionally, you can use it to simulate movement or perspective pivoting from the edge of your clip like a door opening.
You can directly manipulate the properties of the Corner Pin effect in the Program monitor by clicking the Transform right next to Corner Pin. To adjust the properties, drag one of the corner handles.
- To use this effect, open Premiere Pro and click File. Choose Import from the drop-down menu. The File Explorer window will open and allow you to find your footage. Select the video file you want to import, then click Open.
- Go to Effects Control and click Distortion. Choose Corner Pin Effect from the drop-down menu.

- You can now pin each corner from its original point to another specific point by adjusting the slider on the Upper Left, Upper Right, Lower Left, and Lower Right. You can also highlight your selection tool when working with the Corner Pin effect.

2. Lens Distortion Effect
This distortion effect Premiere Pro simulates the distorted lens through which people view the clip.
1. Go to Effects Control>Distortion>Lens Distortion Effect.
2. Choose the settings you want to use from the available options and adjust the slider.
- The Vertical and Horizontal Decentering control displaces the lens’ focal and makes the image bend and smear. The image will wrap in on itself at extreme settings.
- The Curvature setting alters the curvature of the lens. You can specify a positive value to make the image convex, while the negative value makes the image concave.
- The Vertical and Horizontal Prism FX setting created results similar to horizontal decentering and vertical, but the image does not wrap in on itself at extreme values.
- Use the Fill Color option to specify the background color, and Fill Alpha to make your background transparent.

3. Magnify Effect
This effect allows you to enlarge a selected area of your clip. The Magnify effect acts as a magnifying glass set over an area of an image. You can also use this effect to scale the whole image far beyond 100 percent and still maintain resolution.
1. To use this effect, go to Effect Control>Distortion>Magnify.
2. Next, go to the left side of the Effects Control panel and make the necessary adjustments to suit your preferences.
- Shape: This control specifies the magnified area shape.
- Center: The Center control allows you to specify the center of the magnified section.
- Magnification: This setting lets users specify the percentage of the magnification of the area they have selected, while the values represent the scale percentage.
- Link: The Link control allows you to specify how the effect will link the Size, Feather, and Magnification amount, to enable them to decrease or increase proportionally. You will disable the Resize Layer option if you set the Link control to any of the available settings except None. Setting the Link control to any setting except None disables Resize Layer. Size & Feather To Magnification allows you to specify that the edge feather and size of the magnified section decrease or increase proportionally regarding the magnification adjustment.
- Size: This control allows you to specify the magnified area size in pixels.
- Feather: With the Feather option, you can specify the amount of feather the effect applies to the magnified area edge. Lower values will sharpen the edge. Higher values will soften the edge while blending the edge with the layer that’s behind it.
- Opacity: This control allows you to specify the transparency of the magnified region.
- Scaling: Use this option to specify the kind of scaling the effect is using to magnify an image.
- Blending Mode: Use this control to specify the blend mode the effect will use to combine the original clip with the magnified area. The None option shows transparent pixels around the magnified section.
- Resize Layer: Selecting this option means the effect will only use the boundaries as the clip’s edge when the magnified region extends beyond the original boundaries of the clip. Deselecting the Resize Layer means that the boundaries of the clip will crop any area of your image outside the bounding box of the original clip.

4. Mirror Effect
This distortion Premiere Pro effect splits an image along a line while reflecting one side onto the other. Where the reflection appears and which side will be reflected is determined by the reflection angles.
1. Head over to Effect Control>Distortion>Mirror to use this effect.
2. Adjust the controls until you get the results you desire.
- Reflection Angle: With the Reflection Angle control, you can specify the angle of reflection and where it appears on the clip. A zero-degree angle reflects the left-hand side on the right.
- Reflection Center: This control allows you to specify the position of the line. You need to click the box, then drag the resulting crosshair up to the area in the image where you would like to place the line.

5. Offset Effect
This effect pans your image within a clip, and visual details pushed off one side of this image will appear on the opposite side. You have to perform the offset with subpixel precision at the best quality.
Also, you can use Offset with a combination of other effects. Head over to Effect Control>Distortion>Offset to use this effect.

6. Spherize Effect
The Spherize effect allows users to wrap a video clip around a spherical shape. You can use it to give texts and objects a three-dimensional effect. Go to Effect Control>Distortion>Spherize and adjust the radius and center of the sphere.

7. Transform Effect
This effect applies 2-dimensional geometric transformations to your clip. You can use this effect to skew clips along any axis.
1. Go to Effect Control>Distortion>Transform to apply this effect to your clip.
2. Use Transform settings to adjust Opacity, Skew, Rotation, Scale, Anchor Point, and more.

8. Turbulent Displace Effect
This fun effect utilizes fractal noise to create turbulent Premiere Pro distortion effects in your image. You can use the Turbulent Displace effect to add movement to your clip.
1. Head to Effect Control>Distortion>Turbulent Displace.
2. Adjust the following controls:
- Displacement
- Amount
- Size
- Offset (Turbulence)
- Complexity
- Evolution
- Pinning
- Resize Layer
- Antialiasing For Best Quality

9. Twirl Effect
The Twirl effect allows you to rotate your clip around its center. It rotates the image more sharply in the middle than at the edge. You can use it on faces to make a funny clip. Navigate to Effect Control>Distortion>Twirl to start using this effect. Next, use the settings to adjust how much angle it twirls and the radius.

10. Wave Warp Effect
This effect is one of the most popular Premiere Pro distortion effects. It generates the appearance of a wave as it’s traveling across an image. The Wave Warp effect allows you to produce various wave shapes, including sine, circular, and square waves.
It’s automatically animated at a steady speed across the time range, and that’s without frames. You need to set keyframes to vary speeds.
1. Head to Effect Control>Distortion>Wave Warp to apply this effect in your video clip.
2. Now, change the wave speed, direction, height, width, and type to suit your preference.

Bonus! Free Distortion Effects for Premiere Pro
1. Liquid Distortion Effect
This effect can distort the content in a clip and can be used to shift into the next clip. It could be utilized in editing or used as a transition.

2. Earthquake Effect
This effect adds a shaking motion to the video clip you add it to; it works as a transition but could also be a useful editing tool.

3. Glass Effect
This effect can add various blurs to the video clip and be used to transition from one clip to the next.

4. TV Effect
This effect imitates the view of a television being turned on or off. You can use it to introduce a new video clip. It would also be a great start or end to the entire video.

5. Glitch Effect
This effect adds a glitch to the video clip. You can use it in editing or as a transition from one clip to the next.

Conclusion
● You can add any of these Premiere Pro distortion effects to make your videos more catchy. In turn, they will get more attention and views. Premiere Pro comes with tons of distortion effects and a responsive interface.
Premiere Pro is one of the most popular timeline-based video editing software, with over 9 million users. It’s the successor to Adobe Premiere, and it comes with cool distortion effects. We’ll look at Premiere Pro distortion effects and how to use them.
In this article
01 How to Use Distortion Effect in Premiere Pro?
02 Bonus! Free Distortion Effects for Premiere Pro
Adobe Premiere Pro offers a wide variety of beneficial editing tools and effects. Below are some of the impressive distortion effects you’ll find in Premiere Pro and how to use them in your project.
1. Corner Pin Effect
This effect distorts your image by simply changing the position of its corners. You can use the Corner pin effect to twist, skew, shrink, or stretch an image. Additionally, you can use it to simulate movement or perspective pivoting from the edge of your clip like a door opening.
You can directly manipulate the properties of the Corner Pin effect in the Program monitor by clicking the Transform right next to Corner Pin. To adjust the properties, drag one of the corner handles.
- To use this effect, open Premiere Pro and click File. Choose Import from the drop-down menu. The File Explorer window will open and allow you to find your footage. Select the video file you want to import, then click Open.
- Go to Effects Control and click Distortion. Choose Corner Pin Effect from the drop-down menu.
- You can now pin each corner from its original point to another specific point by adjusting the slider on the Upper Left, Upper Right, Lower Left, and Lower Right. You can also highlight your selection tool when working with the Corner Pin effect.
2. Lens Distortion Effect
This distortion effect Premiere Pro simulates the distorted lens through which people view the clip.
1. Go to Effects Control>Distortion>Lens Distortion Effect.
2. Choose the settings you want to use from the available options and adjust the slider.
- The Vertical and Horizontal Decentering control displaces the lens’ focal and makes the image bend and smear. The image will wrap in on itself at extreme settings.
- The Curvature setting alters the curvature of the lens. You can specify a positive value to make the image convex, while the negative value makes the image concave.
- The Vertical and Horizontal Prism FX setting created results similar to horizontal decentering and vertical, but the image does not wrap in on itself at extreme values.
- Use the Fill Color option to specify the background color, and Fill Alpha to make your background transparent.
3. Magnify Effect
This effect allows you to enlarge a selected area of your clip. The Magnify effect acts as a magnifying glass set over an area of an image. You can also use this effect to scale the whole image far beyond 100 percent and still maintain resolution.
1. To use this effect, go to Effect Control>Distortion>Magnify.
2. Next, go to the left side of the Effects Control panel and make the necessary adjustments to suit your preferences.
- Shape: This control specifies the magnified area shape.
- Center: The Center control allows you to specify the center of the magnified section.
- Magnification: This setting lets users specify the percentage of the magnification of the area they have selected, while the values represent the scale percentage.
- Link: The Link control allows you to specify how the effect will link the Size, Feather, and Magnification amount, to enable them to decrease or increase proportionally. You will disable the Resize Layer option if you set the Link control to any of the available settings except None. Setting the Link control to any setting except None disables Resize Layer. Size & Feather To Magnification allows you to specify that the edge feather and size of the magnified section decrease or increase proportionally regarding the magnification adjustment.
- Size: This control allows you to specify the magnified area size in pixels.
- Feather: With the Feather option, you can specify the amount of feather the effect applies to the magnified area edge. Lower values will sharpen the edge. Higher values will soften the edge while blending the edge with the layer that’s behind it.
- Opacity: This control allows you to specify the transparency of the magnified region.
- Scaling: Use this option to specify the kind of scaling the effect is using to magnify an image.
- Blending Mode: Use this control to specify the blend mode the effect will use to combine the original clip with the magnified area. The None option shows transparent pixels around the magnified section.
- Resize Layer: Selecting this option means the effect will only use the boundaries as the clip’s edge when the magnified region extends beyond the original boundaries of the clip. Deselecting the Resize Layer means that the boundaries of the clip will crop any area of your image outside the bounding box of the original clip.
4. Mirror Effect
This distortion Premiere Pro effect splits an image along a line while reflecting one side onto the other. Where the reflection appears and which side will be reflected is determined by the reflection angles.
1. Head over to Effect Control>Distortion>Mirror to use this effect.
2. Adjust the controls until you get the results you desire.
- Reflection Angle: With the Reflection Angle control, you can specify the angle of reflection and where it appears on the clip. A zero-degree angle reflects the left-hand side on the right.
- Reflection Center: This control allows you to specify the position of the line. You need to click the box, then drag the resulting crosshair up to the area in the image where you would like to place the line.
5. Offset Effect
This effect pans your image within a clip, and visual details pushed off one side of this image will appear on the opposite side. You have to perform the offset with subpixel precision at the best quality.
Also, you can use Offset with a combination of other effects. Head over to Effect Control>Distortion>Offset to use this effect.
6. Spherize Effect
The Spherize effect allows users to wrap a video clip around a spherical shape. You can use it to give texts and objects a three-dimensional effect. Go to Effect Control>Distortion>Spherize and adjust the radius and center of the sphere.
7. Transform Effect
This effect applies 2-dimensional geometric transformations to your clip. You can use this effect to skew clips along any axis.
1. Go to Effect Control>Distortion>Transform to apply this effect to your clip.
2. Use Transform settings to adjust Opacity, Skew, Rotation, Scale, Anchor Point, and more.
8. Turbulent Displace Effect
This fun effect utilizes fractal noise to create turbulent Premiere Pro distortion effects in your image. You can use the Turbulent Displace effect to add movement to your clip.
1. Head to Effect Control>Distortion>Turbulent Displace.
2. Adjust the following controls:
- Displacement
- Amount
- Size
- Offset (Turbulence)
- Complexity
- Evolution
- Pinning
- Resize Layer
- Antialiasing For Best Quality
9. Twirl Effect
The Twirl effect allows you to rotate your clip around its center. It rotates the image more sharply in the middle than at the edge. You can use it on faces to make a funny clip. Navigate to Effect Control>Distortion>Twirl to start using this effect. Next, use the settings to adjust how much angle it twirls and the radius.
10. Wave Warp Effect
This effect is one of the most popular Premiere Pro distortion effects. It generates the appearance of a wave as it’s traveling across an image. The Wave Warp effect allows you to produce various wave shapes, including sine, circular, and square waves.
It’s automatically animated at a steady speed across the time range, and that’s without frames. You need to set keyframes to vary speeds.
1. Head to Effect Control>Distortion>Wave Warp to apply this effect in your video clip.
2. Now, change the wave speed, direction, height, width, and type to suit your preference.
Bonus! Free Distortion Effects for Premiere Pro
1. Liquid Distortion Effect
This effect can distort the content in a clip and can be used to shift into the next clip. It could be utilized in editing or used as a transition.
2. Earthquake Effect
This effect adds a shaking motion to the video clip you add it to; it works as a transition but could also be a useful editing tool.
3. Glass Effect
This effect can add various blurs to the video clip and be used to transition from one clip to the next.
4. TV Effect
This effect imitates the view of a television being turned on or off. You can use it to introduce a new video clip. It would also be a great start or end to the entire video.
5. Glitch Effect
This effect adds a glitch to the video clip. You can use it in editing or as a transition from one clip to the next.
Conclusion
● You can add any of these Premiere Pro distortion effects to make your videos more catchy. In turn, they will get more attention and views. Premiere Pro comes with tons of distortion effects and a responsive interface.
Live Stream on YouTube Using Zoom
Abundant Video Effects - Wondershare Filmora
Provide abundant video effects - A creative video editor
Powerful color correction and grading
Detailed tutorials provided by the official channel
Zoom sessions have made daily meetings a lot easier as it offers great flexibility to the people. You can conduct long and important business meetings or educational class lessons in the comfort of your home. As Zoom meetings are widely adopted as a new medium of communication, many people have started to stream live Zoom sessions across various online platforms.
One of the popular online platforms is YouTube, so one must know how to Zoom YouTube live streaming instantly. Through this article, you will come to know about simple and basic steps regarding stream Zoom to YouTube flawlessly.
In this article
Part 1: Software Requirements
Part 2: Live Stream on YouTube Using Zoom
Part 1: Software Requirements
In this part, we will mention software requirements for Zoom meetings and webinars to conduct Zoom live streams on YouTube comfortably on your devices.
Streaming for Zoom Meeting
- Pro, Business, Education, or Enterprise Account
- The Host is Licensed
- Zoom Desktop Client
- **Windows:**Version 4.4.53582 or Higher
- **macOS:**Version 4.4.53582 or Higher
- Zoom Mobile Client
- **Android:**Version 5.4.0 or Higher
- **iOS:**Version 5.4.0 or Higher
- Live streaming is enabled on YouTube
Streaming for Zoom Webinar
- Pro, Business, Education, or Enterprise Account
- The Host is Assigned a Zoom Webinar License
- Zoom Desktop Client
- **Windows:**Version 4.0 or Higher
- **macOS:**Version 4.0 or Higher
- Zoom Mobile Client
- **Android:**Version 5.4.0 or Higher
- **iOS:**Version 5.4.0 or Higher
- Live Streaming Enabled on YouTube
Part 2: Live Stream on YouTube Using Zoom
To Zoom YouTube live, this part contains detailed steps that will assist you throughout the whole process.
Steps to Execute Before Live Streaming
Before going live on YouTube, the first step is to schedule the meeting in Zoom for successful live streaming. To do so, open your Zoom account and schedule a suitable time for the meeting or webinar you want to conduct.

Activating the Live Streaming Option
Step 1: To begin, first sign in to your Zoom account and then navigate to “Zoom meeting settings.” On this menu, scroll down to find the option “In Meeting (Advanced)” on the left side.
Step 2: Now turn on the toggle of “Allow live streaming meetings” to activate the feature of live streaming. Afterward, you would see four checkboxes on your screen through which you can control where to stream Zoom meetings.
Step 3: Start by unchecking the Facebook box if you don’t want to want live stream Zoom on the Facebook platform. Then, tap on the checkbox of YouTube to allow the live streaming of Zoom meetings on your YouTube account.
Step 4: Now, click on the checkbox for “Custom live streaming service” to enable the live streaming before your meeting starts. Also, on the displayed text box, you can enter any instructions for the host who will live stream your Zoom meeting. Once done with all the changes, tap on “Save” and continue with the steps given below.

Settings Up Live Streaming of Scheduled Meeting
If you want to live stream the scheduled Zoom meeting through the option of “Custom live streaming,” you should have your stream key, stream URL, and the URL of the live streaming page of your streaming site. Now read the below instructions to set up live streaming settings on YouTube.
Step 1: Navigate to the site Youtube.com by entering the internet ID and password. Then tap on the button “Create a video or post” displayed in the top right corner.

Step 2: From the displayed options, click on “Go Live” and create your channel for the live streaming videos. Verify your account from the phone call or received text message. Now from the YouTube home page, tap on the “Create a video or post” button to proceed further.

Step 3: After clicking on the option of “Go Live” again, enter the information about your live streaming video in the pop-up window. For this, you should navigate to the “Stream” tab to build an “Event title.” You can also enter a description along with the title. Now you can control the viewability of your live stream video such as public, private and unlisted.

Step 4: From the appeared drop-down menu, tap on the category of your live stream video. You can also turn on the toggle of “Schedule for later” if you want to live stream later and enter the date and time simultaneously.
Step 5: You can also add a thumbnail to your live stream video so that people can easily search. Afterward, choose the option either “Yes” or “No” of the heading saying, “Is this video made for kids?”. Once done, tap on the “Create Stream” button.
Step 6: A new window will appear containing your “Stream URL” and “Stream Key.” Copy and save this information for pre-scheduled live streaming on a text file. Now tap on the “Share” option from the top right and then also copy the “Livestream URL” and save it in a text file.

How to Set Up the Live Stream on Zoom
Step 1: On your Zoom account, go to the lists of upcoming meetings and locate your scheduled meeting. After finding the scheduled meeting, choose the meeting topic to continue.

Step 2: Now scroll down the page to select the option called “Live Streaming.” Click on this tab and then click on the option saying “configure live stream settings.”

Step 3: On the pop-up screen, enter all the information you saved before, such as “Stream key,” “Stream URL,” and “Live streaming page URL” on their respective boxes. Once done, click on the “Save” button.

Guidelines to Perform Quickly Before Your Live Stream
Step 1: Start this process before half an hour of your meeting and click to begin your Zoom meeting. Then tap on the “More” option displayed on the toolbar.

Step 2: From the more options, select “Live on custom live streaming service.” Now proceed with the live streaming on your streaming platform.

Step 3: If you are utilizing YouTube live from the settings of “Live on custom live streaming service,” navigate to your YouTube live window. If you don’t have this window open, tap on the “Create a video or post” button and click on “Go Live.” From the “Manage” tab, select the title of your live stream video and then tap on the “Go Live” option from the top right corner.

How to Go Live from Your Zoom Meeting
Step 1: Through your Zoom meeting, tap on the “More” button and then click on “Live on YouTube.” A new window will display the form where you select your account.

Step 2: On the next page, enter the title of the YouTube live stream video and choose the viewability options such as public, private and unlisted. Once done with privacy options, tap on the “Go Live” button.

How to Stop the Stop the Live Stream and End the Zoom Meeting
Ending the Live Stream through Custom Streaming Service
For live-streaming YouTube videos through “Live on custom live streaming service,” tap on the “End Stream” button displayed in the top right corner that will end your live session.
Ending the Live Stream and Zoom Meeting
From your Zoom meeting, tap on the “More” button and tap on the option called “Stop live stream.” Afterward, select the “End Meeting” option to end the Zoom meeting for all participants. Then tap on the “End Meeting for All” option for confirmation.

Conclusion
Many people across the world use online platforms like YouTube to live stream their videos for more connectivity. As Zoom meetings and webinars are getting recognition, it’s a great idea to stream Zoom to YouTube live to have a larger audience. Using this article, you can find easy and simple steps to Zoom YouTube live according to your convenience.
Zoom sessions have made daily meetings a lot easier as it offers great flexibility to the people. You can conduct long and important business meetings or educational class lessons in the comfort of your home. As Zoom meetings are widely adopted as a new medium of communication, many people have started to stream live Zoom sessions across various online platforms.
One of the popular online platforms is YouTube, so one must know how to Zoom YouTube live streaming instantly. Through this article, you will come to know about simple and basic steps regarding stream Zoom to YouTube flawlessly.
In this article
Part 1: Software Requirements
Part 2: Live Stream on YouTube Using Zoom
Part 1: Software Requirements
In this part, we will mention software requirements for Zoom meetings and webinars to conduct Zoom live streams on YouTube comfortably on your devices.
Streaming for Zoom Meeting
- Pro, Business, Education, or Enterprise Account
- The Host is Licensed
- Zoom Desktop Client
- **Windows:**Version 4.4.53582 or Higher
- **macOS:**Version 4.4.53582 or Higher
- Zoom Mobile Client
- **Android:**Version 5.4.0 or Higher
- **iOS:**Version 5.4.0 or Higher
- Live streaming is enabled on YouTube
Streaming for Zoom Webinar
- Pro, Business, Education, or Enterprise Account
- The Host is Assigned a Zoom Webinar License
- Zoom Desktop Client
- **Windows:**Version 4.0 or Higher
- **macOS:**Version 4.0 or Higher
- Zoom Mobile Client
- **Android:**Version 5.4.0 or Higher
- **iOS:**Version 5.4.0 or Higher
- Live Streaming Enabled on YouTube
Part 2: Live Stream on YouTube Using Zoom
To Zoom YouTube live, this part contains detailed steps that will assist you throughout the whole process.
Steps to Execute Before Live Streaming
Before going live on YouTube, the first step is to schedule the meeting in Zoom for successful live streaming. To do so, open your Zoom account and schedule a suitable time for the meeting or webinar you want to conduct.
Activating the Live Streaming Option
Step 1: To begin, first sign in to your Zoom account and then navigate to “Zoom meeting settings.” On this menu, scroll down to find the option “In Meeting (Advanced)” on the left side.
Step 2: Now turn on the toggle of “Allow live streaming meetings” to activate the feature of live streaming. Afterward, you would see four checkboxes on your screen through which you can control where to stream Zoom meetings.
Step 3: Start by unchecking the Facebook box if you don’t want to want live stream Zoom on the Facebook platform. Then, tap on the checkbox of YouTube to allow the live streaming of Zoom meetings on your YouTube account.
Step 4: Now, click on the checkbox for “Custom live streaming service” to enable the live streaming before your meeting starts. Also, on the displayed text box, you can enter any instructions for the host who will live stream your Zoom meeting. Once done with all the changes, tap on “Save” and continue with the steps given below.
Settings Up Live Streaming of Scheduled Meeting
If you want to live stream the scheduled Zoom meeting through the option of “Custom live streaming,” you should have your stream key, stream URL, and the URL of the live streaming page of your streaming site. Now read the below instructions to set up live streaming settings on YouTube.
Step 1: Navigate to the site Youtube.com by entering the internet ID and password. Then tap on the button “Create a video or post” displayed in the top right corner.
Step 2: From the displayed options, click on “Go Live” and create your channel for the live streaming videos. Verify your account from the phone call or received text message. Now from the YouTube home page, tap on the “Create a video or post” button to proceed further.
Step 3: After clicking on the option of “Go Live” again, enter the information about your live streaming video in the pop-up window. For this, you should navigate to the “Stream” tab to build an “Event title.” You can also enter a description along with the title. Now you can control the viewability of your live stream video such as public, private and unlisted.
Step 4: From the appeared drop-down menu, tap on the category of your live stream video. You can also turn on the toggle of “Schedule for later” if you want to live stream later and enter the date and time simultaneously.
Step 5: You can also add a thumbnail to your live stream video so that people can easily search. Afterward, choose the option either “Yes” or “No” of the heading saying, “Is this video made for kids?”. Once done, tap on the “Create Stream” button.
Step 6: A new window will appear containing your “Stream URL” and “Stream Key.” Copy and save this information for pre-scheduled live streaming on a text file. Now tap on the “Share” option from the top right and then also copy the “Livestream URL” and save it in a text file.
How to Set Up the Live Stream on Zoom
Step 1: On your Zoom account, go to the lists of upcoming meetings and locate your scheduled meeting. After finding the scheduled meeting, choose the meeting topic to continue.
Step 2: Now scroll down the page to select the option called “Live Streaming.” Click on this tab and then click on the option saying “configure live stream settings.”
Step 3: On the pop-up screen, enter all the information you saved before, such as “Stream key,” “Stream URL,” and “Live streaming page URL” on their respective boxes. Once done, click on the “Save” button.
Guidelines to Perform Quickly Before Your Live Stream
Step 1: Start this process before half an hour of your meeting and click to begin your Zoom meeting. Then tap on the “More” option displayed on the toolbar.
Step 2: From the more options, select “Live on custom live streaming service.” Now proceed with the live streaming on your streaming platform.
Step 3: If you are utilizing YouTube live from the settings of “Live on custom live streaming service,” navigate to your YouTube live window. If you don’t have this window open, tap on the “Create a video or post” button and click on “Go Live.” From the “Manage” tab, select the title of your live stream video and then tap on the “Go Live” option from the top right corner.
How to Go Live from Your Zoom Meeting
Step 1: Through your Zoom meeting, tap on the “More” button and then click on “Live on YouTube.” A new window will display the form where you select your account.
Step 2: On the next page, enter the title of the YouTube live stream video and choose the viewability options such as public, private and unlisted. Once done with privacy options, tap on the “Go Live” button.
How to Stop the Stop the Live Stream and End the Zoom Meeting
Ending the Live Stream through Custom Streaming Service
For live-streaming YouTube videos through “Live on custom live streaming service,” tap on the “End Stream” button displayed in the top right corner that will end your live session.
Ending the Live Stream and Zoom Meeting
From your Zoom meeting, tap on the “More” button and tap on the option called “Stop live stream.” Afterward, select the “End Meeting” option to end the Zoom meeting for all participants. Then tap on the “End Meeting for All” option for confirmation.
Conclusion
Many people across the world use online platforms like YouTube to live stream their videos for more connectivity. As Zoom meetings and webinars are getting recognition, it’s a great idea to stream Zoom to YouTube live to have a larger audience. Using this article, you can find easy and simple steps to Zoom YouTube live according to your convenience.
How to Got Free After Effects Templates Slideshow with Simple Trick
How I Got Free After Effects Templates Slideshow with Simple Trick
An easy yet powerful editor
Numerous effects to choose from
Detailed tutorials provided by the official channel
Making slide shows is an eminent task for a majority of us. Whether you are a student at a school or University, working at a corporate office or trying to present yourself in a meeting, you will require making slideshows. And the more engaging your slideshow is, the better your presentation is.
One of the many ways for improving your slideshows is by adding after effects templates. And the best part is, you can readily opt for using after effects slideshow template for free. But, how can you get the aftereffect slideshows for free? Or, where can you get free after effect templates?
We have put forth the following discussion where we discuss the different free after effects templates for slides, where can you get them and the solutions to the frequent questions related to it. Lastly, we will also introduce you to the best video editing tool, with which you can use the free after effects template and make amazing sideshow videos.
In this article
01 [10 Best Free After Effects Templates Slideshow](#Part 1)
02 [Where to Get Free After Effects Templates](#Part 2)
03 [FAQ of After Effects Slideshow Template](#Part 3)
Part 1 Best Free After Effects Templates Slideshow
We will begin our discussion by presenting photo slideshows after effects template free download, which means, with the following templates, you can make a slideshow f as many a hundred images and that too, for free.
01Wall Slideshow
Wall Slideshow is free after effects template ideal for making slideshows in which you want to integrate modern essence. It is best suited for creating slideshows of family photographs for occasions, with a touch go modernity. The design of this template is classy but simple at the same time.
One can readily customise the entire template according to their preference, skills and imagination. Also, one can have ultimate control over the colour of the template.
02Old Slideshow
The Old Slideshow is the after effects slideshow template free to download. It is best suitable if you want your slideshow to have a retro style or a retro vibe. Giving such an aura to the slideshow is a recent trend and makes your slideshow look more exciting and updated with the times. One has complete control over the template’s colour and can easily customise every aspect of the template if needed.
03Clean Slideshow
The Clean Slideshow template, as its name suggests, gives you a clean and sophisticated looking slideshow design. It is best for corporate office presentations, school presentations or university slideshows, and it is ideal for any formal or professional purposes. It includes simple texts, a stylish put look, smooth transitional effects and animations. You can customise the template accordingly and make the necessary edits and changes.
04Modern Zoom Telescopic Template Creative Slideshow
Suppose you want your slideshows to look exceptionally incredible. In that case, the Modern Zoom Telescopic Template is the best option among all the other available after effects photo slideshow templates for free. It has an incredible zooming effect that occurs through a transition involving a telescope. So, the entire concept is unique, thereby making your presentation inimitably engaging. It includes numerous light leaks with sleek camera motion.
05Free Elegant Slideshow Template
The Free Elegant Slideshow Template is yet another template ideal for professional use. It is best for making a slideshow for your corporate workplace and office. The elements of this template are elegant and classy. And thus, it is highly suitable for professional purposes. One can readily edit and customise the other features and factors of this template. You can also integrate colours that you prefer to put in your slideshows.

06Travel Slideshow
To portray anything chaotic, dynamic and flowing, the Travel Slideshow is the best template option available for free. Here, the after-effects slide is ideal for making cinematic style slideshow videos that would include an upbeat aura. You can readily update and make the necessary edits in this template and customise it the way you prefer.
07Stylish Spinning Columns Slideshow
For any high-end project requiring slideshow videos, the Stylish Spinning Columns template is the best option. It includes stylish spinning columns, transitional effects and multiple light leaks. You can easily customise the different elements of this template and make the changes according to your preference in this slideshow template.
08Free Dynamic Colourful Slideshow
The Free Dynamic Colourful template has a stylish and modern style of design, and it includes minimalistic typography and the use of vibrant colours. So, to portray anything joyful and ecstatic or to engage the audience more, this template is the best option top pick. These slideshow after-effects are free and thus, make it a more accessible option to use to make the best and the most vibrant slideshows.
This template can serve many purposes and is ideal for professional and informal purposes. You can edit and customise the different elements of this template to make it look the way you want.
09Modern Tile Slideshow
The Modern Tile template is an after effects photo slideshow template that is best suitable for professional and formal use. It is the best option for making sophisticated and formal slideshow videos and presenting them in a corporate office environment.
The design of this template is based on tiles, which its name suggests. The design is unique and includes a 3D tile drop effect as well. You can readily custom and edit the parts and elements of the template to bring about the necessary changes.
10Free Parallax Scrolling Slideshow
Parallax is one of the most commonly used and famous after effect-slide transitions in the present. And you can readily integrate it into your slideshow videos with the Free Parallax Scrolling slideshow template. You can customise the parts where you find changes are necessary. The transitions, video quality and the effects in this template are among the most engaging ones.
If you want to make any slideshow video for your social media platforms, this is the best suitable template.

Part 2 Where to Get Free After Effects Templates
To include the after effects slideshow template, you must know the sources where they are available for free. The after-effects templates are available for free in almost all the video editing and slideshow-making tools, apps, and platforms. However, to name the best among the rest available, Motion Elements is known to have the best collection of free after effects templates for slideshows.
The variety of effects template found in MotionElements is incomparable. You will get the opportunity of choosing among more than 100 after effects templates for your slideshows. There are many other sources, including Adobe, Motion Array, and Rocket Stock.
Part 3 FAQ of After Effects Slideshow Template
There are some questions about After Effects slideshow templates that are commonly asked. So, we will now discuss and present solutions to these FAQs about the slideshow after effects templates.
01How can I make slideshows in the After Effects template?
You will have to open a new project in the app or tool you use to make slideshows. Then, open compositions and import images. The next step is to rinse and then repeat this step to make a slideshow in after effects template.
02Are after effects templates available in Filmora?
Wondershare Filmora Video Editor consists of an innumerable variety of templates and among which there are numerous after effects templates as well. Most importantly, they are available for free so that anyone can use them to make the Ost fantastic slideshow videos.
For Win 7 or later (64-bit)
For macOS 10.12 or later
03Are the after-effects templates arable for free?
One can get the after-effects photo slideshow template free of charge from specific sources, such as Adobe, Motion Array, MotionElements and Filmora.
Filmora is one of the best sources for free after effects slideshow templates. And not just that, it is the best tool for all video editing purposes. If you are a beginner at editing and making slideshow, Filmora can help you develop and nurture your editing skills. Also, if you are a professional, Filmora has the most advanced features that can help you enhance, practise, and put your proficient editing skills into work.
A free version of this tool is available that you can readily use for making slideshow videos. But, if you want to upgrade and opt for better and even more advanced features for editing, you can readily do so with the paid version of Filmora. You get to enjoy the features like using more than 800 templates and filters, having ultimate control over the motion of your videos, compatibility with every device, and the list keeps being unending.
● Ending Thoughts →
● So, in the above discussion, we have covered the following discussion points.
● We examined the ten bests after effects photo slideshow available for free
● We stated the sources where one can get the after-effects templates for slideshows for free.
● We solved the different common questions relating to the after-effects template, and then we introduced the best video editing tool, Filmora.
Making slide shows is an eminent task for a majority of us. Whether you are a student at a school or University, working at a corporate office or trying to present yourself in a meeting, you will require making slideshows. And the more engaging your slideshow is, the better your presentation is.
One of the many ways for improving your slideshows is by adding after effects templates. And the best part is, you can readily opt for using after effects slideshow template for free. But, how can you get the aftereffect slideshows for free? Or, where can you get free after effect templates?
We have put forth the following discussion where we discuss the different free after effects templates for slides, where can you get them and the solutions to the frequent questions related to it. Lastly, we will also introduce you to the best video editing tool, with which you can use the free after effects template and make amazing sideshow videos.
In this article
01 [10 Best Free After Effects Templates Slideshow](#Part 1)
02 [Where to Get Free After Effects Templates](#Part 2)
03 [FAQ of After Effects Slideshow Template](#Part 3)
Part 1 Best Free After Effects Templates Slideshow
We will begin our discussion by presenting photo slideshows after effects template free download, which means, with the following templates, you can make a slideshow f as many a hundred images and that too, for free.
01Wall Slideshow
Wall Slideshow is free after effects template ideal for making slideshows in which you want to integrate modern essence. It is best suited for creating slideshows of family photographs for occasions, with a touch go modernity. The design of this template is classy but simple at the same time.
One can readily customise the entire template according to their preference, skills and imagination. Also, one can have ultimate control over the colour of the template.
02Old Slideshow
The Old Slideshow is the after effects slideshow template free to download. It is best suitable if you want your slideshow to have a retro style or a retro vibe. Giving such an aura to the slideshow is a recent trend and makes your slideshow look more exciting and updated with the times. One has complete control over the template’s colour and can easily customise every aspect of the template if needed.
03Clean Slideshow
The Clean Slideshow template, as its name suggests, gives you a clean and sophisticated looking slideshow design. It is best for corporate office presentations, school presentations or university slideshows, and it is ideal for any formal or professional purposes. It includes simple texts, a stylish put look, smooth transitional effects and animations. You can customise the template accordingly and make the necessary edits and changes.
04Modern Zoom Telescopic Template Creative Slideshow
Suppose you want your slideshows to look exceptionally incredible. In that case, the Modern Zoom Telescopic Template is the best option among all the other available after effects photo slideshow templates for free. It has an incredible zooming effect that occurs through a transition involving a telescope. So, the entire concept is unique, thereby making your presentation inimitably engaging. It includes numerous light leaks with sleek camera motion.
05Free Elegant Slideshow Template
The Free Elegant Slideshow Template is yet another template ideal for professional use. It is best for making a slideshow for your corporate workplace and office. The elements of this template are elegant and classy. And thus, it is highly suitable for professional purposes. One can readily edit and customise the other features and factors of this template. You can also integrate colours that you prefer to put in your slideshows.
06Travel Slideshow
To portray anything chaotic, dynamic and flowing, the Travel Slideshow is the best template option available for free. Here, the after-effects slide is ideal for making cinematic style slideshow videos that would include an upbeat aura. You can readily update and make the necessary edits in this template and customise it the way you prefer.
07Stylish Spinning Columns Slideshow
For any high-end project requiring slideshow videos, the Stylish Spinning Columns template is the best option. It includes stylish spinning columns, transitional effects and multiple light leaks. You can easily customise the different elements of this template and make the changes according to your preference in this slideshow template.
08Free Dynamic Colourful Slideshow
The Free Dynamic Colourful template has a stylish and modern style of design, and it includes minimalistic typography and the use of vibrant colours. So, to portray anything joyful and ecstatic or to engage the audience more, this template is the best option top pick. These slideshow after-effects are free and thus, make it a more accessible option to use to make the best and the most vibrant slideshows.
This template can serve many purposes and is ideal for professional and informal purposes. You can edit and customise the different elements of this template to make it look the way you want.
09Modern Tile Slideshow
The Modern Tile template is an after effects photo slideshow template that is best suitable for professional and formal use. It is the best option for making sophisticated and formal slideshow videos and presenting them in a corporate office environment.
The design of this template is based on tiles, which its name suggests. The design is unique and includes a 3D tile drop effect as well. You can readily custom and edit the parts and elements of the template to bring about the necessary changes.
10Free Parallax Scrolling Slideshow
Parallax is one of the most commonly used and famous after effect-slide transitions in the present. And you can readily integrate it into your slideshow videos with the Free Parallax Scrolling slideshow template. You can customise the parts where you find changes are necessary. The transitions, video quality and the effects in this template are among the most engaging ones.
If you want to make any slideshow video for your social media platforms, this is the best suitable template.
Part 2 Where to Get Free After Effects Templates
To include the after effects slideshow template, you must know the sources where they are available for free. The after-effects templates are available for free in almost all the video editing and slideshow-making tools, apps, and platforms. However, to name the best among the rest available, Motion Elements is known to have the best collection of free after effects templates for slideshows.
The variety of effects template found in MotionElements is incomparable. You will get the opportunity of choosing among more than 100 after effects templates for your slideshows. There are many other sources, including Adobe, Motion Array, and Rocket Stock.
Part 3 FAQ of After Effects Slideshow Template
There are some questions about After Effects slideshow templates that are commonly asked. So, we will now discuss and present solutions to these FAQs about the slideshow after effects templates.
01How can I make slideshows in the After Effects template?
You will have to open a new project in the app or tool you use to make slideshows. Then, open compositions and import images. The next step is to rinse and then repeat this step to make a slideshow in after effects template.
02Are after effects templates available in Filmora?
Wondershare Filmora Video Editor consists of an innumerable variety of templates and among which there are numerous after effects templates as well. Most importantly, they are available for free so that anyone can use them to make the Ost fantastic slideshow videos.
For Win 7 or later (64-bit)
For macOS 10.12 or later
03Are the after-effects templates arable for free?
One can get the after-effects photo slideshow template free of charge from specific sources, such as Adobe, Motion Array, MotionElements and Filmora.
Filmora is one of the best sources for free after effects slideshow templates. And not just that, it is the best tool for all video editing purposes. If you are a beginner at editing and making slideshow, Filmora can help you develop and nurture your editing skills. Also, if you are a professional, Filmora has the most advanced features that can help you enhance, practise, and put your proficient editing skills into work.
A free version of this tool is available that you can readily use for making slideshow videos. But, if you want to upgrade and opt for better and even more advanced features for editing, you can readily do so with the paid version of Filmora. You get to enjoy the features like using more than 800 templates and filters, having ultimate control over the motion of your videos, compatibility with every device, and the list keeps being unending.
● Ending Thoughts →
● So, in the above discussion, we have covered the following discussion points.
● We examined the ten bests after effects photo slideshow available for free
● We stated the sources where one can get the after-effects templates for slideshows for free.
● We solved the different common questions relating to the after-effects template, and then we introduced the best video editing tool, Filmora.
Create Glitch Text Effect
Glitch text effect is a trending video effect whereby the texts get distorted for a few seconds. The effect is comparable to the glitch you face when your screen starts to malfunction, and the screen appears to be wavy and disoriented. A glitch text effect is better than a regular animated text effect as it helps to get the attention of the viewers immediately and get the message across clearly.
The glitch effect can be applied to the entire video as well as the text as per your preference. There are several video editors available where the glitch text effect comes pre-loaded. All you need to do is to apply it to the text and get it done in a few steps. We will illustrate how to add glitch text effect Premiere Pro. But we recommend Filmora for the best glitter text effect that you can add to your video instantly.
Part 1. Create Glitch Text in Video with Filmora
We have already stated that Wondershare Filmora is the best video editor for the best glitch text effect download and apply to your video in simple steps. Filmora is a premium video editor that is widely used by amateur and professional video editors. You can get all glitch text effect After Effects and add them to your video conveniently in comparison to After Effects.
As a matter of fact, there are literally unlimited video and text effects available, and you can find different types of glitch text effects to apply to your titles and texts. Filmora is available for both Windows and mac users. Here are the steps to create glitch text in video with Filmora.
Free Download For Win 7 or later(64-bit)
Free Download For macOS 10.14 or later
Step1 Download and install Filmora on your computer. Go to File> New Project from the menu bar to start video editing project.

Step2 Go to File> Import Media > Import Media Files to import the video clips where you want to add glitch text effect. Drop the clip into the Timeline to get started.

Step3 Go to Titles tab located at the top. From the left panel, click on Titles option. Search “glitch” in the search field and you will see all the glitch text effects that you can apply to the text in your video.
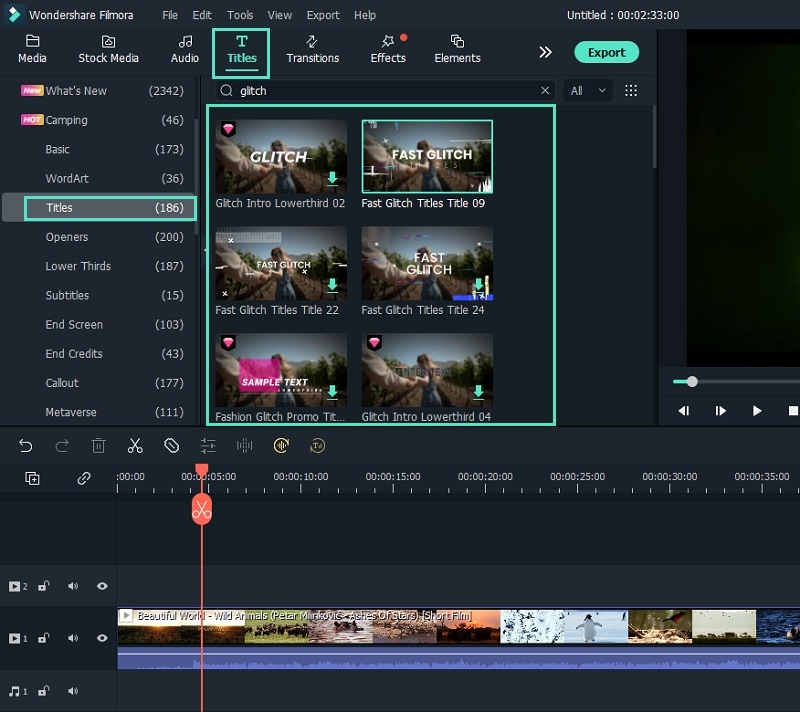
Step4 Select any glitch text effect and drop it into the Timeline above the video clip exactly where you want the text and the effect to appear.
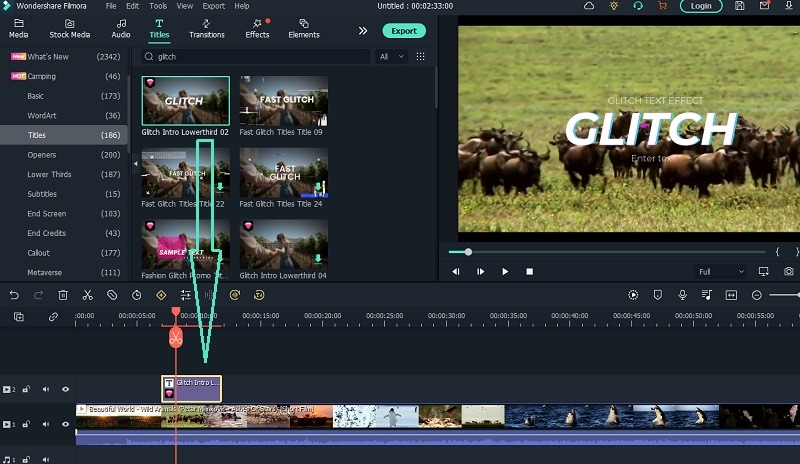
Step5 Double-click on the glitch text effect located on Timeline and edit the text, style, and other parameters as per your preference. Click on Ok and play the video to see your edited video with the glitch text effect.
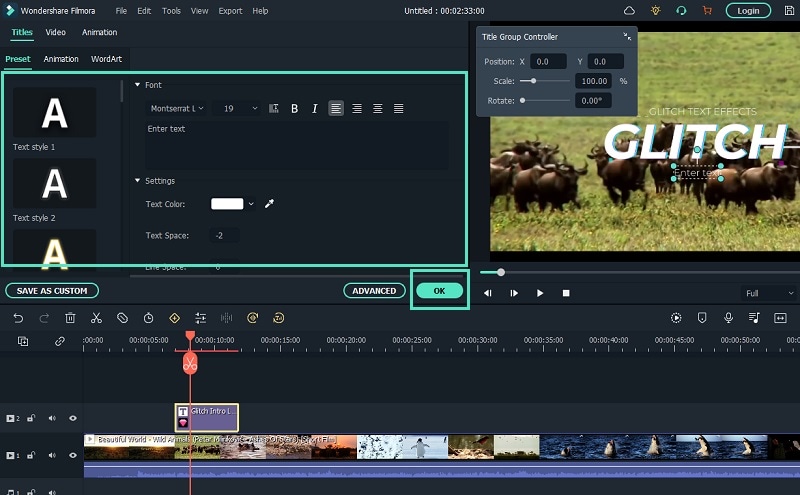
Part 2. How to Make Glitch Text Effect with Premiere Pro
Adobe Premiere Pro is another renowned video editor where you can add glitch text effect to your video. Premiere Pro is strictly for professional video editors as the user interface is not as intuitive as Filmora . The learning curve is steep, and therefore, you need to go through the steps to add glitch text effect Premiere Pro. There are several glitch text effect presets available that you can apply to any text on your video to make them engaging. Here are the steps to make glitch text effect with Premiere Pro.
Step1 Launch Adobe Premiere Pro and go to New> Project to get started. Import your video and drop it into Timeline.
Step2 Use the Type tool to write any text on your video to add glitch text effect. You should have a text layer on Timeline.
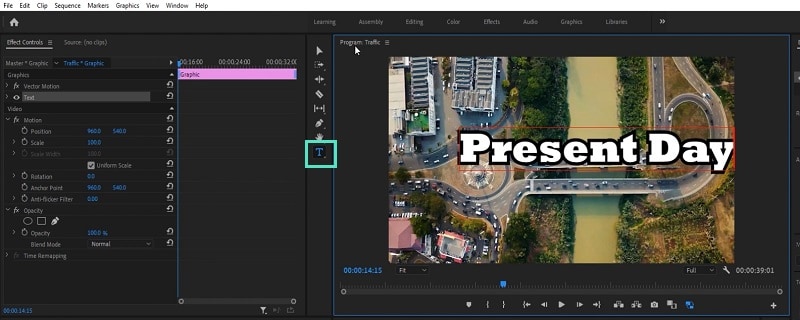
Step3 Go to Effects> Immersive Video> VR Digital Glitch option. Drag and drop the effect to text layer.
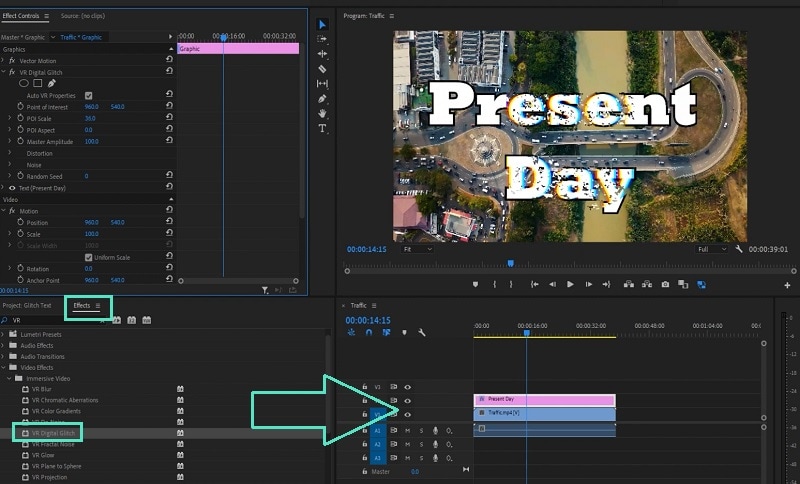
Step4 Under Effect Controls tab, you will find all the different parameters that you can adjust to get the glitch text effect perfectly.
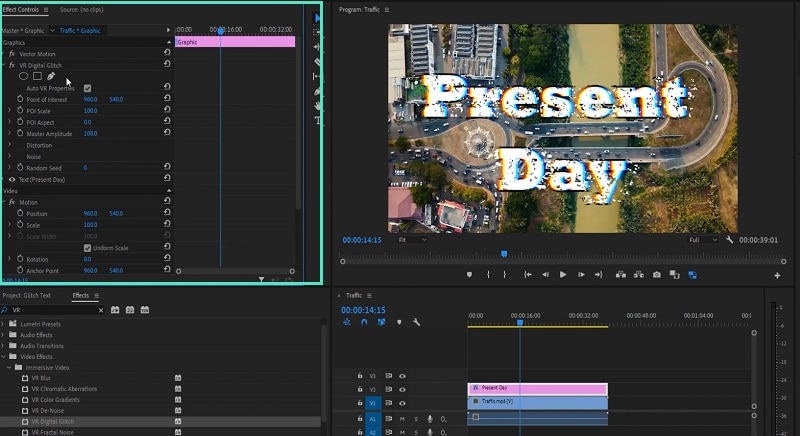
Step5 Turn on Master Amplitude and add multiple keyframes as different points in the Timeline and change the distortion value to make the effect prominent.
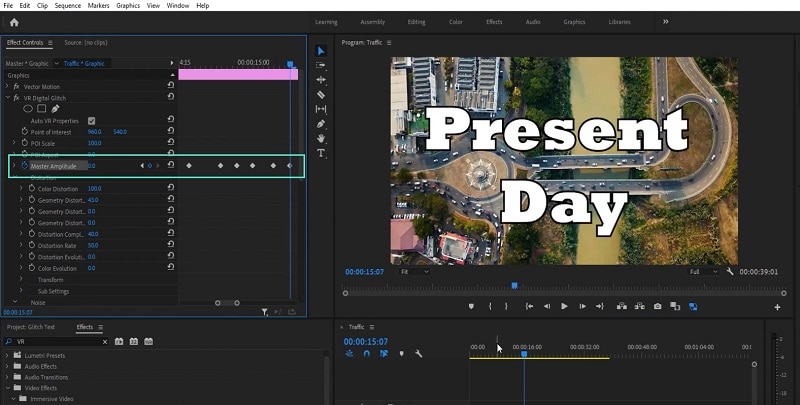
Step6 Go to the first keyframe and turn on Random Seed effect. Go to the last keyframe and turn on Random Seed effect and change the value to 75. Play the video to check the entire video with glitch text effect.
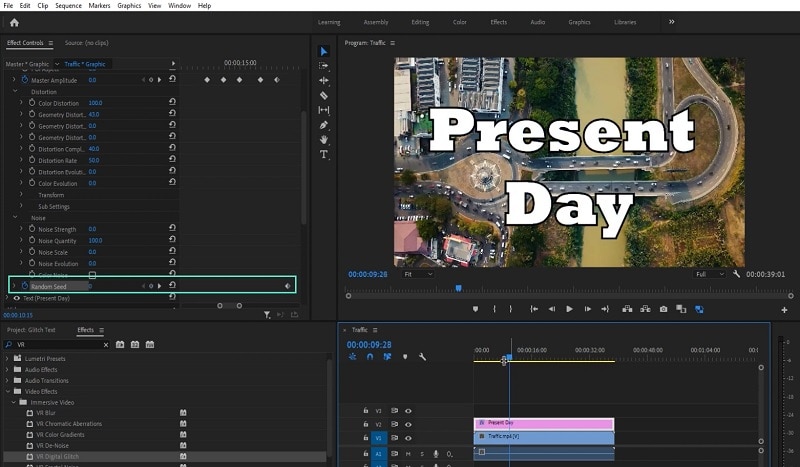
Part 3. Use VSDC Video Editor to Create Glitch Text
If you do not have any premium video editor on your computer and you do not want to purchase any premium video editor, you can still get glitter text effect free. You need to download and install VSDC free video editor on your computer. But the steps to create glitch text on VSDC video editor are slightly complicated as the user interface is not as intuitive as Filmora . Here are the steps to add free glitch text effect on your video.
Step1 Download and install VSDC video editor. Launch the editor and click on New Project to get started. Import your video to your project where you want to add glitch text effect.
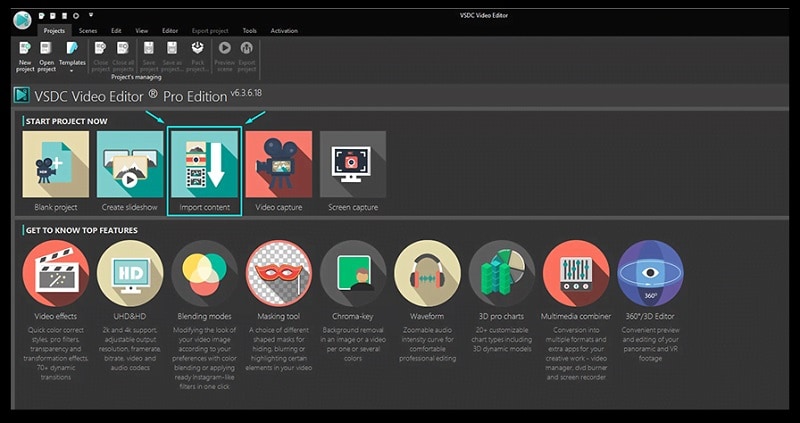
Step2 Use Type tool to write a text on the video. You can press Shift+T shortcut as well. After typing the text, adjust the text style as per your preference.
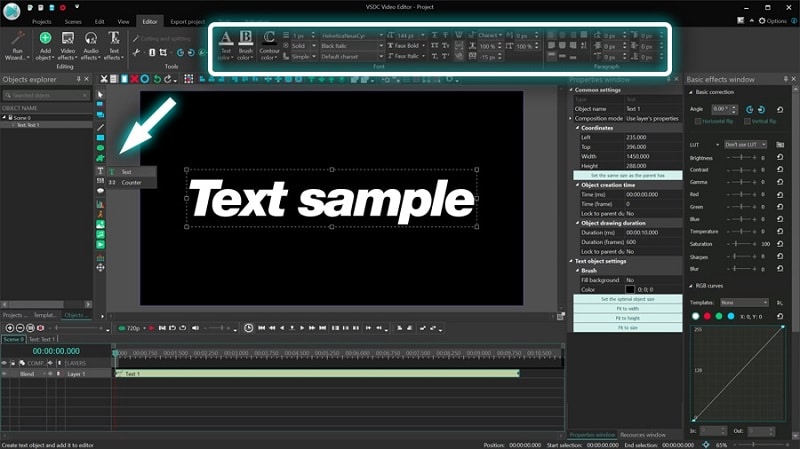
Step3 Double-click on the text layer on Timeline and go to Video Effects> Special FX and click on Glitch option.
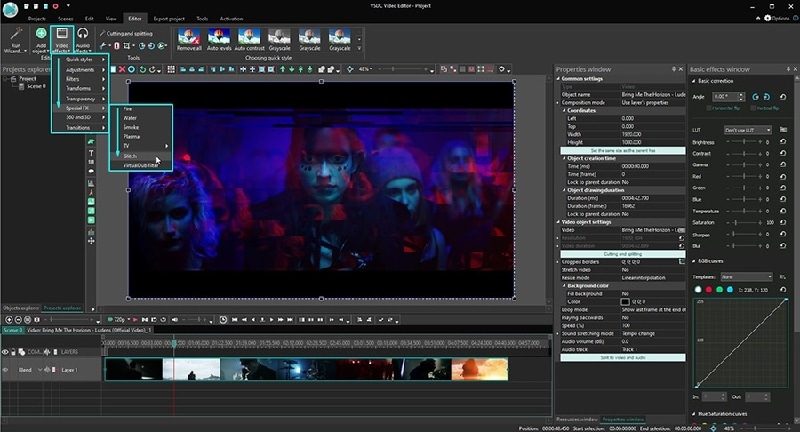
Step4 A window will appear where you can set the starting point, duration, and different parameters. Click on Ok button.
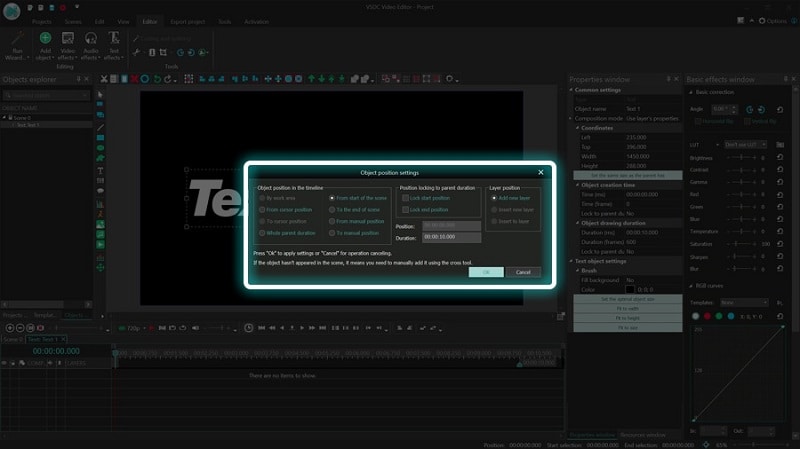
Step5 Go to Properties Windows and click on Presets to select different types of glitch text effects. You can also adjust the intensity of the text effects and other parameters as you feel.
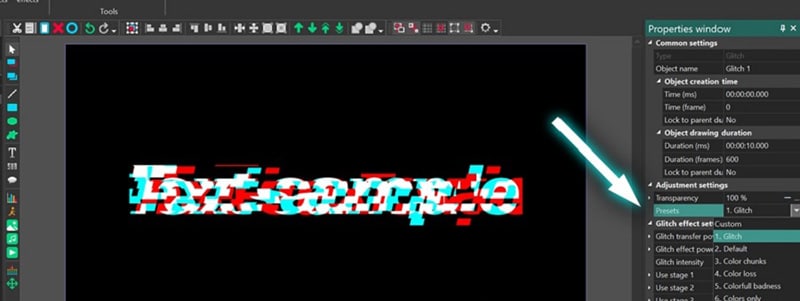
Part 4. Related FAQs about Glitch Text
1. How do you animate glitch text?
If you want to animate glitch text for free, VSDC video editor is ideal as you can customize the effect on any text in simple steps. If you want to use a premium video editor, we recommend Filmora as there are various glitch text effects available to apply to any text on your video instantly.
2. How do you glitch text on video?
First, you have to import your video in your video editor. Type the desired text and set the style. Thereafter, go to glitch text effect presets available on the video editor and apply it to the text instantly. You can customize the glitch text effect as per your preference to make the animation more prominent.
3. How do you glitch text on Android?
You should first install Glitch Video Effect: Glitch FX app from Play Store. Edit your video on the app to add any text, and thereafter, add glitch text effect instantly. In fact, the glitch text effect is available in almost all popular video editor apps on Android due to the effect being trendy and viral.
Free Download For macOS 10.14 or later
Step1 Download and install Filmora on your computer. Go to File> New Project from the menu bar to start video editing project.
Step2 Go to File> Import Media > Import Media Files to import the video clips where you want to add glitch text effect. Drop the clip into the Timeline to get started.
Step3 Go to Titles tab located at the top. From the left panel, click on Titles option. Search “glitch” in the search field and you will see all the glitch text effects that you can apply to the text in your video.
Step4 Select any glitch text effect and drop it into the Timeline above the video clip exactly where you want the text and the effect to appear.
Step5 Double-click on the glitch text effect located on Timeline and edit the text, style, and other parameters as per your preference. Click on Ok and play the video to see your edited video with the glitch text effect.
Part 2. How to Make Glitch Text Effect with Premiere Pro
Adobe Premiere Pro is another renowned video editor where you can add glitch text effect to your video. Premiere Pro is strictly for professional video editors as the user interface is not as intuitive as Filmora . The learning curve is steep, and therefore, you need to go through the steps to add glitch text effect Premiere Pro. There are several glitch text effect presets available that you can apply to any text on your video to make them engaging. Here are the steps to make glitch text effect with Premiere Pro.
Step1 Launch Adobe Premiere Pro and go to New> Project to get started. Import your video and drop it into Timeline.
Step2 Use the Type tool to write any text on your video to add glitch text effect. You should have a text layer on Timeline.
Step3 Go to Effects> Immersive Video> VR Digital Glitch option. Drag and drop the effect to text layer.
Step4 Under Effect Controls tab, you will find all the different parameters that you can adjust to get the glitch text effect perfectly.
Step5 Turn on Master Amplitude and add multiple keyframes as different points in the Timeline and change the distortion value to make the effect prominent.
Step6 Go to the first keyframe and turn on Random Seed effect. Go to the last keyframe and turn on Random Seed effect and change the value to 75. Play the video to check the entire video with glitch text effect.
Part 3. Use VSDC Video Editor to Create Glitch Text
If you do not have any premium video editor on your computer and you do not want to purchase any premium video editor, you can still get glitter text effect free. You need to download and install VSDC free video editor on your computer. But the steps to create glitch text on VSDC video editor are slightly complicated as the user interface is not as intuitive as Filmora . Here are the steps to add free glitch text effect on your video.
Step1 Download and install VSDC video editor. Launch the editor and click on New Project to get started. Import your video to your project where you want to add glitch text effect.
Step2 Use Type tool to write a text on the video. You can press Shift+T shortcut as well. After typing the text, adjust the text style as per your preference.
Step3 Double-click on the text layer on Timeline and go to Video Effects> Special FX and click on Glitch option.
Step4 A window will appear where you can set the starting point, duration, and different parameters. Click on Ok button.
Step5 Go to Properties Windows and click on Presets to select different types of glitch text effects. You can also adjust the intensity of the text effects and other parameters as you feel.
Part 4. Related FAQs about Glitch Text
1. How do you animate glitch text?
If you want to animate glitch text for free, VSDC video editor is ideal as you can customize the effect on any text in simple steps. If you want to use a premium video editor, we recommend Filmora as there are various glitch text effects available to apply to any text on your video instantly.
2. How do you glitch text on video?
First, you have to import your video in your video editor. Type the desired text and set the style. Thereafter, go to glitch text effect presets available on the video editor and apply it to the text instantly. You can customize the glitch text effect as per your preference to make the animation more prominent.
3. How do you glitch text on Android?
You should first install Glitch Video Effect: Glitch FX app from Play Store. Edit your video on the app to add any text, and thereafter, add glitch text effect instantly. In fact, the glitch text effect is available in almost all popular video editor apps on Android due to the effect being trendy and viral.
Also read:
- Lets Introduce the Top 5 Applications to Add a Song to a Video for Free with some Amazing Sound and Visual Effects
- In 2024, Discover 8 Top-Rated Video and Photo Merger Tools for Desktop, Mobile, and Online Use. Elevate Your Media Game and Create Stunning Visuals with Ease
- Make Time-Lapse Video on MacBook Complete Guide
- 2024 Approved Create True 3D Text Effects Using After Effects
- Updated How to Make a Slideshow GIF for 2024
- New Kinetic Typography Text Effect 【EASY&FAST】
- New In 2024, 8 Frame Rate Video Converters You Must Try
- Updated Any Video May Be Enhanced Using Adobe Premiere Transitions. If You Are Looking to Learn How to Add Fade to Black in Premiere Pro? Then, Check Out This Fade to Black Transition Premiere Pro Guide to Learn the Trick
- How to Do Motion Graphics in Filmora for 2024
- 2024 Approved How to Rotate a Video in Windows 10
- How to Create a Video Slideshow in iMovie for 2024
- New 2024 Approved How to Add Miniature Effect in Video with Filmora
- In 2024, Use This Color Match Paint Technique to Find the Exact Shade of Any Hue You Have in Mind for Your Paint Project. Match the Paint to Your Desired Color Even without Knowing the Paint Name or Brand with Automotive Paint Matching
- Updated 2 Ways to Fade in Text in Premiere Pro
- New How to Overlay Video in Premiere Pro
- In 2024, The Definite Guide to Craig Bot Discord
- Updated VN Editor A Prominent Option for Adding Luts for Video Editing
- New Efficient Ways to Manage Your Timeline for 2024
- Having GoPro Accessories Is Easy, but Editing on GoPro Quik Is Challenging. Read This Guide and, Stepwise, Learn to Use GoPro Slow-Motion for Perfect Shots
- Updated 2024 Approved Color Correction Basics (S-LOG Footage)
- In 2024, Color Correction Basics (S-LOG Footage)
- Are You an Apple User Interested in Adding a Slow-Mo to Their Videos? This Article Features an Exceptional Procedure for Creating Slow-Mo in iMovie for 2024
- New 2024 Approved Split a Clip in DaVinci Resolve Step by Step
- New Add Motion Blur in After Effects for 2024
- Updated 2024 Approved 2 Methods to Crop Video in VLC
- New How to Zoom In and Out on Mac
- New Learn Top Best Free LUTs For Premiere Pro
- New 2024 Approved Easiest Fix Included! Top 5 Ways to Convert HDR to SDR Videos
- 2024 Approved Easy Guide to Overlay Videos in Premiere Pro
- New The Top Tips for Becoming a Good Podcast Host Are Presented in This Article. How to Start and End the Podcast Show Is All Set Below. You Can Also Learn About the Ways to Call Guests to Your Show
- New How to Create Realistic Fire Effects for 2024
- To Find the Best Tool Out of Hundreds of Online and Offline GIF to Video Converters, You Need to Check These Specifications. Read This Review and Get the Best Out of the Best
- 2024 Approved Step By Step Guide on Using Media Player Classic To Rotate A Video
- Updated 7 Ways to Make GIF From Videos on Mac for 2024
- New In 2024, How to Splice Videos Together on iPhone
- Updated Do You Want to Know Which Are the Best Wondershare Filmora LUTs to Use? There Are Many LUTs that You Can Download, Each with a Different Tone and Style
- Updated Are You Looking for Ways to Add Background to Green Screen Video Online? Worry Not, as in This Article; We Shall Discuss Using a Green Screen Background Adder in Filmora
- 2024 Approved Learn to Create Custom Sequence Presets in Premiere Pro for Efficient Video Editing. Ensure Consistency and Speed up Your Workflow with Personalized Settings
- Can You Make an Fcpx Slideshow? Undoubtedly Yes, with the Unlimited Best Fcpx Slideshow Templates Available. To Know How to, Follow the Discussion Below
- Updated Top 5 Free Online Video Filter Editors Improve Your Videos with Filters for 2024
- In 2024, Let Us Talk About the Famous Photoshop and Most Commonly Used Glitch Effect. The Article Understudy Will Discuss in Detail About Photo Glitch Effect
- In This Article, We Will Cover the Stages of Film Production You Need to Keep in Mind.Without Further Ado, Lets Get Started
- In 2024, How to Create Cinematic Style Videos?
- 2024 Approved You May Want to Create Your Video Tutorial and Share Your Knowledge with Others. Fortunately, You Can Easily Create a Professionally Edited Tutorial Video with Filmora. Keep Reading This Article Since We Will Show You How to Do It
- New 2024 Approved Basic Introduction for LumaFusion Color Grading
- Updated An Easy-to-Understand Guide on How to Loop a Video on Canva. This Article Is Sure to Help You if This Is Your First Time Attempting a Loop Video
- Updated 2024 Approved Detailed Tutorial to Crop a Video Using Openshot?
- 2024 Approved Advancements in Game Recording Software A Comprehensive Overview
- S-Log Is a Gamma Curve Optimized for Digital Cameras to Maximize the Image Sensors Performance. Although These Videos May Look Flat and Washed Out, They Contain Lots of Color Information for 2024
- Updated How to Add VHS Green Screen to Your Video
- In 2024, Ways to stop parent tracking your Vivo T2 5G | Dr.fone
- In 2024, Does find my friends work on Nokia C12 Plus | Dr.fone
- The Best Android SIM Unlock Code Generators Unlock Your OnePlus Open Phone Hassle-Free
- In 2024, Forgot Your Apple ID Password and Email From iPhone 15? Heres the Best Fixes
- Issues playing H.265 HEVC video on Xiaomi Redmi K70
- Bypass iCloud Activation Lock with IMEI Code On your iPhone 11 Pro
- 5 Ways to Reset Vivo Y100i Power 5G Without Volume Buttons | Dr.fone
- Authentication Error Occurred on Vivo S17t? Here Are 10 Proven Fixes | Dr.fone
- How to Remove Forgotten PIN Of Your Samsung Galaxy XCover 7
- New Best Tool to Translate YouTube Video to Arabic for 2024
- How to Easily Hard reset my HTC U23 | Dr.fone
- How to Show Wi-Fi Password on Xiaomi Redmi A2
- Updated Top 9 Choices for Video Auto Translate
- In 2024, How to Screen Mirroring Vivo V29 Pro? | Dr.fone
- How to Change/Add Location Filters on Snapchat For your Apple iPhone 14 Pro Max | Dr.fone
- In 2024, How To Unlock Stolen iPhone 13 Pro In Different Conditionsin
- Can You Unlock Apple iPhone SE After Forgetting the Passcode?
- How to Transfer Photos from Samsung Galaxy XCover 6 Pro Tactical Edition to New Android? | Dr.fone
- 2024 Approved Revolutionize Creative Tasks With Proficiency AI Voice Cloning
- Reasons for Oppo A1 5G Stuck on Startup Screen and Ways To Fix Them | Dr.fone
- Methods to Change GPS Location On Xiaomi Redmi Note 13 5G | Dr.fone
- A Complete Guide To OEM Unlocking on OnePlus Ace 3
- In 2024, Android Unlock Code Sim Unlock Your Samsung Galaxy A15 4G Phone and Remove Locked Screen
- How to share/fake gps on Uber for Samsung Galaxy F34 5G | Dr.fone
- Reasons why Pokémon GPS does not Work On Meizu 21? | Dr.fone
- Everything To Know About Apple ID Password Requirements For Apple iPhone 11 Pro Max
- In 2024, Android to Apple How To Transfer Photos From Xiaomi Redmi K70E to iPad Easily | Dr.fone
- How To Fix Auto Lock Greyed Out on Apple iPhone XS Max
- How to use Pokemon Go Joystick on OnePlus Open? | Dr.fone
- Unlocking Made Easy The Best 10 Apps for Unlocking Your Samsung Galaxy A24 Device
- Rootjunky APK To Bypass Google FRP Lock For Nokia
- How to retrieve erased messages from Infinix Note 30 5G
- Can I Bypass a Forgotten Phone Password Of Samsung Galaxy Z Fold 5?
- Full Guide to Unlock Apple iPhone 13 with iTunes
- How to Mirror Apple iPhone 14 Pro to PC via USB? | Dr.fone
- CatchEmAll Celebrate National Pokémon Day with Virtual Location On OnePlus Open | Dr.fone
- Best Anti Tracker Software For Xiaomi Redmi Note 13 Pro 5G | Dr.fone
- In 2024, Detailed Review of doctorSIM Unlock Service For iPhone 6s | Dr.fone
- How Do You Get Sun Stone Evolutions in Pokémon For Apple iPhone 13 Pro Max? | Dr.fone
- How to Fix It Vivo Y78 5G Wont Turn On | Dr.fone
- How to solve MKV lagging problem in Galaxy A54 5G?
- Remove the Lock Screen Fingerprint Of Your Samsung Galaxy A34 5G
- In 2024, 3 Easy Methods to Unlock iCloud Locked Apple iPhone SE (2022)/iPad/iPod
- Simple ways to get lost files back from Oppo Find X6
- How to Soft Reset Vivo G2 phone? | Dr.fone
- In 2024, How to Transfer Data After Switching From Google Pixel 8 to Latest Samsung | Dr.fone
- 2 Ways to Monitor Apple iPhone 12 Pro Max Activity | Dr.fone
- Title: New In 2024, A Guide to Use Distortion Effect in Premeiere Pro
- Author: Chloe
- Created at : 2024-04-24 07:08:28
- Updated at : 2024-04-25 07:08:28
- Link: https://ai-editing-video.techidaily.com/new-in-2024-a-guide-to-use-distortion-effect-in-premeiere-pro/
- License: This work is licensed under CC BY-NC-SA 4.0.
