
:max_bytes(150000):strip_icc():format(webp)/best-instagram-captions-4171697-ae21b04e6866470c80a50c9bef1cc26e.png)
New In 2024, Add Green Screen Video on TikTok
Add Green Screen Video on TikTok
TikTok is the most popular platform for making short videos. You can create creative short videos and upload to TikTok so that they can entertain your followers and make your videos go viral. To add variety to your video content, the use of green screen in short videos is a great idea. You can replace the green screen with any background in your TikTok video. You need to know how to add green screen video on TikTok.
Adding green screen on TikTok videos has become a trend now as there are several green screen TikTok videos that have gone viral. In fact, creative green screen videos are extremely popular on social media platforms. Instead of replacing the green screen in your video with a single photo, you can replace it with multiple pictures on TikTok. We will illustrate how to add multiple pictures on TikTok green screen.
Part 1. How to Add Green Screen on TikTok?
To add green screen on TikTok video, you need to have a background of uniform color. It does not necessarily have to be a green screen. For example, if you are shooting a video of your legs and the floor tiles have uniform color, you can use green screen on TikTok to replace the tiles with any picture. Instead of using one picture on TikTok short video, you can use multiple pictures in the background to create stunning TikTok videos. Here are the steps on how to add multiple pictures to TikTok green screen.
Step1 Open TikTok app on your phone. Tap on Plus icon located at the bottom of the app screen to make a new video.
Step2 Choose the duration of the video as per your preference. Thereafter, tap on Effects option located at the bottom-left corner to see the different effects available on TikTok.
![]()
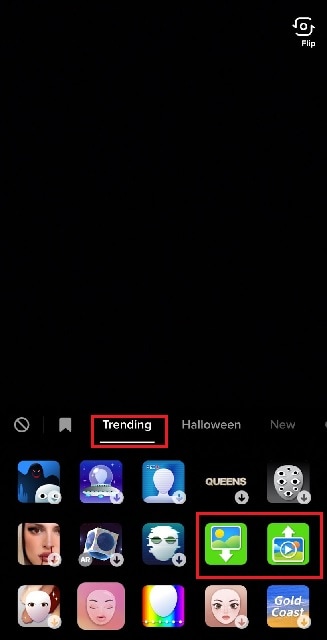
Step3 Go to Trending tab and you will see Green Screen and Green Screen Video icons. If you want your video to have green screen photo, tap on Green Screen icon. If you want your video to have green screen video, tap on Green Screen Video icon.
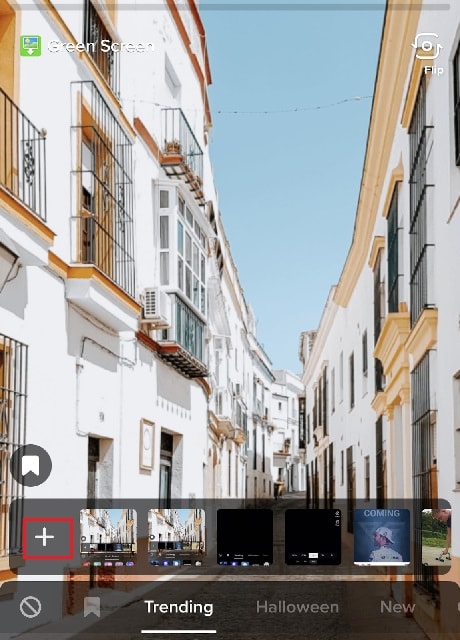
Step4 You will get a generic background and you can choose any preset background or select photo or video from your phone gallery by tapping on Plus icon. Once you are done, tap on Record button.
Step5 In order to use multiple pictures, you should stop recording in between and change your green screen image to anything you desire. Then tap on Record button again. TikTok will string your clips and it would appear that you have been changing multiple pictures of your background for your video.
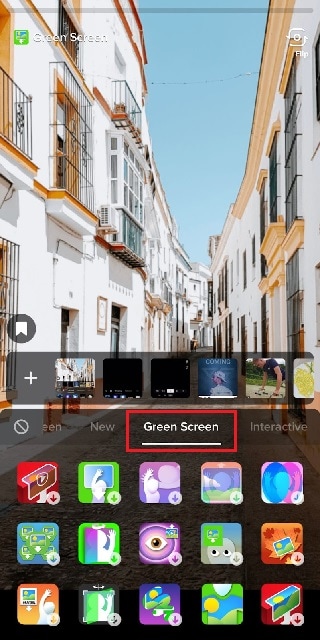
If you want to experiment with green scree effects, you can scroll down after tapping on Green Screen icon under Effects. You will see different types of green screen videos possible on TikTok to choose from.
Part 2. Creative Ideas to Make TikTok Green Screen Video
Now that you know how to add a video on TikTok green screen, you have to make the most out of it. If you are wondering how you can use green screen in your TikTok videos, here are some creative ideas for you.
Walking Out Videos – You can use green screen effect to show that you are walking out of plane, walking vertically on the wall like inception, walking on the roof of a building. In fact, you can show that you are walking out of popular monuments and palaces and trick your viewers into thinking that you were actually there.
Photoshoot Location – Create a TikTok video showing your favorite locations across the world where you dream of doing photoshoot. You can pose differently and place the location in your background through green screen effect.
How-To Video – If your TikTok channel is about tutorial and learning videos, you can explain things better by putting screenshots and multiple relevant pictures in the background so that viewers can get a pictorial representation of what you are speaking to them.
Mystery Story – You can a create short video describing unknowing facts and mysteries around certain places in the world. You can put photos or video clips of those mysterious places in your background to keep your viewers hooked and related to your narration.
Rate Them Video – You can use green screen effect to showcase your old Instagram photos or videos and rate them. This is an extremely popular trend in TikTok where people show their old photos, display work from the past, and rate them today.
Reveal Your Creation – Share your secrets or interesting stories behind some of the photos or videos you took in the past. You can talk about how creatively you took certain photos and put those photos in the background while discussing them.
Part 3. How to Make Green Screen Video on Computer?
If you have a computer and a webcam, you can record a green screen video on your computer. You can place the green screen in the background perfectly and place the webcam so that the background stays within the green screen. You will need a video recorder and a video editor to make green screen video as well as replace the green screen with any photo or video. We recommend Wondershare Filmora where you can record as well as edit green screen video.
Filmora is a professional video editor where you can record your computer screen as well as your webcam video with green screen background in Picture-in-Picture mode. After recording the video, you can replace the green screen with any video clip or photo instantly in a few steps. You can also fine-tune green screen effect for perfection. Therefore, you can save the video in any resolution and file format as per your preference.

Free Download For Win 7 or later(64-bit)
Free Download For macOS 10.14 or later
Conclusion
Adding green screen effect on TikTok videos can make your videos stand out. We have illustrated how to add multiple green screen videos on TikTok and your videos will have a better chance of getting viral. Keep the green screen ideas in mind while making TikTok green screen videos. If you want to make and edit green screen videos on computer, Wondershare Filmora is the best application available for Windows and Mac users.
[Step by Step] to Rotate Video in Google Photos
Google photos let you store, view, edit and share your videos and photos and are automatically organized. It is a very great cloud storage service and most people use it. Google Photos has introduced an artificial intelligence technology into the app. That’s why it can automatically organize and rotate.
You have videos on google photos that are automatically rotated, others are not.
How do you rotate them manually?
It’s is so simple and will not take much of your time.
Let’s dive in…
Rotating videos in google photos
Rotating a video in google photos is pretty simple and will not take much of your time. You can easily fix the rotation and aspect ratio of your videos. But it’s a little tricky.
I’m going to show you how to flip your videos from portrait mode to landscape mode or from landscape mode to portrait mode.
You need to open up your google photos app and choose the video you want to flip, then you’re going to pick the button in the bottom middle with the levers on it and in the bottom right hand corner.

You will see a diamond with a circular arrow on it. You’re going to hit that until you find the way you want it to be.

Once you’re happy, in the top right hand corner, hit Save Copy and that’s it, the size of the file determines how long it takes to finish this process later.

An easier way to rotate videos in Google Photos
If you just need to rotate a video in portrait mode to the landscape mode or 180 degrees, Google photos will be the best choice to do that. However, what if rotate a video 32 degrees or 157 degrees, or maybe you need to do more editing operations, you can’t rely on Google Photos anymore.
But stop worrying, you can set your video at any angle with Filmora Video Editor . It is one of the best video editing software that provides you with the editing tools you need to edit and share your videos across the globe. It allows you to flip and rotate the orientation of the video. It also supports many popular formats used on different social media platforms like Linkedin, Instagram, Twitter, YouTube and so many more.
Let’s have look at this professionally designed software that everyone can master in a few minutes and can film professional videos. Since it provides all the features that you will need to make movies in a good way. Moreover, its interface is very simple to use.
For Win 7 or later (64-bit)
For macOS 10.14 or later
Here’s How to do it…
Rotate video at any angle
You can also rotate the video by using the Transform tab located at the top right corner.
- Drag your video into the timeline.
- Double click on the video to bring up the editing panel.
- Hit the basic tab under the video tab in the menu bar.
- Select the Transform
- Click the rotate
- Here you can move the rotate slider or directly enter the rotating value.

You will notice that I have changed the rotation of my video from its original position to the rotated angle.
You can rotate upside down, rotate left, rotate right or 90 degrees clockwise, 180 degrees, 270 degrees, 360 degrees rotate, and back to the original. Check the video result in the preview window. Once you get satisfied with the rotation.
- Hit the ok
- Select the save

Similarly, you can drag the video from the preview panel and adjust it as required.
Here, you can Flip function your video to change the direction. Like in this screenshot, suppose you want to change the place from right to left. You can easily change the direction by hitting on the flip tab.

Now you can see that the image has flipped without making a big effort you can also do it. I have done it for you, you are smarter.
Just go ahead and start…
Scale is also used to remove the unwanted and rubbish scenes from the selected video. Like if you don’t want to show something behind the scene, you can use the scale function to cut that scene from your video.
What’s more you can do with Filmora
Changing the Aspect ratio
After you rotate the video at an angle you like. You can change the aspect ratio of the video furthermore.
- Import the desired video and drag it into the timeline. Then click the Aspect Ratio icon at the bottom of the preview window.
- You can select the 16:9, 1:1, 4:3, or custom aspect ratio.
- Press OK

By the way, you can choose the suitable aspect ratio according to the social media platform you are using. Like, a 1:1 aspect ratio for Instagram, a 9:16 aspect ratio for portrait videos, and a 4:3 standard video.
Conclusion
Here’s how you can rotate your video using two different softwares. Now you can shoot your videos without setting the proper video orientation. Sometimes, while shooting a video, the real scene unfolds in making a lot settings. I hope, after reading this content, you will be confident enough to start shooting videos and then editing them without having trouble of learning the software.
Let’s dive in!
Go ahead…
A good destiny is waiting for you.
You will see a diamond with a circular arrow on it. You’re going to hit that until you find the way you want it to be.
Once you’re happy, in the top right hand corner, hit Save Copy and that’s it, the size of the file determines how long it takes to finish this process later.
An easier way to rotate videos in Google Photos
If you just need to rotate a video in portrait mode to the landscape mode or 180 degrees, Google photos will be the best choice to do that. However, what if rotate a video 32 degrees or 157 degrees, or maybe you need to do more editing operations, you can’t rely on Google Photos anymore.
But stop worrying, you can set your video at any angle with Filmora Video Editor . It is one of the best video editing software that provides you with the editing tools you need to edit and share your videos across the globe. It allows you to flip and rotate the orientation of the video. It also supports many popular formats used on different social media platforms like Linkedin, Instagram, Twitter, YouTube and so many more.
Let’s have look at this professionally designed software that everyone can master in a few minutes and can film professional videos. Since it provides all the features that you will need to make movies in a good way. Moreover, its interface is very simple to use.
For Win 7 or later (64-bit)
For macOS 10.14 or later
Here’s How to do it…
Rotate video at any angle
You can also rotate the video by using the Transform tab located at the top right corner.
- Drag your video into the timeline.
- Double click on the video to bring up the editing panel.
- Hit the basic tab under the video tab in the menu bar.
- Select the Transform
- Click the rotate
- Here you can move the rotate slider or directly enter the rotating value.
You will notice that I have changed the rotation of my video from its original position to the rotated angle.
You can rotate upside down, rotate left, rotate right or 90 degrees clockwise, 180 degrees, 270 degrees, 360 degrees rotate, and back to the original. Check the video result in the preview window. Once you get satisfied with the rotation.
- Hit the ok
- Select the save
Similarly, you can drag the video from the preview panel and adjust it as required.
Here, you can Flip function your video to change the direction. Like in this screenshot, suppose you want to change the place from right to left. You can easily change the direction by hitting on the flip tab.
Now you can see that the image has flipped without making a big effort you can also do it. I have done it for you, you are smarter.
Just go ahead and start…
Scale is also used to remove the unwanted and rubbish scenes from the selected video. Like if you don’t want to show something behind the scene, you can use the scale function to cut that scene from your video.
What’s more you can do with Filmora
Changing the Aspect ratio
After you rotate the video at an angle you like. You can change the aspect ratio of the video furthermore.
- Import the desired video and drag it into the timeline. Then click the Aspect Ratio icon at the bottom of the preview window.
- You can select the 16:9, 1:1, 4:3, or custom aspect ratio.
- Press OK
By the way, you can choose the suitable aspect ratio according to the social media platform you are using. Like, a 1:1 aspect ratio for Instagram, a 9:16 aspect ratio for portrait videos, and a 4:3 standard video.
Conclusion
Here’s how you can rotate your video using two different softwares. Now you can shoot your videos without setting the proper video orientation. Sometimes, while shooting a video, the real scene unfolds in making a lot settings. I hope, after reading this content, you will be confident enough to start shooting videos and then editing them without having trouble of learning the software.
Let’s dive in!
Go ahead…
A good destiny is waiting for you.
Mask Tracking with Adobe Premiere Pro: A Detailed Guide
Mask tracking Premiere Pro is a technique that lets you apply effects to a precise frame area. In video editing, mask tracking is crucial because it lets you apply effects to areas of your footage rather than the full frame. This can assist you in producing videos that look more professional by emphasizing crucial details, obscuring delicate content, and using imaginative effects.
This article guides Premiere Pro mask tracking using the right tools and effects. Give it a read if you are interested in tracking mask Premiere.
AI Smart Masking Spice up your video content with the endless possibilities of AI masking functions!
Free Download Free Download Learn More

Part 1. What Do You Know About Mask Tracking in Videos?
Automatic tracking and following a certain object or area during a video clip is known as mask tracking. Usually, the “mask” depicts a designated zone of interest, such as a person’s face, an item, or any other area. Mask tracking is achieved using various methods and algorithms, including computer vision techniques such as optical flow, feature tracking, or machine learning.
The objective of the effect is to track the targeted item consistently over all video frames. Mask tracking Premiere Pro is a common special effect in video editing. It can add visual components, apply filters, or change the color and lighting inside the tracked region.
Part 2. How To Perform Mask Tracking with Adobe Premiere Pro
One of the most widely used industry standard programs for video editing is Adobe Premiere Pro . With the help of this tool, users can alter various aspects of photographs and films. It can tweak effects in nearly every frame according to user preferences using Premiere mask tracking. You will undoubtedly get remarkable outcomes from it in a short amount of time.
The tool is a video editing expert, so many professional video editors rely on it. It offers a huge range of editing features that get together to create an impactful and eye-catching video.
Marked Key Features of Adobe Premiere Pro
- Video Editing: You can combine audio and apply effects and transitions to your video content. The platform also helps you work with color or add animated titles to your videos.
- Text-Based Editing: Text-based editing creates a transcript and automatically highlights text to add clips to your timeline. It can edit and rearrange clips like a text document.
- Color Correction: With the help of AI, you can automatically balance your colors or modify the frame using expert color wheels and curve controls. It also assists in viewing your work using integrated video scopes.
- Audio Editing: With Adobe Premiere Pro, you can explore audio tracks, license them, and utilize AI to adapt them to your clips automatically.
Step-by-Step Guide to Perform Mask Tracking with Premiere Pro
Adobe Premiere mask tracking is one of the many remarkable features of the app. If you want to employ mask tracking in your videos using Adobe Premiere, look at the steps below:
Step 1: To start off with the process, import the video onto the timeline that needs to be edited. Navigate to the top of the screen and select “Effect Controls” to proceed further. Select any specific shape present below the “Opacity” option on the left to add a mask to your clip.

Step 2: Set the shape according to the person or object you will track by masking. Now, under the “Mask” option, you will see the “Mask Feather” option. Click on “Mask Feather” and adjust it so it won’t look too harsh on the edges.

Step 4: Go to the beginning of the video you are editing, return to the editing section, and look for the “Mask Path” option. Now hit the “Track Selected Masked Forward” button and wait for the system to complete the Premiere Pro tracking mask process and save the video.

Part 3. Making Masking Easy with Wondershare Filmora: Reviewing the Details
Adobe Premiere Pro is an incredible tool, without a doubt. However, many users say that it needs to be simpler to use. You cannot generate a good video even after watching tutorials because it’s hard for an amateur to use Adobe Premiere Pro. Because of this, many users look for alternative options to add a premiere tracking mask and make other changes to their videos.
This part is all about the amazing alternative that you’re looking for. Wondershare Filmora is a video editing tool that provides professional quality content editing. The tool is so easy to use that you can start immediately with basic instructions. Its smart editing features, combined with a fast and intelligent system, make it a great choice for everyone.
Free Download For Win 7 or later(64-bit)
Free Download For macOS 10.14 or later
Key Features of Wondershare Filmora
- Compound Clip: This feature will arrange all your clips, combine them, and edit them as a single clip. This strong and intuitive feature improves and edits your video.

- AI Text-to-Video: You can convert text into engaging visual narratives and instantly turn text inputs into interesting videos. The feature makes ideas into stunning videos with ease.

- Speed Ramping: This feature produces distinctive cinematic effects by managing your keyframes and altering the speed of your film.

- AI Thumbnail Creator: The tool uses AI to create attractive, engaging thumbnails that get the viewers’ attention. You can use different presets to beautify your thumbnail.

Step-by-Step Guide on How to Perform AI Masking on Filmora
Wondershare Filmora Premiere Pro mask tracking is way easier and provides the same high-end results. Follow the steps below to do mask tracking using Filmora’s unique functions and procedures:
Step 1Add Video Content to Timeline in Filmora
Launch Wondershare Filmora on your computer and proceed by creating a “New Project.” As a new window opens, import your required video clips to the timeline. Double-click and proceed to their respective video settings.

Step 2Use AI Masking Feature on Video
On double-clicking the video, proceed to the “Video” tab from the top and continue into the “Mask” section. Select the “AI Mask” option in the provided list to open further settings. Select any appropriate mode of AI Mask from the bottom options and set the respective parameters accordingly. You can either select “Smart Brush” or go for “Smart Character” or “Smart Subject.”

Step 3Save Final Video
On clicking “OK,” all changes are applied to the video. Continue to the “Export” button to save your edited video clip on your computer.

Free Download For Win 7 or later(64-bit)
Free Download For macOS 10.14 or later
Conclusion
Mask tracking is handy for adding effects to a moving object in your video. By tracking the movement, you can ensure the effect persists even as the object moves around the frame. Many professionals use it in their videos to edit and enhance a specific area in their clip. Check out this article if you also seek an app for Premiere mask tracking.
Free Download Free Download Learn More
Part 1. What Do You Know About Mask Tracking in Videos?
Automatic tracking and following a certain object or area during a video clip is known as mask tracking. Usually, the “mask” depicts a designated zone of interest, such as a person’s face, an item, or any other area. Mask tracking is achieved using various methods and algorithms, including computer vision techniques such as optical flow, feature tracking, or machine learning.
The objective of the effect is to track the targeted item consistently over all video frames. Mask tracking Premiere Pro is a common special effect in video editing. It can add visual components, apply filters, or change the color and lighting inside the tracked region.
Part 2. How To Perform Mask Tracking with Adobe Premiere Pro
One of the most widely used industry standard programs for video editing is Adobe Premiere Pro . With the help of this tool, users can alter various aspects of photographs and films. It can tweak effects in nearly every frame according to user preferences using Premiere mask tracking. You will undoubtedly get remarkable outcomes from it in a short amount of time.
The tool is a video editing expert, so many professional video editors rely on it. It offers a huge range of editing features that get together to create an impactful and eye-catching video.
Marked Key Features of Adobe Premiere Pro
- Video Editing: You can combine audio and apply effects and transitions to your video content. The platform also helps you work with color or add animated titles to your videos.
- Text-Based Editing: Text-based editing creates a transcript and automatically highlights text to add clips to your timeline. It can edit and rearrange clips like a text document.
- Color Correction: With the help of AI, you can automatically balance your colors or modify the frame using expert color wheels and curve controls. It also assists in viewing your work using integrated video scopes.
- Audio Editing: With Adobe Premiere Pro, you can explore audio tracks, license them, and utilize AI to adapt them to your clips automatically.
Step-by-Step Guide to Perform Mask Tracking with Premiere Pro
Adobe Premiere mask tracking is one of the many remarkable features of the app. If you want to employ mask tracking in your videos using Adobe Premiere, look at the steps below:
Step 1: To start off with the process, import the video onto the timeline that needs to be edited. Navigate to the top of the screen and select “Effect Controls” to proceed further. Select any specific shape present below the “Opacity” option on the left to add a mask to your clip.
Step 2: Set the shape according to the person or object you will track by masking. Now, under the “Mask” option, you will see the “Mask Feather” option. Click on “Mask Feather” and adjust it so it won’t look too harsh on the edges.
Step 4: Go to the beginning of the video you are editing, return to the editing section, and look for the “Mask Path” option. Now hit the “Track Selected Masked Forward” button and wait for the system to complete the Premiere Pro tracking mask process and save the video.
Part 3. Making Masking Easy with Wondershare Filmora: Reviewing the Details
Adobe Premiere Pro is an incredible tool, without a doubt. However, many users say that it needs to be simpler to use. You cannot generate a good video even after watching tutorials because it’s hard for an amateur to use Adobe Premiere Pro. Because of this, many users look for alternative options to add a premiere tracking mask and make other changes to their videos.
This part is all about the amazing alternative that you’re looking for. Wondershare Filmora is a video editing tool that provides professional quality content editing. The tool is so easy to use that you can start immediately with basic instructions. Its smart editing features, combined with a fast and intelligent system, make it a great choice for everyone.
Free Download For Win 7 or later(64-bit)
Free Download For macOS 10.14 or later
Key Features of Wondershare Filmora
- Compound Clip: This feature will arrange all your clips, combine them, and edit them as a single clip. This strong and intuitive feature improves and edits your video.
- AI Text-to-Video: You can convert text into engaging visual narratives and instantly turn text inputs into interesting videos. The feature makes ideas into stunning videos with ease.
- Speed Ramping: This feature produces distinctive cinematic effects by managing your keyframes and altering the speed of your film.
- AI Thumbnail Creator: The tool uses AI to create attractive, engaging thumbnails that get the viewers’ attention. You can use different presets to beautify your thumbnail.
Step-by-Step Guide on How to Perform AI Masking on Filmora
Wondershare Filmora Premiere Pro mask tracking is way easier and provides the same high-end results. Follow the steps below to do mask tracking using Filmora’s unique functions and procedures:
Step 1Add Video Content to Timeline in Filmora
Launch Wondershare Filmora on your computer and proceed by creating a “New Project.” As a new window opens, import your required video clips to the timeline. Double-click and proceed to their respective video settings.
Step 2Use AI Masking Feature on Video
On double-clicking the video, proceed to the “Video” tab from the top and continue into the “Mask” section. Select the “AI Mask” option in the provided list to open further settings. Select any appropriate mode of AI Mask from the bottom options and set the respective parameters accordingly. You can either select “Smart Brush” or go for “Smart Character” or “Smart Subject.”
Step 3Save Final Video
On clicking “OK,” all changes are applied to the video. Continue to the “Export” button to save your edited video clip on your computer.
Free Download For Win 7 or later(64-bit)
Free Download For macOS 10.14 or later
Conclusion
Mask tracking is handy for adding effects to a moving object in your video. By tracking the movement, you can ensure the effect persists even as the object moves around the frame. Many professionals use it in their videos to edit and enhance a specific area in their clip. Check out this article if you also seek an app for Premiere mask tracking.
How to Create and Use Adjustment Layers in After Effects
Have you ever used After Effects for professional video editing? Adobe After Effects is a significant video editing software that is used to add animating effects, transitions, intros, outros, and visual effects. You can launch this software on Windows and Mac effectively. Using this high-end software allows you to work on team projects as it consists of auto-saving features.
Moreover, you can add adjustment layers on After Effects to make your video editing more efficient. If you don’t know what the adjustment layer in After Effects is, this article will help you. By reading this article, you can easily learn how to create adjustment layers in your video clips using After Effects.

Part 1: What is the Adjustment Layer in After Effects?
The adjustment layer can save you time and energy from adding effects to multiple clips individually. It does not alter the composition of your video clip until you start applying the effects. Once you add the effect in the adjustment layer, it will replace the effect on all the layers under it.
You can add the adjustment layers in your timeline for creating visual effects such as film grain or color grading. Using the adjustment layer, you can produce transition effects by adding effects to shorter compositions. However, if you want to use the adjustment layer properly, you should select its position carefully in the layer’s stack.

Moreover, always keep in mind that anything placed under the adjustment layer will have a direct effect. In contrast, anything above the adjustment layer won’t get affected. Hence, you can use adjustment layers in After Effects for your convenience to apply all kinds of effects from color to distortion.
Part 2: How to Add Adjustment Layers in After Effects?
Do you want to learn how to add an adjustment layer in After Effects? In this section, we will shed light on two ways through which you can add an adjustment layer to your video clips in After Effects:
Way 1: After opening After Effects and uploading your project, go to the “Layers” tab. Tap on the “New” button and choose “Adjustment Layer.”

Way 2: Once done with uploading the project on After Effects, go to the blank space in the timeline section on the left side. Right-click using your mouse and select the option “New.” Afterward, click on “Adjustment Layer” to proceed. This will add the adjustment layer on the top of your layers stack.

Tips – Keyboard Shortcuts of Adjustment Layers in After Effects
Do you want to save time while creating an adjustment layer in After Effects? Through the following table, you can learn the shortcuts that you can utilize to generate adjustment layers quickly.
| For Windows | For MacBook |
|---|---|
| Ctrl+Alt+Y | Command+Option+Y |
Part 3: Popular Effects You Can Try With Adjustment Layers in After Effects
In this section, you can find out different effects that you can try with the adjustment layer in After Effects. By applying these effects with an adjustment layer, you can transform your video drastically.
1. Animated Ink Text
Do you want to give a unique sense of style to your added text in the video? This particular effect can add animation to your text to produce engaging and distinctive visuals for your text. To make animated ink text illustrations efficiently, you can check the following steps:
Step1 Once you have uploaded the project on After Effects, you can begin with the process. First, open the composition settings and modify the width, height, frame rate, resolution, and background color according to your choice.
Step2 Make sure to select a suitable text font and color to craft a vibrant output. Afterward, head to the “Effect” tab and select tap on “Transition.” From there, select “Linear Wipe.” Now adjust the settings of the “Linear Wipe” effect from the left panel.

Step3 Now add an adjustment layer to your timeline and select “Distort” from the “Effect” tab. From the “Distort” drop-down menu, choose “Turbulent Displace.” After making its settings, such as adjusting the evolution time, head back to the “Effects” tab and select “Blur and Sharpen.” From there, click on “Fast Box Blur.”
Step4 Manage the threshold value properly and then add a new effect called “Stylize.” From its drop-down menu, click on “Roughen Edges.” Afterward, you can add some elements, such as ink droplets, to create a more vibrant look. To ensure a flawless illustration, make sure to match the color of ink droplets with your text color.
Step5 If you want to give a highlight effect to your animated text, you can add 2nd adjustment layer. Afterward, you can select a bold color for your text, such as black, and add a “Perspective” effect. You can adjust the light color and intensity to create compelling results.
Moreover, you can also add blur and matte effects for more modifications. You can use the blending mode to adjust all the colors. Also, you can apply noise and grain effects to eliminate all the harsh edges from the text.

2. Add Blur Effect
There are various blur effects, such as Gaussian blur, motion blur, radial blur, etc. You can add any of the blur effects in your video clip to craft a smoother look. In After Effects, you can find a variety of blur effects that can help you change your video’s perspective. To use an adjustment layer for adding the blur effect, here are the accurate steps:
Step1 Once you have imported the video clip to the timeline of After Effects, add an adjustment layer. Afterward, go to the “Effects” tab and locate any of your preferred effects, such as Gaussian blur. After locating this effect, apply it to the adjustment layer.

Step2 After applying the effect to the adjustment layer, you can change its settings from the left side. From the left panel, you can change the blurriness value and blur dimensions according to your choice.
3. Color Correction
Color correction effects can add and manage the colors in your videos effortlessly. You can change the basic corrections of your video by adjusting the brightness, contrast, hue, exposure, highlight, and other elements. Here are the simple steps to use the adjustment layer for color correction:
Step1 After uploading the video on After Effects, go to the “Layer” tab and add an adjustment layer from there. Once done, you can search for the color correction effect on this tool.
Step2 Once you have found the suitable color correction effect, apply it to the adjustment layer. You can always change the settings of the applied effect from the left panel.

Conclusion
Many beginners are unaware of the term called adjustment layer in video editing. By reading this article, you can find out brief and authentic details about the adjustment layer. Moreover, we have also addressed how to add an adjustment layer in After Effects in simple and easy steps. You can also check about the common effects that people use in Adobe After Effects, using adjustment layers to enhance their videos.
Part 3: Popular Effects You Can Try With Adjustment Layers in After Effects
In this section, you can find out different effects that you can try with the adjustment layer in After Effects. By applying these effects with an adjustment layer, you can transform your video drastically.
1. Animated Ink Text
Do you want to give a unique sense of style to your added text in the video? This particular effect can add animation to your text to produce engaging and distinctive visuals for your text. To make animated ink text illustrations efficiently, you can check the following steps:
Step1 Once you have uploaded the project on After Effects, you can begin with the process. First, open the composition settings and modify the width, height, frame rate, resolution, and background color according to your choice.
Step2 Make sure to select a suitable text font and color to craft a vibrant output. Afterward, head to the “Effect” tab and select tap on “Transition.” From there, select “Linear Wipe.” Now adjust the settings of the “Linear Wipe” effect from the left panel.
Step3 Now add an adjustment layer to your timeline and select “Distort” from the “Effect” tab. From the “Distort” drop-down menu, choose “Turbulent Displace.” After making its settings, such as adjusting the evolution time, head back to the “Effects” tab and select “Blur and Sharpen.” From there, click on “Fast Box Blur.”
Step4 Manage the threshold value properly and then add a new effect called “Stylize.” From its drop-down menu, click on “Roughen Edges.” Afterward, you can add some elements, such as ink droplets, to create a more vibrant look. To ensure a flawless illustration, make sure to match the color of ink droplets with your text color.
Step5 If you want to give a highlight effect to your animated text, you can add 2nd adjustment layer. Afterward, you can select a bold color for your text, such as black, and add a “Perspective” effect. You can adjust the light color and intensity to create compelling results.
Moreover, you can also add blur and matte effects for more modifications. You can use the blending mode to adjust all the colors. Also, you can apply noise and grain effects to eliminate all the harsh edges from the text.
2. Add Blur Effect
There are various blur effects, such as Gaussian blur, motion blur, radial blur, etc. You can add any of the blur effects in your video clip to craft a smoother look. In After Effects, you can find a variety of blur effects that can help you change your video’s perspective. To use an adjustment layer for adding the blur effect, here are the accurate steps:
Step1 Once you have imported the video clip to the timeline of After Effects, add an adjustment layer. Afterward, go to the “Effects” tab and locate any of your preferred effects, such as Gaussian blur. After locating this effect, apply it to the adjustment layer.
Step2 After applying the effect to the adjustment layer, you can change its settings from the left side. From the left panel, you can change the blurriness value and blur dimensions according to your choice.
3. Color Correction
Color correction effects can add and manage the colors in your videos effortlessly. You can change the basic corrections of your video by adjusting the brightness, contrast, hue, exposure, highlight, and other elements. Here are the simple steps to use the adjustment layer for color correction:
Step1 After uploading the video on After Effects, go to the “Layer” tab and add an adjustment layer from there. Once done, you can search for the color correction effect on this tool.
Step2 Once you have found the suitable color correction effect, apply it to the adjustment layer. You can always change the settings of the applied effect from the left panel.
Conclusion
Many beginners are unaware of the term called adjustment layer in video editing. By reading this article, you can find out brief and authentic details about the adjustment layer. Moreover, we have also addressed how to add an adjustment layer in After Effects in simple and easy steps. You can also check about the common effects that people use in Adobe After Effects, using adjustment layers to enhance their videos.
Also read:
- New 2024 Approved Top 7 MP4 Video Editors on Mac Edit MP4 Videos Easily
- New In 2024, As a Designer, Color Is the Most Powerful and the Most Diverse Tool at Your Disposal. Here Are Ten Matching Color Combinations to Get You Started on Your Next Project
- New Best 31 Video Trimmers for Computer, Phone and Online
- Updated Things You Need to Know About Color Grading in Photography
- Updated Do You Want to Download Slow-Motion Apps that Can Edit Video Professionally? This Article Will Discuss some Slomo Makers for Both iOS and Android
- 2024 Approved Do You Want to Crop a TikTok Video? In This Article, We Will Provide You with Detailed Steps Through Which You Can Discover How to Crop TikTok Videos Easily
- In 2024, Do You Wish to Create High-Quality Videos and Experience Effective Videos with Editing? No Problem at All because the Keyboard Shortcuts Listed Here Will Assist You
- New Are You Looking for a Video Format Converter Free? We Will Introduce the 5 Best Online Converters and Also the 5 Best Video Format Converters for PC
- Updated How to Rotate Videos With Media Player Classic for 2024
- New 7 Best MP4 Editors for Mac Edit MP4 in Mac
- New Convert Time-Lapse to Normal Video for 2024
- New Ultimate Guide on Making A Slideshow Video for 2024
- 2024 Approved Create Slide Masking Effect Intro【Filmora】
- In 2024, In This Article, We Are Going to Learn the Simplest Procedure on How to Cut And/Or Trim Videos Using VLC Media Player. Each Step Is Carefully Explained, with Screenshots Attached
- New How to Remove Motion Blur In Photoshop for 2024
- Updated Replacing Sky in Your Pictures Using Online and Offline Tools for 2024
- 2024 Approved The Ultimate Guide to GIF for Discord Profile
- New In 2024, How to Share YouTube Video on Zoom?
- New Looking for a Free Video Editor to Edit Videos on Mac? IMovie by Apple Is a Great Choice? But Is It the Best Video Editor or Is There a Better Alternative Available? Check Out Our iMovie Review
- Updated Top 10 Old Film Overlays to Make Your Videos Look Vintage for 2024
- Updated In 2024, How to Make Sony Vegas Freeze Frame
- Updated 2024 Approved Detailed Tutorial to Merge Videos in VLC Media Player
- In 2024, Recommended Video Background Online Changers
- Updated How To Create a Polaroid Collage?
- The Updated Method to Bypass Xiaomi Redmi Note 13 Pro 5G FRP
- In 2024, Full Guide to Unlock Apple iPhone 14 Pro with iTunes
- How To Reset the Security Questions of Your Apple ID From Your iPhone 12 mini
- In 2024, Tutorial to Change Motorola Moto G23 IMEI without Root A Comprehensive Guide
- In 2024, Solutions to Spy on Xiaomi Redmi Note 12T Pro with and without jailbreak | Dr.fone
- 2 Ways to Transfer Text Messages from Oppo Reno 10 Pro+ 5G to iPhone 15/14/13/12/11/X/8/ | Dr.fone
- In 2024, A Complete Guide To OEM Unlocking on Nokia G22
- New 2024 Approved How to Cartoonize Photo Photoshop in Simple Steps
- In 2024, 3 Effective Methods to Fake GPS location on Android For your Vivo V30 Lite 5G | Dr.fone
- In 2024, Is Your Apple iPhone 13 mini in Security Lockout? Proper Ways To Unlock | Dr.fone
- In 2024, Top 5 Vivo Y77t Bypass FRP Tools for PC That Actually Work
- Most Asked Questions about Pokemon Go Battle League Rewards On Apple iPhone 13 Pro Max | Dr.fone
- In 2024, 6 Ways To Transfer Contacts From Honor Play 8T to iPhone | Dr.fone
- How to Cast Xiaomi Redmi Note 12 Pro 5G to Computer for iPhone and Android? | Dr.fone
- In 2024, 9 Best Phone Monitoring Apps for Vivo S18 Pro | Dr.fone
- Solutions to Spy on Oppo A56s 5G with and without jailbreak | Dr.fone
- In 2024, How to Bypass Android Lock Screen Using Emergency Call On Vivo Y100A?
- How to Fix Android App Not Installed Error on Huawei Nova Y91 Quickly? | Dr.fone
- How To Bypass Meizu 21 FRP In 3 Different Ways
- In 2024, 9 Best Free Android Monitoring Apps to Monitor Phone Remotely For your Realme GT Neo 5 | Dr.fone
- How to Rescue Lost Music from Honor Magic5 Ultimate
- Complete guide for recovering pictures files on Vivo S17t.
- A Comprehensive Guide to iPhone 13 Pro Blacklist Removal Tips and Tools | Dr.fone
- How to Unlock SIM Card on Nokia C300 online without jailbreak
- Title: New In 2024, Add Green Screen Video on TikTok
- Author: Chloe
- Created at : 2024-04-24 07:08:29
- Updated at : 2024-04-25 07:08:29
- Link: https://ai-editing-video.techidaily.com/new-in-2024-add-green-screen-video-on-tiktok/
- License: This work is licensed under CC BY-NC-SA 4.0.
