
:max_bytes(150000):strip_icc():format(webp)/ipad-pro-pencil-56a533763df78cf77286e0e0.png)
New In 2024, Add Text Animation to A Video Online
Add Text Animation to A Video Online
Do you want to make a creative video? Do you want your presentation or video to be easy to follow and entertaining? You can take the video to another level with the help of text animation. This article will discuss how to add text animation to online videos. You can use a good video editor from where you can select fresh styles and make the best video from there. One of the simplest ways to elevate your movie from good to excellent is with understandable text animation.
Text animation and short captions can broaden the audience for your content as more consumers view videos without sound these days. It matters what fonts you use in the videos, and they establish the mood and facilitate interaction with most viewers who rely on video captions. Add text, alter the font, add transitions, and use text effects to draw the user’s attention as they scroll. Please continue reading to discover how simple it is to make interactive video titles, words, and supers.
1. Use Kapwing animation text editor
(https://www.kapwing.com/animated-text-video-maker )
You can use the potent online editor Kapwing to add animated text to videos online, utilizing music, videos, GIFs, and images. There are no downloads required because everything is already present inside the browser. Kapwing is a capable tool for content production that is simple enough for everyone to use. The majority of video formats, GIF and image, including avi, png, jpg, gif, MOV, mp4, and more, are supported by Kapwing.
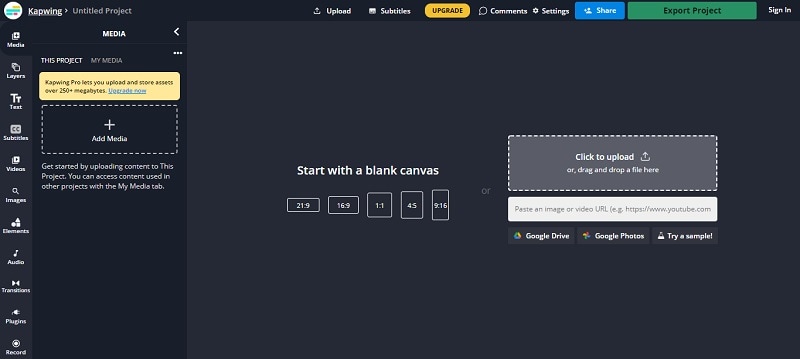
Step1 Upload the Video to Kapwing
You can open Kapwing with the device and tap on “Start Editing” to open up Kapwimg studio. After that, one can use the drag and drop option to upload the video in the studio. You can click on upload or use the link to upload.
If you have a more than 250 MB video, then you will require the Pro version.
Step2 Add the Text
When the video gets uploaded, now you can add your text. You must click the “Text” option on the left and type the text. After that, you can pick your favorite color, background, and color to add style.
You will always want that your text to get animated, but it doesn’t mean that you will have to use explosive fonts or funky or bright, which are very funky. The animation will make your text look attractive, and you can experiment with the colors and fonts to find the best combination.
Step3 Animate the Text
Now the fun part starts; choose the text box present on the right side and click on the “Animate” tab. It will allow the user to select animations like fade, flicker, hue rotates, and many more. Choose the speed according to your requirement, and if you want to change the background and color, you can do it too.
Use “Apply To” for applying this animation in the outro, intro, or both. It will help you to make the text fade out, fade in, or transition out and in with animation. Now the animation library has nine options:
- Drop: It appears on top of the text box
- Flicker: This one is like a candle’s flicker, and text flashes disappear and appear before staying.
- Fade: Opacity can be changed from 0% to 100%.
- Pop:- This grows the text more extensive than the text box and shrinks back to the place.
- Reveal:- Rolls from the left side to the right side
- Wipe:- Rolls from the left side to the right side with a colored background.
- Vibrate: The text box shakes in every direction.
- Hue rotates:- Colour of text cycles through the hue values..
You can use a timeline to adjust the animation’s termination when you set text animation. You can even drag that layer after the start time or use it on end/start time sliders to decrease or increase the time of your video. Text animation can get started when the cursor reaches the start time.
Step4 Export
The video with animated text is now ready to boom. You can click on “Export Video” present at the top and wait for the process. After that, you can download that video and use the links to share it on your social media platform.
2. Use veed.io text video editor
(https://www.veed.io/create/text-video-maker )
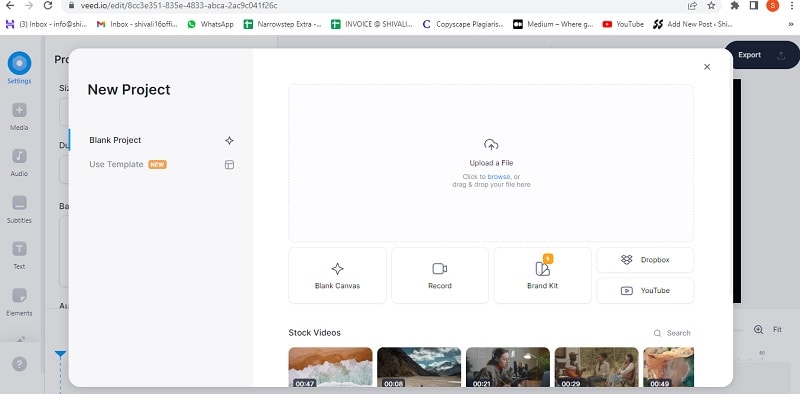
Veed is one of the best video editor text effects online, which allows you to add text to online videos. You can easily add style, color, text, and font in a few clicks. You can upload the video and tap the text to get started. Add title and text or select handwriting font. One can select it from templates. Change transparency, alignment, and font size of the text.
This online software is perfect for creating attractive videos on social media. This is free, which omits the usage of expensive software. It is much easier to avoid many complex video editor apps. With the help of VEED, you can create an excellent video without any experience and do it with a few clicks. Let’s see how to add animated text to photos online.
Step1 Upload the video
Tap on “Choose Video” and choose the file you want to upload on VEED. One can even use the drag and drop option from the folder to the editor.
Step2 Add text
After that, you can add the text by tapping on the “Text” option on the left menu. You can select the text style and start typing.
Step3 Export
Save the video with the text you placed by tapping on “Export.” The video gets saved in an MP4 file.
3. Use Animaker text maker
(https://www.animaker.com/text-animation-maker )
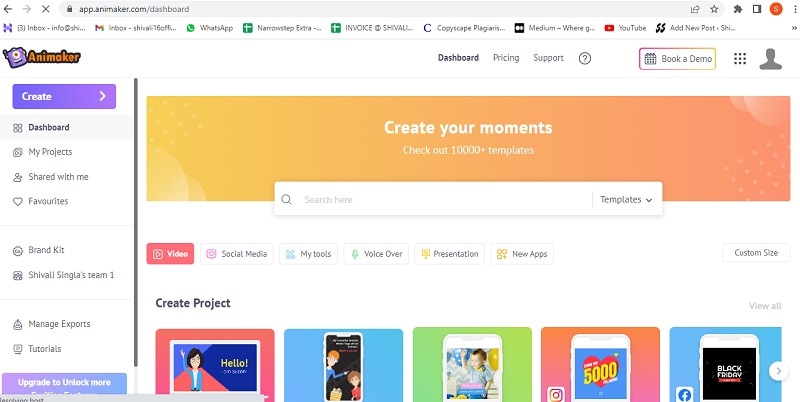
The Animaker is one of the best-animated video makers. This app offers the best collection of charts, BGs, and animated characters. With the help of Animaker, you can make the text disappear or appear off-screen in the best way. After you finish your video, you can download the format in MP4.
Step1 Upload the video clip
First, you can upload your video clip present on top that you wish to add text animation.
- Tap on the “Upload section” on the bottom left. You can upload your video where you wish to add the animated text.
- The video will get uploaded to “My Files.”
- Click on the uploaded video in the library to load it on the workspace.
Step2 Add text to the video
- You can add text in their text section
- In the next section, one can find two different text types. At the top, you will discover plain text options, and at the bottom, you can find pre-designed boxes seasoned at Animaker.
Let’s see how you can use pre-built text boxes.
- Tap on pre-built designs for your text animation. One can see the text appearing in the center of the workspace, and you can click it and type new text if you want to customize it.
- You can notice widespread options appearing with your text. It is known as the item menu. It will allow the user to modify their text. One can change font size, color, style, etc. Your text will come with pre-defined effects, which will help you to animate text instantly.
- You must have noticed that the purple color bar appears on the timeline, representing the duration of the text visible in the video. For example, if you want that text to get visible between 4rth to 8th seconds, then you will have to drag the edges of that purple bar to the same duration.
To see the scene, you must click on the play button on top of the timeline.
Let’s check the other ways of adding animated text to the video. In the previous one, you have seen how you can add text animation using pre-built boxes. Now you will get to know about doing it by using blank boxes.
- Start tapping the “text section”. Select the bank textbox.
- Click on them and then opt to add new text.
- Opt for clicking the cog icon that is there in the item menu.
- You will notice the settings tab that is on the screen’s right side.
- You can easily opt for the customization of the text in the way you wish. You can start by modifying the style of the font. One can change the size and color of the font as well.
- Use these options and opt for the application of enter and/or exit effects to text. Now, opt to click on the effect option to get more than 50 options. You can select the effect from there.
- Once the animation effect is applied to your timeline, you can notice the pink part in the bar i.e. purple. This completes creating text animation by using Animaker.
Step3 Download the Video
- You can visit the publish option in the right window to download the video.
- Tap on the “download video” option for downloading.
Conclusion
Now, you are aware of how to add text animation to video online and the three best video editors that will help you add animated text to your videos. At this point, you can choose the best one according to your needs and usage. These steps will help you create a unique and good video that will be easy to understand and entertaining.
Free Download For Win 7 or later(64-bit)
Free Download For macOS 10.14 or later
Free Download For macOS 10.14 or later
Looking for a Way to Learn How to Merge Videos in HandBrake? There’s a Better Solution Waiting for You Inside
So you have captured some mind-blowing clips and want to join them together to make an excellent movie? But, sadly, you are still stuck because you are not sure what video editors would be suitable to complete this task fast.
If such miseries are haunting you, take a deep breath because many like you are searching for the right video merging tools. However, some people recommend using HandBrake for merging clips. So let’s dig some ground to know if the software can really combine clips. And if there’s a “Yes”? Then how to merge videos in HandBrake?
In this article
02 Using HandBrake to Merge Videos – Possible or Not?
03 Combining Videos with Filmora Wondershare
Part 1: What is HandBrake?
Before you gear up for HandBrake to merge videos, it would be wise to know a few essential details about this software.
HandBrake is a free tool for Windows, Linux, and MAC operating systems. The basic purpose of this software is to convert videos from any format in MKV, WebM, and MP4. It is an open-source program that allows users to convert their videos to play them on multiple devices, such as TV media players, computers, tablets, mobile phones, etc.
Moreover, this platform gives you the power to turn your low-quality videos into high-quality screen time. That is why most professional videographers use this tool to polish videos captured with old cameras.
A few more interesting features of HandBrake are:
- Combing artifacts removal due to interlacing
- Convert videos without negatively affecting the audio quality
- Volume and range adjustment
- Addition, removal, and preservation of soft subtitles
However, one vital thing to understand is that although HandBrake takes a tiny little space of your hard drive, the interface is complicated for beginners.

Part 2: Using HandBrake to Merge Videos – Possible or Not?
There is a great misconception about HandBrake among the newbies that HandBrake is primarily a video merger software. But, in reality, that is not true at all. Or, at least, the latest HandBrake version 1.5.1 lacks such features.
Even the official website states that HandBrake cannot combine two or more clips to make them whole.
So feel yourself lucky to read this article if you haven’t downloaded HandBrake yet. Congratulations! You are saved from another heartbreak.
But wait! If the software is not meant to merge clips, it doesn’t mean that you can’t use it to prepare your videos for the real deal. HandBrake can still be a helpful tool, permitting you to convert videos in a similar format before you start merging them on any other video editor.
For example, suppose you have two video clips in different formats. In that case, you can use HandBrake to convert all of them in a similar format so that they can be easily be merged when imported on any video merger tool.
But, again, the question is, if not HandBrake, then what?
Frankly, you will find hundreds of video editing tools with a combining clips feature, but not all of them deserve your attention and time. While software like DaVinci Resolve includes characteristics to merge two or more clips in a single shot, beginners and mid-level users may still find them a bit difficult at the start.
That is why professionals and experts prefer Filmora by Wondershare to merge videos without banging their heads on the screen.
So, how to merge videos in Filmora with simple clicks? Focus on the next part of the article to learn the step-by-step method within a few minutes.
Part 3: Combining Videos with Filmora Wondershare
Filmora Video Editor is a remarkable video editing tool for all types of users. The software works on all major operating systems (MAC and Windows) and includes a gigantic library of effects, presets, overlays, and so much more than you can imagine.
You can download Filmora for free if watermarks don’t annoy you. On the other hand, you can purchase a suitable plan to get rid of watermarks, so your videos look 100% professional.
For Win 7 or later (64-bit)
For macOS 10.14 or later
Now, without any more delay, let’s start learning how to combine videos in Filmora through the following steps.
Step 1: Install Filmora on Your Computer
Just visit Filmora’s website to download the latest version of the software for your Windows or MAC.

After downloading the software on your computer, install it. Once the software is ready, double-click the “Wondershare Filmora” icon (it should be on your desktop screen) to open the program.
As you can see, the interface is simple with user-friendly options.

Step 2: Import Multiple Videos in Filmora
Click on the blue icon with a “+” sign to import videos.

Or, click on the “File” button on the top menu to import files and drag and drop both clips to the same timeline.
As you can see, there are two clips on the timeline. The first clip is called “Cherry Blossom,” and the second clip’s name is “Plating Food.”

Step 3: Keep Video Clips on the Same Timeline
There shouldn’t be any gap or spaces between the two clips.

It is because gaps will create a dark blank space between the clips when you export the clips, like this:

Therefore, slide the second video right next to the first video without leaving any gaps with your mouse.

And guess what? You have already merged the two clips.
Step 4: Save Video on Your PC
Now, hit the “Export” button and save the merged video on your computer.

HandBrake is an outstanding tool for video conversion, but there’s no benefit of learning how to merge videos in HandBrake, as the software does not include such features. Nevertheless, when it is about combining multiple videos in high quality, you can rely on Filmora to merge clips in no time.
FAQs
Q1. Can you increase the video quality in HandBrake?
Yes. You can use HandBrake to convert videos and adjust the video quality settings as per your requirements before starting the conversion process.
Q2. Can you crop and resize the video in HandBrake?
HandBrake makes it easy to crop and resize all types of videos without disturbing the audio quality.
Q3. Can you use HandBrake clips on other video editors for video mergers?
After converting videos in HandBrake, you can use the clips in video editors, like Filmora, to merge clips.
02 Using HandBrake to Merge Videos – Possible or Not?
03 Combining Videos with Filmora Wondershare
Part 1: What is HandBrake?
Before you gear up for HandBrake to merge videos, it would be wise to know a few essential details about this software.
HandBrake is a free tool for Windows, Linux, and MAC operating systems. The basic purpose of this software is to convert videos from any format in MKV, WebM, and MP4. It is an open-source program that allows users to convert their videos to play them on multiple devices, such as TV media players, computers, tablets, mobile phones, etc.
Moreover, this platform gives you the power to turn your low-quality videos into high-quality screen time. That is why most professional videographers use this tool to polish videos captured with old cameras.
A few more interesting features of HandBrake are:
- Combing artifacts removal due to interlacing
- Convert videos without negatively affecting the audio quality
- Volume and range adjustment
- Addition, removal, and preservation of soft subtitles
However, one vital thing to understand is that although HandBrake takes a tiny little space of your hard drive, the interface is complicated for beginners.
Part 2: Using HandBrake to Merge Videos – Possible or Not?
There is a great misconception about HandBrake among the newbies that HandBrake is primarily a video merger software. But, in reality, that is not true at all. Or, at least, the latest HandBrake version 1.5.1 lacks such features.
Even the official website states that HandBrake cannot combine two or more clips to make them whole.
So feel yourself lucky to read this article if you haven’t downloaded HandBrake yet. Congratulations! You are saved from another heartbreak.
But wait! If the software is not meant to merge clips, it doesn’t mean that you can’t use it to prepare your videos for the real deal. HandBrake can still be a helpful tool, permitting you to convert videos in a similar format before you start merging them on any other video editor.
For example, suppose you have two video clips in different formats. In that case, you can use HandBrake to convert all of them in a similar format so that they can be easily be merged when imported on any video merger tool.
But, again, the question is, if not HandBrake, then what?
Frankly, you will find hundreds of video editing tools with a combining clips feature, but not all of them deserve your attention and time. While software like DaVinci Resolve includes characteristics to merge two or more clips in a single shot, beginners and mid-level users may still find them a bit difficult at the start.
That is why professionals and experts prefer Filmora by Wondershare to merge videos without banging their heads on the screen.
So, how to merge videos in Filmora with simple clicks? Focus on the next part of the article to learn the step-by-step method within a few minutes.
Part 3: Combining Videos with Filmora Wondershare
Filmora Video Editor is a remarkable video editing tool for all types of users. The software works on all major operating systems (MAC and Windows) and includes a gigantic library of effects, presets, overlays, and so much more than you can imagine.
You can download Filmora for free if watermarks don’t annoy you. On the other hand, you can purchase a suitable plan to get rid of watermarks, so your videos look 100% professional.
For Win 7 or later (64-bit)
For macOS 10.14 or later
Now, without any more delay, let’s start learning how to combine videos in Filmora through the following steps.
Step 1: Install Filmora on Your Computer
Just visit Filmora’s website to download the latest version of the software for your Windows or MAC.
After downloading the software on your computer, install it. Once the software is ready, double-click the “Wondershare Filmora” icon (it should be on your desktop screen) to open the program.
As you can see, the interface is simple with user-friendly options.
Step 2: Import Multiple Videos in Filmora
Click on the blue icon with a “+” sign to import videos.
Or, click on the “File” button on the top menu to import files and drag and drop both clips to the same timeline.
As you can see, there are two clips on the timeline. The first clip is called “Cherry Blossom,” and the second clip’s name is “Plating Food.”
Step 3: Keep Video Clips on the Same Timeline
There shouldn’t be any gap or spaces between the two clips.
It is because gaps will create a dark blank space between the clips when you export the clips, like this:
Therefore, slide the second video right next to the first video without leaving any gaps with your mouse.
And guess what? You have already merged the two clips.
Step 4: Save Video on Your PC
Now, hit the “Export” button and save the merged video on your computer.
HandBrake is an outstanding tool for video conversion, but there’s no benefit of learning how to merge videos in HandBrake, as the software does not include such features. Nevertheless, when it is about combining multiple videos in high quality, you can rely on Filmora to merge clips in no time.
FAQs
Q1. Can you increase the video quality in HandBrake?
Yes. You can use HandBrake to convert videos and adjust the video quality settings as per your requirements before starting the conversion process.
Q2. Can you crop and resize the video in HandBrake?
HandBrake makes it easy to crop and resize all types of videos without disturbing the audio quality.
Q3. Can you use HandBrake clips on other video editors for video mergers?
After converting videos in HandBrake, you can use the clips in video editors, like Filmora, to merge clips.
Why Your Transparent GIF Is Hard to Remove
Why Your Transparent GIF Is Hard to Remove and How to Do With It
An easy yet powerful editor
Numerous effects to choose from
Detailed tutorials provided by the official channel
GIFs are very popular type of content these days, on social media. It seems to be very engaging for the audience. The GIF image format was first developed by CompuServe in 1987. Since that time, they have been used for entertainment purposes and their application is increasing with each passing day. But when it comes to transparent GIFs, it gets annoying sometimes. It looks ugly with weird white edges.
Sometimes it becomes hard to remove such GIFs with transparent backgrounds. Do you ever think about why it happens? This blog is dedicated to explaining the possible reasons for this. Also, we are going to explain how one can achieve to remove such a transparent background from the GIF.
In this article
01 [Why Sometimes Transparent Gif is Hard to Remove](#Part 1)
02 [How to Remove the Background from an Animated Gif in Photoshop](#Part 2)
03 [8 Best Online Transparent Gif Maker Websites](#Part 3)
Part 1 Why Sometimes Transparent Gif is Hard to Remove
When the GIF looks ugly with a transparent background, it becomes necessary to remove the background. But it sometimes becomes hard as this requires proper skills as well as adequate tools to achieve this. In the absence of even one, the final output may come out to be clumsy. There are many tools that can be used to remove the background from a transparent animated GIF. But it is hard to use these tools without proper knowledge. If you learn the skills, the task becomes so easy.
Part 2 How to Remove the Background from an Animated Gif in Photoshop
Photoshop is popularly known for being a photo manipulation and editing software. But it can also be used to remove the background of an animated GIF. Here, we will discuss the step-by-step approach to removing an animated GIF background.
Step 1: Import The GIF File
This can be done in 2 ways. One is clicking and dragging the file from the file location on the computer, into Photoshop. The second way is to click on the “File” menu of Photoshop. Then tap on “Open” and double click on the desired GIF file.

Step 2: Set Up The Project
It is required to edit each frame separately for deleting the background of an animated GIF (gif remove bg). For this:
Find the “Video Group” option on the right side of Photoshop. Right-click on it and tap on the “Ungroup layers” option.

This will give you the video layer, which you want to edit. Right-click on “layer 1” and tap on the “Convert to smart object” option. Again right-click on “Layer 1” and click on “Edit Contents”.

You will get a new Photoshop tap for the editing of GIF files. Just freely close the original tab.
Step 3: Begin The Editing Part
Find the blue line called the Timeline at the bottom of the screen. This Timeline will help you to edit the GIF. To make your editing easy, you can zoom on the frames with the help of a slider located at the bottom of the screen.
For a better outcome, the frame-by-frame deletion of the GIF background is advisable. It might be a little time-consuming but it is the most appropriate and accurate approach. So, delete the background from each frame independently.
To move from one frame of the GIF to another, hold and move the blue arrow having a red line.
\

Step 4: Delete The Transparent GIF Background
Now, delete the background of each frame of your GIF. To delete the background of any particular frame, click on that frame. For this, you can either use a “Quick Selection Tool” or a “Polygonal Lasso Tool”. You will get the final result that will be background free.

Step 5: Save The Project In GIF Format
To save the GIF project, click on the “File” menu and then tap on the “Save As” option. Give a file name and select “GIF” on the “Save As Type” options menu. Then click on “OK” to save the GIF file.

Part 3 Best Online Transparent Gif Maker Websites
When it comes to how to make a gif transparent through online sources, there are many options available. Here, we are going to discuss the best options out of them.
01 Online Transparent Gif Maker for Windows
Let’s learn about the best performing online transparent Gif creator websites compatible with Windows.
● EzGif
EzGif is among the best transparent GIF-making websites available online. Using the website, one can create a high-resolution GIF with a transparent background. To achieve this, the website will ask to upload a number of images of transparent backgrounds. The images can be uploaded in PNG, JPEG, GIF, or any other format. Then, next is to combine all the images to form a GIF. The website allows users to upload a maximum of 2000 images. Each image size should not exceed 6MB and the total size of all images should not exceed 100 MB.

● Lunapic
Lunapic is also one of the best and easy-to-use websites for making a confetti GIF transparent, available for free. There is no limitation to the number of images or image size. Also, the website does not have limitations for the total file size, one can upload. It also allows the user to upload an image already having a transparent background and create a GIF out of it.

● GIF Make
GIF make is also a useful free website for making high-quality transparent GIFs. It is easy to use this website for transparent GIF creations. You only need to upload transparent PNG images for this. It allows you to add as many as 80 images to create a GIF file. But there is one limitation to the website that it does not contain the option of uploading images without a transparent background and removing the background. So, the user only needs to upload an image with a transparent background to create a GIF.

● Animizer.net
Animizer.net is also a good option when it comes to creating transparent GIFs from images, for free. For this, you can upload multiple PNG images in this online tool. Then, the tool will help you create a GIF by joining them all together. It allows you to upload an unlimited number of images. The online website also enables the creation of transparent background GIFs by uploading images with colored backgrounds. It allows you to remove the background of images and make them transparent.

02 Online Transparent Gif Maker for Mac
● EzGif
We have already discussed EzGif as the best online transparent GIF maker website for Windows. But, we want to ensure that this also works best in the MAC version. It helps to convert either a video or photos into a GIF file. Moreover, the website supports all the standard image formats such as HEIC, TIFF, PNG, JPEG, BMP, etc.

● Picasion
Picasion is one of the best websites for Mac users to create transparent GIFs and memes. The website is easy to use by uploading the images from the desktop location. But it has certain limitations. It only allows you to add a maximum of 3 images to convert them into GIF files. Moreover, it also lacks the capabilities of adding texts and resizing the GIFs.

● Gifpal
Gifpal also allows the MAC user to convert images into transparent GIFs with the least effort. The loading time of the website is very fast. It also allows the user to upload the images directly from a phone camera or webcam. The user can also rearrange and remove the watermarks of the images after uploading them. It also enables the user to preview the GIF before downloading.

● Make A GIF
Last but not the least, Make a GIF is also a great website for MAC users to create transparent GIFs. People can use this website for free. It enables the user to generate GIFs out of multiple images or videos. Customization options like adding text, resizing, rearranging, etc are also available with it. But, there is a limitation with Make a GIF that it does not allow the user to preview the GIF before download.

These are some of the widely used websites for Windows and MACs applicable for making transparent GIFs. But now we are introducing the best option out of all and i.e. Wondershare Filmora.
Both Windows and MAC users can use Wondershare Filmora effectively for creating snow transparent GIFs. Though it can be used easily, it creates a GIF of high quality and resolution. This tool is highly recommended for such purposes because of its simple and most interactive interface. The user can make a GIF by combining any number of images and also from small videos. Easy customization of GIFs such as adding texts, elements, overlays, etc, is also available for the user
Moreover, one can also use Wondershare Filmora Video Editor meme maker to create a GIF online. You can directly make the GIF here, without any watermark. No sign up required for this and one can use it for free. A lot more editing options for GIFs are also accessible by the user easily.
For Win 7 or later (64-bit)
For macOS 10.12 or later
● Ending Thoughts →
● So, we can conclude that though it is hard to remove the transparent GIF, it can be done with proper knowledge and skills. There are many online free and paid tools available for this. Choose according to your suitability.
● When it comes to making a GIF on Windows and MAC platforms, we have discussed the best online websites according to their effectiveness.
● Wondershare Filmora is the most suitable option out of all, as it can be used in both Windows and MAC platforms. Moreover, people can use this wonderful tool for both creating a transparent animated GIF and removing the transparent background of the GIF. So, we can say it is an all-in-one solution.
GIFs are very popular type of content these days, on social media. It seems to be very engaging for the audience. The GIF image format was first developed by CompuServe in 1987. Since that time, they have been used for entertainment purposes and their application is increasing with each passing day. But when it comes to transparent GIFs, it gets annoying sometimes. It looks ugly with weird white edges.
Sometimes it becomes hard to remove such GIFs with transparent backgrounds. Do you ever think about why it happens? This blog is dedicated to explaining the possible reasons for this. Also, we are going to explain how one can achieve to remove such a transparent background from the GIF.
In this article
01 [Why Sometimes Transparent Gif is Hard to Remove](#Part 1)
02 [How to Remove the Background from an Animated Gif in Photoshop](#Part 2)
03 [8 Best Online Transparent Gif Maker Websites](#Part 3)
Part 1 Why Sometimes Transparent Gif is Hard to Remove
When the GIF looks ugly with a transparent background, it becomes necessary to remove the background. But it sometimes becomes hard as this requires proper skills as well as adequate tools to achieve this. In the absence of even one, the final output may come out to be clumsy. There are many tools that can be used to remove the background from a transparent animated GIF. But it is hard to use these tools without proper knowledge. If you learn the skills, the task becomes so easy.
Part 2 How to Remove the Background from an Animated Gif in Photoshop
Photoshop is popularly known for being a photo manipulation and editing software. But it can also be used to remove the background of an animated GIF. Here, we will discuss the step-by-step approach to removing an animated GIF background.
Step 1: Import The GIF File
This can be done in 2 ways. One is clicking and dragging the file from the file location on the computer, into Photoshop. The second way is to click on the “File” menu of Photoshop. Then tap on “Open” and double click on the desired GIF file.
Step 2: Set Up The Project
It is required to edit each frame separately for deleting the background of an animated GIF (gif remove bg). For this:
Find the “Video Group” option on the right side of Photoshop. Right-click on it and tap on the “Ungroup layers” option.
This will give you the video layer, which you want to edit. Right-click on “layer 1” and tap on the “Convert to smart object” option. Again right-click on “Layer 1” and click on “Edit Contents”.
You will get a new Photoshop tap for the editing of GIF files. Just freely close the original tab.
Step 3: Begin The Editing Part
Find the blue line called the Timeline at the bottom of the screen. This Timeline will help you to edit the GIF. To make your editing easy, you can zoom on the frames with the help of a slider located at the bottom of the screen.
For a better outcome, the frame-by-frame deletion of the GIF background is advisable. It might be a little time-consuming but it is the most appropriate and accurate approach. So, delete the background from each frame independently.
To move from one frame of the GIF to another, hold and move the blue arrow having a red line.
\
Step 4: Delete The Transparent GIF Background
Now, delete the background of each frame of your GIF. To delete the background of any particular frame, click on that frame. For this, you can either use a “Quick Selection Tool” or a “Polygonal Lasso Tool”. You will get the final result that will be background free.
Step 5: Save The Project In GIF Format
To save the GIF project, click on the “File” menu and then tap on the “Save As” option. Give a file name and select “GIF” on the “Save As Type” options menu. Then click on “OK” to save the GIF file.
Part 3 Best Online Transparent Gif Maker Websites
When it comes to how to make a gif transparent through online sources, there are many options available. Here, we are going to discuss the best options out of them.
01 Online Transparent Gif Maker for Windows
Let’s learn about the best performing online transparent Gif creator websites compatible with Windows.
● EzGif
EzGif is among the best transparent GIF-making websites available online. Using the website, one can create a high-resolution GIF with a transparent background. To achieve this, the website will ask to upload a number of images of transparent backgrounds. The images can be uploaded in PNG, JPEG, GIF, or any other format. Then, next is to combine all the images to form a GIF. The website allows users to upload a maximum of 2000 images. Each image size should not exceed 6MB and the total size of all images should not exceed 100 MB.
● Lunapic
Lunapic is also one of the best and easy-to-use websites for making a confetti GIF transparent, available for free. There is no limitation to the number of images or image size. Also, the website does not have limitations for the total file size, one can upload. It also allows the user to upload an image already having a transparent background and create a GIF out of it.
● GIF Make
GIF make is also a useful free website for making high-quality transparent GIFs. It is easy to use this website for transparent GIF creations. You only need to upload transparent PNG images for this. It allows you to add as many as 80 images to create a GIF file. But there is one limitation to the website that it does not contain the option of uploading images without a transparent background and removing the background. So, the user only needs to upload an image with a transparent background to create a GIF.
● Animizer.net
Animizer.net is also a good option when it comes to creating transparent GIFs from images, for free. For this, you can upload multiple PNG images in this online tool. Then, the tool will help you create a GIF by joining them all together. It allows you to upload an unlimited number of images. The online website also enables the creation of transparent background GIFs by uploading images with colored backgrounds. It allows you to remove the background of images and make them transparent.
02 Online Transparent Gif Maker for Mac
● EzGif
We have already discussed EzGif as the best online transparent GIF maker website for Windows. But, we want to ensure that this also works best in the MAC version. It helps to convert either a video or photos into a GIF file. Moreover, the website supports all the standard image formats such as HEIC, TIFF, PNG, JPEG, BMP, etc.
● Picasion
Picasion is one of the best websites for Mac users to create transparent GIFs and memes. The website is easy to use by uploading the images from the desktop location. But it has certain limitations. It only allows you to add a maximum of 3 images to convert them into GIF files. Moreover, it also lacks the capabilities of adding texts and resizing the GIFs.
● Gifpal
Gifpal also allows the MAC user to convert images into transparent GIFs with the least effort. The loading time of the website is very fast. It also allows the user to upload the images directly from a phone camera or webcam. The user can also rearrange and remove the watermarks of the images after uploading them. It also enables the user to preview the GIF before downloading.
● Make A GIF
Last but not the least, Make a GIF is also a great website for MAC users to create transparent GIFs. People can use this website for free. It enables the user to generate GIFs out of multiple images or videos. Customization options like adding text, resizing, rearranging, etc are also available with it. But, there is a limitation with Make a GIF that it does not allow the user to preview the GIF before download.
These are some of the widely used websites for Windows and MACs applicable for making transparent GIFs. But now we are introducing the best option out of all and i.e. Wondershare Filmora.
Both Windows and MAC users can use Wondershare Filmora effectively for creating snow transparent GIFs. Though it can be used easily, it creates a GIF of high quality and resolution. This tool is highly recommended for such purposes because of its simple and most interactive interface. The user can make a GIF by combining any number of images and also from small videos. Easy customization of GIFs such as adding texts, elements, overlays, etc, is also available for the user
Moreover, one can also use Wondershare Filmora Video Editor meme maker to create a GIF online. You can directly make the GIF here, without any watermark. No sign up required for this and one can use it for free. A lot more editing options for GIFs are also accessible by the user easily.
For Win 7 or later (64-bit)
For macOS 10.12 or later
● Ending Thoughts →
● So, we can conclude that though it is hard to remove the transparent GIF, it can be done with proper knowledge and skills. There are many online free and paid tools available for this. Choose according to your suitability.
● When it comes to making a GIF on Windows and MAC platforms, we have discussed the best online websites according to their effectiveness.
● Wondershare Filmora is the most suitable option out of all, as it can be used in both Windows and MAC platforms. Moreover, people can use this wonderful tool for both creating a transparent animated GIF and removing the transparent background of the GIF. So, we can say it is an all-in-one solution.
Denoise Video in Adobe Premiere Pro – Audio and Video Noise Removal
What’s the key to our success? And what’s the process that it takes us? How can we attract audiences and guarantee the viewers’ transition to loyalty? – these are the questions that people in the professions connected to the technology should ask. There is no recipe, but at least, we know what NOT to do – DO NOT create bad content! You will never have a desired amount of listeners for your podcasts if the voice of the actor or noise of the whole track is annoying, you will struggle to have success on Youtube if your shots are unpleasant to watch, and the list goes on – there are just too many things you should not do!
But sometimes bad quality just happens. It happens when you know you have a problem and it happens when you think everything is going well in producing. You might come back from the production and find out that every shot you took had bad lightning, or there was an almost naked guy running on the background, or there is a noise on the background that just makes the whole experience of watching and listening not worthwhile! This might be something that sinks your heart…
But the mistakes we make don’t ensure that there has been a verdict cast for our failure. Nowadays, the will is everything – if you are really willing to make something work, you will just have to find the right tools, and learn a little about them, and, Voila! – Maybe you can turn bad into something good? Unacceptable into something acceptable? Annoying into interesting, and unpleasant into enjoyable?
This is called EDITING. And Editing covers different, almost endless days – too many computer programs, too many tools, too many opportunities to modify almost anything you want to make look and sound better - All of this feels like magic!
Among many instruments and techniques, there is one thing called denoising, with two different meaning. You might find noise in two areas – video and audio. Audio denoising means to remove or reduce the background noise, such as air conditioner hum, someone screaming from far away, birds chirping, the waves, etc. the noise in photo and video terms means that the scene we are looking at is grainy and makes watching the scene a little more difficult, with a less clear picture. And whenever these kind of things appear, mostly out of the blue, – because no one wants to take a bad video or record a bad voice-over, - our magical tools and abilities come to play…
One of those is called Adobe Premiere Pro, using for video editing, viewed as the most sophisticated video editor software. So, in this article, we will learn how to handle bot noise-s – in video as well as audio terms, and how to create a better viewer/listener experience in this very program. Lastly, we’ll touch upon an alternative for background noise removal, so, there’s nothing left but tuning in!
Video denoising in Adobe Premiere Pro
Reducing the noise in the video in this software can be achieved through using effect which is called Median. Before discovering it, without any doubt, we need to add our footage into the Timeline in Premiere Pro. Then, we can proceed to finding the Effects Panel, where our wanted Median can be found – just drag and drop the effect to your clip.

In order to make sure that the Median touches the grainiest parts of the whole clip, we need to use something called masks. In the Effects Control panel, we can select the mask shape for our clip –either choose rectangle, circle, or pen tool. Pen tool is something with which we move the Mask around the screen and resize it to include the desired area and cover it.

Changing Feather setting to 100 will make sure that the effect loses a visible edge and there is some smoothness added to those edges.

There might be the need to repeat this process and create several masks, if that means to have covered all of the grainy area of the scene.
Lastly, tom reduce the noise, adjusting the effect settings is needed.

Technically, what the Median effect does is just blurring the graininess, not exactly “taking it away”. And if we play with the Radius settings there, we can find our desired look!
How to remove background noise in Adobe Premiere Pro
Removing background noise in Adobe Premiere Pro can be a pretty simple process and lead to much better results. First of all, of course, import the desired material into your software so you can see the video and audio in the sequence visually. After having the project set up, you will need to find the Efffects Panel, which might be hidden a little, but it must be on the left and bottom of the program layout; or, you can find it on the top, in the navbar.

After having located the Effects panel, go for the search bar and type: denoise, and you’ll see that DeNoise effect is under Audio Effects.

You hold onto the effect, drag and drop it on the audio track in the timeline itself! Then, you just click on the audio in the sequence and on the top right Effect Controls will appear, which we need to concentrate on. You will scroll down a little there and below Audio notice: fx DeNoise, where you hit on the Edit button. This will open the Clip Fx Editor for the Audio denoising.

Basically, it only has one, Amount scale, and if you drag the slider of it to the right at 100%, it will remove the whole noise, but setting it on 0% will not remove any noise at all. So, you need to choose your preferred percentage! Just listen what is acceptable for you, but the general suggestion here would be that you can choose as high percent as you want, but if the effect starts taking out the voice and actually wanted parts, then you will have to stop and keep it that way. So, that’s actually it!
Bonus tip: how to remove audio noise in video with Wondershare Filmora
What we have promised in the beginning in the video, we like to offer now – the alternative to reduce or remove audio noise in the video is called Wondershare Filmora, which functions in a very simple way. So, we can start using these guides:
Drag and drop your video into the timeline. Right-clicking on the video and hitting Detach Audio will enable us to separate audio and video from one another, getting us a chance to work on them individually.

Double-click on the audio track shows the editing panel, where we see Remove background noise – choosing this option removes the noise!

Though, there is another way to do this too. If you don’t want to detach the audio, then first, double-click on the video clip in the timeline and when the editing panel opens, switch to Audio. If you check the box next to Remove background noise, you will see that there are three levels – weak, mid, and strong, which determine the strength of how toe noise is going to be reduced. Choosing one of them is up to you!
In case you find that the voice sounds a little robotics, you’ll need to make it sound more natural, of course. For it, you will need to click Customize, which will take you into the Customize Equalizer department.

The low tunes are on the left, while the highs are on the right. Background noises are often the low ones, so we better lower them even more, but we would raise the middle ones to achieve a natural sound.

And, that’s it – you are done with audio background noise removal!
So, in this article, we learned how to remove the video noise and grain and audio background noise using the software Adobe Premire Pro, while we also discussed how to do the latter using Wondershare Filmora – hope you can start using your new knowledge and tools very soon and create the content you never thought you could have created!
In order to make sure that the Median touches the grainiest parts of the whole clip, we need to use something called masks. In the Effects Control panel, we can select the mask shape for our clip –either choose rectangle, circle, or pen tool. Pen tool is something with which we move the Mask around the screen and resize it to include the desired area and cover it.
Changing Feather setting to 100 will make sure that the effect loses a visible edge and there is some smoothness added to those edges.
There might be the need to repeat this process and create several masks, if that means to have covered all of the grainy area of the scene.
Lastly, tom reduce the noise, adjusting the effect settings is needed.
Technically, what the Median effect does is just blurring the graininess, not exactly “taking it away”. And if we play with the Radius settings there, we can find our desired look!
How to remove background noise in Adobe Premiere Pro
Removing background noise in Adobe Premiere Pro can be a pretty simple process and lead to much better results. First of all, of course, import the desired material into your software so you can see the video and audio in the sequence visually. After having the project set up, you will need to find the Efffects Panel, which might be hidden a little, but it must be on the left and bottom of the program layout; or, you can find it on the top, in the navbar.
After having located the Effects panel, go for the search bar and type: denoise, and you’ll see that DeNoise effect is under Audio Effects.
You hold onto the effect, drag and drop it on the audio track in the timeline itself! Then, you just click on the audio in the sequence and on the top right Effect Controls will appear, which we need to concentrate on. You will scroll down a little there and below Audio notice: fx DeNoise, where you hit on the Edit button. This will open the Clip Fx Editor for the Audio denoising.
Basically, it only has one, Amount scale, and if you drag the slider of it to the right at 100%, it will remove the whole noise, but setting it on 0% will not remove any noise at all. So, you need to choose your preferred percentage! Just listen what is acceptable for you, but the general suggestion here would be that you can choose as high percent as you want, but if the effect starts taking out the voice and actually wanted parts, then you will have to stop and keep it that way. So, that’s actually it!
Bonus tip: how to remove audio noise in video with Wondershare Filmora
What we have promised in the beginning in the video, we like to offer now – the alternative to reduce or remove audio noise in the video is called Wondershare Filmora, which functions in a very simple way. So, we can start using these guides:
Drag and drop your video into the timeline. Right-clicking on the video and hitting Detach Audio will enable us to separate audio and video from one another, getting us a chance to work on them individually.
Double-click on the audio track shows the editing panel, where we see Remove background noise – choosing this option removes the noise!
Though, there is another way to do this too. If you don’t want to detach the audio, then first, double-click on the video clip in the timeline and when the editing panel opens, switch to Audio. If you check the box next to Remove background noise, you will see that there are three levels – weak, mid, and strong, which determine the strength of how toe noise is going to be reduced. Choosing one of them is up to you!
In case you find that the voice sounds a little robotics, you’ll need to make it sound more natural, of course. For it, you will need to click Customize, which will take you into the Customize Equalizer department.
The low tunes are on the left, while the highs are on the right. Background noises are often the low ones, so we better lower them even more, but we would raise the middle ones to achieve a natural sound.
And, that’s it – you are done with audio background noise removal!
So, in this article, we learned how to remove the video noise and grain and audio background noise using the software Adobe Premire Pro, while we also discussed how to do the latter using Wondershare Filmora – hope you can start using your new knowledge and tools very soon and create the content you never thought you could have created!
Also read:
- In 2024, Speed up Video on Splice
- New If You Want an App to Make Videos with Pictures and Music for Social Media Posts, We Are with the Best Apps to Make Videos with Music and Pictures
- New 2024 Approved Guide To Cropping and Combining Content in Wondershare Filmora Latest
- New 2024 Approved A Guide To Adopting Lumetri Color Presets in Effective Color Grading
- New Top Things People Know About Wedding Slideshow for 2024
- New Camtasia Video Editor Review for 2024
- Do You Want to Watch Videos in QuickTime with Subtitles in Your Desired Language? Here Are Different Ways to Add Subtitles in QuickTime Player
- New 2024 Approved 22 Free Video Editing Software to Save Your Money and Time
- New 2024 Approved 5 Ways to Denoise a Video
- Free LUTs for OBS How to Use Them for 2024
- Updated 2024 Approved Adobe After Effects Review
- New Perfect Moody LUTs for VN Editor An Overview for 2024
- New How to Share YouTube Video on Zoom, In 2024
- New Learn How to Add Fun and Personalized AR Emoji Stickers to Your Videos. Discover Tips and Tricks for Using These Stickers Like a Pro and Making Your Videos Stand Out
- Do You Want to Apply LUTs Using Open Broadcaster Software? You Can Download Free LUTs for OBS and Apply Them to Your Files. There Are Many LUTs Available for 2024
- Updated Learning The Details Of How To Replace Sky in Lightroom for 2024
- How to Find a High-Quality Video Marketing Agency?
- New After Reading This Article, You Can Add a B-Roll Feature From Filmora and Captivate More Audience. Explanation Video B-Roll and Story-Telling B-Roll Are Well Illustrated
- Updated 2024 Approved 8 Apps to Custom Your GIF Stickers
- How does the stardust trade cost In pokemon go On Apple iPhone 13? | Dr.fone
- In 2024, How to Spy on Text Messages from Computer & Oppo A59 5G | Dr.fone
- In 2024, Forgot iPhone Passcode Again? Unlock Apple iPhone 6s Plus Without Passcode Now | Dr.fone
- Apply These Techniques to Improve How to Detect Fake GPS Location On Realme Narzo N55 | Dr.fone
- How to Fix & Retrieve Pictures/Videos From a Water Damaged iPhone 6 That Wont Turn on | Stellar
- In 2024, How To Pause Life360 Location Sharing For Nokia 150 (2023) | Dr.fone
- In 2024, How to Transfer Data from Lava Blaze 2 5G to BlackBerry | Dr.fone
- Best software to Fix and Repair Corrupt MP4,MOV,AVI video files of Xiaomi Redmi A2
- In 2024, How to Send and Fake Live Location on Facebook Messenger Of your Realme Note 50 | Dr.fone
- Pokémon Go Cooldown Chart On Vivo Y27 4G | Dr.fone
- 3 Ways to Unlock Your iPhone XR for Free
- 6 Proven Ways to Unlock Xiaomi Redmi 12 Phone When You Forget the Password
- How to Track Vivo V30 Lite 5G by Phone Number | Dr.fone
- Top 15 Augmented Reality Games Like Pokémon GO To Play On Tecno Pop 8 | Dr.fone
- Can I Bypass a Forgotten Phone Password Of Realme GT Neo 5?
- In 2024, Top 10 Password Cracking Tools For Samsung Galaxy S23 Tactical Edition
- 8 Best Apps for Screen Mirroring OnePlus Ace 2 Pro PC | Dr.fone
- What is Geo-Blocking and How to Bypass it On Lava Blaze Pro 5G? | Dr.fone
- How to Factory Reset Vivo S18 Pro in 5 Easy Ways | Dr.fone
- Title: New In 2024, Add Text Animation to A Video Online
- Author: Chloe
- Created at : 2024-04-24 07:08:29
- Updated at : 2024-04-25 07:08:29
- Link: https://ai-editing-video.techidaily.com/new-in-2024-add-text-animation-to-a-video-online/
- License: This work is licensed under CC BY-NC-SA 4.0.
