
:max_bytes(150000):strip_icc():format(webp)/GettyImages-541365354-5c8ad42246e0fb00014a9687.jpg)
New In 2024, Customize PowerPoint Slideshow Icon in 8 Simple Ways
Customize PowerPoint Slideshow Icon in 8 Simple Ways
Customise Powerpoint Slideshow Icon in Simple Ways
An easy yet powerful editor
Numerous effects to choose from
Detailed tutorials provided by the official channel
We often need to make different PowerPoint presentations. Be it for school projects, office presentations, college work or corporate presentations, PowerPoint slides are the major and the most commonly used technique for presenting any study or work material.
There are many methods to make your PowerPoint presentation stand out among the rest. Among all the ways, one of the most effective ones is customizing slideshow icons in PowerPoint. If you do not yet know about customizing slideshow icons in a PowerPoint, follow the following discussion, as we will discuss all the necessary information about it.
In this article
01 [Where is the Slide Show Button in PowerPoint?](#Part 1)
02 [What Are the Icons of PowerPoint Presentation?](#Part 2)
03 [How to Get More Icons for PowerPoint?](#Part 3)
04 [How to Customize PowerPoint Slideshow Icon in 8 Simple Ways](#Part 4)
Part 1 Where is the Slide Show Button in PowerPoint?
To present the PowerPoint presentation you make, you will have to find and click on the slide show view icon. The slide show option helps you to present the PowerPoint presentation. You can present each of the slides, one after the other.
You can choose to change the slides manually, or there is also an option where the slides can change automatically. You can readily select either of the options according to your needs. Also, you can fix the time duration that would determine how long would each slide stay on the screen if you choose to present your PowerPoint presentation automatically.
But before accessing all of them, it is crucial, or rather necessary, for you to know the slide show button in PowerPoint. So, here are the different steps that will help you find the slide sorter view icon in PowerPoint.
● Step 1
Open Microsoft PowerPoint.
![]()
● Step 2
Reach out to the top Menu bar.
![]()
● Step 3
You will find the option of “Slide Show” there.
● Step 4
You can make the necessary customization about the slide show setting of your presentation there.
![]()
● Step 5
Select the option “From Beginning” to begin your PowerPoint slide show from the first slide. Or, you can select the option “From Current Slide” if you’re going to start the slide show from the slide you are currently present.
![]()
Part 2 What Are the Icons of PowerPoint Presentation?
Customizing your slides for your slide show with the help of the innumerable icons of the PowerPoint requires you to know about the various groups of available icons. So, we will now discuss the different groups of icons available in the PowerPoint.
The following are the different icons of PowerPoint that you can integrate into your PowerPoint presentation.
● Accessibility
The first groups of icons are about accessibility. It denotes the symbols or icons that depict the differently-abled or specially-abled people. It helps represent and include a large community of specially-abled people.
![]()
● Analytics
The following group represents the different symbols related to Mathematics, analysis, presentation, graphs and the like.
● Animals
This set of icons includes the symbols for various animals and birds that one can include in their presentation and make it look more attractive.
![]()
● Apparel
This group of icons include the different symbols of the outfits, clothes, dresses and the other accessories that we wear.
● Arrows
It includes the symbols for the arrows pointing in different directions. This group of icons can be one of the most useful ones among the rest.
● Art
It includes a group of icons that depict anything and everything artistic.
![]()
● Body Parts
You will get the symbols for all the body parts in this icon group.
![]()
● Bugs
Get the symbols of the bugs and insects under this category.
● Buildings
This set of symbols shows different types of buildings. It can be a house, a church, a bakery, etc.
There are many such groups of icons, which include the follows.
● Business
● Commerce
● Communication
● Celebration
● Education
● Faces
● Dinosaurs
● Food and Drinks
● Holidays
● Home
● Interface
● Landscape
● Location
● Medical
● Nature and Outdoors
● Occupation
● People
● Process
● Puzzles and Games
● Security and Justice
● Signs and Symbols
● Sports
● Technology and electronics
● Tools and Buildings
● Vehicles
● Weather and Seasons
Part 3 How to Get More Icons for PowerPoint?
PowerPoint has an endless variety of icons for your presentation. No matter what your need is or which type of presentation you are making. You will find any type of icon to ornament your presentation to the fullest.
But, how can you get more icons for your PowerPoint presentation? So, here are the steps for integrating as many icons as you want in your PowerPoint presentation.
Step 1
Go to PowerPoint and reach out to the top Menu bar.
![]()
Step 2
Select the option “Insert”.
Step 3
Select the option “Icons.”
Step 4
Search for as many and whatever type of icon you want to integrate into your PowerPoint presentation.
![]()
Step 5
Select “Insert” option.
![]()
Part 4 How to Customize PowerPoint Slideshow Icon in 8 Simple Ways
Here are the eight different ways in which you can customize the PowerPoint Slideshow Icon.
01Using sketchy lines
First thing, insert any icon of PowerPoint and then use the option “Convert to Shape”.
Go to the “Shape Format Tab” and go to the “Shape Outline.”
Select “Sketchpad”.
You can readily customize the icons in PowerPoint using this recently introduced option at PowerPoint.
![]()
02Adding Simple Shapes
Through this step, you can add some additional details and make the icons of PowerPoint even more enhanced and attractive. You have the option of including a simple and basic shape. Or you can also add some detailing to the icons. You have the freedom of letting your creativity flow to the fullest.
● Group your icon
● Make it effortless to copy and paste and move around all over the slide.
03Adding Animations
You can present your icons in the PowerPoint presentation in the form of animations. You can make them appear through different animation speeds and variations. You can resize them and add layers for animating the icons in PowerPoint.
04Changing the properties of the icons
You can also change the icons’ brightness, contrast, or colours to make them look more enhanced and engaging.
05Adding entrances and exists
You can make your icons enter and leave the presentation in many unique ways.
![]()
06Select the icon you prefer to customise
● Choose the “BrightSlide tab.”
● Go to “My Animations”
Choose your preferred way of making your icon enter or exit the slide
07Using mask
For this, here are the steps.
● Cover a part of the entire slide by selecting a rectangle.
● Match your design and change the fill colour.
● Use the “Align” tools to make circles.
● Animate the icons according to the way you prefer.
08Direction
Another exciting yet straightforward way of customising your icons in PowerPoint is by making them appear from a different direction. Although it sounds simple, it will make your presentation look more formal and intreating.
09Fading in and out
You can readily make your icons fade in or fade out and make them appear more exciting and engaging for your presentation.
Another way of making your presentation look entirely out of the box is with one of the best video editing tools: Filmora. Wondershare Filmora Video Editor has been the best tool for editing videos and enhancing them, and you can readily use it for presenting any slide show or presentation.
For Win 7 or later (64-bit)
For macOS 10.12 or later
It will make your presentation unique, as it has some of the most extraordinary and incredible features. Some of the features are as follows.
● Motion Tracking feature- This feature will make your videos look more fascinating. You can use your creativity to customise the motion of your videos and edit them according to your ideas and inspirations.
● Effects-There are as many as more than 800 effects in Filmora. So, if you want to make your presentation look absolutely different and more incredible from the crowd, use Fimlora and its numerous effects to make your presentation the best of the best.
● Text and Titles- Add texts and titles wherever necessary so that you do not miss out on any information about your topic at the presentation.
● Music Library- Add some more uniqueness and exciting feature to your PowerPoint presentation with the help of the various music and tunes present at the Music Library of Filmora.
There are several other features of Filmora that, if we start including them, will make a list unending. It is the ideal tool for editing videos and also using it for producing some of the most wonderful presentations.
● Ending Thoughts →
● So, now you can readily make some of the most exciting and engaging PowerPoint presentations as you are well aware of the different ways of searching for the icons in PowerPoint, searching for the slideshow icon at PowerPoint, and also slideshow icons in PowerPoint.
● Additionally, you can use the best video editing tool, Filmora, for making your presentation stand out among the crowd in the optimal way possible.
● If you enjoyed reading this article, don’t forget to drop a comment below. Also, share your views with us regarding the content or anything related to the topic.
Detailed Tutorial to Crop a Video in KineMaster
“Create. Edit. Share. Transform your videos with KineMaster! Powerful tools, easy to use.” – a few words we read when we come up with the official web-site of KineMaster, a mobile video editing application.

Scrolling down, we see a rich list of all the features KineMaster offers to its users, such as: Assets, Projects, Backup and Share, Blending Modes, Reverse, Chroma Key, High Resolution, Video Layers. Simply put, on KineMaster, you can download projects, add more than 2 500 effects, use powerful tools, add cinematic color, etc…

This many features make you think – how come it is possible to do all that on a mobile phone? How come Kinemaster is not only a software you can download, pay for, and use on your computer, which, on its behalf, should also be a powerful one? It would be a logical question, but remember, we are in 2022 already, so, no limits are put to the technology of today! On Google Play Store, in the description of the abovementioned app, it reads: “KineMaster makes video editing fun on your phone, tablet, or Chromebook!” – So, why not use this opportunity, to explore new ways of making our content better and as appealing as ever for our viewers?
Even though Kinemaster deserves a bigger article with more explanation of each tool, for now, we will only be focusing on cropping a video in this app. First off, why crop a video at all? – well, sometimes we have a wonderful footage but the aspect ratio just doesn’t work for us. It might be because we want to upload our clip on a platform needing a specific aspect ratio, or, we just need to crop and pan (which means to move around within a clip or an image) because we don’t like some things shown in the original video – we might as well need to zoom in and out, in order to get the best out of our footage. For whatever reason, when you need or just wish to crop a video, it should not be a big deal, and let’s see how KineMaster makes it a good and easy experience.
So, the first thing we do in almost every situation is to access the platform or an application itself! – you guessed it right, download KineMaster from Google Play Store! Once you have it on your phone, open it and enjoy the introduction of the app itself.

The interesting fact you will notice is that the layout of the app is horizontal, not vertical, unlike in most cases. So, it makes you feel like you are at least close to what video editors who work on their computers represent. The interface of the app is quite enjoyable for your eyes, as it is kind of fun, as well.
It is needless to say that, if you are going to do a specific “operation” to the video, such as cropping, you will already have figured out which one of your footage you want to crop and pan. So, it’s wise to jump on the button which says: Create New.

This will take you to the editor. Even though in the media section you will find the video you want to work on, but you might be struggling to notice a Crop button. It is because unfortunately, it’s not possible to crop your video right away in KineMaster – first, you will need to add a background, for example, a black one.

Then, you will go back to the menu and find Media section again to add the video clip you want to crop.

After adding it to the editor, you need to tap on the video file which has appeared in the sequence – this will show you different features you can use on the right. You have to scroll down a little and Voila! – here you find Cropping. After having clicked on that, a little cropping window will appear on the screen.

You can resize the clip, and in order to crop the video, turning on the mask option is needed.


After you have finished cropping and resizing it to your liking, you need to click on the icon on the top right, and it will take you to the Save and Share page.

There, you will choose the Resolution and Frame rate, and Save as Video.

You can check your new cropped video on your gallery.
An easier way to crop video in Wondershare Filmora
An alternate way of cropping your video would be Filmora Video Editor , which is a software you can download and install on your computer and use its features only then. You can also try your hand at this very handy computer program which has an easy and user-friendly interface.
For Win 7 or later (64-bit)
For macOS 10.14 or later
Frist, as mentioned, you need to download and install Wondershare Filmora X. To add your files, you will need to click on Import Media Files Here.

You will choose your clip(s) you would like to crop and then drag and drop it in the sequence.

Above your video in the sequence you will see little icons and find a Crop one.

After clicking on it, a new window will open – it’s for Crop and Zoom, where you can choose a needed ratio or do it manually (for it, you have to select Custom first).

After clicking OK, your video will be cropped as you like. Then, you can proceed with Exporting it – click on Export, choose your preferred settings, and save the video at last.

So, in this article, you have learned how to crop a video using a mobile app KineMaster, as well as using a software – Wondershare Filmora X. of course, there are many other ways in which you can crop your video and make the best out of it. The technology and innovation gives us the opportunity to have great results with as little work as just a few minutes. You might need to crop your video for your channel on Youtube, or for your page on social media, or an official web-page of your company; last but not least is cropping and editing your video for your own pleasure, which is also a great way to interact with the virtual world around us.
Scrolling down, we see a rich list of all the features KineMaster offers to its users, such as: Assets, Projects, Backup and Share, Blending Modes, Reverse, Chroma Key, High Resolution, Video Layers. Simply put, on KineMaster, you can download projects, add more than 2 500 effects, use powerful tools, add cinematic color, etc…
This many features make you think – how come it is possible to do all that on a mobile phone? How come Kinemaster is not only a software you can download, pay for, and use on your computer, which, on its behalf, should also be a powerful one? It would be a logical question, but remember, we are in 2022 already, so, no limits are put to the technology of today! On Google Play Store, in the description of the abovementioned app, it reads: “KineMaster makes video editing fun on your phone, tablet, or Chromebook!” – So, why not use this opportunity, to explore new ways of making our content better and as appealing as ever for our viewers?
Even though Kinemaster deserves a bigger article with more explanation of each tool, for now, we will only be focusing on cropping a video in this app. First off, why crop a video at all? – well, sometimes we have a wonderful footage but the aspect ratio just doesn’t work for us. It might be because we want to upload our clip on a platform needing a specific aspect ratio, or, we just need to crop and pan (which means to move around within a clip or an image) because we don’t like some things shown in the original video – we might as well need to zoom in and out, in order to get the best out of our footage. For whatever reason, when you need or just wish to crop a video, it should not be a big deal, and let’s see how KineMaster makes it a good and easy experience.
So, the first thing we do in almost every situation is to access the platform or an application itself! – you guessed it right, download KineMaster from Google Play Store! Once you have it on your phone, open it and enjoy the introduction of the app itself.
The interesting fact you will notice is that the layout of the app is horizontal, not vertical, unlike in most cases. So, it makes you feel like you are at least close to what video editors who work on their computers represent. The interface of the app is quite enjoyable for your eyes, as it is kind of fun, as well.
It is needless to say that, if you are going to do a specific “operation” to the video, such as cropping, you will already have figured out which one of your footage you want to crop and pan. So, it’s wise to jump on the button which says: Create New.
This will take you to the editor. Even though in the media section you will find the video you want to work on, but you might be struggling to notice a Crop button. It is because unfortunately, it’s not possible to crop your video right away in KineMaster – first, you will need to add a background, for example, a black one.
Then, you will go back to the menu and find Media section again to add the video clip you want to crop.
After adding it to the editor, you need to tap on the video file which has appeared in the sequence – this will show you different features you can use on the right. You have to scroll down a little and Voila! – here you find Cropping. After having clicked on that, a little cropping window will appear on the screen.
You can resize the clip, and in order to crop the video, turning on the mask option is needed.
After you have finished cropping and resizing it to your liking, you need to click on the icon on the top right, and it will take you to the Save and Share page.
There, you will choose the Resolution and Frame rate, and Save as Video.
You can check your new cropped video on your gallery.
An easier way to crop video in Wondershare Filmora
An alternate way of cropping your video would be Filmora Video Editor , which is a software you can download and install on your computer and use its features only then. You can also try your hand at this very handy computer program which has an easy and user-friendly interface.
For Win 7 or later (64-bit)
For macOS 10.14 or later
Frist, as mentioned, you need to download and install Wondershare Filmora X. To add your files, you will need to click on Import Media Files Here.
You will choose your clip(s) you would like to crop and then drag and drop it in the sequence.
Above your video in the sequence you will see little icons and find a Crop one.
After clicking on it, a new window will open – it’s for Crop and Zoom, where you can choose a needed ratio or do it manually (for it, you have to select Custom first).
After clicking OK, your video will be cropped as you like. Then, you can proceed with Exporting it – click on Export, choose your preferred settings, and save the video at last.
So, in this article, you have learned how to crop a video using a mobile app KineMaster, as well as using a software – Wondershare Filmora X. of course, there are many other ways in which you can crop your video and make the best out of it. The technology and innovation gives us the opportunity to have great results with as little work as just a few minutes. You might need to crop your video for your channel on Youtube, or for your page on social media, or an official web-page of your company; last but not least is cropping and editing your video for your own pleasure, which is also a great way to interact with the virtual world around us.
How to Make A Funny Vlog for TikTok?
TikTok has been among the few social media platforms that have gained an exponential following in a truly short time. Regardless of this stunted digital environment, the platform made its statement of becoming part of the all-time greats.
TikTok became known as a short-video platform that influenced the making of funny vlogs. If you are interested in making a funny vlog, you are at the right place.
In this article
01 Ideas for Creating A Funny Vlog for TikTok
02 5 Popular Funny Vloggers on TikTok
Part 1: Ideas for Creating A Funny Vlog for TikTok
When creating a funny vlog across TikTok, there are numerous ideas that one can think of. However, since TikTok videos are of small lengths, achieving diversity is difficult yet possible. You’ll surely get your break if you understand the following ideas for creating a funny vlog.

React to Other Videos
While it may seem the most mainstream style of creating funny content across TikTok, it is also the most effective way of making people laugh while watching your video. This will also bring recurring viewers across your channel.
Display Failure Videos
It is always great to see people trying and doing something funny across the video. Failure videos are believed to be the other way of creating content for a funny vlog on your TikTok, which shall make people laugh hard.
Use Goofy and Peculiar Voices
Unrealistic and weird voices can make your short video seem funny. If you consider talking about something in a silly voice, it will make people burst out of laughter.
Trolling Family Members
One of the best ways to make something good out of TikTok is creating candid moments. This can always be done if you troll or prank your family members out of nowhere. Just keep reminding that you have to ensure no one gets injured due to it.
Impersonations
Making impersonated videos of major celebrities is another way of showing funny content to the viewers on TikTok. If you consider some funny examples for this, it will surely bring you effective results.
Make Puns and Funny Statements
Another great way to create a funny vlog for your TikTok is to be good at making puns. This is purely hilarious content and needs someone to be highly great in it.
Physical Challenges
This can be a bit risky, but it can become quite fun to make and show to the world if executed with care. However, this can be conducted individually or in a group of people, as you find it appropriate.
Use Effects of TikTok
TikTok makes sure to provide something funny in effects to its users. The use of effects for TikTok is an excellent technique to make funny vlogs; however, it can get funny if the elements used across it have a dubious meaning.
Run Everything in Reverse
One of the most straightforward techniques to make a funny vlog is to run everything in reverse order. The simplest thing of a video becomes the funniest to watch.
Part 2: 5 Popular Funny Vloggers on TikTok
This part will provide some popular examples of TikTokers who have made a considerate performance in providing funny content to people across the platform.
Khaby Lame
This is, without a doubt, the first-choice in TikTok accounts that would always come while relating to funny content. Khaby started his journey as a TikToker with a remarkably simple motive of pointing out the simplicity in different tasks, which were displayed to be difficult. Although it sounds pretty basic, the technique taken by Khaby has been so considerate it brought him millions of followers for creating funny content.

Sarah Cooper
Want to see a great impersonation of Donald Trump? It is undoubtedly great to see every time. With Sarah Cooper, it just becomes an entirely different story. Her impersonation has been so perfect that she has been referred to as one of the best funny vloggers on TikTok. Her likes across the platform may not be that great, but she has shown some stature in presenting funny content in a great way.

Dobre Twins
This twin duo is known across many social media platforms for its funny content. As the twins started using TikTok, they started creating good funny vlogs, which gained quite the traction for them. Their unique ideas to present different things have presented the following worth 23 million likes across TikTok, which is quite commendable. However, Lucas and Marcus are only known to operate this TikTok account.

Image alt: dobre twins funny tiktoker
Brittany Broski
Quite a few TikTokers actually make funny videos with impressive comedy. Brittany Broski is a celebrity in this genre, where she has taken great use of her comedy skills to present great vlogs with different and unique topics. Her take on comedy is entirely different, which makes her funny vlog unique and better than others.

Cole LeBrant
This TikToker makes a good collection of funny vlogs across his account with his family. The variety and variability in his videos make him a different version of fun compared to other TikTokers. He has built a great reach across the account, which makes him an impressive choice.

Part 3: How to Make a Funny Vlog?
Funny vlogs are a fabulous way to interact with people of different tastes. It can be something that cherishes the moods of the viewers, regardless of their current emotions. To make this happen, you need a good platform that helps you create a video for your viewers to watch. Wondershare Filmora fulfills the needs of a video editor by providing you with the perfect options while editing the video for TikTok.
For Win 7 or later (64-bit)
For macOS 10.12 or later
If you are looking forward to understanding how to create a funny vlog for your TikTok using Filmora, you need to follow a set of simple steps. These are shown as follows:
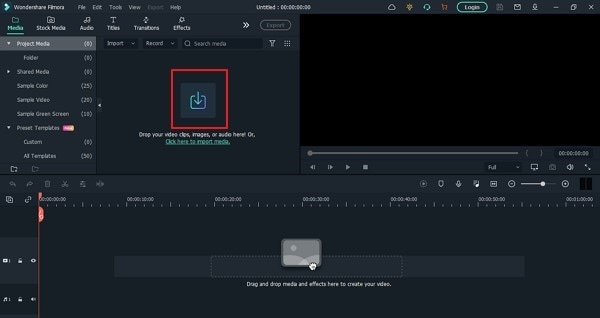
Step 1: Launch and Import Video
To start, you need to have Wondershare Filmora installed across your device. Launch the tool and click on “New Project” to start from scratch. Once the screen opens up, you need to click on the “Arrow Head” icon across the ‘Media’ Tab to import the audio you wish to amend for TikTok.
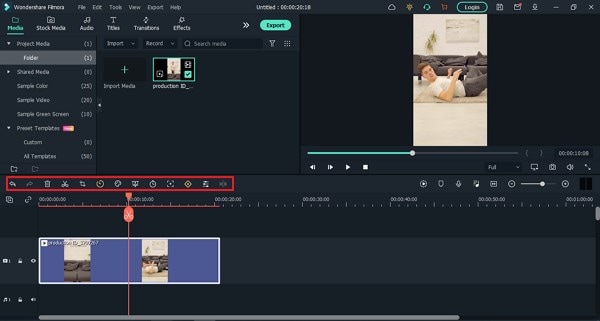
Step 2: Perform Basic Editing
Wondershare Filmora provides users with multiple options for editing their files. At first, drag the file onto the timeline. Following this, you can merge different videos or enhance the video by trimming it. Along with that, you can also consider splitting the image or changing its playback speed for different results.
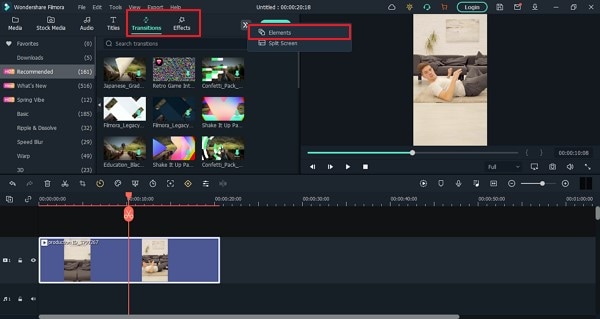
Step 3: Add Effects and Transitions
After you are done with some basic editing, you can add different effects from the “Effects” section. To make the video look exclusive, you can also include “Transitions” across it. Use the “Elements” tab to include stickers and emojis to enhance your TikTok video.
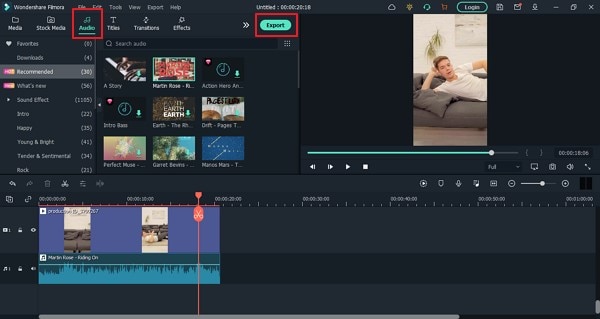
Step 4: Manage the Audio
For managing the audio of your video, you can make several changes across it. You can detach audio and change the audio with another soundtrack. Filmora also allows you to add audio from the “Audio” section, which contains royalty-free music to add. Once you are done, click on the “Export” button to set the settings of the video before exporting it back onto the device.
Closing Words
This article has presented some of the finest tips that can be utilized for creating funny vlogs on your TikTok. If you coherently use these tips, you can get significant results across your account in the name of the followers. Along with that, you can also use Filmora for making the best funny vlog with different editing tools.
Wondershare Filmora
Get started easily with Filmora’s powerful performance, intuitive interface, and countless effects!
Try It Free Try It Free Try It Free Learn More >

02 5 Popular Funny Vloggers on TikTok
Part 1: Ideas for Creating A Funny Vlog for TikTok
When creating a funny vlog across TikTok, there are numerous ideas that one can think of. However, since TikTok videos are of small lengths, achieving diversity is difficult yet possible. You’ll surely get your break if you understand the following ideas for creating a funny vlog.
React to Other Videos
While it may seem the most mainstream style of creating funny content across TikTok, it is also the most effective way of making people laugh while watching your video. This will also bring recurring viewers across your channel.
Display Failure Videos
It is always great to see people trying and doing something funny across the video. Failure videos are believed to be the other way of creating content for a funny vlog on your TikTok, which shall make people laugh hard.
Use Goofy and Peculiar Voices
Unrealistic and weird voices can make your short video seem funny. If you consider talking about something in a silly voice, it will make people burst out of laughter.
Trolling Family Members
One of the best ways to make something good out of TikTok is creating candid moments. This can always be done if you troll or prank your family members out of nowhere. Just keep reminding that you have to ensure no one gets injured due to it.
Impersonations
Making impersonated videos of major celebrities is another way of showing funny content to the viewers on TikTok. If you consider some funny examples for this, it will surely bring you effective results.
Make Puns and Funny Statements
Another great way to create a funny vlog for your TikTok is to be good at making puns. This is purely hilarious content and needs someone to be highly great in it.
Physical Challenges
This can be a bit risky, but it can become quite fun to make and show to the world if executed with care. However, this can be conducted individually or in a group of people, as you find it appropriate.
Use Effects of TikTok
TikTok makes sure to provide something funny in effects to its users. The use of effects for TikTok is an excellent technique to make funny vlogs; however, it can get funny if the elements used across it have a dubious meaning.
Run Everything in Reverse
One of the most straightforward techniques to make a funny vlog is to run everything in reverse order. The simplest thing of a video becomes the funniest to watch.
Part 2: 5 Popular Funny Vloggers on TikTok
This part will provide some popular examples of TikTokers who have made a considerate performance in providing funny content to people across the platform.
Khaby Lame
This is, without a doubt, the first-choice in TikTok accounts that would always come while relating to funny content. Khaby started his journey as a TikToker with a remarkably simple motive of pointing out the simplicity in different tasks, which were displayed to be difficult. Although it sounds pretty basic, the technique taken by Khaby has been so considerate it brought him millions of followers for creating funny content.
Sarah Cooper
Want to see a great impersonation of Donald Trump? It is undoubtedly great to see every time. With Sarah Cooper, it just becomes an entirely different story. Her impersonation has been so perfect that she has been referred to as one of the best funny vloggers on TikTok. Her likes across the platform may not be that great, but she has shown some stature in presenting funny content in a great way.
Dobre Twins
This twin duo is known across many social media platforms for its funny content. As the twins started using TikTok, they started creating good funny vlogs, which gained quite the traction for them. Their unique ideas to present different things have presented the following worth 23 million likes across TikTok, which is quite commendable. However, Lucas and Marcus are only known to operate this TikTok account.
Image alt: dobre twins funny tiktoker
Brittany Broski
Quite a few TikTokers actually make funny videos with impressive comedy. Brittany Broski is a celebrity in this genre, where she has taken great use of her comedy skills to present great vlogs with different and unique topics. Her take on comedy is entirely different, which makes her funny vlog unique and better than others.
Cole LeBrant
This TikToker makes a good collection of funny vlogs across his account with his family. The variety and variability in his videos make him a different version of fun compared to other TikTokers. He has built a great reach across the account, which makes him an impressive choice.
Part 3: How to Make a Funny Vlog?
Funny vlogs are a fabulous way to interact with people of different tastes. It can be something that cherishes the moods of the viewers, regardless of their current emotions. To make this happen, you need a good platform that helps you create a video for your viewers to watch. Wondershare Filmora fulfills the needs of a video editor by providing you with the perfect options while editing the video for TikTok.
For Win 7 or later (64-bit)
For macOS 10.12 or later
If you are looking forward to understanding how to create a funny vlog for your TikTok using Filmora, you need to follow a set of simple steps. These are shown as follows:
Step 1: Launch and Import Video
To start, you need to have Wondershare Filmora installed across your device. Launch the tool and click on “New Project” to start from scratch. Once the screen opens up, you need to click on the “Arrow Head” icon across the ‘Media’ Tab to import the audio you wish to amend for TikTok.
Step 2: Perform Basic Editing
Wondershare Filmora provides users with multiple options for editing their files. At first, drag the file onto the timeline. Following this, you can merge different videos or enhance the video by trimming it. Along with that, you can also consider splitting the image or changing its playback speed for different results.
Step 3: Add Effects and Transitions
After you are done with some basic editing, you can add different effects from the “Effects” section. To make the video look exclusive, you can also include “Transitions” across it. Use the “Elements” tab to include stickers and emojis to enhance your TikTok video.
Step 4: Manage the Audio
For managing the audio of your video, you can make several changes across it. You can detach audio and change the audio with another soundtrack. Filmora also allows you to add audio from the “Audio” section, which contains royalty-free music to add. Once you are done, click on the “Export” button to set the settings of the video before exporting it back onto the device.
Closing Words
This article has presented some of the finest tips that can be utilized for creating funny vlogs on your TikTok. If you coherently use these tips, you can get significant results across your account in the name of the followers. Along with that, you can also use Filmora for making the best funny vlog with different editing tools.
Wondershare Filmora
Get started easily with Filmora’s powerful performance, intuitive interface, and countless effects!
Try It Free Try It Free Try It Free Learn More >
Have You Ever Tried Using the Premiere Pro Motion Blur Plugin? Read This Article to Learn How to Efficiently Use the ReelSmart Motion Blur Plugin in Premiere Pro
Premiere Pro is an exceptional tool for editing videos flawlessly by using various advanced features. For instance, you can use Adobe Premiere Pro to add extraordinary effects to your videos, such as motion blur. However, if you want a more smooth and flawless effect, you can use a plugin known as ReelSmart Motion Blur. By reading this article, you can learn about the ReelSmart Motion Blur Plugin Premiere Pro and its related instructions for usage.
Part 1: What is ReVisionFX ReelSmart Motion Blur?
You must be wondering why it’s essential to use the motion blur plugin for Premiere Pro. The reason is that using a plugin like ReelSmart Motion Blur can offer more advanced capabilities and options to create professional results. The ReelSmart Motion Blur plugin uses advanced algorithms to track each pixel automatically. As a result, it provides a more compelling and natural outlook to the video. Hence, you can easily apply the motion blur effect to your videos using RSMB without hard work.
Key Features
- Offers Automatic Tracking: To provide accurate and precise results, RSMB uses automatic tracking. This function allows the plugin to track every pixel automatically from one frame to another efficiently.
- Ability to Adjust Blur: You can add refinements by adjusting the amount of blur according to your preference. By doing so, you can generate the desired final output easily.
- Removing Motion Blur: Apart from adding and adjusting the motion blur effect, you can also remove the blur effect using RSMB effortlessly.
- Add Motion Blur to 360 Videos: RSMB is also capable of adding a motion blur to 360 videos properly. It can recognize the edges of sides along with the top and bottom to create a motion blur effect appropriately.
Part 2: Is It Worth Trying ReelSmart Motion Blur Pro?
As we have discussed the regular version of ReelSmart Motion Blur, now we will also shed light on its Pro version. To help you in choosing the best version, we will draw a comparison between the regular and pro versions of RSMB in this section.
Pricing Price
| Regular Version | Pro Version |
|---|---|
| $104.95 | $164.95 |
Supported Hosts
| ReelSmart Motion Blur | Regular Version | Pro Version |
|---|---|---|
| Adobe: After Effects, Premiere Pro | Adobe: After Effects, Premiere Pro | |
| Apple: Final Cut Pro, Motion | Apple: Final Cut Pro, Motion | |
| / | Avid: Media Composer | |
| OFX: Catalyst Edit, DaVinci Resolve, Final Cut Pro, HitFilm, Movie Studio, Natron, and Vegas Pro | Supports all Regular version Hosts Plus the Following:OFX: Baselight, Flame, Fusion Studio, Smoke, Nucoda, Scratch, Nuke, and Silhouette |
New Features
- Separates the Object: RSMB Pro has the additional capability to isolate the background and foreground effectively. It utilizes a specified matte that can help in object separation to create motion blur with great precision. (Not available with Movie Studio, Vegas Pro, Catalyst Edit, Smoke, Media Composer, Flame, or Nucoda)
- Blur with Motion Vectors: If you have imported a 3D animation video, the pro version can blur the motion vectors provided by you. Thus, it can work on a 3D animation system perfectly. (Not available with Vegas Pro, DaVinci Resolve, Movie Studio, Media Composer, Catalyst Edit, or Nucoda)
- RGB+A Tracking: This option is used to recognize and track dark images with mattes by using the alpha channel. You can use this option for masked or CG stuff. (Not available with Media Composer)
- Use of Tracking Points: To help the RSMB’s calculation of motion vectors, you can provide tracking points. By defining the tracking points, you can tell RSMB about the movement of one pixel from one frame to another efficiently. (Not available with Vegas Pro, Media Composer, Catalyst Edit, DaVinci Resolve, Smoke, Flame, Movie Studio, or Nucoda)
- Spline Guidance: If RSMB encounters problems related to tracking, you can draw and animate shapes to tell about the object’s movement. Thus, it can help the RSMB find the object movement easily. (Not available with Premiere Pro, Nucoda, Vegas Pro, HitFilm, Movie Studio, Smoke, Sihouette, Flame, Scratch, Nuke, Motion, Media Composer, DaVinci Resolve, Catalyst Edit, FCPX)
Rating
- 7 out of 5
Our Verdict
The new features in the pro version of RSMB are really compelling and beneficial. However, there are various restrictions when it comes to the supported hosts of the pro version. So, if you are using any common software for video editing that is not recognized by the pro version, we will recommend you use the regular version of RSMB. The regular version of RSMB is cost-effective and works proficiently.
Part 3: How to Use ReelSmart Motion Blur Plugin in Premiere Pro?
Are you eager to know how to use the Premiere Pro motion blur plugin? Read and follow the steps provided below to craft flawless results.
Step1 Import Video Clip
Open Adobe Premiere Pro in your system and start with a new project. On the newly displayed window, import the video clip by browsing through your computer. After importing the desired video file, make sure to drag and drop it into the timeline to begin editing.

Step2 Search for RSMB Effect
Once you have dropped the video into the timeline, navigate to the “Effects” tab given on the right side. On the search box, type “RSMB.” From the fetched results, select RSMB and apply it to the above layer of your video clip in the timeline.

Step3 Adjust the Plugin Settings
Now head to the settings on the left side and enable the GPU settings. Moreover, you can increase the blur amount to 1 or 1.5. By doing so, you can create a smoother look in your video. Once done with the settings, make sure to render your video to produce a smooth finish. Once done with rendering, you can preview and save the video easily.

Conclusion
Motion blur effect can drastically transform your video clip. If you are using Premiere Pro to add motion blur, we will recommend you use the plugin called ReVisionFX ReelSmart Motion Blur. If you are unaware of the motion blur plugin Premiere Pro, this article has fetched all the related details. This article has provided all the significance and instructions to use the RSMB plugin.
Supported Hosts
| ReelSmart Motion Blur | Regular Version | Pro Version |
|---|---|---|
| Adobe: After Effects, Premiere Pro | Adobe: After Effects, Premiere Pro | |
| Apple: Final Cut Pro, Motion | Apple: Final Cut Pro, Motion | |
| / | Avid: Media Composer | |
| OFX: Catalyst Edit, DaVinci Resolve, Final Cut Pro, HitFilm, Movie Studio, Natron, and Vegas Pro | Supports all Regular version Hosts Plus the Following:OFX: Baselight, Flame, Fusion Studio, Smoke, Nucoda, Scratch, Nuke, and Silhouette |
New Features
- Separates the Object: RSMB Pro has the additional capability to isolate the background and foreground effectively. It utilizes a specified matte that can help in object separation to create motion blur with great precision. (Not available with Movie Studio, Vegas Pro, Catalyst Edit, Smoke, Media Composer, Flame, or Nucoda)
- Blur with Motion Vectors: If you have imported a 3D animation video, the pro version can blur the motion vectors provided by you. Thus, it can work on a 3D animation system perfectly. (Not available with Vegas Pro, DaVinci Resolve, Movie Studio, Media Composer, Catalyst Edit, or Nucoda)
- RGB+A Tracking: This option is used to recognize and track dark images with mattes by using the alpha channel. You can use this option for masked or CG stuff. (Not available with Media Composer)
- Use of Tracking Points: To help the RSMB’s calculation of motion vectors, you can provide tracking points. By defining the tracking points, you can tell RSMB about the movement of one pixel from one frame to another efficiently. (Not available with Vegas Pro, Media Composer, Catalyst Edit, DaVinci Resolve, Smoke, Flame, Movie Studio, or Nucoda)
- Spline Guidance: If RSMB encounters problems related to tracking, you can draw and animate shapes to tell about the object’s movement. Thus, it can help the RSMB find the object movement easily. (Not available with Premiere Pro, Nucoda, Vegas Pro, HitFilm, Movie Studio, Smoke, Sihouette, Flame, Scratch, Nuke, Motion, Media Composer, DaVinci Resolve, Catalyst Edit, FCPX)
Rating
- 7 out of 5
Our Verdict
The new features in the pro version of RSMB are really compelling and beneficial. However, there are various restrictions when it comes to the supported hosts of the pro version. So, if you are using any common software for video editing that is not recognized by the pro version, we will recommend you use the regular version of RSMB. The regular version of RSMB is cost-effective and works proficiently.
Part 3: How to Use ReelSmart Motion Blur Plugin in Premiere Pro?
Are you eager to know how to use the Premiere Pro motion blur plugin? Read and follow the steps provided below to craft flawless results.
Step1 Import Video Clip
Open Adobe Premiere Pro in your system and start with a new project. On the newly displayed window, import the video clip by browsing through your computer. After importing the desired video file, make sure to drag and drop it into the timeline to begin editing.
Step2 Search for RSMB Effect
Once you have dropped the video into the timeline, navigate to the “Effects” tab given on the right side. On the search box, type “RSMB.” From the fetched results, select RSMB and apply it to the above layer of your video clip in the timeline.
Step3 Adjust the Plugin Settings
Now head to the settings on the left side and enable the GPU settings. Moreover, you can increase the blur amount to 1 or 1.5. By doing so, you can create a smoother look in your video. Once done with the settings, make sure to render your video to produce a smooth finish. Once done with rendering, you can preview and save the video easily.
Conclusion
Motion blur effect can drastically transform your video clip. If you are using Premiere Pro to add motion blur, we will recommend you use the plugin called ReVisionFX ReelSmart Motion Blur. If you are unaware of the motion blur plugin Premiere Pro, this article has fetched all the related details. This article has provided all the significance and instructions to use the RSMB plugin.
Also read:
- Updated 2024 Approved Final Cut Pro for iPad- Is It Available?
- In 2024, 4 Simple Methods for Making a High-Quality Recap Video
- 2024 Approved Finding Best GIF Websites Is Easy as Pie
- Updated Best Video Editing Courses Online with Certificate
- New In 2024, Create a Brand Video to Make Your Business Shine
- Detailed Tutorial to Rotate Videos in Cyberlink PowerDirector for 2024
- In 2024, Top 7 Best GoPro Video Editors for Mac
- In 2024, Top 6 MP4 Mergers to Join Videos Easily
- In 2024, Do You Want to Make Your Video Look Like Its From the 90S? Then, Make Sure to Add Vintage Overlays and VHS Sound Effects to Give It the Old Feel
- New In 2024, Everything That You Need to Know About Video Montages- Ideas, Techniqu
- New In 2024, Change Video Speed with FFmpeg
- 2 Effective Ways to Make SRT File Translation Like a Pro
- New 2 Methods to Cut Video in VLC on Windows for 2024
- In 2024, 4 Methods How To Make a Recap Video
- New Best 8 Online MPEG to GIF Converters for 2024
- Updated 2024 Approved Guide to Add Transition Effects in Premiere Pro
- 2024 Approved Make A Countdown Video
- New 10 Top Innovative AR Video Effects to Check Out
- How to Make Canva Collages for 2024
- 2024 Approved How to Make a Gaming Montage - Guide & Tips
- 2024 Approved Why Your Transparent GIF Is Hard to Remove and How to Do With It
- New Discover the Various Techniques of Video Framing, Which Involve Capturing the Essence of a Subject While Eliminating Distractions in the Background, Andlearn How to Apply Them Skillfully to Achieve Desired Results
- 2024 Approved 7 Solutions Cut Video For Instagram On Mac
- New Deleting White Background in Photoshop Is Hard for 2024
- New How To Use Virtual Green Screen to Shoot Video for 2024
- Updated 2024 Approved The Craziest 10 AI Editors Youve Ever Seen
- Updated 2024 Approved Every Compositor Should Know The Trick of Color Match in After Effects
- How to Add Echo Effect to Video
- 2024 Approved A Roster of 8 Best Color Match Generators
- Updated How to Brighten Video in Premiere Pro for 2024
- Updated Ll About GIF Keyboard That You Want to Know for 2024
- New How to Create Datamoshing Effect to Your Footage in After Effects, In 2024
- Updated Spooky Halloween with the Best 15+ Halloween Countdown Video Clips for 2024
- New In 2024, Steps to Rotate Videos in Lightworks
- 9 Solutions to Fix Oppo Find X7 System Crash Issue | Dr.fone
- In 2024, Top 5 Vivo S17 Bypass FRP Tools for PC That Actually Work
- How Can Tecno Camon 20Mirror Share to PC? | Dr.fone
- Best Anti Tracker Software For Realme 12 Pro+ 5G | Dr.fone
- How To Exit DFU Mode on Apple iPhone 11 Pro Max? | Dr.fone
- How to Fix It Xiaomi Redmi K70 Pro Wont Turn On | Dr.fone
- Fixed Excel 2023 Found a Problem with One or more Formula | Stellar
- Fix File Not Loaded Completely Error in Excel
- How To Bypass Motorola Moto G34 5G FRP In 3 Different Ways
- In 2024, What to do if your iPhone XS Max has bad ESN or blacklisted IMEI?
- In 2024, How to Unlock Samsung Galaxy Z Fold 5 Phone without Any Data Loss
- In 2024, Pokemon Go Error 12 Failed to Detect Location On Vivo Y36? | Dr.fone
- In 2024, 3 Effective Ways to Bypass Activation Lock on iPhone 8 Plus
- In 2024, How to Remove Apple ID from iPhone XS Max without Password?
- Top 10 AirPlay Apps in Motorola Moto G14 for Streaming | Dr.fone
- The Complete Guide to Sony Xperia 10 V FRP Bypass Everything You Need to Know
- Cellular Network Not Available for Voice Calls On Vivo G2 | Dr.fone
- Disabled Apple iPhone 11 Pro How to Unlock a Disabled Apple iPhone 11 Pro?
- How Can I Use a Fake GPS Without Mock Location On Samsung Galaxy Z Flip 5? | Dr.fone
- In 2024, 9 Best Free Android Monitoring Apps to Monitor Phone Remotely For your Motorola Moto E13 | Dr.fone
- In 2024, Disabling iPhone 15 Pro Parental Restrictions With/Without Password | Dr.fone
- In 2024, Does Life360 Notify When You Log Out On Samsung Galaxy A25 5G? | Dr.fone
- How To Fix Unresponsive Phone Touchscreen Of Nokia G22 | Dr.fone
- In 2024, How To Unlock Apple iPhone 14 Pro Max Without Passcode? 4 Easy Methods
- In 2024, 3 Solutions to Find Your Nokia G22 Current Location of a Mobile Number | Dr.fone
- Top 4 Ways to Trace Vivo S17 Pro Location | Dr.fone
- Unlocking Apple iPhone 6 Passcode without a Computer
- Title: New In 2024, Customize PowerPoint Slideshow Icon in 8 Simple Ways
- Author: Chloe
- Created at : 2024-04-24 07:08:33
- Updated at : 2024-04-25 07:08:33
- Link: https://ai-editing-video.techidaily.com/new-in-2024-customize-powerpoint-slideshow-icon-in-8-simple-ways/
- License: This work is licensed under CC BY-NC-SA 4.0.
