
:max_bytes(150000):strip_icc():format(webp)/free-language-exchange-websites-1357059-d87c92dbdba3429dbf17d51ba313b1ff.png)
New In 2024, Customize PowerPoint Slideshow Icon in Simple Ways
Customize PowerPoint Slideshow Icon in Simple Ways
Customise Powerpoint Slideshow Icon in Simple Ways
An easy yet powerful editor
Numerous effects to choose from
Detailed tutorials provided by the official channel
We often need to make different PowerPoint presentations. Be it for school projects, office presentations, college work or corporate presentations, PowerPoint slides are the major and the most commonly used technique for presenting any study or work material.
There are many methods to make your PowerPoint presentation stand out among the rest. Among all the ways, one of the most effective ones is customizing slideshow icons in PowerPoint. If you do not yet know about customizing slideshow icons in a PowerPoint, follow the following discussion, as we will discuss all the necessary information about it.
In this article
01 [Where is the Slide Show Button in PowerPoint?](#Part 1)
02 [What Are the Icons of PowerPoint Presentation?](#Part 2)
03 [How to Get More Icons for PowerPoint?](#Part 3)
04 [How to Customize PowerPoint Slideshow Icon in 8 Simple Ways](#Part 4)
Part 1 Where is the Slide Show Button in PowerPoint?
To present the PowerPoint presentation you make, you will have to find and click on the slide show view icon. The slide show option helps you to present the PowerPoint presentation. You can present each of the slides, one after the other.
You can choose to change the slides manually, or there is also an option where the slides can change automatically. You can readily select either of the options according to your needs. Also, you can fix the time duration that would determine how long would each slide stay on the screen if you choose to present your PowerPoint presentation automatically.
But before accessing all of them, it is crucial, or rather necessary, for you to know the slide show button in PowerPoint. So, here are the different steps that will help you find the slide sorter view icon in PowerPoint.
● Step 1
Open Microsoft PowerPoint.
![]()
● Step 2
Reach out to the top Menu bar.
![]()
● Step 3
You will find the option of “Slide Show” there.
● Step 4
You can make the necessary customization about the slide show setting of your presentation there.
![]()
● Step 5
Select the option “From Beginning” to begin your PowerPoint slide show from the first slide. Or, you can select the option “From Current Slide” if you’re going to start the slide show from the slide you are currently present.
![]()
Part 2 What Are the Icons of PowerPoint Presentation?
Customizing your slides for your slide show with the help of the innumerable icons of the PowerPoint requires you to know about the various groups of available icons. So, we will now discuss the different groups of icons available in the PowerPoint.
The following are the different icons of PowerPoint that you can integrate into your PowerPoint presentation.
● Accessibility
The first groups of icons are about accessibility. It denotes the symbols or icons that depict the differently-abled or specially-abled people. It helps represent and include a large community of specially-abled people.
![]()
● Analytics
The following group represents the different symbols related to Mathematics, analysis, presentation, graphs and the like.
● Animals
This set of icons includes the symbols for various animals and birds that one can include in their presentation and make it look more attractive.
![]()
● Apparel
This group of icons include the different symbols of the outfits, clothes, dresses and the other accessories that we wear.
● Arrows
It includes the symbols for the arrows pointing in different directions. This group of icons can be one of the most useful ones among the rest.
● Art
It includes a group of icons that depict anything and everything artistic.
![]()
● Body Parts
You will get the symbols for all the body parts in this icon group.
![]()
● Bugs
Get the symbols of the bugs and insects under this category.
● Buildings
This set of symbols shows different types of buildings. It can be a house, a church, a bakery, etc.
There are many such groups of icons, which include the follows.
● Business
● Commerce
● Communication
● Celebration
● Education
● Faces
● Dinosaurs
● Food and Drinks
● Holidays
● Home
● Interface
● Landscape
● Location
● Medical
● Nature and Outdoors
● Occupation
● People
● Process
● Puzzles and Games
● Security and Justice
● Signs and Symbols
● Sports
● Technology and electronics
● Tools and Buildings
● Vehicles
● Weather and Seasons
Part 3 How to Get More Icons for PowerPoint?
PowerPoint has an endless variety of icons for your presentation. No matter what your need is or which type of presentation you are making. You will find any type of icon to ornament your presentation to the fullest.
But, how can you get more icons for your PowerPoint presentation? So, here are the steps for integrating as many icons as you want in your PowerPoint presentation.
Step 1
Go to PowerPoint and reach out to the top Menu bar.
![]()
Step 2
Select the option “Insert”.
Step 3
Select the option “Icons.”
Step 4
Search for as many and whatever type of icon you want to integrate into your PowerPoint presentation.
![]()
Step 5
Select “Insert” option.
![]()
Part 4 How to Customize PowerPoint Slideshow Icon in 8 Simple Ways
Here are the eight different ways in which you can customize the PowerPoint Slideshow Icon.
01Using sketchy lines
First thing, insert any icon of PowerPoint and then use the option “Convert to Shape”.
Go to the “Shape Format Tab” and go to the “Shape Outline.”
Select “Sketchpad”.
You can readily customize the icons in PowerPoint using this recently introduced option at PowerPoint.
![]()
02Adding Simple Shapes
Through this step, you can add some additional details and make the icons of PowerPoint even more enhanced and attractive. You have the option of including a simple and basic shape. Or you can also add some detailing to the icons. You have the freedom of letting your creativity flow to the fullest.
● Group your icon
● Make it effortless to copy and paste and move around all over the slide.
03Adding Animations
You can present your icons in the PowerPoint presentation in the form of animations. You can make them appear through different animation speeds and variations. You can resize them and add layers for animating the icons in PowerPoint.
04Changing the properties of the icons
You can also change the icons’ brightness, contrast, or colours to make them look more enhanced and engaging.
05Adding entrances and exists
You can make your icons enter and leave the presentation in many unique ways.
![]()
06Select the icon you prefer to customise
● Choose the “BrightSlide tab.”
● Go to “My Animations”
Choose your preferred way of making your icon enter or exit the slide
07Using mask
For this, here are the steps.
● Cover a part of the entire slide by selecting a rectangle.
● Match your design and change the fill colour.
● Use the “Align” tools to make circles.
● Animate the icons according to the way you prefer.
08Direction
Another exciting yet straightforward way of customising your icons in PowerPoint is by making them appear from a different direction. Although it sounds simple, it will make your presentation look more formal and intreating.
09Fading in and out
You can readily make your icons fade in or fade out and make them appear more exciting and engaging for your presentation.
Another way of making your presentation look entirely out of the box is with one of the best video editing tools: Filmora. Wondershare Filmora Video Editor has been the best tool for editing videos and enhancing them, and you can readily use it for presenting any slide show or presentation.
For Win 7 or later (64-bit)
For macOS 10.12 or later
It will make your presentation unique, as it has some of the most extraordinary and incredible features. Some of the features are as follows.
● Motion Tracking feature- This feature will make your videos look more fascinating. You can use your creativity to customise the motion of your videos and edit them according to your ideas and inspirations.
● Effects-There are as many as more than 800 effects in Filmora. So, if you want to make your presentation look absolutely different and more incredible from the crowd, use Fimlora and its numerous effects to make your presentation the best of the best.
● Text and Titles- Add texts and titles wherever necessary so that you do not miss out on any information about your topic at the presentation.
● Music Library- Add some more uniqueness and exciting feature to your PowerPoint presentation with the help of the various music and tunes present at the Music Library of Filmora.
There are several other features of Filmora that, if we start including them, will make a list unending. It is the ideal tool for editing videos and also using it for producing some of the most wonderful presentations.
● Ending Thoughts →
● So, now you can readily make some of the most exciting and engaging PowerPoint presentations as you are well aware of the different ways of searching for the icons in PowerPoint, searching for the slideshow icon at PowerPoint, and also slideshow icons in PowerPoint.
● Additionally, you can use the best video editing tool, Filmora, for making your presentation stand out among the crowd in the optimal way possible.
● If you enjoyed reading this article, don’t forget to drop a comment below. Also, share your views with us regarding the content or anything related to the topic.
3 Ways To Stream And Record At The Same Time
The popularity of live streaming has exploded recently. A live stream is simply a video broadcast in real-time over the internet. It’s a great way to connect with people directly, whether for a gaming session, a cooking show, or a Q&A.
Many reasons are there for which why you might want to live stream and record at the same time. For instance, keep a record of your gameplay or stream highlights for future editing or use your live stream to generate content for your YouTube channel.
Whatever your reasons, this article will show you how to do live streaming and recording at the same time using three different methods.
Way 1. Use OBS To Stream And Record Video At The Same Time
OBS, or Open Broadcaster Software, is a free and open-source tool that allows you to stream and record video at the same time, which can be useful if you want to live-stream your gameplay on Twitch or record a tutorial for YouTube.
Key Features of OBS
- Compatible with Mac OS X, Linux, and Windows operating systems.
- Requires at least 4 GB of storage space and an Intel i5 2000-series processor or higher DirectX 10 capable graphics card.
- High-performance video capturing and mixing in real-time.
- With Custom Transitions, you can set up an unlimited number of scenes you can switch between seamlessly.
- Intuitive audio mixer.
- Easy-to-use and simple configuration options.
Steps
Here’s an easy and quick guide on how to use OBS Studio to stream and record videos simultaneously:
Step1 Download OBS Studio from the official website and install it on your computer or laptop.
Step2 Launch OBS Studio and go to the Settings menu. Find the Recording section under the Output tab.
Step3 Click “Start Recording” to manually start the recording or head to the General Tab and checkmark the box before “Automatically Record When Streaming.”
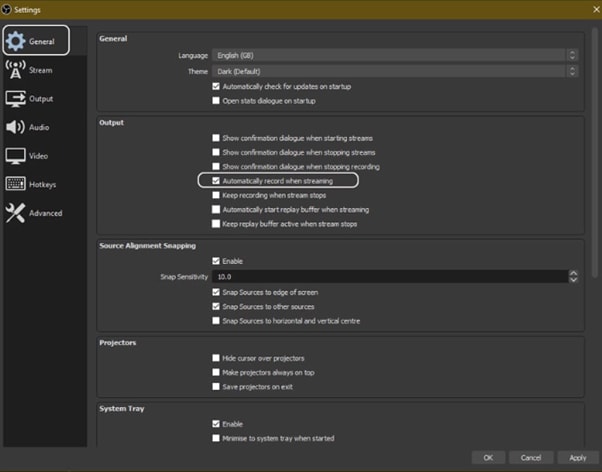
Step4 Finally, click “Apply” to save your settings. Now when you start your stream, the recording will also begin simultaneously.
Way 2. Use Twitch To Save Your Streams
Twitch is the most popular and best live streaming platform that allows gamers to broadcast their gameplay to a live audience and also gives them the ability to save their past broadcasts, or “streams.”
This feature can be useful to save your live stream for later viewing or share your stream with someone who missed it.
Features
Twitch offers a variety of features that make it a unique and powerful game streaming platform. Some of the most notable ones are:
- Live streaming: Twitch allows gamers to share their gameplay in real-time with other gamers around the world. This live aspect of the platform makes it unique and engaging.
- Social interaction: Twitch offers a variety of features that allow gamers to connect with each other, including chat rooms, forums, and user-generated content.
You can save your stream on Twitch in two ways:
- Use the “Highlights” feature, which allows you to save specific moments from your live stream.
- Download your stream’s entire VOD (video on demand) after it has ended.
Steps
Here are the quick steps to saving a stream on your PC from Twitch. But first, you need to enable Twitch VODs before starting your broadcast in the following way:
Step1 Visit Twitch and sign in to your account. Now, click the “Profile” icons and go to “Creator Dashboard.”
Step2 Head to Setting from the left-sidebar and click the “Stream” option. Scroll down and find the VOD Settings. Toggle the buttons next to “Store Past Broadcasts.”
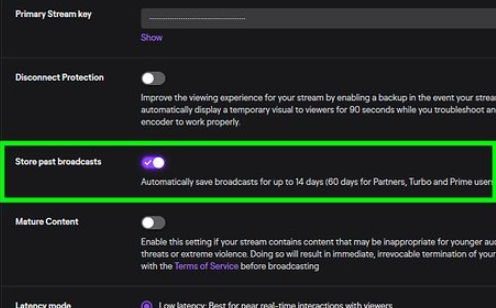
Step3 To publish your VODs instantly after broadcasting, toggle the button next to “Always Publish VODs.”
Now, to download the recordings of your broadcasts to your PC, do the following steps in sequence:
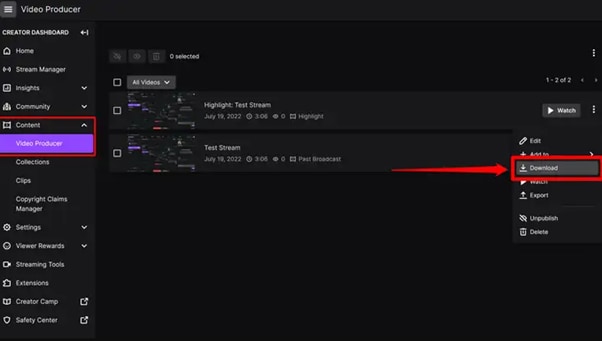
Step1 Head to the Creator Dashboard, find the “Content” section in the left sidebar, and click “Video Producer.”
Step2 Find the stream (VOD or Highlights) you want to download and on the right side, click the three dots.
Step3 Finally, click the “Download” option and let Twitch prepare your video. You will then get the stream’s recording in MP4 format.
Way 3. Use Screen Recorder To Record Your Streams
Using a screen recorder is a great way to record your live stream because it lets you capture the full screen of your PC. Although there are many different screen recorders to choose from, we recommend using Filmora.
Wondershare Filmora is a powerful editor with easy-to-use screen recording capabilities, giving you everything you need to record and stream your video at the same time. The software is free to use and has an intuitive interface.
Features of Filmora
- Support for both Mac OS X and Windows operating systems.
- Ability to record your PC screen, audio, and webcam all at once
- A variety of video editing features
- An easy-to-use interface
Steps
Here’s how to use Filmora for recording while streaming:
Step1 Head to the official Filmora website, download the software and install it on your PC.
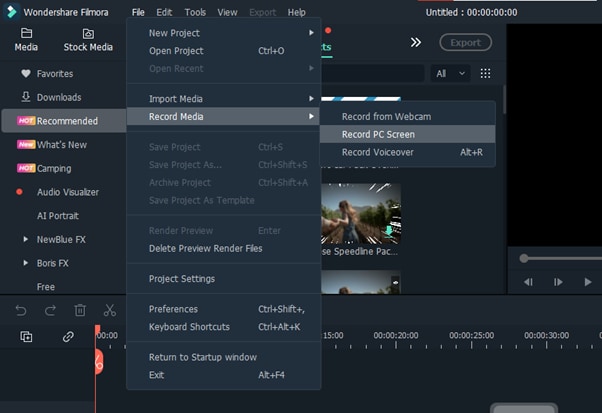
Step2 Launch Filmora 11 and click “New project” in the main interface. Click “File” from the top toolbar and scroll down to “Record media.” From the drop-down menu, select “Record PC Screen.”
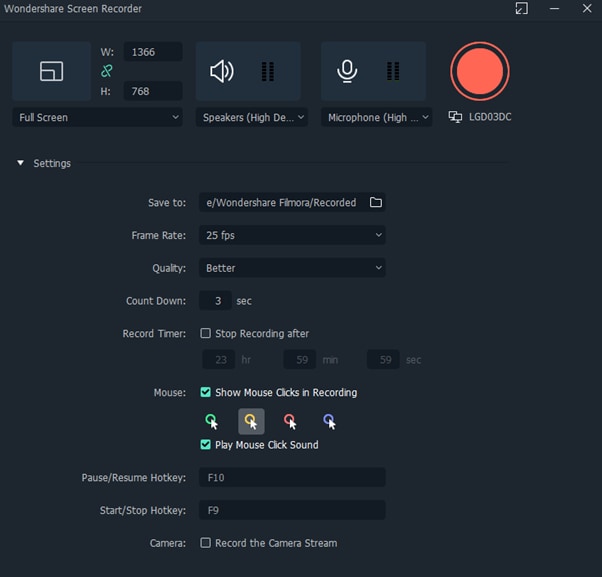
Step3 A new “Wondershare Screen Recorder” window will pop up. You can set up a full screen, custom or target screen recording, speaker, and microphone settings. If you want more Settings, click the drop-down icon.
Step4 Click the Start icon to begin your recording. Afterward, click the Stop icon to stop the recording, and your stream will be saved in the selected destination.
Conclusion
In this article, we’ve discussed three step-by-step methods to help you do live streaming and recording at the same time. With these solutions at your disposal, you’ll be able to save your VODs with ease.
It is best to choose only one software to start with to avoid the time-consuming trial-and-error process. If you want to add another tool, do so later; otherwise, you will waste your precious time and resources.
Give these methods a shot, and eventually, you will find your groove—and become accustomed to just how easy it is to record and stream a video simultaneously.
Free Download For Win 7 or later(64-bit)
Free Download For macOS 10.14 or later
Free Download For macOS 10.14 or later
Templates Increase the Editing Possibilities for Beginners and Professionals. Read This Article to Learn About some Customizable Slow-Motion CapCut Templates
Editing from scratch is a time-consuming process, especially when you’re a beginner. Even skilled editors opt for different ways to maintain productivity. One of the means to save time is the use of templates for creating or editing videos. Slow-motion videos require the manipulation of speed or framerate to produce results. Slow-motion CapCut templates prove to be a valuable source.
In this article, readers will learn about slow-mo CapCut templates for crafting slow-motion videos. For those unfamiliar with CapCut, a brief overview of its functions will be provided. In addition, we’ll introduce some remarkable slow-mo CapCut templates. Moreover, you can learn about an extraordinary alternative for fashioning amazing slow-motion videos.
Slow Motion Video Maker Slow your video’s speed with better control of your keyframes to create unique cinematic effects!
Make A Slow Motion Video Make A Slow Motion Video More Features

Part 1. CapCut Video Editor for Smartphone: Reading Out the Detailed Review
CapCut is a content editing platform that acts as a smartphone application and computing software. The application serves in various video editing tasks while giving professional outcomes. Most of CapCut’s features are free to use; however, there is an affordable subscription plan.
It has AI and manual functioning features to help you edit how you like. In its “Explore” section, you can find various effects, text styles, stickers, and audio tracks. Moreover, you can also introduce subtitles and captions with its “Caption” tool. Plus, it offers camera recording where you can adjust record time, effects, multi-clip options, and more. Here are some of CapCut’s limitless editing features:

- Templates: CapCut enables you to access its pre-built templates for distinct purposes. You can access it all from there, be it fast-motion, cinematic effect, or CapCut slow-mo template. Moreover, when you add the keyword for search, it can show you trending templates and hashtags.
- Remove Background: If you couldn’t decide on a good background while recording, CapCut has got you covered. This feature not only removes the background but also offers a setting for bringing precision. You can adjust the edge setting or intensity of these settings accordingly.
- Smart User-Interface: This application has an intuitive, clean, and smart smartphone interface. The themes and the positioning of features are done minimally, where nothing looks stuffed. In addition, you can expand or collapse the display menu accordingly.
- Image Enhancement: As discussed before, CapCut is a content editing app that offers image enhancements as well. The feature automatically compresses your content quality to 1080p. Moreover, you can resize the image post-enhancement and add an AI background to it.
- Cloud Storage and Collaboration: You can edit without any prior account information in CapCut. However, signing up comes with various benefits, such as accessing pre-edited projects. In addition, you can connect with other editors on CapCut and take your editing up a notch.
Part 2. Some Top-Rated CapCut Templates to Try for Creating Perfect Slow-Motion Videos
With a wide range of features and effects, CapCut also has the power to turn videos into slow-mos. You can craft a slow-motion video via manual speed change or be smart with its templates. CapCut slow-motion templates are easily accessible in its Template section. While there are hundreds of slow-mo templates CapCut, take a look at these that we’ve compiled for you:
1. Slowmo
This template is reachable via the CapCut slow-mo edit template gallery and is open for access. The template possesses an aspect ratio of 9:16 and is a suitable fit for your Instagram reels and YouTube shorts. It only requires a video of 16 seconds to get started with this trending template. The template slows down your video at specific durations, giving it a majestic resonance.

2. Slowmotion Smooth
With a catchy song and visually striking filter, this is perfect for aesthetic dress-up videos. This CapCut video slow motion template applies to a single clip of 14 seconds duration. With its 9:16 aspect ratio, it is well-fitted for a majority of social platforms. The template has over 316.3K uses, and you can replace its background song using CapCut.

3. Trend Slowmo
Use this trending slow-motion song CapCut template with over 1.1 million uses to make viral slo-mos. It doesn’t offer a basic Slomo effect but has a trendy background song. In addition, the template is a collaboration between slow motion and blur effect. Users only require a video to employ this effect, offering a 9:16 aspect ratio.

4. Slowmo Aesthetic
Make your modeling and dress-up video look aesthetic with this slow-mo CapCut template. It is a beautiful blend of slow-motion effects on specific scenes with an aesthetic filter. The video will start with a black-and-white look with a smooth transition toward colors and slo-mo. With its 9:16 aspect ratio and 6-second duration, it is perfect for showcasing dresses and fashion.

5. Healing Slowmo
Craft aesthetic travel videos and capture landscapes using this CapCut slow-mo template. It appears as a combination of slow motion and blur effect at multiple periods. You only require a portrait clip to use this template in an efficient way. You can fashion captivating Instagram, Facebook, and Pinterest reels with its 9:16 ratio.

Part 3. How to Create Proper Slow-Motion Videos on CapCut Video Editor?
CapCut slow-mo edit not only slows down video but also helps in post-editing. The user interface is self-explanatory, and you can find the features with ease. However, this section will provide you with a detailed guide on using the template CapCut slow-mo. Here is a step-by-step guide to creating a slo-mo in CapCut via its templates collection:
Step 1. After downloading CapCut on your smartphone, launch it to access its main menu. From there, navigate towards the downward bar and click the “Templates” option.

Step 2. In the templates collection, go to the search bar and type slow motion. Multiple options will appear on the screen in the Trending section. From there, select a template to employ it. Once you have selected the template, observe if it is right for your video. Afterward, click the “Use template” button to start editing with it.

Step 3. Once you have selected a video, click the “Preview” button. Notice that you can only select the number of videos the template offers.

Step 4. Afterward, click on the “Text” option and add text if you want. After all the editing is done, click on the “Export” button to download the video.

Part 4. Smartphone Alternative: Creating Slow Motion Videos with Wondershare Filmora App
Wondershare Filmora is a versatile platform for creating or editing slow motions with smartphone services. You can access the application from the Play Store or App Store and start editing instantly. The Filmora app displays a clearly laid out interface with easy access to features. Here, you can use advanced and basic speed editing to create a slow motion:

Method 1. Using the Normal Speed Option
The normal method in this CapCut slow-mo edit alternative uses playback speed. It involves a simple slider positioning and some enhancement options. Here is how to create a slow motion in the Filmora app using the standard approach:
Step 1. After downloading the Filmora application, navigate towards the top tools. From there, select the “Speed” option and choose a clip for import.

Step 2. Select the “Normal” section and drag the playback towards the left. This will slow down the video, and you can set the speed up to 0.2x for slo-mo. After speed settings, click the “ü” icon, and if you want, do other settings.

Step 3. Once you are done with post-slow motion settings, click the “Export” button.

Method 2. Using the Speed Curve Option
This method involves slightly advanced speed settings for slow-motion creation. This method features many templates alternative to CapCut slow-mo templates. Further, you can use the custom setting template to edit as per your taste. Here is how to create a slow motion using Filmora’s speed curve:
Step 1. Repeat the same process of importing the video and go to the “Curve” section. Select a pre-designed speed template if it fits your video. If not, go for the “Customize” template, and a panel will display.

Step 2. In this panel, adjust the slider position in the downward direction. This will slow down your video at specific durations. You can also enable the “+ Add beat” option for audio adjustments.

Step 3. Click the “ü” icon a couple of times in the respective panels to finalize settings. Afterward, export the video by opting for the “Export” button.

Bonus Part. Make Your Video Editing Perfect with Wondershare Filmora
For beginners, smartphone editing might be satisfactory. However, for a skilled professional with a passion for editing, it’s not enough. For more precise editing and smooth slow motions, we recommend a desktop solution. This CapCut slow-motion edit alternative is Wondershare Filmora’s computing software.
It is an adaptable editing software offering basic as well as advanced video editing features. The features rest on its intuitive interface and are reachable to all. It has a resource library that is filled with transition templates, effects, presets, and more. It has both visual and audio editing options along with AI abilities for production purposes. All in all, the software is an amazing pick for those who prefer high-quality results.
Free Download For Win 7 or later(64-bit)
Free Download For macOS 10.14 or later
AI-Backed Professional Video Editing Features of Filmora
If you are looking to create high-grade slow motions using speed templates, Filmora is for you. There are multiple settings to enhance visuals, audio tracks, and texts. You can do amazing color corrections or add mesmerizing effects to videos. Here are some of its video editing features to consider during editing:
1. AI Copilot Editing
For instance, you are using Filmora for slow motion and don’t know where to start. Employ its copilot assistant and ask it about slo-mo creation. It will direct you towards the speed options with insights on editing. Moreover, the copilot provides one-click access buttons for you to access the feature.
2. AI Text-to-Video
If you are a big fan of AI applications, then Filmora is the right stop for you. Its text-to-video AI allows you to generate videos via prompts or scripts. The function automatically adds graphics and AI voice to videos.
3. Remove Background
The video background remover of Filmora uses high-end AI technology to do the work. It analyzes and cuts out the background with accuracy while providing replacements. You employ three background options: solid color, gradients, and graphics. Users can also add a custom image or video in the timeline to use a background.
4. Instant Mode
If you are not familiar with video and need to start editing videos, this feature is for you. It is an automated video editor for you that uses AI algorithms to edit videos. It color-corrects or enhances any flaws and adds templates and beats to the video. Moreover, it has 115+ multi-contextual templates for diverse video editing.
Conclusion
Slow-motion CapCut templates serve as a powerful resource for creating slo-mos. The con is that with automated templates, there is no room for customizations. However, Wondershare Filmora is a powerful software application with no such limit. It offers visual, audio, and more custom options after some creation. Hence, if you are looking for an editor to broaden your editing game, use Filmora.
Make A Slow Motion Video Make A Slow Motion Video More Features
Part 1. CapCut Video Editor for Smartphone: Reading Out the Detailed Review
CapCut is a content editing platform that acts as a smartphone application and computing software. The application serves in various video editing tasks while giving professional outcomes. Most of CapCut’s features are free to use; however, there is an affordable subscription plan.
It has AI and manual functioning features to help you edit how you like. In its “Explore” section, you can find various effects, text styles, stickers, and audio tracks. Moreover, you can also introduce subtitles and captions with its “Caption” tool. Plus, it offers camera recording where you can adjust record time, effects, multi-clip options, and more. Here are some of CapCut’s limitless editing features:
- Templates: CapCut enables you to access its pre-built templates for distinct purposes. You can access it all from there, be it fast-motion, cinematic effect, or CapCut slow-mo template. Moreover, when you add the keyword for search, it can show you trending templates and hashtags.
- Remove Background: If you couldn’t decide on a good background while recording, CapCut has got you covered. This feature not only removes the background but also offers a setting for bringing precision. You can adjust the edge setting or intensity of these settings accordingly.
- Smart User-Interface: This application has an intuitive, clean, and smart smartphone interface. The themes and the positioning of features are done minimally, where nothing looks stuffed. In addition, you can expand or collapse the display menu accordingly.
- Image Enhancement: As discussed before, CapCut is a content editing app that offers image enhancements as well. The feature automatically compresses your content quality to 1080p. Moreover, you can resize the image post-enhancement and add an AI background to it.
- Cloud Storage and Collaboration: You can edit without any prior account information in CapCut. However, signing up comes with various benefits, such as accessing pre-edited projects. In addition, you can connect with other editors on CapCut and take your editing up a notch.
Part 2. Some Top-Rated CapCut Templates to Try for Creating Perfect Slow-Motion Videos
With a wide range of features and effects, CapCut also has the power to turn videos into slow-mos. You can craft a slow-motion video via manual speed change or be smart with its templates. CapCut slow-motion templates are easily accessible in its Template section. While there are hundreds of slow-mo templates CapCut, take a look at these that we’ve compiled for you:
1. Slowmo
This template is reachable via the CapCut slow-mo edit template gallery and is open for access. The template possesses an aspect ratio of 9:16 and is a suitable fit for your Instagram reels and YouTube shorts. It only requires a video of 16 seconds to get started with this trending template. The template slows down your video at specific durations, giving it a majestic resonance.
2. Slowmotion Smooth
With a catchy song and visually striking filter, this is perfect for aesthetic dress-up videos. This CapCut video slow motion template applies to a single clip of 14 seconds duration. With its 9:16 aspect ratio, it is well-fitted for a majority of social platforms. The template has over 316.3K uses, and you can replace its background song using CapCut.
3. Trend Slowmo
Use this trending slow-motion song CapCut template with over 1.1 million uses to make viral slo-mos. It doesn’t offer a basic Slomo effect but has a trendy background song. In addition, the template is a collaboration between slow motion and blur effect. Users only require a video to employ this effect, offering a 9:16 aspect ratio.
4. Slowmo Aesthetic
Make your modeling and dress-up video look aesthetic with this slow-mo CapCut template. It is a beautiful blend of slow-motion effects on specific scenes with an aesthetic filter. The video will start with a black-and-white look with a smooth transition toward colors and slo-mo. With its 9:16 aspect ratio and 6-second duration, it is perfect for showcasing dresses and fashion.
5. Healing Slowmo
Craft aesthetic travel videos and capture landscapes using this CapCut slow-mo template. It appears as a combination of slow motion and blur effect at multiple periods. You only require a portrait clip to use this template in an efficient way. You can fashion captivating Instagram, Facebook, and Pinterest reels with its 9:16 ratio.
Part 3. How to Create Proper Slow-Motion Videos on CapCut Video Editor?
CapCut slow-mo edit not only slows down video but also helps in post-editing. The user interface is self-explanatory, and you can find the features with ease. However, this section will provide you with a detailed guide on using the template CapCut slow-mo. Here is a step-by-step guide to creating a slo-mo in CapCut via its templates collection:
Step 1. After downloading CapCut on your smartphone, launch it to access its main menu. From there, navigate towards the downward bar and click the “Templates” option.
Step 2. In the templates collection, go to the search bar and type slow motion. Multiple options will appear on the screen in the Trending section. From there, select a template to employ it. Once you have selected the template, observe if it is right for your video. Afterward, click the “Use template” button to start editing with it.
Step 3. Once you have selected a video, click the “Preview” button. Notice that you can only select the number of videos the template offers.
Step 4. Afterward, click on the “Text” option and add text if you want. After all the editing is done, click on the “Export” button to download the video.
Part 4. Smartphone Alternative: Creating Slow Motion Videos with Wondershare Filmora App
Wondershare Filmora is a versatile platform for creating or editing slow motions with smartphone services. You can access the application from the Play Store or App Store and start editing instantly. The Filmora app displays a clearly laid out interface with easy access to features. Here, you can use advanced and basic speed editing to create a slow motion:
Method 1. Using the Normal Speed Option
The normal method in this CapCut slow-mo edit alternative uses playback speed. It involves a simple slider positioning and some enhancement options. Here is how to create a slow motion in the Filmora app using the standard approach:
Step 1. After downloading the Filmora application, navigate towards the top tools. From there, select the “Speed” option and choose a clip for import.
Step 2. Select the “Normal” section and drag the playback towards the left. This will slow down the video, and you can set the speed up to 0.2x for slo-mo. After speed settings, click the “ü” icon, and if you want, do other settings.
Step 3. Once you are done with post-slow motion settings, click the “Export” button.
Method 2. Using the Speed Curve Option
This method involves slightly advanced speed settings for slow-motion creation. This method features many templates alternative to CapCut slow-mo templates. Further, you can use the custom setting template to edit as per your taste. Here is how to create a slow motion using Filmora’s speed curve:
Step 1. Repeat the same process of importing the video and go to the “Curve” section. Select a pre-designed speed template if it fits your video. If not, go for the “Customize” template, and a panel will display.
Step 2. In this panel, adjust the slider position in the downward direction. This will slow down your video at specific durations. You can also enable the “+ Add beat” option for audio adjustments.
Step 3. Click the “ü” icon a couple of times in the respective panels to finalize settings. Afterward, export the video by opting for the “Export” button.
Bonus Part. Make Your Video Editing Perfect with Wondershare Filmora
For beginners, smartphone editing might be satisfactory. However, for a skilled professional with a passion for editing, it’s not enough. For more precise editing and smooth slow motions, we recommend a desktop solution. This CapCut slow-motion edit alternative is Wondershare Filmora’s computing software.
It is an adaptable editing software offering basic as well as advanced video editing features. The features rest on its intuitive interface and are reachable to all. It has a resource library that is filled with transition templates, effects, presets, and more. It has both visual and audio editing options along with AI abilities for production purposes. All in all, the software is an amazing pick for those who prefer high-quality results.
Free Download For Win 7 or later(64-bit)
Free Download For macOS 10.14 or later
AI-Backed Professional Video Editing Features of Filmora
If you are looking to create high-grade slow motions using speed templates, Filmora is for you. There are multiple settings to enhance visuals, audio tracks, and texts. You can do amazing color corrections or add mesmerizing effects to videos. Here are some of its video editing features to consider during editing:
1. AI Copilot Editing
For instance, you are using Filmora for slow motion and don’t know where to start. Employ its copilot assistant and ask it about slo-mo creation. It will direct you towards the speed options with insights on editing. Moreover, the copilot provides one-click access buttons for you to access the feature.
2. AI Text-to-Video
If you are a big fan of AI applications, then Filmora is the right stop for you. Its text-to-video AI allows you to generate videos via prompts or scripts. The function automatically adds graphics and AI voice to videos.
3. Remove Background
The video background remover of Filmora uses high-end AI technology to do the work. It analyzes and cuts out the background with accuracy while providing replacements. You employ three background options: solid color, gradients, and graphics. Users can also add a custom image or video in the timeline to use a background.
4. Instant Mode
If you are not familiar with video and need to start editing videos, this feature is for you. It is an automated video editor for you that uses AI algorithms to edit videos. It color-corrects or enhances any flaws and adds templates and beats to the video. Moreover, it has 115+ multi-contextual templates for diverse video editing.
Conclusion
Slow-motion CapCut templates serve as a powerful resource for creating slo-mos. The con is that with automated templates, there is no room for customizations. However, Wondershare Filmora is a powerful software application with no such limit. It offers visual, audio, and more custom options after some creation. Hence, if you are looking for an editor to broaden your editing game, use Filmora.
Top 5 Best Video to PPT Converters You Should Know
Almost three decades after its debut, Microsoft PowerPoint has become a hallmark of professionalism and quality in the presentation software industry. Traditional PPT files produced by PowerPoint have many drawbacks, including the fact that the content of your presentations may be readily edited and reused by others.
The Save to Video option in 2010 and subsequent versions of PowerPoint addresses this problem by allowing users to produce video files that may be readily shared on social media, video sharing sites, or utilized in eLearning courses. The built-in PPT file conversion function in newer versions of PowerPoint has several restrictions that prohibit you from picking the video file type or incorporating embedded media files in the PowerPoint presentation video.
That’s why we’ve compiled a list of the top five video to ppt converter to make the process of turning a PowerPoint presentation into a movie as simple and enjoyable as possible.
Top 5 Best Video to PPT Converters
1.Moyea

Price: $49.95, Free trial available
This extremely effective program allows you to convert any documents written with PowerPoint versions up to 2013 and PowerPoint viewer. Convert the presentations to various common file formats, including MP4, WMV, and AVI. All sound files, transitions, and animations from your original presentation are preserved using this Windows-based tool.
In order to tailor the video quality and frame rates to your project’s requirements, Moyea Video to PowerPoint Converter gives you total control over the output video parameters. PPT to Video Converter makes it easy to include logos, watermarks, music and voiceovers in your PowerPoint films.
Pros
Options for converting files with a lot of power
It is possible to convert many files at once.
Cons
There aren’t any HD output choices available.
To be able to convert presentations, you must have PowerPoint installed.
2.Leawo Video to PPT Pro

Price: $44.95
PowerPoint presentations in PPT, PPTX, PPTM, POT, or POTX file formats may be converted to practically any video file type with our video to ppt converter. PowerPoint 2000 through 2016 (both 64-bit and 32-bit) are all supported, as are all versions of the program.
Leawo Video to PPT Pro’s video files is compatible with iPhone and Android smartphones, tablets, gaming consoles, and Apple TV. You can turn your PowerPoint presentations into high-definition films with narration and other audio files using this program. Share your movies with the world through the likes of DailyMotion, Vimeo, YouTube, and Metacafe.
Pros
The ability to do unlimited batch conversions at once.
Allows you to brand converted films with custom logos and watermarks.
Cons
The Mac OS cannot run this program.
Requirements for a complicated system.
3.iSpring River

Price: $97 for a single lifetime license
Installing iSpring River on your PC turns it into a PowerPoint add-on that you can use from the ribbon. This isn’t a limitation since iSpring River allows you to convert PPT files to widely suitable video file formats like MP4 or AVI, even though it’s not stand-alone computer software. In addition, you may choose the video size and compression parameters before each file conversion using the add-video on’s settings.
All of the original PowerPoint presentation’s animations and audio files, as well as transitions and font and text formatting, will be included in the final film. Video files exported from iSpring River may be uploaded straight to YouTube, but no other social media services such as Dropbox or Google Drive are supported.
Pros
It’s quick and simple to use.
Upload YouTube videos directly from your computer’s hard disc.
Cons
Cannot be used as a standalone application.
There isn’t any support for high-definition video.
4.RZ PowerPoint Converter

Price: There is a free version available, and prices begin at $29.99.
Using this sophisticated converter, any PPT files made with 2013 or previous versions of PowerPoint may be quickly converted to movies. RZ PowerPoint video to ppt converter also allows you to create HD video files that can be readily shared online, as well as files that can be burnt to DVDs.
Any current video playback device can play videos generated with this program, and the quality is so outstanding that you can play them on huge LCD displays. Though this video to ppt converter is accessible for free, its free edition lacks all of the capabilities that make this program an excellent alternative for professionals that prepare PowerPoint presentations on a consistent basis. It’s possible to get the commercial edition of this Windows-based tool and have all of the multimedia you include in the presentations converted to video without losing any quality.
Pros
You may use this to burn DVDs.
All PowerPoint file types are supported.
Cons
However, basic PPT to video file conversion is only available in the free edition of the product.
There is no possibility to convert many files at once.
5.Camtasia Studio

Price: A free trial is offered, and a single-user license is $249.
There is much more to Camtasia Studio than simply a video to ppt converter in it. An unencumbered trial edition of this video editing program helps you create professional-looking films from PowerPoint presentations. Camtasia Studio’s single-user license is a good alternative for those who just need to convert a few presentations for free, but if you’re searching for a full-featured video to ppt converter, you should consider purchasing Camtasia.
When using the software’s premium edition, you may add multimedia files, such as PowerPoint presentations and webcam footage to your final video project. With Camtasia Studio, you can easily post your films in nearly any video file type on social media.
Pros
With Camtasia Studio, adding transitions, callouts, or text effects is a cinch.
Advanced video editing tools are available.
Cons
Only 30 days are included in the free trial.
Expensive.
Conclusions
When looking for the best PowerPoint conversion software, there are a lot of factors to consider. The output quality, the ability to use PowerPoint effects, compatibility with new devices, & one publishing are all key considerations. Get a free trial of iSpring Converter Pro, the number one choice on our list, if you need a dependable video to ppt converter that can handle any amount of slides and animations in your presentation.
For Win 7 or later (64-bit)
For macOS 10.12 or later
Price: $49.95, Free trial available
This extremely effective program allows you to convert any documents written with PowerPoint versions up to 2013 and PowerPoint viewer. Convert the presentations to various common file formats, including MP4, WMV, and AVI. All sound files, transitions, and animations from your original presentation are preserved using this Windows-based tool.
In order to tailor the video quality and frame rates to your project’s requirements, Moyea Video to PowerPoint Converter gives you total control over the output video parameters. PPT to Video Converter makes it easy to include logos, watermarks, music and voiceovers in your PowerPoint films.
Pros
Options for converting files with a lot of power
It is possible to convert many files at once.
Cons
There aren’t any HD output choices available.
To be able to convert presentations, you must have PowerPoint installed.
2.Leawo Video to PPT Pro
Price: $44.95
PowerPoint presentations in PPT, PPTX, PPTM, POT, or POTX file formats may be converted to practically any video file type with our video to ppt converter. PowerPoint 2000 through 2016 (both 64-bit and 32-bit) are all supported, as are all versions of the program.
Leawo Video to PPT Pro’s video files is compatible with iPhone and Android smartphones, tablets, gaming consoles, and Apple TV. You can turn your PowerPoint presentations into high-definition films with narration and other audio files using this program. Share your movies with the world through the likes of DailyMotion, Vimeo, YouTube, and Metacafe.
Pros
The ability to do unlimited batch conversions at once.
Allows you to brand converted films with custom logos and watermarks.
Cons
The Mac OS cannot run this program.
Requirements for a complicated system.
3.iSpring River
Price: $97 for a single lifetime license
Installing iSpring River on your PC turns it into a PowerPoint add-on that you can use from the ribbon. This isn’t a limitation since iSpring River allows you to convert PPT files to widely suitable video file formats like MP4 or AVI, even though it’s not stand-alone computer software. In addition, you may choose the video size and compression parameters before each file conversion using the add-video on’s settings.
All of the original PowerPoint presentation’s animations and audio files, as well as transitions and font and text formatting, will be included in the final film. Video files exported from iSpring River may be uploaded straight to YouTube, but no other social media services such as Dropbox or Google Drive are supported.
Pros
It’s quick and simple to use.
Upload YouTube videos directly from your computer’s hard disc.
Cons
Cannot be used as a standalone application.
There isn’t any support for high-definition video.
4.RZ PowerPoint Converter
Price: There is a free version available, and prices begin at $29.99.
Using this sophisticated converter, any PPT files made with 2013 or previous versions of PowerPoint may be quickly converted to movies. RZ PowerPoint video to ppt converter also allows you to create HD video files that can be readily shared online, as well as files that can be burnt to DVDs.
Any current video playback device can play videos generated with this program, and the quality is so outstanding that you can play them on huge LCD displays. Though this video to ppt converter is accessible for free, its free edition lacks all of the capabilities that make this program an excellent alternative for professionals that prepare PowerPoint presentations on a consistent basis. It’s possible to get the commercial edition of this Windows-based tool and have all of the multimedia you include in the presentations converted to video without losing any quality.
Pros
You may use this to burn DVDs.
All PowerPoint file types are supported.
Cons
However, basic PPT to video file conversion is only available in the free edition of the product.
There is no possibility to convert many files at once.
5.Camtasia Studio
Price: A free trial is offered, and a single-user license is $249.
There is much more to Camtasia Studio than simply a video to ppt converter in it. An unencumbered trial edition of this video editing program helps you create professional-looking films from PowerPoint presentations. Camtasia Studio’s single-user license is a good alternative for those who just need to convert a few presentations for free, but if you’re searching for a full-featured video to ppt converter, you should consider purchasing Camtasia.
When using the software’s premium edition, you may add multimedia files, such as PowerPoint presentations and webcam footage to your final video project. With Camtasia Studio, you can easily post your films in nearly any video file type on social media.
Pros
With Camtasia Studio, adding transitions, callouts, or text effects is a cinch.
Advanced video editing tools are available.
Cons
Only 30 days are included in the free trial.
Expensive.
Conclusions
When looking for the best PowerPoint conversion software, there are a lot of factors to consider. The output quality, the ability to use PowerPoint effects, compatibility with new devices, & one publishing are all key considerations. Get a free trial of iSpring Converter Pro, the number one choice on our list, if you need a dependable video to ppt converter that can handle any amount of slides and animations in your presentation.
For Win 7 or later (64-bit)
For macOS 10.12 or later
Also read:
- Updated 10 Best Video Editing Apps With Templates for 2024
- New Best Dark Moody LUTs During Editing for 2024
- Updated How to Do Perfect Match Paint 100 the Simple Way
- Updated 2024 Approved Hitfilm Express Video Editor Review
- New How to Use Deep Fried Meme Maker
- New Detailed Tutorial to Rotate a Video in Cyberlink PowerDirector for 2024
- In 2024, Do You Still Waste Time Making Transparent Background in Paint
- Fixing The Slow Playback Issues in DaVinci Resolve
- How to Create The Best Video Collages ?
- This Article Discusses What Is Blender Video Editor, How to Download, Install and Use It, and Its Key Features. It Further Discusses Its Alternative for Editing Your Videos and More. Check Out Now
- Updated In 2024, How to Become a Youtuber
- In 2024, 12 Impressive AI Video Ideas for Creating Engaging Video Content
- Updated How to Become a Youtuber, In 2024
- Updated Easy Way to Inset Text in Video
- New Step By Step Guide on Using Media Player Classic To Rotate A Video
- Updated The Best Way to Remove Audio From Your Videos
- New Camtasia Vs. Final Cut Pro for 2024
- 2024 Approved Best Audio Plug-Ins For Video Editors
- New 15 Must-Use Gifs Editors for 2024
- New Offering The Best Understanding of Performing iMovie Slow Motion Video
- Updated The Top 10 AI Video Analytics Companies at a Glance
- Color Correction Basics (S-LOG Footage) for 2024
- New | How to Change Quicktime Player Speed on Mac for 2024
- New 2024 Approved 11 Ways To Radial Blur To Images (iPhone/Android/Mac/Windows)
- 2024 Approved Are You Curious About Finding a Good iPhone Slow-Motion App? Discover the Top-Rated Applications in the Market that Will Help You Create the Perfect Video
- New 2024 Approved Replacing the Sky in Adobe After Effects An Extensive Guide
- In 2024, Best Phantom Slow-Mo Camera For Recording Slow Motion Videos
- How D AI Video Games Act More Human Than Human for 2024
- 2024 Approved Discover 30+ Amazing Templates for VN Video Editor to Elevate Your Videos. Create Professional-Looking Videos with Ease
- Updated Discovering The Best Wedding LUTs for Premiere Pro | An Overview for 2024
- Do You Want to Crop a TikTok Video? In This Article, We Will Provide You with Detailed Steps Through Which You Can Discover How to Crop TikTok Videos Easily
- Updated In 2024, Adobe Premiere Pro Download and Use Guide
- Updated Best 8 Online GIF to APNG Converters
- New 2024 Approved 4 Ways to Loop a Video on Vimeo
- 2024 Approved What Is Lumetri Color and How Do You Use It in Adobe After Effects? Find Out the Numerous Functions of Lumetri Panel and Ways to Apply Them to Your Video
- 2024 Approved 4 Ways to Add White Border to Video on Mobile and Desktop
- New Top 8 Memoji Makers to Make a Memoji on PC, Android & iPhone for 2024
- Updated How to Use LUTs in Lumafusion & Free LUTs Resource for 2024
- 2024 Approved How To Cut Videos For Instagram On Mac
- New Change Background Color in After Effects
- Updated Best Movie Title Maker for 2024
- New 2024 Approved | How to Livestream Zoom on Facebook?
- New This Article Is a Guide on How to Download and Install Final Cut Pro, Its Key Features, and More. It Also Discusses an Alternative Option to It so the Creators or Editors Can Opt for Editing Videos Accordingly
- New 2024 Approved Detailed Tutorial to Resize Your Video in VLC
- In 2024, How to Transfer Contacts from Xiaomi Redmi K70 Pro to iPhone XS/11 | Dr.fone
- How to Transfer Videos from Oppo Reno 10 Pro+ 5G to iPad | Dr.fone
- How To Install the Latest iOS Beta Version on iPhone 13? | Dr.fone
- 6 Fixes to Unfortunately WhatsApp has stopped Error Popups On Poco M6 5G | Dr.fone
- How does the stardust trade cost In pokemon go On Nubia Red Magic 8S Pro? | Dr.fone
- In 2024, Tips and Tricks for Apple ID Locked Issue On iPhone 14 Pro
- Updated Chrome Video Translators Top 5 Video Translation Chrome Extensions
- In 2024, How to Access Your iPhone XS When You Forget the Passcode?
- Complete guide for recovering video files on Vivo S17 Pro
- Ways To Find Unlocking Codes For Oppo Find X6 Phones
- Title: New In 2024, Customize PowerPoint Slideshow Icon in Simple Ways
- Author: Chloe
- Created at : 2024-04-24 07:08:42
- Updated at : 2024-04-25 07:08:42
- Link: https://ai-editing-video.techidaily.com/new-in-2024-customize-powerpoint-slideshow-icon-in-simple-ways/
- License: This work is licensed under CC BY-NC-SA 4.0.
