

New In 2024, How Long Does It Take To Edit Videos
How Long Does It Take To Edit Videos
If you want to put together the pieces for online videos the number one thing most of the time takes is editing.
Why does editing take so much time and what to do for that?
- Too many choices.
It completely depends upon how many choices you are giving yourself while editing a video. It takes time to make choices. For example, if your friend asks you to buy a card (any card) from the store. You go into the store and start searching cards from more than 50000 cards, it takes time. On the other hand, if your friend asks you to buy a card for his uncle’s pet dog. This time it becomes easier for you to go straight and choose from the pet cards without moving around the birthday and anniversary cards.
- Amount of footage.
It depends upon how much footage you have on your edit and what kind of content you are editing. Some of the content is really complex and takes a lot of time like V-logging but at the same time, you may have content that requires very less edit or zero edit.
The video editing will become a slit and a quick process for you compared to what it was a few years back. But there are a few key things that really speed up the editing process.
I am going to discuss from beginning to end how to edit a video.
- Outline
You should take a paper and write down what you are going to say about your video. It would make your editing easy because you have already structured your content.
- Avoid distractions
While editing you make a flow state in which the editing process becomes easier. But when you got distracted it takes a lot of time to get back to that flow state.
- My kids are my big distraction so, I usually start my editing process after they go to bed. (You can set yours).
- Keep your phone away because it is another distraction that consumes most of your time.
- Don’t keep re-watching your video all the time. Usually, people edit the first clip and before starting to edit the second clip they watch the first clip. After that, they edit the second clip and then re-watch the first and the second clip. It is also wasting a lot of your time. Do it at the end.
How to Edit Video Faster with the Best Video Editor
Filmora 11 is one of the easiest to learn and one of the most beginner-friendly apps. It is available on both Mac and windows. You can download it for free to use its features. Now let’s get started to go deep down into the steps.
- Open the Filmora 11, a window will be opened.
- The Create Project is for a new project.
- You can change the Aspect Ratio coinciding with the social media platforms. Widescreen 16:9 is for TV or YouTube.
- You can use the previously made projects.
- To start with a new project hit the New Project.

In the user interphase, there are 3 basic sections.
- Editing tabs are at the top to change the formatting of the videos.
- Media tab is to Import videos or photos.
- Preview window to watch the editing process.
- Down here is the timeline where all the editing process takes place.

- Select the video from the system storage and drag it and drop it into the timeline.
- The video then be visible in the preview window.

You can split, cut, trim, delete, animate, and add effects and music. There are hundreds of editing features inside the menu bar that provide the edit controls and you can enjoy editing in the palm of your hand.
Here is an important feature you should know.
- Select the video and hit the speed
- You can select slow, fast, normal, and the most interesting one is speed ramping.
- Speed ramping allows you to set automatically made patterns to slow down then fast again slow. It will create a cinematic effect in the video. But this feature is only for paid users.

- Here is another very interesting tool the color correction tool. To get a uniform color in the combination of different clips, you can automatically set the color correction and color match.
- You can match the reference frame with the current to match their colors.

- Hit the File option and select the Save as Project.
- Now hit the Export tab to export the video. You can set the format of the video and the platform like YouTube, Instagram, Facebook, or any of them.

It will give you the fundamental framework for editing any video using Filmora 11.
1. Photos app for Windows 10.
I am going to show you how you can edit videos in Windows 10 using the app that comes with windows 10. Yes! Windows 10 include a free video editor and I am going to tell you step-by-step how to take advantage of it. If you are using windows 7 or windows 8 don’t feel let down, you can also create windows 10 totally free.
Microsoft has added the Photos app to Windows 10 and has added a fully functional video editor. You can do all sorts of things like trimming and splitting clips and re-organizing clips.

The great news is you don’t have to go out and buy a video editor or search for the video editor to download on your system instead if you are Windows 10 you already have some awesome software to edit your videos.
2. CapCut App for Android.
CapCut is the best video editing app, whether you are making videos for youtube, TikTok, Instagram, or Facebook. It is a free and all-in-one video editing app and you can use it without watermarks and annoying ads. The good thing about this app is, that it is very easy to use. Now let’s have a quick overview of the CapCut app.
- After opening your video select the clips you want to edit and here you will get a project timeline.

Here you can add, move or replace clips and can perform even more editing in the timeline.
You can split, trim, and delete

You can also apply some filters and adjustments. Adding text, stickers, and audio and the rest of the editing is just fun doing in CapCut. You can change the animation and style of your video in just a few clicks.

It also provides us with the Effects options.
- The video effects are effects on the entire video.
- The body effects are the effects applied only on the body.

Let’s enjoy its advanced features without paying for monthly subscription.
3. Davinci Resolve for Mac.
The Davinci Resolve is the most professional video editing software on Mac. It is absolutely ridiculous that it is giving access to you for free. Along with this, it is very professional video editing software that people used to create Hollywood movies and that kind of stuff. It provides a very easy and professional interphase that anyone can use without having training.
- The controls and features in the software are amazing and can edit videos frame by frame.

- There is also a dedicated area for audio creation.

- The motion graphics and

- A specific area just for color grading and color correcting.

That’s why the Davinci Resolve has got its name as a finishing application of movies. People come in and color grade their videos. As it is a very powerful software hence if you are working with an old computer and that’s not really a powerful computer, the Davinci Resolve would not be going to work properly for you.
It completely depends upon how many choices you are giving yourself while editing a video. It takes time to make choices. For example, if your friend asks you to buy a card (any card) from the store. You go into the store and start searching cards from more than 50000 cards, it takes time. On the other hand, if your friend asks you to buy a card for his uncle’s pet dog. This time it becomes easier for you to go straight and choose from the pet cards without moving around the birthday and anniversary cards.
- Amount of footage.
It depends upon how much footage you have on your edit and what kind of content you are editing. Some of the content is really complex and takes a lot of time like V-logging but at the same time, you may have content that requires very less edit or zero edit.
The video editing will become a slit and a quick process for you compared to what it was a few years back. But there are a few key things that really speed up the editing process.
I am going to discuss from beginning to end how to edit a video.
- Outline
You should take a paper and write down what you are going to say about your video. It would make your editing easy because you have already structured your content.
- Avoid distractions
While editing you make a flow state in which the editing process becomes easier. But when you got distracted it takes a lot of time to get back to that flow state.
- My kids are my big distraction so, I usually start my editing process after they go to bed. (You can set yours).
- Keep your phone away because it is another distraction that consumes most of your time.
- Don’t keep re-watching your video all the time. Usually, people edit the first clip and before starting to edit the second clip they watch the first clip. After that, they edit the second clip and then re-watch the first and the second clip. It is also wasting a lot of your time. Do it at the end.
How to Edit Video Faster with the Best Video Editor
Filmora 11 is one of the easiest to learn and one of the most beginner-friendly apps. It is available on both Mac and windows. You can download it for free to use its features. Now let’s get started to go deep down into the steps.
- Open the Filmora 11, a window will be opened.
- The Create Project is for a new project.
- You can change the Aspect Ratio coinciding with the social media platforms. Widescreen 16:9 is for TV or YouTube.
- You can use the previously made projects.
- To start with a new project hit the New Project.
In the user interphase, there are 3 basic sections.
- Editing tabs are at the top to change the formatting of the videos.
- Media tab is to Import videos or photos.
- Preview window to watch the editing process.
- Down here is the timeline where all the editing process takes place.
- Select the video from the system storage and drag it and drop it into the timeline.
- The video then be visible in the preview window.
You can split, cut, trim, delete, animate, and add effects and music. There are hundreds of editing features inside the menu bar that provide the edit controls and you can enjoy editing in the palm of your hand.
Here is an important feature you should know.
- Select the video and hit the speed
- You can select slow, fast, normal, and the most interesting one is speed ramping.
- Speed ramping allows you to set automatically made patterns to slow down then fast again slow. It will create a cinematic effect in the video. But this feature is only for paid users.
- Here is another very interesting tool the color correction tool. To get a uniform color in the combination of different clips, you can automatically set the color correction and color match.
- You can match the reference frame with the current to match their colors.
- Hit the File option and select the Save as Project.
- Now hit the Export tab to export the video. You can set the format of the video and the platform like YouTube, Instagram, Facebook, or any of them.
It will give you the fundamental framework for editing any video using Filmora 11.
1. Photos app for Windows 10.
I am going to show you how you can edit videos in Windows 10 using the app that comes with windows 10. Yes! Windows 10 include a free video editor and I am going to tell you step-by-step how to take advantage of it. If you are using windows 7 or windows 8 don’t feel let down, you can also create windows 10 totally free.
Microsoft has added the Photos app to Windows 10 and has added a fully functional video editor. You can do all sorts of things like trimming and splitting clips and re-organizing clips.
The great news is you don’t have to go out and buy a video editor or search for the video editor to download on your system instead if you are Windows 10 you already have some awesome software to edit your videos.
2. CapCut App for Android.
CapCut is the best video editing app, whether you are making videos for youtube, TikTok, Instagram, or Facebook. It is a free and all-in-one video editing app and you can use it without watermarks and annoying ads. The good thing about this app is, that it is very easy to use. Now let’s have a quick overview of the CapCut app.
- After opening your video select the clips you want to edit and here you will get a project timeline.
Here you can add, move or replace clips and can perform even more editing in the timeline.
You can split, trim, and delete
You can also apply some filters and adjustments. Adding text, stickers, and audio and the rest of the editing is just fun doing in CapCut. You can change the animation and style of your video in just a few clicks.
It also provides us with the Effects options.
- The video effects are effects on the entire video.
- The body effects are the effects applied only on the body.
Let’s enjoy its advanced features without paying for monthly subscription.
3. Davinci Resolve for Mac.
The Davinci Resolve is the most professional video editing software on Mac. It is absolutely ridiculous that it is giving access to you for free. Along with this, it is very professional video editing software that people used to create Hollywood movies and that kind of stuff. It provides a very easy and professional interphase that anyone can use without having training.
- The controls and features in the software are amazing and can edit videos frame by frame.
- There is also a dedicated area for audio creation.
- The motion graphics and
- A specific area just for color grading and color correcting.
That’s why the Davinci Resolve has got its name as a finishing application of movies. People come in and color grade their videos. As it is a very powerful software hence if you are working with an old computer and that’s not really a powerful computer, the Davinci Resolve would not be going to work properly for you.
Guide To Selecting and Using the Best Braw Luts
Good content plays a huge role in this digital age, and making one has many different ingredients. LUTs are one of those secret ingredients that can take your content to new heights. They are essentially pre-defined color grading presets you can apply to your media files. Furthermore, these LUTs act as a guiding map to maintain your video’s color and tone.
In addition, there are many more in the world of LUTs, such as BRAW LUTs. BRAW (Blackmagic RAW) is a popular raw video format with excellent media quality. Such LUTs are specifically used to optimize and improve the colors of any BRAW footage. Moreover, their utility goes beyond just one software. There are many platforms to use these LUTs, such as Premiere Pro and Wondershare Filmora .
Add LUTs on Video For Win 7 or later(64-bit)
Add LUTs on Video For macOS 10.14 or later


Part 1: How to Apply BRAW LUTs on Premiere Pro?
If you want to apply BRAW LUTs Premier Pro to your videos, follow these steps. These simple steps will guide you on how to apply your LUTs using Premier Pro.
Step 1: Import and Set up Your Video
Open Premiere Pro and locate the “File” menu. Choose the “Import” option from the menu and select your files to import. Find your imported video in the “Project” panel and drag it into the timeline. In this way, your files will be imported.

Step 2: Adjust Blackmagic RAW Settings
Lead into the “Source” section and look for the “Effect Controls” tab. Inside the Effects Control tab, locate the Blackmagic RAW tab. Underneath the Blackmagic RAW tab, change the “Decode Using” settings to “Clip.” Furthermore, adjust the “Gamma” settings to “Blackmagic Design Extended Video.”

Step 3: Apply the LUT to Your Video Clips
To apply the LUT to all your video clips, right-click on the “Blackmagic RAW” tab. Click on the “Copy” option from the menu that appears. Now, select all your clips in the “Project” panel by holding the SHIFT key while clicking on each clip. Right-click on the selected clips and choose the “Paste” option to apply the LUT. Your Blackmagic LUT will now be applied to all the selected video files. After completing your edits save your file.

Empower your videos with a new mood using different LUTs. Filmora now offers 100+ top-quality 3D LUTs cover a broad range of scenarios. Transform your videos with Filmora’s powerful 3D LUTs.
Apply LUT on Videos Apply LUT on Videos Learn More

Part 2: Selecting the Best BRAW LUTs: A Look into The Details
Do you have so many BRAW to Rec709 LUTs options to choose from? You don’t need to waste your time in selecting a good one. Here is a list of some of the best BRAW LUTs that you can download.
1. Blackmagic BaseLUTs for BRAW – Gen 5 & Gen 4 Film
The Blackmagic BaseLUTs for BRAW – Gen 5 & Gen 4 Film powerful pack consists of two different Blackmagic LUTs. These LUTs are designed to enhance your video in remarkable ways. Furthermore, you can expect exceptional retention in the highlights. Additionally, these LUTs offer well-balanced saturation levels for your videos.

2. Cinematic BRAW BMPCC LUTs Gen5
Cinematic BRAW BMPCC LUTs Gen5 is a powerful set of seven different cinematic LUTs. With this pack of BRAW LUTs, you can take your video to the next level. It makes your videos feel larger than life with this LUT pack. Additionally, this pack brings cinematic flair and vibrant colors to create an epic visual experience. Besides this, each LUT comes with its unique color grading.

3. Blackmagic Braw Vivid LUTs
Blackmagic BRAW Vivid LUTs is a great pack to make your videos and images look professional. These LUTs work by exposing your images, revealing hidden details and textures. Furthermore, it increases saturation to make your videos pop. Besides this, it also highlights the red and green channels to make your media look more natural and prominent.

4. S20-F87 BRAW FILM
Experience the magic of the S20-F87 BRAW FILM LUT. Using this LUT pack, you can unlock a world of visual possibilities. Moreover, you can improve your videos’ overall look and feel with their soft, warm green tones. This LUT is designed to create a cinematic atmosphere and a professional look. Using this pack, you can impress your viewers with movie-like color grading.

5. Cine Vintage Nature LUT 22
Cine Vintage Nature LUT 22 is a remarkable LUT pack that transports your video back in time. It creates an old vintage look with a cinematic touch. With this pack, you can transform your modern videos into classic Hollywood movies. It beautifully enhances your videos’ colors, tones, and textures to add depth and emotion. Similarly, using this pack, you can recreate old-school cinematic videos.

6. JM- 15+ PREMIUM BMPCC BRAW LUTS
JM-15+ Premium BMPCC BRAW LUTs are the key to unlocking a cinematic feel in your videos. These powerful LUTs highlight colors, creating a cinematic experience. It is a pack of 15 premium cinematic-style LUTs. Additionally, you can darken colors, giving your videos a rich and dramatic look. Furthermore, these LUTs add depth and dimension to your videos by enhancing shadows and textures.

Part 3: An Alternative to Apply 3D LUTs to Videos: Wondershare Filmora
Wondershare Filmora is what you’re looking for if you want a professional video editing tool. It is an all-in-one video editing tool. From basic editing options to high-end professional video editing features, Filmora has it. You can make basic color corrections and adjustments with this tool. However, Filmora also offers more creative editing options for your videos.
Add LUTs on Video For Win 7 or later(64-bit)
Add LUTs on Video For macOS 10.14 or later
Moreover, this tool has recently been updated and has many more options. With this LUT tool, you can apply different LUTs to enhance the mood of your videos. Apart from this, it has a library of 200+ LUTs to download. This extensive library allows you to choose different color grading presets according to your mood. Furthermore, its library also has other free media assets, ranging from over 10 billion.

Conclusion
LUTs are incredible tools to transform your ordinary content into something extraordinary. You can unleash your creativity with professional-looking content. Many LUTs, particularly BRAW LUTs, can be applied to your Blackmagic RAW footage. Take your videos to new heights with these tools by applying them using your favorite editing tools.
Add LUTs on Video For macOS 10.14 or later
Part 1: How to Apply BRAW LUTs on Premiere Pro?
If you want to apply BRAW LUTs Premier Pro to your videos, follow these steps. These simple steps will guide you on how to apply your LUTs using Premier Pro.
Step 1: Import and Set up Your Video
Open Premiere Pro and locate the “File” menu. Choose the “Import” option from the menu and select your files to import. Find your imported video in the “Project” panel and drag it into the timeline. In this way, your files will be imported.
Step 2: Adjust Blackmagic RAW Settings
Lead into the “Source” section and look for the “Effect Controls” tab. Inside the Effects Control tab, locate the Blackmagic RAW tab. Underneath the Blackmagic RAW tab, change the “Decode Using” settings to “Clip.” Furthermore, adjust the “Gamma” settings to “Blackmagic Design Extended Video.”
Step 3: Apply the LUT to Your Video Clips
To apply the LUT to all your video clips, right-click on the “Blackmagic RAW” tab. Click on the “Copy” option from the menu that appears. Now, select all your clips in the “Project” panel by holding the SHIFT key while clicking on each clip. Right-click on the selected clips and choose the “Paste” option to apply the LUT. Your Blackmagic LUT will now be applied to all the selected video files. After completing your edits save your file.
Empower your videos with a new mood using different LUTs. Filmora now offers 100+ top-quality 3D LUTs cover a broad range of scenarios. Transform your videos with Filmora’s powerful 3D LUTs.
Apply LUT on Videos Apply LUT on Videos Learn More
Part 2: Selecting the Best BRAW LUTs: A Look into The Details
Do you have so many BRAW to Rec709 LUTs options to choose from? You don’t need to waste your time in selecting a good one. Here is a list of some of the best BRAW LUTs that you can download.
1. Blackmagic BaseLUTs for BRAW – Gen 5 & Gen 4 Film
The Blackmagic BaseLUTs for BRAW – Gen 5 & Gen 4 Film powerful pack consists of two different Blackmagic LUTs. These LUTs are designed to enhance your video in remarkable ways. Furthermore, you can expect exceptional retention in the highlights. Additionally, these LUTs offer well-balanced saturation levels for your videos.
2. Cinematic BRAW BMPCC LUTs Gen5
Cinematic BRAW BMPCC LUTs Gen5 is a powerful set of seven different cinematic LUTs. With this pack of BRAW LUTs, you can take your video to the next level. It makes your videos feel larger than life with this LUT pack. Additionally, this pack brings cinematic flair and vibrant colors to create an epic visual experience. Besides this, each LUT comes with its unique color grading.
3. Blackmagic Braw Vivid LUTs
Blackmagic BRAW Vivid LUTs is a great pack to make your videos and images look professional. These LUTs work by exposing your images, revealing hidden details and textures. Furthermore, it increases saturation to make your videos pop. Besides this, it also highlights the red and green channels to make your media look more natural and prominent.
4. S20-F87 BRAW FILM
Experience the magic of the S20-F87 BRAW FILM LUT. Using this LUT pack, you can unlock a world of visual possibilities. Moreover, you can improve your videos’ overall look and feel with their soft, warm green tones. This LUT is designed to create a cinematic atmosphere and a professional look. Using this pack, you can impress your viewers with movie-like color grading.
5. Cine Vintage Nature LUT 22
Cine Vintage Nature LUT 22 is a remarkable LUT pack that transports your video back in time. It creates an old vintage look with a cinematic touch. With this pack, you can transform your modern videos into classic Hollywood movies. It beautifully enhances your videos’ colors, tones, and textures to add depth and emotion. Similarly, using this pack, you can recreate old-school cinematic videos.
6. JM- 15+ PREMIUM BMPCC BRAW LUTS
JM-15+ Premium BMPCC BRAW LUTs are the key to unlocking a cinematic feel in your videos. These powerful LUTs highlight colors, creating a cinematic experience. It is a pack of 15 premium cinematic-style LUTs. Additionally, you can darken colors, giving your videos a rich and dramatic look. Furthermore, these LUTs add depth and dimension to your videos by enhancing shadows and textures.
Part 3: An Alternative to Apply 3D LUTs to Videos: Wondershare Filmora
Wondershare Filmora is what you’re looking for if you want a professional video editing tool. It is an all-in-one video editing tool. From basic editing options to high-end professional video editing features, Filmora has it. You can make basic color corrections and adjustments with this tool. However, Filmora also offers more creative editing options for your videos.
Add LUTs on Video For Win 7 or later(64-bit)
Add LUTs on Video For macOS 10.14 or later
Moreover, this tool has recently been updated and has many more options. With this LUT tool, you can apply different LUTs to enhance the mood of your videos. Apart from this, it has a library of 200+ LUTs to download. This extensive library allows you to choose different color grading presets according to your mood. Furthermore, its library also has other free media assets, ranging from over 10 billion.
Conclusion
LUTs are incredible tools to transform your ordinary content into something extraordinary. You can unleash your creativity with professional-looking content. Many LUTs, particularly BRAW LUTs, can be applied to your Blackmagic RAW footage. Take your videos to new heights with these tools by applying them using your favorite editing tools.
Before & After Editing Trick | Wondershare Filmora Tutorial
How do travel vloggers instantly grab everyone’s attention with their magical content? The unique animation preset is the answer. Video makers use them to morph video clips into scenic views that make viewers’ jaws drop in awe. Also, these edits can cover up any flaws made during the production of the original video clip. Isn’t it cool?
You might be wondering how to add these effects to the video. Keep reading to discover some of the simplest effects that are bound to add soul to your content. Before diving into the details, let’s first understand these effects.
Part 1. What are the before/after effects?
After-effects are visual effects that are used to enhance the aesthetic appeal of videos. You might have encountered these effects several times during watching YouTube videos or movies. These transitions make the videos more appealing to the audience.
In films, for example, the dissolve effect is employed to signify a time change. It informs viewers that there is a time difference between the two shots. You can see how this effect is used to dissolve one scene into another in the video clip mentioned below.

The history of after-effects can be traced back to 1993. These effects enabled the crew to mix 3D and 2D images to produce virtual dinosaur motion visuals in the Jurassic Park film, which we all love. Now that you have a fundamental understanding of the origins of after-effects, let’s take a look at where they might be applied!
Part 2. Where can you use these before/after effects?
If you are a fan of fiction movies, then you must have noticed that some of their scenes though fake, look so realistic that they blow our minds. And now you might have an idea of how these shots are created!
Whether it be shooting a movie or a commercial, these transitions have the power to make our content irresistible. Once you are familiar with the purpose of these after-effects, it’s time to show you how you can edit your videos using these effects.
Part 3. How to edit your videos using before/after effects?
If you’re new to editing and don’t know much about video graphics, Filmora video editor is the finest platform for you. It is not only easier to use but also more entertaining than other online video editors. Filmora is a free video editor that is accessible for both Windows and macOS.
Steps for installing the Filmora video editor
To install the Filmora video editor, follow these steps
Step1 Go to the official site of Filmora.
Step2 Click on the download button.
Step3 Install the application on your PC.
Step4 Now, you can use the Filmora video editor to beautify your content.
Now, let’s explore some of the coolest transition effects that you can use in your videos for before and after comparison.
Part 4. Filmora’s top three transition effects for beginners
Wondershare Filmora can help video editors achieve their goals in the most basic and economical fashion. The best three transition effects that may completely transform your videos are shown below.
Wipe Effect
Wipe transition is used to produce an apparent transformation to videos with similar frames for the before/after comparison. Travel vloggers mostly use this effect to create a retro vibe in their videos. This transition is frequently used in movies to demonstrate the influence of time on any place.
The wipe effect’s fundamental goal is to transition from one shot into another via a sliding animation, giving the video an elegant vibe. For instance, we can use the wipe effect to convert the raw film to colored corrected footage.
Steps to apply the Wipe effect
Step1 Drag and drop the video clip ‘before color correction’ onto the timeline’s first video track.

Step2 Then, drag and drop the color-corrected video clip on the second video track. Ensure that the clips are piled on top of one another so they may all be played simultaneously. It will make it easier for us to trim the footage.

Step3 Place the play head where we want the transformation to begin. Then trim the second clip.

Step4 Go to the Transitions window and select “Erase slide.” Drag the transition to the start of the second video clip. Then, double-click the transition on the timeline to open the settings box.

Step5 Adjust the length of the “Erase slide.” Let’s see how it turns out!

Dissolve Effect
The dissolve effect allows us to shift from one shot to another by using slow block dissolution. It gives the impression that one scene is being morphed into another. And, it is frequently used in documentaries.
We may utilize the dissolve transition to display the differences between two video segments more naturally. To explain the objective of the dissolve effect, we used two clips of the same place shot at separate times. The first film is current, but the second is from the same place but was taken a few years back.
Steps to apply the Dissolve effect
Step1 Drag and drop the first video clip onto the timeline’s first video track.

Step2 Then, on the second video track, drag and drop the second video clip. Make sure the start of the second clip is where you want the transition to begin.

Step3 Then Go to the Transitions window and choose the “Dissolve” effect.

Step4 Drag the transition to the start of the second video clip.

Step5 Then, on the timeline, double-click the transition to open the settings box. If necessary, adjust the duration of the “Dissolve “ effect as needed.

You can see how it looks in the image below. If we play the timeline, we can watch the green court convert into the old basketball court. However, the two visuals don’t truly match each other during the transformation.
Steps to adjust the frames of the clips
Step1 We may fix it by adjusting the location and scale of the clips.
Step2 Move the play head to the transition section to watch both video segments.
Step3 To open the settings window, double-click on the first video.
Step4 Find the transform section and scale it to 110%.
Step5 Then, move the first video’s frame to match the second video’s placement. We may notice a more natural transition when we replay the timeline.
Split Screen Effect
The split-screen technique first appeared in the film “The Queen of Spades,” which was released in 1949. It depicted a man suffering from a psychological illness. The split-screen effect was used to demonstrate the contrast between reality and his hallucinations. It made the viewer more aware of what was actually happening in the film.

Since then, the split screen has been used as the simplest technique to demonstrate the before/after comparison. This effect is also ideal for emphasizing the changes in only one section of the video.
Because the split screen effect does not display the whole frame of the video clips, you may eliminate the top and bottom bars of the video clips using this effect.
How to apply a split screen effect?
Step1 Find “Split Screen1” in the window by clicking “Split Screen.”
Step2 Drag it over to the timeline.
Step3 You’ll see the split-screen template in the preview box when you double-click it.

Step4 Drag the two video clips you wish to compare to the template’s left and right sides.

Step5 If necessary, you may also adjust the location of the videos in the preview clip.
Step6 Finally, uncheck the option labeled “allow split screen animation.”

Step7 All of the steps for the before/after split screen are now complete.
Step8 Let’s wait and see how it turns out!

Final words
If you are a vlogger and you desire to add an aesthetic touch to your videos, you should try Filmora. It offers a variety of unique transitions, so you can use it to build your own trademark style that will represent your content.
By the end of this article, you must understand how to employ the wipe effect, the dissolve effect, or the split screen effect in your videos to give them an elegant and professional vibe.
Free Download For Win 7 or later(64-bit)
Free Download For macOS 10.14 or later
Free Download For macOS 10.14 or later
Add Green Screen Effects in Final Cut Pro
No matter the type of video you are shooting, the background of the video plays a major play. The background determines how eye-pleasing the frame of the entire video looks. A beautiful background enhances the video content while a distracting background can deteriorate the video outlook. You do not need to be in exotic locations or have eye-catching backgrounds in reality while shooting a video thanks to the use of the green screen effect.
Once you shoot a video with green screen background, you can replace the green screen with anything you want. You will need a video editor to replace the green screen, and Final Cut Pro is the most widely used video editor among Mac Users. We will illustrate how to add green screen in Final Cut Pro and get any background for your recorded video. We will also recommend an alternative watt to add green screen effect to your video.
Part 1. How to add green screen on Final Cut Pro
Final Cut Pro is the most popular professional video editor among Mac users. The learning curve is slightly steep, but once you get used to Final Cut Pro, you can take your recorded video to the next level with profound editing. The most important part of adding green screen effect to a video is shooting the video with a proper green screen in the background. Once you have successfully recorded your video, here are the steps on how to add background to green screen Final Cut Pro.
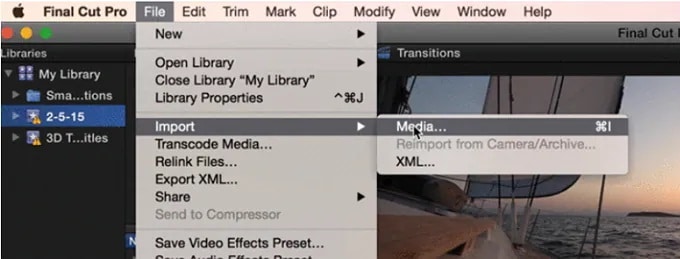
Step1 Launch Final Cut Pro and go to File> Import> Media. Select the video file with green screen background from your storage to import the file into FCP. Similarly, you should import the video or photo with which you want to replace the green screen.
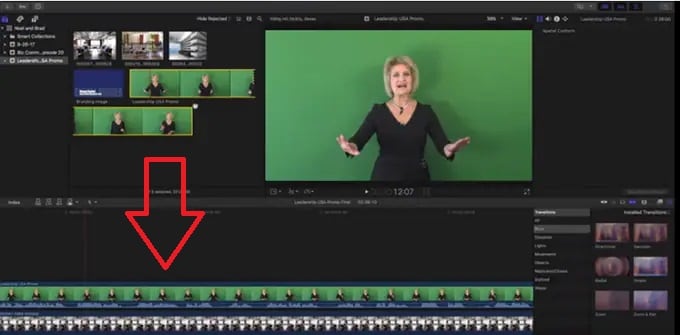
Step2 Drag the video clip with green screen background (called foreground clip) to Timeline and place it to Primary Storyline. Drag the replacement video (called background clip) below the foreground clip in Timeline.
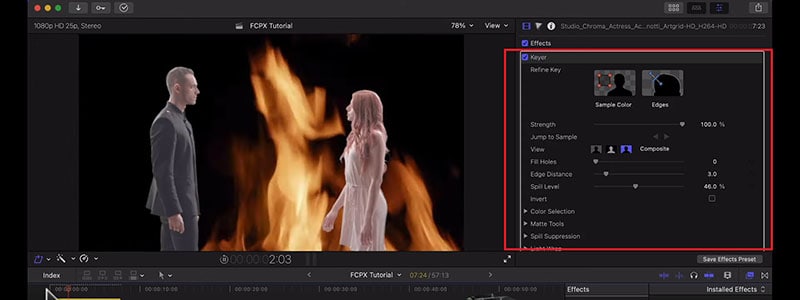
Step3 Select the foreground clip and click on Effects button present at the extreme top-right corner of the Timeline.
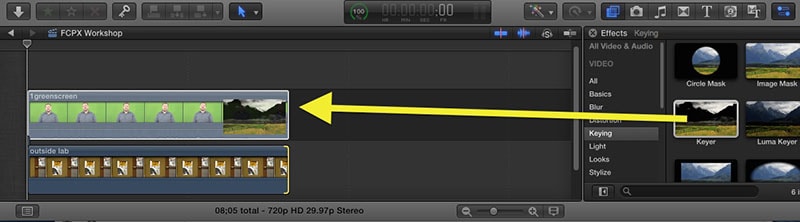
Step4 From the Effects options, select Keyer effect. If you cannot spot it immediately, you can search for it from the search field.
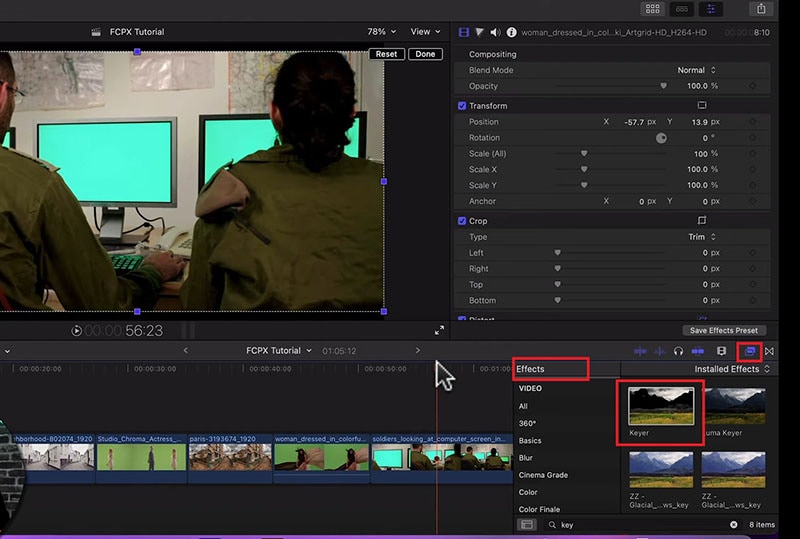
Step5 Drag and drop Keyer effect to the foreground clip. The effect detects the green screen and replaces it with the available background clip.
Step6 You might have to adjust the Keyer effect settings to get the green screen effect perfectly. Go to Inspector Window and click on Sample color and fine-tune the available settings to get it correct.
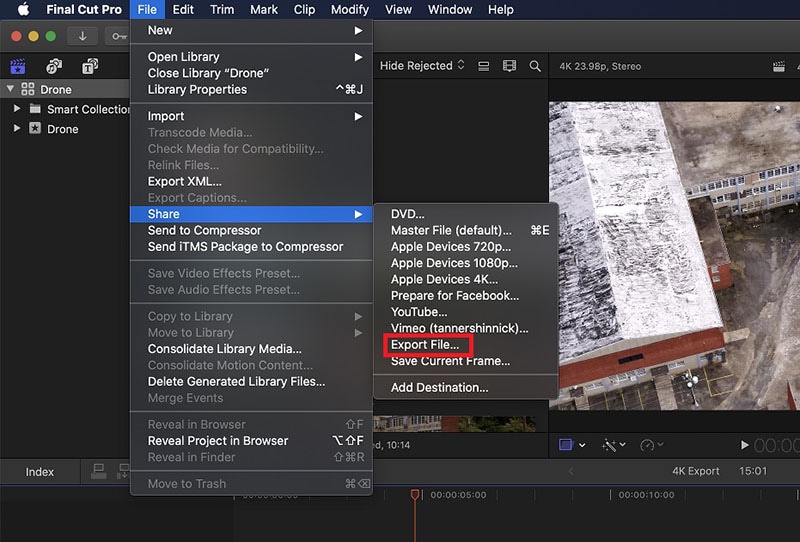
Step7 Once you are satisfied with the effect, go to File> Share> Export File and save the modified video.
Part 2. Alternative Way to Add Green Screen to Videos
Final Cut Pro is a professional but highly expensive video editor. The learning curve is not very suitable for amateur video editors. That is why if you are looking for a better alternative way to add green screen to videos, we recommend Wondershare Filmora . Filmora is a popular video editor that is available for Mac and Windows users. The user interface is extremely intuitive, and adding green screen effect is super easy. Here are the steps on how to add background to green screen effect.
Free Download For Win 7 or later(64-bit)
Free Download For macOS 10.14 or later
Step1 Download and install Filmora on your computer. Launch Filmora and click on New Projects.
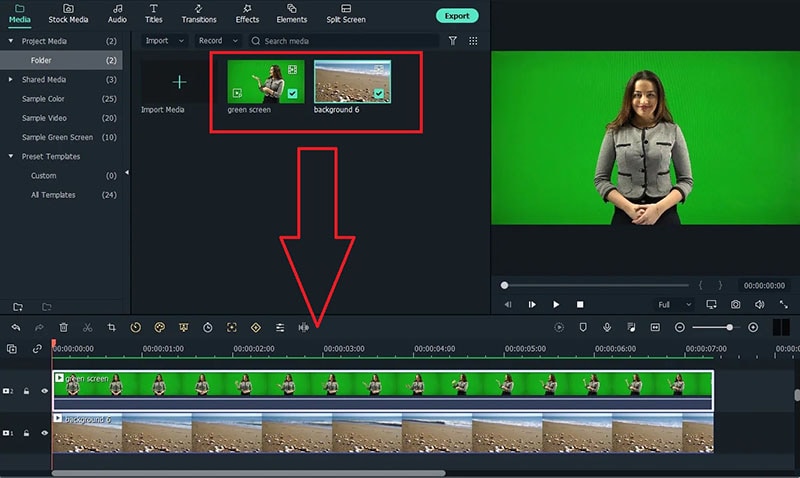
Step2 Under Project Media folder, Drag and drop the video clip with green screen background as well as the photo or video with which you want to replace the green screen.
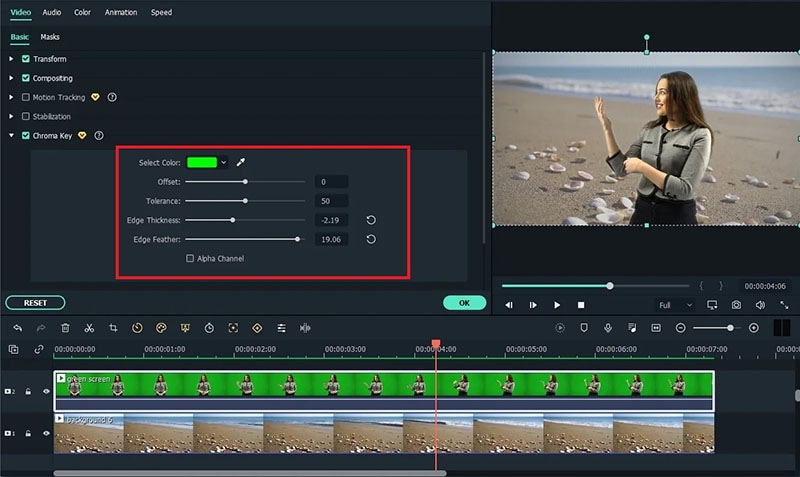
Step3 Drag and drop the video clips on the Timeline. The video with green screen should be at the top while the replacement video or photo should be below it.
Step4 Double-click on the green screen video clip on Timeline. Go to Video>Basic and turn on Chroma key option.
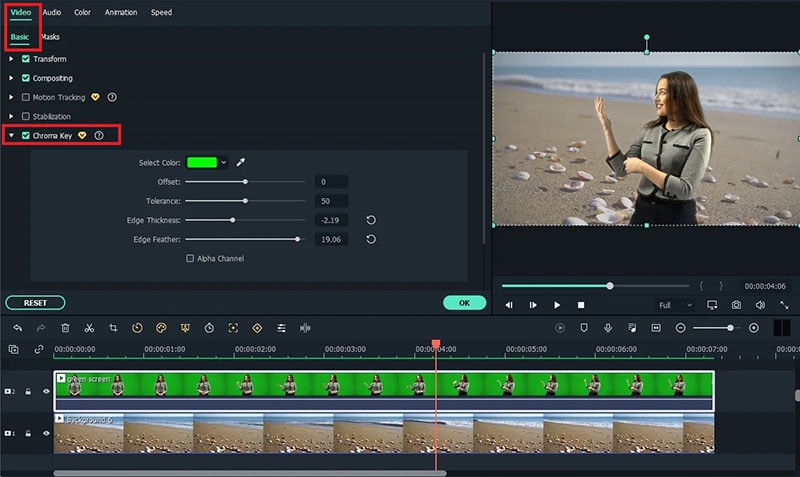
Step5 Adjust the different parameters such as offset to get the effect perfect and click on Ok button.
Step6 Play the video and if you are satisfied with the result, click on Export button to save the modified video file.
Part 3. Green Screen Video Tips to Use
We have already stated that replacing green screen in your video with an eye-catching background is the easiest part. On the contrary, shooting the green screen video is the most important part. If you shoot the video perfectly, replacing the background accurately in the video editor becomes super easy. Here are some important tips to use while shooting green screen video.
Distance – There should be enough distance between the subject and the green screen background so that the subject does not cast a shadow on the green screen. This distance is also important to place lights in between so that the green screen is perfectly lit for a great video shooting session.
Quality – You should opt for a high-quality green screen cloth for the background. This means the green screen should have a solid color instead of light and dark patches here and there. Besides, you should ensure that there are no wrinkles on the green screen.
Otherwise, when you will apply green screen effect through the video editor, the transformation will be uneven. You have to spend a lot of time adjusting the parameters to cover up uneven patches in the background.
Lighting – The way you set up your lights plays a major role in shooting green screen video perfectly. The light falling on the green screen will light up the screen evenly so that there are no light and dark patches. Transforming the green screen in the video editor will become that much easier.
You should focus on soft and even lighting for the entire green screen, and you should check through your camera to ensure the lighting is perfect. Sometimes, you can place lights behind the subject if the subject is staying stationary throughout the video. Otherwise, you can place the light above the subject for even distribution.
Aperture – The settings of your camera are equally important to smoothen out the green screen in the background and focus on the subject sharply. That is where aperture comes into the scene, and you need to use low aperture while shooting green screen videos. Low aperture opens up the camera lens, and the green screen turns softer in the background. The subject stands out while the background turns uniformly green.
Shutter Speed – While shooting a green screen video, you should keep a high shutter speed to prevent motion blur and uneven background. If the subject stays fixed throughout, the shutter speed should be double the frame rate. If the subject is moving throughout, the shutter speed should be around 4 times the frame rate such as 1/100.
ISO – The last thing you want in a green screen video is grainy footage. Your life will turn upside down editing the video and getting the green screen effect perfectly in any video editor. ISO determines the sensitivity and thereby, the grainy effect in your video. When the ISO is too high, the chance of getting grains in the video is high. It is better to use a native ISO for green screen effect, but you need to check with a sample recording and adjust if required.
Conclusion
We have answered how to add background to green screen Final Cut Pro. You can replace any green screen in your video with any video or photo for the background of the video. If you do not have Final Cut Pro or you find the steps slightly complicated, we recommend you to use Wondershare Filmora for instant green screen effect and quick adjustments for the best outcome.
Free Download For macOS 10.14 or later
Step1 Download and install Filmora on your computer. Launch Filmora and click on New Projects.
Step2 Under Project Media folder, Drag and drop the video clip with green screen background as well as the photo or video with which you want to replace the green screen.
Step3 Drag and drop the video clips on the Timeline. The video with green screen should be at the top while the replacement video or photo should be below it.
Step4 Double-click on the green screen video clip on Timeline. Go to Video>Basic and turn on Chroma key option.
Step5 Adjust the different parameters such as offset to get the effect perfect and click on Ok button.
Step6 Play the video and if you are satisfied with the result, click on Export button to save the modified video file.
Part 3. Green Screen Video Tips to Use
We have already stated that replacing green screen in your video with an eye-catching background is the easiest part. On the contrary, shooting the green screen video is the most important part. If you shoot the video perfectly, replacing the background accurately in the video editor becomes super easy. Here are some important tips to use while shooting green screen video.
Distance – There should be enough distance between the subject and the green screen background so that the subject does not cast a shadow on the green screen. This distance is also important to place lights in between so that the green screen is perfectly lit for a great video shooting session.
Quality – You should opt for a high-quality green screen cloth for the background. This means the green screen should have a solid color instead of light and dark patches here and there. Besides, you should ensure that there are no wrinkles on the green screen.
Otherwise, when you will apply green screen effect through the video editor, the transformation will be uneven. You have to spend a lot of time adjusting the parameters to cover up uneven patches in the background.
Lighting – The way you set up your lights plays a major role in shooting green screen video perfectly. The light falling on the green screen will light up the screen evenly so that there are no light and dark patches. Transforming the green screen in the video editor will become that much easier.
You should focus on soft and even lighting for the entire green screen, and you should check through your camera to ensure the lighting is perfect. Sometimes, you can place lights behind the subject if the subject is staying stationary throughout the video. Otherwise, you can place the light above the subject for even distribution.
Aperture – The settings of your camera are equally important to smoothen out the green screen in the background and focus on the subject sharply. That is where aperture comes into the scene, and you need to use low aperture while shooting green screen videos. Low aperture opens up the camera lens, and the green screen turns softer in the background. The subject stands out while the background turns uniformly green.
Shutter Speed – While shooting a green screen video, you should keep a high shutter speed to prevent motion blur and uneven background. If the subject stays fixed throughout, the shutter speed should be double the frame rate. If the subject is moving throughout, the shutter speed should be around 4 times the frame rate such as 1/100.
ISO – The last thing you want in a green screen video is grainy footage. Your life will turn upside down editing the video and getting the green screen effect perfectly in any video editor. ISO determines the sensitivity and thereby, the grainy effect in your video. When the ISO is too high, the chance of getting grains in the video is high. It is better to use a native ISO for green screen effect, but you need to check with a sample recording and adjust if required.
Conclusion
We have answered how to add background to green screen Final Cut Pro. You can replace any green screen in your video with any video or photo for the background of the video. If you do not have Final Cut Pro or you find the steps slightly complicated, we recommend you to use Wondershare Filmora for instant green screen effect and quick adjustments for the best outcome.
Also read:
- New 2024 Approved How to Crop a Video in Windows Media Player
- 2024 Approved How to Merge Videos in HandBrake? Expectation Vs. Reality
- Updated 8 Frame Rate Video Converters You Must Try
- In 2024, Freeze Frame Clone Effect Is a Creative Effect to Use for Many Video Creators. This Article Will Show You How to Use Filmora to Make a Frozen Frame Clone Video Effect
- New In 2024, How to Create Glowing Edge Effect in TikTok Dancing Video
- Updated In 2024, Learn Topaz Video Enhance AI Review and Achieve Powerful Video Conversion
- New List of Supported Whatsapp Video Format You May Want to Know
- New Guiding Principles of Track Matte and Tracking in Adobe After Effects
- New In 2024, Hard to Remove Black Background in After Effects?
- New Applying the Effect of Camera Shake in Video Creation
- Looking for Efficient Ways to Create a Slow-Motion Video? Read the Article for Reliable Solutions that Provide Excellent Results for 2024
- Merge MP4 Online? Its Easy With These 5 Tools
- New Adobe Premiere Pro Rec 709 LUTs Finding The Best Options for 2024
- A Guide to Effective Video Marketing
- If Youre Looking to Create a Brand Video that Makes Your Business Pop Out, We Have Put Together some Video Editing Tips and Tricks that Work for 2024
- 2024 Approved 8 Frame Rate Video Converters for a Professional Finish
- In 2024, Reviewing Efectum App and The Best Alternatives for Smartphone Users
- New Guide to Create an Intro Video with Filmora for 2024
- New 2024 Approved 10 Amazing Anime Character Designs to Inspire You
- In 2024, How to Use Lumetri Color in Adobe After Effects
- How to Make Simple Slideshow Word for 2024
- New 2024 Approved Gimp Green Screen
- Different Methods To Unlock Your iPhone 8 | Dr.fone
- How to Flash Dead Honor Magic 6 Pro Safely | Dr.fone
- In 2024, How to use iSpoofer on Tecno Spark 20? | Dr.fone
- In 2024, How To Unlock iPhone 11 Without Passcode? 4 Easy Methods | Dr.fone
- Ultimate guide to get the meltan box pokemon go For Samsung Galaxy A34 5G | Dr.fone
- Poco X5 Pro Screen Unresponsive? Heres How to Fix It | Dr.fone
- In 2024, Best Options Top Live Streaming Platforms According to Types
- How to Reset Xiaomi Redmi Note 12 5G Without the Home Button | Dr.fone
- In 2024, Full Guide to Bypass Samsung Galaxy S23 FE FRP
- Reasons why Pokémon GPS does not Work On Vivo X Fold 2? | Dr.fone
- In 2024, Why Your WhatsApp Live Location is Not Updating and How to Fix on your Oppo A79 5G | Dr.fone
- Android Unlock Code Sim Unlock Your Nokia C210 Phone and Remove Locked Screen
- Spotify Keeps Crashing A Complete List of Fixes You Can Use on Infinix Note 30i | Dr.fone
- Set Your Preferred Job Location on LinkedIn App of your Oppo A1 5G | Dr.fone
- In 2024, Things You Should Know When Unlocking Total Wireless Of Apple iPhone 12 Pro Max
- In 2024, How to Transfer from Apple iPhone 11 Pro Max to Samsung Galaxy S20? | Dr.fone
- How Do You Unlock your Apple iPhone 6s? Learn All 4 Methods | Dr.fone
- In 2024, How To Create an Apple Developer Account On iPhone 13 mini
- 8 Solutions to Fix Find My Friends Location Not Available On Poco C51 | Dr.fone
- 5 Ways to Reset Nokia C300 Without Volume Buttons | Dr.fone
- Will the iPogo Get You Banned and How to Solve It On OnePlus Nord N30 5G | Dr.fone
- How does the stardust trade cost In pokemon go On Oppo A58 4G? | Dr.fone
- Title: New In 2024, How Long Does It Take To Edit Videos
- Author: Chloe
- Created at : 2024-06-09 16:15:19
- Updated at : 2024-06-10 16:15:19
- Link: https://ai-editing-video.techidaily.com/new-in-2024-how-long-does-it-take-to-edit-videos/
- License: This work is licensed under CC BY-NC-SA 4.0.
