:max_bytes(150000):strip_icc():format(webp)/CODA-d4dd2a9b6c3d4a008a05c9718c9bce1e.jpg)
New In 2024, How to Add a Spooky Shadow Effect

How to Add a Spooky Shadow Effect
Wondershare Filmora’s main purpose is the empowerment of content creators. The latest updates to the program are one of the pieces of evidence.
Whether you’re a horror content creator or simply living the Halloween vibe 24/7, continue reading to know how to use its latest masking feature to create a cool shadow effect for your next mind-blowing social media video.
How to Use The Masking Effect
Wondershare Filmora’s latest Masking feature allows its users to select a specific clip that they can overlay on other parts of the video or other clips.
Free Download For Win 7 or later(64-bit)
Free Download For macOS 10.14 or later
The feature allows you to insert the mask in any shape, such as a rectangle, circle, or triangle. You can also import any shapes you like if you can’t find them in the presets library. You can also adjust the mask placement, width, height, and feather effect.
Without further ado, let’s see the detailed step-by-step guide for this effect.
a. Preparation
You will need at least three shots of the same frame to get the shadow effect to work. The first is the main video, the second is the shadow clip, and the last would be a clip portraying just a plain background.
Make sure that your camera stays at the same point and angle. You can use a tripod for assurance.
Take the first main video and don’t forget to mark the positioning of the object for the next take. Then, you can shoot the shadow clip following the marking of the object to match its position in the main clip.
Finally, shoot the final clip without the object on the frame.

b. Steps to add the shadow effect to your videos using Masking
Step 1: Place the main clip on the timeline and find the start of the segment that you want to use. Press M on the keyboard to set a marker.

Step 2: Place the shadow clip on top of the main clip on the timeline. Trim and adjust until the shadow clip ends right at the marker of the main clip.

Step 3: Move the play head to the start of the shadow clip. Trim the main clip right on that mark so both clips have the same start by clicking the scissor icon and deleting the unused part.

Step 4: Double-click the shadow clip. OpenSettings > Mask Section > Rectangle to apply the mask. Adjust the blur strength to smooth out the edge.

Step 5: Play the result to see if there’s any part you need to block out. When you find them, repeat steps 1 to 4 but with the background clip. Try to conceal all things you need to hide using the masks. Make sure that you get the timings right.

Step6 Trim the length of the masking clips to match the main clip by sliding the play head and clicking the Split button.
Adjust the audio and preview the effect before you save the result. You can also add extra features like slow motion for maximum effect.

Summary
It is so easy to use this shadow effect on your video using Wondershare Filmora. The handy masking feature also comes with additional keyframe control and easy composite adjustment.
Wondershare Filmora is also packed with other powerful new features. This includes Auto Beat Sync, Speed Ramping, Quick Split Mode, and the upgraded Denoise feature. Update today to add more quirk to your content.
Free Download For macOS 10.14 or later
The feature allows you to insert the mask in any shape, such as a rectangle, circle, or triangle. You can also import any shapes you like if you can’t find them in the presets library. You can also adjust the mask placement, width, height, and feather effect.
Without further ado, let’s see the detailed step-by-step guide for this effect.
a. Preparation
You will need at least three shots of the same frame to get the shadow effect to work. The first is the main video, the second is the shadow clip, and the last would be a clip portraying just a plain background.
Make sure that your camera stays at the same point and angle. You can use a tripod for assurance.
Take the first main video and don’t forget to mark the positioning of the object for the next take. Then, you can shoot the shadow clip following the marking of the object to match its position in the main clip.
Finally, shoot the final clip without the object on the frame.

b. Steps to add the shadow effect to your videos using Masking
Step 1: Place the main clip on the timeline and find the start of the segment that you want to use. Press M on the keyboard to set a marker.

Step 2: Place the shadow clip on top of the main clip on the timeline. Trim and adjust until the shadow clip ends right at the marker of the main clip.

Step 3: Move the play head to the start of the shadow clip. Trim the main clip right on that mark so both clips have the same start by clicking the scissor icon and deleting the unused part.

Step 4: Double-click the shadow clip. OpenSettings > Mask Section > Rectangle to apply the mask. Adjust the blur strength to smooth out the edge.

Step 5: Play the result to see if there’s any part you need to block out. When you find them, repeat steps 1 to 4 but with the background clip. Try to conceal all things you need to hide using the masks. Make sure that you get the timings right.

Step6 Trim the length of the masking clips to match the main clip by sliding the play head and clicking the Split button.
Adjust the audio and preview the effect before you save the result. You can also add extra features like slow motion for maximum effect.

Summary
It is so easy to use this shadow effect on your video using Wondershare Filmora. The handy masking feature also comes with additional keyframe control and easy composite adjustment.
Wondershare Filmora is also packed with other powerful new features. This includes Auto Beat Sync, Speed Ramping, Quick Split Mode, and the upgraded Denoise feature. Update today to add more quirk to your content.
Free Download For macOS 10.14 or later
The feature allows you to insert the mask in any shape, such as a rectangle, circle, or triangle. You can also import any shapes you like if you can’t find them in the presets library. You can also adjust the mask placement, width, height, and feather effect.
Without further ado, let’s see the detailed step-by-step guide for this effect.
a. Preparation
You will need at least three shots of the same frame to get the shadow effect to work. The first is the main video, the second is the shadow clip, and the last would be a clip portraying just a plain background.
Make sure that your camera stays at the same point and angle. You can use a tripod for assurance.
Take the first main video and don’t forget to mark the positioning of the object for the next take. Then, you can shoot the shadow clip following the marking of the object to match its position in the main clip.
Finally, shoot the final clip without the object on the frame.

b. Steps to add the shadow effect to your videos using Masking
Step 1: Place the main clip on the timeline and find the start of the segment that you want to use. Press M on the keyboard to set a marker.

Step 2: Place the shadow clip on top of the main clip on the timeline. Trim and adjust until the shadow clip ends right at the marker of the main clip.

Step 3: Move the play head to the start of the shadow clip. Trim the main clip right on that mark so both clips have the same start by clicking the scissor icon and deleting the unused part.

Step 4: Double-click the shadow clip. OpenSettings > Mask Section > Rectangle to apply the mask. Adjust the blur strength to smooth out the edge.

Step 5: Play the result to see if there’s any part you need to block out. When you find them, repeat steps 1 to 4 but with the background clip. Try to conceal all things you need to hide using the masks. Make sure that you get the timings right.

Step6 Trim the length of the masking clips to match the main clip by sliding the play head and clicking the Split button.
Adjust the audio and preview the effect before you save the result. You can also add extra features like slow motion for maximum effect.

Summary
It is so easy to use this shadow effect on your video using Wondershare Filmora. The handy masking feature also comes with additional keyframe control and easy composite adjustment.
Wondershare Filmora is also packed with other powerful new features. This includes Auto Beat Sync, Speed Ramping, Quick Split Mode, and the upgraded Denoise feature. Update today to add more quirk to your content.
Free Download For macOS 10.14 or later
The feature allows you to insert the mask in any shape, such as a rectangle, circle, or triangle. You can also import any shapes you like if you can’t find them in the presets library. You can also adjust the mask placement, width, height, and feather effect.
Without further ado, let’s see the detailed step-by-step guide for this effect.
a. Preparation
You will need at least three shots of the same frame to get the shadow effect to work. The first is the main video, the second is the shadow clip, and the last would be a clip portraying just a plain background.
Make sure that your camera stays at the same point and angle. You can use a tripod for assurance.
Take the first main video and don’t forget to mark the positioning of the object for the next take. Then, you can shoot the shadow clip following the marking of the object to match its position in the main clip.
Finally, shoot the final clip without the object on the frame.

b. Steps to add the shadow effect to your videos using Masking
Step 1: Place the main clip on the timeline and find the start of the segment that you want to use. Press M on the keyboard to set a marker.

Step 2: Place the shadow clip on top of the main clip on the timeline. Trim and adjust until the shadow clip ends right at the marker of the main clip.

Step 3: Move the play head to the start of the shadow clip. Trim the main clip right on that mark so both clips have the same start by clicking the scissor icon and deleting the unused part.

Step 4: Double-click the shadow clip. OpenSettings > Mask Section > Rectangle to apply the mask. Adjust the blur strength to smooth out the edge.

Step 5: Play the result to see if there’s any part you need to block out. When you find them, repeat steps 1 to 4 but with the background clip. Try to conceal all things you need to hide using the masks. Make sure that you get the timings right.

Step6 Trim the length of the masking clips to match the main clip by sliding the play head and clicking the Split button.
Adjust the audio and preview the effect before you save the result. You can also add extra features like slow motion for maximum effect.

Summary
It is so easy to use this shadow effect on your video using Wondershare Filmora. The handy masking feature also comes with additional keyframe control and easy composite adjustment.
Wondershare Filmora is also packed with other powerful new features. This includes Auto Beat Sync, Speed Ramping, Quick Split Mode, and the upgraded Denoise feature. Update today to add more quirk to your content.
Have You Ever Tried Using the Premiere Pro Motion Blur Plugin? Read This Article to Learn How to Efficiently Use the ReelSmart Motion Blur Plugin in Premiere Pro
Premiere Pro is an exceptional tool for editing videos flawlessly by using various advanced features. For instance, you can use Adobe Premiere Pro to add extraordinary effects to your videos, such as motion blur. However, if you want a more smooth and flawless effect, you can use a plugin known as ReelSmart Motion Blur. By reading this article, you can learn about the ReelSmart Motion Blur Plugin Premiere Pro and its related instructions for usage.
Part 1: What is ReVisionFX ReelSmart Motion Blur?
You must be wondering why it’s essential to use the motion blur plugin for Premiere Pro. The reason is that using a plugin like ReelSmart Motion Blur can offer more advanced capabilities and options to create professional results. The ReelSmart Motion Blur plugin uses advanced algorithms to track each pixel automatically. As a result, it provides a more compelling and natural outlook to the video. Hence, you can easily apply the motion blur effect to your videos using RSMB without hard work.
Key Features
- Offers Automatic Tracking: To provide accurate and precise results, RSMB uses automatic tracking. This function allows the plugin to track every pixel automatically from one frame to another efficiently.
- Ability to Adjust Blur: You can add refinements by adjusting the amount of blur according to your preference. By doing so, you can generate the desired final output easily.
- Removing Motion Blur: Apart from adding and adjusting the motion blur effect, you can also remove the blur effect using RSMB effortlessly.
- Add Motion Blur to 360 Videos: RSMB is also capable of adding a motion blur to 360 videos properly. It can recognize the edges of sides along with the top and bottom to create a motion blur effect appropriately.
Part 2: Is It Worth Trying ReelSmart Motion Blur Pro?
As we have discussed the regular version of ReelSmart Motion Blur, now we will also shed light on its Pro version. To help you in choosing the best version, we will draw a comparison between the regular and pro versions of RSMB in this section.
Pricing Price
| Regular Version | Pro Version |
|---|---|
| $104.95 | $164.95 |
Supported Hosts
| ReelSmart Motion Blur | Regular Version | Pro Version |
|---|---|---|
| Adobe: After Effects, Premiere Pro | Adobe: After Effects, Premiere Pro | |
| Apple: Final Cut Pro, Motion | Apple: Final Cut Pro, Motion | |
| / | Avid: Media Composer | |
| OFX: Catalyst Edit, DaVinci Resolve, Final Cut Pro, HitFilm, Movie Studio, Natron, and Vegas Pro | Supports all Regular version Hosts Plus the Following:OFX: Baselight, Flame, Fusion Studio, Smoke, Nucoda, Scratch, Nuke, and Silhouette |
New Features
- Separates the Object: RSMB Pro has the additional capability to isolate the background and foreground effectively. It utilizes a specified matte that can help in object separation to create motion blur with great precision. (Not available with Movie Studio, Vegas Pro, Catalyst Edit, Smoke, Media Composer, Flame, or Nucoda)
- Blur with Motion Vectors: If you have imported a 3D animation video, the pro version can blur the motion vectors provided by you. Thus, it can work on a 3D animation system perfectly. (Not available with Vegas Pro, DaVinci Resolve, Movie Studio, Media Composer, Catalyst Edit, or Nucoda)
- RGB+A Tracking: This option is used to recognize and track dark images with mattes by using the alpha channel. You can use this option for masked or CG stuff. (Not available with Media Composer)
- Use of Tracking Points: To help the RSMB’s calculation of motion vectors, you can provide tracking points. By defining the tracking points, you can tell RSMB about the movement of one pixel from one frame to another efficiently. (Not available with Vegas Pro, Media Composer, Catalyst Edit, DaVinci Resolve, Smoke, Flame, Movie Studio, or Nucoda)
- Spline Guidance: If RSMB encounters problems related to tracking, you can draw and animate shapes to tell about the object’s movement. Thus, it can help the RSMB find the object movement easily. (Not available with Premiere Pro, Nucoda, Vegas Pro, HitFilm, Movie Studio, Smoke, Sihouette, Flame, Scratch, Nuke, Motion, Media Composer, DaVinci Resolve, Catalyst Edit, FCPX)
Rating
- 7 out of 5
Our Verdict
The new features in the pro version of RSMB are really compelling and beneficial. However, there are various restrictions when it comes to the supported hosts of the pro version. So, if you are using any common software for video editing that is not recognized by the pro version, we will recommend you use the regular version of RSMB. The regular version of RSMB is cost-effective and works proficiently.
Part 3: How to Use ReelSmart Motion Blur Plugin in Premiere Pro?
Are you eager to know how to use the Premiere Pro motion blur plugin? Read and follow the steps provided below to craft flawless results.
Step1 Import Video Clip
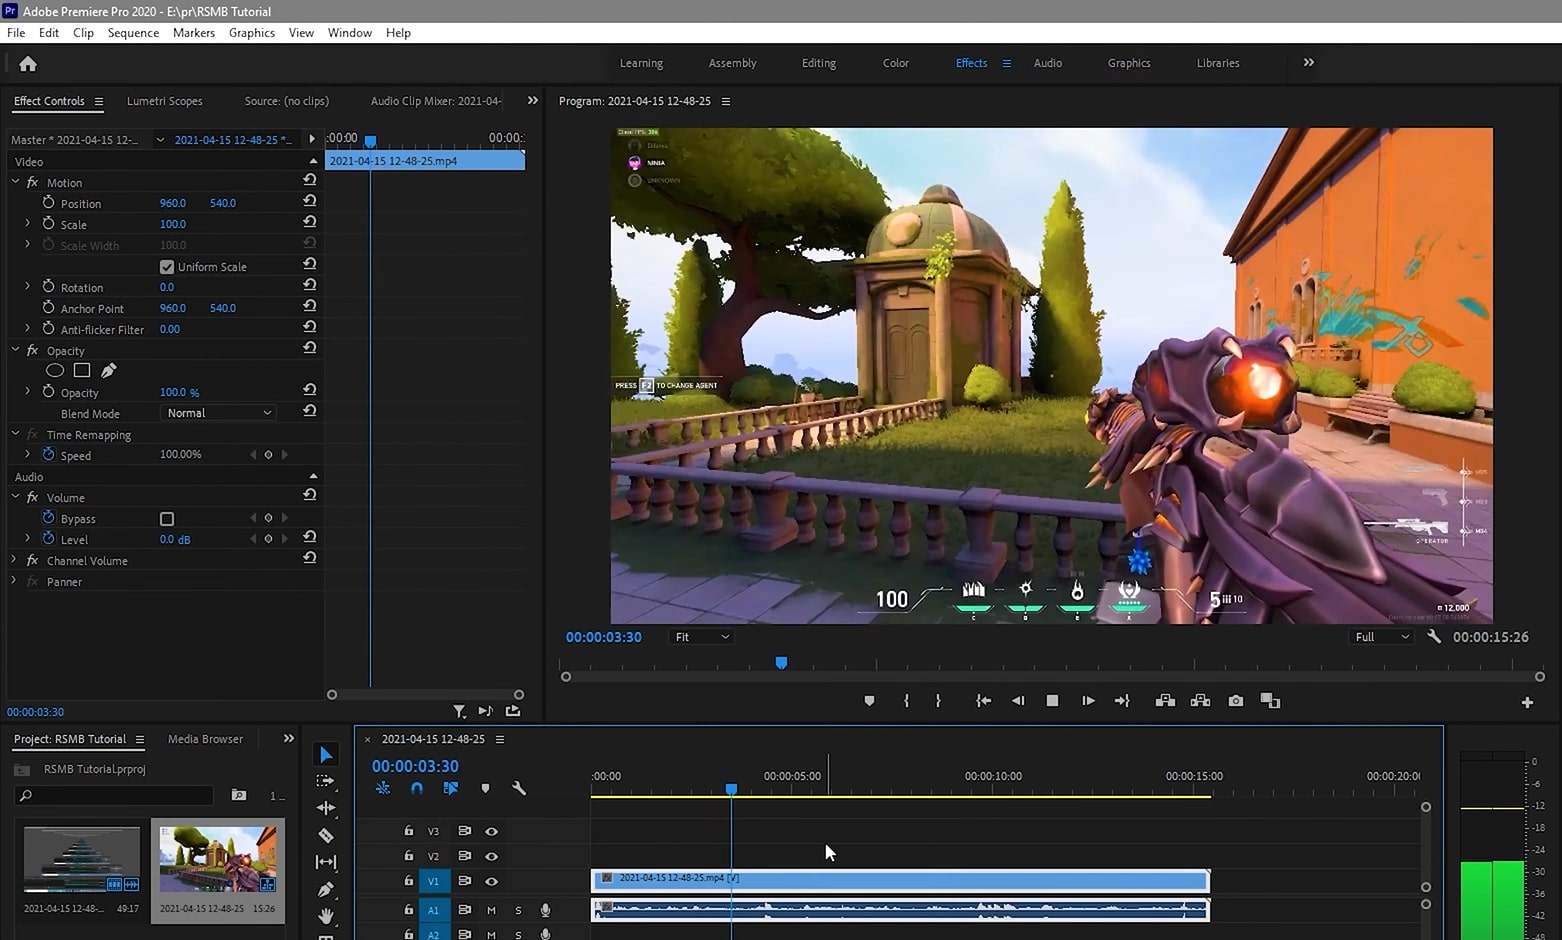
Open Adobe Premiere Pro in your system and start with a new project. On the newly displayed window, import the video clip by browsing through your computer. After importing the desired video file, make sure to drag and drop it into the timeline to begin editing.
Step2 Search for RSMB Effect
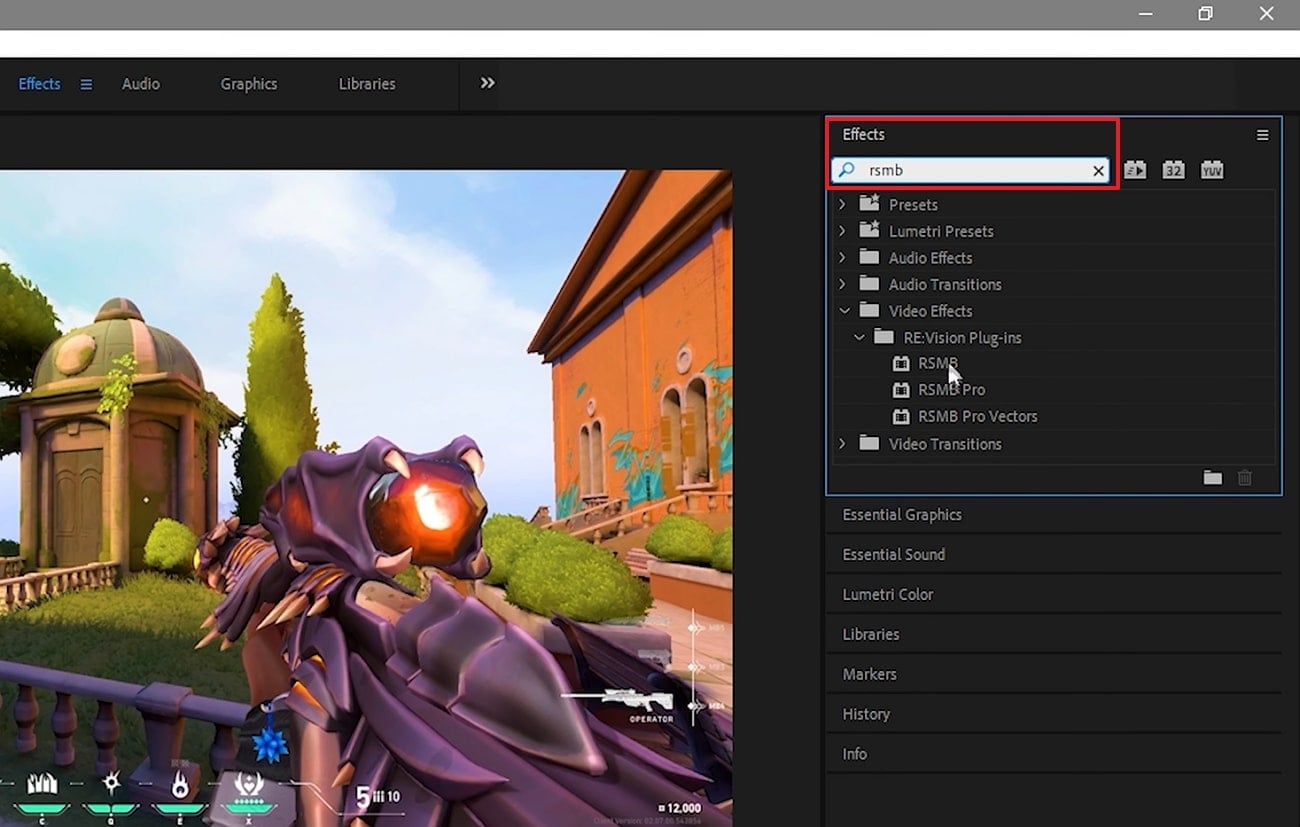
Once you have dropped the video into the timeline, navigate to the “Effects” tab given on the right side. On the search box, type “RSMB.” From the fetched results, select RSMB and apply it to the above layer of your video clip in the timeline.
Step3 Adjust the Plugin Settings
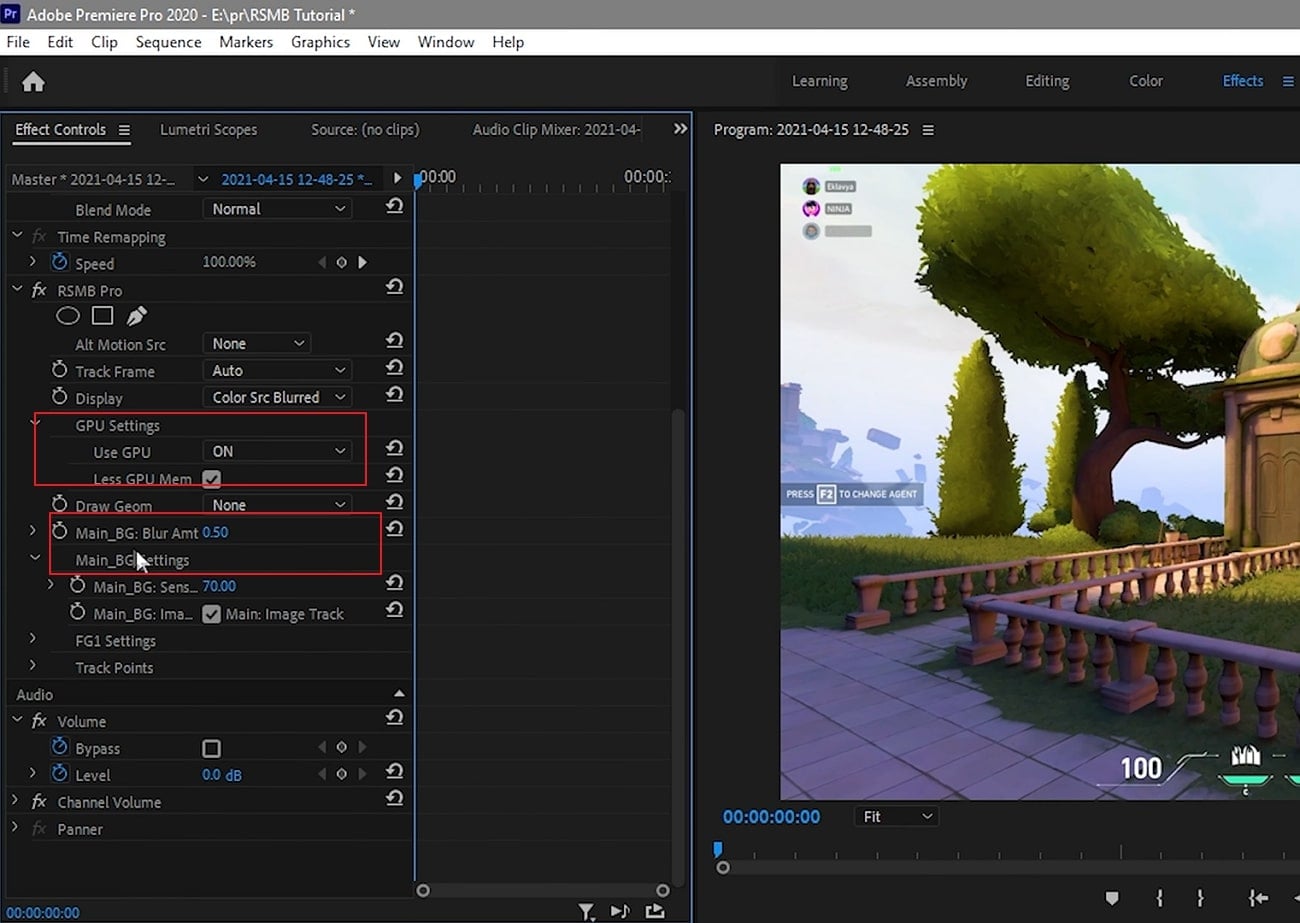
Now head to the settings on the left side and enable the GPU settings. Moreover, you can increase the blur amount to 1 or 1.5. By doing so, you can create a smoother look in your video. Once done with the settings, make sure to render your video to produce a smooth finish. Once done with rendering, you can preview and save the video easily.
Conclusion
Motion blur effect can drastically transform your video clip. If you are using Premiere Pro to add motion blur, we will recommend you use the plugin called ReVisionFX ReelSmart Motion Blur. If you are unaware of the motion blur plugin Premiere Pro, this article has fetched all the related details. This article has provided all the significance and instructions to use the RSMB plugin.
Supported Hosts
| ReelSmart Motion Blur | Regular Version | Pro Version |
|---|---|---|
| Adobe: After Effects, Premiere Pro | Adobe: After Effects, Premiere Pro | |
| Apple: Final Cut Pro, Motion | Apple: Final Cut Pro, Motion | |
| / | Avid: Media Composer | |
| OFX: Catalyst Edit, DaVinci Resolve, Final Cut Pro, HitFilm, Movie Studio, Natron, and Vegas Pro | Supports all Regular version Hosts Plus the Following:OFX: Baselight, Flame, Fusion Studio, Smoke, Nucoda, Scratch, Nuke, and Silhouette |
New Features
- Separates the Object: RSMB Pro has the additional capability to isolate the background and foreground effectively. It utilizes a specified matte that can help in object separation to create motion blur with great precision. (Not available with Movie Studio, Vegas Pro, Catalyst Edit, Smoke, Media Composer, Flame, or Nucoda)
- Blur with Motion Vectors: If you have imported a 3D animation video, the pro version can blur the motion vectors provided by you. Thus, it can work on a 3D animation system perfectly. (Not available with Vegas Pro, DaVinci Resolve, Movie Studio, Media Composer, Catalyst Edit, or Nucoda)
- RGB+A Tracking: This option is used to recognize and track dark images with mattes by using the alpha channel. You can use this option for masked or CG stuff. (Not available with Media Composer)
- Use of Tracking Points: To help the RSMB’s calculation of motion vectors, you can provide tracking points. By defining the tracking points, you can tell RSMB about the movement of one pixel from one frame to another efficiently. (Not available with Vegas Pro, Media Composer, Catalyst Edit, DaVinci Resolve, Smoke, Flame, Movie Studio, or Nucoda)
- Spline Guidance: If RSMB encounters problems related to tracking, you can draw and animate shapes to tell about the object’s movement. Thus, it can help the RSMB find the object movement easily. (Not available with Premiere Pro, Nucoda, Vegas Pro, HitFilm, Movie Studio, Smoke, Sihouette, Flame, Scratch, Nuke, Motion, Media Composer, DaVinci Resolve, Catalyst Edit, FCPX)
Rating
- 7 out of 5
Our Verdict
The new features in the pro version of RSMB are really compelling and beneficial. However, there are various restrictions when it comes to the supported hosts of the pro version. So, if you are using any common software for video editing that is not recognized by the pro version, we will recommend you use the regular version of RSMB. The regular version of RSMB is cost-effective and works proficiently.
Part 3: How to Use ReelSmart Motion Blur Plugin in Premiere Pro?
Are you eager to know how to use the Premiere Pro motion blur plugin? Read and follow the steps provided below to craft flawless results.
Step1 Import Video Clip
Open Adobe Premiere Pro in your system and start with a new project. On the newly displayed window, import the video clip by browsing through your computer. After importing the desired video file, make sure to drag and drop it into the timeline to begin editing.

Step2 Search for RSMB Effect
Once you have dropped the video into the timeline, navigate to the “Effects” tab given on the right side. On the search box, type “RSMB.” From the fetched results, select RSMB and apply it to the above layer of your video clip in the timeline.

Step3 Adjust the Plugin Settings
Now head to the settings on the left side and enable the GPU settings. Moreover, you can increase the blur amount to 1 or 1.5. By doing so, you can create a smoother look in your video. Once done with the settings, make sure to render your video to produce a smooth finish. Once done with rendering, you can preview and save the video easily.

Conclusion
Motion blur effect can drastically transform your video clip. If you are using Premiere Pro to add motion blur, we will recommend you use the plugin called ReVisionFX ReelSmart Motion Blur. If you are unaware of the motion blur plugin Premiere Pro, this article has fetched all the related details. This article has provided all the significance and instructions to use the RSMB plugin.
How To Add Motion Blur Effect To Photos in GIMP
GIMP is a cross-platform image editing software that you can use to edit photos and create graphics. The software is available for Linux, Windows, and macOS and can add a motion blur effect (A sense of movement in the photo), making your pictures look more realistic and professional.
So to help you tone your skills, we’ve written a comprehensive guide on how to apply the GIMP motion blur effect to your photos!
Part I. What Is GIMP?
GIMP software, a GNU Image Manipulation Program, is an open-source raster graphics editor used for image editing and retouching, converting between different image formats, free-form drawing, and more.
GIMP is frequently used as a Photoshop alternative. The software boasts a wide range of features, including support for layers, masks, color management, and third-party plugins.
Key Features
Here are some key features of the GIMP software:
- Quickly hide panels and menus to let you switch to a full-screen mode to preview pictures
- Fixes distorted images
- Available for Windows, Linux, Mac OS, and other operating systems
- Automatic image enhancement tool
- Lets you remove all the panels and tools from the workflow except the one you are working with.
- Released under a license called GNU General Public License v3 and later, which makes it free to use and distribute
- Add overlays and crop or resize an image
- Wide range of file formats that it can read and write, making it a versatile tool for working with images
Part II. How To Add The Motion Blur Effect To Your Photos in GIMP?
Below we’ve provided the step-by-step tutorial to add a motion blur effect to your photos in GIMP:
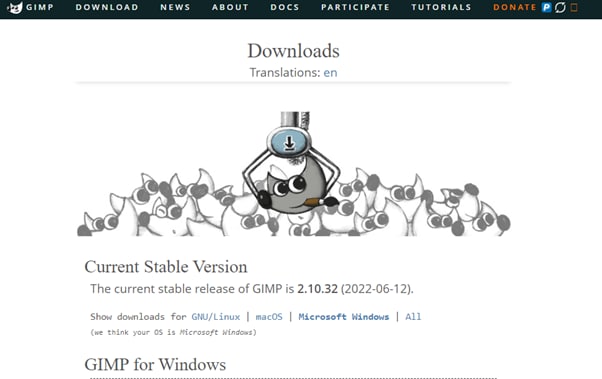
Step1 In the first step, launch a browser on your device, head to the GIMP website , and download the installation file according to your operating system. Now, click the downloaded installer, install the software on your system and launch it.
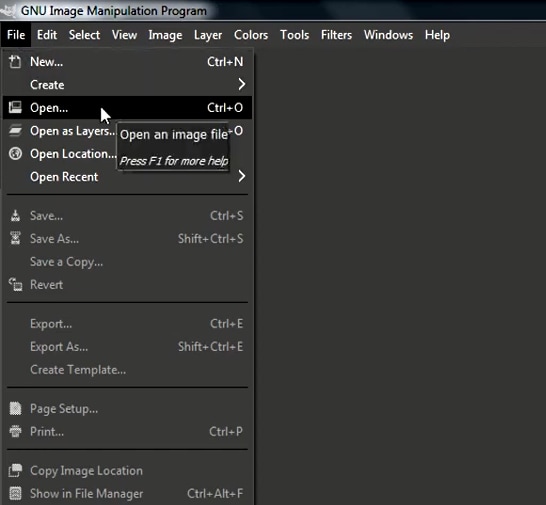
Step2 In the next step, click “File” on the GIMP dashboard, and select “Open” to access the Open Image window. Select your image file from your system and click “Open” to import the file.
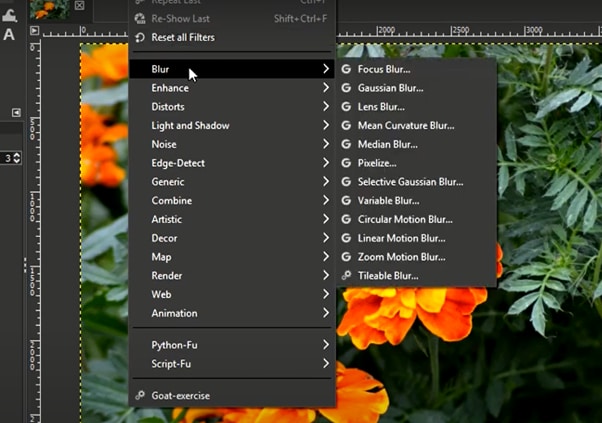
Step3 Next, click the “Filters” option from the top toolbar, select “Blur,” and choose “Motion Blur” from the drop-down menu. A dialogue box will now open where you can preview the effect and adjust the settings, including Blur Type, Blur Center, and Blur Parameters.
Step4 Once you are satisfied with your changes, click “OK” to apply the effect to the image, and make some other edits if needed. Finally, click “File” from the top toolbar, choose “Export As,” click “File Type” to select the format, and select the “Export” option to save your file.
Bonus Tips – The Alternative To GIMP To Create Motion Blur Effect
GIMP is a popular image editor that you can use to create motion blur effects. However, some users find it difficult to use the software for this purpose.
To simplify the process, we recommend usingWondershare Filmora an all-in-one editing software that offers multiple advanced features to help you quickly enhance your project.
Free Download For Win 7 or later(64-bit)
Free Download For macOS 10.14 or later
Here’s why Filmora is the best alternative to GIMP for creating motion blur effects:
- A user-friendly interface where you can quickly create the motion blur effect without spending hours learning the process
- Advanced video editing tools, such as keyframing, speed ramping, green screen, title editing, motion tracking, screen recorder, and preset templates
- Royalty-free music library where you can access millions of music and soundtracks
- Adds the motion blur effect to your videos as well as images
- Comes with multiple parameters to adjust the effect on your clip or image
To add the radial blur effect to images using Filmora, here are the quick and easy-to-follow steps:
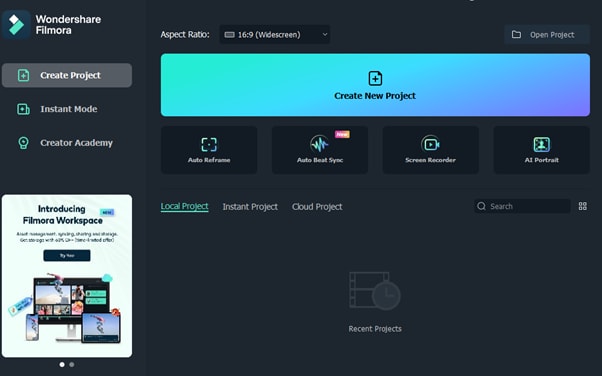
Step1 Download the Filmora software on your PC, launch it, and click “Create New Project” on the main panel. Use the “Click Here to Import your Media File” option to import your photo and drag and drop it into the timeline.
Step2 Now, head to the “Effects” tab from the taskbar. Use the search option to find the Blur effect. Afterward, drag & drop it in the timeline and adjust it on your selected clip.
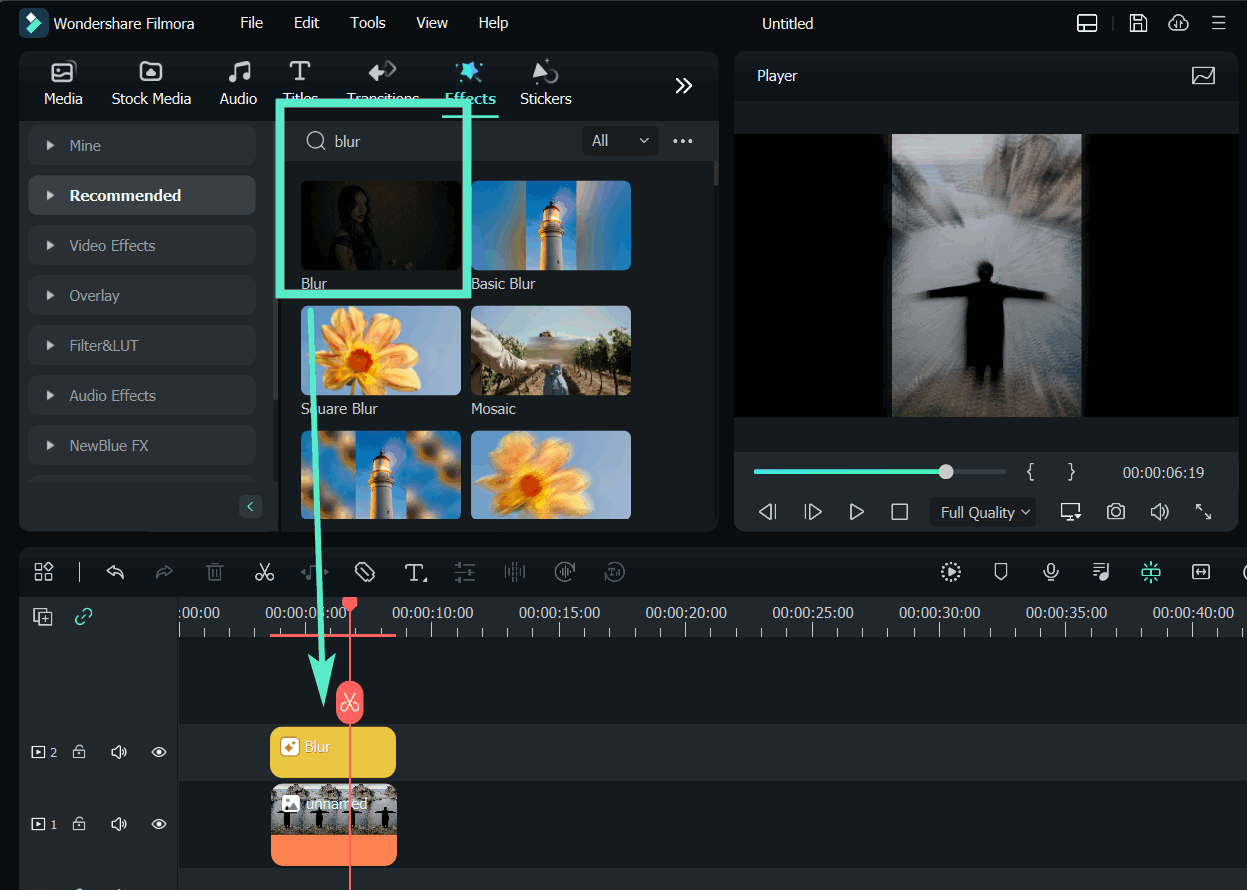
Step3 Please note that motion blur is now a dynamic effect on the image. That means you can add multiple photos and make them into a slideshow with a blur effect transition. Or, press the “Play” icon to preview your photo and pause the clip where you think motion blur works best.
Step4 Click the effect in the timeline to open its settings. Now, play your clip to preview and adjust the parameters as you want to smooth down the motion effect.
Step5 Once satisfied with the outcome, click the “Export” option, go to the “Local” tab, select a file format to save the images, and click “Export” again to save your project.
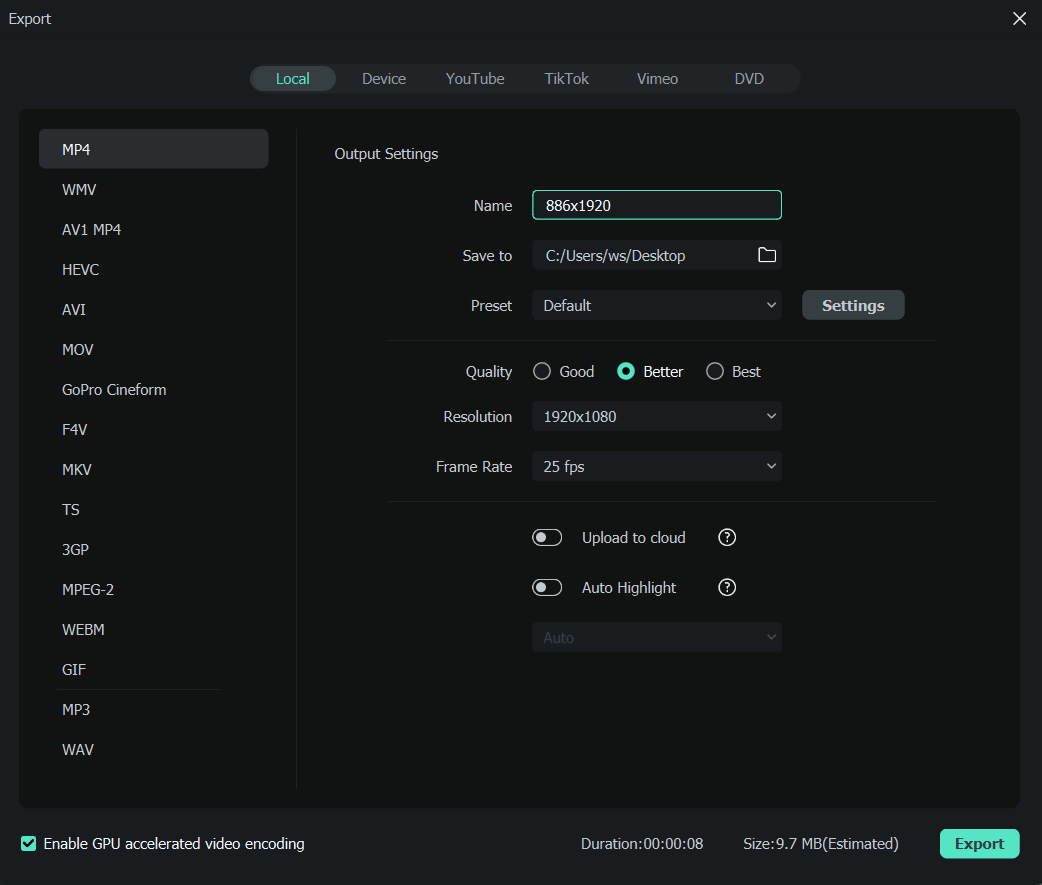
Filmora offers many export options, such as your device, YouTube, Vimeo, and DVD, with just a few clicks.
Last Words
In this detailed tutorial, we’ve discussed what GIMP is and its key features. We’ve provided a step-by-step guide to walk you through the process of creating the motion blur effect using the GIMP software.
In addition, we’ve provided a bonus tip to recommend Filmora as the best alternative to GIMP for creating the motion blur effect.
Hopefully, you found this article helpful in resolving your queries, and you can now add a smooth motion blur effect to your images.
Free Download For macOS 10.14 or later
Here’s why Filmora is the best alternative to GIMP for creating motion blur effects:
- A user-friendly interface where you can quickly create the motion blur effect without spending hours learning the process
- Advanced video editing tools, such as keyframing, speed ramping, green screen, title editing, motion tracking, screen recorder, and preset templates
- Royalty-free music library where you can access millions of music and soundtracks
- Adds the motion blur effect to your videos as well as images
- Comes with multiple parameters to adjust the effect on your clip or image
To add the radial blur effect to images using Filmora, here are the quick and easy-to-follow steps:
Step1 Download the Filmora software on your PC, launch it, and click “Create New Project” on the main panel. Use the “Click Here to Import your Media File” option to import your photo and drag and drop it into the timeline.

Step2 Now, head to the “Effects” tab from the taskbar. Use the search option to find the Blur effect. Afterward, drag & drop it in the timeline and adjust it on your selected clip.

Step3 Please note that motion blur is now a dynamic effect on the image. That means you can add multiple photos and make them into a slideshow with a blur effect transition. Or, press the “Play” icon to preview your photo and pause the clip where you think motion blur works best.
Step4 Click the effect in the timeline to open its settings. Now, play your clip to preview and adjust the parameters as you want to smooth down the motion effect.
Step5 Once satisfied with the outcome, click the “Export” option, go to the “Local” tab, select a file format to save the images, and click “Export” again to save your project.

Filmora offers many export options, such as your device, YouTube, Vimeo, and DVD, with just a few clicks.
Last Words
In this detailed tutorial, we’ve discussed what GIMP is and its key features. We’ve provided a step-by-step guide to walk you through the process of creating the motion blur effect using the GIMP software.
In addition, we’ve provided a bonus tip to recommend Filmora as the best alternative to GIMP for creating the motion blur effect.
Hopefully, you found this article helpful in resolving your queries, and you can now add a smooth motion blur effect to your images.
Splice Video Editor Online - Get Your Videos Splice Easily
Create High-Quality Video - Wondershare Filmora
An easy and powerful YouTube video editor
Numerous video and audio effects to choose from
Detailed tutorials are provided by the official channel
We are in the digital era, and any online activity gives us a high exposure level. Making digital content and posting it online is not enough. You have to be creative and adopt an advanced mode of communication. The best place to begin is with online platforms. This is because most people find it easy to source information online instead of any other place.
The availability of video editors makes it possible to splice videos online and post them instantly, reaching thousands of viewers through social media platforms in a short time.
Recent research has shown that online videos are more effective and can help brands connect with their audience compared to other data types like images, audio, GIFs, and text, among others. Check out how to merge videos online and the advantages of going online on your video editing journey.
In this article
01 The Meaning of Splice Video
02 Top 6 Online Video Splice Editors
The Meaning of Splice Video
To splice a video means combining two or more video clips to form one. You can use the available editing apps to merge several videos. You need to select each video to splice and put them together in the timeline. Several apps enable you to edit your footage by trimming, cropping, adding music, and transitions, among other adjustments.
Reasons to splice video
You could be wondering why it is necessary to splice your videos. Well, people love to be creative, and working on several videos may not bring out the creativity they need. Here are some reasons that come in handy as far as splicing video is concerned.
- It isn’t easy to share many videos at once. Splicing your videos is a quick way to get your videos to move as one piece and express your message as direct as possible.
- You can also splice videos for easy management. Remember, you can edit it as one, making you finish the editing process quickly and easily.
- Merged videos make it easy to share on other platforms. It would be very hectic to promote several videos separately on media sites.
- Another reason for splicing videos is to compress them. It will take up less space compared to dealing with several videos at once.
- Spliced video is organized, indicating the starting point and endpoint of the video.
The Benefits of Online Video Editing
Since its backbone reason is to share videos online, several pros come with it. The Splice video editor online enables anyone to create engaging videos without software installation. Let’s peruse the advantages of using online video editing compared to the conventional options.
• Automatic updates
Updates are important for the normal operation of an application. It may be hectic to keep remembering when you should update your drivers on your device. However, online apps need no manual configuration as they do this automatically. You’ll always get the latest version anytime you log in. Besides, new templates and features are instantly available to you after every update.
• Easy collaboration
This comes when several people work on a project. It could be difficult to share files manually, given the rise of computer crashes and data loss. Online mechanisms come to the rescue as all files are kept in the cloud. This lets anyone working on the project access it on any device, anywhere, thereby minimizing the risks of data loss. Furthermore, multiple collaborators can log in to the same project to input their views and other additions. Anyone can upload the file from their end and make the necessary adjustments.
• Convenient
You don’t require any tools while manage Splice video editor online. You can easily make edits from anywhere as long as you have an internet connection. It also promotes easy accessibility of your files from any device. More so, making edits and polishing your video is accomplished faster than ever.
• Time-saving
You’ll get improved productivity when you work online on your video. You won’t waste time running up and down the stairs to install your app or get updates. All you need are a few clicks of a button to make quick moves as far as video editing is concerned. Instead, you can easily polish and post your clip while you figure out what works best for your audience at each step.
• Multi-OS compatible
An online video editor runs in a web browser and, therefore, can run on several operating systems. It doesn’t matter which device you use to compose your video. You can easily share it and be accessible on other platforms by several people. Likewise, the speed will not be affected no matter which operating system you use.
Top 6 Online Video Splice Editors
Now that we have seen what online video editing is best at, we need to explore the suitable Splice video editor online that will quickly bring out the creativity in you and elevate your editing ability to the next level.
1) MiniTool MovieMaker
The app comes free with no ads and is watermark-free as well. It is rich in features that help you to maneuver as you edit your video to perfection. The MiniTool lets you create continuous videos based on your vision. It also encompasses video templates that make it easy to settle on a theme.
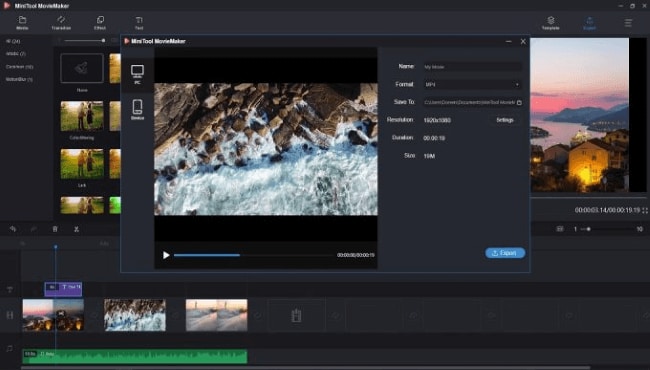
Pros
Customize videos with video transitions and animated text.
This app contains no advertisements.
It leaves no watermark on the finished video.
It has an intuitive and clean interface that enables easy editing of videos.
The app is highly compatible with popular video and audio formats.
Cons
It lacks some advanced features, like a green screen and motion speed control.
2) Filmora Video Editor
Filmora is another powerful tool with splice video templates. It has an intuitive interface that enables any level of user to easily edit videos. You can add filters and other video effects to create an engaging video. Also, make use of advanced features like keyframe animation, color matching, split screen, etc.
For Win 7 or later (64-bit)
For macOS 10.12 or later
Pros
It comes with advanced features to help you create compelling videos.
You can add music and other sound effects directly.
An intuitive interface that suits beginners.
Produce high-density videos.
Cons
It doesn’t support newer formats like HEIC photos..
3) Clipchamp
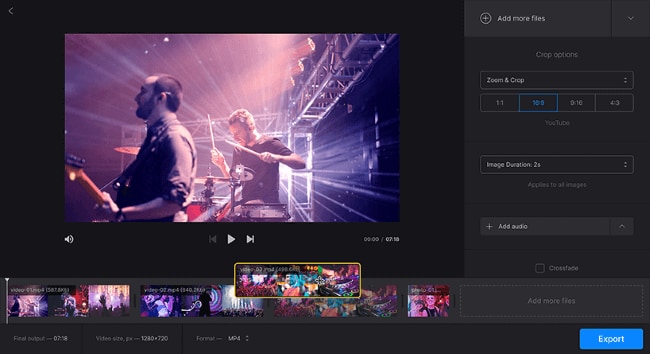
This online splice video editor offers you two modes of video creation online. You can either use the video templates or the blank project option. For templates, get customized ones right from the app’s gallery. However, you may also opt to start your video creation from scratch and make progress toward completion.
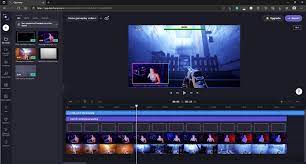
Pros
This app offers you two modes for video creation.
Preview your video clips before posting them.
Easily organize your music tracks in the timeline.
Splice your videos without quality loss.
Use styled text templates with animations.
Cons
It has no keyframe features for animation creation.
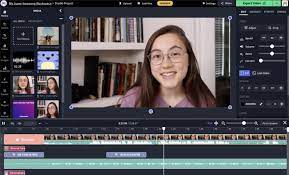
4) Kapwing
This is a video converter and splice video editor that freely edits your videos to any file format. You can use the screen-by-screen editing option for advanced editing ability. You can also bring on more creativity by using multiple scenes. Furthermore, you can’t run out of editing tools, which include rotating, splitting, and trimming, among others. Also, spice up your project by adding some background music and customizing text to the desired font and color.
Pros
It includes free music from the internet.
It comes with a large library of photos, stickers, etc.
It’s easy to use and allows editing of videos without signing in.
Cons
It lacks advanced features like speech ramping.
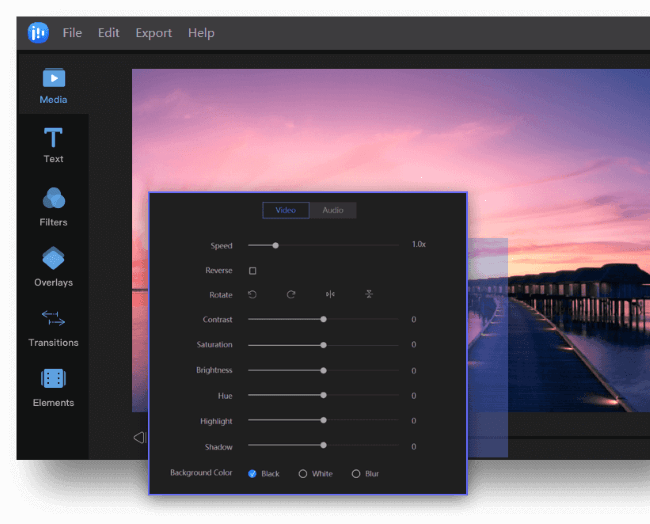
5) Video Editor by EaseUS
This is another reliable splice editor that comes with quality editing features. You can splice, merge, trim, and rotate your video, among other functionalities. Furthermore, the advanced features allow you to easily apply transitions and elements.
Pros
Splice your videos instantly using your mouse.
Easily detach the audio from the spliced video.
It supports various video formats.
Cons
It has limited templates.
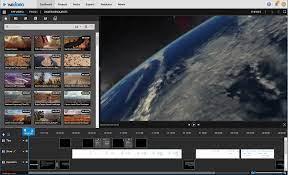
6) WeVideo
This online editor lets you splice your videos anywhere. It supports several formats, and you can finally export your video in any format. Besides, it allows you access to free stock media like music tracks, videos, and images, among others.
Pros
WeVideo is free to use. However, you can upgrade to the premium version for advanced features.
Directly export videos to YouTube, Instagram, etc.
Cons
The free version leaves a watermark on your videos.
Conclusion
● Are you looking forward to promoting your brand online? Then splice the video online at the best resolution for your editing purposes. You’ll quickly edit your videos and reach your target audience with just a few clicks of a button. Likewise, it is effective to monitor your viewers’ reactions through various comments and feedback. This article has brought you several editing apps for online use. You can easily pinpoint what works best for you concerning their features.
We are in the digital era, and any online activity gives us a high exposure level. Making digital content and posting it online is not enough. You have to be creative and adopt an advanced mode of communication. The best place to begin is with online platforms. This is because most people find it easy to source information online instead of any other place.
The availability of video editors makes it possible to splice videos online and post them instantly, reaching thousands of viewers through social media platforms in a short time.
Recent research has shown that online videos are more effective and can help brands connect with their audience compared to other data types like images, audio, GIFs, and text, among others. Check out how to merge videos online and the advantages of going online on your video editing journey.

In this article
01 The Meaning of Splice Video
02 Top 6 Online Video Splice Editors
The Meaning of Splice Video
To splice a video means combining two or more video clips to form one. You can use the available editing apps to merge several videos. You need to select each video to splice and put them together in the timeline. Several apps enable you to edit your footage by trimming, cropping, adding music, and transitions, among other adjustments.
Reasons to splice video
You could be wondering why it is necessary to splice your videos. Well, people love to be creative, and working on several videos may not bring out the creativity they need. Here are some reasons that come in handy as far as splicing video is concerned.
- It isn’t easy to share many videos at once. Splicing your videos is a quick way to get your videos to move as one piece and express your message as direct as possible.
- You can also splice videos for easy management. Remember, you can edit it as one, making you finish the editing process quickly and easily.
- Merged videos make it easy to share on other platforms. It would be very hectic to promote several videos separately on media sites.
- Another reason for splicing videos is to compress them. It will take up less space compared to dealing with several videos at once.
- Spliced video is organized, indicating the starting point and endpoint of the video.
The Benefits of Online Video Editing
Since its backbone reason is to share videos online, several pros come with it. The Splice video editor online enables anyone to create engaging videos without software installation. Let’s peruse the advantages of using online video editing compared to the conventional options.
• Automatic updates
Updates are important for the normal operation of an application. It may be hectic to keep remembering when you should update your drivers on your device. However, online apps need no manual configuration as they do this automatically. You’ll always get the latest version anytime you log in. Besides, new templates and features are instantly available to you after every update.
• Easy collaboration
This comes when several people work on a project. It could be difficult to share files manually, given the rise of computer crashes and data loss. Online mechanisms come to the rescue as all files are kept in the cloud. This lets anyone working on the project access it on any device, anywhere, thereby minimizing the risks of data loss. Furthermore, multiple collaborators can log in to the same project to input their views and other additions. Anyone can upload the file from their end and make the necessary adjustments.
• Convenient
You don’t require any tools while manage Splice video editor online. You can easily make edits from anywhere as long as you have an internet connection. It also promotes easy accessibility of your files from any device. More so, making edits and polishing your video is accomplished faster than ever.
• Time-saving
You’ll get improved productivity when you work online on your video. You won’t waste time running up and down the stairs to install your app or get updates. All you need are a few clicks of a button to make quick moves as far as video editing is concerned. Instead, you can easily polish and post your clip while you figure out what works best for your audience at each step.
• Multi-OS compatible
An online video editor runs in a web browser and, therefore, can run on several operating systems. It doesn’t matter which device you use to compose your video. You can easily share it and be accessible on other platforms by several people. Likewise, the speed will not be affected no matter which operating system you use.
Top 6 Online Video Splice Editors
Now that we have seen what online video editing is best at, we need to explore the suitable Splice video editor online that will quickly bring out the creativity in you and elevate your editing ability to the next level.
1) MiniTool MovieMaker
The app comes free with no ads and is watermark-free as well. It is rich in features that help you to maneuver as you edit your video to perfection. The MiniTool lets you create continuous videos based on your vision. It also encompasses video templates that make it easy to settle on a theme.

Pros
Customize videos with video transitions and animated text.
This app contains no advertisements.
It leaves no watermark on the finished video.
It has an intuitive and clean interface that enables easy editing of videos.
The app is highly compatible with popular video and audio formats.
Cons
It lacks some advanced features, like a green screen and motion speed control.
2) Filmora Video Editor
Filmora is another powerful tool with splice video templates. It has an intuitive interface that enables any level of user to easily edit videos. You can add filters and other video effects to create an engaging video. Also, make use of advanced features like keyframe animation, color matching, split screen, etc.
For Win 7 or later (64-bit)
For macOS 10.12 or later
Pros
It comes with advanced features to help you create compelling videos.
You can add music and other sound effects directly.
An intuitive interface that suits beginners.
Produce high-density videos.
Cons
It doesn’t support newer formats like HEIC photos..
3) Clipchamp
This online splice video editor offers you two modes of video creation online. You can either use the video templates or the blank project option. For templates, get customized ones right from the app’s gallery. However, you may also opt to start your video creation from scratch and make progress toward completion.

Pros
This app offers you two modes for video creation.
Preview your video clips before posting them.
Easily organize your music tracks in the timeline.
Splice your videos without quality loss.
Use styled text templates with animations.
Cons
It has no keyframe features for animation creation.
4) Kapwing
This is a video converter and splice video editor that freely edits your videos to any file format. You can use the screen-by-screen editing option for advanced editing ability. You can also bring on more creativity by using multiple scenes. Furthermore, you can’t run out of editing tools, which include rotating, splitting, and trimming, among others. Also, spice up your project by adding some background music and customizing text to the desired font and color.

Pros
It includes free music from the internet.
It comes with a large library of photos, stickers, etc.
It’s easy to use and allows editing of videos without signing in.
Cons
It lacks advanced features like speech ramping.
5) Video Editor by EaseUS
This is another reliable splice editor that comes with quality editing features. You can splice, merge, trim, and rotate your video, among other functionalities. Furthermore, the advanced features allow you to easily apply transitions and elements.

Pros
Splice your videos instantly using your mouse.
Easily detach the audio from the spliced video.
It supports various video formats.
Cons
It has limited templates.
6) WeVideo
This online editor lets you splice your videos anywhere. It supports several formats, and you can finally export your video in any format. Besides, it allows you access to free stock media like music tracks, videos, and images, among others.

Pros
WeVideo is free to use. However, you can upgrade to the premium version for advanced features.
Directly export videos to YouTube, Instagram, etc.
Cons
The free version leaves a watermark on your videos.
Conclusion
● Are you looking forward to promoting your brand online? Then splice the video online at the best resolution for your editing purposes. You’ll quickly edit your videos and reach your target audience with just a few clicks of a button. Likewise, it is effective to monitor your viewers’ reactions through various comments and feedback. This article has brought you several editing apps for online use. You can easily pinpoint what works best for you concerning their features.
We are in the digital era, and any online activity gives us a high exposure level. Making digital content and posting it online is not enough. You have to be creative and adopt an advanced mode of communication. The best place to begin is with online platforms. This is because most people find it easy to source information online instead of any other place.
The availability of video editors makes it possible to splice videos online and post them instantly, reaching thousands of viewers through social media platforms in a short time.
Recent research has shown that online videos are more effective and can help brands connect with their audience compared to other data types like images, audio, GIFs, and text, among others. Check out how to merge videos online and the advantages of going online on your video editing journey.

In this article
01 The Meaning of Splice Video
02 Top 6 Online Video Splice Editors
The Meaning of Splice Video
To splice a video means combining two or more video clips to form one. You can use the available editing apps to merge several videos. You need to select each video to splice and put them together in the timeline. Several apps enable you to edit your footage by trimming, cropping, adding music, and transitions, among other adjustments.
Reasons to splice video
You could be wondering why it is necessary to splice your videos. Well, people love to be creative, and working on several videos may not bring out the creativity they need. Here are some reasons that come in handy as far as splicing video is concerned.
- It isn’t easy to share many videos at once. Splicing your videos is a quick way to get your videos to move as one piece and express your message as direct as possible.
- You can also splice videos for easy management. Remember, you can edit it as one, making you finish the editing process quickly and easily.
- Merged videos make it easy to share on other platforms. It would be very hectic to promote several videos separately on media sites.
- Another reason for splicing videos is to compress them. It will take up less space compared to dealing with several videos at once.
- Spliced video is organized, indicating the starting point and endpoint of the video.
The Benefits of Online Video Editing
Since its backbone reason is to share videos online, several pros come with it. The Splice video editor online enables anyone to create engaging videos without software installation. Let’s peruse the advantages of using online video editing compared to the conventional options.
• Automatic updates
Updates are important for the normal operation of an application. It may be hectic to keep remembering when you should update your drivers on your device. However, online apps need no manual configuration as they do this automatically. You’ll always get the latest version anytime you log in. Besides, new templates and features are instantly available to you after every update.
• Easy collaboration
This comes when several people work on a project. It could be difficult to share files manually, given the rise of computer crashes and data loss. Online mechanisms come to the rescue as all files are kept in the cloud. This lets anyone working on the project access it on any device, anywhere, thereby minimizing the risks of data loss. Furthermore, multiple collaborators can log in to the same project to input their views and other additions. Anyone can upload the file from their end and make the necessary adjustments.
• Convenient
You don’t require any tools while manage Splice video editor online. You can easily make edits from anywhere as long as you have an internet connection. It also promotes easy accessibility of your files from any device. More so, making edits and polishing your video is accomplished faster than ever.
• Time-saving
You’ll get improved productivity when you work online on your video. You won’t waste time running up and down the stairs to install your app or get updates. All you need are a few clicks of a button to make quick moves as far as video editing is concerned. Instead, you can easily polish and post your clip while you figure out what works best for your audience at each step.
• Multi-OS compatible
An online video editor runs in a web browser and, therefore, can run on several operating systems. It doesn’t matter which device you use to compose your video. You can easily share it and be accessible on other platforms by several people. Likewise, the speed will not be affected no matter which operating system you use.
Top 6 Online Video Splice Editors
Now that we have seen what online video editing is best at, we need to explore the suitable Splice video editor online that will quickly bring out the creativity in you and elevate your editing ability to the next level.
1) MiniTool MovieMaker
The app comes free with no ads and is watermark-free as well. It is rich in features that help you to maneuver as you edit your video to perfection. The MiniTool lets you create continuous videos based on your vision. It also encompasses video templates that make it easy to settle on a theme.

Pros
Customize videos with video transitions and animated text.
This app contains no advertisements.
It leaves no watermark on the finished video.
It has an intuitive and clean interface that enables easy editing of videos.
The app is highly compatible with popular video and audio formats.
Cons
It lacks some advanced features, like a green screen and motion speed control.
2) Filmora Video Editor
Filmora is another powerful tool with splice video templates. It has an intuitive interface that enables any level of user to easily edit videos. You can add filters and other video effects to create an engaging video. Also, make use of advanced features like keyframe animation, color matching, split screen, etc.
For Win 7 or later (64-bit)
For macOS 10.12 or later
Pros
It comes with advanced features to help you create compelling videos.
You can add music and other sound effects directly.
An intuitive interface that suits beginners.
Produce high-density videos.
Cons
It doesn’t support newer formats like HEIC photos..
3) Clipchamp
This online splice video editor offers you two modes of video creation online. You can either use the video templates or the blank project option. For templates, get customized ones right from the app’s gallery. However, you may also opt to start your video creation from scratch and make progress toward completion.

Pros
This app offers you two modes for video creation.
Preview your video clips before posting them.
Easily organize your music tracks in the timeline.
Splice your videos without quality loss.
Use styled text templates with animations.
Cons
It has no keyframe features for animation creation.
4) Kapwing
This is a video converter and splice video editor that freely edits your videos to any file format. You can use the screen-by-screen editing option for advanced editing ability. You can also bring on more creativity by using multiple scenes. Furthermore, you can’t run out of editing tools, which include rotating, splitting, and trimming, among others. Also, spice up your project by adding some background music and customizing text to the desired font and color.

Pros
It includes free music from the internet.
It comes with a large library of photos, stickers, etc.
It’s easy to use and allows editing of videos without signing in.
Cons
It lacks advanced features like speech ramping.
5) Video Editor by EaseUS
This is another reliable splice editor that comes with quality editing features. You can splice, merge, trim, and rotate your video, among other functionalities. Furthermore, the advanced features allow you to easily apply transitions and elements.

Pros
Splice your videos instantly using your mouse.
Easily detach the audio from the spliced video.
It supports various video formats.
Cons
It has limited templates.
6) WeVideo
This online editor lets you splice your videos anywhere. It supports several formats, and you can finally export your video in any format. Besides, it allows you access to free stock media like music tracks, videos, and images, among others.

Pros
WeVideo is free to use. However, you can upgrade to the premium version for advanced features.
Directly export videos to YouTube, Instagram, etc.
Cons
The free version leaves a watermark on your videos.
Conclusion
● Are you looking forward to promoting your brand online? Then splice the video online at the best resolution for your editing purposes. You’ll quickly edit your videos and reach your target audience with just a few clicks of a button. Likewise, it is effective to monitor your viewers’ reactions through various comments and feedback. This article has brought you several editing apps for online use. You can easily pinpoint what works best for you concerning their features.
We are in the digital era, and any online activity gives us a high exposure level. Making digital content and posting it online is not enough. You have to be creative and adopt an advanced mode of communication. The best place to begin is with online platforms. This is because most people find it easy to source information online instead of any other place.
The availability of video editors makes it possible to splice videos online and post them instantly, reaching thousands of viewers through social media platforms in a short time.
Recent research has shown that online videos are more effective and can help brands connect with their audience compared to other data types like images, audio, GIFs, and text, among others. Check out how to merge videos online and the advantages of going online on your video editing journey.

In this article
01 The Meaning of Splice Video
02 Top 6 Online Video Splice Editors
The Meaning of Splice Video
To splice a video means combining two or more video clips to form one. You can use the available editing apps to merge several videos. You need to select each video to splice and put them together in the timeline. Several apps enable you to edit your footage by trimming, cropping, adding music, and transitions, among other adjustments.
Reasons to splice video
You could be wondering why it is necessary to splice your videos. Well, people love to be creative, and working on several videos may not bring out the creativity they need. Here are some reasons that come in handy as far as splicing video is concerned.
- It isn’t easy to share many videos at once. Splicing your videos is a quick way to get your videos to move as one piece and express your message as direct as possible.
- You can also splice videos for easy management. Remember, you can edit it as one, making you finish the editing process quickly and easily.
- Merged videos make it easy to share on other platforms. It would be very hectic to promote several videos separately on media sites.
- Another reason for splicing videos is to compress them. It will take up less space compared to dealing with several videos at once.
- Spliced video is organized, indicating the starting point and endpoint of the video.
The Benefits of Online Video Editing
Since its backbone reason is to share videos online, several pros come with it. The Splice video editor online enables anyone to create engaging videos without software installation. Let’s peruse the advantages of using online video editing compared to the conventional options.
• Automatic updates
Updates are important for the normal operation of an application. It may be hectic to keep remembering when you should update your drivers on your device. However, online apps need no manual configuration as they do this automatically. You’ll always get the latest version anytime you log in. Besides, new templates and features are instantly available to you after every update.
• Easy collaboration
This comes when several people work on a project. It could be difficult to share files manually, given the rise of computer crashes and data loss. Online mechanisms come to the rescue as all files are kept in the cloud. This lets anyone working on the project access it on any device, anywhere, thereby minimizing the risks of data loss. Furthermore, multiple collaborators can log in to the same project to input their views and other additions. Anyone can upload the file from their end and make the necessary adjustments.
• Convenient
You don’t require any tools while manage Splice video editor online. You can easily make edits from anywhere as long as you have an internet connection. It also promotes easy accessibility of your files from any device. More so, making edits and polishing your video is accomplished faster than ever.
• Time-saving
You’ll get improved productivity when you work online on your video. You won’t waste time running up and down the stairs to install your app or get updates. All you need are a few clicks of a button to make quick moves as far as video editing is concerned. Instead, you can easily polish and post your clip while you figure out what works best for your audience at each step.
• Multi-OS compatible
An online video editor runs in a web browser and, therefore, can run on several operating systems. It doesn’t matter which device you use to compose your video. You can easily share it and be accessible on other platforms by several people. Likewise, the speed will not be affected no matter which operating system you use.
Top 6 Online Video Splice Editors
Now that we have seen what online video editing is best at, we need to explore the suitable Splice video editor online that will quickly bring out the creativity in you and elevate your editing ability to the next level.
1) MiniTool MovieMaker
The app comes free with no ads and is watermark-free as well. It is rich in features that help you to maneuver as you edit your video to perfection. The MiniTool lets you create continuous videos based on your vision. It also encompasses video templates that make it easy to settle on a theme.

Pros
Customize videos with video transitions and animated text.
This app contains no advertisements.
It leaves no watermark on the finished video.
It has an intuitive and clean interface that enables easy editing of videos.
The app is highly compatible with popular video and audio formats.
Cons
It lacks some advanced features, like a green screen and motion speed control.
2) Filmora Video Editor
Filmora is another powerful tool with splice video templates. It has an intuitive interface that enables any level of user to easily edit videos. You can add filters and other video effects to create an engaging video. Also, make use of advanced features like keyframe animation, color matching, split screen, etc.
For Win 7 or later (64-bit)
For macOS 10.12 or later
Pros
It comes with advanced features to help you create compelling videos.
You can add music and other sound effects directly.
An intuitive interface that suits beginners.
Produce high-density videos.
Cons
It doesn’t support newer formats like HEIC photos..
3) Clipchamp
This online splice video editor offers you two modes of video creation online. You can either use the video templates or the blank project option. For templates, get customized ones right from the app’s gallery. However, you may also opt to start your video creation from scratch and make progress toward completion.

Pros
This app offers you two modes for video creation.
Preview your video clips before posting them.
Easily organize your music tracks in the timeline.
Splice your videos without quality loss.
Use styled text templates with animations.
Cons
It has no keyframe features for animation creation.
4) Kapwing
This is a video converter and splice video editor that freely edits your videos to any file format. You can use the screen-by-screen editing option for advanced editing ability. You can also bring on more creativity by using multiple scenes. Furthermore, you can’t run out of editing tools, which include rotating, splitting, and trimming, among others. Also, spice up your project by adding some background music and customizing text to the desired font and color.

Pros
It includes free music from the internet.
It comes with a large library of photos, stickers, etc.
It’s easy to use and allows editing of videos without signing in.
Cons
It lacks advanced features like speech ramping.
5) Video Editor by EaseUS
This is another reliable splice editor that comes with quality editing features. You can splice, merge, trim, and rotate your video, among other functionalities. Furthermore, the advanced features allow you to easily apply transitions and elements.

Pros
Splice your videos instantly using your mouse.
Easily detach the audio from the spliced video.
It supports various video formats.
Cons
It has limited templates.
6) WeVideo
This online editor lets you splice your videos anywhere. It supports several formats, and you can finally export your video in any format. Besides, it allows you access to free stock media like music tracks, videos, and images, among others.

Pros
WeVideo is free to use. However, you can upgrade to the premium version for advanced features.
Directly export videos to YouTube, Instagram, etc.
Cons
The free version leaves a watermark on your videos.
Conclusion
● Are you looking forward to promoting your brand online? Then splice the video online at the best resolution for your editing purposes. You’ll quickly edit your videos and reach your target audience with just a few clicks of a button. Likewise, it is effective to monitor your viewers’ reactions through various comments and feedback. This article has brought you several editing apps for online use. You can easily pinpoint what works best for you concerning their features.
Also read:
- New In 2024, Best GIF to AVI Converters (Online + Software Solutions)
- 2024 Approved Complete Tutorial to Make an Impressive Countdown Timer Video
- New Stunning Glitch Effect and Its Creation Steps for Premiere Pro
- In 2024, In This Article, We Will Cover the Stages of Film Production You Need to Keep in Mind.Without Further Ado, Lets Get Started
- 2024 Approved How To Change Speed of Video in Final Cut Pro?
- New How to Combine Videos Into One on Instagram for 2024
- How to Create a Custom Slide Show in PowerPoint
- In 2024, A Complete Guide to Use Distortion Effect in Premiere Pro
- Updated 10 Innovative AR Teaching Examples to Tell You What Is AR in Teaching for 2024
- Updated Creating Testimonial Videos For Health And Wellness Business Industry for 2024
- New Best Ideas on Using Green Screen with Filmora for 2024
- Updated 2024 Approved Replacing the Sky in Adobe After Effects An Extensive Guide
- New Best Free LUTs to Use for 2024
- 2024 Approved How Important It Is to Perform Color Correction to Your Video? Here Is a Solution with After Effects Color Correction with Illustrative Videos
- New Online Video Makers
- New In 2024, How to Use the Logo Intro Templates for Your Next Video
- REVIEW Whats Top 10 Software to Make AI Upscaling Video for 2024
- New In 2024, How To Polish Your Music Video Edits Using Filmora
- Updated 2024 Approved Guide To Scaling and Setting Videos in Filmora | Tutorial
- 2024 Approved 3D Ray Traced Settings In After Effects
- New Why Your Transparent GIF Is Hard to Remove
- New 2024 Approved How to Concatenate Videos Using FFmpeg
- In 2024, Full Tutorial to Bypass Your Poco C50 Face Lock?
- In 2024, How to Bypass Android Lock Screen Using Emergency Call On Poco X5?
- How to Rescue Lost Messages from Xiaomi Civi 3 Disney 100th Anniversary Edition
- In 2024, 4 Ways to Unlock iPhone 13 mini to Use USB Accessories Without Passcode
- How do I reset my Vivo Y100i Phone without technical knowledge? | Dr.fone
- How to Install Forex Trade Copier Software on MT4 and MT5
- 4 Methods to Turn off Life 360 On Realme V30T without Anyone Knowing | Dr.fone
- How to Change Samsung Galaxy A25 5G Location on Skout | Dr.fone
- Top 15 Apps To Hack WiFi Password On Vivo V29e
- Top 5 Vivo Y100i Bypass FRP Tools for PC That Actually Work
- In 2024, Why is iPogo not working On Vivo V29 Pro? Fixed | Dr.fone
- Forgot Your Apple ID Password and Email On Apple iPhone 12 Pro Max? Heres the Best Fixes
- How to Turn Off Find My iPhone 15 Plus when Phone is Broken?
- How To Transfer Data From Apple iPhone 13 To Others Android Devices? | Dr.fone
- Easy Ways to Manage Your Motorola G24 Power Location Settings | Dr.fone
- How to Rescue Lost Videos from Lava Blaze 2 Pro
- How to Change your Huawei Nova Y71 Location on Twitter | Dr.fone
- What Pokémon Evolve with A Dawn Stone For Vivo Y17s? | Dr.fone
- How to Unlock Your iPhone 8 Plus Passcode 4 Easy Methods (With or Without iTunes) | Dr.fone
- In 2024, Locked Out of iPhone XR? 5 Ways to get into a Locked iPhone XR | Dr.fone
- How to Perform Hard Reset on Infinix Smart 8 Plus? | Dr.fone
- Title: New In 2024, How to Add a Spooky Shadow Effect
- Author: Chloe
- Created at : 2024-04-24 07:08:29
- Updated at : 2024-04-25 07:08:29
- Link: https://ai-editing-video.techidaily.com/new-in-2024-how-to-add-a-spooky-shadow-effect/
- License: This work is licensed under CC BY-NC-SA 4.0.

