
New In 2024, How To Add Motion Blur Effect To Photos in GIMP

How To Add Motion Blur Effect To Photos in GIMP
GIMP is a cross-platform image editing software that you can use to edit photos and create graphics. The software is available for Linux, Windows, and macOS and can add a motion blur effect (A sense of movement in the photo), making your pictures look more realistic and professional.
So to help you tone your skills, we’ve written a comprehensive guide on how to apply the GIMP motion blur effect to your photos!
Part I. What Is GIMP?
GIMP software, a GNU Image Manipulation Program, is an open-source raster graphics editor used for image editing and retouching, converting between different image formats, free-form drawing, and more.
GIMP is frequently used as a Photoshop alternative. The software boasts a wide range of features, including support for layers, masks, color management, and third-party plugins.
Key Features
Here are some key features of the GIMP software:
- Quickly hide panels and menus to let you switch to a full-screen mode to preview pictures
- Fixes distorted images
- Available for Windows, Linux, Mac OS, and other operating systems
- Automatic image enhancement tool
- Lets you remove all the panels and tools from the workflow except the one you are working with.
- Released under a license called GNU General Public License v3 and later, which makes it free to use and distribute
- Add overlays and crop or resize an image
- Wide range of file formats that it can read and write, making it a versatile tool for working with images
Part II. How To Add The Motion Blur Effect To Your Photos in GIMP?
Below we’ve provided the step-by-step tutorial to add a motion blur effect to your photos in GIMP:
Step1 In the first step, launch a browser on your device, head to the GIMP website , and download the installation file according to your operating system. Now, click the downloaded installer, install the software on your system and launch it.

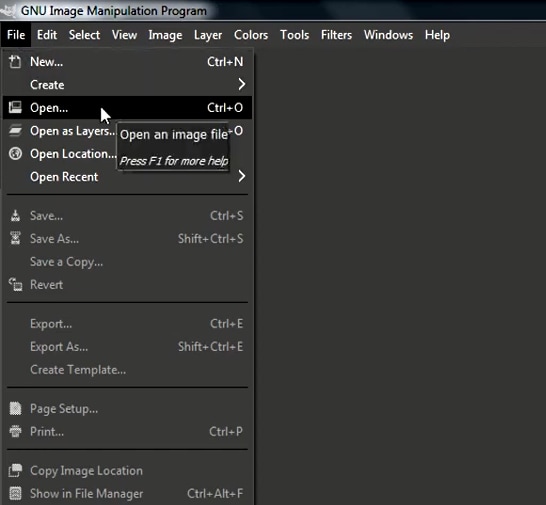
Step2 In the next step, click “File” on the GIMP dashboard, and select “Open” to access the Open Image window. Select your image file from your system and click “Open” to import the file.
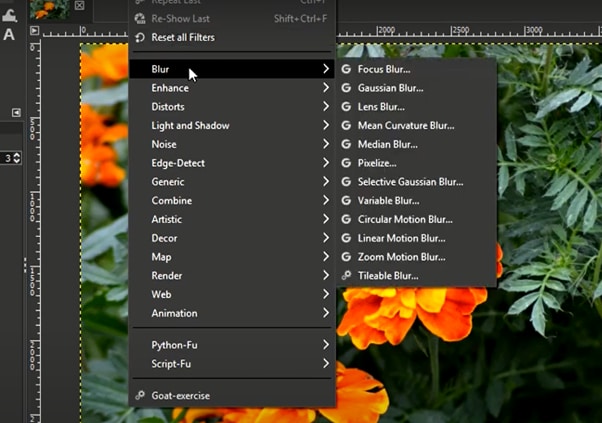
Step3 Next, click the “Filters” option from the top toolbar, select “Blur,” and choose “Motion Blur” from the drop-down menu. A dialogue box will now open where you can preview the effect and adjust the settings, including Blur Type, Blur Center, and Blur Parameters.
Step4 Once you are satisfied with your changes, click “OK” to apply the effect to the image, and make some other edits if needed. Finally, click “File” from the top toolbar, choose “Export As,” click “File Type” to select the format, and select the “Export” option to save your file.
Bonus Tips – The Alternative To GIMP To Create Motion Blur Effect
GIMP is a popular image editor that you can use to create motion blur effects. However, some users find it difficult to use the software for this purpose.
To simplify the process, we recommend usingWondershare Filmora an all-in-one editing software that offers multiple advanced features to help you quickly enhance your project.
Free Download For Win 7 or later(64-bit)
Free Download For macOS 10.14 or later
Here’s why Filmora is the best alternative to GIMP for creating motion blur effects:
- A user-friendly interface where you can quickly create the motion blur effect without spending hours learning the process
- Advanced video editing tools, such as keyframing, speed ramping, green screen, title editing, motion tracking, screen recorder, and preset templates
- Royalty-free music library where you can access millions of music and soundtracks
- Adds the motion blur effect to your videos as well as images
- Comes with multiple parameters to adjust the effect on your clip or image
To add the radial blur effect to images using Filmora, here are the quick and easy-to-follow steps:
Step1 Download the Filmora software on your PC, launch it, and click “Create New Project” on the main panel. Use the “Click Here to Import your Media File” option to import your photo and drag and drop it into the timeline.

Step2 Now, head to the “Effects” tab from the taskbar. Use the search option to find the Blur effect. Afterward, drag & drop it in the timeline and adjust it on your selected clip.
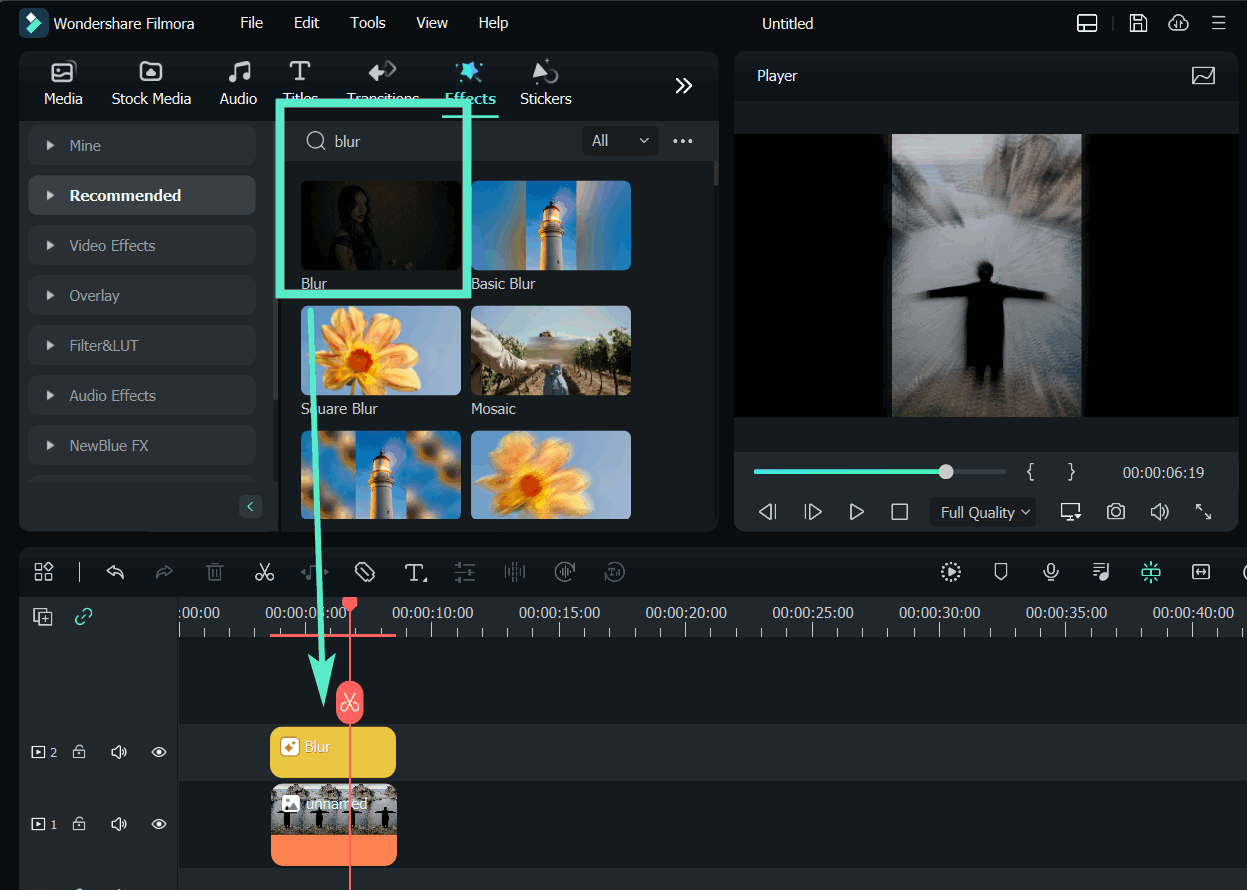
Step3 Please note that motion blur is now a dynamic effect on the image. That means you can add multiple photos and make them into a slideshow with a blur effect transition. Or, press the “Play” icon to preview your photo and pause the clip where you think motion blur works best.
Step4 Click the effect in the timeline to open its settings. Now, play your clip to preview and adjust the parameters as you want to smooth down the motion effect.
Step5 Once satisfied with the outcome, click the “Export” option, go to the “Local” tab, select a file format to save the images, and click “Export” again to save your project.

Filmora offers many export options, such as your device, YouTube, Vimeo, and DVD, with just a few clicks.
Last Words
In this detailed tutorial, we’ve discussed what GIMP is and its key features. We’ve provided a step-by-step guide to walk you through the process of creating the motion blur effect using the GIMP software.
In addition, we’ve provided a bonus tip to recommend Filmora as the best alternative to GIMP for creating the motion blur effect.
Hopefully, you found this article helpful in resolving your queries, and you can now add a smooth motion blur effect to your images.
Free Download For macOS 10.14 or later
Here’s why Filmora is the best alternative to GIMP for creating motion blur effects:
- A user-friendly interface where you can quickly create the motion blur effect without spending hours learning the process
- Advanced video editing tools, such as keyframing, speed ramping, green screen, title editing, motion tracking, screen recorder, and preset templates
- Royalty-free music library where you can access millions of music and soundtracks
- Adds the motion blur effect to your videos as well as images
- Comes with multiple parameters to adjust the effect on your clip or image
To add the radial blur effect to images using Filmora, here are the quick and easy-to-follow steps:
Step1 Download the Filmora software on your PC, launch it, and click “Create New Project” on the main panel. Use the “Click Here to Import your Media File” option to import your photo and drag and drop it into the timeline.

Step2 Now, head to the “Effects” tab from the taskbar. Use the search option to find the Blur effect. Afterward, drag & drop it in the timeline and adjust it on your selected clip.

Step3 Please note that motion blur is now a dynamic effect on the image. That means you can add multiple photos and make them into a slideshow with a blur effect transition. Or, press the “Play” icon to preview your photo and pause the clip where you think motion blur works best.
Step4 Click the effect in the timeline to open its settings. Now, play your clip to preview and adjust the parameters as you want to smooth down the motion effect.
Step5 Once satisfied with the outcome, click the “Export” option, go to the “Local” tab, select a file format to save the images, and click “Export” again to save your project.

Filmora offers many export options, such as your device, YouTube, Vimeo, and DVD, with just a few clicks.
Last Words
In this detailed tutorial, we’ve discussed what GIMP is and its key features. We’ve provided a step-by-step guide to walk you through the process of creating the motion blur effect using the GIMP software.
In addition, we’ve provided a bonus tip to recommend Filmora as the best alternative to GIMP for creating the motion blur effect.
Hopefully, you found this article helpful in resolving your queries, and you can now add a smooth motion blur effect to your images.
This Article Can Help You Know How to Crop Video in After Effects and on the Alternative by Using Wondershare Filmora. I Know that It May Seem Confusing to Compare These Two at First. But, I’ll Provide an Explanation to Get the Cropped Video that You Want
Cropping a video is part of the process of video edting. Not all video editing software can be obtained freely. There are some that you need to spend to get the professional output that you aim for. After Effects,a member of the Adobe tools that exist can enhance your videos to another level. This article can help you know how to crop video in After Effects and on the alternative by using Wondershare Filmora. I know that it may seem confusing to compare these two at first. But, I’ll provide an explanation to get the cropped video that you want.
Method 1: Cropping a Video using After Effects
After Effects is a professional motion graphics tool that can create outputs that are beyond the limits of reality. Like the other Adobe tools, this comes with a subscription fee to be able to maximize this product. But, is the price worth the risk? The “ Adobe” brand is known for its quality applications and customer’s satisfaction.
Let’s start with using this tool. The situation is that you want to crop your video using Adobe After Effects but you don’t know how to start. Search for the application on your computer. Launch it, then click the New Project. If you have files from your storage then select the New Composition Footage.
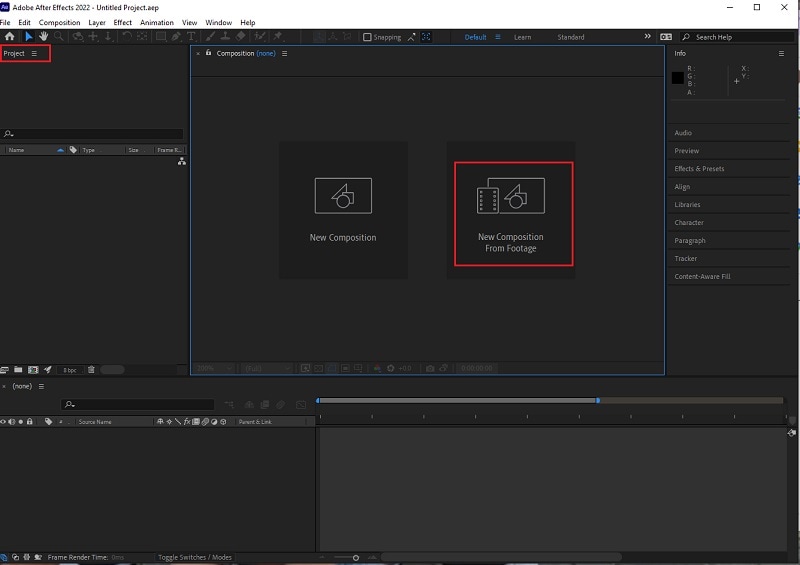
Check if the video is already in the interface. Find the Magnifying tab and zoom out the video into 50%. After that, click the Grid icon and Proportional Grid.
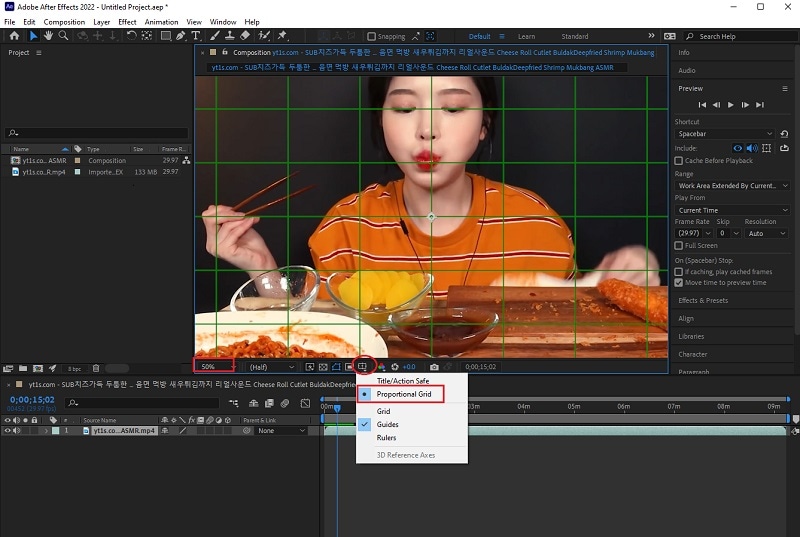
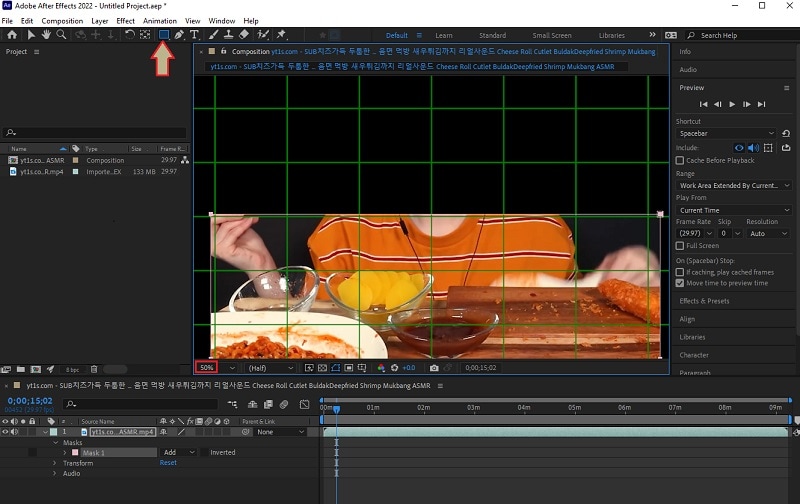
Click the Square icon, it is located beside the Pencil icon at the top section. The shape’s purpose is to crop the video section that you want to remain. If you’re done cutting then you should unclick the Proportional grid, and the video’s magnification should be 100%. Afterwards, you can check the pixel aspect ratio correction in the After Effects. You need to go through the video before saving your project. This is to avoid unnecessary errors that will make the process troublesome.
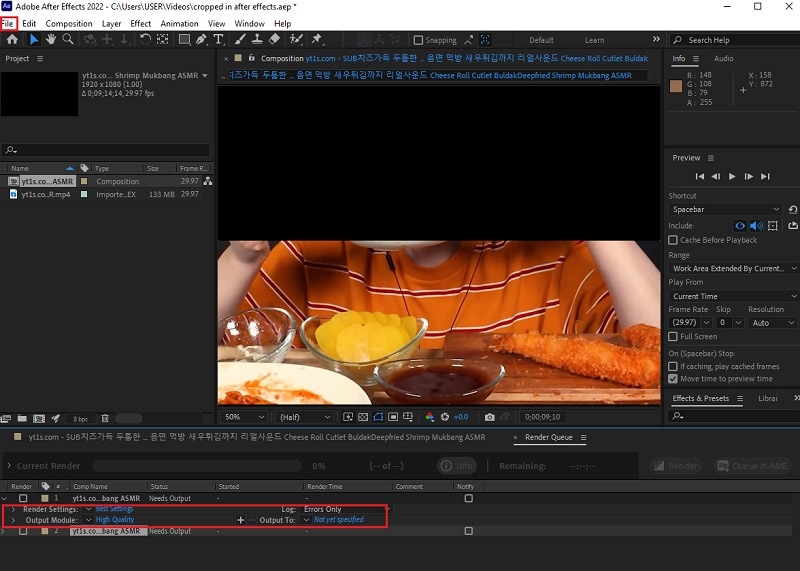
Already satisfied with the cropped video? Then, select File, Export and finally Add to Render Queue. Check on the Render Settings (located bottom of the interface) to ensure high quality output. Following that, hit the Output To part and decide the destination and folder where you want it to be.
Watch your cropped video and go ahead and repeat this with your other videos. After practicing this process many times, this will come to you as easy. If you get lost while following the instructions go back to this guide until it becomes a part of your memory.
Congratulations on making your first cropped video using After Effects! What was your experience while following through the guide? I hope that the information presented here is easy to understand and implement.
Even though it is not a free application, I hope you have experienced the advantages of using this compared to other tools. Did it come as a surprise for you that you can crop a video not just in Adobe Premiere but also in After Effects as well?
I hope that fear will not hinder you from trying this tool to crop your videos.
Method 2: Cropping a Video using Wondershare Filmora
If you didn’t know there is also an awesome video editing software called Wondershare Filmora Video Editor .
You can try it by searching the internet and downloading it on your computer. If simplicity is your priority then this may suit you perfectly. If you’re still hesitant then read the reviews and watch how others are using it.
There is no need to worry if you have a tight budget as downloading this would be free. You just need to go to the official site. Do not be scared of trying with something unfamiliar. I will guide you with using it and utilizing it to get the result that you dream of.
Wondershare Filmora just like the others that exist are video editors that will turn your raw videos into the vision that you like. Thanks to these applications, the gruesome process of manually cutting it by hand and permanently altering the footage are gone. You can make how many changes that you want without damaging the original video.
For Win 7 or later (64-bit)
For macOS 10.14 or later
Are you done installing the application? If you have any encountered issues with installing it, you can contact customer support.
Not only does it have a straightforward and simple interface but it is also packed with useful tools that can turn your video into another level. But, you should not be overwhelmed by the number of icons and features that exist. Take a deep breath and proceed to opening it in your computer.

Preparation is a must especially if you have multiple videos on your computer. A good tip would be renaming them by the sequence you plan to have. And, you could also place them in folders to avoid repetition and double copies. Once you’re done, you can drag and drop your video or
click the Import.

Go ahead and select the video clip that you want to crop. Then, click the Crop tool and choose if you want the Crop or Pan & Zoom. Yes, you have options on what kind of crop you want it to be.

An alternative way is by right clicking the video clip .Under the Video tab you can select the Crop and Zoom or Crop to Fit then adjust to your preferred ratio.
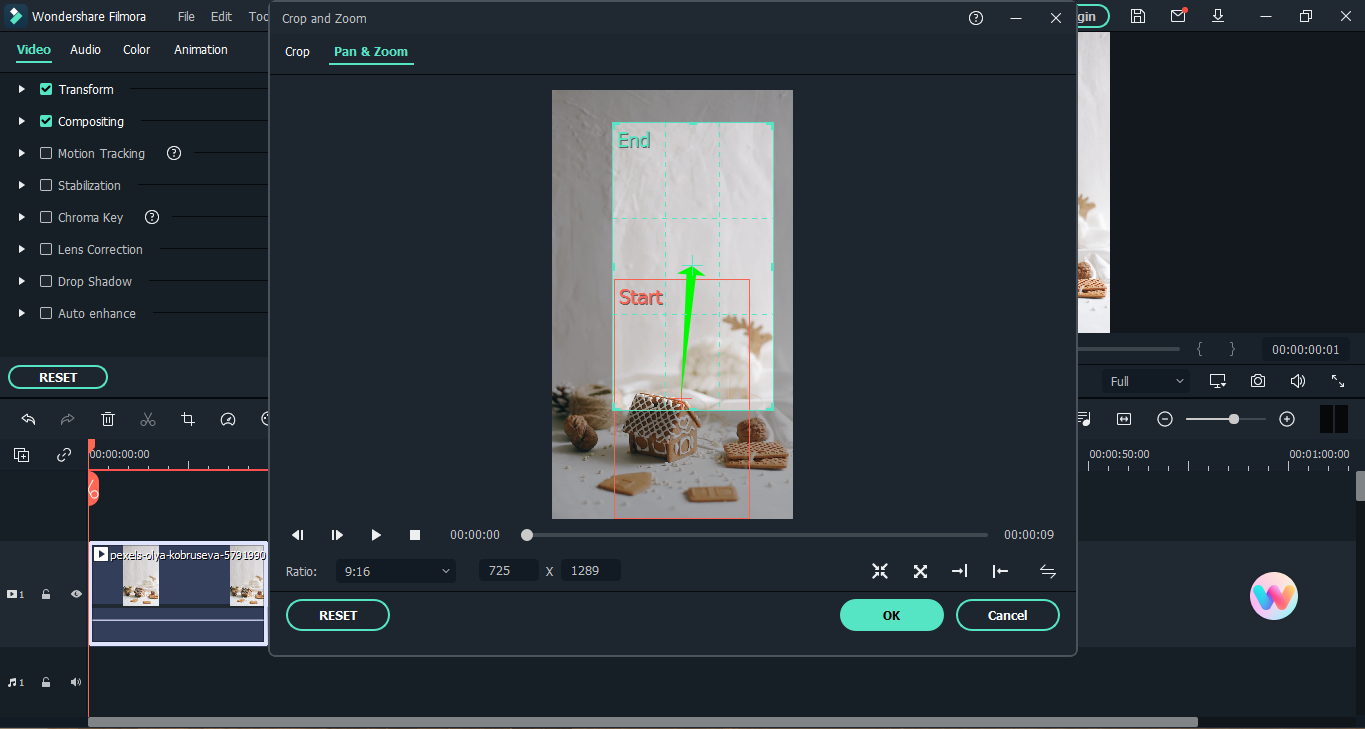
You can review the cropped video to think through if this is the portion that you want to be included. Unlike other applications, you can go back and adjust it to your liking.
If you’re finally satisfied then you can export it. Choose the output format and you can also rename the file. Clicking the settings button will offer you additional options of your video output.
After all that, you have the cropped video that you can either upload or repurpose in another content. Did you enjoy the process of cropping it in Wondershare Filmora?
Remember, that you have the option to batch crop multiple video clips on this so no need to manually crop and export it. You can see the big picture and monitor if the flow makes sense to you.
Don’t you think that the subscription is worth it? There is a trial that you could check out to test its capabilities and awesomeness.
The Bottom Line
You are once again done with the process of checking out these two applications. After Effects and Wondershare Filmora have a different process when it comes to cropping videos. I hope that you had a clearer understanding on which of these two would suit your video editing needs. The interface also could change your mind depending if you want simplicity or a challenge. Price is also a factor that can affect your willingness to use these applications. But, this guide clearly shows you that it is worth paying for.
What are your thoughts on both of these tools? Did you find this information to be helpful?
Check if the video is already in the interface. Find the Magnifying tab and zoom out the video into 50%. After that, click the Grid icon and Proportional Grid.

Click the Square icon, it is located beside the Pencil icon at the top section. The shape’s purpose is to crop the video section that you want to remain. If you’re done cutting then you should unclick the Proportional grid, and the video’s magnification should be 100%. Afterwards, you can check the pixel aspect ratio correction in the After Effects. You need to go through the video before saving your project. This is to avoid unnecessary errors that will make the process troublesome.

Already satisfied with the cropped video? Then, select File, Export and finally Add to Render Queue. Check on the Render Settings (located bottom of the interface) to ensure high quality output. Following that, hit the Output To part and decide the destination and folder where you want it to be.

Watch your cropped video and go ahead and repeat this with your other videos. After practicing this process many times, this will come to you as easy. If you get lost while following the instructions go back to this guide until it becomes a part of your memory.
Congratulations on making your first cropped video using After Effects! What was your experience while following through the guide? I hope that the information presented here is easy to understand and implement.
Even though it is not a free application, I hope you have experienced the advantages of using this compared to other tools. Did it come as a surprise for you that you can crop a video not just in Adobe Premiere but also in After Effects as well?
I hope that fear will not hinder you from trying this tool to crop your videos.
Method 2: Cropping a Video using Wondershare Filmora
If you didn’t know there is also an awesome video editing software called Wondershare Filmora Video Editor .
You can try it by searching the internet and downloading it on your computer. If simplicity is your priority then this may suit you perfectly. If you’re still hesitant then read the reviews and watch how others are using it.
There is no need to worry if you have a tight budget as downloading this would be free. You just need to go to the official site. Do not be scared of trying with something unfamiliar. I will guide you with using it and utilizing it to get the result that you dream of.
Wondershare Filmora just like the others that exist are video editors that will turn your raw videos into the vision that you like. Thanks to these applications, the gruesome process of manually cutting it by hand and permanently altering the footage are gone. You can make how many changes that you want without damaging the original video.
For Win 7 or later (64-bit)
For macOS 10.14 or later
Are you done installing the application? If you have any encountered issues with installing it, you can contact customer support.
Not only does it have a straightforward and simple interface but it is also packed with useful tools that can turn your video into another level. But, you should not be overwhelmed by the number of icons and features that exist. Take a deep breath and proceed to opening it in your computer.

Preparation is a must especially if you have multiple videos on your computer. A good tip would be renaming them by the sequence you plan to have. And, you could also place them in folders to avoid repetition and double copies. Once you’re done, you can drag and drop your video or
click the Import.

Go ahead and select the video clip that you want to crop. Then, click the Crop tool and choose if you want the Crop or Pan & Zoom. Yes, you have options on what kind of crop you want it to be.

An alternative way is by right clicking the video clip .Under the Video tab you can select the Crop and Zoom or Crop to Fit then adjust to your preferred ratio.

You can review the cropped video to think through if this is the portion that you want to be included. Unlike other applications, you can go back and adjust it to your liking.
If you’re finally satisfied then you can export it. Choose the output format and you can also rename the file. Clicking the settings button will offer you additional options of your video output.
After all that, you have the cropped video that you can either upload or repurpose in another content. Did you enjoy the process of cropping it in Wondershare Filmora?
Remember, that you have the option to batch crop multiple video clips on this so no need to manually crop and export it. You can see the big picture and monitor if the flow makes sense to you.
Don’t you think that the subscription is worth it? There is a trial that you could check out to test its capabilities and awesomeness.
The Bottom Line
You are once again done with the process of checking out these two applications. After Effects and Wondershare Filmora have a different process when it comes to cropping videos. I hope that you had a clearer understanding on which of these two would suit your video editing needs. The interface also could change your mind depending if you want simplicity or a challenge. Price is also a factor that can affect your willingness to use these applications. But, this guide clearly shows you that it is worth paying for.
What are your thoughts on both of these tools? Did you find this information to be helpful?
Check if the video is already in the interface. Find the Magnifying tab and zoom out the video into 50%. After that, click the Grid icon and Proportional Grid.

Click the Square icon, it is located beside the Pencil icon at the top section. The shape’s purpose is to crop the video section that you want to remain. If you’re done cutting then you should unclick the Proportional grid, and the video’s magnification should be 100%. Afterwards, you can check the pixel aspect ratio correction in the After Effects. You need to go through the video before saving your project. This is to avoid unnecessary errors that will make the process troublesome.

Already satisfied with the cropped video? Then, select File, Export and finally Add to Render Queue. Check on the Render Settings (located bottom of the interface) to ensure high quality output. Following that, hit the Output To part and decide the destination and folder where you want it to be.

Watch your cropped video and go ahead and repeat this with your other videos. After practicing this process many times, this will come to you as easy. If you get lost while following the instructions go back to this guide until it becomes a part of your memory.
Congratulations on making your first cropped video using After Effects! What was your experience while following through the guide? I hope that the information presented here is easy to understand and implement.
Even though it is not a free application, I hope you have experienced the advantages of using this compared to other tools. Did it come as a surprise for you that you can crop a video not just in Adobe Premiere but also in After Effects as well?
I hope that fear will not hinder you from trying this tool to crop your videos.
Method 2: Cropping a Video using Wondershare Filmora
If you didn’t know there is also an awesome video editing software called Wondershare Filmora Video Editor .
You can try it by searching the internet and downloading it on your computer. If simplicity is your priority then this may suit you perfectly. If you’re still hesitant then read the reviews and watch how others are using it.
There is no need to worry if you have a tight budget as downloading this would be free. You just need to go to the official site. Do not be scared of trying with something unfamiliar. I will guide you with using it and utilizing it to get the result that you dream of.
Wondershare Filmora just like the others that exist are video editors that will turn your raw videos into the vision that you like. Thanks to these applications, the gruesome process of manually cutting it by hand and permanently altering the footage are gone. You can make how many changes that you want without damaging the original video.
For Win 7 or later (64-bit)
For macOS 10.14 or later
Are you done installing the application? If you have any encountered issues with installing it, you can contact customer support.
Not only does it have a straightforward and simple interface but it is also packed with useful tools that can turn your video into another level. But, you should not be overwhelmed by the number of icons and features that exist. Take a deep breath and proceed to opening it in your computer.

Preparation is a must especially if you have multiple videos on your computer. A good tip would be renaming them by the sequence you plan to have. And, you could also place them in folders to avoid repetition and double copies. Once you’re done, you can drag and drop your video or
click the Import.

Go ahead and select the video clip that you want to crop. Then, click the Crop tool and choose if you want the Crop or Pan & Zoom. Yes, you have options on what kind of crop you want it to be.

An alternative way is by right clicking the video clip .Under the Video tab you can select the Crop and Zoom or Crop to Fit then adjust to your preferred ratio.

You can review the cropped video to think through if this is the portion that you want to be included. Unlike other applications, you can go back and adjust it to your liking.
If you’re finally satisfied then you can export it. Choose the output format and you can also rename the file. Clicking the settings button will offer you additional options of your video output.
After all that, you have the cropped video that you can either upload or repurpose in another content. Did you enjoy the process of cropping it in Wondershare Filmora?
Remember, that you have the option to batch crop multiple video clips on this so no need to manually crop and export it. You can see the big picture and monitor if the flow makes sense to you.
Don’t you think that the subscription is worth it? There is a trial that you could check out to test its capabilities and awesomeness.
The Bottom Line
You are once again done with the process of checking out these two applications. After Effects and Wondershare Filmora have a different process when it comes to cropping videos. I hope that you had a clearer understanding on which of these two would suit your video editing needs. The interface also could change your mind depending if you want simplicity or a challenge. Price is also a factor that can affect your willingness to use these applications. But, this guide clearly shows you that it is worth paying for.
What are your thoughts on both of these tools? Did you find this information to be helpful?
Check if the video is already in the interface. Find the Magnifying tab and zoom out the video into 50%. After that, click the Grid icon and Proportional Grid.

Click the Square icon, it is located beside the Pencil icon at the top section. The shape’s purpose is to crop the video section that you want to remain. If you’re done cutting then you should unclick the Proportional grid, and the video’s magnification should be 100%. Afterwards, you can check the pixel aspect ratio correction in the After Effects. You need to go through the video before saving your project. This is to avoid unnecessary errors that will make the process troublesome.

Already satisfied with the cropped video? Then, select File, Export and finally Add to Render Queue. Check on the Render Settings (located bottom of the interface) to ensure high quality output. Following that, hit the Output To part and decide the destination and folder where you want it to be.

Watch your cropped video and go ahead and repeat this with your other videos. After practicing this process many times, this will come to you as easy. If you get lost while following the instructions go back to this guide until it becomes a part of your memory.
Congratulations on making your first cropped video using After Effects! What was your experience while following through the guide? I hope that the information presented here is easy to understand and implement.
Even though it is not a free application, I hope you have experienced the advantages of using this compared to other tools. Did it come as a surprise for you that you can crop a video not just in Adobe Premiere but also in After Effects as well?
I hope that fear will not hinder you from trying this tool to crop your videos.
Method 2: Cropping a Video using Wondershare Filmora
If you didn’t know there is also an awesome video editing software called Wondershare Filmora Video Editor .
You can try it by searching the internet and downloading it on your computer. If simplicity is your priority then this may suit you perfectly. If you’re still hesitant then read the reviews and watch how others are using it.
There is no need to worry if you have a tight budget as downloading this would be free. You just need to go to the official site. Do not be scared of trying with something unfamiliar. I will guide you with using it and utilizing it to get the result that you dream of.
Wondershare Filmora just like the others that exist are video editors that will turn your raw videos into the vision that you like. Thanks to these applications, the gruesome process of manually cutting it by hand and permanently altering the footage are gone. You can make how many changes that you want without damaging the original video.
For Win 7 or later (64-bit)
For macOS 10.14 or later
Are you done installing the application? If you have any encountered issues with installing it, you can contact customer support.
Not only does it have a straightforward and simple interface but it is also packed with useful tools that can turn your video into another level. But, you should not be overwhelmed by the number of icons and features that exist. Take a deep breath and proceed to opening it in your computer.

Preparation is a must especially if you have multiple videos on your computer. A good tip would be renaming them by the sequence you plan to have. And, you could also place them in folders to avoid repetition and double copies. Once you’re done, you can drag and drop your video or
click the Import.

Go ahead and select the video clip that you want to crop. Then, click the Crop tool and choose if you want the Crop or Pan & Zoom. Yes, you have options on what kind of crop you want it to be.

An alternative way is by right clicking the video clip .Under the Video tab you can select the Crop and Zoom or Crop to Fit then adjust to your preferred ratio.

You can review the cropped video to think through if this is the portion that you want to be included. Unlike other applications, you can go back and adjust it to your liking.
If you’re finally satisfied then you can export it. Choose the output format and you can also rename the file. Clicking the settings button will offer you additional options of your video output.
After all that, you have the cropped video that you can either upload or repurpose in another content. Did you enjoy the process of cropping it in Wondershare Filmora?
Remember, that you have the option to batch crop multiple video clips on this so no need to manually crop and export it. You can see the big picture and monitor if the flow makes sense to you.
Don’t you think that the subscription is worth it? There is a trial that you could check out to test its capabilities and awesomeness.
The Bottom Line
You are once again done with the process of checking out these two applications. After Effects and Wondershare Filmora have a different process when it comes to cropping videos. I hope that you had a clearer understanding on which of these two would suit your video editing needs. The interface also could change your mind depending if you want simplicity or a challenge. Price is also a factor that can affect your willingness to use these applications. But, this guide clearly shows you that it is worth paying for.
What are your thoughts on both of these tools? Did you find this information to be helpful?
Want to Make a Single Video From Different Clips? Follow These Ways to Learn About How to Merge Clips in DaVinci Resolve
Combining two or more clips in a video doesn’t seem like a tough job. But to be fair, the video merger means a lot to professional video editors and videographers. Doing so could add that “special” element of continuity you mostly see in the long clips without noticing the cuts, breaks, and retakes between them.
And just like a few drops makes an entire ocean, the joining of multiple video clips can give life and meaning to your shots. So, how to merge clips in DaVinci Resolve to make your videos look perfect? Here’s the step-by-step guide.
In this article
02 How to Merge Clips in DaVinci Resolve?
03 How to Merge Clips in Wondershare Filmora?
Part 1: About DaVinci Resolve
DaVinci Resolve is a Blackmagic Design’s video editing software. It’s one of the favorite tools of professional video editors. And apart from video editing, the software works great when it comes to color coding, motion graphics, and even audio production.
Although DaVinci Resolve has several excellent video editing tools, it isn’t easy for beginners and intermediate users. Nevertheless, you can expect admirable outcomes if you spend a reasonable amount of time learning this software.
But on the other hand, if merging clips in DaVinci Resolve is what you want to do, you will be glad to know that it has an uncomplicated method. So let’s begin with the step-by-step process on how to merge clips in DaVinci Resolve.
Part 2: How to Merge Clips in DaVinci Resolve
Step 1: Download DaVinci Resolve
To download DaVinci Resolve , go to the official website and click on the “Free Download Now” button if you wish to use it for free.
Contrarily, if you desire to enjoy all the software features, feel free to purchase it by clicking on the “Buy Online Now” button.

Step 2: Import Clips on DaVinci Resolve Timeline
After installing the software on your PC or MAC operating systems, open DaVinci Resolve and import two or more clips on the timeline.
For example, you can see two different video clips on the timeline.

Step 3: Slide Clips and Select
In the next step, slide both clips together, so there’s no gap left between them. And then, using your mouse, select both clips, like this:

Make sure that all clips are on the same timeline.
Step 4: Merge Clips
Once you have selected all the clips, right-click anywhere on the selection. And choose the “New Compound” option from the list of options.

Now, rename the clip and hit the “Create” button.

DaVinci Resolve will merge the clips within a blink of an eye, as seen in this screenshot.

You can see that within a few steps, you can easily merge videos using DaVinci Resolve. However, you should know that this software requires a heavy system to work smoothly. And sometimes, the quality and result are not up to the mark.
That is why most video editors prefer Filmora by Wondershare when editing and merging videos. So, let’s see how you can use Filmora to do the same task in the next part.
Part 3: An Easier Way to Merge Clips in Wondershare Filmora
Filmora Video Editor is a powerful tool for video editing. With easy options and an extremely user-friendly interface, the software is nothing less than a boon for newbies, intermediated, and professional-level video editors.
For Win 7 or later (64-bit)
For macOS 10.14 or later
Compared to DaVinci Resolve, Filmora requires fewer tools to combine multiple videos in a single frame. So, without further waiting, let’s learn how to merge clips in Filmora.
Step 1: Download and Open Filmora
Go to Filmora’s official website and download the latest version for your MAC or Windows.

Run the setup and let the system complete the installation. Depending on the version, more or less, the software will look like this as you will open it on your system.

Step 2: Import Your Videos to Merge
Click on the “Import Media Files Here” button to choose the videos you want to merge.

For instance, here, you can see two different video clips on the timeline.

Step 3: Place Videos on the Same Timeline to Merge
First of all, you must plan the order of the clips because it will help you place the video clips correctly.
So, use your mouse and select the clip.
For example, you can see that there are two clips below. The first clip is named “Islands,” and the second clip is called “Beach.”

Then, move the selected clip (“second clip” is selected for demonstration) and place it right next to the first clip.

You must keep in mind that there shouldn’t be any gap between the clips.

Or else the final result will have a “black space” between the clips.

Step 4: Export Your File
When you are done merging clips on the timeline, click on the “Export” button to save the combined video in your system.

You can merge several clips in just four steps without wasting your time looking around for options and losing the video quality.
If you are aware of using the software, you can quickly learn how to merge clips in DaVinci Resolve. Undoubtedly, this video editing tool is helpful for professionals, and that is why new users may find it a bit difficult when using it for the first time. Contrarily, Filmora is a friendly video editor, allowing all kinds of users to merge clips quickly.
FAQs
Q1. Can I merge clips on different timelines in DaVinci Resolve?
To merge two or more clips in DaVinci Resolve, you must place the clips on the same timeline for better results.
Q2. How can I unmerge clips in DaVinci Resolve?
To unmerge clips in DaVinci, right-click on the merged clip and select the “Decompose in Place” option.
Q3. Can I use the same method to merge video clips in DaVinci Resolve 16 and 17?
Yes. You can use the same method to merge clips in any version of DaVinci Resolve.
02 How to Merge Clips in DaVinci Resolve?
03 How to Merge Clips in Wondershare Filmora?
Part 1: About DaVinci Resolve
DaVinci Resolve is a Blackmagic Design’s video editing software. It’s one of the favorite tools of professional video editors. And apart from video editing, the software works great when it comes to color coding, motion graphics, and even audio production.
Although DaVinci Resolve has several excellent video editing tools, it isn’t easy for beginners and intermediate users. Nevertheless, you can expect admirable outcomes if you spend a reasonable amount of time learning this software.
But on the other hand, if merging clips in DaVinci Resolve is what you want to do, you will be glad to know that it has an uncomplicated method. So let’s begin with the step-by-step process on how to merge clips in DaVinci Resolve.
Part 2: How to Merge Clips in DaVinci Resolve
Step 1: Download DaVinci Resolve
To download DaVinci Resolve , go to the official website and click on the “Free Download Now” button if you wish to use it for free.
Contrarily, if you desire to enjoy all the software features, feel free to purchase it by clicking on the “Buy Online Now” button.

Step 2: Import Clips on DaVinci Resolve Timeline
After installing the software on your PC or MAC operating systems, open DaVinci Resolve and import two or more clips on the timeline.
For example, you can see two different video clips on the timeline.

Step 3: Slide Clips and Select
In the next step, slide both clips together, so there’s no gap left between them. And then, using your mouse, select both clips, like this:

Make sure that all clips are on the same timeline.
Step 4: Merge Clips
Once you have selected all the clips, right-click anywhere on the selection. And choose the “New Compound” option from the list of options.

Now, rename the clip and hit the “Create” button.

DaVinci Resolve will merge the clips within a blink of an eye, as seen in this screenshot.

You can see that within a few steps, you can easily merge videos using DaVinci Resolve. However, you should know that this software requires a heavy system to work smoothly. And sometimes, the quality and result are not up to the mark.
That is why most video editors prefer Filmora by Wondershare when editing and merging videos. So, let’s see how you can use Filmora to do the same task in the next part.
Part 3: An Easier Way to Merge Clips in Wondershare Filmora
Filmora Video Editor is a powerful tool for video editing. With easy options and an extremely user-friendly interface, the software is nothing less than a boon for newbies, intermediated, and professional-level video editors.
For Win 7 or later (64-bit)
For macOS 10.14 or later
Compared to DaVinci Resolve, Filmora requires fewer tools to combine multiple videos in a single frame. So, without further waiting, let’s learn how to merge clips in Filmora.
Step 1: Download and Open Filmora
Go to Filmora’s official website and download the latest version for your MAC or Windows.

Run the setup and let the system complete the installation. Depending on the version, more or less, the software will look like this as you will open it on your system.

Step 2: Import Your Videos to Merge
Click on the “Import Media Files Here” button to choose the videos you want to merge.

For instance, here, you can see two different video clips on the timeline.

Step 3: Place Videos on the Same Timeline to Merge
First of all, you must plan the order of the clips because it will help you place the video clips correctly.
So, use your mouse and select the clip.
For example, you can see that there are two clips below. The first clip is named “Islands,” and the second clip is called “Beach.”

Then, move the selected clip (“second clip” is selected for demonstration) and place it right next to the first clip.

You must keep in mind that there shouldn’t be any gap between the clips.

Or else the final result will have a “black space” between the clips.

Step 4: Export Your File
When you are done merging clips on the timeline, click on the “Export” button to save the combined video in your system.

You can merge several clips in just four steps without wasting your time looking around for options and losing the video quality.
If you are aware of using the software, you can quickly learn how to merge clips in DaVinci Resolve. Undoubtedly, this video editing tool is helpful for professionals, and that is why new users may find it a bit difficult when using it for the first time. Contrarily, Filmora is a friendly video editor, allowing all kinds of users to merge clips quickly.
FAQs
Q1. Can I merge clips on different timelines in DaVinci Resolve?
To merge two or more clips in DaVinci Resolve, you must place the clips on the same timeline for better results.
Q2. How can I unmerge clips in DaVinci Resolve?
To unmerge clips in DaVinci, right-click on the merged clip and select the “Decompose in Place” option.
Q3. Can I use the same method to merge video clips in DaVinci Resolve 16 and 17?
Yes. You can use the same method to merge clips in any version of DaVinci Resolve.
02 How to Merge Clips in DaVinci Resolve?
03 How to Merge Clips in Wondershare Filmora?
Part 1: About DaVinci Resolve
DaVinci Resolve is a Blackmagic Design’s video editing software. It’s one of the favorite tools of professional video editors. And apart from video editing, the software works great when it comes to color coding, motion graphics, and even audio production.
Although DaVinci Resolve has several excellent video editing tools, it isn’t easy for beginners and intermediate users. Nevertheless, you can expect admirable outcomes if you spend a reasonable amount of time learning this software.
But on the other hand, if merging clips in DaVinci Resolve is what you want to do, you will be glad to know that it has an uncomplicated method. So let’s begin with the step-by-step process on how to merge clips in DaVinci Resolve.
Part 2: How to Merge Clips in DaVinci Resolve
Step 1: Download DaVinci Resolve
To download DaVinci Resolve , go to the official website and click on the “Free Download Now” button if you wish to use it for free.
Contrarily, if you desire to enjoy all the software features, feel free to purchase it by clicking on the “Buy Online Now” button.

Step 2: Import Clips on DaVinci Resolve Timeline
After installing the software on your PC or MAC operating systems, open DaVinci Resolve and import two or more clips on the timeline.
For example, you can see two different video clips on the timeline.

Step 3: Slide Clips and Select
In the next step, slide both clips together, so there’s no gap left between them. And then, using your mouse, select both clips, like this:

Make sure that all clips are on the same timeline.
Step 4: Merge Clips
Once you have selected all the clips, right-click anywhere on the selection. And choose the “New Compound” option from the list of options.

Now, rename the clip and hit the “Create” button.

DaVinci Resolve will merge the clips within a blink of an eye, as seen in this screenshot.

You can see that within a few steps, you can easily merge videos using DaVinci Resolve. However, you should know that this software requires a heavy system to work smoothly. And sometimes, the quality and result are not up to the mark.
That is why most video editors prefer Filmora by Wondershare when editing and merging videos. So, let’s see how you can use Filmora to do the same task in the next part.
Part 3: An Easier Way to Merge Clips in Wondershare Filmora
Filmora Video Editor is a powerful tool for video editing. With easy options and an extremely user-friendly interface, the software is nothing less than a boon for newbies, intermediated, and professional-level video editors.
For Win 7 or later (64-bit)
For macOS 10.14 or later
Compared to DaVinci Resolve, Filmora requires fewer tools to combine multiple videos in a single frame. So, without further waiting, let’s learn how to merge clips in Filmora.
Step 1: Download and Open Filmora
Go to Filmora’s official website and download the latest version for your MAC or Windows.

Run the setup and let the system complete the installation. Depending on the version, more or less, the software will look like this as you will open it on your system.

Step 2: Import Your Videos to Merge
Click on the “Import Media Files Here” button to choose the videos you want to merge.

For instance, here, you can see two different video clips on the timeline.

Step 3: Place Videos on the Same Timeline to Merge
First of all, you must plan the order of the clips because it will help you place the video clips correctly.
So, use your mouse and select the clip.
For example, you can see that there are two clips below. The first clip is named “Islands,” and the second clip is called “Beach.”

Then, move the selected clip (“second clip” is selected for demonstration) and place it right next to the first clip.

You must keep in mind that there shouldn’t be any gap between the clips.

Or else the final result will have a “black space” between the clips.

Step 4: Export Your File
When you are done merging clips on the timeline, click on the “Export” button to save the combined video in your system.

You can merge several clips in just four steps without wasting your time looking around for options and losing the video quality.
If you are aware of using the software, you can quickly learn how to merge clips in DaVinci Resolve. Undoubtedly, this video editing tool is helpful for professionals, and that is why new users may find it a bit difficult when using it for the first time. Contrarily, Filmora is a friendly video editor, allowing all kinds of users to merge clips quickly.
FAQs
Q1. Can I merge clips on different timelines in DaVinci Resolve?
To merge two or more clips in DaVinci Resolve, you must place the clips on the same timeline for better results.
Q2. How can I unmerge clips in DaVinci Resolve?
To unmerge clips in DaVinci, right-click on the merged clip and select the “Decompose in Place” option.
Q3. Can I use the same method to merge video clips in DaVinci Resolve 16 and 17?
Yes. You can use the same method to merge clips in any version of DaVinci Resolve.
02 How to Merge Clips in DaVinci Resolve?
03 How to Merge Clips in Wondershare Filmora?
Part 1: About DaVinci Resolve
DaVinci Resolve is a Blackmagic Design’s video editing software. It’s one of the favorite tools of professional video editors. And apart from video editing, the software works great when it comes to color coding, motion graphics, and even audio production.
Although DaVinci Resolve has several excellent video editing tools, it isn’t easy for beginners and intermediate users. Nevertheless, you can expect admirable outcomes if you spend a reasonable amount of time learning this software.
But on the other hand, if merging clips in DaVinci Resolve is what you want to do, you will be glad to know that it has an uncomplicated method. So let’s begin with the step-by-step process on how to merge clips in DaVinci Resolve.
Part 2: How to Merge Clips in DaVinci Resolve
Step 1: Download DaVinci Resolve
To download DaVinci Resolve , go to the official website and click on the “Free Download Now” button if you wish to use it for free.
Contrarily, if you desire to enjoy all the software features, feel free to purchase it by clicking on the “Buy Online Now” button.

Step 2: Import Clips on DaVinci Resolve Timeline
After installing the software on your PC or MAC operating systems, open DaVinci Resolve and import two or more clips on the timeline.
For example, you can see two different video clips on the timeline.

Step 3: Slide Clips and Select
In the next step, slide both clips together, so there’s no gap left between them. And then, using your mouse, select both clips, like this:

Make sure that all clips are on the same timeline.
Step 4: Merge Clips
Once you have selected all the clips, right-click anywhere on the selection. And choose the “New Compound” option from the list of options.

Now, rename the clip and hit the “Create” button.

DaVinci Resolve will merge the clips within a blink of an eye, as seen in this screenshot.

You can see that within a few steps, you can easily merge videos using DaVinci Resolve. However, you should know that this software requires a heavy system to work smoothly. And sometimes, the quality and result are not up to the mark.
That is why most video editors prefer Filmora by Wondershare when editing and merging videos. So, let’s see how you can use Filmora to do the same task in the next part.
Part 3: An Easier Way to Merge Clips in Wondershare Filmora
Filmora Video Editor is a powerful tool for video editing. With easy options and an extremely user-friendly interface, the software is nothing less than a boon for newbies, intermediated, and professional-level video editors.
For Win 7 or later (64-bit)
For macOS 10.14 or later
Compared to DaVinci Resolve, Filmora requires fewer tools to combine multiple videos in a single frame. So, without further waiting, let’s learn how to merge clips in Filmora.
Step 1: Download and Open Filmora
Go to Filmora’s official website and download the latest version for your MAC or Windows.

Run the setup and let the system complete the installation. Depending on the version, more or less, the software will look like this as you will open it on your system.

Step 2: Import Your Videos to Merge
Click on the “Import Media Files Here” button to choose the videos you want to merge.

For instance, here, you can see two different video clips on the timeline.

Step 3: Place Videos on the Same Timeline to Merge
First of all, you must plan the order of the clips because it will help you place the video clips correctly.
So, use your mouse and select the clip.
For example, you can see that there are two clips below. The first clip is named “Islands,” and the second clip is called “Beach.”

Then, move the selected clip (“second clip” is selected for demonstration) and place it right next to the first clip.

You must keep in mind that there shouldn’t be any gap between the clips.

Or else the final result will have a “black space” between the clips.

Step 4: Export Your File
When you are done merging clips on the timeline, click on the “Export” button to save the combined video in your system.

You can merge several clips in just four steps without wasting your time looking around for options and losing the video quality.
If you are aware of using the software, you can quickly learn how to merge clips in DaVinci Resolve. Undoubtedly, this video editing tool is helpful for professionals, and that is why new users may find it a bit difficult when using it for the first time. Contrarily, Filmora is a friendly video editor, allowing all kinds of users to merge clips quickly.
FAQs
Q1. Can I merge clips on different timelines in DaVinci Resolve?
To merge two or more clips in DaVinci Resolve, you must place the clips on the same timeline for better results.
Q2. How can I unmerge clips in DaVinci Resolve?
To unmerge clips in DaVinci, right-click on the merged clip and select the “Decompose in Place” option.
Q3. Can I use the same method to merge video clips in DaVinci Resolve 16 and 17?
Yes. You can use the same method to merge clips in any version of DaVinci Resolve.
Color Matching Is the Trickiest Part of Graphic Designing. Learn in Detail About Using Canva Color Match Ideally While Working on Your Pins, Social Media Posts, and Other Designs
How to Perfectly Use Canva Color Match?
An easy yet powerful editor
Numerous effects to choose from
Detailed tutorials provided by the official channel
Color combination is the essential thing that you need to keep in mind designing. It helps create eye-catchy designs and can create a positive impact on the target audience.

This is the greatest secret of creating attractive and wonderful designs. Reading further will help you to understand the Canva color match in detail. So, without any further dues, let’s get started!
In this article
01 [What is the Canva Color Picker?](#Part 1)
02 [Why Use the Color Match Tool?](#Part 2)
03 [How to Use Color Match in Canva to Match Your Brand](#Part 3)
04 [Alternative to Canva Color Match](#Part 4)
Part 1 What is the Canva Color Picker?
Canva is one of the simplest and easiest ways of creating great and eye-catchy graphic designs. Color combinations help us to make these designs more attractive. But earlier, there were some limitations in Canva regarding the color picker tool; designers had to use browser extensions like ColorZilla to match the color combinations perfectly. They faced many problems while selecting the perfect color of their choice while designing their pins, social media content, logos, online invitations, etc. They had to find the perfect color code of their choice from an external source and paste it into the Canva, which was simply very time-consuming.
The most-awaited color picker tool was introduced in Canva at the end of November 202This new design tool makes the design very convenient while using Canva for graphic designing. With this tool, you don’t need to spend hours searching for the right color that matches the background. Color picker helps you to find a perfect color match according to the image, logo, or anything else uploaded on Canva.
But before using this new color match tool, you must ensure that:
● You are using the updated version of the Canva desktop app.
● You have the latest version of the browsers like Chrome, Mozilla, Internet Explorer, etc.
Part 2 Why Use the Color Match Tool?
This color match tool is the most-demanded feature that has been updated on Canva. It helps choose the perfect color match very efficiently without wasting time and effort. It works like an eyedropper tool available in graphic designing software like Photoshop. It is elementary and valuable to use, and it saves a lot of time in creating attractive and wonderful designs.
It helps determine the different colors available in a particular image uploaded on the Canva app. You can easily choose the appropriate color by placing the tool in the place that has your desired color. It is a compassionate tool, so you should be very careful while choosing the color of your choice. You can press the ‘Esc’ button to exit the command without choosing any color.
This color match tool magically helps select the desired color in seconds without using any external color picker browser extension. This tool is readily available on the color pallet in the updated version of the Canva desktop app.
Part 3 How to Use Color Match in Canva to Match Your Brand
The color match tool is now inbuilt in the Canva desktop app, which is very easy and convenient. You need to download the Canva desktop app to use this feature from the official website of Canva.

The designers need to follow the simple steps given below to use the color match tool (eyedropper tool) in the updated version of the Canva desktop app:
● First of all, open the Canva desktop app.
● After this, open any design or image of your choice that you want to edit. This color match tool can work on any type of image, regardless of the shape and size.
● Now, select the particular part of the image whose color you want to change.
● After this, click on the color block available at the top corner to open the color customization options.
● A color pallet will open.
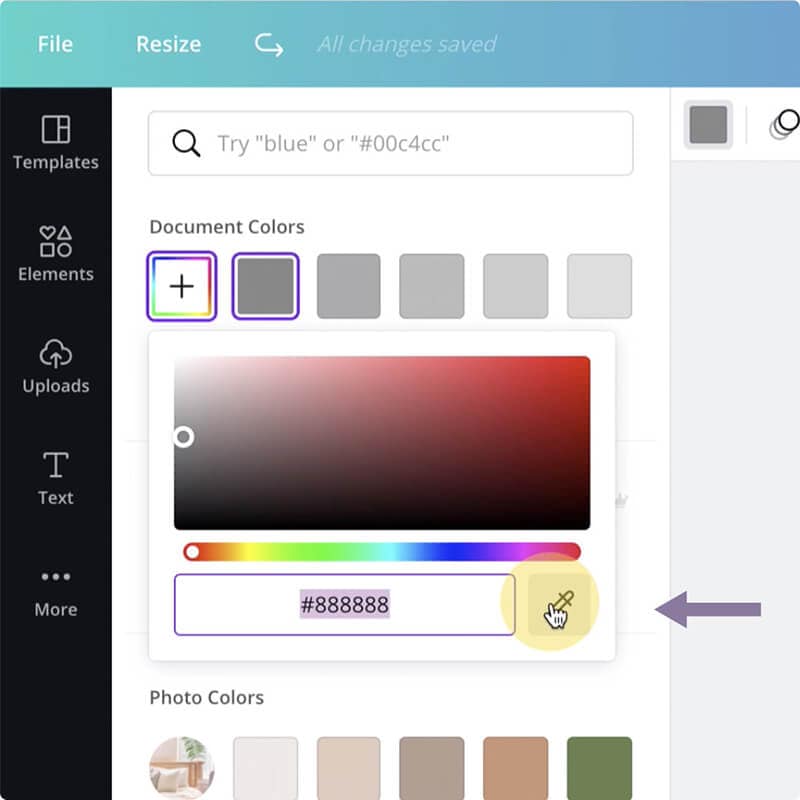
● On the top of the color pallet, you will see a ‘+’ (add new color) button, this button has a colorful square outline.
● After this, a color chart will appear under that button. You will see the color code written over there and an eyedropper tool will be available next to that color code (hex code).
● Click on this eyedropper tool and select the color of your choice either from the image or any other color available in Canva.
● After selecting the color tap on the particular part of the image whose color you want to change.
This is how you can change the color using the new color picker tool available in Canva and enjoy editing your images using the new Canva desktop app.
Part 4 Alternative to Canva Color Match
As we all know, Canva is the most accessible online graphic designing platform used for image editing and video editing. But there are certain limitations of using it, so here we have listed some of the other graphic designing tools for both image and video editing that can be used as an alternative to the Canva app:
● Visme: It is a drag and drops editing and graphic designing tool. Using; this tool is effortless to use, and you can easily create attractive presentations, infographics, social media graphics, logos, etc. This tool can be used by anyone like students (to create their school activities), educators (to create easy to learn infographics), business people (to create attractive presentations), graphic designers (to create different content), etc.
It contains a lot of features like:
● Data Visualization Tools
● Variety of Professionally Designed Easy to Use Templates
● Infographic Maker
● A Large Number of Editing Tools
● Animation Feature with Hover Effects
● Analytics Feature
● Adobe Spark: It is an online tool launched by Adobe. Although it can’t compete with professional software like Photoshop and Illustrator, it can be treated as the best alternative for Canva. It is used to create social media posts, logos, and graphic designs easily and efficiently. The only limitation it has is that non-designers and newcomers can’t use it without any knowledge of graphic design.
● PicMonkey: PicMonkey is another great alternative to Canva, just like Visme. It has many features that help both professional and non-professional designers create attractive and wonderful designs very easily and efficiently. It has many exciting features like photo re-toucher, pattern & effects tools, etc., just like Photoshop, but it is relatively easier to use and can be used by anyone who wants to create beautiful and creative graphic designs.
● ****Wondershare Filmora Video Editor **: Filmora is a video editing software and can be used as an alternative to Canva if you create and edit the videos to medium & advanced levels. It is used to create and edit short videos for social media and ad campaigns very quickly, with many features available in professional software like Adobe Premiere Pro. It is easy-to-use with an intuitive user interface that is very helpful for non-professional and less experienced video editors.
For Win 7 or later (64-bit)
For macOS 10.12 or later
● Key Takeaways from This Episode →
● It can be concluded that Canva is a fantastic graphic designing tool for all the non-professionals and newcomers in the field of design. It helps people create attractive and creative designs with less effort and less time consumption.
● No doubt, everything has its pros and cons. Similarly, Canva also has certain limitations compared to the other professional graphic designing tools like Photoshop, Illustrator, etc.
● But still, it is continuously updating and removing those limitations. For example- the new color match tool is introduced to this platform for easy and convenient graphic designing.
● This color match tool (eyedropper tool) was demanded by the designers who use Canva for their graphics and creating attractive social media posts, infographics, video editing, etc.
Color combination is the essential thing that you need to keep in mind designing. It helps create eye-catchy designs and can create a positive impact on the target audience.

This is the greatest secret of creating attractive and wonderful designs. Reading further will help you to understand the Canva color match in detail. So, without any further dues, let’s get started!
In this article
01 [What is the Canva Color Picker?](#Part 1)
02 [Why Use the Color Match Tool?](#Part 2)
03 [How to Use Color Match in Canva to Match Your Brand](#Part 3)
04 [Alternative to Canva Color Match](#Part 4)
Part 1 What is the Canva Color Picker?
Canva is one of the simplest and easiest ways of creating great and eye-catchy graphic designs. Color combinations help us to make these designs more attractive. But earlier, there were some limitations in Canva regarding the color picker tool; designers had to use browser extensions like ColorZilla to match the color combinations perfectly. They faced many problems while selecting the perfect color of their choice while designing their pins, social media content, logos, online invitations, etc. They had to find the perfect color code of their choice from an external source and paste it into the Canva, which was simply very time-consuming.
The most-awaited color picker tool was introduced in Canva at the end of November 202This new design tool makes the design very convenient while using Canva for graphic designing. With this tool, you don’t need to spend hours searching for the right color that matches the background. Color picker helps you to find a perfect color match according to the image, logo, or anything else uploaded on Canva.

But before using this new color match tool, you must ensure that:
● You are using the updated version of the Canva desktop app.
● You have the latest version of the browsers like Chrome, Mozilla, Internet Explorer, etc.
Part 2 Why Use the Color Match Tool?

This color match tool is the most-demanded feature that has been updated on Canva. It helps choose the perfect color match very efficiently without wasting time and effort. It works like an eyedropper tool available in graphic designing software like Photoshop. It is elementary and valuable to use, and it saves a lot of time in creating attractive and wonderful designs.
It helps determine the different colors available in a particular image uploaded on the Canva app. You can easily choose the appropriate color by placing the tool in the place that has your desired color. It is a compassionate tool, so you should be very careful while choosing the color of your choice. You can press the ‘Esc’ button to exit the command without choosing any color.
This color match tool magically helps select the desired color in seconds without using any external color picker browser extension. This tool is readily available on the color pallet in the updated version of the Canva desktop app.
Part 3 How to Use Color Match in Canva to Match Your Brand
The color match tool is now inbuilt in the Canva desktop app, which is very easy and convenient. You need to download the Canva desktop app to use this feature from the official website of Canva.

The designers need to follow the simple steps given below to use the color match tool (eyedropper tool) in the updated version of the Canva desktop app:
● First of all, open the Canva desktop app.
● After this, open any design or image of your choice that you want to edit. This color match tool can work on any type of image, regardless of the shape and size.
● Now, select the particular part of the image whose color you want to change.
● After this, click on the color block available at the top corner to open the color customization options.
● A color pallet will open.
● On the top of the color pallet, you will see a ‘+’ (add new color) button, this button has a colorful square outline.
● After this, a color chart will appear under that button. You will see the color code written over there and an eyedropper tool will be available next to that color code (hex code).
● Click on this eyedropper tool and select the color of your choice either from the image or any other color available in Canva.
● After selecting the color tap on the particular part of the image whose color you want to change.
This is how you can change the color using the new color picker tool available in Canva and enjoy editing your images using the new Canva desktop app.
Part 4 Alternative to Canva Color Match
As we all know, Canva is the most accessible online graphic designing platform used for image editing and video editing. But there are certain limitations of using it, so here we have listed some of the other graphic designing tools for both image and video editing that can be used as an alternative to the Canva app:
● Visme: It is a drag and drops editing and graphic designing tool. Using; this tool is effortless to use, and you can easily create attractive presentations, infographics, social media graphics, logos, etc. This tool can be used by anyone like students (to create their school activities), educators (to create easy to learn infographics), business people (to create attractive presentations), graphic designers (to create different content), etc.
It contains a lot of features like:
● Data Visualization Tools
● Variety of Professionally Designed Easy to Use Templates
● Infographic Maker
● A Large Number of Editing Tools
● Animation Feature with Hover Effects
● Analytics Feature
● Adobe Spark: It is an online tool launched by Adobe. Although it can’t compete with professional software like Photoshop and Illustrator, it can be treated as the best alternative for Canva. It is used to create social media posts, logos, and graphic designs easily and efficiently. The only limitation it has is that non-designers and newcomers can’t use it without any knowledge of graphic design.
● PicMonkey: PicMonkey is another great alternative to Canva, just like Visme. It has many features that help both professional and non-professional designers create attractive and wonderful designs very easily and efficiently. It has many exciting features like photo re-toucher, pattern & effects tools, etc., just like Photoshop, but it is relatively easier to use and can be used by anyone who wants to create beautiful and creative graphic designs.
● ****Wondershare Filmora Video Editor **: Filmora is a video editing software and can be used as an alternative to Canva if you create and edit the videos to medium & advanced levels. It is used to create and edit short videos for social media and ad campaigns very quickly, with many features available in professional software like Adobe Premiere Pro. It is easy-to-use with an intuitive user interface that is very helpful for non-professional and less experienced video editors.
For Win 7 or later (64-bit)
For macOS 10.12 or later
● Key Takeaways from This Episode →
● It can be concluded that Canva is a fantastic graphic designing tool for all the non-professionals and newcomers in the field of design. It helps people create attractive and creative designs with less effort and less time consumption.
● No doubt, everything has its pros and cons. Similarly, Canva also has certain limitations compared to the other professional graphic designing tools like Photoshop, Illustrator, etc.
● But still, it is continuously updating and removing those limitations. For example- the new color match tool is introduced to this platform for easy and convenient graphic designing.
● This color match tool (eyedropper tool) was demanded by the designers who use Canva for their graphics and creating attractive social media posts, infographics, video editing, etc.
Color combination is the essential thing that you need to keep in mind designing. It helps create eye-catchy designs and can create a positive impact on the target audience.

This is the greatest secret of creating attractive and wonderful designs. Reading further will help you to understand the Canva color match in detail. So, without any further dues, let’s get started!
In this article
01 [What is the Canva Color Picker?](#Part 1)
02 [Why Use the Color Match Tool?](#Part 2)
03 [How to Use Color Match in Canva to Match Your Brand](#Part 3)
04 [Alternative to Canva Color Match](#Part 4)
Part 1 What is the Canva Color Picker?
Canva is one of the simplest and easiest ways of creating great and eye-catchy graphic designs. Color combinations help us to make these designs more attractive. But earlier, there were some limitations in Canva regarding the color picker tool; designers had to use browser extensions like ColorZilla to match the color combinations perfectly. They faced many problems while selecting the perfect color of their choice while designing their pins, social media content, logos, online invitations, etc. They had to find the perfect color code of their choice from an external source and paste it into the Canva, which was simply very time-consuming.
The most-awaited color picker tool was introduced in Canva at the end of November 202This new design tool makes the design very convenient while using Canva for graphic designing. With this tool, you don’t need to spend hours searching for the right color that matches the background. Color picker helps you to find a perfect color match according to the image, logo, or anything else uploaded on Canva.

But before using this new color match tool, you must ensure that:
● You are using the updated version of the Canva desktop app.
● You have the latest version of the browsers like Chrome, Mozilla, Internet Explorer, etc.
Part 2 Why Use the Color Match Tool?

This color match tool is the most-demanded feature that has been updated on Canva. It helps choose the perfect color match very efficiently without wasting time and effort. It works like an eyedropper tool available in graphic designing software like Photoshop. It is elementary and valuable to use, and it saves a lot of time in creating attractive and wonderful designs.
It helps determine the different colors available in a particular image uploaded on the Canva app. You can easily choose the appropriate color by placing the tool in the place that has your desired color. It is a compassionate tool, so you should be very careful while choosing the color of your choice. You can press the ‘Esc’ button to exit the command without choosing any color.
This color match tool magically helps select the desired color in seconds without using any external color picker browser extension. This tool is readily available on the color pallet in the updated version of the Canva desktop app.
Part 3 How to Use Color Match in Canva to Match Your Brand
The color match tool is now inbuilt in the Canva desktop app, which is very easy and convenient. You need to download the Canva desktop app to use this feature from the official website of Canva.

The designers need to follow the simple steps given below to use the color match tool (eyedropper tool) in the updated version of the Canva desktop app:
● First of all, open the Canva desktop app.
● After this, open any design or image of your choice that you want to edit. This color match tool can work on any type of image, regardless of the shape and size.
● Now, select the particular part of the image whose color you want to change.
● After this, click on the color block available at the top corner to open the color customization options.
● A color pallet will open.
● On the top of the color pallet, you will see a ‘+’ (add new color) button, this button has a colorful square outline.
● After this, a color chart will appear under that button. You will see the color code written over there and an eyedropper tool will be available next to that color code (hex code).
● Click on this eyedropper tool and select the color of your choice either from the image or any other color available in Canva.
● After selecting the color tap on the particular part of the image whose color you want to change.
This is how you can change the color using the new color picker tool available in Canva and enjoy editing your images using the new Canva desktop app.
Part 4 Alternative to Canva Color Match
As we all know, Canva is the most accessible online graphic designing platform used for image editing and video editing. But there are certain limitations of using it, so here we have listed some of the other graphic designing tools for both image and video editing that can be used as an alternative to the Canva app:
● Visme: It is a drag and drops editing and graphic designing tool. Using; this tool is effortless to use, and you can easily create attractive presentations, infographics, social media graphics, logos, etc. This tool can be used by anyone like students (to create their school activities), educators (to create easy to learn infographics), business people (to create attractive presentations), graphic designers (to create different content), etc.
It contains a lot of features like:
● Data Visualization Tools
● Variety of Professionally Designed Easy to Use Templates
● Infographic Maker
● A Large Number of Editing Tools
● Animation Feature with Hover Effects
● Analytics Feature
● Adobe Spark: It is an online tool launched by Adobe. Although it can’t compete with professional software like Photoshop and Illustrator, it can be treated as the best alternative for Canva. It is used to create social media posts, logos, and graphic designs easily and efficiently. The only limitation it has is that non-designers and newcomers can’t use it without any knowledge of graphic design.
● PicMonkey: PicMonkey is another great alternative to Canva, just like Visme. It has many features that help both professional and non-professional designers create attractive and wonderful designs very easily and efficiently. It has many exciting features like photo re-toucher, pattern & effects tools, etc., just like Photoshop, but it is relatively easier to use and can be used by anyone who wants to create beautiful and creative graphic designs.
● ****Wondershare Filmora Video Editor **: Filmora is a video editing software and can be used as an alternative to Canva if you create and edit the videos to medium & advanced levels. It is used to create and edit short videos for social media and ad campaigns very quickly, with many features available in professional software like Adobe Premiere Pro. It is easy-to-use with an intuitive user interface that is very helpful for non-professional and less experienced video editors.
For Win 7 or later (64-bit)
For macOS 10.12 or later
● Key Takeaways from This Episode →
● It can be concluded that Canva is a fantastic graphic designing tool for all the non-professionals and newcomers in the field of design. It helps people create attractive and creative designs with less effort and less time consumption.
● No doubt, everything has its pros and cons. Similarly, Canva also has certain limitations compared to the other professional graphic designing tools like Photoshop, Illustrator, etc.
● But still, it is continuously updating and removing those limitations. For example- the new color match tool is introduced to this platform for easy and convenient graphic designing.
● This color match tool (eyedropper tool) was demanded by the designers who use Canva for their graphics and creating attractive social media posts, infographics, video editing, etc.
Color combination is the essential thing that you need to keep in mind designing. It helps create eye-catchy designs and can create a positive impact on the target audience.

This is the greatest secret of creating attractive and wonderful designs. Reading further will help you to understand the Canva color match in detail. So, without any further dues, let’s get started!
In this article
01 [What is the Canva Color Picker?](#Part 1)
02 [Why Use the Color Match Tool?](#Part 2)
03 [How to Use Color Match in Canva to Match Your Brand](#Part 3)
04 [Alternative to Canva Color Match](#Part 4)
Part 1 What is the Canva Color Picker?
Canva is one of the simplest and easiest ways of creating great and eye-catchy graphic designs. Color combinations help us to make these designs more attractive. But earlier, there were some limitations in Canva regarding the color picker tool; designers had to use browser extensions like ColorZilla to match the color combinations perfectly. They faced many problems while selecting the perfect color of their choice while designing their pins, social media content, logos, online invitations, etc. They had to find the perfect color code of their choice from an external source and paste it into the Canva, which was simply very time-consuming.
The most-awaited color picker tool was introduced in Canva at the end of November 202This new design tool makes the design very convenient while using Canva for graphic designing. With this tool, you don’t need to spend hours searching for the right color that matches the background. Color picker helps you to find a perfect color match according to the image, logo, or anything else uploaded on Canva.

But before using this new color match tool, you must ensure that:
● You are using the updated version of the Canva desktop app.
● You have the latest version of the browsers like Chrome, Mozilla, Internet Explorer, etc.
Part 2 Why Use the Color Match Tool?

This color match tool is the most-demanded feature that has been updated on Canva. It helps choose the perfect color match very efficiently without wasting time and effort. It works like an eyedropper tool available in graphic designing software like Photoshop. It is elementary and valuable to use, and it saves a lot of time in creating attractive and wonderful designs.
It helps determine the different colors available in a particular image uploaded on the Canva app. You can easily choose the appropriate color by placing the tool in the place that has your desired color. It is a compassionate tool, so you should be very careful while choosing the color of your choice. You can press the ‘Esc’ button to exit the command without choosing any color.
This color match tool magically helps select the desired color in seconds without using any external color picker browser extension. This tool is readily available on the color pallet in the updated version of the Canva desktop app.
Part 3 How to Use Color Match in Canva to Match Your Brand
The color match tool is now inbuilt in the Canva desktop app, which is very easy and convenient. You need to download the Canva desktop app to use this feature from the official website of Canva.

The designers need to follow the simple steps given below to use the color match tool (eyedropper tool) in the updated version of the Canva desktop app:
● First of all, open the Canva desktop app.
● After this, open any design or image of your choice that you want to edit. This color match tool can work on any type of image, regardless of the shape and size.
● Now, select the particular part of the image whose color you want to change.
● After this, click on the color block available at the top corner to open the color customization options.
● A color pallet will open.
● On the top of the color pallet, you will see a ‘+’ (add new color) button, this button has a colorful square outline.
● After this, a color chart will appear under that button. You will see the color code written over there and an eyedropper tool will be available next to that color code (hex code).
● Click on this eyedropper tool and select the color of your choice either from the image or any other color available in Canva.
● After selecting the color tap on the particular part of the image whose color you want to change.
This is how you can change the color using the new color picker tool available in Canva and enjoy editing your images using the new Canva desktop app.
Part 4 Alternative to Canva Color Match
As we all know, Canva is the most accessible online graphic designing platform used for image editing and video editing. But there are certain limitations of using it, so here we have listed some of the other graphic designing tools for both image and video editing that can be used as an alternative to the Canva app:
● Visme: It is a drag and drops editing and graphic designing tool. Using; this tool is effortless to use, and you can easily create attractive presentations, infographics, social media graphics, logos, etc. This tool can be used by anyone like students (to create their school activities), educators (to create easy to learn infographics), business people (to create attractive presentations), graphic designers (to create different content), etc.
It contains a lot of features like:
● Data Visualization Tools
● Variety of Professionally Designed Easy to Use Templates
● Infographic Maker
● A Large Number of Editing Tools
● Animation Feature with Hover Effects
● Analytics Feature
● Adobe Spark: It is an online tool launched by Adobe. Although it can’t compete with professional software like Photoshop and Illustrator, it can be treated as the best alternative for Canva. It is used to create social media posts, logos, and graphic designs easily and efficiently. The only limitation it has is that non-designers and newcomers can’t use it without any knowledge of graphic design.
● PicMonkey: PicMonkey is another great alternative to Canva, just like Visme. It has many features that help both professional and non-professional designers create attractive and wonderful designs very easily and efficiently. It has many exciting features like photo re-toucher, pattern & effects tools, etc., just like Photoshop, but it is relatively easier to use and can be used by anyone who wants to create beautiful and creative graphic designs.
● ****Wondershare Filmora Video Editor **: Filmora is a video editing software and can be used as an alternative to Canva if you create and edit the videos to medium & advanced levels. It is used to create and edit short videos for social media and ad campaigns very quickly, with many features available in professional software like Adobe Premiere Pro. It is easy-to-use with an intuitive user interface that is very helpful for non-professional and less experienced video editors.
For Win 7 or later (64-bit)
For macOS 10.12 or later
● Key Takeaways from This Episode →
● It can be concluded that Canva is a fantastic graphic designing tool for all the non-professionals and newcomers in the field of design. It helps people create attractive and creative designs with less effort and less time consumption.
● No doubt, everything has its pros and cons. Similarly, Canva also has certain limitations compared to the other professional graphic designing tools like Photoshop, Illustrator, etc.
● But still, it is continuously updating and removing those limitations. For example- the new color match tool is introduced to this platform for easy and convenient graphic designing.
● This color match tool (eyedropper tool) was demanded by the designers who use Canva for their graphics and creating attractive social media posts, infographics, video editing, etc.
Also read:
- Add Text Animation to A Video Online
- New 2024 Approved How to Add Custom Subtitles to Netflix
- 3D Ray Traced Settings In After Effects A Comprehensive Guide for 2024
- In 2024, You Are Planning to Convert an AVI to GIF Online but You Are Not Sure How? If You Are Looking for an Idea on How to Do It, You Have Come to the Right Place
- New How To Make A Video Longer for 2024
- Updated 2024 Approved Best Ideas on Using Green Screen with Filmora
- 2024 Approved How To Change Font In Premiere Pro
- Updated Best Ai Generated Memes for 2024
- New How to Loop Video in Canva
- Updated 10 Best Mp3 Visualizers Windows, Mac, Android, iPhone & Online for 2024
- New Legend Intro Maker – Create Intro Video with Ease
- Updated In 2024, Create Realistic Fire Effects by Filmora
- 2024 Approved How to Record Clips Using Your Camera and Edit Them Using Wondershare Filmora to Make a Loop Video? A Complete Guide for Beginners
- Looking for the Best Websites for 3D Text PNG? Weve Covered You with Our Top 8 Picks for Your Upcoming Work for 2024
- New In 2024, Top 10 3D Slideshow Software Review
- New Top Photo Video Maker Apps with Song
- New In 2024, Want to Immediately Know All About Discord GIF?
- Updated Wondershare Filmora Has Introduced a New Feature - AI Portrait Effect that You Can Use to Remove Background From Various Videos and Images. Explore the Uses, Benefits, and Real-Life Scenarios of This Feature in a Comprehensive Guide
- Updated 2024 Approved How to Loop Video in Canva
- Updated You Have to Get It Right when It Comes to Cinematic Grading. We Highlight the Most Common Mistakes to Avoid While Focusing on Various Tips to Apply in the Process
- How to Add Filters on iMovie for 2024
- Do You Wish to Convert GIF to Animated PNG? Then, You Need to Know About Using a GIF to APNG Converter to Help You Carry This Process Out in No Time. Read On for 2024
- Updated Best Way to Freeze-Frame in Final Cut Pro
- Updated Top Photo Video Maker Apps with Song
- New 2024 Approved How to Share YouTube Video on Zoom?
- Updated How to Color Grade Your Picture in LightRoom
- 2024 Approved End Screen Makers
- New You Will Also Be Guided on How to Use This Software to Crop Your Videos. Dont Worry and Just Take It One Step at a Time
- 2024 Approved Designed for You! Best Image (JPG/PNG) to GIF Converters
- Do You Want to Know Where You Can Find Online Video Editing Courses? In This Article, We Have Provided 15 Options for Your Various Demand. We Also Recommend a Great Video Editor to Help You Start Your Video Editing Journey with Ease
- In 2024, TXT to SRT 3 Effective Ways to Convert TXT to SRT
- Updated In 2024, Best Tools To Create Blend Image Collage
- New 2024 Approved All About GIF Keyboard That You May Want to Know
- In 2024, Discover a Quick Guide to Add Personalized Video Filters in VN App. Learn How to Use Built-In Filters and Import External Ones for Creative Video Editing
- New How to Livestream Zoom on Facebook, In 2024
- How to Convert a GIF to a Video for Instagram
- Updated In 2024, 10 Best Meme Text to Speech Tools Windows, Mac, Android, iPhone&Online
- Want to Speed up Your Video to Create Short-Duration Instagram Reels? Here Is How You Can Change the Speed of Pre-Recorded and Live Videos on Instagram Reels for 2024
- In 2024, Want to Find a Good Camera for YouTube? This Article Brings You some of the Best Options of Different Varieties for Your Channel
- New How Can You Get VHS Filter and Glitch Filter to Your Images or Videos for 2024
- New 12 Impressive AI Video Ideas for Making Engaging Video Content for 2024
- 2024 Approved Record Slow Motion Videos With Phantom Slow-Mo Camera
- How to Create an Aesthetic Slideshow Presentation
- New Are You Eager to Discover All About Dynamic Videos? You Are in the Right Place because This Article Provides Insight Into Dynamic Video Collages
- Live Selling A Comprehensive Starters Guide for 2024
- How To Fake GPS On Google Pixel 8 For Mobile Legends? | Dr.fone
- 2024 Approved A Guide to Unlock Descript Text-to-Speech Features in Detail
- In 2024, Complete Review & Guide to Techeligible FRP Bypass and More For Vivo G2
- How To Remove or Bypass Knox Enrollment Service On Realme C33 2023
- The Updated Method to Bypass OnePlus 12R FRP
- How to Get and Use Pokemon Go Promo Codes On Realme V30 | Dr.fone
- FRP Hijacker by Hagard Download and Bypass your Vivo Y200e 5G FRP Locks
- How To Fix OEM Unlock Missing on Itel P55?
- Updated In 2024, 25 Cute Memes to Make You Feel Better
- How Can We Unlock Our Oppo A2 Phone Screen?
- In 2024, How to Change Location On Facebook Dating for your Samsung Galaxy S24+ | Dr.fone
- In 2024, Unlocking Made Easy The Best 10 Apps for Unlocking Your Poco C51 Device
- In 2024, How to Bypass iCloud Lock from iPhone 15 Plus
- How To Transfer Data From Apple iPhone 15 Plus To Other iPhone 11 devices? | Dr.fone
- Still Using Pattern Locks with ZTE Blade A73 5G? Tips, Tricks and Helpful Advice
- What is Geo-Blocking and How to Bypass it On Vivo V29e? | Dr.fone
- Complete guide for recovering call logs on Xiaomi
- 3 Ways for Android Pokemon Go Spoofing On HTC U23 Pro | Dr.fone
- Here are Some Pro Tips for Pokemon Go PvP Battles On Motorola Defy 2 | Dr.fone
- In 2024, Best Solutions for OnePlus Network Unlock
- How to Transfer Photos from Oppo Reno 11 5G to New Android? | Dr.fone
- Process of Screen Sharing Honor Magic 5 Lite to PC- Detailed Steps | Dr.fone
- In 2024, How To Unlock Apple iPhone 15 Pro Max Without Passcode? 4 Easy Methods
- How to Exit Android Factory Mode On Infinix Note 30? | Dr.fone
- Title: New In 2024, How To Add Motion Blur Effect To Photos in GIMP
- Author: Chloe
- Created at : 2024-06-09 16:15:31
- Updated at : 2024-06-10 16:15:31
- Link: https://ai-editing-video.techidaily.com/new-in-2024-how-to-add-motion-blur-effect-to-photos-in-gimp/
- License: This work is licensed under CC BY-NC-SA 4.0.

