
:max_bytes(150000):strip_icc():format(webp)/GettyImages-642981042-5a903651a18d9e0037d31742.jpg)
New In 2024, How to Add Text Animation Online
How to Add Text Animation Online
Before you can publish your recorded video to your viewers, you need to polish the video so that you can get everyone’s appreciation. This is where the magic of video editing comes into the scene. Editing your video is not just about trimming unnecessary parts and adding transitions and effects. The titles and texts you display on your video play a major role in your video content. In fact, you can create a video based on texts and titles only.
Instead of showing static texts, you should create animated texts and place them in the video wherever appropriate. You do not need to download a video editor on your computer or smartphone to add animated text to your video. You can make text animation online using an online text animation maker. We will illustrate the steps to create animated text with three different online editors.
Part 1. Use Biteable Animated Text
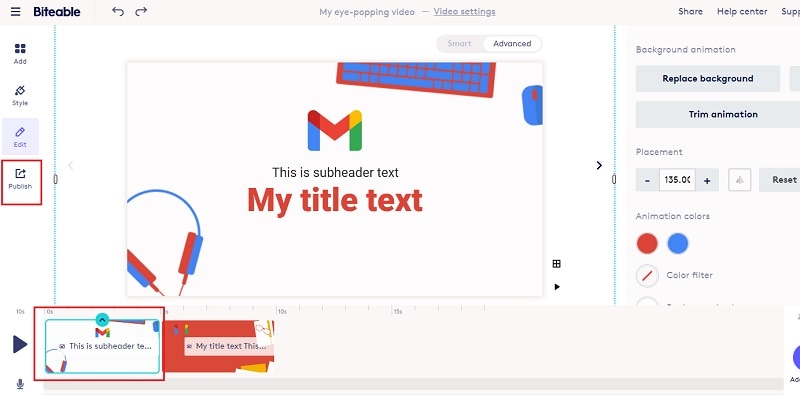
Biteable is a popular online platform where you can create amazing animated text video using Biteable text video maker. You can add animated text to your videos as well as photos. The user interface of Biteable is extremely easy for all users. You have to first create an account for free to get started. There are various templates available to create your animated text video from scratch. Here are the steps to use Biteable online text animation maker to create a video based on animated texts.
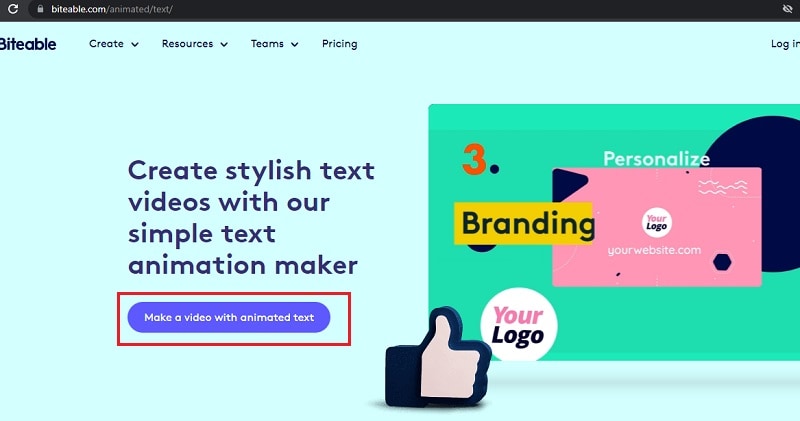
Step1Open your web browser and visit “biteable.com/animated/text”. Click on “Make a video with animated text” button.
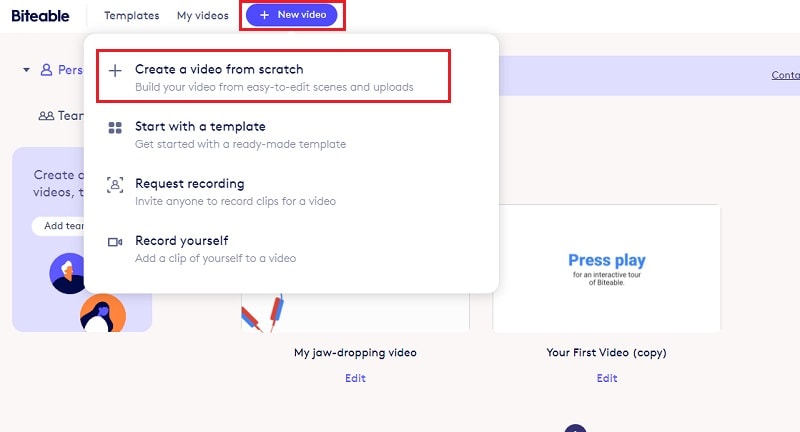
Step2Create an account by following the on-screen instructions. Click on New Video button and select “Create a video from scratch”.
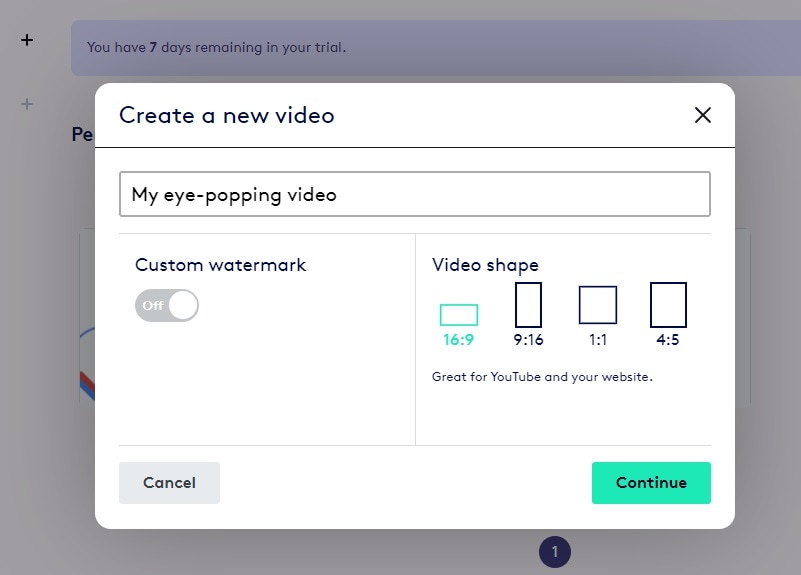
Step3Enter a name for the video and select a video shape as per your preference. Click on Continue button.
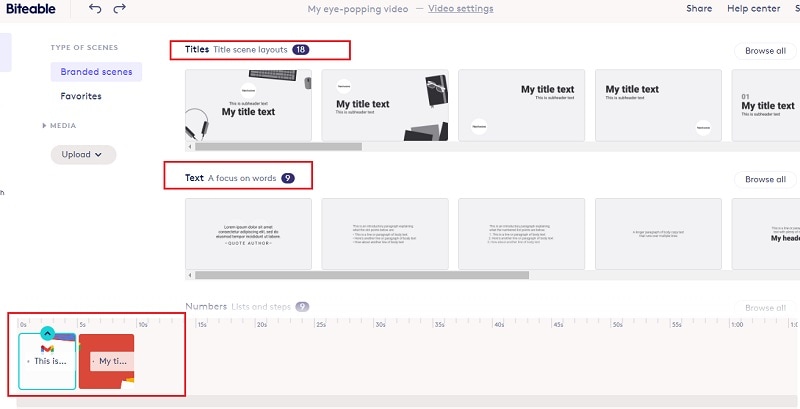
Step4Under Titles, select any template and it will be added to the Timeline. Similarly, you can add multiple titles templates, text templates, number templates and likewise. You will see them in the Timeline placed side by side. You can stretch their durations as per your requirements.
Step5Double-click on each template to edit the text in them and select the text animations as per your preference. Play the video and if you are satisfied, click on Publish button to save the video.
Part 2. Use Motionden Video Maker
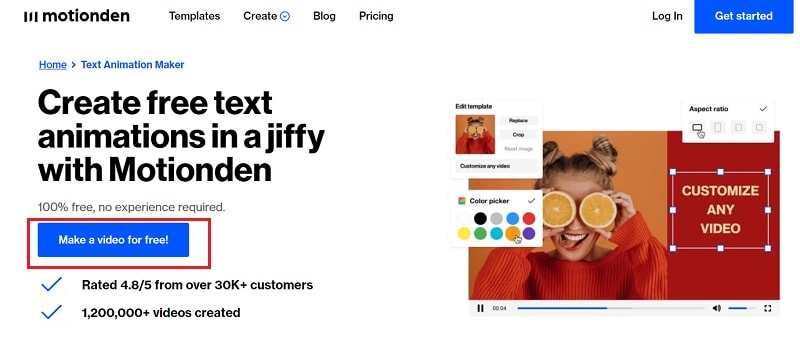
Motionden is yet another powerful text animation maker where you can create free text animations instantly. There are over 1500 templates available to choose from in order to create text videos from scratch. You can choose video templates from any category as per the video theme you want. Besides, you can upload your video or photo and add texts and music as per your preference. Here are the steps to create animated text online using Motionden Video Maker.
Step1Open your web browser and visit “motionden.com/video-maker/text-animation”. Click on “Make a video for free” button.
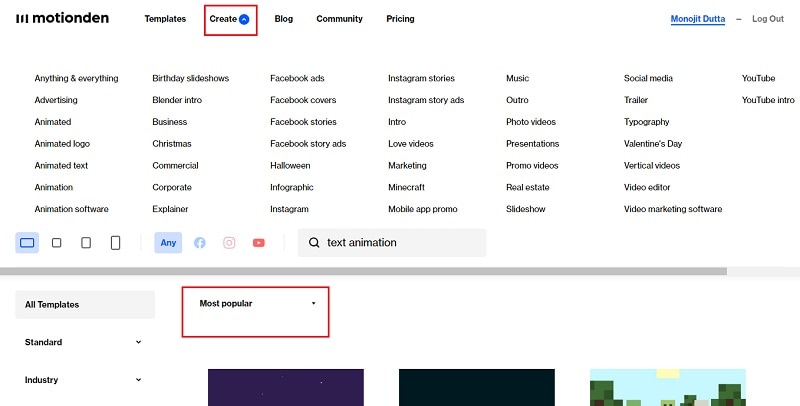
Step2Go to Create menu option and select any category of video templates. You can also check out the popular video templates and select anyone as per your preference.
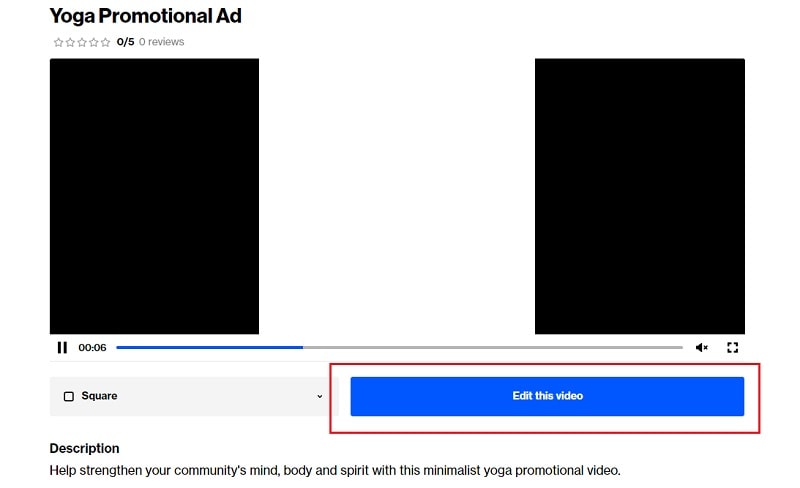
Step3For the selected category, you need to select the desired video template. Click on Edit Video and you can make changes to the template on the video editor as per your requirements. You need to sign up for free in order to continue and edit the template.
Step4Click on individual scenes and click on texts to customize them. Once the editing is done for each scene, click on Make Video button to build and save the text video.

Part 3. Use Flexclip Text Animation Tool
You can use Flexclip Text Animation Tool to create text video from scratch as well as add text to your recorded video. You should use Biteable and Motionden to create video with text effects only directly using video template while you should use Flexclip to edit your video and add text. You can add text effects to photos and videos and here are the steps to follow.
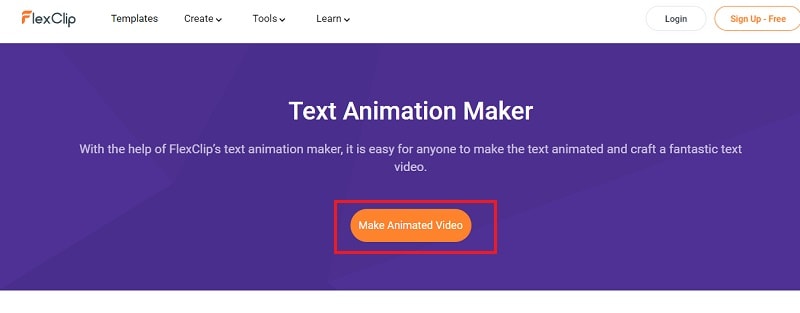
Step1Open web browser and visit “flexclip.com/features/text-animation.html”. Click on Make Animated Video button.
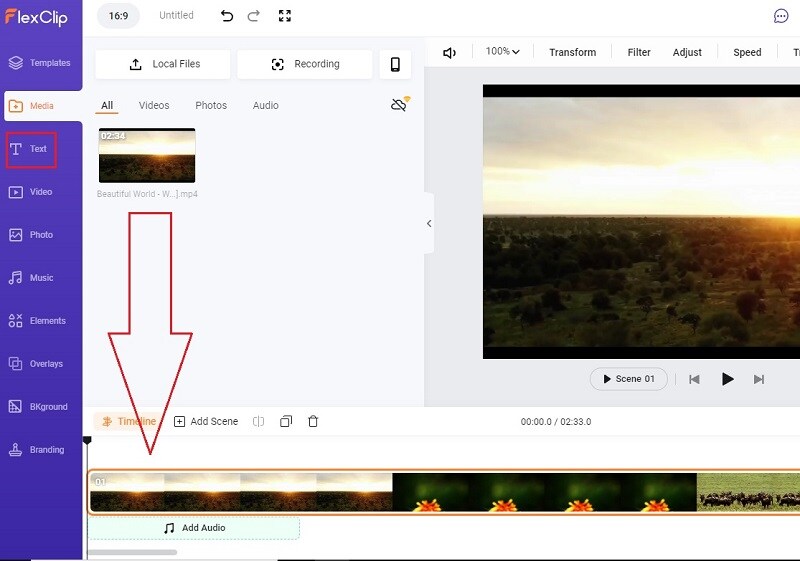
Step2You can choose from the available templates to create video with text from scratch. If you want to add text to your recorded video, go to Media tab. Click on Local Files button and upload your recorded video.

Step3Drag and drop the uploaded video into the Timeline. Thereafter, go to Text tab.
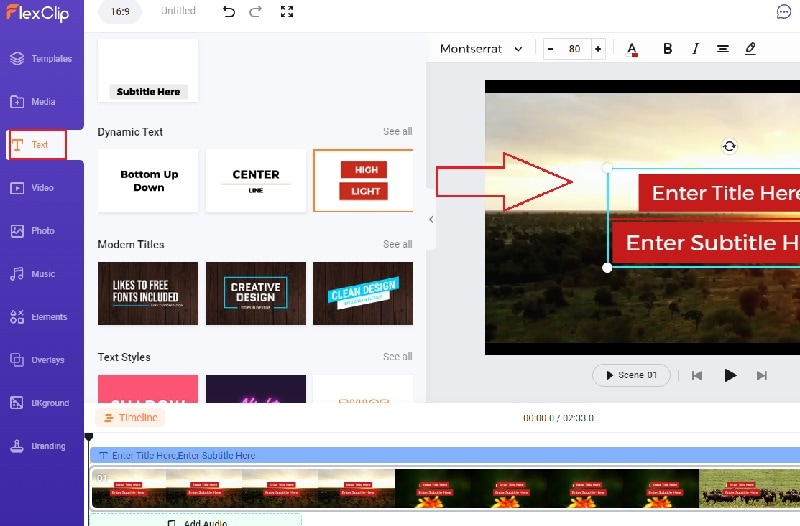
Step4You will see all the different text effects and animations. Place your mouse pointer to preview the animation. Drag and drop the select text template to the video on the Viewer. You can check the Timeline and stretch or compress the text layer as per your requirements.
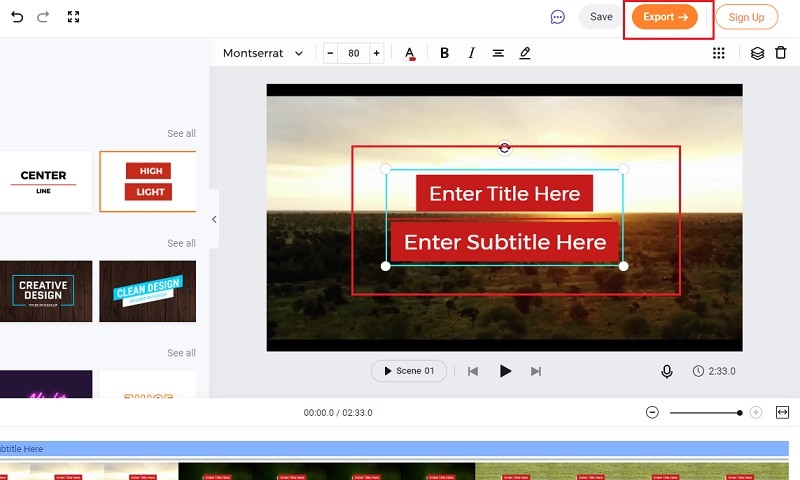
Step5Double-click on the text on Viewer window and customize the text as per your preference. Finally, click on Export button to save the edited video.
Conclusion
You can make video with animated text to make your presentation video eye-catching and attention-grabbing. We have mentioned three different online text animation makers that you can use to create animated text video from scratch by choosing different video templates. You can also edit your recorded video and add animated text wherever you want using Flexclip Text Animation Tool.
Free Download For Win 7 or later(64-bit)
Free Download For macOS 10.14 or later
Step by Step to Cut Videos in Adobe Premiere Pro
Video editing is an essential skill in a world that has a growing focus on creative fields. And if you work with videos, knowing which clips to use and where to cut is essential in conveying your story and increasing its impact. So, if you are a beginner and want to familiarise yourself with steps and terms used in video editing, in this article, we will go through the steps you will need to cut your video file in Adobe Premiere Pro and Wondershare Filmora.
This guide uses Adobe Premiere Pro 2022 and Wondershare Filmora X.
How to cut video in Adobe Premiere Pro?
Once you have Adobe Premiere Pro open on your computer, follow the steps listed below.
Step 1: Create a new project in Premiere Pro.

During project creation, we recommend keeping an eye on the file name set and the storage location; this can help reduce the time spent in locating the Premiere Project.

Step 2: Import a video file into Premiere Pro with a double click in the marked area and choose the file from its stored location.

Step 3: Double click on any imported media to activate it and send it to the Source Window.

You can continue to import more media by double-clicking within the marked area. For better organization, users can also create Bins, which are folders within a Premiere Pro File that are often in use to sort out imported media.
Users can create Bins with a right-click in the red box marked area (refer to image above).
Step 4: Select either the whole clip or a part of it from the Source Window and drag it onto the Timeline.

Step 5: Select the Razor Tool from the Tools Window. Now, pick the point where you want to introduce a cut and confirm with your left mouse button; this will split your video track into two parts.
Make a second cut where desired, following which you can move around the newly generated clip or delete it.

**Tip:**You can also select the Razor Tool by pressing C on the keyboard_._
We also recommend using the Snap in Timeline feature (activated with (S) on your keyboard or by choosing the magnet option), which will match your mouse pointer with the Playhead to ensure your cut will match the exact frame shown on your screen.
-—————————————————————————————————————————————-
Some more tips for Adobe Premiere Pro:
- Using the I and O keys on your keyboard while playing a video in the Source Window will allow you to set an In Pointand an Out Point. These markers will allow you to move a specific part of your video file into the Timeline, thus, reducing the amount of time spent making the right cut.
We have tagged the Mark In and Mark Out buttons with a Green Box in the image below.
- Clicking on the Step Frame Buttons [marked in Yellow] will also help increase the accuracy of your cut by allowing you to select the exact moment you desire.
- You can also mark a Point of Interest in your video file with the help of Markers in Premiere Pro. These afford you the ability to come back to the moment at a later time and see why it interested you in the first place, as editing sessions can often take hours at an end.

An alternative way to cut video with Wondershare Filmora
In Wondershare Filmora Video Editor , the steps to cut a video are simplified and don’t require as many steps as seen earlier. Opening the application throws you straight into a project, and following this, you can import a video file and begin editing. From the process you will learn below, it is easy to assume that Wondershare Filmora is more convenient for beginners and provides software features that match paid professional software.
For Win 7 or later (64-bit)
For macOS 10.14 or later
Note: If you don’t have Wondershare Filmora installed, you can get the video editor by visiting its official website . Once the setup program download completes, execute it and begin the installation process.
Once you have the editing software open, follow the steps listed below.
Step 1: Import a video file by clicking on the import window.
The default project setting for Filmora X is 1920x1080 at 25 frames per second. Users can change this to match their video file by going into Project Settings under the File tab or by accepting the automatic prompt that appears when dragging the video file onto the Timeline.

Note: If you have a PC with weak hardware, Wondershare Filmora gives you the option to create Video Proxies that will reduce the load on your computer by creating smaller clips that are lower in size, resulting in a smoother and faster experience. You can also do this in Premiere Pro, but Filmora does it for you automatically once given permission.
Step 2: Drag the video file onto the Timeline to begin previewing it in the Playback Window and commence editing operations.

Step 3: Locate where you want to cut in the video file and click on the orange scissors option to split the video file.

Tip: You can also use the keyboard shortcut (CTRL+B) to cut without using a mouse click, in case you make use of a trackpad while editing.
The Bottom Line
As said earlier, knowing where to cut is essential in improving the feel of your video, and we hope this guide showed you exactly how to perform the actions to create your best project. If you are a beginner, the simplistic approach of Wondershare Filmora will be more welcoming and easier to navigate. In addition, the software is also free to download, with added features that you can activate by paying a monthly, yearly, or one-time fee. Adobe Premiere Pro is an option worth considering if you plan on using third-party plugins and other applications from the Creative Cloud Suite.
During project creation, we recommend keeping an eye on the file name set and the storage location; this can help reduce the time spent in locating the Premiere Project.
Step 2: Import a video file into Premiere Pro with a double click in the marked area and choose the file from its stored location.
Step 3: Double click on any imported media to activate it and send it to the Source Window.
You can continue to import more media by double-clicking within the marked area. For better organization, users can also create Bins, which are folders within a Premiere Pro File that are often in use to sort out imported media.
Users can create Bins with a right-click in the red box marked area (refer to image above).
Step 4: Select either the whole clip or a part of it from the Source Window and drag it onto the Timeline.
Step 5: Select the Razor Tool from the Tools Window. Now, pick the point where you want to introduce a cut and confirm with your left mouse button; this will split your video track into two parts.
Make a second cut where desired, following which you can move around the newly generated clip or delete it.
**Tip:**You can also select the Razor Tool by pressing C on the keyboard_._
We also recommend using the Snap in Timeline feature (activated with (S) on your keyboard or by choosing the magnet option), which will match your mouse pointer with the Playhead to ensure your cut will match the exact frame shown on your screen.
-—————————————————————————————————————————————-
Some more tips for Adobe Premiere Pro:
- Using the I and O keys on your keyboard while playing a video in the Source Window will allow you to set an In Pointand an Out Point. These markers will allow you to move a specific part of your video file into the Timeline, thus, reducing the amount of time spent making the right cut.
We have tagged the Mark In and Mark Out buttons with a Green Box in the image below.
- Clicking on the Step Frame Buttons [marked in Yellow] will also help increase the accuracy of your cut by allowing you to select the exact moment you desire.
- You can also mark a Point of Interest in your video file with the help of Markers in Premiere Pro. These afford you the ability to come back to the moment at a later time and see why it interested you in the first place, as editing sessions can often take hours at an end.
An alternative way to cut video with Wondershare Filmora
In Wondershare Filmora Video Editor , the steps to cut a video are simplified and don’t require as many steps as seen earlier. Opening the application throws you straight into a project, and following this, you can import a video file and begin editing. From the process you will learn below, it is easy to assume that Wondershare Filmora is more convenient for beginners and provides software features that match paid professional software.
For Win 7 or later (64-bit)
For macOS 10.14 or later
Note: If you don’t have Wondershare Filmora installed, you can get the video editor by visiting its official website . Once the setup program download completes, execute it and begin the installation process.
Once you have the editing software open, follow the steps listed below.
Step 1: Import a video file by clicking on the import window.
The default project setting for Filmora X is 1920x1080 at 25 frames per second. Users can change this to match their video file by going into Project Settings under the File tab or by accepting the automatic prompt that appears when dragging the video file onto the Timeline.
Note: If you have a PC with weak hardware, Wondershare Filmora gives you the option to create Video Proxies that will reduce the load on your computer by creating smaller clips that are lower in size, resulting in a smoother and faster experience. You can also do this in Premiere Pro, but Filmora does it for you automatically once given permission.
Step 2: Drag the video file onto the Timeline to begin previewing it in the Playback Window and commence editing operations.
Step 3: Locate where you want to cut in the video file and click on the orange scissors option to split the video file.
Tip: You can also use the keyboard shortcut (CTRL+B) to cut without using a mouse click, in case you make use of a trackpad while editing.
The Bottom Line
As said earlier, knowing where to cut is essential in improving the feel of your video, and we hope this guide showed you exactly how to perform the actions to create your best project. If you are a beginner, the simplistic approach of Wondershare Filmora will be more welcoming and easier to navigate. In addition, the software is also free to download, with added features that you can activate by paying a monthly, yearly, or one-time fee. Adobe Premiere Pro is an option worth considering if you plan on using third-party plugins and other applications from the Creative Cloud Suite.
How to Perfect Quick and Efficient Video Editing | Keyboard Shortcuts in Filmora
To get rid of mistakes in the videos and to make them more visually appealing, people prefer to edit videos. You can also shape the video in a storytelling way to express and present the cohesive story to the world. Nowadays, video editing is a demanded skill, and every person wishes to master it. In these scenarios, the built-in keyboard shortcuts will help you a lot.
The best tool that provides built-in keyboard shortcuts and can help you experience the best video editing experience is Wondershare Filmora. By the end of this article, you will be aware of the checkpoints along with the keyboard shortcuts of Filmora. We will also provide keyboard shortcuts in this article to encourage shortcut video editing.
Wondershare Filmora12 A cross-platform helping you make quick and efficient video editing!
Free Download Free Download Learn More

Part 1: Major Checkpoints in Quick Video Editing
While doing video editing, it is very important to focus on efficiency and speed. It is essential to focus on the speed and efficiency of a video editing tool. Moreover, there are some checkpoints that you have to consider before getting into video editing. Some of them are:
01of 05Preparing Footage
Before anything else, you have to arrange and prepare your footage. It helps optimize the editing procedure, and you can label the files properly. Besides this, it also saves you time searching for specific files and footage.
02of 05Timeline Setting
You have to set up your timelines in the desired and recognizable resolutions. Moreover, adjusting frame rates and duration of videos and creating customized templates before anything else.
03of 05Selection of moments
Make sure you watch your video in a proper manner so you don’t have to waste time finding a specific moment. By this, you will be able to select a moment without wasting additional time.
04of 05Transitions and Adjustments
While editing the videos, you need to add the basic transitions to add consistency. Furthermore, you can adjust the audio metrics of videos and sync them with the length of videos.
05of 05Preview and Export
After editing the videos, you also have to preview them to check and fix the mistakes. Above all, always select the tool through which you can preview the videos and export them in the desired output format.
Part 2: An Introduction to Wondershare Filmora and Its Video Editing Intuition
Wondershare Filmora can be referred to as a feature-packed, cost-effective, all-in-one, easy-to-use video editing software. This tool has the capability to create professional-grade videos. You can also take assistance from this tool for creating advanced-level content for your social media platforms. It is also known to be the best choice when it comes to editing videos.
In Filmora, you can find diversified video editing tools as it comprehends timeline-based editing, so you can also use it to edit your memories. Several video formats are compatible with Filmora, so you will not face restrictions in this part.
Free Download For Win 7 or later(64-bit)
Free Download For macOS 10.14 or later
Key Features of Wondershare Filmora
- The AI Smart Cutout feature of Filmora lets you highlight and edit diversified unrequired objects, persons, or pets from the background.
- One of the best things about Filmora is it supports the AI Image feature through which you can turn descriptive text into illustrative images.
- It also shows the integrations with ChatGPT, through which you can generate AI text during video editing. This is perfect for YouTube descriptions and titles.
- You can also adjust the speed of the video while controlling the keyframes to make cinematic-grade edits in simple videos.
- The title editing feature lets you create artistic features with modernized word art, illustrations, and animations.

Part 3: Learning All Keyboard Shorts for Quick and Efficient Video Editing
To maximize productivity and workflow efficiency, you can take assistance from the keyboard shortcuts. Luckily, the industry-standard tool named Filmora offers effective keyboard shortcuts. Do you wish to know the keyboard shortcuts integrated with Wondershare Filmora? There is nothing to worry about because in this part, you will find the effective and implementable easy edit video shortcuts:
| Function | Shortcut |
|---|---|
| Preference | Ctrl+Shift+, |
| Keyboard Shortcut | Ctrl+Alt+K |
| Exit | Alt+F |
| New Project | Ctrl+N |
| Open Project | Ctrl+O |
| Save Project | Ctrl+S |
| Save Project As | Ctrl+Shift+S |
| Archive Project | Ctrl+Shift+A |
| Import Media Files | Ctrl+I |
| Record Voice-Over | Alt+R |
| Add a New Folder | +Alt+N |
| Undo | Ctrl+Z |
| Redo | Ctrl+Y |
| Cut | Ctrl+X |
| Copy | Ctrl+C |
| Paste | Ctrl+V |
| Duplicate | Ctrl+D |
| Delete | Del |
| Ripple Delete | Shift+Del |
| Close Gap | Alt+Del |
| Select All | +A |
| Copy Effects | Ctrl+Alt+C |
| Paste Effects | Ctrl+Alt+V |
| Select Clip Range | X |
| Cancel the Selected Range | Shift+X |
| Nudge Left | Alt+Left |
| Nudge Right | Alt+Right |
| Nudge Up | Alt+Up |
| Edit Properties | Alt+E |
| Split | Ctrl+B |
| Trim Start to Playhead | Alt+[ |
| Trim End to Playhead | Alt+] |
| Crop to Fit | Ctrl+F |
| Crop and Zoom | Alt+C |
| Rotate 90CW | Ctrl+Alt+Right |
| Rotate CCW | Ctrl+Alt+Left |
| Group | Ctrl+G |
| UnGroup | Ctrl+Alt+G |
| Uniform Speed | Ctrl+R |
| Add Freeze Frame | Alt+F |
| Detach Audio | Ctrl+Alt+D |
| Mute | Ctrl+Shift+M |
| Stabilization | Alt+S |
| Chroma Key | Ctrl+Shift+G |
| Red Marker | Alt+1 |
| Orange Marker | Alt+2 |
| Yellow Marker | Alt+3 |
| Green Marker | Alt+4 |
| Cyan Marker | Alt+5 |
| Blue Marker | Alt+6 |
| Purple Marker | Alt+7 |
| Grey Marker | Alt+8 |
| Select All Clips With the Same Color Mark | Alt+Shift+ |
| Render Preview | Enter |
| Add Audio/Video Keyframes | Alt+Left Click |
| Previous Keyframes | [ |
| Next Keyframes | ] |
| Motion Tracking | Alt+X |
| Color Match | Alt+M |
| Insert | Shift+QI |
| Overwrite | Shift_+O |
| Replace | Alt+Mouse Drag |
| Rename | F2 |
| Reveal in Explorer | Ctrl+Shift+R |
| Apply | Alt+A |
| Quick Split Mode | C |
| Select | V |
| Open Audio Stretch | S |
| Exit Audio Stretch | Shift+S |
| Add to Favorites | Shift+F |
| Adjust the Bezier Curve | Alt+Mouse Drag |
| Split 9 Edited State0 | Shift+Enter |
| Merge Up (Cursor at the beginning of the sentence0 | Backspace |
| Merge down subtitles 9radio or edited state) | Alt+Q |
| Merge selected subtitles (multi-select state | Alt+Q |
| Play/Pause | Space |
| Stop | Ctrl +/ |
| Full Screen/Restore Snapshot | Ctrl+Alt+S |
| Previous Frame /Move Left | Left |
| Next Frame/ More Right | Right |
| Previous Edit Point / Move Up | Up |
| Next Edit Point/ Move Down | Down |
| Go To Next Second | Shift+Right |
| Go to Previous Marker | Shift+Up |
| Go to Next Marker | Shift+Down |
| Go to Project Beginning | Home |
| Go to Project End | End |
| Go to Selected Clip Start | Shift+Home |
| Go to Selected Clip End | Shift+End |
| Zoom In | Ctrl+= |
| Zoom Out | Ctrl+_ |
| Zoom to Fit Timeline | Shift+Z |
| Select Previous | Ctrl+Left |
| Select Next | Ctrl+Right |
| Horizontal Scroll (Timeline) | Alt+Scroll Up/Down |
| Vertical Scroll (Timeline) | Scroll Up/Down |
| Mark In | I |
| Mark Out | O |
| Clear In And Out | Ctrl+Shift+X |
| Add Marker | M |
| Edit Marker | Shift+M |
| Help | F |
| Export | Ctrl+ E |
Conclusion
In the article, you have discovered crucial information about video editing in Filmora. There are some checkpoints that you need to keep in mind before getting into editing. Integrating these checkpoints, there is a consistent need to understand keyboard shortcuts in video editing. This procedure, in particular, helps much in effective video editing.
With the help of the Filmora shortcut video editor, you can make cinematic-level edits to the video. It also integrates several features such as AI Smart Cutout, AI Copywriting, and more. To know more about these useful keyboard shortcuts, this article has surely been of great help.
Free Download Free Download Learn More
Part 1: Major Checkpoints in Quick Video Editing
While doing video editing, it is very important to focus on efficiency and speed. It is essential to focus on the speed and efficiency of a video editing tool. Moreover, there are some checkpoints that you have to consider before getting into video editing. Some of them are:
01of 05Preparing Footage
Before anything else, you have to arrange and prepare your footage. It helps optimize the editing procedure, and you can label the files properly. Besides this, it also saves you time searching for specific files and footage.
02of 05Timeline Setting
You have to set up your timelines in the desired and recognizable resolutions. Moreover, adjusting frame rates and duration of videos and creating customized templates before anything else.
03of 05Selection of moments
Make sure you watch your video in a proper manner so you don’t have to waste time finding a specific moment. By this, you will be able to select a moment without wasting additional time.
04of 05Transitions and Adjustments
While editing the videos, you need to add the basic transitions to add consistency. Furthermore, you can adjust the audio metrics of videos and sync them with the length of videos.
05of 05Preview and Export
After editing the videos, you also have to preview them to check and fix the mistakes. Above all, always select the tool through which you can preview the videos and export them in the desired output format.
Part 2: An Introduction to Wondershare Filmora and Its Video Editing Intuition
Wondershare Filmora can be referred to as a feature-packed, cost-effective, all-in-one, easy-to-use video editing software. This tool has the capability to create professional-grade videos. You can also take assistance from this tool for creating advanced-level content for your social media platforms. It is also known to be the best choice when it comes to editing videos.
In Filmora, you can find diversified video editing tools as it comprehends timeline-based editing, so you can also use it to edit your memories. Several video formats are compatible with Filmora, so you will not face restrictions in this part.
Free Download For Win 7 or later(64-bit)
Free Download For macOS 10.14 or later
Key Features of Wondershare Filmora
- The AI Smart Cutout feature of Filmora lets you highlight and edit diversified unrequired objects, persons, or pets from the background.
- One of the best things about Filmora is it supports the AI Image feature through which you can turn descriptive text into illustrative images.
- It also shows the integrations with ChatGPT, through which you can generate AI text during video editing. This is perfect for YouTube descriptions and titles.
- You can also adjust the speed of the video while controlling the keyframes to make cinematic-grade edits in simple videos.
- The title editing feature lets you create artistic features with modernized word art, illustrations, and animations.
Part 3: Learning All Keyboard Shorts for Quick and Efficient Video Editing
To maximize productivity and workflow efficiency, you can take assistance from the keyboard shortcuts. Luckily, the industry-standard tool named Filmora offers effective keyboard shortcuts. Do you wish to know the keyboard shortcuts integrated with Wondershare Filmora? There is nothing to worry about because in this part, you will find the effective and implementable easy edit video shortcuts:
| Function | Shortcut |
|---|---|
| Preference | Ctrl+Shift+, |
| Keyboard Shortcut | Ctrl+Alt+K |
| Exit | Alt+F |
| New Project | Ctrl+N |
| Open Project | Ctrl+O |
| Save Project | Ctrl+S |
| Save Project As | Ctrl+Shift+S |
| Archive Project | Ctrl+Shift+A |
| Import Media Files | Ctrl+I |
| Record Voice-Over | Alt+R |
| Add a New Folder | +Alt+N |
| Undo | Ctrl+Z |
| Redo | Ctrl+Y |
| Cut | Ctrl+X |
| Copy | Ctrl+C |
| Paste | Ctrl+V |
| Duplicate | Ctrl+D |
| Delete | Del |
| Ripple Delete | Shift+Del |
| Close Gap | Alt+Del |
| Select All | +A |
| Copy Effects | Ctrl+Alt+C |
| Paste Effects | Ctrl+Alt+V |
| Select Clip Range | X |
| Cancel the Selected Range | Shift+X |
| Nudge Left | Alt+Left |
| Nudge Right | Alt+Right |
| Nudge Up | Alt+Up |
| Edit Properties | Alt+E |
| Split | Ctrl+B |
| Trim Start to Playhead | Alt+[ |
| Trim End to Playhead | Alt+] |
| Crop to Fit | Ctrl+F |
| Crop and Zoom | Alt+C |
| Rotate 90CW | Ctrl+Alt+Right |
| Rotate CCW | Ctrl+Alt+Left |
| Group | Ctrl+G |
| UnGroup | Ctrl+Alt+G |
| Uniform Speed | Ctrl+R |
| Add Freeze Frame | Alt+F |
| Detach Audio | Ctrl+Alt+D |
| Mute | Ctrl+Shift+M |
| Stabilization | Alt+S |
| Chroma Key | Ctrl+Shift+G |
| Red Marker | Alt+1 |
| Orange Marker | Alt+2 |
| Yellow Marker | Alt+3 |
| Green Marker | Alt+4 |
| Cyan Marker | Alt+5 |
| Blue Marker | Alt+6 |
| Purple Marker | Alt+7 |
| Grey Marker | Alt+8 |
| Select All Clips With the Same Color Mark | Alt+Shift+ |
| Render Preview | Enter |
| Add Audio/Video Keyframes | Alt+Left Click |
| Previous Keyframes | [ |
| Next Keyframes | ] |
| Motion Tracking | Alt+X |
| Color Match | Alt+M |
| Insert | Shift+QI |
| Overwrite | Shift_+O |
| Replace | Alt+Mouse Drag |
| Rename | F2 |
| Reveal in Explorer | Ctrl+Shift+R |
| Apply | Alt+A |
| Quick Split Mode | C |
| Select | V |
| Open Audio Stretch | S |
| Exit Audio Stretch | Shift+S |
| Add to Favorites | Shift+F |
| Adjust the Bezier Curve | Alt+Mouse Drag |
| Split 9 Edited State0 | Shift+Enter |
| Merge Up (Cursor at the beginning of the sentence0 | Backspace |
| Merge down subtitles 9radio or edited state) | Alt+Q |
| Merge selected subtitles (multi-select state | Alt+Q |
| Play/Pause | Space |
| Stop | Ctrl +/ |
| Full Screen/Restore Snapshot | Ctrl+Alt+S |
| Previous Frame /Move Left | Left |
| Next Frame/ More Right | Right |
| Previous Edit Point / Move Up | Up |
| Next Edit Point/ Move Down | Down |
| Go To Next Second | Shift+Right |
| Go to Previous Marker | Shift+Up |
| Go to Next Marker | Shift+Down |
| Go to Project Beginning | Home |
| Go to Project End | End |
| Go to Selected Clip Start | Shift+Home |
| Go to Selected Clip End | Shift+End |
| Zoom In | Ctrl+= |
| Zoom Out | Ctrl+_ |
| Zoom to Fit Timeline | Shift+Z |
| Select Previous | Ctrl+Left |
| Select Next | Ctrl+Right |
| Horizontal Scroll (Timeline) | Alt+Scroll Up/Down |
| Vertical Scroll (Timeline) | Scroll Up/Down |
| Mark In | I |
| Mark Out | O |
| Clear In And Out | Ctrl+Shift+X |
| Add Marker | M |
| Edit Marker | Shift+M |
| Help | F |
| Export | Ctrl+ E |
Conclusion
In the article, you have discovered crucial information about video editing in Filmora. There are some checkpoints that you need to keep in mind before getting into editing. Integrating these checkpoints, there is a consistent need to understand keyboard shortcuts in video editing. This procedure, in particular, helps much in effective video editing.
With the help of the Filmora shortcut video editor, you can make cinematic-level edits to the video. It also integrates several features such as AI Smart Cutout, AI Copywriting, and more. To know more about these useful keyboard shortcuts, this article has surely been of great help.
Are You Curious About Finding a Good iPhone Slow-Motion App? Discover the Top-Rated Applications in the Market that Will Help You Create the Perfect Video
iPhone is undoubtedly an awesome device to capture moments. Regardless of the iOS you are using; it has better lens and resolution sensors than Android. The launch of the iPhone 5S enables users to record video in slow motion with their smartphones. Although it is best in capturing and editing slow-mo, people still look for third-party apps .
The reason might be that the iPhone slow motion app offers certain additional features. Maybe they provide more advanced settings and personalization. To find an answer, you should read this article, which lists the best iPhone slow-mo apps.
Slow Motion Video Maker Slow your video’s speed with better control of your keyframes to create unique cinematic effects!
Make A Slow Motion Video Make A Slow Motion Video More Features
Part 1: [Top 10] Slowing Down Videos With Finest iPhone Slow Motion Apps
Are you an enthusiastic user of the iPhone and want to create videos across it to save time? Provided are some quick and effective iPhone slow-motion apps that you can go with. These applications will help you create the best slow-motion content without taking up much effort:
- Slow Motion Video Fx Editor
- SloMo Slow Motion Video Editor
- Slow Motion Video Editor
- Slow Motion’ Video Editor
- Slow Motion Video FX Edit
- Slow Fast Motion Video Editor
- Slow-Fast Motion Video Editor
- TimeFreeze
- Vidma – Video Editor Music
- Vizmato: Video Editor & Maker
1. Slow Motion Video Fx Editor
If you are seeking an iPhone slo-mo app, then this application holds all the relevant features. The application is designed to assist users in achieving slow motion and other speed effects. For precise and accurate slow motion, it offers basic slider and timeline settings. You can slow down a video at any scene by incorporating Advanced or Basic options.

Key Features
- The application offers to manipulate frame rate by 240 fps and 12x slower.
- Users can improve videos by incorporating music using its music library of 170+ tracks.
- The platform provides sharing options along social platforms like Instagram and Facebook.
2. SloMo Slow Motion Video Editor
This iPhone slow-motion app has all the abilities to slow down videos and enhance them. It provides two options to slow down a video via playback speed or video frame rate. The playback speed slows a video instantly while the frame rates smoothen it. You can also choose a specific period for adding the slow-motion effect.

Key Features
- The frame manipulation goes up to 120 fps, and the playback speed goes 12x.
- The application offers 40 color filters to enhance your video’s visual outlook.
- There are multiple ratio options to export a video to upload it to different platforms.
3. Slow Motion Video Editor
Create ultra-slow motion or ultra-high motion videos with this iPhone slo-mo app. It offers distinct speed manipulation options, such as up to 10x to slow down a video. In addition, the application offers built-in speed templates to help you add speed effects to dance videos. Users can also retain the original audio of the videos after speed alteration.

Key Features
- An intuitive user interface that offers a seamless slo-mo editing method.
- Import music from iTunes into this iPhone slo-mo app and add it to your videos.
- Publish your slo-mos directly to other editing apps like GoPro and InShot for additional editing.
4. Slow Motion’ Video Editor
Make professional-grade slow-motion videos using this iPhone slow-motion app. The application can record and edit videos at 60 to 240 fps, ensuring smooth, slow motions. With its modern and accessible user interface, achieving slow motions is easy. Other speed settings include split-second freezing frames and time-lapse videos.

Key Features
- The application passes subscription charges via iTunes for a seamless and trusted process.
- You can trim the unnecessary parts of the video using its Trim tool.
- Offers one-click functionality to share videos across Instagram, YouTube, Facebook, or Email.
5. Slow Motion Video FX Edit
Do you want to be in control of your slow-motion videos while editing? This iPhone slow motion app offers custom speed manipulation options like 12x and 240 fps. You can add freeze frames if you want to highlight a specific part of the video. With its interface, speed manipulation is just as simple as dragging a slider.

Key Features
- Enhance your video’s visuals with up to 40 stunning visual filters to enhance colors.
- The application offers weekly, monthly, and yearly plans to suit your requirements.
- You can add music from your library to videos or specific scenes via this app.
6. Slow Fast Motion Video Editor
Apply slow motion effect to the specific parts of your videos using this iPhone slow motion app. You can access it on the app store; the application is free to download. It features a timeline editing interface and a playback speed of up to 8x for Slomo. It separates the video frames, and you can change their speed, and afterward, it merges them.

Key Features
- The ability to incorporate music from your music library into videos with this app.
- You can manually trim out video segments and merge them back.
- Showcase your creativity to other social platforms directly from the app.
7. Slow-Fast Motion Video Editor
This iPhone slow-motion app download unlocks a professional way of creating slo-mos. The user interface is professional and accessible for all types of editors. It displays a velocity graph to change the playback speed to 8x at specific video frames. This application slows down video to 1/10th of its actual speed. It also maintains the pitch of audio while creating fast or slow-motion videos.

Key Features
- There is no restriction on video length to edit in this iPhone slow-motion app.
- It doesn’t export video with Watermark addition, which is remarkable for branding.
- You can edit and export a video in Portrait or Landscape display.
8. TimeFreeze
If you want to create slow-motion videos effectively, then this iPhone slow-motion app can do it. It works by manipulating the video frame rates from 24 fps to 120 fps. Along with slowing down videos, you can slow down high-motion video to normal as well. The user interface is basic and lacks technicalities to be accessed by skilled people.

Key Features
- The application supports all iOS 12.1, macOS 12.1, and newer versions.
- Uses advanced image processing algorithms for video frame manipulation.
- The application is free to use and only takes up 25.3 MB of your iPhone’s storage.
9. Vidma - Video Editor Music
You have read about many applications that offer to transform normal videos into slow motions. However, this iPhone slo-mo app is much more than just a speed changer. It slows down your videos via a velocity graph and maintains the audio pitch during the process. Using this application, you can slow down videos to 0.1x while also having video reverse options.

Key Features
- With 1000+ music tracks and hundreds of visual effects and filters, your videos can stand out.
- Along with the slow motion, you can also create time-lapse and apply speed ramping presets.
- Export your video in high-quality 4K resolution without any quality loss.
10. Vizmato: Video Editor & Maker
Vizmato stands as a multipurpose video editing app with slow-motion capabilities. Beyond the creation of compelling slow-motion scenes, Vizmato adds dramatic flair by reversing the speed. Furthermore, the software extends the speed manipulation feature via a custom option. In this way, everyone gets a chance to design their videos per their preferences.

Key Features
- It offers 20+ visual themes, 40+ effects, and 140+ music assets to uplift your videos.
- The tool can transform images into slideshows, making a video of your memories.
- You can record and add voiceovers with this iPhone slow-motion app.
Bonus Part: Wondershare Filmora and Slow Motion Video Making: A Simple Connection
Having no fun while editing video with the iPhone slow-motion app? It’s obvious because such applications are limited to slowing down your videos. So, using Wondershare Filmora could change the game in video editing of all types. Users from every field can rely on Filmora to get unique and polished content. This editing platform is available online for Windows, macOS, and mobile phone users.
Wondershare Filmora is integrated with artificial intelligence to boost your productivity in editing. You can use Filmora’s asset library to get media or create your own with AI. Using Filmora will amaze you at every step of editing and creating engaging media.
Free Download For Win 7 or later(64-bit)
Free Download For macOS 10.14 or later
Steps to Slow Down Video with Speed Ramping in Filmora
Speed ramping is a way to slow down or speed up videos smoothly. A slow change in videos gives a more professional outlook to videos. Have you observed this feature in any of the above-discussed iPhone slow-motion apps? The answer is no, so let’s benefit from speed ramping in Filmora by following the given steps.
Step 1Start Working on the New Project
Begin your video editing journey after downloading Filmora on your device. After downloading, open this platform and select “New Project.” This way, you will access its editing screen to begin working. Start with importing your video and bringing it to the timeline.

Step 2Discover the Speed Ramping Option with Templates
Place your cursor on the video and right-click to choose “Speed Ramping” from the list. Now, you can see an editing screen on your right. Pick any of the templates for effortless speed ramping.

Step 3Customize Speed Ramping to Smoothly Slow Down Videos
Otherwise, hit the “Customize” and direct downward. Go to the editing panel and hold the dots to move downward if you want to slow down. You can speed up video portions by holding the dots upward. Meanwhile, you can play the video to see the changes.

Step 4Use Optical Flow for Good Quality and Move to Save Changes
Extend the “AI Frame Interpolation” menu and hit the “Optical Flow.” That’s how you will get a high-quality video with slow speed. Keep editing or save changes through the “Export” button on the upper right.

Find Core Functionalities of Wondershare Filmora
Before using Filmora, it’s important to explore it to avoid confusion. Considering this point, you should discover some of its main features below:
1. AI Copywriting
Except for AI, no one can provide you with an engaging script on short notice. Thus, Filmora integrates an AI copywriting feature for generating the desired script within seconds. It accepts natural language prompts, not limiting experts to giving commands. This feature is considered professional in creating YouTube descriptions to rank the content.
2. AI Copilot Editing
Humans typically need suggestions in editing, whether they are beginners or professionals. What could be better than having an AI as your personal editing assistant? Filmora offers an AI copilot editor that answers your editing-related queries. Besides, it navigates you toward practical solutions by providing links or buttons.
3. AI Audio Denoise
Sometimes, background noises ruin the vocals of the audio. Remove that noise with the help of AI, which can detect the noise type for exact results. This feature can enhance your audio by performing reverb reduction. It can make the voice clear that is present in surroundings, like electrical voices from devices. Audio denoise proves vital in recording podcasts and online course recording scenarios.
4. AI Portrait
It’s a human urge to look beautiful, and video editing apps are not denying it. Filmora also provides more than 70 AI portrait effects to beautify facial features. Moreover, it can assist you in removing the background and keeping humans in video frames. Some AI stickers include Heart eyes, Emojis, and Sunglasses that can evoke humorous emotions.
Conclusion
Until now, you might find your answer about using iPhone slow-motion apps. The overview of such premium apps has guided you to select an app that best aligns with your needs. If you are still confused, use Wondershare Filmora, an incredible video editor. This platform is available for iPhone, Android, Windows, and macOS with its limitless editing tools.
Make A Slow Motion Video Make A Slow Motion Video More Features
Part 1: [Top 10] Slowing Down Videos With Finest iPhone Slow Motion Apps
Are you an enthusiastic user of the iPhone and want to create videos across it to save time? Provided are some quick and effective iPhone slow-motion apps that you can go with. These applications will help you create the best slow-motion content without taking up much effort:
- Slow Motion Video Fx Editor
- SloMo Slow Motion Video Editor
- Slow Motion Video Editor
- Slow Motion’ Video Editor
- Slow Motion Video FX Edit
- Slow Fast Motion Video Editor
- Slow-Fast Motion Video Editor
- TimeFreeze
- Vidma – Video Editor Music
- Vizmato: Video Editor & Maker
1. Slow Motion Video Fx Editor
If you are seeking an iPhone slo-mo app, then this application holds all the relevant features. The application is designed to assist users in achieving slow motion and other speed effects. For precise and accurate slow motion, it offers basic slider and timeline settings. You can slow down a video at any scene by incorporating Advanced or Basic options.
Key Features
- The application offers to manipulate frame rate by 240 fps and 12x slower.
- Users can improve videos by incorporating music using its music library of 170+ tracks.
- The platform provides sharing options along social platforms like Instagram and Facebook.
2. SloMo Slow Motion Video Editor
This iPhone slow-motion app has all the abilities to slow down videos and enhance them. It provides two options to slow down a video via playback speed or video frame rate. The playback speed slows a video instantly while the frame rates smoothen it. You can also choose a specific period for adding the slow-motion effect.
Key Features
- The frame manipulation goes up to 120 fps, and the playback speed goes 12x.
- The application offers 40 color filters to enhance your video’s visual outlook.
- There are multiple ratio options to export a video to upload it to different platforms.
3. Slow Motion Video Editor
Create ultra-slow motion or ultra-high motion videos with this iPhone slo-mo app. It offers distinct speed manipulation options, such as up to 10x to slow down a video. In addition, the application offers built-in speed templates to help you add speed effects to dance videos. Users can also retain the original audio of the videos after speed alteration.
Key Features
- An intuitive user interface that offers a seamless slo-mo editing method.
- Import music from iTunes into this iPhone slo-mo app and add it to your videos.
- Publish your slo-mos directly to other editing apps like GoPro and InShot for additional editing.
4. Slow Motion’ Video Editor
Make professional-grade slow-motion videos using this iPhone slow-motion app. The application can record and edit videos at 60 to 240 fps, ensuring smooth, slow motions. With its modern and accessible user interface, achieving slow motions is easy. Other speed settings include split-second freezing frames and time-lapse videos.
Key Features
- The application passes subscription charges via iTunes for a seamless and trusted process.
- You can trim the unnecessary parts of the video using its Trim tool.
- Offers one-click functionality to share videos across Instagram, YouTube, Facebook, or Email.
5. Slow Motion Video FX Edit
Do you want to be in control of your slow-motion videos while editing? This iPhone slow motion app offers custom speed manipulation options like 12x and 240 fps. You can add freeze frames if you want to highlight a specific part of the video. With its interface, speed manipulation is just as simple as dragging a slider.
Key Features
- Enhance your video’s visuals with up to 40 stunning visual filters to enhance colors.
- The application offers weekly, monthly, and yearly plans to suit your requirements.
- You can add music from your library to videos or specific scenes via this app.
6. Slow Fast Motion Video Editor
Apply slow motion effect to the specific parts of your videos using this iPhone slow motion app. You can access it on the app store; the application is free to download. It features a timeline editing interface and a playback speed of up to 8x for Slomo. It separates the video frames, and you can change their speed, and afterward, it merges them.
Key Features
- The ability to incorporate music from your music library into videos with this app.
- You can manually trim out video segments and merge them back.
- Showcase your creativity to other social platforms directly from the app.
7. Slow-Fast Motion Video Editor
This iPhone slow-motion app download unlocks a professional way of creating slo-mos. The user interface is professional and accessible for all types of editors. It displays a velocity graph to change the playback speed to 8x at specific video frames. This application slows down video to 1/10th of its actual speed. It also maintains the pitch of audio while creating fast or slow-motion videos.
Key Features
- There is no restriction on video length to edit in this iPhone slow-motion app.
- It doesn’t export video with Watermark addition, which is remarkable for branding.
- You can edit and export a video in Portrait or Landscape display.
8. TimeFreeze
If you want to create slow-motion videos effectively, then this iPhone slow-motion app can do it. It works by manipulating the video frame rates from 24 fps to 120 fps. Along with slowing down videos, you can slow down high-motion video to normal as well. The user interface is basic and lacks technicalities to be accessed by skilled people.
Key Features
- The application supports all iOS 12.1, macOS 12.1, and newer versions.
- Uses advanced image processing algorithms for video frame manipulation.
- The application is free to use and only takes up 25.3 MB of your iPhone’s storage.
9. Vidma - Video Editor Music
You have read about many applications that offer to transform normal videos into slow motions. However, this iPhone slo-mo app is much more than just a speed changer. It slows down your videos via a velocity graph and maintains the audio pitch during the process. Using this application, you can slow down videos to 0.1x while also having video reverse options.
Key Features
- With 1000+ music tracks and hundreds of visual effects and filters, your videos can stand out.
- Along with the slow motion, you can also create time-lapse and apply speed ramping presets.
- Export your video in high-quality 4K resolution without any quality loss.
10. Vizmato: Video Editor & Maker
Vizmato stands as a multipurpose video editing app with slow-motion capabilities. Beyond the creation of compelling slow-motion scenes, Vizmato adds dramatic flair by reversing the speed. Furthermore, the software extends the speed manipulation feature via a custom option. In this way, everyone gets a chance to design their videos per their preferences.
Key Features
- It offers 20+ visual themes, 40+ effects, and 140+ music assets to uplift your videos.
- The tool can transform images into slideshows, making a video of your memories.
- You can record and add voiceovers with this iPhone slow-motion app.
Bonus Part: Wondershare Filmora and Slow Motion Video Making: A Simple Connection
Having no fun while editing video with the iPhone slow-motion app? It’s obvious because such applications are limited to slowing down your videos. So, using Wondershare Filmora could change the game in video editing of all types. Users from every field can rely on Filmora to get unique and polished content. This editing platform is available online for Windows, macOS, and mobile phone users.
Wondershare Filmora is integrated with artificial intelligence to boost your productivity in editing. You can use Filmora’s asset library to get media or create your own with AI. Using Filmora will amaze you at every step of editing and creating engaging media.
Free Download For Win 7 or later(64-bit)
Free Download For macOS 10.14 or later
Steps to Slow Down Video with Speed Ramping in Filmora
Speed ramping is a way to slow down or speed up videos smoothly. A slow change in videos gives a more professional outlook to videos. Have you observed this feature in any of the above-discussed iPhone slow-motion apps? The answer is no, so let’s benefit from speed ramping in Filmora by following the given steps.
Step 1Start Working on the New Project
Begin your video editing journey after downloading Filmora on your device. After downloading, open this platform and select “New Project.” This way, you will access its editing screen to begin working. Start with importing your video and bringing it to the timeline.
Step 2Discover the Speed Ramping Option with Templates
Place your cursor on the video and right-click to choose “Speed Ramping” from the list. Now, you can see an editing screen on your right. Pick any of the templates for effortless speed ramping.
Step 3Customize Speed Ramping to Smoothly Slow Down Videos
Otherwise, hit the “Customize” and direct downward. Go to the editing panel and hold the dots to move downward if you want to slow down. You can speed up video portions by holding the dots upward. Meanwhile, you can play the video to see the changes.
Step 4Use Optical Flow for Good Quality and Move to Save Changes
Extend the “AI Frame Interpolation” menu and hit the “Optical Flow.” That’s how you will get a high-quality video with slow speed. Keep editing or save changes through the “Export” button on the upper right.
Find Core Functionalities of Wondershare Filmora
Before using Filmora, it’s important to explore it to avoid confusion. Considering this point, you should discover some of its main features below:
1. AI Copywriting
Except for AI, no one can provide you with an engaging script on short notice. Thus, Filmora integrates an AI copywriting feature for generating the desired script within seconds. It accepts natural language prompts, not limiting experts to giving commands. This feature is considered professional in creating YouTube descriptions to rank the content.
2. AI Copilot Editing
Humans typically need suggestions in editing, whether they are beginners or professionals. What could be better than having an AI as your personal editing assistant? Filmora offers an AI copilot editor that answers your editing-related queries. Besides, it navigates you toward practical solutions by providing links or buttons.
3. AI Audio Denoise
Sometimes, background noises ruin the vocals of the audio. Remove that noise with the help of AI, which can detect the noise type for exact results. This feature can enhance your audio by performing reverb reduction. It can make the voice clear that is present in surroundings, like electrical voices from devices. Audio denoise proves vital in recording podcasts and online course recording scenarios.
4. AI Portrait
It’s a human urge to look beautiful, and video editing apps are not denying it. Filmora also provides more than 70 AI portrait effects to beautify facial features. Moreover, it can assist you in removing the background and keeping humans in video frames. Some AI stickers include Heart eyes, Emojis, and Sunglasses that can evoke humorous emotions.
Conclusion
Until now, you might find your answer about using iPhone slow-motion apps. The overview of such premium apps has guided you to select an app that best aligns with your needs. If you are still confused, use Wondershare Filmora, an incredible video editor. This platform is available for iPhone, Android, Windows, and macOS with its limitless editing tools.
Also read:
- In 2024, Creating Video Testimonials
- Updated Guide To Make a YouTube Intro by Filmora for 2024
- 2 Easy Methods | How To Zoom In On TikTok Videos for 2024
- New What Is Lumetri Color and How Do You Use It in Adobe After Effects? Find Out the Numerous Functions of Lumetri Panel and Ways to Apply Them to Your Video
- Make Videos with Pictures and Music-10 Apps for 2024
- Updated Do You Want to Be Aware of VHSs Meaning? There Is Nothing to Be Worried About because We Will Guide You in This Article
- Want to Make an Epic CSGO Montage? You Are in the Right Place. This In-Depth Guide Will Explain How You Can Make an Attention-Grabbing Gaming Montage for 2024
- Updated 2024 Approved How to Crop Videos in Windows Media Player
- Add some Sci-Fi Touch to Your Next Video Content Using Wondershare Filmora Editing Tools to Create an Alternate Reality Effect
- New This Article Is Actually the Guide Regarding Editing the Videos Through VEED. As a Substitute, Wondershare Filmora Is Also Under Discussion that Is Also Available for the Same Purpose
- In 2024, Best Software or Website to Convert Video Format
- 2024 Approved This Article Will Help You Make Cinematic Shots with Simple DIY Hacks Using Stuff From Your Nearest Dollar Store. You Can Edit Your Video to Get Pro Results by Wondershare Filmora
- Splitting Audio From Video in Sony Vegas Step by Step
- Change Speed of a Video on iPhone
- In 2024, Top 5 Video Filter Software Enhance Your Videos
- In 2024, When the Talk Is About an Effective Slideshow Design, People Also Ask of Creating a Quick Windows 10 Slideshow. Keep Reading to Know About the Quickest Ways of Setting the Issue Straight
- Updated In This Article, You Will Learn About Splitting the Video Into the Frames in FFmpeg and Mentioning the Easy Option for Doing the Same Task in a Few Seconds by Wondershare Filmora
- New In 2024, Elevate Your Designs with Feather Shapes in After Effects
- Updated How to Loop Videos with iMovie for 2024
- New 2024 Approved Best Ways to Blur Zoom Background for Free
- In 2024, 10+ Top Unlimited FCPX Slideshow Templates
- In 2024, Do You Know How Boring a Video Can Be with Silent Moments? Some Tools with Silent Detection Features Help You Delete Those Moments
- Ultimate Guide to Free PPTP VPN For Beginners On Tecno Pop 7 Pro | Dr.fone
- How To Unlock A Found Apple iPhone 12 Pro Max?
- 3uTools Virtual Location Not Working On Oppo K11x? Fix Now | Dr.fone
- How To Change Samsung Galaxy XCover 7 Lock Screen Password?
- iSpoofer is not working On Lenovo ThinkPhone? Fixed | Dr.fone
- Will Pokémon Go Ban the Account if You Use PGSharp On Poco M6 Pro 4G | Dr.fone
- In 2024, How To Unlock Infinix Zero 5G 2023 Turbo Phone Without Password?
- A Quick Guide to Xiaomi 13T FRP Bypass Instantly
- How to Unlock Apple iPhone 12 mini With an Apple Watch & What to Do if It Doesnt Work | Dr.fone
- In 2024, Forgot Apple iPhone 13 Pro Backup Password? Heres What to Do | Dr.fone
- In 2024, How to Animate - Adobe Animate Tutorial for All
- How to use Device Manager to update your hardware drivers on Windows 11 & 10 & 7
- In 2024, Maximize Your User Engagement With Instagram Live Shopping Expert Tips
- How to Fix corrupt video files of Vivo V30 Lite 5G using Video Repair Utility on Windows?
- How to Reset Nokia C02 Without the Home Button | Dr.fone
- 9 Best Free Android Monitoring Apps to Monitor Phone Remotely For your Realme C53 | Dr.fone
- 6 Ways to Change Spotify Location On Your Samsung Galaxy A15 4G | Dr.fone
- In 2024, 9 Best Free Android Monitoring Apps to Monitor Phone Remotely For your Oppo A79 5G | Dr.fone
- In 2024, How To Use Special Features - Virtual Location On Xiaomi 14? | Dr.fone
- In 2024, How to Detect and Stop mSpy from Spying on Your Nokia C02 | Dr.fone
- How to Exit Android Factory Mode On Nokia C12? | Dr.fone
- Title: New In 2024, How to Add Text Animation Online
- Author: Chloe
- Created at : 2024-04-24 07:08:29
- Updated at : 2024-04-25 07:08:29
- Link: https://ai-editing-video.techidaily.com/new-in-2024-how-to-add-text-animation-online/
- License: This work is licensed under CC BY-NC-SA 4.0.
